
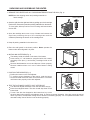
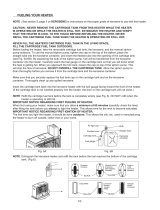
UNPACKING AND ASSEMBLING THE HEATER
1. REMOVE THE HEATER AND ALL PACKING MATERIALS FROM THE BOX. (Fig. 2)
NOTE:Save the shipping carton and packing materials for
future storage.
2. Open the grille from the right hand side, by pulling up on the lower right
hand corner. Remove the protective packing materials from the burner.
To close grille, slide top bar into slot in housing and lower bottom
bar into slot.
3. Open the cartridge tank cover on top of heater and remove the
styrofoam protecting the top of the cartridge tank and the
cardboard protecting the bottom of the cartridge tank.
4. Keep all packing materials in the carton box.
5. Place the wall guard in the down position.
Never operate the
heater unless the wall guard is in place.
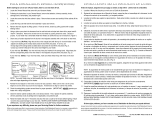
6. INSTALLING BATTERIES (Fig. 3)
The battery holder is located on the back of the heater.
Insert two(2) “D” cell batteries (supplied with this heater)
according to the plus (+) and minus(-) markings inside of the
holder.
Remove dead batteries at once and dispose of them properly.
Remove batteries when not in use or when heater is being
stored.
7. POSITION THE BURNER (Fig. 4)
Position the burner on the wick adjuster.
To confirm proper placement of the burner, grab the burner
knob and rotate the burner back and forth three or four times
until burner sets properly on the wick adjuster.
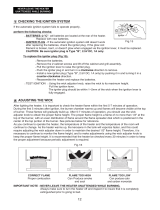
8. TEST THE AUTOMATIC SAFETY SHUT-OFF DEVICE
Turn the wick adjuster clockwise to turn the wick all the way up.
Press the extinguish button. The wick should drop down to the
lowest level.
To test if the wick has dropped to the lowest level, try to turn
the wick down further with the wick adjuster knob, by turning it counter clockwise. If the wick cannot be turned
down any further, the automatic safety shut-off device is functioning properly. Do not operate the heater if the
automatic safety shut-off device is not functioning properly.
9
Fig. 3
Fig. 4
Fig. 2
Owner’s Manual

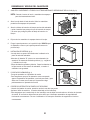
DESEMPAQUE Y MONTAJE DEL CALENTADOR
1. SAQUE EL CALENTADOR Y TODOS LOS OTROS MATERIALES DE EMPAQUE DE LA CAJA (fig. 2)
NOTA :
Guarde el carton del envío y materiales de empaque
para al almacenamiento futuro.
2. Abra la verja desde el lado derecho. Quite los materiales
protectivos de empaque del quemador.
3. Abra la cubierta del cartucho del tanque encima del calentador
y quite el material que protege el tope del cartucho de tanque
y el carton que protege la parte de abajo del cartucho de
tanque.
4. Deje todos los materiales de empaque dentro de la caja.
5. Ponga la pared protectora en la posición baja.
NUNCA
opere
el calentador a menos que la pared protectora esta en la
posición baja.
6. INSTALACIÓN DE BATERIAS (fig. 3)
•La caja donde se ponen las baterias esta localizada en la
parte de atrás del calentador.
•Meta dos (2) baterias "D" (vienen con este calentador) de
acuerdo a las marcas de símbolos positivos (+) y negativos
(-) indicados en la caja.
•Saque las baterias gastadas y bótelas. Saque las baterias de
la caja cuando no este usando el calentador, o cuando el
calentador este guardado.
7.
POSICIÓN DEL QUEMADOR (fig. 4)
•Ponga el quemador en el ajustador de mecha.
•Para asegurarse que puso el quemador como corresponde,
agarre la agarradura del quemador y muévalo para atrás y para
alante tres o cuatro veces hasta que el quemador caiga
perfectamente en el ajustador de mecha.
8.
PRUEBE DEL INTERRUPTOR AUTOMÁTICO DE SEGURIDAD
•Usando el ajustador de mecha, prenda la mecha lo mas alto que pueda.
•Apriete el botón de extinción. La mecha debe bajar al nível mas bajo.
•Para asegurarse que la mecha bajo al nível mas bajo, trate de bajar la mecha más con el botón de ajustador
de mecha. Si la mecha no baja más esto quiere decir que el interruptor automático de seguridad esta
funcionando correctamente. No use el calentador si el interruptor automático de seguridad no funciona
correctamente.
Manual de dueño
Fig. 2
Fig. 3
Fig. 4
8
-
 1
1
-
 2
2


en otros idiomas
- English: DuraHeat DH1100 Installation guide
Artículos relacionados
-
 DuraHeat DH1100 Manual de usuario
-
 DuraHeat DH2304S Manual de usuario
-
 DuraHeat DH1100 Guía del usuario
-
 DuraHeat DH2304S Manual de usuario
-
 DuraHeat DH2304S Instrucciones de operación
-
 DuraHeat DH1100 Especificación
-
 DuraHeat DH-121 Guía de instalación
-
 DuraHeat DH-322 Guía de instalación
-
 DuraHeat DH2304S Guía del usuario
-
 DuraHeat DH2304 Guía de instalación


