La página se está cargando...

FUELING YOUR HEATER
NOTE : See section 3, page 3 on KEROSENE for instructions on the proper grade of kerosene to use with this heater.
CAUTION : NEVER REMOVE THE CARTRIDGE TANK FROM THIS HEATER WHILE THE HEATER
IS OPERATING OR WHILE THE HEATER IS STILL HOT. EXTINGUISH THE HEATER AND VERIFY
THAT THE HEATER IS COOL TO THE TOUCH BEFORE REFUELING THE HEATER. NEVER
REFILL THE CARTRIDGE FUEL TANK WHEN THE HEATER IS OPERATING OR STILL HOT.
NEVER FILL THE HEATER'S CARTRIDGE FUEL TANK IN THE LIVING SPACE;
FILL THE CARTRIDGE FUEL TANK OUTDOORS.
Before fueling the heater, take the removable cartridge fuel tank, the kerosene, and the manual siphon
pump outdoors. To use the manual siphon pump, tighten the cap on the top of the siphon, place the
straight tube into the kerosene container, and insert the flexible tube into the opening of the cartridge tank
(see Fig. 5A/5B). By squeezing the bulb of the siphon pump, fuel will be transferred from the kerosene
container into the heater. Carefully watch the fuel gauge on the cartridge tank so that you will know when
the tank is getting full. When you approach the full mark, loosen the cap on top of the siphon pump. This
will stop the flow of kerosene.
DO NOT OVERFILL THE CARTRIDGE TANK. Allow the siphon pump to
drain thoroughly before you remove it from the cartridge tank and the kerosene container.
Make sure that you securely replace the fuel tank cap on the cartridge tank and on the kerosene
container. Thoroughly clean up any spilled kerosene.
Insert the cartridge tank back into the kerosene heater with the fuel gauge facing toward the front of the heater.
(If the cartridge tank is not inserted properly into the heater, the door on the cartridge tank will not close.)
NOTE: Refill the cartridge fuel tank before the tank is completely empty (see Fig. 6). DO NOT refill when the
heater is operating or still hot.
IMPORTANT NOTICE REGARDING FIRST FUELING OF HEATER;
When first using your heater, make sure that you allow a minimum of 60 minutes (carefully check the time)
after filling the tank before you attempt to light the heater. This allows time for the wick to become saturated.
IMPORTANT NOTICE REGARDING FIRST IGNITION OF HEATER;
The first time you light the heater, it should be done outdoors. This allows the oils, etc. used in manufacturing
the heater to burn off outside, rather than in your home.
NOTE: Extinguish the kerosene heater and refill the tank before the fuel reaches the bottom of the cartridge
tank. (Fig 6.)
Fig. 5A Fig. 5B
Air-tight cap
Flexible hose
Cartridge tank
Fuel gauge
Bulb
Straight hose
Kerosene
container
10
BLACK
BLACK
YELLOW
YELLOW
Excessive
Kerosene
fo level woL)llifeR( ytpmE
kerosene
remains.
(Refill)
Adequate
amount
of kerosene
Adequate amount
of kerosene
(stop supplying
kerosene)
Empty or
small
amount of
kerosene

11
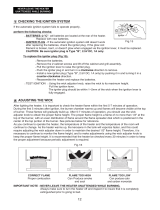
AUTOMATIC IGNITION SYSTEM
For safety and convenience, this heater features an automatic ignition system.
2 “
D” cell batteries, included with the heater, provide the power for the igniter which lights the wick once it
has been raised to its maximum height.
When the heater is fueled for the first time, allow a
minimum of 60 minutes after filling the heater for the
wick to absorb kerosene before you attempt to light the heater. Also, the first time you light the heater, it
should be done
outdoors to allow the oils, etc, used in manufacturing the heater to burn off outside, rather
than in your home.
To use the automatic Ignition system:
- Make sure the batteries have been installed properly.
- Turn the wick adjuster knob clockwise until the wick has been raised to its maximum height.
- Push the ignition button to bring the glowing igniter into contact with the wick. This will cause
ignition to occur.
- As soon as you see that the wick has been lit, release the ignition button. This will automatically
lower the burn chamber back down over the wick.
- Rotate the burner knob from side to side a few times to make sure that the burner is positioned
properly on the wick adjuster.
- Then begin following the steps outlined in "Adjusting the wick" (page 7)
IGNITION VIA MATCH
If you encounter a problem with the ignition mechanism, or if you have
dead batteries, it is possible to light the heater with a match (Fig. 7).
The procedure is as follows:
- Turn the wick adjuster knob clockwise until the wick
has been raised to its maximum height.
- Lift the burn chamber by using the burner knob.
- Touch a lighted match to the exposed top edge of the wick.
- Once you see that the wick has been lit, lower the burn
chamber back down over the wick.
- Rotate the burner knob from side to side a few times to make sure that the burner is positioned
properly on the wick adjuster.
- Then begin following the steps outlined in "Adjusting the wick" (page 7)
CAUTION : Make sure that you do not leave the match, or any portion of it (match head, etc.) in the burner
area. Debris left from the match can cause an uneven alignment of the burner and may
result in smoke, incomplete combustion, odor, or fire.
NOTE : Once you have extinguished the heater, wait at least 10 minutes before reigniting the wick.
Failure to do this will result in a very strong odor and / or smoke being produced.
NOTE : Do not use excessive force when pushing the ignition button. This can cause the igniter to catch
the wick and may prevent ignition from occurring. Pushing too lightly on the Ignition button can
prevent ignition from occurring by keeping the igniter too far from the wick. As Fig. 10 (Page 9) shows,
the optimal distance between the igniter and the wick is 1/64- -1/32 inch (0.5 to 1mm). If it is difficult
to ignite the heater, the filament on the igniter might be bent, broken or misshaped.
burner knob
Fig. 7

15
WICK REPLACEMENT
Wick replacement should be performed on a completely cool heater after the cartridge tank has been removed and
the remainder of the kerosene in the heater has been burned off.
Use only genuine replacement wick.
Replacement wick number : Glowick 200-B, Kero-World 20401U, Dura Heat DH-200, Pick-A-Wick-PW27.
Remove the screw on the wind
cover.
Unscrew 4 wing nuts.
Remove the wick adjuster
assembly.
Remove the wick from the holder
by folding it toward the center
loosening it from the sharp
metal teeth on the inner surface
of the holder, and slide it out.
Remove the wind cover. Remove the automatic ignition
Assembly by unscrewing 2 screws.
6 petS5 petSStep 4
3 petS2 petS
9 petS8 petS7 petS
Step 1
Open the tank cover and
remove the cartridge tank.
Remove the batteries to
prevent possible burns.
Open the front grille and
remove the chimney.
Remove the wick adjusting
knob by pulling straight out.
Unscrew 5 screws, two from the
back and one from the right side
and two from the left side of the
cabinet.
Remove the cabinet.
By pulling it straight up.
Call customer service at 814-643-1775, to order a wick.
Visit our website at www.worldmkting.com for a link to detailed wick replacing directions.
http://worldmkting.com/wick-installation-instructions

16
Replacement wick has a
black line.
Fold the new wick and slide it
into the holder.
Replace the wick and holder
in the burner tank.
Rotate 90 degrees left and
right as well as up and down
until the wick slides freely.
Check to see that gasket is
still in place on the burner tank.
It is recommended to reinstall
the wick adjusting knob for
easier assembling.
Insert the pinion at the other end of
the wick control shaft into top portion
of the rack of the wick holder.
This step can be easily carried out if
the wick holder is raised.
Slide the wick adjuster
assembly down the draft tube.
Position the adjuster shaft to
the front of the heater.
Snug 4 wing nuts on the
mounting stud, but do not
tighten.
Raise the wick to the full “up”
position, and evenly tighten wing
nuts in several steps.
Check height of wick.
It should be 5/16
above collar.
Check for correct clearance
between wick holder and draft
tube. It should be the same all
around.
Check the function of safety
shut-off mechanism by pushing
the extinguish button to upset
the pendulum.
Reinstall the automatic ignition
assembly.
The black line on the outside of
the wick should match the top
edge of the holder.
Then press it against the teeth
inside the holder to obtain a
firm grip.
Step 10
Step 11
Step 15
Step 14
Step 13
Step 16
81 petS71 petS
Step 21Step 20
Step 19
Step 12

17
Install the batteries in the battery case, and fill the Cartridge tank with clean, pure kerosene. Set the tank into the
heater and wait at least 60 minutes for the new wick to fully saturate with kerosene.
Reinstall the wind cover.
Remove the wick adjusting knob
once again, if it was reinstalled
before.
Reinstall the cabinet.
Tighten 5 screws on the
cabinet
Reinstall the chimney and the
cartridge tank.
Reinstall the wick adjusting
knob. Close the front grille.
Step 27
42 petS32 petS22 petS
62 petS52 petS

REEMPLAZO DE LA MECHA
El reemplazo de la mecha debe ser hecho sólo en un calentador que este completamente frío después de haber
sacado el cartucho de tanque, y después que el querosén restante en el calentador ha sido quemado.
Use sólo una mecha de reemplazo auténtica.
Mecha de reemplazo número: Kero-World 20401U, DuraHeat DH-200, Pick-A-Wick PW27.
Llame a servicio al cliente al 814-643-1775, para pedir una mecha.
Visite nuestro sitio web en www.worldmkting.com para un enlace a mecha detallada reemplazando las direcciones.
Abra la cubierta del tanque y saque
el cartucho de tanque. Saque las
baterias para prevenir la posibilidad
de quemaduras. Abra la verja
delantera y saque la chimenea.
Saque la agarradura de ajustador de
mecha alándola directamente hacía
afuera.
Destornille 3 tornillos, uno de la
parte trasera y uno de cada uno de
los lados del gabinete.
Saque el gabinete.
Destornille el tornillo en la cubierta
de aire.
Saque la cubierta de aire. Saque el montaje de ignición
automática destornillando 2 tornillos.
Destornille 4 tuercas de ala. Saque el montaje del ajustador de
mecha.
Saque la mecha del receptáculo
doblandola. Tiene que soltarla del
diente de metal agudo en la superfi-
cie dentro del receptáculo, y alarla
hacia afuera.
Paso 4
9 osaP8 osaP7 osaP
Paso 6
3 osaP2 osaP
Paso 1
Paso 5
14
http://worldmkting.com/wick-installation-instructions

Paso 13
12 osaP02 osaP
Verifique que haya una sepa-
ración clara entre el receptáculo
de mecha y el tubo de corriente
de aire (completamente alrede-
dor)
Deslize el montaje de ajustador
de mecha hacia abajo en el tubo
de corriente de aire. Ponga el
mango del ajustador frente al
calentador.
Acomode 4 tuercas de ala en el
poste de montaje, pero no las
apriéte.
Vuelva a instalar el montaje de
ignición automática.
Verifique la altura de la
mecha.
Verifique el funcionamiento del
interruptor automático de
sequridad, apretando el botón
de apague incliner el péndulo.
La línea negra en la parte de
afuera de la mecha debe encon-
trar el borde superior del
receptáculo.Entonces, apriétela
contra el diente dentro del
receptáculo para obtener un
agarre firme.
La mecha de recambio tiene una
linea negra.Doble la mecha
nueva y métala en el
receptáculo.
Se recomienda que se re-
instale la agarradura de ajus-
tador de mecha para montar
mas fácilmente.
Reemplaze la mecha y el
receptáculo en el tanque del que-
mador. Gire 90 grados hacia la
izquierda,la derecha, y hacia arri-
ba,y abajo hasta que la mecha
entre fácilmente. Verifique que la
junta se haya mantenido en el
mismo lugar en el tanque del que-
mador.
Paso 18
Paso 16
Paso 12
Paso 14
Paso 10
Paso 11
Paso 15
Levante la mecha en la posi-
ción mas "alta", y apriéte uni-
formenmente las tuercas de
ala en varios pasos.
Paso 17
Paso 19
Meta el piñon en la otra esquina de
control de mecha dentro de la parte
de encima del estante del
receptáculo de mecha. Este paso
se puede llevar a cabo mas
fácilmente si el receptáculo de
mecha se levanta.
15

Paso 22
Paso 25
Paso 23
Vuelva a instalar la agarradu-
ra del ajustador de mecha.
Cierre la verja delantera.
Instale el alojamiento de la pila, Llene el depósito del cartucho con keroseno limpio. Ponga el depósito en la cale-
facción y espere aproximadamente 60 minutos antes de que la nueva mecha esté saturada con keroseno.
Quite la agarradura del
ajustador de mecha nueva-
mente, si la habia vuelto a
instalar anteriormente.
Vuelva a montar la cubierta
de aire.
Apriéte 3 tornillos en el gabi-
nete.
Vuelva a instalar el gabinete.
Paso 27
Paso 24
Paso 26
Vuelva a instalar la chime-
nea y el cartucho del
tanque.
16
1/8