PNI Clementine 8428BT Manual de usuario
- Categoría
- Bocinas portables
- Tipo
- Manual de usuario

PNI Clementine 8428BT
Car MP3 player / MP3 плейър за кола / MP3-Player im Auto / Reproductor
de MP3 para coche / Lecteur MP3 de voiture / Autós MP3 lejátszó / Lettore
MP3 per auto / Auto MP3-speler / Samochodowy odtwarzacz MP3
Radio MP3 player auto
EN User manual ......................................................... 3
BG Ръководство за употреба................................ 10
DE Benutzerhandbuch .............................................. 17
ES Manual de usuario ............................................... 24
FR Manuel utilisateur ............................................... 31
HU Használati utasítás .............................................. 38
IT Manuale utente .................................................. 45
NL Handleiding ........................................................ 52
PL Instrukcja obsługi ............................................... 59
RO Manual de utilizare ............................................. 66


3User manual
English
Warnings
• Do not use the product in very high or very low temperature conditions.
• Do not insert metal objects (screws or coins) inside the unit to avoid
shorting the internal components.
• The player can play MP3/WMA files. Do not try to play photo or video
files.
Front panel description
1. On/O
2. Mute
3. Select playback source (Radio, Bluetooth, AUX-In)/Answer phone call
4. Select radio station group (F1, F2, F3)/Reject phone call
5. Search radio frequency/Scroll forward or backward
6. Time setting
7. Stored radio stations
8. Auxiliary input
9. SD card slot
10. USB slot
11. Automatic search and Save button for radio stations
12. Display

User manual 4
English
Rear panel description
1 2 3
4 5
6 7
1. FM antenna
2. Right front speaker
3. Right rear speaker
4. Left front speaker
5. Left rear speaker
6. ISO connector
7. Fuse
Remote control description

5User manual
English
1. Long press: on/o
Short press: select source
2. Mute
3. Select radio station group
4. Previous song
5. Next song
6. Clock display
7. Volume -
8. Volume +
9. Multifunction selection key
10. Automatic search and storage of
radio stations
11. EQ - equalizer
12. Numeric keys
13. Repeat current song
14. Play intro
15. 10 songs before
16. 10 songs back
17. Play/pause song
18. Random playback
Installation instructions
1
2
3
1. Insert the mounting bracket into the dashboard.
2. Bend the bracket’s clips for a more secure fit.
3. To remove the unit from the dashboard, insert the included keys on both
sides of the brackets, then pull the unit out.
Connections
A
B1 3 5 7
2 4 6 8
1 3 5 7
2 4 6 8
FUSE
A:
1-
2-
3-
4- Battery +
5- Antenna
6-
7- Contact +
8- Ground (GND)
B:
1- Right rear speaker +
2- Right rear speaker -
3- Right front speaker +
4- Right front speaker -
5- Left front speaker +
6- Left front speaker -
7- Left rear speaker +
8- Left rear speaker -

User manual 6
English
WARNING
The installation of this player must be performed by qualified personnel only
(car electrician). Before installation, please check the power supply and the
audio connectors on the car.
Some cars are equipped with sockets that do not comply with the ISO standard
(dierent organisation of wires inside the socket). If the car is not equipped
with ISO connectors, the necessary modifications must be performed before
the installation of the player.
Time setup
1. Briefly press the CLK key. 00:00 will show on the screen.
2. Press and hold the CLK key again.
3. The hour indicator will flash. Turn the volume knob in both directions until
you reach the desired value.
4. Briefly press the CLK key to confirm.
5. The minute indicator will flash. Turn the volume knob in both directions
until you reach the desired value.
6. Wait a few seconds. The screen will return to the initial display mode.
Playback source selection
Press the MODE key to select between: Radio, Bluetooth and AUX-in.
• FM Radio
Searching for the radio frequency
1. Press the MODE key repeatedly until RADIO appears on the screen,
immediately followed by the display of the current frequency.
2. Press the ◄ or ► key to search for another frequency.
3. Long press the ◄ or ► key to switch between MANUAL search and
AUTO search (the search stops when the radio reaches a valid signal).

7User manual
English
Saving a radio station
There are 3 groups of radio stations available (F1, F2, F3) that can be selected
by repeatedly pressing the BAND key, each group having 6 memories.
1. First select the group (F1, F2 or F3).
2. Search for your favorite radio station.
3. Long press the key (1 - 6) where you want to save the radio station.
4. On the screen, the group, the frequency and the position where the radio
station was saved will be displayed. For example: F1 96.0 6
Searching for a saved radio station
1. Press the AMS key to search through all saved radio stations.
2. The player will start scanning the memories.
3. Press the AMS key again to stop scanning.
• Bluetooth AD2P
Through Bluetooth function you can answer phone calls or play audio files
through your car’s audio system.
1. Press the MODE key repeatedly until BT OFF appears on the screen.
2. Activate the Bluetooth function on your smartphone.
3. Search for nearby Bluetooth devices.
4. Select “PNI 8428BT” and confirm the pairing.
5. BT ON will be displayed.
6. Now the two devices, the phone and the player, are paired.
7. Select the music you want to listen to on the car’s audio system.
Answer a phone call via Bluetooth
If you receive a phone call while listening to music via Bluetooth, the playback
of the music will be interrupted during the call.
Press the MODE key to answer the call and the BAND key to end or reject
the call.

User manual 8
English
• AUX-in
1. Press the MODE key repeatedly until AUX IN appears on the screen.
2. Connect your phone to the player using an auxiliary cable (3.5mm).
3. Select from the phone the music you want to listen to on the car’s audio
system.
Troubleshooting
1. The unit does not turn on.
Check the ISO connection and power cords.
2. The on/o button does not work.
Press the reset button on the unit. If the fault persists, disconnect the power
supply and reconnect it.
3. There is no sound or just a noise.
Check the ISO connection, speaker cords, or sound settings in the player.
4. Very poor quality sound.
Check the ISO connection or speaker cables.
5. Poor radio reception.
Check the radio antenna connection.
Technical specifications
Power voltage 12V
Bluetooth Yes, AD2P
FM radio Yes
FM frequency 87.5 - 108.0 MHz
Sensibility ≤ 20 dB
Stereo separation ≥ 25 dB
Signal-to-noise rate ≥ 60 dB
Compatible files MP3, WMA
Distortion ≤ 0.3%
Memory up to 18 FM radio stations can be stored
(F1- 6 locations, F2-6 locations, F3-6 locations)

9User manual
English
Maximum audio power 4 x 45W
Digital clock Yes
ISO connector Yes
Dimensions 188 x 122 x 58 mm
Standby consumption max. 5mA
Operating temperature -26°C~+80°C

Ръководство
Български
10
Предупреждения
• Не използвайте продукта при много високи или много ниски
температури.
• Не поставяйте метални предмети (винтове или монети) вътре в
устройството, за да избегнете късо съединение на вътрешните
компоненти.
• Плейърът може да възпроизвежда MP3/WMA файлове. Не се опитвайте
да възпроизвеждате фото или видео файлове.
Описание на предния панел
1. Вкл./Изкл
2. Без звук
3. Изберете източник на възпроизвеждане (Радио, Bluetooth, AUX-In)/Отговорете
на телефонно обаждане
4. Изберете група радиостанции (F1, F2, F3)/Отхвърлете телефонното обаждане
5. Търсене на радиочестоти/Превъртане напред или назад
6. Настройка на дисплея и часа
7. Съхранявани радиостанции
8. Спомагателен вход
9. Слот за SD карта
10. USB слот
11. Бутон за автоматично търсене и запазване на радиостанции
12. Дисплей

Ръководство
Български
11
Описание на задния панел
1 2 3
4 5
6 7
1. FM антена
2. Десен преден високоговорител
3. Заден десен високоговорител
4. Ляв преден високоговорител
5. Заден ляв високоговорител
6. ISO конектор
7. Предпазител
Описание на дистанционното управление

Ръководство
Български
12
1. Дълго натискане: включване/
изключване
Кратко натискане: изберете
източник
2. Без звук
3. Изберете група радиостанции
4. Предишна песен
5. Следваща песен
6. Дисплей на часовника
7. Сила на звука -
8. Сила на звука +
9. Многофункционален клавиш за
избор
10. Автоматично търсене и
съхранение на радиостанции
11. EQ - звуков еквалайзер
12. Цифрови клавиши
13. Повторете текущата песен
14. Пуснете интро
15. 10 песни преди това
16. 10 песни назад
17. Възпроизвеждане/пауза на
песен
18. Случайно възпроизвеждане на
песни
Инструкции за инсталация
1
2
3
1. Поставете монтажната скоба в таблото.
2. Огънете скобите на скобата за по -сигурно прилягане.
3. За да извадите устройството от таблото за управление, поставете
включените ключове от двете страни на скобите, след което издърпайте
устройството.

Ръководство
Български
13
Връзки
A
B
1 3 5 7
2 4 6 8
1 3 5 7
2 4 6 8
FUSE
A:
1-
2-
3-
4- Батерия +
5- Антена
6-
7- Контакт +
8- Заземяване
(GND)
B:
1- Заден десен високоговорител +
2- Заден десен високоговорител -
3- Десен преден високоговорител +
4- Десен преден високоговорител -
5- Преден ляв високоговорител +
6- Преден ляв високоговорител -
7- Заден ляв високоговорител +
8- Заден ляв високоговорител -
ВНИМАНИЕ
Инсталирането на този плейър в колата трябва да се извърши от
квалифициран персонал (автомобилен електротехник), след като е
проверил вида на захранването и аудио конекторите на автомобила.
Някои автомобили са оборудвани с гнезда, конфигурирани по различен
начин от стандарта ISO (различно позициониране на проводниците в
гнездото). Ако автомобилът не е оборудван с ISO съединители, трябва да
се направят необходимите промени в съединителите, преди да се монтира
плейъра.
Настройка на времето
1. Натиснете за кратко клавиша CLK. 00:00 ще се покаже на екрана.
2. Натиснете и задръжте отново клавиша CLK.
3. Индикаторът за час ще мига. Завъртете копчето за сила на звука в двете
посоки, докато достигнете желаната стойност.
4. Натиснете за кратко клавиша CLK, за да потвърдите.
5. Индикаторът за минути ще мига. Завъртете копчето за сила на звука в
двете посоки, докато достигнете желаната стойност.
6. Изчакайте няколко секунди. Екранът ще се върне в режим на показване,
преди да настроите часа.
Избор на източник на възпроизвеждане
Натиснете бутона MODE, за да изберете между: Радио, Bluetooth и AUX-
вход.

Ръководство
Български
14
• FM радио
Търсене на радиочестота
1. Натиснете неколкократно бутона MODE, докато RADIO се появи на
екрана, веднага след което се показва текущата честота.
2. Натиснете бутона ◄ или ►, за да търсите друга честота.
3. Натиснете продължително клавиша ◄ или ►, за да превключите между
РЪЧНО търсене и AUTO търсене (търсенето спира, когато радиото
достигне сигнал).
Запазване на радиостанция
Налични са 3 групи радиостанции (F1, F2, F3), които могат да бъдат избрани
чрез многократно натискане на клавиша BAND, като всяка група има 6 памет.
1. Първо изберете групата (F1, F2 или F3).
2. Потърсете любимата си радиостанция.
3. Натиснете продължително клавиша, съответстващ на позицията (1 - 6),
където искате да го запишете.
4. На екрана ще се покаже групата, честотата и позицията, където е
записана съответната радиостанция. Например: F1 96.0 6
Търсите запазена радиостанция
1. Натиснете клавиша AMS, за да търсите във всички запазени
радиостанции.
2. Плейърът ще започне да сканира спомените.
3. Натиснете отново бутона AMS, за да спрете сканирането.
• Bluetooth AD2P
Bluetooth ви позволява да приемате обаждания от телефона си или да
възпроизвеждате аудио файлове през аудио системата на колата си.
1. Натиснете неколкократно бутона MODE, докато на екрана се появи BT

Ръководство
Български
15
OFF.
2. Активирайте функцията Bluetooth във вашия смарт телефон.
3. Търсете в телефона си Bluetooth устройства в близост.
4. От списъка с намерени устройства изберете „PNI 8428BT“ и потвърдете
сдвояването.
5. BT ON ще се появи на екрана на плейъра.
6. Сега двете устройства, телефонът и плейърът, са сдвоени.
7. Изберете от телефона музиката, която искате да слушате от аудио
системата на автомобила .
Отговорете на телефонно обаждане чрез Bluetooth
Ако получите телефонно обаждане, докато слушате музика чрез Bluetooth,
възпроизвеждането на музиката ще бъде прекъснато по време на
разговора.
Натиснете бутона MODE, за да отговорите на повикването, и клавиша BAND,
за да прекратите разговора или да го отхвърлите.
• AUX-in
1. Натиснете неколкократно бутона MODE, докато на екрана се появи AUX
IN.
2. Свържете телефона си към плейъра с помощта на допълнителен кабел
с 3,5 мм жак.
3. Изберете от телефона музиката, която искате да слушате от аудио
системата на автомобила.
Отстраняване на неизправности
1. Проверете ISO връзката и захранващите кабели.
2. Бутонът за включване/изключване не работи.
Натиснете бутона за нулиране на устройството. Ако неизправността
продължава, изключете захранването и го свържете отново.
3. Няма звук или само шум.
Проверете ISO връзката, кабелите на високоговорителите или настройките
на звука в плейъра.
4. Много лошо качество на звука.
Проверете ISO връзката или кабелите на високоговорителите.

Ръководство
Български
16
5. Лош радиоприем.
Проверете връзката на радио антената.
Технически спецификации
Захранващо
напрежение 12V
Bluetooth Да, AD2P
FM радио Да
FM честота 87.5 - 108.0 MHz
Чувствителност ≤ 20 dB
Стерео разделяне ≥ 25 dB
Скорост сигнал-шум ≥ 60 dB
Съвместими файлове MP3, WMA
Изкривяване ≤ 0.3%
Памет могат да се съхраняват до 18 FM радиостанции
(F1- 6 места, F2-6 места, F3-6 места)
Максимална аудио
мощност 4 x 45W
Дигитален часовник Да
ISO конектор Да
Размери 188 x 122 x 58 mm
Консумация в режим на
готовност max. 5mA
Работна температура -26°C~+80°C

Benutzerhandbuch
Deutsche
17
Warnungen
• Verwenden Sie das Produkt nicht bei sehr hohen oder sehr niedrigen
Temperaturen.
• Führen Sie keine Metallgegenstände (Schrauben oder Münzen) in das
Gerät ein, um einen Kurzschluss der internen Komponenten zu vermeiden.
• Der Player kann MP3/WMA-Dateien abspielen. Versuchen Sie nicht,
Foto- oder Videodateien wiederzugeben.
Beschreibung der Frontplatte
1. An aus
2. Stumm
3. Wählen Sie die Wiedergabequelle (Radio, Bluetooth, AUX-In)/
Beantworten Sie den Anruf
4. Wählen Sie die Radiosendergruppe (F1, F2, F3)/Anruf ablehnen
5. Hochfrequenzsuche/Vorwärts oder rückwärts scrollen
6. Anzeige und Zeiteinstellung
7. Gespeicherte Radiosender
8. Hilfseingang
9. SD-Kartensteckplatz
10. USB-Steckplatz
11. Schaltfläche zum automatischen Suchen und Speichern von Radiosendern
12. Bildschirm

Benutzerhandbuch
Deutsche
18
Beschreibung der Rückseite
1 2 3
4 5
6 7
1. FM-Antenne
2. Rechter Frontlautsprecher
3. Rechter hinterer Lautsprecher
4. Linker Frontlautsprecher
5. Linker hinterer Lautsprecher
6. ISO-Anschluss
7. Sicherung
Beschreibung der Fernbedienung

Benutzerhandbuch
Deutsche
19
1. Langes Drücken: Ein/Aus
Kurz drücken: Quelle auswählen
2. Stumm
3. Wählen Sie die
Radiosendergruppe
4. Vorheriges Lied
5. Nächstes Lied
6. Uhranzeige
7. Lautstärke -
8. Lautstärke +
9. Multifunktions-Auswahltaste
10. Automatische Suche und
Speicherung von Radiosendern
11. EQ - Sound Equalizer
12. Zierntasten
13. Wiederhole den aktuellen Song
14. Intro spielen
15. 10 Songs vorher
16. 10 Songs zurück
17. Song abspielen/pausieren
18. Zufälliges Abspielen von Liedern
Installationsanleitung
1
2
3
1. Setzen Sie die Montagehalterung in das Armaturenbrett ein.
2. Biegen Sie die Clips der Halterung für einen sichereren Sitz.
3. Um das Gerät vom Armaturenbrett zu entfernen, stecken Sie die
mitgelieferten Schlüssel auf beiden Seiten der Kabinenhalterung ein und
ziehen Sie das Gerät heraus.
Verbindungen
A
B1 3 5 7
2 4 6 8
1 3 5 7
2 4 6 8
Sicherung
A:
1-
2-
3-
4- Batterie +
5- Antenne
6-
7- Kontakt +
8- GND
B:
1- Rechter hinterer Lautsprecher+
2- Rechter hinterer Lautsprecher-
3- Rechter Frontlautsprecher +
4- Rechter Frontlautsprecher -
5- Lautsprecher vorne links +
6- Lautsprecher vorne links -
7- Linker hinterer Lautsprecher +
8- Linker hinterer Lautsprecher -

Benutzerhandbuch
Deutsche
20
WARNUNG
Die Installation dieses Players im Auto muss von qualifiziertem Personal
(Autoelektriker) durchgeführt werden, nachdem die Art der Strom- und
Audioanschlüsse am Auto überprüft wurde.
Einige Fahrzeuge sind mit Steckdosen ausgestattet, die anders als in der ISO-
Norm konfiguriert sind (unterschiedliche Positionierung der Drähte in der
Steckdose). Wenn das Fahrzeug nicht mit ISO-Anschlüssen ausgestattet ist,
müssen vor der Montage des Players die erforderlichen Änderungen an den
Anschlüssen vorgenommen werden.
Zeiteinstellung
1. Drücken Sie kurz die CLK-Taste. 00:00 wird auf dem Bildschirm angezeigt.
2. Halten Sie die CLK-Taste erneut gedrückt.
3. Die Stundenanzeige blinkt. Drehen Sie den Lautstärkeregler in beide
Richtungen, bis Sie den gewünschten Wert erreicht haben.
4. Drücken Sie zur Bestätigung kurz die CLK-Taste.
5. Die Minutenanzeige blinkt. Drehen Sie den Lautstärkeregler in beide
Richtungen, bis Sie den gewünschten Wert erreicht haben.
6. Warten Sie einige Sekunden. Der Bildschirm kehrt vor dem Einstellen der
Uhrzeit in den Anzeigemodus zurück.
Auswahl der Wiedergabequelle
Drücken Sie die MODE-Taste, um zwischen zu wählen : Radio, Bluetooth and
AUX-in.
• FM Radio
Suche nach der Funkfrequenz
1. Drücken Sie die MODE-Taste wiederholt, bis RADIO auf dem Bildschirm
angezeigt wird, unmittelbar gefolgt von der Anzeige der aktuellen Frequenz.
2. Drücken Sie die Taste ◄ oder ►, um nach einer anderen Frequenz zu
suchen.
3. Drücken Sie lange die Taste ◄ oder ►, um zwischen MANUELLER

Benutzerhandbuch
Deutsche
21
Suche und AUTO-Suche zu wechseln (die Suche stoppt, wenn das Radio
ein Signal erreicht).
Radiosender speichern
Es stehen 3 Gruppen von Radiosendern zur Verfügung (F1, F2, F3), die durch
wiederholtes Drücken der BAND-Taste ausgewählt werden können, wobei
jede Gruppe 6 Speicher hat.
1. Wählen Sie zuerst die Gruppe aus (F1, F2 oder F3).
2. Suchen Sie nach Ihrem Lieblingsradiosender.
3. Drücken Sie lange die Taste, die der Position (1 - 6) entspricht, an der Sie
sie speichern möchten.
4. Auf dem Bildschirm werden die Gruppe, Frequenz und Position angezeigt,
an der der jeweilige Radiosender gespeichert wurde.
Zum Beispiel: F1 96.0 6
Suche nach einem gespeicherten Radiosender
1. Drücken Sie die AMS-Taste, um alle gespeicherten Radiosender zu
durchsuchen.
2. Der Player beginnt mit dem Scannen der Erinnerungen.
3. Drücken Sie die AMS-Taste erneut, um den Scanvorgang zu beenden.
• Bluetooth AD2P
Mit Bluetooth können Sie Anrufe von Ihrem Telefon entgegennehmen oder
Audiodateien über das Audiosystem Ihres Autos abspielen .
1. Drücken Sie die MODE-Taste wiederholt, bis BT OFF auf dem Bildschirm
angezeigt wird.
2. Aktivieren Sie die Bluetooth-Funktion in Ihrem Smartphone.
3. Suchen Sie in Ihrem Telefon nach Bluetooth-Geräten in der Nähe.
4. Wählen Sie aus der Liste der gefundenen Geräte „PNI 8428BT“ aus und
bestätigen Sie die Kopplung.
5. BT ON wird auf dem Bildschirm des Players angezeigt.

Benutzerhandbuch
Deutsche
22
6. Jetzt sind die beiden Geräte, das Telefon und der Player, gekoppelt.
7. Wählen Sie auf dem Telefon die Musik aus, die Sie über das Audiosystem
des Fahrzeugs hören möchten.
Beantworten Sie einen Anruf über Bluetooth
Wenn Sie einen Anruf erhalten, während Sie Musik über Bluetooth
hören, wird die Musikwiedergabe während des Anrufs unterbrochen.
Drücken Sie die MODE-Taste, um den Anruf anzunehmen, und die BAND-
Taste, um den Anruf zu beenden oder den Anruf abzulehnen.
• AUX-in
1. Drücken Sie die MODE-Taste wiederholt, bis AUX IN auf dem Bildschirm
angezeigt wird.
2. Schließen Sie Ihr Telefon mit einem Zusatzkabel mit einer 3,5-mm-Buchse
an den Player an.
3. Wählen Sie auf dem Telefon die Musik aus, die Sie über das Audiosystem
des Fahrzeugs hören möchten.
Fehlerbehebung
1. Das Gerät lässt sich nicht einschalten.
Überprüfen Sie den ISO-Anschluss und die Netzkabel.
2. Die Ein/Aus-Taste funktioniert nicht.
Drücken Sie die Reset-Taste am Gerät. Wenn der Fehler weiterhin besteht,
trennen Sie die Stromversorgung und schließen Sie sie wieder an.
3. Es ist kein Ton oder nur ein Geräusch zu hören.
Überprüfen Sie die ISO-Verbindung, die Lautsprecherkabel oder die
Toneinstellungen im Player.
4. Sehr schlechte Klangqualität.
Überprüfen Sie die ISO-Verbindung oder die Lautsprecherkabel.
5. Schlechter Radioempfang.
Überprüfen Sie die Funkantennenverbindung.

Benutzerhandbuch
Deutsche
23
Technische Spezifikationen
Netzspannung 12V
Bluetooth Ja, AD2P
FM-Radio Ja
FM-Frequenz 87.5 - 108.0 MHz
Sensibilität ≤ 20 dB
Stereo-Trennung ≥ 25 dB
Signal-Rausch-Rate ≥ 60 dB
Kompatibele Dateien MP3, WMA
Verzerrung ≤ 0.3%
Erinnerung
Es können bis zu 18 UKW-Radiosender
gespeichert werden
(F1-6-Standorte, F2-6-Standorte, F3-6-
Standorte)
Maximale Audioleistung 4 x 45W
Digitaluhr Ja
ISO-Anschluss Ja
Dimensionen 188 x 122 x 58 mm
Standby-Verbrauch max. 5mA
Arbeitstemperatur -26°C~+80°C

Manual de usuario
Español
24
Advertencias
• No utilice el producto en condiciones de temperatura muy alta o muy baja.
• No inserte objetos metálicos (tornillos o monedas) dentro de la unidad para
evitar cortocircuitos en los componentes internos.
• El reproductor puede reproducir archivos MP3/WMA. No intente
reproducir archivos de fotos o videos.
Descripción del panel frontal
1. Encendido apagado
2. Silencio
3. Seleccione la fuente de reproducción (Radio, Bluetooth, AUX-In)/
Responder llamada telefónica
4. Seleccionar grupo de emisoras de radio (F1, F2, F3)/Rechazar llamada
telefónica
5. Búsqueda de radiofrecuencia/Desplazarse hacia adelante o hacia atrás
6. Ajuste de visualización y hora
7. Estaciones de radio almacenadas
8. Entrada auxiliar
9. ranura para tarjetas SD
10. Puerto USB
11. Botón de búsqueda y guardado automático para estaciones de radio
12. Pantalla

Manual de usuario
Español
25
Descripción del panel trasero
1 2 3
4 5
6 7
1. Antena FM
2. Altavoz frontal derecho
3. Altavoz trasero derecho
4. Altavoz frontal izquierdo
5. Altavoz trasero izquierdo
6. Conector ISO
7. Fusible
Descripción del control remoto

Manual de usuario
Español
26
1. Pulsación larga: on/o
Pulsación corta: seleccionar fuente
2. Silencio
3. Seleccionar grupo de emisoras de
radio
4. Canción anterior
5. Siguiente cancion
6. Visualización del reloj
7. Volumen -
8. Volumen +
9. Tecla de selección multifunción
10. Búsqueda y almacenamiento
automático de estaciones de
radio.
11. EQ - ecualizador de sonido
12. Teclas numéricas
13. Repite la canción actual
14. Reproducir intro
15. 10 canciones antes
16. 10 canciones de vuelta
17. Reproducir/pausar canción
18. Reproducción aleatoria
Instrucciones de instalación
1
2
3
1. Inserte el soporte de montaje en el tablero.
2. Doble los clips del soporte para un ajuste más seguro.
3. Para quitar la unidad del tablero, inserte las llaves incluidas en ambos lados
del brackets, luego extraiga la unidad.

Manual de usuario
Español
27
Conexiones
A
B1 3 5 7
2 4 6 8
1 3 5 7
2 4 6 8
fusible
A:
1-
2-
3-
4- Batería +
5- Antena
6-
7- Contacto +
8- GND
B:
1- Altavoz trasero derecho +
2- Altavoz trasero derecho -
3- Altavoz frontal derecho +
4- Altavoz frontal derecho -
5- Altavoz frontal izquierdo +
6- Altavoz frontal izquierdo -
7- Altavoz trasero izquierdo +
8- Altavoz trasero izquierdo -
ADVERTENCIA
La instalación de este reproductor en el automóvil debe ser realizada
por personal calificado (electricista del automóvil) después de haber
verificado el tipo de conectores de alimentación y audio del automóvil.
Algunos coches están equipados con enchufes configurados de manera
diferente a la norma ISO (diferente posición de los cables en el enchufe).
Si el automóvil no está equipado con conectores ISO, se deben realizar las
modificaciones necesarias en los conectores antes de montar el reproductor.
Configuración de la hora
1. Presione brevemente la tecla CLK. 00:00 aparecerá en la pantalla.
2. Presione y mantenga presionada la tecla CLK nuevamente.
3. El indicador de hora parpadeará. Gire la perilla de volumen en ambas
direcciones hasta que alcance el valor deseado.
4. Presione brevemente la tecla CLK para confirmar.
5. El indicador de minutos parpadeará. Gire la perilla de volumen en ambas
direcciones hasta que alcance el valor deseado.
6. Espere unos segundos. La pantalla volverá al modo de visualización antes de
configurar la hora.
Selección de fuente de reproducción
Presione la tecla MODE para seleccionar entre: Radio, Bluetooth, AUX-in.

Manual de usuario
Español
28
• FM Radio
Buscando la frecuencia de radio
1. Presione la tecla MODE repetidamente hasta que aparezca RADIO en
la pantalla, seguido inmediatamente por la visualización de la frecuencia
actual.
2. Presione la tecla ◄ o ► para buscar otra frecuencia.
3. Mantenga presionada la tecla ◄ o ► para cambiar entre la búsqueda
MANUAL y la búsqueda AUTO (la búsqueda se detiene cuando la radio
alcanza una señal).
Guardar una emisora de radio
Hay 3 grupos de estaciones de radio disponibles (F1, F2, F3) que se pueden
seleccionar presionando repetidamente la tecla BAND, cada grupo tiene 6
memorias.
1. Primero seleccione el grupo (F1, F2 o F3).
2. Busque su estación de radio favorita.
3. Mantenga presionada la tecla correspondiente a la posición (1 - 6) donde
desea guardarla.
4. En la pantalla se mostrará el grupo, la frecuencia y la posición donde se
guardó la respectiva estación de radio. Por ejemplo: F1 96.0 6
Buscando una emisora de radio guardada
1. Presione la tecla AMS para buscar entre todas las estaciones de radio
guardadas.
2. El jugador comenzará a escanear los recuerdos.
3. Presione la tecla AMS nuevamente para detener el escaneo .
• Bluetooth AD2P
Bluetooth le permite recibir llamadas desde su teléfono o reproducir archivos

Manual de usuario
Español
29
de audio a través del sistema de audio de su automóvil.
1. Presione la tecla MODE repetidamente hasta que aparezca BT OFF en la
pantalla.
2. Active la función Bluetooth en su teléfono inteligente.
3. Busque en su teléfono dispositivos Bluetooth cercanos.
4. De la lista de dispositivos encontrados, seleccione “PNI 8428BT” y
confirme el emparejamiento.
5. BT ON aparecerá en la pantalla del reproductor.
6. Ahora los dos dispositivos, el teléfono y el reproductor, están emparejados.
7. Seleccione en el teléfono la música que desea escuchar en el sistema de
audio del automóvil.
Responder una llamada telefónica a través de Bluetooth
Si recibe una llamada telefónica mientras escucha música a través de Bluetooth,
la reproducción de la música se interrumpirá durante la llamada.
Presione la tecla MODE para contestar la llamada y la tecla BAND para
finalizar la llamada o rechazarla.
• AUX-in
1. Presione la tecla MODE repetidamente hasta que AUX IN aparezca en la
pantalla.
2. Conecte su teléfono al reproductor con un cable auxiliar con un conector
de 3,5 mm.
3. Seleccione en el teléfono la música que desea escuchar en el sistema de
audio del automóvil.
Solución de problemas
1. La unidad no se enciende.
Compruebe la conexión ISO y los cables de alimentación.
2. El botón de encendido/apagado no funciona.
Presione el botón de reinicio en la unidad. Si la falla persiste, desconecte la
fuente de alimentación y vuelva a conectarla.

Manual de usuario
Español
30
3. No hay sonido o solo un ruido.
Compruebe la conexión ISO, los cables de los altavoces o la configuración de
sonido del reproductor.
4. Sonido de muy mala calidad.
Compruebe la conexión ISO o los cables de los altavoces.
5. Recepción de radio deficiente.
Verifique la conexión de la antena de radio.
Especificaciones técnicas
Voltaje de potencia 12V
Bluetooth Si, AD2P
Radio FM Si
Frecuencia FM 87.5 - 108.0 MHz
Sensibilidad ≤ 20 dB
Separación estéreo ≥ 25 dB
Tasa de señal a ruido ≥ 60 dB
Archivos compatibles MP3, WMA
Distorsión ≤ 0.3%
Memoria
se pueden almacenar hasta 18 estaciones de
radio FM
(Ubicaciones F1-6, ubicaciones F2-6,
ubicaciones F3-6)
Potencia de audio
máxima 4 x 45W
Reloj digital Si
Conector ISO Si
Dimensiones 188 x 122 x 58 mm
Consumo en espera max. 5mA
Temperatura de trabajo -26°C~+80°C

Manuel utilisateur
Français
31
Avertissements
• N’utilisez pas le produit dans des conditions de températures très élevées
ou très basses.
• N’insérez pas d’objets métalliques (vis ou pièces de monnaie) à l’intérieur
de l’appareil pour éviter de court-circuiter les composants internes.
• Le lecteur peut lire des fichiers MP3/WMA. N’essayez pas de lire des
fichiers photo ou vidéo.
Description du panneau avant
1. Allumé éteint
2. Muet
3. Sélectionnez la source de lecture (Radio, Bluetooth, AUX-In)/Répondre à
un appel téléphonique
4. Sélectionnez le groupe de stations de radio (F1, F2, F3)/Rejeter l’appel
téléphonique
5. Recherche de fréquence radio/Défilement vers l’avant ou vers l’arrière
6. Achage et réglage de l’heure
7. Stations de radio mémorisées
8. Entrée auxiliaire
9. Fente pour carte SD
10. Fente USB
11. Recherche automatique et bouton d’enregistrement pour les stations de
radio
12. Écran

Manuel utilisateur
Français
32
Description du panneau arrière
1 2 3
4 5
6 7
1. Antenne FM
2. Haut-parleur avant droit
3. Haut-parleur arrière droit
4. Haut-parleur avant gauche
5. Haut-parleur arrière gauche
6. Connecteur ISO
7. Fusible
Description de la télécommande

Manuel utilisateur
Français
33
1. Appui long: marche/arrêt
Appui court: sélectionner la source
2. Muet
3. Sélectionnez un groupe de
stations de radio
4. Chanson précédente
5. Prochaine chanson
6. Achage de l’horloge
7. Le volume -
8. Volume +
9. Touche de sélection multifonction
10. Recherche automatique et
stockage des stations de radio
11. EQ - égaliseur sonore
12. Touches numériques
13. Répéter la chanson actuelle
14. Jouer l’intro
15. 10 chansons avant
16. 10 chansons de retour
17. Lire/mettre en pause la chanson
18. Lecture aléatoire de chansons
Instructions d’installation
1
2
3
1. Insérez le support de montage dans le tableau de bord.
2. Pliez les clips du support pour un ajustement plus sûr.
3. Pour retirer l’unité du tableau de bord, insérez les clés fournies des deux
côtés du brackets, puis retirez l’unité.

Manuel utilisateur
Français
34
Connexions
A
B1 3 5 7
2 4 6 8
1 3 5 7
2 4 6 8
fusible
A:
1-
2-
3-
4- Batterie +
5- Antenne
6-
7- Contact +
8- Terre (GND)
B:
1- Haut-parleur arrière droit +
2- Haut-parleur arrière droit -
3- Enceinte avant droite +
4- Enceinte avant droite -
5- Haut-parleur avant gauche +
6- Haut-parleur avant gauche -
7- Haut-parleur arrière gauche+
8- Haut-parleur arrière
gauche-
ATTENTION
L’installation de ce lecteur dans la voiture doit être eectuée par du personnel
qualifié (électricien automobile) après avoir vérifié le type de connecteurs
d’alimentation et audio de la voiture.
Certaines voitures sont équipées de prises configurées diéremment de la
norme ISO (positionnement diérent des fils dans la prise). Si la voiture n’est
pas équipée de connecteurs ISO, les modifications nécessaires doivent être
apportées aux connecteurs avant de monter le lecteur.
Configuration de l’heure
1. Appuyez brièvement sur la touche CLK. 00:00 s’ache à l’écran.
2. Appuyez de nouveau sur la touche CLK et maintenez-la enfoncée.
3. L’indicateur des heures clignotera. Tournez le bouton de volume dans les
deux sens jusqu’à atteindre la valeur souhaitée.
4. Appuyez brièvement sur la touche CLK pour confirmer.
5. L’indicateur des minutes clignotera. Tournez le bouton de volume dans les
deux sens jusqu’à atteindre la valeur souhaitée.
6. Attendez quelques secondes. L’écran retournera au mode d’achage avant
de régler l’heure.

Manuel utilisateur
Français
35
Sélection de la source de lecture
Appuyez sur la touche MODE pour sélectionner entre: Radio, Bluetooth et
AUX-in.
• FM Radio
Recherche de la fréquence radio
1. Appuyez plusieurs fois sur la touche MODE jusqu’à ce que RADIO
apparaisse à l’écran, immédiatement suivi de l’affichage de la fréquence
actuelle.
2. Appuyez sur la touche ◄ ou ► pour rechercher une autre fréquence.
3. Appuyez longuement sur la touche ◄ ou ► pour basculer entre la
recherche MANUELLE et la recherche AUTO (la recherche s’arrête
lorsque la radio atteint un signal).
Enregistrer une station de radio
Il existe 3 groupes de stations radio disponibles (F1, F2, F3) qui peuvent être
sélectionnés en appuyant plusieurs fois sur la touche BAND, chaque groupe
ayant 6 mémoires.
1. Sélectionnez d’abord le groupe (F1, F2 ou F3).
2. Recherchez votre station de radio préférée.
3. Appuyez longuement sur la touche correspondant à la position (1 - 6) où
vous souhaitez l’enregistrer.
4. Sur l’écran, le groupe, la fréquence et la position où la station de radio
respective a été enregistrée seront achés. Par exemple: F1 96,0 6
Recherche d’une station de radio enregistrée
1. Appuyez sur la touche AMS pour rechercher parmi toutes les stations de
radio enregistrées.
2. Le lecteur commencera à scanner les souvenirs.
3. Appuyez à nouveau sur la touche AMS pour arrêter la recherche.

Manuel utilisateur
Français
36
• Bluetooth AD2P
Le Bluetooth vous permet de prendre des appels depuis votre téléphone ou de
lire des fichiers audio via le système audio de votre voiture.
1. Appuyez plusieurs fois sur la touche MODE jusqu’à ce que BT OFF
apparaisse à l’écran.
2. Activez la fonction Bluetooth sur votre smartphone.
3. Recherchez dans votre téléphone les appareils Bluetooth à proximité.
4. Dans la liste des appareils trouvés, sélectionnez «PNI 8428BT» et
confirmez l’appairage.
5. BT ON apparaîtra sur l’écran du lecteur.
6. Maintenant, les deux appareils, le téléphone et le lecteur, sont couplés.
7. Sélectionnez sur le téléphone la musique que vous souhaitez écouter sur le
système audio de la voiture.
Répondre à un appel téléphonique via Bluetooth
Si vous recevez un appel téléphonique en écoutant de la musique via Bluetooth,
la lecture de la musique sera interrompue pendant l’appel.
Appuyez sur la touche MODE pour répondre à l’appel et sur la touche BAND
pour mettre fin à l’appel ou rejeter l’appel.
• AUX-in
1. Appuyez plusieurs fois sur la touche MODE jusqu’à ce que AUX IN
apparaisse à l’écran.
2. Connectez votre téléphone au lecteur avec un câble auxiliaire avec une
prise jack 3,5 mm.
3. Sélectionnez sur le téléphone la musique que vous souhaitez écouter sur le
système audio de la voiture.

Manuel utilisateur
Français
37
Dépannage
1. L’appareil ne s’allume pas.
Vérifiez la connexion ISO et les cordons d’alimentation.
2. Le bouton marche/arrêt ne fonctionne pas.
Appuyez sur le bouton de réinitialisation de l’appareil. Si le défaut persiste,
débranchez l’alimentation électrique et rebranchez-la.
3. Il n’y a pas de son ou juste un bruit.
Vérifiez la connexion ISO, les cordons des haut-parleurs ou les paramètres
audio du lecteur.
4. Son de très mauvaise qualité.
Vérifiez la connexion ISO ou les câbles d’enceinte.
5. Mauvaise réception radio.
Vérifiez la connexion de l’antenne radio.
Spécifications techniques
Tension d'alimentation 12V
Bluetooth Oui, AD2P
Radio FM Oui
Fréquence FM 87.5 - 108.0 MHz
Sensibilité ≤ 20 dB
Séparation stéréo ≥ 25 dB
Taux de signal sur bruit ≥ 60 dB
Fichiers compatibles MP3, WMA
Distorsion ≤ 0.3%
Mémoire jusqu’à 18 stations FM peuvent être mémorisées
(F1- 6 mémoire, F2-6 mémoire, F3-6 mémoire)
Puissance audio
maximale 4 x 45W
Horloge digitale Oui
Connecteur ISO Oui
Dimensions 188 x 122 x 58 mm
Consommation en veille max. 5mA

Használati utasítás
Magyar
38
Figyelmeztetések
• Ne használja a terméket nagyon magas vagy nagyon alacsony hőmérsékletű
körülmények között.
• Ne helyezzen fémtárgyakat (csavarokat vagy érméket) a készülék belsejébe,
hogy elkerülje a belső alkatrészek rövidzárlatát.
• A lejátszó MP3/WMA fájlokat képes lejátszani. Ne próbáljon meg fénykép-
vagy videofájlokat lejátszani.
Az előlap leírása
1. Be ki
2. Néma
3. Válassza ki a lejátszási forrást (rádió, Bluetooth, AUX-In) / válaszoljon
telefonhívást
4. Válassza ki a rádióállomások csoportját (F1, F2, F3) / Hívás elutasítása
5. Rádiófrekvenciás keresés / görgetés előre vagy hátra
6. Kijelző és idő beállítása
7. Tárolt rádióállomások
8. Kiegészítő bejárat
9. SD kártya foglalat
10. USB csatlakozó
11. Automatikus keresés és mentés gomb rádióállomásokhoz
12. Képernyő

Használati utasítás
Magyar
39
A hátsó panel leírása
1 2 3
4 5
6 7
1. FM antenna
2. Jobb első hangszóró
3. Jobb hátsó hangszóró
4. Bal első hangszóró
5. Bal hátsó hangszóró
6. ISO csatlakozó
7. Biztosíték
Távirányító leírása

Használati utasítás
Magyar
40
1. Hosszan nyomja meg: be / ki
Rövid megnyomás: a forrás
kiválasztása
2. Néma
3. Válassza ki a rádióállomások
csoportját
4. Előző dal
5. Következő dal
6. Óra kijelzése
7. Hangerő -
8. Volume +
9. Többfunkciós választógomb
10. Rádióállomások automatikus
keresése és tárolása
11. EQ - hangkiegyenlítő
12. Numerikus billentyűk
13. Ismételje meg az aktuális dalt
14. Play intro
15. 10 dal korábban
16. 10 dal vissza
17. Dal lejátszása / szüneteltetése
18. A dalok véletlenszerű lejátszása
Telepítési útmutató
1
2
3
1. Helyezze a rögzítő konzolt a műszerfalba.
2. Hajlítsa meg a konzol klipjeit a biztonságosabb illeszkedés érdekében.
3. Az egység eltávolításához a műszerfalon helyezze be a mellékelt kulcsokat
a cabacketse mindkét oldalára, majd húzza ki az egységet.

Használati utasítás
Magyar
41
Kapcsolatok
A
B1 3 5 7
2 4 6 8
1 3 5 7
2 4 6 8
biztosíték
A:
1-
2-
3-
4- Akkumulátor +
5- Antenna
6-
7- Kapcsolat +
8- Föld (GND)
B:
1- Jobb hátsó hangszóró +
2- Jobb hátsó hangszóró -
3- Jobb első hangszóró +
4- Jobb első hangszóró -
5- Első bal hangszóró +
6- Első bal hangszóró -
7- Bal hátsó hangszóró +
8- Bal hátsó hangszóró -
FIGYELEM
A lejátszó felszerelését az autóba képzett személyzetnek (autó-villanyszerelőnek)
kell elvégeznie, miután ellenőrizte az autó tápellátásának és audiocsatlakozóinak
típusát.
Egyes autók az ISO szabványtól eltérően konfigurált aljzatokkal vannak ellátva
(a vezetékek eltérő elhelyezése az aljzatban). Ha az autó nincs felszerelve ISO
csatlakozókkal, a lejátszó felszerelése előtt meg kell változtatni a csatlakozókat.
Idő beállítása
1. Nyomja meg röviden a CLK gombot. 00:00 jelenik meg a képernyőn.
2. Nyomja meg és tartsa lenyomva a CLK gombot újra.
3. Az óra jelzőfény villog. Forgassa el a hangerő-szabályozó gombot mindkét
irányban, amíg el nem éri a kívánt értéket.
4. A megerősítéshez nyomja meg röviden a CLK gombot.
5. A perc jelző villog. Forgassa el a hangerő-szabályozó gombot mindkét
irányban, amíg el nem éri a kívánt értéket.
6. Várjon néhány másodpercet. Az idő beállítása előtt a képernyő visszatér a
kijelző módba.
Lejátszási forrás kiválasztása
A MODE gomb megnyomásával válasszon a következők közül: Radio,
Bluetooth és AUX-in.

Használati utasítás
Magyar
42
• FM Radio
A rádiófrekvencia keresése
1. Nyomja meg többször a MODE gombot, amíg a képernyőn meg nem
jelenik a RADIO, majd azonnal az aktuális frekvencia megjelenítése.
2. Nyomja meg a ◄ vagy ► gombot egy másik frekvencia kereséséhez.
3. Hosszan nyomja meg a ◄ vagy ► gombot a MANUAL keresés és az
AUTO keresés közötti váltáshoz (a keresés leáll, amikor a rádió jelet ér).
Rádióállomás mentése
A rádióállomások 3 csoportja áll rendelkezésre (F1, F2, F3), amelyek a BAND
gomb ismételt megnyomásával választhatók ki, mindegyik csoportnak 6
memóriája van.
1. Először válassza ki a csoportot (F1, F2 vagy F3).
2. Keresse meg kedvenc rádióállomását.
3. Hosszan nyomja meg azt a gombot (1 - 6), amelyikbe menteni kívánja.
4. A képernyőn megjelenik az a csoport, frekvencia és hely, ahová az adott
rádióállomás mentésre került. Például: F1 96,0 6
Mentett rádióállomás keresése
1. Nyomja meg az AMS gombot az összes mentett rádióállomás kereséséhez.
2. A játékos elkezdi beolvasni az emlékeket.
3. A szkennelés leállításához nyomja meg ismét az AMS gombot.
• Bluetooth AD2P
A Bluetooth lehetővé teszi, hogy hívásokat fogadjon telefonjáról, vagy
hangfájlokat játsszon át autójának audiorendszerén keresztül .
1. Addig nyomja meg a MODE gombot, amíg a BT OFF felirat meg nem
jelenik a képernyőn.

Használati utasítás
Magyar
43
2. Aktiválja az okostelefon Bluetooth funkcióját .
3. Keresse meg telefonján a közeli Bluetooth-eszközöket.
4. A megtalált eszközök listájából válassza a „PNI 8428BT” lehetőséget, és
erősítse meg a párosítást.
5. A BT ON megjelenik a lejátszó képernyőjén.
6. Most a két eszköz, a telefon és a lejátszó párosítva van.
7. Válassza ki a telefonról azt a zenét, amelyet hallgatni szeretne az autó
audiorendszerén.
Telefonon válaszolhat Bluetooth-on keresztül
Ha telefonhívást fogad, miközben zenét hallgat Bluetooth-on keresztül, akkor
a zene lejátszása megszakad a hívás során.
Nyomja meg a MODE gombot a hívás fogadásához, és a BAND gombot a
hívás befejezéséhez vagy a hívás elutasításához.
• AUX-in
1. Nyomja meg többször a MODE gombot, amíg az AUX IN meg nem jelenik
a képernyőn.
2. Csatlakoztassa telefonját a lejátszóhoz egy 3,5 mm-es csatlakozóval ellátott
segédkábellel.
3. Válassza ki a telefonról azt a zenét, amelyet hallgatni szeretne az autó
audiorendszerén.
Hibaelhárítás
1. Az egység nem kapcsol be.
Ellenőrizze az ISO csatlakozást és a tápkábeleket.
2. A be / ki gomb nem működik.
Nyomja meg a készülék reset gombját. Ha a hiba továbbra is fennáll, válassza le
az áramellátást és csatlakoztassa újra.
3. Nincs hang vagy csak zaj.
Ellenőrizze az ISO csatlakozást, a hangszórók vezetékeit vagy a hangbeállításokat
a lejátszóban.
4. Nagyon rossz minőségű hang.

Használati utasítás
Magyar
44
Ellenőrizze az ISO csatlakozást vagy a hangszórókábeleket.
5. Gyenge rádió vétel.
Ellenőrizze a rádióantenna csatlakozását.
Műszaki adatok
Tápfeszültség 12V
Bluetooth Igen, AD2P
FM rádió Igen
FM frekvencia 87.5 - 108.0 MHz
Érzékenység ≤ 20 dB
Sztereó elválasztás ≥ 25 dB
Jel-zaj arány ≥ 60 dB
Kompatibilis fájlok MP3, WMA
Torzítás ≤ 0.3%
Memória legfeljebb 18 FM rádió állomás tárolható
(F1- 6 helyszín, F2-6 helyszín, F3-6 helyszín)
Maximális
hangteljesítmény 4 x 45W
Digitális óra Igen
ISO csatlakozó Igen
Méretek 188 x 122 x 58 mm
Készenléti fogyasztás max. 5mA
Üzemhőmérséklet -26°C~+80°C

Manuale dell’utente
Italiano
45
Avvertenze
• Non usare il prodotto in condizioni di temperatura troppo elevata o troppo
bassa.
• Non inserire oggetti metallici (viti o monete) all’interno dell’unità, per
evitare il cortocircuito dei componenti interni.
• Il player può riprodurre file MP3/WMA. Non tentare di riprodurre file
video.
Descrizione del pannello frontale
1. Avvio/Arresto
2. Disabilita il suono (MUTE)
3. Selezione sorgente di riproduzione (Radio, Bluetooth, AUX-In)/Rispondi a
una telefonata
4. Selezione gruppo stazioni radio (F1, F2, F3)/Rifiuto della telefonata
5. Ricerca frequenza radio/Scorri la canzone in avanti o indietro
6. Visione e impostazione ora
7. Stazioni radio memorate
8. Ingresso ausiliario
9. Slot scheda SD
10. Slot USB
11. Tasto ricerca e memorizzazione automatica stazioni radio
12. Schermo

Manuale dell’utente
Italiano
46
Descrizione pannello posteriore
1 2 3
4 5
6 7
1. Antenna FM
2. Altoparlante anteriore destro
3. Altoparlante posteriore destro
4. Altoparlante anteriore sinistro
5. Altoparlante posteriore sinistro
6. Connettore ISO
7. Fusibile
Descrizione telecomando

Manuale dell’utente
Italiano
47
1. Pressione lunga: avvio/arresto
Pressione breve: selezione sorgente
2. Disabilita il suono (MUTE)
3. Selezione gruppo stazioni radio
4. Canzone precedente
5. Prossima canzone
6. Visione dell’orologio
7. Volume -
8. Volume +
9. Tasto di selezione multifunzione
10. Ricerca e memorizzazione
automatica delle stazioni radio
11. EQ - equalizzatore del suono
12. Tasti numerici
13. Ripeti il brano corrente
14. Riproduci intro
15. 10 canzoni avanti
16. 10 canzoni indietro
17. Riproduci / metti in pausa il brano
18. Riproduzione casuale di brani
Istruzione di installazione
1
2
3
1. Inserire la staa di montaggio nel cruscotto.
2. Piegare le clip della staa per un montaggio più sicuro.
3. Per rimuovere l’unità dal cruscotto, inserire le chiavi incluse su entrambi i
lati della staa, quindi estrarre l’unità.

Manuale dell’utente
Italiano
48
Connessioni
A
B1 3 5 7
2 4 6 8
1 3 5 7
2 4 6 8
fusibile
A:
1-
2-
3-
4- Batteria+
5- Antenna
6-
7- Contatto+
8- GND
B:
1- Altoparlante posteriore destro+
2- Altoparlante posteriore destro-
3- Altoparlante anteriore destro+
4- Altoparlante anteriore destro-
5- Altoparlante anteriore sinistro+
6- Altoparlante anteriore sinistro-
7- Altoparlante posteriore sinistro+
8- Altoparlante posteriore
sinistro-
AVVERTENZA
L’installazione di questo lettore nell’auto deve essere eseguita da personale
qualificato (elettricista auto) dopo aver verificato prima il tipo di connettori di
alimentazione e audio dell’auto.
Alcune vetture sono dotate di prese configurate diversamente dallo standard
ISO (diverso posizionamento dei fili nelle prese). Se l’auto non è dotata di
connettori ISO, è necessario apportare le modifiche necessarie ai connettori
prima di montare il lettore.
Impostazione ora
1. Premere brevemente il tasto CLK. Lo schermo mostrerà 00:00.
2. Premere di nuovo a lungo il tasto CLK.
3. L’indicatore delle ore lampeggerà. Ruotare la manopola del volume in
entrambe le direzioni fino a raggiungere il valore desiderato.
4. Premere brevemente il tasto CLK per confermare.
5. L’indicatore dei minuti lampeggerà. Ruotare la manopola del volume in
entrambe le direzioni fino a raggiungere il valore desiderato.
6. Attendere per quanche secondo. Lo schermo tornerà alla modalità di
visualizzazione prima di impostare l’ora.

Manuale dell’utente
Italiano
49
Selezionare la sorgente di riproduzione
Premere il tasto MODE per scegliere tra: Radio, Bluetooth e AUX-in.
1. Radio FM
Ricerca di una frequenza radio
1. Premere ripetutamente il tasto MODE finché non appare sullo schermo
RADIO, immediatamente seguito dalla visualizzazione della frequenza
corrente.
2. Premere il tasto ◄ oppure ► per cercare un’altra frequenza.
3. Premere a lungo il tasto ◄ oppure ►per passare dalla ricerca MANUALE
alla ricerca AUTOMATICA (la ricerca si ferma quando il lettore trova
segnale).
Salvataggio di una stazione radio
Sono disponibili 3 gruppi di stazioni radio (F1, F2, F3) che possono essere
selezionati premendo ripetutamente il tasto BAND, ogni gruppo ha 6 memorie.
1. Seleziona prima il gruppo (F1, F2 sau F3).
2. Cerca la stazione radio preferita.
3. Premere a lungo il tasto corrispondente alla posizione (1 - 6) in cui si
desidera salvare la stazione radio.
4. Sullo schermo, verranno visualizzati il gruppo, la frequenza e la posizione
in cui è stata salvata la rispettiva stazione radio. Per esempio: F1 96.0 6
Ricerca di una stazione radio memorizzata
1. Premere il tasto AMS per cercare tra tutte le stazioni radio salvate.
2. Il lettore inizierà a scansionare le memorie.
3. Premere di nuovo il tasto AMS per fermare la scansione.

Manuale dell’utente
Italiano
50
2. Bluetooth AD2P
La funzione Bluetooth consente di rispondere alle chiamate dal telefono o
riprodurre file audio tramite il sistema audio dell’auto.
1. Premere ripetutamente il tasto MODE finché non appare sullo schermo
BT OFF.
2. Attiva la funzione Bluetooth nel suo telefono smart.
3. Cercare tramite il telefono i dispositivi Bluetooth vicini.
4. Dall’elenco dei dispositivi trovati, seleziona “PNI 8428BT“ e confermare
l’abbinamento.
5. Apparirà BT ON sullo schermo del lettore.
6. Ora i due dispositivi, il telefono e il lettore, sono abbinati.
7. Seleziona dal telefono la musica che desidera ascoltare sul sistema audio
dell’auto.
Rispondi a una telefonata tramite Bluetooth
Se si riceve una telefonata mentre si ascolta la musica tramite Bluetooth, la
riproduzione della musica viene messa in pausa durante la chiamata.
Premere il tasto MODE per rispondere alla chiamata e il tasto BAND per
terminare o rifiutare la chiamata.
3. AUX-in
1. Premere ripetutamente il tasto MODE inché non appare sullo schermo
AUX IN.
2. Collega il telefono al lettore con un cavo ausiliario con jack da 3,5 mm.
3. Seleziona dal telefono la musica che desidera ascoltare sul sistema audio
dell’auto.
Problemi e soluzioni
1. L’unità non si avvia
Verificare la connessione ISO e i cavi di alimentazione.
2. Il pulsante di accensione / spegnimento non funziona.

Manuale dell’utente
Italiano
51
Premere il pulsante di ripristino sull’unità. Se il guasto persiste, scollegare
l’alimentazione e ricollegarla.
3. Non c’è alcun suono o solo un rumore.
Verificare la connessione ISO, i cavi degli altoparlanti o le impostazioni audio
nel lettore.
4. Suono di qualità molto scarsa.
Verificare la connessione ISO o i cavi degli altoparlanti.
5. Scarsa ricezione radio.
Verificare il collegamento dell’antenna radio.
Specifiche tecniche
Alimentazione 12V
Bluetooth Si, AD2P
Radio FM Si
Frequenza FM 87.5 - 108.0 MHz
Sensibilità ≤ 20 dB
Separazione stereo ≥ 25 dB
Rapporto segnale-
rumore ≥ 60 dB
File compatibili MP3, WMA
Distorsione ≤ 0.3%
Memoria delle stazioni
radio 18 stazioni FM
(Memorie F1-6, memorie F2-6, memorie F3-6)
Massima potenza audio 4 x 45W
Orologio digitale Si
Connettore ISO Si
Dimensioni 188 x 122 x 58 mm
Consumo in standby max. 5mA
Temperatura di lavoro -26°C~+80°C

Gebruikershandleiding
Nederlands
52
Waarschuwingen
• Gebruik het product niet bij zeer hoge of zeer lage temperaturen.
• Steek geen metalen voorwerpen (schroeven of munten) in het apparaat
om kortsluiting in de interne componenten te voorkomen.
• De speler kan MP3 / WMA-bestanden afspelen. Probeer geen foto- of
videobestanden af te spelen.
Beschrijving voorpaneel
1. Aan uit
2. Dempen
3. Selecteer de afspeelbron (radio, Bluetooth, AUX-In) / beantwoord
telefoongesprek
4. Selecteer de radiostationgroep (F1, F2, F3) / Telefoongesprek weigeren
5. Radiofrequentie zoeken / Vooruit of achteruit bladeren
6. Weergave en tijdinstelling
7. Opgeslagen radiostations
8. Extra ingang
9. SD-kaartsleuf
10. USB-sleuf
11. Automatische zoek- en bewaarknop voor radiostations
12. Scherm

Gebruikershandleiding
Nederlands
53
Beschrijving achterpaneel
1 2 3
4 5
6 7
1. FM-antenne
2. Rechter voorluidspreker
3. Rechter achterluidspreker
4. Linker voorluidspreker
5. Linker achterluidspreker
6. ISO-stekker
7. Lont
Beschrijving afstandsbediening

Gebruikershandleiding
Nederlands
54
1. Lang indrukken: aan / uit
Kort indrukken: bron selecteren
2. Dempen
3. Selecteer een radiostationgroep
4. Vorig nummer
5. Volgende liedje
6. Klokweergave
7. Volume -
8. Volume +
9. Multifunctionele selectietoets
10. Automatisch zoeken en opslaan
van radiostations
11. EQ - geluidsequalizer
12. Numerieke toetsen
13. Herhaal huidig nummer
14. Speel intro
15. 10 nummers ervoor
16. 10 nummers terug
17. Nummer afspelen / pauzeren
18. Willekeurig afspelen van nummers
Installatie instructies
1
2
3
1. Plaats de montagebeugel in het dashboard.
2. Buig de clips van de beugel voor een stevigere pasvorm.
3. Om de eenheid van het dashboard te verwijderen, steekt u de meegeleverde
sleutels aan beide zijden van de houder in en trekt u de eenheid eruit.
Verbindingen
A
B1 3 5 7
2 4 6 8
1 3 5 7
2 4 6 8
lont
A:
1-
2-
3-
4- Batterij +
5- Antenne
6-
7- Neem contact
op met+
8- Aarde (GND)
B:
1- Rechter achterluidspreker +
2- Rechter achterluidspreker-
3- Rechter voorluidspreker +
4- Rechter voorluidspreker -
5- Luidspreker linksvoor +
6- Luidspreker linksvoor -
7- Luidspreker linksachter +
8- Luidspreker links achter -

Gebruikershandleiding
Nederlands
55
WAARSCHUWING
De installatie van deze speler in de auto moet worden uitgevoerd door
gekwalificeerd personeel (auto-elektricien) na controle van het type stroom-
en audioconnectoren op de auto.
Sommige auto’s zijn uitgerust met stopcontacten die anders zijn geconfigureerd
dan de ISO-norm (verschillende positionering van draden in het stopcontact).
Als de auto niet is uitgerust met ISO-connectoren, moeten de nodige
wijzigingen aan de connectoren worden aangebracht voordat de speler wordt
gemonteerd.
Tijdinstellingen
1. Druk kort op de CLK-toets. 00:00 verschijnt op het scherm.
2. Houd de CLK-toets opnieuw ingedrukt.
3. De uurindicator knippert. Draai de volumeknop in beide richtingen totdat
u de gewenste waarde heeft bereikt.
4. Druk ter bevestiging kort op de CLK-toets.
5. De minutenindicator knippert. Draai de volumeknop in beide richtingen
totdat u de gewenste waarde heeft bereikt.
6. Wacht een paar seconden. Het scherm keert terug naar de weergavemodus
voordat de tijd werd ingesteld.
Selectie van afspeelbron
Druk op de MODE-toets om te kiezen tussen: Radio, Bluetooth en AUX-in.
• FM Radio
Zoeken naar de radiofrequentie
1. Druk herhaaldelijk op de MODE-toets totdat RADIO op het scherm
verschijnt, onmiddellijk gevolgd door de weergave van de huidige frequentie.
2. Druk op de toets ◄ of ► om naar een andere frequentie te zoeken.
3. Druk lang op de toets ◄ of ► om te schakelen tussen HANDMATIG
zoeken en AUTOMATISCH zoeken (het zoeken stopt wanneer de radio

Gebruikershandleiding
Nederlands
56
een signaal bereikt).
Een radiostation opslaan
Er zijn 3 groepen radiostations beschikbaar (F1, F2, F3) die kunnen worden
geselecteerd door herhaaldelijk op de BAND-toets te drukken, elke groep
heeft 6 geheugens.
1. Selecteer eerst de groep (F1, F2 of F3).
2. Zoek naar je favoriete radiostation.
3. Druk lang op de toets die overeenkomt met de positie (1 - 6) waar u deze
wilt opslaan.
4. Op het scherm worden de groep, frequentie en positie weergegeven waar
het betreende radiostation is opgeslagen. Bijvoorbeeld: F1 96,0 6
Zoeken naar een opgeslagen radiostation
1. Druk op de AMS-toets om door alle opgeslagen radiozenders te zoeken.
2. De speler begint de herinneringen te scannen.
3. Druk nogmaals op de AMS-toets om het scannen te stoppen.
• Bluetooth AD2P
Met Bluetooth kunt u oproepen aannemen vanaf uw telefoon of audiobestanden
afspelen via het audiosysteem van uw auto.
1. Druk herhaaldelijk op de MODE-toets totdat BT OFF op het scherm
verschijnt.
2. Activeer de Bluetooth-functie op uw smartphone.
3. Zoek op uw telefoon naar Bluetooth-apparaten in de buurt.
4. Selecteer “PNI 8428BT” in de lijst met gevonden apparaten en bevestig
de koppeling.
5. BT ON verschijnt op het scherm van de speler.
6. Nu zijn de twee apparaten, de telefoon en de speler, gekoppeld.
7. Selecteer op de telefoon de muziek waarnaar u op het audiosysteem van
de auto wilt luisteren.

Gebruikershandleiding
Nederlands
57
Beantwoord een telefoontje via bluetooth
Als u wordt gebeld terwijl u naar muziek luistert via Bluetooth, wordt het
afspelen van de muziek tijdens het gesprek onderbroken.
Druk op de MODE-toets om de oproep te beantwoorden en op de BAND-
toets om de oproep te beëindigen of te weigeren.
• AUX-in
1. Druk herhaaldelijk op de MODE-toets totdat AUX IN op het scherm
verschijnt.
2. Sluit uw telefoon aan op de speler met een hulpkabel met een 3,5 mm-
aansluiting.
3. Selecteer op de telefoon de muziek waarnaar u op het audiosysteem van
de auto wilt luisteren.
Probleemoplossen
1. Het apparaat gaat niet aan.
Controleer de ISO-aansluiting en netsnoeren.
2. De aan / uit-knop werkt niet.
Druk op de resetknop op het apparaat. Als de fout aanhoudt, koppelt u de
stroomtoevoer los en sluit u deze weer aan.
3. Er is geen geluid of alleen een geluid.
Controleer de ISO-verbinding, luidsprekersnoeren of geluidsinstellingen in de
speler.
4. Zeer slechte geluidskwaliteit.
Controleer de ISO-aansluiting of luidsprekerkabels.
5. Slechte radio-ontvangst.
Controleer de radioantenne-aansluiting.

Gebruikershandleiding
Nederlands
58
Technische specificaties
Netspanning 12V
Bluetooth Ja, AD2P
FM radio Ja
FM-frequentie 87.5 - 108.0 MHz
Gevoeligheid ≤ 20 dB
Stereo scheiding ≥ 25 dB
Signaal-ruis-snelheid ≥ 60 dB
Compatibele bestanden MP3, WMA
Vervorming ≤ 0.3%
Geheugen Er kunnen maximaal 18 FM-radiozenders
worden opgeslagen
(F1- 6 locaties, F2-6 locaties, F3-6 locaties)
Maximaal
audiovermogen 4 x 45W
Digitale klok Ja
ISO-stekker Ja
Dimensies 188 x 122 x 58 mm
Stand-by verbruik max. 5mA
Werktemperatuur -26°C~+80°C

Instrukcja obsługi
Polskie
59
Ostrzeżenia
• Nie używaj produktu w bardzo wysokich lub bardzo niskich temperaturach.
• Nie wkładaj metalowych przedmiotów (śrub lub monet) do wnętrza
urządzenia, aby uniknąć zwarcia elementów wewnętrznych.
• Odtwarzacz może odtwarzać pliki MP3 / WMA. Nie próbuj odtwarzać
zdjęć lub plików wideo.
Opis panelu przedniego
1. On / O
2. Niemy
3. Wybierz źródło odtwarzania (radio, Bluetooth, wejście AUX) / Odbierz
połączenie telefoniczne
4. Wybierz grupę stacji radiowych (F1, F2, F3) / Odrzuć połączenie
telefoniczne
5. Wyszukiwanie częstotliwości radiowych / Przewijanie do przodu lub do tyłu
6. Wyświetlanie i ustawienie czasu
7. Zapisane stacje radiowe
8. Wejście pomocnicze
9. Gniazdo karty SD
10. Gniazdo USB
11. Przycisk automatycznego wyszukiwania i zapisywania stacji radiowych
12. Ekran

Instrukcja obsługi
Polskie
60
Opis panelu tylnego
1 2 3
4 5
6 7
1. Antena FM
2. Prawy przedni głośnik
3. Prawy tylny głośnik
4. Lewy przedni głośnik
5. Lewy tylny głośnik
6. Złącze ISO
7. Bezpiecznik
Opis pilota

Instrukcja obsługi
Polskie
61
1. Długie naciśnięcie: włączanie /
wyłączanie
Krótkie naciśnięcie: wybór źródła
2. Niemy
3. Wybierz grupę stacji radiowych
4. Poprzednia piosenka
5. Następna piosenka
6. Wyświetlacz zegara
7. Tom -
8. Głośność +
9. Wielofunkcyjny klawisz wyboru
10. Automatyczne wyszukiwanie i
przechowywanie stacji radiowych
11. EQ - korektor dźwięku
12. Klawisze numeryczne
13. Powtórz tą piosenkę
14. Odtwórz intro
15. 10 piosenek wcześniej
16. 10 piosenek z powrotem
17. Odtwórz / wstrzymaj utwór
18. Losowe odtwarzanie piosenek
Instrukcje Instalacji
1
2
3
1. Włóż wspornik montażowy do deski rozdzielczej.
2. Zagnij zaciski wspornika, aby zapewnić lepsze dopasowanie.
3. Aby wyjąć urządzenie z deski rozdzielczej, włóż dołączone klucze po obu
stronach kabiny, a następnie wyciągnij urządzenie.
Znajomości
A
B1 3 5 7
2 4 6 8
1 3 5 7
2 4 6 8
bezpiecznik
A:
1-
2-
3-
4- Bateria +
5- Antena
6-
7- Kontakt +
8- GND
B:
1- Prawy tylny głośnik +
2- Prawy tylny głośnik -
3- Prawy przedni głośnik +
4- Prawy przedni głośnik -
5- Lewy przedni głośnik +
6- Głośnik przedni lewy -
7- Lewy tylny głośnik +
8- Lewy tylny głośnik -

Instrukcja obsługi
Polskie
62
OSTRZEŻENIE
Instalacja tego odtwarzacza w samochodzie musi być wykonana przez
wykwalifikowany personel (elektryka samochodowego) po sprawdzeniu typu
gniazd zasilania i audio w samochodzie.
Niektóre samochody są wyposażone w gniazda skonfigurowane inaczej niż w
standardzie ISO (inne ułożenie przewodów w gnieździe). Jeśli samochód nie jest
wyposażony w złącza ISO, przed zamontowaniem odtwarzacza należy dokonać
niezbędnych modyfikacji w złączach.
Konfiguracja czasu
1. Krótko naciśnij klawisz CLK. Na ekranie pojawi się 00:00.
2. Ponownie naciśnij i przytrzymaj klawisz CLK.
3. Wskaźnik godzin zacznie migać. Obracaj pokrętłem głośności w obu
kierunkach, aż osiągniesz żądaną wartość.
4. Krótko naciśnij klawisz CLK, aby potwierdzić.
5. Wskaźnik minut zacznie migać. Obracaj pokrętłem głośności w obu
kierunkach, aż osiągniesz żądaną wartość.
6. Poczekaj kilka sekund. Ekran powróci do trybu wyświetlania przed
ustawieniem czasu.
Wybór źródła odtwarzania
Naciśnij przycisk MODE, aby wybrać pomiędzy: Radio, Bluetooth i AUX-in.
• FM Radio
Wyszukiwanie częstotliwości radiowej
1. Naciśnij kilkakrotnie przycisk MODE, aż na ekranie pojawi się RADIO, a
zaraz po nim wyświetlenie aktualnej częstotliwości.
2. Naciśnij klawisz ◄ lub ►, aby wyszukać inną częstotliwość.
3. Długo naciśnij przycisk ◄ lub ►, aby przełączać się między wyszukiwaniem
RĘCZNYM a wyszukiwaniem AUTO (wyszukiwanie zatrzymuje się, gdy
radio osiągnie sygnał).

Instrukcja obsługi
Polskie
63
Zapisywanie stacji radiowej
Dostępne są 3 grupy stacji radiowych (F1, F2, F3), które można wybrać,
naciskając kilkakrotnie przycisk BAND, każda grupa ma 6 pamięci .
1. Najpierw wybierz grupę (F1, F2 lub F3).
2. Wyszukaj swoją ulubioną stację radiową.
3. Długo naciśnij klawisz odpowiadający pozycji (1 - 6), w której chcesz go
zapisać.
4. Na ekranie zostanie wyświetlona grupa, częstotliwość i pozycja, w której
została zapisana odpowiednia stacja radiowa. Na przykład: F1 96,0 6
Wyszukiwanie zapisanej stacji radiowej
1. Naciśnij klawisz AMS, aby przeszukać wszystkie zapisane stacje radiowe.
2. Gracz rozpocznie skanowanie wspomnień.
3. Naciśnij ponownie klawisz AMS, aby zatrzymać skanowanie .
• Bluetooth AD2P
Bluetooth umożliwia odbieranie połączeń z telefonu lub odtwarzanie plików
audio przez samochodowy system audio.
1. Naciśnij kilkakrotnie przycisk MODE, aż na ekranie pojawi się BT OFF.
2. Włącz funkcję Bluetooth w swoim smartfonie.
3. Wyszukaj w telefonie pobliskie urządzenia Bluetooth.
4. Z listy znalezionych urządzeń wybierz „PNI 8428BT” i potwierdź parowanie.
5. BT ON pojawi się na ekranie odtwarzacza.
6. Teraz oba urządzenia, telefon i odtwarzacz, są sparowane.
7. Wybierz z telefonu muzykę, której chcesz słuchać w samochodowym
systemie audio.
Odbierz telefon przez Bluetooth
Jeśli otrzymasz połączenie telefoniczne podczas słuchania muzyki przez
Bluetooth, odtwarzanie muzyki zostanie przerwane podczas połączenia.

Instrukcja obsługi
Polskie
64
Naciśnij przycisk MODE, aby odebrać połączenie i przycisk BAND, aby
zakończyć lub odrzucić połączenie.
• AUX-in
1. Naciśnij kilkakrotnie przycisk MODE, aż AUX IN pojawi się na ekranie.
2. Podłącz telefon do odtwarzacza za pomocą dodatkowego kabla z wtykiem
3,5 mm.
3. Wybierz z telefonu muzykę, której chcesz słuchać w samochodowym
systemie audio.
Rozwiązywanie problemów
1. Urządzenie nie włącza się.
Sprawdź połączenie ISO i przewody zasilające.
2. Przycisk włączania / wyłączania nie działa.
Naciśnij przycisk resetowania na urządzeniu. Jeśli usterka nie ustąpi, odłącz
zasilanie i podłącz je ponownie.
3. Brak dźwięku lub po prostu hałas.
Sprawdź połączenie ISO, przewody głośnikowe lub ustawienia dźwięku w
odtwarzaczu.
4. Bardzo słaba jakość dźwięku.
Sprawdź połączenie ISO lub kable głośnikowe.
5. Słaby odbiór radiowy.
Sprawdź podłączenie anteny radiowej.
Specyfikacja techniczna
Napięcie 12V
Bluetooth Tak, AD2P
Radio FM Tak
Częstotliwość FM 87.5 - 108.0 MHz
Wrażliwość ≤ 20 dB
Separacja stereo ≥ 25 dB

Instrukcja obsługi
Polskie
65
Stosunek sygnału do
szumu ≥ 60 dB
Zgodne pliki MP3, WMA
Zniekształcenie ≤ 0.3%
Pamięć Można zapisać do 18 stacji radiowych FM
(Lokalizacje F1- 6, lokalizacje F2-6, lokalizacje
F3-6)
Maksymalna moc
dźwięku 4 x 45W
Zegar cyfrowy Tak
Złącze ISO Tak
Wymiary 188 x 122 x 58 mm
Zużycie w trybie
czuwania Max. 5mA
Temperatura pracy -26°C~+80°C

Manual de utilizare
Romana
66
Atentionari
• Nu utilizati produsul in conditii de temperatura foarte ridicata sau foarte
scazuta.
• Nu introduceti obiecte metalice (suruburi sau monede) in interiorul unitatii,
pentru a evita scurtcircuitarea componentelor interne.
• Player-ul poate reda fisiere de tip MP3/WMA. Nu incercati redarea
fisierelor foto sau video.
Descriere panou frontal
1. Pornire/Oprire
2. Dezactivare sunet (MUTE)
3. Selectare sursa redare (Radio, Bluetooth, AUX-In)/Preluare apel
4. Selectare grup posturi radio (F1, F2, F3)/Respingere apel
5. Cautare frecventa radio/Derulare melodie inainte sau inapoi
6. Afisare si setare ora
7. Posturi radio memorate
8. Intrare auxiliara
9. Slot card SD
10. Slot USB
11. Buton cautare si memorare automata posturi radio
12. Ecran

Manual de utilizare
Romana
67
Descriere panou posterior
1 2 3
4 5
6 7
1. Antena FM
2. Difuzor fata dreapta
3. Difuzor spate dreapta
4. Difuzor fata stanga
5. Difuzor spate stanga
6. Conector ISO
7. Siguranta
Descriere telecomanda

Manual de utilizare
Romana
68
1. Apasare lunga: pornire/oprire
Apasare scurta: selectare sursa
2. Dezactivare sunet (MUTE)
3. Selectare grup posturi radio
4. Melodia anterioara
5. Melodia urmatoare
6. Afisare ceas
7. Volum -
8. Volum +
9. Tasta de selectie multifunctionala
10. Cautare si memorare automata
posturi radio
11. EQ - egalizator sunet
12. Taste numerice
13. Repetare melodie curenta
14. Redare intro
15. 10 melodii inainte
16. 10 melodii inapoi
17. Redare/pauza melodie
18. Redare aleatorie melodii
Instructiuni de instalare
1
2
3
1. Introduceti carcasa de montaj in bord.
2. Indoiti clemele carcasei pentru o fixare mai sigura.
3. Pentru a scoate unitatea din bord, introduceti cheile incluse pe ambele
parti ale carcasei, dupa care trageti unitatea afara.
Conexiuni
A
B1 3 5 7
2 4 6 8
1 3 5 7
2 4 6 8
SIGURANTA
A:
1-
2-
3-
4- Baterie +
5- Alimentare antena
6-
7- Contact +
8- Masa (GND)
B:
1- Difuzor dreapta spate +
2- Difuzor dreapta spate -
3- Difuzor dreapta fata +
4- Difuzor dreapta fata -
5- Difuzor stanga fata +
6- Difuzor stanga fata -
7- Difuzor stanga spate +
8- Difuzor stanga spate -

Manual de utilizare
Romana
69
ATENTIONARE
Instalarea acestui player in autoturism trebuie efectuata doar de personal
calificat (electrician auto) dupa verificarea in prealabil a tipurilor de conectori
de alimentare si audio de pe autoturism.
Anumite autoturisme sunt echipate cu mufe configurate diferit fata de
standardul ISO (diferita pozitionare a firelor in mufe). Daca autoturismul nu
este echipat cu conectori ISO, trebuie facute modificarile necesare in conectori
inainte de montarea playerului.
Setare ora
1. Apasati scurt tasta CLK. Pe ecran va aparea ora sub forma 00:00.
2. Mai apasati inca o data lung tasta CLK.
3. Indicatorul orei va clipi. Rotiti butonul de volum in ambele sensuri pana
ajungeti la valoarea dorita.
4. Apasati scurt tasta CLK pentru a confirma.
5. Indicatorul minutelor va clipi. Rotiti butonul de volum in ambele sensuri
pana ajungeti la valoarea dorita.
6. Asteptati cateva secunde. Ecranul se va intoarce la modul de afisare
anterior setarii orei.
Selectare sursa de redare
Apasati tasta MODE pentru a selecta intre: Radio, Bluetooth sau AUX-in.
1. Radio FM
Cautarea unei frecvente radio
1. Apasati in mod repetat tasta MODE pana cand pe ecran apare RADIO,
urmat imediat de afisarea frecventei curente.
2. Apasati tasta ◄ sau ► pentru a cauta alta frecventa.
3. Apasati lung tasta ◄ sau ►pentru a schimba intre cautare MANUALA si
cautare AUTOMATA (cautarea se opreste cand radioul gaseste semnal).

Manual de utilizare
Romana
70
Salvarea unui post radio
Sunt disponibile 3 grupuri de posturi radio (F1, F2, F3) care pot fi selectate
apasand in mod repetat tasta BAND, fiecare grup avand cate 6 memorii.
1. Selectati mai intai grupul (F1, F2 sau F3).
2. Cautati postul radio preferat.
3. Apasati lung tasta corespunzatoare pozitiei (1 - 6) unde vreti sa-l salvati.
4. Pe ecran, vor fi afisate grupul, frecventa si pozitia unde a fost salvat postul
radio respectiv. De exemplu: F1 96.0 6
Cautarea unui post radio memorat
1. Apasati tasta AMS pentru a cauta printre toate posturile radio salvate.
2. Player-ul va incepe scanarea memoriilor.
3. Apasati din nou tasta AMS pentru a opri scanarea.
2. Bluetooth AD2P
Functia Bluetooth permite preluarea apelurilor de pe telefon sau redarea
fisierelor audio prin sistemul audio al autovehiculului.
1. Apasati in mod repetat tasta MODE pana cand pe ecran apare BT OFF.
2. Activati functia Bluetooth in telefonul dvs. smart.
3. Cautati din telefon dispozitivele Bluetooth din apropiere.
4. Din lista de dispozitive gasite, selectati “PNI 8428BT“ si confirmati
imperecherea.
5. Pe ecranul player-ului va aparea BT ON.
6. Acum cele doua dispozitive, telefonul si player-ul, sunt imprecheate.
7. Selectati din telefon muzica pe care doriti sa o ascultati pe sistemul audio
al masinii.
Preluarea unui apel telefonic prin Bluetooth
Daca in timp ce ascultati muzica prin Bluetooth, primiti un apel telefonic,
redarea muzicii se va intrerupe pe durata convorbirii.
Apasati tasta MODE pentru a prelua apelul si tasta BAND pentru a finaliza

Manual de utilizare
Romana
71
convorbirea sau pentru a respinge apelul.
3. AUX-in
1. Apasati in mod repetat tasta MODE pana cand pe ecran apare AUX IN.
2. Conectati telefonul dvs. cu player-ul printr-un cablu auxiliar cu mufa jack
3.5mm.
3. Selectati din telefon muzica pe care doriti sa o ascultati pe sistemul audio
al masinii.
Probleme si solutii
1. Unitatea nu porneste
Verificati conexiunea ISO si cablurile de alimentare
2. Butonul de pornire/oprire nu functioneaza
Apasati butonul de reset de pe unitate. Daca defectiunea persista, scoateti
alimentarea si conectati-o din nou.
3. Nu se aude nici un sunet sau doar un zgomot
Verificati conexiunea ISO, cablurile difuzoarelor sau setarile de sunet din player.
4. Sunet de foarte proasta calitate
Verificati conexiunea ISO sau cablurile difuzoarelor.
5. Receptie radio slaba
Verificati conexiunea antenei radio
Specificatii tehnice
Alimentare 12V
Bluetooth Da, AD2P
Radio FM Da
Frecventa FM 87.5 - 108.0 MHz
Sensibilitate ≤ 20 dB
Separatie stereo ≥ 25 dB
Rata semnal-zgomot ≥ 60 dB
Fisiere compatibile MP3, WMA

Manual de utilizare
Romana
72
Distorsiune ≤ 0.3%
Memorie posturi radio 18 posturi FM
(F1- 6 memorii, F2-6 memorii, F3-6 memorii)
Putere audio maxima 4 x 45W
Ceas digital Da
Conector ISO Da
Dimensiuni 188 x 122 x 58 mm
Consum in standby max. 5mA
Temperatura de lucru -26°C~+80°C

EN:
EU Simplified Declaration of Conformity
SC ONLINESHOP SRL declares that MP3 car player PNI Clementine 8428BT complies
with the Directive EMC 2014/30/EU and RED 2014/53/UE. The full text of the EU
declaration of conformity is available at the following Internet address:
https://www.mypni.eu/products/4782/download/certifications
DE:
Vereinfachte EU- Konformitätserklärung
SC ONLINESHOP SRL erklärt, dass das MP3-Auto-Player PNI Clementine 8428BT der
Richtlinie EMC 2014/30/EU und RED 2014/53/UE entspricht. Sie finden den ganzen Text
der EU-Konformitätserklärung an der folgenden Internetadresse:
https://www.mypni.eu/products/4782/download/certifications
ES:
Declaración UE de conformidad simplificada
SC ONLINESHOP SRL declara que el Reproductor MP3 para coche PNI Clementine
8428BT cumple con la Directiva EMC 2014/30/EU y la Directiva RED 2014/53/EU. El
texto completo de la declaración de conformidad de la UE está disponible en la siguiente
dirección de Internet:
https://www.mypni.eu/products/4782/download/certifications
FR
Déclaration de conformité simplifiée de l’UE
SC ONLINESHOP SRL déclare que Lecteur MP3 pour voiture PNI Clementine 8428BT
est conforme à la directive EMC 2014/30/EU et RED 2014/53/UE. Le texte complet de la
déclaration de conformité UE est disponible à l’adresse Internet suivante:
https://www.mypni.eu/products/4782/download/certifications
HU:
Egyszerűsített EU Megfelelési Közlemény
SC ONLINESHOP SRL kijelenti azt, hogy a MP3 autós lejátszó PNI Clementine 8428BT
megfelel az EMC 2014/30/EU és RED 2014/53/UE irányelvnek. Az EU-megfelelőségi
nyilatkozat teljes szövege a következő internetes címen érhető el:
https://www.mypni.eu/products/4782/download/certifications
IT:
Dichiarazione UE di conformità semplificata
SC ONLINESHOP SRL dichiara che il Lettore MP3 per auto PNI Clementine 8428BT è
conforme alla direttiva EMC 2014/30/UE e alla direttiva RED 2014/53/UE. Il testo completo
della dichiarazione di conformità europea è disponibile al seguente indirizzo Internet:
https://www.mypni.eu/products/4782/download/certifications

NL:
Vereenvoudigde EU-conformiteitsverklaring
SC ONLINESHOP SRL verklaart dat MP3-autospeler PNI Clementine 8428BT voldoet
aan de richtlijn EMC 2014/30/EU en RED 2014/53/UE. De volledige tekst van de EU-
conformiteitsverklaring is beschikbaar op het volgende internetadres:
https://www.mypni.eu/products/4782/download/certifications
PL:
Uproszczona deklaracja zgodności UE
SC ONLINESHOP SRL oświadcza, że Odtwarzacz samochodowy MP3 PNI Clementine
8428BT jest zgodny z dyrektywą EMC 2014/30/EU i RED 2014/53/UE. Pełny tekst
deklaracji zgodności UE dostępny jest pod następującym adresem internetowym:
https://www.mypni.eu/products/4782/download/certifications
RO:
Declaratie UE de conformitate simplificata
SC ONLINESHOP SRL declara ca Radio MP3 player auto PNI Clementine 8428BT este
in conformitate cu Directiva EMC 2014/30/EU si Directiva RED 2014/53/UE. Textul
integral al declaratiei UE de conformitate este disponibil la urmatoarea adresa de internet:
https://www.mypni.eu/products/4782/download/certifications


-
 1
1
-
 2
2
-
 3
3
-
 4
4
-
 5
5
-
 6
6
-
 7
7
-
 8
8
-
 9
9
-
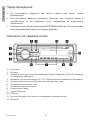 10
10
-
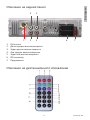 11
11
-
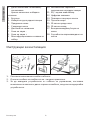 12
12
-
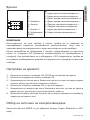 13
13
-
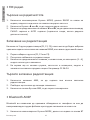 14
14
-
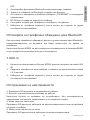 15
15
-
 16
16
-
 17
17
-
 18
18
-
 19
19
-
 20
20
-
 21
21
-
 22
22
-
 23
23
-
 24
24
-
 25
25
-
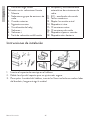 26
26
-
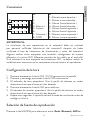 27
27
-
 28
28
-
 29
29
-
 30
30
-
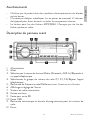 31
31
-
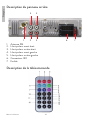 32
32
-
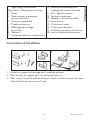 33
33
-
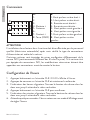 34
34
-
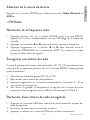 35
35
-
 36
36
-
 37
37
-
 38
38
-
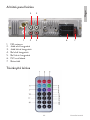 39
39
-
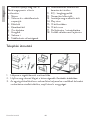 40
40
-
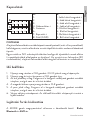 41
41
-
 42
42
-
 43
43
-
 44
44
-
 45
45
-
 46
46
-
 47
47
-
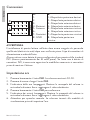 48
48
-
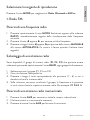 49
49
-
 50
50
-
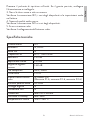 51
51
-
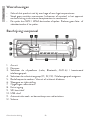 52
52
-
 53
53
-
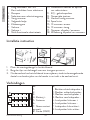 54
54
-
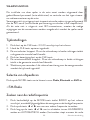 55
55
-
 56
56
-
 57
57
-
 58
58
-
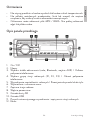 59
59
-
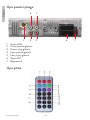 60
60
-
 61
61
-
 62
62
-
 63
63
-
 64
64
-
 65
65
-
 66
66
-
 67
67
-
 68
68
-
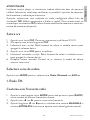 69
69
-
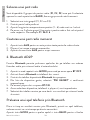 70
70
-
 71
71
-
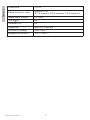 72
72
-
 73
73
-
 74
74
-
 75
75
-
 76
76


PNI Clementine 8428BT Manual de usuario
- Categoría
- Bocinas portables
- Tipo
- Manual de usuario
en otros idiomas
- français: PNI Clementine 8428BT Manuel utilisateur
- italiano: PNI Clementine 8428BT Manuale utente
- Deutsch: PNI Clementine 8428BT Benutzerhandbuch
- polski: PNI Clementine 8428BT Instrukcja obsługi
Artículos relacionados
-
PNI 8550BT Manual de usuario
-
PNI Escort HP 8500 CB Radio and MP3 Player Manual de usuario
-
PNI RD290 Manual de usuario
-
PNI BH800 Manual de usuario
-
PNI 8524BT Manual de usuario
-
PNI Escort HP 9700 Guía del usuario
-
PNI HP-6550 Manual de usuario
-
-
PNI House IPMAX Manual de usuario
-
PNI CBM-2 Single Fase DC Combiner Box Manual de usuario