
FX 50
User Instructions
Instrucciones de usuario
Guide d'utilisation
Gebrauchsanleitung
Manuale d'uso
Gebruiksinstructies
*AWT35-000315*
AWT35-000315 Issue AA August 2007
FX50_User.book Page 1 Thursday, August 23, 2007 2:31 PM

FX50_User.book Page 2 Thursday, August 23, 2007 2:31 PM

FX 50 User Instructions i
ENGLISH
© Avery Berkel Limited 2007. All rights reserved.
The information contained herein is the property of Avery Berkel Limited and is supplied without
liability for errors or omissions. No part may be reproduced or used except as authorised by
contract or other written permission. The copyright and the foregoing restriction on reproduction
and use extend to all media in which the information may be embodied.
Trademarks and ackowledgements
Avery, Avery Berkel and Avery Weigh-Tronix are registered trademarks in certain jurisdictions
and owned and registered by companies within the Avery Weigh-Tronix Group.
All brands and product names used within this document are trademarks or registered
trademarks of their respective holders.
IMPORTANT
When programming or configuring the equipment you must ensure that you comply with all
relevant standards and legislation. The example settings given in this book may not be legal for
trade with the public.
ESPANOL
© Avery Berkel Limited 2007. Todos los derechos reservados.
La información aquí contenida es propiedad de Avery Berkel Limited y se suministra sin asumir
la responsabilidad sobre errores u omisiones.No están permitidos la reproducción ni el uso de
ninguna de sus partes, a menos que haya sido autorizado por contrato u otro medio escrito. Los
derechos de autor y la restricción anterior con respecto a la reproducción y el uso se aplican a
todos los medios en que la información pueda presentarse.
Marcas comerciales y aceptaciones
Avery, Avery Berkel y Avery Weigh-Tronix son marcas comerciales registradas en ciertas
jurisdicciones y con propiedad y registro de empresas del Grupo Avery Weigh-Tronix.
Todos los nombres de marcas y productos mencionados en este documento son marcas
comerciales o marcas comerciales registradas de sus respectivos dueños.
IMPORTANTE
Al programar o configurar el equipo, debe asegurarse de cumplir todas la legislación y las
normas relevantes.
Los ejemplos de configuraciones que se ofrecen en este libro pueden no
ser legales para el comercio público
.
FX50_User.book Page i Thursday, August 23, 2007 2:31 PM

ii FX 50 User Instructions
FRANCAIS
© Avery Berkel Limited 2007. Tous droits réservés.
Les informations contenues dans le présent document sont la propriété exclusive de Avery
Berkel Limited et elles sont communiquées sans responsabilité concernant les erreurs ou
omissions possibles. Aucune partie ne peut être reproduite ou utilisée sauf en cas d’autorisation
préalable par contrat ou autre accord écrit. Les droits d’auteur et les restrictions susmentionnées
concernant la reproduction et l’utilisation s’étendent à tous les médias dans lesquels les
informations peuvent être contenues.
Marques de commerce et reconnaissances
Avery, Avery Berkel et Avery Weigh-Tronix sont des marques déposées dans certaines
juridictions et sont la propriété exclusive des sociétés du groupe Avery Weigh-Tronix.
Toutes les marques et les noms de produit utilisés dans ce document sont des marques de
commerce ou des marques de commerce déposées appartenant à leurs détenteurs respectifs.
IMPORTANT
Lors de la programmation ou de la configuration de la machine, assurez-vous que vous
respectez toutes les normes en vigueur. Il se peut que les paramètres cités en exemple dans ce
manuel ne soient pas légaux pour les transactions commerciales avec le public.
DEUTSCH
© Avery Berkel Limited 2007. Alle Rechte vorbehalten.
Diese Informationen sind Eigentum von Avery Berkel Limited und werden ohne jegliche Haftung
für Fehler oder Auslassungen zur Verfügung gestellt.
Dieses Dokument darf weder ganz noch
auszugsweise ohne ausdrückliche schriftliche Genehmigung reproduziert oder verwendet
werden.
Dieses Urheberrecht und die obigen Einschränkungen auf Reproduktion und Gebrauch
schließen alle Medien ein, die Informationen auf jegliche Art speichern.
Warenzeichen und Anerkennungen
Avery, Avery Berkel und Avery Weigh-Tronix sind eingetragene Warenzeichen in bestimmten
Gerichtsbarkeiten und im Eigentum und eingetragen von Firmen innerhalb der Avery Weigh-
Tronix Gruppe.
Alle Marken und Produktnamen, die in dieser Dokumentation verwendet werden, sind
Warenzeichen oder eingetragene Warenzeichen der jeweiligen Inhaber.
ACHTUNG
Wenn Sie die Geräte programmieren oder konfigurieren, müssen Sie sicherstellen, dass Sie alle
relevanten Standards und Gesetzgebungen einhalten. Die Beispieleinstellungen in diesem Buch
sind möglicherweise für öffentliche Verkaufsstellen verboten..
FX50_User.book Page ii Thursday, August 23, 2007 2:31 PM

FX 50 User Instructions iii
ITALIANO
© Avery Berkel Limited 2007. Tutti i diritti riservati.
Le informazioni qui contenute sono di proprietà della Avery Berkel Limited e sono fornite senza
alcuna responsabilità relativamente a errori o omissioni. Nessuna parte può essere riprodotta o
usata eccetto salvo quanto autorizzato per contratto o altro consenso scritto. Il copyright e la
precedente restrizione relativa alla riproduzione e all'uso si estendono a tutti i supporti in cui le
informazioni possono essere racchiuse.
Marchi di fabbrica e riconoscimenti
Avery, Avery Berkel e Avery Weigh-Tronix sono marchi commerciali registrati in alcune
giurisdizioni; sono registrati dalle società del Gruppo Avery Weigh-Tronix e sono di loro proprietà.
Tutti i brand e i nomi di prodotto menzionati in questo documento sono marchi commerciali o
marchi depositati dai rispettivi proprietari.
IMPORTANTE
Durante la programmazione o la configurazione delle apparecchiature, occorre assicurarsi di
aderire a tutte le norme pertinenti e alla legislazione vigente. Le impostazioni per gli esempi forniti
nel presente manuale possono non essere conformi alla legge in vigore per la vendita al
pubblico.
NEDERLANDS
© Avery Berkel Limited 2007. Alle rechten voorbehouden.
De informatie die dit document bevat is eigendom van Avery Berkel Limited en wordt gegeven
zonder aanspraak te kunnen maken op fouten of tekortkomingen.
Niets mag worden gekopieerd
of gebruikt zonder contractuele overeenkomst of schriftelijke toestemming.
Het copyright en de
hierboven genoemde beperking op reproductie en gebruik betreffen alle media waarin de
informatie wordt geleverd.
Handelsmerken en erkenningen
Avery, Avery Berkel en Avery Weigh-Tronix zijn geregistreerde handelsmerken in bepaalde
rechtsgebieden en zijn het eigendom van en geregistreerd door bedrijven van de Avery Weigh-
Tronix Group.
Alle merken en productnamen die in dit document worden gebruikt, zijn handelsmerken of
geregistreerde handelsmerken van hun respectieve eigenaars.
BELANGRIJK
Bij het programmeren of configureren van de apparatuur moet u steeds de betreffende normen
en regels respecteren. De in dit document vermelde instellingen zijn eventueel niet wettelijk voor
handel met het publiek.
FX50_User.book Page iii Thursday, August 23, 2007 2:31 PM

FX50_User.book Page iv Thursday, August 23, 2007 2:31 PM

Contents
FX 50 User Instructions 1
English
Contents
1. Warnings and cautions 5
1.1 Installing the scale safely . . . . . . . . . . . . . . . . . . . . . . . . . . . . . . . . . 5
1.2 Cautions for using the scale safely . . . . . . . . . . . . . . . . . . . . . . . . . 5
1.3 Cleaning the scale . . . . . . . . . . . . . . . . . . . . . . . . . . . . . . . . . . . . . . 7
2. Main parts, keyboard and display 9
2.1 Main parts . . . . . . . . . . . . . . . . . . . . . . . . . . . . . . . . . . . . . . . . . . . . 9
2.2 Keyboard variants . . . . . . . . . . . . . . . . . . . . . . . . . . . . . . . . . . . . . 11
3. Installing the scale 17
3.1 Assembling the tower variant . . . . . . . . . . . . . . . . . . . . . . . . . . . . . 17
3.2 Levelling the scale . . . . . . . . . . . . . . . . . . . . . . . . . . . . . . . . . . . . . 18
3.3 Charging the battery . . . . . . . . . . . . . . . . . . . . . . . . . . . . . . . . . . . 19
3.4 Changing the display backlight mode . . . . . . . . . . . . . . . . . . . . . . 19
3.5 Setting the auto power off mode . . . . . . . . . . . . . . . . . . . . . . . . . . 20
3.6 Changing the battery . . . . . . . . . . . . . . . . . . . . . . . . . . . . . . . . . . . 21
4. Operating the scale 23
4.1 Key to symbols used . . . . . . . . . . . . . . . . . . . . . . . . . . . . . . . . . . . 23
4.2 Switching on and setting up the scale . . . . . . . . . . . . . . . . . . . . . . 25
4.3 Weighing individual items . . . . . . . . . . . . . . . . . . . . . . . . . . . . . . . 26
4.4 Weighing items of the same unit price . . . . . . . . . . . . . . . . . . . . . . 27
4.5 Weighing using known tares . . . . . . . . . . . . . . . . . . . . . . . . . . . . . 28
4.6 Weighing using unknown tares . . . . . . . . . . . . . . . . . . . . . . . . . . . 30
4.7 Using proportional tares . . . . . . . . . . . . . . . . . . . . . . . . . . . . . . . . . 31
4.8 Multiplying a unit price . . . . . . . . . . . . . . . . . . . . . . . . . . . . . . . . . . 33
4.9 Programming direct PLUs . . . . . . . . . . . . . . . . . . . . . . . . . . . . . . . 34
4.10 Weighing using direct PLUs . . . . . . . . . . . . . . . . . . . . . . . . . . . . . . 35
FX50_User.book Page 1 Thursday, August 23, 2007 2:31 PM

Contents
2 FX 50 User Instructions
4.11 Programming indirect PLUs . . . . . . . . . . . . . . . . . . . . . . . . . . . . . .36
4.12 Weighing using indirect PLUs . . . . . . . . . . . . . . . . . . . . . . . . . . . .37
5. Error codes 39
FX50_User.book Page 2 Thursday, August 23, 2007 2:31 PM

English
FX 50 User Instructions 3
Thank you for choosing this Avery Berkel product.
Please read these safety and user instructions before you use this product.
Please read all the sections of this document that have Danger, Warning and
Caution symbols and notices.
W WARNING! This is a Warning symbol. Warnings mean that failure
to follow specific practices and procedures may have major
consequences such as injury to personnel or serious corruption
to data or loss of data.
D DANGER! This is a Danger symbol. Danger means that failure to
follow specific practices or procedures may result in an electrical
shock that could cause personal injury or death.
C CAUTION! This is a Caution symbol. Cautions give information about
procedures that, if not observed, could result in damage to equipment
or corruption to and loss of data.
N NOTE: This is a Note symbol. Notes give additional and important
information, hints and tips that help you to use your product.
FX50_User.book Page 3 Thursday, August 23, 2007 2:31 PM

FX50_User.book Page 4 Thursday, August 23, 2007 2:31 PM

English
1.1 Installing the scale safely
FX 50 User Instructions 5
1. Warnings and cautions
1.1 Installing the scale safely
W WARNING: You must install pluggable equipment near to an
easily accessible socket outlet. The electrical supply to the outlet
must give over-current protection of an appropriate rating.
W WARNING: If in doubt, ask a qualified electrician for advice.
1.2 Cautions for using the scale safely
Fig 1-1. Picking up the scale correctly
FX50_User.book Page 5 Thursday, August 23, 2007 2:31 PM

1. Warnings and cautions
6 FX 50 User Instructions
Fig 1-2. Cautions for using the scale
FX50_User.book Page 6 Thursday, August 23, 2007 2:31 PM

English
1.3 Cleaning the scale
FX 50 User Instructions 7
1.3 Cleaning the scale
C CAUTION: Do not use harsh abrasives, solvents, scouring cleaners
and alkaline cleaning solutions, such as washing soda, to clean the
outside of the scale.
Fig 1-3. Cleaning the scale
To clean the outside of the scale, wipe it down with a clean cloth moistened
with water containing a small amount of mild detergent or unscented
washing-up liquid.
FX50_User.book Page 7 Thursday, August 23, 2007 2:31 PM

FX50_User.book Page 8 Thursday, August 23, 2007 2:31 PM

English
2.1 Main parts
FX 50 User Instructions 9
2. Main parts, keyboard and display
2.1 Main parts
Fig 2-1. Main parts of the FX 50 monoblock & tower variants
FX50_User.book Page 9 Thursday, August 23, 2007 2:31 PM

2. Main parts, keyboard and display
10 FX 50 User Instructions
Item Part Item Part
1 Monoblock variant 8 AC adaptor
2 Tower variant 9 On/Off switch
3 Stainless steel weigh pan 10 AC adaptor socket
4 Keyboard 11 Rechargeable battery
5 Operator display 12 Levelling feet
6 Customer display 13 Levelling bubble
7 Tower assembly 14 Locknut for levelling feet
FX50_User.book Page 10 Thursday, August 23, 2007 2:31 PM

English
2.2 Keyboard variants
FX 50 User Instructions 11
2.2 Keyboard variants
Fig 2-2. USA & Canada keyboard (above) and
Europe & Rest of the World (RoW) keyboard (below)
FX50_User.book Page 11 Thursday, August 23, 2007 2:31 PM

2. Main parts, keyboard and display
12 FX 50 User Instructions
No. Key Key name Press this key to ...
1 Numeric keys Enter individual unit prices, unit prices
for direct PLUs and indirect PLUs,
known tares and proportional tares.
2 Units of Weight
key (USA &
Canada option)
Switch between kilogram and pound
units of weight. An arrow T appears in
the display above the units you
selected.
3 Price Base
Selection key
(UK, Europe &
RoW option)
Switch between a price per kilogram
and a price per 100 grams price base.
An arrow T appears in the display
above the price base you selected.
4 Fix key (UK,
Europe & RoW) or
Save key (USA &
Canada). Also
Menu Navigation
key (X).
Fix or save a weight or price you
entered until you cancel it. You also
press this key (X) to scroll through the
menu options.
5 Tare key. Also
Select Menu
Option key (S).
Enter and clear tare weights such as
item containers and wrappers. The
scale subtracts the tare weight when
items are packaged for weighing. You
also press this key (S) to select an
option from the menu.
6 Zero key Manually zero the scale and return the
unit price and total weight displays to
zeros.
7 Clear key Clear incorrect entries and error
conditions.
8 Multiply by 2 key
(USA & Canada
only)
Multiply the total price by two.
FX50_User.book Page 12 Thursday, August 23, 2007 2:31 PM

English
2.2 Keyboard variants
FX 50 User Instructions 13
9 Multiply by 4 key
(USA & Canada
only)
Multiply the total price by four.
10 Indirect PLU key Recall and set up prices against up to
38 indirect Price Look-Up (PLU) keys.
11 Direct PLU keys Recall and set up prices against up to
12 direct Price Look-Up (PLU) keys.
No. Key Key name Press this key to ...
FX50_User.book Page 13 Thursday, August 23, 2007 2:31 PM

2. Main parts, keyboard and display
14 FX 50 User Instructions
Fig 2-3. USA & Canada display
Fig 2-4. UK display
Fig 2-5. Europe & Rest of the World (RoW) display
FX50_User.book Page 14 Thursday, August 23, 2007 2:31 PM

English
2.2 Keyboard variants
FX 50 User Instructions 15
Item Name & Symbol Purpose
1 Weight display Shows the gross or net weight of the item.
2 Unit price display Shows the unit price of the item.
3 Total price display Shows the total price of the item.
4
Battery is
charging indicator
A red light shows that the battery is charging.
A green light shows that the battery is fully charged.
5
Battery charge is
low indicator
A light comes on to show that the battery charge is
low so you must recharge it immediately.
6
Fix or Save
indicator
An arrow Tshows you pressed the key
before any operation to stop the weight display and
the unit price display from clearing automatically.
7 Units of weight
indicator
An arrow Tshows that the units of weight you
selected is either kilograms or pounds (USA/Canada
variant only).
8 Price-based
selection indicator
An arrow Tshows that the price base you selected
is either price per 100 grams or price per kilogram
(UK/Europe/RoW variant only). NOTE: The
Australian variant is fixed to kilogram only.
9
Zero indicator
An arrow Tshows that the scale is at gross zero
(there is no tare weight). Arrows above both NET
and -0- show that the scale is at net zero (includes a
tare weight).
10
Stable indicator
An arrow Tshows that the item weight is stable.
11
Net weight
indicator
An arrow Tshows that a tare weight is set and the
displayed weight is a net weight (the displayed
weight excludes the tare weight).
F / Save
-0-
NET
FX50_User.book Page 15 Thursday, August 23, 2007 2:31 PM

FX50_User.book Page 16 Thursday, August 23, 2007 2:31 PM

English
3.1 Assembling the tower variant
FX 50 User Instructions 17
3. Installing the scale
3.1 Assembling the tower variant
Fig 3-1. Assembling and installing the tower variant
FX50_User.book Page 17 Thursday, August 23, 2007 2:31 PM

3. Installing the scale
18 FX 50 User Instructions
3.2 Levelling the scale
Fig 3-2. Levelling the scale
FX50_User.book Page 18 Thursday, August 23, 2007 2:31 PM

English
3.3 Charging the battery
FX 50 User Instructions 19
3.3 Charging the battery
You can power and operate the scale using:
• mains power supply from the AC adaptor (with the rechargeable
battery fitted); or
• a re-chargeable battery located inside the scale.
When you connect the scale to the mains power supply using the AC adaptor
the battery charging indicator comes on to show that the power is connected
and the battery is charging.
• Red battery charging indicator = Battery needs charging.
• Green battery charging indicator = Battery is fully charged.
You need to fully charge the battery before the first time that you use the
scale.
If you do not use the scale over a long period of time, you need to charge the
battery every three to six months to maintain its performance.
3.4 Changing the display backlight mode
You can set the backlights for the operator and customer displays to operate
in one of these three different modes:
• ON = always on.
• OFF = always off.
• AUTO = the backlight comes on when you start to use the scale.
To change the display backlight mode do the steps as follows:
1. Press the On switch to turn the scale on. The scale makes the
first beep.
2. Press and hold down the key and release it when you hear a
second beep and the display comes on.
3. Press the key to scroll through the three backlight modes
(ON, OFF and AUTO) that the scale displays in the total price display.
N NOTE: To cancel changing the backlight mode and return to weighing
press the key.
4. Press the key to save the backlight mode you selected and return
to weighing.
FX50_User.book Page 19 Thursday, August 23, 2007 2:31 PM

3. Installing the scale
20 FX 50 User Instructions
N NOTE: If you have the backlight ON all the time or set to AUTO it
reduces the life of the battery in between charges.
3.5 Setting the auto power off mode
You can change the auto power off mode so that the scale stays on all the
time or it automatically turns off after a pre-set amount of inactivity of 1, 5 or
30 minutes.
Do the steps as follows to set the auto power off mode:
1. Press the On switch to turn the scale on.
2. While the scale is checking itself (when all the numbers on the scale’s
three displays count down from all zeros to all nines), press the
key. The total price display shows the current power off
mode.
3. Press the key to scroll through the following auto power off
modes:
• 0 = Scale stays on (as the auto power mode is disabled).
• 1 = Scale turns off after 1 minute of inactivity.
• 5 = Scale turns off after 5 minutes of inactivity.
• 30 = Scale turns off after 30 minutes of inactivity.
4. Press the key to save the auto power off mode you selected and
return to weighing.
FX50_User.book Page 20 Thursday, August 23, 2007 2:31 PM

English
3.6 Changing the battery
FX 50 User Instructions 21
3.6 Changing the battery
Fig 3-3. Changing the battery
FX50_User.book Page 21 Thursday, August 23, 2007 2:31 PM

3. Installing the scale
22 FX 50 User Instructions
Fig 3-4. Changing the battery (continued)
FX50_User.book Page 22 Thursday, August 23, 2007 2:31 PM

English
4.1 Key to symbols used
FX 50 User Instructions 23
4. Operating the scale
4.1 Key to symbols used
Symbol Action
Press the On/Off switch below the scale to turn the
scale on or off.
Press the Price Base Selection key to select the price
base for the item you want to weigh.
NOTE: This key is for the UK, Europe and the Rest of
the World (RoW) variants only.
NOTE: The Australian variant is Kg only.
Press the Units of Weight key to select the units of
weight for the item you want to weigh.
NOTE: This key is for the USA and Canada variant
only.
Put an item without a container or wrapping on the
weigh pan Ð. Remove the item Ï.
Put an empty container or wrapping (or another type
of tare weight) on the weigh pan Ð. Remove the
container Ï.
Put the item in a container or wrapping (or another
type of tare weight) on the weigh pan Ð. Remove the
item and the container Ï.
Put items of the same unit price on the weigh pan Ð
such as ‘pick and mix’ sweets. Remove the items Ï.
FX50_User.book Page 23 Thursday, August 23, 2007 2:31 PM

4. Operating the scale
24 FX 50 User Instructions
Do not put any items on the weigh pan.
Depending on the functional mode of the scale, either
press the keyboard numbers to enter the unit price of
an item or press the keyboard numbers to type the unit
prices for direct and indirect PLUs, known tare weights
and proportional tares.
If necessary, with no item on the weigh pan, press the
Zero key to zero the scale.
Clear the unit price you entered.
Multiplies the total net price of the item the scale has
weighed by either two or four.
NOTE: These keys are for the USA and Canada
variant only.
Select a Direct PLU key.
Select the Indirect PLU key.
Repeat the numbered steps shown.
Symbol Action
2-6
FX50_User.book Page 24 Thursday, August 23, 2007 2:31 PM

English
4.2 Switching on and setting up the scale
FX 50 User Instructions 25
4.2 Switching on and setting up the scale
To switch on and set up the scale so that it is ready to use do the steps as
follows:
Fig 4-1. Switching on and setting up the scale
FX50_User.book Page 25 Thursday, August 23, 2007 2:31 PM

4. Operating the scale
26 FX 50 User Instructions
4.3 Weighing individual items
Do these steps to weigh items that have different weights and different unit
prices:
Fig 4-2. Weighing individual items
FX50_User.book Page 26 Thursday, August 23, 2007 2:31 PM

English
4.4 Weighing items of the same unit price
FX 50 User Instructions 27
4.4 Weighing items of the same unit price
You can weigh the same type of items or different items that have the same
unit price without the need to keep keying the unit price into the scale. To do
this you enter and save the unit price in the scale until you decide to either
change or cancel the price.
To weigh items of the same unit price do the steps as follows:
Fig 4-3. Weighing items of the same unit price
00086_A
FX50_User.book Page 27 Thursday, August 23, 2007 2:31 PM

4. Operating the scale
28 FX 50 User Instructions
N NOTE: You can change the unit price that the scale has saved. To do
this, retype the price and the scale will save the new unit price until you
press the key to cancel it.
4.5 Weighing using known tares
N NOTE: This function is for the USA and Canada variant only.
If you know the weight of an item such as a food container or wrapping that
you use to contain or pack items on the scale and you want to use this as a
tare weight, you can manually enter the tare weight into the scale. The scale
deducts the weight of the tare item from the total gross weight and displays
the net weight and the total price of the item only.
N NOTE: When you have entered a tare weight the scale displays a
minus figure in the weight display to represent the tare weight.
N NOTE: At step 6 you can manually enter the unit price of the item or
you can recall the item price using either a direct PLU or an indirect
PLU. See Sections 4.9 - 4.12 for information about PLUs.
To enter a tare weight that you know and then weigh an item that has the
same tare weight do the steps as follows:
Fig 4-4. Weighing using known tares
FX50_User.book Page 28 Thursday, August 23, 2007 2:31 PM

English
4.5 Weighing using known tares
FX 50 User Instructions 29
Fig 4-5. Weighing using known tares (continued)
FX50_User.book Page 29 Thursday, August 23, 2007 2:31 PM

4. Operating the scale
30 FX 50 User Instructions
4.6 Weighing using unknown tares
You can weigh items such a food containers and wrapping you use to contain
or pack items on the scale and save their tare weights before you weigh the
items. You do this so that, when you put items on the scale in a container, the
scale deducts the tare weight from the total gross weight and displays the net
weight and the total price of the items only.
N NOTE: At step 6 you can manually enter the unit price of the item or
you can recall the item price using either a direct PLU or an indirect
PLU. See Sections 4.9 - 4.12 for information about PLUs.
Do the steps as follows to weigh and save an unknown tare weight:
Fig 4-6. Weighing using unknown tares
FX50_User.book Page 30 Thursday, August 23, 2007 2:31 PM

English
4.7 Using proportional tares
FX 50 User Instructions 31
Fig 4-7. Weighing using unknown tares (continued)
4.7 Using proportional tares
N NOTE: This function is for the USA and Canada variant only.
You can enter the tare weight of items such as a containers as a percentage
proportion of the total gross weight of the item and the tare. For example, you
can enter a proportional tare of 25% if the gross weight of the items you want
to weigh includes a tare weight that is 25% of the gross weight to package the
item.
N NOTE: At step 6 you can manually enter the unit price of the item or
you can recall the item price using either a direct PLU or an indirect
PLU. Refer to Sections 4.9 - 4.12 for information about PLUs.
FX50_User.book Page 31 Thursday, August 23, 2007 2:31 PM

4. Operating the scale
32 FX 50 User Instructions
To enter an example proportional tare weight of 25% do the steps as follows:
Fig 4-8. Using proportional tares
FX50_User.book Page 32 Thursday, August 23, 2007 2:31 PM

English
4.8 Multiplying a unit price
FX 50 User Instructions 33
4.8 Multiplying a unit price
N NOTE: This function is for the USA and Canada variant only.
You can weigh items, enter a unit price and then multiply the total price you
entered by either two or four. You do this to multiply the total price of items
that are priced in divisions of pound units, such as a quarter pound and half
a pound.
N NOTE: At step 6 you can manually enter the unit price of the item or
you can recall the item price using either a direct PLU or an indirect
PLU. Refer to Sections 4.9 - 4.12 for information about PLUs.
To multiply a unit price you entered by a multiple of either two or four do these
steps:
Fig 4-9. Multiplying a unit price
FX50_User.book Page 33 Thursday, August 23, 2007 2:31 PM

4. Operating the scale
34 FX 50 User Instructions
4.9 Programming direct PLUs
N NOTE: You can press the direct PLU keys to recall the units
of weight and the item prices of particular items after you have saved
this information in the scale’s memory.
You can enter and store the units of weight (or the price base for UK, Europe
and RoW scale variants) together with different unit prices to the twelve direct
Price Look-Up (PLU) keys on the keyboard. This allows you to recall and use
a unit price that you have already stored in the scale’s memory against a
direct PLU key. This means you can quickly weigh items that you sell a lot of
without the need to type unit prices for particular items each time you weigh
them.
To store the units of weight (or the price base) together with a price against
an example direct PLU of number 8 do the steps as follows:
Fig 4-10. Programming direct PLUs
N NOTE: An additional 38 indirect PLUs are available. See Sections 4.11
and 4.12.
FX50_User.book Page 34 Thursday, August 23, 2007 2:31 PM

English
4.10 Weighing using direct PLUs
FX 50 User Instructions 35
4.10 Weighing using direct PLUs
When you have programmed unit prices against direct PLU keys you can
weigh items more quickly by recalling the preset unit prices you programmed
using the direct PLU keys such as .
To weigh an item using an example direct PLU of number 8 do the steps as
follows:
N NOTE: You can use two methods to weigh items using direct PLUs.
You can put the item on the scale and then press the direct PLU key or
you can press the direct PLU key and then put the item on the scale
(see steps 2 & 3 below).
Fig 4-11. Weighing using direct PLUs
FX50_User.book Page 35 Thursday, August 23, 2007 2:31 PM

4. Operating the scale
36 FX 50 User Instructions
4.11 Programming indirect PLUs
N NOTE: Indirect PLUs work the same way as direct PLUs except that,
to recall an indirect PLU, you press the key and then manually
type the indirect PLU number.
You can enter and store the units of weight (or the price base for UK, Europe
and RoW scale variants) together with different unit prices against up to 38
indirect PLU keys that have PLU numbers from 13 to 50 assigned to them.
This allows you to recall and use a unit price that you have already stored in
the scale’s memory. This means you can quickly weigh items that you sell a
lot of without the need to type unit prices for particular items each time you
weigh them.
To store the units of weight (or the price base) together with a price against
an example indirect PLU of number 20 do the steps as follows:
Fig 4-12. Programming indirect PLUs
FX50_User.book Page 36 Thursday, August 23, 2007 2:31 PM

English
4.12 Weighing using indirect PLUs
FX 50 User Instructions 37
4.12 Weighing using indirect PLUs
When you have programmed prices against the indirect PLU keys you can
weigh items more quickly by recalling the preset price you programmed
against an indirect PLU.
To weigh an item using an example indirect PLU of number 20 do the steps
as follows:
Fig 4-13. Weighing using indirect PLUs
FX50_User.book Page 37 Thursday, August 23, 2007 2:31 PM

FX50_User.book Page 38 Thursday, August 23, 2007 2:31 PM

English
FX 50 User Instructions 39
5. Error codes
If persistent error messages appear on the scale’s display:
1. Remove the battery to disconnect the scale from the power supply.
2. Reinstall the battery to reconnect the power supply.
Error
Code
Problem Action
Err 4 The initial zero or the
zero key is attempting to
zero the load that is more
than 4% of the scale’s
maximum capacity.
Remove all weight from the weigh pan then
turn on the scale. Press the Zero key to
zero the scale. If this does not work the
scale needs calibration or service.
Err 5 Keyboard error. The keyboard has a short circuit so it must
be replaced. Please contact your Avery
Berkel dealer.
Err 6 A/D converter error. The scale needs calibration or service.
Please contact your Avery Berkel
dealer.
FX50_User.book Page 39 Thursday, August 23, 2007 2:31 PM

FX50_User.book Page 40 Thursday, August 23, 2007 2:31 PM

Contenido
FX 50 Instrucciones de usuario 1
Español
Contenido
1. Advertencias y precauciones 5
1.1 Instalación de la balanza de forma segura . . . . . . . . . . . . . . . . . . . 5
1.2 Precauciones para utilizar la balanza de forma segura . . . . . . . . . . 5
1.3 Limpieza de la balanza . . . . . . . . . . . . . . . . . . . . . . . . . . . . . . . . . . 7
2. Componentes principales, teclado y pantalla 9
2.1 Componentes principales . . . . . . . . . . . . . . . . . . . . . . . . . . . . . . . . 9
2.2 Variantes de teclado . . . . . . . . . . . . . . . . . . . . . . . . . . . . . . . . . . . 11
3. Instalación de la balanza 17
3.1 Montaje de la variante de torre . . . . . . . . . . . . . . . . . . . . . . . . . . . 17
3.2 Nivelado de la balanza . . . . . . . . . . . . . . . . . . . . . . . . . . . . . . . . . 18
3.3 Carga de la batería . . . . . . . . . . . . . . . . . . . . . . . . . . . . . . . . . . . . 19
3.4 Cambio del modo de iluminación de fondo de la pantalla . . . . . . . 19
3.5 Ajuste del modo de desconexión automática . . . . . . . . . . . . . . . . 20
3.6 Cambio de la batería . . . . . . . . . . . . . . . . . . . . . . . . . . . . . . . . . . . 21
4. Funcionamiento de la balanza 23
4.1 Clave de los símbolos utilizados . . . . . . . . . . . . . . . . . . . . . . . . . . 23
4.2 Conexión y ajuste de la balanza . . . . . . . . . . . . . . . . . . . . . . . . . . 25
4.3 Pesaje de artículos individuales . . . . . . . . . . . . . . . . . . . . . . . . . . 26
4.4 Pesaje de artículos con el mismo precio unitario . . . . . . . . . . . . . 27
4.5 Pesaje utilizando taras conocidas . . . . . . . . . . . . . . . . . . . . . . . . . 28
4.6 Pesaje utilizando taras desconocidas . . . . . . . . . . . . . . . . . . . . . . 30
4.7 Utilización de taras proporcionales . . . . . . . . . . . . . . . . . . . . . . . . 31
4.8 Multiplicación por un precio unitario . . . . . . . . . . . . . . . . . . . . . . . 33
4.9 Programación de búsquedas de precio directas . . . . . . . . . . . . . . 34
4.10 Pesaje utilizando búsquedas de precio directas . . . . . . . . . . . . . . 35
SPANISH.book Page 1 Thursday, August 23, 2007 2:35 PM

Contenido
2 FX 50 Instrucciones de usuario
4.11 Programación de búsquedas de precio indirectas . . . . . . . . . . . . .36
4.12 Pesaje utilizando búsquedas de precio indirectas . . . . . . . . . . . . .37
5. Códigos de error 39
SPANISH.book Page 2 Thursday, August 23, 2007 2:35 PM

Español
FX 50 Instrucciones de usuario 3
Gracias por escoger este producto Avery Berkel.
Por favor, lea estas instrucciones de usuario y seguridad antes de utilizar
este producto.
Por favor, lea todas las secciones de este documento que contengan avisos
y símbolos de peligro, advertencia y precaución.
W ¡ADVERTENCIA! Éste es un símbolo de advertencia. Las
advertencias significan que no seguir las prácticas y los
procedimientos específicos puede tener importantes
consecuencias como lesiones en el personal o importantes
daños en los datos o pérdida de datos.
D ¡PELIGRO! Éste es un símbolo de peligro. Peligro significa que no
seguir las prácticas y los procedimientos específicos puede
ocasionar una descarga eléctrica que podría causar lesiones
personales o la muerte.
C ¡PRECAUCIÓN! Éste es un símbolo de precaución. Las precauciones
dan información sobre procedimientos que, si no se observan, podrían
ocasionar daños en los equipos, daños en los datos o la pérdida de los
mismos.
N AVISO: Éste es un símbolo de aviso. Los avisos proporcionan
información, indicios y consejos importantes y adicionales que le
ayudan a utilizar su producto.
SPANISH.book Page 3 Thursday, August 23, 2007 2:35 PM

SPANISH.book Page 4 Thursday, August 23, 2007 2:35 PM

Español
1.1 Instalación de la balanza de forma segura
FX 50 Instrucciones de usuario 5
1. Advertencias y precauciones
1.1 Instalación de la balanza de forma segura
W ADVERTENCIA: Debe instalar equipos conectables cerca de una
toma de salida de fácil acceso. El suministro eléctrico de la toma
debe proporcionar protección contra sobrecorriente de un valor
apropiado.
W ADVERTENCIA: Si tiene alguna duda, pida consejo a un
electricista cualificado.
1.2 Precauciones para utilizar la balanza de
forma segura
Fig 1-1. Recogida de la balanza de forma correcta
SPANISH.book Page 5 Thursday, August 23, 2007 2:35 PM

1. Advertencias y precauciones
6 FX 50 Instrucciones de usuario
Fig 1-2. Precauciones para utilizar la balanza
SPANISH.book Page 6 Thursday, August 23, 2007 2:35 PM

Español
1.3 Limpieza de la balanza
FX 50 Instrucciones de usuario 7
1.3 Limpieza de la balanza
C PRECAUCIÓN: No utilice abrasivos fuertes, disolventes, limpiadores
para fregar y soluciones de limpieza alcalinas, como sosa para lavar,
para limpiar la parte exterior de la balanza.
Fig 1-3. Limpieza de la balanza
Para limpiar la parte exterior de la balanza, frótela con un paño limpio
humedecido con agua conteniendo una pequeña cantidad de detergente
suave o líquido de limpieza sin perfume.
SPANISH.book Page 7 Thursday, August 23, 2007 2:35 PM

SPANISH.book Page 8 Thursday, August 23, 2007 2:35 PM

Español
2.1 Componentes principales
FX 50 Instrucciones de usuario 9
2. Componentes principales, teclado y
pantalla
2.1 Componentes principales
Fig 2-1. Componentes principales de las variantes monobloque y de torre de FX 50
SPANISH.book Page 9 Thursday, August 23, 2007 2:35 PM

2. Componentes principales, teclado y pantalla
10 FX 50 Instrucciones de usuario
Artículo Componente Artículo Componente
1 Variante monobloque 8 Adaptador de CA
2 Variante de torre 9 Interruptor de activación /
desactivación
3 Cubeta de pesaje de
acero inoxidable
10 Toma adaptadora de CA
4 Teclado 11 Batería recargable
5 Pantalla para el vendedor 12 Patas de nivelado
6 Pantalla para el cliente 13 Nivel de burbuja
7 Unidad de torre 14 Contratuerca para las patas
de nivelado
SPANISH.book Page 10 Thursday, August 23, 2007 2:35 PM

Español
2.2 Variantes de teclado
FX 50 Instrucciones de usuario 11
2.2 Variantes de teclado
Fig 2-2. Teclado para los Estados Unidos y Canadá (arriba) y
teclado para Europa continental y resto del mundo (abajo)
SPANISH.book Page 11 Thursday, August 23, 2007 2:35 PM

2. Componentes principales, teclado y pantalla
12 FX 50 Instrucciones de usuario
Nº Tecla Nombre de tecla Pulse esta tecla para …
1 Teclas numéricas Introduzca los precios unitarios
individuales, los precios unitarios para
Búsquedas de precio directas y
Búsquedas de precio indirectas, las
taras conocidas y las taras
proporcionales.
2 Tecla de unidades
de precio (opción
de Estados
Unidos y Canadá)
Cambie entre unidades de peso de
kilogramos y libras. Aparece T una
flecha en la pantalla encima de las
unidades que haya seleccionado.
3 Tecla de
selección de base
de precios
(opción de Reino
Unido, Europa
continental y resto
del mundo)
Cambie entre base de precios con
precio por kilogramo y precio por 100
gramos. Aparece T una flecha en la
pantalla encima de la base de precios
que haya seleccionado.
4 Tecla Fijar (Reino
Unido, Europa
continental y resto
del mundo) o tecla
Guardar (Estados
Unidos y
Canadá).
También la tecla
Navegación en
menú (X).
Fije o guarde un peso o precio quehaya
introducido hasta que lo cancele. Pulse
también esta tecla para (X) desplazarse
por las opciones de menú.
5 Tecla Tara.
También la tecla
Selección de
opción de menú
(X).
Introduzca y elimine pesos de tara
como contenedores y envolturas. La
balanza resta el peso de tara cuando
los artículos están empaquetados para
el pesaje. Pulse también esta tecla (S)
para seleccionar una opción del menú.
SPANISH.book Page 12 Thursday, August 23, 2007 2:35 PM

Español
2.2 Variantes de teclado
FX 50 Instrucciones de usuario 13
6 Tecla Puesta a
cero
Ponga manualmente a cero la balanza y
vuelva a poner las pantallas de precio
unitario y precio total a cero.
7 Tecla Eliminar Elimine las entradas incorrectas y las
condiciones de error.
8 Tecla Multiplicar
por 2 (sólo
Estados Unidos y
Canadá)
Multiplique el precio total por dos.
9 Tecla Multiplicar
por 4 (sólo
Estados Unidos y
Canadá)
Multiplique el precio total por cuatro.
10 Tecla Búsqueda
de precio indirecta
Recupere y establezca precios con un
máximo de 38 teclas Búsqueda de
precio indirectas.
11 Teclas Búsqueda
de precio directas
Recupere y establezca precios con un
máximo de 12 teclas Búsqueda de
precio directas.
Nº Tecla Nombre de tecla Pulse esta tecla para …
SPANISH.book Page 13 Thursday, August 23, 2007 2:35 PM

2. Componentes principales, teclado y pantalla
14 FX 50 Instrucciones de usuario
Fig 2-3. Pantalla para los Estados Unidos y Canadá
Fig 2-4. Pantalla para el Reino Unido
Fig 2-5. Pantalla para Europa continental y resto del mundo
SPANISH.book Page 14 Thursday, August 23, 2007 2:35 PM

Español
2.2 Variantes de teclado
FX 50 Instrucciones de usuario 15
Artículo
Nombre y
símbolo
Finalidad
1 Pantalla de peso Muestra el peso neto o bruto del artículo.
2 Pantalla de precio
unitario
Muestra el precio unitario del artículo.
3 Pantalla de precio
total.
Muestra el precio total del artículo.
4
Indicador de
batería
cargándose
Una luz roja muestra que la batería está
cargándose.
Una luz verde muestra que la batería está
totalmente cargada.
5
Indicador de
carga de la
batería baja
Se enciende una luz para indicar que la carga de
la batería es baja por lo tanto debe recargarla
inmediatamente.
6
Indicador Fijar o
Guardar
Una flecha Tindica que pulsó la tecla
antes de cualquier operación para evitar que la
pantalla de peso y la pantalla de precio unitario
se reinicien automáticamente.
7 Indicador de
unidades de peso
Una flecha Tindica si las unidades de peso que
seleccionó son kilogramos o libras (variante sólo
para los Estados Unidos y Canadá).
8 Indicador de
selección de base
de precios
Una flecha Tindica si la base de precios que
seleccionó es precio por 100 gramos o precio por
kilogramo (variante sólo para el Reino Unido /
Europa continental y resto del mundo).
NOTA: La variante australiana está fijada sólo en
kilogramos.
9
Indicador de cero
Una flecha Tindica que la balanza está a cero
bruto (no hay peso de tara). Las flechas por
encima de NETO y -0- indican que la balanza
está a cero neto (incluye el peso de tara).
F /
-0-
SPANISH.book Page 15 Thursday, August 23, 2007 2:35 PM

10
Indicador de
estabilidad
Una flecha Tindica que el peso del artículo es
estable.
11
Indicador de peso
neto
Una flecha Tindica que se ha establecido el
peso de tara y que el peso visualizado es un
peso neto (el peso visualizado excluye el peso
de tara).
Artículo
Nombre y
símbolo
Finalidad
NET
SPANISH.book Page 16 Thursday, August 23, 2007 2:35 PM

Español
3.1 Montaje de la variante de torre
FX 50 Instrucciones de usuario 17
3. Instalación de la balanza
3.1 Montaje de la variante de torre
Fig 3-1. Montaje e instalación de la variante de torre
SPANISH.book Page 17 Thursday, August 23, 2007 2:35 PM

3. Instalación de la balanza
18 FX 50 Instrucciones de usuario
3.2 Nivelado de la balanza
Fig 3-2. Nivelado de la balanza
SPANISH.book Page 18 Thursday, August 23, 2007 2:35 PM

Español
3.3 Carga de la batería
FX 50 Instrucciones de usuario 19
3.3 Carga de la batería
Puede alimentar y hacer funcionar la balanza utilizando:
• Suministro eléctrico de red del adaptador de CA (con la batería
recargable insertada); o
• Una batería recargable ubicada en el interior de la balanza.
Cuando conecte la balanza al suministro eléctrico de red utilizando el
adaptador de CA, el indicador de carga de la batería se enciende para indicar
que la alimentación está conectada y que la batería se está cargando.
• Indicador de carga de la batería rojo = Es necesario cargar la batería.
• Indicador de carga de la batería verde = La batería está
completamente cargada.
Es necesario que cargue completamente la batería antes de utilizar la
balanza por primera vez.
Si no utiliza la balanza durante un período de tiempo largo, es necesario que
cargue la batería cada tres - seis meses para mantener su rendimiento.
3.4 Cambio del modo de iluminación de fondo de
la pantalla
Puede ajustar las luces de fondo para las pantallas para el vendedor y el
cliente para que funcionen en uno de estos tres modos diferentes:
• ACTIVADA = siempre activada.
• DESACTIVADA = siempre desactivada.
• AUTO = la luz de fondo se enciende cuando empieza a utilizar la
balanza.
Para cambiar el modo de luz de fondo de la pantalla, lleve a cabo los pasos
siguientes:
1. Pulse el interruptor Activado para conectar la balanza. La
balanza emite el primer pitido.
2. Pulse y mantenga pulsada la tecla y suéltela cuando oiga un
segundo pitido y se encienda la pantalla.
3. Pulse la tecla para desplazarse por los tres modos de
iluminación de fondo (ACTIVADA, DESACTIVADA y AUTO) que la
balanza visualiza en la pantalla de precio total.
SPANISH.book Page 19 Thursday, August 23, 2007 2:35 PM

3. Instalación de la balanza
20 FX 50 Instrucciones de usuario
N NOTA: Para cancelar el cambio de modo de luz de fondo y volver al
pesaje pulse la tecla .
4. Pulse la tecla para guardar el modo de luz de fondo que
seleccionó y volver al pesaje.
N NOTA: Si tiene la luz de fondo ACTIVADA todo el tiempo o ajustada a
AUTO, se reduce la duración entre cargas de la batería.
3.5 Ajuste del modo de desconexión automática
Puede cambiar el modo de desconexión automática de forma que la balanza
permanezca conectada todo el tiempo o se desconecte automáticamente
tras un período de inactividad pre-ajustado de 1, 5 ó 30 minutos.
Lleve a cabo los pasos siguientes para ajustar el modo de desconexión
automática:
1. Pulse el interruptor Activado para conectar la balanza.
2. Mientras la balanza esté realizando una auto-comprobación (cuando
todos los números de las tres pantallas de la balanza pasen de todo
cero a todo nueve), pulse la tecla . La pantalla de pecio total
muestra el modo de desconexión actual.
3. Pulse la tecla para desplazarse por los siguientes modos de
desconexión automática:
• 0 = La balanza permanece conectada (cuando el modo de
desconexión automática está desactivado).
• 1 = La balanza se desconecta tras 1 minuto de inactividad.
• 5 = La balanza se desconecta tras 5 minutos de inactividad.
• 30 = La balanza se desconecta tras 30 minutos de inactividad.
4. Pulse la tecla para guardar el modo de desconexión automática
que seleccionó y volver al pesaje.
SPANISH.book Page 20 Thursday, August 23, 2007 2:35 PM

Español
3.6 Cambio de la batería
FX 50 Instrucciones de usuario 21
3.6 Cambio de la batería
Fig 3-3. Cambio de la batería
SPANISH.book Page 21 Thursday, August 23, 2007 2:35 PM

3. Instalación de la balanza
22 FX 50 Instrucciones de usuario
Fig 3-4. Cambio de la batería (continuación)
SPANISH.book Page 22 Thursday, August 23, 2007 2:35 PM

Español
4.1 Clave de los símbolos utilizados
FX 50 Instrucciones de usuario 23
4. Funcionamiento de la balanza
4.1 Clave de los símbolos utilizados
Símbolo Acción
Pulse el interruptor Activación / desactivación
debajo de la balanza para activar o desactivar la
balanza.
Pule la tecla Selección de base de precios para
seleccionar la base de precios para el artículo que
quiera pesar.
NOTA: Esta tecla es sólo para las variantes del RU,
Europa continental y el resto del mundo.
NOTA: La variante australiana es sólo Kg.
Pulse la tecla Unidades de peso para seleccionar las
unidades de peso para el artículo que quiera pesar.
NOTA: Esta tecla es sólo para la variante de los
Estados Unidos y Canadá.
Ponga un artículo sin contenedor ni envoltura en la
cubeta de pesaje Ð. Saque el artículo Ï.
Ponga una envoltura o un contenedor (u otro tipo de
peso de tara) vacío en la cubeta de pesaje Ð. Saque
el contenedor Ï.
Ponga el artículo en una envoltura o un contenedor (u
otro tipo de peso de tara) vacío en la cubeta de pesaje
Ð. Saque el artículo y el contenedor Ï.
Ponga los artículos del mismo precio unitario en la
cubeta de pesaje Ð, como por ejemplo dulces
variados. Saque los artículos Ï.
SPANISH.book Page 23 Thursday, August 23, 2007 2:35 PM

4. Funcionamiento de la balanza
24 FX 50 Instrucciones de usuario
No ponga ningún artículo en la cubeta de pesaje.
Según el modo funcional de la balanza, pulse los
números de teclado para introducir el precio unitario
de un artículo o pulse los números de teclado para
introducir los precios unitarios para búsquedas de
precio directas e indirectas, pesos de tara conocidos y
taras proporcionales.
Si es necesario, con ningún artículo en la cubierta de
pesaje, pulse la tecla Puesta a cero para poner a cero
la balanza.
Elimine el precio unitario que introdujo.
Multiplica el precio neto total del artículo que la
balanza ha pesado por dos o cuatro.
NOTA: Estas teclas son sólo para la variante de los
Estados Unidos y Canadá.
Seleccione una tecla de búsqueda de precio directa.
Seleccione la tecla de búsqueda de precio indirecta.
Repita los pasos numerados mostrados.
Símbolo Acción
2-6
SPANISH.book Page 24 Thursday, August 23, 2007 2:35 PM

Español
4.2 Conexión y ajuste de la balanza
FX 50 Instrucciones de usuario 25
4.2 Conexión y ajuste de la balanza
Para conectar y ajustar la balanza de forma que esté a punto para el uso,
lleve a cabo los pasos siguientes:
Fig 4-1. Conexión y ajuste de la balanza
SPANISH.book Page 25 Thursday, August 23, 2007 2:35 PM

4. Funcionamiento de la balanza
26 FX 50 Instrucciones de usuario
4.3 Pesaje de artículos individuales
Lleve a cabo estos pasos para pesar artículos que tengan diferentes pesos y
diferentes precios unitarios:
Fig 4-2. Pesaje de artículos individuales
SPANISH.book Page 26 Thursday, August 23, 2007 2:35 PM

Español
4.4 Pesaje de artículos con el mismo precio unitario
FX 50 Instrucciones de usuario 27
4.4 Pesaje de artículos con el mismo precio
unitario
Puede pesar el mismo tipo de artículos o artículos diferentes que tengan el
mismo precio unitario sin necesidad de seguir tecleando el precio unitario en
la balanza. Para hacer esto, introduzca y guarde el precio unitario en la
balanza hasta que decida cambiar o cancelar el precio.
Para pesar artículos del mismo precio unitario, lleve a cabo los pasos
siguientes:
Fig 4-3. Pesaje de artículos con el mismo precio unitario
00086_A
SPANISH.book Page 27 Thursday, August 23, 2007 2:35 PM

4. Funcionamiento de la balanza
28 FX 50 Instrucciones de usuario
N NOTA: Puede cambiar el precio unitario que la balanza ha guardado.
Para hacerlo, vuelva a teclear el precio y la balanza guardará el nuevo
precio unitario hasta que pulse la tecla para cancelarlo.
4.5 Pesaje utilizando taras conocidas
N NOTA: Esta función es sólo para la variante de los Estados Unidos y
Canadá.
Si conoce el peso de un artículo como una envoltura o envase para alimentos
que utilice para contener o empaquetar artículos en la balanza y quiere
utilizarlo como peso de tara, puede introducir manualmente el peso de tara
en la balanza. La balanza deduce el peso del artículo de tara del peso bruto
total y visualiza el peso neto y el precio total sólo del artículo.
N NOTA: Cuando ha introducido un peso de tara, la balanza visualiza
una cifra negativa en la pantalla de peso para representar el peso de
tara.
N NOTA: En el paso 6, puede introducir manualmente el precio unitario
del artículo o puede recuperar el precio del artículo utilizando una
búsqueda de precio directa o una búsqueda de precio indirecta. Vea
las secciones 4.9 – 4.12 para obtener información sobre búsquedas de
precio.
Para introducir un peso de tara que conozca y a continuación pesar un
artículo que tenga el mismo peso de tara, lleve a cabo los pasos siguientes:
Fig 4-4. Pesaje utilizando taras conocidas
SPANISH.book Page 28 Thursday, August 23, 2007 2:35 PM

Español
4.5 Pesaje utilizando taras conocidas
FX 50 Instrucciones de usuario 29
Fig 4-5. Pesaje utilizando taras conocidas (continuación)
SPANISH.book Page 29 Thursday, August 23, 2007 2:35 PM

4. Funcionamiento de la balanza
30 FX 50 Instrucciones de usuario
4.6 Pesaje utilizando taras desconocidas
Puede pesar artículos como envolturas y envases de comida que utilice para
contener o empaquetar artículo en la balanza y guardar sus pesos de tara
antes de pesar los artículos. Hágalo de forma que, cuando ponga artículos
en la balanza en un envase, la balanza deduzca el peso de tara de un peso
bruto total y visualice el peso neto y el precio total sólo de los artículos.
N NOTA: En el paso 6, puede introducir manualmente el precio unitario
del artículo o puede recuperar el precio del artículo utilizando una
búsqueda de precio directa o una búsqueda de precio indirecta. Vea
las secciones 4.9 – 4.12 para obtener información sobre búsquedas de
precio.
Lleve a cabo los pasos siguientes para pesar y guardar un peso de tara
desconocido:
Fig 4-6. Pesaje utilizando taras desconocidas
SPANISH.book Page 30 Thursday, August 23, 2007 2:35 PM

Español
4.7 Utilización de taras proporcionales
FX 50 Instrucciones de usuario 31
Fig 4-7. Pesaje utilizando taras desconocidas (continuación)
4.7 Utilización de taras proporcionales
N NOTA: Esta función es sólo para la variante de los Estados Unidos y
Canadá.
Puede introducir el peso de tara de artículos como contenedores como una
proporción porcentual del peso bruto total del artículo y la tara. Por ejemplo,
puede introducir una tara proporcional de un 25% si el peso bruto de los
artículos que quiere pesar incluye un peso de tara que sea un 25% del peso
bruto para empaquetar el artículo.
N NOTA: En el paso 6, puede introducir manualmente el precio unitario
del artículo o puede recuperar el precio del artículo utilizando una
búsqueda de precio directa o una búsqueda de precio indirecta.
Consulte las secciones 4.9 – 4.12 para obtener información sobre
búsquedas de precio.
SPANISH.book Page 31 Thursday, August 23, 2007 2:35 PM

4. Funcionamiento de la balanza
32 FX 50 Instrucciones de usuario
Para introducir un ejemplo de peso de tara proporcional de un 25%, lleve a
cabo los pasos siguientes:
Fig 4-8. Utilización de taras proporcionales
SPANISH.book Page 32 Thursday, August 23, 2007 2:35 PM

Español
4.8 Multiplicación por un precio unitario
FX 50 Instrucciones de usuario 33
4.8 Multiplicación por un precio unitario
N NOTA: Esta función es sólo para la variante de los Estados Unidos y
Canadá.
Puede pesar artículos, introducir un precio unitario y a continuación
multiplicar el precio total que introdujo por dos o cuatro. Haga esto para
multiplicar el precio total de los artículos cuyo precio se expresa en divisiones
de unidades de libra, como cuarto de libra y media libra.
N NOTA: En el paso 6, puede introducir manualmente el precio unitario
del artículo o puede recuperar el precio del artículo utilizando una
búsqueda de precio directa o una búsqueda de precio indirecta.
Consulte las secciones 4.9 – 4.12 para obtener información sobre
búsquedas de precio.
Para multiplicar un precio unitario que introdujo por un múltiple de dos o
cuatro, lleve a cabo estos pasos:
Fig 4-9. Multiplicación por un precio unitario
SPANISH.book Page 33 Thursday, August 23, 2007 2:35 PM

4. Funcionamiento de la balanza
34 FX 50 Instrucciones de usuario
4.9 Programación de búsquedas de precio
directas
N NOTA: Puede pulsar las teclas de búsqueda de pecio directa
para recuperar las unidades de peso y los precios de
artículo de artículos concretos tras haber guardado esta información
en la memoria de la balanza.
Puede introducir y guardar unidades de peso (o las variantes de balanza con
base de precios para el RU, Europa continental y el resto del mundo) junto
con diferentes precios unitarios en las doce teclas de búsqueda de precio
directa en el teclado. Esto le permite recuperar y utilizar un precio unitario que
ya haya guardado en la memoria de la balanza con una tecla de búsqueda
de precio directa. Esto significa que puede pesar rápidamente artículos que
venda mucho sin necesidad de teclear precios unitarios para artículos
concretos cada vez que los pese.
Para guardar las unidades de peso (la base de precios) junto con un precio
con un ejemplo de búsqueda de precio directa de número 8, lleve a cabo los
pasos siguientes:
Fig 4-10. Programación de búsquedas de precio directas
N NOTA: Se dispone de 38 búsquedas de precio indirectas adicionales.
Vea las secciones 4.11 y 4.12.
SPANISH.book Page 34 Thursday, August 23, 2007 2:35 PM

Español
4.10 Pesaje utilizando búsquedas de precio directas
FX 50 Instrucciones de usuario 35
4.10 Pesaje utilizando búsquedas de precio
directas
Cuando haya programado precios unitarios con teclas de búsqueda de
precio directa, puede pesar artículos más rápidamente recuperando los
precios unitarios preajustados que programó utilizando las teclas de
búsqueda de precio directa como .
Para pesar un artículo utilizando un ejemplo de búsqueda de precio directa
de número 8, lleve a cabo los pasos siguientes:
N NOTA: Puede utilizar dos métodos para pesar artículos utilizando
búsquedas de precio directas. Puede poner el artículo en la balanza y
a continuación pulsar la tecla de búsqueda de precio directa o puede
pulsar la tecla de búsqueda de precio directa y a continuación poner el
artículo en la balanza (vea los pasos 2 y 3 siguientes).
Fig 4-11. Pesaje utilizando búsquedas de precio directas
SPANISH.book Page 35 Thursday, August 23, 2007 2:35 PM

4. Funcionamiento de la balanza
36 FX 50 Instrucciones de usuario
4.11 Programación de búsquedas de precio
indirectas
N NOTA: Las búsquedas de precio indirectas funcionan de la misma
forma que las búsquedas de pecio directas, con la excepción de que,
para recuperar una búsqueda de precio indirecta, usted pulsa la tecla
y a continuación teclea manualmente el número de búsqueda de
precio indirecta.
Puede introducir y guardar unidades de peso (o las variantes de balanza con
base de precios para el RU, Europa continental y el resto del mundo) junto
con diferentes precios unitarios con un máximo de 38 teclas de búsqueda de
precio indirecta que tengan números de búsqueda de precio entre 13 y 50
asignados a ellas. Esto le permite recuperar y utilizar un precio unitario que
ya haya guardado en la memoria de la balanza. Esto significa que puede
pesar rápidamente artículos que venda mucho sin necesidad de teclear
precios unitarios para artículos concretos cada vez que los pese.
Para guardar las unidades de peso (la base de precios) junto con un precio
con un ejemplo de búsqueda de precio indirecta de número 20, lleve a cabo
los pasos siguientes:
Fig 4-12. Programación de búsquedas de precio indirectas
SPANISH.book Page 36 Thursday, August 23, 2007 2:35 PM

Español
4.12 Pesaje utilizando búsquedas de precio indirectas
FX 50 Instrucciones de usuario 37
4.12 Pesaje utilizando búsquedas de precio
indirectas
Cuando haya programado precios con las teclas de búsqueda de precio
indirecta puede pesar artículos más rápidamente recuperando el precio
preajustado que programó con una búsqueda de precio indirecta.
Para pesar un artículo utilizando un ejemplo de búsqueda de precio indirecta
de número 20, lleve a cabo los pasos siguientes:
Fig 4-13. Pesaje utilizando búsquedas de precio indirectas
SPANISH.book Page 37 Thursday, August 23, 2007 2:35 PM

SPANISH.book Page 38 Thursday, August 23, 2007 2:35 PM

Español
FX 50 Instrucciones de usuario 39
5. Códigos de error
Si aparecen mensajes de error de forma persistente en la pantalla de la
balanza:
1. Saque la batería y desconecte la balanza del suministro eléctrico.
2. Vuelva a instalar la batería para volver a conectar el suministro
eléctrico.
Código
de error
Problema Acción
Err 4 La tecla de cero o cero
inicial intenta poner a
cero la carga que sea
más de un 4% de la
capacidad máxima de la
balanza.
Saque todo el peso de la cubeta de
pesaje y a continuación conecte la
balanza. Pulse la tecla Puesta a cero
para poner a cero la balanza. Si no
funciona, la balanza necesita calibración
o servicio.
Err 5 Error de teclado. El teclado tiene un cortocircuito, por lo
tanto debe cambiarse. Por favor,
póngase en contacto con su
distribuidor Avery Berkel.
Err 6 Error de convertidor A/D. La balanza necesita calibración o
servicio. Por favor, póngase en
contacto con su distribuidor Avery
Berkel.
SPANISH.book Page 39 Thursday, August 23, 2007 2:35 PM

SPANISH.book Page 40 Thursday, August 23, 2007 2:35 PM

Table des matières
FX 50 Guide d'utilisation 1
Français
Table des matières
1. Avertissements 3
1.1 Installation sans danger . . . . . . . . . . . . . . . . . . . . . . . . . . . . . . . . . . 3
1.2 Précautions d'utilisation de la balance en toute sécurité . . . . . . . . . 3
1.3 Nettoyage de la balance . . . . . . . . . . . . . . . . . . . . . . . . . . . . . . . . . 5
2. Éléments principaux, clavier et écran 7
2.1 Éléments principaux . . . . . . . . . . . . . . . . . . . . . . . . . . . . . . . . . . . . 7
2.2 Claviers . . . . . . . . . . . . . . . . . . . . . . . . . . . . . . . . . . . . . . . . . . . . . . 9
3. Installation de la balance 15
3.1 Assemblage de la version avec colonne . . . . . . . . . . . . . . . . . . . . 15
3.2 Mise à niveau de la balance . . . . . . . . . . . . . . . . . . . . . . . . . . . . . 16
3.3 Chargement de la batterie . . . . . . . . . . . . . . . . . . . . . . . . . . . . . . . 17
3.4 Changement du mode de rétro éclairage de l'affichage . . . . . . . . 17
3.5 Configuration du mode d'arrêt automatique . . . . . . . . . . . . . . . . . . 18
3.6 Remplacement de la batterie . . . . . . . . . . . . . . . . . . . . . . . . . . . . . 19
4. Fonctionnement de la balance 21
4.1 Légende des symboles utilisés . . . . . . . . . . . . . . . . . . . . . . . . . . . 21
4.2 Mise sous tension et configuration de la balance . . . . . . . . . . . . . 23
4.3 Pesage d'articles individuels . . . . . . . . . . . . . . . . . . . . . . . . . . . . . 24
4.4 Pesage d'articles ayant le même prix unitaire . . . . . . . . . . . . . . . . 25
4.5 Pesage avec des tares connues . . . . . . . . . . . . . . . . . . . . . . . . . . 26
4.6 Pesage avec des tares inconnues . . . . . . . . . . . . . . . . . . . . . . . . . 28
4.7 Utilisation des tares proportionnelles . . . . . . . . . . . . . . . . . . . . . . . 29
4.8 Multiplication d'un prix unitaire . . . . . . . . . . . . . . . . . . . . . . . . . . . . 31
4.9 Programmation des PLU directs . . . . . . . . . . . . . . . . . . . . . . . . . . 32
4.10 Pesage avec les PLU indirects . . . . . . . . . . . . . . . . . . . . . . . . . . . 33
FRENCH.book Page 1 Thursday, August 23, 2007 2:38 PM

Table des matières
2 FX 50 Guide d'utilisation
4.11 Programmation des PLU indirects . . . . . . . . . . . . . . . . . . . . . . . . .34
4.12 Pesage avec les PLU indirects . . . . . . . . . . . . . . . . . . . . . . . . . . .35
5. Codes d’erreur 37
FRENCH.book Page 2 Thursday, August 23, 2007 2:38 PM

Français
FX 50 Guide d'utilisation 3
Merci d’avoir choisi ce produit Avery Berkel.
Veuillez lire les instructions de sécurité et le guide d'utilisation avant d'utiliser
ce produit.
Veuillez lire toutes les sections de ce document précédés des symboles
Danger, Attention et Prudence.
W ATTENTION! Ceci est un symbole d'avertissement. Les
avertissements signifient que le non respect d'usages et de
procédures précis peuvent avoir des conséquences sérieuses
comme des blessures corporelles ou l'endommagement ou la
perte des données.
D DANGER! Ceci est un symbole de danger. Danger signifie que le
non respect d'usages ou de procédures spécifiques posent un
risque d'électrocution pouvant entraîner des blessures
corporelles ou la mort.
C PRUDENCE! Ceci est un symbole de prudence. Les symboles de
prudences fournissent des informations sur des procédures qui en cas
de non respect peuvent entraîner l'endommagement de l'appareil et la
perte de données.
N REMARQUE : Ceci est un symbole de remarque. Les remarques
fournissent des informations supplémentaires et importantes, des
astuces et des conseils vous aidant à tirer le meilleur parti de votre
produit.
FRENCH.book Page 3 Thursday, August 23, 2007 2:38 PM

FRENCH.book Page 4 Thursday, August 23, 2007 2:38 PM

Français
1.1 Installation sans danger
FX 50 Guide d'utilisation 5
1. Avertissements
1.1 Installation sans danger
W ATTENTION : Les équipements susceptibles d'être branchés
doivent être installés près d'une prise de courant facilement
accessible. L’alimentation électrique au niveau de la prise de
courant doit procurer une protection adéquate contre les
surintensités au grade approprié.
W ATTENTION : En cas de doute, demandez conseil auprès d'un
électricien qualifié.
1.2 Précautions d'utilisation de la balance en
toute sécurité
Fig 1-1. Soulèvement correct de la balance
FRENCH.book Page 5 Thursday, August 23, 2007 2:38 PM

1. Avertissements
6 FX 50 Guide d'utilisation
Fig 1-2. Précautions d'utilisation de la balance
FRENCH.book Page 6 Thursday, August 23, 2007 2:38 PM

Français
1.3 Nettoyage de la balance
FX 50 Guide d'utilisation 7
1.3 Nettoyage de la balance
C PRUDENCE : Ne pas utiliser de détergents, de solvants ou d'éponges
abrasives ou de produits alcalins, tels que la soude ménagère, pour
nettoyer l'extérieur de la balance.
Fig 1-3. Nettoyage de la balance
Pour nettoyer l'extérieur de la balance, essuyez-la à l'aide d'un chiffon propre
humidifié à l'eau contenant une petite quantité de détergent doux ou de
liquide vaisselle non parfumé.
FRENCH.book Page 7 Thursday, August 23, 2007 2:38 PM

FRENCH.book Page 8 Thursday, August 23, 2007 2:38 PM

Français
2.1 Éléments principaux
FX 50 Guide d'utilisation 9
2. Éléments principaux, clavier et
écran
2.1 Éléments principaux
Fig 2-1. Éléments principaux des versions monobloc ou avec colonne de la FX 50
FRENCH.book Page 9 Thursday, August 23, 2007 2:38 PM

2. Éléments principaux, clavier et écran
10 FX 50 Guide d'utilisation
Numéro
d'élément
Pièce
Numéro
d'élément
Pièce
1 Version monobloc 8 Sortie secteur
2 Version sur colonne 9 Interrupteur Marche /
Arrêt
3 Plateau en acier
inoxydable
10 Prise secteur
4 Clavier 11 Batterie rechargeable
5 Écran vendeur 12 Pieds réglables
6 Écran client 13 Bulle de mise à niveau
7 Colonne 14 Contre écrou pour les
pieds réglables
FRENCH.book Page 10 Thursday, August 23, 2007 2:38 PM

Français
2.2 Claviers
FX 50 Guide d'utilisation 11
2.2 Claviers
Fig 2-2. Clavier États Unis et Canada (dessus) et
clavier Europe et Reste du monde (dessous)
FRENCH.book Page 11 Thursday, August 23, 2007 2:38 PM

2. Éléments principaux, clavier et écran
12 FX 50 Guide d'utilisation
N° Touche
Nom de la
touche
Appuyez sur cette touche pour...
1 Touches
numériques
Saisir les prix unitaires individuels, les
prix unitaires des PLU directs et
indirects et les tares connues ou
proportionnelles.
2 Touche d'unités
de poids (option
États Unis et
Canada)
Basculer entre kilogrammes et livres.
Une flèche T apparaît sur l'écran au
dessus des unités sélectionnées.
3 Touche de
sélection de la
base de prix
(Option GB,
Europe & Reste
du monde)
Basculer entre le prix au kilo et le prix au
100 grammes. Une flèche T apparaît
sur l'écran au dessus de la base de prix
sélectionnée.
4 Touche Fix (GB,
Europe & Reste
du monde) ou
touche de
sauvegarde (États
Unis et Canada)
Aussi touche de
déplacement dans
le menu (X)
Fixer ou sauvegarder un poids ou un
prix que vous avez saisi jusqu'à ce que
vous l'annuliez. Vous pouvez aussi
appuyer sur cette touche (X) pour
défiler à travers les options du menu.
5 Touche tare
Aussi touche de
sélection d'option
du menu (S)
Saisir et effacer les tares telles que les
récipients et papiers ou cartons
d'emballages. La balance soustrait la
tare des produits emballés pour les
peser. Cette touche (S) sert également
à sélectionner les options du menu.
6 Touche zéro Mettre la balance à zéro manuellement
et remettre l'affichage du prix unitaire et
du poids total à zéro.
FRENCH.book Page 12 Thursday, August 23, 2007 2:38 PM

Français
2.2 Claviers
FX 50 Guide d'utilisation 13
7 Touche
d’effacement
Effacer les erreurs de saisies et les
erreurs.
8 Touche multiplier
par 2 (États Unis
et Canada
uniquement)
Multiplier le prix total par deux.
9 Touche multiplier
par 4 (États Unis
et Canada
uniquement)
Multiplier le prix total par quatre.
10 Touche de PLU
indirect
Rappeler et configurer des prix pour un
maximum de 38 touches de PLU
(données de recherche d'un prix)
indirects.
11 Touches directes
de PLU
Rappeler et configurer des prix pour un
maximum de 12 touches de PLU
(données de recherche d'un prix)
directs.
N° Touche
Nom de la
touche
Appuyez sur cette touche pour...
FRENCH.book Page 13 Thursday, August 23, 2007 2:38 PM

2. Éléments principaux, clavier et écran
14 FX 50 Guide d'utilisation
Fig 2-3. Écran États-Unis et Canada
Fig 2-4. Écran GB
Fig 2-5. Écran Europe et Reste du monde
FRENCH.book Page 14 Thursday, August 23, 2007 2:38 PM

Français
2.2 Claviers
FX 50 Guide d'utilisation 15
Numéro
d'élément
Nom et symbole Fonction
1 Affichage du
poids
Indique le poids brut ou net de l'article.
2 Affichage du prix
unitaire
Indique le prix unitaire de l'article.
3 Affichage du prix
total
Indique le prix total de l'article.
4
Indicateur de
chargement de la
batterie
Un voyant rouge indique que la batterie est en
cours de chargement.
Un voyant vert indique que la batterie est
chargée.
5
Indicateur de
batterie faible
Un voyant s'allume pour indiquer que la
charge de la batterie est faible. Vous devez la
recharger immédiatement.
6
Indicateur Fix ou
de sauvegarde
Une flèche T indique que vous avez appuyé
sur la touche avant toute
manipulation pour empêcher que l'affichage
du poids et du prix unitaire ne s'effacent
automatiquement.
7 Indicateur des
unités de poids
Une flèche T indique que vous avez
sélectionné soit kilogrammes soit livres
comme unité de poids (versions États Unis et
Canada uniquement).
8 Indicateur de
sélection de la
base de prix
Une flèche T indique que vous avez
sélectionné soit le prix aux 100 grammes ou le
prix au kilogramme (version GB/Europe/Reste
du monde uniquement).
REMARQUE : La version australienne ne
pèse qu'en kilogrammes.
9
Indicateur de zéro
Une flèche Tindique que la balance est au
zéro brut (il n'y a pas de tare). La flèche au
dessus de NET et -0- indique que la balance
est au zéro net (inclut une tare).
F / Save
-0-
FRENCH.book Page 15 Thursday, August 23, 2007 2:38 PM

2. Éléments principaux, clavier et écran
16 FX 50 Guide d'utilisation
10
Indicateur de
stabilité
Une flèche T indique que le poids de l'article
est stable.
11
Indicateur de
poids net
Une flèche Tindique que la tare est
configurée et que le poids affiché est un poids
net (le poids affiché exclut la tare).
Numéro
d'élément
Nom et symbole Fonction
NET
FRENCH.book Page 16 Thursday, August 23, 2007 2:38 PM

Français
3.1 Assemblage de la version avec colonne
FX 50 Guide d'utilisation 17
3. Installation de la balance
3.1 Assemblage de la version avec colonne
Fig 3-1. Assemblage et installation de la version avec colonne
FRENCH.book Page 17 Thursday, August 23, 2007 2:38 PM

3. Installation de la balance
18 FX 50 Guide d'utilisation
3.2 Mise à niveau de la balance
Fig 3-2. Mise à niveau de la balance
FRENCH.book Page 18 Thursday, August 23, 2007 2:38 PM

Français
3.3 Chargement de la batterie
FX 50 Guide d'utilisation 19
3.3 Chargement de la batterie
Vous pouvez mettre sous tension et utiliser la balance en vous servant :
• de l'alimentation secteur avec l'adaptateur secteur (lorsque la batterie
rechargeable est installée); ou
• d'une batterie rechargeable située à l'intérieur de la balance.
Lorsque vous connectez la balance à l'alimentation secteur avec l'adaptateur
secteur, le voyant de chargement de la batterie s'allume pour indiquer que la
balance est sous tension et que la batterie est en cours de chargement.
• Voyant de chargement de batterie rouge = la batterie doit être
rechargée.
• Voyant de chargement de batterie vert = la batterie est chargée.
Vous devez complètement charger la batterie avant d'utiliser la balance pour
la première fois.
Si vous n'utilisez pas la balance pendant une longue période de temps, vous
devez charger la batterie tous les trois ou six mois pour entretenir sa capacité.
3.4 Changement du mode de rétro éclairage de
l'affichage
Il existe trois modes de rétro éclairage des écrans vendeurs et clients :
• ON = toujours éclairé
• OFF = toujours éteint
• AUTO = le rétro éclairage s'allume quand vous commencez à utiliser
la balance.
Pour changer le mode de rétro éclairage de l'écran suivez les étapes ci-
dessous :
1. Appuyez sur l'interrupteur de Marche pour allumer la balance.
La balance émet un premier signal sonore.
2. Appuyez et maintenez la touche enfoncée lorsque vous
entendez le second signal sonore et que l'affichage s'allume.
3. Appuyez sur la touche pour défiler parmi les modes de rétro
éclairage (ON, OFF et AUTO) affichés dans l'écran de prix total.
FRENCH.book Page 19 Thursday, August 23, 2007 2:38 PM

3. Installation de la balance
20 FX 50 Guide d'utilisation
N REMARQUE : Pour annuler le changement du mode de rétro
éclairage et revenir à la pesée appuyez sur la touche .
4. Appuyez sur la touche pour sauvegarder le mode de rétro
éclairage de votre choix et revenir au pesage.
N REMARQUE : Si le rétro éclairage est sur ON en permanence ou sur
AUTO, la durée de vie de votre batterie s'en retrouve diminuée entre
chaque charge.
3.5 Configuration du mode d'arrêt automatique
Vous pouvez régler le mode d'arrêt automatique de manière à ce que la
balance reste constamment allumée ou à ce qu'elle s'éteigne après une
durée d'inactivité prédéterminée de 1, 5 ou 30 minutes.
Suivez les étapes ci-dessous pour configurer le mode d'arrêt automatique :
1. Appuyez sur l'interrupteur de Marche pour allumer la balance.
2. Lorsque la balance passe par sa routine de vérification (lorsque tous
les chiffres des trois écrans de la balance défilent de zéro à 9),
appuyez sur la touche . L'écran de prix total affiche le mode
actuel d'arrêt automatique.
3. Appuyez sur la touche pour défiler parmi les modes d'arrêt
automatique :
• 0 = La balance ne s'éteint jamais (le mode d'arrêt automatique est
désactivé).
• 1 = La balance s'éteint après 1 minute d'inactivité.
• 5 = La balance s'éteint après 5 minutes d'inactivité.
• 30 = La balance s'éteint après 30 minutes d'inactivité.
4. Appuyez sur la touche pour sauvegarder le mode d'arrêt
automatique de votre choix et revenir au pesage.
FRENCH.book Page 20 Thursday, August 23, 2007 2:38 PM

Français
3.6 Remplacement de la batterie
FX 50 Guide d'utilisation 21
3.6 Remplacement de la batterie
Fig 3-3. Remplacement de la batterie
FRENCH.book Page 21 Thursday, August 23, 2007 2:38 PM

3. Installation de la balance
22 FX 50 Guide d'utilisation
Fig 3-4. Remplacement de la batterie (suite)
FRENCH.book Page 22 Thursday, August 23, 2007 2:38 PM

Français
4.1 Légende des symboles utilisés
FX 50 Guide d'utilisation 23
4. Fonctionnement de la balance
4.1 Légende des symboles utilisés
Symbole Signification
Appuyer sur l'interrupteur Marche/Arrêt situé sous la
balance pour allumer ou éteindre la balance.
Appuyer sur la touche de sélection de la base de prix
pour sélectionner la base de prix de l'article à peser.
REMARQUE : Cette touche ne s'applique qu'aux
versions GB, Europe et Reste du monde
REMARQUE : La version australienne ne pèse qu'en
kilogrammes.
Appuyer sur la touche des unités de poids pour
sélectionner l'unité de poids de l'article à peser.
REMARQUE : Cette touche ne s'applique qu'aux
versions États Unis et Canada.
Mettre un article sans récipient ou emballage sur le
plateau Ð. Retirer l'article Ï.
Mettre un récipient ou emballage vide (ou autre type
d'objet à tarer) sur le plateau Ð. Retirer le récipient Ï.
Mettre l'article dans un récipient ou emballage (ou
autre type d'objet à tarer) sur le plateau Ð. Retirer
l'article et le récipient Ï.
FRENCH.book Page 23 Thursday, August 23, 2007 2:38 PM

4. Fonctionnement de la balance
24 FX 50 Guide d'utilisation
Mettre des articles de même prix unitaire sur le
plateau Ð, comme des bonbons. Retirer les articles
Ï.
Ne pas mettre d'articles sur le plateau.
Selon le mode de fonctionnement de la balance,
appuyer sur les touches numériques du clavier soit
pour saisir le prix unitaire d'un article soit pour saisir
les prix unitaires de PLU directs et indirects, les tares
connues et les tares proportionnelles.
Si nécessaire, lorsqu'il n'y a aucun article sur le
plateau, appuyer sur la touche zéro de la balance.
Effacer le prix unitaire saisi.
Multiplier le prix net total de l'article pesé par la
balance par 2 ou 4.
REMARQUE : Ces touches ne s'appliquent qu'aux
versions États Unis et Canada.
Sélectionner une touche de PLU direct.
Sélectionner la touche de PLU indirect.
Symbole Signification
FRENCH.book Page 24 Thursday, August 23, 2007 2:38 PM

Français
4.2 Mise sous tension et configuration de la balance
FX 50 Guide d'utilisation 25
4.2 Mise sous tension et configuration de la
balance
Pour allumer et configurer la balance de façon à ce qu'elle soit prête à utiliser,
veuillez effectuer les étapes suivantes :
Fig 4-1. Mise sous tension et configuration de la balance
Répéter les étapes numérotées.
Symbole Signification
2-6
FRENCH.book Page 25 Thursday, August 23, 2007 2:38 PM

4. Fonctionnement de la balance
26 FX 50 Guide d'utilisation
4.3 Pesage d'articles individuels
Suivez ces étapes pour peser des articles ayant des poids et prix unitaires
différents :
Fig 4-2. Pesage d'articles individuels
FRENCH.book Page 26 Thursday, August 23, 2007 2:38 PM

Français
4.4 Pesage d'articles ayant le même prix unitaire
FX 50 Guide d'utilisation 27
4.4 Pesage d'articles ayant le même prix
unitaire
Vous pouvez peser le même type d'articles ou des articles différents ayant le
même prix unitaire sans avoir à constamment saisir le prix unitaire au clavier.
Pour ce faire, vous saisissez et sauvegardez le prix unitaire dans la balance
jusqu'à ce que vous décidiez de modifier ou d'annuler le prix.
Pour peser des articles ayant le même prix unitaire, suivez les étapes ci-
dessous :
Fig 4-3. Pesage d'articles ayant le même prix unitaire
00086_A
FRENCH.book Page 27 Thursday, August 23, 2007 2:38 PM

4. Fonctionnement de la balance
28 FX 50 Guide d'utilisation
N REMARQUE : Vous pouvez modifier le prix unitaire mémorisé par la
balance. Pour ce faire, saisissez à nouveau le prix. La balance
mémorise le nouveau poids unitaire jusqu'à ce que vous appuyiez sur
la touche pour l'annuler.
4.5 Pesage avec des tares connues
N REMARQUE : Cette fonction ne s'applique qu'aux versions États Unis
et Canada.
Si vous connaissez le poids d'un article, tel qu'une barquette ou un emballage
que vous utilisez pour contenir ou emballer les articles sur la balance et que
vous voulez vous en servir de tare, vous pouvez saisir la tare manuellement.
La balance soustrait la tare de l'article au poids brut total et affiche le poids
net et le prix total de l'article.
N REMARQUE : Lorsque vous avez saisi une tare, la balance affiche un
nombre négatif dans l'écran de poids pour représenter la tare.
N REMARQUE : A l'étape 6 vous pouvez saisir manuellement le prix
unitaire de l'article ou rappeler le prix de l'article avec un PLU direct ou
indirect. Voir sections 4.9 - 4.12 pour plus de renseignements sur les
PLU.
FRENCH.book Page 28 Thursday, August 23, 2007 2:38 PM

Français
4.5 Pesage avec des tares connues
FX 50 Guide d'utilisation 29
Pour saisir une tare connue puis peser un article ayant la même tare, suivez
les étapes ci-dessous :
Fig 4-4. Pesage avec des tares connues
FRENCH.book Page 29 Thursday, August 23, 2007 2:38 PM

4. Fonctionnement de la balance
30 FX 50 Guide d'utilisation
4.6 Pesage avec des tares inconnues
Vous pouvez peser des articles tels que des récipients ou des emballages à
utiliser pour contenir ou emballer des articles sur la balance et sauvegarder
leurs tares avant de peser les articles. Cela s'utilise lorsque vous mettez des
articles sur la balance dans un récipient. La balance soustrait la tare du poids
brut total et affiche le poids net et le prix total des articles.
N REMARQUE : A l'étape 6 vous pouvez saisir manuellement le prix
unitaire de l'article ou rappeler le prix de l'article avec un PLU direct ou
indirect. Voir sections 4.9 - 4.12 pour plus de renseignements sur les
PLU.
Suivez les étapes ci-dessous pour peser et sauvegarder une tare inconnue :
Fig 4-5. Pesage avec des tares inconnues
FRENCH.book Page 30 Thursday, August 23, 2007 2:38 PM

Français
4.7 Utilisation des tares proportionnelles
FX 50 Guide d'utilisation 31
Fig 4-6. Pesage avec des tares inconnues (suite)
4.7 Utilisation des tares proportionnelles
N REMARQUE : Cette fonction ne s'applique qu'aux versions États Unis
et Canada.
Vous pouvez saisir la tare d'articles tels que les récipients en tant qu'un
pourcentage du poids brut total de l'article et de la tare. Par exemple, vous
pouvez saisir une tare proportionnelle de 25% si le poids brut total des articles
que vous souhaitez inclut une tare de 25% du poids brut pour emballer
l'article.
N REMARQUE : A l'étape 6 vous pouvez saisir manuellement le prix
unitaire de l'article ou rappeler le prix de l'article avec un PLU direct ou
indirect. Voir sections 4.9 - 4.12 pour plus de renseignements sur les
PLU.
FRENCH.book Page 31 Thursday, August 23, 2007 2:38 PM

4. Fonctionnement de la balance
32 FX 50 Guide d'utilisation
Pour saisir un exemple de tare proportionnelle de 25%, suivez les étapes ci-
dessous :
Fig 4-7. Utilisation des tares proportionnelles
FRENCH.book Page 32 Thursday, August 23, 2007 2:38 PM

Français
4.8 Multiplication d'un prix unitaire
FX 50 Guide d'utilisation 33
4.8 Multiplication d'un prix unitaire
N REMARQUE : Cette fonction ne s'applique qu'aux versions États Unis
et Canada.
Vous pouvez peser les articles, saisir un prix unitaire puis multiplier le prix
total saisi par deux ou par quatre. Vous effectuez ceci pour multiplier le prix
total d'articles dont le prix est déterminé en division de livres comme le quart
de livre ou la demi livre.
N REMARQUE : A l'étape 6 vous pouvez saisir manuellement le prix
unitaire de l'article ou rappeler le prix de l'article avec un PLU direct ou
indirect. Voir sections 4.9 - 4.12 pour plus de renseignements sur les
PLU.
Pour multiplier un prix unitaire que vous avez saisi par deux ou quatre, suivez
les étapes ci-dessous :
Fig 4-8. Multiplication d'un prix unitaire
FRENCH.book Page 33 Thursday, August 23, 2007 2:38 PM

4. Fonctionnement de la balance
34 FX 50 Guide d'utilisation
4.9 Programmation des PLU directs
N REMARQUE : Vous pouvez appuyer sur la touche de PLU direct
pour rappeler les unités de poids et les prix d'articles
particuliers après avoir sauvegardé ces informations dans la mémoire
de la balance.
Vous pouvez attribuer des unités de poids ( ou la base de prix pour les
versions GB, Europe et Reste du monde) ayants des prix unitaires différents
aux douze touches de PLU directs du clavier. Cela vous permet de rappeler
et utiliser un prix unitaire que vous avez mémorisé préalablement dans la
mémoire de la balance et attribué à une touche de PLU direct. Vous pouvez
ainsi peser rapidement des articles qui vendent beaucoup sans avoir besoin
de saisir les prix unitaires de ces articles chaque fois que vous les pesez.
Par exemple, pour mémoriser les unités de poids (ou la base de prix) avec un
prix sur le PLU direct numéro 8, suivez les étapes ci-dessous :
Fig 4-9. Programmation des PLU directs
N REMARQUE : 38 PLU indirects sont également disponibles. Voir
sections 4.11 et 4.12.
FRENCH.book Page 34 Thursday, August 23, 2007 2:38 PM

Français
4.10 Pesage avec les PLU indirects
FX 50 Guide d'utilisation 35
4.10 Pesage avec les PLU indirects
Lorsque vous avez programmé les prix unitaires sur les touches de PLU
direct vous pouvez peser les articles plus rapidement en rappelant les prix
unitaires que vous avez programmés à l'aide des touche de PLU directs telles
que .
Par exemple, pour peser un article avec le PLU direct numéro 8, suivez les
étapes ci-dessous :
N REMARQUE : Vous avez le choix entre deux méthodes pour peser les
articles avec les PLU directs. Vous pouvez placer l'article sur la
balance puis appuyer sur la touche de PLU direct ou vous pouvez
appuyer sur la touche de PLU direct puis mettre l'article sur la balance.
(voir étapes 2 & 3 ci-dessous).
Fig 4-10. Pesage avec les PLU directs
FRENCH.book Page 35 Thursday, August 23, 2007 2:38 PM

4. Fonctionnement de la balance
36 FX 50 Guide d'utilisation
4.11 Programmation des PLU indirects
N REMARQUE : Les PLU indirects fonctionnent de la même manière
que les PLU direct, sauf que pour rappeler un PLU indirect, il faut
appuyer sur la touche puis saisir le numéro de PLU indirect.
Vous pouvez attribuer des unités de poids (ou le base de prix pour les
versions GB, Europe et Reste du monde) ayant des prix unitaire différents au
38 touches de PLU indirect allant de 13 à 50. Cela vous permet de rappeler
et utiliser un prix unitaire que vous avez mémorisé préalablement dans la
mémoire de la balance. Vous pouvez ainsi peser rapidement des articles qui
vendent beaucoup sans avoir besoin de saisir les prix unitaires de ces articles
chaque fois que vous les pesez.
Par exemple, pour mémoriser les unités de poids (ou la base de prix) avec un
prix sur le PLU direct numéro 20 suivez les étapes ci-dessous :
Fig 4-11. Programmation des PLU indirects
FRENCH.book Page 36 Thursday, August 23, 2007 2:38 PM

Français
4.12 Pesage avec les PLU indirects
FX 50 Guide d'utilisation 37
4.12 Pesage avec les PLU indirects
Lorsque vous avez programmé les prix sur les touches de PLU indirects vous
pouvez peser les articles plus rapidement en rappelant le prix que vous avez
programmé sur un PLU indirect.
Par exemple, pour peser un article avec le PLU direct numéro 20, suivez les
étapes ci-dessous :
Fig 4-12. Pesage avec les PLU indirects
FRENCH.book Page 37 Thursday, August 23, 2007 2:38 PM

FRENCH.book Page 38 Thursday, August 23, 2007 2:38 PM

Français
FX 50 Guide d'utilisation 39
5. Codes d’erreur
Si des messages d'erreurs apparaissent sans arrêt sur l'écran de la balance :
1. Retirez la batterie pour déconnecter la balance de l'alimentation
électrique.
2. Réinstallez la batterie pour reconnecter l'alimentation électrique.
Code
d'erreur
Problème Résolution
Err 4 Le zéro initial ou la
touche zéro tente de
mettre la charge à zéro
qui est supérieure à 4%
de la capacité maximum
de la balance.
Retirez le poids du plateau puis
allumez la balance. Appuyez sur Zéro
pour remettre la balance à zéro. Si cela
ne rectifie pas le problème, la balance
doit être calibrée ou révisée.
Err 5 Erreur de clavier. Il y a un court circuit dans le clavier. Il
doit être remplacé. Veuillez contacter
votre distributeur Avery Berkel.
Err 6 Erreur de convertisseur
A/D.
La balance doit être calibrée ou
révisée. Veuillez contacter votre
distributeur Avery Berkel.
FRENCH.book Page 39 Thursday, August 23, 2007 2:38 PM

FRENCH.book Page 40 Thursday, August 23, 2007 2:38 PM

Deutsch
Inhalt
FX 50 Gebrauchsanleitung 1
Inhalt
1. Warnhinweise 5
1.1 Sicheres Aufstellen der Waage . . . . . . . . . . . . . . . . . . . . . . . . . . . . 5
1.2 Warnhinweise für die sichere Verwendung der Waage . . . . . . . . . . 5
1.3 Reinigen der Waage . . . . . . . . . . . . . . . . . . . . . . . . . . . . . . . . . . . . 7
2. Hauptkomponenten, Tastenfeld und Anzeige 9
2.1 Hauptkomponenten . . . . . . . . . . . . . . . . . . . . . . . . . . . . . . . . . . . . . 9
2.2 Tastenfeldvarianten . . . . . . . . . . . . . . . . . . . . . . . . . . . . . . . . . . . . 11
3. Aufstellen der Waage 17
3.1 Montieren der Tower-Variante . . . . . . . . . . . . . . . . . . . . . . . . . . . . 17
3.2 Nivellieren der Waage . . . . . . . . . . . . . . . . . . . . . . . . . . . . . . . . . . 18
3.3 Laden der Batterie . . . . . . . . . . . . . . . . . . . . . . . . . . . . . . . . . . . . . 19
3.4 Ändern der Betriebsart der Hintergrundbeleuchtung . . . . . . . . . . . 19
3.5 Einstellen der automatischen Abschaltung . . . . . . . . . . . . . . . . . . 20
3.6 Wechseln der Batterie . . . . . . . . . . . . . . . . . . . . . . . . . . . . . . . . . . 21
4. Bedienen der Waage 23
4.1 Legende der verwendeten Symbole . . . . . . . . . . . . . . . . . . . . . . . 23
4.2 Einschalten und Einstellen der Waage . . . . . . . . . . . . . . . . . . . . . 25
4.3 Wiegen verschiedener Waren . . . . . . . . . . . . . . . . . . . . . . . . . . . . 26
4.4 Wiegen von Waren mit demselben Einheitspreis . . . . . . . . . . . . . 27
4.5 Wiegen unbekanter Tara . . . . . . . . . . . . . . . . . . . . . . . . . . . . . . . . 28
4.6 Wiegen mit unbekannten Tara . . . . . . . . . . . . . . . . . . . . . . . . . . . . 30
4.7 Verwenden proportionaler Tara . . . . . . . . . . . . . . . . . . . . . . . . . . . 31
4.8 Multiplizieren eines Einheitspreises . . . . . . . . . . . . . . . . . . . . . . . . 33
4.9 Programmieren direkter PLUs . . . . . . . . . . . . . . . . . . . . . . . . . . . . 34
4.10 Wiegen mit direkten PLUs . . . . . . . . . . . . . . . . . . . . . . . . . . . . . . . 35
GERMAN.book Page 1 Thursday, August 23, 2007 2:41 PM

Inhalt
2 FX 50 Gebrauchsanleitung
4.11 Programmieren indirekter PLUs . . . . . . . . . . . . . . . . . . . . . . . . . . .36
4.12 Wiegen mit indirekten PLUs . . . . . . . . . . . . . . . . . . . . . . . . . . . . . .37
5. Fehlercodes 39
GERMAN.book Page 2 Thursday, August 23, 2007 2:41 PM

Deutsch
FX 50 Gebrauchsanleitung 3
Vielen Dank dafür, dass Sie sich für dieses Avery Berkel Produkt
entschieden haben.
Lesen Sie bitte diese Sicherheits- und Bedienungshinweise bevor Sie dieses
Produkt verwenden.
Lesen Sie bitte alle Abschnitte dieses Dokuments, die Gefahren-, Warn- und
Achtungssymbole und hinweise haben.
W WARNUNG! Dies ist ein Warnsymbol. Warnungen bedeuten, dass
ein Nichtbefolgen bestimmter Praktiken und Vorgehensweisen
schwerwiegende Auswirkungen wie Verletzungen des Körpers
oder schwerwiegende Beschädigung von Daten oder den Verlust
von Daten zur Folge haben kann.
D GEFAHR! Dies ist ein Gefahrensymbol. Gefahr bedeutet, dass ein
Nichtbefolgen bestimmter Praktiken und Vorgehensweisen einen
elektrischen Schlag zur Folge haben kann, der eine Verletzung
oder den Tod von Personal verursachen kann.
C ACHTUNG! Dies ist ein Achtungssymbol. Ein Achtungssymbol
informiert über Vorgehensweisen, die bei Nichtbeachtung eine
Beschädigung der Geräte oder eine Beschädigung von Daten oder
den Verlust von Daten zur Folge haben können.
N HINWEIS: Dies ist ein Hinweissymbol. Hinweise geben zusätzliche
und wichtige Informationen, Hinweise und Tipps, die Ihnen bei der
Verwendung Ihres Produkts helfen.
GERMAN.book Page 3 Thursday, August 23, 2007 2:41 PM

GERMAN.book Page 4 Thursday, August 23, 2007 2:41 PM

Deutsch
1.1 Sicheres Aufstellen der Waage
FX 50 Gebrauchsanleitung 5
1. Warnhinweise
1.1 Sicheres Aufstellen der Waage
W WARNUNG: Sie müssen netzbetriebene Geräte an einer leicht
zugänglichen Steckdose anschließen. Die Netzsteckdose muss
unbedingt mit einem entsprechend bemessenen
Überstromschutz ausgerüstet sein.
W WARNUNG: Konsultieren Sie im Zweifelsfall unbedingt ein
ausgebildeten Elektriker.
1.2 Warnhinweise für die sichere Verwendung
der Waage
Abb 1-1. Richtiges Anheben der Waage
GERMAN.book Page 5 Thursday, August 23, 2007 2:41 PM

1. Warnhinweise
6 FX 50 Gebrauchsanleitung
Abb 1-2. Warnhinweise für die Verwendung der Waage
GERMAN.book Page 6 Thursday, August 23, 2007 2:41 PM

Deutsch
1.3 Reinigen der Waage
FX 50 Gebrauchsanleitung 7
1.3 Reinigen der Waage
C ACHTUNG: Verwenden Sie keine scharfen Scheuermittel,
Lösungsmittel, Spülreiniger und alkalischen Reinigungslösungen, wie
Kristallsoda, um die Außenseite der Waage zu reinigen.
Abb 1-3. Reinigen der Waage
Wischen Sie die Außenseite der Waage zum Reinigen mit einem sauberen
Tuch ab, welches mit Wasser und einer kleinen Menge mildem
Reinigungsmittel oder unparfümiertem Spülmittel angefeuchtet ist.
GERMAN.book Page 7 Thursday, August 23, 2007 2:41 PM

GERMAN.book Page 8 Thursday, August 23, 2007 2:41 PM

Deutsch
2.1 Hauptkomponenten
FX 50 Gebrauchsanleitung 9
2. Hauptkomponenten, Tastenfeld und
Anzeige
2.1 Hauptkomponenten
Abb 2-1. Hauptkomponenten der Varianten FX 50 Monoblock & Tower
GERMAN.book Page 9 Thursday, August 23, 2007 2:41 PM

2. Hauptkomponenten, Tastenfeld und Anzeige
10 FX 50 Gebrauchsanleitung
Position Komponente Position Komponente
1 Monoblock-Variante 8 Netzteil
2 Tower-Variante 9 Ein/Aus-Schalter
3 Edelstahl-Waagschale 10 Netzteilanschluss
4 Tastenfeld 11 Aufladbare Batterie
5 Bedieneranzeige 12 Nivellierfüße
6 Kundenanzeige 13 Nivellierlibelle
7 Tower-Baugruppe 14 Kontermutter für
Nivellierfüße
GERMAN.book Page 10 Thursday, August 23, 2007 2:41 PM

Deutsch
2.2 Tastenfeldvarianten
FX 50 Gebrauchsanleitung 11
2.2 Tastenfeldvarianten
Abb 2-2. Tstenfeld für USA & Kanada (oben) und
Tastenfeld für Europa & und den Rest der Welt (RdW) (unten)
GERMAN.book Page 11 Thursday, August 23, 2007 2:41 PM

2. Hauptkomponenten, Tastenfeld und Anzeige
12 FX 50 Gebrauchsanleitung
Nr. Taste Tastenname Drücken Sie diese Taste zur ...
1 Zifferntasten Eingabe individueller Einheitspreise,
Einheitspreise für direkte PLUs und
indirekte PLUs, bekannte Tara und
proportionale Tara.
2 Gewichtseinheits-
Tast e (Option
USA & Kanada)
Unschaltung zwischen den
Gewichtseinheiten Kilogramm und
Pfund. Ein Pfeil T erscheint über der
ausgewählten Einheit in der Anzeige.
3 Auswahltaste für
Preisbasis
(Option UK,
Europa & RdW)
Unschaltung zwischen der Preisbasis
Preis pro Kilogramm und Preis pro 100
Gramm. Ein Pfeil T erscheint über der
ausgewählten Preisbasis in der
Anzeige.
4Fix-Taste (UK,
Europa & RdW)
oder Speicher-
Tast e (USA &
Kanada). Auch
Menü-
Navigations-Taste
(X).
Fixieren oder Speichern eines
eingegebenen Gewichts oder Preises
bis zur Löschung. Sie drücken diese
Taste (X) auch zur Navigation durch die
Menüoptionen.
5 Tara-Taste. Auch
Menüoptionsausw
ahl-Taste (S).
Eingabe und Löschung von Tara-
Gewichten, wie Warenbehälter und
Einwickelmaterial. Die Waage zieht das
Tara-Gewicht ab, wenn Waren zum
Wiegen verpackt werden. Sie drücken
diese Taste (S) auch zur Auswahl einer
Menüoption.
6 Null-Taste Manuelle Nullstellung der Waage und
Rückstellen von Einheitspreis- und
Gesamtgewichtsanzeige auf Null.
7 Lösch-Taste Löschen falscher Eingaben und
Fehlerzustände.
GERMAN.book Page 12 Thursday, August 23, 2007 2:41 PM

Deutsch
2.2 Tastenfeldvarianten
FX 50 Gebrauchsanleitung 13
8 Verdoppelungs-
Tast e (nur USA &
Kanada)
Multiplizieren des Preises mit Zwei.
9 Vervierfachungs-
Tast e (nur USA &
Kanada)
Multiplizieren des Preises mit Vier.
10 Indirekte PLU-
Tast e
Aufrufen und Einstellen von Preisen von
bis zu 38 indirekten PLU-Tasten (Price
Look-Up = Preisaufruf).
11 Direkte PLU-
Tast e
Aufrufen und Einstellen von Preisen von
bis zu 12 direkten PLU-Tasten (Price
Look-Up = Preisaufruf).
Nr. Taste Tastenname Drücken Sie diese Taste zur ...
GERMAN.book Page 13 Thursday, August 23, 2007 2:41 PM

2. Hauptkomponenten, Tastenfeld und Anzeige
14 FX 50 Gebrauchsanleitung
Abb 2-3. Anzeige für USA & Kanada
Abb 2-4. Anzeige für UK
Abb 2-5. Anzeige für Europa & und den Rest der Welt (RdW)
GERMAN.book Page 14 Thursday, August 23, 2007 2:41 PM

Deutsch
2.2 Tastenfeldvarianten
FX 50 Gebrauchsanleitung 15
Position Name & Symbol Zweck
1 Gewichtsanzeige Zeigt das Brutto- oder Nettogewicht der Ware an.
2 Einheitspreisan-
zeige
Zeigt den Einheitspreis der Ware an.
3 Gesamtpreisan-
zeige
Zeigt den Gesamtpreis der Ware an.
4
Batterieladungs-
anzeige
Ein rotes Licht zeigt an, dass die Batterie
geladen wird.
Ein grünes Licht zeigt an, dass die Batterie voll
geladen ist.
5
Batterieentla-
dungsanzeige
Ein Licht geht an, um zu signalisieren, dass die
Batterieladung niedrig ist und sofort wieder
aufgeladen werden muss.
6
Fix- oder
Speicher-Anzeige
Ein Pfeil Tzeigt, dass Sie vor einer Bedienung
die Taste gedrückt haben, um die
automatische Löschung der Gewichts- und
Einheitspreisanzeige zu verhindern.
7 Gewichtseinheits-
anzeige
Ein Pfeil Tzeigt, dass entweder Kilogramm oder
Pfund als Gewichtseinheit gewählt sind (nur
USA/Kanada-Varianten).
8 Anzeige der
gewählten
Preisauswahl
Ein Pfeil Tzeigt, dass entweder Preis pro 100
Gramm oder Preis pro Kilogramm als Preisbasis
gewählt sind (nur UK/Europa/RdW-Varianten).
HINWEIS: Die australische Variante ist fest auf
Kilogramm eingestellt.
9
Null-Anzeige
Ein Pfeil Tzeigt, dass sich die Waage auf Brutto-
Null befindet (es gibt kein Tara-Gewicht). Pfeile
sowohl über NET und -0- zeigen, dass sich die
Waage auf Netto-Null befindet (beinhaltet ein
Tara-Gewicht).
10
Stabilitäts-
Anzeige
Ein Pfeil Tzeigt, dass das Warengewicht stabil
ist.
11
Nettogewichts-
Anzeige
Ein Pfeil Tzeigt, dass ein Tara-Gewicht
eingestellt ist und das angezeigte Gewicht ein
Netto-Gewicht ist (das angezeigte Gewicht
beinhaltet nicht das Tara-Gewicht).
F / Save
-0-
NET
GERMAN.book Page 15 Thursday, August 23, 2007 2:41 PM

GERMAN.book Page 16 Thursday, August 23, 2007 2:41 PM

Deutsch
3.1 Montieren der Tower-Variante
FX 50 Gebrauchsanleitung 17
3. Aufstellen der Waage
3.1 Montieren der Tower-Variante
Abb 3-1. Montieren und Aufstellen der Tower-Variante
GERMAN.book Page 17 Thursday, August 23, 2007 2:41 PM

3. Aufstellen der Waage
18 FX 50 Gebrauchsanleitung
3.2 Nivellieren der Waage
Abb 3-2. Nivellieren der Waage
GERMAN.book Page 18 Thursday, August 23, 2007 2:41 PM

Deutsch
3.3 Laden der Batterie
FX 50 Gebrauchsanleitung 19
3.3 Laden der Batterie
Sie haben folgende Möglichkeiten zum Betreiben der Waage:
• Netzstromversorgung über das Netzteil (mit eingesetzter
wiederaufladbarer Batterie).
• Eine wiederaufladbare Batterie in der Waage.
Wenn Sie die Waage mit dem Netzteil an die Netzstromversorgung
anschließen, leuchtet die Batterieladeanzeige, um anzuzeigen, dass
Netzstrom anliegt und die Batterie geladen wird.
• Rote Batterieladeanzeige = Batterie muss geladen werden.
• Grüne Batterieladeanzeige = Batterie ist vollständig aufgeladen.
Sie müssen die Batterie vollständig aufladen, bevor Sie die Waage das erste
Mal benutzen.
Wenn Sie die Waage über einen längeren Zeitraum nicht verwenden,
müssen Sie die Batterie alle sechs Monate aufladen, damit diese ihre
Leistung behält.
3.4 Ändern der Betriebsart der
Hintergrundbeleuchtung
Sie können die Hintergrundbeleuchtung für die Bediener- und
Kundenanzeige auf eine dieser drei verschiedenen Betriebsarten einstellen:
• ON = immer an.
• OFF = immer aus.
• AUTO = die Hintergrundbeleuchtung geht an, wenn Sie die Waage
bedienen.
Gehen Sie wie folgt vor, um die Betriebsart der Hintergrundbeleuchtung zu
ändern:
1. Drücken Sie den Schalter On zum Einschalten der Waage.
Die Waage gibt einen ersten Piepton aus.
2. Drücken Sie die Taste und halten Sie diese gedrückt, bis Sie
einen zweiten Piepton hören und die Anzeige aufleuchtet.
3. Drücken SIe die Taste zum Durchschalten der Betriebsarten
der Hintergrundbeleuchtung (ON, OFF und AUTO), welche die
Waage in der Gesamtpreisanzeige anzeigt.
GERMAN.book Page 19 Thursday, August 23, 2007 2:41 PM

3. Aufstellen der Waage
20 FX 50 Gebrauchsanleitung
N HINWEIS: Um die Änderung der Betriebsart der
Hintergrundbeleuchtung zu verlassen und zum Wiegen
zurückzukehren, drücken Sie die Taste .
4. Drücken Sie die Taste zum Abspeichern der gewählten
Betriebsart für die Hintergrundbeleuchtung und kehren Sie zum
Wiegen zurück.
N HINWEIS: Wenn die Hintergrundbeleuchtung die ganze Zeit auf ON
oder AUTO eingestellt ist, verkürzt dies die Betriebszeit der Batterie
zwischen den Ladezyklen.
3.5 Einstellen der automatischen Abschaltung
Sie können die automatische Abschaltung so einstellen, dass die Waage
immer eingeschaltet bleibt oder sich nach einem voreingestellten Zeitraum
ohne Bedieneraktivität von 1, 5 oder 30 Minuten automatisch abschaltet.
Gehen Sie wie folgt vor, um die automatische Abschaltung einzustellen:
1. Drücken Sie den Schalter On zum Einschalten der Waage.
2. Drücken Sie die Taste während die Waage einen Selbsttest
durchführt (wenn alle Ziffern auf den drei Anzeigen der Waage von
Nullen auf Neunen zählen). Die Anzeige des Gesamtpreises zeigt die
aktuelle Betriebsart der automatischen Abschaltung.
3. Drücken Sie die Taste zum Durchschalten der Betriebsarten
der automatischen Abschaltung:
• 0 = Waage bleibt an (da die automatische Abschaltung deaktiviert
ist).
• 1 = Waage schaltet nach 1 Minute ohne Aktivität ab.
• 5 = Waage schaltet nach 5 Minuten ohne Aktivität ab.
• 30 = Waage schaltet nach 30 Minuten ohne Aktivität ab.
4. Drücken Sie die Taste zum Abspeichern der gewählten
Betriebsart für die automatische Abschaltung und kehren Sie zum
Wiegen zurück.
GERMAN.book Page 20 Thursday, August 23, 2007 2:41 PM

Deutsch
3.6 Wechseln der Batterie
FX 50 Gebrauchsanleitung 21
3.6 Wechseln der Batterie
Abb 3-3. Wechseln der Batterie
GERMAN.book Page 21 Thursday, August 23, 2007 2:41 PM

3. Aufstellen der Waage
22 FX 50 Gebrauchsanleitung
Abb 3-4. Wechseln der Batterie (Fortsetzung)
GERMAN.book Page 22 Thursday, August 23, 2007 2:41 PM

Deutsch
4.1 Legende der verwendeten Symbole
FX 50 Gebrauchsanleitung 23
4. Bedienen der Waage
4.1 Legende der verwendeten Symbole
Symbol Handlung
Drücken Sie die Taste On/Off unten an der Waage
zum Ein- oder Ausschalten der Waage.
Drücken Sie die Auswahltaste für die Preisbasis, um die
Preisbasis für die zu wiegende Ware zu wählen.
HINWEIS: Diese Taste gibt es nur bei den Varianten für
UK, Europa und den Rest der World (RdW).
HINWEIS: Die Variante für Australien verwendet nur Kg.
Drücken Sie die Taste für die Gewichtseinheit, um die
Gewichtseinheit für die zu wiegende Ware zu wählen.
HINWEIS: Diese Taste gibt es nur bei den Varianten
für die USA und Kanada.
Legen Sie eine Ware ohne Behälter oder
Einwickelmaterial in die Waagschale Ð. Nehmen Sie
die Ware heraus Ï.
Legen Sie einen leeren Behälter oder
Einwickelmaterial (oder ein anderes Tara-Gewicht) in
die Waagschale Ð. Nehmen Sie den Behälter heraus
Ï.
Legen Sie die Ware in einem Behälter oder
Einwickelmaterial (oder ein anderes Tara-Gewicht) in
die Waagschale Ð. Nehmen Sie die Ware und den
Behälter heraus Ï.
Legen Sie Waren mit demselben Einheitspreis in die
Waagschale Ð wie eine selbstzusammengestellte
Süßigkeitsmischung. Nehmen Sie die Waren heraus
Ï.
GERMAN.book Page 23 Thursday, August 23, 2007 2:41 PM

4. Bedienen der Waage
24 FX 50 Gebrauchsanleitung
Legen Sie keine Waren in die Waagschale.
Drücken Sie je nach Funktionsart der Waage
entweder die Zahlen am Tastenfeld, um den
Einheitspreis einer Ware einzugeben, oder drücken
Sie die Zahlen am Tastenfeld, um den Einheitspreis
für direkte und indirekte PLUs, bekannte Tara-
Gewichte und proportionale Tara einzugeben.
Drücken Sie gegebenenfalls die Null-Taste auf der
Waage ohne eine Ware in der Waagschale, um die
Waage auf Null zu stellen.
Löschen Sie den eingegebenen Einheitspreis.
Multipliziert den Gesamt-Netto-Preis der mit der
Waage gewogenen Ware entweder mit zwei oder mit
vier.
HINWEIS: Diese Tasten gibt es nur bei den Varianten
für die USA und Kanada.
Wählen Sie eine Taste für eine direkte PLU.
Wählen Sie eine Taste für eine indirekte PLU.
Wiederholen Sie die gezeigten numerierten Schritte.
Symbol Handlung
2-6
GERMAN.book Page 24 Thursday, August 23, 2007 2:41 PM

Deutsch
4.2 Einschalten und Einstellen der Waage
FX 50 Gebrauchsanleitung 25
4.2 Einschalten und Einstellen der Waage
Führen Sie die folgenden Schritte durch, um die Waage einzuschalten und
einzustellen, so dass sie betriebsbereit ist.
Abb 4-1. Einschalten und Einstellen der Waage
GERMAN.book Page 25 Thursday, August 23, 2007 2:41 PM

4. Bedienen der Waage
26 FX 50 Gebrauchsanleitung
4.3 Wiegen verschiedener Waren
Führen Sie die folgenden Schritte durch, um Waren mit verschiedenen
Gewichten und verschiedenen Einheitspreisen zu wiegen:
Abb 4-2. Wiegen verschiedener Waren
GERMAN.book Page 26 Thursday, August 23, 2007 2:41 PM

Deutsch
4.4 Wiegen von Waren mit demselben Einheitspreis
FX 50 Gebrauchsanleitung 27
4.4 Wiegen von Waren mit demselben
Einheitspreis
Sie können Waren derselben Art oder verschiedene Waren mit demselben
Einheitspreis wiegen, ohne den Einheitspreis jedes Mal in die Waage
eingeben zu müssen. Geben Sie dazu den Einheitspreis in die Waage ein
und speichern Sie ihn ab bis sie den Preis entweder ändern oder löschen.
Führen Sie die folgenden Schritte durch, um Waren mit demselben
Einheitspreis zu wiegen:
Abb 4-3. Wiegen von Waren mit demselben Einheitspreis
00086_A
GERMAN.book Page 27 Thursday, August 23, 2007 2:41 PM

4. Bedienen der Waage
28 FX 50 Gebrauchsanleitung
N HINWEIS: Sie können den in der Waage abgespeicherten
Einheitspreis ändern. Geben Sie dazu den Einheitspreis neu ein und
die Waage speichert den neuen Preis bis sie die Taste
drücken, um ihn zu löschen.
4.5 Wiegen unbekanter Tara
N HINWEIS: Diese Funktion gibt es nur bei den Varianten für die USA
und Kanada.
Wenn Sie das Gewicht einer Ware, wie eines Lebensmittelbehälters oder von
Einwickelmaterial, dass Sie zum Aufnehmen oder Verpacken von Waren auf
der Waage verwenden, kennen und dieses als Tara-Gewicht verwenden
wollen, können Sie das Tara-Gewicht manuell in die Waage eingeben. Die
Waage zieht das Gewicht der Tara-Ware vom Gesamt-Bruttogewicht ab und
zeigt nur das Nettogewicht und den Gesamtpreis der Ware an.
N HINWEIS: Wenn Sie ein Tara-Gewicht eingegeben haben, zeigt die
Waage eine negative Zahl in der Anzeige der Waage an, um das Tara-
Gewicht darzustellen.
N HINWEIS: Bei Schritt 6 können Sie den Einheitspreis der Ware
manuell eingeben oder Sie können den Einheitspreis entweder mit
einer direkten PLU oder mit einer indirekten PLU wieder aufrufen.
Siehe Abschnitte 4.9 - 4.12 für Informationen zu den PLUs.
Führen Sie die folgenden Schritte durch, um ein bekanntes Tara-Gewicht
einzugeben und dann eine Ware mit demselben Tara-Gewicht zu wiegen:
Abb 4-4. Wiegen mit bekannten Tara
GERMAN.book Page 28 Thursday, August 23, 2007 2:41 PM

Deutsch
4.5 Wiegen unbekanter Tara
FX 50 Gebrauchsanleitung 29
Abb 4-5. Wiegen mit bekannten Tara (Fortsetzung)
GERMAN.book Page 29 Thursday, August 23, 2007 2:41 PM

4. Bedienen der Waage
30 FX 50 Gebrauchsanleitung
4.6 Wiegen mit unbekannten Tara
Sie können Waren, wie Lebensmittelbehälter und Einwickelmaterial, dass Sie
zum Aufnehmen oder Verpacken von Waren auf der Waage verwenden,
wiegen und deren Tara-Gewichte speichern, bevor Sie die Waren wiegen.
Sie führen dies durch, damit die Waage das Tara-Gewicht vom Gesamt-
Bruttogewicht abzieht und nur das Nettogewicht und den Gesamtpreis der
Waage anzeigt, wenn Sie Waren in einem Behälter auf die Waage legen.
N HINWEIS: Bei Schritt 6 können Sie den Einheitspreis der Ware
manuell eingeben oder Sie können den Einheitspreis entweder mit
einer direkten PLU oder mit einer indirekten PLU wieder aufrufen.
Siehe Abschnitte 4.9 - 4.12 für Informationen zu den PLUs.
Führen Sie die folgenden Schritte durch, um ein unbekanntes Tara-Gewicht
zu wiegen und abzuspeichern:
Abb 4-6. Wiegen mit unbekannten Tara
GERMAN.book Page 30 Thursday, August 23, 2007 2:41 PM

Deutsch
4.7 Verwenden proportionaler Tara
FX 50 Gebrauchsanleitung 31
Abb 4-7. Wiegen mit unbekannten Tara (Fortsetzung)
4.7 Verwenden proportionaler Tara
N HINWEIS: Diese Funktion gibt es nur bei den Varianten für die USA
und Kanada.
Sie können das Tara-Gewicht von Waren wie Behältern als prozentualen
Anteil vom Gesamt-Bruttogewicht von Ware und Tara eingeben. Sie können
zum Beispiel ein proportionales Tara von 25% eingeben, wenn das
Bruttogewicht der Ware, die Sie wiegen wollen, ein Tara-Gewicht beinhaltet,
dass 25% des Bruttogewichts beträgt, um die Ware zu verpacken.
N HINWEIS: Bei Schritt 6 können Sie den Einheitspreis der Ware
manuell eingeben oder Sie können den Einheitspreis entweder mit
einer direkten PLU oder mit einer indirekten PLU wieder aufrufen.
Siehe Abschnitte 4.9 - 4.12 für Informationen zu den PLUs.
GERMAN.book Page 31 Thursday, August 23, 2007 2:41 PM

4. Bedienen der Waage
32 FX 50 Gebrauchsanleitung
Führen Sie die folgenden Schritte durch, um ein beispielhaftes proportionales
Tara-Gewicht von 25% einzugeben:
Abb 4-8. Verwenden proportionaler Tara
GERMAN.book Page 32 Thursday, August 23, 2007 2:41 PM

Deutsch
4.8 Multiplizieren eines Einheitspreises
FX 50 Gebrauchsanleitung 33
4.8 Multiplizieren eines Einheitspreises
N HINWEIS: Diese Funktion gibt es nur bei den Varianten für die USA
und Kanada.
Sie können Waren wiegen, einen Einheitspreis eingeben und dann den
eingegebenen Gesamtpreis entweder mit zwei oder mit vier multiplizieren.
Sie führen dies durch, um den Gesamtpreis von Waren zu multiplizieren, die
in Bruchteilen von Pfundeinheiten, wie ein Viertel Pfund oder ein halbes
Pfund ausgezeichnet sind.
N HINWEIS: Bei Schritt 6 können Sie den Einheitspreis der Ware
manuell eingeben oder Sie können den Einheitspreis entweder mit
einer direkten PLU oder mit einer indirekten PLU wieder aufrufen.
Siehe Abschnitte 4.9 - 4.12 für Informationen zu den PLUs.
Führen Sie die folgenden Schritte durch, um einen eingegebenen
Einheitspreis entweder mit zwei oder mit vier zu multiplizieren:
Abb 4-9. Multiplizieren eines Einheitspreises
GERMAN.book Page 33 Thursday, August 23, 2007 2:41 PM

4. Bedienen der Waage
34 FX 50 Gebrauchsanleitung
4.9 Programmieren direkter PLUs
N HINWEIS: Sie können die Tasten für die direkte PLU
drücken, um die Gewichtseinheiten und die Einheitspreise von
bestimmten Artikeln aufzurufen, nachdem Sie diese Informationen im
Speicher der Waage abgespeichert haben.
Sie können die Gewichtseinheiten (oder die Preisbasis bei den Waage-Varianten
für UK, Europa und RdW) zusammen mit verschiedenen Einheitspreisen
eingeben, abspeichern und den zwölf direkten PLU-Tasten (Price Look-Up =
Preisaufruf) am Tastenfeld zuordnen. Dies ermöglicht Ihnen, einen Einheitspreis,
den Sie bereits im Speicher der Waage auf einer direkten PLU-Taste
abgespeichert haben, aufzurufen und zu verwenden. Dies bedeutet, dass Sie
Waren, die Sie oft verkaufen, schnell wiegen können, ohne die Einheitspreise für
bestimmte Waren jedes Mal eingeben müssen, wenn Sie diese wiegen.
Führen Sie die folgenden Schritte durch, um Gewichtseinheiten (oder die
Preisbasis) zusammen mit einem Preis auf eine direkte PLU-Taste (in diesem
Beispiel die Nummer 8) abzuspeichern:
Abb 4-10. Programmieren direkter PLUs
N HINWEIS: Es gibt zusätzliche 38 indirekte PLUs. Siehe Abschnitte
4.11 und 4.12.
GERMAN.book Page 34 Thursday, August 23, 2007 2:41 PM

Deutsch
4.10 Wiegen mit direkten PLUs
FX 50 Gebrauchsanleitung 35
4.10 Wiegen mit direkten PLUs
Wenn Sie Einheitspreise auf direkten PLU-Tasten programmiert haben,
können Sie Waren schneller wiegen, indem Sie die voreingestellten
Einheitspreise, die Sie programmiert haben, mit den direkten PLU-Tasten wie
aufrufen.
Führen Sie die folgenden Schritte durch, um Ware mit der direkten PLU mit
der Nummer 8 (in diesem Beispiel) zu wiegen.
N HINWEIS: Sie können zwei Methoden verwenden, um Waren mit
direkten PLUs zu wiegen. Sie können die Ware auf die Waage legen
und dann die direkte PLU-Taste drücken oder die direkte PLU-Taste
drücken und dann die Ware auf die Waage legen (siehe Schritte 2 & 3
unten).
Abb 4-11. Wiegen mit direkten PLUs
GERMAN.book Page 35 Thursday, August 23, 2007 2:41 PM

4. Bedienen der Waage
36 FX 50 Gebrauchsanleitung
4.11 Programmieren indirekter PLUs
N HINWEIS: Indirekte PLUs funktionieren genauso wie direkte PLUs
außer, dass Sie zum Aufrufen einer indirekten PLU die Taste
drücken und dann manuell die Nummer der indirekten PLU eingeben.
Sie können die Gewichtseinheiten (oder die Preisbasis bei den Waage-
Varianten für UK, Europa und RdW) zusammen mit verschiedenen
Einheitspreisen eingeben, abspeichern und den 38 indirekten PLU-Tasten
mit den PLU-Nummern 13 bis 50 zuordnen. Dies ermöglicht Ihnen, einen
Einheitspreis, den Sie bereits im Speicher der Waage abgespeichert haben,
aufzurufen und zu verwenden. Dies bedeutet, dass Sie Waren, die Sie oft
verkaufen, schnell wiegen können, ohne die Einheitspreise für bestimmte
Waren jedes Mal eingeben müssen, wenn Sie diese wiegen.
Führen Sie die folgenden Schritte durch, um Gewichtseinheiten (oder die
Preisbasis) zusammen mit einem Preis auf eine indirekte PLU-Taste (in
diesem Beispiel die Nummer 20) abzuspeichern:
Abb 4-12. Programmieren indirekter PLUs
GERMAN.book Page 36 Thursday, August 23, 2007 2:41 PM

Deutsch
4.12 Wiegen mit indirekten PLUs
FX 50 Gebrauchsanleitung 37
4.12 Wiegen mit indirekten PLUs
Wenn Sie Einheitspreise auf indirekten PLU-Tasten programmiert haben,
können Sie Waren schneller wiegen, indem Sie die voreingestellten
Einheitspreise, die Sie auf die indirekten PLUs programmiert haben, aufrufen.
Führen Sie die folgenden Schritte durch, um Ware mit der indirekten PLU mit
der Nummer 20 (in diesem Beispiel) zu wiegen.
Abb 4-13. Wiegen mit indirekten PLUs
GERMAN.book Page 37 Thursday, August 23, 2007 2:41 PM

GERMAN.book Page 38 Thursday, August 23, 2007 2:41 PM

Deutsch
FX 50 Gebrauchsanleitung 39
5. Fehlercodes
Wenn permanente Fehlermeldungen auf der Anzeige der Waage erscheinen:
1. Entfernen Sie die Batterie, um die Waage von der
Spannungsversorgung zu trennen.
2. Setzen Sie die Batterie wieder ein, um die Spannungsversorgung
wiederherzustellen.
Fehler-
Code
Problem Handlung
Err 4 Die anfängliche
Nullstellung oder die
Null-Taste versuchen,
eine Last auf Null zu
stellen, die mehr als 4%
des maximalen
Wiegevermögens der
Waage beträgt.
Entfernen Sie alles Gewicht aus der
Waagschale und schalten Sie dann die
Waage ein. Drücken Sie die Null-Taste, um
die Waage auf Null zu stellen. Wenn dies
nicht funktioniert, muss die Waage
kalibriert oder gewartet werden.
Err 5 Tastenfeldfehler Das Tastenfeld hat einen Kurzschluss und
muss ausgetauscht werden. Setzen Sie
sich bitte mit Ihrem Avery Berkel-
Händler in Verbindung.
Err 6 A/D-Wandlerfehler. Die Waage muss kalibriert oder gewartet
werden. Setzen Sie sich bitte mit Ihrem
Avery Berkel-Händler in Verbindung.
GERMAN.book Page 39 Thursday, August 23, 2007 2:41 PM

GERMAN.book Page 40 Thursday, August 23, 2007 2:41 PM

Italiano
Sommario
FX 50 Manuale d'uso 1
Sommario
1. Avvertenze e precauzioni 5
1.1 Installazione sicura della bilancia . . . . . . . . . . . . . . . . . . . . . . . . . . 5
1.2 Precauzioni da adottare per l'uso sicuro della bilancia . . . . . . . . . . 5
1.3 Pulizia della bilancia . . . . . . . . . . . . . . . . . . . . . . . . . . . . . . . . . . . . 7
2. Componenti principali, tastiera e display 9
2.1 Componenti principali . . . . . . . . . . . . . . . . . . . . . . . . . . . . . . . . . . . 9
2.2 Varianti tastiera . . . . . . . . . . . . . . . . . . . . . . . . . . . . . . . . . . . . . . . 11
3. Installazione della bilancia 17
3.1 Montaggio della variante a torre . . . . . . . . . . . . . . . . . . . . . . . . . . 17
3.2 Livellamento della bilancia . . . . . . . . . . . . . . . . . . . . . . . . . . . . . . . 18
3.3 Ricarica della batteria . . . . . . . . . . . . . . . . . . . . . . . . . . . . . . . . . . 19
3.4 Modifica del modo retroilluminazione display . . . . . . . . . . . . . . . . 19
3.5 Impostazione della modalità di spegnimento automatico . . . . . . . 20
3.6 Sostituzione della batteria . . . . . . . . . . . . . . . . . . . . . . . . . . . . . . . 21
4. Funzionamento della bilancia 23
4.1 Simboli usati . . . . . . . . . . . . . . . . . . . . . . . . . . . . . . . . . . . . . . . . . 23
4.2 Accensione e configurazione della bilancia . . . . . . . . . . . . . . . . . . 25
4.3 Pesatura di singoli articoli . . . . . . . . . . . . . . . . . . . . . . . . . . . . . . . 26
4.4 Pesatura di articoli aventi lo stesso prezzo unitario . . . . . . . . . . . . 27
4.5 Pesatura utilizzando tare conosciute . . . . . . . . . . . . . . . . . . . . . . . 28
4.6 Pesatura utilizzando tare sconosciute . . . . . . . . . . . . . . . . . . . . . . 30
4.7 Uso di tare proporzionali . . . . . . . . . . . . . . . . . . . . . . . . . . . . . . . . 31
4.8 Moltiplicazione di un prezzo unitario . . . . . . . . . . . . . . . . . . . . . . . 33
4.9 Programmazione di PLU diretti . . . . . . . . . . . . . . . . . . . . . . . . . . . 34
4.10 Pesatura utilizzando PLU diretti . . . . . . . . . . . . . . . . . . . . . . . . . . . 35
ITALIAN.book Page 1 Thursday, August 23, 2007 5:43 PM

Sommario
2 FX 50 Manuale d'uso
4.11 Programmazione di PLU indiretti . . . . . . . . . . . . . . . . . . . . . . . . . .36
4.12 Pesatura utilizzando PLU indiretti . . . . . . . . . . . . . . . . . . . . . . . . .37
5. Codici di errore 39
ITALIAN.book Page 2 Thursday, August 23, 2007 5:43 PM

Italiano
FX 50 Manuale d'uso 3
Grazie per aver scelto questo prodotto Avery Berkel.
Leggere le presenti istruzioni di sicurezza e d'uso prima di utilizzare questo
prodotto.
Leggere tutti i paragrafi di questo documenti che hanno simboli e avvisi di
pericolo, avvertimento e attenzione.
W AVVERTENZA! Questo è un simbolo di avvertimento. Le
avvertenze indicano che la mancata osservanza di prassi e
procedure specifiche può avere gravi conseguenze, quali lesioni
a persone o grave danneggiamento di dati o perdita di dati.
D PERICOLO! Questo è un simbolo di pericolo. Il simbolo Pericolo
indica che la mancata osservanza di specifiche prassi o
procedure può comportare scariche elettriche che potrebbero
causare lesioni a persone oppure decesso.
C ATTENZIONE! Questo è un simbolo di attenzione. Le precauzioni
forniscono informazioni su procedure che, se non osservate,
potrebbero determinare danni all'apparecchiatura o danneggiamento e
perdita di dati.
N NOTA: Questo è il simbolo di Nota. Le note forniscono ulteriori
informazioni, suggerimenti e consigli importanti che semplificano l'uso
del prodotto.
ITALIAN.book Page 3 Thursday, August 23, 2007 5:43 PM

ITALIAN.book Page 4 Thursday, August 23, 2007 5:43 PM

Italiano
1.1 Installazione sicura della bilancia
FX 50 Manuale d'uso 5
1. Avvertenze e precauzioni
1.1 Installazione sicura della bilancia
W ATTENZIONE: Installare l'apparecchiatura da collegare vicino a
una presa facilmente accessibile. L'alimentazione elettrica alla
presa di corrente deve fornire una protezione da sovracorrente di
una potenza appropriata.
W ATTENZIONE: In caso di dubbi, rivolgersi ad un elettricista
qualificato.
1.2 Precauzioni da adottare per l'uso sicuro
della bilancia
Fig 1-1. Sollevare la bilancia in modo corretto
ITALIAN.book Page 5 Thursday, August 23, 2007 5:43 PM

1. Avvertenze e precauzioni
6 FX 50 Manuale d'uso
Fig 1-2. Precauzioni da adottare per usare la bilancia
ITALIAN.book Page 6 Thursday, August 23, 2007 5:43 PM

Italiano
1.3 Pulizia della bilancia
FX 50 Manuale d'uso 7
1.3 Pulizia della bilancia
C ATTENZIONE: Non usare sostanze abrasive aggressive, solventi,
sgrassanti e soluzioni detergenti alcaline, quali cristalli di soda, per
pulire l'esterno della bilancia.
Fig 1-3. Pulizia della bilancia
Per pulire l'esterno della bilancia, strofilarna con un panno inumidito con
acqua e una piccola quantità di detersivo neutro o liquido di lavaggio inodore.
ITALIAN.book Page 7 Thursday, August 23, 2007 5:43 PM

ITALIAN.book Page 8 Thursday, August 23, 2007 5:43 PM

Italiano
2.1 Componenti principali
FX 50 Manuale d'uso 9
2. Componenti principali, tastiera e
display
2.1 Componenti principali
Fig 2-1. Componenti principali delle varianti FX 50 monoblocco e a torre
ITALIAN.book Page 9 Thursday, August 23, 2007 5:43 PM

2. Componenti principali, tastiera e display
10 FX 50 Manuale d'uso
Particolare Componente Particolare Componente
1 Variante monoblocco 8 Alimentatore CA
2 Variante a torre 9 Pulsante On/Off
(Accensione/
Spegnimento)
3 Piatto di pesatura in
acciaio inossidabile
10 Presa alimentatore CA
4 Tastiera 11 Batteria ricaricabile
5 Display operatore 12 Piedini di livellamento
6 Display cliente 13 Bolla di livellamento
7 Assieme torre 14 Dado di sicurezza per
piedini di livellamento
ITALIAN.book Page 10 Thursday, August 23, 2007 5:43 PM

Italiano
2.2 Varianti tastiera
FX 50 Manuale d'uso 11
2.2 Varianti tastiera
Fig 2-2. Tastiera per gli Stati Uniti e il Canada (sopra) e
tastiera per l'Europa e il resto del mondo (RoW) (sotto)
ITALIAN.book Page 11 Thursday, August 23, 2007 5:43 PM

2. Componenti principali, tastiera e display
12 FX 50 Manuale d'uso
N. Tasto Nome tasto Premere questo tasto per ...
1 Tasti numerici Immettere singoli prezzi unitari, prezzi
unitari per PLU diretti e PLU indiretti,
tare conosciute e tare proporzionali.
2 Tasto Unità di
peso (a richiesta
USA e Canada)
Alternare tra l'unità di peso chilogrammi
e libbre. Nel display sopra le unità
selezionate, appare la freccia T.
3 Tasto di selezione
del prezzo
campione
(a richiesta per
Regno Unito,
Europa e resto del
mondo)
Alternare tra prezzo al chilo e prezzo
campione di 100 grammi. Nel display
sopra il prezzo campione selezionato,
appare la freccia T.
4 Tasto fisso (per
Regno Unito,
Europa e resto del
mondo) oppure
tasto Salva (per
Stati Uniti e
Canada). Anche
tasto di
navigazione nei
menu (X).
Fissare o salvare un peso o prezzo
immesso finché non lo si annulla.
Premere questo tasto (X) anche per
scorrere le opzioni di menu.
5 Tasto tara. Anche
tasto di selezione
opzione di menu
(X).
Immettere e cancellare i pesi di tara,
quali quelli di contenitori e involucri. La
bilancia sottrae il peso di tara quando gli
articoli sono imballati per la pesatura.
Premere questo tasto anche (S) per
selezionare un'opzione del menu.
6 Tasto di
azzeramento
Azzerare manualmente la bilancia e
riportare a zero il valore del prezzo
unitario e del peso totale.
ITALIAN.book Page 12 Thursday, August 23, 2007 5:43 PM

Italiano
2.2 Varianti tastiera
FX 50 Manuale d'uso 13
7 Tasto di
cancellazione
Cancellare le voci errate e le condizioni
di errore.
8 Tasto di
moltiplicazione
per 2 (solo per gli
Stati Uniti e il
Canada)
Moltiplicare il prezzo totale per due.
9 Tasto di
moltiplicazione
per 4 (solo per gli
Stati Uniti e il
Canada)
Moltiplicare il prezzo totale per quattro.
10 Tasto PLU
indiretto
Richiamare e impostare i prezzi per
max. 38 tasti di ricerca prezzi (PLU)
indiretti.
11 Tasti PLU diretti Richiamare e impostare i prezzi per
max. 12 tasti di ricerca prezzo (PLU)
indiretto.
N. Tasto Nome tasto Premere questo tasto per ...
ITALIAN.book Page 13 Thursday, August 23, 2007 5:43 PM

2. Componenti principali, tastiera e display
14 FX 50 Manuale d'uso
Fig 2-3. Display per Stati Uniti e Canada
Fig 2-4. Display per Regno Unito
Fig 2-5. Display per Europa e resto del mondo (RoW)
ITALIAN.book Page 14 Thursday, August 23, 2007 5:43 PM

Italiano
2.2 Varianti tastiera
FX 50 Manuale d'uso 15
Parti-
colare
Nome e simbolo Scopo
1 Display peso Mostra il peso lordo o netto dell'articolo.
2 Display prezzo
unitario
Mostra il prezzo unitario dell'articolo.
3 Display prezzo
totale
Mostra il prezzo totale dell'articolo.
4
Indicatore batteria
in carica
Una spia rossa indica che la batteria è in carica.
Una spia verde indica che la batteria è carica.
5
Indicatore batteria
scarica
Appare una spia ad indicare che la batteria è
scarica e che occorre ricaricarla immediatamente.
6
Indicatore Fissa o
Salva
La freccia Tindica che è stato premuto il tasto
prima di qualsiasi operazione per
interrompere la cancellazione automatica del
display del peso e del display del prezzo unitario.
7 Indicatore unità di
peso
La freccia Tmostra che le unità di peso
selezionate sono chilogrammi o libbre (variante
disponibile solo per Stati Uniti e Canada).
8 Indicatore di
selezione basata
sul prezzo
La freccia Tmostra che il prezzo campione
selezionato è il prezzo per 100 grammi o il prezzo
per chilogrammo (variante disponibile solo per i
modelli per Regno Unito/Europa/resto del mondo).
NOTA: per la variante australiana il prezzo è solo
quello per chilogrammo.
9
Indicatore
azzeramento
La freccia Tmostra che la bilancia è sullo zero
lordo (non c'è alcun peso di tara). Le frecce sopra
NETTO e -0- mostrano che la bilancia è sullo zero
netto (comprende un peso di tara).
10
Indicatore di
stabilità
La freccia Tmostra che il peso dell'articolo è
stabile.
F /
-0-
ITALIAN.book Page 15 Thursday, August 23, 2007 5:43 PM

11
Indicatore peso
netto
La freccia Tmostra che è impostato un peso di
tara e il peso visualizzato è un peso netto (il peso
visualizzato esclude il peso di tara).
Parti-
colare
Nome e simbolo Scopo
NETT
ITALIAN.book Page 16 Thursday, August 23, 2007 5:43 PM

Italiano
3.1 Montaggio della variante a torre
FX 50 Manuale d'uso 17
3. Installazione della bilancia
3.1 Montaggio della variante a torre
Fig 3-1. Montaggio e installazione della variante a torre
ITALIAN.book Page 17 Thursday, August 23, 2007 5:43 PM

3. Installazione della bilancia
18 FX 50 Manuale d'uso
3.2 Livellamento della bilancia
Fig 3-2. Livellamento della bilancia
ITALIAN.book Page 18 Thursday, August 23, 2007 5:43 PM

Italiano
3.3 Ricarica della batteria
FX 50 Manuale d'uso 19
3.3 Ricarica della batteria
È possibile alimentare e far funzionare la bilancia utilizzando:
• l'alimentazione di rete erogata dall'alimentatore CA (con la batteria
ricaricabile installata); oppure
• una batteria ricaricabile posta all'interno della bilancia.
Quando si collega la bilancia all'alimentazione di rete utilizzando
l'alimentatore CA, l'indicatore di ricarica della batteria si illumina ad indicare
che l'alimentazione è collegata e la batteria si sta ricaricando.
• Indicatore rosso di ricarica batteria = la batteria deve essere
ricaricata.
• Indicatore verde di ricarica batteria = la batteria è carica.
Occorre caricare completamente la batteria la prima volta che si utilizza la
bilancia.
Se non si usa la bilancia per un periodo prolungato, occorre caricare la
batteria ogni tre-sei mesi per mantenerla funzionante.
3.4 Modifica del modo retroilluminazione display
È possibile impostare la retroilluminazione per i display operatore e cliente
cosicché funzionino in uno di questi tre modi differenti:
• ON = sempre attivata.
• OFF = sempre disattivata.
• AUTO = la retroilluminazione viene attivata quando si inizia ad usare
la bilancia.
Per cambiare il modo retroilluminazione del display, eseguire la procedura
descritta di eseguito.
1. Premere l'interruttore On per accendere la bilancia. La
bilancia emette il primo bip.
2. Tenere premuto il tasto e rilasciarlo quando si sente un secondo
bip e il display si accende.
3. Premere il tasto per scorrere le tre modalità di
retroilluminazione (ON, OFF e AUTO) utilizzate dalla bilancia per la
visualizzazione del prezzo totale.
ITALIAN.book Page 19 Thursday, August 23, 2007 5:43 PM

3. Installazione della bilancia
20 FX 50 Manuale d'uso
N NOTA: Per annullare la modalità di retroilluminazione e ritornare alla
pesatura, premere il tasto .
4. Premere il tasto per salvare la modalità di retroilluminazione
selezionata e ritornare alla pesatura.
N NOTA: Se la retroilluminazione è sempre accesa oppure impostata su
AUTO, si riduce la durata della batteria tra una ricarica e l'altra.
3.5 Impostazione della modalità di spegnimento
automatico
È possibile cambiare la modalità di spegnimento automatico in modo che la
bilancia resti sempre accesa o si spenga automaticamente dopo un tempo
predefinito di inattività (1, 5 o 30 minuti).
Per impostare la modalità di spegnimento automatico, eseguire la procedura
descritta di seguito.
1. Premere l'interruttore On per accendere la bilancia.
2. Mentre la bilancia sta eseguendo l'autoverifica (quando tutti i numeri
sui tre display della bilancia eseguono il conteggio da zero a nove),
premere il tasto . Sul display del prezzo totale appare l'attuale
modo di spegnimento.
3. Premere il tasto per scorrere i seguenti modi di spegnimento
automatico:
• 0 = la bilancia resta accesa (dato che il modo di spegnimento
automatico è disabilitato).
• 1 = la bilancia si spegne dopo 1 minuto di inattività.
• 5 = la bilancia si spegne dopo 5 minuti di inattività.
• 30 = la bilancia si spegne dopo 30 minuti di inattività.
4. Premere il tasto per salvare la modalità di spegnimento
automatico selezionato e ritornare alla pesatura.
ITALIAN.book Page 20 Thursday, August 23, 2007 5:43 PM

Italiano
3.6 Sostituzione della batteria
FX 50 Manuale d'uso 21
3.6 Sostituzione della batteria
Fig 3-3. Sostituzione della batteria
ITALIAN.book Page 21 Thursday, August 23, 2007 5:43 PM

3. Installazione della bilancia
22 FX 50 Manuale d'uso
Fig 3-4. Sostituzione della batteria (continua)
ITALIAN.book Page 22 Thursday, August 23, 2007 5:43 PM

Italiano
4.1 Simboli usati
FX 50 Manuale d'uso 23
4. Funzionamento della bilancia
4.1 Simboli usati
Simbolo Intervento
Premere l'interruttore On/Off sotto la bilancia per
accendere o spegnere la bilancia.
Premere il tasto di selezione del prezzo campione per
selezionare il prezzo campione per l'articolo che si intende
pesare.
NOTA: Questo tasto è valido solo per i modelli per Regno
Unito, Europa e Resto del mondo (RoW).
NOTA: Per il modello per l'Australia il tasto è solo per i Kg.
Premere il tasto Unità di peso per selezionare le unità
di peso per l'articolo che si intende pesare.
NOTA: Questo tasto è valido solo per la variante per
gli Stati Uniti e il Canada.
Mettere un articolo senza contenitore o involucro sul
piatto di pesatura Ð. Rimuovere l'articolo Ï.
Mettere un contenitore o involucro vuoto (o un altro
tipo di peso a vuoto) sul piatto di pesatura Ð.
Rimuovere il contenitore Ï.
Mettere l'articolo in un contenitore o involucro (o un
altro tipo di peso a vuoto) sul piatto di pesatura Ð.
Rimuovere l'articolo e il contenitore Ï.
Mettere gli articoli con lo stesso prezzo unitario sul
piatto di pesatura Ð, come ad esempio un mix di
dolcetti. Rimuovere gli articoli Ï.
ITALIAN.book Page 23 Thursday, August 23, 2007 5:43 PM

4. Funzionamento della bilancia
24 FX 50 Manuale d'uso
Non mettere altri articoli sul piatto di pesatura.
In base al modo operativo della bilancia, premere i
numeri della tastiera per immettere il prezzo unitario di
un articolo oppure premere i numeri della tastiera per
digitare i prezzi unitari per PLU diretti e indiretti, pesi di
tara conosciuti e tare proporzionali.
Se necessario, senza alcun articolo sul piatto di
pesatura, premere il tasto Zero per azzerare la
bilancia.
Cancellare il prezzo unitario immesso.
Moltiplica per due o quattro il prezzo netto totale
dell'articolo pesato dalla bilancia.
NOTA: questi tasti sono validi solo per la variante per
gli Stati Uniti e il Canada.
Selezionare un tasto PLU diretto.
Selezionare un tasto PLU indiretto.
Ripetere i passi numerati mostrati.
Simbolo Intervento
2-6
ITALIAN.book Page 24 Thursday, August 23, 2007 5:43 PM

Italiano
4.2 Accensione e configurazione della bilancia
FX 50 Manuale d'uso 25
4.2 Accensione e configurazione della bilancia
Per accendere e configurare la bilancia in modo che sia pronta per l'uso,
eseguire le procedure descritte di seguito.
Fig 4-1. Accensione e configurazione della bilancia
ITALIAN.book Page 25 Thursday, August 23, 2007 5:43 PM

4. Funzionamento della bilancia
26 FX 50 Manuale d'uso
4.3 Pesatura di singoli articoli
Eseguire i passi riportati di seguito per pesare articoli con pesi differenti e
prezzi unitari diversi.
Fig 4-2. Pesatura di articoli singoli
ITALIAN.book Page 26 Thursday, August 23, 2007 5:43 PM

Italiano
4.4 Pesatura di articoli aventi lo stesso prezzo unitario
FX 50 Manuale d'uso 27
4.4 Pesatura di articoli aventi lo stesso prezzo
unitario
È possibile pesare lo stesso tipo di articoli o articoli differenti con lo stesso
prezzo unitario senza dover immettere il prezzo unitario nella bilancia. A tal
fine, immettere e salvare il prezzo unitario nella bilancia finché non si decide
di cambiare o annullare il prezzo.
Per pesare articoli aventi lo stesso prezzo unitario, eseguire la procedura
descritta di seguito.
Fig 4-3. Pesatura di articoli aventi lo stesso prezzo unitario
00086_A
ITALIAN.book Page 27 Thursday, August 23, 2007 5:43 PM

4. Funzionamento della bilancia
28 FX 50 Manuale d'uso
N NOTA: È possibile cambiare il prezzo unitario salvato dalla bilancia. A
tal fine, ridigitare il prezzo e la bilancia salverà il nuovo prezzo unitario
finché non si preme il tasto per annullarlo.
4.5 Pesatura utilizzando tare conosciute
N NOTA: Questa funzione è valida solo per la variante per gli Stati Uniti
e il Canada.
Se si conosce il peso di un articolo quale un contenitore o involucro per
alimenti utilizzato per contenere o imballare gli articoli sulla bilancia e si
desidera usare tale peso come peso di tara, è possibile immettere
manualmente il peso di tara nella bilancia. La bilancia sottrae il peso di tara
dell'articolo dal peso lordo totale e visualizza solo il peso netto e il prezzo
totale dell'articolo.
N NOTA: Quando si inserisce un peso di tara, la bilancia visualizza un
meno (-) nel display del peso a rappresentare il peso di tara.
N NOTA: Nel passo 6 è possibile immettere manualmente il prezzo
unitario dell'articolo oppure è possibile richiamare il prezzo unitario
usando un PLU diretto o un PLU indiretto. Per ulteriori informazioni sui
PLU, vedere i paragrafi 4.9 - 4.12.
Per immettere un peso di tara conosciuto e poi pesare un articolo che ha lo
stesso peso di tara, eseguire la procedura descritta di seguito.
Fig 4-4. Pesatura utilizzando tare conosciute
ITALIAN.book Page 28 Thursday, August 23, 2007 5:43 PM

Italiano
4.5 Pesatura utilizzando tare conosciute
FX 50 Manuale d'uso 29
Fig 4-5. Pesatura utilizzando tare conosciute (continua)
ITALIAN.book Page 29 Thursday, August 23, 2007 5:43 PM

4. Funzionamento della bilancia
30 FX 50 Manuale d'uso
4.6 Pesatura utilizzando tare sconosciute
È possibile pesare articoli quali contenitori e involucri per alimenti utilizzati per
contenere o imballare gli articoli sulla bilancia e salvare il peso di tara prima
di pesare gli articoli. Eseguire questa operazione cosicché, quando si
mettono gli articoli sulla bilancia in un contenitore, la bilancia sottrae il peso
di tara dal peso lordo totale e visualizza solo il peso netto e il prezzo totale
degli articoli.
N NOTA: Nel passo 6 è possibile immettere manualmente il prezzo
unitario dell'articolo oppure è possibile richiamare il prezzo unitario
usando un PLU diretto o un PLU indiretto. Per ulteriori informazioni sui
PLU, vedere i paragrafi 4.9 - 4.12.
Per pesare e salvare un peso di tara sconosciuto, eseguire la procedura
descritta di seguito.
Fig 4-6. Pesatura utilizzando tare sconosciute
ITALIAN.book Page 30 Thursday, August 23, 2007 5:43 PM

Italiano
4.7 Uso di tare proporzionali
FX 50 Manuale d'uso 31
Fig 4-7. Pesatura utilizzando tare sconosciute (continua)
4.7 Uso di tare proporzionali
N NOTA: Questa funzione è valida solo per la variante per gli Stati Uniti
e il Canada.
È possibile immettere il peso di tara di articoli, quali i contenitori, come una
percentuale proporzionale del peso lordo totale dell'articolo e della tara. Ad
esempio, è possibile immettere una tara proporzionale del 25% se il peso
lordo degli articoli da pesare comprende un peso di tara che è il 25% del peso
lordo dell'imballo dell'articolo.
N NOTA: Nel passo 6 è possibile immettere manualmente il prezzo
unitario dell'articolo oppure è possibile richiamare il prezzo unitario
usando un PLU diretto o un PLU indiretto. Per ulteriori informazioni sui
PLU, vedere i paragrafi 4.9 - 4.12.
ITALIAN.book Page 31 Thursday, August 23, 2007 5:43 PM

4. Funzionamento della bilancia
32 FX 50 Manuale d'uso
Per immettere un peso di tara proporzionale, a titolo d'esempio, del 25%,
eseguire la procedura descritta di seguito.
Fig 4-8. Uso di tare proporzionali
ITALIAN.book Page 32 Thursday, August 23, 2007 5:43 PM

Italiano
4.8 Moltiplicazione di un prezzo unitario
FX 50 Manuale d'uso 33
4.8 Moltiplicazione di un prezzo unitario
N NOTA: Questa funzione è valida solo per la variante per gli Stati Uniti
e il Canada.
È possibile pesare articoli, immettere un prezzo unitario e quindi moltiplicare
per due o quattro il prezzo totale immesso. Questa operazione è eseguibile
per moltiplicare il prezzo totale degli articoli prezzati per valori divisori di unità
espresse in kg, quali un quarto di chilo o mezzo chilo.
N NOTA: Nel passo 6 è possibile immettere manualmente il prezzo
unitario dell'articolo oppure è possibile richiamare il prezzo unitario
usando un PLU diretto o un PLU indiretto. Per ulteriori informazioni sui
PLU, vedere i paragrafi 4.9 - 4.12.
Per moltiplicare un prezzo unitario immesso per un multiplo di due o quattro,
eseguire quanto descritto di seguito.
Fig 4-9. Moltiplicazione di un prezzo unitario
ITALIAN.book Page 33 Thursday, August 23, 2007 5:43 PM

4. Funzionamento della bilancia
34 FX 50 Manuale d'uso
4.9 Programmazione di PLU diretti
N NOTA: È possibile premere i tasti PLU diretti per
richiamare le unità di peso e i prezzi di determinati articoli dopo aver
salvato queste informazioni nella memoria della bilancia.
È possibile immettere e memorizzare le unità di peso (o il prezzo campione
per le varianti per Regno Unito, Europa e resto del mondo) insieme a
differenti prezzi unitari per dodici tasti PLU diretti sulla tastiera. Ciò consente
di richiamare e usare un prezzo unitario che è già memorizzato nella memoria
della bilancia con un tasto PLU diretto. In tal modo, è possibile pesare
rapidamente articoli maggiormente venduti senza dover immettere i prezzi
unitari per tali articoli ogni volta che li si pesa.
Per memorizzare le unità di peso (o il prezzo campione) insieme ad un
prezzo, ad esempio, per il PLU diretto numero 8, eseguire la procedura
descritta di seguito.
Fig 4-10. Programmazione di PLU diretti
N NOTA: Sono disponibili altri 38 PLU indiretti. Vedere i paragrafi 4.11 e
4.12.
ITALIAN.book Page 34 Thursday, August 23, 2007 5:43 PM

Italiano
4.10 Pesatura utilizzando PLU diretti
FX 50 Manuale d'uso 35
4.10 Pesatura utilizzando PLU diretti
Quando si programmano i prezzi unitari per i tasti PLU diretti, è possibile
pesare articoli più rapidamente richiamando i prezzi unitari predefiniti che
sono stati programmati usando i tasti PLU diretti, come ad esempio .
Per pesare un articolo usando, ad esempio, il PLU diretto numero 8, eseguire
la procedura descritta di seguito.
N NOTA: È possibile usare due metodi per pesare articoli usando PLU
diretti. È possibile mettere l'articolo sulla bilancia e quindi premere il
tasto PLU diretto oppure premere il tasto PLU diretto e quindi mettere
l'articolo sulla bilancia (vedere i passi 2 e 3 sotto).
Fig 4-11. Pesatura utilizzando PLU diretti
ITALIAN.book Page 35 Thursday, August 23, 2007 5:43 PM

4. Funzionamento della bilancia
36 FX 50 Manuale d'uso
4.11 Programmazione di PLU indiretti
N NOTA: I PLU indiretti funzionano nello stesso modo dei tasti PLU
diretti, fatta eccezione che per richiamare un PLU indiretto, si preme il
tasto e quindi si immette manualmente il numero PLU indiretto.
È possibile immettere e memorizzare le unità di peso (o il prezzo campione
per le varianti per Regno Unito, Europa e resto del mondo) insieme a
differenti prezzi unitari per 38 tasti PLU indiretti a cui sono stati assegnati
numeri PLU che vanno da 13 a 50. Ciò consente di richiamare e usare un
prezzo unitario che è già memorizzato nella memoria della bilancia. In tal
modo, è possibile pesare rapidamente articoli maggiormente venduti senza
dover immettere i prezzi unitari per tali articoli ogni volta che li si pesa.
Per memorizzare le unità di peso (o il prezzo campione) insieme ad un
prezzo, ad esempio, per il PLU indiretto numero 20, eseguire la procedura
descritta di seguito.
Fig 4-12. Programmazione di PLU indiretti
ITALIAN.book Page 36 Thursday, August 23, 2007 5:43 PM

Italiano
4.12 Pesatura utilizzando PLU indiretti
FX 50 Manuale d'uso 37
4.12 Pesatura utilizzando PLU indiretti
Quando si programmano prezzi per i tasti PLU indiretti, è possibile pesare
articoli più rapidamente richiamando il prezzo predefinito programmato per
un PLU indiretto.
Per pesare un articolo usando, ad esempio, il PLU indiretto numero 20,
eseguire la procedura descritta di seguito.
Fig 4-13. Pesatura utilizzando PLU indiretti
ITALIAN.book Page 37 Thursday, August 23, 2007 5:43 PM

ITALIAN.book Page 38 Thursday, August 23, 2007 5:43 PM

Italiano
FX 50 Manuale d'uso 39
5. Codici di errore
Se sul display della bilancia, appaiano messaggi di errore persistenti,
eseguire quanto descritto di seguito.
1. Rimuovere la batteria per scollegare la bilancia dall'alimentazione.
2. Rimettere la batteria per ricollegare l'alimentazione.
Codice
di
errore
Problema Intervento
Err 4 L'azzeramento iniziale o
il tasto di azzeramento
sta cercando di azzerare
il carico che è superiore
al 4% della capacità
massima della bilancia.
Rimuovere ogni peso dal piatto di
pesatura, quindi accendere la bilancia.
Premere il tasto di azzeramento per
azzerare la bilancia. Se questo intervento
non risolve il problema, la bilancia deve
essere ricalibrata o sottoposta a
manutenzione.
Err 5 Errore tastiera. La tastiera è in cortocircuito e deve essere
sostituita. Contattare il rivenditore Avery
Berkel.
Err 6 Errore convertitore A/D. La bilancia deve essere ricalibrata o
sottoposta a manutenzione. Contattare il
rivenditore Avery Berkel.
ITALIAN.book Page 39 Thursday, August 23, 2007 5:43 PM

ITALIAN.book Page 40 Thursday, August 23, 2007 5:43 PM

Inhoud
FX 50 Gebruiksinstructies 1
Nederlands
Inhoud
1. Waarschuwingen en aandachtspunten 5
1.1 De schaal veilig installeren . . . . . . . . . . . . . . . . . . . . . . . . . . . . . . . 5
1.2 Instructies voor het veilig gebruiken van de schaal . . . . . . . . . . . . . 5
1.3 Reinigen van de schaal . . . . . . . . . . . . . . . . . . . . . . . . . . . . . . . . . . 7
2. Belangrijkste onderdelen, toetsenbord en
display 9
2.1 Belangrijkste onderdelen . . . . . . . . . . . . . . . . . . . . . . . . . . . . . . . . . 9
2.2 Toetsenbordversies . . . . . . . . . . . . . . . . . . . . . . . . . . . . . . . . . . . . 11
3. De schaal installeren 17
3.1 Tower-versie monteren . . . . . . . . . . . . . . . . . . . . . . . . . . . . . . . . . 17
3.2 Waterpas zetten van de schaal . . . . . . . . . . . . . . . . . . . . . . . . . . . 18
3.3 Batterij laden . . . . . . . . . . . . . . . . . . . . . . . . . . . . . . . . . . . . . . . . . 19
3.4 Achtergrondverlichting van de display wijzigen . . . . . . . . . . . . . . . 19
3.5 Automatische uitschakelfunctie instellen . . . . . . . . . . . . . . . . . . . . 20
3.6 Batterij vervangen . . . . . . . . . . . . . . . . . . . . . . . . . . . . . . . . . . . . . 21
4. De schaal bedienen 23
4.1 Legende bij de gebruikte symbolen . . . . . . . . . . . . . . . . . . . . . . . . 23
4.2 De schaal aanzetten en instellen . . . . . . . . . . . . . . . . . . . . . . . . . . 25
4.3 Individuele producten wegen . . . . . . . . . . . . . . . . . . . . . . . . . . . . . 26
4.4 Producten met dezelfde eenheidsprijs wegen . . . . . . . . . . . . . . . . 27
4.5 Producten met gekende tarra wegen . . . . . . . . . . . . . . . . . . . . . . . 28
4.6 Producten met onbekende tarra wegen . . . . . . . . . . . . . . . . . . . . . 30
4.7 Gebruik van proportionele tarra . . . . . . . . . . . . . . . . . . . . . . . . . . . 31
4.8 Een eenheidsprijs vermenigvuldigen . . . . . . . . . . . . . . . . . . . . . . . 33
DUTCH.book Page 1 Thursday, August 23, 2007 5:52 PM

Inhoud
2 FX 50 Gebruiksinstructies
4.9 Directe PLUs programmeren . . . . . . . . . . . . . . . . . . . . . . . . . . . . .34
4.10 Wegen met directe PLUs . . . . . . . . . . . . . . . . . . . . . . . . . . . . . . . .35
4.11 Indirecte PLUs programmeren . . . . . . . . . . . . . . . . . . . . . . . . . . . .36
4.12 Wegen met indirecte PLUs . . . . . . . . . . . . . . . . . . . . . . . . . . . . . .37
5. Foutcodes 39
DUTCH.book Page 2 Thursday, August 23, 2007 5:52 PM

Nederlands
FX 50 Gebruiksinstructies 3
Gefeliciteerd met uw Avery Berkel product.
Lees deze veiligheids- en gebruiksinstructies voordat u met het product
werkt.
Lees alle hoofdstukken in dit document die gevaar-, waarschuwings- en
attentiesymbolen of -instructies bevatten.
W WAARSCHUWING! Dit is een waarschuwingssymbool.
Waarschuwingen betekenen dat het niet naleven van bepaalde
instructies en procedures ernstige gevolgen kan hebben, zoals
ernstig letsel en verlies of aantasting van gegevens.
D GEVAAR! Dit is een gevaarsymbool. Gevaar betekent dat het niet
naleven van bepaalde instructies of procedures kan leiden tot
elektrische schokken en letsel of zelfs de dood kunnen
veroorzaken.
C LET OP! Dit is een attentiesymbool. Deze waarschuwingen betekenen
dat wanneer bepaalde procedures niet worden gevolgd, de apparatuur
schade kan oplopen en gegevens verloren kunnen gaan of onleesbaar
kunnen worden.
N OPMERKING: Dit is een opmerkingsymbool. Opmerkingen geven
bijkomende en belangrijke informatie, hints en tips die u helpen bij het
gebruik van het product.
DUTCH.book Page 3 Thursday, August 23, 2007 5:52 PM

DUTCH.book Page 4 Thursday, August 23, 2007 5:52 PM

Nederlands
1.1 De schaal veilig installeren
FX 50 Gebruiksinstructies 5
1. Waarschuwingen en
aandachtspunten
1.1 De schaal veilig installeren
W WAARSCHUWING: Als de apparatuur van een stekker voorzien is,
dan moet deze apparatuur in de buurt van een goed toegankelijke
schakelaar in de stroomkring opgenomen worden. De elektrische
leiding naar het stopcontact moet een overstroombescherming
van een geschikte toelaatbare belasting bieden.
W WAARSCHUWING: Vraag bij twijfel het advies van een opgeleide
elektricien.
1.2 Instructies voor het veilig gebruiken van de
schaal
Fig 1-1. De schaal correct oppakken
DUTCH.book Page 5 Thursday, August 23, 2007 5:52 PM

1. Waarschuwingen en aandachtspunten
6 FX 50 Gebruiksinstructies
Fig 1-2. Instructies voor het gebruik van de schaal
DUTCH.book Page 6 Thursday, August 23, 2007 5:52 PM

Nederlands
1.3 Reinigen van de schaal
FX 50 Gebruiksinstructies 7
1.3 Reinigen van de schaal
C LET OP: Gebruik geen harde schuurmiddelen, oplosmiddelen en
alkalische reinigers, zoals schoonmaaksoda, om de buitenkant van de
schaal te reinigen.
Fig 1-3. Reinigen van de schaal
De buitenkant van de schaal kan met een schone vochtige doek met geurloos
afwasmiddel worden afgenomen.
DUTCH.book Page 7 Thursday, August 23, 2007 5:52 PM

DUTCH.book Page 8 Thursday, August 23, 2007 5:52 PM

Nederlands
2.1 Belangrijkste onderdelen
FX 50 Gebruiksinstructies 9
2. Belangrijkste onderdelen,
toetsenbord en display
2.1 Belangrijkste onderdelen
Fig 2-1. Belangrijkste onderdelen van de FX 50 "monoblock" en "tower" versies
DUTCH.book Page 9 Thursday, August 23, 2007 5:52 PM

2. Belangrijkste onderdelen, toetsenbord en display
10 FX 50 Gebruiksinstructies
Item Onderdeel Item Onderdeel
1 Monoblock 8 Stroomadapter
2 Tower 9 Aan/uit-schakelaar
3 Roestvrijstalen weegkom 10 Aansluiting stroomadapter
4 Toetsenbord 11 Herlaadbare batterij
5 Bedieningsdisplay 12 Verstelbare pootjes
6 Klantendisplay 13 Waterpas
7 Tower 14 Borgmoer voor verstelbare
pootjes
DUTCH.book Page 10 Thursday, August 23, 2007 5:52 PM

Nederlands
2.2 Toetsenbordversies
FX 50 Gebruiksinstructies 11
2.2 Toetsenbordversies
Fig 2-2. USA & Canada (boven) en
Europa & Rest of the World (RoW - rest van de wereld) (onder)
DUTCH.book Page 11 Thursday, August 23, 2007 5:52 PM

2. Belangrijkste onderdelen, toetsenbord en display
12 FX 50 Gebruiksinstructies
Nr. Toets Toetsnaam Functie
1 Cijfertoetsen Invoeren van individuele prijzen,
eenheidsprijzen voor directe PLU's en
indirecte PLU's, gekende tarra en
proportionele tarra.
2 Toets
gewichtseenheden
(USA & Canada
optie)
Wisselen tussen kilogram en pond als
gewichtseenheid. Een pijl T wordt
weergegeven boven de geselecteerde
eenheid.
3 Selectietoets
prijsbasis
(UK, Europa &
RoW optie)
Wisselen tussen prijs per kilogram en
prijs per 100 g als prijsbasis. Een pijl T
wordt weergegeven boven de
geselecteerde prijsbasis.
4Fix (UK, Europa &
RoW) of Save
(USA & Canada).
Ook
menunavigatie
(X).
Ingevoerd gewicht of ingevoerde prijs
bevestigen of opslaan tot deze wordt
geannuleerd. Met deze toets (X) bladert
u ook door de menuopties.
5 Tarra Ook
menuoptie
selecteren (S).
Tarra van bijv. schaaltje of verpakking
invoeren en wissen. De schaal trekt de
tarra af wanneer verpakte goederen
worden gewogen. Met deze toets (S)
selecteert u ook door een menuoptie.
6 Nultoets De schaal handmatig resetten en de
eenheidsprijs en het totale gewicht op
nul zetten.
7 Wistoets Incorrecte gegevens en storingen
wissen.
8 Maal 2 (USA &
Canada optie)
De totale prijs vermenigvuldigen met 2.
DUTCH.book Page 12 Thursday, August 23, 2007 5:52 PM

Nederlands
2.2 Toetsenbordversies
FX 50 Gebruiksinstructies 13
9 Maal 4 (USA &
Canada optie)
De totale prijs vermenigvuldigen met 4.
10 Indirecte PLU Prijzen oproepen en instellen met
maximaal 38 indirecte PLU-toetsen.
11 Directe PLU Prijzen oproepen en instellen met
maximaal 12 directe PLU-toetsen.
Nr. Toets Toetsnaam Functie
DUTCH.book Page 13 Thursday, August 23, 2007 5:52 PM

2. Belangrijkste onderdelen, toetsenbord en display
14 FX 50 Gebruiksinstructies
Fig 2-3. USA & Canada display
Fig 2-4. UK display
Fig 2-5. Europa & Rest of the World (RoW - rest van de wereld) display
DUTCH.book Page 14 Thursday, August 23, 2007 5:52 PM

Nederlands
2.2 Toetsenbordversies
FX 50 Gebruiksinstructies 15
Item Naam & symbool Doel
1 Gewichtdisplay Vermeldt het bruto of netto gewicht van het product.
2Display
eenheidsprijs
Vermeldt de eenheidsprijs van het product.
3 Display totale prijs Vermeldt de totale prijs van het product.
4
Batterij wordt
geladen
Een rood lampje geeft aan dat de batterij wordt
geladen.
Een groen lampje geeft aan dat de batterij volledig is
geladen.
5
Batterij bijna leeg
Als het lampje brandt, betekent dit dat de batterij
bijna leeg is en meteen moet worden geladen.
6
Fix of Save
Een pijltje T geeft aan dat u op de toets
hebt gedrukt voordat een handeling werd
uitgevoerd. De gewichtdisplay en de display
eenheidsprijs worden niet langer automatisch
gewist.
7 Gewichtseenhe-
den
Een pijltje T geeft aan dat u als gewichtseenheid
kilogram of pond (enkel USA/Canada versie) hebt
gekozen.
8 Geselecteerde
prijsbasis
Een pijltje T geeft aan dat u als prijsbasis prijs per
100 g of prijs per kg (enkel UK/Europe/RoW versie)
hebt gekozen. OPMERKING: De Australische
versie is standaard ingesteld op kg.
9
Nul-indicator
Een pijltje T geeft aan dat voor de schaal nul bruto
is ingesteld (er is geen tarra). Een pijltje boven NET
en -0- geeft aan dat de schaal is ingesteld op nul
netto (er is een tarra).
10
Stabiel
Een pijltje T geeft aan dat het gewicht stabiel is.
11
Nettogewicht
Een pijtje T geeft aan dat een tarra is ingesteld en
dat het weergegeven gewicht het netto gewicht is
(het weergegeven gewicht is exclusief tarra).
F / Save
-0-
NET
DUTCH.book Page 15 Thursday, August 23, 2007 5:52 PM

DUTCH.book Page 16 Thursday, August 23, 2007 5:52 PM

Nederlands
3.1 Tower-versie monteren
FX 50 Gebruiksinstructies 17
3. De schaal installeren
3.1 Tower-versie monteren
Fig 3-1. Tower-versie monteren en installeren
DUTCH.book Page 17 Thursday, August 23, 2007 5:52 PM

3. De schaal installeren
18 FX 50 Gebruiksinstructies
3.2 Waterpas zetten van de schaal
Fig 3-2. Waterpas zetten van de schaal
DUTCH.book Page 18 Thursday, August 23, 2007 5:52 PM

Nederlands
3.3 Batterij laden
FX 50 Gebruiksinstructies 19
3.3 Batterij laden
U kunt de schaal aanzetten en bedienen met:
• de stroomtoevoer via de stroomadapter (met de aangebrachte
herlaadbare batterij) of
• een herlaadbare batterij in de schaal.
Als u de schaal via de stroomadapter aansluit op het stroomnet, brandt de
laadindicator als teken dat de stroom is aangesloten en de batterij wordt
geladen.
• Rode indicator = batterij moet worden geladen.
• Groene indicator = batterij is volledig geladen.
Voordat u de schaal de eerste keer gebruikt, moet u de batterij volledig laten
laden.
Als u de schaal gedurende een langere periode niet gebruikt, moet u de
batterij elke 3 tot 6 maanden laden om deze in goede staat te houden.
3.4 Achtergrondverlichting van de display
wijzigen
U kunt de achtergrondverlichting voor de operator- en klantendisplay instellen
op een van deze drie waarden:
• ON = altijd aan.
• OFF = altijd uit.
• AUTO = de achtergrondverlichting brandt wanneer de schaal wordt
gebruikt.
U doet het volgende om de instelling van de achtergrondverlichting te
wijzigen:
1. Druk op de schakelaar On om de schaal aan te zetten. De
schaal maakt en piepgeluid.
2. Houd de toets ingedrukt en laat deze los als u een tweede
piepgeluid hoort en de display wordt ingeschakeld.
3. Druk op de toets om de drie mogelijkheden (ON, OFF en
AUTO) te zien die voor de displays kunnen worden ingesteld.
DUTCH.book Page 19 Thursday, August 23, 2007 5:52 PM

3. De schaal installeren
20 FX 50 Gebruiksinstructies
N OPMERKING: Om de instelling van de achtergrondverlichting af te
sluiten en terug te keren naar de weegfunctie drukt u op de toets .
4. Druk op de toets om de ingestelde achtergrondverlichting op te
slaan en terug te keren naar de weegfunctie.
N OPMERKING: Als de achtergrondverlichting is ingesteld op ON of
AUTO, gaat de batterij tussen de verschillende laadbeurten minder
lang mee.
3.5 Automatische uitschakelfunctie instellen
U kunt de automatische uitschakelfunctie instellen zodat de schaal altijd
aanblijft of na een bepaalde periode van inactiviteit (1, 5 of 30 minuten) wordt
uitgeschakeld.
Volg deze stappen om de automatische uitschakelfunctie in te stellen:
1. Druk op de schakelaar On om de schaal aan te zetten.
2. Terwijl de schaal de zelfcontrole uitvoert (alle cijfers oip de drie
displays gaan van allemaal nullen naar allemaal negens), drukt u op
de toets . De display voor de totale prijs geeft de huidige
uitschakelmodus weer.
3. Druk op de toets om de volgende automatische
uitschakelfuncties te doorlopen:
• 0 = schaal blijft aan (automatische uitschakelfunctie is
uitgeschakeld).
• 1 = schaal gaat na 1 minuut inactiviteit uit.
• 5 = schaal gaat na 5 minuten inactiviteit uit.
• 30 = schaal gaat na 30 minuten inactiviteit uit.
4. Druk op de toets om de ingestelde automatische
uitschakelfunctie op te slaan en terug te keren naar de weegfunctie.
DUTCH.book Page 20 Thursday, August 23, 2007 5:52 PM

Nederlands
3.6 Batterij vervangen
FX 50 Gebruiksinstructies 21
3.6 Batterij vervangen
Fig 3-3. Batterij vervangen
DUTCH.book Page 21 Thursday, August 23, 2007 5:52 PM

3. De schaal installeren
22 FX 50 Gebruiksinstructies
Fig 3-4. Batterij vervangen (vervolg)
DUTCH.book Page 22 Thursday, August 23, 2007 5:52 PM

Nederlands
4.1 Legende bij de gebruikte symbolen
FX 50 Gebruiksinstructies 23
4. De schaal bedienen
4.1 Legende bij de gebruikte symbolen
Symbool Actie
Druk op de toets On/Off onder de schaal om deze aan
en uit te zetten.
Druk op de toets Prijsbasis selecteren om de
prijsbasis te selecteren voor het te wegen product.
OPMERKING: Deze toets bevindt zich alleen op de
versies voor UK, Europa en Rest of the World (RoW,
rest van de wereld).
OPMERKING: De Australische versie heeft alleen Kg.
Druk op de toets Gewichtseenheden om de
gewichtseenheden te selecteren voor het te wegen
product.
OPMERKING: Deze toets bevindt zich alleen op de
versie voor USA en Canada.
Plaats een product zonder verpakking op de
weegkomÐ. Verwijder het product Ï.
Plaats een lege verpakking (of een ander soort tarra)
op de weegkom Ð. Verwijder de verpakking Ï.
Plaats het product met de verpakking (of een ander
soort tarra) op de weegkom Ð. Verwijder het product
en de verpakkingÏ.
Plaats producten met dezelfde eenheidsprijs op de
weegkom Ð zoals snoepjes in bulk. Verwijder de
producten Ï.
DUTCH.book Page 23 Thursday, August 23, 2007 5:52 PM

4. De schaal bedienen
24 FX 50 Gebruiksinstructies
Plaats geen producten op de weegkom.
Afhankelijk van de functie van de schaal drukt u op de
cijfertoetsen om de eenheidsprijs van ene product in
te voeren of typt u met de cijfertoetsen de
eenheidsprijs voor directe en indirecte PLU's,
gekende tarra en proportionele tarra.
Als er geen product op de weegkom is geplaatst, drukt
u eventueel op nul om de schaal te resetten.
Verwijder de ingevoerde eenheidsprijs.
Vermenigvuldigt de totale netto prijs van het gewogen
product met twee of met vier.
OPMERKING: Deze toetsen bevinden zich alleen op
de versie voor USA en Canada.
Selecteer een toets Directe PLU.
Selecteer een toets Indirecte PLU.
Herhaal de verschillende stappen.
Symbool Actie
2-6
DUTCH.book Page 24 Thursday, August 23, 2007 5:52 PM

Nederlands
4.2 De schaal aanzetten en instellen
FX 50 Gebruiksinstructies 25
4.2 De schaal aanzetten en instellen
Om de schaal aan te zetten en gebruiksklaar te maken volgt u deze stappen:
Fig 4-1. De schaal aanzetten en instellen
DUTCH.book Page 25 Thursday, August 23, 2007 5:52 PM

4. De schaal bedienen
26 FX 50 Gebruiksinstructies
4.3 Individuele producten wegen
Voer deze stappen uit om producten te wegen met verschillende gewichten
en verschillende eenheidsprijzen.
Fig 4-2. Individuele producten wegen
DUTCH.book Page 26 Thursday, August 23, 2007 5:52 PM

Nederlands
4.4 Producten met dezelfde eenheidsprijs wegen
FX 50 Gebruiksinstructies 27
4.4 Producten met dezelfde eenheidsprijs wegen
U kunt hetzelfde type product of verschillende producten wegen die dezelfde
eenheidsprijs hebben, zonder dat u de eenheidsprijs opnieuw moet invoeren.
U voert de eenheidsprijs in en slaat deze in de schaal op tot u de prijs wilt
wijzigen of annuleren.
Om producten met dezelfde eenheidsprijs te wegen doet u het volgende:
Fig 4-3. Producten met dezelfde eenheidsprijs wegen
00086_A
DUTCH.book Page 27 Thursday, August 23, 2007 5:52 PM

4. De schaal bedienen
28 FX 50 Gebruiksinstructies
N OPMERKING: U kunt de eenheidsprijs wijzigen die in de schaal is
opgeslagen. Voer de prijs opnieuw in. De schaal slaat de nieuwe prijs
op tot u deze met de toets annuleert.
4.5 Producten met gekende tarra wegen
N OPMERKING: Deze functie geldt zich alleen voor de versie voor USA
en Canada.
Als u het gewicht kent van een product, zoals een bakje of verpakking,
waarmee u artikelen op de schaal verpakt en u dit wilt gebruiken als tarra,
kunt u deze tarra handmatig in de schaal invoeren. De schaal trekt het
gewicht van de verpakking af van het bruto gewicht en geeft alleen het netto
gewicht en de totale prijs van het product weer op de display.
N OPMERKING: Als u een tarra hebt ingevoerd, geeft de schaal een
negatief cijfer weer om de tarra weer te geven.
N OPMERKING: Bij stap 6 kunt u de eenheidsprijs van het product
handmatig invoeren of u kunt de eenheidsprijs oproepen met een
directe PLU of indirecte PLU. Zie hoofdstukken 4.9 - 4.12 voor meer
informatie over PLUs.
Om een gekende tarra in te voeren en vervolgens een product te wegen met
dezelfde tarra volgt u de volgende stappen:
Fig 4-4. Producten met gekende tarra wegen
DUTCH.book Page 28 Thursday, August 23, 2007 5:52 PM

Nederlands
4.5 Producten met gekende tarra wegen
FX 50 Gebruiksinstructies 29
Fig 4-5. Producten met gekende tarra wegen (vervolg)
DUTCH.book Page 29 Thursday, August 23, 2007 5:52 PM

4. De schaal bedienen
30 FX 50 Gebruiksinstructies
4.6 Producten met onbekende tarra wegen
U kunt artikelen, zoals bakjes en verpakkingen, wegen die worden gebruikt
om producten op de schaal te verpakken en de tarra opslaan voordat u de
producten weegt. Als u dan verpakte producten op de schaal plaatst, trekt de
schaal de tarra af van het bruto gewicht en wordt alleen het netto gewicht en
de totale prijs weergegeven.
N OPMERKING: Bij stap 6 kunt u de eenheidsprijs van het product
handmatig invoeren of u kunt de eenheidsprijs oproepen met een
directe PLU of indirecte PLU. Zie hoofdstukken 4.9 - 4.12 voor meer
informatie over PLUs.
Volg onderstaande stappen om een onbekende tarra te wegen en op te
slaan:
Fig 4-6. Producten met onbekende tarra wegen
DUTCH.book Page 30 Thursday, August 23, 2007 5:52 PM

Nederlands
4.7 Gebruik van proportionele tarra
FX 50 Gebruiksinstructies 31
Fig 4-7. Producten met onbekende tarra wegen (vervolg)
4.7 Gebruik van proportionele tarra
N OPMERKING: Deze functie geldt zich alleen voor de versie voor USA
en Canada.
U kunt de tarra van bijv. verpakkingen invoeren als percentage van het bruto
gewicht van het product en de tarra. Voorbeeld: u kunt een proportionele tarra
van 25% invoeren wanneer de tarra 25% vertegenwoordigt van het bruto
gewicht om het product te verpakken.
N OPMERKING: Bij stap 6 kunt u de eenheidsprijs van het product
handmatig invoeren of u kunt de eenheidsprijs oproepen met een
directe PLU of indirecte PLU. Zie hoofdstukken 4.9 - 4.12 voor meer
informatie over PLUs.
DUTCH.book Page 31 Thursday, August 23, 2007 5:52 PM

4. De schaal bedienen
32 FX 50 Gebruiksinstructies
Om een proportionele tarra van 25% in te voeren volgt u deze stappen:
Fig 4-8. Gebruik van proportionele tarra
DUTCH.book Page 32 Thursday, August 23, 2007 5:52 PM

Nederlands
4.8 Een eenheidsprijs vermenigvuldigen
FX 50 Gebruiksinstructies 33
4.8 Een eenheidsprijs vermenigvuldigen
N OPMERKING: Deze functie geldt zich alleen voor de versie voor USA
en Canada.
U kunt producten wegen, een eenheidsprijs invoeren en dan de ingevoerde
totale prijs vermenigvuldigen met twee of vier. Deze functie wordt gebruikt om
de totale prijs te vermenigvuldigen van producten waarvan de prijs wordt
weergegeven in delen van een pond, zoals een kwart pond of half pond.
N OPMERKING: Bij stap 6 kunt u de eenheidsprijs van het product
handmatig invoeren of u kunt de eenheidsprijs oproepen met een
directe PLU of indirecte PLU. Zie hoofdstukken 4.9 - 4.12 voor meer
informatie over PLUs.
Om een eenheidsprijs te vermenigvuldigen volgt u twee of vier stappen:
Fig 4-9. Een eenheidsprijs vermenigvuldigen
DUTCH.book Page 33 Thursday, August 23, 2007 5:52 PM

4. De schaal bedienen
34 FX 50 Gebruiksinstructies
4.9 Directe PLUs programmeren
N OPMERKING: U kunt op de toetsen voor directe PLU
drukken om de gewichtseenheden en prijzen op te roepen van
bepaalde producten, wanneer deze informatie is opgeslagen in het
geheugen van de schaal.
U kunt de gewichtseenheden (of de prijsbasis voor UK, Europa en RoW
versies) met verschillende eenheidsprijzen invoeren en opslaan in twaalf
direchte PLU-toetsen (Price Look-Up, prijs opzoeken) van het toetsenbord.
Hiermee kunt u een eenheidsprijs oproepen die voor een directe PLU is
opgeslagen in het geheugen van de schaal. U kunt dus snel producten wegen
die u vaak verkoopt zonder dat u de prijzen moet invoeren telkens wanneer
u de producten weegt.
Om de gewichtseenheden (of prijsbasis) met de prijs op te slaan in een
directe PLU, bijv. 8, volgt u deze stappen:
Fig 4-10. Directe PLUs programmeren
N OPMERKING: Er zijn ook nog 38 indirecte PLU's beschikbaar. Zie
hoofdstuk 4.11 en 4.12.
DUTCH.book Page 34 Thursday, August 23, 2007 5:52 PM

Nederlands
4.10 Wegen met directe PLUs
FX 50 Gebruiksinstructies 35
4.10 Wegen met directe PLUs
Als u eenheidsprijzen hebt geprogrammeerd in directe PLUs, kunt u
producten sneller wegen door de geprogrammeerde eenheidsprijzen op te
roepen met de directe PLUs, bijvoorbeeld .
Om een product te wegen met een directe PLU, bijv. 8, volgt u deze stappen:
N OPMERKING: Er zihjn twee manieren om producten te wegen met
een directe PLU. U kunt het product op de schaal plaatsen en op de
betreffende toets voor de directe PLU drukken of u kunt op de toets
voor de directe PLU drukken en daarna het product op de schaal
plaatsen (zie stappen 2 & 3).
Fig 4-11. Wegen met directe PLUs
DUTCH.book Page 35 Thursday, August 23, 2007 5:52 PM

4. De schaal bedienen
36 FX 50 Gebruiksinstructies
4.11 Indirecte PLUs programmeren
N OPMERKING: Indirecte PLUs werken op dezelfde manier als directe
PLUs, maar om een indirecte PLU op te roepen moet u op de toets
drukken en het nummer van de indirecte PLU met de hand
invoeren.
U kunt de gewichtseenheden (of de prijsbasis voor UK, Europa en RoW
versies) met verschillende eenheidsprijzen invoeren en opslaan in 38
indirecte PLU-toetsen (PLU-nummers 13 tot 50 van het toetsenbord).
Hiermee kunt u een eenheidsprijs oproepen die is opgeslagen in het
geheugen van de schaal. U kunt dus snel producten wegen die u vaak
verkoopt zonder dat u de prijzen moet invoeren telkens wanneer u de
producten weegt.
Om de gewichtseenheden (of prijsbasis) met de prijs op te slaan in een
indirecte PLU, bijv. 20, volgt u deze stappen:
Fig 4-12. Indirecte PLU's programmeren
DUTCH.book Page 36 Thursday, August 23, 2007 5:52 PM

Nederlands
4.12 Wegen met indirecte PLUs
FX 50 Gebruiksinstructies 37
4.12 Wegen met indirecte PLUs
Als u prijzen hebt geprogrammeerd in indirecte PLUs, kunt u producten
sneller wegen door de geprogrammeerde prijzen op te roepen met een
indirecte PLU.
Om een product te wegen met een indirecte PLU, bijv. 20, volgt u deze
stappen:
Fig 4-13. Wegen met indirecte PLU's
DUTCH.book Page 37 Thursday, August 23, 2007 5:52 PM

DUTCH.book Page 38 Thursday, August 23, 2007 5:52 PM

Nederlands
FX 50 Gebruiksinstructies 39
5. Foutcodes
Als op de display foutmeldingen blijven verschijnen:
1. Verwijder de batterij en haal de stekker uit het stopcontact.
2. Breng de batterij opnieuw aan en sluit de stroom weer aan.
Foutcode Probleem Actie
Err 4 De eerste nul of de
nultoets probeert een
belasting te resetten die
meer weegt dan 4% van
de maximale capaciteit
van de schaal.
Haal het volledige gewicht van de
weegkom en zet de schaal aan. Drukt
op de toets nul om de schaal te
resetten. Als dit niet helpt, moet u de
schaal laten kalibreren of repareren.
Err 5 Toetsenbordfout. Het toetsenbord heeft een kortsluiting
en moet worden vervangen. Neem
contact op met uw Avery Berkel
dealer.
Err 6 Fout A/D-converter. De schaal moet worden gekalibreerd of
gerepareerd. Neem contact op met uw
Avery Berkel dealer.
DUTCH.book Page 39 Thursday, August 23, 2007 5:52 PM

DUTCH.book Page 40 Thursday, August 23, 2007 5:52 PM

Europe
Austria
Schember Berkel GmbH
A-2355 Wiener Neudorf
Industrie Zendrum Nö Süd
Strasse 3, Objekt 30
Tel: +43 2236 62630-1
Fax: +43 2236 62631-6
France
Avery Weigh-Tronix France SAS
36 Avenue de l'Europe
Domont, Cedex
Tel: +33 (0)8 25 87 08 00
Fax: +33 (0)1 39 35 57 57
Republic of Ireland
Avery Weigh-Tronix
Metrology House
Airton Park, Tallaght
Dublin 24
Tel: +353 1 4000 700
Fax: +353 1 4000 750
United Kingdom
Avery Weigh-Tronix
Avery Berkel Limited
Foundry Lane
Smethwick
West Midlands
England
B66 2LP
Tel: +44 (0)870 90 34343
Fax: +44 (0)870 90 50085
Americas
Canada
Weigh Tronix Canada, ULC
217 Brunswick Blvd, Pointe Claire
Quebec H9R 4R7
Tel: +416 213 9900
Fax: +416 213 9960
Mexico
Automatizacion
Basculas y Control SA do CV
Blvd. Agua Caliente # 9051
Col. Cacho, Tijuana, BC 22150
Tel: +416 213 9900
Fax: +416 213 9960
USA
Avery Berkel North America
1000 Armstrong Drive
Fairmont
MN 56031
Tel: +52 333 634 9050
Fax: +52 333 634 9049
ENGLISH
FX50_User.book Page 41 Thursday, August 23, 2007 2:31 PM

Europa continental
Austria
Schember Berkel GmbH
A-2355 Wiener Neudorf
Industrie Zendrum Nö Süd
Strasse 3, Objekt 30
Tel: +43 2236 62630-1
Fax: +43 2236 62631-6
Francia
Avery Weigh-Tronix France SAS
36 Avenue de l'Europe
Domont, Cedex
Tel: +33 (0)8 25 87 08 00
Fax: +33 (0)1 39 35 57 57
República de Irlanda
Avery Weigh-Tronix
Metrology House
Airton Park, Tallaght
Dublin 24
Tel: +353 1 4000 700
Fax: +353 1 4000 750
Reino Unido
Avery Weigh-Tronix
Avery Berkel Limited
Foundry Lane
Smethwick
West Midlands
England
B66 2LP
Tel: +44 (0)870 90 34343
Fax: +44 (0)870 90 50085
Estados Unidos
Canadá
Weigh Tronix Canada, ULC
217 Brunswick Blvd, Pointe Claire
Quebec H9R 4R7
Tel: +416 213 9900
Fax: +416 213 9960
México
Automatizacion
Basculas y Control SA do CV
Blvd. Agua Caliente # 9051
Col. Cacho, Tijuana, BC 22150
Tel: +416 213 9900
Fax: +416 213 9960
EE.UU
Avery Berkel North America
1000 Armstrong Drive
Fairmont
MN 56031
Tel: +52 333 634 9050
Fax: +52 333 634 9049
ESPANOL
FX50_User.book Page 42 Thursday, August 23, 2007 2:31 PM

Europe
Autriche
Schember Berkel GmbH
A-2355 Wiener Neudorf
Industrie Zendrum Nö Süd
Strasse 3, Objekt 30
Tel: +43 2236 62630-1
Fax: +43 2236 62631-6
France
Avery Weigh-Tronix France SAS
36 Avenue de l'Europe
Domont, Cedex
Tel: +33 (0)8 25 87 08 00
Fax: +33 (0)1 39 35 57 57
République d’Irlande
Avery Weigh-Tronix
Metrology House
Airton Park, Tallaght
Dublin 24
Tel: +353 1 4000 700
Fax: +353 1 4000 750
Royaume Uni
Avery Weigh-Tronix
Avery Berkel Limited
Foundry Lane
Smethwick
West Midlands
England
B66 2LP
Tel: +44 (0)870 90 34343
Fax: +44 (0)870 90 50085
Amériques
Canada
Weigh Tronix Canada, ULC
217 Brunswick Blvd, Pointe Claire
Quebec H9R 4R7
Tel: +416 213 9900
Fax: +416 213 9960
Mexique
Automatizacion
Basculas y Control SA do CV
Blvd. Agua Caliente # 9051
Col. Cacho, Tijuana, BC 22150
Tel: +416 213 9900
Fax: +416 213 9960
États Unis
Avery Berkel North America
1000 Armstrong Drive
Fairmont
MN 56031
Tel: +52 333 634 9050
Fax: +52 333 634 9049
FRANCAIS
FX50_User.book Page 43 Thursday, August 23, 2007 2:31 PM

Europa
Österreich
Schember Berkel GmbH
A-2355 Wiener Neudorf
Industrie Zendrum Nö Süd
Strasse 3, Objekt 30
Tel: +43 2236 62630-1
Fax: +43 2236 62631-6
Frankreich
Avery Weigh-Tronix France SAS
36 Avenue de l'Europe
Domont, Cedex
Tel: +33 (0)8 25 87 08 00
Fax: +33 (0)1 39 35 57 57
Irland
Avery Weigh-Tronix
Metrology House
Airton Park, Tallaght
Dublin 24
Tel: +353 1 4000 700
Fax: +353 1 4000 750
Vereinigtes Königreich
Avery Weigh-Tronix
Avery Berkel Limited
Foundry Lane
Smethwick
West Midlands
England
B66 2LP
Tel: +44 (0)870 90 34343
Fax: +44 (0)870 90 50085
Amerika
Kanada
Weigh Tronix Canada, ULC
217 Brunswick Blvd, Pointe Claire
Quebec H9R 4R7
Tel: +416 213 9900
Fax: +416 213 9960
Mexiko
Automatizacion
Basculas y Control SA do CV
Blvd. Agua Caliente # 9051
Col. Cacho, Tijuana, BC 22150
Tel: +416 213 9900
Fax: +416 213 9960
USA
Avery Berkel North America
1000 Armstrong Drive
Fairmont
MN 56031
Tel: +52 333 634 9050
Fax: +52 333 634 9049
DEUTSCH
FX50_User.book Page 44 Thursday, August 23, 2007 2:31 PM

Europa
Austria
Schember Berkel GmbH
A-2355 Wiener Neudorf
Industrie Zendrum Nö Süd
Strasse 3, Objekt 30
Tel: +43 2236 62630-1
Fax: +43 2236 62631-6
Francia
Avery Weigh-Tronix France SAS
36 Avenue de l'Europe
Domont, Cedex
Tel: +33 (0)8 25 87 08 00
Fax: +33 (0)1 39 35 57 57
Repubblica d'Irlanda
Avery Weigh-Tronix
Metrology House
Airton Park, Tallaght
Dublin 24
Tel: +353 1 4000 700
Fax: +353 1 4000 750
Regno Unito
Avery Weigh-Tronix
Avery Berkel Limited
Foundry Lane
Smethwick
West Midlands
England
B66 2LP
Tel: +44 (0)870 90 34343
Fax: +44 (0)870 90 50085
Stati Uniti d'America
Canada
Weigh Tronix Canada, ULC
217 Brunswick Blvd, Pointe Claire
Quebec H9R 4R7
Tel: +416 213 9900
Fax: +416 213 9960
Messico
Automatizacion
Basculas y Control SA do CV
Blvd. Agua Caliente # 9051
Col. Cacho, Tijuana, BC 22150
Tel: +416 213 9900
Fax: +416 213 9960
Stati Uniti d'America
Avery Berkel North America
1000 Armstrong Drive
Fairmont
MN 56031
Tel: +52 333 634 9050
Fax: +52 333 634 9049
ITALIANO
FX50_User.book Page 45 Thursday, August 23, 2007 2:31 PM

Europa
Oostenrijk
Schember Berkel GmbH
A-2355 Wiener Neudorf
Industrie Zendrum Nö Süd
Strasse 3, Objekt 30
Tel: +43 2236 62630-1
Fax: +43 2236 62631-6
Frankrijk
Avery Weigh-Tronix France SAS
36 Avenue de l'Europe
Domont, Cedex
Tel: +33 (0)8 25 87 08 00
Fax: +33 (0)1 39 35 57 57
Republiek Ierland
Avery Weigh-Tronix
Metrology House
Airton Park, Tallaght
Dublin 24
Tel: +353 1 4000 700
Fax: +353 1 4000 750
Verenigd Koninkrijk
Avery Weigh-Tronix
Avery Berkel Limited
Foundry Lane
Smethwick
West Midlands
England
B66 2LP
Tel: +44 (0)870 90 34343
Fax: +44 (0)870 90 50085
Amerika
Canada
Weigh Tronix Canada, ULC
217 Brunswick Blvd, Pointe Claire
Quebec H9R 4R7
Tel: +416 213 9900
Fax: +416 213 9960
Mexico
Automatizacion
Basculas y Control SA do CV
Blvd. Agua Caliente # 9051
Col. Cacho, Tijuana, BC 22150
Tel: +416 213 9900
Fax: +416 213 9960
USA
Avery Berkel North America
1000 Armstrong Drive
Fairmont
MN 56031
Tel: +52 333 634 9050
Fax: +52 333 634 9049
NEDERLANDS
FX50_User.book Page 46 Thursday, August 23, 2007 2:31 PM

FX50_User.book Page 47 Thursday, August 23, 2007 2:31 PM

Este documento contiene una guía general exclusivamente del producto y no formará parte de ningún contrato
a no ser que sea acordado de forma específica por Avery Berkel Limited por escrito en cada caso en la
aceptación del pedido. Las especificaciones de los productos aquí descritos pueden variar de vez en cuando
y pueden modificarse sin previo aviso. Avery Weigh-Tronix es una marca comercial de Avery Berkel Limited.
Le document contient seulement un guide général du produit et il ne fait pas partie du contrat sauf accord
spécifique écrit avec Avery Berkel Limited dans chaque cas sur le récépissé de commande. Les informations
contenues dans ce document sont non-contractuelles et peuvent être modifiées sans notification préalable.
Avery Weight-Tronix is a trading name of Avery Berkel Limited.
Dieses Dokument enthält nur ein allgemeines Handbuch für das Produkt und soll keinen Teil eines Vertrags
bilden, außer wenn dies in jedem Fall explizit durch Avery Berkel Limited schriftlich auf der Auftragbestätigung
vereinbart wird. Die Spezifikation der hierin beschriebenen Produkte kann sich von Zeit zu Zeit ändern und
ohne Ankündigung geändert werden. Avery Weight-Tronix ist ein Handelsname von Avery Berkel Limited.
Il presente documento contiene una guida generica del prodotto e non fa parte di alcun contratto se non
specificatamente concordato da Avery Berkel Limited per iscritto sulla conferma dell'ordine. Le caratteristiche
dei prodotti descritti qui possono variare nel tempo e possono essere modificate senza preavviso. Avery
Weight-Tronix è un nome commerciale di Avery Berkel Limited.
Dit document bevat slechts een algemene gids voor het product en mag geenszins worden beschouwd als
onderdeel van een overeenkomst, tenzij dit uitdrukkelijk en schriftelijk is overeengekomen met Avery Berkel
Limited en telkens op de Order Acknowledgement is vermeldt. De specificatie van de in dit document.
This document contains a general guide only of the product and shall not form part of any contract unless
specifically agreed by Avery Berkel Limited in writing in each case on the Order Acknowledgement. The
specification of the products described herein may vary from time to time and may be altered without notice.
Avery Weight-Tronix is a trading name of Avery Berkel Limited.
UK
Avery Weigh-Tronix
Foundry Lane, Smethwick
West Midlands, England B66 2LP
Tel: +44 (0)870 903 4343
Fax: +44 (0)121 224 8183
Email: [email protected]
Website: www.averyweigh-tronix.com
USA
Avery Weigh-Tronix
1000 Armstrong Dr.
Fairmont MN 56031 USA
Tel: +1 507-238-4461
Fax: +1 507-238-4195
Email: sales@averyberkelusa.com
Website: www.averyweigh-tronix.com
FX50_User.book Page 48 Thursday, August 23, 2007 2:31 PM
-
 1
1
-
 2
2
-
 3
3
-
 4
4
-
 5
5
-
 6
6
-
 7
7
-
 8
8
-
 9
9
-
 10
10
-
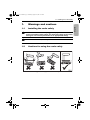 11
11
-
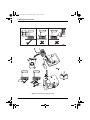 12
12
-
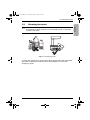 13
13
-
 14
14
-
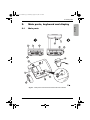 15
15
-
 16
16
-
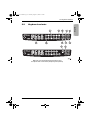 17
17
-
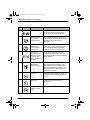 18
18
-
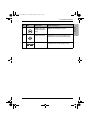 19
19
-
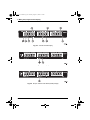 20
20
-
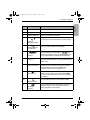 21
21
-
 22
22
-
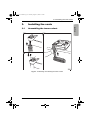 23
23
-
 24
24
-
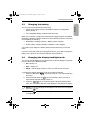 25
25
-
 26
26
-
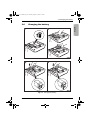 27
27
-
 28
28
-
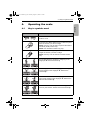 29
29
-
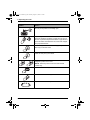 30
30
-
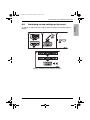 31
31
-
 32
32
-
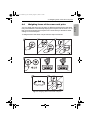 33
33
-
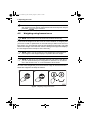 34
34
-
 35
35
-
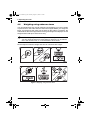 36
36
-
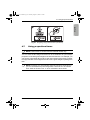 37
37
-
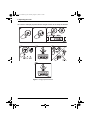 38
38
-
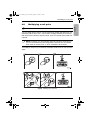 39
39
-
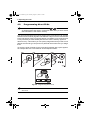 40
40
-
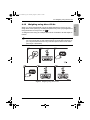 41
41
-
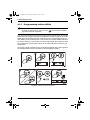 42
42
-
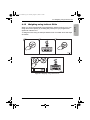 43
43
-
 44
44
-
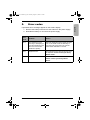 45
45
-
 46
46
-
 47
47
-
 48
48
-
 49
49
-
 50
50
-
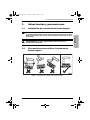 51
51
-
 52
52
-
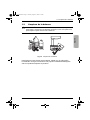 53
53
-
 54
54
-
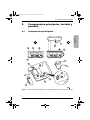 55
55
-
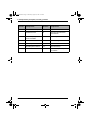 56
56
-
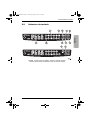 57
57
-
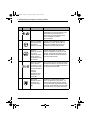 58
58
-
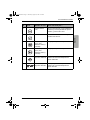 59
59
-
 60
60
-
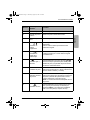 61
61
-
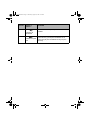 62
62
-
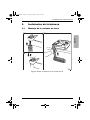 63
63
-
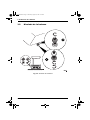 64
64
-
 65
65
-
 66
66
-
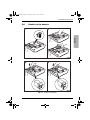 67
67
-
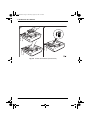 68
68
-
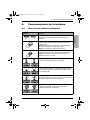 69
69
-
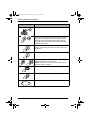 70
70
-
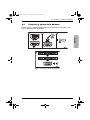 71
71
-
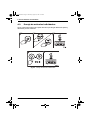 72
72
-
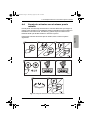 73
73
-
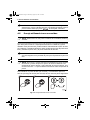 74
74
-
 75
75
-
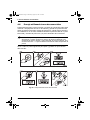 76
76
-
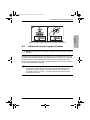 77
77
-
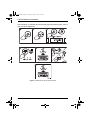 78
78
-
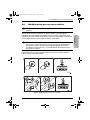 79
79
-
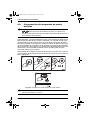 80
80
-
 81
81
-
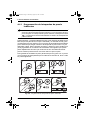 82
82
-
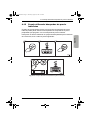 83
83
-
 84
84
-
 85
85
-
 86
86
-
 87
87
-
 88
88
-
 89
89
-
 90
90
-
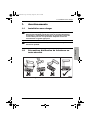 91
91
-
 92
92
-
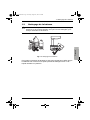 93
93
-
 94
94
-
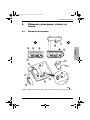 95
95
-
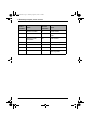 96
96
-
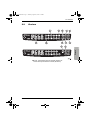 97
97
-
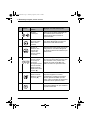 98
98
-
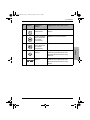 99
99
-
 100
100
-
 101
101
-
 102
102
-
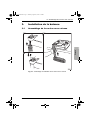 103
103
-
 104
104
-
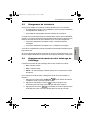 105
105
-
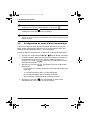 106
106
-
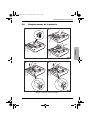 107
107
-
 108
108
-
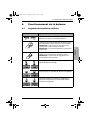 109
109
-
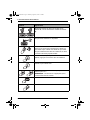 110
110
-
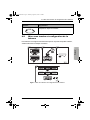 111
111
-
 112
112
-
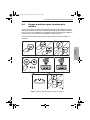 113
113
-
 114
114
-
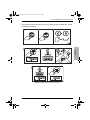 115
115
-
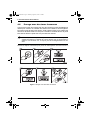 116
116
-
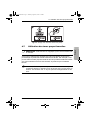 117
117
-
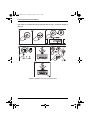 118
118
-
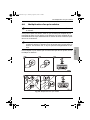 119
119
-
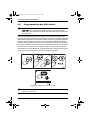 120
120
-
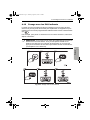 121
121
-
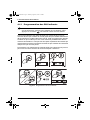 122
122
-
 123
123
-
 124
124
-
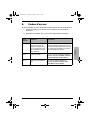 125
125
-
 126
126
-
 127
127
-
 128
128
-
 129
129
-
 130
130
-
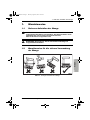 131
131
-
 132
132
-
 133
133
-
 134
134
-
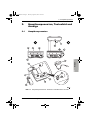 135
135
-
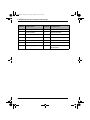 136
136
-
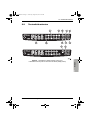 137
137
-
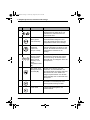 138
138
-
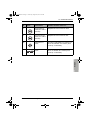 139
139
-
 140
140
-
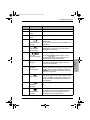 141
141
-
 142
142
-
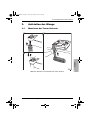 143
143
-
 144
144
-
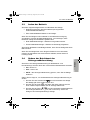 145
145
-
 146
146
-
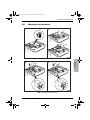 147
147
-
 148
148
-
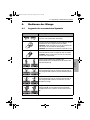 149
149
-
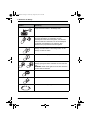 150
150
-
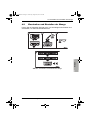 151
151
-
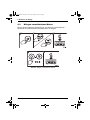 152
152
-
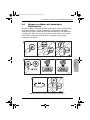 153
153
-
 154
154
-
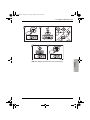 155
155
-
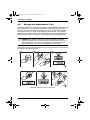 156
156
-
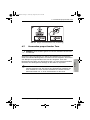 157
157
-
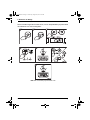 158
158
-
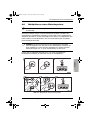 159
159
-
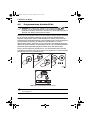 160
160
-
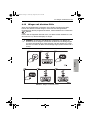 161
161
-
 162
162
-
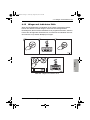 163
163
-
 164
164
-
 165
165
-
 166
166
-
 167
167
-
 168
168
-
 169
169
-
 170
170
-
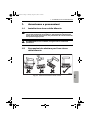 171
171
-
 172
172
-
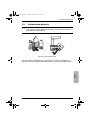 173
173
-
 174
174
-
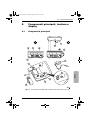 175
175
-
 176
176
-
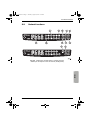 177
177
-
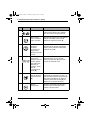 178
178
-
 179
179
-
 180
180
-
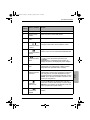 181
181
-
 182
182
-
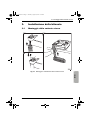 183
183
-
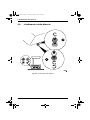 184
184
-
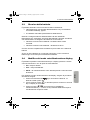 185
185
-
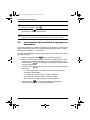 186
186
-
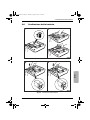 187
187
-
 188
188
-
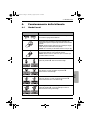 189
189
-
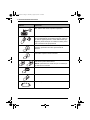 190
190
-
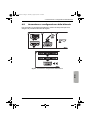 191
191
-
 192
192
-
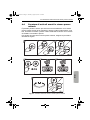 193
193
-
 194
194
-
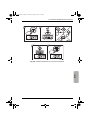 195
195
-
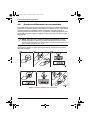 196
196
-
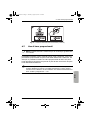 197
197
-
 198
198
-
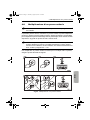 199
199
-
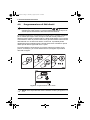 200
200
-
 201
201
-
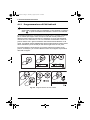 202
202
-
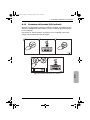 203
203
-
 204
204
-
 205
205
-
 206
206
-
 207
207
-
 208
208
-
 209
209
-
 210
210
-
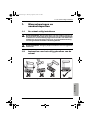 211
211
-
 212
212
-
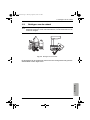 213
213
-
 214
214
-
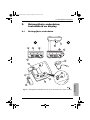 215
215
-
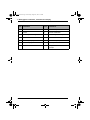 216
216
-
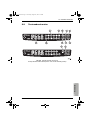 217
217
-
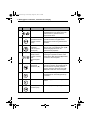 218
218
-
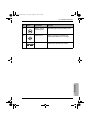 219
219
-
 220
220
-
 221
221
-
 222
222
-
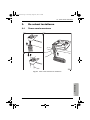 223
223
-
 224
224
-
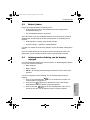 225
225
-
 226
226
-
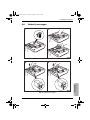 227
227
-
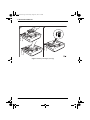 228
228
-
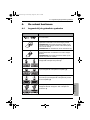 229
229
-
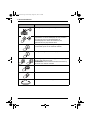 230
230
-
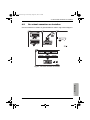 231
231
-
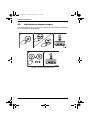 232
232
-
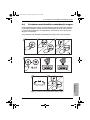 233
233
-
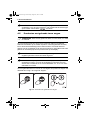 234
234
-
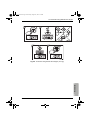 235
235
-
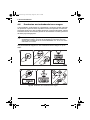 236
236
-
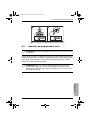 237
237
-
 238
238
-
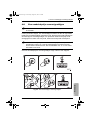 239
239
-
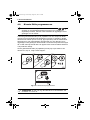 240
240
-
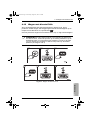 241
241
-
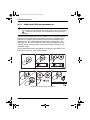 242
242
-
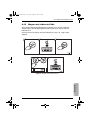 243
243
-
 244
244
-
 245
245
-
 246
246
-
 247
247
-
 248
248
-
 249
249
-
 250
250
-
 251
251
-
 252
252
-
 253
253
-
 254
254


Berkel FX50 Guía del usuario
- Tipo
- Guía del usuario
- Este manual también es adecuado para
En otros idiomas
- français: Berkel FX50 Mode d'emploi
- italiano: Berkel FX50 Guida utente
- Deutsch: Berkel FX50 Benutzerhandbuch
- Nederlands: Berkel FX50 Gebruikershandleiding
Otros documentos
-
Gram XFOC+ El manual del propietario
-
Thulos TH-BD30 El manual del propietario
-
-
Ohaus Aviator 7000 Manual de usuario
-
Premier ED-4323 Manual de usuario
-
Samsung SGH-Z107 Manual de usuario
-
Mettler Toledo VIVA Manual de usuario
-
-
-
 CVS Pharmacy KS 34 Manual de usuario
