
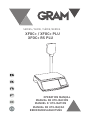
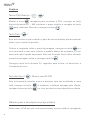
SERIES / SERIE / SÉRIE /SERIES
XFOC+ / XFOC+ PLU
XFOC+ RS PLU
OPERATION MANUAL
MANUAL DE UTILIZACIÓN
MANUEL D´UTILISATION
MANUAL DE UTILIZAÇAO
BEDIENUNGSANLEITUNG
DE

2
INDEX English
Functions 7
Warning 7
Technical specification 8
Operation 8
The time of auto power saving set 9
Set the time how long backlight will be on 9
Scale protocol transferring (model with RS-232) 10
Function Keys Operation 11
Function Explanation 12
Unit price setting methods 14
Hotkeys 14
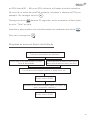
Diagram of Basic Operation Process 15
Communication protocol (RS Model) 15
Guarantee 16

3
ÍNDICE Español
Funciones 17
Precauciones 17
Especificaciones técnicas 18
Operación 18
Selección del tiempo de autodesconexión 19
Selección del tiempo de iluminación del display 19
Transmisión del protocol (modelo con RS-232) 20
Función de las teclas 21
Funciones 23
Teclas PLU directas 23
Tecla Tara 23
Tecla de cambio (Modelo con RS-232) 23
Métodos para la introducción del precio unitario 24
Diagrama del proceso básico de utilización 24
Protocolo de comunicación (modelos con RS-232) 24
Garantía 25

4
SOMMAIRE Français
Fonctions 26
Précautions 26
Specificités techniques 27
Operation 27
Sélection du temps d´auto-déconnexion 28
Sélection du temps d´éclairage de l´écran 28
Transmission du protocole 29
Fonction des touches 30
Fonctions 31
Touches PLU directes 32
Touche TARE 32
Touche pour rendu monnaie (Modèles avec RS-232) 32
Methodes pour introduction du prix unitaire 32
Diagramme du processus fondamental d´utilisation 33
Protocole de communication (Modèles avec RS-232) 33
Garantie 34

5
ÍNDICE Português
Funções 35
Precauções 35
Especificações técnicas 36
Operações 36
Selecção de tempo de poupança de energia 37
Selecção de tempo de iluminação do visor 37
Protocolo de transmissão 38
Funções das teclas 39
Explicação das funções 41
Teclas PLU directas 41
Tecla TARA 41
Tecla de troco (Modelo com RS-232) 41
Métodos para a introdução do preço unitário 42
Diagrama do processo básico de utilização 42
Communication protocol (RS Model) 42
Garantia 43

6
INDEX Deutsch
Funktionen 44
Vorsichtsmaßnahmen 45
Technische daten 45
Betrieb 46
Auswahl der zeit bis zur automatischen abschaltung 47
Einstellung der beleuchtungszeit des displays 47
Funktionen der tasten 48
Direkte plu-tasten 49
Tara-taste 50
Rückgeldtaste (modell mit rs-232) 50
Methoden zur eingabe des stückpreises 50
Diagramm der grundanwendung 51
Kommunikationsprotokoll 51
Garantie 52

7
ENGLISH
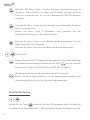
FUNCTIONS
• 35 keys of unit price memory (PLU model), 8 keys for the other models.
• Auto-power saving design, will enter into the stand-by status automatically
without any operation(user-defined 4-200 seconds at will, 200 seconds
won’t enter into auto-power saving status) only consuming 21 μA,able to
be awake by any loading or operation due to the inner shaking mechanism.
(please tap the platter when there is no response in loading)
• Support backlight shift function by pressing the backlight key for 2.5
seconds ,able to save electric power by turning off backlight in bright
area and extend service life of dry battery.
• CHG function assists users to change notes accuracy.
• Store 70PLU (ps1XD)
• Support price-lock function, suitable to sell weighing commodity of
same price.
• Ranges: 6/15 kg (e = 2/5 g) or 15/30 kg (e = 5/10 g)
WARNING
• There is “stable” mark on the display screen. When the weight is stable,
the triangle indicator will light which means it is in the normal weighing
status, at this time you can put commodity on the platter to sell.

8
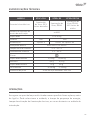
TECHNICAL SPECIFICATION
OPERATION
Make sure the scale is placed at the steady platform and then power on. You
can set the unit, the time of auto power saving, time of switching backlight,
decimal point and input method, please take explanation for your reference:
MODEL XFOC+ PLU XFOC+ RS XFOC+ RS PLU
Basic features Backlight,
35*2 hotkeys
Backlight,
RS232
Backlight,
RS232,
35*2 hotkeys
Number of verification
scale interval n=3000
Weight range 0-15-30 kg
Column Yes No
Power supply 3pcs D batteries RS232 and 3 AA batteries
Battery estimated use time 8000 hours / 24 months
Working temperature 0 ºC – 40 ºC
Working humidity 5 % - 85 %
Accuracy class
Weighing capacity (Max.) 6/15 kg 15/30 kg
Verification scale interval 2/5 g 5/10 g
Weighing capacity (Min.) 40 g 100 g
Tare (Max.) -5.998 kg -9.995 kg
Platter size Stainless steel platter - 330*230

9
The time of auto power saving set
The time of auto power saving set (power saving set aims to saving power by
setting the scale to sleeping mode and the scale can work again by putting
on some weight cargo and tapping it, the scale will power off itself for 1 hour
no operation).
1. Press key to enter into the setting interface when starting up.
2. Input the time of auto power saving and then press key to confirm.
The price column will display the time just set.
3. Press key to exit the status.
Note: user-defined 4~200 seconds at will, 200 seconds won’t enter into auto-
power saving status (display F after setting). If the time you set is in the range
of 4~199 seconds, put commodity on the platter, the scale will also enter into
the auto-power saving status after 15 minutes without any operation. When
the logo “ “ appears on the screen, it means the scale has been in auto-
power saving status.
Backlight Setting
Backlight on/off:
1. Under normal weighting status, press and hold the key for 2.5
seconds to open or close the operator display backlight:
2. Press key to enter the setting interface during the countdown of
power on —> press and hold the key for 2.5 seconds to open or close
the customer display backlight press key to exit this interface.

10
Backlight level: Press key to enter the setting interface during the
countdown of power on —> press the key to switch the backlight level
(0-7 level. the default backlight level of scale is level 3) press key to exit
this interface.
Backlight time: Press key to enter the setting interface during the
countdown of power on —> input the backlight time —> press the key to
confirm —> press key to exit this interface.
Note:
Default backlight time is 2 seconds. User-defined 1-200 seconds at will. the
backlight will be on all the time if the time be set 200 seconds (display ‘F’ on
the Total Price Column): If the scale enters into the power saving status. the
backlight will be off. Backlight time should lower than sleep tune.
Scale protocol transferring (model with RS-232)
1. Power on your scale, then you can press key to enter into scale
protocol transferring setting.
2. Press the key for switchover, at that time the left side of display
screen is to show signals BELOW.
CO,D0. Passive sending out.
C1,D1. Wagon balance scale active sending out.
C2,D2. FTP scale active sending out.
You can enter any section you need by pressing key and press for exit.

11
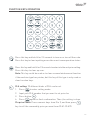
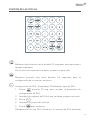
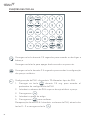
FUNCTION KEYS OPERATION
Press this key and hold it for 2.5 seconds to turn on or turn off the scale.
Press this key to clear inputting error data or exit some operation status.
Press this key and hold it for 2.5 seconds to enter into the unit price setting.
Press this key to clear up sum.
Note: This key could be used as to clear accumulated amount function
if the machine type has printer, but this key of this type is only used as
clear function keys.
PLU setting: 70 different kinds of PLU can be set
1. Press to enter setting mode.
2. Input your PLU number that you want to set price for.
3. Press button .
4. Press again for final confirmation. Then ,the setting is done.
Plu price Check: Press numeric keys from 0 to 9, and then press
key to call the commodity price you want from PLU1-PLU70.

12
Press this key to use price lock function. The mark on the LCD will
light which means the scale is in price lock status. It‘s suitable to sell
weighing commodity of same price.
Press this key to deduct the packing weight.
Press this key for 2.5 seconds to shift the backlight.
Press this key to give changes.
Press this key to check the battery voltage.
Price key :the same to PLU key
Press this key and hold it for 2.5 seconds, the scale will display total sum.
Press key to clear total sum records.
Note: You have to accumulate each sale record if you want to use
“sum” function.
Total sum starts from last time you clearing records to current status.
This key is to adjust the ‘WEIGHT’ column to zero value. Place the
scale level steadily, if there are digits displayed on LCD, press this key
to adjust to zero. Press this key and hold it for seconds to check the
version information and the time of auto-power saving.
Function Explanation
-
Be used as unit price key.
You can use the unit price that has been set by pressing any key from M0 to M6.

13
1. Input number ”0”.
2. for confirmation.
3. Input the price.
4. Press MX(MX=M---M6).
5. If you want to quit your setting, please press for exit.
This key is to deduct the packing weight.
If you need to deduct the packing weight, put the container or wrapper on
the scale first, and then press key to enter weight- deducting state.
Then, take off the container and put the commodity into the container and
then place the packed goods on the pan again, now, the LCD will display the
net weight. Remove the merchandise and press the key , the scale will
return to normal weighting state.
Press this key and hold it for 2.5 seconds to shift the backlight.
Note: when put small weight items on the platter, if the backlight is not on,
at this time, you can input price , the backlight will be on.
This key is the function key of giving changes.
After displaying total price, press key, and input the amount you received
from customer, then press key, and then the LCD will show the changes.
If you haven’t press key in time, the scale will auto start calculating change
notes. If the payment amount is not enough, CHG operation is not allowed.
Press key continually to exit this function.
If the total price is 0 when weighing, CHG operation is not allowed, either.

14
Press this key to display battery voltage when the weight is 0.
Note: Please replace the 3PCS dry battery when the voltage is lower than 3.3V.
Unit price setting methods
Select the PLU that needs to set the unit price, pressing the direct PLU (M1 –
M6) or the indirect PLU using the numerical keys. In the case of indirect PLU,
enter the PLU number, for exemple 15 and then press the key.
Keep pressed the key for 2.5 seconds, at this time, the last digit of
display Total will flash.
Input the unit price using the numerical keys and press to confirm.
To exit press the key.
Hotkeys
PS1XD has hotkey function.
Please continuously press twice to shift PLU key when using the second
page PLU.
E.g. If you want to input ‘PLU 36’, press the first hotkey twice continuously
so as to realize inputting ‘PLU 36’.

15
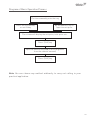
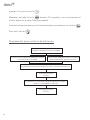
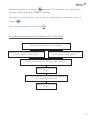
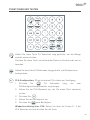
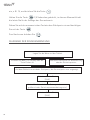
Diagram of Basic Operation Process
Press the PLU hotkey
or unit N key
By the numeric key to
input the unit price
Put the commodity onto the tray.
The screen will display the unit price, total price. etc.
Input the amount received (it must be greater
than the subtotal amount)
Press [CHG] key
Press [CHG] key
Note: You can choose any method arbitrarily to carry out selling in your
practical application.

16
GUARANTEE
This balance is guaranteed for one year from the delivery date. The guarantee
covers any fabrication defect of the material.
During this period, GRAM PRECISION, SL, covers the manpower and the
spare parts necessary to repair the scale.
This guarantee does not cover the failures caused by an inappropriate use
or overload.
The guarantee does not cover the freight cost (transport) necessary to
repair the balance.

17
ESPAÑOL
FUNCIONES
• 35 teclas de memoria de precio unitario (modelo PLU), 8 teclas para el
resto de modelos.
• Función de auto-desconexión, la balanza entra automáticamente en
estado de Stand-by cuando no detecta ninguna operación (el usuario
puede configurar el tiempo de 4-200 segundos, con 200 segundos la
balanza no entrará en el estado de stand-by) consumiendo solo 21 μA.
La función standby se desactivará en el momento que la balanza capte
un movimiento sobre el plato de pesada.
• Función de iluminación del display pulsando la tecla de iluminación
durante 1.5 segundos.
• La función CHG ayuda al usuario a cambiar notas con exactitud.
• Almacenamiento de 70PLU (solo en modelos XFOC+ PLU).
• Función de bloqueo de precio, apta para vender productos del mismo
precio.
• Rangos: 6/15 kg (e = 2/5 g) o 15/30 kg (e = 5/10 g)
PRECAUCIONES
• Símbolo de estabilidad. Cuando el peso es estable, el indicador de
estabilidad se activará, indicando que es el momento de colocar el
producto sobre el plato de pesada.

18
ESPECIFICACIONES TÉCNICAS
OPERACIÓN
Asegurarse de que la balanza está situada sobre una superficie firme y
plana, entonces conectarla. Se puede seleccionar la unidad, el tiempo de
auto-desconexión, tiempo de activación de la iluminación del display, el
punto decimal y el método de entrada.
MODELO XFOC+ PLU XFOC+ RS XFOC+ RS PLU
Características básicas
Visor iluminado,
35x2 teclas
acceso directo
Visor iluminado,
RS232
Visor iluminado,
RS232, 35x2
teclas acceso
directo
Nº de intervalo de la
escala de verificación n=3000
Capacidad 0-15-30 kg
Columna Si No
Alimentación 3 pilas tipo D RS232 o 3 pilas tipo AA
Duración de la batería 8000 horas / 24 meses
Temperatura de trabajo 0 ºC – 40 ºC
Humedad de trabajo 5 % - 85 %
Clase
Capacidad maxima 6/15 kg 15/30 kg
Intervalo 2/5 g 5/10 g
Capacidad minima 40 g 100 g
Tara maxima -5.998 kg -9.995 kg
Dimensión del plato Plato de acero inoxidable - 330*230

19
Selección del tiempo de autodesconexión
1. Al poner en marcha la balanza, en el momento que el display muestra
todos sus segmentos, pulsar la tecla para acceder al parámetro de
configuración.
2. Introducir el tiempo de auto-desconexión y pulsar la tecla para
confirmar. El display de precio mostrará el tiempo de autodesconexión
introducido.
3. Pulsar la tecla para salir.
Nota: El usuario puede seleccionar entre 4~199 segundos, la balanza
también se autodesconectará transcurridos 15 minutos de no uso. Cuando
el símbolo “ ” aparece debajo de “Power saving” significa que la balanza
se encuentra dentro del estado auto-desconexión (standby).
Ajuste de la iluminación del display
Iluminación del display encendida/apagada:
1. En el estado de ponderación normal, mantenga pulsada la tecla
durante 2,5 segundos para abrir o cerrar la luz de fondo de la pantalla
del operador:
2. Pulse la tecla para entrar en la interfaz de configuración durante
la cuenta atrás de encendido -> pulse y mantenga pulsada la tecla
durante 2,5 segundos para abrir o cerrar la luz de fondo de la pantalla
del cliente pulse la tecla para salir de esta interfaz.
Nivel de iluminación del display: Pulse la tecla para entrar en la
interfaz de ajuste durante la cuenta atrás del aceite de alimentación ->

20
pulse la tecla para cambiar el nivel de la luz de fondo (nivel 0-7. el
nivel de luz de fondo de la balanza por defecto es el nivel 3) pulse la tecla
para salir de esta interfaz.
Tiempo de retroiluminación: Pulse la tecla para entrar en la interfaz
de ajuste durante la cuenta atrás de la puesta en marcha -> introduzca el
tiempo de luz de fondo -> pulse la tecla para confirmar -> pulse la
tecla para salir de esta interfaz.
Nota: El tiempo de luz de fondo predeterminado es de 2 segundos. Definido
por el usuario 1-200 segundos a voluntad. la luz de fondo estará encendida
todo el tiempo si el tiempo se ajusta a 200 segundos (pantalla ‘F’ en la
columna de precio total): Si la báscula entra en el estado de ahorro de
energía, la luz de fondo estará apagada. El tiempo de la luz de fondo debería
ser menor que la melodía de sueño.
Transmisión del protocol (modelo con RS-232)
1. Poner en marcha la balanza y en el momento de que el display muestre
todos sus segmentos, pulsar la tecla para acceder al parámetro de
configuración.
2. Pulsar la tecla . En la parte izquierda del display Status aparecerán
las siguientes opciones pulsando la tecla
CO,D0. Transmisión pasiva.
C1,D1. Transmisión activa de la balanza.
C2,D2. Transmisión activa del FTP.
3. Pulsar la tecla para confirmar y la tecla para salir.

21
FUNCIÓN DE LAS TECLAS
Mantener pulsada esta tecla durante 2.5 segundos para encender o
apagar la balanza.
Pulsar esta tecla para borrar datos erroneos o para salir.
Mantener pulsada esta tecla durante 2.5 segundos para la
configuración de los precios unitarios.
Configuración de PLU : disponibles 70 diferentes tipos de PLU.
1. Pulsar durante 2.5 seg. para acceder al parámetro de
configuración de PLU.
2. Introducir el número de PLU al que se desea asignar un precio.
3. Pulsar .
4. Introducir el precio del artículo.
5. Pulsar para confimar.
Recuperación de una PLU: Introducir el número de PLU mediante

22
las teclas 0 – 9 y pulsar la tecla .
Pulsar esta tecla para activar la función de bloqueo de precio. Esta
función es ideal para vender productos del mismo precio y solo es
válida para balanzas con salida RS-232.
Pulsar esta tecla para sustraer el peso de un recipiente (función
tara)
Mantener pulsada esta tecla durante 2 segundos para activar/
desactivar la iluminación del display.
Pulsar esta tecla para calcular el cambio a devolver (solo para
modelos con RS-232).
Pulsar esta tecla para revisar el estado de la pilas.
PLU directas.
Mantener pulsada esta tecla durante 2.5 segundos, la balanza
mostrará la suma total. Pulsar la tecla para borrar la suma
realizada (solo para modelos con RS-232).
Esta tecla se utiliza para poner a cero la lectura del display.
Mantener pulsada esta tecla para visualizar la información de la
version y el tiempo de autodesconexión predeterminado.

23
Funciones
Teclas PLU directas ( - )
Mantener pulsada la tecla hasta visualizar PLU, pulsar la tecla directa
deseada (M1 – M6) introducir el precio unitario y pulsar la tecla para
confirmar. Para salir, pulsar la tecla .
Tecla Tara ( )
Esta tecla se utiliza para sustraer el peso de un recipiente y posteriormente
obtener el peso neto del producto.
Colocar el recipiente sobre el plato de pesada, pulsar la tecla el display
quedará a cero, colocar el producto dentro del recipiente, el display mostrará
el peso neto del producto. Para salir del modo Tara y volver al modo normal
de pesaje, volver a pulsar la tecla .
Mantener pulsada esta tecla durante 2.5 segundos para activar o desactivar
la iluminación del display.
Tecla de cambio ( ) (Modelo con RS-232)
Esta tecla permite calcular el cambio a devolver, una vez visualizada la suma
total, pulsar la tecla e introducir el dinero entregado por el cliente, pulsar
de nuevo la tecla el display mostrará el cambio a devolver al cliente.
Métodos para la introducción del precio unitario
Seleccionar la PLU en la que se desea introducir un precio unitario, pulsando
la PLU directa M1 – M6 o la PLU indirecta utilizando el teclado numérico. En
el caso de tratarse de una PLU indirecta, introducir el número de PLU por

24
ejemplo 15 y pulsa la tecla .
Mantener pulsada la tecla durante 2.5 segundos, en este momento el
último dígito del display Total parpadeará.
Introducir el precio unitario con el teclado numérico y confirmar con la tecla .
Para salir pulsar .
Diagrama del proceso básico de utilización
Pulse la tecla de acceso directo PLU o
la tecla N de la unidad.
Con la tecla numérica para introducir
directamente el precio unitario.
Ponga la mercancía en la bandeja.
La pantalla mostrará el precio unitario, el precio total, etc.
Introduzca la cantidad recibida (debe ser mayor
que la cantidad del subtotal)
Presione la tecla
[CHG].
Presione la tecla
[CHG].

25
GARANTÍA
Esta balanza está garantizada contra todo defecto de fabricación y de
material, por un periodo de 1 año a partir de la fecha de entrega.
Durante este periodo, GRAM PRECISION, SL, se hará cargo de la reparación
de la balanza.
Esta garantía no incluye los daños ocasionados por uso indebido o
sobrecargas.
La garantía no cubre los gastos de envío (portes) necesarios para la
reparación de la balanza.

26
FRANÇAIS
FONCTIONS
• 35 clés de mémoire de prix unitaires (modèle PLU), 8 clés pour les autres
modèles.
• Fonction auto-off, la balance entre automatiquement en mode veille
lorsque celle-ci ne détecte aucune opération (l´utilisateur peut
configurer le temps de 4-200 secondes, avec 200 secondes afin que la
balance n´entre pas en état de stand-by) consommer seul 21 μA. La
fonction standby est désactivée au moment ou la balance détecte un
mouvement sur le plateau de pesée.
• Fonction d´éclairage de l´écran: Appuyer sur la touche d´éclairage
pendant 2.5 secondes.
• La fonction CHG aide l´utilisateur à changer notes avec exactitude.
• Mémorisation de 70PLU (ps1XD)
• Fonction de blocage de rangs des produits de même prix.
• Rangs: 6/15 kg (e = 2/5 g) o 15/30 kg (e = 5/10 g)
PRÉCAUTIONS
• Symbole de stabilité. Lorsque le poids est stable, l´indicateur de stabilité
est activé, indiquant que le moment est venu afin de placer le produit sur
le plateau.

27
SPECIFICITÉS TECHNIQUES
OPERATION
Veillez à ce que la balance soit située sur une surface ferme et plate, pour
ensuite la brancher. Vous pouvez sélectionner l´unité, le temps d´auto-
déconnexion, le temps d´activation de l´éclairage de l´écran, le point
décimal ainsi que la méthode d´entrée.
MODEL XFOC+ PLU XFOC+ RS XFOC+ RS PLU
Caractéristiques de base
Eclairage de
l´écran, 35*2
touches de
raccourci
Eclairage de
l´écran, RS232
Eclairage de
l´écran, RS232,
35*2 touches de
raccourci
Nombre d’échelles de
vérification n=3000
Capacité 0-15-30 kg
Colonne Oui Non
Alimentation 3 piles D RS232 et 3 piles AA
Durée de la batterie 8000 heures / 24 mois
Température de travail 0 ºC – 40 ºC
Humidité de travail 5 % - 85 %
Classe
Capacité maximale 6/15 kg 15/30 kg
Intervalle 2/5 g 5/10 g
Capacité minimale 40 g 100 g
Tare maximale -5.998 kg -9.995 kg
Dimension du plateau 330*230

28
Sélection du temps d´auto-déconnexion
1. Allumer la balance et au moment où l´écran affiche tous les chiffres,
appuyer sur la touche pour accéder au paramètre de configuration.
2. Introduire le temps d´auto-déconnexion et confirmer en appuyant sur
la touche L´écran “prix” affichera le temps d´auto-déconnexion
introduit.
3. Appuyer sur la touche pour sortir.
Note: L´utilisateur peut choisir entre 4~199 secondes, la balance également
s´éteindra après 15 minutes de non utilisation. Lorsque le symbole “ ”
apparaît en dessus de “Power saving” signifie que la balance se trouve en
état d´auto-déconnexion (standby)
Réglage du rétro-éclairage
Rétro-éclairage allumé/éteint :
1. En mode de pondération normal, appuyez sur la touche pendant
2,5 secondes pour ouvrir ou fermer le rétro-éclairage de l’écran de
l’opérateur :
2. Appuyez sur la touche pour entrer dans l’interface de réglage
pendant le compte à rebours de la mise sous tension -> appuyez et
maintenez la touche pendant 2,5 secondes pour ouvrir ou fermer
le rétroéclairage de l’écran du client ; appuyez sur la touche pour
quitter cette interface.
Niveau de rétro-éclairage : Appuyez sur la touche pour entrer dans
l’interface de réglage pendant le compte à rebours de la mise sous tension ->
appuyez sur la touche pour changer le niveau de rétroéclairage (niveau

29
0-7. Le niveau de rétroéclairage par défaut de la balance est le niveau 3)
appuyez sur la touche pour quitter cette interface.
Durée du rétro-éclairage : Appuyez sur la touche pour entrer dans
l’interface de réglage pendant le compte à rebours de la mise sous tension
-> entrez la durée du rétroéclairage -> appuyez sur la touche pour
confirmer -> appuyez sur la touche pour quitter cette interface.
Notes: La durée du rétroéclairage par défaut est de 2 secondes. Le rétro-
éclairage sera allumé en permanence si la durée est réglée à 200 secondes
(affichage “F” dans la colonne “Prix total”) : Si la balance passe en mode
d’économie d’énergie, le rétroéclairage s’éteint. La durée du rétro-éclairage
doit être inférieure à celle de la mise en veille.
Transmission du protocole (Modèles avec RS-232)
1. Allumer la balance et au moment où l´écran affiche tous les segments,
appuyer sur la touche pour accéder aux paramètres de configuration.
2. Appuyer sur la touche . Dans la partie gauche du display “Status”
apparaîtront les options suivantes:
CO,D0. Transmission passive.
C1,D1. Transmission active de la balance.
C2,D2. Transmission active du FTP.
3. Appuyer sur la touche et la touche pour confirmer et pour
sortir.

30
FONCTION DES TOUCHES
Maintenir appuyée la touche pendant 2.5 secondes pour allumer ou
éteindre la balance.
Appuyer sur cette touche pour effacer les données erronées ou pour sortir.
Maintenir appuyée la touche pendant 2.5 secondes pour la
configuration des prix unitaires.
Configuration de PLU: disponibles 70 différents types de PLU.
1. Appuyer sur la touche pendant 2.5 secondes pour accéder au
paramètre de configuration de PLU.
2. Introduire le nombre de PLU où l´on veut introduire un prix.
3. Appuyer sur la touche .
4. Introduire le prix unitaire du produit.
5. Appuyer sur la touche pour confirmer.
Récupération d´une PLU: Introduire le nombre de la PLU en appuyant
les touches 0 – 9 et appuyer la touche .

31
Appuyer cette touche pour activer la fonction de blocage de prix. Cette
fonction est idéale pour vendre des produits au même prix. Cette
fonction est seulement valable pour balances avec sortie RS-232.
Appuyer sur cette touche pour soustraire le poids d´un récipient
(fonction tare).
Maintenir appuyée cette touche pendant 2.5 secondes pour activer/
désactiver l´éclairage du display.
Appuyer cette touche pour calculer la monnaie à rembourser
(seulement valable pour les modèles avec sortie RS-232).
Appuyer cette touche pour observer l´état des piles.
PLU directes.
Maintenir appuyée cette touche pendant 2.5 secondes, la balance
affichera la somme totale.
Appuyer sur la touche pour effacer la somme réalisée (seulement
valable pour modèles avec RS-232).
Cette touche est utilisée pour mettre à zéro la lecture du display.
Maintenir appuyée cette touche pour afficher des informations de la
version ainsi que le temps d´auto-deconnexion.
Fonctions
Touches PLU directes ( - )
Maintenir appuyée la touche jusqu´à afficher le message “visualizar
PLU”, appuyer sur la touche directe souhaitée (M1 – M6), introduire le prix
unitaire et confirmer en appuyant la touche .

32
Pour sortir, appuyer sur la touche .
Touche TARE ( )
Cette touche est utilisée pour soustraire le poids d´un récipient et ensuite
obtenir le prix net du produit.
Placer le récipient sur le plateau, appuyer sur la touche , l´écran se met
à zéro. Placer le produit dans le récipient, le display affichera le poids net
du produit. Pour sortir du mode Tare et revenir en mode normal de pesage,
appuyer sur la touche .
Maintenir enfoncée cette touche pendant 2.5 secondes pour activer ou
désactiver l´éclairage de l´écran.
Touche pour rendu monnaie ( ) (Modèles avec RS-232)
Cette touche permet de calculer le rendu monnaie. Une fois affichée la somme
totale de la vente, appuyer sur la touche , introduire la somme délivrée par
le client, appuyer sur la touche , l´écran affichera la monnaie à retourner
au client.
Methodes pour introduction du prix unitaire
Sélectionner la PLU souhaitée, PLU directe en appuyant les touches directes
M1 – M6 ou PLU indirecte utilisant les touches numériques, et appuyer sur
la touche .
Par exemple : dans le cas d´une PLU indirecte, introduire le nombre de la
PLU (15) et ensuite appuyer sur la touche .

33
Maintenir enfoncer la touche pendant 2.5 secondes, à ce moment le
dernier chiffre du display “Total” clignotera.
Introduire le prix unitaire avec le clavier numérique et confirmer avec la
touche .
Pour sortir, appuyer sur la touche .
Diagramme du processus fondamental d´utilisation
Appuyez sur la touche de raccourci PLU
ou sur la touche N de l’unité.
Par la touche numérique pour entrer
directement le prix unitaire.
Mettez la marchandise sur le plateau.
L’écran affichera le prix unitaire, le prix total, etc.
Saisissez le montant reçu (il doit être supérieur
au montant du sous-total)
Appuyez sur la touche
[CHG].
Appuyez sur la touche
[CHG].

34
GARANTIE
Cette balance est garantie contre les défauts de fabrication ou de pièce
pendant une année, à partir de la date de livraison.
Durant cette période, GRAM PRECISON, SL, se chargera de la réparation de
la balance.
Cette garantie n’inclut pas les dommages causés par une utilisation
impropre, surcharge, ou par faute de ne pas avoir suivi les recommandations
écrites dans ce manuel (particulièrement de l’aparté CONSEILS POUR
L’ENTRETIEN).
La garantie ne couvre pas les frais d’envoi (transport) nécessaires pour la
réparation de la balance.

35

36
PORTUGUÊS
FUNÇÕES
• 35 teclas de memória de preço unitário (modelo PLU), 8 teclas para os
outros modelos.
• Função de poupança de energia, a balança entra automáticamente
em Stand-by quando não detecta nenhuma operação (o utilizador
pode configurar o tempo de 4-200 segundos, com 200 segundos,
a balança não entrará em estado stand-by) consumindo só 21 μA. A
função standby é desactivada no momento em que a balança detecte
um movimento no prato da pesagem.
• Função de iluminação do visor, precionando a tecla de iluminação
durante 2.5 segundos.
• A função CHG ajuda o utilizador a alterar as moedas com exatidão.
• Armazenamento de 70PLU (ps1XD)
• Função de bloqueio de preço, ajuste para vender produtos do mesmo
preço.
• Pesagens: 15kg(e=/5g) a 30kg(e=10g)
PRECAUÇÕES
• Símbolo de estabilidade. Quando o peso está estável, o indicador
de estabilidade é activado, indicando que é o momento de colocar o
produto sobre o prato de pesagem.

37
ESPECIFICAÇÕES TÉCNICAS
OPERAÇÕES
Assegure-se que a balança está situada numa superfície firme e plana, antes
de ligá-la. Pode seleccionar a unidade, o tempo de poupança de energia,
tempo de activação da iluminação do visor, as casas decimais e o método de
introdução.
MODELO XFOC+ PLU XFOC+ RS XFOC+ RS PLU
Características básicas
Iluminação
do Visor, 35*2
teclas de atalho
Iluminação do
Visor, RS232
Iluminação do
Visor, RS232,
35*2 teclas de
atalho
Número do intervalo da
escala de verificação n=3000
Capacidade 0-15-30 kg
Coluna Sim Não
Alimentação 3 pilhas D RS232 ou 3 pilhas AA
Duração da Bateria 8000 horas / 24 meses
Temperatura de trabalho 0 ºC – 40 ºC
Humidade de trabalho 5 % - 85 %
Classe
Capacidade máxima 6/15 kg 15/30 kg
Intervalo 2/5 g 5/10 g
Capacidade mínima 40 g 100 g
Tara máxima -5.998 kg -9.995 kg
Dimensão do prato Prato em aço inoxidável: 330*230

38
Seleccionar o tempo de poupança de energia
1. Ao iniciar a balança, no momento em que o visor mostra todos os seus
segmentos, carregar na tecla para aceder aos parametros de
configuração.
2. Introduzir o tempo de poupança de energia e carregar na tecla para
confirmar. O visor do preço mostrará o tempo de poupança de energia
introduzido.
3. Carregar na tecla para sair.
Nota: O utilizador pode seleccionar entre 4 e 199 segundos, a balança também
se desligará automáticamente, decorridos 15 minutos sem utilização.
Quando o símbolo “ ” aparece debaixo de “Power saving”, significa que
a balança se encontra em estado poupança de energia (standby).
Ajuste da retroiluminação
Retroiluminação ligada/desligada:
1. Sob o estado normal de pesagem, manter pressionada a tecla
durante 2,5 segundos para abrir ou fechar a retroiluminação do visor
do operador.
2. Prima a tecla para entrar na interface de configuração durante a
contagem decrescente da energia ligada -> prima e mantenha premida
a tecla durante 2,5 segundos para abrir ou fechar a retroiluminação
do visor do cliente prima a tecla para sair desta interface.
Nível de retroiluminação: Prima a tecla para entrar na interface de
configuração durante a contagem decrescente de potência ligada -> prima
a tecla para mudar o nível de retroiluminação (nível 0-7. o nível

39
predefinido de retroiluminação é o nível 3) prima a tecla para sair
desta interface.
Tempo de retroiluminação: Premir a tecla para entrar na interface
de configuração durante a contagem decrescente de luz de fundo ligada
-> introduzir o tempo de retroiluminação -> premir a tecla para
confirmar -> premir a tecla para sair desta interface.
Nota: O tempo de retroiluminação predefinido é de 2 segundos. Definido
pelo utilizador 1-200 segundos à vontade. a retroiluminação estará
sempre ligada se o tempo for definido 200 segundos (visor ‘F’ na Coluna
de Preço Total): Se a escala entrar no estado de poupança de energia. a
retroiluminação estará desligada. O tempo de retroiluminação deverá ser
mais baixo do que a melodia do sono.
Protocolo de transmissão (modelo RS-232)
1. Ligar a balança, e quando o monitor mostrar todos os seus segmentos,
carregar na tecla para aceder aos parâmetros de configuração.
2. Carregar na tecla . Na parte esquerda do monitor, em Estado,
aparecerão as seguintes opções carregando nas teclas:
CO,D0: Transmissão passiva.
C1,D1: Transmissão activa da balança.
C2,D2: Transmissão activa do FTP.
3. Carregar na tecla para confirmar e na tecla para sair.

40
FUNÇÕES DAS TECLAS
Carregar na tecla durante 2.5 segundos para acender ou desligar a
balança.
Carregar nesta tecla para apagar dados errados ou para sair.
Carregar na tecla durante 2.5 segundos para aceder à configuração
dos preços unitários.
Configuracção de PLU : disponíveis 70 diferentes tipos de PLU
1. Carregar na tecla durante 2.5 seg. para acceder al
parámetro de configuración de PLU.
2. Introduzir o número de PLU a que se deseja atribuir o preço.
3. Carregar em .
4. Introduzir o preço do artigo.
5. Carregar em para confimar.
Recuperação de uma PLU: Introduzir o número da PLU, através das
teclas 0 – 9 e carregar na tecla .

41
Carregar nesta tecla para activar a função de bloqueio de preço. Esta
função é ideal para vender produtos do mesmo preço, e só é válida
para balanças com saída RS-232.
Carregar nesta tecla para subtrair o peso de um recipiente (função
tara).
Manter esta tecla carregada durante 2 segundos para activar/
desactivar a iluminação do visor.
Carregar nesta tecla para calcular o troco a devolver (só para
modelos com RS-232)
Carregar nesta tecla para ver o estado das pilhas.
PLU directas.
Carregar nesta tecla durante 2.5 segundos, a balança mostrará a
soma total. Carregar na tecla para apagar a soma realizada (só
para modelos com RS-232).
Esta tecla é utilizada para colocar a zero a leitura do visor.
Manter esta tecla carregada, para visualizar a informação da versão
e o tempo de poupança de energia determinado.

42
Funções
Teclas PLU directas ( - )
Manter a tecla carregada para visualizar a PLU, carregar na tecla
directa desejada (M1 – M6) introduzir o preço unitário e carregar na tecla
para confirmar. Para sair, carregar na tecla .
Tecla Tara ( )
Esta tecla utiliza-se para subtrair o peso de um recipiente e posteriormente
obter o peso líquido do produto.
Colocar o recipiente sobre o prato da pesagem, carregar na tecla e o
visor mostrará o valor zero, colocar o produto dentro do recipiente, o visor
mostrará o peso líquido do produto. Para sair do modo Tara e voltar ao modo
normal de pesagem, voltar a carregar na tecla .
Carregar nesta tecla durante 2.5 segundos para activar ou desactivar a
iluminação do visor.
Tecla de troco ( ) (Modelo com RS-232)
Esta tecla permite calcular o troco a devolver, uma vez visualizada a soma
total, carregar na tecla e introduzir o dinheiro entregue pelo cliente,
carregar de novo na tecla e o visor mostrará o troco a devolver ao cliente.
Métodos para a introdução do preço unitário
Seleccionar a PLU em que se deseja introduzir o preço unitário, carregando

43
na PLU directa M1 – M6 ou na PLU indirecta, utilizando o teclado numérico.
No caso de se tratar de uma PLU indirecta, introduzir o número da PLU, por
exemplo 15 e carregar na tecla .
Carregar na tecla durante 2.5 segundos, neste momento o ultimo digito
do visor “Total” piscará.
Introduzir o preço unitário com o teclado numérico e confirmar com a tecla .
Para sair, carregar em .
Diagrama do processo básico de utilização
Pressionar a tecla de atalho PLU ou a
tecla N da unidade.
Através da tecla numérica para intro-
duzir directamente o preço unitário.
Colocar a mercadoria no tabuleiro.
O ecrã mostrará o preço unitário, o preço total, etc.
Introduza o montante recebido (deve ser maior do
que o montante subtotal)
Prima a tecla [CHG].
Prima a tecla [CHG].

44
GARANTIA
A garantia desta balança abrange todos os defeitos de fabrico e de material,
pelo periodo de 1 ano, a contar da ficha de entrega.
Durante este periodo, GRAM PRECISION, garante a reparação da balança.
Esta garantía não inclui os danos surgidos por uso indevido ou sobrecargas.
A garantía não cobre os gastos de envío (portes) necessários para a reparação
da balanaça.

45
DEUTSCH
FUNKTIONEN
• 35 Tasten des Einheitspreisspeichers (PLU-Modell), 8 Tasten für die
anderen Modelle.
• Funktion automatisches Abschalten: Die Waage schaltet automatisch
auf Standby, wenn sie keinen Betrieb bemerkt (der Benutzer kann die
Zeit von 4 bis 200 Sekunden einstellen. Bei 200 Sekunden schaltet die
Waage nicht
• auf Standby). In diesem Modus verbaucht sie nur 21 μA. Die Standby-
Funktion wird deaktiviert, sobald die Waage eine Bewegung auf der
Wägeplatte verzeichnet.
• Displaybeleuchtungsfunktion durch Drücken der Beleuchtungstaste für
2,5 Sekunden.
• Die Funktion CHG hilft dem Benutzer, Notizen exakt zu ändern.
• Speicherung von 70 PLU (ps 1 XD)
• Preisblockierungs-Funktion zum Verkauf von Produkten mit dem
gleichem Preis
• Wägebereiche: 15kg (Ablesbarkeit = 5g) oder 30 kg (Ablesbarkeit = 10g)

46
VORSICHTSMASSNAHMEN
• Symbol für Stabilität: Wenn das Gewicht stabil ist, wird die
Stabilitätsanzeige aktiviert und gibt an, dass das Produkt auf die
Wägeplatte gelegt werden kann.
TECHNISCHE DATEN
MODEL XFOC+ PLU XFOC+ RS XFOC+ RS PLU
Grundlegende
Eigenschaften
Display-
beleuchtung,
35*2 Hotkeys
Display-
beleuchtung,
RS232
Display-
beleuchtung,
RS232, 35*2
Hotkeys
Nummer des
Eichteilungsintervalls n=3000
Wägebereiche 0-15-30 kg
Kolumne Ja Nein
Stromversorgung 3pcs D Batterien RS232 and 3 AA Batterien
Lebensdauer der Batterie 8000 Stunden / 24 Monate
Betriebstemperatur 0 ºC – 40 ºC
Betriebsfeuchtigkeit 5 % - 85 %
Klasse
Wägebereich 6/15 kg 15/30 kg
Ablesbarkeit 2/5 g 5/10 g
Minimaler Wägebereich 40 g 100 g
Maximale Tara -5.998 kg -9.995 kg
Maße der Wägeplatte Edelstahlplatte - 330*230

47
BETRIEB
Überprüfen Sie, dass die Wage auf einer festen und ebenen Oberfläche steht
und schalten Sie sie ein. Sie können die Einheit, die Zeit bis zur automatischen
Abschaltung, die Zeit der Aktivierung der Beleuchtung, den Dezimalpunkt
und die Eingabemethode auswählen.
Auswahl der Zeit bis zur automatischen Abschaltung
1. Beim Einschalten der Waage drücken Sie in dem Moment, in dem
das Display all seine Ziffern anzeigt, die Taste , um auf den
Konfigurationsparameter zuzugreifen.
2. Geben Sie die Zeit bis zur automatischen Abschaltung ein und drücken Sie
die Taste zum Bestätigen. Das Preis-Display zeigt die eingegebene
Zeit bis zur automatischen Abschaltung an.
3. Input the time of auto power saving and then press key to confirm.
The price column will display the time just set.
4. Zum Verlassen drücken Sie die Taste .
Hinweis: Der Nutzer kann zwischen 4 und 199 Sekuden auswählen, die
Waage schaltet auch nach 15 Minuten ohne Verwendung automatisch ab.
Wenn das Symbol “ ” unter “Power saving” eingeschaltet wird, bedeutet
dies, dass die Waage sich im Zustand automatisches Abschalten befindet
(Standby)

48
Einstellung der Hintergrundbeleuchtung
Hintergrundbeleuchtung ein/aus:
1. Halten Sie im normalen Gewichtungsstatus die Taste 2,5 Sekunden
lang gedrückt, um die Hintergrundbeleuchtung der Bedieneranzeige zu
öffnen oder zu schließen:
2. Drücken Sie die Taste , um während des Einschaltcountdowns
in die Einstellungsschnittstelle zu gelangen -> halten Sie die Taste
2,5 Sekunden lang gedrückt, um die Hintergrundbeleuchtung der
Kundenanzeige zu öffnen oder zu schließen; drücken Sie die Taste ,
um diese Schnittstelle zu verlassen.
Stufe der Hintergrundbeleuchtung: Drücken Sie die Taste , um während
des Einschaltcountdowns in die Einstellungsschnittstelle zu gelangen
-> drücken Sie die Taste , um die Hintergrundbeleuchtungsstufe
umzuschalten (Stufe 0-7. Die Standard-Stufe der Skala ist Stufe 3) Drücken
Sie die Taste , um diese Schnittstelle zu verlassen.
Zeit der Hintergrundbeleuchtung: Drücken Sie die Taste , um während
des Countdowns des Einschaltens in die Einstellschnittstelle zu gelangen
-> geben Sie die Hintergrundbeleuchtungszeit ein -> drücken Sie die Taste
zur Bestätigung -> drücken Sie die Taste , um diese Schnittstelle
zu verlassen.
Hinweis: Die voreingestellte Hintergrundbeleuchtungszeit beträgt
2 Sekunden. Benutzerdefiniert 1-200 Sekunden nach Belieben. Die
Hintergrundbeleuchtung ist die ganze Zeit eingeschaltet, wenn die Zeit auf
200 Sekunden eingestellt ist (Anzeige ‘F’ in der Spalte Gesamtpreis): Wenn
die Waage in den Stromsparstatus übergeht, ist die Hintergrundbeleuchtung
ausgeschaltet. Die Zeit der Hintergrundbeleuchtung sollte niedriger als die
Schlafmelodie sein.

49
FUNKTIONEN DER TASTEN
Halten Sie diese Taste 2,5 Sekunden lang gedrückt, um die Waage
einoder auszuschalten.
Drücken Sie diese Taste, um fehlerhafte Daten zu löschen oder um zu
beenden.
Halten Sie diese Taste 2,5 Sekunden lang gedrückt, um Stückpreise zu
konfigurieren.
PLU-Konfiguration: 70 verschiedene PLU stehen zur Verfügung
1. Drücken Sie 2,5 Sekunden lang, um zum
PLUKonfigurationsparameter zu gelangen.
2. Geben Sie die PLU-Nummer ein, der Sie einen Preis zuweisen
wollen.
3. Drücken Sie .
4. Geben Sie den Artikelpreis ein.
5. Drücken Sie zum Bestätigen.
Wiederherstellung einer PLU: Geben Sie über die Tasten 0 - 9 die
PLU Nummer ein und drücken Sie die Taste.

50
Drücken Sie diese Taste, um die Funktion Preisblockierung zu
aktivieren. Diese Funktion ist ideal, um Produkte mit dem gleichen
Preis zu verkaufen und ist nur für Waagen mit RS-232-Ausgang
verfügbar.
Drücken Sie diese Taste, um das Gewicht eines Behälters (Funktion
Tara) zu subtrahieren.
Halten Sie diese Taste 2 Sekunden lang gedrückt um die
Displaybeleuchtung ein- oder auszuschalten.
Drücken Sie diese Taste, um das Wechselgeld zu berechnen (nur für
Modelle mit RS-232-Ausgang).
Drücken Sie diese Taste, um den Batteriestand zu überprüfen.
Direkte PLU
Halten Sie diese Taste 2,5 Sekunden lang gedrückt, woraufhin die Waage
die Gesamtsumme anzeigt. Drücken Sie die Taste um die erstellte
Summe zu löschen (nur für Modelle mit RS-232-Ausgang).
Mit dieser Taste wird die Displayanzeige auf Null gestellt.
Halten Sie diese Taste gedrückt, um die Versionsinformationen und
die voreingestellte Zeit bis zur Abschaltung anzuzeigen.
Direkte PLU-Tasten
-
Halten Sie die Taste gedrückt, bis die PLU angezeigt wird, Drücken Sie
die gewünschte Direkttaste (M 1 - M 6) und geben Sie den Stückpreis ein und

51
drücken Sie zum Bestätigen die Taste . Zum Verlassen drücken Sie die
Taste .
Tara-Taste
Diese Taste wird verwendet, um das Gewicht eines Behälters zu subtrahier-
en und daraufhin das Nettogewicht des Produkts zu erhalten.
Stellen Sie den Behälter auf die Wägeplatte, drücken Sie die Taste ;
die Anzeige steht weiterhin auf Null. Legen Sie das Produkt in den Behälter;
das Display zeigt das Nettogewicht des Produkts an. Um den Tara-Modus
zu verlassen und zum normalen Wägemodus zurückzukehren, drücken Sie
noch einmal die Taste .
Halten Sie diese Taste 2,5 Sekunden lang gedrückt um die Displaybeleich-
tung ein- oder auszuschalten.
Rückgeldtaste (Modell mit RS-232)
Diese Taste ermöglicht die Berechnung des Wechselgelds. Sobald die
Gesamtsumme angezeigt wurde, drücken Sie die Taste und geben Sie
den vom Kunden gezahlten Betrag ein, drücken Sie noch einmal die Taste
und im Display wird das Rückgeld für den Kunden angezeigt.
Methoden zur eingabe des stückpreises
Wählen Sie die PLU, in die Sie einen Stückpreis eingeben wollen, indem
Sie die direkte PLU M1 - M6 oder die indirekte PLU mit der nummerischen
Tastatur eingeben. Im Falle einer indirekten PLU geben Sie die PLU-Nummer

52
ein, z. B. 15, und drücken SIe die Taste .
Halten Sie die Taste 2,5 Sekunden gedrückt, in diesem Moment blinkt
die letzte Stelle der Anzeige des Gesamtwerts.
Geben Sie mit der nummerischen Tastatur den Stückpreis ein und bestätigen
Sie mit der Taste
Zum Verlassen drücken Sie .
DIAGRAMM DER GRUNDANWENDUNG
Drücken Sie den PLU-Hotkey oder die
Taste Einheit N.
Über die Zifferntaste zur direkten Eing-
abe des Einheitspreises.
Legen Sie die Ware auf das Tablett.
Auf dem Bildschirm wird der Stückpreis, der Gesamtpreis usw. angezeigt.
Geben Sie den erhaltenen Betrag ein (er muss
größer als der Zwischensummenbetrag sein)
Drücken Sie die Taste
[CHG].
Drücken Sie die Taste
[CHG].

53
GARANTIE
Diese Waage hat eine Garantie auf jegliche Herstellungs- und Materialdefekte
während eines Zeitraums von einem Jahr ab Lieferdatum.
Innerhalb dieser Zeit übernimmt GRAM PRECISION die Reparatur der
Waage.
Diese Garantie schließt keine Schäden durch unsachgemäße Verwendung
oder Überlastungen ein.
Die Garantie deckt nicht die für den Transport der Waage anfallenden
Versandkosten ab.

54
NOTES

55
NOTES

Gram Precision S.L.
Travesía Industrial, 11 · 08907 Hospitalet de Llobregat · Barcelona (Spain)
Tel. +34 902 208 000 · +34 93 300 33 32
Fax +34 93 300 66 98
comercial@gram.es
www.gram-group.com
004/04052023
-
 1
1
-
 2
2
-
 3
3
-
 4
4
-
 5
5
-
 6
6
-
 7
7
-
 8
8
-
 9
9
-
 10
10
-
 11
11
-
 12
12
-
 13
13
-
 14
14
-
 15
15
-
 16
16
-
 17
17
-
 18
18
-
 19
19
-
 20
20
-
 21
21
-
 22
22
-
 23
23
-
 24
24
-
 25
25
-
 26
26
-
 27
27
-
 28
28
-
 29
29
-
 30
30
-
 31
31
-
 32
32
-
 33
33
-
 34
34
-
 35
35
-
 36
36
-
 37
37
-
 38
38
-
 39
39
-
 40
40
-
 41
41
-
 42
42
-
 43
43
-
 44
44
-
 45
45
-
 46
46
-
 47
47
-
 48
48
-
 49
49
-
 50
50
-
 51
51
-
 52
52
-
 53
53
-
 54
54
-
 55
55
-
 56
56


en otros idiomas
- français: Gram XFOC+ Le manuel du propriétaire
- English: Gram XFOC+ Owner's manual
- Deutsch: Gram XFOC+ Bedienungsanleitung
- português: Gram XFOC+ Manual do proprietário
Otros documentos
-
Thulos TH-BD30 El manual del propietario
-
-
Berkel FX50 Guía del usuario
-
Mettler Toledo Ariva Quick Manual
-
-
Ohaus Aviator 7000 Manual de usuario
-
HAEGER KS-05B.002B Manual de usuario
-
Sharp UP800F Instrucciones de operación
-
Sharp XE-A505 Manual de usuario
-