Aroma ARC-930SB Manual de usuario
- Categoría
- Pequeños electrodomésticos de cocina
- Tipo
- Manual de usuario

www.AromaCo.com
Arrocera y vaporera
digital de 10 tazas
Manual de instrucciones
ARC-930SB
10-Cup Digital Rice
Cooker & Food Steamer
Instruction Manual
ARC-930SB
www.AromaCo.com

Congratulations on your purchase of the Aroma
®
Sensor Logic 10-
Cup Digital Rice Cooker. In no time at all, you’ll be making fantastic,
restaurant-quality rice at the touch of a button! Whether long, medium or
short grain, this machine is specially calibrated to cook all varieties of rice,
including tough-to-cook brown rice, to fluffy perfection.
In addition to rice, your new Aroma
®
Rice Cooker is ideal for
healthy, one-pot meals for the whole family. The convenient steam tray
inserts directly over the rice, allowing you to cook moist, fresh meats and
vegetables at the same time, in the same pot. Steaming foods locks in
their natural flavor and nutrients (which are often lost with other methods
of cooking) without added oil or fat, for meals that are as nutritious and
low-calorie as they are easy.
But it doesn’t end there. Your new rice cooker is also great for
soups, stews, stocks, gumbos, jambalaya, breakfast frittatas, dips and
even desserts! Several delicious recipes are included at the back of this
manual.
This manual contains instructions for using your rice cooker and its
convenient pre-programmed digital settings, as well as all of the
accessories included. Also included are helpful measurement charts for
cooking rice and steaming. For more information on your Sensor Logic
rice cooker, or for product service, recipes and other home appliance
solutions, please visit us online at www.AromaCo.com.
Published By:
Aroma Housewares Co.
6469 Flanders Drive
San Diego, CA 92121
U.S.A.
1-800-276-6286
www.aromaco.com
© 2008 Aroma Housewares Company All rights reserved.
Felicidades por comprar la Arrocera Digital para 10 Tazas Sensor Logic
Aroma
®
. ¡En cualquier momento, usted estará preparando arroz
fantástico, de la calidad de un restaurante, con el toque de un botón!
Ya sea que el grano sea largo, mediano o corto, esta máquina está
calibrada especialmente para cocinar todas las variedades de arroz,
incluyendo el arroz integral difícil de cocinar, con un esponjado perfecto.
Además del arroz, su nueva Arrocera Aroma
®
es ideal para platillos
saludables cocinados en una sola olla para toda la familia. La cómoda
charola de vapor se inserta directamente encima el arroz, permitiéndole
cocinar vegetales y carnes frescas al vapor al mismo tiempo, en la misma
olla. Los alimentos al vapor encierran sus nutrientes y sabores naturales
(los cuales se pierden con frecuencia con otros métodos de cocinado)
sin tener que agregar aceite o grasa, para platillos que son tan nutritivos
y bajos en calorías como fáciles de preparar.
Pero esto no es todo. ¡Su nueva arrocera también es grandiosa para
sopas, guisos, caldos, sopas de mariscos, jambalaya, frittatas para el
desayuno, dips y hasta postres! En la parte trasera de este manual se
incluyen varias deliciosas recetas.
Este manual contiene instrucciones para usar su arrocera y sus
configuraciones digitales preprogramadas, así como todos los accesorios
que se incluyen. También se incluyen tablas útiles de medida para
cocinar arroz y otros alimentos al vapor. Para más información acerca de
su arrocera Sensor Logic o el servicio del producto, recetas y soluciones
de otros electrodomésticos, por favor visítenos en línea en
www.AromaCo.com.
Publicado Por:
Aroma Housewares Co.
6469 Flanders Drive
San Diego, CA 92121
U.S.A.
1-800-276-6286
www.aromaco.com
© 2008 Aroma Housewares Company. Todos los derechos reservados.

MEDIDAS IMPORTANTES DE SEGURIDAD
1. Importante: Lea cuidadosamente
todas las instrucciones de seguridad
antes de comenzar a usar el aparato
por primera vez.
2. No toque las superficies calientes.
Utilice para ello los mangos o las
perillas.
3. Use el aparato sobre una superficie
nivelada, seca y resistente al calor.
4. Para protegerse y evitar un choque
eléctrico, no sumerja en agua o en
cualquier otro líquido el cordón, la
clavija o el aparato mismo.
5. Mantenga el aparato fuera del
alcance de los niños para evitar
accidentes.
6. Asegúrese de que el aparato esté
apagado OFF, cuando no se esté
usando, antes de ponerle o quitarle
partes y antes de limpiarlo.
7. No ponga a funcionar ningún aparato
si el cordón eléctrico o la clavija de
enchufe están dañados o si la unidad
no funciona bien o si se ha dañado
de alguna manera. Regrese el
aparato a la agencia de servicio
autorizada más cercana, para
revisión, reparación o ajuste.
8. No utilice aditamentos o accesorios
que no sean surtidos o recomendados
por el fabricante. Las partes
incompatibles crean un peligro.
9. No se use en exteriores.
10. No deje que el cordón cuelgue sobre
la orilla de la mesa o del mostrador ni
toque las superficies calientes.
11. No coloque el aparato sobre o cerca
de una rejilla de gas o eléctrica
encendidas ni dentro de un horno
caliente.
12. No utilice el aparato para otro uso
que no sea el indicado.
13. Se deberán tomar precauciones
extremas al mover el aparato cuando
contenga arroz u otros líquidos
calientes.
1
IMPORTANT SAFEGUARDS
14. Durante la etapa de cocimiento,
podrá observar vapor saliendo de las
ventanillas sobre las tapas. Esto es
normal. No cubra, toque ni obstruya
la ventanilla de vapor.
15. Úsese únicamente con una
tomacorriente AC de 120V.
16. Siempre desconecte desde la base
de la tomacorriente de la pared.
Nunca jale del cordón.
17. La olla arrocera deberá operarse en
un circuito eléctrico separado de
otros aparatos que estén
funcionando. Si el circuito eléctrico se
sobrecarga con otros aparatos,
puede ser que esta unidad no
funcione adecuadamente.
18. Asegúrese siempre de que la
cacerola para cocinar interna esté
seca por la parte de afuera antes de
usarla. Si la cacerola para cocinar se
mete húmeda en la olla arrocera,
esto dañará al producto,
ocasionando que no funcione bien.
19. Recomendamos que se tomen
precauciones extremas al abrir la
tapa durante el tiempo que cocine o
después de haber cocinado, ya que
el vapor caliente escapará de la olla
y esto podría ocasionar quemaduras.
20. El arroz no debe permanecer dentro
de la olla de arroz con la función de
"mantener caliente" por más de 24
horas.
21. Para evitar daños o deformaciones,
no use la olla interna sobre una estufa
o quemador.
22. Antes de retirar el enchufe de la toma
de corriente eléctrica de la pared,
asegúrese de que el aparato haya
sido apagado.
23. Para reducir el riesgo de incendio o
choque eléctrico, cocina recipiente
interior.
Cuando se usen aparatos electricos, siempre deberán observarse las
precauciones básicas de seguridad, incluyendo las siguientes:
GUARDE ESTAS INSTRUCCIONES
Basic safety precautions should always be followed when using electrical
appliances, including the following:
1. Important: Read all instructions
carefully before first use.
2. Do not touch hot surfaces. Use the
handles or knobs.
3. Use only on a level, dry and heat-
resistant surface.
4. To protect against electrical shock,
do not immerse cord, plug or the
appliance in water or any other
liquid.
5. Close supervision is necessary when
the appliance is used by or near
children.
6. Unplug from outlet when not in use
and before cleaning. Allow unit to
cool before putting on or taking off
parts and before cleaning the
appliance.
7. Do not operate any appliance with
a damaged cord or plug or after
the appliance malfunctions or has
been damaged in any manner.
Return the appliance to the nearest
authorized service facility for
examination, repair or adjustment.
8. The use of accessory attachments
not recommended by the
appliance manufacturer may result
in fire, electrical shock or injury.
9. Do not use outdoors.
10. Do not let cord touch hot surfaces
or hang over the edge of a counter
or table.
11. Do not place on or near a hot
burner or in a heated oven.
12. Do not use the appliance for other
than its intended use.
13. Extreme caution must be used when
moving the appliance containing
hot water or other liquids.
14. Do not touch, cover or obstruct the
steam vent on the top of the rice
cooker as it is extremely hot and
may cause scalding.
15. Use only with a 120V AC power
outlet.
16. Always unplug from the base of the
wall outlet. Never pull on the cord.
17. The rice cooker should be operated
on a separate electrical circuit from
other operating appliances. If the
electrical circuit is overloaded with
other appliances, the appliance
may not operate properly.
18. Always make sure the outside of the
inner cooking pot is dry prior to use.
If the cooking pot is returned to
cooker when wet, it may damage
or cause the product to
malfunction.
19. Use extreme caution when opening
the lid during or after cooking. Hot
steam will escape and may cause
burns.
20. Rice should not be left in the rice pot
with the keep warm function on for
more than 12 hours.
21. To prevent damage or deformation,
do not use the inner pot on a
stovetop or burner.
22. To disconnect, turn any control to
“OFF”, then remove plug from wall
outlet.
23. To reduce the risk of electrical shock,
cook only in the removable
container provided.
SAVE THESE INSTRUCTIONS
1

INSTRUCCIONES DE CABLE CORTO
1. A short power-supply cord is provided to reduce the risks resulting from
becoming entangled in or tripping over a longer cord.
2. Longer extension cords are available and may be used if care is exercised in
their use.
3. If a longer extension cord is used:
a. The marked electrical rating of the extension cord should be at least as
great as the electrical rating of the appliance.
b. The longer cord should be arranged so that it will not drape over the
counter top or tabletop where it can be pulled by children or tripped over
unintentionally.
2
This appliance has a polarized plug (one blade is wider than the other); follow
the instructions below:
To reduce the risk of electric shock, this plug is intended to fit into a polarized
outlet only one way. If the plug does not fit fully into the outlet, reverse the
plug. If it still does not fit, contact a qualified electrician. Do not attempt to
modify the plug in any way.
If the supply cord is damaged, it must be replaced by the manufacturer, its
service agent or a similarly qualified person in order to avoid a hazard.
This appliance is for household use only.
SHORT CORD INSTRUCTIONS
POLARIZED PLUG
PLOYA POLARIZADA
2
1. Se proporciona un cable eléctrico corto con el propósito de reducir el
riesgo de tropezarse o enredarse con un cable más largo.
2. Hay cables de extensión más largos disponibles y deben ser usados con
sumo cuidado.
3. Si se usa un cable de extensión más largo:
a. La clasificación eléctrica marcada en el cable de extensión debe ser
por lo menos igual que la clasificación eléctrica del aparato.
b. El cable más largo debe ser colocado de manera que no cuelguepor
el borde del mostrador o mesa en donde pudiera ser jalado por un
niño o alguien pudiera tropezarse con el cable sin querer.
Si este aparato tiene ploya polarizada:
Para reducir el riesgo de descarga eléctrica, este ploya intencionalmente solo
debe de enchufar un lado en enchufes de luz de ploya polarisada. Si la clavija
no entra completamente, da vuelta a la clavija. Si aun la clavija no puede
entrar, llame a un electricista calificada. No intente de modificar la clavija, es
muy peligroso.
Si esté estropeado el cordón eléctrico, hay que ser reemplazado por el
fabricante o su agencia de servicio u otra persona calificada para hacer que se
evita cualquier peligro.
¡NO DEJE QUE EL CABLE
CUELGUE!
¡MANTÉNGALO
LEJOS DE LOS
NIÑOS!
ESTE APARATO ES PARA USO DOMÉSTICO.

3
PARTS IDENTIFICATION
3
IDENTIFICACION DE LAS PARTES
1. Lid Release
Button
2. Handle
3. Steam Vent
4. Lid
5. Condensation
Collector
6. Digital Display
7. Inner Pot
Steam Tray
Measuring Cup
Rice Paddle
Control Panel
3
8. White Rice Button/
Indicator Light
9. Brown Rice Button/
Indicator Light
10. Warm/Off Button/
Indicator Light
11. Steam/Cook
Button/
Indicator Light
12. Delay Timer Button
1. Botón para Abrir
2. Asa
3. Abertura
removible
4. Tapa
5. Recolector de
condensación
6. Pantalla digital
7. Recipiente Interior
Charola de
vapor
Taza de medir
Pala para arroz
Panel de control
8. Botón/ Luz
Indicadora para
arroz blanco
9. Botón/ Luz
Indicadora para
arroz integral
10. Botón/ Luz
Indicadora para
Calentar/Apagar
11. Botón/ Luz
Indicadora para
cocinar al vapor
12. Botón de demorar
tiempo
1
2
4
5
6
7
11
8
10
1
2
4
5
6
7
11
8
9
10
3
12
9
12

4
1. Read all instructions and important safeguards.
2. Remove all packaging materials and make sure items are received in good
condition.
3. Tear up all plastic bags as they can pose a risk to children.
4. Wash lid, steam vent and accessories in warm, soapy water. Rinse and dry
thoroughly.
5. Remove inner pot from rice cooker and clean with warm, soapy water. Rinse
and dry thoroughly before returning to cooker.
6. Wipe body clean with a damp cloth.
• Do not use abrasive cleaners or scouring pads.
• Do not immerse the rice cooker base, cord or plug in water at any time.
4
1. Lea todas las instrucciones y medidas importantes de seguridad.
2. Retire todos los materiales de empaque y la etiqueta engomada. Asegúrese
de que todos los artículos se reciban en buenas condiciones.
3. Rompa todas las bolsas de plástico, ya que pueden representar un riesgo para
los niños.
4. Lave todos los accesorios y la ventanilla de vapor con agua tibia y jabón.
Enjuáguelos y séquelos completamente.
5. Saque la cazuela interna de la olla arrocera y lávela con agua tibia y jabón.
Enjuáguela y séquela perfectamente antes de volverla a poner dentro de la
olla.
6. Limpie el cuerpo de la olla y el elemento de calentamiento con una toalla
húmeda. Seque perfectamente antes de usar.
• No utilice limpiadores abrasivos o fibras para tallar.
• En ningún momento sumerja en agua la olla arrocera, el cordón eléctrico o la
clavija.
USING YOUR RICE COOKER
COMO USAR EL APARATO
Before First Use:
To Cook Rice:
1. Using the measuring cup provided, measure out the desired amount of rice.
One full, level cup of uncooked rice will yield 2 cups of cooked rice. The
measuring cup provided adheres to rice industry standards (180mL) and is not
equal to one U.S. cup (240 mL).
2. Rinse rice in a separate container until the water becomes relatively clear;
drain.
3. Place rinsed rice in the inner pot.
4. Using the measuring cup provided or the water measurement lines located
inside the inner pot, add the appropriate amount of water. If you are making
brown rice, follow the rice/water measuring guide for brown rice located on
page 9 of this manual. Do not use the water measurement lines inside the inner
pot for brown rice, they are intended for white rice only.
5. For softer rice, allow rice to soak for 10-20 minutes prior to cooking.
6. Making sure that the exterior of the inner pot is clean, dry and free of debris; set
the inner pot in the rice cooker. Snap the lid closed and plug the power cord
into a wall outlet.
* To avoid loss of steam and longer cooking times, do not open the lid at
any point during the cooking process.
7. To begin cooking, press the "WHITE RICE" or "BROWN RICE" button, depending
on the type of rice to be cooked. The cooking mode indicator light will
illuminate. Once cooking is complete, the rice cooker will automatically switch
to keep warm mode.
8. After cooking, open the lid and use the rice paddle to stir the rice. This will release
excess moisture and give the rice a fluffier texture. Then, close the lid and allow
the unit to remain on warm mode for 5-10 minutes. This will ensure optimal rice
texture and moisture level.
9. Press the "WARM/OFF" button to turn off the rice cooker. If the “WARM/OFF”
button is not pressed, the rice cooker will remain in keep warm mode. It is not
recommended to leave rice on keep warm mode for more than 12 hours.
Antes de usar por primera vez:
1. Utilice la taza de medir que viene con el producto para medir el arroz. Una
medida rasa de esta taza equivale a una taza en la tabla incluida. La taza
de medir incluida es de 180mL y no es igual a una taza estándar (240 mL).
2. Enjuague el arroz dentro de un recipiente hasta que el agua salga
relativamente clara. Agruege el arroz a la olla interior.
3. De acuerdo con las líneas de medición de agua marcadas dentro de la olla
o bien utilizando la taza de medir, agregue la cantidad de agua adecuada.
En la página 9 se incluye una tabla con las medidas para el agua/arroz.
También se incluye instrucciones específicas para cocinar el arroz integral.
4. Si desea obtener un arroz más suave, déjelo remojando de 10 a 20 minutos.
5. Asegúrese de que el exterior de la olla está completamente limpio y seco.
Coloque la olla interior en el cuerpo del aparato. Es importante que no hay
agua ni otra sustancia en el exterior de la olla cuando la coloque en el
cuerpo. Tape la olla y enchufe el cordón eléctrico en la tomacorriente.
6. Presione el boton de ‘arroz blanco’ o ‘arroz integral’. El foco indicador se
encenderá. Una vez terminado el cocimiento, la arrocera cambiará al
modo de calentamiento y el foco indicador “warm” se encenderá.
7. Una vez terminado el cocimiento, deje reposar el arroz de 5 a 10 minutos, sin
destapar. Esto asegurará que el arroz quede bien cocido.
8. La arrocera se quedará en el modo de calentamiento hasta que se
desconecte el enchufe de la tomacorriente. Desconecte la olla arrocera
una vez que termine el cocimiento.
Para cocinar arroz:
* Es muy importante que la olla interior esté completamente limpia y seca antes de que
se coloque en el cuerpo de la arrocera. La presencia de agua u otras sustancias en la
superficie exterior de la olla puede causar que este aparato malfuncione.

5
USING YOUR RICE COOKER
5
COMO USAR SU APARATO
To Use Delay Timer:
1. Press the “DELAY TIMER” button (in 1-hour increments) until it displays the
number of hours in which you would like your rice to be finished cooking
.
2. Press “WHITE RICE” or “BROWN RICE” after you have made your choice.
3. Press the “WARM/OFF” button to cancel your choice and reset.
4. When cooking has completed, the rice cooker will automatically switch to
keep warm mode.
5. The rice cooker will remain on keep warm mode until it is unplugged. Be sure
to unplug the cord from the wall outlet when not in use.
1. En estado de espera, oprima la tecla "Demorar Tiempo" para seleccionar la
hora en que usted desea que su arroz esté listo
.
2. Oprima el botón de “WHITE RICE” (arroz blanco)o “BROWN RICE”
(arroz integral ).
3. Oprima el botón de ‘WARM/OFF’ (calentar/apagar) para cancelar su
selección y empezar de nuevo.
4. Cuando termina el ciclo de cocción, la arrocera cambiará automáticamente
al modo de mantener caliente.
5. La arrocera permanecerá al modo de calentamiento hasta que el enchufe
sea desconectado de la tomacorriente. Siempre desenchufe la arrocera
después de usarla.
Para usar el temporizador programado:
NOTE
The digital display on this unit is for the delay timer function only. When using
cooking or warming mode, the display will show two red lines (See illustration
below).
To Steam Food:
1. Add the desired amount of water to the inner pot. A convenient steaming
guide has been included on page 11 for vegetables and page 12 for meat.
2. Place steam tray inside rice cooker.
3. Place food on steam tray and close the lid.
4. Press the “STEAM COOK” button.
5. When steaming is complete, the rice cooker will automatically switch to keep
warm mode.
6. Remove food immediately after cooking process has completed. Leaving it in
the rice cooker may cause food to over cook.
7. The rice cooker will remain on keep warm mode until it is unplugged. Be sure
to unplug the cord from the wall outlet when not in use.
SEE PAGE 6 FOR INSTRUCTIONS ON COOKING RICE
AND STEAMING SIMULTANEOUSLY.
NOTA
La pantalla digital en este aparato es solamente para el temporizador
programado. Cuando se usan los modos de ‘COOK’ (cocer) o ‘WARM’ (calentar),
se muestran dos líneas rojas en la pantalla (vea la diagrama de abajo).
1. Agregue la cantidad deseada de agua en la olla interna. Unas
convenientes guías de como cocer al vapor están incluidas en las páginas
11 y 12 de este manual.
2. Introduzca la raca para vapor dentro de la arrocera.
3. Introduzca la comida en la raca para vapor y cierre la tapadera.
4. Presione el botón "Steam Cook" (vapor/cocinar).
5. Cuando el proceso de vaporización sea completado, la arrocera
aumáticamente cambiará al modo de mantener caliente.
6. Retire la comida inmediatamente después del proceso ya terminado. Dejar
la comida en la arrocera podría causar sobre calentado.
7. La arrocera permanecerá al modo de calentamiento hasta que el enchufe sea
desconectado de la tomacorriente. Siempre desenchufe la arrocera después de
usarla.
VEA LA PÁGINA 6 PARA INSTRUCCIONES DE COCINAR ARROZ
Y COCER AL VAPOR SIMULTANEAMENTE.
Para cocer alimentos al vapor:
* It is important that the outside surface of the inner pot is completely clean and dry
before it is placed into the rice cooker. Water, food or other substances on the pot will
come into contact with the heating element and may cause damage to the product.

USING YOUR RICE COOKER
COMO USAR SU APARATO
PRECAUCIÓN:
• No abra la tapa cuando la olla está en uso si no es necesario.
• Si la olla para cocer está mojada y se coloca nuevamente en la olla
interior, causará daños y fallas al producto.
To Steam Food And Cook Rice Simultaneously:
One of the most convenient features of this rice cooker is the ability to both cook
rice and steam food simultaneously, ideal for creating delicious all-in-one meals.
1. Place the desired amount of rice and appropriate amount of water into the
inner pot. See “To Cook Rice” on page 4 for details. Do not attempt to cook
more than 8 cups (uncooked) of rice if trying to use the steam tray
simultaneously. The steam tray will not fit.
2. Place the inner pot into the unit and begin to cook the rice.
3. Refer to the steaming guides for vegetables (page 11) or meat (page 12) for
hints and approximate steaming times. It is best to insert the food to be
steamed toward the end of the rice cooking cycle so that your meal is fresh
and warm all at once. See the cooking time chart included on Page 10 for
approximate rice cooking times.
4. Place your choice of vegetables or meat into the steam tray. Open the lid,
using caution as steam escaping will be extremely hot, and place steam tray
into the rice cooker.
5. Close the lid and allow the cooker to resume cooking.
6. Once food has been steamed for the appropriate time open the lid. Use
caution when opening lid as steam escaping will be extremely hot. Remove
the steam tray and check food to be sure it has been thoroughly cooked.
Exercise caution when removing the steam tray as well, as it will be hot.
7. If the rice has not finished cooking, close the lid of the rice cooker and allow
rice to continue to cook until done. Once the rice is finished, the rice cooker
will automatically switch to keep warm mode.
8. The rice cooker will remain on keep warm mode until it is unplugged. Be sure
to unplug the cord from the wall outlet when not in use.
6
6
Para cocinar arroz y cocer al vapor a la vez:
1. Agruege el arroz e el agua a la olla interior. No intentar cocer más que 8 tazas
de arroz (crudo) se se desee cocinar al vapor a la vez. La bandeja para
vaporar no caberá. Vea ‘Para cocinar arroz’ en la página 4 para instrucciones
detalladas.
2. Coloque la olla interior en la base de la arrocera y empiece cocinar el arroz.
3. Use las tablas de referencia para vegetales (página 11) y para carne (página
12) para sugerencias y tiempos de cocimiento aproximados.
4. Se recomienda agregar la bandeja cerca del fin del ciclo de cocimiento para
evitar que la comida se enfríe antes de que esté listo el arroz. Ponga la carne
y/o las vegetales en la bandeja para vaporar. Abre la tapa con mucho
cuidado porque vapor caliente se escapará. Coloque la bandeja para
vaporar en la olla interior.
5. Cierra la tapa y permite que el aparato continue cocinando.
6. Una vez que los alimentos han cocidos por el tiempo necesario, abre la tapa
con mucho cuidado. El vapor caliente se escapará. Remueva la bandeja
para vaporar, con cuidado por que estará caliente, y asegúrese de que los
alimentos estén listos.
7. Si el arroz ya no esté listo, cierre la tapa y permite que el arroz cocine hasta
que esté terminado. La arrocera soñará y cambiará automáticamente al
modo de ‘WARM’ (calentar).
8. La arrocera permanecerá al modo de calentamiento hasta que el enchufe sea
desconectado de la tomacorriente. Siempre desenchufe la arrocera después de
usarla.
NOTE
It is possible to steam at any point during the rice cooking cycle.
However, it is recommended that you steam during the end of the
cycle so that steamed food does not grow cold or become soggy
before the rice is ready.
NOTA:
Se puede vaporar la comida durante cualquier parte del ciclo de
cocimiento. Se recomienda vaporar al fin del ciclo para evitar que los
alimentos se enfríen antes de que el arroz esté listo.
CAUTION:
• Open the lid only when necessary.
• If cooking pot is returned to cooker when wet it will damage this product,
causing it to malfunction.

USING YOUR RICE COOKER
To Cook Soups and Stews:
1. Add ingredients to inner pot.
2.
Making sure that the exterior of the inner pot is clean, dry and free of debris;
set the inner pot into the rice cooker. Close the lid and plug the power cord
into a wall outlet.
3.
Press the “STEAM/COOK” button. The “STEAM/COOK” indicator light will
illuminate.
4. Allow soup to cook until ready, stirring often.
5. When soup is finished cooking, press the “WARM/OFF” button. The cooker will
then switch to keep warm mode.
6. The rice cooker will remain in keep warm mode until it is unplugged. Be sure
to unplug the unit from the wall outlet when it is not in use.
HELPFUL HINTS
1. Rinse rice before placing it into the inner pot to remove excess bran and
starch. This will help reduce browning and sticking to the bottom of the
pot.
2. If you have experienced any sticking with the type of rice you are using,
try adding a light coating of vegetable oil or non-stick spray to the
bottom of the inner pot before adding rice.
3. As there are many different kinds of rice available (see About Rice on
page 14), rice/water measurements may vary slightly.
4. For softer rice, allow it to soak for 10-20 minutes prior to cooking.
7
COMO USAR SU APARATO
Para cocer sopas y guisados:
1. Agregue los ingredientes a la olla inerior y colóquela en la arrocera.
2. Presione el interruptor hacia abajo, al modo de vaporar/cocinar
(“steam/cook”).
3. Dejar la sopa a cocer hasta que sea lista, agitando de menudo.
4. Oprima el botón de calentar (“warm”) una vez que esté lista la sopa
. La
arrocera cambiará al modo de calentamiento ("warm")
5.
La arrocera permanecerá al modo de calentamiento hasta que el enchufe sea
desconectado de la tomacorriente. Siempre desenchúfe la arrocera después de
usarla.
CONSEJOS ÚTILES
1. Enjuague el arroz para quitarle el exceso de salvado y almidón. Esto
evitará que el arroz se queme o se pegue en el fondo de la olla.
2. Si se le está pegando el arroz debido al tipo de arroz que está usando,
intente agregar una ligera capa de aceite vegetal o rocío (spray)
antiadherente al fondo de la olla interior antes de agregar el arroz.
3. Puesto que existe una gran variedad de clases de arroz en el mercado
(véase Acerca del Arroz en la página 14), las medidas de arroz/agua
pueden variar ligeramente.
7

Always unplug unit and allow to cool completely before cleaning.
1. Remove the inner cooking pot. Wash it in warm, soapy water using a sponge
or dishcloth.
2. Rinse and dry thoroughly.
3. Repeat process with steam tray and other provided accessories.
4. Wipe the underside of the lid with a warm, damp cloth. Dry with a soft cloth.
5. Wipe the body of the rice cooker and the underside of the lid clean with a
damp cloth.
6. To clean the steam vent (clean after each use):
• Pull out the steam vent as shown in Diagram 1.
• Empty and wash the steam vent in warm, soapy
water. Rinse thoroughly.
• Dry the steam vent with a soft cloth.
• Reinsert the steam vent for next use.
• Do not use harsh abrasive cleaners, scouring pads or products that are not
considered safe to use on non-stick coatings.
• This appliance is NOT
dishwasher safe. Inner pot and accessories are NOT
dishwasher safe.
• Always make sure the outside of the inner pot is dry prior to use. If the inner
cooking pot is returned to the rice cooker when wet, it may damage this
product, causing it to malfunction.
8
8
Desconecte siempre la unidad y deje que se enfríe completamente antes de
limpiaria.
1. Saque la cacerola interna. Lávela con agua tibia y jabón, usando una
esponja o toalla para platos.
2. Enjuáguela y séquela perfectamente.
3. Repita este proceso con la charola para vapor, la ventanilla de vapor y con
los otros accesorios que se proporcionan.
4. Limpie el cuerpo de la olla arrocera y la parte inferior de la tapa con una
toalla húmeda.
5. Para limpiar la ventanilla de vapor:
• No utilice limpiadores abrasivos ásperos.
• No sumerja en agua o en cualquier otro líquido la olla exterior.
• No deberá meterse en lavavajillas. La cacerola interna TAMPOCO deberá
lavarse en lavavajillas.
COMO LIMPIAR EL APARATO
HOW TO CLEAN
Diagram 1
Hay que limpiar la ventanilla de vapor
después de cada uso.
1. Remueva la ventanilla de vapor como se
muestra en el Diagrama 1.
2. Vacié y lave la ventanilla de vapor con
agua tibia y jabón y enjuague.
3. Seque con un trapo seco.
4. Re inserte la ventanilla de vapor para su
próximo uso.
Diagrama 1

UNCOOKED
RICE
WHITE RICE
WATER WITH
MEASURING CUP
WHITE RICE
WATERLINE
INSIDE POT
APPROX COOKED
RICE YIELD
2 Cups 2-1/2 Cups Line 2 4 Cups
3 Cups 3-1/2 Cups Line 3 6 Cups
4 Cups 4-1/2 Cups Line 4 8 Cups
5 Cups 5-1/2 Cups Line 5 10 Cups
6 Cups 6-1/2 Cups Line 6 12 Cups
7 Cups 7-1/2 Cups Line 7 14 Cups
8 Cups 8-1/2 Cups Line 8 16 Cups
9 Cups 9-1/2 Cups Line 9 18 Cups
10 Cups 10-1/2 Cups Line 10 20 Cups
INSTRUCCIONES ESPECIALES
• El arroz integral demora más en cocinar que el arroz blanco debido a las capas extras
de los granos de trigo. Las líneas de medir en la olla interior se aplican solamente al
arroz blanco. Vea a la tabla de medidas para instrucciones especiales para cocinar
arroz integral.
• El arroz integral, salvaje y otros tipos de arroz varían en sus contenidos. Algunos tipos
de arroz podrán requerir un tiempo más largo para cocinar y/o agua adicional.
Consulte con las instrucciones del paquete para sugerencias de como cocinarlo.
• La taza para medir incluida no es igual a una taza estándar. La tabla se refiere a
tazas de arroz/agua según la taza para medir incluida.
• La capacidad máxima de la arrocera es 10 tazas de arroz crudo (8 tazas arroz
integral) que se equivale a 20 tazas de arroz cocido (16 tazas si es arroz integral) . No
ponga más que 10 tazas de arroz crudo (8 tazas si es arroz integral) en la olla interior.
White Rice/Water Measurement Chart:
9
Tabla de medidas de arroz blanco:
9
COOKING GUIDE
GUIAS DE COCCION
* Due to the extra water needed to cook brown rice, the maximum amount
of brown rice that may be cooked at one time is 8 cups.
* Debido a la agua adicional que se require con el arroz integral, la capacidad máxima
para arroz integral es de 8 tazas.
20 TazasLínea 1010-1/2 Tazas10 Tazas
18 TazasLínea 99-1/2 Tazas9 Tazas
16 TazasLínea 88-1/2 Tazas8 Tazas
14 TazasLínea 77-1/2 Tazas7 Tazas
12 TazasLínea 66-1/2 Tazas6 Tazas
10 TazasLínea 55-1/2 Tazas5 Tazas
8 TazasLínea 44-1/2 Tazas4 Tazas
6 TazasLínea 33-1/2 Tazas3 Tazas
4 TazasLínea 22-1/2 Tazas2 Tazas
ARROZ
COCIDO
ARROZ BLANCO
LÍNEA
ADENTRO
DE LA OLLA
ARROZ BLANCO
AGUA CON
LA MEDIDA
ARROZ CRUDO
UNCOOKED
RICE
BROWN RICE
WATER WITH MEASURING
CUP
APPROX COOKED RICE YIELD
2 Cups
3 Cups
4 Cups
3 Cups
4-1/4 Cups
6 Cups
4 Cups
5-1/2 Cups
8 Cups
5 Cups
6-3/4 Cups
10 Cups
6 Cups
8 Cups
12 Cups
7 Cups
9-1/4 Cups
14 Cups
8 Cups
10-1/2 Cups
16 Cups
Brown Rice/Water Measurement Chart:
ARROZ CRUDO
ARROZ INTEGRAL
AGUA CON LA MEDIDA
ARROZ
COCIDO
2 Tazas
3 Tazas
4 Tazas
3 Tazas
4-1/4 Tazas
6 Tazas
4 Tazas
5-1/2 Tazas
8 Tazas
5 Tazas
6-3/4 Tazas
10 Tazas
6 Tazas
8 Tazas
12 Tazas
7 Tazas
9-1/4 Tazas
10 Tazas
8 Tazas
10-1/2 Tazas
12 Tazas
Tabla de medidas de arroz integral:
SPECIAL INSTRUCTIONS
• Brown rice, wild rice and rice mixes vary in their make-up. Some
variations may require longer cooking times and/or additional water in
order to achieve optimum results. Refer to the individual package
instructions for cooking suggestions.
• The measuring cup included adheres to rice industry standards (180mL)
and is not equal to one U.S. cup (240mL). The chart above refers to cups
of rice/water according to the measuring cup provided.
• Do not place more than 10 cups of uncooked rice (8 cups if brown rice)
into this appliance at one time. The maximum capacity of this unit is 10
cups raw rice (8 cups if brown rice) which yields 20 cups of cooked rice
(16 cups brown rice).

Tabla de tiempos de cocción:
Cooking Time Chart:
Cooking times are approximate. This table is for reference only. Possible
variations in cooking times may be caused by one or more of the following
factors:
• Variations in the type of rice being cooked.
• Variations in the amount of rice and/or water in the inner pot.
• If you are making a second batch of rice shortly after the first batch,
cooking times may be reduced because the heating element will
already be warm.
• Opening the lid during the cooking cycle causes a loss of heat and
steam. Cooking time may be prolonged if the lid is opened before the
rice is finished.
WHITE RICE
UNCOOKED CUPS
COOKING TIME
BROWN RICE
UNCOOKED CUPS
COOKING TIME
2 Cups 30-35 Min 2 Cups 100-105 Min
3 Cups 32-37 Min 3 Cups 102-107 Min
4 Cups 34-39 Min 4 Cups 110-115 Min
5 Cups 38-43 Min 5 Cups 114-119 Min
6 Cups 40-45 Min 6 Cups 116-121Min
7 Cups 41-46 Min 7 Cups 118-123 Min
8 Cups 43-48 Min 8 Cups 120-125 Min
9 Cups 44-49 Min 9 Cups N/A
10 Cups 46-51 Min 10 Cups N/A
COOKING GUIDE
ARROZ BLANCO
NO COCIDO
DURACION DE
COCCION
ARROZ INTEGRAL
NO COCIDO
DURACION DE
COCCION
2 Tazas 30-35 Min 2 Tazas 100-105 Min
3 Tazas 32-37 Min 3 Tazas 102-107 Min
4 Tazas 34-39 Min 4 Tazas 110-115 Min
5 Tazas 38-43 Min 5 Tazas 114-119 Min
6 Tazas 40-45 Min 6 Tazas 116-121Min
7 Tazas 41-46 Min 7 Tazas 118-123 Min
8 Tazas 43-48 Min 7 Tazas 120-125 Min
9 Tazas 44-49 Min 9 Tazas *
10 Tazas 46-51 Min 10 Tazas *
TIEMPOS DE COCCION
Los tiempos de cocción son aproximados. Esta tabla es para referencia
únicamente. Posibles variaciones en tiempos de cocción podrían ser causados
por uno o más de los siguientes factores:
• Variaciones en el tipo de arroz cocinado.
• Variaciones en la cantidad de arroz y/o agua en la olla interna.
• Si usted prepara una segunda tanda de arroz enseguida de la primera,
los tiempos de cocción podrían ser menos debido a que los
componentes del electrodoméstico de aun estén calientes.
• Abrir la tapadera durante el ciclo de cocción podrían causar perdida de
calor y vapor. El tiempo de cocción podría ser prolongado si la tapadera
es abierta antes de que el arroz esté listo.
10
10
HELPFUL HINTS
1. Rinse rice before placing into the inner pot to remove excess bran and
starch. This will help reduce browning and sticking to the bottom of the
pot.
2. If you have experienced any sticking with the type of rice you are using,
try adding a light coating of vegetable oil or non-stick spray to the bottom
of the inner pot before adding rice.
3. The chart on page 9 is only a general measuring guide. As there are
many different kinds of rice available (see About Rice on page 14),
rice/water measurements may vary slightly.
CONSEJOS ÚTILES
1. Enjuague el arroz para quitarle el exceso de salvado y almidón. Esto
evitará que el arroz se queme o se pegue en el fondo de la olla.
2. Si se le está pegando el arroz debido al tipo de arroz que está usando,
intente agregando una ligera capa de aceite vegetal o rocío (spray)
antiadherente al fondo de la olla interior antes de agregar el arroz.
3. La tabla en la página 9 es sólo una guía general de medición. Puesto que
existe una gran variedad de clases de arroz en el mercado (véase Acerca
del Arroz en la página 14), las medidas de arroz/agua pueden variar
ligeramente.

11
Tabla para cocer al vapor:
10 Minutos1/2 TazaCalabacín
10 Minutos1/2 TazaCalabaza
10 Minutos1/2 TazaEspinaca
10 Minutos1/2 TazaChicharos
15 Minutos1 TazaEjotes
20 Minutos1-1/4 TazasBerenjena
15 Minutos1 TazaMaiz
15 Minutos1 TazaColiflor
15 Minutos1 TazaZanahoria
15 Minutos1 TazaCol
5 Minutos1/4 TazaBrocoli
10 Minutos1/2 TazaEspárragos
TIEMPO DE
COCIMIENTO
CANTIDAD DE AGUAVEGETAL
GUIAS DE COCCION
VEGETABLE STEAMING CHART:
VEGETABLE AMOUNT OF WATER STEAMING TIME
Asparagus 1/2 Cup 10 Minutes
Broccoli 1/4 Cup 5 Minutes
Cabbage 1 Cup 15 Minutes
Carrots 1 Cup 15 Minutes
Cauliflower 1 Cup 15 Minutes
Corn 1 Cup 15 Minutes
Eggplant 1-1/4 Cup 20 Minutes
Green Beans 1 Cup 15 Minutes
Peas 1/2 Cup 10 Minutes
Spinach 1/2 Cup 10 Minutes
Squash 1/2 Cup 10 Minutes
Zucchini 1/2 Cup 10 Minutes
11
COOKING GUIDE
HELPFUL HINTS
1. Since most vegetables only absorb a small amount of water, there is no
need to increase the amount of water with a larger serving of
vegetables.
2. When steaming and cooking rice simultaneously, follow the instructions
on page 6. Place the steam tray over the rice as it cooks for the
amount of time needed, checking the food every so often for
doneness. Do not cook more than 8 cups (6 cups if brown rice)
uncooked rice while steaming, or the steam tray will not fit into the rice
cooker.
3. When possible, keep the lid closed during the entire steaming process.
Opening the lid causes a loss of heat and steam, resulting in a slower
cooking time. If you find it necessary to open the lid, you may want to
add a small amount of water to help restore the cooking time.
4. Altitude, humidity and outside temperature will affect cooking times.
5. This steaming chart is for reference only. Actual cooking time may vary.
SUGERENCIAS ÚTILES
1. La mayoría de los vegetales absorben unicamente una pequeña parte
de agua cuando se están cocinando al vapor, no es necesario
cambiar la cantidad de agua para cocinar al vapor diferentes
alimentos.
2. Para vaporar y cocer arroz simultáneamente, sigue las instrucciones de
la página 6. Coloque la charola de vapor sobre la olla interior
mientras cocina el arroz, examinando los alimentos de vez en cuando
para evitar que sobrecocinen. No más que 8 tazas de arroz(6 si es
arroz integral) se puede cocinar cuando se usa la charola de vapor.
3. Cuando sea posible, mantenga la tapa cerrada durante todo el
proceso de cocer al vapor. El abrir la tapa causará una pérdida de
calor y vapor, resultando en un tiempo de cocción más lento. Si es
necesario abrir la tapa, tal vez desee agregar una pequeña cantidad
de agua a la olla para ayudar a reponer el tiempo de cocción.
4. La altura, la humedad y la temperatura exterior afectarán los tiempos
de cocción.
5. La tabla de cocción al vapor es sólo para propósitos de consulta. El
tiempo real de cocción puede variar.

COOKING GUIDE
MEAT STEAMING CHART:
Meat
Amount of
Water
Steaming Time
Safe Internal
Temperature
Fish
2 Cups 15 Min. 140º
Chicken
2-1/2 Cups 20 Min. 165º
Pork
2-1/2 Cups 20 Min. 160º
Beef
2-1/2 Cups
Medium = 15 Min.
Medium-Well = 20 Min.
Well = 23 Min.
160º
NOTE
1. Steaming times may vary depending on the cut of meat being used.
2. To ensure meat tastes its best, and to prevent possible illness, check
that meat is completely cooked prior to serving. If it is not, simply place
more water in the inner pot and repeat the cooking process until the
meat is adequately cooked.
12
12
GUIAS DE COCCION
Carne
Cantidad de
agua
Tiempo de
cocimiento
Temperatura sana
Pescado
2 Tazas 15 Min. 140º
Pollo
2-1/2 Tazas 20 Min. 165º
Carne de
cerdo
2-1/2 Tazas 20 Min. 160º
Carne de
vaca
2-1/2 Tazas
En su punto = 15 Min.
Bien hecho = 20 Min.
Muy hecho = 23 Min.
160º
NOTA
1. El tiempo de cocimiento puede variar depende del ancho de la pieza
de carne que se usa.
2. Para protegerse de la enfermedad, asegúrese de que la carne esté
cocido adecuadamente antes de servir. Si está poco hecho, agregue
más agua a la olla interior y repite el proceso hasta que esté lista.
Tabla para cocer al vapor las carnes:

SOLUCION DE PROBLEMAS
Dado que las variedades de arroz pueden variar en su
composición, los resultados también pueden diferir. A continuación se
incluyen algunos consejos para solucionar problemas, a fin de ayudarle
a lograr la consistencia deseada.
PROBLEMA SOLUCION
El arroz está seco y/o
duro.
Si el arroz está seco o duro/gomoso cuando
la cacerola para arroz cambia a modo
WARM (CALENTAR), el arroz se ablandará
con más agua y más tiempo de cocción.
Según cuán seco esté el arroz, agregue
entre ½ y 1 taza de agua, y revuelva. Cierre
la tapa y presione el botón de arroz blanco
(WHITE RICE) o arroz integral (BROWN RICE)
de nuevo. Cuando la arrocera cambia a
modo WARM (CALENTAR), abra la tapa y
revuelva el arroz para controlar su
consistencia. Repita este procedimiento
según sea necesario hasta que el arroz esté
blando y húmedo.
El arroz está caldoso
y/o aguachento
Si el arroz aún está demasiado caldoso o
aguachento cuando la arrocera cambia a
modo WARM (CALENTAR), revuelva con la
paleta para arroz. Esto redistribuirá el arroz
que está en el fondo (el más húmedo) y
también liberará el exceso de humedad.
Cierre la tapa y deje en modo WARM
(CALENTAR) durante 10 a 30 minutos según
sea necesario; abra la tapa y revuelva
periódicamente a fin de liberar el exceso de
humedad.
13
TROUBLESHOOTING
Because rice varieties may vary in their make-up, results may
differ. Below are some troubleshooting tips to help you achieve the
desired consistency.
PROBLEM SOLUTION
Rice is too dry/hard
after cooking.
If your rice is dry or hard/chewy when the rice
cooker switches to keep warm mode,
additional water and cooking time will soften
the rice. Depending on how dry your rice is,
add ½ to 1 cup of water and stir through.
Close the lid and press the “STEAM/COOK”
button. When rice cooker switches to warm
mode, open the lid and stir the rice to check
the consistency. Repeat as necessary until
rice is soft and moist.
Rice is too moist/soggy
after cooking.
If your rice is still too wet or soggy when the
rice cooker switches to keep warm mode, use
the rice paddle to stir the rice. This will
redistribute the bottom (moistest) part of the
rice as well as release excess moisture. Close
the lid and allow to remain on keep warm
mode for 10-30 minutes as needed, opening
the lid and stirring periodically to release
excess moisture.
13

Rice is a valuable source of low fat, complex carbohydrates
and is abundant in thiamin, niacin and iron. It is an essential
ingredient for a healthy diet.
There are many different varieties of rice available in the
market. Your Aroma
®
Rice Cooker can cook any type perfectly
every time. Following are the commonly available varieties of rice
and their characteristics:
14
ABOUT RICE
Long Grain Rice
Typically this rice is not starchy and
has loose, individual grains after
cooking. "Carolina" is firm, and
"Jasmine" is the firmest of the long
grain variety and is flavorful and
aromatic.
Short Grain Rice
Short grain is characteristically soft,
sticky and chewy. This is the rice
used to make sushi. "California
Rice" is soft; "Sweet Rice", often
called "pearl" rice for its round
shape, is extra sticky and is
excellent for making rice pudding.
Brown Rice
Brown rice is often considered the
most healthy variety. It has bran
layers on the rice grains and
contains more B-complex vitamins,
iron, calcium, and fiber than
polished (white) rice. The most
popular brown rice is long grain
and has a chewy texture.
Wild Rice
Wild Rice comes in many delicious
varieties and mixes. Often it is
mixed with long grain rice for its
firmer texture and rich brown to
black color. Wild rice makes
wonderful stuffing for poultry when
cooked with broth and mixed with
your favorite dried fruits.
El arroz es una fuente importante de carbohidratos complejos
bajos en grasa y es abundante en tiamina, niacina y hierro. Es un
ingrediente esencial para una dieta saludable.
Hay muchas diferentes variedades de arroz disponibles en el
mercado. Su Olla para Cocinar Arroz de Aroma puede cada vez cocinar
cualquier tipo de arroz perfectamente. A continuación encontrará las
variedades de arroz comúnmente disponibles y sus características:
14
ACERCA DEL ARROZ
Arroz de grano largo
Típicamente este arroz no tiene mucho
almidón y presenta granos individuales
y sueltos después de su cocimiento. El
arroz "Carolina" es un poco firme, y el
arroz "Jazmín" es el más firme de las
variedades de granos largos y es
aromático y de mucho sabor.
Arroz de grano corto
El arroz de grano corto es de
naturaleza suave, pegajoso y firme al
diente. Este es el arroz que se usa para
hacer sushi. El "Arroz California " es
suave; el "Arroz Dulce ",
frecuentemente llamado arroz "perla"
debido a su forma redonda, es extra
pegajosa y es excelente para recetas
como el arroz con leche o budín de
arroz.
Arroz integral
El arroz integral es frecuentemente
considerado la variedad más
saludable. Tiene capas de salvado en
cada grano y contiene más vitaminas
del complejo B, hierro, calcio y fibra
que el arroz pulido (blanco). El arroz
integral más popular es de grano largo
y tiene una textura firme al diente.
Arroz silvestre
El arroz silvestre viene en muchas
diferentes variedades y mezclas.
Frecuentemente es mezclado con
arroz de grano largo por su textura más
firme y color en tonos de café hasta
negro. El arroz silvestre es ideal para
rellenar aves como pollo y pavo
cuando es cocinado con consomé y
mezclado con sus frutas secas favoritas.

Safety Considerations:
1) Rice cookers cook at very high temperatures and will produce
large amounts of steam. Use extreme caution when opening rice
cooker during and after the cooking cycle. When lifting the
hinged cover, keep hands and face away from the rice cooker
to avoid the steam.
2) If a recipe calls for the sauteing of butter or oil, use extreme
caution, as you would when cooking with other high-temperature
devices like a stove or oven. The inner pot will be hot, so use a
long-handled plastic or wooden spoon for stirring. DO NOT USE
the short-handled rice paddle for this type of cooking.
3) It is important to remember that the cooking cycle of the rice
cooker is controlled by the temperature of the inner pot. When
liquid boils off, the temperature will rise, causing the rice cooker
to automatically shift into the low temperature ‘keep warm’
mode. This is fine for making rice dishes but if a recipe calls for
steaming or making soups, where copious quantities of liquid are
used, the rice cooker will not shut off until all liquid is boiled
away. Follow the recipes carefully and do not leave the rice
cooker unattended as it will continue to cook at high
temperatures when making soups, stews and steaming. Monitor
the cooking process and MANUALLY TURN OFF the rice cooker
when the time that the recipe stipulates has elapsed.
• Spraying the inner pot with a light coating of nonstick cooking
spray is a great way to make cleanup easier without adding flavor
or calories to your meal.
• When a recipe calls for salt, use kosher salt. It has no impurities
or additives and dissolves easily. You will need to use about half
again more kosher salt than you would table salt.
• If the rice cooker shuts off before the food is totally cooked, add
more water and start the cooker again.
• Stocks and broths can be used in place of water to add flavor and
improve texture when cooking rice. Stocks and broths can be
found in your local supermarket. Another option is to use
bouillon cubes (they come in a wide variety of flavors). One cube
and one cup of water usually makes one cup of stock.
HELPFUL HINTS
Consideraciones de seguridad:
1) Las arroceras cocinan a temperaturas muy altas y producirán grandes
cantidades de vapor. Tenga extrema precaución cuando abra la arrocera
durante y después del ciclo de cocinado. Cuando levante la cubierta
con bisagras, conserve las manos y la cara lejos de la arrocera para evitar
el vapor.
2) Si una receta necesita ser salteada con mantequilla o aceite, tenga
extrema precaución, al igual que cuando cocina con otros dispositivos de
alta temperatura, como la estufa o el horno. La olla interior estará caliente,
así que utilice un cucharón largo de plástico o madera para remover. NO
USE la pala para arroz corta para este tipo de cocinado.
3) Es importante recordar que el ciclo de cocinado de la arrocera es
controlado por la temperatura de la olla interior. Cuando el líquido hierve,
la temperatura sube, causando que la arrocera cambie
automáticamente al modo de “conservar caliente”, cuya temperatura es
menor. Esto está bien cuando se hacen platillos de arroz, pero si una
receta necesita vapor o hacer sopas, conde se utilizan grandes
cantidades de líquido, la arrocera no se apagará hasta que se haya
evaporado todo el líquido. Siga las recetas cuidadosamente y no deje la
arrocera sin supervisión, ya que continuará cocinando a temperaturas
altas cuando se cocinen sopas, estofados y alimentos al vapor
Monitoree el proceso de cocinado y APAGUE MANUALMENTE la arrocera
cuando haya transcurrido el tiempo especificado para esa receta.
• Rociar la olla interior con una capa ligera de spray para cocinar
antiadherente es una grandiosa forma de hacer la limpieza más
fácil sin agregar sabor o calorías a sus alimentos.
• Cuando una receta lleva sal, use sal kosher. No tiene impurezas ni
aditivos y se disuelve fácilmente. Usted necesitará usar media
porción de sal kosher más de la sal de mesa normal que utilizaría.
• Si la arrocera se apaga antes de que los alimentos estén
completamente cocinados, agregue más agua y vuelva a iniciar
la arrocera.
• Los caldos y consomés se pueden usar en lugar de agua para dar
sabor y mejorar la textura cuando cocine arroz. Puede encontrar
caldos y consomés en su supermercado local. Otra opción es usar
cubos de consomé (vienen en una gran variedad de sabores). Un
cubo y una taza de agua hacen generalmente una taza de
consomé.
CONSEJOS ÚTILES
15
15

1 cup uncooked long-grain rice
1 jar (12oz.) fresh salsa, mild or hot
1 tbsp. vegetable oil
1 cup fresh or canned corn kernels
1/2 tsp. ground cumin
1/2 tsp. salt
fresh ground black pepper to taste
1-1/4 cups water
minced fresh cilantro for garnish (optional)
Add all ingredients except cilantro to the inner pot, stir, close the
lid, and press the “WHITE RICE” button. When rice cooker switches to
warm mode, open the cooker, quickly stir and re-cover. Allow to stand
for 8-10 minutes before serving. Spoon onto a serving dish, garnish with
fresh cilantro and serve. Makes a flavorful supper or side dish for grilled
chicken or fish. Serves 3-4.
San Antonio Rice
Thai-Style Rice
1 cup uncooked long-grain Jasmine rice
2 cups canned coconut milk
1/4 tsp. ground cardamom
1/2 tsp. ground coriander
1/4 tsp. salt
ribbons of fresh basil leaves or cilantro leaves for
garnish (optional)
Add all ingredients to the inner pot except basil or cilantro.
Close the lid, press the “WHITE RICE” button and cook until the rice
cooker switches to warm mode, about 20 minutes. Allow to stand 10
minutes before serving. Goes well with spicy foods. Serves 3-4.
1 taza arroz de grano largo crudo
1 jarra (12 oz.) salsa fresca, leve o picante
1 cucharada aceite vegetal
1 taza granos de elote frescos o en lata
1/2 cucharadita comino molido
1/2 cucharadita sal
pimienta negra molida fresca al gusto
1-1/4 tazas agua
cilantro fresco picado para aderezar (opcional)
Agregar todos los ingredientes, excepto el cilantro, en la olla interior,
remover, cerrar la tapa y presionar el botón de Arroz blanco. Cuando la
arrocera cambie al modo de conservar caliente, abrir la arrocera, agitar
rápidamente y volver a tapar. Dejar reposar por 8-10 minutos antes de
servir. Colocar en un plato, aderezar con el cilantro fresco y servir. Como
platillo o guarnición para pollo o pescado asado. Rinde 3-4 porciones.
Arroz San Antonio
Arroz estilo Thai
1 taza arroz Jazmín de grano largo crudo
2 tazas leche de coco en lata
1/4 cucharadita cardamomo molido
1/2 cucharadita cilantro molido
1/4 cucharadita sal
listones de hojas de albahaca fresca u hojas de
cilantro para decorar (opcional)
Agregar todos los ingredientes en la olla interior, a excepción de la
albahaca o el cilantro. Cerrar la tapa, presionar el botón de Arroz
blanco y cocinar hasta que la arrocera cambie al modo de conservar
caliente, 20 minutos aprox. Dejar reposar por 10 minutos antes de servir.
Se acompaña bien con alimentos picantes. Rinde 3-4 porciones.
16
16
RECIPES
RECETAS

2 tbsp. unsalted butter
1/4 cup onion, finely chopped or 1 tbsp. dried onion
flakes
- grated zest of 1 orange
- juice of 2 oranges plus enough chicken broth to
make 1-3/4 cups liquid
1 cup long-grain rice
1/2 tsp. kosher salt
1/4 cup slivered toasted almonds for garnish
Add all ingredients to inner pot except toasted almonds. Close
lid, press “STEAM/COOK” button and cook until liquid evaporates, about
20 minutes. Allow to stand for 10 minutes. Spoon into a serving bowl,
top with toasted almonds and serve immediately. Goes well with almost
any fish, chicken or pork dish. Serves 3-4.
Orange Rice Pilaf
Lemon Dill Rice
1 cup long-grain Jasmine rice
1-3/4 cups water
1/2 tsp. salt
- grated zest of 1 lemon
1 tbsp. lemon juice
1/2 tsp. dried dill weed
1 tsp. dried parsley, or 1 tbsp. minced fresh flat-leaf
parsley
2 tbsp. butter, cut into 4 pieces
- kosher salt and freshly ground black pepper to
taste
Add all ingredients to the inner pot and stir to combine. Place
inner pot in the rice cooker and close the lid. Press the “WHITE RICE”
button and cook until rice cooker switches to warm mode. Allow rice to
stand, covered, for 10 minutes. Adjust seasoning as desired. Pour into a
serving bowl and serve immediately. Makes a delicious accompaniment
for fish and chicken dishes. Serves 4.
* Add shrimp or scallops and frozen peas during the last five
minutes of cooking to make a main dish.
2 cucharadas mantequilla sin sal
1/4 taza cebolla, finamente picada o 1 cucharada de hojuelas de
cebolla deshidratada
- cáscara rallada de 1 naranja
- jugo de 2 naranjas más suficiente consomé de pollo para
hacer 1-3/4 de líquido
1 taza arroz de grano largo
1/2 cucharadita de sal kosher
1/4 taza almendras tostadas para aderezar
Agregar todos los ingredientes en la olla interior, a excepción de las
almendras tostadas. Cerrar la tapa, presionar el botón de
Cocinar/Vaporizar y cocinar hasta que el líquido se evapore, 20 minutos
aprox. Dejar reposar por 10 minutos. Colocar en un tazón, aderezar con
almendras tostadas y servir de inmediato. Se acompaña bien con casi
cualquier platillo de pescado, pollo o puerco. Rinde 3-4 porciones.
Arroz Pilaf a la naranja
Arroz al limón con eneldo
1 taza arroz Jazmín de grano largo
1-3/4 tazas agua
1/2 cucharadita sal
- cáscara rallada de 1 limón
1 cucharada jugo de limón
1/2 cucharadita eneldo seco
1 cucharada perejil seco o 1 cucharada de hojas picadas de
perejil fresco
2 cucharadas mantequilla, cortada en 4 trozos
- sal kosher y pimienta negra fresca molida al gusto
Agregar todos los ingredientes en la olla interior y remover para
mezclar. Colocar la olla interior en la arrocera y cerrar la tapa. Presionar
el botón de Arroz blanco y cocinar hasta que la arrocera cambie al
modo de conservar caliente. Dejar reposar, cubierto, por 10 minutos.
Ajustar el condimento al gusto. Verter en un tazón y servir de inmediato.
Deliciosa guarnición para platillos de pescado y pollo. Rinde 4 porciones.
*Agregue camarones o vieiras y chícharos congelados durante los
últimos cinco minutos de cocinado para hacer un platillo principal.
17
17

1-1/2 cups uncooked wild and brown rice mix
3 cups water
1/3 cup dried cranberries
1/4 cup red bell pepper, chopped
1/3 cup fresh mango, chopped
3 tbsp. walnuts, chopped
Dressing:
1/3 cup vegetable oil
1/4 cup rice vinegar
2 tsp. sugar
1 tsp. dried basil leaves
1 tsp. dried parsley
1/4 tsp. salt
freshly ground pepper to taste
Place the rice and water in the inner pot. Press the “BROWN RICE”
button. Cook until the rice is done, about 1 hour, 45 minutes. Remove
the rice to a large bowl and cool. When the rice has cooled, add the
cranberries, red bell pepper, mango and walnuts. Fold in gently.
In a small bowl, whisk together the dressing ingredients and drizzle over
the salad. Mix gently to combine, cover and chill for up to 4 hours
before serving. Serves 4.
Cranberry Mango Wild Rice Salad
1-1/2 tazas mezcla de arroz salvaje e integral crudo
3 tazas agua
1/3 taza arándanos agrios deshidratados
1/4 taza pimiento rojo, picado
1/3 taza mango fresco, picado
3 cucharadas nueces de Castilla, picadas
Aderezo:
1/3 taza aceite vegetal
1/4 taza vinagre de arroz
2 cucharaditas azúcar
1 cucharadita hojas de albahaca seca
1 cucharadita perejil seco
1/4 cucharadita sal
pimienta molida fresca al gusto
Colocar el arroz y el agua en la olla interior. Presionar el botón de
Arroz integral. Cocinar hasta que el arroz esté cocido, 1 hora, 45 minutos
aprox. Colocar el arroz en un tazón grande y dejar enfriar. Cuando el
arroz se haya enfriado, agregar los arándanos agrios, el pimiento rojo, el
mango y las nueces de Castilla. Mezclar con cuidado.
En un tazón pequeño, mezclar los ingredientes del aderezo y verter
encima de la ensalada. Mezclar suavemente para combinar, cubrir y
enfriar por hasta 4 horas antes de servir. Rinde 4 porciones.
Ensalada de Arroz salvaje con mango y arándanos agrios
18
18

2 tbsp. extra virgin olive oil
1/2 tsp. curry powder
1 tsp. ground cumin
1 cup brown or green lentils, picked over and washed
2-2/3 cups water
1 can (14 oz) tomato pieces with juice
2 tbsp. dried minced onion
1 tbsp. dried vegetable flakes
2 tbsp. dried parsley
- kosher salt and freshly ground black pepper to taste
Add all ingredients to inner pot and stir. Place inner pot in the
rice cooker, close the lid, and press the ”STEAM/COOK” button. Allow
to cook until the rice cooker switches to warm mode. Midway through
cooking, carefully open rice cooker, stir ingredients with a long-handled
wooden spoon and re-cover. Keep face and hands away from the
inner pot when opening the lid to avoid steam burns. Inner pot will be
hot, so use caution and be sure that your stirring utensil has a long
handle to avoid burning your hands on the inner pot. When rice cooker
switches to keep-warm mode, carefully open the lid, stir again and re-
cover. Allow to stand for 10 minutes before serving. Serves 4.
Savory Lentils
Green Chile and Chicken Rice
1-1/2 cups medium-grain rice, such as Calrose
3 cups low sodium chicken broth
2 tbsp. dried minced onion
1/2 tsp. kosher salt
1 can (10 oz) chicken breast chunks with liquid
1 can (4 oz) diced green chiles with liquid
- salt to taste
Place all ingredients in the inner pot and stir. Place inner pot into
the rice cooker, cover and press the ”STEAM/COOK” button. Allow to
cook until rice cooker switches to warm mode. Add salt to taste. Stir
and serve immediately as a main course. Serves 4.
2 cucharadas aceite de oliva extra virgen
1/2 cucharadita curry en polvo
1 cucharadita comino molido
1 taza lentejas verdes o cafés, limpias y lavadas
2-2/3 tazas agua
1 taza (14 oz.) tomate en trozos con jugo
2 cucharadas cebolla deshidratada picada
1 cucharada hojuelas de vegetales deshidratados
2 cucharadas perejil deshidratado
-sal kosher y pimienta negra fresca molida al gusto
Agregar todos los ingredientes en la olla interior y remover. Colocar la
olla interior en la arrocera, cerrar la tapa y presionar el botón de
Cocinar/Vaporizar. Dejar cocinar hasta que la arrocera cambie al modo
de conservar caliente. A la mitad del proceso de cocinado, abra la
arrocera con cuidado, remueva los ingredientes con un cucharón de
madera largo y vuelva a tapar. Conserve las manos y cara lejos de la
olla interior cuando abra la tapa para evitar quemaduras por el vapor.
La olla interior estará caliente, por lo que debe tener precaución y
asegurarse de que su utensilio para remover tenga un mango largo
para evitar quemarse las manos con la olla interior. Cuando la arrocera
cambie al modo de conservar caliente, abrir la tapa con cuidado,
volver a remover y volver a cerrar. Dejar reposar por 10 minutos antes de
servir. Rinde 4 porciones.
Lentejas saladas
Arroz con pollo y chile verde
1-1/2 tazas arroz de grano mediano, como el Calrose
3 tazas consomé de pollo bajo en sodio
2 cucharadas cebolla deshidratada picada
1/2 cucharadita sal kosher
1 lata (10 oz.) trozos de pechuga de pollo con líquido
1 lata (4 oz.) chiles verdes en cubos con sal líquida al gusto
Colocar todos los ingredientes en la olla interior y remover. Colocar la
olla interior en la arrocera, cubrir y presionar el botón de
Cocinar/Vaporizar. Dejar cocinar hasta que la arrocera cambie al modo
de conservar caliente. Agregar sal al gusto. Remover y servir
inmediatamente como platillo principal. Rinde 4 porciones.
19
19

1 cup Jasmine or other long-grain rice
1 cup low sodium chicken broth
1 bottle (8 oz) clam juice, or 1 cup water
2 tbsp. unsalted butter
1 tbsp. dried minced onion
- zest of 1 lemon
2 tbsp. lemon juice
1 generous pinch of saffron
5-6 drops Tabasco sauce, or to taste
- kosher salt and freshly ground black pepper to
taste
8 oz. large shrimp, peeled, de-veined, tails left on
- fresh or dried minced chives for garnish
Place all ingredients, except shrimp and chives, in the inner pot
and place in the rice cooker. Press the “STEAM/COOK” button. After
liquid begins to boil, cook the rice for 10 minutes. Carefully open the
rice cooker, keeping hands and face away to avoid steam burns and
add shrimp on top of rice. Cover and continue to cook until the rice
cooker switches to warm mode. Serve immediately and garnish with
chives. Do not allow to stand after rice cooker switches to warm mode
because shrimp will be overcooked. Serves 2-3.
Shrimp with Saffron Rice
Basic Steamed Chicken Breasts
2 boneless, skinless chicken breasts
- kosher salt and freshly ground black pepper to taste
Season chicken breasts with salt and pepper. Place chicken
breasts in the steam tray. You may also place chicken breasts on a
plate that is just large enough to fit into the steam tray with about 1/2-
inch clearance for steam circulation. If using a plate, spray plate with
nonstick cooking spray, place seasoned chicken on the plate and cover
with plastic wrap. Add 1 cup water to inner pot and place in the rice
cooker. Place steam tray with chicken breasts into the inner pot. Cover
and press the “STEAM/COOK” button. Steam for about 10 minutes, or
until chicken is firm to the touch and no pink is left in the center. Using
oven mitts, carefully remove steam tray from rice cooker and serve
chicken immediately. Serves 2.
1 taza arroz Jazmín u otro arroz de grano largo
1 taza consomé de pollo bajo en sodio
1 botella (8 oz.) jugo de almejas o 1 taza de agua
2 cucharadas mantequilla sin sal
1 cucharada cebolla deshidratada picada
- cáscara rallada de 1 limón
2 cucharadas jugo de limón
1 pizca generosa de azafrán
5-6 gotas salsa Tabasco o al gusto
- sal kosher y pimienta negra molida al gusto
8 oz. camarones grandes, pelados desvenados con
cola
- cebollines frescos o deshidratados picados para
aderezar
Colocar todos los ingredientes, a excepción de los camarones y los
cebollines, en la olla interior y colocar en la arrocera. Presionar el botón
de Cocinar/Vaporizar. Después de que el líquido empiece a hervir,
cocinar el arroz por 10 minutos. Con cuidado, abrir la arrocera,
conservando las manos y la cara lejos para evitar quemaduras por el
vapor y agregar los camarones encima del arroz. Cubrir y continuar
cocinando hasta que la arrocera cambie al modo de conservar
caliente. Servir de inmediato y aderezar con los cebollines. No dejar
reposar después de que la arrocera cambie al modo de conservar
caliente, ya que los camarones se pueden cocinar en exceso. Rinde 2-3
porciones.
Camarones con arroz al azafrán
Pechugas de pollo al vapor
2 pechugas de pollo sin hueso y sin piel
- sal kosher y pimienta negra fresca molida al gusto
Condimentar las pechugas de pollo con sal y pimienta. Colocar las
pechugas de pollo en la charola de vapor. También se pueden colocar
las pechugas de pollo en un plato que sea lo suficientemente grande
para caber en la charola de vapor con un espacio de 1,27cm aprox.
para la circulación del vapor. Si se va a utilizar un plato, rociar al plato
con spray para cocinar antiadherente, colocar el pollo condimentado
en el plato y cubrir con plástico. Agregar 1 taza de agua en la olla
interior y colocar dentro de la arrocera. Colocar la charola de vapor
con las pechugas de pollo dentro de la olla interior. Cubrir y presionar el
botón de Cocinar/Vaporizar. Vaporizar por 10 minutos aprox. o hasta
que el pollo tenga una consistencia firme al tacto y que no queden
porciones color rosa en el centro. Con guantes térmicos, sacar
cuidadosamente la charola de vapor de la arrocera y servir el pollo de
inmediato. Rinde 2 porciones.
20
20

2 boneless, skinless chicken breasts or turkey
breast cutlets, about 3/4-inch thick
2 tbsp. soy sauce
1 tbsp. sugar
1 tsp. toasted sesame oil
1 small clove garlic, minced
1/2 tsp. grated fresh ginger
1 green onion, white part with 1 inch of green, cut
into slivers
Combine soy sauce, sugar, sesame oil, garlic, and ginger with
chicken breasts and marinate for 10-15 minutes. Choose a plate that is
just large enough to fit into the steam tray with about 1/2-inch
clearance for steam circulation. Place chicken breasts and marinade
on plate sprayed with nonstick cooking spray, top with slivered onion,
and cover plate with plastic wrap. Add 1 cup of water to inner pot.
Place steam tray into the inner pot and place inner pot into the rice
cooker. Close lid and press the “STEAM/COOK” button. Steam for
about 10 minutes, or until chicken is firm to the touch and no pink is left
in the center. Using oven mitts, carefully remove steam tray from the
rice cooker and serve chicken immediately. Serves 2.
Soy Sauce Marinated Chicken Breasts
Chicken Breasts Dijon
2 boneless, skinless chicken breasts
1 tbsp. Dijon-style mustard
1 tbsp. plain yogurt
1/2 tsp. sambal oelek (a mixture of chiles, brown sugar, and
salt), optional
- kosher salt and freshly ground black pepper to taste
1 tsp. dried chives
Place chicken breasts on a small plate sprayed with nonstick
cooking spray. Mix together mustard, yogurt, sambal oelek, salt and
pepper. Spread over chicken breast and sprinkle with chives. Cover
chicken and plate with plastic wrap and place plate in steam tray. Add
1 cup of water to inner pot. Place steam tray in inner pot and place
inner pot in the rice cooker. Cover and press the “STEAM/COOK” button.
Steam for about 10 minutes, or until chicken is firm to the touch and no
pink is left in the center. Using oven mitts, carefully remove steam tray
from rice cooker and serve chicken immediately. Serves 2.
2 pechugas de pollo sin hueso y sin piel o filetes de pechuga de
pavo con un grosor de fl” de pulgada aprox.
2 cucharadas salsa de soya
1 cucharada azúcar
1 cucharadita aceite de ajonjolí tostado
1 diente de ajo chico, picado
1/2 cucharadita jengibre fresco rallado
1 cebolla verde, la parte blanca con 1” de verde, cortar en
rodajas
Combinar la salsa de soya, el azúcar, el aceite de ajonjolí, el ajo y el
jengibre con las pechugas de pollo y marinar por 10-15 minutos. Elegir un
plato que sea lo suficientemente grande para caber en la charola de
vapor dejando un espacio de 1,27cm para la circulación del vapor.
Colocar las pechugas de pollo y el marinado en el platón rociado con
spray para cocinar antiadherente, cubrir con la cebolla y cubrir con
plástico. Agregar 1 taza de agua en la olla interior. Colocar dentro de la
charola interior y ésta dentro de la arrocera. Cerrar la tapa y presionar el
botón de Cocinar/Vaporizar. Vaporizar por 10 minutos aprox. o hasta
que el pollo tenga una textura firme al tacto y que no queden porciones
color rosa en el centro. Con guantes térmicos, sacar cuidadosamente la
charola de vapor de la arrocera y servir el pollo de inmediato. Rinde 2
porciones.
Pechugas de pollo marinadas con salsa de soya
Pechugas de pollo Dijon
2 pechugas de pollo sin hueso y sin piel
1 cucharada mostaza Dijon
1 cucharada yogurt natural
1/2 cucharadita Oelek Sambal (una mezcla de chiles, azúcar
moreno y sal) opcional
- sal kosher y pimienta negra fresca molida al gusto
1 cucharadita cebollines deshidratados
Colocar las pechugas de pollo en un plato pequeño rociado con
spray para cocinar antiadherente. Mezclar la mostaza, el yogurt, el
oelek timbal, la sal y la pimienta. Espolvorear sobre las pechugas de
pavo y aderezar con los cebollines. Cubrir el pollo y el plato con plástico
y colocar el plato en la charola de vapor. Agregar 1 taza de agua en la
olla interior. Colocar la charola de vapor en la olla interior y ésta en la
arrocera. Cubrir y presionar el botón de Cocinar/Vaporizar. Vaporizar por
10 minutos aprox. o hasta que el pollo tenga una textura firme al tacto y
que no queden porciones color rosa en el centro. Con guantes térmicos,
sacar cuidadosamente la charola de vapor de la arrocera y servir el
pollo de inmediato. Rinde 2 porciones.
21
21

2 turkey tenderloins, about 10-11 oz. each
- kosher salt and ground black pepper to taste
Add 3 cups of water to inner pot, place inner pot in rice cooker,
cover and press “STEAM/COOK” button to let water come to a boil.
Season tenderloins with salt and pepper. Place tenderloins in the steam
tray. You may also choose a plate that is just large enough to fit into
the steam tray with about 1/2-inch clearance for steam circulation. If
using a plate, spray with nonstick cooking spray before placing
tenderloins on the plate and cover with plastic wrap before placing in
the steam tray. When water has come to a boil in the rice cooker,
carefully open lid, keeping hands and face away to avoid steam burns.
Using oven mitts (inner pot will be hot), carefully place the steam tray
into the rice cooker, cover, and steam for about 25 minutes. Check
after 20 minutes with an instant meat thermometer. Turkey should reach
about 160°F and not be pink in the center. Using oven mitts, remove
steam tray from rice cooker. A general rule is to stand for about 15
minutes per 1-inch thickness. Refrigerate if not serving immediately.
Serves 4.
Steamed Turkey Tenderloins
Basic Steamed New Potatoes
1-2 lbs. small new potatoes (about 1-2 inches in diameter),
scrubbed, unpeeled
Add potatoes in one layer to steam tray. Add 3 cups water to
the inner pot. Place inner pot in the rice cooker and place steam tray
into the inner pot. Close lid and press the “STEAM/COOK” button. Allow
to cook until potatoes are tender, about 20 minutes after water begins to
boil. Test potatoes: carefully open the lid, keeping hands and face away
to avoid steam burns. Check potatoes with a fork, taking care not to
touch the sides of the steam tray or inner pot, as they will be hot. If
potatoes are not completely cooked, replace cover and cook for
another few minutes. Use oven mitts to remove steam tray from rice
cooker and serve hot with butter, salt and pepper.
2 lomos de pavo, 10-11 oz. cada uno
- sal kosher y pimienta negra molida al gusto
Agregar 3 tazas de agua en la olla interior, colocar la olla interior en
la arrocera, cubrir y presionar el botón de cocinar/vaporizar para
permitir que el agua hierva. Condimentar los lomos con sal y pimienta.
Colocar los lomos en la charola de vapor. También se puede elegir un
plato que sea lo suficientemente grande para caber en la charola de
vapor con un espacio de 1,27cm para la circulación del vapor. Si se va
a utilizar un plato, rociar con spray para cocinar antiadherente antes de
colocar los lomos en el plato y cubrir con plástico antes de colocar en la
charola de vapor. Cuando el agua haya hervido en la arrocera, abrir la
tapa con cuidado, conservando las manos y la cara lejos para evitar
quemaduras por el vapor. Con guantes térmicos (la olla interior estará
caliente), colocar cuidadosamente la charola de vapor en la arrocera,
cubrir y vaporizar por 25 minutos aprox. Revisar después de 20 minutos
con un termómetro instantáneo para carne. El pavo debe alcanzar una
temperatura de 160° F aprox. y no debe estar color rosa al centro. Con
guantes térmicos, sacar la charola de vapor de la arrocera. Una regla
general es dejar reposar por 15 minutos por cada pulgada de grosor.
Refrigerar si no se va a servir de inmediato. Rinde 4 porciones.
Lomo de pavo al vapor
Papitas al vapor
0,45kg-.91kg papitas chicas (2,54cm-5,08cm de diámetro),
lavadas y peladas
Agregar las papas en una capa en la charola de vapor. Agregar 3
tazas de agua en la olla interior. Colocar la olla interior en la arrocera y
colocar la charola de vapor en la olla interior. Cerrar la tapa y presionar
el botón de Cocinar/Vaporizar. Cocinar hasta que las papas estén
suaves, 20 minutos aprox. después de que el agua empiece a hervir.
Probar las papas: con cuidado, abra la tapa, conservando las manos y
la cara lejos para evitar quemaduras por el vapor. Revise las papas con
un tenedor, teniendo cuidado de no tocar las paredes de la charola de
vapor ni la olla interior, ya que estarán calientes. Si las papas no están
cocidas por completo, volver a cubrir y cocinar por otros cuantos
minutos. Usar guantes térmicos para sacar la charola de vapor de la
arrocera y servir con mantequilla caliente, sal y pimienta.
22
22

2 tbsp. extra virgin olive oil
1 cup coarsely chopped onion
1 red bell pepper, peeled and diced
1 medium stalk celery, diced
1 cup uncooked long-grain rice
1 3/4 cups chicken broth
1 can (14 oz) tomato pieces with juice
1 tbsp. tomato paste
1/2 tsp. dried thyme
3/4 tsp. kosher salt, or 1/2 tsp. regular salt
- freshly ground black pepper to taste
1 pinch powdered cloves
1/4 tsp. prepared chili powder
1 tbsp. dried parsley
6-8 drops Tabasco sauce
1/3 cup diced ham
6 oz. smoked Polish sausage, cut into slices
6-8 medium shrimp (optional)
Heat oil in the inner pot and, using extreme caution, sauté onion,
pepper, and celery for 3-4 minutes to soften (see Safety Considerations
on page 15). Use a long-handled wooden spoon for stirring to avoid
burning hands on the inner pot. Add rice and stir to coat. Add
remaining ingredients. Close the lid and press “STEAM/COOK” button.
Allow to cook, stirring once or twice, until the rice is tender and meat is
cooked through. Allow jambalaya to stand for about 10 minutes before
serving on warmed plates. Serves 4.
Jambalaya
Steamed Sweet Potatoes
1 lb. sweet potatoes
Peel and cut potatoes into 1-inch cubes and place in a single
layer in the steam tray. Add 2 cups water to the inner pot and place in
the rice cooker. Place steam tray into the inner pot, close lid, and press
“STEAM/COOK” button. Steam until potatoes are tender, about 17
minutes after water boils. Test potatoes: carefully open the lid, keeping
hands and face away to avoid steam burns. Using a fork, test potatoes
for doneness. Take care not to touch sides of steam tray or inner pot, as
they will be hot. If potatoes are not done, close lid and steam for an
additional few minutes. Use oven mitts to remove steam tray from rice
cooker and serve potatoes immediately with butter.
2 cucharadas aceite de oliva extra virgen
1 taza cebolla picada en trozos grandes
1 pimiento rojo, pelado y picado en cubos
1 tallo de apio mediano, picado en cubos
1 taza arroz de grano largo crudo
1 3/4 taza consomé de pollo
1 lata (14 oz.) tomate en trozos con jugo
1 cucharada pasta de tomate
1/2 cucharadita tomillo deshidratado
3/4 cucharadita sal kosher o 1/2 cucharadita de sal normal
- pimienta negra molida fresca al gusto
1 pizca clavo en polvo
1/4 cucharadita chile preparado en polvo
1 cucharada perejil deshidratado
6-8 gotas salsa Tabasco
1/3 taza jamón en cubos
6 oz. chorizo ahumado Polaco, cortado en rebanadas
6-8 camarones medianos (opcional)
Calentar el aceite en la olla interior y, con extrema precaución,
saltear la cebolla, el pimiento y el apio por 3-4 minutos para ablandarlos
(véanse las Consideraciones de seguridad en la página 15). Utilizar un
cucharón de madera de mango largo para remover con el fin de evitar
quemarse las manos con la olla interior. Agregar el arroz y remover para
cubrir. Agregar los ingredientes restantes. Cerrar la tapa y presionar el
botón de Cocinar/Vaporizar. Cocinar, removiendo una o dos veces,
hasta que el arroz esté suave y la carne se haya cocido por completo.
Dejar reposar por 10 minutos antes de servir en platos calentados. Rinde
4 porciones.
Jambalaya
Papas dulces al vapor
0,45kg papas dulces
Pelar y cortar las papas en cubos de 2,50cm y colocar en una sola
capa en la charola de vapor. Agregar 2 tazas de agua en la olla interior
y colocar en la arrocera. Colocar la charola de vapor en la olla interior,
cerrar la tapa y presionar el botón de Cocinar/Vaporizar. Vaporizar
hasta que las papas estén suaves, 17 minutos aprox. después de que
hierva el agua. Probar las papas: con cuidado, abra la tapa,
conservando las manos y la cara lejos para evitar quemaduras por el
vapor. Utilizando un tenedor, pruebe que las papas estén cocidas.
Tenga cuidado de no tocar las paredes de la charola de vapor ni la olla
interior, ya que estarán calientes. Si las papas no están cocidas, cerrar la
tapa y dejar cocinar por unos cuantos minutos más. Usar guantes
térmicos para sacar la charola de vapor de la arrocera y servir las papas
inmediatamente con mantequilla.
23
23

1/2 lb. carrots, peeled, sliced or cut into 3/8-inch square
by 3-inch long strips
- grated zest of 1 orange
1/2 cup orange juice or combination of orange juice and
water
2 slices fresh ginger
1 tbsp. butter
Add carrots and remaining ingredients to inner pot. Place inner
pot into rice cooker, cover, and press “STEAM/COOK” button. Steam for
10 minutes after liquid has come to a boil. Check to see if carrots are
tender by carefully opening the lid, keeping hands and face away to
avoid steam burns. If carrots are not done, cover and cook for an
additional 1-2 minutes, adding more water if needed. Spoon out of
inner pot and serve.
Orange Gingered Carrots
Steamed Broccoli or Cauliflower
Broccoli or Cauliflower or a mixture of both
Wash broccoli/cauliflower and cut into florets or pieces with 2-3
inch stems. Place in the steam tray. Add 1-1/2 cups water to the inner
pot, place inner pot into the rice cooker, close lid and press
“STEAM/COOK” button. When water has reached a boil, carefully open
the lid, keeping hands and face away to avoid steam burns. Using oven
mitts, place steam tray with vegetables into the rice cooker, taking care
not to touch sides of the inner pot, as it will be hot. Steam for 8 to 10
minutes or to desired crispness. Using oven mitts, remove steam tray
from inner pot and place vegetables in a serving dish. Season with salt,
pepper, butter, olive oil, or cheese if desired.
0,23kg zanahorias peladas, rebanadas o cortadas en tiras de
3/8” por 3 pulgadas de largo
- cáscara rallada de 1 naranja
1/2 taza jugo de naranja o una combinación de jugo de naranja y
agua
2 rebanadas jengibre fresco
1 cucharada mantequilla
Colocar las zanahorias y los ingredientes restantes en la olla interior.
Colocar la olla interior en la arrocera, cubrir y presionar el botón de
Cocinar/Vaporizar. Vaporizar por 10 minutos después de que el líquido
haya hervido. Revisar que las zanahorias estén suaves al abrir la tapa
con cuidado, conservando las manos y la cara lejos para evitar
quemaduras por vapor. Si las zanahorias no están cocidas, cubrir y
cocinar por 1-2 minutos adicionales, agregando más agua si es
necesario. Sacar de la charola de vapor y servir.
Zanahorias con jengibre a la naranja
Brócoli o coliflor al vapor
Brócoli o coliflor o una mezcla de ambos
Lavar el brócoli/coliflor y cortar en ramilletes o piezas con tallos de
5,08cm-7,62cm. Colocar en la charola de vapor. Agrega 1-1/2 tazas de
agua en la olla interior y ésta en la arrocera, cerrar la tapa y presionar el
botón Cocinar/Vaporizar. Cuando el agua haya hervido, abra la tapa
con cuidado, conservando las manos y la cara lejos para evitar
quemaduras por el vapor. Utilizando guantes térmicos, colocar la
charola de vapor con vegetales en la arrocera, teniendo cuidado de no
tocar las paredes de la olla interior, ya que estará caliente. Vaporizar
por 8 a 10 minutos o hasta obtener la firmeza deseada. Utilizando
guantes térmicos, sacar la charola de vapor de la olla interior y colocar
los vegetales en un platón. Sazonar con sal, pimienta, mantequilla,
aceite de oliva o queso si se desea.
24
24

Steamed Green Beans
1 lb. green beans, stemmed
Add 2 cups water to the inner pot and place into the rice
cooker, cover and press the “STEAM/COOK” button to bring to a boil.
Place beans in the steam tray. When water has come to a boil,
carefully open the lid, keeping hands and face away to avoid steam
burns. Using oven mitts, carefully place steam tray with beans into the
rice cooker. Close the lid and steam for 10 to 12 minutes or until beans
are tender. Do not allow to stand on warm mode or beans will be over-
cooked. Using oven mitts, carefully remove steam tray from the inner
pot. Spoon beans onto a platter, season with salt, pepper, and butter.
Serve immediately.
Steamed Butternut Squash
1 lb. butternut squash, peeled and cut into 1-inch cubes
Add 2 cups water to the inner pot and place into the rice
cooker, cover and press the “STEAM/COOK” button to bring to a boil.
Place squash in the steam tray. When water has come to a boil,
carefully open the lid, keeping hands and face away to avoid steam
burns. Using oven mitts, carefully place steam tray with squash into the
rice cooker. Close the lid and steam for 10 to 12 minutes or until squash
is tender. Do not allow to stand on warm mode or squash will be over-
cooked. Using oven mitts, carefully remove steam tray from the inner
pot. Spoon squash onto a platter, season as desired and serve
immediately.
Sweet Corn
Fresh corn, trimmed, cut in half if needed
Remove corn husks and silk and trim as needed. Place corn ears
in the steam tray. Add 1-1/2 cups water to the inner pot, place in the
rice cooker, cover and press the “STEAM/COOK” button. When water
has come to a boil, carefully open the lid, keeping hands and face
away to avoid steam burns. Using oven mitts, place steam tray with
corn into the rice cooker, taking care not to touch sides of the inner pot,
as it will be hot. Steam for 10 minutes. Using oven mitts, remove the
steam tray immediately. Season corn as desired and serve hot.
Ejotes al vapor
0,45kg ejotes, sin tallo
Agregar 2 tazas de agua en la olla interior y colocar dentro de la
arrocera, cubrir y presionar el botón de Cocinar/Vaporizar para hervir.
Colocar los ejotes en la charola de vapor. Cuando el agua haya
hervido, abra la tapa con cuidado, conservando las manos y la cara
lejos para evitar quemaduras por el vapor. Utilizando guantes térmicos,
colocar la charola de vapor con los ejotes dentro de la arrocera
cuidadosamente. Cerrar la tapa y vaporizar por 10 a 12 minutos o hasta
que los ejotes estén suaves. No dejar reposar en el modo de conservar
caliente o los ejotes se cocerán en exceso. Utilizando guantes térmicos,
saque la charola de vapor de la olla interior con cuidado. Colocar los
ejotes en un platón, condimentar con sal, pimienta y mantequilla. Servir
de inmediato.
Calabaza sidra al vapor
0,45kg calabaza sidra, pelada y cortada y cubos de 2,54cm
Agregar 2 tazas de agua en la olla interior y colocar en la arrocera,
cubrir y presionar el botón de Cocinar/Vaporizar para hervir. Colocar la
calabaza en la charola de vapor. Cuando el agua haya hervido, abra
la tapa con cuidado, conservando las manos y la cara lejos para evitar
quemaduras por el vapor. Utilizando guantes térmicos, colocar la
charola de vapor con la calabaza en la arrocera con cuidado. Cerrar la
tapa y vaporizar por 10 a 12 minutos o hasta que la calabaza esté
suave. No dejar reposar en el modo de conservar caliente o la calabaza
se cocerá en exceso. Utilizando guantes térmicos, sacar la charola de
vapor de la olla interior. Colocar la calabaza en un platón, condimentar
al gusto y servir de inmediato.
Elote dulce
Elote fresco, recortado y cortado a la mitad si es necesario
Quitar las espigas y cortar como sea necesario. Colocar los trozos de
elote en la charola de vapor. Agregar 1-1/2 tazas de agua en la olla
interior, colocar en la arrocera, cubrir y presionar el botón de
Cocinar/Vaporizar. Cuando el agua haya hervido, abra la tapa con
cuidado, conservando las manos y la cara lejos para evitar quemaduras
por el vapor. Utilizando guantes térmicos, colocar la charola de vapor
con el elote en la arrocera, teniendo cuidado de no tocar las paredes
de la olla interior, ya que estarán calientes. Vaporizar por 10 minutos.
Utilizando guantes térmicos, sacar la charola de vapor de inmediato.
Condimentar el elote al gusto y servir caliente.
25
25

1 1/2 cups long grain rice
3 cups low-sodium chicken broth
4 ounce can diced green chiles
1 small white onion, diced
1 pound boneless, skinless chicken breasts, cut into 1/2-inch
pieces
1 tsp. salt
1/4 tsp. cayenne pepper
6 flour tortilla wraps
1 cup lowfat sour cream
2 tbsp. fresh cilantro, chopped
1 tbsp. fresh chives, chopped
1 cup Monterey Jack cheese, shredded
Place the rice, chicken broth and chiles in the inner pot. Stir with a
long-handled plastic spoon. Add the onion, chicken meat, salt and
cayenne pepper. Cover and press the “WHITE RICE” button.
While the chicken and rice cook, loosely wrap the four tortillas in a
paper towel and place them in the steamer tray. Combine the sour
cream, cilantro and chives in a small bowl. After the rice has steamed
for 25 minutes, open the lid, keeping hands and face away to avoid
steam burns, and use oven mitts to place the tortilla-filled steamer tray
into the rice cooker. Steam for an additional 5 minutes. Using oven
mitts, remove the tray and check the chicken with the tip of a knife to
determine that the chicken is cooked through and no pink remains.
Add the sour cream mixture to the rice, carefully replace the steam tray
with the tortillas and steam for an additional 3 minutes.
When done, spoon the Monterrey Green Chile Chicken equally into the
wraps. Layer the Jack cheese over all and wrap. Serves 4.
Monterrey Green Chile Chicken Wraps
1 1/2 tazas arroz de grano largo
3 tazas consomé de pollo bajo en sodio
114 gramos chiles verdes en cubos de lata
1 chica cebolla blanca, picada en cubos
0,45kg pechugas de pollo sin hueso y sin piel, cortadas
en piezas de 1,27cm
1 cucharadita sal
1/4 cucharadita pimienta de Cayena
6 rollitos de tortilla de harina
1 taza crema agria baja en grasa
2 cucharadas cilantro fresco, picado
1 cucharada cebollines frescos, picados
1 taza queso Monterey Jack, desmenuzado
Colocar el arroz, el consomé de pollo y los chiles en la olla interior.
Remover con un cucharón de plástico con mango largo. Agregar la
cebolla, el pollo, la sal y la pimienta de Cayena. Cubrir y presionar el
botón de Arroz blanco.
Mientras el pollo y el arroz se cocinan, enrollar holgadamente las cuatro
tornillas en una toalla de papel y colocarlas en la charola de vapor.
Combinar la crema agria, el cilantro y los cebollines en un tazón chico.
Después de que el arroz se haya cocinado por 25 minutos, abrir la tapa,
conservando las manos y la cara lejos para evitar quemaduras por el
vapor, y usar guantes térmicos para colocar la charola de vapor rellena
de tortillas en la arrocera. Vaporice por 5 minutos más. Utilizando
guantes térmicos, sacar la charola de vapor y revisar el pollo con la
punta de un cuchillo para determinar que el pollo está completamente
cocido y no hay porciones color rosa. Agregar la mezcla de crema
agria al arroz, volver a colocar la charola de vapor con las tortillas y
vaporizar por otros 3 minutos.
Cuando se haya terminado, colocar el pollo con chile verde estilo
Monterrey de manera equitativa en las tortillas. Colocar una capa de
queso Jack encima y enrollar. Rinde 4 porciones.
Rollitos de pollo con chile verde estilo Monterrey
26
26

2 cups uncooked brown rice
1 1/2 cups water
1 1/2 cups sauterne cooking wine
1/2 lb. salmon fillets
salt and pepper to taste
1/2 lb. fresh asparagus, cut into 1-inch pieces
1 tbsp. extra-virgin olive oil
1/2 cup Parmesan cheese, finely grated
2 tbsp. pecans, chopped
1 lemon for garnish
Place the rice, water and sauterne in the inner pot. Close the lid and
press the “BROWN RICE” button; steam for 1 hour and 30 minutes.
Meanwhile, season the salmon with salt and pepper to taste. Place a
heat-resistant plate on the bottom of the steam tray and add the
salmon fillets. Arrange the asparagus around the salmon fillets as space
allows. Open the lid after 1 hour and 30 minutes, keeping hands and
face away to avoid steam burns, and carefully insert the steam tray with
salmon and asparagus into the rice cooker (use oven mitts and avoid
touching the inner pot, as it will be hot).
Close the lid and press the “STEAM/COOK” button; cook for 15 minutes.
When done, check the fish and asparagus with the tip of a fork and
continue steaming if needed until the fish is opaque and the asparagus
is tender. When done, remove the salmon and asparagus and place
each on a plate. Squeeze the lemon over the salmon.
Remove the rice from the inner pot to a bowl. Drizzle with the olive oil,
add the Parmesan cheese and chopped pecans and toss thoroughly.
Serve with the salmon and asparagus. Serves 2.
Salmon with Pecan Parmesan Risotto &
Asparagus Tips
2 tazas arroz integral crudo
1 1/2 tazas agua
1 1/2 tazas vino para cocinar Sauterne
0,23kg filetes de salmón
sal y pimienta al gusto
0,23kg espárragos frescos, cortados en trozos de 2,54cm
1 cucharada aceite de oliva extra virgen
1/2 taza queso Parmesano, finamente rallado
2 cucharadas nueces, picadas
1 limón para aderezar
Colocar el arroz, el agua y el vino en la olla interior. Cerrar la tapa y
presionar el botón de Arroz integral; vaporizar por 1 hora y 30 minutos.
Mientras tanto, condimentar el salmón con sal y pimienta al gusto.
Colocar un plato resistente al calor en el fondo de la charola de vapor
y agregar los filetes de salmón. Acomodar los espárragos alrededor de
los filetes de salmón como lo permita el espacio. Abra la tapa después
de 1 hora y 30 minutos, conservando las manos y la cara lejos para
evitar quemaduras por el vapor, e insertar cuidadosamente la charola
de vapor con el salmón y los espárragos en la arrocera (usar guantes
térmicos y evitar tocar la olla interior, ya que estará caliente).
Cerrar la tapa y presionar el botón de Cocinar/Vaporizar; cocinar por 15
minutos. Cuando termine, revisar el pescado y los espárragos con la
punta de un tenedor y continuar cocinando si es necesario hasta que el
pescado esté opaco y los espárragos suaves. Sacar el salmón y los
espárragos y colocarlos en un plato. Exprimir el limón encima del
salmón.
Sacar el arroz de la olla interior y colocarlo en un tazón. Mezclar con el
aceite de oliva, agregar el queso Parmesano y las nueces picadas y
remover perfectamente. Servir con el salmón y los espárragos. Rinde 2
porciones.
Salmón con risotto parmesano y nueces y
puntas de espárragos
27
27

8 oz. pkg. cream cheese, softened
1/4 cup lowfat mayonnaise
3/4 cup Parmesan cheese, grated
1 clove garlic, minced
14 oz. can artichoke hearts, drained and chopped
1/2 cup frozen spinach, thawed and squeezed dry
1/2 tsp dried Italian seasoning
1 tbsp. fresh Italian parsley, chopped
salt and freshly ground black pepper
4 cups water
In a medium bowl, blend together the cream cheese,
mayonnaise and Parmesan cheese. Add the garlic, artichoke hearts,
spinach, Italian seasoning, parsley, salt and pepper. Mix well. Coat a 4-
cup heatproof dish with nonstick cooking spray. Spoon the spread into
the dish and smooth the top with a knife. Cover the top of the dish with
aluminum foil. Pour the water into the inner pot and position the steam
tray on top. Place the dish in the steam tray. Close the lid and press
the “STEAM/COOK” button for 15 minutes. Carefully open the lid,
keeping hands and face away to avoid steam burns, and check the
spread. When done, it will be warm throughout. Serve with herbed
crackers. Serves 6.
Hot Spinach & Artichoke Spread
2-1/2 cups chicken broth
1-1/2 cups water
1 (5.5 oz) pk. instant au gratin potatoes plus seasoning packet
6 baby red potatoes, rinsed and cut into small cubes
1/4 tsp. freshly ground black pepper
1/2 cup smoked ham, chopped (you may use lowfat turkey
ham)
1 cup half and half cream
3 tbsp. fresh chives, chopped
Place the broth, water, instant potatoes, seasoning, potatoes and
pepper in the inner pot. Close the lid and press the “STEAM/COOK”
button and steam for 20 minutes. Carefully open the lid, keeping hands
and face away to avoid steam burns. Use a long-handled plastic spoon
to stir in the ham and cream, taking care not to touch the inner pot, as it
will be hot. Close the lid and continue steaming for 3 minutes. When
done, use ladle to spoon into individual bowls and garnish with the
chopped chives.
Serves 4.
Red Potato, Smoked Ham & Chive Soup
8 oz. queso crema, suave
1/4 taza mayonesa baja en grasa
3/4 taza queso Parmesano, rallado
1 diente ajo, picado
14 oz. corazones de alcachofa en lata, drenados y
picados
1/2 taza espinacas congeladas, descongeladas y drenadas
1/2 cucharadita aderezo Italiano deshidratado
1 cucharada perejil Italiano fresco, picado
sal y pimienta negra molida fresca
4 tazas agua
En un tazón mediano, mezclar el queso crema, la mayonesa y el queso
Parmesano. Agregar al ajo, los corazones de alcachofa, la espinaca, el
aderezo Italiano, el perejil, la sal y la pimienta. Mezclar bien. Cubrir un plato
de 4 tazas resistente al calor con spray para cocinar antiadherente. Colocar
la mezcla en el plato y aplanar la superficie con un cuchillo. Cubrir la
superficie del plato con papel aluminio. Verter el agua en la olla interior y
colocar la charola de vapor en la parte superior. Colocar el plato en la
charola de vapor. Cerrar la tapa y presionar el botón de Cocinar/Vaporizar
por 15 minutos. Con cuidado, abrir la tapa, conservando las manos y la cara
lejos para evitar quemaduras por el vapor, y revisar la mezcla. Cuando
termine, estará caliente. Servir con galletas saladas con hierbas. Rinde 6
porciones.
Queso untable con espinacas picantes y alcachofa
Sopa de papa roja, jamón ahumado y cebollín
2-1/2 tazas consomé de pollo
1-1/2 tazas agua
1 paquete (5.5 oz.) papas gratinadas instantáneas más sobre de
condimento
6 papas rojas chicas, lavadas y cortadas en cubos
chicos
1/4 cucharadita pimienta negra molida fresca
1/2 taza jamón ahumado, picado (se puede usar jamón de
pavo bajo en grasa)
1 taza media crema
3 cucharadas cebollines frescos, picados
Colocar el consomé, el agua, las papas instantáneas, el condimento, las
papas y la pimienta en la olla interior. Cerrar la tapa y presionar el botón de
Cocinar/Vaporizar y vaporizar por 20 minutos. Con cuidado, abrir la tapa,
conservando las manos y la cara lejos para evitar quemaduras por el vapor.
Utilizar un cucharón de plástico de mango largo para agregar y remover el
jamón y la crema, teniendo cuidado de no tocar la olla interior, ya que
estará caliente. Cerrar la tapa y continuar vaporizando por 3 minutos.
Cuando termine, usar el cucharón para colocar en tazones individuales y
aderezar con los cebollines picados. Rinde 4 porciones.
28
28

2 tbsp. butter or margarine
1 large yellow onion, chopped
2 lbs. ripe tomatoes, cored, peeled and cut into small
pieces
1 tsp. salt
1/2 tsp. freshly ground black pepper
4 cups chicken or vegetable broth
1/2 cup lowfat milk
2 tbsp. fresh cilantro, minced
1 tsp. lemon juice
1/4 cup lowfat mayonnaise
Place the butter and onions in the inner pot and sauté for 3 to 4
minutes, or until the onions are translucent (see Safety Considerations on
page 15). Add the tomatoes, salt, pepper and broth. Close lid and
press the “STEAM/COOK” button and steam for 30 minutes. When done,
carefully open the lid, keeping hands and face away to avoid steam
burns, and add the milk. Continue steaming for 3 minutes, or until the
soup is heated through. If desired, puree the soup in a blender before
serving. Prepare the aioli by combining the cilantro, lemon juice and
mayonnaise. Blend until smooth. To serve, pour the hot soup into
individual bowls and spoon the aioli in a swirl over each serving. Serves
6.
Homemade Tomato Soup with Cilantro Aioli
1 small yellow onion, chopped
2 tsp. vegetable oil
1 clove garlic, minced
2 15 oz. cans prepared chili without beans
1 cup prepared medium salsa
1/2 cup black olives, sliced
3 oz. lowfat cream cheese, cubed
3 oz. cheddar cheese, grated
tortilla chips
Place the onion, oil and garlic in the inner pot and sauté for 3 minutes
(see Safety Considerations on page 15). Use a large wooden spoon to
gently stir as the onion and garlic cook. Add the chili, salsa, olives,
cream cheese and cheddar cheese. Stir to combine all of the
ingredients, close the lid, and press the “STEAM/COOK” button. Steam
for 4 minutes. Carefully open the lid, keeping hands and face away to
avoid steam burns, and stir the dip. Steam again for 3 minutes. Open
the lid and stir again. Continue steaming until the dip is warm
throughout and the cheeses are melted. When done, serve in a large
bowl and use the tortilla chips for dipping. Serves 6.
Game Day Warm Chili & Cheese Dip
2 cucharadas mantequilla o margarina
1 grande cebolla amarilla, picada
0,91kg tomates maduros, sin corazón, pelados y cortados en
trozos chicos
1 cucharadita sal
1/2 cucharadita pimienta negra molida fresca
4 tazas consomé de pollo o verduras
1/2 taza leche baja en grasa
2 cucharadas cilantro fresco, picado
1 cucharadita jugo de limón
1/4 taza mayonesa baja en grasa
Colocar la mantequilla y las cebollas en la olla interior y saltear por 3 a 4 minutos
o hasta que las cebollas estén translúcidas (véanse las Consideraciones de
seguridad en la página 15). Agregar los tomates, la sal, la pimienta y el
consomé. Cerrar la tapa y presionar el botón de Cocinar/Vaporizar y vaporizar
por 30 minutos. Cuando termine, abra la tapa con cuidado, conservando las
manos y la cara lejos para evitar quemaduras por el vapor, y agregue la leche.
Continuar vaporizando por 3 minutos o hasta que la sopa esté completamente
cocida. Si se desea, se puede hacer un puré con la sopa en una licuadora
antes de servir. Preparar el aioli al combinar el cilantro, el jugo de limón y la
mayonesa. Mezclar hasta obtener una textura suave. Para servir, verter la sopa
caliente en tazones en tazones individuales y aderezar cada porción con el aioli.
Rinde 6 porciones.
Sopa de tomate casera con Aioli de cilantro
1 chica cebolla amarilla, picada
2 cucharaditas aceite vegetal
1 diente ajo, picado
2 de 15 oz. latas de chili preparado sin frijoles
1 taza salsa preparada no picosa
1/2 tazaa ceitunas negras, rebanadas
3 oz. queso crema bajo en grasa, en cubos
3 oz. queso Cheddar, rallado
totopos de tortilla
Colocar la cebolla, el aceite y el ajo en la olla interior y saltear por 3 minutos
(véanse las Consideraciones de seguridad en la página 15). Usar un cucharón
de madera grande para remover suavemente mientras se cocinan la cebolla y
el ajo. Agregar el chili, la salsa, las aceitunas, el queso crema y el queso
Cheddar. Remover para combinar todos los ingredientes, cerrar la tapa y
presionar el botón de Cocinar/Vaporizar. Vaporizar por 4 minutos. Abrir la tapa
con cuidado, conservando las manos y la cara lejos para evitar quemaduras por
el vapor, y remover el dip. Vaporizar por otros 3 minutos. Abrir la tapa y remover
otra vez. Continuar vaporizando hasta que el dip esté caliente y los quesos se
hayan derretido. Cuando termine, servir en un tazón grande y aderezar con los
totopos de tortilla.
Dip botanero caliente de queso y chili
29
29

1/2 cup frozen spinach, thawed, drained and squeezed dry
1/2 cup fresh button mushrooms, cleaned and sliced
2 green onions, chopped
4 large eggs, beaten (you may use egg substitute)
1/2 tsp. ground oregano
1/2 tsp. ground thyme
pinch salt and freshly ground black pepper
1/4 cup Asiago cheese, grated (you may use Parmesan
cheese)
Coat the inner pot with nonstick cooking spray. In a medium
bowl, mix together the spinach, mushrooms and onions. Add the eggs,
oregano, thyme, salt, pepper and cheese. Mix well until all ingredients
are combined. Spoon the frittata into the inner pot. Close the lid and
press the “STEAM/COOK” button and steam for 12-14 minutes. When
done, the eggs should be firm on the bottom and almost set on the top.
Use a plastic spatula to slice the frittata into wedges and serve.
Serves 4.
Spinach & Mushroom Breakfast Frittata
3 medium Yukon Gold potatoes, cleaned and cut into 1-inch
pieces
2 cups water
4 large eggs, beaten
pinch salt and freshly ground black pepper
1/2 cup Gouda cheese, shredded
1 green onion, chopped
Coat the inner pot with nonstick cooking spray. Place the
potatoes in the bottom of the inner pot and cover with the water. Close
the lid, press the “STEAM/COOK” button and steam for 25 minutes. When
done, use oven mitts to remove inner pot from the rice cooker and
carefully strain out the remaining water. Replace the inner pot and
potatoes in the rice cooker and pour the eggs over the potatoes.
Sprinkle with the salt and pepper. Layer with the Gouda cheese and
green onion. Close the lid, press the “STEAM/COOK” button and steam
for 12-14 minutes, or until the eggs are firm around the edges and the
top is almost set. Let stand for 2 minutes. Spoon onto 4 individual plates.
Serves 4.
Yukon Gold Potato & Egg Scramble
1/2 taza espinacas congeladas, descongeladas y
drenadas
1/2 taza champiñones frescos, limpios y rebanados
2 cebollas verdes, picadas
4 grandes huevos, batidos (se puede usar sustituto de huevo)
1/2 cucharadita orégano molido
1/2 cucharadita tomillo molido
Pizca sal y pimienta negra molida fresca
1/4 taza queso Aciago, rallado (se puede usar queso
Parmesano)
Cubrir la olla interior con spray para cocinar antiadherente. En un
tazón mediano, mezclar la espinaca, los champiñones y las cebollas.
Agregar los huevos, el orégano, el tomillo, la sal, la pimienta y el queso.
Mezclar bien hasta que todos los ingredientes estén combinados. Con
un cucharón, verter la frittata en la olla interior. Cerrar la tapa y presionar
el botón de Cocinar/Vaporizar y vaporizar por 12-14 minutos. Cuando
termine, los huevos deben estar firmes en el fondo y casi listos en la
superficie. Usar una espátula de plástico para rebanar la frittata en
rebanadas y servir. Rinde 4 porciones.
Frittata de espinacas y champiñones para el desayuno
3 medianas papas doradas Yukon, limpias y cortadas en trozos
de 2,54cm
2 tazas agua
4 grandes huevos, batidos
Pizca sal y pimienta negra molida fresca
1/2 taza queso Gouda, desmenuzado
1 cebolla verde, picada
Cubrir la olla interior con spray para cocinar antiadherente. Colocar
las papas en el fondo de la olla interior y cubrir con el agua. Cerrar la
tapa, presionar el botón de Cocinar/Vaporizar y vaporizar por 25
minutos. Cuando termine, usar guantes térmicos para sacar la olla
interior de la arrocera y drenar cuidadosamente el agua restante. Volver
a insertar la olla interior y las papas en la arrocera y verter los huevos
sobre las papas. Espolvorear con la sal y la pimienta. Colocar una capa
de queso Gouda y cebolla. Cerrar la tapa, presionar el botón de
Cocinar/Vaporizar y vaporizar por 12-14 minutos o hasta que los huevos
estén firmes alrededor de la orilla y la superficie esté casi lista. Dejar
reposar por 2 minutos. Servir en 4 platos individuales. Rinde 4 porciones.
Huevos revueltos con papas doradas Yukon
30
30

1-1/3 cups rolled oats (not quick cooking)
2 cups apple juice
3/4 cup water
1/3 cup raisins
1 dash salt
Add ingredients to the inner pot and stir. Place inner pot into the
rice cooker, cover and press the “STEAM/COOK” button. Halfway
through the steaming cycle, carefully open the lid, keeping hands and
face away to avoid steam burns and stir. Cover and continue cooking
until the rice cooker switches to keep warm mode. Allow to stand for 10
minutes before serving.
Breakfast Oatmeal
Wine-Poached Pears
4 small to medium pears, firm but ripe
2 cups white wine (Reisling is suggested)
1/2 cup sugar
1/2 tsp. vanilla
- whipped cream and toasted sliced almonds for
garnish (optional)
Peel pears and remove core from bottom. Cut a slice from the
bottom of each pear to form a flat base. Leave stem on top of pear.
Add wine and sugar to the inner pot, and place inner pot into the rice
cooker. Dip the pears into the wine mixture to coat, and lay them on
their sides in the steam tray. Place the steam tray into the rice cooker,
cover and press the “STEAM/COOK” button. Steam for about 20
minutes or until cooked (when the tip of a knife goes in easily). If pears
are still firm, cook for another 3-5 minutes. Turn off the cooker. Using
oven mitts, carefully remove steam tray from the rice cooker, taking
care not to touch the sides of the inner pot, as it will be hot. Place
steam tray aside and allow to cool. When pears are cool enough to
handle, move them to a bowl. Add vanilla to liquid and pour over the
pears. Chill or 1-2 hours or overnight in the refrigerator. Serve with
whipped cream and toasted sliced almonds.
*For a dramatic pink blush, use red wine instead of white.
1-1/3 tazas avena desmenuzada (no de la que se cocina rápido)
2 tazas jugo de manzana
3/4 taza agua
1/3 taza pasas
1 pizca sal
Agregar los ingredientes en la olla interior y remover. Colocar la olla
interior en la arrocera, cubrir y presionar el botón de Cocinar/Vaporizar.
A la mitad del proceso de vaporización, abrir la tapa con cuidado,
conservando las manos y la cara lejos para evitar quemaduras por el
vapor, y remover. Cubrir y continuar cocinando hasta que la arrocera
cambie al modo de conservar caliente. Dejar reposar por 10 minutos
antes de servir.
Avena para el desayuno
Peras cocidas al vino
4 peras chicas a medianas, firmes pero maduras
2 tazas vino blanco (se sugiere Reisling)
1/2 taza azúcar
1/2 cucharadita vainilla
- crema batida y almendras tostadas rebanadas
para aderezar (opcional)
Pelar las peras y quitar el corazón desde la parte inferior. Cortar una
rebanada de la parte inferior de cada pera para formar una base
plana. Dejar el tallo en la parte superior de las peras. Agregar el vino y el
azúcar en la olla interior y colocar la olla interior en la arrocera. Sumergir
las peras en la mezcla de vino para que se cubran con dicha mezcla y
colocarlas de lado en la charola de vapor. Colocar la charola de vapor
en la arrocera, cubrir y presionar el botón de Cocinar/Vaporizar.
Vaporizar por 20 minutos aprox. o hasta que estén cocidas (cuando la
punta de un cuchillo entra con facilidad). Si las peras todavía están
firmes, cocinar por otros 3-5 minutos. Utilizando guantes térmicos, sacar
la charola de vapor de la arrocera cuidadosamente, teniendo cuidado
de no tocar las paredes de la olla interior, ya que estará caliente.
Apartar la charola de vapor y dejar que se enfríe. Cuando las peras
estén lo suficientemente frías para tocarlas, pasarlas a un tazón. Agregar
la vainilla al líquido y verter encima de las peras. Enfriar por 1-2 horas o
toda la noche en el refrigerador. Servir con crema batida y almendras
tostadas rebanadas.
* Para dar un toque rosado, usar vino tinto en lugar de vino blanco.
31
31

Nonstick cooking spray
1 cup cake flour
1/2 tsp. salt
1 tsp. baking powder
3 eggs, beaten
1 cup sugar
2 tbsp. lemon juice, divided
1/2 tsp. lemon extract
6 tbsp. milk
1 cup powdered sugar
Coat a heatproof 1-1/2 quart soufflé dish with nonstick cooking
spray. In a medium bowl, sift together the flour, salt and baking
powder. Set aside. In a large bowl, beat the eggs with the sugar until
very smooth. Add 1 tablespoon of the juice, extract and milk and beat
for 2 minutes on medium speed. Add the dry ingredients gradually and
beat again for 2 minutes on medium speed.
Pour the batter into the dish, leaving 1/2-inch space at the top.
Fill the inner pot with water to the 4-cup line. Place the soufflé dish in
the water, making sure that the water does not go over the top of the
dish. Press the “STEAM/COOK” button and cook for 25 minutes.
Carefully open the lid, keeping hands and face away to avoid
steam burns, and check the water level. If it is below 1 cup, add water
to the 3-cup level, cover and continue cooking for 20 minutes. Check
the cake when done; it should be just dry on top. Using oven mitts,
carefully remove the cake from the cooker and place on a rack to
cool.
Prepare the glaze by combining the lemon juice with the
powdered sugar. Drizzle the glaze over the sponge cake and serve at
once. Serves 4 to 6.
Double Lemon Glazed Sponge Cake
Spray para cocinar antiadherente
1 taza harina para pastel
1/2 cucharadita sal
1 cucharadita polvo para hornear
3 huevos, batidos
1 taza azúcar
2 cucharadas jugo de limón, dividido
1/2 cucharadita extracto de limón
6 cucharadas leche
1 taza azúcar en polvo
Cubrir un platón para soufflé resistente al calor con spray para
cocinar antiadherente. En un tazón mediano, batir poco a poco la
harina, la sal y el polvo para hornear. Apartar. En un tazón grande, batir
los huevos con el azúcar a punto de turrón. Agregar 1 cucharada del
jugo, extracto y leche y batir por 2 minutos a velocidad media. Agregar
los ingredientes secos de manera gradual y batir por otros 2 minutos a
velocidad media.
Verter el batido en el platón, dejando un espacio de 1,27cm en la
parte superior. Llenar la olla interior con agua hasta la línea de 4 tazas.
Colocar el platón en el agua, asegurándose de que el agua no entre
por la parte superior del platón. Presionar el botón de Cocinar/Vaporizar
y cocinar por 25 minutos.
Con cuidado, abrir la tapa, conservando las manos y la cara lejos
para evitar quemaduras por el vapor, y revisar el nivel del agua. Si se
encuentra por debajo de 1 taza, agregar agua hasta el nivel de 3 tazas,
cubrir y continuar cocinando por 20 minutos. Revisar el pastel cuando
esté terminado; debe estar seco en la parte superior. Utilizando guantes
térmicos, sacar el pastel de la arrocera cuidadosamente y colocarlo en
una rejilla para que se enfríe.
Preparar el glaceado al combinar el jugo de limón con el azúcar en
polvo. Espolvorear el glaceado encima del pastel y servir. Rinde 4 a 6
porciones.
Pastel doble de limón glaceado
32
32

LIMITED WARRANTY
Aroma Housewares Company warrants this product free from defects in
material and workmanship for one year from provable date of purchase
in the continental United States.
Within this warranty period, Aroma Housewares Company will repair or
replace, at its option, defective parts at no charge, provided the
product is returned, freight prepaid with proof of purchase and U.S.
$14.00 for shipping and handling charges payable to Aroma Housewares
Company. Before returning an item, please call the toll free number
below for a return authorization number. Allow 2-4 weeks for return
shipping.
This warranty does not cover improper installation, misuse, abuse or
neglect on the part of the owner. Warranty is also invalid in any case
that the product is taken apart or serviced by an unauthorized service
station.
This warranty gives you specific legal rights which may vary from state to
state and does not cover areas outside the United States.
AROMA HOUSEWARES COMPANY
6469 Flanders Drive
San Diego, California 92121
1-800-276-6286
M-F, 8:30 AM - 5:00 PM, Pacific Time
Website: www.aromaco.com
33
GARANTÍA LIMITADA
Aroma Housewares Company garantiza que este producto no
tenga defectos en sus materiales y fabricación durante un período
de un año a partir de la fecha comprobada de compra dentro de
la parte continental de los Estados Unidos.
Dentro de este período de garantía, Aroma Housewares Company
reparará o reemplazará, a su opción, las partes defectuosas sin
ningún costo, siempre y cuando el producto sea devuelto, con el
flete prepagado, con comprobación de compra y $14.00 dólares
para cargos de envío y manejo a favor de Aroma Housewares
Company. Antes de devolver un producto, sírvase llamar al número
telefónico gratuito que está más abajo para obtener un número de
autorización de devolución. Espere entre 2-4 semanas para recibir el
aparato nuevamente.
Esta garantía no cubre la instalación incorrecta, el uso indebido,
maltrato o negligencia por parte del usuario. La garantía también
es inválida en caso de que el aparato sea desarmado o se le dé
mantenimiento en un centro de servicio no autorizado.
Esta garantía le da derechos legales específicos los cuales podrán
variar de un estado a otro y no cubre áreas fuera de los Estados
Unidos.
AROMA HOUSEWARES COMPANY
6469 Flanders Drive
San Diego, California 92121
1-800-276-6286
L-V, 8:30 AM - 5:00 PM, Tiempo del Pacífico
Sitio Web: www.aromaco.com
33
Transcripción de documentos
www.AromaCo.com ARC-930SB Arrocera y vaporera digital de 10 tazas Manual de instrucciones Instruction Manual 10-Cup Digital Rice Cooker & Food Steamer www.AromaCo.com ARC-930SB Felicidades por comprar la Arrocera Digital para 10 Tazas Sensor Logic Aroma®. ¡En cualquier momento, usted estará preparando arroz fantástico, de la calidad de un restaurante, con el toque de un botón! Ya sea que el grano sea largo, mediano o corto, esta máquina está calibrada especialmente para cocinar todas las variedades de arroz, incluyendo el arroz integral difícil de cocinar, con un esponjado perfecto. Además del arroz, su nueva Arrocera Aroma® es ideal para platillos saludables cocinados en una sola olla para toda la familia. La cómoda charola de vapor se inserta directamente encima el arroz, permitiéndole cocinar vegetales y carnes frescas al vapor al mismo tiempo, en la misma olla. Los alimentos al vapor encierran sus nutrientes y sabores naturales (los cuales se pierden con frecuencia con otros métodos de cocinado) sin tener que agregar aceite o grasa, para platillos que son tan nutritivos y bajos en calorías como fáciles de preparar. © 2008 Aroma Housewares Company All rights reserved. Aroma Housewares Co. 6469 Flanders Drive San Diego, CA 92121 U.S.A. 1-800-276-6286 www.aromaco.com Published By: Pero esto no es todo. ¡Su nueva arrocera también es grandiosa para sopas, guisos, caldos, sopas de mariscos, jambalaya, frittatas para el desayuno, dips y hasta postres! En la parte trasera de este manual se incluyen varias deliciosas recetas. Este manual contiene instrucciones para usar su arrocera y sus configuraciones digitales preprogramadas, así como todos los accesorios que se incluyen. También se incluyen tablas útiles de medida para cocinar arroz y otros alimentos al vapor. Para más información acerca de su arrocera Sensor Logic o el servicio del producto, recetas y soluciones de otros electrodomésticos, por favor visítenos en línea en www.AromaCo.com. Publicado Por: Aroma Housewares Co. 6469 Flanders Drive San Diego, CA 92121 U.S.A. 1-800-276-6286 www.aromaco.com © 2008 Aroma Housewares Company. Todos los derechos reservados. This manual contains instructions for using your rice cooker and its convenient pre-programmed digital settings, as well as all of the accessories included. Also included are helpful measurement charts for cooking rice and steaming. For more information on your Sensor Logic rice cooker, or for product service, recipes and other home appliance solutions, please visit us online at www.AromaCo.com. But it doesn’t end there. Your new rice cooker is also great for soups, stews, stocks, gumbos, jambalaya, breakfast frittatas, dips and even desserts! Several delicious recipes are included at the back of this manual. In addition to rice, your new Aroma® Rice Cooker is ideal for healthy, one-pot meals for the whole family. The convenient steam tray inserts directly over the rice, allowing you to cook moist, fresh meats and vegetables at the same time, in the same pot. Steaming foods locks in their natural flavor and nutrients (which are often lost with other methods of cooking) without added oil or fat, for meals that are as nutritious and low-calorie as they are easy. Congratulations on your purchase of the Aroma® Sensor Logic 10Cup Digital Rice Cooker. In no time at all, you’ll be making fantastic, restaurant-quality rice at the touch of a button! Whether long, medium or short grain, this machine is specially calibrated to cook all varieties of rice, including tough-to-cook brown rice, to fluffy perfection. 1 SAVE THESE INSTRUCTIONS MEDIDAS IMPORTANTES DE SEGURIDAD Cuando se usen aparatos electricos, siempre deberán observarse las precauciones básicas de seguridad, incluyendo las siguientes: 1. 2. 13. Extreme caution must be used when moving the appliance containing hot water or other liquids. 14. Do not touch, cover or obstruct the steam vent on the top of the rice cooker as it is extremely hot and may cause scalding. 15. Use only with a 120V AC power outlet. 16. Always unplug from the base of the wall outlet. Never pull on the cord. 17. The rice cooker should be operated on a separate electrical circuit from other operating appliances. If the electrical circuit is overloaded with other appliances, the appliance may not operate properly. 18. Always make sure the outside of the inner cooking pot is dry prior to use. If the cooking pot is returned to cooker when wet, it may damage or cause the product to malfunction. 19. Use extreme caution when opening the lid during or after cooking. Hot steam will escape and may cause burns. 20. Rice should not be left in the rice pot with the keep warm function on for more than 12 hours. 21. To prevent damage or deformation, do not use the inner pot on a stovetop or burner. 22. To disconnect, turn any control to “OFF”, then remove plug from wall outlet. 23. To reduce the risk of electrical shock, cook only in the removable container provided. Important: Read all instructions carefully before first use. 2. Do not touch hot surfaces. Use the handles or knobs. 3. Use only on a level, dry and heatresistant surface. 4. To protect against electrical shock, do not immerse cord, plug or the appliance in water or any other liquid. 5. Close supervision is necessary when the appliance is used by or near children. 6. Unplug from outlet when not in use and before cleaning. Allow unit to cool before putting on or taking off parts and before cleaning the appliance. 7. Do not operate any appliance with a damaged cord or plug or after the appliance malfunctions or has been damaged in any manner. Return the appliance to the nearest authorized service facility for examination, repair or adjustment. 8. The use of accessory attachments not recommended by the appliance manufacturer may result in fire, electrical shock or injury. 9. Do not use outdoors. 10. Do not let cord touch hot surfaces or hang over the edge of a counter or table. 11. Do not place on or near a hot burner or in a heated oven. 12. Do not use the appliance for other than its intended use. 1. 3. 4. 5. 6. 7. 8. 9. 10. 11. 12. 13. Importante: Lea cuidadosamente todas las instrucciones de seguridad antes de comenzar a usar el aparato por primera vez. No toque las superficies calientes. Utilice para ello los mangos o las perillas. Use el aparato sobre una superficie nivelada, seca y resistente al calor. Para protegerse y evitar un choque eléctrico, no sumerja en agua o en cualquier otro líquido el cordón, la clavija o el aparato mismo. Mantenga el aparato fuera del alcance de los niños para evitar accidentes. Asegúrese de que el aparato esté apagado OFF, cuando no se esté usando, antes de ponerle o quitarle partes y antes de limpiarlo. No ponga a funcionar ningún aparato si el cordón eléctrico o la clavija de enchufe están dañados o si la unidad no funciona bien o si se ha dañado de alguna manera. Regrese el aparato a la agencia de servicio autorizada más cercana, para revisión, reparación o ajuste. No utilice aditamentos o accesorios que no sean surtidos o recomendados por el fabricante. Las partes incompatibles crean un peligro. No se use en exteriores. No deje que el cordón cuelgue sobre la orilla de la mesa o del mostrador ni toque las superficies calientes. No coloque el aparato sobre o cerca de una rejilla de gas o eléctrica encendidas ni dentro de un horno caliente. No utilice el aparato para otro uso que no sea el indicado. Se deberán tomar precauciones extremas al mover el aparato cuando contenga arroz u otros líquidos calientes. 14. 15. 16. 17. 18. 19. 20. 21. 22. 23. Durante la etapa de cocimiento, podrá observar vapor saliendo de las ventanillas sobre las tapas. Esto es normal. No cubra, toque ni obstruya la ventanilla de vapor. Úsese únicamente con una tomacorriente AC de 120V. Siempre desconecte desde la base de la tomacorriente de la pared. Nunca jale del cordón. La olla arrocera deberá operarse en un circuito eléctrico separado de otros aparatos que estén funcionando. Si el circuito eléctrico se sobrecarga con otros aparatos, puede ser que esta unidad no funcione adecuadamente. Asegúrese siempre de que la cacerola para cocinar interna esté seca por la parte de afuera antes de usarla. Si la cacerola para cocinar se mete húmeda en la olla arrocera, esto dañará al producto, ocasionando que no funcione bien. Recomendamos que se tomen precauciones extremas al abrir la tapa durante el tiempo que cocine o después de haber cocinado, ya que el vapor caliente escapará de la olla y esto podría ocasionar quemaduras. El arroz no debe permanecer dentro de la olla de arroz con la función de "mantener caliente" por más de 24 horas. Para evitar daños o deformaciones, no use la olla interna sobre una estufa o quemador. Antes de retirar el enchufe de la toma de corriente eléctrica de la pared, asegúrese de que el aparato haya sido apagado. Para reducir el riesgo de incendio o choque eléctrico, cocina recipiente interior. GUARDE ESTAS INSTRUCCIONES Basic safety precautions should always be followed when using electrical appliances, including the following: IMPORTANT SAFEGUARDS 1 INSTRUCCIONES DE CABLE CORTO 1. Se proporciona un cable eléctrico corto con el propósito de reducir el riesgo de tropezarse o enredarse con un cable más largo. 2. Hay cables de extensión más largos disponibles y deben ser usados con sumo cuidado. 3. Si se usa un cable de extensión más largo: a. La clasificación eléctrica marcada en el cable de extensión debe ser por lo menos igual que la clasificación eléctrica del aparato. b. El cable más largo debe ser colocado de manera que no cuelguepor el borde del mostrador o mesa en donde pudiera ser jalado por un niño o alguien pudiera tropezarse con el cable sin querer. ¡NO DEJE QUE EL CABLE CUELGUE! 2 This appliance is for household use only. If the supply cord is damaged, it must be replaced by the manufacturer, its service agent or a similarly qualified person in order to avoid a hazard. To reduce the risk of electric shock, this plug is intended to fit into a polarized outlet only one way. If the plug does not fit fully into the outlet, reverse the plug. If it still does not fit, contact a qualified electrician. Do not attempt to modify the plug in any way. This appliance has a polarized plug (one blade is wider than the other); follow the instructions below: POLARIZED PLUG ¡MANTÉNGALO LEJOS DE LOS NIÑOS! PLOYA POLARIZADA Si este aparato tiene ploya polarizada: Para reducir el riesgo de descarga eléctrica, este ploya intencionalmente solo debe de enchufar un lado en enchufes de luz de ploya polarisada. Si la clavija no entra completamente, da vuelta a la clavija. Si aun la clavija no puede entrar, llame a un electricista calificada. No intente de modificar la clavija, es muy peligroso. Si esté estropeado el cordón eléctrico, hay que ser reemplazado por el fabricante o su agencia de servicio u otra persona calificada para hacer que se evita cualquier peligro. ESTE APARATO ES PARA USO DOMÉSTICO. 2 1. A short power-supply cord is provided to reduce the risks resulting from becoming entangled in or tripping over a longer cord. 2. Longer extension cords are available and may be used if care is exercised in their use. 3. If a longer extension cord is used: a. The marked electrical rating of the extension cord should be at least as great as the electrical rating of the appliance. b. The longer cord should be arranged so that it will not drape over the counter top or tabletop where it can be pulled by children or tripped over unintentionally. SHORT CORD INSTRUCTIONS Steam Tray 3 Measuring Cup Rice Paddle 1 IDENTIFICACION DE LAS PARTES 2 3 4 5 1. Botón para Abrir 2. Asa 3. Abertura removible 4. Tapa 5. Recolector de condensación 6. Pantalla digital 7. Recipiente Interior 6 8 9 10 Control Panel 11 12 8 Panel de control 9 10 11 7 8. Botón/ Luz Indicadora para arroz blanco 9. Botón/ Luz Indicadora para arroz integral 10. Botón/ Luz Indicadora para Calentar/Apagar 11. Botón/ Luz Indicadora para cocinar al vapor 12. Botón de demorar tiempo 12 6 3 1 2 4 5 PARTS IDENTIFICATION White Rice Button/ Indicator Light 9. Brown Rice Button/ Indicator Light 10. Warm/Off Button/ Indicator Light 11. Steam/Cook Button/ Indicator Light 12. Delay Timer Button 8. 1. Lid Release Button 2. Handle 3. Steam Vent 4. Lid 5. Condensation Collector 6. Digital Display 7. Inner Pot 7 Charola de vapor Taza de medir Pala para arroz 3 COMO USAR EL APARATO Antes de usar por primera vez: 1. Lea todas las instrucciones y medidas importantes de seguridad. 2. Retire todos los materiales de empaque y la etiqueta engomada. Asegúrese de que todos los artículos se reciban en buenas condiciones. 3. Rompa todas las bolsas de plástico, ya que pueden representar un riesgo para los niños. 4. Lave todos los accesorios y la ventanilla de vapor con agua tibia y jabón. Enjuáguelos y séquelos completamente. 5. Saque la cazuela interna de la olla arrocera y lávela con agua tibia y jabón. Enjuáguela y séquela perfectamente antes de volverla a poner dentro de la olla. 6. Limpie el cuerpo de la olla y el elemento de calentamiento con una toalla húmeda. Seque perfectamente antes de usar. • No utilice limpiadores abrasivos o fibras para tallar. • En ningún momento sumerja en agua la olla arrocera, el cordón eléctrico o la clavija. Para cocinar arroz: 1. 2. 3. 4. 5. 6. 7. 8. Utilice la taza de medir que viene con el producto para medir el arroz. Una medida rasa de esta taza equivale a una taza en la tabla incluida. La taza de medir incluida es de 180mL y no es igual a una taza estándar (240 mL). Enjuague el arroz dentro de un recipiente hasta que el agua salga relativamente clara. Agruege el arroz a la olla interior. De acuerdo con las líneas de medición de agua marcadas dentro de la olla o bien utilizando la taza de medir, agregue la cantidad de agua adecuada. En la página 9 se incluye una tabla con las medidas para el agua/arroz. También se incluye instrucciones específicas para cocinar el arroz integral. Si desea obtener un arroz más suave, déjelo remojando de 10 a 20 minutos. Asegúrese de que el exterior de la olla está completamente limpio y seco. Coloque la olla interior en el cuerpo del aparato. Es importante que no hay agua ni otra sustancia en el exterior de la olla cuando la coloque en el cuerpo. Tape la olla y enchufe el cordón eléctrico en la tomacorriente. Presione el boton de ‘arroz blanco’ o ‘arroz integral’. El foco indicador se encenderá. Una vez terminado el cocimiento, la arrocera cambiará al modo de calentamiento y el foco indicador “warm” se encenderá. Una vez terminado el cocimiento, deje reposar el arroz de 5 a 10 minutos, sin destapar. Esto asegurará que el arroz quede bien cocido. La arrocera se quedará en el modo de calentamiento hasta que se desconecte el enchufe de la tomacorriente. Desconecte la olla arrocera una vez que termine el cocimiento. * Es muy importante que la olla interior esté completamente limpia y seca antes de que se coloque en el cuerpo de la arrocera. La presencia de agua u otras sustancias en la superficie exterior de la olla puede causar que este aparato malfuncione. 4 4 1. Using the measuring cup provided, measure out the desired amount of rice. One full, level cup of uncooked rice will yield 2 cups of cooked rice. The measuring cup provided adheres to rice industry standards (180mL) and is not equal to one U.S. cup (240 mL). 2. Rinse rice in a separate container until the water becomes relatively clear; drain. 3. Place rinsed rice in the inner pot. 4. Using the measuring cup provided or the water measurement lines located inside the inner pot, add the appropriate amount of water. If you are making brown rice, follow the rice/water measuring guide for brown rice located on page 9 of this manual. Do not use the water measurement lines inside the inner pot for brown rice, they are intended for white rice only. 5. For softer rice, allow rice to soak for 10-20 minutes prior to cooking. 6. Making sure that the exterior of the inner pot is clean, dry and free of debris; set the inner pot in the rice cooker. Snap the lid closed and plug the power cord into a wall outlet. * To avoid loss of steam and longer cooking times, do not open the lid at any point during the cooking process. 7. To begin cooking, press the "WHITE RICE" or "BROWN RICE" button, depending on the type of rice to be cooked. The cooking mode indicator light will illuminate. Once cooking is complete, the rice cooker will automatically switch to keep warm mode. 8. After cooking, open the lid and use the rice paddle to stir the rice. This will release excess moisture and give the rice a fluffier texture. Then, close the lid and allow the unit to remain on warm mode for 5-10 minutes. This will ensure optimal rice texture and moisture level. 9. Press the "WARM/OFF" button to turn off the rice cooker. If the “WARM/OFF” button is not pressed, the rice cooker will remain in keep warm mode. It is not recommended to leave rice on keep warm mode for more than 12 hours. To Cook Rice: • Do not use abrasive cleaners or scouring pads. • Do not immerse the rice cooker base, cord or plug in water at any time. 1. Read all instructions and important safeguards. 2. Remove all packaging materials and make sure items are received in good condition. 3. Tear up all plastic bags as they can pose a risk to children. 4. Wash lid, steam vent and accessories in warm, soapy water. Rinse and dry thoroughly. 5. Remove inner pot from rice cooker and clean with warm, soapy water. Rinse and dry thoroughly before returning to cooker. 6. Wipe body clean with a damp cloth. Before First Use: USING YOUR RICE COOKER 5 SEE PAGE 6 FOR INSTRUCTIONS ON COOKING RICE AND STEAMING SIMULTANEOUSLY. 1. Add the desired amount of water to the inner pot. A convenient steaming guide has been included on page 11 for vegetables and page 12 for meat. 2. Place steam tray inside rice cooker. 3. Place food on steam tray and close the lid. 4. Press the “STEAM COOK” button. 5. When steaming is complete, the rice cooker will automatically switch to keep warm mode. 6. Remove food immediately after cooking process has completed. Leaving it in the rice cooker may cause food to over cook. 7. The rice cooker will remain on keep warm mode until it is unplugged. Be sure to unplug the cord from the wall outlet when not in use. To Steam Food: The digital display on this unit is for the delay timer function only. When using cooking or warming mode, the display will show two red lines (See illustration below). NOTE 1. Press the “DELAY TIMER” button (in 1-hour increments) until it displays the number of hours in which you would like your rice to be finished cooking. 2. Press “WHITE RICE” or “BROWN RICE” after you have made your choice. 3. Press the “WARM/OFF” button to cancel your choice and reset. 4. When cooking has completed, the rice cooker will automatically switch to keep warm mode. 5. The rice cooker will remain on keep warm mode until it is unplugged. Be sure to unplug the cord from the wall outlet when not in use. To Use Delay Timer: * It is important that the outside surface of the inner pot is completely clean and dry before it is placed into the rice cooker. Water, food or other substances on the pot will come into contact with the heating element and may cause damage to the product. USING YOUR RICE COOKER COMO USAR SU APARATO Para usar el temporizador programado: 1. En estado de espera, oprima la tecla "Demorar Tiempo" para seleccionar la hora en que usted desea que su arroz esté listo. 2. Oprima el botón de “WHITE RICE” (arroz blanco)o “BROWN RICE” (arroz integral ). 3. Oprima el botón de ‘WARM/OFF’ (calentar/apagar) para cancelar su selección y empezar de nuevo. 4. Cuando termina el ciclo de cocción, la arrocera cambiará automáticamente al modo de mantener caliente. 5. La arrocera permanecerá al modo de calentamiento hasta que el enchufe sea desconectado de la tomacorriente. Siempre desenchufe la arrocera después de usarla. NOTA La pantalla digital en este aparato es solamente para el temporizador programado. Cuando se usan los modos de ‘COOK’ (cocer) o ‘WARM’ (calentar), se muestran dos líneas rojas en la pantalla (vea la diagrama de abajo). Para cocer alimentos al vapor: 1. Agregue la cantidad deseada de agua en la olla interna. Unas convenientes guías de como cocer al vapor están incluidas en las páginas 11 y 12 de este manual. 2. Introduzca la raca para vapor dentro de la arrocera. 3. Introduzca la comida en la raca para vapor y cierre la tapadera. 4. Presione el botón "Steam Cook" (vapor/cocinar). 5. Cuando el proceso de vaporización sea completado, la arrocera aumáticamente cambiará al modo de mantener caliente. 6. Retire la comida inmediatamente después del proceso ya terminado. Dejar la comida en la arrocera podría causar sobre calentado. 7. La arrocera permanecerá al modo de calentamiento hasta que el enchufe sea desconectado de la tomacorriente. Siempre desenchufe la arrocera después de usarla. VEA LA PÁGINA 6 PARA INSTRUCCIONES DE COCINAR ARROZ Y COCER AL VAPOR SIMULTANEAMENTE. 5 6 USING YOUR RICE COOKER CAUTION: PRECAUCIÓN: COMO USAR SU APARATO 6 • No abra la tapa cuando la olla está en uso si no es necesario. • Si la olla para cocer está mojada y se coloca nuevamente en la olla interior, causará daños y fallas al producto. NOTE It is possible to steam at any point during the rice cooking cycle. However, it is recommended that you steam during the end of the cycle so that steamed food does not grow cold or become soggy before the rice is ready. Para cocinar arroz y cocer al vapor a la vez: 1. Place the desired amount of rice and appropriate amount of water into the inner pot. See “To Cook Rice” on page 4 for details. Do not attempt to cook more than 8 cups (uncooked) of rice if trying to use the steam tray simultaneously. The steam tray will not fit. 2. Place the inner pot into the unit and begin to cook the rice. 3. Refer to the steaming guides for vegetables (page 11) or meat (page 12) for hints and approximate steaming times. It is best to insert the food to be steamed toward the end of the rice cooking cycle so that your meal is fresh and warm all at once. See the cooking time chart included on Page 10 for approximate rice cooking times. 4. Place your choice of vegetables or meat into the steam tray. Open the lid, using caution as steam escaping will be extremely hot, and place steam tray into the rice cooker. 5. Close the lid and allow the cooker to resume cooking. 6. Once food has been steamed for the appropriate time open the lid. Use caution when opening lid as steam escaping will be extremely hot. Remove the steam tray and check food to be sure it has been thoroughly cooked. Exercise caution when removing the steam tray as well, as it will be hot. 7. If the rice has not finished cooking, close the lid of the rice cooker and allow rice to continue to cook until done. Once the rice is finished, the rice cooker will automatically switch to keep warm mode. 8. The rice cooker will remain on keep warm mode until it is unplugged. Be sure to unplug the cord from the wall outlet when not in use. 1. Agruege el arroz e el agua a la olla interior. No intentar cocer más que 8 tazas de arroz (crudo) se se desee cocinar al vapor a la vez. La bandeja para vaporar no caberá. Vea ‘Para cocinar arroz’ en la página 4 para instrucciones detalladas. 2. Coloque la olla interior en la base de la arrocera y empiece cocinar el arroz. 3. Use las tablas de referencia para vegetales (página 11) y para carne (página 12) para sugerencias y tiempos de cocimiento aproximados. 4. Se recomienda agregar la bandeja cerca del fin del ciclo de cocimiento para evitar que la comida se enfríe antes de que esté listo el arroz. Ponga la carne y/o las vegetales en la bandeja para vaporar. Abre la tapa con mucho cuidado porque vapor caliente se escapará. Coloque la bandeja para vaporar en la olla interior. 5. Cierra la tapa y permite que el aparato continue cocinando. 6. Una vez que los alimentos han cocidos por el tiempo necesario, abre la tapa con mucho cuidado. El vapor caliente se escapará. Remueva la bandeja para vaporar, con cuidado por que estará caliente, y asegúrese de que los alimentos estén listos. 7. Si el arroz ya no esté listo, cierre la tapa y permite que el arroz cocine hasta que esté terminado. La arrocera soñará y cambiará automáticamente al modo de ‘WARM’ (calentar). 8. La arrocera permanecerá al modo de calentamiento hasta que el enchufe sea desconectado de la tomacorriente. Siempre desenchufe la arrocera después de usarla. One of the most convenient features of this rice cooker is the ability to both cook rice and steam food simultaneously, ideal for creating delicious all-in-one meals. NOTA: To Steam Food And Cook Rice Simultaneously: Se puede vaporar la comida durante cualquier parte del ciclo de cocimiento. Se recomienda vaporar al fin del ciclo para evitar que los alimentos se enfríen antes de que el arroz esté listo. • Open the lid only when necessary. • If cooking pot is returned to cooker when wet it will damage this product, causing it to malfunction. USING YOUR RICE COOKER 7 To Cook Soups and Stews: 1. Add ingredients to inner pot. 2. Making sure that the exterior of the inner pot is clean, dry and free of debris; set the inner pot into the rice cooker. Close the lid and plug the power cord into a wall outlet. 3. Press the “STEAM/COOK” button. The “STEAM/COOK” indicator light will illuminate. 4. Allow soup to cook until ready, stirring often. 5. When soup is finished cooking, press the “WARM/OFF” button. The cooker will then switch to keep warm mode. 6. The rice cooker will remain in keep warm mode until it is unplugged. Be sure to unplug the unit from the wall outlet when it is not in use. HELPFUL HINTS 1. Rinse rice before placing it into the inner pot to remove excess bran and starch. This will help reduce browning and sticking to the bottom of the pot. 2. If you have experienced any sticking with the type of rice you are using, try adding a light coating of vegetable oil or non-stick spray to the bottom of the inner pot before adding rice. 3. As there are many different kinds of rice available (see About Rice on page 14), rice/water measurements may vary slightly. 4. For softer rice, allow it to soak for 10-20 minutes prior to cooking. 1. Enjuague el arroz para quitarle el exceso de salvado y almidón. Esto evitará que el arroz se queme o se pegue en el fondo de la olla. 2. Si se le está pegando el arroz debido al tipo de arroz que está usando, intente agregar una ligera capa de aceite vegetal o rocío (spray) antiadherente al fondo de la olla interior antes de agregar el arroz. 3. Puesto que existe una gran variedad de clases de arroz en el mercado (véase Acerca del Arroz en la página 14), las medidas de arroz/agua pueden variar ligeramente. CONSEJOS ÚTILES 5. 3. 4. 1. 2. 7 Agregue los ingredientes a la olla inerior y colóquela en la arrocera. Presione el interruptor hacia abajo, al modo de vaporar/cocinar (“steam/cook”). Dejar la sopa a cocer hasta que sea lista, agitando de menudo. Oprima el botón de calentar (“warm”) una vez que esté lista la sopa. La arrocera cambiará al modo de calentamiento ("warm") La arrocera permanecerá al modo de calentamiento hasta que el enchufe sea desconectado de la tomacorriente. Siempre desenchúfe la arrocera después de usarla. Para cocer sopas y guisados: COMO USAR SU APARATO HOW TO CLEAN 8 Always unplug unit and allow to cool completely before cleaning. Hay que limpiar la ventanilla de vapor después de cada uso. 1. Remueva la ventanilla de vapor como se muestra en el Diagrama 1. 2. Vacié y lave la ventanilla de vapor con agua tibia y jabón y enjuague. 3. Seque con un trapo seco. 4. Re inserte la ventanilla de vapor para su próximo uso. • Do not use harsh abrasive cleaners, scouring pads or products that are not considered safe to use on non-stick coatings. • This appliance is NOT dishwasher safe. Inner pot and accessories are NOT dishwasher safe. • Always make sure the outside of the inner pot is dry prior to use. If the inner cooking pot is returned to the rice cooker when wet, it may damage this product, causing it to malfunction. • No utilice limpiadores abrasivos ásperos. • No sumerja en agua o en cualquier otro líquido la olla exterior. • No deberá meterse en lavavajillas. La cacerola interna TAMPOCO deberá lavarse en lavavajillas. 1. Remove the inner cooking pot. Wash it in warm, soapy water using a sponge or dishcloth. 2. Rinse and dry thoroughly. 3. Repeat process with steam tray and other provided accessories. 4. Wipe the underside of the lid with a warm, damp cloth. Dry with a soft cloth. 5. Wipe the body of the rice cooker and the underside of the lid clean with a damp cloth. Diagram 1 6. To clean the steam vent (clean after each use): • Pull out the steam vent as shown in Diagram 1. • Empty and wash the steam vent in warm, soapy water. Rinse thoroughly. • Dry the steam vent with a soft cloth. • Reinsert the steam vent for next use. Diagrama 1 1. Saque la cacerola interna. Lávela con agua tibia y jabón, usando una esponja o toalla para platos. 2. Enjuáguela y séquela perfectamente. 3. Repita este proceso con la charola para vapor, la ventanilla de vapor y con los otros accesorios que se proporcionan. 4. Limpie el cuerpo de la olla arrocera y la parte inferior de la tapa con una toalla húmeda. 5. Para limpiar la ventanilla de vapor: Desconecte siempre la unidad y deje que se enfríe completamente antes de limpiaria. COMO LIMPIAR EL APARATO 8 9 • Brown rice, wild rice and rice mixes vary in their make-up. Some variations may require longer cooking times and/or additional water in order to achieve optimum results. Refer to the individual package instructions for cooking suggestions. • The measuring cup included adheres to rice industry standards (180mL) and is not equal to one U.S. cup (240mL). The chart above refers to cups of rice/water according to the measuring cup provided. • Do not place more than 10 cups of uncooked rice (8 cups if brown rice) into this appliance at one time. The maximum capacity of this unit is 10 cups raw rice (8 cups if brown rice) which yields 20 cups of cooked rice (16 cups brown rice). SPECIAL INSTRUCTIONS of brown rice that may be cooked at one time is 8 cups. * Due to the extra water needed to cook brown rice, the maximum amount UNCOOKED RICE 2 Cups 3 Cups 4 Cups 5 Cups 6 Cups 7 Cups 8 Cups BROWN RICE WATER WITH MEASURING APPROX COOKED RICE YIELD CUP 3 Cups 4 Cups 4-1/4 Cups 6 Cups 5-1/2 Cups 8 Cups 6-3/4 Cups 10 Cups 8 Cups 12 Cups 9-1/4 Cups 14 Cups 10-1/2 Cups 16 Cups Brown Rice/Water Measurement Chart: 9 Cups 10 Cups UNCOOKED RICE 2 Cups 3 Cups 4 Cups 5 Cups 6 Cups 7 Cups 8 Cups WHITE RICE WATER WITH MEASURING CUP WHITE RICE WATERLINE INSIDE POT APPROX COOKED RICE YIELD 9-1/2 Cups 10-1/2 Cups Line 9 Line 10 18 Cups 20 Cups 2-1/2 3-1/2 4-1/2 5-1/2 6-1/2 7-1/2 8-1/2 Cups Cups Cups Cups Cups Cups Cups Line Line Line Line Line Line Line 2 3 4 5 6 7 8 White Rice/Water Measurement Chart: 4 Cups 6 Cups 8 Cups 10 Cups 12 Cups 14 Cups 16 Cups GUIAS DE COCCION Tabla de medidas de arroz blanco: ARROZ CRUDO 2 Tazas 3 Tazas 4 Tazas 5 Tazas 6 Tazas 7 Tazas ARROZ BLANCO AGUA CON LA MEDIDA 2-1/2 Tazas 8-1/2 Tazas 8 Tazas 9 Tazas ARROZ BLANCO LÍNEA ADENTRO DE LA OLLA 3-1/2 Tazas Línea 2 Línea 3 4-1/2 Tazas Línea 4 5-1/2 Tazas Línea 5 6-1/2 Tazas Línea 6 7-1/2 Tazas 10-1/2 Tazas 10 Tazas Línea 7 Línea 8 9-1/2 Tazas Línea 9 Línea 10 Tabla de medidas de arroz integral: ARROZ CRUDO 2 Tazas 3 Tazas 4 Tazas 5 Tazas ARROZ INTEGRAL AGUA CON LA MEDIDA ARROZ COCIDO 4 Tazas 6 Tazas 8 Tazas 10 Tazas 12 Tazas 14 Tazas 16 Tazas 18 Tazas 20 Tazas ARROZ COCIDO 4 Tazas 3 Tazas 6 Tazas 4-1/4 Tazas 8 Tazas 5-1/2 Tazas 10 Tazas 6-3/4 Tazas 12 Tazas 10-1/2 Tazas 8 Tazas 12 Tazas 8 Tazas 6 Tazas 7 Tazas 10 Tazas 9-1/4 Tazas * Debido a la agua adicional que se require con el arroz integral, la capacidad máxima para arroz integral es de 8 tazas. • • • • COOKING GUIDE INSTRUCCIONES ESPECIALES El arroz integral demora más en cocinar que el arroz blanco debido a las capas extras de los granos de trigo. Las líneas de medir en la olla interior se aplican solamente al arroz blanco. Vea a la tabla de medidas para instrucciones especiales para cocinar arroz integral. El arroz integral, salvaje y otros tipos de arroz varían en sus contenidos. Algunos tipos de arroz podrán requerir un tiempo más largo para cocinar y/o agua adicional. Consulte con las instrucciones del paquete para sugerencias de como cocinarlo. La taza para medir incluida no es igual a una taza estándar. La tabla se refiere a tazas de arroz/agua según la taza para medir incluida. La capacidad máxima de la arrocera es 10 tazas de arroz crudo (8 tazas arroz integral) que se equivale a 20 tazas de arroz cocido (16 tazas si es arroz integral) . No ponga más que 10 tazas de arroz crudo (8 tazas si es arroz integral) en la olla interior. 9 TIEMPOS DE COCCION CONSEJOS ÚTILES 1. Enjuague el arroz para quitarle el exceso de salvado y almidón. Esto evitará que el arroz se queme o se pegue en el fondo de la olla. 2. Si se le está pegando el arroz debido al tipo de arroz que está usando, intente agregando una ligera capa de aceite vegetal o rocío (spray) antiadherente al fondo de la olla interior antes de agregar el arroz. 3. La tabla en la página 9 es sólo una guía general de medición. Puesto que existe una gran variedad de clases de arroz en el mercado (véase Acerca del Arroz en la página 14), las medidas de arroz/agua pueden variar ligeramente. Tabla de tiempos de cocción: ARROZ BLANCO NO COCIDO 2 Tazas 3 Tazas 4 Tazas 5 Tazas 6 Tazas 7 Tazas DURACION DE COCCION ARROZ INTEGRAL NO COCIDO 30-35 Min 2 Tazas 32-37 Min 3 Tazas 34-39 Min 4 Tazas 38-43 Min 5 Tazas 40-45 Min 6 Tazas 41-46 Min 43-48 Min 8 Tazas 7 Tazas 7 Tazas 44-49 Min 9 Tazas DURACION DE COCCION 100-105 Min 102-107 Min 110-115 Min 114-119 Min 116-121Min 118-123 Min 120-125 Min * 110-115 Min 9 Tazas 4 Cups 102-107 Min * 34-39 Min 3 Cups 10 Tazas 100-105 Min 4 Cups 32-37 Min 2 Cups 46-51 Min N/A 120-125 Min 3 Cups 30-35 Min 10 Tazas 9 Cups 8 Cups 2 Cups Los tiempos de cocción son aproximados. Esta tabla es para referencia únicamente. Posibles variaciones en tiempos de cocción podrían ser causados por uno o más de los siguientes factores: N/A 118-123 Min 116-121Min 114-119 Min COOKING TIME • • • 10 Cups 7 Cups 6 Cups 5 Cups BROWN RICE UNCOOKED CUPS • 46-51 Min 44-49 Min 43-48 Min 41-46 Min 40-45 Min 38-43 Min COOKING TIME Variaciones en el tipo de arroz cocinado. Variaciones en la cantidad de arroz y/o agua en la olla interna. Si usted prepara una segunda tanda de arroz enseguida de la primera, los tiempos de cocción podrían ser menos debido a que los componentes del electrodoméstico de aun estén calientes. Abrir la tapadera durante el ciclo de cocción podrían causar perdida de calor y vapor. El tiempo de cocción podría ser prolongado si la tapadera es abierta antes de que el arroz esté listo. 10 Cooking times are approximate. This table is for reference only. Possible variations in cooking times may be caused by one or more of the following factors: • Variations in the type of rice being cooked. • Variations in the amount of rice and/or water in the inner pot. • If you are making a second batch of rice shortly after the first batch, cooking times may be reduced because the heating element will already be warm. • Opening the lid during the cooking cycle causes a loss of heat and steam. Cooking time may be prolonged if the lid is opened before the rice is finished. 10 Cups 9 Cups 8 Cups 7 Cups 6 Cups 5 Cups WHITE RICE UNCOOKED CUPS Cooking Time Chart: 1. Rinse rice before placing into the inner pot to remove excess bran and starch. This will help reduce browning and sticking to the bottom of the pot. 2. If you have experienced any sticking with the type of rice you are using, try adding a light coating of vegetable oil or non-stick spray to the bottom of the inner pot before adding rice. 3. The chart on page 9 is only a general measuring guide. As there are many different kinds of rice available (see About Rice on page 14), rice/water measurements may vary slightly. HELPFUL HINTS COOKING GUIDE 10 11 1. Since most vegetables only absorb a small amount of water, there is no need to increase the amount of water with a larger serving of vegetables. 2. When steaming and cooking rice simultaneously, follow the instructions on page 6. Place the steam tray over the rice as it cooks for the amount of time needed, checking the food every so often for doneness. Do not cook more than 8 cups (6 cups if brown rice) uncooked rice while steaming, or the steam tray will not fit into the rice cooker. 3. When possible, keep the lid closed during the entire steaming process. Opening the lid causes a loss of heat and steam, resulting in a slower cooking time. If you find it necessary to open the lid, you may want to add a small amount of water to help restore the cooking time. 4. Altitude, humidity and outside temperature will affect cooking times. 5. This steaming chart is for reference only. Actual cooking time may vary. Zucchini HELPFUL HINTS 1/2 Cup Eggplant 1-1/4 Cup Peas 1/2 Cup Squash 1/2 Cup Spinach Green Beans Corn Cauliflower Carrots Cabbage 1/2 Cup 1 Cup 1 Cup 10 Minutes 10 Minutes 10 Minutes 10 Minutes 15 Minutes 20 Minutes 15 Minutes 1 Cup 15 Minutes 1 Cup 15 Minutes 1 Cup 15 Minutes VEGETABLE AMOUNT OF WATER STEAMING TIME Broccoli 1/4 Cup 5 Minutes Asparagus 1/2 Cup VEGETABLE STEAMING CHART: 10 Minutes GUIAS DE COCCION Tabla para cocer al vapor: VEGETAL Espárragos CANTIDAD DE AGUA 1/2 Taza 1 Taza Zanahoria 1/4 Taza Brocoli Col 1 Taza 1/2 Taza Chicharos 1-1/4 Tazas Berenjena 1 Taza Coliflor Maiz Ejotes Espinaca Calabaza Calabacín 1 Taza 1 Taza 1/2 Taza 1/2 Taza 1/2 Taza TIEMPO DE COCIMIENTO 10 Minutos 5 Minutos 15 Minutos 15 Minutos 15 Minutos 15 Minutos 20 Minutos 15 Minutos 10 Minutos 10 Minutos 10 Minutos 10 Minutos SUGERENCIAS ÚTILES 1. La mayoría de los vegetales absorben unicamente una pequeña parte de agua cuando se están cocinando al vapor, no es necesario cambiar la cantidad de agua para cocinar al vapor diferentes alimentos. 2. Para vaporar y cocer arroz simultáneamente, sigue las instrucciones de la página 6. Coloque la charola de vapor sobre la olla interior mientras cocina el arroz, examinando los alimentos de vez en cuando para evitar que sobrecocinen. No más que 8 tazas de arroz(6 si es arroz integral) se puede cocinar cuando se usa la charola de vapor. 3. Cuando sea posible, mantenga la tapa cerrada durante todo el proceso de cocer al vapor. El abrir la tapa causará una pérdida de calor y vapor, resultando en un tiempo de cocción más lento. Si es necesario abrir la tapa, tal vez desee agregar una pequeña cantidad de agua a la olla para ayudar a reponer el tiempo de cocción. 4. La altura, la humedad y la temperatura exterior afectarán los tiempos de cocción. 5. La tabla de cocción al vapor es sólo para propósitos de consulta. El tiempo real de cocción puede variar. COOKING GUIDE 11 GUIAS DE COCCION Tabla para cocer al vapor las carnes: Carne 15 Min. Tiempo de cocimiento Cantidad de agua Temperatura sana 140º 160º 2 Tazas Medium = 15 Min. Medium-Well = 20 Min. Well = 23 Min. 20 Min. Pescado 165º 2-1/2 Cups 2-1/2 Cups 20 Min. Beef Pork 2-1/2 Tazas 165º Pollo 160º 20 Min. 20 Min. 2-1/2 Cups 2-1/2 Tazas Chicken Carne de cerdo 160º 140º En su punto = 15 Min. Bien hecho = 20 Min. Muy hecho = 23 Min. 15 Min. 2-1/2 Tazas 2 Cups Fish NOTA Safe Internal Temperature 1. El tiempo de cocimiento puede variar depende del ancho de la pieza de carne que se usa. 2. Para protegerse de la enfermedad, asegúrese de que la carne esté cocido adecuadamente antes de servir. Si está poco hecho, agregue más agua a la olla interior y repite el proceso hasta que esté lista. NOTE Steaming Time Carne de vaca 12 1. Steaming times may vary depending on the cut of meat being used. 2. To ensure meat tastes its best, and to prevent possible illness, check that meat is completely cooked prior to serving. If it is not, simply place more water in the inner pot and repeat the cooking process until the meat is adequately cooked. Amount of Water Meat MEAT STEAMING CHART: 160º COOKING GUIDE 12 13 SOLUCION DE PROBLEMAS Dado que las variedades de arroz pueden variar en su composición, los resultados también pueden diferir. A continuación se incluyen algunos consejos para solucionar problemas, a fin de ayudarle a lograr la consistencia deseada. PROBLEMA El arroz está seco y/o duro. Rice is too dry/hard after cooking. If your rice is dry or hard/chewy when the rice cooker switches to keep warm mode, additional water and cooking time will soften the rice. Depending on how dry your rice is, add ½ to 1 cup of water and stir through. Close the lid and press the “STEAM/COOK” button. When rice cooker switches to warm mode, open the lid and stir the rice to check the consistency. Repeat as necessary until rice is soft and moist. Rice is too moist/soggy after cooking. If your rice is still too wet or soggy when the rice cooker switches to keep warm mode, use the rice paddle to stir the rice. This will redistribute the bottom (moistest) part of the rice as well as release excess moisture. Close the lid and allow to remain on keep warm mode for 10-30 minutes as needed, opening the lid and stirring periodically to release excess moisture. El arroz está caldoso y/o aguachento PROBLEM SOLUTION SOLUCION Si el arroz está seco o duro/gomoso cuando la cacerola para arroz cambia a modo WARM (CALENTAR), el arroz se ablandará con más agua y más tiempo de cocción. Según cuán seco esté el arroz, agregue entre ½ y 1 taza de agua, y revuelva. Cierre la tapa y presione el botón de arroz blanco (WHITE RICE) o arroz integral (BROWN RICE) de nuevo. Cuando la arrocera cambia a modo WARM (CALENTAR), abra la tapa y revuelva el arroz para controlar su consistencia. Repita este procedimiento según sea necesario hasta que el arroz esté blando y húmedo. Si el arroz aún está demasiado caldoso o aguachento cuando la arrocera cambia a modo WARM (CALENTAR), revuelva con la paleta para arroz. Esto redistribuirá el arroz que está en el fondo (el más húmedo) y también liberará el exceso de humedad. Cierre la tapa y deje en modo WARM (CALENTAR) durante 10 a 30 minutos según sea necesario; abra la tapa y revuelva periódicamente a fin de liberar el exceso de humedad. Because rice varieties may vary in their make-up, results may differ. Below are some troubleshooting tips to help you achieve the desired consistency. TROUBLESHOOTING 13 ACERCA DEL ARROZ 14 El arroz es una fuente importante de carbohidratos complejos bajos en grasa y es abundante en tiamina, niacina y hierro. Es un ingrediente esencial para una dieta saludable. Hay muchas diferentes variedades de arroz disponibles en el mercado. Su Olla para Cocinar Arroz de Aroma puede cada vez cocinar cualquier tipo de arroz perfectamente. A continuación encontrará las variedades de arroz comúnmente disponibles y sus características: Arroz de grano largo Típicamente este arroz no tiene mucho almidón y presenta granos individuales y sueltos después de su cocimiento. El arroz "Carolina" es un poco firme, y el arroz "Jazmín" es el más firme de las variedades de granos largos y es aromático y de mucho sabor. Arroz integral El arroz integral es frecuentemente considerado la variedad más saludable. Tiene capas de salvado en cada grano y contiene más vitaminas del complejo B, hierro, calcio y fibra que el arroz pulido (blanco). El arroz integral más popular es de grano largo y tiene una textura firme al diente. Arroz silvestre El arroz silvestre viene en muchas diferentes variedades y mezclas. Frecuentemente es mezclado con arroz de grano largo por su textura más firme y color en tonos de café hasta negro. El arroz silvestre es ideal para rellenar aves como pollo y pavo cuando es cocinado con consomé y mezclado con sus frutas secas favoritas. Wild Rice Wild Rice comes in many delicious varieties and mixes. Often it is mixed with long grain rice for its firmer texture and rich brown to black color. Wild rice makes wonderful stuffing for poultry when cooked with broth and mixed with your favorite dried fruits. Brown Rice Brown rice is often considered the most healthy variety. It has bran layers on the rice grains and contains more B-complex vitamins, iron, calcium, and fiber than polished (white) rice. The most popular brown rice is long grain and has a chewy texture. Arroz de grano corto El arroz de grano corto es de naturaleza suave, pegajoso y firme al diente. Este es el arroz que se usa para hacer sushi. El "Arroz California " es suave; el "Arroz Dulce ", frecuentemente llamado arroz "perla" debido a su forma redonda, es extra pegajosa y es excelente para recetas como el arroz con leche o budín de arroz. Short Grain Rice Short grain is characteristically soft, sticky and chewy. This is the rice used to make sushi. "California Rice" is soft; "Sweet Rice", often called "pearl" rice for its round shape, is extra sticky and is excellent for making rice pudding. Long Grain Rice Typically this rice is not starchy and has loose, individual grains after cooking. "Carolina" is firm, and "Jasmine" is the firmest of the long grain variety and is flavorful and aromatic. There are many different varieties of rice available in the market. Your Aroma® Rice Cooker can cook any type perfectly every time. Following are the commonly available varieties of rice and their characteristics: Rice is a valuable source of low fat, complex carbohydrates and is abundant in thiamin, niacin and iron. It is an essential ingredient for a healthy diet. ABOUT RICE 14 15 Safety Considerations: 1) Rice cookers cook at very high temperatures and will produce large amounts of steam. Use extreme caution when opening rice cooker during and after the cooking cycle. When lifting the hinged cover, keep hands and face away from the rice cooker to avoid the steam. 2) If a recipe calls for the sauteing of butter or oil, use extreme caution, as you would when cooking with other high-temperature devices like a stove or oven. The inner pot will be hot, so use a long-handled plastic or wooden spoon for stirring. DO NOT USE the short-handled rice paddle for this type of cooking. 3) It is important to remember that the cooking cycle of the rice cooker is controlled by the temperature of the inner pot. When liquid boils off, the temperature will rise, causing the rice cooker to automatically shift into the low temperature ‘keep warm’ mode. This is fine for making rice dishes but if a recipe calls for steaming or making soups, where copious quantities of liquid are used, the rice cooker will not shut off until all liquid is boiled away. Follow the recipes carefully and do not leave the rice cooker unattended as it will continue to cook at high temperatures when making soups, stews and steaming. Monitor the cooking process and MANUALLY TURN OFF the rice cooker when the time that the recipe stipulates has elapsed. • Spraying the inner pot with a light coating of nonstick cooking spray is a great way to make cleanup easier without adding flavor or calories to your meal. • When a recipe calls for salt, use kosher salt. It has no impurities or additives and dissolves easily. You will need to use about half again more kosher salt than you would table salt. • If the rice cooker shuts off before the food is totally cooked, add more water and start the cooker again. • Stocks and broths can be used in place of water to add flavor and improve texture when cooking rice. Stocks and broths can be found in your local supermarket. Another option is to use bouillon cubes (they come in a wide variety of flavors). One cube and one cup of water usually makes one cup of stock. HELPFUL HINTS • • • • CONSEJOS ÚTILES Rociar la olla interior con una capa ligera de spray para cocinar antiadherente es una grandiosa forma de hacer la limpieza más fácil sin agregar sabor o calorías a sus alimentos. Cuando una receta lleva sal, use sal kosher. No tiene impurezas ni aditivos y se disuelve fácilmente. Usted necesitará usar media porción de sal kosher más de la sal de mesa normal que utilizaría. Si la arrocera se apaga antes de que los alimentos estén completamente cocinados, agregue más agua y vuelva a iniciar la arrocera. Los caldos y consomés se pueden usar en lugar de agua para dar sabor y mejorar la textura cuando cocine arroz. Puede encontrar caldos y consomés en su supermercado local. Otra opción es usar cubos de consomé (vienen en una gran variedad de sabores). Un cubo y una taza de agua hacen generalmente una taza de consomé. Consideraciones de seguridad: 1) Las arroceras cocinan a temperaturas muy altas y producirán grandes cantidades de vapor. Tenga extrema precaución cuando abra la arrocera durante y después del ciclo de cocinado. Cuando levante la cubierta con bisagras, conserve las manos y la cara lejos de la arrocera para evitar el vapor. 2) Si una receta necesita ser salteada con mantequilla o aceite, tenga extrema precaución, al igual que cuando cocina con otros dispositivos de alta temperatura, como la estufa o el horno. La olla interior estará caliente, así que utilice un cucharón largo de plástico o madera para remover. NO USE la pala para arroz corta para este tipo de cocinado. 3) Es importante recordar que el ciclo de cocinado de la arrocera es controlado por la temperatura de la olla interior. Cuando el líquido hierve, la temperatura sube, causando que la arrocera cambie automáticamente al modo de “conservar caliente”, cuya temperatura es menor. Esto está bien cuando se hacen platillos de arroz, pero si una receta necesita vapor o hacer sopas, conde se utilizan grandes cantidades de líquido, la arrocera no se apagará hasta que se haya evaporado todo el líquido. Siga las recetas cuidadosamente y no deje la arrocera sin supervisión, ya que continuará cocinando a temperaturas altas cuando se cocinen sopas, estofados y alimentos al vapor Monitoree el proceso de cocinado y APAGUE MANUALMENTE la arrocera cuando haya transcurrido el tiempo especificado para esa receta. 15 RECETAS Arroz San Antonio 1 taza 1 jarra (12 oz.) 1 cucharada 1 taza 1/2 cucharadita 1/2 cucharadita 1-1/4 tazas arroz de grano largo crudo salsa fresca, leve o picante aceite vegetal granos de elote frescos o en lata comino molido sal pimienta negra molida fresca al gusto agua cilantro fresco picado para aderezar (opcional) Agregar todos los ingredientes, excepto el cilantro, en la olla interior, remover, cerrar la tapa y presionar el botón de Arroz blanco. Cuando la arrocera cambie al modo de conservar caliente, abrir la arrocera, agitar rápidamente y volver a tapar. Dejar reposar por 8-10 minutos antes de servir. Colocar en un plato, aderezar con el cilantro fresco y servir. Como platillo o guarnición para pollo o pescado asado. Rinde 3-4 porciones. Arroz estilo Thai 1 taza 2 tazas 1/4 cucharadita 1/2 cucharadita 1/4 cucharadita arroz Jazmín de grano largo crudo leche de coco en lata cardamomo molido cilantro molido sal listones de hojas de albahaca fresca u hojas de cilantro para decorar (opcional) uncooked long-grain Jasmine rice canned coconut milk ground cardamom ground coriander salt ribbons of fresh basil leaves or cilantro leaves for garnish (optional) uncooked long-grain rice fresh salsa, mild or hot vegetable oil fresh or canned corn kernels ground cumin salt fresh ground black pepper to taste water minced fresh cilantro for garnish (optional) Agregar todos los ingredientes en la olla interior, a excepción de la albahaca o el cilantro. Cerrar la tapa, presionar el botón de Arroz blanco y cocinar hasta que la arrocera cambie al modo de conservar caliente, 20 minutos aprox. Dejar reposar por 10 minutos antes de servir. Se acompaña bien con alimentos picantes. Rinde 3-4 porciones. 16 Add all ingredients to the inner pot except basil or cilantro. Close the lid, press the “WHITE RICE” button and cook until the rice cooker switches to warm mode, about 20 minutes. Allow to stand 10 minutes before serving. Goes well with spicy foods. Serves 3-4. 1 cup 2 cups 1/4 tsp. 1/2 tsp. 1/4 tsp. Thai-Style Rice Add all ingredients except cilantro to the inner pot, stir, close the lid, and press the “WHITE RICE” button. When rice cooker switches to warm mode, open the cooker, quickly stir and re-cover. Allow to stand for 8-10 minutes before serving. Spoon onto a serving dish, garnish with fresh cilantro and serve. Makes a flavorful supper or side dish for grilled chicken or fish. Serves 3-4. 1-1/4 cups 1 cup 1 jar (12oz.) 1 tbsp. 1 cup 1/2 tsp. 1/2 tsp. San Antonio Rice RECIPES 16 17 * Add shrimp or scallops and frozen peas during the last five minutes of cooking to make a main dish. Add all ingredients to the inner pot and stir to combine. Place inner pot in the rice cooker and close the lid. Press the “WHITE RICE” button and cook until rice cooker switches to warm mode. Allow rice to stand, covered, for 10 minutes. Adjust seasoning as desired. Pour into a serving bowl and serve immediately. Makes a delicious accompaniment for fish and chicken dishes. Serves 4. 2 tbsp. - 1 cup 1-3/4 cups 1/2 tsp. 1 tbsp. 1/2 tsp. 1 tsp. long-grain Jasmine rice water salt grated zest of 1 lemon lemon juice dried dill weed dried parsley, or 1 tbsp. minced fresh flat-leaf parsley butter, cut into 4 pieces kosher salt and freshly ground black pepper to taste Lemon Dill Rice Add all ingredients to inner pot except toasted almonds. Close lid, press “STEAM/COOK” button and cook until liquid evaporates, about 20 minutes. Allow to stand for 10 minutes. Spoon into a serving bowl, top with toasted almonds and serve immediately. Goes well with almost any fish, chicken or pork dish. Serves 3-4. 1 cup 1/2 tsp. 1/4 cup - 2 tbsp. 1/4 cup unsalted butter onion, finely chopped or 1 tbsp. dried onion flakes grated zest of 1 orange juice of 2 oranges plus enough chicken broth to make 1-3/4 cups liquid long-grain rice kosher salt slivered toasted almonds for garnish Arroz Pilaf a la naranja 2 cucharadas mantequilla sin sal 1/4 taza cebolla, finamente picada o 1 cucharada de hojuelas de cebolla deshidratada cáscara rallada de 1 naranja jugo de 2 naranjas más suficiente consomé de pollo para hacer 1-3/4 de líquido 1 taza arroz de grano largo 1/2 cucharadita de sal kosher 1/4 taza almendras tostadas para aderezar Agregar todos los ingredientes en la olla interior, a excepción de las almendras tostadas. Cerrar la tapa, presionar el botón de Cocinar/Vaporizar y cocinar hasta que el líquido se evapore, 20 minutos aprox. Dejar reposar por 10 minutos. Colocar en un tazón, aderezar con almendras tostadas y servir de inmediato. Se acompaña bien con casi cualquier platillo de pescado, pollo o puerco. Rinde 3-4 porciones. Arroz al limón con eneldo 1 taza 1-3/4 tazas 1/2 cucharadita 1 cucharada 1/2 cucharadita 1 cucharada 2 cucharadas - arroz Jazmín de grano largo agua sal cáscara rallada de 1 limón jugo de limón eneldo seco perejil seco o 1 cucharada de hojas picadas de perejil fresco mantequilla, cortada en 4 trozos sal kosher y pimienta negra fresca molida al gusto Agregar todos los ingredientes en la olla interior y remover para mezclar. Colocar la olla interior en la arrocera y cerrar la tapa. Presionar el botón de Arroz blanco y cocinar hasta que la arrocera cambie al modo de conservar caliente. Dejar reposar, cubierto, por 10 minutos. Ajustar el condimento al gusto. Verter en un tazón y servir de inmediato. Deliciosa guarnición para platillos de pescado y pollo. Rinde 4 porciones. *Agregue camarones o vieiras y chícharos congelados durante los últimos cinco minutos de cocinado para hacer un platillo principal. 17 Orange Rice Pilaf Ensalada de Arroz salvaje con mango y arándanos agrios 1-1/2 tazas 3 tazas 1/3 taza 1/4 taza 1/3 taza 3 cucharadas Aderezo: 1/3 taza 1/4 taza 2 cucharaditas 1 cucharadita 1 cucharadita 1/4 cucharadita mezcla de arroz salvaje e integral crudo agua arándanos agrios deshidratados pimiento rojo, picado mango fresco, picado nueces de Castilla, picadas 18 aceite vegetal vinagre de arroz azúcar hojas de albahaca seca perejil seco sal pimienta molida fresca al gusto Colocar el arroz y el agua en la olla interior. Presionar el botón de Arroz integral. Cocinar hasta que el arroz esté cocido, 1 hora, 45 minutos aprox. Colocar el arroz en un tazón grande y dejar enfriar. Cuando el arroz se haya enfriado, agregar los arándanos agrios, el pimiento rojo, el mango y las nueces de Castilla. Mezclar con cuidado. En un tazón pequeño, mezclar los ingredientes del aderezo y verter encima de la ensalada. Mezclar suavemente para combinar, cubrir y enfriar por hasta 4 horas antes de servir. Rinde 4 porciones. In a small bowl, whisk together the dressing ingredients and drizzle over the salad. Mix gently to combine, cover and chill for up to 4 hours before serving. Serves 4. Place the rice and water in the inner pot. Press the “BROWN RICE” button. Cook until the rice is done, about 1 hour, 45 minutes. Remove the rice to a large bowl and cool. When the rice has cooled, add the cranberries, red bell pepper, mango and walnuts. Fold in gently. vegetable oil rice vinegar sugar dried basil leaves dried parsley salt freshly ground pepper to taste uncooked wild and brown rice mix water dried cranberries red bell pepper, chopped fresh mango, chopped walnuts, chopped 18 Dressing: 1/3 cup 1/4 cup 2 tsp. 1 tsp. 1 tsp. 1/4 tsp. 1-1/2 cups 3 cups 1/3 cup 1/4 cup 1/3 cup 3 tbsp. Cranberry Mango Wild Rice Salad 19 Place all ingredients in the inner pot and stir. Place inner pot into the rice cooker, cover and press the ”STEAM/COOK” button. Allow to cook until rice cooker switches to warm mode. Add salt to taste. Stir and serve immediately as a main course. Serves 4. 1-1/2 cups medium-grain rice, such as Calrose 3 cups low sodium chicken broth 2 tbsp. dried minced onion 1/2 tsp. kosher salt 1 can (10 oz) chicken breast chunks with liquid 1 can (4 oz) diced green chiles with liquid salt to taste Green Chile and Chicken Rice Add all ingredients to inner pot and stir. Place inner pot in the rice cooker, close the lid, and press the ”STEAM/COOK” button. Allow to cook until the rice cooker switches to warm mode. Midway through cooking, carefully open rice cooker, stir ingredients with a long-handled wooden spoon and re-cover. Keep face and hands away from the inner pot when opening the lid to avoid steam burns. Inner pot will be hot, so use caution and be sure that your stirring utensil has a long handle to avoid burning your hands on the inner pot. When rice cooker switches to keep-warm mode, carefully open the lid, stir again and recover. Allow to stand for 10 minutes before serving. Serves 4. 2 tbsp. extra virgin olive oil 1/2 tsp. curry powder 1 tsp. ground cumin 1 cup brown or green lentils, picked over and washed 2-2/3 cups water 1 can (14 oz) tomato pieces with juice 2 tbsp. dried minced onion 1 tbsp. dried vegetable flakes 2 tbsp. dried parsley kosher salt and freshly ground black pepper to taste Lentejas saladas 2 cucharadas 1/2 cucharadita 1 cucharadita 1 taza 2-2/3 tazas 1 taza (14 oz.) 2 cucharadas 1 cucharada 2 cucharadas - aceite de oliva extra virgen curry en polvo comino molido lentejas verdes o cafés, limpias y lavadas agua tomate en trozos con jugo cebolla deshidratada picada hojuelas de vegetales deshidratados perejil deshidratado sal kosher y pimienta negra fresca molida al gusto Agregar todos los ingredientes en la olla interior y remover. Colocar la olla interior en la arrocera, cerrar la tapa y presionar el botón de Cocinar/Vaporizar. Dejar cocinar hasta que la arrocera cambie al modo de conservar caliente. A la mitad del proceso de cocinado, abra la arrocera con cuidado, remueva los ingredientes con un cucharón de madera largo y vuelva a tapar. Conserve las manos y cara lejos de la olla interior cuando abra la tapa para evitar quemaduras por el vapor. La olla interior estará caliente, por lo que debe tener precaución y asegurarse de que su utensilio para remover tenga un mango largo para evitar quemarse las manos con la olla interior. Cuando la arrocera cambie al modo de conservar caliente, abrir la tapa con cuidado, volver a remover y volver a cerrar. Dejar reposar por 10 minutos antes de servir. Rinde 4 porciones. Arroz con pollo y chile verde 1-1/2 tazas 3 tazas 2 cucharadas 1/2 cucharadita 1 lata (10 oz.) 1 lata (4 oz.) arroz de grano mediano, como el Calrose consomé de pollo bajo en sodio cebolla deshidratada picada sal kosher trozos de pechuga de pollo con líquido chiles verdes en cubos con sal líquida al gusto Colocar todos los ingredientes en la olla interior y remover. Colocar la olla interior en la arrocera, cubrir y presionar el botón de Cocinar/Vaporizar. Dejar cocinar hasta que la arrocera cambie al modo de conservar caliente. Agregar sal al gusto. Remover y servir inmediatamente como platillo principal. Rinde 4 porciones. 19 Savory Lentils Camarones con arroz al azafrán 1 taza arroz Jazmín u otro arroz de grano largo 1 taza consomé de pollo bajo en sodio 1 botella (8 oz.) jugo de almejas o 1 taza de agua 2 cucharadas mantequilla sin sal 1 cucharada cebolla deshidratada picada cáscara rallada de 1 limón 2 cucharadas jugo de limón 1 pizca generosa de azafrán 5-6 gotas salsa Tabasco o al gusto sal kosher y pimienta negra molida al gusto 8 oz. camarones grandes, pelados desvenados con cola cebollines frescos o deshidratados picados para aderezar Colocar todos los ingredientes, a excepción de los camarones y los cebollines, en la olla interior y colocar en la arrocera. Presionar el botón de Cocinar/Vaporizar. Después de que el líquido empiece a hervir, cocinar el arroz por 10 minutos. Con cuidado, abrir la arrocera, conservando las manos y la cara lejos para evitar quemaduras por el vapor y agregar los camarones encima del arroz. Cubrir y continuar cocinando hasta que la arrocera cambie al modo de conservar caliente. Servir de inmediato y aderezar con los cebollines. No dejar reposar después de que la arrocera cambie al modo de conservar caliente, ya que los camarones se pueden cocinar en exceso. Rinde 2-3 porciones. Pechugas de pollo al vapor 2 - pechugas de pollo sin hueso y sin piel sal kosher y pimienta negra fresca molida al gusto boneless, skinless chicken breasts kosher salt and freshly ground black pepper to taste Condimentar las pechugas de pollo con sal y pimienta. Colocar las pechugas de pollo en la charola de vapor. También se pueden colocar las pechugas de pollo en un plato que sea lo suficientemente grande para caber en la charola de vapor con un espacio de 1,27cm aprox. para la circulación del vapor. Si se va a utilizar un plato, rociar al plato con spray para cocinar antiadherente, colocar el pollo condimentado en el plato y cubrir con plástico. Agregar 1 taza de agua en la olla interior y colocar dentro de la arrocera. Colocar la charola de vapor con las pechugas de pollo dentro de la olla interior. Cubrir y presionar el botón de Cocinar/Vaporizar. Vaporizar por 10 minutos aprox. o hasta que el pollo tenga una consistencia firme al tacto y que no queden porciones color rosa en el centro. Con guantes térmicos, sacar cuidadosamente la charola de vapor de la arrocera y servir el pollo de inmediato. Rinde 2 porciones. 20 20 Season chicken breasts with salt and pepper. Place chicken breasts in the steam tray. You may also place chicken breasts on a plate that is just large enough to fit into the steam tray with about 1/2inch clearance for steam circulation. If using a plate, spray plate with nonstick cooking spray, place seasoned chicken on the plate and cover with plastic wrap. Add 1 cup water to inner pot and place in the rice cooker. Place steam tray with chicken breasts into the inner pot. Cover and press the “STEAM/COOK” button. Steam for about 10 minutes, or until chicken is firm to the touch and no pink is left in the center. Using oven mitts, carefully remove steam tray from rice cooker and serve chicken immediately. Serves 2. 2 - Basic Steamed Chicken Breasts Place all ingredients, except shrimp and chives, in the inner pot and place in the rice cooker. Press the “STEAM/COOK” button. After liquid begins to boil, cook the rice for 10 minutes. Carefully open the rice cooker, keeping hands and face away to avoid steam burns and add shrimp on top of rice. Cover and continue to cook until the rice cooker switches to warm mode. Serve immediately and garnish with chives. Do not allow to stand after rice cooker switches to warm mode because shrimp will be overcooked. Serves 2-3. 1 cup Jasmine or other long-grain rice 1 cup low sodium chicken broth 1 bottle (8 oz) clam juice, or 1 cup water 2 tbsp. unsalted butter 1 tbsp. dried minced onion zest of 1 lemon 2 tbsp. lemon juice 1 generous pinch of saffron 5-6 drops Tabasco sauce, or to taste kosher salt and freshly ground black pepper to taste 8 oz. large shrimp, peeled, de-veined, tails left on fresh or dried minced chives for garnish Shrimp with Saffron Rice 21 Place chicken breasts on a small plate sprayed with nonstick cooking spray. Mix together mustard, yogurt, sambal oelek, salt and pepper. Spread over chicken breast and sprinkle with chives. Cover chicken and plate with plastic wrap and place plate in steam tray. Add 1 cup of water to inner pot. Place steam tray in inner pot and place inner pot in the rice cooker. Cover and press the “STEAM/COOK” button. Steam for about 10 minutes, or until chicken is firm to the touch and no pink is left in the center. Using oven mitts, carefully remove steam tray from rice cooker and serve chicken immediately. Serves 2. 1 tsp. 2 1 tbsp. 1 tbsp. 1/2 tsp. boneless, skinless chicken breasts Dijon-style mustard plain yogurt sambal oelek (a mixture of chiles, brown sugar, and salt), optional kosher salt and freshly ground black pepper to taste dried chives Chicken Breasts Dijon Combine soy sauce, sugar, sesame oil, garlic, and ginger with chicken breasts and marinate for 10-15 minutes. Choose a plate that is just large enough to fit into the steam tray with about 1/2-inch clearance for steam circulation. Place chicken breasts and marinade on plate sprayed with nonstick cooking spray, top with slivered onion, and cover plate with plastic wrap. Add 1 cup of water to inner pot. Place steam tray into the inner pot and place inner pot into the rice cooker. Close lid and press the “STEAM/COOK” button. Steam for about 10 minutes, or until chicken is firm to the touch and no pink is left in the center. Using oven mitts, carefully remove steam tray from the rice cooker and serve chicken immediately. Serves 2. 2 tbsp. 1 tbsp. 1 tsp. 1 1/2 tsp. 1 2 boneless, skinless chicken breasts or turkey breast cutlets, about 3/4-inch thick soy sauce sugar toasted sesame oil small clove garlic, minced grated fresh ginger green onion, white part with 1 inch of green, cut into slivers Soy Sauce Marinated Chicken Breasts Pechugas de pollo marinadas con salsa de soya 2 2 1 1 1 1/2 1 pechugas de pollo sin hueso y sin piel o filetes de pechuga de pavo con un grosor de fl” de pulgada aprox. cucharadas salsa de soya cucharada azúcar cucharadita aceite de ajonjolí tostado diente de ajo chico, picado cucharadita jengibre fresco rallado cebolla verde, la parte blanca con 1” de verde, cortar en rodajas Combinar la salsa de soya, el azúcar, el aceite de ajonjolí, el ajo y el jengibre con las pechugas de pollo y marinar por 10-15 minutos. Elegir un plato que sea lo suficientemente grande para caber en la charola de vapor dejando un espacio de 1,27cm para la circulación del vapor. Colocar las pechugas de pollo y el marinado en el platón rociado con spray para cocinar antiadherente, cubrir con la cebolla y cubrir con plástico. Agregar 1 taza de agua en la olla interior. Colocar dentro de la charola interior y ésta dentro de la arrocera. Cerrar la tapa y presionar el botón de Cocinar/Vaporizar. Vaporizar por 10 minutos aprox. o hasta que el pollo tenga una textura firme al tacto y que no queden porciones color rosa en el centro. Con guantes térmicos, sacar cuidadosamente la charola de vapor de la arrocera y servir el pollo de inmediato. Rinde 2 porciones. Pechugas de pollo Dijon 2 1 cucharada 1 cucharada 1/2 cucharadita 1 cucharadita pechugas de pollo sin hueso y sin piel mostaza Dijon yogurt natural Oelek Sambal (una mezcla de chiles, azúcar moreno y sal) opcional sal kosher y pimienta negra fresca molida al gusto cebollines deshidratados Colocar las pechugas de pollo en un plato pequeño rociado con spray para cocinar antiadherente. Mezclar la mostaza, el yogurt, el oelek timbal, la sal y la pimienta. Espolvorear sobre las pechugas de pavo y aderezar con los cebollines. Cubrir el pollo y el plato con plástico y colocar el plato en la charola de vapor. Agregar 1 taza de agua en la olla interior. Colocar la charola de vapor en la olla interior y ésta en la arrocera. Cubrir y presionar el botón de Cocinar/Vaporizar. Vaporizar por 10 minutos aprox. o hasta que el pollo tenga una textura firme al tacto y que no queden porciones color rosa en el centro. Con guantes térmicos, sacar cuidadosamente la charola de vapor de la arrocera y servir el pollo de inmediato. Rinde 2 porciones. 21 Lomo de pavo al vapor 2 - lomos de pavo, 10-11 oz. cada uno sal kosher y pimienta negra molida al gusto Agregar 3 tazas de agua en la olla interior, colocar la olla interior en la arrocera, cubrir y presionar el botón de cocinar/vaporizar para permitir que el agua hierva. Condimentar los lomos con sal y pimienta. Colocar los lomos en la charola de vapor. También se puede elegir un plato que sea lo suficientemente grande para caber en la charola de vapor con un espacio de 1,27cm para la circulación del vapor. Si se va a utilizar un plato, rociar con spray para cocinar antiadherente antes de colocar los lomos en el plato y cubrir con plástico antes de colocar en la charola de vapor. Cuando el agua haya hervido en la arrocera, abrir la tapa con cuidado, conservando las manos y la cara lejos para evitar quemaduras por el vapor. Con guantes térmicos (la olla interior estará caliente), colocar cuidadosamente la charola de vapor en la arrocera, cubrir y vaporizar por 25 minutos aprox. Revisar después de 20 minutos con un termómetro instantáneo para carne. El pavo debe alcanzar una temperatura de 160° F aprox. y no debe estar color rosa al centro. Con guantes térmicos, sacar la charola de vapor de la arrocera. Una regla general es dejar reposar por 15 minutos por cada pulgada de grosor. Refrigerar si no se va a servir de inmediato. Rinde 4 porciones. Papitas al vapor 0,45kg-.91kg papitas chicas (2,54cm-5,08cm de diámetro), lavadas y peladas Agregar las papas en una capa en la charola de vapor. Agregar 3 tazas de agua en la olla interior. Colocar la olla interior en la arrocera y colocar la charola de vapor en la olla interior. Cerrar la tapa y presionar el botón de Cocinar/Vaporizar. Cocinar hasta que las papas estén suaves, 20 minutos aprox. después de que el agua empiece a hervir. Probar las papas: con cuidado, abra la tapa, conservando las manos y la cara lejos para evitar quemaduras por el vapor. Revise las papas con un tenedor, teniendo cuidado de no tocar las paredes de la charola de vapor ni la olla interior, ya que estarán calientes. Si las papas no están cocidas por completo, volver a cubrir y cocinar por otros cuantos minutos. Usar guantes térmicos para sacar la charola de vapor de la arrocera y servir con mantequilla caliente, sal y pimienta. small new potatoes (about 1-2 inches in diameter), scrubbed, unpeeled turkey tenderloins, about 10-11 oz. each kosher salt and ground black pepper to taste 22 22 Add potatoes in one layer to steam tray. Add 3 cups water to the inner pot. Place inner pot in the rice cooker and place steam tray into the inner pot. Close lid and press the “STEAM/COOK” button. Allow to cook until potatoes are tender, about 20 minutes after water begins to boil. Test potatoes: carefully open the lid, keeping hands and face away to avoid steam burns. Check potatoes with a fork, taking care not to touch the sides of the steam tray or inner pot, as they will be hot. If potatoes are not completely cooked, replace cover and cook for another few minutes. Use oven mitts to remove steam tray from rice cooker and serve hot with butter, salt and pepper. 1-2 lbs. Basic Steamed New Potatoes Add 3 cups of water to inner pot, place inner pot in rice cooker, cover and press “STEAM/COOK” button to let water come to a boil. Season tenderloins with salt and pepper. Place tenderloins in the steam tray. You may also choose a plate that is just large enough to fit into the steam tray with about 1/2-inch clearance for steam circulation. If using a plate, spray with nonstick cooking spray before placing tenderloins on the plate and cover with plastic wrap before placing in the steam tray. When water has come to a boil in the rice cooker, carefully open lid, keeping hands and face away to avoid steam burns. Using oven mitts (inner pot will be hot), carefully place the steam tray into the rice cooker, cover, and steam for about 25 minutes. Check after 20 minutes with an instant meat thermometer. Turkey should reach about 160°F and not be pink in the center. Using oven mitts, remove steam tray from rice cooker. A general rule is to stand for about 15 minutes per 1-inch thickness. Refrigerate if not serving immediately. Serves 4. 2 - Steamed Turkey Tenderloins 23 Peel and cut potatoes into 1-inch cubes and place in a single layer in the steam tray. Add 2 cups water to the inner pot and place in the rice cooker. Place steam tray into the inner pot, close lid, and press “STEAM/COOK” button. Steam until potatoes are tender, about 17 minutes after water boils. Test potatoes: carefully open the lid, keeping hands and face away to avoid steam burns. Using a fork, test potatoes for doneness. Take care not to touch sides of steam tray or inner pot, as they will be hot. If potatoes are not done, close lid and steam for an additional few minutes. Use oven mitts to remove steam tray from rice cooker and serve potatoes immediately with butter. 1 lb. sweet potatoes Steamed Sweet Potatoes Heat oil in the inner pot and, using extreme caution, sauté onion, pepper, and celery for 3-4 minutes to soften (see Safety Considerations on page 15). Use a long-handled wooden spoon for stirring to avoid burning hands on the inner pot. Add rice and stir to coat. Add remaining ingredients. Close the lid and press “STEAM/COOK” button. Allow to cook, stirring once or twice, until the rice is tender and meat is cooked through. Allow jambalaya to stand for about 10 minutes before serving on warmed plates. Serves 4. 2 tbsp. extra virgin olive oil 1 cup coarsely chopped onion 1 red bell pepper, peeled and diced 1 medium stalk celery, diced 1 cup uncooked long-grain rice 1 3/4 cups chicken broth 1 can (14 oz) tomato pieces with juice 1 tbsp. tomato paste 1/2 tsp. dried thyme 3/4 tsp. kosher salt, or 1/2 tsp. regular salt freshly ground black pepper to taste 1 pinch powdered cloves 1/4 tsp. prepared chili powder 1 tbsp. dried parsley 6-8 drops Tabasco sauce 1/3 cup diced ham 6 oz. smoked Polish sausage, cut into slices 6-8 medium shrimp (optional) Jambalaya Jambalaya 2 cucharadas 1 taza 1 1 1 taza 1 3/4 taza 1 lata (14 oz.) 1 cucharada 1/2 cucharadita 3/4 cucharadita 1 pizca 1/4 cucharadita 1 cucharada 6-8 gotas 1/3 taza 6 oz. 6-8 aceite de oliva extra virgen cebolla picada en trozos grandes pimiento rojo, pelado y picado en cubos tallo de apio mediano, picado en cubos arroz de grano largo crudo consomé de pollo tomate en trozos con jugo pasta de tomate tomillo deshidratado sal kosher o 1/2 cucharadita de sal normal pimienta negra molida fresca al gusto clavo en polvo chile preparado en polvo perejil deshidratado salsa Tabasco jamón en cubos chorizo ahumado Polaco, cortado en rebanadas camarones medianos (opcional) Calentar el aceite en la olla interior y, con extrema precaución, saltear la cebolla, el pimiento y el apio por 3-4 minutos para ablandarlos (véanse las Consideraciones de seguridad en la página 15). Utilizar un cucharón de madera de mango largo para remover con el fin de evitar quemarse las manos con la olla interior. Agregar el arroz y remover para cubrir. Agregar los ingredientes restantes. Cerrar la tapa y presionar el botón de Cocinar/Vaporizar. Cocinar, removiendo una o dos veces, hasta que el arroz esté suave y la carne se haya cocido por completo. Dejar reposar por 10 minutos antes de servir en platos calentados. Rinde 4 porciones. Papas dulces al vapor 0,45kg papas dulces Pelar y cortar las papas en cubos de 2,50cm y colocar en una sola capa en la charola de vapor. Agregar 2 tazas de agua en la olla interior y colocar en la arrocera. Colocar la charola de vapor en la olla interior, cerrar la tapa y presionar el botón de Cocinar/Vaporizar. Vaporizar hasta que las papas estén suaves, 17 minutos aprox. después de que hierva el agua. Probar las papas: con cuidado, abra la tapa, conservando las manos y la cara lejos para evitar quemaduras por el vapor. Utilizando un tenedor, pruebe que las papas estén cocidas. Tenga cuidado de no tocar las paredes de la charola de vapor ni la olla interior, ya que estarán calientes. Si las papas no están cocidas, cerrar la tapa y dejar cocinar por unos cuantos minutos más. Usar guantes térmicos para sacar la charola de vapor de la arrocera y servir las papas inmediatamente con mantequilla. 23 Brócoli o coliflor al vapor Brócoli o coliflor o una mezcla de ambos Lavar el brócoli/coliflor y cortar en ramilletes o piezas con tallos de 5,08cm-7,62cm. Colocar en la charola de vapor. Agrega 1-1/2 tazas de agua en la olla interior y ésta en la arrocera, cerrar la tapa y presionar el botón Cocinar/Vaporizar. Cuando el agua haya hervido, abra la tapa con cuidado, conservando las manos y la cara lejos para evitar quemaduras por el vapor. Utilizando guantes térmicos, colocar la charola de vapor con vegetales en la arrocera, teniendo cuidado de no tocar las paredes de la olla interior, ya que estará caliente. Vaporizar por 8 a 10 minutos o hasta obtener la firmeza deseada. Utilizando guantes térmicos, sacar la charola de vapor de la olla interior y colocar los vegetales en un platón. Sazonar con sal, pimienta, mantequilla, aceite de oliva o queso si se desea. Zanahorias con jengibre a la naranja 0,23kg zanahorias peladas, rebanadas o cortadas en tiras de 3/8” por 3 pulgadas de largo cáscara rallada de 1 naranja 1/2 taza jugo de naranja o una combinación de jugo de naranja y agua 2 rebanadas jengibre fresco 1 cucharada mantequilla Colocar las zanahorias y los ingredientes restantes en la olla interior. Colocar la olla interior en la arrocera, cubrir y presionar el botón de Cocinar/Vaporizar. Vaporizar por 10 minutos después de que el líquido haya hervido. Revisar que las zanahorias estén suaves al abrir la tapa con cuidado, conservando las manos y la cara lejos para evitar quemaduras por vapor. Si las zanahorias no están cocidas, cubrir y cocinar por 1-2 minutos adicionales, agregando más agua si es necesario. Sacar de la charola de vapor y servir. carrots, peeled, sliced or cut into 3/8-inch square by 3-inch long strips grated zest of 1 orange orange juice or combination of orange juice and water fresh ginger butter 24 24 Add carrots and remaining ingredients to inner pot. Place inner pot into rice cooker, cover, and press “STEAM/COOK” button. Steam for 10 minutes after liquid has come to a boil. Check to see if carrots are tender by carefully opening the lid, keeping hands and face away to avoid steam burns. If carrots are not done, cover and cook for an additional 1-2 minutes, adding more water if needed. Spoon out of inner pot and serve. 2 slices 1 tbsp. 1/2 cup 1/2 lb. Orange Gingered Carrots Wash broccoli/cauliflower and cut into florets or pieces with 2-3 inch stems. Place in the steam tray. Add 1-1/2 cups water to the inner pot, place inner pot into the rice cooker, close lid and press “STEAM/COOK” button. When water has reached a boil, carefully open the lid, keeping hands and face away to avoid steam burns. Using oven mitts, place steam tray with vegetables into the rice cooker, taking care not to touch sides of the inner pot, as it will be hot. Steam for 8 to 10 minutes or to desired crispness. Using oven mitts, remove steam tray from inner pot and place vegetables in a serving dish. Season with salt, pepper, butter, olive oil, or cheese if desired. Broccoli or Cauliflower or a mixture of both Steamed Broccoli or Cauliflower 25 Remove corn husks and silk and trim as needed. Place corn ears in the steam tray. Add 1-1/2 cups water to the inner pot, place in the rice cooker, cover and press the “STEAM/COOK” button. When water has come to a boil, carefully open the lid, keeping hands and face away to avoid steam burns. Using oven mitts, place steam tray with corn into the rice cooker, taking care not to touch sides of the inner pot, as it will be hot. Steam for 10 minutes. Using oven mitts, remove the steam tray immediately. Season corn as desired and serve hot. Fresh corn, trimmed, cut in half if needed Sweet Corn Add 2 cups water to the inner pot and place into the rice cooker, cover and press the “STEAM/COOK” button to bring to a boil. Place squash in the steam tray. When water has come to a boil, carefully open the lid, keeping hands and face away to avoid steam burns. Using oven mitts, carefully place steam tray with squash into the rice cooker. Close the lid and steam for 10 to 12 minutes or until squash is tender. Do not allow to stand on warm mode or squash will be overcooked. Using oven mitts, carefully remove steam tray from the inner pot. Spoon squash onto a platter, season as desired and serve immediately. 1 lb. butternut squash, peeled and cut into 1-inch cubes Steamed Butternut Squash Add 2 cups water to the inner pot and place into the rice cooker, cover and press the “STEAM/COOK” button to bring to a boil. Place beans in the steam tray. When water has come to a boil, carefully open the lid, keeping hands and face away to avoid steam burns. Using oven mitts, carefully place steam tray with beans into the rice cooker. Close the lid and steam for 10 to 12 minutes or until beans are tender. Do not allow to stand on warm mode or beans will be overcooked. Using oven mitts, carefully remove steam tray from the inner pot. Spoon beans onto a platter, season with salt, pepper, and butter. Serve immediately. 1 lb. green beans, stemmed Ejotes al vapor 0,45kg ejotes, sin tallo Agregar 2 tazas de agua en la olla interior y colocar dentro de la arrocera, cubrir y presionar el botón de Cocinar/Vaporizar para hervir. Colocar los ejotes en la charola de vapor. Cuando el agua haya hervido, abra la tapa con cuidado, conservando las manos y la cara lejos para evitar quemaduras por el vapor. Utilizando guantes térmicos, colocar la charola de vapor con los ejotes dentro de la arrocera cuidadosamente. Cerrar la tapa y vaporizar por 10 a 12 minutos o hasta que los ejotes estén suaves. No dejar reposar en el modo de conservar caliente o los ejotes se cocerán en exceso. Utilizando guantes térmicos, saque la charola de vapor de la olla interior con cuidado. Colocar los ejotes en un platón, condimentar con sal, pimienta y mantequilla. Servir de inmediato. Calabaza sidra al vapor 0,45kg calabaza sidra, pelada y cortada y cubos de 2,54cm Agregar 2 tazas de agua en la olla interior y colocar en la arrocera, cubrir y presionar el botón de Cocinar/Vaporizar para hervir. Colocar la calabaza en la charola de vapor. Cuando el agua haya hervido, abra la tapa con cuidado, conservando las manos y la cara lejos para evitar quemaduras por el vapor. Utilizando guantes térmicos, colocar la charola de vapor con la calabaza en la arrocera con cuidado. Cerrar la tapa y vaporizar por 10 a 12 minutos o hasta que la calabaza esté suave. No dejar reposar en el modo de conservar caliente o la calabaza se cocerá en exceso. Utilizando guantes térmicos, sacar la charola de vapor de la olla interior. Colocar la calabaza en un platón, condimentar al gusto y servir de inmediato. Elote dulce Elote fresco, recortado y cortado a la mitad si es necesario Quitar las espigas y cortar como sea necesario. Colocar los trozos de elote en la charola de vapor. Agregar 1-1/2 tazas de agua en la olla interior, colocar en la arrocera, cubrir y presionar el botón de Cocinar/Vaporizar. Cuando el agua haya hervido, abra la tapa con cuidado, conservando las manos y la cara lejos para evitar quemaduras por el vapor. Utilizando guantes térmicos, colocar la charola de vapor con el elote en la arrocera, teniendo cuidado de no tocar las paredes de la olla interior, ya que estarán calientes. Vaporizar por 10 minutos. Utilizando guantes térmicos, sacar la charola de vapor de inmediato. Condimentar el elote al gusto y servir caliente. 25 Steamed Green Beans Rollitos de pollo con chile verde estilo Monterrey 1 1/2 tazas 3 tazas 114 gramos 1 chica 0,45kg 1 cucharadita 1/4 cucharadita 6 1 taza 2 cucharadas 1 cucharada 1 taza arroz de grano largo consomé de pollo bajo en sodio chiles verdes en cubos de lata cebolla blanca, picada en cubos pechugas de pollo sin hueso y sin piel, cortadas en piezas de 1,27cm sal pimienta de Cayena rollitos de tortilla de harina crema agria baja en grasa cilantro fresco, picado cebollines frescos, picados queso Monterey Jack, desmenuzado Colocar el arroz, el consomé de pollo y los chiles en la olla interior. Remover con un cucharón de plástico con mango largo. Agregar la cebolla, el pollo, la sal y la pimienta de Cayena. Cubrir y presionar el botón de Arroz blanco. Mientras el pollo y el arroz se cocinan, enrollar holgadamente las cuatro tornillas en una toalla de papel y colocarlas en la charola de vapor. Combinar la crema agria, el cilantro y los cebollines en un tazón chico. Después de que el arroz se haya cocinado por 25 minutos, abrir la tapa, conservando las manos y la cara lejos para evitar quemaduras por el vapor, y usar guantes térmicos para colocar la charola de vapor rellena de tortillas en la arrocera. Vaporice por 5 minutos más. Utilizando guantes térmicos, sacar la charola de vapor y revisar el pollo con la punta de un cuchillo para determinar que el pollo está completamente cocido y no hay porciones color rosa. Agregar la mezcla de crema agria al arroz, volver a colocar la charola de vapor con las tortillas y vaporizar por otros 3 minutos. long grain rice low-sodium chicken broth can diced green chiles white onion, diced boneless, skinless chicken breasts, cut into 1/2-inch pieces salt cayenne pepper flour tortilla wraps lowfat sour cream fresh cilantro, chopped fresh chives, chopped Monterey Jack cheese, shredded Cuando se haya terminado, colocar el pollo con chile verde estilo Monterrey de manera equitativa en las tortillas. Colocar una capa de queso Jack encima y enrollar. Rinde 4 porciones. 1/2 cups cups ounce small pound 26 26 When done, spoon the Monterrey Green Chile Chicken equally into the wraps. Layer the Jack cheese over all and wrap. Serves 4. While the chicken and rice cook, loosely wrap the four tortillas in a paper towel and place them in the steamer tray. Combine the sour cream, cilantro and chives in a small bowl. After the rice has steamed for 25 minutes, open the lid, keeping hands and face away to avoid steam burns, and use oven mitts to place the tortilla-filled steamer tray into the rice cooker. Steam for an additional 5 minutes. Using oven mitts, remove the tray and check the chicken with the tip of a knife to determine that the chicken is cooked through and no pink remains. Add the sour cream mixture to the rice, carefully replace the steam tray with the tortillas and steam for an additional 3 minutes. Place the rice, chicken broth and chiles in the inner pot. Stir with a long-handled plastic spoon. Add the onion, chicken meat, salt and cayenne pepper. Cover and press the “WHITE RICE” button. 1 tsp. 1/4 tsp. 6 1 cup 2 tbsp. 1 tbsp. 1 cup 1 3 4 1 1 Monterrey Green Chile Chicken Wraps 27 Salmón con risotto parmesano y nueces y puntas de espárragos 2 tazas 1 1/2 tazas 1 1/2 tazas 0,23kg Remove the rice from the inner pot to a bowl. Drizzle with the olive oil, add the Parmesan cheese and chopped pecans and toss thoroughly. Serve with the salmon and asparagus. Serves 2. Close the lid and press the “STEAM/COOK” button; cook for 15 minutes. When done, check the fish and asparagus with the tip of a fork and continue steaming if needed until the fish is opaque and the asparagus is tender. When done, remove the salmon and asparagus and place each on a plate. Squeeze the lemon over the salmon. Place the rice, water and sauterne in the inner pot. Close the lid and press the “BROWN RICE” button; steam for 1 hour and 30 minutes. Meanwhile, season the salmon with salt and pepper to taste. Place a heat-resistant plate on the bottom of the steam tray and add the salmon fillets. Arrange the asparagus around the salmon fillets as space allows. Open the lid after 1 hour and 30 minutes, keeping hands and face away to avoid steam burns, and carefully insert the steam tray with salmon and asparagus into the rice cooker (use oven mitts and avoid touching the inner pot, as it will be hot). 1/2 lb. 1 tbsp. 1/2 cup 2 tbsp. 1 0,23kg 1 cucharada 1/2 taza 2 cucharadas 1 arroz integral crudo agua vino para cocinar Sauterne filetes de salmón sal y pimienta al gusto espárragos frescos, cortados en trozos de 2,54cm aceite de oliva extra virgen queso Parmesano, finamente rallado nueces, picadas limón para aderezar Colocar el arroz, el agua y el vino en la olla interior. Cerrar la tapa y presionar el botón de Arroz integral; vaporizar por 1 hora y 30 minutos. Mientras tanto, condimentar el salmón con sal y pimienta al gusto. Colocar un plato resistente al calor en el fondo de la charola de vapor y agregar los filetes de salmón. Acomodar los espárragos alrededor de los filetes de salmón como lo permita el espacio. Abra la tapa después de 1 hora y 30 minutos, conservando las manos y la cara lejos para evitar quemaduras por el vapor, e insertar cuidadosamente la charola de vapor con el salmón y los espárragos en la arrocera (usar guantes térmicos y evitar tocar la olla interior, ya que estará caliente). Cerrar la tapa y presionar el botón de Cocinar/Vaporizar; cocinar por 15 minutos. Cuando termine, revisar el pescado y los espárragos con la punta de un tenedor y continuar cocinando si es necesario hasta que el pescado esté opaco y los espárragos suaves. Sacar el salmón y los espárragos y colocarlos en un plato. Exprimir el limón encima del salmón. Sacar el arroz de la olla interior y colocarlo en un tazón. Mezclar con el aceite de oliva, agregar el queso Parmesano y las nueces picadas y remover perfectamente. Servir con el salmón y los espárragos. Rinde 2 porciones. 2 cups 1 1/2 cups 1 1/2 cups 1/2 lb. uncooked brown rice water sauterne cooking wine salmon fillets salt and pepper to taste fresh asparagus, cut into 1-inch pieces extra-virgin olive oil Parmesan cheese, finely grated pecans, chopped lemon for garnish Salmon with Pecan Parmesan Risotto & Asparagus Tips 27 Queso untable con espinacas picantes y alcachofa 8 oz. 1/4 taza 3/4 taza 1 diente 14 oz. 1/2 taza 1/2 cucharadita 1 cucharada 4 tazas queso crema, suave mayonesa baja en grasa queso Parmesano, rallado ajo, picado corazones de alcachofa en lata, drenados y picados espinacas congeladas, descongeladas y drenadas aderezo Italiano deshidratado perejil Italiano fresco, picado sal y pimienta negra molida fresca agua En un tazón mediano, mezclar el queso crema, la mayonesa y el queso Parmesano. Agregar al ajo, los corazones de alcachofa, la espinaca, el aderezo Italiano, el perejil, la sal y la pimienta. Mezclar bien. Cubrir un plato de 4 tazas resistente al calor con spray para cocinar antiadherente. Colocar la mezcla en el plato y aplanar la superficie con un cuchillo. Cubrir la superficie del plato con papel aluminio. Verter el agua en la olla interior y colocar la charola de vapor en la parte superior. Colocar el plato en la charola de vapor. Cerrar la tapa y presionar el botón de Cocinar/Vaporizar por 15 minutos. Con cuidado, abrir la tapa, conservando las manos y la cara lejos para evitar quemaduras por el vapor, y revisar la mezcla. Cuando termine, estará caliente. Servir con galletas saladas con hierbas. Rinde 6 porciones. Sopa de papa roja, jamón ahumado y cebollín 2-1/2 tazas 1-1/2 tazas 1 paquete (5.5 oz.) 6 1/4 cucharadita 1/2 taza 1 taza 3 cucharadas consomé de pollo agua papas gratinadas instantáneas más sobre de condimento papas rojas chicas, lavadas y cortadas en cubos chicos pimienta negra molida fresca jamón ahumado, picado (se puede usar jamón de pavo bajo en grasa) media crema cebollines frescos, picados Colocar el consomé, el agua, las papas instantáneas, el condimento, las papas y la pimienta en la olla interior. Cerrar la tapa y presionar el botón de Cocinar/Vaporizar y vaporizar por 20 minutos. Con cuidado, abrir la tapa, conservando las manos y la cara lejos para evitar quemaduras por el vapor. Utilizar un cucharón de plástico de mango largo para agregar y remover el jamón y la crema, teniendo cuidado de no tocar la olla interior, ya que estará caliente. Cerrar la tapa y continuar vaporizando por 3 minutos. Cuando termine, usar el cucharón para colocar en tazones individuales y aderezar con los cebollines picados. Rinde 4 porciones. chicken broth water instant au gratin potatoes plus seasoning packet baby red potatoes, rinsed and cut into small cubes freshly ground black pepper smoked ham, chopped (you may use lowfat turkey ham) half and half cream fresh chives, chopped pkg. cream cheese, softened lowfat mayonnaise Parmesan cheese, grated garlic, minced can artichoke hearts, drained and chopped frozen spinach, thawed and squeezed dry dried Italian seasoning fresh Italian parsley, chopped salt and freshly ground black pepper water 28 28 Place the broth, water, instant potatoes, seasoning, potatoes and pepper in the inner pot. Close the lid and press the “STEAM/COOK” button and steam for 20 minutes. Carefully open the lid, keeping hands and face away to avoid steam burns. Use a long-handled plastic spoon to stir in the ham and cream, taking care not to touch the inner pot, as it will be hot. Close the lid and continue steaming for 3 minutes. When done, use ladle to spoon into individual bowls and garnish with the chopped chives. Serves 4. 1 cup 3 tbsp. 2-1/2 cups 1-1/2 cups 1 (5.5 oz) pk. 6 1/4 tsp. 1/2 cup Red Potato, Smoked Ham & Chive Soup In a medium bowl, blend together the cream cheese, mayonnaise and Parmesan cheese. Add the garlic, artichoke hearts, spinach, Italian seasoning, parsley, salt and pepper. Mix well. Coat a 4cup heatproof dish with nonstick cooking spray. Spoon the spread into the dish and smooth the top with a knife. Cover the top of the dish with aluminum foil. Pour the water into the inner pot and position the steam tray on top. Place the dish in the steam tray. Close the lid and press the “STEAM/COOK” button for 15 minutes. Carefully open the lid, keeping hands and face away to avoid steam burns, and check the spread. When done, it will be warm throughout. Serve with herbed crackers. Serves 6. 4 cups 8 oz. 1/4 cup 3/4 cup 1 clove 14 oz. 1/2 cup 1/2 tsp 1 tbsp. Hot Spinach & Artichoke Spread Place the onion, oil and garlic in the inner pot and sauté for 3 minutes (see Safety Considerations on page 15). Use a large wooden spoon to gently stir as the onion and garlic cook. Add the chili, salsa, olives, cream cheese and cheddar cheese. Stir to combine all of the ingredients, close the lid, and press the “STEAM/COOK” button. Steam for 4 minutes. Carefully open the lid, keeping hands and face away to avoid steam burns, and stir the dip. Steam again for 3 minutes. Open the lid and stir again. Continue steaming until the dip is warm throughout and the cheeses are melted. When done, serve in a large bowl and use the tortilla chips for dipping. Serves 6. 29 1 small 2 tsp. 1 clove 2 15 oz. 1 cup 1/2 cup 3 oz. 3 oz. yellow onion, chopped vegetable oil garlic, minced cans prepared chili without beans prepared medium salsa black olives, sliced lowfat cream cheese, cubed cheddar cheese, grated tortilla chips Game Day Warm Chili & Cheese Dip Place the butter and onions in the inner pot and sauté for 3 to 4 minutes, or until the onions are translucent (see Safety Considerations on page 15). Add the tomatoes, salt, pepper and broth. Close lid and press the “STEAM/COOK” button and steam for 30 minutes. When done, carefully open the lid, keeping hands and face away to avoid steam burns, and add the milk. Continue steaming for 3 minutes, or until the soup is heated through. If desired, puree the soup in a blender before serving. Prepare the aioli by combining the cilantro, lemon juice and mayonnaise. Blend until smooth. To serve, pour the hot soup into individual bowls and spoon the aioli in a swirl over each serving. Serves 6. 1 tsp. 1/2 tsp. 4 cups 1/2 cup 2 tbsp. 1 tsp. 1/4 cup 2 tbsp. 1 large 2 lbs. butter or margarine yellow onion, chopped ripe tomatoes, cored, peeled and cut into small pieces salt freshly ground black pepper chicken or vegetable broth lowfat milk fresh cilantro, minced lemon juice lowfat mayonnaise Homemade Tomato Soup with Cilantro Aioli Sopa de tomate casera con Aioli de cilantro 2 cucharadas 1 grande 0,91kg 1 cucharadita 1/2 cucharadita 4 tazas 1/2 taza 2 cucharadas 1 cucharadita 1/4 taza mantequilla o margarina cebolla amarilla, picada tomates maduros, sin corazón, pelados y cortados en trozos chicos sal pimienta negra molida fresca consomé de pollo o verduras leche baja en grasa cilantro fresco, picado jugo de limón mayonesa baja en grasa Colocar la mantequilla y las cebollas en la olla interior y saltear por 3 a 4 minutos o hasta que las cebollas estén translúcidas (véanse las Consideraciones de seguridad en la página 15). Agregar los tomates, la sal, la pimienta y el consomé. Cerrar la tapa y presionar el botón de Cocinar/Vaporizar y vaporizar por 30 minutos. Cuando termine, abra la tapa con cuidado, conservando las manos y la cara lejos para evitar quemaduras por el vapor, y agregue la leche. Continuar vaporizando por 3 minutos o hasta que la sopa esté completamente cocida. Si se desea, se puede hacer un puré con la sopa en una licuadora antes de servir. Preparar el aioli al combinar el cilantro, el jugo de limón y la mayonesa. Mezclar hasta obtener una textura suave. Para servir, verter la sopa caliente en tazones en tazones individuales y aderezar cada porción con el aioli. Rinde 6 porciones. Dip botanero caliente de queso y chili 1 chica 2 cucharaditas 1 diente 2 de 15 oz. 1 taza 1/2 tazaa 3 oz. 3 oz. cebolla amarilla, picada aceite vegetal ajo, picado latas de chili preparado sin frijoles salsa preparada no picosa ceitunas negras, rebanadas queso crema bajo en grasa, en cubos queso Cheddar, rallado totopos de tortilla Colocar la cebolla, el aceite y el ajo en la olla interior y saltear por 3 minutos (véanse las Consideraciones de seguridad en la página 15). Usar un cucharón de madera grande para remover suavemente mientras se cocinan la cebolla y el ajo. Agregar el chili, la salsa, las aceitunas, el queso crema y el queso Cheddar. Remover para combinar todos los ingredientes, cerrar la tapa y presionar el botón de Cocinar/Vaporizar. Vaporizar por 4 minutos. Abrir la tapa con cuidado, conservando las manos y la cara lejos para evitar quemaduras por el vapor, y remover el dip. Vaporizar por otros 3 minutos. Abrir la tapa y remover otra vez. Continuar vaporizando hasta que el dip esté caliente y los quesos se hayan derretido. Cuando termine, servir en un tazón grande y aderezar con los totopos de tortilla. 29 Frittata de espinacas y champiñones para el desayuno 1/2 taza drenadas 1/2 taza 2 4 grandes 1/2 cucharadita 1/2 cucharadita Pizca 1/4 taza espinacas congeladas, descongeladas y champiñones frescos, limpios y rebanados cebollas verdes, picadas huevos, batidos (se puede usar sustituto de huevo) orégano molido tomillo molido sal y pimienta negra molida fresca queso Aciago, rallado (se puede usar queso Parmesano) Cubrir la olla interior con spray para cocinar antiadherente. En un tazón mediano, mezclar la espinaca, los champiñones y las cebollas. Agregar los huevos, el orégano, el tomillo, la sal, la pimienta y el queso. Mezclar bien hasta que todos los ingredientes estén combinados. Con un cucharón, verter la frittata en la olla interior. Cerrar la tapa y presionar el botón de Cocinar/Vaporizar y vaporizar por 12-14 minutos. Cuando termine, los huevos deben estar firmes en el fondo y casi listos en la superficie. Usar una espátula de plástico para rebanar la frittata en rebanadas y servir. Rinde 4 porciones. Huevos revueltos con papas doradas Yukon 3 medianas 2 tazas 4 grandes Pizca 1/2 taza 1 papas doradas Yukon, limpias y cortadas en trozos de 2,54cm agua huevos, batidos sal y pimienta negra molida fresca queso Gouda, desmenuzado cebolla verde, picada Cubrir la olla interior con spray para cocinar antiadherente. Colocar las papas en el fondo de la olla interior y cubrir con el agua. Cerrar la tapa, presionar el botón de Cocinar/Vaporizar y vaporizar por 25 minutos. Cuando termine, usar guantes térmicos para sacar la olla interior de la arrocera y drenar cuidadosamente el agua restante. Volver a insertar la olla interior y las papas en la arrocera y verter los huevos sobre las papas. Espolvorear con la sal y la pimienta. Colocar una capa de queso Gouda y cebolla. Cerrar la tapa, presionar el botón de Cocinar/Vaporizar y vaporizar por 12-14 minutos o hasta que los huevos estén firmes alrededor de la orilla y la superficie esté casi lista. Dejar reposar por 2 minutos. Servir en 4 platos individuales. Rinde 4 porciones. Yukon Gold potatoes, cleaned and cut into 1-inch pieces water eggs, beaten salt and freshly ground black pepper Gouda cheese, shredded green onion, chopped frozen spinach, thawed, drained and squeezed dry fresh button mushrooms, cleaned and sliced green onions, chopped eggs, beaten (you may use egg substitute) ground oregano ground thyme salt and freshly ground black pepper Asiago cheese, grated (you may use Parmesan cheese) 30 30 Coat the inner pot with nonstick cooking spray. Place the potatoes in the bottom of the inner pot and cover with the water. Close the lid, press the “STEAM/COOK” button and steam for 25 minutes. When done, use oven mitts to remove inner pot from the rice cooker and carefully strain out the remaining water. Replace the inner pot and potatoes in the rice cooker and pour the eggs over the potatoes. Sprinkle with the salt and pepper. Layer with the Gouda cheese and green onion. Close the lid, press the “STEAM/COOK” button and steam for 12-14 minutes, or until the eggs are firm around the edges and the top is almost set. Let stand for 2 minutes. Spoon onto 4 individual plates. Serves 4. 2 cups 4 large pinch 1/2 cup 1 3 medium Yukon Gold Potato & Egg Scramble Coat the inner pot with nonstick cooking spray. In a medium bowl, mix together the spinach, mushrooms and onions. Add the eggs, oregano, thyme, salt, pepper and cheese. Mix well until all ingredients are combined. Spoon the frittata into the inner pot. Close the lid and press the “STEAM/COOK” button and steam for 12-14 minutes. When done, the eggs should be firm on the bottom and almost set on the top. Use a plastic spatula to slice the frittata into wedges and serve. Serves 4. 1/2 cup 1/2 cup 2 4 large 1/2 tsp. 1/2 tsp. pinch 1/4 cup Spinach & Mushroom Breakfast Frittata 31 *For a dramatic pink blush, use red wine instead of white. Peel pears and remove core from bottom. Cut a slice from the bottom of each pear to form a flat base. Leave stem on top of pear. Add wine and sugar to the inner pot, and place inner pot into the rice cooker. Dip the pears into the wine mixture to coat, and lay them on their sides in the steam tray. Place the steam tray into the rice cooker, cover and press the “STEAM/COOK” button. Steam for about 20 minutes or until cooked (when the tip of a knife goes in easily). If pears are still firm, cook for another 3-5 minutes. Turn off the cooker. Using oven mitts, carefully remove steam tray from the rice cooker, taking care not to touch the sides of the inner pot, as it will be hot. Place steam tray aside and allow to cool. When pears are cool enough to handle, move them to a bowl. Add vanilla to liquid and pour over the pears. Chill or 1-2 hours or overnight in the refrigerator. Serve with whipped cream and toasted sliced almonds. 4 2 cups 1/2 cup 1/2 tsp. - small to medium pears, firm but ripe white wine (Reisling is suggested) sugar vanilla whipped cream and toasted sliced almonds for garnish (optional) Wine-Poached Pears Add ingredients to the inner pot and stir. Place inner pot into the rice cooker, cover and press the “STEAM/COOK” button. Halfway through the steaming cycle, carefully open the lid, keeping hands and face away to avoid steam burns and stir. Cover and continue cooking until the rice cooker switches to keep warm mode. Allow to stand for 10 minutes before serving. 1-1/3 cups 2 cups 3/4 cup 1/3 cup 1 dash rolled oats (not quick cooking) apple juice water raisins salt Avena para el desayuno 1-1/3 tazas 2 tazas 3/4 taza 1/3 taza 1 pizca avena desmenuzada (no de la que se cocina rápido) jugo de manzana agua pasas sal Agregar los ingredientes en la olla interior y remover. Colocar la olla interior en la arrocera, cubrir y presionar el botón de Cocinar/Vaporizar. A la mitad del proceso de vaporización, abrir la tapa con cuidado, conservando las manos y la cara lejos para evitar quemaduras por el vapor, y remover. Cubrir y continuar cocinando hasta que la arrocera cambie al modo de conservar caliente. Dejar reposar por 10 minutos antes de servir. Peras cocidas al vino 4 2 tazas 1/2 taza 1/2 cucharadita - peras chicas a medianas, firmes pero maduras vino blanco (se sugiere Reisling) azúcar vainilla crema batida y almendras tostadas rebanadas para aderezar (opcional) Pelar las peras y quitar el corazón desde la parte inferior. Cortar una rebanada de la parte inferior de cada pera para formar una base plana. Dejar el tallo en la parte superior de las peras. Agregar el vino y el azúcar en la olla interior y colocar la olla interior en la arrocera. Sumergir las peras en la mezcla de vino para que se cubran con dicha mezcla y colocarlas de lado en la charola de vapor. Colocar la charola de vapor en la arrocera, cubrir y presionar el botón de Cocinar/Vaporizar. Vaporizar por 20 minutos aprox. o hasta que estén cocidas (cuando la punta de un cuchillo entra con facilidad). Si las peras todavía están firmes, cocinar por otros 3-5 minutos. Utilizando guantes térmicos, sacar la charola de vapor de la arrocera cuidadosamente, teniendo cuidado de no tocar las paredes de la olla interior, ya que estará caliente. Apartar la charola de vapor y dejar que se enfríe. Cuando las peras estén lo suficientemente frías para tocarlas, pasarlas a un tazón. Agregar la vainilla al líquido y verter encima de las peras. Enfriar por 1-2 horas o toda la noche en el refrigerador. Servir con crema batida y almendras tostadas rebanadas. * Para dar un toque rosado, usar vino tinto en lugar de vino blanco. 31 Breakfast Oatmeal Pastel doble de limón glaceado Spray para cocinar antiadherente 1 taza harina para pastel 1/2 cucharadita sal 1 cucharadita polvo para hornear 3 huevos, batidos 1 taza azúcar 2 cucharadas jugo de limón, dividido 1/2 cucharadita extracto de limón 6 cucharadas leche 1 taza azúcar en polvo Cubrir un platón para soufflé resistente al calor con spray para cocinar antiadherente. En un tazón mediano, batir poco a poco la harina, la sal y el polvo para hornear. Apartar. En un tazón grande, batir los huevos con el azúcar a punto de turrón. Agregar 1 cucharada del jugo, extracto y leche y batir por 2 minutos a velocidad media. Agregar los ingredientes secos de manera gradual y batir por otros 2 minutos a velocidad media. Verter el batido en el platón, dejando un espacio de 1,27cm en la parte superior. Llenar la olla interior con agua hasta la línea de 4 tazas. Colocar el platón en el agua, asegurándose de que el agua no entre por la parte superior del platón. Presionar el botón de Cocinar/Vaporizar y cocinar por 25 minutos. Con cuidado, abrir la tapa, conservando las manos y la cara lejos para evitar quemaduras por el vapor, y revisar el nivel del agua. Si se encuentra por debajo de 1 taza, agregar agua hasta el nivel de 3 tazas, cubrir y continuar cocinando por 20 minutos. Revisar el pastel cuando esté terminado; debe estar seco en la parte superior. Utilizando guantes térmicos, sacar el pastel de la arrocera cuidadosamente y colocarlo en una rejilla para que se enfríe. Preparar el glaceado al combinar el jugo de limón con el azúcar en polvo. Espolvorear el glaceado encima del pastel y servir. Rinde 4 a 6 porciones. Nonstick cooking spray cake flour salt baking powder eggs, beaten sugar lemon juice, divided lemon extract milk powdered sugar 32 32 Prepare the glaze by combining the lemon juice with the powdered sugar. Drizzle the glaze over the sponge cake and serve at once. Serves 4 to 6. Carefully open the lid, keeping hands and face away to avoid steam burns, and check the water level. If it is below 1 cup, add water to the 3-cup level, cover and continue cooking for 20 minutes. Check the cake when done; it should be just dry on top. Using oven mitts, carefully remove the cake from the cooker and place on a rack to cool. Pour the batter into the dish, leaving 1/2-inch space at the top. Fill the inner pot with water to the 4-cup line. Place the soufflé dish in the water, making sure that the water does not go over the top of the dish. Press the “STEAM/COOK” button and cook for 25 minutes. Coat a heatproof 1-1/2 quart soufflé dish with nonstick cooking spray. In a medium bowl, sift together the flour, salt and baking powder. Set aside. In a large bowl, beat the eggs with the sugar until very smooth. Add 1 tablespoon of the juice, extract and milk and beat for 2 minutes on medium speed. Add the dry ingredients gradually and beat again for 2 minutes on medium speed. 1 cup 1/2 tsp. 1 tsp. 3 1 cup 2 tbsp. 1/2 tsp. 6 tbsp. 1 cup Double Lemon Glazed Sponge Cake 33 GARANTÍA LIMITADA Aroma Housewares Company garantiza que este producto no tenga defectos en sus materiales y fabricación durante un período de un año a partir de la fecha comprobada de compra dentro de la parte continental de los Estados Unidos. AROMA HOUSEWARES COMPANY 6469 Flanders Drive San Diego, California 92121 1-800-276-6286 M-F, 8:30 AM - 5:00 PM, Pacific Time Website: www.aromaco.com This warranty gives you specific legal rights which may vary from state to state and does not cover areas outside the United States. This warranty does not cover improper installation, misuse, abuse or neglect on the part of the owner. Warranty is also invalid in any case that the product is taken apart or serviced by an unauthorized service station. Within this warranty period, Aroma Housewares Company will repair or replace, at its option, defective parts at no charge, provided the product is returned, freight prepaid with proof of purchase and U.S. $14.00 for shipping and handling charges payable to Aroma Housewares Company. Before returning an item, please call the toll free number below for a return authorization number. Allow 2-4 weeks for return shipping. Dentro de este período de garantía, Aroma Housewares Company reparará o reemplazará, a su opción, las partes defectuosas sin ningún costo, siempre y cuando el producto sea devuelto, con el flete prepagado, con comprobación de compra y $14.00 dólares para cargos de envío y manejo a favor de Aroma Housewares Company. Antes de devolver un producto, sírvase llamar al número telefónico gratuito que está más abajo para obtener un número de autorización de devolución. Espere entre 2-4 semanas para recibir el aparato nuevamente. Esta garantía no cubre la instalación incorrecta, el uso indebido, maltrato o negligencia por parte del usuario. La garantía también es inválida en caso de que el aparato sea desarmado o se le dé mantenimiento en un centro de servicio no autorizado. Esta garantía le da derechos legales específicos los cuales podrán variar de un estado a otro y no cubre áreas fuera de los Estados Unidos. AROMA HOUSEWARES COMPANY 6469 Flanders Drive San Diego, California 92121 1-800-276-6286 L-V, 8:30 AM - 5:00 PM, Tiempo del Pacífico Sitio Web: www.aromaco.com Aroma Housewares Company warrants this product free from defects in material and workmanship for one year from provable date of purchase in the continental United States. LIMITED WARRANTY 33-
 1
1
-
 2
2
-
 3
3
-
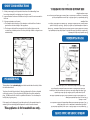 4
4
-
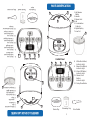 5
5
-
 6
6
-
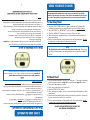 7
7
-
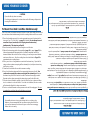 8
8
-
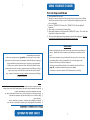 9
9
-
 10
10
-
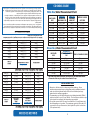 11
11
-
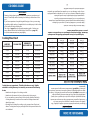 12
12
-
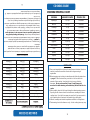 13
13
-
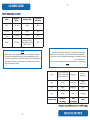 14
14
-
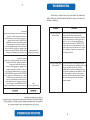 15
15
-
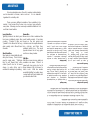 16
16
-
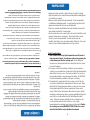 17
17
-
 18
18
-
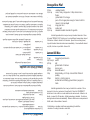 19
19
-
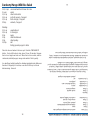 20
20
-
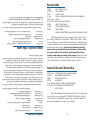 21
21
-
 22
22
-
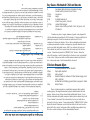 23
23
-
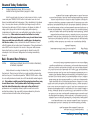 24
24
-
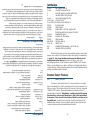 25
25
-
 26
26
-
 27
27
-
 28
28
-
 29
29
-
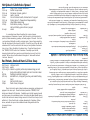 30
30
-
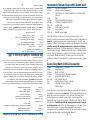 31
31
-
 32
32
-
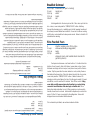 33
33
-
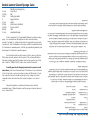 34
34
-
 35
35


Aroma ARC-930SB Manual de usuario
- Categoría
- Pequeños electrodomésticos de cocina
- Tipo
- Manual de usuario
en otros idiomas
- English: Aroma ARC-930SB User manual
Artículos relacionados
-
Aroma ARC-852 Manual de usuario
-
-
Aroma ARC-737-1G Manual de usuario
-
-
-
-
-
-
Aroma ARC-914SBB Manual de usuario
-
Otros documentos
-
BLACK+DECKER RC5200M Guía del usuario
-
Black & Decker Rice Cooker Manual de usuario
-
-
Black & Decker RC3406 Manual de usuario
-
 Black and Decker Appliances RC5200 Guía del usuario
-
Bella 16 Cup Rice Cooker El manual del propietario
-
-
Insignia NS-RC14WH7 guía de instalación rápida
-
 Continental Electric CE23201 Manual de usuario
-
 Continental Electric CE23291 Manual de usuario


