Kmart 02891808-4 El manual del propietario
- Categoría
- Cortadoras de césped
- Tipo
- El manual del propietario

perator's
I:RnFrSMRN°
LAWN TRACTOR
7 Speed, Shift-on=the=Go
42" Deck
Model No. 247.28881
• Espanol, P. 58
This product has a low emission engine which operates differently
from previously built engines. Before you start the engine, read and
understand this Operator's Manual.
Before using this equipment,
read this manual and follow
all safety rules and operating
instructions.
For answers to your questions about
this product, Call:
1-800=659=5917
CraftsmanTractorHelpLine
7 am =7 pm CT, Mort. =Sun.
Sears Brands Management Corporation, Hoffman Estates, IL 60179 U.S.A.
Visit our website: www.craftsman.com FormNo.769-06422
(November1,2010)

Off-Season Storage ........................................................ 27
Trou bleshooting .............................................................. 28
Labels ............................................................................. 29
Parts List ......................................................................... 30
Espafiol ............................................................................ 57
Service Numbers ............................................. Back Cover
CRAFTSMAN TWO YEAR FULL WARRANTY
FORTWOYEARSfromthedateofpurchase,ifanynon-expendablepartofthis ridingequipmentfailsduetoa defectinmaterialorworkman-
ship,visitwww.craftsman.com or call1-800-659-5917to arrangeforfreein-homerepair.
Theframeandfrontaxlewillbe repairedfreeofchargeforfiveyearsfromthedateofpurchaseifdefectiveinmaterialor workmanship.
Inallcases,ifrepairprovesimpossible,theridingequipmentwillbe replacedfreeofchargewiththesameoran equivalentmodel.
Thebatterywillbe replacedfreeofchargefor90 daysfromthedateofpurchaseifdefectiveinmaterialorworkmanship(ourtestingprovesthat it
willnotholda charge).
Thiswarrantyisvoidifthisproductiseverusedwhileprovidingcommercialservicesor ifrentedtoanotherperson.
This warranty covers ONLYdefects in material andworkmanship. Warrantycoverage does NOTinclude:
• Expendableitemsthatcanwearoutfromnormalusewithinthewarrantyperiod,includingbutnotlimitedtoblades,sparkplugs,air
cleaners,belts,andoilfilters.
o
o
o
o
Standardmaintenanceservicing,oilchanges,or tune-ups.
Tirereplacementor repaircausedbypuncturesfromoutsideobjects,suchasnails,thorns,stumps,or glass.
Tireor wheelreplacementor repairresultingfromnormalwear,accident,orimproperoperationor maintenance.
Repairsnecessarybecauseof operatorabuse,includingbutnotlimitedtodamagecausedbytowingobjectsbeyondthecapabilityof
theridingequipment,impactingobjectsthatbendtheframeorcrankshaft,or over-speedingtheengine.
Repairsnecessarybecauseof operatornegligence,includingbutnotlimitedto,electricalandmechanicaldamagecausedbyimproper
storage,failureto usethepropergradeandamountofengineoil,failuretokeepthedeckclearofflammabledebris,orfailureto
maintainthe ridingequipmentaccordingtotheinstructionscontainedin theoperator'smanual.
Engine(fuelsystem)cleaningor repairscausedbyfueldeterminedto becontaminatedoroxidized(stale).Ingeneral,fuelshouldbe
usedwithin30 daysof itspurchasedate.
Normaldeteriorationandwearoftheexteriorfinishes,or productlabelreplacement.
Thiswarrantygivesyouspecificlegalrights,andyoumayalsohaveotherrightswhichvaryfromstatetostate.
Sears BrandsManagementCorporation, HoffmanEstates,IL60179
EngineOil: SAE30
Fuel: UnleadedGasoline
SparkPlug: Champion®RC12YC
Engine: Briggs& StrattonI/C®
Model Number:
Serial Number:
Dateof Purchase:
Recordthemodelnumber,serialnumber,
anddateof purchaseabove.
© KCDIRLLC 2

Thissymbolpointsoutimportantsafetyinstructionswhich,if not
followed,couldendangerthepersonalsafetyand/orpropertyof
yourselfandothers.Readandfollowall instructionsin thismanual
beforeattemptingtooperatethismachine.Failuretocomplywith
theseinstructionsmayresultin personalinjury.Whenyouseethis
symbol,HEEDITSWARNING!
CALIFORNIA PROPOSITION 65
EngineExhaust,someof itsconstituents,andcertainvehicle
componentscontainoremitchemicalsknowntoStateofCalifornia
tocausecancerandbirthdefectsorotherreproductiveharm.
Batteryposts,terminals,and relatedaccessoriescontainleadand
leadcompounds,chemicalsknowntotheStateof Californiato
causecancerandreproductiveharm.Washhandsafterhandling.
Thismachinewasbuilttobeoperatedaccordingtothesafeopera-
tionpracticesinthis manual.Aswithanytypeof powerequipment,
carelessnessorerroron thepartoftheoperatorcanresultin serious
injury.Thismachineiscapableofamputatingfingers,hands,toes
andfeetandthrowingdebris.Failuretoobservethefollowingsafety
instructionscouldresultin seriousinjuryor death.
Your Responsibility--Restricttheuseofthispowermachineto
personswhoread,understandandfollowthewarningsand instruc-
tionsin thismanualandon themachine.
SAVE THESE INSTRUCTIONS!
GENERAL OPERATION
• Read,understand,andfollowall instructionson themachineand
in themanual(s)beforeattemptingtoassembleandoperate.
Keepthis manualina safeplaceforfutureand regularreference
andfororderingreplacementparts.
• Befamiliarwithall controlsandtheirproperoperation.Knowhow
tostopthemachineanddisengagethemquickly.
• Neverallowchildrenunder14yearsoldtooperatethis machine.
Children14yearsoldandovershouldreadandunderstandthe
operationinstructionsandsafetyrulesinthismanualandshould
betrainedandsupervisedbya parent.
• Neverallowadultstooperatethis machinewithoutproper
instruction.
• Tohelpavoidbladecontactora thrownobjectinjury,keep
bystanders,helpers,childrenandpetsatleast75feetfromthe
machinewhileitisin operation.Stopmachineifanyoneenters
thearea.
• Thoroughlyinspecttheareawheretheequipmentistobe used.
Removeallstones,sticks,wire,bones,toys,andotherforeign
objectswhichcouldbe pickedupandthrownbytheblade(s).
Thrownobjectscancauseseriouspersonalinjury.
• Planyourmowingpatterntoavoiddischargeofmaterialtoward
roads,sidewalks,bystandersandthelike.Also,avoiddischarg-
ingmaterialagainstawallorobstructionwhichmaycause
dischargedmaterialto ricochetbacktowardtheoperator.
• Alwayswearsafetyglassesor safetygogglesduringoperation
andwhileperformingan adjustmentor repairto protectyoureyes.
Thrownobjectswhichricochetcancauseseriousinjurytothe
eyes.
• Wearsturdy,rough-soledworkshoesandclose-fittingslacksand
shirts.Loosefittingclothesandjewelrycanbecaughtin movable
parts.Neveroperatethismachineinbarefeetorsandals.
• Beawareofthemowerandattachmentdischargedirectionand
do notpointitatanyone.Donotoperatethemowerwithoutthe
dischargecoverorentiregrasscatcherin its properplace.
Donotputhandsor feetnearrotatingpartsor underthecutting
deck.Contactwiththeblade(s)canamputatehandsandfeet.
A missingor damageddischargecovercancausebladecontact
or thrownobjectinjuries.
• Stoptheblade(s)whencrossinggraveldrives,walks,or roads
andwhilenotcuttinggrass.
• Watchfortrafficwhenoperatingnearorcrossingroadways.This
machineisnotintendedforuseonanypublicroadway.
• Donotoperatethemachinewhileundertheinfluenceofalcohol
or drugs.
• Mowonlyindaylightorgoodartificiallight.
Nevercarrypassengers.
• Disengageblade(s)beforeshiftingintoreverse.Backup slowly.
Alwayslookdownandbehindbeforeandwhilebackingtoavoida
back-overaccident.
3

• Slowdownbeforeturning.Operatethemachinesmoothly.Avoid
erraticoperationandexcessivespeed.
Disengageblade(s),setparkingbrake,stopengineandwaituntil
theblade(s)cometoa completestopbeforeremovinggrass
catcher,emptyinggrass,uncloggingchute,removinganygrassor
debris,or makinganyadjustments.
Neverleavea runningmachineunattended.Alwaysturnoff
blade(s),setparkingbrake,stopengineandremovekeybefore
dismounting.
Useextracarewhenloadingorunloadingthemachineintoa
trailerortruck.Thismachineshouldnotbedrivenupor down
ramp(s),becausethemachinecouldtipover,causingserious
personalinjury.Themachinemustbe pushedmanuallyon
ramp(s)to loador unloadproperly.
Mufflerandenginebecomehotandcancausea burn.Donot
touch.
Checkoverheadclearancescarefullybeforedrivingunderlow
hangingtreebranches,wires,dooropeningsetc.,wherethe
operatormaybestruckor pulledfromthemachine,whichcould
resultinseriousinjury.
Disengageallattachmentclutchesanddepressthebrakepedal
completelybeforeattemptingtostartengine.
Yourmachineisdesignedto cutnormalresidentialgrassofa
heightnomorethan10".Donotattemptto mowthroughunusually
tall,drygrass(e.g.,pasture)orpilesofdryleaves.Drygrassor
leavesmaycontacttheengineexhaustand/orbuilduponthe
mowerdeckpresentingapotentialfirehazard.
Useonlyaccessoriesandattachmentsapprovedforthis machine
bythemachinemanufacturer.Read,understandandfollowall
instructionsprovidedwiththeapprovedaccessoryor attachment.
Fora list ofapprovedaccessoriesandattachments,call 1-800-
659-5917.
Dataindicatesthatoperators,age60yearsandabove,are
involvedin a largepercentageofridingmower-relatedinjuries.
Theseoperatorsshouldevaluatetheirabilitytooperatetheriding
mowersafelyenoughto protectthemselvesandothersfrom
seriousinjury.
If situationsoccurwhicharenotcoveredinthismanual,usecare
andgoodjudgment.Contact1-800-659-5917forinformationand
assistance.
SLOPE OPERATION
Slopesarea majorfactorrelatedtolossofcontrolandtip-over
accidentswhichcanresultinsevereinjuryordeath.Allslopesrequire
extracaution.Ifyoucannotbackuptheslopeor ifyoufeeluneasyon
it, do notmowit.
Foryoursafety,usetheSlopeGuideincludedaspartofthis manual
to measureslopesbeforeoperatingthis machineona slopedor hilly
area.Iftheslopeisgreaterthan15degreesasshownonthe Slope
Guide,do notoperatethis machineonthatareaor seriousinjurycould
result.
Do:
o
Mowupanddownslopes,notacross.Exerciseextremecaution
whenchangingdirectionon slopes.
• Watchforholes,ruts,bumps,rocks,orotherhiddenobjects.
Uneventerraincouldoverturnthemachine.Tallgrasscanhide
obstacles.
Useslowspeed.Choosea lowenoughspeedsettingsothat
youwillnothavetostopor shiftwhileon theslope.Tiresmay
losetractionon slopeseventhoughthe brakesarefunctioning
properly.Alwayskeepmachinein gearwhengoingdownslopes
totakeadvantageofenginebrakingaction.
• Followthemanufacturer'srecommendationsforwheelweights
or counterweightstoimprovestability.Forrecommendations,call
1-800-659-5917.
• Useextracarewithgrasscatchersor otherattachments.These
canchangethestabilityofthe machine.
Keepallmovementontheslopesslowandgradual.Donotmake
suddenchangesinspeedordirection.Rapidengagementor
brakingcouldcausethefrontofthemachinetolift andrapidlyflip
overbackwardswhichcouldcauseseriousinjury.
• Avoidstartingorstoppingona slope.Iftireslosetraction,disen-
gagetheblade(s)andproceedslowlystraightdowntheslope.
DoNot:
• Donotturnon slopesunlessnecessary;then,turnslowlyand
graduallydownhill,ifpossible.
• Donotmowneardrop-offs,ditchesor embankments.Themower
couldsuddenlyturnoverifa wheelisovertheedgeofa cliff,
ditch,or ifan edgecavesin.
• Donottry tostabilizethemachinebyputtingyourfooton the
ground.
• Donotusea grasscatcheron steepslopes.
• Donotmowon wetgrass.Reducedtractioncouldcausesliding.
• Donotattempttocoastdownhill.Over-speedingmaycausethe
operatortolosecontrolofthemachineresultingin seriousinjury
or death.
• Donottowheavypull behindattachments(e.g.loadeddumpcart,
lawnroller,etc.)on slopesgreaterthan5degrees.Whengoing
downhill,theextraweighttendstopushthetractorandmay
causeyoutoloosecontrol(e.g.tractormayspeedup,brakingand
steeringabilityarereduced,attachmentmayjack-knifeandcause
tractortooverturn).
4

CHILDREN
Tragicaccidentscanoccuriftheoperatorisnotalerttothepresence
ofchildren.Childrenareoftenattractedtothemachineandthemowing
activity.Theydo notunderstandthedangers.Neverassumethat
childrenwillremainwhereyoulastsawthem.
• Keepchildrenoutofthemowingareaand inwatchfulcareofa
responsibleadultotherthantheoperator.
• Bealertandturnmachineoff ifa childentersthearea.
• Beforeandwhilebacking,lookbehindanddownforsmall
children.
Nevercarrychildren,evenwiththeblade(s)shutoff.Theymay
falloffandbe seriouslyinjuredorinterferewithsafemachine
operation.
• Useextremecarewhenapproachingblindcorners,doorways,
shrubs,treesorotherobjectsthatmayblockyourvisionofa child
whomayrunintothe machine.
Toavoidback-overaccidents,alwaysdisengagethecutting
blade(s)beforeshiftingintoReverse.Ifequipped,the"Reverse
CautionMode"(bladesoperatewhilemachineridesinreverse)
shouldnotbe usedwhenchildrenor othersarearound.
Keepchildrenawayfromhotor runningengines.Theycansuffer
burnsfroma hotmuffler.
• Removekeywhenmachineisunattendedtopreventunauthorized
operation.
Neverallowchildrenunder14yearsofagetooperatethis machine.
Children14andovershouldreadandunderstandtheinstructionsand
safeoperationpracticesinthismanualandon themachineandshould
betrainedandsupervisedbyan adult.
TOWING
Towonlywitha machinethathasahitchdesignedfortowing.Do
notattachtowedequipmentexceptatthehitchpoint.
Followthemanufacturersrecommendationforweightlimitsfor
towedequipmentandtowingonslopes.Forrecommendations,
call1-800-659-5917.
Neverallowchildrenor othersinoron towedequipment.
Onslopes,theweightof thetowedequipmentmaycauselossof
tractionandlossofcontrol.
Alwaysuseextracautionwhentowingwitha machinecapableof
makingtightturns(e.g."zero-turn"ride-onmower). Makewide
turnstoavoidjack-knifing.
Travelslowlyandallowextradistancetostop.
Donotcoastdownhill.
SERVICE
SafeHandlingof Gasoline
Toavoidpersonalinjuryorpropertydamageuseextremecarein
handlinggasoline.Gasolineisextremelyflammableandthevaporsare
explosive.Seriouspersonalinjurycanoccurwhengasolineisspilled
on yourselforyourclotheswhichcanignite.Washyourskinand
changeclothesimmediately.
• Useonlyanapprovedgasolinecontainer.
Neverfillcontainersinsidea vehicleoron a truckortrailerbed
witha plasticliner.Alwaysplacecontainerson thegroundaway
fromyourvehiclebeforefilling.
Whenpractical,removegas-poweredequipmentfromthetruck
or trailerandrefueliton theground.Ifthis isnotpossible,then
refuelsuchequipmentona trailerwitha portablecontainer,rather
thanfroma gasolinedispensernozzle.
Keepthenozzleincontactwiththerimofthefueltankor
containeropeningatall timesuntilfuelingiscomplete.Donotuse
a nozzlelock-opendevice.
Extinguishall cigarettes,cigars,pipesandothersourcesof
ignition.
• Neverfuelmachineindoors.
Neverremovegascapor addfuelwhiletheengineishotor run-
ning.Allowengineto coolatleasttwominutesbeforerefueling.
Neveroverfillfueltank.Filltanktono morethan1/2inchbelow
bottomoffillernecktoallowspaceforfuelexpansion.
• Replacegasolinecapandtightensecurely.
• Ifgasolineisspilled,wipeitoff theengineandequipment.Move
machinetoanotherarea.Wait5 minutesbeforestartingthe
engine.
• Toreducefirehazards,keepmachinefreeofgrass,leaves,or
otherdebrisbuild-up.Cleanup oilor fuelspillageandremoveany
fuelsoakeddebris.
• Neverstorethemachineor fuelcontainerinsidewherethereisan
openflame,sparkor pilotlightasona waterheater,spaceheater,
furnace,clothesdryeror othergasappliances.
Allowa machineto coolatleastfiveminutesbeforestoring.

GeneralService
• Neverrunanengineindoorsorinapoorlyventilatedarea.Engine
exhaustcontainscarbonmonoxide,anodorless,anddeadlygas.
• Beforecleaning,repairing,orinspecting,makecertainthe
blade(s)andallmovingpartshavestopped.Disconnectthespark
plugwireandgroundagainsttheenginetopreventunintended
starting.
• Periodicallychecktomakesurethebladescometocomplete
stopwithinapproximately(5)fivesecondsafteroperatingthe
bladedisengagementcontrol.Ifthebladesdonotstopwithinthe
thistimeframe,yourmachineshouldbeservicedprofessionally
byaSearsorotherqualifiedservicedealer.
• Checkbrakeoperationfrequentlyasitissubjectedtowearduring
normaloperation.Adjustandserviceasrequired.
• Checktheblade(s)andenginemountingboltsatfrequent
intervalsforpropertightness.Also,visuallyinspectblade(s)
fordamage(e.g.,excessivewear,bent,cracked).Replacethe
blade(s)withtheoriginalequipmentmanufacturer's(O.E.M.)
blade(s)only,listedinthismanual.Useofpartswhichdonot
meettheoriginalequipmentspecificationsmayleadtoimproper
performanceandcompromisesafety!
• Mowerbladesaresharp.Wrapthebladeorweargloves,anduse
extracautionwhenservicingthem.
• Keepallnuts,bolts,andscrewstighttobesuretheequipmentis
insafeworkingcondition.
• Nevertamperwiththesafetyinterlocksystemor othersafety
devices.Checktheirproperoperationregularly.
• Afterstrikinga foreignobject,stoptheengine,disconnectthe
sparkplugwire(s)andgroundagainsttheengine.Thoroughly
inspectthemachineforanydamage.Repairthedamagebefore
startingandoperating.
• Neverattempttomakeadjustmentsor repairstothemachine
whiletheengineis running.
• Grasscatchercomponentsandthedischargecoverare subject
towearanddamagewhichcouldexposemovingpartsor allow
objectsto bethrown.Forsafetyprotection,frequentlycheck
componentsand replaceimmediatelywithoriginalequipment
manufacturer's(O.E.M.)partsonly,listedinthis manual.Useof
partswhichdo notmeettheoriginalequipmentspecificationsmay
leadtoimproperperformanceandcompromisesafety!
• Donotchangetheenginegovernorsettingsorover-speedthe
engine.Thegovernorcontrolsthemaximumsafeoperatingspeed
oftheengine.
Maintainor replacesafetyandinstructionlabels,asnecessary.
• Observeproperdisposallawsandregulationsforgas,oil,etc.to
protecttheenvironment.
• Accordingtothe ConsumerProductsSafetyCommission(CPSC)
andthe U.S.EnvironmentalProtectionAgency(EPA),this product
hasanAverageUsefulLifeofseven(7)years,or 270hours
ofoperation.AttheendoftheAverageUsefulLife,buyanew
machineor havethemachineinspectedannuallybya Searsor
otherqualifiedservicedealerto ensurethatall mechanicaland
safetysystemsareworkingproperlyandnotwornexcessively.
Failuretodosocanresultinaccidents,injuriesor death.
DO NOT MODIFY ENGINE
Toavoidseriousinjuryor death,do notmodifyengineinanyway.
Tamperingwiththegovernorsettingcanleadtoa runawayengineand
causeittooperateat unsafespeeds.Nevertamperwithfactorysetting
ofenginegovernor.
NOTICE REGARDING EMISSIONS
Engineswhicharecertifiedto complywithCaliforniaandfederal
EPAemissionregulationsforSORE(SmallOffRoadEquipment)are
certifiedtooperateon regularunleadedgasoline,andmayinclude
thefollowingemissioncontrolsystems:EngineModification(EM)and
ThreeWayCatalyst(TWO)if soequipped.
SPARK ARRESTOR
Thismachineisequippedwithan internalcombustionengineand
shouldnotbe usedonor nearanyunimprovedforest-covered,
brushcoveredorgrass-coveredlandunlesstheengine'sexhaust
systemisequippedwitha sparkarrestormeetingapplicablelocalor
statelaws(ifany).
Ifa sparkarrestoris used,itshouldbemaintainedin effectiveworking
orderbytheoperator.IntheStateof Californiatheaboveisrequired
bylaw(Section4442of theCaliforniaPublicResourcesCode).Other
statesmayhavesimilarlaws.Federallawsapplyonfederallands.
A sparkarrestorforthemufflerisavailablethroughyournearestSears
PartsandRepairServiceCenter.
6

SAFETY SYMBOLS
Thispagedepictsanddescribessafetysymbolsthatmayappearonthis product.Read,understand,andfollowallinstructionson themachine
beforeattemptingtoassembleandoperate.
O
A
READ THE OPERATOR'S MANUAL(S)
Read, understand, and follow all instructions in the manual(s) before attempting to assemble and
operate
DANGER-- ROTATING BLADES
Never carry passengers. Never carry children, even with the blades off.
DANGER-- ROTATING BLADES
Always look down and behind before and while backing to avoid a back-over accident.
WARNING-- ROTATING BLADES
Do not put hands or feet near rotating parts or under the cutting deck. Contact with the blade(s)
can amputate hands and feet.
WARNING--THROWN OBJECTS
This machine may pick up and throw and objects which can cause serious personal injury.
WARNING--THROWN OBJECTS
This machine may pick up and throw and objects which can cause serious personal injury.
BYSTANDERS
Keep bystanders, helpers, children and pets at least 75 feet from the machine while it is in
operation.
WARNING-- SLOPE OPERATION
Do not operate this machine on a slope greater than 15 degrees.
WARNING-- HOT SURFACE
Engine parts, especially the muffler, become extremely hot during operation. Allow engine and
muffler to cool before touching.
DANGER- ROTATING BLADES
To reduce the risk of injury, keep hands and feet away. Do not operate unless discharge cover or grass
catcher is in its proper place. If damaged, replace immediately.
7

0o
Sight andhold this
i
levelwith avertical tree...
|
I
|
|
I
|
|
|
or acorner of a building...
15 °
Use this page as a guideto determine slopes where you may not operate safely.
Donotoperateyourlawnmoweron suchslopes.Donotmowon inclineswitha slopeinexcessof 15degrees(a riseofapproximately2-1/2feetevery10feet). A riding
mowercouldoverturnand causeseriousinjury.Operateridingmowersupanddownslopes,neveracrossthefaceofslopes.

ROTATING BLADES CAUSE
SERIOUS INJURY OR DEATH
DONOTMOWWHENCHILDRENOROTHERSARE
AROUND
NEVERCARRYCHILDRENEVENWITHBLADE(S)OFF.
LOOKDOWNANDBEHINDBEFOREANDWHILE
BACKING.
MOWINGINREVERSEISNOTRECOMMENDED.
WARNING
Thissymbol points outimportant safety instructions
which, if notfollowed,could endangerthe personal
safety and/or property of yourselfand others. Readand
follow all instructions inthis manualbeforeattempting
to operatethis machine.Failuretocomply with these
instructions may resultin personalinjury.When yousee
this symbol HEED ITS WARNING!
Your Responsibility
Restrictthe useof this powermachineto persons who
read, understand,and follow thewarnings and instruc-
tions in this manual and on the machine.
9

IMPORTANT:Yourtractorisshippedwithmotoroil in theengine.
However,youMUSTchecktheoil levelbeforeoperating.Refertothe
Service& Maintenancesectionforinstructionson checkingtheoil
level.
Attaching the Battery Cables
CALIFORNIA PROPOSITION 65
Batteryposts,terminals,andrelatedaccessoriescontainleadand
leadcompounds,chemicalsknowntotheStateof Californiato
causecancerandreproductiveharm.Washhandsafterhandling.
Whenattachingbatterycables,alwaysconnectthePOSITIVE(Red)
wiretoits terminalfirst,followedbytheNEGATIVE(Black)wire.
Forshippingreasons,bothbatterycablesonyourequipmentmay
havebeenleftdisconnectedfromtheterminalsatthefactory.To
connectthebatterycables,proceedasfollows:
NOTE:ThepositivebatteryterminalismarkedPos.(+).Thenegative
batteryterminalis markedNeg.(-).
1. Removethe plasticcover,if present,fromthe positivebattery
terminaland attachthe redcableto thepositivebatteryterminal
(+)withtheboltandhexnut.See Figure1.
2. Removethe plasticcover,if present,fromthe negativebattery
terminaland attachtheblackcabletothenegativebattery
terminal(-) withtheboltandhexnut.SeeFigure1.
f
J
Figure1
3. Positionthe redrubberbootoverthepositivebatteryterminalto
helpprotectitfromcorrosion.
NOTE:If thebatteryisputintoserviceafterthedateshownon topof
battery,chargethebatteryas instructedintheService& Maintenance
sectionofthis manualpriortooperatingthetractor.
Shipping Brace Removal
Makesuretheridingmower'sengineisoff,removetheignitionkey,
andset theparkingbrakebeforeremovingtheshippingbrace.Refer
ItotheOperationsectionforinstructionsonhowto settheparking
lbrake.
• Locatetheshippingbrace,ifpresent,andaccompanyingwarning
tagfoundonthe rightsideofthemower,betweenthedischarge
chutedeflectorandthecuttingdeck.SeeFig.2.
//
Figure2
Placethedecklift leverinthehighestcuttingposition.Referto
SettingtheCuttingHeightin theOperationsectionofthismanual.
Whilepushingthedischargechuteddlectortowardsthemachinewith
yourlefthand,removetheshippingbracewithyourrighthandbygrasp-
ingitbetweenyourthumbandindexfingerandrotatingitclockwise.
Theshippingbrace,usedforpackagingpurposesonly,mustbe
removedand discardedbeforeoperatingyourridingmower.
Themowingdeck iscapableofthrowingobjects.Failureto operate
the ridingmowerwithoutthedischargecoverin theproperoperating
Ipositioncouldresultin seriouspersonalinjuryand/orproperty
ldamage.
Attaching The Steering Wheel
Ifthesteeringwheelforyourtractordid notcomeattached,the
hardwareforattachingithasbeenpackedwithinthesteeringwheel,
beneaththesteeringwheelcap.Carefullypryoff thesteeringwheel
capandremovethe hardware.
1. Withthewheelsofthetractorpointingstraightforward,placethe
steeringwheeloverthesteeringshaft.
2. Placethewasher(withthecuppedsidedown)overthesteering
wheeland securewiththehexbolt.SeeFig.3-3.
10

f
\
Figure3
3. Placethe steeringwheelcap overthecenterofthe steering
wheeland pushdownwarduntilit"clicks"intoplace.
Attaching The Seat
If theseatforyourtractorwasnotattachedatthefactory,refertothe
followingsteps.
NOTE: Forshippingreasons,seatsareeitherfastenedtothetractor
seat'spivotbracketwitha plastictie,or mountedbackwardtothepivot
bracket.Ineithercase,freetheseatfromits shippingpositionand
removetheadjustmentknobfromthebottomof seatbeforeproceed-
ingwiththeinstructionsbelow.
1. Positionthe shoulderscrews(foundonthe baseofthe seat)
insidethe slotopeningsintheseatpivotbracket.
Fig.4.
2. Slidetheseat slightlyrearwardin theseatpivot bracket,lining
up thecenterrearslotin thepivotbracketwiththeremaininghole
in theseat'sbase.
Figure4
3. Selectdesiredpositionfor theseat,and securewiththeadjust-
mentknobremovedearlier.
4. Toadjustthepositionof theseat,loosentheadjustmentknob
on thebottomoftheseat.Slidetheseatforwardor backwardas
desired.Retightentheadjustmentknob.
Tire Pressure
X
Maximumtire pressureunderanycircumstancesis30 psi.Equal
tirepressureshouldbe maintainedatall times.Neverexceedthe
_maxmum nfatonpressureshownonthesdewa of thet re.
Therecommendedoperatingtirepressureis:
Approximately10psiforthe reartires
Approximately14psiforthefronttires
IMPORTANT: Refertothetiresidewallforexacttiremanufacturer's
recommendedormaximumpsi.Donotoverinfiate.Uneventirepres-
surecouldcausethecuttingdeckto mowunevenly.
11

B
14
A
C
G
D
F
Figure5
A SpeedControlLever/ ParkingBrakeLever
B Throttle/chokecontrollever
C IgnitionSwitch
D DeckLiftLever
E PTOLever(BladeEngage)
F CupHolder
G ShiftLever
H Clutch-BrakePedal
NOTE: Anyreferencein thismanualtotheRIGHTor LEFTsideofthetractorisobservedfromoperator'sseat
positionfacingforwardtowardsthefrontof tractor.
Meets ANSi Safety Standards
CraftsmanTractorsconformtothesafetystandardoftheAmericanNationalStandardsInstitute(ANSI).
E
J
12

SPEED CONTROL LEVER
Thespeedcontrollever,locatedontheleft sideofthe
tractor'sdashconsole,allowsyouto regulatetheground
speedofthelawntractor.Touse,depresstheclutch-
brakepedalandmovetheleveroutoftheparkingbrake
notchandforwardtoincreasethetractor'sgroundspeed.
Whenadesiredspeedhasbeenreached,releasethe
leverintoanappropriatenotchto maintainthatspeed.
Toslowthetractor'sgroundspeed,depresstheclutch-
brakepedalandmovethespeedcontrolleverrearward
andreleaseit intoa notch.
PARKING BRAKE
Tosettheparkingbrake,fullydepresstheclutch-brake _._J
PARK
pedal.Movethespeedcontrolleverall thewaydownand BRAKE
intotheparkingbrakeposition.Releasetheclutch-brake
pedaltoallowtheparkingbraketo engage.
Toreleasetheparkingbrake,depresstheclutch-brakepedaland
movethespeedcontrolleveroutofthenotchestothedesiredposition.
Releasethespeedcontrolleverandtheclutch-brakepedal.
NOTE:Theparkingbrakemustbe setiftheoperatorleavestheseat
withtheenginerunningor theenginewillautomaticallyshutoff.
THROTTLE/CHOKE CONTROL LEVER
Thethrottle/chokecontrolleverislocatedon therightsideof thetrac-
tor'sdashpanel.This levercontrolsthespeedoftheengineandwhen
pushedall thewayforward,thechokecontrolalso.Whensetin a given
position,thethrottlewillmaintaina uniformenginespeed.
iMPORTANT:Whenoperatingthetractorwiththecuttingdeck
engaged,thethrottle/chokecontrollevermustalwaysbein theFAST
(rabbit)position.
IGNITION SWITCH
Thekeyswitchmoduleisusedto
startand stoptheengine.Insert
keyintothekeyswitchmodule
andturnclockwiseto theSTART
position.Releasethe keyintothe
normalmowingpositiononceen-
ginehasstarted.Theheadlights
willbeactivatedautomatically.
Tostoptheengine,turnthe
ignitionkeycounterclockwiseto
theSTOPposition.
IMPORTANT:Priortooperatingthetractor,refertoboththe"Safety
InterlockSystem"and"StartingTheEngine"laterinthissectionofthis
manualfordetailedinstructionsregardingtheIgnitionSwitchModule.
Neverleavea runningmachineunattended.AlwaysdisengagePTO
(BladeEngageLever),moveshiftleverintoneutralposition,setpark-
ingbrake,stopengineandremovekeyto preventunintendedstarting.
SHIFT LEVER
Theshiftleverislocatedontheleft
sideofthefenderand hasthree
positions,FORWARD,NEUTRAL
and REVERSE.Theclutch-brake
pedalmustbedepressedandthe
tractormustnotbe inmotionwhen
themovingshiftlever.
iMPORTANT:Neverforcethe
shiftlever.Doingsomayresultin
seriousdamagetothetractor's
transmission.
DECK LIFT LEVER
Foundonyourtractor'srightfender,thedeckliftleveris used
tochangetheheightofthecuttingdeck.Touse,movethe
levertotheleft,thenplacein thenotchbestsuitedforyour
application.
PTO (BLADE ENGAGE) LEVER
Foundonthetractor'srightfender,the PTO(bladeengage)
leveris usedtoengagepowertothecuttingdeckorother
(separatelyavailable)attachments.Tooperate,movethe
leverall thewayforward.Movingtheleveralltheway
rearwardintothePTOOFFpositiondisengagespowertothe
cuttingdeck/attachment.
NOTE:ThePTO(bladeengage)levermustbe inthe
disengaged(PTOOFF)positionwhenstartingtheengine.
CUP HOLDER
Thetractor'scupholderis locatedon thefendertotheleft of
theseat.
SEAT ADJUSTMENT KNOB
Theseatadjustmentknobislocatedonthebottomsideoftheseat.
Usethisknobtoadjusttheseatforwardor rearwardtoa comfortable
operatingpositionbylooseningtheknob,positioningtheseattothe
desiredpreference,thenretighteningtheknob.
CLUTCH-BRAKE PEDAL
Theclutch-brakepedalislocatedontheleft sideofthelawntractor,
alongtherunningboard.Depresstheclutch-brakepedalpartway
downwhenslowingthetractorbychangingspeeds(RefertoSpeed
ControlLever).Depressthepedalall thewaydowntoengagethedisc
brakeandbringthetractortoa completestop.
NOTE:Thepedalmustbe depressedtostarttheengine.Referto
SafetyInterlockSwitcheslaterin thissectionof thismanual.
13

Gas and Oil Fill=up
0il
iMPORTANT:Yourtractorisshippedwithmotoroil intheengine.
However,youMUSTchecktheoil levelbeforeoperating.Becareful
notto overfill.
Forinstructionsonhowtochecktheengineoil, referto CheckingThe
EngineOilin theServiceandMaintenancesectionofthis manual.
Alwayschecktheengineoil levelbeforeeachuseas instructedin
theMaintenancesection.Addoilas necessary.Failuretodo somay
resultin seriousdamagetoyourengine.
Gasoline
Thegasolinetankis locatedunderthehood.Donotoverfill.
Useextremecarewhenhandlinggasoline.Gasolineisextremely
flammableandthevaporsareexplosive.Neverfuelmachineindoors
orwhiletheengineishotorrunning.Extinguishcigarettes,cigars,
_ppes,andothersourcesof gnton.
NOTE : Purchasegasolineinsmallquantities.Donotusegasolineleft
overfromthe previousseason,tominimizegumdepositsin thefuel
system.
• Thisengineiscertifiedtooperateon unleadedgasoline.Forbest
results,fillthefueltankwithonlyclean,fresh,unleadedgasoline
witha pumpstickeroctaneratingof87or higher.
• Gasohol(upto 10%ethylalcohol,90%unleadedgasolineby
volume)isanapprovedfuel.Othergasoline/alcoholblends,such
asE85,arenotapproved.
• MethylTertiaryButylEther(MTBE)andunleadedgasolineblends
(uptoa maximumof 15%MTBEbyvolume)are approvedfuels.
Othergasoline/etherblendsare notapproved.
• Fillfueltankoutdoorsorin well-ventilatedarea.
• Donotoverfillfueltank.Filltanktono morethan1/2inchbelow
bottomoffillernecktoallowspaceforfuelexpansion.
• Neverremovegascapor addfuelwhiletheengineishotor run-
ning.Allowenginetocoolatleasttwo minutesbeforerefueling.
• Ifgasolineisspilled,wipeitoff theengineandequipment.Move
machinetoanotherarea.Wait5 minutesbeforestartingthe
engine.
To Add Gasoline
1. Turntheengineoff andletenginecoolatleast2 minutesbefore
removingthefuelcap.Thegasolinetankislocatedunderthe
hood.Removethefuelcapbyturningitcounterclockwise.
2. Fillthefueltankwithgasoline.Useonlyclean,fresh(nomorethan
30daysold),unleadedgasoline.Filltanktonomorethan1/2inch
belowbottomoffillernecktoallowspaceforfuelexpansion.
3. Reinstallthefuelcap.
iMPORTANT: Donotoverfillthetank.Filltanktonomorethan1/2
inchbelowbottomoffillernecktoallowspaceforfuelexpansion.See
Fig.6.
Figure 6
SAFETY INTERLOCK SYSTEM
J
Thesafetyinterlocksystemisdesignedforsafeoperationofthetrac-
tor.If thissystemshouldevermalfunction,donotoperatethetractor,
immediatelycontact1-800-4-MY-HOMEto havethesystemserviced.
• Thesafetyinterlocksystempreventstheenginefromstarting
unlesstheparkingbrakeisengagedandthe PTO(BladeEngage)
leveris inthedisengaged(OFF)position.
• Thesafetyinterlocksystemwillautomaticallyshutofftheengineif
theoperatorleavestheseatbeforeengagingtheparkingbrake.
• Thesafetyinterlocksystemwillautomaticallyshutoff theengineif
theoperatorleavesthetractor'sseatwiththePTO(BladeEngage)
leverengaged,regardlessofwhethertheparkingbrakeisengaged.
• Theenginewillautomaticallyshutoff ifthePTO(BladeEngage)
leveris movedintotheengaged(ON)positionwiththeshiftlever
in Reverse.
Avoid Serious injury or Death
• Goup anddownslopes,notacross.
• Avoidsuddenturns.
• Donotoperatetheunitwhereitcouldsliportip.
• If machinestopsgoinguphill,stopbladesandbackdownhill
slowly.
• Donotmowwhenchildrenor othersarearound.
• Nevercarrychildren,evenwithbladesoff.
• Lookdownandbehindbeforeandwhilebacking.
• Keepsafetydevices(guards,shields,andswitches)in place
andworking.
• Removeobjectsthatcouldbethrownbytheblades.
• Knowlocationandfunctionofall controls.
• Be surebladesandengineare stoppedbeforeplacinghandsor
feetnearblades.
• Beforeleavingoperator'sposition,stoptractor,disengage
blades,engageparkingbrake,shutengineoff,andremovekey.
Read Operator's Manual
14

iGNiTiON SWITCH
Theignitionswitchisactivatedtostarttheengine.Insertkeyintothe
ignitionswitchandturnclockwisetotheSTARTposition.Releasethe
keyintotheONpositiononceenginehasfired.SeeFig.7.
Tostoptheengine,turntheignitionkeycounterclockwisetotheOFF
position.SeeFig.7.
NEVERleavea runningmachineunattended.Alwaysdisengage
PTO,moveshiftleverintoneutralposition,setparkingbrake,stop
engneandremovekeytopreventunntendedstartng.
F
On
Start
off
Figure 7
iMPORTANT: Priortooperatingthetractor,refertobothSafety
InterlockSystemandStartingTheEngineintheOperationsectionof
thismanualforfurtherdetailedinstructions.
ENGAGING THE PARKING BRAKE
To engage the parking brake:
1. Fullydepresstheclutch-brakepedalandholditdownwithyour
foot.
2. Movethespeedcontrolleverallthewaydownandintothe
parkingbrakeposition.
3. Releasethedutch-brakepedaltoallowtheparkingbraketo
engage.
To release the parking brake:
1. Depresstheclutch-brakepedalandmovethespeedcontrollever
outoftheparkingbrakepositionand intoa desiredspeed.
SETTING THE CUTTING HEIGHT
1. Selecttheheightpositionofthecuttingdeckbyplacingthedeck
liftleverinanyofthesixdifferentcuttingheightnotchesonthe
rightsideofthefender.
Keephandsandfeetawayfromthedischargeopeningofthecutting
deck.
STARTING THE ENGINE
Donotoperatethetractoriftheinterlocksystemismalfunctioning.
Thissystemwasdesignedforyoursafetyandprotection.
NOTE:RefertotheGasolineandOilfill-upinstructionsearlierin this
section.
1. Insertthetractorkeyintotheignitionswitch.
2. PlacethePTO(BladeEngage)leverin thedisengaged(OFF)
position.
3. Engagethetractor'sparkingbrake.
4. Activatethechokecontrolbymovingthethrottle/chokeleverall
thewayupintothechokeposition.
5. TurntheignitionkeyclockwisetotheSTARTposition.Afterthe
enginestarts,releasethekey.ItwillreturntotheON(orNormal
Mowing)position.
DO NOTholdthekeyintheSTARTpositionforlongerthanten
secondsata time.Doingsomaycausedamagetoyourengine's
electricstarter.
6. Aftertheenginestarts,deactivatethechokecontrolandplacethe
throttlecontrolin theFASTposition.
NOTE:DoNOTleavethechokecontrolon whileoperatingthetractor.
Doingsowillresultina "rich"fuelmixtureandcausetheenginetorun
poorly.
15

STOPPING THE ENGINE
If youstrikea foreignobject,stoptheengine,disconnectthespark
plugwire(s)andgroundagainsttheengine.Thoroughlyinspectthe
machineforanydamage.Repairthedamagebeforerestartingand
operating
1. Ifthe bladesareengaged,placethePTO(BladeEngage)leverin
thedisengaged(OFF)position.
2. TurntheignitionkeycounterclockwisetotheSTOPposition.
3. Removethe keyfromtheignitionswitchto preventunintended
starting.
DRIVING THE TRACTOR
Avoidsuddenstarts,excessivespeedandsuddenstops.
DonotleavetheseatofthetractorwithoutfirstplacingthePTO
(BladeEngage)leverinthedisengaged(OFF)position,depressing
Ithebrakepedalandengagingtheparkingbrake.Ifleavingthetractor
[unattended,alsoturntheignitionkeyoffand removethekey.
Alwayslookdownandbehindbeforeandwhilebackinguptoavoida
back-overaccident.
1. Depresstheclutch-brakepedaltoreleasetheparkingbrakeand
thenletthepedalup.
2. MovethethrottleleverintotheFAST(rabbit)position.
3. PlacetheshiftleverineithertheFORWARDor REVERSE
position.
IMPORTANT: DoNOTusetheshiftleverto changethedirectionof
travelwhenthetractorisin motion.Alwaysusetheclutch-brakepedal
tobringthetractortoa completestopbeforeshifting.
4. Releasetheparkingbrakebydepressingtheclutch-brakepedal
andpositioningthespeedcontrolleverinthedesiredposition.
IMPORTANT: First-timeoperatorsshouldusespeedpositions1or
2.Becomecompletelyfamiliarwiththetractor'soperationandcontrols
beforeoperatingthetractorinhigherspeedpositions.
5. Releaseclutch-brakepedalslowlytoputunitintomotion.
6. Thelawntractorisbroughttoa stopbydepressingtheclutch-
brakepedal.
NOTE: Whenoperatingtheunitinitially,therewillbe littledifference
betweenthehighesttwospeedsuntilafterthe beltshaveseated
themselvesintothepulleysduringthebreak-inperiod.
WARNING!Beforeleavingtheoperator'spositionforanyreason,
disengagetheblades,placetheshiftleverinneutral,engagethe
parkingbrake,shutengineoff andremovethekey.
1. Placetheshiftleverinneutral,
2. Engagetheparkingbrake,
3. Shutengineoffand removethekey.Doingsowillminimizethe
possibilityofhavingyourlawn"browned"byhotexhaustfrom
yourtractor'srunningengine.
Ifunitstallswithspeedcontrolinhighspeed,orif unitwillnotoperate
withspeedcontrolleverin a lowspeedposition,proceedas follows:
1. PlaceshiftleverinNEUTRAL.
2. Restartengine.
3. Placespeedcontrolleverinhighestspeedposition.
4. Releaseclutch-brakepedalfully.
5. Depressclutch-brakepedal.
6. Placespeedcontrolleverindesiredposition.
7. PlaceshiftleverineitherFORWARDorREVERSE,andfollow
normaloperatingprocedures.
DRIVING ON SLOPES
RefertotheSLOPEGAUGEintheSafetyInstructionssectionofthe
manualto helpdetermineslopeswhereyoumayoperatethistractor
safely.
Donotmowon inclineswitha slopeinexcessof 15degrees(arise
ofapproximately2-1/2feetevery10feet).Thetractorcouldoverturn
andcauseseriousinjury.
• Mowupanddownslopes,NEVERacross.
• Exerciseextremecautionwhenchangingdirectionon slopes.
• Watchforholes,ruts,bumps,rocks,orotherhiddenobjects.
Uneventerraincouldoverturnthemachine.Tallgrasscanhide
obstacles.
• Avoidturnswhendrivingona slope.If a turnmustbe made,turn
downtheslope.Turningupa slopegreatlyincreasesthechance
ofa rollover.
• Avoidstoppingwhendrivingup a slope.If itisnecessarytostop
whiledrivingupa slope,startupsmoothlyandcarefullyto reduce
thepossibilityofflippingthetractoroverbackward.
ENGAGING THE BLADES
Engagingthe PTO(BladeEngage)transferspowertothecuttingdeck
or other(separatelyavailable)attachments.Toengagetheblades,
proceedasfollows:
1. Movethethrottle/chokecontrollevertotheFAST(rabbit)position.
2. GraspthePTO(BladeEngage)leverandpivotitall theway
forwardintotheengaged(ON)position.
3. KeepthethrottleleverintheFAST(rabbit)positionforthemost
efficientuseofthecuttingdeckorother(separatelyavailable)
attachments.
NOTE:Theenginewillautomaticallyshutoff if thePTO(Blade
Engage)leverismovedintotheengaged(ON)positionwiththeshift
leverin Reverse.
IMPORTANT:Whenstoppingthetractorforanyreasonwhileona
grasssurface,always:
16

MULCHING
A mulch kit is available as an attachment. Mulching is a process of
recirculating grass clippings repeatedly beneath the cutting deck.
The ultra-fine clippings are then forced back into the lawn where
they act as a natural fertilizer.
A mulchkit canbe purchased.SeetheReplacementParts& Attach-
mentssectionofthis manualformoreinformation.
USING THE DECK LIFT LEVER
Toraisethecuttingdeck,movethedecklift levertothe left,thenplace
itin thenotchbestsuitedforyourapplication.RefertoSettingThe
CuttingHeightearlierinthis Operationsection.
MOWING
Tohelpavoidbladecontactora thrownobjectinjury,keepbystand-
ers,helpers,childrenandpetsatleast75feetfromthemachine
whileitis inoperation.Stopmachineifanyoneentersthearea.
Thefollowinginformationwillbehelpfulwhenusingthecuttingdeck
withyourtractor:
Planyourmowingpatterntoavoiddischargeof materialstoward
roads,sidewalks,bystandersandthelike.Also,avoiddischarging
materialagainsta wallor obstructionwhichmaycausedischarged
materialto ricochetbacktowardtheoperator.
HEADLIGHTS
• Thelampsare ONwheneverthetractor'sengineis running.
• ThelampsturnOFFwhentheignitionkeyismovedtotheSTOP
position.
• Donotmowathighgroundspeed,especiallyifa mulchkitor
grasscollectorisinstalled.
• Forbestresultsitis recommendedthatthefirsttwolapsbecut
withthedischargethrowntowardsthecenter.Afterthefirsttwo
laps,reversethedirectiontothrowthedischargetotheoutside
forthebalanceofcutting.Thiswillgivea betterappearancetothe
lawn.
• Donotcut thegrasstooshort.Shortgrassinvitesweedgrowth
andyellowsquicklyindryweather.
• Mowingshouldalwaysbedonewiththeengineatfullthrottle.
• Underheavierconditionsitmaybenecessarytogo backoverthe
cutareaa secondtimetogeta cleancut.
• DoNOTattempttomowheavybrushandweedsandextremely
tallgrass.Yourtractorisdesignedto mowlawns,NOTclear
brush.
• Keepthebladessharpandreplacethebladeswhenworn.Refer
toCuttingBladesin theServicesectionofthis manualforproper
bladesharpeninginstructions.
17

MAINTENANCE SCHEDULE
Beforeperforminganytypeofmaintenance/service,disengageall
controlsandstoptheengine.Waituntilallmovingpartshavecometo
acompletestop.Disconnectsparkplugwireandgrounditagainstthe
enginetopreventunintendedstarting.Alwayswearsafetyglassesduring
operationor whileperforminganyadjustmentsor repairs.
Followthemaintenanceschedulegivenbelow.Thischartdescribes
serviceguidelinesonly.UsetheServiceLogcolumntokeeptrack
ofcompletedmaintenancetasks.Tolocate the nearest Parts&
RepairService Centeror to scheduleservice,simplycontact
1-800-4-MY-HOME®.
BeforeEachUse
IntheFirstFiveHours
Every10Hours
Every25 hours
Every50 hours
Annually
BeforeStorage
1. Engineoil level
2. Mufflerareaandcontrols
3. Fingerguard
7. EngineOil
9. Hood/Dashairvents
10. Batteryterminals
11. Deckspindlesand idler
bracket
15. Air filter'sprecleaner*
16. Air filter*
17. Midsteeringarms,pivot
shafts,andaxles
18. Frontwheelbearings
19. Frontdeckwheels
25. Engineoil/Oil filter
26. Muffler
29. Air filter
30. Air filter'spre-cleaner
31. Sparkplug
32. Air coolingsystem*
33. Fuelfilter
34. SteeringGears
35. RearWheels
43. Hood/Dashairvents
44. Batteryterminals
45. Midsteeringarms,pivot
shafts,andaxles
46. Frontwheelbearings
47. Frontdeckwheels
48. Deckspindlesand idler
bracket
49. Pedalpivotpoints
4. Check
5. Clean
6. Clean
8. Change
12. Clean
13. Clean
14. Lubricate
20. Clean
21. Clean
22. Lubricate
23. Lubricate
24. Lubricate
27. Change/Replace
28. Check
36. Replace
37. Replace
38. Replace
39. Clean
40. Replace
41. Clean
42. Removeandgreaseaxles
50. Clean
51. Clean
52. Lubricate
53. Lubricate
54. Lubricate
55. Lubricate
56. Lubricate
*Servicemorefrequentlyunderdustyconditions.
Beforeperforminganymaintenanceor repairs,disengagethePTO
(BladeEngageLever),engagetheparkingbrake,stoptheengine
and removethekeytopreventunintendedstarting.
Iftheenginehasbeenrecentlyrun,theengine,mufflerandsur-
roundingmetalsurfaceswillbehotandcancauseburnsto theskin.
Exercisecautiontoavoidburns.
18

ENGINE MAINTENANCE
Checking the Engine Oil
Onlyusehighqualitydetergentoil ratedwithAPIserviceclassification
SF,SG,SH,or SJ, Selecttheoil'sSAEviscositygradeaccordingto
theexpectedoperatingtemperature.Followthechartbelow.
Althoughmulti-viscosityoils(5W20,10W30,etc.)improvestarting
in coldweather,theywillresultinincreasedoil consumptionwhen
usedabove32°ECheckyourengineoillevelmorefrequentlytoavoid
possibleenginedamagefromrunninglowonoil.
('_older _ 32°F _War me'_r
Oil Viscosity Chart
Tochecktheengineoil,proceedasfollows:
• Ensurethatthetractorisona levelsurface.
• Cleantheoil fillareaofanydebris.
1. Removethedipstickandwipewithacleancloth.
2. Insertandtightendipstick.
3. Removethedipstickandchecktheoil level.It shouldbeatthe Full
markon thedipstick.SeeFigure9.
f
Dipstick-_
OilDrain
Valve
Oil Drain
Sleeve
J
Figure9
Iflow,addoilslowlyintotheengineoilfill.Donotoverfill.Afteradding
oil,waitone minuteandthenrechecktheoil level.
Donotoverfill.Overfillingwithoil maycausetheenginetonotstart,
hardstarting,orenginesmoking.If overtheFULLmarkonthe
dipstick,drainoil toreduceoil leveltoFULLmarkondipstick.
5. Replaceandtightendipstick.
Changing Engine Oil
Theengineoil shouldbechangedinthefirst5 hoursand thenevery
50 hoursoroncea season.Tochangetheengineoil,proceedas
follows:
1. WithengineOFFbutstillwarm,disconnectsparkplugwireand
keepit awayfromsparkplug.
2. Removetheoilfillcap/dipstickfromtheoil filltube.SeeFigure9.
3. Turnthesteeringwheelallthewaytotherightto betterexpose
thedrainplug.
4. Cliptheoildrainsleeve(packedwiththis manual)ontotheoil
drainport. Routetheoppositeendofthesleeveintoanappropri-
ateoilcollectioncontainerwitha capacitygreatenoughtocollect
theusedoil.
5. Removetheoildrainplug,Theoilwillbegintodrainoutofthe
engine.
6. Aftertheoil hasfinisheddraining,replacetheoil drainplugand
tighten.Becarefulnottoovertighten.
7. Removetheoildrainsleeveandstoreforlateruse.
8. Refilltheenginewithnewmotoroil untiltheoil levelonthe
dipstickreadsFULL.Replacetheoil fillcap/dipstick.
Usedoil isa hazardouswasteproduct.Disposeofusedoil properly.
Donotdiscardwithhouseholdwaste.Checkwithyourlocalauthori-
ties oror contact1-800-4-MY-HOMEforalist ofsafedisposal/
recyclingfacilities.
Changing the Oil Filter
1. Draintheoil fromtheengineasdescribedabove.
2. Removetheoilfilteranddisposeofproperly.See Figure10.
19
J
Figure10
3. Beforeyouinstallthenewoilfilter,lightlylubricatetheoilfiltergasket
withfresh,cleanoil.
4. Installtheoil filterbyhanduntilthegasketcontactstheoil filter
adapter,thentightentheoilfilter 1/2to3/4 turns.
5. Addoil asdescribedabove.
6. Startandruntheengine.Astheenginewarrnsup,checkforoilleaks.
7. Stoptheengineandchecktheoillevel.ItshouldbeattheFULLmark
on thedipstick.

Fuel Filter Air Cleaner
Gasolineand itsvaporsareextremelyflammableandexplosive.Fire
orexplosioncancausesevereburnsordeath.
• Keepgasolineawayfromsparks,openflames,pilotlights,heat,
andotherignitionsources.
• Checkfuellines,tank,cap,andfittingsfrequentlyforcracksor
leaks.Replaceif necessary.
• Beforereplacingthefuelfilter,drainthefueltankasperthe
instructionsbelow.
• Donotdrainfuelwhentheengineishot.Allowtheengine
adequatetimetocool. Drainfuelintoan approvedcontainer
outdoors,awayfromopenflame.
• Drainanylargevolumeoffuelfromthetankbydisconnectingthe
fuellinefromthein-linefuelfilterneartheengine.
• RemovethefuellinefromtheIn-lineside(sidetowardsthefuel
tank)of thefuelfilter.
• Replacementpartsmustbethesameand installedin thesame
positionastheoriginalparts.
• Iffuelspills,waituntilitevaporatesbeforestartingengine.
• Beforereplacingthefuelfilter,drainthefueltank.Otherwisefuel
canleakoutandcausea fireor explosion.
ToDrainthe fuel:
1. Locatethefuelfilter,whichisroutedontheleftsideoftheengine
betweenthefueltankandthecarburetor,andmaybeattachedto
theenginewitha tiestrap.Cutthetiestrap,ifpresent,thenpinch
thein-lineclamponthefuelfilterwitha pairofpliers,slidethe
clampupthefuelline.Pullthefuellinefreefromthefilterandplace
theopenendofthelineintoanapprovedcontainertodrainthefuel.
Tochangethe fuel filter:
1. Useplierstosqueezethetabsontheotherclamp(theout-line
sideofthefuelfilter),thenslidetheclampawayfromthefuelfilter.
Twistandpullthefuellineoff ofthefuelfilter.SeeFigure11.
2. Checkthefuellinesforcracksor leaks.Replaceifnecessary.
3. Replacethefuelfilterwithanoriginalequipmentreplacementfilter.
Call1-800-4-MY-HOME®topurchasetheoriginalequipment
replacementfilter.
4. Securethefuellineswiththeclamps.
f
Clamp
Fuel
Line
Tab
Iffilters,or coversare notinstalledcorrectlyseriousinjuryordeath
couldresultfrombackfire.Donotattemptto starttheenginewith
themremoved.
Donotusepressurizedair or solventstocleantheaircleaner
cartridge.
Theairfiltersystemusesa cylindricalcartridge.Thismodelalso
includesa pre-cleanerthatcanbewashedand reused.
1. Removethefasteners(A)andtheairfiltercover(B).SeeFigure12.
2. Toremovethefilter(C),lifttheendofthefilterandthenpullthefilter
off theintake(D).
3. Removethepre-cleaner(E),if equipped,fromthefilter.
4. Toloosendebris,gentlytapthefilteronahardsurface,ifthefilteris
excessivelydirty,replacewitha newfilter.
f --,,,
Figure12
5. Washthepre-cleanerinliquiddetergentandwater.Thenallowitto
thoroughlyair dry.Donotoil thepre-cleaner.
6. Assemblethedrypre-cleanertothefilter.
7. Installthefilterontheintake.Pushtheendofthefilterintothebaseas
shown.Makesurefilterfitssecurelyinthebase.
8. Installairfiltercoverandsecurewithfasteners.
... J
Figure11
2O

Spark Plug
1. Cleanareaaroundthesparkplugbase.Donotsandblastspark
plug,Sparkplugshouldbecleanedbyscrapingorwirebrushing
andwashingwitha commercialsolvent
Removeandinspectthesparkplug.Checkgap tomakesureitis
setat.030".SeeFigure13.
Electrode Porcelain
_.030 (.76 mm) gap
\
Figure13
3. Replacethesparkplug(Champion®RC12YC)oncea season.
Muffler
Temperatureof mufflerandnearbyengineareasmayexceed150°F
(65°0).Avoidcontactwiththeseareas.
• inspectmufflerperiodically,and replaceifnecessary.Replace-
mentpartsforthemufflermustbethesameand installedin the
samepositionastheoriginalparts.
Clean Engine
• Dailyor beforeeveryuse,cleangrass,chafforaccumulated
debrisfromengine.Keeplinkage,spring,andcontrolsclean.
Keepareaaroundandbehindmufflerfreeofanycombustible
debris.
Keepingenginecleanallowsair movementaroundengine.
• Enginepartsshouldbe keptcleanto reducetheriskofoverheat-
ingandignitionofaccumulateddebris.
Donotusewatertocleanengineparts.Watercouldcontaminatefuel
system.Usea brushordrycloth.
Carburetor Adjustment
• Thecarburetoron thisengineisnotadjustable.
LUBRICATION
Beforelubricating,repairing,or inspecting,alwaysdisengagePTO
(BladeEngageLever),moveshiftleverintoneutralposition,set
parkingbrake,stopengineandremovekeytopreventunintended
starting.
Pivot Points & Linkage
Lubricateallthepivotpointsonthedrivesystem,parkingbrakeandlift
linkageatleastoncea seasonwithlightoil.
Rear Wheels
Therearwheelsshouldberemovedfromtheaxlesoncea season.
Lubricatetheaxlesandtherimswellwithan all-purposegreasebefore
re-installingthem.
Front Axles
Eachend ofthetractor'sfrontpivotbar maybeequippedwitha grease
fitting.Lubricatewitha greasegunafterevery25hoursoftractor
operation.
Battery
Thebatteryissealedandismaintenance-free.Acidlevelscannotbe
checked.
Alwayskeepthebatterycablesandterminalscleanandfreeof
corrosivebuild-up.
Aftercleaningthebatteryandterminals,applya lightcoatof
petroleumjellyorgreasetobothterminals.
Alwayskeepthe rubberbootpositionedoverthepositiveterminal
to preventshorting.
iMPORTANT:if removingthebatteryforanyreason,disconnectthe
NEGATIVE(Black)wirefromitsterminalfirst,followedbythePOSI-
TIVE(Red)wire.Whenre-installingthebattery,alwaysconnectthe
POSITIVE(Red)wiretoits terminalfirst,followedbythe NEGATIVE
(Black)wire.Becertainthatthewiresareconnectedtothecorrect
terminals;reversingthemcouldchangethepolarityandresultin
damageto yourengine'salternatingsystem.
Cleaning Battery
Cleanthebatterybyremovingitfromthetractorandwashingwith
a bakingsodaandwatersolution.Ifnecessary,scrapethe battery
terminalswitha wirebrushto removedeposits.Coatterminalsand
exposedwiringwithgreaseor petroleumjellytopreventcorrosion.
Battery Failures
Somecommoncausesfor batteryfailureare:
incorrectinitialactivation
Overcharging
Freezing
Undercharging
Corrodedconnections
Thesefailuresare NOTcoveredbyyourtractor'swarranty.
21

CLEANING THE ENGINE AND DECK
Anyfueloroil spilledonthemachineshouldbewipedoff promptly.Do
NOTallowdebristoaccumulatearoundthecoolingfinsoftheengine
oron anyotherpartofthemachine.
IMPORTANT: Theuseof apressurewasherto cleanyourtractoris
NOTrecommended.It maycausedamagetoelectricalcomponents,
spindles,pulleys,bearingsortheengine.
A screwplugcanbefoundonyourtractor'sdecksurfaceasseenin
Fig. 14.Thisplugcanbe replacedwitha waterporttobeusedaspart
ofa separately-availabledeckwashsystem.
TheDeckWashSystemTM is usedto rinsegrassclippingsfromthe
deck'sundersideandpreventthebuildupofcorrosivechemicals.
NOTE: Adeckwashsystemcanbepurchasedthroughtheretail
locationinwhichyoupurchasedthistractor.Formoreinformation,
simplycall 1-800-4-MY-HOME®.
/
/
Figure14
ADJUSTMENTS
Neverattempttomakeanyadjustmentswhiletheengineis running,
exceptwherespecifiedin theoperator'smanual.
Leveling the Deck
NOTE: Checkthetractor'stirepressurebeforeperforminganydeck
levelingadjustments.RefertoTiresinthe Servicesectionofthis
manualformoreinformationregardingtirepressure.
Front To Rear
2. Measurethedistancefromthefrontofthebladetiptotheground
andthe rearofthebladetipto theground.Thefirstmeasure-
menttakenshouldbe between1A"and3A"lessthanthesecond
measurement.Determinetheapproximatedistancenecessaryfor
properadjustmentandproceed,ifnecessary,tothenextstep.
3. Locatetheflangelocknutonthefrontsideofthestabilizer
bracket.SeeFig.15.
Tightentheflangelocknuttoraisethefrontofthedeck;
Loosentheflangelocknuttolowerthefrontof thedeck.
Thefrontofthecuttingdeckissupportedbya stabilizerbarthatcan
beadjustedtolevelthedeckfromfronttorear.Thefrontofthedeck
shouldbebetween1A-inchand3A-inchlowerthantherearofthedeck.
Adjustif necessaryasfollows:
1. Withthetractorparkedon a firm,levelsurface,placetheleverfor
liftingtheplatformon thesecondtothetopnotch(secondhighest
position)androtatethebladeasclosetothedischargechannel
thatisparalleltothetractor.
22
f
/
Figure15
Side to Side
Ifthecuttingdeckappearstobe mowingunevenly,a sideto side
adjustmentcanbeperformed.Adjustifnecessaryasfollows:
1. Withthetractorparkedonafirm,levelsurface,placethedeckliftlever
in thesecondfromthetopnotch(secondhighestposition)and
rotatebothbladessothattheyare perpendicularwiththetractor.
2. Measurethedistancefromtheoutsideoftheleft bladetiptothe
groundandthedistancefromtheoutsideoftherightbladetipto
theground.Bothmeasurementstakenshouldbeequal.Ifthey're
not, proceedto thenextstep.
3. Loosen,butdo NOTremove,thehexcap screwonthe leftdeck
hangerbracket.SeeFig. 16.
4. Balancethedeckbyusinga wrenchtoturntheadjustmentgear
(foundimmediatelybehindthehexcapscrewjust loosened)
clockwise/uporcounterclockwise/down.Thedeckis properly
balancedwhenbothbladetipmeasurementstakenearlierare
equal.
5. Retightenthehexcapscrewon theleftdeckhangerbracketwhen
properadjustmentisachieved.

He× Cap Screw
'_. ._
Figure16
Seat Adjustment
RefertotheAssemblysectionofthismanualforseatadjustment
instructions.
Parking Brake Adjustment
Neverattempttoadjustthebrakeswhiletheengineisrunning.
AlwaysdisengagePTO,moveshiftleverintoneutralposition,stop
engineandremovekeytopreventunintendedstarting.
If thetractordoesnotcometoacompletestopwhenthebrakepedal
iscompletelydepressed,or ifthetractor'srearwheelscanrollwiththe
parkingbrakeapplied,thebrakeisin needofadjustment.Contactthe
nearest SearsService Centerto haveyourbrakesproperlyadjusted.
Tolocatethenearest Parts& RepairServiceCenteror toschedule
service,contact 1-800-4-MY-HOME®.
CUTTING DECK REMOVAL
To remove the cutting deck, proceed as follows:
1. Placethe PTO(BladeEngage)leverin thedisengaged(OFF)
positionandengagethe parkingbrake.
2. Lowerthedeck bymovingthedeck lift leverintothe bottom
notchon therightfender.
3. Removetheself-tappingscrew(A) thatsecuresthebelt-keeper
rodfromaroundthetractor'sPTOpulley,thenremovethe belt
keeperrod(B). SeeFig. 17.
NOTE: Makea mentalnotewhatholetheotherendofthebelt-keeper
rodisinsertedinforreinstallationpurposes.
4. Removethebelt(C)fromaroundthetractor'sPTOpulley.See
Fig.17.
Figure17
5. Lookingatthecuttingdeckfromtheleftsideofthetractor,locatethe
bow-tiepin thatsecuresthedecksupportrodonthe rearleft side
ofthedeck.SeeFig.18.Removethebow-tiepinthat securesthe
decksupportrod,andcarefullyremovethedecksupportfromthe
decklift arm.
/
/
Bow-TieClip jj
/ /
/ /
/
/
i /
J
Figure18
6. Repeattheabovestepson thetractor'srightside.
NOTE:Thebow-tieclipsshouldbe re-installedfromthetopdown.
7. Movethedeckliftleverintothetopnotchontherightfendertoraise
thedecklift armsupandoutoftheway.
Avoidpinchinginjuries.Neverplaceyourfingersontheidlerspringor
betweenthebeltanda pulleywhileremovingthebelt.
23

8, Removethebow-tiecotterpinsecuringthedeckstabilizerrodtothe
deck.Slidethedecklift rodfromthemountingbracketon the
deckasseenin Fig.19.
............./1;_,_......................... / ..............................
_... j2
Figure19
.
f
CarefullyremovethePTOcablefromtherearofthecuttingdeckby
removingthebow-tiecotterpinwhichsecuresit. Removethe
springfromthedeckidlerbracket.SeeFig.20.
PTOCable
Figure20
10. Gentlyslidethecuttingdeck(fromtheleftside)outfromunderneath
thetractor.
TIRES
Neverexceedthe maximuminflationpressureshownonthesidewall
oftire.
The recommended operating tire pressure is:
• Approximately10psiforthereartires
• Approximately14psiforthefronttires
IMPORTANT: RefertothetiresidewaNforexacttiremanufacturer's
recommendedormaximumpsi.Donotoverinflate.Uneventire pres-
surecouldcausethecuttingdeckto mowunevenly.
BATTERY
CaliforniaProposition65 WARNING!Batteryposts,terminals,and
relatedaccessoriescontainleadandleadcompounds,chemicals
knowntotheStateofCaliforniatocausecancerandreproductive
harm.Washhandsafter handling.
If removingthebattery,disconnecttheNEGATIVE(Black)wire
fromits terminalfirst,followedbythe POSITIVE(Red)wire.When
relinstallingthebattery,alwaysconnectthePOSITIVE(Red)wireto
Its termna frst,fo owedbytheNEGATVE(Back) wre.
JUMP STARTING
Neverjumpstarta damagedorfrozenbattery.Becertainthevehicles
do nottouch,and ignitionsareoff.Donotallowcableclampsto
touch.
1. Connectpositive(+)cableto positivepost(+)ofyourtractor's
dischargedbattery.
2. Connecttheotherendof thecabletothe (positive+) postofthe
jumperbattery.
3. Connectthesecondcable(negative-) totheotherpostofthe
jumperbattery.
4. Connecttheotherendof thenegativecabletotheengineblockof
thetractor,awayfromthebattery.Attachtoanunpaintedpartto
assurea goodconnection.
Ifthejumperbatteryis installedona vehicle(i.e.car,truck),do NOT
startthevehicle'senginewhenjumpstartingyourtractor.
5. Startthetractor(asinstructedearlierinthissectionofthismanual).
6. Setthetractor'sparkingbrakebeforeremovingthejumpercables,
in reverseorderofconnection.
CHARGING
giveoffan explosivegaswhilecharging.ChargethebatteryI
Batteries
ina wellventilatedareaandkeepawayfroman openflameor pilot
ghtasona waterheater,spaceheater,furnace,cothesdryeror |
othergasappliances.
J
Whenchargingyourtractor'sbattery,useonlya chargerdesignedfor I
12Vlead-acidbatteries.ReadyourbatterychargersOwners Manual
priortochargingyourtractorsbattery.Alwaysfollowits instructions I
land heed ts warnngs. j
24

If yourtractorhasnotbeenputintouseforanextendedperiodoftime,
chargethebatteryasfollows:
1. Setyourbatterychargertodelivera maxof 10amperes.
If yourbatterychargerisautomatic,chargethebatteryuntilthe
chargerindicatesthatchargingiscomplete.Ifthechargerisnot
automatic,chargefornofewerthaneighthours.
FUSE
One20AMPfuseisinstalledin yourtractor'swiringharnesstoprotect
thetractor'selectricalsystemfromdamagecausedbyexcessive
amperage.
If theelectricalsystemdoesnotfunction,or yourtractor'senginewill
notcrank,firstchecktobe certainthatthefusehasnotblown.It can
befoundattherearoftheunit,underneaththefenderlocatedbythe
battery.
Alwaysusea fusewiththesameamperagecapacityforreplacement.
CUTTING BLADES
Shuttheengineoff andremoveignitionkeybeforeremovingthe
cuttingblade(s)forsharpeningor replacement.Protectyourhands
byusingheavygloveswhengraspingtheblade.
Periodicallyinspectthebladeand/orspindleforcracksordamage,
especiallyafter you'vestrucka foreignobject.Donotoperatethe
machineuntil damagedcomponentsare replaced.
Toremovetheblades,proceedasfollows.
1. Removethedeckfrombeneaththetractor,(refertoCuttingDeck
Removalearlierinthis section)thengentlyflipthedeckoverto
exposeitsunderside.
2. Placea blockofwoodbetweenthecenterdeckhousingbaffle
andthecuttingbladetoactasa stabilizer.
SeeFig.21.
f
©
Figure21
25
.
4.
Removethehexflangenutthatsecuresthebladetothespindle
assembly.SeeFig.21.
Toproperlysharpenthecuttingblades,removeequalamountsof
metalfrombothendsofthebladesalongthecuttingedges,
paralleltothetrailingedge,ata250.to 300angle.Alwaysgrind
eachcuttingbladeedgeequallytomaintainproperbladebalance.
SeeFig.22.
Figure 22
Ifthecuttingedgeofthebladehaspreviouslybeensharpened,or if
anymetalseparationis present,replacethebladeswith newones.
A poorlybalancedbladewillcauseexcessivevibration,maycause
damagetothetractorand/orresultin personalinjury.
5. Testtheblade'sbalanceusingabladebalancer.Grindmetalfromthe
heavysideuntilitbalancesevenly.
NOTE"Whenreplacingtheblade,be suretoinstallthebladewiththe
sideoftheblademarked"Bottom"(orwitha partnumberstampedin
it)facingthegroundwhenthemowerisintheoperatingposition.
Usea torquewrenchtotightenthebladespindlehexflangenutto
between70Ibs-ftand 90Ibs-ft.
CHANGING THE DECK BELT
Besuretoshuttheengineoff,removeignitionkey,disconnectthe
Isparkplugwire(s)andgroundagainsttheenginetopreventunin-
pnded startingbeforeremovingthebelt.
All beltsonyourtractoraresubjecttowearandshouldbereplacedif
anysignsof wearare present.

iMPORTANT:TheV-beltfoundon yourtractorisspeciallydesigned
toengageanddisengagesafely.A substitute(non-OEM)V-beltcan
bedangerousbynotdisengagingcompletely.Fora properworking
machine,useidenticalequipmentbeltsas listedinthepartspagesof
thisOperator'sManual.
Tochangeor replacethedeckbeltonyourtractor,proceedasfollows:
1. Removethedeckasinstructedearlierinthis section.
2. Removethe beltcoversfromthespindlepulleysbyremovingthe
hexscrewsthatfastenthecoverstothedeck.SeeFig.23,
3. itmayalsobenecessaryto loosenthehexnutontheleftidler
pulleytogetthebeltoffthepulleyandaroundthebeltguard.
4. Carefullyremovethedeckbeltfromaroundthetwospindle
pulleysandthetwo deckidlerpulleys,SeeFig,23,
5. Toplacethenewbelt,beginbyroutingthebeltaroundthetwo
outerspindlepulleysasshownin Fig.23,
6. ThenroutethebeltaroundthetwodeckidlerpulleysasshowninFig.
23.
7. Retightenthebeltkeeperrodloosenedearlier.
8. Remountthebeltguardsremovedearlier,
9. Re-installthedeck,makingsurethebeltremainsroutedaround
thepulleysas instructed.Thecompletebeltroutingisshownin
Fig,23.
10. Pulltherightsideofthe belt,and placethenarrowVsideofthe
beltintothePTOpulley.
11. Whileholdingthebeltandpulleytogether,rotatethepulleytotheleft.
Continueholdingandrotatingthepulleyandbeltuntilthebeltis
fully rolledintothe PTOpulley.
PARKING BRAKE ADJUSTMENT
Neverattempttoadjustthebrakeswhiletheengineis running.Always
disengagePTO(BladeEngageLever),moveshiftleverintoneutral
position,stopengineandremovekeytopreventunintendedstarting.
Ifthetractordoesnotcometoa completestopwhentheclutch-brake
pedaliscompletelydepressed,or ifthetractor'srearwheelscan roll
withtheparkingbrakeapplied,thebrakeis inneedofadjustment.
Contactthe nearest Parts& RepairService Centertohaveyour
brakesserviced.
Tolocatethe nearestParts& RepairServiceCenteror to schedule
service,contact1-800-4-MY-HOME®.
CHANGING THE TRANSMiSSiON DRIVE
BELT
NOTE:Severalcomponentsmustberemovedandspecialtools(i.e.
air/impactwrench)inordertochangethetractor'sdrivebelt.Contact
the nearest Parts& RepairService Centerto haveyourtransmis-
siondrivebeltserviced.
Tolocatethe nearestParts& RepairServiceCenteror to schedule
service, contact 1-800-4-MY-HOME®.
Figure 23
26

Neverstorelawntractorwithfuelintankindoorsorin poorly
ventilatedareaswherefuelfumesmayreachan openflame,spark,
orpilotlightasona furnace,waterheater,clothesdryer,or gas
appliance.
PREPARING THE ENGINE
IMPORTANT:Fuelleftin thefueltankduringwarmweatherdeterio-
ratesandwillcauseseriousstartingproblems.
Topreventgumdepositsfromforminginsidetheengine'scarburetor
andcausingpossiblemalfunctionof theengine,thefuelsystemmust
be eithercompletelyemptied,orthegasolinemustbe treatedwitha
stabilizertopreventdeterioration.
1. Ifusingafuel stabilizer:
a. Readtheproductmanufacturer'sinstructionsandrecom-
mendations.
b. Addtoclean,freshgasolinethecorrectamountofstabilizer
forthecapacityofthefuelsystem.
c. Fillthefueltankwithtreatedfuelandruntheenginefor2-3
minutestogetstabilizedfuelintothecarburetor.
2. Ifemptyingthefuelsystem:
a. Donotdrainfuelwhentheengineishot.Allowtheengine
adequatetimetocool.Drainfuelintoanapprovedcontainer
outdoors,awayfromopenflame.
b. Drainanylargevolumeoffuelfromthetank bydisconnect-
ing thefuellinefromthein-linefuelfilterneartheengine.
SeethecompleteinstructionsforDrainingTheFuellaterin
this section.
Gasolineisextremelyflammableandcanbeexplosiveundercertain
conditions.Draingasolinebeforestoringtheequipmentforextended
periods.Drainfuelonlyintoanapprovedcontaineroutdoors,away
froman openflame.Allowenginetocool.Extinguishcigarettes,
cigars,pipes,andothersourcesofignitionpriortodrainingfuel.
Storegasolineinan approvedcontainerinsafelocation.
c. Reconnectthefuellineandruntheengineuntilitstartsto
falter,thenusethechoketo keeptheenginerunninguntilall
fuelin thecarburetorhasbeenexhausted.
d. Disconnectthefuellineanddrainanyremaininggasoline
fromthesystem.
DRAiNiNG THE FUEL
1. Locatethefuelfilter,whichislocatedonthe leftsideofthe
engine,andmaybe attachedtotheenginewitha tiestrap.
2. Cutthetiestrap,ifpresent,thenpinchthein-lineclamponthe
fuelfilterwitha pairofpliers,slidetheclampupthefuelline.
3. Pullthefuellinefreefromthefilterandplacetheopenendofthe
lineintoanapprovedcontainertodrainthefuel.
PREPARING THE LAWN TRACTOR
1. Cleanandlubricatetractorthoroughlyasdescribedinthelubrica-
tioninstructions.
2. Donotusea pressurewasheror gardenhosetocleanyourunit.
3. Storemowerin a dry,cleanarea.Donotstorenextto corrosive
materials,suchasfertilizer.
Gasolineisa toxicsubstance.Disposeofgasolineproperly.Contact
yourlocalauthoritiesforapproveddisposalmethods.
3. Removethesparkplugandpourone(1)ounceofengineoil
throughthesparkplugholeintothecylinder.Cranktheengine
severaltimestodistributetheoil.Replacethesparkplug.
27

Enginefailstostart
Enginerunserratically
1. PTO/BladeEngageleverengaged.
2. Parkingbrakenotengaged.
3. Sparkplugwire(s)disconnected.
4. Throttlecontrollevernotin correctstarting
position.
5. Chokenotactivated
6. Fueltankempty,or stalefuel.
7. Blockedfuelline.
8. Faultysparkplug(s).
9. Engineflooded.
10. BlownFuse(s)
1. UnitrunningwithCHOKEactivated.
2. Sparkplugwire(s)loose.
3. Blockedfuellineor stalefuel.
4. Ventingascapplugged.
5. Waterordirtinfuel system.
6. Dirtyair cleaner.
Engineoverheats 1. Engineoillevellow. 1.
2. Air flowrestricted. 2.
Enginehesitatesat highRPM 1. Sparkpluggaptoo close. 1.
Engineidlesrough 1. Sparkplugfouled,faultyor gaptoowide. 1.
2. Dirtyair cleaner. 2.
Excessivevibration
Mowerwillnotmulchgrass
Unevencut
1. Cuttingbladelooseor unbalanced.
2. Damagedor bentcuttingblade.
1. Enginespeedtoolow.
2. Wetgrass.
3. Excessivelyhighgrass.
4. Dullblade.
1. Decknotleveledproperly.
2. Dullblade.
3. Uneventirepressure.
1. Placeleverindisengaged(OFF)position.
2. Engageparkingbrake.
3. Connectwire(s)to sparkplug(s).
4. Placethrottleleverto FASTposition.
5. PulltheCHOKEcontroloutward.
6. Filltankwithclean,fresh(lessthan30daysold) gas.
7. Replacethefuellineandreplacefuelfilter.
8. Clean,adjustgapor replaceplug(s).
9. CrankenginewiththrottleinFASTposition.
10. ReplaceFuse(s)
1. PushCHOKEcontrolin.
2. Connectsparkplugwire(s).
3. Replacethefuelline;filltankwithclean,fresh
gasolineandreplacefuelfilter.
4. Clearventorreplacecapifdamaged.
5. Drainfueltank.Refillwithclean,freshgasoline.
6. Replaceair cleanerpaperelementor cleanfoam
pre-cleaner,ifequipped.
Fillcrankcasewith properamountandweightof oil.
Cleangrassclippingsanddebrisfromaroundthe
engine'scoolingfinsandhousing.
Removesparkplugandresetthegap.
Replacesparkplug.Setpluggap.
Replaceair cleanerelementand/orcleanpre-
cleaner.
1. Tightenbladeandspindle.
2. Replaceblade.
1. Placethrottlein FAST(rabbit)position.
2. Donotmulchwhengrassiswet.
3. Mowonceata highcuttingheight,thenmowagain
atdesiredheightormakea narrowercuttingswath.
4. Sharpenor replaceblade.
1. Performside-to-sidedeckadjustment.
2. Sharpenor replaceblade.
3. Checktirepressureinallfourtires.
NEED MORE HELP?
Find this and aLLyour other product manuals online,
Get answers from our team of home experts.
Get a personalized maintenance plan for your home,
Find information and tools to help with home projects.
_o #At 1oye b:_ Sea_s
28

777D15592
777D15595 777122773
777S33583
STEERINGWHEEL
MOUHTIN6HARDWARE
UHDER CAR BEFORE
OPERATIOHSECURE
STEERIHGWHEELTO
SHAFT ACCORDING
TOMAHUAL
777X43688
DONOT
USE E85 ORFUEL
CONTAININGMORE
THAN 10% E]}IAHAL
777X44366 777X44365
LEFT RIGHT
777J23366
777122479
777123364
(QTY 2) 777D15624
777D15622
777D15625
777D15626
777D15623
777S30018
777S30503
777X44382
i
29

Craftsman IViodel 247.28881
/22 21
19
12
17
_f 39
1.38
3O

Craftsman IViodel 247.28881
Ref. I
No,
1 925-1649
2 683-04619-4043
3 710-04484
4 710-0599
5 712-0292
6 710-0751
7 710-05108
8 712-04064
9 931-07668
10 731-07458
11 731-07459
12 731-07460
13 731-07711
14 731-07712
15 735-0271A
16 738-04091A
17 783-05327B-0637
18 783-05328A-0637
19 783-06598-4043
20 783-06610-0637
21 983-04503
22 710-05280
23 710-3144
24 711-0736
Part No. Description
BulbSocket
HoodAssembly
Screw,5/16-18x .750
HexWasherScrew,1/4-20x .500
Tin ClipNut,1/4-20
HexScrew,1/4-20x .620
Screw,1/4x .750
Nut,HexFlangeInsertLock,1/4-20
Grill
HeadlightLens,RH
HeadlightLens,LH
DashCollar
HoodScoop,LH
HoodScoop,RH
Bumper
ShoulderScrew,5/16-18
LeftSupportPivotBracket
RightSupportPivotBracket
LowerGrill
LowerGrillBracket
SpeedSelector,7-Speed
Self-TapScrew,1/4-20
HexHeadScrew,3/8-16
Ferrule,1/4-20x 1.00
Ref. I
No,
25 712-04065
26 714-04040
27 783-06823
28 750-04465B
29 783-04903A
30 710-0604A
31 710-05108
32 712-04063
33 731-04945
34 783-04873B-0637
35 747-05371
36 747-05326
37 747-04430
38 751-0555B
39 751-0603A
40 783-04584B-0637
41 731-05265
42 746-04364
43 925-04659
44 625-04124
45 725-0157
46 925-0963
47 726-04072A
48 936-0463
Part No. Description
Nut,HexFlangeInsertLock,3/8-16
CotterPin
SpeedLatchSupportTab
FlangeSpacer
Speedlatch
Self-TapScrew,5/16-18
HexScrew,1/4x .750
Nut,HexFlangeLock,5/16-18
SteeringSupport
Dash
FuelTankSupportRod
DashsupportRod
SpeedSelectorControlRod
1.5GallonFuelTank
FuelCap
GasTankSupportBracket
ChokePlug
Throttle/ChokeAssembly
KeySwitchModule
Key(2 pack)
CableTie
HeadlightBulb
RatchetClip:.250x .500
FlatWasher,.25x .630x .0515
31

Craftsman IViodel 247.28881
22
14
12
39
11
2
32

Craftsman IViodel 247.28881
Ref. I
No.
1 683-04155A-0637
2 712-04065
3 714-04040
4 716-0106A
5 720-0311
6 732-04225
7 738-04130
8 941-0225
9 747-05296
10 747-04393
11 783-04494C-0637
783-04711C-0637
12 647-04096-0637
13 710-04608
14 710-0599
15 714-04040
16 720-04049A
17 732-04276A
18 936-0171
19 736-0322
20 738-04237A
21 741-04119A
22 946-04173C
PartNo. Description
Shaft,Lift
Nut,HexFlangeInsertLock,3/8-16
Bow-TiePin,91, RH
E-ring,.625Shaft
Grip,Handle
Spring,Lift HandleTorsion
Bolt,Shoulder,.625x .175:3/8-16
Bearing,HexFlange,
Handle,Lift
Lift Rod,13.68
Arm,DeckLiftRH
Arm,DeckLiftLH
PTOHandleAssembly
Screw,Hx.Hd.,7/16-20x 3.25
Screw,Hd.Tapp,1/4-20x .5
ClickPin
HandleGrip
PTOSpring,Extension
Washer,Flat,7/16
Washer,Fiat,.450x .250x .164
ShoulderScrew,#10-32x .500
PTOBearing
DeckEngagementCable
Ref. I
No.
23 725-04439
24 756-04196A
25 747-04857
26 710-04484
27 683-04195-0637
28 683-04649
29 710-0134
30 710-3008
31 712-04063
32 712-04064
33 912-0429
34 732-04035
35 736-0173
36 783-04548D-0637
37 783-04637-0637
38 783-04753-0637
39 783-04869A-0637
40 783-05389A-0637
41 725-05090
42 738-1132
43 712-0271
44 683-04448-0637
45 725-04363
PartNo. Description
12v.Solenoid
EngagementPulley
BeltKeeperRodAssembly
Screw,Hd.Tapp,5/16-18x .75
SupportBracketAssembly
RiderFrameAssembly
CarriageScrew,1/4-20x .62
Screw,Hx.Hd.,5/16-18x .75
Nut,HexFlangeInsertLock,5/16-18
Nut,HexFlangeInsertLock,1/4-20
HexlockNut,5/16-18
Spring,Compress.,1.28x 3.125
FlatWasher,.28x .74x .063
SeatBracketFrame
RunningBoardBracket
FrameSupportBracket
BatteryBracket
FrameBraceBracket
DieHardBattery
Screw,Shoulder,.250x .150
Nut,Sems,1/4-20
BatteryRod
InterlockSwitch
33

Craftsman IViodel 247.28881
21
30
25
22
................ 33_ /_ ........................
34

Craftsman IViodel 247.28881
Ref, I
No,
1 617-04094
2 710-0643
3 710-1309
4 710-3094A
5 710-3180
6 912-0214
7 912-0240
8 712-04063
9 712-04065
10 923-0448A
11 736-0242
12 931-0484A
13 738-04141
14 738-04162A
15 738-0919A
16 941-04124
17 747-05385
18 948-0389
19 748-04065-0637
20 748-04068
Part No. Description
GearAssembly,Steering
Screw,5/16-18,1.00,Gr5,Lock
Screw,Mach,5/16-18,0.750
HexHeadScrew,3/8-16x 1.00
Screw,5/16-18,1.75,Gr5
Nut,JamLock,3/8-24
Nut,Jam,7/16-20,Gr2
Nut,FlangeLock,5/16-18,Grf
Nut,FlangeLock,3/8-16,Grf
BallJoint,7/16-20,Lock
Washer,Bell,.340x .872x .060
HubCap
ShoulderScrew,5/16-18
ShoulderSpacer,.8840x.190
SteeringShaft,5/8 Splinex 21.86
Bearing,Flange,Hex5/8
DragLink,Steering
Cap,1.25x .16
Steering,Block
Spacer,.710IDx .125ODx .56
Ref, I
NO,
21 683-0128B-0637
22 710-04484
23 712-04065
24 714-04039A
25 914-0474
26 736-0341
27 731-04057A
28 736-04228A
29 738-04128
30 741-0660A
31 747-04299A
32 783-05326B-0637
33 938-04007A-0637
34 638-04008P
35 631-04028
36 731-06825
37 634-04086-0961
38 934-04081-4042
39 734-1731-0901
40 934-0255
Part No. Description
PivotBarAxleAssembly
Screw,5/16-18,0.750
Nut,FlangeLock,3/8-16,GrF
Pin,Cotter,5/32,1.25
Pin,Cotter,1/8x0.75
PushCap,3/4
AxleCap
Washer,Fiat,.781x 1.59
Screw,Shlder,.500x 2.380,3/8-16
FlangeBearing
Tie Rod
PivotBar Bracket
AxleAssemblyLH
AxleAssemblyRH
SteeringWheel,StandardGrip
Cap,SteeringWheel(Crafts.logo)
WheelAssembly
Rim
Tire,15x6 x6Sq.Shoulder
ValveStem
35

Craftsman IViodel 247.28881
\
36

Craftsman IViodel 247.28881
Ref. I
No,
1 710-0227
2 710-04484
3 712-04063
4 720-04061
5 925-1303
6 725-1439
7 726-0278
8 726-0279
9 732-1184
10 936-0108
11 736-0242
12 938-0296
13 783-0209D
14 783-04081D-0637
15 783-1489D-0637
16 757-04124
17 710-05280
18 710-0599
19 731-04591A
20 783-04587C-4043
21 783-04843-0637
22 723-04025
723-04026
23 710-0134
24 732-04035
Part No. Description
Screw,8-18x .500
Screw,5/16-18x .750
FlangeLockNut,5/16-18
Knob,3/8-16x .875
OuterSeatSpring
InnerSeatSpring
InsulatorBossPlate
InsulatorPlate
ExtensionSpring
FiatWasher,.510x .750x .033
FlatWasher,.340x .872x .060
ShoulderScrew,5/16-18x .437x .268
LiftSeatBracket
SeatPivotBracket
SeatMountingBracket
LowBackSeat
Screw,1/4-20x .500
ScrewPanTorxHead,1/4-20x .500
CupHolder
Fender
LiftAdjusterBracket
AbrasiveFootPad,LH
AbrasiveFootPad,RH
CarriageScrew,.62:1/4-20
Spring,Compress.,1.28x3.125
37

Craftsman IViodel 247.28881
38

Craftsman IViodel 247.28881
I
Ref. I Part No.
1 683-04549-0637
2 710-0227
3 710-04683
4 710-0642
5 710-1314A
6 712-0271
7 BS-692236
8 725-0157
9 726-0205
10 731-05628
11 751-10349
12 751-10448B
13 751-10353
14 31C707-3346-G2/G6
Description
MufflerShieldAssembly
Screw,AB#8-180.500
TapScrew,3/8-161.000
TapScrew,1/4-200.750
Screw,SocketHead,5/16-18x .750
SemsNut,1/4-20
ExhaustGasket
CableTie,3/16X .05X7.4
HoseClamp,.490Dia.
Oil DrainSleeve
LowPermeationFuelHose,1/4
BriggsSingleMuffler
LongMufflerDeflector
Engine
39

Craftsman Model 247.28881
18
8
27
38
6O
62
\
23
47
1 "
> 28
4O

Craftsman IViodel 247.28881
Ref, I
NO,
1 918-04566
2 647-04034C-0637
3 647-04035
4 710-0227
5 710-04484
6 710-0599
7 710-0604A
8 710-0809
9 710-0176
10 710-3008
11 911-04075A
12 712-04063
13 712-0700
14 914-0209
15 714-04040
16 718-04407
17 720-04028
18 725-0157
19 725-1644
20 726-0214
21 926-0320
22 731-04602
23 731-04604
24 731-06894
25 732-04306
26 732-04488
27 732-04746
28 732-0716D
29 735-0239
30 736-0242
31 747-04969
32 747-05186
Part No. Description
TransmissionDriveAssembly
PedalAssembly
ShaftLeverAssembly
Screw,8-18:0.500
Screw,5/16-18x .750
Screw,1/4-20x 0.500
Screw,5/16-18x0.625
Screw,1/4-20x 1.250
HexScrew,5/16-18x 2.75
HexScrew,5/16-18x .75
Ferrule,3/8-24X .375DIA.
FlangelockNut,5/16-18
FlangeNut,9/16-18
CotterPinINT-.125DIA
Bow-TieCotterPin
PulleyHub,5/8SPLINE
ShiftKnob
CableTie
Short SpringSwitch
PushCap,5/8
PlateInsulatorNut
Sleeve,.758x .821x 3.3125
Sleeve,.758x .821x 2.4375
ShiftBearingPlate
SpringExtension,.80ODx 3.28LG
SpringExtension,.38ODx 3.25LG
SpringExtension,.94ODx 6.75LG
SpringExtension,.59ODx 4.00LG
FootPad,4.0 LONG
BellWasher,.340x .872x .060
BeltKeeperRod
VariableSpeedControlRod
Ref. I
No,
33 747-05188
34 747-05244
35 738-04237A
36 750-0566A
37 750-0802
38 954-04249
39 954-0241A
40 956-04002
41 783-04536B-0637
42 783-04595A
43 956-04015A
44 683-04206
45 710-0627
46 710-0778
47 718-04261
48 736-0362
49 941-0600
50 683-04176A
51 683-04207
52 710-0347
53 710-1260A
54 712-04065
55 938-0347
56 756-04325
57 725-04363
58 17962
59 634-0104
60 634-04369-4042
61 934-0255
62 734-1730
-- 925-04082
Part No. Description
BrakeRod
ShiftRod
ShoulderScrew,#10-32x .500
Spacer,.260x .375x 1.030LG
Spacer,.640IDx .76ODx 2.63
VBelt,5L:70.90POLY
VBelt,5L:35.25POLY
Trans.Pulley
PedalSupportBracket
ShaftAdjustBracket
VariableSpeedPulleyAssembly
BracketAssembly
HexScrew,5/16-24x .750
Screw,1/4-20x 1.500
BearingCup
FlatWasher,.330x 1.25x .06:HT
BallBearing,17x 40x 12
TransmissionBracketAssembly
IdlerBracketAssembly
HexScrew,3/8-16x 1.75
Screw,5/16-18x 0.750
FlangeLockNut,3/8-16
ShoulderSpacer,.625IDx .169
IdlerPulley
SwitchInterlock
PlateSwitch
WheelAssembly,20x 8 x 8Sq.Sh.
RimAssembly
ValveStem
Tire,20x 8x 8Sq.Sh.
WiringHarness(NotShown)
41

Craftsman IViodel 247.28881
42\
[]
19
32
42

Craftsman IViodel 247.28881
Ref, I
No,
1 918-04822A
2 683-0254B-0637
3 710-0642
4 983-04511
5 983-04525
6 983-04570-0637
7 710-04484
8 710-0514
9 710-0528
10 710-0599
11 710-0778
12 710-3144
13 710-3178
14 712-0229
15 712-04063
16 712-04065
17 712-0417A
18 712-04243
19 912-0641
20 714-04043
21 917-04074
22 932-0384
23 732-04727
24 936-0119
25 736-0187
26 736-0225
27 736-0262
28 936-0344
Part No. Description
SpindlePulleyAssembly
DeckHangerBracketAssembly
Screw,1/4-20x .750
BrakeAssembly
BrakeAssembly
Deck
Screw,5/16-18x .750
Screw,3/8-16x 1.00
HexScrew,5/16-18x 1.25
Screw,1/4-20x .500
Screw,1/4-20x 1.50
HexHeadScrew,3/8-16
CarriageBolt,3/8-16x .75
PushNut,3/8
FlangelockNut,5/16-18
FlangelockNut,3/8-16
FlangeNut,5/8-18
FlangelockNut,1/2-13
HexNut,M16- 1.5
CotterPin,Bow-Tie
DeckAdjusterGear
ExtensionSpring,.62x 6.12
TorsionSpring,1.0x 1.17
LockWasher,5/16
FiatWasher,.64x 1.24x .06
FlatWasher,.5/8Int.Tth.
FiatWasher,.385x .870x .092
FiatWasher,.385x 1.0x .030
Ref. I
NO,
29 736-0362
30 738-04146
31 738-04162A
32 942-04308
33 747-05105
34 747-05141A
35 747-05323
36 748-0234
37 748-04069
38 750-0258
39 750-0566A
40 954-04060B
41 756-04129B
42 783-05946
43 783-06243-0637
44 783-06368A-0637
45 783-06424A-0637
46 783-06643-0637
47 631-04460
48 711-04847B
49 732-04372
50 783-06074A
51 936-0351
52 738-1186A
53 941-0919
54 750-04936
55 956-1227
Part No. Description
FlatWasher,.330x 1.25x .06
BoltPlug,M16x 1.5
ShoulderSpacer,.8840x .190
CuttingBlade,21.23":2in 1
BrakeControlRod
DeckLiftRod
BeltKeeperRod
ShoulderSpacer
DeckLiftPivotCup
Spacer
Spacer
V-TypeBelt,96.5
IdlerPulley,4.25Diameter
IdlerPivotBracket
DeckCableEngagementBracket
BeltPulleyGuard
DeckBeltCover
DeckSupportBracket
ChuteDeflectorAssembly
HingePin
TorsionSpring,.44x2.0
ChuteBracket
FlatWasher,.760x 1.50
SpindleShaft
BallBearing,.787x 1.85x .551
Spacer,.792x 1.060x 1.860
DeckPulley,6.3dia.
43

Craftsman Engine Model 31C707=3346=G2/G6 For Model 247.28881
48 SHORT BLOCK 1058 OPERATOR'S MANUAL [ 1329 REPLACEMENT ENGINE ] 1330 REPAIR MANUAL
616
129 1_ _¢\
_ 32_}_
/
25_ 27
q
ii
306 i J
,4_,
,\
307 @_
552<-_
691 @
718 d/"
_..-.(:::J
146 _'
741
24 _
1270
757
759
85O
f T"-_.
684 @ 11 _ .......:_._:@
584
585_ _
1264 I_
s__
842 c,_9
s__JG
5240
Q
15 @
44

Craftsman Engine Model 31C707-3346-G2/G6 For Model 247.28881
lO26_/_
s _
883
51
238 (3 36 35
1022
1o22
337
501
617
914 ©'9
85O
54%
654 _)
53 d:*-;_::::$S'i_
45

Craftsman Engine IViodel 31C707-3346-G2/G6 For IViodel 247.28881
130 :-'_
95 _ _
987
_ lO_
i
633 _
2179
51
105
Q
127
1127__
276 _)
1091
964 ........
' i
24O
6Ol _
i
46

Craftsman Engine Model 310707=3346=G2/G6 For Model 247.28881
1036 EMiSSiONS LABEL
968
445
\\
I
2
1040
305 _
305AQ_
305B
324
415A
,./:,,;\ \"_{,":,_j !/ 4_7><_
lOOS C-;>..._\\d_-_t ib.j,:Q _
1044
78 b_ d_
37 _
47

Craftsman Engine IViodel 31C707-3346-G2/G6 For IViodel 247.28881
lO51 8ol
@
783
513
462
579
. i '¸
797
802
729
334
1054
697 _
1119
188 _
202
216
232
209
222
48

Craftsman Engine IViodel 31C707-3346-G2/G6 For IViodel 247.28881
51
104
105
121 CARBURETOR OVERHAUL KiT
O 127 _
617,, ifX,
1266 :, '_,
33 _'_
217
987_/
1266A
/';/ .>_,
3 _<J/
358 ENGINE GASKET SET
12
_i / JJ
883
943 O
2O
51
524
O
691
842 g
868 %_9
1O22
1266 ((
617
1095 VALVE GASKET SET
51
868
1o22
883
49

Craftsman Engine IViodel 31C707=3346=G2/G6 For IViodel 247.28881
Ref.
NO,
1 796010
2 399265
3 391086s
4 697106
5 796026
7 796584
11 794683
12 697110
13 793988
15 690946
16 797579
20 795387
22 692125
23 698281
24 796335
25 796172
796173
26 791936
792649
27 698469
28 796007
29 794122
32 791118
33 792868
34 791935
35 691279
36 691279
37 697352
42 499586
43 691968
45 690564
46 793880
48 697761
50 796180
51 692137
51A 796081
53 690227
54 691148
78 691693
94 793610
95 690718
98 695408
Part No. Description
CylinderAssembly
Bushing/SealKit(MagnetoSide)
Seal-Oil(MagnetoSide)
Sump-Engine
Head-Cylinder
Gasket-CylinderHead
Tube-Breather
Gasket-Crankcase
Screw(CylinderHead)
Plug-OilDrain
Crankshaft
Seal-Oil(PTOSide)
Screw(CrankcaseCover/Sump)
Flywheel
Key-Flywheel(Steel)
PistonAssembly(Standard)
PistonAssembly(.020"Oversize)
RingSet(Standard)
RingSet(.020"Oversize)
Lock-PistonPin
Pin-Piston
Rod-Connecting
Screw(ConnectingRod)
Valve-Exhaust
Valve-Intake
Spring-Valve(Intake)
Spring-Valve(Exhaust)
Guard-Flywheel
Keeper-Valve
Slinger-Governor/Oil
Tappet-Valve
Gear-Cam
ShortBlock
Manifold-Intake
Gasket-Intake
Gasket-Intake
Stud(Carburetor)
Screw(IntakeManifold)
Screw(FlywheelGuard)
Kit-Nle Mixture
Screw(ThrottleValve)
Kit-NleSpeed
50
I
Ref.
I Part No,
No,
I
104 694918
105 696136
108 695419
117 843099
118 790890
121 796184
125 796109
127 690727
130 699500
131 699501
133 694914
135 698780
137 698781
141 792777
146 691639
186 794873
187 791805
188 691693
192 691986
202 691841
209 692208
216 691840
217 695409
222 694042
227 691374
232 691842
238 691843
240 394358s
265 691024
267 794904
276 695410
304 797900
305 697102
305A 793376
305B 795891
306 796006
307 691693
309 693551
Description
Pin-FloatHinge
Valve-FloatNeedle
Valve-Choke
Jet-Main(Standard)
Jet-Main(HighAltitude)
Kit-CarburetorOverhaul
Carburetor
Plug-Welch
Valve-Throttle
Kit-ThrottleShaft
Float-Carburetor
Tube-FuelTransfer
Gasket-FloatBowl
Kit-ChokeShaft
Key-Timing
Connector-Hose(intakeManifold)
Line-Fuel(Formed)(Cutto RequiredLength)
Screw(ControlBracket)
Adjuster-RockerArm
Link-MechanicalGovernor
Spring-Governor(Green)
Link-Choke
Spring-ChokeReturn
Bracket-Control
Lever-GovernorControl
Spring-GovernorLink
Cap-Valve
Filter-Fuel
Clamp-Casing
Screw(CasingClamp)
Washer-Sealing
BlowerHousing
Screw(BlowerHousing)(1/4-20x1.14)
Screw(BlowerHousing)(1/4-20x.68)
Screw(BlowerHousing)(10-16x.43)
Shield-Cylinder
Screw(CylinderShield)
Motor-Starter

Craftsman Engine IViodel 31C707=3346=G2/G6 For IViodel
I
Ref.
I Part No.
No,
I
310 690323
324 796308
333 795315
334 691061
337 491055s
358 796187
404 691691
415 794903
415A 794129
431 797901
445 796031
462 691261
474 696459
503 691532
505 691251
510 693699
513 692024
523 699908
524 691032
525 697184
552 697144
562 691119
579 691029
584 794682
585 697109
601 791850
614 691620
616 692012
617 692138
633 699813
634 698779
635 691909
654 690958
684 697157
691 692407
697 791680
718 690959
247.28881
Description
Screw(StarterMotor)
Screen/CupAssembly
Armature-Magneto
Screw(MagnetoArmature)
Plug-Spark
GasketSet-Engine
Washer(GovernorCrank)
Plug(intakeManifold)
Plug(Cover/Retainer)
Elbow-intake
Filter-AirCleanerCartridge
Washer(StarterCable)
Alternator
Strap-Starter
Nut(GovernorControlLever)
Drive-Starter
Clutch-Drive
Dipstick
Seal-DipstickTube
Tube-Dipstick
Bushing-GovernorCrank
Screw(GovernorControlLever)
Nut(StarterCable)
Cover-BreatherPassage
Gasket-BreatherPassage
Hose-Clamp(Green)
Pin-Cotter(GovernorCrank)
Crank-Governor
Seal-ORing(IntakeManifold)(Red)
Seal-Choke/ThrottleShaft(ChokeShaft)
Spring/SealAssembly(ChokeShaft)
Boot-SparkPlug
Nut(Carburetor)
Screw(BreatherAssembly)
Seal-GovernorShaft
Screw(DriveCap)
Pin-Locating
Ref.
No,
724
729
741
757
758
759
783
789
797
801
8O2
83O
842
847
85O
851
868
883
914
947
964
968
975
987
1005
1022
1023
1026
1029
1034
1036
1040
1044
1051
1054
1058
51
Part No. Description
697478
691224
697128
793242
793763
697392
693713
698329
693167
691283
691286
691095
691031
790442
100106
692424
690968
692236
697551
699915
799159
797902
699502
698777
796201
272475s
797421
692003
692011
691751
690822
Link-StarterSwitch
Clip-Wire
Gear-Timing
Link-Counterweight
Counterweight
Pin-Counterweight
Gear-Pinion
Harness-Wiring
Nut(BrushRetainer)
Cap-Drive
Cap-End
Stud-RockerArm
Seal-ORing(DipstickTube)
Dipstick/TubeAssembly
Sealant-Liquid
Terminal-SparkPlug
Seal-Valve
Gasket-Exhaust
Screw(RockerCover)
Solenoid-Fuel
Cap-Connector
Cover-AirCleaner
Bowl-Fuel
Seal-ThrottleShaft
Fan-Flywheel
Gasket-RockerCover
Cover-Rocker
Rod-Push(Intake)
Rod-Push(Exhaust)
Arm-Rocker
Guide-PushRod
Label-Emissions(AvailablefromaBriggs& StrattonAutho-
rized Dealer)
698368
698139
691265
280275
276344
Plate-Trim
Screw(Flywheel)
Ring-Retaining
Tie-Cable
Operator'sManual

Craftsman Engine IViodel 31C707=3346=G2/G6 For IViodel 247.28881
Ref, I
NO,
1059 698516
1090 691293
1091 691333
1095 794152
1119 691183
1127 695407
1263 697124
1264 697104
1266 691917
1266A 697123
1267 697419
1270 793243
31C707-
1329 3346-G2/
G6
1330 272147
Part No. Description
Kit-Screw/Washer(Alternator)
Retainer-Brush
Cap-Limiter
GasketSet-Valve
Screw(Alternator)
Screw(FloatBowl)
Reed-Breather
Screw(BreatherReed)
Seal-ORing(IntakeElbow)(Red)
Seal-ORing(IntakeElbow)
Latch-BlowerHousing
Plug-AVSCounterweight
ReplacementEngine
RepairManual
EngineGasketSet
ValveGasketSet
CarburetorOverhaulKit
KeyNo. 358
KeyNo. 1095
KeyNo. 121
52

Look For Relevant Emissions Durability Period and
Air index information On Your Engine Emissions Label
Engines that are certified to meet the California Air Resources Board (CARB) Tier 2 Emission Standards must
display information regarding the Emissions Durability Period and the Air Index. Sears Brands Management
Corporation makes this information available to the consumer on our emission labels.
The Emissions Durability Period describes the number of hours of actual running time for which the engine is
certified to be emissions compliant, assuming proper maintenance in accordance with the Operating & Mainte-
nance Instructions. The following categories are used:
Moderate: Engine is certified to be emission compliant for 125 hours of actual engine running time.
Intermediate: Engine is certified to be emission compliant for 250 hours of actual engine running time.
Extended: Engine is certified to be emission compliant for 500 hours of actual engine running time.
For example, a typical walk-behind lawn mower is used 20 to 25 hours per year. Therefore, the Emissions
Durability Period of an engine with an intermediate rating would equate to 10 to 12 years.
The Air index is a calculated number describing the relative level of emissions for a specific engine family. The
lower the Air Index, the cleaner the engine. This information is displayed in graphical form on the emissions label.
After July 1,2000, Look For Emissions Compliance Period
On Engine Emissions Compliance Label
After July 1, 2000 certain Sears Brands Management Corporation engines will be certified to meet the United
States Environmental Protection Agency (USEPA) Phase 2 emission standards. For Phase 2 certified engines, the
Emissions Compliance Period referred to on the Emissions Compliance label indicates the number of operating
hours for which the engine has been shown to meet Federal emission requirements.
For engines less than 225 cc displacement, Category C = 125 hours, B = 250 hours and A = 500 hours.
For engines of 225 cc or more, Category C = 250 hours, B = 500 hours and A = 1000 hours.
This isa generic representation of the emission label typically found on a certified engine.
FAMILYYBSXS.3192VA 274812
GDOC-100182Rev.B
53

(Thispageapplicableinthe U.S.A.and Canadaonly.)
Sears Brands Management Corporation (Sears), the California Air Resources Board (CARD)
and the United States Environmental Protection Agency (U.S. EPA)
Emission Control System Warranty Statement (Owner's Defect Warranty Rights and Obligations)
EMISSIONCONTROLWARRANTYCOVERAGEISAPPLICABLETOCERTI-
FIEDENGINESPURCHASEDINCALIFORNIAIN1995ANDTHEREAF-
TER,WHICHARE USEDINCALIFORNIA,ANDTOCERTIFIEDMODEL
California and United States Emission
TheCaliforniaAirResourcesBoard(CARD),U.S.EPAand Searsarepleased
toexplainthe EmissionControlSystemWarrantyonyourmodelyear2000and
latersmalloff-roadengine(SORE).InCalifornia,newsmalloff-roadengines
mustbedesigned,builtand equippedto meettheState'sstringentanti-smog
standards.Elsewherein theUnitedStates,newnon-road,spark-ignition
enginescertifiedformodelyear1997and latermustmeetsimilarstandardsset
forthbythe U.S.EPA.Searsmustwarranttheemissioncontrolsystemonyour
YEAR1997ANDLATERENGINESWHICHAREPURCHASEDANDUSED
ELSEWHEREINTHEUNITEDSTATES(ANDAFTERJANUARY1,2001 IN
CANADA).
Control Defects Warranty Statement
enginefortheperiodsoftime listedbelow,providedtherehasbeennoabuse,
neglector impropermaintenanceofyoursmalloff-roadengine.Youremis-
sioncontrolsystemincludespartssuchasthecarburetor,aircleaner,ignition
system,mufflerand catalyticconverter.Alsoincludedmaybeconnectorsand
otheremissionrelatedassemblies.Whereawarrantableconditionexists,Sears
will repairyoursmalloff-roadengineatnocostto youincludingdiagnosis,parts
andlabor.
Sears Emission Control Defects Warranty Coverage
Smalloff-roadenginesarewarrantedrelativeto emissioncontrolpartsdefects
foraperiodofone year,subjecttoprovisionssetforthbelow.Ifanycovered
Owner's Warranty
Asthe smalloff-roadengineowner,youareresponsiblefor theperformanceof
therequiredmaintenancelistedin yourOperatingandMaintenanceInstruc-
tions.Searsrecommendsthatyouretainallyourreceiptscoveringmaintenance
onyoursmalloff-roadengine,butSearscannotdenywarrantysolelyfor the
lackofreceiptsorfor yourfailuretoensuretheperformanceof allscheduled
maintenance.Asthe smalloff-roadengineowner,youshouldhoweverbe
awarethat Searsmaydenyyouwarrantycoverageifyoursmalloff-roadengine
ora parthasfaileddueto abuse,neglect,impropermaintenanceor unap-
parton yourengineis defective,the partwillbe repairedorreplacedbySears.
Responsibilities
provedmodifications.Youareresponsiblefor presentingyoursmalloff-road
engineto anAuthorizedSearsServiceDealeras soonasa problemexists.The
undisputedwarrantyrepairsshouldbecompletedinareasonableamountof
time,notto exceed30days.Ifyouhaveanyquestionsregardingyourwarranty
rightsand responsibilities,youshouldcontactaSearsServiceRepresentative
at 1-800-469-4663.Theemissionwarrantyisa defectswarranty.Defectsare
judgedonnormalengineperformance.Thewarrantyis notrelatedtoan in-use
emissiontest.
Sears Emission Control Defects Warranty Provisions
ThefollowingarespecificprovisionsrelativetoyourEmissionControlDefectsWarrantyCoverage.ItisinadditiontotheSearsenginewarrantyfornon-regulated
enginesfoundin theOperatingand MaintenanceInstructions.
1. WarrantedParts
Coverageunderthiswarrantyextendsonlytothe partslistedbelow(the
emissioncontrolsystemsparts)tothe extentthesepartswere presenton
the enginepurchased.
a. FuelMeteringSystem
• Coldstartenrichmentsystem
• Carburetorandinternalparts
• FuelPump
b. AirlnductionSystem
• Aircleaner
• Intakemanifold
c. IgnitionSystem
• Sparkplug(s)
• Magnetoignitionsystem
d. CatalystSystem
• Catalyticconverter
• Exhaustmanifold
• Air injectionsystemor pulsevalve
e. MiscellaneousItemsUsedin AboveSystems
• Vacuum,temperature,position,timesensitivevalves
andswitches
• Connectorsandassemblies
2. LengthofCoverage
Searswarrantstothe initialownerand eachsubsequentpurchaserthat
the WarrantedPartsshallbefreefromdefectsin materialsandworkman-
shipwhichcausedthefailureofthe WarrantedPartsfor aperiodofone
yearfromthe datethe engineis deliveredtoa retailpurchaser.
3. NoCharge
Repairor replacementof anyWarrantedPartwill beperformedat no
chargetothe owner,includingdiagnosticlaborwhichleadstothe
determinationthataWarrantedPartisdefective,ifthe diagnosticworkis
performedatanAuthorizedSearsServiceDealer.Foremissionswarranty
servicecontactyournearestAuthorizedSearsServiceDealeras listedin
the "YellowPages"under"Engines,Gasoline,""GasolineEngines,""Lawn
Mowers,"orsimilarcategory.
4. ClaimsandCoverageExclusions
Warrantyclaimsshallbefiledin accordancewiththe provisionsofthe
SearsEngineWarrantyPolicy.Warrantycoverageshallbeexcludedfor
failuresof WarrantedPartswhicharenotoriginalSearspartsor because
ofabuse,neglector impropermaintenanceas setforth inthe Sears
EngineWarrantyPolicy.Searsisnotliableto coverfailuresof Warranted
Partscausedby theuseof add-on,non-original,or modifiedparts.
5. Maintenance
AnyWarrantedPartwhichis notscheduledfor replacementas required
maintenanceor whichis scheduledonlyfor regularinspectiontothe effect
of"repairor replaceas necessary"shallbe warrantedasto defectsforthe
warrantyperiod.AnyWarrantedPartwhichisscheduledfor replacement
asrequiredmaintenanceshallbewarrantedasto defectsonlyforthe
periodoftime uptothe firstscheduledreplacementfor that part.Any
replacementpartthat isequivalentin performanceand durabilitymay
beusedin the performanceofanymaintenanceor repairs.Theowneris
responsibleforthe performanceof allrequiredmaintenance,asdefinedin
the SearsOperatingandMaintenanceInstructions.
6. ConsequentialCoverage
Coveragehereundershallextendtothefailureofanyenginecomponents
causedbythe failureofanyWarrantedPartstillunderwarranty.
Inthe USAandCanada,a 24hourhotline,1-800-469-4663,hasamenuofpre-recordedmessagesofferingyouenginemaintenanceinformation.
GD0C-100188Rev.B
54

FEDERAL and/or CALIFORNIA EMISSION CONTROL WARRANTY STATEMENT
YOUR WARRANTY RIGHTS AND OBLIGATIONS
MTDConsumerGroupInc,the UnitedStatesEnvironmentalProtectionAgency(EPA),and,forthoseproductscertifiedfor salein thestateofCalifornia,the
CaliforniaAirResourcesBoard(CARB)are pleasedtoexplainthe emission(evaporativeand/orexhaust)controlsystem(ECS)warrantyonyouroutdoor2006
andlatersmalloff-roadspark-ignitedengineandequipment(outdoorequipmentengine)InCalifornia,newoutdoorequipmentenginesmustbedesigned,builtand
equippedtomeetthe State'sstringentanti-smogstandards(inotherstates,1997andlatermodelyearequipmentmustbedesigned,built,and equippedto meet
theU.S.EPAsmalloff-road,sparkignitionengineregulations.MTDConsumerGroupIncmustwarrantthe ECSonyouroutdoorequipmentenginefor the periodof
timelistedbelowprovidedtherehasbeennoabuse,neglector impropermaintenanceofoutdoorequipmentengine.
YourECSmayincludepartssuchasthecarburetor,fuel-injectionsystem,the ignitionsystem,catalyticconverter,fueltanks,fuel lines,fuelcaps,valves,canisters,
filters,vaporhoses,clamps,connectors,andotherassociatedemission-relatedcomponents.
Whereawarrantableconditionexists,MTDConsumerGroupIncwill repairyouroutdoorequipmentengineatnocosttoyouincludingdiagnosis,partsandlabor.
MAN UFACTURER'S WARRANTY COVERAGE:
Thisemissioncontrolsystemiswarrantedfortwoyears.Ifanyemission-relatedpartonyouroutdoorequipmentengineisdefective,thepartwill berepairedor
replacedbyMTDCONSUMERGROUPINC.
OWNER'S WARRANTY RESPONSIBILITIES:
Asthe outdoorequipmentengineowner,youareresponsiblefor performanceofthe requiredmaintenancelistedinyourowner'smanual.MTDConsumerGroup
Increcommendsthat youretainallreceiptscoveringmaintenanceonyouroutdoorequipmentengine,butMTDConsumerGroupInccannotdeny warrantysolely
forthe lackof receipts.
Asthe outdoorequipmentengineowner,youshouldhoweverbe awarethat MTDConsumerGroupIncmaydenyyouwarrantycoverageifyouroutdoorequipment
engineor a parthasfaileddue toabuse,neglect,or impropermaintenanceor unapprovedmodifications.
Youare responsiblefor presentingyouroutdoorequipmentengineto MTDConsumerGroupInc'sdistributioncenterorservicecenterassoon asthe problem
exists.Thewarrantyrepairsshouldbecompletedin a reasonableamountoftime,nottoexceed30 days.Ifyouhaveaquestionregardingyourwarrantycoverage,
youshouldcontactthe MTDConsumerGroupIncServiceDepartmentat 1-800-800-7310orvia emailathttp://support.mtdproducts.com
GENERAL EMISSIONS WARRANTY COVERAGE:
MTDConsumerGroupIncwarrantstothe ultimatepurchaserand eachsubsequentpurchaserthat theoutdoorequipmentengineis: Designed,builtand equipped
soasto conformwithall applicableregulations;and freefromdefectsin materialsand workmanshipthatcausethe failureofa warrantedparttobe identicalin all
materialrespectstothatpartas describedin MTDConsumerGroup Inc'sapplicationfor certification.
Thewarrantyperiodbeginsonthedatetheoutdoorequipmentengineisdeliveredto anultimatepurchaserorfirst placedintoservice.Thewarrantyperiodistwo
years.
Subjecttocertainconditionsandexclusionsasstatedbelow,the warrantyonemission-relatedpartsis asfollows:
1. Anywarrantedpartthatisnotscheduledfor replacementasrequiredmaintenancein thewritteninstructionssupplied,iswarrantedforthe warrantyperiod
statedabove.Ifthe partfails duringthe periodofwarrantycoverage,thepartwill berepairedor replacedbyMTDConsumerGroupIncaccordingto subsection
(4)below.Anysuchpart repairedor replacedunderwarrantywillbewarrantedfor the remainderof the period.
2. Anywarrantedpartthatisscheduledonlyfor regularinspectionin the writteninstructionssuppliediswarrantedforthe warrantyperiodstatedabove.Anysuch
partrepairedor replacedunderwarrantywill bewarrantedforthe remainingwarrantyperiod.
3. Anywarrantedpartthatisscheduledforreplacementasrequiredmaintenancein thewritteninstructionssuppliediswarrantedfor the periodoftimebeforethe
firstscheduledreplacementdateforthat part.If the partfails beforethefirst scheduledreplacement,the partwill berepairedor replacedbyMTDConsumer
GroupIncaccordingto subsection(4)below.Anysuchpartrepairedor replacedunderwarrantywill bewarrantedfor the remainderofthe periodpriortothe
firstscheduledreplacementpointfor the part.
4. Repairor replacementofanywarrantedpart underthe warrantyprovisionshereinmustbeperformedatawarrantystationatno chargetothe owner.
5. Notwithstandingthe provisionsherein,warrantyservicesor repairswill beprovidedatallof ourdistributioncentersthatarefranchisedtoservicethe subject
enginesor equipment.
6. Theoutdoorequipmentengineownerwill notbe chargedfor diagnosticlaborthat isdirectlyassociatedwithdiagnosisof a defective,emission-relatedwar-
rantedpart, providedthat suchdiagnosticworkis performedata warrantystation.
7. MTDConsumerGroupIncisliablefordamagestootherengineor equipmentcomponentsproximatelycausedby afailureunderwarrantyof anywarranted
part.
8. Throughoutthe off-roadengineandequipmentwarrantyperiodstatedabove,MTDConsumerGroupIncwill maintainasupplyofwarrantedpartssufficientto
meetthe expecteddemandforsuchparts.
9. Anyreplacementpartmaybe usedinthe performanceof anywarrantymaintenanceor repairsand mustbeprovidedwithoutchargetothe owner.Suchusewill
notreducethe warrantyobligationsofMTDConsumerGroupInc.
10.Add-onor modifiedpartsthat arenotexemptedbythe AirResourcesBoardmaynot beused.Theuseofany non-exemptedadd-onor modifiedpartsby the
ultimatepurchaserwill begroundsfordisallowingawarrantyclaims.MTDConsumerGroup Incwill notbe liabletowarrantfailuresofwarrantedpartscaused
bythe useofa non-exemptedadd-onor modifiedpart.

WARRANTED PARTS:
Therepairor replacementofanywarrantedpart otherwiseeligibleforwarrantycoveragemaybeexcludedfromsuchwarrantycoverageif MTDConsumerGroup
Incdemonstratesthatthe outdoorequipmentenginehasbeenabused,neglected,orimproperlymaintained,and thatsuchabuse,neglect,or impropermainte-
nancewasthe directcauseof the needfor repairor replacementofthe part.Thatnotwithstanding,anyadjustmentofa componentthat hasafactoryinstalled,
andproperlyoperating,adjustmentlimitingdeviceisstilleligiblefor warrantycoverage.Further,the coverageunderthiswarrantyextendsonlyto partsthat were
presentonthe off-roadengineand equipmentpurchased.
Thefollowingemissionwarrantypartsarecovered(ifapplicable):
(1)FuelMeteringSystem
• Cold startenrichmentsystem(softchoke)
• Carburetorandinternalparts(orfuel injectionsystem)
• Fuelpump
• Fueltank
(2)Air InductionSystem
• Aircleaner
• Intakemanifold
(3) IgnitionSystem
• Sparkplug(s)
• Magnetoignitionsystem
(4) ExhaustSystem
• Catalyticconverter
• SAI(Reedvalve)
(5) MiscellaneousItemsUsedin AboveSystem
• Vacuum,temperature,position,timesensitivevalvesandswitches
• Connectorsandassemblies
(6) EvaporativeControl
• Fuelhose
• Fuelhoseclamps
• Tetheredfuel cap
• Carboncanister
• Vapor lines
GDOC-100223Rev.A

Congratulationson makinga smartpurchase.YournewCraftsman@
productisdesignedandmanufacturedforyearsofdependableopera-
tion.Butlikeallproducts,itmayrequirerepairfromtimetotime.That's
whenhavinga RepairProtectionAgreementcansaveyoumoneyand
aggravation.
Here'swhattheRepairProtectionAgreement*includes:
* Expert service byour10,000professionalrepairspecialists
o Unlimitedserviceand no chargeforpartsand laboron all
coveredrepairs
o Product replacementupto$1500if yourcoveredproductcan'tbe
fixed
• Discountof 10%from regularpriceofserviceand relatedinstalled
partsnotcoveredbytheagreement;also,10%off regularpriceof
preventivemaintenancecheck
• Fasthelp byphone- wecallitRapidResolution- phonesupport
froma Searsrepresentative.Thinkof usasa "talkingowner's
manual."
OnceyoupurchasetheAgreement,a simplephonecallisall thatit
takesforyouto scheduleservice.Youcancallanytimedayor night,or
schedulea serviceappointmentonline.
TheRepairProtectionAgreementisa risk-freepurchase.If youcancel
foranyreasonduringtheproductwarrantyperiod,wewillprovideafull
refund.Or,a proratedrefundanytimeaftertheproductwarrantyperiod
expires.PurchaseyourRepairProtectionAgreementtoday!
Somelimitationsand exclusionsapply. Forpricesand additional
informationin the U.S.A.call 1-800-827-6655.
*CoverageinCanadavarieson some items.Forfull details call
SearsCanadaat 1-800-361-6665.
SearsInstallation Service
ForSearsprofessionalinstallationofhomeappliances,garagedoor
openers,waterheaters,andothermajorhomeitems,intheU.S.A.or
Canadacall1-800-4-MY-HOME®.
57

Operaci6n segura Practicas .......... Paginas 59 Fuera de temporada de almacenamiento Paginas 84
Etiquetas De Seguridad .............. Paginas 64 Solucion de problemas .............. Paginas 85
Asamblea ......................... Paginas 66 Lista de piezas ..................... Paginas 30
Operacion de ...................... Paginas 68 Reparaci6n de Acuerdo de Proteccion .. Paginas 91
De Servicio y Mantenimiento de ....... Paginas 75 Servicio de nOmeros .......... atrasados Paginas
ARTESANO DE DOS AI_IOS DE GARANTiA
PORDOSAnOSa partirdela fechade compra,sialgunapartenofungiblesdeesteequipode equitaci6nfalladebidoaundefectode material
o manode obra,www.craftsman.cornvisiteo Ilamea 1-800-659-5917paraorganizardeformagratuitaen reparaci6ndeviviendas.
Elmarcoy eleje delanterosereparar_deformagratuitadurantecincoa_osa partirdela fechade comprapordefectosen materialomanode
obra.
Entodosloscasos,sila reparaci6nresultaimposible,el equipode montara caballoserAsustituidodeformagratuitaconelmismoo equiva-
lente.
Labateriasesustituyede formagratuitadurante90 diasa partirdela fechade comprapordefectosenmaterialomanode obra(nuestras
pruebasdemuestraqueno mantienela carga).
Estagarantiaesinv_lidasiesteproductoseutilizaal mismotiempolaprestaci6nde servicioscomercialeso sisealquilaa otrapersona.
Estagarantia cubrelosdefectosSOLOdematerialesy fabricaci6n. Lagarantiano incluye:
* Aquellaspiezasfungiblesquepuedengastarseporel usonormaldentrodelperiodode garantia,incluyendoperono limitadoa,cuchillas,
bujias,filtrosdeaire,correasy filtrosdeaceite.
* Losserviciosde mantenimiento,cambiosde aceite,o puestasa punto.
* Tireel reemplazoo reparaci6nde pinchazoscausadospotobjetosexternos,talescomoclavos,espinas,toconesovidrio.
* Tirede la ruedao el reemplazoo la reparaci6nresultantesdeldesgastenormal,accidenteo realfuncionamientoo mantenimiento.
. Lasreparacionesnecesariasdebidoal abusodeloperador,incluyendoperono limitadoa losda_oscausadosporel remolquede los
objetosm_sall_ dela capacidaddelequipode equitaci6n,el impactode objetosquedoblenlaestructuraoel cig(Je_al,ode excesode
velocidaddel motor.
. Lasreparacionesnecesariasdebidoa la negligenciadeloperador,incluyendoperono limitadoa, da_osel_ctricosy mec_nicoscausados
porunalmacenamientoinadecuado,noutilizaci6nde la calidado cantidaddeaceitede motor,no mantenerel pisolibrede residuos
infiamables,o faltademantenimientodelEquipoecuestredeacuerdoa lasinstruccionescontenidasen el manualdeloperador.
. Elmotor(sistemadecombustible)de limpiezao reparacionesprovocadasporuncombustiblequesecontaminadou oxidado(viejo).En
general,elcombustibledebeserutilizadodentrodelos30 diassiguientesa lafechadecompra.
. Deterioroydesgastenormaldelosacabadosexteriores,o reemplazode la etiquetadelproducto.
Estagarantialeotorgaderechoslegalesespecificos,yustedtambi_npuedetenerotrosderechosque variandeestadoa estado.
Sears BrandsCorporation Gesti6n, Hoffman Estates,iL60179
Aceitedel motor: SAE30
Combustible: Gasolinasinplomo
Bujia: Champion®RC12YC
Motor: Briggs& StrattonI/C®
N_mero de modelo ..........................................................
N_mero de serie..............................................................
Fechade compra .............................................................
Registrearribael nOmerodel modelo,el nOmerode serieyla fecha
de compra
©SearsBrands,LLC
58

Lapresenciadeeste sirnboloindicaque setratade instrucciones
irnportantesde seguridadquesedebenrespetarparaevitar
ponerenpeligrosuseguridadpersonaly/o materialy lade otras
personas.Leaysigatodaslasinstruccionesdeestemanualantes
de poneren funcionarnientoestarn_.quina.Si no respetaestas
instruccionespodriaprovocarlesionespersonales.Cuandoveaeste
sirnbolo,ipresteatenci6na la advertencia!
PROPOSICION 65 DE CALIFORNIA
Elescapedel motordeesteproducto,algunosde suscornponentes
y algunoscornponentesdelvehiculocontieneno liberansustancias
quirnicasqueelestadodeCaliforniaconsideraque puedenproducir
c_.ncer,defectosde nacirnientouotrosproblernasreproductivos.
Losbornesdela bateriay losaccesoriosalinescontienenplornoy
cornpuestosde plorno,sustanciasquirnicasque segOnIoestableci-
do potel Estadode Californiacausanc_.ncery da_osenel sisterna
reproductivo.Ldveselasmanos despu_sde estaren contacto
con estoscomponentes.
Estarn_.quinarueconstruidaparaseroperadadeacuerdocon
lasreglasde seguridadcontenidasenestemanual.AIigualque
concualquiertipodeequipornotorizado,undescuidoo errorpor
partedeloperadorpuedeproducirlesionesgraves.Estarn_.quina
escapazde arnputarrnanosy piesy dearrojarobjetoscongran
fuerza.Deno respetarlasinstruccionesde seguridadsiguientesse
puedenproducirlesionesgraveso larnuerte.
Su responsabilidad--Restrinja el usode estarn_.quina
rnotorizadaalas personasque lean,cornprendany respetenlas
advertenciase instruccionesqueaparecenen estemanualyen la
rn_.quina.
iGUARDEESTASINSTRUCCIONES!
FUNCIONAIVIIENTO GENERAL
• Lea,entiendaycurnplatodaslasinstruccionesincluidasen
la rn_.quinayen losrnanualesantesdernontarlay utilizarla.
Guardeestemanualenun lugarseguroparaconsultasfuturasy
peri6dicas,asi cornoparasolicitarrepuestos.
• Farniliaricesecontodosloscontrolesyconel usoadecuado
delosrnisrnos.Sepac6rnodetenerlarn_.quinaydesactivarlos
controlesr_.pidarnente.
• Noperrnitanuncaque losni_osrnenoresde 14a_osutilicen
estarn_.quina.Losni_osde14a_osenadelantedebenleery
entenderlasinstruccionesde operaci6ny norrnasdeseguridad
contenidaseneste manual,yen la rn_.quinay debenser
entrenadosy supervisadospor unadulto.
• Nuncaperrnitaquelosadultosoperenestarn_.quinasinrecibir
antesla instrucci6napropiada.
• Paraayudaraevitarel contactoconlascuchillaso unalesi6npor
algOnobjetoqueseaarrojado,rnantengaa losobservadores,a
losayudantes,ni_osy rnascotasalejadosal rnenos25 metrosde
la rn_.quinarnientrasest,.en funcionarniento.Detengala rn_.quina
sialguienentraenlazona.
• Inspeccionerninuciosarnenteel Areadondeutilizar_,el equipo.
Retiretodaslaspiedras,palos,cables,huesos,juguetesy otros
objetosextra_osquepodrianserrecogidosyarrojadospor la
acci6nde lascuchillas.Losobjetosarrojadospor larn_.quina
puedenproducirlesionesgraves.
• Planifiqueel patr6ndecortedelc_spedque hade seguirpara
evitarla descargade materialhacialoscarninos,lasveredas,los
observadores,etc.Eviteadern_.sdescargarmaterialcontralas
paredesyobstruccionesquepodrianprovocarqueel material
descargadorebotecontrael operador.
• Paraprotegerselosojosutilicesiernpreanteojoso antiparras
deseguridadrnientrasoperalarn_.quinao rnientraslaajusta
o repara.Losobjetosarrojadosque rebotanpuedenproducir
lesionesocularesgraves.
• Utilicezapatosde trabajoresistentes,desuelafuerte,asicorno
pantalonesycarnisasajustados.Lasprendassueltaso las
alhajaspuedenquedaratrapadasenlaspiezasrnovibles.Nunca
operela rn_.quinadescalzoo consandalias.
• Est_atentoa lacortadoraya la direcci6nde la descargade
losaditarnentosy noapuntea nadie.Nuncaoperelacortadora
de c_spedsinqueest_nen sulugarapropiadolacubiertade
descargao elcolectorde recortesdecesped.
• Nopongalasrnanoso lospiescercade laspiezasrotatoriaso
debajode la plataforrnadecorte.Elcontactoconlascuchillas
puedeproducirla arnputaci6ndernanosy pies.
• Unacubiertade descargafaltanteo da_adapuedeprovocarel
contactoconlacuchillao lesionesporobjetosarrojados.
• Detengala(s)cuchilla(s)cuandoatraviesesenderos,sendaso
carninosdegravaycuandonoest_cortandoel cesped.
• Vigileel tr_.nsitovehicularcuandoest_operandocercadeo en
crucesde carninos.Estarn_.quinanodebeutilizarseenlavia
pOblica.
• Noopereestarn_.quinabajolosefectosdelalcoholode drogas.
• Corteel cespedsolarnenteconluzdediao conunabuenaluz
artificial.
• Nuncatransportepasajeros.
• Desenganchela(s)cuchilla(s)antesdecolocarlarnarchaatr_.s.
Retrocedalentarnente.Siernpremirehaciaabajoyhaciaatr_.santes
y rnientrasretrocede,paraevitaraccidentes.
• Reduzcalavelocidadantesdedarlavuelta.Operela rn_.quina
suavernente.Evitelaoperaci6nerr_.ticay lavelocidadexcesiva.
• Desenganchela(s)cuchilla(s),coloqueel frenodeestaciona-
rniento,detengael motoryesperehastaquela(s)cuchilla(s)se
detenga(n)porcornpletoantesderetirarelcolectordec_sped,
vaciarlosrecortes,destaparelcanal,retirarrestosde cespedo
desechos,o hacercualquierajuste.
59

• Nuncadejelarn_.quinaen funcionarnientosinvigilancia.Apague
siernprelascuchillas,coloqueelfrenodernano,detengaelmotory
retirela Ilaveantesdebajarsedelvehiculo.
• Tengasurnocuidadoalcargaro descargarlarn_.quinaen un
rernolqueocarni6n.Estaunidadnodebeconducirseenascensoo
descensoderarnpas,porquepodrialadearseyprovocarlesiones
personalesgraves.Enlasrarnpaslarn_.quinasedebeernpujar
rnanualrnenteparacargarlao descargarlacorrectarnente.
• Elsilenciadoryel motorsecalientanypuedencausarquernaduras.
Nolostoque.
• Reviseel espaciolibrepotencirnade lacabezaantesdeconducir
bajolasrarnasbajasde_.rboles,cables,cerrarnientosdepuertas,
etc.enloscualeseloperadorpodriaatorarseo serernpujadofuera
dela rn_.quina,Ioquepodriaresultaren lesionesgraves.
• Desenganchetodoslosernbraguesdelosaccesoriosy presione
totalrnenteel pedaldelfrenoantesdeintentararrancarel motor.
• Larn_.quinaest,.diseSadaparacortarc_spedresidencialnormal,
conunaalturanomayora 10".Nointentecortarcespeddernasiado
crecido,seco(porej.,pastura)nipilasdehojassecas.Elc_sped
ylashojassecaspuedenentraren contactoconel escapedel
motory/o acurnularseenla plataforrnade lacortadoradecesped,
convirti_ndoseen unpeligrodeincendio
• Utilicesolarnenteaccesoriosyaditarnentosaprobadosparaesta
rn_.quinapotelfabricantedela misrna.Lea,cornprenday siga
todaslasinstruccionesproporcionadasconlosaccesorioso
aditarnentosaprobados.Paraobtenerunalistadelosaccesorios
aprobadosy losarchivosadjuntos,Ilarne1-800-659-5917.
• Losdatosestadfsticosrnuestranquelosoperadoresde60 aSos
yrnayoresseven involucradosenunaltoporcentajedelesiones
relacionadascontractorescortacesped.Estosoperadoresdeben
evaluarsucapacidadparaoperareltractorcortac_spedenforrna
suficienternenteseguraparaprotegersea ellosrnisrnosy a los
dern_.scontralesionesgraves.
Si sepresentansituacionesque noest_.nprevistasen este
manualseacuidadosoyuseel sentidocornQn.Contacto1-800-
659-5917parainforrnaci6ny asistencia.
FUNCIONAiVIIENTO EN PENDIENTES
Laspendientessonunfactorirnportanterelacionadoconaccidentes
porderrapeyvuelcosquepuedenproducirlesionesgravese incluso
la rnuerte.Laoperaci6nen pendientesrequieremayorprecauci6n.
Si nopuederetrocederen la pendienteo sino sesienteseguro,no
realiceningunaoperaci6ndecorte.
Parasuseguridad,useel indicadordependientesqueseincluye
cornopartede estemanualpararnedirla pendienteantesdeoperarla
rn_.quinaenunazonainclinada.Sila pendientees mayorde 15grados
segQnel rnedidor,noopereestarn_.quinaenesesector,puespodria
causarlesionesgraves.
HagaIosiguiente:
• Podehaciaarribayabajodelaspendientes,nodeforrnatrans-
versal.Tengacuidadocuandocarnbiededirecci6nal operaren
pendiente.
• Est_atentoa loshoyos,surcos,baches,rocas,uotrosobjetos
ocultos.Elterrenodesniveladopuedevoltearla rn_.quina.Elcesped
altopuedeocultarobst_.culos.
• Vayaa bajavelocidad.ElijaunavelocidadIosuficienternentebaja,
de rnodoquenotengaquedetenerseohacercarnbiosrnientras
est,.sobrela pendiente.Losneurn_.ticospodrianperdertracci6n
sobrelaspendientesa[3ncuandolosfrenosfuncionaranapro-
piadarnente.Siernprernantengala rn_.quinaencarnbiornientras
desciendelaspendientes,parapoderfrenarconel motor.
• Sigalasrecornendacionesdelfabricanteparalospesoso contra-
pesosdelasruedas,pararnejorarlaestabilidaddelarn_.quina.
Pararecornendaciones,Ilarneal 1-800-659-5917.
• Tengaespecialcuidadoconloscolectoresdec_speduotros
aditarnentos.Losrnisrnospuedenrnodificarlaestabilidadde la
rn_.quina.
• Hagaquetodoslosrnovirnientosen laspendientesseanlentosy
graduales.Nocarnbierepentinarnentela velocidadnila direcci6n.
Unfrenadoo carnbiode velocidadrepentinospuedencausarque
el frentede larn_.quinaselevantey d_unavolteretahaciaatr_.s,Io
quepodriaproducirlesionesgraves.
• Evitearrancaro detenerseenunapendiente.Silosneurn_.ticos
pierdenlatracci6n,desenganchelascuchillasydescienda
lentarnentela pendiente.
No hagaIo siguiente:
• Nogiresobrelaspendientesarnenosqueseanecesario.Sies
posible,girelentarnenteygradualrnenteduranteeldescenso.
• Nocorteelc_spedcercade pozos,hundirnientosoterraplenes.La
cortadoradec_spedpuedevolcarserepentinarnentesiunade las
ruedasest,.sobreel hordedeunacantilado,zanjao siunhordese
desrnorona.
• Nointenteestabilizarlarn_.quinaponiendoelpieenel suelo.
• Noutiliceuncolectordec_speden pendientesernpinadas.
• Nopodeel c_spedhQrnedo.Unarnenortracci6npodriacausar
derrapes.
• Noparadescender.Elexcesodevelocidadpuedehacerqueel
operadorpierdaelcontroldelarn_.quina,ocasionandolesiones
graveseinclusolarnuerte.
• Norernolquecargaspesadasdetr_.sdelosaditarnentos(carritode
basuracargado,podadoraderodillos,etc)en pendientesrnayores
de5 grados.Cuandosedesplazapendienteabajo,elpesoadicional
tiendeaernpujareltractorypuedehacerquesepierdael control
delrnisrno(porejernplo,eltractorsepuedeacelerar,sereducela
capacidadparafrenaryrnaniobrar,losaccesoriospuedenplegarse
cornouncortaplurnasyhacerqueeltractorvuelque).
NINOS
Puedenocurriraccidentestr_.gicossiel operadornoest,.atentoa la
presenciade niSos.PotIogeneral,losniSossesientenatraidospor
estetipode rn_.quinasy sufuncionarniento.Noentiendenlosriesgos
ni lospeligros.NuncaasurnaquelosniSosperrnanecer_.nen el rnisrno
lugardondelosvioporQltirnavez.
• Mantengaa losniSosfueradel_.readetrabajoybajoestricta
vigilanciadeunadultoresponsableadern_.sdelpropiooperador.
Est_alertayapaguela rn_.quinasiunniSoingresaal_.rea.
• Antesy rnientrasest,.retrocediendo,mirehaciaatr_.sycuidequeno
hayaniSos.
NuncatransporteniSos,aQnconlacuchillaapagada.Podriancaerse
y resultarseverarnenteheridoso interferirconlaoperaci6nsegurade
la rn_.quina.
Tengaextrernaprecauci6ncuandoseaproxirneaesquinasciegas,
portales,arbustos,_.rbolesuotrosobjetosquepuedanirnpedirlever
a unniSoquesecruceenel recorridode larn_.quina.
6O

• ParaevitaraccidentesaloperarenrnarchaatrAs,siernpredesengan-
chelascuchillasantesdecolocarrnarchaatrAs.Siest_instalado,
el"ModoPrecaucidnMarchaAtr_s"(hojasdeoperarlarn_quina,
rnientrasquelospaseosala inversa)nodebeutilizarsecuandohay
ni_osuotraspersonaspresentes.
• Mantengaa losni_osalejadosdelosrnotoresenrnarchao calientes.
Puedensufrirquernadurasconunsilenciadorcaliente.
• RetirelaIlavecuandodejelarn_.quinasinvigilancia,evitequeuna
personasinautorizaci6nlarnaneje.
Noperrnitanuncaque losni_osrnenoresde 14a_osutilicenesta
rn_quina.Losni_osde 14a_osenadelantedebenleeryentenderlas
instruccionesdeoperaci6nynorrnasde seguridadcontenidaseneste
manual,yen la rn_quinaydebenserentrenadosysupervisadospor
unadulto.
REIVIOLQUE
• RernolqueL_nicarnenteconunarn_quinaquecuenteconun
enganchediseSadopararernolcar.Noacopleequiporernolcado
exceptoenelpuntodeenganche.
• SigalasrecornendacionesdelfabricanteenIoquerespectaalos
lirnitesdepesodelosequiposa rernolcaryalrernolqueenpendien-
tes.Pararecornendaciones,Ilarneal 1-800-659-5917.
• Nuncaperrnitala presenciadeniSosuotraspersonasdentroosobre
losequiposrernolcados.
• Enlaspendientes,elpesodelequiporernolcadopuedecausar
p_rdidadetraccidnyperdidadecontroldelarn&quina.
• Siernpreuseextralaprecauci6nrernolcandoconunarnaquina
capazdehacervueltasapretadas(p.ejpaseo"devueltacero"-enel
cortacesped).Hagaarnpliasvueltasparaevitaralgato-knifing.
• Desplaceselentarnenteydejedistanciaadicionalparafrenado.
• Noparadescender.
SERVIClO
Manejoseguro de lagasolina
Paraevitarlesionespersonaleso daSosrnaterialesseasurnarnente
cuidadosoal rnanipularla gasolina.Lagasolinaessurnarnente
inflarnableysusvaporespuedencausarexplosiones.Se puede
lesionargravernentesiderrarnagasolinasobreustedo sobrelaropa,
yaque_stasepuedeincendiar.L&veselapiely c&rnbiesede ropade
inrnediato.
• Utilices61olosrecipientesparagasolinaautorizados.
• NuncaIlenelosrecipientesenel interiorde unvehiculoo carni6n
o cajade rernolqueconrecubrirnientopl&stico.Coloquesiernpre
losrecipientesenel pisoylejosdel vehiculoantesde realizarla
carga.
• Cuandoseafactible,retireel equipoa gasolinadel carni6no
rernolqueyII_neloen elsuelo.Siestonoes posible,Ileneel
equipoen unrernolqueconun contenedorport&til,envezde
hacerloconunaboquilladispensadoradegasolina.
• Mantengalaboquillade Ilenadoencontactoconelhordedel
dep6sitode combustibleoconla aberturadel recipienteen todo
rnornento,hastaterrninarlacarga.1/outiliceundispositivode
boquilladeapertura/cierre.
• Apaguetodosloscigarrillos,cigarros,pipasy otrasfuentesde
cornbusti6n.
• Nuncacarguecombustibleenlarn&quinaenun espaciocerrado.
• Nuncasaquelatapadel cornbustibleniagreguecombustible
rnientrasel motorest&calienteo enrnarcha.Dejequeel motor
seenfrieporIornenosdosrninutosantesde volvera cargar
combustible.
• Nuncalleneen excesoel dep6sitode combustible.Lleneel
tanquenorn&sde 1/2pulgadapordebajode labasedel cuello
del tap6ndecarga,paradejarespacioparalaexpansi6ndel
combustible.
• Vuelvaa colocarlatapadelagasolinayajL_stelabien.
• Lirnpieel combustiblequese hayaderrarnadosobreel motory el
equipo.Trasladelarn&quinaa otrazona.Espere5 rninutosantes
de encenderelmotor.
• Parareducirel riesgode incendio,rnantengalarn&quinalirnpia
de pasto,hojasy deacurnulaci6ndeotros residuos.Lirnpielos
derrarnesdeaceiteo combustibleysaquetodoslosresiduos
ernbebidosde combustible.
• Nuncaguardelarn&quinao el recipientedecombustibleen un
espaciocerradodondehayafuego,chispaso luzpiloto,corno
porejernplodecalentadoresdeagua,calefactoresde arnbientes,
hornos,secadoresde ropau otrosaparatosa gas.
• Dejequelarn&quinaseenfriecincorninutospor Iornenosantes
de guardarla.
Servicio general
• Nuncaenciendael motoren espacioscerradosoen unazona
conpocaventilaci6n.Elescapedel motorcontienernon6xidode
carbono,ungasinodoroyletal.
• Antesdelirnpiar,repararo inspeccionarla rn&quina,cornpruebe
que la(s)cuchilla(s)ytodaslaspartesenrnovirnientosehayan
detenido.Desconecteel cabledelabujfay p6ngalohaciendo
rnasacontrael motorparaevitarqueseenciendaaccidental-
rnente.
• Reviseperi6dicarnenteparaasegurarsequelascuchillasse
detenganporcornpletoenaproxirnadarnentecinco(5)segundos
despu_sdeaccionarel controldedesenganchede la(s)
cuchilla(s).Si lascuchillasnosedetienendentrodeeste lapso
de tiernpo,suunidaddeber&ser reparadaporsudistribuidorde
servicioautorizadoMTD.
• Reviseconfrecuenciaelfuncionarnientodelsisternadefrenos
yaqueest,.sujetoa desgasteporlaoperaci6nnormal.Ajustey
efectL_ernantenirnientosegL_nserequiera.
61

• Reviselospernosdemontajedela(s)cuchilla(s)ydel motora
intervalosfrecuentesparaverificarqueest_nbienapretados.
Adem_.s,inspeccionevisualmentela(s)cuchilla(s)en buscade
daSos(porejemplo,desgasteexcesivo,abolladuras,rajaduras,
etc.). Reemplacela(s)cuchilla(s)Qnicamenteconlascuchillas
defabricantesde equiposoriginales(O.E.M.)listadasen este
manual.Elusode piezasquenocumplenconlasespecifi-
cacionesdelequipooriginalpodriatenercomoresultadoun
rendimientoincorrectoyadem_.sponeren riesgola seguridad.
• Lascuchillasdelaspodadorassonmuyafiladas.Envuelvala
cuchillao utiliceguantesyextremelasprecaucionescuando
efectQemantenimiento.
Mantengatodoslospernos,tuercasy tornillosbienajustados
paraasegurarsede quela m_.quinaseencuentraen condiciones
segurasde operaci6n.
• Nuncaaltereel sistemade enclavamientode seguridadni
otrosmecanismosde seguridad.Controleperi6dicamenteque
funcionencorrectamente.
Despu_sdegolpearconalgQnobjetoextraSo,detengael motor,
desconecteelcablede la bujfay conecteel motora masa.
Inspeccioneminuciosamentela m_.quinaparaversiest,.daSada.
Repareel daSoantesdearrancary ufilizarla m_.quina.
Nuncatratedehacerajusteso reparacionesa lam&quina
mientrasel motorest&enmarcha.
• Loscomponentesdel colectordec_spedy la cubiertade
descarga,estansujetosa desgasteydaSosque podriandejar
expuestaspartesen movimientoo permifirque searrojenobjetos.
Paraprotegersuseguridad,verifiquefrecuentementetodoslos
componentesy reempl_.celosinmediatamentes61oconpiezasde
losfabricantesdel equipooriginal,listadosen estemanual.Eluso
de piezasque nocumplenconlasespecificacionesdel equipo
originalpodriatenercomoresultadoun rendimientoincorrectoy
adem_.sponeren riesgola seguridad.
• Nocambielaconfiguraci6ndel reguladordel motorni Ioopere
a sobrevelocidad.El reguladordel motorcontrolala velocidad
m_.ximaseguradefuncionamientodel motor.
• Mantengao reemplacelasefiquetasde seguridade instrucciones
segQnseanecesario.
Respetelasnormasreferentesa ladisposici6ncorrectay las
reglamentacionessobregasolina,aceite,etc.paraprotegerel
medicambiente.
• SegQnla Comisi6ndeSeguridadde Productosparael Consu-
midorde losEstadosUnidos(CPSC)y laAgenciade Protecci6n
Ambientalde losEstadosUnidos(EPA),esteproductotieneuna
vidaQtilmediade siete(7)aSos,6 270horasdefuncionamiento.
AIfinalizarla vidaOtilmedia,adquieraunam_.quinanuevao haga
inspeccionaranualmente_staSearsporunou otrodistribuidorde
serviciosparacerciorarsedequetodoslossistemasmec_.nicos
yde seguridadfuncionancorrectamenteyno tienenexcesivo
desgaste.Si noIohace,puedenproducirseaccidentes,lesiones
o muerte.
NO MODIFIQUE EL MOTOR
Paraevitarlesionesgraveso lamuerte,nomodifiqueel motorbajo
ningunacircunstancia.Si cambialaconfiguraci6ndel reguladordel
motorel motorpuededescontrolarsey operara velocidadesinsegu-
ras.Nuncacambielaconfiguraci6ndef_.bricadel reguladordel motor.
AVlSO REFERIDO A EMISIONES
Losmotoresqueest_.ncertificadosycumplenconlasregulaciones
de emisionesfederalesEPAyde CaliforniaparaSORE(Equipos
peque_ostodoterreno)est_.ncertificadosparaoperarcongasolina
comQnsinplomoy puedenincluirlossiguientessistemasde control
de emisiones:Modificaci6nde motor(EM)ycatalizadorde tresvias
(TWO)siest_.nequipadosde esamanera.
GUARDACHISPAS
EstamAquinaest,.equipadaconunmotorde combusti6ninternay
nodebeserutilizadaen o cercade unterrenoagrestecubiertopor
bosque,malezaso hierbaexceptosiel sistemade escapedelmotor
est,.equipadoconunamortiguadordechispasquecumplaconlas
leyeslocaleso estatalescorrespondientes,encasode haberlas.
Si seutilizaunamortiguadorde chispasel operadorIodebemantener
en condicionesde usoadecuadas.Enel Estadode Californialas
medidasanteriormentemencionadassonexigidasporIcy(Arficulo
4442del C6digode RecursosPOblicosde California).Esposible
queexistanleyessimilaresenotrosestados.Lasleyesfederalesse
aplicanenterritoriosfederales.
Puedeconseguirelamortiguadordechispasparael silenciadora
travesdesudistribuidorautorizadode motoreso poni_ndoseen
contactoconel centrode servicioSears.
62

SJlVlBOLOS DE SEGURIDAD
Estap&ginarepresentay describelaseguridadlossimbolosquepuedenpareceren esteproducto.Lea,comprenda,y sigatodasinstrucciones
enla m_quinaantesprocurarparareuniry operar.
0
AL
LEA EL MANUAL(S) DEL OPERADOR
leido, entienda, y siga todas las instrucciones en el manual(s) antes de procurar montar y funcionar
PELIGRO-- DE EL CORTE DE PIE
Nunca transporte pasajeros. Nunca transporte ni_os, aun con la cuchilla apagada.
PELIGRO-- DE EL CORTE DE PIE
Retroceda lentamente. Siempre mire hacia abajo y hacia atr_is antes y mientras retrocede, para evitar
accidentes.
PELIGRO-- DE EL CORTE DE PIE
Guarde manos y pies lejos de hacer girar partes.
PELIGRO-- ESCOMBROS LANZADOS
Quite objetos que pueden set lanzados pot la I_imina en cualquier direcci6n. Lleve galas de
seguridad..
PELIGRO-- ESCOMBROS LANZADOS
Quite objetos que pueden set lanzados pot la I_imina en cualquier direcci6n. Lleve galas de
seguridad.
ERSONAS PRESENTES
Guarde alas personas presentes, a los ayudantes y a ni_os pot Io menos 75 pies lejos.
PELIGRO-- CUESTAS
Use extra la precauci6n en cuestas. No siegue cuestas mayores que 15°.
ADVERTENCIA -- SUPERFICIE CALIENTE
Las partes del motor, especialmente el silenciador, Ilega a set muy caliente durante la operaci6n.
Permita motor y silenciador para ponerse frio antes de tocar.
PELIGRO-- GIRANDO HOJAS
Para reducir el riesgo de herida, guarde manos y pies lejos. No funcione a menos que la tapa
de descarga o el receptor de hierba est_n en su lugar apropiado. De ser dahado, sustituya
inmediatamente.
63

_- Mireymantengaestehive[conunJrbo[vertical
Z
IJJ
o[aesqu[nadeunedifido...
15°
Useesta paginacomo guia para determinar en qu_ pendientes no puede operar el tractor de manera segura.
Nooperelacortadoradecespeden dichaspendientes.Nocorteen inclinacionesmayoresde 15grados(elevaci6naproximadade 2 1/2piesporcada10pies). Eltractor
cortacespedpodriavoltearsey causarlesionesgraves.Enlaspendientesopereconlostractorescorta-cespedhaciaarribay abajo,nuncade formatransversal.
£5

ROTATING BLADES CAUSE
SERIOUS INJURY OR DEATH
DONOTMOWWHENCHILDRENOROTHERSARE
AROUND
NEVERCARRYCHILDRENEVENWITHBLADE(S)OFF.
LOOKDOWNANDBEHINDBEFOREANDWHILE
BACKING.
MOWINGINREVERSEISNOTRECOMMENDED.
ADVERTENCIA
EstesimboloseRalaa cabo las instruccionesdesegu-
ridad importantesque, si nose siguen,podria poner
en peligrolaseguridadpersonaly / o la propiedadde
si mismoy los dem,_s.Lea y siga las instruccionesen
estemanual antesde intentaroperar esta m_tquina.El
incumplimientode estas instruccionespuede resultar
en lesionespersonales.Cuandoveaestesimbolo de
prestaratenci6na sus iADVERTENCIA!
Su Responsabilidad
Restringirel usode esta ma.quinade poder alas per-
sonas que leer,comprendery seguir las instruccionesy
advertenciasen este manualyen la m,_quina.
65

IMPORTANTE: Sutractorseentregaconaceitedemotoren el
motor.Sinembargo,debecornprobarel niveldeaceiteantesde
operar.Consultela secci6nde Servicioy Mantenirnientoparaobtener
instrucdonessobrelacornprobad6ndelniveldeaceite.
CONEXION DE LOS CABLES DE LA BATERIA
PROPOSlClON 65 DE CALIFORNIA
Postesdela bateria,terrninalesyaccesoriosrelacionados,con-
fienenplornoycornpuestosde plorno,sustanciasqueen el Estado
de Californiaporcausarc_.ncery dafiosreproducfivos.L_.veselas
rnanosdespu6sde rnanipular.
Cuandoconecteloscablesde la bateria,siernpreconecteel posifivo
I(rojo)dealarnbrea suterminalenprimerlugar,seguidoporel
pgafivo (Negro)dealarnbre.
Porrazonesde envio,tantodecablesde la bateriade suequipose
hanquedadodesconectadode losterrninalesen laf_.brica.Para
conectarloscablesde la bateria,hagaIosiguiente:
NOTA: La terminalde Pospositivode la bateriaest,.rnarcada.(+).El
terminalnegativode labateriaest&rnarcadaNeg.(-).
1. Quitela cubiertadepl&stico,siest&presente,desdeelterminal
positivode labateriayconectarelcablerojoalterminalpositivode
labateria(+)conel pernoytuercahexagonal.Veaselafigura1.
f
J
J
J
J
J
J
J
J
J
J
J
J
J
J
Figura1
2. Quitelacubiertadepl_.stico,siest,.presente,desdeelterminalnega-
tivode labateriayconectarel cablenegroalterminalnegativode
la bateria(-) conel pernoytuercahexagonal.V6asela figura1.
3. La posici6nde la botadegornarojasobreelterminalpositivode
la bateriaparaayudara protegerde lacorrosi6n.
NOTA: Si la bateriaseponeenserviciodespuesde la fechaindicada
en lapartesuperiorde la bateria,carguela bateriacornoseindicaen
el Servicioy Mantenirnientode la secci6ndeeste manualantesde
operarel tractor.
ENVlO BRACE ELIMINACI(SN
AsegQresedequeel motordel tractorcortacespedes, retirelaIlave
de encendido,yponerel frenoantesdequitarla Ilavedeenvio.
IConsultela secci6nde Operaci6nparaobtenerinstruccionessobre
lc6rnoestablecerel frenode estacionarniento.
• Busquela Ilavedeenvio,siexiste,ylaetiquetadeadvertenciaque
acornpafiaa encontrarseenel ladoderechode lacortadorade
cesped,entrelatolvadedescargay laplataforrnadecorte.V6ase
la figura.2.
• Coloquelapalancadeelevaci6ndecubiertaen laposici6nrn_.s
altadecorte.ConsulteAjustede laalturade corteenlasecci6nde
Operaci6ndeestemanual.
• Mientraspresionalatolvadedescargahaciala rn_.quinaconla
rnanoizquierda,retirela Ilavedetransporternaritirnoconla rnano
derechaagarrandoentreel pulgaryel dedoindiceygirandoen
sentidohorario.
ElenvioIlave,usadoparalosprop6sitosQnicarnenteel envasado,
debeserrernovidoydesechadoantesde operarsucortacesped.
f
Figura2
Lacubiertade lasiegaescapazdelanzarobjetos.La faltade operar
el cortac6spedsinlacubiertade descargaen la posici6napropiada
de operaci6npodriaresultarenlesionespersonalesgravesy / o I
[dafiosa a propedad. ]
66

QUE UNE EL VOLANTE
Siel volantedesutractorno Ileg6adjunta,el hardwarede la
colocaci6nsehaembaladoen el volante,pordebajode latapadel
volante.Concuidadolatapadela palancadelvolantey quitarel
hardware.
1. Conlas ruedasdeltractor,apuntandodirectamentehaciadelante,
colocarel volantesobreel ejede direcci6n.
2. Coloquela arandela(conla parteahuecadahaciaabajo)sobreel
volantey seguraconel tornillohexagonal.Wase la figura.3.
Coloquela tapadelvolantesobreelcentrodelvolanteyempujehacia
abajohastaque"clics"ensu lugar.
(
Figura3
COLOCACION DE LA SEDE
NOTA: Si sehaenviadosuinstaladasenel asientohaciaatr&sen el
asientodeleje soporte,tirede la pesta5aseencuentraen la sedede
paradaymantenerlaabiertamientrasdeslizael asientodelasientodel
pivotesoporte.
Siel asientode sutractornoseadjunt6enla f&brica,serefierena los
siguientespasos:
1. Lostornillosdeposici6ndelhombro(queseencuentraenlabasede
la sede)dentrode lasaberturasde la ranuraen elasientodel eje
soporte.
2. Fig.4.
3. Desliceel asientoligeramentehaciaatr&senel asientodeleje
soporte,alineandoel centrode la ranuraposteriorenel ejedel
soporteconel agujeroquequedaen la basedelasiento.
4. Seleccionelaposici6ndeseadaparaelasiento,yseguroconelbot6n
deajustede retirarseantes.
5. Paraajustarlaposici6ndelasientoenlosmodelos,equipados,afloje
la perilladeajusteenla parteinferiordel asiento.Desliceel
asientohaciaadelanteo haciaatr&scomosedesee.Vuelvaa
apretarla perillade ajuste.
Figura4
PRESlON DE LAS LLANTAS
M_ximapresi6nde losneurn_ticos,en ning_ncasoesde30 psi.
Igualdadde presi6nde losneumb.ticosdebenmantenerseen todo
momento.Nosobrepasarnuncalapresi6nm&ximade infladofiguran
_ene fancode neum&tco.
Lapresi6nde losneumb.ticosrecomendadade funcionamientoesel
siguiente:
• Aproximadamenteel 10psiparalosneum&ticostraseros
• Aproximadamenteel 14psiparalosneumb.ticosdelanteros
IMPORTANTE: Refi_rasea lapareddel neum&ticoparala ISP
recomendadoso m&ximosfabricantede neum&ticoses exacto.No
inflardemasiado.Lapresi6ndel neumb.ticodesigualpodriacausarque
laplataformade corteparacortarde maneradesigual.
67

H
B
D
G
F
E
Figure5
A Palancadelfrenodeestacionamiento
B Aceleradory palancade controldeChoke
C Interruptordeencendido
D Levantelapalancade la cubierta
E Tomadefuerzade palanca(BladeEngage)
F Portavasos
G DeVelocidad
H Pedalde freno
NOTA:Cualquierreferenciahechaenestemanualal ladoDERECHO
o IZQUIERDOdeltractordebeentendersetalcomoseobserva
desdelaposici6ndeloperador.
Curnple con los est_ndares de seguridad de ANSI
Lasm_.quinasquitanievedeCraftsmancumplenconlosest_.ndaresdeseguridaddel
institutoestadounidensedeest_.ndaresnacionales(ANSi).
68

DE VELOCIDAD
La palancadecontrolde velocidad,ubicadoenel lado
izquierdodel tablerodel tractorde la consola,le perrnite
regularlavelocidadbajadeltractordel cesped.Para
usarlo,presioneel pedalde freno-ernbragueymover
la palancadela rnuescade frenodeestacionarnientoy
haciadelanteparaaurnentarla velocidadentierradel
tractor.CuandolavelocidaddeseadasehaIlegadoa sol-
tarla palancaenunarnuescaadecuadapararnantener
esavelocidad.
Parafrenarla velocidadentierradeltractor,presioneel
pedalde freno-ernbraguey moverlapalancade control
develocidadhaciaatr_.sy selanzaa unarnuesca.
FRENO DE ESTACIONAIVIIENTO
PARK
BRAKE
Paraajustarel frenodeestacionarniento,suelte
totalrnenteel pedaldefreno.Moverlapalancadel frenodeestaciona-
rnientoen laposici6nON.Suelteel pedaldel frenoparaqueelfreno
deestacionarnientoa participar.
Paraliberarelfrenode rnano,presioneel pedalde frenoymoverla
palancadel frenode estacionarnientofuerade la posici6nONyen la
posici6nOFE
NOTA: Elfrenodeestacionarnientosedebeestablecersiel operador
dejaelasientoconel motoren rnarchao el motorseapagar_.
autorn_.ticarnente.
ACELERADOR Y PALANCA DE CONTROL DE
ESTRANGULADOR
Elacelerador/ cebadorpalanca
decontrolseencuentraen el lado
derechodelpanelde instrurnentos
deltractor.Estapalancacontrola
la velocidaddelmotory, cuandose
ernpujatodoelcarninoa seguir,el
controldelestranguladortarnbi_n.
Cuandoseponeenunaposici6n
deterrninada,el aceleradorser_.
rnantenerunavelocidaduniforrne.
IMPORTANTE: Cuandoopereel
tractorconla plataforrnade corte
SLOW
cornprornetido,estarsegurosde quela palancadelaceleradorest,.
siernpreenel FAST(conejo)laposici6n.
INTERRUPTOR DE ENCENDIDO
Elrn6dulode interruptorde la
Ilaveseutilizaparainiciaryparar
el motor.IntroduzcalaIlaveen
el rn6dulode interruptorde la
Ilaveygirehacialaderechaa
la posici6nSTART.Sueltela
teclaenla posici6ndecorte
normalunavezqueel motorha
arrancado.Losfarosseactivar_.
autorn_.ticarnente.
Paraapagarel motorgirea laizquierdala Ilavedeencendidohastala
posici6nde STOR
IMPORTANTE:Antesde operareltractor,serefierentantoal
"Sisternade bloqueodeseguridad"y"Arranquedelmotor"rn_.s
adelanteenesta secci6ndeestemanualparainstruccionesdetalladas
sobrela Ilavedeencendidodel rn6dulo.
Nuncadejea un equipoqueejecutasinsupervisi6n.Siernpre
desconectetornade fuerza,palancade carnbiosepongaen
posici6nneutral,elfrenodernano,apagueel motoryquitelaIlave
paraevitarel arranquenodeseado.
LEVANTE LA PALANCA DE LA CUBIERTA
Encontradoenel guardabarrosderechodesutractor,la
palancadelevantarlacubiertaseusaparacarnbiarlaaltura
de la plataforrnadecorte.Parautilizar,moverlapalancaala
izquierda,secolocar_,en laprirneracategoriarn_.sadecuada
parasuaplicaci6n.
PTO (BLADE ENGAGE) PALANCA
Encontradoenel guardabarrosderechodeltractor,latorna
de fuerza(hojade participar)la palancaseutilizaparapoder
dedicarsea laplataforrnade corteode otto tipo(disponible
porseparado)losarchivosadjuntos.Paraoperar,rnuevala
palancadetodoelcarninoa seguir.Moviendola palanca
haciaatr_.s,todoelcarninohacialaposici6nOFFPTO
desconectade alirnentaci6na la plataforrnade corte/ archivo
adjunto.
NOTA: Latornadefuerza(hojade participar)de lapalanca
debeestarenla desernbragar(PTOOFF)cuandola posici6n
de arrancarel motor.
PORTAVASOS
Titulardela tazadeltractorseencuentraenel guardabarrosa la
izquierdadelasiento.
BOTON DE AJUSTE DEL ASIENTO
Laperillade ajustedelasientoseencuentraen elladobotterndel
asiento.Useestaperillaparaajustarel asientohaciaadelanteo hacia
atr_.sa unaposici6ndetrabajoc6rnodasoltandoel bot6n,la posici6n
del asientoa lapreferenciaquenecesitayluegovolvera apretarla
perilla.
EIVIBRAGUE-PEDAL DE FRENO
Elernbrague-pedaldelfrenoest,.situadoenel ladoizquierdodel
tractorde cesped,a Iolargodelestribo.Pisarelernbrague-pedalde
frenoforrnaparteporla desaceleraci6ncuandoel tractoralcarnbiar
lasvelocidades(Refi_rasea la palancade controlde velocidad).
Presioneel pedalhastael rondoparacontratarlosfrenosde discoy
Ilevarel tractora una paradacornpleta.
NOTA: Elpedaldebe serpresionadaparaencenderel motor.
ConsulteInterruptoresde enclavarnientode seguridadrn_.sadelante
en estasecci6nde estemanual.
CARGA DE ACEITE Y GASOLINA
Aceite
69

IMPORTANTE:Su tractorseenviaconaceiteen el motor.Sin "" "
embargo,ustedDEBEcontrolarel nivelde aceiteantesde hacerlo
fundonar.Vealasecci6n"ServMoy Mantenirniento".
Gasolina
Tengarnuchocuidadoal trabajarcongasolina.Lagasolinaessurna-
rnenteinflarnableysusvaporespuedencausarexplosiones.Nunca
carguecombustibleenla rn_.quinaen unespaciocerradoo cuandoel
motorest,.calienteo en rnarcha.Apaguecigarrillos,cigarros,pipasy
otrasfuentesde cornbusti6n.
NOTA: Cornpregasolinaen peque_ascantidades.Nousegasolina
quehayaquedadode laternporadaanterior,pararninirnizarla
forrnaci6nde dep6sitosdegornaenel sisternadecombustible.
• Estemotorest,.habilitadoparafuncionarcongasolinasinplorno.
Paraobtenerel rnejorresultado,Ileneel dep6sitodecombustible
0nicarnentecongasolinasinplornolirnpiay fresca,enun surtidor
queindiqueunoctanajeiguala 87o rn_.s.
• Elgasohol(hasta10%dealcoholetilico,90%degasolinasin
plornoporvolurnen)esuncombustibleaprobado.Noseaprueba
el usode otrasrnezclasdegasolina/alcohol,cornoE85.
• El_terrnetilicoterciario-butilico(MTBE)ylasrnezclasde
gasolinasinplorno(hastaun rn_.xirnode 15%de MTBEpor
volurnen)soncombustiblesaprobados.Noseapruebaelusode
otrasrnezclasdegasolina/eter.
• Llenarel dep6sitode combustibleal airelibreo enlugarbien
ventilado.
• NuncaIleneenexcesoel dep6sitodecombustible.Lleneel
tanquenorn_.sde1/2pulgadapordebajode la basedelcuello
deltap6nde carga,paradejarespacioparala expansi6ndel
combustible.
• Nuncasaquela tapadelcombustibleniagreguecombustible
rnientrasel motorest,.calienteo en rnarcha.Dejequeel motor
seenfrieporIornenosdosrninutosantesdevolvera cargar
combustible.
• Lirnpieel combustiblequesehayaderrarnadosobreelmotoryel
equip&Trasladela rn_.quinaa otrazona.Espere5 rninutosantes
deencenderel motor.
1. EnciendaelmotorapagadoydejarqueenfrieelmotorporIornenos2
rninutosantesdequitarla tapadelcombustible.Eltanquedegaso-
linaest,.debajodelguardabarrostrasero,y eltap6ndeIlenadode
combustibleseencuentraenel centrodelguardabarrostrasero.El
tap6ndelcombustibleest,.arnarradoaltractorparairnpedirquese
pierda.Nointenteretirareltap6ndeltractor.
2. Llenarel dep6sitode combustibleconla gasolina.
Vuelvaa instalarlatapadelcombustible.
NOTA: Eltractorest,.equipadoconunatapade atado,combustible
trinquete.Dejede Ilenareltanqueunavezqueelcombustiblees
vistodentrodela bocade Ilenado.Estoaseguraqueunaexpansi6n
delvolurnenadecuadosecreaIocontrario,elcombustiblesepuede
derrarnarlacreaci6nde unasituaci6npeligrosa.NOrernatarel tanque
decombustible.Wase la figura.6.
J
Figura 6
Evite lesiones personales graves o la muerte
• Enlaspendientesconduzcahaciaarribay haciaabajo,
no deforrnatransversal.
• Eviternaniobrasdegirobruscas.
• Nooperela unidaden &reasdondepuedederraparo
ladearse.
• Si la rn&quinadejadesubirlapedientedetengalas
cuchillasyretrocedalentarnentebajandola pendiente.
• Nocorteel c_spedcuandohayaniSosu otras
personascerca.
• NuncatransporteniSos,ni siquierasilascuchillas
estAndesconectadas.
• Mirehaciaabajoy haciaatrAsantesyrnientrasopera
en rnarchaatrAs.
• Mantengatodoslosdispositivosdeseguridad
(protecciones,escudose interruptores)en sulugary
en correctofuncionarniento.
• Retirelosobjetosque puedanserarrojadosporlas
cuchillasencualquierdirecci6n.
• Conozcala ubicaci6ny funci6ndetodosloscontroles.
• Aseg0resedeque lascuchillasyel motorsedetengan
antesdecolocarlasrnanoso lospiescercade las
cuchillas.
• Antesde abandonarla posici6ndeloperafor,dejarde
tractor,desenganchelascuchillas,coloqueelfrenode
rnano,apagueel motory retirelaIlave.
Lea el manual del o erador
70

SISTEMA DE BLOQUEO DE SEGURIDAD
Elsisternade Noqueode seguridadest,.diseSadoparala operaci6n
seguradel tractor.Si estesisternanuncadejade funcionarcorrecta-
rnente,no opereel tractor,contacteinrnediatarnenteconsuSears
Parts& RepairServiceCenter.
• Elsisternade bloqueode seguridadirnpideel arranquedel
vehiculoa rnenosqueel frenode estacionarnientoy sededica
a latornadefuerza(BladeEngage)palancaest,.en laposici6n
OFFdesconectadoposici6n0.
• Elsisternade bloqueode seguridadseapagar_,autorn_.ticarnente
el motorsiel operadordejael asientoantesde iniciarel frenode
estacionarniento.
• Elsisternade Noqueode seguridadseapagar_,autorn_.ticarnente
el motorcuandoel operadorabandonasuasientodel tractorcon
la tornadefuerza(BladeEngage)palancacornprornetido,inde-
pendienternentede siest,.activadoel frenodeestacionarniento.
INTERRUPTOR DE ENCENDIDO
Elinterruptordeencendidoseactivaparaarrancarelmotor.InsertelaIlaveen
elinterruptordeencendidoygirarhacialaderechaa laposici6nSTART.Suelte
lateclaenlaposici6nON,unavezqueelmotorhayadespedido.Wasela
figura.Z
Paraapagarelmotor,girelaIlavedeencendidoensentidoantihorariohastala
_osici6nOFEWaselaligura.ZAccionadoelfrenodeestacionarniento.
NUNCA dejela rn_.quinafuncionandosinatenci6n.Siernpre
desconectelatornadefuerza,rnuevala palancadecarnbiosa la
posici6nneutral,pongaelfrenode rnano,apagueel motoryretirela
Ilaveparaevitarelencendidoaccidental.
IMPORTANTE:Antesdeoperarel tractor,serefierentantoa los
interruptoresde seguridaddispositivode seguridady arrancarel motor
enla secci6nde0peraci6ndeestemanualpararn&sinstrucciones
detalladas.
Encendido/luces
apagado
Encendido
Figura 7
Para activar el freno de estacionamiento:
1. Cornpletarnenteel pedalde frenoyrnantengahaciaabajoconel
pie.
2. Moverlapalancadel frenodeestacionarnientohastael rondoy
en elfrenode estacionarniento(ON)la posici6n.
3. Suelteel pedaldelfrenoparaqueel frenode estacionarnientoa
participar.
4. Paraliberarel frenodeestacionarniento:
5. Presioneel pedalde frenoymoverla palancadelfrenode
estacionarnientofueradelfrenodeestacionarniento(ON)la
posici6nyen la posici6nOFE
AJUSTE DE LA ALTURA DE CORTE
Seleccionelaposici6ndealturadelaplataforrnadecorternediantela
colocaci6nde lapalancade levantarlacubiertaencualquierade
losseisdiferentesrnuescasalturadecorteenel ladoderechode
ladefensa.
Mantengalasrnanosypiesdedistanciade laaberturadedescarga
de laplataforrnadecorte.
ARRANQUE DEL MOTOR
Nohagafuncionarel tractor,siel sisternade bloqueonofunciona
correctarnente.Estesisternaruedise_adoparasuseguridady
protecci6n.
NOTA: Refi_rasea lagasolinayel aceitehastacornpletarlasinstruc-
clonesanteriorrnenteenestasecci6n.
1. Insertela Ilavedeltractorenel interruptordeencendido.
2. Colocarlatornadefuerza(BladeEngage)palancaenlaposici6nOFF
desconectadoposici6n0.
3. Elfrenodeestacionarnientodeltractor.
4. Activeel controldelestrangulador.
5. Girea la izquierdala Ilavede encendidoa la posici6ninicial.
Despu_sde queel motorarranque,sueltelated& Sevolver_,a la
ON(Normalo cortarel c_sped)posici6n.
NOtienenla Ilaveen la posici6ninicialdurantern_.sde diezsegun-
dosa lavez.SiIohacepuedecausardaSosal motorde arranque
el_ctricodelmotor.
6. Despu_sde queel motorarranque,desactivarel controldel
estranguladory coloqueel controldelaceleradorenla posici6n
de FAST.
NOTA: NOdejeel controldelestranguladorenduranteelfuncio-
narnientodel tractor.SiIohace,dar_.lugarauna rnezcla"rica"de
combustibleycausarqueel motorfuncionernal.
71

PARO DEL MOTOR
Sisegolpeaunobjetoextra,o,detengael motor,desconecteel
cabledela bujfa(s)ytierracontrael motor.Inspeccionarcuidadosa-
menteelequipodelosda_os.Reparaci6ndelosda_osantesde
rencar yde funconamento.
1. Si sededicanalas hojas,colocarla tomade fuerza(Blade
Engage)palancaenla posici6nOFFdesconectadoposici6nO.
2. Girea laizquierdala Ilavede encendidoa laposici6nSTOR
3. Retirela Ilavedela Ilavedeencendidoparaevitarel arranqueno
deseado.
LA CONDUCCION DEL TRACTOR
Evitecomienzapronto,el excesodevelocidadyparadasbruscas.
Nodejeel asientodel tractor,sincolocarla tomadefuerza(Blade
Engage)palancaen laposici6nOFFdesembragar0 posici6n,
presionandoel pedalde frenoyaccionadoel frenodeestaciona-
miento.Sino puedesalirdeltractorsinvigilancia,tambi_na suvez
la Ilavedeencendidoapagadoyquitarla Ilave.
Siempremirehaciaabajoydetr_.santesydurantelacopiade
seguridadparaevitarla copiadem_.sde unaccidente.
Pisarel embrague-pedaldefrenoparaliberarel frenodeestaciona-
mientoy dejarqueel pedal.
Moverla palancadel aceleradorenel FAST(conejo)laposici6n.
Coloquelapalancade cambiostantoenla posici6ninversao
FORWARD.
IMPORTANTE:NOutilizarla palancadecambiosparacambiarla
direcci6ndela marchacuandoel tractorest_en movimiento.Siempre
utiliceel frenode pedaldeembragueparaqueel tractora unaparada
completaantesdepasar.
Suelteel frenodeestacionamientopresionandoelembrague-pedalde
frenoy el posicionamientodela palancadecontroldevelocidadenla
posici6ndeseada.
EnprimerlugarIMPORTANTE:-tiempo,losoperadoresdebenutilizar
posicionesdevelocidadde 1o 2.Convi_rtetetotalmentefamiliarizado
conel funcionamientodeltractory loscontrolesantesde operarel
tractoren lospuestosde mayorvelocidad.
Embrague-pedaldefrenolentamenteparacolocarlaunidaden
movimiento.
Eltractorde c_spedesIlevadoa unaparadapresionandoel
embrague-pedalde freno.
NOTA:Cuandooperela unidadinicial,habr_,pocadiferenciaentrelas
dosvelocidadesm_.saltashastadespu_sdeloscinturonesseban
sentadoen laspoleasduranteel periodode rodaje.
Antesde abandonarla posici6ndel operadorporcualquierraz6n,
separarlashojas,ponerla palancadecontroldevelocidaden
neutral,pongael frenode estacionamiento,paradamotorapagadoy
quitarla llave.
IMPORTANTE:AIpararel tractor,porcualquiermotivo,mientrasque
en unasuperficiedehierba,siempre:
1. Coloquelapalancade cambiosen puntomuerto,
2. Apliqueel frenodeestacionamiento,
3. Apagueel motoryquitarlaIlave.Si Iohace,reducir_,al minimola
posibilidaddeque sucespedsedore'"'porel escapecalientedel
motorde sutractor.
72

Si seestancala unidadconel controlde velocidadenaltavelocidad,
o sila unidadnofuncionar_,conla palancadecontrolde velocidaden
condicionesde bajavelocidad,sigaestospasos:
1. La palancadecarnbiosen puntornuerto.
2. Reinicieelmotor.
3. Coloquela palancadecontrolde velocidaden la posici6nrn_.s
altavelocidad.
4. Ernbrague-pedaldefrenocornpletarnente.
5. Pisarelernbrague-pedalde freno.
6. Coloquela palancadecontrolde velocidaden la posici6n
deseada.
7. Coloquela palancadecarnbiosencualquieradeavanceo retro-
ceso,yseguirlosprocedirnientosnorrnalesde funcionarniento.
CONDUCCION EN LAS LADERAS
Refierenal anchodela pendienteen la seguridadde laspr_.cticasde
operaci6nirnportantesecci6ndelmanualparaayudara deterrninar
zonasde laderadondepuedeoperareltractorcontotalseguridad.
Nocorteel cespeden pendientesconunainclinaci6nde rn_.sde 15
grados(unaurnentodeaproxirnadarnente2-1/2piescada10pies).
Eltractorpuedevolcary causarlesionesgraves.
INVOLUCRAR A LOS BLADES
Participaci6ndelatornade fuerza(BladeEngage)lastransferenciasde
energiaala plataforrnadecorteo deottotipo(disponibleporseparado)
losarchivosadjuntos.Paraparticiparde lashojas,hagaIosiguiente:
1. Moverlapalancade controldelaceleradora la r_.pida(conejo)la
posici6n.
2. Sujetela tornade fuerza(BladeEngage)ygirarla palancade
todoelcarninoa seguiralosnovios(ON)laposici6n.
3. Mantengala palancadel aceleradoren el FAST(conejo)la
posici6nparael usorn_.seficientede laplataforrnade corteo de
otrotipo(disponibleporseparado)losarchivosadjuntos.
IMPORTANTE: Enel reversoPrecauci6nrnodoqueel motorse
apagar_,autorn_.ticarnentesi latornadefuerzaest,.comprornetidacon
lapalancade controldevelocidadenla posici6ninversaparaviajar
conla Ilavedeencendidoenla posici6nnormalde siega.
USO DE LA CUBIERTA DE LEVANTE LA
PALANCA DE
Paraelevarla plataforrnade corte,moverla palancadeelevaci6nde
cubiertaa la izquierda,luegosecolocaen laranurarn_.sadecuada
parasuaplicaci6n.ConsulteAjustelaalturade corteanteriorrnenteen
estasecci6n.
• Corteel c_spedy laspendientes,nuncatransversal.
Tengaextrernaprecauci6nalcarnbiarde direcci6nen las
pendientes.
Watchparalosagujeros,grietas,baches,piedrasu otrosobjetos
ocultos.Terrenoirregularpuederevertirla rn_.quina.Elcesped
altopuedeocultarobst_.culos.
Evitegirarcuandosecirculaporunapendiente.Si unavez,debe
hacerse,a suvez porlapendiente.El regresode unapendiente
aurnentala posibilidadde un rollover.
Evitedetenersecuandoseconducepotunapendiente.Sies
necesariodetenerrnientrasseconducepotunapendiente,
puestaen rnarchasinproblernasyconcuidadoparareducirla
posibilidadde volteareltractorhaciaatr_.s.
73

CORTAR
Paraayudara evitarelcontactoconlacuchillao unalesi6nen
elobjetolanzado,Mantengaa losespectadores,losayudantes,
losniSosylasmascotasporIomenos75piesde distandade la
m_.quinamientrasest,.enfundonamiento.Paradade lam_.quina,si
alguienentraenel _.rea.
La siguienteinformaci6nser_.Qfilcuandoseufilizala plataformade
corteconsutractor:
Plande supatr6nde corteparaevitarla descargade materiales
hada lascarreteras,aceras,transeQntes,etc.Adem_.s,evitematerial
quesedescargacontraunaparedo unaobstrucd6nque puede
causaraltamateriala rebotarhaciael operador.
FAROS
• LasI&mparasest&nONcuandoel motordeltractorseest&
ejecutando.
• Laslucesseapagacuandola Ilavede contactosemuevea la
posici6nSTOR
• Nocorteel c6speda la velocidadde terrenoelevado,especial-
mentesiseha instaladoun kitde mantilloo colectorde cesped.
• Paraobtenerlosmejoresresultadosserecomiendaquelas
dosprimerasvueltassecortar&conlaaprobaci6nde lagesti6n
arrojadohaciael centro.Traslasdosprimerasvueltas,invertirel
sentidode lanzarla descargahaciael exteriordela balanzade
corte.Estoledar&unamejoraparienciaalcesped.
• Nocorteelcespeddemasiadocorto.Pastocortoinvitacrecimiento
demalashierbasy losamarillosconrapidezenel tiemposeco.
• Cortarel cespedsiempresedebehacerconel motora todogas.
• Bajolascondicionesm_.spesadas,puedesernecesariovolver
sobrelazonadelcorteporsegundavezparaobteneruncorte
limpio.
• NOintentecortarespesamalezaymalashierbasyelpastomuyalto.
Sutractorestadise_adoparacortarelc6sped,uncepillonoest_claro.
• Mantengalascuchillasafiladasy sustituirlascuchillasencaso
dedesgaste.ConsulteHojasdecorteenel servicioyla secci6n
Mantenimientode estemanualdeinstruccionesdeafilarlahoja
adecuada.
74

LISTA DE iVlANTENIIVllENTO
Antesde realizarcualquiertipodel rnantenirniento/servicio,suelte
todoslosrnandosypareel motor.Esperehastaquetodaslaspartes
de rnovirnientohayanvenidoa unaparadacornpleta.Desconecteel
alarnbrede bujiay b_.selocontrael motorparaprevenirel cornienzo
involuntario.SiernpreIlevepuestoscristalesinastillablesdurantela
operaci6no realizandocualquierajusteo reparaciones.
Sigala listade rnantenirnientodadaabajo.Estacartadescribepautas
de servicios61o.Usela colurnnade Troncode Servicioparaguardarla
pistade tareasdernantenirnientocornpletadas.
Localizarelrn_scercanoChamuscael Centrode Servicio o pro-
gramar elservicio,simplementeponerseencontactoChamusca
en 1-800-4-MY-HOME®.
Antesde cadauso
Losprirneroscincohoras
Cada10horas
Cada25horas
Cada50horas
Anualrnente
Antesde Alrnacenaje
1. Niveldelaceitede motor
2. Silenciadorzonay loscontroles
3. Dedodela rnanodeguardia
1. Elaceitedel motor
1. EIcap6/Iosrespiraderos
2. Losbornesdela bateria
3. Loshusillosy larn_nsulainterrnediade la
plataforrna
1. Eldepuradordelfiltrode aire*
2. Filtrode aire*
3. Losbrazosde rnandointerrnedios,ejesdel
pivotey ejes
4. Losrodarnientosde lasruedasdelanteras
5. Lasruedasdelanterasde la plataforrna
1. Elaceitedel motor/elfiltrodeaceite
2. Silenciador
1. Filtrode aire
2. Eldepuradordelfiltrode aire
3. Bujia
4. Sisternaderefrigeraci6nporaire*
5. Filtrode combustible
6. DirectivoEngranajes
7. Ruedastraseras
1. EIcap6/Iosrespiraderos
2. Loshomesdela bateria
3. Losbrazosde rnandointerrnedios,ejesdel
pivotey ejes
4. Losrodarnientosdelas ruedasdelanteras
5. Lasruedasdelanterasde la plataforrna
6. Loshusillosy larn_nsulainterrnediade la
plataforrna
7. Lospuntosdepivotedel pedal
Realiceel serviciorn_.sfrecuenternentecuandohayarnuchopolvo.
Antesde realizartareasde mantenirnientoo reparaciones,
desconectela potenciadearranque(PTO),coloqueel frenode
rnano,apagueel motory retirela Ilave,paraevitarelencendido
accidentaldel motor.
.
2.
3.
1.
1.
2.
3.
Cornprobar
Lirnpie
Lirnpie
Carnbie
Lirnpie
Lirnpie
Lubrique
1. Lirnpie
2. Lirnpie
3. Lubrique
4. Lubrique
5. Lubrique
1. Carnbie/reernplace
2. Cornprobar
1. Reernplace
2. Reernplace
3. Reernplace
4. Lirnpie
5. Reernplace
6. Lirnpie
7. Quitelagrasay losejes
1. Lirnpie
2. Lirnpie
3. Lubrique
4. Lubrique
5. Lubrique
6. Lubrique
Z Lubrique
Si el motorseha puestoen funcionarnientorecienternente,el motor,
silenciadory lassuperficiesrnet_.licascircundantesestar_.ncalientes
Iy puedencausarquernadurasa la piel.Tengaprecauci6nparaevitar
[quernaduras.
75

MANTENIMIENTO DEL MOTOR
Comprobar el aceite del motor
$61oel usodeaceitedealtadetergenteseevalu6lacalidadconla
clasificaci6nde servicioAPI
SF,SG,SH,o SJ.Seleccioneel aceitede gradode viscosidadSAEde
acuerdocon
de laternperaturadefuncionarniento.Sigalatablade abajo.
Aunquevariosdelosaceitesdeviscosidad(5W20,10W30,etc)
rnejorarla partida
enc!_ue setraducir_,en el consurnodepetr61eoaurnenta
Colder _ 32°F _Warmer
Oil Viscosity Chart
J
cuando
utilizadoporencirnade32 oE Reviseel niveldeaceitedelmotorcon
rnAsfrecuenciaparaevitarla
posiblesdafiosen el motordeagotarseel petr61eo.
Paracornprobarel aceitedel motor,sigaestospasos:
1. AsegOresedequeel tractorseencuentraen unasuperficieplana.
2. Lirnpieel _.reade Ilenadode aceitede cualquierresiduo.
f Tira reactiva
V_lvulade drenaje
de aceite
Drenajede aceite
demanga
Figura11
3. Retirela varillay lirnpiarconun patiolirnpio.
4. Insertey aprietevarilla.
5. Retirelatirareactivaydecornprobarelniveldeaceite.Debeserpor
la rnarcadellenoen lavarilla.VerFigura11.
6. Siest_ bajo,agregueel aceitepocoapocoen elaceitedelmotor
de relleno.1/oIlenedernasiado.Despu_sdeagregarel aceite,
espereunrninutoyluegovuelvaacornprobarel nivelde aceite.
7. Pongayajustecontirareactiva.
76
NoIlenedernasiado.Llenadoexcesivodeaceitepuedeprovocarque
elmotornoernpezar,diffcilde partida,o furnarmotor.Si rn_sde la
rnarcaFULLen lavarilla,el aceitede drenajeparareducirel nivelde
aceiteen FULLrnarcaen lavarillade rnedici6n.
Cambio de aceite de motor
Elaceitedel motordebesetcarnbiadoen lasprirneras5 horasy luego
cada50horasouna vezporternporada.Paracarnbiarel aceitedel
motor,sigaestospasos:
1. Conel motorapagadoperoaOncaliente,desconecteelcablede
la bujiayrnant_ngaloalejadodela bujia.
2. RetirelatapadeIlenadodeaceite/varillarnedidoradeltubode
Ilenadode aceite.VetFigura12.
3. Clipde larnangadedrenajedeaceite(ernpaquetadoconeste
manual)enel puertode drenajedeaceite.Rutadeel extrerno
opuestode larnangaenun recipienteapropiadode recolecci6n
de aceiteconunagrancapacidadsuficientepararecogerel
aceiteusado.
4. Retireel tap6ndedesagOeydrenajedeaceiteenun recipiente
adecuadoconunacapacidaddeno rnenosde64 oz
5. Realizarlospasosanterioresenelordeninverso,despu_sdelpetr61eo
haterrninadolaevacuaci6n.
6. Vuelvaa Ilenarelrnotorconelaceitedemotornuevobasraelnivelde
aceiteenla varilladiceFULL.Vuelvaa colocarla tapadeIlenado
de aceite/ varilladernedici6n.
Elaceiteusadoesun productode residuospeligrosos.Desecheel
aceiteusadocorrectarnente.1/odesecharconlosresiduosdorn_sti-
cos.Consulteconlasautoridadeslocaleso SearsCentrodeServicio
_aralaelirninaci6nsegura/instalacionesde reciclaje.
Elaceiteusadoesun productode residuospeligrosos.Desecheel
aceiteusadocorrectarnente.1/odesecharconlosresiduosdorn_sti-
cos.Consulteconlasautoridadeslocaleso SearsCentrodeServicio
[para a e rnnac6n segura/ nstaaconesde reccaje.
Figura12
Filtrode
aceite

Fuel Filter
• Mantengalagasolinalejosdechispas,llamas,lucespiloto,el
calor,yotrasfuentesde ignici6n.
• Compruebelaslineasde combustible,eltanque,la tapay los
accesoriosconfrecuenciaparadetectarrajadurasoescapes.
Reemplazarsiesnecesario.
• Antesde reemplazarel filtrodecombustible,vaciarel tanquede
combustiblesegQnlasinstruccionesdeabajo.
• Nofugadecombustiblecuandoel motorest,.caliente.Dejeque
el motordetiempoadecuadoparaenfriar.Evacuarelcombustible
enun recipienteaprobadoal airelibre,lejosde llamasabiertas.
• Cualquierfugadegranvolumende combustibledesdeel
dep6sitode desconectarlalineade combustibledelfiltroen la
lineadecombustiblecercadel motor.
• Quitelalineadecombustibledela LN-ladode la linea(ladohacia
el tanquede combustible)delfiltrode combustible.
• Laspiezasderecambiodebe serla mismae instaladosenla
mismaposici6nquelaspiezasoriginales.
• Si sederramacombustible,esperehastaqueseevaporaantes
dearrancarel motor.
• Antesde reemplazarel filtrodecombustible,vaciarel tanque
decombustible.DeIocontrario,el combustiblepuedefiltrarsey
provocarun incendioo unaexplosi6n.
Paradrenarelcombustible:
1. Localiceelfiltrodecombustible,quesetransfierenenelladoizquierdo
delmotorentreel tanquedecombustibleyel carburador,y puede
setconectadoal motorconunacorreade empate.Cortarla
correadela corbata,siest,.presente,entoncesemergenteen
la abrazaderaenIfneaenel filtrode combustibleconunparde
alicates,deslicelaabrazaderade la lineade combustible.Quite
la lineade combustibleenla lineayla fugadecombustibleen un
recipienteaprobado.
Paracambiarelfiltrodecombustible:
1. Usepinzasparaapretarlaspesta_asdelaabrazadera(elladodela
lineadefueradel filtrode combustible),a continuaci6n,deslicela
abrazaderalejosdel filtrode combustible.Twistytirarde la linea
decombustiblefueradelfiltrode combustible.Wase lafigura13.
Compruebelaslineasde combustibleparalasgrietaso fugas.
Reemplazarsiesnecesario.
Reemplaceelfiltrodecombustibleconunoriginalfiltrodeteemplazo
.
3.
f
Clamp
Fuel
Line
Tab
de equipo.ContactoSear'sal 1-800-4-MY-HOME® paracomprar
el originalde filtrode reemplazodelequipo.
4. Asegurelaslineasde combustibleconlaspinzas.
LIIVIPIADOR DE AIRE
Si losfiltros,o cubiertasnoest_.ninstaladoscorrectamentelesiones
graveso la muertepodiadeberseafracasar.Notratedeencenderel
motorconlasretiren.
Nouseaire comprimidoodisolventesparalimpiarel cartuchodel
filtrodeaire.
Elsistemade filtrodeaire utilizauncartuchocilindrico.Estemodelo
tambi_nincluyeun pre-limpiadorque sepuedenlavary reutilizar.
1. Retirelossujetadores(A) yel filtrode aire(B).Vet Figura14.
2. Paraquitarelfiltro(C),levanteelextremodelfiltroyluegotireelfiltro
fuerade la ingesta(D).
3. Quiteel pre-filtro(E),siest,.equipado,desdeelfiltro.
A
B
Figura14
J
4. Paraaflojarlosdesechos,golpearsuavementeel filtroenuna
superficiedura.Siel filtroest,.muysucio,c_.mbieloporun nuevo
filtro.
5. Lavarelpre-limpiadordedetergenteliquidoyagua.Luego,lepermiten
a rondoel aireseco.Nodepetr61eode la pre-limpia.
6. Montarel pretintoreriaalfiltro.
7. Instalarelfiltroenlaingesta.Presioneelextremodelfiltroenlabase
comosemuestra.AsegQresede filtroencajadeformaseguraen
labase.
8. Instalarfiltrodeairey seguraconlossujetadores.
Figura13
77

Bujia
1. Lirnpieel _reaalrededorde la basedela bujia.Nochorrode
arenade labujfa.Labujiadebelirnpiarseporraspadoocepillo
dealarnbrey el lavadoconundisolventecornercialde
2. Retirare inspeccionarlabujia.BrechaAsegQresedequeseha
fijadoen .030".VetFigura15.
f
Electrode Porcelain
.030 (.76 mm) gap
Figura15
J
3. Carnbiarla bujia(Champion® RC12YC)unavezporternporada.
Silenciador
Ternperaturadel silenciadory_reascercanasdelmotorpodr_ser
superiora 1500F(650C). Eviteel contactoconestas_reas.
Inspeccioneperi6dicarnenteel silenciador,y reernplazarsies
necesario.Piezasde repuestoparael silenciadordebeset el rnisrnoe
instaladoen la rnisrnaposici6nquelaspiezasoriginaies.
LIMPIEZA DEL MOTOR
Noutiliceaguaparalirnpiarlaspiezasdelmotor.Elaguapuede
contarninarelsisternadecombustible.Utiiiceuncepilloo unpasoseco.
1. Diariarnenteoantesdecadauso,lirnpiardehierba,pajaodesechos
acurnuladosenei motor.Mantenerla vinculaci6n,laprirnavera,y
loscontrolesde lirnpieza.
2. Mantengael_reaalrededorydetr_sdelsilenciadorlibredecualquier
residuocombustible.
3. Manteneriirnpioeimotorperrniteeirnovirnientodelairealrededordel
motor.
4. Piezasdernotordebenrnantenerselirnpiasparareducirelriesgode
sobrecalentarnientoy la ignici6nde losresiduosacurnulados.
Carburador de ajuste
• Elcarburadorenestemotornoesajustable.
Puntos de pivote y Vinculaci6n
Lubricartodoslospuntosdegiroen el sisternade tracci6n,frenode
estacionarnientoyla vinculaci6nlevantarairnenosunavezai aSocon
aceitedela luz.
Ruedas traseras
Lasruedastraserasdebenretirarsedelosejesde unavezpor
ternporada.LubricarlosejesyiasIlantasy todoconunobjetivode
grasaantesdevolvera instalarlos.
Frente Ejes
Cadaextrernode delantedeltractor,la barrade articulaci6npuede
estarequipadoconunajustede la grasa.Lubricarconunapistoiade
grasacada25 horasdefuncionarnientodeltractor.
Bateria
Labateriaest_ seiladayeslibrede rnantenirniento.Losniveiesde
_cidonosepuedecornprobar.
• Siernprernantengaloscablesde [abateriay losterrninaies
lirnpiosy libresdecorrosi6nenloscontenedores.
• Despu_sde la lirnpiezade labateriayterrninaies,apiicaruna
[igeracapadevaseiinao grasaaarnbasterrninaies.
• Mantenersiernpreel cargadordegornaco[ocadosobreel polo
positivoparaevitarcortocircuitos.
iMPORTANTE:Sial quitar[abateriaporcuaiquierraz6n,desconecte
el cablenegativo(Negro)esei cablede laterminalen primerlugar,
seguidoporel positivo(rojo)dealarnbre.Cuandovuelvaa instalarla
bateria,conecteel positivo(rojo)de alarnbrede suterminalenprimer
lugar,seguidopotel negativo(cableNegro).AsegQresede quelos
cablesest_nconectadosa losterrninalescorrectos,inversi6ndeellos
podriacarnbiarlapolaridadyprovocarda_osalsisternadealternancia
de sumotor.
Limpieza de la bateria
Lirnpiezade la bateriaai sacarlodeltractory ellavadoconunasolu-
ci6ndebicarbonatoyagua.Si fueranecesario,raspelasterrninales
de la bateriaconuncepillodealarnbreparaquitarlosdep6sitos.
Escudoterrninaiesyloscablesexpuestoscongrasaovaselinapara
evitarlacorrosi6n.
Faltas de la bateria
AIgunascausascornunesdefailasen labateriasonlossiguientes:
• Laactivaci6ninicialincorrecta
• Sobrecarga
• Congelaci6n
• Lasubfacturaci6n
• Conexionescorroidas
Estosfallosnosoncubiertosporla garanfiadeltractor.
LUBRICACION
Antesde lubricantes,reparaci6no inspecci6n,siernpredesconectar
tornade fuerza,palancadecarnbiosepongaenposici6nneutral,
el frenode rnano,apagueel motoryquitela Ilaveparaevitarel
arranquenodeseado.
78

LIMPIEZA DE LAS MAQUINAS Y LA CUBI-
ERTA
Cualquiercombustibleo aceitederrarnadoen la rn_.quinadebeser
borradodeinrnediato.NOperrnitaquelosdesechosqueseacurnulan
alrededorde lasaletasde refrigeraci6ndelmotoro encualquierotra
partede larn_.quina.
IMPORTANTE: Elusode unalavadoradepresi6nparalirnpiarsu
tractornoserecornienda.PuedecausardaSosa loscornponentes
el_ctricos,ejes,poleas,rodarnientoso el motor.
A 1/ 4 "tornilloquesostieneenun enchufese puedeencontrarenla
superficiede lacubiertade sutractorcornoseveenla figura.8. Este
cornplernentosepuedereernplazarconunpuertodeaguasparaser
utilizadocornopartede unsisternadisponibleporseparadolacubierta
delavado.
Elsisternade lavadodecubiertaTMseutilizaparaenjuagarlos
recortesde cespeddela parteinferiorde la cubiertayevitarla
acurnulaci6ndesustanciasquirnicascorrosivas.
NOTA: Consultela secci6nAccesoriosyadjuntosdeestemanual
paraobtenerinforrnaci6nsobre_steyotrosaccesoriosdisponiblespor
separadoy accesoriosparasutractor.
y
/
/
/
J
j ......
\\\,
AJUSTES
Figura16
Nuncatratedehacerlosajustesrnientrasel motorest_en rnarcha,
exceptosiseespecificaen el manualdeloperador.
Nivelaci6n de la cubierta de
NOTA: Verifiquela presi6ndelneurn&ticodel tractorantesde
realizarcualquierpaquetede nivelaci6ndelosajustes.Consultea los
neurn_.ticosen la secci6nde serviciosde estemanualparaobtener
rn_.sinforrnaci6nsobrelapresi6ndelosneurn_.ticos.
Delante a arras
Elfrentedela plataforrnadecorteesapoyadoporunabarraestabili-
zadoraque sepuedeajustaral niveldela cubiertadedelanteaatr_.s.
Lapartefrontalde lacubiertadebeset de 1Apulgadasy 3/8-pulgada
inferiora la partetraserade la cubierta.Ajustesi esnecesarioIo
siguiente:
1. Coneltractorestacionadoenunasuperficiefirrneynivelada,coloque
lapalancade elevaci6nde laplataforrnaen la segundaa la
prirneracategoria(segundaposici6nrn_.salta),ygirela hojaIo
rn_.scercadelcanalde descargaqueesparaleloaltractor.
2. Medirladistanciadesdelapartefrontaldelapuntade lapalaenel
sueloylapartetraseradelapuntade lapalaenelsuelo.Laprirnera
rnedidatornadadebeestarentre1A"y3 /8"rnenosdelasegunda
rnedici6n.Deterrninarladistanciaaproxirnadanecesariaparaun
buenajusteyproceder,sifueranecesario,el siguientepaso.
f
/
_. j
Figura17
.
79
3. Busquelatuercaylatuercadebloqueoenlapartefrontaldelsoporte
del estabilizador.Wase lafigura.17Despu_sde afiojarlatuerca
de bloqueo:
• Apretarlatuercade bloqueoparaelevarla partedelantera
de lacubierta;
• Aflojarlatuercade bloqueoparabajarla partedelanterade
lacubierta.
4. Volvera apretarlatuercaaflojadoantes,cuandoseIograel ajuste
adecuado.
Un lado a otto
Sila plataforrnadecortepareceserlasiegadeforrnadesigual,un
ladoa ladodeajustepuedeserrealizado.AjustesiesnecesarioIo
siguiente:
1. Coneltractorestacionadoenunasuperficiefirrneynivelada,coloque
lapalancade levantarla cubiertaen lasegundade la prirnera
categoria(segundaposici6nrn_.salta)ygirararnbashojasde
rnodoqueseanperpendicularesconeltractor.
2. Medirladistanciadesdeel exteriorde la puntadela palaa la
izquierdaenel sueloy ladistanciadesdeel exteriordela punta
de la paladerechoa latierra.Arnbasrnedidasadoptadasdeben
seriguales.Si noesasi,continQeconel pasosiguiente.
Afloje,peronoIoquite,eltornillohexagonaldelaizquierdasoportede

Figura18
lacubiertadecolgar.Waselafigura.18.
4. BalancedelacubiertaconunaIlaveparaencenderelequipode
ajuste(queseencuentrainrnediatarnentedetr_.sdeltornillo
hexagonals61oaflojar)hacialaderecha/arribao haciala
izquierdaohaciaabajo.Lacubiertaest,. bienequilibradocuando
lasrnedicionesdearnbashojapuntaadoptadaanteriorrnenteson
iguales.
5. Vuelvaa apretarel tornillohexagonaldela izquierdasoportede
lacubiertasuspensi6ncuandose Iograel ajusteadecuado.
Ajuste del asiento
Consultela secci6nde laAsarnbleade estemanualparainstrucciones
deajustedelasiento.
Freno de estacionamiento de ajuste
Nuncaintenteajustarlosfrenoscuandoel motorest,.funcionando.
Siernpredesconectetornade fuerza,palancadecarnbioseponga
Ienposici6nneutral,apagueelmotory quitelaIlaveparaevitarel
_arranquenodeseado.
Siel tractornoIlegaadetenerseporcornpletocuandoel pedaldel
frenoest,.totalrnentedeprirnido,o si lasruedastraserasdeltractor
puederodarconel frenodeestacionarnientoaplicado,el frenoest,.en
la necesidadde ajuste.Cornuniqueseconel Centrode Serviciorn_.s
cercanoSearsque losfrenoscorrectarnenteajustado.
Paraubicar el Centrode Servicio rn_scercanoSearso para pro-
grarnarelservicio,sirnplernentep6ngaseencontactoconSears
al 1-800-4-MY-HOME®.
PLATAFORMA DE CORTE DE ELIMINATION
Para quitar la plataforma de corte, haga Io si-
guiente:
1. Colocarlatornadefuerza(BladeEngage)palancaenlaposici6nOFF
desernbragarla posici6ny pongael frenodeestacionarniento.
2. Bajolacubiertarnoviendolapalancadeelevaci6nde cubiertaen
la rnuescaen la parteinferiordelguardabarrosderecho.
3. Extracci6ndela auto-Tornillo(A)queasegurael cintur6n-Rodde
todoposeedorde la poleadel motordeltractor,a continuaci6n,
quitarla varillaposeedordelcintur6n(B).Wase la figura.11.
NOTA: HagaunanotamentaldeIoagujeroal ottoextrernode la
cinta-Rodposeedorseinsertaen losprop6sitosde reinstalaci6n.
4. Retirelacorrea(C)dealrededordela poleadel motordel tractor.
Wase lafigura.19.
f
Figura19
Evitelaslesionespellizcos.Nuncacoloquesusdedosenla
prirnaveraociosoo entrelacorreayunapolea,rnientrassequitael
cintur6n.
.
,
Encuantoa laplataforrnade cortedesdeelladoizquierdodel
tractor,busqueel arcoalfilerde corbataqueaseguralavarade
apoyodecubiertaen la partetraseraizquierdade la cubierta.
Wase lafigura.20. Retireel arcoalfilerde corbataqueasegura
Figura20
8O

NEUiVlATICOS
la varadeapoyodecubierta,y refirarconcuidadoel apoyode la
cubiertade losbrazosde elevaci6ndela cubierta,
6, Repitalospasosanterioresenel ladoderechodel tractor,
NOTA: Elarcodepeloalfilerde corbataclipsdebeserinstalado
desdearribahaciaabajo,
7, Moverla palancadeelevaci6nen la cubiertade prirneraclaseen
el guardabarrosderechoa plantearla cubiertadelevantarlos
brazoshaciaarribay fueradelcarnino.
8, Refirelapajaritachavetagaranfizarlabarraestabilizadoradecubierta
a cubierta.Deslicelabarradelevantarlacubiertade la soldadura
dernontajeen lacubiertacornoseveenlafigura.21.
Figura21
9, Retireconcuidadoel cabledetornadefuerzadela partetrasera
dela plataforrnadecorteal elirninarel clipde horquillaqueIo
sujeta.RetireelrnuelledelsoporteruedaIocadela cubierta,
Wase la figura,22.
10, Deslicesuavernentela plataforrnadecorte (dela izquierda)la
partede debajodeltractor,
PTOCable
Figura22
Nosobrepasarnuncalapresi6nrn_.xirnade infiadoqueapareceen
la paredlateralde laIlanta.
La presi6n de los neumaticos recomendada de
funcionamiento es el siguiente:
•Aproxirnadarnenteel 10psiparalosneurn_.ticostraseros
•Aproxirnadarnenteel 14psiparalosneurn_.ticosdelanteros
llVlPORTANTE:Refi_rasea lapareddel neurn_.ticoparala ISP
recornendadoso rn_.xirnosfabricantede neurn_.ticosesexacto.No
sobreinfiar.Lapresi6ndel neurn_.ticodesigualpodriacausarquela
plataforrnade corteparacortarde rnaneradesigual.
BATERiA
Proposici6n65de CaliforniaiADVERTENCIA!Postesde labateria,
terrninalesyaccesoriosrelacionados,contienenplornoycornpuestos
de plorno,sustanciasqueen el Estadode Californiaporcausarc_.ncer
da_osreproductivos.L_.veselasrnanosdespu_sde rnanipular.
Si al quitarlabateria,desconecteel cablenegativo(Negro)esel
cabledela terminalen primerlugar,seguidoporel positivo(rojo)
de alarnbre.Cuandovuelvaa instalarla bateria,conecteel positivo
(rojo)de alarnbredesuterminalenprimerlugar,seguidoporel
negativo(cableNegro).
EL ARRANQUE
NuncasalteiniciarunabateriadaSadaocongelados.Est_segurode
losvehiculosno setocan,y est_.nfuerade ignici6n.Noperrnitaque
lasabrazaderasde cableal tacto.
1. Conectarpositivo(+)paraenviarpor cablepositivo(+)de la
bateriadescargadadesutractor.
2. Conecteel otto extrernodelcableala (positivo+) despu_sde la
bateriade puente.
3. Conecteel segundocable(negativo-)parael otto puestode la
bateriadelpuente.
4. Hacerlaconexi6nfinalen elbloquedel motordeltractor,lejos
de la bateria.Adjuntara unapartesinpintar,paraaseguraruna
buenaconexi6n.
Si la bateriapuenteest,.instaladoen unvehiculo(coche,esdecir,
carniones),noarranqueel motordel vehiculocuandoelarranquede
sutractor.
5. Iniciodeltractor(cornoseindicaanteriorrnenteenestasecci6n
de estemanual).
6. Elfrenode rnanodel tractorantesde retirarloscablesde puente,
en elordeninversodela conexi6n.
81

CARGA
Bateriasemitenungasexplosivodurantela carga.Cargade la
bateriaen un_.reabienventiladay mantenerselejosdeunallama
abiertao pilotocomoen uncalentadordeagua,estufa,homo,
secadorade ropao de otrosaparatosdegas.
AIcargarla bateriade sutractor,utilices61ouncargadorde 12V
diseSadoparabateriasde plomo-_.cido.Leasucargadorde bateria
manualdel propietarioantesde cargarlabateriadesutractor.Siga
_sempreas nstrucconesy presteatenc6na suADVERTENCAS.
Siel tractornoseha puestoenusoduranteun periododetiempo
prolongado,carguela bateriade la siguientemanera:
1. Fijesucargadorde bateriaparaofrecerunm_.ximode 10
amperios.
Siel cargadorde labateriaesautom_.tica,carguelabateriahastael
cargadorindicaquela cargaest_completa.Siel cargadornoest,.
autom_.tica,cargoporno menosde ochohoras.
FUSIBLE
Unfusiblede20 AMPest,.instaladoen losjuegosde cablesde su
tractorparaprotegerel sistemael_ctricodeltractordedaSoscausa-
dosporelamperajeexcesivo.
Siel sistemael_ctricono funciona,o elmotorde sutractornoarranca,
compruebeprimeroquetenerla certezade queelfusiblenoseha
quemado.Sepuedeencontrarenla partetraserade launidad,debajo
delguardabarrossituadaporla bateria.
Siempreuseunfusibleconla capacidaddepotenciaequivalente
lasustituci6n.
CUCHILLAS DE CORTE
Apagueelmotoryquitela Ilavedeencendidoantesde retirarla
cuchilladecorte(s) paraafilaro de sustituci6n.Protejasusmanos
[usandoguantesgruesosa sujetar a hoja.
Inspeccioneperi6dicamentelahojay/ o husillodegrietaso daSos,
sobretododespu_sdehaberIlegadoa unobjetoextraSo.No
Ihagafuncionarla m_.quinahastaquesesustituir_.nloselementos
_daSados.
Paraquitarlashojas,hagaIosiguiente:
1. Quitelacubiertadedebajodeltractor,(verplataformadecorte
deeliminaci6nanteriormenteen estasecci6n)y luegosetira
suavementedela cubiertaparaexponerla parteinferior.
2. Coloqueun bloquedemaderaentreelcentroy eldeflectorde la
viviendacubiertadela cuchilladecorteparaactuarcomoun
estabilizador.Wase lafigura.23.
3. QuitelatuercahexagonalbridaquesujetalahojaalaAsambleadel
husillo.Wase la figura.23.
.
Figura 23
Paraafinarcorrectamentelashojasdecorte,retirelamismacantidad
de metalde ambosextremosde lashojasa Iolargodelos
hordesdecorte,paraleloal hordede fuga,enun250. 300de
_.ngulo.Siempreraciercadafilodela cuchilladecortepor iguala
mantenerel equilibriode la hojaadecuada.Wase lafigura.24.
Siel filodela hojahasidopreviamenteafilado,o sicualquiersepa-
raci6nde metalest,.presente,sustituirlashojasporotrasnuevas.
Unahojarealequilibradacausar_,excesivavibraci6n,puedecausar
daSosen eltractory/ o resultaren lesionespersonales.
k..
5.
Figura24
Pruebade equilibriode lahojaconun balanceadorde lahoja.
Grindmetaldesdeel ladom_.spesadohastaqueseequilibrede
manerauniforme.
82

NOTA: Cuandotengaque reernplazarla hoja,aseg[3resedeinstalar
la hojaconla caradela hojarnarcada"fondo"(oconun nQrnero
estarnpadoen_1)frentea la tierracuandoel cortac_spedseencuen-
traenla posici6ndefuncionarniento.
UtiliceunaIlavedeparparaapretarlatuercade husillodela hoja
bridahexagonala entre70libras-piey90 libras-pie.
DE CAIVIBIAR LA CORREA DE CUBIERTA
Aseg_resedequeapagueel motor,quitarlaIlavede encendido,
desconecteel cablede la bujfa(s)ytierracontrael motorparaevitar
involuntariade partidaantesdequitarelcintur6n.
Todosloscinturonesensutractorest_.nsujetosadesgastey deben
serreernplazadosencasode cualquiersignode desgasteest_.n
4. Retireconcuidadolacintadecubiertadealrededorde lasdos
poleasdel husilloy lasdospoleaspoleatensorade lacubierta.
Wase lafigura.25.
5. Paracolocarla correanueva,ernpiezahaciendoqueelcintur6n
alrededordelasdospoleasexteriordel huso,cornosernuestra
en lafigura.25.
6. Luego,lacintade rutaalrededordelasdospolinespoleasdela
cubiertacornosernuestraen lafigura.25.
7. Volveraapretarlabarraposeedordelcintur6naflojadoantes.
8. Volverarnontarla cintadelosguardiasde retirarseantes.
9. Vuelvaa instalarla cubierta,asegur_.ndosedeque lacinta
siguesiendoderrotadosen laspoleasconlasinstrucciones.El
enrutarnientodebandacornpletasernuestraen la figura.25.
10. Tiredela partederechade lacinta,ycoloqueel ladoV estrecha
de lacorreaen la poleaPTO.
11. Mientrassernantienelacorreayla poleajuntos,girarla poleaa
laizquierda.Seguirrnanteniendoy rotaci6nde la poleay lacor-
teahastaquela correaestotalrnenteenrolladoen la poleaPTO.
presentes.
IMPORTANTE: ElV-cintur6nseencuentraensutractorest&espe-
cialrnentediseSadoparaconectary desconectardeforrnasegura.Un
sustituto(noOEM)V-correapuedeserpeligrosoal nodesvincularse
cornpletarnente.Paraunarn_.quinade buenfuncionarniento,laf_.brica
decinturonesdeusoaprobado.
Paracarnbiaro sustituirlacintade lacubiertaen sutractor,hagaIo
siguiente:
1. Quitela cubiertacornoseindicaanteriorrnenteen estasecci6n.
2. Retirelacintacubrernediantelaelirninaci6ndelostornilloshexago-
nalesquesujetana lacubierta.Wasela figura.25.
3. Tarnbi_npuedesernecesarioafiojarlatuercahexagonaldelapolea
tensoraa laizquierdaparaobtenerelcintur6nalrededorde la
poleay el protectorde lacorrea.
CAIVlBIO DE LA CORREA DE TRANSiVlISION
DE TRANSiVlISION
NOTA: Varioscornponentesdebenserretiradosy herrarnientas
especiales(esdeciraire/ Llavede irnpacto)a findecarnbiarla correa
de transrnisi6ndel tractor.CornuniqueseconelCentrode Servicio
rn_.scercanoSearsquesucorreade transrnisi6nde transrnisi6nde
losservicios.
Paraubicar elCentro de Servicio m_s cercanoSearso para
programarelservicio, simplemente pbngaseen contacto con
Searsal 1-800-4-MY-HOME@.
Cubierta de
la ¢orrea
Figura25
83

Nuncaalmacenetractorde cespedconcombustibleenel tanque
en unespadocerradoo en _.reasconpocavenfilad6n,dondelos
gasesdelcombustiblepuedanalcanzarel fuego,chispaso unaluz
pilotocomola quetienenalgunoshornos,calentadoresde agua,
secadoresde ropao algQnottodisposifivoa gas.
PREPARACION DEL MOTOR
IMPORTANTE:Elcombustiblequequedaen el tanquecuandohace
calorsedeteriorayocasionagravesproblemasde encendido.
Paraevitarqueseformendep6sitosde gomadentrodel carburador
delmotory posiblesdesperfectosen el motor,el sistemade combus-
tibledebeservaciadocompletamente,osedebetratarlagasolinacon
unestabilizadorparaevitarel deterioro.
1. Si ufilizaunestabilizadordecombustible:
a. Lealasinstrucdonesy recomendadonesdelfabricantedel
producto.
b. Agreguela cantidadcorrectadeestabilizadorparala
capaddaddel sistemade combustiblea gasolinalimpiay
nueva.
c. Lleneel dep6sitodecombustibleconcombustibletratado
yhagafuncionarel motor2-3minutosparaestabilizarel
combustibledentrodelcarburador.
4. Cuandovacieel sistemadecombustible:
a. Nodreneel combustiblecuandoel motorest,.caliente.
Permitaqueel motorseenfriebien.Dreneel combustible
dentrode un recipienteaprobadoyal airelibre,lejosde
cualquierllamaexpuesta.
b. Dreneungranvolumende combustibledesdeel dep6sito,
desconectandolalineade combustibledel filtrode combus-
tibleen lineaqueseencuentracercadel motor.
c. Vuelvaa contectarla lineadecombustibleyhagafuncionar
el motorhastaquecomiencea fallar,useentoncesel
cebadorparamantenerel motorenmarchahastaagotar
todoel combustibledel carburador.
d. Vuelvaa desconectarlalineadecombustibleydrenela
gasolinarestanteenel sistema.
5. Extraigala bujiay viertauna(1)onzadeaceiteparamotorpotel
orificiode la bujiaen elcilindro.Hagagirarel motorvariasveces
paradistribuirel aceite.Vuelvaa colocarlabujia.
Lagasolinaessumamenteinflamabley puedesetexplosivaenciertas
condiciones.Vacielaantesdeaimacenarei equipoduranteperiodos
prolongados.Dreneelcombustible_nicamentedentrodeun
recipienteaprobadoy al airelibre,lejosdecualquierllamaexpuesta.
Dejequeel motorseenfrie.Antesdedrenarel combustible,apague
cigarrillos,cigarros,pipasyotrasfuentesde combusti6n.Vaciela
gasolinaenuna.reabienventilada,lejosdecualquierfuentedellama
o chispas,incluidocuaiquierartefactoconluzpiloto.AImacenela
gasolinaenunrecipienteaprobado,en unlugarseguro.
EL DRENAJE DE LOS COMBUSTIBLES
1. Localiceel filtrodecombustible,que seencuentraen el lado
izquierdodel motor,ypuedeserconectadoal motorconuna
correade empate.
2. Cortarla correade la corbata,siest,.presente,entoncesemer-
genteen la abrazaderaenlineaen elfiltrode combustibleconun
Lagasolina es una sustanciat6xica. Elimineiagasolina
adecuadamente.Comuniquese con las autoridades locales para
averiguarcua.iesson los metodos adecuados paraeliminar lagasolina.
pardealicates,deslicelaabrazaderadela lineadecombustible.
3. Quitelalineade combustibleen la lineay lafugadecombustible
en un recipienteaprobado.
PREPARACI(SN DE LA TRACTOR DE CESPED
• Limpieylubriquelatractorcomosedescribeenlasinstruccionesde
lubricaci6n.
• Noutiliceunalavadoraapresi6nni unamangueradejardinpara
limpiarsuunidad.
• Almacenelatractorenunazonaiimpiayseca.Nolaalmacenecerca
de materialescorrosivoscomopotejemplofertilizantes.
84

El motornoarranca
El motorfuncionade manera
err_tica
1. Perilladepotenciade arranque(PTO)conectada.
2. Noest&colocadoelfreno demano.
3. Sehadesconectadoel cablede lasbujias.
4. Lapalancadecontroldelreguladornoest_en
la posici6nde arranquecorrecta.
5. Noseha activadoel cebador
6. Eldep6sitodecombustibleest&vaciooel
combustiblesehaechadoaperder.
7. Lalineadelcombustibleest&bloqueada.
8. Lasbujiasnofuncionancorrectamente.
9. Motorahogado.
10. Fusiblefundido(s)
1. Launidadest_funcionandoconel CEBADOR
activado.
2. Sehanaflojadoloscablesde la bujia.
3. Lalineadelcombustibleest_ tapadaoel
combustiblesehaechadoaperder.
4. Laventilaci6nenlatapadelcombustibleest_
obstruida.
5. Aguao suciedaden elsistemadelcombustible.
6. Elfiltrode aireest_ sucio.
1. Coloquela perillaenla posici6ndedesconexi6n(OFF).
2. Coloqueelfreno demano.
3. Conecteelcable alas bujias.
4. Muevala palancadel reguladorala posici6nFAST
(r@ido).
5. Tireel controldelCEBADORhaciaafuera.
6. Lleneel dep6sitocon gasolinalimpiay nueva(demenos
de30dias).
7. Limpielalineadecombustibley reemplaceelfiltrodecombustible.
8. Limpieocambielas bujiasoajustela separaci6n.
9. Arranqueelmotorconelreguladorenposici6nFAST(r@ido).
10. Reemplaceelfusible(s)
1. Presioneel controldelCEBADOR.
2,
3.
4,
5.
6,
El motorrecalienta 1. El niveldeaceitedelmotorest_ bajo. 1.
2.
2. Flujodeairerestringido.
El motorvacilaaaltas 1. Laseparaci6ndelas bujiases muypeque_a. 1.
revoluciones
El motorfuncionacondificultad 1. Bujiaatorada,averiadao excesode separaci6n. 1.
en ralenti 2. Elfiltrode aireest_ sucio. 2.
Demasiadavibraci6n 1. Cuchillade cortefloja o descentrada. 1.
2. CuchilladaSadaocurvada 2.
1. Lavelocidaddelmotoresdemasiadolenta. 1.
2. CespedhQmedo.
3. Cespeddemasiadoalto.
La cortadorade cespedno
regresaelrecortedecesped
comoabono
4,
1.
2.
3.
Lacuchillade la cortadoranoest_afilada.
Cortedesigual Laplataformanoest&correctamentenivelada.
Lacuchillade la cortadoranoest_afilada.
Presi6nde neum_ticosdesigual.
Conecteloscablesde la bujia.
Limpiela lineadecombustible;Ileneeltanque congaso-
linalimpiay nuevay reemplaceelfiltro decombustible.
Destapelaventilaci6noreemplacelatapasiest&daSada.
Vacieel tanquedecombustible.Lleneel tanquecon
gasolinalimpiay nueva.
Reemplaceelelementode papeldelfiltrode aireo limpie
eldepuradordeespuma.
Lleneel cartercon laadecuadacantidady pesodeaceite.
Limpielos recortesdepastoyla suciedadacumulados
alrededorde lasaletasde refrigeraci6ndelmotorydel
alojamientodelsoplador.
Retirelasbujiasy reajustelaseparaci6n
Reemplacelasbujias.Configurela separaci6nde la bujia.
Reemplaceelelementodelfiltro deairey/o limpieel
depurador.
Aprietela cuchillayel husillo.
Reemplacelacuchilla.
Coloqueelcontroldelreguladoren la posici6nFAST
(velocidadr@ida,representadaporunaliebre).
2. Norealiceabonocuandoel cespedest&hQmedo.
3. Corteunaveza unaalturadecorteelevaday luego
vuelvaacortarel cespeda la alturadeseada,ohagauna
pasadade cortem_sangosta.
4. Afileo cambielacuchilla.
1. Realiceunajustede laplataformaladoalado.
2. Afileo cambielacuchilla.
3. Verifiquela presi6ndeloscuatroneum_ticos.
85

This page intentionally left blank. Use this page to make any notes regarding your tractor.
86

Busque el periodo de duraci6n de emisiones importantes yla informaci6n de clasificaci6n de aire en
la etiqueta de emisiones de su motor
Los motores cuyo cumpiimiento con los estAndares de emisi6n Tier 2 de laComisi6n de Recursos Ambientales de California (CARB)
est6 certificado deben exhibir la informaci6n relacionada con el periodo de duraci6n de ias emisiones y la clasificaci6n de aire. Sears
Brands Management Corporation ponen esta informaci6n a disposici6n del consumidor en nuestras etiquetas de emisiones.
Ei Periodo de Duraci6n de las Emisiones describe el nQmero de horas de tiempo real de funcionamiento para el cuai se certifica que
el motor cumpie con ias reglas de emisi6n, descontando el mantenimiento adecuado del mismo segQn las instrucciones de oper-
aci6n y mantenimiento. Se utilizan las siguientes categonas:
Moderado:Se certifica que el motor cumpie con las reglas de emisi6n durante 125 horas de tiempo real de funcionamiento del motor.
Inmediato:Se certifica que el motor cumpie con las reglas de emisi6n durante 250 horas de tiempo real de funcionamiento del motor.
Extendido:Se certifica que el motor cumpie con las reglas de emisi6n durante 500 horas de tiempo real de funcionamiento del motor.
Por ejemplo, una cortadora de c6sped tJpica que se empuja desde arras se usa entre 20 y 25 horas por aSo. Por Io tanto, el Periodo
de Duraci6n de Emisiones de un motor con una clasificaci6n intermedia sena equivaiente a entre 10 y 12 aSos.
Laciasificaci6n de aire es un nQmero calculado para describir el nivel relativo de emisiones para un grupo de motores en particular.
Cuanto menor sea la clasificaci6n de aire, mayor es la limpieza del motor. La informaci6n se presenta de forma grAfica en la etiqueta
de emisiones.
Despu_s del 1 de julio de 2000, busque el periodo de cumplimiento de las reglas de
emisiones en la etiqueta de cumplimiento de las reglas de emisiones del motor
Despu6s del 1 de julio de 2000 se certificarA que determinados motores Sears Brands Management Corporation cumplen
con los estAndares de emisiones de la fase 2 de la Agencia de Protecci6n Ambientai de los Estados Unidos (USEPA). Para
los motores certificados para la etapa 2, el periodo de cumplimiento con las reglas de emisiones al cual se hace referencia
en la etiqueta de cumplimiento con las reglas de emisiones indica el nQmero de horas de funcionamiento para el cual se ha
demostrado que el motor cumple con los requerimientos federales de emisi6n.
Para los motores con desplazamiento inferior a 225 cc, Categoria C = 125 horas, B = 250 horas y A = 500 horas.
Para los motores con desplazamiento de 225 cc o mAs, Categoria C = 250 horas, B = 500 horas y A = 1000 horas.
El desplazamiento de los motores de la serie modelo 150112 es 249 cc.
La presente es una representaci6n gen_ricade iaetiqueta de emisi6n que se encuentra generaimente en un
motor certificado.
FAMILYYBSXS.3192VA 274812
GDOC-100182Rev.A
87

(Esta p_.ginase aplica s61oen EE.UU. y Canada.).
Sears Brands Management Corporation, el Consejo de Recursos Ambientales de California (CARB)
y la Agencia de Protecci6n Ambiental de los Estados Unidos (EPA)
Declaraci6n de garantia del sistema de control de emisiones (derechos y obligaciones de la garanfia de defectos del propi=
etario)
LACOBERTURADE LAGARANTJADECONTROLDEEMISIONESES Y PARALOSMODELOSCERTIFICADOSDELANO1997YPOSTERIORES,
APLIOABLEALOSMOTORESCERTIFICADOSCOMPRADOSENCALIFOR- QUESECOMPRENY UTILICENENCUALQUIERPARTEDE LOSESTADOS
NIAEN1995Y POSTERIORMENTE,QUESE UTILIZANENCALIFORNIA, UNIDOS(Y A PARTIRDEL1DE ENERODE2001ENCANADA).
Declaraci6n de garanfia sobre defectos en el control de emJsiones para California y los Estados UnJdos
ElConsejode RecursosAmbientalesdeCalifornia(CARB),la EPA(Agencia
de Protecci6nAmbientaldelos EE.UU.)y Searstienenel gustodeexplicarla
garantiadelsistemadecontroldeemisionesparamotoresdela_o 2000y para
elfuturoconrelaci6na motorespeque_ostodoterreno(SORE).EnCalifornia,
los nuevosmotorespeque_ostodoterrenodebenestardise_ados,construidos
y equipadosparacumplirconlas rigurosasnormasanti-smogdelestado.En
el restodelos EstadosUnidos,losmotoresnuevostodoterrenodeencendido
porchispacertificadosparael a_o 1997debencumplirest_ndaressimilares
establecidospot laEPA.Searsdebegarantizarel sistemadecontroldeemi-
sionesdesu motorparalosperiodosdetiempoenumeradosacontinuaci6n,
siemprequenohayaabuso,negligenciaomantenimientoindebidode su
motortodoterrenopeque_o.Susistemade controldeemisionespuedeincluir
piezastalescomoel carburador,el filtrodeaire,elsistemadeencendido,el
silenciadoryel conversorcatalitico.Tambienpuedeincluirconectoresyotras
unidadesrelacionadasconlasemisiones.Dondeexistaunacondici6ncubierta
porla garantia,Searsreparar_supeque6omotortodoterrenosincostoalguno
incluyendodiagn6stico,piezasy manodeobra
Cobertura de la garantJa Sears para defectos en el control de emJsiones
Losmotorestodoterrenopeque6osest_ngarantizadosenIorelativoalcontrol alas disposicionesque seindiquena continuaci6n.Si una partedesumotor
deemisionesparadefectosenpiezasduranteunperiododedosa_os,sujeto cubiertapot lagaranfiaes defectuosa,Searsreparar_o sustituir_dichaparte.
Responsabilidades del propietario en relacibn con la garantia
Comopropietariodelmotortodoterrenopeque_o,Ud.esresponsabledela
realizaci6ndelmantenimientorequeridoqueseincluyeenlas instrucciones
deoperaci6ny mantenimiento.Searsrecomiendaqueseconserventodoslos
recibosrelativosal mantenimientodesumotortodoterrenopeque_o,pero
nopudedenegarla garantiasimplementeporla faltade los mismos,oporsu
incumplimientodelmantenimientoprogramatic.Comopropietariodelmotor
peque_otodoterrenodebesaberque,sinembargo,Searslepuedenegar
lacoberturade lagarantiasi su motortodoterrenopeque6oouna piezadel
mismohanfalladodebidoa abuso,negligencia,mantenimientoindebidoo
a modificacionesnoaprobadas.Ud.esresponsabledepresentarsu motor
todoterrenopeque6oaundistribuidorde serviciosSearsautorizadotan pronto
comoaparezcaunproblema.Lasreparacionesdela garantiasinconfiicto
debencompletarseen unplazodetiemporazonable,nosuperiora30dias.Si
tienealgunapreguntarespectoa susderechosy responsabilidadesreferentes
a lagarantia,debecontactarconun representantedeserviciosSearsal 1--
800--469--4663.Lagarantiadeemisioneses una garantiapotdefectos.Los
defectossejuzgandeacuerdocon elfuncionamientonormalde unmotor.La
garantiano est_relacionadaconunapruebade emisionesenuso.
Disposiciones de la garantJa Sears para defectos en el control de emJsiones
Lassiguientessondisposicionesespecificasrelacionadasconla coberturade lagarantiaparadefectosenel controldeemisiones.Esuna_adidoa lagarantiade
motorSearsparamotoresnoreguladosqueseencuentraen lasinstruccionesdefuncionamientoy mantenimiento.
1. Piezascongarantia
Lacoberturadeesta garantiaseextiendeL]nicamentealas piezas
queaparecena continuaci6n(las partesde lossistemasdecontrolde
emisiones),siempreque dichaspiezasestuvieranyaenel motoren el
momentodesucompra.
a. Sistemademedici6ndecombustible
•Sistemade enriquecimientoparaarranqueenfrio
•Carburadory partesinternas
• Bombade combustible
b. Sistemadeinducci6nde aire
• Filtrodeaire
•Colectordeadmisi6n
c. Sistemadeencendido
• Bujia(s)deencendido
•Sistemade encendidomagneto
d. Sistemadelcatalizador
•Convertidorcatalitico
•Colectordeescape
•Sistemade inyecci6nde aireov_lvulade impulsos
e. Elementosvariadosusadosenlossistemasanteriores
•Wlvulas devacio,sensiblesatemperatura,posici6ny tiempo
einterruptores
•Conectoresy montajes
2. AIcancedela cobertura
Searsgarantizaal poseedorinicialy a loscompradoressubsiguientes
quelaspiezascongarantianotendr_ndefectosen materialesni mano
deobraque provoquenla falladelas mismasduranteun periodode
dosaSosa partirdela fechaen queel motorseentregaa uncomprador
particular.
3. Sincargo
Lareparaci6noreemplazodecualquierpartecongarantiaserealizar_
sin cargoalgunoparael poseedor,incluyendotareasdediagn6sticoque
permitandeterminarsi una partecongarantiaesdefectuosa,siempreque
dichodiagn6sticoserealiceenundistribuidorde serviciosSearsautoriza-
do. Parael serviciode lagarantiade emisiones,contacteal distribuidorde
serviciosSearsautorizadom_scercanoincluidoen las"P_ginasamarillas"
en lascategorias"Motores,gasolina","Motoresdegasolina","Podadoras
de cesped",osimilares.
4. Reclamacionesyexclusionesala cobertura
Las reclamacionesde lagarantiadebenenviarsedeacuerdocon las
disposicionesdela politicadegarantiaparamotoresSears.La cobertura
de lagarantiaexcluir_defectosen piezascongarantiaquenosean partes
originalesSears,o abuso,negligenciao mantenimientoincorrecto,taly
comoseestableceen lapoliticadegarantiaparamotoresSears.Searsno
esresponsablede lasfallasenpiezascongarantiaprovocadasporel uso
de partesa_adidas,que noseanoriginalesoquesehayanmodificado.
5. Mantenimiento
Cualquierpartecongarantiaque noesteprogramadaparaset reempla-
zadacomomantenimientorequerido,oques61odebainspeccionarse
regularmentealefectode"inspeccioneoreemplacesegL]nsea necesario",
estar_garantizadacontradefectosduranteelperiodode lagarantia.Todas
las piezasgarantizadasqueestenprogramadasparasureemplazopara
cumplirconlos requisitosdemantenimientoestar_ngarantizadass61o
porel periodoanterioral primerreemplazoprogramaticparadicha pieza.
Cualquierpiezade recambioqueseaequivalenteenfuncionamientoy
durabilidadpuedeusarsepararealizarmantenimientoo reparaciones.El
propietarioes responsablederealizartodoel mantenimientorequerido,tal
y comose defineenlas instruccionesdefuncionamientoy mantenimiento
Sears
6. Coberturaindirecta
Porla presente,la coberturaseextiendeala falladecualquiercomponente
de motorprovocadapotlafallade unapiezacongarantiaqueestetodavia
en periododegarantia.
Enlos EstadosUnidosy Canad_hayunalineadeatenci6nde24 horas,1-800-469--4GG3,quecuentacon unmenL]conmensajespre-grabadosquecontienen
informaci6nparael mantenimientodemotores.

DECLARACIONFEDERALy/oDECALIFORNIASOBRE GARANTJAS EN EL CONTROL DE EIVIISIONES
SUS DERECHOS Y OBLIGACIONES EN CUANTO A LA GARANTJA
MTDConsumerGroupInc,laAgenciadeProtecci6nMedioambientaldelos EstadosUnidos(EPA),y paraaquellosproductoscertificadosparasu ventaen el es-
tadode California,el Departamentode losRecursosdelAire deCalifornia(CARB)secomplacenenexplicarla garanfiaquecubreal sistemade control(ECS)de
emisiones(evaporativasy/ode escape)de suequipoy motor(motordeequiposdeexteriores)deencendidopot chispaparatodoterreno,peque_o,deexteriores
dela_o2006y a_osposterioresEnCalifornia,losnuevosmotoresdeequiposdeexterioresdebenestardise_ados,construidosyequipadosparacumplircon las
estrictasnormasantipoluci6ndel Estado(enotrosestados,losequiposdela_o 1997y modelosposterioresdebenserestardise_ados,construidosy equipados
paracumplirconlas regulacionesdemotoresdeencendidoporchispaparatodoterrenopeque_osde laAgenciade Protecci6nMedioambientaldelos Estados
Unidos,(EPA).MTDConsumerGroupInc.debegarantizarel sistemadecontroldeemisiones(ECS)desumotordeequiposdeexteriorespot el periodode
tiempoindicadom_sabajo,siempreycuando noexistausoincorrecto,negligenciaomantenimientoinadecuadodedicho motor.
SuECSpuedeincluirpiezastalescomoel carburador,el sistemade inyecci6ndecombustible,el sistemadeencendido,el convertidorcatalitico,losdep6sitos
decombustible,laslineasdecombustible,lostaponesdecombustible,lasv_lvulas,contenedores,filtros,manguerasdevapor,abrazaderas,conectoresyotros
componentesafinesrelacionadosconlasemisiones.
Dondeexistaunacondici6ncubiertaporla garantia,MTDConsumerGroupInc.reparar_su motorde equiposde exterioressincostoalgunoincluyendoel
diagn6stico,las piezasy lamanodeobra.
COBERTURA DE LA GARANTJA DEL FABRICANTE:
Estesistemadecontroldeemisionessegarantizaporel t@minode dosaSos.Si algunapiezarelacionadacon lasemisionesdesu motorde equiposde
exterioresesdefectuosa,MTDCONSUMERGROUPINC.reparar_osustituir_dichapieza.
RESPONSABILIDADES DEL PROPIETARIO SEGUN LA GARANTJA:
Ensu car_cterdepropietariodelmotordeequiposdeexteriores,ustedesresponsabledel mantenimientorequeridoqueseespecificaenel manualdel propieta-
rio.MTDConsumerGroupIncle recomiendaque conservetodoslosrecibosquecubrenelmantenimientode sumotor,noobstanteIocualMTDConsumerGroup
Incnopodr_denegarel cumplimientode lagarantiaQnicamenteporlafaltade los recibos.
Comopropietariodel motordeequiposde exteriores,usteddebesaberqueMTDConsumerGroupInc.puededenegarlacoberturade lagarantiasisumotoro
unapiezadel mismofallandebidoa uso incorrecto,negligencia,mantenimientoindebidooamodificacionesnoaprobadas.
Ustedesresponsablede presentarsumotoral centrodedistribuci6noserviciotecnicodeMTDConsumerGroupInc.tan prontocomoaparezcael problema.Las
reparacionescubiertasporla garantiase debenIlevara caboen unlapsorazonablequenoexcedade30 dias.Sitiene algunapreguntarespectode lacobertura
dela garantia,p6ngaseen contactoconel DepartamentodelServicioT@nicode MTDConsumerGroupInc.al telefono1-800-800-7310opot correoelectr6nico
enhttp://support.mtdproducts.com
COBERTURA DE LA GARANTJA DE EMISIONES GENERALES:
MTDConsumerGroupIncgarantizaal compradorfinaly acadacompradorsubsiguientequeel motordeequiposde exteriores:est_ dise_ado,construidoy
equipadodemododecumplircontodaslas regulacionesaplicablesy quese encuentralibrededefectosdematerialesyde fabricaci6nquepudierencausarla
falladeuna piezagarantizadaidentica,entodoslosaspectosmaterialesala piezadescriptaenla solicitudde certificaci6ndeMTDConsumerGroupInc.
El periododegarantiacomienzaenla fechade entregadelmotoral compradorfinaloen lafechaenque la m_quinase poneenfuncionamientopot primeravez.
El periododegarantiaesde dosaSos.
Sujetoaciertascondicionesyexclusionesquese indicanacontinuaci6n,lagarantiadelas piezasrelacionadascon lasemisionesesla siguiente:
1. Cualquierpiezagarantizadaque noesteprogramadaparaser reemplazadacomopartedelmantenimientorequeridoen lasinstruccionesescritassuminis-
tradassegarantizaporel periododegarantiaarribamencionado.Sila piezafalladuranteel periododecoberturade lagarantia,la mismaser_reparada
oreemplazadaporMTDConsumerGroupInc.deacuerdoconel parrafo(4)acontinuaci6n.Cualquierpiezareparadao reemplazadasegQnlagaranfiase
garantizar_potel restodelperiodode garantia.
2. Cualquierpiezagarantizadaqueeste programadasolamenteparainspecci6nregularenlas instruccionesescritassuministradassegarantizapotel periodo
degarantiaarribamencionado.CualquierpiezareparadaoreemplazadasegQnla garantiasegarantizar_pot el restodelperiodo.
3. Cualquierpiezagarantizadaqueeste programadaparareemplazosegQnel mantenimientorequeridode conformidadcon lasinstruccionesescritassuminis-
tradas,se garantizaporel periododetiempoanteriora laprimerafechade reemplazoprogramadaparaesapieza.Si la piezafallaantesdelprimerreemplazo
programado,la mismaser_reparadaoreemplazadapot MTDConsumerGroupInc.deacuerdoconel parrafo(4)acontinuaci6n.Cualquierpiezareparadao
reemplazadabajogarantiase garantizar_potel restodelperiodoanterioral primerreemplazoprogramaticpuntualparaesapieza.
4. Lareparaci6noel reemplazodecualquierpiezagarantizadadeconformidadconlasdisposicionesde lagarantiaqueaquiseestipulasedeben realizarenun
centrodegarantiasin costoalgunoparael propietario.
5. Noobstantelas disposicionesque aquiseestipulan,losservicioso reparacionesbajo garantiasesuministrar_nentodosnuestroscentrosdedistribuci6nbajo
franquiciademantenimientoparalos motoresoequiposencuesti6n.
6. El propietariodelmotorde equiposdeexterioresno deber_pagareltrabajodediagn6sticodirectamenteasociadocon unapiezagarantizadadefectuosaen
relaci6nconlas emisiones,siempreycuandodichotrabajode diagn6sticoserealiceen uncentrocubiertopot lagarantia.
7. MTDConsumerGroupInces responsablepotda6oscausadosaotroscomponentesdemotoresoequiposderivadosde lafallabajo garantiadecualquier
piezagarantizada.

8.Durantelatotalidaddelperiododegarantiadelmotoryequipoparatodoterrenoarribamencionado,MTDConsumerGroupIncmantendr_unsuministro
depiezasbajogarantiasuficienteparasatisfacerlademandaesperadadetalespiezas.
9.Cualquierpiezadereemplazosepodr_usarparaelcumplimientodelmantenimientoolasreparacionesbajogarantiaysesuministrar_nsincargopara
elpropietario.Dichousonoreducir_lasobligacionesdegarantiadeMTDConsumerGroupInc.
10.Nosepodr_nusarpiezasadicionalesnimodificadasquenoestenexentasdeacuerdoconelDepartamentodelosRecursosdelAire(AirResourcesBoard).
Elusodecualquierpiezaadicionalomodificadanoexentaporelcompradorfinalser_causaldeinvalidezdelosreclamosbajogaranfia.MTDConsumer
GroupIncnotendr_responsabilidadpotlagarantiadefallasdepiezasgarantizadasquefuerencausadaspotelusodeunapiezaadicionalnoexenta
omodificada.
PIEZAS GARANTIZADAS:
Lareparaci6noel reemplazodecualquierpiezagarantizadaquede ottomodopudieseestarcubiertapot lagarantiapodr_set excluidadetalcoberturade
garantiasi MTDConsumerGroupIncdemuestraqueel motoresobjetodeusoincorrecto,negligenciao mantenimientoinadecuado,y quetalusoincorrecto,
negligenciaomantenimientoinadecuadofue causadirectade la necesidadde reparaci6noreemplazode dichapieza.NoobstanteIoantedicho,cualquierajuste
deuncomponenteconundispositivodelimitaci6nde ajusteinstaladoenf_bricay quefuncioneadecuadamente,podr_setcubiertopot lagarantia.Adem_s,
la coberturabajoestagarantiaseextiendesoloapiezasqueestuvieronpresentesenel motory equipotodoterrenoadquiridos.
Est_ncubiertaslas siguientespiezascongaranfiaparaemisiones(decorresponder):
(1)Sistemademedici6nde combustible
• Sistemade mejoraparainicioenfrio (cebadosuave)
• Carburadory piezasinternas(osistemade inyecci6npotcombustible)
• Bombadecombustible
• Dep6sitodecombustible
(2)Sistemade inducci6ndeaire
• Purificadordeaire
• Colectordeadmisi6n
(3) Sistemadeencendido
• Bujia(s) deencendido
• Sistemade encendidopot magneto
(4)Sistemade encendido
• Convertidorcatalitico
• SAl(v_lvula Reed)
(5)Componentesvariosutilizadosen el sistemaanterior
• Wlvulas e interruptoresdevacio,temperatura,posici6nsensiblesal tiempo
• Conectoresy montajes
(6) Controlevaporativo
• Manguerade combustible
• Abrazaderasde la mangueradecombustible
• Tap6ndelcombustibleatadopot correa
• Cajadecarbono
• Lineas de vapor
GDOC-100223

Felicitacionespor haberrealizadounaadquisici6ninteligente.El
productoCraftsman@queha adquiridoest_dise_adoyfabricado
parabrindarrnuchosa_osde funcionarnientoconfiable.Perocorno
todoslosproductosa vecespuederequerirde reparaciones.Esen
esernornentocuandoel disponerde unAcuerdode protecci6npara
reparacionesle puedeahorrardineroy problernas.
A continuaci6nsedetallanlospuntosincluidosenel Acuerdo:
• Servicio experto prestadopornuestros10,000especialistasen
reparacionesprofesionales
• Servicio ilirnitadosincargoparalaspiezasylarnanodeobraen
todaslas reparacionescubiertas
• Reemplazodel productohasta1500d61aressino esposible
repararel productocubierto
• Descuentode 10%del precionormaldel servicioy delaspiezas
relacionadasconel rnisrnoqueno est_ncubiertasporel acuerdo;
adern&s,10%del precionormalde laverificaci6nde rnantenirniento
preventivo
• Ayudar_pidapottel_fono- IoIlarnarnosResoluci6nR_.pida- el
apoyotelef6nicode unCharnuscaal representante.Pienseen
nosotroscornoel manual"deundue_ohablador."
Unavezadquiridoel Acuerdo,puedeprograrnarel serviciocon
tans61orealizarunaIlarnadatelef6nica.PuedeIlarnarencualquier
mornentodeldia o dela nocheo prograrnarun servicioen linea.
ElAcuerdode Protecci6nde Reparaci6nesunacornprasinriesgo.
Siustedanulaporalgunaraz6nduranteel periodode garantiade
producto,proporcionarernosun reernbolsoIleno.O,unreernbolso
prorrateadoencualquierrnornentodespu_sdelperiodode garantia
de productoexpira,iAdquieraboysuacuerdode protecci6npara
reparaciones!
Se aplican determinadas limitaciones y exclusiones. Para obtener
informaci6n adicional y precios en los Estados Unidos Ilame al
1-800-827-6655.
El *Coverage en Canad;_varia en algunos articulos. Para detalles
Ilenos la Ilamada Chamusca Canad_ en 1-800-361-6665.
Servicio de instalaci6nde Sears
Sideseasolicitarla instalaci6nprofesionalde Searsde aparatos
dorn_sticos,dispositivosparaabrirportones,calentadoresde agua
y otrosarficulosdorn_sticosirnportantes,en losEstadosUnidoso
Canada.Ilarneal 1-800-4-MY-HOME@.
91

Riding Equipment
questions or problems?
Satisfaction with your purchase
is our number one concern!
To troubleshoot problems,
get answers to questions, order parts,
or schedule repair service for your
Riding Equipment, call the number below.
Para respuestas a preguntas o problemas,
y ordenar piezas o pedir servicio para la
reparacibn de su equipo, Ilame el nt_mero abajo.
1-800-659-5917
Craftsman Help Line
www.craftsman.com
® Registered Trademark / TMTrademark of KCD IP, LLC in the United States, or Sears Brands, LLC in other countries
® Marca Registrada / TMMarca de Fabrica de KCD IP, LLC en Estados Unidos, o Sears Brands, LLC in otros paises
-
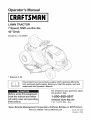 1
1
-
 2
2
-
 3
3
-
 4
4
-
 5
5
-
 6
6
-
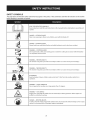 7
7
-
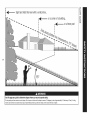 8
8
-
 9
9
-
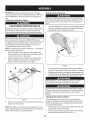 10
10
-
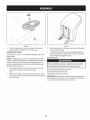 11
11
-
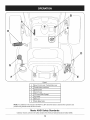 12
12
-
 13
13
-
 14
14
-
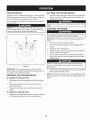 15
15
-
 16
16
-
 17
17
-
 18
18
-
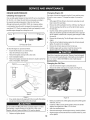 19
19
-
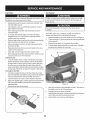 20
20
-
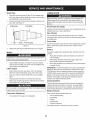 21
21
-
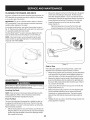 22
22
-
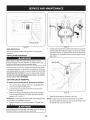 23
23
-
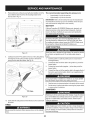 24
24
-
 25
25
-
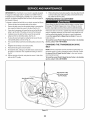 26
26
-
 27
27
-
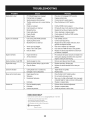 28
28
-
 29
29
-
 30
30
-
 31
31
-
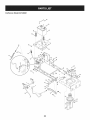 32
32
-
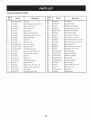 33
33
-
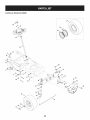 34
34
-
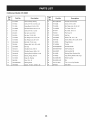 35
35
-
 36
36
-
 37
37
-
 38
38
-
 39
39
-
 40
40
-
 41
41
-
 42
42
-
 43
43
-
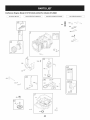 44
44
-
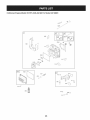 45
45
-
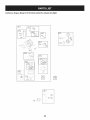 46
46
-
 47
47
-
 48
48
-
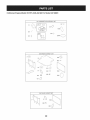 49
49
-
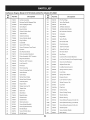 50
50
-
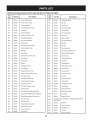 51
51
-
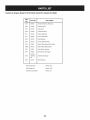 52
52
-
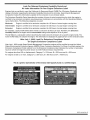 53
53
-
 54
54
-
 55
55
-
 56
56
-
 57
57
-
 58
58
-
 59
59
-
 60
60
-
 61
61
-
 62
62
-
 63
63
-
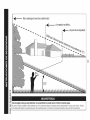 64
64
-
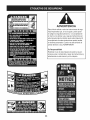 65
65
-
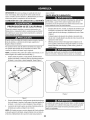 66
66
-
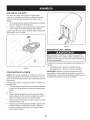 67
67
-
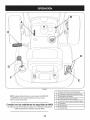 68
68
-
 69
69
-
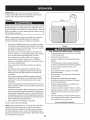 70
70
-
 71
71
-
 72
72
-
 73
73
-
 74
74
-
 75
75
-
 76
76
-
 77
77
-
 78
78
-
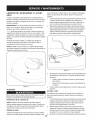 79
79
-
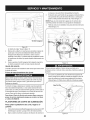 80
80
-
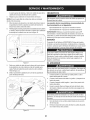 81
81
-
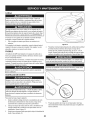 82
82
-
 83
83
-
 84
84
-
 85
85
-
 86
86
-
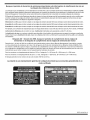 87
87
-
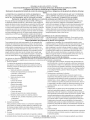 88
88
-
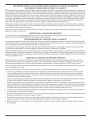 89
89
-
 90
90
-
 91
91
-
 92
92


Kmart 02891808-4 El manual del propietario
- Categoría
- Cortadoras de césped
- Tipo
- El manual del propietario
en otros idiomas
- English: Kmart 02891808-4 Owner's manual
Artículos relacionados
Otros documentos
-
Craftsman 247.28901 Manual de usuario
-
-
-
Craftsman 247.28905 Manual de usuario
-
-
-
MTD 13AN77SS299 El manual del propietario
-
-
-