MTD 13A277SS099 El manual del propietario
- Categoría
- Cortadoras de césped
- Tipo
- El manual del propietario

perator's
I:RnFrSMRN°
LAWN TRACTOR
7 Speed, Shift-on=the=Go
42" Deck
Model No. 247.288820
• Espanol, P. 61
This product has a low emission engine which operates differently
from previously built engines. Before you start the engine, read and
understand this Operator's Manual.
Before using this equipment,
read this manual and follow
all safety rules and operating
instructions.
For answers to your questions about
this product, Call:
1-800=659=5917
CraftsmanTractorHelpLine
7 am =7 pm CT, Mort. =Sun.
Sears Brands Management Corporation, Hoffman Estates, IL 60179 U.S.A.
Visit our website: www.craftsman.com FormNo.769-08538
(November26,2012)

Warranty Statement .......................................................... 2
Safety Instructions ............................................................ 3
Slope Gauge ..................................................................... 8
Assembly ........................................................................... 9
Operation ........................................................................ 11
Service and Maintenance .............................................. 17
Off-Season Storage ........................................................ 27
Troubleshooting .............................................................. 28
Labels ............................................................................. 29
Parts List ......................................................................... 30
Espafiol ............................................................................ 61
Service Numbers ............................................. Back Cover
CRAFTSMAN FULL WARRANTY
FORTWOYEARSfromthedateofpurchase,allnon-expendablepartsofthis ridingequipmentarewarrantedagainstanydefectsinmaterialor
workmanship.Adefectivenon-expendablepartwill receivefreein-homerepairor replacementif repairisunavailable.
BATTERYLIMITEDWARRANTY
FOR90 DAYSfromthedateofpurchase,thebattery(an expendablepart)ofthis ridingequipmentiswarrantedagainstanydefectsinmaterialor
workmanship.Anewbatterywillbesuppliedfreeof charge.Youareresponsibleforthelaborcostof batteryinstallation.
ADDITIONALLIMITEDWARRANTIES
Inthefollowingadditionalwarranties,youare responsibleforthe laborcostofpartinstallationafterthe secondyearfromthedateof purchase.
FORFIVEYEARSfromthedateof purchase,theframeofthis ridingequipmentiswarrantedagainstanydefectsinmaterialorworkmanship.A
newframewillbe suppliedfreeofcharge.
FORTENYEARSfromthedateofpurchase,thefrontaxleof thisridingequipmentiswarrantedagainstanydefectsin materialorworkmanship.
A newfrontaxlewillbe suppliedfreeofcharge.
FORASLONGASIT ISUSEDbytheoriginalownerafterthetenthyearfromthedateofpurchase,thecastironfrontaxle(ifequipped)ofthisriding
equipmentiswarrantedagainstanydefectsinmaterialorworkmanship.Withproofofpurchase,a newcastironfrontaxlewillbesuppliedfreeofcharge.
WARRANTYSERVICE
Forwarrantycoveragedetailsto obtainfreerepairor replacement,call1-800-659-5917orvisitthewebsite:www.craftsman.com
Inallcasesabove,if partrepairor replacementisimpossible,theridingequipmentwillbe replacedfreeofchargewiththesameor anequivalent
model.
Alloftheabovewarrantycoverageisvoidifthisridingequipmentiseverusedwhileprovidingcommercialservicesor if rentedtoanotherperson.
ThiswarrantycoversONLYdefectsin materialandworkmanship.WarrantycoveragedoesNOTinclude:
• Expendableparts(exceptbattery)thatcanwearoutfromnormalusewithinthewarrantyperiod,includingbutnotlimitedto blades,spark
plugs,air cleaners,belts,andoil filters.
Standardmaintenanceservicing,oilchanges,or tune-ups.
Tirereplacementor repaircausedbypuncturesfromoutsideobjects,suchasnails,thorns,stumps,or glass.
• Tireorwheelreplacementor repairresultingfromnormalwear,accident,orimproperoperationor maintenance.
Repairsnecessarybecauseof operatorabuse,includingbutnotlimitedtodamagecausedbytowingobjectsbeyondthecapabilityofthe
ridingequipment,impactingobjectsthatbendtheframe,axleassemblyorcrankshaft,or over-speedingtheengine.
Repairsnecessarybecauseof operatornegligence,includingbutnotlimitedto,electricalandmechanicaldamagecausedbyimproper
storage,failureto usethepropergradeandamountofengineoil,failuretokeepthedeckclearofflammabledebris,orfailuretomaintainthe
ridingequipmentaccordingtotheinstructionscontainedintheoperator'smanual.
• Engine(fuelsystem)cleaningor repairscausedbyfueldeterminedto becontaminatedoroxidized(stale).Ingeneral,fuelshouldbeused
within30 daysof itspurchasedate.
• Normaldeteriorationandwearoftheexteriorfinishes,or productlabelreplacement.
Thiswarrantygivesyouspecificlegalrights,andyoumayalsohaveotherrightswhichvaryfromstatetostate.
Sears BrandsManagementCorporation, HoffmanEstates,IL 60179
Model Number:
EngineOil: SAE30 Serial Number:
Fuel: UnleadedGasoline Dateof Purchase:
SparkPlug: F6RTC(951-10292) Recordthemodelnumber,serialnumber,
anddateof purchaseabove.
© SearsBrands,LLC 2

Thissymbolpointsoutimportantsafetyinstructionswhich,if not
followed,couldendangerthepersonalsafetyand/orpropertyof
yourselfandothers.Readandfollowall instructionsin thismanual
beforeattemptingtooperatethismachine.Failuretocomplywith
theseinstructionsmayresultin personalinjury.Whenyouseethis
symbol,HEEDITSWARNING!
CALIFORNIA PROPOSITION 65
EngineExhaust,someof itsconstituents,andcertainvehicle
componentscontainoremitchemicalsknowntoStateofCalifornia
tocausecancerandbirthdefectsorotherreproductiveharm.
Batteryposts,terminals,and relatedaccessoriescontainleadand
leadcompounds,chemicalsknowntotheStateof Californiato
causecancerandreproductiveharm.Washhandsafterhandling.
Thismachinewasbuilttobeoperatedaccordingtothesafeopera-
tionpracticesinthis manual.Aswithanytypeof powerequipment,
carelessnessorerroron thepartoftheoperatorcanresultin serious
injury.Thismachineiscapableofamputatingfingers,hands,toes
andfeetandthrowingdebris.Failuretoobservethefollowingsafety
instructionscouldresultin seriousinjuryor death.
Your Responsibility--Restrict theuseofthispowermachineto
personswhoread,understandandfollowthewarningsand instruc-
tionsin thismanualandon themachine.
SAVE THESE INSTRUCTIONS!
GENERAL OPERATION
• Read,understand,andfollowall instructionson themachineand
in themanual(s)beforeattemptingtoassembleandoperate.
Keepthis manualina safeplaceforfutureand regularreference
andfororderingreplacementparts.
• Befamiliarwithall controlsandtheirproperoperation.Knowhow
tostopthemachineanddisengagethemquickly.
• Neverallowchildrenunder14yearsoldtooperatethis machine.
Children14yearsoldandovershouldreadandunderstandthe
operationinstructionsandsafetyrulesinthismanualandshould
betrainedandsupervisedbya parent.
• Neverallowadultstooperatethis machinewithoutproper
instruction.
• Tohelpavoidbladecontactora thrownobjectinjury,keep
bystanders,helpers,childrenandpetsatleast75feetfromthe
machinewhileitisin operation.Stopmachineifanyoneenters
thearea.
• Thoroughlyinspecttheareawheretheequipmentistobe used.
Removeallstones,sticks,wire,bones,toys,andotherforeign
objectswhichcouldbe pickedupandthrownbytheblade(s).
Thrownobjectscancauseseriouspersonalinjury.
• Planyourmowingpatterntoavoiddischargeofmaterialtoward
roads,sidewalks,bystandersandthelike.Also,avoiddischarg-
ingmaterialagainstawallorobstructionwhichmaycause
dischargedmaterialto ricochetbacktowardtheoperator.
• Alwayswearsafetyglassesor safetygogglesduringoperation
andwhileperformingan adjustmentor repairto protectyoureyes.
Thrownobjectswhichricochetcancauseseriousinjurytothe
eyes.
• Wearsturdy,rough-soledworkshoesandclose-fittingslacksand
shirts.Loosefittingclothesandjewelrycanbecaughtin movable
parts.Neveroperatethismachineinbarefeetorsandals.
• Beawareofthemowerandattachmentdischargedirectionand
do notpointitatanyone.Donotoperatethemowerwithoutthe
dischargecoverorentiregrasscatcherin its properplace.
Donotputhandsor feetnearrotatingpartsor underthecutting
deck.Contactwiththeblade(s)canamputatehandsandfeet.
A missingor damageddischargecovercancausebladecontact
or thrownobjectinjuries.
• Stoptheblade(s)whencrossinggraveldrives,walks,or roads
andwhilenotcuttinggrass.
• Watchfortrafficwhenoperatingnearorcrossingroadways.This
machineisnotintendedforuseonanypublicroadway.
• Donotoperatethemachinewhileundertheinfluenceofalcohol
or drugs.
• Mowonlyindaylightorgoodartificiallight.
Nevercarrypassengers.
• Disengageblade(s)beforeshiftingintoreverse.Backup slowly.
Alwayslookdownandbehindbeforeandwhilebackingtoavoida
back-overaccident.
3

• Slowdownbeforeturning.Operatethemachinesmoothly.Avoid
erraticoperationandexcessivespeed.
Disengageblade(s),setparkingbrake,stopengineandwaituntil
theblade(s)cometoa completestopbeforeremovinggrass
catcher,emptyinggrass,uncloggingchute,removinganygrassor
debris,or makinganyadjustments.
Neverleavea runningmachineunattended.Alwaysturnoff
blade(s),setparkingbrake,stopengineandremovekeybefore
dismounting.
Useextracarewhenloadingorunloadingthemachineintoa
trailerortruck.Thismachineshouldnotbedrivenupor down
ramp(s),becausethemachinecouldtipover,causingserious
personalinjury.Themachinemustbepushedmanuallyon
ramp(s)to loador unloadproperly.
Mufflerandenginebecomehotandcancausea burn.Donot
touch.
Checkoverheadclearancescarefullybeforedrivingunderlow
hangingtreebranches,wires,dooropeningsetc.,wherethe
operatormaybestruckor pulledfromthemachine,whichcould
resultinseriousinjury.
Disengageallattachmentclutchesanddepressthebrakepedal
completelybeforeattemptingtostartengine.
Yourmachineisdesignedto cutnormalresidentialgrassofa
heightnomorethan10".Donotattemptto mowthroughunusually
tall,drygrass(e.g.,pasture)orpilesofdryleaves.Drygrassor
leavesmaycontacttheengineexhaustand/orbuilduponthe
mowerdeckpresentinga potentialfirehazard.
Useonlyaccessoriesandattachmentsapprovedforthis machine
bythemachinemanufacturer.Read,understandandfollowall
instructionsprovidedwiththeapprovedaccessoryor attachment.
Fora list ofapprovedaccessoriesandattachments,call 1-800-
659-5917.
Dataindicatesthatoperators,age60yearsandabove,are
involvedin a largepercentageofridingmower-relatedinjuries.
Theseoperatorsshouldevaluatetheirabilitytooperatetheriding
mowersafelyenoughto protectthemselvesandothersfrom
seriousinjury.
If situationsoccurwhicharenotcoveredinthismanual,usecare
andgoodjudgment.
SLOPE OPERATION
Slopesarea majorfactorrelatedtolossofcontrolandtip-over
accidentswhichcanresultinsevereinjuryordeath.Allslopesrequire
extracaution.Ifyoucannotbackuptheslopeor ifyoufeeluneasyon
it, do notmowit.
Foryoursafety,usetheSlopeGuideincludedaspartofthis manual
to measureslopesbeforeoperatingthis machineona slopedor hilly
area.Iftheslopeisgreaterthan15degreesasshownonthe Slope
Guide,do notoperatethis machineonthatareaor seriousinjurycould
result.
Do:
o
Mowupanddownslopes,notacross.Exerciseextremecaution
whenchangingdirectionon slopes.
• Watchforholes,ruts,bumps,rocks,orotherhiddenobjects.
Uneventerraincouldoverturnthemachine.Tallgrasscanhide
obstacles.
Useslowspeed.Choosea lowenoughspeedsettingsothat
youwillnothavetostopor shiftwhileon theslope.Tiresmay
losetractionon slopeseventhoughthe brakesarefunctioning
properly.Alwayskeepmachinein gearwhengoingdownslopes
totakeadvantageofenginebrakingaction.
• Followthemanufacturer'srecommendationsforwheelweightsor
counterweightsto improvestability.
Useextracarewithgrasscatchersor otherattachments.These
canchangethestabilityofthe machine.
Keepallmovementontheslopesslowandgradual.Donotmake
suddenchangesinspeedordirection.Rapidengagementor
brakingcouldcausethefrontofthemachinetolift andrapidlyflip
overbackwardswhichcouldcauseseriousinjury.
• Avoidstartingorstoppingona slope.Iftireslosetraction,disen-
gagetheblade(s)andproceedslowlystraightdowntheslope.
DoNot:
• Donotturnon slopesunlessnecessary;then,turnslowlyand
graduallydownhill,ifpossible.
• Donotmowneardrop-offs,ditchesor embankments.Themower
couldsuddenlyturnoverifa wheelisovertheedgeofa cliff,
ditch,or ifan edgecavesin.
• Donottry tostabilizethemachinebyputtingyourfooton the
ground.
• Donotusea grasscatcheron steepslopes.
• Donotmowon wetgrass.Reducedtractioncouldcausesliding.
• Donotattempttocoastdownhill.Over-speedingmaycausethe
operatortolosecontrolofthemachineresultingin seriousinjury
or death.
• Donottowheavypull behindattachments(e.g.loadeddumpcart,
lawnroller,etc.)onslopesgreaterthan5 degrees.Whengoing
downhill,theextraweighttendstopushthetractorandmay
causeyoutoloosecontrol(e.g.tractormayspeedup,brakingand
steeringabilityarereduced,attachmentmayjack-knifeandcause
tractortooverturn).
4

CHILDREN
Tragicaccidentscanoccuriftheoperatorisnotalerttothepresence
ofchildren.Childrenareoftenattractedtothemachineandthemowing
activity.Theydo notunderstandthedangers.Neverassumethat
childrenwillremainwhereyoulastsawthem.
• Keepchildrenoutofthemowingareaand inwatchfulcareofa
responsibleadultotherthantheoperator.
• Bealertandturnmachineoff ifa childentersthearea.
• Beforeandwhilebacking,lookbehindanddownforsmall
children.
Nevercarrychildren,evenwiththeblade(s)shutoff.Theymay
falloffandbe seriouslyinjuredorinterferewithsafemachine
operation.
• Useextremecarewhenapproachingblindcorners,doorways,
shrubs,treesorotherobjectsthatmayblockyourvisionofa child
whomayrunintothe machine.
Toavoidback-overaccidents,alwaysdisengagethecutting
blade(s)beforeshiftingintoReverse.Ifequipped,the"Reverse
CautionMode"(bladesoperatewhilemachineridesinreverse)
shouldnotbe usedwhenchildrenor othersarearound.
Keepchildrenawayfromhotor runningengines.Theycansuffer
burnsfroma hotmuffler.
• Removekeywhenmachineisunattendedtopreventunauthorized
operation.
Neverallowchildrenunder14yearsofagetooperatethis machine.
Children14andovershouldreadandunderstandtheinstructionsand
safeoperationpracticesinthismanualandon themachineandshould
betrainedandsupervisedbyan adult.
TOWING
Towonlywitha machinethathasahitchdesignedfortowing.Do
notattachtowedequipmentexceptatthehitchpoint.
Followthemanufacturersrecommendationforweightlimitsfor
towedequipmentandtowingonslopes.
Neverallowchildrenor othersinoron towedequipment.
Onslopes,theweightof thetowedequipmentmaycauselossof
tractionandlossofcontrol.
Alwaysuseextracautionwhentowingwitha machinecapableof
makingtightturns(e.g."zero-turn"ride-onmower). Makewide
turnstoavoidjack-knifing.
Travelslowlyandallowextradistancetostop.
Donotcoastdownhill.
SERVICE
SafeHandlingof Gasoline
Toavoidpersonalinjuryorpropertydamageuseextremecarein
handlinggasoline.Gasolineisextremelyflammableandthevaporsare
explosive.Seriouspersonalinjurycanoccurwhengasolineisspilled
on yourselforyourclotheswhichcanignite.Washyourskinand
changeclothesimmediately.
• Useonlyanapprovedgasolinecontainer.
Neverfillcontainersinsidea vehicleoron a truckortrailerbed
witha plasticliner.Alwaysplacecontainerson thegroundaway
fromyourvehiclebeforefilling.
Whenpractical,removegas-poweredequipmentfromthetruck
or trailerandrefueliton theground.Ifthis isnotpossible,then
refuelsuchequipmentona trailerwitha portablecontainer,rather
thanfroma gasolinedispensernozzle.
Keepthenozzleincontactwiththerimofthefueltankor
containeropeningatall timesuntilfuelingiscomplete.Donotuse
a nozzlelock-opendevice.
Extinguishall cigarettes,cigars,pipesandothersourcesof
ignition.
• Neverfuelmachineindoors.
Neverremovegascapor addfuelwhiletheengineishotor run-
ning.Allowengineto coolatleasttwominutesbeforerefueling.
Neveroverfillfueltank.Filltanktono morethan1/2inchbelow
bottomoffillernecktoallowspaceforfuelexpansion.
• Replacegasolinecapandtightensecurely.
• Ifgasolineisspilled,wipeitoff theengineandequipment.Move
machinetoanotherarea.Wait5 minutesbeforestartingthe
engine.
• Toreducefirehazards,keepmachinefreeofgrass,leaves,or
otherdebrisbuild-up.Cleanup oilor fuelspillageandremoveany
fuelsoakeddebris.
• Neverstorethemachineor fuelcontainerinsidewherethereisan
openflame,sparkor pilotlightasona waterheater,spaceheater,
furnace,clothesdryeror othergasappliances.
Allowa machineto coolatleastfiveminutesbeforestoring.

GeneralService
• Neverrunanengineindoorsorinapoorlyventilatedarea.Engine
exhaustcontainscarbonmonoxide,anodorless,anddeadlygas.
• Beforecleaning,repairing,orinspecting,makecertainthe
blade(s)andallmovingpartshavestopped.Disconnectthespark
plugwireandgroundagainsttheenginetopreventunintended
starting.
• Periodicallychecktomakesurethebladescometocomplete
stopwithinapproximately(5)fivesecondsafteroperatingthe
bladedisengagementcontrol.Ifthebladesdonotstopwithinthe
thistimeframe,yourmachineshouldbeservicedprofessionally
byaSearsorotherqualifiedservicedealer.
• Checkbrakeoperationfrequentlyasitissubjectedtowearduring
normaloperation.Adjustandserviceasrequired.
• Checktheblade(s)andenginemountingboltsatfrequent
intervalsforpropertightness.Also,visuallyinspectblade(s)
fordamage(e.g.,excessivewear,bent,cracked).Replacethe
blade(s)withtheoriginalequipmentmanufacturer's(O.E.M.)
blade(s)only,listedinthismanual.Useofpartswhichdonot
meettheoriginalequipmentspecificationsmayleadtoimproper
performanceandcompromisesafety!
• Mowerbladesaresharp.Wrapthebladeorweargloves,anduse
extracautionwhenservicingthem.
• Keepallnuts,bolts,andscrewstighttobesuretheequipmentis
insafeworkingcondition.
• Nevertamperwiththesafetyinterlocksystemor othersafety
devices.Checktheirproperoperationregularly.
• Afterstrikinga foreignobject,stoptheengine,disconnectthe
sparkplugwire(s)andgroundagainsttheengine.Thoroughly
inspectthemachineforanydamage.Repairthedamagebefore
startingandoperating.
• Neverattempttomakeadjustmentsor repairstothemachine
whiletheengineis running.
• Grasscatchercomponentsandthedischargecoverare subject
towearanddamagewhichcouldexposemovingpartsor allow
objectsto bethrown.Forsafetyprotection,frequentlycheck
componentsandreplaceimmediatelywithoriginalequipment
manufacturer's(O.E.M.)partsonly,listedinthis manual.Useof
partswhichdo notmeettheoriginalequipmentspecificationsmay
leadtoimproperperformanceandcompromisesafety!
• Donotchangetheenginegovernorsettingsorover-speedthe
engine.Thegovernorcontrolsthemaximumsafeoperatingspeed
oftheengine.
Maintainor replacesafetyandinstructionlabels,asnecessary.
• Observeproperdisposallawsandregulationsforgas,oil,etc.to
protecttheenvironment.
• Accordingtothe ConsumerProductsSafetyCommission(CPSC)
andthe U.S.EnvironmentalProtectionAgency(EPA),this product
hasanAverageUsefulLifeofseven(7)years,or270hours
ofoperation.AttheendoftheAverageUsefulLife,buyanew
machineor havethemachineinspectedannuallybya Searsor
otherqualifiedservicedealerto ensurethatall mechanicaland
safetysystemsareworkingproperlyandnotwornexcessively.
Failuretodosocanresultinaccidents,injuriesor death.
DO NOT MODIFY ENGINE
Toavoidseriousinjuryor death,do notmodifyengineinanyway.
Tamperingwiththegovernorsettingcanleadtoa runawayengineand
causeittooperateat unsafespeeds.Nevertamperwithfactorysetting
ofenginegovernor.
NOTICE REGARDING EMISSIONS
Engineswhicharecertifiedto complywithCaliforniaandfederal
EPAemissionregulationsforSORE(SmallOffRoadEquipment)are
certifiedtooperateon regularunleadedgasoline,andmayinclude
thefollowingemissioncontrolsystems:EngineModification(EM)and
ThreeWayCatalyst(TWO)if soequipped.
SPARK ARRESTOR
Thismachineisequippedwithan internalcombustionengineand
shouldnotbeusedonor nearanyunimprovedforest-covered,
brushcoveredorgrass-coveredlandunlesstheengine'sexhaust
systemisequippedwitha sparkarrestormeetingapplicablelocalor
statelaws(ifany).
Ifa sparkarrestoris used,itshouldbemaintainedin effectiveworking
orderbytheoperator.IntheStateof Californiatheaboveisrequired
bylaw(Section4442of theCaliforniaPublicResourcesCode).Other
statesmayhavesimilarlaws.Federallawsapplyonfederallands.
A sparkarrestorforthemufflerisavailablethroughyournearestSears
PartsandRepairServiceCenter.
6

SAFETY SYMBOLS
Thispagedepictsanddescribessafetysymbolsthatmayappearonthis product.Read,understand,andfollowallinstructionson themachine
beforeattemptingtoassembleandoperate.
0
A
READ THE OPERATOR'S MANUAL(S)
Read, understand, and follow all instructions in the manual(s) before attempting to assemble and
operate
DANGER-- ROTATING BLADES
Never carry passengers. Never carry children, even with the blades off.
DANGER-- ROTATING BLADES
Always look down and behind before and while backing to avoid a back-over accident.
WARNING-- ROTATING BLADES
Do not put hands or feet near rotating parts or under the cutting deck. Contact with the blade(s) can
amputate hands and feet.
WARNING--THROWN OBJECTS
This machine may pick up and throw and objects which can cause serious personal injury.
WARNING--THROWN OBJECTS
This machine may pick up and throw and objects which can cause serious personal injury.
BYSTANDERS
Keep bystanders, helpers, children and pets at least 75 feet from the machine while it is in operation.
WARNING-- SLOPE OPERATION
Do not operate this machine on a slope greater than 15 degrees.
WARNING-- HOT SURFACE
Engine parts, especially the muffler, become extremely hot during operation. Allow engine and
muffler to cool before touching.
DANGER-- ROTATING BLADES
To reduce the risk of injury, keep hands and feet away. Do not operate unless discharge cover or grass
catcher is in its proper place. If damaged, replace immediately.
7

(OK)
15° Slope
X
(TOO STEEP)
15° Slope
'_. _ Figure1
USETHISSLOPEGAUGETODETERMINE
IFA SLOPEISTOOSTEEPFORSAFEOPERATION!
Tochecktheslope,proceedasfollows:
1. Removethis pageandfoldalongthedashedline.
2. Locatea verticalobject onor behindtheslope(e.g.a pole,building,fence, tree,etc.)
3. Align eithersideoftheslopegaugewith theobject(SeeFigure1 and Figure2 ).
4. Adjust gaugeupor downuntilthe left cornertouchestheslope(SeeFigure1and Figure2).
5.
15°
dashedline
If thereisagap belowthegauge,theslopeistoo steepfor safeoperation(SeeFigure2 above).
Figure2
Slopesare a majorfactor relatedtotip-over and roll-overaccidentswhich can resultin severeinjury or death. Do not operatemachine onslopes
in excessof 15degrees.All slopes requireextracaution. Ifyou cannotbackup the slope orifyou feeluneasyon it, do not mowit.
Always mowup and down the face ofslopes, never mowacrossthe face of slopes.

IM PORTANT: Yourtractorisshippedwith motoroil intheengine.However,
youMUSTchecktheoillevelbeforeoperating.RefertotheService& Maintenance
sectionforinstructionsoncheckingtheoillevel.
Attaching the Battery Cables
CALIFORNIA PROPOSITION 65
Batteryposts,terminals,and relatedaccessoriescontainleadand lead
compounds,chemicalsknown tothe StateofCaliforniato causecancerand
reproductiveharm.Washhandsafter handling.
Shipping BraceRemoval
Makesurethe ridingmower'sengineisoff, removethe ignition key,and
setthe parkingbrakebeforeremovingthe shippingbrace.Refertothe
Operatonsectonfor nstructonsonhowtosetthe parkngbrake.
Locatetheshippingbrace,if present,andaccompanyingwarningtagfound
ontherightsideofthemower,betweenthedischargechutedeflectorand
thecuttingdeck.SeeFigure2.
Whenattachingbatterycables,alwaysconnectthe POSITIVE(Red)wire toits
terminalfirst, followed bythe NEGATIVE(Black)wire.
Forshippingreasons,bothbatterycablesonyourequipmentmayhavebeenleft
disconnectedfromtheterminalsatthefactory.Toconnectthe batterycables,
proceedasfollows:
NOTE:ThepositivebatteryterminalismarkedPos.(+).Thenegativebattery
terminalismarkedNeg.(-).
1. Removetheplasticcover,ifpresent,fromthepositivebatteryterminaland
attachtheredcabletothepositivebatteryterminal(+) with theboltand
hexnut.SeeFigure1.
2. Removetheplasticcover,ifpresent,fromthenegativebatteryterminaland
attachtheblackcabletothenegativebatteryterminal(-) with theboltand
hexnut.SeeFigure1.
f
/
/
/
/
/
Figure1
3. Positionthe redrubberbootoverthepositivebatteryterminaltohelp
protectit fromcorrosion.
NOTE:Ifthe batteryisput intoserviceafterthedateshownontopofbattery,
chargethe batteryasinstructedin theService& Maintenancesectionofthis
manualpriortooperatingthetractor.
J
Figure2
Placethedecklift leverin thehighestcuttingposition.RefertoSettingthe
CuttingHeightintheOperationsectionofthismanual.
Whilepushingthedischargechutedeflectortowardsthemachinewithyourleft
hand,removetheshippingbracewithyourrighthandbygraspingitbetweenyour
thumbandindexfingerandrotatingitclockwise.
9
Theshippingbrace,usedforpackagingpurposesonly,mustberemovedand
discardedbeforeoperatingyourridingmower.
Themowingdeckiscapableof throwing objects.Failuretooperatethe
ridingmowerwithout the dischargecoverinthe properoperating position
coudresut nsetouspersona njury and/orproperty damage.
Attaching TheSteeringWheel
Ifthesteeringwheelforyourtractordidnotcomeattached,thehardwarefor
attachingit hasbeenpackedwithin thesteeringwheel,beneaththesteeringwheel
cap.Carefullypryoffthe steeringwheelcapandremovethehardware.
1. Withthewheelsofthetractorpointingstraightforward,placethesteering
wheeloverthesteeringshaft.
2. Placethewasher(withthecuppedsidedown)overthesteeringwheeland
securewith thehexbolt.SeeFigure3.

F
\
Figure3
3.
Placethesteeringwheelcapoverthecenterofthesteeringwheeland
pushdownwarduntilit"clicks"intoplace.
Attaching TheSeat
Iftheseatforyourtractorwasnotattachedatthefactory,refertothefollowing
steps.
NOTE:Forshippingreasons,seatsareeitherfastenedtothetractorseat'spivot
bracketwith a plastictie,ormountedbackwardtothepivotbracket.Ineithercase,
freetheseatfromitsshippingpositionandremovetheadjustmentknobfromthe
bottomofseatbeforeproceedingwith theinstructionsbelow.
1. Asalreadyinstructed,removetheseatadjustmentknobinstalledbythe
factoryin thebottomoftheseat.See"a"inFigure4.
®
Slidetheseatrearwardin theseatpivotbracket(c),liningupthecenter
rearslotinthepivotbracketwith theremainingholeintheseat'sbase.See
FigureS.
Note:Becertainthetwoseattabsengaugethepivotbracketasshownin
thebottominsetofFigure5.
Figure5
4. Selectdesiredpositionfortheseat,andsecurewith theadjustmentknob
removedearlier(dinFigure5).
5. Toadjustthepositionoftheseat,removetheadjustmentknobonthe
bottomoftheseat.Slidetheseatforwardor backwardasdesired.Reinstall
theadjustmentknob.SeeFigure5.
TirePressure
Maximumtire pressureunderanycircumstancesis30psi. Equaltire pressure
shouldbemaintainedat alltimes. Neverexceedthe maximuminflation
)ressureshownonthe sidewallofthe tire.
Therecommendedoperatingtirepressureis:
Approximately10psiforthereartires
Approximately14psiforthefronttires
IMPORTANT: Refertothetiresidewallforexacttiremanufacturer's
recommendedormaximumpsi.Donotoverinflate.Uneventire
pressurecouldcausethecuttingdeckto mowunevenly.
2.
Figure4
Aligntheseatovertheseatpivotbracketasshownin Figure4andfit the
seatontothepivotbracketinsertingthetwotabsontheseatbottominto
theslotsonthepivotbracket.
10

H
A
c)
D
(3
F
E
Figure6
A SpeedControlLever/ ParkingBrakeLever
B Throttle/chokecontrollever
C IgnitionSwitch
D DeckLiftLever
E PTOLever(BladeEngage)
F CupHolder
G ShiftLever
H Clutch-BrakePedal
NOTE:AnyreferenceinthismanualtotheRIGHTorLEFTsideofthetractorisobservedfromoperator'sseatpositionfacingforward
towardsthefrontoftractor.
MeetsANSISafety Standards
CraftsmanTractorsconformtothesafetystandardoftheAmericanNationalStandardsInstitute(ANSI).
11

SpeedControlLever
Thespeedcontrollever,Moatedontheleftsideofthetractor's
dashconsole,allowsyoutoregulatethegroundspeedofthelawn
tractor.Touse,depressthedutch-brakepedalandmovethelever
outofthe parkingbrakenotchandforwardtoincreasethetractor's
groundspeed.Whenadesiredspeedhasbeenreached,releasethe
leverintoanappropriatenotchtomaintainthatspeed.
Toslowthetractor'sgroundspeed,depressthedutch-brakepedal
andmovethespeedcontrolleverrearwardandreleaseitintoa
notch.
ParkingBrake
Tosettheparkingbrake,fully depresstheclutch-brakepedal.Move
thespeedcontrolleverallthewaydownandintothe parkingbrake
position.Releasetheclutch-brakepedaltoallowtheparkingbrake
toengage.
7_
2-
1=
(Q)
PARK
BRAKE
Toreleasetheparkingbrake,depresstheclutch-brakepedalandmovethespeed
controlleveroutofthenotchestothedesiredposition.Releasethespeedcontrol
leverandtheclutch-brakepedal.
NOTE:Theparkingbrakemustbesetif theoperatorleavestheseatwith theengine
runningortheenginewill automaticallyshutoff.
Throttle/Choke ControlLever
Thethrottle/chokecontrolleverislocatedontherightsideofthe
tractor'sdashpanel.Thislevercontrolsthespeedoftheengine
andwhenpushedallthewayforward,thechokecontrolalso.
Whensetinagivenposition,thethrottlewill maintainauniform
enginespeed.
IMPORTANT:Whenoperatingthetractorwiththecuttingdeck
engaged,thethrottle/chokecontrollevermustalwaysbeinthe
FAST(rabbit)position.
Ignition Switch
Thekeyswitch
moduleisusedto
startandstopthe
engine.Insertkey
intothekeyswitch
moduleandturnclockwisetothe
STARTposition.Releasethekeyinto
thenormalmowingpositiononce
enginehasstarted.Theheadlightswill
beactivatedautomatically.
Tostoptheengine,turntheignitionkeycounterclockwisetotheSTOPposition.
IMPORTANT:Priortooperatingthetractor,refertoboththe"SafetyInterlock
System"and"StartingTheEngine"laterinthissectionofthismanualfordetailed
instructionsregardingthe IgnitionSwitchModule.
Neverleavearunningmachineunattended.AlwaysdisengagePTO(Blade
EngageLever),moveshift leverintoneutral position,setparkingbrake,
stopengineand removekeyto preventunintendedstarting.
Shift Lever
Theshiftleverislocatedontheleftside
ofthefenderandhasthreepositions,
FORWARD,NEUTRALandREVERSE.The
clutch-brakepedalmustbedepressed
andthetractormustnotbein motion
whenthemovingshiftlever.
IMPORTANT:Neverforcetheshiftlever.
Doingsomayresultin
seriousdamagetothetractor's
transmission.
DeckLift Lever
Foundonyourtractor'srightfender,thedecklift leverisusedtochangetheheight
ofthecuttingdeck.Touse,movethelevertotheleft,thenplaceinthe notchbest
suitedforyourapplication.
PTO(BladeEngage)Lever
Foundonthetractor'srightfender,thePTO(bladeengage)lever
isusedtoengagepowertothecuttingdeckorother(separately
available)attachments.Tooperate,movetheleveralltheway
forward.Movingthe leverallthewayrearwardintothe PTOOFF
positiondisengagespowertothecuttingdeck/attachment.
NOTE"ThePTO(bladeengage)levermustbein thedisengaged(PTO
OFF)positionwhenstartingtheengine.
CupHolder
Thetractor'scupholderislocatedonthefendertotheleftofthe
seat.
SeatAdjustment Knob
Theseatadjustmentknobislocatedonthebottomsideoftheseat.
Usethisknobtoadjusttheseatforwardorrearwardtoa comfortable
operatingpositionbylooseningtheknob,positioningtheseatto the
desiredpreference,thenretighteningtheknob.
Clutch-BrakePedal
Thedutch-brakepedalislocatedontheleftsideofthelawntractor,alongthe
runningboard.Depressthedutch-brakepedalpartwaydownwhenslowingthe
tractorbychangingspeeds(RefertoSpeedControlLever).Depressthe pedalallthe
waydowntoengagethediscbrakeandbringthetractortoacompletestop.
NOTE:Thepedalmustbedepressedtostarttheengine.Referto SafetyInterlock
Switcheslaterin thissectionofthismanual.
12

Gasand Oil Fill-up
Oil
IMPORTANT:Yourtractorisshippedwith motoroilin theengine.However,you
MUSTchecktheoiilevelbeforeoperating.Becarefulnottooverfill.
Forinstructionsonhowtochecktheengineoil,refertoCheckingTheEngineOilin
theServiceandMaintenancesectionofthismanual.
Gasoline
Thegasolinetankislocatedunderthehood.Donotoverfill.
Useextremecarewhen handlinggasoline.Gasolineisextremelyflammable
andthe vaporsareexplosive.Neverfuel machineindoorsorwhile the
engineishotor running. Extinguishcigarettes,cigars,pipes,andother
sourcesof gnt on.
NOTE:Purchasegasolinein smallquantities.Donotusegasolineleftoverfromthe
previousseason,to minimizegumdepositsinthefuelsystem.
Thisengineiscertifiedtooperateonunleadedgasoline.Forbestresults,fill
thefueltankwith onlyclean,fresh,unleadedgasolinewith apumpsticker
octaneratingof87orhigher.
Gasohol(upto10%ethylalcohol,90%unleadedgasolinebyvolume)isan
approvedfuel.Othergasoline/alcoholblends,suchasE85,arenotapproved.
MethylTertiaryButylEther(MTBE)andunleadedgasolineblends(uptoa
maximumof15%MTBEbyvolume)areapprovedfuels.Othergasoline/ether
blendsarenotapproved.
Fillfueltankoutdoorsorinwell-ventilatedarea.
Donotoverfillfueltank.Filltankto nomorethan1/2inchbelowbottomof
fillernecktoallowspaceforfuelexpansion.
Neverremovegascaporaddfuelwhiletheengineishotor running.Allow
enginetocoolatleasttwo minutesbeforerefueling.
Ifgasolineisspilled,wipeit off theengineandequipment.Movemachineto
anotherarea.Wait5 minutesbeforestartingtheengine.
ToAdd Gasoline
1. Turntheengineoffandletenginecoolatleast2minutesbeforeremoving
thefuelcap.Thegasolinetankisundertherearfender,with thefuelfill cap
locatedin thecenteroftherearfender.Thefuelcapistetheredtothetractor
topreventitsloss.Donotattempttoremovethecapfromthetractor.
2. Fillthefueltankwithgasoline.
3. Reinstallthefuelcap.
Note:Thetractorisfitted with atethered,ratchetingfuelcap.STOPfilling thetank
oncethefuelisseeninsidethefillerneck.Thisensuresthataproperexpansion
volumeiscreated,otherwisethefuelcanoverflowcreatinga hazardoussituation.
DoNOTtopoffthe fueltank.SeeFigure7.
Figure7
Avoid Serious Injury or Death
Goupanddownslopes,notacross.
Avoidsuddenturns.
Donotoperatetheunitwhereit couldsliportip.
Ifmachinestopsgoinguphill,stopbladesandbackdownhillslowly.
Donotmowwhenchildrenorothersarearound.
Nevercarrychildren,evenwith bladesoff.
Lookdownandbehindbeforeandwhilebacking.
Keepsafetydevices(guards,shields,andswitches)inplaceandworking.
Removeobjectsthat couldbethrownbytheblades.
Knowlocationandfunctionofallcontrols.
Besurebladesandenginearestoppedbeforeplacinghandsorfeetnear
blades.
Beforeleavingoperator'sposition,stoptractor,disengageblades,engage
parkingbrake,shutengineoff,andremovekey.
Read Operator's Manual
SafetyInterlock System
Thesafetyinterlocksystemisdesignedfor safeoperationofthetractor.Ifthis
systemshouldevermalfunction,donotoperatethetractor.Immediatelycontact
1-800-659-5917to havethesystemserviced.
Thesafetyinterlocksystempreventstheenginefromstartingunless
theparkingbrakeisengagedandthePTO(BladeEngage)leverisinthe
disengaged(OFF)position.
Thesafetyinterlocksystemwill automaticallyshutofftheengineifthe
operatorleavestheseatbeforeengagingtheparkingbrake.
Thesafetyinterlocksystemwill automaticallyshutofftheengineifthe
operatorleavesthetractor'sseatwiththe PTO(BladeEngage)leverengaged,
regardlessofwhethertheparkingbrakeisengaged.
13

Theenginewill automaticallyshutoffif thePTO(BladeEngage)leveris
movedintotheengaged(ON)positionwith theshiftleverinReverse.
Ignition Switch
Theignitionswitchisactivatedtostarttheengine.Insertkeyintotheignition
switchandturnclockwisetotheSTARTposition.ReleasethekeyintotheON
positiononceenginehasfired.SeeFigure8.
Tostoptheengine,turntheignitionkeycounterclockwisetotheOFFposition.See
Figure8.
Neverleave a running machine unattended. Always disengage PTO,
move shift lever intoneutral position, set parking brake, stop engine
land remove key to prevent un ntended start ng.
IMPORTANT:Priortooperatingthetractor,refertobothSafetyInterlockSwitches
andStartingTheEngineintheOperationsectionofthismanualforfurtherdetailed
instructions.
On
Off
Start
Setting the CuttingHeight
1. Selecttheheightpositionofthecuttingdeckbyplacingthedecklift leverin
anyofthesixdifferentcuttingheightnotchesonthe rightsideofthefender.
Keephandsand feet awayfrom the dischargeopening of the cutting
deck.
Starting the Engine
Donotoperatethe tractor if the interlocksystemismalfunctioning.This
systemwasdesignedforyoursafetyandprotection.
NOTE:RefertotheGasolineand0ii fill-up instructionsearlierinthissection.
1. Insertthetractorkeyintotheignitionswitch.
2. PlacethePTO(BladeEngage)leverinthedisengaged(OFF)position.
3. Engagethetractor'sparkingbrake.
4. Activatethechokecontrolbymovingthethrottle/chokeleverallthewayup
intothechokeposition.
5. TurntheignitionkeyclockwisetotheSTARTposition.Aftertheenginestarts,
releasethekey.Itwill returntotheON(orNormalMowing)position.
DoNOTholdthekeyintheSTARTpositionforlongerthanten
secondsat atime.Doingsomaycausedamagetoyourengine's
electricstarter.
6. Aftertheenginestarts,deactivatethechokecontrolandplacethethrottle
controlinthe FASTposition.
NOTE:DoNOTleavethechokecontrolonwhileoperatingthetractor.Doingsowill
resultina"rich"fuelmixtureandcausetheenginetorunpoorly.
J
Figure8
Engagingthe ParkingBrake
Toengagethe parking brake:
I. Fullydepresstheclutch-brakepedalandholditdownwithyourfoot.
2. Movethespeedcontrolleverallthewaydownandintotheparkingbrake
position.
3. Releasetheclutch-brakepedaltoallowtheparkingbraketoengage.
Toreleasethe parking brake:
I. Depresstheclutch-brakepedalandmovethespeedcontrolleveroutofthe
parkingbrakepositionandintoadesiredspeed.
14

Stoppingthe Engine
Ifyoustrikeaforeignobject,stop theengine,disconnectthe sparkplug
wire(s)andgroundagainstthe engine.Thoroughlyinspectthe machinefor
anydamage.Repairthe damagebeforerestartingandoperating
1. Ifthebladesareengaged,placethe PTO(BladeEngage)leverinthe
disengaged(OFF)position.
2. TurntheignitionkeycounterclockwisetotheSTOPposition.
3. Removethekeyfromtheignitionswitchto preventunintendedstarting.
Driving TheTractor
Avoidsuddenstarts,excessivespeedandsuddenstops.
Donotleavethe seatofthe tractorwithout first placingthe PTO(Blade
Engage)leverinthe disengaged(OFF)position,depressingthe brakepedal
andengagingthe parking brake.If leavingthetractor unattended,also
turn the ignition keyoff andremovethe key.
Alwayslookdownandbehind beforeandwhile backingupto avoidaback-
overaccident.
1. Depresstheclutch-brakepedaltoreleasetheparkingbrakeandthenlet the
pedalup.
2. Movethethrottle leverintothe FAST(rabbit)position.
3. PlacetheshiftleverineithertheFORWARDorREVERSEposition.
IMPORTANT: DoNOTusetheshiftlevertochangethedirectionoftravelwhen
thetractorisinmotion.Alwaysusetheclutch-brakepedaltobringthetractortoa
completestopbeforeshifting.
4. Releasetheparkingbrakebydepressingtheclutch-brakepedaland
positioningthespeedcontrolleverinthedesiredposition.
IMPORTANT: First-timeoperatorsshouldusespeedpositions1or2.Become
completelyfamiliarwith thetractor'soperationandcontrolsbeforeoperatingthe
tractorinhigherspeedpositions.
5. Releaseclutch-brakepedalslowlytoputunitintomotion.
6. Thelawntractorisbroughttoastopbydepressingtheclutch-brakepedal.
NOTE:Whenoperating the unit initially, therewill be little difference
between the highest two speeds until after the belts have seated
themselves into the pulleys during the break-in period.
Before leaving the operator's position for any reason, disengage the
blades, place the shift lever in neutral, engage the parking brake,
shut engine off and remove the key.
2. Engagetheparkingbrake.
3. Shutengineoffandremovethekey.Doingsowill minimizethepossibility
ofhavingyourlawn"browned"byhotexhaustfromyourtractor'srunning
engine.
Ifunitstallswithspeedcontrolinhighspeed,orifunitwill notoperatewithspeed
controlleverinalowspeedposition,proceedasfollows:
1. PlaceshiftleverinNEUTRAL
2. Restartengine.
3. Placespeedcontrolleverinhighestspeedposition.
4. Releaseclutch-brakepedalfully.
5. Depressclutch-brakepedal.
6. Placespeedcontrolleverindesiredposition.
7. PlaceshiftleverineitherFORWARDorREVERSE,andfollow normaloperating
procedures.
Driving OnSlopes
RefertotheSLOPEGAUGEin theSafetyInstructionssectionofthemanualtohelp
determineslopeswhereyoumayoperatethistractorsafely.
Donotmowoninclineswith aslopein excessof 15degrees(ariseof
approximately2-I12feetevery10feet). Thetractorcouldoverturnand
causeseriousinjury.
Mowupanddownslopes,NEVERacross.
Exerciseextremecautionwhenchangingdirectiononslopes.
Watchforholes,ruts,bumps,rocks,orotherhiddenobjects.Uneventerrain
couldoverturnthemachine.Tallgrasscanhideobstacles.
Avoidturnswhendrivingonaslope.Ifaturnmustbemade,turndownthe
slope.Turningupaslopegreatlyincreasesthechanceofarollover.
Avoidstoppingwhendrivingupa slope.Ifitisnecessarytostopwhile
drivingupa slope,startupsmoothlyandcarefullyto reducethepossibility
offlippingthetractoroverbackward.
Engagingthe Blades
Engagingthe PTO(BladeEngage)transferspowertothecuttingdeckorother
(separatelyavailable)attachments.Toengagetheblades,proceedasfollows:
1. Movethethrottle/chokecontrollevertotheFAST(rabbit)position.
2. Graspthe PTO(BladeEngage)leverandpivotitallthewayforwardintothe
engaged(ON)position.
3. KeepthethrottleleverintheFAST(rabbit)positionforthemostefficientuse
ofthecuttingdeckorother(separatelyavailable)attachments.
NOTE:Theenginewill automaticallyshutoff ifthe PTO(BladeEngage)leveris
movedintotheengaged(ON)positionwiththeshiftleverinReverse.
IMPORTANT: Whenstoppingthetractorforanyreasonwhileonagrass
surface,always:
1. Placetheshiftleverin neutral.
15

Mulching
Amulchkitisavailableasanattachment.Mulchingisaprocessofredrculating
grassclippingsrepeatedlybeneaththecuttingdeck.Theultra-fineclippingsare
thenforcedbackintothe lawnwheretheyactasanaturalfertilizer.
Amulchkitcanbepurchased.Seethe ReplacementParts&Attachmentssectionof
thismanualformoreinformation.
Usingthe DeckLift Lever
Toraisethecuttingdeck,movethedeckliftlevertothe left,thenplaceitinthe
notchbestsuitedfor yourapplication.RefertoSettingTheCuttingHeightearlierin
thisOperationsection.
MOWING
Tohelpavoidbladecontactorathrown objectinjury,keepbystanders,
[ helpers,childrenandpetsat least75feet from the machinewhile itisin
[ operation.Stopmachineifanyoneentersthe area.
Thefollowinginformationwill behelpfulwhenusingthecuttingdeckwith your
tractor:
Planyourmowingpattern toavoiddischargeofmaterialstoward roads,
sidewalks,bystandersandthe like.Also,avoiddischargingmaterialagainst
awall orobstructionwhich maycausedischargedmaterialto ricochetback
towardthe operator.
Headlights
ThelampsareONwheneverthetractor'sengineisrunning.
Thelampsturn OFFwhentheignitionkeyismovedtotheSTOPposition.
Donotmowathighgroundspeed,especiallyifamulchkit orgrasscollector
isinstalled.
Forbestresultsitisrecommendedthatthefirsttwo lapsbecutwith the
dischargethrowntowardsthecenter.Afterthefirsttwo laps,reversethe
directiontothrowthedischargetotheoutsideforthe balanceofcutting.
Thiswill givea betterappearancetothelawn.
Donotcutthegrasstooshort.Shortgrassinvitesweedgrowthandyellows
quicklyindryweather.
Mowingshouldalwaysbedonewith theengineatfull throttle.
Underheavierconditionsit maybenecessarytogobackoverthecutareaa
secondtimetogetacleancut.
DoNOTattempttomowheavybrushandweedsandextremelytallgrass.
Yourtractorisdesignedtomowlawns,NOTclearbrush.
Keepthebladessharpandreplacethebladeswhenworn.RefertoCutting
BladesintheServicesectionofthismanualforproperbladesharpening
instructions.
16

MAINTENANCESCHEDULE
Beforeperforminganytypeofmaintenance/service,disengageall controls
andstoptheengine.Waituntilallmovingpartshavecometoacomplete
stop.Disconnectsparkplugwireandgrounditagainsttheengineto prevent
unintendedstarting.AlwayswearsafetyglassesduringoperationorwhUe
performinganyadjustmentsor repairs.
BeforeEachUse I. Engineoil level I.
2. Mufflerareaandcontrols 2.
3. Fingerguard 3.
Inthe FirstFiveHours I. EngineOil I.
Every10Hours I. Hood/Dashairvents I.
2. Batteryterminals 2.
3. Deckspindlesandidlerbracket 3.
Every25hours 1. Airfilter'sprecleaner* 1.
2. Airfilter* 2.
3. Midsteeringarms,pivotshafts, 3.
andaxles
4. Frontwheelbearings 4.
5. Frontdeckwheels 5.
Every50hours 1. Engineoil/Oil filter 1.
2. Muffler 2.
Annually 1. Airfilter 1.
2. Airfilter'spre-cleaner 2.
3. Sparkplug 3.
4. Aircoolingsystem* 4.
5. Fuelfilter 5.
6. SteeringGears 6.
7. RearWheels 7.
BeforeStorage 1. Hood/Dashairvents 1.
2. Batteryterminals 2.
3. Midsteeringarms,pivotshafts, 3.
andaxles
4. Frontwheelbearings
5. Frontdeckwheels
6. Deckspindlesandidlerbracket
7. Pedalpivotpoints
*Servicemorefrequentlyunderdustyconditions.
Followthe maintenanceschedulegivenbelow.Thischartdescribesservice
guidelinesonly.UsetheServiceLogcolumnto keeptrackofcompleted
maintenancetasks.Tolocatethe nearest Parts&RepairServiceCenteror to
scheduleservice,simplycontact 1-800-659-5917.
Check
Clean
Clean
Change
Clean
Clean
Lubricate
Clean
Clean
Lubricate
Lubricate
Lubricate
Change/Replace
Check
Replace
Replace
Replace
Clean
Replace
Clean
Removeandgreaseaxles
Clean
Clean
Lubricate
4. Lubricate
5. Lubricate
6. Lubricate
7. Lubricate
Beforeperforminganymaintenanceor repairs,disengagethe PTO(Blade
EngageLever),engagethe parkingbrake,stopthe engineandremovethe
keyto preventunintendedstarting.
Ifthe enginehasbeenrecentlyrun,theengine,muffler andsurrounding
metalsurfaceswill behot andcancauseburnsto the skin. Exercisecaution
to avoidburns.
17

Engine Maintenance
Checkingthe EngineOil
Onlyusehighqualitydetergentoilratedwith APIserviceclassificationSF,SG,
SH,or SJ.Selecttheoil'sSAEviscositygradeaccordingtotheexpectedoperating
temperature.Followthechartbelow.Althoughmulti-viscosityoils(5W20,10W30,
etc.)improvestartingincoldweather,theywill resultinincreasedoilconsumption
whenusedabove32°1:.Checkyourengineoillevelmorefrequentlytoavoidpossible
enginedamagefromrunninglowonoil.
E
Colder _ 32°F _Warmer
1.
2.
3.
Oil Viscosity Chart
Tochecktheengineoil,proceedasfollows:
Ensurethatthetractorisonalevelsurface.
Cleantheoilfill areaofanydebris.
Removethedipstick,seeFigure9,andwipewith acleancloth.
Reinsertdipstickandpresscompletelydown.
F
J
Removethedipstickandchecktheoillevel.ItshouldbeattheFullmarkon
thedipstick.
Dipstick
OilDrain
Changingthe EngineOiland Filter
Ifthe enginehasbeenrecentlyrun,the engine,muffler andsurrounding
metalsurfaceswill behotandcancauseburnsto theskin.Exercisecaution
toavoidburns.
NOTE:Theoilfilter shouldbechangedateveryoilchangeinterval.
Theengineoilshouldbechangedin thefirst5hoursandthenevery50hoursor
onceaseason.Tochangetheengineoil,proceedasfollows:
1. Runtheengineforafewminutestoallowtheoilinthecrankcasetowarm
up.Warmoilwill flowmorefreelyandcarryawaymoreoftheengine
sedimentwhichmayhavesettledatthe bottomofthecrankcase.Usecareto
avoidburnsfromhotoil.
2. Openthetractor'shoodandlocatetheoildrainportontherightsideofthe
engine.SeeFigure9.
3. Disconnectsparkplugwireandkeepit awayfromsparkplug.
4. Removetheoilfill cap/dipstkkfromtheoilfill tube.SeeFigure9.
5. Turnthesteeringwheelallthewaytothe righttobetterexposethedrain
plug.
6. Cliptheoildrainsleeve(packedwith thismanual)ontotheoil drainportas
showninFigure10.Routetheoppositeendofthesleeveintoanappropriate
oilcollectioncontainerwith acapacitygreatenoughtocollectthe usedoil.
Figure9
4. Iflow,addoii slowlyintotheengineoiifill. Donotoverfill.Afteraddingoii,
waitoneminuteandthenrechecktheoillevel.
Donotoverfill. Overfillingwithoii maycausethe engineto notstart, hard
starting, orenginesmoking.Ifoverthe FULLmarkonthedipstick,drain oil
to reduceoil levelto FULLmarkondipstick.
5. Replacedipstick,andtighten.
Figure10
Removedrainpluganddrainoilintoasuitablecontainerwith a capacityof
nolessthan64oz.
8. Refilltheenginewith newmotoroil untiltheoil levelonthedipstickreads
FULL.Replacetheoilfill cap/dipstick.
9. Replacetheoilfilter,seeFigure11,byremovinganddisposingofit properly.
10. Partiallyfilltheoil filterapproximately3/4ofthewayfullwith clean,fresh
oil. Beforeyouinstallthenewoil filter,lightly lubricatetheoil filter gasket
with someoftheoilbysimplydippingyourfingerintheoilandrunningit
aroundthegasket.
18

f
Oil Filter
Figure11
11. Installtheoil filter byhanduntilthegasketcontactstheoilfilter adapter,
thentightentheoilfilter 1/2to3/4turns.
12. Refilltheenginewith newmotoroiluntiltheoillevelonthedipstickreads
FULL.Replacetheoilfill cap/dipstkk.
Usedoil isahazardouswasteproduct.Disposeof usedoil properly.Donot
discardwith householdwaste.Checkwith yourlocal authoritiesororcontact
1-800-659-5917for a listof safedisposal/recyclingfacilities.
13. Startandruntheengine.Astheenginewarmsup,checkforoilleaks.
14. Stoptheengineandchecktheoil level.It shouldbeattheFULLmarkonthe
dipstick.
FuelFilter
Gasolineanditsvaporsareextremelyflammable andexplosive.Fireor
explosioncancausesevereburnsordeath.
Keepgasolineawayfromsparks,openflames,pilotlights,heat,andother
ignitionsources.
Checkfuellines,tank,cap,andfittingsfrequentlyforcracksor leaks.Replace
if necessary.
Beforereplacingthefuelfilter, drainthefueltankaspertheinstructions
below.
Donotdrainfuelwhentheengineishot.Allowtheengineadequatetimeto
cool.Drainfuelintoanapprovedcontaineroutdoors,awayfromopenflame.
Drainanylargevolumeoffuelfromthetankbydisconnectingthefuelline
fromthe in-linefuelfilter neartheengine.
Removethefuellinefromthe In-lineside(sidetowardsthefueltank)ofthe
fuelfilter.
Replacementpartsmustbethesameandinstalledinthesamepositionas
theoriginalparts.
Iffuelspills,wait untilit evaporatesbeforestartingengine.
Beforereplacingthefuelfilter,drainthefueltank.Otherwise,fuelcanleak
outandcauseafire orexplosion.
ToDrainthe fuel:
Locatethefuelfilter,seeFigure12,whichisroutedontheleftsideofthe
enginebetweenthefueltankandthecarburetor,andmaybeattachedtothe
enginewithatie strap.Cutthetiestrap,if present,thenpinchthetabsonthe
in-lineclamponthefuelfilterwithapairofpliers,slidetheclampupthefuel
line.Pullthefuellinefreefromthefilterandplacetheopenendofthelineinto
anapprovedcontainertodrainthefuel.
Tochangethe fuel filter:
1. Useplierstosqueezethetabsontheotherclamp(theout-linesideofthe
fuelfilter),thenslidetheclampawayfromthefuelfilter. Twistandpullthe
fuellineoffof thefuelfilter.SeeFigure12.
Fuel Filter
\
Tab
Fuel Line
j/
Figure12
2. Checkthe fuellinesforcracksorleaks.Replaceifnecessary.
3. Replacethefuelfilter withanoriginalequipmentreplacementfilter. Call
1-800-659-5917topurchasetheoriginalequipmentreplacementfilter.
4. Securethefuellineswith theclamps.
Iffilters, orcoversarenot installedcorrectlyseriousinjuryordeathcould
resultfrom backfire.Donot attempt to startthe enginewith themremoved,
Donot usepressurizedairor solventsto cleanthe aircleanercartridge.
19

Air Cleaner
Paperfilterscannotbecleanedandshouldbereplacedevery100operatinghours;
moreoftenif usedin extremelydustyconditions.
Removethefoampre-fiIterfromaroundthepaperairfilter. SeeFigure
15.Replacepaperelementwhendirtyordamaged.Cleanfoamelementor
replacewhendamaged.
Neverusegasolineor lowflash pointsolventsfor cleaningtheair filter
element.Afire orexplosioncouldresult.
IMPORTANT:Neverruntheenginewithout theairfilter.Rapidenginewearwill
result.
1. Unscrewthethumbscrewsandremovetheairfilter cover.SeeFigure13.
Thumb
Screw
Air FHter
//
2.
Figure13
Removetheairfilter. SeeFigure14.
Figure14
Air FHter
Figure15
4. Tocleanfoamelement,washina mildliquiddetergentandwater.Squeeze
orpressthefoamelementtorinseout dirtandwater.Donottwist;this
coulddamageortearthefoamelement.Allowtodrythoroughlybefore
using.DONOToil thefoamelement.
5. Attachthenewairfilterwith foamelement,aligningtheholeintheairfilter
with theintakemanifold.SeeFigure16.
/
/
Manifold
Figure16
20

6.
Attachtheairfilter cover,makingsuretoalignplasticribfeaturesonthe
shroudtotheplasticfeaturesontheairfilter cover.SeeFigure17.Turn
thumbscrewsclockwiseuntilsnug.Checkfor anymisalignment.
Air Filter
Cover
Plastic
Feature
Shroud
Feature
Figure17
SparePlug Service
Toensureproperengineoperation,thesparkplugmustbeproperlygappedand
freeofdeposits.
1. Removethesparkplugbootanduseasparkplugwrenchtoremovethe
plug.SeeFigure18.
f
Spark Plug
J
Ifthe enginehasbeenrunning,the mufflerwill beveryhot.Becareful not
to touchthe muffler.
Measurethepluggapwithafeelergauge.Correctasnecessarybybending
sideelectrode.SeeFigure19.Thegapshouldbesetto0.024-0.031in.
Electrode
_=--_0.024-0.031 in,
J
Figure19
4. Checkthatthesparkplugwasherisingoodconditionandthreadthespark
pluginby handtopreventcross-threading.
5. Afterthesparkplugisseated,tightenwith asparkplugwrenchtocompress
thewasher.
NOTE:Wheninstallinga newsparkplug,tighten1/2turnafterthespark
plugseatstocompressthewasher.Whenreinstallingausedsparkplug,
tighten1/8-1/4turnafterthesparkplugseatstocompressthewasher.
IMPORTANT:Thesparkplugmustbesecurelytightened.Animproperly
tightenedsparkplugcanbecomeveryhotandmaydamagetheengine.
Muffler
Temperatureofmuffler and nearbyengineareasmayexceed150° F(65°C).
Avoidcontactwith theseareas.
Inspectmufflerperiodically,andreplaceif necessary.Replacementparts
forthe mufflermustbethesameandinstalledinthesamepositionasthe
originalparts.
CleanEngine
Dailyorbeforeeveryuse,cleangrass,chafforaccumulateddebrisfrom
engine.Keeplinkage,spring,andcontrolsclean.
Keepareaaroundandbehindmufflerfreeofanycombustibledebris.
Keepingenginecleanallowsairmovementaroundengine.
Enginepartsshouldbekeptcleantoreducetheriskofoverheatingand
ignitionofaccumulateddebris.
Donotusewater tocleanengineparts.Watercouldcontaminatefuel
system.Usea brushor drycloth.
CarburetorAdjustment
Thecarburetoronthisengineisnotadjustable.
2.
Visuallyinspectthesparkplug.Discardthesparkplugif thereisapparent
wear,orif theinsulatoriscrackedorchipped.Cleanthesparkplugwitha
wirebrushifit istobereused.
21

Lubrication
Beforelubricating,repairing,orinspecting,alwaysdisengagePTO(Blade
EngageLever),moveshift leverintoneutral position,setparkingbrake,stop
engneandremovekeytopreventun ntendedstart rig.
Pivot Points& Linkage
Lubricateallthepivotpointsonthedrivesystem,parkingbrakeandlift linkageat
leastonceaseasonwith lightoil.
RearWheels
Therearwheelsshouldberemovedfromtheaxlesonceaseason.Lubricatethe
axlesandtherimswellwith anall-purposegreasebeforere-installingthem.
Front Axles
Eachendofthetractor'sfrontpivotbarmaybeequippedwith agreasefitting.
Lubricatewith agreasegunafterevery25hoursoftractoroperation.
Battery
Thebatteryissealedandismaintenance-free.Acidlevelscannotbechecked.
Alwayskeepthebatterycablesandterminalscleanandfreeofcorrosive
build-up.
Aftercleaningthe batteryandterminals,applyalightcoatofpetroleumjelly
orgreasetobothterminals.
Alwayskeeptherubberbootpositionedoverthe positiveterminaltoprevent
shorting.
IM PORTANT: Ifremovingthebatteryforanyreason,disconnecttheNEGATIVE
(Black)wirefromitsterminalfirst,followedbythePOSITIVE(Red)wire.When
re-installingthebattery,alwaysconnectthe POSITIVE(Red)wiretoitsterminal
first,followedbytheNEGATIVE(Black)wire.Becertainthatthewiresareconnected
tothecorrectterminals;reversingthemcouldchangethepolarityandresultin
damageto yourengine'salternatingsystem.
CleaningBattery
Cleanthebatterybyremovingit fromthetractorandwashingwith abakingsoda
andwatersolution.Ifnecessary,scrapethebatteryterminalswithawirebrushto
removedeposits.Coatterminalsandexposedwiringwith greaseorpetroleumjelly
topreventcorrosion.
Battery Failures
Somecommoncausesforbatteryfailureare:
Incorrectinitialactivation
Overcharging
Freezing
Undercharging
Corrodedconnections
ThesefailuresareNOTcoveredbyyourtractor'swarranty.
Cleaningthe EngineAnd Deck
Anyfueloroilspilledonthemachineshouldbewipedoff promptly.DoNOTallow
debristoaccumulatearoundthecoolingfinsoftheengineoronanyotherpartof
themachine.
IMPORTANT: TheuseofapressurewashertocleanyourtractorisNOT
recommended.Itmaycausedamageto electricalcomponents,spindles,pulleys,
bearingsortheengine.
Adjustments
Neverattempt to makeanyadjustmentswhile the engineisrunning,except
wherespecifiedintheoperator'smanual.
Levelingthe Deck
NOTE:Checkthetractor'stirepressurebeforeperforminganydeckleveling
adjustments.RefertoTiresintheServicesectionofthismanualformore
informationregardingtirepressure.
FrontTo Rear
Thefrontofthecuttingdeckissupportedbyastabilizerbarthat canbeadjustedto
levelthedeckfromfronttorear.Thefrontofthedeckshouldbebetween1g-inch
and_8-inchlowerthantherearofthedeck.Adjustif necessaryasfollows:
1. Withthetractorparkedonafirm,levelsurface,placetheleverfor liftingthe
platformonthesecondtothetopnotch(secondhighestposition)androtate
the bladeascloseaspossibletothedischargechannelthatisparalleltothe
tractor.
2. Measurethedistancefromthefrontofthebladetiptothegroundandthe
rearofthebladetiptotheground.Thefirst measurementtakenshould
bebetweenlg"and_8"lessthanthesecondmeasurement.Determine
theapproximatedistancenecessaryforproperadjustmentandproceed,if
necessary,tothenextstep.
3. Locatetheflangelocknutonthefrontsideofthestabilizerbracket.See
Figure20.
Tightentheflangelocknutto raisethefrontofthedeck;
Loosentheflangelocknuttolowerthefrontofthedeck.
f
J
22

Sideto Side
Ifthecuttingdeckappearstobemowingunevenly,asidetosideadjustmentcanbe
performed.Adjustif necessaryasfollows:
1. Withthetractorparkedona firm,levelsurface,placethedecklift leverin
thesecondfromthetop notch(secondhighestposition)androtateboth
bladessothattheyareperpendicularwith thetractor.
2. Measurethedistancefromtheoutsideoftheleft bladetiptotheground
andthedistancefromtheoutsideoftherightbladetip totheground.Both
measurementstakenshouldbeequal.If they'renot,proceedtothenext
step.
3. Loosen,butdoNOTremove,thehexcapscrewontheleftdeckhanger
bracket.SeeFigure21.
4. Balancethedeckby usingawrenchtoturntheadjustmentgear(found
immediatelybehindthehexcapscrewjustloosened)clockwise/upor
counterclockwise/down.Thedeckisproperlybalancedwhenbothbladetip
measurementstakenearlierareequal.
5. Retightenthehexcapscrewontheleftdeckhangerbracketwhenproper
adjustmentisachieved.
Hex Cap Screw
Figure21
SeatAdjustment
RefertotheAssemblysectionofthismanualforseatadjustmentinstructions.
Parking BrakeAdjustment
Neverattempt toadjust the brakeswhile theengineisrunning.Always
disengagePTO(bladeengage)lever,moveshift leverinto neutralposition,
stopengineandremovekeytopreventunintendedstarting.
Cutting Deck Removal
Toremovethe cutting deck,proceedasfollows:
1. PlacethePTO(BladeEngage)leverin thedisengaged(OFF)positionand
engagetheparkingbrake.
2. Lowerthedeckbymovingthe decklift leverintothebottomnotchonthe
rightfender.
3. Removetheself-tappingscrewCA)that securesthebelt-keeperrodfrom
aroundthetractor'sPTOpulley,thenremovethebeltkeeperrod(B).See
Figure22.
Note:Makeamentalnotewhatholetheotherendofthe belt-keeperrodisinserted
inforreinstallationpurposes.
4. Removethebelt(C)fromaroundthetractor'sPTOpulley.SeeFigure22.
Avoidpinchinginjuries.Neverplaceyourfingers onthe idler springor
between the beltand apulleywhile removingthe belt.
f
\
J
Figure22
Movethedecklift leverintothetopnotchontherightfendertoraisethe
decklift armsupandoutoftheway.
Ifthetractordoesnotcometoa completestopwhenthe brakepedaliscompletely
depressed,orif thetractor'srearwheelscanrollwith theparkingbrakeapplied,
thebrakeisin needofadjustment.ContactthenearestSearsServiceCentertohave
yourbrakesproperlyadjusted.
Tolocatethe nearestParts& RepairService(:enteror toscheduleservice,
contact1-800-659-5917.
23

/_
//
/
/
/
PTOCable
6.
Figure23
Removethebow-tiecotterpinsecuringthedeckstabilizerrodtothedeck.
Slidethedecklift rodfromthe mountingbracketonthedeckasshownin
Figure24.
f
,,__ /,__ ,........................
,.. j
Figure24
7. CarefullyremovethePTOcablefromtherearofthecuttingdeckby
removingthebow-tiecotterpinwhichsecuresit.Removethespringfrom
thedeckidlerbracket.SeeFigure25.
8. Gentlyslidethecuttingdeck(fromthe leftside)outfromunderneaththe
tractor.
Tires
Figure25
Neverexceedthemaximuminflationpressureshownonthesidewalloftire.
Therecommendedoperating tire pressureis:
Approximately10psiforthereartires
Approximately14psiforthefronttires
IMPORTANT: Refertothetire sidewallforexacttire manufacturer's
recommendedormaximumpsi.Donotoverinflate.Uneventirepressurecould
causethecuttingdecktomowunevenly.
Battery
CaliforniaProposition65WARNING!Batteryposts,terminals,andrelated
accessoriescontainleadandleadcompounds,chemicalsknowntotheStateof
Californiato causecancerandreproductiveharm.Washhandsafterhandling.
Ifremovingthe battery,disconnectthe NEGATIVE(Black)wire from its
terminal first, followed bythe POSITIVE(Red)wire.Whenre-installing
the battery,alwaysconnectthe POSITIVE(Red)wireto itsterminalfirst,
followed bythe NEGATIVE(Black)wire.
JumpStarting
Neverjumpstart adamagedorfrozen battery.Becertainthe vehiclesdo not
touch,andignitionsareoff. Donotallow cableclampstotouch.
1. Connectpositive(+) cabletopositivepost(+)ofyourtractor'sdischarged
battery.
2. Connecttheotherendofthecabletothe(positive+) postofthejumper
battery.
24

3. Connectthesecondcable(negative-) totheotherpostofthejumper
battery.
4. Connecttheotherendofthenegativecabletotheengineblockofthe
tractor,awayfromthebattery.Attachtoanunpaintedparttoassureagood
connection.
1. Removethedeckfrombeneaththetractor,(refertoCuttingDeckRemoval
earlierinthissection)thengentlyflip thedeckovertoexposeitsunderside.
2. Placeablockofwoodbetweenthecenterdeckhousingbaffleandthe
cuttingbladetoactasastabilizer.SeeFigure26.
3. Removethehexflangenutthatsecuresthebladetothespindleassembly.
Ifthejumperbatteryisinstalledonavehicle(i.e.car,truck),doNOTstart
thevehicle'senginewhenjumpstartingyourtractor.
5. Startthetractor(asinstructedearlierin thissectionofthismanual).
6. Setthetractor'sparkingbrakebeforeremovingthejumpercables,inreverse
orderofconnection.
Charging
Batteriesgiveoff anexplosivegaswhile charging.Chargethe battery ina
wellventilatedareaandkeepawayfrom anopenflameor pilotlight asona
waterheater,spaceheater,furnace,clothesdryeror othergasappliances.
HexFlangeNut
Whenchargingyourtractor'sbattery,useonlyachargerdesignedfor 12Vlead-
acidbatteries.Readyourbatterycharger'sOwner'sManualpriortocharging
yourtractor'sbattery.Alwaysfollow itsinstructionsandheeditswarnings.
Ifyourtractorhasnotbeenputintouseforanextendedperiodoftime,chargethe
batteryasfollows:
1. Setyourbatterychargertodeliveramaxof10amperes.
2. Ifyourbatterychargerisautomatic,chargethebatteryuntilthecharger
indicatesthatchargingiscomplete.Ifthechargerisnotautomatic,charge
fornofewerthaneighthours.
Fuse
One20AMPfuseisinstalledin yourtractor'swiringharnessto protectthetractor's
electricalsystemfromdamagecausedbyexcessiveamperage.
Iftheelectricalsystemdoesnotfunction,oryourtractor'senginewill notcrank,
firstchecktobecertainthatthefusehasnotblown.Itcanbefoundatthe rearof
theunit,underneaththefenderlocatedbythebattery.
Alwaysuseafusewith the sameamperagecapacityfor replacement.
Cutting Blades
Shutthe engineoffand removeignitionkeybeforeremovingthecutting
blade(s)for sharpeningorreplacement.Protectyourhandsbyusingheavy
gloveswhengraspingthe blade.
Periodicallyinspectthe bladeand/orspindlefor cracksordamage,
especiallyafter you'vestruckaforeign object.Donot operatethe machine
until damagedcomponentsarereplaced.
Toremovetheblades,proceedasfollows:
Figure26
Toproperlysharpenthecuttingblades,removeequalamountsofmetal
frombothendsofthebladesalongthecuttingedges,parallelto thetrailing
edge,ata25°-to30°angle.Alwaysgrindeachcuttingbladeedgeequallyto
maintainproperbladebalance.SeeFigure27.
\4
Figure27
Ifthe cutting edgeofthe bladehaspreviouslybeensharpened,orif any
metal separationispresent,replacethe bladeswith newones.
Apoorlybalancedbladewill causeexcessivevibration,maycausedamageto
the tractor and/orresultinpersonalinjury.
Testtheblade'sbalanceusingabladebalancer.Grindmetalfromthe
heavysideuntil itbalancesevenly.
25

NOTE:Whenreplacingtheblade,besureto installthebladewith thesideofthe
blademarked"Bottom"(orwith apartnumberstampedin it)facingtheground
whenthemowerisintheoperatingposition.
Useatorquewrenchto tighten thebladespindle he×flange nutto between
70[bs-ft and90[bs4t.
Changingthe DeckBelt
Besuretoshut theengineoff, removeignitionkey,disconnectthe spark
plugwire(s)andgroundagainstthe engineto preventunintendedstarting
[before removngthe bet.
Allbeltsonyourtractoraresubjectto wearandshouldbereplacedif any
signsof weararepresent.
IM PORTANT: TheV-beltfoundonyourtractorisspeciallydesignedtoengage
anddisengagesafely.Asubstitute(non-OEM)V-beltcanbedangerousbynot
disengagingcompletely.Foraproperworkingmachine,useidenticalequipment
beltsaslistedinthepartspagesofthisOperator'sManual.
Tochangeor replacethedeckbeltonyourtractor,proceedasfollows:
Removethedeckasinstructedearlierinthissection.
4.
1. Removethebeltcoversfromthespindlepulleysbyremovingthehexscrews
thatfastenthecoverstothedeck.SeeFigure28.
2. Itmayalsobenecessarytoloosenthehexnutontheleftdeckidlerpulleyto
getthebeltoffthe pulleyandaroundthebeltguard.
3. Carefullyremovethedeckbeltfromaroundthetwospindlepulleysandthe
twodeckidlerpulleys.SeeFigure28.
Toplacethenewbelt,beginbyroutingthebeltaroundthetwoouterspindle
pulleysasshownin Figure28.
5. Thenroutethe beltaroundthetwodeckidlerpulleysasshownin Figure28.
6. Retightenthe beltkeeperrodloosenedearlier.
7. Remountthe beltguardsremovedearlier.
8. Re-installthedeck,makingsurethebeltremainsroutedaroundthepulleys
asinstructed.Thecompletebeltroutingisshownin Figure28.
9. Pulltherightsideofthebelt,andplacethenarrowVsideofthebeltintothe
PTOpulley.
10. Whileholdingthebeltandpulleytogether,rotatethe pulleytotheleft.
Continueholdingandrotatingthepulleyandbeltuntilthebeltisfully rolled
intothePTOpulley.
ParkingBrakeAdjustment
Neverattempt to adjustthe brakeswhile the engineisrunning.Always
[disengagePTO(BladeEngageLever),moveshift leverintoneutralposition,
[stopengineand removekeyto preventunintendedstarting.
Ifthetractordoesnotcometoacompletestopwhentheclutch-brakepedalis
completelydepressed,orif thetractor'srearwheelscanrollwith theparkingbrake
applied,thebrakeisin needofadjustment.ContactthenearestParts&Repair
ServiceCentertohaveyourbrakesserviced.
Tolocate the nearestParts& RepairServiceCenterorto scheduleservice,
contact1-800-659-5917.
Changingthe TransmissionDriveBelt
NOTE"Several components must be removed and special tools (i.e. air/
impactwrench) inorder to change the tractor's drive belt. Contact the
nearest Parts & Repair Service Center to have your transmission
drive belt serviced.
Tolocatethe nearestParts& RepairServiceCenteror to scheduleservice,
contact1-800-659-5917.
J

Neverstorelawntractorwith fuel in tank indoorsor inpoorlyventilated
areaswherefuelfumesmayreachan openflame,spark,or pilot light ason
afurnace,waterheater,clothesdryer,or gasappliance.
PreparingTheEngine
IMPORTANT: Fuelleft inthefueltankduringwarmweatherdeterioratesand
will causeseriousstartingproblems.
Topreventgumdepositsfromforminginsidetheengine'scarburetorandcausing
possiblemalfunctionoftheengine,thefuelsystemmustbeeithercompletely
emptied,orthegasolinemustbetreatedwith astabilizertopreventdeterioration.
I. Ifusinga fuelstabilizer:
a. Readtheproductmanufacturer'sinstructionsandrecommendations.
b. Addtoclean,freshgasolinethecorrectamountofstabilizerforthe
capacityofthefuelsystem.
c. Fillthefueltankwith treatedfuelandruntheenginefor 2-3minutesto
getstabilizedfuelintothecarburetor.
2. Ifemptylngthefuelsystem:
a. Donotdrainfuelwhentheengineishot.Allowtheengineadequate
timetocool.Drainfuelintoanapprovedcontaineroutdoors,awayfrom
openflame.
b. Drainanylargevolumeoffuelfromthetankbydisconnectingthe
fuellinefromthein-linefuelfilter neartheengine.Seethecomplete
instructionsforDrainingTheFuellaterin thissection.
Gasolineisextremelyflammableand canbeexplosiveundercertain
conditions. Draingasolinebeforestoring theequipmentforextended
periods.Drainfuel onlyinto anapprovedcontaineroutdoors,awayfrom
anopenflame.Allowengineto cool.Extinguishcigarettes,cigars,pipes,
andothersourcesofignition prior todraining fuel. Storegasolinein an
approvedcontainerin safelocation.
c. Reconnectthefuellineandruntheengineuntilit startstofalter,then
usethechoketokeeptheenginerunninguntilallfuelin thecarburetor
hasbeenexhausted.
d. Disconnectthefuellineanddrainanyremaininggasolinefromthe
system.
DrainingTheFuel
1. Locatethefuelfilter,whichislocatedonthe leftsideoftheengine,andmay
beattachedtotheenginewithatiestrap.
2. Cutthetiestrap,if present,thenpinchthe in-lineclamponthefuelfilter
with apairofpliers,slidetheclampupthefuelline.
3. Pullthefuellinefreefromthefilterandplacetheopenendofthe lineinto
anapprovedcontainertodrainthefuel.
PreparingThelawn tractor
Cleanandlubricatetractorthoroughlyasdescribedinthelubrication
instructions.
2. Donotusea pressurewasherorgardenhosetocleanyourunit.
3. Storemowerin adry,cleanarea.Donotstorenexttocorrosivematerials,
suchasfertilizer.
Gasolineisatoxicsubstance.Disposeofgasolineproperly.Contactyour
localauthoritiesforapproveddisposalmethods.
3. Removethesparkplugandpourone(1)ounceofengineoilthroughthespark
plugholeintothecylinder.Cranktheengineseveraltimestodistributethe
oil. Replacethesparkplug.
27

Enginefailstostart
Enginerunserratically
1. PTO/BladeEngageleverengaged.
2. Parkingbrakenotengaged.
3. Sparkplugwire(s)disconnected.
4. Throttle/Chokecontrollevernotincorrect
startingposition.
5. Chokenotactivated
6. Fueltankempty,or stalefuel.
7. BIockedfuelline.
8. Faultysparkplug(s).
9. Engineflooded.
10. BlownFuse(s)
1. UnitrunningwithCHOKEactivated.
2. Sparkplugwire(s)loose.
3. Blockedfuellineor stalefuel.
4. Ventingascapplugged.
5. Waterordirtinfuel system.
6. Dirtyair cleaner.
Engineoverheats 1. Engineoillevellow. 1.
2. Airflowrestricted. 2.
Enginehesitatesat highRPM 1. Sparkpluggaptoo close. 1.
Engineidlesrough 1. Sparkplugfouled,faultyor gaptoowide. 1.
2. Dirtyair cleaner. 2.
Excessivevibration
Mowerwillnotmulchgrass
Unevencut
1. Cuttingbladelooseor unbalanced.
2. Damagedor bentcuttingblade.
1. Enginespeedtoolow.
2. Wetgrass.
3. Excessivelyhighgrass.
4. Dullblade.
1. Decknotleveledproperly.
2. Dullblade.
3. Uneventirepressure.
1. Placeleverindisengaged(OFF)position.
2. Engageparkingbrake.
3. Connectwire(s)to sparkplug(s).
4. PlaceThrottle/ChokeleverintotheFASTposition.
5. MovetheThrottle/ChokeleverintotheChoke
position.
6. Filltankwithclean,fresh(lessthan30 daysold) gas.
7. Replacethefuellineandreplacefuelfilter.
8. Clean,adjustgapor replaceplug(s).
9. CrankenginewiththrottleinFASTposition.
10. ReplaceFuse(s)
1. DeactivatetheCHOKE.
2. Connectsparkplugwire(s).
3. Replacethefuelline;filltankwithclean,fresh
gasolineandreplacefuelfilter.
4. Clearventor replacecapifdamaged.
5. Drainfueltank.Refillwithclean,freshgasoline.
6. Replaceair cleanerpaperelementor cleanfoam
pre-cleaner,ifequipped.
Fillcrankcasewith properamountandweightof oil.
Cleangrassclippingsanddebrisfromaroundthe
engine'scoolingfinsandhousing.
Removesparkplugandresetthegap.
Replacesparkplug.Setpluggap.
Replaceair cleanerelementand/orcleanpre-
cleaner.
1. Tightenbladeandspindle.
2. Replaceblade.
1. Placethrottlein FAST(rabbit)position.
2. Donotmulchwhengrassiswet.
3. Mowonceata highcuttingheight,thenmowagain
at desiredheightor makea narrowercuttingswath.
4. Sharpenor replaceblade.
1. Performside-to-sidedeckadjustment.
2. Sharpenor replaceblade.
3. Checktirepressureinallfourtires.
NEE]) MORE HELP?
Find this and all your other product manuals online.
Get answers from our team of home experts.
Get a personalized maintenance plan for your home,
Find information and tools to help with home projects.
28

777122454
777D15624 (Side Hood - qty. 2)
777D18490
777S34008
777D17061 (Rear Fender)
777D18491
777123364
777D17044
777D17045
777X43688
DONOT
USEE85 OR FUEL
CONTAININGMORE
THANIO%ETHANOLI
777125063 777123754
777X46377
rDescription
OilFilter
Air Filter 951-12260
SparkPlug 951-10292
FeelFilter 751-3013
Blades 33022 942-04308
UpperDriveBelt 954-0241A
LowerDriveBelt 33079 954-04249
OeckSpindleBelt 33074 954-04060B
Engineto DeckBelt N/A
DeckSpindle 918-04822A
IgnitionKeys 24698 025-04124
FuelCap 951-12179A
PartsavailableatmostSeatsRetailStoresandService
Centersorcall1-800-36G-PART(7279)ifyouwantthepart
sentdirectlytoyogrholue. X46377
Specific tractor attachmentsfor your Craftsman
tractoravailableatSearsStoresandServiceCeaters.
Seebelowforotheruniversalattachmentsalsoavailable.
Description Stock No.
MulchKit 33748
Bagger 24019
BumperKit 24611
WeightKit 24641
Weight ;
777S33896
777D17038
777S33183
•KEE_HANDS_tgFEETAWAyFROMROT_TINapAR_ "J
ASSEMBLE CHUTE
DEFLECTOR TO THIS UNIT/-
BEFORE OPERATING.
29

Craftsman IViodel 247.288820
13
\
55 56
42
22
\ \
32
f 5
4
\
\\\
46

Craftsman Model 247.288820
Ref, I
No,
1 925-1649
2 683-04619A-0691
3 710-04484
4 710-0599
5 712-0292
6 710-0751
7 710-05108
8 712-04064
9 931-07668
10 731-07458
II 731-07459
12 731-07460A
13 731-07711A
14 731-07712A
15 735-0271A
16 738-04091A
17 783-05327B-0637
18 783-05328A-0637
19 783-06598-4043
20 783-06610-0637
21 731-09253
22 710-05070
23 710-3144
24 731-07895A
25 712-04065
26 732-04877
27 783-06823
28 750-04465C
29 783-06991
30 710-0604A
Part No, Description
Bulb Socket
Hood Assembly
Screw, 5/16-18 x .750
Hex Washer Screw, 1/4-20 x .500
Tin Clip Nut, 1/4-20
Hex Screw, 1/4-20 x .620
Screw, 1/4 x .750
Nut, Hex Flange Insert Lock, 1/4-20
Grill
Headlight Lens, RH
Headlight Lens, LH
Dash Collar
Hood Scoop, LH
Hood Scoop, RH
Bumper
Shoulder Screw, 5/16-18
Left Support Pivot Bracket
Right Support Pivot Bracket
Lower Grill
Lower Grill Bracket
Shift Lever
Self-Tap Screw, 1/4-20
Hex Head Screw, 3/8-16
7-Speed Control Index
Nut, Hex Flange Insert Lock, 3/8-16
Compression Spring
Speed Latch Support Tab
Flange Spacer
Speed latch Bracket No RMC
Self-Tap Screw, 5/16-18
Ref, [
No,
31 741-0587
32 712-04063
33 783-06785A
34 783-06811-0637
35 747-05371
36 731-08440
37 747-05398
38 751-10782
39 751-12179A
40 783-07083-0637
41 731-05265
42 746-04367
43 925-04659
44 625-05001
45 725-0157
46 925-0963
47 726-04072A
48 936-0463
49 735-04081
50 751-12118
51 751-12089
52 710-1652
53 731-08542A
54 710-05237
55 712-0414
56 736-3006
57 710-0224
58 710-3025
-- 777X44366
-- 777X44365
Part No, Description
Steering Column Bearing
Nut, Hex Flange Lock, 5/16-18
Steering Support Bracket
Dash
Fuel Tank Support Rod
Plenum
Control Rod
FuelTank
Fuel Cap
Gas Tank Support Bracket
Choke Plug
Throttle/Choke Assembly
Key Switch Module
Key Assembly
Cable Tie
Headlight Bulb
Ratchet Clip, .250 x .500
Flat Washer, .25 x .630 x .0515
Rubber Grommet
Fuel Rollover Valve
Vent Hose
Hex Washer Screw, 1/4-20 x .625
Upper Dash
Hex Flange Bolt
Top Lock Weldnut
LockWasher
Screw, #10
Hex Head Screw, 5/16-18
Headlight Reflector LH (NotShown)
Headlight Reflector RH (NotShown)
31

Craftsman Model 247.288820
26
34
22
21
14
12
39
i31
2
_29
? 27
32

Craftsman Model 247.288820
Ref. I
No.
1 683-04155A-0637
2 712-04065
3 714-04040
4 716-0106A
5 720-0311
6 732-04225
7 738-04130
8 941-0225
9 747-05296
10 747-04393
11 783-04494C-0637
783-04711C-0637
12 647-04096A-0637
13 710-3157A
14 710-0599
15 714-04040
16 720-04049A
17 732-04276A
18 936-0171
19 736-0322
20 738-04237A
21 741-04119A
22 946-04173E
23 725-04439
PartNo. Description
Shaft,Lift
Nut,HexFlangeInsertLock,3/8-16
Bow-TiePin,91, RH
E-ring,.625Shaft
Grip,Handle
Spring,Lift HandleTorsion
Bolt,Shoulder,.625x .175:3/8-16
Bearing,HexFlange,
Handle,Lift
Lift Rod,13.68
Arm,DeckLiftRH
Arm,DeckLiftLH
PTOHandleAssembly
Screw,Hx.Hd.,7/16-20x 3.25
Screw,Hd.Tapp,1/4-20x .5
ClickPin
HandleGrip
PTOSpring,Extension
Washer,Flat,7/16
Washer,Fiat,.450x .250x .164
ShoulderScrew,#10-32x .500
PTOBearing
DeckEngagementCable
12v.Solenoid
Ref. I
No.
24 756-04196A
25 747-04857
26 710-04484
27 683-04195-0637
28 683-04649A-0637
29 710-0134
30 710-3008
31 712-04063
32 712-04064
33 912-0429
34 732-04035
35 736-0173
36 783-04548D-0637
37 783-04637-0637
38 783-04753-0637
39 783-04869A-0637
40 783-05389A-0637
41 925-1704A
42 738-1132
43 712-0271
44 683-04448-0637
45 725-04363
46 936-0300
PartNo. Description
EngagementPulley
BeltKeeperRodAssembly
Screw,Hd.Tapp,5/16-18x .75
SupportBracketAssembly
RiderFrameAssembly
CarriageScrew,1/4-20x .62
Screw,Hx.Hd.,5/16-18x .75
Nut,HexFlangeInsertLock,5/16-18
Nut,HexFlangeInsertLock,1/4-20
HexlockNut,5/16-18
Spring,Compress.,1.28x 3.125
FlatWasher,.28x .74x .063
SeatBracketFrame
RunningBoardBracket
FrameSupportBracket
BatteryBracket
FrameBraceBracket
Battery
Screw,Shoulder,.250x .150
Nut,Sems,1/4-20
BatteryRod
InterlockSwitch
FlatWasher,.406x .875x .059
33

Craftsman IViodel 247.288820
21
30
25
22
................ 33_ /_ ........................
34

Craftsman Model 247.288820
Ref, I
No.
1 617-04094
2 710-0643
3 710-1309
4 710-0514
5 710-3180
6 912-0214
7 912-0240
8 712-04063
9 712-04065
10 923-0448A
11 736-0242
12 931-0484A
13 738-04141
14 738-04162C
15 738-0919A
16 941-04124
17 747-05385
18 948-0389
19 748-04278
20 748-04068
Part No. Description
GearAssembly,Steering
Screw,5/16-18,1.00,Gr5,Lock
Screw,Mach,5/16-18,0.750
HexHeadScrew,3/8-16x 1.00
Screw,5/16-18,1.75,Gr5
Nut,JamLock,3/8-24
Nut,Jam,7/16-20,Gr2
Nut,FlangeLock,5/16-18,Grf
Nut,FlangeLock,3/8-16,Grf
BallJoint,7/16-20,Lock
Washer,Bell,.340x .872x .060
HubCap
ShoulderScrew,5/16-18
ShoulderSpacer,.8840x.190
SteeringShaft,5/8 Splinex 21.86
Bearing,Flange,Hex5/8
DragLink,Steering
Cap,1.25x .16
Steering,Block
Spacer,.710IDx .125ODx .56
Ref, I
No.
21 683-0128B-0637
22 710-04484
23 712-04065
24 714-0162
25 914-0474
26 736-0341
27 731-04057A
28 736-04228A
29 738-04128
30 741-0660A
31 747-04299A
32 783-05326B-0637
33 938-04007A-0637
34 638-04008P
35 631-04028
36 731-06825
37 634-05053-0961
38 634-05066
39 734-04240A
40 934-0255
Part No, Description
PivotBarAxleAssembly
Screw,5/16-18,0.750
Nut,FlangeLock,3/8-16,GrF
Pin,Cotter,5/32,1.25
Pin,Cotter,1/8x0.75
PushCap,3/4
AxleCap
Washer,Flat,.781x 1.59
Screw,Shlder,.500x 2.380,3/8-16
FlangeBearing
Tie Rod
PivotBar Bracket
AxleAssemblyLH
AxleAssemblyRH
SteeringWheel,StandardGrip
Cap,SteeringWheel(Crafts.logo)
WheelAssembly
Rim
Tire,15x6 x6 Rd.Shoulder
ValveStem
35

Craftsman IViodel 247.288820
\
\
36

Craftsman Model 247.288820
Ref. I
No,
1 710-0227
2 710-04484
3 712-04063
4 720-04061
5 925-1303
6 725-1439
7 726-0278
8 726-0279
9 732-1184
10 936-0108
11 736-0242
12 938-0296
13 783-0209D
14 783-04081D-0637
15 783-1489D-0637
16 757-04124
17 710-05070
18 710-0599
19 731-04591A
20 783-04587D-4043
21 783-04843-0637
22 723-04026
723-04025
23 710-0134
24 732-04035
Part No. Description
Screw,8-18x .500
Screw,5/16-18x .750
FlangeLockNut,5/16-18
Knob,3/8-16x .875
OuterSeatSpring
InnerSeatSpring
InsulatorBossPlate
InsulatorPlate
ExtensionSpring
FiatWasher,.510x .750x .033
FlatWasher,.340x .872x .060
ShoulderScrew,5/16-18x .437x .268
LiftSeatBracket
SeatPivotBracket
SeatMountingBracket
LowBackSeat
Screw,1/4-20x .500
ScrewPanTorxHead,1/4-20x .500
CupHolder
Fender
LiftAdjusterBracket
AbrasiveFootPad,LH
AbrasiveFootPad,RH
CarriageScrew,.62:1/4-20
Spring,Compress.,1.28x3.125
37

Craftsman IViodel 247.288820
9/_ _ ......
11J_ .......................
38

Craftsman Model 247.288820
I
Fief. I Part No.
1 683-04549
2 710-0227
3 710-04683A
4 710-0599
5 710-0642
6 712-04064
7 712-3086
8 725-0157
9 726-0205
10 731-05628
II 751-10349-28
12 751-12836
13 751-14284
14 751-3013
15 783-08122
N/A
Description
Muffler Shield Assembly with Weld
Screw, 8-18 x .500
Screw, 3/8-16 x 1.0
Screw, 1/4-20 x .500
Screw, 1/4-20 x .750
Flangelock Nut, 1/4-20
Flange Nut, M8-1.25
Cable Tie
Clamp Hose, .490 diameter
Oil Drain Sleeve
Fuel Hose, Low Permeation
Muffler
Muffler Deflector
Fuel Filter
Deflector Bracket
Engine (Seebreakdown)
Craftsman Model No. 4P9OHU
39

Craftsman Model 247.288820
18
24
8
27
38
6O
62
\
23
47
1 "
> 28
1 15
4O

Craftsman Model 247.288820
Ref, I
NO,
1 918-04566
2 647-04034C-0637
3 647-04266
4 710-0227
5 710-04484
6 710-0599
7 710-0604A
8 710-0809
9 710-0176
10 710-3008
11 711-06103
12 712-04063
13 712-0700
14 914-0209
15 714-04040
16 718-04407
17 720-04028
18 725-0157
19 725-1644
20 726-0214
21 926-0320
22 731-04602
23 731-04604
24 731-06894
25 732-04306
26 732-04488
27 732-04746
28 732-0716D
29 735-0239
30 736-0242
31 747-04969
32 747-05186
Part No. Description
TransmissionDriveAssembly
PedalAssembly
ShaftLeverAssembly
Screw,8-18:0.500
Screw,5/16-18x .750
Screw,1/4-20x 0.500
Screw,5/16-18x0.625
Screw,1/4-20x 1.250
HexScrew,5/16-18x 2.75
HexScrew,5/16-18x .75
Ferrule,3/8-24X .375DIA.
FlangelockNut,5/16-18
FlangeNut,9/16-18
CotterPinINT-.125DIA
Bow-TieCotterPin
PulleyHub,5/8SPLINE
ShiftKnob
CableTie
Short SpringSwitch
PushCap,5/8
PlateInsulatorNut
Sleeve,.758x .821x 3.3125
Sleeve,.758x .821x 2.4375
ShiftBearingPlate
SpringExtension,.80ODx 3.28LG
SpringExtension,.38ODx 3.25LG
SpringExtension,.94ODx 6.75LG
SpringExtension,.59ODx 4.00LG
FootPad,4.0 LONG
BellWasher,.340x .872x .060
BeltKeeperRod
VariableSpeedControlRod
Ref. I
No,
33 747-05188
34 747-05244
35 738-04237A
36 750-0566A
37 750-0802
38 954-04249A
39 954-0241A
40 956-04002
41 783-04536B-0637
42 783-04595A
43 956-04015A
44 683-04206
45 710-05339
46 710-0778
47 718-04261
48 736-0362
49 941-0600
50 683-04176A
51 683-04207
52 710-0347
53 710-1260A
54 712-04065
55 938-0347
56 756-04325
57 725-04363
58 17962
59 634-04324
60 634-04369-4042
61 934-0255
62 734-04241
-- 725-04567G
Part No. Description
BrakeRod
ShiftRod
ShoulderScrew,#10-32x .500
Spacer,.260x .375x 1.030LG
Spacer,.640IDx .76ODx 2.63
VBelt,5L:70.90POLY
VBelt,5L:35.25POLY
Trans.Pulley
PedalSupportBracket
ShaftAdjustBracket
VariableSpeedPulleyAssembly
BracketAssembly
SEMSScrew,5/16-24x .750
Screw,1/4-20x 1.500
BearingCup
FlatWasher,.330x 1.25x .06:HT
BallBearing,17x 40x 12
TransmissionBracketAssembly
IdlerBracketAssembly
HexScrew,3/8-16x 1.75
Screw,5/16-18x 0.750
FlangeLockNut,3/8-16
ShoulderSpacer,.625IDx .169
IdlerPulley
SwitchInterlock
PlateSwitch
WheelAssembly,20x 8 x 8
RimAssembly
ValveStem
Tire,20x 8x 8Rd.Sh.
WiringHarness(NotShown)
41

Craftsman Model 247.288820
10\®\
44
9
/
51
i
_\15
12
41
i
35
@_/18
39
42

Craftsman Model 247.288820
Ref, I
No,
1. 918-04822A
2. 683-0254B
3. 983-04511
4. 983-04525
5. 983-04570A
6. 710-04484
7. 710-3005
8. 710-0528
9. 710-0599
10. 936-3039
11. 710-0642
12. 710-3144
13. 710-3178
14. 712-0229
15. 712-04063
16. 712-04065
17. 712-0417A
18. 712-04243
19. 783-06464
20. 714-04043
21. 783-06074A
22. 917-04074
23. 932-0384
24. 783-07236
25. 732-04840
26. 783-06243
Part No. Description
Spindle Ass'y, Pulley, 6.3 Dia
Bracket Ass'y, Deck, Hanger LH
Brake Ass'y, Deck, 42/46
Brake Ass'y, Deck, 46"
Deck Ass'y, Offset, 42" W/O wheel
Screw, Self-tapping, 5/16-18, .750
Hex Screw, 3/8-16, 1.25, Gr5, Std
Hex Screw, 5/16-18, 1.25, Gr5, Std
Screw, Self-tapping, 1/4-20, 0.500
Flat Washer, .406 x 1.500 x .105
Screw, Self-tapping, 1/4-20, .750
Hex Screw, 3/8-16, 2.00, Gr5, Std
Bolt, Carriage, 3/8-16, 0.75, Grl
Nut, Push, 3/8
Nut, Flange Lock, 5/16-18, Grf
Nut, Flange Lock, 3/8-16, Grf
Nut, Flange, 5/8-18
Nut, Lock, 1/2-13
Deck Wash Plug
Bow-Tie Cotter Pin
Chute Bracket
Gear, Deck, Adjustment
Spring, Extension, .62 Dia x 6.12
Pulley Cap
Spring, Torsion, .992 ID X 1.17OD
Bracket, Cable, Deck Engage
Ref, I
No,
2X 936-0119
28. 941-0919A
29. 936-0344
30. 710-0376
31. 720-05010
32. 736-0262
33. 750-04936
34. 783-06643
35. 748-04069
36. 738-04162C
37. 748-04272
38. 783-06368
39. 942-04308
40. 747-05323
41. 747-05141A
42. 747-05105B
43. 631-04288
44. 783-06424A
45. 936-0351
46. 738-1186A
47. 954-04060B
48. 756-04129B
49. 711-04847B
50. 956-1227
51. 732-04372
52. 783-05946
Part No. Description
Washer, Lock, 5/16, Regular Duty
Bearing, Ball, .787id x 1.85 Odx.551
Washer, Flat, .385 X 1.0 X .030
Hex Cap Screw, 5/16-18 x 1.00
Cap, .290 x .500
Washer, Flat, .385 x .870 x .092
Spacer, .792 x 1.060 x 1.860
Bracket, Support, Stationary Idler
Deck Lift Pivot Cup
Spacer, Shoulder, .8840 x .190
Shoulder Spacer
Bracket, Guard, Belt, 4.25 Pulley
Blade, Cut, 21.23" 2-1n-1, Econ
Rod, Keepr, Belt 42 Idler
Rod, Lift, Deck, Frt, 12.7
Rod, Control, Brake 42"
Chut Assembly, 42" Deck
Deck Belt Cover, 42
Washer, Flat, .760 Idxl.50 OD
Shift, Spindle, 6.11.
Belt, V Type, A Sec X 96.5
Pulley, Idler, 4.25"Dia
Pin, Hinge, Dia .3125 x 7.96
Pulley, Deck, 6.3 Dia
Spring,Torsion, .44 I.D. X2.0
Pivot idler Bracket, 46
43

Craftsman Engine Model 4P90HU For Model 247.288820
120
[
0
122 _ 121
121--_
_124
127__ __
;Y 127
129
-- 126
m
120
121
122
124
126
127
128
129
130
951-14458
951-14466
951-12255
951-12256
951-12260
712-04212
951-12328
951-12257
951-12258
D = _ O II
Air FilterCoverAssembly
Air FilterLockNut
Air FilterCover
SpongeFilter
Air FilterAssembly
NutM6
RubberCap
Manifold
ManifoldGasket
44

Craftsman Engine Model 4P90HU For Model 247.288820
I
m
1
2
3
4
5
6
7
188
951-12205
712-04290
750-05320
951-14454
951-11622
710-05305
951-14455
710-05303
D = O O
DebrisShield
Nut
EngineShroudSpacer
Starter/ ShroudStudM6x99
FlexibleClamp
HookBolt
Air Shield
Self-TappingBolt5.5x25
45

Craftsman Engine Model 4P90HU For Model 247.288820
191- GasketKit- External
192- GasketKit- Complete
193- Complete Engine
s1-_
_---53
_47
187
1_3-U
_181
I
176 68
55
I
7O
46

Craftsman Engine IViodel 4P90HU For IViodel 247.288820
m
47
48
49
5O
51
52
53
54
55
56
57
58
59
6O
62
63
64
65
66
67
68
951-11499
710-04916
951-14456
951-12226
951-12685
951-12227
951-12686
951-12228
951-12229
736-04558
714-04074
951-11574
951-12230
951-12231
951-12232
710-04908
712-04212
951-12233
710-04979
710-05310
951-14457
D = O
UpperCrankshaftSeal
BoltM6x14
BreatherCoverPlate
BreatherGasket
UmbrellaValve
MeshScreen
UmbrellaValveSeat
ChokeLinkage
GovernorArmShaft
GovernorWasher
GovernorCotterPin
GovernorSeal
ThrottleLinkage
ThrottleLinkageSpring
GovernorArm
GovernorArmBolt
GovernorArmNutM6
GovernorSpring
BoltM6x18
BoltM6x38
ComponentBracket/Separate
m
69
7O
72
73
74
176
181
182
183
184
187
191
192
193
750-05530
951-12235
951-12236
951o14462
951-12237
951-12275
951-11953
951-12276
951-11954
951-12277
710-05319
951-12201
951-12204
952Z4P90HU
m = O
ComponentBracketSpacer
BreatherHoseAssembly
BreatherHoseClamp
ShortBlockAssembly
(Incl.37,47-53,55-58,73-77,84,
86-89,91-93,98-104,112,113,
115-119,137,138,144,158,170,
171,173-176,181-184)
CrankcaseCoverGasket
PistonRingSet
PistonPinSnapRing
Piston
PistonPin
ConnectingRodAssembly
ConnectingRodBolt
GasketKit- External
(Inc1.113,130,136-138,144,158)
GasketKit- Complete
(Incl.47,50,58,74,113,118,130,
136-138,144,158,170)
Complete Engine (4PgOHU)
4.7

Craftsman Engine Model4P90HUFor Model247.288820
191- GasketKit- External
192- GasketKit- Complete
193- Complete Engine
154 157
152_ _153 __ '_
I58
i_515oio2
153
1_ 147 148 149
147 148 149
161
150
142
142
I
145
161
_--- 142
159
160
166
171
173
172 _)
173
172
171
1401
141
_140
48

Craftsman Engine IViodel 4P90HU For IViodel 247.288820
m
140
141
142
143
144
145
146
147
148
149
150
151
152
153
154
155
156
157
158
159
159
160
161
162
710-05315
951-12265
710-05316
951-12266
951-12267
951-11981
751-11124
751-11123
951-11966
710-04962
D = O 0
BoltM5xlO
Cowl
ValveCoverBolt
ValveCover
ValveCoverRing
RockerArmAssembly
Jam Nut
FulcrumNut
RockerArm
RockerArmStud
951-12268
951-12269
951-12080
951-12078
951-11964
951-12077
951-11337
951-11337
951-12271
951-14459
951-14464
951-10292
710-05317
710-05318
PushRodGuide
ExhaustValveAdjuster
ExhaustValveSpringRetainer
ValveSpring
IntakeValveSeal
ValveSpringRetainer
ValveKit
ValveKit
ExhaustPipeGasket
MuffStudM8x47
MufflerStudAssembly
SparkPlug/F6Rtc
BoltM10x1.25x85
Bolt/M10x1.25x65
m
163
164
165
166
167
168
169
170
171
172
173
174
175
189
191
192
193
951-12202
951-14463
951-14460
951-12775
951-12776
951-12777
736-04629
710-05337
951-12273
715-04122
951-11335
951-11962
736-04561
951-12274
951-12197
951-12201
951-12204
952Z4P90HU
D = O O
CylinderHeadKit
(Incl.114,154,161,162,170)
CylinderHeadAssembly
(Incl.137-139,144,146-159,
Air ValveCore
StrainerClip
SecondAirValveFilterElement
TheAirValveBonnet
Washer
ScrewM5x12
CylinderHeadGasket
CylinderHeadDowel12x16
PushRodKit
Tappet
CamshaftThrustWasher
CamshaftAssembly
ValveCoverKit
GasketKit- External
(IncM13,130,136-138,144,158)
GasketKit- Complete
(Incl.47,50,58,74,113,118,130,
136-138,144,158,170)
CompleteEngine(4PgOHU)
49

Craftsman Engine Model 4P90HU For Model 247.288820
79_ -8(
2.'
sl 3
82_81
76_
--75
104
116
117
5O

Craftsman Engine IViodel 4P90HU For IViodel 247.288820
m
5
75
76
77
79
8O
81
82
83
84
85
86
87
88
89
9O
91
92
93
951-11622
951-12238
951-11969
951-10307
951-12239
951-12241
951-12363
951-12240
710-04980
710-05311
951-12242
715-04121
951-12243
951-12244
710-05312
736-04557
951-12245
751-12246
736-04559
D = I! O
FlexibleClamp
CrankshaftAssembly
MainBearing
WoodruffKey
DipstickAssembly
UpperO-Ring
LowerO-Ring
Oil FillTubeAssembly
BoltM6x35
Oil DrainPlug
Regulator
DowelPin8x14
Ball6.35
Spring
Bolt
CrankshaftThrustWasher
BalanceableShaftBearing
BalanceableShaftAssembly
BalanceableThrustWasher
m
98
99
1CO
101
102
103
104
112
113
114
115
116
117
118
119
190
951-12248
951-12247
951-12249
951-12250
951-12251
951-12252
951-11956
710-05313
736-04560
951-12690
951-12253
951-12254
951-12318
710-04982
951-11375
710-05314
951-12194
D = O O
OilPumpAssembly
O-Ring10x2.65
Filter
FilterSpring
O-Ring35.5x2.65
FilterCover
GovernorGear/ShaftAssembly
BoltM8x15
OilDrainPlugWasher
Oil Filter
ScrewJoint
CrankcaseCover
CrankcaseCoverAssembly
(Incl.87-89,100-104,112,113,115,116)
BoltM8x54
LowerCrankshaftSeal
BoltM8x43
OilDrainPlugAssembly
51

Craftsman Engine Model 4P9OHU For Model 247.288820
194-CarburetorKit-Major
131--
--133
52

Craftsman Engine Model 4P90HU For Model 247.288820
m
130
131
132
133
134
136
137
138
139
194
A
B
C
D
E
F
G
H
I
J
K
L
951-12258
951-12771A
951-11731
951-11336
723-04071
951-12261
951-12262
951-12263
951-12264
951-14179
n/a
n/a
n/a
n/a
n/a
n/a
n/a
n/a
n/a
n/a
n/a
n/a
m = O O
ManifoldGasket
CarburetorAssembly
FuelHoseClamp
FuelLineKit
PlasticSupportClamp
CarburetorGasket
CarburetorInsulator
CarburetorInsulatorGasket
CarbStud
CarburetorKit- Major
(Inck130,136,138,F,G,S
,T,U,V,W,X,Y,Z)
ChokeShaft
ChokeShaftFiberO-Ring
ChokeReturnSpring
FlatSteelWasher
ChokePlate
IdleJetAssembly
IdleJet O-Ring
SheetmetalHousing
ThrottleShaft
ThrottlePlate
ScrewM3x5
LockWasher
m
M
N
0
P
Q
R
S
T
U
V
W
X
Y
Z
AA
BB
CC
DD
EE
GG
HH
n/a
n/a
n/a
n/a
n/a
n/a
n/a
n/a
n/a
n/a
n/a
n/a
n/a
n/a
951-14175
951-14176
n/a
n/a
n/a
n/a
n/a
D = O O
Nylon/PlasticO-Ring
FiberO-Ring
IdleSpeedAdjustingScrew
IdleMixtureScrew
CarburetorBody
FuelInlet
FloatPin
EmulsionTube
NeedleValve
MainJet
NeedleValveSpring
Float
FuelBowlO-Ring
O-Ring
SolenoidValveAssembly
(IncM30,136,138,AA,G,H,Z)
FuelBowlKit
(IncM30,136,138,BB,CC,DD,EE,Y,Z)
FuelDrainPlugGasket
FuelDrainPlug
Seat!FuelBowlBolt
Washer
ScrewM5x12
53

Craftsman Engine IViodel 4P90HU For IViodel 247.288820
m42
38
m
38
39
4O
41
42
43
44
45
46
710-04931
951-12220
712-04220
951-12221
951-12222A
951-12223
951-12224
710-04940
951-12279
D = O O
BoltM6x28
IgnitionCoilAssembly
FlywheelNutM16x1.5
Plate
CoolingFan
Flywheel
CoilAssy.Charge
BoltM6xlO
Cowl
54

Craftsman Engine Model 4P90HU For Model 247.288820
8
9
I
24
25
10
11--o I o--ll
=-12
11 _12
i
_--17
37
?
37
m
8
9
10
11
12
13
14
15
16
17
18
19
2O
21
710-05306
951-12207
710-05307
736-04554
736-04556
I = O
BoltM8x40
StarterAssembly
ScrewM5x25
LockWasher5
PlainWasher6
951-12208
951-12211
951-12210
951-12312
951-12209
951-12212
951-12214
951-12215
951-12216
ElectricalStarterFrontCover
Bearing
Pinion/ClutchAssembly
Gear
Bearing
PinionCover
Bearing6001Zz
StarterArmature
Bearing
m
22
24
25
26
29
30
31
32
33
34
35
36
37
951-12528
951-12217
736-04554
951-12529
951-12219
710-05308
710-05309
951-12324
736-04555
736-04556
736-04477
712-04212
715-04120
m = O O
StarterHousingAssembly
Screw
LockWasher
Brush Assembly
ElectricalStarterBackCover
BoltM6xl00
BoltM6x30Assembly
WaterproofWasher
InsulationWasher
PlainWasher6
LockWasher6
NutM6
DowelPin 10x14
55

Look For Relevant Emissions Durability Period and
Air index information OnYour Engine Emissions Label
Engines that are certified to meet the California Air Resources Board (CARB) Tier 2 Emission Standards must
display information regarding the Emissions Durability Period and the Air Index. Sears Brands Management
Corporation makes this information available to the consumer on our emission labels.
The Emissions Durability Period describes the number of hours of actual running time for which the engine is
certified to be emissions compliant, assuming proper maintenance in accordance with the Operating & Mainte-
nance Instructions. The following categories are used:
Moderate: Engine is certified to be emission compliant for 125 hours of actual engine running time.
Intermediate: Engine is certified to be emission compliant for 250 hours of actual engine running time.
Extended: Engine is certified to be emission compliant for 500 hours of actual engine running time.
For example, a typical walk-behind lawn mower is used 20 to 25 hours per year. Therefore, the Emissions
Durability Period of an engine with an intermediate rating would equate to 10 to 12 years.
The Air index is a calculated number describing the relative level of emissions for a specific engine family. The
lower the Air Index, the cleaner the engine. This information is displayed in graphical form on the emissions label.
After July 1,2000, Look For Emissions Compliance Period
On Engine Emissions Compliance Label
After July 1, 2000 certain Sears Brands Management Corporation engines will be certified to meet the United
States Environmental Protection Agency (USEPA) Phase 2 emission standards. For Phase 2 certified engines, the
Emissions Compliance Period referred to on the Emissions Compliance label indicates the number of operating
hours for which the engine has been shown to meet Federal emission requirements.
For engines less than 225 cc displacement, Category C = 125 hours, B = 250 hours and A = 500 hours.
For engines of 225 cc or more, Category C = 250 hours, B = 500 hours and A = 1000 hours.
This isa generic representation of the emission label typically found on a certified engine.
FAMILYYBSXS.3192VA 274812
GDOC-100182Rev.B
56

(Thispageapplicableinthe U.S.A.and Canadaonly.)
Sears Brands Management Corporation (Sears), the California Air Resources Board (CARD)
and the United States Environmental Protection Agency (U.S. EPA)
Emission Control System Warranty Statement (Owner's Defect Warranty Rights and Obligations)
EMISSIONCONTROLWARRANTYCOVERAGEISAPPLICABLETOCERTI-
FIEDENGINESPURCHASEDINCALIFORNIAIN1995ANDTHEREAF-
TER,WHICHARE USEDINCALIFORNIA,ANDTOCERTIFIEDMODEL
California and United States Emission
TheCaliforniaAirResourcesBoard(CARD),U.S.EPAandSearsarepleased
toexplainthe EmissionControlSystemWarrantyonyourmodelyear2000and
latersmalloff-roadengine(SORE).InCalifornia,newsmalloff-roadengines
mustbedesigned,builtand equippedto meettheState'sstringentanti-smog
standards.Elsewherein theUnitedStates,newnon-road,spark-ignition
enginescertifiedformodelyear1997and latermustmeetsimilarstandardsset
forthbythe U.S.EPA.Searsmustwarranttheemissioncontrolsystemonyour
YEAR1997ANDLATERENGINESWHICHAREPURCHASEDANDUSED
ELSEWHEREINTHEUNITEDSTATES(ANDAFTERJANUARY1,2001 IN
CANADA).
Control Defects Warranty Statement
enginefortheperiodsoftime listedbelow,providedtherehasbeennoabuse,
neglector impropermaintenanceofyoursmalloff-roadengine.Youremis-
sioncontrolsystemincludespartssuchasthecarburetor,aircleaner,ignition
system,mufflerand catalyticconverter.Alsoincludedmaybeconnectorsand
otheremissionrelatedassemblies.Whereawarrantableconditionexists,Sears
will repairyoursmalloff-roadengineatnocostto youincludingdiagnosis,parts
andlabor.
Sears Emission Control Defects Warranty Coverage
Smalloff-roadenginesarewarrantedrelativeto emissioncontrolpartsdefects
foraperiodofone year,subjecttoprovisionssetforthbelow.Ifanycovered
Owner's Warranty
Asthe smalloff-roadengineowner,youareresponsiblefortheperformanceof
therequiredmaintenancelistedin yourOperatingandMaintenanceInstruc-
tions.Searsrecommendsthatyouretainallyourreceiptscoveringmaintenance
onyoursmalloff-roadengine,butSearscannotdenywarrantysolelyforthe
lackofreceiptsorfor yourfailuretoensuretheperformanceof allscheduled
maintenance.As the smalloff-roadengineowner,youshouldhoweverbe
awarethat Searsmaydenyyouwarrantycoverageifyoursmalloff-roadengine
ora parthasfaileddueto abuse,neglect,impropermaintenanceor unap-
parton yourengineis defective,the partwillbe repairedorreplacedbySears.
Responsibilities
provedmodifications.Youareresponsiblefor presentingyoursmalloff-road
engineto anAuthorizedSearsServiceDealeras soonasa problemexists.The
undisputedwarrantyrepairsshouldbecompletedinareasonableamountof
time,notto exceed30days.Ifyouhaveanyquestionsregardingyourwarranty
rightsand responsibilities,youshouldcontactaSearsServiceRepresentative
at 1-800-469-4663.Theemissionwarrantyisa defectswarranty.Defectsare
judgedonnormalengineperformance.Thewarrantyis notrelatedtoan in-use
emissiontest.
Sears Emission Control Defects Warranty Provisions
ThefollowingarespecificprovisionsrelativetoyourEmissionControlDefectsWarrantyCoverage.ItisinadditiontotheSearsenginewarrantyfornon-regulated
enginesfoundin theOperatingand MaintenanceInstructions.
1. WarrantedParts
Coverageunderthiswarrantyextendsonlytothe partslistedbelow(the
emissioncontrolsystemsparts)tothe extentthesepartswerepresenton
theenginepurchased.
a. FuelMeteringSystem
• Coldstartenrichmentsystem
• Carburetorandinternalparts
• FuelPump
b. AirlnductionSystem
• Aircleaner
• Intakemanifold
c. IgnitionSystem
• Sparkplug(s)
• Magnetoignitionsystem
d. CatalystSystem
• Catalyticconverter
• Exhaustmanifold
• Air injectionsystemor pulsevalve
e. MiscellaneousItemsUsedin AboveSystems
• Vacuum,temperature,position,timesensitivevalves
andswitches
• Connectorsandassemblies
2. LengthofCoverage
Searswarrantstothe initialownerand eachsubsequentpurchaserthat
theWarrantedPartsshallbefreefromdefectsin materialsandworkman-
shipwhichcausedthefailureofthe WarrantedPartsfor aperiodofone
yearfromthe datethe engineis deliveredtoa retailpurchaser.
3. NoCharge
Repairor replacementof anyWarrantedPartwill beperformedat no
chargetothe owner,includingdiagnosticlaborwhichleadstothe
determinationthataWarrantedPartisdefective,ifthe diagnosticworkis
performedatanAuthorizedSearsServiceDealer.Foremissionswarranty
servicecontactyournearestAuthorizedSearsServiceDealeras listedin
the "YellowPages"under"Engines,Gasoline,""GasolineEngines,""Lawn
Mowers,"orsimilarcategory.
4. ClaimsandCoverageExclusions
Warrantyclaimsshallbefiledin accordancewiththe provisionsofthe
SearsEngineWarrantyPolicy.Warrantycoverageshallbeexcludedfor
failuresof WarrantedPartswhicharenotoriginalSearspartsor because
ofabuse,neglector impropermaintenanceas setforth inthe Sears
EngineWarrantyPolicy.Searsisnotliableto coverfailuresof Warranted
Partscausedby theuseof add-on,non-original,or modifiedparts.
5. Maintenance
AnyWarrantedPartwhichis notscheduledfor replacementas required
maintenanceor whichis scheduledonlyfor regularinspectiontothe effect
of"repairor replaceas necessary"shallbe warrantedastodefectsfor the
warrantyperiod.AnyWarrantedPartwhichisscheduledfor replacement
asrequiredmaintenanceshallbewarrantedastodefectsonlyforthe
periodoftime uptothe firstscheduledreplacementfor that part.Any
replacementpartthat isequivalentin performanceand durabilitymay
beusedin the performanceofanymaintenanceor repairs.Theowneris
responsibleforthe performanceof all requiredmaintenance,asdefinedin
the SearsOperatingandMaintenanceInstructions.
6. ConsequentialCoverage
Coveragehereundershallextendtothefailureofanyenginecomponents
causedbythe failureofanyWarrantedPartstillunderwarranty.
Inthe USAandCanada,a 24hourhotline,1-800-469-4663,hasamenuofpre-recordedmessagesofferingyouenginemaintenanceinformation.
GDOC-100188Rev.B
57

FEDERALand/or CALIFORNIAEMISSIONCONTROLWARRANTYSTATEMENT
YOURWARRANTYRIGHTSANDOBLIGATIONS
MTD Consumer Group Inc, the United States Environmental Protection Agency (EPA), and, for those products certified for sale in the state of
California, the California Air Resources Board (CARB) are pleased to explain the emission (evaporative and/or exhaust) control system (ECS)
warranty on your outdoor 2006 and later small off-road spark-ignited engine and equipment (outdoor equipment engine) In California, new
outdoor equipment engines must be designed, built and equipped to meet the State's stringent anti-smog standards (in other states, 1997 and
later model year equipment must be designed, built, and equipped to meet the U.S. EPA small off-road, spark ignition engine regulations. MTD
Consumer Group Inc must warrant the ECSon your outdoor equipment engine for the period of time listed below provided there has been no
abuse, neglect or improper maintenance of outdoor equipment engine.
Your ECS may include parts such as the carburetor, fuel-injection system, the ignition system, catalytic converter, fuel tanks, fuel lines, fuel caps,
valves, canisters, filters, vapor hoses, clamps, connectors, and other associated emission-related components.
Where a warrantable condition exists, MTD Consumer Group Inc will repair your outdoor equipment engine at no cost to you including
diagnosis, parts and labor.
MANUFACTURER'SWARRANTYCOVERAGE:
This emission control system is warranted for two years. If any emission-related part on your outdoor equipment engine is defective, the part
will be repaired or replaced by MTD CONSUMER GROUP INC.
OWNER'SWARRANTYRESPONSIBILITIES:
As the outdoor equipment engine owner, you are responsible for performance of the required maintenance listed in your owner's manual. MTD
Consumer Group Inc recommends that you retain all receipts covering maintenance on your outdoor equipment engine, but MTD Consumer
Group Inc cannot deny warranty solely for the lack of receipts.
As the outdoor equipment engine owner, you should however be aware that MTD Consumer Group Inc may deny you warranty coverage if
your outdoor equipment engine or a part has failed due to abuse, neglect, or improper maintenance or unapproved modifications.
You are responsible for presenting your outdoor equipment engine to MTD Consumer Group Inc's distribution center or service center as soon
as the problem exists. The warranty repairs should be completed in a reasonable amount of time, not to exceed 30 days. If you have a question
regarding your warranty coverage, you should contact the MTD Consumer Group Inc Service Department at 1-800-800-7310 or via email at
http://su pport.mtd prod ucts.com
GENERALEMISSIONSWARRANTYCOVERAGE:
MTD Consumer Group Inc warrants to the ultimate purchaser and each subsequent purchaser that the outdoor equipment engine is: Designed,
built and equipped so as to conform with all applicable regulations; and free from defects in materials and workmanship that cause the failure
of a warranted part to be identical in all material respects to that part as described in MTD Consumer Group Inc's application for certification.
The warranty period begins on the date the outdoor equipment engine is delivered to an ultimate purchaser or first placed into service. The
warranty period is two years.
Subject to certain conditions and exclusions as stated below, the warranty on emission-related parts is as follows:
1. Any warranted part that is not scheduled for replacement as required maintenance in the written instructions supplied, is warranted for
the warranty period stated above. If the part fails during the period of warranty coverage, the part will be repaired or replaced by MTD
Consumer Group Inc according to subsection (4) below. Any such part repaired or replaced under warranty will be warranted for the
remainder of the period.
2. Any warranted part that is scheduled only for regular inspection in the written instructions supplied is warranted for the warranty period
stated above. Any such part repaired or replaced under warranty will be warranted for the remaining warranty period.
3. Any warranted part that is scheduled for replacement as required maintenance in the written instructions supplied is warranted for the
period of time before the first scheduled replacement date for that part. If the part fails before the first scheduled replacement, the part
will be repaired or replaced by MTD Consumer Group Inc according to subsection (4) below. Any such part repaired or replaced under
warranty will be warranted for the remainder of the period prior to the first scheduled replacement point for the part.
Repair or replacement of any warranted part under the warranty provisions herein must be performed at a warranty station at no charge
to the owner.
4.
5. Notwithstanding the provisions herein, warranty services or repairs will be provided at all of our distribution centers that are franchised to
service the subject engines or equipment.
6. The outdoor equipment engine owner will not be charged for diagnostic labor that is directly associated with diagnosis of a defective,
emission-related warranted part, provided that such diagnostic work is performed at a warranty station.
7. MTD Consumer Group Inc is liable for damages to other engine or equipment components proximately caused by a failure under
warranty of any warranted part.
8. Throughout the off-road engine and equipment warranty period stated above, MTD Consumer Group Inc will maintain a supply of
warranted parts sufficient to meet the expected demand for such parts.
9. Any replacement part may be used in the performance of any warranty maintenance or repairs and must be provided without charge to
the owner. Such use will not reduce the warranty obligations of MTD Consumer Group Inc.

10. Add-onormodifiedpartsthatarenotexemptedbytheAirResourcesBoardmaynotbeused.Theuseofanynon-exemptedadd-onor
modifiedpartsbytheultimatepurchaserwillbegroundsfordisallowingawarrantyclaims.MTDConsumerGroupIncwillnotbeliableto
warrantfailuresofwarrantedpartscausedbytheuseofanon-exemptedadd-onormodifiedpart.
WARRANTEDPARTS:
The repair or replacement of any warranted part otherwise eligible for warranty coverage may be excluded from such warranty coverage if
MTD Consumer Group Inc demonstrates that the outdoor equipment engine has been abused, neglected, or improperly maintained, and that
such abuse, neglect, or improper maintenance was the direct cause of the need for repair or replacement of the part. That notwithstanding,
any adjustment of a component that has a factory installed, and properly operating, adjustment limiting device is still eligible for warranty
coverage. Further, the coverage under this warranty extends only to parts that were present on the off-road engine and equipment purchased.
The following emission warranty parts are covered (if applicable):
1. Fuel Metering System
Cold start enrichment system (soft choke)
Carburetor and internal parts (or fuel injection system)
Fuel pump
Fuel tank
2. Air Induction System
Air cleaner
Intake manifold
3. Ignition System
Spark plug(s)
Magneto ignition system
4. Exhaust System
Catalytic converter
SAI (Reed valve)
5. Miscellaneous Items Used in Above System
Vacuum, temperature, position, time sensitive valves and switches
Connectors and assemblies
6. Evaporative Control
Fuel hose
Fuel hose clamps
Tethered fuel cap
Carbon canister
• Vapor lines
GDOCq00223Rev.A

Congratulations on making a smart purchase. Your new Craftsman® product is designed and
manufactured for years of dependable operation. But like all products, it may require repair
from time to time. That's when having a Repair Protection Agreement can save you money and
aggravation.
Here's what the Repair Protection Agreement* includes:
[] Expert service by our 10,000 professional repair specialists
[] Unlimited service and no charge for parts and labor on all covered repairs
[] Product replacement up to $1500 if your covered product can't be fixed
[] Discount of 25% from regular price of service and related installed parts not covered by the
agreement; also, 25% off regular price of preventive maintenance check
[] Fast help by phone - we call it Rapid Resolution - phone support from a Sears representative.
Think of us as a "talking owner's manual."
Once you purchase the Repair Protection Agreement, a simple phone call is all that it takes for you
to schedule service. You can call anytime day or night, or schedule a service appointment online.
The Repair Protection Agreement is a risk-free purchase. If you cancel for any reason during the
product warranty period, we will provide a full refund. Or, a prorated refund anytime after the
product warranty period expires. Purchase your Repair Protection Agreement today!
Some limitations and exclusions apply. For prices and additional information in the U.S.A.
call 1=800=827=6655.
*Coverage in Canada varies on some items. For full details call Sears Canada at 1=800=361=
6665.
Sears Installation Service
For Sears professional installation of home appliances, garage door openers, water heaters, and
other major home items, in the U.S.A. or Canada call 1=800=4=MY=HOME®.
60

Operaci6n segura Pr,_cticas .......... Paginas 62
Asamblea ........................... Page 68
Operaci6n de ...................... Paginas 70
De Servicio y Mantenimiento de ....... Paginas 76
Fuera de temporada de almacenamiento .. Page 87
Soluci6n de problemas ................ Page 88
Etiquetas ................................. 29
Lista de piezas ..................... Paginas 30
Reparaci6n de Acuerdo de Protecci6n .... Page 95
Servicio de nOmeros ............ atrasados Page
CRAFTSMAN GARANTJA COMPLETA
DURANTEdosa_osdesdelafechadecornpra,todaslaspartesdenofungiblesdeesteequipodeequitaci6nestangarantizadascontracualquier
defectodematerialo rnanodeobra.Unapartenofungiblesdefectuosarecibir_adornicilioreparaci6no lasustituci6nsilareparaci6nnoest_disponible.
GARANTJALIMITADADELABATERJA
POR90 diasdesdelafechadecornpra,labateria(unapiezaconsurnible)deesteequipode conducci6nestagarantizadacontracualquier
defectode materialo rnanode obra.Unabaterianuevase surninistrar_gratuitarnente.Ustedes responsableporelcostodernanodeobrade
instalaci6ndela bateria.
GARANTJALIMITADAADiCIONAL
Enlassiguientesgaranfiasadicionales,ustedes responsableporel costode rnanode obradeinstalaci6ndelapartedespu_sdelsegundoaSo
desdelafechadecornpra.
DURANTEcincoaSosdesdelafechade cornpra,el marcodeesteequipode conducci6nest&garantizadocontracualquierdefectode material
o rnanodeobra.Sesurninistrar&un nuevomarcode forrnagratuita.
DURANTEdiezaSosdesdelafechadecornpra,elejedelanterode esteequipode conducci6nest&garantizadocontracualquierdefectode
materialo rnanode obra.Se surninistrar&unnuevoejedelanterogratuitarnente.
PARArnientrasesutilizadoporel propietariooriginaldespu_sdeld@irnoaSode lafechadecornpra,eleje hierrofundidofrontal(siesta
equipado)de esteequipodeconducci6nest&garantizadocontracualquierdefectodematerialo rnanode obra.Concornprobantedecornpra,
sesurninistrar&un nuevoejedelanterode fundici6nde hierrodeforrnagratuita.
SERViCIODEGARANTJA
Paradetallesde lacoberturade garantiaobtenerlareparaci6no reernplazo,llarneal 1-800-659-5917o visiteel sitioweb:www.craftsrnan.corn
Entodosloscasos,sisepartedelareparaci6noreernplazoesirnposible,elequipodeequitaci6nsereernplazar&gratuitarnenteconelrnisrnooequivalente.
Todoslosdelaanteriorgarantiaesnulasiseutilizaesteequipodeconducci6nrnientrasqueproporcionaservicioscornercialeso Sialquilaaotrapersona.
Estagaranfiacubresolarnentedefectosenmaterialy rnanode obra.Coberturade lagaranfianoinduye:
• Piezasfungibles(exceptolabateria)que puedengastarseporel usonormaldentrodelperiododegarantia,incluyendoperonolirnitadoa
cuchillas,bujias,filtrosdeaire,correasy filtrosdeaceite.
• Serviciode rnantenirnientoestAndar,carnbiosde aceiteo puestasa punto.
NeurnAticoderepuestoo reparaci6ncausadasporpinchazosde objetosexternos,talescomoclavos,espinas,toconeso vidrio.
• Neurn&ticooruedade repuestoo reparaci6nresultantesdeldesgastenormal,accidente,o funcionarnientoincorrectoo rnantenirniento.
• Reparacionesnecesariasdebidoa abusodeloperador,incluyendoperonolirnitadoa daSoscausadosporobjetosrn&sall&de lacapacidad
de losequiposdeconducci6nde rernolque,afectarobjetosquedoblanelmarco,eleje o elcig(JeSalo over-speedingel motor.
• Reparacionesnecesariasdebidoa lanegligenciadeloperador,incluyendoperonolirnitadoa, daSosel@tricosyrnecanicoscausados
poralrnacenarnientoinadecuado,nousarelgradoadecuadoylacantidaddeaceitede motor,no rnantenerlacubiertalibrede residuos
inflarnables,ofaltade rnantenirnientodelequipode equitaci6nsegL_nlasinstruccionescontenidasenel manualdel operador.
Motor(sistemadecombustible)limpiezao reparacionesocasionadosporel combustibledeterrninadoestarcontarninadosuoxidan
(obsoletos).Engeneral,el combustibledebeutilizarsedentrode30 diasdelafechade cornpra.
• Eldeterioronormalyel desgastedelosacabadosexteriores,o reernplazode laetiquetadelproducto.
Estagarantialeotorgaderechoslegalesespecificos,y ustedtambi_npuedetenerotrosderechosquevariandeestadoa estado.
SearsBrands ManagementCot_oration,Hoffman Estates,iL 60179
NSrnerode rnodelo ..........................................................
Aceitedel motor: SAE30 N_mero de serie..............................................................
Combustible: Gasolinasinplorno Fechade compra.............................................................
Bujia: F6RTC(951-10292) RegistrearribaelnQmerodelmodelo,elnQmerodeserieylafechadecompra
©SearsBrands,LLC
61

Lapresenciadeestesirnboloindicaquesetratadeinstrucciones
irnportantesdeseguridadquesedebenrespetarparaevitar
ponerenpeligrosuseguridadpersonaly/omaterialyladeotras
personas.Leaysigatodaslasinstruccionesdeestemanualantes
deponerenfuncionarnientoestarn_.quina.Sinorespetaestas
instruccionespodriaprovocarlesionespersonales.Cuandoveaeste
sirnbolo,ipresteatenci6nalaadvertencia!
PROPOSICI6N 65 DE CALIFORNIA
Elescapedel motorde esteproducto,algunosdesuscornponentes
y algunoscornponentesdelvehiculocontieneno liberansustancias
quirnicasqueelestadode Californiaconsideraque puedenproducir
c_.ncer,defectosde nacirnientouotrosproblernasreproductivos.
Losbornesdela bateriay losaccesoriosdines contienenplornoy
cornpuestosdeplorno,sustanciasquirnicasquesegQnIoestableci-
do potel EstadodeCaliforniacausanc_.nceryda_osenel sisterna
reproductivo.Ldveselasmanos despu_sde estaren contadto
con estoscomponentes.
Estarn_.quinarueconstruidaparaseroperadadeacuerdocon
lasreglasde seguridadcontenidasenestemanual.AIigualque
concualquiertipodeequipornotorizado,undescuidoo errorpor
partedeloperadorpuedeproducirlesionesgraves.Estarn_.quina
escapazde arnputarrnanosy piesy dearrojarobjetoscongran
fuerza.Denorespetarlasinstruccionesde seguridadsiguientesse
puedenproducirlesionesgraveso la rnuerte.
Su responsabilidad--Restrinja el usode estarn_.quina
rnotorizadaalas personasque lean,cornprendany respetenlas
advertenciase instruccionesqueaparecenenestemanualyen la
rn_.quina.
iGUARI)E ESTASINSTRUCCIONES!
FUNCIONAMIENTO GENERAL
• Lea,entienday curnplatodaslasinstruccionesincluidasen
la rn_.quinayen losrnanualesantesde rnontarlayutilizarla.
Guardeestemanualenun lugarseguroparaconsultasfuturasy
peri6dicas,asicornoparasolicitarrepuestos.
• Farniliaricesecontodosloscontrolesyconel usoadecuado
de losrnisrnos.Sepac6rnodetenerlarn_.quinaydesactivarlos
controlesr_.pidarnente.
• Noperrnitanuncaque losni_osrnenoresde 14a_osutilicen
estarn_.quina.Losni_osde 14a_osenadelantedebenleery
entenderlasinstruccionesde operaci6nynorrnasdeseguridad
contenidasen estemanual,yen la rn_.quinay debenser
entrenadosy supervisadosporun adulto.
• Nuncaperrnitaquelosadultosoperenestarn_.quinasinrecibir
antesla instrucci6napropiada.
• Paraayudara evitarelcontactoconlascuchillaso unalesi6npor
algQnobjetoqueseaarrojado,rnantengaa losobservadores,a
losayudantes,ni_osy rnascotasalejadosal rnenos25 metrosde
la rn_.quinarnientrasest,.en funcionarniento.Detengala rn_.quina
sialguienentraenlazona.
• Inspeccionerninuciosarnenteel Areadondeutilizar_,el equipo.
Retiretodaslaspiedras,palos,cables,huesos,juguetesyotros
objetosextra_osquepodrianserrecogidosyarrojadosporla
acci6nde lascuchillas.Losobjetosarrojadosporla rn_.quina
puedenproducirlesionesgraves.
• Planifiqueel patr6nde cortedelc_spedque hadeseguirpara
evitarla descargade materialhacialoscarninos,lasveredas,los
observadores,etc. Eviteadern_.sdescargarmaterialcontralas
paredesyobstruccionesquepodrianprovocarqueel material
descargadorebotecontrael operador.
• Paraprotegerselosojosutilicesiernpreanteojoso antiparras
de seguridadrnientrasoperalarn_.quinao rnientraslaajusta
o repara.Losobjetosarrojadosque rebotanpuedenproducir
lesionesocularesgraves.
• Utilicezapatosde trabajoresistentes,desuelafuerte,asicorno
pantalonesycarnisasajustados.Lasprendassueltaso las
alhajaspuedenquedaratrapadasen laspiezasrnovibles.Nunca
operela rn_.quinadescalzoo consandalias.
• Est_atentoa lacortadoraya la direcci6ndela descargade
losaditarnentosy noapunteanadie.Nuncaoperela cortadora
de cespedsinqueest_nen sulugarapropiadola cubiertade
descargao elcolectorde recortesde c_sped.
• Nopongalasrnanoso lospiescercade laspiezasrotatoriaso
debajode la plataforrnadecorte.Elcontactoconlascuchillas
puedeproducirlaarnputaci6ndernanosy pies.
• Unacubiertadedescargafaltanteoda_adapuedeprovocarel
contactoconla cuchillao lesionesporobjetosarrojados.
• Detengala(s)cuchilla(s)cuandoatraviesesenderos,sendaso
carninosdegravaycuandonoest_cortandoel c_sped.
• Vigileeltr_.nsitovehicularcuandoest_operandocercadeoen
crucesde carninos.Estarn_.quinanodebeutilizarseenlavia
pQblica.
• Noopereestarn_.quinabajolosefectosdelalcoholode drogas.
• Corteel cespedsolarnenteconluzdediao conunabuenaluz
artificial.
• Nuncatransportepasajeros.
• Desenganchela(s)cuchilla(s)antesdecolocarlarnarchaatr_.s.
Retrocedalentarnente.Siernpremirehaciaabajoyhaciaatr_.santes
yrnientrasretrocede,paraevitaraccidentes.
• Reduzcalavelocidadantesdedarlavuelta.Operelarn_.quina
suavernente.Evitelaoperaci6nerr_.ticayla velocidadexcesiva.
• Desenganchela(s)cuchilla(s),coloqueelfrenodeestaciona-
rniento,detengael motoryesperehastaquela(s)cuchilla(s)se
detenga(n)porcornpletoantesderetirarelcolectordec_sped,
vaciarlosrecortes,destaparel canal,retirarrestosde cespedo
desechos,o hacercualquierajuste.
62

• Nuncadejelarn_.quinaenfuncionarnientosinvigilancia.Apague
siernprelascuchillas,coloqueelfrenodernano,detengaelmotory
retirela Ilaveantesdebajarsedelvehiculo.
• Tengasurnocuidadoalcargaro descargarla rn_.quinaenun
rernolqueocarni6n.Estaunidadnodebeconducirseenascensoo
descensoderarnpas,porquepodrialadearseyprovocarlesiones
personalesgraves.Enlasrarnpasla rn_.quinasedebeernpujar
rnanualrnenteparacargarlao descargarlacorrectarnente.
• Elsilenciadoryelmotorsecalientanypuedencausarquernaduras.
Nolostoque.
• Reviseelespaciolibreporencirnade lacabezaantesdeconducir
bajolasrarnasbajasde _.rboles,cables,cerrarnientosde puertas,
etc.enloscualeseloperadorpodriaatorarseo seternpujadofuera
dela rn_.quina,Ioquepodriaresultarenlesionesgraves.
• Desenganchetodoslosernbraguesde losaccesoriosypresione
totalrnenteel pedaldelfrenoantesdeintentararrancarel motor.
• Larn_.quinaest,.dise_adaparacortarc_spedresidencialnormal,
conunaalturanomayora 10".Nointentecortarcespeddernasiado
crecido,seco(porej.,pastura)nipilasde hojassecas.Elc_sped
ylashojassecaspuedenentrarencontactoconelescapedel
motory/o acurnularseenlaplataforrnade lacortadorade cesped,
convirti_ndoseen unpeligrodeincendio
• Utilicesolarnenteaccesoriosyaditarnentosaprobadosparaesta
rn_.quinaporelfabricantedelarnisrna.Lea,cornprendaysiga
todaslasinstruccionesproporcionadasconlosaccesorioso
aditarnentosaprobados.Paraobtenerunalistadelosaccesorios
aprobadosy losarchivosadjuntos,Ilarne1-800-659-5917.
• Losdatosestadfsticosrnuestranquelosoperadoresde60 a_os
yrnayoresseven involucradosenunaltoporcentajedelesiones
relacionadascontractorescortacesped.Estosoperadoresdeben
evaluarsucapacidadparaoperareltractorcortac_spedenforrna
suficienternenteseguraparaprotegersea ellosrnisrnosy a los
dern_.scontralesionesgraves.
Si sepresentansituacionesquenoest_.nprevistasen este
manualseacuidadosoyuseel sentidocornOn.
FUNCIONAMIENTO EN PENDIENTES
Laspendientessonunfactorirnportanterelacionadoconaccidentes
porderrapeyvuelcosquepuedenproducirlesionesgravese incluso
la rnuerte.Laoperaci6nen pendientesrequiemmayorprecauci6n.
Si nopuederetrocederen lapendienteo sino sesienteseguro,no
realiceningunaoperaci6ndecorte.
Parasuseguridad,useel indicadorde pendientesqueseincluye
cornopartedeestemanualpararnedirla pendienteantesde operarla
rn_.quinaenunazonainclinada.Silapendienteesmayorde 15grados
segOnelrnedidor,noopereestarn_.quinaenesesector,puespodria
causarlesionesgraves.
HagaIosiguiente:
• Podehaciaarribayabajode laspendientes,node forrnatrans-
versal.Tengacuidadocuandocarnbiededirecci6nal operaren
pendiente.
• Est_atentoa loshoyos,surcos,baches,rocas,uotrosobjetos
ocultos.Elterrenodesniveladopuedevoltearla rn_.quina.Elcesped
altopuedeocultarobst_.culos.
Vayaa bajavelocidad.ElijaunavelocidadIosuficienternentebaja,
de rnodoquenotengaquedetenerseo hacercarnbiosrnientras
est,.sobrela pendiente.Losneurn_.ticospodrianperdertracci6n
sobrelaspendientesaQncuandolosfrenosfuncionaranapro-
piadarnente.Siernprernantengala rn_.quinaen carnbiornientras
desciendelaspendientes,parapoderfrenarconel motor.
• Sigalasrecornendacionesdelfabricanteparalospesoso contra-
pesosdelasruedas,pararnejorarlaestabilidaddela rn_.quina.
• Tengaespecialcuidadoconloscolectoresdec_speduotros
aditarnentos.Losrnisrnospuedenrnodificarlaestabilidaddela
rn_.quina.
• Hagaquetodoslosrnovirnientosenlaspendientesseanlentosy
graduales.Nocarnbierepentinarnentelavelocidadniladirecci6n.
Unfrenadoo carnbiodevelocidadrepentinospuedencausarque
el frentede larn_.quinaselevanteyd_ unavolteretahaciaatr_.s,Io
quepodriaproducirlesionesgraves.
• Evitearrancaro detenerseenunapendiente.Silosneurn_.ticos
pierdenlatracci6n,desenganchelascuchillasydescienda
lentarnentelapendiente.
NohagaIo siguiente:
• Nogiresobrelaspendientesa rnenosqueseanecesario.Sies
posible,girelentarnenteygradualrnenteduranteeldescenso.
• Nocorteelcespedcercadepozos,hundirnientosoterraplenes.La
cortadoradec_spedpuedevolcarserepentinarnentesiunadelas
ruedasest,.sobreel hordedeunacantilado,zanjao siunhordese
desrnorona.
• Nointenteestabilizarlarn_.quinaponiendoelpieenel suelo.
• Noutiliceuncolectordec_spedenpendientesernpinadas.
• NopodeelcespedhOrnedo.Unarnenortracci6npodriacausar
derrapes.
• Noparadescender.Elexcesodevelocidadpuedehacerqueel
operadorpierdaelcontroldelarn_.quina,ocasionandolesiones
graveseinclusolarnuerte.
• Norernolquecargaspesadasdetr_.sdelosaditarnentos(carritode
basuracargado,podadorade rodillos,etc)enpendientesrnayores
de5 grados.Cuandosedesplazapendienteabajo,elpesoadicional
tiendeaernpujareltractorypuedehacerquesepierdaelcontrol
delrnisrno(potejernplo,eltractorsepuedeacelerar,sereducela
capacidadparafrenaryrnaniobrar,losaccesoriospuedenplegarse
cornouncortaplurnasyhacerqueeltractorvuelque).
NINOS
Puedenocurriraccidentestr_.gicossiel operadorno est,.atentoa la
presenciade ni_os.PorIogeneral,losni_ossesientenatraidospor
estetipodern_.quinasy sufuncionarniento.Noentiendenlosriesgos
nilospeligros.Nuncaasurnaquelosni_osperrnanecer_.nen el rnisrno
lugardondelosvioporQltirnavez.
Mantengaalosni_osfueradel_readetrabajoybajoestricta
vigilanciadeunadultoresponsableadern_.sdelpropiooperador.
Est_alertayapaguelarn_.quinasiunni_oingresaal_.rea.
Antesy rnientrasest,.retrocediendo,mirehaciaatr_.sycuidequeno
hayani_os.
Nuncatransporteni_os,aQnconlacuchillaapagada.Podriancaerse
y resultarseverarnenteheridoso interferirconlaoperaci6nsegurade
lam_.quina.
• Tengaextrernaprecauci6ncuandoseaproxirnea esquinasciegas,
portales,arbustos,_.rbolesuotrosobjetosquepuedanirnpedirlever
a unni_oquesecruceenel recorridodelarn_.quina.
63

• Paraevitaraccidentesaloperarenrnarchaatr_.s,siernpredesengan-
chelascuchillasantesdecolocarrnarchaatr_.s.Siest,.instalado,
el"ModoPrecauci6nMarchaAtr_.s"(hojasdeoperarlarn_.quina,
rnientrasquelospaseosala inversa)nodebeutilizarsecuandohay
ni_osuotraspersonaspresentes.
• Mantengaa losni_osalejadosdelosrnotoresenrnarchaocalientes.
Puedensufrirquernadurasconunsilenciadorcaliente.
• RetirelaIlavecuandodejelarn_.quinasinvigilancia,evitequeuna
personasinautorizaci6nlarnaneje.
Noperrnitanuncaque losni_osrnenoresde 14a_osutilicenesta
rn_.quina.Losni_osde14a_osen adelantedebenleeryentenderlas
instruccionesdeoperaci6nynorrnasde seguridadcontenidasen este
manual,y enla rn_.quinaydebenserentrenadosysupervisadospor
unadulto.
REIVIOLQUE
• Rernolque_nicarnenteconunarn_.quinaquecuenteconun
enganchediseSadopararernolcar.Noacopleequiporernolcado
exceptoenelpuntodeenganche.
• SigalasrecornendacionesdelfabricanteenIoquerespectaalos
lirnitesdepesodelosequiposa rernolcaryal rernolqueenpendien-
tes.
• NuncaperrnitalapresenciadeniSosu otraspersonasdentroo sobre
losequiposrernolcados.
• Enlaspendientes,elpesodelequiporernolcadopuedecausar
p_rdidadetracci6nyperdidadecontroldela rn_.quina.
• Siernpreuseextralaprecauci6nrernolcandoconunarn_.quina
capazdehacervueltasapretadas(p.ejpaseo"devueltacero"-enel
cortac_sped).Hagaarnpliasvueltasparaevitaralgato-knifing.
• Despl_.ceselentarnenteydejedistanciaadicionalparafrenado.
• Noparadescender.
SERVIClO
Manejosegurode lagasolina
Paraevitarlesionespersonaleso daSosrnaterialesseasurnarnente
cuidadosoal rnanipularla gasolina.Lagasolinaessurnarnente
inflarnableysusvaporespuedencausarexplosiones.Sepuede
lesionargravernentesiderrarnagasolinasobreustedo sobrela ropa,
yaque_stasepuedeincendiar.L_.vesela pielyc_.rnbiesede ropade
inrnediato.
• Utilices61olosrecipientesparagasolinaautorizados.
• NuncaIlenelosrecipientesenel interiordeunvehiculoo carni6n
ocajade rernolquecon recubrirnientopl_.stico.Coloquesiernpre
losrecipientesenel pisoylejosdelvehiculoantesde realizarla
carga.
• Cuandoseafactible,retireel equipoa gasolinadelcarni6no
rernolquey II_neloen el suelo.Siestonoesposible,Ileneel
equipoen unrernolqueconun contenedorport_.til,envezde
hacerloconunaboquilladispensadoradegasolina.
• Mantengala boquillade Ilenadoencontactoconelhordedel
dep6sitode combustibleo conla aberturadel recipienteentodo
rnornento,hastaterrninarlacarga.Noutiliceundispositivode
boquilladeapertura/cierre.
Apaguetodosloscigarrillos,cigarros,pipasy otrasfuentesde
cornbusti6n.
• Nuncacarguecombustibleenla rn_.quinaen unespaciocerrado.
• Nuncasaquelatapadel combustibleniagreguecombustible
rnientrasel motorest,.calienteo enrnarcha.Dejequeelmotor
seenfrieporIornenosdosrninutosantesdevolvera cargar
combustible.
• NuncaIleneen excesoel dep6sitode combustible.Lleneel
tanqueno rn_.sde 1/2pulgadapordebajode labasedelcuello
del tap6ndecarga,paradejarespacioparalaexpansi6ndel
combustible.
• Vuelvaa colocarlatapade la gasolinayajQstelabien.
• Lirnpieel combustibleque sehayaderrarnadosobreel motory el
equipo.Trasladelarn_.quinaa otrazona.Espere5 rninutosantes
de encenderel motor.
• Parareducirel riesgode incendio,rnantengala rn_.quinalirnpia
de pasto,hojasy deacurnulaci6nde otrosresiduos.Lirnpielos
derrarnesde aceiteo combustibleysaquetodoslosresiduos
ernbebidosde combustible.
• Nuncaguardelarn_.quinao el recipientedecombustibleen un
espaciocerradodondehayafuego,chispaso luzpiloto,corno
por ejernplodecalentadoresdeagua,calefactoresde arnbientes,
hornos,secadoresde ropau otrosaparatosagas.
• Dejeque la rn_.quinaseenfriecincorninutosporIornenosantes
de guardarla.
Servicio general
• Nuncaenciendaelmotorenespacioscerradoso en unazona
conpocaventilaci6n.Elescapedel motorcontienernon6xidode
carbono,ungasinodoroyletal.
• Antesde lirnpiar,repararo inspeccionarlarn_.quina,cornpruebe
que la(s)cuchilla(s)ytodaslaspartesen rnovirnientosehayan
detenido.Desconecteelcablede la bujfayp6ngalohaciendo
rnasacontrael motorparaevitarqueseenciendaaccidental-
rnente.
• Reviseperi6dicarnenteparaasegurarsequelascuchillasse
detenganpotcornpletoenaproxirnadarnentecinco(5)segundos
despu_sdeaccionarel controldedesenganchedela(s)
cuchilla(s).Si lascuchillasnosedetienendentrodeestelapso
de tiernpo,suunidaddeber_,serreparadapor sudistribuidorde
servicioautorizadoMTD.
• Reviseconfrecuenciael funcionarnientodel sisternade frenos
yaqueest,.sujetoa desgasteporla operaci6nnormal.Ajustey
efectQernantenirnientosegQnserequiera.
64

• Reviselospernosdernontajede la(s)cuchilla(s)ydelmotora
intervalosfrecuentesparaverificarqueest_nbienapretados.
Adern_.s,inspeccionevisualrnentela(s)cuchilla(s)enbuscade
da_os(porejernplo,desgasteexcesivo,abolladuras,rajaduras,
etc.). Reernplacela(s)cuchilla(s)Qnicarnenteconlascuchillas
defabricantesdeequiposoriginales(O.E.M.)listadasen este
manual.Elusode piezasqueno curnplenconlasespecifi-
cacionesdelequipooriginalpodriatenercornoresultadoun
rendirnientoincorrectoyadern_.sponeren riesgola seguridad.
Lascuchillasdelaspodadorassonrnuyafiladas.Envuelvala
cuchillao utiliceguantesyextremelasprecaucionescuando
efect_ernantenirniento.
• Mantengatodoslospernos,tuercasy tornillosbienajustados
paraasegurarsede quela rn_.quinaseencuentraen condiciones
segurasde operaci6n.
• Nuncaaltereel sisternade enclavarnientode seguridadni
otrosmecanisrnosde seguridad.Controleperi6dicarnenteque
funcionencorrectarnente.
• Despu_sdegolpearconalgQnobjetoextra_o,detengael motor,
desconecteelcablede la bujfayconecteel motora rnasa.
Inspeccionerninuciosarnentela rn_.quinaparaversiest,.da_ada.
Repareel da_oantesdearrancary utilizarla rn_.quina.
• Nuncatratedehacerajusteso reparacionesa la rn_.quina
rnientrasel motorest,.enrnarcha.
• Loscornponentesdel colectordecespedyla cubiertade
descarga,est_.nsujetosa desgasteyda_osque podriandejar
expuestaspartesen rnovirnientoo perrnitirquesearrojenobjetos.
Paraprotegersuseguridad,verifiquefrecuenternentetodoslos
cornponentesy reernpl_.celosinrnediatarnentes61oconpiezasde
losfabricantesdel equipooriginal,listadosenestemanual.Eluso
depiezasque nocurnplenconlasespecificacionesdel equipo
originalpodriatenercornoresultadounrendirnientoincorrectoy
adern_.sponeren riesgola seguridad.
• Nocarnbielaconfiguracidndel reguladordelmotorni Ioopere
a sobrevelocidad.El reguladordel motorcontrolalavelocidad
rn_.xirnaseguradefuncionarnientodelmotor.
• Mantengao reernplacelasetiquetasde seguridade instrucciones
segQnseanecesario.
• Respetelasnorrnasreferentesa ladisposici6ncorrectay las
reglarnentacionessobregasolina,aceite,etc.paraprotegerel
medicarnbiente.
• SegOnla Cornisidnde Seguridadde Productosparael Consurni-
dorde losEstadosUnidos(CPSC)y la Agenciade Proteccidn
Arnbientalde losEstadosUnidos(EPA),esteproductotieneuna
vidaQtilmediade siete(7) a_os,6 270horasde funcionarniento.
AIfinalizarla vida[3tilmedia,adquieraunarn_.quinanuevao haga
inspeccionaranualrnente_staSearsporunou otrodistribuidorde
serviciosparacerciorarsedequetodoslossisternasrnec_.nicos
yde seguridadfuncionancorrectarnenteynotienenexcesivo
desgaste.Si noIohace,puedenproducirseaccidentes,lesiones
o rnuerte.
NO MODIFIQUE EL MOTOR
Paraevitarlesionesgraveso larnuerte,nornodifiqueel motorbajo
ningunacircunstancia.Si carnbiala configuracidndel reguladordel
motorelmotorpuededescontrolarsey operara velocidadesinsegu-
ras.Nuncacarnbielaconfiguracidndef_.bricadelreguladordel motor.
AVISO REFERIDO A EMISIONES
Losrnotoresqueest&ncertificadosycurnplenconlasregulaciones
de ernisionesfederalesEPAyde CaliforniaparaSORE(Equipos
peque_ostodoterreno)est_.ncertificadosparaoperarcongasolina
cornOnsinplornoy puedenincluirlossiguientessisternasde control
de ernisiones:Modificacidndemotor(EM)ycatalizadorde tresvias
(TWO)si est_.nequipadosdeesarnanera.
GUARDACHISPAS
Estarn&quinaest,.equipadaconunmotorde cornbusti6ninternay
nodebe serutilizadaeno cercade unterrenoagrestecubiertopor
bosque,rnalezaso hierbaexceptosiel sisternade escapedel motor
est,.equipadoconun arnortiguadordechispasquecurnplaconlas
leyeslocalesoestatalescorrespondientes,encasode haberlas.
Siseutilizaun arnortiguadordechispasel operadorIodebernantener
en condicionesde usoadecuadas.Enel Estadode Californialas
rnedidasanteriorrnenternencionadassonexigidasporley(Arficulo
4442del Cddigode RecursosPOblicosde California).Esposible
queexistanleyessirnilaresenotrosestados.Lasleyesfederalesse
aplicanenterritoriosfederales.
Puedeconseguirelarnortiguadorde chispasparael silenciadora
travesde sudistribuidorautorizadode rnotoreso poni_ndoseen
contactoconelcentrode servicioSears.
65

S[IVIBOLOS DE SEGURIDAD
Estap&ginarepresentay describelaseguridadlossimbolosquepuedenpareceren esteproducto.Lea,comprenda,ysigatodasinstrucciones
en lam_quinaantesprocurarparareuniry operar.
i
i
®
J
®
,E,
AL
LEA EL MANUAL(S) DEL OPERADOR
leido, entienda, y siga todas las instrucciones en el manual(s) antes de procurar montar y funcionar
PELIGRO-- DE EL CORTE DE PIE
Nunca transporte pasajeros. Nunca transporte niffos, aun con la cuchilla apagada.
PELIGRO-- DE EL CORTE DE PIE
Retroceda lentamente. Siempre mire hacia abajo y hacia atr_is antes y mientras retrocede, para evitar
accidentes.
PELIGRO-- DE EL CORTE DE PIE
Guarde manos y pies lejos de hacer girar partes.
PELIGRO-- ESCOMBROS LANZADOS
Quite objetos que pueden set lanzados por la I_imina en cualquier direcci6n. Lleve gafas de
seguridad..
PELIGRO-- ESCOMBROS LANZADOS
Quite objetos que pueden set lanzados por la I_imina en cualquier direcci6n. Lleve gafas de
seguridad.
ERSONAS PRESENTES
Guarde alas personas presentes, a los ayudantes y a nihos pot Io menos 75 pies lejos.
PELIGRO-- CUESTAS
Use extra la precauci6n en cuestas. No siegue cuestas mayores que 15°.
ADVERTENCIA -- SUPERFICIE CALIENTE
Las partes del motor, especialmente el silenciador, Ilega a set muy caliente durante la operaci6n.
Permita motor y silenciador para ponerse frio antes de tocar.
PELIGRO-- GIRANDO HOJAS
Para reducir el riesgo de herida, guarde manos y pies lejos. No funcione a menos que la tapa
de descarga o el receptor de hierba est6n en su lugar apropiado. De set dahado, sustituya
inmediatamente.
66

(ACEPTAR)
15° Pendiente
15° Pendiente
X
(DElVlASlADO ESCARPADO)
FiguraI Figura2
15°/fn
US0 DE ESTEPENDIENTEDECALIBREPARADETERMINAR
SI UNA PENDIENTEESDEMASIADOESCARPADOPARAUNAOPERACIONSEGURA!
Paracomprobar lapendiente,hagaIo siguiente:
1. Borrar esta p@inay doblea Io largo de la lineadiscontinua.
2. Localizar un objeto vertical sobre o detr_.sde la pendiente(un poste, un edificio, unavalla, un _.rbol,etc.)
3. Alineecada lado de pendientede calibre con el objeto vertical (consultar Figura1and Figura2 ).
4. Ajusteel pendientede calibre arriba o hacia abajohasta los toques esquina izquierda el pendiente
(consultar Figura 1and Figura2).
5. Si hay unespacio pot debajo de la pendientede calibre, el pendientees demasiado escarpapot operaciCn
segura(consultar Figura2 above).
Las pendientesson unfactorimportante relacionadocon unvuelcoy renovaciCndelos accidentesque puedenprovocar lesionesgraveso la muerte.
No utilicela ma.quinaenpendientesde masde 15grados.Todos pendientesrequiere mayorprecauciCn.Si nopuede retrocederen la pendiente o si se
siente inseguroenella, no la recorte. Siemprecorteel cespedarriba y abajo laspendientes, nuncaentoda la superficiede la cuesta.
¢0

IMPORTANTE: Su tractorseentregaconaceitedemotoren el
motor.Sinembargo,debecomprobarel niveldeaceiteantesde
operar.Consultela secci6nde Servicioy Mantenimientoparaobtener
instruccionessobrelacomprobaci6ndelnivelde aceite.
CONEXION DE LOS CABLES DE LA BATER{A
PROPOSlClON 65 DE CALiFORNiA
Postesdela bateria,terminalesyaccesoriosrelacionados,con-
fienenplomoycompuestosde pJomo,sustanciasqueen el Estado
de Californiaporcausarc_.ncery daSosreproducfivos.L_.veselas
manosdespu_sde manipular.
Cuandoconecteloscablesdela bateria,siempreconecteel posifivo
I(rojo)dealambrea suterminalenprimerlugar,seguidoporel
pgafivo (Negro)dealambre.
Porrazonesde envb, tantodecablesde la bateriade suequipose
hanquedadodesconectadode losterminalesen laf_.brica.Para
conectarloscablesde la bateria,hagaIosiguiente:
NOTA: Laterminalde Pospositivode labateriaest,.marcada.(+).El
terminalnegativode labateriaest&marcadaNeg.(-).
1. Quitela cubiertadepl&stico,siest&presente,desdeelterminal
positivode labateriayconectarelcablerojoalterminalpositivode
labateria(+)conel pernoy tuercahexagonal.VeaselaFigure28.
J
J
J
J
J
J
Figure28
2. QuitelacubiertadeplAsfico,siestApresente,desdeel terminal
negafivode la bateriayconectarel cablenegroal terminal
negativode la bateria(-) conelpernoytuercahexagonal.Wase
la Figure28.
3. La posici6nde la botadegomarojasobreel terminalposifivode
la bateriaparaayudara protegerde lacorrosi6n.
NOTA: Sila bateriase poneen serviciodespu_sdela fechaindicada
en la partesuperiorde labateria,carguelabateriacomoseindicaen
el Servicioy Uantenimientodela secci6ndeestemanualantesde
operarel tractor.
ENVJO BRACE ELllVlINACIC)N
AsegQresedequeel motordel tractorcortacespedes, retirelaIlave
de encendido,yponerel frenoantesdequitarla Ilavedeenvio.
IConsultela secci6nde Operaci6nparaobtenerinstruccionessobre
lc6moestaNecerel frenode estacionamiento.
• Busquela Ilavedeenvio,siexiste,ylaetiquetadeadvertenciaque
acompaSaa encontrarseenel ladoderechode lacortadorade
cesped,entrelatolvadedescargay laplataformadecorte.Wase
la Figure29.
• CoJoquelapalancade elevaci6ndecubiertaen laposici6nm_.s
altade corte.ConsulteAjustede laalturadecorteenlasecci6nde
Operaci6ndeestemanual.
• MientraspresionalatoJvadedescargahaciala m_.quinaconla
manoizquierda,retirela Ilavedetransportemaritimoconla mano
derechaagarrandoentreel pulgaryel dedoindiceygirandoen
sentidohorario.
ElenvioIlave,usadoparalosprop6sitosQnicamenteel envasado,
debeserremovidoydesechadoantesde operarsucortacesped.
Lacubiertade lasiegaescapazdelanzarobjetos.La faltade operar
el cortac_spedsinlacubiertade descargaen la posici6napropiada
de operaci6npodriaresultarenlesionespersonalesgravesy / o j
lda_osa a propedad. j
Figure29
,,J
68

QUE UNE EL VOLANTE
Siel volantedesutractorno Ileg6adjunta,el hardwarede la
colocaci6nsehaembaladoen el volante,pordebajode latapadel
volante.Concuidadolatapadela palancadelvolantey quitarel
hardware.
1. Conlas ruedasdeltractor,apuntandodirectamentehaciadelante,
colocarel volantesobreel ejede direcci6n.
2. Coloquela arandela(conla parteahuecadahaciaabajo)sobreel
volantey seguraconel tornillohexagonal.Wase la Figure30.
Coloquela tapadelvolantesobreelcentrodelvolanteyempujehacia
abajohastaque"clics"en sulugar.
I
Figure31
Figure30
COLOCACiON DE LA SEDE
Los estilos de asiento varian segun el modelo de tractor. Hay tres
estilos disponibles:
NOTE: Para transportar motivos, los asientos son o sujetados al
soporte de pivote del asiento de tractor con un lazo pl_stico, o
montados hacia atr&s al soporte de pivote. En el uno o el otro caso,
libere el asiento de su posici6n de embarque y quite la perilla de
ajuste del rondo de asiento antes de seguir con las instrucciones
abajo.
1. Como ya se ha indicado, quitar la perilla de ajuste de asiento
instalado en la f_brica en la parte inferior del asiento. Consulte la
secci6n "A" en la Figure 31.
2. Alinear el asiento sobre el soporte de pivote del asiento como
se muestra en la Figure 31 y montar el asiento en el soporte de
pivote insertando las dos lengOetas de la parte inferior del asiento
en las ranuras de la m6nsula de pivote.
3. Deslice el asiento hacia atr&s en el soporte de pivote del asiento,
alineando la ranura central trasera en el soporte de pivote con el
agujero que queda en la base del asiento.
4. Seleccione la posici6n deseada para el asiento y fijelo con el
tornillo de ajuste quit6 antes.
5. Para ajustar la posici6n del asiento, retire la perilla de ajuste en
la parte inferior del asiento. Deslice el asiento hacia adelante
o hacia atr&s segun se desee. Vuelva a instalar el tornillo de
ajuste. Vea la Figure 32.
Figure32
PRESION DE LAS LLANTAS
M&ximapresi6nde losneumaticos,en ningOncasoesde30 psi.
Igualdadde presi6nde losneum&ticosdebenmantenerseen todo
momento.I/o sobrepasarnuncalapresi6nm&ximade infiadofiguran
_ene fancode neum&tco.
Lapresi6nde losneum&ticosrecomendadade funcionamientoesel
siguiente:
• Aproximadamenteel 10psiparalosneum_.ticostraseros
• Aproximadamenteel 14psiparalosneum_.ticosdelanteros
IMPORTANTE: Refi_rasea la pareddel neum_.ticoparala ISP
recomendadoso m_.ximosfabricantede neum_.ticosesexacto.No
inflardemasiado.Lapresi6ndel neum_.ticodesigualpodriacausarque
laplataformade corteparacortarde maneradesigual.
69

A
C
H
©
D
G
F
E
Figure34
A Palancadelfrenodeestadonam[ento
B AceleradorypalancadecontroldeChoke
C Interruptordeencend[do
D Levante[apa[ancade[acubierta
E Tomadefuerzadepalanca(BladeEngage)
F Portavasos
G DeVeloddad
H Pedaldefreno
NOTA:Cualqu[erreferendahechaenestemanualal ladoDERECHOoIZQUIERDOdeltractordebeentendersetal comoseobservadesdela posidbndeloperador.
Curnpieconlosest_ndaresdeseguridad deANSi
Lasm_iqu[nasqu[tan[evedeCraftsmancumplenconlosest_indaresdesegur[daddel[nstitutoestadounidensedeest_indaresnadonales(ANSI).
70
J

DeVeloddad
Lapalancadecontroldeveloddad,uNcadoenelladoizquierdo
deltablerodeltractordelaconsola,lepermiteregularlaveloddad
bajadeltractordelc_sped.Parausarlo,presioneel pedalde
freno-embragueymoverlapalancadelamuescadefrenode
estadonamientoyhadadelanteparaaumentarlaveloddaden
tierradeltractor.Cuandolaveloddaddeseadasehallegadoasoltar
lapalancaenunamuescaadecuadaparamanteneresavelocidad.
Parafrenarlaveloddadentierradeltractor,presioneelpedalde
freno-embragueymoverlapalancadecontroldeveloddadhada
atr_syselanzaaunamuesca.
Frenode estadonamiento
Paraajustarelfrenodeestadonamiento,sueltetotalmenteel
pedaldefreno.Moverlapalancadelfrenodeestadonamiento
enlaposid6nON.Suelteelpedaldelfrenoparaqueelfrenode
estadonamientoapartidpar.
ParaIiberarelfrenodemano,presioneelpedaldefrenoymoverlapalancadel
frenodeestadonamientofueradelaposki6nONyenlaposki6nOFF.
flO@:Elfrenodeestadonamientosedebeestablecersieloperadordejaelasiento
conel motorenmarchaoelmotorseapagar_autom_tkamente.
Aceleradory palancadecontroldeestrangulador
Elacelerador/ cebadorpalancadecontrolseencuentraenel lado
derechodelpaneldeinstrumentosdeltractor.Estapalancacontrola
laveloddaddelmotory,cuandoseempujatodoelcaminoaseguir,
elcontroldelestranguladortambi(!n.Cuandoseponeenuna
posici6ndeterminada,elaceleradorser_mantenerunaveloddad
uniforme.
IMPORTANTE: (uandoopereeltractorconlaplataformade
cortecomprometido,estarsegurosdequelapalancadelacelerador
est_siempreenel FAST(conejo)laposid6n.
Interruptor de encendido
Elm6dulodeinterruptordelallaveseutllizaparainiciarypararel
motor.Introduzcalallaveenelm6dulodeinterruptordelallave
ygirehadaladerechaalaposid6n
START.Sueltelateclaenlaposid6n
decortenormalunavezqueelmotor
haarrancado.Losfarosseactivar_
autom_ticamente.
ParaapagarelmotorgirealaizquierdalaIlavedeencendidohastalaposid6nde
STOP.
IMPORTANTE: Antesde operareltractor,se refierentantoal
"Sistemade bloqueodeseguridad"y"Arranquedelmotor"m&s
adelanteenesta secci6ndeestemanualparainstruccionesdetalladas
sobrela Ilavedeencendidodel m6dulo.
Nuncadejeaunequipoqueejecutasinsupervisi6n.Siempredesconecte
tomadefuerza,palancadecambiosepongaenposici6nneutral,elfrenode
mano,apagueelmotoryquitelallaveparaevitarelarranquenodeseado.
Levantela palancade la cubierta
Encontradoenel guardabarrosderechodesutractor,lapalancadelevantarla
cubiertaseusaparacamNarlaalturadelaplataformadecorte.Parautilizar,mover
lapalancaalaizquierda,secolocar_enla primeracategoriam_sadecuadaparasu
aplkad6n.
PTO(BladeEngage)Palanca
Encontradoenel guardabarrosderechodeltractor,latomadefuerza
(hojadeparticipar)lapalancaseutilizaparapoderdedicarseala
plataformadecorteodeotrotipo(disponibleporseparado)los
archivosadjuntos.Paraoperar,muevala palancadetodoelcamino
aseguir.Moviendola palancahadaatr_s,todoelcaminohadala
posid6nOFFPT0desconectadealimentad6nalaplataformadecorte/
archivoadjunto.
NOT/!:Latomadefuerza(hojadepartidpar)delapalancadebeestar
enladesembragar(PT0OFF)cuandolaposid6ndearrancarelmotor.
Portavasos
Titulardelatazadeltractorseencuentraenel guardabarrosala
izquierdadelasiento.
Bot6n de ajuste del asiento
Laperilladeajustede[asientoseencuentraenelladobottemde[
asiento.Useestaperillaparaajustarelaslentohadaadelanteohada
atr_sa unaposki6ndetrabajoc6modasoltandoelbot6n,laposici6n
delasientoalapreferendaquenecesitayluegovolveraapretarla
perilla.
Embrague-pedalde freno
Elembrague-pedaldelfrenoest_situadoenelladoizquierdodeltractorde
c_sped,aIolargodelestribo.Pisarelembrague-pedaldefrenoformaparteporla
desacelerad6ncuandoeltractoralcambiarlasveloddades(Refi(!rasealapalanca
decontroldeveloddad).Presioneelpedalhastaelrondoparacontratarlosfrenos
dediscoyllevareltractoraunaparadacompleta.
flOrA:Elpedaldebeserpresionadaparaencenderel motor.Consulte
Interruptoresde enclavamientode seguridadm_sadelanteenesta
secd6ndeestemanual.
Cargade aceitey gasoliaa
Aceite
IM PORTANTE: Sutractorseenviaconaceiteenelmotor.Sinembargo,usted
DEBEcontrolarel niveldeaceiteantesdehacerlofundonar.Yealasecd6n"Servicio
y Mantenimiento."
71

Gasolina
Tengamuchocuidadoal trabajarcongasolina.Lagasolinaessumamente
inflamabley susvaporespuedencausare×plosiones.Nuncacargue
combustibleenlam_quinaenunespaciocerradoocuandoel motorest_
calienteoen marcha.Apaguecigarrillos,cigarros,pipasy otrasfuentesde
combusti6n.
NOTA: Compregasolinaenpequeffascantidades.Nousegasolinaquehaya
quedadodelatemporadaanterior,paraminimizarlaformaci6ndedep6sitosde
gomaenel sistemadecombustible.
Estemotorest_habilitadoparafuncionarcongasolinasinplomo.Para
obtenerelmejorresultado,lleneeldep6sitodecombustibleunicamentecon
gasolinasinplomolimpiayfresca,enunsurtidorqueindiqueunoctanaje
iguala87om_s.
Elgasohol(hasta10%dealcoholetilico,90%degasolinasinplomopor
volumen)esuncombustibleaprobado.Noseapruebaelusodeotras
mezclasdegasolina/alcohol,comoE85.
El(_termetflicoterciario-butflico(MTBE)ylasmezclasdegasolinasin
plomo(hastaunm_ximode15%deMTBEporvolumen)soncombustibles
aprobados.Noseapruebael usodeotrasmezclasdegasolina/(!ter.
Llenarel dep6sitodecombustiblealairefibreoenlugarbienventilado.
Nuncalleneenexcesoeldep6sitodecombustible.Lleneeltanquenom_s
deI/2pulgadapordebajodelabasedelcuellodeltap6ndecarga,paradejar
espacioparalaexpansi6ndelcombustible.
Nuncasaquelatapadelcombustibleniagreguecombustiblemientrasel
motorest_calienteoenmarcha.DejequeelmotorseenfrieporIomenos
dosminutosantesdevolveracargarcombustible.
Limpieel combustiblequesehayaderramadosobreelmotoryelequipo.
Trasladelam_quinaaotrazona.Espere5minutosantesdeencenderel
motor.
I. EnciendaelmotorapagadoydejarqueenfrieelmotorporIomenos2minutos
antesdequitarlatapadelcombustible.Eltanquedegasolinaest_debajodel
guardabarrostrasero,yeltap6ndellenadodecombustibleseencuentraen
elcentrodelguardabarrostrasero.Eltap6ndelcombustibleest_amarradoal
tractorparaimpedirquesepierda.Nointenteretirareltap6ndeltractor.
2. Llenarel dep6sitodecombustibleconlagasolina.
3. Vuelvaainstalarlatapadelcombustible.
Nora:Eltractorest_equipadoconunatapadeatado,combustibletrinquete.Deje
dellenareltanqueunavezqueelcombustibleesvistodentrodelabocadellenado.
Estoaseguraqueunaexpansi6ndelvolumenadecuadosecreaIocontrario,el
combustiblesepuedederramarlacreaci6ndeunasituaci6npeligrosa.NOrematar
eltanquedecombustible.VdaselaFigure35.
Figure35
Evite lesionespersonalesgraveso la muerte
Enlaspendientesconduzcahaciaarribayhaciaabajo,node
formatransversal.
Evitemaniobrasdegirobruscas.
Nooperelaunidaden_reasdondepuedederraparoladearse.
Silam_quinadejadesubirlapedientedetengalascuchillasy
retrocedalentamentebajandolapendiente.
Nocorteelc(_spedcuandohayaniffosuotraspersonascerca.
Nuncatransporteniffos,ni siquierasilascuchillasest_n
desconectadas.
Mirehaciaabajoyhaciaatr_santesymientrasoperaenmarcha
atr_s.
Mantengatodoslosdispositivosdeseguridad(protecciones,
escudoseinterruptores)ensulugaryencorrecto
fundonamiento.
Retirelosobjetosquepuedanserarrojadosporlascuchillasen
cualquierdirecci6n.
Conozcalaubicaci6nyfunci6ndetodosloscontroles.
Aseguresedequelascuchillasyelmotorsedetenganantesde
colocarlasmanosolospiescercadelascuchillas.
Antesdeabandonarlaposici6ndeloperafor,dejardetractor,
desenganchelascuchillas,coloqueelfrenodemano,apagueel
motoryretirelallave.
Leael manualdel operador
72

Sistemadebloqueode seguridad
Elsistemadebloqueodeseguridadest_diseffadoparalaoperad6nseguradel
tractor.Siestesistemanuncadejadefuncionarcorrectamente,noopereeltractor,
contacteinmediatamenteconsuSearsParts&RepairServiceCenter.
Elsistemadebloqueodeseguridadimp[deelarranquedelvehkuloamenos
queelfrenodeestacionamientoysededkaalatomadefuerza(Blade
Engage)palancaest_enlaposki6nOFFdesconectadoposki6n.
Elsistemadebloqueodeseguridadseapagar_autom_tkamenteelmotorsi
eloperadordejael asientoantesdeinkiarelfrenodeestacionamiento.
Elsistemadebloqueodeseguridadseapagar_autom_ticamenteelmotor
cuandoeloperadorabandonasuasientodeltractorconlatomadefuerza
(BladeEngage)palancacomprometido,independientementedesiest_
activadoelfrenodeestadonamiento.
Paraactivar el freno de estadonamiento:
1. Completamenteelpedaldefrenoymantengahaciaabajoconelpie.
2. Moverlapalancadelfrenodeestacionamientohastael rondoyen elfreno
deestadonamiento(ON)la poski6n.
3. Suelteel pedaldelfrenoparaqueelfrenodeestadonamientoapartidpar.
4. Paraliberarel frenodeestadonamiento:
5. Presioneel pedaldefrenoymoverlapalancadelfrenodeestadonamiento
fueradelfrenodeestadonamiento(ON)laposid6nyenlaposici6nOFF.
Ajuste de la altura detorte
6. Seleccionelaposki6ndealturadelaplataformadecortemediantela
colocaci6ndelapalancadelevantarlacubiertaencualquieradelosseis
diferentesmuescasalturadecorteenel ladoderechodeladefensa.
Interruptor de encendido
Elinterruptordeencendidoseactivaparaarrancarelmotor.InsertelaIlaveenel
interruptordeencendidoygirarhadaladerechaa laposki6nSTART.Sueltelatecla
enlaposki6nON,unavezqueelmotorhayadespedido.V(_aselaFigure36.
Paraapagarelmotor,girelaIlavedeencendidoensent[doantihorariohastala
_osid6nOFF.V_aselaFigure36.
Nuncadeje[am_quinafuncionandosinatenci6n.Siempredesconecte[a
tomadefuerza,mueva[apalancadecambiosala posici6nneutral,ponga
elfreno demano,apagueel motory retire [aIlaveparaevitarel encendido
accidental.
[NIPORTANTE: Antesdeoperareltractor,serefierentantoalosinterruptores
deseguridaddispositivodeseguridadyarrancarel motorenlasecd6ndeOperad6n
deestemanualparam_sinstrucdonesdetalladas.
f
Encendido/luces
apagado
Encendido
Mantengalasmanosy piesdedistanciadela aberturadedescargadela
plataformadecorte.
Arranque del motor
Nohagafuncionareltractor, siel sistemadebloqueonofunciona
correctamente.Estesistemafue diseffadoparasuseguridadyprotecd6n.
NOTA:Refi_rasealagasolinayelaceitehastacompletarlasinstrucdones
anteriormenteenestasecd6n.
1.
2.
3.
4.
5.
InsertelaIlavedeltractorenelinterruptordeencendido.
Colocarlatomadefuerza(BladeEngage)palancaenla posid6nOFF
desconectadoposki6nO.
Elfrenodeestadonamientodeltractor.
Activeelcontroldelestrangulador.
Girea laizquierdalaIlavedeencendidoalaposici6ninidal.Despu_sdeque
el motorarranque,sueltelatecla.Sevolver_alaON(Normalocortarel
c(_sped)posid6n.
NOtienen la flareenlaposici6ninicialdurantem_sdediezsegundosa la
vez.SiIohacepuedecausardaffosal motordearranqueel_ctricodel motor.
6. Despu_sdequeelmotorarranque,desactivarelcontroldelestranguladory
coloqueelcontroldelaceleradorenlaposid6ndeFAST.
NOTA:NOdejeel oontroldelestranguladoren duranteel
fundonamientodeltraotor.SiIohaoe,dar_lugara unamezda"rioa"
de oombustibley oausarqueel motorfunoionereal.
J
Figure36
73

Parodel motor
Sisegolpeaunobjeto e×traffo,detengael motor,desconecteel cabledela
bujia(s)y tierra contrael motor.Inspeccionarcuidadosamenteelequipode
losdaffos.Reparaci6ndelosdaffosantesde reiniciary defuncionamiento.
1. Sisededlcanalashojas,colocarlatomadefuerza(BladeEngage)palancaen
laposid6nOFFdesconectadoposid6nO.
2. @ealaizquierdalaIlavedeencendidoa laposici6nSTOR
3. RetirelaIlavedelaIlavedeencendidoparaevitarelarranquenodeseado.
Laconducd6n del tractor
Evitecomienzapronto,el excesodevelocidady paradasbruscas.
Nodejeelasientodeltractor,sin colocarlatoma defuerza(BladeEngage)
palancaen laposici6nOFFdesembragar0 posici6n,presionandoel pedalde
ffeno y accionadoelfreno deestacionamiento.Sinopuedesalirdeltractor
sinvigilanda, tambi_nasuvezla llavedeencendidoapagadoy guitar la
llave.
Siempremirehaciaabajoy detr_santesydurante lacopiadeseguridad
paraevitar lacopiadem_sdeunacddente.
1. Pisarelembrague-pedaldefrenoparaliberarelfrenodeestacionamientoy
dejarqueelpedal.
2. Moverlapalancadelaceleradorenel FAST(conejo)laposicidn.
3. Coloquelapalancadecambiostantoenla posici6ninversao FORWARD.
IM PORTANTE: NOutilizarlapalancadecambiosparacambiarladirecci6nde
lamarchacuandoeltractorest_enmovimiento.Siempreutiliceelfrenodepedalde
embragueparaqueeltractoraunaparadacompletaantesdepasar.
4. Suelteelfrenodeestacionamientopresionandoelembrague-pedaldefreno
yelposicionamientodelapalancadecontroldevelocidadenla posici6n
deseada.
IM PORTANTE: Tiempo,losoperadoresdebenutilizarposicionesdeveloddad
de1o2.Convi_rtetetotalmentefamlllarlzadoconelfundonamlentodeltractory
loscontrolesantesdeoperareltractorenlospuestosdemayorvelocidad.
5. Embrague-pedaldefrenolentamenteparacolocarlaunidadenmovimiento.
6. Eltractordec_spedesIlevadoaunaparadapresionandoelembrague-pedal
defreno.
NOTA:Cuandooperelaunidadinidal,habr_pocadiferendaentrelasdos
velocidadesm_saltashastadespu_sdeloscinturonessehansentadoenlaspoleas
duranteelper[ododerodaje.
Antesdeabandonarla posici6ndeloperadorporcualquierraz6n,
separarlashojas,ponerlapalancade controlde velocidaden
Ineutral,pongaelfrenodeestacionamiento,paradamotorapagadoy
[quitarlaIlave.
INIPORTANTE: AIparareltractor,porcualquiermotivo,mientrasqueenuna
superficiedehierba,siempre:
1. Coloquelapalancadecambiosenpuntomuerto,
2. Apliqueelfrenodeestacionamiento,
3. ApagueelmotoryquitarlaIlave.SiIohace,reducir,_alm[nimolaposibilidad
dequesuc_spedsedore'"'porelescapecalientedelmotordesutractor.
Siseestancalaunidadconelcontroldevelocidadenaltaveloddad,osilaunidad
nofuncionar_conla palancadecontroldevelocidadencondicionesdebaja
velocidad,sigaestospasos:
I. Lapalancadecambiosenpuntomuerto.
2. Reinicieelmotor.
3. Coloquelapalancadecontroldeveloddadenlaposid6nm_saltaveloddad.
4. Embrague-pedaldefrenocompletamente.
5. Plsarelembrague-pedaldefreno.
6. Coloquelapalancadecontroldeveloddadenlaposid6ndeseada.
7. Coloquelapalancadecambiosencualquieradeavanceoretroceso,yseguir
losprocedimientosnormalesdefundonamiento.
Conducd6nenlasladeras
Refierenalanchodelapendienteenlaseguridaddelaspr_cticasdeoperaci6n
lmportantesecci6ndelmanualparaayudaradetermlnarzonasdeladendonde
puedeoperareltractorcontotalseguridad.
A
Nocorteelc_spedenpendientesconunainclinaci6ndem_sde15grados
(unaumentodeaproximadamente2412piescada10pies).Eltractor puede
volcarycausarlesionesgraves.
Corteelc#spedylaspendientes,nuncatransversal.
Tengaextremaprecaud6nalcambiardedirecci6nenlaspendientes.
Watchparalosagujeros,grietas,baches,piedrasuotrosobjetosocultos.
Terrenoirregularpuederevertirla m_quina.Elc#spedaltopuedeocultar
obst_culos.
Evitegirarcuandosecirculaporunapendiente.Siunavez,debehacerse,a
suvezpotlapendiente.Elregresodeunapendienteaumentalaposibilidad
deunrollover.
Evitedetenersecuandoseconduceporunapendiente.Siesnecesario
detenermientrasseconduceporunapendiente,puestaenmarchasin
problemasyconcuidadoparareducirlaposibilidaddevolteareltractor
hadaatr_s.
74

Involucrara losBlades
PartJcipacJ6nde[atomadefuerza(BladeEngage)lastransferenciasdeenergiaala
plataformadecorteodeotrotipo(disponibleporseparado)losarchivosadjuntos.Para
partidpardelashojas,hagaIoslgulente:
I. Moverlapalancadecontroldelaceleradoralar@ida(conejo)laposicJ6n.
2. Sujetelatomadefuerza(BladeEngage)ygirarlapalancadetodoel camlno
asegulralosnovJos(ON)laposid6n.
3. Mantengalapalancadelaceleradorenel FAST(conejo)la posici6nparael
usom_seficientedelaplataformadecorteo deotrotJpo(dlsponlblepor
separado)losarchlvosadjuntos.
iMPORTANTE: En el reverso Precauci6n modo que el motor se
apagar_,autom_.tJcamentesJla toma de fuerza est,. comprometida con
la palanca de control de velocJdaden la posJcJ6ninversa para vJajar
con la Ilave de encendido en la posJcJ6nnormal de sJega.
Osode la cubiertade Levantela palancade
Paraelevarlaplataformadecorte,moverlapalancadeelevaci6ndecubiertaala
izquierda,luegosecolocaenlaranuram_sadecuadaparasuaplicaci6n.Consulte
Ajustelaalturadecorteanterlormenteenestaseccl6n.
Cortar
Paraayudaraevitarelcontactoconla cuchillao unalesi6nenel objeto
lanzado,Mantengaa losespectadores,losayudantes,los niffosylas
mascotasporIomenos75piesdedistanciadela m,_quinamientrasest,_en
funcionamiento.Paradadelam,_quina,sialguienentra enel,_rea.
Fal'os
Lasl&mparasest&nONcuandoelmotordeltractorseest&ejecutando.
Laslucesseapagacuandolallavedecontactosemuevealaposici6nSTOP.
LasiguJenteinformaci6nser_t_tJlcuandoseutJlizalaplataformadecorteconsu
tractor:
Plandesupatr6ndecorteparaevitarla descargadematerialeshacialas
carreteras,aceras,transeuntes,etc.Adem,_s,evite materialquesedescarga
contraunaparedounaobstrucci6nquepuedecausaralia materiala
rebotarhaciaeloperador.
Nocorteelc_spedalaveioddaddeterrenoelevado,especlalmentes[seha
instaladounkitdemantJlloocolectordec_sped.
Paraobtenerlosmejoresresultadosserecomiendaquelasdosprimeras
vueltassecortar_conlaaprobaci6ndelagesti6narrojadohaciaelcentro.
TraslasdosprJmerasvueltas,invertirelsentJdodelanzarladescargahacJael
exteriordelabalanzadecorte.Estoledar_unamejoraparienciaalc_sped.
Nocorteelc_speddemasJadocorto.Pastocortoinvitacrecimientodemalas
hierbasy losamarillosconrapidezeneltiemposeco.
Cortarel c_spedsiempresedebehacerconelmotoratodogas.
Bajolascon@Jonesm_spesadas,puedesernecesarJovolversobrelazona
delcorteporsegundavezparaobteneruncortelimpio.
NOJntentecortarespesamalezaymalashierbasyelpastomuyalto.Sutractorest_
diseffadoparacortarelc_sped,uncepillonoest_daro.
Mantengalascuchillasafiladasysustituirlascuchillasencasodedesgaste.
ConsulteHojasdecorteenelservicioylaseccidnMantenimientodeeste
manualdeinstruccionesdeafilarla hojaadecuada.
75

LISTADEMANTENIMIENTO
Antesderealizarcualquiertipo delmantenimiento/servicio,sueltetodoslos
mandosypareel motor.Esperehastaquetodaslaspartesdemovimiento
hayanvenidoaunaparadacompleta.Desconecteel aiambrede bujiay
b_selocontrael motorparaprevenirel comienzoinvoluntario.SiempreIleve
puestoscristaiesinastillablesdurantelaoperaci6noreaiizandocualquier
ajusteoreparaciones.
Antesdecadauso
Losprimeroscincohoras
Cada10horas
Cada25horas
Sigalalistademantenimientodadaabajo.Estacartadescribepautasdeservicio
s61o.UselacolumnadeTroncodeServicioparaguardarlapistadetareasde
mantenimientocompletadas.
Local[zarel m_scercanoChamuscael Centrode Serviciooprogramarel
servicio,simplemente ponerseencontactoChamuscaen 1-800-659-5917.
1. Niveldelaceitedemotor
2. Silendadorzonay loscontroles
3. Dedodelamanodeguardia
1. Elaceitedelmotor
1. Elcap6/Iosrespiraderos
2. Losbornesdelabater[a
3. Loshusillosyla m_nsulaintermediadelaplataforma
1. Eldepuradordelfiltro deaire*
2. Filtrodeaire*
3. Losbrazosdemando[ntermedios,ejesdelpivoteyejes
4. Losrodamientosdelasruedasdelanteras
5. Lasruedasdelanterasdelaplataforma
Cada50horas 1. Elaceitedelmotor/elfiltro deaceite
2. Silenciador
Anualmente
AntesdeAlmacenaje
1.
2.
3.
1.
1.
2.
3.
1.
2.
3.
Comprobar
Limpie
Limpie
Cambie
Limpie
Limpie
Lubrique
Limpie
Limpie
Lubrique
4. Lubrique
5. Lubrique
1. Cambie/reemplace
2. Comprobar
1. Filtrodeaire
2. Eldepuradordelfiltro deaire
3. Buj[a
4. Sistemaderefrigerad6nporaire*
5. Filtrodecombustible
6. DirectivoEngranajes
1.
2.
3.
4.
5.
6.
Reemplace
Reemplace
Reemplace
Limpie
Reemplace
Limpie
7. Ruedastraseras
1. Elcap6/Iosrespiraderos
2. Losbornesdelabater[a
3. Losbrazosdemando[ntermedios,ejesdelpivoteyejes
4. Losrodamientosdelasruedasdelanteras
5. Lasruedasdelanterasdelaplataforma
6. Loshusillosyla m_nsulaintermediadelaplataforma
7. Lospuntosdepivotedelpedal
* Realiceelserviciom_sfrecuentementecuandohayamuchopolvo.
LpAntesderealizartareasdemantenimiento desconectela
o
reparadones, potencia
dearranque(PTO),coloqueel frenodemano,apagueelmotory retirelaIlave,
araevitarel encendidoaccidentaldelmotor.
7. Quitelagrasay losejes
1. Limpie
2. Limpie
3. Lubrique
4. Lubrique
5. Lubrique
6. Lubrique
7. Lubrique
Siel motorsehapuestoenfuncionamientorecientemente,elmotor,silenciador
y lassuperficiesmet_licasdrcundantesestar_ncalientesy puedencausar
quemadurasa apie. Tengaprecauci6nparaevitarquemaduras.
76

Mantenimiento del motor
Comprobar el aceite del motor
$61oelusodeaceitedealtadetergenteseevalu6lacalidadconlaclasificaci6n
deservicioAPI,SF,SG,SH,o SJ.SeleccioneelaceitedegradodeviscosidadSAEde
acuerdocondelatemperaturadefuncionamiento.Sigalatabladeabajo.Aunque
variosdelosaceitesdeviscosidad(5W20,IOW30,etc)mejorarlapartidaenclima
frio,quesetraducir_ienelconsumodepetr61eoaumentacuandoutilizadopor
encimade32oF.Reviseelniveldeaceitedelmotorconm_isfrecuenciaparaevitar
laposiblesda_osenelmotordeagotarseelpetr61eo.
f'_older _ 32°F _Warmer_
Oil Viscosity Chart
J
Paracomprobarelaceitedelmotor,procedacomosigue:
AsegOresedequeeltractorest_sobreunasuperfidenivelada.
Limpieel_ireadeIlenadodeaceitedecualquierescombro.
1. Retirelavarllla,vealaFigure37yIlmpleconunpahoIlmpio.
2. Vuelvaacolocarlavarillaypulsecompletamente.
3. Retirelavarillay compruebeelniveldeaceite.Sedebealaplenamarcade
lavarllla.
Siesthbajo,agregueaceitelentamenteenel Ilenadodeaceitedelmotor.
NoIleneenexceso.Despu_sdeagregarelaceite,espereunminutoyluego
vuelvaacomprobarel niveldeaceite.
4.
5. Vuelvaacolocarlavarillayapriete.
OilDrain
Figure37
11ollenedemasiado.Llenadoexcesivodeaceitepuedeprovocarqueel motor
noempezar,difkil departida,ofumarmotor.Sire,isdela marcaFULLenla
varilla, elaceitededrenajeparareducirel niveldeaceiteenFULLmarcaenla
varilla demedici6n.
Cambiodeaceite motor yfiltro
Neta: Elfiltro deaceitesedebecambiarencadaintervalodecambiodeaceite.
Debecambiarseelaceitedelmotorenlasprimeras5horasy luegocada50horaso
unavezpottemporada.Paracambiarelaceitedelmotor,procedacomosigue:
1. Hagafundonarelmotorduranteunosminutospermitirqueelaceiteen
elc_irtercaliente.Aceitecalientefluyam_isIibrementeyIlevarm_isdel
sedimentodelmotorquesehanasentadoenlaparteinferiordelc_irter.
Tengacuidadoparaevitarquemadurasconelaceitecaliente.
2. AbralacubiertadeltractoryIocaliceelorifido dedrenajedeaceiteenel lado
derechodelmotor.Veala Figure38.
3. Desconecteelcabledelabujiaymant_ngaloalejadodela bujia.
4. Retireel tapadeaceitedesdeeltubodeIlenadodeaceite.Veala Figure38.
5. Gireel volantehadaladerechaparaexponermejoreltap6ndedrenaje.
6. Sujetelamangadedrenajedeaceite(embaladaconestemanual)elorifido
dedrenajedeaceitecomosemuestraenla Figure38.Coloqueelextremo
opuestodelamangaenunredpientederecolecd6ndeaceiteapropiadocon
unacapacidadtangrandepararecogerelaceiteusado.
Figure38
7. Retireel tap6ndedrenajeydreneelaceiteenunredpienteconuna
capaddaddenomenosde64oz.
8. Llenarelmotorconaceitenuevohastael niveldeaceiteenlavarillaLee
completo.Vuelvaacolocareltapadeaceite.
9. Reemplaceelfiltro deaceite,veala Figure39,potextraerydesechar
adecuadamente.
77

10.
Lleneparcialmenteelfiltro deaceiteaproximadamente3/4delcamino
completoconaceitelimpioyfresco.Antesdeinstalarel nuevofiltro de
aceite,lubriqueligeramentelaJuntadelfiltro deaceiteconpartedelaceite
simplementeeldedoenelaceitedeinmersi6nyejecut_ndoloalrededorde
laJunta.
11.
12.
Oil Filter
Figure39
Instaleelfiltro deaceiteconlamanohastaquelaJuntaentraencontacto
conel adaptadordelfiltro deaceitey,acontinuaci6n,aprieteelfiltro de
aceiteI/2 a3/4vueltas.
Llenarel motorconaceitenuevohastaelniveldeaceiteenlavarillaLee
completo.Vuelvaacolocareltapadeaceite.
Aceiteusadoesun productode residuospeligrosos,Desecheelaceite
usadocorrectamente.Desecharconlabasuradom_stica.Consultecon
lasautoridadeslocalesuo1-800-659-5917paraobtenerunalista de
instaladonesderedclajeseguro.
13. Arranquey hagafundonarel motor.Mientrassecalientaelmotor,revisesi
hayfugasdeaceite.
14. Pareelmotorycompruebeelniveldeaceite.Sedebeala plenamarcadela
varilla.
Filtro de combustible
Gasolinay susvaporessonextremadamenteinflamablesy explosivosoFuego
oexplosi6npuedecausarquemadurasgravesolamuerte.
Mantengalagasolinalejosdechispas,llamas,lutespiloto,elcalor,yotras
fuentesdeignici6n.
Compruebelaslineasdecombustible,eltanque,latapaylosaccesorioscon
frecuendaparadetectarrajadurasoescapes.Reemplazarsiesnecesario.
Antesdereemplazarelfiltro decombustible,vaciareltanquede
combustiblesegtinlasinstrucdonesdeabajo.
Nofugadecombustiblecuandoelmotorest_caliente.Dejequeelmotor
detiempoadecuadoparaenfriar.Evacuarelcombustibleenunrecipiente
aprobadoalairelibre,lejosdellamasabiertas.
Cualquierfugadegranvolumendecombustibledesdeeldep6sitode
desconectarlalineadecombustibledelfiltro enlalineadecombustible
cercadelmotor.
QuitelalineadecombustibledelaLN-ladodelalinea(ladohaciaeltanque
decombustible)delfiltro decombustible.
Laspiezasderecambiodebeserlamismaeinstaladosenlamismaposici6n
quelaspiezasoriginales.
Sisederramacombustible,esperehastaqueseevaporaantesdearrancarel
motor.
Antesdereemplazarel filtrodecombustible,vaciareltanquede
combustible.DeIocontrario,elcombustiblepuedefiltrarseyprovocarun
incendioounaexplosi6n.
Para drenar el combustible:
1. Localiceelfiltro decombustible,quesetransfierenenelladoizquierdo
delmotorentreeltanquedecombustibleyelcarburador,y puedeser
conectadoalmotorconunacorreadeempate.Cortarlacorreadela
corbata,siest_presente,entoncesemergenteenlaabrazaderaenlineaen
elfiltro decombustibleconunpardealicates,deslicelaabrazaderadela
I[neadecombustible.QuitelalineadecombustibleenlaI[neaylafugade
combustibleenunredpienteaprobado.
Para cambiar el filtro de combustible:
1. Usepinzasparaapretarlaspestaffasdelaabrazadera(elladodelalineade
fueradelfiltro decombustible),acontinuad6n,deslicelaabrazaderalejos
delfiltro decombustible.TwistytirardelaI[neadecombustiblefueradel
filtro decombustible.V_aselaFigure40.
/
Fuel Filter /
\
Tab
Fuel Line
Figure40
Compruebelaslineasdecombustibleparalasgrietasofugas.Reemplazarsi
esnecesario.
3. Reemplaceelfiltro decombustibleconunoriginalfiltro dereemplazode
equipo.ContactoSear'sal 1-800-659-5917paracomprareloriginaldefiltro
dereemplazodelequipo.
4. AsegurelasI[neasdecombustibleconlaspinzas.
Limpiadorde aire
Silosfiltros,ocubiertasnoest_ninstaladoscorrectamentelesionesgraveso la
muertepodiadeberseafracasar.Notratedeencenderelmotorconlasretiren.
78

Nouseairecomprimidoodisolventesparalimpiarelcartuchodelfiltro deaire.
IMPORTANTE:Nuncaarranqueel motorsinelfiltrodeaire.Resultar_elr_pido
desgastedelmotor.
Desatornillelostornillosyretirelacubiertadelfiltro deaire.Yeala Figure41.
1.
f
Thumb
Screw
Air Filter
2.
Figure41
Retireelfiltro deaire.Veala Figure42.
,J
3.
Figure42
Retireelfiltro deespumadea[rededorde[filtro deairedepapeLVea[a
Figure43.Reemp[aceele[ementodepape[cuandoest_sucioodaffado.
Limpiarelelementodeespumaoreemplazardaffado.
Air Filter,
Figure43
4. Tocleanfoamelement,washinamildliquiddetergentandwater.Squeeze
orpressthefoamelementtorinseoutdirt andwater.Donottwist;this
coulddamageortearthefoamelement.Allowtodrythoroughlybefore
using.DONOToil thefoamelement.
5. Attachthenewairfilter withfoamelement,aligningthe holein theairfilter
with theintakemanifold.SeeFigure44.
Manifold
Figure44
Coloque[atapade[fiitro deaire,asegur_ndosedealinearlascaracter[sticas
de[acostilladepi_sticode[acubiertaa[asfuncionesdepi_sticasen[a
cubiertadelfiltro deaire.VealaFigure45.Girelostorniiioshacia[aderecha
hastaquequedeajustado.Sicualquierdesalineaci6n.
79

Air FilterCover
Plastic
Feature
Figure45
Serviciode labujia
Paraasegurarelfuncionamientoadecuadodelmotor,labujiadebeserunespacio
adecuadoy librededep6sitos.
1.
f
Retirelabuj[ayutiliceunaIlavedebuj[aparadesconectarelenchufe.Yeala
Figure46.
Figure46
Sielmotorhaestadofuncionando,elsiienciadorestar_muycaiiente.Tenga
cuidadodenotocarel silenciador.
2. Visualmenteinspecdonelabuj[a.Desechelabuj[asihaydesgasteevidente,
osiel aisladorest_agrietadooastillado.Limpielabuj[aconuncepillode
alambreparasetreutilizado.
3. Midaladistanciaentreelectrodosconunagalga.Corregirsiesnecesario,
doblandoelelectrodolateral.Yeala Figure47.Labrechasedebeestablecer
a0.024-0.031.
Electrode
Figure47
4. Compruebequelaarandeladelabujiaest_enbuenascondicionesy
enrosquelabujiaamanoparaevitarquelarosca.
5. Despu(_sdehaberseasentadalabujia,apfieteconunaIlavedebujiapara
comprimirlaarandela.
Nota:AIinstalarunabujianueva,apfiete1/2vueltadespu_squela bujia
seasientaparacompfimirlaarandela.Cuandovuelvaainstalarunabujia
usada,apfiete1/8-1/4vueltadespu(_sdelosasientosdela bujiapara
comprimirlaarandela.
IMPORTANTE: Labujiadebeestarbienapretada.Unabujiamalapretada
puedecalentarsemuchoypuededaffarel motor.
Silenciador
Temperaturadelsilenciadory_reascercanasdelmotorpodr_setsuperiora
150° F(65°C).Eviteel contactoconestas_reas.
Inspeccioneperi6dicamenteelsilenciador,yreemplazarsiesnecesario.Piezasde
repuestoparaelsilenciadordebeserel mismoeinstaladoenlamismaposici6nque
laspiezasoriginales.
Limpiezadel motor
Noutiliceaguaparalimpiar laspiezasdelmotor.Elaguapuedecontaminar
el sistemadecombustible.Utiliceuncepilloo un paffoseco.
1. Diariamenteoantesdecadauso,limpiardehierba,pajaodesechos
acumuladosenelmotor.Mantenerlavinculaci6n,laprimavera,ylos
controlesdelimpieza.
2. Mantengael _reaalrededorydetr_sdelsilenciadorlibredecualquierresiduo
combustible.
Mantenerlimpioelmotorpermiteelmovimientodelairealrededordel
motor.
Piezasdemotordebenmantenerselimpiaspararedudrelriesgode
sobrecalentamientoylaignici6ndelosresiduosacumulados.
Carburadordeajuste
Elcarburadorenestemotornoesajustable.
8O

Lubricad6n
Antesde[ubricantes,reparacidnoinspecci6n,siempredesconectartomade
fuerza,palancadecambiosepongaenposicidnneutral,el freno demano,
apagueel motor yquitelaIlaveparaevitarel arranquenodeseado.
Puntosde pivote yVinculad6n
Lubrkartodoslospuntosdegiroenelsistemadetracddn,frenode
estadonamientoylavinculaddnlevantaralmenosunavezal afroconaceitedela
hz.
Ruedastraseras
Lasruedastraserasdebenretirarsedelosejesdeunavezportemporada.Lubrkar
losejesylasIlantasytodoconunobjetivodegrasaantesdevolvera[nstalarlos.
FrenteEjes
Cadaextremodedelantedeltractor,labarradeartkulad6n puedeestarequipado
conunajustedelagrasa.LubrkarconunaNstoladegrasacada25horasde
fundonamientodeltractor.
Bateria
Labateriaest.1se[[adayes[ibredemantenimiento.Losnive[esde_iddonosepuede
comprobar.
• Siempremantengaloscablesde labateriaylosterminales
limpiosylibresdecorrosidnen loscontenedores.
• Despu_sde[a[impiezade [abateriay terminaies,apiicaruna
[igeracapadevaseiinaograsaaambasterminales.
• Mantenersiempreelcargadorde gomaco[ocadosobreel polo
positivoparaevitarcortocircuitos.
IMPORTANTE:Sial quitarlabateriapor cualquierrazdn,desconecte
el cablenegativo(Negro)eselcabledela terminalen primerlugar,
seguidoporel positivo(rojo)de alambre.Cuandovuelvaa instalarla
bateria,conecteel positivo(rojo)dealambrede suterminalen primer
lugar,seguidoporel negativo(cableNegro).AsegQresedeque los
cablesestfinconectadosa losterminalescorrectos,inversidnde ellos
podriacambiarla polaridady provocardaffosal sistemade alternancia
de su motor.
Limpieza de labateda
LimNezadeh bateriaa[sacarlodeltractoryelhvadoconunasoluddnde
bicarbonatoyagua.S[fueranecesario,raspelasterminalesdelabateriacon
uncepiHodealambreparaquitarlosdepdsitos.Escudoterminalesyloscables
expuestoscongrasaovaselinaparaevitarlacorrosidn.
Faltas de la bateria
Algunascausascomunesdefallasenlabateriasonlossiguientes:
• Laactivacidninicialincorrecta
• Sobrecarga
• Congelacidn
• La subfacturacidn
• Conexionescorroidas
Estosfallosnosoncubiertosporlagarantiadeltractor.
Limpiezade lasm,iquinasy lacubierta
Cualquiercombustibleoaceitederramadoenlam_iquinadebeserborradode
[nmediato.NOpermitaquelosdesechosqueseacumulanalrededordelasaletasde
refrigeraddndelmotoroencualquierotrapartedelam_iquina.
IMPORTANTE:Elusodeunalavadoradepresidnparalimpiarsu
tractorno serecomienda.Puedecausardaffosa loscomponentes
el_ctricos,ejes,poleas,rodamientoso el motor.
Ajustes
Nuncatratedehacerlosajustesmientrasel motorest_enmarcha,exceptosise
espedficaenelmanualdeloperador.
Nivelad6n de lacubiertade
NOTA:Verifiquela presidndelneum_.ticodeltractorantesderealizar
cualquierpaquetede nivelacidndelosajustes.Consultea los
neumfiticosenla seccidndeserviciosdeestemanualparaobtener
milsinformacidnsobrela presidnde losneumfitJcos.
Delanteaatr,is
Elfrentedelaplataformadetorte esapoyadoporunabarraestaNlizadoraque
sepuedeajustaral niveldelacubiertadedelanteaatkis.Lapartefrontaldela
cubiertadebeserde1Apulgadasy3/8-pulgadainferiora lapartetraseradela
cubierta.AjustesiesnecesarioIosiguiente:
1. Conel tractorestadonadoenunasuperfidefirmeyNvelada,coloquela
palancadeelevaddndelaplataformaenlasegundaalaprimeracategoria
(segundaposiddnm_isalta),ygirela hojaIom_iscercadelcanaldedescarga
queesparaleloal tractor.
2. Medirladistanciadesdelapartefrontaldelapuntadelapalaenelsueloyla
partetraseradelapuntadelapalaenelsuelo.Laprimeramedidatomadadebe
estarentrelg'y 3/8" menosdelasegundamedkidn.Determinarladistanda
aproximadanecesariaparaunbuenajusteyproceder,sifueranecesar[o,el
siguientepaso.
3. LocalkelatuercaconbridaenlapartedelanteradelsoporteestaNlizador.
Yealafigura48.
• Apretar la tuerca de bloqueo para elevar la parte delantera
de la cubierta',
• Aflojar la tuerca de bloqueo para bajar la partedelantera de
[acubierta.
f
Figure48
81

Unladoa otto
Silaplataformadecortepareceserlasiegadeformadesigual,unladoaladode
ajustepuedeserreallzado.Ajustes[esnecesarloIoslguiente:
1. Coneltractorestadonadoenunasuperfidefirmeynivelada,coloque
lapalancadelevantarlacubiertaenlasegundadelaprimeracategoria
(segundaposicl6nm_salta)ygirarambashojasdemodoquesean
perpendkularesconeltractor.
2. Medlrladlstandadesdeelexteriordela puntadelapalaa la[zqulerdaen
elsueloyladistandadesdeelexteriordelapuntadelapaladerechoala
tierra.Ambasmedidasadoptadasdebenser[guales.S[noesas[,continue
conel pasosiguiente.
3. Afloje,peronoIoquite,eltornillohexagonaldela[zquierdasoportedela
cubiertadecolgar.V(_asela Figure49.
4. BalancedelacubiertaconunaIlaveparaencenderelequipodeajuste(que
seencuentra[nmedlatamentedetr_sdeltorn[llohexagonals61oaflojar)
hadaladerecha/ambaohaciala[zqulerdaohadaabajo.Lacubiertaest_
bienequllibradocuandolasmedlclonesdeambashojapuntaadoptada
anterlormentesonlguales.
5. Vuelvaaapretareltorn[llohexagonaldela izquierdasoportedelacubierta
suspensi6ncuandoselograelajusteadecuado.
Paraubicar elCentrode Serviciom_scercanoSearso para pro-
gramarelservicio,simplementep6ngaseencontactoconSears
al 1-800-659-5917.
Plataformadetorte de eliminad6n
Paraquitar la plataforma de torte, hagaIosiguiente:
I. Colocarlatomadefuerza(BladeEngage)palancaenlaposid6nOFF
desembragarlaposici6nypongaelfrenodeestadonamiento.
2. Bajolacubiertamoviendolapalancadeelevaci6ndecubiertaenla muesca
enlaparteinferiordelguardabarrosderecho.
3. Extracci6ndelaauto-TornilloCA)queaseguraeldntur6n-Roddetodo
poseedordelapoleadelmotordeltractor,acontinuaci6n,quitarlavarilla
poseedordeldntur6n(B).V6asela Figure50.
Nora:HagaunanotamentaldeIoagujeroalotroextremodeladnta-Rodposeedor
se[nsertaenlosprop6sitosdereJnstalad6n.
4. Retirelacorrea(C)dealrededordelapoleadelmotordeltractor.V_asela
Figure50.
Evitelaslesionespellizcos.Nuncacoloquesusdedosenla primaveraodosoo
entre la correay unapolea,mientrassequitaelcintur6n.
Tornillo hexagonal
Figure49
Ajuste del asiento
Consultelasecd6ndelaAsambleadeestemanualparalnstrucdonesdeajustedel
aslento.
Freno de estacionarniento de ajuste
Nuncaintenteajustarlosfrenoscuandoel motorest_funcionando.Siempre
desconectetomadefuerza,palancadecamb[osepongaenposki6nneutral,
apagueel motoryquitelaIlaveparaevitarelarranquenodeseado.
Figure50
Localkelatuercaconbridaenlapartedelanteradelsoporteestabilizador.
Veala Figure51.
SieltractornoIlegaadetenerseporcompletocuandoelpedaldelfrenoest_
totalmentedeprimido,osilasruedastraserasdeltractorpuederodarconelfreno
deestacionamientoaplicado,elfrenoest_enlanecesidaddeajuste.Comun[quese
conel CentrodeServiciom_scercanoSearsquelosfrenoscorrectamenteajustado.
82

f
6,
F
8,
J
Figure51
Retireelpasadordelapajarita,asegurarlavarilladeestabilizadordela
plataformaalacubierta.Desliceeltiradordelacubiertadelsoporteenla
cubiertacomosemuestraenlaFigure52.
::,2
I _ZZ%:; ( _ ZZZZ;7 ¢:ZZZ_,) 'Z2£M ZZZ.; _
ZZZ2 ( Z_ZI3
Figure52
RetireconcuidadoelcabledelPTOdelaparteposteriordela plataformade
tortequitandoelpasadordecorbatadelazoqueIoasegura.Quiteelresorte
delsoportedelacubiertaintermedio.V(_asela Figure53.
SuavementeDeslicelaplataformadetorte (ala izquierda)haciaafuera
desdedebajodeltractor.+
/
/
PTOCable
Neum4ticos
Figure53
Nosobrepasarnuncala presi6nm_×imadeinflado clueapareceen lapared
lateral delallanta.
Lapresi6nde losneum_ticosrecomendadadefundonamiento es
elsiguiente:
Aproximadamenteel 10psiparalosneum_ticostraseros
Aproximadamenteel 14psiparalosneum_ticosdelanteros
IMPORTANTE: Refi_rasealapareddelneum_ticoparala ISPrecomendados
om_ximosfabricantedeneum_ticosesexacto.Nosobreinflar.Lapresi6ndel
neum_ticodesigualpodriacausarquelaplataformadecorteparacortardemanera
desigual.
BaterJa
Proposici6n65deCaliforniaiADVERTENCIA!Postesdela bateria,terminalesy
accesoriosrelacionados,contienenplomoycompuestosdeplomo,sustanciasque
enel EstadodeCaliforniaporcausarc4ncerydaffosreproductivos.L4veselasmanos
despu(_sdemanipular.
Sial quitar labateria,desconecteelcablenegativo(Negro)esel cabledela
terminalenprimerlugar,seguidoporelpositivo(rojo)dealambre.Cuando
vuelvaainstalarla bateria,conecteel positivo(rojo)dealambredesu
terminal enprimerlugar,seguidoporel negativo (cableNegro).
Elarranque
Nuncasalteiniciarunabateriadaffadao congelados.Est_segurode
losvehiculosnosetocan,yest_nfuera deignici6n.Nopermitaquelas
abrazaderasdecablealfacto.
83

1. Conectarpositivo(+) paraenviarporcablepositivo(+)delabateria
descargadadesutractor.
2. Conecteelotroextremodelcableala(positivo+) despu(_sdelabateriade
puente.
3. Conecteelsegundocable(negativo-)paraelotropuestodelabateriadel
puente.
4. Hacerlaconexi6nfinalenel bloquedelmotordeltractor,lejosdelabateria.
Adjuntaraunapartesinpintar,paraasegurarunabuenaconexi6n.
Silabateriapuenteest_[nstaladoenunvebkulo (coche,esdecir,camiones),
noarrangueel motor delvehkulocuandoelarranguedesutractor.
5. Inidodeltractor(comoseindicaanteriormenteenestasecd6ndeeste
manual).
6. Elfrenodemanodeltractorantesderetirarloscablesdepuente,enelorden
inversodelaconexi6n.
Carga
Bateriasemitenun gasexplosivodurantela carga.Cargadela bateriaen
un_reabienventiladay mantenerselejosdeunallamaabiertao piloto
comoen uncaientadordeagua,estufa,homo, secadoraderopaodeotros
aparatosdegas.
o
AIcargarla bateriadesutractor, utilke s61ouncargadorde12Vdiseffado
parabateriasdeplomo-_cido.Leasucargadordebateriamanualdel
Ipropietarioantesdecargarlabateriadesutractor. Sigasiemprelas
[instrucdonesy presteatenci6na suADVERTENCIAS.
Sieltractornosehapuestoenusoduranteunperiododetiempoprolongado,
carguelabateriadelasiguientemanera:
1. Fijesucargadordebateriaparaofrecerunm&ximode10amperios.
S[elcargadordela bateriaesautom&tica,carguelabateriahastael cargador[ndica
quelacargaest_completa.Sielcargadornoest&autom&tica,cargopornomenos
deochohoras.
Fusible
Unfusiblede20AMPest_instaladoenIosjuegosdecablesdesutractorpara
protegerelsistemael(!ctricodeltractordedaffoscausadospotelamperajeexcesivo.
Sielsistemael(!ctrkonofundona,o elmotordesutractornoarranca,compruebe
primeroquetenetlacertezadequeelfusiblenosehaquemado.Sepuede
encontrarenlapartetraseradelaunidad,debajodelguardabarrossituadaporla
bater[a.
Cuchillasde torte
Apagueel motoryquitelaIlavedeencendidoantesderetirar lacuchilla
detorte (s)paraafilarodesustituci6n.Protejasusmanosusandoguantes
lgruesosa sujetar ahoja.
Inspeccioneperi6dicamentelahojay/ ohusillode grietasodaffos,sobre
tododespu_sdehaberIlegadoaunobjetoextraffo. Nohagafuncionarla
m_quinahastaquesesustituir_n loselementosdaffados.
Paraquitarlashojas,hagaIosiguiente:
1. Quitelacubiertadedebajodeltractor,(verplataformadecortede
eliminad6nanteriormenteenestasecd6n)yluegosetirasuavementedela
cubiertaparaexporterlaparteinferior.
2. Coloqueunbloquedemaderaentreelcentroyeldeflectordelavivienda
cubiertadelacuchilladecorteparaactuarcomounestabilizador.Wasela
Figure54.
FlexFlangeNut
Figure54
3. QuitelatuercahexagonalbridaquesujetalahojaalaAsambleadelhusillo.
V_aselaFigure54.
Siempreuseunfusibleconla capaddaddepotendaequivalenteparala
sustituci6n.
84

4,
Paraafinarcorrectamentelashojasdecorte,retirelamismacantidadde
metaldeambosextremosdelashojasa Iolargodelosbordesdecorte,
paraleloalbordedefuga,enun25°- 30° de_ngulo.Siempremolercadafilo
delacuchilladecorteporigualamantenerelequilibriodelahojaadecuada.
V_asela Figure55.
Figure55
Sielfilo delahoja hasidopreviamenteafilado,o sicualquierseparaci6nde
metalest_presente,sustituirlashojaspototrasnuevas.
Unahojarealequilibradacausar_excesivavibrad6n, puedecausardaffosen
eltractor yI oresultarenlesionespersonales.
5. Pruebadeequilibriodelahojaconunbalanceadordelahoja.Grindmetal
desdeelladom_spesadohastaqueseequilibredemanerauniforme.
NOTA:Cuandotengaquereemplazarlahoja,aseguresedeinstalarlahojaconla
caradelahojamarcada"fondo"(oconunnumeroestampadoen_I)frentealatierra
cuandoelcortac_spedseencuentraenlaposid6ndefundonamiento.
Utiliceunaflaredeparparaapretarlatuercadehusillodela hojabrida
hexagonalaentre 70libras-piey 90libras-pie.
[M PORTANTE: ElV-dntur6nseencuentraensutractorest_especialmente
diseffadoparaconectarydesconectardeformasegura.Unsustituto(no0EM)
V-correapuedeserpeligrosoalnodesvincularsecompletamente.Paraunam_quina
debuenfuncionamiento,laf_bricadecinturonesdeusoaprobado.
Paracambiarosustituirlacintadelacubiertaensutractor,hagaIosiguiente:
1. Quitelacubiertacomoseindicaanteriormenteenestasecd6n.
2. Retirelacintacubremediantelaeliminad6ndelostornilloshexagonales
quesujetanalacubierta.V(_aselaFigure56.
3. Tambi(_npuedesernecesarioaflojarlatuercahexagonaldela poleatensora
alaizquierdaparaobtenerelcintur6nalrededordelapoleayelprotectorde
lacorrea.
4. Retireconcuidadoladntadecubiertadealrededordelasdospoleasdel
husilloy lasdospoleaspoleatensoradelacubierta.V(_asela Figure56.
5. Paracolocarlacorreanueva,empiezahadendoqueelcinturdnalrededorde
lasdospoleasexteriordelhuso,comosemuestraenla Figure56.
6. Luego,ladntaderutaalrededordelasdospolinespoleasdelacubierta
comosemuestraenlaFigure56.
7. Volveraapretarlabarraposeedordelcinturdnaflojadoantes.
8. Volveramontarlacintadelosguardiasderetirarseantes.
9. Vuelvaainstalarlacubierta,asegur_ndosedequeladntasiguesiendo
derrotadosenlaspoleasconlasinstrucdones.Elenrutamientodebanda
completasemuestraenlaFigure56.
10. Tiredelapartederechadelacinta,ycoloqueelladoVestrechadelacorrea
enlapoleaPT0.
11. Mientrassemantienelacorreaylapoleajuntos,girarlapoleaalaizquierda.
Seguirmanteniendoyrotad6ndela poleaylacorreahastaquelacorreaes
totalmenteenrolladoenlapoleaPT0.
Cambiode la correadetransmisi6n detransmisi6n
#OTA:Varioscomponentesdebenserretiradosy herramientasespeciales(es
deciraire/ Llavedeimpacto)afindecambiarlacorreadetransmisi6ndeltractor.
Comuniqueseconel CentrodeServiciom_scercanoSearsquesucorreade
transmisidndetransmisi6ndelosservidos.
Paraubicarel CentrodeServidom_scercanoSearso paraprogramarel
servido, simplemente p6ngaseencontacto conSearsal 1-800-659-5917.
Decambiar la correadecubierta
Aseguresedequeapagueel motor,quitarlaflaredeencendido,desconecte
elcabledelabujia (s)ytierra contrael motorparaevitarinvoluntariade
partidaantesdequitareldntur6n.
Todosloscinturonesensutractor est_nsujetosa desgasteydebenser
reemplazadosencasodecualquiersignodedesgasteest_npresentes.
85

l
Cubierta de
la correa
Figure56
86

Nuncaalmacenetractordec_spedconcombustibleenel tanque enun
espaciocerradooen,_reasconpocaventilaci6n,dondelosgasesdel
combustiblepuedanalcanzarelfuego,chispasounaluz pilotocomolaque
tienen algunoshornos,calentadoresdeagua,secadoresderopaoalgun
otro dispositivoagas.
Preparad6ndeimotor
IM PORTANTE: Elcombustiblequequedaeneltanquecuandohatecalorse
deteriorayocasionagravesproblemasdeencendido.
Panevitarqueseformendep6sitosdegomadentrodelcarburadordelmotor
yposiblesdesperfectosenel motor,elsistemadecombustibledebeservadado
completamente,osedebetratarlagasolinaconunestabilizadorparaevitarel
deterioro.
I. Siutilizaunestabilizadordecombustible:
a. Lealasinstrucdonesy recomendadonesdelfabricantedelproducto.
b. Agreguelacantidadcorrectadeestabilizadorparalacapaddaddel
sistemadecombustibleagasolinaIimpiaynueva.
c. Lleneeldep6sitodecombustibleconcombustibletratadoyhaga
fundonarelmotor2-3minutosparaestabilizarel combustibledentro
delcarburador.
Cuandovacieelsistemadecombustible:
a. Nodreneelcombustiblecuandoelmotorest_caliente.Permitaque
elmotorseenfriebien.Dreneelcombustibledentrodeunredpiente
aprobadoyalairelibre,lejosdecualquierllamaexpuesta.
b. Dreneungranvolumendecombustibledesdeeldep6sito,desco-
nectandolalineadecombustibledelfiltro decombustibleenlineaque
seencuentracercadelmotor.
Lagasolinaessumamenteinflamabley puedesetexplosivaendertas
condkiones.Vadela antesdealmacenarelequipoduranteperiodos
prolongados.Dreneel combustiblet_nicamentedentrodeunrecipiente
aprobadoy al airefibre,lejosdecualquierllamaexpuesta.Dejeque
el motorseenfrie.Antesdedrenarel combustible,apaguedgarrillos,
cigarros,pipasyotrasfuentesdecombusti6n.Vadelagasolinaenun_rea
bienventilada,lejosdecualquierfuentedellamaochispas,incluidocualquier
artefactoconluzpiloto.Almacenelagasolinaenunredpienteaprobado,enun
lugarseguro.
Extraigalabujiayviertauna(1)onzadeaceiteparamotorporelorifido
delabujiaenelcilindro.Hagagirarel motorvariasvecesparadistribuirel
aceite.Vuelvaacolocarlabujia.
Eldrenaje de loscombustibles
1. Localiceelfiltro decombustible,queseencuentraenel ladoizquierdodel
motor,ypuedeserconectadoalmotorconunacorreadeempate.
2. Cortarlacorreadelacorbata,siest_presente,entoncesemergenteenla
abrazaderaenlineaenelfiltro decombustibleconunpardealicates,deslice
laabrazaderadela lineadecombustible.
Quitelalineadecombustibleenlalineaylafugadecombustibleenun
redpienteaprobado.
Preparad6nde ia tractor dec sped
1. Limpieylubriquelatractorcomosedescribeenlasinstrucdonesde
lubricaci6n.
2. Noutiliceunalavadoraapresi6nniunamangueradejard[nparalimpiarsu
unidad.
3. Almacenelatractorenunazonalimpiayseca.Nolaalmacenecercade
materialescorrosivoscomoporejemplofertilizantes.
c. Vuelvaacontectarlalineadecombustibleyhagafundonarel motor
hastaquecomienceafallar,useentoncesel cebadorparamantenerel
motorenmarchahastaagotartodoelcombustibledelcarburador.
d. VuelvaadesconectarlaI[neadecombustibleydrenelagasolina
restanteenelsistema.
Lagasolinaesunasustandat6xica.Eliminelagasolinaadecuadamente.
Comuniqueseconlasautofidadeslocalesparaaveriguarcuriessonlos
_todosadecuadosparaeliminar lagasolina.
87

El motor no arranca
El motor funciona de manera
err_tica
El motor recalienta
1. Perilla de potencia de arranque (PTO)
conectada.
2. No est.1 colocado el freno de mano.
3. Se ha desconectado el cable de las bujias.
4. La palanca de control del regulador no
est.1 en la posici6n de arranque correcta.
5. No se ha activado el cebador
6. El dep6sito de combustible est.1 vacio o el
combustible se ha echado a perder.
7. La linea del combustible est.1 bloqueada.
8. Las bujias no funcionan correctamente.
9. Motor ahogado.
10. Fusible fundido (s)
1. La unidad est,1 funcionando con el
CEBADOR activado.
2. Se han aflojado los cables de la bujia.
3. La linea del combustible est,1 tapada o el
combustible se ha echado a perder.
4.
5.
6.
La cortadora de c6sped no
regresa el recorte de c6sped
como abono
La ventilaci6n en la tapa del combustible
est,1 obstruida.
Agua o suciedad en el sistema del
combustible.
El filtro de aire est,1 sucio.
1. El nivel de aceite del motor est,1 bajo.
2. Flujo de aire restringido.
1. Coloque la perilla en la posicidn de desconexidn
(OFF).
2. Coloque el freno de mano.
3. Conecte el cable a las bujias.
4. Mueva la palanca del regulador a la posici6n FAST
(r_ipido).
5. Tire el control del CEBADOR hacia afuera.
6. Llene el dep6sito con gasolina limpia y nueva (de
menos de 30 dias).
7. Limpie la linea de combustible y reemplace el filtro de
combustible.
8. Limpie o cambie las bujias o ajuste la separaci6n.
9. Arranque el motor con el regulador en posici6n FAST
(r_ipido).
10. Reemplace el fusible (s)
1. Presione el control del CEBADOR.
2.
3.
El motor vacila a altas 1. La separaci6n de las bujias es muy 1.
revoluciones pequer_a.
El motor funciona con 1. Bujia atorada, averiada o exceso de 1.
dificultad en ralenti separacidn.
2. El filtro de aire est,1 sucio. 2.
Demasiada vibracidn 1. Cuchilla de corte floja o descentrada. 1.
2. Cuchilla dahada o curvada 2.
1. La velocidad del motor es demasiado 1.
lenta.
Corte desigual
2. C6sped humedo.
3. C6sped demasiado alto.
Conecte los cables de la bujia.
Limpie la linea de combustible; Ilene el tanque
con gasolina limpia y nueva y reemplace el filtro
de combustible.
4. La cuchilla de la cortadora no est.1 afilada.
1. Laplataforma no est.1correctamente nivelada.
2. La cuchilla de la cortadora no est.1 afilada.
3. Presi6n de neum_iticos desigual.
Destape la ventilaci6n o reemplace la tapa si est,1
dahada.
5. Vacie el tanque de combustible. Llene el tanque
con gasolina limpia y nueva.
6. Reemplace el elemento de papel del filtro de aire
o limpie el depurador de espuma.
1. Llene el c_irter con la adecuada cantidad y peso de
aceite.
2.
3.
Limpie los recortes de pasto y la suciedad
acumulados alrededor de las aletas de refrigeraci6n
del motor y del alojamiento del soplador.
Retire las bujias y reajuste la separaci6n
4.
1.
2.
3.
Reemplace las bujias. Configure la separacidn de
la bujia.
Reemplace el elemento del filtro de aire y/o limpie
el depurador.
Apriete la cuchilla y el husillo.
Reemplace la cuchilla.
Coloque el control del regulador en la posicidn
FAST (velocidad r_ipida, representada pot una
liebre).
No realice abono cuando el c_sped est,1 humedo.
Corte una vez a una altura de corte elevada
y luego vuelva a cortar el c_sped a la altura
deseada, o haga una pasada de corte m_is
angosta.
Afile o cambie la cuchilla.
Realice un ajuste de la plataforma lado a lado.
Afile o cambie la cuchilla.
Verifique la presi6n de los cuatro neum_iticos.
87

Estapagina se dej6 intencionalmente en blanco. Utilice esta pagina para tomar notas acerca de su tractor.
89

Esta pagina se dej6 intencionalmente en blanco. Utilice esta pagina para tomar notas acerca de su tractor.
9O

Busque el periodo de duraci6n de emisiones importantes yla informaci6n de clasificaci6n de aire en
la etiqueta de emisiones de su motor
Los motores cuyo cumpiimiento con los estAndares de emisi6n Tier 2 de laComisi6n de Recursos Ambientales de California (CARB)
est6 certificado deben exhibir la informaci6n relacionada con el periodo de duraci6n de ias emisiones y la clasificaci6n de aire. Sears
Brands Management Corporation ponen esta informaci6n a disposici6n del consumidor en nuestras etiquetas de emisiones.
Ei Periodo de Duraci6n de las Emisiones describe el nQmero de horas de tiempo real de funcionamiento para el cuai se certifica que
el motor cumpie con ias reglas de emisi6n, descontando el mantenimiento adecuado del mismo segQn las instrucciones de oper-
aci6n y mantenimiento. Se utilizan las siguientes categonas:
Moderado:Se certifica que el motor cumpie con las reglas de emisi6n durante 125 horas de tiempo real de funcionamiento del motor.
Inmediato:Se certifica que el motor cumpie con las reglas de emisi6n durante 250 horas de tiempo real de funcionamiento del motor.
Extendido:Se certifica que el motor cumpie con las reglas de emisi6n durante 500 horas de tiempo real de funcionamiento del motor.
Por ejemplo, una cortadora de c6sped tJpica que se empuja desde arras se usa entre 20 y 25 horas por aSo. Por Io tanto, el Periodo
de Duraci6n de Emisiones de un motor con una clasificaci6n intermedia sena equivaiente a entre 10 y 12 aSos.
Laciasificaci6n de aire es un nQmero calculado para describir el nivel relativo de emisiones para un grupo de motores en particular.
Cuanto menor sea la clasificaci6n de aire, mayor es la limpieza del motor. La informaci6n se presenta de forma grAfica en la etiqueta
de emisiones.
Despu_s del 1 de julio de 2000, busque el periodo de cumplimiento de las reglas de
emisiones en la etiqueta de cumplimiento de las reglas de emisiones del motor
Despu6s del 1 de julio de 2000 se certificarA que determinados motores Sears Brands Management Corporation cumplen
con los estAndares de emisiones de la fase 2 de la Agencia de Protecci6n Ambientai de los Estados Unidos (USEPA). Para
los motores certificados para la etapa 2, el periodo de cumplimiento con ias reglas de emisiones al cual se hace referencia
en la etiqueta de cumplimiento con las reglas de emisiones indica el nQmero de horas de funcionamiento para el cual se ha
demostrado que el motor cumple con los requerimientos federales de emisi6n.
Para los motores con desplazamiento inferior a 225 cc, Categoria C = 125 horas, B = 250 horas y A = 500 horas.
Para los motores con desplazamiento de 225 cc o mAs, Categoria C = 250 horas, B = 500 horas y A = 1000 horas.
El desplazamiento de los motores de la serie modelo 150112 es 249 cc.
La presente es una representaci6n gen_rica de laetiqueta de emisi6n que se encuentra generaimenteen un
motor certificado.
FAMILYYBSXS.3192VA 274812
GDOC-100182Rev.A

(Estap_.ginaseaplicas61oenEE.UU.yCanada.).
SearsBrandsManagement Corporation, el Consejo de Recursos Ambientales de California (CARB)
y la Agencia de Protecci6n Ambiental de los Estados Unidos (EPA)
Declaraci6n de garantia del sistema de control de emisiones (derechos y obligaciones de la garanfia de defectos del propi=
etario)
LACOBERTURADE LAGARANTJADECONTROLDEEMISIONESES Y PARALOSMODELOSCERTIFICADOSDELANO1997YPOSTERIORES,
APLIOABLEALOSMOTORESCERTIFICADOSCOMPRADOSENCALIFOR- QUESECOMPRENYUTILICENENCUALQUIERPARTEDE LOSESTADOS
NIAEN1995Y POSTERIORMENTE,QUESE UTILIZANENCALIFORNIA, UNIDOS(Y APARTIRDEL1DE ENERODE2001ENCANADA).
Declaraci6n de garanfia sobre defectos en el control de emisiones para California y los Estados Unidos
ElConsejode RecursosAmbientalesdeCalifornia(CARB),la EPA(Agencia
de Protecci6nAmbientaldelos EE.UU.)y Searstienenel gustodeexplicarla
garantiadelsistemadecontroldeemisionesparamotoresdela_o2000y para
elfuturoconrelaci6na motorespeque_ostodoterreno(SORE).EnCalifornia,
los nuevosmotorespeque_ostodoterrenodebenestardise_ados,construidos
y equipadosparacumplirconlas rigurosasnormasanti-smogdelestado.En
el restodelos EstadosUnidos,losmotoresnuevostodoterrenodeencendido
porchispacertificadosparael a_o 1997debencumplirest_ndaressimilares
establecidospot laEPA.Searsdebegarantizarel sistemadecontroldeemis-
ionesdesu motorparalosperiodosdetiempoenumeradosacontinuaci6n,
siemprequenohayaabuso,negligenciaomantenimientoindebidode su
motortodoterrenopeque_o.Susistemade controldeemisionespuedeincluir
piezastalescomoel carburador,el filtrodeaire,elsistemadeencendido,el
silenciadoryel conversorcatalitico.Tambienpuedeincluirconectoresyotras
unidadesrelacionadasconlasemisiones.Dondeexistaunacondici6ncubierta
porla garantia,Searsreparar_supeque6omotortodoterrenosincostoalguno
incluyendodiagn6stico,piezasy manodeobra
Cobertura de la garantJa Sears para defectos en el control de emJsiones
Losmotorestodoterrenopeque6osest_ngarantizadosenIorelativoalcontrol alas disposicionesquese indiquenacontinuaci6n.Si unapartedesumotor
deemisionesparadefectosenpiezasduranteunperiododedosa_os,sujeto cubiertapot lagaranfiaesdefectuosa,Searsreparar_osustituir_dichaparte.
Responsabilidades del propietario en relacibn con la garantia
Comopropietariodelmotortodoterrenopeque_o,Ud.esresponsabledela
realizaci6ndelmantenimientorequeridoqueseincluyeenlas instrucciones
deoperaci6ny mantenimiento.Searsrecomiendaqueseconserventodoslos
recibosrelativosal mantenimientodesu motortodoterrenopeque_o,pero
nopudedenegarla garantiasimplementeporla faltade los mismos,oporsu
incumplimientodelmantenimientoprogramatic.Comopropietariodelmotor
peque_otodoterrenodebesaberque,sinembargo,Searslepuedenegar
lacoberturade lagarantiasi su motortodoterrenopeque6oouna piezadel
mismohanfalladodebidoa abuso,negligencia,mantenimientoindebidoo
a modificacionesnoaprobadas.Ud.esresponsabledepresentarsumotor
todoterrenopeque6oaundistribuidorde serviciosSearsautorizadotan pronto
comoaparezcaunproblema.Lasreparacionesdela garantiasinconfiicto
debencompletarseen unplazodetiemporazonable,nosuperiora30dias.Si
tienealgunapreguntarespectoa susderechosy responsabilidadesreferen-
tesala garantia,debecontactarconunrepresentantedeserviciosSearsal
1--800--469--4663.Lagarantiadeemisionesesunagarantiapordefectos.Los
defectossejuzgandeacuerdoconelfuncionamientonormalde unmotor.La
garantiano est_relacionadaconunapruebade emisionesenuso.
Disposiciones de la garantJa Sears para defectos en el control de emJsiones
Lassiguientessondisposicionesespecificasrelacionadasconla coberturade lagarantiaparadefectosenel controldeemisiones.Esuna_adidoa lagarantiade
motorSearsparamotoresnoreguladosque seencuentraen lasinstruccionesdefuncionamientoy mantenimiento.
1. Piezascongarantia
Lacoberturadeesta garantiaseextiendeL]nicamentea laspiezas
queaparecena continuaci6n(las partesde lossistemasdecontrolde
emisiones),siempreque dichaspiezasestuvieranyaenel motoren el
momentodesucompra.
a. Sistemademedici6ndecombustible
•Sistemadeenriquecimientoparaarranqueenfrio
•Carburadory partesinternas
• Bombade combustible
b. Sistemadeinducci6nde aire
• Filtrodeaire
•Colectordeadmisi6n
c. Sistemadeencendido
• Bujia(s)deencendido
•Sistemadeencendidomagneto
d. Sistemadelcatalizador
•Convertidorcatalitico
•Colectordeescape
•Sistemadeinyecci6nde aireov_lvulade impulsos
e. Elementosvariadosusadosenlossistemasanteriores
•Wlvulas devacio,sensiblesatemperatura,posici6ny tiempo
einterruptores
•Conectoresy montajes
2. AIcancedela cobertura
Searsgarantizaal poseedorinicialy a loscompradoressubsiguientes
quelaspiezascongarantianotendr_ndefectosen materialesni mano
deobraque provoquenla falladelas mismasduranteun periodode
dosaSosa partirdela fechaen queel motorseentregaa uncomprador
particular.
3. Sincargo
Lareparaci6noreemplazodecualquierpartecongarantiase realizar_
sin cargoalgunoparael poseedor,incluyendotareasdediagn6sticoque
permitandeterminarsi una partecongarantiaesdefectuosa,siempreque
dichodiagn6sticoserealiceenundistribuidordeserviciosSearsautoriza-
do. Parael serviciode lagarantiadeemisiones,contacteal distribuidorde
serviciosSearsautorizadom_scercanoincluidoen las"P_ginasamarillas"
en lascategorias"Motores,gasolina","Motoresdegasolina","Podadoras
de cesped",osimilares.
4. Reclamacionesyexclusionesala cobertura
Las reclamacionesde lagarantiadebenenviarsedeacuerdocon las
disposicionesdela politicadegarantiaparamotoresSears.Lacobertura
de lagarantiaexcluir_defectosen piezascongarantiaquenoscan partes
originalesSears,o abuso,negligenciao mantenimientoincorrecto,taly
comoseestableceen lapoliticadegarantiaparamotoresSears.Searsno
es responsablede lasfallasenpiezascongarantiaprovocadasporel uso
de partesa6adidas,que noscanoriginalesoquesehayanmodificado.
5. Mantenimiento
Cualquierpartecongarantiaque noesteprogramadaparaser reem-
plazadacomomantenimientorequerido,oque s61odebainspeccionarse
regularmentealefectode"inspeccioneoreemplacesegL]nsea necesario",
estar_garantizadacontradefectosduranteelperiodode lagarantia.Todas
las piezasgarantizadasqueestenprogramadasparasureemplazopara
cumplirconlos requisitosdemantenimientoestar_ngarantizadass61o
porel periodoanterioral primerreemplazoprogramaticparadicha pieza.
Cualquierpiezade recambioqueseaequivalenteenfuncionamientoy
durabilidadpuedeusarsepararealizarmantenimientoo reparaciones.El
propietarioes responsablederealizartodoel mantenimientorequerido,tal
y comose defineenlas instruccionesdefuncionamientoy mantenimiento
Sears
6. Coberturaindirecta
Porla presente,la coberturaseextiendeala falladecualquiercomponente
de motorprovocadapotlafallade unapiezacongarantiaqueestetodavia
en periododegarantia.
Enlos EstadosUnidosy Canad_hayunalineadeatenci6nde24 horas,1-800-469--4GG3,quecuentacon unmenL]conmensajespre-grabadosquecontienen
informaci6nparael mantenimientodemotores.

DECLARACIONFEDERALy/oDECALIFORNIASOBRE GARANTJAS EN EL CONTROL DE EIVIISIONES
SUS DERECHOS Y OBLIGACIONES EN CUANTO A LA GARANTJA
MTDConsumerGroupInc,laAgenciadeProtecci6nMedioambientaldelos EstadosUnidos(EPA),y paraaquellosproductoscertificadosparasu ventaen el es-
tadode California,el Departamentode losRecursosdelAire deCalifornia(CARB)secomplacenenexplicarla garanfiaquecubreal sistemade control(ECS)de
emisiones(evaporativasy/ode escape)de suequipoy motor(motordeequiposdeexteriores)deencendidopot chispaparatodoterreno,peque_o,deexteriores
dela_o2006y a_osposterioresEnCalifornia,losnuevosmotoresdeequiposdeexterioresdebenestardise_ados,construidosyequipadosparacumplircon las
estrictasnormasantipoluci6ndel Estado(enotrosestados,losequiposdela_o1997y modelosposterioresdebenserestardise_ados,construidosy equipados
paracumplirconlasregulacionesdemotoresdeencendidoporchispaparatodoterrenopeque_osde laAgenciade Protecci6nMedioambientaldelos Estados
Unidos,(EPA).MTDConsumerGroupInc.debegarantizarel sistemadecontroldeemisiones(ECS)desu motordeequiposdeexteriorespot el periodode
tiempoindicadom_sabajo,siempreycuando noexistausoincorrecto,negligenciaomantenimientoinadecuadodedicho motor.
SuECSpuedeincluirpiezastalescomoel carburador,el sistemade inyecci6ndecombustible,el sistemadeencendido,el convertidorcatalitico,losdep6sitos
decombustible,laslineasdecombustible,lostaponesdecombustible,lasv_lvulas,contenedores,filtros,manguerasdevapor,abrazaderas,conectoresyotros
componentesafinesrelacionadosconlasemisiones.
Dondeexistaunacondici6ncubiertaporlagarantia,MTDConsumerGroupInc.reparar_su motorde equiposde exterioressincostoalgunoincluyendoel
diagn6stico,las piezasy lamanodeobra.
COBERTURA DE LA GARANTJA DEL FABRICANTE:
Estesistemadecontroldeemisionessegarantizaporel t@minode dosaSos.Si algunapiezarelacionadacon lasemisionesdesu motorde equiposde
exterioresesdefectuosa,MTDCONSUMERGROUPINC.reparar_osustituir_dichapieza.
RESPONSABILIDADES DEL PROPIETARIO SEGUN LA GARANTJA:
Ensu car_cterdepropietariodelmotordeequiposdeexteriores,ustedes responsabledel mantenimientorequeridoqueseespecificaenel manualdel propieta-
rio.MTDConsumerGroupIncle recomiendaque conservetodoslosrecibosquecubrenel mantenimientode sumotor,noobstanteIocualMTDConsumerGroup
Incnopodr_denegarel cumplimientode lagarantiaQnicamenteporlafaltade los recibos.
Comopropietariodel motordeequiposde exteriores,usteddebesaberqueMTDConsumerGroupInc.puededenegarlacoberturade lagarantiasisumotoro
unapiezadel mismofallandebidoa uso incorrecto,negligencia,mantenimientoindebidooamodificacionesnoaprobadas.
Ustedesresponsablede presentarsumotoral centrodedistribuci6no serviciotecnicodeMTDConsumerGroupInc.tan prontocomoaparezcael problema.Las
reparacionescubiertasporla garantiasedebenIlevara caboen unlapsorazonablequenoexcedade30 dias.Sitiene algunapreguntarespectode lacobertura
dela garantia,p6ngaseen contactoconel DepartamentodelServicioT@nicode MTDConsumerGroupInc.al telefono1-800-800-7310opot correoelectr6nico
enhttp://support.mtdproducts.com
COBERTURA DE LA GARANTJA DE EMISIONES GENERALES:
MTDConsumerGroupIncgarantizaal compradorfinaly acadacompradorsubsiguienteque el motordeequiposde exteriores:est_ dise_ado,construidoy
equipadodemododecumplircontodaslas regulacionesaplicablesy queseencuentralibrededefectosdematerialesyde fabricaci6nque pudierencausarla
falladeuna piezagarantizadaidentica,entodoslosaspectosmaterialesala piezadescriptaenla solicitudde certificaci6ndeMTDConsumerGroupInc.
El periododegarantiacomienzaenla fechade entregadelmotoral compradorfinalo en lafechaenque la m_quinaseponeenfuncionamientopot primeravez.
El periododegarantiaesde dosaSos.
Sujetoaciertascondicionesyexclusionesqueseindicana continuaci6n,lagarantiadelas piezasrelacionadascon lasemisionesesla siguiente:
1. Cualquierpiezagarantizadaque noesteprogramadaparaserreemplazadacomopartedelmantenimientorequeridoen lasinstruccionesescritassuminis-
tradassegarantizaporel periododegarantiaarribamencionado.Sila piezafalladuranteelperiododecoberturade lagarantia,la mismaser_reparada
oreemplazadaporMTDConsumerGroupInc.deacuerdoconel parrafo(4)acontinuaci6n.Cualquierpiezareparadao reemplazadasegQnlagaranfiase
garantizar_potel restodelperiodode garantia.
2. Cualquierpiezagarantizadaqueeste programadasolamenteparainspecci6nregularenlasinstruccionesescritassuministradassegarantizapotel periodo
degarantiaarribamencionado.CualquierpiezareparadaoreemplazadasegQnla garantiasegarantizar_pot elrestodelperiodo.
3. Cualquierpiezagarantizadaqueeste programadaparareemplazosegQnel mantenimientorequeridode conformidadcon lasinstruccionesescritassuminis-
tradas,se garantizaporel periododetiempoanteriora laprimerafechade reemplazoprogramadaparaesapieza.Si la piezafallaantesdelprimerreemplazo
programatic,la mismaser&reparadaoreemplazadapot MTDConsumerGroupInc.deacuerdoconel parrafo(4)acontinuaci6n.Cualquierpiezareparadao
reemplazadabajogarantiase garantizar_potel restodelperiodoanterioral primerreemplazoprogramaticpuntualparaesapieza.
4. Lareparaci6noel reemplazodecualquierpiezagarantizadadeconformidadconlasdisposicionesde lagarantiaqueaquiseestipulasedeben realizarenun
centrodegarantiasin costoalgunoparael propietario.
5. Noobstantelas disposicionesque aquiseestipulan,losservicioso reparacionesbajo garantiasesuministrar_nentodosnuestroscentrosdedistribuci6nbajo
franquiciademantenimientoparalos motoresoequiposencuesti6n.
6. El propietariodelmotorde equiposdeexterioresno deber_pagareltrabajodediagn6sticodirectamenteasociadocon unapiezagarantizadadefectuosaen
relaci6nconlas emisiones,siempreycuandodichotrabajode diagn6sticoserealiceen uncentrocubiertopot lagarantia.
7. MTDConsumerGroupInces responsablepotdaSoscausadosaotroscomponentesdemotoresoequiposderivadosde lafallabajo garantiadecualquier
piezagarantizada.

8.Durantelatotalidaddelperiododegarantiadelmotoryequipoparatodoterrenoarribamencionado,MTDConsumerGroupIncmantendr_unsuministro
depiezasbajogarantiasuficienteparasatisfacerlademandaesperadadetalespiezas.
9.Cualquierpiezadereemplazosepodr_usarparaelcumplimientodelmantenimientoolasreparacionesbajogarantiaysesuministrar_nsincargopara
elpropietario.Dichousonoreducir_lasobligacionesdegarantiadeMTDConsumerGroupInc.
10.Nosepodr_nusarpiezasadicionalesnimodificadasquenoestenexentasdeacuerdoconelDepartamentodelosRecursosdelAire(AirResourcesBoard).
Elusodecualquierpiezaadicionalomodificadanoexentaporelcompradorfinalser_causaldeinvalidezdelosreclamosbajogaranfia.MTDConsumer
GroupIncnotendr_responsabilidadpotlagarantiadefallasdepiezasgarantizadasquefuerencausadaspotelusodeunapiezaadicionalnoexenta
omodificada.
PIEZAS GARANTIZADAS:
Lareparaci6noel reemplazodecualquierpiezagarantizadaquede ottomodopudieseestarcubiertaporlagarantiapodr_set excluidadetal coberturade
garantiasi MTDConsumerGroupIncdemuestraqueel motoresobjetodeusoincorrecto,negligenciao mantenimientoinadecuado,y quetal usoincorrecto,
negligenciaomantenimientoinadecuadofuecausa directade la necesidadde reparaci6no reemplazode dichapieza.NoobstanteIoantedicho,cualquierajuste
deuncomponenteconundispositivodelimitaci6nde ajusteinstaladoenf_bricay quefuncioneadecuadamente,podr_setcubiertopot lagarantia.Adem_s,
la coberturabajoestagarantiaseextiendesoloapiezasqueestuvieronpresentesenel motory equipotodoterrenoadquiridos.
Est_ncubiertaslas siguientespiezascongaranfiaparaemisiones(decorresponder):
(1)Sistemademedici6nde combustible
• Sistemade mejoraparainicioenfrio (cebadosuave)
• Carburadory piezasinternas(osistemade inyecci6npotcombustible)
• Bombadecombustible
• Dep6sitodecombustible
(2)Sistemade inducci6ndeaire
• Purificadordeaire
• Colectordeadmisi6n
(3) Sistemadeencendido
• Bujia(s) deencendido
• Sistemade encendidopot magneto
(4)Sistemade encendido
• Convertidorcatalitico
,, SAI(v_lvulaReed)
(5)Componentesvariosutilizadosen el sistemaanterior
• Wlvulas e interruptoresdevacio,temperatura,posici6nsensiblesal tiempo
• Conectoresy montajes
(6) Controlevaporativo
• Manguerade combustible
• Abrazaderasde la mangueradecombustible
• Tap6ndelcombustibleatadopot correa
• Cajadecarbono
• Lineas de vapor
GDOC-100223

Felicitaciones por haber realizado una adquisici6n inteligente. El producto Craftsman® que ha
adquirido esta diseSado y fabricado para brindar muchos aSos de funcionamiento confiable. Pero
como todos los productos a veces puede requerir de reparaciones. Es en ese momento cuando el
disponer de un Acuerdo de protecci6n para reparaciones le puede ahorrar dinero y problemas.
A continuaci6nse detallanlos puntosincluidosen el Acuerdo:
[] Servicio experto prestadopor nuestros10,000especialistasen reparacionesprofesionales
[] Servicio ilirnitado sin cargo paralas piezasy la mano de obra entodas las reparacionescubiertas
[] Reernplazo del producto hasta 1500d61aressi no es posible repararel producto cubierto
[] Descuento de 25% del precionormal delservicio y de las piezas relacionadascon el mismo que no estencubiertas
por elacuerdo;ademas,25% del precionormal de laverificaci6nde mantenimientopreventivo
[] Ayuda r_pida pot tel_fono - Io IlamamosResoluci6n RApida- el apoyotelef6nico de un Chamusca al representante.
Pienseennosotroscomo el manual "de un dueSohablador."
Una vezadquiridoel Acuerdo,puede programarel servicio con tan s61orealizar una Ilamadatelef6nica. PuedeIlamaren
cualquier momentodeldia o de la nocheo programarunservicio en linea.
ElAcuerdode Protecci6nde Reparaci6nes unacompra sin riesgo.Si ustedanulapor alguna raz6n duranteel periodode
garantiade producto,proporcionaremosunreembolso Ileno.O, un reembolsoprorrateadoencualquier momentodespues
del periodode garantiade productoexpira,iAdquiera hoysu acuerdode protecci6nparareparaciones!
Se aplican determinadas limitaciones y exclusiones.Paraobtener informaciTnadicional y precios en los Estados
Unidos Ilame al 1-800-827-6655.
El *Coverage en Canad_ivaria en algunos articulos. Para detalles Ilenos la Ilamada Chamusca Canad_ien 1-800-
361-8885.
Servicio de instalaci6nde Sears
Sidesea solicitar la instalaci6nprofesionalde Searsde aparatosdomesticos,dispositivos paraabrir portones,calentado-
resde aguay otrosarticulos domesticosimportantes,en los EstadosUnidoso Canadaflameal 1-800-4-MY-HOME®.

Riding Equipment
questions or problems?
Satisfaction with your purchase
is our number one concern!
To troubleshoot problems,
get answers to questions, order parts,
or schedule repair service for your
Riding Equipment, call the number below.
Para respuestas a preguntas o problemas,
y ordenar piezas o pedir servicio para la
reparacibn de su equipo, Ilame el nt_mero abajo.
1-800-659-5917
Craftsman Help Line
www.craftsman.com
TM
® Registered Trademark / Trademark of KCD IP, LLC in the United States, or Sears Brands, LLC in other countries
® Marca Registrada / TMMarca de Fabrica de KCD IP, LLC en Estados Unidos, o Sears Brands, LLC in otros paises
-
 1
1
-
 2
2
-
 3
3
-
 4
4
-
 5
5
-
 6
6
-
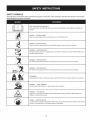 7
7
-
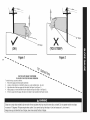 8
8
-
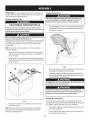 9
9
-
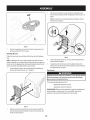 10
10
-
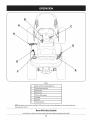 11
11
-
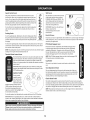 12
12
-
 13
13
-
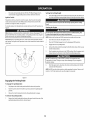 14
14
-
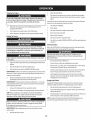 15
15
-
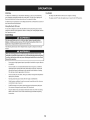 16
16
-
 17
17
-
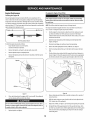 18
18
-
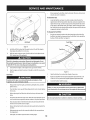 19
19
-
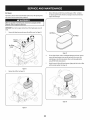 20
20
-
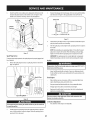 21
21
-
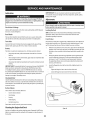 22
22
-
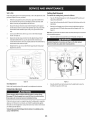 23
23
-
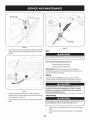 24
24
-
 25
25
-
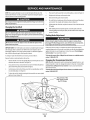 26
26
-
 27
27
-
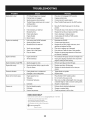 28
28
-
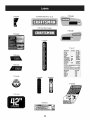 29
29
-
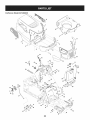 30
30
-
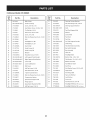 31
31
-
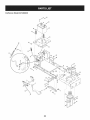 32
32
-
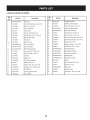 33
33
-
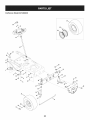 34
34
-
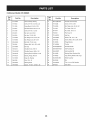 35
35
-
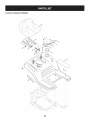 36
36
-
 37
37
-
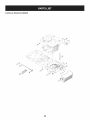 38
38
-
 39
39
-
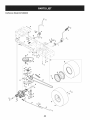 40
40
-
 41
41
-
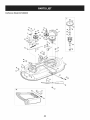 42
42
-
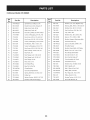 43
43
-
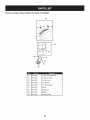 44
44
-
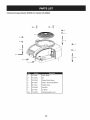 45
45
-
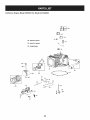 46
46
-
 47
47
-
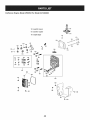 48
48
-
 49
49
-
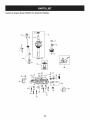 50
50
-
 51
51
-
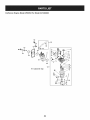 52
52
-
 53
53
-
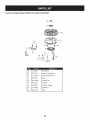 54
54
-
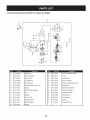 55
55
-
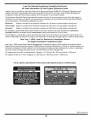 56
56
-
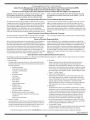 57
57
-
 58
58
-
 59
59
-
 60
60
-
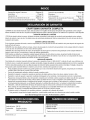 61
61
-
 62
62
-
 63
63
-
 64
64
-
 65
65
-
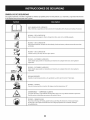 66
66
-
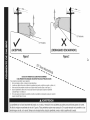 67
67
-
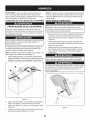 68
68
-
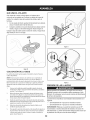 69
69
-
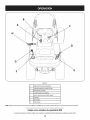 70
70
-
 71
71
-
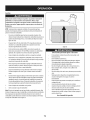 72
72
-
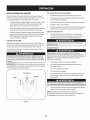 73
73
-
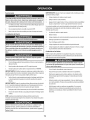 74
74
-
 75
75
-
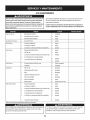 76
76
-
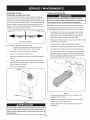 77
77
-
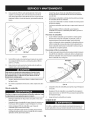 78
78
-
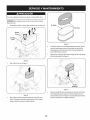 79
79
-
 80
80
-
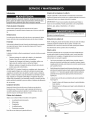 81
81
-
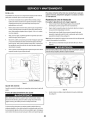 82
82
-
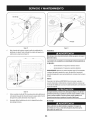 83
83
-
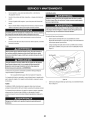 84
84
-
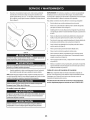 85
85
-
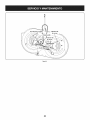 86
86
-
 87
87
-
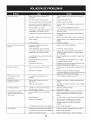 88
88
-
 89
89
-
 90
90
-
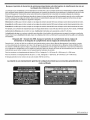 91
91
-
 92
92
-
 93
93
-
 94
94
-
 95
95
-
 96
96


MTD 13A277SS099 El manual del propietario
- Categoría
- Cortadoras de césped
- Tipo
- El manual del propietario
en otros idiomas
- English: MTD 13A277SS099 Owner's manual
Artículos relacionados
Otros documentos
-
Craftsman 247.203700 Manual de usuario
-
-
-
-
-
Kmart 02891808-4 El manual del propietario
-
-
Craftsman 247.290000 Manual de usuario
-