Bella 3 Tier Food Steamer El manual del propietario
- Categoría
- Cocinas de vapor
- Tipo
- El manual del propietario

WWW.BE LLAHOUSEWARES.COM
Register your product and get support • Registrar y obtener asistencia de su producto
9.5QT
3 TIER FOOD STEAMER Instruction Manual and Recipe Guide
VAPORERA DE ALIMENTOS DE 9.5QT
Manual de instrucciones y guía de recetas

THANK YOU
for your purchase
BellaLifestyle
BellaLife
for special announcements trendy recipes!
REGISTER
AND SIGN UP
Rate, review or ask us a question.
TELL US WHAT
YOU THINK!
GO TO
:
bellahousewares.com
#myBELLAlife

Table of Contents
Important Safeguards .................................................................................................................................. 4
Additional Important Safeguards ...............................................................................................................5
Notes On The Cord ....................................................................................................................................... 5
Notes On The Plug........................................................................................................................................5
Plasticizer Warning ....................................................................................................................................... 5
Electric Power................................................................................................................................................5
Safety Precaution .........................................................................................................................................5
Getting To Know Your 3-Tier Food Steamer ............................................................................................. 6
Before Using For The First Time ...............................................................................................................7
Operating Instructions ................................................................................................................................. 7
Adding Water To The Reservoir Mid-Cycle ...............................................................................................8
Steaming Eggs ..............................................................................................................................................8
Rice And Grain Bowl ....................................................................................................................................8
Care And Maintenance ................................................................................................................................9
Steaming Guide: Vegetables .....................................................................................................................10
Steaming Guide: Fish And Seafood .........................................................................................................11
Steaming Guide: Meat ...............................................................................................................................12
Steaming Guide: Eggs And Other ............................................................................................................12
Warranty ......................................................................................................................................................13
Índice
Medidas De Seguridad Importantes ...................................................................................................14-15
Otras Medidas De Seguridad Importantes .............................................................................................15
Notas Sobre El Cable .................................................................................................................................15
Notas Sobre El Enchufe .............................................................................................................................15
Advertencia Sobre el PlastifIcante ........................................................................................................... 15
Alimentación Eléctrica ...............................................................................................................................15
Precaución De Seguridad .......................................................................................................................... 16
Descripción De La Vaporera De Alimentos ............................................................................................. 16
Antes De Utilizar Por Primera Vez ............................................................................................................17
Cómo Utilizar ...............................................................................................................................................17
Agregar Agua Al Embalse De La Mitad Del Ciclo ..................................................................................18
Huevos Al Vapor .........................................................................................................................................18
Granos De Arroz .........................................................................................................................................18
Cuidado Y Mantenimiento .........................................................................................................................19
Guía De Vapor : Vegetales .........................................................................................................................20
Guía De Vapor : Pescados Y Mariscos ..................................................................................................... 21
Guía De Vapor : Carnes .............................................................................................................................. 22
Guía De Vapor : Huevos ............................................................................................................................. 22
Garantía........................................................................................................................................................23

4
IMPORTANT SAFEGUARDS
WARNING: When using electrical appliances, basic safety precautions should
always be followed, including the following:
1. READ ALL INSTRUCTIONS.
2. Do not touch hot surfaces. Use pot holders when removing cover or handling
hot containers.
3. To protect against electrical shock, do not immerse cord, plug or base unit
in water.
4. Close supervision is necessary when any appliance is used by or near
children.
5. Unplug when not in use. Unplug before putting on or taking off parts,
and allow to cool before cleaning.
6. Do not operate any appliance with a damaged cord or plug, or after the
appliance malfunctions or has been damaged in any manner. Return
appliance to authorized service facility for repair.
7. The use of accessory attachments not recommended by this appliance
manufacturer may cause hazards.
8. Do not use outdoors.
9. Do not let cord touch hot surfaces.
10. Do not place near hot gas or electric burner or in heated oven.
11. Caution when moving appliance containing hot food, other hot liquids.
12. Lift and open cover carefully to avoid scalding, and allow water to drip
into steamer.
13. Do not place the unit directly under cabinets when operating as this product
produces large amounts of steam.
14. Some water will remain in the water reservoir after the steamer has turned
off; this is normal.
15. Do not use any steam parts in microwave or on heated surface.
16. Fill the reservoir with water before plugging the power cord otherwise the
appliance may be damaged.
17. If the supply cord is damaged, it must be replaced by the manufacturer,
its service agent or similarly qualied persons in order to avoid a hazard.
18. The appliance is not intended for use by children or other persons without
assistance or supervision if their physical, sensory or mental capabilities
prevent them from using it safely. Children should be supervised to ensure
that they do not play with the appliance.
19. To avoid a circuit overload, do not operate another high wattage appliance
on the same circuit.
20. Extension cords may be used if care is exercised in their use.
If extension cord is used:
(a)The electrical rating of the extension cord should be at least that of the
appliance. (b)The longer cord should be arranged so that it will not drape
over the counter or table top where it can be pulled on by children or
tripped over.
21. Do not immerse base unit in water or other liquids.
FOR HOUSEHOLD USE ONLY
SAVE THESE INSTRUCTIONS

5
ADDITIONAL IMPORTANT
SAFEGUARDS
NOTES ON THE CORD
A. A short power-supply cord (or detachable power-supply cord) is to be provided
to reduce the risk resulting from becoming entangled in or tripping over a longer
cord.
B. Longer detachable power-supply cords or extension cords are available and
may be used if care is exercised in their use.
C. If a long detachable power-supply cord or extension cord is used :
1. The marked electrical rating of the cord or extension cord should be at least
as great as the electrical rating of the appliance.
2. If the appliance is of the grounded type, the extension cord should be a
grounding-type3-wire cord.
3. The longer cord should be arranged so that it does not drape over the
counter top or table top where it can be pulled on by children or tripped
over unintentionally.
NOTES ON THE PLUG
This appliance has a polarized plug (one blade is wider than the other). To reduce
the risk of electric shock, this plug will t in a polarized outlet only one way. If the
plug does not t fully into the outlet, reverse the plug. If it still does not t, contact
a qualied electrician. Do not modify the plug in any way.
PLASTICIZER WARNING
CAUTION: To prevent Plasticizers from migrating to the nish of the counter top
or table top or other furniture, place NON-PLASTIC coasters or place mats
between the appliance and the nish of the counter top or table top. Failure to
do so may cause the nish to darken; permanent blemishes may occur or stains
can appear.
ELECTRIC POWER
If the electrical circuit is overloaded with other appliances, your appliance may
not operate properly. It should be operated on a separate electrical circuit from
other appliances.
CAUTION
To prevent electric shock disconnect from the mains before removing cover.
No user serviceable parts inside. Refer servicing to qualied service personnel.
SAFETY PRECAUTION
Do not allow this unit to be exposed to rain or moisture.
Mains Supply: 120 Volts / 60Hz AC only
Connecting it to other power source may damage the unit.

6
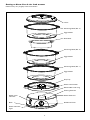
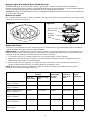
Getting to Know Your 3-tier food steamer
Product may vary slightly from illustrations.
Cover
Steaming Bowl (No. 2)
Steaming Bowl (No. 3)
Egg Holders
Egg Holders
Egg Holders
Rice Bowl
Steaming Bowl (No. 1)
Drip Tray
Water Inlet Drawer
Heating Element
Removable turbo ring
Water Reservoir
60 Minute Timer
Base
Power Indicator
Light
Water Level
Indicator

7
Before Using for the First Time
1. Carefully unpack the 2-tier food steamer
and remove all packing materials.
2. Wash the lid, rice bowl, the 3 steaming
bowls, and the drip tray in warm
soapy water or on the top rack of the
dishwasher.
3. Wipe the inside of the reservoir and
heating element with a damp cloth.
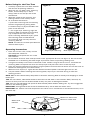
4. To assemble the steamer:
a. place the turbo ring over the heating
element large opening facing down
b. Hold the drip tray by the handles and
place it into the base.
c. For single layer steaming, align the
steaming bowl marked #1 onto the drip
tray and place the clear lid on top.
d) For steaming additional layers, place
the steaming bowl marked #2 and
#3 numerical wise securely onto the
steaming bowl #1.
NOTE: The lid and rice bowl provided will
work for both layers.
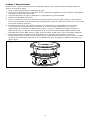
Operating Instructions
1. Place the unit on a at, sturdy surface
with adequate clearance.
CAUTION: Do not place the unit under
wall cabinets.
2. Fill the water reservoir with cold tap water to the appropriate ll line (see gure 3). Do not exceed
the MAX line as overlling will take longer to produce steam and prolong cooking time.
3. Using the assembly instructions mentioned under “before using for the rst time” assemble the
steaming bowls and place the cover on the top layer and place the cover on the top layer.
4. Place the steaming bowl onto the base, plug the power cord into the wall outlet and set the timer to
the desire cooking time (max 60 minutes).
5. When the time expires, a signal bell will be heard and the power indicator light will turn off.
6. Use pot holders when handling the steaming bowl, drip tray or rice bowl during or after the
cooking process.
NOTE: Meat or sh should always be placed in the lower steaming bowl to avoid juices dripping on to the
lower layer.
TIPS: For extra avor, add chicken broth or white wine to the water in the reservoir. Beer, red wine, oil,
extracts or fruit juices are not recommended as they may stain or damage the heater.
TIPS: You can also add herbs and spices to avor healthy foods without adding salt. Try some suggested
avors in the steaming guide.
IMPORTANT: Arrange food at the center of the bowl and try not to block the steam vents.
IMPORTANT: the steamer unit and components are not for use in microwave or conventional ovens, or on
the stove top.-
Figure 3
Base
Water Level
Indicator
Maximum water level
Minimum water level
Single layer steaming Multi layer steaming
1
1
2
3
Figure 2

8
Adding Water to the Reservoir Mid-Cycle
The water reservoir can be safely re-lled while the machine is operating. Slide out the inlet drawer and
add the desired amount of water to prolong your cycle by pouring water in the drip tray handles which
also serve as water inlet.
Caution: Do not remove the steaming bowls or drip tray during the cooking cycle. The steam that will be
emitted is scalding hot.
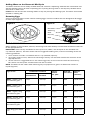
Steaming Eggs
All the 3 steaming bowls can be used for cooking eggs. There are indents that are designed to t 6 eggs
on each layer (gure 4).
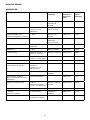
RICE & GRAIN BOWL
When cooking in the rice bowl, add rice, seasonings and water directly into the bowl and ll the reservoir
to the appropriate line.
IMPORTANT: Rice industry standards for one cup of rice (180mL) are not equal to one standard U.S.
cup measure (240 mL). For best results with the suggested cooking time, measure according to the rice
industry guidelines.
1. Your steamer includes a rice bowl with a 5 cup (cooked) capacity.
2. Accurately measure rice, water and seasonings directly into the bowl and ll the reservoir to the
appropriate line.
3. At the minimum suggested time in the steaming guide, stir the rice and check the consistency.
Be careful not to drip the condensation into the rice bowl
NOTE: The bowl can be used in both steaming trays to prepare rice, grains or foods with sauces or
liquids (gure 5).
Type of rice Combined in rice bowl Approx.
cooked
rice yield
Water ll
line in base
Approx.
time
(minutes)
Amount of
uncooked rice
Amount of
cold water
White - regular, long
and medium grain
1 cup 1 1/2 cups 2 cups MAX 19-24 mins
White - regular, long
and medium grain
2 cups 2 1/2 cups 4 cups MAX 23-28 mins
White - regular, long
and medium grain
3 cups 3 1/2 cups 6 cups MAX 27-32 mins
Brown - regular, long
and medium grain
1 cup 1 1/2 cups 2 cups MAX 28-33 mins
Brown - regular, long
and medium grain
2 cups 3 cups 4 cups MAX 32-37 mins
Extra long grain white
rice
1 cup 1 1/3 cups 2 cups MAX 50-55 mins
Figure 5
Rice bowl
Steaming
bowl
Drip tray
Base
Figure 4

9
CARE AND MAINTENANCE
Unplug cord from outlet. Before cleaning allow steamer to cool. Never immerse the base, cord or plug
in water.
1. Empty the drip tray and the water reservoir.
2. Wash lid, steaming bowl(s), rice bowl and drip tray in hot, soapy water, rinse and dry all parts.
3. Clean reservoir with soapy water then wipe with damp cloth.
4. Do not use abrasive cleaners.
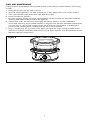
5. For more compact storage, the lower steaming bowl and the rice bowl can be stored inside the
steaming bowl above it with the lid on top (gure 6).
6. In hard water areas, the scale may build up on the heating element. If scale is allowed to
accumulate, food may not be cooked properly in the given time. Element should be cleaned every
7-10 uses. Pour 3 cups of clear vinegar into the water reservoir then ll water up to MAX level.
Do not use lid, steaming bowl, rice bowl and drip tray in this procedure.
7. Plug in, and set timer for up to 20 minutes. When the signal bell rings, unplug cord from outlet.
Allow the unit to cool completely before emptying the water reservoir. Use the cold water to rinse
the water reservoir several times.
Figure 6

10
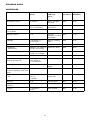
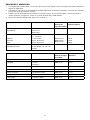
STEAMING GUIDE
VEGETABLES
Variety Weight/or number
pieces
Suggested
herbs and
spices
Water ll
line in base
Approx. time
(minutes)
Artichokes, whole 6 medium Garlic, tarragon,
dill seed
MAX 35-38
Asparagus, spears 1/2 -1 Ib (about
1/2” in diameter)
Lemon, thyme,
bay leaves
MIN 10-13
Beans, green/wax
cut or whole
1 Ib Dill seed MAX 15-18
Broccoli, spears 1 Ib Cilantro,
tarragon, crushed
red pepper
MIN 14-17
Cabbage 1 Ib (about 1/2
small head)
Savory, caraway
seed
MAX 22-25
Carrots 1 lb Mint, dill MIN 16-19
Cauliower
– whole head
Medium size (about 2
1/2 lbs untrimmed)
Rosemary, basil MAX 20-23
Corn on cob Up to 8 pieces
(2 3/4”-3” in length)
MAX 20-23
Mushrooms, whole -medium 10 ounces MIN 10-11
Onions, whole (to partially
cook for grilling use)
1 Ib medium
size (about 4-
2 1/2”diameter)
MIN 7-9
Peas – green 1/2 Ibs in pod Cilantro, garlic,
ginger
MIN 8-10
Peppers, whole -sweet green
or red (to partially, cook, then
stuff)
Up to 4 medium MIN 9-11
Potatoes, halved
- red
1 Ib (about 8 small, 1
1/2”-2”
in width)
Rosemary,
chives, dill
MAX 35-40
Spinach 1 lb Thyme, garlic MIN 14-16
Squash -summer yellow and
zucchini
1 Ib medium size Basil, oregano MIN 11-13
Turnips 1 Ib (about 5
small)
Basil, parsley MIN 14-16

11
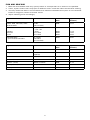
FISH AND SEAFOOD
1. Most sh and seafood cook very quickly. Steam in small portions or in amounts as specied.
2. Clams, oysters and mussels may open at different times. Check the shells to avoid over cooking.
3. You may steam sh llets in the rice bowl serve steamed seafood and sh plain or use seasoned
butter or margarine, lemon or favorite sauces.
4. Adjust steaming times accordingly.
Type of sh Amount Water ll line in
base
Approx. time
(minutes)
Fillets -Sole, Flounder, other
favorite llets
3/4 lbs
(1/4-1/2”thick)
MIN 10-12
Steaks
-Halibut
-Salmon
-Tuna
1-2 pieces
1-1 1/2 – Ibs
1”thick
3/4-1”thick
3/4-1”thick
MAX
MAX
MAX
13-14
19-22
20-23
Poached llets
- your favorite sh llets
1/2 -3/4 Ib.
(3-4 llets;
1/4 -1/2”thick)
MAX 30-35
Type of seafood Amount Water ll line in
base
Approx. time
(minutes)
Clams 1/2-1 Ib in shell MIN 12-17
King crab 1 Ib (about
6 pieces)
MIN 15-18
Lobster -tails 1 or 2 (7 to 8 ozs each) MIN 18-20
Mussels (fresh) 1 Ib in shell MIN 12-14
Oysters (fresh) About 1/2 dozen MIN 11-13
Scallops (fresh) 1/2 Ib shucked MIN 14-17
Shrimp 1 Ib in shell MIN 15-17

12
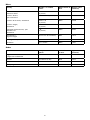
Meat
Variety Weight / or number
pieces
Water ll line in
base
Approx. time
(minutes)
Chicken breast,
boneless llets
1 1/4 Ibs
(4 pieces)
MAX 22-25
Chicken breast,
split with bone
1 - 1 1/4 Ibs (2 pieces) MAX 37-41
Chicken drumsticks, with bone about 1 Ib
(4 pieces)
MAX 32-36
Chicken thighs,
with bone
about 1 Ib
(4 pieces)
MAX 34-37
Poached chicken breast, split
-boneless or
with bone
1 Ib
(2 pieces)
MAX 45-47
Frankfurters -
regular length
Up to 1 Ib (8-10 franks) MIN 14-17
Sausage - fully cooked -Bratwurst Up to 1 Ibs MIN 17-19
-Kielbasa Up 1 3/4 Ibs MAX 19-21
Other
Food Weight / or number
pieces
Water ll line
in base
Approx. time
(minutes)
Eggs
-large size hard boiled
1-16 MIN 13-15
Apples 5 medium (2 lbs) MIN 10-13
Tamales 6-8 MIN 45-55
Dumplings 10-12 MIN 15

Limited TWO-YEAR Warranty
SENSIO Inc. hereby warrants that for a period of TWO YEARS from the date
of purchase, this product will be free from mechanical defects in material and
workmanship, and for 90 days in respect to non-mechanical parts. At its sole
discretion, SENSIO Inc. will either repair or replace the product found to be
defective, or issue a refund on the product during the warranty period.
The warranty is only valid for the original retail purchaser from the date of initial
retail purchase and is not transferable. Keep the original sales receipt, as proof
of purchase is required to obtain warranty validation. Retail stores selling this
product do not have the right to alter, modify, or in any way revise the terms and
conditions of the warranty.
EXCLUSIONS:
The warranty does not cover normal wear of parts or damage resulting from
any of the following: negligent use of the product, use of improper voltage or
current, improper routine maintenance, use contrary to the operating instructions,
disassembly, repair, or alteration by anyone other than qualied SENSIO Inc.
personnel. Also, the warranty does not cover Acts of God such as re, oods,
hurricanes, or tornadoes.
SENSIO Inc. shall not be liable for any incidental or consequential damages
caused by the breach of any express or implied warranty. Apart from the extent
prohibited by applicable law, any implied warranty of merchantability or tness
for a particular purpose is limited in time to the duration of the warranty. Some
states, provinces or jurisdictions do not allow the exclusion or limitation of
incidental or consequential damages, or limitations on how long an implied
warranty lasts, and therefore, the above exclusions or limitations may not apply to
you. The warranty covers specic legal rights which may vary by state, province
and/or jurisdiction.
HOW TO OBTAIN WARRANTY SERVICE:
You must contact Customer Service at our toll-free number: 1-866-832-4843.
A Customer Service Representative will attempt to resolve warranty issues
over the phone. If the Customer Service Representative is unable to resolve the
problem, you will be provided with a case number and asked to return the product
to SENSIO Inc. Attach a tag to the product that includes: your name, address,
daytime contact telephone number, case number, and description of the problem.
Also, include a copy of the original sales receipt. Carefully package the tagged
product with the sales receipt, and send it (with shipping and insurance prepaid)
to SENSIO Inc.’s address. SENSIO Inc. shall bear no responsibility or liability for
the returned product while in transit to SENSIO Inc.’s Customer Service Center.
13

14
MEDIDAS DE SEGURIDAD
IMPORTANTES
ADVERTENCIA: Cuando se utilizan aparatos eléctricos, se deben seguir
precauciones de seguridad básicas, entre ellas:
1. Lea todas las instrucciones.
2. No toque las supercies calientes. Use agarraderas para quitar la tapa o
cuando manipule recipientes calientes.
3. Para protegerse contra una descarga eléctrica, no sumerja el cable, el enchufe
ni la unidad base en agua.
4. Es necesario supervisar atentamente a los niños si usan aparatos o si están
cerca de ellos.
5. Desenchufe el aparato cuando no lo use. Desenchúfelo antes de colocarle o
quitarle partes y espere a que se enfríe antes de limpiarlo.
6. No opere ningún aparato con un cordón o con un enchufe dañado o después
de que el aparato ha funcionado inadecuadamente o ha sido dañado en
cualquier manera. Lleve el aparato al servicio técnico autorizado para
reparaciones.
7. El uso de accesorios o aditamentos que no sean los recomendados por
el fabricante de este aparato pueden causar lesiones o daños.
8. No utilice el aparato en exteriores.
9. No permita que el cable toque las supercies calientes.
10. No lo coloque cerca de un quemador a gas o eléctrico caliente, ni cerca de
un horno caliente.
12. Tenga sumo cuidado cuando traslade un aparato que contenga alimentos
o líquidos calientes.
12. Levante y abra la tapa cuidadosamente para evitar escaldaduras y deje que el
agua gotee dentro de la vaporera.
13. No coloque la unidad directamente debajo de muebles mientras esté en
funcionamiento, ya que este aparato produce mucho vapor.
14. Quedará algo de agua en el depósito de agua una vez que se haya apagado
la vaporera. Esto es normal.
15. No coloque partes de la vaporera en el microondas ni sobre una supercie
caliente.
16. Llene el depósito con agua antes de enchufar el cable de alimentación;
de lo contrario, puede dañar el aparato.
17. Si el cable de alimentación está dañado, debe ser reemplazado por el
fabricante, el agente de servicio técnico o personas igualmente calicadas
para evitar riesgos.
18. Este aparato no debe ser usado por niños u otras personas sin asistencia
o supervisión si sus capacidades físicas, sensoriales o mentales les impiden
utilizarlo de forma segura. Se debe supervisar a los niños para evitar que
jueguen con el aparato.
19. Para evitar una recarga en el circuito, no utilice otro aparato de alta potencia
en el mismo circuito.
20. Podrá usar un cable de extensión si tiene cuidado al usarlo.
Si usa un cable de extensión:
(a) el calibre del cable de extensión debe ser como mínimo igual al del
aparato, y
(b) el cable más largo debe manipularse de modo que no cuelgue por la
mesada ni la mesa, los niños no puedan jalarlo y las personas no puedan
tropezarse con él.

15
21. No sumerja la unidad base en agua u otros líquidos.
SOLO PARA USO DOMÉSTICO
GUARDE ESTAS
INSTRUCCIONES
OTRAS MEDIDAS DE
SEGURIDAD IMPORTANTES
NOTAS SOBRE EL CABLE
A. Se debe utilizar un cable de alimentación corto (o un cable de alimentación
desmontable) para reducir el riesgo de enredarse o tropezar con un cable más
largo.
B. Hay disponibles cables de alimentación o de extensión más largos y
desmontables, que se pueden utilizar si se usan con cuidado.
C. Si se usa un cable de alimentación o de extensión desmontables:
1. La capacidad eléctrica nominal del cable o de la extensión debe ser al menos
de la misma magnitud que la capacidad eléctrica del electrodoméstico.
2. Si el electrodoméstico tiene conexión a tierra, la extensión debe ser un cable
de 3 hilos con conexión a tierra.
3. El cable más largo debe colocarse de tal manera que no caiga sobre la
encimera o la mesa, donde los niños puedan jalarlo o tropezar
con él sin querer.
NOTAS SOBRE EL ENCHUFE
Este aparato tiene un enchufe polarizado (una clavija es más ancha que la
otra). Para reducir el riesgo de descarga eléctrica, este enchufe se debe colocar
en un tomacorriente polarizado en una sola dirección. Si el enchufe no entra
completamente en el tomacorriente, dé vuelta el enchufe. Si aun así no encaja,
llame a un electricista calicado. No modique el enchufe de ninguna manera.
ADVERTENCIA SOBRE EL PLASTIFICANTE
PRECAUCIÓN: Para evitar que el plasticante se transera sobre el acabado
de la encimera, la supercie de trabajo u otro mueble, coloque posavasos o
manteles individuales NO PLÁSTICOS entre el electrodoméstico y el acabado
de la encimera o la supercie. De lo contrario, el acabado puede oscurecerse o
pueden aparecer manchas o marcas permanentes.
ALIMENTACIÓN ELÉCTRICA
Si el circuito eléctrico está sobrecargado con otros artefactos, su electrodoméstico
puede dejar de funcionar correctamente. El electrodoméstico debe funcionar
en un circuito eléctrico separado de otros artefactos.
PRECAUCIÓN
Para evitar una descarga eléctrica, desconecte el aparato antes de quitar la tapa.
No contiene en su interior piezas que el usuario pueda reparar. Lleve a reparar
el aparato solo con personal técnico calicado.

16
PRECAUCIÓN DE SEGURIDAD
No exponga esta unidad a la lluvia ni a la humedad.
Alimentación: 120 V / 60Hz CA solamente
Si conecta la unidad a otra fuente de alimentación, podría dañarla
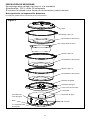
Descripción De La Vaporera De Alimentos
El producto puede diferir levemente de las ilustraciones.
Figura 1
Tapa
Bol de vapor (2)
Bol de vapor (3)
Sostenedores de huevos
Sostenedores de huevos
Sostenedores de huevos
Recipiente de arroz
Bol de vapor (1)
Bandeja de goteo
Vertedero de agua
Calentador
Anillo turbo desmontable
Depósito de agua
60 minutos
Base
Luz indicadora de
encendido
Indicador del
nivel de agua

17
Antes de utilizar por primera vez
1. Desembale cuidadosamente la vaporera de
alimentos y retire todos los materiales de
embalaje.
2. Lave la tapa, el recipiente para arroz, los 3
recipientes de cocción al vapor y la bandeja
de goteo en agua tibia jabonosa o en la
rejilla superior del lavavajillas.
3. Limpie el interior del depósito y el elemento
de calentamiento con un paño húmedo.
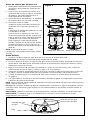
4. Para armar la olla al vapor:
Coloque el anillo turbo sobre el elemento
calentador con la abertura grande hacia
abajo
b. Sostenga la bandeja de goteo por las asas
y colóquela en la base.
d. Para cocinar al vapor en un solo nivel,
alinee el recipiente de cocción al vapor que
tiene la marca #1 sobre la bandeja de goteo
y coloque encima la tapa transparente.
d. Para agregar niveles adicionales de
cocción, coloque los recipientes de cocción
al vapor que tienen las marcas #2 y #3 en
forma rme sobre el recipiente de cocción al
vapor #1.
NOTA: El recipiente de arroz y la tapa
transparente suministrado funciona para ambos
envases.
Cómo Utilizar
1. Coloque la unidad sobre una supercie plana y rme con el espacio adecuado.
PRECAUCIÓN: No coloque la unidad debajo de los gabinetes de pared.
2. Llenar el depósito de agua con agua fría del grifo hasta la línea de llenado apropiado (ver Figura 3).
No exceda la línea MAX como el llenado excesivo se necesitará más tiempo para producir vapor y
prolongar el tiempo de cocción.
3. Siga las instrucciones de montaje mencionadas en “Antes de usar por primera vez”, monte los
recipientes de cocción al vapor y coloque la tapa en el nivel superior.
4. Coloque el recipiente vaporizador dentro de la base, conecte el cable de alimentación a la toma de
corriente y ajustar el temporizador para el tiempo de cocción deseado (máximo 60 minutos).
5. Cuando el tiempo expira, una campana de señal se escuchará y la luz indicadora de encendido
se apagará.
6. Use agarraderas al manipular el envase humeante, bandeja de goteo o recipiente de arroz durante
o después del proceso de cocción
NOTA: Carne o pescado siempre debe ser colocado en el recipiente inferior de vapor para evitar jugos que
gotean sobre la capa inferior.
Consejos: Para acentuar el sabor, agregue el caldo de pollo o vino blanco al agua en el depósito. Cerveza,
vino tinto, aceite, extractos o jugos de frutas no son recomendables ya que pueden manchar o dañar el
calentador.
IMPORTANTE: Coloque los alimentos en el centro del plato y trate de no bloquear los oricios de vapor.
IMPORTANTE: La unidad de vapor y los componentes no son para uso en microondas u hornos
convencionales, o en la estufa.
Figura 3
Base
Indicador del nivel
de agua
Nivel máximo de agua
Nivel mínimo de agua
Single layer steaming Multi layer steaming
1
1
2
3
Figura 2

18
Agregar agua al embalse de la mitad del ciclo
El depósito de agua se puede volver a llenar seguramente mientras la máquina está funcionando.
Deslice el cajón de entrada y añadir la cantidad deseada de agua para prolongar su ciclo vertiendo agua en
las asas de la bandeja de goteo, que también funcionan como entrada de agua.
Cuidado: No retire los recipientes de vapor ni la bandeja de goteo durante el ciclo de cocción. El vapor que
se emitirá está ardiendo
Huevos al vapor
Los 3 recipientes de cocción al vapor se pueden usar para cocer huevos. Hay oricios que son para encajar
6 huevos en cada capa (Figura 4).
Granos De Arroz
Al cocinar en el recipiente de arroz, añadir el arroz, los condimentos y agua directamente en el recipiente
y llenar el depósito de agua hasta la linea apropiada.
IMPORTANTE: Los estándares de la industria para el arroz una taza de arroz (180 mL) no son iguales a una
medida estándar de EE. UU. taza (240 ml). Para obtener los mejores resultados con el tiempo de cocción
sugerido, mida de acuerdo a las directrices de la industria del arroz.
1. La vaporera incluye un recipiente de arroz con capacidad para 5 tazas (cocida).
2. Medir con precisión el arroz, el agua y los condimentos directamente en el recipiente y llenar el
depósito de agua hasta la linea apropiada.
3. En el tiempo mínimo sugerido en la guía de vapor, remover el arroz y vericar la consistencia.
Tenga cuidado de no derramar la condensación en el tazón de arroz.
NOTA: El recipiente puede ser utilizado en ambas envases humeantes de preparar el arroz, granos
o alimentos con salsas o líquidos (Figura 5).
Tipo de arroz Mezcla en recipiente
de arroz
Aprox.
producción
de arroz
cocido
Línea de
llenado de
agua en la
base
Tiempo
aprox.
(minutos)
Cant. de
arroz crudo
Cant. de agua
fría
Blanco - grano regular,
largo y mediano
1 taza 1 1/2 tazas 2 tazas MAX (máx.) 19-24
Blanco - grano regular,
largo y mediano
2 tazas 2 1/2 tazas 4 tazas MAX (máx.) 23-28
Blanco - grano regular,
largo y mediano
3 tazas 3 1/2 tazas 6 tazas MAX (máx.) 27-32
Integral: grano regular,
largo y mediano
1 taza 1 1/2 tazas 2 tazas MAX (máx.) 28-33
Integral: grano regular,
largo y mediano
2 tazas 3 tazas 4 tazas MAX (máx.) 32-37
Grano de arroz blanco
extra largo
1 taza 1 1/3 tazas 2 tazas MAX (máx.) 50-55
Figura 5
Bol para arroz
Bol de vapor
Bandeja
de goteo
Base
Figura 4

19
Cuidado Y Mantenimiento
Desenchufe la unidad. Antes de limpiar la vaporera, espere a que se enfríe. Nunca sumerja la base, el
cable ni el enchufe en agua.
1. Vacíe la bandeja de goteo y el depósito de agua.
2. Lave la tapa, el bol de vapor, el bol para arroz y la bandeja de goteo con agua caliente y detergente.
Enjuague y seque todas las partes.
3. Limpie el depósito con agua y detergente y luego pásele un paño húmedo.
4. No utilice limpiadores abrasivos.
5. Para un almacenamiento más compacto, el recipiente de cocción al vapor inferior y el recipiente
para arroz se pueden guardar dentro del recipiente de cocción al vapor que está encima, con la tapa
en la parte superior (Figura 6).
6. En áreas de agua dura, se pueden acumular incrustaciones en el calentador. Si se acumulan
incrustaciones, es posible que los alimentos no se cocinen adecuadamente en un tiempo
determinado. El calentador se debe limpiar cada 7 a 10 usos. Coloque 3 tazas de vinagre en el
depósito de agua y luego llene con agua hasta el nivel máximo de llenado (MAX). Durante este
procedimiento no se debe utilizar la tapa, el bol de vapor, el bol para arroz ni la bandeja de goteo.
7. Enchufe el aparato y congure el temporizador en un máximo de 20 minutos. Cuando el
temporizador emita la señal sonora, desenchufe el cable del tomacorriente. Espere a que la unidad
se enfríe completamente antes de vaciar el depósito de agua. Enjuague el depósito con agua fría
varias veces.
Figura 6

20
GUÍA DE VAPOR
VEGETALES
Tipo de vegetal Peso/Cant. de piezas Hierbas y especias
sugeridas
Línea de
llenado de
agua en la
base
Tiempo
aprox.
(minutos)
Alcauciles enteros 6 medianos Ajo, estragón,
semillas de
eneldo
MAX (máx.) 35-38
Espárragos enteros 1/2 o 1 libra
(aprox. 1/2” de
diámetro)
Limón, hojas de
laurel, tomillo
MIN (mín.) 10-13
Porotos (verdes o de
manteca), cortados o enteros
1 libra Semillas de
eneldo
MIN (mín.) 15-18
Flores de brócoli 1 libra Cilantro, estragón,
aplastado
pimiento rojo
MIN (mín.) 14-17
Repollo 1 libra (medio repollo
pequeño)
Gustoso, comino MAX (máx.) 22-25
Zanahorias 1 libra Menta, eneldo MIN (mín.) 16-19
Colior entero Mediano (aprox. 2 1/2
libras sin recortar)
Romero, albahaca MAX (máx.) 20-23
Mazorca de maíz Hasta 8 piezas
(2 3/4” a 3” de largo)
MAX (máx.) 20-23
Hongos enteros, medianos 10 onzas MIN (mín.) 10-11
Cebollas, enteras (cocción
parcial antes de asarlas)
1 libra de cebollas
medianas
(aprox. 4- 2 1/2”
de diámetro)
MIN (mín.) 7-9
Arvejas 1/2 libras en vaina Cilantro, ajo,
jengibre
MIN (mín.) 8-10
Ajíes enteros verdes o
rojos (cocción parcial antes
derellenar)
Hasta 4 medianos MIN (mín.) 9-11
Papas en mitades, rojas 1 libra
Aprox. 8 pequeñas
(1 1/2” a 2” de ancho)
Romero, cebollin,
eneldo
MAX (máx.) 35-40
Espinaca 1 libra Tomillo, ajo MIN (mín.) 14-16
Calabaza
amarilla y zucchini
1 libra mediana Albahaca,
oregano
MIN (mín.) 11-13
Nabo 1 libra
(5 pequeños aprox.)
Albahaca, perejil MIN (mín.) 14-16

21
PESCADOS Y MARISCOS
1. La mayoría de los pescados y mariscos se cocinan muy rápido. Cocine al vapor porciones pequeñas
según se especica.
2. Las almejas, las ostras y los mejillones pueden abrirse en distintos momentos. Controle las conchas
para evitar que se pasen de cocción.
3. Puede cocinar los letes de pescado en el bol para arroz, servir los pescados y mariscos solos o
utilizar manteca, margarina, limón o su salsa favorita para saborizarlos.
4. Ajuste los tiempos de cocción según sea necesario.
Tipo de pescado Cantidad Línea de
llenado de
agua en la base
Línea de llenado de
agua en la base
Filetes, lenguado, rodaballo u
otros letes
3/4 libra
(1/4 a 1/2”
de ancho)
MIN (mín.) 10-12
Filetes
-Halibut
-Salmón
-Atún
1 o 2
1-1 1/2 libras
1” de ancho
3/4-1” de ancho
3/4-1” de ancho
MAX (máx.)
MAX (máx.)
MAX (máx.)
13-14
19-22
20-23
Filetes escalfados, sus letes de
pescado favoritos
1/2 -3/4 Iibras
(3 o 4 letes; 1/4 -1/2” de
ancho)
MAX (máx.) 30-35
Tipo de mariscos Cantidad Línea de
llenado de agua
en la base
Tiempo aprox.
(minutos)
Almejas 1/2-1 Iibra con concha MIN (mín.) 12-17
Cangrejo 1 Iibra
(6 aprox.)
MIN (mín.) 15-18
Langosta, cola 1 o 2 (7 a 8 onzas cada una) MIN (mín.) 18-20
Mejillones (frescos) 1 Iibra con concha MIN (mín.) 12-14
Ostras (frescas) 1/2 docena aprox. MIN (mín.) 11-13
Vieiras (frescas) 1/2 libra, peladas MIN (mín.) 14-17
Camarones 1 Iibra sin pelar MIN (mín.) 15-17

22
CARNES
Tipo de carne Peso/Cant. de piezas Línea de
llenado de
agua en la
base
Tiempo
aprox.
(minutos)
Pollo, letes de pechuga
deshuesados
1-1 1/4 Iibras
(4 piezas)
MAX (máx.)
22-25
Pollo, pechuga con hueso 1 a 1 1/4 Iibras
(2 piezas)
MAX (máx.)
37-41
Pollo, pata con hueso 1 libra aprox.
(4 piezas)
MAX (máx.)
32-36
Pollo, muslos con hueso 1 libra aprox.
(4 piezas)
MAX (máx.)
34-37
Pechuga de pollo escalfada,
cortada, con o sin hueso
1 libra
(2 piezas)
MAX (máx.)
45-47
Salchicha de viena
- largo estándar
Hasta 1 libra
(8 a 10 salchichas)
MIN (mín.)
14-17
Salchicha bien cocida
-Bratwurst
Hasta 1 libra
MIN (mín.)
17-19
-Kielbasa Hasta 3/4 Iibras
MAX (máx.)
19-21
OTROS
Otros alimentos Peso/Cant. de piezas Línea de
llenado de
agua en la
base
Tiempo
aprox.
(minutos)
Huevos
- Grandes
- Cocidos
1 a 16
MIN (mín.)
13-15
Manzanas 5 medios (2 libras)
MIN (mín.)
10-13
Tamales 6-8
MIN (mín.)
45-55
Dumplings 10-12
MIN (mín.)
15

Garantía limitada de DOS AÑOS
Mediante la presente, SENSIO Inc. garantiza que, durante el plazo de DOS AÑOS
a partir de la fecha de compra, este producto no presentará defectos mecánicos
en el material ni en la mano de obra, y durante 90 días, no los presentará en las
piezas no mecánicas. A su entera discreción, SENSIO Inc. reparará o reemplazará
el producto que resulte defectuoso, o emitirá un reembolso por el producto
durante el plazo de garantía.
Esta garantía es válida únicamente para el comprador minorista original a partir
de la fecha de compra minorista inicial y no es transferible. Conserve el recibo de
compra original, ya que se exige una prueba de compra para obtener la validación
de la garantía. Las tiendas minoristas no tienen derecho a alterar, modicar ni
corregir de ninguna manera los términos y condiciones de la garantía.
EXCLUSIONES:
La garantía no cubre el desgaste normal de las piezas ni el daño ocasionado
por cualquiera de las siguientes causas: uso negligente del producto, uso de
un voltaje o corriente incorrectos, mantenimiento de rutina inadecuado, uso
contrario al de las instrucciones de funcionamiento, desarmado, reparación o
alteración a cargo de personas que no sean miembros del personal calicado
de SENSIO Inc. Asimismo, la garantía no cubre actos de la naturaleza, como
incendios, inundaciones, huracanes o tornados.
SENSIO Inc. no asumirá responsabilidad por daños incidentales o resultantes
ocasionados por la violación de cualquier garantía expresa o implícita. Salvo en
la medida en que lo prohíban las leyes aplicables, cualquier garantía implícita de
comerciabilidad o aptitud para un propósito particular se limita temporalmente
a la duración de la garantía. Algunos estados, provincias o jurisdicciones no
permiten la exclusión ni la limitación de daños incidentales o resultantes, o
limitaciones sobre la duración de una garantía implícita y, por lo tanto, es posible
que las exclusiones o limitaciones mencionadas no le correspondan. La garantía
cubre derechos legales especícos que pueden variar de un estado, una provincia
o una jurisdicción a otros.
CÓMO OBTENER EL SERVICIO DE GARANTÍA:
Debe comunicarse con el Servicio de atención al cliente a nuestro número
telefónico gratuito: 1-866-832-4843. Un representante del Servicio de atención
al cliente intentará resolver los problemas referidos a la garantía por teléfono.
Si este no puede resolver el problema, le proporcionarán un número de caso
y le solicitarán que devuelva el producto a SENSIO Inc. Adhiera una etiqueta
al producto que incluya: su nombre, dirección, número telefónico de contacto
durante el día, número de caso y descripción del problema. Además, incluya
una copia del recibo de compra original. Envuelva cuidadosamente el producto
etiquetado con el recibo de compra, y envíelo (con el envío y el seguro
prepagados) a la dirección de SENSIO Inc. SENSIO Inc. no asumirá obligación ni
responsabilidad alguna por el producto devuelto que esté en el trayecto hacia el
Centro de servicio al cliente de SENSIO Inc.
23

BELLA is a registered trademark of Sensio Inc., Montréal, Canada H3C 4S9.
All rights reserved.
BELLA es una marca registrada de Sensio Inc., Montréal, Canada H3C 4S9.
Todos los derechos reservados.
For customer service questions or comments
Dudas o comentarios contactar el departamento de servicio al cliente
1-866-832-4843 / [email protected]
SO-316328 Rev. 4
-
 1
1
-
 2
2
-
 3
3
-
 4
4
-
 5
5
-
 6
6
-
 7
7
-
 8
8
-
 9
9
-
 10
10
-
 11
11
-
 12
12
-
 13
13
-
 14
14
-
 15
15
-
 16
16
-
 17
17
-
 18
18
-
 19
19
-
 20
20
-
 21
21
-
 22
22
-
 23
23
-
 24
24


Bella 3 Tier Food Steamer El manual del propietario
- Categoría
- Cocinas de vapor
- Tipo
- El manual del propietario
en otros idiomas
Artículos relacionados
Otros documentos
-
Oster 5712 Manual de usuario
-
Black and Decker Flavor Scenter Steamer Plus HS900 Manual de usuario
-
Black & Decker Flavor Scenter Handy Steamer HS800 Manual de usuario
-
Black & Decker Flavor Scenter Steamer HS1776 Manual de usuario
-
-
-
Deni 7697 Instructions For Proper Use And Care Manual
-
-
-
Philips HD9120 Manual de usuario