Zipper Maschinen ZI-KGS255DS El manual del propietario
- Categoría
- Herramientas eléctricas
- Tipo
- El manual del propietario

Edition: 12.11.2019 – Revision - 00 – RAR - DE/EN/ES
Originalfassung
DE
BETRIEBSANLEITUNG
KAPP- & GEHRUNGSSÄGE
Übersetzung / Translation
EN
USER MANUAL
MITER SAW
ES
INSTRUCCIONES DE
SERVICIO
SIERRA TRONZADORA E INGLETADORA
ZI-KGS255DS
EAN: 9120039234052

INHALT / INDEX
ZIPPER MASCHINEN GmbH www.Zipper-Maschinen.at 2
ZI-KGS255DS
1 INHALT / INDEX
1 INHALT / INDEX 2
2 SICHERHEITSZEICHEN / SAFETY SIGNS / SEÑALES DE SEGURIDAD 5
3 TECHNIK / TECHNICS / TÉCNICA 6
3.1 Lieferumfang / delivery content / Volumen de suministro ............................ 6
3.2 Komponenten / component / Componentes .................................................. 6
3.3 Technische Daten / technical data / Datos técnicos ...................................... 7
4 VORWORT (DE) 9
5 SICHERHEIT 10
5.1 Bestimmungsgemäße Verwendung ............................................................. 10
5.1.1 Technische Einschränkungen .................................................................... 10
5.1.2 Verbotene Anwendungen / Gefährliche Fehlanwendungen ............................ 10
5.2 Anforderungen an Benutzer......................................................................... 10
5.3 Sicherheitseinrichtungen ............................................................................. 11
5.4 Allgemeine Sicherheitshinweise .................................................................. 11
5.5 Elektrische Sicherheit .................................................................................. 12
5.6 Spezielle Sicherheitshinweise für diese Maschine ....................................... 12
5.7 Gefahrenhinweise ........................................................................................ 13
6 TRANSPORT 14
7 MONTAGE 14
7.1 Lieferumfang prüfen .................................................................................... 14
7.2 Der Arbeitsplatz .......................................................................................... 14
7.3 Maschine zusammenbauen .......................................................................... 14
8 BETRIEB 15
8.1 Kontrolle vor der Inbetriebnahme ............................................................... 15
8.2 Bedienung ................................................................................................... 15
8.2.1 Transportposition Maschinenkopf einrasten / entriegeln. .............................. 15
8.2.2 Winkellage Arbeitstisch einstellen. ............................................................ 15
8.2.3 Winkellage Sägearm/Maschinenkopf einstellen. .......................................... 15
8.2.4 Anschläge einstellen. ............................................................................... 16
8.2.5 Sägeblattgeschwindigkeit einstellen .......................................................... 16
8.2.6 Schnitttiefenbegrenzung einstellen ............................................................ 16
8.2.7 Anschluss an eine Absauganlage ............................................................... 16
8.2.8 Maschine EIN-AUS schalten ...................................................................... 16
8.3 Betriebsarten .............................................................................................. 17
8.3.1 Kappschnitte .......................................................................................... 17
8.3.2 Zugschnitte ............................................................................................ 17
8.3.3 Nutschnitte ............................................................................................ 18
9 REINIGUNG, WARTUNG, LAGERUNG, ENTSORGUNG 18
9.1 Reinigung .................................................................................................... 18
9.2 Wartung ...................................................................................................... 18
9.2.1 Instandhaltungs- und Wartungsplan .......................................................... 18
9.2.2 Einrichten der Winkellage (mittels Anschlagwinkel) ..................................... 19
9.2.3 Sägeblattwechsel .................................................................................... 20
9.2.4 Laser einrichten ...................................................................................... 20
9.2.5 Spänefangsack leeren/wechseln ............................................................... 21
9.2.6 Kohlebürsten kontrollieren / wechseln ....................................................... 21
9.2.7 Tischeinlage austauschen ......................................................................... 21
9.3 Lagerung ..................................................................................................... 22
9.4 Entsorgung .................................................................................................. 22
10 FEHLERBEHEBUNG 22
11 PREFACE (EN) 23
12 SAFETY 24
12.1 Intended Use of the Machine ....................................................................... 24
12.1.1 Technical Restrictions .......................................................................... 24
12.1.2 Prohibited Use / Forseeable Misuse ........................................................ 24
12.2 User Requirements ...................................................................................... 24

INHALT / INDEX
ZIPPER MASCHINEN GmbH www.Zipper-Maschinen.at 3
ZI-KGS255DS
12.3 Safety Devices ............................................................................................. 25
12.4 General Safety Instructions ......................................................................... 25
12.5 Electrical Safety ........................................................................................... 26
12.6 Special Safety Instructions for Woodworking machines .............................. 26
12.7 Hazard Warnings ......................................................................................... 27
13 TRANSPORT 28
14 ASSEMBLY 28
14.1 Checking Scope of Supply ............................................................................ 28
14.2 The workplace ............................................................................................. 28
14.3 Assembling the machine .............................................................................. 28
15 OPERATION 29
15.1 Initial check before start ............................................................................. 29
15.2 Operation .................................................................................................... 29
15.2.1 Locking / unlocking the machine head in the transport position ................. 29
15.2.2 Setting the angular position of the worktable .......................................... 29
15.2.3 Setting the angular position of the machine head .................................... 29
15.2.4 Setting the stops/fences. ..................................................................... 30
15.2.5 Setting saw blade speed ...................................................................... 30
15.2.6 Setting cutting depth limiting ................................................................ 30
15.2.7 Connection to a dust collection system ................................................... 30
15.2.8 Switch machine ON-OFF ....................................................................... 30
15.3 Operation modes ......................................................................................... 31
15.3.1 Mitre cuts ........................................................................................... 31
15.3.2 Sliding cuts ........................................................................................ 31
15.3.3 Slot cuts ............................................................................................ 32
16 CLEANING, MAINTENANCE, STORAGE, DISPOSAL 32
16.1 Cleaning ...................................................................................................... 32
16.2 Maintenance ................................................................................................ 32
16.2.1 Maintenance schedule .......................................................................... 32
16.2.2 Adjusting the angular position (by means of stop angle) .......................... 33
16.2.3 Saw blade change ............................................................................... 34
16.2.4 Setting the Laser ................................................................................. 34
16.2.5 Emptying/changing the chip bag ........................................................... 35
16.2.6 Checking / changing carbon brusher ...................................................... 35
16.2.7 Exchange table insert .......................................................................... 35
16.3 Storage ........................................................................................................ 35
16.4 Disposal ....................................................................................................... 36
17 TROUBLESHOOTING 36
18 PRÓLOGO (ES) 37
19 SEGURIDAD 38
19.1 Uso conforme a las especificaciones ............................................................ 38
19.1.1 Limitaciones técnicas ........................................................................... 38
19.1.2 Aplicaciones prohibidas / aplicaciones indebidas peligrosas ....................... 38
19.2 Requisitos del usuario ................................................................................. 38
19.3 Dispositivos de seguridad ............................................................................ 39
19.4 Indicaciones generales de seguridad ........................................................... 39
19.5 Seguridad eléctrica ...................................................................................... 40
19.6 Indicaciones especiales de seguridad para esta máquina ............................ 40
19.7 Advertencias de peligro ............................................................................... 41
20 TRANSPORTE 41
21 MONTAJE 42
21.1 Comprobación del volumen de suministro ................................................... 42
21.2 El lugar de trabajo ....................................................................................... 42
21.3 Montaje de la máquina ................................................................................ 42
22 FUNCIONAMIENTO 43
22.1 Comprobaciones antes de la puesta en marcha ........................................... 43
22.2 Manejo ........................................................................................................ 43

INHALT / INDEX
ZIPPER MASCHINEN GmbH www.Zipper-Maschinen.at 4
ZI-KGS255DS
22.2.1 Enclavamiento / desenclavamiento de la posición de transporte del cabezal
de la máquina. ............................................................................................... 43
22.2.2 Ajuste de la posición angular de la mesa de trabajo. ................................ 43
22.2.3 Ajuste de la posición angular del brazo de la sierra/cabezal de la máquina. 43
22.2.4 Ajuste de los topes. ............................................................................. 44
22.2.5 Ajuste de la velocidad de la hoja de la sierra .......................................... 44
22.2.6 Ajuste del límite de la profundidad de corte ............................................ 44
22.2.7 Conexión a un sistema de aspiración ..................................................... 44
22.2.8 Encendido / apagado de la máquina ...................................................... 44
22.3 Modos de funcionamiento ............................................................................ 45
22.3.1 Tronzado ............................................................................................ 45
22.3.2 Corte deslizante .................................................................................. 45
22.3.3 Ranurado ........................................................................................... 46
23 LIMPIEZA, MANTENIMIENTO, ALMACENAMIENTO Y ELIMINACIÓN DE
RESIDUOS 46
23.1 Limpieza ...................................................................................................... 46
23.2 Mantenimiento ............................................................................................ 46
23.2.1 Programa de conservación y de mantenimiento....................................... 46
23.2.2 Ajuste de la posición angular (con el ángulo del tope) .............................. 47
23.2.3 Sustitución de la hoja de la sierra .......................................................... 48
23.2.4 Ajuste del láser ................................................................................... 48
23.2.5 Vaciado/sustitución de la bolsa colectora de virutas ................................. 49
23.2.6 Comprobación / sustitución de las escobillas de carbón ............................ 49
23.2.7 Sustitución del suplemento de la mesa .................................................. 49
23.3 Almacenamiento .......................................................................................... 50
23.4 Eliminación de residuos ............................................................................... 50
24 SUBSANACIÓN DE ERRORES 50
25 SCHALTPLAN / WIRING DIAGRAM / DIAGRAMA DE CABLEADO 51
26 ERSATZTEILE / SPARE PARTS / PIEZAS DE RECAMBIO 51
26.1 Ersatzteilbestellung / spare parts order / Pedido de piezas ........................ 51
26.2 Explosionszeichnung / exploded view / Vista de despiece .......................... 52
27 EU-KONFORMITÄTSERKLÄRUNG / CE-CERTIFICATE OF CONFORMITY
/ DECLARACIÓN DE CONFORMIDAD CE 54
28 GEWÄHRLEISTUNG (DE) 55
29 WARRANTY GUIDELINES (EN) 56
30 GARANTÍA (ES) 57
31 PRODUKTBEOBACHTUNG | PRODUCT MONITORING 58

SICHERHEITSZEICHEN / SAFETY SIGNS / SEÑALES DE SEGURIDAD
ZIPPER MASCHINEN GmbH www.Zipper-Maschinen.at 5
ZI-KGS255DS
2 SICHERHEITSZEICHEN / SAFETY SIGNS / SEÑALES DE
SEGURIDAD
DE
SICHERHEITSZEICHEN
BEDEUTUNG DER SYMBOLE
EN
SAFETY SIGNS
DEFINITION OF SYMBOLS
ES
SEÑALES DE SEGURIDAD
SIGNIFICADO DE LOS SÍMBOLOS
DE
CE-KONFORM! - Dieses Produkt entspricht den EG-Richtlinien.
EN
CE-Conformal! - This product complies with the EC-directives.
ES
¡CONFORMIDAD CE! - Este producto cumple con las directivas CE.
DE
Benutzen von Handschuhen verboten!
EN
Do not use wearing gloves!
ES
¡Prohibido utilizar guantes!
DE
ANLEITUNG LESEN! Lesen Sie die Betriebsanleitung aufmerksam
durch und machen Sie sich mit den Bedienelementen Ihrer
Maschine gut vertraut, um sie ordnungsgemäß bedienen und
warten zu können und so Schäden an Mensch und Maschine
vorzubeugen.
EN
READ THE MANUAL! Read these operating instructions carefully
and familiarize yourself well with the operating elements of your
machine in order to be able to operate and maintain it properly
and thus prevent damage to man and machine.
ES
¡LEER LAS INSTRUCCIONES! Lea atentamente las instrucciones
de servicio y familiarícese con los elementos de mando de la
máquina para poder manejarla correctamente y llevar a cabo
debidamente los trabajos de mantenimiento de la misma y, de
este modo, evitar que se produzcan daños personales y en la
máquina.
DE
Maschine vor Wartung und Pausen ausschalten und Netzstecker
ziehen!
EN
Switch off the machine before maintenance and breaks and pull out
the mains plug!
ES
¡Pare la máquina y desconéctela de la red eléctrica antes de llevar
a cabo trabajos de mantenimiento y antes de las pausas!
DE
Persönliche Schutzausrüstung
EN
Personal Protection Equipment
ES
Equipo de protección individual
DE
Warnung vor spitzen Gegenständen!
EN
Warning of sharp objects!
ES
¡Advertencia frente a objetos puntiagudos!
DE
Achtung Laserstrahlung, Nicht in den Strahl blicken!
EN
Attention Laser light, Do not look into the beam!
ES
Atención radiación láser. ¡No mire el rayo!
DE Warnschilder und/oder Aufkleber an der Maschine, die unleserlich sind oder die
entfernt wurden, sind umgehend zu erneuern!
EN Missing or non-readable security stickers have to be replaced immediately!
ES ¡Deben sustituirse inmediatamente los letreros de advertencia y/o las pegatinas
que haya en la máquina, que se hayan vuelto ilegibles o se hayan retirado!

TECHNIK / TECHNICS / TÉCNICA
ZIPPER MASCHINEN GmbH www.Zipper-Maschinen.at 6
ZI-KGS255DS
3 TECHNIK / TECHNICS / TÉCNICA
3.1 Lieferumfang / delivery content / Volumen de suministro
1x Maschine / machine / Máquina
1x Sägeblatt 48Zähne / saw balde 48T / Hoja
de sierra de 48 dientes
Ø255 x 30 x 2,2 mm
1x Spänefangsack / chip collection bag / Bolsa
colectora de virutas
1x Sägeblatt 40Zähne / saw balde 40T / Hoja
de sierra de 40 dientes
Ø254 x 30 x 2,8 mm
2x Verlängerungstisch / extension table /
Mesa de extensión
Werkzeug / tools / Herramienta
1x Kohlebürsten-set / carbon brush set /
Juego de escobillas de carbón
Bedienungsanleitung / user manual /
Instrucciones de uso
1x Spanvorrichtung / clamping device /
Dispositivo de sujeción
3.2 Komponenten / component / Componentes
ZI-KGS255DS
1
Feststellschraube Maschinenkopfschwenkung /
fixation screw machine head-tilt / Tornillo de
fijación de la inclinación del cabezal de la
máquina
20
Beweglicher Sägeblattschutz / moveable saw
blade guard / Protección móvil de la hoja de la
sierra
2
Neigungsbegrenzung / tilt protection / Tope de
inclinación
21
Absauganschluss / Dust collection port /
Conexión del sistema de aspiración
3
Feststellschraube Tischverlängerung /
fixation screw table extension / Tornillo de
fijación de la extensión de la mesa
22
Schnitttiefeneinstellschraube / screw for cutting
depth limiting / Tornillo de ajuste de la
profundidad de corte
4
Tischverlängerung / table extension /
Extensión de la mesa
22-
01
Anschlag Schnitttiefeneinstellung / stop for
cutting depth limiting / Tope del ajuste de la
profundidad de corte
5
Skala Winkeleinstellung Tisch /
scale for table angle adjustment / Escala del
ajuste angular de la mesa
23
Fixierschraube Zugeinrichtung / fixation screw
sliding mechanism / Tornillo de fijación del
dispositivo deslizante
6
Fixierhebel Winkeleinstellung Tisch / fixation
lever angle adjustment table / Palanca de
fijación del ajuste angular de la mesa
24
Fixierschraube Anschlag / fixation screw fence
/ Tornillo de fijación del tope
7
Entriegelungshebel für Winkeleinstellung Tisch
/ position angle adjustment lever / Palanca de
desbloqueo del ajuste angular de la mesa
25
Justierschraube 90° Schnitt / adjusting screw
90° cut / Tornillo de ajuste del corte de 90°

TECHNIK / TECHNICS / TÉCNICA
ZIPPER MASCHINEN GmbH www.Zipper-Maschinen.at 7
ZI-KGS255DS
8
Einstellschraube Tischabstützung / adjusting
screw table support / Tornillo de ajuste del
soporte de la mesa
26
Justierschraube 45° Schnitt / adjusting screw
45° cut / Tornillo de ajuste del corte de 45°
9
Anschlag / fence / Tope
27
Zugeinrichtung / sliding mechanism /
Dispositivo deslizante
9-1
Anschlag (Einstellbar) / fence (adjustable) /
Tope (ajustable)
28
Wahlschalter Sägeblattdrehzahl / Saw blade
speed selector switch / Interruptor selector de
velocidad de la hoja de la sierra
10
Zeiger Maschinenkopfschwenkwinkel / pointer
machine head angle adjustment / Indicador del
ángulo de inclinación del cabezal de la máquina
29
EIN-AUS-Schalter Laser / ON-OFF-switch laser
/ Interruptor ON/OFF del láser
10-1
Skala Maschinenkopfschwenkwinkel / scale
machine head angle adjustment / Escala del
ángulo de inclinación del cabezal de la máquina
30
Befestigungsflansch Sägeblatt / outer fixation
flange saw-blade / Brida de fijación de la hoja
de la sierra
11
Verriegelungsknopf Transportstellung / locking
bolt transport position / Botón de bloqueo de la
posición de transporte
31
Flanschschraube Sägeblatt / flange screw saw-
blade / Tornillo de la brida de la hoja de la
sierra
12
Motor / motor / Motor
32
Schwenkbarer Tisch / rotary table / Mesa giratoria
13
Abeckung Kohlebürsten / cover carbon brush /
Cubierta de escobillas de carbón
33
Zeiger Winkellage Maschinenkopf / pointer
angle adjustment machine head / Indicador
posición angular del cabezal de la máquina
14
Handgriff / handle / Mango
34
Maschinenkopf / machine head / Cabezal de la
máquina
15
Verriegelungsknopf START / lock switch start /
Botón de bloqueo de ARRANQUE
35
Sägeblatt / saw blade / Hoja de la sierra
16
EIN-AUS-Schalter Säge / ON-OFF-Switch saw /
Interruptor ON/OFF de la sierra
36
Sägewellen-Verriegelung (Sägeblatttausch) /
saw shaft lock (saw blade change) / Dispositivo
de bloqueo del eje de la sierra (sustitución de
la hoja de la sierra)
17
Laser / laser / Láser
37
Sägetisch (Fixteil) / fixed saw table / Mesa de
la sierra (componente fijo)
18
Spanvorrichtung / clamping device /
Dispositivo de sujeción
38
Spänefangsack / chip collection bag** / Bolsa
colectora de virutas**
19
Tischeinlage / table insert / Suplemento de la
mesa
**nicht abgebildet / not shown / no representada
3.3 Technische Daten / technical data / Datos técnicos
ZI-KGS255DS
Spannung / Voltage / Tensión
220-240 V / 50 Hz
Motorleistung / motor power / Potencia del motor
2000 W
Leerlaufdrehzahl Sägeblatt (1;2-Gang) /
no-load speed (1;2 gear) /
Velocidad de ralentí de la hoja de la sierra (1;2 marchas)
3200 min-1 (I) ;
4500 min-1 (II)
Schutzklasse / appliance class / Clase de protección
II
Schutzart / protection class / Grado de protección
IP 20
Sägeblattdurchmesser / saw blade diameter / Diámetro de
la hoja de la sierra
Ø 255 mm
Bohrungdurchmesser Sägeblatt / saw blade bore diameter /
Diámetro del orificio de la hoja de la sierra
Ø 30 mm

TECHNIK / TECHNICS / TÉCNICA
ZIPPER MASCHINEN GmbH www.Zipper-Maschinen.at 8
ZI-KGS255DS
Arbeitstisch Schwenkwinkel / work table tilting angle /
Ángulo de inclinación de la mesa de trabajo
± 45 °
Sägeaggregat Schwenkwinkel / saw unit tilting angle /
Ángulo de inclinación del grupo de la sierra
+ 45 °
Schnittleistung / cutting capacity / Potencia de corte 90° / 90°
340 x 90 mm
Schnittleistung / cutting capacity / Potencia de corte 90° / 45°
240 x 90 mm
Schnittleistung / cutting capacity / Potencia de corte 45° / 90°
340 x 45 mm
Schnittleistung / cutting capacity / Potencia de corte 45° / 45°
240 x 45 mm
Anschlagdimension / fence dimension (L x H) / Dimensiones
del tope (L x H)
218 x 54 mm
Verpackungsmaße / packaging dimension / Dimensiones del
embalaje
815 x 480 x 405 mm
Maschinenmaße (L x B (mit Verlängerung) x H) /
machine dimension (L x W (with extension) x H) /
Dimensiones de la máquina (L x A (con extensión) x H)
780 x 450 (700) x 585 mm
Absauganschlussdurchmesser / dust collection port diameter
/ Diámetro de la conexión del sistema de aspiración
43 mm
Anschlusskabellänge / cable length / Longitud del cable de
conexión
2 m
Schalldruckpegel / livello di pressione sonora LPA / Nivel de
presión sonora
97,2dB(A) K:3dB(A)
Schallleistungspegel / livello di potenza del suono LWA /
Nivel de potencia acústica
110,2dB(A) K:3dB(A)
Gewicht (Netto) / weight (net) / Peso (neto)
14,6 kg
Gewicht (Brutto) / weight (gross) / Peso (bruto)
18,2 kg
Laser
Laser class / Clase de láser
Class II
Norm / Standard / Norma
EN 60825-1:2014
Laserwellenlänge / wavelength of laser / Longitud de onda
del láser
650nm
Laserleistung / laser output / Potencia del láser
< 1 mW
(DE) Hinweis Geräuschangaben: Die angegebenen Werte sind Emissionswerte und müssen damit nicht zugleich auch sichere
Arbeitsplatzwerte darstellen. Obwohl es eine Korrelation zwischen Emissions- und Immissionspegeln gibt, kann daraus nicht zuverlässig
abgeleitet werden, ob zusätzliche Vorsichtsmaßnahmen notwendig sind oder nicht. Faktoren, welche den am Arbeitsplatz tatsächlich
vorhandenen Immissionspegel beeinflussen, beinhalten die Eigenart des Arbeitsraumes und andere Geräuschquellen, d. h. die Zahl der
Maschinen und anderer benachbarter Arbeitsvorgänge. Die zulässigen Arbeitsplatzwerte können ebenso von Land zu Land variieren. Diese
Information soll jedoch den Anwender befähigen, eine bessere Abschätzung von Gefährdung und Risiko vorzunehmen.
(EN) Notice noise emission: The values given are emission values and therefore do not have to represent safe workplace values at the same
time. Although there is a correlation between emission and immission levels, it cannot be reliably deduced whether additional precautions are
necessary or not. Factors influencing the actual immission level at the workplace include the nature of the workspace and other noise
sources, i.e. the number of machines and other adjacent operations. The permissible workplace values may also vary from country to
country. However, this information should enable the user to make a better assessment of hazard and risk.
(ES) Aviso sobre los valores de ruido: Los valores indicados son valores de emisión y, por lo tanto, no representan necesariamente al mismo
tiempo valores seguros en el lugar de trabajo. Aunque hay una correlación entre los niveles de emisión y los de inmisión, no se puede deducir
con certeza si es necesario adoptar medidas de precaución adicionales o no. Entre los factores que influyen en el nivel de inmisión real en el
lugar de trabajo, se encuentran la naturaleza del espacio de trabajo y otras fuentes de ruido, es decir, el número de máquinas y otros
procesos de trabajo adyacentes. Asimismo, los valores admisibles en el lugar de trabajo pueden variar de un país a otro. No obstante, esta
información debe capacitar al usuario a evaluar mejor los peligros y los riesgos.

VORWORT (DE)
ZIPPER MASCHINEN GmbH www.Zipper-Maschinen.at 9
ZI-KGS255DS
4 VORWORT (DE)
Sehr geehrter Kunde!
Diese Betriebsanleitung enthält Informationen und wichtige Hinweise zur Inbetriebnahme und
Handhabung der Kapp- und Gehrungssäge ZI-KGS255DS, nachfolgend als „Maschine“ bezeichnet.
Die Anleitung ist Bestandteil der Maschine und darf nicht entfernt werden. Bewahren Sie sie
für spätere Zwecke an einem geeigneten, für Nutzer (Betreiber) leicht zugänglichen, vor
Staub und Feuchtigkeit geschützten Ort auf, und legen Sie sie der Maschine bei, wenn sie an
Dritte weitergegeben wird!
Beachten Sie im Besonderen das Kapitel Sicherheit!
Durch die ständige Weiterentwicklung unserer Produkte können Abbildungen und Inhalte geringfügig
abweichen. Sollten Sie Fehler feststellen, informieren Sie uns bitte.
Technische Änderungen vorbehalten!
Kontrollieren Sie die Ware nach Erhalt unverzüglich und vermerken Sie etwaige
Beanstandungen bei der Übernahme durch den Zusteller auf dem Frachtbrief!
Transportschäden sind innerhalb von 24 Stunden separat an uns zu melden.
Für nicht vermerkte Transportschäden kann ZIPPER-Maschinen keine Gewährleistung
übernehmen.
Urheberrecht
© 2018
Diese Dokumentation ist urheberrechtlich geschützt. Alle Rechte bleiben vorbehalten! Insbesondere
der Nachdruck, die Übersetzung und die Entnahme von Fotos und Abbildungen werden gerichtlich
verfolgt.
Als Gerichtsstand gilt das Landesgericht Linz oder das für 4707 Schlüsslberg zuständige Gericht.
Kundendienstadresse
ZIPPER MASCHINEN GmbH
Gewerbepark 8, A-4707 Schlüsslberg
AUSTRIA
Tel.: +43 7248 61116-700
Fax: +43 7248 61116–720
Mail: info@zipper-maschinen.at

SICHERHEIT
ZIPPER MASCHINEN GmbH www.Zipper-Maschinen.at 10
ZI-KGS255DS
5 SICHERHEIT
Dieser Abschnitt enthält Informationen und wichtige Hinweise zur sicheren Inbetriebnahme und
Handhabung der Maschine.
Zu Ihrer Sicherheit lesen Sie diese Betriebsanleitung vor Inbetriebnahme
aufmerksam durch. Das ermöglicht Ihnen den sicheren Umgang mit der Maschine,
und Sie beugen damit Missverständnissen sowie Personen- und Sachschäden vor.
Beachten Sie außerdem die an der Maschine verwendeten Symbole und
Piktogramme sowie die Sicherheits- und Gefahrenhinweise!
5.1 Bestimmungsgemäße Verwendung
Die Maschine ist ausschließlich für folgende Tätigkeiten bestimmt:
Kapp- und Gehrungsschnitt von Holz und Werkstoffen mit ähnlichen physikalischen Eigenschaften
wie Holz innerhalb der vorgegebenen technischen Grenzen.
Für eine andere oder darüber hinausgehende Benutzung und daraus resultierende
Sachschäden oder Verletzungen übernimmt ZIPPER-MASCHINEN keine Verantwortung
oder Garantieleistung.
5.1.1 Technische Einschränkungen
Die Maschine ist für den Einsatz unter folgenden Umgebungsbedingungen bestimmt:
Rel. Feuchtigkeit:
max. 65 %
Temperatur (Betrieb)
+5° C bis +40° C
Temperatur (Lagerung, Transport)
-20° C bis +55° C
5.1.2 Verbotene Anwendungen / Gefährliche Fehlanwendungen
- Betreiben der Maschine ohne adäquate körperliche und geistige Eignung
- Betreiben der Maschine ohne Kenntnis der Bedienungsanleitung
- Änderungen der Konstruktion der Maschine
- Betreiben der Maschine in explosionsgefährdeter Umgebung (Maschine kann beim Betrieb
Zündfunken erzeugen)
- Betrieb der Maschine in geschlossenen Räumen ohne Späne- und Staubabsaugung.
- Betreiben der Maschine außerhalb der in dieser Anleitung angegebenen Grenzen
- Entfernen der an der Maschine angebrachten Sicherheitskennzeichnungen
- Verändern, umgehen oder außer Kraft setzen der Sicherheitseinrichtungen der Maschine
- Nuten
- Bearbeitung von Materialien mit Abmessungen außerhalb der in dieser Anleitung
angegebenen Grenzen.
- Verwendung von Werkzeugen, die nicht den Sicherheitsanforderungen der Norm für
Werkzeugmaschinen für die Holzbearbeitung (EN847-1) entsprechen.
- Verwendung von Sägeblättern aus HSS-Stahl.
- Verwendung von Sägeblättern die eine geringere max. Geschwindigkeit als die Maschine
aufweisen
Die nicht bestimmungsgemäße Verwendung bzw. die Missachtung der in dieser Anleitung
dargelegten Ausführungen und Hinweise hat das Erlöschen sämtlicher Gewährleistungs- und
Schadenersatzansprüche gegenüber der Holzmann Maschinen GmbH zur Folge.
5.2 Anforderungen an Benutzer
Voraussetzungen für das Bedienen der Maschine sind die körperliche und geistige Eignung sowie
Kenntnis und Verständnis der Betriebsanleitung.
Bitte beachten Sie, dass örtlich geltende Gesetze und Bestimmungen das Mindestalter
des Bedieners festlegen und die Verwendung dieser Maschine einschränken können!
Legen Sie ihre persönliche Schutzausrüstung vor Arbeiten an der Maschine an.
Arbeiten an elektrischen Bauteilen oder Betriebsmitteln dürfen nur von einer
Elektrofachkraft durchgeführt oder unter Anleitung und Aufsicht einer Elektrofachkraft
vorgenommen werden.

SICHERHEIT
ZIPPER MASCHINEN GmbH www.Zipper-Maschinen.at 11
ZI-KGS255DS
5.3 Sicherheitseinrichtungen
Die Maschine ist mit folgenden Sicherheitseinrichtungen ausgestattet:
Trennende Schutzeinrichtung Sägeblattschutz
Niederhalter und Anschlag
5.4 Allgemeine Sicherheitshinweise
Zur Vermeidung von Fehlfunktionen, Schäden und gesundheitlichen Beeinträchtigungen sind bei
Arbeiten mit der Maschine neben den allgemeinen Regeln für sicheres Arbeiten insbesondere
folgende Punkte zu berücksichtigen:
Kontrollieren Sie die Maschine vor Inbetriebnahme auf Vollständigkeit und Funktion. Benutzen
Sie die Maschine nur dann, wenn die für die Bearbeitung erforderlichen trennenden
Schutzeinrichtungen und andere nicht trennende Schutzeinrichtungen angebracht sind, sich in
gutem Betriebszustand befinden und richtig gewartet sind.
Wählen Sie als Aufstellort einen ebenen, erschütterungsfreien, rutschfesten Untergrund.
Sorgen Sie für ausreichend Platz rund um die Maschine!
Sorgen Sie für ausreichende Lichtverhältnisse am Arbeitsplatz, um stroboskopische Effekte zu
vermeiden!
Achten Sie auf ein sauberes Arbeitsumfeld!
Verwenden Sie nur einwandfreies Werkzeug, das frei Rissen und anderen Fehlern (z.B.
Deformationen) ist.
Entfernen Sie Einstellwerkzeuge vor dem Einschalten von der Maschine.
Halten Sie den Bereich rund um die Maschine frei von Hindernissen (z.B. Staub, Späne,
abgeschnittene Werkstückteile etc.).
Überprüfen Sie die Verbindungen der Maschine vor jeder Verwendung auf ihre Festigkeit.
Lassen Sie die laufende Maschine niemals unbeaufsichtigt. Die Maschine muss stillgesetzt
werden falls diese unbeaufsichtigt ist.
Die Maschine darf nur von Personen betrieben, gewartet oder repariert werden, die mit ihr
vertraut sind und die über die im Zuge dieser Arbeiten auftretenden Gefahren unterrichtet sind.
Stellen Sie sicher, dass Unbefugte einen entsprechenden Sicherheitsabstand zum Gerät
einhalten, und halten Sie insbesondere Kinder von der Maschine fern.
Tragen Sie geeignete Schutzausrüstung (Augenschutz, Staubmaske, Gehörschutz, Handschuhe
beim Umgang mit Werkzeugen) sowie eng anliegende Arbeitsschutzkleidung – niemals lose
Kleidung, Krawatten, Schmuck, etc. – Einzugsgefahr!
Verbergen Sie lange Haare unter einem Haarschutz.
Entfernen Sie keine Abschnitte oder andere Teile des Werkstücks bei laufender Maschine aus
dem schneidenden Bereich!
Arbeiten Sie immer mit bedacht und der nötigen Vorsicht und wenden Sie auf keinen Fall
übermäßige Gewalt an.
Überbeanspruchen Sie die Maschine nicht!
Unterlassen Sie das Arbeiten an der Maschine bei Müdigkeit, Unkonzentriertheit bzw. unter
Einfluss von Medikamenten, Alkohol oder Drogen!

SICHERHEIT
ZIPPER MASCHINEN GmbH www.Zipper-Maschinen.at 12
ZI-KGS255DS
Verwenden Sie die Maschine nicht in Bereichen, in denen Dämpfe von Farben, Lösungsmitteln
oder brennbaren Flüssigkeiten eine potenzielle Gefahr darstellen (Brand- bzw.
Explosionsgefahr!).
Rauchen Sie nicht in unmittelbarer Umgebung der Maschine (Brandgefahr)!
Stellen Sie sicher, dass sich der Hauptschalter in der Stellung „O“ befindet, bevor Sie die
Maschine an die Stromquelle anschließen.
Verwenden Sie nur geeignete Verlängerungskabel.
Setzen Sie die Maschine vor Umrüst-, Einstell-, Mess-, Reinigungs-, Wartungs- oder
Instandhaltungsarbeiten stets still und trennen sie diese für Wartungs- oder
Instandhaltungsarbeiten stets vom der Stromversorgung. Warten Sie vor der Aufnahme der
Arbeit an der Maschine den völligen Stillstand aller Werkzeuge bzw. Maschinenteile ab und
sichern Sie die Maschine gegen unbeabsichtigtes Wiedereinschalten.
5.5 Elektrische Sicherheit
Verwenden Sie nur geeignete Verlängerungskabel (Querschnitt 1.5mm² bis 25m Länge; H05VV-F).
Ein beschädigtes oder verheddertes Kabel erhöht die Stromschlaggefahr. Behandeln Sie das
Kabel sorgfältig. Benutzen Sie das Kabel niemals zum Tragen, Ziehen oder Abtrennen des
Elektrowerkzeugs. Halten Sie das Kabel vor Hitze, Öl, scharfen Kanten oder beweglichen Teilen
fern.
Vorschriftsmäßige Stecker und passende Steckdosen reduzieren die Stromschlaggefahr.
Wasser, das in Elektrowerkzeug eindringt, erhöht die Stromschlaggefahr. Setzen Sie die
Elektrowerkzeuge keinem Regen oder Nässe aus.
Der Einsatz der Maschine in feuchter Umgebung ist nur dann statthaft, wenn die Stromquelle
mit einem Fehlerstrom-Schutzschalter geschützt ist.
Benutzen Sie das Elektrowerkzeug nicht, wenn es sich nicht mit dem EIN-AUS-Schalter ein- und
ausschalten lässt.
Vermeiden Sie den Kontakt des Körpers mit geerdeten Oberflächen wie Rohren, Heizkörpern,
Öfen und Kühlschränken. Es besteht ein erhöhtes Risiko eines Stromschlags, wenn der Körper
geerdet ist.
5.6 Spezielle Sicherheitshinweise für diese Maschine
Die Arbeit mit Handschuhen an rotierenden Teilen ist nicht zulässig!
Beim Betrieb der Maschine wird Holzstaub erzeugt. Schließen Sie die Maschine deshalb bei der
Installation an eine geeignete Absauganlage für Staub und Späne an oder betreiben sie diese
nur in gut durchlüfteter Umgebung mit Staubmaske.
Schalten Sie die Staubabsaugungseinrichtung immer an, bevor Sie mit der Bearbeitung des
Werkstückes beginnen!
Entfernen Sie Abschnitte oder andere Teile des Werkstückes niemals bei laufenden Maschine aus
dem schneidenden Bereich.
Bei der Verwendung von Fräswerkzeugen mit einem Durchmesser ≥ 16 mm und
Kreissägeblättern müssen diese EN 847-1:2013 und EN 847-2:2013 entsprechen;
Werkzeugträger müssen EN 847-3:2013 entsprechen;
Übermäßiger Lärm kann zu Gehörschäden und temporären oder dauerhaften Verlust der
Hörfähigkeit führen. Tragen Sie einen nach Gesundheits- und Sicherheitsregelungen
zertifizierten Gehörschutz, um die Lärmbelastung zu begrenzen.
Ersetzen Sie gerissene und verformte Sägeblätter sofort, sie können nicht repariert werden.
Verwenden sie saubere und geschärfte Sägeblätter, diese sind weniger störanfällig und können
leichter geführt werden.
Verwenden Sie nach Möglichkeit Spannzangen, um das Werkstück zu halten/fixieren. Wenn Sie
das Werkstück von Hand halten, müssen Sie Ihre Hand immer mindestens 100 mm von beiden
Seiten des Sägeblattes entfernt halten. Verwenden Sie diese Säge nicht, um Teile zu schneiden,
die zu klein sind, um sicher eingespannt oder von Hand gehalten zu werden.
Überkreuzen Sie niemals die vorgesehene Schnittlinie vor oder hinter dem Sägeblatt.
Überprüfen Sie Ihr Werkstück vor dem Schneiden. Wenn das Werkstück gebogen oder verzogen
ist, klemmen Sie es mit der außen gebogenen Fläche zum Anschlag. Achten Sie immer darauf,
dass zwischen Werkstück, Anschlag und Tisch entlang der Schnittlinie kein Spalt vorhanden ist.
Verbogene oder verzogene Werkstücke können sich verdrehen oder verschieben und können
während des Schneidens eine Verklemmung des Kreissägeblattes verursachen. Es dürfen sich
auch keine Nägel oder Fremdkörper im Werkstück befinden.
Nur ein Werkstück auf einmal schneiden.

SICHERHEIT
ZIPPER MASCHINEN GmbH www.Zipper-Maschinen.at 13
ZI-KGS255DS
Bei jeder Änderung der Gehrungswinkeleinstellung ist darauf zu achten, dass der einstellbare
Anschlag zur Abstützung des Werkstücks richtig eingestellt ist und das Sägeblatt oder das
Schutzsystem nicht stört. Ohne die Maschine "EIN" zu schalten überprüfen sie ohne Werkstück
durch Bewegung des Sägeblattes (vollständig simulierten Schnitt), dass es keine Störungen
oder Gefahren beim Schneiden am Anschlag gibt.
Für ein Werkstück, das breiter oder länger als die Auflagefläche ist, ist eine ausreichende
Unterstützung wie Tischverlängerungen, Sägeböcke usw. zu gewährleisten.
Verwenden Sie immer eine Klemme oder eine Vorrichtung, die so konzipiert ist, dass sie
Rundmaterial wie Stangen oder Rohre ordnungsgemäß aufnimmt.
Lassen Sie das Sägeblatt die volle Geschwindigkeit erreichen, bevor Sie das Werkstück
berühren.
Wenn sich das Werkstück oder die Sägeblätter verklemmen, schalten Sie die Gehrungssäge
sofort aus. Warten Sie, bis alle beweglichen Teile zum Stillstand gekommen sind, und ziehen Sie
den Stecker von der Stromquelle und beginnen sie erst dann mit das verklemmte Material zu
entfernen.
Nachdem Sie den Schnitt beendet haben, lassen Sie den Schalter los, halten Sie den
Maschinenkopf nach unten und warten Sie, bis das Blatt stehen bleibt, bevor Sie das
geschnittene Teil entfernen.
Halten Sie den Griff fest, wenn Sie einen unvollständigen Schnitt machen oder den Schalter
loslassen, bevor sich der Maschinenkopf vollständig in der unteren Position befindet
Hinweise für die Benützung des LASERS:
Schauen Sie nicht mit ungeschützten Augen direkt in den Laserstrahl.
Richten Sie den Laserstrahl niemals auf reflektierende Oberflächen und Personen oder Tiere.
Schon ein Laserstrahl mit geringer Leistung kann zu Augenschäden führen.
Öffnen Sie niemals das Lasermodul. Unerwartete Einwirkung des Strahls kann auftreten.
Der Laser darf nicht durch einen anderen Lasertyp ersetzt werden.
Reparaturen am Laser dürfen nur vom Laserhersteller oder einem autorisierten Vertreter
durchgeführt werden.
5.7 Gefahrenhinweise
Trotz bestimmungsmäßiger Verwendung bleiben bestimmte Restrisiken bestehen. Bedingt durch
Aufbau und Konstruktion der Maschine können im Umgang mit den Maschinen
Gefährdungssituationen auftreten, die in dieser Bedienungsanleitung wie folgt gekennzeichnet
sind:
GEFAHR
Ein auf diese Art gestalteter Sicherheitshinweis weist auf eine unmittelbar
gefährliche Situation hin, die zum Tod oder zu schweren Verletzungen führt, wenn
sie nicht gemieden wird.
WARNUNG
Ein solcherart gestalteter Sicherheitshinweis weist auf eine möglicherweise
gefährliche Situation hin, zu schweren Verletzungen oder sogar zum Tod führen
kann, wenn sie nicht gemieden wird.
VORSICHT
Ein auf diese Weise gestalteter Sicherheitshinweis weist auf eine möglicherweise
gefährliche Situation hin, die zu geringfügigen oder leichten Verletzungen führen
kann, wenn sie nicht gemieden wird.
HINWEIS
Ein derartig gestalteter Sicherheitshinweis weist auf eine möglicherweise gefährliche
Situation hin, die zu Sachschäden führen kann, wenn sie nicht gemieden wird.

TRANSPORT
ZIPPER MASCHINEN GmbH www.Zipper-Maschinen.at 14
ZI-KGS255DS
6 TRANSPORT
Für den ordnungsgemäßen Transport beachten Sie die Anweisungen und Angaben auf der
Transportverpackung bezüglich Schwerpunkt, Anschlagstellen, Gewicht, einzusetzende
Transportmittel sowie vorgeschriebene Transportlage etc.
Transportieren Sie die Maschine in der Verpackung zum Aufstellort. Achten Sie beim Heben, Tragen
und Absetzen der Last auf die richtige Körperhaltung:
Heben, Absetzen:
Stellen Sie beim Heben / Absetzen Standfestigkeit her (Beine hüftbreit).
Last mit gebeugten Knien und geradem Rücken heben / absetzen (wie Gewichtheber).
Last nicht ruckartig anheben / absetzen.
Tragen:
Last mit beiden Händen möglichst körpernah tragen.
Last mit geradem Rücken tragen.
7 MONTAGE
7.1 Lieferumfang prüfen
Überprüfen Sie die Maschine nach Anlieferung unverzüglich auf Transportschäden und fehlende
Teile.
7.2 Der Arbeitsplatz
Wählen Sie einen passenden Platz für die Maschine.
Beachten Sie dabei auf die Sicherheitsanforderungen sowie die Abmessungen der Maschine.
Der gewählte Platz muss einen passenden Anschluss an das elektrische Netz gewährleisten als
auch die Möglichkeit für den Anschluss an eine Absauganlage. Vergewissern Sie sich, dass der
gewählte Arbeitsplatz (Maschinenständer, Arbeitsplatte,…) die Last der Maschine tragen kann und
die Maschine an dieser mittels Schrauben (Schrauben sind nicht im Lieferumfang inkludiert)
befestigt werden kann. Die Maschine muss an allen Stützpunkten gleichzeitig nivelliert werden.
Man muss außerdem einen Abstand von mindestens 0.8 m um die Maschine rundum sichern. Es
muss für den notwendigen Abstand für die Zufuhr von langen Werkstücken gesorgt werden.
7.3 Maschine zusammenbauen
Die Maschine kommt vormontiert. Folgende kleine Montage / Einstellung sind vor Gebrauch noch
vorzunehmen
Ziehen Sie den vormontierten Kippschutz (A)
vollständig heraus und sichern Sie ihn mittels
Inbusschraube (S).
Justieren sie noch die Einstellschraube (B) auf
das Niveau der Tischplatte, um ein Wackeln
der Maschine zu vermeiden.
und der Anschluss an die Stromversorgung / Absaugeinrichtung vorzunehmen sowie die Maschine
an einem passenden Arbeitsort aufzustellen und die Anbauteile je nach Arbeitsschritt einzustellen.

BETRIEB
ZIPPER MASCHINEN GmbH www.Zipper-Maschinen.at 15
ZI-KGS255DS
8 BETRIEB
8.1 Kontrolle vor der Inbetriebnahme
Kontrollieren Sie, dass die Drehzahl der Maschine kleiner als die max. zulässige des
verwendeten Sägeblatts ist.
Kontrolle Sägeblattrotation und Sägeblattdimension passend zur Maschine.
Kontrolle ob Sägeblattschutz ordnungsgemäß funktioniert.
Kontrolle ob der Anschluss an ein Absaugsystem vorhanden ist.
Kontrolle ob Anschläge korrekt eingestellt und Sägeblatt angezogen ist.
Kontrolle ob Maschine fixiert ist (Arbeitsplatte, Maschinenständer)
8.2 Bedienung
8.2.1 Transportposition Maschinenkopf einrasten / entriegeln.
Durch leichtes Herunterdrücken des Maschinenkopfes (34) und gleichzeitiges Entfernen des
Verriegelungsbolzens (11) aus der Motorhalterung wird die Säge aus der untersten /Transport-
Position gelöst.
Hinweis: Bitte halten sie den Griff fest und führen sie den Maschinenkopf langsam nach oben bis
dieser die oberste Position erreicht hat. Falls Griff losgelassen würde, schnellt der Maschinenkopf
wegen der Federvorspannung hoch.
Zum Einrasten Maschinenkopf (34) nach unten drücken und den Verriegelungsbolzen (11) wieder
anbringen.
8.2.2 Winkellage Arbeitstisch einstellen.
Lösen Sie den Verriegelungsgriff (6), wenn er
angezogen ist, ziehen Sie den verriegelten
Positionshebel (7) nach oben und stellen Sie
den Drehtisch (32) mit dem Verriegelungsgriff
(6) auf den gewünschten Winkel ein.
Die Winkellage wird mittels Zeiger (33) auf dem
Drehtisch angezeigt.
Bringen Sie den Verriegelungsgriff (6) wieder in
die geschlossen Stellung, um den Drehtisch zu
sichern (32).
8.2.3 Winkellage Sägearm/Maschinenkopf einstellen.
Die Fixierschraube (1) lösen.
Den Maschinenkopf (34) mit dem Handgriff (14)
nach links schwenken, bis er mit dem
gewünschten Winkelwert übereinstimmt auf der
Skala (10) übereinstimmt.
Anschließend Ziehen Sie die Fixierschraube (1)
wieder an.

BETRIEB
ZIPPER MASCHINEN GmbH www.Zipper-Maschinen.at 16
ZI-KGS255DS
8.2.4 Anschläge einstellen.
Die beiden verstellbaren Anschläge (9-1) müssen nach
Veränderung des Maschinenkopfwinkels (90-45°)
angepasst werden. Dazu die Fixierschrauben (24) lösen
und die Anschläge so einstellen, dass ein Abstand von 8-
10 mm zwischen Sägeblatt und Anschlag vorhanden ist.
Anschließend die Fixierschrauben (24) wieder festziehen
um die Anschläge (9-1) zu fixieren.
VORSICHT
Vor dem Schnitt prüfen, ob die
Anschlagschienen und das Sägeblatt
nicht kollidieren können. (simulierter
Schnitt mit ausgeschalteter Maschine)
8.2.5 Sägeblattgeschwindigkeit einstellen
Je nach gewünschter Drehzahl den Wahlschalter (28) auf
Pos I : 3200 min-1
Pos II: 4500 min-1
legen.
8.2.6 Schnitttiefenbegrenzung einstellen
Die Schnitttiefe kann mit der Schraube (22) stufenlos
eingestellt werden. Dazu die Rändelmutter (M) an der
Schraube (22) lösen. Drehen Sie die Schraube (22) ein-
oder aus, um die gewünschte Schnitttiefe einzustellen.
Anschließend die Rändelmutter (M) wieder anziehen.
HINWEIS
Überprüfen Sie die Einstellung, indem
Sie einen Testschnitt durchführen.
8.2.7 Anschluss an eine Absauganlage
Zur Staubabsaugung in geschlossenen Räumen einen Absaugschlauch an den Staubabsaugstutzen
anschließen und diesen mit einer Schlauchklemme fixieren. Anschlussmaße lt. Technischen Daten
8.2.8 Maschine EIN-AUS schalten
Maschine EIN schalten:
Den Verriegelungsschalter (15) drücken und den EIN-AUS-
Schalter (16) an den Handgriff drücken.
Maschine AUS schalten:
Den EIN-AUS-Schalter loslassen

BETRIEB
ZIPPER MASCHINEN GmbH www.Zipper-Maschinen.at 17
ZI-KGS255DS
8.3 Betriebsarten
8.3.1 Kappschnitte
Kappschnitte sind besonders geeignet beim Ablängen von schmalen Werkstücken (ca 100mm).
Für Kappschnitte wird die Zugeinrichtung durch die Zugverriegelung (23) fixiert, sodass während
dem Schnitt das Sägeaggregat nicht nach vorne bzw. hinten gleiten kann.
Die Winkeleinstellung je nach gewünschtem Arbeitsvorgang einstellen und Anschläge
dementsprechend einstellen.
Schnittlinie markieren (mittels Laser).
Werkstück an Anschlag und Tisch anlegen und mit Niederhalter fixieren
Maschinenkopf in oberste Position bringen.
Maschine einschalten und Abwarten bis volle Sägeblattdrehzahl erreicht wurde (ca. 5sek),
Kappschnitt durchführen (Maschinenkopf nach unten bewegen) bis dieses an der untersten
Position angekommen ist.
Maschinenkopf in oberste Position bringen
HINWEIS
Maschinenkopf ist Federbelastet, Maschinenkopf nicht einfach loslassen, sondern am
Handgriff nach oben führen bis die oberste Position erreicht ist (Ruheposition.
Ein-Aus-Schalter loslassen, warten bis das Kreissägeblatt still steht.
Werkstück entfernen
8.3.2 Zugschnitte
Zugschnitte sind geeignet für lange Schnitte.
Für die Schnitte wird die Zugeinrichtung entriegelt durch lösen der Zugverriegelung (23), sodass
während dem Schnitt das Sägeaggregat nach vorne bzw. hinten gleiten kann.
Die Winkeleinstellung je nach gewünschtem Arbeitsvorgang einstellen und Anschläge
dementsprechend einstellen.
Schnittlinie markieren (mittels Laser).
Werkstück an Anschlag und Tisch anlegen und mit Niederhalter fixieren
Maschinenkopf in oberste Position bringen und Maschinenkopf zu sich ziehen.
Maschine einschalten und Abwarten bis volle Sägeblattdrehzahl erreicht wurde (ca. 5sek),
Kappschnitt durchführen (Maschinenkopf nach unten bewegen) bis dieses an der untersten
Position angekommen ist und anschließend langsam den Maschinenkopf nach hinten drücken um
das lange Werkstück auf der gesamten Länge bearbeiten zu können.
Maschinenkopf in oberste Position bringen
HINWEIS
Maschinenkopf ist Federbelastet, Maschinenkopf nicht einfach loslassen, sondern am
Handgriff nach oben führen bis die oberste Position erreicht ist (Ruheposition.
Ein-Aus-Schalter loslassen, warten bis das Kreissägeblatt still steht.
Werkstück entfernen

REINIGUNG, WARTUNG, LAGERUNG, ENTSORGUNG
ZIPPER MASCHINEN GmbH www.Zipper-Maschinen.at 18
ZI-KGS255DS
8.3.3 Nutschnitte
Tiefenanschlag für Nutschnitte so einstellen, dass sie bei gewähltem Winkel die gewünschte
Schnitttiefe erhalten.
Kapp und Zugschnitte wie im jeweiligen Kapitel beschrieben durchführen mit dem Unterschied,
dass das Werkstück nicht ganz durchgetrennt wird.
9 REINIGUNG, WARTUNG, LAGERUNG, ENTSORGUNG
WARNUNG
Gefahr durch elektrische Spannung! Das Hantieren an der Maschine bei
aufrechter Spannungsversorgung kann zu schweren Verletzungen oder zum Tod
führen. Maschine vor Reinigungs-, Wartungs- bzw. Instandhaltungsarbeiten
deshalb stets von der Spannungsversorgung trennen und gegen unbeabsichtigtes
Wiedereinschalten sichern!
9.1 Reinigung
HINWEIS
Falsche Reinigungsmittel können den Lack der Maschine angreifen. Verwenden
Sie zum Reinigen keine Lösungsmittel, Nitroverdünnung oder andere
Reinigungsmittel, die den Lack der Maschine beschädigen könnten. Beachten
Sie die Angaben und Hinweise des Reinigungsmittelherstellers!
Regelmäßige Reinigung ist Voraussetzung für den sicheren Betrieb der Maschine sowie ihre lange
Lebensdauer. Entfernen sie daher altes Sägemehl und Holzsplitter mit einer Bürste oder ähnlichem
Werkzeug.
9.2 Wartung
Die Maschine ist wartungsarm und nur wenige Teile müssen gewartet werden. Ungeachtet dessen
sind Störungen oder Defekte, die geeignet sind, die Sicherheit des Benutzers zu beeinträchtigen,
umgehend zu beseitigen!
Vergewissern Sie sich vor jeder Inbetriebnahme vom einwandfreien Zustand und
ordnungsgemäßen Funktionieren der Sicherheitseinrichtungen.
Überprüfen Sie regelmäßig den einwandfreien und lesbaren Zustand der Warn- und
Sicherheitsaufkleber der Maschine.
Verwenden Sie nur einwandfreies und geeignetes Werkzeug
Verwenden Sie ausschließlich vom Hersteller empfohlene Originalersatzteile
9.2.1 Instandhaltungs- und Wartungsplan
Art und Grad des Maschinen-Verschleißes hängen in hohem Maß von den Betriebsbedingungen ab.
Die nachfolgend angeführten Intervalle gelten bei Verwendung der Maschine innerhalb der
festgelegten Grenzen:
Intervall
Komponente
Maßnahme
Jeweils vor
Arbeitsbeginn
Sägeblatt
Auf Beschädigungen prüfen und ggf. austauschen
Sägeblattschutz
Auf Funktion prüfen (siehe Funktionscheck Sägeblattschutz)
Tischeinlage
Auf Beschädigungen prüfen und ggf. austauschen
Netzkabel
Auf Beschädigungen prüfen und ggf. reparieren
Jeweils nach
Beendigung der
Arbeit
Maschine
Staub/Holzsplitter und Schmutz entfernen
Sägeblattschutz
Spänefangsack
Nach 50h (bzw.
10h)
Kohlebürsten
Kontrolle und ggf. Austausch
Bei Bedarf
Sägeblatt
Wenn Sägeblatt stumpf austauschen

REINIGUNG, WARTUNG, LAGERUNG, ENTSORGUNG
ZIPPER MASCHINEN GmbH www.Zipper-Maschinen.at 19
ZI-KGS255DS
9.2.2 Einrichten der Winkellage (mittels Anschlagwinkel)
90°-Schnitt
Den Maschinenkopf absenken und mit
dem Verriegelungsbolzen (11) sichern.
- Lösen Sie die Fixierschraube (1).
- 90° Anschlagwinkel (W) zwischen
Sägeblatt und Drehtisch positionieren.
- Kontermutter an der Einstellschraube
(25) lösen und die Einstellschraube (25)
so lange verstellen, bis der Winkel
zwischen Sägeblatt und Drehtisch 90°
beträgt.
- Kontermutter wieder anziehen.
- Überprüfen Sie anschließend die
Position der Winkelanzeige.
Gegebenenfalls den Zeiger (10) mit
einem Kreuzschlitzschraubendreher lösen
und in die Position 0° auf der Skala (10-
1) bringen und anschließend wieder
fixieren.
45°-Schnitt
Den Maschinenkopf absenken und mit
dem Verriegelungsbolzen (11) sichern.
- Drehtisch in 0°-Stellung fixieren.
- Lösen Sie die Fixierschraube (1) und
winkeln Sie den Maschinenkopf mit dem
Griff 45° nach links.
- 45° Winkelanschlag zwischen Sägeblatt
und Drehtisch positionieren.
- Kontermutter an der Einstellschraube
(26) lösen und die Einstellschraube (26)
so lange verstellen bis der Winkel
zwischen Sägeblatt und Drehtisch exakt
45° beträgt.
- Kontermutter wieder anziehen.
- Überprüfen Sie anschließend die
Position der Winkelanzeige.
Gegebenenfalls den Zeiger (10) mit
einem Kreuzschlitzschraubendreher
lösen, auf der Winkelskala (10-1) in
Position 45° bringen und die
Befestigungsschraube wieder anziehen.

REINIGUNG, WARTUNG, LAGERUNG, ENTSORGUNG
ZIPPER MASCHINEN GmbH www.Zipper-Maschinen.at 20
ZI-KGS255DS
9.2.3 Sägeblattwechsel
- Den Maschinenkopf nach oben schwenken und mit dem Verriegelungsbolzen (11) verriegeln.
- Mit einer Hand den Inbusschlüssel in die Flanschschraube (31) stecken.
- Die Sägewellenverriegelung (36) fest drücken und die Schraube (31) langsam im Uhrzeigersinn
drehen. Die Sägewellenverriegelung (36) rastet spätestens nach einer Umdrehung ein.
- Lösen Sie nun die Flanschschraube (31) im Uhrzeigersinn und entfernen sie diese und den
Außenflansch (30).
- Den Sägeblattschutz (20) nach oben klappen.
- Das Sägeblatt (35) vom Innenflansch abnehmen und nach unten herausziehen.
- Flanschschraube (31), Außenflansch (30) und Innenflansch sorgfältig reinigen.
- Das neue Sägeblatt (35) in umgekehrter Reihenfolge montieren und befestigen.
VORSICHT
Korrekte Drehrichtung und Dimension des Sägeblattes (6) beachten:
Max. Durchmesser von 255mm und max. Stärke von 2.8mm, sowie
Aufnahmedurchmesser von 30mm
- Bevor Sie mit Ihrer Arbeit fortfahren, stellen Sie sicher, dass sich alle Sicherheitseinrichtungen
in gutem Betriebszustand befinden. (Sägeblattschutz Check)
- Wichtig! Jedes Mal, wenn Sie das Sägeblatt (6) wechseln, prüfen, ob er sich frei im Tischeinsatz
(10) in beiden Fällen dreht. Senkrecht- und 45°-Winkeleinstellungen.
- Wichtig! Die Arbeiten zum Wechseln und Ausrichten des Sägeblattes (6) muss korrekt
ausgeführt werden.
9.2.4 Laser einrichten
Wenn der Laser (17) nicht mehr die richtige
Schnittlinie anzeigt, können Sie den Laser neu
einstellen. Lösen Sie die Kreuzschlitzschrauben (S)
und stellen Sie den Laser ein, indem Sie ihn seitlich
bewegen, bis der Laserstrahl auf die Zähne des
Sägeblattes trifft. Beide Schrauben (S) wieder fest
anziehen.
VORSICHT
Verletzungsgefahr! Beim Wechsel des Sägeblattes Schutzhandschuhe tragen.

REINIGUNG, WARTUNG, LAGERUNG, ENTSORGUNG
ZIPPER MASCHINEN GmbH www.Zipper-Maschinen.at 21
ZI-KGS255DS
9.2.5 Spänefangsack leeren/wechseln
Die Säge ist mit einem Spänefangsack für Sägemehl
und Späne) ausgestattet.
Achtung! Der Spänefangsack darf nur zum Schneiden
von Holz und holzähnlichen Materialien verwendet
werden!
Drücken Sie den Metallring am Spänesack zusammen
und befestigen Sie ihn an der Auslassöffnung. Der
Spänesack kann mittels eines Reißverschlusses an
der Unterseite entleert werden.
9.2.6 Kohlebürsten kontrollieren / wechseln
Überprüfen Sie die Kohlebürsten nach den ersten 50
Betriebsstunden mit einer neuen Maschine oder wenn
neue Bürsten montiert sind. Nach Durchführung der
ersten Kontrolle wiederholen Sie die Kontrolle alle 10
Betriebsstunden.
Wenn die Kohle auf eine Länge von 6 mm abgenutzt
ist, oder wenn die Feder oder der Fahrdraht
verbrannt oder beschädigt ist, ist es notwendig, beide
Bürsten auszutauschen. Wenn sich herausstellt, dass
die Bürsten nach dem Ausbau verwendbar sind, ist es
möglich, sie wieder zu montieren.
Bei der Wartung der Kohlebürsten öffnen Sie die
beiden Verriegelungen (13) gegen den Uhrzeigersinn.
Dann die Kohlebürsten entfernen. Ersetzen Sie die
Kohlebürsten in umgekehrter Reihenfolge.
9.2.7 Tischeinlage austauschen
VORSICHT
Bei einem beschädigten Tischeinsatz (19) besteht die Gefahr, dass sich Kleinteile
zwischen Tischeinsatz und Sägeblatt festsetzen und das Sägeblatt blockieren.
1. Schrauben (S) am Tischeinsatz (19) entfernen.
Drehen Sie bei Bedarf Drehtisch und Maschinenkopf,
um die Schrauben erreichen zu können.
2. Tischeinsatz (19) entfernen.
3. Neuen Tischeinsatz (19) installieren.
4. Ziehen Sie die Schrauben (S) am Tischeinsatz (19)
an.

FEHLERBEHEBUNG
ZIPPER MASCHINEN GmbH www.Zipper-Maschinen.at 22
ZI-KGS255DS
9.3 Lagerung
HINWEIS
Bei unsachgemäßer Lagerung können wichtige Bauteile beschädigt und zerstört
werden. Lagern Sie verpackte oder bereits ausgepackten Teile nur unter den
vorgesehenen Umgebungsbedingungen!
Lagern Sie die Maschine bei Nichtgebrauch an einem trockenen, frostsichereren und versperrbaren
Ort um einerseits der Entstehung von Rost entgegenzuwirken, und um andererseits
sicherzustellen, dass Unbefugte und insbesondere Kinder keinen Zugang zur Maschine haben.
9.4 Entsorgung
Beachten Sie die nationalen Abfallbeseitigungs-Vorschriften. Entsorgen Sie
die Maschine, Maschinenkomponenten oder Betriebsmittel niemals im
Restmüll. Kontaktieren Sie gegebenenfalls Ihre lokalen Behörden für
Informationen bezüglich der verfügbaren Entsorgungsmöglichkeiten.
Wenn Sie bei Ihrem Fachhändler eine neue Maschine oder ein
gleichwertiges Gerät kaufen, ist dieser in bestimmten Ländern verpflichtet,
Ihre alte Maschine fachgerecht zu entsorgen.
10 FEHLERBEHEBUNG
WARNUNG
Gefahr durch elektrische Spannung! Das Manipulieren an der Maschine bei
aufrechter Spannungsversorgung kann zu schweren Verletzungen oder zum Tod
führen. Trennen Sie die Maschine vor der Durchführung von Arbeiten zur
Fehlerbehebung daher zunächst immer von der Stromversorgung und sichern Sie
sie gegen unbeabsichtigte Wiederinbetriebnahme!
Viele mögliche Fehlerquellen können bei ordnungsgemäßem Anschluss der Maschine an das
Stromnetz bereits im Vorfeld ausgeschlossen werden.
Sollten sie sich außer Stande sehen, erforderliche Reparaturen ordnungsgemäß durchzuführen
und/oder besitzen sie die vorgeschriebene Ausbildung dafür nicht, ziehen sie immer einen
Fachmann zum Beheben des Problems hinzu.
Fehler
mögliche Ursache
Behebung
Maschine lässt sich nicht
einschalten
Netzstecker ist nicht eingesteckt
Netzstecker einstecken
Kohlebürsten defekt
Kohlebürsten wechseln
Motor defekt
Motor wechseln
Ein-Aus-Schalter ist defekt
Schalter reparieren
Material-Rückschlag
Stumpfes Sägeblatt
Sägeblatt ersetzen
Sägeblatt falsch montiert
überprüfen
Falscher Schnittwinkel
Winkellage nicht korrekt
Justieren Winkellage
Sägeblatt berührt den
Maschinenboden
Schnitttiefeneinstellung falsch
eingestellt
Korrektur
Schnitttiefeneinstellung

PREFACE (EN)
ZIPPER MASCHINEN GmbH www.Zipper-Maschinen.at 23
ZI-KGS255DS
11 PREFACE (EN)
Dear Customer!
This manual contains information and important instructions for the installation and correct use of
the miter saw ZI-KGS255DS.
Following the usual commercial name of the device (see cover) is substituted in this manual with the
name "machine".
This manual is part of the product and shall not be stored separately from the product.
Save it for later reference and if you let other people use the product, add this
instruction manual to the product.
Please read and obey the security instructions!
Due to constant advancements in product design, construction pictures and content may diverse
slightly. However, if you discover any errors, inform us please.
Technical specifications are subject to changes!
Please check the product contents immediately after receipt for any eventual transport
damage or missing parts.
Claims from transport damage or missing parts must be placed immediately after initial
product receipt and unpacking before putting the product into operation.
Please understand that later claims cannot be accepted anymore.
Copyright
© 2018
This document is protected by international copyright law. Any unauthorized duplication,
translation or use of pictures, illustrations or text of this manual will be pursued by law.
Court of jurisdiction is the regional court Linz or the competent court for 4707 Schlüsslberg,
AUSTRIA.
Customer service contact
ZIPPER MASCHINEN GmbH
Gewerbepark 8, 4707 Schlüsslberg
AUSTRIA
Tel.: +43 7248 61116-700
Fax: +43 7248 61116–720
Mail: [email protected]

SAFETY
ZIPPER MASCHINEN GmbH www.Zipper-Maschinen.at 24
ZI-KGS255DS
12 SAFETY
This section contains information and important notes on safe commissioning and handling of the
machine.
For your personal safety, please read these operating instructions carefully
before commissioning. This will enable you to handle the machine safely and
prevent misunderstandings as well as personal injury and damage to property.
Also observe the symbols and pictograms used on the machine as well as the
safety and danger information!
12.1 Intended Use of the Machine
The machine is intended exclusively for the following activities:
Cross-cut and mitre cutting of wood and materials with similar physical properties to wood within
the specified technical limits.
ZIPPER-MASCHINEN assumes no responsibility or warranty for any other use or use
beyond this and for any resulting damage to property or injury.
12.1.1 Technical Restrictions
The machine is intended for use under the following ambient conditions:
Rel. Humidity:
max. 65 %
Temperature (operational)
+5° C bis +40° C
Temperature (Storage, Transport)
-20° C bis +55° C
12.1.2 Prohibited Use / Forseeable Misuse
- Operation of the machine without adequate physical and mental aptitude
- Operating the machine without knowledge of the operating instructions
- Changes in the design of the machine
- Operating the machine in a potentially explosive environment (machine can generate
ignition sparks during operation)
- Operation of the machine in closed rooms without chip and dust extraction (a normal
household vacuum cleaner is not suitable as an extraction device).
- Operating the machine outside the limits specified in this manual
- Remove the safety markings attached to the machine.
- Modify, circumvent or disable the safety devices of the machine.
- Cutting of materials with dimensions outside the limits specified in this manual
- Use of tools which do not meet the safety requirements of the standard for machine tools
for woodworking (EN847-1).
The improper use or disregard of the versions and instructions described in this manual will result
in the voiding of all warranty and compensation claims against Holzmann Maschinen GmbH.
12.2 User Requirements
The physical and mental suitability as well as knowledge and understanding of the operating
instructions are prerequisites for operating the machine. Persons who, because of their physical,
sensory or mental abilities or their inexperience or ignorance, are unable to operate the machinery
safely must not use it without the supervision or instruction by a responsible person.
Please note that local laws and regulations may stipulate the minimum age of the operator
and restrict the use of this machine!
Put on your personal protective equipment before working on the machine.
Work on electrical components or equipment may only be carried out by a qualified
electrician or under the instruction and supervision of a qualified electrician.

SAFETY
ZIPPER MASCHINEN GmbH www.Zipper-Maschinen.at 25
ZI-KGS255DS
12.3 Safety Devices
The machine is equipped with the following safety devices:
Safety guard, saw blade protection
Clamping device and stop/fence
12.4 General Safety Instructions
To avoid malfunctions, damage and health hazards when working with the machine, in addition to
the general rules for safe working, the following points must be observed:
Before commissioning, check the machine for completeness and function.
Choose a level, vibration-free, non-slip surface for the installation location.
Ensure sufficient space around the machine!
Ensure sufficient lighting conditions at the workplace to avoid stroboscopic effects!
Only use perfect tools that are free of cracks and other defects (e.g. deformations).
Remove setting tools from the machine before switching on.
Keep the area around the machine free of obstacles (e.g. dust, chips, cut workpiece parts
etc.).
Check the strength of the machine connections before each use.
Never leave the running machine unattended. If necessary, stop the machine before leaving.
The machine may only be operated, serviced or repaired by persons who are familiar with it
and who have been informed of the dangers arising in the course of this work.
Ensure that unauthorised persons maintain an appropriate safety distance from the machine
and, in particular, keep children away from the machine..
Wear suitable protective equipment (eye protection, dust mask, respiratory protection, ear
protection, gloves when handling tools) as well as close-fitting work protective clothing -
never wear loose clothing, ties, jewellery, etc. - danger of being drawn in!
Work with gloves on rotating parts is not permitted!
Hide long hair under hair protection.
Do not remove any sections or other parts of the workpiece from the cutting area while the
machine is running!
Do not remove splinters and chips by hand! Use a sliding stick for this purpose!
Always work with care and the necessary caution and never use excessive force.
Do not overload the machine!
Do not work on the machine if you are tired, not concentrated or under the influence of
medication, alcohol or drugs!
Do not use the machine in areas where vapours from paints, solvents or flammable liquids
represent a potential danger (danger of fire or explosion!).
Do not smoke in the immediate vicinity of the machine (fire hazard)!
Make sure that the ON/OFF switch is in the "OFF" position before connecting the machine to
the power source.
Do not use the machine if it cannot be switched on and off with the ON/OFF switch.
Make sure that the device is earthed.
Only use suitable extension cords.
Always shut down the machine before carrying out any conversion, adjustment, measuring,
cleaning, maintenance or repair work and always disconnect it from the power supply for

SAFETY
ZIPPER MASCHINEN GmbH www.Zipper-Maschinen.at 26
ZI-KGS255DS
maintenance or repair work. Before starting any work on the machine, wait until all tools or
machine parts have come to a complete standstill and secure the machine against
unintentional restarting.
12.5 Electrical Safety
Only use suitable extension cords. (cross-section 1.5mm² for length up to 25m; H05VV-F)
A damaged or tangled cable increases the risk of electric shock. Handle the cable with care.
Never use the cable to carry, pull or disconnect the power tool. Keep the cable away from
heat, oil, sharp edges or moving parts.
Proper plugs and sockets reduce the risk of electric shock.
Water entry into machine increases the risk of electric shock. Do not expose machine to rain
or moisture.
The machine may only be used in humid environments if the power source is protected by a
residual current circuit breaker.
Do not use the power tool if it cannot be turned on and off with the ON/OFF switch.
Avoid contact of the body with grounded surfaces such as pipes, radiators, ovens and
refrigerators. There is an increased risk of electric shock if the body is earthed.
12.6 Special Safety Instructions for Woodworking machines
Work with gloves on rotating parts is not permitted!
During operation of the machine wood dust is generated. Therefore, connect the machine to
a suitable dust collection system for dust and chips during installation!
Always switch on the dust collection system before you start machining the workpiece!
Never remove sections or other parts of the workpiece from the cutting area while the
machine is running.
When using milling tools with a diameter of ≥ 16 mm and circular saw blades, these must
comply with EN 847-1:2013 and EN 847-2:2013; tool carriers must comply with EN 847-
3:2013;
Excessive noise can cause hearing damage and temporary or permanent hearing loss. Wear
hearing protection certified to health and safety regulations to limit noise exposure.
Replace cracked and deformed saw blades immediately, they cannot be repaired.
Use clean and sharpened saw blades, which are less sensitive to malfunctions and easier to
guide.
If possible, use clamps to hold/fix the workpiece. If you hold the workpiece by hand, always
hold your hand at least 100 mm from both sides of the saw blade. Do not use this saw to cut
parts that are too small to be securely clamped or held by hand.
Never cross the intended cutting line in front of or behind the saw blade.
Check your workpiece before cutting. If the workpiece is bent or warped, clamp it with the
outside bent surface against the stop. Always make sure that there is no gap between the
workpiece, stop and table along the cutting line. Bent or warped workpieces can twist or
move and can cause jamming of the circular saw blade during cutting. There must also be no
nails or foreign objects in the workpiece.
Cut only one workpiece at the same time.
Whenever you change the mitre angle setting, make sure that the adjustable stop for
supporting the workpiece is set correctly and does not disturb the saw blade or the protective
system. Without switching the machine "ON", check without moving the workpiece by moving
the saw blade (completely simulated cut) that there are no disturbances or dangers when
cutting at the stop.
For a workpiece that is wider or longer than the supporting table, sufficient support such as
table extensions, saw blocks, etc. must be provided.
Always use a clamp or fixture designed to accept round material such as rods or tubes
properly.
Allow the saw blade to reach full speed before touching the workpiece.
If the workpiece or saw blades become jammed, turn off the mitre saw immediately. Wait
until all moving parts have come to a standstill and disconnect the plug from the power
source, then start removing the jammed material.

SAFETY
ZIPPER MASCHINEN GmbH www.Zipper-Maschinen.at 27
ZI-KGS255DS
After you have finished cutting, release the switch, hold the machine head down and wait for
the blade to stop before removing the cut part.
Hold the handle firmly if you make an incomplete cut or release the switch before the
machine head is fully in the down position.
Instructions for the use of the LASER:
Do not look directly into the laser beam with unprotected eyes.
Never point the laser beam at reflective surfaces or persons or animals. Even a low-power
laser beam can cause eye damage.
Never open the laser module. Unexpected exposure to the beam may occur.
Do not replace the laser with another type of laser.
Repairs to the laser may only be carried out by the laser manufacturer or an authorized
representative.
12.7 Hazard Warnings
Despite their intended use, certain residual risks remain. Due to the structure and construction of
the machine, hazardous situations may occur when handling the machines:
DANGER
A safety instruction designed in this way indicates an imminently hazardous
situation which, if not avoided, will result in death or serious injury.
WARNING
Such a safety instruction indicates a potentially hazardous situation which, if not
avoided, may result in serious injury or even death..
CAUTION
A safety instruction designed in this way indicates a potentially hazardous situation
which, if not avoided, may result in minor or moderate injury.
NOTICE
A safety notice designed in this way indicates a potentially hazardous situation
which, if not avoided, may result in property damage.
Irrespective of all safety regulations, their sound common sense and corresponding technical
suitability/training are and remain the most important safety factor in the error-free operation of
the machine. Safe working depends first and foremost on you!

TRANSPORT
ZIPPER MASCHINEN GmbH www.Zipper-Maschinen.at 28
ZI-KGS255DS
13 TRANSPORT
For proper transport, follow the instructions and information on the transport packaging regarding
centre of gravity, attachment points, weight, means of transport to be used and prescribed transport
position, etc.
Transport the machine in its packaging to the place of installation. When lifting, carrying and
depositing the load, make sure that you are in the correct posture:
Lifting, Depositing
Ensure stability when lifting / setting down (legs hip width).
Lift / lower load with bent knees and straight back (like weightlifter).
Do not lift / lower the load jerkily.
Carrying
Carry load with both hands as close to body as possible.
Carry load with straight back.
14 ASSEMBLY
14.1 Checking Scope of Supply
Check the machine immediately after delivery for transport damage and missing parts.
14.2 The workplace
Choose a suitable place for the machine.
Pay attention to the safety requirements and the dimensions of the machine.
The selected location must ensure a suitable connection to the electrical supply as well as the
possibility of connection to an extraction system. Make sure that the floor can support the load of
the machine. The machine must be levelled simultaneously at all support points. It is also
necessary to guarantee a distance of at least 0.8 m around the machine. The necessary distance
must be provided for the feeding of long workpieces.
14.3 Assembling the machine
The machine is pre-assembled. Following assembly-steps are necessary:
Pull out the pre-assembled tilt-protection (A)
completely and secure it with the Allen screw (S).
Adjust the adjusting screw (B) to the level of the
table top to avoid wobbling of the machine.

OPERATION
ZIPPER MASCHINEN GmbH www.Zipper-Maschinen.at 29
ZI-KGS255DS
15 OPERATION
15.1 Initial check before start
Check that the speed of the machine is lower than the max. permissible speed of the saw
blade used.
Check saw blade rotation and saw blade dimensions to match the machine.
Check that the saw blade guard works properly.
Check whether the connection to a dust collection system is installed.
Check whether the stops/fences are set correctly and the saw blade is tightened.
Check whether the machine is fixed on the working plate or a machine stand.
15.2 Operation
15.2.1 Locking / unlocking the machine head in the transport position
By slightly pressing down the machine head (34) and simultaneously removing the locking bolt
(11) from the motor holder, the saw is released from the lowest /transport position.
Note: Please hold the handle and guide the machine head slowly upwards until it reaches the
uppermost position. If the handle is released, the machine head will jump up due to the spring
preload. Press the machine head (34) downwards to engage and reattach the locking bolt (11).
15.2.2 Setting the angular position of the worktable
Release the locking lever (6) when it is
tightened, pull the locked position lever (7)
upwards and adjust the rotary table (32) with
the locking lever (6) to the desired angle.
The angular position is indicated by a pointer
(33) on the turntable.
Return the locking lever (6) to the closed
position to secure the rotary table (32).
15.2.3 Setting the angular position of the machine head
Loosen the fixing screw (1).
Turn the machine head (34) with the handle
(14) to the left until desired angle value on the
scale (10) is reached.
Then tighten the fixing screw (1) again.

OPERATION
ZIPPER MASCHINEN GmbH www.Zipper-Maschinen.at 30
ZI-KGS255DS
15.2.4 Setting the stops/fences.
The two adjustable stops (9-1) must be adjusted after
changing the machine head angle (90-45°). Loosen the
fixing screws (24) and adjust the stops so that there is a
distance of 8-10 mm between the saw blade and the
stop. Then retighten the fixing screws (24) to fix the
stops (9-1).
CAUTION
Before cutting, check that the stop
bars and the saw blade cannot collide.
(simulated cut with switch-off
machine)
15.2.5 Setting saw blade speed
Set the selector switch (28) to the desired speed.
Pos I : 3200 min-1
Pos II: 4500 min-1
15.2.6 Setting cutting depth limiting
The cutting depth can be adjusted continuously with the
screw (22). To do this, loosen the thumb nut (M) on the
screw (22). Turn the screw (22) in or out to set the desired
cutting depth. Then tighten the thumb nut (M) again.
NOTE
Check the setting by performing a test
cut.
15.2.7 Connection to a dust collection system
For dust extraction in closed rooms, connect a suction hose to the dust extraction nozzle and fix it
with a hose clamp. Connection dimensions according to technical data.
15.2.8 Switch machine ON-OFF
Switch machine ON:
Press the lock switch (15) and press the ON/OFF switch
(16) on the handle.
Switch the machine OFF:
Release the ON-OFF switch (16).

OPERATION
ZIPPER MASCHINEN GmbH www.Zipper-Maschinen.at 31
ZI-KGS255DS
15.3 Operation modes
15.3.1 Mitre cuts
Mitre are particularly suitable for cutting small workpieces (approx. 100 mm) to length.
For cross-cut cuts, the sliding mechanism is fixed by the fixation screw (23) so that the saw unit
cannot slide forwards or backwards during the cut.
Adjust the angle setting according to the desired operation and adjust the stops/fences
accordingly.
Mark the cutting line (by laser).
Place workpiece against stop/fence and table and fix with the clamp device.
Move the machine head to the uppermost position.
Switch on the machine and wait until the saw blade has reached full speed (approx. 5 sec.),
Make the crosscut (move the machine head downwards) until it has reached the lowest position.
Move the machine head to the uppermost position.
NOTE
Machine head is spring loaded, do not simply release the machine head, instead
move the handle upwards until the uppermost position is reached (rest position).
Release the ON-OFF switch and wait until saw blade comes to stand still.
Remove workpiece
15.3.2 Sliding cuts
Sliding cuts are suitable for cutting longer workpieces.
For that kind of cuts, the sliding mechanism is unlocked by releasing the fixation screw (23) so
that the saw unit can slide forwards or backwards during the cut.
Adjust the angle setting according to the desired operation and adjust the stops/fences
accordingly.
Mark the cutting line (by laser).
Place workpiece against stop/fence and table and fix with the clamp device.
Move the machine head to its uppermost position and pull the machine head towards you.
Switch on the machine and wait until the saw blade has reached full speed (approx. 5 sec.),
Make the cut (move the machine head downwards) until it has reached the lowest position and
then slowly push the machine head backwards to be able to machine the wide workpiece over
its entire length.
Move the machine head to the uppermost position.
NOTE
Machine head is spring loaded, do not simply release the machine head, instead
move the handle upwards until the uppermost position is reached (rest position).
Release the ON-OFF switch and wait until saw blade comes to stand still.
Remove workpiece

CLEANING, MAINTENANCE, STORAGE, DISPOSAL
ZIPPER MASCHINEN GmbH www.Zipper-Maschinen.at 32
ZI-KGS255DS
15.3.3 Slot cuts
Set the depth stop for slot cuts so that the desired cutting depth is obtained at the selected angle.
Make the mitre or sliding cuts as described in the respective chapter with the difference that the
workpiece is not completely cut through.
16 CLEANING, MAINTENANCE, STORAGE, DISPOSAL
WARNING
Danger due to electrical voltage! Handling at the machine with upright
power supply can lead to serious injuries or death. Always disconnect the
machine from the power supply before cleaning, servicing or maintenance work
and secure it against unintentional reconnection!
16.1 Cleaning
NOTE
Wrong cleaning agents can attack the varnish of the machine. Do not use
solvents, nitro thinners, or other cleaning agents that could damage the
machine's paint. Observe the information and instructions of the cleaning agent
manufacturer!
Regular cleaning is a prerequisite for the safe operation of the machine and its long service life.
Therefore, clean the machine after each use and remove any sawdust with a brush,
broom or vacuum cleaner.
16.2 Maintenance
The machine is low-maintenance and only a few parts have to be serviced. Nevertheless,
malfunctions or defects which could impair the safety of the user must be rectified immediately!
Before each operation, check that the safety devices are in perfect condition.
Regularly check that the warning and safety labels on the machine are in perfect and
legible condition.
Use only proper and suitable tools.
Only use original spare parts recommended by the manufacturer.
16.2.1 Maintenance schedule
The type and degree of machine wear depend on the operating conditions. The following intervals
apply when the machine is used within the specified limits:
interval
components
activity
Before usage
Saw blade
Check for damage and replace if necessary.
Saw blade guard
Check function (see function check saw blade protection)
Table inlet
Check for damage and replace if necessary.
Cable
Check for damage and repair if necessary.
After usage
Maschine
Remove dust/wood splinters and dirt
Saw blade guard
Chip bag
after 50h (/ 10h)
Carbon brush
Check and replace if necessary.
When required
Saw balde
Check sharpness of saw blade and replace when
necessary

CLEANING, MAINTENANCE, STORAGE, DISPOSAL
ZIPPER MASCHINEN GmbH www.Zipper-Maschinen.at 33
ZI-KGS255DS
16.2.2 Adjusting the angular position (by means of stop angle)
90°-cut
Lower the machine head and secure it
with the locking bolt (11).
- Loosen the fixing screw (1).
- Position the 90° stop angle (W)
between the saw blade and the rotary
table.
- Loosen the lock nut on the adjusting
screw (25) and adjust the adjusting
screw (25) until the angle between saw
blade and rotary table is 90°.
- Tighten the lock nut again.
- Then check the position of the angle
indicator. If necessary, loosen the
pointer (10) with a Phillips screwdriver
and move it to the 0° position on the
scale (10-1) and then fix it again.
45°-cut
Lower the machine head and secure it
with the locking bolt (11).
- Fix the rotary table in the 0° position.
- Loosen the fixing screw (1) and angle
the machine head with the handle 45° to
the left.
- Position the 45° angle stop between
the saw blade and the turntable.
- Loosen the lock nut on the adjusting
screw (26) and adjust the adjusting
screw (26) until the angle between saw
blade and turntable is exactly 45°.
- Tighten the lock nut again.
- Then check the position of the angle
indicator. If necessary, loosen the
pointer (10) with a Phillips screwdriver,
bring it into position 45° on the angle
scale (10-1) and tighten the fixing screw
again.

CLEANING, MAINTENANCE, STORAGE, DISPOSAL
ZIPPER MASCHINEN GmbH www.Zipper-Maschinen.at 34
ZI-KGS255DS
16.2.3 Saw blade change
- Swivel the machine head upwards and lock it with the locking bolt (11).
- Insert the Allen key into the flange screw (31) with one hand.
- Firmly press the saw shaft lock (36) and slowly turn the screw (31) clockwise. The saw shaft
lock (36) engages after one turn at the latest.
- Loosen the flange screw (31) clockwise and remove the screw and the outer flange (30).
- Fold the saw blade guard (20) upwards.
- Remove the saw blade (35) from the inner flange and pull it downwards.
- Carefully clean the flange screw (31), outer flange (30) and inner flange.
- Mount and fasten the new saw blade (35) in reverse order.
CAUTION
Pay attention to correct direction of rotation and dimension of the saw blade (6)
Limits for dimension: Max. Diameter of 255mm and max. thickness of 2.8mm,
as well as mounting diameter of 30mm.
- Before continuing with your work, make sure that all safety devices are in good operating
condition. (Saw blade protection check)
- Important! Always when you change the saw blade (6), check that it rotates freely in the table
insert (10) in both cases. Vertical and 45° angle settings.
- Important! The work for changing and aligning the saw blade (6) must be carried out correctly.
16.2.4 Setting the Laser
If the laser (17) does not show the correct cutting
line any more, you can adjust the laser. Loosen the
Phillips screws (S) and adjust the laser by moving it
sideways until the laser beam hits the teeth of the
saw blade. Tighten both screws (S) again.
CAUTION
Risk of injury! Wear protective gloves when changing the saw blade.

CLEANING, MAINTENANCE, STORAGE, DISPOSAL
ZIPPER MASCHINEN GmbH www.Zipper-Maschinen.at 35
ZI-KGS255DS
16.2.5 Emptying/changing the chip bag
The machine is equipped with a chip bag for sawdust
and chips.
Attention! The chip collection bag may only be used
for cutting wood and wood-like materials!
Press the metal ring on the chip bag together and
fasten it to the dust collector port. The chip bag can
be emptied by means of a zipper on the underside.
16.2.6 Checking / changing carbon brusher
Check the carbon brushes after the first 50 hours of
operation with a new machine or when new brushes
are installed. After performing the first check, repeat
the check every 10 operating hours.
If the carbon is worn to a length of 6 mm, or if the
spring or contact wire is burnt or damaged, it is
necessary to replace both brushes. If it proves that
the brushes can be used after removal, it is possible
to reassemble them.
When servicing the carbon brushes, open the two
covers (13) counterclockwise. Then remove the
carbon brushes. Replace the carbon brushes in
reverse order.
16.2.7 Exchange table insert
CAUTION
If the table insert (19) is damaged, there is a risk that small parts may become
stucked between the table insert and the saw blade and block the saw blade
1. Remove screws (S) from the table insert (19). If
necessary, turn the rotary table and machine head to
reach the screws.
2. remove the table insert (19).
3 Install the new table insert (19).
4 Tighten the screws (S) on the table insert (19).
16.3 Storage
NOTE
Improper storage can damage and destroy important components. Only store
packed or unpacked parts under the intended ambient conditions!
When not in use, store the machine in a dry, frost-proof and lockable place to prevent the
formation of rust on the one hand and to ensure that unauthorised persons and in particular
children have no access to the machine.

TROUBLESHOOTING
ZIPPER MASCHINEN GmbH www.Zipper-Maschinen.at 36
ZI-KGS255DS
16.4 Disposal
Observe the national waste disposal regulations. Never dispose of the
machine, machine components or operating materials (like oil,…) in
residual waste. If necessary, contact your local authorities for information
on the disposal options available.
If you buy a new machine or an equivalent device from your specialist
dealer, he is obliged in certain countries to dispose of your old machine
properly.
17 TROUBLESHOOTING
WARNING
Danger due to electrical voltage! Manipulating the machine with the power
supply up can lead to serious injuries or death. Always disconnect the machine
from the power supply before carrying out any troubleshooting work!
Many possible sources of error can be excluded in advance if the machine is properly connected to
the mains.
If you are unable to carry out necessary repairs properly and/or do not have the required training,
always consult a specialist to correct/solve the problem!
.
Fault
Possible cause
Correction
Machine doesn’t start
No power supply
Connect to mains
Carbon brushes defect
Exchange carbon brushes
Motor defect
Exchange motor
ON-OFF-switch defect
Repair switch
Workpiece kick-back
Dull saw blade
Replace saw blade
Wrong assembled saw blade
Check direction / assemble
Wrong cutting angle
Angular position not correct
Adjusting the angular position
Saw blade cuts the table
Incorrect setting of cutting
depth
Adjust cutting depth

PRÓLOGO (ES)
ZIPPER MASCHINEN GmbH www.Zipper-Maschinen.at 37
ZI-KGS255DS
18 PRÓLOGO (ES)
¡Estimado cliente!:
Las presentes instrucciones de servicio contienen información e indicaciones esenciales relativas a
la puesta en marcha y manejo de la sierra tronzadora e ingletadora ZI-KGS255DS, en lo sucesivo
denominada "Máquina".
El manual forma parte de la máquina y no debe guardarse aparte de ella. ¡Consérvelo para
futuras consultas en un lugar adecuado de fácil acceso para el usuario (operario) y protegido
del polvo y de la humedad y adjúntelo a la máquina en caso de que la transfiera a terceros!
¡Preste especial atención al capítulo Seguridad!
Debido al constante desarrollo de nuestros productos, las ilustraciones y los contenidos pueden diferir
ligeramente. Si detecta algún fallo, comuníquenoslo.
¡Sujeto a modificaciones técnicas!
¡Compruebe la mercancía inmediatamente después de la recepción y anote las posibles
reclamaciones en la carta de porte al recibir la mercancía del transportista!
Los daños ocasionados durante el transporte deben notificarse por separado en un plazo
de 24 horas.
ZIPPER-Maschinen no podrá asumir ningún tipo de responsabilidad por los daños
ocasionados por el transporte que no se hayan detectado.
Derechos de propiedad
© 2018
La presente documentación está protegida por la ley de propiedad intelectual. ¡Todos los derechos
reservados! En particular, serán objeto de procedimientos judiciales la reimpresión, traducción y la
extracción de fotos e ilustraciones.
El tribunal de jurisdicción será el tribunal regional de Linz o el tribunal competente para 4707
Schlüsslberg.
Dirección del servicio postventa
ZIPPER MASCHINEN GmbH
Gewerbepark 8, A-4707 Schlüsslberg
AUSTRIA
Tel.: +43 7248 61116-700
Fax: +43 7248 61116–720
Mail: [email protected]

SEGURIDAD
ZIPPER MASCHINEN GmbH www.Zipper-Maschinen.at 38
ZI-KGS255DS
19 SEGURIDAD
Esta sección contiene información e indicaciones esenciales relativas a la puesta en marcha y
manejo seguros de la máquina.
Para su seguridad, lea atentamente las presentes instrucciones de servicio antes de
poner en marcha la máquina. Esto le permitirá manipular de manera segura la
máquina y evitar, de este modo, malentendidos, así como daños personales y
materiales. ¡Observe, además, los símbolos y pictogramas utilizados en la máquina,
así como las indicaciones de seguridad y las advertencias de peligro!
19.1 Uso conforme a las especificaciones
La máquina ha sido diseñada exclusivamente para llevar a cabo las siguientes tareas:
Tronzado y corte en inglete de madera y materiales con propiedades físicas similares a las de la
madera dentro de los límites técnicos especificados.
ZIPPER-MASCHINEN no asumirá ninguna responsabilidad ni serán motivo de garantía
otros usos o cualquier uso que no sea el previsto y los daños materiales o lesiones
resultantes.
19.1.1 Limitaciones técnicas
La máquina ha sido diseñada para utilizarse en las siguientes condiciones ambientales:
Humedad rel.:
máx. 65%
Temperatura (funcionamiento)
+5° C a +40° C
Temperatura (almacenamiento,
transporte)
-20° C a +55° C
19.1.2 Aplicaciones prohibidas / aplicaciones indebidas peligrosas
- Operar la máquina sin actitudes físicas ni mentales adecuadas.
- Operar la máquina sin conocer las instrucciones de servicio.
- Modificaciones del diseño de la máquina.
- Operar la máquina en entornos con riesgo de explosión (la máquina puede generar
chispas durante el funcionamiento)
- Operar la máquina en estancias cerradas sin sistema de aspiración de virutas y polvo.
- Operar la máquina fuera de los límites especificados en las presentes instrucciones
- Retirar las indicaciones de seguridad colocadas en la máquina.
- Modificar, puentear o desactivar los dispositivos de seguridad de la máquina.
- Ranuras
- Mecanizado de materiales con dimensiones fuera de los límites especificados en las
presentes instrucciones.
- Utilización de herramientas que no cumplen los requisitos de seguridad de la norma para
máquinas herramientas para la transformación de madera (EN847-1).
- Utilización de hojas de sierra de acero HSS.
- Utilización de hojas de sierra con una velocidad máx. inferior a la de la máquina
El uso indebido o la inobservancia de las informaciones e indicaciones contenidas en el presente
manual anulará todos los derechos de garantía y de reclamaciones por daños y perjuicios contra
Holzmann Maschinen GmbH.
19.2 Requisitos del usuario
Los requisitos para operar la máquina son la aptitud física y mental y conocer y comprender las
instrucciones de servicio.
¡Tenga en cuenta que las leyes y disposiciones locales pueden estipular la edad mínima
del operario y restringir el uso de esta máquina!
Antes de trabajar en la máquina, póngase el equipo de protección individual.
Los trabajos en los componentes o equipos eléctricos sólo deben ser llevados a cabo por
personal especializado en sistema eléctricos o bajo la instrucción y supervisión de
personal especializado en sistemas eléctricos.

SEGURIDAD
ZIPPER MASCHINEN GmbH www.Zipper-Maschinen.at 39
ZI-KGS255DS
19.3 Dispositivos de seguridad
La máquina está equipada con los siguientes dispositivos de seguridad:
Resguardo de protección de la hoja de la sierra
Pisador y tope
19.4 Indicaciones generales de seguridad
Para evitar fallos de funcionamiento, daños y efectos perjudiciales para la salud, además de las
normas generales de seguridad en el trabajo, se deben tener en cuenta especialmente los
siguientes puntos al trabajar en la máquina:
Compruebe la integridad y el funcionamiento de la máquina antes de ponerla en marcha. Utilice
la máquina sólo si los resguardos necesarios para llevar a cabo el mecanizado y el resto de
dispositivos de protección se han instalado, están en buenas condiciones de funcionamiento y
con un mantenimiento correcto.
Como lugar de instalación, seleccione una superficie nivelada, sin vibraciones y antideslizante.
¡Asegúrese de que haya suficiente espacio alrededor de la máquina!
Asegúrese de que hay suficiente iluminación en el lugar de trabajo para evitar efectos
estroboscópicos.
Asegúrese de que el entorno de trabajo esté limpio
Utilice únicamente herramientas que estén en perfecto estado, que no presenten fisuras ni otros
defectos (p. ej., deformaciones).
Retire las herramientas de ajuste de la máquina antes de encenderla.
Mantenga el área alrededor de la máquina libre de obstáculos (p. ej., polvo, virutas, piezas de
trabajo cortadas, etc.).
Compruebe la resistencia de las conexiones de la máquina antes de utilizarla.
No deje nunca desatendida la máquina cuando esté en marcha. La máquina se debe detener, si
está desatendida.
El manejo, los trabajos de mantenimiento o los de reparación sólo deben ser llevados a cabo por
personal que esté familiarizado con la máquina y haya sido instruido en los peligros que pueden
surgir al llevar a cabo estos trabajos.
Asegúrese de que las personas no autorizadas mantengan una distancia de seguridad adecuada
con el aparato y, especialmente, mantenga a los niños alejados de la máquina.
Use un equipo de protección adecuado (protección ocular, máscara antipolvo, protección
auditiva; guantes en el caso de que manipule herramientas). En ningún caso, lleve ropa
holgada, corbatas, joyas, etc. ¡Peligro de atrapamiento!
Oculte el cabello largo bajo una redecilla para el cabello.
¡No retire nunca secciones u otras partes de la pieza de trabajo del área de corte con la
máquina en marcha!
Trabaje siempre con cuidado y precaución y no ejerza nunca una fuerza excesiva.
¡No sobrecargue la máquina!
¡No trabaje en la máquina si está cansado, desconcentrado o bajo la influencia de
medicamentos, alcohol o drogas!
No utilice la máquina en áreas, en las que los vapores de pinturas, los disolventes o los líquidos
inflamables representen un peligro potencial (¡peligro de incendio o de explosión!).

SEGURIDAD
ZIPPER MASCHINEN GmbH www.Zipper-Maschinen.at 40
ZI-KGS255DS
¡No fume en las inmediaciones de la máquina (peligro de incendio)!
Asegúrese de que el interruptor principal se encuentra en la posición "O" antes de conectar la
máquina a la fuente de energía.
Utilice únicamente cables alargadores adecuados.
Apague la máquina antes de llevar a cabo trabajos de equipamiento, ajuste, medición, limpieza,
mantenimiento o reparación y desconéctela siempre de la fuente de alimentación para llevar a
cabo trabajos de mantenimiento y de reparación. Antes de dejar de trabajar en la máquina,
espere a que se hayan detenido completamente todas las herramientas o componentes de la
máquina y asegure la máquina contra arranques accidentales.
19.5 Seguridad eléctrica
Utilice únicamente cables alargadores adecuados (sección transversal 1.5mm² de hasta 25 m de
longitud; H05VV-F).
Los cables dañados o enredados incrementan el riesgo de sufrir descargas eléctricas. Manipule
el cable con cuidado. No utilice nunca el cable para llevar, tirar o desconectar la herramienta
eléctrica. Mantenga el cable alejado del calor, aceite, bordes afilados o componentes móviles.
Los enchufes homologados y las tomas de corriente adecuadas reducen el riesgo de sufrir
descargas eléctricas.
La entrada de agua en la herramienta eléctrica incrementa el riesgo de sufrir descargas
eléctricas. No exponga las herramientas eléctricas a la lluvia o la humedad.
La máquina sólo se podrá utilizar en ambientes húmedos si la fuente de energía está protegida
por un interruptor de corriente residual.
No utilice la herramienta eléctrica si no se puede encender ni apagar con el interruptor ON/OFF.
Evite el contacto físico con superficies conectadas a tierra, como p. ej., tubos, radiadores,
hornos y frigoríficos. Se incrementa el riesgo de sufrir una descarga eléctrica si el grupo está
conectado a tierra.
19.6 Indicaciones especiales de seguridad para esta máquina
¡No se permite trabajar con guantes en componentes giratorios!
Al operar la máquina se produce polvo de madera. Por lo tanto, durante la instalación, conecte
la máquina a un sistema adecuado de aspiración de polvo y virutas o utilícela sólo en entornos
bien ventilados con una máscara antipolvo.
¡Encienda siempre el sistema de aspiración de polvo antes de comenzar a mecanizar la pieza de
trabajo!
No retire nunca secciones u otras partes de la pieza de trabajo del área de corte con la máquina
en marcha.
Si se utilizan herramientas de fresado con un diámetro ≥ 16 mm y hojas para sierras circulares,
éstas deben cumplir las normas EN 847-1:2013 y EN 847-2:2013. Los portaherramientas deben
cumplir la norma EN 847-3:2013;
El ruido excesivo puede producir daños auditivos y pérdida temporal o permanente de la
capacidad auditiva. Lleve una protección auditiva certificada con arreglo a las normas de salud y
seguridad para limitar la exposición al ruido.
Sustituya inmediatamente las hojas de sierra rotas y deformadas, ya que no pueden reparar.
Utilice hojas de sierra limpias y afiladas. Son menos propensas a la rotura y se pueden guiar con
más facilidad.
Si es posible, utilice pinzas de sujeción para sujetar/fijar la pieza de trabajo. Cuando sostenga la
pieza de trabajo con la mano, mantenga siempre su mano al menos a 100 mm de distancia de
ambos lados de la hoja de la sierra. No utilice esta sierra para cortar piezas demasiado
pequeñas como para sujetarlas con seguridad o con la mano.
No cruce nunca su mano a través de la línea de corte prevista delante o detrás de la hoja de la
sierra.
Compruebe la pieza de trabajo antes de cortarla. Si la pieza está doblada o deformada, sujétela
con la superficie curvada exterior hacia el tope. Asegúrese de que a lo largo de la línea de corte
no hay un intersticio entre la pieza de trabajo, el tope y la mesa. Las piezas de trabajo dobladas
o deformadas se pueden retorcer o desplazar y producir que la hoja de la sierra se atasque
durante el proceso de corte. No debe haber clavos u objetos extraños en la pieza de trabajo.
Corte solamente una pieza de trabajo a la vez.
Cada vez que modifique el ajuste angular del inglete, hay que asegurarse de que el tope
ajustable esté ajustado correctamente al soporte de la pieza de trabajo y de que no interfiera
con la hoja de la sierra o con el sistema de protección. Sin "encender" la máquina, compruebe,

TRANSPORTE
ZIPPER MASCHINEN GmbH www.Zipper-Maschinen.at 41
ZI-KGS255DS
sin pieza de trabajo y moviendo la hoja de la sierra (corte completo simulado), que no hay
interferencias o peligros en el tope durante el proceso de corte.
En el caso de una pieza de trabajo que sea más ancha o larga que la superficie de apoyo,
prevea un soporte adecuado como extensiones de mesa, caballetes para serrar, etc.
Utilice siempre una abrazadera o un dispositivo adecuado para sujetar correctamente materiales
redondos como barras o tubos.
Deje que la hoja de la sierra alcance su máxima velocidad antes de tocar la pieza de trabajo.
En caso de que la pieza de trabajo o las hojas de la sierra se atasquen, desconecte
inmediatamente la sierra ingletadora. Espere a que todos los componentes móviles se detengan
y desconéctela de la fuente de energía. A continuación, retire el material atascado.
Una vez finalizado el corte, suelte el interruptor, mantenga el cabezal de la máquina hacia abajo
y espere hasta que la sierra se detenga, antes de retirar la pieza cortada.
Sujete firmemente el mango al realizar un corte incompleto o al soltar el interruptor antes de
que el cabezal de la máquina esté completamente abajo
Indicaciones para utilizar el LÁSER:
No mire directamente el rayo láser con los ojos desprotegidos.
No apunte nunca el rayo láser a superficies reflectantes, personas o animales. Incluso un rayo
láser de baja potencia puede causar daños en los ojos.
No abra nunca el módulo láser. Puede producirse una exposición inesperada al rayo.
El láser no debe reemplazarse por otro tipo de láser.
El láser sólo debe ser reparado por el fabricante del láser o por un representante autorizado.
19.7 Advertencias de peligro
A pesar de que se utilice la máquina conforme a las especificaciones, sigue habiendo determinados
riesgos residuales. Debido al diseño y a la construcción de la máquina, pueden producirse
situaciones peligrosas al manipular las máquinas que se identifican en el presente manual de
instrucciones de la siguiente manera:
PELIGRO
Una indicación de seguridad de este tipo indica una situación peligrosa inminente
que de no evitarse tendrá como consecuencia la muerte o lesiones graves.
ADVERTENCIA
Una indicación de seguridad de este tipo indica una situación potencialmente
peligrosa que de no evitarse tendrá como consecuencia lesiones graves o incluso la
muerte.
ATENCIÓN
Una indicación de seguridad de este tipo indica una situación potencialmente
peligrosa que de no evitarse tendrá como consecuencia lesiones leves o moderadas.
AVISO
Una indicación de seguridad similar indica una situación potencialmente peligrosa
que de no evitarse puede producir daños materiales.
20 TRANSPORTE
Para transportar la máquina de manera adecuada, observe las instrucciones y la información del
embalaje de transporte relativas al punto de gravedad, puntos de anclaje, peso, medios de
transporte que se deben utilizar y la posición de transporte especificada, etc.

MONTAJE
ZIPPER MASCHINEN GmbH www.Zipper-Maschinen.at 42
ZI-KGS255DS
Transporte la máquina en su embalaje hasta el lugar de instalación. Al elevar, transportar y depositar
la carga, asegúrese de adoptar una postura correcta:
Elevar, depositar:
Al elevar / depositar la carga, permanezca estable (las piernas separadas a la altura de
las caderas).
Eleve / deposite la carga con las rodillas dobladas y la espalda recta (como los
levantadores de peso).
No eleve / deposite la carga bruscamente.
Transportar:
Lleve la carga con ambas manos lo más cerca posible del cuerpo.
Lleve la carga con la espalda recta.
21 MONTAJE
21.1 Comprobación del volumen de suministro
Compruebe la máquina inmediatamente después de la entrega para verificar si presenta daños por
transporte o faltan componentes.
21.2 El lugar de trabajo
Seleccione un lugar adecuado para la máquina.
Observe los requisitos de seguridad y las dimensiones de la máquina.
El lugar elegido debe garantizar una conexión adecuada a la red eléctrica, así como la posibilidad
de conectar un sistema de aspiración. Asegúrese de que el lugar de trabajo elegido (soporte de la
máquina, superficie de trabajo,…) pueda soportar la carga de la máquina y que la máquina se
pueda fijar a éste con tornillos (los tornillos no están incluidos en el volumen de suministro). La
máquina se debe nivelar al mismo tiempo en todos los puntos de apoyo. Además, se debe
asegurar una distancia mínima de 0,8 m alrededor de la máquina. Debe haber suficiente espacio
para introducir piezas de trabajo largas.
21.3 Montaje de la máquina
La máquina viene premontada. Antes de usarla, lleve a cabo los siguientes trabajos menores de
montaje / ajuste
Extraiga completamente la protección
antivuelco premontada (A) y asegúrela con el
tornillo Allen (S).
Ajuste el tornillo de ajuste (B) al nivel de la
mesa para evitar que la máquina se tambalee.
y conéctela a la alimentación de corriente / al sistema de aspiración e instale la máquina en un
lugar adecuado y ajuste los componentes de montaje con arreglo al paso de trabajo.

FUNCIONAMIENTO
ZIPPER MASCHINEN GmbH www.Zipper-Maschinen.at 43
ZI-KGS255DS
22 FUNCIONAMIENTO
22.1 Comprobaciones antes de la puesta en marcha
Compruebe que la velocidad de la máquina sea inferior a la velocidad máx. permitida de la
hoja de la sierra utilizada.
Compruebe que la rotación y las dimensiones de la hoja de la sierra se ajustan a la máquina.
Compruebe que la protección de la hoja de la sierra funciona correctamente.
Compruebe si la máquina está conectada a un sistema de aspiración.
Compruebe si los topes están correctamente ajustados y si la hoja de la sierra está apretada.
Compruebe la fijación de la máquina (superficie de trabajo, soporte de la máquina)
22.2 Manejo
22.2.1 Enclavamiento / desenclavamiento de la posición de transporte del cabezal de
la máquina.
La sierra se libera de la posición más baja /de transporte presionando ligeramente el cabezal de la
máquina (34) y retirando al mismo tiempo el perno de bloqueo (11) del soporte del motor.
Aviso: Sujete el mango y mueva lentamente el cabezal de la máquina hacia arriba hasta que haya
alcanzado la posición más elevada. Si se suelta el mango, el cabezal de la máquina saltará hacia
arriba debido a la precarga del resorte.
Para enclavar el cabezal de la máquina (34), presiónelo hacia abajo y vuelva a colocar el perno de
bloqueo (11).
22.2.2 Ajuste de la posición angular de la mesa de trabajo.
Afloje la palanca de fijación (6), en caso de que
esté apretada, tire de la palanca de posición
bloqueada (7) hacia arriba y ajuste la mesa
giratoria (32) al ángulo deseado con la palanca
de fijación (6).
La posición angular se muestra en el indicador
(33) que hay en la mesa de trabajo.
Vuelva a colocar la palanca de fijación (6) en la
posición cerrada para asegurar la mesa giratoria
(32).
22.2.3 Ajuste de la posición angular del brazo de la sierra/cabezal de la máquina.
Afloje el tornillo de fijación (1).
Gire el cabezal de la máquina (34) con el mango
(14) hacia la izquierda hasta que coincida con el
valor angular deseado de la escala (10).
A continuación, vuelva a apretar el tornillo de
fijación (1).
Palanca de fijación
aflojada
Palanca de fijación cerrada

FUNCIONAMIENTO
ZIPPER MASCHINEN GmbH www.Zipper-Maschinen.at 44
ZI-KGS255DS
22.2.4 Ajuste de los topes.
Los dos topes ajustables (9-1) se deben ajustar cada vez
que se modifique el ángulo del cabezal de la máquina
(90-45°). Para ello, afloje los tornillos de fijación (24) y
ajuste los topes, de modo que entre la hoja de la sierra y
el tope haya una distancia de 8-10 mm. A continuación,
vuelva a apretar los tornillos de fijación (24) para fijar los
topes (9-1).
ATENCIÓN
Antes del proceso de corte,
compruebe que los carriles de los
topes y la hoja de la sierra no pueden
chocar. (Corte simulado con la
máquina apagada)
22.2.5 Ajuste de la velocidad de la hoja de la sierra
Ponga el interruptor selector (28) en
Pos I : 3200 min-1
Pos II: 4500 min-1
en función de la velocidad requerida.
22.2.6 Ajuste del límite de la profundidad de corte
La profundidad de corte se puede ajustar gradualmente con
el tornillo (22). Para ello, afloje la tuerca moleteada (M) del
tornillo (22). Enrosque o desenrosque el tornillo (22) para
ajustar la profundidad de corte requerida. A continuación,
vuelva a apretar la tuerca moleteada (M).
AVISO
Compruebe el ajuste haciendo un corte
de prueba.
22.2.7 Conexión a un sistema de aspiración
Para aspirar el polvo en estancias cerradas, conecte una manguera de aspiración a la boquilla del
sistema de aspiración de polvo y fíjela con una abrazadera para mangueras. Dimensiones de la
conexión según los Datos Técnicos
22.2.8 Encendido / apagado de la máquina
Encendido de la máquina:
Pulse el interruptor de bloqueo (15) y pulse el interruptor
ON/OFF (16) del mango.
Apagado de la máquina:
Suelte el interruptor ON/OFF

FUNCIONAMIENTO
ZIPPER MASCHINEN GmbH www.Zipper-Maschinen.at 45
ZI-KGS255DS
22.3 Modos de funcionamiento
22.3.1 Tronzado
El tronzado es especialmente ideal para cortar piezas de trabajo estrechas (aprox. 100 mm).
En el tronzado, el dispositivo deslizante está fijado por el dispositivo de bloqueo del dispositivo
deslizante (23), de modo que, durante el corte, el grupo de la sierra no pueda deslizarse hacia
delante o hacia atrás.
Ajuste el ángulo en función del proceso requerido y ajuste en consecuencia los topes.
Marque la línea de corte (con el láser).
Coloque la pieza de trabajo en el tope y en la mesa y fíjela con el pisador
Mueva el cabezal de la máquina a la posición más elevada.
Encienda la máquina y espere a que la hoja de la sierra alcance la velocidad máxima (aprox. 5 seg.).
Lleve a cabo el tronzado (mueva el cabezal de la máquina hacia abajo) hasta que alcance la
posición más baja.
Mueva el cabezal de la máquina a la posición más elevada
AVISO
El cabezal de la máquina está accionado por resorte. No suelte simplemente el
cabezal de la máquina, sino muévalo hacia arriba cogiéndolo del mango hasta que
alcance la posición más elevada (posición de reposo).
Suelte el interruptor ON/OFF. Espere a que la hoja de la sierra circular se detenga.
Retire la pieza de trabajo
22.3.2 Corte deslizante
Los cortes deslizantes son adecuados para realizar cortes largos.
Para llevar a cabo el corte, el dispositivo deslizante se desbloquea aflojando el dispositivo de
bloqueo del dispositivo deslizante (23), de modo que, durante el corte, el grupo de la sierra
pueda deslizarse hacia delante o hacia atrás.
Ajuste el ángulo en función del proceso requerido y ajuste en consecuencia los topes.
Marque la línea de corte (con el láser).
Coloque la pieza de trabajo en el tope y en la mesa y fíjela con el pisador
Mueva el cabezal de la máquina a la posición más elevada y tire del cabezal hacia usted.
Encienda la máquina y espere a que la hoja de la sierra alcance la velocidad máxima (aprox. 5 seg.).
Lleve a cabo el tronzado (mueva el cabezal de la máquina hacia abajo) hasta que alcance la
posición más baja y, a continuación, empuje lentamente el cabezal de la máquina hacia atrás
para poder mecanizar la pieza de trabajo a lo largo de toda su longitud.
Mueva el cabezal de la máquina a la posición más elevada
AVISO
El cabezal de la máquina está accionado por resorte. No suelte simplemente el
cabezal de la máquina, sino muévalo hacia arriba cogiéndolo del mango hasta que
alcance la posición más elevada (posición de reposo).
Suelte el interruptor ON/OFF. Espere a que la hoja de la sierra circular se detenga.
Retire la pieza de trabajo

LIMPIEZA, MANTENIMIENTO, ALMACENAMIENTO Y ELIMINACIÓN DE RESIDUOS
ZIPPER MASCHINEN GmbH www.Zipper-Maschinen.at 46
ZI-KGS255DS
22.3.3 Ranurado
Ajuste el tope de profundidad para el ranurado, de modo que obtenga la profundidad de corte
requerida con el ángulo seleccionado.
Lleve a cabo el tronzado y el corte deslizante, como se describe en el capítulo correspondiente,
con la diferencia de que la pieza de trabajo no se secciona completamente.
23 LIMPIEZA, MANTENIMIENTO, ALMACENAMIENTO Y
ELIMINACIÓN DE RESIDUOS
ADVERTENCIA
¡Peligro ocasionado por tensiones eléctricas! Manipular la máquina con la
alimentación eléctrica encendida puede producir lesiones graves o incluso la
muerte. ¡Por lo tanto, al llevar a cabo trabajos de limpieza, mantenimiento o de
reparación, desconecte siempre la máquina de la alimentación eléctrica y
asegúrela contra arranques accidentales!
23.1 Limpieza
AVISO
Los productos de limpieza incorrectos pueden dañar la pintura de la máquina.
No utilice para limpiar disolventes, diluyentes para lacas nitrocelulósicas u otros
productos de limpieza que puedan dañar la pintura de la máquina. ¡Observe las
instrucciones y las indicaciones del fabricante del producto de limpieza!
Es imprescindible limpiar periódicamente la máquina para garantizar un funcionamiento seguro y
una larga vida útil de la máquina. Retire el serrín y las astillas de madera de procesos anteriores
con un cepillo o una herramienta similar.
23.2 Mantenimiento
La máquina precisa de poco mantenimiento y únicamente se debe llevar a cabo el mantenimiento
de unos pocos componentes. ¡Independientemente de esto, se deben subsanar inmediatamente los
fallos y defectos que puedan afectar a la seguridad del usuario!
Antes de cada puesta en marcha, asegúrese de que los dispositivos de seguridad están
en perfecto estado y de que funcionan correctamente.
Compruebe periódicamente que las etiquetas de advertencia y de seguridad de la
máquina están en perfecto estado y son legibles.
Utilice únicamente herramientas adecuadas y que estén en perfecto estado
Utilice únicamente las piezas de recambio originales recomendadas por el fabricante
23.2.1 Programa de conservación y de mantenimiento
El tipo y el grado de desgaste de la máquina depende en gran medida de las condiciones de
funcionamiento. Los intervalos que se especifican a continuación se aplican cuando la máquina se
utiliza dentro de los límites especificados:
Intervalo
Componente
Medida
Antes de
comenzar a
trabajar
Hoja de la
sierra
Compruebe si presenta daños y sustitúyala, en caso
necesario
Protección de la
hoja de la
sierra
Compruebe su funcionamiento (consulte Comprobación de
funcionamiento de la protección de la hoja de la sierra)
Suplemento de
la mesa
Compruebe si presenta daños y sustitúyala, en caso
necesario
Cable de
alimentación
Compruebe si presenta daños y repárelo, en caso
necesario
Después de
finalizar el trabajo
Máquina
Retire el polvo/astillas de madera y la suciedad
Protección de la
hoja de la
sierra

LIMPIEZA, MANTENIMIENTO, ALMACENAMIENTO Y ELIMINACIÓN DE RESIDUOS
ZIPPER MASCHINEN GmbH www.Zipper-Maschinen.at 47
ZI-KGS255DS
Bolsa colectora
de virutas
Transcurridas 50
h. (o 10 h.)
Escobillas de
carbón
Compruébelas y sustitúyalas, en caso necesario
Si es necesario
Hoja de la
sierra
Sustituya la hoja de sierra mellada
23.2.2 Ajuste de la posición angular (con el ángulo del tope)
Corte de 90°
Baje el cabezal de la máquina y
asegúrelo con el perno de bloqueo (11).
- Afloje el tornillo de fijación (1).
- Coloque el ángulo del tope de 90° (W)
entre la hoja de la sierra y la mesa
giratoria.
- Afloje la contratuerca del tornillo de
ajuste (25) y ajuste el tornillo (25) hasta
que el ángulo entre la hoja de la sierra y
la mesa giratoria sea de 90°.
- Vuelva a apretar la contratuerca.
- A continuación, compruebe la posición
del indicador de ángulo. Si es necesario,
afloje el indicador (10) con un
destornillador de estrella y colóquelo en
la posición de 0° de la escala (10-1) y, a
continuación, vuelva a fijarlo.
Corte de 45°
Baje el cabezal de la máquina y
asegúrelo con el perno de bloqueo (11).
- Fije la mesa giratoria en la posición de
0°.
- Afloje el tornillo de fijación (1) e incline
el cabezal de la máquina 45° hacia la
izquierda con el mango.
- Coloque el ángulo del tope de 45°
entre la hoja de la sierra y la mesa
giratoria.
- Afloje la contratuerca del tornillo de
ajuste (26) y ajuste el tornillo (26) hasta
que el ángulo entre la hoja de la sierra y
la mesa giratoria sea exactamente de
45°.
- Vuelva a apretar la contratuerca.
- A continuación, compruebe la posición
del indicador de ángulo. Si es necesario,
afloje el indicador (10) con un
destornillador de estrella, muévalo a la
posición de 45° de la escala de ángulos
(10-1) y vuelva a apretar el tornillo de
fijación.

LIMPIEZA, MANTENIMIENTO, ALMACENAMIENTO Y ELIMINACIÓN DE RESIDUOS
ZIPPER MASCHINEN GmbH www.Zipper-Maschinen.at 48
ZI-KGS255DS
23.2.3 Sustitución de la hoja de la sierra
- Eleve el cabezal de la máquina y asegúrelo con el perno de bloqueo (11).
- Con una mano, inserte la llave Allen en el tornillo de la brida (31).
- Presione firmemente el dispositivo de bloqueo del eje de la sierra (36) y gire el tornillo (31)
lentamente en el sentido de las agujas del reloj. El dispositivo de bloqueo del eje de la sierra
(36) se enclava después de una vuelta como máximo.
- A continuación, afloje el tonillo de la brida (31) girándolo en el sentido de las agujas del reloj y
extráigalo junto con la brida exterior (30).
- Levante la protección de la hoja de la sierra (20).
- Extraiga la hoja de la sierra (35) de la brida interior y tire de ella hacia abajo.
- Limpie cuidadosamente el tornillo de la brida (31), la brida exterior (30) y la brida interior.
- Para montar y fijar la nueva hoja de la sierra (35), proceda en orden inverso.
ATENCIÓN
Observe el sentido de rotación y las dimensiones correctas de la hoja de la
sierra (6):
Diámetro máx. de 255 mm y grosor máx. de 2,8 mm, y diámetro del orificio de
montaje 30 mm
- Antes de continuar con el trabajo, asegúrese de que los dispositivos de seguridad están en
buen estado de funcionamiento. (Comprobación de la protección de la hoja de la sierra)
- ¡Importante! Cada vez que sustituya la hoja de la sierra (6), compruebe si gira libremente en el
suplemento de la mesa (10) en ambos casos. Ajustes verticales y de ángulo de 45°.
- ¡Importante! La sustitución y alineación de la hoja de la sierra (6) deben realizarse
correctamente.
23.2.4 Ajuste del láser
Se puede reajustar el láser (17), en caso de que no
muestre la línea de corte correcta. Afloje los tornillos
de estrella (S) y ajuste el láser moviéndolo hacia un
lado hasta que el rayo láser alcance los dientes de la
hoja de la sierra. Vuelva a apretar los dos tornillos (S).
ATENCIÓN
¡Riesgo de sufrir lesiones! Lleve guantes protectores al sustituir la hoja de la sierra.

LIMPIEZA, MANTENIMIENTO, ALMACENAMIENTO Y ELIMINACIÓN DE RESIDUOS
ZIPPER MASCHINEN GmbH www.Zipper-Maschinen.at 49
ZI-KGS255DS
23.2.5 Vaciado/sustitución de la bolsa colectora de virutas
La sierra viene equipada con una bolsa colectora para
serrín y virutas.
¡Nota! ¡La bolsa colectora de virutas sólo se puede
utilizar para cortar madera y materiales similares a la
madera!
Presione el anillo metálico de la bolsa colectora de
virutas y fíjelo al orificio de salida. La bolsa colectora
de virutas se puede vaciar por medio de una
cremallera que hay en la parte inferior.
23.2.6 Comprobación / sustitución de las escobillas de carbón
Compruebe las escobillas de carbón transcurridas las
primeras 50 horas de funcionamiento con una nueva
máquina o cuando se instalen nuevas escobillas.
Después de la primera comprobación, repita la
comprobación cada 10 horas de funcionamiento.
Es necesario sustituir las escobillas, cuando el carbón
se ha gastado hasta alcanzar los 6 mm de longitud o
cuando el resorte o el hilo de contacto se han
quemado o dañado. Si, al desmontar las escobillas,
se constata que se pueden seguir utilizando, se
pueden volver a montar.
Para llevar a cabo el mantenimiento de las escobillas
de carbón, abra las dos cubiertas (13) girándolas en
el sentido contrario a las agujas del reloj. A
continuación, extraiga las escobillas de carbón. Para
sustituirlas, proceda en orden inverso.
23.2.7 Sustitución del suplemento de la mesa
ATENCIÓN
Si el suplemento de la mesa está dañado (19), existe el riesgo de que piezas
pequeñas se atasquen entre el suplemento de la mesa y la hoja de la sierra y que
bloqueen la hoja de la sierra.
1. Quite los tornillos (S) del suplemento de la mesa
(19). En caso necesario, gire la mesa giratoria y el
cabezal de la máquina para poder alcanzar los
tornillos.
2. Retire el suplemento de la mesa (19).
3. Instale un nuevo suplemento de la mesa (19).
4. Apriete los tornillos (S) del suplemento de la mesa
(19).

SUBSANACIÓN DE ERRORES
ZIPPER MASCHINEN GmbH www.Zipper-Maschinen.at 50
ZI-KGS255DS
23.3 Almacenamiento
AVISO
Un almacenamiento inadecuado puede dañar y deteriorar los componentes.
¡Almacene los componentes empaquetados o desembalados sólo en las
condiciones ambientales especificadas!
En caso de que no se utilice, almacene la máquina en un lugar seco, protegido contra las heladas y
con cerradura para evitar, por un lado, que se forme óxido y para garantizar, por otro lado, que las
personas no autorizadas y, especialmente, los niños puedan acceder a la máquina.
23.4 Eliminación de residuos
Tenga en cuenta las normas de carácter nacional sobre tratamiento de
residuos. No elimine nunca la máquina, los componentes de la máquina o
equipos con los residuos municipales. Si es necesario, póngase en contacto
con las autoridades locales para informarse sobre las opciones de
eliminación que haya disponibles.
Si compra una nueva máquina o un aparato similar a su distribuidor, éste
estará obligado en determinados países a eliminar correctamente su
máquina usada.
24 SUBSANACIÓN DE ERRORES
ADVERTENCIA
¡Peligro ocasionado por tensiones eléctricas! Manipular la máquina con la
alimentación eléctrica encendida puede producir lesiones graves o incluso la
muerte. ¡Antes de llevar a cabo trabajos para la subsanación de errores,
desconecte siempre la máquina de la fuente de alimentación y asegúrela contra
arranques accidentales!
Muchas posibles fuentes de errores se pueden excluir si la máquina está conectada correctamente
a la alimentación eléctrica.
Si no se ve capaz de llevar a cabo correctamente las reparaciones necesarias y/o no cuenta con la
formación requerida, encomiende siempre a personal especializado la subsanación del problema.
Error
Posible causa
Subsanación
La máquina no se puede
encender
No está conectado el enchufe de
alimentación
Conecte el enchufe de
alimentación
Escobillas de carbón dañadas
Sustituya las escobillas de
carbón
Motor dañado
Sustituya el motor
El interruptor ON/OFF está
dañado
Repare el interruptor
Contragolpe del material
Hoja de sierra mellada
Sustituya la hoja de la sierra
La hoja de la sierra está mal
montada
Compruébelo
Ángulo de corte incorrecto
La posición angular no es
correcta
Ajuste la posición angular
La hoja de la sierra toca el
suelo de la máquina
Profundidad de corte mal
ajustada
Corrija el ajuste de la
profundidad de corte

SCHALTPLAN / WIRING DIAGRAM / DIAGRAMA DE CABLEADO
ZIPPER MASCHINEN GmbH www.Zipper-Maschinen.at 51
ZI-KGS255DS
25 SCHALTPLAN / WIRING DIAGRAM / DIAGRAMA DE CABLEADO
26 ERSATZTEILE / SPARE PARTS / PIEZAS DE RECAMBIO
26.1 Ersatzteilbestellung / spare parts order / Pedido de piezas
(DE) Mit ZIPPER-Ersatzteilen verwenden Sie Ersatzteile, die ideal aufeinander abgestimmt sind. Die
optimale Passgenauigkeit der Teile verkürzen die Einbauzeiten und erhöhen die Lebensdauer.
HINWE I S
Der Einbau von anderen als Originalersatzteilen führt zum Verlust der Garantie!
Daher gilt: Beim Tausch von Komponenten/Teilen nur Originalersatzteile verwenden
Beim Bestellen von Ersatzteilen verwenden Sie bitte das Serviceformular, das Sie am Ende dieser Anleitung finden.
Geben Sie stets Maschinentype, Ersatzteilnummer sowie Bezeichnung an. Um Missverständnissen vorzubeugen,
empfehlen wir mit der Ersatzteilbestellung eine Kopie der Ersatzteilzeichnung beizulegen, auf der die benötigten
Ersatzteile eindeutig markiert sind.
Bestelladresse sehen Sie unter Kundendienstadressen im Vorwort dieser Dokumentation.
(EN) With original ZIPPER spare parts you use parts that are attuned to each other shorten the
installation time and elongate your machines lifespan.
IMP OR TAN T
The installation of other than original spare parts voids the warranty!
So you always have to use original spare parts
When you place a spare parts order please use the service formular you can find in the last chapter of this manual.
Always take a note of the machine type, spare parts number and partname. We recommend to copy the spare parts
diagram and mark the spare part you need.
You find the order address in the preface of this operation manual.
(ES) Con las piezas de recambio de ZIPPER, utiliza piezas de recambio que se ajustan perfectamente
entre sí. El ajuste óptimo de los componentes acorta el tiempo de instalación y aumenta la vida útil.
AVISO
¡La instalación de piezas de recambio no originales lleva a la pérdida de garantía!
Por lo tanto: Al llevar a cabo la sustitución de componentes/piezas, utilice únicamente piezas de
recambio originales
Para pedir piezas de recambio utilice el formulario del servicio de atención al cliente que encontrará al final del
presente manual. Indique siempre el tipo de máquina, la referencia de la pieza de recambio y la denominación. Para
evitar malentendidos, se recomienda adjuntar al pedido una copia del esquema de piezas de recambio en el que se
marque claramente las piezas de recambio necesarias.
Encontrará la dirección de pedidos en las direcciones del servicio postventa que se encuentra en el prólogo de esta
documentación.

ERSATZTEILE / SPARE PARTS / PIEZAS DE RECAMBIO
ZIPPER MASCHINEN GmbH www.Zipper-Maschinen.at 52
ZI-KGS255DS
26.2 Explosionszeichnung / exploded view / Vista de despiece

ERSATZTEILE / SPARE PARTS / PIEZAS DE RECAMBIO
ZIPPER MASCHINEN GmbH www.Zipper-Maschinen.at 53
ZI-KGS255DS

GEWÄHRLEISTUNG (DE)
ZIPPER MASCHINEN GmbH www.Zipper-Maschinen.at 55
ZI-KGS255DS
28 GEWÄHRLEISTUNG (DE)
1.) Gewährleistung:
Die Fa. ZIPPER Maschinen gewährt für mechanische und elektrische Bauteile eine
Gewährleistungsfrist von 2 Jahren für den Hobby Einsatz; bei gewerblichem Einsatz besteht eine
Gewährleistung von 1 Jahr, beginnend ab dem Erwerb des Endverbrauchers/Käufers. Treten
innerhalb dieser Frist Mängel auf, welche nicht auf im Punkt 3 angeführten Ausschlussdetails
beruhen, so wird die Fa. Zipper nach eigenem Ermessen das Gerät reparieren oder ersetzen.
2.) Meldung:
Damit die Berechtigung des Gewährleistungsanspruches überprüft werden kann, muss der Käufer
seinen Händler kontaktieren; dieser meldet schriftlich den aufgetretenen Mangel am Gerät der Fa.
Zipper. Bei berechtigtem Gewährleistungsanspruch wird das Gerät beim Händler von Zipper
abgeholt. Retoursendungen ohne vorheriger Abstimmung mit der Fa. Zipper werden nicht
akzeptiert und angenommen.
3.) Bestimmungen:
a) Gewährleistungsansprüche werden nur akzeptiert, wenn zusammen mit dem Gerät eine Kopie
der Originalrechnung oder des Kassenbeleges vom Zipper Handelspartner beigelegt ist. Es erlischt
der Anspruch auf Gewährleistung, wenn das Gerät nicht komplett mit allen Zubehörteilen zur
Abholung gemeldet wird.
b) Die Gewährleistung schließt eine kostenlose Überprüfung, Wartung, Inspektion oder
Servicearbeiten am Geräte aus. Defekte aufgrund einer unsachgemäßen Benutzung durch den
Endanwender oder dessen Händler werden ebenfalls nicht als Gewährleistungsanspruch akzeptiert.
Z.B.: Verwendung von falschem Treibstoffen, Frostschäden in Wasserbehältern, Treibstoff über
Winter im Benzintank des Gerätes.
c) Ausgeschlossen sind Defekte an Verschleißteilen wie : Kohlebürsten, Fangsäcke, Messer,
Walzen, Schneideplatten, Schneideeinrichtungen, Führungen, Kupplungen, Dichtungen, Laufräder,
Sageblätter, Spaltkreuze, Spaltkeile, Spaltkeilverlängerungen, Hydrauliköle, Öl,- Luft-u.
Benzinfilter, Ketten, Zündkerzen, Gleitbacken usw.
d) Ausgeschlossen sind Schäden an den Geräten verursacht durch: Unsachgemäße Verwendung,
Fehlgebrauch des Gerätes; nicht seinem normalen Verwendungszweckes entsprechend;
Nichtbeachtung der Bedienungs-u. Wartungsanleitung; Höhere Gewalt; Reparaturen oder
technische Änderungen durch nicht autorisierte Werkstätten oder Kunden selbst. Durch
Verwendung von nicht originalen Zipper Ersatz- oder Zubehörteilen.
e) Entstandene Kosten ( Frachtkosten ) und Aufwendungen bei nichtberechtigten
Gewährleistungsansprüchen werden nach Überprüfung unseres Fachpersonals dem Kunden oder
Händler in Rechnung gestellt.
f) Geräte außerhalb der Gewährleistungsfrist: Reparatur erfolgt nur nach Vorkasse oder
Händlerrechnung gemäß des Kostenvoranschlages (inkl. Frachtkosten) der Fa. Zipper.
g) Gewährleistungsansprüche werden nur für den Kunden eines Zipper Händlers, der das Gerät
direkt bei der Fa. Zipper erworben hat, gewährt. Diese Ansprüche sind nicht übertragbar bei
mehrfacher Veräußerung des Gerätes.
4.) Schadensersatzansprüche und sonstige Haftungen:
Die Fa. Zipper haftet in allen Fällen nur beschränkt auf den Warenwert des Gerätes.
Schadensersatzansprüche aufgrund schlechter Leistung, Mängel, sowie Folgeschäden oder
Verdienstausfälle wegen eines Defektes während der Gewährleistungsfrist werden nicht anerkannt.
Die Fa. Zipper besteht auf das gesetzliche Nachbesserungsrecht eines Gerätes.

WARRANTY GUIDELINES (EN)
ZIPPER MASCHINEN GmbH www.Zipper-Maschinen.at 56
ZI-KGS255DS
29 WARRANTY GUIDELINES (EN)
1.) Warranty:
Company ZIPPER Maschinen GmbH grants for mechanical and electrical components a warranty
period of 2 years for amateur use; and warranty period of 1 year for professional use, starting with
the purchase of the final consumer. In case of defects during this period, which are not excluded
by paragraph 3, ZIPPER will repair or replace the machine at its own discretion.
2.) Report:
In order to check the legitimacy of warranty claims, the final consumer must contact his dealer.
The dealer has to report in written form the occurred defect to ZIPPER. If the warranty claim is
legitimate, ZIPPER will pick up the defective machine from the dealer. Returned shippings by
dealers which have not been coordinated with ZIPPER, will not be accepted and refused.
3.) Regulations:
a) Warranty claims will only be accepted, when a copy of the original invoice or cash voucher from
the trading partner of ZIPPER is enclosed to the machine. The warranty claim expires if the
accessories belonging to the machine are missing.
b) The warranty does not include free checking, maintenance, inspection or service works on the
machine. Defects due to incorrect usage of the final consumer or his dealer will not be accepted as
warranty claims either. Some examples: usage of wrong fuel, frost damages in water tanks,
leaving fuel in the tank during the winter, etc.
c) Defects on wear parts are excluded, e.g. carbon brushes, collection bags, knives, cylinders,
cutting blades, clutches, sealings, wheels, saw blades, splitting crosses, riving knives, riving knife
extensions, hydraulic oils, oil/air/fuel filters, chains, spark plugs, sliding blocks, etc.
d) Also excluded are damages on the machine caused by incorrect or inappropriate usage, if it was
used for a purpose which the machine is not supposed to, ignoring the user manual, force majeure,
repairs or technical manipulations by not authorized workshops or by the customer himself, usage
of non-original ZIPPER spare parts or accessories.
e) After inspection by our qualified personnel, resulted costs (like freight charges) and expenses
for not legitimated warranty claims will be charged to the final customer or dealer.
f) In case of defective machines outside the warranty period, we will only repair after advance
payment or dealer’s invoice according to the cost estimate (incl. freight costs) of ZIPPER.
g) Warranty claims can only be granted for customers of an authorized ZIPPER dealer who directly
purchased the machine from ZIPPER. These claims are not transferable in case of multiple sales of
the machine.
4.) Claims for compensation and other liabilities:
The liability of company ZIPPER is limited to the value of goods in all cases. Claims for
compensation because of poor performance, lacks, damages or loss of earnings due to
defects during the warranty period will not be accepted. ZIPPER insists on its right to
subsequent improvement of the machine.

GARANTÍA (ES)
ZIPPER MASCHINEN GmbH www.Zipper-Maschinen.at 57
ZI-KGS255DS
30 GARANTÍA (ES)
1.) Garantía:
La empresa ZIPPER Maschinen concede a los componentes eléctricos y mecánicos una garantía de
2 años para uso amateur. Para el uso comercial, hay un período de garantía de 1 año a partir de la
fecha de compra del usuario final/comprador. Si durante este período se producen defectos que no
estén excluidos en los detalles enumerados en el punto 3, la empresa Zipper reparará o sustituirá
el aparato a su discreción.
2.) Notificación:
Para comprobar la legitimidad de la reclamación de garantía, el comprador deberá ponerse en
contacto con el distribuidor, que informará por escrito a la empresa Zipper del defecto que se ha
producido. En caso de que la reclamación de garantía sea legítima, Zipper recogerá el aparato en el
distribuidor. No se aceptarán las devoluciones que no hayan sido coordinadas previamente con la
empresa Zipper.
3.) Disposiciones:
a) Sólo se aceptarán reclamaciones de garantía si se adjunta al aparato una copia de la factura
original o del recibo de compra del socio comercial de Zipper. La reclamación de garantía expirará
si el aparato no se envía completo con todos los accesorios.
b) La garantía no incluye trabajos de comprobación, mantenimiento, inspección o de servicio
gratuitos en el aparato. Los defectos ocasionados por un uso incorrecto por parte del usuario final
o su distribuidor tampoco estarán cubiertos por la garantía. P. ej.: uso de combustible incorrecto,
daños por heladas en los depósitos de agua, combustible durante el invierno en el depósito de la
gasolina del aparato.
c) Quedan excluidos los defectos en las piezas de desgaste como, por ejemplo: escobillas de
carbón, bolsas colectoras, cuchillas, rodillos, placas de corte, dispositivos de corte, guías,
acoplamientos, juntas, impulsores, hojas de sierra, cuñas en cruz, cuñas de separación,
extensiones para cuñas de separación, aceites hidráulicos, filtros de aceite, de aire y de gasolina,
cadenas, bujías, mordazas deslizantes, etc.
d) Quedan excluidos los daños en los aparatos ocasionados por: uso inadecuado, uso indebido del
aparato (no conforme a su finalidad de uso normal), incumplimiento de las instrucciones de uso y
de mantenimiento, fuerza mayor, reparaciones o modificaciones técnicas llevadas a cabo por
talleres no autorizados o por los propios clientes. El uso de piezas de recambio o accesorios no
originales de Zipper.
e) Los gastos (gastos de transporte) y costes incurridos en caso de reclamaciones de garantía no
legitimadas se facturarán al cliente o distribuidor después de que nuestro personal especializado
haya realizado las comprobaciones.
f) Aparatos fuera del período de garantía: Las reparaciones sólo se llevarán a cabo tras el pago por
adelantado o la factura del distribuidor con arreglo a la estimación de costes (incluidos los gastos
de transporte) de la empresa Zipper.
g) Las reclamaciones de garantía sólo se concederán a los clientes de un distribuidor de Zipper que
haya comprado el aparato directamente a la empresa Zipper. Estas reclamaciones no se podrán
transferir en caso de que el aparato se venda varias veces.
4.) Reclamaciones por daños y perjuicios y otras responsabilidades:
En todos los casos, la responsabilidad de la empresa Zipper se limita al valor del aparato. No se
aceptarán reclamaciones por daños y perjuicios debido al mal funcionamiento, defectos, daños
indirectos o pérdidas de ingresos ocasionados por un defecto durante el período de garantía. La
empresa Zipper insiste en su derecho legal a una mejora posterior del aparato.

PRODUKTBEOBACHTUNG | PRODUCT MONITORING
ZIPPER MASCHINEN GmbH www.Zipper-Maschinen.at 58
ZI-KGS255DS
31 PRODUKTBEOBACHTUNG | PRODUCT MONITORING
Wir beobachten unsere Produkte auch nach
der Auslieferung.
Um einen ständigen Verbesserungsprozess
gewährleisten zu können, sind wir von
Ihnen und Ihren Eindrücken beim Umgang
mit unseren Produkten abhängig:
- Probleme, die beim Gebrauch des
Produktes auftreten
- Fehlfunktionen, die in bestimmten
Betriebssituationen auftreten
- Erfahrungen, die für andere Benutzer
wichtig sein können
Wir bitten Sie, derartige Beobachtungen zu
notieren und diese per E-Mail, Fax oder Post
an uns zu senden
We monitor the quality of our delivered
products in the frame of a Quality
Management policy.
Your opinion is essential for further product
development and product choice. Please let us
know about your:
- Impressions and suggestions for
improvement.
- experiences that may be useful for other
users and for product design
- Experiences with malfunctions that occur in
specific operation modes
We would like to ask you to note down your
experiences and observations and send them
to us via FAX, E-Mail or by post
Meine Beobachtungen / My experiences:
N a m e / n a m e :
P r o d u k t / p r o d u c t :
K a u f d a t u m / p u r c h a s e d a t e :
E r w o r b e n v o n / p u r c h a s e d f r o m :
E - M a i l / e - m a i l :
V i e l e n D a n k f ü r I h r e M i t a r b e i t ! / T h a n k y o u f o r y o u r c o o p e r a t i o n !
KONTAKTADRESSE / CONTACT:
Z.I.P.P.E.R MASCHINEN GmbH
4707 Schlüsslberg, Gewerbepark 8
AUSTRIA
Tel :+43 7248 61116 700
Fax:+43 7248 61116 720

PRODUKTBEOBACHTUNG | PRODUCT MONITORING
ZIPPER MASCHINEN GmbH www.Zipper-Maschinen.at 59
ZI-KGS255DS
-
 1
1
-
 2
2
-
 3
3
-
 4
4
-
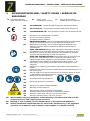 5
5
-
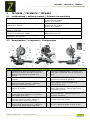 6
6
-
 7
7
-
 8
8
-
 9
9
-
 10
10
-
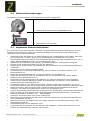 11
11
-
 12
12
-
 13
13
-
 14
14
-
 15
15
-
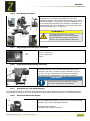 16
16
-
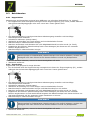 17
17
-
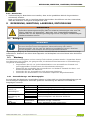 18
18
-
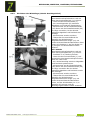 19
19
-
 20
20
-
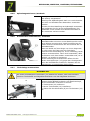 21
21
-
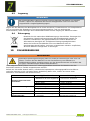 22
22
-
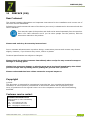 23
23
-
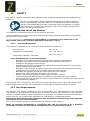 24
24
-
 25
25
-
 26
26
-
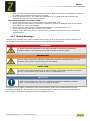 27
27
-
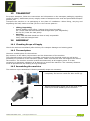 28
28
-
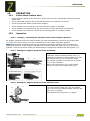 29
29
-
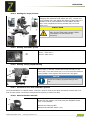 30
30
-
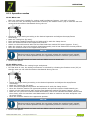 31
31
-
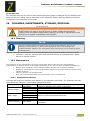 32
32
-
 33
33
-
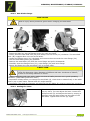 34
34
-
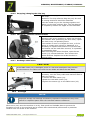 35
35
-
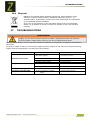 36
36
-
 37
37
-
 38
38
-
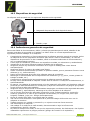 39
39
-
 40
40
-
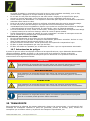 41
41
-
 42
42
-
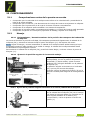 43
43
-
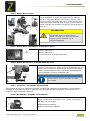 44
44
-
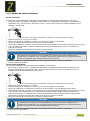 45
45
-
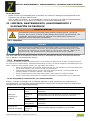 46
46
-
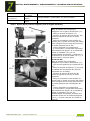 47
47
-
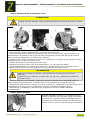 48
48
-
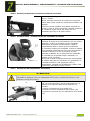 49
49
-
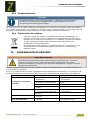 50
50
-
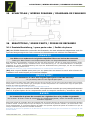 51
51
-
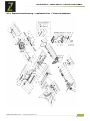 52
52
-
 53
53
-
 54
54
-
 55
55
-
 56
56
-
 57
57
-
 58
58


Zipper Maschinen ZI-KGS255DS El manual del propietario
- Categoría
- Herramientas eléctricas
- Tipo
- El manual del propietario
en otros idiomas
Artículos relacionados
Otros documentos
-
Zipper Mowers ZI-KGS250 Instrucciones de operación
-
-
-
-
Zipper ZI-MOS125 El manual del propietario
-
-
-
-
-
HEYLO EW 18-e El manual del propietario