Bella 10.5 QT Air Convection Fryer Oven Dehydrator El manual del propietario
- Categoría
- Pequeños electrodomésticos de cocina
- Tipo
- El manual del propietario
Este manual también es adecuado para

10.5 QT AIR CONVECTION FRYER
OVEN DEHYDRATOR
10.5 QT FREIDORA DE CONVECCIÓN Y HORNO
CON DESHIDRATADOR
Instruction Manual (Recipe Guide)
Manual de instrucciones (Guía de recetas)
Register your product and get support at:
Para registrar y obtener asistencia de su producto ir:
www.bellahousewares.com

THANK YOU
For Your Purchase
BellaLifestyle
BellaLife
@
bellahousewares.com
#get inspired
Register
& sign up for special
announcements and trendy
recipes!
Tell us what you think!
Rate, review or ask us a question.

3
Table of Contents
Important Safeguards ................................................................................................................................... 4-5
Additional Important Safeguards ....................................................................................................................5
Notes on the Plug ...............................................................................................................................................6
Notes on the Cord ............................................................................................................................................. 6
Plasticizer Warning ............................................................................................................................................ 6
Electric Power ..................................................................................................................................................... 6
Getting to Know Your 10.5 QT Air Convection Fryer Oven Dehydrator ....................................................7
Touchscreen Control ..........................................................................................................................................8
Menu Chart ..........................................................................................................................................................9
Weight/Size Restrictions ..................................................................................................................................9
Cooking Containers .........................................................................................................................................10
Before Using for the First Time ......................................................................................................................10
Operating Instructions ....................................................................................................................................10
Air Fry Manual Operation ............................................................................................................................... 11
Menu: 9 Preset Air Fry Options ......................................................................................................................12
Air Fry For Best Results................................................................................................................................... 12
A Note on Air Frying Pre-Packaged Frozen Foods ...................................................................................... 12
Air Fry Chart (Includes Preset MENU ( ) Options) ................................................................................... 13
Rotisserie Assembly ........................................................................................................................................ 14
Dehydrate ..........................................................................................................................................................15
Dried Herbs........................................................................................................................................................15
User Maintenance Instructions ......................................................................................................................16
Care & Cleaning Instructions .........................................................................................................................16
Storing Instructions .........................................................................................................................................16
Recipes .......................................................................................................................................................... 17-24
Warranty ............................................................................................................................................................ 25
Índice
Medidas de seguridad importantes ..............................................................................................................26
Otras medidas de seguridad importantes ..............................................................................................27-28
Notas sobre el enchufe ...................................................................................................................................29
Notas sobre el cable ........................................................................................................................................29
Advertencia sobre los plasticantes .............................................................................................................29
Corriente eléctrica............................................................................................................................................29
Conozca su 10.5 QT freidora de convección y horno con deshidratador ................................................30
Pantalla táctil .................................................................................................................................................... 31
Carta de menú ..................................................................................................................................................32
Restricciones de peso/tamaño ......................................................................................................................32
Recipientes de cocción ....................................................................................................................................33
Antes de usar por primera vez ....................................................................................................................... 33
Instrucciones de uso ........................................................................................................................................ 33
Instrucciones de uso al freír con aire ............................................................................................................ 34
MENÚ. 9 opciones de freír con aire preajustadas ......................................................................................35
Freír con aire. Para mejores resultados ........................................................................................................ 35
Una nota sobre los alimentos frescos o congelados preenvasados para freír al aire ..........................35
Carta de freír con aire ................................................................................................................................ 36-37
Asador de convección......................................................................................................................................38
Asador. Para mejores resultados ................................................................................................................... 38
Guía según el USDA: Temperaturas internas ..............................................................................................38
Deshidratar .................................................................................................................................................. 39-40
Instrucciones de mantenimiento ...................................................................................................................41
Instrucciones de cuidado y limpieza ............................................................................................................. 41
Instrucciones de almacenamiento ................................................................................................................41
Guía de recetas ............................................................................................................................................41-49
Garantía .............................................................................................................................................................51

4
IMPORTANT SAFEGUARDS
When using electrical appliances, basic safety precautions should always be
followed, including the following:
1. READ ALL INSTRUCTIONS.
2. Do not touch hot surfaces. Use handles or knobs. Use oven mitts or potholders.
3. To protect against electric shock do not immerse cord, plugs, or appliance in
water or other liquid.
4. This appliance is not intended for use by persons (including children) with
reduced physical, sensory or mental capabilities, or lack of experience and
knowledge, unless they have been given supervision or instruction concerning
use of the appliance by a person responsible for their safety.
5. Close supervision is necessary when any appliance is used by or near children.
6. Unplug from outlet when not in use and before cleaning. Allow to cool before
putting on or taking off parts, and before cleaning the appliance.
7. Do not operate any appliance with a damaged cord or plug or after the appliance
malfunctions, or has been damaged in any manner. Bring it to a qualied
technician for examination, repair or electrical or mechanical adjustment.
8. The use of accessory attachments not recommended by the appliance
manufacturer may cause injuries.
9. Do not use outdoors.
10. Do not let cord hang over edge of table or counter, or touch hot surfaces.
11. Do not place on or near a hot gas or electric burner, or in a heated oven.
12. Extreme caution must be used when moving an appliance containing hot oil
orother hot liquids.
13. To disconnect, press the white POWER ( ) button and then open the
AirConvection Fryer Oven door. Then remove plug from wall outlet.
14. Do not use appliance for other than intended use.
15. Oversize foods or metal utensils must not be inserted in the Air Convection
Fryer Oven as they may create a re or risk of electric shock.
16. A re may occur if the Air Convection Fryer Oven is covered or touching
ammable material, including curtains, draperies, walls, and the like, when in
operation. Do not store any item on top of the appliance when in operation.
17. Do not clean with metal scouring pads. Pieces can break off the pad and touch
electrical parts involving a risk of electrical shock.
18. Extreme caution should be exercised when using containers constructed of
other than metal or glass.
19. Do not store any materials, other than manufacturer’s recommended
accessories, in this Air Convection Fryer Oven when not in use.
20. Do not place any of the following materials in the Air Convection Fryer Oven:
paper, cardboard, plastic, and the like.
21. Do not cover drip pan or any part of the Air Convection Fryer Oven with metal
foil. This will cause overheating of the Air Convection Fryer Oven.
22. Use extreme caution when removing the drip pan or disposing of hot grease.
23. Do not cover the Air Convection Fryer Oven with anything that would prevent steam
from escaping. This may cause warping, discoloration, malfunction or even re.
WARNING: This Air Convection Fryer Oven will not operate unless the Oven
door is fully closed.

5
CAUTION: After cooking, the crisping racks or rotisserie assembly, drip pan and
the cooked foods are hot. Extreme caution must be used when handling the hot
Air Convection Fryer Oven and accessories.
FOR HOUSEHOLD USE ONLY
SAVE THESE INSTRUCTIONS
ADDITIONAL IMPORTANT SAFEGUARDS
CAUTION HOT SURFACES: This appliance generates heat and escaping steam
during use. Proper precautions must be taken to prevent the risk of burns, res,
orother injury to persons or damage to property.
CAUTION: This appliance is hot during operation and retains heat for some time
after turning OFF. Always use oven mitts to grasp the front grips when handling hot
crisping racks and allow metal parts to cool before cleaning. Do not place anything
on top of the appliance while it is operating or while it is hot.
1. All users of this appliance must read and understand this instruction manual
before operating or cleaning this appliance.
2. The cord to this appliance should be plugged into a 120V AC electrical outlet only.
3. If this appliance begins to malfunction during use, press the white POWER ( )
button and open the Oven door. Then remove plug from wall outlet. Do not use
or attempt to repair the malfunctioning appliance.
4. Do not immerse power cord in any liquid. If the power cord to this appliance
isdamaged, it must be replaced by contacting Customer Service.
5. If this appliance falls or accidentally becomes immersed in water, unplug it
from the wall outlet immediately. DO NOT REACH INTO THE WATER!
6. Keep the cord out of reach from children and infants to avoid the risk of electric
shock and choking.
7. Place the Air Convection Fryer Oven on a at, heat-resistant work area.
8. Do not obstruct the air outlet or air inlets on the back of the Air Convection
Fryer Oven, with any objects. Avoid escaping steam from the air outlet during
air frying.
9. When using this appliance, provide adequate air space above and on all sides
for air circulation. Do not operate this appliance while it is touching or near
curtains, wall coverings, clothing, dishtowels or other ammable materials.
10. Keep appliance at least 4 inches away from walls or other objects during operation.
11. Never move a hot Air Convection Fryer Oven containing hot food.
Allow to cool before moving.
12. Do not use this appliance in an unstable position.
13. To reduce the risk of burns or other injuries, do not touch hot surfaces. The use of
protective oven mitts or gloves as well as long-handled utensils is recommended.
14. Always use oven mitts and the rotisserie handle when removing food locked onto
the rotisserie bar assembly from inside the Air Convection Fryer Oven cavity.
15. Always keep the appliance unplugged from the wall outlet when not in use.
16. Do not attempt to dislodge food or clean the Air Convection Fryer Oven while it
is plugged in or while it is still hot.
17. Do not attempt to use the Air Convection Fryer Oven without the drip pan in
place on the Oven oor.
CAUTION: Never leave the Air Convection Fryer Oven unattended while in use.

6
Notes on the Plug
This appliance has a polarized plug (one blade is wider than the other). To reduce
the risk of electric shock, this plug will t in a polarized outlet only one way.
If the plug does not t fully into the outlet, reverse the plug. If it still does not t,
contact a qualied electrician. Do not modify the plug in any way.
Notes on the Cord
A. A short power-supply cord (or detachable power-supply cord) is to be
provided to reduce risks resulting from becoming entangled in or tripping
over a longer cord.
B. Longer detachable power-supply cords or extension cords are available and may
be used if care is exercised in their use.
C. If a long detachable power-supply cord or extension cord is used:
1. The marked electrical rating of the detachable power-supply cord or extension
cord should be at least as great as the electrical rating of the appliance;
2. If the appliance is of the grounded type, the extension cord should be a
grounding- type 3-wire cord;
3. The longer cord should be arranged so that it will not drape over the counter
top or table top where it can be pulled on by children or tripped over.
Plasticizer Warning
CAUTION: To prevent Plasticizers from migrating to the nish of the counter
top or table top or other furniture, place NON-PLASTIC coasters or place mats
between the appliance and the nish of the counter top or table top.Failure to do
so may cause the nish to darken; permanent blemishes may occur or stains can
appear.
Electric Power
If the electrical circuit is overloaded with other appliances, your appliance may
not operate properly. It should be operated on a separate electrical circuit from
other appliances.

7
Getting to Know Your 10.5 QT Air Convection Fryer Oven Dehydrator
Product may vary slightly from illustration
Non-Skid Feet
(Not shown)
Power Cord with
Polarized Plug
(Not shown)
Door Handle
Convection Fan
(Not shown)
Metal Notch
Upper Heating
Element
(not shown)
Touchscreen Control
Rotisserie Bar Slot
Red Rotisserie Bar Release
Rotisserie Bar Notch
Lower Heating Elements
Oven Door with Extra
Large Viewing Window
Figure 1
ACCESSORIES
ROTISSERIE ASSEMBLY
2 Crisping Racks
with Front Grip
Bake/Drip Pan
with Front Grip
Rotisserie Bar
Meat Tines (2)
Rotisserie Handle
Finger
Screws (2)
Figure 2

8
Touchscreen Control
1. POWER( ) button. Press the red POWER button to begin. The POWER( ) button will turn white while
the AirConvection Fryer Oven is in operation. Press the white POWER( ) button to pause or long press
the power button to turn the Oven off
2. Digital Display. While in operation, the Air Convection Fryer Oven’s set TEMPERATURE and remaining
TIME alternate on the digital display. When the time counts down to 00:00, “OFF” will appear and 5
beeps sound as the Air Convection Fryer Oven turns OFF automatically.
3. MENU ( ) button. To use any of the 9 preset menu icons, simply press the MENU ( ) button.
Each time MENU ( ) is pressed, the next menu option’s icon will ash:
French Fries | Toast | Meat | Fish | Poultry | Cake | Pizza | Dehydrate | Reheat.
While in operation, the icon remains illuminated on the digital display.
4. Oven LIGHT( ) button. Press to turn the LIGHT on or off. While ON, the button will ash. Press the
ashing Oven LIGHT ( ) button to turn the Oven light OFF.
NOTE: Any time the Oven door is opened, the light will illuminate. When the Oven door is properly
closed, the light will turn OFF.
The oven light can be turned on and off during the cooking process. Light turns off once the cooking
time has ended and air fryer has turned off automatically.
5. FAN( ) Icon. The white convection fan( ) will ash when the Air Convection Fryer is ON, as “OFF”
appears on the digital display, until 5 beeps sound and the Air Convection Fryer Oven turns OFF.
6. TIME( ) button. Press to change the TIME on the digital display. The ( ) and (-) symbols enable you
toadd or decrease cook TIME 1 minute at a time. Long press the ( ) or ( ) symbol to increase or
decrease time at 5 minute increments.
Note: Cooking time can be added or reduced while cooking is in progress
7. TEMPERATURE( ) button. Press to change the TEMPERATURE on the digital display. The ( ) and (-)
symbols enable you to add or decrease cooking TEMPERATURE 5°F at a time.
Note: Cooking temperature can be increased or reduced while cooking is in progress
8. ROTISSERIE( ) button. When the food is securely fastened to the rotisserie assembly and the
rotisserie bar is securely in place, press to turn the ROTISSERIE ON. The rotisserie bar will begin to
rotate, and theROTISSERIE icon will ash. Press the ashing ROTISSERIE ( ) button again to turn
rotation OFF.
Figure 3

9
MENU CHART
Press MENU
( )
once. The French Fries icon will ash. Press MENU
( )
to advance to the next menu option.
Note: Rotisserie can be used along with the 9 presets or at the default temperature of 380°F for 15 mins
Weight/Size Restrictions
1. The Air Convection Fryer Oven can roast up to a 4 lb. chicken or turkey breast and up to a 4 lb. roast.
2. IMPORTANT: Chickens or game birds up to 4 lbs. must be well trussed and may be cooked using the
Rotisserie.
3. Poultry and meats cooked on the Rotisserie must be no wider than 7-1/2 inches and must t comfortably
in the Air Convection Fryer Oven without touching either the lower or the upper heating elements.
4. The Air Convection Fryer Oven can bake any fresh or frozen 8-inch x 7-inch “PARTY” pizza or up to a
7-inch round pizza.
ICON MENU
Default
TEMP
(ºF)
ADJUSTABLE
TEMPERATURE
(ºF)
TIME
(MINUTES)
ADJUSTABLE
TIME
(MINUTES)
1
French Fries
400 180 - 400 16 1 - 90
2
Toast
400 350 - 400 3 1 - 10
3
Meat
360 180 - 400 20 1 - 90
4
Fish
320 180 - 400 12 1 - 90
5
Chicken
360 180 - 400 20 1 - 90
6
Cake
350 180 - 400 25 1 - 90
7
Pizza
360 180 - 400 12 1 - 90
8
Dehydrate
125 90 - 170 4:00 1:00 - 24:00
9
Preheat
250 180 - 400 6 1 - 90
10 Default 380 180 - 400 15 1 - 90
11
Rotisserie
380 180 - 400 15 1 - 90

10
Cooking Containers
• A variety of standard baking dishes, such as a 7-inch x 8-inch casserole, any 7-inch round or square cake
pan, a 6-cup mufn pan, an 8-inch loaf pan, 1 quart round, square, or rectangular casserole dishes may
beused for cooking many different foods.
• The drip pan included with the Air Convection Fryer Oven is suitable for baking items such as cookies,
rolls, biscuits, nachos, pizza, and hot appetizers.
• For a crispier crust, bake the pizza in the crisping rack. For a softer crust, bake pizza in the drip pan.
Dark or dull pans absorb heat faster; foods will bake more rapidly, and crust will brown more easily
than in shiny bake pans.
• Check package directions on the container or contact the ovenware manufacturer to determine the
container’s suitability for use in a convection oven.
• Do not use oven roasting bags in this Air Convection Fryer Oven, as they may come in contact with
theheating elements.
CAUTION: Allow at least 1-inch air space between the top of the container and the upper heating elements.
Never use glass lids on glass or metal bakeware. If a lid is necessary, cover tightly with aluminum foil.
For best cooking results, it is recommended to use the middle level for cooking foods when 1 layer is
being used.
Before Using for the First Time
CAUTION: To protect against electric shock, do not immerse the Air Convection Fryer Oven or allow cord
tocome into contact with water or other liquids.
1. Read all operating instructions carefully.
2. Carefully unpack the Air Convection Fryer Oven and accessories, removing all packaging materials.
Remove any labels from the outer surfaces.
3. Place your Air Convection Fryer Oven on a level surface such as a countertop or table. Be sure the sides,
back, and top of the Air Convection Fryer Oven are at least 4 inches away from any walls, cabinets,
orobjects on the counter or table.
4. To avoid scratching, marring, or discoloration, do not store anything on top of the Air Convection
FryerOven during operation.
5. Wash both crisping racks, drip pan, rotisserie assembly and in hot, soapy water.
6. Rinse and dry thoroughly before placing in the Air Convection Fryer Oven.
7. Make sure the drip pan is in place on the Oven oor.
NOTE: During rst use, the Air Convection Fryer Oven may emit a slight odor. This is normal.
Operating Instructions
1. Place the Air Convection Fryer Oven on a at, heat-resistant work area, close to an electrical outlet.
2. Plug the power-supply cord into a 120V AC electrical wall outlet. A lone red POWER
( )
button will appear
on a black background. (See Fig.4.)
3. To begin, press the red POWER
( )
button.
4. The control panel will appear as the red POWER
( )
button begins to ash. (See Fig.5.)
5.
The default Temperature and Time: 380°F and 15 minutes will alternate on the digital display. (See Fig. 6.)
Figure 6
15
380
Figure 4 Figure 5

11
AIR FRY MANUAL OPERATION
6. To adjust the cook TIME to your recipe, press the TIME
( )
button and then the
( )
or
( )
to advance
or decrease time. When dehydration is chosen, the time can be increased at an interval of 30 minutes for
maximum dehydration of 24hours.
7. Press the TEMP
( )
button and then the
( )
or
( )
to adjust TEMPERATURE from 180°F to 400°F in
5degree increments. Choose temperature ranging from 90°F to 170°F when dehydration is selected
8. When the desired TIME and TEMPERATURE appear, press the red ashing POWER
( )
button to turn the Air
Convection Fryer Oven ON. The POWER
( )
button will illuminate solid white, the white convection fan
( )
will ash, the Oven LIGHT button and the ROTISSERIE button illuminate, and may be activated any time the
Air Convection Fryer Oven is in operation. The TIME and TEMPERATURE will alternate on the digital display,
and can be changed, until the TIME counts down to 00:00.
IMPORTANT: The Air Convection Fryer Oven will not heat until the red ashing POWER ( ) button is
pressed. If no buttons are pressed, in 15 minutes, the Air Convection Fryer Oven will automatically turn OFF.
9. To PAUSE the Air Convection Fryer Oven, press the white POWER ( ) button. The white POWER
( )
button will turn red and begin to ash. TEMPERATURE or TIME changes can be made. Press the red
ashing POWER ( ) button to resume cooking.
10. While cooking, when the Oven door is opened, the Air Convection Fryer Oven will PAUSE and the Oven
light will illuminate to allow you to remove, add, brush or rearrange food or alternate crisping shelf
positions. When the Oven door is closed and locked into position, the Oven light will turn OFF and
theAir Convection Fryer Oven will resume cooking.
11. To turn the Air Convection Fryer Oven OFF at any time, long press the white POWER ( ) button and then
open the Air Convection Fryer Oven door.
12. When the TIME counts down to 00:00, “OFF” will appear on the digital display and the white convection
fan
( )
will continue to ash until the lone red POWER ( ) button appears on a black background. 5
beeps sound as the Air Convection Fryer Oven turns OFF automatically.
WARNING! ALWAYS USE A MEAT THERMOMETER TO ENSURE THAT MEAT, POULTRY AND FISH ARE
COOKED THOROUGHLY BEFORE EATING.
CAUTION: INSIDE OVEN SURFACES ARE HOT DURING AND AFTER USE. ALWAYS WEAR PROTECTIVE,
INSULATED OVEN MITTS ON HANDS WHEN REACHING INSIDE THE HOT AIR CONVECTION
FRYER OVEN.
13. Allow cooked to rest for 10 to 15 minutes. Remove the crisping rack(s) from the Oven and place on a at,
heat resistant surface. Remove air fried foods to the serving area. Promptly return the crisping rack(s)
tothe Air Convection Fryer Oven. Continue air frying subsequent batches, if any.
14. Unplug the Air Convection Fryer Oven when not in use.
Figure 7

12
MENU: 9 PRESET AIR FRY OPTIONS
(French Fries | Toast | Meat | Fish | Chicken | Cake | Pizza | Dehydrate | Reheat)
1. To begin, press the red POWER ( ) button.
2. The control panel will appear as the red POWER ( ) button begins to ash. (See Fig.8.)
3. Press MENU
( )
button once. The French Fries icon and the preset TIME and TEMPERATURE will begin
toash. Press MENU
( )
button to advance to the next MENU option.
4. When the desired MENU icon is ashing, check as the preset TIME and TEMPERATURE alternate on the
digital display. Adjust preset TEMPERATURE or TIME to your recipe. Press the red ashing POWER
( )
button to resume cooking
Air Fry For Best Results
1. Please consult the Air Fry Chart and/or follow package instructions for suggested convection cook
TEMPERATURE and time
NOTE: As a general rule, when air convection frying, reduce the package’s suggested conventional COOK
time by 20% to 30% depending on the food and amount to be cooked.
NOTE: The quantity, density, weight of food will alter the total air frying TIME necessary. Remember,
cooking smaller batches will result in shorter cook TIMES and more even food quality.
2. When convection baking, the shelf position used will depend on the size of the food being prepared. It is
important to place your food as close to the center of the Air Convection Fryer Oven as possible to ensure
even cooking. For best cooking results, it is recommended to use the middle level for cooking foods when 1
layer is being used.
3. Always pat food dry before cooking to encourage browning and avoid excess smoke. When cooking
naturally high fat foods, such as chicken wings or sausages, it may be necessary to empty fat from
thedrip pan between batches.
4. For crispier results, air fry small batches of freshly breaded foods. Create more surface area by cutting
food into smaller pieces. Press breading onto food to help it adhere. Refrigerate breaded foods for at least
30 minutes. Spray with oil before air frying.
5. Arrange breaded food on the crisping rack(s) so that food is not touching to allow air ow on all surfaces.
6. Do not overll crisping racks with food.
7. Spray olive oil or vegetable oil works best as oil is distributed evenly and less oil is needed.
8. To assure even cooking/browning, ALWAYS open the Oven door halfway through the cook TIME and
check, turn or rotate the food and crisping racks from top to bottom. Check food and adjust TIME or
TEMPERATURE if needed.
9. If additional air frying is needed, adjust TEMPERATURE if desired, and set TIME for 2 to 5 minute intervals
until fully cooked.
10. WARNING: Extreme caution must be used when handling the hot crisping racks and drip pan.
Alwaysuse oven mitts or long-handled utensils to grasp the front grips. Avoid escaping steam hot food.
A Note on Air Frying Pre-Packaged Frozen Foods
1. This 1650W high performance heating system circulates heat for fast air frying and recovery. As a general
rule, reduce the package conventional COOK time by 20% to 30% depending on the food and amount to
be cooked.
2. Always check food halfway though cook TIME to determine nal cook time and temperature.
3. Always check cooking progress after TIME has expired. If additional air frying is needed, adjust
TEMPERATURE if desired, and set TIME for 2 to 5 minute intervals until fully cooked.
Figure 8

13
Air Fry Chart (Includes Preset MENU ( ) Options)
WARNING! ALWAYS USE A MEAT THERMOMETER TO ENSURE THAT MEAT, POULTRY AND FISH ARE
COOKED THOROUGHLY BEFORE EATING.
The following chart is intended as a general guide only. The quantity of food air fried at one time, the thickness
or density of the food, and whether the food is fresh, thawed, or frozen will alter the total cook TIME necessary.
FOOD TEMP AIR FRY TIME ACTION
Broccoli (roasted) 400ºF 15 - 20 minutes Turn and rotate crisping racks halfway through air frying.
Fennel, fresh, chopped 380ºF 8 - 11 minutes Turn and rotate crisping racks halfway through air frying.
Vegetables, Roasted Root,
1/2-in. chunks
400ºF 15 - 20 minutes Spray, turn and rotate crisping racks halfway through air
frying.
Chicken Breast, boneless,
skinless
360ºF 10 – 15 minutes Brush, turn and rotate halfway through air frying.
Chicken Nuggets (frozen) 360ºF 10 - 15 minutes Turn and rotate crisping racks halfway through air frying.
Chicken Pieces 360ºF 20 - 30 minutes Spray, turn and rotate crisping racks halfway through air
frying.
Chicken Tenders/Fingers 360ºF 13 - 15 minutes Spray, turn and rotate crisping racks halfway through air
frying.
Chicken Wings (sauced) 360ºF 20 minutes Turn and rotate crisping racks halfway through air frying.
Cheese Sticks (frozen) 350ºF 8 – 12 minutes Turn and rotate crisping racks halfway through air frying.
Onion Rings (frozen) 400ºF 12 – 18 minutes Turn and rotate crisping racks halfway through air frying.
French Fries, (fresh, soaked,
1/4 to 1/3-in. thick)
400ºF 16 - 20 minutes Spray, turn and rotate crisping racks halfway through air
frying.
French Fries, thick (frozen)
4 cups
400ºF 17 – 21 minutes Turn and rotate crisping racks halfway through air frying.
French Fries, thin (frozen)
4 cups
400ºF 15 – 17 minutes Turn and rotate crisping racks halfway through air frying.
Hamburgers, 1/4 lb. (up to 4) 360ºF 10 – 14 minutes Turn and rotate crisping racks halfway through air frying.
Hot Dogs /Sausages 360ºF 10 – 15 minutes Turn and rotate crisping racks halfway through air frying.
Meatloaf, 1 lb. 360ºF 35 – 40 minutes Rotate loaf pan halfway through air frying.
Steak 360ºF 8 – 12 minutes Turn and rotate halfway through air frying.
Pork Chops 360ºF 10 – 14 minutes Turn and rotate halfway through air frying.
Pizza, frozen, 7-in. x 8-in. 360ºF 12 – 16 minutes Rotate pizza halfway through air frying.
Shrimp (thawed, battered) 360ºF 12 minutes Spray, turn and rotate crisping racks halfway through air
frying.
Shrimp (thawed, sauced) 320ºF 8 minutes Turn and rotate crisping racks halfway through air frying.
Fish Sticks (frozen) 400ºF 10 - 15 minutes Turn and rotate crisping racks halfway through air frying.
Catsh Fingers (thawed,
battered)
360ºF 10 - 15 minutes Spray, turn and rotate crisping racks halfway through air
frying.
Donuts 350ºF 8 minutes Turn and rotate crisping racks halfway through air frying.
Apple Turnovers 400ºF 10 minutes Rotate crisping racks halfway through air frying.
PLEASE NOTE:
The USDA recommends that meats such as beef and lamb, etc. should be cooked to an internal temperature of
145ºF/63ºC. Pork should be cooked to an internal temperature of 160ºF/71ºC and poultry products should be
cooked to an internal temperature of 170ºF/77ºC - 180ºF/82ºC to be sure any harmful bacteria has been killed.
When reheating meat/poultry products, they should also be cooked to an internal temperature of 165ºF/74ºC.

14
Rotisserie Assembly
1. Remove both crisping trays from the Air Convection Fryer Oven. Make sure the drip pan is in place on the
Oven oor.
2. It is best to secure meat on the rotisserie bar with butcher’s cooking twine.
3. When preparing rotisserie chicken or game birds, truss the bird into a tight package. Tie both chicken legs
together, tie the breast area together with the wings, then wrap more string around the middle
4. Push the rotisserie bar through the center of meat or poultry to be cooked. Make sure food is centered on
the bar.
IMPORTANT: If the food is not centered it will cause a jerking motion during cooking. This results in undue
stress on the motor.
5. Thread the square hole of the meat tine over the end of the bar and press into food to secure. Tighten
nger screw to hold food in place. Repeat with the second meat tine. (See Fig.9.)
6. Plug the power-supply cord into a 120V AC electrical wall outlet.
7. Open the Oven door. The Oven light will illuminate. Press the red rotisserie release while inserting the
pointed end of the rotisserie bar into the rotisserie slot on the left side of the Oven’s interior. Rest the long
square end into the metal notch on the right side of the Air Convection Fryer Oven’s interior. (See Fig.10.)
8. Close the Oven door. No preheat is necessary.
9. Press MENU
( )
until the POULTRY or MEAT icon illuminates.
10. Adjust cook TEMPERATURE or TIME to your recipe. When the desired TEMPERATURE and time appear on
the digital display, press the red ashing POWER
( )
button to turn the ROTISSERIE function ON.
Note: Rotisserie can be used along with the 9 presets or at the default temperature of 380°F for 15 mins.
11. When selecting a preset option along with the rotiserrie, using the Menu (M) button, choose the preferred
setting and press the rotisserie button
( )
. The Rotisserie will start turning and the time and temperature
will alternate on the display.
IMPORTANT: Press the Oven LIGHT
(
) button and watch the food while the rotisserie bar rotates at least
1 complete turn to ensure proper clearance of the heating elements and drip pan.
12. As the rotisserie bar turns, the ROTISSERIE button will ash. The POWER
( )
button and the Oven LIGHT
button will illuminate solid white. The white convection fan
( )
will ash.
13. Set TEMPERATURE and remaining time will alternate on the digital display, and can be changed, until the
time counts down to 00:00.
14. When the time counts down to 00:00, “OFF” will appear on the digital display and the white convection
fan
( )
will continue to ash for 15 seconds until the lone red POWER
( )
button appears on a black
background. 5 beeps sound as the Air Convection Fryer Oven turns OFF automatically.
WARNING! ALWAYS USE A MEAT THERMOMETER TO ENSURE THAT MEAT OR POULTRY ARE COOKED
THOROUGHLY BEFORE EATING.
Figure 9
Figure 10
Red Rotisserie Release
Rotisserie Slot
Drip Pan
Metal Notch

15
15. Wearing protective oven mitts, grasp the rotisserie handle to lift the rotisserie bar , press the Red
Rotisserie Release to right to release the locked rotisserie bar and safely remove the rotisserie bar from
the air convection fryer oven.
CAUTION: Be careful when removing cooked food from the Air Convection Fryer Oven. The inside of the
Air Convection Fryer Oven is very hot. Close Oven door.
16. Unplug when not in use and allow the Air Convection Fryer Oven to cool completely before cleaning.
Dehydrate
Dried meats, vegetables, and fruits are perfect for cooking, travel, camping, and snacking. Preparing your own
dried foods ensures healthy, safe, preservative-free results. Dehydrate fresh, ripe foods to preserve nutrients
and enhance avor. Bruised fruits or vegetables are also acceptable for dehydrating. Trim away any bruises
with a knife. Your Air Convection Fryer Oven’s automated drying makes home dehydration both simple and
rewarding.
Dried Herbs
Makes about 1/3 cup
NOTE: When utilizing both crisping racks, the Air Convection Fryer Oven can DEHYDRATE 2 (1/2 oz./14 g.)
packages of fresh herbs such as fresh parsley, rosemary, thyme, tarragon, oregano, and sage.
CAUTION: Light and leafy herbs such as parsley or cilantro, should not be placed on the top shelf as the
convection currents may cause the herbs to get caught in the fan.
If herbs are very small, line the crisping racks with parchment paper. Spread fresh herbs evenly onto the
crisping racks.
Place both crisping racks in top 2 shelves of the Air Convection Fryer Oven.
Press MENU (M) until the DEHYDRATE icon illuminates.
Adjust TEMPERATURE or TIME to your recipe. When the desired TEMPERATURE and time appear, press the
red ashing POWER
( )
button to turn the DEHYDRATE function ON.
Rotate shelves halfway through DEHYDRATE TIME for even drying.
DRIED HERBS
TEMP TIME Notes
Oregano 125°F
2 -3 hrs. Rotate shelves.
Parsley 125°F
2 -3 hrs. Use lower racks. Rotate shelves.
Thyme 125°F
3- 4 hrs. Rotate shelves.
Rosemary 125°F
2 -3 hrs. Rotate shelves.
Tarragon 125°F
3- 4 hrs. Rotate shelves.
Sage 125°F
3- 4 hrs. Rotate shelves.
Kale Chips 125°F
1 hr. 30 mins. Massage kale with olive oil. Rotate shelves.
FRUIT
Wash all fruit skins well.
Slice fruit into 1/4-inch thick slices and arrange on both crisping racks to ensure even drying.
Rotate shelves halfway through DEHYDRATE TIME for even drying.
FRUIT
TEMP TIME Notes
Apples
135°F
8 - 10 hrs. Core/slice into 1/4-in. rounds,
Soak in acidulated water. Rotate shelves.
Mango/Papaya
135°F
10 hrs. Peel/slice into 1/4-in. pieces. Rotate shelves.
Kiwi
135°F
6 hrs. 1/4-in. rounds. Rotate shelves.
Orange Slices 135°F 10 hrs. Citrus is crisp when fully dried. Rotate shelves.
Tomatoes (Roma)
145°F
10 hrs. Skin-side down. Rotate shelves.
Tomatoes (Cherry/
Grape)
145°F
5 - 9 hrs. Skin-side down. Rotate shelves.
BEEF JERKEY TEMP TIME Notes
1/2 lb. London Broil or Flank
145°F
5 - 6 hrs. Flip and rotate shelves halfway.
CROUTONS TEMP TIME Notes
Croutons
400°F
3 - 4 mins Flip, oil, and rotate shelves halfway.

16
User Maintenance Instructions
This appliance requires little maintenance. It contains no user serviceable parts. Do not try to repair it
yourself. Any servicing that requires disassembly other than cleaning must be performed by a qualied
appliance repair technician.
Care & Cleaning Instructions
WARNING! Unplug the Air Convection Fryer Oven. And allow the Air Convection Fryer Oven and all accessories
to cool completely before cleaning.
1. Clean the outside of the Air Convection Fryer Oven with a damp cloth and dry thoroughly. A non-abrasive
liquid cleaner may be used for stubborn stains. Do not use metal scouring pads or abrasive cleaners that
will scratch the surface.
2. Clean the Oven’s interior with a mild or non-abrasive cleaner and plastic scouring pad after each use to
avoid build-up. Do not rub too hard as surface can be scratched.
3. For ease in cleaning, your Air Convection Fryer Oven is equipped with a removable Oven door. Open the
door to a 45-degree angle. Firmlygrasp the Oven door handle and pull to remove.
4. To remove baked-on food, pour a small amount of cooking oil onto the food and allow to stand for 5 to
10minutes. Remove the softened food with a soft cloth. Do not use steel wool, scouring pads or abrasive
cleaners.
7. Wash crisping racks and drip pan in soapy water and dry thoroughly. All Air Convection Fryer Oven
accessories may be washed in the dishwasher.
8. If the ROTISSERIE was used, wash the rotisserie bar, meat tines, 2 nger screws, and rotisserie bar handle
in warm, soapy water and dry thoroughly. The ROTISSERIE accessories may be washed in the dishwasher.
9. CAUTION: DO NOT use spray-on or other oven cleaners. Using these types of cleaners may cause
cosmetic and/or electrical damage to the Air Convection Fryer Oven.
Storing Instructions
1. Assemble rotisserie bar with tines and nger screws (without food) inside the Air Convection Fryer Oven.
Store both crisping racks and the drip pan inside the Oven.
2. Store Air Convection Fryer Oven in its box in a clean, dry place.
3. Never store appliance while it is hot or still plugged in.
4. Never wrap cord tightly around the appliance. Do not put any stress on the cord where it enters the unit,
as it could cause the cord to fray and break.

17
Recipes
Cinnamon Apple Crisps
Keep the apple skins on for additional ber. With no added sugar, these vegan, gluten-free,
Cinnamon Apple Crisps are healthy for snacking any time. Experiment with different varieties of
apples to taste their distinctive avor proles.
Serves 2 – 4
• 2 apples
• 1 tablespoon cinnamon
• 1 cup water
• 1 tablespoon lemon juice
1. Peel apples, if desired. Remove the core using an apple corer or a knife. Slice the apples into
thin rings between 3/16-inch and 1/4-inch thick.
2. Add lemon juice to 1 cup of water in a large, shallow bowl. To prevent the apples from turning
brown, dip the apple slices into the acidulated water. Then press the excess moisture from the
apple rings using a clean kitchen towel or paper towels.
3. Arrange the apple slices in a single layer on both crisping racks. Sprinkle the apple rings with
cinnamon.
4. Choose DEHYDRATE ( ) menu option. Adjust the TEMPERATURE
( )
to 135º and TIME
( )
to
10:00 hours.
5. Flip apples and rotate crisping racks several times through drying. Remove apples when they
are browned and crispy to your liking.
6. Store dried apples in zippered bags.
Trail Mix Granola with Maple Syrup
These snack bars are both versatile and easy to make. Nuts, sweeteners and add-ins may be altered
to create various avored bars that everyone will love. Include pumpkin seeds, pistachios, cashews
and sesame seeds. Use honey, molasses or agave syrup. Vary your bars by adding coconut akes,
chocolate chips, peanut butter, almond butter, and exotic dried fruits. Possibilities are endless.
Makes 12 bars
• 3 cups old fashioned rolled oats
• 1/2 cup sliced almonds
• 1/2 cup sunower seeds, roasted, salted
• 1 tablespoon pumpkin pie spice
• 3 tablespoons coconut oil, melted
• 6 tablespoons cup Grade B maple syrup
• 1/2 cup dried cranberries
• 2 oranges, zested and juiced
• 2 egg whites, whisked
1. Combine dry ingredients in a large bowl. Combine wet ingredients in another bowl.
2. Add wet ingredients to dry and mix well. Granola mixture should be slightly moist.
3. Line both crisping trays with parchment paper. Spread half the mixture onto each rack.
4. Choose CAKE ( ) menu option. Adjust the TEMPERATURE
( )
to 300°F and TIME
( )
to 20
minutes and bake until golden brown. Cut into bars while warm. The granola will crisp as it
cools.
5. Store in a tightly sealed container.

18
Recipes
Classic Beef Jerky
Homemade Jerky? This classic is protein-rich, low-fat and healthy. No nitrates! No chemical
additives! No nothing YOU don’t want… and everything YOU do!
HINT: Ask your butcher to cut meat into 1/4-inch thick strips.
Serves 4
• 1/2 – 3/4 lb. London broil or ank steak
• 1/2 teaspoon black pepper
• 1/2 teaspoon chili powder
• 1/2 teaspoon garlic powder
• 1/2 teaspoon cayenne pepper, or more to
taste
• 1/2 teaspoon onion powder
• 1/8 cup soy sauce (may substitute low
sodium)
• 1/4 cup Worcestershire sauce
• 1/8 cup hot sauce, optional
1. For ease of trimming, meat should be partially frozen. Trim fat from meat. Cut steak 1/4-inch
thick; then into 4-inch strips.
2. Add all marinade ingredients to a zipper bag or covered container.
3. Mix well. Add meat. Cover and refrigerate overnight.
4. Dry meat using a clean kitchen towel or paper towels. Arrange steak strips onto the crisping
racks so that pieces do not touch.
5. Choose DEHYDRATE ( ) menu option. Adjust TEMPERATURE
( )
to 145º and TIME
( )
to
05:00 to 06:00 hours. Flip meat and rotate crisping racks halfway through drying. Jerky is done
when meat is dried to your liking.
6. To store, place jerky into tightly covered containers or zippered bags.

19
Recipes
Rotisserie Chicken
Use kitchen twine to truss the bird into a tight package. Tie both chicken legs together, tie the
breast area together with the wings, then wrap more string around the middle. Please consult the
detailed instructions described in the Rotisserie Assembly section of this instruction manual. (See
Figures 9 and 10.)
Serves 2 - 3
• 1 (2-1/2 - 3 lb.) whole chicken, giblets
removed
• 1/4 cup butter, melted
• 2 teaspoons granulated garlic
• 2 teaspoons granulated onion
• 1 teaspoon sea salt
• 1 teaspoon ground black pepper
• 2 teaspoons paprika
1. Combine butter and seasonings in a small bowl. Coat the chicken generously and marinate at
room temperature for 30 minutes.
2. Truss the chicken and mount securely onto the rotisserie bar.
3. Assemble the Rotisserie following the detailed procedure described in Rotisserie Assembly
section in this instruction manual.
4. Choose ROTISSERIE ( ) menu option. Roast chicken at 400°F. Adjust TIME
( )
to 15 minutes.
5. Baste chicken with marinade. Adjust the TEMPERATURE
( )
to 350°F and TIME
( )
to 30
minutes.
NOTE: On average, cook chicken 15 minutes/lb.
6. Use a meat thermometer to measure the internal temperature. At 165°F, the chicken is done.
7. Allow chicken to rest 15 to 20 minutes before carving.
Honey Glazed Ham
A favorite for any holiday or special occasion. Treat your family to a scrumptious traditional Honey
Glazed Ham or…surprise everyone with your own spicy pepper touch of Sriracha!
Serves 6
• 1 (3 lb.) ham, pre-brined, boneless, fully-cooked
Glaze
• 1 orange, zested and juiced
• 1/2 cup honey
• 1/2 cup Dijon mustard
• 1/2 teaspoon allspice
• 4 tablespoons butter
• 1 tablespoon Sriracha sauce, optional
1. Simmer the glaze ingredients in a small saucepan over medium heat.
2. Remove ham from the refrigerator 1 hour before preparation; allow meat to come to room
temperature and pat dry. Score ham by cutting a 1/4-inch deep 1-inch diamond pattern in the
top rind of the ham. Pour the glaze over the ham and refrigerate for 2 hours.
3. Assemble the Rotisserie following the detailed procedure described in Rotisserie Assembly
section in this instruction manual.
4. Choose ROTISSERIE ( ) menu option. Adjust TEMPERATURE
( )
to 300°F and TIME
( )
to 60
minutes. During the last 30 minutes of cooking, glaze the ham every 10 minutes.
NOTE: On average, cook ham 18 minutes/lb.
5. The ham will be warm enough to serve when the internal temperature reaches 140°F.
6. Allow the ham to rest for 5 to 10 minutes before slicing.

20
Recipes
Fully Loaded Veggie Dorito® Nachos
Cool tomato relish spooned over these Loaded Veggie Nachos brightens the avors and enhances
the many delicious components. Game time, movie time, party time, lunch time, share time.
Serves 4
• 2 (1-3/4 oz.) bags Doritos®
• 1 cup shredded white cheddar or white American cheese
• 1/2 cup black olives, sliced
• 1/2 cup green olives, sliced
• 1/2 cup frozen corn kernels, defrosted
• 3 green onions, chopped
• 2 jalapeño peppers, seeded, deveined, sliced,
• 1/2 lime, juiced
• 1/2 teaspoon salt
• 2 large plum tomatoes, chopped
• 1/4 cup cilantro, chopped, for serving
• guacamole, for serving
• sour cream, for serving
• jalapeño peppers, sliced, fresh or jarred
1. Empty the rst bag of Doritos® onto a 7-inch or 8-inch pie tin.
2. Sprinkle half of the shredded cheddar cheese, olives, corn, and green onions over the chips.
3. Layer the remaining bag of Doritos® onto the pile.
4. Sprinkle the remaining cheese, olives, corn, and green onions over the chips.
5. Center the pie tin on the lower shelf.
6. Choose FRENCH FRIES ( ) menu option. Adjust TIME
( )
to 7 minutes.
7. Mix the chopped tomato, lime juice, and salt in a small bowl.
8. After 7 minutes, check to make sure cheese is melted to your satisfaction. Remove from Oven
and spoon tomato mixture over the nachos.
9. Serve with fresh cilantro, guacamole, sour cream, and plenty of fresh jalapeño peppers.

21
Recipes
Rosemary Peppercorn Beef Tenderloin
For an intimate dinner at home, this is beef let is perfection. Serve with roasted rosemary
potatoes and fresh garden salad. #happydinner
Serves 4
• 1 (18 oz.) beef tenderloin
Rub
• 3 cloves garlic
• 3 sprigs rosemary, chopped
• 3 tablespoons Kosher salt
• 1 tablespoon onion powder
• 3 tablespoons olive oil
1. Trim tenderloin of all silver skin before roasting.
2. Combine rub ingredients in a small bowl. Coat the tenderloin generously and allow the meat to
rest at room temperature for 30 minutes.
3. Assemble the Rotisserie following the detailed procedure described in Rotisserie Assembly
section in this instruction manual.
4. Choose ROTISSERIE ( ) menu option. Adjust TEMPERATURE
( )
to 350°F and TIME
( )
to 30
minutes.
NOTE: On average, cook beef 16 minutes/lb. for rare, 18 minutes/lb. for medium.
5. Use a meat thermometer to measure the internal temperature. (Rare: 145°F, Medium: 160°F.)
6. Due to carry-over cooking, it is best to remove meat slightly before the target temperature as
the meat’s temperature increases 5ºF to 10ºF after being removed from the heat (while resting).
7. Allow meat to rest 15 minutes before slicing.

22
Recipes
Buffalo Chicken Tacos
Tasty. A real mashup of crunchy air fried buffalo chicken tenders served in a convenient, easy-to-
eat our tortilla. These tacos are lled with fresh lettuce, tomato and celery crunch accented with
spicy wing sauce and cooled with traditional creamy blue cheese dressing.
Serves 4
• 4 our tortillas
• 3/4 lb. chicken tenders
• 1/2 cup our
• 1 packet taco seasoning
• 2 eggs, beaten
• 1-1/2 cups seasoned panko (Japanese breadcrumbs)
• 4 tablespoons buffalo wing sauce
• 4 tablespoons blue cheese dressing
• 2 limes, cut into wedges
• 1/2 cup iceberg lettuce, shredded
• 1/2 cup grape tomatoes, halved
• 2 stalks celery, diced
• 1/2 cup cilantro, chopped
1. Cut chicken tenders into 9 to 12 bite-sized pieces.
2. Set up 3-bowl breading station:
• our + taco seasoning
• whisk 2 eggs
• seasoned panko breadcrumbs
3. Dredge the chicken pieces in our. Pat gently to remove any excess.
4. Dip chicken into egg.
5. Swirl the coated chicken in the panko breadcrumbs until each piece is fully coated.
6. Add breaded chicken to both crisping racks. Spray with olive oil.
7. Choose CHICKEN ( ) menu option. Adjust TIME
( )
to 15 minutes.
8. Turn and rotate crisping racks halfway through air frying.
9. Assemble tacos. Prepare a bed of lettuce, tomatoes, and celery in the base of the tortilla.
Add chicken. Spoon wing sauce and blue cheese dressing over the chicken. Add a sprinkle of
chopped cilantro and a squeeze of fresh lime juice to nish.

23
Recipes
Garlic Shrimp Skewers
Elegant party food can be assembled ahead and prepared for serving in minutes.
Serves 4
• 1 lb. (16-20) shrimp, peeled & deveined, tails on
Marinade
• 1 lime, zested and juiced
• 1 tablespoon olive oil
• 8 cloves garlic, minced
• 1/2 cup parsley, chopped
• 1/2 teaspoon sea salt
• 2 limes, for garnish
1. Combine marinade ingredients in a zipper bag.
2. Marinade shrimp 30 minutes before cooking.
3. Thread the shrimp onto the skewers. Brush shrimp with marinade.
4. Choose FISH ( ) menu option. Adjust TIME
( )
to 5 to 7 minutes, depending on the size of the
shrimp. Turn and rotate crisping racks halfway through air frying. Brush before serving.

24
Recipes
Homemade Oatbran Bread
Nothing beats bread warm from your Air Convection Fryer Oven. The sweet, crunchy topping
bakes perfect for morning toast and jam, as a canvas for fruity or herbal cheese spreads, topped
with meat, sh or simply toasted and slathered with nut butter and sliced banana.
Makes 1 loaf
• 2 eggs
• 1 cup buttermilk
•
• 2 large apples, cored, grated
• 1 teaspoon vanilla extract
• 1/2 cup coconut oil, melted
•
• 1-1/3 cup plain bran cereal (may substitute bran with raisins)
•
• 1 cup whole wheat our
• 1 teaspoon baking soda
• 1 teaspoon baking powder
• 1 teaspoon salt
• 1/2 teaspoon cinnamon
• 1/4 teaspoon nutmeg
Topping
• 1/2 cup oats
• 1/3 cup brown sugar
1. Whisk eggs and buttermilk in a large bowl. Add apple, vanilla, and coconut oil. Mix well.
2. Add bran cereal and allow to sit for 5 minutes until liquid is absorbed.
3. Combine dry ingredients in a large bowl. Whisk until well mixed.
4. Add wet ingredients to the dry. Do not overmix! Add to a well-oiled 8-inch x 5-inch loaf pan.
Combine topping ingredients and spoon over the top of the batter.
5. Choose CAKE ( ) menu option. Adjust the TIME
( )
to 35 minutes.
6. Bread is done when a toothpick inserted into the center of the loaf comes out clean.
Depending on the loaf pan, bake an additional 5 minutes if needed.

25
Limited TWO-YEAR Warranty
SENSIO Inc. hereby warrants that for a period of TWO YEARS from the date
of purchase, this product will be free from mechanical defects in material and
workmanship, and for 90 days in respect to non-mechanical parts. At its sole
discretion, SENSIO Inc. will either repair or replace the product found to be defective,
or issue a refund on the product during the warranty period.
The warranty is only valid for the original retail purchaser from the date of initial
retail purchase and is not transferable. Keep the original sales receipt, as proof of
purchase is required to obtain warranty validation. Retail stores selling this product
do not have the right to alter, modify, or in any way revise the terms and conditions of
the warranty.
EXCLUSIONS:
The warranty does not cover normal wear of parts or damage resulting from
any of the following: negligent use of the product, use of improper voltage or
current, improper routine maintenance, use contrary to the operating instructions,
disassembly, repair, or alteration by anyone other than qualied SENSIO Inc.
personnel. Also, the warranty does not cover Acts of God such as re, oods,
hurricanes, or tornadoes.
SENSIO Inc. shall not be liable for any incidental or consequential damages caused
by the breach of any express or implied warranty. Apart from the extent prohibited
by applicable law, any implied warranty of merchantability or tness for a particular
purpose is limited in time to the duration of the warranty. Some states, provinces or
jurisdictions do not allow the exclusion or limitation of incidental or consequential
damages, or limitations on how long an implied warranty lasts, and therefore, the
above exclusions or limitations may not apply to you. The warranty covers specic
legal rights which may vary by state, province and/or jurisdiction.
HOW TO OBTAIN WARRANTY SERVICE:
You must contact Customer Service at our toll-free number: 1-866-832-4843.
A Customer Service Representative will attempt to resolve warranty issues over
the phone. If the Customer Service Representative is unable to resolve the problem,
you will be provided with a case number and asked to return the product to SENSIO
Inc. Attach a tag to the product that includes: your name, address, daytime contact
telephone number, case number, and description of the problem. Also, include a
copy of the original sales receipt. Carefully package the tagged product with the sales
receipt, and send it (with shipping and insurance prepaid) to SENSIO Inc.’s address.
SENSIO Inc. shall bear no responsibility or liability for the returned product while in
transit to SENSIO Inc.’s Customer Service Center.

26
MEDIDAS DE SEGURIDAD
IMPORTANTES
Cuando se usan artefactos eléctricos, se deben siempre seguir las precauciones
básicas de seguridad, incluso lo siguiente:
1. LEA TODAS LAS INSTRUCCIONES.
2. No toque las supercies calientes. Utilice las asas o los mangos. Utiliceguantes
de cocina.
3. Para protegerse del riesgo de descarga eléctrica, no sumerja el cable, el enchufe
ni la unidad en agua ni en ningún otro líquido.
4. Este electrodoméstico no debe ser utilizado por personas (incluidos niños) con
capacidades físicas, sensoriales o mentales reducidas, o con falta de experiencia
y conocimientos, a menos que una persona responsable de su seguridad les
haya brindado supervisión o instrucciones sobre el uso de los electrodomésticos.
5. Los niños deben ser supervisados para asegurarse de que no juegan
con el aparato.
6. Desenchufe el electrodoméstico del tomacorriente cuando no esté en uso y antes
de limpiarlo. Deje que el aparato se enfríe antes de colocar o retirar piezas o
antes de limpiarlo.
7. No utilice ningún electrodoméstico que tenga un cable o enchufe dañado, que
muestre un funcionamiento defectuoso o que se haya dañado de cualquier
manera. Lleve el electrodoméstico a un técnico calicado para que lo examine,
lo repare o le haga ajustes eléctricos o mecánicos.
8. El uso de accesorios no recomendados o vendidos por el fabricante puede
causar fuego, descarga eléctrica o lesiones.
9. No lo utilice en exteriores.
10. No permita que el cable cuelgue del borde de la mesa o encimera o toque
supercies calientes.
11. NO coloque el aparato encima de, cerca de o en un quemador eléctrico o de
gases calientes, ni dentro una estufa encendida.
12. Se debe tener extrema precaución al mover un aparato que contenga aceite
caliente u otros líquidos calientes.
13. Para desconectar, pulse el botón blanco POWER ( ) y luego abra la puerta
del horno de la freidora por convección de aire. Saque el enchufe de la
toma de corriente.
14. No utilice el aparato para otro uso que no sea el previsto.
15. Los alimentos de gran tamaño o los utensilios metálicos no deben insertarse en
el horno de freído por convección de aire, ya que pueden provocar un incendio o
riesgo de descarga eléctrica.
16. Se puede producir un incendio si el horno de la freidora por convección de aire
está cubierto o si toca material inamable, como cortinas, paredes y similares,
cuando está en funcionamiento. No almacene ningún artículo sobre el aparato
cuando esté en funcionamiento.
17. No limpiar con estropajos metálicos. Las piezas pueden romper la almohadilla y
tocar las partes eléctricas, lo que implica un riesgo de descarga eléctrica.
18. Se debe tener mucho cuidado al usar recipientes construidos de otro tipo que no
sea metal o vidrio.
19. No almacene ningún material, aparte de los accesorios recomendados por el
fabricante, en este horno de freír por convección de aire cuando no esté en uso.

27
20. No coloque ninguno de los siguientes materiales en el horno de freír por
convección de aire: papel, cartón, plástico y similares.
21. No cubra la bandeja de goteo ni ninguna parte del horno de freír por convección
de aire con una lámina metálica. Esto provocará el sobrecalentamiento del horno
de freír por convección de aire.
22. Tenga mucho cuidado al retirar la bandeja de goteo o al desechar
la grasa caliente.
23. No cubra el horno de freír por convección de aire con nada que evite que
el vapor se escape. Esto puede causar deformaciones, decoloración, mal
funcionamiento o incluso incendio.
ADVERTENCIA: Este horno de freír por convección de aire no funcionará a
menos que la puerta del horno esté completamente cerrada.
PRECAUCIÓN: después de la cocción, las rejillas de dorar o el conjunto de
asar, la bandeja de goteo y los alimentos cocidos están calientes. siempre use
guantes para horno cuando retire alimentos cocidos o accesorios del horno de
freír por convección con aire caliente.
GUARDE ESTAS INSTRUCCIONES
SOLO PARA EL USO DOMÉSTICO
OTRAS MEDIDAS DE SEGURIDAD
IMPORTANTES
PRECAUCIÓN, SUPERFICIES CALIENTES: Este aparato emite calor y se escape el
vapor durante el uso. Se deben tomar las medidas necesarias para evitar riesgos de
quemaduras, incendios u otras lesiones a personas o daños a la propiedad.
PRECAUCIÓN: Este aparato está caliente durante el funcionamiento y retiene el calor
durante algún tiempo después de apagarlo. Siempre use guantes de horno cuando
maneje materiales calientes y permita que las partes metálicas se enfríen antes de
limpiar. No coloque nada encima del aparato mientras esté en funcionamiento o
mientras esté caliente.
1. Todos los usuarios de este electrodoméstico deben leer y comprender este
manual de instrucciones antes de poner en funcionamiento o limpiar el aparato.
2. Enchufe la unidad solamente en un tomacorriente de 120V de CA.
3. Si este aparato comienza a funcionar mal durante el uso, presione el botón
blanco de ENCENDIDO( ) y luego abra la puerta del horno de freído por
convección de aire. Retire el enchufe de la toma de corriente.
4. NO SUMERJA EL CABLE DE ALIMENTACIÓN EN NINGÚN LÍQUIDO! Si el cable
de alimentación de este aparato está dañado, debe ser reemplazado por el
servicio de atención al consumidor.
5. Si este aparato se cae o se sumerge accidentalmente en el agua, desenchúfelo
de la toma de corriente inmediatamente. ¡No metas la mano en el agua!
6. Mantenga el cable fuera del alcance de los niños y bebés para evitar el riesgo de
descarga eléctrica y asxias.
7. Coloque la freidora de aire sobre una supercie plana, resistente al calor.

28
8. No obstruya la salida de aire o las entradas de aire en la parte posterior y en los
laterales de la freidora con cualquier objeto. Evite el escape de vapor de la salida
de aire cuando freía con aire.
9. Al usar este aparato, proporcione un espacio de aire adecuado por encima y en
todos los lados para la circulación de aire. No opere este aparato mientras esté
tocando o cerca de cortinas, revestimientos de paredes, ropa, paños de cocina u
otros materiales inamables.
10. Mantenga el aparato a una distancia de al menos 4 pulgadas de las paredes u
otros objetos durante la operación.
11. Nunca mueva una freidora de aire caliente o una freidora de aire que contenga
alimentos calientes. Deje enfriar antes de mover.
12. No utilice este aparato en una posición inestable.
13. Para reducir el riesgo de quemaduras u otras lesiones, no toque las supercies
calientes. Se recomienda el uso de guantes o guantes protectores para el horno,
así como utensilios de mango largo.
14. Siempre use guantes para horno y el mango del asador cuando retire los
alimentos jados en el conjunto de la barra del asador desde el interior de la
cavidad del horno de la freidora de aire.
15. Mantenga siempre el aparato desenchufado de la toma de corriente cuando no
esté en uso.
16. No intente desalojar los alimentos ni limpiar el horno de freído por convección
de aire mientras esté enchufado o cuando aún esté caliente.
17. No use el horno de freír por convección de aire sin la bandeja de goteo colocada
en el piso del horno.
PRECAUCIÓN: Las hierbas ligeras y frondosas como el perejil o el cilantro, no
deben colocarse en el estante superior ya que las corrientes de convección
pueden hacer que las hierbas se enganchen en el ventilador.
PRECAUCIÓN: Nunca deje el horno de freír por convección de aire desatendido
mientras esté en uso.

29
Notas sobre el enchufe
Este aparato tiene un enchufe polarizado (una hoja es más ancha que la otra).
Para reducir el riesgo de descarga eléctrica, este enchufe encajará en una toma de
corriente polarizada sólo de una manera. Si el enchufe no entra completamente
en el tomacorriente, invierta el enchufe. Si el enchufe no puede encajar en la toma
eléctrica, póngase en contacto con un electricista calicado. No modique el enchufe
de ninguna manera.
Notas sobre el cable
A. Un cable corto de alimentación (o cable de alimentación desmontable) es
suministrado para reducir el riesgo de que se enreden o se tropiecen con un
cable más largo.
B. Cables de alimentación más largos y removibles o las alargadoras son
disponibles y se pueden utilizarlos si se ejerce cuidado.
C. Si un cable largo y removible o una alargadora sea usado:
1. La potencia eléctrica marcada del cordón o de la alargadora debe ser, por
lo menos, tan fuerte como la potencia eléctrica del aparato;
2. Si el aparato es del tipo con conexión a tierra, el cable o la alargadora debe
ser un enchufe de 3 hojas con conexión a tierra,
3. El cordón debe estar dispuesto de manera que no cuelga del borde de
la encimera o la mesa donde pueda ser tirado por niños o donde alguien se
tropiece involuntariamente con el cable.
Advertencia sobre los plasticantes
PRECAUCIÓN: A n de evitar que los plasticantes se adhieran al acabado de la
encimera, la mesa u otro mueble, coloque un posafuentes o salvamanteles que
NO SEA DE PLÁSTICO entre el electrodoméstico y la supercie de la encimera o
mesa. Si no se hace esto, es posible que el acabado se oscurezca, se formen marcas
permanentes o aparezcan manchas.
Corriente eléctrica
Si el circuito eléctrico está sobrecargado con otros artefactos, es posible que el
electrodoméstico no funcione correctamente. El electrodoméstico debe funcionar en
un circuito eléctrico separado de otros aparatos.

30
Patas antideslizantes
(no mostrado)
Cable de
alimentación con
enchufe polarizado
(no mostrado)
Manija de la Puerta
Ventilador de
convección
(no mostrado)
Ranura de la barra
del espetón
Elemento superior
de calentador
(no mostrado)
Control de pantalla táctil
Ranura de la barra
del espetón
Botón de liberación de la
barra del espetón rojo
Agujero de la barra
del espetón
Elementos inferiores de
calentador
Puerta del horno
extraíble con ventana de
observación extragrande
Figura 1
Conozca su 10.5 QT freidora de convección y horno con deshidratador
El producto puede diferir levemente de las illustraciones
ACCESORIOS
ASADOR MONTAJE
Rejilla de dorar (2)
con agarre frontal
Bandeja de goteo con
agarre frontal
Barra del espetón
Meat Tines (2)
Conjunto
del espetón
(asador)
Tornillos de
dedo (2)
Figura 2

31
Control de pantalla táctil
1. Botón de ENCENDIDO ( ). Pulse el botón de encendido rojo solo para comenzar. El botón de
ENCENDIDO ( ) se iluminará en blanco jo mientras el horno de la freidora por convección de aire está
en funcionamiento. Presione el botón blanco de ENCENDIDO ( ) para PAUSE (PAUSAR) o para apagar
el horno.
2. Pantalla digital. Mientras está en funcionamiento, la TEMPERATURA del horno de la freidora por
convección de aire y el TIME (HORA) restante se alternan en la pantalla digital. Cuando la HORA cuenta
hasta 00:00, aparecerá “END” (TERMINADO) y sonarán 5 pitidos cuando el horno de la freidora por
convección de aire se apague automáticamente.
3. Botón de MENÚ ( ). Para usar cualquiera de los 9 íconos de menú preestablecidos, simplemente
presione el botón MENÚ ( ). Cada vez que se pulsa el botón MENÚ ( ), el siguiente icono de menú
parpadeará: Papas fritas | Tostadas | Carne | Pescado | Aves de corral | Pastel | Pizza | Deshidratar |
Recalentar. Mientras está en funcionamiento, el icono elegido permanece iluminado.
4. Botón de luz del horno ( ). Pulse para encender la LUZ ( ) para vericar el progreso de cocción y
dorado. Mientras está encendido, el botón parpadeará. Pulse el botón parpadeante ( ) para apagar la
luz del horno.
NOTA: Cada vez que se abra la puerta del horno, la luz se iluminará. Cuando la puerta del horno esté
bien cerrada, la luz se apagará.
5. Icono del VENTILADOR ( ). El ícono del ventilador de convección blanco ( ) parpadeará cuando la
Freidora de convección de aire esté encendida, mientras “END” (TERMINADO) aparece en la pantalla
digital, hasta que suenen 5 pitidos y el horno de la freidora de convección de aire se apague.
6. Botón de la HORA ( ). Pulse para cambiar la HORA (TIME) de cocción en la pantalla digital.
Use los botones ( ) y ( ) para agregar o disminuir la HORA de cocción.
NOTA: El tiempo de cocción se puede agregar o reducir mientras se está cocinando en curso
7. Botón de TEMPERATURA ( ). Pulse para cambiar la TEMPERATURA en la pantalla digital.
Use los botones ( ) y ( ) para agregar o disminuir la TEMPERATURA de cocción.
NOTA: La temperatura de cocción se puede aumentar o reducir mientras la cocción está en curso
8. Botón de ASADOR (al usar el espetón) ( ). Cuando la comida esté bien sujeta al ensamblaje del
espetón y la barra del espetón esté bloqueada en su lugar, pulse para encender la ROTISSERIE
(ASADOR). La barra del espetón comenzará a girar y el icono de ROTISSERIE parpadeará. Pulse el botón
ROTISSERIE ( ) que parpadea nuevamente para desactivar la rotación.
Figura 3

32
CARTA DE MENÚ
Pulse MENÚ ( ) una vez. El icono de papas fritas se iluminará. Pulse MENÚ ( ) para avanzar al siguiente
icono del menú.
ICONO MENÚ
TEMP
por
defecto
(ºF)
TEMPERATURA
ajustable
(ºF)
HORA por
defecto
(MINUTOS)
HORA
ajustable
(MINUTOS)
1
Papas fritas
400 180 - 400 16 1 - 90
2
Tostadas
400 350 - 400 3 1 - 10
3
Carne
360 180 - 400 20 1 - 90
4
Pescado
320 180 - 400 12 1 - 90
5
Pollo
360 180 - 400 20 1 - 90
6
Pastel
350 180 - 400 25 1 - 90
7
Pizza
360 180 - 400 12 1 - 90
8
Deshidratar
125 90 - 170 4:00 1:00 - 24:00
9
Recalentar
250 180 - 400 6 1 - 90
10
Por
defecto
380 180 - 400 15 1 - 90
11
Asador
380 180 - 400 15 1 - 90
Nota: El rosticero puede usarse conjuntamente con los 9 ajustes preseleccionados o a la temperatura
predeterminada de 380 °F durante 15 minutos.
Restricciones de peso/tamaño
1 El horno de la freidora por convección con aire puede asar hasta una pechuga de pollo o pavo de 4 lb. y
una carne asada de ternera, cerdo o cordero de 4 lb.
2 IMPORTANTE: pollos o aves de caza de hasta 4 libras. debe estar bien atado y puede cocinarse
utilizando el asador.
3 Las aves de corral y las carnes cocidas en el asador no deben tener una anchura más que 7-1 / 2
pulgadas y deben caber cómodamente en el horno de freír por convección de aire sin tocar ni los
elementos de calentador inferiores ni los superiores.
4 El horno de la freidora por convección de aire puede hornear cualquier pizza de estas de 8 “x 7” o de
una pizza redonda de hasta 7”.

33
Recipientes de cocción
• Una variedad de platos para hornear estándar, como una cacerola de 7 pulgadas x 8 pulgadas, cualquier
molde para pastel redondo o cuadrado de 7 pulgadas, un molde para mufns de 6 tazas, un molde para
pastel de 8 pulgadas, redondo de 1 cuarto, o platos de cacerola rectangulares se pueden usar para
cocinar muchos alimentos diferentes.
• La bandeja de goteo incluida con el horno de freír por convección de aire es adecuada para hornear
elementos como galletas, rollos, panecillos, nachos, pizza y aperitivos calientes.
• Para obtener una corteza más crujiente, hornee la pizza en la rejilla para dorar. Para una corteza más
suave, hornee la pizza en la bandeja de goteo. Las bandejas oscuras o sin brillo absorben el calor más
rápido; los alimentos se hornearán más rápidamente y la corteza se dorará más fácilmente que en las
bandejas de hornear brillantes.
• Verique las instrucciones del paquete en el recipiente o comuníquese con el fabricante del horno para
determinar la idoneidad del recipiente para su uso en un horno de convección.
• No use bolsas para asar en el horno en este horno de freír por convección de aire, ya que pueden entrar
en contacto con los elementos de calentador.
PRECAUCIÓN: deje un espacio de aire de al menos 1 pulgada entre la parte superior del recipiente
y el elemento del calentador superior. Nunca use tapas de vidrio en utensilios de vidrio o metal. Si
es necesaria una tapa, cúbrala bien con papel de aluminio. Para obtener los mejores resultados de
cocción, se recomienda el uso del nivel medio para cocinar alimentos en una parrilla.
Antes de usar por primera ve
PRECAUCIÓN: Para protegerse contra descargas eléctricas, no sumerja el horno de la freidora por convección
de aire ni permita que el cable entre en contacto con agua u otros líquidos.
1. Lea atentamente todas las instrucciones de funcionamiento.
2. Desempaque cuidadosamente el horno y los accesorios de la freidora por convección de aire, retirando
todos los materiales de embalaje. Quite cualquier etiqueta de las supercies exteriores.
3. Coloque el horno de la freidora por convección de aire en una supercie nivelada, como una encimera
o una mesa. Asegúrese de que los lados, la parte posterior y la parte superior del horno de freidora por
convección de aire estén al menos a 4 pulgadas de distancia de las paredes, gabinetes u objetos en el
mostrador o la mesa.
4. Para evitar rayar, estropear o decolorar, no almacene nada sobre el horno de freidora por convección de
aire durante la operación.
5. Lave las dos rejillas para dorar, la bandeja de goteo y el conjunto del espetón en agua caliente y
jabonosa.
6. Enjuague y seque completamente antes de colocarlo en el horno de la freidora por convección de aire.
7. Asegúrese de que la bandeja de goteo esté colocada en el piso del horno.
NOTA: Durante el primer uso, el horno de freír por convección de aire puede emitir un ligero olor.
Esto es normal.
Instrucciones de uso
1. Coloque el horno de freír por convección de aire en un área de trabajo plana y resistente al calor, cerca
de un tomacorriente.
2. Enchufe el cable de alimentación en un tomacorriente de pared de 120V CA. Aparecerá un botón rojo
POWER (ENCENDIDO) ( ) solitario sobre un fondo negro. (Ver Figura 4)
3. Para comenzar, pulse el botón rojo de ENCENDIDO ( ).
4. El panel de control aparecerá cuando el botón rojo ENCENDIDO ( ) comience a parpadear.
(Ver Figura 5).
Figura 6
15
380
Figura 4 Figura 5
5. La temperatura y la hora por defectos: 380ºF y 15 minutos se alternarán en la pantalla digital.
(Ver Figuras 6)

34
Figura 7
INSTRUCCIONES DE USO AL FREÍR CON AIRE
6 Para ajustar la HORA de cocción a su receta, pulse el botón HORA ( ) y luego el botón ( ) y ( ) para
avanzar o disminuir el tiempo de 1 a 60 minutos, en incrementos de 1 minuto. Para la deshidratación, se
puede aumentar el tiempo a intervalos de 30 minutos para una deshidratación máxima de 24 horas.
7. Pulse el botón de TEMPERATURA ( ) y luego el botón ( ) y ( ) para ajustar la TEMPERATURA de
180°F a 400°F, en incrementos de 5 grados. Elija una temperatura que oscile entre 90 °F y 170 °F al
seleccionar la deshidratación
8. Cuando aparezcan los valores de TEMPERATURA y HORA deseados, pulse el botón rojo ENCENDIDO
( ) para encender el horno de freír por convección de aire. El botón de ENCENDIDO ( ) se iluminará en
blanco, el ventilador de convección blanco ( ) parpadeará. El botón Oven LIGHT y el botón ROTISSERIE
se iluminan, y pueden activarse en cualquier momento en que el horno de freír por convección de aire
esté en funcionamiento. La TEMPERATURA y la HORA programadas se alternarán en la pantalla digital
y se podrán cambiar, hasta que la HORA restante cuente hasta 00:00. (Ver Figura 7)
IMPORTANTE: El horno de la freidora por convección de aire no calentará hasta que se presione el
botón POWER ( ) que parpadea en rojo. Si no se presiona ningún botón, en 15 minutos, el horno de la
freidora por convección de aire se apagará automáticamente.
9. PARA DETENER el horno de la freidora por convección de aire, pulse el botón blanco de ENCENDIDO
( ). La luz blanca de encendido ( ) se pondrá rojo y comenzará a parpadear. Se pueden hacer cambios
de TEMPERATURA o HORA. Pulse el botón rojo ENCENDIDO ( ) que parpadea para reanudar la cocción
10. Mientras cocina, cuando se abre la puerta del horno, el horno de la freidora por convección por aire
hará una pausa, y la luz del horno se iluminará para permitirle quitar, agregar, cepillar, sazonar o
reorganizar los alimentos o alternar las posiciones de los estantes. Cuando la puerta del horno está
cerrada y bloqueada en su posición, la luz del horno se apagará y el horno de la freidora por convección
de aire reanudará la cocción.
11. Para apagar el horno de la freidora por convección de aire en cualquier momento, pulse el botón blanco
de ENCENDIDO ( ) y luego abra la puerta del horno de la freidora por convección de aire.
12. Cuando la HORA cuenta hasta 00:00, aparecerá “END” (TERMINADO) en la pantalla digital y el
ventilador de convección blanco ( ) seguirá parpadeando hasta que aparezca el botón rojo ENCENDIDO
( ) sobre un fondo negro. 5 pitidos suenan cuando el horno de la freidora por convección de aire se
apaga automáticamente.
¡ADVERTENCIA! SIEMPRE UTILICE UN TERMÓMETRO DE CARNE PARA ASEGURAR
QUE LA CARNE, LA AVES DE CORRAL Y EL PESCADO SE COCINAN POR COMPLETO
ANTES DE COMER.
PRECAUCIÓN: LAS SUPERFICIES INTERNAS DEL HORNO ESTÁN CALIENTES DURANTE
Y DESPUÉS DEL USO. SIEMPRE USE GUANTES PROTECTORES AISLADOS PARA EL
HORNO EN LAS MANOS CUANDO TOQUE EL INTERIOR DEL HORNO DE LA FREIDORA POR
CONVECCIÓN CON AIRE CALIENTE.
13. Deje reposar los alimentos cocidos durante 10 a 15 minutos. Saque la (s) rejilla (s) de verduras del horno
y colóquelas sobre una supercie plana y resistente al calor. Saque los alimentos fritos al aire al área de
servicio. Devuelva rápidamente la (s) rejilla (s) de verduras al horno de freír por convección de aire. Siga
friendo los lotes subsiguientes, si los hay.
14. Desenchufe el horno de la freidora por convección de aire cuando no esté en uso.

35
MENÚ. 9 OPCIONES DE FREÍR CON AIRE PREAJUSTADAS
(Papas fritas | Tostadas | Carne | Pescado | Aves de corral | Pastel | Pizza | Deshidratar | Recalentar)
1. Para comenzar, pulse el botón rojo de ENCENDIDO ( )
2. El panel de control aparecerá cuando el botón rojo POWER ( ) comience a parpadear. (Ver Figura 8.)
3. Pulse el botón MENÚ ( ) una vez. El icono de papas fritas y la TEMPERATURA y HORA predenidas
comenzarán a parpadear. (Consulte la gura 10.) Pulse el botón MENÚ (M) para avanzar al siguiente
ícono MENÚ.
4. Cuando el icono del MENÚ ( ) deseado esté parpadeando, verique que la TEMPERATURA y la HORA
predenidas se alternan en la pantalla digital. Ajuste la TEMPERATURA o la HORA preestablecidas a su
receta. Pulse el botón rojo POWER ( ) que parpadea para reanudar la cocción.
Freír con aire. Para mejores resultados
1. Consulte la carta de freír con aire y/o siga las instrucciones del paquete para obtener la TEMPERATURA
y el TIEMPO de cocción por convección sugeridos.
NOTA: Como regla general, cuando la convección de aire se fríe, reduzca el tiempo de COCCIÓN
convencional sugerido por el paquete entre un 20% y un 30%, dependiendo de la comida y la cantidad a
cocinar.
NOTA: La cantidad, densidad y peso de los alimentos alterarán la HORA total de freír al aire necesario.
Recuerde, cocinar lotes más pequeños dará como resultado un TIEMPO de cocción más corto y una
calidad de la comida más uniforme.
2. Cuando se hornea por convección, la posición del estante utilizada dependerá del tamaño del alimento
que se esté preparando. Es importante colocar sus alimentos lo más cerca posible del centro del horno
de freír por convección de aire para asegurar una cocción uniforme.
3. Siempre seque la comida con palmaditas antes de cocinarla para fomentar el dorado y evitar el exceso
de humo. Cuando cocine alimentos naturalmente altos en grasa, como alitas de pollo o salchichas,
puede ser necesario vaciar la grasa de la bandeja de goteo entre lotes.
4. Para obtener resultados más crujientes, freír pequeños lotes de alimentos recién empanizados. Crea
más área de supercie cortando los alimentos en pedazos más pequeños. Pulse el empanado sobre la
comida para que se adhiera. Refrigere los alimentos empanizados durante al menos 30 minutos y rocíe
con aceite antes de freírlos al aire. 5. Organice los alimentos empanizados en las rejillas para que no se
toquen para permitir que el aire uya en todas las supercies.
6. No llene en exceso las rejillas de alimentos.
7. El aceite de oliva en aerosol o el aceite vegetal funciona mejor ya que el aceite se distribuye
uniformemente y se necesita menos aceite.
8. Para asegurar una cocción/dorado uniforme, SIEMPRE abra la puerta del horno a la mitad del TIEMPO
de cocción y verique, gire o gire los alimentos y las rejillas para picar de arriba a abajo. Compruebe los
alimentos y ajuste la TEMPERATURA o la HORA si es necesario.
9. Si se necesita freír con aire un poco más, ajuste la TEMPERATURA si lo desea, y ajuste la HORA en
intervalos de 2 a 5 minutos hasta que esté completamente cocida.
10. ADVERTENCIA: se debe tener mucho cuidado al manipular las rejillas para dorar y la bandeja de goteo.
Siempre use guantes protectores para el horno o utensilios de mango largo para agarrar los agarres
delanteros. Evite el escape de vapor de los alimentos calientes.
Una nota sobre los alimentos frescos o congelados preenvasados para freír al aire
1. Este sistema de calefacción de alto rendimiento de 1650 W hace circular el calor para una fritura rápida
y recuperación del aire. Como regla general, reduzca el tiempo de horneado convencional del paquete
en un 20% a 30%, dependiendo de la comida y la cantidad a cocinar.
2. Siempre verique los alimentos a la mitad del TIEMPO de cocción para determinar la TEMPERATURA y
el TIEMPO de cocción nal.
3. Siempre revise el progreso de la cocción después de que la HORA haya expirada. Si se necesita freír
con aire un poco más, ajuste la TEMPERATURA si lo desea, y ajuste la HORA en intervalos de 2 a 5
minutos hasta que esté completamente cocida.
Figure 8

36
ALIMENTO TEMP TIEMPO DE
FREÍR
ACCÍON
Brócoli (asado) 400ºF 15 - 20 minutos Girar y dar vuelta la rejilla para dorar a la mitad de la
cocción freír con aire
Hinojo, Fresco, Picado 380ºF 8 - 11 minutos Girar y dar vuelta la rejilla para dorar a la mitad de la
cocción freír con aire.
Verduras, raíces asadas,
pedazos de 1/2 pulg.
400ºF 15 - 20 minutos Rociar con aceite aerosol, girar y dar vuelta la rejilla para
dorar a la mitad de la cocción freír con aire.
Pechuga de pollo,
deshuesada, sin piel
360ºF 10 – 15 minutos Aplicar aceite, dar vuelta a la mitad de la cocción freír con
aire.
Presas de pollo (Congeladas) 360ºF 10 - 15 minutos Girar y dar vuelta la rejilla para dorar a la mitad de la
cocción freír con aire.
Pedazos de pollo 360ºF 20 - 30 minutos Rociar con aceite aerosol, girar y dar vuelta la rejilla para
dorar a la mitad de la cocción freír con aire.
Filetes / dedos de pollo 360ºF 13 - 15 minutos Rociar con aceite aerosol, girar y dar vuelta la rejilla para
dorar a la mitad de la cocción freír con aire.
Alitas de pollo (con salsa) 360ºF 20 minutos Girar y dar vuelta la rejilla para dorar a la mitad de la
cocción freír con aire.
Tequeños (congelados) 350ºF 8 – 12 minutos Girar y dar vuelta la rejilla para dorar a la mitad de la
cocción freír con aire.
Aros de cebolla (congelados) 400ºF 12 – 18 minutos Girar y dar vuelta la rejilla para dorar a la mitad de la
cocción freír con aire.
Papas fritas, (frescas,
remojadas, 1/4 a 1/3-pulgada
de espesor)
400ºF 16 - 20 minutos Rociar con aceite aerosol, girar y dar vuelta la rejilla para
dorar a la mitad de la cocción freír con aire.
Papas fritas, espesas
(congeladas) 4 tazas
400ºF 17 – 21 minutos Girar y dar vuelta la rejilla para dorar a la mitad de la
cocción freír con aire.
Papas fritas, nas
(congeladas) 4 tazas
400ºF 15 – 17 minutos Girar y dar vuelta la rejilla para dorar a la mitad de la
cocción freír con aire.
Hamburguesas, 1/4 lb. (hasta
4)
360ºF 10 – 14 minutos Girar y dar vuelta la rejilla para dorar a la mitad de la
cocción freír con aire.
Perros calientes/salchichas 360ºF 10 – 15 minutos Girar y dar vuelta la rejilla para dorar a la mitad de la
cocción freír con aire.
Pastel de carne, 1 libra. 360ºF 35 – 40 minutos Girar el molde de pan a la mitad de la cocción freír con aire.
Bistec 360ºF 8 – 12 minutos Girar y dar vuelta a la mitad de la cocción freír con aire.
Chuletas de cerdo 360ºF 10 – 14 minutos Turn and rotate halfway through air frying.
Pizza, congelada, 7-in. x 8
pulgadas
360ºF 12 – 16 minutos Girar la pizza a la mitad de la cocción freír con aire.
Carta de freír con aire (Incluye opciones preestablecidas de MENÚ ( )
¡ADVERTENCIA! SIEMPRE UTILICE UN TERMÓMETRO DE CARNE PARA ASEGURAR QUE LA CARNE, LA
AVES DE CORRAL Y EL PESCADO SE COCINAN POR COMPLETO ANTES DE COMER.
La tabla siguiente es solo una guía general. La cantidad de aire del alimento frito a la vez, el grosor o la
densidad del alimento y si el alimento está fresco, descongelado o congelado alterará la HORA total de
cocción necesario.

37
TENGA EN CUENTA:
El USDA recomienda que las carnes como la carne de res y el cordero, etc., se cocinen a una temperature
interna de 145ºF / 63ºC. El cerdo debe cocinarse a una temperatura interna de 160ºF / 71ºC y las carnes de ave
deben ser cocinados a una temperatura interna de 170ºF/77ºC - 180ºF/82ºC para asegurarse de que
cualquier bacteria danina ha sido matada. En el recalentamiento de carnes/carnes de ave, tambien deben
cocinarse a una temperatura interna de 165ºF/74ºC.
Carta de freír con aire (Incluye opciones preestablecidas de MENÚ ( )
Camarones (descongelados,
rebozados)
360ºF 12 minutos Rociar con aceite aerosol, Girar y dar vuelta la rejilla para
dorar a la mitad de la cocción freír con aire.
Camarones (descongelados,
salseados)
320ºF 8 minutos Girar y dar vuelta la rejilla para dorar a la mitad de la
cocción freír con aire.
Palitos de pescado
(congelados)
400ºF 10 - 15 minutos Girar y dar vuelta la rejilla para dorar a la mitad de la
cocción freír con aire.
Palitos bagre
(descongelados, maltratados)
360ºF 10 - 15 minutos Rociar con aceite aerosol, Girar y dar vuelta la rejilla para
dorar a la mitad de la cocción freír con aire.
Donas 350ºF 8 minutos Girar y dar vuelta la rejilla para dorar a la mitad de la
cocción freír con aire.
Tartas de manzana 400ºF 10 minutos Dar vuelta la rejilla para dorar a la mitad de la cocción freír
con aire.
ALIMENTO TEMP TIEMPO DE
FREÍR
ACCÍON

38
El conjunto del espetón
1. Saque las dos bandejas de verduras del horno de la freidora por convección de aire. Asegúrese de que
la bandeja de goteo esté colocada en el piso del horno.
2. Es mejor asegurar la carne en la barra del asador con un cordel para cocinar.
3. Cuando prepare pollo asado o aves de caza, ate el ave en un paquete apretado. Ate las dos patas de
pollo juntas, ate el área de la pechuga con las alas, luego enrolle más cuerdas alrededor del centro.
4. Empuje la barra de asador a través del centro de la carne o las aves para cocinar. Asegúrese de que la
comida esté centrada en la barra.
IMPORTANTE: Si la comida no está bien centrada, causará un movimiento brusco durante la cocción.
Esto resulta en una tensión excesiva en el motor.
5. Pase el oricio cuadrado del tenedor de carne sobre el extremo de la barra y presione sobre los
alimentos para asegurarlos. Apriete el tornillo para sujetar los alimentos en su lugar. Repita con el
segundo tenedor de carne. (Ver Figura 9)
Figura 9
Figura 10
Botón de liberación de
la barra del espetón rojo
Ranura de la barra
del espetón
Bandeja de goteo
Ranura de
la barra del
espetón
6. Enchufe el cable de alimentación en un tomacorriente de pared de 120V CA.
7. Abra la puerta del horno. La luz del horno se iluminará. Pulse el botón rojo del asador mientras
introduce el extremo punta de la barra del asador en la ranura del asador del lado izquierdo del interior
del horno. Coloque el extremo cuadrado largo en la muesca metálica en el lado derecho de la freidora
de convección de aire. (Ver Figura 10.)
8. Cierre la puerta del horno. No es necesario precalentar.
9. Presione el botón MENÚ ( ) hasta que el ícono de ROTISSERIE comience a destellar.
10 . Ajuste la TEMPERATURA de cocción o la HORA a su receta. Cuando aparezcan las TEMPERATURA y
HORA deseadas en la pantalla digital, presione el botón rojo ENCENDIDO ( ) que parpadea para activar
la función ROTISSERIE.
11. NOTA: El rosticero puede usarse conjuntamente con los 9 ajustes preseleccionados o a la temperatura
predeterminada de 380 °F durante 15 minutos. Si selecciona una opción preestablecida junto con el
rosticero, con el botón Menú ( ) elija la conguración preferida y presione el botón del rosticero
( ). El rosticero comenzará a girar y la hora y la temperatura se visualizarán de forma alternada en la
pantalla.
IMPORTANTE: Pulse el botón de la luz del horno ON ( ) y observe la comida mientras la barra del
asador gira al menos 1 vuelta completa para asegurar el espacio adecuado de los elementos de
calentador y la bandeja de goteo.
12. A medida que la barra del asador gira, el botón ROTISSERIE parpadeará. El botón de ENCENDIDO ()
y el botón de LUZ del horno se iluminarán en blanco sólido. El ventilador de convección blanco ( )
parpadeará.
13. Establezca la TEMPERATURA y la HORA restante alternará en la pantalla digital, y podrá cambiarse,
hasta que la HORA cuente hasta 00:00.

39
14. Cuando la HORA cuenta hasta 00:00, aparecerá "END" (TERMINADO) en la pantalla digital y el
ventilador de convección blanco ( ) continuará parpadeando durante 15 segundos hasta que el botón
rojo ENCENDIDO ( ) aparezca sobre un fondo negro. 5 pitidos suenan cuando el horno de la freidora
por convección de aire se apaga automáticamente.
¡ADVERTENCIA! SIEMPRE UTILICE UN TERMÓMETRO DE CARNE PARA ASEGURAR QUE LA CARNE O
AVES SE COCINAN POR COMPLETO ANTES DE COMER.
15. Usando guantes protectores para el horno, agarre la manija del asador para levantar la barra del asador.
PRECAUCIÓN: tenga cuidado al retirar los alimentos cocidos del horno de la freidora por convección de
aire. El interior del horno de la freidora por convección está muy caliente. Cierre la puerta del horno.
16. Desenchúfelo cuando no esté en uso y deje que el horno de la freidora por convección de aire se enfríe
completamente antes de limpiarlo.
Deshidratar
Las carnes secas, verduras y frutas son perfectas para cocinar, viajar, acampar y comer bocadillos. La
preparación de sus propios alimentos secos garantiza resultados saludables y sin conservantes. Deshidrate
los alimentos frescos y maduros para conservar los nutrientes y mejorar el sabor. Las frutas o verduras
maduras también son aceptables para deshidratar. Recorte cualquier fruta madura con un cuchillo. El secado
automatizado de su horno de aire hace que la deshidratación casera sea sencillo y graticante.
HIERBAS SECAS
Hace aproximadamente 1/3 taza
NOTA: Cuando se utilizan ambas rejillas para hacer crujientes, el horno de freído por convección con aire
puede DESHIDRATAR 2 (1/2 oz./14 g) de paquetes de hierbas frescas como perejil fresco, romero, tomillo,
estragón, orégano y salvia.
PRECAUCIÓN: Las hierbas ligeras y frondosas como el perejil o el cilantro, no deben colocarse en el estante
superior ya que las corrientes de convección pueden hacer que las hierbas se enganchen en el abanico.
Si las hierbas son muy pequeñas, cubra las rejillas con papel de pergamino. Extienda las hierbas frescas de
manera uniforme sobre las rejillas de crujientes.
Coloque las dos bandejas de crujientes en los 2 estantes superiores del horno de la freidora por
convección de aire.
Pulse MENÚ ( ) hasta que se ilumine el icono DEHYDRATE (DESHIDRATAR).
Ajuste la temperatura o el tiempo a su receta. Cuando aparezcan las TEMPERATURA y HORA deseadas, pulse
el botón rojo POWER ( ) que parpadea para activar la función DEHYDRATE (DESHIDRATAR).
Gire los estantes a la mitad del tiempo de DEHYDRATE (DESHIDRATAR) para un secado uniforme.
HIERBA
TEMP HORA Notas
Orégano 125°F
2 -3 hrs. Girar los estantes
Perejil 125°F
2 -3 hrs. Use estantes inferiores. Girar los estantes
Tomillo 125°F
3- 4 hrs. Girar los estantes.
Romero 125°F
2 -3 hrs. Girar los estantes.
Estragón 125°F
3- 4 hrs. Girar los estantes.
Salvia 125°F
3- 4 hrs. Girar los estantes.
Chips de col
rizada
125°F
1 hr. 30 mins. Masajear la col rizada con aceite de oliva. Girar los estantes.

40
FRUTAS
Lave bien todas las pieles de frutas.
Corte la fruta en rebanadas de 1/4 de pulgada de grosor y colóquelas en ambas rejillas para asegurar un
secado uniforme.
Gire los estantes a la mitad del tiempo de DESHIDRATAR para un secado uniforme.
FRUIT
TEMP TIME NOTAS
Manzanas
135°F
8 - 10 hrs. Deshuesar/cortar en ¼ plgs rondas,
Remojar en agua acidulada. Girar los estantes.
Mango/Papaya
135°F
10 hrs. Pelar/cortar en ¼ plgs. rondas. Girar los estantes.
Kiwi
135°F
6 hrs. ¼ plgs. rondas. Girar los estantes.
Rodajas de naranja 135°F 10 hrs. Los cítricos son crujientes cuando están completamente
secos. Girar los estantes.
Tomates (Roma)
145°F
10 hrs. Skin-side down. Rotate shelves.
Tomatitos
145°F
5 - 9 hrs. Skin-side down. Rotate shelves.
CHARQUI TEMP HORA NOTAS
1/2 lb. Asado o bife
145°F
5 - 6 hrs. Dar la vuelta y girar los estantes a la mitad de la
cocción.
CROUTONS TEMP HORA NOTAS
Croutons
400°F
3 - 4 mins Dar la vuelta, aceitar, y girar los estantes a la mitad
de la cocción.

41
Instrucciones de mantenimiento
Este aparato requiere poco mantenimiento. No contiene piezas que el usuario pueda reparar. Cualquier
servicio que requiera el desmontaje que no sea la limpieza debe ser realizada por un técnico calicado.
Instrucciones de cuidado y limpieza
¡ADVERTENCIA! Desenchufe la unidad y deje que el horno de freír por convección de aire y todos los
accesorios se enfríen completamente antes de limpiarlos.
1. Limpie el exterior del horno de freidora por convección con aire con un trapo húmedo y seque
completamente. Se puede usar un limpiador líquido no abrasivo para las manchas difíciles. No utilice
estropajos metálicos o limpiadores abrasivos que rayen la supercie.
2. Limpie el interior del horno con un limpiador suave o no abrasivo y un estropajo de plástico después de
cada uso para evitar la acumulación. No frote demasiado fuerte ya que la supercie puede rayarse.
3. Para facilitar la limpieza, su el horno de freidora por convección con aire está equipado con una puerta
de horno extraíble. Abra la puerta en un ángulo de 45 grados. Sujete rmemente la manija de la puerta
del horno y tire hacia afuera para extraerla.
4. Limpie la ventana de observación con un paño o esponja humedecida con agua tibia y
jabonosa. Seque bien.
5. Para sacar los alimentos horneados, vierta una pequeña cantidad de aceite de cocina sobre los
alimentos y deje reposar durante 5 a 10 minutos. Retire los alimentos ablandados con un paño suave.
No utilice lana de acero, estropajos o limpiadores abrasivos.
6. Vuelva a colocar la puerta del horno encajando las muescas en las ranuras de la bisagra en la parte
inferior del cuerpo del horno.
7. Asegúrese de que la puerta del horno esté bien ensamblada y que encaje y se cierre de manera segura
en la parte frontal del horno de freidora por convección con aire. La luz del horno debe estar apagada.
8. Lave las dos rejillas para dorar y la bandeja de goteo en agua jabonosa y seque completamente. Todos
los accesorios del horno de freidora por convección con aire pueden lavarse en el lavaplatos.
9. Si se usó el ASADOR, lave la barra del asador, los tenedores de carne, los 2 tornillos de mano y el asa
del asador en agua tibia jabonosa y seque completamente. Los accesorios ROTISSERIE se pueden lavar
en el lavaplatos.
PRECAUCIÓN: NO use aerosol u otros limpiadores para horno. El uso de estos tipos de limpiadores
puede causar daños y/o eléctricos al horno de freír por convección con aire.
Instrucciones de almacenamiento
1. Ensamble la barra de asador con dientes y tornillos (sin alimentos). Guarde ambos estantes y la bandeja
de goteo dentro del horno, con la puerta del horno cerrada.
2. Almacene el horno en su caja en un lugar limpio y seco.
3. Nunca almacene el aparato mientras esté caliente o aún enchufado.
4. Nunca enrolle el cable con fuerza alrededor del aparato. No ejerza ningún esfuerzo sobre el cable
donde entra en la unidad, ya que podría deshilacharse y romperse.

42
Recetas
Manzanas crujientes de canela
Mantenga las pieles de manzana para bra adicional. Sin azúcar, estas papas veganas, sin gluten,
Manzanas crujientes de canela, son saludables para comer en cualquier momento. Experimenta con
diferentes variedades de manzanas para degustar sus distintivos perles de sabor
Para 2- 4 personas
• 2 manzanas
• 1 cucharada de canela
• 1 taza de agua
• 1 cucharada de jugo de limón
1. Pele las manzanas, si se desea. Saque el hueso con un corer de manzana o un cuchillo. Corte las
manzanas en aros nos de entre 3/16-pulgada y 1/4-pulgada de grosor.
2. Agregue el jugo de limón a 1 taza de agua en un tazón grande y poco profundo. Para evitar
que las manzanas se vuelvan marrones, sumerja las rodajas de manzana en el agua acidulada.
Luego presione el exceso de humedad de los anillos de manzana con una toalla de cocina limpia
o toallas de papel.
3. Organice las rebanadas de manzana en una sola capa en ambas rejillas de crujiente. Espolvoree
los anillos de manzana con canela.
4. Elija la opción de menú DESHIDRATAR ( ). Ajuste la TEMPERATURA ( ) a 135º y la HORA ( ) a
las 10:00 horas.
5. Voltee las manzanas y rotar las parrillas de crujido varias veces durante el secado. Retira las
manzanas cuando estén doradas y crujientes a tu gusto.
6. Almacene las manzanas secas en bolsas con cremallera
Surtido rico de granola con jarabe de arce
Estas barras de boca son versátiles y fáciles de cocinar. Las nueces, los edulcorantes y los
complementos pueden cambiarse para crear varias barras de sabores que encantarán a todos.
Incluye semillas de calabaza, pistachos, anacardos y semillas de sésamo. Utilize miel, melaza o
jarabe de agave. Varíe sus barras agregando hojuelas de coco, chips de chocolate, mantequilla de
maní, mantequilla de almendras y frutas exóticas y secas. Las posibilidades son innitas.
Para 12 barras
• 3 tazas de avena
• 1/2 taza de almendras en rodajas
• 1/2 taza de semillas de girasol, asadas
• 1 cucharada de especia de pastel de calabaza
• 3 cucharadas de aceite de coco, fundido
• 6 cucharadas de jarabe de arce de grado B
• 1/2 taza de arándanos secos
• 2 naranjas, sin piel y exprimido
• 2 claras de huevo, batidas
1. Combine ingredientes secos en un tazón grande. Combine los ingredientes húmedos en otro
tazón.
2. Añada los ingredientes húmedos para secar y mezclar bien. La mezcla de granola debe estar
ligeramente húmeda.
3. Cubre las dos bandejas de crujiente con papel pergamino. Extienda la mitad de la mezcla en
cada rejilla.
4. Elija la opción de menú CAKE ( ). Ajuste la TEMPERATURA ( ) a 300 ° F y TIEMPO ( ) a 20
minutos y hornee hasta que se doren. Cortar en barras mientras está caliente. El granola crujirá
cuando se enfríe.
5. Almacene en un recipiente herméticamente cerrado

43
Recetas
Charqui clásico
¿Charqui casero? Este clásico es rico en proteínas, bajo en grasa y saludable. ¡Sin nitratos! ¡Sin aditivos
químicos! No, nada que USTED no quiera ... ¡pero todo lo que USTED quiera!
PISTA: Pídale a su carnicero que corte la carne en tiras gruesas de 1/4 de pulgada.
Para 4 personas
• 1/2 - 3/4 libras de lete a la parrilla o anco
• 1/2 cucharadita de pimienta negra
• 1/2 cucharadita de chile en polvo
• 1/2 cucharadita de ajo en polvo
• 1/2 cucharadita de pimienta de cayena, o más
al gusto
• 1/2 cucharadita de cebolla en polvo
• 1/8 taza de salsa de soja (puede sustituir a
una baja en sodio)
• 1/4 taza de salsa inglesa
• 1/8 taza de salsa picante, opcional
1. Para facilitar el corte, la carne debe estar parcialmente congelada. Recorte la grasa de la carne.
Corte el lete de 1/4 de pulgada de espesor; Luego en tiras de 4 pulgadas.
2. Agregue todos los ingredientes de la marinada a una bolsa con cremallera o recipiente
cubierto.
3. Mezcle bien. Añada la carne. Cubra y refrigere durante la noche.
4. Seque la carne con una toalla de cocina limpia o toallas de papel. Coloque las tiras de lete
sobre las rejillas para que las piezas no se toquen.
5. Elija la opción de menú DESHIDRATAR ( ). Ajuste la TEMPERATURA ( ) a 145º y la HORA ( ) a
las 05:00 a las 06:00 horas. Voltee la carne y gire las bandejas de verduras a la mitad del secado.
Charqui se hace cuando la carne se seca a su gusto.
6. Para almacenar, coloque la cecina en recipientes bien tapados o en bolsas con cremallera.
El pollo asado
Use hilo de cocina para atar al ave en un paquete apretado. Ate las dos patas de pollo juntas, ate
el área de la pechuga con las alas, luego enrolle más cuerdas alrededor del centro. Consulte las
instrucciones detalladas que se describen en la sección Ensamblaje del Rotisserie de este manual
de instrucciones. (Ver Figuras 11 y 12).
• 1 (2-1 / 2 - 3 lb.) pollo entero, sin menudos
• 1/4 taza de mantequilla, fundida
• 2 cucharaditas de ajo granulado
• 2 cucharaditas de cebolla granulada
• 1 cucharadita de sal marina
• 1 cucharadita de pimienta negra molida
• 2 cucharaditas de paprika
1. Combine la mantequilla y los condimentos en un tazón pequeño. Cubra el pollo generosamente
y deje marinar a temperatura ambiente durante 30 minutos.
2. Ate el pollo y monte de forma segura en la barra de asador.
3. Ensamble el asador siguiendo el procedimiento detallado descrito en la sección Ensamblaje del
asador en este manual de instrucciones.
4. Elija la opción de menú ROTISSERIE ( ). Pollo asado a 400°F. Ajustar el tiempo ( )
a 15 minutos.
5. Bañe el pollo con la marinada. Ajuste la TEMPERATURA ( ) a 350°F y el TIEMPO ( )
a 30 minutos.
NOTA: En promedio, cocinar pollo 15 minutos / lb.
6. Use un termómetro para carne para medir la temperatura interna. A 165°F, el pollo está listo.
7. Deje que el pollo descanse de 15 a 20 minutos antes de cortarlo

44
Recetas
Jamón glaseado con miel
Un favorito para cualquier esta o suceso especial. Trate a su familia con un delicioso jamón
glaseado con miel tradicional o… ¡sorprenda a todos con su propio toque picante de Sriracha!
Para 6 personas
• 1 (3 lb.) Jamón, Pre-Salmuera, Deshuesado,
Completamente Cocido
• Glaseado
• 1 naranja, sin piel y exprimido.
• 1/2 taza de miel
• 1/2 taza de mostaza Dijon
• 1/2 cucharadita de pimienta de Jamaica
• 4 cucharadas de mantequilla
• 1 cucharada de salsa Sriracha, opcional
1. Cocine a fuego lento los ingredientes del glaseado en una cacerola pequeña a fuego medio.
2. Saque el jamón del refrigerador 1 hora antes de la preparación; Deje que la carne alcance la
temperatura ambiente y seque. Puntúa el jamón cortando un patrón de diamante de 1 pulgada
de profundidad en la cáscara superior del jamón. Vierta el glaseado sobre el jamón y refrigere
por 2 horas.
3. Ensamble el asador siguiendo el procedimiento detallado descrito en la sección Ensamblaje del
asador en este manual de instrucciones.
4. Elija la opción de menú ROTISSERIE ( ). Ajuste la TEMPERATURA ( ) a 300°F y el TIEMPO ( )
a 60 minutos. Durante los últimos 30 minutos de cocción, glasear el jamón cada 10 minutos.
NOTA: En promedio, se cocina jamón 18 minutos por libra
5. El jamón estará lo sucientemente caliente para servir cuando la temperatura interna
alcance los 140°F.
6. Deje reposar el jamón durante 5 a 10 minutos antes de cortarlo.

45
Recetas
Nachos pesados de Dorito® y legumbres
El condimento fresco de tomate sobre estos Nachos de Verduras Cargadas aclara los sabores y
realza los muchos componentes deliciosos. Tiempo de juego, tiempo de película, tiempo de esta,
tiempo de almuerzo, tiempo compartido.
Para 4 personas
• 2 bolsas (1-3/4 oz.) de Doritos®
• 1 taza de queso cheddar blanco rallado o
queso blanco americano
• 1/2 taza de aceitunas negras, en rodajas
• 1/2 taza de aceitunas verdes, en rodajas
• 1/2 taza de granos de maíz congelados,
descongelados
• 3 cebollas verdes, picadas
• 2 chiles jalapeños, sin semillas, rebanados
• 1/2 limón, jugo
• 1/2 cucharadita de sal
• 2 tomates grandes, picados
• 1/4 taza de cilantro, picado, para servir
• guacamole, para servir
• crema agria, para servir
• Pimientos jalapeños, en rodajas, frescos o en
tarro.
1. Vacíe la primera bolsa de Doritos® en un molde para tartas de 7 u 8 pulgadas.
2. Espolvoree la mitad del queso cheddar rallado, las aceitunas, el maíz y las cebollas verdes
sobre las papas fritas.
3. Coloque la bolsa restante de Doritos® en la pila.
4. Espolvoree el queso restante, las aceitunas, el maíz y las cebollas verdes sobre las papas fritas.
5. Centre el molde de pastel en el estante inferior.
6. Elija la opción de menú PAPAS FRITAS ( ). Ajuste el tiempo ( ) a 7 minutos.
7. Mezcle el tomate picado, el jugo de limón y la sal en un tazón pequeño.
8. Después de 7 minutos, verique que el queso se funde a su satisfacción. Quite del horno y
vierta la mezcla de tomate sobre los nachos.
9. Sirva con cilantro fresco, guacamole, crema agria y abundante jalapeño.

46
Recetas
Solomillo de romero y grano de pimienta
Para una cena íntima en casa, este lete de ternera es la perfección. Sirva con papas al romero
asadas y ensalada fresca de jardín. #cenaperfecta
Para 4 personas
• 1 (18 oz.) De lomo de res
Condimento
• 3 dientes de ajo
• 3 ramitas de romero, picadas
• 3 cucharadas de sal kosher
• 1 cucharada de cebolla en polvo
• 3 cucharadas de aceite de oliva
1. Pele el lomo de toda la piel antes de asar.
2. Combine los ingredientes de condimento en un tazón pequeño. Cubra el lomo y deje reposar la
carne a temperatura ambiente durante 30 minutos.
3. Ensamble el asador siguiendo el procedimiento detallado descrito en la sección el Conjunto del
espetón en este manual de instrucciones.
4. Elija la opción de menú ROTISSERIE ( ). Ajuste la temperatura ( ) a 350°F y la HORA ( )
a 30 minutos.
NOTA: En promedio,se cocina carne de res 16 minutos / lb. Por raro, 18 minutos / lb. por medio
5. Use un termómetro para carne para medir la temperatura interna. (Raro: 145 ° F, Medio: 160 ° F.)
6. Debido a la cocción por arrastre, es mejor quitar la carne ligeramente antes de la temperatura
deseada, ya que la temperatura de la carne aumenta de 5º a 10ºF después de retirarla del calor
(mientras está en reposo).
7. Deje reposar la carne 15 minutos antes de cortarla.

47
Recetas
Tacos de letes de pollo
Sabroso. Una buena mezcla de letes de pollo de búfalo fritos al aire crujiente servidos en una
tortilla de harina conveniente y fácil de comer. Estos tacos están rellenos de lechuga fresca, tomate
y apio crujiente sazonado con salsa picante y se enfrían con aderezo de queso azul cremoso.
Para 4 personas
• 4 our tortillas
• 3/4 lb. chicken tenders
• 4 tortillas de harina
• 3/4 libras de letes de pollo
• 1/2 taza de harina
• 1 paquete de condimento para tacos
• 2 huevos batidos
• 1-1/2 tazas de panko sazonado (migas de pan
japonés)
• 4 cucharadas de salsa de alitas de pollo
• 4 cucharadas de aderezo de queso azul
• 2 limas, cortadas en trozos
• 1/2 taza de lechuga iceberg, rallada
• 1/2 taza de tomatitos, a la mitad
• 2 tallos de apio cortado en cubitos
• 1/2 taza de cilantro, picado
1. Corte los letes de pollo en 9 a 12 mini pedazos
2. Prepare la estación de empanado de 3 tazones:
• harina + condimento para tacos
• 2 huevos revueltos
• pan rallado de panko sazonado
3. Pon los letes de pollo en harina. De la palmadita suavemente para eliminar cualquier
harina excesa.
4. Sumerge el pollo en el huevo.
5. Agite el pollo cubierto en las migas de pan panko hasta que cada pieza esté completamente
cubierta.
6. Agregue el pollo empanado a ambas rejillas para dorar. Rocie con aceite de oliva.
7. Elija la opción de menú POLLO ( ). Ajuste el tiempo ( ) a 15 minutos.
8. Gire las rejillas para dorar asta la mitad a través de la fritura al aire.
9. Prepare los tacos. Prepare una cama de lechuga, tomates y apio en la base de la tortilla. Añada
el pollo. Cuchara la salsa de alitas y aderezo de queso azul sobre el pollo. Agregue un poco de
cilantro picado y un poco de jugo de limón fresco para terminar.

48
Recetas
Brochetas de camarones de ajo
La comida de esta elegante se puede preparar con anticipación para servir en minutos.
Para 4 personas
• 1 libra (16-20) de camarones, pelados con colas
Marinada
• 1 limón, jugo
• 1 cucharada de aceite de oliva
• 8 dientes de ajo, picados
• 1/2 taza de perejil, picado
• 1/2 cucharadita de sal marina
• 2 limas, para decorar
1. Combine los ingredientes de la marinada en una bolsa con cremallera.
2. Adobe los camarones 30 minutos antes de cocinarlos.
3. Pon los camarones en los pinchos. Cepille los camarones con la marinada.
4. Elija la opción de menú PESCADO ( ). Ajuste el TIEMPO ( ) de 5 a 7 minutos, dependiendo
del tamaño de los camarones. Gire las rejillas para dorar hasta la mitad a través de freír con
aire. Cepille antes de servir.

49
Recetas
Pan de avena hecho en casa
Nada es mejor que el pan caliente de su horno de freír por convección con aire. La cobertura dulce
y crujiente hornea perfecta para tostadas y mermeladas de la mañana, como un base para untar
queso hierbas, cubierto con carne, pescado o simplemente tostado y untado con mantequilla de
nuez y plátano en rodajas.
Para hornear un pan
• 2 huevos
• 1 taza de suero de mantequilla
• 2 manzanas grandes, sin semillas, ralladas
• 1 cucharadita de extracto de vainilla
• 1/2 taza de aceite de coco, fundido
• 1-1/3 taza de cereal de salvado (puede sustituir el salvado con pasas)
• 1 taza de harina integral
• 1 cucharadita de bicarbonato de sodio
• 1 cucharadita de polvo de hornear
Cubierta
• 1/2 taza de avena
• 1/3 taza de azúcar moreno
1. Bata los huevos y el suero de mantequilla en un tazón grande. Añada la manzana, la vainilla y el
aceite de coco. Mezcle bien.
2. Agregue el cereal de salvado y deje reposar durante 5 minutos hasta que se absorba el líquido.
3. Combine ingredientes secos en un tazón grande. Batir hasta que esté bien mezclado.
4. Añada los ingredientes húmedos con ellos secos. ¡No mezcle demasiado! Agregue a un molde
para pan de 8 pulgadas x 5 pulgadas bien engrasado. Combine los ingredientes de la cubierta y
cucharee sobre la masa.
5. Elija la opción de menú PASTEL ( ). Ajustar el tiempo ( ) a 35 minutos.
6. El pan esté cocido cuando un palillo insertado en el centro del pan sale limpio. Dependiendo del
molde, hornee 5 minutos adicionales como sea necesario.


51
Garantía limitada de DOS AÑOS
Mediante la presente, SENSIO Inc. garantiza que, durante el plazo de DOS AÑOS a
partir de la fecha de compra, este producto no presentará defectos mecánicos en el
material ni en la mano de obra, y durante 90 días, no los presentará en las piezas no
mecánicas. A su entera discreción, SENSIO Inc. reparará o reemplazará el producto
que resulte defectuoso, o emitirá un reembolso por el producto durante el plazo de
garantía.
Esta garantía es válida únicamente para el comprador minorista original a partir de la
fecha de compra minorista inicial y no es transferible. Conserve el recibo de compra
original, ya que se exige una prueba de compra para obtener la validación de la
garantía. Las tiendas minoristas no tienen derecho a alterar, modicar ni corregir de
ninguna manera los términos y condiciones de la garantía.
EXCLUSIONES:
La garantía no cubre el desgaste normal de las piezas ni el daño ocasionado por
cualquiera de las siguientes causas: uso negligente del producto, uso de un voltaje
o corriente incorrectos, mantenimiento de rutina inadecuado, uso contrario al de
las instrucciones de funcionamiento, desarmado, reparación o alteración a cargo de
personas que no sean miembros del personal calicado de SENSIO Inc. Asimismo, la
garantía no cubre actos de la naturaleza, como incendios, inundaciones, huracanes o
tornados.
SENSIO Inc. no asumirá responsabilidad por daños incidentales o resultantes
ocasionados por la violación de cualquier garantía expresa o implícita. Salvo en
la medida en que lo prohíban las leyes aplicables, cualquier garantía implícita de
comerciabilidad o aptitud para un propósito particular se limita temporalmente a la
duración de la garantía. Algunos estados, provincias o jurisdicciones no permiten la
exclusión ni la limitación de daños incidentales o resultantes, o limitaciones sobre
la duración de una garantía implícita y, por lo tanto, es posible que las exclusiones o
limitaciones mencionadas no le correspondan. La garantía cubre derechos legales
especícos que pueden variar de un estado, una provincia o una jurisdicción a otros.
CÓMO OBTENER EL SERVICIO DE GARANTÍA:
Debe comunicarse con el Servicio de atención al cliente a nuestro número telefónico
gratuito: 1-866-832-4843. Un representante del Servicio de atención al cliente
intentará resolver los problemas referidos a la garantía por teléfono. Si este no puede
resolver el problema, le proporcionarán un número de caso y le solicitarán que
devuelva el producto a SENSIO Inc. Adhiera una etiqueta al producto que incluya: su
nombre, dirección, número telefónico de contacto durante el día, número de caso y
descripción del problema. Además, incluya una copia del recibo de compra original.
Envuelva cuidadosamente el producto etiquetado con el recibo de compra, y envíelo
(con el envío y el seguro prepagados) a la dirección de SENSIO Inc. SENSIO Inc. no
asumirá obligación ni responsabilidad alguna por el producto devuelto que esté en el
trayecto hacia el Centro de servicio al cliente de SENSIO Inc.

GRACIAS
Para su compra
BellaLifestyle
BellaLife
@
bellahousewares.com
inspírate
Registrarse
y rmar para arriba para
anuncios especiales y los ingresos
de la moda!
Cuéntanos lo que piensas!
Evaluar, revisar o hacernos una
pregunta.
!
52


10.5 QT AIR CONVECTION FRYER
OVEN DEHYDRATOR
10.5 QT FREIDORA DE CONVECCIÓN Y HORNO
CON DESHIDRATADOR
Instruction Manual (Recipe Guide)
Manual de instrucciones (Guía de recetas)
Register your product and get support at:
Para registrar y obtener asistencia de su producto ir:
www.bellahousewares.com
-
 1
1
-
 2
2
-
 3
3
-
 4
4
-
 5
5
-
 6
6
-
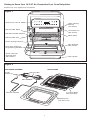 7
7
-
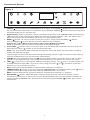 8
8
-
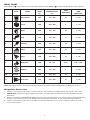 9
9
-
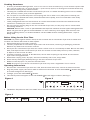 10
10
-
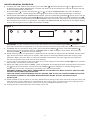 11
11
-
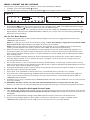 12
12
-
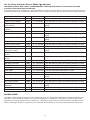 13
13
-
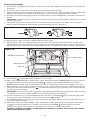 14
14
-
 15
15
-
 16
16
-
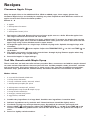 17
17
-
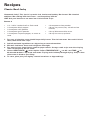 18
18
-
 19
19
-
 20
20
-
 21
21
-
 22
22
-
 23
23
-
 24
24
-
 25
25
-
 26
26
-
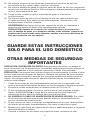 27
27
-
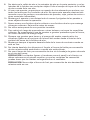 28
28
-
 29
29
-
 30
30
-
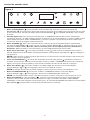 31
31
-
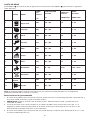 32
32
-
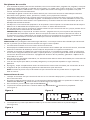 33
33
-
 34
34
-
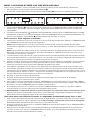 35
35
-
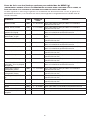 36
36
-
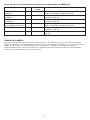 37
37
-
 38
38
-
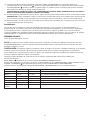 39
39
-
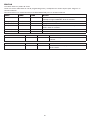 40
40
-
 41
41
-
 42
42
-
 43
43
-
 44
44
-
 45
45
-
 46
46
-
 47
47
-
 48
48
-
 49
49
-
 50
50
-
 51
51
-
 52
52
-
 53
53
-
 54
54
-
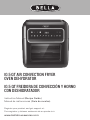 55
55


Bella 10.5 QT Air Convection Fryer Oven Dehydrator El manual del propietario
- Categoría
- Pequeños electrodomésticos de cocina
- Tipo
- El manual del propietario
- Este manual también es adecuado para
En otros idiomas
Documentos relacionados
-
Bella 4.6QT Air Fryer Digital El manual del propietario
-
-
-
-
-
-
-
-
Otros documentos
-
KALORIK FT 46587 Guía del usuario
-
Insignia NS-AFO6DBK1 Guía del usuario
-
Masterpro ROCKET 1100 Manual de usuario
-
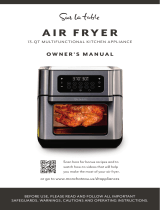 Sur La Table 13-Quart Multifunctional Air Fryer El manual del propietario
-
KALORIK 22 Quart Digital Air Fryer Toaster Oven Manual de usuario
-
Oster CKSTAF-TECO Instrucciones de operación
-
bluMill GLA-1006A Manual de usuario
-
all-clad EH800D51 Professional Immersion Circulator Slow Cooker El manual del propietario
-
AcuRite Thermometer Manual de usuario
-
Tefal GC714834 Manual de usuario
