Oster CKSTAF-TECO Instrucciones de operación
- Categoría
- Cocina
- Tipo
- Instrucciones de operación

Freidora de Aire
Instruction Manual & Recipe Book
Manual de Instrucciones & Libro de Recetas
www.oster.com
Air Fryer
TITANIUM INFUSED

3
2
North American models with polarized plugs:
POWER CORD INSTRUCTIONS:
A short power-supply cord or detachable power-supply cord is provided to reduce risks
resulting from becoming entangled in or tripping over a longer cord. Longer detachable
power-supply cords or extension cords are available and may be used if care is exercised
in their use. If a long detachable power-supply cord or extension cord is used:
a. The marked electrical rating of the cord set or extension cord should be at least as
great as the electrical rating of the appliance;
b. The cord should be arranged so that it will not drape over the countertop or tabletop
where it can be pulled on by children or tripped over unintentionally; and
c. If the appliance is of the grounded type, the cord set or extension cord should be a
grounding-type 3-wire cord.
Do not pull, twist or otherwise abuse the power cord.
NOTICES
1. Some countertop and table surfaces are not designed to withstand the prolonged heat
generated by certain appliances. Do not set the heated unit on a nished wood table.
We recommend placing a hot pad or trivet under your toaster oven to prevent possible
damage to the surface.
2. During initial use of this appliance, some slight smoke and/or odor may be detected.
This is normal and should go away after a few uses.
WHEN USING ELECTRICAL APPLIANCES, BASIC SAFETY PRECAUTIONS
SHOULD ALWAYS BE FOLLOWED INCLUDING THE FOLLOWING:
1. Read all instructions before using this product.
2. This appliance generates heat during use. Do not touch hot surfaces. Use handles or
knobs. Allow to cool before handling.
3. To protect against electric shock, do not place or immerse cord, plugs, or appliance in
water or other liquid.
4. This appliance is not to be used by children or by persons with reduced physical,
sensory or mental capabilities.
5. Close supervision is necessary when any appliance is used near children. Children
should not play with the appliance.
6. Unplug from outlet when not in use, before putting on or taking off parts and before
cleaning. Allow to cool before putting on or taking off parts, and before cleaning.
To disconnect, turn any control to OFF, then unplug power cord from outlet. Do not
disconnect by pulling on cord.
7. Do not operate any appliance with a damaged cord or plug or after the appliance
malfunctions, or has been damaged in any manner. Do not attempt to replace or
splice a damaged cord. Return appliance to the manufacturer (see warranty) for
examination, repair or adjustment.
8. The use of accessory attachments not recommended by the appliance manufacturer
may cause injuries.
9. Do not use outdoors or for commercial purposes.
10. Do not let cord hang over edge of table or counter, or touch hot surfaces.
11. Do not place on or near wet surfaces, or heat sources such as a hot gas or electric
burner, or in a heated oven.
12. Extreme caution must be used when moving an appliance containing hot oil or other
hot liquids.
13. Use caution when opening the lid during or after a cooking cycle. Escaping steam
can cause burns.
14. Do not use appliance for other than intended use. Misuse can cause injuries.
15. Intended for household countertop use only. Keep 6 inches (152 mm) clear from the
wall and on all sides. Always use appliance on a dry, stable, level surface.
16. When the appliance is in the tilted position, the lid will not stay open on its own.
Always return the appliance to the level position before opening the lid.
17. Never operate this appliance by means of an external timer or separate remote-
control system.
18. WARNING: Spilled food can cause serious burns. Keep appliance and cord away
from children. Never drape cord over edge of counter and never use outlet below
counter.
SAVE THESE INSTRUCTIONS
HOUSEHOLD USE ONLY
important safeguards
POLARIZED PLUG
This appliance has a polarized plug, (one blade is wider than the
other). As a safety feature to reduce the risk of electrical shock,
this plug is intended to t in a polarized outlet only one way. If the
plug does not t fully in the outlet, reverse the plug. If it still does
not t, contact a qualied electrician. Do not attempt to defeat this
safety feature or modify the plug in any way. If the plug ts loosely into the AC outlet or
if the AC outlet feels warm do not use that outlet.

5
4
Due to our policy of continuous improvement, the actual product may differ slightly from the one illustrated in these instructions.
1. Lid - removable for cleaning
2. Heater and fan assembly
3. Lid cleaning release button (one on each side)
4. Lid latch button
5. Removable condensation tray
6. Tilt mechanism lock and window
7. Icon for tilted position
8. Icon for level position
9. + (increase time) button
10. – (decrease time) button
11. Display
12. Dual heat mode button
13. Grill button
14. Ceramic inner bowl
15. Roasting rack
16. Oil measure (approximately equal to 15ml)
17. Detachable bowl handle
parts
Tilt
Level

7
6
bowl handle
Only use the handle to remove the bowl after cooking has nished. Remember
the bowl will be very hot! Don’t set the bowl down on a surface that may be
damaged by heat.
After cooking, you can use the detachable bowl handle to remove the inner bowl and its
contents safely.
1. Make sure that the jaws of the handle are open. Press the button on the handle to
open the jaws if required.
2. Place the bowl handle over the lip of the inner bowl
3. Slide the lever forwards. The handle will grip the inner bowl. Let the lever return to its
rest position.
4. Lift the inner bowl out of the Air Fryer body.
5. To release the bowl, press the button on the handle.
6. Lift the handle off the rim of the bowl.
before first use
Never immerse any part of the Air Fryer body, power cord or plug in water or
any other liquid. Before assembling or disassembling your Air Fryer, ensure it is
unplugged and all parts are cool.
Unpack the appliance and remove all packaging, promotional materials and stickers.
Remove all printed documents. Wash the inner bowl, measuring spoon, roasting rack,
drip tray and bowl handle in hot soapy water. Rinse then dry all of the parts. Wipe the
body and lid with a damp cloth only—see page 16 for cleaning instructions.

9
8
cooking fries
WARNING: When your Air Fryer is in the tilted position, the lid will not stay open
on its own and may close unexpectedly. Always return the appliance to the level
position before opening the lid.
Your Air Fryer can be used to cook fresh or frozen fries, however, for the healthiest option,
we suggest you try our perfect homemade fries on page 17.
1. Press the lid latch button and open the lid.
2. Fit the inner bowl over the central shaft.
3. Add the fries to the bowl. Distribute the fries evenly over the bottom of the bowl. Don’t
exceed 45oz of fresh fries or 45oz of frozen fries.
4. Add the recommended quantity of oil to the fries using the cooking oil measure.
Spread the oil evenly over the fries. Please refer to our cooking popular, convenience
and frozen foods guide on page 13-15.
5. Close the lid and plug your Air Fryer into a suitable mains supply and switch the
socket on. Your Air Fryer will beep, the display will light up blue and after a second or
two will show 00.
6. Use the + button to enter the desired cooking time in minutes. If you keep your nger
on the + button, the time will increase quickly. When you are near the desired time,
make single presses of the button. If you overshoot the desired time, use the – button
to adjust the time.
Next, pull the tilt mechanism lock outwards and tilt your Air Fryer forwards. Release
the tilt lock to lock your Air Fryer in the fully tilted position. When in the correct
position, the Tilt icon will show in the window of the tilt lock.
7. Press the dual heat mode ( ) button to start cooking. The display will turn orange,
the heater will illuminate and the fan will start. The timer will start to count down in
minutes until 1 minute remains when it will count down in seconds.
8. When the cooking time has ended, your Air Fryer will beep and the heater will turn off.
Notes
The cooking time can be adjusted up or down during cooking using the + or – buttons.
During cooking, you may open the lid if required. First, set your Air Fryer to the level
position then press the lid release button. Opening the lid will switch off the heater and
the fan, and the timer will stop counting down. To restart cooking, close the lid then return
your fryer to the tilted position. Cooking will resume when you close the lid and the timer
will continue to count down.
During cooking, the heater will switch on and off from time to time. This is normal and
allows your Air Fryer to maintain an even cooking temperature.
You can cancel cooking at any time by pressing and holding either the dual heat mode
button or the grill mode button. Your Air Fryer will beep, the display will return to
00 and cooking will be cancelled.

11
10
other cooking methods
Grilling
Your Air Fryer comes complete with a dishwasher safe rack suitable for grilling and
other types of cooking. Foods can also be cooked directly in the removable bowl. Use
whichever method gives you the best results.
1. Press the release button and open the lid. Place the rack into the inner bowl. For
best results lightly oil the rack before use.
2. Place the food on the rack (if you are using it). Select the cooking time, then the grill
function. The rack and food will rotate during cooking so make sure that the food
will not touch any part of the heater/fan assembly or other part of the lid when it is
closed.
3. If required, add oil evenly over the food.
4. Close the lid and plug your Air Fryer into a suitable mains supply and switch the
socket on. Your Air Fryer will beep, the display will light up blue and after a second or
two will show 00.
5. Use the + button to enter the desired cooking time in minutes. If you keep your
nger on the + button, the time will increase quickly. When you are near the desired
time, make single presses of the button. If you overshoot the desired time, use the
– button to adjust the time.
When grilling, your Air Fryer should be in the level position (the Level icon will show in
the window of the tilt lock).
6. Press the grill mode button to start cooking. The display will turn orange, the
heater will illuminate and the fan will start. The timer will start to count down in
minutes until 1 minute remains when it will count down in seconds.
7. When the cooking time has ended, your Air Fryer will beep and the heater will turn
off.
Notes
This product has been designed to cook foods in a healthier way. We do not recommend
that you use your Air Fryer to cook foods which are very fatty e.g. chicken portions (with
the skin on), lamb chops, sausages or other fatty cuts of meat.
Dual Heat cooking mode without tilting
To tilt or not to tilt....
Your Air Fryer can be used to cook the foods and recipes that you would normally cook
in a standard oven or saucepan. However, when your Air Fryer is tilted, the food inside is
‘tumbled’ which may damage fragile foods such as salmon, jacket potatoes, fairy cakes,
etc. You can use the dual heat mode cooking method without setting your Air Fryer into
the fully tilted position. The recipes in these instructions will give you more details on
which method is best.

13
12
Using your Air Fryer to cook food will help you to reduce the amount of oil needed in
some recipes, which may benet your diet.
The table below lists some of the more widely available, popular oils. All of them can be
used in your Air Fryer. However, for best results, we recommend Vegetable or Rapeseed
oil.
Oil Type Use
Vegetable oil Shallow, deep and stir frying.
Rapeseed oil (often called vegetable oil) Shallow, deep and stir frying.
Corn oil Shallow, deep and stir frying.
Sunower oil Shallow, deep and stir frying.
Olive oil Shallow and stir frying. Marinades,
dressings, drizzling.
Sesame oil Shallow, deep and stir frying. Marinades,
drizzling.
Peanut oil (often called ground nut oil) Shallow and stir frying. Dressings. Adds a
nutty avour.
Grape Seed oil Shallow, deep and stir frying.
• You can also use low calorie cooking spray in your Air Fryer.
• Always ensure that the ingredients are evenly coated with oil.
guide to oils and fats cooking popular, convenience and frozen foods
Food
Cooking
Time
(mins)
Notes
Roasting
rack
GRILL
Mode
DUAL
HEAT
Mode
Tilted
(1)
Oil
45oz fresh
fries
40 Wash and pat dry
-
- YES YES 1
35oz fresh
fries
35-40 Wash and pat dry
-
- YES YES ½
28oz fresh
fries
25-30 Wash and pat dry
-
- YES YES ½
20oz fresh
fries
25-30 Wash and pat dry
-
- YES YES ¼ - ½
8/10oz fresh
fries
18-20 Wash and pat dry
-
- YES YES ¼
45oz fresh
fries
35-40 Wash and pat dry
-
- YES YES ½
45oz frozen
fries
25-35 -
-
- YES YES -
20oz frozen
fries
15-20 -
-
- YES YES -
8/10oz frozen
fries
12-15 -
-
- YES YES -
8oz jacket
potato
60
Prick with a fork and
lightly rub with oil
-
- YES NO -
Salmon llet 15-20 Lightly oil grill rack
YES
YES - NO -
Boneless,
skinless
chicken llet
15-20
Lightly oil grill rack. Turn
once.
YES
YES - NO -
Sirloin steak
8-10
(2)
10-12
(3)
15-20
(4)
Lightly oil grill rack. Turn
once.
YES
YES - NO -
Premium
(5)
Sausages
10-12
(6)
Turn once.
YES
YES - NO -
The following table provides basic cooking guidelines for popular, convenience and frozen
foods. Please note that due to the variations in thickness and size of the foods being cooked
some experimentation may be required for the best cooking results. Always ensure that the
food is thoroughly cooked and piping hot throughout before consuming.
When cooking fresh fries, we’ve kept the oil quantites as low as possible for the healthiest
results. However, if you feel the fries are a little pale and require further browning, increase the
quantity of oil slightly.
Note: For crispier results it is recommended to use the roasting rack in the level/at position.

15
14
Food
Cooking
Time
(mins)
Notes
Roasting
rack
GRILL
Mode
DUAL
HEAT
Mode
Tilted
(1)
Oil
Bacon 12-15 Turn once.
YES
YES - NO -
Cheese on
toast
5-7
Toast the bread in a
toaster rst.
YES
YES - NO -
Fish ngers 10-12
Lightly oil grill rack. Turn
once.
YES
YES - NO -
Frozen pizza 10-12 Cut into slices to t rack.
YES
YES - NO -
Individual
frozen pies
25-30
Place directly into the
inner bowl
-
- YES NO -
Fresh garlic
baguette
8-10
Cut in half. Place directly
into the inner bowl.
-
- YES NO -
Large chicken
breast
nuggets 10oz
15-20
Place directly into the
inner bowl.
NO
- YES NO -
Small chicken
nuggets 18oz
15
Place directly into the
inner bowl.
NO
- YES NO -
Frozen
Southern
fried coated
chicken wings
2.2lb.
20-25
Place directly into the
inner bowl, turn half way
through.
NO
- YES NO -
Frozen Hot
and Spicy
coated
chicken wings
18oz
20
Place directly into the
inner bowl.
NO
- YES NO -
Fresh Raw
Chicken
drumsticks,
31oz
35
Place directly into the
inner bowl, turn half way
through
NO
- YES NO -
Frozen
Calamari
18oz
20
Place directly into the
inner bowl. Turn half way
through
NO
- YES NO -
Frozen
Breaded
shrimps 15oz
15-20
Place directly into the
inner bowl.
NO
- YES NO -
Frozen
Coated onion
rings 10oz
15
Place directly into the
inner bowl.
NO
- YES NO -
Food
Cooking
Time
(mins)
Notes
Roasting
rack
GRILL
Mode
DUAL
HEAT
Mode
Tilted
(1)
Oil
Frozen
Cheese sticks
10oz
10
Space out evenly on the
rack
YES
- YES NO -
Frozen Hash
Browns
10-15
Place evenly into the
inner bowl
NO
- YES NO -
Fresh Beef
Steak, Sirloin
10oz
12 mins,
medium
rare
Lightly oil the rack,
season the steak.
YES
YES - NO -
Food
Cooking
Time
(mins)
Notes
Roasting
rack
GRILL
Mode
DUAL
HEAT
Mode
Tilted
(1)
Oil
Fresh
Mushrooms,
cut into
quarters, 18oz
10
Place directly into the
inner bowl, season.
NO
- YES YES -
Fresh
Asparagus,
snap off
woody ends,
21.8oz
8-10
Place onto the rack,
drizzle with the olive oil,
season
YES
YES NO NO -
Fresh Zucchini
cut into slices.
8.8oz
8-10
Place directly into the
inner bowl, drizzle with
the olive oil, season
NO
- YES YES
½
optional
Fresh
Tomatoes, cut
into quarters
28oz
12-15
Place directly into the
inner bowl, season.
NO
- YES NO -
(1) Shows whether to place your Air Fryer in the fully tilted position (YES) or in the level
position (NO).
(2) Cooked rare
(3) Cooked medium rare
(4) Cooked well done
(5) E.g. high meat content
(6) Depending on thickness
Vegetables

17
16
recipes
General
For a guide to cooking popular, convenience and frozen foods, see page 13-15.
When necessary, this symbol will show you how much oil to add using the supplied
oil measure.
This symbol indicates that the recipe is suitable for vegetarians.
Cooking methods used in these recipes.
Dual Heat mode with Fan
Recipes marked with the icon use the dual heat mode feature of your Air Fryer. Dual
heat mode cooking uses an additional heating element placed below the bowl along with
the top heating element and fan above the bowl to ensure efcient, even heat distribution.
1. Set the timer according to the recipe.
2. Set your Air Fryer into the TILTED or LEVEL position according to the recipe. To tilt
your Air Fryer, pull the tilt mechanism lock outwards and tilt your Air Fryer forwards.
Release the tilt mechanism lock to hold your Air Fryer in the fully tilted position.
When in the tilted position, the Tilt icon will show in the window of the tilt lock. Many
recipes will use dual heat mode with your Air Fryer in the level position. When in the
level position, the Level icon will show in the window of the tilt lock.
3. Press the dual heat mode ( ) button to start cooking.
4. Once cooking has nished, if your Air Fryer is in the tilted position, release the tilt
mechanism lock and return the unit to the level position. Use the clip-on handle to
remove the inner bowl.
Grill mode with Fan
Recipes marked with the icon use the grill mode feature of your Air Fryer. Grill mode
cooking uses the top heating element and fan only.
1. Set the timer according to the recipe.
2. Make sure that your Air Fryer is in the LEVEL position. When in the correct level
position, the Level icon will show in the window of the tilt lock.
3. Press the GRILL mode ( ) button to start cooking.
4. Once cooking has nished, remove the inner bowl using the clip-on handle.
care and cleaning
Always unplug your Air Fryer and allow it to cool completely before cleaning it.
NEVER immerse the MAIN body, power cord or plug in water or any other liquid.
Never use harsh abrasive cleaners or cleaning materials.
• Carefully wipe any oil spatter from the heater/fan assembly cover with kitchen paper.
Wipe over the outer body and lid with a clean, slightly damp cloth and dry.
• Wash the removable clear lid, roasting rack, cooking oil measure, inner bowl, drip tray
and bowl handle warm soapy water using a cloth, sponge or brush. Dry completely
before use or storage. The roasting rack, cooking oil measure, drip tray and inner
bowl may be washed in a dishwasher.
To remove the clear lid:
1. Press the two lid release buttons (one on each side).
2. Lift off the clear lid.
3. To ret the lid, position the lid over the tongue on the top of the body as shown then
pivot the lid into place until the locks on each side click.
This appliance has no user serviceable parts. Any servicing beyond that described in the
Cleaning Section should be performed by an Authorized Service Representative only.
See Warranty Section.

19
18
Perfect Roasted New Potatoes (serves 4)
• 28oz new potatoes, halved but with the skins still on
• 1 of olive oil
• Salt and Pepper
1. Place the new potatoes into the bowl and drizzle over the oil. Season.
2. Set the timer for 35 to 40 minutes and cook on the dual heat mode setting with your
Air Fryer in the Tilt position until they are golden and crisp.
Cheesy Nacho’s with Spicy Tomato Salsa
• 1 large bag of plain nachos
• 3.5oz of cheddar cheese
• ½ green chill, deseeded and sliced
• Sour cream, salsa and Guacamole to serve
1. Evenly scatter the nachos over the bottom of the inner bowl.
2. Sprinkle the nachos with cheese and the green chilli
3. Set the timer for 5 minutes and cook on the dual heat mode setting with your Air Fryer
in the Level position until the cheese has melted.
4. Serve the nachos topped with the spicy tomato salsa, sour cream and guacamole.
Stuffed Jacket Potatoes with Sweetcorn and Peppers
(serves 4)
• 2 medium jacket potatoes, cleaned with the skins still on
• 1.8oz strong cheddar cheese, grated
• 1.8oz sweetcorn
• 1.8oz nely diced mixed peppers
• 0.5oz butter or low-fat spread
• Salt and Pepper
• Small handful of fresh herbs, such as basil or thyme.
1. Prick the potatoes all over and rub them with a little oil to coat.
2. Set the timer for 55-60 minutes and cook on the dual heat mode setting with your Air
Fryer in the Level position until the potatoes are soft when they are squeezed.
3. Carefully slice the cooked potatoes in half lengthways. Wear oven gloves and be
careful not to tear the skin.
4. Remove the potato from the skins using a spoon and add to a large mixing bowl. Set
the potato skins to one side.
5. Add the butter, sweetcorn, peppers, herbs and ¾ of the cheese to the mixing bowl.
Use a fork to combine the mixture then season.
6. Spoon the mixture back into the potato skins and sprinkle with the remaining cheese
7. Gently place the potatoes back into the bowl and cook for a further 15 minutes on the
dual heat mode setting with your Air Fryer in the Level position until the cheese turns
crispy and golden.
Delicious served with a fresh, crispy salad and coleslaw.
recipes - side dishes and snacks
Perfect Homemade Fries (serves 4)
• 28oz of potatoes
• ½ of vegetable oil
• Salt to serve
1. Peel the potatoes and chip them into approximately 11-13 mm wide fries with a sharp
knife.
2. Rinse them twice to remove the starch and completely cover them with water until you
are ready to cook them.
3. When you are ready to cook them, drain the fries and pat them dry to remove the
excess moisture.
4. Place the fries into the inner bowl and drizzle with the vegetable oil.
5. Set the timer for 25 to 30 minutes and cook on the dual heat mode setting with your
Air Fryer in the Tilt position until they are golden and crisp.
6. Sprinkle the fries with salt if required and serve hot.
Cajun-Style Potatoes (serves 4)
• 28oz of small potatoes, skins left on but well washed
• 1 of olive oil
• 1 clove garlic, chopped
• 1 of Cajun spices
• Salt and freshly ground black pepper
1. Cut the potatoes into halves, using a sharp knife. Rinse them twice to remove the
starch then completely cover with water until you are ready to cook them.
2. When you are ready to cook them, drain and pat the potatoes dry with kitchen paper.
3. Coat them with the oil, Cajun spices and the chopped garlic.
4. Set the timer for 35 to 40 minutes and cook on the dual heat mode setting with your
Air Fryer in the Tilt position until they are golden and crisp.

21
20
recipes - side dishes and snacks
Stuffed Jacket Potatoes with Antipasto and Pancetta
(serves 4)
• 2 medium jacket potatoes, cleaned with the skins still on
• 2oz soft cheese avoured with garlic and herbs
• 0.3oz grated parmesan
• 1 chargrilled pepper nely sliced (these can be bought ready cooked in jars)
• 3 pancetta rashers, cooked until crisp, crumbled
• Salt and pepper
• Pesto (optional)
1. Prick the potatoes all over and rub them with a little oil to coat.
2. Set the timer for 55-60 minutes and cook on the dual heat mode setting with your Air
Fryer in the Level position until the potatoes are soft when they are squeezed.
3. Carefully slice the cooked potatoes in half lengthways. Wear oven gloves and be
careful not to tear the skin.
4. Remove the potato from the skins using a spoon and add to a large mixing bowl. Set
the potato skins to one side.
5. Using a fork break down the potato adding the soft cheese, chargrilled pepper,
pancetta and seasoning.
6. Spoon the mixture back into the potato skins and sprinkle with the remaining cheese
7. Top with the grated parmesan and cook for a further 15 minutes on the dual heat
mode setting with your Air Fryer in the Level position until golden and piping hot.
Serve drizzled with pesto (optional).
Roasted Mediterranean Vegetables (serves 4)
• 1 small aubergine, diced
• 2 courgettes, thickly sliced or diced
• 1 medium carrot, diced
• 1 large red onions, cut into chunks
• 1 red pepper, diced
• 3.5oz button mushrooms, wiped
• 1 tsp dried mixed herbs
• 1 large clove garlic, nely chopped
• ½ of honey
• 1 of olive oil
• Salt and pepper
1. Place the vegetables into the inner bowl along with the garlic and herbs. Drizzle over
the oil and honey.
2. Set the timer for 25-30 minutes and cook on the dual heat mode setting with your Air
Fryer in the Tilt position.
Delicious served with some oven baked sh or our Parmesan Crusted Salmon.
Roasted Root Vegetables (serves 4)
Perfect as an accompaniment to your Sunday roast The vegetables should be cut to a
similar size. For those vegetables where only half is required, why not use up the extra
half in a tasty homemade soup.
• 2 medium carrots, peeled, halved lengthways and cut into chunks
• 2 parsnips, peeled, halved lengthways and cut into chunks
• ½ small butternut squash, de-seeded, peeled and cut to a similar size as above
• ½ small celeriac, peeled and cut as above
• 1 tsp cumin seeds, ground
• 1 tsp ground coriander
• 1 of vegetable oil
• Salt and pepper
1. Place the vegetables into the inner bowl and drizzle with the oil. Add the spices, salt
and pepper and stir well to combine.
2. Set the timer for 30-35 minutes and cook on the dual heat mode setting with your Air
Fryer in the Tilt position.
Serve with your favourite roast meat or grilled chicken for an alternative to your usual
vegetables.
For an extra spicy twist, drizzle with a little runny honey and a scattering of dried
crushed chilli.

23
22
Breaded Haddock Goujons with Lemon Mayonnaise
(serves 3-4)
• 3 boned haddock llets, skins removed
• 7oz white bread crumbs
• 2.6oz plain our
• Salt and freshly ground pepper
• 2 eggs, beaten
• 2 tbsp of fresh chopped parsley
• 1 of sunower oil
• 300ml mayonnaise
• 3 tsp of lemon juice
• 2 tsp of nely grated lemon zest
• 1 clove garlic, crushed
1. Using a sharp knife, carefully slice the haddock llets into 2cm wide strips.
2. Place the bread crumbs, eggs and our separately into individual dishes, season the
our and sprinkle the bread crumbs with the herbs.
3. Place the haddock goujons into the our dish and toss until coated, shake off the
excess our and then dip them into the beaten egg. Next, toss the goujons in the
bread crumbs until completely coated.
4. Flatten the goujons carefully on a at surface using the palm of your hand.
5. Place the goujons into the bowl and drizzle over the oil. Cook on the dual heat mode
setting for 15-20 minutes with your Air Fryer in the Level position. Turn the goujons
half way through cooking.
6. To make the lemon mayonnaise, mix the mayonnaise with the lemon juice, lemon zest
and garlic. Spoon into a suitable serving dish.
Serve the goujons with the mayonnaise dip and a salad of your choice.
Baked Salmon with a Parmesan Crust (serves 2)
• 2 salmon llets, boned
• 2 slices of bread, 1 or 2 days old is the best
• 1 cloves of garlic
• 1.7oz parmesan cheese
• 0.7oz soft spread (low-fat margarine, etc.)
• 1 tbsp of fresh basil
• 1 tbsp of fresh parsley
• Salt and freshly ground black pepper
1. Insert the roasting rack into your Air Fryer. Lightly oil the rack.
2. Place the bread, garlic, parmesan cheese and herbs into a food processor or mini
chopper and process into a ne bread crumb consistency. Rub or pulse in the soft
spread, season.
3. Place the salmon llets onto the grill rack, skin side down, and lightly brush with olive
oil.
4. Set the timer for 10-15 minutes (depending on the thickness of the llets) and cook on
the dual heat mode setting with your Air Fryer in the Level position.
5. Open the lid and cover the top of each salmon llet with the bread crumb mixture.
6. Set the timer for 5-10 minutes and cook on the dual heat mode setting with your Air
Fryer in the Level position until the topping is golden.
Delicious served with our Roasted Mediterranean Vegetable recipe
recipes - fish and seafood dishes

25
24
recipes - chicken dishes
Prosciutto Wrapped Chicken (serves 2)
• 2 chicken breasts, skin removed
• Zest of one lemon
• 4-6 slices of prosciutto
• 1tsp fresh thyme
• ½ garlic clove, nely chopped
• Olive oil
1. Insert the roasting rack into your Air Fryer. Lightly oil the rack.
2. Place each chicken breast between cling lm and use a rolling pin to gently beat the
breast until it is evenly attened to about 2cm thick.
3. Remove the attened chicken breast from cling lm and drizzle with a little olive oil.
Sprinkle with the garlic, lemon zest and a pinch of the fresh thyme.
4. Wrap the prosciutto carefully around the breast so that the join is underneath and the
whole breast is wrapped in the ham.
5. Lightly oil the chicken and carefully place it onto the rack with the join of the ham on
the underside.
6. Set the timer for 20-25minutes and cook on the dual heat mode setting with your
Air Fryer in the Level position. Carefully turn the chicken over half way through the
cooking cycle.
Delicious served sliced on the diagonal with some freshly cooked pasta drizzled with
pesto. Garnish with torn basil leaves and ground black pepper.
Thai Green Chicken Curry (serves 4)
• 1 small onion, thinly sliced
• 1 stalk lemongrass
• 3-4 tsp Green Thai curry paste
• 3 boneless and skinless chicken breasts, cut into bite-size pieces
• 1 tbsp sh sauce
• 1 tsp brown sugar
• 4 freeze-dried Kafr lime leaves (optional)*
• 400ml can coconut milk
• 20g pack fresh coriander
• ½ of vegetable oil
*Kafr lime leaves are now widely available in most good supermarkets.
1. Very nely slice the lemongrass, starting at the thinner end and stopping towards the
base when it gets tough (often described as ‘woody’ and white in the centre).
2. Place the sliced onion and chopped lemongrass in the inner bowl. Drizzle with the
vegetable oil. Set the timer for 5 minutes and cook on the dual heat mode setting
with your Air Fryer in the Tilt position until the onions begin to soften. Add the chicken
pieces and the Thai paste and cook for a further 5-6 minutes.
3. Place your Air Fryer into the Level position. Add the sh sauce, sugar, kafr lime
leaves and coconut milk and carry on cooking for a further 15 minutes until the
chicken is cooked through. Open the lid and stir occasionally.
4. While the chicken is cooking, strip the leaves from the coriander stalks, gather into a
pile and roughly chop. Taste the curry and adjust the seasoning. Stir half the coriander
into the curry and sprinkle the rest over the top.
Delicious served with Thai, jasmine or basmati rice.

27
26
Creamy Chicken Korma (serves 4)
• 3 chicken breasts, cubed
• ½ of olive oil
• 1 onion, nely chopped
• 2 cloves of garlic, nely chopped
• 1cm piece of ginger, nely chopped
• ½ of Garam Masala
• 200ml chicken stock
• 100ml coconut milk
• 1 heaped of toasted sliced almonds
• Chopped fresh coriander
1. Place the chicken pieces into the inner bowl and drizzle with the olive oil.
2. Set the timer for 35 minutes and cook on the dual heat mode setting with your Air
Fryer in the Tilt position.
3. After approx 10 minutes, add the onion, garlic, ginger and garam masala and cook for
a further 10 minutes. Stir halfway through.
4. Place your Air Fryer into the Level position. Add the stock, coconut milk and almonds,
stir well and continue to cook for the remainder of the time, occasionally stir.
5. Sprinkle with the coriander and serve with steamed rice and warm Naan bread.
recipes - chicken dishes
recipes - beef and lamb dishes
Creamy Steak Stroganoff (serves 4)
• 1 of olive oil
• 1 lb of lean frying steak thinly cut into strips,
• 1 onion, nely diced
• 1 clove of garlic, nely chopped
• 3.5oz button mushrooms, nely sliced
• 1 brandy
• ½ of Worcestershire sauce
• 150ml hot beef stock
• ½ of Dijon mustard
• ½ of freshly chopped parsley
• 1.5oz plain our
• 110ml soured cream
1. Set the timer for 35 minutes.
2. Place the steak strips into the inner bowl, drizzle with the oil and cook on the dual
heat mode setting for 10 minutes with your Air Fryer in the Tilt position.
3. Add the onions, garlic and mushrooms, stir and cook for a further 10 minutes.
4. Add the brandy, stir and allow to cook for a further few minutes until bubbling away.
5. Place your Air Fryer into the Level position. Sprinkle the our over the mixture then
add the mustard, Worcestershire sauce and stock and stir to combine.
6. Allow to cook for the remainder of the cooking time (approx. 10 minutes).
7. Season if required, then stir in the cream.
Serve with freshly cooked pasta or creamy mashed potato.

29
28
Beef and Caramelized Red Onion Burgers (makes 4)
• 1lb of good quality minced beef
• 1 small red onion, nely chopped
• 1 tsp of brown sugar
• 1 tsp of dried mixed herbs
• 1 egg, beaten
• Handful of coriander leaves, chopped
To serve: Bread rolls, cheese slices, sliced tomatoes, lettuce and ketchup
1. In a frying pan gently sauté the chopped red onion on a low/medium heat with the
olive oil and brown sugar for 5 minutes. Remove from the heat and set aside to cool.
2. Work the mince together in a bowl with the caramelized onions and the beaten egg.
You want to combine the mixture so that all the ingredients are mixed but don’t make
it too mushy and soft.
3. Stir in the chopped coriander and the dried herbs. Season to taste.
4. Take a handful of the mixture and form it into a burger shape. The mixture should
make about 4 burgers. The thicker they are, the longer they will take to cook through.
5. Lay each burger on a board that has been covered in cling lm and then cover them.
6. Put them in the fridge to chill for approximately 1 hour. This will help them to maintain
their shape while cooking.
7. When you are ready to cook the burgers, place them onto the lightly oiled roasting
rack.
8. Cook for 15-20 minutes on the grill mode setting with your Air Fryer in the Level
position carefully turning them over half way through the cooking cycle.
Serve the burgers on the bread rolls with cheese, tomato, lettuce and ketchup.
Spicy Lamb Burgers (makes 4)
• 1lb of lean lamb mince
• ½ red onion, nely chopped
• 1 egg, beaten
• 1 tablespoon of mango chutney
• Handful of fresh coriander leaves, chopped
• ½ red chilli, deseeded and chopped
• 1 garlic clove, crushed
• ½ tsp of cumin
• ½ tsp of ground coriander
To serve
• 4 mini Ciabattas
• Mint, chopped
• Thick greek yogurt
• 1 cucumber, nely chopped
1. In a frying pan, gently sauté the chopped red onion on a low/medium heat with a
splash of vegetable oil until softened. Set aside to cool.
2. In a bowl work together the lamb mince with the beaten egg.
3. Stir in the cooked onion, mango chutney, coriander leaves, chilli, garlic and the spices.
4. Work the mixture together using your hands then pat the mixture into burger shapes.
5. Place them on a cling lm lined tray and cover. Chill them in the fridge for about 1
hour.
6. Lightly oil the roasting rack. Place the burgers onto the rack and brush with olive oil.
7. Cook for 15-20 minutes on the grill mode setting with your Air Fryer in the Level
position carefully turning them over half way through the cooking cycle. Check that the
burgers are thoroughly cooked through.
8. In a separate bowl, mix together the Greek yogurt, chopped cucumber and the mint.
9. Place the ciabatta under a grill for 1-2 minutes until it is lightly toasted. Serve the lamb
burgers on the Ciabatta topped with the lettuce and yogurt dressing.
recipes - beef and lamb dishes

31
30
Vegetable Burgers (makes 4)
• 1lb canned chickpeas, drained and rinsed
• 1 medium onion, grated
• 1 medium carrot, grated
• 1 red chilli, nely chopped
• 5cm (2 inch) piece fresh ginger, grated
• bunch fresh coriander, roughly chopped
• 1 medium egg, beaten
• 2 tbsp fresh breadcrumbs
• Vegetable oil
• 4 burger buns
To serve
• tomato ketchup, mustard, fried onions and coleslaw
1. In a large bowl, mash the chickpeas with a fork until smooth (or process using a hand
blender). Add the onion, carrot, chilli, ginger and chopped coriander and mix together
well until combined. If you are using a hand blender, a few pulses combines this
mixture perfectly.
2. Add the beaten egg and breadcrumbs and mix together well. Season with a little salt
and pepper to taste.
3. Divide the mixture equally into four portions. Roll each portion into balls about the size
of a tennis ball. Flatten slightly into patties about 2cm thick using the palms of your
hands. Make sure all the burgers are the same thickness.
4. Transfer the burgers to a plate, cover with cling lm and chill in the fridge for 30-60
minutes.
5. Lightly brush the roasting rack with vegetable oil and carefully place the burgers on
top. Brush the burgers with a little vegetable oil then cook on the grill mode setting
with your Air Fryer in the Level position for about 15 minutes carefully turning half way
through cooking.
6. To serve, slice the buns in half and place one burger inside each. Top with your choice
of accompaniment.
recipes - vegetable dishes
recipes - vegetable dishes
Goat Cheese Stuffed Mushrooms (serves 4)
• 4 large at mushrooms
• 1½ of olive oil
• 1 red onion, nely chopped and lightly cooked till softened
• 6 tablespoons of white bread crumbs
• 1 clove of garlic, crushed
• 2.7oz of goat’s cheese, crumbled
• 1 tbsp toasted pine nuts
• 1 tbsp freshly chopped parsley
• Freshly ground black pepper
1. In a bowl, mix together half of the oil with the onions, bread crumbs, parsley, garlic,
pine nuts, crumbled goat’s cheese and some freshly ground pepper.
2. Place the mushrooms upside down onto the lightly oiled roasting rack and spoon the
goat’s cheese mixture into them. Drizzle with the remaining oil and cook for approx
15-20 minutes on the dual heat mode setting with your Air Fryer in the Level position.

33
32
recipes - desserts
Individual Cupcakes (makes 8 cooked in 2 batches)
• 3.5oz softened butter or margarine
• 3.5oz caster sugar
• 2 eggs
• Few drops of vanilla essence
• 3.5oz self raising our
• ½ tsp baking powder
1. Place all the ingredients into a bowl and use a hand mixer to whisk all the ingredients
together until a light creamy mixture is achieved.
2. Fill 6-8 silicone cupcake moulds half full with the cake mixture.
3. Place the cakes inside the inner bowl and close the lid. Set the timer for 11 minutes
and cook on the dual heat mode setting with your Air Fryer in the Level position.
4. Once cooked, carefully remove the inner bowl and place it onto a roasting rack to
cool.
5. After 5 minutes remove the cakes from the inner bowl and cool them for a further 15
minutes on the roasting rack before decorating.
Tip: To stop your cakes from sliding around the inner bowl, cut out a piece of foil roughly
the same size as the bowl. Make a slit in the centre and slide the foil over the inner bowl’s
central shaft. Sit your cakes on top of the foil and this will stop them sliding about.
Warm Tropical Fruit Salad
• 100ml of tropical juice
• 1oz of golden caster sugar
• 1 teaspoon of vanilla extract
• 1 orange, zested
• 2 passion fruits (pulp and seeds)
• 1 ripe mango, peeled and de-stoned
• 1 pineapple, prepared
• 1 kiwi, peeled, cut into chunks
• 2 ripe peaches or nectarines, de-stoned
1. Have a bowl of iced water ready.
2. Heat the tropical juice, sugar, vanilla, orange zest and passion fruit until the sugar has
dissolved in a small pan on a low to medium heat. Quickly place the pan into the cold
water so that the mixture forms a syrup.
3. Cut the prepared fruit into slices. It is attractive to cut the pineapple into rings, the
peaches or nectarines into segments and the mango into wedges but you can prepare
the fruit any way you like.
4. Place the fruit in the bowl and coat it with the syrup. Cook for approximately 5-8
minutes on the dual heat mode setting with your Air Fryer in the Level position until
softened and juicy.
Delicious served warm over pancakes with ice cream.
Baked Peaches With Amaretti Biscuits (serves 2)
if you have a food processor, why not use this to chop up your biscuits and nuts!
• 1.5oz toasted hazelnuts, roughly chopped
• 1.5oz amaretti biscuits, crushed
• 0.8oz unsalted butter, room temperature (soft spread can also be used as a
substitute)
• 15g caster sugar
• 1 free-range egg yolk
• ½ lemon, juice only
• 2 ripe peaches or nectarines
• 1 tsp lemon zest
• 2 tbsp thick cream
• 2 sprigs fresh mint (optional)
• Icing sugar (optional)
• Raspberries (optional)
1. Mix the hazelnuts, biscuits, butter, sugar, and egg yolk in a bowl until the ingredients
hold together as a rough paste.
2. Cut each peach in half, remove the stone and pack a rounded spoonful of the lling
onto each half. This should ll the cavity in the peach and cover most of the exposed
half of the fruit.
3. Place the halves onto the lightly oiled roasting rack. Cook for about 10-15 minutes on
the dual heat mode setting with your Air Fryer in the Level position until cooked (the
cooking time will depend on the ripeness of the fruit).
4. To serve, place the baked peaches on to serving plates, and place a large dollop
of the thick cream alongside it. Optionally, garnish with mint and a handful of fresh
raspberries and dust with icing sugar.
recipes - desserts

35
34
guarantee
Sunbeam Products, Inc. or if in Canada, Sunbeam Corporation (Canada) Limited (collective-
ly “Sunbeam”) warrants that for a period of one year from the date of purchase, this product
will be free from defects in material and workmanship. Sunbeam, at its option, will repair or
replace this product or any component of the product found to be defective during the warran-
ty period. Replacement will be made with a new or remanufactured product or component. If
the product is no longer available, replacement may be made with a similar product of equal
or greater value. This is your exclusive warranty. Do NOT attempt to repair or adjust any
electrical or mechanical functions on this product. Doing so will void this warranty.
This warranty is valid for the original retail purchaser from the date of initial retail purchase
and is not transferable. Keep the original sales receipt. Proof of purchase is required to obtain
warranty performance. Sunbeam dealers, service centers, or retail stores selling Sunbeam
products do not have the right to alter, modify or any way change the terms and conditions
of this warranty.
This warranty does not cover normal wear of parts or damage resulting from any of the
following: negligent use or misuse of the product, use on improper voltage or current, use
contrary to the operating instructions, disassembly, repair or alteration by anyone other than
Sunbeam or an authorized Sunbeam service center. Further, the warranty does not cover:
Acts of God, such as re, ood, hurricanes and tornadoes.
What are the limits on Sunbeam’s Liability?
Sunbeam shall not be liable for any incidental or consequential damages caused by the
breach of any express, implied or statutory warranty or condition.
Except to the extent prohibited by applicable law, any implied warranty or condition of mer-
chantability or tness for a particular purpose is limited in duration to the duration of the above
warranty.
Sunbeam disclaims all other warranties, conditions or representations, express, implied, stat-
utory or otherwise.
Sunbeam shall not be liable for any damages of any kind resulting from the purchase, use or
misuse of, or inability to use the product including incidental, special, consequential or similar
damages or loss of prots, or for any breach of contract, fundamental or otherwise, or for any
claim brought against purchaser by any other party.
Some provinces, states or jurisdictions do not allow the exclusion or limitation of incidental
or consequential damages or limitations on how long an implied warranty lasts, so the above
limitations or exclusion may not apply to you.
This warranty gives you specic legal rights, and you may also have other rights that vary
from province to province, state to state or jurisdiction to jurisdiction.
How to Obtain Warranty Service
In the U.S.A.
If you have any question regarding this warranty or would like to obtain warranty service,
please call 1-800-334-0759 and a convenient service center address will be provided to you.
In Canada
If you have any question regarding this warranty or would like to obtain warranty service,
please call 1-800-667-8623 and a convenient service center address will be provided to you.
In the U.S.A., this warranty is offered by Sunbeam Products, Inc. located in Boca Raton, Florida
33431. In Canada, this warranty is offered by Sunbeam Corporation (Canada) Limited, located
at 20 B Hereford Street, Brampton, Ontario L6Y 0M1. If you have any other problem or claim in
connection with this product, please write our Consumer Service Department.
PLEASE DO NOT RETURN THIS PRODUCT TO ANY OF
THESE ADDRESSES OR TO THE PLACE OF PURCHASE.

37
36
CUANDO SE UTILIZAN APARATOS ELÉCTRICOS, SIEMPRE SE DEBEN
SEGUIR PRECAUCIONES BÁSICAS DE SEGURIDAD, INCLUYENDO LAS
SIGUIENTES:
1. Lea todas las instrucciones antes de utilizar este producto.
2. No toque las supercies calientes, utilice las asas.
3. A n de protegerse contra una descarga eléctrica, no sumerja el control de
temperatura, el cable ni el enchufe en agua ni en ningún otro líquido.
4. Este producto no debe ser utilizado por los niños ni por personas con su capacidad
física, mental o sensorial reducida.
5. Cuando el producto es utilizado cerca de los niños, se requiere la supervisión de un
adulto. Los niños no deben jugar con el aparato.
6. Desenchufe el aparato del tomacorriente cuando no esté en uso y antes de limpiarlo.
Espere a que el aparato se enfríe antes de instalarle o retirarle piezas y antes de
limpiarlo.
7. No utilice un producto que tenga un CABLE o ENCHUFE dañado o después de
presentar un problema de funcionamiento, o que se haya dañado de manera alguna.
Devuelva el aparato al centro de servicio autorizado de Oster para que lo examinen,
reparen o ajusten.
8. El uso de accesorios no recomendados por el fabricante del producto podría
ocasionar lesiones.
9. No utilice el aparato a la intemperie.
10. No permita que el cable cuelgue del borde de la mesa o del mostrador ni que entre
en contacto con supercies calientes. No coloque sobre o cerca de una hornilla de
gas o eléctrica ni en un horno caliente.
11. Proceda con extrema precaución al mover de un lugar a otro un aparato que
contenga aceite u otros líquidos calientes.
12. No utilice el aparato para otro n que no sea para el que ha sido diseñado.
13. Tenga cuidado al abrir la tapa durante o después de un ciclo de cocción. El escape
de vapor puede causar quemaduras.
14. No use el aparato para otro uso que no sea el previsto. El mal uso puede causar
lesiones.
15. Destinado solo para el uso doméstico en encimeras. Mantenga 6 pulgadas (152 mm)
despejadas de la pared y de todos los lados. Siempre use el electrodoméstico en
una supercie seca, estable y nivelada.
16. Cuando el electrodoméstico está en la posición inclinada, la tapa no se quedará
abierta por sí misma. Siempre regrese el aparato a la posición nivelada antes de
abrir la tapa.
17. Nunca opere el producto por medio de un temporizador externo o un sistema de
control remoto por separado.
18. PRECAUCION: Mantenga el electrodoméstico y el cable lejos de los niños. Nunca
permita que el cable eléctrico cuelgue del borde del mostrador y nunca use la salida
de electricidad debajo del mostrador.
medidas de seguridad importantes
GUARDA ESTAS INSTRUCCIONES
ESTA UNIDAD ESTÁ DISEÑADA PARA
USO DOMÉSTICO ÚNICAMENTE.
Modelos Estadounidenses con enchufes polarizados:
INSTRUCCIONES DEL CABLE ELÉCTRICO:
Se proporciona un cable corto de suministro de energía o un cable de electricidad que
se desconecta para reducir los riesgos que resultan al enredarse o tropezarse con un
cable más largo. Se encuentran disponibles cordones de extensión o cables eléctricos
desmontables más largos que pueden usarse si se tiene cuidado. Si se usa un cable de
extensión o un cable de desconexión inmediata:
a. La calicación eléctrica marcada del juego de cables o del cable de extensión debe
ser al menos tan alta como la clasicación eléctrica del aparato;
b. El cable debe colocarse de modo que no cuelgue del tope o de la mesa donde los
niños puedan tirar de él o tropezarse involuntariamente; y
c. Si el electrodoméstico es de tipo con conexión a tierra, el juego de cables o el cable de
extensión deben ser un cable de 3 hilos con conexión a tierra.
No hale, ni tuerza, ni abuse del cable eléctrico.
NOTAS
1. Algunas supercies de topes y mesas no están diseñadas para soportar el calor
prolongado generado por ciertos electrodomésticos. No coloque la unidad calentada
sobre una mesa de madera. Recomendamos colocar un protector térmico o un trébede
debajo de su artefacto para evitar posibles daños a la supercie.
2. Durante el uso inicial de este aparato, puede detectarse un poco de humo y / u olor.
Esto es normal y debería desaparecer después de algunos usos.
ENCHUFE POLARIZADO
Este electrodoméstico tiene un enchufe polarizado, (un
extremo es más ancho que el otro). Como una característica
de seguridad para reducir el riesgo de descarga eléctrica, este
enchufe está diseñado para encajar en una toma polarizada de
una sola manera. Si el enchufe no encaja completamente en la
toma de corriente, invierta el enchufe. Si todavía no encaja, contacte a un electricista
calicado. No intente vencer esta característica de seguridad ni modique el enchufe
de ninguna manera. Si el enchufe se ajusta ojamente a la toma de corriente o si la
toma de corriente se siente caliente, no la use.

39
38
1. Tapa - extraíble para limpiar
2. Ensamblaje de calentamiento y ventilador
3. Botón de liberación de la tapa para limpieza (uno en cada lado)
4. Botón de bloqueo de la tapa
5. Bandeja de condensación extraíble
6. Cerradura del mecanismo de inclinación y ventana
7. Icono para posición inclinada
8. Icono para posición nivelada
9. + botón (aumentar tiempo)
10. - botón (disminuir el tiempo)
11. Pantalla
12. Botón de modo de calentamiento dual
13. Botón de asador
14. de ceramica
15. Rejilla de asar
16. Cuchara de medir aceite (aproximadamente igual a 15 ml)
17. Asa desmontable del recipiente
piezas
Debido a nuestra política de mejora continua, el producto actual puede diferir ligeramente del ilustrado en estas instrucciones.
Tilt
Level

41
40
antes del primer uso
Nunca sumerja ninguna parte externa de la Freidora de Aire, ni el cable eléctrico
ni el enchufe en agua ni en ningún otro líquido. Antes de ensamblar o desmontar
su Freidora de Aire, asegúrese de que esté desenchufada y de que todas las piezas
estén frías.
Desempaque el electrodoméstico y retire todo el embalaje, materiales promocionales y
pegatinas. Retire todos los documentos impresos. Lave el recipiente interior, la cuchara
medidora, la rejilla para asar, la bandeja de goteo y el asa del recipiente con agua
caliente y jabón. Enjuague y seque todas las partes. Limpie la parte exterior y la tapa
únicamente con un paño húmedo; consulte la página 51 para obtener instrucciones de
limpieza.
asa del recipiente
Solo use el asa para retirar el recipiente después de que la cocción haya
terminado. Recuerde que el recipiente estará muy caliente! No coloque el
recipiente sobre una supercie que pueda dañarse por el calor.
No coloque el recipiente sobre una supercie que pueda dañarse por el calor. Después
de cocinar, puede usar el asa para retirar el recipiente interno y su contenido de forma
segura.
1. Asegúrese de que los extremos del asa estén abiertos. Presione el botón en el asa
para abrir los extremos si es necesario.
2. Coloque el asa sobre el borde interno del recipiente.
3. Deslice la palanca hacia adelante. El asa agarrará el recipiente interno. Deje que la
palanca vuelva a su posición de descanso.
4. Levante el recipiente interno hacia fuera de la Freidora de Aire
5. Para liberar el recipiente, presione el botón en el asa.
6. Retire el asa del borde del recipiente.

43
42
cocinando papas fritas
ADVERTENCIA: Cuando su Freidora de Aire está en posición inclinada, la tapa
no se abrirá sola y puede cerrarse inesperadamente. Siempre regrese el aparato a
la posición nivelada antes de abrir la tapa.
Su Freidora Salu de Aire se puede utilizar para hacer papas fritas frescas o congeladas,
sin embargo, para la opción más saludable, le sugerimos que pruebe nuestras papas
fritas caseras perfectas en la página 52.
1. Presione el botón para bloquear la tapa y abra la tapa.
2. Coloque el recipiente interior sobre el eje central.
3. Agregue las papas fritas al recipiente. Distribuya las papas fritas uniformemente
sobre el fondo del recipiente. No exceda de 45 oz de papas fritas frescas o 45 oz de
papas fritas congeladas.
4. Agregue la cantidad recomendada de aceite a las papas fritas usando la medida de
aceite de cocina. Extienda el aceite uniformemente sobre las papas fritas. Consulte
nuestra guía de cocina popular, conveniente y de alimentos congelados en la página
48-50.
5. Cierre la tapa, enchufe la Freidora de Aire y enciéndala. Su Freidora de Aire emitirá
un pitido, la pantalla se iluminará en azul y después de un segundo o dos mostrará
00.
6. Use el botón + para ingresar el tiempo de cocción deseado en minutos. Si mantiene
el dedo sobre el botón +, el tiempo aumentará rápidamente. Cuando esté cerca del
tiempo deseado, presione una sola vez el botón. Si sobrepasa el tiempo deseado,
use el botón - para ajustar la hora. A continuación, hale el bloqueo del mecanismo
de inclinación hacia afuera e incline su Freidora de Aire hacia adelante. Suelte
la cerradura de inclinación para asegurar su freidora de salud en la posición
completamente inclinada. Cuando esté en la posición correcta, el Tilt icono se
mostrará en la ventana del bloqueo de inclinación.
7. Presione el botón dual heat mode (botón de calentamiento dual) ( ) para comenzar
a cocinar. La pantalla se volverá naranja, el calentador se iluminará y el ventilador
se encenderá. El temporizador comenzará la cuenta regresiva en minutos hasta que
quede 1 minuto cuando se cuente en segundos.
8. Cuando el tiempo de cocción haya terminado, su Freidora de Aire emitirá un pitido y
el calentador se apagará.
Notas
El tiempo de cocción se puede ajustar hacia arriba o hacia abajo durante la cocción con
los botones + o –.
Durante la cocción, puede abrir la tapa si es necesario. Primero, coloque su Freidora de
Aire en la posición nivelada y luego presione el botón de liberación de la tapa. Al abrir
la tapa, se apagará el calentador y el ventilador, y el temporizador dejará de contar.
Para reiniciar la cocción, cierre la tapa y luego vuelva a poner la freidora en la posición
inclinada. La cocción se reanudará cuando cierre la tapa y el temporizador continuará la
cuenta regresiva.
Durante la cocción, el calentador se encenderá y apagará de vez en cuando. Esto es
normal y le permite a su freidora mantener una temperatura de cocción uniforme.
Puede cancelar la cocción en cualquier momento presionando y manteniendo presionado
el botón de modo de calentamiento dual o el botón de asar. Su Freidora de Aire
emitirá un pitido, la pantalla regresará a 00 y se cancelará la cocción.

45
44
otros métodos de cocción
1. Presione el botón de liberación y abra la tapa. Coloque la rejilla en el recipiente
interior. Para obtener los mejores resultados, lubrique ligeramente la rejilla antes de
usarla.
2. Coloque la comida sobre la rejilla (si lo está usando). Seleccione el tiempo de
cocción, luego la función de grill (asar). La rejilla y la comida girarán durante la
cocción, por lo tanto, asegúrese de que la comida no toque ninguna parte del
conjunto de calentador / ventilador u otra parte de la tapa cuando esté cerrada.
3. Si es necesario, agregue aceite uniformemente sobre la comida.
4. Cierre la tapa, conecte la Freidora de Aire y enciéndala. Su Freidora de Aire emitirá
un pitido, la pantalla se iluminará en azul y después de un segundo o dos mostrará
00.
5. Use el botón + para ingresar el tiempo de cocción deseado en minutos. Si mantiene
el dedo sobre el botón +, el tiempo aumentará rápidamente. Cuando esté cerca
del tiempo deseado, presione una sola vez el botón. Si sobrepasa el tiempo
deseado, use el botón - para ajustar la hora. Al asar, su Freidora de Aire debe estar
en la posición nivelada (el icono Level se mostrará en la ventana del bloqueo de
inclinación).
6. Presione el botón de modo asar ( ) para comenzar a cocinar. La pantalla
se volverá naranja, el calentador se iluminará y el ventilador se encenderá. El
temporizador comenzará la cuenta regresiva en minutos hasta que quede 1 minuto
cuando se cuente en segundos.
7. Cuando el tiempo de cocción haya terminado, su Freidora de Aire emitirá un pitido y
el calentador se apagará.
Notas
Este producto ha sido diseñado para cocinar alimentos de una manera más saludable.
No recomendamos que use su freidora para cocinar alimentos que sean muy grasosos,
por ejemplo. porciones de pollo (con piel), chuletas de cordero, salchichas u otros cortes
grasos de carne.
Modo de cocción de calor dual sin inclinación
Inclinar o no inclinar...
Su Freidora de Aire puede usarse para cocinar los alimentos y las recetas que
normalmente cocinaría en un horno o una sartén estándar. Sin embargo, cuando su
freidora está inclinada, la comida adentro se “tambalea”, lo que puede dañar alimentos
frágiles como el salmón, papas con concha, pasteles, etc. Puede usar el método de
cocción en modo de calentamiento dual sin congurar su freidora de una manera
completa en la posición inclinada. Las recetas en estas instrucciones le darán más
detalles sobre qué método es mejor.

47
46
Usar su freidora para cocinar alimentos le ayudará a reducir la cantidad de aceite
necesaria en algunas recetas, lo que puede beneciar su dieta.
La tabla a continuación enumera algunos de los aceites populares más ampliamente
disponibles. Todos ellos se pueden usar en su Freidora de Aire. Sin embargo, para
obtener los mejores resultados, recomendamos el aceite Vegetal o de Colza.
Tipo de Aceite Uso
Aceite Vegetal Supercial, profundo y para salteados.
Aceite de Colza (a menudo llamado aceite
vegetal)
Supercial, profundo y para salteados.
Aceite de Maíz Supercial, profundo y para salteados.
Aceite de Girasol Supercial, profundo y para salteados.
Aceite de Oliva Supercial y para salteados. Marinados,
aderezos, rociados.
Aceite de Sésamo Supercial, profundo y para salteados .
Marinados, rociados.
Aceite de Maní (a menudo llamado aceite
de nuez molida)
Supercial y para salteados. Aderezos.
Añade un sabor a nueces.
Aceite de Semilla de Uva Supercial, profundo y para salteados.
• También puede utilizar un aceite de cocinar en spray bajo en calorías con su
Freidora de Aire
• Siempre asegúrese de que los ingredientes estén uniformemente cubiertos de
aceite.
guía de aceites y grasas
cocinar alimentos populares, convenientes y congelados
Alimento
Tiempo
de
Cocción
(mins)
Notas
Rejilla
para
Asar
Modo
ASAR
Modo
CALOR
DUAL
Inclinación
(1)
Aceite
28 oz papas
frescas
40 Lavar y Secar
-
- SI SI 1
35 oz papas
frescas
35-40 Lavar y Secar
-
- SI SI ½
28 oz papas fritas
frescas
25-30 Lavar y Secar
-
- SI SI ½
20 oz papas fritas
frescas
25-30 Lavar y Secar
-
- SI SI ¼ - ½
8/10 oz papas
fritas frescas
18-20 Lavar y Secar
-
- SI SI ¼
45 oz papas fritas
frescas
35-40 Lavar y Secar
-
- SI SI ½
45 oz papas fritas
congeladas
25-35 -
-
- SI SI -
20 oz papas fritas
congeladas
15-20 -
-
- SI SI -
8/10 oz papas
fritas
12-15 -
-
- SI SI -
8oz papas enteras 60
Pinche con tenedor y unte
con un poco de aceite
-
- SI NO -
Filete de Salmon 15-20
Unte la rejilla con un poco de
aceite
SI
SI - NO -
Filete de pollo sin
hueso ni piel.
15-20
Unte la rejilla con un poco de
aceite. Voltee una vez
SI
SI - NO -
Bistec de Sirloin
8-10
(2)
10-12
(3)
15-20
(4)
Unte la rejilla con un poco de
aceite. Voltee una vez
SI
SI - NO -
Salchichas
Premium
(5)
10-12
(6)
Voltee una vez.
SI
SI - NO -
La siguiente tabla proporciona pautas básicas de cocina para alimentos populares,
convenientes y congelados. Tenga en cuenta que, debido a las variaciones en el grosor y el
tamaño de los alimentos que se cocinan, es posible que se necesiten algunos experimentos
para obtener los mejores resultados de cocción. Siempre asegúrese de que la comida esté
completamente cocida y caliente por completo antes de consumirla.
Al cocinar papas fritas frescas, hemos mantenido las cantidades de aceite lo más bajo posible
para obtener los resultados más saludables. Sin embargo, si siente que las papas fritas están
un poco pálidas y requieren un dorado adicional, aumente ligeramente la cantidad de aceite.
Nota: Para obtener resultados más crujientes, se recomineda utilizar la parrilla de asar en la
posición nivelada.

49
48
Alimento
Tiempo
de
Cocción
(mins)
Notas
Rejilla
para
Asar
Modo
ASAR
Modo
CALOR
DUAL
Inclinación
(1)
Aceite
Tocino 12-15 Voltee una vez.
SI
SI - NO -
Queso sobre pan
tostado
5-7
Tueste primero el pan en la
tostadora
SI
SI - NO -
Deditos de
pescado
10-12
Unte la rejilla con un poco de
aceite. Voltee una vez
SI
SI - NO -
Pizza congelada 10-12
Corte en pedazos para que
quepan en la rejilla
SI
SI - NO -
Tartaletas
individuales
congeladas
25-30
Coloque las tartaletas dentro
del recipiente interno
-
- SI NO -
Pan tipo baguette,
fresco, con ajo
8-10
Corte por la mitad. Coloque
las mitades dentro del
recipiente
-
- SI NO -
10 oz Nuggets
grandes de
pechuga de pollo
15-20
Coloque directo dentro del
recipiente interno
NO
- SI NO -
18 oz Nuggets
pequeños de
pechuga de pollo
15
Coloque directo dentro del
recipiente
NO
- SI NO -
2.2lb. Alitas de
pollo recubiertas
estilo sureño
congeladas
20-25
Coloque directo dentro del
recipiente interno Voltee en la
mitad del
NO
- SI NO -
18oz Alitas de
pollo recubiertas
picantes,
congeladas
20
Coloque directo dentro del
recipiente interno
NO
- SI NO -
31 oz Patas de
pollo crudas y
frescas
35
Coloque directo dentro del
recipiente interno Voltee en la
mitad del tiempo
NO
- SI NO -
18 oz Calamares
congelados
20
Coloque directo dentro del
recipiente interno Voltee en la
mitad del tiempo
NO
- SI NO -
15 oz Camarones
empaniza dos
congelados
15-20
Coloque directo dentro del
recipiente interno
NO
- SI NO -
10 oz Aros
de cebolla
recubiertas,
congeladas
15
Coloque directo dentro del
recipiente interno
NO
- SI NO -
Alimento
Tiempo
de
Cocción
(mins)
Notas
Rejilla
para
Asar
Modo
ASAR
Modo
CALOR
DUAL
Inclinación
(1)
Aceite
1 0oz Palitos
de queso
congelados
10
Acomodesobre la rejilla
de forma uniforme
SI
- SI NO -
Papas estilo
“Hash Browns”
congeladas
10-15
Coloque de forma
uniforme dentro del
recipiente interno
NO
- SI NO -
10 oz Bistec
fresco de
Sirloin
12 mins,
medio
crudo
Unte la rejilla con un
poco de aceite. Adobe
el bistec
SI
SI - NO -
Alimento
Tiempo
de
Cocción
(mins)
Notas
Rejilla
para
Asar
Modo
ASAR
Modo
CALOR
DUAL
Inclinación
(1)
Aceite
18oz
Champiñones
Frescos
cortados en
cuartos
10
Coloque directo dentro
del recipiente interno.
Sazone
NO
- SI SI -
250g
Espárragos
Frescos sin
los extremos
brosos
8-10
Acomodesobre la rejilla,
rocíe con aceite de oliva.
Sazone
SI
SI NO NO -
Zucchinis
Frescos
cortados en
rebanadas.
8.8oz
8-10
Coloque directo dentro
del recipiente interno.
Rocíe con aceite de
oliva. Sazone
NO
- SI SI
½
opcional
Tomates
Frescos,
cortados en
cuartos
28oz
12-15
Coloque directo dentro
del recipiente interno.
Sazone.
NO
- SI NO -
(1) Muestra si se coloca La Freidora de Aire en la posición completamente inclinada (SÍ) o
en la posición nivelada (NO).
(2) Cocido crudo
(3) Cocido medio crudo
(4) Bien cocido
(5) P. ej. alto contenido de carne
(6) Dependiendo del grosor
Verduras

51
50
cuidado y limpieza
Siempre desenchufe su Freidora Salu de Aire y permita que se enfríe
completamente antes de limpiarla. NUNCA sumerja el ARTEFACTO , el cable
eléctrico ni el enchufe en agua ni en ningún otro líquido. Nunca use limpiadores
abrasivos fuertes o materiales de limpieza.
• Con cuidado, limpie cualquier salpicadura de aceite con papel de cocina de la
cubierta del conjunto calentador / ventilador. Pase un trapo limpio y ligeramente
húmedo por la parte externa del artefacto y su tapa, séquelo luego.
• Lave la tapa transparente extraíble, la rejilla de asar, la cuchara de medir aceite, el
recipiente interior, la bandeja de goteo y el asa, con agua tibia y jabón con un paño,
una esponja o un cepillo. Seque completamente antes de usar o almacenar. La rejilla
de asar, la cuchara de medir aceite, la bandeja de goteo y el recipiente interior se
pueden lavar en un lavavajillas.
Para retirar la tapa transparente:
1. Presione los dos botones de liberación de la tapa (uno en cada lado).
2. Levante la tapa transparente.
3. Para volver a colocar la tapa, coloque la tapa sobre la lengüeta en la parte superior
del artefacto, como se muestra a continuación, gire la tapa hasta que haga clic en las
cerraduras de cada lado.
Este electrodoméstico no tiene partes reparables por el usuario. Cualquier servicio
más allá de lo descrito en la sección de limpieza debe ser realizado únicamente por un
representante de servicio autorizado. Ver la sección de Garantía.
recetas
General
Para obtener una guía sobre cómo cocinar alimentos congelados populares y
convenientes, consulte la página 48-50.
Cuando sea necesario, este símbolo le mostrará la cantidad de aceite que se debe
agregar utilizando la cuchara de medir suministrada.
Este símbolo indica que la receta es adecuada para vegetarianos.
Métodos de cocción utilizados en estas recetas.
Modo de Calentamiento Dual con Ventilador
Las recetas marcadas con el ícono usan la función de modo de calentamiento
dual de su freidora. La cocción en modo de calentamiento dual utiliza un elemento de
calentamiento adicional colocado debajo del recipiente que junto con el elemento de
calentamiento superior y el ventilador sobre el recipiente garantizan una distribución de
calor eciente y uniforme.
1. Congure el temporizador según la receta.
2. Congure su Freidora de Aire en la posición INCLINADA o NIVELADA de acuerdo
con la receta. Para inclinar la freidora, tire del mecanismo de inclinación hacia afuera
e incline la freidora hacia adelante. Suelte el bloqueo del mecanismo de inclinación
para mantener su freidora en la posición completamente inclinada. Cuando está
en la posición inclinada, el icono Tilt se mostrará en la ventana del bloqueo de
inclinación. Muchas recetas utilizarán el modo de calentamiento dual con su freidora
en la posición nivelada. Cuando se encuentre en la posición nivelada, el icono Level
se mostrará en la ventana del bloqueo de inclinación.
3. Presione el botón dual heat mode (calentamiento dual) para comenzar a cocinar.
4. Una vez que la cocción ha nalizado, si su freidora está en posición inclinada, suelte
el bloqueo del mecanismo de inclinación y vuelva a colocar la unidad en la posición
nivelada. Use el asa con clip para retirar el recipiente interior.
Modo para Asar con Ventilador
Las recetas marcadas con el ícono usan la función del modo Asar de su freidora. La
cocción en modo Asar utiliza solo el elemento de calentamiento superior y el ventilador.
1. Congure el temporizador según la receta.
2. Asegúrese de que su freidora esté en la posición NIVELADA. Cuando esté en la
posición de nivel correcta, el icono Level se mostrará en la ventana del bloqueo de
inclinación.
3. Presione el botón de modo ASAR ( ) para comenzar a cocinar.
4. Una vez que la cocción ha nalizado, retire el recipiente interior con el asa con clip.

53
52
Papas Asadas a la Perfección (para 4 personas)
• 28 onzas de papas frescas, cortadas a la mitad pero con concha.
• 1 de aceite de oliva
• Sal y pimienta
1. Coloque las papas en el recipiente y rocíe con el aceite. Sazone.
2. Ajuste el temporizador durante 35 a 40 minutos y cocine en la conguración del modo
de calentamiento dual con su freidora en la posición Tilt hasta que estén doradas y
crujientes.
recetas - acompañantes y aperitivos
Papas Fritas Caseras Perfectas (4 porciones)
• 28 oz de papas
• ½ de aceite vegetal
• Sal para servir
1. Pele las papas y córtelas para papas fritas en aproximadamente 11-13 mm de ancho
con un cuchillo alado.
2. Enjuáguelos dos veces para quitar el almidón y cúbralos completamente con agua
hasta que esté listo para cocinarlos.
3. Cuando esté listo para cocinarlos, cuele las papas y séquelas con papel de cocina
para eliminar el exceso de humedad.
4. Coloque las papas en el recipiente interior y rocíe con aceite vegetal.
5. Ajuste el temporizador durante 25 a 30 minutos y cocine en la conguración del modo
de calentamiento dual con su freidora en la posición Tilt hasta que estén doradas y
crujientes.
6. Espolvoree las papas fritas con sal si es necesario y sírvalas calientes.
Papas al Estilo Cajún (para 4 personas)
• 28 oz de papas pequeñas, con concha pero bien lavadas
• 1 de aceite de oliva
• 1 diente de ajo, picado
• 1 de especias Cajún
• Sal y pimienta negra molida
1. Corte las papas en mitades, usando un cuchillo alado. Enjuáguelos dos veces
para eliminar el almidón y cubra completamente con agua hasta que esté listo para
cocinarlos.
2. Cuando esté listo para cocinarlos, cuele y seque las papas con papel de cocina.
3. Cúbralos con el aceite, las especias Cajún y el ajo picado.
4. Ajuste el temporizador durante 35 a 40 minutos y cocine en la conguración del modo
de calentamiento dual con su freidora en la posición Tilt hasta que estén doradas y
crujientes.
Nacho’s de Queso con Salsa Picante de Tomate
• - 1 bolsa grande de nachos simples
• - 3,5 oz de queso cheddar
• - ½ pimiento verde, sin semillas y en rodajas
• - Crema agria, salsa y Guacamole para servir
1. Distribuya uniformemente los nachos sobre el fondo del recipiente interior.
2. Espolvoree los nachos con queso y el pimiento verde
3. Ajuste el temporizador durante 5 minutos y cocine en la conguración del modo de
calentamiento dual con su freidora en la posición Level hasta que el queso se haya
derretido.
4. Sirva los nachos cubiertos con salsa de tomate picante, crema agria y guacamole.
Papas “JACKET” Rellenas con Maíz Dulce y Pimientos
(para 4 personas)
• 2 papas medianas, limpias y con concha
• 1.8 oz, queso cheddar fuerte, rallado
• 1.8 oz de maíz dulce
• Pimientos mixtos namente cortados en cuadritos de 1.8 oz
• 0.5 oz de mantequilla o un “spread” bajo en grasa.
• Sal y pimienta
• Un pequeño puñado de hierbas frescas, como albahaca o tomillo.
1. Pinche las papas por completo y frótelas con un poco de aceite para cubrirlas.
2. Ajuste el temporizador durante 55-60 minutos y cocine en la conguración del modo
de calentamiento dual con su freidora en la posición Level hasta que las papas estén
blandas al aplasten.
3. Con cuidado, corte las papas cocinadas por la mitad y a lo largo. Use guantes para
horno y tenga cuidado de no sacarle la concha.
4. Saque la papa de la concha con una cuchara y agregue a un tazón grande. Coloque
la concha de la papa a un lado.
5. Agregue la mantequilla, el maíz dulce, los pimientos, las hierbas y ¾ del queso al
tazón. Use un tenedor para combinar la mezcla y sazone.
6. Vierta la mezcla en la concha de las papas y espolvoree con el resto del queso
7. Coloque cuidadosamente las papas en el recipiente y cocine durante 15 minutos más
en el modo de calentamiento dual con su freidora en la posición Level hasta que el
queso se ponga crujiente y dorado.
8. Delicioso servido con una ensalada fresca, crujiente y ensalada de col.

55
54
recetas - acompañantes y aperitivos
Papas “Jackets” Rellenas con Antipasto y Pancetta
(para 4 personas)
• 2 papas medianas, limpias y con concha
• 2oz de queso blando con sabor a ajo y hierbas
• 0,3 oz de parmesano rallado
• 1 pimiento asado y namente cortado en rodajas (estos se pueden comprar listos ya
en frasco)
• 3 lonjas de pancetta, cocinadas hasta que estén crujientes, desmenuzadas
• Sal y pimienta
• Pesto (opcional)
1. Pinche las papas por completo y frótelas con un poco de aceite para cubrirlas.
2. Ajuste el temporizador durante 55-60 minutos y cocine en la conguración del modo
de calentamiento dual con su freidora en la posición Level hasta que las papas estén
blandas cuando se aplasten.
3. Con cuidado, corte las papas cocidas por la mitad y a lo largo. Use guantes para
hornos y tenga cuidado de no sacarle la concha.
4. Saque la papa de la concha con una cuchara y agregue a un tazón grande. Coloque
la concha de la papa a un lado.
5. Usando un tenedor, desmenuce la papa agregando el queso blando, la pimienta a la
brasa, la panceta y el condimento.
6. Vierta la mezcla en la concha de las papas y espolvoree con el resto del queso
7. Cubra con el queso parmesano rallado y cocine por otros 15 minutos en la
conguración del modo de calentamiento dual con la freidora en la posición Level
hasta que esté dorada y caliente.
Servir rociado con pesto (opcional).
Vegetales Asados Mediterráneos (para 4 personas)
• 1 berenjena pequeña, cortada en cubitos
• 2 calabacines, en rodajas gruesas o en cubitos
• 1 zanahoria mediana, cortada en cubitos
• 1 cebolla roja grande, cortada en trozos
• 1 pimiento rojo, cortado en cubitos
• Champiñones de 3.5 oz, limpios
• 1 cucharadita de hierbas mezcladas secas
• 1 diente de ajo grande, namente picado
• ½ de miel
• 1 de aceite de oliva
• Sal y pimienta
1. Coloque las verduras en el recipiente interior junto con el ajo y las hierbas. Rocíe el
aceite y la miel.
2. Ajuste el temporizador durante 25-30 minutos y cocine en la conguración del modo
de calentamiento dual con su freidora en la posición Tilt.
3. Delicioso servido con un poco de pescado al horno o nuestro Salmón Recubierto a la
Parmesana.
Verduras Asadas (para 4 personas)
Perfecto como acompañamiento de su asado dominical. Las verduras deben cortarse en
un tamaño similar. Para aquellos vegetales donde solo se requiera la mitad, ¿por qué no
utilizar la mitad extra en una sabrosa sopa casera?
• 2 zanahorias medianas, peladas, cortadas a la mitad a lo largo y en trozos
• 2 chirivías, peladas, cortadas a la mitad a lo largo y en trozos
• ½ calabaza pequeña, sin semilla, pelada y cortada a un tamaño similar a los de arriba
• ½ apio pequeño, pelado y cortado como arriba
• 1 cucharadita de semillas de comino molidas
• 1 cucharadita de cilantro molido
• 1 ( ) de aceite vegetal
• Sal y pimienta
1. Coloque las verduras en el recipiente interior y rocíe con el aceite. Agregue las
especias, sal y pimienta y revuelva bien para combinar.
2. Ajuste el temporizador durante 30-35 minutos y cocine en la conguración del modo
de calentamiento dual con su freidora en la posición Tilt.
Sirva con su carne asada favorita o pollo asado para una alternativa a sus verduras
habituales.
Para obtener un toque extra picante, rocíe con un poco de miel y un poco de chile picado
seco.

57
56
Bastoncitos de Pescado Haddock con Mayonesa de Limón
(para 3-4 personas)
• 3 letes de pescado haddock deshuesados, sin piel
• 7 oz de pan blanco de migas
• 2,6oz de harina simple
• Sal y pimienta recién molida
• 2 huevos batidos
• 2 cucharadas de perejil fresco picado
• 1 ( ) de aceite de girasol
• 300 ml de mayonesa
• 3 cucharaditas de jugo de limón
• 2 cucharaditas de ralladura de limón namente rallada
• 1 diente de ajo,
1. Con un cuchillo alado, corte con cuidado los letes de pescado en tiras de 2 cm de
ancho.
2. Coloque las migas de pan, los huevos y la harina por separado en platos individuales,
sazone la harina y espolvoree las migas de pan con las hierbas.
3. Coloque los bastoncitos de pescado en el plato de harina y dele vueltas hasta
que estén cubiertos, sacuda el exceso de harina y luego sumérjalos en el huevo
batido. A continuación, mezcle los bastoncitos en las migas de pan hasta que estén
completamente cubiertos.
4. Aplanar los bastoncitos cuidadosamente sobre una supercie plana con la palma de
su mano.
5. Coloque los bastoncitos en el recipiente y rocíelos con el aceite. Cocine en la
conguración del modo de calentamiento dual durante 15-20 minutos con su freidora
en la posición Level. Voltee los bastoncitos cuando la cocción esté a la mitad del
tiempo congurado.
6. Para hacer la mayonesa de limón, mezcle la mayonesa con el jugo de limón, la
ralladura de limón y el ajo. Colóquelo en un plato de servir adecuado.
Sirve los bastoncitos con salsa de mayonesa y una ensalada de su preferencia.
recetas- platos de pescado y mariscos
Salmón Recubierto al Horno a la Parmesana (para 2 personas)
• 2 letes de salmón, deshuesados
• 2 rebanadas de pan, de 1 o 2 días es lo mejor
• 1 diente de ajo
• 1,7 oz de queso parmesano
• 0.7 oz de “spread” suave (margarina baja en grasa, etc.)
• 1 cucharada de albahaca fresca
• 1 cucharada de perejil fresco
• Sal y pimienta negra recién molida
1. Inserte la rejilla en su Freidora de Aire. Engrase ligeramente la rejilla.
2. Coloque el pan, el ajo, el queso parmesano y las hierbas en un procesador de
alimentos o mini picadora y procese a una consistencia de miga de pan no. Mezcle
con el “spread” suave, sazone.
3. Coloque los letes de salmón en la rejilla, con la piel hacia abajo, y unte ligeramente
con aceite de oliva.
4. Ajuste el temporizador durante 10-15 minutos (según el grosor de los letes) y cocine
en la conguración de modo de calentamiento dual con su freidora en la posición
Level.
5. Abra la tapa y cubra la parte superior de cada lete de salmón con la mezcla de
migas de pan.
6. Ajuste el temporizador durante 5-10 minutos y cocine en la conguración del modo
de calentamiento dual con su freidora en la posición Level hasta que la cubierta esté
dorada.
Delicioso servido con nuestra receta de vegetales asados mediterráneos

59
58
recetas- platos de pollo
Pollo envuelto en Prosciutto (para 2 personas)
• 2 pechugas de pollo, sin piel
• Ralladura de un limón
• 4-6 rebanadas de jamón prosciutto
• 1 cucharadita de tomillo fresco
• ½ diente de ajo, namente picado
• Aceite de oliva
1. Inserte la rejilla en su freidora. Engrase ligeramente la rejilla.
2. Coloque cada pechuga de pollo entre una película adhesiva y use un rodillo para
golpear suavemente la pechuga hasta que esté uniformemente aplanada hasta
aproximadamente 2 cm de grosor.
3. Retire la pechuga de pollo aplastada de la película adhesiva y rocíe con un poco de
aceite de oliva. Espolvoree con el ajo, la ralladura de limón y una pizca de tomillo
fresco.
4. Envuelva cuidadosamente el jamón alrededor de la pechuga para que la unión quede
debajo y toda la pechuga esté envuelta dentro del jamón.
5. Rocie de aceite ligeramente el pollo y colóquelo cuidadosamente sobre la rejilla con
la unión del jamón en la parte inferior.
6. Ajuste el temporizador durante 20-25 minutos y cocine en la conguración de modo
de calentamiento dual con su freidora en la posición Level. Con cuidado, voltee el
pollo en la mitad del ciclo de cocción.
Delicioso servido cortado en diagonal con un poco de pasta recién cocida rociada con
pesto. Adorne con hojas de albahaca y pimienta negra molida.
Pollo Thai al Curry Verde (para 4 personas)
• 1 cebolla pequeña, namente cortada
• 1 tallo de hierba de limón
• 3-4 cucharaditas de pasta de curry verde tailandés
• 3 pechugas de pollo deshuesadas y sin piel, cortadas en trozos pequeños
• 1 cucharada de salsa de pescado
• 1 cucharadita de azúcar moreno
• 4 hojas secas congeladas de lima kafr (opcional) *
• 1 lata de 400 ml de leche de coco
• 1 paquete de 20 g de cilantro fresco
• ½ de aceite vegetal
* Las hojas de lima kafr ahora están ampliamente disponibles en la mayoría de los
buenos supermercados.
1. Corte muy namente el limoncillo, comenzando en el extremo más delgado y
deteniéndote hacia la base cuando se pone duro (a menudo descrito como ‘talloso’ y
blanco en el centro).
2. Coloque la cebolla cortada en rodajas y la hierba de limón picada en el recipiente
interior. Rocíe con el aceite vegetal. Ajuste el temporizador durante 5 minutos y
cocine en la conguración del modo de calentamiento dual con su freidora en la
posición Tilt hasta que la cebolla comience a ablandarse. Agregue los trozos de pollo
y la pasta tailandesa y cocine por otros 5-6 minutos.
3. Coloque su freidora en la posición Level. Agregue la salsa de pescado, el azúcar,
las hojas de lima kafr y la leche de coco y continúe cocinando por otros 15 minutos
hasta que el pollo esté bien cocido. Abra la tapa y revuelva de vez en cuando.
4. Mientras el pollo está cocinándose, quite las hojas de los tallos de cilantro, agrúpelas
y córtelas un poco. Pruebe el curry y ajuste la sazón. Mezcle la mitad del cilantro en
el curry y espolvoree el resto adentro.
Delicioso servido con arroz tailandés, de jazmín o basmati.

61
60
Pollo Cremoso Korma (para 4 personas)
• 3 pechugas de pollo, en cubos
• ½ de aceite de oliva
• 1 cebolla, namente picada
• 2 dientes de ajo, namente picados
• 1 cm de jengibre, namente picado
• ½ de garam masala
• 200 ml de caldo de pollo
• 100 ml de leche de coco
• almendras rebanadas tostadas al gusto
• Cilantro fresco picado
1. Coloque las piezas de pollo en el recipiente interior y rocíe con aceite de oliva.
2. Ajuste el temporizador durante 35 minutos y cocine en la conguración del modo de
calentamiento dual con su freidora en la posición Tilt.
3. Después de aproximadamente 10 minutos, agregue la cebolla, el ajo, el jengibre
y el garam masala y cocine por otros 10 minutos. Revuelve en la mitad del tiempo
congurado.
4. Coloque su freidora en la posición Level. Agregue el caldo, la leche de coco y las
almendras, revuelva bien y continúe cocinando por el resto del tiempo, de vez en
cuando revuelva.
5. Espolvoree con el cilantro y sirva con arroz al vapor y pan Naan caliente.
recetas- platos de pollo
Carne Cremosa a la Stroganoff (para 4 personas)
• 1 ( ) de aceite de oliva
• 1 libra de carne magra namente cortada en tiras,
• 1 cebolla, namente picada
• 1 diente de ajo, namente picado
• 3.5 oz de champiñones namente cortados
• 1 ( ) brandy
• ½ ( ) de salsa inglesa (Worcestershire)
• 150 ml de caldo de carne caliente
• ½ ( ) de mostaza Dijon
• ½ ( ) de perejil recién picado
• 1.5oz de harina simple
• 110 ml de crema agria
1. Congure el temporizador para 35 minutos.
2. Coloque las tiras de carne en el recipiente interior, rocíe con aceite y cocine en el
modo de calentamiento dual durante 10 minutos con la freidora en la posición Tilt.
3. Agregue las cebollas, el ajo y los champiñones, revuelva y cocine por otros 10
minutos.
4. Agregue el brandy, revuelva y deje cocinar durante unos minutos más hasta que
burbujee.
5. Coloque su freidora en la posición Level. Espolvoree la harina sobre la mezcla y
luego agregue la mostaza, la salsa inglesa y el caldo y revuelve para mezclar.
6. Deje cocinar por el resto del tiempo de cocción (aproximadamente 10 minutos).
7. Sazonar si es necesario, luego agregue la crema.
Sirva con pasta recién hecha o puré de papas cremoso.

63
62
Hamburguesas de Carne de Res con Cebolla Roja
Caramelizada (para 4 personas)
• 1 libra de carne picada de buena calidad
• 1 cebolla roja pequeña, namente picada
• 1 cucharadita de azúcar morena
• 1 cucharadita de hierbas mixtas secas
• 1 huevo batido
• un puñado de hojas de cilantro, picadas
Para servir: panecillos de hamburguesas, rebanadas de queso, tomates en rodajas,
lechuga y ketchup.
1. En una sartén, saltee suavemente la cebolla roja picada a fuego medio bajo con
aceite de oliva y azúcar morena durante 5 minutos. Retirar del fuego y reservar para
enfriar.
2. Mezcle la carne picada en un bol con las cebollas caramelizadas y el huevo batido.
Combine la mezcla para que todos los ingredientes estén mezclados, pero no los
haga demasiado blandos y suaves.
3. Agregue el cilantro picado y las hierbas secas. Sazone al gusto.
4. Tome una bola de la mezcla y forme una hamburguesa. La mezcla debe hacer
aproximadamente 4 hamburguesas. Cuanto más gruesas sean, más tiempo tomarán
para cocinar.
5. Coloque cada hamburguesa en un tablero que haya sido cubierto con película
adhesiva y luego cúbralas.
6. Póngalos en el refrigerador para enfriar por aproximadamente 1 hora. Esto les
ayudará a mantener su forma mientras se cocinan.
7. Cuando esté listo para cocinar las hamburguesas, colóquelas en la rejilla para asar
ligeramente engrasada.
8. Cocine por 15-20 minutos en la conguración del modo Asar con su freidora en la
posición Level cuidadosamente volteándolas a la mitad del ciclo de cocción.
Sirva las hamburguesas en los panecillos con queso, tomate, lechuga y ketchup.
Hamburguesas Picantes de Cordero (para 4 personas))
• 1 libra de carne magra de cordero
• ½ cebolla roja, namente picada
• 1 huevo batido
• 1 cucharada de chutney de mango
• Un puñado de hojas de cilantro fresco, picado
• ½ chile rojo, sin semillas y picado
• 1 diente de ajo, machacado
• ½ cucharadita de comino
• ½ cucharadita de cilantro molido
Para servir
• 4 mini Ciabattas
• Menta, picada
• Yogurt griego espeso
• 1 pepino, namente picado
•
1. En una sartén, saltee suavemente la cebolla roja picada a fuego medio bajo con un
chorrito de aceite vegetal hasta que se ablande. Deje de lado para enfriar.
2. En un recipiente, mezcle juntos la carne picada de cordero con el huevo batido.
3. Agregue la cebolla cocida, el chutney de mango, las hojas de cilantro, el chile, el ajo y
las especias.
4. Trabaje la mezcla con sus manos y luego haga bolitas de la mezcla en forma de
hamburguesa.
5. Colóquelos en una bandeja y cubierta y revestida con una película adhesiva.
Enfríelos en la nevera durante aproximadamente 1 hora.
6. Engrase ligeramente la rejilla de asar. Coloque las hamburguesas en la rejilla y unte
con una brocha el aceite de oliva.
7. Cocine por 15-20 minutos en la conguración del modo Asar con su freidora en la
posición Level cuidadosamente volteándolos a la mitad del ciclo de cocción. Verique
que las hamburguesas estén completamente cocidas.
8. En un recipiente aparte, mezcle el yogurt griego, el pepino picado y la menta.
9. Tueste ligeramente la Ciabatta durante 1-2 minutos. Sirva las hamburguesas de
cordero dentro de la Ciabatta cubierto con la lechuga y el aderezo de yogurt.
recetas- platos de carne y cordero

65
64
Hamburguesas Vegetales (para 4 personas)
• 1 libra de garbanzos enlatados, escurridos y enjuagados
• 1 cebolla mediana rallada
• 1 zanahoria mediana, rallada
• 1 chile rojo, namente picado
• Jengibre fresco de 5 cm (2 pulgadas), rallado
• Un manojo de cilantro fresco, toscamente picado
• 1 huevo mediano batido
• 2 cucharadas de pan fresco rallado
• Aceite vegetal
• 4 bollos de hamburguesa
Para servir
• Ketchup de tomate, mostaza, cebollas fritas y ensalada de col
1. En un tazón grande, machaque los garbanzos con un tenedor hasta que quede
suave (o procese con una batidora de mano). Agregue la cebolla, la zanahoria, el
chile, el jengibre y el cilantro picado y mezcle bien hasta que se combinen. Si está
utilizando una licuadora de mano, pulse varias veces para combinar perfectamente
esta mezcla.
2. Agregue el huevo batido y las migas de pan y mezcle bien. Sazone con un poco de
sal y pimienta al gusto.
3. Divida la mezcla en partes iguales. Tome porciones del tamaño de una pelota
de tennis. Aplane ligeramente con las palmas de las manos para que sean
hamburguesas de aproximadamente 2 cm de espesor. Asegúrese de que todas las
hamburguesas tengan el mismo grosor.
4. Transera las hamburguesas a un plato, cubra con una película adhesiva y enfríe en
el refrigerador durante 30-60 minutos.
5. Con una brocha unte ligeramente la rejilla de asar con aceite vegetal y coloque
cuidadosamente las hamburguesas encima. Unte las hamburguesas con un poco de
aceite vegetal y luego cocine en la conguración del modo Asar con su freidora en la
posición Level durante aproximadamente 15 minutos, volteándolas cuidadosamente
en la mitad de tiempo de la cocción.
6. Para servir, corta los bollos de pan por la mitad y coloque una hamburguesa dentro
de cada uno. Sírvalo con su acompañamiento preferido.
recetas- platos de vegetales
recetas- platos de vegetales
Champiñones Rellenos de Queso de Cabra
(para 4 personas)
• 4 champiñones grandes y chatos
• 1½ ( ) de aceite de oliva
• 1 cebolla roja, namente picada y ligeramente cocida hasta que se ablande
• 6 cucharadas de migas de pan blanco
• 1 diente de ajo, machacado
• 2.7 oz de queso de cabra, desmenuzado
• 1 cucharada de piñones tostados
• 1 cucharada de perejil recién picado
• Pimienta negra recién molida
1. En un tazón, mezcle la mitad del aceite con las cebollas, las migas de pan, el perejil,
el ajo, los piñones, el queso de cabra desmenuzado y un poco de pimienta recién
molida.
2. Coloque los champiñones al revés en la rejilla para asar ligeramente engrasada
y coloque la mezcla de queso de cabra en ellos. Rocíe con el aceite restante y
cocínelo durante aproximadamente 15-20 minutos en la conguración del modo de
calentamiento dual con su freidora en la posición Level.

67
66
recetas- postres
Pasteles Individuales “Cup Cakes” (8 pasteles en 2 lotes)
• 3,5oz de mantequilla blanda o margarina
• 3.5 oz de azúcar en polvo
• 2 huevos
• Algunas gotas de esencia de vainilla
• 3.5 oz de harina leudante
• ½ cucharadita de polvo de hornear
1. Coloque todos los ingredientes en un tazón y use un mezclador manual para batir
todos los ingredientes hasta obtener una mezcla cremosa y ligera.
2. Llene hasta la mitad los moldes de cup cakes de silicona con la mezcla de pastel.
3. Coloque los moldes dentro del recipiente interior y cierre la tapa. Ajuste el
temporizador durante 11 minutos y cocine en la conguración del modo de
calentamiento dual con su freidora en la posición Level.
4. Una vez que esté cocinado, retire con cuidado el recipiente interior y colóquelo sobre
la rejilla para que se enfríe.
5. Después de 5 minutos retire los pasteles del recipiente interior y enfríelos por otros 15
minutos en la rejilla antes de decorar.
Consejo: Para evitar que sus pasteles se deslicen alrededor del recipiente interior, corte
un trozo de aluminio aproximadamente del mismo tamaño que el recipiente. Haga una
hendidura en el centro y deslice la lámina sobre el eje central del recipiente interior.
Coloque sus pasteles encima de la lámina y esto evitará que se deslicen.
Ensalada Caliente de Frutas Tropicales
• 100 ml de jugo tropical
• 1 oz de azúcar en polvo
• 1 cucharadita de extracto de vainilla
• 1 naranja rallada
• 2 frutas de la pasión (pulpa y semillas)
• 1 mango maduro, pelado y deshuesado
• 1 piña, preparada
• 1 kiwi, pelado, cortado en trozos
• 2 melocotones o nectarinas maduras, deshuesadas
1. Tenga listo un recipiente con agua helada.
2. Caliente el jugo tropical, el azúcar, la vainilla, la ralladura de naranja y la fruta de la
pasión hasta que el azúcar se haya disuelto en una sartén pequeña a fuego medio.
Coloque rápidamente la sartén en agua fría para que la mezcla forme un jarabe.
3. Corte la fruta preparada en rebanadas. Es atractivo cortar la piña en anillos, los
melocotones o las nectarinas en segmentos y el mango en rodajas, pero puede
preparar la fruta de la forma que desee.
4. Coloque la fruta en el recipiente y cúbrala con el jarabe. Cocine por aproximadamente
5-8 minutos en la conguración del modo de calentamiento dual con su freidora en la
posición Level hasta que esté suave y jugoso.
Delicioso servido caliente sobre panquecas con helado.
Melocotones al Horno con Galletas Amaretti (para 2 personas)
Si tiene un procesador de alimentos, ¿por qué no utilizarlo para cortar sus galletas y
nueces?
• 1.5 oz de avellanas tostadas, más o menos picadas
• 1.5 oz de galletas amaretti, aplastadas
• 0,8 oz de mantequilla sin sal, a temperatura ambiente (un “spread” blando también se
puede usar como sustituto)
• 0.5 oz de azúcar en polvo
• 1 yema de huevo
• ½ limón, solo el jugo
• 2 melocotones maduros o nectarinas
• 1 cucharadita de ralladura de limón
• 2 cucharadas de crema espesa
• 2 ramitas de menta fresca (opcional)
• Azúcar para glasear (opcional)
• Frambuesas (opcional)
1. Mezcle las avellanas, los bizcochos, la mantequilla, el azúcar y la yema de huevo en
un tazón hasta que los ingredientes se mantengan unidos como una pasta.
2. Corte cada melocotón a la mitad, retire la semilla y ponga en cada mitad una
cucharada del relleno. Esto debería llenar la cavidad en el melocotón y cubrir la mitad
expuesta de la fruta.
3. Coloque las mitades en la rejilla de asar ligeramente aceitada. Cocine durante
aproximadamente 10-15 minutos en la conguración del modo de calentamiento dual
con su freidora en la posición Level hasta que esté cocinada (el tiempo de cocción
dependerá de la madurez de la fruta).
4. Para servir, coloque los melocotones horneados en platos para servir, y coloque una
cucharada grande de la crema espesa a su lado. Opcionalmente, adornar con menta
y un puñado de frambuesas frescas y polvo con azúcar de glasear.
recetas- postres

69
68
garantía
Sunbeam Products, Inc. o en Canadá, Sunbeam Corporation (Canada) Limited (en forma
conjunta, Sunbeam), garantiza que por un período de un año a partir de la fecha de com-
pra, este producto estará libre de defectos de materiales y mano de obra. Sunbeam, a su
elección, reparará o reemplazará este producto o cualquier componente del mismo que pre-
sente defectos durante el período de garantía. El reemplazo se realizará por un producto o
componente nuevo o reparado. Si el producto ya no estuviera disponible, se lo reemplazará
por un producto similar de valor igual o superior. Esta es su garantía exclusiva. NO intente
reparar o ajustar ninguna función eléctrica o mecánica de este producto. Al hacerlo anulará
esta garantía.
Esta garantía es válida para el comprador minorista original a partir de la fecha de compra
inicial y la misma no es transferible. Conserve el recibo de compra original. Para solicitar
servicio en garantía se requiere presentar un recibo de compra. Los agentes y centros de
servicio de Sunbeam o las tiendas minoristas que venden productos de Sunbeam no tienen
derecho a alterar, modicar ni cambiar de ninguna manera los términos y las condiciones de
esta garantía.
Esta garantía no cubre el desgaste normal de las piezas ni los daños que se produzcan
como resultado de lo siguiente: uso negligente o mal uso del producto, uso de voltaje incor-
recto o corriente inapropiada, uso contrario a las instrucciones de operación, desensamble,
reparación o alteración por parte de un tercero ajeno a Sunbeam o a un Centro de Servicio
autorizado por Sunbeam. Asimismo, la garantía no cubre: actos fortuitos tales como incendi-
os, inundaciones, huracanes y tornados.
¿Cuáles son los límites de responsabilidad de Sunbeam?
Sunbeam no será responsable de daños incidentales o emergentes causados por el incum-
plimiento de alguna garantía o condición expresa, implícita o legal.
Excepto en la medida en que lo prohíba la ley aplicable, cualquier garantía o condición
implícita de comerciabilidad o aptitud para un n determinado se limita, en cuanto a su dura-
ción, al plazo de la garantía antes mencionada.
Sunbeam queda exenta de todas otras garantías, condiciones o manifestaciones, expresa,
implícita, legal o de cualquier otra naturaleza.
Sunbeam no será responsable de ningún tipo de daño que resulte de la compra, uso o mal
uso del producto, o por la imposibilidad de usar el producto, incluyendo los daños inciden-
tales, especiales, emergentes o similares, o la pérdida de ganancias, ni de ningún incum-
plimiento contractual, sea de una obligación esencial o de otra naturaleza, ni de ningún
reclamo iniciado contra el comprador por un tercero.
Algunas provincias, estados o jurisdicciones no permiten la exclusión o limitación de los
daños incidentales o emergentes ni las limitaciones a la duración de las garantías implícitas,
de modo que es posible que la exclusión o las limitaciones antes mencionadas no se apli-
quen en su caso.
Esta garantía le otorga derechos legales especícos y es posible que usted tenga otros
derechos que varían de provincia a provincia, estado a estado, o jurisdicción a jurisdicción.
Cómo solicitar el servicio de garantía
En los Estados Unidos
Si tiene alguna pregunta sobre esta garantía o desea recibir servicio de garantía, por favor
llame al 1-800-334-0759 y podrá obtener la dirección del centro de servicio que le resulte
más conveniente.
En Canadá
Si tiene alguna pregunta sobre esta garantía o desea recibir servicio de garantía, por favor
llame al 1-800-667-8623 y podrá obtener la dirección del centro de servicio que le resulte
más conveniente.
En los Estados Unidos, esta garantía es ofrecida por Sunbeam Products, Inc., localizada en
Boca Ratón, Florida 33431. En Canadá, esta garantía es ofrecida por Sunbeam Corporation
(Canada) Limited, localizada en 20B Hereford Street, Brampton, Ontario L6Y 0M1. Si usted
tiene cualquier otro problema o reclamo en conexión con este producto, por favor escriba al
Departamento de Servicio al Consumidor.
POR FAVOR NO DEVUELVA ESTE PRODUCTO A NINGUNA DE ESTAS DIRECCIONES
NI AL LUGAR DE COMPRA.

CKSTAF-TECO_17ESM2 P.N. 194383 Rev A
CSH-SL1217-OST176086
For product questions contact:
Oster Consumer Service
USA : 1.800.334.0759
Canada : 1.800.667.8623
www.oster.com
Para preguntas sobre los productos, comuníquese a:
Oster Consumer Service
EE.UU.: 1.800.334.0759
Canadá : 1.800.667.8623
www.oster.com
© 2018 Sunbeam Products, Inc. All rights reserved. Distributed by Sunbeam Products, Inc., Boca
Raton, Florida 33431.
© 2018 Sunbeam Products, Inc. Todos los derechos reservados. Distribuido por Sunbeam
Products, Inc., Boca Ratón, Florida 33431.
-
 1
1
-
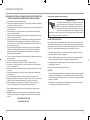 2
2
-
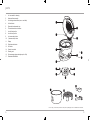 3
3
-
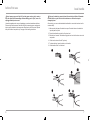 4
4
-
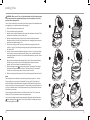 5
5
-
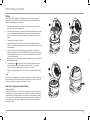 6
6
-
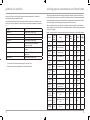 7
7
-
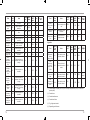 8
8
-
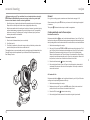 9
9
-
 10
10
-
 11
11
-
 12
12
-
 13
13
-
 14
14
-
 15
15
-
 16
16
-
 17
17
-
 18
18
-
 19
19
-
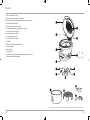 20
20
-
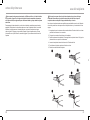 21
21
-
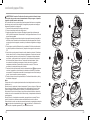 22
22
-
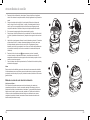 23
23
-
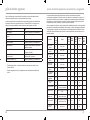 24
24
-
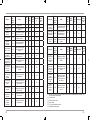 25
25
-
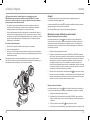 26
26
-
 27
27
-
 28
28
-
 29
29
-
 30
30
-
 31
31
-
 32
32
-
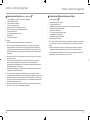 33
33
-
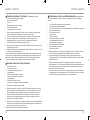 34
34
-
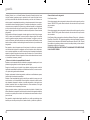 35
35
-
 36
36


Oster CKSTAF-TECO Instrucciones de operación
- Categoría
- Cocina
- Tipo
- Instrucciones de operación
en otros idiomas
Artículos relacionados
Otros documentos
-
 Brentwood AF-500DBK Manual de usuario
-
KALORIK FT 46587 Guía del usuario
-
Taurus 973922 Manual de usuario
-
NuWave 36011 El manual del propietario
-
Krups EY401D51 Manual de usuario
-
Tefal EY120850 Manual de usuario
-
Bella 10.5 QT Air Convection Fryer Oven Dehydrator El manual del propietario
-
George Foreman GSF026BQVC Manual de usuario
-
KALORIK FT 44790 BK El manual del propietario
-
Morphy Richards FOOD STEAMER 48780 El manual del propietario
