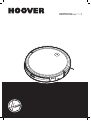
Hoover HGO310 011 Manual de usuario
- Categoría
- Aspiradoras roboticas
- Tipo
- Manual de usuario
Este manual también es adecuado para

®
USER MANUAL (GB) .........................2
MANUAL DE USUARIO (ES) .............9

2
INSTRUCTIONS FOR SAFE USE
This appliance should only be used for domestic cleaning, as described in this user guide.
Please ensure that this guide is fully understood before operating the appliance.
Always switch off and remove the charger from the socket before cleaning the appliance or
any maintenance task.
This appliance can be used by children aged from 8 years and above and persons with
reduced physical, sensory or mental capabilities or lack of experience and knowledge if they
have been given supervision or instruction concerning use of the appliance in a safe way and
understand the hazards involved. Children shall not play with the appliance. Cleaning and user
maintenance shall not be made by children without supervision.
If the power cord is damaged stop using the appliance immediately. To avoid a safety hazard, an
authorised Hoover service engineer must replace the power cord.
If the area to be cleaned contains a balcony or stairs, a physical barrier should be used to
prevent access to the balcony or stairs and ensure safe operation. Small children and pets
must be supervised while the Robot is cleaning.
Always store the appliance indoors. Do not use outdoors or expose the appliance to the
elements, humidity or heating sources (oven, replace, wet oor).
Do not expose the Robot or accessories to excessive heat / cold (keep between 0-30°C).
Do not drop the Robot or use any accessory if it has been dropped, damaged, left outdoors or
dropped in water.
Never unplug or pull the mains power adaptor by the power cord.
Do not use to clean stairs.
Battery Charging
Use only the original charger supplied with the appliance.
Check that your supply voltage is the same as that stated on the charger.
Never charge the batteries in temperatures above 30°C or below 0°C.
Plug the charger delivered with this appliance into a suitable socket.
Leaks from battery cells can occur under extreme usage or temperature conditions. If the liquid gets
on skin, wash quickly with water. If the liquid gets into the eyes, ush them immediately with clean
water for a minimum of 10 minutes. Seek medical attention.
It is normal for the charger to become warm to the touch when charging.
Use only attachments, consumables or spares recommended or supplied by Hoover.
Do not pick up hard or sharp objects, matches, hot ashes, cigarette ends or other similar
items.
Do not spray with or pick up ammable liquids, cleaning uids, aerosols or their vapours.
Do not continue to use your appliance or charger if it appears faulty.
Hoover service: To ensure the continued safe and efcient operation of this appliance we
recommend that any servicing or repairs are only carried out by an authorised Hoover service
engineer.
Do not use the appliance to clean animals or people.
Do not replace the Robot batteries with non-rechargeable batteries.
If the Robot will not be used for a long time (several weeks), unplug the mains power adaptor.
End of life battery removal
If the appliance is to be disposed of the batteries must rst be removed. The appliance must
be disconnected from the supply mains when removing the battery. Dispose of the batteries safely.
Run the appliance until it stops because the batteries are fully discharged. Used batteries should
be taken to a recycling station and not disposed of with household waste. To remove the batteries,
please contact the Hoover Customer Centre or proceed according to the following instructions.
Unplug the charger and switch off the Robot. Turn the Robot over and place on a level surface.
Remove the screws and battery compartment cover. Remove the battery pack.
[Fig. 7]
NOTE: Should you experience any difculty in dismantling the unit or for more detailed
information on treatment, recovery and recycling of this appliance, please contact your local
city ofce or your household waste disposal service.
* Certain Models Only ** May vary according to model
GB

3
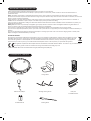
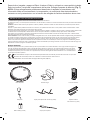
CONTENTS OF THE BOX
Robot Cleaner Charger Base Remote Control
Mains Power Adaptor X4 Edge Cleaning Brush Filter pack
X1 Additional Filter
X2 AAA Batteries Cleaning Brush
IMPORTANT NOTES BEFORE USE
Please read the following information carefully before using your Robot or its accessories.
Do not disassemble the Robot and do not attempt to repair it yourself. If a fault occurs, please contact the Hoover after Sales Service for
professional advice.
Stairs: The Robot uses sensors to avoid falling down steps, stairs or over an edge. In some situations the sensors can become confused.
The Robot cannot detect steps that are less than 8cm in height. Steps less than 8cm may cause the Robot to fall down. If available, use the Virtual
Barrier to protect your Robot from falling.
Highly reective or very dark surfaces used on some steps or stairs, such as glass or polished ceramics may cause the Robot to fall down.
If
available use the Virtual Barrier or place a carpet on the lower step to protect your Robot from falling.
Using your Robot on mezzanines, landings or raised areas without borders should be avoided. If available use the Virtual Barrier to prevent your
Robot entering these areas.
Battery Use: Your Robot is powered by rechargeable, high capacity lithium ion batteries. These rechargeable batteries are guaranteed for a
period of 6 months if they are maintained and operated according to this User Manual.
In the event of a signicant drop in the Robot’s performance, replacement batteries can be obtained from your Hoover retailer.
Only use Hoover approved replacement parts for your Robot. Use of parts that are not approved by Hoover are dangerous and will invalidate your
warranty.
Only use the supplied charging station and mains power adaptor to recharge your Robot. Use of the incorrect charging station or mains power
adaptor is dangerous and will invalidate your warranty.
The Environment
The symbol on this appliance indicates that this appliance may not be treated as household waste. Instead it must be handed over to the
applicable collection point for the recycling of electrical and electronic equipment. Disposal must be carried out in accordance with local
environmental regulations for waste disposal. For more detailed information about treatment, recovery and recycling of this appliance,
please contact your local city ofce, your household and waste disposal service or the shop where you purchased the appliance.
This appliance complies with the European Directives 2014/35/EU, 2014/30/EU and 2011/65/EU
. To receive a copy of the declaration
of conformity, please contact the manufacturer through the website: www.candy-group.com
CANDY HOOVER GROUP Srl Via Privata Eden Fumagalli, 20861 Brugherio (MB) Italy

12
4
9
1717
18
10
1
14
12
11
13
15
19
16
3
5
20
21
22
23
24
25
30
31
29
28
26
27
18
16
6
7
8
4
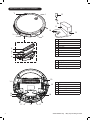
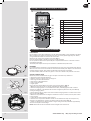
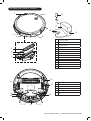
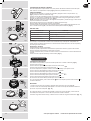
GETTING TO KNOW YOUR CLEANER
1 On/Standby Switch with Power LED
2 Front Bumper
3 Dust Container Release Button
4 Dust Container
5 Filter Mesh
6 Epa Filter
7 Sponge Filter
8 Filter Holder
9 DC Jack, vacuum Robot
10 Charging Contacts
11 Charger Base
12 Mains Power Adaptor
13 DC Jack, Charger Base
14 Agitator
15 Drive Wheel
16 Edge Cleaning Brush
17 Robot Charging Contacts
18 Anti-Fall Sensor
19 On/Off Switch
* Certain Models Only ** May vary according to model

5
12
4
9
1717
18
10
1
14
12
11
13
15
19
16
3
5
20
21
22
23
24
25
30
31
29
28
26
27
18
16
6
7
8
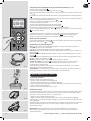
Fig. 3
Fig. 2
Fig. 1
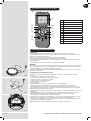
20 Trasmitter Diode
21 Suction Power
22 Button Forward
23 Button Left
24 Scheduling Button
25 Charging Station Button
26 Timing Setting Button
27 Button Backward
28 Button Right
29 Start/Pause Button
30 Mode Button
31 Display
GETTING TO KNOW YOUR ROBOT CLEANER
PREPARE YOUR ROBOT CLEANER
PACKAGING
Do not dispose of your Robot packaging. It may be required the validity of your guarantee in the future.
When unpacking your Robot and its accessories, take care to keep plastic bags away from babies,
young children and animals to avoid the risk of suffocation.
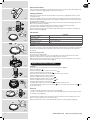
Before rst use, charge your appliance for 8 hours. [Fig. 1]
From the second charge, it will take 4-5 hours to be fully recharged.
Do not expose the Robot’s mains power adaptor to temperatures below 0°C or above 30°C as this
may damage the battery.
The mains power adaptor must only be connected to a standard mains power outlet.
BATTERY
For optimum battery performance it is recommended that you keep your robot batteries fully charged.
When the robot is not in use it should be left connected to the mains power adaptor. The robot has an
intelligent charging system. This prevents the batteries from becoming overcharged.
To avoid accidents, make sure that every person in the room is aware of the presence of the robot.
Charging Station Setup
Before use, remove obstacles that may get in the path of the Robot. Pay attention to:
• Objects that can be easily knocked over.
• Edges of carpets or rugs that it may get caught on.
• Floor length curtains and tablecloths.
• Heat sources or ammable items.
• Power cords and cables.
• Fragile objects.
Plug in the mains power adaptor and connect to the charging station. [Fig. 2]
1. Make sure the power cord is not caught underneath the charging station.
2. Place the charging station on a non-reective level oor, preferably against a wall. If the oor
surface is too reective, it will interfere with the Robot navigation system and it may have difculty
locating the charging station.
3. There should not be any objects in the area around the charging station for 2 meters in front and 1
meter to each side. [Fig. 2]
4. Make sure the power cord is not tangled or stretched. If there is an excess, use the power cord tie
to store it neatly.
5. Check that the dust container is inside on Robot.
6. Press the two rotary brushes labelled L and R onto the brackets until they click into place. Pay
attention to the designation L and R on the device as well as the brushes. [Fig. 3]
7. Guide your Robot into the charging station to begin. During normal use, it will take approximately
4/5 hours to complete a full recharge.
NOTE: Before rst time use the batteries must be charged for at least 8 hours.
* Certain Models Only ** May vary according to model
GB

6
USING YOUR ROBOT CLEANER
Set Time
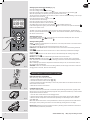
To use the timer, the rst time must be set on the remote control. [Fig. 8]
Press the time button.
Press the Left/Right buttons to select the current day.
Press the Play/Pause button to set the day.
The hours will then start fashing. Press the Up/Down buttons to set the hour.
Press the Left/Right buttons to select the minutes.
Press the Up/Down buttons to set the minutes.
Press the Left/Right buttons to select the minutes.
Press the Up/Down buttons to set the minutes.
Press the Play/Pause button to set the time.
An audible signal is given from the robot signifying that the time has been set.
If the audible signal is not given, press the ‘AUTO’ button on the robot, then press the time button
on the remote control.
Power On
1. Press the ON/OFF power switch on the bottom robot. [Fig. 9]
2. Press the on/ standby button on the device or the start/ pause button on the remote control to start
the cleaning process. [Fig. 10]
In standby mode, the LED is off. To activate the vacuum robot press the on/ standby button on the
device or the start/ pause button on the remote control.
When the battery level is low, the robot automatically returns to the charging station. [Fig. 11]
Remote Control Setup
Open the battery compartment on the back of the remote control. Insert two AAA / LR03 batteries into
the battery compartment. [Fig. 4] Observe the correct polarity (+/-).
Charging the battery
Switch on the vacuum robot with the On/Off switch on the bottom ( I ). [Fig. 9] Set it down in front of
the charging station.
Press the on/ standby switch on the vacuum robot or the charging base button on the remote control
and then immediately the charging station button. Make sure the robotic vacuum cleaner is moving to
the charging station. [Fig. 5]
NOTE: Make sure that the charging contacts of the robot vacuum cleaner and charging base are not
dirty. Clean the contacts if necessary.
It is normal for the charging base and vacuum cleaner to become warm during charging.
Remove the water tank before charging the robot vacuum cleaner.
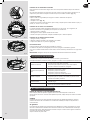
When the battery is charging, the on/ standby switch LED ashes blue. If the battery is charged, the
LED is on permanently. [Fig. 6]
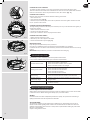
LED indicator
LED COLOR
CONDITION
PEMANENTLY BLUE
Battery is fully charged
BLUE FLASHING
During charging
INDICATOR LIGHT OFF
Product is swithced off
PEMANENTLY RED
Error
Battery
Over time the capacity of your robot battery will diminish and it will need to be replaced. A replacement
battery can be purchased from an approved Hoover retailer. Only use genuine Hoover spares and
accessories.
Removal and replacement
Ensure the robot is switched OFF.
Locate the battery compartment cover on the underside of the robot and remove the two screws.
Remove the battery from the compartment and disconnect the connector.
Ret a new battery and reconnect the connector. Pay attention to correct alignment of the connector.
Ret the battery cover and the two screws. [Fig. 7]
* Certain Models Only ** May vary according to model
GB
Fig. 5
Fig. 4
Fig. 7
Fig. 6
Fig. 8
Fig. 9
Fig. 11
Fig. 10

7
Setting up the Cleaning Schedule [Fig. 12]
Press the schedule button.
Press the Left/Right buttons to select a day.
Press the Up/Down buttons to select or deselect that day, several days can be selected.
When all required days are selected, press the Play/Pause button to set.
The hours will then start ashing. Set the time you want to start the scheduled cleaning. Press the Up/
Down buttons to set the hours.
Press the Play/Pause button to set the hours.
The minutes will then start ashing.
Press the Up/Down buttons to set the minutes.
Press the Play/Pause button to set the minutes.
An audible signal is given from the robot signifying that the schedule has been set.
If the audible signal is not given, press the ‘AUTO’ button on the robot, then press the schedule
button on the remote control.
The LED of the control lamp ashes. At the set time, the cleaning process starts. To deactivate the
start time, press the Schedule button for approx. 3 seconds. The Schedule symbol in the display of
the remote control turns off.
Setting Power Level
Press POWER LEVEL button on the remote control to select the desired power level. Choose
between Normal Power and Turbo Power .
Setting Cleaning Mode
AUTO : Press the on/ standby button on the device or the start/ pause button on the remote control
to start the cleaning process.
Robot will automatically choose the best cleaning mode to clean you room.
PARALLEL: Press MODE button on the remote control for the robot to start cleaning under this
mode .
SPOT: Press MODE button on the remote control. It cleans a intensively conned area following a
circular path .
EDGE: Press MODE button on the remote control, It will automatically start cleaning along walls,
around furniture etc .
MANUAL: The Robot can be controlled using the arrows on the remote control.
RETURN TO BASE: Press the button on the remote control to send the robot to the charging
base. This mode can be activated during any cleaning cycle and the robot will automatically return to
the charging base.
When a cleaning cycle has been completed or the Robot’s battery is low, the robot will also return to
the charging base automatically.
WARNING: If there are obstacles in the room being cleaned, the robot might not be able to reach the
charging base. In this case, take the robot manually.
MAINTAINING YOUR ROBOT CLEANER
EMPTYING THE DUST CONTAINER
After vacuuming, remove the dust container.
1. Press the release button and pull it out. [Fig. 13]
2. Hold the dust container over a dust bin. [Fig. 14]
3. Use the cleaning brush when necessary to remove any excess dust from the internal surface of the
dust container or ter surface.
4. Ret the dust container to the Robot.
CLEANING THE FILTERS
The robot is tted with a pre-motor lter. To maintain optimum cleaning performance, regularly clean
the lter cover, the pre-motor lter and the sponge lter. They should be cleaned every 5 dust container
empties and should not be washed.
1. Turn the robot off and remove from the charging station.
2. Press the dust container release button and remove the dust container from the Robot. [Fig. 13]
4. Remove all lter components and clean them separately. The assembly is done in reverse
order. [Fig. 16]
Make sure, that the lter insert is correctly assembled. To ensure this, press the shorter side wall into
the tting rst, before pushing in the lter on the other sides by pressing down on the edges.
IMPORTANT: Regularly check and maintain the lters by following the lter maintenance instructions.
This will maintain your Robot’s performance.
Fig. 12
Fig. 13
Fig. 14
Fig. 15
Fig. 16
* Certain Models Only ** May vary according to model
GB

8
CLEANING ANTI FALL SENSORS
To maintain the safe operation of your robot it is important to keep the Anti fall sensors clean.
There are 3 sensors are located on the underside of the robot. Turn the robot upside down and clean
them with a soft brush to remove any accumulation of dust, dirt or debris. [Fig. 17]
CLEANING THE AGITATOR
Regularly clean the agitator to maintain maximum cleaning performance.
1. Turn the Robot off.
2. Turn the Robot over. [Fig. 18]
3. Press the clips on the sole plate, remove the cap and then remove the agitator. Remove hair and
lint, etc. by hand or with a brush.
CLEANING THE EDGE SIDE BRUSHES
The edge cleaning brushes can be easily worn from heavy use so you should check them regularly to
monitor their condition.
1. Switch the Robot off and turn it over.
2. Unclip the two edge side brushes.
3. Use a pair of scissors to remove any trapped hair or debris.
CLEANING THE DRIVE WHEELS
1. Switch the Robot off and turn it over.
2. Remove any dirt or hair trapped in the wheels.
3. Clean the wheels with a dry cloth. [Fig. 19]
IMPORTANT NOTICE
Only use approved replacement parts for your Robot.
Using parts not validated by Hoover are dangerous and will invalidate your guarantee.
If the Robot will not to be used for several months, please remove the batteries and store in cool a dry
location.
IMPORTANT: Always make sure your device is switched off before changing.
IMPORTANT INFORMATION
Hoover Spares and Consumables
Always replace parts with genuine Hoover spares. These are available from your local Hoover dealer
or direct from Hoover. When ordering parts always quote your model number.
Quality
Hoover’s factories have been independently assessed for quality. Our products are made using a
quality system which meets the requirements of ISO 9001.
Your Guarantee
The guarantee conditions for this appliance are as dened by our representative in the country in
which it is sold. Details regarding these conditions can be obtained from the dealer from whom the
appliance was purchased. The bill of sale or receipt must be produced when making any claim under
the terms of this guarantee.
Subject to change without notice.
TROUBLESHOOTING
The following is a list of commonly encountered problems and solutions.
If any of these problems persist contact your local Hoover representative.
The Robot does not work
• Robot requires attention.
• Check that the Robot is switched on.
• Check that the dust container, filter are clean.
• Check if the Robot needs to be charged.
Cleaning power is weak
• Turn power off and empty dust container.
• Check and clean the filter and motor.
• Check and clean the Floor Brushes.
• Check and clean the sensors.
• Check and clean the drive wheels.
The Robot is very noisy
while cleaning
• Clean the dust container and filter.
• Check the brushes and drive wheels for dirt and debris.
The Robot does not
automatically charge
• Make sure there are no barriers between the Robot and the
charger station.
Robot is trapped
• The Robot will attempt to free itself but in some cases assist
the Robot manually.
Fig. 19
Fig. 18
Fig. 17
GB

9
INSTRUCCIONES PARA UN USO SEGURO
Este aparato solo debe utilizarse para la limpieza doméstica, como se describe en este manual
de usuario. Asegúrese de haber comprendido todo el contenido de este manual antes de poner
en funcionamiento el aparato.
Apague y quite el cargador de la toma de corriente antes de limpiar el aparato o de efectuar
cualquier operación de mantenimiento.
Este aparato puede ser usado por niños de 8 años en adelante y personas con capacidades
físicas, sensoriales o mentales reducidas o falta de experiencia y conocimiento bajo supervisión
y con una explicación de las instrucciones con respecto al uso del aparato de manera segura y
que comprendan los riesgos implicados. Los niños no deben jugar con el aparato. Los niños no
deben limpiar ni dar mantenimiento sin supervisión.
Si el cable de alimentación está dañado, deje de utilizar el aparato inmediatamente. Para evitar riesgos
de seguridad, el cable de alimentación sólo puede ser cambiado por un especialista del servicio técnico
de Hoover.
Si el área a limpiar es un balcón o escaleras, debe utilizarse una barrera física para impedir la
entrada al balcón o las escaleras y garantizar un funcionamiento seguro. Mientras el Robot está
limpiando, se debe vigilar a los niños pequeños y las mascotas.
Conserve el aparato siempre en interiores. No utilizar el aparato en exteriores ni exponerlo a la
intemperie, humedad o fuentes de calor (horno, chimenea, piso mojado).
No exponer el Robot o sus accesorios a calor o frío excesivo;(mantenerlo entre 0-30 grados).
No cuelgue el Robot ni utilice ningún accesorio si se ha caído, dañado, dejado a la intemperie o
mojado.
Nunca desenchufe ni tire del adaptador tirando del cable de conexión.
No lo utilice para limpiar escaleras.
Recarga de las baterías
Utilice únicamente el cargador original suministrado con el aparato.
Controle que el voltaje de la corriente eléctrica sea el mismo que el indicado en el cargador.
Nunca cargue las baterías a una temperatura superior a 30ºC o inferior a 0ºC.
Enchufe el cargador suministrado con este electrodoméstico en una toma de corriente adecuada.
Bajo condiciones de uso excesivo o temperatura extrema, pueden producirse fugas de las celdas de
la batería. Si el líquido entra en contacto con la piel, lávela rápidamente con agua. Si el líquido entra
en contacto con los ojos enjuáguelos de inmediato y de forma continuada con agua limpia durante un
mínimo de 10 minutos. Solicite atención médica.
Es normal que el cargador esté caliente al tacto mientras se está cargando.
Utilice únicamente accesorios, consumibles o repuestos recomendados o distribuidos por Hoover.
No debe aspirar objetos duros o alados, cerillas, ceniza, colillas u otros objetos similares.
No debe pulverizar ni recoger con el aparato líquidos inamables, productos de limpieza,
aerosoles u otros vapores.
No debe seguir utilizando el electrodoméstico o el cargador si parece estar defectuoso.
Servicio Técnico de Hoover: Para garantizar el funcionamiento seguro, ecaz y duradero del
aspirador, recomendamos que las tareas de mantenimiento sean realizadas exclusivamente por
técnicos autorizados del servicio Técnico de Hoover.
No debe emplear el aparato para limpiar personas o animales.
No sustituya las baterías del Robot con baterías no recargables.
Si no se va a utilizar el Robot durante un largo periodo de tiempo (varias semanas), desconecte
la base de carga del suministro eléctrico.
Extracción de las baterías por nalización de la vida útil
Si se debe desechar el aparato, primero es necesario extraer la batería. Cuando extraiga la
batería, el electrodoméstico debe estar desconectado de la corriente eléctrica. Elimine la batería de
manera segura. Haga funcionar el electrodoméstico hasta que se detenga debido a que la batería
esté totalmente descargada. Las baterías usadas deben llevarse a un punto de reciclaje y no deben
desecharse con los residuos domésticos. Para quitar la batería, contacte con el Servicio Técnico de
Hoover o siga las instrucciones presentes.
* Sólo para algunos modelos ** Puede variar dependiendo del modelo
ES

10
CONTENIDO DE LA CAJA
Robot aspirador Base de Carga Control a distancia
Adaptador Cepillo para limpieza de rincones (2 piezas) Paquete de ltros
Filtro adicional (1 pieza)
Batería AAA (2 piezas) Cepillo para limpieza
Desenchufe el cargador y apague el Robot. Vuelque el Robot y colóquelo en una supercie nivelada.
Retire los tornillos y la tapa del compartimento de las pilas. Extraiga el paquete de baterías.
[Fig. 7]
NOTA: Si llega a experimentar problemas al desmontar el aspirador o para obtener más
información sobre el funcionamiento, la recuperación y el reciclaje de este electrodoméstico,
contacte con su Ayuntamiento o con el servicio de recogida de residuos domésticos de su zona.
ANTES DE SU USO: NOTAS IMPORTANTES
Lea atentamente la siguiente información antes de utilizar el Robot o sus accesorios.
No desmonte el robot y no intente repararlo usted mismo.. En caso de fallos, contacte con el Servicio Postventa de Hoover para recibir asesoramiento
profesional.
Escaleras: El Robot utiliza sensores que impiden su caída en peldaños, escaleras o bordes. En ciertas situaciones, los sensores pueden resultar
confundidos.
El Robot no puede detectar peldaños inferiores a 8 cm de altura, Los peldaños de altura inferior a 8 cm pueden causar la caída de Robot. Si está
disponible, utilice la Barrera Virtual, para evitar que el Robot se caiga.
Las supercies altamente reectantes o muy oscuras, utilizadas en algunos peldaños o escaleras, tales como vidrio o cerámica pulida, pueden causar
la caída de Robot.
Si está disponible, utilice la Barrera Virtual o coloque una alfombra en el peldaño más bajo para evitar la caída del Robot.
Debe evitarse el uso del Robot en entresuelos, descansillos de escalera o áreas elevadas sin bordes. Si está disponible, utilice la Barrera Virtual,
para evitar que el Robot se introduzca en tales áreas.
Uso de la batería: El Robot está accionado por baterías recargables de ion-litio de alta capacidad. Estas baterías recargables están garantizadas por
un período de 6 meses, siempre que su mantenimiento y operación sean efectuados de acuerdo con las instrucciones de este manual de usuario.
En caso de una reducción signicativa del rendimiento del Robot, el Servicio Técnico de Hoover puede proporcionarle baterías de repuesto.
Para su robot, utilice sólo repuestos autorizados. El uso de piezas de recambio no autorizadas por Hoover son peligrosas e invalidarán la garantía.
Utilice únicamente la estación de carga y el adaptador de corriente suministrados para recargar el Robot. El uso incorrecto de la base de carga o del
adaptador de corriente es peligroso e invalida su garantía.
El Medio Ambiente:
El símbolo que puede verse en el producto indica que este no puede tratarse como residuo doméstico. En su lugar, se debe entregar en un
punto de recogida de electrodomésticos para el reciclaje de equipos eléctricos y electrónicos. La eliminación debe llevarse a cabo según
los reglamentos medioambientales locales sobre eliminación de residuos. Para más información sobre el tratamiento, la recuperación y el
reciclaje de este aparato, ponte en contacto con tu Ayuntamiento, el servicio de recogida de residuos domésticos o con el establecimiento
donde hayas comprado el producto.
Este electrodoméstico cumple con las Directivas Europeas 2014/35/UE, 2014/30/UE y 2011/65/
UE. Para recibir una copia de la
declaración de conformidad, contacte con el fabricante a través del sitio web: www.hoover.es
CANDY HOOVER GROUP Srl Via Privata Eden Fumagalli, 20861 Brugherio (MB) Italy

12
4
9
1717
18
10
1
14
12
11
13
15
19
16
3
5
20
21
22
23
24
25
30
31
29
28
26
27
18
16
6
7
8
11
INFORMACIÓN SOBRE EL APARATO
1 Interruptor de encendido/espera con
LED de encendido
2 Amortiguador frontal
3 Pulsador desbloqueo contenedor
recolector polvo
4 Depósito de suciedad
5 Malla del ltro
6 Filtro Epa
7 Filtro de la esponja de extracción
8 Portaltros
9 Clavija de CC, robot aspirador
10 Contactos de carga
11 Base de Carga
12 Adaptador
13 Conector de CC, base de carga
14 Agitador
15 Rueda propulsora
16 Cepillo para limpieza de bordes
17 Contactos de carga del robot
18 Sensor anticaída
19 Interruptor de encedido/apagado (on/
off)
* Sólo para algunos modelos ** Puede variar dependiendo del modelo

12
12
4
9
1717
18
10
1
14
12
11
13
15
19
16
3
5
20
21
22
23
24
25
30
31
29
28
26
27
18
16
6
7
8
Fig. 3
Fig. 2
Fig. 1
20 Transmisor de diodo
21 Poder de Succión
22 Botón adelante
23 Botón izquierdo
24 Botón de programación
25 Botón de base de carga
26 Botón de conguración del horario
27 Botón retroceder
28 Botón derecha
29 Botón de inicio/pausa
30 Botón de modo de potencia
31 Display
INFORMACIÓN SOBRE SU ROBOT
PREPARACIÓN DEL ROBOT
EMBALAJE
No tirar el embalaje del Robot. Puede que se requiera la validez de su garantía en el futuro.
Al desembalar el robot y sus accesorios, deje fuera del alcance de bebés, niños y animales las bolsas
plásticas, para evitar peligros de asxia.
Para usarlo por primera vez, cargue el aspirador durante 8 horas. [Fig. 1]
A partir de la segunda carga, tardará 4-5 horas en cargarse por completo.
No exponga el adaptador del Robot a temperaturas inferiores a 0°C o mayores de 30°C porque podría
dañar la batería.
El adaptador debe conectarse únicamente a una toma de red estándar.
BATERÍA
Para unas prestaciones óptimas de la batería, se recomienda mantener las baterías de su Robot a plena
carga. Cuando el Robot no está en uso debe dejarse conectado al adaptador. El robot tiene un sistema
de carga inteligente. que evita que las baterías se sobrecarguen.
Para evitar accidentes, asegurarse de que todas las personas presentes en la estancia son conscientes
de la presencia del Robot.
Conguración de la estación de carga
Antes del uso, elimine los obstáculos que pudiesen encontrarse en el itinerario del Robot. Preste
atención a:
• Los objetos que puedan volcarse con facilidad.
• Los bordes de las alfombras en los que pueda agarrarse.
• Cortinas que lleguen hasta el suelo y manteles.
• Fuentes de calor o artículos inamables.
• Cables y cables de alimentación
• Objetos frágiles.
Enchufe el adaptador de corriente y conéctelo a la base de carga. [Fig. 2]
1. Asegúrese de que el cable de alimentación no esté atrapado debajo de la base de carga.
2. Sitúe la base de carga en un suelo no reectante y plano, preferiblemente contra una pared. Si la
supercie del piso es muy reectante, interferirá con el sistema de navegación del robot, el cual puede
hallar dicultades en localizar la base de carga.
3. No debería haber ningún objeto en el área cercana a la base de carga en 2m por delante y 1m. a cada
lado. [Fig. 2]
4. Asegúrese de que el cable de alimentación no esté enredado ni tenso. Si su longitud es excesiva,
utilizar la presilla de amarre del cable de alimentación para guardarlo de manera ordenada.
5. Compruebe que el depósito de polvo está dentro del Robot.
6. Presione los dos cepillos rotatorios etiquetados L y R en los soportes hasta que encajen en su lugar.
Preste atención a la designación L y R en el dispositivo, así como a los cepillos. [Fig. 3]
7. Guíe a su robot a la estación de carga para comenzar. Durante un uso normal, una recarga completa
se efectuará en aproximadamente 4/5 horas.
NOTA: Antes del primer uso, las baterías deben cargarse durante al menos 8 horas.
* Sólo para algunos modelos ** Puede variar dependiendo del modelo
ES

13
USO DEL ROBOT
Conguración del tiempo
Para utilizar el temporizador, la primera vez debe ajustarse en el mando a distancia. [Fig. 8]
Pulse el botón de tiempo.
Pulse los botones Izquierda/Derecha para seleccionar el día actual.
Pulse el botón Reproducir/Pausa para ajustar el día.
Las horas empezarán a parpadear. Pulse los botones Arriba/Abajo para ajustar la hora.
Pulse los botones Izquierda/Derecha para seleccionar los minutos.
Pulse los botones Arriba/Abajo para ajustar los minutos.
Pulse los botones Izquierda/Derecha para seleccionar los minutos.
Pulse los botones Arriba/Abajo para ajustar los minutos.
Pulse los botones Reproducir/Pausa para ajustar la hora.
El robot emite una señal audible que indica que la hora se ha jado.
Si no oye la señal audible, pulse el botón ‘AUTO’ del robot, después pulse el botón de tiempo en
el mando a distancia.
Encendido
1. Presione el interruptor de encendido y apagado de la parte inferior del robot. [Fig. 9]
2. Pulse el botón de encendido/pausadel aparato o el botón de inicio/pausa del mando a distancia
para iniciar el proceso de limpieza. [Fig. 10]
En el modo de espera, la luz LED está apagada. Para activar el robot aspirador, pulse la tecla de
encendido/pausa del aparato o la tecla de inicio/pausa del mando a distancia.
Cuando la carga de la batería es baja, el Robot vuelve a la base de carga automáticamente. [Fig. 11]
Conguración del mando a distancia
Abra el compartimento de pilas ubicado en la parte posterior del mando a distancia. Inserte dos pilas
AAA / LR03 en el compartimento de pilas. [Fig. 4] Observe la polaridad correcta (+/-).
Carga de la batería
Encienda el robot aspirador con el botón de encendido y apagado ubicado en la parte inferior ( I ).
[Fig. 9] Colóquelo frente a la estación de carga.
Presione el botón de encendido/espera del robot aspirador o el botón de base de carga en el mando a
distancia y, a continuación, inmediatamente el botón de la base de carga. Asegúrese de que el robot
aspirador se desplaza hacia la base de carga. [Fig. 5]
NOTA: Asegúrese de que los contactos de carga del robot aspirador y la base de carga no estén sucios.
Limpie los contactos si es necesario.
Es normal que la base de carga y el aspirador se calienten durante la carga.
Retire el depósito de agua antes de cargar el robot aspirador.
Cuando la batería se está cargando, la luz LED del interruptor de encendido/pausa parpadea en color
azul. Si la batería está cargada, la luz LED está encendida permanentemente. [Fig. 6]
Indicador LED
COLOR LUZ LED
CONDICIÓN
PEMANENTEMENTE AZUL
La batería está completamente cargada
PARPADEO AZUL
Durante la carga
LUZ LED DE APAGADO
El producto está desconectado
PEMANENTEMENTE ROJO
Error
Batería
Con el tiempo, la capacidad de la batería de su robot disminuirá y tendrá que ser reemplazada. Se
puede comprar una batería de repuesto en un Servicio Técnico Ocial de Hoover. Solo use repuestos y
accesorios genuinos de Hoover.
Desmontaje y reemplazo
Asegúrese de que el Robot esté apagado.
Localice la tapa del compartimento de la batería en la parte inferior del robot y quite los dos tornillos.
Retire la batería del compartimento y desconecte el conector.
Coloque una batería nueva y conecte el conector de nuevo. Preste atención a la correcta alineación del
conector.
Vuelva a colocar la tapa de la batería y los dos tornillos. [Fig. 7]
* Sólo para algunos modelos ** Puede variar dependiendo del modelo
ES
Fig. 5
Fig. 4
Fig. 7
Fig. 6
Fig. 8
Fig. 9
Fig. 11
Fig. 10

14
Conguración de establecimiento de programación de limpieza. [Fig. 12]
Pulse el botón de programación.
Pulse los botones Izquierda/Derecha para seleccionar un día.
Pulse los botones Arriba/Abajo para seleccionar o deseleccionar ese día, se pueden seleccionar varios
días.
Cuando se hayan seleccionado todos los días necesarios, pulse el botón Reproducir/Pausa para ajustar.
Las horas empezarán a parpadear. Establezca la hora a la que quiere empezar la limpieza programada.
Pulse los botones Arriba/Abajo para ajustar la hora.
Pulse los botones Reproducir/Pausa para ajustar las horas.
Los minutos empezarán a parpadear.
Pulse los botones Arriba/Abajo para ajustar los minutos.
Pulse los botones Reproducir/Pausa para ajustar los minutos.
El robot emite una señal audible que indica que la programación se ha jado.
Si no oye la señal audible, pulse el botón ‘AUTO’ del robot, después pulse el botón de programación
en el mando a distancia.
El LED de la lámpara de control parpadea. A la hora jada, se inicia el proceso de limpieza. Para
desactivar la hora de inicio, pulse el botón de pro
gramaci
ón durante aproximadamente 3
segundos.. El símbolo de programación de la pantalla del mando a distancia se apaga.
Ajuste del nivel de potencia
Pulse el Botón de NIVEL D
E POTEN
CIA del mando a distancia para seleccionar el nivel adecuado.
Elija entre la potencia norm
al
y la turbo
.
Conguración del modo de limpieza
AUTO : Pulse el botón de encendido/pausadel aparato o el botón de inicio/pausa del mando a
distancia para iniciar el proceso de limpieza.
El Robot seleccionará automáticamente el modo óptimo de limpiar su habitación.
PARALELO: Pulse el botón MODE del mando a distancia para que el robot empiece a limpiar con
este mo
do
.
FOCUS: Pulse el botón MODE del mando a distancia. Limpia un área connada siguiendo un patrón
circular .
BORDES: Pulse el botón MODE del mando a distancia, empezará a limpiar automáticamente por las
paredes, alrededor de los
muebles
, etc. .
MANUAL: el robot se puede controlar con las echas del mando a distancia.
VOLVER A LA BASE: Pulse el botón
d
el mando a distancia para enviar el robot a la base
de carga. Este modo puede activarse durante cualquier ciclo de limpieza y el robot volverá
automáticamente a la base de carga.
Cuando se haya completado un ciclo de limpieza o la batería del robot esté baja, el robot también
volverá a la base de carga automáticamente.
ADVERTENCIA: Si hay obstáculos en la habitación que se está limpiando, es posible que el robot no
pueda llegar a la base de carga. En este caso, desplace el robot manualmente.
MANTENIMIENTO DEL ROBOT
VACIADO DEL DEPÓSITO
Después de aspirar, retire el depósito de polvo.
1. Presione el botón de liberación y sáquelo. [Fig. 13]
2. Sostenga el depósito de polvo sobre una papelera. [Fig. 14]
3. Utilice el cepillo de limpieza cuando sea necesario para eliminar el exceso de polvo de la supercie
interna o de la supercie de la boquilla.
4. Vuelva a colocar el contenedor de polvo en el robot.
LIMPIEZA DE FILTROS
El robot está equipado con un ltro premotor. Para mantener un rendimiento de limpieza óptimo, limpie
regularmente la cubierta del ltro, el ltro del premotor y el ltro de esponja. Deben limpiarse cada 5
veces que se vacía el contenedor de polvo y no deben lavarse.
1. Apague el Robot y quítelo de la base de carga.
2. Pulsar el botón de desbloqueo del depósito de polvo y extraer el depósito de Robot. [Fig. 13]
4. Retire todos los componentes del ltro y límpielos por separado. El montaje se realiza en orden
inverso. [Fig. 16]
Asegúrese de que el cartucho ltrante esté correctamente montado. Para asegurarse de ello, presione
primero la pared lateral más corta en el accesorio, antes de introducir el ltro por los otros lados
presionando los bordes.
IMPORTANTE: Controle periódicamente y mantenga la integridad de los ltros siguiendo las
instrucciones de mantenimiento de los ltros que aparecen a continuación. Esto mantendrá las
prestaciones del Robot.
Fig. 12
Fig. 13
Fig. 14
Fig. 15
Fig. 16
* Sólo para algunos modelos ** Puede variar dependiendo del modelo
ES

15
LIMPIEZA DE LOS SENSORES ANTICAÍDA
Para mantener el funcionamiento seguro de su robot es importante mantener limpios los sensores
anticaída.
Hay 3 sensores situados en la parte inferior del robot. Ponga el robot boca abajo y límpielos con un
cepillo suave para eliminar cualquier acumulación de polvo, suciedad o residuos. [Fig. 17]
Limpieza del rodillo
Limpie el rodillo con regularidad para asegurar un máximo rendimiento de limpieza.
1. Apague el Robot.
2. Vuelque el robot. [Fig. 18]
3. Presione los clips de la placa de la base, quite la tapa y después quite el rodillo. Elimine el pelo y la
pelusa, etc. a mano o con un cepillo.
LIMPIEZA DE LOS CEPILLOS LATERALES
Los cepillos laterales pueden desgastarse fácilmente por un uso intenso, por consiguiente, es
necesario controlarlos con regularidad para comprobar sus condiciones.
1. Apague el Robot y vuélquelo.
2. Desenganche los dos cepillos laterales de los bordes.
3. Utilizar unas tijeras para eliminar cualquier cantidad de pelo o residuo atrapados.
LIMPIEZA DE LAS RUEDAS PROPULSORAS
1. Apague el Robot y vuélquelo.
2. Eliminar cualquier suciedad o pelo atrapado en las ruedas.
3. Limpiar las ruedas con un paño seco. [Fig. 19]
NOTA IMPORTANTE
Utilice únicamente piezas de repuesto aprobadas en su Robot.
La utilización de piezas no homologadas por Hoover es peligrosa e invalidará su garantía.
Si no se va a utilizar el Robot durante varios meses, retire las baterías y almacénelo en un lugar fresco
y seco.
IMPORTANTE: Asegúrese siempre de que el aparato está desconectado antes de cambiar.
INFORMACIÓN IMPORTANTE
Piezas de repuesto y consumibles de Hoover
Utilice siempre piezas de repuesto originales de Hoover. Puede adquirirlas a través de su
ServicioTécnico de Hoover. Cuando realice pedidos de piezas, indique siempre el número de modelo
que posee.
Calidad
Las fábricas de Hoover han sido sometidas a inspecciones de calidad independientes. Nuestros
productos se fabrican de conformidad con un sistema de calidad que cumple los requisitos de la
norma ISO 9001.
Su garantía
Las condiciones de garantía para este aparato vienen denidas por nuestro representante en el país
de venta. Puede obtener los detalles acerca de estas condiciones en el establecimiento donde haya
comprado este aparato. Debe mostrarse la factura de compra o el recibo al hacer alguna reclamación
en virtud de las condiciones de garantía.
Sujeto a cambios sin previo aviso.
SOLUCIÓN DE PROBLEMAS
A continuación se expone una lista de problemas comunes y sus soluciones.
Si cualquiera de dichos problemas persiste, póngase en contacto con su representante local de Hoover.
El Robot no funciona
• El Robot requiere supervisión.
• Controle que el Robot esté conectado.
• Comprobar que depósito de polvo y filtro están limpios.
• Controle si el Robot necesita ser recargado.
La potencia de limpieza es
baja
• Apague el aparato y vacíe el contenedor de polvo.
• Comprobar y limpiar filtro y motor.
• Comprobar y limpiar los cepillos.
• Comprobar y limpiar los sensores.
• Comprobar y limpiar las ruedas propulsoras
El Robot es muy ruidoso
durante la limpieza
• Limpiar el contenedor de polvo y el filtro.
• Comprobar que los cepillos y las ruedas propulsoras están
exentos de suciedad y residuos.
El Robot no se carga
automáticamente
• Asegurarse de que no hay obstáculos entre el Robot y la
base de carga.
El robot está atrapado
• El Robot intentará liberarse por sí mismo, pero en algunos
casos hay que prestarle asistencia manual.
Fig. 19
Fig. 18
Fig. 17
ES

®
PRINTED IN P.R.C.
48031327/01
-
 1
1
-
 2
2
-
 3
3
-
 4
4
-
 5
5
-
 6
6
-
 7
7
-
 8
8
-
 9
9
-
 10
10
-
 11
11
-
 12
12
-
 13
13
-
 14
14
-
 15
15
-
 16
16


Hoover HGO310 011 Manual de usuario
- Categoría
- Aspiradoras roboticas
- Tipo
- Manual de usuario
- Este manual también es adecuado para
en otros idiomas
- English: Hoover HGO310 011 User manual
Artículos relacionados
-
Hoover HGO330HC 011 Manual de usuario
-
-
Hoover RBT001 011 Manual de usuario
-
-
-
-
-
-
-
Hoover RBC011 011 Manual de usuario
Otros documentos
-
Silvercrest SSRA1 Manual de usuario
-
Solac AA3400 ECOGENIC El manual del propietario
-
Sharper Image Self-Emptying Robot Vacuum with HEPA Filter El manual del propietario
-
ECOVACS DA5G Manual de usuario
-
Sharper Image DD4G-KTA El manual del propietario
-
Palson DIABOLO Operating Instructions Manual
-
Moneual MBOT500 El manual del propietario
-
Vileda Relax Plus El manual del propietario