

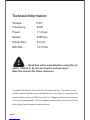
Technical Information
Copyright© 2010by ACL Group (Intl) Ltd All rights reserved. This manual or any
artwork contained herein must not be reproduced in any shape or form without the
express written consent of ACL Group (Intl) Ltd. Diagrams within this manual may
not be drawn proportionally. Due to continuing improvements, actual product may
differ slightly from the product described herein.
Read this entire manual before using this pr-
oduct. Failure to do so can result in serious injury.
Save this manual for future reference.
Page 1
Voltage: 120V
Frequency: 60Hz
Power: 1.1Amps
Speed: 3450rpm
Wheel Size: 6
"
x1/2
"
NW/GW: 13/15 lbs.

Page 2
1
2
3
4
5
6
7
8
9
10
11
12
13
14
15
16
17
18
19
20
21
22
23
24
25
26
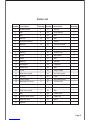
Part
Number Component
Description Part
Number Component
Description
Grinder Wheel
Bolt
Bolt
Washer
Eyeshield Bracket
Washer
Screw
Eyeshield
Bearing
Rotor
Stator
Bearing
Nameplate
Middle ring
Cover
Right Inner guard
winding
Wheel flange
Nameplate of wheel
Grinder Wheel
Nut
Right outer guard
Bolt
Square Neck Screw
Right tool rest
Washer
1
8
2
15
2
15
11
2
1
1
1
1
1
1
2
1
2
4
4
1
1
1
6
4
1
4
27
28
29
30
31
32
33
34
35
36
37
38
39
40
41
42
43
44
45
46
47
48
49
50
51
Washer
Work handle
Bolt
Bolt
Switch
Ground terminal
Washer
Bolt
Rubber Feet
Base plate
Bolt
Washer
Capacitor
Bolt
Plug & Cable
Left Inner guard
Nut
Left Outer guard
Left tool rest
Bolt
Cable adaptor
Bolt
Cable Block
Cable clip
Base
4
2
1
4
1
1
1
1
4
1
2
2
1
1
1
1
1
1
1
2
1
1
1
1
1
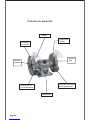
Parts List
Quantity Quantity


Please read carefully all instructions within this manual. Failure to follow all safety warn-
ings can result in serious personal injury. The term “Power Tool” in all of the following
warnings refers to your main operated (corded) or battery operated (cordless) power
tool
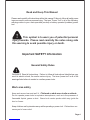
Important SAFETY Information
This symbol is to warn you of potential personal
injury hazards. Please read carefully the notes along side
this warning to avoid possible injury or death.
General Safety Rules
WARNING! Read all instructions. Failure to follow all instructions listed below may
result in electric shock, fire and/or serious injury. The term “power tool” in all of the
warnings listed refers to corded or cordless power tools.
Work area safety
Read and Keep This Manual
Keep children and bystanders away while operating a power tool. Distractions can
cause you to lose control.
Keep work area clean and well lit. Cluttered or dark areas invite accidents.
Do not operate power tools in explosive atmospheres, such as in the presence of
flammable liquids, gases or dust. Power tools create sparks which may ignite the
dust or fumes.
Page 4

Electrical safety
Before use. ensure that the power outlet you are using matches the plug on your
power tool and that the voltage of the outlet matches that of your power tool.
Only use grounded extension cords with power tools fitted with 3 pin plugs and if
using outdoors ensure any extension cord is suitable for outdoor use.
Always try to avoid body contact with grounded surfaces, such as radiators, cooking
ranges and any other fixed appliance with metal surfaces.
Do not expose your power tool to wet or damp conditions and NEVER use in rain.
Check regularly the power cord of your machine and any extension cord that you are
using for damage.
Do not carry or pull the machine with the power cord.
Ensure the cord is clear from hot surfaces, oil or sharp objects.
Personal safety
Never use your machine whilst under the influence of alcohol, drugs or medication.
Tiredness can often cause accidents, stay alert.
Never use your machine without the correct guards in place.
Always use ANSI approved eye protection and dust mask. Non slip safety shoes and
hearing protectors should be worn at all times when using your power tool.
Ensure any dust collecting device supplied with your machine is connected correctly
before use.
Ensure all loose clothing, long hair or jewelry is kept clear of the machine.
Before plugging your machine into the power outlet ensure the machine is in the OFF
position and that all blades and accessories being used are secure.
Check that wrenches or adjusting keys have been removed. Any wrench or key left
attached to a moving part can result in injury.
Power tool use and care.
Keep your machine clean and well serviced at all times.
Never adjust or service any power tool before disconnecting from the mains electricity
supply.
Page 5

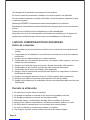
SAFTEY CHECK LIST
Before starting
1 Check that the power outlet matches your power tool plug.
2. Check voltage of power outlet, make sure it matches your power tool
3. Check that power cords are not damaged
4. Check that guards and clamps are secure and working.
5. Check that all wrenches, keys and accessories are clear.
6. Check that blades/cutting parts move freely
7. Check surrounding environment is clear.
8. Check the power tool is fixed securely to its work stand or bench
9. Check that no person under the age of 18 years old will use this tool.
10 Check all children are out of the work area.
11. Check you are working with the correct materials recommended for use with
this tool.
During Use
1. Do not reach across the machine.
2. Do not operate without the correct safety apparel.
3. Do not operate with loose clothing.
4. Keep all hands and limbs a safe distance from the wheels.
5. Ensure all clamps and guards are being used.
6. Do not grind materials not suitable for this machine.
7. Do not use in wet/damp conditions or locations.
8. Always use supports when working with long pieces of metal.
9. Always disconnect from the main power supply before making any adjustments to
this machine. ..
10. DO NOT LEAVE THIS MACHINE UNATTENDED WHILE CONNECTED TO THE
POWER SUPPLY
Always use the correct tool for the job.
Never force the tool to work harder than it is designed to do.
Never use your machine with broken parts such as switches, guide fences or leg stands.
ALWAYS keep your power tools away from children.
Keep cutting tools sharp to ensure less stress on the motor.
Replace damaged or dull blades.
Only have your power tool serviced by a qualified repair agent using manufacturers re-
commended parts.
Page 6

power tools any operator must have read and understood the manual and apply
their own caution and common sense when using this machine.
Following this guide will greatly reduce your risk of electric shock or injury.
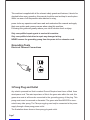
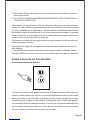
Grounding Tools
Electrical Powered Connections
3-Prong Plug and Outlet
Any electric powered tool that is marked Ground Required must have a fitted three
wired power cord. The main importance of this is the green wire within the cord, this
green wire must at all times be connected to the grounding prong of the plug. This
prong must never be removed or discarded. The green wire Must NEVER be conn-
ected to any other prong. The Three prong plug must only be connected to the power
supply through a three prong power outlet
The illustration above shows a three prong plug and outlet.
This machine is supplied with all the relevant safety guards and features, it should be
checked before every operation. this manual should be read and kept in a safe place .
Whilst we warn of all the possible risks attached to using,
Only use qualified repair agents to service this machine.
Only use qualified electrician to repair any damaged wiring.
NEVER remove the grounding prong from the power toll or extension cord.
Page7

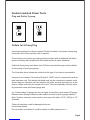
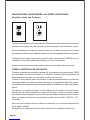
Outlets for 2-Prong Plug
Any electric powered tool that is marked “Double Insulated” only needs a two prong
connection and will be perfectly safe to operate.
These tools do not require grounding as they are fitted with an additional insulation
system internally that complies with all relevant electrical safety standards.
Unlike the three prong tools these tools CAN be connected through outlets suitable
for two prong or three prong plugs.
The illustration above shows the outlets that this type of tool can be connected to.
Any power tool marked “Grounding Required”, MUST only be connected to a three
wire extension cord. Only double insulated tools can be connected to twowire cords.
When using any extension cord the machine will suffer a power reduction due to the
drop in voltage caused by the length of the cord. This can be partially offset by selec-
ting extension cords with lower gauge wire.
e.g. Cords marked 14 gauge can carry a higher current than cords marked 16 gauge,
therefore when linking extension cords make sure each cord wire gauge matches.
Note: Outdoor extension cords used in must carry the letters “W-A” (USA)) or “W”
(Canada)
Check all extension cords for damage before use.
Avoid sharp objects.
Do not position cord where it could be subject to traffic passing over it.
Double Insulated Power Tools
Plug and Outlet, 2 prong
Page8

Turn on the grinder and wait until it reaches full speed before you start grinding.
Use the tool rest to keep the work piece steady. Keep a steady even pressure on the
work piece and keep moving it from side to side at even pace for smooth grinding and
to avoid uneven wheel wear. Do not push too hard because this may overheat the
motor and prematurely wear down the wheels, work slowly.
Note the original grind angle on the item you are sharpening/grindring and try to keep
the same angle. Make sure the grinding wheel always rotates down onto the object you
are grinding to avoid injury. Obtain a tray with water and place it next to the grinder to
dip your work to keep from overheating or burning as this will weaken the metal.
Maintenance
Grinding Wheel Care
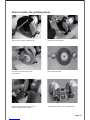
Wheel Replacement
WARNING: For your own safety, make sure switch is OFF and unplugged from the
power source before doing any maintenance or adjustments. Replace the power cord
immediately if it is cut, worn, or damaged in any way.
Under normal use, grinding wheels may become cracked, chipped, grooved or pack with
debris from materials being cut. If a wheel cracks or chips replace it immediately.
New wheels occasionally require dressing to remedy out of round conditions.
Operation
Always wear eye protection when using this or any other grinder.
If replacing a wheel make sure it is replaced with the same wheel and specs as the
existing wheel. Maintain the existing sequence of retaining hardware.
For your own safety make sure grinder is unplugged before attempting any repairs.
Your bench grinder can be used for polishing and buffing, you can obtain these wheels
from most hardware stores.
WARNING: The use of any other accessories is not recommended because it may result
in serious injury.
Page 9


Accessories list:
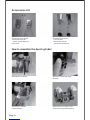
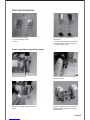
Remove the eye shield
protective sleeve
Always mount on a stable / level
surface (mounting holes provided)
How to assemble the bench grinder:
Accessories for eye shield
1.Screw set-screw, flat
washer, spring washer,nut
2.Eye shield
Accessories for tool rest
1. Tool rest part
2.Screw set-screw,flat
washer,star washer,knob
Assemble the eye shield Attach the tool rest and adjust
the knob
Page 11


Page 13
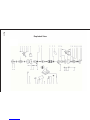
Terratek and/or it’s distributor has provided the parts list and assembly diagram as a
reference tool only. Neither Terratek or it’s distributor makes any representation or
warranty of any kind to the buyer that he or she is qualified to do any repairs or replace
any parts of this product. Terratek and it’s distributor expressly state that all repairs or
parts replacement should be done by certified or licensed technicians. The buyer as-
sumes all risk and liability arising out of his or her repairs or parts replacement to the
original product.
Please read the following carefully
LIMITED WARRANTY
This product is covered by a two year warranty from the date of purchase. If the product
is defective in workmanship or material and upon returning the product to its distributor/
dealer in its original packaging, the distributor will repair and/or replace it free of charge.
This warranty DOES NOT COVER normal wear, or any damage as a result of accidents,
misuse, abuse or negligence. Terratek Intl. obligations under this warranty shall be
limited to the repair and/or replacement of the product. Terratek Intl. is not responsible
for direct, indirect, or incidental damages. This warranty is void if the product or any
of its components are modified, altered, or in any way changed, or if the product is
used in a manner or with parts that are not recommended by Terratek Intl. To receive
a replacement power tool or requested warranty service, you must present proof of
purchase and return all original equipment packaged with the original product. The
replacement power tool will be covered by the limited warranty for the balance of the
two year period from the date of the original purchase. This warranty applies only to
the original purchaser and cannot be transferred.


Información técnica
Voltaje: 120V ~ 60Hz
Potencia: 1.1 Amps
Velocidad: 3450 rpm
Amano de muela: 6
"
x5/8
"
x1/2
"
Peso: 13/15 lbs
Page 15
Este manual debe leerse por completo antes
de utilizar este producto. Si no se hace así pueden sufrirse
lesiones graves. Guardar este manual para referencia futura.
Copyright© 2010 perteneciente al ACL Group (Intl) Ltd. Quedan reservados todos los
derechos. Este manual o cualquier material artístico incluido en el mismo no deberá
ser reproducido en cualquier versión o forma sin el permiso escrito expreso del ACL
Group (Intl) Ltd. Los diagramas que aparecen en este manual no podrán ser dibujados
de manera proporcional. Debido a mejoras continuas, el producto especificado puede
diferir ligeramente del producto descrito en el presente.

Page 16
1
2
3
4
5
6
7
8
9
10
11
12
13
14
15
16
17
18
19
20
21
22
23
24
25
26
27
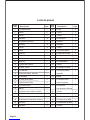
La rueda esmeril
Tornillo
Tornillo
Arendela
La grapa de protector
Arendela
Tornillo
Visera
Almacen
El rotor
Stator
Almacen
La placa del nombre
El anillo, centro
La cobertura
Protectora interna, derecha
El bobinado
El collar de la rueda
La placa de la rueda
La rueda esmeril
Manija
El protector de la rueda, derecho
Tornillo
Tornillo cuadrado
El descanso herramienta, derecha
Arendela
Arendela
1
8
2
15
2
15
11
2
1
1
1
1
1
1
2
1
2
4
4
1
1
1
6
4
1
4
4
28
29
30
31
32
33
34
35
36
37
38
39
40
41
42
43
44
45
46
47
48
49
50
51
El asa
Tornillo
Tornillo
El interruptor
La tierra
Arendela
Tornillo
Los pies de goma
La placa de la base
Tornillo
Arendela
El condensador
Tornillo
La clavija e el cable
Protectora interna,
izquierda
Manija
El protector de la
rueda, izquierda
El descanso
herramienta, izquierda
Tornillo
El adaptador de el cable
Tornillo
El bloque de el cable
La mordaza de el cable
La base
2
1
4
1
1
1
1
4
1
2
2
1
1
1
1
1
1
1
2
1
2
1
1
1
Lista de piezas
Pieza
num. Descripcion Cant. Pieza
num. Descripcion Cant.


Page 18
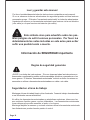
Información de SEGURIDAD importante
Este símbolo sirve para advertirle sobre los pos-
ibles peligros de sufrir lesiones personales. Por favor lea
detenidamente las notas incluidas en este aviso para evitar
sufrir una posible lesión o muerte.
Reglas de seguridad generales
¡AVISO! Lea todas las instrucciones. Si no se observan todas las instrucciones e-
numeradas a continuación podrán sufrirse sacudidas eléctricas, quemaduras o les-
iones graves. El término “herramienta motorizada” incluido en todos los avisos en-
umerados se refiere a herramientas motorizadas con cable o sin cable.
Seguridad en el área de trabajo
Leer y guardar este manual
No utilice las herramientas motorizadas en atmósferas explosivas, tales como las
que contienen líquidos, gases o polvos inflamables. Las herramientas motorizadas
crean chispas que pueden encender el polvo o los humos.
Mantenga alejados a menores y curiosos mientras utiliza la herramienta motorizada.
Las distracciones pueden hacerle perder el control.
Mantenga el área de trabajo limpia y bien iluminada. Áreas de trabajo desordenadas
o mal iluminadas causan accidentes.
Por favor lea detenidamente todas las instrucciones contenidas en este manual.
Si no se observan todas as advertencias de seguridad pueden sufrirse lesiones
personales graves. El término “herramienta motorizada” en todas las advertencias
siguientes se refiere a su herramienta motorizada que funciona vía la red eléctrica
(con cable) o a la que funciona vía baterías (sin cable).

Page 19
Seguridad eléctrica
Seguridad personal
Antes de usar, asegure que la toma de energía que utiliza coincide con el enchufe
incluido en su herramienta motorizada y que el voltaje de la toma coincide con el de
la herramienta motorizada.
Use solamente cables de extensión conectados a tierra con herramientas motorizadas
provistas de enchufes de 3 clavijas y si las usa en el exterior asegure que el cable de
extensión sea adecuado para uso externo.
Trate siempre de evitar contacto corporal con las superficies conectadas a tierra, tales
como las de radiadores, hornillas de cocinar y cualquier otro aparato fijo con superfi-
cies metálicas.
No exponga su herramienta motorizada a condiciones mojadas o húmedas y no la use
NUNCA bajo la lluvia.
Compruebe regularmente el cable eléctrico de su máquina y cualquier cable de exte-
nsión que esté utilizando por si muestra daños.
No transporte o tire de la máquina usando su cable eléctrico.
Asegure que el cable esté alejado de superficies calientes, aceite u objetos afilados.
Utilización y cuidado de la herramienta motorizada
No use nunca la máquina mientras está bajo la influencia de alcohol, drogas o medi-
camentos.
El cansancio con frecuencia puede causar accidentes; permanezca alerta.
Asegure que cualquier dispositivo colector de polvo suministrado con la máquina esté
conectado correctamente antes de usarla.
Asegure que todas las ropas, pelo largo o joyas se mantengan alejadas de la máquina.
Antes de enchufar la máquina en la toma eléctrica asegure que la máquina esté en la
posición OFF (apagada) y que todas las cuchillas y accesorios utilizados estén colocados
con seguridad.
No use nunca la máquina sin las cubiertas protectoras correctas en su sitio.
Compruebe que hayan sido retiradas todas las llaves de tuercas o de ajuste. Cualquier
llave de tuerca o de ajuste que haya sido dejada acoplada a una pieza móvil puede
causar lesiones.
Use siempre protección ocular y máscara antipolvo aprobadas por ANSI. Mientras se
utiliza la herramienta motorizada deberá llevarse en todo momento calzado y auricu-
lares protectores.
Mantenga su máquina limpia y en buen estado de servicio en todo momento.
No efectúe nunca el ajuste o servicio de cualquier herramienta motorizada antes de
desconectarla del suministro eléctrico.

Page 20
LISTA DE COMPROBACIÓN DE SEGURIDAD
Antes de comenzar
1. Compruebe que la toma eléctrica coincide con el enchufe de la herramienta mot-
orizada.
2. Compruebe que el voltaje de la toma eléctrica coincida con el de su herramienta
motorizada.
3. Asegure que los cables eléctricos no estén dañados.
4. Compruebe que las cubiertas protectoras y las pinzas estén seguras y en buen
estado de funcionamiento.
5. Asegure que todas las llaves de tuercas y demás accesorios esté retirados.
6. Compruebe que las cuchillas y piezas de corte funcionan libremente.
7. Compruebe que el entorno de trabajo esté despejado.
8. Asegure que la herramienta motorizada esté sujeta con seguridad a su banco o
plataforma de trabajo.
9. Asegure que ninguna persona menor de 18 años maneje esta herramienta.
10. Asegure que todos los menores estén alejados del área de trabajo.
11. Asegure que trabaja con los materiales correctos recomendados para uso con esta
herramienta.
Durante la utilización
1. No extienda el cuerpo sobre la máquina.
2. No ponga la máquina en marcha sin las ropas de seguridad correctas.
3. No ponga la máquina en marcha con las ropas sueltas.
4. Mantenga manos y extremidades alejadas de las cuchillas de la sierra.
5. Asegure que todas las abrazaderas y cubiertas protectoras estén en su sitio.
6. No corte metal o mampostería con una máquina de cortar madera.
7. No use la máquina en condiciones mojadas o húmedas.
8. Use siempre soportes cuando trabaje con piezas de madera largas.
Use siempre la herramienta correcta para la herramienta.
No fuerce nunca la herramienta a trabajar con fuerza superior a la diseñada.
No use nunca la máquina con piezas rotas tales como interruptores, defensas de guía
o soportes de patas.
Mantenga SIEMPRE la herramienta motorizada alejada de los menores.
Mantenga las herramientas cortantes afiladas para asegurar que el motor se esfuerza
menos.
Sustituya las cuchillas si tienen desperfectos o están desafiladas.
Haga que el servicio de la herramienta motorizada sea realizado por un agente de
reparaciones profesional que utilice piezas recomendadas por el fabricante.

Page 21
Esta máquina se suministra con todas las cubiertas y dispositivos de protección rele-
vantes, los cuales deberán comprobarse antes de cada operación. Este manual deberá
ser leído y guardado en un lugar seguro. Aunque nosotros advertimos acerca de todos
los posibles riesgos involucrados en el uso de herramientas motorizadas, el operador
deberá haber leído y comprendido el manual y haber aplicado su propia precaución y
sentido común a la hora de utilizar la máquina.
Si observa el contenido de esta guía reducirá en gran manera el riesgo de sufrir sac-
udidas eléctricas o lesiones.
Puesta a tierra de las herramientas
Conexiones eléctricas activas
Cualquier herramienta motorizada marcada con requerimiento de puesta a tierra inc-
orpora un cable eléctrico con tres hilos. La principal importancia de esto es el hilo verde
dentro del cable, el cual debe estar conectado en todo momento al pitón de puesta a
tierra del enchufe. El pitón no debe retirarse o desecharse nunca. El hilo verde no debe
ser conectado NUNCA a cualquier otra púa. El enchufe de tres pitones solamente debe
ser conectado al suministro eléctrico a través de una toma eléctrica con tres pitones.
Arriba se ilustra un enchufe con tres pitones y una toma.
Pida solamente a agentes de reparación profesionales que efectúen el servicio de
esta máquina.
Use solamente electricistas profesionales para reparar cualquier cableado dañado.
No retire NUNCA la conexión a tierra de la toma de energía o del cable de extensión.
9. Desconecte siempre la máquina de la red eléctrica antes de efectuar cualquier
ajuste en la misma.
10. NO DEJE LA MÁQUINA DESATENDIDA MIENTRAS ESTÁ CONECTADA AL
SUMINISTRO ELÉCTRICO.

Page 22
Cables eléctricos de extensión
Cualquier herramienta motorizada eléctrica marcada con doble aislamiento solamente
requerirá una conexión con dos pitones y su funcionamiento será totalmente seguro.
Estas herramientas no requieren puesta a tierra ya que están provistas de un sistema
de aislamiento adicional que satisface todas las normas de seguridad eléctrica relevantes.
A diferencia de las que incorporan tres pitones estas herramientas PUEDEN ser con-
ectadas en tomas adecuadas para enchufes con dos o tres pitones.
Arriba se ilustran las tomas a las cuales puede ser conectada esta herramienta.
Herramientas motorizadas con doble aislamiento
Enchufe y toma con 2 pitones
Cualquier herramienta motorizada marcada con “requerimiento de puesta a tierra” DEBE
ser conectada a un cable de extensión con tres hilos. Solamente las herramientas con
doble aislamiento pueden ser conectadas a cables con dos hilos.
Cuando se usa cualquier cable de extensión la máquina experimentará una reducción
de energía debido a la caída de voltaje causada por la longitud del cable. Esto puede
ser parcialmente compensado seleccionando cables de extensión con calibre de alambre
inferior.
Por ejemplo, los cables marcados con 14 calibres pueden portar una corriente más
elevada que los cables marcados con calibre 16. Así pues, cuando se conectan cables
de extensión debe asegurarse que concuerde cada calibre de alambre de los cables.
Nota: Los cables de extensión usados deben mostrar las letras “W-A” (EEUU) o “W”
(Canadá).
Antes de usar verifique todos los cables de extensión por si muestran desperfectos.
Evite objetos afilados.
No posicione el cable donde podría estar expuesto a las pisadas de personas.

Siempre use protección para los ojos cuando use este o cualquier otro esmeril.
Encienda el esmeril y espere a que alcance la velocidad máxima antes de comenzar
a esmerilar. Use el descanso de la herramienta para mantener quieta la pieza de trabajo.
Mantenga una presión continua y pareja en la pieza de trabajo y sígala moviendo de
lado a lado a velocidad pareja para obtener esmerilado parejo y evitar que la ruda de
desgaste de forma dispareja. No empuje muy duro porque esto podrá recalentar el
motor y desgastar prematuramente las ruedas, trabaje lentamente.
Note el ángulo original de esmerilado en el artículo que está esmerilando/dándole
forma y trate de mantenerlo en el mismo ángulo. Asegúrese de que la rueda esmeril
siempre gire hacia abajo sobre el objeto que está esmerilando para evitar lesiones.
Obtenga una bandeja con agua y colóquela al lado del esmeril para mojar su trabajo
y evitar que se recaliente o se queme ya que esto debilitará el metal.
AVISO: Para su propia seguridad, asegúrese de que el interruptor este APAGADO
y desconectado de la fuente de energía antes de darle mantenimiento o hacerle
ajustes. Reemplace inmediatamente el cable de energía si se corta, desgasta o se
daña de cualquier manera.
Bajo uso normal, las ruedas esmeril se podrán fisurar, desportillar, ranurar o entraparse
de residuos del material que se esta cortando. Si una rueda se fisura o se desportilla,
reemplácela inmediatamente. Las ruedas nuevas requieren ocasionalmente que sean
alineadas para remediar condiciones de ovalamiento.
Operation
Ensamblaje y ajustes
Mantenimiento
Cuidados de la rueda esmeril
Page 23
Asegure que el cable esté desconectado del suministro eléctrico de la red.


Lista de accesorios:
Montela si siempre sobre una superfice
estable/nivelada (agujeros de montaje
suministrados)
Como ensamblar el esmeril de banco.
Accesorios para la visera
1. Tornillo de fijacion, plano
2. Visera
Accesorios para el descanso de la
herramienta
1. Pieza del descanso de la herramienta
2. Tornillo de fijacion, plano arendela, a
rendela estrela, manija.
Ensamble de la visera Sujete el descanso de la herramienta
y ajuste la manija.
Remueva la manga de proteccion de la
visera
Page 25

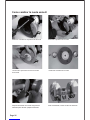
Como cambiar la rueda esmeril
Retire los 3 tornillos en el protector de la rueda Remueva el protector de la rueda
Use una llave para retirar la tuerca roscada
de la rueda.
Despues decambiar una rueda asegurese de
alinerarla para eliminar qualquier bamboleo
Para ensamblarla, invierta el orden de desarme.
Piezas del ensamble de la rueda.
Page 26

Page 27
Por favor lea cuidadosamente lo siguiente
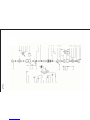
Terratek y/o sus distribuidores suministran la lista de piezas y el diagrama de ensamble
sólo como una herramienta de referencia. Ni Terratek ni sus distribuidores hacen nin-
guna representación o garantía de ninguna clase al comprador de que el o ella está
calificado para efectuar ninguna reparación o reemplazar ninguna pieza de este producto.
Terratek y su distribuidores declaran expresamente que todas las reparaciones o re-
emplazo de piezas deben ser efectuados por técnicos certificados o con licencia. El
comprador asume todos los riesgos y responsabilidad civil resultante de las reparaciones
o reemplazo de piezas al producto origina.
GARANTÍA LIMITADA
Este producto esta cubiérto por una garantia de dos anos desde la fecha de compra.
Al distribuidor reparara y/o reemplazara el producto sin costo al consumidor si el producto
esta defectuoso en material o mano de obra y se devuelve al distribuidor en su empaque
original. Esta garantia NO CUBRE desgaste normal, ni danos ausados por accidentes,
mal uso, abuso o negligencia. La responsabilidad de Terratek Intl. bajo esta garantia
esta limitada à la reparacion y/o reemplazo del producto. Terratek Intl. no es reponsable
de daños directos, indirectos o incidentales,. Esta garantia quedara nula si el producto
o algunos de sus componentes se modifican, alteran, o se cambian de alguna manera,
o si el producto se usa de una manera o con una cuchilla que no este recomendada
por Terratek Intl. Para recibir la herramienta eléctrica de reemplazo o el servicio de
garantía solicitado, debe presentar documentación de prueba de la compra, y devolver
el equipo original empaquetado con el producto original. La herramienta eléctrica de
reemplazo queda cubierta por la garantía limitada por el resto del período de garantía
de dos años a partir de la fecha de la compra original. Esta garantía se ofrece excl-
usivamente al comprador original al menudeo y no puede transferirse.
-
 1
1
-
 2
2
-
 3
3
-
 4
4
-
 5
5
-
 6
6
-
 7
7
-
 8
8
-
 9
9
-
 10
10
-
 11
11
-
 12
12
-
 13
13
-
 14
14
-
 15
15
-
 16
16
-
 17
17
-
 18
18
-
 19
19
-
 20
20
-
 21
21
-
 22
22
-
 23
23
-
 24
24
-
 25
25
-
 26
26
-
 27
27
-
 28
28


en otros idiomas
- English: Terratek PBG6 User manual
Otros documentos
-
 ShopSeries RK7867 El manual del propietario
-
Genesis GBG800L Guía del usuario
-
Milwaukee 2680-059 Manual de usuario
-
Black & Decker BT3500 Manual de usuario
-
 HART HTBG01 Manual de usuario
-
Worx WX801L.1 El manual del propietario
-
-
Ryobi BG612G El manual del propietario
-
DeWalt DW756 Manual de usuario

