La página se está cargando...

Please Read and Save this Use and Care Book.
IMPORTANT SAFEGUARDS
When using electrical appliances, basic safety precautions should
always be followed to reduce the risk of fire, electric shock, and/or
injury to persons, including the following:
• Read all instructions.
• Do not touch hot surfaces. Use handles or knobs.
• To protect against fire, electric shock and injury to persons do not
immerse cord, plugs or appliance in water or other liquid.
• Close supervision is necessary when any appliance is used by or
near children.
• Unplug from outlet when either the appliance or display clock is
not in use, and before cleaning. Allow to cool before putting on or
taking off parts, and before cleaning the appliance.
•
Do not operate any appliance with a damaged cord or plug, or after
the appliance malfunctions or has been damaged in any manner.
Contact Consumer Support at the number listed in this manual.
•
The use of accessory attachments not recommended by the appliance
manufacturer may result in fire, electric shock or injury to persons.
• Do not use outdoors.
•
Do not let cord hang over edge of table or counter, or touch hot surfaces.
•
Do not place on or near a hot gas or electric burner, or in a heated oven.
• To disconnect, turn any control to OFF (O), then remove plug from
wall outlet.
• Do not use this appliance for other than intended use.
• Keep lid on the carafe when in use.
•
Scalding may occur if the lid is removed during the brewing cycles.
• The carafe is designed for use with this appliance. It must never
be used on a range top.
• Do not set a hot carafe on a wet or cold surface.
• Do not use a cracked carafe or a carafe having a loose or
weakened handle.
• Do not clean carafe with cleansers, steel wool pads or other
abrasive material.
• This appliance is not intended for use by persons (including
children) with reduced physical, sensory or mental capabilities, or
lack of experience and knowledge, unless they have been given
supervision or instruction concerning use of the appliance by a
person responsible for their safety.
• Children
should be supervised to ensure that they do not play with
the appliance.
SAVE THESE INSTRUCTIONS.
This product is for household use only.
POLARIZED PLUG (120V Models Only)
This appliance has a polarized plug (one blade is wider than the other). To reduce
the risk of electric shock, this plug is intended to fit into a polarized outlet only
one way. If the plug does not fit fully into the outlet, reverse the plug. If it still does
not fit, contact a qualified electrician. Do not attempt to modify the plug in any
way.
TAMPER-RESISTANT SCREW
Warning: This appliance is equipped with a tamper-resistant screw to
prevent removal of the outer cover. To reduce the risk of fire or electric
shock, do not attempt to remove the outer cover. There are no user-
serviceable parts inside. Repair should be done only by authorized service
personnel.
ELECTRICAL CORD
1) A short power-supply cord is provided to reduce the risks resulting from
becoming entangled in or tripping over a longer cord.
2) Extension cords are available and may be used if care is exercised in their use.
3) If an extension cord is used:
a) The marked electrical rating of the extension cord should be at least as great
as the electrical rating of the appliance;
b) If the appliance is of the grounded type, the extension cord should be a
grounding-type 3-wire cord; and
c) The cord should be arranged so that it will not drape over the counter top or
tabletop where it can be pulled on by children or tripped over.
Note: If the power cord is damaged, please contact the warranty department
listed in these instructions.
HOW TO USE
This product is for household use only.
GETTING STARTED
• Remove packaging, any stickers, and the plastic band around the power plug.
• Please register your warranty at www.prodprotect.com/blackanddecker.
• Wash removable parts as instructed in CARE AND CLEANING.
• Open one-piece cover and insert an empty paper filter into removable brew basket.
• Pour fresh, filtered water up to 10-cup mark into water reservoir.
• Brew water through appliance following BREWING COFFEE instructions without coffee
grounds.
Note: This removes any dust or residue that may remain in system during manufacturing
process.
• Discard water from carafe and paper filter.
• Turn off coffeemaker, unplug and let it cool down.
SETTING THE CLOCK
1. Plug appliance into standard electrical outlet. The digital display flashes 12:00.
2. To set the time: Use the HOUR and MIN button to set the correct time. P.M. is indicated by a
small dot in the top left corner of the display.
Note: If unit is unplugged or power is interrupted even momentarily, the time will need to
be reset.
BREWING COFFEE
1. Open one-piece cover. Fill water reservoir with fresh, filtered water using water markings
on reservoir as a guide. Do not exceed 12 cups (MAX) level.
2. Place basket-style paper filter into brew basket. Add ground coffee
(we suggest 1 heaping tablespoon per cup). Place brew basket in place.
3. Close one-piece cover.
4. Place brew-thru lid on empty carafe and place carafe on “Keep Hot” carafe plate.
Important: Coffee may overflow if brew-thru lid is not properly aligned.
5. Plug cord into standard electrical outlet. Press On/Off (I/O) button and brewing begins.
6. When coffee grounds are cool, carefully remove and discard used grounds and filter and
paper filter. Coffeemaker will keep brewed coffee hot for 2 hours and then automatically
turn off.
7. To turn off coffeemaker at any time press On/Off (I/O) button.
SNEAK-A-CUP™ FEATURE
Remove the carafe and brewing is paused. The carafe must be placed back on the “Keep
Hot” carafe plate in 30 seconds to prevent overflow. Brewing begins again.
SETTING AUTO BREW TIME
1. Press PROG button. The AUTO light blinks.
2. Quickly press HOUR button then MIN button to select the time you would like automatic
brewing to begin (for example, 7:15 A.M. Make sure the P.M. light is not on.)
3. Press AUTO button. The AUTO light comes on and stays on. The digital display changes to
time of day.
4. Press PROG button again; auto brew time is set.
5. Press AUTO button to activate the timer. The AUTO light appears on digital display.
6. To check preset auto time, press PROG button and preset auto time is displayed. The AUTO
light blinks until the AUTO button is pressed.
7. To cancel AUTO brew function, press On/Off (I/O) button twice. All lights go off.
CARE AND CLEANING
This product contains no user serviceable parts. Refer service to qualified service personnel.
CLEANING
1. Make sure your coffeemaker is unplugged and cool.
2. Remove brew basket. Discard used paper filter and coffee grounds.
3. Wash brew basket and carafe in dishwasher (top-rack) or by hand in warm water with
dish soap.
4. Wipe outside of coffeemaker, control panel and “Keep Hot” carafe plate with a soft,
damp cloth.
Note: Do not use abrasive cleansers or scouring pads. Never immerse the coffeemaker in
water.
5. To clean the inside of the cover, open the cover and leave in the open position; wipe with a
damp cloth.
CLEANING WITH VINEGAR
Mineral deposits left by hard water can clog your coffeemaker. Cleaning is recommended
once a month.
1. Pour white vinegar into water reservoir up to 6-cup line on the water level window. Add
water up to 10-cup line.
Caution: Be careful not to exceed the 12-cup maximum level, to avoid water running
out the overflow hole in the back of the coffeemaker.
2. Put a paper filter in the brew basket and close the one-piece cover. Set empty carafe on
the “Keep Hot” carafe plate.
3. Turn on coffeemaker and let half the cleaning solution brew into carafe (until water level
goes down to around the 5-cup line on the water level window). Turn coffeemaker off and
let it soak for at least 15 minutes to soften the deposits.
4 Turn on coffeemaker and brew remaining cleaning solution into carafe.
5. Turn off coffeemaker, empty carafe and discard filter.
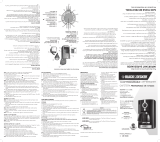
Product may vary slightly from what is illustrated.
1. One-piece cover
2. Showerhead
3. Removable brew basket
4. Water reservoir with cup level markings (not shown)
5. Sneak-A-Cup™ feature
6. 12-cup Duralife™ carafe
7. Cord storage (back of unit) (not shown)
8. “Keep Hot” carafe plate
9. Control panel
IMPORTANT: WASH CARAFE BEFORE FIRST USE!
12-CUP* PROGRAMMABLE COFFEEMAKER
*One cup equals approximately 5 oz. (varies by brewing technique)
29672 E/S T22-9003552-A
Sello del Distribuidor:
Fecha de compra:
Modelo:
900W 120V~ 60 Hz
Please do not throw this product away with normal household waste. If possible, take it
to an official collection point in your area that recycles this type of product. Thank you for
considering the environment.
No deseche este producto junto con los residuos domésticos. Si es possible, llévalo a un
lugar oficial para su correcto reciclaje, ayúdanos a preservar elmedio ambiente.
BLACK+DECKER® and the BLACK+DECKER® logos are trademarks of The Black & Decker
Corporation, used under license by Empower Brands, LLC, a subsidiary of Spectrum Brands,
Inc. for its manufacturing and sale of this product. All rights reserved. All other marks are
Trademarks of Empower Brands, LLC.
BLACK+DECKER® y los logotipos BLACK+DECKER® son marcas registradas de Black
& Decker Corporation, utilizados por Empower Brands, LLC, una subsidiaria de Spectrum
Brands, Inc. bajo su licencia para su fabricación y venta de este producto. Todos los derechos
reservados. Todas la Demas marcas son Marcas Registradas de Empower Brands, LLC.
Made in China.
Fabricado en China.
© 2023 Empower Brands, LLC. All rights reserved / Todos los derechos reservados.
Empower Brands, LLC, Middleton, WI 53562 09/2023
6. Fill reservoir with fresh water to 10-cup line, replace empty carafe on the “Keep Hot”
carafe plate and then turn on coffeemaker for a complete brew cycle to flush out remaining
cleaning solution. You may wish to repeat this step again to eliminate any remaining
vinegar smell/taste.
7. Wash the brew basket and carafe as instructed for normal cleaning.
WARNING
RISK OF FIRE OR ELECTRIC SHOCK. DO NOT OPEN.
The lightning symbol refers to “dangerous voltage”; the exclamation symbol
refers to maintenance instructions. See below.
Warning: To reduce the risk of fire or electric shock, do not remove
the cover of the coffeemaker. There are no user-serviceable parts
inside. Repair should be done by authorized service personnel only.
Model: DCM100B, DCM100R
Customer Care Line: 1-800-465-6070
For online customer service: www.prodprotect.com/blackanddecker
DCM100Series_29672_ES_IB_A.indd 1DCM100Series_29672_ES_IB_A.indd 1 9/1/23 2:03 PM9/1/23 2:03 PM

Por favor lea este instructivo antes de usar el producto.
INSTRUCCIONES IMPORTANTES
DE SEGURIDAD
Cuando se utilizan aparatos eléctricos, siempre se debe respetar
ciertas medidas de seguridad a fin de reducir el riesgo de un
incendio, un choque eléctrico y (o) lesiones a las personas,
incluyendo las siguientes:
• Lea todas las instrucciones antes de utilizar.
• No toque las superficies calientes. Use las asas o las perillas.
• A fin de protegerse contra un incendio, descarga eléctrica y
lesiones a las personas, no sumerja el cable, los enchufes ni el
aparato en agua ni en ningún otro líquido.
• Todo aparato eléctrico utilizado cerca de la presencia de los niños
o por ellos mismos, requiere la supervisión de un adulto.
• Desenchufe del aparato del tomacorriente cuando éste o el reloj
de la pantalla no estén en uso y antes de limpiarlo. Permita que el
aparato se enfríe antes de colocarle o retirar las piezas y antes de
limpiarlo.
• No opere ningún aparato eléctrico que tenga el cable o el enchufe
averiado, que presente un problema de funcionamiento o que esté
dañado. Comuníquese con el departamento de Servicio para el
Cliente, llamando gratis al número que aparece en la sección de
Garantía.
• El uso de accesorios no recomendados por el fabricante para ser
utilizados con este aparato puede ocasionar incendio, descarga
eléctrica o lesiones a las personas.
• No utilice este aparato a la intemperie.
• No permita que el cable cuelgue del borde de la mesa o del
mostrador ni que entre en contacto con las superficies calientes.
• No coloque el aparato sobre ni cerca de una hornilla de gas o
eléctrica ni adentro de un horno caliente.
• Para desconectar el aparato, ajuste todo control a la posición de
apagado (OFF) y luego, desconecte el aparato del tomacorriente.
• Este aparato se debe usar únicamente con el fin previsto.
•
La tapa debe mantenerse sobre la jarra cuando el aparato está en uso.
• El retirar o abrir la tapa durante el ciclo de colado puede ocasionar
quemaduras.
• La jarra está diseñada para ser utilizada con este aparato. Jamás
se deberá utilizar sobre una estufa.
•
Nunca coloque una jarra caliente sobre una superficie fría ni mojada.
•
No utilice la jarra si el vidrio se ha rajado o si el asa está floja o débil.
• No limpie la jarra con limpiadores abrasivos, con almohadillas de
fibra de metal ni demás limpiadores abrasivos.
• Este aparato no está diseñado para ser usado por personas
(incluyendo los niños) con su capacidad física, psíquica o sensorial
reducida, o con falta de experiencia o sabiduria, a menos que
sean supervisadas o instruidas acerca del uso del aparato por una
persona responsable de su seguridad.
• Los niños deben ser supervisados para asegurar que no jueguen
con el aparato.
CONSERVE ESTAS INSTRUCCIONES.
Este aparato eléctrico es para uso doméstico solamente.
ENCHUFE POLARIZADO (Solamente para los modelos de 120V)
Este aparato cuenta con un enchufe polarizado (un contacto es más ancho que
el otro). A fin de reducir el riesgo de un choque eléctrico, este enchufe encaja
en un tomacorriente polarizada en un solo sentido. Si el enchufe no entra en el
tomacorriente, inviértalo y si aun así no encaja, consulte con un electricista. Por
favor no trate de alterar esta medida de seguridad.
TORNILLO DE SEGURIDAD
Advertencia: Este aparato cuenta con un tornillo de seguridad para evitar
la remoción de la cubierta exterior del mismo. A fin de reducir el riesgo de
incendio o de choque eléctrico, por favor no trate de remover la cubierta
exterior. Este producto no contiene piezas reparables por el consumidor.
Toda reparación se debe llevar a cabo únicamente por personal de servicio
autorizado.
CABLE ÉLECTRICO
1. El producto debe proporcionarse con un cable corto para reducir el riesgo de
enredarse o de tropezar con un cable largo.
2. Se encuentran disponibles cables de extensión más largos, que es posible
utilizar si se emplea el cuidado debido.
3. Si un cable de extensión es utilizado:
a) La capacidad eléctrica del cable de extensión debe ser por lo menos igual
que la capacidad eléctrica nominal del electrodoméstico.
b) Si el aparato es de conexión a tierra, el cable de extensión debe ser un cable
de tres alambres de conexión a tierra.
c) Uno debe de acomodar el cable más largo de manera que no cuelgue del
mostrador o de la mesa, para evitar que un niño tire del mismo o que alguien se
tropiece.
Nota: Si el cable de alimentación está dañado, por favor llame al número de
Servicios para el Cliente que aparece en estas instrucciones.
COMO USAR
Este product es solamente para uso doméstico.
PRIMEROS PASOS
• Retiere todo material de empaque, etiquetas y la tira plástica alrededor del enchufe.
• Por favor, visite www.prodprotect.com/blackanddecker para registrar su garantía.
• Lave las piezas removibles según se indica en la sección de CUIDADO Y LIMPIEZA.
• Abra la tapa enteriza e inserte un filtro vacío de papel en el cesto para colar.
• Vierta agua fresca y filtrada en el tanque de agua hasta el nivel que indica 10 tazas.
• Siga las instrucciones de PARA COLAR CAFÉ y cuele agua solamente, sin usar café
molido.
Nota: Esto elimina cualquier residuo de polvo que pudiera haber en el sistema debido al
proceso de fabricación.
• Deseche el agua de la jarra y el filtro de papel (si es usado).
• Apague el aparato, desconéctelo y espere que se enfríe.
PARA PROGRAMAR EL RELOJ
1. Enchufe la cafeteria en un tomacorriente estándar. La pantalla indica 12:00.
2. Para establecer la hora: Utilice los botones de hora (HOUR) y de los minutos (MIN) para
establecer la hora correcta. P.M. se indica con un pequeño punto en la esquina superior
izquierda de la pantalla.
Nota: Si uno desconecta el aparato o si se interrumpe la corriente momentáneamente, la
hora debe ser reajustada.
PARA COLAR CAFÉ
1. Abra la tapa enteriza. Llene la jarra con agua con agua fresca y filtrada, usando las marcas
indicadas en el tanque de agua. Vierta el agua en el tanque, sin exceder el nivel máximo
(MAX) de llenado de 12 tazas.
2. Coloque un filtro de papel en el cesto del colar. Añada la cantidad de café molido deseado
(se sugiere una cuchara por taza).
3. Cierre la tapa enteriza.
4. Coloque la tapa de colar sobre la jarra. Coloque la jarra vacía sobre la placa calefactora.
Nota: El café puede derramarse si la tapa no se coloca bien.
5. Enchufe el cable a un tomacorriente estándar. Presione el botón de encender/apagar (I/O).
6. Una vez que el café molido se enfríe, abra la tapa enteriza y sujete el cesto del colar por el
mango para retirar y desechar el café y el filtro de papel. Cierre la tapa enteriza.
7. Desenchufe la cafetera cuando no la esté usando.
DISPOSITIVO DE INTERRUPCIÓN DE COLADO SNEAK-A-CUP™
Al retirar la jarra,se detiene el proceso de colado. Para evitar un derrame, coloque de nuevo
la jarra sobre la placa antes de 30 segundos. el proceso de colado vuelve a empezar.
PARA PROGRAMAR COLADO AUTOMÁTICO
1. Presione el botón de programar (PROG). La luz AUTO parpadea.
2. Presione con rápidez el botón de hora (HOUR) y después el botón de minutos (MIN) para
seleccionar el horario que desee para que comience a colar el café automáticamente (por
ejemplo, 7:15 A.M. Asegúrese de que la luz indicadora de P.M. no aparece).
3. Presion el boton AUTO. La luz indicadora AUTO se ilumina y la pantalla cambia a la hora
actual.
4. Presione el botón de programación (PROG) nuevamente. El colado automático ha sido
programado.
5. Presione el botón AUTO para activar el ciclo de colado automático. La luz indicadora AUTO
se ilumina y aparece en la pantalla.
6. Para verificar la hora programada, presione el botón de programación (PROG) y la pantalla
exhibe la hora que uno ha seleccionado para dar inicio al ciclo de colado. La luz indicadora
parpadea has que se presiona el boton AUTO.
7. Para cancelar el ciclo de colado automático, presione el botón de encendido/apagado (I/O).
Todas las luces se apagan.
El producto puede variar ligeramente del que aparece ilustrado aquí.
1. Tapa enteriza
2. Distribuidor de agua
3. Cesto removible para colar
4. Tanque de agua con marcas de nivel de tazas (no ilustrado)
5. Dispositivo de interrupción de colado Sneak-A-Cup™
6. Jarra Duralife™
7. Guardacable (detrás de la unidad) (no ilustrado)
8. Placa calefactora
9. Panel de control
PRECAUCIÓN
RIESGO DE INCENDIO O DE CHOQUE ELÉCTRICO. NO ABRA.
El símbolo de un rayo indica voltaje peligroso. El signo de exclamación
indica importantes instrucciones de mantenimiento. Consulte a
continuación.
Precaución: Para reducir el riesgo de incendio o de choque eléctrico,
no retire la cubierta de la cafetera. No contiene por dentro partes
reparables por el consumidor. Cualquier reparación deberá ser
efectuada únicamente por personal autorizado.
IMPORTANTE: ¡LAVE LA JARRA ANTES DEL PRIMER USO!
CAFETERA PROGRAMABLE DE 12 TAZAS*
*Una taza equivale a aproximadamente 5 onzas.
(varía de acuerdo al método de preparación utilizado)
CUIDADO Y LIMPIEZA
Este producto no contiene partes que el consumidor pueda reparar. En caso de requerir
mantenimiento, envíela al personal de servicio calificado.
LIMPIEZA
1. Asegúrese que la cafetera esté apagada y que se haya enfriado.
2. Deseche el filtro de papel con el café molido.
3. Lave el cesto del filtro y la jarra en la máquina lavaplatos (escurridor superior) o a mano
con agua caliente y líquido de fregar.
4. Limpie la superficie exterior de la cafetera, el panel de control y la placa calefactora con un
paño suave humedecido.
Nota: No use limpiadores abrasivos ni almohadillas de fregar. Nunca sumerja la cafetera
en agua.
5. Para limpiar el interior de la tapa, álcela de manera que permanezca en posición abierta;
limpie las superficies con un paño humedecido.
LIMPIAR CON VINAGRE
Nota: Debido al uso regular, los minerales y el agua dura pueden tapar su cafetera. Se
recomienda limpiar la cafetera con vinagre una vez al mes.
1. Vierta vinagre blanco en el tanque de agua hasta la marca de la taza 6 en la ventanilla de
agua. Agregue agua fría hasta la marca de la taza 10.
Precaución: Tenga cuidado de no exceeder la marca máxima de la taza 12 para evitar
que se desborde el agua y se salga de la cafetera.
2. Coloque un filtro de papel en el cesto removible y cierre la tapa. Coloque la jarra vacía
sobre la placa calefactora.
3. Encienda la cafetera. Permita que la mitad de la mezcla se cuele a la jarra (hasta la marca
del nivel 5). Apague la cafetera y deje que se absorba al menos durante 15 minutos.
4. Encienda de nuevo la cafetera y cuele el resto de la mezcla en la jarra.
5. Apague la cafetera, vacíe la jarra y tire a la basura el filtro de papel.
6. Llene el tanque con agua fría hasta la marca de la taza 10, Vuelva a colocar la jarra en la
placa y a continuación encienda la cafetera para un ciclo de colado complete para eliminar
el resto de la mezcla de agua y vinagre. Si desea, puede repetir este paso para eliminar por
completo el sabor/olor a vinagre.
7. Lave el cesto del colar y la jarra como se describe en la sección LIMPIEZA.
Modelo: DCM100B, DCM100R
Línea de Atención del Cliente: 1-800-465-6070
Para servicio al cliente en línea: www.prodprotect.com/blackanddecker
DCM100Series_29672_ES_IB_A.indd 2DCM100Series_29672_ES_IB_A.indd 2 9/1/23 2:03 PM9/1/23 2:03 PM
/