STIHL RMI 422 PC-L Manual de usuario
- Categoría
- Cortadoras de césped
- Tipo
- Manual de usuario

STIHL RMI 422 PC-L
Instruction Manual
Manual de instrucciones
WARNING
Read Instruction Manual thoroughly before use and
follow all safety precautions – improper use can cause
serious or fatal injury.
ADVERTENCIA
Antes de usar la máquina lea y siga todas las precauciones
de seguridad dadas en el manual de instrucciones – el uso
incorrecto puede causar lesiones graves o mortales.


Original Instruction ManualPrinted on chlorine-free paper
Printing inks contain vegetable oils, paper can be recycled.
© STIHL Tirol GmbH 2019
0478-131-3050-A. H19.
0000008405_003_GB
0478-131-3050-A
English
1
This instruction manual is protected by copyright. All rights reserved, especially the rights to reproduce, translate and process
with electronic systems.
Contents
1 Introduction
. . . . . . . . . . . . . . . . . . . . . . . . . . . . . . . . . . . . . . . . .
3
2 Guide to Using this Manual
. . . . . . . . . . . . . . . . . . . . . . . . . .
3
2.1 Signal Words
. . . . . . . . . . . . . . . . . . . . . . . . . . . . . . . . . . . . . . . .
3
2.2 Symbols in Text
. . . . . . . . . . . . . . . . . . . . . . . . . . . . . . . . . . . . .
3
3 Main Parts
. . . . . . . . . . . . . . . . . . . . . . . . . . . . . . . . . . . . . . . . . .
4
3.1 Robotic Mower
. . . . . . . . . . . . . . . . . . . . . . . . . . . . . . . . . . . . . .
4
3.2 Docking Station
. . . . . . . . . . . . . . . . . . . . . . . . . . . . . . . . . . . . .
5
3.3 Control Panel
. . . . . . . . . . . . . . . . . . . . . . . . . . . . . . . . . . . . . . .
5
3.4 Installation Material
. . . . . . . . . . . . . . . . . . . . . . . . . . . . . . . . .
6
4 Safety Symbols
. . . . . . . . . . . . . . . . . . . . . . . . . . . . . . . . . . . . .
6
4.1 Robotic Mower
. . . . . . . . . . . . . . . . . . . . . . . . . . . . . . . . . . . . . .
6
5 IMPORTANT SAFETY INSTRUCTIONS
. . . . . . . . . . . . .
7
5.1 Intended Use
. . . . . . . . . . . . . . . . . . . . . . . . . . . . . . . . . . . . . . . .
7
5.2 Operator
. . . . . . . . . . . . . . . . . . . . . . . . . . . . . . . . . . . . . . . . . . . .
7
5.3 Personal Protective Equipment
. . . . . . . . . . . . . . . . . . . . . .
7
5.4 Robotic Mower
. . . . . . . . . . . . . . . . . . . . . . . . . . . . . . . . . . . . . .
8
5.5 Integrated Battery
. . . . . . . . . . . . . . . . . . . . . . . . . . . . . . . . . . .
9
5.6 Using the Robotic Mower
. . . . . . . . . . . . . . . . . . . . . . . . . . .
10
6 Docking Station and Power Supply Safety
. . . . . . . . . .
13
6.1 Introduction
. . . . . . . . . . . . . . . . . . . . . . . . . . . . . . . . . . . . . . . .
13
6.2 Warnings and Instructions
. . . . . . . . . . . . . . . . . . . . . . . . . .
14
7 Maintenance, Repair and Storage
. . . . . . . . . . . . . . . . . .
15
7.1 Warnings and Instructions
. . . . . . . . . . . . . . . . . . . . . . . . . .
15
8 Operating Principle
. . . . . . . . . . . . . . . . . . . . . . . . . . . . . . . . .
16
9 Key Features
. . . . . . . . . . . . . . . . . . . . . . . . . . . . . . . . . . . . . . .
17
9.1 Key Features
. . . . . . . . . . . . . . . . . . . . . . . . . . . . . . . . . . . . . . .
17
10 Installing the Robotic Mower
. . . . . . . . . . . . . . . . . . . . . . .
18
10.1 Preparing the Lawn and the Robotic Mower for
Operation
. . . . . . . . . . . . . . . . . . . . . . . . . . . . . . . . . . . . . . . . . .
18
10.2 Setting the Language, Date and Time
. . . . . . . . . . . . . .
19
10.3 Installing the Docking Station
. . . . . . . . . . . . . . . . . . . . . .
20
10.4 Installing the Perimeter Wire
. . . . . . . . . . . . . . . . . . . . . . .
24
10.5 Connecting the Perimeter Wire to the Docking
Station
. . . . . . . . . . . . . . . . . . . . . . . . . . . . . . . . . . . . . . . . . . . . .
27
10.6 Linking the Robotic Mower and Docking Station
. . . .
31
10.7 Checking the Installation
. . . . . . . . . . . . . . . . . . . . . . . . . . .
31
10.8 Programming the Robotic Mower: the Mowing
Plan
. . . . . . . . . . . . . . . . . . . . . . . . . . . . . . . . . . . . . . . . . . . . . . .
32
10.9 Completing the Initial Installation and First
Mowing Operation
. . . . . . . . . . . . . . . . . . . . . . . . . . . . . . . . . .
34
11 Installing the Perimeter Wire
. . . . . . . . . . . . . . . . . . . . . . .
34
11.1 Planning the Layout of the Mowing Area
. . . . . . . . . . .
34
11.2 Making a Sketch of the Mowing Area
. . . . . . . . . . . . . . .
35
11.3 Measuring Wire Clearances with the iMow Ruler
. . .
36
11.4 Measuring Wire Clearances at Corners
. . . . . . . . . . . .
37
11.5 Routing the Perimeter Wire in Confined Areas
. . . . .
37
11.6 Routing Around Restricted Areas
. . . . . . . . . . . . . . . . . .
38
11.7 Installing Linked Areas and Secondary Areas
. . . . . .
39
11.8 Installing Corridors
. . . . . . . . . . . . . . . . . . . . . . . . . . . . . . . . .
39
11.9 Installing Search Loops
. . . . . . . . . . . . . . . . . . . . . . . . . . . .
40
11.10 Installing Linking Sections
. . . . . . . . . . . . . . . . . . . . . . . .
41
11.11 Accurate Mowing Along Edges
. . . . . . . . . . . . . . . . . . . .
42
11.12 Sloping Terrain in the Mowing Area
. . . . . . . . . . . . . . .
42
11.13 Installing Reserve Wire
. . . . . . . . . . . . . . . . . . . . . . . . . . .
42
11.14 Using Wire Connectors
. . . . . . . . . . . . . . . . . . . . . . . . . . .
43
11.15 Installing the Perimeter Wire Closer to the Edge
of the Mowing Area
. . . . . . . . . . . . . . . . . . . . . . . . . . . . . . . .
43
12 Docking Station
. . . . . . . . . . . . . . . . . . . . . . . . . . . . . . . . . . . .
44
12.1 LED on the Docking Station
. . . . . . . . . . . . . . . . . . . . . . . .
44
12.2 Docking Station Controls
. . . . . . . . . . . . . . . . . . . . . . . . . . .
44
12.3 Docking the Robotic Mower
. . . . . . . . . . . . . . . . . . . . . . . .
45
12.4 Charging the Robotic Mower
. . . . . . . . . . . . . . . . . . . . . . .
45
13 Control Panel Display Information
. . . . . . . . . . . . . . . . . .
46
13.1 Information Area
. . . . . . . . . . . . . . . . . . . . . . . . . . . . . . . . . . .
46
13.2 Status Screens
. . . . . . . . . . . . . . . . . . . . . . . . . . . . . . . . . . . .
47
14 Menu Functions
. . . . . . . . . . . . . . . . . . . . . . . . . . . . . . . . . . . .
48
14.1 Navigating the Menus
. . . . . . . . . . . . . . . . . . . . . . . . . . . . . .
48

0478-131-3050-A
2
English
Contents
14.2 Overview
. . . . . . . . . . . . . . . . . . . . . . . . . . . . . . . . . . . . . . . . . .
49
14.3 Commands
. . . . . . . . . . . . . . . . . . . . . . . . . . . . . . . . . . . . . . . .
50
14.4 Information
. . . . . . . . . . . . . . . . . . . . . . . . . . . . . . . . . . . . . . . .
51
14.5 Mowing Plan
. . . . . . . . . . . . . . . . . . . . . . . . . . . . . . . . . . . . . . .
52
14.6 Active Times
. . . . . . . . . . . . . . . . . . . . . . . . . . . . . . . . . . . . . . .
53
14.7 Mowing Duration
. . . . . . . . . . . . . . . . . . . . . . . . . . . . . . . . . . .
54
15 Settings
. . . . . . . . . . . . . . . . . . . . . . . . . . . . . . . . . . . . . . . . . . . .
55
15.1 Settings Overview
. . . . . . . . . . . . . . . . . . . . . . . . . . . . . . . . . .
55
15.2 iMow Settings
. . . . . . . . . . . . . . . . . . . . . . . . . . . . . . . . . . . . . .
55
15.3 Installation
. . . . . . . . . . . . . . . . . . . . . . . . . . . . . . . . . . . . . . . . .
56
15.4 Safety
. . . . . . . . . . . . . . . . . . . . . . . . . . . . . . . . . . . . . . . . . . . . .
57
15.5 Service
. . . . . . . . . . . . . . . . . . . . . . . . . . . . . . . . . . . . . . . . . . . .
59
15.6 Setting Starting Points
. . . . . . . . . . . . . . . . . . . . . . . . . . . . .
59
16 STIHL iMow App
. . . . . . . . . . . . . . . . . . . . . . . . . . . . . . . . . . .
60
16.1 Functions of the iMow App
. . . . . . . . . . . . . . . . . . . . . . . . .
60
17 During Operation
. . . . . . . . . . . . . . . . . . . . . . . . . . . . . . . . . . .
61
17.1 Automatic Mowing
. . . . . . . . . . . . . . . . . . . . . . . . . . . . . . . . .
61
17.2 Mowing Duration
. . . . . . . . . . . . . . . . . . . . . . . . . . . . . . . . . . .
61
17.3 Opening and Closing the Flap
. . . . . . . . . . . . . . . . . . . . . .
61
17.4 Adjusting the Cutting Height
. . . . . . . . . . . . . . . . . . . . . . . .
62
17.5 Adjusting the Mowing Duration and Active Times
. . .
62
17.6 Mowing Outside of Active Times
. . . . . . . . . . . . . . . . . . .
63
18 Transporting
. . . . . . . . . . . . . . . . . . . . . . . . . . . . . . . . . . . . . . .
63
18.1 Transporting the Robotic Mower
. . . . . . . . . . . . . . . . . . .
63
19 Storing the Robotic Mower and Docking Station
. . . .
64
19.1 Robotic Mower
. . . . . . . . . . . . . . . . . . . . . . . . . . . . . . . . . . . . .
64
19.2 Docking Station and Power Supply
. . . . . . . . . . . . . . . . .
65
20 Cleaning
. . . . . . . . . . . . . . . . . . . . . . . . . . . . . . . . . . . . . . . . . . .
66
20.1 Cleaning the Robotic Mower and Docking Station
. . .
66
21 Inspection and Maintenance
. . . . . . . . . . . . . . . . . . . . . . . .
66
21.1 Inspection and Maintenance Intervals
. . . . . . . . . . . . . .
66
21.2 Inspecting the Mowing Blade
. . . . . . . . . . . . . . . . . . . . . . .
67
21.3 Replacing the Mowing Blade
. . . . . . . . . . . . . . . . . . . . . . .
67
21.4 Mounting and Removing the Carrier Plate
. . . . . . . . . .
68
22 Troubleshooting Guide
. . . . . . . . . . . . . . . . . . . . . . . . . . . . .
70
22.1 Messages
. . . . . . . . . . . . . . . . . . . . . . . . . . . . . . . . . . . . . . . . . .
70
22.2 Robotic Mower
. . . . . . . . . . . . . . . . . . . . . . . . . . . . . . . . . . . . .
77
22.3 Searching for a Wire Break
. . . . . . . . . . . . . . . . . . . . . . . .
82
23 Specifications
. . . . . . . . . . . . . . . . . . . . . . . . . . . . . . . . . . . . . .
83
23.1 STIHL RMI 422.0 PC-L Robotic Mower (iMow)
. . . . .
83
23.2 STIHL AAI 80 Battery
. . . . . . . . . . . . . . . . . . . . . . . . . . . . . .
83
23.3 STIHL ADO 401 Docking Station and OWA-60U-
27VUSM Power Supply
. . . . . . . . . . . . . . . . . . . . . . . . . . . .
83
23.4 Symbols on the Robotic Mower, Battery, Docking
Station and Power Supply
. . . . . . . . . . . . . . . . . . . . . . . . . .
84
23.5 Engineering Improvements
. . . . . . . . . . . . . . . . . . . . . . . . .
84
23.6 FCC 15 Compliance Statement
. . . . . . . . . . . . . . . . . . . .
84
24 Replacement Parts and Equipment
. . . . . . . . . . . . . . . . .
85
24.1 Genuine STIHL Replacement Parts
. . . . . . . . . . . . . . . .
85
24.2 Standard Replacement Parts and Accessories
. . . . .
85
25 Disposal
. . . . . . . . . . . . . . . . . . . . . . . . . . . . . . . . . . . . . . . . . . .
85
25.1 Disposal of the Robotic Mower, Docking Station
and Power Supply
. . . . . . . . . . . . . . . . . . . . . . . . . . . . . . . . . .
85
26 Installation Examples
. . . . . . . . . . . . . . . . . . . . . . . . . . . . . .
86
26.1 Installation Examples
. . . . . . . . . . . . . . . . . . . . . . . . . . . . . .
86
27 Limited Warranty
. . . . . . . . . . . . . . . . . . . . . . . . . . . . . . . . . . .
91
27.1 STIHL Incorporated Limited Warranty Policy
. . . . . . .
91
28 Trademarks
. . . . . . . . . . . . . . . . . . . . . . . . . . . . . . . . . . . . . . . .
91
28.1 Registered Trademarks
. . . . . . . . . . . . . . . . . . . . . . . . . . . .
91
28.2 Common Law Trademarks
. . . . . . . . . . . . . . . . . . . . . . . . .
91
29 Addresses
. . . . . . . . . . . . . . . . . . . . . . . . . . . . . . . . . . . . . . . . .
91
29.1 STIHL Incorporated
. . . . . . . . . . . . . . . . . . . . . . . . . . . . . . . .
91

0478-131-3050-A
3
English
1 Introduction
Thank you for your purchase. The information contained in
this manual will help you receive maximum performance and
satisfaction from your STIHL robotic mower and, if followed,
reduce the risk of injury from its use.
IMPORTANT
READ CAREFULLY BEFORE USE
KEEP FOR FUTURE REFERENCE
This robotic mower has a GPS receiver and can also
connect to the Internet over a cellular network, allowing the
operator to track mowing activity and modify certain settings
using the STIHL iMow U.S. mobile and web apps ("iMow
App").
Discuss setup and operation of your robotic mower with your
authorized STIHL iMow servicing dealer. STIHL
recommends having an authorized STIHL iMow servicing
dealer set up your robotic mower.
Before the robotic mower can connect to the Internet, the
unit must be unlocked by an authorized STIHL iMow dealer.
The dealer can also guide you through the registration and
activation process.
Do not lend or rent your robotic mower without this
instruction manual. Allow only persons who fully understand
the information in this manual to set up, operate or maintain
the robotic mower. The operator must be familiar with the
robotic mower's controls before starting work. The operator
is responsible for accidents or hazards occurring to other
people or their property.
For further information, or if you do not understand any of
the instructions in this manual, please refer to the iMow App,
go to www.stihlusa.com or contact your authorized STIHL
iMow servicing dealer.
2.1 Signal Words
This manual contains safety information that requires your
special attention. Such information is introduced with the
following symbols and signal words:
DANGER
Indicates a hazardous situation that, if not avoided, will
result in death or serious injury.
WARNING
Indicates a hazardous situation that, if not avoided, could
result in death or serious injury.
NOTICE
Indicates a risk of property damage, including damage to the
machine or its individual components.
2.2 Symbols in Text
The following symbol is included to assist you with the use
of the manual:
1Introduction
Because a robotic mower is a high-speed cutting
tool, designed for operation independent from
the active control or supervision of an operator,
special safety precautions must be observed to
reduce the risk of personal injury.
Read this instruction manual thoroughly before
setting up your robotic mower and periodically
thereafter. Follow all safety precautions.
Careless or improper use of the robotic mower
can cause serious or fatal injury.
2 Guide to Using this Manual
Refers to a designated chapter or sub-chapter in this
instruction manual.

0478-131-3050-A
4
English
3 Main Parts
3.1 Robotic Mower
1 Cutting Height Adjustment Knob
For adjusting the height of the mowing blade.
2 Control Panel
For navigating the mower's menu options.
3Flap
Covers the control panel and cutting height adjustment
knob.
4 Rain Sensor
Detects rainfall.
5 STOP Button
Stops the robotic mower and the mowing blade.
6 Rear Wheels
The mower's drive wheels.
7Hood
Covers the mower's internal parts.
8 Charging Contacts
Electrical contacts in the robotic mower for connecting to
the docking station for charging.
9 Front Carrying Handle (integrated into the Hood)
For lifting and transporting the robotic mower.
10 Rear Carrying Handle (integrated into the Hood)
For lifting and transporting the robotic mower.
11 Mowing Blade
Metal blade for cutting grass.
12 Carrier Plate
For mounting and securing the mowing blade.
13 Mower Deck
Underside of the mower where mowing and mulching
operations take place.
14 Front Wheels
Guide wheels for the robotic mower.
15 Battery Compartment
Compartment for the integrated lithium ion battery.
Integrated GPS Receiver (not illustrated)
Provides location, speed and navigation information for
the robotic mower.
Cellular Module (not illustrated)
Provides an Internet connection.
# Rating Plate
Contains electrical information and the product's serial
number.
3Main Parts
1 2
141312
11
15
4
#
3
10
5
8
7
6
9
0000-GXX-4374-A2

0478-131-3050-A
5
English
3 Main Parts
3.2 Docking Station
1 Charging Contacts
Electrical contacts for connecting the docking station to
the robotic mower for charging.
2LED
Indicates the operating status of the docking station and
perimeter wire signal.
3 ON/OFF/Home Button
Turns the signal to the perimeter wire on and off.
Commands the robotic mower to return to the docking
station when pressed twice within two seconds.
4Cover
Covers the charging contacts and other electronics of the
docking station.
5 Power Supply Cord
Supplies the docking station with electricity when
plugged into an electrical outlet.
6 Power Supply
Supplies the docking station and perimeter wire with
electricity when plugged into an electrical outlet.
7Plug
Connects the power supply cord to an electrical outlet.
8 Wire Channels
For securing the perimeter wire in the base plate.
9 Base Plate
Base of the docking station.
# Rating Plate
Contains electrical information and the product's serial
number.
3.3 Control Panel
1 Graphical Display
Displays the robotic mower's menus and messages.
2 Navigation Pad
For navigating the mower's menu options.
3 OK Button
For selecting menu options on the control panel.
4 Back Button
For navigating the robotic mower's menus.
1
1
#
4
5
9
8
7
6
#
3
2
0000-GXX-5344-A0
1
4
2
3
0000-GXX-4376-A0

0478-131-3050-A
6
English
4 Safety Symbols
3.4 Installation Material
STIHL recommends having your robotic mower and the
perimeter wire installed by an authorized STIHL iMow
servicing dealer.
1 Perimeter Wire
Transmits an electrical signal to the robotic mower and
defines the mowing area for automatic mowing
operation.
2 Wire Stakes
Used to secure the perimeter wire.
3 Wire Connectors
Electrical connectors used to link sections of perimeter
wire.
4.1 Robotic Mower
The following safety symbols are found on the robotic
mower:
4 Safety Symbols
To reduce the risk of injury, follow the specified
safety precautions.
1
2
3
0000-GXX-3340-A1
Read and follow all safety precautions in the
instruction manual. Improper use can lead to
serious or fatal personal injury or property
damage.
Wear goggles or close-fitting protective glasses
with adequate side protection that are impact-
rated and marked as complying with ANSI Z87
"+" when setting up or servicing the robotic
mower and anytime you are in the mowing area
during operation, @ 5.3.
To reduce the risk of laceration injuries, keep
hands, feet and other body parts away from the
mowing blade. Never put hands or feet under the
mower, particularly during operation. Never
attempt to clear clippings or debris from the
mowing blade or mowing deck without first
switching off the robotic mower and disabling it
by pressing and holding the STOP button for five
seconds, @ 5.6.3.
The rotating cutting attachment may throw or
fling foreign objects directly or by ricochet. To
reduce the risk of personal injury from thrown
objects, inspect the mowing area and remove
stones, pieces of metal, glass, wire and other
objects that could be thrown by the cutting
attachment, @ 5.6.3.
To reduce the risk of personal injury, keep other
persons, especially children, and animals away
from the mower during operation. Do not operate
the mower when children or pets are or may be
in the mowing area or vicinity, @ 5.6.3.
To reduce the risk of personal injury, keep
children away from the mower during operation.
Do not operate the mower when children are or
may be in the mowing area or vicinity, @ 5.6.3.
To reduce the risk of injury to animals, keep
dogs and other pets away from the mower during
operation. Do not operate the mower when
animals are or may be in the mowing area or
vicinity, @ 5.6.3.

0478-131-3050-A
7
English
5 IMPORTANT SAFETY INSTRUCTIONS
5.1 Intended Use
WARNING
■ This robotic mower is intended for autonomous,
programmable lawn care. Use for other purposes may
increase the risk of personal injury and property damage.
■ The robotic mower is intended for cutting grass in yards up
to approximately a quarter of an acre (1000 m²).
■ The ADO 401 docking station and the OWA-60U-27VUSM
power supply are designed for charging the lithium ion
battery integrated into the robotic mower and supplying
low voltage electrical current to the perimeter wire. Use of
the docking station or power supply for any purpose not
authorized or intended may result in serious injury or
death.
■ Improper or unauthorized use of the robotic mower, its
integrated battery or the docking station and power supply
could result in personal injury or property damage. Use
the ADO 401 docking station, the STIHL RMI 422 PC-L
robotic mower and its integrated battery only as described
in this manual.
5.2 Operator
WARNING
■ According to STIHL's current information, the electric
motor of this robotic mower should not interfere with a
pacemaker.
– However, persons with a pacemaker or other
implanted medical device should consult their
physician and device manufacturer before operating
this robotic mower.
5.3 Personal Protective Equipment
WARNING
■ To reduce the risk of personal injury, always wear proper
clothing and protective apparel when:
– installing the docking station and setting up the robotic
mower for operation;
– installing or repairing the perimeter wire;
– entering the mowing area or approaching the mower
while in operation;
– replacing the mowing blade;
– inspecting or cleaning the robotic mower;
■ To reduce the risk of eye injury:
Never stand on, sit on or attempt to ride the
robotic mower or allow others to do so. Serious
personal injury and damage to the robotic
mower could result, @ 5.6.3.
Never immerse the robotic mower in water or
other liquids, @ 5.6.3.
Always disable the robotic mower by pressing
and holding the STOP button for 5 seconds
before lifting, transporting, inspecting, cleaning
or servicing, @ 5.6.3.
5 IMPORTANT SAFETY
INSTRUCTIONS
Wear goggles or close-fitting protective
glasses with adequate side protection that
are impact-rated and marked as complying
with ANSI Z87 "+" when setting up the
docking station and robotic mower,
installing or repairing the perimeter wire,
inspecting or cleaning the mower,
replacing the mowing blade and any time
you are in the mowing area during
operation.

0478-131-3050-A
8
English
5 IMPORTANT SAFETY INSTRUCTIONS
■ Good footing is very important. To help maintain a secure
footing and reduce the risk of injury:
– Always wear substantial footwear with non-slip
soles. Do not wear sandals, flip-flops, open-toed or
similar footwear.
■ To improve your grip and help protect your hands:
– Always wear heavy-duty, non-slip work gloves made
of leather or another wear resistant material when
setting up the docking station and robotic mower,
installing or repairing the perimeter wire, inspecting
or cleaning the mower, replacing the mowing blade
and any other time you are handling the robotic
mower.
■ To reduce the risk of personal injury:
– Wear overalls or long pants when approaching the
robotic mower while in operation. Do not wear
shorts.
– Secure hair above shoulder level before performing
any installation, setup, inspection, service,
maintenance or cleaning activities, and before
approaching the robotic mower while in operation.
5.4 Robotic Mower
WARNING
■ If the moving mowing blade contacts you, it will result in
serious laceration injuries. To reduce the risk of such
injuries:
– Keep hands, feet and other parts of your body away
from the mowing blade.
– Never touch the moving mowing blade with your
hand or any other part of your body.
■ To reduce the risk of personal injury to the operator and
bystanders:
■ Although certain unauthorized attachments may fit STIHL
robotic mowers, their use may be extremely dangerous.
Only attachments supplied by STIHL or expressly
approved by STIHL for use with this specific iMow model
are recommended.
– Use only attachments supplied or expressly
approved by STIHL.
– Never modify this robotic mower or its software in
any way.
– Never attempt to modify or override the robotic
mower's controls or safety devices in any way.
– Never use a robotic mower that has been modified or
altered from its original design.
■ If the robotic mower is dropped or subjected to similar
heavy impacts:
– Check that it is undamaged, in good condition and
functioning properly before continuing work.
– Check that the controls and safety devices are
working properly.
– Check the display for error messages, @ 22.1.
– Never work with a damaged or malfunctioning
robotic mower.
– Never use or charge a robotic mower if the hood or
housing is cracked, deformed or excessively hot, if
battery fluid is leaking from the battery compartment,
or if the battery is otherwise damaged. A damaged
battery increases the risk of personal injury and
property damage from short circuit, fire or explosion.
– Always press and hold the STOP button
for 5 seconds to activate the disabling
device before assembling, transporting,
adjusting, inspecting, cleaning,
servicing, maintaining or storing.
– Never lift the robotic mower or reach
under the hood to clear clippings or
debris, or for any other reason, without
first activating the disabling device and
confirming that the mowing blade has
come to a complete stop.

0478-131-3050-A
9
English
5 IMPORTANT SAFETY INSTRUCTIONS
– In case of doubt, have the robotic mower checked by
your authorized STIHL iMow servicing dealer before
using it.
■ If the robotic mower is damaged, not working properly or
has been immersed in water or other liquids, its
components, including its integrated battery, may no
longer function properly and safety devices may be
inoperative. To reduce the risk of personal injury and
property damage:
– Take the robotic mower to your authorized STIHL
iMow servicing dealer to be checked before further
use.
■ Genuine STIHL replacement parts are specifically
designed to match your robotic mower and meet safety
and performance requirements. Use of parts that are not
authorized or approved by STIHL may cause serious or
fatal injury or property damage.
– STIHL recommends that only identical STIHL
replacement parts be used.
5.5 Integrated Battery
WARNING
■ Use of an unauthorized charging device can damage the
lithium ion battery inside the robotic mower and result in
fire, explosion and personal injury and property damage.
– Charge the robotic mower only with a genuine
STIHL ADO 401 docking station and OWA-60U-
27VUSM power supply.
■ The robotic mower's integrated battery contains safety
features and devices which, if damaged, may allow it to
generate heat, rupture, leak, ignite or explode.
– Be alert for signs that the battery may be damaged:
never use or charge a robotic mower if the hood or
housing is cracked, deformed or excessively hot, if
battery fluid is leaking from the battery compartment,
or if the battery is otherwise damaged. A damaged
battery increases the risk of personal injury and
property damage from short circuit, fire or explosion.
– The battery is integrated into the robotic mower and
should not be removed by the operator. Have the
integrated battery removed by an authorized STIHL
iMow servicing dealer when the battery is depleted
or the mower reaches the end of its useful life. Never
attempt to remove the battery or open or
disassemble the robotic mower's hood for any
reason.
– Never subject the robotic mower to heavy impacts or
attempt to crush, drop or otherwise damage it.
– Never expose the robotic mower to microwaves or
high pressures.
– Never insert foreign objects into the robotic mower's
charging socket or other openings.
■ High temperatures may cause the robotic mower's
integrated battery to generate heat, rupture, leak, ignite or
explode, resulting in severe or fatal personal injury and
property damage. Exposure to temperatures outside the
recommended temperature range may also damage the
battery and reduce its useful life.
– Never heat the robotic mower above
212 °F (100 °C) or place it on or near
fires, stoves or other high-temperature
locations.
– Use the robotic mower only within an
ambient temperature range of 41 °F to
104 °F (5 °C to 40 °C).
– Store the robotic mower only within an
ambient temperature range of 32 °F to
122 °F (0 °C to 50 °C).
– Never store the robotic mower inside a
vehicle in hot weather.

0478-131-3050-A
10
English
5 IMPORTANT SAFETY INSTRUCTIONS
■ To reduce the risk of personal injury and property damage
in the event the robotic mower emits smoke, an unusual
smell or feels unusually hot while using, charging or
storing:
– Immediately discontinue using or charging the
robotic mower and prepare to contact the authorities
in the event of fire or explosion.
■ To reduce the risk of electric shock:
– Do not attempt to repair, open or disassemble the
robotic mower. There are no user-serviceable parts
inside.
■ If the integrated battery is damaged, battery fluid can leak
from the robotic mower. Leaking battery fluid can cause
skin and eye irritation or chemical burns.
– Avoid contact with skin and eyes.
– Use an inert absorbent such as sand on spilled fluids
or liquids.
– In the event of accidental contact with battery fluids
or liquids, immediately rinse the contact area
thoroughly with mild soap and water.
– If battery fluids or liquids get into your eye(s): Do not
rub. Rinse water over the open eye(s) for at least 15
minutes and seek medical attention.
■ A battery fire can be dangerous. To reduce the risk of
severe personal injury and property damage in the event
of fire:
– Evacuate the area. Fire can spread rapidly. Stay
clear of any vapors generated and maintain a safe
distance.
– Contact the fire department.
– Although water can be used to put out a battery fire,
use of a multi-purpose, dry chemical fire
extinguisher is preferable.
– Consult the fire department regarding proper
disposal of the burned battery.
5.6 Using the Robotic Mower
5.6.1 Before Operation
WARNING
■ Misuse or unauthorized use may result in personal injury
and property damage.
– Use the robotic mower only as described in this
instruction manual.
■ Using a robotic mower that is damaged, improperly
adjusted or maintained, or not completely and securely
assembled can lead to a malfunction and increase the risk
of serious personal injury or death.
– Never operate a robotic mower that is damaged,
improperly maintained or not completely and
properly assembled.
– Always check your robotic mower for proper
condition and operation before starting work.
– Never attempt to modify or override the controls or
safety devices in any way.
– If your robotic mower or any part is damaged or does
not function properly, take it to your authorized
STIHL iMow servicing dealer. Do not use the robotic
mower until the problem has been corrected.
■ To help reduce the risk of serious personal injury or death
from unintentional starting:
– Never immerse the robotic mower in
water or other liquids.
– Always press and hold the STOP button
for 5 seconds to activate the disabling
device before assembling, transporting,
adjusting, inspecting, cleaning,
servicing, maintaining or storing the
robotic mower.

0478-131-3050-A
11
English
5 IMPORTANT SAFETY INSTRUCTIONS
5.6.2 Working Conditions
WARNING
■ Sparks generated from operation of the robotic mower
may be capable of igniting combustible gases, liquids,
vapors, dusts or other combustible materials and
substances. To reduce the risk of fire and explosion:
– Never operate the robotic mower in a location where
combustible gases, liquids, vapors, dusts or other
combustible materials and substances are present.
– Read and follow recommendations issued by
government authorities (e.g., OSHA) for identifying
and avoiding the hazards of combustible gases,
liquids, vapors, dusts or other combustible materials
and substances.
■ If a rotating metal blade strikes a rock or other hard object,
sparks may be created, which can ignite flammable
materials under certain circumstances. Flammable
materials can include dry vegetation and brush,
particularly when weather conditions are hot and dry.
– When there is a risk of fire or wildfire, do not use the
robotic mower around flammable materials or
around dry vegetation or brush.
– Contact your local fire authorities or the U.S. Forest
Service if you have any question about whether
vegetation and weather conditions are suitable for
the use of a metal blade.
■ Use of this robotic mower can generate dust and other
substances containing chemicals known to cause
respiratory problems, cancer, birth defects and other
reproductive harm.
– Consult governmental agencies such as EPA,
OSHA, CARB and NIOSH and other authoritative
sources on hazardous materials if you are unfamiliar
with the risks associated with the particular
substances you are cutting or with which you are
working.
■ Inhalation of certain dusts, especially organic dusts such
as mold or pollen, can cause susceptible persons to have
an allergic or asthmatic reaction. Substantial or repeated
inhalation of dust or other airborne contaminants,
especially those with a smaller particle size, may cause
respiratory or other illnesses.
– Control dust at the source where possible.
– To the extent possible, operate the robotic mower so
that the wind or operating process directs any dust,
mist or other particulate matter raised by the robotic
mower away from the operator.
– When respirable dust or other particulate matter
cannot be kept at or near background levels, always
wear a respirator that is approved by NIOSH and
rated for worksite-specific conditions. Follow the
recommendations of governmental authorities (e.g.,
OSHA/NIOSH) and occupational and trade
associations.
■ If the vegetation being cut or the surrounding ground is
coated with a chemical substance, such as a pesticide,
fertilizer or herbicide:
– Read and follow the instructions and warnings that
accompanied the substance coating the vegetation
or surrounding ground.
5.6.3 Operating Instructions
WARNING
■ You will be able to start the robotic mower or change its
mowing plan through the iMow App. To reduce the risk of
personal injury:
– Keep bystanders, especially children, and pets out
of the mowing area during operation.
– Do not operate the mower when children or pets are
or may be in the mowing area or vicinity.

0478-131-3050-A
12
English
5 IMPORTANT SAFETY INSTRUCTIONS
■ In the event of an emergency:
– Push and hold the STOP button for 5 seconds to
stop the mower and its cutting attachment. The
display shows the message "Disab. device. Unlock
using the indicated key combination."
■ The mowing blade continues to rotate for a short period
after the motor is switched off. This is known as the
"flywheel effect." To reduce the risk of serious personal
injury from contact with the cutting attachment:
– Activate the disabling device and wait for the
mowing blade to stop before lifting or carrying the
mower. Never attempt to lift or tilt the robotic mower
while it is running.
■ The rotating mowing blade may throw or fling foreign
objects directly or by ricochet. Objects that are thrown or
flung, including broken mowing blades, may result in
serious or fatal injury to the operator or bystanders. To
reduce the risk of severe personal injury:
■ When the red STOP button on top of the robotic mower is
pressed, operation of the mower will stop and the mowing
blade will come to a stop after a few moments. The
message "STOP button pressed" will appear in the
display. To reduce the risk of injury from contact with the
mowing blade, always press the STOP button:
– Before changing settings in the menu.
– Before setting up a mowing plan or otherwise
programming the robotic mower.
– Before adjusting the cutting height.
■ Press and hold the STOP button for 5 seconds to activate
the disabling device:
– Before lifting, carrying or transporting the robotic
mower.
– Before removing blockages or objects near the mower
deck or mowing blade.
– Before mounting, removing, inspecting or cleaning the
mowing blade.
– Before reaching under the mower for any reason.
– Before checking or cleaning the robotic mower.
– Inspect the mowing area. Remove
stones, pieces of metal, glass, wire or
other objects that could be thrown or
flung by the cutting attachment, damage
the cutting attachment or cause damage
to property (e.g., parked vehicles,
windows).
– Remove objects from the mowing area
such as toys, balls, lawn furniture,
landscape ornaments, flower pots,
garden hoses, lawn equipment and
anything else that could impede the
proper operation of the robotic mower or
become entangled in its mowing blade.
– Keep bystanders, especially children,
and pets away from the mower during
operation. Any person who enters the
mowing area during operation of the
mower must wear proper eye protection
and proper protective equipment as
specified in this instruction manual.
– Never allow the robotic mower to operate
if you know that animals or persons are
or may be in the mowing area.
– Never allow children or anyone else to
ride on, approach or play with the robotic
mower. Keep children and other
bystanders out of the mowing area while
the mower is in operation.

0478-131-3050-A
13
English
6 Docking Station and Power Supply Safety
■ Stop and inspect the robotic mower for damage if it hits a
foreign object or exhibits unusual operating behavior,
such as abnormal vibration. After disabling the robotic
mower, inspect the cutting assembly (mowing blade,
blade shaft and blade mount). If the unit continues to
function abnormally, take it to an authorized STIHL iMow
servicing dealer for service before restarting and allowing
the robotic mower to operate.
■ To reduce the risk of severe personal injuries from
unintentional starting:
■ A damaged or loose mowing blade may vibrate, crack,
break or come off the robotic mower, which may result in
serious or fatal injury.
– Make sure the mowing blade is undamaged and
properly tightened before starting work.
– If the mowing blade loosens after being properly
tightened, stop work immediately and have the
robotic mower repaired by your authorized STIHL
iMow servicing dealer.
– Never use a robotic mower with a loose or damaged
mowing blade.
6.1 Introduction
This section contains the general safety warnings and
instructions prescribed for the docking station and power
supply. Additional important warnings and instructions are
provided in subsequent sections of this manual.
READ AND FOLLOW ALL SAFETY INSTRUCTIONS.
WARNING
■ When using the docking station and power supply, basic
safety precautions should always be followed to reduce
the risk of fire, electric shock and personal injury and
property damage, including the following:
1)READ AND FOLLOW ALL SAFETY INSTRUCTIONS.
2)Read and follow all instructions that are on the docking
station and power supply or provided with the docking
station or power supply.
3)Do not use an extension cord.
4)Reference the National Electrical Code, ANSI/NFPA 70,
specifically for the installation of wiring and clearances
from power and lighting conductors.
5)Installation work and electrical wiring must be done by
qualified person(s) in accordance with all applicable
codes and standards, including fire-rated construction.
6)Do not install or use within 10 feet of a swimming pool.
7)Do not use in a bathroom.
8)WARNING: Risk of Electric Shock. When used outdoors,
install only to a covered Class A GFCI protected
receptacle that is weatherproof with the power supply
connected to the receptacle. If one is not provided, contact
a qualified electrician for proper installation. Ensure that
the power supply and cord do not interfere with completely
closing the receptacle cover.
9)WARNING: Risk of Fire. Installation involves special
wiring methods to run wiring through a building structure.
Consult a qualified electrician.
10)WARNING: Not for use with receptacles that are
weatherproof only when the receptacle is covered
(attachment plug cap not inserted and receptacle cover
closed).
SAVE THESE INSTRUCTIONS – This manual contains
important safety and operating instructions for the STIHL
ADO 401 Docking Station and the OWA-60U-27VUSM
power supply.
– Never touch the mowing blade with your
hands, feet or any other part of your body
without first de-activating the machine.
Press and hold the STOP button for 5
seconds and confirm that the mowing
blade has stopped.
6 Docking Station and Power Supply
Safety

0478-131-3050-A
14
English
6 Docking Station and Power Supply Safety
6.2 Warnings and Instructions
WARNING
■ To reduce the risk of fire, electric shock and other
personal injury or property damage:
– Read and follow all cautionary markings on the
docking station, power supply and robotic mower
and all instructions in this manual before using the
docking station.
– Use the ADO 401 docking station and OWA-60U-
27VUSM power supply only for charging the
STIHL RMI 422 PC-L robotic mower. Using the
docking station or power supply for other purposes
is prohibited and may lead to fire, explosion or
electric shock, resulting in serious or fatal personal
injury and property damage.
– Never use a damaged or improperly functioning
docking station or power supply.
– Never use or charge a robotic mower if the hood or
housing is cracked, deformed or excessively hot, if
battery fluid is leaking from the battery compartment,
or if the battery is otherwise damaged. A damaged
battery increases the risk of personal injury and
property damage from short circuit, fire or explosion.
– Connect the power supply cord only to a properly
covered Class A Ground Fault Circuit Interruptor
(GFCI) receptacle that has an enclosure that is
weatherproof with an attachment plug cap inserted
or removed. Do not use with receptacles that are
weatherproof only when the receptacle is covered
(attachment plug cap not inserted and receptacle
cover closed).
– Never plug the docking station into a power strip or
an extension cord.
– Do not operate a docking station or power supply
that has received a sharp or heavy blow, has been
dropped or is otherwise damaged or not functioning
properly in any way.
– Do not attempt to repair, open or disassemble the
docking station or power supply. There are no user-
serviceable parts inside.
■ The docking station and power supply heat up during the
charging process. To reduce the risk of fire:
– Use the docking station and power supply only within
an ambient temperature range of 32 °F to 122 °F
(0 °C to 50 °C).
– Do not operate the docking station on a combustible
surface (e.g., paper, cardboard, textiles) or in a
combustible environment.
– Allow the docking station and power supply to cool
down normally. Do not cover them.
■ The docking station can produce sparks which may ignite
combustible gases, liquids, vapors, dusts or other
combustible materials. To reduce the risk of fire and
explosion:
– Do not operate in a location where combustible
gases, liquids, vapors, dusts or other combustible
materials are present.
■ Using a damaged power supply cord or plug may result in
fire, electric shock and other serious personal injury or
property damage. To reduce these risks:
– Unplug the power supply from the electrical outlet
when the docking station is not in use for charging or
mowing operations.
– Never jerk the power supply cord to disconnect it
from the electrical outlet. To unplug, grasp the plug,
not the power supply cord.
– Do not use the power supply cord for carrying or
hanging up the power supply.
– Make sure the power supply cord is located or
marked so that it will not be stepped on, tripped over,
come in contact with sharp objects or moving parts,
or otherwise be subjected to damage or stress.
– Check the power supply cord and plug
before use and regularly thereafter for
damage. If damaged, immediately
disconnect from the electrical outlet.

0478-131-3050-A
15
English
7 Maintenance, Repair and Storage
■ In case of fire, or if the docking station or power supply
emits smoke, an unusual smell, feels hot or appears
abnormal in any other way:
– Immediately disconnect the power supply from the
outlet and prepare to contact the authorities in the
event of fire or explosion.
– Have the docking station and power supply
inspected and repaired by an authorized STIHL
iMow servicing dealer before use.
WARNING
■ To reduce the risk of fire, electric shock and other
personal injury or property damage:
– Insert the power supply only into a covered Class A
GFCI receptacle that has an enclosure that is
weatherproof with an attachment plug cap inserted
or removed. Do not use with receptacles that are
weatherproof only when the receptacle is covered
(attachment plug cap not inserted and receptacle
cover closed.)
– Mount the power supply unit at a height greater than
1 foot (0.3 m) from the ground surface.
– Never plug the power supply into a power strip or
extension cord.
■ To reduce the risk of personal injury or property damage:
– Return the robotic mower to the docking station and
disconnect the power supply from the power
receptacle if there is a threat of lightning strikes in
the vicinity.
DANGER
■ Using a damaged power supply cord or plug may result in
fire, electric shock and other personal injury or property
damage. To reduce the risk of electrocution:
7.1 Warnings and Instructions
WARNING
■ There are no user-authorized repairs for the robotic
mower, docking station or power supply. To reduce the
risk of fire, electric shock or other personal injury and
property damage:
– Users may carry out only the cleaning and
maintenance operations described in this manual.
– Strictly follow the cleaning and maintenance
instructions in the appropriate sections of this
instruction manual.
– Check the power supply cord and plug
regularly for damage. If they become
damaged, immediately disconnect from
the electrical outlet. Never use a
damaged power supply cord or plug.
– Do not abrade, crush, jerk, or otherwise
abuse or misuse the power supply cord
or plug. Protect it from heat, oil and sharp
edges.
– If the power supply cord or plug becomes
damaged, replace the power supply.
– Unplug the power supply cord when the
docking station is not in use.
– Never yank or jerk the power supply cord
to disconnect. To unplug, grasp the plug,
not the power supply cord.
– Make sure the power supply cord is
positioned and secured or marked so
that it will not be stepped on, tripped
over, come in contact with sharp objects,
moving parts, or otherwise be subjected
to damage or stress.
7 Maintenance, Repair and Storage

0478-131-3050-A
16
English
8 Operating Principle
– STIHL recommends that all repair work be
performed by authorized STIHL iMow servicing
dealers.
– Maintain and replace warning and instruction labels
as necessary.
■ Unintentional starting may result in personal injury or
property damage. To reduce the risk of personal injury
and property damage from unintentional starting:
■ The mowing blade is the only user-serviceable part on the
robotic mower.
– Wear heavy-duty, non-slip work gloves made of
leather or another wear resistant material when
handling the mowing blade.
– Replace the mowing blade when it becomes worn or
damaged.
– Tighten all nuts, bolts and screws after replacing the
mowing blade.
■ Use of parts that are not authorized or approved by STIHL
may cause serious or fatal injury or property damage.
– STIHL recommends that only authorized STIHL
replacement parts be used for repair or
maintenance.
■ To reduce the risk of electric shock:
– Unplug the power supply from the electrical outlet
before inspecting the docking station or perimeter
wire.
– Regularly check the docking station and ensure that
the insulation of the power supply cord and plug are
in good condition and show no signs of aging
(brittleness), wear or damage. Check the charging
contacts for signs of corrosion or damage that may
lead to short circuit during charging.
– Replace the power supply if its power supply cord or
plug is damaged.
■ Improper storage can result in unauthorized use, damage
to the robotic mower, its integrated battery and docking
station, and an increased risk of fire, electric shock and
other personal injury or property damage.
– Press and hold the STOP button for 5 seconds to
activate the disabling device.
– Allow the robotic mower to cool down for at least
5 minutes before storing.
– Before storing, always unplug the docking station
from the electrical outlet.
– Store the robotic mower and docking station indoors
in a dry, secure place that cannot be accessed by
children or other unauthorized users.
– Store the robotic mower only within an ambient
temperature range of 32 °F to 122 °F (0 °C to 50 °C).
SAVE THESE
INSTRUCTIONS
This iMow (1) is a mulching mower, designed for
autonomous, programmable lawn care. It mows the lawn in
randomly chosen paths. During mulching, the grass
– Always press and hold the STOP button
for 5 seconds to activate the disabling
device before assembling, transporting,
adjusting, inspecting, cleaning,
servicing, maintaining or storing the
robotic mower.
8 Operating Principle
0000-GXX-3427-A1
1
5
2
4
3
A

0478-131-3050-A
17
English
9 Key Features
clippings are further shredded in the mowing deck after
cutting. They then fall back into the turf, where they
decompose.
In order for the robotic mower to detect the borders of the
mowing area (A), a perimeter wire (2) must be laid around
that area. A low-voltage electrical signal generated by the
docking station (3) flows through this perimeter wire.
Solid obstacles of sufficient size and weight (5) in the
mowing area are detected by the robotic mower's impact
sensor. Obstacles and areas that the robotic mower must
avoid (4) should be separated from the mowing area using
the perimeter wire.
9.1 Key Features
WARNING
The robotic mower is equipped with several devices to help
reduce the risk of personal injury or property damage during
use. If a safety device has a malfunction, do not operate the
robotic mower and take the it to an authorized STIHL iMow
servicing dealer to be repaired.
1. STOP button
If you push the STOP button, the mower and its mowing
blade will stop and the display will show the message "STOP
button pressed." The robotic mower cannot be operated
while this message is active, @ 22.1.
If you want to resume automatic mowing, the robotic mower
will ask whether automatic operation is to be continued. To
continue automatic operation:
► Confirm the message "STOP button pressed" by pressing
the OK button.
► Select "Yes" and press the OK button.
The robotic mower resumes automatic mowing in
accordance with the mowing plan.
► Select "No" and press the OK button to have the robotic
mower remain stationary in the mowing area and switch
off automatic mowing, @ 14.3.
2. Disabling device
► To activate the disabling device in the "Commands" menu,
select "Lock iMow" and confirm by pressing the OK button,
@ 14.3.
► To activate the disabling device in the "Settings" menu,
open the "Safety" submenu, select "Lock iMow" and
confirm by pressing the OK button, @ 15.4.
To deactivate the disabling device:
► Wake up the robotic mower, if required, by pressing any
button.
► Press the Back button and the OK button in the sequence
illustrated on the display.
Once the disabling device is deactivated, the robotic
mower can be operated again.
3. Impact sensor
The hood is designed to function as an impact sensor.
During automatic operation, the robotic mower stops if the
hood contacts a solid obstacle taller than 3.9 in. (10 cm).
The robotic mower then turns and continues automatic
mowing in another direction. If the impact sensor is triggered
too frequently, the mowing blade will stop rotating.
NOTICE
The impact sensor may not detect certain obstacles, such as
small flower pots or other lighter objects, which can be
knocked over or damaged. STIHL recommends removing
obstacles or blocking them off by creating restricted areas
through the placement of the perimeter wire, @ 11.6.
9 Key Features
To activate the disabling device, press and hold
the STOP button for 5 seconds. The mower and
its mowing blade stop and the display shows the
message "Disab. device. Unlock using the
indicated key combination." The robotic mower
cannot be operated while this message is
active,@ 22.1.

0478-131-3050-A
18
English
10 Installing the Robotic Mower
4. Lifting protection
If you attempt to lift the robotic mower by the hood or at the
carrying handles during operation, its lift sensor will be
activated and will stop the mowing blade within a short
period. Nevertheless, do not attempt to lift or reach under
the robotic mower for any reason without first activating the
disabling device and ensuring that the mowing blade has
stopped.
5. Tilt sensor
If the robotic mower exceeds the permissible incline of more
than 21.8° (40 %), the robotic mower will turn and continue
mowing in a different direction. An incline of 21.8°
corresponds to a vertical height increase of a = 15.7 in.
(40 cm) for a b = 39.4 in. (100 cm) horizontal distance.
Exclude such inclines from the mowing area and trim the
excluded area with a suitable line trimmer or other tool.
In the event of a rollover, the wheel drive stops and the
mowing blade will stop within a short period.
6. Illuminated display
The display is backlit during operation to help you track the
robotic mower in darkness.
7. Anti-theft alarm
When the anti-theft feature is activated:
– An alarm sounds when the robotic mower is lifted unless
the PIN code is entered within one minute, @ 15.4.
– If you replace the docking station or robotic mower after
completing the initial setup, you will need to link the
robotic mower and docking station before use, @ 10.6.
8. GPS protection
For theft detection, STIHL recommends activating the GPS
protection feature. When GPS protection is activated:
– The registered owner of the robotic mower will be notified
through the iMow App if the unit is carried more than
1640 ft. (500 m) away from the perimeter of the
established mowing area, @ 15.4.
– When low, medium or high security levels are set, the
robotic mower can be operated outside the established
mowing area only after the security PIN code is entered,
@ 15.4.
10.1 Preparing the Lawn and the Robotic Mower for
Operation
To prepare the lawn for installation of the perimeter wire:
► Mow the lawn using a conventional lawn mower. An ideal
grass height is 2.4 in. (6 cm) or less.
► If the surface is hard and dry, water the mowing area
lightly in order to make it easier to drive in the perimeter
wire stakes.
► STIHL recommends that you install the perimeter wire at
least 11 in. (28 cm) from obstacles or the outer boundary
of your yard, @ 11. This will make continuous operation
of your robotic mower more likely. You may reduce
unmowed areas by installing the perimeter wire closer
than 11 in. (28 cm) to obstacles, but the successful
installation will depend on the particular characteristics of
your yard, @ 11.15.
a
b
24°
0000-GXX-3662-A0
10 Installing the Robotic Mower

0478-131-3050-A
19
English
10 Installing the Robotic Mower
► Where more than one mowing area has been set up, keep
a minimum distance of at least 3.3 ft (1 m) between the
perimeter wires of the two areas of neighbor A and
neighbor B.
To prepare the robotic mower for operation, follow the built-
in installation assistant, which guides you through the initial
installation of the robotic mower:
► Set the time and the date on the robotic mower, @ 10.2.
► Install the docking station, @ 10.3.
► Install the perimeter wire, @ 11.
► Connect the perimeter wire to the docking station,
@ 10.5.
► Link the robotic mower and the docking station, @ 10.6.
► Check the installation, @ 10.7.
► Program the robotic mower and create an automatic
mowing plan, @ 12.4.
► Complete the initial installation and begin mowing,
@ 14.5.
Consult an authorized STIHL iMow servicing dealer for
further information on installing the perimeter wire and
setting up the robotic mower. STIHL recommends having an
authorized STIHL iMow servicing dealer set up your robotic
mower.
10.2 Setting the Language, Date and Time
Always set the correct date and time to ensure an accurate
mowing plan and to prevent automatic mowing at unwanted
times.
► During the initial installation, press any button on the
control panel to activate the installation assistant.
► Select the desired language and press the OK button.
► Confirm your language selection by pressing the OK
button or select "Change" to repeat the language
selection.
► If prompted, enter the 9-digit serial number of the robotic
mower found on the rating plate behind the control panel.
► Set the current date using the navigation pad and confirm
it by pressing the OK button.
► Set the current time using the navigation pad and confirm
it by pressing the OK button.
A
B
0000-GXX-3343-A1
0000-GXX-3344-A1
2018
2017
2019

0478-131-3050-A
20
English
10 Installing the Robotic Mower
10.3 Installing the Docking Station
WARNING
To reduce the risk of injury during installation and operation,
read and follow the docking station safety precautions and
instructions in this manual, @ 6. To reduce the risk of eye
injury, always wear close-fitting protective eyewear when
installing the docking station and perimeter wire, @ 5.3.
WARNING
To reduce the risk of fire and electric shock, install the
docking station's power supply at least one foot off the
ground and ensure that there is no risk that it may be
immersed in water or other liquids. Do not place the power
supply on the ground or at ground level. Always install the
power supply on a stable surface.
WARNING
Since the docking station and power supply heat up during
the charging process, do not operate the docking station on
a combustible surface or in a location where combustible
gases, liquids, vapors, dusts or other materials and
substances are present, @ 6.
WARNING
To reduce the risk of fire and electric shock, connect the
docking station only to a covered Class A GFCI receptacle
that matches the voltage and electrical frequency stated on
the power supply. It must have an enclosure that makes it
weatherproof both when the plug cap is inserted and when
it is removed. Ensure that the docking station is located in
sufficient proximity to reach a covered, weatherproof
Class A GFCI receptacle with the 33 ft. (10 m) power supply
cord. Do not use an extension cord. Use of extension cords
are not authorized and increase the risk of electric shock
and fire. Always ensure that the power supply cord is out of
the cutting path of the robotic mower.
► Depending on your lawn, you may install the docking
station partly within the mowing area (internal docking
station) or outside the mowing area (external docking
station). Review the installation examples provided in this
instruction manual, @ 26.
NOTICE
An invisible dog fence or other in-ground wiring will interfere
with the operation of your robotic mower. Investigate all
potential sources of electrical interference and discuss
these with your STIHL iMow servicing dealer before starting
installation.
To install the docking station within the mowing area
(Internal Docking Station):
► Leave a free, level area (3) with a radius of at least
a = 3.3 ft. (1 m) in the mowing area (2) in front of the
docking station (1), free of hills, inclines, depressions,
holes or obstacles. Select an area free of magnetic or
electrical interference. For example, never install over a
metal grate or near an electrical motor, such as a
swimming pool pump. Be sure to remove any existing
perimeter wires before starting a new installation.
3
a
1
1
2
0000-GXX-3345-A0
90
a
a
90
1
2
3
0000-GXX-3353-A0

0478-131-3050-A
21
English
10 Installing the Robotic Mower
► Install the perimeter wire on the left side (2) and on the
right side (1) of the docking station (3) in a straight line
with a length of a > 23.6 in. (60 cm) and at right
angles (90°) to the base plate.
To install the docking station outside the mowing area
(External Docking Station):
► Select an area outside of the perimeter wire that is flat and
free of hills, inclines, depressions, holes or obstacles.
Select an area free of magnetic interference. For example,
never install over a metal grate or near an electrical motor,
such as a swimming pool pump. Be sure to remove any
existing perimeter wires before starting a new installation.
► Position the docking station (1) outside the mowing
area (2) in a space that meets the following requirements:
– Minimum clearance to the mowing area:
a ≥ 19.7 in. (50 cm)
– Width of the free area: b = 15.7 in. (40 cm)
– Maximum clearance to the mowing area:
c ≥ 39.4 ft. (12 m)
► A corridor (3) can be installed, @ 11.8.
– d = 9 in. (22 cm)
► Use the tunnel-shaped STIHL Corridor Pattern to install
the gate (A) at the end of the corridor.
► When installing the docking station outside the mowing
area and the "Passage" function ("Offset Drive Home") is
activated, install "search loops" to allow the robotic
mower to more easily find the docking station. Search
loops are explained later in this manual, @ 11.9.
If an external docking station has been installed, STIHL
recommends defining at least one "starting point" outside
the corridor to the docking station after initial installation is
complete. Starting points are explained later in this manual,
@ 15.6.
To secure the docking station:
► For longer service life, STIHL recommends installing the
docking station in a protected, shady location.
► Select an area free of magnetic interference. For example,
never install over a metal grate or near an electrical motor,
such as a swimming pool pump.
► Ensure that the docking station is located in sufficient
proximity to reach a covered, weatherproof Class A GFCI
receptacle with the 33 ft. (10 m) power supply cord. Do not
use an extension cord.
► The ground selected for the docking station should be flat
and level. The base plate should not have an incline of
more than more than d = 3.2 in. (8 cm) or a downward
slope of more than e = 0.8 in. (2 cm).
► Secure the docking station (1) in position at the chosen
location using four pegs (4). Make sure the base plate fully
contacts the ground at all four corners.
A
3
4
1
d
e
0000-GXX-3347-A2

0478-131-3050-A
22
English
10 Installing the Robotic Mower
To connect the power supply to the docking station:
WARNING
To reduce the risk of electric shock, make sure the power
supply is not plugged into the electrical socket when
handling the connector and inserting it into the docking
station. Always unplug the power supply from the electrical
socket before removing the cover of the docking station.
► Remove the docking station cover (5) by lifting it over the
tabs on each side.
► Fold the panel (6) forward and hold it in the open position.
► Insert the connector (7) to the left port (8) on the circuit
board of the panel as illustrated.
► Guide the power supply cord through the strain relief (9),
through the cable duct (10) and out the rear of the docking
station.
NOTICE
Make sure the connector and port on the circuit board are
clean before connecting them.
The power supply is rated for outdoor use. For longer
service life, STIHL recommends protecting the power supply
from direct sunlight and damp or wet conditions.
To mount the power supply:
► Install the power supply outside the mowing area at least
one foot above the ground and never at ground level or in
any location where it could be immersed in water or other
liquids.
5 5
0000-GXX-3348-A1
6
7
8
0000-GXX-5345-A0
9
10
10
10
0000-GXX-5346-A0
1 2
b
a
c
0000-GXX-3609-A0

0478-131-3050-A
23
English
10 Installing the Robotic Mower
► Use appropriate screw-in wall anchors or other similar
mounting devices if an appropriate wall stud is not
available.
► Align the power supply as shown above. Mount to a wall
with the following dimensions:
– a = minimum 1 ft. (30 cm)
– b = minimum 3.9 in. (10 cm)
– c = 5.0 in. (128 mm)
NOTICE
When mounting, ensure that no electrical cables, pipes or
other service lines run in the wall behind the power supply.
► Route the power supply cord outside the mowing area, out
of working range of the mowing blade, and secure it to the
ground or route it through a cable duct.
► Direct the power supply cord away from the docking
station in order to avoid electrical interference with the
perimeter wire signal. Make sure that it will not be in the
cutting path of the robotic mower.
► Close the panel (6). Take care not to pinch the power
supply cord or the perimeter wire.
► Re-attach the cover (5). Take care not to pinch the power
supply cord or the perimeter wire.
► Connect the docking station only to a covered Class A
GFCI receptacle that matches the voltage and electrical
frequency stated on the power supply. It must have an
enclosure that makes it weatherproof both when the plug
cap is inserted and when it is removed.
The LED on the docking station will flash red rapidly when
the perimeter wire is installed and properly connected to
the docking station.
► Press the OK button on the control panel.
If an external docking station has been installed, STIHL
recommends defining at least one "starting point" outside
the corridor to the docking station after initial installation is
complete. Starting points are explained later in this manual,
@ 15.6.
6
0000-GXX-5347-A0
5
0000-GXX-3350-A0

0478-131-3050-A
24
English
10 Installing the Robotic Mower
NOTICE
A canopy top is available to protect the docking station from
the elements. Exposure to direct sunlight can lead to
increased temperatures inside the machine and battery
compartment, which can increase battery charging times
and reduce battery life.
To charge the robotic mower:
► Lift the robotic mower slightly by the rear carrying
handle (11) to relieve the weight on the drive wheels.
► Push the robotic mower, resting on its front wheels, into
the docking station.
The LED on the docking station flashes slowly after
docking.
► Press the OK button on the robotic mower's control panel.
If the battery is discharged, a plug symbol will appear at
the top right corner of the display after docking. The
battery will charge while the perimeter wire is being
installed.
10.4 Installing the Perimeter Wire
WARNING
To reduce the risk of injury to bystanders and unauthorized
users, secure the perimeter wire in the ground with the wire
stakes. Ensure that the perimeter wire and stakes are buried
or properly secured low enough to the ground that they will
not get caught in the robotic mower's mowing blade or
present a tripping hazard. To reduce the risk of eye injury,
always wear close-fitting protective eyewear when installing
the docking station and perimeter wire, @ 5.3.
► Before installing the perimeter wire, plan the wire routing
in detail. In particular, observe the wire clearances and
install restricted areas, reserve wire, linking sections,
secondary areas and corridors during wire routing. Before
starting installation, read the entire chapter on routing the
perimeter wire, @ 11.
► Install the perimeter wire in a continuous loop around the
entire mowing area with a maximum length of 1640 ft.
(500 m).
► If you install the perimeter wire around areas smaller than
120 square yards (100 m²),or if the total length of the
perimeter wire is less than 575 ft. (175 m), the STIHL
Small Area Module AKM 100 (special accessory) must
also be installed. For more information, contact your
authorized STIHL iMow servicing dealer.
STIHL recommends making a sketch of the mowing area
that includes the following:
– The contour of the mowing area including important
obstacles, borders and any restricted areas which the
robotic mower must not mow, @ 26.
– The location and position of the docking station, @ 10.3.
– The location of the perimeter wire and any wire
connectors you have installed, @ 11.

0478-131-3050-A
25
English
10 Installing the Robotic Mower
NOTICE
Use only perimeter wire and wire stakes authorized by
STIHL.
NOTICE
The maximum distance between the robotic mower and any
perimeter wire must not be more than 55 ft. (17 m), since
otherwise the wire signal is no longer recognizable.
NOTICE
Especially when installing with a wire laying machine, make
sure that the perimeter wire runs loosely from the spool.
Avoid pulling on the perimeter wire. Tensile stress can lead
to wire breaks.
The perimeter wire (1) is installed on the ground and fixed in
place with wire stakes (2) every 3.3 ft. (1 m). Stakes may
need to be closer together if the ground is uneven. This
prevents the wire from being cut by the mower blade.
To install the perimeter wire around an internal docking
station:
► Secure the perimeter wire (1) with a wire stake (2) on the
left side (A) or on the right side (B) of the docking station,
next to a wire channel in the base plate.
► Leave a section of wire (1) with a length of approximately
a = 4.92 ft. (1.5 m). This segment will later be connected
to the docking station.
► Install the perimeter wire on the left side (2) and on the
right side (1) of the docking station (3) in a straight line
with a length of a > 23.6 in. (60 cm) and at right
angles (90°) to the base plate.
► If the "Passage" feature ("Offset Drive Home") in the
installation settings is activated (@ 15.3), this section of
perimeter wire (a) must be longer, at least a = 4.9 ft.
(1.5 m).
a
A
B
1
2
1
0000-GXX-4384-A1
90
a
a
90
1
2
3
0000-GXX-3353-A0

0478-131-3050-A
26
English
10 Installing the Robotic Mower
To install the perimeter wire around an external docking
station:
► Secure the perimeter wire (1) with a wire stake (2) on the
left front side (A) or on the right front side (B) of the
docking station, next to a wire channel in the base plate.
► Leave a section of wire (1) with a length of approximately
a = 6.56 ft. (2 m). This segment will later be connected to
the docking station.
► Install the perimeter wire (1) in front of and behind the
docking station (3) with a clearance of
a ≥ 19.7 in. (50 cm) and at right angles (90°) to the base
plate.
► Install a corridor, @ 11.8 or install the perimeter wire
around the mowing area.
► Leave a minimum clearance of b = 15.7 in. (40 cm) to the
side of the base plate.
To install the perimeter wire around the mowing area:
► Install the perimeter wire (1) around the mowing area and
around any obstacles, @ 11.6.
► Secure it to the ground using wire stakes (2).
One wire stake per 3.3 ft. (1 m) is sufficient as a rough
guide. Stakes may need to be closer together if the ground
is uneven. The perimeter wire must always lie flat on the
lawn, low enough that it will not be cut by the robotic
mower's blade. Gradually over time, the mowing and
mulching process will help conceal the perimeter wire
below the surface of the grass. Alternatively, the perimeter
wire can be buried up to a depth of 3.9 in. (10 cm).
► Check perimeter wire clearances using the iMow Ruler,
@ 11.3.
► Maintain the wire clearance at the corners around high
obstacles such as wall corners or high flowerbeds (5) to
prevent the robotic mower from scraping against the
obstacle.
1
a
1
2
B
A
0000-GXX-5348-A1
b
b
a
3
90
90
1
1
0000-GXX-3354-A0
1
2
0000-GXX-3355-A0

0478-131-3050-A
27
English
10 Installing the Robotic Mower
► Install the perimeter wire (1) with the aid of the
iMow Ruler (4) as illustrated.
► Secure it to the ground using wire stakes (2).
► Never install the perimeter wire at angles less than 90°.
► After a corner of 90° (6), at least the length of an
iMow Ruler (4) must be laid straight before the next corner
is installed.
► If necessary, extend the perimeter wire using wire
connectors, @ 11.14.
► In the case of several adjacent mowing areas, install
secondary areas (@ 11.7) or join the mowing areas with
corridors (@ 11.8).
► If you install the perimeter wire around areas smaller than
120 square yards (100 m²), or if the total length of the
perimeter wire is less than 575 ft. (175 m), the STIHL
Small Area Module AKM 100 (special accessory) must
also be installed. For more information, contact your
authorized STIHL iMow servicing dealer.
To finish installing the perimeter wire:
► Drive in the last wire stake (2) on the left or right of the
base plate, next to the wire channel in the base plate.
► Drive the wire stakes fully into the ground.
► Cut the perimeter wire (1) so that you have a section of
wire approximately 4.92 ft. (1.5 m) in length available to
connect to the docking station.
► If installing the perimeter wire around an external docking
station: Cut the perimeter wire (1) so that you have a
section of wire approximately 6.56 ft. (2 m) in length
available to connect to the docking station.
► Press the OK button on the control panel.
If the robotic mower's battery is not sufficiently charged to
work through the remaining steps of the installation, the
robotic mower will display a message that it is charging. If
you receive this message, keep the robotic mower in the
docking station to continue charging. Moving ahead to the
next step of the installation assistant by pressing the OK
button is only possible once the necessary battery voltage is
available.
NOTICE
For the first two weeks of operation after initial installation,
set the mowing height on the robotic mower to its highest
level. That will help reduce the likelihood of cutting the
perimeter wire with the mowing blade.
NOTICE
NOTICE
Further information on installation of the docking station is
contained in the installation examples section, @ 26.
10.5 Connecting the Perimeter Wire to the Docking
Station
WARNING
To reduce the risk of fire, electric shock and other personal
injury, unplug the power supply from the electrical outlet
before attempting to connect the perimeter wire to the
docking station. Always unplug the unit before removing the
cover from the docking station.
2
1
1
2
0000-GXX-4385-A1
Take care when using a trimmer near the
perimeter of the mowing area. If you are not
careful, perimeter wire that is not buried could be
cut by the rotating trimmer line.

0478-131-3050-A
28
English
10 Installing the Robotic Mower
NOTICE
Make sure that all contacts are clean and not corroded.
► Place the robotic mower (1) next to the docking station (2)
in the mowing area as illustrated.
► Press the OK button on the control panel.
► Disconnect the plug from the electrical outlet and press
the OK button.
► Remove the cover, @ 10.3.
► Press the OK button on the control panel.
To connect the perimeter wire to an internal docking station:
► Insert the perimeter wire (3) into the wire channels in the
base plate and guide it through the port (4) to the rear of
the docking station.
► Cut the ends of the perimeter wire (5 and 6) so that
approximately 15.7 in. (40 cm) is available for insertion
into the docking station. Additional length is not needed.
► Do not coil excess wire behind the docking station.
Excess wire can interfere with the operation of the robotic
mower.
To connect the perimeter wire to an external docking station:
► Guide the perimeter wire (3) though the wire channel in
the base plate (7). Thread the perimeter wire into the wire
channels. If necessary, loosen the wire stakes.
► Insert the perimeter wire (3) into the wire channels in the
base plate and guide it through the port (4) to the rear of
the docking station.
1
2
0000-GXX-3358-A2
0000-GXX-3359-A2
Unplug the
docking station
4
5
6
3
0000-GXX-5349-A0
7
7
3
4
0000-GXX-5350-A0

0478-131-3050-A
29
English
10 Installing the Robotic Mower
► Cut the ends of the perimeter wire (5 and 6) so that
approximately 15.7 in. (40 cm) is available for insertion
into the docking station. Additional length is not needed.
► Do not coil excess wire behind the docking station.
Excess wire can interfere with the operation of the robotic
mower.
To connect the perimeter wire to the panel:
► Use a suitable tool to strip a = 0.236 in. (6 mm) from the
of the left perimeter wire (5) end and twist the perimeter
wire strands.
► Twist both perimeter wire ends together (5 and 6).
► Open the panel, @ 10.3.
► Press and open the left clamping lever (8).
► Insert the stripped perimeter wire end (5) into the clamping
block as far as it will go.
► Close the clamping lever (8)
► Use a suitable tool to strip a = 0.236 in. (6 mm) from the
end of the right perimeter wire (6) and twist the perimeter
wire strands.
► Press and open the right clamping lever (9).
► Insert the stripped perimeter wire end (6) into the clamping
block as far as it will go.
► Close the clamping lever (9)
► Close the panel. Take care not to pinch the power supply
cord or the perimeter wire.
5
6
0000-GXX-5351-A0
5 + 6
a
5
0000-GXX-5352-A0
5
8
6
a
0000-GXX-5353-A1
6
9
0000-GXX-5354-A1

0478-131-3050-A
30
English
10 Installing the Robotic Mower
► Close the cover of the cable duct (10).
► Check the routing of the perimeter wire. The two perimeter
wire ends must be routed as illustrated.
► Press the OK button on the control panel.
► Re-attach the cover as described in the "Installing the
docking station" section (@ 10.3) and press the OK
button on the control panel.
► Connect the power supply plug to the electrical outlet and
press the OK button on the control panel.
When the perimeter wire is correctly installed and connected
to the docking station, a glowing red LED (11) will indicate
that the docking stations is ready for operation.
► If the LED flashes red or remains off, the perimeter wire is
broken or not correctly connected to the docking station. It
could also indicate a malfunction in the docking station.
Check the perimeter wire or contact a STIHL iMow
servicing dealer.
► Lift the robotic mower slightly by the rear carrying
handle (12) and relieve the weight on the drive wheels.
► Push the machine, resting on its front wheels, into the
docking station.
► Press the OK button on the control panel.
10
0000-GXX-5355-A0
0000-GXX-5413-A2
perimeter wire
0000-GXX-3363-A2
Plug in the
docking station
11
0000-GXX-5356-A0

0478-131-3050-A
31
English
10 Installing the Robotic Mower
10.6 Linking the Robotic Mower and Docking Station
The robotic mower can only be operated if it receives the
wire signal emitted by the docking station. The robotic
mower and docking station must be linked before the mower
can receive the wire signal.
Checking the wire signal may take several minutes.
► To terminate the linking process, push the STOP button.
The previous step of the installation assistant will be
called up again.
► Continue the initial installation by pressing the OK button
on the control panel.
Interrupted Reception
If the wire signal is interrupted or not received properly, the
display will show one of the following symbols:
For troubleshooting information, @ 22.2.
10.7 Checking the Installation
► Start the test run by pressing the OK button on the control
panel. This does not activate the mowing blade.
► Close the flap.
The robotic mower will start following the perimeter wire
along the edge of the mowing area.
► As the robotic mower follows the edge, walk behind it and
ensure the following:
– The robotic mower follows the edge of the mowing area.
– The robotic mower clears obstacles and the borders of
the mowing area.
Once the robotic mower and the docking station
are linked properly, the display shows this
symbol and the message "Wire signal OK".
The robotic mower is not receiving a wire signal.
The display shows the message "No wire
signal."
The robotic mower is receiving a faulty wire
signal. The display shows the message "Check
wire signal."
0000-GXX-3366-A1
The robotic mower is receiving a reversed-
polarity wire signal. The display shows the
message "Connections swapped or iMow
outside."
25 ft
0000-GXX-4818-A1

0478-131-3050-A
32
English
10 Installing the Robotic Mower
– The robotic mower docks and undocks properly.
The robotic mower tracks its location using the built-in GPS
receiver. The coordinates of the perimeter wire are captured
during installation and each time the "iMow follows edge"
function is performed.
The display will show the distance covered as the robotic
mower travels around the perimeter of the mowing area.
► If you want to set specific starting points along the
perimeter wire, take note of the distance indicated on the
display at the desired location. For more information on
starting points, see @ 15.6.
► Remove all obstacles from the perimeter and adjust the
perimeter wire as necessary to ensure problem-free
operation.
To continue the test run after an interruption:
► Place the robotic mower on the perimeter wire or place it
within the mowing area facing the perimeter wire.
► Select Yes and press the OK button on the control panel.
After completing the test run, the robotic mower will dock
and then repeat the test in the opposite direction. After
completing the second test run, the robotic mower will dock
again and the next step of the installation assistant will be
called up. A successful perimeter wire test must be
completed for iMow to work properly.
NOTICE
STIHL recommends completing the full test run in both
directions.
10.8 Programming the Robotic Mower: the Mowing
Plan
WARNING
The robotic mower can be programmed to cut autonomously
during specific blocks of time (active times). When utilizing
this feature, keep bystanders, especially children, and pets
out of the mowing area. Never allow the robotic mower to
operate if you know that animals or persons are or may be
in the mowing area or vicinity, @ 5.6.3.
WARNING
Observe all applicable laws, regulations, standards and
ordinances when programming active times. Set and adjust
active times after completing the initial installation, @ 14.6.
► Select the size of your lawn and confirm it by pressing the
OK button on the control panel.
Restricted areas and secondary areas must not be
included when calculating the size of the mowing area.
The robotic mower automatically calculates a mowing plan
based on the size of the lawn and the length of the perimeter
wire.
When the robotic mower has finished calculating the mowing
plan, the display shows the message "Confirm each day
individually or change active time."
► To end the calculation of the mowing plan, push the STOP
button.
0000-GXX-3368-A1
0000-GXX-3369-A3
2000 ft²
3000 ft²
2500 ft²

0478-131-3050-A
33
English
10 Installing the Robotic Mower
► Press the OK button on the control panel to approve or
change the active times. Before modifying active times,
see @ 14.5.
The active times for Monday are displayed and the menu
item "Confirm active times" is highlighted.
► Confirm all active times by pressing the OK button on the
control panel. The display will show the next day's mowing
plan for you to approve or modify.
In the case of small mowing areas, mowing may not be
necessary every day. In this case, no active times will be
displayed, and the menu item "Delete all active times" is
not available. Days without active times must also be
confirmed by pressing the OK button on the control panel.
Next to each menu item, one of the following symbols is
displayed:
To complete programming:
► Confirm the active times for Sunday.
The final mowing plan will be displayed.
► Confirm the mowing plan by pressing the OK button on the
control panel.
The final step of the installation assistant will be called up.
► Select "Change" if you need to modify one of the active
times.
Before changing the active times or mowing duration on your
iMow, see the chapters on the Mowing Plan, @ 14.5,
@ 14.6 and @ 14.7.
NOTICE
If you have a sprinkler system, program the robotic mower
to avoid active watering times to reduce the likelihood of
damage to the sprinkler heads from contact with the mowing
blade. The mower and sprinkler system should never be run
at the same time.
NOTICE
Avoid contacting the perimeter wire when de-thatching or
aerating the lawn. Also use caution when operating a line
trimmer near the perimeter wire. De-thatching, aerating and
trimming operations can result in a cut or damaged
perimeter wire. Refer to your sketch of the mowing area and
take special care to avoid the perimeter wire when
performing these operations.
The displayed active times can be changed. Select
the time interval to be changed using the navigation
pad and open it by pressing the OK button on the
control panel, @ 14.6.
Additional active times can be programmed. Select
the menu item "New active time" and open it by
pressing the OK button on the control panel.
Select up to three active times per day with their start
and end times in the selection window. Confirm it by
pressing the OK button on the control pane.
Active times can be deleted. Select the menu item
"Delete all active times" and confirm it by pressing the
OK button on the control panel.
0000-GXX-3370-A1
0000-GXX-3371-A1

0478-131-3050-A
34
English
11 Installing the Perimeter Wire
10.9 Completing the Initial Installation and First
Mowing Operation
WARNING
Inspect the mowing area. Just as you would before starting
a mowing operation with a traditional lawn mower, remove
all sticks, stones, pieces of metal, glass, wire or other
objects that could be thrown or flung by the cutting
attachment, damage the cutting attachment or cause
damage to property (e.g., parked vehicles, windows).
Remove objects from the mowing area such as toys, balls,
lawn furniture, landscape ornaments, flower pots, garden
hoses, lawn equipment and anything else that could impede
the proper operation of the robotic mower or become
entangled in its mowing blade.
► Complete the initial installation by pressing the OK button
on the control panel.
If you complete the initial installation during an active time,
the robotic mower will immediately begin to mow.
If you complete the initial installation outside an active time,
you can start a mowing operation by pressing the OK button
on the control panel.
► If you do not want the robotic mower to mow immediately,
select "No" and press the OK button on the control panel.
You can also start a mowing operation using the iMow App.
► Confirm by pressing the OK button on the control panel.
11.1 Planning the Layout of the Mowing Area
When planning the layout of the mowing area and placement
of the perimeter wire:
► Study the installation examples at the end of this
instruction manual, @ 26. Consider restricted areas,
corridors, secondary areas, search loops and reserve wire
in your planning to prevent or minimize the need for
subsequent re-routing and adjustment of the perimeter
wire.
► Determine the location of the docking station, @ 10.3.
► Remove obstacles from the mowing area and create
restricted areas as necessary, @ 11.6.
► Join all parts of the mowing area by planning and installing
corridors or secondary areas, @ 11.8 and @ 11.7.
► Plan search loops if you use the "Passage" function
("Offset Drive Home"), @ 11.9.
► Plan locations for reserve wire at several points to make it
easier to subsequently adjust or modify the path of the
perimeter wire, @ 11.13.
0000-GXX-3372-A0
11 Installing the Perimeter Wire
Start App
0000-GXX-7721-A0

0478-131-3050-A
35
English
11 Installing the Perimeter Wire
When installing the perimeter wire:
► Use only perimeter wire and wire stakes authorized by
STIHL.
► Install the perimeter wire in a continuous loop around the
entire mowing area with a maximum length of 1640 ft.
(500 m).
► If you install the perimeter wire around areas smaller than
120 square yards (100 m²), or if the total length of the
perimeter wire is less than 575 ft. (175 m), the STIHL
Small Area Module AKM 100 (special accessory) must
also be installed, @ 10.4. For more information, contact
your authorized STIHL iMow servicing dealer.
► Maintain the specified wire clearances specified below.
Measure the clearances using the iMow Ruler, @ 11.3.
– Patios and paths with a maximum height difference
between lawn area of +/- 0.4 in. (1 cm): 0 in. (0 cm)
– Corridors: 9 in. (22 cm)
– High obstacles (e.g. walls, fences, trees): 11 in. (28 cm)
– Narrow passages: 17.3 in. (44 cm)
– Swimming pools, ponds and falling edges: 3.3 ft. (1 m)
► Avoid creating angles less than 90°. These will be difficult
for the robotic mower to navigate, and could result in
unmowed areas.
► Mowing areas must not overlap. Keep a minimum
distance of a ≥ 3.3 ft. (1 m) between the perimeter wires
of the two mowing areas of neighbor A and neighbor B.
► Install reserve lengths of perimeter wire at regular
intervals near difficult passages. Doing so make it easier
to modify the installation of the perimeter wire or docking
station if that should become necessary.
► If burying the perimeter wire, place it at a depth of no more
than 3.9 in. (10 cm).
Burying the perimeter wire in the ground may influence
signal reception, particularly if flagstones or paving stones
are laid over the perimeter wire. The robotic mower may
then travel along at a greater offset to the perimeter wire,
requiring more space in corridors, confined areas and when
traveling along edges. Adjust the location and depth of the
perimeter wire if necessary.
NOTICE
Avoid contacting the perimeter wire when de-thatching or
aerating the lawn. Also use caution when operating a line
trimmer near the perimeter wire. De-thatching, aerating and
trimming operations can result in a cut or damaged
perimeter wire. Refer to your sketch of the mowing area and
take special care to avoid the perimeter wire when
performing these operations.
11.2 Making a Sketch of the Mowing Area
STIHL recommends making a sketch of the mowing area
that includes the following:
– The contour of the mowing area including important
obstacles, borders and any restricted areas which the
robotic mower must not mow, @ 26.
– The location and position of the docking station, @ 10.3.
– The location of the perimeter wire and any wire
connectors you have installed, @ 11.
– If you change the dimensions of your mowing area after
the initial setup (by adding sections or moving the
perimeter wire, for example), re-link the iMow to the
docking station (@ 10.6) and run the test edge function
(@ 15.3) to measure the length of the perimeter wire and
develop a new mowing plan.
A
B

0478-131-3050-A
36
English
11 Installing the Perimeter Wire
11.3 Measuring Wire Clearances with the
iMow Ruler
The perimeter wire (1) can be routed next to surfaces such
as patios and paths as long as the surface is flat, level with
the grass, and allows the robotic mower to travel unimpeded
by obstacles. If necessary, the robotic mower may travel
with one rear wheel outside the mowing area.
The maximum height difference between lawn area (2) and
obstacle (1) must not exceed 0.4 in. (1 cm).
The iMow Ruler is designed to help you maintain the proper
the clearances when installing the perimeter wire.
To ensure that the robotic mower runs without contacting
any obstacle, even around corners:
► Keep a minimum clearance of the length of the iMow Ruler
(a = 11 in. (28 cm)) from obstacles.
► If routing the perimeter wire in confined areas, keep a
minimum clearance of 17.4 in. (44 cm), @ 11.5.
1
0000-GXX-4391-A0
Minimum distance to be maintained between an
obstacle and the perimeter wire.

0478-131-3050-A
37
English
11 Installing the Perimeter Wire
► Maintain the wire clearance a = 11 in. (28 cm) at the
corners around high obstacles such as wall corners or
high flowerbeds (2). This keeps the robotic mower from
scraping against the obstacle.
► Install the perimeter wire (1) with the aid of the
iMow Ruler (3) as illustrated.
► Maintain the wire clearance a = 11 in. (28 cm) at the inner
corner of a high obstacles such as walls or high
flowerbeds (2). This keeps the robotic mower from
scraping against the obstacle.
► Install the perimeter wire (1) with the aid of the
iMow Ruler (3) as illustrated.
11.4 Measuring Wire Clearances at Corners
In tapered corners (< 90°) the perimeter wire should be
installed as shown. The two angles must be at least one
length of the iMow ruler (a = 11 in. (28 cm)) apart so that the
robot mower can drive down the edge.
11.5 Routing the Perimeter Wire in Confined Areas
The robotic mower can travel automatically though narrow
passages, provided the minimum wire clearances are
maintained.
► If you route the wire between obstacles higher than 0.4 in.
(1 cm), e.g. walls or hedges, keep a minimum wire
clearance of one length of the iMow ruler (b = 11 in.
(28 cm)).
► If you route the wire between obstacles lower than 0.4 in.
(1 cm), e.g. paths or patios, keep a minimum wire
clearance of c = 17.4 in. (44 cm).

0478-131-3050-A
38
English
11 Installing the Perimeter Wire
► Route the perimeter wire to block off narrower areas in
which a < 39.4 in. (100 cm).
► If you route the perimeter wire in a confined area,
deactivate the passage function (offset drive home),
@ 15.3 or install a search loop, @ 11.9.
11.6 Routing Around Restricted Areas
A restricted area is an area that the robotic mower must
avoid, including obstacles that cannot be mowed or objects
that the mower can't bump off of to change direction, such
as flower beds, trees with buttressed roots, etc.
► Install a restricted area around such obstacles.
► To ensure a robust operation, install restricted areas in a
round shape - no oval, angular or inwardly curved shapes.
► Maintain the wire clearance a = 11 in. (28 cm) around the
obstacle (2) to prevent the robotic mower from scraping
against the obstacle (2).
► Install the perimeter wire (1) with the aid of the
iMow Ruler (3) as illustrated.
► The diameter of any restricted area must be at least 22 in.
(56 cm) and no more than 9.8 ft. (3 m).
► Keep a minimum clearance of b = 17.4 in. (44 cm)
between the perimeter wire routed around a restricted
area and the perimeter wire at the edge of the mowing
area.
► Keep a minimum clearance within a radius of at least
c = 6.6 ft. (2 m) around the docking station (1).
► Route the perimeter wire from the edge to the obstacle
with the proper clearance.
► Route the perimeter wire around the obstacle (2) and
attach it to the ground using a sufficient number of wire
stakes (3). Observe the installation direction (arrows).
► Then route the perimeter wire back to the edge. The
segment of perimeter wire routed back to the edge (4)
must be laid directly next to the segment leading to the
restricted area. Keep the segments parallel. When the
wire is laid side-by-side, the signal is canceled and the
iMow will mow directly over this section of perimeter wire.

0478-131-3050-A
39
English
11 Installing the Perimeter Wire
If the wires are separated, however, the iMow will not
traverse the wire and the area between the two segments
of perimeter wire will not be mowed.
► After routing the perimeter wire back to the edge, do not
cross the sections of the perimeter wire. Continue the
installation around the perimeter of the mowing area. The
perimeter wire must exit the restricted area in the direction
opposite to the direction in which it entered the restricted
area, @ 11.10.
NOTICE
STIHL recommends checking the proper installation of
restricted areas using the "Test edge" command, @ 14.3.
11.7 Installing Linked Areas and Secondary Areas
Linked areas (B) and secondary areas (C) are parts of the
mowing area that are not located in the primary mowing
area (A) where the docking station (1) is located.
A secondary area is an area that iMow cannot physically
drive to. It cannot be mowed automatically. The robotic
mower must be picked up and carried to the secondary area
and brought back to the primary area when mowing is
complete.
Linked areas (B) can only be mowed automatically if they
are linked by corridors or linking sections.
► Route the perimeter wire (2) in the same direction in all
linked areas and secondary areas.
► Connect the linked areas to the primary mowing area by
installing corridors (@ 11.8) or linking
sections (@ 11.10). Never cross perimeter wires in the
linking areas. Keep them parallel.
► Activate secondary areas in the "Settings – Installation"
menu, @ 15.3.
11.8 Installing Corridors
A corridor joins a linked area to the primary mowing area,
e.g. a mowing area in front of and behind the house. This
allows both mowing areas to be mowed automatically.
In corridors, the lawn is only mowed along the path of the
perimeter wire. In order for the iMow to mow the linked area,
a starting point in the linked area must be defined, @ 15.6.
The wire spacing and the STIHL Corridor Pattern are
matched to the installation of the perimeter wire on the lawn
surface. If the perimeter wire is buried very deeply, e.g.
under stone paving, the dimensions differ. Check the
function and adjust the wire installation if necessary.
In corridors, the lawn is only mowed along the path of the
perimeter wire.
To install a corridor:
► Remove stones, pieces of metal, glass, wire or other
objects that could be thrown or flung by the cutting
attachment.
► Keep a minimum clearance between obstacles higher
than 0.4 in. (1 cm) of a = 34.6 in. (88 cm).
1
A
B C
2
2
0000-GXX-3399-A0

0478-131-3050-A
40
English
11 Installing the Perimeter Wire
► Keep a minimum clearance between obstacles lower than
0.4 in. (1 cm), paths/obstacles that can be travelled on, of
b=9in. (22cm).
► Route the perimeter wire (1) parallel to the ground and
attach it to the ground with a sufficient number of wire
stakes (2).
► Install a gate, which is a funnel-shaped entrance and exit
area at the start and the end of the corridor. Keep the
following distances:
–c=2.4in. (6cm)
– d = 9 in. (22 cm)
– e = 9 in. (22 cm)
The iMow will not enter the corridor unintentionally.
► Install the perimeter wire (1) in a straight line on the left
and right side of the corridor entrance. The straight line
must be at least one length of the robotic mower.
► Use the tunnel-shaped STIHL Corridor Pattern (C) to
install the gate at each end of the corridor.
► When using the "Passage" feature ("Offset Drive Home"),
search loops must be installed in the linked area in order
for the iMow to be able to locate the gate and return to the
docking station, @ 11.9.
► Define at least 1 starting point in the linked area, @ 15.6.
► If necessary, activate automatic edge mowing or mow the
corridor area manually on a regular basis, @ 14.3 and
@ 15.3.
Corridor Installation Example
The docking station (1) is installed in the primary mowing
area (A). A linked mowing area (B) is linked to the primary
mowing area with a corridor (2). The perimeter wire (3) can
be followed by the robotic mower. To ensure mowing of the
linked mowing area, two starting points (4) were defined.
11.9 Installing Search Loops
If the "Passage" function ("Offset Drive Home") is activated,
search loops must be installed to help the robotic mower
recognize the location of an external docking station, a
corridor or a confined area. If the robotic mower crosses a
search loop during its drive home, the robotic mower will
then directly travel to the perimeter wire and to the docking
station or through the corridor or confined area.
C
1
0000-GXX-5414-A0
1
B
A
4 4
2
3
0000-GXX-3400-A1

0478-131-3050-A
41
English
11 Installing the Perimeter Wire
To install a search loop:
► Keep a minimum clearance of a = 6.6 ft. (2 m) from the
corners of the mowing area.
► Install the perimeter wire (1) with a minimum length of
b = 3.3 ft. (1 m) and with a distance of d = 0.4 in. (1 cm) in
between.
► Fasten the perimeter wire to the ground with two wire
stakes at the edge (A). Do not cross the perimeter wires.
Keep them parallel.
► Attach the search loop to the ground with a sufficient
number of wire stakes.
To install a search loop in combination with an external
docking station:
► Install two search loops (1), each at a 90° angle on the left
and right side of the docking station.
► Keep a minimum clearance of a = 6.6 ft. (2 m) from the
docking station.
To install a search loop in combination with a corridor:
► Install two search loops (1) at an angle of 90° in the part
of the mowing area that can only be reached via a corridor.
► Keep a minimum clearance of a = 6.6 ft. (2 m) from the
corridor entrance.
11.10 Installing Linking Sections
A linking section links a secondary area to the primary
mowing area, e.g. a mowing area in front of and behind the
house that the iMow cannot travel to on its own. This allows
both mowing areas to be mowed automatically.
► Route the perimeter wire (1) parallel and close to one
another.
► Attach the linking section to the ground with a sufficient
number of wire stakes (2).
a
a
b
1
A
C
A
1
1
d
0000-GXX-3406-A1
11
aa
0000-GXX-3404-A0
aa
11
0000-GXX-3405-A0
1
1
2
1
0000-GXX-3403-A0

0478-131-3050-A
42
English
11 Installing the Perimeter Wire
11.11 Accurate Mowing Along Edges
► Along high obstacles, route the perimeter wire with a
minimum clearance of a = 11 in. (28 cm) from the
obstacle. This buffer area will be left unmowed.
To avoid the buffer area which will be left unmowed, you can
lay edging stones or pavers around high obstacles, e.g.
walls. The width of the eding stones must be at least
b = 10.2 in. (26 cm).
11.12 Sloping Terrain in the Mowing Area
NOTICE
STIHL recommends that you install the perimeter wire at a
maximum pitch of +/- 10 degrees. The perimeter wire can be
installed up to +/- 15 degrees, but this can require additional
adjustments to the perimeter wire installation. Slopes should
also be noted in the garden sketch.
Maintain a minimum distance of at least 39.4 in. (100 cm)
from water and other potential drop-offs, such as edges and
steps.
To install the perimeter wire at a slope with an incline of 5°
to 15°:
► Route the perimeter wire (1) past the top edge of the
slope, keeping a minimum clearance of a = 19.7 in.
(0.5 m).
► If the incline exceeds 15°, route the perimeter wire so that
the robotic mower will stop before it reaches the edge of
the slope. The top edge of the slope and the slope itself
should remain outside the mowing area.
11.13 Installing Reserve Wire
Installing reserve lengths of perimeter wire at regular
intervals will make it easier to later modify the mowing area
or placement of the docking station if that should become
necessary.
1
5-15
a
0000-GXX-4395-A0
1
15
0000-GXX-4396-A1

0478-131-3050-A
43
English
11 Installing the Perimeter Wire
To install reserve wire:
► Route the perimeter wire (1) between 2 wire stakes
spaced approximately a = 3.3 ft. (1 m) apart.
► Attach the reserve wire to the ground in the center using
an additional wire stake.
11.14 Using Wire Connectors
WARNING
To reduce serious or fatal injury or property damage from
fire or electric shock, use only wire connectors authorized by
STIHL.
Wire connectors are designed to link two loose ends of
perimeter wire to extend the perimeter wire or to connect
loose wire ends caused by a breakage. They are filled with
gel to prevent premature wear or corrosion of the wire ends.
► Note the positions of the wire connectors on your sketch
of the mowing area, @ 11.2.
► Insert the unstripped wire ends (2) in the wire
connector (1).
► Press the wire connector together using suitable pliers.
► Attach the perimeter wire to the ground using two wire
stakes, leaving a = 2 in (5 cm) of strain relief as depicted
above.
11.15 Installing the Perimeter Wire Closer to the Edge
of the Mowing Area
Following installation, make sure there is at least a 2 in.
(5 cm) gap between the robotic mower and the obstacle
during operation, @ 10.7, @ 15.3. If necessary, increase
the wire clearance from the obstacle. In straight sections,
the perimeter wire can be routed as close as 9 in. (22 cm)
from high obstacles. This will reduce the amount of
unmowed grass.
a
1
0000-GXX-3410-A0
2
1
0000-GXX-3411-A1
a
0000-GXX-3412-A1

0478-131-3050-A
44
English
12 Docking Station
In the garden sketch, note those areas where the perimeter
wire is routed closer to the edge of the mowing area.
► Install the perimeter wire (1) with the aid of the
iMow Ruler (2) as illustrated.
– a = 9 in. (22 cm)
12.1 LED on the Docking Station
A red LED (1) shows the status of the docking station and
the perimeter wire signal.
If the LED is off: The docking station is switched off and the
wire signal is not being transmitted.
If the LED glows: The docking station is switched on and the
robotic mower is not docked.
If the LED flashes slowly: The docking station is switched
on, the robotic mower has docked successfully or is being
charged.
If the LED glows for 3 seconds followed by a 1 second
pause: The "Homecall" function is activated and the robotic
mower has received a command to return to the docking
station.
If the LED flashes rapidly (approximately two times per
second): The perimeter wire is not properly connected to the
docking station or the wire signal is no longer present. The
perimeter wire may be broken (wire break).
If the LED flashes rapidly at intervals: The LED flashes
alternately 3 times at a 1- second interval, 3 times at a 2-
second interval, 3 times at a 1-second interval, 5 second
pause. After the pause, the signal is repeated. The docking
station has a malfunction. For troubleshooting information,
@ 22.
12.2 Docking Station Controls
ON/OFF/Home button
12 Docking Station
1
0000-GXX-3341-A0
Press and hold the ON/OFF/Home button for
2 seconds during a mowing operation to switch off
the wire signal. The robotic mower will stop, remain in
the mowing area and a corresponding message will
appear in the display of the robotic mower.
1
0000-GXX-3341-A0

0478-131-3050-A
45
English
12 Docking Station
12.3 Docking the Robotic Mower
Automatic docking
The robotic mower will travel to the docking station
automatically and dock when the active time ends or the
robotic mower needs to be recharged.
Docking with the Homecall function
The robotic mower can be called back to the docking station
manually. To call the robotic mower back:
► Press the ON/OFF/Home button on the docking station
twice within 2 seconds.
The robotic mower will return to the docking station and
will not start any further mowing operation during the
current active time.
Manual docking
► Activate the disabling device and transport the robotic
mower to the docking station by hand, @ 18.
► Lift the robotic mower slightly by the rear carrying
handle (1) and relieve the weight on the drive wheels.
► Push the robotic mower, resting on its front wheels, into
the docking station.
12.4 Charging the Robotic Mower
WARNING
Read and follow the safety precautions and instructions for
the robotic mower and docking station in this manual, @ 5.4
and @ 6. Be alert for signs that the integrated battery may
be damaged. To reduce the risk of personal injury from short
circuit, fire and explosion, never use or charge a robotic
mower if the hood or housing is cracked, deformed or
excessively hot, if battery fluid is leaking from the battery
compartment, or if the battery is otherwise damaged,
@ 5.5.
WARNING
To reduce the risk of electric shock, charge the robotic
mower only in the docking station. Do no remove the battery
or attempt to charge it using an external power supply.
Automatic charging
The robotic mower will begin charging automatically when it
returns to the docking station at the end of the mowing
operation and its energy level is below a certain value.
Press the ON/OFF/Home button twice within
2 seconds during a mowing operation to bring back
the robotic mower to the docking station (Homecall).
The robotic mower will end its current mowing
operation, search for the perimeter wire and return to
the docking station to recharge the battery. When
Homecall is initiated, the robotic mower will not start
any further mowing operations during the current
active time. A Homecall remains active until the
robotic mower is docked. You can end Homecall
manually by pressing the ON/OFF/Home button twice
within 2 seconds. It will resume mowing operations
during its next scheduled active time.
1
0000-GXX-4398-A2

0478-131-3050-A
46
English
13 Control Panel Display Information
Manual Charging
To start charging:
► Dock the robotic mower.
► If necessary, end standby mode of the robotic mower by
pressing any button.
Charging will start automatically.
Charging time depends on a number of factors, including
battery condition and the ambient temperature. Exposure to
direct sunlight can lead to increased temperatures inside the
machine and battery compartment, which can increase
battery charging times.
Charge status
If you end standby mode, but the state of charge is too low
for the robotic mower to return to the docking station, this
symbol is displayed over the entire screen. After a few
seconds, the display will turn off and the robotic mower will
return to standby mode.
13.1 Information Area
The following information is shown in the top right corner of
the display:
1. Cellular Signal
The display shows the strength of the cellular signal.
2. Time
The current time is indicated in 24-hour format.
During charging, the status screen will show the
charging symbol and the message "Charging
battery".
In all the other menus, the display will show a plug
symbol to indicate that the robotic mower is charging.
The status screen will show the current state of
charge.
In all the other menus, the display will show a battery
symbol to indicate the robotic mower's charge status.
0000-GXX-3878-A0
13 Control Panel Display Information
– 4 bars: optimum signal strength
– 1 to 3 bars: medium signal strength
– No bars: no signal
A question mark is shown during initialization of the
module while the unit is acquiring the cellular signal.
A small "x" indicates that there is no Internet
connection.
0000-GXX-7722-A0

0478-131-3050-A
47
English
13 Control Panel Display Information
3. Automatic mowing status
4. Charge status
The battery symbol shows the battery's state of charge.
13.2 Status Screens
Different status screens may appear, depending on the
status of the robotic mower.
► Configure the status screen with various information,
@ 14.4.
Status screen when the robotic mower is not in operation
The text "iMow ready for op." and the automatic mowing
status is displayed in the bottom area of the screen.
There are two configurable fields in the top display area.
Status screen during operation
The text "Attention – iMow starting" and the safety alert
symbol are displayed before a mowing operation starts.
Flashing of the display illumination and a signal tone
additionally indicate the start of the mower.
The text "iMow mowing lawn" and a corresponding symbol
are displayed during an active mowing operation. The text
and symbol will depend on the specific active operation.
When automatic mowing is switched on, the
Automatic symbol appears.
– No bars: battery discharged
– 1 to 5 bars: battery partially discharged
– 6 bars: full charge
During charging, the plug symbol is displayed instead
of the battery symbol.
0000-GXX-3377-A0
Edge mowing: While the robotic mower mows the
edges of the mowing area, the text "Mowing edge" is
displayed.
Drive to docking station: When the robotic mower
returns to the docking station, the relevant reason is
indicated in the display (e.g., "Battery discharged" or
"Mowing completed").
0000-GXX-3379-A0
0000-GXX-3378-A0

0478-131-3050-A
48
English
14 Menu Functions
Status screen for messages
If an error occurs during operation, a message will be
displayed that includes the date and time of its occurrence
and the relevant message code. If several messages apply,
they appear alternatively, @ 22.1.
14.1 Navigating the Menus
► Select a submenu using the navigation pad.
If a submenu is selected, it is displayed on a black
background.
► Open the selected submenu by pressing the OK button.
In the second menu level, the various submenus are
shown as tabs.
► Select a tab by pressing the navigation pad to the left or
right.
► Select a submenu by pressing the navigation pad
downwards or upwards.
Selected tabs and submenu entries are displayed on a
black background.
► If there is a scroll bar at the right edge of the display, see
further entries by pressing the navigation pad downwards
or upwards.
► Press the OK button to open a submenu.
Options are listed in the submenus. Selected entries are
displayed on a black background.
► Press the OK button to open a selection window or dialog
window.
Battery charging: The text "Charging battery"
appears during charging.
14 Menu Functions
0000-GXX-3380-A0
0000-GXX-3375-A0
0000-GXX-3376-A0

0478-131-3050-A
49
English
14 Menu Functions
Selection window
The selected value is displayed on a black background.
► Navigate through the values and change them by using
the navigation pad.
► Press the OK button to confirm your selections.
Dialog window
If changes have to be saved or messages confirmed, a
dialog window appears in the display. The selected button is
displayed on a black background.
► Press the OK button to confirm the selection.
14.2 Overview
Commands
Information
Mowing plan
Settings
2018
2017
2019
0000-GXX-3595-A0
The main menu contains 4 submenus. The main
menu will be displayed,
– when the status screen (@ 13.2) is quit by
pressing the OK button,
– when the "Main menu" command is activated,
– when the Back button is pressed in the second
menu level.
This submenu contains a set of autonomous mowing
operations, @ 14.3.
This submenu contains information about the lawn or
the robotic mower's status, @ 14.4.
This submenu contains functions to change the
mowing plan, @ 14.5.
This submenu contains functions to change the
robotic mower's settings, @ 15.

0478-131-3050-A
50
English
14 Menu Functions
14.3 Commands
► Select a tab by pressing the navigation pad to the left or
right.
► Press the OK button to open the submenu.
Main menu
Lock robotic mower and activate disabling device
Switch automatic mowing on/off
This feature can also be controlled using the iMow App. The
robotic mower will return to the docking station when
automatic mowing is switched off using the iMow App.
Drive to docking station
This feature can also be controlled using the iMow App.
Start mowing
This feature can also be controlled using the iMow App.
Select to return to the main menu.
Select to return to lock the robotic mower and activate
the disabling device.
Select to turn automatic mowing on or off.
When automatic mowing is switched on, the text
"Automatic switched on" appears in the status screen
and the symbol is displayed next to the battery
symbol.
When automatic mowing is switched off, the text
"Automatic switched off" appears in the status screen
and the active times are shown as inactive (greyed
out) in the mowing plan.
Select to command the robotic mower to drive to the
docking station immediately.
The robotic mower travels back to the docking station
and charges its battery. If automatic mowing is
switched on, the robotic mower will start to mow the
mowing area again at the next possible active time.
Select to start the mowing operation immediately.
If a secondary area was installed, press the OK
button and then specify whether the mowing
operation is taking place in a secondary area or in the
main area, @ 14.6.
If an external docking station with a corridor was
installed, bring the robotic mower to the mowing area
before activation of the command "Start mowing."
You will be prompted to enter the time to end the
mowing operation. The default setting for the duration
of the mowing operation can be modified under
"Mowing time" in the machine settings, @ 15.
Mowing time in primary or linked areas following the
"Start mowing" command will be deducted from the
weekly mowing plan's total mowing duration.

0478-131-3050-A
51
English
14 Menu Functions
Start time-delayed mowing
This feature can also be controlled using the iMow App.
Skip next active time
Edge mowing
14.4 Information
Messages
Events
Select to set a defined time to start the mowing
operation.
If a secondary area was installed, after pressing the
OK button it is necessary to define whether the
mowing operation is taking place on a secondary
area or on the main area, @ 14.6.
If an external docking station with a corridor was
installed, bring the robotic mower to the mowing area
before activation of the command "Start time-delayed
mowing."
You will be prompted to enter the time to end the
mowing operation. The default setting for the duration
of the mowing operation can be modified under
"Mowing time" in the machine settings, @ 15.
Mowing time in primary or linked areas following the
"Start time-delayed mowing" command will be
deducted from the weekly mowing plan's total
mowing duration.
Select to skip the next active time.
No mowing will take place during the next active time.
Active times which have been cancelled in this
manner are greyed out in the mowing plan. They can
be released for mowing again in the "Daily plan"
menu, @ 14.6.
If the command is performed several times in
succession, the next active time is always skipped. If
no active times remain for the current week, the
message "No mowing will take place next week"
appears.
Select to mow the edge of the mowing area.
After completing one circuit, the robotic mower
travels back to the docking station and charges the
battery.
This submenu contains a list of all active errors and
recommendations including date and time of their
occurrence and the respective message code.
Press the OK button to display details for every
message, @ 22.1.
If no messages are available, this display shows the
text "No messages."
This submenu contains a list of the last activities of
the robotic mower. Details of the events (additional
text, time and code) can be displayed by pressing the
OK button.
Errors during normal operation are documented in
the messages.

0478-131-3050-A
52
English
14 Menu Functions
Robotic mower status
Lawn information
Cellular module status
14.5 Mowing Plan
Mowing Plan Theory of Operation
Before changing your mowing plan, read the following
section carefully.
During the initial setup, the iMow will automatically calculate
an appropriate automatic mowing plan. That plan consists of
active times and a weekly mowing duration. Active times are
those windows of time in which the iMow is programmed to
mow automatically. The iMow will only mow in automatic
mode during the active times. The mowing duration is the
total number of hours the iMow will mow per week.
Satisfactory cutting results depend on the iMow having
sufficient mowing duration and sufficient active times to
complete the mowing operation for the entire lawn.
Automatic mowing will cease once the iMow has reached its
total allotted mowing duration for the week, even if there are
remaining active times scheduled.
This submenu contains information on the robotic
mower's status:
– Charging status: Battery charging status in percent
– Rem. time: The remaining mowing duration during
the current week in hours and minutes
– Time and date
– Start time: Start of the next planned mowing
operation
– Total number of completed mowing operations
– Mowing hours: Duration of all completed mowing
operations in hours
– Distance: Total distance covered in meters
– Ser.-No.: Serial number of the robotic mower. This
is also to be found on the identification plate in the
compartment beneath the control panel.
– Battery: Serial number of the battery
– Software: Installed machine software
This submenu contains information on the lawn:
– Mowing area in square meters: This measurement
is taken during installation
– Round time: Duration of one circuit around the
mowing area in minutes and seconds
– Starting points 1 – 4: Distance of the relevant
starting point from the docking station in meters,
measured in a clockwise direction
– Circumference: Circumference of the mowing area
in meters
– Edge mowing: Frequency of edge mowing per
week
This submenu contains information on the status of
the integrated cellular module:
– Satellites: Number of satellites within range
– Position: Current position of the robotic mower
– Signal strength: Signal strength of the mobile
cellular connection
– Network: Network ID, comprising country code
(MCC) and provider code (MNC)
– Mobile phone number: Mobile phone number of the
registered owner, entered in the iMow App
– IMEI: Hardware number of the cellular module
– IMSI: International mobile subscriber identity
– SW: Software version of the cellular module
– Ser.-No.: Serial number of the cellular module

0478-131-3050-A
53
English
14 Menu Functions
The active times and mowing duration must be set properly
to ensure that a sufficient number of mowing hours are set
each week (mowing duration) and that the iMow has
sufficient windows of time (active times) to complete the
mowing.
If you increase the mowing duration, be sure expand the
active times as well to accommodate the increased number
of mowing hours. The total weekly active time must be
higher than the total weekly mowing duration in order to
account for charging time and to provide a buffer in case
active times are missed due to rainfall.
The status screen displays the remaining mowing duration
for the week and the next scheduled active time.
Mowing Plan Menu
The rectangular blocks displayed in black beneath the days
of the week represent the saved active times. When
automatic mowing is turned on, mowing operations take
place only during active times. The iMow will not mow during
all active times as the iMow may return to the docking station
if it starts raining or the iMow requires charging.
Blocks displayed in grey represent active times without
mowing operations, e.g. where the active time has been
deactivated by the operator or the active time has been
skipped, @ 14.3. When automatic mowing is turned off, the
entire mowing plan is deactivated and all active times are
shown in grey.
► Select an active time or the mowing duration by pressing
the navigation pad downwards or upwards.
► Open the settings by pressing the OK button.
14.6 Active Times
WARNING
Keep bystanders, especially children, and pets out of the
mowing area during active times. Never allow children to
approach or play with the robotic mower. Keep children and
pets away from the mower while it is in operation. Never
allow the robotic mower to operate if you know that animals
or persons are or may be in the mowing area or vicinity.
Next to every active time, a symbol shows the current status
of the active time:
Call up the stored mowing plan in the "Mowing plan"
submenu.
If you want to edit the active times for an individual
day, press the navigation pad to the left or right to
select the day.
Select the "Active times" submenu and press the OK
button.
This symbol indicates that the active time is
activated. The robotic mower will mow automatically
according to the mowing plan.
This symbol indicates that the active time is
deactivated. The robotic mower will not mow during
this time.

0478-131-3050-A
54
English
14 Menu Functions
If active times are not sufficient to allow for the necessary
mowing and charging operations, you can increase active
times or reduce the mowing duration. To edit the active
times:
NOTICE
If you have a sprinkler system, program the robotic mower
to avoid active watering times to reduce the likelihood of
damage to the sprinkler heads from contact with the mowing
blade. The mower and sprinkler system should never be run
at the same time.
14.7 Mowing Duration
If you are reprogramming the mowing plan during one of the
in your new mowing plan, active times, the robotic mower
will begin an automatic mowing operation after you confirm
the new mowing plan.
Select the "New active time" menu item to add an
active time. An additional active time may not overlap
with other active times.
Up to 3 active times per day can be saved.
Select "Delete all active times" to delete all active
times on the selected day.
The robotic mower will no longer operate on this day.
Select "Active time on/off" to enable or disable the
selected time for automatic mowing.
Select "Change active time" to change the time the
robotic mower will be mowing.
Select "Delete active time" to delete this specific
active time.
The robotic mower will no longer operate at this time.
0000-GXX-3386-A0
Select "Change mowing duration" to change the total
weekly mowing hours. The mowing duration set
during initial installation is based on the size of the
mowing area, but it can be increased or decreased in
this submenu.
Select "New mowing plan" to delete all currently
stored active times and to program a new mowing
plan. The step "Program the robotic mower" of the
installation assistant will be called up, @ 10.8.

0478-131-3050-A
55
English
15 Settings
15.1 Settings Overview
The Settings menu contains 5 submenus, displayed as
buttons:
Robotic mower
Installation
Safety
Service
Dealer area
15.2 iMow Settings
Rain Sensor
To set the rain sensor:
► Press the navigation pad to the left or right. The current
value is displayed by means of a line diagram.
Mowing Time
Delay
Status Screen
To set the status screen:
► Select the left or right part of the screen using the
navigation pad and confirm your selection by pressing OK.
► For each part of the display, select one of the following to
appear on the status screen:
15 Settings
Select this submenu to change the robotic mower's
settings, @ 15.2.
Select this submenu to change and test the
installation, @ 15.3.
Select this submenu to change the security settings,
@ 15.4.
Select this submenu to confirm replacement of the
mowing blade. This will reset the internal blade
replacement counter. Also select this submenu to find
a wire break, @ 15.5.
This code-protected submenu is accessible only by
your authorized STIHL iMow servicing dealer.
Adjust the sensitivity of the 5-stage rain sensor.
Select this option to allow mowing at higher moisture
levels. If the bar is moved all the way to the left, the
robotic mower will mow even when it is raining.
Select this option to allow mowing under ordinary
ambient conditions.
Select this option to allow mowing only at lower
moisture levels. If the bar is moved all the way to the
right, the robotic mower will only mow if the rain
sensor is completely dry.
Set the default mowing time for the duration of a
mowing operation when activating automatic mowing
with the "Start mowing" command, @ 14.3.
Set the length of the delay when activating the "Start
time-delayed mowing" command, @ 14.3.
You can edit the status screen to display the
information you want to appear, @ 13.2.
Charging status: The battery charging status in
percent will appear on the status screen.
Rem. time: The remaining mowing duration during
the current week will appear on the status screen.
Time and date: The current date and current time will
appear on the status screen.
Start time: The start of the next planned mowing
operation will appear on the status screen. During a
running active time, the text "active" will be displayed.

0478-131-3050-A
56
English
15 Settings
Time
The time can also be set using the iMow App.
Date
The date can also be set using the iMow App.
Date Format
Track offset
Language
Contrast
Energy mode
15.3 Installation
Passage (Offset Drive Home)
The robotic mower can travel back to the docking station
with an increased offset to the perimeter wire.
► Ensure that the perimeter wire has been routed with a
clearance of at least 2 m at the narrowest sections.
► Activate the passage setting to change the way the robotic
mower travels back home to the docking station. Select
one of three options:
Mowing events: The total number of mowing
operations performed will appear on the status
screen.
Mowing hours: The total duration of all mowing
operations performed will appear on the status
screen.
Distance: The total distance traveled will appear on
the status screen.
Signal strength: Signal strength of the cellular
connection with network ID.
A small "x" indicates that the robotic mower is not
connected to the Internet.
Signal strength: A question mark is shown during
initialisation of the cellular module (checking
hardware and software, e.g. after switching on the
robotic mower).
GPS reception: GPS coordinates of the robotic
mower.
Set the current time.
Always set the correct time to ensure an accurate
mowing plan and to prevent automatic mowing at
unwanted times.
Set the current calender date.
Always set the correct date to ensure an accurate
mowing plan and to prevent automatic mowing at
unwanted times.
Set your desired date format.
Change the robotic mower's standard 2.36 in. (6 cm)
offset from the perimeter wire to a smaller or larger
offset (1.18 in. to 3.54 in. (3 cm to 9 cm)).
To ensure optimal performance under the standard
setup instructions, STIHL recommends that you keep
the default track offset setting.
Set the desired display language. The language
selected during initial installation is set as the default.
Change the display's contrast.
If the mode is set to "Standard" (default setting), the
robotic mower is connected to the Internet at all times
and can be reached using the iMow App as long as
sufficient battery charge is available.
If the mode is set to "ECO," cellular communication is
deactivated when the robotic mower is in the docking
station to reduce energy consumption. The robotic
mower cannot be reached using the app, which will
continue to display the last data successfully
transmitted.

0478-131-3050-A
57
English
15 Settings
– Off (default setting): The robotic mower travels along
the perimeter wire.
– Narrow: The robotic mower travels along the perimeter
wire or with an offset of 15.7 in. (40 cm) inside the
perimeter wire.
– Wide: The robotic mower travels within a passage of
15.7 in. to 31.5 in. (40 cm to 80 cm) from the perimeter
wire.
► If you have installed an external docking station, a
confined area or a linked section using a corridor, install
search loops for offset drive home, @ 11.9.
ASM (Anti-Stuck-Maneuver)
The robotic mower starts an evasive routine if it becomes
stuck: ASM is switched off by default.
► Leave the default setting (ASM switched off), if there are
large, flat expanses in the mowing area (e.g. asphalt
driveways), if the robotic mower often unexpectedly turns
90° during operation or if the mower unexpectedly stops
mowing and the display shows the message "1131 -
Stuck".
New installation
Starting points
Test edge
► To check correct wire routing around restricted areas,
position the robotic mower in the mowing area with the
front facing the restricted area and start the test run.
Edge mowing
► Select one of three options:
– Never: The edges will never be mowed.
– Once (default): The edges will be mowed once a week.
– Twice: The edges will be mowed twice a week.
Secondary areas
► Activate to enable mowing of a secondary area.
15.4 Safety
Disab. device
► To deactivate the disabling device, press the sequence
illustrated on the display. Once the disabling device is
deactivated, the robotic mower can be operated again.
Level
► Select one of four options:
– None: All functions of the robotic mower can be
accessed.
– Low:
– Anti-theft alarm: If the mower is lifted or tilted for
longer than 10 seconds, the PIN query appears. If you
do not enter then PIN code within one minute, an
alarm sounds and automatic operation is switched off.
– Connection lock: The PIN code must be entered prior
to linking of the robotic mower and docking station.
The current mowing plan will be deleted and the
installation assistant will start again.
To set starting points, see @ 15.6.
Start a test run for checking correct wire routing. The
step "Check installation" of the installation assistant
will be called up, @ 10.7.
Select the mowing frequency for edges.
Enable or disable secondary areas.
To activate the disabling device in the "Settings"
menu, open the "Safety" submenu, select "Lock
iMow" and confirm by pressing the OK button.
Four security levels can be set. Various locks and
security devices are activated, depending on the
level.

0478-131-3050-A
58
English
15 Settings
– Reset lock: The PIN code must be entered prior to
resetting the machine to the factory defaults.
– Medium:
– All of the features from the "Low" setting.
– Time lock: PIN code query for changing a setting if no
PIN code has been entered for more than one month.
– High:
– All of the features from the "Medium" setting.
– Setting protection: The PIN code must be entered
before settings can be changed.
► Select the desired security level and confirm it by pressing
the OK button.
► If necessary, enter the 4-digit PIN code.
STIHL recommends that the "Low," "Medium" or "High"
security level be set as part of the installation process.
GPS protection
For theft detection, STIHL recommends activating the GPS
protection feature.
Change PIN code
► Enter the old PIN code and confirm it by pressing the OK
button.
► Enter the new 4-digit PIN code and confirm it by pressing
the OK button.
Take note of your PIN code and keep it in a safe place. If the
PIN code is entered incorrectly 5 times, automatic operation
is switched off and can only be restored with a master code
generated by your authorized STIHL iMow servicing dealer.
Start signal
Alarm signal
Menu signal
Child lock
If the impact sensor is triggered several times in succession
within a short time, the robotic mower and the mowing blade
will stop.
If the impact sensor is not triggered again, the robotic mower
will continue automatic mowing after a few seconds.
Keylock
Link iMow and dock:
► Install the docking station and connect the perimeter wire,
@ 10.3 and @ 10.5.
To activate the GPS protection feature.
The 4-digit PIN code can be changed if necessary.
The "Change PIN code" menu item is only displayed
in the "Low," "Medium" or "High" settings.
The acoustic signal when the mowing blade is
activated.
The acoustic signal when the robotic mower hits an
obstacle.
The acoustic indicator when you open a menu and
confirm a selection by pressing the OK button.
When the keylock is activated, the control panel is
locked. The operator must press and hold the Back
button and then press the forward navigation button
on the navigation pad to unlock the control panel. The
keylock will lock the control panel again 2 minutes
after the last button is pressed.
The mower and docking station must be linked if you
replace the docking station or the robotic mower.
1
0000-GXX-4398-A2

0478-131-3050-A
59
English
15 Settings
► Lift the robotic mower slightly by the rear carrying
handle (1) and relieve the weight on the drive wheels.
Push the machine, resting on its front wheels, into the
docking station.
► After pressing the OK button, enter the PIN code.
The robotic mower will then search for the wire signal and
automatically save it for automatic operation. This process
may take several minutes, @ 10.6.
15.5 Service
Blade change
► After mounting a new mowing blade, confirm the
replacement of the mowing blade by pressing the OK
button.
Find wire break
► Activate the assistant to find a wire break by pressing the
OK button.
► Find the wire break, @ 22.3.
Reset settings
► Press the OK button and enter the PIN code.
The robotic mower will be reset to factory defaults and the
installation assistant will be started, @ 10.
15.6 Setting Starting Points
► Set starting points to target automatic mowing in a specific
part of your lawn. Starting points are used to access parts
of your lawn that are not being mowed frequently enough,
sometimes because part of the mowing area is accessible
only through a corridor.
Starting points can be set in two different ways.
"Teaching-in" starting points
To teach-in up to 4 starting points:
► Save each starting point by pressing the OK button during
the robotic mower's travel around the perimeter wire.
► The teach-in procedure is interrupted automatically when
the robotic mower contacts obstacles along the perimeter
wire. If the teach-in procedure is interrupted, remove any
obstacles that may be found along the cutting path or
correct the installation of the perimeter wire.
► If necessary, interrupt the teach-in procedure manually by
pressing the STOP button.
► Check the position of the robotic mower before continuing
the teach-in procedure. The robotic mower must be
located on the perimeter wire or within the mowing area
facing the perimeter wire.
► The starting frequency defines how often a mowing
operation is to begin from a starting point. The default
setting is 2 of 10 mowing operations (2/10) at each starting
point. You can change the starting frequency as desired
after each teach-in.
► If the teach-in procedure has been ended prematurely,
send the robotic mower back the to docking station.
Setting starting points 1 to 4 manually:
To manually set up to 4 starting points:
► Determine the distance of the starting points from the
docking station, measured in a clockwise direction.
► Set a starting frequency between 0 of 10 mowing
operations (0/10) and 10 of 10 mowing operations (10/10).
The docking station is defined as starting point 0. Mowing
operations will start from the docking station as a default.
Press the OK button. The robotic mower will begin to
travel along the perimeter wire. If it is not docked, it
first travels to the docking station. All current existing
starting points are deleted.
Press the OK button. All existing starting points are
deleted.

0478-131-3050-A
60
English
16 STIHL iMow App
Setting a mowing radius
The robotic mower can be programmed to mow concentric
circles around a specified starting point. Each starting point
can be assigned a radius from 10 ft. to 100 ft. (3 m to 30 m),
which will be mowed before the robotic mower moves on to
other areas of the yard.
16.1 Functions of the iMow App
This robotic mower can be programmed and operated using
the STIHL iMow U.S. mobile and web apps ("iMow App"),
available on the App Store
®1
and on Google Play™
2
for
download to your mobile device, tablet or computer.
Activation
Before the robotic mower can connect to the Internet and
transmit data to the iMow App, the unit must be unlocked by
an authorized STIHL iMow servicing dealer. The dealer can
also guide you through the registration and activation
process. During activation, you will be asked for an email
address and password. Keep this information in a secure
location.
Data Transmission
Cellular data transmission to and from the robotic mower is
included in the purchase price.
Data transmission is not continuous, and there may be a lag
between mowing activity and the information displayed in
the app.
Your wireless plan's standard usage and data rates will
apply when accessing the STIHL iMow App on your
smartphone, tablet or other mobile device.
The use and availability of wireless cellular and GPS
connections depend on third-party products and services. If
these third-party products and services do not operate in a
reliable manner, they may impact the way your STIHL
connected product and iMow App operate. STIHL makes no
representation or warranty about the operation, use, safety
or reliability of any third-party products and services. STIHL
is not responsible for damages or losses due to the
operation of third-party products and services, including any
personal injury, property damage, interruption of service,
downtime, data loss or any other harm or loss arising from
or relating to your use of any third-party products and
services or apps.
NOTICE
If the connection to the cellular network is lost, the unit will
still remain active, but the operator will not receive email,
SMS or in-app notifications. The GPS protection feature will
remain active.
Main Function of the iMow App
– Viewing and editing the mowing plan
– Starting mowing
– Switching automatic mowing on and off
– Sending the robotic mower to the docking station
– Changing the date and time
– Calling up the unit's current location
WARNING
To reduce the risk of personal injury, keep bystanders,
especially children, and pets out of the mowing area during
operation. Do not operate the mower when children or pets
are or may be in the mowing area or vicinity.
16 STIHL iMow App
1
Apple, the Apple logo, iPhone, and iPad are trademarks of Apple
Inc., registered in the U.S. and other countries and regions. App
Store is a service mark of Apple Inc.
2
Google Play and the Google Play logo are trademarks of Google
LLC.

0478-131-3050-A
61
English
17 During Operation
17.1 Automatic Mowing
WARNING
Keep bystanders, especially children, and pets out of the
mowing area during active times. Never allow children to
approach or play with the robotic mower. Keep children and
pets away from the mower while it is in operation. Never
allow the robotic mower to operate if you know that animals
or persons are or may be in the mowing area or vicinity.
When automatic mowing is switched on, the robotic mower
independently leaves the docking station and mows the lawn
during the active times set by the operator, @ 14.6. The
number and duration of the mowing and charging operations
within the active times are determined automatically.
The mowing plan is determined based on the size of the
mowing area, which is calculated during installation or
during the creation of a new mowing plan.
► Define starting points within linked areas to ensure that
linked areas will be mowed regularly.
► To end an active mowing operation manually, press the
STOP button on the robotic mower or press the
ON/OFF/Home button on the docking station twice at any
time.
When the battery is discharged, the robotic mower
automatically returns to the docking station.
Automatic mowing can also be controlled using the iMow
App.
17.2 Mowing Duration
The mowing duration specifies how many hours per week
the robotic mower will mow the lawn. Charging time is not
included in the mowing duration.
During initial installation, the robotic mower automatically
calculates the mowing duration appropriate for your lawn
based on the size of the mowing area.
To complete a mowing area of approximately 1076 sq. ft.
(100 m²), the robotic mower will need approximately 100
minutes on average.
► If necessary, extend or reduce the active times and
mowing duration, @ 14.6 and @ 14.7.
Mowing duration can also be set using the iMow App.
17.3 Opening and Closing the Flap
The robotic mower is equipped with a flap which protects the
display from the weather and from inadvertent operation. If
the flap is opened during use of the robotic mower, operation
is stopped and the mowing blade and robotic mower come
to a standstill.
To open the flap:
► Press the STOP button during running operation.
► Grasp the flap (1) at the lifting point (2) and release it
upwards by pulling lightly.
► Open the flap as far as the stop.
To close the flap:
► Carefully fold the flap downwards and allow it to engage.
17 During Operation
When you switch on automatic mowing, the display
shows the automatic mowing symbol next to the
battery symbol.
1
2
0000-GXX-4829-A1

0478-131-3050-A
62
English
17 During Operation
NOTICE
The opened flap can be removed upwards from the
machine. This ensures that the unit cannot be lifted and
carried by the flap.
17.4 Adjusting the Cutting Height
WARNING
To reduce the risk of serious personal injury or death,
always press the STOP button before opening the flap and
adjusting the cutting height of the mowing blade.
To lower the cutting height (A):
► Open the flap.
► Press and turn the rotary knob (1) counterclockwise.
The marking (2) indicates the selected cutting height.
► Close the flap.
To raise the cutting height (B):
► Open the flap.
► Press and turn the rotary knob (1) clockwise.
The marking (2) indicates the selected cutting height.
► Close the flap.
8 different cutting heights can be selected:
– Level 1: 0.79 in. (20 mm)
– Level 2: 1.01 in. (25.7 mm)
– Level 3: 1.24 in. (31.4 mm)
– Level 4: 1.46 in. (37.1 mm)
– Level 5: 1.69 in. (42.8 mm)
– Level 6: 1.91 in. (48.5 mm)
– Level 7: 2.13 in. (54.2 mm)
– Level 8: 2.4 in. (60 mm)
NOTICE
To avoid damaging the perimeter wire, set the cutting height
to level 4 or higher for the first few weeks. This will allow the
grass to grow through and cover the perimeter wire. Levels
1, 2 and 3 are special heights suitable only for flat lawns with
a ground unevenness less than +/- 0.4 in. (1 cm).
NOTICE
To reduce the risk of damaging the robotic mower, never
attempt to lift, carry or transport the robotic mower by the
rotary knob. The rotary knob is designed to come off the
robotic mower if pulled. This prevents the unit from being
lifted and carried by the rotary knob.
NOTICE
To avoid overloading the motor, avoid setting the cutting
height too low in tall grass. If the motor slows or bogs down
when entering the grass, activate the disabling device and
raise the cutting height.
17.5 Adjusting the Mowing Duration and Active
Times
During active times, the robotic mower leaves the docking
station and mows the lawn autonomously. During these
times, mowing operations, charging operations and rest
periods take place. The robotic mower automatically
distributes the mowing and charging operations between the
available time windows. Under certain circumstances (e.g.
when grass growth is slowed by weather conditions), not all
the active times may be necessary for optimal lawn care.
The active times and the mowing duration can be changed
manually. You can set up to 3 different active times per day,
@ 14.5.
1 1
2 2
A B
0000-GXX-4400-A0

0478-131-3050-A
63
English
18 Transporting
► You may wish to change the mowing duration and active
times for one of the following reasons:
– Additional active times for further mowing operations
are necessary to complete the weekly mowing duration.
– The active times need to be modified to prevent mowing
during a particular time of day.
– Individual active times need to be omitted, because the
mowing area will be in use, e.g., for a backyard party.
► You may wish to extend the mowing duration and active
times for one of the following reasons:
– There are areas which are not mowed sufficiently.
– Intensive grass growth.
– Particularly dense lawn.
► You may wish to reduce the mowing duration and active
times when there is slower grass growth due to heat, cold
or dryness.
► You must re-link the docking station and create a new
mowing plan if the size of the mowing area has been
changed or the docking station has been relocated.
17.6 Mowing Outside of Active Times
Mowing primary mowing areas
► In order to mow a part of the mowing area that can only be
reached via a corridor, carry the robotic mower to the
linked area.
► For immediate mowing, call up the "Start mowing"
command, @ 14.3.
The mowing operation starts immediately and continues
until the selected time.
► For time-delayed mowing, call up the command "Start
time-delayed mowing", @ 14.3.
The mowing operation starts at the selected start time and
continues until the selected end time.
► To end an active mowing operation manually, press the
STOP button on the robotic mower. To return the robotic
mower to the docking station, press the ON/OFF/Home
button on the docking station twice at any time.
Secondary areas
► Carry the robotic mower to the secondary area.
► Activate the secondary area, @ 15.3.
► For immediate mowing, call up the "Start mowing"
command, @ 14.3.
The mowing operation starts immediately and continues
until the selected time.
► For time-delayed mowing, call up the command "Start
time-delayed mowing", @ 14.3.
The mowing operation starts at the selected start time and
continues until the selected end time.
When the selected end time is reached, the robotic mower
travels to the perimeter wire and comes to a standstill.
► Return the machine to the docking station to recharge the
battery and confirm the displayed message, @ 22.1.
► To end an active mowing operation manually, press the
STOP button at any time.
If the battery is discharged before the selected end time, the
mowing operation will be shortened accordingly.
18.1 Transporting the Robotic Mower
When transporting the robotic mower:
18 Transporting
0000-GXX-4401-A1

0478-131-3050-A
64
English
19 Storing the Robotic Mower and Docking Station
► Always disable the robotic mower by pressing and holding
the STOP button for 5 seconds before lifting or
transporting.
► When carrying the robotic mower by hand, hold it by the
front and the rear handles with the mowing blade pointing
away from you. Never attempt to carry the robotic mower
by its flap.
► When transporting the robotic mower in a vehicle, position
and secure the robotic mower to prevent turnover, impact
and damage. Fasten the machine using suitable fastening
materials (straps, ropes) (see illustration above).
► Secure components being transported (e.g. docking
station, small components) to prevent turnover, impact
and damage.
A Note on Battery Transport
The battery inside this robotic mower complies with the
requirements set forth in UN-Manual
ST/SG/AC.10/11/Rev.5/Part III, Subsection 38.3.
Commercial air, vessel and ground transportation of lithium
ion cells and batteries contained in equipment is regulated.
The battery inside this robotic mower is classified as a UN
3481, Class 9, packaging group II product. Shipping it
requires compliance with all applicable shipping regulations.
Check with the ground, vessel, air cargo or passenger airline
to determine if transport is prohibited or subject to
restrictions or exemptions prior to shipping or travel.
Normally, no further conditions have to be met by the user in
order to transport this robotic mower by road to the operating
site. Check and comply with any special regulations that
may apply to your situation.
For further information please go to
www.stihlusa.com/battery-transportation-safety.
19.1 Robotic Mower
WARNING
After the mowing season is over, or any time the robotic
mower is not available for mowing operations, store the
iMow indoors in a dry, secure place that is inaccessible to
children and other unauthorized users, @ 5.4. Improper
storage can result in unauthorized use and damage to the
robotic mower, @ 5.4. Never place or store objects on the
robotic mower.
WARNING
If the robotic mower is damp or wet, dry it thoroughly before
storing to reduce the risk of short circuit and electric shock,
@ 5.4.
WARNING
High temperatures may cause the integrated battery to
generate heat, rupture, leak, ignite or explode, resulting in
severe or fatal personal injury or property damage, @ 5.5.
Store the robotic mower only within an ambient temperature
range of 32 °F to 122 °F (0 °C to 50 °C), @ 5.5. Never
store the robotic mower inside a vehicle in hot weather,
@ 5.5.
When storing the robotic mower for three months or longer
(e.g. winter break):
► Charge the battery fully, @ 12.4.
► Switch off automatic mowing, @ 14.3.
► Set the highest security level, @ 15.4.
► Activate the GPS protection feature, @ 15.4.
► Set "ECO" energy mode, @ 15.2.
► Activate the disabling device, @ 9.1.
► Clean the robotic mower, @ 20.
► Dock the robotic mower in the docking station.
19 Storing the Robotic Mower and
Docking Station

0478-131-3050-A
65
English
19 Storing the Robotic Mower and Docking Station
► Store the robotic mower and docking station indoors in a
dry and secure location, out of the reach of children and
other unauthorized persons.
► At the end of the mowing season, protect the terminals
(connectors) removed from the docking station from
environmental damage by wrapping them with a generous
amount of insulating tape or storing them in a container
with grease so that they are protected from the elements.
NOTICE
Charging the battery fully before storage will help prevent
damage and prolong its useful life.
NOTICE
Avoid contacting the perimeter wire when de-thatching or
aerating the lawn. Also use caution when operating a line
trimmer near the perimeter wire. De-thatching, aerating and
trimming operations can result in a cut or damaged
perimeter wire. Refer to your sketch of the mowing area and
take special care to avoid the perimeter wire when
performing these operations.
19.2 Docking Station and Power Supply
WARNING
Store the docking station and the power supply indoors in a
dry, secure place that is inaccessible to children and other
unauthorized users, @ 6. Improper storage can result in
unauthorized use and damage to the docking station or the
power supply, @ 6. Never place or store objects on the
docking station.
WARNING
To reduce the risk of electric shock, always unplug the
power supply from the electrical socket before removing the
cover of the docking station.
When storing the docking station or the power supply for
three months or longer (e.g. winter break):
► Disconnect the power supply from the electrical outlet.
► Remove the docking station cover.
► Open the panel.
► Press and open the left clamping lever (2).
► Pull out the stripped perimeter wire end (1).
► Close the clamping lever.
► Press and open the right clamping lever (4).
► Pull out the stripped perimeter wire end (3).
► Close the clamping lever.
► Open the cover of the cable duct and guide the perimeter
wire out of the docking station socket.
► Do not remove the perimeter wire from the mowing area.
► Disconnect the power supply from the docking station.
► Close the panel.
► Reinstall the docking station cover.
► Remove the docking station.
► At the end of the mowing season, protect the loose
perimeter ends removed from the docking station by
wrapping a generous amount of insulating tape or storing
them in a container with grease so that they are protected
from the elements.
► Store the docking station and the power supply indoors in
a dry and secure location, out of the reach of children and
other unauthorized persons.
1
2
3
4
0000-GXX-5415-A1

0478-131-3050-A
66
English
20 Cleaning
20.1 Cleaning the Robotic Mower and Docking
Station
WARNING
To reduce the risk of personal injury from unintended
activation, activate the disabling device. Disconnect the
power supply from the electrical outlet before carrying out
any cleaning work, @ 7. Users of this robotic mower should
carry out only the cleaning described in this manual. To help
prevent injuries, always wear heavy-duty work gloves when
handling the mowing blade.
To clean the robotic mower and the docking station:
► Place the robotic mower on a firm, level and flat surface
for cleaning the upper side of the robotic mower.
► To clean the underside of the machine (mowing blade,
mowing deck), tilt the robotic mower onto its left side and
lean it against a wall (see illustration above).
► Remove accumulated clipping deposits in the housing and
in the mowing deck.
► Clean off dirt with a brush or a cloth. Do not use
detergents or harsh solvents, which may damage or
weaken polymer components.
► Clean the docking station with a brush, a slightly
dampened cloth or resin solvent. Do not use detergents.
► Remove the carrier plate and remove grass residues.
► Never use a hose or a pressure washer to clean the
robotic mower or docking station or spray them with water
or other liquids.
NOTICE
Place the robotic mower on a firm and level surface. The
robotic mower can topple over when it is in the cleaning
position.
NOTICE
Never use a hose or a pressure washer to clean the robotic
mower or docking station. Spraying the mower or docking
station with water or other liquids could lead to permanent
damage. The carrier plate must be cleaned more frequently
if the iMow regularly operates in wet weather. Dirt deposits
between the carrier plate and the mowing deck housing can
create friction and lead to increased power consumption.
21.1 Inspection and Maintenance Intervals
The following maintenance intervals are examples and apply
in standard operating conditions. Actual use and your
experience will determine the frequency of inspection and
maintenance.
► Regularly check the "Mowing hours" counter in the
"Information" menu, @ 14.4.
On days with active times:
► Visually inspect the robotic mower and the docking
station.
► Check current time and the start of the next mowing
operation on the display.
► Inspect the mowing area. Remove stones, pieces of
metal, glass, wire or other objects that could be thrown or
flung by the cutting attachment or interfere with the
operation of the mower. Examples of common objects that
could interfere with mowing or damage the mowing blade
include garden furniture, balls, garden hoses, landscape
ornaments, flower pots, toys and other lawn equipment.
20 Cleaning
0000-GXX-4403-A2
21 Inspection and Maintenance

0478-131-3050-A
67
English
21 Inspection and Maintenance
Objects hidden or buried in the turf (e.g., sprinkler heads,
water valves, electrical wires) must be avoided. Ensure
that these objects are not in the mowing area before
starting operation of the robotic mower.
► Check that the battery is charged, @ 12.4.
Weekly:
► Clean the robotic mower and the docking station, @ 20.
► Visually inspect the mowing blade, blade fastening and
mowing deck for damage (notches, cracks, fractures, etc.)
and wear, @ 21.2.
Every 200 hours:
► Replace the mowing blade. A reminder will appear in the
display.
Annually:
► Have the robotic mower and the docking station inspected
and maintained by an authorized STIHL iMow servicing
dealer after the mowing season ends.
21.2 Inspecting the Mowing Blade
WARNING
The mowing blade has sharp edges. If it contacts your flesh,
it will cut you, even if it is not moving. Always wear heavy-
duty work gloves when mounting or otherwise handling the
mowing blade, @ 5.3.
WARNING
Never use a dull or damaged mowing blade. Working with a
dull blade leads to increased vibration, unsatisfactory cutting
results and increased wear, in particular if you use the
robotic mower on sandy ground or use it frequently under
dry conditions. A damaged mowing blade may vibrate,
crack, break or come off the robotic mower, which may result
in serious or fatal injury or property damage. Make sure the
mowing blade is sharp and in good condition before starting
work.
WARNING
Never attempt to sharpen the mowing blade. The mowing
blade must be replaced when it becomes dull, or every 200
operating hours, whichever occurs first. STIHL recommends
having your iMow's mowing blade replaced by an authorized
STIHL iMow servicing dealer to reduce the risk of severe or
fatal injury from an improperly mounted mowing blade.
To inspect the mowing blade:
► Activate the disabling device, @ 9.
► Tilt the robotic mower onto its side and lean it securely
against a stable wall. Carefully clean the mowing deck and
mowing blade, @ 20.
► Use a caliper to check the blade width. Blade width must
be at least a = 1 in. (25 mm) at its narrowest point.
► Use a caliper to check the blade thickness. Blade
thickness must be at least b = 0.05 in. (1.3 mm) at its
narrowest point.
► Replace the mowing blade if the measured values are
outside the permissible limits.
21.3 Replacing the Mowing Blade
WARNING
A cracked, damaged or worn out mowing blade may shatter
at high speeds and cause serious or fatal injury. To reduce
the risk of injury from broken parts, check the condition of
a
b
0000-GXX-4404-A0

0478-131-3050-A
68
English
21 Inspection and Maintenance
the mowing blade before mounting and at regular intervals
thereafter. Do not mount a worn, broken or damaged
mowing blade.
WARNING
The mowing blade has sharp edges. If it contacts your flesh,
it will cut you, even if it is not moving. Always wear heavy-
duty work gloves when mounting or otherwise handling the
mowing blade, @ 5.3.
To replace the mowing blade:
► Tilt the robotic mower onto its side and lean it securely
against a stable wall.
► Push in both tabs (1) on the carrier plate with one hand
and hold.
► Remove the fastening nut (2) with your other hand.
► Remove the mowing blade including the fastening nut.
► Mount the new mowing blade (2) as depicted above. The
retainers (3) must fit into the holes in the mowing blade.
► Turn the fastening nut (4) clockwise until you hear several
audible clicks.
► Confirm having mounted a new mowing blade in the
"Service" menu, @ 15.5.
21.4 Mounting and Removing the Carrier Plate
21.4.1 Mounting the Carrier Plate
WARNING
To reduce the risk of personal injury from thrown or flung
objects, do not mount a worn, broken or damaged carrier
plate.
WARNING
To reduce the risk of laceration injuries, always wear heavy-
duty work gloves when mounting or otherwise handling the
carrier plate, @ 5.3.
To mount the carrier plate:
► Tilt the robotic mower onto its side and lean it securely
against a wall.
► Clean the mowing deck with a brush or a slightly
dampened cloth.
11
0000-GXX-4381-A0
2
3
3
0000-GXX-4379-A1
4
0000-GXX-4380-A0

0478-131-3050-A
69
English
21 Inspection and Maintenance
► Clean the blade shaft (2) and the mounting on the carrier
plate (1) with a brush or a slightly dampened cloth.
► Push the carrier plate onto the blade shaft.
NOTICE
Never use a hose or pressure washer to clean the robotic
mower, or otherwise spray it with water or other liquids.
Doing so could lead to permanent damage.
21.4.2 Removing the Carrier Plate
WARNING
To reduce the risk of laceration injuries, always wear heavy-
duty work gloves when mounting or otherwise handling the
carrier plate, @ 5.3.
To remove the carrier plate:
► Tilt the robotic mower onto its side and lean it securely
against a wall.
► Insert the carrier plate removal tool (1) into the openings
in the carrier plate (2) and turn it counterclockwise until it
stops.
► Support the robotic mower with one hand and remove the
carrier plate by pulling the removal tool.
1
2
0000-GXX-4377-A0
1
1
2
0000-GXX-4378-A0

0478-131-3050-A
70
English
22 Troubleshooting Guide
22.1 Messages
Messages provide information on active errors and
recommendations. They are displayed in a dialog window.
► Call up messages by pressing the OK button in the
"Messages" menu, @ 14.4. Recommendations and
active messages also appear in the status screen,
@ 13.2.
► Open the message to display the message code, the time
of occurrence, the priority and the frequency of
occurrence.
22 Troubleshooting Guide
Recommendations designated "Low" priority or the
designation "Info" do not require action. Operation of
the robotic mower will continue. They appear in the
status screen alternately with the text "iMow ready for
op."
Errors are designated "Medium" priority and require
action on the part of the user. The robotic mower can
only be operated again once the error has been
rectified. Errors are also reported to the iMow App.
Errors are given "High" priority and require action of
an authorized STIHL iMow servicing dealer. The text
"Contact your iMow dealer" appears in the display.
The robotic mower can only be operated again once
the error has been rectified by an authorized STIHL
iMow servicing dealer. Errors are also reported to the
iMow App.
Message Possible Cause Remedy
0001 – Data loss
Press OK to release
– The software has been updated.
– Voltage loss.
– Software or hardware error.
► Press the OK button. The robotic mower
operates with its default settings.
► Check and, if necessary, correct the date,
time and mowing plan.
0100 – Battery
discharged
Charge battery
Battery voltage too low. ► Place the robotic mower in the docking station
to recharge the battery.
0180 – Temperature low
Temperature range not
reached
Temperature inside the robotic mower too low. ► Let the robotic mower warm up at ambient
temperature.
0181 – Temperature high
Temperature range
exceeded
Temperature inside the robotic mower too high. ► Allow the robotic mower to cool down.
0183 – Temperature high See message 0181. ► See message 0181.
0185 – Temperature high See message 0181. ► See message 0181.
0186 – Temperature low See message 0180. ► See message 0180.
0187 – Temperature high See message 0181. ► See message 0181.

0478-131-3050-A
71
English
22 Troubleshooting Guide
0302 – Drive motor fault
Temperature range
exceeded
Temperature in left drive motor too high. ► Allow the robotic mower to cool down.
0305 – Drive motor fault
Left wheel is stuck
Overload at left drive wheel. ► Clean the robotic mower.
► Level out any uneven areas (holes,
depressions) in the mowing area.
0402 – Drive motor fault
Temperature range
exceeded
Temperature in right drive motor too high. ► Allow the robotic mower to cool down.
0405 – Drive motor fault
Right wheel is stuck
Overload at right drive wheel. ► Clean the robotic mower.
► Level out any uneven areas (holes,
depressions) in the mowing area.
0502 – Mowing motor
fault
Temperature range
exceeded
Temperature in mowing motor too high. ► Allow the robotic mower to cool down
0505 – Mowing motor
fault
Mowing blade blocked
– Dirt between carrier plate and mowing deck
housing.
– Mowing motor cannot be switched on.
– Mowing motor overloaded.
► Clean mowing blade and mowing deck.
► Clean carrier plate.
► Set higher cutting height.
► Level out any uneven areas (holes,
depressions) in the mowing area.
0701 – Battery
temperature
Outside temperature
range
Temperature in battery too low or too high. ► Allow the robotic mower to warm up or cool
down.
0703 – Battery
discharged
See message 0100. ► See message 0100.
0704 – Battery
discharged
See message 0100. ► See message 0100.
1000 – Rollover
Too steep of slope
Tilt sensor has detected a rollover. ► Place the robotic mower on its wheels, check
for damage and confirm the message by
pressing the OK button.
1010 – iMow raised
Press OK to release
Robotic mower has been lifted by the hood. ► Check the movement of the hood and confirm
the message by pressing the OK button.
Message Possible Cause Remedy

0478-131-3050-A
72
English
22 Troubleshooting Guide
1030 – Hood fault
Check hood, Then press
OK
No hood detected. ► Check hood (movement, firm seating) and
confirm the message with OK.
1120 – Hood blocked
Check hood, Then press
OK
Permanent collision detected. ► Free the robotic mower, remove the obstacle
or change the routing of the perimeter wire if
necessary.
► Confirm the message by pressing the OK
button.
► Check movement of the hood and confirm the
message by pressing the OK button.
1125 – Remove obstacle
Check wire routing
Perimeter wire routed inaccurately. ► Check the routing of the perimeter wire and
check the clearances using the iMow Ruler.
1130 – Stuck
Free iMow, Then press
OK
– Robotic mower has become stuck.
– Drive wheels are spinning.
► Free the robotic mower, level out the mowing
area or change routing of perimeter wire if
necessary.
► Clean the drive wheels, if necessary prevent
operation during rain.
► Confirm the message by pressing the OK
button.
1131 – Stuck See message 1130. ► See message 1130.
1135 – Outside
Place iMow in mowing
area
The robotic mower is located outside the
mowing area.
► Return the robotic mower to the mowing area.
1140 – Too steep
Check wire routing
Tilt sensor has detected slope exceeding 22°. ► Change routing of perimeter wire and block
off areas of the lawn with slopes exceeding
22°.
1160 – Handle actuated
Press OK to release
The robotic mower has been lifted by a carrying
handle.
► Confirm message by pressing the OK button.
1170 – No signal
Check perimeter wire
signal
– No reception of wire signal during operation.
– The robotic mower is located outside the
mowing area.
– Docking station or electronic components
were replaced.
► Check the power supply to the docking
station.
Check the LED on the docking station. The
LED must glow red during operation.
► Return the robotic mower to the mowing area.
► Link the robotic mower and docking station.
Message Possible Cause Remedy

0478-131-3050-A
73
English
22 Troubleshooting Guide
1180 – Dock iMow
Automatic docking not
possible
– The docking station was not found.
– A corridor is not installed correctly.
► Check the LED on the docking station and
switch on the docking station if necessary.
► Correctly install the corridors.
1190 – Docking error
Docking station occupied
Docking station occupied by a second robotic
mower.
► Dock the robotic mower once the docking
station is unoccupied again.
1200 – Mowing motor
fault
See message 0505. ► See message 0505.
1210 – Drive motor fault
Wheel stuck
Overload at a drive wheel. ► Clean the robotic mower.
► Level out any uneven areas (holes,
depressions) in the mowing area.
1220 – Rain detected
Mowing interrupted
Mowing operation has been halted or delayed
due to rain.
► No action necessary; adjust rain sensor if
required.
1230 – Docking error
Dock iMow
Docking station has been located, automatic
docking not possible.
► Check docking, if necessary manually dock
robotic mower.
► Check perimeter wire – ensure correct routing
in the area of the docking station.
2000 – Signal problem
Dock iMow
Wire signal error. ► Place the robotic mower in the docking station
and press the OK button.
2010 – Replace mowing
blade
Allowed operating time
reached
Mowing blade has been in use for more than
200 hours, replacement is necessary.
► Replace the mowing blade.
► Confirm the blade replacement in the
"Service" menu.
2020 – Recommendation
Annual service by spec.
dealer required
Service recommended. ► Have the annual service carried out by an
authorized STIHL iMow servicing dealer.
2030 – Battery
Allowed operating time
reached
Battery replacement necessary. ► Have the battery replaced by an authorized
STIHL iMow servicing dealer.
2031 – Charging failure
Check charging contacts
Charging cannot be started. ► Check the charging contacts on the docking
station and robotic mower and clean if
necessary.
► Confirm the message by pressing the OK
button.
Message Possible Cause Remedy

0478-131-3050-A
74
English
22 Troubleshooting Guide
2032 – Battery
temperature
Outside temperature
range
Temperature in battery during charging too low
or too high.
► Allow the robotic mower to warm up or cool
down.
2040 – Battery
temperature
Outside temperature
range
Temperature in battery when starting mowing
operation too low or too high.
► Allow the robotic mower to warm up or cool
down.
2050 – Adapt mowing
plan
Extend active times
Active times have been shortened/deleted or
the mowing duration has been extended – the
stored active times are insufficient for the
necessary mowing operations.
► Extend the active times or shorten the
mowing duration.
2060 – Mowing
completed
Press OK to release
Mowing in secondary area successfully
completed.
► Return the robotic mower to the mowing area
and dock to charge the battery.
2070 – GPS signal
No reception at edge
No GPS reception. ► Repeat edge testing, @ 15.3.
► If the problem persists, have wire routing
checked by an authorized STIHL iMow
servicing dealer.
2071 – GPS signal
No reception at starting
pt. 1
No GPS reception. ► Change the position of starting point 1,
@ 15.6.
2072 – GPS signal
No reception at starting
pt. 2
No GPS reception. ► Change the position of starting point 2,
@ 15.6.
2073 – GPS signal
No reception at starting
pt. 3
No GPS reception. ► Change the position of starting point 3,
@ 15.6.
2074 – GPS signal
No reception at starting
pt. 4
No GPS reception. ► Change the position of starting point 4,
@ 15.6.
2075 – GPS signal
No reception in desired
zone
No GPS reception. ► Redefine the desired zone in the iMow App.
Make sure that the desired zone and
perimeter wire overlap.
Message Possible Cause Remedy

0478-131-3050-A
75
English
22 Troubleshooting Guide
2076 – GPS signal
Desired zone not found
The desired zone could not be found during
edge following.
► Redefine the desired zone in the iMow App.
Make sure that the desired zone and
perimeter wire overlap.
2077 – Desired zone
Desired zone outside
home area
The desired zone is outside the stored mowing
area.
► Redefine the desired zone in the iMow App.
Make sure that the desired zone and
perimeter wire overlap.
2080 – Network
No LTE reception
No cellular reception. ► Contact an authorized STIHL iMow servicing
dealer.
2090 – Radio module
Contact your specialist
dealer
Communication with the radio module is
interrupted.
No action required, firmware will be
automatically updated.
► If the problem persists, contact an authorized
STIHL iMow servicing dealer.
2100 – GPS protect.
Outside home area
Machine disabled
The robotic mower was removed from the
stored mowing area.
► Return the robotic mower to the home area
and enter the PIN code.
► Alternatively, enter the PIN code and perform
new installation.
2110 – GPS protect.
New location
New installation req.
The robotic mower was operated on a different
mowing area. The wire signal of a second
docking station is already stored.
► Perform new installation.
2120 – Child lock
Child lock active
– Impact sensor triggered several times
consecutively.
– Robotic mower has been lifted during travel.
► No action required if the impact sensor is not
triggered again, the message automatically
becomes inactive within max. 1 minute.
► Deactivate the child lock.
2400 – iMow successfully
reset to factory default
Robotic mower has been reset to factory
default.
► Confirm message by pressing the OK button.
4001 – Internal fault
Outside temperature
range
Temperature in battery or inside the machine
too low or too high.
► Allow the robotic mower to warm up or cool
down.
4002 – Rollover See message 1000. ► See message 1000.
4003 – Hood lifted
Check hood, Then press
OK
Hood has been lifted. ► Check the hood and confirm the message by
pressing the OK button.
Message Possible Cause Remedy

0478-131-3050-A
76
English
22 Troubleshooting Guide
4004 – Internal fault
Press OK to release
– Error in the program sequence.
– Power failure during automatic operation.
– Robotic mower is located outside the mowing
area.
► Check the power supply to the docking
station.
Check the LED on the docking station. The
LED must glow red during operation.
► Return the robotic mower to the mowing area.
► Confirm message by pressing the OK button.
4005 – Internal fault See message 4004. ► See message 4004.
4006 – Internal fault See message 4004. ► See message 4004.
4008 – Internal fault See message 4004. ► See message 4004.
4027 – STOP button
pressed
Press OK to release
STOP button has been pressed. ► Confirm message by pressing the OK button.
Message Possible Cause Remedy

0478-131-3050-A
77
English
22 Troubleshooting Guide
22.2 Robotic Mower
Always activate the disabling device before carrying out any inspection, cleaning or maintenance.
Condition Possible Cause Remedy
The robotic mower operates at
the wrong times.
Date and time incorrectly set. ► Set the time and date, @ 15.2.
Active times incorrectly set. ► Set the active times, @ 14.6.
Robotic mower has been
operated by unauthorised
persons.
► Set the safety level to "Medium" or "High", @ 15.4.
The robotic mower fails to
operate during an active time.
Battery is charging. ► Allow the battery to finish charging, @ 12.4.
Automatic mowing switched off. ► Switch on automatic mowing, @ 15.2.
Active time switched off. ► Release the active time, @ 14.6.
Rain detected. ► Set the rain sensor, @ 15.2.
Weekly mowing duration has
been reached, no further mowing
operations required that week.
► No further action necessary, mowing operations are
automatically distributed over the week – if
necessary, start the mowing operation with the
"Mowing" command, @ 14.3.
Message is active. ► Rectify displayed error and confirm the message by
pressing the OK button.
– Docking station not connected
to power supply.
– Robotic mower too hot / too
cold.
– Power failure.
► Check the power supply to the docking station,
@ 10.3.
► Allow the robotic mower to warm up or cool down
gradually at ambient temperatures of about 50 °F to
68 °F (10 °C to 20 °C).
► Check the power supply.
The robotic mower fails to mow
after the commands "Start
mowing" or "Start timedelayed
mowing" have been called up.
Insufficient battery charge. ► Charge the battery, @ 12.4.
Rain detected. ► Set the rain sensor, @ 15.2.
Message is active. ► Rectify displayed error and confirm the message by
pressing the OK button.
The ON/OFF/Home button on the
docking station has been pressed
twice. Homecall is active.
► Press the ON/OFF/Home button twice to switch off
Homecall or repeat command following docking.

0478-131-3050-A
78
English
22 Troubleshooting Guide
The robotic mower is not working
and nothing is shown in the
display.
– Machine is in standby.
– Battery discharged.
► Press any button to wake up the robotic mower. The
status screen appears, @ 13.2.
► If the robotic mower is still not working, have the
battery replaced by an authorized STIHL iMow
servicing dealer.
The robotic mower is noisy and
vibrates.
Mowing blade is damaged. ► Replace the mowing blade and remove any
obstacles from the lawn, @ 21.3.
Mowing deck is very dirty ► Clean the mowing deck, @ 20.
Poor mulching or mowing result. Grass is too high in relation to the
cutting height.
► Adjust the cutting height, @ 17.4.
Lawn is extremely wet. ► Set the rain sensor, @ 15.2.
► Change the active times, @ 14.6.
Mowing blade is blunt or worn. ► Replace the mowing blade, @ 21.3.
Active times insufficient, mowing
duration too short.
► Extend or add active times, @ 14.6.
► Extend the mowing duration, @ 14.7.
Size of mowing area set
incorrectly.
► Create a new mowing plan, @ 14.5.
Long periods of rain. ► Allow mowing during rain, @ 15.2.
► Extend the active times, @ 14.6.
Display in a foreign language Language setting has been
changed.
► Set the language, @ 10.2.
Brown (earthy) patches appear in
the mowing area.
Mowing duration is too long in
relation to the mowing area.
► Reduce the mowing duration, @ 14.6.
Perimeter wire has been routed
with excessively tight radius.
► Correct the routing of the perimeter wire, @ 11.
Size of mowing area set
incorrectly.
► Create a new mowing plan, @ 14.5.
Mowing operations are
significantly shorter than usual.
Grass is very high or too wet. ► Adjust the cutting height, @ 17.4.
► Set the rain sensor, @ 15.2.
► Change the active times, @ 14.6.
Machine (mowing deck, drive
wheels) is very dirty.
► Clean the machine,
@ 20.
Battery has reached end of
service life.
► Have the battery replaced by an authorized STIHL
iMow servicing dealer.
The robotic mower is docked, the
battery is not charging.
The battery does not need to be
charged.
► No action necessary. The battery charging occurs
automatically below a certain voltage.
Always activate the disabling device before carrying out any inspection, cleaning or maintenance.
Condition Possible Cause Remedy

0478-131-3050-A
79
English
22 Troubleshooting Guide
Docking station not connected to
power supply.
► Check power supply to the docking station, @ 10.3.
Incorrect docking. ► Place the robotic mower in the mowing area and
send it back to the docking station (@ 14.3), check
for correct docking. If necessary, correct the position
of the docking station,@ 10.3.
Charging contacts corroded. ► Have the charging contacts replaced by an
authorized STIHL iMow servicing dealer.
Docking not working. Uneven entry area to docking
station.
► Level out the entry area to the docking station,
@ 14.3.
Dirty drive wheels or dirty base
plate.
► Clean the drive wheels and the base plate of the
docking station, @ 20.
Perimeter wire incorrectly routed
in area of docking station.
► Re-route the perimeter wire. Ensure correct routing
in the area of the docking station, @ 11.
Ends of perimeter wire not cut. ► Cut the perimeter wire as described and route it
without excess length. Do not roll up protruding
ends, @ 10.5.
The robotic mower travels past
the docking station or docks at an
angle.
Wire signal affected. ► Link the robotic mower and docking station again.
Ensure that the robotic mower is in correct
alignment to the docking station.
Perimeter wire incorrectly routed
in area of docking station.
► Re-route the perimeter wire. Ensure correct routing
in the area of the docking station, @ 11.
► Check for correct connection of the perimeter wire
ends in the docking station, @ 10.5.
The robotic mower has crossed
the perimeter wire.
Perimeter wire incorrectly routed,
clearances are not correct.
► Check the routing of the perimeter wire, @ 10.7.
Slope of mowing area too steep. ► Check the clearances with the iMow Ruler, @ 11.3.
Interference affecting the robotic
mower.
► Contact an authorized STIHL iMow servicing dealer.
The robotic mower frequently
becomes stuck.
Cutting height too low. ► Increase the cutting height, @ 17.4.
Drive wheels dirty. ► Clean the drive wheels, @ 20.
Depressions or obstacles in the
mowing area.
► Fill up holes in the mowing area, install restricted
areas around obstacles such as exposed roots,
remove obstacles.
Impact sensor is not activated
when the robotic mower hits an
obstacle.
Low obstacle (height less than
3.9 in. (10 cm)).
► Remove the obstacle or block it off with a restricted
area, @ 11.6.
Always activate the disabling device before carrying out any inspection, cleaning or maintenance.
Condition Possible Cause Remedy

0478-131-3050-A
80
English
22 Troubleshooting Guide
The obstacle is not firmly
attached to the ground – e.g.
fallen fruit or tennis ball.
► Start all mowing operations at the docking station in
suitable mowing areas, @ 15.6.
Driving tracks at edge of mowing
area.
Too frequent edge mowing. ► Switch off edge mowing or reduce it to once per
week, @ 15.3.
Starting points in use. ► Start all mowing operations at the docking station in
suitable mowing areas, @ 15.6.
Battery is charged very frequently
towards the end of its service life.
► Have the battery replaced by an authorized STIHL
iMow servicing dealer.
Offset drive home (passage) not
switched on.
► Switch on offset drive home, @ 15.2.
Unmowed grass at edge of
mowing area.
Edge mowing switched off. ► Mow the edge once or twice per week, @ 15.3
Perimeter wire routed
inaccurately.
► Check the routing of the perimeter wire, @ 10.7.
► Check the clearances with the iMow Ruler, @ 11.3.
Grass is out of reach of mowing
blade.
► Cut the unmowed areas regularly using a suitable
grass trimmer.
No wire signal Docking station switched off – the
LED is off.
► Switch on the docking station, @ 12.
Docking station not connected to
electrical socket – the LED is off.
► Check power supply to the docking station, @ 10.3.
Perimeter wire not connected to
the docking station – red LED
flashes.
► Connect the perimeter wire to the docking station,
@ 10.5.
Break in perimeter wire – red LED
flashes.
► Search for wire break (@ 22.3), then repair
perimeter wire using wire connectors, @ 11.14.
Robotic mower and docking
station are not linked.
► Link robotic mower and docking station, @ 10.6.
Electronics error. ► Contact an authorized STIHL iMow servicing dealer.
Installed perimeter wire too short
– red LED flashes rapidly at
intervals, @ 12.1.
► Install the STIHL Small Area Module AKM 100
(special accessory).
► Contact an authorized STIHL iMow servicing dealer.
The robotic mower is not
receiving any GPS signal.
The connection to the satellites is
being established.
No further action required. It can take a few minutes
for the connection to be established.
3 or fewer satellites within range. No further action required. It can take a few minutes
for the connection to be established.
Always activate the disabling device before carrying out any inspection, cleaning or maintenance.
Condition Possible Cause Remedy

0478-131-3050-A
81
English
22 Troubleshooting Guide
No GPS signal. ► Avoid or remove obstacles that might be blocking
the signal (e.g. trees, canopies).
The robotic mower cannot be
reached using the iMow App.
Cellular module inactive. The cellular module is switched off during linking, then
it is reactivated and the robotic mower can be reached
again.
Robotic mower in standby mode. ► Activate the robotic mower by pressing the button,
set "Standard" energy mode.
Smart phone or tablet is not
connected to the Internet.
► Connect the device on which the app is installed to
the Internet.
Robotic mower not associated
with the correct e-mail address.
► Correct the e-mail address.
Always activate the disabling device before carrying out any inspection, cleaning or maintenance.
Condition Possible Cause Remedy

0478-131-3050-A
82
English
22 Troubleshooting Guide
22.3 Searching for a Wire Break
The LED on the docking station flashes red when there is a
break in the perimeter wire.
The following instructions describe how to search for a wire
break in a clockwise direction, i.e. if the perimeter wire is
followed in a clockwise direction when facing the front of the
docking station. The search can also be performed in a
counterclockwise direction if necessary. However, if you
search in a counterclockwise direction, you must disconnect
the right perimeter wire end.
WARNING
To reduce the risk of electric shock, always unplug the
power supply from the electrical socket before removing the
cover of the docking station.
To find a wire break:
► Press the ON/OFF/Home button on the docking station
one time to activate the search for a wire break. The LED
on the docking station will continue to flash red, while in
the search function.
► Disconnect the power supply from the electrical outlet.
► Remove the docking station cover and open the panel.
► Press and open the left clamping lever (1).
► Remove the left stripped perimeter wire end (2).
► Close the clamping lever (1)
► Close the panel and re-attach the docking station cover.
► In the "Service" menu, select the "Find wire break" entry
and press the OK button.
► Lift the robotic mower slightly by the rear carrying handle
(1) and relieve the weight on the drive wheels. Push the
machine, resting on its front wheels. Follow the perimeter
wire (2).
► Starting at the docking station, follow the edge of the
mowing area in a clockwise direction with the robotic
mower (1). Ensure that the perimeter wire (2) runs under
the wire sensor in the robotic mower. The wire sensors are
installed in a protected position on the left and right at the
front of the robotic mower.
► During the wire break search, the signal strength is
indicated on the display. The wire sensors are in the ideal
position above the perimeter wire when this value is at its
highest.
► Repair the wire break using a wire connector, @ 11.14. If
necessary, re-route the perimeter wire to avoid the source
of the wire break.
2
1
0000-GXX-5357-A1
If the wire sensors are correctly receiving the
wire signal, the display shows this symbol.
In the area of the wire break, the signal strength
drops and the display shows this symbol.
2
1
0000-GXX-4406-A1

0478-131-3050-A
83
English
23 Specifications
NOTICE
If you cannot find a wire break as described, contact your
authorized STIHL iMow servicing dealer.
23.1 STIHL RMI 422.0 PC-L Robotic Mower (iMow)
RMI = Robotic lawn mower, automatic and battery powered
– Cutting width: 7.9 in. (20 cm)
– Cutting height: 0.79 in. to 2.4 in. (20 mm to 60 mm)
– Speed of mowing blade: 4450 RPM
– Weight: 19.8 lbs. (10 kg)
– Insulation: Class III (designed to be supplied from a
separated/safety extra-low voltage (SELV) power source)
– Protection rating: IPX4 (protected against spraying or
splashing water from all directions)
– Permissible ambient temperature range during use: 41 °F
to 104 °F (5 °C to 40 °C)
– Permissible ambient temperature range during storage:
32 °F to 122 °F (0 °C to 50 °C)
– Supported mobile radio frequency bands: E-GSM-900,
DCS-1800
– Radiated maximum transmitting power:
– E-GSM-900: 880 to 915 MHz, 33.0 dBm
– DCS-1800: 1710 to 1785 MHz, 30.0 dBm
– Frequency range of perimeter wire and search loops:
1 kHz to 90 kHz
– Maximum field strength: < 72 μA/m
23.2 STIHL AAI 80 Battery
Approved power supply type: STIHL ADO 401 Docking
Station in combination with OWA-60U-27VUSM Power
Supply
– Battery technology: Lithium-Ion
– Voltage: 18.5 V
– Rated capacity in Ah
1
: 4.5 Ah
– Stored energy in Wh
2
: 83 Wh
– Weight in kg: 3.1 lbs. (1.4 kg)
– Permissible ambient temperature range during use or
storage: 14 °F to 122 °F (- 10 °C to 50 °C)
23.3 STIHL ADO 401 Docking Station and OWA-
60U-27VUSM Power Supply
STIHL ADO 401 Docking Station
– Approved power supply: OWA-60U-27VUSM Power
Supply.
– Voltage: 27 V
– Amperage: 2.3 A
– Insulation: Class III (designed to be supplied from a
separated/safety extra-low voltage (SELV) power source)
– Protection rating: IPX4 (protected against spraying or
splashing water from all directions)
– Weight: 6.6 lbs. (3 kg)
– Permissible ambient temperature range during use or
storage: 32 °F to 122 °F (0 °C to 50 °C)
OWA-60U-27VUSM Power Supply
For use only with STIHL ADO 401 Docking Station.
– Input Voltage: 100 V to 240 V
– Frequency: 50/60 Hz
– Output Voltage: 27 V
– Insulation: Class II (Double Insulation)
23 Specifications
1
Rated capacity calculated pursuant to IEC 61960. Usable energy
available to the operator will be less.
2
The battery is marked with its stored energy as provided by the cell
manufacturer. Usable energy available to the operator will be less.

0478-131-3050-A
84
English
23 Specifications
– Protection rating for power body: IP67 (protected from
total dust ingress)
– Permissible ambient temperature range during use or
storage: 32 °F to 122 °F (0 °C to 50 °C)
23.4 Symbols on the Robotic Mower, Battery,
Docking Station and Power Supply
23.5 Engineering Improvements
STIHL's philosophy is to continually improve all of its
products. As a result, engineering changes and
improvements are made from time to time. Therefore, some
changes, modifications and improvements may not be
covered in this manual. If the operating characteristics or the
appearance of your machine differs from those described in
this manual, please contact your STIHL dealer or the STIHL
distributor for your area for assistance.
23.6 FCC 15 Compliance Statement
This device contains a transmitter
(FCC ID: XPY2AGQN4NNN) that complies with part 15 of
the FCC Rules.
Operation is subject to the following two conditions:
– this device may not cause harmful interference.
– this device must accept any interference received,
including interference that may cause undesired
operation.
Note: This equipment has been tested and found to comply
with the limits for a Class B digital device, pursuant to part
15 of the FCC Rules. These limits are designed to provide
reasonable protection against harmful interference in a
residential installation. This equipment generates, uses and
can radiate radio frequency energy and, if not installed and
used in accordance with the instructions, may cause harmful
interference to radio communications. However, there is no
guarantee that interference will not occur in a particular
installation.
If this equipment does cause harmful interference to radio or
television reception, which can be determined by turning the
equipment off and on, the user is encouraged to try to
correct the interference by one or more of the following
measures:
– reorient or relocate the receiving antenna,
Symbol Explanation
VVolt
Hz Hertz
A Ampere
Ah Ampere hour
WWatt
Wh Watt hour
AC Alternating current
IP Degree of electrical protection
Cutting width of the mowing blade in centimeters
STIHL products must not be disposed of in the
household trash, but only in accordance with local,
state and federal laws and regulations and as
provided in this manual, @ 25.
Direct current
Number of cells and stored energy according to cell
manufacturer's specification. Usable energy will be
less.
The RBRC seal indicates that STIHL has prepaid for
battery recycling.
Insulation: Class III (designed to be supplied from a
separated/safety extra-low voltage (SELV) power
source)
Certification/listing mark of UL.
Certification/listing mark of UL.
;;
Energy Efficiency Level.

0478-131-3050-A
85
English
24 Replacement Parts and Equipment
– increase the separation between the equipment and
receiver,
– connect the equipment to an outlet on a circuit different
from that to which the receiver is connected,
– consult an authorized STIHL servicing dealer or an
experienced radio/TV technician for help.
Do not change or modify this product in any way unless
specifically allowed in this manual, since this could void your
authority to operate it.
24.1 Genuine STIHL Replacement Parts
STIHL recommends the use of genuine STIHL replacement
parts. Genuine STIHL parts can be identified by the STIHL
part number, the logo and, in some cases, by the
STIHL parts symbol . The symbol may appear alone on
small parts.
24.2 Standard Replacement Parts and Accessories
Replacement Parts
– Mowing blade: 6301 702 0101
Accessories
– Kit S Installation kit for mowing areas up to 600 square
yards (500 m²) (contains 150 Wire stakes AFN 075.0, 3
Wire connectors ADV 010.0)
– Kit L Installation kit for mowing areas from 0.5 acres to 1
acre (2000 m² to 4000 m²) (contains 375 Wire stakes
AFN 075.0, 7 Wire connectors ADV 010.0)
– STIHL Small Area Module AKM 100.0 for mowing areas
smaller than 120 square yards (100 m²), or if the total
length of the perimeter wire is less than 575 ft. (175 m)
25.1 Disposal of the Robotic Mower, Docking Station
and Power Supply
WARNING
Even if believed to be discharged, the lithium ion battery
integrated into the robotic mower may never totally
discharge and still may deliver a dangerous short circuit
current. Handle a discharged/depleted battery carefully. If
damaged or exposed to high temperatures, it may leak,
generate heat, catch fire or explode.
STIHL products must not be thrown in household trash or
disposed of except as outlined in this manual.
► Take the robotic mower to an authorized STIHL iMow
servicing dealer to have its integrated battery removed
and recycled.
► Take the docking station, power supply, accessories and
packaging to an approved disposal site for
environmentally friendly recycling.
► Observe all federal, state and local disposal rules and
regulations.
► Contact your authorized STIHL iMow servicing dealer for
the latest information on disposal and recycling.
The RBRC seal indicates that STIHL has prepaid for battery
recycling. RBRC has a toll free phone number (1-800-822-
8837) that connects you to information on battery recycling
locations and information on battery disposal bans or
restrictions in your area.
24 Replacement Parts and Equipment
25 Disposal
STIHL is committed to the development of products
that are environmentally responsible. This
commitment does not stop when the product leaves
the authorized STIHL iMow servicing dealer. STIHL
has partnered with the RBRC (Rechargeable Battery
Recycling Corporation) to promote the collection and
recycling of spent STIHL lithium ion batteries in the
United States and Canada.

0478-131-3050-A
86
English
26 Installation Examples
26.1 Installation Examples
Rectangular mowing area with one tree and swimming pool:
– Docking station: Location (1) next to the house (A).
– Restricted area: Installation around the free-standing
tree (3), based on a linking section installed at right angles
to the perimeter of the mowing area.
– Swimming pool: Distance between perimeter wire (2) and
pool (B): 3.3 ft. (1 m).
– Wire clearances:
– Clearance from obstacles which can be travelled on,
such as patios and paths with a maximum height
difference between lawn area and obstacle of +/- 0.4 in.
(1 cm): 0 in. (0 cm)
– Clearance from high obstacles: 11 in. (28 cm)
– Clearance from the tree: 11 in. (28 cm)
– Clearance from the pool: 3.3 ft. (1 m)
– Programming: No further modification is necessary
following definition of the size of the mowing area.
– Particulars: Unmowed areas around the swimming pool
must be mowed manually or cut with a suitable trimmer or
other tool.
26 Installation Examples
3
2
1
A
B
0000-GXX-3428-A0

0478-131-3050-A
87
English
26 Installation Examples
U-shaped mowing area with several free-standing trees:
– Docking station: Location (1) next to the house (A)
– Restricted area: Installation around the free-standing
trees, based on linking sections installed at right angles to
the perimeter of the mowing area (2), two restricted areas
are connected via a linking section.
– Swimming pool: Distance between perimeter wire (2) and
pool B: 3.3 ft. (1 m)
– Wire clearances:
– Clearance from obstacles which can be travelled on,
such as patios and paths with a maximum height
difference between lawn area and obstacle of +/- 0.4 in.
(1 cm): 0 in. (0 cm)
– Clearance from high obstacles: 11 in. (28 cm)
– Clearance from the trees: 11 in. (28 cm)
– Programming: No further modification is necessary
following definition of the size of the mowing area.
– Particulars: Tree in the corner of the mowing area. Mow
the area behind the blocked-off tree regularly using a
suitable trimmer or other tool.

0478-131-3050-A
88
English
26 Installation Examples
Divided mowing area with a pond and a free-standing tree:
– Docking station: Location (1) next to the house (A)
– Restricted area: Installation around the free-standing tree,
based on a linking section installed at right angles to the
perimeter of the mowing area.
– Pond: Clearance from the perimeter wire (2) to the
pond (B): 3.3 ft. (1 m)
– Wire clearances:
– Clearance from obstacles which can be travelled on,
such as patios and paths with a maximum height
difference between lawn area and obstacle of +/- 0.4 in.
(1 cm): 0 in. (0 cm)
– Clearance from high obstacles: 11 in. (28 cm)
– Clearance around the tree: 11 in. (28 cm)
– Clearance from the pond: 3.3 ft. (1 m)
– Confined area: Installation of a corridor (3) with a wire
clearance of 9 in. (22 cm).
– Search loops: Installation of two search loops (4) with a
minimum distance from the corridor entrance of 6.6 ft.
(2 m) for using the drive home function. Note the minimum
clearance from corners, @ 11.9.
– Programming: Define the total size of the mowing area,
program two starting points (5) (close to the docking
station and in the corner near the pond) – starting
frequency 2 of 10 operations in each case.
– Points to note: Unmowed areas, e.g. around the pond,
must be mowed manually or cut with a suitable trimmer or
other tool.

0478-131-3050-A
89
English
26 Installation Examples
Divided mowing area. The robotic mower cannot travel
independently from one mowing area to the other:
– Docking station: Location (1) next to the house (A)
– Restricted area: Installation of the perimeter wire (2)
around the free-standing tree and around the vegetable
patch (B) based on a linking section installed at right
angles to the perimeter of the mowing area.
– Wire clearances:
– Clearance from obstacles which can be travelled on,
such as patios and paths with a maximum height
difference between lawn area and obstacle of +/- 0.4 in.
(1 cm): 0 in. (0 cm)
– Clearance from high obstacles: 11 in. (28 cm)
– Clearance around the tree: 11 in. (28 cm)
– Secondary area: Installation of a secondary area (C) with
a linking section (3) on the patio routed in a cable duct.
– Programming: Define the size of the mowing area (without
secondary area), program one starting point (4) in the
confined area with a starting frequency 2 of 10 operations.
– Particulars: Bring the robotic mower to the secondary area
several times per week and activate the command "Start
mowing". Take the mowing performance into account. If
necessary, install two separate mowing areas with
2 docking stations.
1
A
B
4
2
2
3
A
C
0000-GXX-3431-A0

0478-131-3050-A
90
English
26 Installation Examples
Mowing area around a free-standing house with external
docking station (1):
– Docking station: Location next to the garage (B) and
behind the house (A).
– Wire clearances:
– Clearance from obstacles which can be travelled on,
such as patios and paths with a maximum height
difference between lawn area and obstacle of +/- 0.4 in.
(1 cm): 0 in. (0 cm)
– Clearance from high obstacles: 11 in. (28 cm)
– Search loops: Installation of two search loops (2) with a
minimum distance from the corridor entrance of 6.6 ft.
(2 m) for using the drive home function. Note the minimum
clearance from corners, @ 11.9.
– Programming: Set the size of the mowing area and at least
one starting point (2), @ 15.6.
– Points to note: Installation of a corridor (4) with funnel-
shaped entrance area (3) with a wire clearance of 9 in.
(22 cm). The corridor leads to the external docking
station (1). Increase the wire clearance (5) in the corridor
to the width of the base plate with a length of (3.3 ft. (1 m))
in front of the docking station. Note the space requirement
in the corridor and beside the docking station.

0478-131-3050-A
91
English
27 Limited Warranty
27.1 STIHL Incorporated Limited Warranty Policy
This product is sold subject to the STIHL Incorporated
Limited Warranty Policy, available at
www.stihlusa.com/warranty.html. It can also be obtained
from your authorized STIHL dealer or by calling
1
-
800
-
GO
-
STIHL (1
-
800
-
467
-
8445).
28.1 Registered Trademarks
28.2 Common Law Trademarks
This listing of trademarks is subject to change.
Any unauthorized use of these trademarks without the
express written consent of ANDREAS STIHL AG & Co. KG,
Waiblingen is strictly prohibited.
29.1 STIHL Incorporated
STIHL Incorporated
536 Viking Drive
P.O. Box 2015
Virginia Beach, VA
23452-2015
27 Limited Warranty
28 Trademarks
STIHL
®
FARM BOSS
®
iCademy
®
MAGNUM
®
The color combination
orange-grey (U.S.
Registrations #2,821,860;
#3,010,057, #3,010,058,
#3,400,477; and
#3,400,476)
MasterWrench Service
®
MotoMix
®
OILOMATIC
®
ROCK BOSS
®
STIHL Cutquik
®
AutoCut
®
STIHL DUROMATIC
®
YARD BOSS
®
STIHL Quickstop
®
STIHL ROLLOMATIC
®
STIHL WOOD BOSS
®
WOOD BOSS
®
TIMBERSPORTS
®
4-MIX™ HT Plus™
BioPlus™ STIHL PowerSweep™
Easy2Start™ STIHL Protech™
EasySpool™ STIHL MiniBoss™
ElastoStart™ STIHL MotoPlus 4™
Ematic™ Master Control Lever™
STIHL Precision Series™ STIHL OUTFITTERS™
FixCut™ STIHL PICCO™
Micro™ TrimCut™
Pro Mark™ STIHL M-Tronic™
Quad Power™ STIHL HomeScaper Series™
Quiet Line™ STIHL PolyCut™
STIHL Arctic™ STIHL RAPID™
STIHL Compact™ STIHL SuperCut™
STIHL Interchangeable
Attachment Series™
STIHL Multi-Cut HomeScaper
Series™
TapAction™ STIHL Territory™
29 Addresses
TM
STIHL
Injection

Manual de instrucciones original Impreso en papel libre de cloro.
Las tintas contienen aceites vegetales, el papel es reciclable.
© STIHL Tirol GmbH 2019
0478-131-3050-A. H19.
0000008405_003_EA
0478-131-3050-A
español / EE.UU
92
Este manual de instrucciones está protegido por derechos de propiedad intelectual. Todos los derechos reservados, especial
-
mente los derechos de reproducción, traducción y procesamiento con sistemas electrónicos.
Contenido
1 Introducción
. . . . . . . . . . . . . . . . . . . . . . . . . . . . . . . . . . . . . . . .
94
2 Acerca de este manual de instrucciones
. . . . . . . . . . . .
94
2.1 Palabras identificadoras
. . . . . . . . . . . . . . . . . . . . . . . . . . . .
94
2.2 Símbolos en el texto
. . . . . . . . . . . . . . . . . . . . . . . . . . . . . . .
94
3 Componentes importantes
. . . . . . . . . . . . . . . . . . . . . . . . .
95
3.1 Robot cortacéspedes
. . . . . . . . . . . . . . . . . . . . . . . . . . . . . . .
95
3.2 Estación de carga
. . . . . . . . . . . . . . . . . . . . . . . . . . . . . . . . . .
96
3.3 Panel de mandos
. . . . . . . . . . . . . . . . . . . . . . . . . . . . . . . . . . .
96
3.4 Material de instalación
. . . . . . . . . . . . . . . . . . . . . . . . . . . . .
97
4 Símbolos de seguridad
. . . . . . . . . . . . . . . . . . . . . . . . . . . . .
97
4.1 Robot cortacéspedes
. . . . . . . . . . . . . . . . . . . . . . . . . . . . . . .
97
5 INSTRUCCIONES IMPORTANTES DE
SEGURIDAD
. . . . . . . . . . . . . . . . . . . . . . . . . . . . . . . . . . . . . . .
98
5.1 Uso previsto
. . . . . . . . . . . . . . . . . . . . . . . . . . . . . . . . . . . . . . .
98
5.2 Operador
. . . . . . . . . . . . . . . . . . . . . . . . . . . . . . . . . . . . . . . . . . .
99
5.3 Equipos de protección personal
. . . . . . . . . . . . . . . . . . . .
99
5.4 Robot cortacéspedes
. . . . . . . . . . . . . . . . . . . . . . . . . . . . . . .
99
5.5 Batería integrada
. . . . . . . . . . . . . . . . . . . . . . . . . . . . . . . . . .
101
5.6 Uso del robot cortacéspedes
. . . . . . . . . . . . . . . . . . . . . .
102
6 Seguridad de la estación de carga y de la fuente
de alimentación
. . . . . . . . . . . . . . . . . . . . . . . . . . . . . . . . . . .
105
6.1 Introducción
. . . . . . . . . . . . . . . . . . . . . . . . . . . . . . . . . . . . . . .
105
6.2 Advertencias e instrucciones
. . . . . . . . . . . . . . . . . . . . . .
106
7 Mantenimiento, reparación y almacenamiento
. . . . .
109
7.1 Advertencias e instrucciones
. . . . . . . . . . . . . . . . . . . . . .
109
8 Principio de funcionamiento
. . . . . . . . . . . . . . . . . . . . . . .
110
9 Funciones clave
. . . . . . . . . . . . . . . . . . . . . . . . . . . . . . . . . . .
110
9.1 Características principales
. . . . . . . . . . . . . . . . . . . . . . . .
110
10 Instalación del robot cortacéspedes
. . . . . . . . . . . . . . .
112
10.1 Preparación del césped y del robot
cortacéspedes para el funcionamiento
. . . . . . . . . . . . .
112
10.2 Configuración de idioma, fecha y hora
. . . . . . . . . . . .
113
10.3 Instalación de la estación de carga
. . . . . . . . . . . . . . . .
113
10.4 Tendido del cable perimétrico
. . . . . . . . . . . . . . . . . . . . .
118
10.5 Conexión del cable perimétrico a la estación de
carga
. . . . . . . . . . . . . . . . . . . . . . . . . . . . . . . . . . . . . . . . . . . . .
122
10.6 Conexión del robot cortacéspedes con la
estación de carga
. . . . . . . . . . . . . . . . . . . . . . . . . . . . . . . . .
125
10.7 Comprobación de la instalación
. . . . . . . . . . . . . . . . . . .
126
10.8 Programación del robot cortacéspedes: El plan
de corte
. . . . . . . . . . . . . . . . . . . . . . . . . . . . . . . . . . . . . . . . . . .
127
10.9 Finalización de la instalación inicial y primera
operación de corte
. . . . . . . . . . . . . . . . . . . . . . . . . . . . . . . .
128
11 Instalación del cable perimétrico
. . . . . . . . . . . . . . . . . .
129
11.1 Planificación de la distribución de la superficie a
cortar
. . . . . . . . . . . . . . . . . . . . . . . . . . . . . . . . . . . . . . . . . . . . .
129
11.2 Realización de un bosquejo de la superficie a
cortar
. . . . . . . . . . . . . . . . . . . . . . . . . . . . . . . . . . . . . . . . . . . . .
130
11.3 Medición de separaciones del cable con la regla
iMow
. . . . . . . . . . . . . . . . . . . . . . . . . . . . . . . . . . . . . . . . . . . . . .
131
11.4 Medición de distancias del cable en esquinas
. . . . .
132
11.5 Tendido del cable perimétrico en zonas
confinadas
. . . . . . . . . . . . . . . . . . . . . . . . . . . . . . . . . . . . . . . .
132
11.6 Tendido del cable en torno a superficies
excluidas
. . . . . . . . . . . . . . . . . . . . . . . . . . . . . . . . . . . . . . . . . .
133
11.7 Instalación de superficies contiguas y
secundarias
. . . . . . . . . . . . . . . . . . . . . . . . . . . . . . . . . . . . . . .
134
11.8 Instalación de corredores
. . . . . . . . . . . . . . . . . . . . . . . . .
134
11.9 Instalación de lazos de búsqueda
. . . . . . . . . . . . . . . . .
136
11.10 Instalación de tramos de unión
. . . . . . . . . . . . . . . . . .
137
11.11 Corte preciso de los bordes
. . . . . . . . . . . . . . . . . . . . . .
137
11.12 Terreno inclinado en la superficie a cortar
. . . . . . .
137
11.13 Instalación de cables de reserva
. . . . . . . . . . . . . . . . .
138
11.14 Uso de conectores de cable
. . . . . . . . . . . . . . . . . . . . .
138
11.15 Instalación del cable perimétrico más cerca del
borde de la zona de corte
. . . . . . . . . . . . . . . . . . . . . . . . .
139
12 Estación de conexión
. . . . . . . . . . . . . . . . . . . . . . . . . . . . .
139
12.1 LED en la estación de carga
. . . . . . . . . . . . . . . . . . . . . .
139

0478-131-3050-A
93
español / EE.UU
Contenido
12.2 Controles de la estación de carga
. . . . . . . . . . . . . . . . .
140
12.3 Conexión del robot cortacéspedes
. . . . . . . . . . . . . . . .
140
12.4 Carga del robot cortacéspedes
. . . . . . . . . . . . . . . . . . . .
141
13 Información de pantalla del tablero de control
. . . . .
142
13.1 Área de información
. . . . . . . . . . . . . . . . . . . . . . . . . . . . . .
142
13.2 Pantallas de estado
. . . . . . . . . . . . . . . . . . . . . . . . . . . . . . .
142
14 Funciones de los menús
. . . . . . . . . . . . . . . . . . . . . . . . . .
144
14.1 Navegación por los menús
. . . . . . . . . . . . . . . . . . . . . . . .
144
14.2 Descripción general
. . . . . . . . . . . . . . . . . . . . . . . . . . . . . . .
145
14.3 Comandos
. . . . . . . . . . . . . . . . . . . . . . . . . . . . . . . . . . . . . . . .
145
14.4 Información
. . . . . . . . . . . . . . . . . . . . . . . . . . . . . . . . . . . . . . .
147
14.5 Plan de corte
. . . . . . . . . . . . . . . . . . . . . . . . . . . . . . . . . . . . .
149
14.6 Intervalos de actividad
. . . . . . . . . . . . . . . . . . . . . . . . . . . .
150
14.7 Duración de corte
. . . . . . . . . . . . . . . . . . . . . . . . . . . . . . . . .
151
15 Ajustes
. . . . . . . . . . . . . . . . . . . . . . . . . . . . . . . . . . . . . . . . . . . .
151
15.1 Descripción general de ajustes
. . . . . . . . . . . . . . . . . . . .
151
15.2 Ajustes de iMow
. . . . . . . . . . . . . . . . . . . . . . . . . . . . . . . . . .
151
15.3 Instalación
. . . . . . . . . . . . . . . . . . . . . . . . . . . . . . . . . . . . . . . .
153
15.4 Seguridad
. . . . . . . . . . . . . . . . . . . . . . . . . . . . . . . . . . . . . . . . .
154
15.5 Mantenimiento
. . . . . . . . . . . . . . . . . . . . . . . . . . . . . . . . . . . .
155
15.6 Ajustar puntos de inicio
. . . . . . . . . . . . . . . . . . . . . . . . . . .
156
16 Aplicación iMow de STIHL
. . . . . . . . . . . . . . . . . . . . . . . . .
157
16.1 Funciones de la app iMow
. . . . . . . . . . . . . . . . . . . . . . . .
157
17 Durante el funcionamiento
. . . . . . . . . . . . . . . . . . . . . . . . .
158
17.1 Corte automático
. . . . . . . . . . . . . . . . . . . . . . . . . . . . . . . . . .
158
17.2 Duración de corte
. . . . . . . . . . . . . . . . . . . . . . . . . . . . . . . . .
158
17.3 Apertura y cierre de la tapa
. . . . . . . . . . . . . . . . . . . . . . .
158
17.4 Ajuste de la altura de corte
. . . . . . . . . . . . . . . . . . . . . . . .
159
17.5 Ajuste de la duración de corte y de los intervalos
de actividad
. . . . . . . . . . . . . . . . . . . . . . . . . . . . . . . . . . . . . . .
160
17.6 Operación de corte fuera de los intervalos de
actividad
. . . . . . . . . . . . . . . . . . . . . . . . . . . . . . . . . . . . . . . . . .
160
18 Transporte
. . . . . . . . . . . . . . . . . . . . . . . . . . . . . . . . . . . . . . . .
161
18.1 Transporte del robot cortacéspedes
. . . . . . . . . . . . . . .
161
19 Almacenamiento del cortacéspedes robot y la
estación de carga
. . . . . . . . . . . . . . . . . . . . . . . . . . . . . . . . .
161
19.1 Robot cortacéspedes
. . . . . . . . . . . . . . . . . . . . . . . . . . . . .
161
19.2 Estación de carga y fuente de alimentación
. . . . . . .
162
20 Limpieza
. . . . . . . . . . . . . . . . . . . . . . . . . . . . . . . . . . . . . . . . . .
163
20.1 Limpieza del robot cortacéspedes y la estación
de carga
. . . . . . . . . . . . . . . . . . . . . . . . . . . . . . . . . . . . . . . . . .
163
21 Inspección y mantenimiento
. . . . . . . . . . . . . . . . . . . . . . .
164
21.1 Intervalos de inspección y mantenimiento
. . . . . . . . .
164
21.2 Inspección de la cuchilla de corte
. . . . . . . . . . . . . . . . .
164
21.3 Cambio de la cuchilla de corte
. . . . . . . . . . . . . . . . . . . .
165
21.4 Montaje y retiro de la placa portacuchillas
. . . . . . . . .
166
22 Guía de solución de problemas
. . . . . . . . . . . . . . . . . . .
168
22.1 Mensajes
. . . . . . . . . . . . . . . . . . . . . . . . . . . . . . . . . . . . . . . . .
168
22.2 Robot cortacéspedes
. . . . . . . . . . . . . . . . . . . . . . . . . . . . .
175
22.3 Identificación de la rotura de cable
. . . . . . . . . . . . . . . .
181
23 Especificaciones
. . . . . . . . . . . . . . . . . . . . . . . . . . . . . . . . . .
182
23.1 Robot cortacéspedes (iMow) STIHL RMI
422.0 PC-L
. . . . . . . . . . . . . . . . . . . . . . . . . . . . . . . . . . . . . . . .
182
23.2 Batería STIHL AAI 80
. . . . . . . . . . . . . . . . . . . . . . . . . . . . .
182
23.3 Estación de carga STIHL ADO 401 y fuente de
alimentación OWA-60U-27VUSM
. . . . . . . . . . . . . . . . . .
182
23.4 Símbolos del robot cortacéspedes, la batería, la
estación de carga y la fuente de alimentación
. . . . .
183
23.5 Mejoramientos técnicos
. . . . . . . . . . . . . . . . . . . . . . . . . . .
183
23.6 Declaración de cumplimiento con norma FCC 15
. .
183
24 Piezas y equipos de repuesto
. . . . . . . . . . . . . . . . . . . . .
184
24.1 Piezas de repuesto originales de STIHL
. . . . . . . . . . .
184
24.2 Repuestos y accesorios estándar
. . . . . . . . . . . . . . . . .
184
25 Eliminación
. . . . . . . . . . . . . . . . . . . . . . . . . . . . . . . . . . . . . . .
184
25.1 Eliminación del robot cortacéspedes, la estación
de carga y la fuente de alimentación
. . . . . . . . . . . . . .
184
26 Ejemplos de instalación
. . . . . . . . . . . . . . . . . . . . . . . . . . .
186
26.1 Ejemplos de instalación
. . . . . . . . . . . . . . . . . . . . . . . . . . .
186
27 Garantía limitada
. . . . . . . . . . . . . . . . . . . . . . . . . . . . . . . . . .
193
27.1 Política de garantía limitada de STIHL
Incorporated
. . . . . . . . . . . . . . . . . . . . . . . . . . . . . . . . . . . . . .
193
28 Marcas comerciales
. . . . . . . . . . . . . . . . . . . . . . . . . . . . . . .
193
28.1 Marcas comerciales registradas
. . . . . . . . . . . . . . . . . . .
193
28.2 Marcas comerciales por ley común
. . . . . . . . . . . . . . . .
193
29 Direcciones
. . . . . . . . . . . . . . . . . . . . . . . . . . . . . . . . . . . . . . .
193
29.1 STIHL Incorporated
. . . . . . . . . . . . . . . . . . . . . . . . . . . . . . .
193

0478-131-3050-A
94
español / EE.UU
1 Introducción
Gracias por su compra. La información que contiene este
manual lo ayudará a obtener el máximo rendimiento y
satisfacción del robot cortacéspedes de STIHL, y a reducir
el riesgo de lesiones que supone su uso, si dicha
información se respeta.
IMPORTANTE
LEER DETENIDAMENTE ANTES DE USAR
CONSERVAR PARA FUTURAS CONSULTAS
Este robot cortacéspedes cuenta con un receptor de GPS y
también puede conectarse con Internet a través de una red
móvil, lo cual permite al usuario supervisar las actividades
de corte y modificar algunos ajustes si utiliza las
aplicaciones móviles y web de STIHL iMow U.S. ("app
iMow").
Analice los requisitos de montaje y uso del robot
cortacéspedes con un concesionario de servicio autorizado
de STIHL iMow. STIHL recomienda que un concesionario de
servicio autorizado de STIHL iMow se encargue de
configurar su robot cortacéspedes.
Antes de que el robot cortacéspedes pueda conectarse con
la Internet, será necesario que lo desbloquee un
concesionario autorizado de STIHL iMow. El concesionario
también puede indicarle como llevar a cabo el proceso de
registro y activación.
No preste ni alquile nunca el robot cortacéspedes sin el
manual de instrucciones. Solo las personas que
comprendan toda la información incluida en este manual
podrán ocuparse del montaje, uso y mantenimiento del
robot cortacéspedes. El usuario deberá estar familiarizado
con los controles del robot cortacéspedes antes de empezar
a trabajar. El usuario será responsable por los accidentes o
riesgos que afecten a otras personas y a sus bienes.
Para obtener más información, o si no comprende alguna de
las instrucciones incluidas en este manual, consulte la app
iMow, visite www.stihlusa.com o comuníquese con el
concesionario de servicio autorizado de STIHL iMow.
2.1 Palabras identificadoras
Este manual contiene información sobre seguridad a la que
usted debe prestar atención especial. Dicha información se
indica con los siguientes símbolos y palabras
identificadoras:
PELIGRO
Identifica una situación de peligro que, de no evitarse,
causará lesiones graves o mortales.
ADVERTENCIA
Identifica una situación de peligro que, de no evitarse,
podría causar lesiones graves o mortales.
INDICACIÓN
Indica el riesgo de daños a la propiedad, incluidos la
máquina o sus componentes.
2.2 Símbolos en el texto
El siguiente símbolo tiene como finalidad ayudarlo a utilizar
este manual.
1Introducción
Dado que el robot cortacéspedes es una
herramienta de corte de gran velocidad,
diseñada para funcionar de manera autónoma,
sin la supervisión o el control activos del
usuario, es necesario tomar medidas especiales
de seguridad para reducir el riesgo de lesiones
personales.
Lea con atención este manual de instrucciones
antes de montar el robot cortacéspedes y vuelva
a leerlo luego periódicamente. Siga todas las
precauciones de seguridad. Todo uso
negligente o indebido del robot cortacéspedes
puede provocar lesiones graves o mortales.
2 Acerca de este manual de
instrucciones
Hace referencia a un capítulo o subcapítulo designado
en este manual de instrucciones.

0478-131-3050-A
95
español / EE.UU
3 Componentes importantes
3.1 Robot cortacéspedes
1 Perilla de ajuste de altura de corte
Para ajustar la altura de la cuchilla de corte.
2 Panel de mandos
Para moverse a través de las opciones del menú del
robot cortacéspedes.
3Tapa
Cubre el panel de mandos y la perilla de ajuste de altura
de corte.
4 Sensor de lluvia
Detecta la lluvia.
5 Botón STOP
Detiene el robot cortacéspedes y la cuchilla de corte.
6 Ruedas traseras
Las ruedas motrices del cortacéspedes.
7Capó
Cubre las piezas internas del cortacéspedes.
8 Contactos de carga
Contactos eléctricos que permiten conectar el robot
cortacéspedes con la estación de carga para cargar la
batería.
9 Mango de transporte delantero (integrado en el capó)
Para levantar y transportar el robot cortacéspedes.
10 Mango de transporte trasero (integrado en el capó)
Para levantar y transportar el robot cortacéspedes.
11 Cuchilla de corte
Cuchilla de metal para cortar pasto.
12 Placa de soporte
Para montar y asegurar la cuchilla de corte.
13 Plataforma de corte
El lado inferior del cortacéspedes en donde ocurren las
operaciones de corte y de acolchado/mulching.
14 Ruedas delanteras
Ruedas que dirigen el robot cortacéspedes.
15 Compartimiento de la batería
Compartimiento para la batería de iones de litio
integrada.
Receptor de GPS integrado (no se ilustra)
Brinda información de ubicación, velocidad y navegación
al robot cortacéspedes.
3 Componentes importantes
1 2
141312
11
15
4
#
3
10
5
8
7
6
9
0000-GXX-4374-A2

0478-131-3050-A
96
español / EE.UU
3 Componentes importantes
Módulo celular (no se ilustra)
Brinda una conexión con Internet.
# Placa de características
Contiene información eléctrica y el número de serie del
producto.
3.2 Estación de carga
1 Contactos de carga
Contactos eléctricos para conectar la estación de carga
al robot cortacéspedes para carga.
2LED
Indica el estado operativo de la estación de carga y la
señal del cable perimétrico.
3 Botón de encendido/apagado/posición inicial
Activa y desactiva la señal del cable perimétrico. Ordena
al robot cortacéspedes regresar a la estación de carga
cuando se pulsa dos veces en un lapso de dos
segundos.
4Cubierta
Cubre los contactos de carga y además componentes
electrónicos de la estación de carga.
5 Cable de fuente de alimentación
Suministra electricidad a la estación de carga cuando se
enchufa a un tomacorriente.
6 Fuente de alimentación
Suministra electricidad a la estación de carga y al cable
perimétrico cuando se enchufa a un tomacorriente.
7Enchufe
Conecta el cable de la fuente de alimentación a un
tomacorriente.
8 Canales para cables
Para asegurar el cable perimétrico en la placa base.
9Placa base
Base de la estación de carga.
# Placa de características
Contiene información eléctrica y el número de serie del
producto.
3.3 Panel de mandos
1
1
#
4
5
9
8
7
6
#
3
2
0000-GXX-5344-A0
1
4
2
3
0000-GXX-4376-A0_E

0478-131-3050-A
97
español / EE.UU
4 Símbolos de seguridad
1 Pantalla gráfica
Muestra los menús y mensajes del robot cortacéspedes.
2 Teclado de navegación
Para moverse a través de las opciones del menú del
robot cortacéspedes.
3 Botón OK
Para seleccionar opciones del menú en el panel de
mandos.
4 Botón Atrás
Para moverse a través de los menús del robot
cortacéspedes.
3.4 Material de instalación
STIHL recomienda que su robot cortacéspedes y el cable
perimétrico sean instalados por un concesionario de
servicio autorizado de STIHL iMow.
1 Cable perimétrico
Transmite una señal eléctrica al robot cortacéspedes y
define la superficie a cortar para funcionamiento de corte
automático.
2 Estacas para cable
Usadas para asegurar el cable perimétrico.
3 Conectores de cable
Conectores eléctricos usados para unir secciones de
cable perimétrico.
4.1 Robot cortacéspedes
Los siguientes símbolos de seguridad están presentes en el
robot cortacéspedes:
1
2
3
0000-GXX-3340-A1
4 Símbolos de seguridad
Para reducir el riesgo de lesiones, respete las
medidas de seguridad especificadas.
Lea y siga todas las precauciones de seguridad
dadas en el manual de instrucciones. El uso
inadecuado puede provocar lesiones personales
graves o mortales o daños materiales.
Utilice gafas o anteojos protectores bien
ajustados con protección lateral adecuada
resistentes a impactos y que porten
designaciones que indiquen que cumplen con la
norma ANSI Z87 «+» cuando se prepara o se le
da mantenimiento al robot cortacéspedes y
siempre que se encuentre en la superficie a
cortar con la unidad en marcha, @ 5.3.
Para reducir el riesgo de sufrir laceraciones,
mantenga las manos, los pies y otras partes del
cuerpo alejados de las cuchillas. Nunca coloque
las manos o los pies debajo del robot
cortacéspedes, en especial durante su
funcionamiento. Nunca intente retirar la hierba
cortada u otros residuos de la cuchilla de corte o
de la plataforma corte sin antes apagar el robot
cortacéspedes e inhabilitándolo pulsando el
botón STOP por cinco segundos, @ 5.6.3.

0478-131-3050-A
98
español / EE.UU
5 INSTRUCCIONES IMPORTANTES DE SEGURIDAD
5.1 Uso previsto
ADVERTENCIA
■ Este robot cortacéspedes fue diseñado para realizar
procesos de corte autónomos y programables. El uso
para otros fines puede aumentar el riesgo de lesiones
personales y daños materiales.
■ El robot cortacéspedes está diseñado para cortar el pasto
en terrenos de hasta 1/4 acre (1,000 m²).
■ La estación de carga ADO 401 y la fuente de alimentación
OWA-60U-27VUSM están diseñadas para cargar la
batería de iones de litio integrada del robot cortacéspedes
y suministrar corriente de bajo voltaje al cable perimétrico.
Si se usa la estación de carga o la fuente de alimentación
en operaciones para las cuales no ha sido diseñada o
prevista, podrían producirse lesiones graves o mortales.
■ El uso indebido o no autorizado del robot cortacéspedes,
su batería integrada o la estación de carga y la fuente de
alimentación podrían causar lesiones personales o daños
materiales. Utilice la estación de carga ADO 401 y el robot
cortacéspedes STIHL RMI 422 PC-L y su batería
integrada únicamente como se indica en este manual.
El accesorio de corte giratorio puede arrojar
objetos extraños a gran distancia directamente o
por rebote. Para reducir el riesgo de sufrir
lesiones por un golpe con algún objeto
despedido, inspeccione la superficie a cortar y
retire las piedras, los trozos de metal y otros
objetos que pudieran salir despedidos por el
accesorio de corte, @ 5.6.3.
Para reducir el riesgo de sufrir lesiones
personales, no permita que haya personas,
especialmente niños, y animales cerca del robot
cortacéspedes durante su funcionamiento. No
use el robot cortacéspedes cuando haya niños o
mascotas en la superficie a cortar o sus
alrededores, @ 5.6.3.
Para reducir el riesgo de sufrir lesiones
personales, mantenga a los niños alejados del
robot cortacéspedes durante su funcionamiento.
No use el robot cortacéspedes cuando haya
niños en la superficie a cortar o sus alrededores,
@ 5.6.3.
Para reducir el riesgo de que los animales
sufran lesiones, mantenga a los perros y demás
mascotas lejos del robot cortacéspedes
mientras la unidad está en funcionamiento. No
use el robot cortacéspedes cuando haya
animales en la superficie a cortar o sus
alrededores, @ 5.6.3.
Ninguna persona deberá pararse o sentarse
sobre el robot cortacéspedes ni intentar subirse
a la unidad. Podría sufrir graves lesiones físicas
y provocarle serios daños al robot
cortacéspedes, @ 5.6.3.
Nunca sumerja el robot cortacéspedes en agua
u otros líquidos, @ 5.6.3.
Siempre inhabilite el robot cortacéspedes
pulsando el botón STOP por 5 segundos antes
de levantarlo, transportarlo, inspeccionarlo,
limpiarlo o darle mantenimiento, @ 5.6.3.
5 INSTRUCCIONES IMPORTANTES
DE SEGURIDAD

0478-131-3050-A
99
español / EE.UU
5 INSTRUCCIONES IMPORTANTES DE SEGURIDAD
5.2 Operador
ADVERTENCIA
■ Según los conocimientos actuales de STIHL, el motor
eléctrico de este robot cortacéspedes no debería interferir
con un marcapasos.
– Sin embargo, las personas con marcapasos u otro
dispositivo médico implantado deben consultar a su
médico y al fabricante del dispositivo antes de
utilizar este robot cortacéspedes.
5.3 Equipos de protección personal
ADVERTENCIA
■ Para reducir el riesgo de sufrir lesiones personales, use
siempre ropa adecuada y trajes protectores para:
– La instalación de la estación de carga y la configuración
del robot cortacéspedes para su uso.
– La instalación o reparación del cable perimétrico.
– El ingreso a la superficie a cortar o la aproximación al
robot cortacéspedes mientras está funcionando.
– El reemplazo de la cuchilla de corte.
– La inspección o limpieza del robot cortacéspedes.
■ Para reducir el riesgo de lesiones oculares:
■ Es muy importante tener una buena superficie de apoyo
para los pies. Para ayudar mantener un punto de apoyo
seguro y reducir el riesgo de lesiones:
– Póngase siempre un calzado sólido con suela
antideslizante. Nunca use sandalias, chanclas,
zapatos que dejen los dedos descubiertos ni
calzado de ese tipo.
■ Para mejorar el manejo y ayudar a proteger las manos:
– Siempre use guantes gruesos y antideslizantes de
cuero o de algún otro material resistente al desgaste
cuando manipule la estación de carga y el robot
cortacéspedes, instale o repare el cable perimétrico,
inspeccione o limpie el robot cortacéspedes,
reemplace la cuchilla de corte y siempre que
manipule el robot cortacéspedes.
■ Para reducir el riesgo de lesiones personales:
– Utilice overoles o pantalones largos si va a
acercarse al robot cortacéspedes cuando está en
marcha. No use pantalones cortos.
– Sujétese el cabello por encima de los hombros antes
de realizar una instalación, ajuste, inspección,
servicio, mantenimiento o actividades de limpieza, y
antes de acercarse al robot cortacéspedes mientras
está funcionando.
5.4 Robot cortacéspedes
ADVERTENCIA
■ El contacto con la cuchilla de corte en movimiento puede
causarle laceraciones graves. Para reducir el riesgo de
este tipo de lesiones:
– Mantenga las manos, pies y otras partes de su
cuerpo lejos de la cuchilla de corte.
– Nunca toque la cuchilla de corte en movimiento con
su mano o cualquier otra parte de su cuerpo.
■ Para reducir el riesgo de lesiones personales al operador
y a otras personas presentes:
Utilice gafas protectoras ajustadas con
protección lateral adecuada que ofrezcan
protección contra impactos y que
presenten la marca de cumplimiento con la
norma ANSI Z87 «+» cuando manipule la
estación de carga y el robot
cortacéspedes, instale o repare el cable
perimétrico, inspeccione o limpie el robot
cortacéspedes, reemplace la cuchilla de
corte y siempre que esté en la superficie a
cortar durante el funcionamiento de la
unidad.

0478-131-3050-A
100
español / EE.UU
5 INSTRUCCIONES IMPORTANTES DE SEGURIDAD
■ Aunque existan ciertos accesorios no autorizados que
puedan acoplarse a los robots cortacéspedes STIHL, el
uso de estos puede ser extremadamente peligroso. Se
recomiendan únicamente los accesorios distribuidos por
STIHL o aprobados expresamente por STIHL para su uso
con este modelo específico de iMow.
– Solo use los accesorios distribuidos o aprobados
expresamente por STIHL.
– Nunca modifique este robot cortacéspedes o su
software de ninguna manera.
– Nunca intente modificar o anular los controles del
robot cortacéspedes o los dispositivos de seguridad
de ninguna manera.
– Nunca use un robot cortacéspedes que haya sido
modificado o alterado de su diseño original.
■ Si el robot cortacéspedes se cae o se somete a impactos
fuertes similares:
– Revise que no presente daños, que esté en buenas
condiciones y que esté funcionando
adecuadamente antes de continuar trabajando.
– Revise que los controles y los dispositivos de
seguridad estén trabajando apropiadamente.
– Revise la pantalla para ver si hay mensajes de error,
@ 22.1.
– Nunca trabaje con un robot cortacéspedes dañado o
averiado.
– Nunca use o cargue un robot cortacéspedes si el
capó o la carcasa presentan fisuras, deformaciones
o están excesivamente calientes, si hay fugas de
líquido de batería en el compartimento de batería o
si la batería está dañada de alguna manera. Una
batería dañada aumenta el riesgo de lesiones
personales y daños materiales a causa de
cortocircuitos, incendios o explosiones.
– Si tiene dudas, lleve el robot cortacéspedes a
revisar con su concesionario de servicio autorizado
de STIHL iMow antes de usarlo.
■ Si el robot cortacéspedes está dañado, no funciona
apropiadamente o se ha sumergido en agua u otros
líquidos, sus componentes, incluyendo su batería
integrada, podrían ya no funcionar adecuadamente y los
dispositivos de seguridad no estar funcionando. Para
reducir el riesgo de lesiones personales y daños
materiales:
– Lleve el robot cortacéspedes a revisar con su
concesionario de servicio autorizado de STIHL iMow
antes de seguir usándolo.
■ Las piezas STIHL originales están diseñadas
específicamente para acoplarse a tu robot cortacéspedes
y cumplir con los requisitos de seguridad y rendimiento. El
uso de piezas no autorizadas o aprobadas por STIHL
puede ocasionar tanto lesiones graves o mortales como
daños materiales.
– STIHL recomienda usar solo piezas de repuesto
STIHL idénticas.
– Siempre presione y mantenga
presionado el botón STOP durante 5
segundos para activar el bloqueo de
equipo antes de montar, transportar,
ajustar, inspeccionar, limpiar, dar
mantenimiento o almacenar.
– Nunca levante el robot cortacéspedes o
meta la mano debajo del capó para
quitar trozos o restos, ni por ninguna otra
razón, sin antes activar el bloqueo de
equipo y asegurarse de que la cuchilla
de corte se haya detenido por completo.

0478-131-3050-A
101
español / EE.UU
5 INSTRUCCIONES IMPORTANTES DE SEGURIDAD
5.5 Batería integrada
ADVERTENCIA
■ El uso de un dispositivo de carga no autorizado puede
dañar la batería de iones de litio dentro del robot
cortacéspedes y provocar incendios, explosiones y
lesiones personales y daños materiales.
– Cargue el robot cortacéspedes exclusivamente en
una estación de carga STIHL ADO 401 original y con
una fuente de alimentación OWA-60U-27VUSM.
■ La batería integrada del robot cortacéspedes posee
características y dispositivos de seguridad que, en caso
de dañarse, podrían hacer que esta genere calor, se
rompa, pierda líquido, se incendie o explote.
– Esté alerta a los signos que indiquen que la batería
integrada podría estar dañada: nunca use o cargue
un robot cortacéspedes si el capó o la carcasa
presentan fisuras, deformaciones o están
excesivamente calientes, si hay fugas de líquido de
batería en el compartimento de batería o si la
batería está dañada de alguna manera. Una batería
dañada aumenta el riesgo de lesiones personales y
daños materiales a causa de cortocircuitos,
incendios o explosiones.
– La batería está integrada en el robot cortacéspedes
y el usuario nunca debe retirarla. Pida al
concesionario de servicio autorizado de STIHL iMow
que retire la batería integrada cuando se haya
agotado, o cuando el robot cortacéspedes cumpla
su vida útil. Nunca intente retirar la batería o abrir o
desarmar el capó del robot cortacéspedes por
ninguna razón.
– Nunca someta al robot cortacéspedes a impactos
fuertes o intente aplastarlo, dejarlo caer o dañarlo de
alguna manera.
– Nunca exponga el robot cortacéspedes a microonda
o presiones elevadas.
– Nunca introduzca objetos extraños en la ranura de
carga u otros orificios del robot cortacéspedes.
■ Las altas temperaturas pueden hacer que la batería
integrada del robot cortacéspedes genere calor, se
rompa, sufra fugas, se incendie o explote y provoque
lesiones graves o mortales y daños materiales. La
exposición a temperaturas fuera del rango de temperatura
recomendado también puede dañar la batería y reducir su
vida útil.
■ Para reducir el riesgo de lesiones personales y daños
materiales en caso de que el robot cortacéspedes despida
humo, un olor inusual o se sienta caliente durante su uso,
carga o almacenaje:
– Deje de usar o cargar inmediatamente el robot
cortacéspedes y prepárese para comunicarse con
las autoridades en caso de incendio o explosión.
■ Para reducir el riesgo de descarga eléctrica:
– No intente reparar, abrir o desmontar el robot
cortacéspedes. No hay piezas reemplazables por el
usuario en el interior.
– Nunca caliente el robot cortacéspedes
por encima de los 212 °F (100 °C) ni lo
coloque cerca o sobre fuego, estufas u
otros lugares con altas temperaturas.
– Use el robot cortacéspedes únicamente
dentro del rango de temperatura
ambiente de 41 °F a 104 °F (5 °C a 40
°C).
– Almacene el robot cortacéspedes
únicamente dentro de un rango de
temperatura ambiente de 32 °F a 122 °F
(0 °C a 50 °C).
– Nunca almacene el robot cortacéspedes
dentro de un vehículo en un clima
caluroso.
– Nunca sumerja el robot cortacéspedes
en agua u otros líquidos.

0478-131-3050-A
102
español / EE.UU
5 INSTRUCCIONES IMPORTANTES DE SEGURIDAD
■ Si la batería integrada está dañada, el líquido de esta
puede filtrarse del robot cortacéspedes. El líquido de
batería que se filtra puede provocar irritación en la piel y
los ojos o quemaduras químicas.
– Evite el contacto con la piel y ojos.
– Use un absorbente inerte como tierra sobre los
fluidos o líquidos derramados.
– En caso de contacto accidental con los fluidos o
líquidos de la batería, enjuague al instante el área
de contacto minuciosamente con jabón suave y
agua.
– Si entra fluido o líquido de la batería en los ojos: No
se frote. Enjuague con agua el ojo abierto por al
menos 15 minutos y busque atención médica.
■ Un incendio causado por baterías puede ser peligroso.
Para reducir el riesgo de lesiones personales graves y
daños materiales en caso de incendio:
– Evacúe el área. El fuego se puede propagar
rápidamente. Manténgase alejado de los vapores
generados y permanezca a una distancia segura.
– Comuníquese con el departamento de bomberos.
– Aunque se puede emplear agua para apagar un
incendio por baterías, es preferible usar un extintor
de incendios de polvo químico multiuso.
– Consulte al departamento de bomberos acerca de
cómo desechar correctamente la batería quemada.
5.6 Uso del robot cortacéspedes
5.6.1 Antes del uso
ADVERTENCIA
■ El uso inadecuado o no autorizado puede causar lesiones
personales y daños materiales:
– Use el robot cortacéspedes solo como se indica en
este manual de instrucciones.
■ Usar un robot cortacéspedes que esté dañado, ajustado o
mantenido inapropiadamente, o que no se haya armado
por completo y de manera segura puede provocar una
avería y aumentar el riesgo de lesiones personales o la
muerte.
– Nunca maneje un robot cortacéspedes que esté
dañado, mantenido inapropiadamente o que no se
haya armado por completo y de manera segura.
– Siempre revise el robot cortacéspedes para
asegurarse de que esté en buenas condiciones y
funcione correctamente antes de comenzar a
utilizarlo.
– Nunca intente modificar o anular los controles o los
dispositivos de seguridad de ninguna manera.
– Si su robot cortacéspedes o alguna parte presenta
daño o no funciona apropiadamente, llévelo con su
concesionario de servicio autorizado de STIHL
iMow. No use el robot cortacéspedes hasta que se
haya corregido el problema.
■ Para ayudar a reducir el riesgo de lesiones personales o
muerte a causa de un encendido accidental:
– En toda ocasión pulse y mantenga
presionado el botón STOP durante 5
para activar el bloqueo de equipo antes
de montar, transportar, ajustar,
inspeccionar, limpiar, dar servicio, dar
mantenimiento o guardar el robot
cortacéspedes.

0478-131-3050-A
103
español / EE.UU
5 INSTRUCCIONES IMPORTANTES DE SEGURIDAD
5.6.2 Condiciones de trabajo
ADVERTENCIA
■ Las chispas generadas durante el funcionamiento del
robot cortacéspedes pueden encender gases, líquidos,
vapores, polvos u otros materiales y sustancias
combustibles. Para reducir el riesgo de incendio y de
explosión:
– Nunca use el robot cortacéspedes en un lugar
donde estén presentes gases, líquidos, vapores,
polvos u otros materiales y sustancias combustibles.
– Lea y sigas las recomendaciones emitidas por las
autoridades gubernamentales (p.ej., OSHA) para
identificar y evitar los peligros de los gases, líquidos,
vapores, polvos u otros materiales y sustancias
combustibles.
■ Si la cuchilla metálica en movimiento golpea una roca u
otro objeto duro, se podrían generar chispas capaces de
encender materiales inflamables en determinadas
circunstancias. Entres los materiales inflamables se
incluyen la vegetación y los matorrales secos, en
particular cuando las condiciones climáticas son calientes
y secas.
– Si existe un riesgo de incendio leve o grave, no use
el robot cortacéspedes cerca de materiales
inflamables o cerca de vegetación o matorrales.
– Comuníquese con las autoridades locales de control
de incendios o con el servicio forestal de EE.UU. si
tiene alguna pregunta sobre si las condiciones de la
vegetación o climáticas son adecuadas para el uso
de una cuchilla metálica.
■ El uso de este robot cortacéspedes puede generar polvo
y otras sustancias que contengan productos químicos
considerados como causantes de problemas
respiratorios, cáncer, defectos de nacimientos y otros
problemas reproductivos.
– Consulte con agencias gubernamentales como
EPA, OSHA, CARB y NIOSH y otras fuentes
fidedignas sobre materiales peligrosos si desconoce
los riesgos asociados con las sustancias
particulares que está cortando o con las que está
trabajando.
■ La inhalación de ciertos polvos, especialmente polvos
orgánicos, tales como moho o polen, puede provocar
reacciones alérgicas o asmáticas en las personas
propensas. La inhalación repetida o de grandes
cantidades de polvo u otros contaminantes del aire,
especialmente los de partículas pequeñas, puede causar
enfermedades respiratorias o de otro tipo.
– Controle el polvo en su fuente, siempre que sea
posible.
– En la medida de lo posible, procure que el viento o
el proceso de operación alejen el polvo, vapor u
otras partículas generados por el robot
cortacéspedes del lugar donde se encuentra el
operador.
– Si no es posible mantener el polvo inhalable y otras
partículas a niveles de fondo o aproximadamente de
fondo, siempre utilice una mascarilla aprobada por
NIOSH y con capacidad adecuada para las
condiciones específicas del sitio. Siga las
recomendaciones dadas por autoridades
gubernamentales (p.ej., OSHA/NIOSH) y
asociaciones laborales y comerciales.
■ Si la vegetación que corta o el terreno están cubiertos por
una sustancia química, como un pesticida, fertilizante o
herbicida:
– Lea y siga las instrucciones y advertencias que
acompañan a la sustancia que cubre la vegetación o
el terreno.

0478-131-3050-A
104
español / EE.UU
5 INSTRUCCIONES IMPORTANTES DE SEGURIDAD
5.6.3 Instrucciones de manejo
ADVERTENCIA
■ A través de la app iMow se puede arrancar el robot
cortacéspedes o modificar su plan de corte. Para reducir
el riesgo de lesiones personales:
– Mantenga a las demás personas, en especial a los
niños, y a las mascotas alejados de la superficie a
cortar durante el uso.
– No haga funcionar el cortacéspedes si sabe que hay
o puede haber niños o mascotas en la superficie a
cortar o cerca de ésta.
■ En caso de emergencia:
– Mantenga pulsado el botón STOP por 5 segundos
para detener el cortacéspedes y su accesorio de
corte. La pantalla indica el mensaje: "Inhab dispos.
Desbloquear con la combinación indicada de
teclas".
■ La cuchilla de corte sigue girando por un breve lapso
después de que se ha apagado el motor. Esto se conoce
como el "efecto de volante". Para reducir el riesgo de
lesiones personales graves, evite el contacto con el
accesorio de corte:
– Active el bloqueo de equipo y espere a que se
detenga la cuchilla de corte antes de levantar o
trasladar el cortacéspedes. Nunca intente levantar
ni inclinar el robot cortacéspedes cuando está en
marcha.
■ La cuchilla giratoria puede arrojar objetos a gran distancia
directa o indirectamente. Los objetos lanzados, incluso
las cuchillas de corte rotas, pueden provocar lesiones
graves o mortales al operador o a las personas que se
encuentren en el área. Para reducir el riesgo de lesiones
personales graves:
■ Cuando se pulsa el botón rojo STOP en la parte superior
del robot cortacéspedes, éste se para y la cuchilla se
detiene luego de unos instantes. El mensaje "Botón STOP
pulsado" aparece en la pantalla. Para reducir el riesgo de
lesionarse por el contacto con la cuchilla cortacéspedes,
siempre pulse el botón STOP:
– Inspeccione la superficie a cortar. Retire
las piedras, piezas metálicas, trozos de
vidrio, alambres y otros objetos que
pudieran ser lanzados por el accesorio
de corte, dañar el accesorio de corte o
causar daños materiales (por ejemplo,
vehículos estacionados, ventanas).
– Quite los objetos tales como juguetes,
pelotas, muebles de jardín, ornamentos,
floreros, mangueras y equipos de
jardinería de la superficie a cortar, al
igual que cualquiera otra cosa que
pudiera impedir el funcionamiento
adecuado del robot cortacéspedes o que
pudiera ser atrapado por la cuchilla.
– Mantenga a las demás personas, en
especial a los niños y a las mascotas
alejados de la zona de trabajo. Toda
persona que ingrese a la superficie a
cortar cuando el cortacéspedes está en
marcha debe usar gafas protectoras y
equipos de protección adecuados,
según se especifica en el manual de
instrucciones.
– No utilice nunca el robot cortacéspedes
si sabe que hay algún animal o persona
en la superficie a cortar.
– No permita que niños o ninguna otra
persona monte, se aproxime o juegue
con el robot cortacéspedes. Mantenga a
niños y otras personas presentes fuera
de la superficie a cortar mientras el
cortacéspedes está trabajando.

0478-131-3050-A
105
español / EE.UU
6 Seguridad de la estación de carga y de la fuente de alimentación
– Antes de cambiar los ajustes en el menú.
– Antes de configurar un plan de corte o de programar el
robot cortacéspedes.
– Antes de ajustar la altura de corte.
■ Mantenga pulsado el botón STOP por 5 segundos para
activar el bloqueo de equipo:
– Antes de levantar, acarrear o transportar el robot
cortacéspedes.
– Antes de quitar obstáculos y objetos cercanos a el
equipo de corte o la cuchilla.
– Antes de montar, retirar, inspeccionar o limpiar la
cuchilla de corte.
– Antes de realizar cualquier tarea debajo del
cortacéspedes.
– Antes de la inspección o limpieza del robot
cortacéspedes.
■ Pare y revise el robot cortacéspedes en busca de daños
si choca contra un objeto extraño o exhibe un
funcionamiento inusual, tal como vibraciones anómalas.
Después de haber desactivado al robot cortacéspedes,
revise el conjunto de corte (cuchilla, su eje y su montaje).
Si la máquina continúa funcionando de modo anómalo,
llévela a un concesionario de servicio de STIHL iMow
antes de volver a arrancar y usar el robot cortacéspedes.
■ Para reducir el riesgo de lesiones personales graves a
causa de arranques accidentales:
■ Una cuchilla de corte dañada o floja puede vibrar,
agrietarse, romperse o salirse del robot cortacéspedes, lo
que podría provocar lesiones graves o mortales.
– Asegúrese de que la cuchilla de corte esté libre de
daños y bien ajustada antes de empezar a trabajar.
– Si la cuchilla de corte se afloja después de haberla
ajustado correctamente, deje de trabajar de
inmediato y lleve el robot cortacéspedes a un
concesionario de servicio autorizado de STIHL iMow
para que lo reparen.
– No use nunca un robot cortacéspedes con una
cuchilla de corte floja o averiada.
6.1 Introducción
Esta sección contiene las advertencias de seguridad
generales e instrucciones prescritas para la estación de
carga y la fuente de alimentación. En las siguientes
secciones de este manual, se proporcionan otras
advertencias e instrucciones importantes.
LEA Y SIGA TODAS LAS INSTRUCCIONES DE
SEGURIDAD.
ADVERTENCIA
■ Cuando se utilizan la estación de carga y la fuente de
alimentación, para reducir el riesgo de incendios,
descargas eléctricas, lesiones personales y daños
materiales, siempre siga las precauciones de seguridad
básicas, incluyendo las siguientes:
1)LEA Y SIGA TODAS LAS INSTRUCCIONES DE
SEGURIDAD.
2)Lea y siga todas las instrucciones que se encuentran en
la estación de carga y en la fuente de alimentación o
provistas con estos.
3)No utilice cables de extensión.
– Nunca toque la cuchilla de corte con las
manos, los pies o algún otro miembro del
cuerpo sin antes haber desactivado la
unidad. Mantenga pulsado el botón
STOP por 5 segundos y confirme que la
cuchilla se ha detenido.
6 Seguridad de la estación de carga y de
la fuente de alimentación

0478-131-3050-A
106
español / EE.UU
6 Seguridad de la estación de carga y de la fuente de alimentación
4)Consulte el Código Eléctrico Nacional, y la norma
ANSI/NFPA 70 específicamente en lo referente a la
instalación de cables y las separaciones requeridas de
conductores de energía eléctrica e iluminación.
5)Los trabajos de instalación y de cableado eléctrico
deberán ser efectuados por personas calificadas para
ello, según todos los códigos y normas aplicables,
incluyendo construcción resistente a incendios.
6)No instale ni se use a menos de 10 pies (3 m) de una
piscina.
7)No usar en un baño.
8)ADVERTENCIA: Riesgo de descarga eléctrica. Cuando
se use a la intemperie, instálela únicamente en un
tomacorriente con protector de pérdidas a tierra (GFCI)
Categoría A que sea resistente al agua con la fuente de
alimentación conectada al tomacorriente. Si no se
proporciona uno, comuníquese con un electricista
calificado para que efectúe una instalación adecuada.
Verifique que la fuente de alimentación y su cordón no
impidan que la cubierta del tomacorriente se cierre por
completo.
9)ADVERTENCIA: Riesgo de incendio. Esta instalación
requiere de métodos especiales para pasar los cables a
través de la estructura de un edificio. Consulte a un
electricista calificado.
10)ADVERTENCIA: No use tomacorrientes que solo sean
resistentes al agua únicamente cuando tengan la cubierta
colocada (clavija del enchufe no conectada y cubierta del
tomacorriente cerrada).
CONSERVE ESTAS INSTRUCCIONES – Este manual
contiene instrucciones importantes de seguridad y de
manejo de la estación de carga ADO 401 y de la fuente de
alimentación OWA-60U-27VUSM de STIHL.
6.2 Advertencias e instrucciones
ADVERTENCIA
■ Para reducir el riesgo de incendio, descarga eléctrica y
otras lesiones personales o daños materiales:
– Antes de usar la estación de carga, lea y siga todas
las señales de precaución presentes en la estación
de carga, la fuente de alimentación y el robot
cortacéspedes, así como las instrucciones de este
manual.
– Use la estación de carga ADO 401 y la fuente de
alimentación OWA-60U-27VUSM únicamente para
cargar el robot cortacéspedes STIHL RMI 422 PC-L.
Está prohibido el uso de la estación de carga o de la
fuente de alimentación para otros propósitos, ya que
puede ocasionar incendios, explosiones o
descargas eléctricas y provocar lesiones personales
graves o mortales así como daños materiales.
– Nunca utilice una estación de carga o una fuente de
alimentación dañada o que no funcione
adecuadamente.
– Nunca use o cargue un robot cortacéspedes si el
capó o la carcasa presentan fisuras, deformaciones
o están excesivamente calientes, si hay fugas de
líquido de batería en el compartimento de batería o
si la batería está dañada de alguna manera. Una
batería dañada aumenta el riesgo de lesiones
personales y daños materiales a causa de
cortocircuitos, incendios o explosiones.
– Conecte el cable de la fuente de alimentación
únicamente un tomacorriente con protector de
pérdidas a tierra (GFCI) Categoría A con una
carcasa que sea resistente al agua tanto para
cuando la clavija de conexión esté enchufada como
desenchufada. No deben usar tomacorrientes que
solo sean a resistentes al agua cuando tienen la
tapa colocada (clavija del enchufe no conectada y
cubierta del tomacorriente cerrada).
– Nunca enchufe la estación de carga a un enchufe
múltiple o a un cable de extensión.

0478-131-3050-A
107
español / EE.UU
6 Seguridad de la estación de carga y de la fuente de alimentación
– No utilice una estación de carga o fuente de
alimentación que haya recibido un golpe
contundente o fuerte, haya sufrido una caída, esté
dañado de alguna otra manera o no funcione
adecuadamente.
– No intente reparar, abrir o desmontar la estación de
carga o la fuente de alimentación. No hay piezas
reemplazables por el usuario en el interior.
■ La estación de carga y la fuente de alimentación se
calientan durante el proceso de carga. Para reducir el
riesgo de incendio:
– Use la estación de carga y la fuente de alimentación
únicamente dentro de un rango de temperatura
ambiente de 32 °F a 122 °F (0 °C a 50 °C).
– No utilice la estación de carga sobre una superficie
combustible (p. ej., papel, cartón, tejidos) o en un
entorno combustible.
– Deje que la estación de carga y la fuente de
alimentación se enfríen normalmente: No las cubra.
■ La estación de carga puede producir chispas que podrían
encender gases, líquidos, vapores y polvos inflamables u
otros materiales combustibles. Para reducir el riesgo de
incendio y de explosión:
– No se debe usar en un lugar donde haya presentes
gases, líquidos, vapores y polvos inflamables u
otros materiales combustibles.
■ El uso de un cable o enchufe de fuente de alimentación
dañados puede provocar incendios, descargas eléctricas
y otros tipos de lesiones personales graves o daños
materiales. Para reducir estos riesgos:
– Desconecte la fuente de alimentación del
tomacorriente cuando la estación de carga no esté
en uso para operaciones de carga o corte.
– Nunca tire del cable de la fuente de alimentación
para desconectarla del tomacorriente. Para
desconectarla, agarre el enchufe, no el cable de la
fuente de alimentación.
– No use el cable de la fuente de alimentación para
transportarla o colgarla.
– Asegúrese de que el cable de la fuente de
alimentación esté situado o marcado de manera que
no se lo pise, que no se pueda tropezar con este,
que no entre en contacto con objetos punzantes ni
piezas móviles y que se vea expuesto de alguna
manera a daños o tensión.
■ En caso de incendio o si la estación de carga o la fuente
de alimentación emiten humo, olor inusual, están
demasiado calientes o parecen fuera de lo normal de
alguna manera:
– Desconecte inmediatamente la fuente de
alimentación del tomacorriente y prepárese para
ponerse en contacto con las autoridades en caso de
incendio o explosión.
– Antes del uso, solicite a un concesionario autorizado
de servicio de STIHL iMow que inspeccione y repare
la estación de carga y la fuente de alimentación.
ADVERTENCIA
■ Para reducir el riesgo de incendio, descarga eléctrica y
otras lesiones personales o daños materiales:
– Conecte la fuente de alimentación únicamente a un
tomacorriente con protector de pérdidas a tierra
(GFCI) Categoría A con una carcasa que sea
resistente al agua tanto para cuando la clavija de
conexión esté enchufada como desenchufada. No
deben usar tomacorrientes que solo sean a
resistentes al agua cuando tengan la tapa colocada
(clavija del enchufe conectada y tapa del
tomacorriente cerrada).
– Monte la fuente de alimentación a una altura por
encima de 1 pie (0.3 m) a partir de la superficie del
suelo.
– Antes del uso y posteriormente de
manera regular, revise que el cable y el
enchufe de la fuente de alimentación no
presenten daños. Si presentan daños,
desconéctelos de inmediato del
tomacorriente.

0478-131-3050-A
108
español / EE.UU
6 Seguridad de la estación de carga y de la fuente de alimentación
– Nunca enchufe la fuente de alimentación a un
enchufe múltiple o a un cable de extensión.
■ Para reducir el riesgo de lesiones personales o daños
materiales:
– Lleve el robot cortacéspedes de regreso a la
estación de carga y desconecte la fuente de
alimentación del tomacorriente si hay peligro de
relámpagos en los alrededores.
PELIGRO
■ El uso de un cable o enchufe de fuente de alimentación
dañados puede provocar incendios, descargas eléctricas
y otras lesiones personales o daños materiales. Para
reducir el riesgo de descarga eléctrica:
– Revise regularmente que el cable y el
enchufe de la fuente de alimentación no
presenten daños. Si se dañan
desconéctelos de inmediato del
tomacorriente. Nunca use un cable o
enchufe de fuente de alimentación que
presenten daños.
– No raspe, aplaste, tire o haga ningún
otro tipo de uso no apropiado del cable o
del enchufe de la fuente de alimentación.
Protéjalos contra el calor, el aceite y los
bordes afilados.
– Si el enchufe o el cable de la fuente de
alimentación están dañados, reemplace
la fuente de alimentación.
– Desenchufe el cable de la fuente de
alimentación cuando la estación de
carga no esté en uso.
– Nunca sacuda ni tire del cable de la
fuente de alimentación para
desconectarla. Para desconectarla,
agarre el enchufe, no el cable de la
fuente de alimentación.
– Asegúrese de que el cable de la fuente
de alimentación esté colocado de
manera que no se lo pise, que no se
pueda tropezar con este, que no entre en
contacto con objetos punzantes ni
piezas móviles y que no se vea expuesto
de ninguna otra manera a daños o
tensión.

0478-131-3050-A
109
español / EE.UU
7 Mantenimiento, reparación y almacenamiento
7.1 Advertencias e instrucciones
ADVERTENCIA
■ El usuario no tiene autorización para realizar
reparaciones en el robot cortacéspedes, la estación de
carga o la fuente de alimentación. Para reducir el riesgo
de incendio, descarga eléctrica u otras lesiones
personales y daños materiales:
– Los usuarios solo pueden llevar a cabo los trabajos
de limpieza y de mantenimiento que se describen en
este manual.
– Siga estrictamente las instrucciones de limpieza y
mantenimiento presentes en los apartados
apropiados de este manual de instrucciones.
– STIHL recomienda que todos los trabajos de
reparación sean realizados por concesionarios de
servicio autorizados de STIHL iMow.
– Mantenga y reemplace las etiquetas de advertencia
e instrucciones, según sea necesario.
■ Una puesta en marcha accidental puede resultar en
lesiones personales o daños materiales. Para reducir el
riesgo de lesiones personales y daños materiales a causa
de una puesta en marcha accidental:
■ La cuchilla de corte es la única pieza del robot
cortacéspedes reemplazable por el usuario.
– Cuando manipule la cuchilla de corte utilice guantes
de trabajo antideslizantes para trabajo pesado de
cuero u otro material resistente al desgaste.
– Reemplace la cuchilla de corte una vez que se
desgaste o si presenta daños.
– Apriete todas las tuercas, los pernos y los tornillos
después de reemplazar la cuchilla de corte.
■ El uso de piezas no autorizadas o aprobadas por STIHL
puede ocasionar tanto lesiones graves o mortales como
daños materiales.
– STIHL recomienda que para las reparaciones o el
mantenimiento se utilicen únicamente piezas de
repuesto autorizadas por STIHL.
■ Para reducir el riesgo de descarga eléctrica:
– Desconecte la fuente de alimentación del
tomacorriente antes de inspeccionar la estación de
carga o el cable perimétrico.
– Controle regularmente la estación de carga y
asegúrese de que el aislamiento del cable y del
enchufe de la fuente de alimentación estén en
buenas condiciones y no presenten signos de
envejecimiento (fragilidad), desgaste o daños.
Revise si los contactos de carga presentan signos
de corrosión o daños que pudieran provocar un
cortocircuito durante la carga.
– Reemplace la fuente de alimentación si el enchufe o
el cable de la misma están dañados.
■ Un almacenamiento inadecuado puede resultar en el uso
no autorizado, en daños en el robot cortacéspedes, su
batería integrada y su estación de carga además de un
mayor riesgo de incendio, electrocución y otras lesiones
personales o daños materiales.
– Presione y mantenga pulsado el botón STOP
durante 5 segundos para conectar el bloqueo de
equipo.
– Deje que el robot cortacéspedes se enfríe durante al
menos 5 minutos antes de almacenarlo.
7 Mantenimiento, reparación y
almacenamiento
– En toda ocasión pulse y mantenga
presionado el botón STOP durante 5
para activar el bloqueo de equipo antes
de montar, transportar, ajustar,
inspeccionar, limpiar, dar servicio, dar
mantenimiento o guardar el robot
cortacéspedes.

0478-131-3050-A
110
español / EE.UU
8 Principio de funcionamiento
– Antes del almacenamiento, siempre desconecte la
estación de carga del tomacorriente.
– Almacene el robot cortacéspedes y la estación de
carga a cubierto en un lugar seco, seguro y fuera del
alcance de los niños o de usuarios no autorizados.
– Almacene el robot cortacéspedes únicamente
dentro de un rango de temperatura ambiente de
32 °F a 122 °F (0 °C a 50 °C).
CONSERVE ESTAS
INSTRUCCIONES
El iMow (1) es un cortacéspedes con función de
mulching/acolchado, diseñado para cuidado de céspedes
autónomo y programable. La unidad corta el césped en
áreas seleccionadas aleatoriamente. Durante el proceso de
mulching/acolchado, se tritura aún más la hierba cortada en
el equipo de corte después del procedimiento de corte.
Luego se deja caer nuevamente la hierba en el césped,
donde se descompone.
Para que el robot cortacéspedes detecte los bordes de una
superficie a cortar (A), un cable perimétrico (2) debe
tenderse alrededor de esa superficie. La estación de carga
(3) emite una señal eléctrica de baja tensión que circula por
el cable perimétrico.
Los obstáculos sólidos de tamaño y peso adecuados (5) en
la superficie a cortar son detectados por el sensor de
impacto del robot cortacéspedes. Los obstáculos y las
zonas que el robot cortacéspedes debe evitar (4) deberían
separarse de la superficie a cortar usando el cable
perimétrico.
9.1 Características principales
ADVERTENCIA
El robot cortacéspedes está equipado con varios
dispositivos que ayudan a reducir el riesgo de lesiones
personales o daños materiales durante su utilización. Si hay
una falla en algún dispositivo de seguridad, no utilice el
robot cortacéspedes y llévelo a un concesionario de servicio
autorizado STIHL iMow para su reparación.
1. Botón STOP
Si pulsa el botón STOP, el robot cortacéspedes y su cuchilla
de corte se detendrán y la pantalla mostrará el mensaje:
"Botón STOP pulsado". El robot cortacéspedes no puede
ser utilizado mientras este mensaje se encuentre activo,
@ 22.1.
Si quiere reanudar el corte automático, el robot
cortacéspedes le preguntará si desea que el servicio
automático se reanude. Para continuar el servicio
automático:
► Pulse el botón OK para confirmar el mensaje "Botón
STOP pulsado".
► Seleccione "Sí" y pulse el botón OK en el panel de
mandos.
El robot cortacéspedes reanuda el corte automático de
acuerdo con el plan de corte.
► Seleccione "No" y pulse el botón OK para que el robot
cortacéspedes se quede inmóvil en la superficie a cortar
y se apague el corte automático, @ 14.3.
8 Principio de funcionamiento
0000-GXX-3427-A1
1
5
2
4
3
A
9 Funciones clave

0478-131-3050-A
111
español / EE.UU
9 Funciones clave
2. Bloqueo de equipo
► Para activar el bloqueo de equipo desde el menú
"Comandos", seleccione "Bloquear iMow" y pulse el botón
OK para confirmar, @ 14.3.
► Para activar el bloqueo de equipo desde el menú
"Ajustes", abra el submenú "Seguridad", seleccione
"Bloquear iMow" y pulse el botón OK para confirmar,
@ 15.4.
Para desactivar el bloqueo de equipo:
► Si es necesario, pulse cualquier botón para encender al
robot cortacéspedes.
► Pulse el botón Atrás y el botón OK en la secuencia que se
muestra en la pantalla.
Una vez que el bloqueo de equipo esté desactivado, el
robot cortacéspedes puede ser utilizado de nuevo.
3. Sensor de impacto
El capó está diseñado para funcionar como un sensor de
impacto.
Durante el funcionamiento automático, el robot
cortacéspedes se detiene si el capó hace contacto con un
objeto sólido de altura mayor a 3.9 pulg. (10 cm). Entonces,
el robot cortacéspedes gira y reanuda el corte automático en
otra dirección. Si el sensor de impacto se acciona con
demasiada frecuencia, la cuchilla de corte dejará de rotar.
INDICACIÓN
El sensor de impacto podría no detectar ciertos obstáculos,
como macetas pequeñas u otros objetos ligeros, que
pueden tirarse o dañarse. STIHL recomienda retirar los
obstáculos o bloquearlos creando áreas restringidas
durante la colocación del cable perimétrico, @ 11.6.
4. Protección de levantamiento
Si intenta levantar el robot cortacéspedes por el capó o
usando los mangos de transporte durante el
funcionamiento, el sensor de elevación se activará y en
breve detendrá la cuchilla de corte. De cualquier manera,
por ningún motivo intente levantar o meter la mano por
debajo del robot cortacéspedes sin antes activar el bloqueo
de equipo y asegurarse de que la cuchilla de corte se haya
detenido.
5. Sensor de inclinación
Si el robot cortacéspedes excede la inclinación admisible de
más de 21.8° (40 %), el robot cortacéspedes girará y
continuará el corte en otra dirección. Una pendiente de
21.8° corresponde a un incremento en la altura vertical de a
= 15.7 pulg. (40 cm) para una distancia horizontal de b =
39.4 pulg. (100 cm). Excluya dichas pendientes de la
superficie a cortar y corte las superficies excluidas con una
desbrozadora apropiada u otra herramienta.
En caso de vuelco, la rueda motriz y la cuchilla de corte se
detendrán en breve.
6. Pantalla iluminada
La pantalla se retroilumina durante el funcionamiento para
ayudarle a localizar el robot cortacéspedes en la oscuridad.
Para conectar el bloqueo de equipo, mantenga
pulsado el botón STOP por 5 segundos. El robot
cortacéspedes y su cuchilla de corte se detienen
y la pantalla muestra el mensaje "Inhab dispos.
Desbloquear con la combinación indicada de
teclas". El robot cortacéspedes no puede ser
utilizado mientras este mensaje se encuentre
activo, @ 22.1.
a
b
24°
0000-GXX-3662-A0

0478-131-3050-A
112
español / EE.UU
10 Instalación del robot cortacéspedes
7. Alarma antirrobo
Cuando la característica antirrobo está activada:
– Suena una alarma cuando el robot cortacéspedes es
levantado, a no ser que el código PIN se introduzca en un
intervalo no mayor a un minuto, @ 15.4.
– Si remplaza la estación de carga o el robot cortacéspedes
después de completar la primera instalación, necesitará
enlazar el robot cortacéspedes con la estación de carga
antes de utilizarlos, @ 10.6.
8. Protección de GPS
Para detección de robo, STIHL recomienda activar la
característica de protección de GPS. Cuando la protección
de GPS está activada:
– El propietario registrado del robot cortacéspedes será
notificado a través de la app iMow si la unidad es
desplazada a una distancia mayor de 1640 ft (500 m) del
perímetro de la superficie a cortar establecida, @ 15.4.
– Cuando se ajusten los niveles de seguridad baja, mediana
o alta, el robot cortacéspedes podrá ser utilizado fuera de
la superficie a cortar establecida solo después de que el
código PIN haya sido introducido, @ 15.4.
10.1 Preparación del césped y del robot
cortacéspedes para el funcionamiento
Para preparar el césped para el tendido del cable
perimétrico:
► Corte el césped con un cortacésped convencional. La
altura ideal del césped son 2.4 pulg. (6 cm) o menos.
► Si la superficie está seca y dura, riegue ligeramente la
superficie a cortar para facilitar el manejo de las estacas
del cable perimétrico.
► STIHL recomienda tender el cable perimétrico a una
distancia de por lo menos 11 pulg. (28 cm) de obstáculos
o del borde exterior del jardín, @ 11. Esto hará que el
funcionamiento continuo de su robot cortacéspedes sea
más probable. Puede reducir las áreas sin podar
tendiendo el cable perimétrico a una distancia menor de
11 pulg. (28 cm) de los obstáculos, pero el éxito del
tendido dependerá de las características específicas de
su jardín, @ 11.15.
► Cuando haya más de una superficie a cortar establecida,
mantenga una distancia mínima de 3.3 pies (1 m) entre
los cables perimétricos de las dos zonas de vecino A y
vecino B.
Para preparar el robot cortacéspedes para el
funcionamiento, siga el asistente de instalación integrado.
Este lo guiará a través de la primera instalación del robot
cortacéspedes:
► Ajuste la hora y la fecha en el robot cortacéspedes,
@ 10.2.
► Instale la estación de carga, @ 10.3.
► Tienda el cable perimétrico, @ 11.
► Conecte el cable perimétrico a la estación de carga,
@ 10.5.
► Enlace el robot cortacéspedes con la estación de carga,
@ 10.6.
► Revise la instalación, @ 10.7.
► Programe el robot cortacéspedes y cree un plan de corte
automático, @ 12.4.
► Complete la primera instalación y comience el corte,
@ 14.5.
10 Instalación del robot cortacéspedes
A
B

0478-131-3050-A
113
español / EE.UU
10 Instalación del robot cortacéspedes
Consulte a un concesionario de servicio autorizado de
STIHL iMow para más información acerca de cómo tender
el cable perimétrico y configurar el robot cortacéspedes.
STIHL recomienda que un concesionario de servicio
autorizado de STIHL iMow se encargue de configurar su
robot cortacéspedes.
10.2 Configuración de idioma, fecha y hora
Siempre establezca la fecha y la hora correcta para
asegurar la precisión del plan de corte y evitar el corte
automático en momentos indeseados.
► Durante la primera instalación, pulse cualquier botón en el
panel de mandos para activar el asistente de instalación.
► Seleccione el idioma deseado y pulse el botón OK.
► Pulse el botón OK para confirmar su configuración de
idioma o seleccione "Cambiar" para repetir la selección de
idioma.
► Si se le solicita, introduzca el número de serie de 9 dígitos
del robot cortacéspedes, el cual se encuentra en la placa
de características detrás del panel de mandos.
► Use el teclado de navegación para ajustar la fecha actual
y pulse el botón OK para confirmar.
► Use el teclado de navegación para ajustar la hora actual
y pulse el botón OK para confirmar.
10.3 Instalación de la estación de carga
ADVERTENCIA
Para reducir el riesgo de lesiones durante la instalación y el
funcionamiento, lea y siga las medidas de seguridad de la
estación de carga, así como las instrucciones de este
manual, @ 6. Para reducir el riesgo de sufrir una lesión
ocular, siempre utilice gafas protectoras ajustadas al
instalar la estación de carga y tender el cable perimétrico,
@ 5.3.
ADVERTENCIA
Para reducir el riesgo de incendio y descarga eléctrica,
instale la fuente de alimentación de la estación de carga al
menos a 1 pie (30 cm) del suelo y asegúrese de que no haya
riesgo de que pueda sumergirse en agua o en otros líquidos.
No coloque la fuente de alimentación sobre el suelo o a nivel
del suelo. Siempre instale la fuente de alimentación sobre
una superficie estable.
ADVERTENCIA
Como la estación de carga y la fuente de alimentación se
calientan durante el proceso de carga, no utilice la estación
de carga sobre una superficie combustible o en una locación
en la que haya gases, líquidos, vapores, polvos u otros
materiales o sustancias combustibles presentes, @ 6.

0478-131-3050-A
114
español / EE.UU
10 Instalación del robot cortacéspedes
ADVERTENCIA
Para reducir el riesgo de incendio y descarga eléctrica,
conecte la estación de carga solo a un tomacorriente con
protector de pérdidas a tierra (GFCI) Categoría A que
coincida con el voltaje y la frecuencia de la corriente
eléctrica declarada en la fuente de alimentación. Debe tener
una carcasa que sea resistente al agua tanto cuando la
clavija del enchufe esté conectada como cuando no lo esté.
Asegúrese de que la estación de carga esté ubicada a la
distancia necesaria para alcanzar un tomacorriente con
protector de pérdidas a tierra (GFCI) Categoría A resistente
al agua con los 33 pies (10 m) del cable de la fuente de
alimentación. No utilice cables de extensión. El uso de
cables de extensión no está autorizado e incrementa el
riesgo de incendio y descarga eléctrica. Siempre asegúrese
de que el cable de la fuente de alimentación esté fuera del
camino de corte del robot cortacéspedes.
► Dependiendo de su césped, es posible instalar la estación
de carga parcialmente dentro de la superficie a cortar
(estación de carga interna) o fuera de la superficie a cortar
(estación de carga externa). Revise los ejemplos de
instalación contenidos en este manual de instrucciones,
@ 26.
INDICACIÓN
Una cerca invisible para perros u otros cableados a nivel del
suelo interferirán con el funcionamiento del robot
cortacéspedes. Investigue todas las fuentes potenciales de
interferencia eléctrica y analícelas con su concesionario de
servicio de STIHL iMow antes de iniciar la instalación.
Para instalar la estación de carga dentro de la superficie a
cortar (Estación de Carga Interna):
► Deje libre una zona plana (3) con un radio mínimo de 3.3
pies (1 m) en la superficie a cortar (2) frente a la estación
de carga (1), libre de elevaciones, pendientes,
depresiones, agujeros u obstáculos. Seleccione una zona
libre de interferencia magnética o eléctrica. Por ejemplo,
nunca instale sobre una reja de metal o cerca de un motor
eléctrico, como una bomba para piscina. Asegúrese de
retirar todos los cables perimétricos existentes antes de
iniciar una instalación nueva.
► Tienda el cable perimétrico en el lado izquierdo (2) y en el
lado derecho (1) de la estación de carga (3) en una línea
recta con una longitud de a > 23.6 pulg. (60 cm) y en
ángulos rectos (90°) a la placa base.
3
a
1
1
2
0000-GXX-3345-A0
90
a
a
90
1
2
3
0000-GXX-3353-A0

0478-131-3050-A
115
español / EE.UU
10 Instalación del robot cortacéspedes
Para instalar la estación de carga fuera de la superficie a
cortar (Estación de Carga Externa):
► Seleccione una zona fuera del cable perimétrico que sea
plana y libre de elevaciones, pendientes, depresiones,
agujeros u obstáculos. Seleccione una zona libre de
interferencia magnética. Por ejemplo, nunca instale sobre
una reja de metal o cerca de un motor eléctrico, como una
bomba para piscina. Asegúrese de retirar todos los cables
perimétricos existentes antes de iniciar una instalación
nueva.
► Posicione la estación de carga (1) fuera de la superficie a
cortar (2) en un espacio que cumpla los siguientes
requisitos:
– Distancia mínima a la superficie a cortar: a ≥ 19.7 pulg.
(50 cm)
– Ancho de la zona libre: b = 15.7 pulg. (40 cm)
– Distancia máxima a la superficie a cortar: c ≥ 39.4 pies
(12 m).
► Puede instalarse un corredor (3), @ 11.8.
– d = 9 pulg. (22 cm)
► Utilice el Patrón de Corredor STIHL en forma de túnel
para instalar la entrada (A) al final del corredor.
► Al instalar la estación de carga fuera de la superficie a
cortar y cuando la función "Pasaje" ("regreso
desplazado") esté activada, instale "lazos de búsqueda"
para permitirle al robot cortacéspedes encontrar la
estación de carga más fácilmente. Los lazos de búsqueda
se explican más adelante en este manual, @ 11.9.
Si se ha instalado una estación de carga externa, STIHL
recomienda establecer al menos un "punto de inicio" fuera
del corredor hacia la estación de carga después de
completar la primera instalación. Los puntos de inicio se
explican más adelante en este manual, @ 15.6.
Para asegurar la estación de carga:
► Para alargar la vida útil, STIHL recomienda instalar la
estación de carga en una ubicación protegida y con
sombra.
► Seleccione una zona libre de interferencia magnética. Por
ejemplo, nunca instale sobre una reja de metal o cerca de
un motor eléctrico, como una bomba para piscina.
► Asegúrese de que la estación de carga esté ubicada a la
distancia necesaria para alcanzar un tomacorriente con
protector de pérdidas a tierra (GFCI) Categoría A
resistente al agua con los 33 pies (10 m) del cable de la
fuente de alimentación. No utilice cables de extensión.
► El suelo seleccionado para la estación de carga debe
estar plano y nivelado. La placa base no debe tener una
pendiente mayor a d = 3.2 pulg. (8 cm) o pendiente
descendiente mayor a e = 0.8 pulg. (2 cm).
► Fije la estación de carga (1) en la ubicación elegida
utilizando cuatro estacas (4). Asegúrese de que la placa
base haga contacto total con el suelo en las cuatro
esquinas.
A
3
4
1
d
e
0000-GXX-3347-A2

0478-131-3050-A
116
español / EE.UU
10 Instalación del robot cortacéspedes
Para conectar la fuente de alimentación a la estación de
carga:
ADVERTENCIA
Para reducir el riesgo de incendio y descarga eléctrica,
asegúrese de que la fuente de alimentación no esté
conectada al tomacorriente al manipular el conector e
insertarlo en la estación de carga. Siempre desconecte la
fuente de alimentación del tomacorriente antes de retirar la
cubierta de la estación de carga.
► Retire la cubierta de la estación de carga (5) levantándola
sobre las pestañas de cada lado.
► Doble el panel (6) hacia adelante y sosténgalo en posición
abierta.
► Inserte el conector (7) al puerto izquierdo (8) del tablero
de circuito del panel como se muestra en la ilustración.
► Guíe el cable de la fuente de alimentación a través del
dispositivo antitirones del cable (9), a través del conducto
para cables (10) y hacia afuera de la estación de carga.
INDICACIÓN
Asegúrese de que el conector y el puerto en el tablero de
circuito estén limpios antes de conectarlos.
La fuente de alimentación está aprobada para uso en
exteriores. Para alargar la vida útil, STIHL recomienda
proteger la fuente de alimentación de los rayos del sol
directos y de ambientes húmedos o mojados.
Para montar la fuente de alimentación:
► Instale la fuente de alimentación fuera de la superficie a
cortar al menos a 1 pie (30 cm) del suelo y nunca a nivel
del suelo o en alguna locación en la que pueda estar
sumergida en agua o en otros líquidos.
5 5
0000-GXX-3348-A1
6
7
8
0000-GXX-5345-A0
9
10
10
10
0000-GXX-5346-A0
1 2
b
a
c
0000-GXX-3609-A0

0478-131-3050-A
117
español / EE.UU
10 Instalación del robot cortacéspedes
► Utilice anclajes para la pared atornillados u otros
dispositivos de montaje similares si no hay un montante
apropiado disponible.
► Alinee la fuente de alimentación como se muestra arriba.
Monte a un muro con las siguientes dimensiones:
– a = mínimo 1 pie (30 cm).
– b = mínimo 3.9 pulg. (10 cm)
– c = 5.0 pulg. (128 mm)
INDICACIÓN
Al montar, asegúrese de que no haya cables eléctricos,
tuberías u otras líneas de servicio corriendo en el muro
detrás de la fuente de alimentación.
► Tienda el cable de la fuente de alimentación fuera de la
superficie a cortar, fuera del alcance de la cuchilla de
corte y fíjelo al suelo o encamínelo a través de un
conducto para cables.
► Dirija el cable de la fuente de alimentación lejos de la
estación de carga para evitar interferencia eléctrica con la
señal del cable perimétrico. Asegúrese de que no esté en
el camino de corte del robot cortacéspedes.
► Cierre el panel (6). Tenga cuidado de no aplastar el cable
de la fuente de alimentación o el cable perimétrico.
► Vuelva a fijar la cubierta (5). Tenga cuidado de no aplastar
el cable de la fuente de alimentación o el cable
perimétrico.
► Conecte la estación de carga solo a un tomacorriente con
protector de pérdidas a tierra (GFCI) Categoría A que
coincida con el voltaje y la frecuencia de la corriente
eléctrica declarada en la fuente de alimentación. Debe
tener una carcasa que sea resistente al agua tanto
cuando la clavija del enchufe esté conectada como
cuando no lo esté.
El LED en la estación de carga parpadeará en rojo
rápidamente cuando el cable perimétrico esté tendido y
adecuadamente conectado a la estación de carga.
► Pulse el botón OK en el panel de mandos.
Si se ha instalado una estación de carga externa, STIHL
recomienda establecer al menos un "punto de inicio" fuera
del corredor hacia la estación de carga después de
completar la primera instalación. Los puntos de inicio se
explican más adelante en este manual, @ 15.6.
6
0000-GXX-5347-A0
5
0000-GXX-3350-A0

0478-131-3050-A
118
español / EE.UU
10 Instalación del robot cortacéspedes
INDICACIÓN
Se encuentra a su disposición un parasol para proteger la
estación de carga de la intemperie. La exposición a los
rayos directos del sol puede conducir al incremento de
temperaturas dentro de la máquina y del compartimento de
batería, lo que puede incrementar los tiempos de carga de
la batería y reducir la vida útil de la batería.
Para cargar el robot cortacéspedes:
► Levante ligeramente el robot cortacéspedes por el asa de
transporte trasero (11) para aliviar el peso ejercido sobre
las ruedas motrices.
► Empuje el robot cortacéspedes, que descansa sobre las
ruedas frontales, hacia la estación de carga.
El LED de la estación de carga parpadeará lentamente
después de la conexión.
► Pulse el botón OK en el panel de mandos del robot
cortacéspedes.
Si la batería está descargada, un símbolo de enchufe
aparecerá en la esquina superior derecha de la pantalla
después de la conexión. La batería se cargará mientras el
cable perimétrico esté siendo tendido.
10.4 Tendido del cable perimétrico
ADVERTENCIA
Para reducir el riesgo de que otras personas y usuarios no
autorizados sufran lesiones, asegure el cable perimétrico al
suelo con estacas. Compruebe que el cable perimétrico y
las estacas estén enterradas o fijadas debidamente
próximas al suelo de modo que no sean atrapadas por la
cuchilla del robot cortacéspedes y que tampoco representen
un riesgo de tropiezos. Para reducir el riesgo de sufrir una
lesión ocular, siempre utilice gafas protectoras ajustadas al
instalar la estación de carga y tender el cable perimétrico,
@ 5.3.
► Antes de tender el cable perimétrico, planifique la ruta de
tendido en detalle. En particular, tenga en cuenta las
distancias del cable, el cable de reserva, los tramos de
unión, las superficies secundarias y los corredores
durante el tendido del cable. Antes de instalar el cable
perimétrico, lea todo el capítulo referente al tendido del
mismo, @ 11.
► Instale el cable perimétrico en un lazo continuo alrededor
de toda la superficie a cortar con una longitud máxima de
1,640 pies (500 m).
► Si instala el cable perimétrico alrededor de zonas más
pequeñas a 120 yd² (100 m²), o si la longitud total del
cable perimétrico es menor a 575 pies (175 m), debe
instalarse también el STIHL Small Area Module 100
(accesorio especial). Para más información, contacte a su
concesionario de servicio autorizado de STIHL iMow.
STIHL recomienda realizar un bosquejo de la superficie a
cortar que incluya lo siguiente:
– El contorno de la superficie a cortar incluyendo obstáculos
importantes, bordes y cualquier superficie excluida en la
que el robot cortacéspedes no deba cortar, @ 26.
– La ubicación y posición de la estación de carga, @ 10.3.

0478-131-3050-A
119
español / EE.UU
10 Instalación del robot cortacéspedes
– La ubicación del cable perimétrico y cualquier conector de
cable que haya instalado, @ 11.
INDICACIÓN
Solo use cable perimétrico y estacas para cable autorizadas
por STIHL.
INDICACIÓN
La distancia máxima entre el robot cortacéspedes y
cualquier tramo de cable perimétrico no deberá ser mayor
que 55 pies (17 m pies), puesto que de otro modo no se
podrá reconocer la señal del cable.
INDICACIÓN
Asegure que el cable perimétrico salga con soltura de su
carrete, especialmente si se usa una máquina instaladora
de cable. Evite darle tirones al cable perimétrico. Los
esfuerzos de tensión pueden causar roturas en el cable.
El cable perimétrico (1) se instala en el suelo y se fija en su
lugar por medio de estacas (2) colocadas cada 3.3 pies (1
m). Podría ser necesario colocar las estacas más próximas
una a la otra si el suelo no está nivelado. Esto evita que la
cuchilla cortacéspedes corte el cable.
Para tender el cable perimétrico en torno a una estación de
carga interna:
► Sujete el cable perimétrico (1) al suelo con una estaca (2)
hacia el lado izquierdo (A) o el lado derecho (B) de la
estación de carga, junto a una salida para cable de la
placa base.
► Deje una sección de cable libre (1), con una longitud
aproximada de a = 4.92 pies (1.5 m). Este segmento
posteriormente se conectará con la estación de carga.
► Tienda el cable perimétrico en el lado izquierdo (2) y en el
lado derecho (1) de la estación de carga (3) en una línea
recta con una longitud de a > 23.6 pulg. (60 cm) y en
ángulos rectos (90°) a la placa base.
► Si se ha activado la función de "Pasaje" (retorno
desplazado) en los ajustes de Instalación (@ 15.3), esta
sección del cable perimétrico (a) deberá ser más larga,
como mínimo a = 4.9 pies (1.5 m).
a
A
B
1
2
1
0000-GXX-4384-A1
90
a
a
90
1
2
3
0000-GXX-3353-A0

0478-131-3050-A
120
español / EE.UU
10 Instalación del robot cortacéspedes
Para tender el cable perimétrico en torno a una estación de
carga externa:
► Sujete el cable perimétrico (1) al suelo con una estaca (2)
hacia el lado delantero izquierdo (A) o el lado delantero
derecho (B) de la estación de carga, junto a una salida
para cable en la placa base.
► Deje una sección de cable libre (1), con una longitud
aproximada de a = 6.56 pies (2 m pies). Este segmento
posteriormente se conectará con la estación de carga.
► Tienda el cable perimétrico (1) por delante y por detrás de
la estación de carga (3), hasta cubrir una longitud de a
≥ 19.7 pulg. (50 cm) y en ángulos rectos (90°) con
respecto a la placa base.
► Instale un corredor, @ 11.8 o instale el cable perimétrico
alrededor de la superficie a cortar.
► Deje una separación mínima de b = 15.7 pulg. (40 cm) con
respecto al costado de la placa base.
Para tender el cable perimétrico en torno a la superficie a
cortar:
► Tienda el cable perimétrico (1) alrededor de la superficie
a cortar y de los obstáculos que hubiera, @ 11.6.
► Asegúrelo al suelo usando las estacas para cable (2).
Como regla general, se considera que una estaca cada
3.3 pies (1 m) es suficiente. Podría ser necesario colocar
las estacas más próximas una a la otra si el suelo no está
nivelado. El cable perimétrico siempre debe quedar plano
contra el suelo, a una altura suficientemente baja que no
sea cortado por la cuchilla del robot cortacéspedes. Con
el paso del tiempo, el proceso de corte y de
mulching/acolchado ayuda a ocultar el cable perimétrico
por debajo de la superficie de la hierba. Como alternativa,
el cable perimétrico puede enterrarse a una profundidad
de hasta 3.9 pulg. (10 cm).
► Revise las separaciones del cable perimétrico usando la
regla iMow, @ 11.3.
1
a
1
2
B
A
0000-GXX-5348-A1
b
b
a
3
90
90
1
1
0000-GXX-3354-A0
1
2
0000-GXX-3355-A0

0478-131-3050-A
121
español / EE.UU
10 Instalación del robot cortacéspedes
► Mantenga la separación del cable en las esquinas
alrededor de obstáculos elevados como esquinas de
pared o canteros (5) para evitar que el robot
cortacéspedes coche con el obstáculo.
► Instale el cable perimétrico (1) con la ayuda de la regla
iMow (4) como se muestra en la ilustración.
► Asegúrelo al suelo usando las estacas para cable (2).
► Nunca instale el cable perimétrico en ángulos menores a
90°.
► Después de una esquina de 90° (6), se deberá tender un
tramo recto de por lo menos la longitud de la regla iMow
(4) antes de instalar otra esquina.
► Si es necesario, extienda el cable perimétrico usando
conectores de cable, @ 11.14.
► En caso de tenerse varias superficies de corte
adyacentes, instale superficies secundarias (@ 11.7) o
una las superficies de corte por medio de corredores
(@ 11.8).
► Si instala el cable perimétrico alrededor de zonas más
pequeñas a 120 yd² (100 m²), o si la longitud total del
cable perimétrico es menor a 575 pies (175 m), debe
instalarse también el STIHL Small Area Module 100
(accesorio especial). Para más información, contacte a su
concesionario de servicio autorizado de STIHL iMow.
Para finalizar el tendido del cable perimétrico:
► Clave la última estaca (2) a la izquierda o a la derecha de
la placa base, junto a la salida del cable en la placa base.
► Clave las estacas para cable completamente en el suelo.
► Corte el cable perimétrico (1) de modo que se tenga una
sección de aproximadamente 4.92 pies (1.5 m) de
longitud disponible para conectarla a la estación de carga.
► Si se va a tender el cable perimétrico en torno a una
estación de carga externa: Corte el cable perimétrico (1)
de modo que se tenga una sección de aproximadamente
6.56 pies (2 m pies) de longitud disponible para conectarla
a la estación de carga.
► Pulse el botón OK en el panel de mandos.
Si la batería del robot cortacéspedes no tiene carga
suficiente para realizar los pasos restantes de la instalación,
el robot cortacéspedes mostrará un mensaje indicando que
está cargando. Si recibe este mensaje, mantenga el robot
cortacéspedes conectado con la estación de carga para
continuar la carga. Solo se podrá pulsar el botón OK para
pasar al siguiente paso del asistente de la instalación
cuando se haya alcanzado el voltaje necesario en la batería.
INDICACIÓN
Por las primeras dos semanas de uso luego de la instalación
inicial, ajuste la altura de corte del robot cortacéspedes a su
altura máxima. Esto ayuda a reducir la probabilidad de que
el cable perimétrico sea cortado por la cuchilla de corte.
INDICACIÓN
INDICACIÓN
En la sección de ejemplos relacionados con la instalación se
ofrece más información sobre la instalación de la estación
de carga, @ 26.
2
1
1
2
0000-GXX-4385-A1
Tenga cuidado cuando use una desbrozadora
cerca del perímetro de la superficie a cortar. Si
no se tiene cuidado, el cable perimétrico que no
esté enterrado podría ser cortado por el hilo
giratorio de la desbrozadora.

0478-131-3050-A
122
español / EE.UU
10 Instalación del robot cortacéspedes
10.5 Conexión del cable perimétrico a la estación de
carga
ADVERTENCIA
Para reducir el riesgo de incendio, descarga eléctrica y otras
lesiones personales, desenchufe la fuente de alimentación
del tomacorriente antes de intentar la conexión del cable
perimétrico a la estación de carga. Siempre desconecte la
unidad antes de quitarle la cubierta a la estación de carga.
INDICACIÓN
Compruebe que todos los contactos estén limpios y sin
corrosión.
► Coloque el robot cortacéspedes (1) junto a la estación de
carga (2) en la zona de corte, como se muestra en la
ilustración.
► Pulse el botón OK en el panel de mandos.
► Desconecte el enchufe del tomacorriente y pulse el botón
OK.
► Retire la cubierta, @ 10.3.
► Pulse el botón OK en el panel de mandos.
Para conectar el cable perimétrico a una estación de carga
interna:
► Inserte el cable perimétrico (3) en los canales para cables
de la placa base y guíelo a través de la abertura (4) que
conduce hacia la parte trasera de la estación de carga.
► Corte los extremos del cable perimétrico (5 y 6) de modo
que un extremo de 15.7 pulg. (40 cm) quede disponible
para insertarlo en la estación de carga. No se requiere
una longitud adicional.
► No enrolle el excedente del cable detrás de la estación de
carga. El excedente de cable podría interferir con el
funcionamiento del robot cortacéspedes.
4
5
6
3
0000-GXX-5349-A0

0478-131-3050-A
123
español / EE.UU
10 Instalación del robot cortacéspedes
Para conectar el cable perimétrico a una estación de carga
externa:
► Guíe el cable perimétrico (3) a través del canal para
cables en la placa base (7). Pase el cable perimétrico por
los canales para cables. Si es necesario, afloje las
estacas para cables.
► Inserte el cable perimétrico (3) en los canales para cables
de la placa base y guíelo a través de la abertura (4) que
conduce hacia la parte trasera de la estación de carga.
► Corte los extremos del cable perimétrico (5 y 6) de modo
que un extremo de 15.7 pulg. (40 cm) quede disponible
para insertarlo en la estación de carga. No se requiere
una longitud adicional.
► No enrolle el excedente del cable detrás de la estación de
carga. El excedente de cable podría interferir con el
funcionamiento del robot cortacéspedes.
Para conectar el cable perimétrico al tablero:
► Utilice una herramienta adecuada para pelar un tramo de
a = 0.236 pulg. (6 mm) del cable perimétrico izquierdo (5)
y trence las hebras del cable perimétrico.
► Trence los dos extremos del cable perimétrico para
unirlos (5 y 6).
► Abra el tablero, @ 10.3.
► Presione y abra la palanca de sujeción izquierda (8).
► Inserte el extremo (5) del cable perimétrico que se había
pelado en el bloque de sujeción hasta que tope.
► Cierre la palanca de sujeción (8).
► Utilice una herramienta adecuada para pelar un tramo de
a = 0.236 pulg. (6 mm) del extremo del cable perimétrico
derecho (6) y trence las hebras del cable perimétrico.
7
7
3
4
0000-GXX-5350-A0
5
6
0000-GXX-5351-A0
5 + 6
a
5
0000-GXX-5352-A0
5
8
6
a
0000-GXX-5353-A1

0478-131-3050-A
124
español / EE.UU
10 Instalación del robot cortacéspedes
► Presione y abra la palanca de sujeción derecha (9).
► Inserte el extremo (6) del cable perimétrico que se había
pelado en el bloque de sujeción hasta que tope.
► Cierre la palanca de sujeción (9).
► Cierre el tablero. Tenga cuidado de no aplastar el cable
de la fuente de alimentación o el cable perimétrico.
► Cierre la cubierta del conducto de cables (10).
► Verifique el tendido del cable perimétrico. Los dos
extremos del cable perimétrico deberán tenderse como lo
muestra la ilustración.
► Pulse el botón OK en el panel de mandos.
► Vuelva a colocar la cubierta de la manera descrita en la
sección "Instalación de la estación de carga" (@ 10.3) y
pulse el botón OK en el panel de mandos.
► Conecte el enchufe de la fuente de alimentación al
tomacorriente y pulse el botón OK en el panel de mandos.
6
9
0000-GXX-5354-A1
10
0000-GXX-5355-A0
0000-GXX-5413-A2_ES
Conecte el
cable perimétrico
11
0000-GXX-5356-A0

0478-131-3050-A
125
español / EE.UU
10 Instalación del robot cortacéspedes
Cuando el cable perimétrico está debidamente instalado y
conectado con la estación de carga, el LED (11) se ilumina
en rojo para indicar que las estaciones de carga están listas
para el uso.
► Si el LED destella rojo o permanece apagado, el cable
perimétrico está roto o no está conectado correctamente
con la estación de carga. Esto también puede indicar una
avería en la estación de carga. Revise el cable
perimétrico o comuníquese con un concesionario de
servicio de STIHL iMow.
► Levante ligeramente el robot cortacéspedes por el asa de
transporte trasero (12) y alivie el peso ejercido sobre las
ruedas motrices.
► Empuje la máquina, que descansa sobre las ruedas
frontales, hacia la estación de carga.
► Pulse el botón OK en el panel de mandos.
10.6 Conexión del robot cortacéspedes con la
estación de carga
El robot cortacéspedes solo podrá funcionar si recibe
correctamente la señal de cable emitida por la estación de
carga. El robot cortacéspedes y la estación de carga deben
estar conectados uno con el otro para que el cortacéspedes
pueda recibir la señal del cable.
La comprobación de la señal del cable puede tardar varios
minutos.
► Para interrumpir el proceso de conexión, pulse el botón
STOP. El asistente de la instalación regresará al paso
anterior del proceso.
► Continúe la instalación inicial por medio de pulsar el botón
OK en el panel de mandos.
Recepción interrumpida
Si deja de interceptarse la señal de cable o no se recibe la
señal correctamente, aparecerá uno de los siguientes
símbolos en pantalla:
Si el robot cortacéspedes y la estación de carga
están conectados correctamente, aparecerá
este símbolo en pantalla, con el mensaje "Señal
de cable OK".
El robot cortacéspedes no recibe señal del
cable. Aparece en pantalla el mensaje "Sin
señal del cable".
El robot cortacéspedes recibe una señal del
cable defectuosa. Aparece en pantalla el
mensaje "Revise señal cabl".
El robot cortacéspedes recibe una señal de
cable con la polaridad invertida. Aparece en
pantalla el mensaje "Conector cambiado de
cable perimetr o iMow fuera".

0478-131-3050-A
126
español / EE.UU
10 Instalación del robot cortacéspedes
Para información de solución de problemas, @ 22.2.
10.7 Comprobación de la instalación
► Empiece la prueba pulsando el botón OK en el panel de
mandos. Esto no activa la cuchilla de corte.
► Cierre la tapa.
El robot cortacéspedes empieza a seguir el cable
perimétrico a lo largo del borde de la superficie a cortar.
► A medida que la unidad recorra el borde, camine detrás
de la unidad y asegure lo siguiente:
– Que el robot cortacéspedes recorra el borde de la
superficie a cortar.
– Que el robot cortacéspedes pase libre de obstáculos y
recorra el borde de la superficie a cortar.
– Que el robot cortacéspedes se conecte y desconecte
como corresponde.
El robot cortacéspedes rastrea su posición por medio del
receptor de GPS integrado. Las coordenadas del cable
perimétrico se capturan durante la instalación y cada vez
que se ejecute la función "iMow sigue el borde".
La pantalla muestra la distancia recorrida a medida que el
robot cortacéspedes avanza por el perímetro de la
superficie a cortar.
► Si desea fijar puntos de inicio a lo largo del cable
perimétrico, anote la distancia que se indica en la pantalla
cuando se llega al punto deseado. Para más información
sobre los puntos de inicio, vea @ 15.6.
► Quite todos los obstáculos del perímetro y ajuste el cable
perimétrico según sea necesario para asegurar un
funcionamiento libre de problemas.
Para continuar con la prueba tras una interrupción:
► Coloque el robot cortacéspedes en el cable perimétrico o
en la superficie a cortar, con la parte delantera orientada
hacia el cable perimétrico.
► Pulse Sí y pulse el botón OK del panel de mandos.
Una vez concluida la prueba, el robot cortacéspedes se
conectará con la estación de carga y repetirá la prueba en
la dirección opuesta. Al finalizar la segunda pasada de la
prueba, la unidad volverá a conectarse con la estación y el
asistente de instalación se activa. Es necesario finalizar una
prueba con éxito para que iMow funcione correctamente.

0478-131-3050-A
127
español / EE.UU
10 Instalación del robot cortacéspedes
INDICACIÓN
STIHL recomienda finalizar la prueba completa en ambos
sentidos.
10.8 Programación del robot cortacéspedes: El plan
de corte
ADVERTENCIA
Se puede programar el robot cortacéspedes para que
funcione de manera autónoma a intervalos específicos
(intervalos de actividad). Cuando utilice esta función,
mantenga a las demás personas, en especial a los niños y
a las mascotas alejados de la superficie a cortar. No utilice
nunca el robot cortacéspedes si sabe que hay personas o
animales en la superficie a cortar o sus alrededores,
@ 5.6.3.
ADVERTENCIA
Respete todas las leyes, disposiciones, reglamentos y
normas pertinentes al programar los intervalos de actividad.
Establezca y ajuste los intervalos de actividad después de
haber finalizado la instalación inicial, @ 14.6.
► Seleccione el tamaño de su jardín y confírmelo pulsando
el botón OK en el panel de mandos.
Las superficies excluidas y secundarias que se hayan
definido no deberán incluirse en el cálculo del tamaño de
la superficie a cortar.
El robot cortacéspedes calculará automáticamente un plan
de corte que contemplará el tamaño del jardín y la longitud
del cable perimétrico tendido.
Cuando el robot cortacéspedes termine de calcular el plan
de corte, aparecerá en pantalla el siguiente mensaje:
"Confirme cada día individualm. o cambie interv de
actividad".
► Para anular el cálculo del plan de corte, pulse el botón
STOP.
► Pulse el botón OK en el panel de mandos para aprobar o
modificar los intervalos de actividad. Antes de modificar
los intervalos de actividad, consulte @ 14.5.
Aparecerán en pantalla los intervalos de actividad
correspondientes al lunes y el elemento del menú
"Confirme interv actividad" se mostrará resaltado.
► Confirme todos los intervalos de actividad pulsando el
botón OK en el panel de mandos. Aparecerá en pantalla
el plan de corte del día siguiente para que lo apruebe o lo
modifique.
En caso de superficies de corte pequeñas, podría no ser
necesario que se corten todos los días. En ese caso, no
se mostrará ningún intervalo de actividad y el elemento
del menú "Eliminar todos interv." no estará disponible.
También es necesario confirmar los días intervalos de
actividad pulsando el botón OK en el panel de mandos.
El siguiente símbolo aparecerá en pantalla junto a cada uno
de los elementos del menú:

0478-131-3050-A
128
español / EE.UU
10 Instalación del robot cortacéspedes
Para finalizar la programación:
► Confirme los intervalos de actividad para el día domingo.
Aparecerá en pantalla el plan de corte definitivo.
► Confirme el plan de corte pulsando el botón OK en el
panel de mandos.
El paso final del asistente de instalación se activará.
► Seleccione "Cambiar" si necesita modificar alguno de los
intervalos de actividad.
Antes de modificar los intervalos de actividad o la duración
del corte del iMow, consulte los capítulos referentes al plan
de corte, @ 14.5, @ 14.6 y @ 14.7.
INDICACIÓN
Si tiene un sistema de aspersores, programe el robot
cortacéspedes para evitar las horas de riego activas para
reducir la probabilidad de dañar las cabezas de los
aspersores del contacto con la cuchilla de corte. El robot
cortacéspedes y el sistema de aspersores nunca deberán
funcionar al mismo tiempo.
INDICACIÓN
Evite el contacto con el cable perimétrico cuando
escarifique o airee el césped. También tenga cuidado
cuando utilice una desbrozadora cerca del cable
perimétrico. El escarificado, la aireación y el desbrozado
pueden provocar cortes o daños en el cable perimétrico.
Consulte su bosquejo de la superficie a cortar y preste
especial atención para evitar el cable perimétrico cuando
realice estas tareas.
10.9 Finalización de la instalación inicial y primera
operación de corte
ADVERTENCIA
Inspeccione la superficie a cortar. Tal como lo haría antes
de iniciar un corte con un cortacéspedes tradicional, retire
las piedras, piezas metálicas, trozos de vidrio, alambres y
otros objetos que pudieran ser lanzados por el accesorio de
corte, dañar el accesorio de corte o causar daños a la
propiedad (por ejemplo, vehículos estacionados, ventanas).
Quite los objetos tales como juguetes, pelotas, muebles de
jardín, ornamentos, floreros, mangueras y equipos de
jardinería de la superficie a cortar, al igual que cualquiera
otra cosa que pudiera impedir el funcionamiento adecuado
del robot cortacéspedes o que pudiera ser atrapado por la
cuchilla.
Los intervalos de actividad mostrados pueden
modificarse. Seleccione el intervalo que desea
cambiar usando el teclado de navegación y
abriéndolo al pulsar el botón OK en el panel de
mandos, @ 14.6.
Se pueden programar intervalos de actividad
adicionales. Seleccione el elemento del menú
"Intervalo nuevo" y confírmelo pulsando el botón OK
en el panel de mandos.
Seleccione hasta tres intervalos de actividad por día
con sus horas de inicio y finalización en la ventana de
selección. Confírmelo pulsando el botón OK en el
panel de mandos.
Es posible eliminar los intervalos de actividad.
Seleccione el elemento del menú "Eliminar todos
interv." y confírmelo pulsando el botón OK en el panel
de mandos.

0478-131-3050-A
129
español / EE.UU
11 Instalación del cable perimétrico
► Finalice la instalación inicial por medio de pulsar el botón
OK en el panel de mandos.
Si se finaliza la instalación inicial durante un intervalo de
actividad, el robot cortacéspedes empezará a cortar de
inmediato.
Si se finaliza la instalación inicial fuera de un intervalo de
actividad, se puede iniciar una operación de corte pulsando
el botón OK del panel de mandos.
► Si no desea que el robot cortacéspedes empiece a cortar
de inmediato, seleccione "No" y pulse el botón OK del
panel de mandos.
También se puede iniciar una operación de corte desde la
app iMow.
► Confírmelo pulsando el botón OK en el panel de mandos.
11.1 Planificación de la distribución de la superficie a
cortar
Cuando se planifique la distribución de la superficie a cortar
y la colocación del cable perimétrico:
► Estudie los ejemplos de instalación al final de este manual
de instrucciones, @ 26. Considere las superficies
excluidas, los corredores, las superficies secundarias, los
lazos de búsqueda y el cable de reserva en su
planificación para prevenir o minimizar la necesidad de
volver a tender o reajustar el cable perimétrico
subsecuentemente.
► Determine la ubicación de la estación de carga, @ 10.3.
► Quite los obstáculos de la superficie a cortar y defina
superficies excluidas según sea necesario, @ 11.6.
► Una todas las partes de la superficie a cortar planificando
e instalando corredores o superficies secundarias,
@ 11.8 y @ 11.7.
► Planifique los lazos de búsqueda si usa la función
"Pasaje" ("regreso desplazado"), @ 11.9.
► Planifique las ubicaciones para el cable de reserva en
diversos puntos para facilitar el ajuste o la modificación
subsecuente del camino del cable perimétrico, @ 11.13.
Cuando instale el cable perimétrico:
► Solo use cable perimétrico y estacas para cable
autorizadas por STIHL.
► Instale el cable perimétrico en un lazo continuo alrededor
de toda la superficie a cortar con una longitud máxima de
1,640 pies (500 m).
► Si instala el cable perimétrico alrededor de zonas más
pequeñas a 120 yd² (100 m²), o si la longitud total del
cable perimétrico es menor a 575 pies (175 m), debe
instalarse también el STIHL Small Area Module 100
(accesorio especial), @ 10.4. Para más información,
contacte a su concesionario de servicio autorizado de
STIHL iMow.
Iniciar App
La app iMow ahora
puede iniciarse
0000-GXX-7721-A0
11 Instalación del cable perimétrico

0478-131-3050-A
130
español / EE.UU
11 Instalación del cable perimétrico
► Mantenga las separaciones específicas del cable que se
detallan de bajo. Mida las separaciones usando la regla
iMow, @ 11.3.
– Patios y caminos con una diferencia máxima de altura
entre el área de corte de +/- 0.4 pulg. (1 cm): 0 pulg.
(0 cm)
– Corredores: 9 pulg. (22 cm).
– Obstáculos altos (p.ej., muros, cercas, árboles): 11
pulg. (28 cm)
– Pasajes estrechos: 17.3 pulg. (44 cm)
– Piscinas, estanques y pendientes descendentes: 3.3
pies (1 m).
► Evite crear ángulos menores a 90°: Será difícil para el
robot cortacéspedes navegar a través de estos, y podría
resultar en superficies sin cortar.
► Las superficies a cortar no deben superponerse.
Mantener una distancia mínima de ≥ 3.3 pies (1 m) entre
los cables perimétricos de las dos superficies a cortar de
vecino A y vecino B.
► Instale longitudes de reserva de cable perimétrico en
intervalos regulares cerca de pasajes difíciles. Hacer esto
facilita modificar la instalación del cable perimétrico o de
la estación de carga si se vuelve necesario.
► Si entierra el cable perimétrico, colóquelo a una
profundidad no mayor a 3.9 pulg. (10 cm).
Enterrar el cable perimétrico en el suelo puede influir en la
recepción de señal, particularmente si se han colocado
losas o adoquines sobre el cable perimétrico. El robot
cortacéspedes puede trasladarse a lo largo de un mayor
desplazamiento del cable perimétrico, requiriendo más
espacio en los corredores, zonas confinadas y cuando viaje
a lo largo de los bordes. Ajuste la ubicación y la profundidad
del cable perimétrico si es necesario.
INDICACIÓN
Evite el contacto con el cable perimétrico cuando
escarifique o airee el césped. También tenga cuidado
cuando utilice una desbrozadora cerca del cable
perimétrico. El escarificado, la aireación y el desbrozado
pueden provocar cortes o daños en el cable perimétrico.
Consulte su bosquejo de la superficie a cortar y preste
especial atención para evitar el cable perimétrico cuando
realice estas tareas.
11.2 Realización de un bosquejo de la superficie a
cortar
STIHL recomienda realizar un bosquejo de la superficie a
cortar que incluya lo siguiente:
– El contorno de la superficie a cortar incluyendo obstáculos
importantes, bordes y cualquier superficie excluida en la
que el robot cortacéspedes no deba cortar, @ 26.
– La ubicación y posición de la estación de carga, @ 10.3.
– La ubicación del cable perimétrico y cualquier conector de
cable que haya instalado, @ 11.
– Si modifica las dimensiones de su superficie a cortar
después de la configuración inicial (por ejemplo,
agregando secciones o moviendo el cable perimétrico),
vuelva a enlazar el iMow a la estación de carga (@ 10.6)
y ejecute la función probar borde (@ 15.3) para medir la
longitud del cable perimétrico y desarrollar un nuevo plan
de corte.
A
B

0478-131-3050-A
131
español / EE.UU
11 Instalación del cable perimétrico
11.3 Medición de separaciones del cable con la regla
iMow
El cable perimétrico (1) puede tenderse junto a superficies
tales como patios y veredas, siempre y cuando la superficie
sea plana, esté a nivel con la hierba y permita que el robot
cortacéspedes viaje sin obstáculos que le estorben. De ser
necesario, el robot cortacéspedes se desplazará con una de
las ruedas traseras fuera de la superficie a cortar.
La diferencia entre la altura de la superficie del césped (2) y
la del obstáculo (1) no debería superar 0.4 pulg. (1 cm).
La regla de iMow es especialmente útil para calcular las
distancias necesarias durante el tendido del cable
perimétrico.
Para asegurarse de que el robot cortacéspedes funcione sin
tocar ningún obstáculo, aun alrededor de las esquinas:
► Mantenga una separación mínima igual la longitud de la
regla iMow (a = 11 pulg. (28 cm)) con los obstáculos.
► Si se tiende el cable perimétrico en zonas confinadas,
mantenga una separación mínima de 17.4 pulg. (44 cm),
@ 11.5.
1
0000-GXX-4391-A0
Distancia mínima que se debe mantener entre
un obstáculo y el cable perimétrico.

0478-131-3050-A
132
español / EE.UU
11 Instalación del cable perimétrico
► Mantenga una separación de a = 11 pulg. (28 cm) entre el
cable y las esquinas de obstáculos altos tales como
paredes o canteros (2). Esto evita que el robot
cortacéspedes choque contra el obstáculo.
► Instale el cable perimétrico (1) con la ayuda de la regla
iMow (3) como se muestra en la ilustración.
► Mantenga una separación de a = 11 pulg. (28 cm) entre el
cable y las esquinas interiores de obstáculos altos tales
como paredes o canteros (2). Esto evita que el robot
cortacéspedes choque contra el obstáculo.
► Instale el cable perimétrico (1) con la ayuda de la regla
iMow (3) como se muestra en la ilustración.
11.4 Medición de distancias del cable en esquinas
En las esquinas agudas (< 90°) se debe instalar el cable
perimétrico de la manera ilustrada. Los dos ángulos
deberán estar separados entre sí por una longitud igual a
por lo menos la longitud de la regla de iMow (a = 11 pulg.
(28 cm)) para que el robot cortacéspedes pueda avanzar a
lo largo del borde.
11.5 Tendido del cable perimétrico en zonas
confinadas
El robot cortacéspedes es capaz de viajar automáticamente
a través de pasajes estrechos, siempre y cuando se
mantengan separaciones mínimas de los cables.
► Si se tiende el cable entre obstáculos de más de 0.4 pulg.
(1 cm) de altura, como paredes o setos, mantenga una
separación de cable mínima de la longitud de la regla
iMow (b = 11 pulg. (28 cm)).

0478-131-3050-A
133
español / EE.UU
11 Instalación del cable perimétrico
► Si se tiende el cable entre obstáculos con menos de 0.4
pulg. (1 cm) de altura, por ejemplo, veredas o patios,
mantenga una separación mínima de cable de c = 17.4
pulg. (44 cm).
► Tienda el cable perimétrico de manera que se evite el
paso a zonas estrechas en las cuales a < 39.4 pulg. (100
cm).
► Si debe tender el cable en una zona confinada, desactive
la función de regreso desplazado, @ 15.3 o instale un
lazo de búsqueda, @ 11.9.
11.6 Tendido del cable en torno a superficies
excluidas
Una superficie excluida es aquella que el robot
cortacéspedes debe evitar, incluyendo obstáculos alrededor
de los cuales no puede cortarse la hierba y objetos contra
los cuales el cortacéspedes no puede chocar para cambiar
de sentido, tales como macetas, árboles con raíces
reforzadas, etc.
► Instale una superficie excluida en torno a esos tipos de
obstáculos.
► Para asegurar una operación robusta, instale zonas
excluidas describiendo una forma circular; no use formas
ovaladas, anguladas ni curvas interiores.
► Mantenga una separación de cable de a = 11 pulg. (28
cm) alrededor del obstáculo (2) para evitar que el robot
cortacéspedes choque contra el obstáculo (2).
► Instale el cable perimétrico (1) con la ayuda de la regla
iMow (3) como se muestra en la ilustración.
► El diámetro de toda superficie excluida deberá medir no
menos de 22 pulg. (56 cm) y no más de 9.8 pies (3 m).
► Mantenga una separación mínima de b = 17.4 pulg. (44
cm) entre el cable perimétrico tendido alrededor de una
superficie excluida y el cable perimétrico tendido en el
borde de la zona de corte.
► Mantenga una separación mínima dentro de un radio de
al menos de c = 6.6 pies (2 m) alrededor de la estación de
carga (1).
► Tienda el cable perimétrico desde el borde del obstáculo,
dejando la distancia correcta con éste.
► Tienda el cable perimétrico en torno al obstáculo (2) y
fíjelo al suelo usando una cantidad adecuada de estacas
para cables (3). Observe el sentido de la instalación
(flechas).
► Luego, vuelva a tender el cable perimétrico de regreso al
borde. El segmento del cable perimétrico que se tiende al
borde (4) debe colocarse directamente junto al cable que

0478-131-3050-A
134
español / EE.UU
11 Instalación del cable perimétrico
conduce a la superficie excluida. Mantenga los
segmentos paralelos. Cuando los cables se tienden uno al
lado de otro, la señal en los mismos se anula y el iMow
cortará directamente sobre esta sección del cable
perimétrico. Sin embargo, si los cables se separan, el
iMow no cruzará sobre el cable y la zona entre los dos
segmentos del cable perimétrico quedará sin cortarse.
► Después de haber tendido el cable perimétrico de regreso
al borde, no cruce una sección del cable con otra.
Continúe la instalación alrededor del perímetro de la
superficie a cortar. El cable perimétrico deberá salir de la
superficie excluida en sentido opuesto al cual ingresó a la
superficie excluida, @ 11.10.
INDICACIÓN
STIHL recomienda comprobar que la instalación de las
superficies excluidas sea adecuada usando el comando
"Probar borde", @ 14.3.
11.7 Instalación de superficies contiguas y
secundarias
Las superficies contiguas (B) y las secundarias (C) son
partes de la superficie a cortar que no están ubicadas en la
superficie a cortar principal (A) en donde se ubica la
estación de carga (1).
Una superficie secundaria es aquella a la que el iMow no
puede trasladarse físicamente. No puede cortarse
automáticamente. El robot cortacéspedes debe ser
levantado y transportado a la superficie secundaria y ser
devuelto a la superficie principal cuando la operación de
corte haya sido completada.
Las superficies contiguas (b) solo pueden cortarse
automáticamente si están conectadas por correctores o
tramos de unión.
► Tienda el cable perimétrico (2) en la misma dirección en
todos los tramos de unión y superficies secundarias.
► Conecte todos los tramos de unión a la superficie a cortar
principal instalando corredores (@ 11.8) o tramos de
unión (@ 11.10). Nunca cruce los cables perimétricos en
los tramos de unión. Manténgalos paralelos.
► Active las superficies secundarias en el menú "Ajustes –
Instalación", @ 15.3.
11.8 Instalación de corredores
Un corredor une una superficie contigua a la superficie a
cortar principal, por ejemplo, cuando hay una superficie a
cortar ubicada frente a una casa y otra detrás de ella. Esto
permite que se corten ambas superficies automáticamente.
En los corredores, solo se corta el césped a lo largo del
recorrido del cable perimétrico. Para que el iMow corte la
superficie contigua, es necesario definir el punto de inicio en
la superficie contigua, @ 15.6.
La distancia de separación del cable y el patrón del corredor
STIHL coinciden con la instalación del cable perimétrico en
la superficie del césped. Si el cable perimétrico se ha
enterrado profundo, por ejemplo, debajo de baldosas, las
dimensiones varían. Compruebe el funcionamiento y ajuste
la instalación del cable, de ser necesario.
En los corredores, solo se corta el césped a lo largo del
recorrido del cable perimétrico.
1
A
B C
2
2
0000-GXX-3399-A0

0478-131-3050-A
135
español / EE.UU
11 Instalación del cable perimétrico
Para instalar un corredor:
► Retire las piedras, los objetos metálicos, vidrio, cables y
cualquier otro objeto que pudiera ser lanzado por el
accesorio de corte.
► Mantenga una distancia de separación mínima entre
obstáculos de más de 0.4 pulg. (1 cm) de a = 34.6 pulg.
(88 cm).
► Mantenga una distancia de separación mínima entre
obstáculos de menos de 0.4 pulg. (1 cm), es decir, entre
caminos u obstáculos transitables, de b = 9 pulg. (22 cm).
► Tienda el cable perimétrico (1) paralelo al suelo y emplee
la cantidad necesaria de estacas (2) para sujetarlo al
suelo.
► Instale una puerta, la cual sea una superficie de entrada
y salida en forma de embudo al inicio y al final del
corredor. Mantenga las siguientes distancias:
– c = 2.4 pulg. (6 cm).
– d = 9 pulg. (22 cm)
– e = 9 pulg. (22 cm)
El iMow no ingresará al corredor por accidente.
► Instale el cable perimétrico (1) en línea recta a la
izquierda y a la derecha de la entrada del corredor. El
tramo recto deberá medir por lo menos una vez la longitud
del robot cortacéspedes.
► Utilice el Patrón de Corredor STIHL en forma de túnel (C)
para instalar la entrada en cada extremo del corredor.
► Cuando se usa la función de "Pasaje" (regreso
desplazado), hay que instalar lazos de búsqueda en la
superficie contigua para que el iMow pueda localizar la
entrada y regresar a la estación de carga, @ 11.9.
► Defina por lo menos 1 punto de inicio en la superficie
contigua, @ 15.6.
► Si es necesario, active la función de corte automático del
borde o corte manualmente la superficie del corredor con
regularidad, @ 14.3 y @ 15.3.
C
1
0000-GXX-5414-A0

0478-131-3050-A
136
español / EE.UU
11 Instalación del cable perimétrico
Ejemplo de instalación de un corredor
La estación de carga (1) está instalada en la superficie a
cortar principal (A). Se conecta una superficie contigua (B)
a la superficie a cortar principal a través de un corredor (2).
El robot cortacéspedes puede seguir el cable perimétrico (3)
sin interrupciones. Para asegurarse de que la unidad corte
la superficie contigua, se definieron dos puntos de inicio (4).
11.9 Instalación de lazos de búsqueda
Si la función "Pasaje" (regreso desplazado) está activa,
deben estar instalados lazos de búsqueda para ayudar al
robot cortacéspedes a reconocer la ubicación de una
estación de carga externa, un corredor o una zona
confinada. Si el robot cortacéspedes cruza un lazo de
búsqueda durante su regreso desplazado, el robot
cortacéspedes viajará directamente hacia el cable
perimétrico y hacia la estación de carga o a través del
corredor o zona confinada.
Para instalar un lazo de búsqueda:
► Mantenga una separación mínima de = 6.6 pies (2 m) de
los bordes de la superficie a cortar.
► Instale el cable perimétrico (1) con una longitud mínima
de b = 3.3 pies (1 m) y con una distancia de d = 0.4 pulg.
(1 cm) en medio.
► Fije el cable perimétrico al suelo con dos estacas para
cables en el borde (A). No cruce los cables perimétricos.
Manténgalos paralelos.
► Fije el lazo de búsqueda al suelo con un número suficiente
de estacas para cables.
Para instalar un lazo de búsqueda junto con una estación de
carga externa:
► Instale dos lazos de búsqueda (1), cada uno en un ángulo
de 90° al lado izquierdo y derecho de la estación de carga.
► Mantenga una separación mínima de 6.6 pies (2 m) de la
estación de carga.
1
B
A
4 4
2
3
0000-GXX-3400-A1
a
a
b
1
A
C
A
1
1
d
0000-GXX-3406-A1
11
aa
0000-GXX-3404-A0

0478-131-3050-A
137
español / EE.UU
11 Instalación del cable perimétrico
Para instalar un lazo de búsqueda junto con un corredor:
► Instale dos lazos de búsqueda (1) en un ángulo de 90° en
la parte de la superficie a cortar a la que solo pueda
acceder mediante un corredor.
► Mantenga una separación mínima de 6.6 pies (2 m) de la
entrada del corredor.
11.10 Instalación de tramos de unión
Un tramo de unión conecta una superficie secundaria a la
superficie a cortar principal, p.ej.,superficie a cortar en
frente de o detrás de la casa a la que el iMow no puede
trasladarse por su cuenta. Esto permite que se corten
ambas superficies automáticamente.
► Tienda los cables perimétricos (1) en paralelo y cerca uno
del otro.
► Fije el tramo de unión al suelo con un número suficiente
de estacas para cables (2).
11.11 Corte preciso de los bordes
► Junto a obstáculos altos, tienda el cable perimétrico a una
distancia mínima de 11 pulg. (28 cm) con respecto al
obstáculo. Esta zona de barrera quedará sin cortar.
Para evitar la zona de barrera que quedará sin cortar, se
pueden colocar piedras de borde o baldosas alrededor de
obstáculos altos, por ejemplo, paredes. El ancho de las
piedras de borde deberá medir b = 10.2 pulg. (26 cm) como
mínimo.
11.12 Terreno inclinado en la superficie a cortar
INDICACIÓN
STIHL recomienda que se instale el cable perimétrico a una
inclinación máxima de +/- 10 grados. El cable perimétrico
puede instalarse a una inclinación de hasta +/- 15 grados,
pero para ello se requerirán ajustes adicionales a la
instalación del cable perimétrico. Las pendientes también
deberán indicarse en el bosquejo del patio.
Mantenga una distancia mínima de 39.4 pulg. (100 cm) de
las regiones con agua y de caídas potenciales, tales como
bordes y escalones.
aa
11
0000-GXX-3405-A0
1
1
2
1
0000-GXX-3403-A0

0478-131-3050-A
138
español / EE.UU
11 Instalación del cable perimétrico
Para instalar el cable perimétrico en una pendiente con una
inclinación de 5° a 15°:
► Tienda el cable perimétrico (1) por encima del borde
superior de la pendiente, manteniendo una distancia
mínima de a = 19.7 pulg. (0.5 m).
► Si la inclinación es superior a 15°, tienda el cable
perimétrico de modo que el robot cortacéspedes se
detenga antes de llegar al borde de la inclinación. El
borde superior de la pendiente y la superficie inclinada
deben permanecer fuera de la zona de corte.
11.13 Instalación de cables de reserva
Instalar longitudes de reserva de cable perimétrico en
intervalos regulares facilita modificar posteriormente la
superficie a cortar o la colocación de la estación de carga,
si fuese necesario.
Para instalar el cable de reserva:
► Tienda el cable perimétrico (1) entre 2 estacas para
cables ubicadas a una distancia de a = 3.3 pies (1 m) una
de la otra.
► Fije el cable de reserva al suelo en el centro usando una
estaca para cables adicional.
11.14 Uso de conectores de cable
ADVERTENCIA
Para reducir los riesgos de lesiones graves o fatales o
daños a la propiedad como resultado de un incendio o
descarga eléctrica, solo use los conectores de cable
autorizados por STIHL.
Los conectores de cable están diseñados para unir dos
extremos sueltos de cable perimétrico para extender el
cable perimétrico o para conectar extremos sueltos de cable
causados por rotura. Contienen gel en su interior para
prevenir desgaste prematuro o corrosión de los extremos
del cable.
► Tome nota de las posiciones de los conectores de cable
en su bosquejo de la superficie a cortar, @ 11.2.
1
5-15
a
0000-GXX-4395-A0
1
15
0000-GXX-4396-A1
a
1
0000-GXX-3410-A0

0478-131-3050-A
139
español / EE.UU
12 Estación de conexión
► Introduzca los extremos sueltos de los cables (2) en el
conector de cables (1).
► Presione el conector de cables usando pinzas adecuadas.
► Fije el cable perimétrico al suelo usando dos estacas para
cables, dejando un tramo de a = 2 pulg. (5 cm) como alivio
de tensión como se muestra arriba.
11.15 Instalación del cable perimétrico más cerca del
borde de la zona de corte
Luego de la instalación, verifique que haya una separación
de por lo menos 2 pulg. (5 cm) entre el robot cortacéspedes
y el obstáculo durante el funcionamiento, @ 10.7, @ 15.3.
De ser necesario, aumente la distancia de separación entre
el cable y el obstáculo. En los tramos rectos, el cable
perimétrico puede tenderse hasta a 9 pulg. (22 cm) de
obstáculos altos. Esto reduce la cantidad de pasto sin
cortar.
En el bosquejo del jardín, anote las zonas en las cuales el
cable perimétrico se ha tendido más cerca del borde de la
zona de corte.
► Instale el cable perimétrico (1) con la ayuda de la regla
iMow (2) como se muestra en la ilustración.
– a = 9 pulg. (22 cm)
12.1 LED en la estación de carga
Un LED rojo (1) muestra el estado de la estación de carga y
la señal del cable perimétrico.
Si el LED está apagado: La estación de carga está apagada
y la señal del cable no se está transmitiendo.
2
1
0000-GXX-3411-A1
a
0000-GXX-3412-A1
12 Estación de conexión
1
0000-GXX-3341-A0

0478-131-3050-A
140
español / EE.UU
12 Estación de conexión
Si el LED brilla: La estación de carga está encendida y el
robot cortacéspedes no está acoplado.
Si el LED destella lentamente: La estación de carga está
encendida, el robot cortacéspedes se ha acoplado
exitosamente o se está cargando.
Si el LED se ilumina por 3 segundos seguido de una pausa
de 1 segundo: La función Homecall está activa y el robot
cortacéspedes ha recibido el comando de regresar a la
estación de carga.
Si el LED destella rápidamente (aproximadamente dos
veces por segundo): El cable perimétrico no está conectado
apropiadamente a la estación de carga o la señal del cable
ya no está presente. El cable perimétrico podría estar roto
(rotura de cable).
Si el LED destella rápidamente en intervalos: El LED
destella alternadamente 3 veces en un intervalo de 1
segundo, 3 veces en un intervalo de 2 segundos, 3 veces en
un intervalo de 1 segundo, pausa de 5 segundos. Después
de la pausa, la señal de repite. La estación de carga
presenta una avería. Para información de solución de
problemas, @ 22.
12.2 Controles de la estación de carga
Botón de encendido/apagado/posición inicial
12.3 Conexión del robot cortacéspedes
Conexión automática
El robot cortacéspedes se desplazará automáticamente
hasta la estación de carga y se conectará cuando finalice el
intervalo de actividad o el robot cortacéspedes necesite
recargarse.
1
0000-GXX-3341-A0
Mantenga pulsado el botón de
encendido/apagado/posición inicial por 2 segundos
durante la operación de corte para desactivar la
señal del cable. El robot cortacéspedes se detendrá,
permanecerá en la superficie a cortar y aparecerá un
mensaje en la pantalla de la unidad.
Pulse el botón de encendido/apagado/posición inicial
dos veces en un lapso de 2 segundos durante una
operación de corte para regresar el robot
cortacéspedes a la estación de carga (Homecall).
El robot cortacéspedes detendrá la operación de
corte en curso, buscará el cable perimétrico y
regresará a la estación de carga para recargar la
batería. Cuando se inicia la función Homecall, el
robot cortacéspedes no iniciará ninguna otra
operación de corte durante el intervalo de actividad
actual. La función Homecall permanece activa hasta
que el robot cortacéspedes se conecte con la
estación de carga. La función Homecall puede
suspenderse manualmente pulsando el botón de
encendido/apagado/posición inicial en un lapso de 2
segundos. El robot cortacéspedes reanudará las
operaciones de corte durante su siguiente intervalo
de actividad programado.

0478-131-3050-A
141
español / EE.UU
12 Estación de conexión
Conexión con la función Homecall
El robot cortacéspedes se puede llamar manualmente de
regreso a la estación de carga. Para llamar de regreso al
robot cortacéspedes:
► Presione el botón de encendido/apagado/posición inicial
situado en la estación de carga dos veces en el plazo de
2 segundos.
El robot cortacéspedes regresará a la estación de carga y
no iniciará ningún otro corte durante el intervalo de
actividad actual.
Conexión manual
► Active el bloqueo de equipo y transporte el robot
cortacéspedes a la estación de carga manualmente,
@ 18.
► Levante ligeramente el robot cortacéspedes por el asa de
transporte trasero (1) y alivie el peso ejercido sobre las
ruedas motrices.
► Empuje el robot cortacéspedes, que descansa sobre las
ruedas frontales, hacia la estación de carga.
12.4 Carga del robot cortacéspedes
ADVERTENCIA
Lea y siga las precauciones de seguridad y las instrucciones
del robot cortacéspedes y de la estación de carga en este
manual, @ 5.4 y @ 6. Esté alerta a los signos que
indiquen que la batería integrada podría estar dañada. Para
reducir el riesgo de lesiones personales como resultado de
un cortocircuito, incendio o explosión, nunca use o cargue
el robot cortacéspedes si el capó o la carcasa está
agrietada, deformada o excesivamente caliente, si hay
fugas de líquidos del compartimiento de la batería, o si la
batería presenta algún daño, @ 5.5.
ADVERTENCIA
Para reducir el riesgo de sufrir una descarga eléctrica, solo
cargue el robot cortacéspedes en la estación de carga. No
remueva la batería o intente cargarla usando una fuente de
alimentación externa.
Carga automática
El robot cortacéspedes comenzará a cargarse
automáticamente cuando regrese a la estación de carga al
finalizar la operación de corte y cuando su nivel de energía
caiga debajo de un valor determinado.
Carga manual
Para iniciar la carga:
► Acople el robot cortacéspedes a la estación de carga.
► Si es necesario, salga del modo de espera del robot
cortacéspedes pulsando cualquier botón.
La carga iniciará automáticamente.
El tiempo de carga depende de varios factores, incluyendo
la condición de la batería y la temperatura ambiente. La
exposición directa a la luz solar puede provocar aumento de
las temperaturas dentro de la máquina y del compartimiento
de la batería, lo que puede aumentar los tiempo de carga de
la batería.
Estado de carga
1
0000-GXX-4398-A2
Durante la carga, la pantalla de estado mostrará el
símbolo de carga y el mensaje "Cargando la batería".
En todos los demás menús, la pantalla mostrará un
símbolo de enchufe que indica que el robot
cortacéspedes está cargando.
La pantalla de estado mostrará el estado actual de la
carga.

0478-131-3050-A
142
español / EE.UU
13 Información de pantalla del tablero de control
Si sale del modo de espera, pero el estado de la carga es
demasiado bajo para que el robot cortacéspedes regrese a
la estación de carga, este símbolo se mostrará en toda la
pantalla. Después de algunos segundos, la pantalla se
apagará y el robot cortacéspedes regresará al modo de
espera.
13.1 Área de información
En la esquina superior derecha de la pantalla aparecerá la
siguiente información:
1. Señal celular
La pantalla muestra la intensidad de la señal celular.
2. Hora
La hora actual se indica en el formato de 24 horas.
3. Estado de la función de corte automático
4. Estado de carga
El símbolo de la batería indicará el estado de carga de la
batería.
13.2 Pantallas de estado
Pueden aparecer pantallas de estado diferentes,
dependiendo del estado del robot cortacéspedes.
En todos los demás menú, la pantalla mostrará un
símbolo de batería para indicar el estado de carga
del robot cortacéspedes.
13 Información de pantalla del tablero de
control
0000-GXX-3878-A0
0000-GXX-7722-A0
– 4 barras: intensidad de señal óptima.
– 1 a 3 barras: intensidad de señal media.
– Ninguna barra: no hay señal.
Se muestra un signo de interrogación durante el
arranque del módulo cuando la unidad está captando
la señal celular.
Una "x" pequeña indica que no hay conexión a
Internet.
Cuando se active la función de corte automático,
aparecerá el símbolo de funcionamiento automático.
– Ninguna barra: batería descargada.
– 1 a 5 barras: batería parcialmente descargada.
– 6 barras: carga completa.
Durante el proceso de carga aparecerá el símbolo
del enchufe de la fuente de alimentación en vez del
símbolo de la batería.

0478-131-3050-A
143
español / EE.UU
13 Información de pantalla del tablero de control
► Configure la pantalla de estado con información diversa,
@ 14.4.
Pantalla de estado cuando el robot cortacéspedes no está
en funcionamiento
Aparecerá el texto "iMow listo para func." y el estado de
corte automático en la parte inferior de la pantalla.
Hay dos campos configurables en la parte superior de la
pantalla.
Pantalla de estado durante la operación
Aparecerá el texto "Atención – iMow arrancando" y el
símbolo de alerta de seguridad antes de que inicie la
operación de corte. Además, el parpadeo de la iluminación
de la pantalla y una señal acústica indican el arranque del
robot cortacéspedes.
Aparecerá el texto "iMow cortando césped" y un símbolo
correspondiente durante la operación de corte activa. El
texto y el símbolo variarán dependiendo de la operación
activa específica.
Pantalla de estado para mensajes
Corte de borde: Mientras el robot cortacéspedes
corte los bordes de la superficie a cortar, aparecerá
el texto "Cortando borde".
Ir a la estación de carga: Cuando el robot
cortacéspedes regrese a la estación de carga, la
razón correspondiente se indica en la pantalla (p.ej.,
"Batería descargada" o "Corte finalizado").
Carga de la batería: El texto "Cargando la batería"
aparecerá durante la carga.

0478-131-3050-A
144
español / EE.UU
14 Funciones de los menús
Si ocurre un error durante el funcionamiento, aparecerá un
mensaje que incluye la fecha y la hora del incidente y el
código del mensaje correspondiente. Si aplican varios
mensajes, aparecerán alternativamente, @ 22.1.
14.1 Navegación por los menús
► Seleccione un submenú usando el teclado de navegación.
Si se selecciona un submenú, éste se muestra en un
fondo negro.
► Abra el submenú seleccionado pulsando el botón OK.
En el segundo nivel del menú, los diversos submenús se
muestras como pestañas.
► Seleccione una pestaña pulsando el teclado de
navegación hacia la izquierda o derecha.
► Seleccione un submenú pulsando el teclado de
navegación hacia arriba o abajo.
Las pestañas seleccionadas y las entradas del submenú
se muestran en un fondo negro.
► Si hay una barra de desplazamiento en el borde derecho
de la pantalla, verá más entradas pulsando el teclado de
navegación hacia arriba o abajo.
► Pulse el botón OK para abrir un submenú.
Las opciones se muestran en los submenús. Las entradas
seleccionadas se muestran en un fondo negro.
► Pulse el botón OK para abrir una ventana de selección o
una ventana de diálogo.
Ventana de selección
El valor seleccionado se muestra en un fondo negro.
► Navegue a través de los valores y cámbielos usando el
teclado de navegación.
► Pulse el botón OK para confirmar sus selecciones.
14 Funciones de los menús
0000-GXX-3375-A0_E
2018
2017
2019
0000-GXX-3594-A0_E

0478-131-3050-A
145
español / EE.UU
14 Funciones de los menús
Ventana de diálogo
Si se tienen que guardar los cambios o confirmar mensajes,
aparecerá una ventana de diálogo en la pantalla. El botón
seleccionado se muestra en un fondo negro.
► Pulse el botón OK para confirmar la selección.
14.2 Descripción general
Comandos
Información
Plan de corte
Ajustes
14.3 Comandos
► Seleccione una pestaña pulsando el teclado de
navegación hacia la izquierda o derecha.
► Pulse el botón OK para abrir el submenú.
Menú principal
El menú principal contiene 4 submenús. El menú
principal aparecerá,
– Cuando la pantalla de estado (@ 13.2) se quite
pulsando el botón OK.
– Cuando el comando "Menú principal" esté
activado.
– Cuando el botón Atrás se pulse en el segundo nivel
del menú.
Este submenú contiene un grupo de operaciones
autónomas de corte, @ 14.3.
Este submenú contiene información sobre el césped
o del estado del robot cortacéspedes, @ 14.4.
Este submenú contiene funciones para modificar el
plan de corte, @ 14.5.
Este submenú contiene funciones para modificar los
ajustes del robot cortacéspedes, @ 15.
Seleccione para regresar al menú principal.

0478-131-3050-A
146
español / EE.UU
14 Funciones de los menús
Bloquee el robot cortacéspedes y active el bloqueo de
equipo.
Encienda/apague el corte automático
Esta función también se puede controlar mediante la app
iMow. El robot cortacéspedes regresará automáticamente a
la estación de carga cuando el corte automático se apaga
mediante la app iMow.
Ir a la estación de carga
Esta función también se puede controlar mediante la app
iMow.
Comenzar a cortar
Esta función también se puede controlar mediante la app
iMow.
Seleccione regresar para bloquear el robot
cortacéspedes y activar el bloqueo de equipo.
Seleccione para encender o apagar el corte
automático.
Cuando el corte automático se enciende, en la
pantalla de estado aparece el texto "Automático
encendido" y se muestra el símbolo junto al símbolo
de la batería.
Cuando el corte automático se apaga, en la pantalla
de estado aparece el texto "Automático apagado" y
los intervalos de actividad se muestran como
inactivos (en gris) en el plan de corte.
Seleccione para ordenar al robot cortacéspedes que
vaya de inmediato a la estación de carga.
El robot cortacéspedes regresa a la estación de
carga y carga su batería. Si el corte automático esta
encendido, el robot cortacéspedes comenzará a
cortar la superficie a cortar nuevamente durante el
próximo intervalo de actividad posible.
Seleccione para comenzar de inmediato la operación
de corte.
Si se ha instalado una superficie secundaria,
presione el botón OK y a continuación especifique si
la operación de corte se está realizando en una
superficie secundaria o en la superficie principal,
@ 14.6.
Si se ha instalado una estación de carga externa con
un corredor, lleve el robot cortacéspedes a la
superficie a cortar antes de activar el comando
"Comenzar a cortar".
Se le solicitará que introduzca la hora para finalizar
la operación de corte. El ajuste por defecto de la
duración de la operación de corte se puede modificar
desde "Tiempo corte" en los ajustes de la unidad,
@ 15.
El tiempo de corte en las superficies principales o
contiguas posterior al comando "Comenzar a cortar"
se descontará de la duración de corte total del plan
de corte semanal.

0478-131-3050-A
147
español / EE.UU
14 Funciones de los menús
Comenzar corte con retardo
Esta función también se puede controlar mediante la app
iMow.
Saltar el próximo intervalo de actividad
Corte de borde
14.4 Información
Mensajes
Eventos
Seleccione para establecer una hora definida para
comenzar la operación de corte.
Si se ha instalado una superficie secundaria,
después de presionar el botón OK es necesario
definir si la operación de corte se está realizando en
una superficie secundaria o en la principal, @ 14.6.
Si se ha instalado una estación de carga externa con
un corredor, lleve el robot cortacéspedes a la
superficie a cortar antes de activar el comando
"Comenzar corte con retardo".
Se le solicitará que introduzca la hora para finalizar
la operación de corte. El ajuste por defecto de la
duración de la operación de corte se puede modificar
desde "Tiempo corte" en los ajustes de la unidad,
@ 15.
El tiempo de corte en las superficies principales o
contiguas posterior al comando "Comenzar corte con
retardo" se descontará de la duración de corte total
del plan de corte semanal.
Seleccione para saltar el próximo intervalo de
actividad.
No tendrá lugar ningún corte durante el próximo
intervalo de actividad. Los intervalos de actividad que
han sido cancelados de esta manera se muestran en
gris en el plan de corte. Pueden ser liberados
nuevamente para corte en el menú "Plan diario",
@ 14.6.
Si el comando se lleva cabo varias veces seguidas,
el próximo intervalo de actividad siempre se salta. Si
no quedan intervalos de actividad para la semana
actual, aparece el mensaje "No se llevará a cabo
ninguna operación de corte la semana que viene".
Seleccione para cortar el borde de la superficie a
cortar.
Después de completar un circuito, el robot
cortacéspedes regresa a la estación de carga y carga
la batería.
Este submenú contiene una lista de todos los errores
activos y recomendaciones, incluyendo la fecha y
hora en la cual ocurrieron y el código de mensaje
correspondiente.
Pulse el botón OK para ver los detalles de cada
mensaje, @ 22.1.
Si no hay ningún mensaje disponible, aparecerá en
pantalla el texto "Sin mensajes".
Este submenú contiene una lista de las últimas
actividades del robot cortacéspedes. Pulsando el
botón OK se pueden ver los detalles de los eventos
(texto adicional, tiempo y código).
Los errores que se producen durante el
funcionamiento normal quedan documentados en los
mensajes.

0478-131-3050-A
148
español / EE.UU
14 Funciones de los menús
Estado del robot cortacéspedes Información del césped
Estado de módulo celular
Este submenú contiene información sobre el estado
del robot cortacéspedes:
– Estado de carga: Estado de carga de la batería
expresado como porcentaje.
– Tiempo rest.: Indicación del tiempo que falta, en
horas y minutos, para completar el proceso de
corte de la semana en curso.
– Hora y fecha.
– Hora inicio: Inicio de la próxima operación de corte
programada.
– Cantidad total de operaciones de corte
completadas.
– Horas corte: Duración (en horas) de todas las
operaciones de corte completadas.
– Distancia: Distancia total cubierta en metros.
– No. de serie: Número de serie del robot
cortacéspedes. También puede hallarse en la
placa de identificación en el compartimiento debajo
del panel de mandos.
– Batería: Número de serie de la batería.
– Software: Software instalado en la unidad.
Este submenú contiene información sobre el césped:
– Superficie de corte en metros cuadrados: Esta
medida se obtiene durante la instalación.
– Tiempo de vuelta: Duración de una vuelta
alrededor de la superficie a cortar expresada en
minutos y segundos.
– Puntos de inicio 1 – 4: Distancia en metros entre el
punto de inicio relevante y la estación de carga,
medida en sentido de las agujas del reloj.
– Circunferencia: Circunferencia de la superficie a
cortar en metros.
– Corte de borde: Frecuencia semanal de las
operaciones de corte del borde.
Este menú contiene información sobre el estado del
módulo celular integrado:
– Satélites: Número de satélites dentro del alcance.
– Posición: Posición actual del robot cortacéspedes.
– Intensidad de señal: La intensidad de la señal de la
red móvil celular.
– Red: Identificador de red, que consta del código de
país (MCC) y código del proveedor (MNC).
– Número de teléfono móvil: Número de teléfono
móvil del propietario registrado, ingresado en la
app iMow.
– IMEI: Número de equipo físico del módulo celular.
– IMSI: Identidad de abonado móvil internacional.
– SW: Versión de software del módulo celular.
– No. de serie: Número de serie del módulo celular.

0478-131-3050-A
149
español / EE.UU
14 Funciones de los menús
14.5 Plan de corte
Teoría de operación de plan de corte
Antes de modificar su plan de corte, lee detenidamente la
siguiente sección.
Durante la configuración inicial, el iMow calculará
automáticamente un plan de corte automático apropiado. El
plan consiste en intervalos de actividad y en una duración
de corte semanal. Los intervalos de actividad son las
ventanas de tiempo en las que el iMow está programado
para cortar automáticamente. El iMow solo cortará en modo
automático durante los intervalos de actividad. La duración
de corte es el número total de horas que el iMow cortará por
semana.
Los resultados de corte satisfactorios dependerán de que el
iMow tenga suficiente duración de corte e intervalos de
actividad suficientes para completar la operación de corte
para todo el césped. El corte automático se detendrá una
vez que el iMow haya alcanzado su duración de corte total
asignada para la semana, incluso aunque haya intervalos
de actividad restantes programados.
Los intervalos de actividad y la duración de corte deben
configurarse apropiadamente para garantizar que un
número suficiente de horas de corte se establezcan cada
semana (duración de corte) y que el iMow tenga suficientes
ventanas de tiempo (intervalos de actividad) para completar
el corte.
Si aumenta la duración de corte, asegúrese de también
extender los intervalos de actividad para adaptarse al
número aumentado de horas de corte. El intervalo de
actividad semanal total debe ser superior a la duración de
corte semanal total para justificar el tiempo de carga y para
proporcionar una reserva en caso de que se pierdan
intervalos de actividad debido a lluvia.
La pantalla de estado muestra la duración de corte restante
para la semana y el siguiente intervalo de actividad
programado.
Menú de plan de corte
Los bloques rectangulares que se muestran en negro
debajo de los días de la semana representan los intervalos
de actividad guardados. Cuando se enciende el corte
automático, las operaciones de corte se llevan a cabo
durante los intervalos de actividad. El iMow no cortará
durante todos los intervalos de actividad, ya que el iMow
podría regresar a la estación de carga si comienza a llover
o si el iMow necesita cargarse.
Los bloques que se muestran en gris representan los
intervalos de actividad sin operaciones de corte, p.ej., el
intervalo de actividad que haya sido desactivado por el
operador o el intervalo de actividad que se haya saltado,
@ 14.3. Cuando se apague el corte automático, todo el
plan de corte se desactiva y todos los intervalos de actividad
se muestran en gris.
► Seleccione un intervalo de actividad o la duración de corte
pulsando el teclado de navegación hacia arriba o abajo.
► Abra los ajustes pulsando el botón OK.
Activa el plan de corte almacenado en el submenú
"Plan de corte".
Si desea editar los intervalos de actividad para un día
individual, pulse el teclado de navegación hacia la
izquierda o derecha para seleccionar el día.
Seleccione el submenú "Intervalos act." y pulse el
botón OK.

0478-131-3050-A
150
español / EE.UU
14 Funciones de los menús
14.6 Intervalos de actividad
ADVERTENCIA
Mantenga a las personas presentes y en especial a los
niños y a las mascotas lejos de la superficie a cortar. Nunca
permita que los niños se aproximen al robot cortacéspedes
o que jueguen con él. Mantenga a los niños y a las mascotas
alejados del robot cortacéspedes mientras está en
funcionamiento. Nunca deje que el robot cortacéspedes
funcione si sabe que hay o puede haber animales o
personas en la superficie a cortar o cerca de ésta.
Al lado de cada intervalo de actividad, aparece un símbolo
del estado actual del intervalo de actividad:
Si los intervalos de actividad no son suficientes para permitir
las operaciones de corte y la carga necesarias, usted puede
aumentar los intervalos de actividad o reducir la duración de
corte. Para editar los intervalos de actividad:
INDICACIÓN
Si tiene un sistema de aspersores, programe el robot
cortacéspedes para evitar las horas de riego activas para
reducir la probabilidad de dañar las cabezas de los
aspersores del contacto con la cuchilla de corte. El robot
cortacéspedes y el sistema de aspersores nunca deberán
funcionar al mismo tiempo.
Este símbolo indica que el intervalo de actividad está
activado. El robot cortacéspedes cortará
automáticamente de acuerdo con el plan de corte.
Este símbolo indica que el intervalo de actividad está
desactivado. El robot cortacéspedes no cortará
durante este intervalo.
Seleccione la opción del menú "Intervalo nuevo" para
agregar un intervalo de actividad. Un intervalo de
actividad adicional no puede superponerse con otros
intervalos de actividad.
Pueden guardarse hasta 3 intervalos de actividad por
día.
Seleccione "Eliminar todos interv." para borrar todos
los intervalos de actividad en el día seleccionado.
El robot cortacéspedes dejará de funcionar en ese
día.
Seleccione "Inicio intervalo act./Fin intervalo act."
para habilitar o deshabilitar el intervalo seleccionado
para corte automático.
Seleccione "Cambiar interv. act." para modificar el
intervalo en el que el robot cortacéspedes estará
cortando.
Seleccione "Eliminar interv. act." para borrar este
intervalo de actividad específico.
El robot cortacéspedes dejará de funcionar en este
intervalo.

0478-131-3050-A
151
español / EE.UU
15 Ajustes
14.7 Duración de corte
Si está reprogramando el plan de corte en su nuevo plan de
corte, intervalos de actividad, el robot cortacéspedes
iniciará una operación de corte después de que confirme el
nuevo plan de corte.
15.1 Descripción general de ajustes
El menú Ajustes contiene 5 submenús, que se muestran
como botones:
Robot cortacéspedes
Instalación
Seguridad
Mantenimiento
Área para concesionarios
15.2 Ajustes de iMow
Sensor de lluvia
Para ajustar el sensor de lluvia:
► Pulse el teclado de navegación hacia la izquierda o
derecha. El valor actual se muestra con un diagrama de
líneas.
Seleccione "Cambiar duración de corte" para
modificar el total semanal de horas de corte. La
duración de corte establecida durante la instalación
inicial se basa en el tamaño de la superficie a cortar,
pero puede aumentarse o disminuirse en este
submenú.
Seleccione "Nuevo plan de corte" para borrar todos
los intervalos de actividad guardados y para
programar un nuevo plan de corte. Se activará el
paso "Programar el robot cortacéspedes" del
asistente de instalación, @ 10.8.
15 Ajustes
Seleccione este submenú para modificar los ajustes
del robot cortacéspedes, @ 15.2.
Seleccione este submenú para modificar y probar la
instalación, @ 15.3.
Seleccione este submenú para modificar los ajustes
de seguridad, @ 15.4.
Seleccione este submenú para confirmar el
reemplazo de la cuchilla de corte. Esto reiniciará el
contador interno de reemplazo de cuchilla. También
seleccione este submenú para encontrar una rotura
del cable, @ 15.5.
Este submenú protegido por código solo es accesible
por tu concesionario de mantenimiento autorizado de
STIHL iMow.
Ajusta la sensibilidad del sensor de lluvia de 5
niveles.
Seleccione esta opción para permitir el corte con
niveles de humedad más altos. Si la barra se
desplaza hasta la extrema izquierda, el robot
cortacéspedes cortará incluso con lluvia.
Seleccione esta opción para permitir el corte en
condiciones ambientales ordinarias.

0478-131-3050-A
152
español / EE.UU
15 Ajustes
Tiempo de corte
Retardo
Pantalla de estado
Para configurar la pantalla de estado:
► Use el teclado de navegación para seleccionar la parte
izquierda o derecha de la pantalla y pulse OK para
confirmar su selección.
► Para cada parte de la pantalla, seleccione uno de los
siguientes para que aparezca en la pantalla de estado:
Hora
La hora también se puede ajustar mediante la app iMow.
Fecha
La fecha también se puede ajustar mediante la app iMow.
Formato fecha
Seleccione esta opción para permitir el corte solo con
niveles de humedad bajos. Si la barra se desplaza
hasta la extrema derecha, el robot cortacéspedes
solo cortará si el sensor de lluvia se encuentra
completamente seco.
Ajusta el tiempo de corte predeterminado para la
duración de un servicio de corte al activar el corte
automático con el comando "Comenzar a cortar",
@ 14.3.
Ajusta la duración del retardo al activar el comando
"Comenzar corte con retardo", @ 14.3.
Puede editar la pantalla de estado para que muestre
la información que usted quiere ver, @ 13.2.
Estado de carga: El estado de carga de la batería
aparecerá en la pantalla de estado expresado en
porcentaje.
Tiempo rest.: La duración de corte restante de la
semana actual aparecerá en la pantalla de estado.
Hora y fecha: La fecha y la hora actuales aparecerán
en la pantalla de estado.
Hora inicio: La hora de inicio de la próxima operación
de corte planeada aparecerá en la pantalla de
estado. Durante la ejecución de un intervalo de
actividad, aparecerá el texto "activo".
Eventos de corte: El número total de operaciones de
corte realizadas aparecerá en la pantalla de estado.
Horas corte: La duración total de todas las
operaciones de corte realizadas aparecerá en la
pantalla de estado.
Distancia: La distancia total recorrida aparecerá en la
pantalla de estado.
Intensidad de señal: Intensidad de señal de la
conexión celular con el ID de red.
Una pequeña "x" indica que el robot cortacéspedes
no está conectado a Internet.
Intensidad de señal: Se muestra un signo de
interrogación durante la inicialización del módulo
celular (revisión de hardware y software, por
ejemplo, después de encender el robot
cortacéspedes).
Recepción GPS: Coordenadas GPS del robot
cortacéspedes.
Establece la hora actual.
Siempre establezca la hora correcta para asegurar la
precisión del plan de corte y evitar el corte
automático en momentos indeseados.
Establece la fecha actual.
Siempre establezca la fecha correcta para asegurar
la precisión del plan de corte y evitar el corte
automático en momentos indeseados.
Establece el formato de fecha de su preferencia.

0478-131-3050-A
153
español / EE.UU
15 Ajustes
Desviación de trayectoria
Idioma
Contraste
Modo energía
15.3 Instalación
Pasaje (regreso desplazado)
El robot cortacéspedes puede regresar a la estación de
carga con un mayor desplazamiento con respecto al cable
perimétrico.
► Asegúrese de que el cable perimétrico haya sido tendido
con una separación mínima de al menos 6.6 pies (2 m) en
las secciones más estrechas.
► Active los ajustes de pasaje para modificar la forma en
que el robot cortacéspedes regresa a la estación de
carga. Seleccione una de las tres opciones:
– Desplazamiento (ajuste predeterminado): El robot
cortacéspedes se desplaza a lo largo del cable
perimétrico.
– Estrecho: El robot cortacéspedes viaja a lo largo del
cable perimétrico con un desplazamiento de 15.7 pulg.
(40 cm) dentro del cable perimétrico.
– Ancho: El robot cortacéspedes viaja dentro de un
pasaje de 15.7 pulg. a 31.5 pulg. (40 cm a 80 cm)) del
cable perimétrico.
► Si ha instalado una estación de carga externa, una zona
confinada o una sección conectada por un corredor,
instale lazos de búsqueda para el regreso desplazado,
@ 11.9.
ASM (Maniobra antiatasco)
El robot cortacéspedes inicia una rutina evasiva si se
atasca: La ASM está apagada de manera predeterminada.
► Deje el ajuste predeterminado (ASM apagada), si hay
extensiones largas y planas en la superficie a cortar (p.ej.,
entradas de asfalto), si el robot cortacéspedes a menudo
da vuelta de 90° inesperadamente durante su
funcionamiento o si éste deja de cortar inesperadamente
y la pantalla muestra el mensaje "1131 - Atascado".
Nueva instalación
Puntos de inicio
Cambia la desviación estándar del robot
cortacéspedes de 2.36 pulg. (6 cm) desde el cable
perimétrico a una desviación mayor o menor (1.18
pulg. a 3.54 pulg. (3 cm a 9 cm)).
Para asegurar el desempeño óptimo bajo las
instrucciones de ajuste estándar, STIHL recomienda
conservar el ajuste por defecto de desviación de
trayectoria.
Seleccione el idioma de su preferencia para la
pantalla. El idioma se selecciona durante la primera
instalación y se conserva como ajuste por defecto.
Cambia el contraste de la pantalla.
Si el modo se configura como "Estándar" (ajuste por
defecto), el robot cortacéspedes estará conectado a
Internet todo el tiempo y podrá accederse a él a
través de la app iMow siempre que la carga de la
batería sea suficiente.
Si el modo se configura como "ECO", la
comunicación celular será desactivada cuando el
robot cortacéspedes se encuentre en la estación de
carga para reducir el consumo de energía. No será
posible acceder al robot cortacéspedes a través de la
app, la cual seguirá mostrando la última información
que se haya transmitido con éxito.
El plan de corte actual se borrará y el asistente de
instalación se iniciará de nuevo.
Para establecer los puntos de inicio, vea @ 15.6.

0478-131-3050-A
154
español / EE.UU
15 Ajustes
Probar borde
► Para verificar un tendido correcto del cable alrededor de
las superficies excluidas, coloque el robot cortacéspedes
en la superficie a cortar con el frente viendo hacia la
superficie excluida e inicie el recorrido de verificación.
Corte de borde
► Seleccione una de las tres opciones:
– Nunca: Nunca se cortarán los bordes.
– Una vez (predeterminado): Los bordes se cortarán una
vez a la semana.
– Dos veces: Los bordes se cortarán dos veces a la
semana.
Superficies secundarias
► Active para habilitar el corte de una superficie secundaria.
15.4 Seguridad
Inhab dispos
► Para desactivar el bloqueo de equipo, pulse el botón Atrás
y el botón OK en la secuencia que se muestra en la
pantalla. Una vez que el bloqueo de equipo esté
desactivado, el robot cortacéspedes puede ser utilizado
de nuevo.
Nivel
► Seleccione una de cuatro opciones:
– Ninguna: Puede accederse a todas las funciones del
robot cortacéspedes.
– Baja:
– Alarma antirrobo: Si el robot es levantado o inclinado
durante más de 10 segundos, aparece la solicitud de
código PIN. Si no introduce el código PIN en un
intervalo no mayor a un minuto, suena una alarma y
el corte automático se apaga.
– Bloqueo de conexión: Debe introducirse el código
PIN antes de enlazar el robot cortacésped con la
estación de carga.
– Bloqueo de reinicio: Debe introducirse el código PIN
antes de restablecer la máquina a los ajustes de
fábrica.
– Mediana:
– Todas las características del ajuste "Baja".
– Bloqueo de tiempo: Solicitud de código PIN para
cambiar un ajuste si no se ha ingresado ningún
código PIN en más de un mes.
– Alta:
– Todas las características del ajuste "Mediana".
– Protección de ajustes: Deberá introducirse el código
PIN antes de cambiar cualquier ajuste.
► Seleccione el nivel de seguridad deseado y pulse el botón
OK para confirmar.
► Si es necesario, introduzca el código PIN de 4 dígitos.
STIHL recomienda que los niveles de seguridad "Baja",
"Mediana" o "Alta" sean configurados como parte del
proceso de instalación.
Protección de GPS
Inicia un recorrido de verificación para comprobar
que el tendido del cable esté correcto. Se tomará el
paso "Verificar instalación" del asistente de
instalación, @ 10.7.
Seleccione la frecuencia de corte para los bordes.
Habilitar o deshabilitar las superficies secundarias.
Para activar el bloqueo de equipo desde el menú
"Ajustes", abra el submenú "Seguridad", seleccione
"Bloquear iMow" y pulse el botón OK para confirmar.
Pueden configurarse cuatro niveles de seguridad.
Dependiendo del nivel, se activan diversos bloqueos
y dispositivos de seguridad.
Para activar la característica de protección de GPS.

0478-131-3050-A
155
español / EE.UU
15 Ajustes
Para detección de robo, STIHL recomienda activar la
característica de protección de GPS.
Cambiar código PIN
► Introduzca el código PIN anterior y pulse el botón OK para
confirmar.
► Introduzca el nuevo código PIN de 4 dígitos y pulse el
botón OK para confirmar.
Tome nota de su código PIN y guárdelo en un lugar seguro.
Si el código PIN se introduce 5 veces de manera incorrecta,
el corte automático se apaga y solo podrá ser restablecido
con un código maestro generado por su concesionario de
servicio autorizado de STIHL iMow.
Señal de arranque
Señal de alarma
Señal de menú
Bloqueo para niños
Si el sensor de impacto se acciona varias veces seguidas en
un breve intervalo de tiempo, el robot cortacésped y la
cuchilla de corte se detendrán.
Si el sensor de impacto no vuelve a accionarse, el robot
cortacéspedes continuará el corte automático al cabo de
unos segundos.
Bloqueo de llave
Enlazar iMow con estación de carga:
► Instale la estación de carga y conecte el cable
perimétrico, @ 10.3 y @ 10.5.
► Levante ligeramente el robot cortacéspedes por el asa de
transporte trasero (1) y alivie el peso ejercido sobre las
ruedas motrices. Empuje la máquina, que descansa sobre
las ruedas frontales, hacia la estación de carga.
► Después de pulsar el botón OK, introduzca el código PIN.
El robot cortacéspedes buscará la señal de cable y la
guardará automáticamente para el corte automático. Este
proceso puede tardar varios minutos, @ 10.6.
15.5 Mantenimiento
Cambio de cuchilla
► Después de montar una nueva cuchilla de corte, confirme
el reemplazo de la cuchilla de corte pulsando el botón OK.
El código PIN de cuatro dígitos puede cambiarse si
es necesario. El elemento de menú "Cambiar código
PIN" solo aparece cuando la seguridad está ajustada
como "Baja", "Mediana" o "Alta".
La señal acústica que indica que la cuchilla de corte
se ha activado.
La señal acústica que indica que el robot
cortacéspedes ha chocado con un obstáculo.
El indicador acústico de que ha abierto un menú o
pulsado el botón OK para confirmar una selección.
Cuando el bloqueo de llave está activado, el panel de
mandos se bloquea. El operador deberá pulsar y
sostener el botón Atrás y luego pulsar el teclado de
navegación hacia adelante para desbloquear el
panel de mandos. El bloqueo de llave bloqueará
nuevamente el panel de mandos 2 minutos después
de que se haya pulsado el último botón.
El robot y la estación de carga deben ser enlazados
cuando remplace la estación de carga o el robot
cortacéspedes.
1
0000-GXX-4398-A2

0478-131-3050-A
156
español / EE.UU
15 Ajustes
Encontrar rotura de cable
► Active el asistente para encontrar una rotura de cable
pulsando el botón OK.
► Encuentre la rotura del cable, @ 22.3.
Reiniciar ajustes
► Pulse el botón OK e introduzca el código PIN.
El robot cortacéspedes se reiniciará a los ajustes
predeterminados de fábrica y se iniciará el asistente de
instalación, @ 10.
15.6 Ajustar puntos de inicio
► Ajuste puntos de inicio para ejecutar el corte automático
en una zona específica de su césped. Los puntos de inicio
se utilizan para acceder a partes de su césped que no se
cortan con suficiente frecuencia, a veces porque parte de
la superficie a cortar solo es accesible a través de un
corredor.
Los puntos de inicio se pueden configurar de dos maneras
diferentes.
"Aprendizaje" de puntos de inicio
Para aprender hasta 4 puntos de inicio:
► Pulse el botón OK durante el desplazamiento del robot
cortacéspedes a lo largo del cable perimétrico para
guardar cada punto de inicio.
► El proceso de aprendizaje se interrumpe
automáticamente si el robot cortacéspedes encuentra
obstáculos a lo largo del cable perimétrico. Si el proceso
de aprendizaje se interrumpe, retire cualquier obstáculo
que pueda encontrarse a lo largo del camino de corte o
corrija el tendido del cable perimétrico.
► Si es necesario, pulse el botón STOP para interrumpir
manualmente el proceso de aprendizaje.
► Compruebe la posición del robot cortacéspedes antes de
reanudar el proceso de aprendizaje. El robot
cortacéspedes debe estar ubicado sobre el cable
perimétrico o dentro de la superficie a cortar de cara al
cable perimétrico.
► La frecuencia de inicio define cada cuándo debe
comenzarse una operación de corte desde un punto de
inicio. El valor de ajuste por defecto es 2 de 10
operaciones de corte (2/10) en cada punto de inicio.
Puede cambiar la frecuencia de inicio según su
preferencia después de cada aprendizaje.
► Si el proceso de aprendizaje se ha interrumpido
prematuramente, envié el robot cortacéspedes de vuelta
a la estación de carga.
Ajustar manualmente los puntos de inicio 1 a 4:
Para ajustar manualmente hasta 4 puntos de inicio:
► Determine la distancia desde la estación de carga hasta
los puntos de inicio, medida en sentido de las agujas del
reloj.
► Ajuste una frecuencia de inicio de entre 0 y 10
operaciones de corte (0/10) y 10 de 10 operaciones de
corte (10/10). La estación de carga queda establecida
como el punto de inicio 0. Por defecto, las operaciones de
corte iniciarán en la estación de carga.
Ajustar un radio de corte
El robot cortacéspedes puede ser programado para cortar
círculos concéntricos en torno a un punto de inicio
especificado. A cada punto de inicio se le puede asignar un
Pulse el botón OK. El robot cortacéspedes
comenzará a desplazarse a lo largo del cable
perimétrico. Si no está conectado, primero se
desplazará hacia la estación de carga. Todos los
puntos de inicio que existan actualmente serán
eliminados.
Pulse el botón OK. Todos los puntos de inicio que
existan serán eliminados.

0478-131-3050-A
157
español / EE.UU
16 Aplicación iMow de STIHL
radio de 10 pies a 100 pies (3 m a 30 m), que será cortado
antes de que el robot cortacéspedes se desplace a otras
zonas del jardín.
16.1 Funciones de la app iMow
Este robot cortacéspedes se puede programar y manejar
mediante la app web y móvil iMow de STIHL EE. UU. ("app
iMow), disponible en la App Store
®1
y en Google Play™
2
para descargar a su dispositivo móvil, tablet o computadora.
Activación
Antes de que el robot cortacéspedes pueda conectarse a
Internet y transmitir datos a la app iMow, la unidad debe ser
desbloqueada por un concesionario de servicio autorizado
de STIHL iMow. El concesionario también puede indicarle
como llevar a cabo el proceso de registro y activación.
Durante la activación se le solicitará una dirección de correo
electrónico y una contraseña. Conserve esta información en
un lugar seguro.
Transmisión de datos
La transmisión celular de datos hacia y desde el robot
cortacéspedes está incluida en el precio de compra.
La transmisión de datos no es continua y puede que haya
un retardo entre la actividad de corte y la información
mostrada en la app.
Cuando acceda a la app iMow de STIHL desde su teléfono
inteligente, tablet u otro dispositivo móvil se aplicarán las
tarifas de uso y datos estándar de su plan de telefonía móvil.
El uso y la disponibilidad de las conexiones de telefonía
móvil y de GPS depende de productos y servicios de
terceros. Si estos productos y servicios de terceros no
funcionan de manera fiable, pueden afectar el modo de
funcionamiento de su producto STIHL conectado y de la app
iMow. STIHL no brinda garantía ni declaración alguna
acerca del funcionamiento, el uso, la seguridad o la
fiabilidad de ningún producto y servicio de terceros. STIHL
no se hace responsable por daños o pérdidas ocasionadas
por el funcionamiento de productos y servicios de terceros,
lo que incluye cualquier lesión personal, daño material,
interrupción de servicio, tiempo de inactividad, pérdida de
datos o cualquier otro perjuicio o pérdida a partir de o en
relación con su uso de cualquier producto y servicio o
aplicaciones de terceros.
INDICACIÓN
Si se pierde la conexión con la red móvil, la unidad
permanecerá activa pero el usuario no recibirá
notificaciones de correo electrónico, SMS o en la app. La
característica de protección de GPS permanecerá activa.
Funciones principales de la app iMow
– Visualización y edición del plan de corte.
– Inicio de corte.
– Encendido y apagado de corte automático.
– Envío del robot cortacéspedes a la estación de carga.
– Cambio de fecha y hora.
– Consulta de la ubicación actual de la unidad.
ADVERTENCIA
Para reducir el riesgo de lesiones personales, mantenga a
las personas presentes y en especial a los niños y a las
mascotas lejos de la superficie a cortar durante el
funcionamiento. No haga funcionar el cortacéspedes si sabe
que hay o puede haber niños o mascotas en la superficie a
cortar o cerca de ésta.
16 Aplicación iMow de STIHL
1
Apple, el logotipo de Apple iPhone e iPad son marcas comerciales
de Apple Inc., registradas en EE. UU. y en otros países y regiones.
App Store es una marca de servicios de Apple Inc.
2
Google Play y el logotipo de Google Play son marcas comerciales
de Google LLC.

0478-131-3050-A
158
español / EE.UU
17 Durante el funcionamiento
17.1 Corte automático
ADVERTENCIA
Mantenga a las personas presentes y en especial a los
niños y a las mascotas lejos de la superficie a cortar. Nunca
permita que los niños se aproximen al robot cortacéspedes
o que jueguen con él. Mantenga a los niños y a las mascotas
alejados del robot cortacéspedes mientras está en
funcionamiento. Nunca deje que el robot cortacéspedes
funcione si sabe que hay o puede haber animales o
personas en la superficie a cortar o cerca de ésta.
Si está encendido el corte automático, el robot
cortacéspedes sale de manera independiente de la estación
de carga y corta el césped durante los intervalos de
actividad establecidos por el usuario, @ 14.6. El número y
la duración de las operaciones de corte y carga dentro de
los intervalos de actividad se determinan automáticamente.
El plan de corte se determina en función del tamaño de la
superficie a cortar, que se calcula durante la instalación o
durante la creación de un nuevo plan de corte.
► Defina puntos de inicio dentro de superficies contiguas
para asegurar que el césped se corte regularmente en las
superficies contiguas.
► Para detener manualmente una operación de corte activa,
presione el botón STOP en el robot cortacéspedes o
presione el botón de encendido/apagado/posición inicial
situado en la estación de carga dos veces en cualquier
momento.
Cuando la batería está descargada, el robot cortacéspedes
regresa automáticamente a la estación de carga.
El corte automático también se puede controlar mediante la
app iMow.
17.2 Duración de corte
La duración de corte especifica cuántas horas por semana
cortará el césped el robot cortacéspedes. El tiempo de
carga no se incluye en la duración de corte.
Durante la primera instalación, el robot cortacéspedes
calcula automáticamente la duración de corte apropiada
para su césped en función del tamaño de la superficie a
cortar.
Para completar una superficie a cortar de aproximadamente
1,076 pies² (100 m²), el robot cortacéspedes necesitará
aproximadamente 100 minutos en promedio.
► Si fuera necesario, extienda o reduzca los intervalos de
actividad y la duración de corte, @ 14.6 y @ 14.7.
La duración de corte también se puede ajustar mediante la
app iMow.
17.3 Apertura y cierre de la tapa
El robot cortacéspedes tiene una tapa que protege la
pantalla contra los elementos del clima y contra la activación
accidental. Si se abre la tapa cuando el robot cortacéspedes
está en marcha, se interrumpe el funcionamiento, la cuchilla
se para y el cortacéspedes se detiene.
Para abrir la tapa:
► Presione el botón STOP durante el funcionamiento.
► Sujete la tapa (1) en el punto de levantamiento (2) y
libérela hacia arriba tirando ligeramente.
► Abra la tapa hasta el tope.
17 Durante el funcionamiento
Cuando se enciende el corte automático, la pantalla
muestra el símbolo de corte automático junto al
símbolo de la batería.
1
2
0000-GXX-4829-A1

0478-131-3050-A
159
español / EE.UU
17 Durante el funcionamiento
Para cerrar la tapa:
► Doble la tapa cuidadosamente hacia abajo y permita que
se enganche.
INDICACIÓN
La tapa abierta puede removerse hacia arriba de la
máquina. Esto asegura que la máquina no se pueda
levantar y transportar usando la tapa como agarre.
17.4 Ajuste de la altura de corte
ADVERTENCIA
Para reducir el riesgo de sufrir lesiones graves o mortales,
siempre pulse el botón STOP antes de abrir o cerrar la tapa
y de ajustar la altura de corte.
Para reducir la altura de corte (A):
► Abra la tapa.
► Presione y gire la perilla giratoria (1) en sentido contrario
a las agujas del reloj.
La marca (2) indica la altura de corte seleccionada.
► Cierre la tapa.
Para incrementar la altura de corte (B):
► Abra la tapa.
► Presione y gire la perilla giratoria (1) en sentido de las
agujas del reloj.
La marca (2) indica la altura de corte seleccionada.
► Cierre la tapa.
Se pueden seleccionar 8 alturas de corte diferentes:
– Nivel 1: 0.79 pulg. (20 mm)
– Nivel 2: 1.01 pulg. (25.7 mm).
– Nivel 3: 1.24 pulg. (31.4 mm)
– Nivel 4: 1.46 pulg. (37.1 mm)
– Nivel 5: 1.69 pulg. (42.8 mm)
– Nivel 6: 1.91 pulg. (48.5 mm)
– Nivel 7: 2.13 pulg. (54.2 mm)
– Nivel 8: 2.4 pulg. (60 mm)
INDICACIÓN
Para evitar dañar el cable perimétrico, ajuste la altura de
corte al nivel 4 o más alto durante las primeras semanas.
Esto permitirá que la hierba crezca por encima del cable
perimétrico y lo cubra. Los niveles 1, 2 y 3 son alturas
especiales adecuadas solamente para céspedes planos con
un desnivel de terreno menor que +/- 0.4 pulg. (1 cm).
INDICACIÓN
Para reducir el riesgo de que se dañe el robot
cortacéspedes, procure no levantar, trasladar o transportar
la unidad tomándola por la perilla giratoria. La perilla
giratoria se separa del robot cortacéspedes si se tira de ella.
Esto ocurre para impedir que se levante la unidad por la
perilla giratoria.
INDICACIÓN
Para evitar la sobrecarga del motor, evite ajustar la altura de
corte demasiado baja cuando el césped está alto. Si el
motor pierde velocidad o se atora cuando la unidad ingresa
al pasto, active el bloqueo de dispositivo y aumente la altura
de corte.
1 1
2 2
A B
0000-GXX-4400-A0

0478-131-3050-A
160
español / EE.UU
17 Durante el funcionamiento
17.5 Ajuste de la duración de corte y de los intervalos
de actividad
Durante los intervalos de actividad, el robot cortacéspedes
deja la estación de carga y corta el césped de forma
autónoma. En estos intervalos se llevan a cabo las
operaciones de corte, las operaciones de carga y los
períodos de descanso. El robot cortacéspedes distribuye
automáticamente las operaciones de corte y de carga entre
las ventanas de tiempo disponibles. Bajo ciertas
circunstancias (p.ej., cuando el crecimiento del césped sea
lento por condiciones climáticas), no todos los intervalos de
actividad pueden ser necesarios para un cuidado óptimo del
césped.
Los intervalos de actividad y la duración de corte pueden
modificarse manualmente. Se pueden configurar hasta 3
intervalos de actividad diferentes por día, @ 14.5.
► Podría ser necesario cambiar la duración de corte y los
intervalos de actividad por una de las siguientes razones:
– Se necesitan intervalos de actividad adicionales para
operaciones de corte requeridas para completar la
duración de corte semanal.
– Se necesita modificar los intervalos de actividad para
prevenir evitar que se corte durante una hora particular
del día.
– Se necesita omitir intervalos de actividad individuales,
porque la superficie a cortar estará en uso, p.ej., para
una fiesta.
► Podría ser necesario extender la duración de corte y los
intervalos de actividad por una de las siguientes razones:
– Hay áreas que no se cortan lo suficiente.
– Crecimiento intenso del césped.
– Césped particularmente denso.
► Podría ser necesario reducir la duración de corte y los
intervalos de actividad cuando el crecimiento del césped
sea más lento debido al calor, frío o sequedad del
ambiente.
► Debe volver a vincular la estación de carga y crear un
nuevo plan de corte si el tamaño de la superficie a cortar
ha cambiado o si la estación de carga ha sido reubicada.
17.6 Operación de corte fuera de los intervalos de
actividad
Corte de superficies principales
► Para cortar una parte de una superficie a cortar a la que
solo se puede acceder a través de un corredor, lleve o
conduzca el robot cortacéspedes hasta la superficie
contigua.
► Para comenzar a cortar de inmediato, ejecute el comando
"Comenzar a cortar", @ 14.3.
La operación de corte comenzará inmediatamente y
proseguirá hasta que se cumpla el intervalo seleccionado.
► Para realizar una operación de corte con retardo, ejecute
el comando "Comenzar corte con retardo", @ 14.3.
La operación de corte comenzará en el intervalo
seleccionado para el inicio y proseguirá hasta que se
cumpla el intervalo seleccionado para la finalización.
► Para finalizar una operación activa de corte
manualmente, pulse el botón STOP en el robot
cortacéspedes. Para que el robot cortacéspedes regrese
a la estación de carga, pulse el botón de
encendido/apagado/posición inicial de la estación de
carga dos veces.
Superficies secundarias
► Lleve el robot cortacéspedes a la superficie secundaria.
► Active la superficie secundaria, @ 15.3.
► Para comenzar a cortar de inmediato, ejecute el comando
"Comenzar a cortar", @ 14.3.
La operación de corte comenzará inmediatamente y
proseguirá hasta que se cumpla el intervalo seleccionado.
► Para realizar una operación de corte con retardo, ejecute
el comando "Comenzar corte con retardo", @ 14.3.
La operación de corte comenzará en el intervalo
seleccionado para el inicio y proseguirá hasta que se
cumpla el intervalo seleccionado para la finalización.
Cuando se alcance el final del intervalo seleccionado, el
robot cortacéspedes se dirigirá al cable perimétrico y
quedará detenido allí.

0478-131-3050-A
161
español / EE.UU
18 Transporte
► Lleve la máquina de regreso a la estación de carga para
recargar la batería y confirme el mensaje que aparece en
pantalla, @ 22.1.
► Para finalizar una operación activa de corte manualmente
en cualquier momento, pulse el botón STOP.
Si la batería se descarga antes del intervalo seleccionado
para la finalización, se acortará la operación de corte.
18.1 Transporte del robot cortacéspedes
Al transportar el robot cortacéspedes:
► Siempre inhabilite el robot cortacéspedes pulsando el
botón STOP por 5 segundos antes de levantarlo o
transportarlo.
► Cuando transporte el robot cortacéspedes a mano,
sujételo por los mangos delantero y trasero, con la
cuchilla lejos de su cuerpo. Nunca intente llevar el robot
cortacéspedes por la tapa.
► Cuando deba transportar el robot cortacéspedes en un
vehículo, asegúrelo y ubíquelo en una posición en la que
no pueda volcarse, golpearse ni dañarse. Sujete la
máquina con piezas de fijación adecuadas (correas o
cuerdas) (vea la ilustración de arriba).
► Asegure todos los demás componentes que deba
transportar (p.ej., la estación de carga y los componentes
pequeños) para evitar que se vuelquen, golpeen y dañen.
Una observación sobre el transporte de la batería
La batería integrada a este robot cortacéspedes cumple con
los requisitos descritos en el Manual UN
ST/SG/AC.10/11/Ver.5/Parte III, Subsección 38.3.
El transporte comercial por aire, agua y tierra de celdas y
baterías de iones de litio contenidas en el equipo está
regulado. La batería integrada a este robot cortacéspedes
está clasificada como un producto UN 3481, Clase 9 y grupo
de envasado II. El traslado de esta batería debe cumplir con
todas las normas de transporte correspondientes. Antes del
transporte o traslado, consulte con la empresa de transporte
por tierra, agua o aire, o bien con la aerolínea de pasajeros,
para determinar si el transporte está prohibido o sujeto a
restricciones o exenciones.
Por lo general, el usuario no debe cumplir con ninguna
condición adicional para poder transportar este robot
cortacéspedes por carretera hasta el sitio donde lo utilizará.
Verifique y respete cualquier norma especial que pudiera
aplicarse a su situación.
Para obtener más información, visite
www.stihlusa.com/battery-transportation-safety.
19.1 Robot cortacéspedes
ADVERTENCIA
Una vez que termine la temporada de corte o siempre que
el robot cortacéspedes no esté disponible para servicios de
corte, almacene el iMow a cubierto en un lugar seco, seguro
y fuera del alcance de los niños o de usuarios no
autorizados, @ 5.4. Un almacenamiento inadecuado
puede resultar en un uso no autorizado y en daños en el
robot cortacéspedes, @ 5.4. Nunca coloque ni almacene
objetos en el robot cortacéspedes.
18 Transporte
0000-GXX-4401-A1
19 Almacenamiento del cortacéspedes
robot y la estación de carga

0478-131-3050-A
162
español / EE.UU
19 Almacenamiento del cortacéspedes robot y la estación de carga
ADVERTENCIA
Si el robot cortacéspedes está húmedo o mojado, séquelo a
conciencia antes de almacenarlo para reducir el riesgo de
cortocircuitos y descarga eléctrica, @ 5.4.
ADVERTENCIA
Las altas temperaturas pueden hacer que la batería
integrada genere calor, se rompa, sufra fugas, se incendie
o explote y provoque lesiones graves o mortales y daños
materiales, @ 5.5. Almacene el robot cortacéspedes
únicamente dentro de un rango de temperatura ambiente de
32 °F a 122 °F (0 °C a 50 °C ), @ 5.5. Nunca almacene el
robot cortacéspedes dentro de un vehículo en un clima
caluroso, @ 5.5.
Cuando almacene el robot cortacéspedes durante tres
meses o más (p. ej., durante el invierno):
► Cargue la batería por completo, @ 12.4.
► Apague el corte automático, @ 14.3.
► Establezca el nivel de seguridad más alto, @ 15.4.
► Active la característica de protección de GPS, @ 15.4.
► Establezca el modo de energía "ECO", @ 15.2.
► Active el bloqueo de equipo, @ 9.1.
► Limpie el robot cortacéspedes, @ 20.
► Conecte el robot cortacéspedes a la estación de carga.
► Almacene el robot cortacéspedes y la estación de carga a
cubierto en un lugar seco y seguro, fuera del alcance de
los niños y de otras personas no autorizadas.
► Al final de la temporada de corte, proteja los terminales
(conectores) retirados de la estación de carga contra los
daños ambientales envolviéndolos con una cantidad
generosa de cinta aislante o almacenándolos en un
recipiente con grasa para que estén protegidos de los
elementos.
INDICACIÓN
Cargar por completo la batería antes del almacenamiento
contribuirá a evitar daños y a prolongar su vida útil.
INDICACIÓN
Evite el contacto con el cable perimétrico cuando
escarifique o airee el césped. También tenga cuidado
cuando utilice una desbrozadora cerca del cable
perimétrico. El escarificado, la aireación y el desbrozado
pueden provocar cortes o daños en el cable perimétrico.
Consulte su bosquejo de la superficie a cortar y preste
especial atención para evitar el cable perimétrico cuando
realice estas tareas.
19.2 Estación de carga y fuente de alimentación
ADVERTENCIA
Almacene la estación de carga y la estación dentro de un
área seca y segura que sea inaccesible para niños y otros
usuarios no autorizados, @ 6. Un almacenamiento
inapropiado puede resultar en el uso no autorizado y daños
de la estación de carga o la fuente de alimentación, @ 6.
Nunca coloque o almacene objetos sobre la estación de
carga.
ADVERTENCIA
Para reducir el riesgo de sufrir una descarga eléctrica,
siempre desconecte la fuente de alimentación del
tomacorriente antes de quitar la cubierta de la estación de
carga.
Cuando almacene la estación de carga o la fuente de
alimentación por tres meses o más tiempo (p.ej., vacaciones
de invierno):
► Desconecte la fuente de alimentación del tomacorriente.
► Retire la cubierta de la estación de carga.
► Abra el tablero.

0478-131-3050-A
163
español / EE.UU
20 Limpieza
► Presione y abra la palanca de sujeción izquierda (2).
► Retire el extremo pelado del cable perimétrico (1).
► Cierre la palanca de sujeción.
► Presione y abra la palanca de sujeción derecha (4).
► Retire el extremo pelado del cable perimétrico (3).
► Cierre la palanca de sujeción.
► Abra la cubierta del conducto para cables y extraiga el
cable perimétrico del enchufe de la estación de carga.
► No retire el cable perimétrico de la superficie a cortar.
► Desconecte la fuente de alimentación de la estación de
carga.
► Cierre el tablero.
► Reinstale la cubierta de la estación de carga.
► Retire la estación de carga.
► Al final de la temporada de corte, proteja los extremos
sueltos del cable perimétrico removidos de la estación de
carga envolviéndolos con una generosa cantidad de cinta
aislante o guardándolos en un contenedor con grasa para
que estén protegidos de los elementos.
► Almacene la estación de carga y la fuente de alimentación
en un sitio seco y seguro, fuera del alcance de niños y
otras personas no autorizadas.
20.1 Limpieza del robot cortacéspedes y la estación
de carga
ADVERTENCIA
Para reducir el riesgo de lesiones personales graves
causadas por la activación accidental, active el bloqueo de
dispositivo. Desconecte la fuente de alimentación del
tomacorriente antes de efectuar los trabajos de limpieza,
@ 7. Los usuarios de este robot cortacéspedes deben
efectuar únicamente el procedimiento de limpieza que se
describe en este manual. Para evitar lesiones, siempre use
guantes resistentes al manipular la cuchilla de corte.
Para limpiar el robot cortacéspedes y la estación de carga:
► Coloque el robot cortacéspedes en una superficie firme,
plana y nivelada para limpiar la parte superior de la
unidad.
► Para realizar la limpieza de la parte inferior de la unidad
(cuchilla y equipo de corte), incline el robot cortacéspedes
sobre el lado izquierdo y apóyelo contra una pared
(consulte la ilustración anterior).
► Retire el material acumulado en la carcasa y en el equipo
de corte.
► Limpie la suciedad con un cepillo o un paño. No utilice
detergentes ni disolventes fuertes, los cuales pueden
dañar o debilitar los componentes de polímeros.
1
2
3
4
0000-GXX-5415-A1
20 Limpieza
0000-GXX-4403-A2

0478-131-3050-A
164
español / EE.UU
21 Inspección y mantenimiento
► Limpie la estación de carga con un cepillo, un paño
levemente humedecido o un disolvente de resinas. No
use detergentes.
► Retire la placa de soporte y quite los residuos de pasto.
► No utilice una manguera ni una hidrolavadora para limpiar
el robot cortacéspedes y la estación de carga, ni los rocíe
con agua u otros líquidos.
INDICACIÓN
Coloque el robot cortacéspedes en una superficie firme y
nivelada. El robot cortacéspedes puede volcarse cuando se
encuentra en la posición de limpieza.
INDICACIÓN
No utilice una manguera ni una hidrolavadora para limpiar el
robot cortacéspedes o la estación de carga. Si se rocía agua
u otros líquidos sobre el cortacéspedes o la estación de
carga, se podrían causar daños permanentes. La placa de
soporte debe limpiarse con frecuencia si el iMow trabaja
frecuentemente en condiciones de humedad. La suciedad
depositada entre la placa de soporte y carcasa del equipo
de corte puede crear fricción, lo que a su vez genera un
mayor consumo de energía.
21.1 Intervalos de inspección y mantenimiento
Los siguientes intervalos de mantenimiento son ejemplos y
aplican a condiciones estándar de funcionamiento. El uso
real y su experiencia determinarán la frecuencia de la
inspección y del mantenimiento.
► Revise regularmente el contador de las "Horas corte" en
el menú "Información", @ 14.4.
En los días con intervalos de actividad:
► Inspeccione visualmente el robot cortacéspedes y la
estación de carga.
► Revise la hora actual e inicie la siguiente operación de
corte en la pantalla.
► Inspeccione la superficie a cortar. Remueva piedras,
piezas de metal, vidrio, cable u otros objetos que pudiera
ser lanzado o arrojado por el accesorio de corte o
interfiera con la operación del robot cortacéspedes.
Ejemplos de los objetos comunes que pudieran interferir
con el corte o dañar la cuchilla de corte incluyen muebles
de jardín, pelotas, mangueras de jardín, adornos de
paisajes, macetas de flores, juguetes y otras
herramientas de jardín. Deben evitarse los objetos ocultos
en el césped (p.ej., cabezas de aspersores, válvulas de
agua, cables eléctricos). Asegúrese de que estos objetos
no se encuentren en la superficie a cortar antes de iniciar
el robot cortacéspedes.
► Revise que la batería esté cargada, @ 12.4.
Semanalmente:
► Limpie el robot cortacéspedes y la estación de carga,
@ 20.
► Inspeccione visualmente la cuchilla de corte, las piezas
de fijación de cuchilla y equipo de corte para detectar
daño (hendiduras, grietas, fracturas, etc.) y desgaste,
@ 21.2.
Cada 200 horas:
► Cambie la cuchilla de corte. Aparecerá un recordatorio en
la pantalla.
Anualmente:
► Solicite a un concesionario de servicio autorizado de
STIHL iMow que realice un proceso de inspección y
mantenimiento al robot cortacéspedes y a la estación de
carga cuando la temporada de corte termine.
21.2 Inspección de la cuchilla de corte
ADVERTENCIA
La cuchilla de corte tiene bordes afilados. Si entra en
contacto con alguna parte de su cuerpo, puede producirle
un corte aunque no esté en movimiento. Siempre use
guantes de trabajo resistentes al montar o manipular la
cuchilla de corte, @ 5.3.
21 Inspección y mantenimiento

0478-131-3050-A
165
español / EE.UU
21 Inspección y mantenimiento
ADVERTENCIA
Nunca utilice una cuchilla de corte desafilada o dañada. El
uso de una cuchilla desafilada conduce al aumento de las
vibraciones, cortes insatisfactorios y un mayor desgaste, en
particular si se usa el robot cortacéspedes sobre suelo
arenoso o si se lo usa frecuentemente en condiciones
secas. Una cuchilla de corte dañada puede vibrar,
agrietarse, romperse o salirse del robot cortacéspedes, lo
que puede provocar lesiones graves o mortales o daños
materiales. Asegúrese de que la cuchilla de corte esté
afilada y en buenas condiciones antes de empezar a
trabajar.
ADVERTENCIA
Nunca intente afilar la cuchilla de corte. La cuchilla de corte
debe cambiarse cuando pierda su filo, o cada 200 horas de
uso, lo que ocurra primero. STIHL recomienda solicitar el
cambio de la cuchilla de corte a un concesionario de servicio
autorizado de STIHL iMow para reducir el riesgo de sufrir
lesiones graves o fatales por una cuchilla mal instalada.
Para inspeccionar la cuchilla de corte:
► Active el bloqueo de equipo, @ 9.
► Incline el robot cortacéspedes hacia un costado y apóyelo
sobre una pared estable. Limpie con cuidado la
plataforma y la cuchilla de corte, @ 20.
► Utilice un calibrador de pinzas para medir el ancho de la
cuchilla. La cuchilla debe tener a = 1 pulg. (25 mm) de
ancho, como mínimo, en el punto más estrecho.
► Utilice un calibrador de pinzas para medir el grosor de la
cuchilla. La cuchilla debe tener un grosor mínimo de a =
0.05 pulg. (1.3 mm) en el punto más estrecho.
► Cambie la cuchilla de corte si las dimensiones medidas no
se encuentren dentro de los límites admisibles.
21.3 Cambio de la cuchilla de corte
ADVERTENCIA
Una cuchilla de corte agrietada, dañada o gastada podría
despedazarse a altas velocidades y causar lesiones graves
o mortales. Para reducir el riesgo de sufrir lesiones
causadas por piezas rotas, revise el estado de la cuchilla de
corte antes del montaje y luego realice inspecciones
frecuentes a intervalos regulares. No utilice una cuchilla de
corte gastada, rota o dañada.
ADVERTENCIA
La cuchilla de corte tiene bordes afilados. Si entra en
contacto con alguna parte de su cuerpo, puede producirle
un corte aunque no esté en movimiento. Siempre use
guantes de trabajo resistentes al montar o manipular la
cuchilla de corte, @ 5.3.
Para cambiar la cuchilla de corte:
► Incline el robot cortacéspedes hacia un costado y apóyelo
sobre una pared estable.
► Empuje hacia adentro ambas lengüetas (1) y
manténgalas presionadas con una mano en la placa de
soporte.
a
b
0000-GXX-4404-A0
11
0000-GXX-4381-A0

0478-131-3050-A
166
español / EE.UU
21 Inspección y mantenimiento
► Extraiga la tuerca de sujeción (2) con la otra mano.
► Retire la cuchilla de corte con la tuerca de sujeción.
► Monte la cuchilla de corte (2) nueva de la manera
ilustrada. Controle que los retenedores (3) queden bien
ubicados en los orificios de la cuchilla de corte.
► Gire la tuerca de sujeción (4) en el sentido de las agujas
del reloj hasta escuchar varios chasquidos audibles.
► En el menú "Mantenimiento", confirme que ha montado
una nueva cuchilla de corte, @ 15.5.
21.4 Montaje y retiro de la placa portacuchillas
21.4.1 Montaje de la placa de soporte
ADVERTENCIA
Para reducir el riesgo de lesiones personales causadas por
objetos lanzados, no monte una placa de soporte
desgastada, rota o dañada.
ADVERTENCIA
Para reducir el riesgo de lacerarse, utilice siempre guantes
gruesos de trabajo al montar o manipular de alguna manera
la placa de soporte, @ 5.3.
Para montar la placa de soporte:
► Incline el robot cortacéspedes hacia un costado y apóyelo
sobre una pared, de manera que quede bien firme.
► Limpie el equipo de corte con un cepille o un paño
levemente humedecido.
► Limpie el eje de la cuchilla (2) y el montaje de la placa de
soporte (1) con un cepillo o un paño levemente
humedecido.
► Presione la placa de soporte sobre el eje de la cuchilla.
INDICACIÓN
Nunca utilice una manguera o una hidrolavadora para
limpiar el robot cortacéspedes ni lo rocíe con agua u otros
líquidos. Esto podría causar daños permanentes.
21.4.2 Retiro de la placa de soporte
ADVERTENCIA
Para reducir el riesgo de lacerarse, utilice siempre guantes
gruesos de trabajo al montar o manipular de alguna manera
la placa de soporte, @ 5.3.
2
3
3
0000-GXX-4379-A1
4
0000-GXX-4380-A0
1
2
0000-GXX-4377-A0

0478-131-3050-A
167
español / EE.UU
21 Inspección y mantenimiento
Para retirar la placa de soporte:
► Incline el robot cortacéspedes hacia un costado y apóyelo
sobre una pared, de manera que quede bien firme.
► Introduzca la herramienta de extracción (1) en las
aberturas de la placa de soporte (2) y gírela en sentido
contrario a las agujas del reloj hasta que se detenga.
► Sostenga el robot cortacéspedes con una mano y extraiga
la placa de soporte con la herramienta de extracción.
1
1
2
0000-GXX-4378-A0

0478-131-3050-A
168
español / EE.UU
22 Guía de solución de problemas
22.1 Mensajes
Los mensajes proporcionan información acerca de errores
activos y recomendaciones. Se muestran en la ventana de
diálogo.
► Para abrir los mensajes, pulse el botón OK en el menú
"Mensajes", @ 14.4. Las recomendaciones y mensajes
activos también se muestran en la pantalla de estado,
@ 13.2.
► Abra el mensaje para mostrar el código de mensaje, el
tiempo de incidencia, la prioridad y la frecuencia de la
incidencia.
22 Guía de solución de problemas
Las recomendaciones etiquetadas con prioridad
"Baja" o la categoría "Info" no requieren ninguna
acción. El funcionamiento del robot cortacéspedes
continuará. Aparecen en la pantalla de estado
alternativamente con el texto "iMow listo para func."
Los errores son etiquetados con prioridad "Mediana"
y requieren acción de parte del usuario. El robot
cortacéspedes solo puede seguir en funcionamiento
una vez que el error ha sido corregido. Los errores
también se reportan en la app iMow.
A los errores se les asigna la prioridad "Alta" y
requieren acción de un concesionario de servicio
autorizado de STIHL iMow. El texto "Contacte a su
concesionario de iMow" aparecerá en la pantalla. El
robot cortacéspedes solo puede seguir en
funcionamiento una vez que el error ha sido
corregido por un concesionario de servicio
autorizado de STIHL iMow. Los errores también se
reportan en la app iMow.
Mensaje Posible causa Solución
0001 – Pérdida de datos
Pulse OK para liberar
– El software ha sido actualizado.
– Pérdida de voltaje.
– Error de software o hardware.
► Pulse el botón OK. El robot cortacéspedes
funciona con sus ajustes por defecto.
► Revise y, si es necesario, corrija la fecha, la
hora y el plan de corte.
0100 – Batería
descargada
Cargue la batería
Voltaje de la batería demasiado bajo. ► Coloque el robot cortacéspedes en la
estación de carga para recargar la batería.
0180 – Temperatura baja
Intervalo de temp no
alcanzado
La temperatura dentro del robot cortacéspedes
es muy baja.
► Deje que el robot cortacéspedes se caliente a
temperatura ambiente.
0181 – Temperatura alta
Intervalo de temp
excedido
La temperatura dentro del robot cortacéspedes
es muy alta.
► Permita que el robot cortacéspedes se enfríe.
0183 – Temperatura alta Vea mensaje 0181. ► Vea mensaje 0181.
0185 – Temperatura alta Vea mensaje 0181. ► Vea mensaje 0181.
0186 – Temperatura baja Vea mensaje 0180. ► Vea mensaje 0180.

0478-131-3050-A
169
español / EE.UU
22 Guía de solución de problemas
0187 – Temperatura alta Vea mensaje 0181. ► Vea mensaje 0181.
0302 – Falla de motor
Intervalo de temp
excedido
La temperatura en el motor izquierdo es muy
alta.
► Permita que el robot cortacéspedes se enfríe.
0305 – Falla de motor
Rueda izquierda está
atorada
Sobrecarga en la rueda motriz izquierda. ► Limpie el robot cortacéspedes.
► Nivele las zonas disparejas (agujeros,
depresiones) en la superficie a cortar.
0402 – Falla de motor
Intervalo de temp
excedido
La temperatura en el motor derecho es muy
alta.
► Permita que el robot cortacéspedes se enfríe.
0405 – Falla de motor
Rueda derecha está
atorada
Sobrecarga en la rueda motriz derecha. ► Limpie el robot cortacéspedes.
► Nivele las zonas disparejas (agujeros,
depresiones) en la superficie a cortar.
0502 – Falla motor de
corte
Intervalo de temp
excedido
La temperatura en el motor de corte es muy
alta.
► Permita que el robot cortacéspedes se enfríe
0505 – Falla motor de
corte
Cuchilla bloqueada
– Suciedad entre la placa de soporte y la
carcasa del equipo de corte.
– El motor de corte no puede ser encendido.
– Motor de corte sobrecargado.
► Limpie la cuchilla de corte y el equipo de
corte.
► Limpie la placa de soporte.
► Ajuste una altura de corte más alta.
► Nivele las zonas disparejas (agujeros,
depresiones) en la superficie a cortar.
0701 – Temperatura
batería
Fuera del rango de
temperatura
La temperatura de la batería es muy baja o muy
alta.
► Permita que el robot cortacéspedes se enfríe
o se caliente.
0703 – Batería
descargada
Vea mensaje 0100. ► Vea mensaje 0100.
0704 – Batería
descargada
Vea mensaje 0100. ► Vea mensaje 0100.
1000 – Vuelco
Pendiente muy empinada
El sensor de inclinación ha detectado un
vuelco.
► Coloque el robot cortacéspedes sobre sus
ruedas, revise que no haya sufrido daños y
pulse el botón OK para confirmar el mensaje.
Mensaje Posible causa Solución

0478-131-3050-A
170
español / EE.UU
22 Guía de solución de problemas
1010 – iMow elevado
Pulse OK para liberar
El robot cortacéspedes ha sido levantado por el
capó.
► Revise el movimiento del capó y pulse el
botón OK para confirmar el mensaje.
1030 – Falla de capó
Revise el capó y pulse
OK
No se ha detectado ningún capó. ► Revise el capó (movimiento, ajuste firme) y
confirme el mensaje con el botón OK.
1120 – Capó bloqueado
Revise el capó y pulse
OK
Colisión permanente detectada. ► Libere el robot cortacéspedes, retire el
obstáculo o cambie el tendido del cable
perimétrico si es necesario.
► Pulse el botón OK para confirmar el mensaje.
► Revise movimiento del capó y pulse el botón
OK para confirmar el mensaje.
1125 – Quitar el
obstáculo
Revise tendido cable
Cable perimétrico tendido incorrectamente. ► Revise el tendido del cable perimétrico y
compruebe las distancias con la regla iMow.
1130 – Atorado
Libere iMow y pulse OK
– El robot cortacéspedes se ha atorado.
– Las ruedas motrices están girando.
► Libere el robot cortacéspedes, nivele la
superficie a cortar o cambie el tendido del
cable perimétrico si es necesario.
► Limpie las ruedas motrices. Si es necesario,
evite el uso cuando llueva.
► Pulse el botón OK para confirmar el mensaje.
1131 – Atascado Vea mensaje 1130. ► Vea mensaje 1130.
1135 – Fuera de
superficie
Coloque el iMow en la
superficie a cortar
El robot cortacéspedes se encuentra fuera de la
superficie a cortar.
► Regrese el robot cortacéspedes a la
superficie a cortar.
1140 – Muy empinado
Revise tendido cable
El sensor de inclinación ha detectado una
pendiente de más de 22°.
► Cambie el tendido del cable perimétrico y
bloquee las zonas con césped con
inclinaciones mayores a 22°.
1160 – Mango accionado
Pulse OK para liberar
El robot cortacéspedes ha sido levantado por
un asa de transporte.
► Pulse el botón OK para confirmar mensaje.
Mensaje Posible causa Solución

0478-131-3050-A
171
español / EE.UU
22 Guía de solución de problemas
1170 – Sin señal
Revise la señal del cable
perimétrico
– Sin recepción de señal del cable durante el
funcionamiento.
– El robot cortacéspedes se encuentra fuera de
la superficie a cortar.
– La estación de carga o los componentes
electrónicos fueron remplazados.
► Revise la fuente de alimentación a la estación
de carga.
Revise el LED en la estación de carga. El
LED debe iluminarse en rojo durante el
funcionamiento.
► Regrese el robot cortacéspedes a la
superficie a cortar.
► Enlace el robot cortacéspedes con la
estación de carga.
1180 – Cargue iMow
Conexión automática no
es posible
– No se encontró la estación de carga.
– Un corredor no está instalado correctamente.
► Revise el LED de la estación de carga y
conecte la estación de carga si es necesario.
► Instale correctamente los corredores.
1190 – Error de conexión
Estación de carga
ocupada
Estación de carga ocupada por un segundo
robot cortacéspedes.
► Conecte el robot cortacéspedes una vez que
la estación de carga esté libre otra vez.
1200 – Falla motor de
corte
Vea mensaje 0505. ► Vea mensaje 0505.
1210 – Falla de motor
Rueda atorada
Sobrecarga en una rueda motriz. ► Limpie el robot cortacéspedes.
► Nivele las zonas disparejas (agujeros,
depresiones) en la superficie a cortar.
1220 – Lluvia detectada
Corte interrumpido
El evento de corte se ha detenido o retrasado
debido a la lluvia.
► No es necesaria ninguna acción; ajuste el
sensor de lluvia si es necesario.
1230 – Error de conexión
Cargue iMow
Se ha localizado la estación de carga, la
conexión automática no es posible.
► Revise la conexión, conecte manualmente el
robot cortacéspedes si es necesario.
► Revise el cable perimétrico – asegure el
tendido adecuado en la zona de la estación
de carga.
2000 – Problema de
señal
Cargue iMow
Error de señal de cable. ► Coloque el robot cortacéspedes en la
estación de carga y pulse el botón OK.
2010 – Cambiar cuchilla
Tiempo de marcha
permitido agotado
La cuchilla ha estado en uso por más de 200
horas, es necesario el remplazo.
► Cambie la cuchilla de corte.
► Confirme el cambio de la cuchilla en el menú
"Mantenimiento".
Mensaje Posible causa Solución

0478-131-3050-A
172
español / EE.UU
22 Guía de solución de problemas
2020 – Recomendación
Requiere servicio anual
por parte del
concesionario
Mantenimiento recomendado. ► Reciba el servicio anual por parte del
concesionario de servicio autorizado de
STIHL iMow.
2030 – Batería
Tiempo de marcha
permitido agotado
Es necesario un cambio de batería. ► Solicite a su concesionario de servicio
autorizado de STIHL iMow un cambio de
batería.
2031 – Falla de carga
Revise los contactos de
carga
La carga no puede ser iniciada. ► Revise los contactos de carga de la estación
de carga y el robot cortacéspedes y limpie si
es necesario.
► Pulse el botón OK para confirmar el mensaje.
2032 – Temperatura
batería
Fuera del rango de
temperatura
La temperatura de la batería durante la carga es
muy baja o muy alta.
► Permita que el robot cortacéspedes se enfríe
o se caliente.
2040 – Temperatura
batería
Fuera del rango de
temperatura
La temperatura de la batería al iniciar un evento
de corte es muy baja o muy alta.
► Permita que el robot cortacéspedes se enfríe
o se caliente.
2050 – Adaptar plan corte
Aumente intervalos de
actividad
Los intervalos de actividad se han reducido o
eliminado o la duración de corte ha sido
extendida – los intervalos de actividad
guardados son insuficientes para los eventos
de corte necesarios.
► Aumente los intervalos de actividad o
reduzca la duración de corte.
2060 – Corte finalizado
Pulse OK para liberar
El corte en la superficie secundaria ha sido
completado exitosamente.
► Regrese el robot cortacéspedes a la
superficie a cortar y conecte para cargar la
batería.
2070 – Señal de GPS
Sin recepción en borde
Sin recepción de GPS. ► Vuelva a probar el borde, @ 15.3.
► Si el problema persiste, solicite a su
concesionario de servicio autorizado de
STIHL iMow que revise el tendido del cable.
2071 – Señal de GPS
Sin recepción en punto
de inicio 1
Sin recepción de GPS. ► Cambie la posición del punto de inicio 1,
@ 15.6.
Mensaje Posible causa Solución

0478-131-3050-A
173
español / EE.UU
22 Guía de solución de problemas
2072 – Señal de GPS
Sin recepción en punto
de inicio 2
Sin recepción de GPS. ► Cambie la posición del punto de inicio 2,
@ 15.6.
2073 – Señal de GPS
Sin recepción en punto
de inicio 3
Sin recepción de GPS. ► Cambie la posición del punto de inicio 3,
@ 15.6.
2074 – Señal de GPS
Sin recepción en punto
de inicio 4
Sin recepción de GPS. ► Cambie la posición del punto de inicio 4,
@ 15.6.
2075 – Señal de GPS
No hay recepción en
zona deseada
Sin recepción de GPS. ► Vuelva a definir la zona deseada en la app
iMow. Asegúrese de que la zona deseada y el
cable perimétrico se superpongan.
2076 – Señal de GPS
Zona deseada no hallada
No pudo encontrarse la zona deseada durante
el seguimiento de los bordes.
► Vuelva a definir la zona deseada en la app
iMow. Asegúrese de que la zona deseada y el
cable perimétrico se superpongan.
2077 – Zona deseada
Zona deseada está fuera
de zona inicial
La zona deseada está fuera de la superficie a
cortar guardada.
► Vuelva a definir la zona deseada en la app
iMow. Asegúrese de que la zona deseada y el
cable perimétrico se superpongan.
2080 – Red
Sin recepción de LTE
Sin recepción celular. ► Contacte a un concesionario de servicio
autorizado de STIHL iMow.
2090 – Módulo de radio
Comuníquese con el
concesionario
La comunicación el módulo de radio se ha
interrumpido.
No se requiere ninguna acción, el firmware se
actualizará automáticamente.
► Si el problema persiste, contacte a un
concesionario de servicio autorizado de
STIHL iMow.
2100 – Protecc. de GPS
Fuera de la zona inicial
Máquina deshabilitada
El robot cortacéspedes ha sido retirado de la
superficie a cortar guardada.
► Regrese el robot cortacéspedes a la zona
inicial e introduzca el código PIN.
► Como alternativa, introduzca el código PIN y
ejecute una instalación nueva.
2110 – Protecc. de GPS
Nueva ubicación
Instalación nueva req.
El robot cortacéspedes se utilizó en una
superficie a cortar distinta. La señal de cable de
una segunda estación de carga ya ha sido
guardada.
► Ejecute instalación nueva.
Mensaje Posible causa Solución

0478-131-3050-A
174
español / EE.UU
22 Guía de solución de problemas
2120 – Bloqueo para
niños
Bloqueo para niños
activado
– El sensor de impacto se ha accionado varias
veces consecutivas.
– El robot cortacéspedes ha sido levantado
durante el desplazamiento.
► Si el sensor de impacto no se acciona de
nuevo, no es necesaria ninguna acción. El
mensaje quedará automáticamente inactivo
en un intervalo máximo de 1 minuto.
► Desactive el bloqueo para niños
2400 – iMow restablecido
con éxito a la
configuración de fábrica
El robot cortacéspedes ha sido reiniciado a
configuración de fábrica.
► Pulse el botón OK para confirmar mensaje.
4001 – Falla interna
Fuera del rango de
temperatura
La temperatura en la batería o dentro de la
máquina es muy baja o muy alta.
► Permita que el robot cortacéspedes se enfríe
o se caliente.
4002 – Vuelco Vea mensaje 1000. ► Vea mensaje 1000.
4003 – Capó levantado
Revise el capó y pulse
OK
El capó ha sido levantado. ► Revise el capó y pulse el botón OK para
confirmar el mensaje.
4004 – Falla interna
Pulse OK para liberar
– Error en la secuencia del programa.
–Fallo eléctrico durante el corte automático.
– Robot cortacéspedes se encuentra fuera de
la superficie a cortar.
► Revise la fuente de alimentación a la estación
de carga.
Revise el LED en la estación de carga. El
LED debe iluminarse en rojo durante el
funcionamiento.
► Regrese el robot cortacéspedes a la
superficie a cortar.
► Pulse el botón OK para confirmar mensaje.
4005 – Falla interna Vea mensaje 4004. ► Vea mensaje 4004.
4006 – Falla interna Vea mensaje 4004. ► Vea mensaje 4004.
4008 – Falla interna Vea mensaje 4004. ► Vea mensaje 4004.
4027 – botón STOP
pulsado
Pulse OK para liberar
El botón STOP ha sido pulsado. ► Pulse el botón OK para confirmar mensaje.
Mensaje Posible causa Solución

0478-131-3050-A
175
español / EE.UU
22 Guía de solución de problemas
22.2 Robot cortacéspedes
Siempre active el bloqueo de equipo antes de efectuar cualquier inspección, limpieza o mantenimiento.
Condición Posible causa Solución
El robot cortacéspedes funciona
en los intervalos incorrectos.
Hora y fecha configurados
incorrectamente.
► Configure la hora y fecha, @ 15.2.
Intervalos de actividad
configurados incorrectamente.
► Configure los intervalos de actividad, @ 14.6.
El robot cortacéspedes ha sido
utilizado por individuos no
autorizados.
► Establezca el nivel de seguridad como "Mediana" o
"Alta", @ 15.4.
El robot cortacéspedes no logra
funcionar durante un intervalo de
actividad.
La batería se está cargando. ► Permita que la batería termine de cargarse,
@ 12.4.
Corte automático apagado. ► Encender corte automático, @ 15.2.
Intervalo de actividad
desactivado.
► Libere el intervalo de actividad, @ 14.6.
Lluvia detectada. ► Ajuste el sensor de lluvia, @ 15.2.
Se ha cumplido la duración de
corte semanal, no se requieren
más operaciones de corte esa
semana.
► No es necesaria ninguna otra acción, las
operaciones de corte se distribuyen
automáticamente a lo largo de la semana – si es
necesario, inicie la operación de corte con el
comando "Corte", @ 14.3.
Mensaje activo. ► Rectifique el error mostrado y pulse el botón OK
para confirmar el mensaje.
– Estación de carga no
conectada a la fuente de
alimentación.
– Robot cortacéspedes muy
caliente / muy frío.
– Falla eléctrica.
► Revise la fuente de alimentación a la estación de
carga, @ 10.3.
► Permita que el robot cortacéspedes se caliente o se
enfríe gradualmente a una temperatura ambiente de
alrededor de 50 °F a 68 °F (10 °C a 20 °C).
► Revise la fuente de alimentación.
El robot cortacéspedes no corta
después de que se han utilizado
los comandos "Comenzar a
cortar" o "Comenzar corte con
retardo".
Carga de la batería insuficiente. ► Cargue la batería, @ 12.4.
Lluvia detectada. ► Ajuste el sensor de lluvia, @ 15.2.
Mensaje activo. ► Rectifique el error mostrado y pulse el botón OK
para confirmar el mensaje.

0478-131-3050-A
176
español / EE.UU
22 Guía de solución de problemas
El botón de
encendido/apagado/posición
inicial situado en la estación de
carga ha sido pulsado dos veces.
Homecall está activo.
► Pulse el botón de encendido/apagado/posición
inicial dos veces para apagar Homecall o repita el
comando después de la conexión.
El robot cortacéspedes no está
funcionando y no se muestra
nada en la pantalla.
– La máquina está en espera.
– Batería descargada.
► Pulse cualquier botón para encender el robot
cortacéspedes. Aparece la pantalla de estado,
@ 13.2.
► Si el robot cortacéspedes sigue sin funcionar,
solicite un cambio de batería a su distribuidor
autorizado de servicio STIHL iMow.
El robot cortacéspedes emite
ruidos y vibraciones.
La cuchilla está dañada. ► Remplace la cuchilla de corte y retire todos los
obstáculos del césped, @ 21.3.
El equipo de corte está muy sucio ► Limpie el equipo de corte, @ 20.
Resultados deficientes de
alcolchado/mulching o de corte.
El césped es muy alto en relación
con la altura de corte.
► Ajuste la altura de corte, @ 17.4.
El césped está extremadamente
mojado.
► Ajuste el sensor de lluvia, @ 15.2.
► Cambie los intervalos de actividad, @ 14.6.
La cuchilla de corte está
desafilada o desgastada.
► Cambie la cuchilla de corte, @ 21.3.
Intervalos de actividad
insuficientes, duración de corte
demasiado corta.
► Aumente o agregue intervalos de actividad,
@ 14.6.
► Aumente la duración de corte, @ 14.7.
Tamaño de la superficie a cortar
establecido incorrectamente.
► Cree un nuevo plan de corte, @ 14.5.
Largos periodos de lluvia. ► Permita el corte durante la lluvia, @ 15.2.
► Aumente los intervalos de actividad, @ 14.6.
Pantalla en un idioma extranjero El valor de ajuste de idioma ha
sido cambiado.
► Configure el idioma, @ 10.2.
Manchas marrones (terrosas)
aparecen en la superficie a
cortar.
La duración de corte es muy
larga en relación a la superficie a
cortar.
► Reduzca la duración de corte, @ 14.6.
El cable perimétrico se ha
tendido con un radio
excesivamente ajustado.
► Corrija el tendido del cable perimétrico, @ 11.
Tamaño de la superficie a cortar
establecido incorrectamente.
► Cree un nuevo plan de corte, @ 14.5.
Siempre active el bloqueo de equipo antes de efectuar cualquier inspección, limpieza o mantenimiento.
Condición Posible causa Solución

0478-131-3050-A
177
español / EE.UU
22 Guía de solución de problemas
Las operaciones de corte son
sustancialmente más cortas de lo
habitual.
El césped está muy alto o muy
mojado.
► Ajuste la altura de corte, @ 17.4.
► Ajuste el sensor de lluvia, @ 15.2.
► Cambie los intervalos de actividad, @ 14.6.
La máquina (equipo de corte,
ruedas motrices) está muy sucia.
► Limpie la máquina, @ 20.
La batería ha llegado al final de
su vida útil.
► Solicite a su concesionario de servicio autorizado de
STIHL iMow un cambio de batería.
El robot cortacéspedes está
conectado, la batería no se
carga.
La batería no necesita ser
cargada.
► No se requiere ninguna acción. La carga de la
batería ocurre automáticamente por debajo de
cierto voltaje.
Estación de carga no conectada
a la fuente de alimentación.
► Revise la fuente de alimentación a la estación de
carga, @ 10.3.
Conexión incorrecta. ► Coloque el robot cortacéspedes en la superficie a
cortar y envíelo de regreso a la estación de carga
(@ 14.3), revise que la conexión se efectúe
correctamente. Si es necesario, corrija la posición
de la estación de carga, @ 10.3.
Contactos de carga corroídos. ► Solicite a su concesionario de servicio autorizado de
STIHL iMow que remplace los contactos de carga.
La conexión no funciona. Zona de entrada a la estación de
carga está desnivelada.
► Nivele la zona de entrada a la estación de carga,
@ 14.3.
Ruedas motrices o placa base
sucias.
► Limpie las ruedas motrices y la placa base de la
estación de carga, @ 20.
Cable perimétrico tendido
incorrectamente en la zona de la
estación de carga.
► Vuelva a tender el cable perimétrico. Asegure el
tendido adecuado en la zona de la estación de
carga, @ 11.
Extremos del cable perimétrico
no fueron cortados.
► Corte el cable perimétrico como se describe y
tiéndalo sin el exceso de longitud. No enrolle los
extremos sobrantes, @ 10.5.
El robot cortacéspedes pasa de
largo la estación de carga o se
conecta en ángulo.
Señal de cable afectada. ► Enlace nuevamente el robot cortacéspedes con la
estación de carga. Asegúrese de que el robot
cortacéspedes esté correctamente alineado a la
estación de carga.
Siempre active el bloqueo de equipo antes de efectuar cualquier inspección, limpieza o mantenimiento.
Condición Posible causa Solución

0478-131-3050-A
178
español / EE.UU
22 Guía de solución de problemas
Cable perimétrico tendido
incorrectamente en la zona de la
estación de carga.
► Vuelva a tender el cable perimétrico. Asegure el
tendido adecuado en la zona de la estación de
carga, @ 11.
► Compruebe la correcta conexión de los extremos
del cable perimétrico en la estación de carga,
@ 10.5.
El robot cortacéspedes ha
cruzado el cable perimétrico.
Cable perimétrico tendido
incorrectamente, las distancias
no son correctas.
► Revise el tendido del cable perimétrico, @ 10.7.
Pendiente muy empinada en la
superficie a cortar.
► Revise las distancias con la regla iMow, @ 11.3.
Robot cortacéspedes afectado
por interferencias.
► Contacte a un concesionario de servicio autorizado
de STIHL iMow.
El robot cortacéspedes se atora
con frecuencia.
Altura de corte demasiado baja. ► Aumente la altura de corte, @ 17.4.
Ruedas motrices sucias. ► Limpie las ruedas motrices, @ 20.
Depresiones u obstáculos en la
zona de corte.
► Rellene los agujeros en la superficie a cortar, instale
superficies excluidas alrededor de obstáculos como
raíces expuestas, quite los obstáculos.
El sensor de impacto no se activa
cuando el robot cortacéspedes
choca con un obstáculo.
Obstáculo bajo (altura menor a
3.9 pulg. (10 cm).
► Retire el obstáculo u obstrúyalo con una superficie
excluida, @ 11.6.
El obstáculo no está fijado
firmemente al suelo, por ejemplo,
fruta caída o una pelota de tenis.
► Inicie todas las operaciones de corte en la estación
de carga en superficies a cortar adecuadas,
@ 15.6.
Carriles de guía en el borde de la
superficie a cortar.
Corte de borde demasiado
frecuente.
► Apague el corte de borde o disminuya la frecuencia
a una vez por semana, @ 15.3.
Puntos de inicio en uso. ► Inicie todas las operaciones de corte en la estación
de carga en superficies a cortar adecuadas,
@ 15.6.
La batería se carga con mucha
frecuencia hacia el final de su
vida útil.
► Solicite a su concesionario de servicio autorizado de
STIHL iMow un cambio de batería.
Regreso desplazado (pasaje) no
está encendido.
► Encienda el regreso desplazado, @ 15.2.
Césped sin cortar en el borde de
la zona de corte.
Corte de borde apagado. ► Corte el borde una o dos veces por semana,
@ 15.3
Siempre active el bloqueo de equipo antes de efectuar cualquier inspección, limpieza o mantenimiento.
Condición Posible causa Solución

0478-131-3050-A
179
español / EE.UU
22 Guía de solución de problemas
Cable perimétrico tendido
incorrectamente.
► Revise el tendido del cable perimétrico, @ 10.7.
► Revise las distancias con la regla iMow, @ 11.3.
El césped está fuera del alcance
de la cuchilla.
► Corte regularmente las superficies sin cortar con
una desbrozadora adecuada.
Sin señal del cable Estación de carga apagada – el
LED no está encendido.
► Encienda la estación de carga, @ 12.
Estación de carga desconectada
del tomacorriente – el LED está
apagado.
► Revise la fuente de alimentación a la estación de
carga, @ 10.3.
Cable perimétrico no conectado a
la estación de carga – el LED rojo
parpadea.
► Conecte el cable perimétrico a la estación de carga,
@ 10.5.
Rotura en el cable perimétrico –
el LED rojo parpadea.
► Busque la rotura del cable (@ 22.3), luego repare
el cable perimétrico con conectores de cable,
@ 11.14.
El robot cortacéspedes y la
estación de carga no están
enlazados.
► Enlace robot cortacéspedes con estación de carga,
@ 10.6.
Error en sistema electrónico. ► Contacte a un concesionario de servicio autorizado
de STIHL iMow.
El cable perimétrico tendido es
muy corto – el LED rojo parpadea
rápidamente a intervalos,
@ 12.1.
► Instale el STIHL Small Area Module AKM 100
(accesorio especial).
► Contacte a un concesionario de servicio autorizado
de STIHL iMow.
El robot cortacéspedes no está
recibiendo ninguna señal de
GPS.
Se está estableciendo la
conexión con los satélites.
No se requiere ninguna otra acción. El
establecimiento de la conexión puede tomar unos
minutos.
3 o menos satélites dentro del
rango.
No se requiere ninguna otra acción. El
establecimiento de la conexión puede tomar unos
minutos.
Sin señal de GPS. ► Evite o quite los obstáculos que puedan estar
bloqueando la señal (por ejemplo, árboles, toldos).
El robot cortacéspedes no puede
ser alcanzado mediante la app
iMow.
Módulo celular inactivo. El módulo celular se apaga durante el enlazamiento,
luego se reactiva y el robot cortacéspedes puede ser
alcanzado nuevamente.
Siempre active el bloqueo de equipo antes de efectuar cualquier inspección, limpieza o mantenimiento.
Condición Posible causa Solución

0478-131-3050-A
180
español / EE.UU
22 Guía de solución de problemas
Robot cortacéspedes en modo de
espera.
► Pulse el botón para activar el robot cortacéspedes,
configure el modo de energía "Estándar".
El smartphone o la tablet no
están conectados a Internet.
► Conecte a Internet el dispositivo en el que está
instalada la app.
El robot cortacéspedes no está
asociado con la dirección de
correo electrónico correcta.
► Corrija la dirección de correo electrónico.
Siempre active el bloqueo de equipo antes de efectuar cualquier inspección, limpieza o mantenimiento.
Condición Posible causa Solución

0478-131-3050-A
181
español / EE.UU
22 Guía de solución de problemas
22.3 Identificación de la rotura de cable
El LED en la estación de carga destella en rojo cuando se
produce una rotura en el cable perimétrico.
Las siguientes instrucciones describen cómo se debe
buscar una rotura en un cable en sentido de las agujas del
reloj, es decir, recorriendo el cable perimétrico en sentido de
las agujas del reloj desde la estación de carga. El proceso
de identificación también se puede efectuar en sentido
contrario a las agujas del reloj, si es necesario. Sin
embargo, si efectúa la búsqueda en sentido contrario a las
agujas del reloj, hay que desconectar el extremo derecho
del cable perimétrico.
ADVERTENCIA
Para reducir el riesgo de sufrir una descarga eléctrica,
siempre desconecte la fuente de alimentación del
tomacorriente antes de quitar la cubierta de la estación de
carga.
Para identificar una rotura en el cable:
► Pulse el botón de encendido/apagado/posición inicial en
la estación de carga una vez para activar la búsqueda de
rotura de cable. El LED en la estación de carga continuará
destellando en rojo mientras esté activa la función de
búsqueda.
► Desconecte la fuente de alimentación del tomacorriente.
► Retire la cubierta de la estación de carga y abra el tablero.
► Presione y abra la palanca de sujeción izquierda (1).
► Retire el extremo izquierdo (2) del cable perimétrico que
se había pelado.
► Cierre la palanca de sujeción (1).
► Cierre el tablero y vuelva a fijar la cubierta de la estación
de carga.
► En el menú "Mantenimiento", seleccione la entrada
"Hallar rotura cable" y pulse el botón OK.
► Levante ligeramente el robot cortacéspedes por el asa de
transporte trasero (1) y alivie el peso ejercido sobre las
ruedas motrices. Empuje la máquina, que descansa sobre
las ruedas frontales. Siga el cable perimétrico (2).
► Partiendo de la estación de carga, siga el borde de la
superficie a cortar en sentido de las agujas del reloj con el
robot cortacéspedes (1). Compruebe que el cable
perimétrico (2) corra bajo el sensor del cable en el robot
cortacéspedes. Los sensores del cable están instalados
en una posición protegida a la izquierda y a la derecha del
robot cortacéspedes, en la parte delantera de la unidad.
► Durante el proceso de identificación de la rotura del cable,
se indicará en pantalla la intensidad de la señal. Los
sensores del cable se encontrarán en la posición óptima
encima del cable perimétrico cuando este valor se
encuentre en su máximo.
2
1
0000-GXX-5357-A1
Mientras los sensores del cable reciban
correctamente la señal del cable, aparecerá
este símbolo en pantalla.
2
1
0000-GXX-4406-A1

0478-131-3050-A
182
español / EE.UU
23 Especificaciones
► Utilice un conector de cable para reparar la rotura,
@ 11.14. Si es necesario, cambie el recorrido del cable
perimétrico en la zona donde se produjo la rotura.
INDICACIÓN
Si usted no logra identificar la rotura del cable mediante el
procedimiento descrito, comuníquese con el concesionario
de servicio autorizado de STIHL iMow.
23.1 Robot cortacéspedes (iMow) STIHL RMI
422.0 PC-L
RMI = robot cortacéspedes, automático y de batería.
– Ancho de corte: 7.9 pulg. (20 cm)
– Altura de corte: 0.79 pulg. a 2.4 pulg. (20 mm a 60 mm)
– Velocidad de cuchilla: 4450 RPM.
– Peso: 19.8 lbs. (10 kg)
– Aislamiento: Clase III (diseñado para conectarse con una
fuente de alimentación de muy baja tensión de
seguridad/independiente(SELV))
– Grado de protección: IPX4 (protegido contra el rociado y
salpicado de agua desde todas direcciones).
– Rango de temperatura ambiente permisible durante el
funcionamiento: 41 °F a 104 °F (5 °C a 40 °C)
– Rango de temperatura ambiente permisible durante el
almacenamiento: 32 °F a 122 °F (0 °C a 50 °C)
– Bandas móviles de radiofrecuencias admitidas: E-GSM-
900, DCS-1800.
– Máxima potencia de transmisión radiada:
– E-GSM-900: 880 a 915 MHz, 33.0 dBm.
– DCS-1800: 1710 a 1785 MHz, 30.0 dBm.
– Rango de frecuencia del cable perimétrico y búsqueda de
lazos: 1 kHz a 90 kHz.
– Máxima intensidad de campo: < 72 μA/m.
23.2 Batería STIHL AAI 80
Tipo aprobado de fuente de alimentación: Estación de carga
STIHL ADO 401 junto con una fuente de alimentación OWA-
60U-27VUSM.
– Tecnología de la batería: Iones de litio.
– Voltaje: 18.5 V.
– Capacidad nominal en Ah
1
: 4.5 Ah.
– Energía almacenada en Wh
2
: 83 Wh.
– Peso en kg: 3.1 lbs. (1.4 kg)
– Rango de temperatura ambiente permisible durante el uso
o el almacenamiento: 14 °F a 122 °F (- 10 °C a 50 °C)
23.3 Estación de carga STIHL ADO 401 y fuente de
alimentación OWA-60U-27VUSM
Estación de carga STIHL ADO 401
– Fuente de alimentación aprobada: Fuente de
alimentación OWA-60U-27VUSM.
– Voltaje: 27 V.
– Amperaje: 2.3 A.
– Aislamiento: Clase III (diseñado para conectarse con una
fuente de alimentación de muy baja tensión de
seguridad/independiente (SELV))
– Grado de protección: IPX4 (protegido contra el rociado y
salpicado de agua desde todas direcciones).
En la zona de la rotura del cable, la señal
perderá intensidad y aparecerá el siguiente
símbolo en pantalla.
23 Especificaciones
1
Capacidad nominal calculada de acuerdo con el estándar IEC
61960. La energía utilizable por el usuario será menor.
2
La batería está marcada con su energía almacenada tal como la
proporcionó el fabricante de la celda. La energía utilizable por el
usuario será menor.

0478-131-3050-A
183
español / EE.UU
23 Especificaciones
– Peso: 6.6 lbs. (3 kg)
– Rango de temperatura ambiente permisible durante el uso
o el almacenamiento: 32 °F a 122 °F (0 °C a 50 °C)
Fuente de alimentación OWA-60U-27VUSM
Para uso únicamente con la estación de carga STIHL ADO
401.
– Voltaje de entrada: 100 V a 240 V.
– Frecuencia: 50/60 Hz.
– Voltaje de salida: 27 V.
– Aislamiento: Clase II (aislamiento doble).
– Capacidad de protección para cuerpo: IP67 (protección
total contra el ingreso de polvo).
– Rango de temperatura ambiente permisible durante el uso
o el almacenamiento: 32 °F a 122 °F (0 °C a 50 °C)
23.4 Símbolos del robot cortacéspedes, la batería, la
estación de carga y la fuente de alimentación
23.5 Mejoramientos técnicos
STIHL tiene la filosofía de mejorar continuamente todos sus
productos. Como resultado de ello, periódicamente se
introducen cambios de diseño y mejoras. Por lo tanto, es
posible que algunos cambios, modificaciones y mejoras no
se describan en este manual. Si las características de
funcionamiento o la apariencia de su máquina difieren de las
descritas en este manual, comuníquese con el
concesionario STIHL para obtener la ayuda que requiera.
23.6 Declaración de cumplimiento con norma FCC
15
Este dispositivo contiene un transmisor (ID de FCC:
XPY2AGQN4NNN) y cumple con la parte 15 de las normas
de la FCC.
El funcionamiento está sujeto a las dos condiciones dadas
a continuación:
– Este dispositivo no deberá causar interferencias nocivas.
– Este dispositivo deberá aceptar todas las interferencias
que reciba, incluso las interferencias que pudieran causar
un funcionamiento no deseado.
Símbolo Explicación
VVoltio
Hz Hertz
A Amperio
Ah Amperio-hora
WVatio
Wh Vatio-hora
AC Corriente alterna
IP Grado de protección eléctrica
Ancho de corte de la cuchilla, expresado en
centímetros.
Los productos STIHL no se deben desechar junto
con la basura del hogar, sino en conformidad con las
leyes y normas locales, estatales y federales
provistas en este manual, @ 25.
Corriente continua.
;;
Cantidad de celdas y contenido energético según las
especificaciones del fabricante de celdas. La energía
utilizable será menor.
El sello de la RBRC indica que STIHL ya aportó
dinero para el reciclado de la batería.
Aislamiento: Clase III (diseñado para conectarse con
una fuente de alimentación de muy baja tensión de
seguridad/independiente (SELV))
Certificado/marca de listado de UL.
Certificado/marca de listado de UL.
Nivel de eficiencia energética.

0478-131-3050-A
184
español / EE.UU
24 Piezas y equipos de repuesto
Nota: Este equipo ha sido sometido a pruebas y se ha
hallado que cumple con los límites de los dispositivos
digitales Categoría B, según la parte 15 de las normas de la
FCC. Estos límites están diseñados para ofrecer protección
razonable contra las interferencias nocivas en una
instalación residencial. Este equipo genera, utiliza y puede
irradiar energía a radiofrecuencias y, si no se lo instala y
utiliza conforme a las presentes instrucciones, podría
causar interferencias nocivas para las comunicaciones por
radio. No obstante, no se ofrece garantía alguna de que la
interferencia no ocurrirá en una instalación particular.
Si este equipo llegara a causar interferencias perjudiciales
a la recepción de radio o televisión, lo cual puede
determinarse encendiendo y apagando el equipo, se le
indica al usuario que intente corregir la interferencia
tomando alguna de las siguientes medidas:
– Reoriente o cambie la ubicación de la antena de
recepción.
– Aumente la separación entre el equipo y el receptor.
– Conecte el equipo a un tomacorriente de un circuito
diferente al cual está conectado el receptor.
– Consulte a un concesionario de servicio autorizado de
STIHL o a un técnico de radio/TV con experiencia para
recibir ayuda.
No cambie ni modifique este producto en modo alguno, a
menos que se le indique específicamente hacerlo en este
manual, puesto que podría anular la autoridad de usarlo.
24.1 Piezas de repuesto originales de STIHL
STIHL recomienda el uso de piezas de repuesto originales
de STIHL. Es posible identificar las piezas originales de
STIHL por el número de pieza STIHL, el logotipo de
y, en ciertos casos, el símbolo de piezas
STIHL. En las piezas pequeñas el símbolo puede aparecer
solo.
24.2 Repuestos y accesorios estándar
Repuestos
– Chuchilla de corte: 6301 702 0101
Accesorios
– Juego de instalación Kit S para zonas de corte de hasta
600 yd² (500 m²) (incluye 150 estacas AFN 075.0 para
cables, 3 conectores de cable ADV 010.0).
– Juego de instalación Kit L para zonas de corte de 0.5
acres a 1 acre (2,000 m² a 4,000 m²) (incluye 375 estacas
AFN 075.0 para cables, 7 conectores de cable ADV
010.0).
– Módulo para zonas pequeñas AKM 100.0 de STIHL para
corte de zonas de menos de 120 yd² (100 m²), o si el cable
perimétrico tiene una longitud total menor que 575 pies
(175 m).
25.1 Eliminación del robot cortacéspedes, la
estación de carga y la fuente de alimentación
ADVERTENCIA
Aunque parezca que esté descargada, la batería de iones
de litio integrada en el robot cortacéspedes podría nunca
descargarse por completo y aún podría producir una
corriente de cortocircuito peligrosa. Manipule la batería
descargada/agotada con cuidado. Si se daña o expone a
altas temperaturas, podría tener fugas, generar calor,
incendiarse o explotar.
Los productos STIHL no se deben desechar junto con la
basura del hogar, sino de la manera en que se detalla en
este manual.
► Lleve el robot cortacéspedes a un concesionario de
servicio autorizado de STIHL para que retire y recicle la
batería integrada.
24 Piezas y equipos de repuesto
25 Eliminación

0478-131-3050-A
185
español / EE.UU
25 Eliminación
► Lleve la estación de carga, la fuente de alimentación, los
accesorios y el embalaje a un vertedero autorizado para
reciclaje ecológico.
► Respete todas las normas y regulaciones locales,
estatales y federales de eliminación de desechos.
► Comuníquese con su concesionario de servicio
autorizado de STIHL iMow para obtener la información
más actualizada sobre eliminación de desechos y
reciclaje.
El sello de la RBRC indica que STIHL ya aportó dinero para
el reciclado de la batería. La RBRC cuenta con un número
telefónico gratuito (1-800-822-8837) que le permite acceder
a información sobre lugares de reciclaje de baterías y sobre
las prohibiciones o restricciones respecto a la eliminación
de baterías en su zona.
STIHL está comprometida al desarrollo de productos
que sean ambientalmente responsables. Este
compromiso no termina cuando el producto sale del
concesionario de servicio autorizado STIHL de iMow.
STIHL se asoció con la RBRC (Corporación de
Reciclaje de Baterías Recargables) para fomentar la
recolección y el reciclaje de baterías de iones de litio
STIHL gastadas en los Estados Unidos y Canadá.

0478-131-3050-A
186
español / EE.UU
26 Ejemplos de instalación
26.1 Ejemplos de instalación
Superficie de corte rectangular con un árbol y una piscina.
– Estación de carga: Ubicación (1) al lado de la casa (A).
– Superficie excluida: Instalación alrededor del árbol
aislado (3), partiendo de un tramo de unión instalado en
ángulo recto hacia el perímetro de la superficie a cortar.
– Piscina: Distancia entre cable perimétrico (2) y piscina
(B): 3.3 pies (1 m).
– Distancias del cable:
– La distancia de los obstáculos sobre los que puede
viajar el cortacéspedes, como patios y veredas con una
diferencia máxima de altura entre la superficie del
césped y el obstáculo de +/- 0.4 pulg. (1 cm): 0 pulg. (0
cm)
– Distancia respecto a obstáculos elevados: 11 pulg. (28
cm)
– Distancia del árbol: 11 pulg. (28 cm)
– Distancia con respecto a la piscina: 3.3 pies (1 m).
– Programación: No se necesitan modificaciones
adicionales después de que se haya determinado el
tamaño de la superficie a cortar.
26 Ejemplos de instalación
3
2
1
A
B
0000-GXX-3428-A0

0478-131-3050-A
187
español / EE.UU
26 Ejemplos de instalación
– Detalles: Las zonas sin cortar alrededor de la piscina
deben cortarse manualmente o cortarse con una
desbrozadora u otra herramienta adecuada.

0478-131-3050-A
188
español / EE.UU
26 Ejemplos de instalación
Superficie de corte en forma de U con varios árboles
aislados:
– Estación de carga: Ubicación (1) al lado de la casa (A).
– Superficie excluida: Instalación alrededor de los árboles
aislados, partiendo de tramos de unión instalados en
ángulos rectos hacia el perímetro de la superficie a cortar
(2), dos superficies excluidas están conectadas con un
tramo de unión.
– Piscina: Distancia entre cable perimétrico (2) y piscina B:
3.3 pies (1 m).
– Distancias del cable:
– La distancia de los obstáculos sobre los que puede
viajar el cortacéspedes, como patios y veredas con una
diferencia máxima de altura entre la superficie del
césped y el obstáculo de +/- 0.4 pulg. (1 cm): 0 pulg. (0
cm)
– Distancia respecto a obstáculos elevados: 11 pulg. (28
cm)
– Distancia de los árboles: 11 pulg. (28 cm)
– Programación: No se necesitan modificaciones
adicionales después de que se haya determinado el
tamaño de la superficie a cortar.
– Detalles: Árbol en la esquina de la superficie a cortar.
Corte la superficie detrás del árbol bloqueado
regularmente usando una desbrozadora u otra
herramienta adecuada.

0478-131-3050-A
189
español / EE.UU
26 Ejemplos de instalación
Superficie de corte dividida con un estanque y un árbol
aislado:
– Estación de carga: Ubicación (1) al lado de la casa (A).
– Superficie excluida: Instalación alrededor del árbol
aislado, partiendo de un tramo de unión instalado en
ángulo recto hacia el perímetro de la superficie a cortar.
– Estanque: Distancia del cable perimétrico (2) al estanque
(B): 3.3 pies (1 m).
– Distancias del cable:
– La distancia de los obstáculos sobre los que puede
viajar el cortacéspedes, como patios y veredas con una
diferencia máxima de altura entre la superficie del
césped y el obstáculo de +/- 0.4 pulg. (1 cm): 0 pulg. (0
cm)
– Distancia respecto a obstáculos elevados: 11 pulg. (28
cm)
– Distancia alrededor del árbol: 11 pulg. (28 cm)
– Distancia con respecto al estanque: 3.3 pies (1 m).
– Zona confinada: Instalación de un corredor (3) con una
distancia del cable de 9 pulg. (22 cm).
– Lazos de búsqueda: Instalación de dos lazos de
búsqueda (4) con una distancia mínima de la entrada del
corredor 6.6 pies (2 m) para usar la función regreso a la
estación. Tenga en cuenta la distancia mínima con
respecto a las esquinas, @ 11.9.
– Programación: Defina el tamaño total de la superficie a
cortar, programe dos puntos de inicio (5) (cerca de la
estación de carga y en la esquina cerca del estanque) –
frecuencia de inicio de 2 de 10 operaciones en ambos
casos.

0478-131-3050-A
190
español / EE.UU
26 Ejemplos de instalación
– Puntos a tener en cuenta: Las superficies sin cortar, p.ej.,
alrededor del estanque, deben cortarse manualmente o
cortarse con una desbrozadora u otra herramienta
adecuada.

0478-131-3050-A
191
español / EE.UU
26 Ejemplos de instalación
Superficie de corte dividida. El robot cortacéspedes no
puede desplazarse independientemente de una superficie a
cortar a otra:
– Estación de carga: Ubicación (1) al lado de la casa (A).
– Superficie excluida: Instalación del cable perimétrico (2)
alrededor del árbol aislado y alrededor del huerto (B) de
un tramo de unión instalado en ángulo recto hacia el
perímetro de la superficie a cortar.
– Distancias del cable:
– La distancia de los obstáculos sobre los que puede
viajar el cortacéspedes, como patios y veredas con una
diferencia máxima de altura entre la superficie del
césped y el obstáculo de +/- 0.4 pulg. (1 cm): 0 pulg. (0
cm)
– Distancia respecto a obstáculos elevados: 11 pulg. (28
cm)
– Distancia alrededor del árbol: 11 pulg. (28 cm)
– Superficie secundaria: Instalación de una superficie
secundaria (C) con un tramo de unión (3) en el patio
empleando un conducto para cables.
– Programación: Defina el tamaño total de la superficie a
cortar (sin superficie secundaria), programe un punto de
inicio (4) en la zona confinada con una frecuencia de inicio
de 2 de 10 operaciones.
– Detalles: Lleve el robot cortacéspedes a la superficie
secundaria varias veces por semana y active el comando
"Comenzar a cortar". Tenga en cuenta la capacidad de
corte. Si es necesario, instale dos áreas de corte
separadas con 2 estaciones de carga.
1
A
B
4
2
2
3
A
C
0000-GXX-3431-A0

0478-131-3050-A
192
español / EE.UU
26 Ejemplos de instalación
Superficie de corte alrededor de una casa aislada con una
estación de carga externa (1):
– Estación de carga: Ubicación junto al garaje (B) y detrás
de la casa (A).
– Distancias del cable:
– La distancia de los obstáculos sobre los que puede
viajar el cortacéspedes, como patios y veredas con una
diferencia máxima de altura entre la superficie del
césped y el obstáculo de +/- 0.4 pulg. (1 cm): 0 pulg. (0
cm)
– Distancia respecto a obstáculos elevados: 11 pulg. (28
cm)
– Lazos de búsqueda: Instalación de dos lazos de
búsqueda (2) con una distancia mínima de la entrada del
corredor 6.6 pies (2 m) para usar la función regreso a la
estación. Tenga en cuenta la distancia mínima con
respecto a las esquinas, @ 11.9.
– Programación: Defina el tamaño de la superficie a cortar
y por lo menos un punto de inicio (2), @ 15.6.
– Puntos a tener en cuenta: Instalación de un corredor (4)
con área de entrada en forma de embudo (3) y una
distancia del cable de 9 pulg. (22 cm). El corredor conecta
a la estación de carga externa (1). Aumente la distancia
del cable (5) en el corredor hasta alcanzar el ancho de la
placa base con una longitud de 3.3 pies (1 m) frente a la
estación de carga. Tenga en cuenta el espacio necesario
en el corredor y al lado de la estación de carga.

0478-131-3050-A
193
español / EE.UU
27 Garantía limitada
27.1 Política de garantía limitada de STIHL
Incorporated
Este producto se vende sujeto a la Política de garantía
limitada de STIHL Incorporated, disponible en
www.stihlusa.com/warranty.html. También puede obtenerlo
de un concesionario de servicio STIHL autorizado o
llamando al 1-800-GO-STIHL (1-800-467-8445).
28.1 Marcas comerciales registradas
28.2 Marcas comerciales por ley común
Esta lista de marcas comerciales está sujeta a cambios.
Queda terminantemente prohibido todo uso de estas
marcas comerciales sin el consentimiento expreso por
escrito de ANDREAS STIHL AG & Co. KG, Waiblingen.
29.1 STIHL Incorporated
STIHL Incorporated
536 Viking Drive
P.O. Box 2015
Virginia Beach, VA
23452-2015
27 Garantía limitada
28 Marcas comerciales
STIHL
®
FARM BOSS
®
iCademy
®
MAGNUM
®
La combinación de colores
anaranjado-gris (Registros
en EE. UU. #2,821,860;
#3,010,057, #3,010,058,
#3,400,477; y #3,400,476)
MasterWrench Service
®
MotoMix
®
OILOMATIC
®
ROCK BOSS
®
STIHL Cutquik
®
AutoCut
®
STIHL DUROMATIC
®
YARD BOSS
®
STIHL Quickstop
®
STIHL ROLLOMATIC
®
STIHL WOOD BOSS
®
WOOD BOSS
®
TIMBERSPORTS
®
4-MIX™ HT Plus™
BioPlus™ STIHL PowerSweep™
Easy2Start™ STIHL Protech™
EasySpool™ STIHL MiniBoss™
ElastoStart™ STIHL MotoPlus 4™
Ematic™ Master Control Lever™
STIHL Precision Series™ STIHL OUTFITTERS™
FixCut™ STIHL PICCO™
Micro™ TrimCut™
Pro Mark™ STIHL M-Tronic™
Quad Power™ STIHL HomeScaper Series™
Quiet Line™ STIHL PolyCut™
STIHL Arctic™ STIHL RAPID™
STIHL Compact™ STIHL SuperCut™
STIHL Interchangeable
Attachment Series™
STIHL Multi-Cut HomeScaper
Series™
TapAction™ STIHL Territory™
29 Direcciones
TM
STIHL
Injection

www.stihl.com
*04781313050A*
0478-131-3050-A
0478-131-3050-A
englisch / spanisch USA
GU
This
robotic lawn mower
, docking
station and power supply contain chemicals
known to the State of California to cause
cancer, birth defects or other reproductive
harm.
WARNING
Este robot cortacésped, esta estación de
acoplamiento y esta fuente de alimentación
contienen productos químicos considerados
por el Estado de California como causantes
de cáncer, defectos de nacimiento u otra
toxicidad reproductora.
ADVERTENCIA
-
 1
1
-
 2
2
-
 3
3
-
 4
4
-
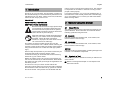 5
5
-
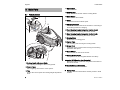 6
6
-
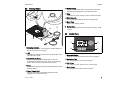 7
7
-
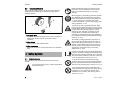 8
8
-
 9
9
-
 10
10
-
 11
11
-
 12
12
-
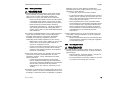 13
13
-
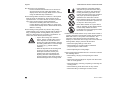 14
14
-
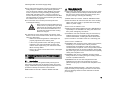 15
15
-
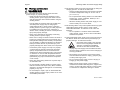 16
16
-
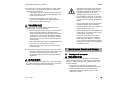 17
17
-
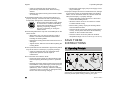 18
18
-
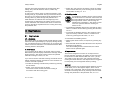 19
19
-
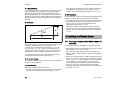 20
20
-
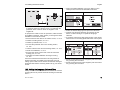 21
21
-
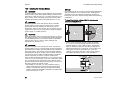 22
22
-
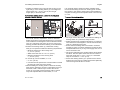 23
23
-
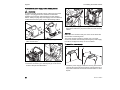 24
24
-
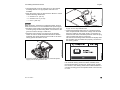 25
25
-
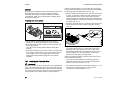 26
26
-
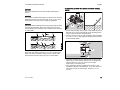 27
27
-
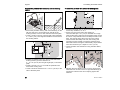 28
28
-
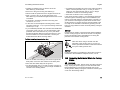 29
29
-
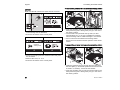 30
30
-
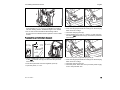 31
31
-
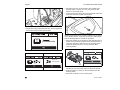 32
32
-
 33
33
-
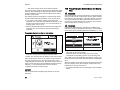 34
34
-
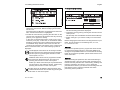 35
35
-
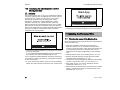 36
36
-
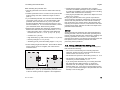 37
37
-
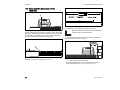 38
38
-
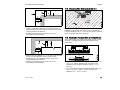 39
39
-
 40
40
-
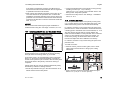 41
41
-
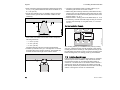 42
42
-
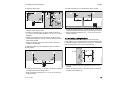 43
43
-
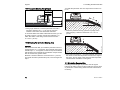 44
44
-
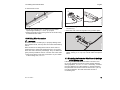 45
45
-
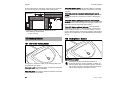 46
46
-
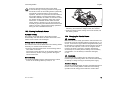 47
47
-
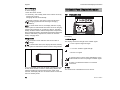 48
48
-
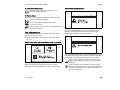 49
49
-
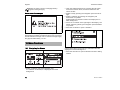 50
50
-
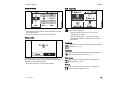 51
51
-
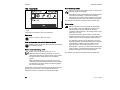 52
52
-
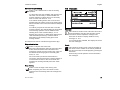 53
53
-
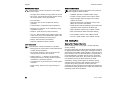 54
54
-
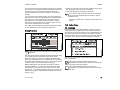 55
55
-
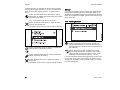 56
56
-
 57
57
-
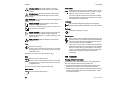 58
58
-
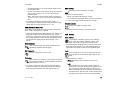 59
59
-
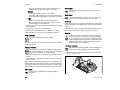 60
60
-
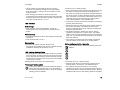 61
61
-
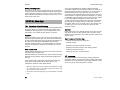 62
62
-
 63
63
-
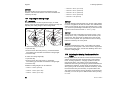 64
64
-
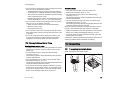 65
65
-
 66
66
-
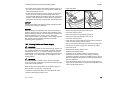 67
67
-
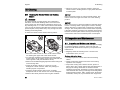 68
68
-
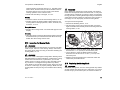 69
69
-
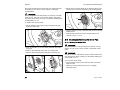 70
70
-
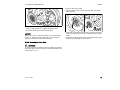 71
71
-
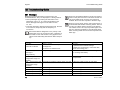 72
72
-
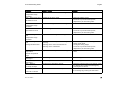 73
73
-
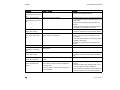 74
74
-
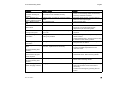 75
75
-
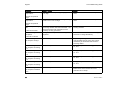 76
76
-
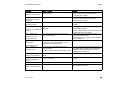 77
77
-
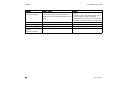 78
78
-
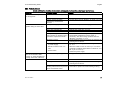 79
79
-
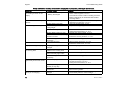 80
80
-
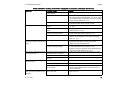 81
81
-
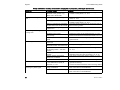 82
82
-
 83
83
-
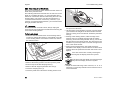 84
84
-
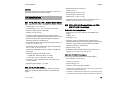 85
85
-
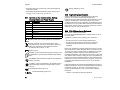 86
86
-
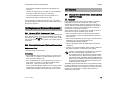 87
87
-
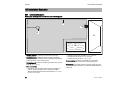 88
88
-
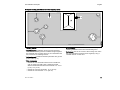 89
89
-
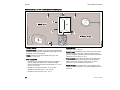 90
90
-
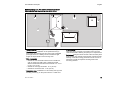 91
91
-
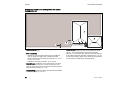 92
92
-
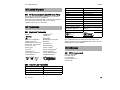 93
93
-
 94
94
-
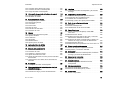 95
95
-
 96
96
-
 97
97
-
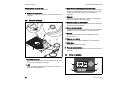 98
98
-
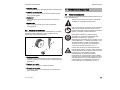 99
99
-
 100
100
-
 101
101
-
 102
102
-
 103
103
-
 104
104
-
 105
105
-
 106
106
-
 107
107
-
 108
108
-
 109
109
-
 110
110
-
 111
111
-
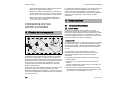 112
112
-
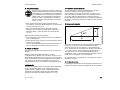 113
113
-
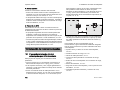 114
114
-
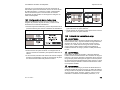 115
115
-
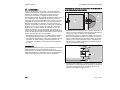 116
116
-
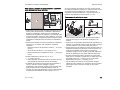 117
117
-
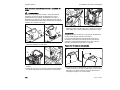 118
118
-
 119
119
-
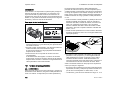 120
120
-
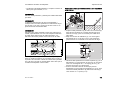 121
121
-
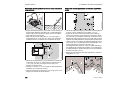 122
122
-
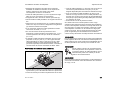 123
123
-
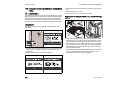 124
124
-
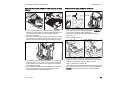 125
125
-
 126
126
-
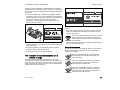 127
127
-
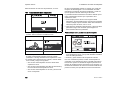 128
128
-
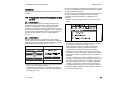 129
129
-
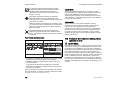 130
130
-
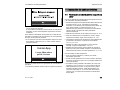 131
131
-
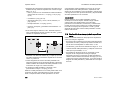 132
132
-
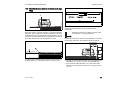 133
133
-
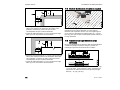 134
134
-
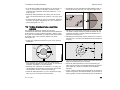 135
135
-
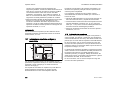 136
136
-
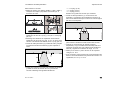 137
137
-
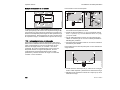 138
138
-
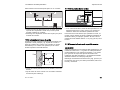 139
139
-
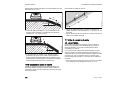 140
140
-
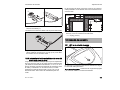 141
141
-
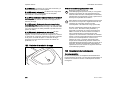 142
142
-
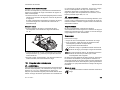 143
143
-
 144
144
-
 145
145
-
 146
146
-
 147
147
-
 148
148
-
 149
149
-
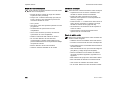 150
150
-
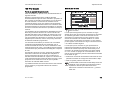 151
151
-
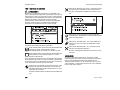 152
152
-
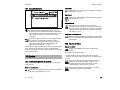 153
153
-
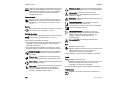 154
154
-
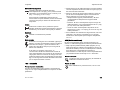 155
155
-
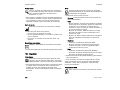 156
156
-
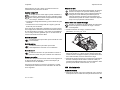 157
157
-
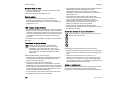 158
158
-
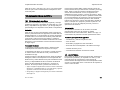 159
159
-
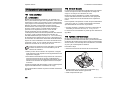 160
160
-
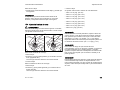 161
161
-
 162
162
-
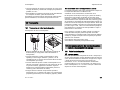 163
163
-
 164
164
-
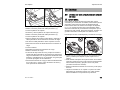 165
165
-
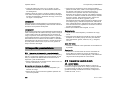 166
166
-
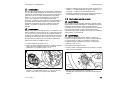 167
167
-
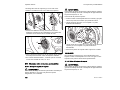 168
168
-
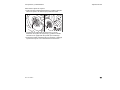 169
169
-
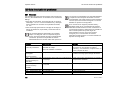 170
170
-
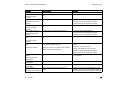 171
171
-
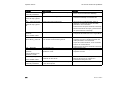 172
172
-
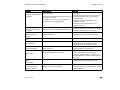 173
173
-
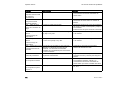 174
174
-
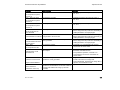 175
175
-
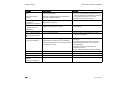 176
176
-
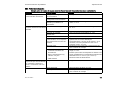 177
177
-
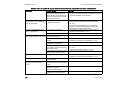 178
178
-
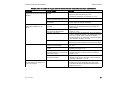 179
179
-
 180
180
-
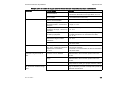 181
181
-
 182
182
-
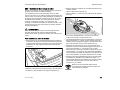 183
183
-
 184
184
-
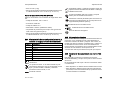 185
185
-
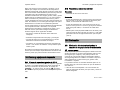 186
186
-
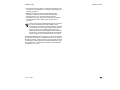 187
187
-
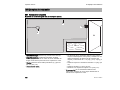 188
188
-
 189
189
-
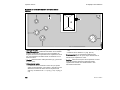 190
190
-
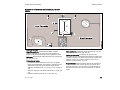 191
191
-
 192
192
-
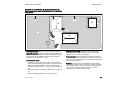 193
193
-
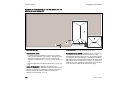 194
194
-
 195
195
-
 196
196


STIHL RMI 422 PC-L Manual de usuario
- Categoría
- Cortadoras de césped
- Tipo
- Manual de usuario
en otros idiomas
- English: STIHL RMI 422 PC-L User manual
Artículos relacionados
Otros documentos
-
Wolf Garten Robo Scooter 400 Original Operating Instructions
-
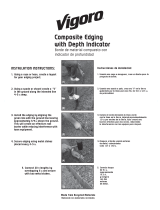 Vigoro 903001VG Instrucciones de operación
-
Landxcape LX790 El manual del propietario
-
Worx landroid wg794 Manual de usuario
-
Worx WG794 El manual del propietario
-
Husqvarna 315, 320 Manual de usuario
-
McCulloch 967059805 Instrucciones de operación
-
Worx WR150 El manual del propietario
-
