
Safety • Assembly • Operation • Tips &Techniques • Maintenance • Troubleshooting • Parts Lists • Warranty
OF A O A AL
Gas Lawn Edger- Model 521
iMPORTANT
READ SAFETY RULES AND iNSTRUCTiONS CAREFULLY BEFORE OPERATION
Warning: Thisunitisequippedwithan internalcombustionengineandshouldnotbeusedon or nearanyunimprovedforest-covered,brush-
coveredor grass-coveredlandunlesstheengine'sexhaustsystemisequippedwitha sparkarrestermeetingapplicablelocalor statelaws(if any).
If a sparkarresterisused,it shouldbemaintainedineffectiveworkingorderbytheoperator.IntheStateofCaliforniatheaboveisrequiredbylaw
(Section4442oftheCaliforniaPublicResourcesCode).Otherstatesmayhavesimilarlaws.Federallawsapplyonfederallands.A sparkarrester
forthemufflerisavailablethroughyournearestengineauthorizedservicedealeror contacttheservicedepartment,RO.Box361131Cleveland,
Ohio44136-0019.
PRINTEDIN U.S.A
MTD LLC, P.O. BOX 361131 CLEVELAND, OHIO 44136-0019
FORMNO. 769-00527G
10/2005

This Operator's Manual is an important part of your new gas lawn edger, it will help you assemble,
prepare and maintain the unit for best performance. Please read and understand what it says.
Table of Contents
1. Safety Labels .................................................. 3
2. Safe Operation Practices ............................ 4-5
3. Setup & Assembly .......................................... 6
4. KnowYour Edger ............................................ 7
5. Operating Your Edger ..................................... 8
6. Maintaining & Servicing ................................. 9
7. Off-Season Storage ...................................... 10
8. Troubleshooting ............................................ 11
9. Parts List .................................................. 12-13
10. Notes Page ............................................. 14-15
11. Warranty ...................................................... 16
Spanish Section Begins ................................... 17
Finding and Recording Model Number
BEFOREYOU STARTASSEMBLINGYOURNEW EQUIP-
MENT,please locatethe modelplateon the equipmentand
copy the informationto thesample modelplate providedto
the right.Youcan locate the modelplate bystanding at the
operating positionand lookingdown at the rearof the gas
lawnedger.This informationwillbe necessaryto usethe
manufacturer'sweb site and/or helpfromthe CustomerSup-
port Departmentor anauthorizedservice dealer.
f
Model Number
®
www.mtdproducts.com
Serial Number
MTD LLC
P.O. BOX 361131
CLEVELAND, OH 44136
330 -220 -4683
800-800-7310
Customer Support
Please do NOTreturn the unit to the retailer from which it was
purchased, without first contacting Customer Support.
If you havedifficulty assemblingthis productor haveany
questions regardingthe controls,operation or maintenanceof
this unit, youcan seek helpfrom the experts. Choosefromthe
options below:
1. Visit mtdproducts.com for many usefulsuggestions.
Click on CustomerSupportbutton and youwill get the four
options reproducedinthis sampleto the right.Click onthe
appropriatebuttonand help isimmediatelyavailable.
2. Phone a Customer Support Representative
at 1(800)800-7310.
3. Theengine manufacturer isresponsiblefor all engine-
related issueswithregards to performance,power-rating,
specifications,warrantyand service. Pleaserefer tothe
enginemanufacturer'sOwner's/Operator'sManual, packed
separatelywith your unit,for more information.
Click here to search our knowledge base.
Search by product, keyword, or phrase.
Login to check the status of your questions, modify
your inquiries, or update your personal profile.
Need local assistance? Click here to find authorized
service centers in your area.
Need a manual and/or parts list? Download
literature from recent model years.
2

7"
YourSafetyLabels
Pleasetakeamomenttoreviewyoursafetylabels. LJ
Labels
S321
3

RNING
This symbol points
i out important safety
instructionswhich, if
notfollowed, could
endangerthe personal
i safetyand/or property
I ofyourself and others.
Readand follow all
instructionsinthis man-
ualbeforeattempting to
operatethis machine.
Failureto complywith
these instructionsmay
i resultin personalinjury.
i When youseethis
_symbol.
HEED ITS WARNING
Your
Responsibility
Restrictthe use
i ofthis powermachine
i to personswho read,
understand
andfollow the warnings
and instructions
inthis manual
andon the machine.
WARNING: EngineExhaust,some of its constituents,andcertain vehiclecompo-
nentscontain or emit chemicals knownto Stateof Californiato cause cancerand
birth defectsor other reproductiveharm.
DANGER: This machinewas builtto beoperatedaccordingto the rulesfor safe operation in this
manual.As with anytype of powerequipment,carelessnessor erroronthe part ofthe operatorcan
result inseriousinjury.This machine iscapableof amputatinghands andfeet andthrowing objects.
Failureto observethe followingsafety instructionscould resultin serious injury or death.
Children
Tragicaccidentscanoccurifoperatorisnotalertto presence
ofchildren.Childrenareoftenattractedtopowerequipment
suchaslawnedgers.Theydo notunderstandthe dangers.
Neverassumethatchildrenwill remainwhereyoulastsaw
them.
1. Keepchildrenoutofthe mowingareaand underwatchful
careofa responsibleadultotherthanthe operator.
2. Bealertandturnlawnedgeroffif achildentersthearea.
3. Beforeandwhilemovingbackwards,lookbehindanddown
forsmallchildren.
4. Useextremecarewhenapproachingblindcorners,
doorways,shrubs,trees,orotherobjectsthatmayobscure
yourvisionofachild whomayrunintothe lawnedger.
5. Keepchildrenawayfromhotor runningengines.Theycan
sufferburnsfroma hotmuffler.
6,
Neverallowchildrenunder14yearsoldto operatean
edger.Children14yearsoldandovershouldreadand
understandoperationinstructionsandsafetyrulesinthis
manualandshouldbetrainedandsupervisedbyaparent.
Operation
Safe HandlingOf Gasoline:
1. Toavoidpersonalinjuryor propertydamageuse
extremecarein handlinggasoline,Gasolineisextremely
flammableand thevaporsareexplosive,Seriouspersonal
injurycanoccurwhengasolineisspilledon yourselfor
yourclotheswhichcan ignite,
2. Washyourskin andchangeclothesimmediately,
3. Useonlyanapprovedgasolinecontainer,
4. Neverfill containersinsideavehicleoron atruck ortrailer
bedwitha plasticliner,Alwaysplacecontainersonthe
groundawayfromyourvehiclebeforefilling.
5. Removegas-poweredequipmentfromthetruckor
trailerandrefuelit onthe ground.Ifthis is notpossible,
thenrefuelsuchequipmenton atrailerwitha portable
container,ratherthanfroma gasolinedispensernozzle.
6. Keepthe nozzleincontactwith the rimofthefuel tankor
containeropeningatalltimesuntilfuelingiscomplete.Do
notusea nozzlelock-opendevice.
7. Extinguishallcigarettes,cigars,pipesandothersources
ofignition.
8. Neverfuel machineindoorsbecauseflammablevapors
willaccumulateinthe area.
9. Neverremovegas caporaddfuel whileengineishotor
running. Allowengineto coolatleasttwominutesbefore
refueling.
10.Neveroverfillfueltank. Filltankto nomorethanY2inch
belowbottomoffiller neckto provideforfuelexpansion.
11.Replacegasolinecap andtightensecurely.
12.Ifgasolineisspilled,wipeitofftheengineandequipment.Move
unittoanotherarea.Wait5minutesbeforestartingengine.
13.Neverstorethe machineor fuelcontainernearanopen
flame,sparkorpilotlightasonawaterheater,space heater,
furnace,clothesdryeror othergasappliances.
14.Toreducefire hazard,keeplawnedgerfreeofgrass,
leaves,or otherdebrisbuild-up.Cleanupoilor fuelspillage
andremoveanyfuelsoakeddebris.
15.Allowalawnedgerto coolatleast5minutesbeforestoring.
General Operation:
1. Readthisoperator'smanual carefullyinits entiretybefore
attemptingtoassemblethismachine.Read,understand,
andfollowall instructionsonthe machineandin the
manual(s) beforeoperation.Becompletelyfamiliarwith
thecontrolsandthe properuseofthis machinebefore
operatingit. Keepthis manualinasafeplaceforfutureand
regularreferenceandfororderingreplacementparts.
2. Thismachineisaprecisionpieceof powerequipment,not a
plaything.Therefore,exerciseextremecautionatalltimes.
Yourunithasbeendesignedto performonejob:to mow
grass.Do notuse itfor anyotherpurpose.
3. Neverallow childrenunder14yearsoldto operatethis
machine.Children14yearsoldandovershouldreadand
understandthe instructionsinthis manualandshould
betrainedand supervisedby a parent.Onlyresponsible
individualswhoarefamiliarwiththeserulesofsafe opera-
tionshouldbeallowedtousethismachine.
4. Tohelpavoidbladecontactorathrownobjectinjury,stayin
operatorzonebehindhandlesandkeepchildren,bystand-
ers,helpersandpetsatleast75feetfrom lawnedgerwhile
it isinoperation.Stopmachineifanyoneentersarea.
5. Thoroughlyinspectthe areawherethe equipmentisto be
used.Removeallstones,sticks,wire,bones,toysand other
foreignobjectswhichcouldbetrippedoveror pickedup
andthrownbythe blade.Thrownobjectscan causeserious
personalinjury.
6. Alwayswearsafetyglassesor safetygogglesduringopera-
tionandwhileperforminganadjustmentorrepairtoprotect
youreyes.Thrownobjectswhichricochetcancauseserious
injurytothe eyes.
7. Wearsturdy,rough-soledworkshoesandclose-fitting
slacksandshirts.Shirtsandpantsthatcoverthe armsand
legsandsteel-toedshoesarerecommended.Neveroperate
thismachineinbarefeet,sandals,slipperyor lightweight
(e.g.canvas)shoes.
8. Neverattemptto makeanyadjustmentswhiletheengine
is running,exceptwherespecificallyrecommendedinthe
operator'smanual.
4

9. Toavoidpersonalinjuryor propertydamageuseextreme
carein handlinggasoline.Gasolineisextremelyflammable
andthevaporsareexplosive.Seriouspersonalinjury can
occurwhengasolineisspilledonyourselfor yourclothes
whichcanignite.Washeryourskinandchangeclothes
immediately.
10.Donotput handsor feetnearrotatingparts.Contactwith
the rotatingbladecanamputatehandsandfeet.
11.Thebladecontrolhandleisa safetydevice.Neverbypass
its operation.Doingso,makesthe machineunsafeandmay
causepersonalinjury.
12.Neveroperatewithout bladeguard,debrisshieldand blade
controlhandlein placeandworking.
13.Neveroperatewith damagedsafetydevices.Failureto do
so,can resultin personalinjury.
14.Neverrunanengineindoorsor inapoorlyventilatedarea.
Engineexhaustcontainscarbonmonoxide,an odorlessand
deadlygas.
15.Donotoperatemachinewhileunderthe influenceofalcohol
or drugs.
16.Mufflerand enginebecomehotandcancausea burn.Do
nottouch.
17.Neveroperatethis machinewithoutgoodvisibilityor light.
Alwaysbesureofyourfootingandkeepafirmhold onthe
handles.Walk,neverrun.
18.Donotoperatethis machineif it hasbeendroppedor dam-
aged. Returnmachinetoyournearestauthorizedservicing
dealerforexaminationand repair.
19.Donotoperatethis machinewitha damagedorexcessively
worncuttingblade.
20.Neverattempttoclear materialfromthe bladeguardwhile
the engineisrunning.Shutthe engineoff,disconnectthe
sparkplugwireandgroundagainsttheengineto prevent
unintendedstarting.
21.Do notoverloadmachinecapacityby attemptingtoedgeat
toofast ofa rate.
22.Stayalertforunevensidewalks,terrainetc.Alwayspush
slowlyoverroughsurfaces.Do notusethismachineon
gravelsurfaces.
23.Do notoperatemachinein rainorwetsoilconditions.
Alwaysoperatemachinefrom behindthe handlesand
positionyourselfwherethedirectlineofsighttocutting
bladeisblockedbyguards.
24.Alwaysstopenginewhenedgingortrimmingisdelayedor
whentransportingmachinefrom onelocationto another.
Neverleavearunningmachineunattended.Stopthe
engine,disconnectsparkplugwireand groundagainstthe
enginetopreventunintendedstarting.
25.Onlyusepartsandaccessoriesmadeforthis machineby
the manufacturer.Failureto doso,canresultin personal
injury.
26. Ifsituationsoccurwhicharenotcoveredinthis manual,use
careandgoodjudgment.Telephone330-220-4683 or
1-800-800-7310 for CustomerSupportandthe nameof
yournearestdealer.
Service
1. Neverrunan engineindoorsor in a poorlyventilatedarea.
Engineexhaustcontainscarbonmonoxide,anodorlessand
deadlygas.
2. Beforecleaning,repairing,or inspecting,makecertainthe
bladeandall movingpartshavestopped.Disconnectthe
sparkplugwireandgroundagainstthe engineto prevent
unintendedstarting.
3. Checkthe bladeandenginemountingboltsatfrequent
intervalsfor propertightness.Also,visuallyinspectblade
fordamage(e.g.,bent,cracked,worn)Replacebladewith
theoriginalequipmentmanufacture's(O.E.M.)bladeonly,
listedin thismanual."Useof partswhichdo notmeetthe
originalequipmentspecificationsmayleadto improper
performanceandcompromisesafety!"
4. Lawnedgerbladesaresharpand cancut.Wrapthe blade
orweargloves,anduseextracautionwhenservicingthem.
5. Keepallnuts,bolts,andscrewstightto besurethe equip-
mentis insafeworkingcondition.
6. Nevertamperwithsafetydevices.Checktheirproper
operationregularly.
7. Afterstrikingaforeignobject,stopthe engine,discon-
nectthesparkplugwireandgroundagainsttheengine.
Thoroughlyinspectthe lawnedgerfor anydamage.Repair
thedamagebeforestartingandoperatingthe lawnedger.
8. Neverattemptto makea wheelor cuttingheightadjust-
mentwhilethe engineisrunning.
9. Manycomponentsonyournewedgercanwearwith
continueduse. Forsafetyprotection,frequentlycheck
alledgercomponentsandreplaceimmediatelywith
originalequipmentmanufacturer's(O.E.M.)partsonly,
listedinthis manual."Useofpartswhichdo notmeetthe
originalequipmentspecificationsmayleadtoimproper
performanceand compromisesafety!"
10.Do notchangetheenginegovernorsettingor overspeed
theengine.Thegovernorcontrolsthemaximumsafe
operatingspeedoftheengine.
11.Maintainor replacesafetylabels,as necessary.
12.Observeproperdisposallawsand regulations.Improper
disposaloffluidsandmaterialscanharmtheenvironment.
Practices
WARNING
Thissymbol points
out importantsafety
instructionswhich, if
notfollowed,could
endangerthe personal
safety and/or property
of yourselfand others.
Readand followall
instructions inthis man-
ual beforeattemptingto
operatethis machine.
Failuretocomply with
these instructionsmay
result inpersonalinjury.
Whenyou see this
symbol.
HEED ITS WARNING
Your
Responsibility
Restrictthe use
ofthis powermachine
to personswho read,
understand
and follow thewarnings
and instructions
inthis manual
and onthe machine.
5

WARNING
The edger blade
WILL rotate when the
starter rope is pulled.
iMPORTANT:
This unitis sh_pped
WITHOUTGASOLINE.
Aftersetting upthe
unit,service engine
with gasoline as in-
structed in the separate
enginemanual packed
with your unit. Besure
to service enginewith
the oil enclosedwith
this unitas instructed
inthe separateengine
manual.
Figure 1
Figure 2
Securing the Handle
IMPORTANT:ThisunitisshippedWITHOUTGASOLINE.
Aftersettingup theunit,serviceenginewithgasolineas
instructedin theseparateenginemanualpackedwithyour
unit. Besuretoserviceenginewiththeoilenclosedwith
thisunitasinstructedinthe separateenginemanual.
NOTE: Referencetorightorlefthandsideoftheedgeris
observedfromtheoperatingposition.
Positioningthe Edger Handles
1. Removeanddiscardanypackagingcardboardthat
maybepresentbetweentheupperhandleandthe
lowerhandle.
2. Depressthebladecontrolat thetopoftheupper
handleandpivottheupperhandleupwarduntilit
snapsintoplace(1).
3. Tightenthehandknobs,whichare locatedon boththe
leftand rightsidesofthehandle(2).SeeFigure2.
Attachingthe Starter Rope
1. Locatetheropeguidefoundonthe rightsideofthe
upperhandle.
2. Loosen,butdo NOTremove,thewingknobwhich
securestheropeguidetotheupperhandle.See
Figure2.
3. Standbehindtheunitandholdthebladecontrol
againsttheupperhandle(1)andgentlypullthestarter
ropeoutoftheengine(2).
WARNING: The edgerblade WILL
rotate whenthe starterropeispulled.
NOTE: Thestarterropewillnotpulloutoftheengine
unlessthebladecontrol(refertoFigure2) isdepressed
againsttheupperhandle.
4. Slipthestarterropethroughthetopof theropeguide
(3).
5. Retightenthewingknobwhichsecuresthe ropeguide
totheupperhandle(4).
6

f BladeControl
Blade DepthControl Lever
(TransportPositionShown)
Pull Rope/ RecoilStarter
BeltGuard
Figure 3
_ ARNING:
Befamiliarwith all controls and
their properoperation. Knowhow
to stopthe machine and disengage
them quickly.
NOTE: RefertotheEngineManualpackedwithyour
edgerfora detaileddescriptionofall engine-related
controlsandcomponents,
Starter Rope / Recoil Starter
Thepullrope/recoilstarterisusedto starttheengine.
Primer
Theprimerisusedto pumpgasintothecarburetorand
aidin startingtheengine.Useittostartacoldengine,
butdonotuseit torestarta warmengineaftera short
shutdown.
NOTE: RefertotheEngineManualpackedwithyour
edgerfora detaileddescriptionofall engine-related
controlsandcomponents,
Blade Control
Locatedontheupperhandle,thebladecontrolmustbe
depressedagainsttheupperhandleinordertooperate
theunit.Releasingthebladecontrolstopstheengine
andtheedgerblade. SeeFigure3.
Blade DepthControl Lever
Thebladedepthcontrolleveris locatedon therightside
oftheupperhandle.It isusedtocontrolthedepthofthe
cut.Thefurtherforwardthebladedepthcontrolleveris
moved,thedeeperintothesoiltheedgerbladewillcut.
See Figure3.
7
WARNING:
Be familiar with all
controlsand their
proper operation.
Know how to stop the
machine and disen-
gagethem quickly.
NOTE: Referto
theEngine Manual
packed withyour
edger for a detailed
descriptionof all en-
gine-related controls
and components.
IMPORTANT:
Becomefamiliarwith
allthe controlsbefore
operatingthe edger.

_i:i_ii!!!.i!!_.... _ .............
_ iiii i i_ i_ i I iiii
opo ti°g
WARNING
Do not lower blade
ifblade is over
concrete, asphalt,
rocksor the like.The
blade can strikethe
supporting surface,
resulting in personal
injuryor property
damage.
Never fill fuel tank
indoors,with engine
running or untilthe
engine has been
allowed to coolfor
at least two minutes
after running.
This control mecha-
nism is a safety
device. Never attempt
to bypass its opera-
tion.
Theoperationofanyedgercanresult
inforeignobjectsbeingthrown intothe
eyes,whichcanresultinsevereeye
damage.Alwayswearsafetyglasses
oreyeshields.We recommendwide
visionsafetymaskforoverspectaclesor
standardsafetyglasses.
WARNING: Donot lowerblade ifblade
isoverconcrete,asphalt,rocksor the
like.The bladecanstrikethesup-
portingsurface,resulting inpersonal
injuryor propertydamage.
AddingGasolineAnd Oil
Servicetheenginewithgasolineandoil asinstructed
inthe EngineManualpackedwithyouredger.Read
instructionscarefully.
_ ARNING: Neverfill fuel tank indoors,
with enginerunningor until the engine
hasbeenallowed to coolfor at least
two minutesafter running.
Starting The Engine
NOTE: RefertotheEngineManualpackedwithyour
edgerfora detaileddescriptionofall engine-related
controlsand components.
Tostarttheedger'sengine,proceedasfollows:
.
2.
Movethebladedepthcontrolleverbacktothe
STARTpositionin theadjacent(top)notch.
Depresstheprimerbulbthreetimes,pausingtwoto
threesecondsbetweeneachpush.Incoldweather
(below50°F/19°0), itmaybenecessarytodepress
theprimerbulbfouror fivetimes.
IMPORTANT:Usingtheprimertorestarta warm
engineaftera shortshutdownisusuallynotnecessary.
Doingsomayresultinafloodedengine.
3. Standingbehindtheunit,depressthebladecontrol
andholditagainsttheupperhandlewith yourleft
hand.
_ ARNING: Thiscontrolmechanism
isa safetydevice.Neverattempt to
bypass itsoperation.
4. Withyourrighthand,grasptherecoilstarterhandle
andslowlypulltheropeoutwarduntilenginereaches
thestartof itscompressioncycle(theropewillpull
slightlyharderatthispoint).
5. Afterslowlyallowingthe ropeto recoil,pulltherope
witharapid,continuous,fullarmstroke.Keepa firm
griponstarterhandlethroughouttheentirestroke.
6. Allowthestarterhandletoslowlyreturntotherope
guide.
NOTE: If theenginefailstostartafter threepulls,
depresstheprimeranadditionaltwotimesbefore
pullingthestarterropeagain.
Edging
Tobeginedging,proceedasfollows:
1. Movetheunitovertotheareatobe edged,making
surethattheleft rearwheelison a hardsurfaceand
thebladeisovertheareatobecut. SeeFigure4.
f
Figure 4
.
Movethebladedepthcontrollevertothe leftandplace
intothenextlowernotch. Thenmakeapassalongthe
areato beedgedbeforeproceedingtothenextnotch.
Thefurtherforwardthebladedepthcontrolleveris
moved,thedeeperor lowerthebladewillcut intothe
ground. Severalpassesmaybenecessarytoobtain
thedesireddepthofcut. Donotlowertheblademore
thanonedepthnotchata timewithoutmakinga pass.
3. Forbestresults,proceedslowlyalongthepathbeing
edged,slowlymovingtheedgerbackandforththrough
thecuttingarea,againmakingsureto keeptheleft
rearwheelonthehardsurfaceandthebladeinthe
cuttingpath,closetobutnottouchingtheedgeofthe
hardsurface.
4. Onceyouhavereachedtheendofyourcuttingpath,
raisethebladecontrolleverbackintotheSTART
position,movetothenextareatobecut,andproceed
againfromstep1.
Stopping The Engine
Tostoptheedger'sengine,releasethe bladecontrol
handle.
NOTE: Seeyourenginemanualpackedwithyourunitfor
moredetailedinstructions.
8

,_ WARNING: Disconnectthe spark plug
wireand groundagainst the engine
before performinganyadjustment,
repairsor maintenance.
Lubrication
Engine
RefertotheEngineManualpackedwithyouredgerfora
detaileddescriptionofallengine-relatedservicespecs.
Wheels
Lubricatethewheelsandbearingsatleastoncea
seasonwitha lightoil.Alsoifthewheelsareremovedfor
anyreason,lubricatethesurfaceoftheaxleboltandthe
innersurfaceofthewheelwithlightoil.
PivotPoints
Lubricatethepivotpointsonthebladecontrolbailand
bladedepthcontrollever
Bearing Block
Lubricatethebearingblockoncea season,orasneeded
bysimplyapplyingoilateachend ofthecoverplate.
SeeFigure9.
F
Figure10
3. Removethespindlesheavesbeltguardbyremoving
thetwoself-tappingscrewswhichsecureittothe
bladeplateassembly.
4. Usetwowrenches(onewrenchtopreventthehex
boltheadfromspinningandtheotherto removethe
flangenut)toremovetheedgerblade.
Referto Figure11.
f
FlangeNut
\
Figure9
Replacing the Edger Blade
,_ WARNING: Theedgerbladeissharp.
Wearleatherwork gloves to protect
your handswhen working around the
-- edger blade.
_ WARNING: Disconnectthe spark plug
wire and ground against engine before
performingthe following steps.
1. Workinginfrontoftheedger,loosentheflangelock
nuton topofframe,allowingthe idlerpulleyassembly
topivotslightlyoutfromtheframe.SeeFigure10.
2. Withyourotherhand,carefullyreachunderthe
rearoftheunitand removethebeltfromaroundthe
engineflywheelpulley.
Belt
Guard
Figure 11
5. Removeanddiscardtheedgerbladebutretainthe
flangenut.
6. Installthereplacementedgerbladeandtheflangenut
removedearlier.
IMPORTANT:Usea torquewrenchtotightentheflange
nuttobetween37foot-lbs,and50foot-lbs.
7. Reinstallthespindlebeltguardwiththeselftapping
screwsremovedearlier.
8. Carefullyplacethedrivebeltbackontotheengine
flywheelpulley,and retightentheflangelocknuton
thetopoftheframe.
IMPORTANT:Makecertainthatthedrivebeltis
seatedcorrectlyonthebladespindleandthat itis riding
smoothlyonthespindlesheavesand isnotpinched
betweenthem.Repeatthefirstthreestepsifthe beltis
9
_iii!_i _ i ii_i_ ii _i_iii i
i i i i _ i
WARNING
The edger blade
is sharp. Wear
leather work gloves
to protect your hands
whenworkin g around
the edger blade
Disconnect the spark
plugwire and ground
against the engine
before performing
any adjustment,
repairs or mainte-
nance.

pinched, oftheunitand removethebeltfromaroundtheengine
flywheelpulley,
Replacing the Drive Belt 3. Removethespindlesheavesbeltguardbyremoving
IMPORTANT:Toaidin reassembly,notetheorientation thetwoself-tappingscrewswhichsecureittothe
ofthedrivebeltonthetwoidlerpulleysandtheengine bladeplateassembly.SeeFigure12,
flywheelpulleypriortoperformingthefollowingsteps. 4. Carefullyremovethebeltfromoff ofthepulleys,again
Referto Figure10. makingsuretonotetheorientationofthebelt. Discard
thebelt.
Theedgerdrivebeltissubjecttowearandshouldbe
replacedifanysignsofcracking,shreddingor rotting Installthereplacementbelt(PartNo,754-04032B)inthesame
arepresent.Toreplacethebelt,proceedasfollows: configurationthattheoriginalbeltwasroutedasfollows:
1. Workingin frontoftheedger,loosentheflange 5. Workingfromthefrontof theedger,placethebeltonto
locknutontopofframe,allowingtheidlerpulley thespindlesheaves,routeitbackontothetwoidler
assemblytopivotslightlyoutfromtheframe.See pulleys,andthenplaceitontotheengineflywheel
Figure10, pulley,
2. Withyourotherhand,carefullyreachunderthe rear IMPORTANT:Makecertainthatthe"V"sideofthebelt
isseatedintothetoppulleyandtheflatsideof thebeltis
seatedintothebottompulley.
.................. " 6. Reinstallthespindlesheavesbeltguardwiththeself
tappingscrewsremovedearlier,
7. Makecertainthatthedrivebeltison theengine
flywheelpulleyandidlerpulleys,andretightenthe
flangelocknuton thetopof theframe.
WARNING
IMPORTANT:Makecertainthatthedrivebeltisseated
correctlyandthatitis ridingsmoothlyon thespindle
: sheavesandis notpinchedbetweenthem,
_ epeatthefirstthreestepsifthebeltis
pinched,
WARNING: Neveroperatethe edger
without thespindle sheavesbelt guard in place.
Figure 12
Neveroperatethe
edgerwithoutthe
spindlesheavesbelt
guardinplace.
Off-Season Storage
Observethefollowingwhenpreparingtheedgerfor
long-termstorage:
1. Cleanandlubricateunitthoroughlyasinstructedon
page9 ofthis manual.
2, RefertotheEngineManualpackedseparately
withtheedgerforenginemanufacturers'sstorage
instructions.
3. Coattheedgerbladewithchassisgreasetoprevent
rustingandcorrosion.
4. Storetheedgerin a dry,cleanarea.Donotstorenext
toanycorrosivematerials,suchaslawnfertilizer.
5. Coattheedger,especiallyanyspringsandbearings
withalightoil or siliconespray.
IMPORTANT:Whenstoringanytypeof powerequipment
in anpoorlyventilatedor metalstorageshed,careshould
betakentorustprooftheequipment.
10

TroubleshootingGuide
Problem
PossibleCause(s)
CorrectiveAction
Enginefails tostart
Dirtyaircleaner
Engineneedsto beprimed
Fueltankempty
Stalefuelin gasolinetank
Sparkplugwiredisconnected.
Sparkplugfouled
Engineflooded
Refertothe EngineManualpackedwithyourunit.
Pushprimerbulbtwo or threetimes.
Filltank withclean,freshgasoline.
Draingasolineand refilltankwithclean,freshgasoline.
Connectthesparkplugwiretothesparkplug.
Clean,adjustgapor replacesparkplug.
Refertothe EngineManualpackedwithyourunit.
Engineruns erratic
Sparkplugwireloose
Stalefuelin gasolinetank
Ventin gascapplugged
Wateror dirt infuel system
Dirtyaircleaner
Carburetoroutofadjustment
Connectand tightensparkplugwire.
Draingasoline& refilltankwith clean,freshgasoline.
Clearventof anydebris.
Drainfueltank. Refillwith freshfuel.
Refertothe EngineManualpackedwith yourunit.
Refertothe EngineManualpackedwith yourunit.
EngineOverheats Engineoil levellow Fillcrankcasewith properoil.
Airflowrestricted Cleantheareaaroundthe engine'scoolingfins.
Dirtyairfilter Replacetheengine'sairfilter.
Carburetornotadjustedproperly Refertothe EngineManualpackedwith yourunit.
ExcessiveVibration Edgerbladebentordamaged Replaceedgerblade.
Bladespindlebentor damaged Contactan authorizedMTDservicedealer.
DrivebeltSlips Beltwornor stretched Replacedrivebelt.
11
eshooting
Guide
Forparts and/or
accessoriesplease
carl 1-330-220-468&
or 1-800-800-7310
www.mtdproducts.com

\
)

S ............
i_ ill ii _ i_ ii
1 710-0870 HexHeadScrew3/8-16 32 732-0369 CompressionSpring
2 711-04362 Axle .50x3.8 33 746-04052 ControlCable(Tecumseh)
3 711-04440 Axle .50x9.25 34 746-04036 WheelAdjustmentCable
4 726-0299 PushCap1/2"rod 35 747-0976A BladeControl
5 732-04045 TorsionSpring 36 749-04183 UpperHandle
6 734-1987 Wheel8xl.8 37 749-04234 LowerHandle
7 734-1988 Wheel7xl.8 38 781-0741A DepthindexBracket
736-0232
9 738-0929
10 750-04129
11 750-04427
12 750-04428
13 787-01240
14 710-0191
15 710-0411
WaveWasher 39
ShoulderScrew,3/8-16 40
Spacer 41
Spacer,.525x .775x .1125 42
Spacer,.525x .775x .3125 43
WheelBracket 44
Screw3/8-24 45
Screw3/8-16 46
781-0742 DepthindexLever
687-02126 BladePlateAssembly
710-04389 HexScrew,5/16-18
710-0599 Self-tappingScrew,1/4-20
710-1143A
712-0417A
714-0104
711-1017
HexScrew,5/8-18
FlangeNut,5/8-18
CotterPin
ClevisPin
16 710-0654A
17 712-04065
18 731-05063
19 736-0452
20 750-04142
21 756-04148
22 756-1150A
23 787-01304
24 710-0726
25 710-1174
26 710-1205
27 710-3180
28 712-04063
29 720-0142
30 720-0279
31 720-04052
Screw,3/8-16 47 718-04012
FlangeLockNut,3/8-16 48 731-04207
DebrisGuard 49 731-05064
BellWasher,.396x 1.140 50 732-04169
PulleyMountSpacer 51 736-0342
FiatIdlerPulley,2.50D 52 736-04088
CombinationFlywheelPulley 53 738-0706C
Frame 54 741-0524
HexScrew,5/16-12 55 750-04105
CarriageBolt,5/16-18 56 750-0547
RopeGuide(EyeBolt) 57 754-04032B
HexScrew,5/16-18 58 756-0449
LockFlangeNut,5/16-18 59 781-0080
Grip
WingNut
HandKnob
BearingCup
BearingBlock
BladeGuard
CompressionSpring
FiatWasher,.260x.72
FiatWasher.635x1.24x.181
ShoulderScrew
Bearing,.625IDx 1.57OD
Spacer,.63x 1.12x 1.06
Spacer,.64x.88x .50
Belt
Sheave
Blade
60 781-0427 BeltGuard
61 787-01075A CoverPlate
PartList"
Handle/Frame/
VVheelAssembly
Model 521
For parts and/or
accessories please
call 1-330-220.4683,
or 1-800-800-7310
www.mtdproducts.corn
13

Use this page to make
notes and write down
important information:
14

notes and write down
important information:
15

MANUFACTURER'S LiMiTED WARRANTY FOR
ThelimitedwarrantysetforthbelowisgivenbyMTDLLCwithrespect
tonewmerchandisepurchasedandusedin theUnitedStates,its
possessionsandterritories.
"MTD"warrantsthisproductagainstdefectsinmaterialandworkman-
shipfora periodoftwo (2)yearscommencingonthedateoforiginal
purchaseandwill,at itsoption,repairor replace,freeofcharge,any
partfoundto bedefectiveinmaterialsorworkmanship.Thislimitedwar-
rantyshallonlyapplyifthisproducthasbeenoperatedandmaintained
inaccordancewiththeOperator'sManualfurnishedwiththeproduct,
andhasnotbeensubjectto misuse,abuse,commercialuse,neglect,
accident,impropermaintenance,alteration,vandalism,theft,fire,water,
ordamagebecauseofotherperilor naturaldisaster.Damageresulting
fromthe installationor useofanypart,accessoryor attachmentnot
approvedby MTDforusewiththeproduct(s)coveredbythis manual
willvoidyourwarrantyastoanyresultingdamage.
Normalwearpartsarewarrantedto befreefromdefectsinmaterialand
workmanshipfora periodofthirty(30)daysfromthedateof purchase.
Normalwearpartsinclude,butare notlimitedto itemssuchas: batter-
ies,belts,blades,bladeadapters,grassbags,riderdeckwheels,seats,
snowthrowerskidshoes,shaveplates,augerspiralrubberandtires.
NOW TO OBTAINSERVICE: Warrantyservice isavailable,WITH
PROOFOF PURCHASE,throughyour localauthorized service
dealer.Tolocate the dealer in yourarea, check yourYellowPages,
or contact MTDLLCat RO. Box361131,Cleveland,Ohio44136-
0019,or call 1-800-800-7310or 1-330-220-4683 or log on to our
Website at www.mtdproducts.com.
Thislimitedwarrantydoesnot providecoverageinthefollowingcases:
a. Theengineor componentpartsthereof.Theseitemsmaycarrya
separatemanufacturer'swarranty.Refertoapplicablemanufacturer's
warrantyfortermsandconditions.
b. Logsplitterpumps,valves,andcylindershavea separateoneyear
warranty.
c. Routinemaintenanceitemssuchaslubricants,filters,blade
sharpening,tune-ups,brakeadjustments,clutchadjustments,deck
adjustments,andnormaldeteriorationoftheexteriorfinishdueto
useor exposure.
d. Servicecompletedbysomeoneotherthananauthorizedservice
dealer.
e. MTDdoesnotextendanywarrantyforproductssoldor exported
outsideoftheUnitedStates,its possessionsandterritories,except
thosesoldthroughMTD'sauthorizedchannelsofexportdistribution.
f. ReplacementpartsthatarenotgenuineMTDparts.
g. Transportationchargesandservicecalls.
Noimpliedwarranty,includingany impliedwarranty of mer-
chantabilityof fitness for a particular purpose,appliesafter the
applicable periodof expresswritten warranty aboveasto the
partsasidentified.Nootherexpresswarranty, whetherwritten or
oral, exceptas mentioned above,givenby anypersonor entity,
includinga dealeror retailer, withrespect to any product,shall
bindMTD.Duringthe periodof the warranty,the exclusiveremedy
isrepairor replacementof the productas setforth above.
Theprovisionsasset forth inthis warrantyprovidethesoleand
exclusiveremedy arising from the sale.MTDshallnot beliable
for incidentalor consequentiallossor damageincluding,without
limitation, expensesincurredfor substituteor replacementlawn
careservicesor for rentalexpensesto temporarily replacea
warranted product.
Somestatesdo notallowtheexclusionor limitationofincidentalor
consequentialdamages,or limitationsonhowlongan impliedwarranty
lasts,sotheaboveexclusionsorlimitationsmaynotapplytoyou.
Innoeventshallrecoveryofanykindbegreaterthantheamountofthe
purchasepriceof theproductsold.Alterationof safetyfeaturesof
the product shallvoid this warranty. Youassumetheriskandliability
forloss,damage,or injurytoyouandyourpropertyand/ortoothersand
theirpropertyarisingoutofthemisuseor inabilitytousethe product.
Thislimitedwarrantyshallnotextendtoanyoneotherthantheoriginal
purchaserorto thepersonforwhomitwas purchasedasa gift.
HOWSTATELAWRELATESTOTHISWARRANTY:This limited
warrantygivesyouspecificlegalrights,and youmayalsohaveother
rightswhichvaryfromstatetostate.
IMPORTANT:OwnermustpresentOriginalProofof Purchasetoobtain
warrantycoverage.
MTD LLC, P.O. BOX 361131 CLEVELAND, OHIO 44136=0019; Phone: 1=800=800=7310, 1=330=220=4683

Seguridad-Ensamblaje=Operaci6n-Consejos y T6cnicas=Mantenimiento=Soluci6n de problemas=Lista de Partes=Garantias
A AL P A O
Bordeadora de c6sped a gasolina- IVlodelo 521
IMPORTANTE
LEA CON ATENCION LAS REGLAS DE SEGURIDAD E INSTRUCCIONES ANTES DE OPERAR LA BORDEADORA
Advertencia: Estaunidadest,.equipadaconun motordecornbusti6ninternoy nodebeserutilizadaeno cercade unterrenoagrestecubierto
porbosque,rnalezaso hierbaexceptoqueelsisternade escapedelmotorest6equipadoconun arnortiguadordechispasquecurnplaconlas
leyeslocaleso estatalescorrespondientes(encasodeexisti0.Si seutilizaun arnortiguadordechispasel operadorIodebe rnanteneren con&
cionesde usoadecuadas.Enel Estadode Californialasrnedidasanteriorrnenternencionadassonexigidasporley(Articulo4442delC6digode
RecursosPOblicosdeCalifornia).Esposiblequeexistanleyessirnilaresenotrosestados.Lasleyesfederalesseaplicanen territoriosfederales.
Sudistribuidorrn_.scercanoautorizadopararealizarel mantenirnientodel motorpuedeconseguirelarnortiguadordechispasparaelsilenciador,si
no ustedpuedecornunicarseconel departarnentode serviciosalapartadopostalRO.Box361131Cleveland,Ohio44136-0019.
IMPRESOENESTADOS NODEFORMULARIO
UNIDOSDEAME_RICA MTD LLC. APARTADO POSTAL 361131 CLEVELAND, OHIO 44136=0019 769-00527G
10/2005

Este manual del operador es una parte importante de su nueva bordeadora de c_sped a gasolina.
Le ayudar_ a montar, preparar y mantener la unidad para obtener los mejores resultados. Por
favor, lea y comprenda el contenido del manual.
r =
Ind=ce
1. Etiquetas de seguridad ............................... 19
2. Pr_cticas de operaci6n seguras ........... 20-21
3. Configuraci6n & ensamblaje ...................... 22
4. Conozca la bordeadora ............................... 23
5. Funcionamiento de la bordeadora ............. 24
6. Mantenimiento & servicio ...................... 25-26
7. Soluci6n de problemas ............................... 27
9. Lista de piezas ........................................ 28-29
10. Las notas Paginan ................................. 30-31
10. Garanfia ...................................................... 32
B squeda y registro del n mero de modelo
ANTES USTEDEMPIEZAA REUNIRSU EQUIPONUEVO,
Iocalizapor favorel plato modelo enel equipoycopia la infor-
maci6na ia muestraplato modeioproporcionadoa ia derecha.
Ustedpuede iocaiizarei plato modeio parandoen ia posici6n
operadora y mirandohaciaabajoen ei traserodei edger de
cesped degas. Esta informaci6nser_.necesariaparautiiizar
ei sitio web deifabricante y/o ia ayudadei Departamentode
Apoyo deCiiente o uncomercianteautorizadodeservicio.
f
Model Number
®
www.mtdproducts.com
Serial Number
MTD LLC
P.O. BOX 361131
CLEVELAND, OH 44136
330 =220 =4683
800-800-731 0
Asistencia al cliente
Por favor, NO la unidad al minorista a quien se la adquiri6 sin contactarse primero
con el Departamento de Asistencia al Cliente.
Encaso de tener probiemaspara montareste productoo de
tenet dudascon respectoa loscontroles,funcionamiento o
mantenimientodel mismo, puedesolicitar la ayuda deexper-
tos. Elijaentre lasopcionesque se presentana continuaci6n:
1.Visitemtdproducts.com paraobtenernumerosas
sugerencias@les.Hagaclicenel bot6ndeasistenciaalcliente
yvera.lascuatroopcionesquesereproducenaladerecha.Haga
clicenelbot6napropiadoypodra,disponerdeayudadeforma
inmediata.
2.SideseacontactarseconunRepresentante del
Departamento deAsistenciaalCliente,porfavor,
comuniqueseal 1(800)800-7310.
3.Elfabricante del motor eselresponsabledetodaslas
cuestionesrelacionadasconelrendimiento,potenciadesalida,
especificaciones,garantiay mantenimientodelmotor.Porfavor,
paraobtenerunamayorinformaci6nconsulteelmanualdel
Propietario/ Operadorentregadoporelfabricantedelmotor,que
seenvia,enunpaqueteporseparado,juntoconsuunidad.
Hagaclicaqd parabuscarennuestrabasedeconocimientos.
Busqueporproducto,palabraclaveo frase.
Entrealsistemapararevisarelestadodesusconsultas,
modificarlaso actualizarsuperfilpersonal.
_de servicio
_,Necesitaayudaen suIocalidad?Hagaclic aquipara
encontrarcentrosdeservicioautorizadosensu&rea.
_,Necesitaun manualy/o listade piezas?Descarguela
documentaci6ndemodelosde aSosrecientes.
18

Lasetiquetasdeseguridad
Porfavor,dediqueunmomentoa/a revisidnde/as
etiquetasdeseguridad
S321
!i i _ i i_ii i i i _i ii i
19

ADVERTENCIA
Estesirnboloindica
instruccionesde
seguridad importantes
que denoseguirse;se
podria ponerenpeligro
la seguridadpersonal
yio lapropiedadSuyay
de terceros:Leay siga
todas lasinstrucciones
enestemanualantes
de _n_c!arlaoperacJ6n
deestamAquin&En
casodenoseguir
estasinstrucciones
podria provocarlesiones
personale&Cuandoyea
estesimbolo
ADVERTE.O A
su
responsabilidad:
EstamAquinamotor zada
s6io puedenUsarlalas
personasquelean,
c0mprendanYrespeten
asadvertencase
instrucclonesque
aparecenen estemanual
i
ADVERTENClA:el escapedel motorde esteproducto, algunos desus com-
ponentesyalgunoscomponentesdelvehiculo contieneno emiten productos
quimicos queel estadode Californiaconsidera quepueden producircancer,
defectos de nacimientou otros problemasreproducWos.
PELIGRO: estamaquinaestAdiseRadaparaser utilizada respetandolas reglasdeseguridad
contenidasen este manual•AI igualque concualquier tipode equipo motorizado,undescuidoo
errorpor parte del operadorpuede producirlesionesgraves•Esta maquinaes capaz de amputar
manosy piesy de arrojar objetoscon gran fuerza. Deno respetar lasinstruccionesdeseguridad
siguientesse puedenproducirlesiones graveso la muerte.
Nihos
Puedenocurriraccidentestr&gicossiel operadornoest_
atentoa la presenciade niSos.LosniSosconfrecuenciase
sientenatraidosporlosequiposmotorizados,talescomo
lasbordeadorasdecesped.Noentiendenlos riesgosni los
peligros.Nuncade porsentadoquelosniSospermanecer_n
enel mismolugardondelosvio porOltimavez.
1. MantengaalosniSosfueradel_readetrabajoy bajo
estrictavigilanciade unadultoresponsableadem_sdel
operador.
2. Estealertay@aguela bordeadorade cespedsi unniSo
ingresaal&tea.
3. Antesy mientasseest&moviendohaciaarras,mirehacia
arrasy cuidequeno hayaniSos.
4. Tengaextremaprecauci6ncuandoseaproximea esquinas
ciegas,entradasdepuertas,arbustos,_rbolesuotros
objetosquepuedanobstaculizarlela vistadeun niSoque
pudiesecorrerhaciala bordeadoradecesped.
5. Mantengaalejadosa losniSosde losmotoresenmarcha
ocalientes.Puedensufrirquemadurasconunsilenciador
caliente.
6,
Nopermitanuncaque losniSosmenoresde 14aSos
utilicenunabordeadora.LosniSosmayoresde 14aSos
debenleeryentenderlasinstruccionesde operaci6ny
reglasdeseguridadcontenidasenestemanualy deben
setentrenadosy supervisadospotsuspadres.
Funcionamiento
Manejo segurode la gasolina:
1. ParaevitarlesionespersonalesodaSosmateriales
seasumamentecuidadosoal manipularla gasolina.La
gasolinaes altamenteinflamabley susvaporespueden
causarexplosiones.Se puedelesionargravementesi
derramagasolinasobreustedosobrela ropayaquese
puedeencender.
2. Lavesela piely c_mbiesede ropadeinmediato.
3. Utilices61orecipientesparagasolinaautorizados.
4. NuncaIleneloscontenedoresenel interiordeunvehiculo
ocami6nocajadecamionetacon recubrimientospl_sti-
cos.Coloquesiemprelosrecipientesen el pisoy lejosdel
vehiculoantesdeIlenarlos.
5. Retireel equipoagasolinadelcami6no remolquey
Ileneloenel piso.Siesto noesposible,entoncesIlene
dichoequipoenunremolqueconunrecipienteport_til,en
vezde hacerlodesdeundispensadorde gasolina.
6. Mantengalaboquillade Ilenadoencontactocon elhorde
dela entradadeltanquede gasolinaocontenedorentodo
momentohastaqueesteIleno.Noutiliceundispositivo
paraabrir/cerrarla boquilla.
7. Apaguetodoslos cigarrillos,cigarros,pipasy otras
fuentesde combusti6n.
8. Nuncacarguecombustibleenla m&quinaeninteriores
p,orquelos vaporesinflamablespodrianacumularseenel
area.
9. Nuncasaquela tapade la gasolinani agreguecombustible
mientrasel motorest&calienteoen marcha.Dejequeel
motorse enfrieporIomenosdosminutosantesdevolvera
cargarcombustible.
10.Nuncarecargueeltanquede combustibleenexceso.Llene
eltanquenom&sde 1/2 pulgadapordebajodela basedel
cuellode Ilenadoparadejarespacioparala expansi6ndel
combustible.
11.Vuelvaacolocarlatapadela gasolinay ajOstelabien.
12.Limpiela gasolinaderramadasobreel motory elequipo.
Trasladelam&quinaaotrazona.Espere5 minutosantesde
encenderel motor.
13.Nuncaalmacenela m&quinao elrecipientedecombustible
cercade llamaexpuesta,chispasoaparatoscon piloto
comoporejemplo,calentadoresde agua,calentadores,
hornos,secadoresde ropau otrosaparatosagas.
14.Parareducirel riesgodeincendiomantengala bordeadora
decespedlimpiade pasto,hojasy dela acumulaci6n
deotrosdesechos.Limpielosderramesdeaceiteo
combustibley saquetodoslosdesechosembebidoscon
combustible.
15.Dejequela bordeadoradecespedseenfrie5minutospot
Iomenosantesde almacenarla.
Funcionamientogeneral:
1. Leay sigatodaslasinstruccionescontenidaseneste
manualantesdeintentarensamblaresta m_quina.Lea,
comprenday sigatodaslasinstruccionesquefiguranenla
mr_tquinayen elo los manualesantesde intentaroperarla.
Familiaricesecompletamentecon loscontrolesy conel
usoapropiadode estam&quinaantesdeoperarla.Guarde
estemanualenunlugarseguroparaconsultasfuturasy
regulates,asicomoparasolicitarrepuestos.
2. Estam&quinaesunaunidaddeequipomotorizadode
precisi6n,no unjuguete.Portanto,tenga lam&xima
precauci6nentodomomento.SuunidadhasidodiseSada
pararealizarunatarea:cortarel cesped.Nola utilicecon
ningQnotto prop6sito.
3. NopermitanuncaquelosniSosmenoresde 14aSos
utilicenesta m&quina.LosniSosde14aSosy m_sdeben
leery comprenderlasinstruccionescontenidaseneste
manualy de,bensercapacitadosy supervisadosporunode
los padres.Unicamentelosindividuosresponsablesquese
hayanfamiliarizadoconestas reglasdeseguridadparala
operaci6ndeber&nusaresta m&quina.
4. Paraayudaraevitarel contactocon lacuchillao una
lesi6nporunobjetoarrojado,mantengaseen lazonadel
operadordetr&sdelas manijasy mantengaalos niSos,
observadores,ayudantesy mascotasapartadosal menos
25metrosdela bordeadoradecespedmientrasest&en
operaci6n.Detengalam&quinasialguienentraenla zona.
5. Inspeccioneminuciosamenteel &teadondeutilizar_el
equipo.Saquetodaslaspiedras,palos,cables,huesos,
juguetesy otrosobjetosextraSosconlosque podria
tropezaro que podrianset arrojadospot lacuchilla.Los
20

objetosarrojadosporla m_quinapuedenproducirlesiones
graves.
6. Paraprotegerselosojosutilicesiempreanteojosoantipar-
ras deseguridadmientrasoperalam_tquinaomientrasla
ajustao repara.Losobjetosarrojadosque rebotanpueden
lesionargravementelavista.
7. Utilicezapatosdetrabajoresistentes,desuelafuerte,asi
comopantalonesy camisasajustados.Se recomienda
utilizarcamisasy pantalonesque cubranlos brazosy
las piernas,asi comocalzadoconpuntasreforzadasen
acero.Nuncaopereestamaquinaconlos piesdesnudos,
sandalias,ocon zapatosligerosocon losquese pueda
resbalar(potejemplo,calzadode Iona).
8. Nuncaintenterealizarajustesmientrasel motorestaen
marchaexceptoen loscasosespecificamenterecomenda-
dosen elmanualdeloperador.
9. Paraevitarlesionespersonalesoda_osmaterialessea
sumamentecuidadosoal manipularlagasolina.Lagasolina
esaltamenteinflamableysusvaporespuedencausar
explosiones.Sepuedelesionargravementesiderrama
gasolinasobreustedo sobrela ropayaquesepuede
encender.L_vesela piely c_mbiesede ropade inmediato.
10.Nocoloquelasmanosni lospiescercade las piezas
rotativas.Elcontactoconla cuchillarotativapuedeproducir
la amputaci6nde manosy pies.
11.Elmecanismodecontroldela cuchillaesundispositivo
de seguridad.Nuncapasepot altosufuncionamiento.De
hacerlola operaci6nde lam_quinaesriesgosay puede
ocasionarlesiones.
12.Nuncahagafuncionarla bordeadorasinusarel protector
de lacuchilla,elescudocontraescombrosy la manija
de controlde lacuchillaenel lugarcorrespondienteyen
funcionamiento.
13.Nuncaoperelabordeadorasilosdispositivosdeseguridad
est_nda_ados.DeIocontrarioestopuedetenet como
resultadolesiones.
14.Nuncaenciendaunmotorenespacioscerradosoen una
zonacon pocaventilaci6n.Elescapedel motorcontiene
mon6xidodecarbono,ungasinodoroy letal.
15.Noutilice lam_quinabajola influenciadelalcohololas
drogas.
16.Elsilenciadory el motorsecalientany puedenproducir
quemaduras.Nolostoque.
17.Nuncaopereesta m_quinasin buenavisibilidado
iluminaci6n.Siempredebeestarsegurode queest_ bien
afirmadoy sostengabienlasmanijas.Camine,nuncacorra.
18.Noopereesta m_quinasi se hacaidooest_da_ada.
Devuelvalam_quinaaldistribuidordeservicioautorizado
m_s cercanoparaque laexaminey repare.
19.Nohagafuncionarla m_quinasi la cuchilladecorteest_
daSadao excesivamentedesgastada.
20. Nuncaintentesacarmaterialdelprotectordela cuchilla
si el motorest_enfuncionamiento.Apagueelmotor,
desconecteel cabledela bujiay p6ngalodemaneraque
hagamasacontrael motorparaevitarqueseenciendade
maneraaccidental.
21.No sobrecarguelacapacidaddela m_quinatratandode
bordeara unavelocidaddemasiador@ida.
22. Mantengasealertaparaadvertirlaexistenciadeaceraso
terrenodesparejos,etc.Siempreempujesuavementesobre
las superficies_speras.No useestam_quinaensuperfi-
cies congrava.
23. Nooperelam_quinabajo laIluviao encondicionesde
suelo hQmedo.Siemprehagafuncionarla m_quinadesde
detr_sde lasmanijasy col6quesede modoquelalineade
vistadirectahaciala cuchilladecortequedebloqueadapot
los protectores.
24.Siempredetengael motorcuandoel bordeadoorecortese
veandemoradosocuandoestetrasladandolam_quinade
un lugaraotro. Nuncadejela m_quinaenfuncionamiento
sin vigilancia.Detengael motor,desconecteelcabledela
bujiay p6ngalode maneraquehagamasacontrael motor
paraevitarqueseenciendademaneraaccidental.
25.Utilicesolamentepiezasy accesoriosmanufacturados
paraestam_quinaporelfabricante.DeIocontrario,esto
puedetenercomoresultadolesiones.
26.Si sepresentansituacionesque noest_nprevistasen
estemanual,seacuidadosoy useel sentidocomQn.
Llameal telefono330-220-46836 al 1-800-800-7310
paracontactarseconeldepartamentode atenci6n
al clientey obtenerel hombredesu distribuidorm_s
cercano.
Servicio
1. Nuncaenciendaun motorenespacioscerradoso enuna
zonaconpocaventilaci6n.Elescapedelmotorcontiene
mon6xidodecarbono,ungas inodoroy letal.
2. Antesdelimpiar,repararo inspeccionarla maquina,
compruebequelacuchillaytodaslaspartesquese
muevensehandetenido.Desconecteel cablede la bujia
y p6ngalodemaneraque hagamasacontrael motorpara
evitarqueseenciendademaneraaccidental.
3. Reviselos pernosde montajedela cuchillay delmotora
intervalosfrecuentesparaverificarqueestenbienaptera-
dos.Inspeccioneadem_svisualmentelacuchillaenbusca
deda_os(abolladuras,desgaste,roturas,etc.).Reemplace
lacuchillaL]nicamenteconequipooriginaldelfabricante
(OEM)listadoenestemanual."Lautilizaci6ndepiezasque
nocumplanconlasespecificacionesdeequiposoriginales
podriatenercomoresultadounrendimientoincorrecto,y
adem_sla seguridadpodriaestarcomprometida"
4. Lascuchillasdelas bordeadorasde cespedson muy
afiladasy podriancortarlo.Envuelvalacuchillao utilice
guantesy extremeprecaucionescuandorealiceelservicio.
5. Mantengatodoslospernos,tuercasy tornillosbien
ajustadosparaasegurarseque lam_quinaseencuentra
encondicionessegurasde operaci6n
6. Nuncamanipulelos dispositivosdeseguridadde manera
imprudente.Controleperi6dicamentequefuncionende
formaadecuada.
7. DespuesdegolpearconalgQnobjetoextra,o,detenga
el motor,desconecteelcablede labujiay conecteel
motora masa.Inspeccioneminuciosamenteparavetsi la
bordeadorade cespedest_da_ada.Repareel daSoantes
deencenderyoperarla bordeadorade cesped.
8. Nuncatratedeajustarunaruedao laalturadecorte
mientraselmotorest_enmarcha.
9. Muchoscomponentesdela nuevabordeadorase
desgastanenraz6ndelusocontinuo.Paraprotegersu
seguridad,verifiquefrecuentementetodosloscomponen-
tesdela bordeadoray reempl_celoss61oconpartesdelos
fabricantesdeequiposoriginales(O.E.M.)listadasen este
manual."Lautilizaci6nde piezasquenocumplancon las
especificacionesdeequiposoriginalespodriatenercomo
resultadoun rendimientoincorrecto,y adem_sla seguridad
podriaestarcomprometida"
10.Nocambiela configuraci6ndel reguladordelmotorni
aceleredemasiadoel mismo.El reguladorcontrolala
velocidadm_ximasegurade operaci6ndelmotor.
11.Mantengao reemplacelasetiquetasde seguridad,segQn
seanecesario.
12.Observelasleyesy normasaplicablesparadisponer
adecuadamentedelos desechos.Ladescargainapropiada
deliquidoso materialespuededaSarel medioambiente.
21
operaclon
ADVERTENCIA
Estesimboloindica
instruccionesdese-
guridadimportantes
que denoseguirse,se
podriaponerenpeligro
laseguridadpersonal
y/o lapropiedadsuyay
deterceros.Leay siga
todaslasinstrucciones
enestemanualantes
deiniciarlaoperaci6n
deestam_.quina.En
casodenoseguir
estasinstrucciones
podriaprovocarlesiones
personales.Cuandovea
estesimbolo
SIGA LA ADVERTENCIA
Su
responsabilidad:
Estamaquinamotorizada
s61opuedenusarlalas
personasquelean,
comprendany respeten
lasadvertenciase
instruccionesque
aparecenen estemanual
yenla m_.quina.

Configuraci6n
& ensamblaje
ADVERTENCI/!
a cuchilla de la
bordeadora ROTA
_uandosetirade la
cuerdadearranque.
IlVlPORTANTE:
Estaunidadse
entregaSIN
GASOLINA.Despues
de instalarla unidad,
cargue gasolinasegt_n
las instruccionesdel
manual especifico
parael motorque se
entregacon la unidad.
Aseg0resede cargar
enel motor elaceite
que se entregacon la
unidadde acuerdocon
las instruccionesdel
manualespecificoque
acompaSaa la misma.
Figura 1
Ajustede la manija
IMPORTANTE:EstaunidadseentregaSINGASOLINA.
Despuesdeinstalarla unidad,carguegasolinasegQnlas
instruccionesdelmanualespecfficoparaelmotorquese
entregaconla unidad.AsegQresede cargarenel motor
el aceitequeseentregaconla unidaddeacuerdoconlas
instruccionesdelmanualespecfficoqueacornpa_aala
rnisrna
NOTA: Lasreferenciasa losladosderechoo izquierdo
de labordeadorase hacenobservandola mDquinadesde
la posici6ndeoperaci#n,
Posicionarnientode las manijas
de la bordeadora
1. Retireydesechecualquiercart6nde ernpaqueque
pudierehaberentrela rnanijasuperioryla rnanija
inferior.
.
.
Presioneel controlde la cuchillaqueseencuentra
arribade la rnanijasuperiory girela rnanijasuperior
haciaarribahastaqueencajeensulugar(1).
Aprietelosbotonesrnanualesqueest_.nubicadosen
losladosderechoe izquierdode la rnanija(2). Veala
Figura2.
Colocaci6n de la cuerda de arranque.
1. Ubiquela guiade cuerdaque seencuentradel lado
derechode larnanijasuperior.
2. Afloje,peroNOretire,laperillaa rnariposaqueajusta
la gufadecuerdaa la rnanijasuperior.VealaFigura2.
3. P_.resedetr_.sde la unidady rnantengaelcontroldela
cuchillacontrala rnanijasuperior(1)ysuavernentetire
dela cuerdadearranquedel motor(2).
Figura 2
__k ADVERTENCIA:Lacuchilla de la
bordeadora ROTAcuandose tira de la
cuerda de arranque.
NOTA: Lacuerdadearranquenosaldr_,delmotoral tirar
dela rnisrnaa rnenosqueel controlde la cuchilla(veala
Figura2) est_presionadocontralarnanijasuperior.
4. Deslicela cuerdadearranquea travesdela parte
superiorde lagufade cuerda.(3).
5. Vuelvaa apretarla perillaa rnariposaqueajustala
guiadecuerdaalarnanijasuperior(4).
22

Controlde cuchillal
Palancadecontrolde la profundidadde lacuchilla
(Semuestraenposici6ndetransporte)
Cuerdadearranque/
Arrancadorde retroceso
ADVERTENCIA:
_ amiliaricese contodos los con-troles y su operaci6n adecuada.
Sepac6mo detenerla m_,quinay
c6mo desengranarlos controles
r_,pidamente.
NOTA: ConsulteelManualdeMotorqueseentrega
conlabordeadoraparaverunadescripcidndetalladade
todosloscontrolesy componentesrelacionadosconel
motor.
Cuerda dearranque / Arrancadorde retroceso
Lacuerdadearranque/arrancadorde retrocesoseusa
paraporterenfuncionamientoel motor.
Cebador
Elcebadorseutilizaparabombeargasolinaalcarbura-
dory ayudara arrancarel motor.Utiliceloparaarrancar
unmotorfrio,peronoIoutiliceparavolvera arrancarun
motorcalientetrasunaparadacorta.
Figura 3
Guarda de la
correa
NOTA: Consulteel Manualdel Motorqueseentrega
conla bordeadoraparavet unadescripcidndetalladade
todosloscontrolesycomponentesrelacionadosconel
motor.
Control de cuchilla
Elcontroldela cuchilla,ubicadosobrela manijasupe-
rior,sedebepresionarcontrala manijasuperiorpara
operarlaunidad.Sisesueltael controlde la cuchillase
detienenel motory lacuchillade la bordeadora.Veala
Figura3.
Palanca de control de la profundidad
de la cuchilla
Lapalancadecontroldela profundidadde lacuchilla
est,.ubicadasobreel ladoderechode la manijasupe-
rior.Sela utilizaparacontrolarla profundidaddecorte.
Cuantom_.ssemuevahaciaadelantela palancade
controlde profundidaddela cuchilla,tantom_.sprofundo
en el suelocortar_,lacuchillade la bordeadora.Veala
Figura3.
23
bordeadora
ADVERTENCIA:
Familiaricese con
todos loscontroles
y su operaci6n
adecuada. Sepa c6mo
detener la m_,quinay
c6mo desengranar los
controles
r_pidamente.
NOTA: Consulteel
Manual del Motor
que se entregacon
la bordeadorapara
veruna descripcidn
detallada de todoslos
controlesy
componentes
relacionadoscon el
motor.
IMPORTANTE:
Familiar{cesecontodos
los controlesantes de
operarla bordeadora.

_ _i_iii_i_II_I_i_ii_i //i _i_it
_, _ Aloperarlabordeadorapuedeserque NOTA: Sielmotornoenciendedespu#sdetresintentos,
I \ _ objetosextra_osseanarrojadosa los aprieteelcebadorunao dosvecesmbsantesde volvera
/ _-_"-, __ ojos Iocualpuededanarlosgravemente, tlrardelacuerdadelarrancador.
_ Usesiempregafasde seguridado pro-
,/ tectoresparalosojos. Recomendamosel ,.. - -
usodeunam_scaraanchadeseguridad _oraeaao
_eeIsaeVius_ade;_sr_anddealr.°Sante°j°s ° gafas Paracomenzara boraear,procedadelasiguienteforma'
FunclonamlentoADVERTENClA 'obaelaouoh,iasilamisma1Llevelaunidadhaciaelfireaaserbordeaaa, '
: J '
de la
bordeadora
ADVERTENCIA
No baje la cuchilla
si lamisma se
encuentra encima de
horrnigon,asfalto,
roca o elementos
sirnilares.La cuchilla
puede golpearla
superficie de soporte,
provocandolesiones
o dahos rnateriales.
Nunca cargue el
tanque de combus-
tible en espacios
cerrados Conel
motor en marcha o
hasta que haya
dejado que ei misrno
se enfde pot io
rnenos dos rninutos
despu_s de haber
estado en marcha.
Esternecanismo de
control es un
dispositivo de
seguridad. Nunca
intentedesviarse de
su funcionamiento.
seencuentraencimade hormig6n,
asfalto, roca o elementossimilares.La
euchilla puedegolpearlasuperfieie de
soporte, provoeandolesioneso da_os
materiales.
Agregado de gasolinayaceite
Cargueel motorcongasolinayaceitecomoseindica
enel Manualdel Motorquevieneembaladoconla
bordeadora.Leacuidadosamentelasinstrucciones.
ADVERTENClA:Nuneaeargueel
tanquede combustible enespaeios
eerradoscon el motor enmarehao
hasta que hayadejado que elmismo
seenfdepot Io menos dos minutos
despu_s de haber estadoenmareha
Encendido del motor
NOTA: ConsulteelManualdelMotorqueseentrega
conla bordeadorapara verunadescripci6ndetallada
de todosloscontrolesy componentesrelacionadoscon
el motor.
.
Paraencenderel motorde la bordeadora,proceda
de lasiguienteforma:
Muevala palancadecontrolde profundidadde la
cuchillanuevamentea la posici6nSTART(AR-
RANQUE)en la muescaadyacente(superior).
Presionelabombilladel cebadortresveces,haci-
endounapausade dosa tressegundosentrecada
presi6n. Enclimafrio (temperaturainferiora50°F/
19°0)puedesetnecesariopresionarla bombilladel
cebadorcuatroo cincoveces.
IMPORTANTE:Habitualmentenoesnecesariousar
elcebadorparavolveraencenderel motorcaliente
despu_sde unadetenci6ncorta.Siseusaelcebador
enestoscasossepuedeahogarel motor.
3. P_.resedetr_.sde la unidad,aprietelamanijade
controlde lacuchillay sost_ngalacontralamanija
superiorconlamanoizquierda.
_ DVERTENCIA:Estemecanismo de
controles un dispositivo deseguri-
dad. Nuncaintentedesviarse de su
funcionamiento.
4. Conlamanoderecha,tomela manijadel arrancador
de retrocesoy lentamentetirede lacuerdahacia
afuerahastaqueel motoralcanceel iniciode su
ciclodecompresi6n(lacuerdaestar_,un pocom_.s
tiranteestepunto).
5. Despu_sdedejarquelacuerdasevuelvaa enrollar
lentamente,tiredelacuerdaconun golper_.pido,
continuoy completodelbrazo.Aprietebienlamanija
delarrancadordurantetodoel movimiento.
6. Dejequela manijadelarrancadorvuelvalentamentea
laguiadelacuerda.
asegur_.ndosede quela ruedatraseraizquierdase
encuentresobreunasuperficiedurayque lacuchilla
seencuentreporencimadel_.reaa sercortada.Veala
Figura4.
Figura 4
.
Muevalapalancadecontrolde profundidaddela
cuchillahaciala izquierday col6quelaenla muesca
inferiorsiguiente.Luegohagaunapasadaa Iolargo
del_.reaa serbordeadaantesde pasara lasiguiente
muesca.Ouantom_.ssemuevahaciaadelantela
palancade controlde profundidadde lacuchilla,
tantom_.sprofundoo m_.sabajoen el suelocortar_,la
cuchilla.Puedesernecesariorealizarvariaspasadas
paraobtenerla profundidadde cortedeseada.Nobaje
la cuchillam_.sde unamuescade profundidadporvez
sinhacerunapasada.
3. Paraobtenermejoresresultados,avancelentamente
a Iolargode lasendaa serbordeada,moviendo
lentamentela bordeadorahaciaatr_.sy haciaadelante
a travesdel _.reade corte,verificandounavezm_.s
quela ruedatraseraizquierdasemantengasobrela
superficieduraylacuchillaenla sendadecorte,cerca
de,perosintocar,elhordedelasuperficiedura.
4. Unavezquehayaalcanzadoel extremodela senda
decorte,levantela palancadecontroldela cuchilla
nuevamentea la posici6nSTART(ARRANQUE),
dirijaseal_.reasiguientea sercortaday repitael
procesodesdeel paso1.
Detenciondel motor
Paradetenerel motordela bordeadora,sueltela palanca
decontrolde lacuchilla.
NOTA: Sideseainstruccionesmbsdetalladasconsulteel
manualdelmotorembaladojunto conla unidad.
24

,_ ADVERTENCIA:Desconecteelcable
de bujia y p6ngalode maneraque
hagamasacontraelmotorantesde
realizarcualquierajuste,reparaci6no
servieiode mantenimiento.
Lubrication
Manual
Consulteel ManualdeMotorqueseentregaconla
bordeadoraparaverunadescripci6ndetalladadetodaslas
especificacionesdeserviciorelacionadasconelmotor.
Ruedas
LubriquelasruedasyloscojinetesporIornenosuna
vezporestaci6nconaceiteliviano.Sinembargo,si las
ruedassequitanporcualquierraz6n,debe lubricarla
superficiedelpernodelejey lasuperficieinternade la
rueda,conaceiteligero.
Puntos dejunta
Lubriquelospuntosdejuntasobreel ganchode control
de lacuchillay lapalancade controlde profundidadde
lacuchilla.
Pedestal
Lubriqueel pedestalunavezpotestaci6no segQn
seanecesario,simplernenteaplicandoaceiteen cada
extrernode laplacade lacubierta.Veala Figura9.
f
Figura10
3. Retirelaguardade la correade laspoleasdel husillo
sacandolosdostornillosautoroscantesquela sujetan
al rnontajedela placade lacuchilla.
4. UsedosIlaves(unaparaevitarquela cabezadel
pernohexagonalgireyla otrapararetirarla tuerca
conreborde)parasacarlacuchilladela bordeadora.
Consultela Figura11.
5. Retirey desechelacuchillade la bordeadorapero
FlangeNut
\
........................................_. Belt
Guard
Figura9
ReempJa2;od_ lapuchilla de
laDoreeaaora
ADVERTENCIA:Lacuchillade la
bordeadora es _osa. Useguantesde
trabajo de euero paraprotegerselas
manos euando trabajealrededor de la
cuchilla de la bordeadora.
.
ADVERTENCIA:Desconecteel cable
de la bujia y p6ngalo de maneraque
haga masacontra el motor antes de
seguir estos pasos:
Trabajandodelantede la bordeadora,aflojelatuerca
de seguridadconrebordeque seencuentraen la
partesuperiordel marco,perrnitiendoqueel rnontaje
de lapoleaIocagirelevernenteparasalirdel marco.
VealaFigura10.
Conlaotrarnano,cuidadosarnentetoquedebajo
de lapartetraserade la unidadyretirelacorreade
alrededorde lapoleadelvolantedelmotor.
Figura 11
conservela tuercaconreborde.
6. Instalela cuchillade reernplazode labordeadorayla
tuercacon reborderetiradaantes.
IMPORTANTE:Useuna Ilavede torsi6nparaajustarla
tuercacon rebordeentre37 pies-librasy50 pies-libras.
7. Vuelvaa instalarla guardade lacorreadelhusillocon
lostornillosautoroscantesquequit6anteriorrnente.
8. Cuidadosarnentecoloquelacorreadetransrnisi6n
nuevarnenteenla poleadelvolantedel motory
vuelvaa ajustarla tuercade seguridadconreborde
queest,.en la partesuperiordelmarco.
IMPORTANTE:Aseg_reseque lacorreadetransrnisi6n
est_correctarnenteasentaday quesedeslicesin
tropiezossobrelaspoleasdel husilloyquenoquede
apretadaentrelasrnisrnas.Repitalosprirnerostres
pasossila correaest,.apretada.
Cambio de la correa de transmision
ADVERTENCl
La cuchillade la
bordeadora es
filosa. Use guantes
de trabajo de cuero
para protegerselas
manos cuando
trabaje alrededor
de la cuchillade la
bordeadora.
Desconecte el cable
de bujia y p6ngalo
de manera que haga
masa contra el motor
antes de realizar
cualquierajuste,
reparaci6n o servicio
de mantenimiento.
25

ADVERTENCIA
Nuncaopere la
bordeadora sin la
guardade lacorrea
de las poleas de
husillodebidamente
colocada.
IMPORTANTE:Paraayudarenel nuevoensarnNaje,
adviertalaorientacbnde lacorreadetransrnisi6nsobre
lasdospoleasIocasyla poleadel volantedelmotor
antesde realizarlossiguientespasos.Consultela
Figura10.
Lacorreade transrnisbnde la bordeadorasedesgasta
y sedebecarnbiarsisepresentanseSalesdeque se
est&agrietando,rnellandoodescomponiendo.Para
carnbiarlacorreaprocedade la siguienternanera:
1. Trabajandodelantedelabordeadora,aflojelatuerca
de seguridadconrebordequeseencuentraenla
partesuperiordel marco,perrnifiendoqueel rnontaje
de lapoleaIocagirelevernenteparasalirdel marco.
VealaFigura10.
2. Conlaotrarnano,cuidadosarnentetoquedebajo
de lapartetraserade la unidadyretirelacorreade
alrededorde lapoleadelvolantedelmotor.
3. Retirela guardade lacorreadelaspoleasdelhusillo
,
sacandolosdostornillosautoroscantesquelasujetan
al rnontajede la placade la cuchilla.Veala Figura12.
Cuidadosarnenteretirelacorreade laspoleas,
verificandounavezrn_.sla orientaci6nde la correa.
Desechelacorrea.
Instalelacorreade recarnbio(PiezaNo754-04032B)
en larnisrnaconfiguraci6nque seorient6la correa
original,de la siguienteforrna:
5. Trabajandodelantedela bordeadora,coloquela
correaen laspoleasdel husillo,ori_ntelanuevarnente
hacialasdospoleasIocasy luegocol6quelaenla
poleadel volantedel motor.
IMPORTANTE:AsegQresequeel lado"V"de lacorrea
est_asentadosobrela poleasuperiory queel ladopiano
dela correaest_asentadoenelfondode lapolea.
6. Vuelvaa instalarlaguardadela correade laspoleas
delhusilloconlostornillosautoroscantesquequit6
anteriorrnente.
7. AsegQreseque lacorreadetransrnisi6nseencuentre
sobrela poleadelvolantede motorylaspoleasIocas,
yajustenuevarnentela tuercade seguridadcon
rebordesobrela partesuperiordelmarco.
IMPORTANTE:Aseg_resequelacorreade transrnisi6n
est_correctarnenteasentadasobreel husillode la
cuchillayquesedeslicesintropiezossobrelaspoleas
delhusilloyque noquedeapretadaentrelasrnisrnas.
Repitalosprirnerostres pasossila correaestaapretada.
ADVERTENCIA:Nuncaopere labordeadora sin la
__i uardade la correade las poleas de
husillo debidamente colocada.
Figura 12
Almacenamiento fuera detemporada
Tengaencuentalassiguientesinstruccionesalpreparar
la bordeadoraparael alrnacenarnientoa largoplazo:
1. Lirnpiey lubriquela unidadafondosegOnlas
instruccionesdela p_.gina9 deestemanual.
2. Consulteel Manualdel Motorentregadoenforrna
separadaconla bordeadoraparaobtenerlasinstruc-
cionesdealrnacenarnientodel fabricantedel motor.
3. Cubralacuchillade la bordeadoracongrasapara
chasisparairnpedirla oxidaci6ny lacorrosi6n.
4. Alrnacenela bordeadoraen unazonasecaylirnpia.
Nolaalrnacenecercade ningQnmaterialcorrosivo,
cornoporejernplofertilizanteparacesped.
5. Recubralabordeadora,especialrnentecualquier
resorteycojinete,conaceitelivianoo aerosolde
silicon&
IMPORTANTE:Cuandoalrnacenecualquiertipode
equipoel_ctricoen ungalp6ndedep6sitornet_.licoo con
pocaventilaci6n,tengaespecialcuidadode realizarleun
tratarnientoantioxidanteal equip&
26

G " paralasolucibndeproblemas
Problema Causa(s)posibles Accionescorrectivas
Elmotor no arranca Eldepuradorde aireest_ sucio. Consulteel ManualdelMotorentregadoconla
unidad.
Esnecesariocebarelmotor Presionela bombilladelcebadordoso tresveces.
Eltanquede combustibleest_vacio Lleneel tanquecongasolinalimpiay fresca.
Eltanquede gasolinatiene Drenelagasolinay vuelvaa Ilenarel tanquecon
combustibleviejo gasolinalimpiayfresca
Sehadesconectadoelcablede la Conecteel cabledebujiacon labujia.
bujia.
Bujiaatorada Limpie,ajusteoreemplacelabujia.
Motorahogado Consulteel ManualdelMotorentregadoconla
unidad.
Elmotor funcionade Elcablede la bujiaest_flojo Conectey ajusteel cablede labujia.
manera err_ttica Eltanquede gasolina Drenela gasolinayvuelvaaIlenareltanquecon
tienecombustibleviejo gasolinalimpiay fresca
Laventilaci6ndela tapadegasolina Limpielaventilaci6npararetirarcualquierbasura.
est_obstruida
Aguaosuciedaden elsistemade Vacieel tanquedelcombustible.Vuelvaa Ilenarlo
combustible con combustiblelimpio.
Eldepuradordeaireest_ sucio. Consulteel Manualdel Motorentregadoconla
unidad.
Esnecesarioajustarelcarburador Consulteel Manualdel Motorentregadoconla
unidad.
Elmotor recalienta Elniveldeaceitedelmotoresbajo. Lleneelc_rterconaceiteadecuado.
Flujode airerestringido Limpieel _reaalrededorde lasaletasdeenfria
mientodel motor.
Filtrodeaire sucio Cambieelfiltro deaire delmotor.
Elcarburadorno est_ajustado Consulteel ManualdelMotorentregadocon la
correctamente, unidad.
Demasiadavibraci6n La cuchilladela bordeadoraest_ Reemplacela cuchillade la bordeadora.
dobladao da_ada
Elhusillode lacuchillaest_dobladoo Contactea undistribuidorMTDautorizadoparael
da6ado mantenimiento.
hacorrea de Correadesgastadaoestirada Reemplacela correade latransmisi6n.
transmisi6nse desliza
27
Parapiezas y/o
accesorios, pot favor
Ilame a!
1-330-220-4683,
o a! 1-800-800-7310
www.mtdproducts.cor_

\
)

710-0870 Tornillohexagonalde 3/8-16
711-04362 Eje.50x 3.8
711-04440 Eje.50x 9.25
726-0299 Tapaa presi6n,varilla1/2pulg.
732-04045 Resortedetorsi6n
734-1987 Rueda8xl.8
734-1988 Rueda7xl.8
736-0232 Arandelaondulatoria
738-0929 Tornilloconreborde,3/8-16
750-04129 Separador
750-04427 Separador,.525x .775x .1125
750-04428 Separador,.525x .775x .3125
787-01240 Mensulade larueda
710-0191 Tornillo3/8-24
710-0411 Tornillo3/8-16
710-0654A Tornillo,3/8-16
712-04065 Tuercadeseguridadconreborde,
3/8-16
731-05063 Guardacontraescombros
736-0452 Arandeladecampana,.396x
1.140
750-04142 Separadorde montajede polea
756-04148 PoleaIoca,Plana2.5dedi_metro
exterior
756-1150A Poleadevolantedecombinaci6n
787-01304 Marco
710-0726 Tornillohexagonal,5/16-12
710-1174 Pernodel carro,5/16-18
710-1205 Guiadecuerda(pernodeojo)
710-3180 Tornillohexagonal,5/16-18
712-04063 Tuercadeseguridadconreborde,
5/16-18
720-0142 Empu_adura
720-0279
720-04052
732-0369
746-04052
746-04036
747-0976A
749-04183
749-04234
781-0741A
781-0742
687-02126
710-04389
710-0599
710-1143A
712-0417A
714-0104
711-1017
718-04012
731-04207
731-05064
732-04169
736-0342
736-04088
738-0706C
741-0524
750-04105
750-0547
754-04032B
756-0449
781-0080
781-0427
787-01075A
Tuercade mariposa
Perillamanual
Resortede compresi6n
CabledeControl(Tecumseh)
Cabledeajustede la rueda
Controldecuchilla
Manijasuperior
Manijainferior
Mensulade indicede profundidad
Palancade indicedeprofundidad
Montajede la placadela cuchilla
Tornillohexagonal,5/16-18
Tornilloautoroscante,1/4-20
Tornillohexagonal,5/8-18
Tuercaconreborde,5/8-18
Pasadordechaveta
Chavetade la horquilla
Cubetadecojinete
Pedestal
Guardadela cuchilla
Resortede compresi6n
Arandelaplana,.260x.72
Arandelaplana.635x1.24x.181
Tornilloconreborde
Cojinete,.625DIx 1.57DE
Separador,.63x 1.12x 1.06
Separador,.64x.88x .50
Correa
Polea
Cuchilla
Guardadela correa
Placadela cubierta
29
plezas:
Manija/Marco/
lVlontajede rueda
Modelo 521
Parapiezas
y/o accesorios
por favor #ame a!
1-330-220-4683, 6 a!
1-800-800-7310
www.mtdproducts.com

NOTAS
iI
Useestap_gi.apara
hacer anotaciones
i
y para escribir infor-
macidn importante.
3O

Use esta p_gina para
hacer anotaciones
escribir infor- '
macl_n importante,
31

GARANTiA LIMITADA DEL FABRICANTE PARA:
Lagaranfialirnitadaqueseextiendeacontinuaci6nesotorgadaporla irniento.
ernpresaMTDLLCycubrernercaderiasnuevascornpradasy utilizadas
e.
en losEstadosUnidos,susposesionesyterritorios.
"MTD"garantizaesteproductopotdefectosde rnaterialesyde
fabricaci6npor unperiododedos(2)aSosa partirde la fechade la
cornpraoriginaly reparar_,ocarnbiar_,sincargocuandoIoconsidere
pertinentetodaslaspiezascondefectosde rnaterialesodefabricaci6n.
Estagarantialirnitadas61oseaplicar_,siel productoha sidooperadoy
rnantenidodeacuerdoconlasinstruccionesdelManualdel Operador
queseproporcionaconelproductoyno hasidosujetoa usoinapro-
piado,abuso,usocornercial,abandono,accidente,rnantenirniento
incorrecto,alteraci6n,vandalisrno,robo,incendio,inundaci6no algOn
daSodebidoaotto peligroo desastrenatural.EldaSoresultanteporla
instalaci6no el usode piezas,accesorioso unionesnoaprobadospot
MTDparasuusoconel(los)producto(s)incluido(s)en estemanual
anular_,lagarantiaenIoquerespectaa esosdaSos.
Segarantizaque laspiezascondesgastenormalest_.nlibresde de-
rectosen losrnaterialeso defabricaci6npotunperiodode treinta(30)
diasapartirdela fechade cornpra.Laspiezasocornponentessujetos
adesgastenormalincluyenperonoselirnitana: baterias,correas,
cuchillas,adaptadoresparacuchillas,bolsasparapasto,ruedaspara
lacubierta,asientos,zapatasantideslizantes,placas,gornasde cortey
neurn_.ticos.COMOSOLICITARY OBTENERSERVlCIOT¢:CNICO:El
serviciode la garantiaest,.disponible,CONPRUEBADECOMPRA,a
travesdel distribuidorlocalautorizadoparaelrnantenirniento.ParaIo-
calizaral distribuidorensu_.rea,busqueen lasp_.ginasarnarillasde su
Iocalidado contactea MTDLLCalApartadoPostal361131,Cleveland,
Ohio44136-0019,o Ilarneal 1-800-800-73106 1-330-220-4683oentre
a la p_.ginaWeben www.rntdproducts.corn.
Estagaranfialirnitadano Iocubrir_,enlossiguientescasos:
a.
c.
El motorylaspiezascornponentesdel rnisrno.Estosproductos
puedentenergaranfiadelfabricantepor separado.Consultelos
t_rrninosycondicionesde la garantiaaplicabledelfabricante.
Lasbornbasparael cortedernadera,lasv_.lvulasyloscilindros
tienenunagaranfiaindependientede una_o.
Losarficulosnecesariosparael rnantenirnientoderutinacornopor
ejernplolubricantes,filtros,afiladoresde cuchillas,losajustesde los
frenos,del ernbragueo de laplataforrnay eldeterioronormaldel
acabadoexteriordebidoal usoo exposici6n.
d. Serviciono realizadoporeldistribuidorautorizadoparael rnanten-
MTD LLC. P.O. BOX 361131 CLEVELAND, OHIO 441
MTDnoextiendeningunagaranfiaparalosproductosvendidoso
exportadosfuerade losEstadosUnidosdeAmerica,susposesio-
nesy territorios,exceptoparaaquellosvendidosa trav_sde los
canalesautorizadosdedistribuci6ndeexportacionesde MTD.
f. Piezasde reernplazoquenosonpiezasgenuinasde MTD.
g. Gastosde transportey Ilarnadaspor serviciost_cnicos.
Noseaplican garantiasimplicitas,incluidaslas garantias
implicitasde comerciabilidado de adecuaci6n paraun prop6sito
determinado,despu_s del periodo de aplicaci6n de la garantiaes-
crita expresaextendida rn_sarriba paralas piezasde acuerdocon
su identificaci6n.Ningunaotra garantiae×presa,oralo escrita,
e×ceptola mencionada anteriormente, extendida pot personas o
personasjuridicas,incluidoslos distribuidores o los rninoristas
con respectoa los productos, obligar_ a MTD.Duranteel plazo
de la garantia el 5nico recursoes la reparaci6no reemplazodel
productocomo se indic6anteriormente.
Lasdisposiciones incluidasen esta garantia proveenel recurso
5nico y exclusivo que surge de lasventas. MTDno ser_respon-
sable pot p_rdidas o daSosincidentaleso directos, incluyendo
sin limites, los gastos incurridospara los servicios de cuidado
del pasto de reernplazoo cambio, o los gastosde alquiler para
reemplazarde maneratransitoda un productobajo garantia.
AIgunosestadosnoperrnitenla exclusi6no lirnitaci6nde losdaSosy
perjuiciosincidentaleso directos,o laslirnitacionessobreladuraci6n
de lasgaranfiasirnplicitas,porIoquelasexclusioneso lirnitaciones
rnencionadasanteriorrnentepuedennoserledeaplicaci6n.EnningOn
casoseobtendr_,unacornpensaci6nmayoralrnontodel preciode
cornpradelproductovendido.Laalteraci6nde lascaracteristicasde
seguridaddel productoanular_,estagarantiaUstedasurneel riesgoy
la responsabilidadporlasp_rdidas,da_oso lesionesquesufraUsted
ysus bienesy/ o otraspersonasysusbienescornoconsecuenciadel
uso,delusoincorrectoo de lairnposibilidadde usodeesteproducto
Estagaranfialirnitadaalcanzasolarnenteal cornpradororiginal,o a la
personaquerecibi6el productode regalo.
COMOSE RELACIONALA LEGISLACK)NESTATALCONESTAGA-
RANTiA: Estagaranfialirnitadale otorgaderechoslegalesespedficos
yustedtarnbi_npuedecontarconotrosderechosquevariandeun
estadoa otro.
IMPORTANTE:El propietariodebepresentarpruebadecornpra
originalparaobtenerlacoberturadelagaranfia.
36=0019, Tei_fono: 1-800-800=7310, 1=330-220=4683
-
 1
1
-
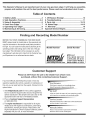 2
2
-
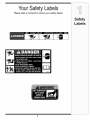 3
3
-
 4
4
-
 5
5
-
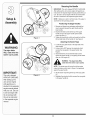 6
6
-
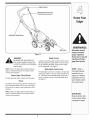 7
7
-
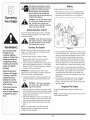 8
8
-
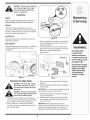 9
9
-
 10
10
-
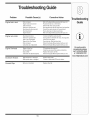 11
11
-
 12
12
-
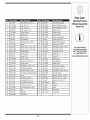 13
13
-
 14
14
-
 15
15
-
 16
16
-
 17
17
-
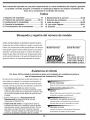 18
18
-
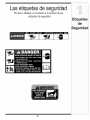 19
19
-
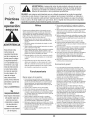 20
20
-
 21
21
-
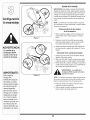 22
22
-
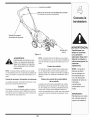 23
23
-
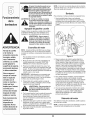 24
24
-
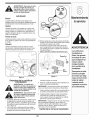 25
25
-
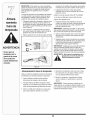 26
26
-
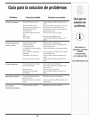 27
27
-
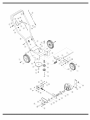 28
28
-
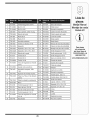 29
29
-
 30
30
-
 31
31
-
 32
32


