MTD 12AE999P099 El manual del propietario
- Categoría
- Cortadoras de césped
- Tipo
- El manual del propietario
Este manual también es adecuado para

Operator's Manual
PRO E S S I 0 N A
21" SELF PROPELLED MOWER
Model No. 247.887761
CAUTION: Before using
this product, read this
manual and follow all
safety rules and operating
instructions.
o SAFETY
ASSEMBLY
OPERATION
MAINTENANCE
PARTS LIST
o ESPANOL, p. 39
Sears Brands Management Corporation, Hoffman Estates, IL 60179, U.S.A.
Visit our website: www.craftsman.com FORMNO.769-04706D
6/22/2011

WarrantyStatement..................................Page2
SafeOperationPractices..........................Pages3-6
SlopeGuide..............................................Page7
SafetyLabels............................................Page9
Assembly..................................................Pages10-13
Operation..................................................Pages14-15
ServiceandMaintenance.........................Pages16-21
Off-SeasonStorage..................................Page22
TroubleShooting.......................................Page23
PartsList...................................................Page24-34
Espa_ol.....................................................Page39
ServiceNumbers......................................BackCover
Craftsman Professional Two Year Full Warranty
FORTWOYEARSfromthedateofpurchase,this productiswarrantedagainstanydefectsinmaterialor workmanship.Defectiveproductwill
receivefreerepairor freereplacementifrepairisunavailable.
Forwarranty coveragedetails to obtain repairor replacement,visit the website: www.craftsman.com.
This warranty covers ONLYdefects in material andworkmanship. Warrantycoverage does NOTinclude:
• Expendableitemswhichcanwearoutfromnormalusewithinthewarrantyperiod,suchas mowerblades,bladeadapters,belts,filters,or
sparkplugs.
• Productdamageresultingfromuserattemptsat productmodificationor repairorcausedbyproductaccessories.
• Repairsnecessarybecauseof accidentorfailuretooperateor maintaintheproductaccordingtoallsuppliedinstructions.
• Preventativemaintenanceor repairsnecessarydueto improperfuelmixture,contaminatedorstalefuel.
Thiswarrantygivesyouspecificlegalrights,andyoumayalsohaveotherrightswhichvaryfromstatetostate.
Sears BrandsManagementCorporation, Hoffman Estates,IL 60179
EngineOilType: SAE30
EngineOilCapacity: 18ounces
Fuel: UnleadedGasoline
SparkPlug: Champion®RC12YC
Engine: Briggs& Stratton
ModelNumber.................................................................
Serial Number.................................................................
Dateof Purchase .............................................................
Recordthemodelnumber,serialnumber
anddateof purchaseabove
©KCDIP,LLC 2

Thissymbolpointsoutimportantsafetyinstructionswhich,if not
followed,couldendangerthepersonalsafetyand/orpropertyof
yourselfandothers.Readandfollowall instructionsin thismanual
beforeattemptingtooperatethismachine.Failuretocomplywith
theseinstructionsmayresultin personalinjury.Whenyouseethis
symbol,HEEDITSWARNING!
CALIFORNIA PROPOSITION 65
EngineExhaust,someof itsconstituents,andcertainvehicle
componentscontainoremitchemicalsknowntoStateofCalifornia
tocausecancerandbirthdefectsorotherreproductiveharm.
Batteryposts,terminals,and relatedaccessoriescontainleadand
leadcompounds,chemicalsknowntotheStateof Californiato
causecancerandreproductiveharm.Washhandsafterhandling.
Thismachinewasbuilttobeoperatedaccordingtothesafeopera-
tionpracticesinthis manual.Aswithanytypeof powerequipment,
carelessnessorerroron thepartoftheoperatorcanresultin serious
injury.Thismachineiscapableofamputatingfingers,hands,toes
andfeetandthrowingdebris.Failuretoobservethefollowingsafety
instructionscouldresultin seriousinjuryor death.
Your Responsibility--Restrict theuseofthis powermachineto
personswhoread,understandandfollowthewarningsand instruc-
tionsin thismanualandon themachine.
SAVE THESE INSTRUCTIONS!
GENERAL OPERATION
• Readthisoperator'smanualcarefullyin itsentiretybefore
attemptingtoassemblethis machine.Read,understand,and
followall instructionsonthemachineandinthemanualsbefore
operation.Keepthismanualina safeplaceforfutureand regular
referenceandfororderingreplacementparts
• Becompletelyfamiliarwiththecontrolsandtheproperuseofthis
machinebeforeoperatingit.
• Thismachineisa precisionpieceofpowerequipment,nota
plaything.Therefore,exerciseextremecautionat alltimes.This
machinehasbeendesignedto performonejob:to mowgrass.
Donotuseitforanyotherpurpose.
• Neverallowchildrenunder14yearsofagetooperatethis
machine.Children14andovershouldreadandunderstandthe
instructionsandsafeoperationpracticesin thismanualandon
themachineandshouldbetrainedandsupervisedbyan adult.
• Onlyresponsibleindividualswhoarefamiliarwiththeserulesof
safeoperationshouldbe allowedtousethis machine.
• Thoroughlyinspecttheareawheretheequipmentistobe used.
Removeallstones,sticks,wire,bones,toysandotherforeign
objects,whichcouldbetrippedoverorpickedupandthrownby
theblade.Thrownobjectscancauseseriouspersonalinjury.
• Planyourmowingpatterntoavoiddischargeofmaterialtoward
roads,sidewalks,bystandersandthelike.Also,avoiddischarg-
ingmaterialagainstawallorobstruction,whichmaycause
dischargedmaterialto ricochetbacktowardtheoperator.
• Tohelpavoidbladecontactora thrownobjectinjury,stayin
operatorzonebehindhandlesand keepchildren,bystanders,
helpersandpetsatleast75feetfrommowerwhileitis inopera-
tion.Stopmachineifanyoneentersarea.
• Alwayswearsafetyglassesor safetygogglesduringoperation
andwhileperformingan adjustmentor repairto protectyoureyes.
Thrownobjectswhichricochetcancauseseriousinjurytothe
eyes.
Wearsturdy,rough-soledworkshoesandclose-fittingslacks
and shirts.Shirtsand pantsthatcoverthearmsandlegsand
steel-toedshoesare recommended.Neveroperatethis machine
inbarefeet,sandals,slipperyor light-weight(e.g.canvas)shoes.
Donotputhandsor feetnearrotatingpartsor underthecutting
deck.Contactwith bladecanamputatefingers,hands,toesand
feet.
A missingor damageddischargecovercancausebladecontact
or thrownobjectinjuries.
• Manyinjuriesoccurasa resultofthemowerbeingpulledoverthe
footduringafallcausedbyslippingor tripping.Donotholdon to
themowerifyouarefalling:releasethehandleimmediately.
Neverpullthemowerbacktowardyouwhileyouarewalking.If
youmustbackthemowerawayfroma wallor obstructionfirst
lookdownandbehindtoavoidtrippingandthenfollowthese
steps:
1. Stepbackfrommowertofullyextendyourarmsforward.
2. Besureyouare wellbalancedwithsurefooting.
3. Pullthemowerbackslowly,no morethanhalfwaytoward
you.
4. Repeatthesestepsasneeded.
Donotoperatethemowerwhileundertheinfluenceofalcoholor
drugs.
Donotengagetheself-propelledmechanismon machinesso
equippedwhilestartingengine.
3

• Thebladecontrolhandleisa safetydevice.Neverattemptto
bypassits operation.Doingsomakesthesafetydeviceinopera-
tiveandmayresultin personalinjurythroughcontactwiththe
rotatingblade.Thebladecontrolhandlemustoperateeasily
in bothdirectionsandautomaticallyreturntothedisengaged
positionwhenreleased.
• Neveroperatethemowerinwetgrass.Alwaysbe sureofyour
footing.A slipandfallcancauseseriouspersonalinjury.Ifyou
feelyouarelosingyourfooting,releasethebladecontrolhandle
immediatelyandthebladewillstop rotatingwithinthreeseconds.
• Mowonlyin daylightor goodartificiallight.Walk,neverrun.
• Stopthebladewhencrossinggraveldrives,walksor roads.
• Iftheequipmentshouldstarttovibrateabnormally,stopthe
engineandcheckimmediatelyforthecause.Vibrationis gener-
allya warningoftrouble.
• Shuttheengineoff andwaituntilthebladecomestoa complete
stopbeforeremovingthegrasscatcheror uncloggingthechute.
Thecuttingbladecontinuesto rotateforafewsecondsafterthe
bladecontrolisreleased.Neverplaceanypartofthebodyinthe
bladeareauntilyouaresurethebladehasstoppedrotating.
• Neveroperatemowerwithoutpropertrailshield,dischargecover,
grasscatcher,bladecontrolhandleor othersafetyprotectivede-
vicesin placeandworking.Neveroperatemowerwithdamaged
safetydevices.Failuretodo socan resultinpersonalinjury.
Mufflerandenginebecomehotandcancausea burn.Donot
touch.
• Neverattempttomakea wheelorcuttingheightadjustmentwhile
theengineisrunning.
• Onlyusepartsand accessoriesmadeforthis machinebythe
manufactureraslistedin thePartspagesofthisOperator's
Manual.Failuretodosocanresultinpersonalinjury.
• Whenstartingengine,pullcordslowlyuntilresistanceisfelt,then
pullrapidly.Rapidretractionof startercord(kickback)willpull
handandarmtowardenginefasterthanyoucanletgo.Broken
bones,fractures,bruisesor sprainscouldresult.
• If situationsoccurwhicharenotcoveredinthismanual,usecare
andgoodjudgement.Contact1-800-4MY-HOME®forinformation
andassistance.
SLOPE OPERATION
Slopesare amajorfactorrelatedto slipandfallaccidents,whichcan
resultinsevereinjury.Operationon slopesrequiresextracaution.If
youfeeluneasyona slope,do notmowit. Foryoursafety,usethe
SlopeGuideincludedaspartof thismanualto measureslopesbefore
operatingthis machineon a slopedor hillyarea.Iftheslopeisgreater
than15degrees,donotmowit.
Do:
o
Mowacrossthefaced slopes;neverupanddown.Exercise
extremecautionwhenchangingdirectiononslopes.
• Watchforholes,ruts,rocks,hiddenobjects,or bumpswhichcan
causeyoutosliportrip.Tallgrasscanhideobstacles.
• Alwaysbesureofyourfooting.A slipandfallcancauseserious
personalinjury.Ifyoufeelyouarelosingyourbalance,release
thebladecontrolhandleimmediatelyandthebladewillstop
rotatingwithinthree(3) seconds.
DoNot:
• Donotmowneardrop-offs,ditchesor embankments,because
youcouldloseyourfootingorbalance.
• Donotmowslopesgreaterthan15degreesas shownon the
slopeguide.
• Donotmowon wetgrass.Unstablefootingcouldcauseslipping.
CHILDREN
Tragicaccidentscanoccuriftheoperatorisnotalerttothepresence
ofchildren.Childrenareoftenattractedto themowerandthemowing
activity.Theydonotunderstandthedangers.Neverassumethat
childrenwillremainwhereyoulastsawthem.
Keepchildrenoutofthemowingareaandunderwatchfulcareof
a responsibleadultotherthantheoperator.
• Bealertandturnmoweroffif achildentersthearea.
• Beforeandwhilemovingbackwards,lookbehindanddownfor
smallchildren.
• Useextremecarewhenapproachingblindcorners,doorways,
shrubs,trees,orotherobjectsthatmayobscureyourvisionofa
childwhomayrunintothemower.
• Keepchildrenawayfromhotor runningengines.Theycansuffer
burnsfroma hotmuffler.
• Neverallowchildrenunder14yearsofagetooperatethis
machine.Children14andovershouldreadand understandthe
instructionsandsafeoperationpracticesinthis manualandon
themachineand betrainedandsupervisedbyan adult.
SERVICE
SafeHandlingOf Gasoline:
• Toavoidpersonalinjuryor propertydamageuseextremecare
in handlinggasoline.Gasolineisextremelyflammableandthe
vaporsareexplosive.Seriouspersonalinjurycanoccurwhen
gasolineisspilledon yourselfor yourclothes,whichcanignite.
Washyourskinandchangeclothesimmediately.
• Useonlyanapprovedgasolinecontainer.
• Neverfillcontainersinsidea vehicleoron atruckortrailerbed
witha plasticliner.Alwaysplacecontainerson thegroundaway
fromyourvehiclebeforefilling.
• Removegas-poweredequipmentfromthetruckortrailerand
refueliton theground.Ifthisis notpossible,thenrefuelsuch
equipmenton atrailerwitha portablecontainer,ratherthanfrom
a gasolinedispensernozzle.
• Keepthenozzleincontactwiththe rimofthefueltankor
containeropeningatall timesuntilfuelingiscomplete.Donotuse
a nozzlelock-opendevice.
4

• Extinguishall cigarettes,cigars,pipesandothersources
ofignition.
• Neverfuelmachineindoorsbecauseflammablevaporswill
accumulateinthearea.
• Neverremovegascaporaddfuelwhileengineis hotor running.
Allowenginetocoolat leasttwo minutesbeforerefueling.
• Neverover-fillfueltank.Toallowforexpansionofthefuel,donot
fillabovethebottomofthefueltankneck.
• Replacegasolinecapandtightensecurely.
• If gasolineisspilled,wipeitofftheengineandequipment.Move
machinetoanotherarea.Wait5 minutesbeforestartingengine.
• Neverstorethemachineorfuelcontainernearanopenflame,
sparkor pilotlightasona waterheater,spaceheater,furnace,
clothesdryerorothergasappliances.
• Toreducefirehazard,keepmachinefreeofgrass,leaves,or
otherdebrisbuild-up.Cleanupoil orfuelspillageand removeany
fuel-soakeddebris.
Allowmachinetocoolatleast5 minutesbeforestoring.
GeneralService:
• Neverrunanengineindoorsor ina poorlyventilatedarea.Engine
exhaustcontainscarbonmonoxide,anodorlessanddeadlygas.
• Beforecleaning,repairing,or inspecting,makecertainthe
bladeandall movingpartshavestopped.Disconnectthespark
plugwireandgroundagainsttheenginetopreventunintended
starting.
Checkthebladeandenginemountingboltsatfrequentintervals
forpropertightness.Also,visuallyinspectbladefordamage(e.g.,
bent,cracked,worn).Replacebladewiththeoriginalequipment
manufacture's(O.E.M.)bladeonly,listedinthePartspagesofthis
manual.Useofpartswhichdonotmeettheoriginalequipment
specificationsmayleadto improperperformanceandcompro-
misesafety!
• Mowerbladesare sharpandcancut.Wrapthe bladeor wear
gloves,anduseextracautionwhenservicingthem.
Keepall nuts,bolts,andscrewstighttobe suretheequipmentis
insafeworkingcondition.
Nevertamperwithsafetydevices.Checktheirproperoperation
regularly.
Afterstrikinga foreignobject,stoptheengine,disconnectthe
sparkplugwireand groundagainsttheengine.Thoroughly
inspectthemowerforanydamage.Repairthedamagebefore
startingandoperatingthemower.
Neverattempttomakea wheelorcuttingheightadjustmentwhile
theengineisrunning.
• Grasscatchercomponents,dischargecover,and trailshieldare
subjectto wearand damagewhichcouldexposemovingpartsor
allowobjectstobethrown.Forsafetyprotection,frequentlycheck
componentsand replaceimmediatelywithoriginalequipment
manufacturer's(O.E.M.)partsonly,listedinthePartspages
ofthismanual.Useof partswhichdo notmeettheoriginal
equipmentspecificationsmayleadto improperperformanceand
compromisesafety!
Donotchangetheengine'sgovernorsettingor over-speedthe
engine.Thegovernorcontrolsthemaximumsafeoperatingspeed
oftheengine.
Checkfuelline,tank,cap,andfittingsfrequentlyforcracksor
leaks.Replaceifnecessary.
Donotcrankenginewith sparkplugremoved.
• Maintainor replacesafetyandinstructionlabels,asnecessary.
• Observeproperdisposallawsand regulations.Improperdisposal
offluidsandmaterialscanharmtheenvironment.
Accordingto theConsumerProductsSafetyCommission(CPSC)
andthe U.S.EnvironmentalProtectionAgency(EPA),thisproduct
hasanAverageUsefulLifeof seven(7)years,or 140hoursof
operation.AttheendoftheAverageUsefulLifehavethemachine
inspectedannuallybya Searsorotherqualifiedservicedealer
toensurethatallmechanicalandsafetysystemsareworking
properlyand notwornexcessively.Failuretodosocanresultin
accidents,injuriesor death.
DO NOT MODIFY ENGINE
Toavoidseriousinjuryor death,do notmodifyengineinanyway.
Tamperingwiththegovernorsettingcanleadtoa runawayengineand
causeittooperateat unsafespeeds.Nevertamperwithfactorysetting
ofenginegovernor.Doingsowillvoidtheproductwarranty.
NOTICE REGARDING EMISSIONS
EngineswhicharecertifiedtocomplywithCaliforniaandfederal
EPAemissionregulationsforSORE(SmallOff RoadEquipment)are
certifiedtooperateon regularunleadedgasoline,andmayinclude
thefollowingemissioncontrolsystems:EngineModification(EM)and
ThreeWayCatalyst(TWC)ifsoequipped.
SPARK ARRESTOR
Thismachineisequippedwithaninternalcombustionengineand
shouldnotbe usedonor nearanyunimprovedforest-covered,
brush-coveredorgrass-coveredlandunlesstheengine'sexhaust
systemisequippedwitha sparkarrestormeetingapplicablelocalor
statelaws(ifany).
Ifa sparkarrestorisused,itshouldbe maintainedineffectiveworking
orderbytheoperator.IntheStateofCaliforniatheaboveisrequired
bylaw(Section4442oftheCaliforniaPublicResourcesCode).Other
statesmayhavesimilarlaws.Federallawsapplyonfederallands.
A sparkarrestor(PartNo.398067)forthemufflerisavailablethrough
yournearestSearsPartsandRepairServiceCenter.

SAFETY SYMBOLS
Thispagedepictsanddescribessafetysymbolsthatmayappearonthisproduct. Read,understand,andfollowall instructionson themachine
beforeattemptingtoassembleandoperate.
i
i
®
J
READ THE OPERATOR'S MANUAL(S)
Read, understand, and follow all instructions in the manual(s) before attempting to assemble and
operate
DANGER -- ROTATING BLADES
To reduce the risk of injury, keep hands and feet away. Do not operate unless discharge cover or grass
catcher is in its proper place. If damaged, replace immediately.
DANGER -- BYSTANDERS
Do not mow when children or others are around.
DANGER-- HAND/FOOT CUT
Keep hands and feet away from rotating parts.
DANGER -- THROWN DEBRIS
Remove objects that can be thrown by the blade in any direction. Wear safety glasses.
DANGER -- SLOPES
Use extra caution on slopes. Do not mow slopes greater than 150.
WARNING--GASOLINE ISFLAMMABLE
Allow the engine to cool at least two minutes before refueling.
WARNING-- CARBON MONOXIDE
Never run an engine indoors or in a poorly ventilated area. Engine exhaust contains carbon
monoxide, an odorless and deadly gas.
WARNING-- HOT SURFACE
Engine parts, especially the muffler, become extremely hot during operation. Allow engine and
muffler to cool before touching.
6

|
|
or acornerof a building...
15°
Use this pageas a guide to determine slopes where you may not operatesafely.
Donotoperateyourlawnmoweronsuchslopes.Donotmowoninclineswitha slopeinexcessof 15degrees(a riseofapproximately2-1/2feetevery10feet).Operatewalk-
behindmowersacrossthefaceofslopes,neverup anddownslopes.

This pageleft intentionallyblank.
8

READOPERATOR'SMANUAL. KEEPSAFETYDEVICES(BLADECONTROL,TRAILINGSHIELD,
DISCHARGECOVER,ETC.)iNPLACEANDWORKING. IF DAMAGED,REPLACEIMMEDIATELY.
Operation Of This Equipment May Create Sparks
That Can Start Fires Around Dry Vegetation.
A Spark Arrestor May Be Required.The Operator Should Contact Loca_ Fire
Agencies For Laws Or Regulations To Fire Prevention Requirements.
9

IMPORTANT:Thisunitisshippedwithoutgasolineoroil intheengine.
Becertaintoserviceenginewithgasolineandoilasinstructedinthe
Operationsectionbeforestartingor runningyourmachine.
NOTE:Referenceto rightand lefthandsideoftheLawnMoweris
observedfromtheoperatingposition.
OPENING CARTON
1. Cuteachcornerofthecartonverticallyfromtopto bottom.
2. Removeall looseparts.
3. Removeloosepackingmaterial.
REMOVING UNIT FROM CARTON
1. Liftunitfromthereartodetachitfromunderlyingcartonmaterial
androllunitoutofcarton.
2. Checkcartonthoroughlyforanyotherlooseparts.
LOOSE PARTS IN CARTON
• GrassCatcher
• GrassCatcherAdapter
• SideDischargeChute
• EngineOil
ASSEMBLY
Attaching The Handle
1. Removeanypackingmaterialwhichmaybebetweenupperand
lowerhandles.
A. PullupandbackonupperhandleasshowninFigure1.
Makecertainthe lowerhandleisseatedsecurelyintothe
handlemountingbrackets.Donotcrimpcableswhilelifting
thehandleup.
B. Tightenstarknobstosecureupperhandletolowerhandle.
Makesurethateachcarriageboltisseatedproperlyinthe
handle.
2. Locatethehairpinclipontheweldpinon eachsideof lower
handle.
A. Removehairpinclipfromthishole.Usinga pairof pliers,
inserthairpinclipintotheholeonpinclosestto thebracket.
SeeFigure2. Repeaton otherside.
B. Insertacarriageboltfromthemanualbagintotheupper
holeonthehandlemountingbracket.Securewithone plastic
wingnut,alsoincludedin themanualbag.Repeatonother
sidewith remaininghardware.
f
Figure1
J
f
_jf
fJ
tj
Figure2
NOTE:Makecertainthedrivecableisroutedaroundtheoutsideand
abovethelowerhandlesoitdoesnotinterferewithattachingthegrass
bag.Thechutedoorhasbeendesignedtomovethestarterropeoutof
thewayofthebagwhenthechutedoorisopened.
10

3. Theropeguide,whichisconnectedtothesupportrod,islocated
onthe rightsideofthelowerhandle.See Figure3 below.
A. Holdbladecontrolagainstupperhandle.
B. Pullstarterropeoutoftheengine.Releasebladecontrol.
C. Slipstarterropeintoropeguide.
D. Usecabletiestosecurecableto lowerhandle.
Attaching the Grass Catcher
Themowerwasshippedwiththemulchingbaffleinstalledontheunit.
Forbaggingpurposes,youwillhavetoattachthegrassbagandits
adapterin placeofthemulchingbaffle.
1. Removethreewingnutsholdingthemulchingbafflein placeand
removefromunit.SeeFigure4.
2. Replacewithgrassbagadapter,whilemakingsurethefrontlipof
adaptergoesundertheedgeofthedeck.Securewithwingnuts
previouslyremoved.
3. Liftchutedooronthegrassbagadapterand slidegrassbagonto
theadapter.SeeFigure5.
Figure3
f
Figure5
Figure4
.J
11

f -'%
Attaching Side Discharge Cover
Followstepsbelowtoinstallthesidedischargecover: .....'....
1. Removemulchingbaffleor grassbagadapterfromunitby
disconnectingwingnuts.
2. Attachsidedischargecovertounitand securewiththethreewing
nuts.SeeFigure6.
ADJUSTMENTS
Cutting Height
Thecuttingheightadjustmentleverislocatedabovethe rearleft
wheel.SeeFigure7Ainsert.
1. Pullleveroutandawayfrommower.
2. Moveleverforwardor backfordesiredcuttingheight.
3. Releaselevertowardsmowerdeck.
Thefrontwheelcuttingheightisdeterminedbyselectingoneof six
positionsoneachcasterassembly.Toadjustfrontcuttingheight,refer
toFigure7Bandproceedasfollows:
1. Removewingnutfromaxlebolt.
Slideaxleboltandwavewasher
fromtheassemblyandselecta
cuttingheight.
2. Withwavewasheron axlebolt,
reinserthardwareinthesquare
holedesiredthroughwheel
assemblyandsecurewithwing
nutpreviouslyremoved.
IMPORTANT:Allwheelsmustbeplacedinthe samerelativeposition.
Forroughor unevenlawns,movetheheightadjustmentlevertoa
higherposition.Thiswillstopscalpingof grass.
Thecasterscanbelockedina straightaheadpositionor positionto
swivelfreely.SeeFigure70 insert.
1. Liftlock pins.
2. Placeinlargerholestolockwheels.Placepinsinsmallerholesto
allowcasterstorotatefreelyforturning.
Drive Control
Theadjustmentwheelislocatedin thedrivecontrolhandlehousing
andisusedtotightenor loosenthedrivebelt.Youwillhaveto adjust
thedrivecontrolifanyofthefollowinghappens:
1. Themowerdoesnotpropelitselfwiththedrivecontrolengaged.
2. Themower'sdrivewheelshesitatewiththedrivecontrolengaged.
Ifeitheroftheseconditionsoccur,rotatetheadjustmentwheel
clockwisetotightenandcounter-clockwiseto loosencabletoadjust
thedrivecontrol.SeeFigure8.
NOTE:Forsomepeoplethedrivecontrolmaynotbeina comfortable
position.Youcanadjustthehandlebytighteningtheadjustmentwheel.
Figure6
f
12
Figure8
\\

Control
Start Ignition Key
Cutting Height
Adjustment Lever
0il Cap/
Side Discharge Cover
J
Figure9
BLADE CONTROL ELECTRIC START IGNITION KEY
Thebladecontrolisattachedtotheupperhandleofthemower.See
Figure9. Depressand squeezeitagainsttheupperhandletooperate
theunit.Releaseitto stopengineand blade.
TheelectricstartignitionkeyislocatedontheIdt sideofthehandle
panel.Itisusedonlyfortheelectricstarter.
SIDE DISCHARGE COVER
Thisbladecontrolisa safetydevice.Neverattempttobypassits
operations.
Yourmoweris shippedasa mulcher.Todischargethegrassclippings
tothesideinstead,followtheinstructionsin theAssemblysectionto
attachthesidedischargecover.
CUTTING HEIGHT ADJUSTMENT
LEVER
Thecuttingheightadjustmentleverislocatedabovethe
left rearwheel.Toadjustthecuttingheight,referto the
Assemblysection.
DRIVE CONTROL
Thedrivecontrolislocatedontheupperhandle.Squeezethedrive
controltoengagethedrivesystem.Releaseittodisengagethedrive
system.
SHIFT LEVER
Theshiftleverislocatedonthedrivecontrolhousingontheupper
handle.Thisleverisusedto selecttheforwardspeedofthemower.
Whenchangingspeedselection,releasethedrivecontrol.
IMPORTANT:Movetheshiftleveronlywhentheengineis running.
Changingtheshiftleversettingwiththeengineoff candamagethe
mower.
Keephandsandfeetawayfromthechuteareaoncuttingdeck.Refer
towarninglabelontheunit.
RECOIL STARTER
Therecoilstarterisconnectedtothesupportrodandislocatedonthe
rightsideofthelowerhandle.Standbehindtheunitandpulltherecoil
starterropetostarttheunit.
GAS CAP
Removethegascaptoaddfueltothefueltank.Useclean,fresh,
regularunleadedgasolinewitha minimumof87 octane.
OIL CAP/DIPSTICK
Referto theMaintenancesectionforinstructionsoncheckingtheoil.
TRAIL SHIELD
Thetrailshieldis attachedtotherearofthemowerand isthereto
protecttheoperatorfromflyingdebris.Donotusethemowerunless
theshieldisfullyfunctionalandin place.
13

GAS AND OiL FILL-UP f "_
IMPORTANT:Thisunitisshippedwithoutgasolineoroil intheengine.
Becertaintoserviceenginewithgasolineandoilasinstructedinthis
sectionbeforestartingor runningyourmachine.
Oil (one 18 ounce bottle shipped with unit)
FirstTime Use
1. Removeoil filldipstick(G).SeeFigure10.
2. Withthe moweron levelground,emptyentirecontentsofoil bottle
providedintotheengineoil fill(H).
3. Replaceoil filldipstickandtighten.
Subsequent Uses
Use4-strokemotoroil thatmeetsor exceedstherequirementsforAPI
servicecategorySF,SG,SH,SJor later.AlwayschecktheAPIservice
labelontheoilcontainertobe sureitincludesthelettersSF,SG,SH,
SJor later.
Outdoortemperaturesdeterminetheproperoilviscosityfortheengine.
Usethechartto selectthebestviscosityfortheoutdoortemperature
rangeexpected.
f
16so4s6 o** " 2
¸
32
14
o4
40
30
20
10
°30
* Below40°F(4°C)theuseofSAE30willresultin hardstarting.
**Above80°F(27°C)theuseof 10W-30maycauseincreasedoil
consumption.Checkoil levelmorefrequently.
1. Checktheoil withtheenginestoppedand level.
2. Removetheoil filldipstickandwipeit clean.
3. Insertandtightentheoilfilldipstick.Removeittochecktheoil
level.SeeFigure10.
4. Iftheoil levelisnearor belowthelowerlimitmarkonthedipstick,
removetheoil filldipstick,andfillwiththe recommendedoil tothe
upperlimitmark(J). Donotoverfill.
5. Reinstalltheoilfilldipstick.
Gasoline
Donotuseunapprovedgasolines,suchasE85.Donotmixoil in
Igasolineor modifyengineto runonalternatefuels.Thiswilldamage
_theenginecomponentsandvoid the engine warranty.
Fuelmustmeet these requirements:
• Clean,fresh,unleadedgasoline.
Figure10
• A minimumof87 octane/87AKI(91RON).
• Gasolinewith upto 10%ethanol(gasohol)or upto 15%MTBE
(methyltertiarybutylether)isacceptable.
Refuelina well-ventilatedareawiththeenginestopped.Iftheengine
hasbeenrunning,allowitto coolfirst. Neverrefueltheengineinsidea
buildingwheregasolinefumesmayreachflamesor sparks.
e
Gasolineishighlyflammableandexplosive,andyoucanbe
burnedor seriouslyinjuredwhenrefueling.Stopengineand keep
heat,sparks,and flameaway.Refuelonlyoutdoors.Wipeupspills
immediately.
Ifyourequipmentwillbe usedonan infrequentorintermittentbasis,
pleaserefertotheOffSeasonStoragesectionforadditionalinforma-
tion regardingfueldeterioration.
NOTE:Fuelcandamagepaintand sometypesof plastic.Becareful
nottospillfuelwhenfillingyourfueltank.
Neverusestaleor contaminatedgasolineoroil/gasolinemixture.
Avoidgettingdirt orwaterin thefueltank.
1. Removethefueltankcap.
2. Fillthefueltankwithfuel.Toallowforexpansionofthefuel,do
notfillabovethebottomofthefueltankneck.Donotoverfill.
Wipeupspilledfuelbeforestartingtheengine.
3. Installthefueltankcapandtightenituntilitclicks.
4. Movelawnmoweratleast10feetawayfromthefuelcontainer/
sourceandsitebeforestartingtheengine.
Besurenooneotherthantheoperatorisstandingnearthelawn
mowerwhilestartingengineoroperatingmower.Neverrunengine
indoorsorin enclosed,poorlyventilatedareas.Engineexhaust
containscarbonmonoxide,an odorlessanddeadlygas.Keephands,
feet,hairand looseclothingawayfromanymovingpartson engine
andlawnmower.
14

TO START ENGINE
1. Standingbehindthemower,squeezethebladecontrolhandle
againstupperhandle.SeeFigure11.
2. Thismowerhastwoseparatestartingsystems,electricand recoil.
Electric Start: Turnignitionkeyto therighttostarttheengine.
Releasethekeyaftertheenginestarts.
Recoil Start: Graspstarterhandleandpullropeoutslowly
untilenginereachesstartofcompressioncycle(ropewillpull
slightlyharderat thispoint).Lettheroperewindslowly.Pullrope
witha rapid,continuous,fullarmstroke.Keepinga firmgripon
thestarterhandle,lettheroperewindslowly.
Rapidretractionof startercord(kickback)willpullhandandarm
towardenginefasterthanyoucanletgo.Brokenbones,fractures,
bruisesorsprainscouldresult.
NOTE:Ifenginefloods,waita fewminutesto restart.
TO STOP ENGINE
1. Releasebladecontroltostoptheengineandblade.
Waitforthebladeto stopcompletelybeforeperforminganyworkon
themoweror toremovethegrasscatcher.
USING YOUR LAWN MOWER
Besurelawnisclearofstones,sticks,wire,orotherobjectswhich
coulddamagelawnmoweror engine.Suchobjectscouldbeaccidently
thrownbythemowerin anydirectionandcauseseriouspersonalinjury
totheoperatorandothers.
Theoperationofanylawnmowercanresultinforeignobjectsbeing
thrownintotheeyes,whichcandamageyoureyesseverely.Always
wearsafetyglasseswhileoperatingthemower,or whileperforming
anyadjustmentsor repairson it.
1. Oncetheengineis running,squeezethedrivecontrolagainstthe
upperhandleto propelmower.Releaseittodisengagethedrive.
2. Usetheshiftlevertoselecttheforwardspeedofthemower- 1
istheslowestspeed,6 isthefastest.Whenchangingspeed
selection,releasethedrivecontrol.
IMPORTANT:Movetheshiftleveronlywhentheengineis running.
Changingtheshiftleversettingwiththeengineoff candamagethe
mower.
USING AS MULCHER
Formulchinggrass,removethegrasscatcheror thesidedischarge
chutefromthe mower,andreattachthemulchingbaffle.Fordfective
mulching,do notcut wetgrass.Ifthegrasshasbeenallowedtogrow
inexcessoffourinches,mulchingisnotrecommended.Usethegrass
catchertobagclippingsinstead.
USING GRASS CATCHER
Youcanusethegrasscatchertocollectclippingswhileyouare
operatingthemower.
1. AttachgrasscatcherfollowinginstructionsintheAssembly
section.Grassclippingswillautomaticallycollectinthebagas
yourunthemower.
2. Operatethemowertillthegrassbagisfull.
3. Stopenginecompletelybyreleasingthebladecontrol.Makesure
thattheunithascometoa completestop.
4. Whileholdingthegrassbagbyboththerearhandleandthelower
handle,liftthegrassbagstraightup offtheadapter.Thechute
doorwillmovetheropeoutofthewayofthebag.
5. Continuingtoholdthelowerhandle,raisethe rearofthegrass
bagand releasethelowerhandleovera properreceptacle.The
grassbagwillopenandthegrassclippingswilldisperse.When
replacingthegrassbag,be surethetopofthebagrestsonthe
wiresupportbetweenthehandles.
Ifyoustrikeaforeignobject,stoptheengine.Removewirefromthe
sparkplug,thoroughlyinspectmowerforanydamage,andrepair
damagebeforerestartingandoperating.Extensivevibrationofmower
duringoperationisan indicationofdamage.Theunitshouldbe
promptlyinspectedandrepaired.
15

MAINTENANCE SCHEDULE
Beforeperforminganytypeofmaintenance/service,disengageall
controlsandstoptheengine.Waituntilallmovingpartshavecometo
acompletestop.Disconnectsparkplugwireandgrounditagainstthe
enginetopreventunintendedstarting.
Followthemaintenanceschedulegivenbelow.Thischartdescribes
serviceguidelinesonly.UsetheServiceLogcolumntokeeptrackof
completedmaintenancetasks.Tolocate the nearest SearsService
Centeror to scheduleservice,simplycontactSearsat
1-800-4-MY-HOME®.
EachUse
1st5 hours
Annuallyor 50hours
Annuallyor 200hours
Annually
BeforeStorage
Cleanmoreoftenunderdustyconditionsor whenairbornedebrisispresent.
1. Engineoillevel
2. Looseormissinghardware
3. Unitandengine.
1. Engineoil
1. Airfilter& Pre-Oleaner(IfEquipped)t
2. Controllinkages/pivotsandwheels
3. Undersideofmowerdeck
4. EngineOil
1. Airfilter& Pre-Oleanert
1. Sparkplug
1. Fuelsystem
1. Check
2. Tightenor replace
3. Clean
1. Change
1. Clean
2. Lubewithlightoil
3. Clean
4. Change
1. Change
1. Replace
1. Runengineuntilitstopsfromlackof
fuel,oradd stabilizertoa fulltankof
freshfuelpriortostorage.
16

Alwaysstopengine,disconnectsparkplugwire,andgroundagainst
enginebeforeperforminganytypeofmaintenanceon yourmachine.
GENERAL RECOMMENDATIONS
• Alwaysobservesafetyruleswhenperforminganymaintenance.
• Thewarrantyon thislawnmowerdoesnotcoveritemsthathave
beensubjectedtooperatorabuseor negligence.Toreceivefull
valuefromwarranty,operatormustmaintaintheequipmentas
instructedhere.
• Changingofengine-governedspeedwillvoidenginewarranty.
• Alladjustmentsshouldbecheckedat leastonceeachseason.
• Periodicallycheckall fastenersandmakesurethesearetight.
ENGINE MAINTENANCE
Spark Plug
Forgoodperformance,thesparkplugmustbeproperlygappedand
freeofdeposits.Replacethesparkplugannually.
1. Disconnectthecapfromthesparkplug,andremoveanydirtfrom
thesparkplugarea.
2. Usethepropersizesparkplugwrenchtoremovethesparkplug.
NOTE:Replacewitha Champion®RC12YCsparkplug.
3. Checkthegapwitha wiregauge.SeeFigure12.Sparkpluggap
shouldbe0.020in(0.51ram).If necessary,resetthegap.
4. installandtightenthesparkplugtotherecommendedtorque(180
Ib-in[20 Nm]).
5. Attachthesparkplugcapto thesparkplug.
Air Cleaner
A dirtyaircleanerwillrestrictairflowtothecarburetorandcausepoor
engineperformance,inspectthefiltereachtimetheengineisoper-
ated.Youwillneedtocleanthefiltermorefrequentlyif youoperatethe
enginein verydustyareas.
Cleantheair cleanerevery50hoursofoperationoroncea season.
Replacetheaircleanerannually.
f
Electrode
Porcelain
Figure12
Fastener
Cover
Air Filter
Neverstartor runtheenginewiththeaircleanerassemblyor theair
filterremoved.
NOTE:Donotusepressurizedairor solventstocleanthefilter.Pres-
surizedair candamagethefilterandsolventswilldissolvethefilter.
1. Removethefastenerandair cleanercover.See Figure13.
2. Removethepre-cleaner(ifequipped)andfilter.
3. Toloosendebris,gentlytapthefilterona hardsurface,iffilteris
excessivelydirty,replacewitha newfilter.
Figure13
4. Washthe pre-cleanerin liquiddetergentandwaterandallowit to
thoroughlyair dry.Donot oilthe pre-cleaner.
5. Assemblethedrypre-cleanertothefilter.
6. installthefilterandpre-cleanerintothebase.Makesurefilterfits
securelyin thebase.
7. installair filtercoverand securewithfastener.Makesurethe
fasteneristight.
17

Check Engine Oil
Checkoil levelbeforeeachoperation.Besureoil levelismaintained.
1. Checktheoil withtheenginestoppedand level.
2. Removetheoil filldipstickandwipeitclean.
3. Insertandtightendipstick.Removeittochecktheoillevel.
4. Iftheoil levelisnearor belowthelowerlimitmarkonthedipstick,
removetheoil fillercap/dipstick,andfillwiththerecommendedoil
totheupperlimitmark.Donotoverfill.
5. Reinstalltheoilfilldipstick.
Change Engine Oil
Gasolineand itsvaporsareextremelyflammableandexplosive.
Fireor explosioncancausesevereburnsor death.
Changeengineoil afterthefirstfivehoursofoperation,andeveryfifty
hoursoroncea seasonthereafter.
lWhen draintheoil fromthe oil fill thefueltankmustbe
you top
tube,
emptyor fuelcanleakoutand resultinafireor explosion.Toempty
thefueltank,runtheengineuntilitstopsfromlackoffuel.
1. Withengineoff butstillwarm,disconnectthesparkplugwireand
keepitawayfromthesparkplug.
2. Placea suitablecontainernextto theenginetocatchtheusedoil.
3. Removetheoil filldipstickanddraintheoil intothecontainerby
tippingtheenginetowardtheoil fillerneck.See Figure14.
Usedoilisa hazardouswasteproduct.Disposeofusedoil properly.
IDonotdiscardwithhouseholdwaste.Checkwithyourlocalauthori-
_tiesor SearsServiceCenterforsafedisposal/recyclingfacilities.
4. Withtheengineina levelposition,filltotheupperlimitmarkon
thedipstickwiththerecommendedoil.
AirFilter
J
Mumer
Figure14
Runningtheenginewithalowoil levelcancauseenginedamage.
5. Reinstalltheoilfilldipsticksecurely.
Clean Engine
• Dailyor beforeeveryuse,cleangrass,chaffor accumulated
debrisfromengine.Keeplinkage,spring,andcontrolsclean.
Keepareaaroundandbehindmufflerfreeofanycombustible
debris.
• Keepingenginecleanallowsairmovementaroundengine.
• Enginepartsshouldbe keptcleanto reducetheriskofoverheat-
ingandignitionofaccumulateddebris.
Donotusewatertocleanengineparts.Watercouldcontaminatefuel
system.Usea brushor drycloth.
Figure15
LUBRICATION
Blade Control
Lubricatepivotpointsonthebladecontrolat leastoncea seasonwith
lightoil.Thiscontrolmustoperatefreelyinbothdirections.SeeFigure
15.
Wheels and Casters
Lubricatethewheelsandcastersat leastonceaseasonwithlightoil
(or motoroil). Ifwheelsareremovedforanyreason,lubricatetheaxle
boltandinnersurfaceofthewheelwithlightoil.See Figure15.
Grass Catcher Adapter
Lubricatethetorsionspringand pivotpointon eachendofthegrass
catcheradapterdooratleastoncea seasonwith lightoil toprevent
rust.SeeFigure15.
Transmission
Thetransmissionispre-lubricatedandsealedatthefactoryanddoes
notrequirelubrication.
18

CLEANING DECK
Cleanundersideofthemowerdeckonceaseasonto preventbuild-up
ofgrassclippingsor otherdebris.Followstepsbelowforthisjob.
1. Disconnectsparkplugwire.Draingasolinefromlawnmoweror
placea pieceofplasticunderthegascap.
2. Tipmowersothat it restson thehousing,keepingthemufflerside
down.Referto Figure14.Holdmowerfirmly.
Nevertip themowermorethan900inanydirectionanddo notleave
the mowertippedforanylengthoftime.Oilcandrainintotheupper
partoftheenginecausinga startingproblem.
3. Scrapeandcleantheundersideof thedeckwitha suitabletool.
Donotspraywithwater.
IMPORTANT:Donotusea pressurewasheror gardenhosetoclean
yourunit.Thesemaycausedamageto bearings,ortheengine.The
useof waterwillresultin shortenedlifeandreduceserviceability.
4. Putthemowerbackon itswheelsontheground.Ifyouhadput
plasticunderthegascapearlier,makesuretoremoveitnow.
REPLACING REAR FLAP
Toreplacerearflap,proceedasfollows:
1. Toremoverearflap,lift reardoor,removescrew,andpressflapin
oneithersideto removefromhole.SeeFigure16.
2. Removescrewandflapfromoppositeholeandreplacewithnew
flapintheoppositeorderand mannerofremoval.
ADJUSTING SHIFT LEVER CABLE
Periodicadjustmentofthesixspeedshiftcablemaybenecessarydue
tonormalwearonthecable.Adjustmentisneededifall six speedsdo
notwork.Theadjustablecablebracketislocatedontheleft sideofthe
mowerbesidetheengine.SeeFigure17.
1. Startengineandplaceshiftleverinthe sixthspeedposition.
2. Stopengineand disconnectsparkplugwireandgrounditagainst
engine.
3. Loosenhexnutwhichsecurestheadjustablecablebracket.See
Figure17.
4. Pushbackontheadjustablecablebracket.
5. Tightenhexnut.
Figure16
Figure17
J
19

BLADE CARE
Periodicallyinspectthebladeadapterforcracks,especiallyifyou
strikea foreignobject.Replacewhennecessary.Followthesteps
belowforbladeservice.
Whenremovingthecuttingbladeforsharpeningor replacement,
protectyourhandswitha pairofheavyglovesor usea heavyragto
holdtheblade.
1. Disconnectsparkplugbootfromsparkplug.Turnmoweron its
sidemakingsurethattheair filterandthecarburetorarefacing
up.
2. Removethe boltandthebladebell supportwhichholdtheblade
andthebladeadaptertotheenginecrankshaft.See Figure18.
3. Removebladeandadapterfromthecrankshaft.
4. Removebladefromtheadapterfortestingbalance.Balancethe
bladeon a roundshaftscrewdrivertocheck.Removemetalfrom
theheavysideuntilitbalancesevenly.Whensharpeningthe
blade,followtheoriginalangleofgrind.Grindeachcuttingedge
equallytokeepthebladebalanced.
Ada
ort
Figure18
Anunbalancedbladewillcauseexcessivevibrationwhenrotatingat
highspeeds.It maycausedamagetomowerandcouldbreakcausin(
personalinjury.
5. Lubricatetheenginecrankshaftandthe innersurfaceoftheblade
adapterwithlightoil. Slidethebladeadapterontotheengine
crankshaft.Placethebladeontheadaptersuchthatthesideof
theblademarked"Bottom"(or withpartnumber)facestheground
whenthemowerisintheoperatingposition.Makesurethatthe
bladeisalignedandseatedon thebladeadapterflanges.
6. Placebladebellsupporton theblade.Align notcheson theblade
bellsupportwithsmallholesin blade.
7. Replacehexboltandtightenhexbolttotorque:450in.Ibs.rain.,
600in.Ibs.max.
Toensuresafeoperationofyourmower,periodicallychecktheblade
boltforcorrecttorque.
BELT CARE
NOTE:Severalcomponentsmustberemovedin ordertochangethe
mower'sself-propulsiondrivebelt.SeeanauthorizedSearsService
Centertohaveyourbeltreplaced.
REPLACING BATTERY
Batteriescontainsulfuricacidwhichmaycauseburns.Donotshort
Icircuitormutilatebatteriesin anyway.Donotputbatteriesin fireas
lthese mayburstorreleasetoxicmaterials.
1. Loosenstarknobssecuringupperandlowerhandlesand
carefullyfoldtheupperhandledowntowardthelowerhandleas
shownin Figure19.
2. Removethetwo screwssecuringbatterycovertobatteryhousing
andplacethemtotheside.See Figure19.
20
J
Figure19
+
Positive
,- Terminal
Negative
._rminal
J
Figure20

Openbatterycover,removepositiveandnegativeleadsfrom
battery,removeandreplacewithnewbattery.Connectthe
positiveleadtothepositivesideofthebatterypack,thenconnect
thenegativeside.
NOTE:Thebatteryyouhavemaydifferslightlyfromtheoneshownin
Figure19.RefertothePartsList.
IMPORTANT:Whenreplacingbatterypackinhandlepanel,battery
packmustbepositionedwiththepositiveterminaltotheleftside
andthenegativeterminaltotherightsideofpanel(Positiveterminal
isclosesttothekeyswitch).SeeFigure20.Replacingbatterypack
incorrectlywillcauseseriousdamage.
4. Reattachbatterycovertobatteryhousingbysecuringwiththe
twoscrewsremovedearlier,makingsuretosnapthewireconduit
ontheleftintoplaceonthehousing.
5. Foldhandlesbackupandtightenstarknobs.
Donotremovethebatterypackfromtheelectricstarterhousingfor
anyreasonotherthanreplacement.
ChargingBattery
Thebatterycontainscorrosivefluidandtoxicmaterial;handlewith
careandkeepawayfromchildren.Donotpuncture,disassemble,
mutilateorincineratethebattery.Explosivegasescouldbevented
duringchargingordischarging.Useinawellventilatedarea,away
fromsourcesofignition.
NOTE:Thespecialdesignedplugonthechargerwillonlyfitintothe
plugonthebatterybox.
1. Plugthebatterychargerintotheportontheundersideofthe
batteryhousing.SeeFigure21.
2. Insertthebatterychargerplugintoastandard120volthousehold
outlet.Chargebatteryfor8to10hoursbeforeinitialuse.Failure
todosomayresultindiminishedbatterylife.Donotcharge
longer than 12 hours. Thebatteryshouldonlyneedto be
chargeduponinitialsetupandafteranyotherextendedperiodsof
non-use.
3. Aftercharging,disconnectchargerplugfromoutletfirst,then
disconnectchargerleadfrombattery.
IMPORTANT:Alwaysplugchargerleadintobatterypackleadfirst,
andtheninsertbatterychargerpluginto120voltstandardhousehold
outlet.Followthisorderofactioneverytimeyouchargethebattery.
Useonlythebatterychargersuppliedwiththismower.
Figure21
Figure22
J
Replacing Fuse
Theelectricstartercircuitand batteryareprotectedbya 40ampere
fuse.Ifthefuseburnsout,theelectricstarterwillnotoperate.If the
unitfailstostartwiththeelectricstarter,performthefollowingstepsto
checkthefuseinsidethebatteryhousing:
1. Openthebatterycoverasdescribedin ReplacingBattery.See
Figure19.
2. Removefusefromsocketandinspectas shownin Figure22.If it
isburnedout,replacewithstandardautomotive40 amperefuse.
3. Carefullyplacewiringbackintohousing,closebatterycover,and
foldupperhandlebackintoplace.
NOTE:Theenginecanbestartedmanuallyifthefuseburnsout.
21

Neverstorelawnmowerwithfuelintankindoorsorin poorly
ventilatedareaswherefuelfumesmayreachan openflame,spark,
or pilotlightasona furnace,waterheater,clothesdryer,or gas
appliance.
PREPARING THE ENGINE
Forenginesstoredover30days:
1. Topreventgumfromforminginfuelsystemoron carburetor
parts,runengineuntilitstopsfromlackoffueloradda gasoline
additiveto thegasin thetank.If youuseagasadditive,runthe
engineforseveralminutesto circulatetheadditivethroughthe
carburetor--afterwhichtheengineandfuelcanbe storedupto
24months.
2. Whileengineisstillwarm,changetheoil.
3. Cleanengineofsurfacedebris.
PREPARING THE LAWN MOWER
• Cleanandlubricatemowerthoroughlyasdescribedinthe lubrica-
tioninstructions.
• Donotusea pressurewasheror gardenhosetocleanyourunit.
• Coatmower'scuttingbladewithchassisgreaseto prevent
rusting.
• RefertoPREPARINGTHE ENGINEforcorrectenginestorage
instructions.
• Storemowerin a dry,cleanarea.Donotstorenexttocorrosive
materials,suchasfertilizer.
Whenstoringanytypeofpowerequipmentina poorlyventilatedor
metalstorageshed,careshouldbetakentorust-prooftheequipment.
Usinga lightoil orsilicone,coattheequipment,especiallycablesand
all movingpartsof yourlawnmowerbeforestorage.
Battery
Thebatterymustbestoredwitha fullcharge.Extendedstorageofa
dischargedbatterywillreducelifeandcapacityofthebattery.
22

Enginefailstostart
.
2.
3.
4.
5.
6.
.
1.
2.
3.
4.
Enginerunserratic
Beforeperforminganytyped maintenance/service,disengageall
controlsandstoptheengine.Waituntilallmovingpartshavecometo
a completestop.Disconnectsparkplugwireandgrounditagainstthe
enginetopreventunintendedstarting.Alwayswearsafetyglassesduring
operationorwhileperforminganyadjustmentsorrepairs.
Bladecontroldisengaged. 1. Engagebladecontrol.
Sparkplugbootdisconnected. 2. Connectwiretosparkboot.
Fueltankemptyor stalefuel. 3. Filltankwithclean,freshgasoline.
Faultysparkplug. 4. Clean,adjustgap,or replace.
Engineflooded. 5. Waita fewminutesto restart.
Blockedfuelline. 6. ContactyourSearsParts& RepairCenterto have
fuel linecleaned.
Burntfuse.(ElectricStartonly) 7. Replacefuse(seeServiceSection).
Sparkplugbootloose. 1. Connectandtightensparkplugboot.
Stalefuel. 2. Filltankwithclean,freshgasoline.
Ventingascapplugged. 3. Clearvent.
Waterordirtinfuel system. 4. Runengineuntilitstopsfromlackoffuel.Refillwith
freshfuel.
5. RefertoAirCleanerinEngineMaintenancesection.
6. ContactyourSearsParts& RepairCenterto have
fuel linecleaned.
Engineoillevellow. 1. Fillcrankcasewith properoil.
Air flowrestricted. 2. Cleanareaaroundandontopofengine.
Sparkpluggaptooclose. 1. Adjustgapto.020".
Sparkplugfouled,faulty,or gaptoowide. 1. Resetgapto .020"orreplacesparkplug.
Dirtyair cleaner. 7. RefertoAirCleanerinEngineMaintenancesection.
Cuttingbladelooseor unbalanced. 1. Tightenbladeandadapter.Balanceblade.
Bentcuttingblade. 2. Replaceblade.
Wetgrass. 1. Donotmowwhengrassiswet;waituntil
laterto cut.
Excessivelyhighgrass. 2. Mowonceata highcuttingheight,thenmowagain
atdesiredheightor makea narrowercuttingpath.
Dullblade. 3. Sharpenor replaceblade.
Dullblade. 1. Sharpenor replaceblade.
Beltnotinstalledproperly. 1. Checkbeltforproperpulleyinstallationand
movement.
Debriscloggingdriveoperation. 2. Stopengine,disconnectsparkplugboot,
andcleanoutdebris.
Damagedorwornbelt. 3. ContactyourSearsServiceCenter.
NEED MORE HELP?
Find this and a[[ your other product manuals online.
Get answers from our team of home experts.
Get a personalized maiatenance ptan for your home.
Find information and tools to he[p with home projects,
Engineoverheats 1.
2.
Occasionalskips(hesitates) 1.
Idlespoorly 1.
2.
Excessivevibration 1.
2.
Mowerwillnotmulchgrass 1.
5. Dirtyair cleaner.
6. BIockedfuelline.
.
.
1.
1.
.
.
Unevencut
Mowerwillnotselfpropel
23

Self Propelled Mower B Model No. 247.887761
\
5
15
42/
43
24

Self Propelled Mower B Model No. 247.887761
1
2
3
4
5
6
7
8
9
10
11
12
13
14
15
16
17
18
19
2O
21
22
23
24
25
26
27
28
29
30
31
32
33
34
35
36
37
38
647-0004A
753-0717
731-0620A
753-0717
710-1667A
753-0717
946-0711B
728-0199
925-04347
925-0201
946-04639
749-04354A-0637
720-04072A
710-1652
710-1174
926-0240
749-0907B
931-0066
731-1832
931-1833A
787-01948-4028
712-0397A
710-0703
914-0104
726-0233
950-1071
756-0612A
756-0613
741-0545
682-7527
748-0377E
736-0524B
710-1257
942-0741A
710-0653
631-04564
954-0460
710-0895
I = O O
BladeControl
UpperControlHousing
DriveControl
LowerControlHousing
C SunkTapScrew,#10x.75Lg
CableMountingCap
DriveCable
Rivet
KeySwitch
Key
ControlCable
UpperHandle
StarKnob
Screw,1/4-20x .625
CarriageBolt,5/16-18x 2.0
CableTie
LowerHandle
AdapterAssembly
SideDischargeChute
MulchCover
Deck21"
WingNut
CarriageBolt, 1/4-20x .75"
CotterPin
PushNut,.25x IDx .50OD
SleeveSpacer,.881Dx 1.130D
Half Pulley:2.62OD
Half Pulley:2.62ODx 1.61
Ball Bearing
Cup
BladeAdapter
BladeBellSupport
HexBolt,3/8-24x2.5
21"MulchingBlade
Screw,1/4-20x3.75
Baffle
Belt,3/8x 39.24
Screw,1/4-15x .750
39
4O
41
42
43
44
45
46
47
48
49
5O
51
52
53
54
55
56
57
58
59
60
61
62
63
64
65
66
67
68
69
70
71
72
73
74
75
964-04093A
747-0940A-0637
747-0939
747-0937-0637
631-0071
926-0106
712-04063
731-1874A
732-0819
726-0111
747-0965
925-04323
710-0654A
925-04072
936-0526
950-1070
782-7596A
932-0807
711-1114
782-7597
738-0924A
756-0625
710-0134
936-0329
782-7575B-0637
946-0939A
782-7574A-0637
712-04064
912-0138
732-0627A
731-0924
913-0397
16864
956-0613A
725-04329
710-0166A
736-3090
D = O m
GrassCatcher
SupportRodw/Rope Guide
PivotRod
GrassCatcherFrame
GrassCatcherCover
CapNut
FlangeLockNut,5/16-18
ChuteDoor
TorsionSpring
PushCap
PivotRod
12VBattery
SeresScrew,3/8-16x 1.00
HarnessAssembly
WaveWasher,1.38IDx.88OD
SIveSpacer,.88IDx 1.00OD
ControlArm
TorsionSpring
PivotShaft
PivotBracket
ShlderScrew,.375ID x1/4-14
CableRoller
CarriageScrew,1/4-20x.62
LockWasher,1/4
CableMountingBracket
6 SpeedCable
CableAdjustmentBracket
HexNut1/4-20
HexNut1/4-28
ShiftLeverSpring
6 SpeedShiftLever
GearInsert
6 Spd.RackCableBracket
PulleyAssembly(Incl.Ref.# 27-30)
12VBatteryCharger
Screw,1/4-20x 1.00
FiatWasher,.260x .720x.060
25

Self Propelled Mower B Model No. 247.887761
44
12
57
49
58
26

Self Propelled Mower B Model No. 247.887761
m
1
2
3
4
5
6
7
8
9
10
11
12
13
14
15
16
17
18
19
20
21
22
23
24
25
26
27
28
914-0474
710-1652
936-0264
914-0104
932-0306A
734-2010B
912-0414
16855
10622BP
748-0381
948-0188B
938-0137A
948-0318
736-0270
710-0751
737-04331
02000300
747-0924
D = O O
CotterPin
Screw1/4-14x .825
FlatWasher.330IDx.630OD
CotterPin
CompressionSpring
Wheel,9 x 2.125
TopLockTabWeldNut1/4-20
RatchetPawlPlate
PlasticSpringRatchet
PawlRH
PawlLH
ShlderScrew.340IDx.285OD
WheelRatchet
BellWasher.265IDx.75OD
HexCapScrew1/4-20x.620
GreaseFitting
PushNut
WheelPinLock
682-9020A-4028
682-9021A-4028
682-9024-4028
682-9026-4028
720-0223
732-0803A
938-0529
936-0369
782-0566B-0637
750-0515
741-0978
950-1056
710-0653
CasterAssemblyRH
CasterAssemblyLH
CasterBracketAssemblyRH
CasterBracketAssemblyLH
Grip
SpringLever
ShoulderNut.825x .165Lg.
FlatWasher.508IDx 1.00D
PivotArmAssembly
Spacer.510IDx .70OD
SIvBearing.504IDx .830OD
ShlderSpacer,.3851Dx .715Lg
TapScrew1/4-20x .375
29
3O
31
32
33
34
35
36
37
38
39
4O
41
42
43
44
45
46
47
48
49
50
51
52
53
54
55
56
57
58
59
682-7528-0637
741-0324A
682-7526-0637
918-0263A
D = e
ChainCoverAssembly
FlgeBearing.506IDx .590Lg
TransmissionAxleAssembly
TransmissionAss'yComplete
734-1857
913-0453
938-0012
941-0522
782-0568B-0637
Wheel7x 2
Chain
RearAxleAssembly
FlgeBearing.506IDx .715Lg
HeightAdjustmentSpringBrkt.
950-0151
710-1315
911-0835
750-0807
732-0832
710-0779A
731-06874
687-02495-4028
687-02494-4028
Spacer.550IDx .750OD
Screw3/8-16x .25
ClevisPin.50Diax4.82Lg.
Spacer.385IDx .624OD
TorsionSpring
Screw,AB,#10-16x .500
TrailShield
HandleBracketAssembly-LH
HandleBracketAssembly-RH
725-0157
710-1348
710-0260A
911-1146
912-0397
712-04063
726-0214
936-0504
736-0366
741-0685
731-0981C
731-1887
710-0604A
CableTie
Screw1/4-14x.500
CarriageBolt5/16-18x.62
CasterAxle
WingNut
FlangeLockNut5/16-18
PushCap
WaveWasher,.510x.750x .017
FlatWasher.640ID x 1.12OD
FlangeBearing
Hubcap-RadialSpoke
Hubcap-Spokew/Hole
Screw,5/16-18x .625
27

Craftsman Engine Model No. 12S905=2732=B1 For Craftsman Mower Model No. 247.887761
I 48 SHORT BLOCK I I 1058 OPERATOR'S MANUAL I 11329 REPLACEMENT ENGINE I I 1330 REPAIR MANUAL I
505 @
562_
78
37A _
251 27 G
32A_ 32_
1376
1264 _ 615,8,
1263(_ 404®
24 (_
287
Y
200 15®
616
®
1523I
524 _
28

Craftsman Engine Model No. 12S905=2732=B1 For Craftsman Mower Model No. 247.887761
337
1022
238 (_
1034
623
36
1o29
©
883 _
81
29

Craftsman Engine Model No. 12S905=2732=B1 For Craftsman Mower Model No. 247.887761
957
957A @
883(__ 21
76
51
623 O
601
@
276
_276
968
365
535
1395
209
3O

Craftsman Engine Model No. 12S905-2732-B1 For Craftsman Mower Model No. 247.887761
592
304
6O
1036 EMISSIONS LABEL ]
789
74_1_
922
23
851
Q
697
853
31

Craftsman Engine Model No. 12S905=2732=B1 For Craftsman Mower Model No. 247.887761
121 CARBURETOR OVERHAUL KIT
163
104_' 276
358 ENGINE GASKET SET
3@
163_
524
623 0
842 @
868 _)
883
883A
993
1022 __
1430
1430A (_
51
163
1095 VALVE GASKET SET
O
623 0
868 (_
883_
993
1022
32

Craftsman Engine Model No. 12S905=2732=B1 For Craftsman Mower Model No. 247.887761
798947 CylinderAssembly N/A ShortBlock(Notavailableatthisprinting)
2 796961 Kit-Bushing/Seal(MagnetoSide) 51 796596 Gasket-Intake
3 299819S Seal-Oil 58 697316 Rope-Starter
4 493279 Sump-Engine 60 795426 Grip-StarterRope
5 796471 Head-Cylinder 75 691736 Washer
7 796475 Gasket-CylinderHead 78 793480 Screw
7A 799275 Gasket-CylinderHead 81 691740 Lock-MufflerScrew
11 796478 Tube-Breather 89 692348 Plug-Oil(CylinderAssembly)
12 692232 Gasket-Crankcase 104 691242 Pin-FloatHinge
13 793451 Screw 117 697355 Jet-Main
15 691680 Plug-OilDrain 118 494870 Jet-Main
16 796469 Crankshaft 121 796612 Kit-CarburetorOverhaul
20 399781S Seal-Oil 122 796595 Spacer-Carburetor
22 691092 Screw 125 796608 Carburetor
23 796619 Flywheel 133 398187 Float-Carburetor
24 222698S Key-Flywheel 134 398188 Kit-Needle/Seat
25 797302 PistonAssembly(Standard) 137 796610 Gasket-FloatBowl
797303 PistonAssembly(.020"Oversize) 137A 693981 Gasket-FloatBowl
26 797304 RingSet(Standard) 163 691894 Gasket-AirCleaner
797305 RingSet(.020"Oversize) 187 796491 Line-Fuel
27 691588 Lock-PistonPin 190 793479 Screw(FuelTank)
28 298909 Pin-Piston 192 796631 Adjuster-RockerArm
29 796470 Rod-Connecting 202 796657 Link-MechanicalGovernor
32 691664 Screw 209 796484 Spring-Governor
32A 695759 Screw 216 796485 Link-Choke
33 499642 Valve-Exhaust 216A 798944 Link-Choke
34 795443 Valve-Intake 222 796482 Bracket-Control
35 691304 Spring-Valve 227 796487 Lever-GovernorControl
36 691304 Spring-Valve 238 691300 Cap-Valve
37 796536 Guard-Flywheel(CarburetorSide) 276 271716 Washer-Sealing
37A 799242 Guard-Flywheel(MufflerSide) 287 793479 Screw(DipstickTube)
40 692194 Retainer-Valve 291 798938 Thermostat
43 796650 Slinger-Governor/Oil 300 798940 Muffler
45 690977 Tappet-Valve 304 798945 Housing-Blower
46 694039 Camshaft 309 799241 Motor-Starter
33

Craftsman Engine Model No. 12S905=2732=B1 For Craftsman Mower Model No. 247.887761
690662 Nut 695268 Adapter-Wire
333 796499 Armature-Magneto 868 795440 Seal-Valve
334 793454 Screw(MagnetoArmature) 875 796492 Base-AirCleaner
334A 796537 Stud(MagnetoArmature) 883 793497 Gasket-Exhaust
337 692051 Plug-Spark 883A 796677 Gasket-Exhaust
356 692390 Wire-Stop 886 796474 GasketKit-CylinderHeadPlate
358 799495 GasketSet-Engine 914 794451 Screw
365 793458 Screw 922 692135 Spring-Brake
404 690272 Washer 923 796635 Brake
445 795066 Filter-AirCleanerCartridge 957 796577 Cap-FueITank
505 793515 Nut 957A 692046 _Cap-FueITank
523 796503 Dipstick 968 796493 Cover-AirCleaner
524 692296 SeaI-DipstickTube 972 796489 Tank-Fuel
525 796502 Tube-Dipstick 975 796611 Bowl-Float
535 796254 Filter-AirCleanerFoam 993 796473 Gasket-CylinderHeadPlate
562 793514 Bolt 1022 796480 Gasket-RockerCover
592 793481 Nut 1023 796479 Cover-RockerArm
601 791850 Clamp-Hose 1026 796481 Rod-Push
608 796497 Starter-Rewind 1029 691230 Arm-Rocker
613 796496 Screw 1034 691343 Guide-PushRod
615 690340 Retainer-GovernorShaft 1036 Label-Emissions
616 798327 Crank-Governor 1058 279946TRI Manual-Operator's
621 692310 Switch-Stop 1059 793471 Kit-Screw/Washer
623 793628 Seal-ORing 1095 796662 GasketSet-Valve
635 66538S Boot-SparkPlug 1263 697124 Reed-Breather
670 793485 Spacer-FueITank 1264 793453 Screw
697 691127 Screw 1329 _ N/A ReplacementEngine(Notavailableatprinting)
718 690959 Pin-Locating 1330 276781 RepairManual
741 795755 Gear-Timing 1375 796476 Cover-Breather/Reed
745 793491 Screw(Brake) 1376 794451 Screw
789 792685 Harness-Wiring 1395 690349 Screw
830 796472 Stud-RockerArm 1430 796477 Gasket-Breather/Reed
842 691031 Seal-ORing 1430A 799494 Gasket-Breather/Reed
847 796501 Dipstick/TubeAssembly EngineGasketSet ReferenceNumber358
851 493880s Terminal-SparkPlug CarburetorOverhaulKit ReferenceNumber121
ValveGasketSet ReferenceNumber1095
34

35

(Thispageapplicableinthe U.S.A.and Canadaonly.)
Sears Brands Management Corporation (Sears), the California Air Resources Board (CARD)
and the United States Environmental Protection Agency (U.S. EPA)
Emission Control System Warranty Statement (Owner's Defect Warranty Rights and Obligations)
EMISSIONCONTROLWARRANTYCOVERAGEISAPPLICABLETOCERTI-
FIEDENGINESPURCHASEDINCALIFORNIAIN1995ANDTHEREAF-
TER,WHICHARE USEDINCALIFORNIA,ANDTOCERTIFIEDMODEL
California and United States Emission
TheCaliforniaAirResourcesBoard(CARD),U.S.EPAandSearsarepleased
toexplainthe EmissionControlSystemWarrantyonyourmodelyear2000and
latersmalloff-roadengine(SORE).InCalifornia,newsmalloff-roadengines
mustbedesigned,builtandequippedto meettheState'sstringentanti-smog
standards.Elsewherein theUnitedStates,newnon-road,spark-ignition
enginescertifiedformodelyear1997andlatermustmeetsimilarstandardsset
forthbythe U.S.EPA.Searsmustwarranttheemissioncontrolsystemonyour
YEAR1997ANDLATERENGINESWHICHAREPURCHASEDANDUSED
ELSEWHEREINTHEUNITEDSTATES(ANDAFTERJANUARY1,2001 IN
CANADA).
Control Defects Warranty Statement
enginefortheperiodsoftime listedbelow,providedtherehasbeennoabuse,
neglector impropermaintenanceofyoursmalloff-roadengine.Youremis-
sioncontrolsystemincludespartssuchasthecarburetor,aircleaner,ignition
system,mufflerandcatalyticconverter.Alsoincludedmaybeconnectorsand
otheremissionrelatedassemblies.Wherea warrantableconditionexists,Sears
will repairyoursmalloff-roadengineatnocostto youincludingdiagnosis,parts
andlabor.
Sears Emission Control Defects Warranty Coverage
Smalloff-roadenginesarewarrantedrelativeto emissioncontrolpartsdefects
fora periodofoneyear,subjecttoprovisionssetforthbelow.Ifanycovered
Owner's Warranty
Asthe smalloff-roadengineowner,youareresponsiblefortheperformanceof
therequiredmaintenancelistedinyourOperatingandMaintenanceInstruc-
tions.Searsrecommendsthatyouretainallyourreceiptscoveringmaintenance
onyoursmalloff-roadengine,butSearscannotdenywarrantysolelyfor the
lackofreceiptsorforyourfailuretoensuretheperformanceof allscheduled
maintenance.Asthe smalloff-roadengineowner,youshouldhoweverbe
awarethatSearsmaydenyyouwarrantycoverageifyoursmalloff-roadengine
ora parthasfaileddueto abuse,neglect,impropermaintenanceor unap-
parton yourengineis defective,the partwillbe repairedorreplacedbySears.
Responsibilities
provedmodifications.Youareresponsibleforpresentingyoursmalloff-road
engineto anAuthorizedSearsServiceDealerassoonasaproblemexists.The
undisputedwarrantyrepairsshouldbecompletedina reasonableamountof
time,notto exceed30days.Ifyouhaveanyquestionsregardingyourwarranty
rightsand responsibilities,youshouldcontacta SearsServiceRepresentative
at 1-800-469-4663.Theemissionwarrantyisa defectswarranty.Defectsare
judgedonnormalengineperformance.Thewarrantyis notrelatedtoan in-use
emissiontest.
Sears Emission Control Defects Warranty Provisions
ThefollowingarespecificprovisionsrelativetoyourEmissionControlDefectsWarrantyCoverage.ItisinadditiontotheSearsenginewarrantyfornon-regulated
enginesfoundin theOperatingandMaintenanceInstructions.
1. WarrantedParts
Coverageunderthiswarrantyextendsonlytothe partslistedbelow(the
emissioncontrolsystemsparts)tothe extentthesepartswere presenton
the enginepurchased.
a. FuelMeteringSystem
• Coldstartenrichmentsystem
• Carburetorandinternalparts
• FuelPump
b. AirlnductionSystem
• Aircleaner
• Intakemanifold
c. IgnitionSystem
• Sparkplug(s)
• Magnetoignitionsystem
d. CatalystSystem
• Catalyticconverter
• Exhaustmanifold
• Air injectionsystemorpulsevalve
e. MiscellaneousItemsUsedin AboveSystems
• Vacuum,temperature,position,timesensitivevalves
andswitches
• Connectorsandassemblies
2. LengthofCoverage
Searswarrantstothe initialownerandeachsubsequentpurchaserthat
the WarrantedPartsshallbefreefromdefectsin materialsandworkman-
shipwhichcausedthefailureofthe WarrantedPartsfora periodofone
yearfromthe datethe engineis deliveredtoa retailpurchaser.
3. NoCharge
Repairor replacementof anyWarrantedPartwill beperformedat no
chargetothe owner,includingdiagnosticlaborwhichleadstothe
determinationthata WarrantedPartisdefective,ifthe diagnosticworkis
performedatanAuthorizedSearsServiceDealer.Foremissionswarranty
servicecontactyournearestAuthorizedSearsServiceDealeraslistedin
the "YellowPages"under"Engines,Gasoline,""GasolineEngines,""Lawn
Mowers,"orsimilarcategory.
4. Claimsand CoverageExclusions
Warrantyclaimsshallbefiledin accordancewiththe provisionsofthe
SearsEngineWarrantyPolicy.Warrantycoverageshallbeexcludedfor
failuresof WarrantedPartswhicharenotoriginalSearspartsor because
ofabuse,neglector impropermaintenanceas setforth inthe Sears
EngineWarrantyPolicy.Searsis notliableto coverfailuresof Warranted
Partscausedbytheuseof add-on,non-original,or modifiedparts.
5. Maintenance
AnyWarrantedPartwhichis notscheduledfor replacementasrequired
maintenanceor whichis scheduledonlyfor regularinspectiontothe effect
of"repairor replaceasnecessary"shallbe warrantedasto defectsfor the
warrantyperiod.AnyWarrantedPartwhichisscheduledfor replacement
asrequiredmaintenanceshallbewarrantedasto defectsonlyforthe
periodoftime uptothe firstscheduledreplacementforthat part.Any
replacementpartthat isequivalentin performanceand durabilitymay
beusedinthe performanceofanymaintenanceor repairs.The owneris
responsiblefortheperformanceof allrequiredmaintenance,as definedin
the SearsOperatingandMaintenanceInstructions.
6. ConsequentialCoverage
Coveragehereundershallextendto thefailureofanyenginecomponents
causedbythefailureofanyWarrantedPartstillunderwarranty.
Inthe USAandCanada,a 24hourhotline,1-800-469-4663,hasamenuofpre-recordedmessagesofferingyouenginemaintenanceinformation.
GDOC-100188Rev.B
36

Look For Relevant Emissions Durability Period and
Air index information On Your Engine Emissions Label
Engines that are certified to meet the California Air Resources Board (CARB) Tier 2 Emission Standards must
display information regarding the Emissions Durability Period and the Air Index. Sears Brands Management
Corporation makes this information available to the consumer on our emission labels.
The Emissions Durability Period describes the number of hours of actual running time for which the engine is
certified to be emissions compliant, assuming proper maintenance in accordance with the Operating & Mainte-
nance Instructions. The following categories are used:
Moderate: Engine is certified to be emission compliant for 125 hours of actual engine running time.
Intermediate: Engine is certified to be emission compliant for 250 hours of actual engine running time.
Extended: Engine is certified to be emission compliant for 500 hours of actual engine running time.
For example, a typical walk-behind lawn mower is used 20 to 25 hours per year. Therefore, the Emissions
Durability Period of an engine with an intermediate rating would equate to 10 to 12 years.
The Air index is a calculated number describing the relative level of emissions for a specific engine family. The
lower the Air Index, the cleaner the engine. This information is displayed in graphical form on the emissions label.
After July 1,2000, Look For Emissions Compliance Period
On Engine Emissions Compliance Label
After July 1, 2000 certain Sears Brands Management Corporation engines will be certified to meet the United
States Environmental Protection Agency (USEPA) Phase 2 emission standards. For Phase 2 certified engines, the
Emissions Compliance Period referred to on the Emissions Compliance label indicates the number of operating
hours for which the engine has been shown to meet Federal emission requirements.
For engines less than 225 cc displacement, Category C = 125 hours, B = 250 hours and A = 500 hours.
For engines of 225 cc or more, Category C = 250 hours, B = 500 hours and A = 1000 hours.
This isa generic representation of the emission label typically found on a certified engine.
FAMILYYBSXS.3192VA 274812
GDOC-100182Rev.B
37

Congratulations on making a smart purchase. Your new Craftsman® product is designed and
manufactured for years of dependable operation. But like all products, it may require repair
from time to time. That's when having a Repair Protection Agreement can save you money and
aggravation.
Here's what the Repair Protection Agreement* includes:
[] Expert service by our 10,000 professional repair specialists
[] Unlimited service and no charge for parts and labor on all covered repairs
[] Product replacement up to $1500 if your covered product can't be fixed
[] Discount of 25% from regular price of service and related installed parts not covered by the
agreement; also, 25% off regular price of preventive maintenance check
[] Fast help by phone - we call it Rapid Resolution - phone support from a Sears representative.
Think of us as a "talking owner's manual."
Once you purchase the Repair Protection Agreement, a simple phone call is all that it takes for you
to schedule service. You can call anytime day or night, or schedule a service appointment online.
The Repair Protection Agreement is a risk-free purchase. If you cancel for any reason during the
product warranty period, we will provide a full refund. Or, a prorated refund anytime after the
product warranty period expires. Purchase your Repair Protection Agreement today!
Some limitations and exclusions apply. For prices and additional information in the U.S.A.
call 1=800=827=6655.
*Coverage in Canada varies on some items. For full details call Sears Canada at 1=800=361=
6665.
Sears Installation Service
For Sears professional installation of home appliances, garage door openers, water heaters, and
other major home items, in the U.S.A. or Canada call 1=800=4=MY=HOME®.
38

Declaraci6n de garantia .................................................. 39
Instrucciones de seguridad ....................................... 40-44
Guia de cuesta ................................................................ 45
Etiquetas de seguridad ..................................................... 9
Montaje ..................................................................... 46-49
Operaci6n .................................................................. 50-51
Servicio y Mantenimiento .......................................... 52-58
Almacenamiento fuera de temporada ............................ 59
Soluci6n de problemas ................................................... 60
NOmero de servicio ............................... Cubierta posterior
Garantia Profesional Completa Craftsman Pot Dos A5os
PORDOSAMOSapartirdela fechade lacompra,esteproductoest&garantizadopordefectosen losmaterialesyla manodeobra.
Losproductosdefectuososser&nreparadossincostoo reernplazadossincostosi la reparaci6nnoest&disponible.
Paraobtener informaci6nsobreelalcancede lagarantiay solicitarlareparaci6no elreernplazo,visiteelsitioWeb:www.craftsman.com.
Esta garantiacubreONICAMENTElosdefectos en losrnaterialesyen lamanode obra. Estagarantia NOcubre:
• Articulosde duraci6nlirnitadaquepuedendesgastarsebajocondicionesnorrnalesdeusoduranteel periododegarantia,talescomo
cuchillasdecortadora,adaptadoresparacuchillas,correas,filtrosdeaire,y bujfasdeencendido.
• Productoda_osresultantesde losintentosdelusuariodemodificaci6ndelproducto,reparaci6no causadosporaccesoriosdeproductos.
• Reparacionesnecesariasdebidoal accidenteo por nooperaro mantenerel productosegOnlasinstruccionesprovistas.
• Mantenirnientopreventivoo reparacionesnecesariasdebidoa mezcladecombustibleirnpropia,combustiblecontaminadoo a_ejo.
Estagarantialeotorgaderechoslegalesespecificos,peroustedpodriagozarde otrosderechosen raz6nde sulugarde residencia.
Sears BrandsManagementCorporation, Hoffman Estates,IL 60179
Aceitedelmotor: SAE30
Capacidaddeaceitedel motor: 18onzas
Combustible: Gasolinasinplomo
Bujia: Champion®RC12YC
Motor: Briggs& Stratton
N_mero de modelo ..........................................................
N_mero de serie..............................................................
Fechade compra .............................................................
RegistreelnQmerode rnodelo,nQmerode serieyfechade compra
rn&sarriba.
© KCDIRLLC 39

Lapresenciade estesirnboloindicaque setratade instrucciones
irnportantesde seguridadquesedebenrespetarparaevitar
ponerenpeligrosu seguridadpersonaly/o materialy lade otras
personas.Leay sigatodaslasinstruccionesdeestemanualantes
de poneren funcionarnientoestarn_.quina.Si no respetaestas
instruccionespodriaprovocarlesionespersonales.Cuandoveaeste
sirnbolo,ipresteatenci6na la advertencia!
PROPOSICION 65 DE CALIFORNIA
Elescapedel motorde esteproducto,algunosde suscornponentes
y algunoscornponentesdelvehiculocontieneno liberansustancias
quirnicasqueelestadode Californiaconsideraque puedenproducir
c_.ncer,defectosde nacirnientouotrosproblernasreproductivos.
Losbornesdela bateriay losaccesoriosdines contienenplornoy
cornpuestosde plorno,sustanciasquirnicasquesegOnIoestableci-
do porel EstadodeCaliforniacausanc_.nceryda_osenel sisterna
reproductivo.Ldveselasmanos despu_sde estaren contacto
con estoscomponentes.
Estarn_.quinarueconstruidaparaseroperadadeacuerdocon
lasreglasde seguridadcontenidasenestemanual.AIigualque
concualquiertipodeequipornotorizado,undescuidoo errorpor
partedeloperadorpuedeproducirlesionesgraves.Estarn_.quina
escapazde arnputarrnanosy piesy dearrojarobjetoscongran
fuerza.Denorespetarlasinstruccionesde seguridadsiguientesse
puedenproducirlesionesgraveso la rnuerte.
Su responsabilidad--Restrinja el usode estarn_.quina
rnotorizadaalas personasque lean,cornprendany respetenlas
advertenciase instruccionesqueaparecenenestemanualyen la
rn_.quina.
iGUARI)E ESTASINSTRUCCIONES!
FUNCIONAMIENTO
Funcionarnientogeneral:
• Leaysigatodaslasinstruccionescontenidasen estemanual
antesde intentarensarnblarestarn_.quina.Lea,cornprenday
sigatodaslasinstruccionesque figuranen la rn_.quinay enel o
losrnanualesantesde intentaroperarla.Farniliaricesecornpleta-
rnenteconloscontrolesy conel usoapropiadodeestarn_.quina
antesde operarla.Guardeestemanualenun lugarseguropara
referenciasfuturasy regulatesy parasolicitarrepuestos.
• Estarn_.quinaes unapiezade equipode precisi6n,no unjuguete.
Portanto,tengala maximaprecauci6nen todornornento.Su
unidadha sidodise_adapararealizarunatarea:cortarel c_sped.
Nola utiliceconningOnottoprop6sito.
• Noperrnitanuncaque losni_osrnenoresde 14a_osoperenesta
rn_.quina.Losni_osde 14a_osy rn_.sdebenleerycornprender
lasinstruccionescontenidasenestemanualy debenser
capacitadosy supervisadospor unode lospadres.Onicarnente
losindividuosresponsablesque sehayanfarniliarizadocon
estasreglasdeseguridadparalaoperaci6ndeber_.nusaresta
rn_.quina.
• Inspeccionerninuciosarnenteel _.reaendondeutilizar_,el equipo.
Saquetodaslaspiedras,palos,cables,huesos,juguetesyotros
objetosextra_osconlosquepodriatropezaroquepodrianser
arrojadosporla cuchilla.Losobjetosarrojadosporla rn_.quina
puedenproducirlesionesgraves.Planifiqueel patr6nen elque
vaa ir descargandoel recorteparaevitarquela descargade
materialserealicehacialoscarninos,lasveredas,losobserva-
dotes,etc.Eviteadern_.sdescargarmaterialcontralasparedesy
obstruccionesquepodrianprovocarqueel materialdescargado
rebotecontrael operador.
• Paraayudara evitarel contactoconlacuchillao unalesi6npor
un objetoarrojado,rnant_ngaseen lazonadeloperadordetr_.s
de lasrnanijasy rnantengaa losni_os,observadores,ayudantes
y rnascotasapartadosal rnenos25 metrosde la podadora
rnientrasest,.en operaci6n.Detengala rn_.quinasialguienentra
en lazona.
• Paraprotegerselosojosutilicesiernpreanteojoso antiparras
de seguridadrnientrasoperala rn_.quinao rnientrasla ajusta
o repara.Losobjetosarrojadosquerebotanpuedenlesionar
gravernentelavista.
• Utilicezapatosde trabajoresistentes,desuelafuerteypanta-
Ionesy carnisasajustados.Se recorniendautilizarcarnisasy
pantalonesquecubranlosbrazosy laspiernas,asicornocalzado
conpuntasreforzadasen acero.Nuncaopereesta rn_.quinacon
lospiesdesnudos,sandalias,o conzapatosligeroso conlosque
sepuedaresbalar(porejernplo,calzadode Iona).
• Nopongalasrnanoso lospiescercade laspiezasrotatoriaso
en latolvade lacortadora.Elcontactoconlascuchillaspuede
producirlaarnputaci6nde rnanosypies.
4O

• Unacubiertade descargafaltanteo da_adapuedeprovocarel
contactoconla cuchillao lesionesporobjetosarrojados.
Muchaslesionesocurrencornoresultadode pasarlacortadora
sobrelospiesduranteunacaidaprovocadaporderrapeso
tropiezos.Nosesostengade la podadorasiseest,.cayendo,
sueltela rnanijainmediatarnente.
Nuncatirehaciaustedlapodadorarnientrascarnina.Sidebe
retrocederla podadoraparaevitarunaparedu obst_.culo,mire
prirneroabajoy atr_.sparaevitartropezarsey luegosigaestos
pasos:
1. Retrocedade la podadorahastaestirarcornpletarnentesus
brazos.
2. AsegOresequeest,. bienequilibradoy bienparado.
3. Tirede la podadoralentarnentehaciausted,norn_.sall_.de la
rnitadde ladistanciaentreustedy lapodadora.
4. Repitaestospasoscornoserequiera.
• Noopereestarn_.quinaestandobajolosefectosdelalcoholo de
drogas.
• Noernbragueel mecanisrnodeautopropulsi6nen unidadescon
esteequipornientrasarrancael motor.
• Elrnecanisrnodecontroldela cuchillaesundispositivode
seguridad.Nuncaintentedesviarsede sufuncionarniento.De
hacerlono funcionarianlosdispositivosde seguridady podrian
producirselesionespersonalesporel contactoconlascuchillas
giratorias.Lasrnanijasdecontrolde lacuchilladebenfuncionar
bienenarnbasdireccionesy regresarautorn_.ticarnentea la
posici6ndedesengranecuandoselassuelta.
• Nuncaoperelapodadoraen c_spedhOrnedo.Siernpreest_
segurode suequilibrio.Si tropiezaycaepuedelesionarse
gravernente.Sisienteque pierdeelequilibrio,suelteinrnediata-
rnentela rnanijade controlde lacuchillay lacuchilladejar_,de
girarentressegundos.
• Corteel cespedsolarnenteconluzdedia o conunabuenaluz
artificial.Carnine,nuncacorra.
• Detengala cuchillacuandocrucecarninosde gravilla,pasoso
andadores.
• Si larn_.quinacornenzaraa vibrarde rnaneraanorrnal,detenga
el motor,y busqueinrnediatarnentelacausa.Lavibraci6nporIo
generalesunaadvertenciadealgQnproblerna.
• Apagueelmotoryesperehastaquela cuchillasedetenga
cornpletarnenteantesde retirarla guardaparael recortede
cespedo desatorarlatolva.LacuchillacontinOagirandopor
unoscuantossegundosdespu_squeel motorsehaapagado.
Nuncacoloqueningunapartedel cuerpoen el_.reade lacuchilla
hastaqueest_seguroquelacuchillahadetenidosurnovirniento
rotatorio.
Nuncaoperela cortadorasinlasguardasapropiadas,cubiertade
descarga,guardapararecorte,rnanijadecontroldela cuchilla
y otrosdispositivosde seguridady protecci6nensulugary
funcionando.Nuncaoperelacortadorasilosdispositivosde
seguridadest_.nda_ados.Si noIohace,estopuedetenetcorno
resultadolesiones.
• Elsilenciadoryel motorsecalientany puedenproducirquerna-
duras.Nolostoque.
• Utilicesolarnentepartesyaccesoriosfabricadosespecialrnente
paraestarn_.quina,originalesdelfabricante(OEM).Sino Io
hace,estopuedetenercornoresultadolesionespersonales.
• Paraencenderel motor,jale dela cuerdalentarnentehastaque
sientaresistencia,luegojale r@idarnente.Elreplieguer@idode
lacuerdadearranque(tensi6nde retroceso)lejalar_,larnanoy
el brazohaciael motorrn_.sr@idode Ioque ustedpuedesoltar.
Elresultadopuedenserhuesosrotos,fracturas,hernatornaso
esguinces.
Sisepresentansituacionesquenoest_.nprevistaseneste
manualseacuidadosoy useel sentidocornQn.Contacto1-800-
659-5917parainforrnaci6nyasistencia.
DIENTES
Laspendientessonun factorirnportantequese relacionaconlos
accidentesproducidosporderrapesy caidasy quepuedenpro@@
lesionesgraves.La operaci6nen pendientesrequieremayorpre-
cauci6n.Sino sesienteseguroen unapendiente,nola pode.Para
seguridad,useel rnedidordependientesqueseincluyecornopartede
estemanualpararnedirla pendienteantesdeoperarlaunidaden una
zonainclinada.Si lapendientesuperalos 15grados,nola pode.
HagaIosiguiente:
• Muevala podadoraa travesde lascarasde la pendiente,nunca
haciaarribayabajo.Tengacuidadocuandocarnbiededirecci6n
cuandooperela rn_.quinaenpendientes.
• Est_atentoa losagujeros,raices,rocas,objetosocultoso
abultarnientosquepuedanprovocarque sederrapeo setropiece.
Elc_spedaltopuedeocultarobst_.culos.
Siernpreest_segurodesuequilibrio.Sitropiezaycaepuede
lesionarsegravernente.Si sJentequepier@el equilibrio,suelte
inrnediatarnentelarnanijadecontrolde lacuchillay lacuchilla
dejar_,degirarentres(3) segundos.
NohagaIo siguiente:
• I/o corteel cespedcercade pozos,hundirnientos,bancos,podria
perderel equilibrio.
• Nopodependientesrnayoresde 15gradoscornoIoindicael
rnedidorde pendientes.
• Nopodeel cespedhOrnedo.Si noest,.firrnernenteparado,puede
resbalarse.
41

N QOS
Puedenocurriraccidentestr_.gicossieloperadornoest,.atentoa la
presenciade ni_os.PorIogenerala losni_oslesatraenlaspodadoras
yla actividadde podarel c_sped.Noentiendenlosriesgosnilos
peligros.Nuncad_porsentadoquelosni_osperrnanecer_.nen el
rnisrnolugardondelosviopor Oltirnavez.
• Mantengaa losni_osfueradelAreadetrabajoybajoestricta
vigilanciade unadultoresponsableadern_.sdeloperador.
Est_alertayapaguela podadorasiun ni_oingresaalArea.
Antesy rnientasseest,.rnoviendohaciaatr_.s,mirehaciaatr_.sy
cuidequeno hayani_os.
Tengaextrernaprecauci6ncuandoseaproxirnea esquinas
ciegas,entradasdepuertas,_.rbolesu otrosobjetosque puedan
obstaculizarlelavistadeun ni_oque pudiesecorrerhaciala
podadora.
Mantengaalejadosa losni_osdelosrnotoresenrnarchao
calientes.Puedensufrirquernadurasconun silenciadorcaliente.
Nuncaperrnitaqueni_osrnenoresde 14a_osoperenesta
rn_.quina.Losni_osrnayoresde 14a_osdebenleery entender
lasinstruccionesde operaci6nyreglasdeseguridadcontenidas
enestemanualy debenserentrenadosy supervisadospor sus
padres.
SERVIClO
Manejosegurode la gasolina:
• Paraevitarlesionespersonaleso daSosrnaterialessea
surnarnentecuidadosoal rnanipularlagasolina.Lagasolinaes
altarnenteinflarnabley losvaporessonexplosivos.Sepuede
lesionargravernentesiderrarnagasolinasobreustedo sobrela
ropaya quesepuedeencender.
• Utilices61orecipientesparagasolinaautorizados.
• NuncaIleneloscontenedoresenel interiordeunvehiculo
ocarni6nocajadecarnionetaconrecubrirnientospl_.sticos.
Coloquesiernprelosrecipientesenel pisoy lejosdelvehiculo
antesde Ilenarlos.
• Retireel equipoa gasolinadelcarni6no rernolqueyII_neloen
el piso.Si estonoesposible,entoncesIlenedichoequipoenun
rernolqueconun recipienteport_.til,en vezdedesdeundispen-
sadordegasolina.
• Mantengala boquillade Ilenadoencontactoconelhordedela
entradadeltanquede gasolinaocontenedoren todornornento
hastaqueest_Ileno.Noutiliceundispositivoparaabrir/cerrarla
boquilla.
• Apaguetodosloscigarrillos,cigarros,pipasyotrasfuentesde
cornbusti6n.
• Nuncacarguecombustibleen larn_.quinaen interioresporque
Losvaporesinflarnablespodrianacurnularseen el_.rea.
Nuncasaquelatapadel gasni agreguecombustiblernientrasel
motorest,.calienteo en rnarcha.Dejequeel motorseenfriepor
Iornenosdosrninutosantesde volvera cargarcombustible.
• Nuncarecargueel tanquedecombustible.Lleneel tanqueno
rn_.sde 1 pulgadapor debajodela basedelcuellode Ilenado
paradejarespacioparala expansi6ndelcombustible.
• Vuelvaa colocarlatapade la gasolinayajOstelabien.
• Lirnpiela gasolinaderrarnadasobreel motoryel equipo.Traslade
la rn_.quinaa otrazona.Espere5 rninutosantesde encenderel
motor.
• Nuncaalrnacenela rn_.quinao el recipientede combustibleen
unespaciocerradodondehayafuego,chispaso aparatoscon
pilotocornoporejernplo,calentadoresde agua,calentadores,
hornos,secadoresde ropau otrosaparatosagas.
• Parareducirel riesgode incendiornantengala rn_.quinalirnpia
de pasto,hojasy deacurnulaci6nde otrosescornbros.Lirnpielos
derrarnesde aceiteo combustibleysaquetodoslosdesechos
ernbebidosconcombustible.
• Dejeque la rn_.quinaseenfrie5 rninutospor Iornenosantesde
alrnacenarla.
Funcionamientogenerah
• Nuncaenciendaunmotoren espacioscerradoso en unazona
conpocaventilaci6n.Elescapedel motorcontienernon6xidode
carbono,ungasinodoroyletal.
• Antesde lirnpiar,repararo inspeccionarlarn_.quina,cornpruebe
que lacuchillaytodaslaspartesquesernuevensehandetenido.
Desconecteel cablede la bujiay p6ngalode rnaneraque haga
rnasacontrael motorparaevitarqueseenciendade rnanera
accidental.
• Reviselospernosde rnontajede lacuchillay delmotora
intervalosfrecuentesparaverificarqueest_nbienapretados.
Inspeccioneadern_.svisualrnentela cuchillaenbuscade daSos
(abolladuras,desgaste,roturas,etc.).Reernplacelacuchillacon
equipooriginaldel fabricante(OEM)listadoenestemanual.La
utilizaci6nde partesquenocurnplanconlasespecificacionesde
equiposoriginalespodriatenetcornoresultadoun rendirniento
incorrectoyadern_.sla seguridadpodriaestarcornprornetida.
• Lascuchillasde laspodadorassonrnuyafiladasy podrian
cortarlo.Envuelvalacuchillao utiliceguantesy extremeprecau-
clonescuandole de servicio.
• Mantengatodoslospernos,tuercasytornillosbienajustados
paraasegurarsequelarn_.quinaseencuentraen condiciones
segurasdeoperaci6n.
• Nuncarnanipulelosdispositivosde seguridaddernanera
irnprudente.Controleperi6dicarnentequefuncionendeforrna
adecuada.
42

• Despu_sdegolpearconalgOnobjetoextrafio,detengael motor,
desconecteelcablede la bujfayconecteel motora rnasa.
Inspeccionerninuciosarnentela rn_.quinaparadeterrninarsiest,.
da_ada.Repareel da_oantesdeencenderlayoperarla.
• Nuncatratedeajustaruna ruedao laalturade corternientrasel
motorest,.en rnarcha.
• Loscornponentesde latolvapararecorte,cubiertade descargay
escudode riel,est_.nsujetosa desgastey da_osquepodriadejar
expuestaspartesquesernueveno perrnitirquesearrojenobje-
tos.Paraprotegersuseguridad,verifiquefrecuenternentetodos
loscornponentesyreernpl_.celoss61oconpartesde losfabri-
cantesde equiposoriginales(O.E.M.)listadasenestemanual.
La utilizaci6nde partesquenocurnplanconlasespecificaciones
deequiposoriginalespodriatenercornoresultadoun rendirniento
incorrectoyadern_.sla seguridadpodriaestarcomprornetida.
• Nocarnbielaconfiguraci6ndel reguladordelmotorni acelere
dernasiadoelrnisrno.Elreguladorcontrolalavelocidadrn_.xirna
segurade operaci6ndel motor.
• Verifiquefrecuenternentela Ifneadecombustible,eltanque,el
tap6n,y losaccesoriosbuscandorajaduraso perdidas.Reern-
placedeset necesario.
• Nod_arranqueal motorsinoest,.la bujfadeencendido.
• Mantengao reernpiacelasetiquetasde seguridad,segOnsea
necesario.
• Observelasleyesynorrnasaplicablesparadisponeradecu-
adarnentedelosdesechos.Ladescargainapropiadadeliquidos
o rnaterialespuededa_are[medicarnbiente.
• SegOnla Cornisi6nde Seguridadde Productosparael Consu-
rnidordelos EstadosUnidos(CPSC)y laAgenciade Protecci6n
Arnbientalde losEstadosUnidos(EPA),esteproductotieneuna
vida_tilmediadesiete(7)a_os,6140horasdefuncionarniento.
AI finalizarladda Qtilmedia,adquieraunarn_.quinanuevao
hagainspeccionaranualrnente_staSearsporunou otrodis-
tribuidorde serviciosparacerciorarsedequetodoslossisternas
rnec_.nicosyde seguridadfuncionancorrectarnenteyno tienen
excesivodesgaste.Si noIohace,puedenproducirseaccidentes,
lesionesornuerte.
NO MODIFIQUE EL MOTOR
Paraevitarlesionesgraveso larnuerte,nornodifiqueel motorbajo
ningunacircunstancia.Si carnbiala configuraci6ndel reguladordel
motorelmotorpuededescontrolarsey operara velocidadesinsegu-
ras.Nuncacarnbielaconfiguraci6ndef_.bricadelreguladordel motor.
AVISO REFERIDO A EMISIONES
Losrnotoresqueest&ncertificadosycurnplenconlasregulaciones
de ernisionesfederalesEPAyde CaliforniaparaSORE(Equipos
pequeSostodoterreno)est_.ncertificadosparaoperarcongasolina
cornOnsinplornoy puedenincluirlossiguientessisternasde control
de ernisiones:Modificaci6nde motor(EM)ycatalizadorde tresvias
(TWO)si est_.nequipadosde esarnanera.
GUARDACHISPAS
Estarn&quinaest,.equipadaconunmotorde cornbusti6ninternay
nodebeserutilizadaen o cercade unterrenoagrestecubiertopor
bosque,rnalezaso hierbaexceptosiel sisternade escapedelmotor
est,.equipadoconunarnortiguadorde chispasquecurnplaconlas
leyeslocaleso estatalescorrespondientes,encasodehaberlas.
Siseutilizaun arnortiguadordechispasel operadorIodebernantener
en condicionesde usoadecuadas.Enel Estadode Californialas
rnedidasanteriorrnenternencionadassonexigidasporley(Arficulo
4442del C6digode RecursosPOblicosde California).Esposible
queexistanleyessirnilaresenotrosestados.Lasleyesfederalesse
aplicanenterritoriosfederales.
Puedeconseguirel arnortiguadorde chispasparael silenciadora
travesde sudistribuidorautorizadode rnotoreso poni_ndoseen
contactoconelcentrode servicioSears.
43

SilVIBOLOS DE SEGURIDAD
Estap&ginarepresentay describelaseguridadlossimbolosquepuedenpareceren esteproducto.Lea,comprenda,ysigatodasinstrucciones
en lam_quinaantesprocurarparareuniry operar.
i
i
®
LEA EL MANUAL(S) DEL OPERADOR
Lea, comprenda,y siga todas instrucciones en el manual (manuales) antes procurar para reunir y
operar.
PELIGRO-- GIRANDO HOJAS
Para reducir el riesgo de herida, guarde manos y pies lejos. No funcione a menos que la tapa
de descarga o el receptor de hierba est6n en su lugar apropiado. De ser dahado, sustituya
inmediatamente.
PELIGRO-- ESPECTADORES
No siegue cuando los ni_os o los otros est_in alrededor.
PELIGRO-- DIe EL CORTE DE PIE/
Guarde manos y pies lejos de hacer girar partes.
PELIGRO-- ESCOMBROS LANZADOS
Quite objetos que pueden set lanzados por la I_imina en cualquier direcci6n. Lleve gafas de
seguridad.
PELIGRO-- CUESTAS
Use extra la precauci6n en cuestas. No siegue cuestas mayores que 15 o
ADVERTENCIA DESPIDA
Para reducir el riesgo de incendio mantenga la m_iquina limpia de pasto, hojas y de acumulaci6n de
otros escombros.
ADVERTENCIA VAPORES TOXICOS
Nunca encienda un motor en espacios cerrados o en una zona con poca ventilaci6n. El escape del
motor contiene mon6xido de carbono, un gas inodoro y letal.
ADVERTENCIA-- SUPERFICIE CALIENTE
Las partes del motor, especialmente el silenciador, Ilega a set muy caliente durante la operaci6n.
Permita motor y silenciador para ponerse frio antes de tocar.
44

01
Mireymantenc3aestenive[conun_rbo[vertical
_. o[aesquinadeunedificio...
oelpostedeunaempaiizada
DoblePorlaI,"
_ -- . '_s_ePreSenta un
, _ ._ _ apendie
,,
Use esta paginacomo guia paradeterminar en qu6 pendientes no puedeoperarel tractor de manera segura.
Nooperelacortadoradec6speden dichaspendientes.Nocorteen inclinacionesmayoresde 15grados(elevaci6naproximadade 2 1/2piespercada10pies).Operelas
podadorasQUESE EMPUJANde maneraquecrucenel frentede laspendientes,nuncahaciaarribay haciaabajo.

IMPORTANTE: Esta unidad seenvfasin gasolina niaceite enel motor.
Antesde comenzar ocorrer lama.quinacargue el motor con gasolina y
aceitecomose indica en lasecci6n de operaci6n de este manual.
NOTA: Las referenciasa los ladosderecho e izquierdode la cortadora de
cespedse hacenobservando la ma.quinadesde la posici6nde operaci6n.
APERTURA DE LA CAJA DE CARTON
1. Cortecada unade ias esquinas de la caja verticaimente,de la parte
superiora la base.
2. Saque todaslas piezassueltas.
3. Quite el materialde empaquesuelto.
C61VIO SACAR LA UNIDAD DE LA CAJA
1. Eleve launidaddesde la parte posterior parasepararla del material
de iacaja quequede debajo y haga rodaria unidadfuera de ia caja.
2. Verifiquecuidadosamentesi en la cajaqueda aiguna partesuelta.
PIEZAS SUELTAS DENTRO DE LA CAJA
Colectorde cesped
Adaptadordel colector de pasto
Tolvade descarga lateral
Aceite del motor
iVIONTAJE
IViontaje de la manija
1. Retireel materialde empaque que pudieraestar entre las manijas
superiore inferior.
A. Tire haciaarriba y hacia atras ia manijasuperior comose
muestraen la Figura 1.Asegurese de queia manijainferioreste
asentadafirmemente en los soportes de montajede lamanija.
Asimismo,no prense loscables mientrasievanta la manija.
B. Apriete las perillas estrella que sujetan la manija superior a
la manija inferior.AsegQrese de que cada perno del carro
est_ apropiadamente asentado en la manija.
2. Localiceel pasadorde horquilla que se encuentraen el pasador
soldado acada ladode la manijainferior.
A. Saque el pasador de horquilla deeste orificio. Con unpar de
pinzas,inserte el pasador de horquilla enel agujerodei pasador
mas cercanoai soporte. Veaia Figura2. Repitadei otto iado.
B. Inserte el bul6n de carro en el manual de la bolsa en el
orificio superior en el soporte de montaje de la manija.
Sujete con una tuerca pl_.sticade mariposa, que tambi_n se
incluyeen el manual de la bolsa. Vea la Figura 2. Repita del
otto lado con los restantes hardware.
f
Figura1
J
f
(
\
Figura2
NOTA: Aseguresede que el cable de transmisi6nquede alrededorde
la parteexterior y pot encima de lamanija inferiorde manera queno
interfiera cuando seacople la boisa colectora. La puertadel canal ha
sido dise_adapara moverla cuerdadel arrancadorfuera del caminode la
bolsa cuando lapuerta del canal esta.abierta.
46

3. Laguia de la cuerda,que esta.conectadaa lavariiiade sosten,se
encuentrasobreel ladederechode lamanijainferior.Vea la Figura3.
A. Sostengala manijade control de lacuchillacontra la manija
superior.
B. Jale la cuerdade arranque parasacarla del motor.Suelteel
control de la cuchilla.
C. Deslicela cuerda dearranque en la guia.
D. La atadurade cables use (s)para garantizarcable (s) para
bajarde manejar.
Conexi6n de la colectora de c_sped
La cortadorafue enviadacon iatolva de abono instalada en launidad.
Parafines de embolsado,debera,acoplaria boisa colectoray su
adaptadoren lugarde la tolva de abono.
1. Extraiga ias tres tuercasde mariposaque sostienen ia toiva de
abono en suiugar y retirelade la unidad. Vea ia Figura4.
2. Reemplacecon el adaptador de iaboisa colectora, asegurandose
de queel labio frontaldel adaptador encajedebajo del hordede la
plataforma.Asegure con lastuercas de mariposa queextrajo antes.
3. Eleveia puertadei canal en el adaptador de labolsa colectoray
deslice labolsa sobre el adaptador. Veala Figura5.
Figura 3
Figura4
4.7

Conexi6n de Canal de Descarga Lateral
Siga lospasos que se indicana continuaci6n parainstaiar elcanal de
descarga lateral:
1. Extraigala tolva de abonoo el adaptador de labolsa colectorade la
unidad soltandolas tuercas de mariposa.
2. Acopleel canal de descarga lateral y asegurecon lastres tuercas
mariposa. Vea laFigura6.
AJUSTES
Altura de torte
La palanca de ajustedeaitura de corte se ubica porencima de la rueda
izquierdatrasera. Veael recuadrode lafigura 7A.
1. Tirede la palanca hacia afuerade iacortadora.
2. Muevala palanca haciaadelante o haciaatra.spara laaltura de corte
deseada.
3. Libere la palanca hacia la plataforma de ia cortadora.
La altura decorte de ia ruedafrontalsedetermina seleccionando unade
las seisposiciones en el montajede cada ruedita.Para ajustar laaltura de
corte frontal,consulte ia Figura7B y reaiice Iosiguiente:
1. Extraigaiatuerca de mariposadel
pernodel eje. Deslice el perno del
ejey la arandela onduladafuera
del montajey seleccione la altura
de corte.
2. Con ia arandeia onduladasobre
el pernodel eje, reinserte los
elementosde ferreterfaen elorificio
cuadradodeseadoa travesdei
montajede la rueda y asegure
con iatuera mariposa previamente
extrafda.
IMPORTANTE: Todas las ruedasdeben set colocadas en lamisma
posici6nrelativa. Cuandoel terrenoes agreste oirregular cambie la
palanca de ajustede la altura auna posici6n ma.salta. De esta manerase
cuida ma.sel cesped.
Las rueditaspuedenasegurarse en posici6n directamente haciaadelante
opara quegiren iibremente.Vea el recuadrode la figura 7C.
1. Levantelos pasadoresdefijaci6n.
2. Col6quelos en los agujerosma.sgrandes paratrabar las ruedas.
Coloque los pasadoresen los orificios ma.speque_os para permitir
quelas ruedasgirenlibremente.
Control de la transmisi6n
La ruedade ajusteesta.ubicada en elalojamiento de lamanijade control
de transmisi6ny se utilizapara ajustar oaflojar la correade transmisi6n.
Debera.ajustar elcontrol de transmisi6nen caso de que:
1. La cortadora nose autopropulsaracon elcontrol de transmisi6n
engranado.
2. Las ruedasde transmisi6n de la cortadora temblarancon el control
de transmisi6nengranado.
Si ocurrieraalguna de estas condiciones,gire la ruedade ajusteen el
sentidode las agujasdel reloj para ajustaryen sentido contrario alas
agujasdel reloj para aflojarel cable para ajustarel control de transmisi6n.
Vea laFigura8.
NOTA: Paraalgunas personas,el control de transmisi6n puedeno
encontrarse en unaposici6nc6moda. Puede ajustar la manijaapretando
la ruedade ajuste.
48
f
Figura 6
2/
J
Figura 8

f
Control de la cuchilla
Controlde la transmisi6n.... de encendidoelectrico
Arrancador de retroceso
Tap6ndeaceite/varilla de
medici6ndel nivelde
Tolvadedescarga lateral
Palancadeajustede
laalturadecorte
Tap6nde combustible
J
J
CONTROL DE LA CUCHILLA
Figura 9
LLAVE DE ENCENDIDO ELI_CTRICO
El control de la cuchillaesta.unidoa la manijasuperior de lacortadora.
Vea iaFigura8. Presioneel control de la cuchilia y aprietelo contraia
manijasuperior para operar la unidad.Sueltelo paradetener el motory la
cuchilla.
El control de ia cuchiiiaes un dispositivode seguridad. Nunca intente
anular sufuncionamiento.
PALANCA DE AJUSTE DE LA
ALTURA DE CORTE
La palanca deajuste de alturade corte se ubica porencima
de larueda izquierdatrasera. Paraajustar laaltura de corte,
consulte la Secci6nMontaje.
CONTROL DE LA TRANSMISI6N
El control de transmisi6nesta.ubicado en la manijasuperior.
Aprieteel control de la transmisi6n para engranarei sistema
de transmisi6n. Libereel control de transmisi6npara desengranarel
sistemade transmisi6n.
PALANCA DE CAMBIOS
La palanca decambios esta.ubicada en elalojamiento de control de
transmisi6nsobre la manijasuperior. Estapalanca se utilizapara
seleccionaria velocidad de avancehacia adeiantede ia cortadora.
Cuandocambie la selecci6n de velocidad, iibereelcontrol de transmisi6n.
J
IMPORTANTE: Mueva lapalanca de cambioss61ocuando el motoreste
en marcha. Sicambiael ajustede la palanca de cambioscon el motor
apagado,su cortadora puede resultardaSada.
LaNavede encendido electrico esta.ubicada en el lado izquierdodei
panelde lamanija. Sela utilizaQnicamentepara el encendido electrico.
TOLVA DE DESCARGA LATERAL
Sucortadora se envfacomo abonadora.Para descargarlosrecortes de
cesped porel costado, sigalas instruccionesde la secci6n Montaje para
acoplar el canal de descarga lateral.
Mantengasus manosy pies alejadosdel area del canal de la plataforma
de corte. Consultela etiqueta deadvertencias en la unidad.
ARRANCADOR DE RETROCESO
Elarrancadorde retrocesoesta.conectadoa iavariilade soportey se
ubicasobreelladoderechode lamanijainferior.Paraencenderlaunidad
col6quesedetra.sde iamismaytirede ia cuerdadelarrancadorderetroceso.
TAPON DE GASOLINA
Retireel tap6n degasolina para agregarcombustible ai tanque de
combustible. Usegasolina limpia, nueva, regular,sinplomo con un
octanaje mfnimode 87.
TAPON DE ACEITE/VARILLA DE MEDICI6N
DEL NIVEL DE ACEITE
Consulteia secci6n Mantenimientoparaobtener instrucciones sobre
c6mo verificarel aceite.
ESCUDO DE RUTA
Elescudo de ruta seadjunta a la parte trasera de lama.quinay esta.
ahf paraprotegeral operadorde escombrosquevuelan. No utiliceel
cortacesped a menosque el escudoes totalmente funcionalyen sulugar.
49

LLENADO DE GASOLINA Y ACEITE
Aceite (se envia una botella junto con la unidad)
Primer uso
1. Saque la varilla del niveldeaceite (G).
2. Con la cortadorade cesped ubicada en suelo nivelado, viertael
aceitebntamente pot dentrodel tubode Ilenadode aceitedel motor
(H) hastala marca de limite alto en la varilla medidoradel nivel de
aceite(J). Vea la Figura 10.
3. Vuelvaacolocar la varilla de Ilenadode aceitey ajQstela.
Usos posteriores
Use aceitepara motorde 4tiempos que cumplao sobrepase los
requisitos para la clasificaci6n de servicio APi SK SG, SH, SJo
equivalente.
Compruebesiempre ia etiquetade servicio API en el recipientedei aceite
para asegurarseque incluye las letrasSK SG,SH, SJ oequivalente.
Temperaturasai airelibre de determinar la viscosidaddei aceite correcto
para elmotor.Usela tabla paraseleccionar la mejor viscosidadpara el
rangode temperatura ai aire libre se espera.
86 _ _o ..... so
2o
50 _ o
C '_'t?'p?:C:_ *'?" 4,10
-_22
*Por debajo de 40 oF (4 oC) eluso de SAE30 dara.lugaraduros de
partida.
** Potencima de 80 oF (27oC)el usode 10W-30puede provocar un
aumentodei consumode petr61eo.Nivel deaceite con ma.sfrecuencia.
1. Reviseel aceitecon el motor paradoy nivelado.
2. Quite ia tapa deldep6sito de aceite/varilla medidora del nivelde
aceitey limpiela.
3. Coioque y ajuste la varilla indicadora. Luegoquitela para revisarel
nivelde aceite.Veaia Figura10.
4. Si el nivel deaceite esta.cercao pot debajo de la marcade limite
bajo de lavarilla medidora del nivelde aceite,quitela tapa del
dep6sito de aceite/varilia medidoradei niveide aceite y iBnelo con
el aceiterecomendado hastala marca de limitesuperior. NoIlene de
ma.s.
5. Vuelvaainstalar la tapa/varilla medidora del nivelde aceite.
Gasolina
No utilicegasolinas noaprobados, tales como E85.Nomezcle el aceite
en ia gasolinao modificarel motorparafuncionar con combustibles
aiternativos. Esto dafiara,los componentesdel motory anularla
garantia del motor.
De combustible debe cumplirestos requisitos:
,, Limpia, fresca, la gasolina sin piomo.
• Un minimo de 87 octane/87 AKI (91 RON).
f
Figura10
,, La gasoiina con hasta un 10% de etanol (gasohoi) o hasta el 15%
de MTBE (metil terbutil _ter) es aceptable.
Eche gasolinaen un a.reabien ventiiada y conei motorparado. Si el motor
haestado funcionando, deje que seenfrie primero.No eche gasolinaa
la ma.quinaen eiinterior de unedificio donde los vaporesde lagasolina
suedanestar ex uestosaal unallama ochis a.
Lagasolina esaitamente inflamabley explosivay usted puede quemars_
o iesionarsegravementeai reabastecer.Pareel motory mantenga iejos
el calor, las chispas y lasllamas. Reabastezcas61oaiaire libre. Limpie
inmediatamente losderrames.
Siva a usarei equipo de forma intermitenteos61oocasionalmente,
consulte ia secci6n deAimacenamiento FueradeTemporada para
obtener ma.sinformaci6nsobre el deterioro delcombustible.
NOTA:El combustible puede dafiar lapinturay aigunos tipos de plastico.
Tengacuidado de no derramarcombustible cuando Ilenael tanque.
No use nuncagasolina rancia ocontaminada ni mezclasde aceitey gaso-
lina.No permitaqueentre suciedad o aguaen el tanque de combustible.
1. Quite ia tapadei tanquede combustible.
2. Agregue combustible hasta ia parteinferiordel iimitede nivel de
combustible en ei tubo deltanque. No iiene de ma.s.Limpieel
combustible derramadoantes de arrancarel motor.
3. Aprieteeltap6n firmemente.
4. Antes de arrancarel motor,aBjese al menos 3metrosdel
emplazamiento y la fuentede la gasolina.
AsegQresede queninguna personaaparte deioperador permanezca
cerca de ia cortadora mientrasarranca el motor uopera la misma.
Nunca encienda elmotor en espacioscerrados o en unazonacon poca
ventilaci6n. Elescapedel motorcontiene mon6xido de carbono, ungas
inodoro y ietai. Mantengaias manos, los pies, elcabello y laropa suelta
alejados de laspartes m6viles del motor y de lacortadora.
5O

PARA ENCENDER EL MOTOR
1. Coi6quese detra.sde la podadora, aprieteia manijade control de la
cuchillay sostengala contra la manija superior.Veala Figura 11.
2. Este cortacespedtiene dos sistemas inicialesseparados,electricos
y retroceso.
Arrancador el_ctrico: Gire laliave de encendido a iaderecha
para arrancarel motor.Sueitelailaveapenas arranque elmotor.
Arrancador de retroceso: Tomela manijadel arrancadory
saquela cuerdalentamentehastaque el motoralcanceei comienzo
delciclo decompresi6n(la cuerdatirara,un pocoma.sfuerte en este
punto). Dejeque la cuerdase enrollelentamente.Tire de lacuerda
con ungolpera.pidoy continuode todoei brazo.Mantengafirme
la manijadelarrancador,dejequela cuerdasevuelvaa enrollar
lentamente.
De retracci6n ra.pidadel cord6nde arranque (soborno) tirara,de mano y
el brazo hacia el motorma.sra.pidode Io que puede dejar ir. Lasfracturas
de huesos,fracturas,contusiones oesguinces podria resultar.
PARA DETENER EL MOTOR
1. Sueltela manijade control de lacuchilla paradetener el motory la
cuchilla.
Esperea que la cuchillase hayadetenidopor completo antesde hacer
cualquiertrabajoen la cortadora o de retirarel colector de cesped.
USO DE LA CORTADORA DE CESPED
Aseguresedequeei cespedesta.librede piedras,palos, cablesuotros
objetosque pudiesendafiar lacortadorao el motor.Dichosobjetospueden
setarrojadosaccidentalmentepot la cortadoraencualquier direcci6ny
_rovocarlesionespersonalesgravesaioperadory a otraspersonas.
AIoperar unacortadora de cespedes posible queobjetos extrafios sean
arrojadosa los ojos, Iocual puede dafiarlos gravemente.Utilicesiempre
galas de seguridad durante laoperaci6n de la cortadora de cespedo
mientraslaajusta o repara.
1. Unavezqueel motorest_funcionando,aprieteel controlde
transmisi6ncontrala manijasuperiorparapropulsarla podadora.
Libereel controldetransmisi6nparadesengranarelsistemade
transmisi6n.
2. Usarlapalancadecambiosparaseleccionarlavelocidaddeavancede
lacortadoradecesped- 1eslavelocidadm_sbaja,6 eselm&sr&pido.
Cuandolaselecci6ndecambiodevelocidad,suelteelcontroldela
unidad.
IMPORTANTE:Moverla palancade cambioss61ocuandoel motor
est,.funcionando.Cambiode lapalancadecambiosde configuraci6n
conel motorapagadopuedendaSarla m_.quina.
USO COMO ABONADORA
Paraabonarei cesped, quite eicolector de cesped oelcanal dedescarga
lateralde ia ma.quina,y acoplela tolva de abono. Paraun abonoeficiente,
nocorte cesped humedo. Si el cesped hacrecido ma.sde 10,2cm. (4
pulg.)no se recomiendael usode la podadoracomoabonadora. Enese
caso, use eicolector de cesped para embolsarlos recortes.
USO DEL COLECTOR DE CE_SPED
Puedeutilizar elcolector de cesped para recoger dichos recortes mientras
operalapodadora.
1. Acople el colector de cesped siguiendo lasinstruccionesde la
secci6n de Montaje.Los recortesde cesped son recolectadosen la
bolsade forma automaticaa medidaque pasaia cortadora.
2. Opere ia cortadora hastaqueia bolsacolectora este iiena.
3. Detengaei motorpot completosoltando lamanijade control de la
cuchiiia. Compruebe queia unidad se hayadetenido porcompleto.
4. Mientrassostengalaboisa colectorade pastopot medio de la
manijatraseray la manijainferior,levantela bolsa colectorapara
sacarla dei adaptador.La puerta delcanal movera,la cuerdafuera
del camino de la bolsa.
5. Continuesosteniendo ia manija inferior,eleve ia parte posteriorde
la bolsa colectora,y liberanel manijainferiorsobre un recepta.culo
apropiado. La boisa colectorase abrira,y los recortesde cesped se
dispersara.n.AIvolver a colocarla bolsa decesped, asegurese de
que la partesuperior de la bolsa seapoye sobre el sostendel cable
entre las manijas.
Si golpea un objeto extrafio,detenga eimotor.Retire el cable de ia
bujia, inspeccione detenidamentelacortadora para vet queno tenga
dafios, y repare el dafio antesde volver aencender y operar. Elexceso
de vibraci6n de lacortadora durante laoperaci6n es unaindicaci6nde
dafio. Se debe inspeccionary reparar launidad Ioantes posible.
51

PROGRAMA DE iVlANTENllVllENTO
Antesde realizarcualquiertipode mantenimientoo servicio,desenganche
todosloscontrolesy detengael motor.Espereaquesedetengancomple-
tamentetodaslaspiezasm6viles.Desconecteel cablede labujiay p6ngalo
haciendomasacontrael motorparaevitarque seenciendaaccidentaimente.
Siga el cronogramade mantenimientoque sepresenta acontinuaci6n.
Estatablas61odescribe pautasde servicio. Utiiiceia columna Registro
de Servicio para hacer ei seguimientode las tareasde mantenimiento
completadas. Para ubicar elCentro de Servieio Sears m_s cercano o
para programar un servicio, simplemente comun/quese con Sears al
tel_fono 1-800-4-MY-HOME®.
Cada uso
lras 5 horas
Anuaimenteo 50 horas
Anuaimenteo 200 horas
Anuaimente
Antesde aimacenar
1. Nivelde aceite dei motor
2. Piezassueltasofaltantes
3. Unidady motor
1. Aceitedei motor
1. Depuradorde aire y Pre-filtro (DeSet equipado)t
2. Varillajes/pivotesde control y ruedas
3. La parteinferior de la plataformade lacortadora
de cesped
4. Aceitedei motor
1. Depuradordeairey Pre-filtrot
1. Bujiadeencendido
1. Sistemade combustible
1. Verificar
2. Ajustaroreemplazar
3. Limpie
1. Cambiar
1. Limpiaro reemplazar
2. Lubricarcon aceiteligero
3. Limpie
4,
1.
1.
1.
Cambiar
Reemplazar
Reemplazar
Hacerfuncionar el motor hastaque se
detenga pot falta de combustible oahadir
estabilizador de untanque Ileno de
combustible nuevoantesde su aimace-
namiento.
Limpiorn_.sa menudoen condicionespolvorientaso cuandolosescombrosaerotransportadosest_.npresentes.
52

Detengasiempreelmotor,desconecteelcabledela bujfayhagamasa
contraelmotorantesde reaiizarcuaiquiertareade mantenimientoa su
ma.quina.
RECOMENDACIONES GENERALES
• Respetesiemprelasreglasdeseguridadcuandorealicetareasde
mantenimiento.
Lagaranfiadeestacortadoranocubreelementosquehan
estadosujetosalmalusoola negligenciadeloperador.Para
recibirel reembolsototaldelagarantia,eioperadordebera,dar
mantenimientoai equipotaiycomoseindicaenestemanual.
Elcambiode lavelocidadcontroladadelmotorinvaiidara,lagarantia
deimotor.
• TodoslosajustesdebenserverificadospotIomenosunavezen
cadaestaci6n.
• Reviseperi6dicamentetodoslossujetadoresycompruebequeesten
bienajustados.
MANTENIMIENTO DEL MOTOR
Bujia de encendido
Paraunbuenfuncionamiento,labujfadebeestaradecuadamenteabierta
ylibrededep6sitos.Reemplacela bujiaanualmente.
1. Desconecteelcapuch6nde labujiayretirecualquiersuciedaddel
a.readeesta.
2. UselaIlavedebujiasdeltama_oadecuadoparaextraerla.
NOTA:ReemplazarconunaChampion®RC12YCbujia.
3. Compruebeel entrehierroconuncalibradordealambre.La
separaci6ncorrectaes0,020in.(0,51mm).Vea[aFigura12.Sies
necesario,reajusteelentrehierro.
4. Instaieyaprietelabujiaa[parde aprieterecomendado.Parael
ajustedelentrehierroo el pardeapriete,consuitela secci6nde
Especificaciones.
5. Coloqueel capuch6ndela bujia.
Filtro de aire
Unfiltrode airesuciorestringir&elfiujodeaireal carburadory causar&
el funcionamientodefectuosodelmotor.Inspeccioneelfiltrocadavez
queopereel motor.Necesitar_.limpiarcon m_.sfrecuenciaelfiitro si
ustedoperael motoren_.reasmuypoivorientas.
Limpioelfiitrodeaire cada50horasde laoperaci6no unavezpor
temporada.Reemplaceel fiitrodeaireanualmente.
Nuncaarranqueuopereel motorsiremovi6el conjuntodel filtrode
aireo elfiltrode aire.
NOTA:Nouseairea presi6nni solventesparalimpiarel filtro.Elairea
presi6npuededaSarel filtroylossolventespuedendisolverlo.
1. Quitarelcierrey lacubiertadel filtrodeaire.VeaFigura13.
6. Quiteel prefiltro(DeSerequipado)y filtro.
1. Paraaflojarlosdesechos,golpearsuavementeelfiltroen una
superficiedura.Si elfiltroest,.muysucio,reemplaceconun
nuevofiltro.
f
Electrodo
Porcelana
Figura12
J
Cierre
Filtro de
4:--
Aire
Figura13
2. Lavarel pre-limpiadorde detergenteliquidoyaguaydejequeel
aireseooa rondo.Nodepetr61eode la pre-limpia.
3. Montarel pretintoreriaalfiltro.
4. Instalarelfiltroy pre-limpiadoren la base.AsegOresedefiltro
encajadeformaseguraen la base.
5. Instalarfiltrodeairey seguroconel sujetador.AsegOresedeque
el sujetadorest,.apretado.
53

Comprobar el aceite del motor
Comprobarel nivelde aceite antesde cada operaci6n. Aseg_resede que
el niveide aceitese mantiene.
1. Reviseel aceitecon ei motor paradey nivelado.
2. Quite ia tapa deldep6sito de aceite/varilla medidora del nivelde
aceitey limpiela.
3. Coloque y ajuste la varilla indicadora. Luegoquitela para revisarel
nivelde aceite.
4. Si el nivel deaceite esta.cercao pot debajo de la marcade limite
bajo de lavarilla medidora del nivelde aceite,quitela tapa del
dep6sito de aceite/varilia medidoradei niveide aceite y ilenelo con
el aceiterecomendado hastala marca de limitesuperior. NoIlene de
ma.s.
5. Vueivaainstalar ia tapa/variiia medidora del niveide aceite.
Cambiar el aceite del motor
La gasolina y sus vapores son extrernadarnente inflarnables y
explosivos. Un incendio o una explosi6n pueden causar graves
quernaduras o a rnuerte.
Tap6n de
aceite/varilla de
medici6n del nivel
de aceite
Filtro de aire
j/
Silenciador
J
Figura 14
Carnbieel aceitedelmotordespu_sdelasprirnerascinco horasde
operaci6n,ycadacincuentahoraso unaveza laternporadadespu_s.
Si drenael aceitedesdeel tubosuperiorde Ilenadodeaceite,el
tanquedecombustibledebeestarvacioo deIocontrariopodria
presentarseunafugade combustiblequepodriaocasionarun
incendioo unaexplosi6n.Paradesocuparel tanquede combustible,
opereel motorhastaquesedetengapor lafaltadecombustible.
1. Con el motor apagado pero a[3ncaliente, desconecte el cable de
la bujfa y rnant_ngalo a distancia de la bujia.
2. Coloque unrecipiente adecuadocerca del motorpara recogerel
aceiteusado.
3. Quite la tapa/varilla medidoradel nivelde aceitey dreneel aceite
al recipiente inclinandoel motorhacia eltube de Ilenadodel aceite.
Vea laFigura 14.
El aceiteusadoes unresiduo peligroso.Elimineelaceite usado
adecuadamente.NoIoarrojejuntocon los residuesdomiciliarios.Consulte
alas autoridadeslocalesoalcentrede servicio Searsparaaveriguar
d6nde hayinstalacionesparala eliminaci6n/reciclaje segura(o)delaceite
usado.
4. Con ei motoren una posici6nnivelada, Ilenehastaia marca de
limite alto en lavarilla medidora del nivelde aceitecon elaceite
recomendado.
Ponerenrnarchael motorconunnivelde aceitebajopuedecausar
daSosen el motor.
5. Vueivaa instaiarbien la tapa/varilla medidora del niveldeaceite.
Limpie el motor
Diariamenteoantes de cadause, limpie el cesped, lagrasa o los
residues acumulados del motor.Mantengalimpios el varillaje,los
resortes y los controles. Mantengaei a.reaque rodeaal silenciador y
detra.sdei mismo iibrede cualquier residue combustible.
El mantenimientodel motor en condiciones limpias permiteel
movimientode aire airededordel mismo.
Laspartes dei motorse deben mantenerlimpias para reducir
el riesgode sobrecalentamientoy combusti6n de los residues
acumulados.
No useagua para limpiar ias piezas dei motor.Elagua puede contaminar
el sistemade combustible. Use un cepilloo un trapo seco.
54

LUBRICACION
Control de la cuchilla
Lubriquecon aceite ligero los puntosde pivotedel control de lacuchilla al
menos unavezcada estaci6n. Estecontroledebe funcionar librementeen
ambas direcciones.Vea la Figura15.
Ruedas y rueditas
Lubriqueiasruedas y rueditas unavez pot temporada con aceite iigero
(o aceite para motor).Sinembargo,si las ruedassequitan pot cualquier
raz6n, debe lubricarla superficie delperno deleje y la superficie interna
de la ruedacon aceiteiigero.Veala Figura 15.
Adaptador de colector de pasto
Lubriqueelresorte de torsi6n y eipunto de pivote en cadaextremo de
la puertadel adaptadorde colector de pasto pot io menosunavez pot
temporada con aceiteligero paraevitar queseoxide. Vea la Figura 16.
Transmisi6n
Latransmisi6n esprelubricada y selladaen la fa.bricay no requiere
lubricaci6n.
LIMPIEZA DE LA PLATAFORMA
Debelimpiar la parte inferiorde la plataformade la cortadora decesped
unavez una temporada para prevenirla acumulaci6n de recortesde
cesped uotros desechos.Siga los pasosque aparecen debajo para
reaiizar esta tarea.
1. Desconecteelcable de la bujia. Drene la gasolinade lacortadora
o coloque untrozo de pla.sticodebajo deltap6n de Ilenadodel
combustible.
2. inclinelacortadora de cesped de modo quequede apoyadasobre
al alojamiento, mantengaelsilenciador de costado hacia abajo.
Sostengafirmemente la cortadora.
Nunca inclineia cortadora de cesped ma.sde 900en ningunadirecci6n
y nodeje la unidad inclinada.Se puede filtrar aceitedentrode la parte
superior del motory causar problemasde arranque.
3. Raspey iimpie iaparte inferiorde laplataformamedianteel uso de
unaherramientaadecuada. No larode conagua.
IMPORTANTE: No utilice unalavadoraa presi6n o manguerade jardin
para limpiarsu unidad. Puedenproducir daSosa los rodamientos oal
motor.El uso de aguaacortara,la vida Qtilde la ma.quinay reducira,su
capacidadde servicio.
4. Vuelvaacolocar ia cortadorade cesped sobre susruedas en
el suelo. Si pusoun pla.sticodebajo deltap6n de Ilenadode
combustible aseguresede sacarlo en este momento.
CAIVIBIO DE LA ALETA TRASERA
Paracambiarla aleta trasera, proceda de la siguiente manera:
1. Para quitar la tapa trasera, levante la puerta trasera, quite el
tornillo, y la tapa de prensa en a arnbos lados para quitar del
agujero. Vet la Figura 16.
2. Quite el tornillo y la tapa del agujero de enfrente y sustituya por la
nueva tapa en la orden de enfrente y la rnanera del retiro.
f
Figura15
_J
Figura16
55

AJUSTE DEL CABLE DE LA PALANCA DE
CAiVIBIOS
Puede set necesarioreaiizar un ajuste peri6dicodel cable de cambios
de seisvelocidades debido aldesgastenormal del cable. Elajuste es
necesariosi lasseis velocidades nofuncionan bien. Lamensula ajustable
delcable seiocalizasobre el lado izquierdode lacortadora de cesped
juntoal motor.Veala Figura18.
1. Pongaen marchaelmotory coloque la palancade cambiosen la
posici6nde sexta velocidad.
2. Detenga eimotor y desconecte elcable de la bujia y con@telo a
tierra contrael motor.
3. Afloje latuerca hexagonalque sujeta la mensulaajustable delcable.
Vea iaFigura 18.
4. Empuje hacia atra.sla mensulaajustable del cable.
5. Ajustelatuerca hexagonal.
CUIDADO DE LA CUCHILLA
sostener la cuchilla.
Inspeccioneperi6dicamente eladaptadorde la cuchiiiaen busca de
rajaduras,especialmentecuandogolpee un objeto extra_o. Realicelos
reemplazosque resultennecesarios. Siga los pasosque aparecen debajo
para reaiizarel mantenimientode lacuchilla.
1. Desconecte elcapuch6n delcable de la bujia. Gire la cortadora
de cespedsobre eicostado y compruebe que el filtrode aire y el
carburadorqueden mirando haciaarriba.
2. Saque el pernoy el soportede campana de iacuchiiia que sostienen
la cuchilla y eladaptador de la mismaal cigQe_aidel motor.Vea la
Figura 18.
3. Saque la cuchillay el adaptador delcigQe_ai.
NOTA:Quitandoestos articulos, la arandela tambienpueden iiberarse
de elcigQefial.Este seguropara hacer lanotade laorientaci6n de este
articulo para nuevasesi6n.
4. Saque ia cuchiliadel adaptador para comprobar el equilibrio.
Balanceela cuchilla sobre un destornilladorde eje redondo para
inspeccionarla.Saque metaldei iado pesadohastaque quede bien
equilibrada.Cuandoafile la cuchilla, siga el a.ngulooriginal de la
muelacomo guia.Afile cadahorde decorte pot igual para mantener
el balance de lacuchilla.
I rote_ortadora decespedI
_ysepuede romper,causandoasi lesionespersonales.
Lubrique el cigQehaidei motor y iasuperficie internadel adaptador
de iacuchilla conaceite iigero. Desliceel adaptadorde la cuchilla
sobre elcigQefialdel motor. Instaleia cuchiiia enei adaptador
con ellado marcado "Bottom" (inferior)(o con el numerode parte)
hacia ei piso cuando iacortadora de cespedesta.en posici6n
de funcionamiento.AsegQreseque la cuchillaquede aiineaday
asentadaen las bridasdel adaptador.
J
Figura 17
Adaptad(
la Mism
Figura18
J
6. Coloque ei soporte de campanade la cuchillaen ia misma.Aiinee
las muescasdel soporte de campanade la cuchilla con los orificios
peque_os de lacuchilla.
7. Vuelvaa colocarel pemo hexagonaly ajQstelosegun los siguientes
valores de torsi6n:450 Ib-pulgcomo minimo, 600 Ib-pulg como
ma.ximo.
Paragarantizaria operaci6n segurade la cortadorade cesped, revise
peri6dicamenteel pernode lacuchilla para determinarsi esta.bien
ajustado.
CUIDADO DE LA CORREA
NOTA:Para cambiarla correade paseode la cortadora de cesped es
necesario extraervarios componentes. Solicite a uncentroautorizado de
servicio Searsque realiceelreemplazo de la correa.
56

CAIVIBIO DE LA BATERiA f
Lasbateriascontienen_.cidosulfOricoquepuedecausarquema-
duras.Nopongaencortocircuitoni mufflelasbateriasde ninguna
manera.Nocoloquelasbateriassobrefuegodadoquepueden
explotaro emitirmaterialest6xicos.
1. Afloje lasperillas en estrellaque sujetan las manijasinferior y
superiory concuidado doble la manijasuperior hacia la manija
inferiortaicome se muestraen la Figura19.
2. Retirelos dos tornillosque sujetania cubierta de iabateria ai
alojamientode la bateriay col6quelosal costado.Vea la Figura19.
3. Abra iacubierta de ia bateria,extraiga los conductorespositive
y negativede la bateria, saquela bateria y coloque unanueva.
Conecteel conductor positiveai lade positive del paquetede bateria,
luegoconecte el lade negative.
NOTA: La bateriaquetiene puede diferir ligeramentede la quese
muestraen la Figura 19.Consultela lista de piezas.
IMPORTANTE: Cuando cambieel paquetede bateriaen ei panelde
la manija, elpaquetede bateria debecolocarse con el terminalpositive
hacia el lade izquierdoy eiterminal negative hacia ellade derecho dei
panel(el terminal positiveestfi mils cerca de la Ilavede contacto). Vea
la Figura20. El cambioincorrecto del paquetede bateria causa daSos
graves.
4. Vueivaainstalar ia cubierta deialojamiento de iabateria y fijela con
los dos tornillosque sac6antes, asegurfindosede colocar a presi6n
el conductode alambre a la izquierdaen sulugar en el alojamiento.
5. Doble lasmanijashacia arriba y aprietela perillasen estrella.
Noquiteelpaquetede bateriasdel alojamientodel arrancador
el_ctricoporningunaraz6nqueno seael reemplazo.
Carga de la bateria
Labateriacontienefluidocorrosivoy materialt6xico;sedebe
manipularconcuidadoy mantenera losni_osalejados.Noperfore,
desensamble,muffleo prendafuegoa labateria.Durantelacarga
o descargasepodrianemitirgasesexplosivos.Utilicelaen un_.rea
bienventilada,lejosde fuentesde ignici6n.
NOTA: La clavijade conexi6nespecialmentedise_ada delcargador
Qnicamenteencajaen la caja de las baterias.
1. Enchufe el cargadorde ia bateria dentrodel orificio en la parte
inferiordel alojamientode la bateria. Vea laFigura21.
2. Inserteel enchufe delcargador de bateriasen un tomacorriente
residenciai comQnde 120voitios. Cargue ia bateria de 8a 10horas
antesde usar ia unidad perprimera vez.Si no io hacese puede
reduciria duraci6n de ia bateria. Nocargue pot milsde 12 horas,
La bateriaQnicamentenecesitarfi cargarse enel ajusteiniciai y luego
de periodos prolongadossin uso.
3. Despuesde cargar,primero desconecte elenchufedel
tomacorriente,luego desconecteel conductor delcargadorde la
bateria.
57
Figura 19
+
Terminalpositivo
m
Terminalnegativo
_J
f
Figura20
Figura 21
J
J

IMPORTANTE:Siempreconecteelconductordelcargadorendel
paquetedebateriasenprimerlugar,yluegoinserteelenchufedel
cargadordebateriasenuntomacorrienteresidencialesta.ndarde120
voltios.Sigaestasecuenciasiemprequecarguelabateria.
UtiliceQnicarnenteel cargadorde bateriassurninistradoconesta
cortadorade c_sped.
Cambio del fusible
El circuitodel arrancadorelectrico y la bateria esta.nprotegidos pot un
fusible de 40 amperes.Si ei fusible se quema,el arrancador electrico no
funcionar& Si ia unidad nose enciendecon ei arrancador electrico, siga
los siguientes pasospara verificarel fusible que esta.en elalojamiento de
la bateria:
1. Abra iacubierta de ia bateriasegQnsemuestra en Cambiode
bateria.Veaia Figura 19.
2. Retireel fusibledel enchufee inspeccione talcomo semuestra
en iaFigura22. Siesta. quemado,reemplacepor unfusible de
autom6vilesesta.ndarde 40 amperes.
3. Coloquecon cuidado loscables dentrodel alojamiento,cierre la tapa
de labateria y doble la manija superior nuevamenteen su lugar.
J
Figura 22
NOTA: El motorpuede ponerse en marchamanualmentesi elfusible se
quema.
58

Nunca almacenelacortadora de cesped concombustible en el tanque
en unespacio cerrado oen a.reascon poca ventilaci6n,donde los
gases deicombustible puedanalcanzar el fuego,chispaso una luz
pilotocomo ia quetienen algunos homos,calentadores de agua,
secadores de ropa o aigOnottodispositivo agas.
PREPARACI6N DEL MOTOR
Yaquelosmotoresalmacenaronm_.sde 30dfas:
1. Paraimpedira lagomaformarseenel sistemadecombustible
oen partesde carburador,dirijasel motorhastaqueestose
parea faltadel combustibleo a_adirun aditivodegasolinaal
gasen el tanque.Siustedusaunaditivode gas,dirigeelmotor
durantevariosminutosparaponeren circulaci6nel aditivoporel
carburador-- despu_squeel motory elcombustiblepuedenser
almacenadoshasta24meses.
2. Mientrasel motorestodavfacaliente,cambioel petr61eo.
3. Limpieel motorde escombrossuperficiales.
PREPARACION DE LA CORTADORA DE
CO'SPED
Limpiey iubriquela cortadora como se describeen las instrucciones
de lubricaci6n.
• No utiliceuna lavadoraa presi6n ni una manguerade jardfn para
limpiar su unidad.
Cubra la cuchilla de lacortadora con grasa parachasis para impedir
la oxidaci6n.
• Refierasea la PREPARACIONDELMOTORpara instruccionesde
almacenaje de motorcorrectas.
• Almacene la unidad en una zonalimpia y seca. No la almacene
cerca de materialescorrosivos como pot ejemplo fertilizantes.
Cuando almacenecuaiquier tipode equipo motorizadoen un gaip6n
de dep6sitomet_.iicoo con poca ventilaci6n,tenga especialcuidado
de realizarle untratamiento antioxidantealequipo. Use aceite ligeroo
silicona para recubrir eiequipo, especialmentelos cables y partes m6viles
de su cortadoraantes de aimacenarla.
Bateria
Labaterfa debeguardarse con carga completa. El aimacenamiento
prolongado de unabaterfa descargadareducira,la vida Otily la capacidad
de la baterfa.
59

hayanvenidoa unaparadacompleta.Desconecteel alambrede bujfayb_.selocontrael motorparaprevenirel comienzoinvolun-
SiempreIlevepuestoscristalesinastillablesdurantelaoperaci6no realizandocualquierajusteo reparaciones.
Elmotor noarranca
Elmotorfunciona de
manera errfitica
1. Controlde ia cuchilla desenganchado.
2. Se hadesconectado el capuch6n de la bujia.
3. El dep6sito de combustibleestfi vacio oel
combustiblese ha echado aperder.
4. La bujia nofunciona correctamente.
5. El motorsedesbord6.
6. Lineade combustible bloqueada.
7. Fusiblequemado. (Arranqueelectrico Qnicamente)
1. El capuch6nde la bujia estfi flojo.
2. El combustiblese haechado aperder.
3. La ventilaci6nde la tapa delcombustible estfi
obstruida.
4. Aguaosuciedad en el sistemadel combustible.
5. El fiitro de aireestfi sucio.
6. Lineade combustible bloqueada.
1. El nivelde aceitedel motorestfi bajo
2. Flujode airerestringido
1. Engraneel control de ia cuchiila.
2. Conecteel cable al capuch6n de labujia.
3. Lleneel tanquecon gasolina limpiay nueva.
4. Limpie,ajuste la separaci6n,ocambie la bujia.
5. Esperar unosminutos parareactivarse.
6. Contactecon sucentro de partes y reparaciones Sears.
7. Reemplaceel fusible (vea la secci6nServicio).
1. Conectey ajuste el capuch6nde la bujia.
2. Lleneel tanquecon gasolina limpiay nueva.
3. Destapelaventilaci6n.
El motorrecalienta
El motorvacilaa altas 1. Poca separaci6nde los electrodosde la bujia 1.
revoluciones
El motorfunciona real 1. Bujia atorada,averiada o excesode separaci6n. 1. Limpie,reemplaceo reajustela separaci6n a .020".
en marchaienta 2. Elfiitro de aireestfi sucio 2. Consulteia secci6n Mantenimientodei manual.
Demasiadavibraci6n 1. Cuchilla de corte flojao descentrada. 1. Aprietela cuchilla y el adaptador Baianceela cuchilla.
2. Cuchillaabollada. 2. Cambielacuchilla.
1. CespedhQmedo.
2. Cespeddemasiadoaito.
3. Lacuchiiia de ia cortadora no estfi afiiada.
1. Lacuchiiia de ia cortadora no estfi afiiada.
1. Correamaiinstaiada.
2. Haydesechos bloqueandoel funcionamiento de la
transmisi6n.
3. CorreadaSadaodesgastada.
La cortadora de
cesped no regresa
el recorte de cesped
comoabono
Cortedesiguai
La cortadora no
avanzapot si misma
4. Vacieei tanquede combustible. Carguecombustible
nuevoen el dep6sito.
5. Consulteia secci6n Mantenimientodei manual.
6. Contactecon su centro de partes y reparaciones Sears.
1. Lleneel motorcon iacantidad y tipo de aceiteadecuado.
2. Limpielos residuosde airededor de las aietas de
refrigeraci6ndel motor y delalojamiento del soplador.
Ajuste laseparaci6n a .020".
1.
2.
3.
1. Afiieo cambieia cuchiiia.
No corte elcesped cuando este mojado,esperehasta
quesea mils tarde para hacerlo.
Corteuna vezaaitura de corte elevada, iuegovueiva a
cortara ia altura deseadao haga unsendero de corte
mils angosto.
Afileo cambiela cuchilla.
1. Compruebeia correa para vet si ia poleaestfi bien
instaiaday se muevecorrectamente.
2. Detengael motor,desconecteel capuch6nde la bujiay
limpie losdesechos.
3. Comuniquesecon el centro de servicio Sears.
60

(Esta p_.ginase aplica s61oen EE.UU. y Canada.).
Sears Brands Management Corporation, el Consejo de Recursos Ambientales de California (CARB)
y la Agencia de Protecci6n Ambiental de los Estados Unidos (EPA)
Declaraci6n de garantia del sistema de control de emisiones (derechos y obligaciones de la garanfia de defectos del propi=
etario)
LACOBERTURADE LAGARANTJADECONTROLDEEMISIONESES Y PARALOSMODELOSCERTIFICADOSDELANO 1997YPOSTERIORES,
APLIOABLEALOSMOTORESCERTIFICADOSCOMPRADOSENCALIFOR- QUESECOMPRENY UTILICENENCUALQUIERPARTEDE LOSESTADOS
NIAEN1995Y POSTERIORMENTE,QUESE UTILIZANENCALIFORNIA, UNIDOS(Y APARTIRDEL1DE ENERODE2001ENCANADA).
Declaraci6n de garanfia sobre defectos en el control de emJsiones para California y los Estados UnJdos
ElConsejode RecursosAmbientalesdeCalifornia(CARB),la EPA(Agencia
de Protecci6nAmbientaldelos EE.UU.)y Searstienenel gustodeexplicarla
garantiadelsistemadecontroldeemisionesparamotoresdela_o 2000y para
elfuturoconrelaci6na motorespeque_ostodoterreno(SORE).EnCalifornia,
los nuevosmotorespeque_ostodoterrenodebenestardise_ados,construidos
y equipadosparacumplirconlasrigurosasnormasanti-smogdelestado.En
el restodelos EstadosUnidos,losmotoresnuevostodoterrenodeencendido
porchispacertificadosparael a_o1997debencumplirest_ndaressimilares
establecidospot laEPA.Searsdebegarantizarel sistemadecontroldeemi-
sionesdesumotorparalosperiodosdetiempoenumeradosacontinuaci6n,
siemprequenohayaabuso,negligenciaomantenimientoindebidode su
motortodoterrenopeque_o.Susistemade controldeemisionespuedeincluir
piezastalescomoel carburador,el filtrodeaire,elsistemadeencendido,el
silenciadoryelconversorcatalitico.Tambienpuedeincluirconectoresyotras
unidadesrelacionadasconlasemisiones.Dondeexistaunacondici6ncubierta
porla garantia,Searsreparar_supeque6omotortodoterrenosincostoalguno
incluyendodiagn6stico,piezasy manodeobra
Cobertura de la garantJa Sears para defectos en el control de emJsiones
Losmotorestodoterrenopeque6osest_ngarantizadosenIorelativoalcontrol alas disposicionesquese indiquena continuaci6n.Si unapartedesumotor
deemisionesparadefectosenpiezasduranteunperiododedosa_os,sujeto cubiertapot lagaranfiaesdefectuosa,Searsreparar_osustituir_dichaparte.
Responsabilidades del propietario en relacibn con la garantia
Comopropietariodelmotortodoterrenopeque_o,Ud.esresponsabledela
realizaci6ndelmantenimientorequeridoqueseincluyeenlas instrucciones
deoperaci6ny mantenimiento.Searsrecomiendaqueseconserventodoslos
recibosrelativosal mantenimientodesumotortodoterrenopeque_o,pero
nopudedenegarla garantiasimplementeporla faltade losmismos,oporsu
incumplimientodelmantenimientoprogramatic.Comopropietariodelmotor
peque_otodoterrenodebesaberque,sinembargo,Searslepuedenegar
lacoberturade lagarantiasi su motortodoterrenopeque6oounapiezadel
mismohanfalladodebidoaabuso,negligencia,mantenimientoindebidoo
a modificacionesnoaprobadas.Ud.es responsabledepresentarsumotor
todoterrenopeque6oaundistribuidorde serviciosSearsautorizadotan pronto
comoaparezcaunproblema.Lasreparacionesdela garantiasinconfiicto
debencompletarseen unplazodetiemporazonable,nosuperiora30dias.Si
tienealgunapreguntarespectoa sus derechosy responsabilidadesreferentes
a lagarantia,debecontactarconun representantedeserviciosSearsal 1--
800--469--4663.Lagarantiadeemisioneses unagarantiapotdefectos.Los
defectossejuzgandeacuerdoconelfuncionamientonormalde unmotor.La
garantiano est_relacionadaconunapruebade emisionesenuso.
Disposiciones de la garantJa Sears para defectos en el control de emJsiones
Lassiguientessondisposicionesespecificasrelacionadasconla coberturade lagarantiaparadefectosenel controldeemisiones.Esuna_adidoa lagarantiade
motorSearsparamotoresnoreguladosqueseencuentraen lasinstruccionesdefuncionamientoy mantenimiento.
1. Piezascongarantia
Lacoberturadeesta garantiaseextiendeL]nicamentealas piezas
queaparecenacontinuaci6n(las partesde lossistemasdecontrolde
emisiones),siempreque dichaspiezasestuvieranyaenel motoren el
momentodesucompra.
a. Sistemademedici6ndecombustible
•Sistemadeenriquecimientoparaarranqueenfrio
•Carburadory partesinternas
• Bombade combustible
b. Sistemadeinducci6nde aire
• Filtrodeaire
•Colectordeadmisi6n
c. Sistemadeencendido
• Bujia(s)deencendido
•Sistemadeencendidomagneto
d. Sistemadelcatalizador
•Convertidorcatalitico
•Colectordeescape
•Sistemadeinyecci6nde aireov_lvulade impulsos
e. Elementosvariadosusadosenlos sistemasanteriores
•Wlvulas devacio,sensiblesatemperatura,posici6ny tiempo
einterruptores
•Conectoresy montajes
2. AIcancedela cobertura
Searsgarantizaal poseedorinicialy a loscompradoressubsiguientes
quelas piezascongarantianotendr_ndefectosen materialesni mano
deobraque provoquenla falladelas mismasduranteun periodode
dosaSosa partirdela fechaen queel motorseentregaa uncomprador
particular.
3. Sincargo
Lareparaci6noreemplazodecualquierpartecongarantiaserealizar_
sin cargoalgunoparael poseedor,incluyendotareasdediagn6sticoque
permitandeterminarsi unapartecongarantiaes defectuosa,siempreque
dichodiagn6sticose realiceenundistribuidordeserviciosSearsautoriza-
do. Parael serviciode lagarantiadeemisiones,contactealdistribuidorde
serviciosSearsautorizadom_scercanoincluidoen las"P_ginasamarillas"
en lascategorias"Motores,gasolina","Motoresdegasolina","Podadoras
de cesped",osimilares.
4. Reclamacionesyexclusionesala cobertura
Las reclamacionesde lagarantiadebenenviarsedeacuerdocon las
disposicionesdela politicadegarantiaparamotoresSears.Lacobertura
de lagarantiaexcluir_defectosen piezascongarantiaquenosean partes
originalesSears,o abuso,negligenciao mantenimientoincorrecto,tal y
comoseestableceen lapoliticadegarantiaparamotoresSears.Searsno
es responsablede lasfallasenpiezascongarantiaprovocadasporel uso
de partesa_adidas,que noseanoriginalesoquese hayanmodificado.
5. Mantenimiento
Cualquierpartecongarantiaque noesteprogramadaparasetreempla-
zadacomomantenimientorequerido,oque s61odebainspeccionarse
regularmentealefectode"inspeccioneoreemplacesegL]nsea necesario",
estar_garantizadacontradefectosduranteelperiodode la garantia.Todas
las piezasgarantizadasqueestenprogramadasparasureemplazopara
cumplirconlosrequisitosdemantenimientoestar_ngarantizadass61o
porel periodoanterioral primerreemplazoprogramaticparadicha pieza.
Cualquierpiezade recambioqueseaequivalenteenfuncionamientoy
durabilidadpuedeusarsepararealizarmantenimientoo reparaciones.El
propietarioes responsablederealizartodoel mantenimientorequerido,tal
y comose defineenlas instruccionesdefuncionamientoy mantenimiento
Sears
6. Coberturaindirecta
Porla presente,la coberturase extiendea la falladecualquiercomponente
de motorprovocadapot lafallade unapiezacongarantiaqueestetodavia
en periododegarantia.
Enlos EstadosUnidosy Canad_hayunalineadeatenci6nde24 horas,1-800-469--4GG3,quecuentacon unmenL]conmensajespre-grabadosque contienen
informaci6nparael mantenimientodemotores.

Busque el periodo de duraci6n de emisiones importantes yla informaci6n de clasificaci6n de aire en
la etiqueta de emisiones de su motor
Los motores cuyo cumpiimiento con los estAndares de emisi6n Tier 2 de laComisi6n de Recursos Ambientales de California (CARB)
est6 certificado deben exhibir la informaci6n relacionada con el periodo de duraci6n de ias emisiones y la clasificaci6n de aire. Sears
Brands Management Corporation ponen esta informaci6n a disposici6n del consumidor en nuestras etiquetas de emisiones.
Ei Periodo de Duraci6n de las Emisiones describe el nQmero de horas de tiempo real de funcionamiento para el cuai se certifica que
el motor cumpie con ias reglas de emisi6n, descontando el mantenimiento adecuado del mismo segQn las instrucciones de oper-
aci6n y mantenimiento. Se utilizan las siguientes categonas:
Moderado:Se certifica que el motor cumpie con las reglas de emisi6n durante 125 horas de tiempo real de funcionamiento del motor.
Inmediato:Se certifica que el motor cumpie con las reglas de emisi6n durante 250 horas de tiempo real de funcionamiento del motor.
Extendido:Se certifica que el motor cumpie con las reglas de emisi6n durante 500 horas de tiempo real de funcionamiento del motor.
Por ejemplo, una cortadora de c6sped tJpica que se empuja desde arras se usa entre 20 y 25 horas por aSo. Por Io tanto, el Periodo
de Duraci6n de Emisiones de un motor con una clasificaci6n intermedia sena equivaiente aentre 10 y 12 aSos.
Laciasificaci6n de aire es un nQmero calculado para describir el nivel relativo de emisiones para un grupo de motores en particular.
Cuanto menor sea la clasificaci6n de aire, mayor es la limpieza del motor. La informaci6n se presenta de forma grAfica en la etiqueta
de emisiones.
Despu_s del 1 de julio de 2000, busque el periodo de cumplimiento de las reglas de
emisiones en la etiqueta de cumplimiento de las reglas de emisiones del motor
Despu6s del 1 de julio de 2000 se certificarA que determinados motores Sears Brands Management Corporation cumplen
con los estAndares de emisiones de la fase 2 de la Agencia de Protecci6n Ambientai de los Estados Unidos (USEPA). Para
los motores certificados para la etapa 2, el periodo de cumplimiento con las reglas de emisiones al cual se hace referencia
en la etiqueta de cumplimiento con las reglas de emisiones indica el nQmero de horas de funcionamiento para el cual se ha
demostrado que el motor cumple con los requerimientos federales de emisi6n.
Para los motores con desplazamiento inferior a 225 cc, Categoria C = 125 horas, B = 250 horas y A = 500 horas.
Para los motores con desplazamiento de 225 cc o mAs, Categoria C = 250 horas, B = 500 horas y A = 1000 horas.
El desplazamiento de los motores de la serie modelo 150112 es 249 cc.
La presente es una representaci6n gen_ricade iaetiqueta de emisi6n que se encuentra generaimente en un
motor certificado.
FAMILYYBSXS.3192VA 274812
GDOC-100182Rev.A
62

Feficitaciones por haber realizado una adquisici6n inteligente. El producto Craftsman® que ha
adquirido esta disedado y fabricado para brindar muchos aSos de funcionamiento confiable. Pero
como todos los productos a veces puede requerir de reparaciones. Es en ese momento cuando el
disponer de un Acuerdo de protecci6n para reparaciones le puede ahorrar dinero y problemas.
A continuaci6nse detallanlos puntosincluidos en el Acuerdo:
[] Servicio experto prestadopor nuestros10,000especialistasen reparacionesprofesionales
[] Servicio ilimitado sin cargo para las piezasy la mano de obra entodas las reparacionescubiertas
[] Reemplazo del producto hasta 1500d61aressi no es posiblerepararel producto cubierto
[] Descuento de 25% del precionormal delservicio y de las piezas relacionadascon el mismo que no estencubiertas
por elacuerdo; adem,_s,25% del precionormal de laverificaci6nde mantenimientopreventivo
[] Ayuda rApida por tel_fono - Io IlamamosResoluci6n RApida- el apoyotelef6nico de unChamusca al representante.
Piense ennosotroscomo elmanual "de un due_ohablador."
Una vezadquiridoel Acuerdo,puedeprogramarel serviciocon tan s61orealizar una Ilamadatelef6nica. PuedeIlamaren
cualquier momentodeldia o de la nocheo programarun servicio en linea.
ElAcuerdode Protecci6nde Reparaci6nes una compra sin riesgo.Si ustedanulapor alguna raz6nduranteel periodode
garantiade producto,proporcionaremosunreembolso Ileno.O, un reembolsoprorrateadoencualquier momentodespues
del periodode garantiade producto expira, iAdquiera hoysu acuerdode protecci6nparareparaciones!
Se aplican determinadas limitaciones y exclusiones. Paraobtener informaci6n adicional y precios en los Estados
Unidos Ilarneal 1-800-827-6655.
El *Coverage en Canada varia en algunos articulos. Para detalles Ilenos la Ilamada Chamusca Canada en 1-800-
361-6665.
Servicio de instalaci6nde Sears
Sideseasolicitar la instalaci6nprofesionalde Searsde aparatosdomesticos,dispositivos paraabrir portones,calentado-
resde aguay otrosarticulos domesticosimportantes,en los EstadosUnidoso Canadaflameal 1-800-4-MY-HOIVlE®.
63

Your Home
For troubleshooting, product manuals and expert advice:
managernylife
www.managemylife.com
For repair - in your home - of all major brand appliances,
lawn and garden equipment, or heating and cooling systems,
no matter who made it, no matter who sold it!
For the replacement parts, accessories and
owner's manuals that you need to do-it-yourself.
For Sears professional installation of home appliances
and items like garage door openers and water heaters.
1-800-4-MY-HOME ® (1-800-469-4663)
Call anytime, day or night (U.S.A. and Canada)
www.sears.com www.sears.ca
Our Home
For repair of carry-in items like vacuums, lawn equipment,
and electronics, call anytime for the location of your nearest
Sears Parts & Repair Service Center
1-800-488-1222 (U.S.A.) 1-800-469-4663 (Canada)
www.sears.com www.sears.ca
To purchase a protection agreement on a product serviced by Sears:
1-800-827-6655 (U.S.A.) 1-800-361-6665 (Canada)
Para pedir servicio de reparaci6n
a domicilio, y para ordenar piezas:
1-888-SU-HOGAR ®
(1-888-784-6427)
www.sears.com
Au Canada pour service en frangais:
1-800-LE-FOYER Mc
(1-800-533-6937)
www.sears.ca
® Registered Trademark / TMTrademark of KCD IP, LLC in the United States, or Sears Brands, LLC in other countries
® Marca Registrada ! TMMarca de Fabrica de KCD IP, LLC en Estados Unidos, o Sears Brands, LLC in otros paises
MCMarque de commerce ! MDMarque deposee de Sears Brands, LLC
-
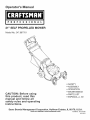 1
1
-
 2
2
-
 3
3
-
 4
4
-
 5
5
-
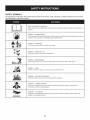 6
6
-
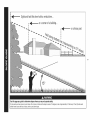 7
7
-
 8
8
-
 9
9
-
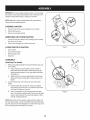 10
10
-
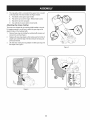 11
11
-
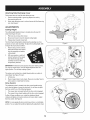 12
12
-
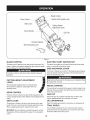 13
13
-
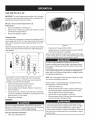 14
14
-
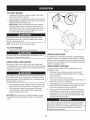 15
15
-
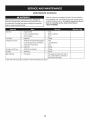 16
16
-
 17
17
-
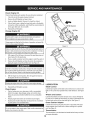 18
18
-
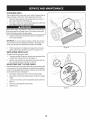 19
19
-
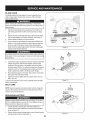 20
20
-
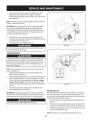 21
21
-
 22
22
-
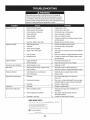 23
23
-
 24
24
-
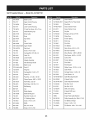 25
25
-
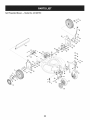 26
26
-
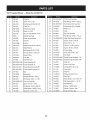 27
27
-
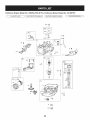 28
28
-
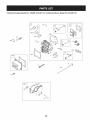 29
29
-
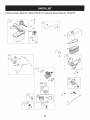 30
30
-
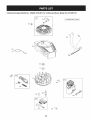 31
31
-
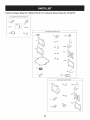 32
32
-
 33
33
-
 34
34
-
 35
35
-
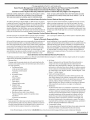 36
36
-
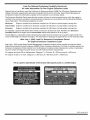 37
37
-
 38
38
-
 39
39
-
 40
40
-
 41
41
-
 42
42
-
 43
43
-
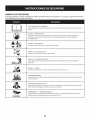 44
44
-
 45
45
-
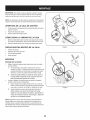 46
46
-
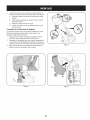 47
47
-
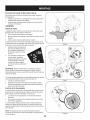 48
48
-
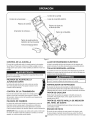 49
49
-
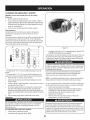 50
50
-
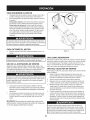 51
51
-
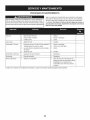 52
52
-
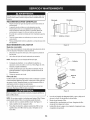 53
53
-
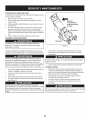 54
54
-
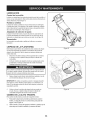 55
55
-
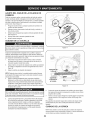 56
56
-
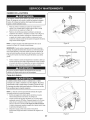 57
57
-
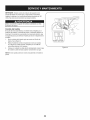 58
58
-
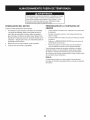 59
59
-
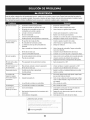 60
60
-
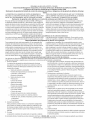 61
61
-
 62
62
-
 63
63
-
 64
64


MTD 12AE999P099 El manual del propietario
- Categoría
- Cortadoras de césped
- Tipo
- El manual del propietario
- Este manual también es adecuado para
Artículos relacionados
-
MTD 12A948J099 El manual del propietario
-
-
Kmart 01643729-5 Manual de usuario
-
-
-
-
MTD 247.38821 El manual del propietario
-
-