La página se está cargando...

TECHNICAL FEATURES
• 433.92MHz Receiver Module.
• 82 PPA standard rolling code controls.
• Output for lock and courtesy light modules.
• Digital / hybrid limit switch.
• Photocell input.
• Electronic clutch adjustment.
• Input for push-button.
• Automatic path memorization.
• Brake adjustment.
• Limit adjustment.
• Delay time for opening with trac light.
• Enables settings via PROG.
• Enables activating the control board via Wi-Fi Connect
PPA ON.
• Pre-setup conguration via jumpers according to gate
type.
• Power source: 12v, 450mA.
SELECTING THE MODEL
Select the gate operator model, sliding (DZ) or swing-
ing (BV).
Keep the 2-way DZ/BV connector open to select the
sliding model; to select the swinging model, close the
2-way DZ/BV connector.
After selecting the desired model, press the CMD but-
ton until LD1 ashes quickly, conrming the operation.
DELETING THE PATH
To delete the path, press and hold the CMD button for
5 seconds until LED LD1 lights up.
PROGRAMMING TRANSMITTERS
1. With the gate stopped, press and release the GRV but-
ton.
2. Press and hold the transmitter button until the LD2 LED
ashes quickly.
3. Soon after this, press the GRV button, the LD2 LED will
remain lit, wait 10 seconds to exit the function and the
transmitter will be recorded.
DELETING TRANSMITTERS
1. With the gate stopped, press and hold down the GRV
button until LD1 LED ashes quickly, conrming the
operation. Once this is done, all transmitters will be
deleted.
AUTOMATIC / SEMI-AUTOMATIC TIME
Once the opening cycle ends, the gate waits for the us-
er-congured pause time to automatically close the gate.
To disable it and set the time to zero, the control board will
wait for a new command to close.
1. With the gate stopped, close the JPROG jumper, and
LED1 starts ashing 2x until a button is pressed.
2. Press the CMD button 1x, LED1 will stop ashing and
remain lit.
3. Press the GRV button to enter the function, and the LED
will show the conguration level.
4. Press the GRV button to increase the automatic waiting
time, and press the CMD button to decrease the time.
5. Resetting the automatic time leaves the control board
in semi-automatic mode, and LED1 ashes quickly.
6. To congure another parameter, press the CMD (-) and
GRV (+) buttons together to return to the initial pro-
gramming mode.
7. Remove the jumper.
Levels:
• N1 ashing = Semi-automatic.
• N1 lit = 5 sec.
• N2 lit = 10 sec.
• N3 lit = 30 sec.
• N4 lit = 60 sec.
• N5 lit = 90 sec.
• N6 lit = 120 sec.
• N7 lit = 180 sec.
• N8 lit = 240 sec.
ADJUSTING THE OPENING AND CLOSING
LIMITS
The limit is the distance left to reach the mechanical
stop. The control board will continuously monitor the
gate’s position; when it comes to this limit, the operating
torque reduces, and the gate reaches the mechanical stop
smoothly.
1. With the gate stopped, close the JPROG jumper, and
LED1 starts ashing 2x until a button is pressed.
2. For the closing limit: press the CMD button 2x, LED1 will
stop ashing, and LED2 should remain lit. Press the GRV
button to enter the function, and the LED will show the
conguration level.
3. For the opening limit: press the CMD button 4x, LED1
will stop ashing, and LED4 should remain lit. Press
the GRV button to enter the function, and the LED will
show the conguration level.
4. Press the GRV button to move the limit to the mechan-
ical stop, thus increasing the distance.
5. Press the CMD button to decrease the distance to the
limit switch.
6. At the minimum value, the limit is disabled and it does
not reduce the torque. This function has eight adjust-
ment levels.
Levels:
• N1 ashing = limit disabled.
• N1 lit = 5% of the path.
• N2 lit = 10% of the path.
• N3 lit = 15% of the path.
• N4 lit = 20% of the path.
• N5 lit = 25% of the path.
• N6 lit = 30% of the path.
• N7 lit = 35% of the path.
• N8 lit = 40% of the path.
OPENING AND CLOSING LIMIT TORQUE
ADJUSTMENT
The limit torque determines the limit behavior within
the given space.
1. With the gate stopped, close the PROG jumper.
2. Use the CMD button (-) to select the opening torque or
closing torque function via the TACT LED.
3. Press the GRV (+) button to enter the function.
4. Press the CMD (-) button to decrease the level, and the
GRV (+) button to increase it.
5. Open the PROG jumper to complete the operation.
BRAKE
When there is a command to turn o the motor, the
brake will be activated and its sensitivity can be adjusted.
1. With the gate stopped, close the JPROG jumper, and
LED1 starts ashing 2x until a button is pressed.
2. Press the CMD button 6x. LED1 will stop ashing, and
LED6 should remain lit.
3. Press the GRV button to enter the function, and the LED
will show the conguration level.
4. Press the GRV button to increase the time the brake will
be activated.
5. Press the CMD button to decrease the time.
6. At the minimum value, the brake is disabled.
7. To congure another parameter, press the CMD (-) and
GRV (+) buttons together, returning to the initial pro-
gramming mode.
8. Remove the Jumper.
Levels:
• N1 ashing = disabled
• N1 lit = minimum
...
• N8 lit = maximum
FORCE (ELECTRONIC CLUTCH)
Adjusting the motor operating force. In order for this
safety sensor device to be used eectively, proceed as
follows:
• After the operator is properly installed on the gate, ad-
just the electronic clutch, so that the force is the min-
imum necessary to move the gate leaf throughout its
path, when opening and closing.
• After adjusting is nished, test the function. Block the
gate movement by placing a rigid object in the gate
path.
1. With the gate stopped, close the JPROG jumper, and
LED1 starts ashing 2x until a button is pressed.
2. Press the CMD button 7x. LED1 will stop ashing, and
LED7 should remain lit.
3. Press the GRV button to enter conguration, and the
LED will show the conguration level.
4. Press the GRV button to increase the force, and the
CMD button to decrease it.
5. To congure another parameter, press the CMD (-) and
GRV (+) buttons together, returning to the initial pro-
gramming mode.
6. Remove the jumper.
COURTESY LIGHT TIME
Setting the time to turn o the courtesy light relay
module when the gate reaches the closing limit switch.
1. With the gate stopped, close the JPROG jumper, and
LED1 starts ashing 2x until a button is pressed.
2. Press the CMD button 8x. LED1 button will stop ash-
ing, and LED8 should remain lit.
3. Press the GRV button to enter conguration, and the
LED will show the conguration level.
4. Press the GRV button to increase the waiting time to
turn o the light, and the CMD button to decrease it.
5. To congure another parameter, press the CMD (-) and
GRV (+) buttons together, returning to the initial pro-
gramming mode.
6. Remove the jumper.
Levels:
• N1 ashing = trac light turns o as soon as it closes.
• N1 lit = 30 sec.
• N2 lit = 60 sec.
• N3 lit = 90 sec.
• N4 lit = 120 sec.
• N5 lit = 150 sec.
• N6 lit = 180 sec.
• N7 lit = 210 sec.
• N8 lit = 240 sec.
CHANGING MEMORIZATION TORQUE
To change the memorization torque, close the PROG
jumper, press and release the GRV button, and you will en-
ter the function. Press and release the GRV button again
to select the torque level. Each time it is pressed, it selects
a dierent level – smooth, moderate and strong – that can
be identied through the LED LD1, LD2 and LD3.
EXTRA SETTINGS MADE VIA PROG ONLY
The PROG programmer module can also be used to
congure:
• Reversal: enabled or disabled.
• Opening delay: the time between the opening com-
mand is received and the time the control board sends
the command to the gate, thus activating a trac light
connected to the courtesy light for signaling. It can be
congured as disabled or with time congured every 3s
with a maximum value of 24s.
SETTINGS VIA “PROG” PROGRAMMER
PROG: enables conguring more precisely.
While PROG is in the control board, the commands via the
push-button, the CMD button and the spare receiver will
be disabled for commands to start the motor in the con-
trol board.
Only PROG can send commands to open and close the
gate using the (+) button and the registered transmitter, if
it is on the main sensor status screen.
Keep any PROG button pressed, and after 3 seconds, it will
enter the self-repeat mode of the pressed button. This will
speed up moving to the next screens or adjustments.
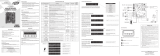
HOME SCREEN
Monitors control board sensors
and peripherals:
(Gate Status, FCF*, FCA*, Photocell
and Transmitter).
FCF* - opening limit switch
FCA* - closing limit switch
FACTORY STAN-
DARD SETUP TYPE Restores factory default settings.
PROGRAM TRANS-
MITTERS
Programs new transmitters (con-
trols) in the electronic control
board.
DELETE TRANSMIT-
TERS
Deletes (erases) all transmitters
(controls) programmed in the
control panel.
PAUSE TIME
Automatic closing time
• Semi-automatic (disabled)
• 1 (5 sec.)
• 2 (10 sec.)
• 8 (240 sec.)
CLOSE LIMIT
9 levels
• 0 (disabled)
• 1 (minimum)
• 8 (maximum)
CLOSE TORQUE 2 levels
• 1 (minimum)
• 2 (maximum)
OPEN LIMIT
9 levels
• 0 (disabled)
• 1 (minimum)
• 8 (maximum)
OPEN TORQUE 2 levels
• 1 (minimum)
• 2 (maximum)
BRAKE
9 levels
• 0 (disabled)
• 1 (minimum)
• 8 (maximum)
FORCE
9 levels
• 0 (disabled)
• 1 (minimum)
• 8 (maximum)
MEMORIZATION
TORQUE
3 levels
• 0 (mild)
• 1 (moderate)
• 2 (strong)
STOP CLEARANCE
9 levels
• 0 (disabled)
• 1 (minimum)
• 8 (maximum)
COURTESY LIGHT
TIME
Courtesy light time
• 0 (disabled)
• 1 (30 sec.)
• 2 (60 sec.)
• 8 (240 sec.)
REVERSAL
Command permission from the
push-button or transmitter to wok
during the gate close path for re-
versal.
TYPE OF CODE Selects the transmitter protocol
(TX) type:
• Rolling code (PPA).
OPEN DELAY
9 levels
• 0 (disabled)
• 1 (minimum)
• 8 (maximum)
CLOSE LOCK Retrieves the lock pin when the
gate is closing and releases the
lock when closing is nished.
CONTROL BOARD
ADJUSTMENTS
Allows or blocks control board ad-
justments
(+) blocked
(-) allowed
PATH Deletes the programmed path.
LANGUAGE Selects the language of PROG.
MOD: FC:
FT: RF: EA: EB:
MOD: displays the model of the Gate/Motor (DZ or BV).
FC: displays opening or closing reeds when positioned.
FT: identies the photocell pulse.
RF: identies radio frequency signal.
EA: indicates the encoder A signal.
EB: indicates the B encoder signal.
MOV GATE
To move the gate slowly towards the opening direction,
hold down the (+) button. To move it slowly to the closing
direction, hold down the (-) button.
MODEL
It sets the machine model for sliding (DZ) or swinging
(BV) gates. Just press the (+) button to select the desired
model.
PROGRAM TX – [000]
In this function, the display shows no signal. When send-
ing a signal, the display will show (+) transmitter. To con-
rm it, press and release the (+) button and the transmit-
ter will be programmed.
DELETE TX
To delete all programmed transmitters, just press and
release the (+) button, and a 10-second timer will be dis-
played decreasing to 0 sec. To conrm the action, press
and release the (+) button.
PAUSE TIME
To increase the automatic time, press (+, and to reduce it,
press (-).
CLOSING LIMIT
To increase the close limit, just press the (+) button, and to
decrease it, just press the (-) button.
AGILITY LEGERO
CONTROL BOARD
TECHNICAL MANUAL
ATTENTION
Do not use this equipment without
rst reading the User’s Guide.
P31322 - 02/2023
Rev. 1
CLOSE TORQUE
To increase the close torque level, press and release the
GRV (+) button, and to decrease it, press and release the
CMD (-) button.
OPEN LIMIT
To increase the open limit, just press the (+) button, and to
decrease it, just press the (-) button.
OPEN TORQUE
To increase the open torque level, press and release the
GRV (+) button, and to decrease it, press and release the
CMD (-) button.
BRAKE
To increase the brake level, just press the (+) button, and
to decrease it, just press the (-) button.
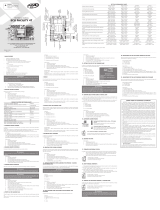
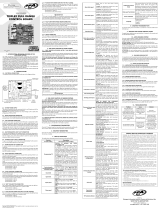
LEGEND
1 - PROGRAM (+) button.
2 - COMMAND (-) button.
3 - JUMPER Programming.
4 - JUMPER Application model.
5 - LOCK connector.
6 - COURTESY LIGHT connector.
7 - PROG PPA connector.
8 - LED Signaling.
9 - Photocell connector.
10 - RX / BOT connector.
POWER SUPPLY
100 - 240 VAC
50 - 60 Hz
POWER SUPPLY
127 - 220 V
MOTOR STARTER
CAPACITATOR
LIMIT SWITCH
REEDS
C A C F
M
TACT
LED
5
6
9
10
4
1
2
3
78
FORCE
The force is set at the maximum level at the factory. To de-
crease it, just press the (-) button until the desired level. To
increase it, just press the (+) button.
MEMORIZATION TORQUE
In this option, you can choose a soft, moderate or strong
memorization torque. To so do, just press the (+) button
until the desired option.
STOP CLEARANCE
To increase the stop clearance, press and release the (+)
button. To decrease it, press and release the (-) button.
COURTESY LIGHT TIME
To increase the courtesy light time, just press the (+) but-
ton, and to decrease it, just press the (-) button.
REVERSAL
To disable the reversal, just press the (-) button. To enable
it, press the (+) button.
OPEN DELAY
To increase the open delay time, press and release the (+)
button and to decrease it, press the (-) button.
CLOSE LOCK
To enable and increase the lock retraction time during the
closing path, press the (+) button, and to decrease it, press
the (-) button.
CONTROL BOARD ADJUSTMENTS
The control board is set as ‘allowed’ at the factory. To lock it,
press and release the (+) button. To unlock it, press and re-
lease the (-) button. This function provides greater security,
and reduces the chance of improper programming.
PATH
To delete the programmed path, just press the (+) button.
LANGUAGE
Select the desired language, Portuguese, English or Span-
ish.
COMMAND TABLE – SETTINGS
Parameters Select function Enter the function Increase Decrease
Automatic time Press 1 x CMD (-) 1 x GRV (+) GRV (+) CMD (-)
Closing limit Press 2 x CMD (-) 1 x GRV (+) GRV (+) CMD (-)
Opening limit Press 4 x CMD (-) 1 x GRV (+) GRV (+) CMD (-)
Brake Press 6 x CMD (-) 1 x GRV (+) GRV (+) CMD (-)
Force Press 7 x CMD (-) 1 x GRV (+) GRV (+) CMD (-)
Courtesy light time Press 8 x CMD (-) 1 x GRV (+) GRV (+) CMD (-)
NOTE: To change parameters without having to open the JUMPER PROG, press both CMD (-) and GRV (+) buttons at
the same time. LED1 starts flashing 2x until the CMD (-) button is pressed again for the next parameter.
JUMPER SETTINGS
PARAMETERS STATUS
OPEN CLOSED
JUMPERS DZ / BV SLIDING SWINING
PROG OPERATING PROGRAMMING
FACTORY DEFAULT SETTINGS TABLE
Parameters
Automatic time Semi-automatic
Closing limit Level 0
Opening limit Level 0
Brake Level 1
Force Level 8
Courtesy light 0 seg
Reversal Enabled
Made by:
Motoppar da Amazônia Indústria e Comércio de Eletrônicos Ltda.
Avenida Açaí, 875 - Distrito Industrial I
Manaus - AM - CEP 69075-904 - Brasil
CNPJ: 09.084.119/0001-64
www.ppa.com.br | +55 14 3407 1000
GENERAL TERMS AND CONDITIONS OF
WARRANTY
Motoppar da Amazônia Indúria e Comércio de
Eletrônicos Ltda
., regiered with the CNPJ (National
Regiry of Legal Entities) under Number
09.084.119/0001-
64
, located at
Av. Açaí nº 875, Dirito Indurial I,
Manaus/AM, CEP 69075-904
, Brasil, manufacturer of
PPA Products, hereby guarantees this product again
design, manufacturing or assembly defects and/or
supportively as a result of material quality aws that could
make its intended use improper or inadequate, within
a legal period of ninety days from time of acquisition,
provided that the inallation inructions described in the
inruction manual are observed.
Due to the credibility and tru placed on PPA products,
we will add 275 more days to the period mentioned
above, reaching a warranty period of one year, likewise
counted from the time of acquisition proven by consumer
through proof of purchase (Cuomer Receipt).
In case of defect, within the warranty period, PPA
responsibilities are rericted to the repair or subitution
of the product manufactured by the company, under the
following conditions:
1. Repair and readjument of equipment may only be
carried out by PPA Technical Assiance, which is qualied
to open, remove, and subitute parts or components,
as well as repair defects covered by this warranty; thus,
failure on observing this guideline and the veried use of
any non-original parts will cause the resignation of this
warranty on the part of the user;
2. The warranty will not extend to accessories such as
cables, screw kit, xing brackets, power supplies etc.;
3. Expenses for packaging, transportation and product
reinallation will be sole responsibility of the consumer;
4. The equipment mu be sent directly to the Company
responsible for the sale (manufacturer's representative),
through the address contained in the purchase invoice,
properly packed, thus avoiding loss of the warranty;
5. Within the additional period of 275 days, visits and
transportation in places where authorized technical
assiance is not available will be charged. The co of
transportation of the product and/or technician will be
sole responsibility of the consumer and
6. The subitution or repair of the product does not
prolong the warranty time.
This warranty will be terminated if the product:
1. Is damaged by natural agents, such as atmospheric
discharges, oods, wildres, landslides etc.;
2. Is inalled in an improper electric power supply or if it
is not according to any of the inallation inructions
displayed on the manual;
3. Shows defects caused by droppings, collisions or any
other physical accident;
4. Shows signs of product violation or attempted repair by
unauthorized personnel;
5. Is not used for its intended purpose;
6. Is not used under normal conditions;
7. Is damaged by accessories or equipment connected to
it.
Recommendation:
We recommend that both the inallation and the
maintenance of the operator to be performed by an
authorized PPA technical service. If the product fails or
has an improper operation, seek an Authorized Technical
Service to x it.

CARACTERÍSTICAS TÉCNICAS
• Módulo Receptor 433,92 MHz
• 82 controles código evolutivo protocolo de PPA
• Salida para módulos de traba y luz de garaje
• Final de carrera digital / híbrido
• Entrada de fotocélula
• Ajuste de embrague electrónico
• Entrada para pulsador
• Memorización automática de recorrido
• Ajuste de freno
• Ajuste de la rampa
• Tiempo de retardo para abertura con semáforo
• Posibilita conguración vía PROG
• Posibilita accionamiento de la central vía Wi-Fi Connect
PPA ON
• Conguración de pre-setup vía puentes de acuerdo
con el tipo de portón
• Fuente: 12 V, 450 mA
SELECCIÓN DEL MODELO
Selecciona el modelo del automatismo, deslizante (DZ)
o basculante (BV).
Mantenga abierto el conector de 2 vías DZ/BV para se-
leccionar el modelo deslizante; para seleccionar el mode-
lo basculante, cierre el conector de 2 vías DZ/BV.
Después de seleccionar el modelo deseado presione el
botón CMD hasta que el led LD1 parpadee rápidamente
conrmando la operación.
BORRAR RECORRIDO
Para borrar el recorrido, mantenga presionado el botón
CMD durante 5 segundos hasta que el led LD1 quede en-
cendido.
GRABAR TRANSMISORES
1. Con el portón parado presione y suelte el botón GRV.
2. Mantenga presionado el botón del transmisor hasta
que el led LD2 parpadee rápidamente.
3. Enseguida presione el botón GRV el led LD2 perma-
necerá encendido, espere 10 segundos para salir de la
función y el transmisor quedará registrado.
APAGAR TRANSMISORES
1. Con el portón parado mantenga presionando el botón
GRV hasta el led LD1 parpadee rápidamente conr-
mando la operación; después de esto, todos los trans-
misores estarán apagados.
TIEMPO AUTOMÁTICO / SEMIAUTOMÁTICO
Tras nalizar el ciclo de apertura, el portón espera du-
rante el tiempo de pausa congurado por el usuario para
cerrarse automáticamente. Para desactivar y congurar
el tiempo en cero, la central esperará un nuevo comando
para cerrarlo.
1. Con el portón parado, cierre el puente JPROG y el LED1
comenzará a parpadear 2 veces hasta que se presione
algún botón.
2. Presione el botón CMD 1 vez y el LED1 dejará de parpa-
dear y permanecerá encendido.
3. Presione el botón GRV para ingresar a la función; el led
pasará a señalizar el nivel de la conguración.
4. Presione el botón GRV para incrementar el tiempo de
espera del automático y el botón CMD, para disminuir-
lo.
5. La puesta a cero del tiempo de automático deja la cen-
tral en modo semiautomático; el LED1 parpadea rápi-
damente.
6. Para congurar otro parámetro, presione los botones
CMD(-) y GRV(+) juntos y se volverá al estado inicial de
programación.
7. Retire el puente.
Niveles:
• N1 parpadeando = Semiautomático.
• N1 encendido = 5 seg.
• N2 encendido = 10 seg.
• N3 encendido = 30 seg.
• N4 encendido = 60 seg.
• N5 encendido = 90 seg.
• N6 encendido = 120 seg.
• N7 encendido = 180 seg.
• N8 encendido = 240 seg.
AJUSTE DE LA RAMPA DE APERTURA Y CIERRE
La rampa es la distancia que falta para alcanzar el stop
mecánico. La central quedará monitoreando continua-
mente la posición del portón y cuando alcance ese límite,
el torque de operación se reduce y llega al stop mecánico
suavemente.
1. Con el portón parado, cierre el puente JPROG; el LED1
comenzará a parpadear 2 veces hasta que se presione
algún botón.
2. Para rampa de cierre: presione el botón CMD 2 veces,
el LED1 dejará de parpadear y el LED2 deberá perma-
necer encendido. Presione el botón GRV para ingresar
a la función; el LED pasará a señalizar el nivel de la con-
guración.
3. Para rampa de apertura: presione el botón CMD 4 ve-
ces, el LED1 dejará de parpadear y el LED4 deberá per-
manecer encendido. Presione el botón GRV para ingre-
sar a la función; el LED pasará a señalizar el nivel de la
conguración.
4. Presione el botón GRV para alejar el límite al stop mecá-
nico y aumentar así la distancia.
5. Presione el botón CMD para disminuir la distancia hasta
el nal de carrera.
6. En el nivel mínimo la rampa es desactivada, no reduce
el torque. Esta función tiene la posibilidad de ajuste de
hasta de 8 niveles.
Niveles:
• N1 intermitente = rampa deshabilitada.
• N1 encendido = 5% do trayecto.
• N2 encendido = 10% do trayecto.
• N3 encendido = 15% do trayecto.
• N4 encendido = 20% do trayecto.
• N5 encendido = 25% do trayecto.
• N6 encendido = 30% do trayecto.
• N7 encendido = 35% do trayecto.
• N8 encendido = 40% do trayecto.
AJUSTE DEL TORQUE DE LA RAMPA
DE APERTURA Y CIERRE
El torque de la rampa determina el comportamiento de
la rampa dentro del espacio determinado.
1. Con el portón parado cierre el puente prog.
2. Seleccione con el botón CMD (-) la función torque de
apertura o torque de cierre a través del tact LED.
3. Presione el botón GRV(+) para ingresar a la función.
4. Presione el botón CMD(-) para disminuir el nivel y el bo-
tón GRV(+), para aumentarlo.
5. Abra el puente prog para concluir la operación.
FRENO
Cuando hay un comando para apagar el motor, el freno
se activará con la posibilidad de ajuste de sensibilidad.
1. Con el portón parado, cierre el puente JPROG; el LED1
comenzará a parpadear 2 veces hasta que se presione
algún botón.
2. Al presionar 6 veces el botón CMD el LED1 dejará de
parpadear y el LED6 deberá permanecer encendido.
3. Presione el botón GRV para ingresar a la función; el LED
pasará a señalizar el nivel de la conguración.
4. Presione el botón GRV para aumentar el tiempo que se
aplicará el freno.
5. Presione el botón CMD para disminuir el freno.
6. En el valor mínimo el freno se desactiva.
7. Para congurar otro parámetro, presione los botones
CMD(-) y GRV(+) juntos, y se volverá al estado inicial de
programación.
8. Retire el puente.
Niveles:
• N1 parpadeando = desactivado
• N1 encendido = mínimo
...
• N8 encendido = máximo;
FUERZA (EMBRAGUE ELECTRÓNICO)
Regular la fuerza de operación del motor: para que la
utilización de este dispositivo sensor de seguridad sea e-
caz, proceda de la siguiente manera:
• Después de la debida instalación del automatismo en
el portón, ajuste el embrague electrónico de manera
que la fuerza sea la mínima necesaria para desplazar la
hoja del portón en todo su recorrido, en la apertura y
el cierre.
• Al nal del ajuste, pruebe la función bloqueando el mo-
vimiento del portón, poniendo un objeto rígido en el
recorrido del portón.
1. Con el portón parado, cierre el puente JPROG; el LED1
comenzará a parpadear 2 veces hasta que se presione
algún botón.
2. Presione el botón CMD 7 veces; el LED1 dejará de par-
padear y el LED7 deberá permanecer encendido.
3. Presione el botón GRV para ingresar a la conguración;
el LED pasará a señalizar el nivel de la conguración.
4. Presione el botón GRV para incrementar la fuerza y el
botón CMD, para disminuirla.
5. Para congurar otro parámetro, presione los botones
CMD(-) y GRV(+) juntos y se volverá al estado inicial de
programación.
6. Retire el Puente.
TIEMPO LUZ DE GARAJE
Conguración del tiempo para apagar el módulo relé
de la luz de garaje cuando el portón llegue al nal de la
carrera de cierre.
1. Con el portón parado cierre el puente JPROG; el LED1
comenzará a parpadear 2 veces hasta que se presione
algún botón.
2. Presione el botón CMD 8 veces; el LED1 dejará de par-
padear y el LED8 deberá permanecer encendido.
3. Presione el botón GRV para entrar en la conguración;
el LED pasará a señalizar el nivel de la conguración.
4. Presione el botón GRV para incrementar el tiempo de
espera para apagar la luz y el botón CMD, para dismi-
nuirlo.
5. Para congurar otro parámetro presione los botones
CMD(-) y GRV(+) juntos y se volverá al estado inicial de
programación.
6. Retire el puente.
Niveles:
• N1 parpadeando = semáforo se apaga así que se cierra.
• N1 encendido = 30 seg.
• N2 encendido = 60 seg.
• N3 encendido = 90 seg.
• N4 encendido = 120 seg.
• N5 encendido = 150 seg.
• N6 encendido = 180 seg.
• N7 encendido = 210 seg.
• N8 encendido = 240 seg.
CAMBIAR TORQUE DE MEMORIZACIÓN
Para cambiar el torque de la memorización, cierre el
puente PROG, presione y suelte el botón GRV e ingresará
a la función. Presione y suelte el botón GRV nuevamente
para seleccionar el nivel de torque. Cada vez que se pre-
siona, se selecciona un nivel diferente (suave, moderado
y fuerte), que se pueden identicar a través de los ledes
LD1, LD2 y LD3.
CONFIGURACIONES EXTRAS REALIZADAS SOLO
UTILIZANDO EL PROG
Utilizando el módulo programador PROG también es
posible congurar:
• Reversión: activado o desactivado.
• Retardo en la apertura: tiempo que transcurre entre
la recepción del comando de apertura y el envío del co-
mando de la central para el portón accionando un se-
máforo conectado a la luz del garaje para señalización.
Se puede congurar como desactivado o con tiempo
congurado cada 3 s, con un valor máximo de 24 s.
CONFIGURACIONES POR EL PROGRAMADOR
“PROG”
PROG: Permite realizar las conguraciones con más
precisión.
Mientras el PROG esté en la central, los comandos por
el pulsador, el botón CMD y el receptor suelto, quedarán
desactivados para comandos de accionamiento del motor
en la central.
Solo el PROG consigue enviar comandos para aper-
tura y cierre del portón, con el botón (+) y el transmisor
registrado, si está en la pantalla principal de estado de los
sensores.
Si se mantiene cualquier tecla del PROG presionada,
después de 3 segundos entrará en el modo de repetición
automática de la tecla presionada, lo que acelerará el pro-
greso de las pantallas o de los ajustes.
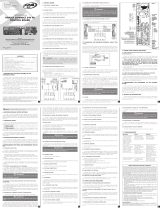
PANTALLA INICIAL
Monitoreo de los sensores y de los
periféricos de la central:
(Estado del portón, FCC, FCA, Fo-
tocélula y Transmisor).
TIPO CONFIGURA-
CIÓN PREDETERMI-
NADA DE FÁBRICA
Restaura las conguraciones a las
predeterminadas de fábrica.
GRABAR TRANSMI-
SORES Graba nuevos transmisores (con-
troles) en la central electrónica.
EXCLUIR TRANSMI-
SORES
Excluye (apaga) todos los trans-
misores (control) grabados en la
central electrónica.
TIEMPO DE PAUSA
Tiempo para cierre automático
• Semiautomático (desactivado)
• 1 (5 s)
• 2 (10 s)
• 8 (240 s)
RAMPA CIERRE
9 Niveles
• 0 (Desactivado)
• 1 (Mínimo)
• 8 (Máximo)
TORQUE CIERRE 2 Niveles
• 1 (mínimo)
• 2 (máximo)
RAMPA APERTURA
9 Niveles
• 0 (Desactivado)
• 1 (Mínimo)
• 8 (Máximo)
TORQUE APERTURA 2 Niveles
• 1 (mínimo)
• 2 (máximo)
FRENO
9 Niveles
• 0 (Desactivado)
• 1 (Mínimo)
• 8 (Máximo)
FUERZA
9 Niveles
• 0 (Desactivado)
• 1 (Mínimo)
• 8 (Máximo)
TORQUE MEMORI-
ZACIÓN
3 Niveles
• 0 (suave)
• 1 (moderado)
• 2 (fuerte)
HOLGURA DEL TOPE
9 Niveles
• 0 (Desactivado)
• 1 (Mínimo)
• 8 (Máximo)
TIEMPO LUZ DE
GARAJE
Tiempo para luz de garaje
• 0 (Desactivado)
• 1 (30 s)
• 2 (60 s)
• 8 (240 s)
REVERSIÓN
Permiso para que el comando del
pulsador o del transmisor funcio-
nen durante el recorrido de cierre
del portón para reversión.
TIPO DE CÓDIGO Selecciona el tipo de protocolo
transmisor (TX):
• Código evolutivo (PPA).
RETARDO APER-
TURA
9 Niveles
• 0 (desactivado)
• 1 (Mínimo)
• 8 (Máximo)
TRABA DE CIERRE
Recoge el pasador de la traba
cuando el portón esté cerrándose
y suelta la traba cuando se naliza
el cierre.
AJUSTES CENTRAL
Permite o bloquea ajustes en la
central
(+) bloqueado
(-) permitido
RECORRIDO Apaga el recorrido grabado.
IDIOMA Selecciona el idioma del PROG.
MOD: FC:
FT: RF: EA: EB:
MOD: indica el modelo del Portón/Motor (DZ o BV).
FC: indica reed apertura o cierre cuando posicionado.
FT: identica el pulso de la fotocélula.
RF: identica señal de radiofrecuencia.
EA: identica la señal de encoder A.
EB: identica la señal de encoder B.
MOV PORTÃO
Para mover el portón lentamente hacia el sentido de aper-
tura, mantenga presionada la tecla (+) y para moverlo len-
tamente hacia el sentido de cierre, mantenga presionada
la tecla (-).
MODELO
Dene el modelo de la máquina para portones corredizos
(DZ) o basculantes (BV). Simplemente presione el botón
(+) para seleccionar el modelo deseado.
GRAVAR TX – [000]
En esta función la pantalla muestra sin señal. Al enviar
una señal, la pantalla mostrará (+) transmisor. Para con-
rmar presione y suelte la tecla (+) y el transmisor estará
grabado.
EXCLUIR TX
Para excluir todos los transmisores grabados basta presio-
nar y soltar la tecla (+). Al hacerlo, aparecerá un contador
de 10 segundos decreciendo hasta 0 segundos. Para con-
rmar la acción presione y suelte la tecla (+).
TEMPO DE PAUSA
Para aumentar el tiempo automático pulse la tecla (+) y
para disminuirlo, pulse la tecla (-).
RAMPA DE FECHAMENTO
Para aumentar la rampa de cierre pulse la tecla (+) y para
disminuirla, pulse la tecla (-).
CENTRAL AGILITY
LEGERO
MANUAL TECNICO
ATENCIÓN
No utilice el equipo sin anter leer
el manual de instrucciones.
P31322 - 02/2023
Rev. 1
TORQUE FECHAMENTO
Para aumentar el nivel del torque de cierre presione y
suelte la tecla (+) y para disminuirlo, presione y suelte la
tecla (-).
RAMPA DE ABERTURA
Para aumentar la rampa de apertura pulse la tecla (+) y
para disminuirla, pulse la tecla (-).
TORQUE ABERTURA
Para aumentar el nivel del torque de apertura pulse la te-
cla (+) y para disminuirlo, pulse la tecla (-).
FREIO
Para aumentar el nivel de freno pulse la tecla (+) y para
disminuirlo, pulse la tecla (-).
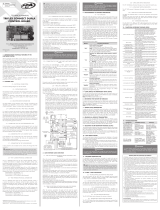
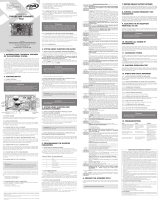
SUBTÍTULO
1 – Botón GRABA (+)
2 – Botón COMANDO (-)
3 – PUENTE Programación
4 – PUENTE Modelo de aplicación
5 – Conector TRABA
6 – Conector LUZ DE GARAJE
7 – Conector PROG PPA
8 – Señalización LEDES
9 – Conector Fotocélula
10 – Conector RX / BOT
RED ELÉCTRICA
100 - 240 VAC
50 - 60 Hz
RED ELÉCTRICA
127 - 220 V
CAPACITOR DE
ARRANQUE DEL
MOTOR
REED DE FINAL
DE CARRERA
C A C F
M
TACT
LED
5
6
9
10
4
1
2
3
78
FORÇA
La fuerza sale de fábrica en el nivel máximo. Para dismi-
nuirla pulse la tecla (-) hasta alcanzar el nivel deseado.
Para aumentarla, pulse la tecla (+).
TORQUE MEMORIZAÇÃO
En esta opción puede elegir que la máquina haga una
memorización suave, moderada o fuerte. Para ello, sim-
plemente presione el botón (+) hasta llegar a la opción
deseada.
FOLGA DE BATENTE
Para aumentar la holgura del tope pulse y suelte la tecla
(+) y para disminuirla, pulse y suelte la tecla (-).
TEMPO LUZ DE GARAGEM
Para aumentar el tiempo de luz de garaje pulse la tecla (+)
y para disminuirlo, pulse la tecla (-).
REVERSÃO
Para desactivar la reversión pulse la tecla (-) y para activar-
la, pulse la tecla (+).
RETARDO NA ABERTURA
Para aumentar el tiempo de retardo en la apertura, pulse
y suelte la tecla (+) y para disminuirlo, pulse la tecla (-).
TRAVA DE FECHAMENTO
Para habilitar y aumentar el tiempo de recogimiento de
la traba durante el recorrido del cierre, pulse la tecla (+) y
para disminuirlo, pulse la tecla (-).
AJUSTES CENTRAL
El ajuste de la fábrica sale como permitido. Para bloquear-
lo pulse y suelte la tecla (+) y para desbloquearlo, pulse y
suelte la tecla (-). Esta función proporciona una mayor se-
guridad y reduce la posibilidad de una programación inco-
rrecta.
PERCURSO
Para apagar el recorrido grabado pulse la tecla (+).
IDIOMA
Se selecciona el idioma deseado, portugués, inglés o es-
pañol
TABLA DE COMANDO CONFIGURACIONES
Parámetros Selecciona función Accede a la función Incrementar Disminuir
Tiempo automático Presione 1 x CMD (-) 1 x GRV (+) GRV (+) CMD (-)
Rampa Cierre Presione 2 x CMD (-) 1 x GRV (+) GRV (+) CMD (-)
Rampa Apertura Presione 4 x CMD (-) 1 x GRV (+) GRV (+) CMD (-)
Freno Presione 6 x CMD (-) 1 x GRV (+) GRV (+) CMD (-)
Fuerza Presione 7 x CMD (-) 1 x GRV (+) GRV (+) CMD (-)
Tiempo Luz Garaje Presione 8 x CMD (-) 1 x GRV (+) GRV (+) CMD (-)
NOTA: Para cambiar de parámetro sin necesidad de abrir el PUENTE PROG presione los dos botones (CMD (-) y GRV
(+) simultáneamente. El led 1 empieza a parpadear 2 veces hasta que el botón CMD (-) es presionado nuevamente para el
siguiente parámetro.
CONFIGURACIONES DE LOS PUENTES
PARÁMETROS ESTADO
ABIERTO CERRADO
PUENTES DZ / BV DESLIZANTE BASCULANTE
PROG OPERANDO PROGRAMACIÓN
TABLA CONFIGURACIÓN
PREDETERMINADA DE FÁBRICA
Parámetros
Tiempo automático Semiautomático
Rampa Cierre Nivel 0
Rampa Apertura Nivel 0
Freno Nivel 1
Fuerza Nivel 8
Tiempo Luz de Garaje O segundo
Reversión Habilitado
Fabricado por:
Motoppar da Amazônia Indústria e Comércio de Eletrônicos Ltda.
Avenida Açaí, 875 - Distrito Industrial I
Manaus - AM - CEP 69075-904 - Brasil
CNPJ: 09.084.119/0001-64
www.ppa.com.br | +55 14 3407 1000
PLAZO DE GARANTÍA
Motoppar da Amazônia Indúria e Comércio
de Eletrônicos Ltda, regirada con CNPJ (CIF)
09.084.119/0001-64, localizada en la Av. Açaí nº 875,
Dirito Indurial I, Manaus/AM, CEP 69075-904, Brasil,
fabricante de los productos PPA, garantiza eo aparato
contra defectos de proyectos, fabricación, montaje y/o
solidariamente en consecuencia de vicios de calidad
de material que se lo hagan impropio o inadecuado al
consumo a cual se deina por el plazo legal de noventa
días desde la fecha de adquisición, siempre que se
cumplan las orientaciones de inalación descritas en el
manual de inrucciones.
Como consecuencia de la credibilidad y de la
conanza depositada en los productos PPA, añadimos al
plazo anteriormente descrito más 275 días, alcanzando
el total de un año, igualmente contados desde que
la fecha de adquisición pueda ser comprobada por
el consumidor a través do comprobante de compra
(Recibo).
En caso de defecto, en el período cubierto por la
garantía, la responsabilidad de PPA se queda reringida
a la reparación o reemplazo del aparato por ella
fabricada, bajo las siguientes condiciones:
1. La reparación y reajue de aparatos solo pueden
realizarse por la Asiencia Técnica de PPA, que
eá habilitada a abrir, remover, suituir piezas o
componentes, así como arreglar los defectos cubiertos
por la garantía, siendo que el incumplimiento de
ee y cualquier utilización de piezas no originales
observadas en el uso, implicará en la exclusión de la
garantía por parte del consumidor;
2. La garantía no se extenderá a accesorios como
cables, kit de tornillos, soportes de jación, fuentes
de alimentación etc.;
3. Los coos de embalaje, transporte y reinalación
del producto son responsabilidad exclusiva de los
consumidores nales;
4. Se debe enviar el aparato directamente a la
empresa responsable de la venta (representante del
fabricante), a través de la dirección que gura en el
recibo de compra, debidamente embalado, evitando
así la pérdida de la garantía;
5. En el período adicional de 275 días, las visitas y los
transportes donde no haya servicios autorizados
serán cargadas. Los gaos de transporte del aparato
y/o técnico son responsabilidad del propietario y
6. La reparación o reemplazo del aparato no prorroga
el plazo de garantía.
Ea garantía perderá su validez si el producto:
1. Sufrir daños provocados por agentes de la naturaleza,
como descargas atmosféricas, inundaciones,
incendios, desmoronamientos etc.;
2. Sea inalado en red eléctrica inadecuada o en
desacuerdo con cualquiera de las inrucciones de
inalación descritas en el manual;
3. Presenta defectos causados por caídas, golpes o
cualquier otro accidente físico;
4. Presenta violación o intento de reparación o
mantenimiento por parte de personal no autorizado;
5. No sea usado para lo que ha sido proyectado;
6. No sea usado en condiciones normales;
7. Sufrir daños causados por accesorios o aparatos
conectados al producto.
Recomendación:
Recomendamos que la inalación y mantenimientos
del aparato sean efectuados por servicio técnico
autorizado PPA.
Caso el producto presente defecto o funcionamiento
anormal, busque un Servicio Técnico especializado para
los debidos arreglos.
/