Panasonic PT-53X54J El manual del propietario
- Tipo
- El manual del propietario

PT-53TW54
l
PT-W4734X
PT-47X54
PT-53X54
TQB2AA0506 40324
PRINTED IN USA
IMPRESO EN EE.UU
IMPRIMI:!: AUX I:!:TATS-UNIS

WARNING
WARNING: TO REDUCE THE RISK OF ELECTRIC SHOCK DO NOT REMOVE
COVER OR BACK. NO USER-SERVICEABLE PARTS INSIDE. REFER SERVICING
TO QUALIFIED SERVICE PERSONNEL
The lightning flash with arrow head
within a triangle is intended to tell the
user that parts inside the product
constitute a risk of electric shock to
persons
The exclamation point within a triangle
is intended to tell the user that
important operating and servicing
instructions are in the papers with the
appliance
j r_l The Class II insulation symbol (square within a square) indicates that this product has been evaluated
and tested to comply with Class II insulation requirements.
WARNING: TO REDUCE THE RISK OF FIRE OR ELECTRIC SHOCK, DO NOT EXPOSE THIS
APPARATUS TO RAIN OR MOISTURE. DO NOT PLACE ANY OBJECTS FILLED WITH
LIQUIDS, SUCH AS VASES, ON THIS APPARATUS.
IMPORTANT SAFETY INSTRUCTIONS
1. Read these instructions.
2. Keep these instructions.
3. Heed all warnings.
4. Follow all instructions.
5. Do not use this apparatus near water.
6. Clean only with dry cloth.
7. Do not block any ventilation openings. Install in accordance with the manufacturer's instructions.
8. Do not install near any heat sources such as radiators, heat registers, stoves, or other apparatus (including
amplifiers) that produce heat.
9. Do not defeat the safety purpose of the polarized or grounding type plug. A polarized plug has two blades with
one wider than the other. A grounding type plug has two blades and a third grounding prong. The wide blade
or the third prong are provided for your safety. If the provided plug does not fit into your outlet, consult an elec-
trician for replacement of the obsolete outlet.
10. Protect the power cord from being walked on or pinched particularly at plugs, convenience
receptacles, and the point where they exit from the apparatus.
11. Only use attachments/accessories specified by the manufacturer.
12. Use only with the cart, stand, tripod, bracket or table specified by the manufacturer, or sold
with the apparatus. When a cart is used, use caution when moving the cart/apparatus combi-
nation to avoid injury from tip-over.
13. Unplug this apparatus during lightning storms or when unused for long periods of time.
14. Refer all servicing to qualified service personnel. Servicing is required when the apparatus has been dam-
aged in any way, such as power-supply cord or plug is damaged, liquid has been spilled or objects have fallen
into the apparatus, the apparatus has been exposed to rain or moisture, does not operate normally, or has
been dropped.
Read these instructions completely before operating television.
Contents are subject to change without notice or obligation,
Copyright 2004 by Matsushita Electric Corporation of America. All rights reserved.
Unauthorized copying and distribution is a violation of law.

IMPORTANT INFORMA T#ON
Important Information
FCC CAUTION: ANY CHANGES OR MODIFICATIONS TO THIS TV RECEIVER NOT EXPRESSLY
APPROVED BY MATSUSHITA ELECTRIC CORPORATION OF AMERICA COULD CAUSE
HARMFUL INTERFERENCE, WHICH WOULD VOID THE USER'S AUTHORITY TO
OPERATE THIS EQUIPMENT.
ENVIRONMENTAL NOTICE: THIS PRODUCT UTILIZES CATHODE RAY TUBES (CRT) AND OTHER
COMPONENTS THAT CONTAIN LEAD. DISPOSAL OF THESE MATERIALS
MAY BE REGULATED IN YOUR COMMUNITY DUE TO ENVIRONMENTAL
CONSIDERATIONS. FOR DISPOSAL OR RECYCLING INFORMATION
PLEASE CONTACT YOUR LOCAL AUTHORITIES, OR THE ELECTRONICS
INDUSTRIES ALLIANCE: <HTTP://WWW.EIAE.ORG.>
The Energy Star label, a symbol for energy efficiency, was created by the U.S.
Environmental Protection Agency (EPA) and the U.S. Department of Energy
(DOE) to help customers identify products that can save them money and protect
the environment by saving energy. Energy Star compliant products generally
consume less energy than similar standard products.
HDML the HDMI logo and High Definition Multimedia Interface are
trademarks or registered trademarks of HDMI Licensing LLC.
High Definition Sound
Manufactured under license from BBE Sound, Inc.
Licensed by BBE Sound, Inc. under USP4638258, 5510752 and
5736897. BBE and BBE symbol are registered trademarks of BBE
Sound, Inc.
BBE ViVA HD3D (High Definition 3D) Sound provides musically accurate natural 3D
image with Hi-Fi sound. The clarity of the sound is improved by BBE while the width,
depth and height of sound image are expanded by BBE'S proprietary 3D sound process.
BBE ViVA HD3D Sound is compatible with all TV programs including news, music,
dramas, movies, sports and electronic games.
BBE High Definition Sound restores clarity and presence for better speech
intelligibility and music realism.
Important Information Regarding the Use of Video Games, Computers, or Other Fixed
Image Displays
WARNING: The marking or retained image on the picture tube resulting from viewing fixed image is
not an operating defect and as such is not covered by Warranty.
The projection television is designed to display constantly moving images on the screen. Continuous
viewing of stationary images such as letterbox pictures on standard screen TVs (with top/bottom bars),
non-expanded standard (4:3) pictures on wide screen TVs (with side bars shown on each side of an
image), stock market report bars (ticker running at the bottom of the screen), video game patterns, fixed
scoreboards, bright station Iogos, on-line (tnternet) or repetitive computer style patterns should be limited.
The extended use of fixed image program material can cause permanent picture tube damage, shown as
a "shadow image" viewable on normal programs. This type of irreversible picture tube deterioration can be
limited by performing the following steps:
Limit the display of fixed image program material to no more than 15% of total viewing time perweek.
Turn the power off when not in use.
1@

IMPORTANT INFORMATION
Important Information (contd.)
Information Regarding Auto Convergence
This feature is used to automatically adjust convergence. It is
recommended that this feature be used after moving the PTV or
any change of the magnetic field, such as changing PTV location
or adding additional speakers around the PTV.
Note: During auto convergence process the remote control has
no effect.
[_ Normal picture with
convergence problem.
AUTO CONV
[_ Press the button
on the front control panel.
Note: Do not turn PTV off during
Auto Convergence process.
C3
After auto convergence has
finished the normal picture
will be displayed, with
convergence problem
corrected.
Note: If convergence is not acceptable after auto convergence
is finished, refer to pages 24 and 25 to set convergence
manually.
Information Regarding Convergence
In the projection television, the image is formed by
projecting 3 different color images (red, green and blue)
onto the projection screen. Convergence refers to the
alignment of red, green and blue images on the
projection screen. When these images are properly
aligned (converged), you see a sharp and vibrant color
image. Sometimes, the three images may require
alignment. This is due to the effect of Earth's magnetic field
on the projection tubes. Normally, adjustment is not
necessary after the initial alignment at the center of the
screen, tt is possible to correct the color fringing on other
areas of the screen by using the buttons on the remote
control and by following the on-screen instructions in the
set-up menu. Please converge the images before using the
television for the first time.
The following diagram shows examples of a misaligned
image and a properly aligned image. Please refer to
pages 24 and 25 for detailed procedure on how to
adjust convergence manually.
Misconvergedimage
Properly aligned image
Note:
Make sure that the PTV is on for at least 20 minutes
before adjusting convergence, as described on pages 24
and 25.
FCC INFORMATION
This equipment has been tested and found to comply with
the limits for a Class B Digital Device in accordance with
the specifications in Part 15 of the FCC Rules. The limits
are designed to provide reasonable protection against
radio and television interference in a residential installation.
This equipment generates, uses and can radiate radio
frequency energy and, if not installed and used in
accordance with the instructions, may cause harmful
interference to radio communications. However, there is no
guarantee that interference will not occur in a particular
installation.
If this equipment does cause interference to radio or
television reception (which you can determine by turning
the equipment off and on), try to correct the interference by
one or more of the following measures.
Reorient or relocate the receiving antenna.
increase the separation between the equipment and the
receiver.
Connect the equipment into an outlet on a circuit
different from that to which the receiver is connected.
Consult the dealer or an experienced radio/TV
technician for help.
2o

Table of Contents
Important Information ..................................... 1
Information Regarding Auto Convergence ................. 2
Information Regarding Convergence .......................... 2
Information Regarding The Use Of Video Games
Computers, Or Other Fixed Image Displays ............ 2
FCC Information ......................................................... 2
Customer Record ........................................................ 4
Care and Cleaning ...................................................... 4
Specifications .............................................................. 4
Feature Chart .............................................................. 4
Installation ........................................................ 5
Television Location ..................................................... 5
Optional Cable Connections ....................................... 5
AC Power Supply Cord ............................................... 5
Cable / Antenna Connection ....................................... 5
Remote Control Battery Installation ............................ 5
Initial Set Up Menu ........................................... 6
Optional Equipment Connections .................. 7
VCR ........................................................................... 7
Cable Box .................................................................. 7
VCR and Cable Box................................................... 7
Front Control Panel ..................................................... 8
Amplifier (TO AUDIO AMP) ........................................ 8
Digital TV - Set-Top Box (DTV-STB) or DVD Players 8
Program Out connection ............................................. 9
HDMI (High Definition Multimedia Interface)input
connection ............................................................... 9
Special Features ............................................. 10
TABLE OF CONTENTS
ASPECT Button .......................................................... 10
BBE Button ................................................................. 10
SAP Button ................................................................. 10
Split Operation ............................................................ 10
Split Operation with Cable Box................................... 10
Split Operational Buttons ............................................ 11
Split CTRL Button ................................................... 11
TV/Video Button ...................................................... 11
Search Button ......................................................... 11
Freeze Button ......................................................... 11
Main Picture Freeze Feature .................................. 11
Direct Video Input Selection ....................................... 11
Remote Control Operation ............................ 12
Operating Components with Remote Control ............. 13
Programming the Remote Control .............................. 15
Programming Without a Code .................................... 15
Component Codes ..................................................... 15
Basic Menu Navigation ................................. 18
Icon Menus Operation .................................. 19
Picture ........................................................................ 19
Audio .......................................................................... 19
Channels .................................................................... 20
Timer .......................................................................... 21
Lock ............................................................................ 21
Set Up ........................................................................ 24
Troubleshooting Chart ................................. 26
Index ............................................................... 27
Note: The warranty and service center information is located in the back of this manual.
3o

CONGRA TULA TIONS
Congratulations
Your new Projection Television (PTV) features state-of-the-
art technology for high quality picture and sound with
complete audio/video connections for your home theater
system. Your PTV is designed to give you many years of
enjoyment. It was thoroughly tested and tuned at the
factory for best performance.
Customer Record
The model and serial number of this product are located on
the back of the PTV. You should note the model and serial
number in the space provided and retain as a permanent
record of your purchase. This will aid in identification in the
event of theft or loss. Product registration for U.S. customers
is available at: www.prodreg.com/panasonic.
Model
Number
Serial
Number
Care and Cleaning
Projection Screen (Turn PTV Off)
The projection screen is a high precision lens system which
has a protective screen. The protective screen is fully
washable with the following precautions:
Use a mild soap solution or window cleaner and a clean
cloth.
DO NOT USE ABRASIVE CLEANERS.
Do not use laundry detergent or automatic dishwasher
soap.
Do not use alcohol, ammonia, or petroleum based
products.
Avoid excessive moisture and wipe dry.
Prevent solution from running into the receiver below.
Avoid bumping or scraping the screen.
Warning: Do not spray any type of cleaning fluid directly on the
screen.
Cabinet and Remote Control
For cabinets and remote control, use a soft cloth
dampened with water or a mild detergent solution. Avoid
excessive moisture and wipe dry.
Do not use benzene, thinner or other petroleum based
products.
Specifications
Specifications are subject to change without notice or
obligation.
PT'53TW54 (4-0A)
PT-W4734X (3.5A) 127V AC, 60Hz
Channel Capability - 181 ' VHF-12; UHF-56; Cabte-113
Video input Jacks • 1Vp-p, 75 Ohm, Phono Jack Type
Audio input Jacks ' 500mV RMS 47K Ohm
Video out jack ' 1Vp-p, 75 Ohm, Phono Jack Type
Audio Output Jacks ' 0-2.0V RMS 4.7K Ohm
HDMI Input jack Type A
Component input (Y / PB / PR) 75 Ohm, Phono Jack Type
S-Video input Jacks " S-Video (Y-C) Connector
Feature Chart
MODELS
_L Q. Q.
Q. Q.
FEATURES
MENU LANGUAGE , • • •
ENG/S PAN/FR ....
i i i i
V-CHIP CAPABILITY • • • •
DIGITAL SCAN RATE 1080i, 1080i, 1080i, 1080i,
540p 540p 540p 540p
NTSC LINE-DOUBLER 540p 540p 540p 540p
i i i i
VIDEO NORM • • • •
I I I I
AI SOUND • • • •
BASS/BALANCE/TREBLE • • • •
I I I I
SURROUND • • • •
BBE • • • •
4 4 4 4
VVIN(REA RONT)(3/i) (3/1)(3/1)(3/i)
i i i i
AUDIO OUT • • • •
HDMI/HDCP INPUT •
I I I I
S-VHS INPUT • • • •
COMPONENT INPUT 2 2 2 2
4O

Installation
Television Location
This unit can be used as part of an entertainment center. Consult
your dealer for available options.
Avoid excessive sunlight or bright lights, including
reflections.
Keep away from excessive heat or moisture. Inadequate
ventilation may cause internal component failure.
Fluorescent lighting may reduce remote control
transmitting range.
Keep away from magnetic equipment, including motors,
fans and external speakers.
Optional Cable Connections
Shielded audio and video cables should be used between
components. For best results:
Use 75-ohm coaxial shielded cables.
Use appropriate input and output connectors that match
your component connectors.
Avoid long cables to minimize interference.
AC Power Supply Cord
CAUTION: TO PREVENT ELECTRIC SHOCK,
MATCH WIDE BLADE OF PLUG TO WIDE SLOT
OF AC OUTLET AND FULLY INSERT. DO NOT Polarized plug
USE A PLUG WITH A RECEPTACLE OR OTHER
OUTLET UNLESS THE BLADE CAN BE FULLY INSERTED TO
PREVENT BLADE EXPOSURE.
PROTECT POWER CORDS FROM BEING WALKED ON, ROLLED
OVER, CRIMPED, BENT, OR PINCHED, PARTICULARLY AT PLUGS,
CONVENIENCE RECEPTACLES, AND THE POINT WHERE THEY EXIT
FROM THE APPARATUS.
Cable / Antenna Connection
For proper reception, either a cable or antenna connection
is required.
Cable Connection
Incoming Cable from
Cable Company
Connect the cable supplied by your local
cable company. Tighten with fingers only.
Use of any tool (e.g. pliers) for tightening
may result in tuner damage.
Note: A cable converter box may be 75Ohm VHF/UHF
on back of TV
required for proper reception.
Check with your local cable
company for compatibility requirements.
Antenna Connection
For proper reception of VHF/UHF channels, an external antenna
is required. For best reception an outdoor antenna is
recommended.
Connect home antenna to ANT lncoming Cablefrom
connection on back of television. Home Antenna
Note: Cable Mode is preset at the
factory.
INSTALLA TION
External Shelf (mounted on top)
(models PT-W4734X, PT-47X54 and PT-53X54 only)
For your convenience, optional devices such as an HDTV
Receiver, a Satellite Receiver, a Cable Box, a DVD player, a VCR
or a center channel speaker can be placed on this shelf.
CAUTION: The weight limit of this shelf must not
exceed 25 Ibs.
Remote Control Battery Installation
Requires two AA batteries (supplied).
Battery Polarity
Procedure
1. Turn the remote control face down. Remove battery
cover by pressing down on the marking on the cover
and sliding it off in the direction indicated.
2. Install batteries matching (+) and (-) polarity signs.
3. Replace the battery cover by sliding in reverse until the
lock snaps.
Note: Incorrect instaflation can cause battery leakage and
corrosion that will damage the Remote Control.
Precautions
Replace batteries in pairs.
Do not mix battery types (zinc carbon with alkaline).
Do not recharge, heat, short-circuit, disassemble, or
burn batteries.
5O

INITtAL SET UP MENU
Initial Set Up Menu
For your convenience, the Initial Set up menu will be
displayed on screen when the set is turned on for the first
time. If needed, follow the menus and procedures for
setting up the features.
IDIOMA/LANGUE
To change menu language to ENGLISH, SPANISH or
FRENCH.
Procedure
Press VOL • to select English, Spanish or French.
INiTiAL SET UP
LDiOMA/LANGBE ENGLISH _,,
MODE CABLE
AUTO PROGRAM
CONVERGENCE
PRESS ACTION TO EXiT
MODE
To select TV (antenna) or CABLE mode depending on the
AUTO PROGRAM
To automatically program all channels received through the
RF input.
Procedure
Press VOL • to start Auto Programming.
INFHAL SET UP
IDIOMA/LANGUE ENGLISH
MODE CABLE
AUTO PROGRAM
CONVERGENCE
PRESS ACTION TO EXIT
CONVERGENCE
This feature is used to automatically adjust convergence. It
is recommended that this feature be used when the set is
turned on for the first time.
Procedure
Press VOL • to display Auto Convergence Process
signal source.
Procedure
Press VOL • to select TV or CABLE.
INiTiAL SET UP
DIOMA/LANGUE ENGLISH
MODE CABLE
AUTO PROGRAM
CONVERGENCE
PRESS ACTION TO EXiT
menu.
Note:
Refer to page 24 for setting Convergence
manually, if needed.
IN_TIAL SET UP
IDIOMA/LANGUE ENGLISH
MODE CABLE
AUIO PROGRAM
CONVERGENCE
PRESS ACTION TO EXiT
6o

Optional Equipment Connections
Note: The remote control must be programmed with supplied
codes to operate the optional equipment.
VCR Connection
Follow this diagram when connecting your television to a
VCR only.
VCR
....
b ©_c::
TERMIKg_¢SON BACK OF TELEVISION
f
VlUEO
boo . ,
• L
_@@oq
RRT GRI
COMPONENT i 2 3 OUT TO AUD_
K. V_DEO _NPUT AMp
CABLES NOT INCLUDED
Viewing a television program
Procedure
Tune the television to the program you want to view.
Viewing a video
Procedure
Option A
Press the TV/VlDEO button on the remote control to
select the video input (VIDEO 1, VIDEO 2, etc.)
connected to your VCR.
Begin the video.
[_ Option B
Tune the television to Channel 3 or 4, depending on your
VCR.
Begin the video.
Recording a television program
Procedure
Option A (Recording and viewing the same program)
Tune the television to Channel 3 or 4, depending on your
VCR.
Using the VCR, tune to the television program you want
to record.
Begin recording.
Option B (Recording one program while viewing another
program)
Press the TV/VlDEO button on the remote control to
select the video input (VIDEO 1, VIDEO 2, etc.)
connected to your VCR.
Using the VCR, tune to the television program you want
to record.
Begin recording.
Press the TV/VlDEO button on the remote control to
switch back to TV mode.
Tune the television to the program you want to view.
OPTIONAL EQUIPMENT CONNECTIONS
Cable Box Connection
Follow this diagram when connecting your television to a
cable box only.
x
TERMINALS ON BACK OF TELE_/ISI@4
Vl_O
fY°°
_'O @ @.......v....
_,O@ @O@
F L
.....@OOOOO@_q
IP_Oq INPOq I_PUT pROG
CABLES NOT _NCLUDED
Viewing a premium (scrambled) cable channel
Procedure
Tune the television to Channel 3.
Using the cable box, tune to the premium cable channel
you want to view.
VCR and Cable Box Connection
Follow this diagram when connecting your television to
both a VCR and a cable box.
VCR
V_DEOOUT
©_
2)
N"
<
J _
TERMINALS ON BACK OF TELEViSiON
VIDEO
@@,'6°
@@@_q
CQMPQNEN1 1 2 3 OUI Q AL[D_
VIDEO [NPLfl /_,r_lp .
CABLES NOT ]NCLUBEB
Viewing a premium (scrambled) cable channel
Procedure
Tune the television to Channel 3.
Using the cable box, tune to the premium cable channel
you want to view.
7o

OPTIONAL EQUIPMENT CONNECTIONS
VCR and Cable Box Connection (Cont.)
Recording a premium (scrambled) cable channel
Procedure
Press the TV/VlDEO button on the remote control to
select the video input (VIDEO 1, VIDEO 2, etc.)
connected to your VCR.
Turn the VCR ON.
Tune the VCR to Channel 3 or 4, depending on the
switch setting on the back of VCR.
Using your cable box, tune to the premium cable channel
you want to record.
Begin recording.
[_ To view a different channel while recording:
Press the TV/VlDEO button on the remote control to
select TV mode.
Tune the television to a program (except another
premium cable channel).
Front Control Panel
The front control panel can be used to access menus and
switch video mode when the remote control is not available.
Note: The ON/OFF indicator LED (red) will be lit when set is
on.
Front pane] for PT-47X54, P%W4734X and PT-53X54
@@@@
L I _ swDo wD_oLAUDio
ON/OFF INDICATOR _ POWER ON/OFF
1
POWER VNID EO A_FO CON_
C:CC3 _ CZD
L
Front pane] for P%53TW54
Location of front Video
4 input jacks for model --
PT-53TW54.
A second VCR, Camcorder, a video disc player, video game
equipment or DSS equipment can also be connected to the
video inputs. See the optional equipment manual for details.
Procedure
Connect equipment to front Audio/Video input jacks.
Press TVNIDEO button to select VIDEO 4 input mode.
Operate optional equipment as instructed in equipment
manual.
Amplifier Connection (TO AUDIO AMP)
To listen through a separate stereo system, connect an
external audio amplifier to TO AUDIO AMP outputs on back
of television.
Note: TO AUDIO AMP terminals cannot be connected directly
to external speakers.
Audio Adjustments
Select SPEAKERS ON located in the onscreen AUDIO
menu.
Set amplifier volume to minimum.
Adjust television volume to desired level.
Adjust amplifier volume to match the television.
Select SPEAKERS OFF & VARIABLE AUDIO OUT from
AUDIO menu.
Volume, mute, bass, treble and balance are now
controlled through the television.
Note: Select SPEAKERS OFF & FIXED AUDIO OUT to control
audio functions through the external ampfifie_
Digital TV - Set-Top Box (DTV-STB) or DVD
Connection
This television is capable of displaying 1080i and 540p DTV
signals when connected to a DTV tuner set-top-box (STB). In
order to view DTV programming, the STB must be connected
to the component video inputs (Y,PB,PR) of the television. A
DTV signal must be available in your area. Select the output of
the STB to either 1080i or 540p.
This television also utilizes a progressive scan doubler, which
de-interlaces the NTSC signal and progressively scans the
image. This allows you to sit close to the TV and not see the
thin black horizontal lines (venetian blind effect) associated
with interlaced TV pictures.
Use this diagram to connect the DTV-STB or DVD player to
the back of your projection television.
CABLESNOr _NCLUDED
Note: There are two sets of three video iacks, Y, PB, and PR.
Separate component color inputs provide luminance and
color separation. Use the L (left) and R (right) audio
inputs.
8O

Program Out Connection (PROG OUT)
To use the television audio and video with optional equipment,
connect the PROG OUT and TO AUDIO AMP connections on the
back of the television.
Note: If the Main Picture signal is Component Video Input or
HDMI, no Program out signal will be available.
5!L
I_-P_4[N_SONBACK OFTELEVES_ON
.... ©
CABLES NOT INCLUDED
Procedure
Connect optional equipment to PROG OUT and TO
AUDIO AMP L/R terminals.
PROG OUT terminal display is the same as on-screen
display.
See optional equipment manual for further instructions
for recording and monitoring.
HDMI (High Definition Multimedia Interface)
input connection
About HDMI
HDMI is the first all digital consumer electronics A/V
interface that supports several uncompressed standards,
enhanced and high definition video formats as well as
existing multi-channel audio format. One jack supports both
video and audio information. The HDMI/HDCP 1 input can
be connected to an EIA/CEA 8612 compliant consumer
electronic device, such as a set top box or DVD player
equipped with an HDMI or DVI output connection. By
inputting a High-bandwidth Digital Content Protection
(HDCP) high definition picture source to the HDMI terminal
of this PTV, high definition pictures can be displayed on the
screen in their digital form. The HDMI input terminal is not
intended to be used with personal computers. This PTV is
compatible with 1080i, 480p and 480i formats. Select the
output of the connecting device to match that of the PTV.
Notes:
1.
HDMI/HDCP = High Definition Multimedia Interface /
High-Bandwidth Digital Copy Protection.
EIA/CEA-861 Profiles compliance covers profiles for
transmission of uncompressed digital video including
high bandwidth digital content protection.
OPTIONAL EQUIPMENT CONNECTIONS
Compatible formats
This PTV is compatible with the following formats. Please
set the connecting device to the following format.
Video signal
1080i 1920 x 1080i 59.94 / 60
480i (480p) 720 x 480p 59.94 / 60
640 x 480p 59.94 / 60
480i (480i) 720 x 480i 59.94 / 60
Audio signal
When digital audio is included in the HDMI connection,
the compatible sampling frequencies are 48 KHz /
44.1Khz / 32 Khz.
Connection diagram
Follow the diagram below to connect the PTV to a set top box or a
DVD player.
I HDMI
I AVlN
TERMINALS ON BACK OF TELEVISION
video
_,@@ @@@
o o@fl
3 OUT TO AUDI{
CABLES NOI INCLUDED
Note: Use an©log audio when no digita_
audio is available. +
EXTERNAL D_G_TAL
CO_PONENT
* The connector on the PTV is HDMI Type A connector.
Procedure
Connect the HDMI output from the set top box or a DVD
player to the HDMI input on the back of the PTV.
Press TV/VIDEO button on the remote control to select
HDMI input. The interface on the PTV is an HDMI Type A
connector.
If the external device has a DVl output only, use a DVl to
HDMI adaptor cable .3 to connect to the HDMI jack on
the PTV. Also, connect the Audio Out signal from the
external device (set top box or DVD player) to the Audio
In.4 jacks below the HDMI input.
If you cannot display the picture because your Digital Set
Top Box does not have a Digital Out terminal setting, use
the Component Video Input (or the S-Video Input or
Video Input). In this case, the picture will be displayed as
an analog signal.
Notes:
*3.
*4.
HDMI-DVI conversion cable (TY-SCH03DH) available
on Panasonic Website: www.panasonic.com.
Please refer to page 20 for Audio setting detail.
9o

SPECIAL FEATURES
Special Features
ASPECT Button
Customer Options depending on Component Input Signal
1080i 16:90nly No options
480i (!6:9) n--f_.lf _. t n.a 43 FutlorZoom (see
'-'"_"'_ _'_""" ' below)
Defaultto FULL mode. _:.. _ ,, _
480i (4:3) Note: Will stretch picture _-'J,rUll,°r,z-°°m(see
' horizontally. . De!0w}
480i Defauit t0 JUST mode 4:3. Full,Just or
zoom (see below)
The ASPECT button on the remote control lets you choose
one of four display modes, depending on the formats of the
received signal and your preferences.
This will display a 4:3 picture
at its standard 4:3 size with
gray side bars. (Not
recommended for viewing
4:3 pictures as it may create
a permanent image on
screen if displayed for a
prolonged period of time.)
Input Signal
480i or 480p
This will expand the 4:3
AS(_OT ,,_a_o,, picture uniformly (width and
_G:gs_;_,,s_z_ height) to full screen width
_G _l and then reposition the
zooM-, _( _T picture vertically.
(Recommended for letterbox
pictures.)
If menu is displayed while in Zoom mode, the aspect
will change to Full to display complete menu.
Note:
This will show picture at full
screen size. (Recommended
for anamorphic pictures.)
ASPECT
h_put Signal f'_ Image on
16:9 Screen Size
This will stretch the right and
left edges of a 4:3 picture to
fill the screen, The center of
the screen will have aspect
correction applied. The size
of the picture will depend on
the original signal.
(Recommended for regular
TV viewing.)
BBE Button
Press this button to turn BBE sound feature On or Off.
SAP Button
Press this button to let you cycle through different audio modes.
For example:
If receiving STEREO, SAP and MONO or receiving
STEREO and MONO only, pressing SAP button will
toggle the audio as follows:
STEREO --> SAP -> MONO
Split Operation
This feature lets you watch two different channels side by
side with or without an external video source.
Procedure
SPLIT
Press _ to display Split frame.
Choose channels for the SPLIT frame by pressing
SPLIT CTRL
button. The right indicator ( _ ) will appear
in Split frame, then use or_, or the remote
i
control numeric keypad.
Note: Split frame channel can only be change while right
indicator (_ )is displayed in split frame.
Change Split Frame channel Change Main Picturechannel
Select channels for the Main picture by pressing
or _ or use the remote control numeric keypad.
CH v
SWAP
Press _ to switch the SPLIT FRAME and MAIN
PICTURE source.
RECALL
Press O to view picture source status.
SPLIT
Press _ to cancel Split frame.
Split Operation With a Cable Box
To view premium (scrambled) cable channels through your
cable box in the Main Picture:
Note: Use this procedure if you want to watch premium cable
channels in the Main Picture while viewing a television
program or video in the Sprit frame.
Procedure
Tune TV to Channel 3.
SPLIT
Press I_ on the remote control to display Split
frame.
Note: Audio is from the Main Picture only.
Verify that the Cable box is ON.
Choose channels for the Main Picture by tuning the
cable box.
Choose channels for the SPLIT frame by pressing
SPLIT CTRL ,_ ca
button, then use _ or _ or the remote
control numeric keypad.
Note: Swap is not available when using the cable box to tune
channels. If your cable box has video output, it can be
connected to the TV to allow you to use all SPLIT
functions.
10e

Split Operational Buttons
SPLIT CTRL Button
SPLIT CTRL
Pressing BEE] will enable you to use _ on or
CH
numeric keys for changing split channel and to use TV/
VIDEO button to select desired input for split frame.
TVNIDEO Button
Press when Split frame is displayed to select desired input
mode.
Procedure
SPLIT
Press _ to display Split frame.
Note:
SPLIT CTRL
Press [_E] to use remote control for split
operation.
TV/VlDEO
Press C') to display video input menu.
Press corresponding number key on the remote control
to select the input of your choice.
Split frame input mode can only be change while right
indicator (_ )is displayed.
Main Picture
I ITv --I_ COMPONENT1 .I_.COMPONENT2
I_ SPLIT Frame
W
Search Button
This feature lets you scan through all available channels.
Procedure
SPLIT
Press _ to display split frame.
SEARCH
Press _ to display search frames.
SEARCH
Press _ again to stop search feature. Split
frame channel will be the last active search frame.
SPLIT
Press _ to cancel split frame.
/
Main Picture k
Frames
T
Note: When main picture is component or HDMI signal, Search
feature is not available.
Freeze Button
This feature is used to stop action in Split frame.
Procedure
SPLIT
Press _ to display split frame.
FREEZE
Press Fir] to stop split frame action.
SPECIAL FEATURES
FREEZE
Press Iqlr] again to continue action.
SPLIT
Press _ to cancel frame.
Main Picture I
Main Picture Freeze Feature
This feature is used to stop action of the Main Picture and
display it on a Split freeze frame.
Procedure
FREEZE
To stop action for Main picture, press Fir] while
Split frame is not displayed.
Main Picture freeze will be displayed in Split frame.
FREEZE
Press Fir] again to cancel Main Picture freeze
frame.
Note: While Main Picture freeze frame is displayed, only
FREEZE button is active for split frame. All other Split
buttons have no effect.
Direct Video Input Selection
This feature lets you select video inputs directly using the
TV/VtDEO button and the numeric keys on the remote
control.
Procedure
TV/VlDEO
Press O on the remote control to display the
Input selection menu.
Note:
Press corresponding number key on the remote control
to select the input of your choice.
Video input can also be selected by pressing TV/WDEO,
then the CH A V buttons.
11e

REMOTE CONTROL OPERATION
Remote Control Operation
Press to select remote operation.
V0L VoL
Press to adjust TV sound and navigate in
menus.
ACTION
Press to access menus.
rl BBE
[ M(_)U
/[MENU - Press to access DBS or DVD menus.
L
R ,L
/ _nel, sleep timer,
[ and other options.
Press numeric keypad to select any channel.
R-TUNE
Press to switch to previously viewed
channel or input modes.
ASPECT
Select picture size (ratio) to match
programming format.
EUR7603ZF0
TV/VIDEO
Press to select TV or input modes for main
picture or split frame.
Note: to TV/VIDEO Button section On
page 11for selecting split frame input.
LIGHT
Press to illuminate remote buttons.
Press to select next or previous channel and
navigate in menus. II
EXIT
(_)
Press to exit PTV and DBS menus.
GUIDE
DBS functions button.
DBS page up!down and DVD skip-/+
buttons. II
Press to enter minor number in a compound II
number. II
*SWAP *SPLIT **SPLIT CTRL
nEW PLAY FF
*FREEZE *SEARCH
PAUSE STOP
TVNCR DVDNCR CH OPEN/CLOSE
*(FREEZE) *(SEARCH)
*Split function buttons
Component function buttons
SPLIT CTRL
**While split frame is displayed press
button: right indicator _ will be displayed in split
frame. Then use CH A/CH • or numeric keypad
to change channels and TV/VIDEO to select input
for split frame.
12e

Operating Components with Remote Control
Note: Refer to page 15 for programming Remote Control
procedure.
Operating a VCR
Program the remote control to use with VCR.
. _ TO DO Till
Turn on/off . 0 Rewind the REW
Tape i
TV/V DEO FF
Select TV Input -- F st Forward
mode for VCR ' (,.) _ a . _)
i
A
Change Channels , CH
up/down CH
Change Channels DVD/VCR CH
upldown (_ (_
I REC
STOP
O®O
Selecta Channel (_) O O
©®®
Change to TV or TV/VCR
VCR Mode I O
On screen VCR RECALL
Display I O
i
Operating a DBS
Program the remote contro to use with DBS.
I SAP
STB Audio track . (_
Navigation , CH
up/down OH
STB Change DVD/VCR CH
Channels up!down _ _)
ASPECT
STB AsPect O
Navigation _vOi
left/right
sTBAot oo
Select a ' (_) C)(_
Channel (_)
Previous R-TUNE
Channel I O
STBpage '
up/down _
STB Menu I STB guide I
EXIT OPEN/CLOSE
STB EXit I O - STB search i ([_
b.up[og[am_'_-::-:_--inf0 RECALL STB Seect PROG
O _ dash channe! .
PLAY SWAP
STBFAV-STBM:guide' O
I REC • I FF
STBjumP . (_
Change to TV or Tv/vcR
SAT Mode O - '
REMOTE CONTROL OPERATION
Operating a DVD
Program the remote control to use with DVD
REW
Tur n on/off . _ _ Skip search << . (_
Nay gaton i • : >> FF
_V °L V0L_ Sk!psearch .
left/right
Navigation CH Select Chapter (_) C) (_)
upldown =
ca
PAUSE
Ch-!+ _ _ Pause
REC ACTION
Record . _ _Select ' O
PLAY RECALL
Play ' {_-_) - DVD Disp!aY O
STOP , MENU
StOP . _ Menu , O
OPEN/CLOSE , GUIDE
°pen/cl°se (_-Title O
PAGE
Skip-i+
Operating a CD
Program the remote control to use with CD.
T. _ : RECALL I . ill, GUIDE
Ime T°rma! ' O II I_eX[ Q!SK ' O
,
Select Tracks (_)
track, CH 0 0 C)
DVDNCR CH R-TUNE
Randomirepeat.@ @ aextd!sk 0
FF REW
Search FE
. (_;_ __earc, mew .
PAGE • PAUSE
Skip q+ @ (_ Still/pause .
STOP • OPEN/CLOSE
StOP . _ _ 0pen!C!0se.
13e

REMOTE CONTROL OPERATION
Operating a DTV Set Top Box
Program the remote control to use with DTV.
Program RECALL
Information I 0
SAP , GUIDE
I ®
Navigation CH Select (_
uP/d0wn CH Channe (_) (_)
I • PROG
Nav=gatton .,_ ,. Select dash
left/right _V01- v0u _ number , (_)
I ASPECT REC
Aspect ' O _Record .
ACTION MENU
DTv ACtiOn O - Menu . O
I EXIT
Operating a Receiver
Program the remote control to operate audio
TO DO THIS.,. ' PRESS TO DO THIS,.; ''
Turn on/off . _ I Volume +/-
I S
AHHir, r,,IHt_, MUTE To select AV input
.......... ' ('_ s or Components
receiver.
PRESS ....
_VOL VOL _
Press Remote
numeric keypad
AVt Press 1
AV2 Press 2
AV3 Press 3
AV4 Press4
CD Press 5
TUNER Press 6
PHONO Press 7
I • TAPE Press 8
' = , AUX Press 9
TVNIDEO PEW
Swtch nput O _ Surround - I
DVD/VCR CH
Center-t+ _ (_ I
Operating a PVR (Personal Video Recorder)
Program the remote control to use with a mVR.
,_ I REW
Turn on/off _ II Rew nd .
TV/VIDEO FF
Select TV/VCR . O _ Fast Forward (_
®®®
®®®
®@¢
TOD_ _J_L' , PRESS ._oO_alS. , PRSSS
I PAUSE
PVRleft!right _VOL VOL _ Pause
Change i DVD/VCR CH R-TUNE
up!downChannels Replay zone O
ACTION TV/VCR
PVR select I Instant replay
O - ' O
' REC PROG
R !urnt°'!ve
PLAY OPEN/CLOSE
Play . _ Quick skip Q
STOP , GUIDE
Stop_ Rep!ay guide
O
Menu
RECALL
-.
Operating a Cassette Deck
To operate a cassette deck, the remote control must be in
AUX mode and be programmed with the appropriate code
for your equipment.
_ _d _J_,_. PRESS,,,,_TO:::DOTalS ,,, ,/P_ESS,
Turn on/off
REC I FF
Record _ Fast Forward . (_
PLAY PAUSE
PJay_ Pause
STOP • OPEN/CLOSE
Stop _ Qpen!CI0se i
i R-TUNE
Deck A!B ' O - '
Operating a CABLE BOX
Program the remote control to use with Cable Box.
},,',,',,'SRE88};,,',,',,',,
Volume '_VOL VoL
upldown _
MUTE ACTION
Audj0 Mute . C) - Enter ' (_
v
€ angi I
Channels I t tel
up/down CH I _
Change Channels DVDNCR CH Previous R _TUNE
up/down (_ (_) Channel I O
14e

Programming The Remote Control
The Universal Remote Control can be programmed to
operate many manufacturers' components using the
component function buttons for VCR, DVD, AUX, RCVR,
TV, DTV CABLE or DBS. Follow the procedures for
programming your Remote Control with or without a code
for the component.
Default Modes for Remote Control
TV TV (Panasonic Only) Panasonic TV Code
DTV-STB DTV (Panasonic Only) Panasonic DTV Code
CABLE I CABLE (Preset) I Panas_;_eCABLE
DBS ' DBS (Preset) Panasonic DBS Code
VCR . VCR (Preset) Panasonic VCR Codes
DVD/CD DVD and CD (Preset) Panasonic DVD Codes
AUX Personal V dec Recorders, Panasonic Personal
I Tape and VCR2 Video Recorder Code
RCVR ' Audio receiver (Preset) Panasonic RCVR code
Note: Determine the manufacturer of the component and look
in the table for the code (found on page 16 and 17).
Procedure
1. Confirm that the external component is plugged in and
operating.
2. Turn the component off.
ACTION
3. Press and together for at least 5
seconds. After 5 seconds, the illuminated mode
(component) buttons will begin to flash. Release the
ACTION and POWER buttons.
4. Press appropriate component button on the Remote
Control: VCR, DVD (CD), AUX (VCR2 or TAPE),
RCVR, DTV, CABLE or DBS. The component button
will illuminate steadily and all others will go out.
5. Enter the 3-digit component code using the Remote
Control numeric keypad (0 ~ 9 buttons). The component
button will blink twice.
6. Press the Remote Control to test the
Note:
component. If the procedure was successful, the
component will turn on and the component key will blink
twice and then go out.
If the component does not operate with the Remote
Control, repeat the steps 3 through 6 using another code
(some brands have multiple codes). If an incorrect code
is entered, or if the procedure takes longer than 30
seconds, the programming will fail.
REMOTE CONTROL OPERATION
Programming Without A Code
This procedure searches all codes and is called the
"sequence method."
1. Confirm that the external component is plugged in and
on.
2. Turn the component off.
ACTION
3. Press and together, for at least 5
seconds. After 5 seconds, the illuminated mode
(component) buttons will begin to flash. Release the
ACTION and POWER buttons.
4. Press the appropriate component button on the Remote
Control. The component button will illuminate steadily
and all others will go out.
5. Press the button to set the remote control to the
step and set mode.
6. Point the remote control towards the component.
7. Press VOL • (the mode key will blink three times), then
press the Remote Control button to test the
component. Continue this process until the proper code
is found. If the procedure was successful, the component
will turn on.
Note: Each time you press the VOL I_ button, make sure that the
component key blinks twice before pressing the POWER
button.
ACTION
8. Once the device responds, press to store the
code. The mode (component) button will blink twice.
Note: It may take many attempts before the correct code
is found. If you miss a code, press _ VOL, then press
the button to test the component.
Component Codes
The Universal Remote Control is capable of operating
many component brands after entering a code. Some
components may not operate because the codes are not
available due to limited memory. The Universal Remote
Control does not control all features found in each model.
titi!tilt t ii ili iil I
VCR DVD DVD(CD)
IIII IIII IIII
AUX (VCR2) AUX (TAPE) RECEIVER
IIII IIII IIII
DTV CABLE DBS
IIII IIII IIII
15e

REMOTE CONTROL OPERA TtON
Component codes
[_]_t;F4kta_J"l_:l,3F211:{_l
Admiral 335
Aiwa 332
Akai 314, 315, 316, 329
Audio
i
31ti 338
Dynamic
Bell & How-
ell 305, 313
Broksonic 3201326
Canon 323, 325
CCE 343
Citizen 366
Craig 305, 306, 329
Curtis 324, 345
Mathes
Daewoo 301,324, 343
DBX 310, 311,339
Dimensia 345
Emerson 303, 319, 320,
325, 326, 343
Fisher 305, 3071308,
309, 313
Funai 320, 326, 334
GE 324, 333, 345
Goldstar 306
Gradiente 334
Hitachi 300, 323, 345
Instant
323, 324
Replay
Jensen 339
JVC 31013tl, 334, 339
Kenwood 306, 310, 311,339
3001305,
LXI
306,307, 308, 308
Magnavox 323, 324, 331
Marantz 310, 311,339
Marta 306
Memorex 309, 324
MGA 338, 340, 3411
347,348
Minolta 3001345
Mitsubishi 338, 340, 3411
347, 348
Multitech 304, 347
NEC 310,311,334, 339
Olympic 323, 324
Optimus 306, 321,328, 335
Orion 3201326
Panasonic 321,322, 323, 324
Penney 300,305,310,3tl,
324, 339, 345
Pentax 300,311,345
Philco 320, 323, 324,
326, 331,343
Philips 323, 324, 331
Pioneer 323
300, 301,302,
Rroscan 323, 324, 331,
333, 345, 346
Quasar 32t, 322, 323, 324
Radio Shack 305, 309, 324,
333, 336, 340
300, 301,302,
RCA 323, 324, 331,
333, 345, 346
Realistic 305, 309, 324,
336, 340
Samsung 302, 304, 333
Sansui 320, 326, 339, 352
Sanyo 305, 309, 3t3
301,302, 304,
Scott 309, 320, 326,
338, 340, 347, 348
Sears 300, 305, 306,
307, 308
Sharp 335, 336
Shintom 317
S gnatu e 335
2000
Singer 337
Sony 328, 329, 330
Sylvania 323, 331,324
Tashiro 306
Tatung 310, 31t, 339
Teac 310, 31!, 339
Technics 32t, 322, 323, 324
Teknika 324
Toshiba 30t, 346
Vector '3ii
Research '
Wards 306, 309, 335,
336, 344
Yamaha 305, 310, 311,339
Zenith 306,344
ABC 124
Archer t25, 132
Cableview 105, 132
Citizen 105,122
Curtis 112, 113
Diamond 124, 125, 132
Eagle 129
Eastern
GCbrand
Gemini
General
134
105, 132
122
!1i:1t9:i20,
Instrument/ 121, 122, 124,
Jerrold 125, ! 26, ! 27
Hamlin 112,118,140,
14t, 142, 145
Hitachi 103, 124
Macom t03, 104, 105
Magnavox 133
Memorex t30
Movietime 105, 132
Oak 102, 1371 139
Panasonic 109, 1t0, 1t4
Philip,.,o 106,107, !28,
129, 130
Pioneer 10t, 1t6
Pulsar 105, 132
Puser 132
RCA 115
Realistic 132
112, 118,140,
Rega! 14!, 142, 145,
Regency 134
Rembrand 105, 132, 137
S.A. 111, 1t2, 113
Samsung 105
Scentfc
Atlanta ' !!!,!!2, !!3
Slmark t01,105
Sprucer 105, 110
Stargate 105, 132
Teleview 10t, 105
Texscan 144
Tocom 135
Toshiba 104
Unika 125, 132
Universal 122, 132
Videoway 166
Viewstar t29, 130
Zenith 100, 1t7
Zenith/.Drake
100
Satellite
Dish Network ,105, !15, !16
(Echostar)
Echostar 105
Express VU 105, 1t5
G E. t06
G.I: (General ,108
Instrument)
Gradiente 114
Hitachi 103, 111,
1t2
HNS (Hughes) 103
Magnavox 101,102
Panasonic 104
Philips 101,102
Primestar 108
Proscan 106,109, 110,
113
RCA 106, 109,
110, 113
Sony 107
Star Choice 103, t08
Toshiba 100
Uniden 101,102
Zenith 127
[o,,]'_'___"-'-'-'-'-'-'-_R__'_'_i _]LVA_,]
Denon 100
Ferguson 101
JVC 109
Mitsubishi 105
Nordmende 101
Panasonic 100
Philips 103
Pioneer 102
RCA 101
Saba 101
Samsung t10
Sharp 108
Sony 104
Technics 100
Thomson 101
Toshiba 103
Yamaha t00
Zenith 107
16e

Component Codes (Cont.)
REMOTE CONTROL OPERATION
Aiwa 223, 224, 225
Denon 23t
Fisher 203
Jensen 2t4
JVC 229, 230
Kenwood 200, 207
Marantz 202
Nakamichi 205
Onkyo 208, 209, 213
Panasonic 2t6, 218
Philips 222
Pioneer 204
RCA 226, 227, 228
Sansui 205, 210
Sharp 231
Sony 2t9, 220
Teac 210, 21!, 215
Technics 2t6, 218
Yamaha 201,202
Admiral 120
Aiwa 125, 126
Denon 134, t35, t36
Fisher 104
Garrard 1t3
Harman ii5, i23
Kardon
Jensen 129
JVC 132,133
Kenwood 100, t08
Magnavox 127
Maran_ 124
Mclntosh 1!6
Nakamichi 106
Onkyo 109, 114
103,127, t30,
Qptimus 13t
Panasonic 1!8,119,121
Philips 123
Pioneer 105,107
Quasar 1t8, t19, t2t
RCA 103,105,127,
130,131
Sansui 103, tlt, t39
Sharp 134,137
Sony 122
Soundesign 138
Teac 1tl, t12, It3
Technics 1!8, 119, 121
Victor 132, t33
Yamaha 101,102
Admiral 226
Aiwa 233,235
Carver 229
Denon 242
Emerson 239
Fisher 205
Harman/Kardon 219, 220,
221,223
Hitachi 207
Jensen 234
JVC 240,24t,245
Kardon 223
Kenwood 200,201,21t,
245
LXl/Sears 236
Magnavox 229,232
Maran_ 229
Mclntosh 22t
Nakamichi 210
Onkyo 214,215
Qptimus 208,218,
220,222
Panasonic 224, 225, 227
Philips 229, 230
Pioneer 208
Quasar 224,225,227
RCA 231,237,
238,247
Sansui 210,246
Sanyo 205
Scott 210,246
Sharp 242,243
Sherwood 220
Sony 228
Soundesign 244
Teac 212, 216, 2t8
Technics 224,225,227
Victor 240,24t,245
Yamaha 202,203,204
17e

BASIC MENU NAWGATION
Basic Menu Navigation
Press
to display the
Main Menu.
Press to choose the
desired icon.
Press to enter the sub-
menu field.
sub Menu
Field
Press to select desired
sub-menu.
Press _'_ _ to select or adjust
desired sub-menu.
Note: For sub-menu with OTHER ADJ.
Press to select OTHER ADJ.
BRIGHTNESS 32 - _-
Press
Press
Press
Press
Press
V
sub sub-Menu
Field
to select desired sub
sub-menu.
to select or adjust
desired sub sub-
menu.
Note: To EXIT menus.
repeatedly until Main Menu
icon is highlighted.
Main Menu Icon
to exit Main Menu.
18e
NORMAL PICTURE

Icon Menus Operation
PICTURE
Note: While sub-menu features are highlighted, press VOL •
to adjust or activate.
[] PIC MODE - Lets you choose one of three pre-set
Picture Modes that best suits the program you are
viewing. Selecting this feature will also affect Color
Temperature setting.
PIC MODE - COLOR TEMP DEFAULT SETTINGS
PIC MODE COLOR TEMP
VIVID ' COOL
STANDARD NORMAL
CINEMA ' WARM
Note: Each mode has its own picture settings (Color, Tint, Brightness,
Picture and Sharpness) and Color Temp settings.
VIVID - This is the default mode, It provides
enhanced picture contrast and sharpness for
viewing in a well-lit room.
STANDARD - Recommended for normal viewing
conditions with subdued room lighting.
CINEMA - Select this mode for watching movies in
a darkened room. It provides a soft, film-like
picture.
[] COLOR - Adjusts desired color intensity.
[] TINT - Adjusts natural flesh tones.
[] BRIGHTNESS - Adjusts dark areas of picture.
[] PICTURE - Adjusts white areas of picture.
[] SHARPNESS - Adjusts clarity of outline detail.
[] NORMAL - Reset each of the PIC Mode adjustments to
factory default settings.
[] OTHER ADJ.
Highlight OTHER ADJ. and press VOL • to display the sub
sub-menu.
Note: While sub sub-menu features are highlighted, press
VOL • to select or activate.
COLOR TEMP (temperature) - To increase or decrease
WARM (red) and COOL (blue) colors to suit personal
preferences.
NATURAL COLOR - To increase the color reproduction
range with natural color gradation and highly delicate
hues.
VIDEO NR - Reduces noise in the channel, commonly
called snow.
3D Y/C FILTER - Minimizes noise and cross color in the
picture.
ICON MENUS OPERATION
COLOR MATRIX - Available only with 480p signal.
Select HD or SD to automatically adjust color
parameters for HD (high definition) and SD (standard
definition). This feature is not selectable when viewing a
regular TV (NTSC) program.
Note: When viewing a non-standard DTV signal
format, you can change color parameters
manually for the best picture quality.
VM (VELOCITY MODULATION)- increases picture
sharpness and provides crisp white to black transitions
MPEG NR - This feature reduces the block noise caused
by the MPEG video compression used in DVD and
H DTV sources.
AUDIO []
Note: While sub-menu features are highlighted, press VOL •
to adjust or activate.
[] MODE - Select STEREO, SAP (Second Audio
Program) or MONO. (Use MONO when stereo signal is
weak).
[] BASS - Increase or decrease the bass response.
[] TREBLE - Increase or decrease the treble response.
[] BALANCE - Emphasize the left/right speaker volume.
[] NORMAL - Reset BASS, TREBLE and BALANCE
adjustments to factory default settings.
[] OTHER ADJ.
Note: While sub sub-menu features are highlighted, press
VOL • to adjust or activate.
Note:
AI SOUND - Equalize overall volume levels across all
channels. (AI sound is not available in VIDEO mode).
BBE VIVA 3D - BBE VIVA provides a musically accurate
natural 3D image with hi-fi sound. The clarity of the
sound is improved by BBE while the width, depth and
height of the sound image are expanded by BBE's
proprietary 3D sound processing. BBE VIVA is
compatible with all TV programs including news, music,
dramas, movies and sports as well as electronic games.
BBE VIVA enhances the surround sound effect, while
maintaining the clarity of dialogue.
BBE WVA 3D is only available in model PT-53TW54.
BBE® - BBE High Definition Sound restores clarity and
presence for better speech intelligibility and music
realism.
19e

ICON MENUS OPERA TION
AUDIO (cont.)
[] OTHER ADJ. (cont.)
SURROUND - Enhances audio response when listening
to stereo.
HDMI IN - When using HDMI, this feature will let you
switch between Analog input and Digital input.
Auto - Automatically selects Analog / Digital signal.
Digital - Digital input only.
Analog - Analog input only.
SPEAKERS - This feature is used when connecting to
an external amplifier.
ON - TV speakers operate normally.
OFF & Variable Audio Out - TV speakers off - audio
adjustable by television.
OFF & Fixed Audio Out - TV speakers off - audio
adjustable by the external amplifier only.
CHANNELS
[] CHANNEL SCAN - Select FAV or ALL.
Note: Use remote numeric keypad to select desired FAV
channels.
[] FAVORITES - To enter up to 16 favorite channels. Use
remote control numeric keypad to select desired
channels.
[] OTHER ADJ.
Highlight OTHER ADJ. and press VOL • to display the sub
sub-menu.
PRESET CAPTION - To enter channel numbers for
popular TV stations.
Procedure
Press CH • to select desired preset caption.
Then use the remote numeric keypad to select
desired channel (refer to your local TV guide).
Note:
To delete a channel, press 41 VOL while channel
number is highlighted.
MANUAL CAPTION - To enter numbers and captions
manually.
Note:
Use the remote numeric keypad to select desired
channel (refer to your local TV guide).
INPUT LABEL - To label video input connections for
onscreen display.
Procedure
Press CH • or CH • to select the desired Video
input.
Press ,d VOL or VOL • to select desired preset
input label (see chart below).
INPUT LABEL CHART
VCR Select when VCR is connected to video input.
DVD Select when DVD is connected to video input.
SKIP Selec t to skip unused video input when
. pressing TVNIDEO button.
Select when CABLE box is connected
' to video input.
DBS Select when DBS is connected to video input.
Select when digital TV set-top:b0x is
DTV STB connected
' to video input.
PVR (Personal Select when a personal video recorder is
Video Recorder) connected to video input.
GAME Select when video game is connected
. to video input.
AUX Select when other components are
. connected.
' Select to delete input label.
20 •

TIMER
Note:
[]
[]
Use CH • or CH • to highlight and use < VOL or
VOL I_ to select.
SLEEP - Select to turn PTV off in 30, 60, or 90 minutes.
Select NO to turn sleep timer off.
TIMER 1 and TIMER 2 - Select one or both timers to
turn the PTV on and off at selected times, on a selected
channel, and on selected days.
Notes:
[]
The television automatically turns OFF after 90 minutes
when turned ON by the TIMER. If the OFF time is
selected or if a key is pressed, the automatic OFF after
90 minutes will be cancelled.
The TIMER is active when the television is OFF or ON.
The television will switch to the selected channel at the
selected time set in the TIMER.
CLOCK SET - Set the time of day and the day of the
week.
LOCK
[] CREATE CODE FIRST - Use the remote numeric
keypad to enter a four-digit secret code (Use a code
that is easy to remember and record it in a safe
place).
[]
Notes:
LOCK SET - To prevent video games, VCR tapes and
all channels and video modes from being viewed.
If you do not remember your code, LOCK will unlock in
12, 24, or 48 hours, depending on the current set-up. Be
cautious when selecting ALWAYS. If ALWAYS is
selected and you forget your secret code, the TV must
be serviced by a qualified technician to clear the LOCK
set-up.
If you select CHANGE CODE, and you change your
code from the one used in the LOCK menu, your new
code becomes the controlling code.
ICON MENUS OPERATION
Procedure
Press VOL • to select.
OFF - Turns Lock function off.
GAME - Lock CH 3, 4 and Video inputs.
CHANNEL - Lock up to four channels.
ALL - Locks all channels and video inputs.
Note:
[]
ACTION
Press then CH • to highlight HOW LONG?.
Press VOL • to select 12 Hours, 24 Hours, 48 Hours or
ALWAYS.
If GAME, CHANNEL or ALL is selected, and if a blocked
channel or video input is selected, the message
LOCKED displays in the upper left corner of the TV
screen.
V-CHIP SET - V-Chip technology allows parents to use
the PTV rating codes to block programs that they feel
are inappropriate for their children to watch. Split will
also be blocked automatically.
Procedure
Press CH • to highlight Enter Code.
Use the numeric keypad to enter your four digit code.
(Use a code that is easy to remember and record it in
a safe place.)
Press CH • to highlight V-CHIP SET.
Press • VOL or VOL • to select desired mode: U.S.
TV Programs, U.S. Movies, Canadian English or
Canadian French mode.
Press CH • to highlight SETTING.
Press • VOL or VOL • to display desired rating chart:
U.S. TV Programs, U.S. Movies, Canadian English or
Canadian French.
Press VOL • to select ON or OFF.
Press CH • to select VIEW NR PROGRAMS? for U.S.
TV Programs and U.S. Movies or VIEW E PROGRAMS
for Canadian English and Canadian French.
Press VOL • to select YES or NO.
21 •

ICON MENUS OPERA TION
U.S TV Programs
This TV model features "V-Chip technology" which allows
you to use U.S. TV PROGRAMS Guide ratings to block
various types of TV programs. Split will also be blocked
automatically.
Note: By selecting "Yes", NR programs will be received. By
selecting "NO'; NR programs will be blocked (See
Customer Caution below).
Procedure
Press CH • to select SETTING.
Press VOL • to select BASIC or DETAILED.
BASIC - Allows you to select only general ratings such
as TV-Y, TV-PG, etc.
DETAILED - Allows you to select both general ratings
and content such as V, L, etc.
Press CH • or CH • to move between different ratings.
Use • VOL or VOL • to select ratings you want to
block (RED) and unblock (GREEN).
ACTION
Press _ to return to V-CHIP SET.
Press CH • to select HOW LONG?.
Press • VOL or VOL • to select 12, 24, 48 hours or
ALWAYS.
ACTION
Press _ to return to Main Menu, then press CH •
to exit.
Customer Caution
The V-Chip system that is used in this set is capable of blocking
"NR" programs (non rated, not applicable and none) as per
FCC Rules Section 15.120(e)(2). If the option of blocking "NR"
programs is chosen "unexpected and possibly confusing
results may occur, and you may not receive emergency
bulletins or any of the following types of programming:"
Emergency Bulletins (Such as EAS messages,
weather warnings and others)
Locally originated programming
News
Political
Public Service Announcements
Religious
Sports
Weather
U.S. TV Programs Ratings Chart Description
NR Not Rated. SEE CUSTOMER CAUTION left.
All children. The themes and elements in this
TV-Y program are specifically designed for a very young
audience, including children from ages 2-6.
Directed to older children, Themes and elements
in this program may include mild physical or
TV.Y7
comedic violence, or may frighten children under
the age of 7.
General audience. It contains little or no violence
TV-G no strong language, and little or no sexual dialogue
or situations.
Parental guidance suggested. The program may
TV.PG contain infrequent coarse language, limited
violence, some suggestive sexual dialogue and
situations.
Parents strongly cautioned. This program may
TV-14 contain sophisticated themes, sexual content
strong language and more intense violence.
Mature audiences only. This program may contain
TV-MA mature themes, profane language, graphic violence
and explicit sexual content.
FV FANTASY/CARTOON VIOLENCE
V VIOLENCE
S SEX
L OFFENSIVE LANGUAGE
D DIALOGUE WITH SEXUAL CONTENT
U.S. Movies
This TV model features "V-Chip technology" which allows
you to use Motion Picture Ratings when viewing movies or
video tapes. This innovation allows parents to block various
types of movies and video tapes at their discretion. Split will
also be blocked automatically.
Note: Some movies are not rated for a variety of reasons. Old
movies and foreign films are usually not rated.
Procedure
Press CH • or CH • to move between different
ratings.
Use • VOL or VOL • to select ratings you want to
block (RED) and unblock (GREEN).
ACTION
Press @ to return to V-CHIP SET.
Press CH • to select HOW LONG?.
22 •

U.S. Movies (cont.)
Press • VOL or VOL • to select 12, 24, 48 hours or
ALWAYS.
ACTION
Press _ to return to Main Menu, then press CH •
to exit.
U.S. Movies Ratings Chart Description
CONTAINS NO RATING (NOT RATED) AND NA
NR (NOT APPLICABLE) PROGRAMS. Movie has
not been rated or rating does not apply.
G GENERAL AUDIENCES. All ages admitted.
PARENTAL GUIDANCE SUGGESTED. Some
PG
material may not be suitable for children.
PARENTS STRONGLY CAUTIONED, Some
PG-13 material may be inappropriate for children under
13.
RESTRICTED, Under 17 requires accompanying
R
parent or adult guardian.
NC-17 NO ONE 17 AND UNDER ADMITTED.
X ADULTS ONLY.
Canadian English
The V-CHIP used in this TV model allows you to block
various types of movies and television programs based on
the two ratings systems used in Canada. Split will also be
blocked automatically.
Note: E (Exempt) programming includes. news, sports,
documentaries and other information programming, talk
shows, music videos, and variety programming.
Procedure
Press CH • or CH • to move between different ratings.
Use • VOL or VOL • to select ratings you want to
block (RED) and unblock (GREEN).
ACTION
Press _ twice to return to V-CHIP SET.
Press CH • to select HOW LONG?.
Press • VOL or VOL • to select 12, 24, 48 hours or
ALWAYS.
ACTION
Press _ to return to Main Menu, then press CH •
to exit.
ICON MENUS OPERA TtON
Canadian English Ratings Description
Exempt - Exempt programming includes:
E news, sports, documentaries and other
information programming, talk shows, music
videos, and variety programming.
Programming intended for children under age
c 8. No offensive language, nudity or sexual
content.
Programming generally considered
C8+ acceptable for children 8 years and over. No
profanity, nudity or sexual content.
General programming, suitable for all
G
audiences.
PG Parental Guidance suggested. Some material
may not be suitable for children.
Programming contains themes or content
which may not be suitable for viewers under
14+ the age of 14, Parents are strongly cautioned
to exercise discretion in permitting viewing
by pre-teens and early teens,
18 ADULTS ONLY
Canadian French
The V-CHIP used in this TV model also lets you block or
unblock Canadian French programs according to various
ratings categories. Split will also be blocked automatically.
'2
@
Note:
E (Exempt) programming includes: news, sports,
documentaries and other information programming, talk
shows, music videos, and variety programming.
Procedure
Press CH • or CH • to move between different ratings.
Use • VOL or VOL • to select ratings you want to
block (RED) and unbiock (GREEN).
ACTION
Press _ twice to return to V-CHIP SET.
Press CH • to select HOW LONG?.
Press • VOL or VOL • to select 12, 24, 48 hours or
ALWAYS.
ACTION
Press _ to return to Main Menu, then press CH •
to exit.
23 •

ICON MENUS OPERA TION
Canadian French (cont).
Canadian French Ratings Description
E
G
8 ans +
13 ans +
t6 ans+
t8 ans+ Contains constant violence or
scenes of extreme violence,
Exempt - Exempt programming,
General - Programming intended
for audience of all ages. Contains
no violence, or the violence
content is minimal or is depicted
appropriately.
8+ General - Not recommended for
young children. Programming
intended for a broad audience but
contains light or occasional
violence. Adult supervision
recommended,
Programming may not be suitable
for children under the age of 13 -
Contains either a few violent
scenes or one or more sufficiently
violent scenes to affect them.
Adult supervision strongly
suggested.
Programming may not be suitable
for children under the age of 16-
Contains frequent scenes
of
violence or intense violence.
Programming restricted to adults.
Main and Split Blocking Message
If V-Chip is enabled and the program exceeds the rating
limit set by you, the blocking message will appear and the
audio will be muted. Enter your four-digit secret code if you
wish to continue viewing the program. After entering your
code, all locks and rating blocks are disabled until the PTV
is turned off or until all settings are reprogrammed.
Note: If you enter your four-digit secret code to override rating
blocks, you must reset all rating blocks by either
reprogramming or turning the PTV off.
Main Picture Split Frame
PROGRAM RATING EXCEEDED
ACCESS CODE ....
PROGRAM
RATING
EXCEEDED
ACCESS ....
CODE
Note:
SPLIT CTRL
To unlock split frame, press F_q button,
will be diplayed in split frame, then enter four-digit
secret code.
SET UP
[] While the desired sub menu is highlighted, press VOL • to
select or activate feature.
[] IDIOMNLANGUE - Select to change menu language
to ENGLISH, ESPANOL (Spanish) or FRAN(_AtS
(French).
[] [_ ON MUTE - Activates the onscreen Closed
Caption feature when the MUTE button on the remote
control is pressed. To deactivate press MUTE button
again.
[] _ MODE - This television contains a built-in decoder
that displays _ (Closed Captioned) text across the
screen (white or colored letters on black background).
It allows the viewer to read the dialogue of a television
program or other information. The program viewed
must include Closed Captioning for the feature to work.
Activate the onscreen Closed Captioning feature by
selecting one of the following modes.
OFF - When Closed Caption is not desired.
C1 - For video related information to be displayed, up to
4 lines onscreen at a time. (It does not block relevant
parts of the picture). Text may be in any language.
C2 to C4 - For other modes of video related information.
T1 to T4 - For program guide and other information to be
displayed, when available. (Blocks a large portion of the
picture on the television screen).
Note: C1 mode is recommended for viewing Closed Captions.
[] CONVERGE
Note: Only use the remote control buttons while adjusting
convergence. The front control panel navigation and
Action buttons have no effect.
Note: Convergence seldom needs adjusting except after
moving the PTV or to make minor adjustments.
Procedure
Press VOL • to enter converge sub-menu field.
Press CH • or CH • to select:
CONVERGENCE ADJ. - Select to correct minor
convergence problem.
Note: After selecting, press VOL • to continue
CONVERGENCE ADJ.
RESET TO DEFAULT - Select to set convergence
to factory default setting.
24 •

[] CONVERGE (cont.)
Note: After selecting, press VOL • to activate RESET TO
DEFAULT feature.
Procedure
After pressing VOL • the align Green to Center screen
will be displayed.
Then use the navigation buttons on the remote control
to align the horizontal and vertical green lines on screen
with the cabinet reference marks on top center and left
center of cabinet, as shown below.
Reference Marks
t
Front of cabinet
•lJ"
PRESS CH AN D VOL KEY TO
ALIGN GREEN LINES TO THE
• CENTER MAR}( ON THE CABINET
-- uP
LEFT • _- RIGHT
DOWN
PRESS ACT iON TO CONTINUE
Note:
ACTION
Press _ to display red center correction screen.
Use the navigation buttons on the remote control to align
the red cross with the white cross pattern at the center of
the screen.
Note: To prevent picture tube damage, do not leave
test pattern on for an extended period of time.
Then press "0" on the remote control keypad to display
the BLUE center correction screen. Repeat procedure
for adjusting blue. If needed press "0" again to return to
RED correction screen.
An adjusted cross pattern appears white with a minimum
of color protrusion.
IFRED ]S PROTRUDING FROM
CENTER CROSS, PRESS CHAND
VOL KEY TO CORRECT
UP
LEFT • I_ REGHT
DOWN
PRESS 0 TO ADJU ST BLUE
PRESS ACTEON TO CONTENUE
Press
IF BLUE iS PROTRUDING FROM
CENTER CROSS, PRESS OH AND
VOk KEYTO CORRECT
UP
LEFT -II lb RIGHT
DOWN
PRESSOTOADJUSTBLUE
PRESS ACTEON TO CONTENUE
NINE POINT CONVERGENCE CORRECTION
Note: Remote Control must be in TV mode.
Procedure
ACTION
Press _ to display red correction screen.
Press the 1 through 9 keypad buttons on the remote
control to select the desired convergence position.
Use the navigation buttons to align the RED cross with
the white cross pattern.
Note: An adjusted cross pattern appears white with a minimum
of color protrusion.
ICON MENUS OPERATION
Press "0" on the remote control keypad to display the
BLUE correction screen, then repeat procedure.
Press
ACTION
To exit press _ repeatedly, then press CH &.
[] ZOOM ADJ.
This feature lets you adjust the size of the zoom picture and
position it vertically.
Note: This feature is only selectable while in Zoom mode.
Press the ASPECT button on the remote control for
selecting Zoom mode.
[] OTHER ADJ.
Highlight OTHER ADJ. and press VOL • to enter sub sub-
menu field.
Note: While sub sub-menu features are highlighted, press
VOL • to adjust or activate.
MODE - To select TV (antenna) or CABLE mode
depending on the signal source.
AUTO PROGRAM - To automatically program all
channels received through the RF input.
MANUAL PROGRAM - To manually add or delete
channels.
AUTO POWER ON - Select SET to power up the TV at
the same time as the Cable box or other components or
select OFF.
CHAN BANNER - Select ON to display onscreen banner
when changing channels.
IMAGE SHIFT - Selecting ON is recommended for this
feature to prevent image retention on screen.
25 •

TROUBLESHOOTING CHART
Troubleshooting Chart
Before calling for service, determine the symptoms and follow suggested solutions.
\
Noisy Audio
\
Noisy Audio
Noisy Audio
No Audio
\
Noisy Audio
No Audio
\
Normal Audio
Normal Audio
Wrong Audio
Normal Audio
Normal Audio
Snowy Video
Multiple Image /
Color shift in picture
Interference
Z
Normal Video
.... , • ;
• *. , * *,
No Video with Snow
No Video / No Split
Picture shifts slightly (horizontally or
vertically) when turned on, changing
channels or within a duration of two
(2) hours of viewing.
Z
No Color
Normal Video
Black Box on Screen
Z
Normal Video
Adjust antenna location and connection
Adjust antenna location and connection
Check antenna lead-in wire
Adjust Convergence (refer to pages 24 and 25)
Move television away from electrical appliances, lights,
vehicles and medical equipment
Increase Volume
Check Mute
Check television SPEAKERS on/off
Change Channel
Set TV or Cable Mode Properly
Check Antenna Cables
Check if Power Cord is Plugged into Active Outlet
Adjust Brightness and Audio Controls
Change Channel
Check Cable Connections
Program the Remote Control Again
Check Second Video Source Operation
Make sure that a PC is not connected to HDMI (DIGITAL-IN) input.
This is a normal condition to prevent image burn-in. This feature can be
turned off. However, turning off this feature may result in image
retention on screen. (refer pg. 25)
Confirm that cables are in the correct jacks
Adjust Color Settings
Change Channel
Check for broken pins on S-Video cable
Check if Audio Is Set To Stereo or Mono, Not SAP
Change CC (Closed Captioning) from Text Mode
Replace Remote Control Batteries
Intermittent Remote Control Operation
26 •

Index
3D Y/C Filter 19
AC Power Supply Cord 5
AI Sound 19
Amplifier Connection 8
Antenna Connection 5
Aspect Button 10
Audio 19
Auto Power On 25
Auto Program 6, 25
Balance 19
Basic Menu Navigation 18
Bass 19
BBE 19
BBE Button 10
BBE VIVA 3D 19
Brightness 19
Cable / Antenna Connection 5
Cable Box Connection 7
Cable Connection 5
Canadian English 23
Canadian English Rating
Description 23
Canadian French 23, 24
Canadian French Rating
Description 24
Care and Cleaning 4
CC Mode 24
CC On Mute 24
Channel Banner 25
Channel Scan 20
Channels 20
Cinema 19
Clock Set 21
Codes For Cable Box 16
Codes For Cassette Decks 17
Codes For CD Player 17
Codes For DBS 16
Codes For DVD 16
Codes For Personal Video
Recorders 17
Codes For Receivers 17
Codes For VCR 16
Color 19
Color Matrix 19
Color Temperature 19
Compatible formats 9
Component Codes 15
Converge 24, 25
Convergence 6
Create Code First 21
Customer Record 4
Digital TV - Set-Top Box or DVD
Connection 8
Direct Video Input Selection 11
Favorites 20
FCC Caution 1
FCC Information 2
Feature Chart 4
Freeze Button 11
Front Control Panel 8
HDMI (High Definition
Multimedia Interface) input 9
HDMI IN 20
Icon Menus Operation 19
Idioma/langue 6, 24
Image Shift 25
Important Information 1
Information Regarding Auto
Convergence 2
Information Regarding
Convergence 2
Initial Set Up Menu 6
Input Label 20
Input Label Chart 20
Installation 5
Lock 21
Lock Set 21
Main and Split Blocking
Message 24
Main Picture Freeze Feature 11
Manual Program 25
Mono 19
MPEG NR 19
Natural Color 19
Nine Point Convergence
Correction 25
Normal 19
Operating a Cable Box 14
Operating a cassette deck 14
Operating a CD 13
Operating a DBS 13
Operating a DTV 14
Operating a DVD 13
Operating a PVR 14
Operating a Receiver 14
Operating a VCR 13
Operating Components with
Remote Control 13
Optional Cable Connections 5
Optional Equipment
Connections 7
Other Adjustment 19, 20, 25
Picture 19
Preset Caption 20
Program Out Connection 9
Programming The Remote
Control 15
INDEX
Programming Without A
Code 15
Projection Screen 4
Remote Control Battery
Installation 5
Remote Control Operation 12
SAP 19
SAP Button 10
Search Button 11
Set Up 24
Sharpness 19
Sleep 21
Speakers 20
Special Features 10
Specifications 4
Split Ctrl Button 11
Split Operation 10, 11
Split Operation With a Cable
Box 10
Split Operational Buttons 11
Standard 19
Stereo 19
Surround 20
Table of Contents 3
Television Location 5
Timer 19, 21
Timer 1 and Timer2 21
Tint 19
Treble 19
Troubleshooting Chart 26
TV/Video Button 11
U.S. TV Programs 22
U.S. Movies 22
U.S. Movies Ratings Chart
Description 23
U.S. TV Programs Ratings Chart
Description 22
V-Chip Set 21
VCR and Cable Box Connection 7
VCR Connection 7
Video NR 19
Vivid 19
VM 19
Zoom Adj. 25
27 •

NOTES
28 •

NOTES
29 •

PRECAUCION
ii iitii i i
ADVERTENCIA: A FIN DE REDUCIR EL RIESGO DE DESCARGAS ELECTRICAS, NO DEBER,_,N QUITARSE NI LA CUBtERTA Nt LA TAPA
POSTERIOR. NO HAY EN EL INTERIOR PtEZA ALGUNA QUE EL USUARIO TENGA QUE REPARAR. TODO SERVlCIO HABRA DE BRINDARLO
PERSONAL DE REPARACION CAPACITADO
El proposito del relampago con punta de flecha
dentro de un trianguto es el de advertir al usuado
de que existen piezas internas del producto que
representan riesgo de que las personas reciban
descargas electricas.
El proposito del signo de exciamaci6n dentro de un
triangulo es et de advertir al usuario de que los
documentos que acompa_an al aparato inciuyen
instrucciones importantes de funcionamiento y
reparacion.
r_ El simbolo de insulacion Clase II (un cuadro dentro de otro cuadro) indica que este producto ha sido I
I
evaluado y probado para cumplir con los requisitos de insulacion Clase II.
I
ADVERTENCIA: CON EL OBJETO DE PREVENIR EL RIESGO DE INCENDIO O DE DESCARGA
EL_:CTRICA, ESTE APARATO NO DEBERA VERSE EXPUESTO A LA LLUVIA NI A LA
HUMEDAD. NO COLOCAR NINGUN OBJETO LLENO LIQUIDO, COMO ENVASES, EN ESTE
APARATO.
INSTRUCCIONES IMPORTANTES DE SEGURIDAD
1. Lea completamente estas instrucciones.
2. Guarde estas instrucciones.
3. Preste atencion a todas las advertencias.
4. Siga todas las instrucciones.
5. No utilice este aparto cerca de agua.
6. Limpie solamente con un trapo seco.
7. No obstruya ninguna abertura de ventilacion, lnstale conforme alas instrucciones del fabricante.
8. No instale cerca de fuentes generadoras de calor tales como radiadores, estufas o cualquier otro aparato (incluyendo
amplificadores) que produzcan calor.
9. No ignore el proposito de seguridad de las clavijas polarizadas o de las clavijas aterrizadas. Una clavija polarizada
tiene dos hojas, una mas ancha que la otra. Una clavija aterrizada tiene dos hojas y un tercer conector. La hoja mas
ancha o el tercer conector son proporcionados para su seguridad. Si la clavija no entra en su contacto de CA, consulte
a un electricista para que reemplace su contacto obsoleto.
10. Proteja el cable de CA de ser pisado o prensado. Ponga especial cuidado en los conectores y el
extremo que Ilega al aparato.
11. Utilice solamente accesorios especificados por el fabricante.
12. Use 0nicamente con el mueble, mesa, c6moda o librero especificado por el fabricante o comprado con
el aparato. Si mueve el mueble con el aparato sobre de el, tenga mucho cuidado de que el aparato no
caiga sobre usted al empujar.
13. Desconecte el aparato durante tormentas electricas o si no se utilizara por un periodo largo de tiempo.
14. Para servicio, acuda con personal calificado. El servicio es necesario si el aparato ha sido daSado de cualquier
manera, como el cable de CA o clavija daSada, si se ha derramado alg0n liquido o algOn objeto ha caido dentro del
aparato, el aparato ha sido expuesto a la Iluvia o a la humedad, no opera normalmente o ha sido golpeado o tirado.
Lea estas instrucciones completamente antes de operar la Television.
El contenido est_ sujeto a cambios sin previo aviso u obligacion.
Derechos Reservados 2004 por Matsushita Electric Corporation of America.
Todos los Derechos Reservados. La copia y distribucion sin autorizacion es violacion de la ley.

INFORMACI6NIMPORTANTE
Informacion Importante
Aviso de la FCC:
Cualquier cambio o modificaci6n a este receptor de TV no aprobado
expresamente pot Matsushita Electric Corporation of America podria
provocar interferencia da_ina, que nulificaria la autoridad del usuario
para operar este equipo.
AVISO AMBIENTAL:
Este producto utiliza un tubo de rayos cat6dicos (TRC) asi como
otros componentes que contienen plomo. El desecho de estos
materiales puede estar regulado en su comunidad debido a
consideraciones ambientales. Para informaci6n de desecho o
reciclaje contacte a sus autoridades locales, o a la alianza de
industrias electr6nicas: <HTTP://WWW.EIAE.ORG.>
La etiqueta de Energy Star, un simbolo para eficiencia de energia, fue creado por
la Agencia de Proteccion Ambiental de los Estados Unidos (EPA) y el
departamento de energia (DOE) para ayudar a los compradores a identificar los
productos que les pueden ayudar a ahorrar dinero y proteger el medio ambiente
con el ahorro de energia. Los productos Energy Star generalmente consumen
menos energia que otros productos estandares similares.
HiGH DEFW_I1_ON MLtL3rIMED_A _NT_R_ACE
BBE_ HD3DSound
HDMI, el logo HDMI y la interfase multimedia de Alta
Definici6n son marcas de fabrica o marcas registradas de
HDMI Licensing LLC.
Brae
High Definition Sound
Bajo licencia de BBE Sound, Inc.
Bajo licencia de BBE Sound, Inc. Sobre el numero USP4638258, 5510752 y
5736897.
BBE y el simbolo de BBE son marcas registradas de BBE Sound, Inc.
BBE ViVA HD3D - El sonido BBE ViVA HD3D (alta definicion 3D)Sound provee una ima-
gen natural 3D musicalmente precisa con sonido hi-fi. La claridad del sonido es mejorada
por BBE mientras el ancho, profundidad y altura de la imagen del sonido son mejorados
por el procesamiento de sonido 3D propietario de BBE. El sonido BBE ViVA HD3D Sound
es compatible con toda la programacion de TV incluyendo noticias, musica, dramas, pelic-
ulas y deportes asi como tambien juegos electronicos.
El Sonido de AIta Definicion BBE restaura la claridad y presencia para un mejor
entendimiento del habla y realismo musical.
Informaci6n Importante Acerca Del Uso De Video Juegos, Computadoras, U Otros Tipos De
Imagenes Fijas.
ADVERTENCIA: El marcado o retenci6n de im&genen los tubos de proyecci6n como resultado del uso de una im&genfija,
no es un defecto de operaci6n y como tal no est&cubierto por la garantia.
El sistema de proyeccion de video esta dise_ado para desplegar imagenes en movimiento constante en la pantalla. El
uso constante de imagenes fijas tal como peliculas en formato letterbox en pantallas estandar (con barras arriba y abajo
de la imagen), peliculas estandar no expandidas (4:3) en TV's de pantalla ancha (con barras laterales visibles a cada
lado de la imagen), barras de reporte de la bolsa mercantil (barra con informacion en movimiento en la parte inferior de
la pantalla), patrones de video juegos, marcadores deportivos fijos, Iogos de estacion televisora, patrones de internet u
otros patrones de tipo computadora deben limitarse.
El uso extendido de material de imagen fija puede causar da5o permanente a los tubos de proyeccion, el cual se
3resenta como 'imagen fantasma" visible en la imagen normal. Este tipo de desgaste irreversible de los tubos de
proyecci6n puede limitarse mediante los siguientes pasos:
Limite el tiempo de uso de material de imagen fija a no mas del 15% del tiempo de uso total a la semana.
Apague la unidad cuando no se este usando.
i ii!!ii!ii!i!iii!iiii!
iiiii!:!:i!iiii_i!i!:!:i!iiii_i!i!:!:i!iiii_i!i!:iJ
1@

INFORMACI6N IMPORTANTE
Informaci6n Importante (Cont.)
Informaci6n sobre la auto convergencia
Esta caractristica es usada para ajutar automaticamentela
convergencia . Se recomienda hacer uso de esta caracteristica
despues de mober el televisor o cualquier cambio en el canpo
magnetico, tales como morer el televisor de lugar o agregar
bocinas adicionles al rededordeltelevisor.
Nota: Durante el proceso de auto convergencia, el control
remoto no tiene efecto.
[3 Imagen normal con problema
de convergencia.
AUTO CONV
[3 Presione el boton (_
en el panel de control frontal.
Nota: No apague e! televisor
durante el proceso de auto
convergencia.
[3
Cuando la auto convergencia
ha terminado, la imagen |
normal sera desplegada con el |
problema de convergencia |
corregido.
Nota: Si la convergencia no es aceptable cuando el proceso
de auto convergencia ha terminado, ser_ necesario
ajustar la convergencia manualmente (ver p_ginas 24 y
25).
Informaci6n sobre la Convergencia
En el televisor de proyecci6n la imagen es formada al
proyectar 3 imagenes de color distinto cada una (verde,
rojo y azQI) en la pantalla. La convergencia se refiere a la
alineacion de las im&genes verde, roja y azul en la
pantalla. Cuando estas imagenes estan alineadas
correctamente (convergen), usted ve una imagen nitida y
de colores vivos. Algunas veces las 3 imagenes requieren
alineacion. Esto se debe al efecto del campo magnetico de
la tierra en los tubos de proyecci6n. Normalmente no se
requiere de ajuste una vez que el ajuste inicial en el centro
de la pantalla se ha Ilevado a cabo. Es posible corregir los
bordes de color en otras areas de la pantalla usando el
control remoto y siguiendo las instrucciones en pantalla del
menQ de AJUSTE. Por favor ajuste la convergencia de las
imagenes al usar el televisor por primera vez. El siguiente
diagrama muestra ejemplos de una imagen mal ajustada y
una imagen correctamente ajustada.
Favor de hacer referencia a las p&ginas 24 y 25 para el
procedimiento en detalle de como ajustar la
convergencia.
Imagen con mala convergencia
Im&gen correctamente ajustada
Notas:
Asegurese de mantener el televisor encendido pot al
menos 20 minutos previo al ajuste de convergencia
descritos en las paginas 24 y 25.
El ajuste de la Convergencia es independiente para
cada formato (480i, 1080i o Zoom). El ajustar en un
formato no afecta los otros.
Informaci6n de la FCC
Este equipo ha sido probado y cumple con el limite para un
equipo digital clase B en acuerdo con las especificaciones
en la parte 15 de las reglas de la FCC. Los limites se
dise5an para proveer protecci6n razonable contra
interferencia de radio y television en una instalacion
residencial. Este equipo genera, utiliza y puede radiar
energia de radiofrecuencia, y de no ser instalado y
utilizado de acuerdo alas instrucciones, puede ocasionar
interferencia nociva a comunicaciones de radio. Sin
embargo, no existe garantia de que no ocurra interferencia
en alguna instalacion en particular.
Si este equipo causa interferencia a recepcion de radio o
television ( la cual puede ser determinada al encender y
apagar el equipo), intente corregir la interferencia con una
o mas de las siguientes medidas.
Re-oriente o re-ubique la antena receptora.
Incremente el espacio entre el equipo y el receptor.
Conecte el equipo en un enchufe de c.a. al cual el
receptor no se encuentre conectado.
Consulte al Vendedor o un tecnico experimentado en
radio/TV.
2O

Tabla de Contenido
Informaci6n Importante ................................... 1
Informacion Auto Convergencia ................................. 2
Informacion sobre la Convergencia Adjustment ......... 2
lnformacion de la FCC ................................................ 2
Felicidades ....................................................... 4
Registro del Usuario ................................................... 4
Cuidado y Limpieza .................................................... 4
Especificaciones ......................................................... 4
Tabla de Caracteristicas ............................................. 4
Instalaci6n ........................................................ 5
Ubicacion de la Television .......................................... 5
Conexiones de Cable Opcional .................................. 5
Cable de Suministro de Corriente Alterna .................. 5
Conexion de Cable / Antena ....................................... 5
Instalacion de Pilas en el Control Remoto .................. 5
Menu de Programaci6n Inicial ........................ 6
Conexiones de Equipo Opcional .................... 7
Conexion de la Videocasetera .................................... 7
Conexion del Decodificador de Cable ........................ 7
Conexion del Decodificador de Cable
y Videocasetera ..................................................... 7
Panel de Control Frontal ............................................. 8
Conexion del Amplificador de Sonido ......................... 8
Conexion del Decodificador de Television Digital ....... 8
Conexion de Salida del (PROG OUT) ........................ 9
Conexion de entrada HDMI ........................................ 9
Botones especiales del control remoto .......................... 9
Caracteristicas especiales ............................ 10
Boton ASPECT ........................................................... 10
TABLA DE CONTENIDO
BotSn BBE .................................................................. 10
Boton SAP .................................................................. 10
Operacion de SPLIT ................................................... 10
Operacion de SPLIT con un decodificador de cable.. 10
Botones de la Operation de Pantalla de Split............. 11
BotSn TV/VtDEO ..................................................... 11
BotSn Search ........................................................... 11
Boton Freeze ........................................................... 11
Funcion de congelamiento de imagen principal ...... 11
Seleccion diresta de la fuente de video ...................... 11
Operaci6n del Control Remoto ..................... 12
Operaci6n de Componentes con el
Control Remoto ............................................ 13
Programando el Control Remoto ................. 15
Programando Sin CSdigo ........................................... 15
CSdigos de Componentes .......................................... 15
Navegaci6n basica de menu ........................ 18
Operaci6n del Menu de Iconos .................... 19
Imagen ....................................................................... 19
Audio .......................................................................... 19
Canales ...................................................................... 20
Cron6metro ................................................................ 20
Bloqueo ...................................................................... 21
Ajuste ......................................................................... 24
Cuadro de Localizaci6n de Fallas ............... 26
Indice .............................................................. 27
3o

FEL/CIDADES
Feficidades
Su nueva Television de Proyeccion (PTV) se caracteriza por
utilizar Io Ultimo en tecnologia en calidad de imagen y sonido,
cuenta con conexiones completas de Audio y Video para su
Sistema de Teatro en Casa. Su television esta diseSada para
brindarle muchos aSos de entretenimiento, fue sintonizada y
comprobada en su totalidad en la fabrica para su major
desempedo.
Registro del Usuario
El modelo y el nQmero de serie de este producto se Iocalizan en
la parte posterior de este televisor. Deber& anotar el modelo y el
nQmero de serie en los espacios que se proveen a continuacion y
conservelos permanentemente como comprobacion de su
compra. Esto le ayudar& a identificarlo en caso de robo 6 perdida.
Los consumidores en los Estados Unidos de America pueden
registrar su producto en la siguiente direccion electronica:
www.prodreg.com/panasonic.
NQmero de
Modelo
NQmero de
Serie
Cuidado y Limpieza
Pantalla de Proyeccion (Apague el Televisor)
La pantalla de proyeccion es un sistema de lentes de alta
precision el cual contiene una pantalla protectora. La pantalla
protectora es completamente lavable, con las siguientes
precauciones:
Use una soluciGn de jabon o limpiador de vidrios y un
paso limpio.
NO UTILICE LIMPIADORES CORROSIVOS.
No use detergente para lavar ropa 6 jabon para lavaplatos
automatico.
No use alcohol, amoniaco, o productos derivados del
petrdleo.
Evite el exceso de humedad y frote hasta secar.
Prevenga que la solucion se derrame al interior del
receptor.
Evite golpear o rayar la pantalla.
PRECAUClON: Evite rociar cualquier tipo de limpiadores
directamente sobre la pantalla.
Gabinete y Control Remoto
Para gabinetes y control remoto use un paso
humedecido con agua o una solucion detergente suave.
Evite el exceso de humedad y frote hasta secar.
No use benceno, diluyentes u otros productos a base de
petroleo.
Especificaciones
Las especificaciones est&n sujetas a cambio sin previo aviso ni
obligacion alguna.
Fuente de Potencia I
PT-47X54 (3,5A)
PT-53X54 (3,5A)
PT-S3TW54 (4,0A)
I
P'F-W4734X (3,5A) 127v CA, 60Hz
Capacidad de Canales - 181
Termina!es de Entrada de
Video
Termina!es de Entrada de
Audio
Terminales de Salida de Video
Terminales de Salida de Audio
Terminal de entrada HDMI
Componente Entrada de Video
VHF-12; UHF-56; Cable-t13
1Vp-p; 75 Ohmios, Estilo RCA
500mV RMS 47Kilo Ohmios
1Vp-p, 75 Ohmios, EstiIo RCA
0-2,0V RMS 4,7Kilo Ohmios
Tipo A
75 Ohmios, Terminal tipo RCA
Terminales de Entrada S- _ ........ _..
Video uonector b-v aeo _Y-U)
Tabla de Caracteristicas
MODELOS _" _
CA RA C TERIS TICA S
LENGUAJE DEL MENU
ENG/ESP/FRAN ....
I
PANTALLA PROTECTORA . • . • . • . •
SPLIT CON 2 • • • •
SINTONIZADORES ....
s os
UBTITUL . • . • . • . •
=
CAPACIDAD DE V-CHIP • • • •
VELOCIDAD DEL BARRIDO t080i 1080i 1080i, 1080i
DIGITAL 540p 540p 540p 540p
DOBLADOR DE LINEAS NTSC 540p 540p 540p 540p
VIDEO NORM . • . • . • . •
AUDIOHORM
ESTEREO . • . • . • . •
SONiDO IA
, , I
BAJOS/BALANCE/AGUDOS . • . • . • . •
SOHIDOEHVOLVEHTE. • . • . • . •
BBE • • • •
ENTRADA A/V _ 4 4 4 4
(POSTERIOR/DELAHTERA) (3/1) (3/1) (3/i) (3/i)
SALIDA AUDIO
SALIDA HDMI . • . • . • . •
ENTRADA S-VHS . • . • . • . •
ENTRADAS DE VIDEO POR
COMPONENTE
4O

Instalaci6n
Ubicaci6n de la Televisi6n
Esta unidad tiene como proposito ser usada come parte de un
centro de entretenimiento. Consulte a su distribuidor para obtener
opciones disponibles.
Evite el exceso de luz solar u otras luces brillantes,
incluyendo reflejos.
Mantenga alejada la unidad del exceso de calor o
humedad. La ventilaci6n inadecuada puede causar
fallas en componentes internos.
La iluminacion fluorescente puede reducir el rango de
transmisi6n del control remoto.
Evite el equipo magnetico, incluyendo motores,
ventiladores o altavoces externos.
Conexiones de Cable Opcional
Cables blindados de audio y video deben usarse entre los
componentes. Para obtener mejores resultados:
Use cable coaxial blindado de 75 ohmios.
Use los conectores de entrada y salida apropiados,
iguales a los de su componente.
Evite el uso de cables largos para minimizar
interferencia.
Cable de Suministro de Corriente Alterna
PRECAUClON: PARA PREVENIR UNA
DESCARGA ELECTRICA, BUSQUE LA CLAVIJA
ANCHA DEL ENCHUFE E INSERTELA POR EnchufepoIarizado
COMPLETO EN LA RENDIJA ANCHA DE LA
TOMA DE CORRIENTE ALTERNA. NO USE ESTE ENCHUFE CON UN
RECEPTACULO U OTRA TOMA DE CORRIENTE SALVO QUE LA
CLAVIJA SE PUEDA INSERTAR POR COMPLETO PREVINIENDO QUE
SE EXPONGA LA CLAVIJA.
PROTEJA EL CABLE DE AC DE SER PISADO, ENROLLADO,
PLEGADO, TROZADO O PERFORADO, PARTICULARMENTE EN LOS
CONECTORES Y EN LOS PUNTOS DONDE SALE DEL APARATO.
Conexi6n de Cable / Antena
Para una recepci6n adecuada, se requiere Cable de Entrada de la
una conexion de cable o de antena. Compa_iia de Cable
Conexion de cable
Conecte el cable suministrado por su
compaSia local de cable. Apriete a mano
solamente. El uso de herramientas (ej. 75OhmiosVHF/UHFenia
pinzas) para apretar el cable puede daSar parte posterior de taTV
el sintonizador.
Nota: Se puede requerir de un decodificador de cable para una
recepci6n adecuada. Verifique con su compa#ia de
cable local sobre los requisitos de compatibilidad.
Conexion de Antena
Para una recepcion adecuada de canales VHF/UHF, se requiere
de una antena externa. Para la mejor recepcion, se recomienda
una antena en el exterior.
Conecte el cable de la antena a la Cable de Entrada de
conexi6n ANT en la parte posterior una Antena de Casa
de la televisi6n.
Nota: La Modalidad de Cable esta
predispuesta de fabrica.
INSTALACI6N
Estante Externo (montado en la parte superior)
(para los modelos PT-W4734X, PT-47X54 y PT-53X54)
Para su conveniencia, dispositivos optativos como un receptor de
alta definici6n, un receptor de satelite, un decodificador de calbe,
un reproductor de DVD, una videocasetera o una bobina de canal
central pueden ser colocados en este estante.
PRECAUClON: El peso maximo para el estante no debe
exceder de 25 Ibs.
Instalaci6n de Pilas en el Control Remoto
Use dos pilas AA:.
Marcas de poland ad
de _a bateria
Procedimiento
1. Voltee el control remoto con los botones hacia abajo.
Remueva la tapa de la bateria presionando la marca y
deslizando la en la direccion indicada.
2. Instale las pilas igualando las marcas (+) y (-) de la
polaridad.
3. Coloque nuevamente la tapa de las pilas.
Nota: Instalaci6n incorrecta puede causar derrame y corrosi6n
que da#ara al control remote.
Precauciones
Reemplaze las pilas por pares.
No mezcle tipos de pilas (carbono de zinc con alcalina).
No intente cargar, hacer corto circuito, desarmar,
calentar o quemar las pilas.
i ii!!ii!ii!i!iii!iiii!
iii:i!:!:i!iiii_i!i!:!:i!iiii_i!i!:!:i!iiii_i!i!ilJ
5o

Mend De Proqramaci6n Inicial
Men de Programaci6n Inicial
Para su conveniencia, el menQ de auto programacion sera
desplegado en pantalla cuando el set sea encendido por
primera vez. De ser necesario, siga los menQs y los
PROGRAMA AUTO
Para programar automaticamente todos los canales con
serial.
procedimientos para ajustar las caracteristicas.
IDIOMA/LANGUE
Seleccione el idioma del menQ ENGLISH
ESPANOL o FRANCAtS (Frances).
Procedimiento
Presione VOL 1_ para seleccionar menQ en Ingles,
Procedimiento
Para programar automaticamente todos los canales con
serial.
(Ingles),
Espafiol, o Frances.
PROGRAMACION INICIAL
ID_OMA/LANGUE ESPANOL _*
MODO _"
PROGRAMA AUTO _"
CONVERGENCIA _*
PRES{ONE ACTION PARA SAUR
CONVERGENClA
Esta caracteristica es usada para ajustar automaticamente
la convergencia. Se recomienda hacer uso de esta
caracteristica cuando el televisor es encendido por primera
vez.
PROGRAMACION INICIAL
IDIOMAJLANGL_E ESPANOL _"
MODO _*
PROGRAMA AUTO _*
CONVERGENClA _"
PRESIONE ACTION PARA SAUR
MODO
Para seleccionar la modalidad de TV (antena) o CABLE
dependiendo de la fuente de la serial.
Procedimiento
Presione VOL 1_ para mostrar el menQ del proceso de
Procedimiento
Presione VOL 1_ para seleccionar
TELEVISION o CABLE.
PROGRAMACiON INICIAL
IDIOMA/LANGUE ESPAItO L _"
MODO _"
PROGRAMA AUTO _"
CONVERGENClA _*
PRESIONE ACTION PARA SAUR
modo de
auto convergencia.
Nota: Ver la pagina 24 para ajustar la convergencia
manualment, en caso de set necesario.
PROGRAMACIONIN{CIAL
IDIOM_LANGUE ESPANOL
MODO
PROGRAMA AUTO
CONVERGENClA
PRESIONE ACTION PARA SAUR
6t1

Conexiones de Equipo Opcional
Nota: El control remoto debe de ser programando con los
codigos suministrados para operar equipo opcional.
Conexi6n de la Videocasetera
Siga este diagrama cuando conecte en su televisi6n,
solamente la videocasetera.
@OO
_OOOL]
9
CABLES NO INCLUiDOS
Viendo un programa de televisi6n
Procedimiento
Sintonize la televisi6n al programa de televisi6n que
desea ver.
Viendo un video
Procedimiento
g Opci6n A
Presione el bot6n de TV/VIDEO en el control remoto
pare seleccionar la entrada de video (VIDEO 1, VIDEO
2, etc.) que esta conectada a su videocasetera.
Comience el video.
g Opci6n B
Sintonize su televisi6n al canal 3 6 4, dependiendo de su
videocasetera.
Comience el video.
Grabando un programa de television
Procedimiento
g Opci6n A (Grabando y viendo el mismo programa)
Sintonize su televisi6n al canal 3 6 4, dependiendo de su
videocasetera.
Usando la videocasetera, sintonize el programa de
televisi6n que desea grabar.
Comience a grabar.
g Opci6n B (Grabando un programa mientras se ve otro
programa.)
Presione el bot6n de TV/VIDEO en el control remoto
pare seleccionar la entrada de video ( VIDEO 1, VIDEO
2, etc.) que esta conectada a su videocasetera.
Usando la videocasetera, sintonize el programa de
televisi6n que desea grabar.
Comience a grabar.
Presione el bot6n de TVNIDEO en el control remoto para
regresar a la modalidad de televisi6n.
Sintonize su televisi6n al programa de televisi6n que
desea ver.
CONEXIONES DE EQUIPO OPCtONAL
Conexi6n del Decodificador de Cable
Siga este diagrama cuando conecte su television solamente a un
decodificador de cable.
DECOD FICADOR A [
DE
A_T
[ERM_NALES EN LA PAR [ E POS [ER[QR DEL SE [
VI_EO
o,c ooo o ®® ®q
'L,®® 9 ®@ 9:1
INPUT INPUt
CABLESNOrNGLU_DOS
Viendo un Canal de Cable Premium (codificado)
Procedimiento
Sintonize la televisi6n al canal 3.
Usando el decodificador de cable, sintonize el canal de
cable premium qua desea ver. Q
Conexiones del Decodificador de Cable y
Videocasetera
Siga este diagrama cuando conecte su televisi6n tanto a una
videocasetera como a un decodificador de cable.
Viendo un canal de cable premium (codificado)
Procedimiento
Sintonize la television al canal 3.
Usando el decodificador de cable, sintonize al canal de
cable premium que desea ver.
Grabando un canal de cable premium (codificado)
Procedimiento
Presione el bot6n TV/VlDEO en el control remoto para
seleccionar la entrada de video (VIDEO 1, VIDEO 2, etc)
que esta conectada con su videocasetera.
Encienda la videocasetera.
Sintonize la videocasetera al canal 3 o 4, dependiendo
de su televisi6n.
Usando el decodificador de cable, sintonize al canal de
cable premium que desea grabar.
Comience a grabar.
[3 Para verun canal diferente mientras graba:
Presione el bot6n TVNIDEO en el control remoto para
seleccionar la modalidad de televisi6n.
Sintonize la televisi6n a un programa de televisi6n
(excepto otro canal de cable premium).
7O

CONEXIONES DE EQUIPO OPCtONAL
Panel de Control Frontal
El panel de control frontal puede ser usado para accesar el mend
6 cambiar el modo de video cuando no se disponga del control
remoto.
El indicador de APAGADO/ENCENDIDO (rojo) estar4 prendido cuando
el telelvisor est6 encendido.
L
Panel {ron{al para PT47X54 PT-W4734X y PT-53X54
s,vf_Eo vf_Eo4 L_AUDfO_R
_WER W,ViDEO AUTOCONY
_ cccc3
Panel frontal para PT_53TW54
H
Localizaci6n de VIDEO 4
para modeto PT-53TW54. --
Abra la puerta del panel frontal de la PTV para usar estas
conexiones para su equipo opcional (videoc&mara, VCR u otros
componentes de video). Seleccione el modo de entrada video 4
presionanado el boton TV/VlDEO.
Procedimiento
Conecte su equipo alas conexiones Audio/Video en la
parte frontal o posterior de la television.
Presione TV/VIDEO para seleccionar la entrada de
VIDEO 4.
Opere el equipo como se instruye en el manual del
equipo.
ConexiOn del Amplificador de Sonido
Conecte a la entrada de audio de un amplificador externo para
escuchar el sonido en sistema estereo.
Nota: Las terminales TO AUDIO AMP no pueden set usadas
directamente para bocinas extemas.
ill i
AMPMFICADOR EXTERNO
Ajustes de Sonido (Audio)
Seleccione ALTAVOCES SI en el menQ de SONIDO
(AUDIO).
Ajuste el volumen del AMP (amplificador) al minimo.
Ajuste el volumen de la Television al nivel deseado.
Ajuste el volumen del AMP hasta igualar el de la
Televisi6n.
Seleccione OFF & VAO (parlantes apagados y salida
variable de audio) en el menQ AUDIO para controlar
Altavoces o bocinas de la PTV o bien seleccione FAO
(salida fija de audio) para controlar Altavoces o bocinas
del amplificador externo.
El Volumen, el silencio, los bajos, los altos y el balance
ahora son controlados por medio de la Televisi6n.
Nora: Seleccione altavoces apagadas y salida de audio Fija para
controlar las funciones de audio atrav6s de un amplificador
externo.
Conexi6n del Decodificador de Televisi6n
Digital (DTV-STB) 6 DVD
Esta television tiene la capacidad de proyectar imagenes
en formato 1080i y 480p Television Digital (DTV) utilizando
un receptor-decodificador (STB). Para ver programacion
de Television Digital, el STB debe estar conectado a las
entradas de video compuesto (Y, PB, PR) de la television.
Debe haber una sepal de DTV disponible en su area.
Seleccione el formato del STB a 1080i 6 480p.
Esta TV utiliza un doblador de barrido progresivo, el cual
barre la imagen de formato NTSC de manera progresiva.
Esto le permite no ver las delgadas lineas negras (efcto de
persiana) que va relacionado con la imagenes
entrelazadas.
Utilice este diagrama para conectar el decodificador de
Televisi6n Digital Panasonic (DTV-STB) 6 DVD a su
Televisor.
El televisor tiene dos grupos de entradas de video compuesto,
cada grupo tiene tres entradas: Y, PB Y PR. Los entradas
separadas para las se#ales compuestas de color, proveen una
mejor separaci6n de luminancia y colot_
8O

Conexi6n de Salida del Programa
(PROG OUT)
Para visualizar en la Television el Video y el Audio con
equipo opcional de video conectese a las terminales
PROG OUT en la parte posterior de la Televisi6n.
Nota: Si la fuente de la imagen principal es de HDMI o video
por eomponentes, la sepal de salida del programa no
estara disponible.
L
TERMi_,_kESEN LAPAR_ POS_R_OR DELSEt
h_.C( (_ _ _v_° ..... MONITOR SETERA
OOOOO
....rLO O
CABLES NO INCLUIDO8
Procedimiento
Conecte el equipo opcional de video alas terminales
PROG OUT y TO AUDIO AMP R/L.
El desplegado de terminal PROG OUT es el mismo que
el desplegado en pantalla.
Vease el manual de equipo opcional para instrucciones
acerca del grabado y monitoreo.
Conexi6n de entrada HDMI
Sobre HDMI
HDMI es la primera interfase de A/V para electr6nica de
consumidor completamente digital que soporta todos los
formatos de video estandar, mejorados y de alta definici6n
asi como todos los formatos de audio multicanal
existentes. Un conector soporta la informaci6n de video y
de audio. La entrada HDMI/HDCP 1 puede ser conectada a
un dispositivo que cumpla con la norma EIA/CEA 8612, tal
como un set top box o reproductor de DVD equipado con
un conector de salida HDMI o DVl. AI conectar una fuente
de imagen de alta definicion con proteccion digital de copia
con alto ancho de banda (HDCP) a la terminal HDMI de
esta unidad, podra ver en pantalla imagenes de alta
definici6n en su forma digital. La terminal de entrada HDMI
no es para conectarse con una computadora personal.
Este PTV es compatible con los formatos 1080i, 480p y
480i. Seleccione la salida del dispositivo conectado a uno
de estos formatos.
Notas:
1. HDMI/HDCP = Interfase Multimedia de AIta Definicion /
Protecci6n Digital de Copia con Alto Ancho de Banda.
Los perfiles EIA//CEA-861 cubre perfiles para la
transmision de video digital sin compresi6n incluyendo
contenido digital de proteccion de alto ancho de banda.
CONEXIONES DE EQUIPO OPCtONAL
Formatos compatible
Este PTV es compatible con los siguientes formatos.
Ajuste el aparato conectodo a uno de los siguientes for-
matos.
SePal de video
,,p_tos! :
i ................................................................................................................
1080i 1920 x 1080i 59.94 / 60
480i (480p) 720 x 480p 59.94 / 60
640 x 480p 59.94 / 60
480i (480i) 720 x 480i 59.94 / 60
SePal de Audio
Cuando audio digital es incluido en la conexion HDMI,
las frecuencias compatibles son 48 KHz / 44.1Khz / 32
Khz.
Diagrama de conexi6n
Siga el diagrama mostrado en la parte inferior para
conectar el PTV a un set top box o a un reproductor de
DVD.
CABLESNO_NCLUDOS
Nota: Use audio ar_logo cuar_do
e] audio digital no esta disl
COMPONENTE
OIG_TAL EXTERNO
Procedimiento
Presione el boton TV/VIDEO en el control remoto para
seleccionar la entrada HDMI. El conector en este PTV es
HDMI tipo A.
Conecte la salida HDMI del set top box o reproductor de
DVD a la entrada HDMI IN en la parte posterior del PTV.
Si el dispositivo extemo solo tiene salida DVl, utilice un
adaptador .3 de DVl a HDMI para conectarse al conector
HDMI en el PTV. Adem&s, conecte la seSal de salida de
audio del dispositivo externo (set top box o reproductor
de DVD) a los conectores de Audio In.4 Iocalizados
abajo del conector HDMI.
Si no puede ver la imagen por que su Set Top Box no
tiene una terminal de salida digital, use la entrada de
video por componentes (o el conector de S-Video o
Video). En este caso, la imagen vista sera de serial
an&loga.
Notas:
*3.
*4.
El cable convertidor HDMI-DVI (TY-SCH03DH) est_
disponible en la p&gina de internet de Panasonic:
www.panasonic.com.
Vea la p&gina 19 para los detalles de ajuste de audio.
i ii!!ii!ii!i!iii!iiii!
iiiii!:!:i!iiii_i!i!:!:i!iiii_i!i!:!:i!iiii_i!i!:iJ
9o

CARACTER[STICAS ESPECIALES
Caracteristicas especiales
Boten ASPECT
Opciones pare la entrada compuesta
1080i Solo 16:9 Sin opcien
480i (!619) Default a i69 1_grC°mPo_uAmcerc
, . _ g. )
Default a modo COMP. ' 43 --0m 0ACerc
480i (4:3) Note: La imagenes estimada ._/_rbs _ umna"
' Horizontalmente. ( g' )
, 4:3, C0mp, Just0 O
480i Default a modo JUSTO i Acerc
' (Ver sig. columna)
El boten ASPECT le permite seleccionar uno de los cuatro
modos de imagen, dependiendo del formate de la seSal
recibida y preferencias personales.
Esta opcien despliega una
imagen 4:3 a su tamaSo
Sehalde ]magenenF°rmat° estandar 4:3 con barras
entrada 16:9
laterales gris. No es
480i o 480p I_ 4 _1 recomendado para ver
o÷o
4:s ÷ imagenes 4:3, puede causar
O O imagen permanente en la
pantalla.
I ...... / .... Amplia la imagen 4:3
480JO480p I'_ 16 _1 unifomemente (ancho y
O O _,cEr_c-_ _ alto).
Note: Si el menQ es desplegado mientras en modo Zoom, el aspecto
cambiara a modo Comp pare desplegar el menQ compteto.
Esta opci6n despliega una
imagen en pantall
completa. (recomendada
para images Anamorficas).
Esta opci6n estira la parte
izquierda y derecha de una
Senalde }magerl en orma_o
erl_rada
_9 imagen 4:3 al tama_o de
_ _l pantalla. El cento de la
pantall tendra correcci6n
JUSTO =_
de aspecto. El tamaSo de
la imagen depende del
tamaSo original.
(recomendado para uso
normal.)
Bot6n BBE
Presione este boton para activar la funci6n BBE
Bot6n SAP
Presione este boton para seleccionar entre los distintos modos de
audio.
Siesta recibiendo un programa en est@eo y
presiona el bot6n SAP, usted puede
seleccionar entre STEREO y MONO.
r_STEREO _ SAP _ MONO
Operaci6n de SPLIT
Esta funci6n permite ver 2 canales diferentes, une al lade
del etre, con o sin una fuente de video externa.
Procedimiento
SPLIT
Presione _ para desplegar la imagen SPLIT.
SPLIT CTRL
El boton F#_q , el indicador de la derecha (_)
ser& mostrado en la imagen SPLIT, luego _ o W o
CH
los botones numericos del control remoto.
Nora: E! canal de la imagen SPLIT solo puede ser cambiado mientras
el indicador de la derecha (_ ) esta desplegado.
Cambiar canal de la imagen SPLIT Cambiarcanal de la imagen principal
Escoja canales para la Imagen Principal presionando
o w o usando el teclado numerico.
CH
SWAP
Presione _ para intercambiar la Imagen SPLIT con
la Imagen Principal derecha.
RECALL
Presione O to para verla informacion imagenes.
SPLIT
Presione _ para cancelar la pantalla Split.
Operaci6n de SPLIT con un Decodificador de
Cable
Para ver canales de cable premium a traves de
decodificador de cable en la lmagen Principal:
Nora: Use este procedimiento si desea vet canales de cable premium
en la Imagen Principal mientras ve un programa de televisi4n o
video en la pantalla SPLIT
Procedimiento
Sintonize la television canal 3.
SPLIT
Presione _ en el control remoto pare desplegar el
marco de la pantalla SPLIT.
Note: E! Audio es se!o de la Imagen Principal.
Verifique que su decodificador de cable este Encendido.
Escoja canales pare la Imagen Principal sintonizando su
decodificador de cable.
Seleccione el canal de la imagen Split presionando el
SPLIT CTRL & CH
boton _ , luego utilice _ o ,_, o los botones
numericos del control remoto.
Nora: La funci4n de SWAP no est4 disponible cuando se usa el
decodificador de cable para sintonizar canales. Si su
decodificador de cable tiene salida de video puede ser
conectada a la televisi4n, para pemitirle usar todas las
funciones de Split.
10e

Botones de la Operaci6n de Pantalla de SPLIT
Boton SPLIT CTRL
SPLIT CTRL
AI presionar el bot6n r_q habilitara el uso de los
botones _ o w o los botones numericos para cambiar
CH
el canal de la imagen SPLIT y para usar el bot6n TV/
VIDEO para seleccionar la fuente deseada de la imagen
SPLIT.
Bot6n TVNIDEO
Procedimiento
Presione cuando la imagen SPLIT esta desplegada para
seleccionar la fuente de video deseada.
SPLIT
Presione el boton _ para mostrar la imagen SPLIT.
Seleccione la fuente de video deseada para la imagen
SPLIT CTRL TVVIDEO
SPLIT presionando los botones _ Y O
Presione el boton TV/VIDEO en el control remoto para
mostrar el menQ de seleccion de fuente.
Presione el boton numerico correspondiente en el
control remoto para seleccionar la fuente deseada.
Nota: La fuente de la imagen SPLIT solo puede set
seleccionada rnientras el indicador (_ ) es mostrado.
Imagen principal
÷
TV ._.COMPONENTE 1._. COMPONENTE 2 q
Bot6n Search
Esta funci6n permite hacer una busqueda de todos los
canales disponibles.
Procedimiento
SPLIT
Presione el boton _ para desplegar el marco de la
pantalla Split.
SEARCH
Presione _ para desplegar los marcos de
busqueda.
SEARCH
Presione _ boton de nuevo para detener la
funcion de busqueda. El canal de la Split ser& el Qltimo
marco activo.
SPLIT
Presione _ para cancelar el marco de la Split.
Imagen _ marco
principal
Nota:
Cuando la fuente de la imagen principal es por
componentes o HDMI, la caracteristca de b#squeda no
esta disponible.
CARACTERiSTICAS ESPECIALES
Bot6n Freeze
Esta funcion es utilizada para congelar la imagen en la
Split.
Procedimiento
SPLIT
Presione _ para desplegar el marco de la Split.
FREEZE
Presione _ de nuevo para congelar la im&gen.
FREEZE
Presione Fir] de nuevo para descongelar la im&gen.
SPLIT
Presione _ para cancalar el marco de la Split.
Imagen principal_
Split imagen
congetada
Funcion de congelamiento de imagen principal
Esta funci6n se usa para congelar la imagen principal y
desplegarla in la en SPLIT.
Procedimiento
FREEZE
Para congelar la imagen principal, presione Fir]
mientras la SPLIT no esten desplegados.
La imagen principal congelada aparecera en la en
SPLIT.
FREEZE
Presione Fir] nuevamente para cancelar la
congelacion de imagen.
Nota: Mientras la imagen SPLIT congelada esta desplegada,
solo el bot6n FREEZE funciona para la imagen SPLIT El
resto de los botoned para la imagen SPLIT no funcionan.
Selecci6n directa de la fuente de video
Esta funcion le permite seleccionar de manera directa la
TVVIDEO
fuente de video usando el bot6n O y los botones
numericos en el control remoto.
Procedimiento
TVVIDEO
Presione el boton O en el control remoto para
mostrar el menQ de seleccion de fuente.
Nota:
Presione el boton numerico correspondiente en el
control remoto para seleccionar la fuente deseada.
La fuente de video tambien puede ser seleccionada
TVVIDEO
presionando los botones de _ y CH A V.
i ii!!ii!ii!i!iii!iiii!
iii:i!:!:i!iiii_i!i!:!:i!iiii_i!i!:!:i!iiii_i!i!ilJ
11e

OPERACI6N DEL CONTROL REMOTO
Operaci6n del Control Remoto
ASPECT
MUTE
Presione para silenciar el sonido.
Selecciona el tamaSo de la imagen (radio)
para igualarlo al formato de la progamaci6n
(solamente para teIevisi6n digital y sistema
de transmision digital).
ii¸!¸¸¸¸¸¸¸¸¸ :/
Presione para seleccionar el funcionamiento del
contro! remoto.
ACTION
Presione para accesar los ment3s.
Presione para ajustar el nivel del audio de la TV
IY navegar en los ment)s.
BBE
MENU
O
BBE - Presione para ENCENDER y APAGAR.
MENU - Presione para accesar el menQ de DBS
6 DVD.
RECALL
Presione para visualizar la hora
cron6metro de apagado automatico, y otras
opciones.
@
Presione elteclado num6rico
cualquier canal.
R-TUNE
Presione para regresar al canal previamente visto
o modo de video. EUR7603ZF0
TV/VIDEO
Presione para seleccionar la modalidad de
televisi6n o video para de image n principal 0
imagen Sp!it-
Neta" Ver la secci6n del bot6n TV/VlDEO en
la pagina 1t para seleccionar la fuente
de video de la imagen SPLIT
L_T
Pressione para i!uminar los botones de! control
IIremoto I1
V
navegar en los menQs. IJ
EXIT
O
Botones de funci6n de DBS.
GUIDE
O
Bot6n de funcidn de DBS y DVD.
PAGE
Pagina previa/siguiente DBS y saut -/+ DVD.
Presione para delimitador entre 10scanales II
mayores y menores, ii
*SWAP '_SPLIT **SPLIT CTRL
REW
*FREEZE *SEARCH
PAUSE STOP REC
TV/VCR DVD/VCR CH OPEN/CLOSE
o ®
*(FREEZE) *(SEARCH)
Botones de funci6n SPLIT
Botones de funci6n Componente
SPLIT CTRL
**Mientras la imagen SPLIT es mostrada, presione el boton _ y el
indicador _ sera mostrado. Luego utilice los botones CH A/CH • o los
botches numericos para cambiar los canales y el bot6n TV/VIDEO para
seleccionar la fuente de video.
12e

OPERACION DEL CONTROL REMOTO
Operaci6n de Componentes con el control remoto
Nota: Refierase a la p4gina 15 para procedimientos de programaci6n
del Control remoto.
Operacion de una Videocasetera
Programe el control remoto para utilizar con la Videocasetera.
Encender!Apagar
Seleccianar TVNIDEO I FF
dem°d°Tvdeparaentradala O Adelandar (_
Videocasetera ' - '
® ®
Cambiar canales CH
arribalabajo CH
Cambiar Canales DVDNCR CH
arriba!abajo
PLAY
Repr0ducir .
I STOP
Seleccionar Canal Q C) (_
PAUSE
Pausar
Cambiar a modo TV/VCR
TV o Videocasetera 0
Despliegue en RECALL
pantalla I 0
i
Operaci6n de DBS
Programe el control remoto para utilizar con el DBS.
Encender!Apagar Navegaci6n
izquierda/derecha
Pista de Audio SAP
del STB _ Action del STB
Navegacidn ' CH
Arriba/Abajo CH
Cambiar el Cana DVD/VCR CH
Arriba/Abaj0 _
' ASPECT
Aspect° DBS O
MENU
Menu STB . O
salir del menQ EXIT
STB ' O
voi voi
ACTION
@ ® @
Seleccionar C) (_)
Canal (_ (_) C)
Sintonizar el R:rUNE
Canal previo , 0
Cambiar a PAGE
la siguiente
pagina (_
Desp!iega guia GUIDE
STB . O
Busqueda del OpEN/CLOsE
STB . Q
Programar RECALL Gui6n pai'a Cana! PR_OG
nformac 6n O _deSTB (,_
PLAY SWAP
Favoritos del STB _ Guia STB . O
REC , FF
Grabar STB
Cambiar a modo TV/VCR
TV o SAT. ' O '
Operaci6n de DVD
Programe eI control remoto para utilizar con et DVD.
Sara Ba_e_:::6_to Opri_ e_ra 8ace_ e_te _prima
,_ REW
Encender!Apaga r . _ -Sa!ar << (_
Navegaci6n I II I FF
izquierda/ _VOL VOL_ Sa!tar>> I
derecha _ _ '
Q ® @
Seleccionar C) (_)
Arriba/Abajo ' CH Capitub C) C) C)
Cambiar el canal DVDNCRCH " ' PAUSE
Ardba!Abajo _
, REC ACTION
Grabar ___ Se!ecciona[ , O
PLAY RECALL
Repr°ducir . _ - Despliega OVD . O
I STOP • i MENU
Detener . _ _ MenCl i O
OPEN/CLOSE GUIDE
Abr!r/c arrar I (_ - TituJ O (_
PAGE
Saltar -/+ _ (_L)
Operaci6n de reproductor de disco compacto
Programe et control remoto para utilizar con el reproductor de disco
compacto.
' '_prima _ra Hae_[ _Sto.
EncendertApagar
Formato de RECALL
tiempo ' O siguiente disco
Pista sigu ente! OH = SeleccJenar
previ a I cH
DVD/VCR CH
Rand/rep. (_
v
Busqueda FF
adelante • (_)
PAGE
Saltar :t+ (_ @
' STOP 0PEN/CLOSE
Detener _ Abrir!Cerrar
® ® ®
© ® ®
R-TUNE
siguiente disco
Busqueda hacia REW
atras . 1_
PAUSE
Pausar
13e

iiiiiiiiiiiiiiiiiiiiiiiiiiiiiiiiiiiiiiiiii!!
OPERACION DEL CONTROL REMOTO
Operaci6n de DTV
Programe el control remoto para utilizar con el DTV.
' ' Opr|ma P_r_ZH_r Esto,. ,
Encender! _ InformaciGn del
Apagar . _ programa
I SAP
' Optima
RECALL
O
GUIDE
NavegacJdn OH
Ar.baJAbajo Se ecc,o0orcono ®
CH C) _) L_)
V - ' (_)
PROG
izquierda/Navegaci6n_VOL VOL _ GuiGn paracana!,
derecha _
I ASPECT • REC
Aspect I O _ G[abar
ACtion DTV I ACTION MenQ I
© - 0
EXIT
Operacion de reproductor de casetes
Para operar un reproductor de casetes, el control remoto
debe ser programando en la opci6n AUX para la marca del
equipo.
REW
Encender!Apagar Regresar .
I REC II I FF
G aba I Adelaota I
' PLAY PAUSE
Rep[oducir _ Pausar
STOP OPEN/CLOSE
Detener _ Abrir/Cerra r
R-TUNE
Unidad A/B I O I
Operacion de receptor de audio
Programe el control remoto para utilizar con el receptor de audio.
encenderiApagar Volomen ÷/- '_V0L Vol
AV1 Presione 1
AV2 Presione2
AV3 Presione 3
I MUTE Para seleccionar AV4 Presione 4
Audi0Mud0 fuente de AV 6 CD Presione5
c0mponentes TUNER Presione 6
| PHONO Presione 7
I TAPE Presione 8
I I AUX Presione 9
' - I
TVNIDEO ' REW
Cambiar fuente ._ Envo!vente - .
Para; _;z_erESto
i i i i{i i iiii I
Sintonizad0r+t-
DVD/VCR CH
Central 4+ (_ (_
Operacion de PVR
Programe el control remoto para utilizar con et PVR.
_ra _ac:er _teL
•_ I REW
EncenderlApaga r . _ _ Regresar I
Seleccionar TV 6 ' TVNIDEO I I FF
VCR 0- Ade!antar .
(9 ® ®
Arriba/Abaj0 PVR CH Seleccionar C)C) (_
OH Caria
I V _ I C)
" " I PAUSE
Izqu_erda/ ' _, _- Pausar _"
derecha PVR _ VOL MOL _
' DVDNCR CH I R-TUNE
Cambiar canaI _ RePetir z0na i O
ACTION
S!ecci°narPvR O Repeticidn TVNCR__
instant_nea I O
' - ' PROG
REC
, PLAY • OPEN/CLOSE
Repr0ducir . __ Sa!t0 r_Pid0 (_
• i
STOP GUIDE
Detener , __ Guia Replay: I O
M MENU .. ,: EXIT
__a!! r
Operaci6n de decodiflcador de Cable
Programe el control remoto para utilizar con la caja de cable.
EncenderlApagar . _Vol+l. '_VOL VOL
, MUTE ACTION
Mudo ' O - Se ecc onar I (b
(9 @
Cambiar el canal CH
ArribatAbajo CH
Cambiar el Canal DVDNCR CH
Arriba/Abajo (_
Seleccionar (_) C) C)
Canal 0 C) (_)
Sintonizar el R-TUNE
canal previo I O
14e

Programaci6n del Control Remoto
El Control Remoto Universal puede programarse para
operar componentes de varios fabricantes usando los
botones de funci6n para VCR, DVD, AUX, RCVR, DTV,
CABLE 6 DBS. Siga los procedimientos para programar su
Control Remoto con o sin cSdigo para el componente.
Modos De Default Para El Control Remoto
Televisi6n Televisi6n (Solo Panasonic) C6digo TV Panasonic
DTV-STB DTV (Solo Panasonic ) Cddigo DTV Panasonic
. Cddigo CABLE
CABLE . CABLE (preajustado) I Panasonic
DBS . DBS (preajustado) C6digo DBS Panasonic
VCR ' VCR (preajustado) Cddigo VCR Panasonic
DVD/CD DVD y CD(preajustado) Cddigo DVD Panasonic
A,,_ Grabadoras Personales de -. : -,,--
UA I Video y VCR2 . L,oalgo _'vK _'anasonic
R_\/# Receptor de audio Codigo RCVR
..... (preajustado) ' Panasonic
Nota: Determine el fabricante del componente y busque en la
tabla su c6digo.
Procedimiento
1. Confirme que el componente este conectado yen
operaci6n.
2. Apague el componente.
ACTION
3. Presione los botones de y juntos,
cuando menos 5 segundos. Despues de este tiempo,
los botones de componentes comenzaran a destellar.
Desoprima los botones ACTION y POWER.
4. Presione el bot6n de la funci6n apropiada del
componente en el Control Remoto. (VCR, DVD, CABLE
o DBS). El bot6n seleccionado quedara iluminado y el
resto se apagar&
5. Accese el c6digo del componente de 3 digitos usando el
teclado numerico (botones 0 ~ 9) del Control Remoto. El
bot6n del componente destellar& dos veces.
6. Presione el bot6n de el Control Remoto para
probar el componente. Si este procedimiento ha sido
exitoso, el componente se encender&.
Nota: Si el componente no opera con el Control Remoto, repita
los pasos del 3 al 6 usando otro c6digo (Algunas mamas
tienen mbltiples c6digos). Si un c6digo se ha accesado
incorrectamente, o si el procedimiento toma mas de 30
segundos, la programaci6n ha fracasado y se tendra
que repetir el procedimiento.
Programaci6n Sin C6digo
Este procedimiento busca todos los c6digos y se le llama
"metodo de secuencia".
1. Confirme que el componente este conectado yen
operaci6n.
2. Apague el componente.
OPERACI6N DEL CONTROL REMOTO
ACTION
3. Presione los botones y juntos, cuando
menos 5 segundos. Despues de este tiempo, los
botones de componentes comenzar&n a destellar.
Desoprima los botones ACTION y POWER.
4. Presione el boton de la funcion apropiada del
componente en el Control Remoto. El boton
seleccionado quedar& iluminado y el resto se apagar&.
5. Presione el boton para que el control remoto
entre en modo de programacion por pasos.
6. Apunte el control remoto hacia el componente.
7. Presione el boton VOL • (los botones de componentes
destellar&n tres veces). Presione el boton de el
Control Remoto para probar el componente. Si este
procedimiento ha sido exitoso, el componente
se encender&.
Nota: Cada vez que presione el bot4n VOL I_, asegurese que el
bot4n del componente destelle dos veces antes de presionar el
bot4n
8. Despues de que el codigo se ha encontrado, presione el
ACTION
boton _ para guardar el codigo. El bot6n del
componente desteliara dos veces.
Nota: Repita los pasos anteriores hasta que el c6digo del
componente se haya encontrado. Puede tomar ratios
intentos hasta encontrar el c6digo correcto. Si se salta
un c6digo, presione • VOL y luego el bot6n de
para probar el c6digo.
C6digos de Componentes
El Control Remoto Universal tiene capacidad de operar
varias marcas de componentes despues de introducir el
c6digo apropiado. A causa del limite de memoria no se han
incluido todos los c6digos existentes, por Io cual es posible
que algunos componentes no operen. El Control Remoto
Universal no controla todas la funciones y caracteristicas
disponibles en todos los modelos.
iJi ,JJI| JliJ i i/ J JJ
DVD DVD (CD)
Videocasetera
IIII IIII IIII
AUX (VCR2) AUX (TAPE) RECEPTOR
IIII IIII IIII
DTV CABLE DBS
IIII IIII IIII
15e

OPERAC/ON DEL CONTROL REMOTO
CGdigos de Componentes (cont.)
_ m]:{,.1
Admiral 335
Aiwa 332
Akai 314, 315, 316,
329
Audio
' 31t, 339
Dynamic
Bell& 305 313
Howell '
Broksonic 3201326
Canon 323, 325
CCE 343
Citizen 306
Craig 305, 306, 329
Curtis 324, 345
Mathes '
Daewoo 301,324, 343
DBX 310, 311,339
Dimensia 345
Emerson 303, 319, 320,
325, 326, 343
Fisher 305, 307; 308,
309, 3t3
Funai 320, 326, 334
GE 324, 333, 345
Goldstar 306
Gradiente 334
Hitachi 300, 323, 345
Instant
323, 324
Replay
Jensen 339
JVC 31013tl, 334,
339
Kenwood 306, 310, 311,
339
300, 305,
_Xl 306,307,308,
309
Magnavox 323, 324, 331
Marantz 31013tl, 339
Marta 306
Memorex 309, 324
MGA 338,340,3411
347,348
Minolta 3001345
338, 340, 341,
Mitsubishi 347, 348
Multitech 304, 347
NEC 310,311,334,
339
Olympic 323, 324
306,3211328,
Optimus 335
Orion 320, 326
321,322, 323;
Panasonic 324
300,305, 310,
Penney 3tl, 324, 339,
345
Pentax 300,311; 345
Philco 320, 323, 324,
326, 331,343
PhiIips 323, 324, 331
Pioneer 323
300, 301,302,
Proscan 323, 324, 331,
333, 345, 346
Quasar 321,322, 323,
324
Radio 305, 309, 324,
Shack 333, 336, 340
300, 301,302,
RCA 323, 324, 331,
333, 345, 346
Realistic 305, 309, 324,
336, 340
Samsung 302, 304, 333
Sansui 320, 326, 339,
352
Sanyo 305, 309, 3t3
3011302,304,
Scott 309, 320, 326,
338, 340, 347;
348
Sears 300, 305, 306,
307, 308
Sharp 335, 336
Shintom 3t7
Signature
2000
Singer 337
Sony 328, 329, 330
Sylvania 331,324, 331
Tashiro 306
Tatung 3t01 3tl, 339
Teac 310, 311,339
Technics 321,322, 323,
324
Teknika 324
Toshiba 301,346
Vector '
311
Research '
Wards 306, 309, 335,
336, 344
Yamaha 305, 310, 311,
339
Zenith 306,344
ABC 124
Archer 125, 132
Cableview 105, 132
Citizen 105,122
Curtis 112, 113
Diamond 124, t25, t32
Eagle 129
Eastern 134
GCbrand 105, 132
Gemini 122
General 1i1, t19, i201
Inst[ument/ 121,122, 124,
Jerrold 125, 126,127
Hamlin 112, 118, 140,
14t, 142, !45
Hitachi 103, 124
Macom 103, 104, t05
Magnavox 133
Memorex 130
Movietime 1051 132
Oak 102, 137, !39
Panasonic 109, 1t0, 114
106,107, 128,
Phi!iPS 129, 130
Pioneer 10t, 1t6
Pulsar 105, 132
Puser 132
RCA 115
Realistic 132
112,118, 140,
Regal 141,142,145,
149
Regency 134
Rembrandt 105, 132, !37
Samsung 105
Scientific
Atlanta !!!, !!2, !13
Slmark 101,105
Sprucer 105, 110
Stargate 105, 1t0
Teleview 101,105
Texscan 144
Tocom 135
Toshiba 104
Unika 125, 132
Universal 122, 132
Videoway 106
Viewstar 129, 130
Zenith 100, 117
ZenithLDrake
100
Satellite
Dish Network ,105, !15, !16
(Echostar)
Echostar 105
Express VU 105, 1t5
G E. t06
G.I: (General ,108
Instrument)
Gradiente 114
Hitachi 103, 111,
1t2
HNS (Hughes) 103
Magnavox 101,102
Panasonic 104
Philips 101,102
Primestar 108
Proscan 106,109, 110,
113
RCA 106, 109,
110, 113
Sony 107
Star Choice 103, t08
Thoshiba 100
Uniden 101,102
Zenith 127
_ mlvAm]
Denon 100
Ferguson 101
JVC 109
Mitsubishi 185
Nordmende 101
Panasonic 100
Philips 103
Pioneer 102
RCA 101
Saba 101
Samsung t10
Sharp 108
Sony 104
Technics 100
Thomson 101
Toshiba 103
Yamaha t00
Zenith 107
16e

C6digos de Componentes (Cont.)
OPERACION DEL CONTROL REMOTO
Aiwa 223, 224, 225
Denon 23t
Fisher 203
Jensen 2t4
JVC 229, 230
Kenwood 200, 207
Marantz 202
Nakamichi 205
Onkyo 208, 209, 213
Panasonic 2t6, 218
Philips 222
Denon 23t
Fisher 203
Jensen 2t4
JVC 229, 230
Kenwood 200, 207
Marantz 202
Nakamichi 205
Onkyo 208, 209, 213
Panasonic 2t6, 218
Philips 222
Pioneer 204
RCA 226, 227, 228
Sansui 205, 210
Sharp 231
Sony 2t91 220
Teac 210, 21!, 215
Technics 2t6, 218
Yamaha 201,202
Admiral 120
Aiwa 125, 126
Denon 134, t35, t36
Fisher 104
Garrard 1t3
Harman ii5, i23
Kardon
Jensen 129
JVC 132, 133
Kenwood 100, t08
Magnavox 127
Marantz 124
Mclntosh 1!6
Nakamichi 106
Onkyo 109, 114
Qptimus 103, 127; t30,
13t
Panasonic 118, 119, 121
Philips 123
Pioneer 105, 107
Quasar 1t8, t19, t2t
RCA 103, 105, 127,
130, 131
Sansui 103, tlt, t39
Sharp 134, 137
Sony 122
Soundesign 138
Teac 1tl, t12, tt3
Technics 1!8, 119, 121
Victor 132, I33
Yamaha 101,102
Admiral 226
Aiwa 233, 235
Carver 229
Denon 242
Emerson 239
Fisher 205
Harman/Kardon 219, 220,
221,223
Hitachi 207
Jensen 234
JVC 240, 24t, 245
Kardon 223
Kenwood 200,201,21 t,
245
LXIiSears 236
Magnavox 229, 232
Marantz 229
Mclntosh 22t
Nakamichi 210
Onkyo 214, 215
Optimus 208, 218,
220, 222
Panasonic 224, 225, 227
Philips 229,230
Pioneer 208
Quasar 224, 225, 227
RCA 231,237,
238, 247
Sansui 210, 246
Sanyo 205
Scott 21O,246
Sharp 242, 243
Sherwood 220
Sony 228
Soundesign 244
Teac 212, 216, 2t8
Technics 224, 225, 227
Victor 240, 24t, 245
Yamaha 202, 203, 204
i ii!!ii!ii!i!iii!iiii!
iiiii!:!:i!iiii_i!i!:!:i!iiii_i!i!:!:i!iiii_i!i!:iJ
17e

NAVEGACI6N B_4SICA DEL MENU
Navegacion basica del menu
Presione
para desplegar el
menu Principal.
Presione
para seleccionar el _ II
icono deseado.
Presione
para accesar al
campo del
submenu.
campo del
submenu
Presione
para seleccionar
el sub-menu
deseado.
Presione
seleccionar o
ajustar el sub-menu I
deseado. BRILLO 32 I
Nota: Para Sub-menu con OTROS AJ.
Presione
para seleccionar
OTROS AJ.
Q/
Presione
Presione
Presione
Presione
Presione
V
sub-menu.
para seleccionarel
sub sub-menu
deseado.
para seleccionar
o _ustar el sub
sub-menu
deseado.
Nota: Para salir de menu.
repetidamente
hasta seleccionar el icono
del menu Principal.
para salir del Menu
Principal.
campo para
sub sub-menu
Icono det Menu
Principal
Imagen normal
18e

Operaci6n del Menu de Iconos
IMAGEN _
Nota: Mientras la funciones del sub-menu estan remarcadas,
presione VOL • para ajustar o activar.
[] MODO - Le permite escoger uno de tres modos de
imagen preseleccionados para ver el programa. El
seleccionar esta funci6n tambien afectara Temp Color.
AJUSTES PREDISPUESTOS DE FABRICA PARA
MODO Y TEMP COLOR
MODO TEMP, COLOR
VlVlOO . AZUL
ESTANDAR NORMAL
CINEMA ' ROJO
Nota: Cada modo tiene sus propios ajustes de imogen Color, brillo,
tinto, contraste, nitidez y de Temp. Color.
VIVIDO - Este el modo de fabrica. Crea una
imagen de contraste y nitidez mejorados para ver
seen un cuarto bien iluminado.
ESTANDAR - Este el modo de fabrica. Crea una
imagen de contraste y nitidez mejorados para ver
se en un cuarto bien iluminado.
CINEMA - Seleccione este modo par vet peliculas
en un cuarto oscuro. Provee una im&gen mas
suave, tipo cine.
COLOR - Ajusta la intensidad del color deseada.
TINTE - Ajusta los tonos naturales de la piel.
[_ BRILLO - Ajusta las &reas oscuras para detalles m&s nitidos.
[_ CONTRASTE - Ajusta las area blancas de la imagen.
NITIDEZ - Ajusta para dar mejor claridad a los detalles de la
silueta.
NORMAL - Reajusta todas las modificaciones de la imagen a
los predispuestos de fabrica.
[] OTROS AJ.
Seleccione OTROS AJ. y presione VOL • par desplegar el
sub sub-menu.
Nota: Mientras las funciones del sub sub-menu estan
remarcadas, presione VOL • para seleccionar o activar.
TEMP COLOR (temperatura) - Para aumentar o
disminuir el rojo y e azul para acomodarse alas
preferencias personales.
COLOR NATURAL - Esta funci6n expande el tango de
reproducci6n del color, Io que resulta en imagenes mas
vivas con una graduaci6n de colores mas nautural y
tonos mas delicados.
REDUC DE RUIDO - Reduce el ruido de canal
normalmente Ilamado "nieve".
3D Y/C FILTRO - Minimiza el ruido y cruce de color en la
imagen.
OPERACI6N DEL MENU DE ICONOS
MATRIZ COLOR - Disponible solo con seSal 480p.
Seleccione HD o SD para ajuste automatico de los
parametros de color para transmisiones de HD (alta
definicion) y SD (definici6n est&ndar). Esta funci6n no se
puede seleccionar cuando se ve programacion regular
de TV (NTSC).
Nota: Cuando este viendo una serial de DTV en un formato no-
est&ndar, puede cambiar los par_metros de color manualmente
para obtener una mejor ca!idad de imogen.
MV (Modulaci6n de velocidad) - Incrementa la nitidez de
la im&gen y da mejor transicion de blancos a negros.
MPEG NR - Esta caracteristica reduce el ruido de
"bloques" ocasionado por la compresi6n de video MPEG
utilizado en DVD y HDTV.
AUDIO []
Nota: Mientras la funciones del sub-menu estan remarcadas,
presione VOL • para ajustar o activar.
MODO - Seleccione ESTEREO, SPA (Programa Secundario
de audio) o MONO. (Use MONO cuando la seSal de estereo
es debil.)
[_ BAJOS - Aumenta o disminuye los sonidos bajos
ALTOS - Aumenta o disminuye los sonidos altos.
BALANCE - Enfatiza el volumen del altavoz derecho /
izquierdo.
[] NORMAL - Reajusta BAJOS, ALTOS y BALANCE a los
niveles prefijados de fabrica.
[] OTROS AJ.
Nota: Mientra las funciones de! sub sub-menu estan remarcadas,
presione VOL • para seleeeionar o aetiva_
Nota:
SONIDO IA - Automaticamente mantiene el volumen
constante entre programas y comerciales.
BBE VIVA 3D - BBE VIVA provee una imagen precisa
natural 3D con sonido hi-fi. La claridad del sonido es
mejorada por BBE mientras el ancho, profundidad y
altura de la imagen del sonido 3D BBE. BBE VIVA es
compatible con toda la programaci6n de TV incluyendo
noticias, musica, dramas, peliculas y deportes asi como
tambien juegos electronicos. BBE VIVA mejora el efecto
del sonido envolvente, mientras mantiene la claridad del
dialogo.
BBE VIVA 3D solo esta disponible para los modelo
PT-53TW54.
BBE® - El Sonido de Alta Definicion BBE restaura la
claridad y presencia para un mejor entendimiento del
habla y realismo musical.
ENVOLVENTE - Sonido envolvente tridimensional con
dos altavoces.
19e

OPERACI6N DEL MENU DE ICONOS
AUDIO (cont.)
[] OTROS AJ. (cont.)
HDMI In -Cuando se utilice HDMI, esta opci6n le
permitir& cambiar entre entrada analoga y entrada
digital.
Auto - Selecciona automaticamente serial analoga/
Digital.
Digital - Solo entrada digital.
Analog - Solo entrada Analoga.
ALTAVOCES - Esta funcion se utiliza cuando se concta
la salida de audio a un amplificador EXTERNO.
SI - Los Altavoces de la televisi6n funcionan
normalmente.
APAGADAS Y SALIDA DE AUDIO VARIABLE -
Los Altavoces de la TV est&n apagados, el sonido
es ajustable mediante la televisi6n.
APAGADAS Y SALIDA DE AUDIO FIJA - Los
Altavoces de la TV estan apagados, el sonido es
ajustable s61o mediante el amplificador externo.
CANALES _
[] BUSQUEDA - Seleccionar FAV 6 TODOS.
Nota: Utilice el teclado numerico del control remoto para
seleccionar CANALES FAVORITOS.
[] FAVORITOS - Para introducir hasta 16 canales
favoritos.
[] OTROS AJ.
Seleccione OTROS AJ. y presione VOL • para desplegar
el sub sub-menu.
PREFIJADO - Asigne los nQmeros de canal para
los titulos/siglas prefijados.
Procedimiento
Presione CH • para seleccionar el titulo prefijado
deseado.
Use los botones numericos del control remoto para
seleccionar el canal deseado (hacer referencia a
su guia de TV local).
Nota: Para borrar un canal presione • VOL cuando el canal est_
seleccionado
MANUAL Para introducir los nQmeros y titulos
manualmente.
Nota: Use los botones numericos del control remoto para seleccionar
el canal deseado (hacer referencia a su guia de TV local).
PONGA TtTULO - Para clasificar las conexiones
de entrada de video que se visualizan en la
pantalla.
Procedimiento
Presione CH • 6 CH • para mover cursor.
Presione, VOL 6 VOL • para seleccionar la
etiqueta de entrada predefinida (ver tabla inferior).
Tabla de etiquetas de entrada
Seleccione cuando tiene conectada una VCR a la
VCR i entrada de video
DVD Seleccione cuando tiene conectado un DVD a !a
i entrada de video.
BRINCAR Seleccione para Saltar esa entrada cuando no est_
' en uso
CABLE Seleccione cuando tiene conectado un
decodificador de cable a la entrada de video.
DBS Seleccione Cuando tiene conectadQ un DBS a !a
i entrada de video.
Seteccione cuando tiene conectado un
DTV STB . Decodificador de Televisi6n Digital a la entrada de
' video.
PVR (Graba- Seleccione cuando tiene conectada una Grabadora
doras de Video de Video Personal a la entrada de video.
Personal)
Seleccione cuando tiene conectado un Juego a la
JUEGO . entrada de video.
AMX Seleccione cuando tiene otto aparato conctado
__ Seleccione para borrar la etiqueta
CRON6METRO
Nota: Utilice CH • o CH • para remarcar y utilice • VOL o VOL •
para seleccionar.
[] APAGADO - En el menQ de Cronometro, seleccione
Apagado para programar la Television en 30, 60 6 90
minutos. Seleccione NO para desactivar el
Cronometro.
[] Cronom 1 y Cronom 2 - Seleccione uno 6 dos
cronometros, para encender y apagar la television a la
hor, canal, dias seleccionados.
Notas:
La televisi6n se activado automaticamente despu_s de 90
minutos cuando se encendi6 con el CRONOMETRO. Si se
selecciona APAGAR o si se presiona una tecla, el apagado
automatico de 90 minutos se cancela.
El CRONOMETRO esta activo cuando la televisi6n esta
apagada o encendida. La televisi6n cambiara al canal
seleccionado a la hora seleccionada segQn se ajust6 en el
CRONOMETRO.
20 •

CRONOMETRO (cont.)
[] Ajuste del reloj - Ajuste la hora y dia de la semana.
BLOQUEO _
[] CREAR CLAVE - Use el teclado numerico para
introducir su c6digo de cuatro digitos.(Use un c6digo
facil de recordar, y escribalo en un lugar seguro.)
[] BLOQUEO - para prevenir juegos de video y
videocasetes de ser vistos. Use un c6digo que sea
facil de recordar y escribalo en un lugar seguro.
Notas:
Si usted no recuerda su c6digo, el BLOQUEO se
desactivara en 12, 24, 6 48 horas dependiendo de Io que
este ajustado. Sea cuidadoso al seleccionar SIEMPRE.
Si SIEMPRE ha sido seleccionado, y olvida su codigo
secreto, la TV debe ser atendida pot un tecnico
calificado para limpiar el ajuste de BLOQUEO.
Si selecciona CAMBIO DE CLAVE, e introduce un
c6digo diferente al usado previamente en el menQ de
BLOQUEO, su nuevo c6digo queda como el c6digo
definitivo.
Procedimiento
Presione VOL • para seleccionar.
NO - Para apagar la funci6n de bloqueo.
JUEGO -Para bloquear las canales 3, 4 y las
entradas de video.
CANAL - Para bloquear hasta cuatro canales de su
elecci6n
TODOS - Para bloquear todos los canales y
entradas de video.
Nota:
ACTION
Presione dos veces CH • para seleccionar
cuanto tiempo?.
Presione VOL • para seleccionar 12 Horas, 24 Horas,
48 Horas 6 Siempre.
Si BLOQUEO, CANAL o TODOS esta acfivado, y se
selecciona alguna de las entradas de video o canales
bloqueados, el mensaje BLOQUEADO aparecera en la
esquina superior derecha de la pantalla de la televisiSn.
OPERAClON DEL MENU DE ICONOS
[] V-CHIP - Tecnologia V-CHIP permite usar
clasificaciones al ver programas de televisi6n.
Esta innovacion permite a los padres bloquear varies
tipos de programaci6n de TV a su discreci6n.
Procedimiento
Presione CH • para remarcar INGRESAR CLAVE
Use el teclado numerico para introducir su c6digo de
cuatro digitos. (Use un c6digo facil de recordar, y
escribalo en un lugar seguro.)
Presione CH • para remarcar V-CHIP.
Presione _ VOL 6 VOL • para seleccionar
PROGRAMAS DE EEUU, PELICULAS DE EEUU,
INGLES DE CANADA o FRANCES DE CANADA.
Presione CH • para seleccionar PROGRAMACION.
Presione_ VOL 6 VOL • para desplegar la tabla de
clasificaci6n Programas EEUU, Peliculas EEUU, ingles
de Canada 6 Frances de Canada.
Presione VOL • para seleccionar SI 6 NO.
Presione OH • para seleccionar NO CLASIFICADOS
para Programas de EEUU y Peliculas de EEUU o VER
NO CLASIFICADOS para Ingles de Canada y Frances
de Canada.
Presione VOL • para seleccionar SI 6 NO.
Programas de EEUU
Las caracteristicas de este modelo de televisi6n y la
Tecnologia V-CHIP permite usar clasificaciones al ver
programas de televisi6n. Esta innovaci6n permite a los
padres bloquear varios tipos de programaci6n de TV a su
discreci6n. IDI (Imagen en Imagen) se bloqueara
automaticamente.
Nota: Si se selecciona "SI" se recibiran programas NO
CLASIFICADOS. Si se selecciona "NO" se bloquearan
los programas NO CLASIFICADOS.
Procedimiento
Presione CH • para seleccionar PROGRAMACION.
Presione VOL • para seleccionar BASICA 6
DETALLADA.
BASICA - Solo le permite seleccionar clasificaciones
generales como TV-Y, TV-PG, etc.
DETALLADA - Le permite seleccionar clasificaciones
generales y contenido como V, L, etc.
Presione CH • 6 OH • para mover el cursor entre las
diferentes clasificaciones.
Use ,q VOL 6 VOL • para seleccionar las
clasificaciones que desea bloquear (ROJO) y desactivar
el bloqueo (VERDE).
i ii!!ii!ii!i!iii!iiii!
iiiii!:!:i!iiii_i!i!:!:i!iiii_i!i!:!:i!iiii_i!i!ilJ
21 •

OPERACION DEL MENU DE ICONOS
BLOQUEO (cont.)
Programas de EEUU (cont.)
ACTION
Presione dos veces para regresar V-CHIP SET.
Presione CH • para realzar TIEMPO?
Presione • VOL 6 VOL • para seleccionar 12, 24, 48
horas 6 SIEMPRE.
ACTION
Presione dos veces para regresar al Menu
Principal, despues presione CH • para salir.
Precauciones de/Cliente
El sistema V-CHIP que es usado en este equipo es capaz de
bloquear programas "NO CLASIFICADOS" (no clasificados,
clasificaci6n no aplicable y ninguna) de acuerdo a la secci6n
15.120(e)(2) del Comite Federal de Comunicaciones de los
Estados Unidos. Si la opci6n de bloqueo "NO CLASIFICADO"
es escogida '#ueden ocurrir resultados inesperados y
)osiblemente confusos, ademas usted podria no recibir
boletines de emergencia o cualquiera de los siguientes tipos
de programaci6n:"
Boletines de Emergencia (como mensajes de EAS
(Servicios de Alerta en Emergencias, advertencias del
clima y otros)
Programas originados Iocalmente
Noticias
Politica
Anuncios de Servicio PQblico
Religioso
Deportes
Estado del Tiempo
Tabla De Programas De EEUU
NR No clasificado. Yea Precauciones del Cliente.
Todos los ni_os. Los temas y elementos en este
TV-Y pregrama estan especialmente disefiados para un
)Obtico infantil, incluyendo ni_os de 2-6 ados.
Dirigido a nii_os mayores, Los temas y elementos
en este programa pueden incluir ligera violencia
TV-Y7
fisica o c6mica, e puede asustar a nidos menores
de 7 afios.
Audiencia General. Centiene poca e nada de
TV-G vlolencla nada de lenguaje fuerte, y poce e nada
de dialego e situacienes con centenide sexual.
Guia de los padres sugerida, El programa puede
TV-PG cemener lenguaje obscene infrecuente, violencia
Iimitada. dialogos o situaciones sexualmente
sugestivas.
Advertencia a los padres, Este pregrama puede
TV-14 contener temas sofisticades, centenide sexual
Ienguaje inapropiado, y violencia mas intensa.
S61o audieneia Madura. Este programa puede
TV-MA comener temas para adultos, lenguaje profano,
violencia grafica y contenido sexual expticito.
FV FANTASIA/CARICATURAS CON VIOLENCIA
V VIOLENCIA
S SEXO
L LENGUAJE OFENSIVO
D DIALOGO CON CONTENIDO SEXUAL
Peliculas de EEUU
Las caracteristicas de este modelo de television y la
"Tecnologia V-CHIP" permite usar clasificaciones al ver
peliculas o videos. Esta innovacion permite a los padres
bloquear varios tipos de peliculas y videos a su discrecion.
Nota: Algunas veces las peliculas no son clasificadas pot una
variedad de razones. Peliculas antiguas y extranjeras
normalmente no tienen clasificaci6n.
Procedimiento
Presione CH • {5CH • para mover el cursor entre las
diferentes clasificaciones.
Use • VOL 6 VOL • para seleccionar las
clasificaciones que desea bloquear (ROJO) y desactivar
el bloqueo (VERDE).
ACTION
Presione dos veces para regresar V-CHIP SET.
Presione CH • para realzar TIEMPO?.
Presione • VOL 6 VOL • para seleccionar 12, 24, 48
horas 6 SIEMPRE.
ACTION
Presione dos veces para para regresar al Menu
Principal, despues presione CH • para salir.
Tabla De Clasificacion De Peliculas De EEUU
PROGRAMA NO CLASlFICADO Y NA (NO
NR APLICABLE). Pelicula que no ha sido clasificada
o que la clasificacion no aplica.
AUDIENClA GENERAL. Se admiten todas las
G
edades.
GUIA DE LOS PADRES SUGERIDA. Con material
PG
no aconsejabte para nidos..
FUERTE SUPERVISION DE LOS PADRES. Con
PG-13 material que puede ser inapropiado para nifios
menores de 13 ados.
RESTRINGIDO. Menores de 17 a_os necesitan ir
R
acompadados de uno de los padres 6 un adulto.
N0-17 NO SE ADMITE NADIE DE 17 AI_IOS O MENOS.
X SOLO ADU LTOS.
22 •

BLOQUEO (cont.)
Ingles de Canada
Las caracteristicas de este modelo de televisi6n y la
"Tecnologia V-CHIP" permite usar clasificaciones al ver
peliculas o videos. Esta innovaci6n permite a los padres
bloquear varios tipos de peliculas y videos a su discreci6n.
Nora: E (Exento) Los programas exentos incluyen: noticieros,
deportivos, documentales y programas informativos; programas
de entretenimiento, videos musicales, yprogramaci6n variada.
Procedimiento
Presione CH • 6 CH • para mover el cursor entre is
diferentes clasificaciones.
Use • VOL 6 VOL • para seleccionar las
clasificaciones que desea bloquear (ROJO) y desactivar
el bloqueo (VERDE).
ACTION
Presione dos veces para regresar V-CHIP SET.
Presione CH • para realzar TIEMPO?
Presione • VOL 6 VOL • para seleccionar 12, 24, 48
horas o SIEMPRE.
ACTION
Presione dos veces para regresar para
regresar al Menu Principal, despues presione CH •
para salir.
Tabla De Ingles De Canada
Exento - Los programas exentos incIuyen:
noticieros, deportivos, documentales y
E programas informativos; programas de
entretenimiento, videos musicales, y
programaci6n variada.
Programacibn dirigida a nihos menores de 8
c afios. No contiene lenguaje ofensivo, sexual nl
desnudos.
Programacibn considerada apta para ni_os
C8+ de 8 ahos en adelante. No tiene contenido
sexual ni desnudos.
AUDIENGIA GENERAL. Se admiten todas las
G
edades.
GUIA DE LOS PADRES SUGERIDA. Con material
PG
no aconsejable para ni_os.
Programacibn que por su contenido no es
recomendada para espectadores menores de
14+ 14 ahos. Se recomienda a los padres discreci6n
con audiencia adolenscente.
18 SOLO ADULTOS
OPERACION DEL MENU DE ICONOS
Frances de Canada
Las caracteristicas de este modelo de television y la
"Tecnologia V-CHIP" permite usar clasificaciones al ver
peliculas o videos. Esta innovacion permite a los padres
bloquear varios tipos de peliculas y videos a su discrecion.
Nota: E (Si se selecciona "SI" se recibir&n programas NO
CLASIFICADOS. Si se selecciona "NO" se bloquearan
los programas NO CLASIFICADOS.
Procedimiento
Presione CH • 6 CH • para mover el cursor entre la
diferentes clasificaciones.
Use • VOL 6 VOL • para seleccionar las
clasificaciones que desea bloquear (ROJO) y desactivar
el bloqueo (VERDE).
ACTION
Presione dos veces para regresar V-CHIP SET.
Presione CH • para realzar TIEMPO?
Presione • VOL 6 VOL • para seleccionar 12, 24, 48
horas o SIEMPRE.
ACTION
Presione dos veces para regresar para regresar
al Menu Principal, despues presione CH • para salir.
Tabla De Clasificaciones Para El Frances De Canada
E Exento - Programacion exenta,
Audiencia General. Contiene poca o
G nada de vioiencia, nada de lenguaje
fuerte, y poco o nada de dialogo o
situaciones con contenido sexual.
8+ General - No recomendada para
' nidos pequedos. Programacidn
dirigida a la audiencia general, pero
8 arts +
con Iigero u ocasional contenido de
violencia. Se recomienda supervisi6n
de un adulto.
Programacibn no recomenda para
menores de 13 ai_os - Puede
contener algunas escenas viotentas
13 ans +
que podrian asustar a los menores.
Se recomienda enf_ticamente
supervisiGn de un adulto.
Programacion no recomenda para
menores de 16 afios - Contiene
16 arts +
frecuentes escenas de vielencia o
violencia intensa.
Programacion solo para adultos -
18 ans÷ contiene escenas de violencia o de
violencia extrema.
23 •

OPERAC/ON DEL MENU DE ICONOS
BLOQUEO (cont.)
Mensaje de Bloqueo de Imagen Principal y SPLIT
Si el V-Chip esta activado y el programa excede el limite
de clasificaci6n ajustado por el usuario, aparecera el
mensaje de bloqueo y el sonido sera desactivado. Si desea
continuar viendo el programa introduzca su c6digo secreto.
Despues de introducir el c6digo, todos los bloqueos y
clasificaciones son desactivados hasta apagar la televisi6n
o hasta que todos los ajustes sean desactivados.
Nora: Si el cddigo secreto es introducido para anular las
clasificaciones, deber& reajustar todas las clasificaciones
mediante reprogramaciOn 6 apagando la PTV
Imagen Principal tmagen en SPLIT
PROGRAMA
ESTRINGIDO
PROGRAMA RESTRINGIDO
REQUIERE CLAVE
REQUIERE
CLAVE ....
Nota:
Para desb!oquear la imagen SPLIT, presione el botdn
SPLIT CTRL
, el indicador _ se mostrara en pantalla y
luego introduzca el cddigo secreto de cuatro digitos.
AJUSTE []
[] Mientras el sub-menu se encuentre remarcado, presione
VOL • para seleccionar o acfivar funciones.
[] IDIOMA/LANGUE - Seleccione el idioma del menu
ENGLISH (Ingles), ESPANOL 6 FRANCAtS (Frances).
[] _ EN MUDO - Activa la modalidad de subtitulos en
pantalla cuando el boton MUTE (MUDO) en el control remoto
es presionado.
[] MODO _ - Esta television tiene un decodificador
integrado que despliega subtitulos (texto en letras
blancas o de colores sobre un fondo negro) en
pantalla. Permite al usario leer el dialogo de un
programa de television u otra informaci6n. El programa
visto debe incluir la modalidad de subtitulos para que
esta funcion opere.
NO - Cuando no se desea la modalidad de subtitulos.
C1 - Para que la informacion relacionada con el video
sea desplegada en hasta 4 lineas en pantalla a la vez.
(No bloquea partes relevantes de la imagen). El texto
puede ser en cualquier idioma.
C2 a C4 - Otras modalidades de informacion relacionada
con el video.
T1 a T4 - Para que la guia de la programacion o
cualquier otra informacion sea desplegada en pantalla,
cuando sea disponible. (Bloquea una gran porcion de la
imagen en la pantalla de la television).
Nota: Se reeomienda el modo C1 para ver subtitulos.
[] CONVERGE.
Nota: Solo use los botones del control remoto mientras ajuste la
convergencia. El panel de control frontal no tiene efecto.
Nota: La necesidad de ajustar CONVERGENCIA es ocasional,
s61o cuando se mueve el PT_A
Procedimiento
Presione VOL • para entrar a Converge. sub-menu.
Presione CH • 6 CH • para seleccionar:
FIJE CONVERGENCIA - Seleccione para corregir
problemas menores de convergencia.
Nora: Despues de seleccionar, presione VOL • para
continuar convergencia.
AJUSTE AUTOMATICO - Selectcione para volver
la convergencia al modo preajustado de fabrica.
24 •

CONVERGE. (cont.)
FIJE CONVERGENCIA
Procedimiento
Despues de presionar VOL • se desplegara la pantalla
para alinear el verde al centro.
Despues utilice los botones de navegaci6n en el control
remoto para alinear las lineas verdes horizontales y
verticales en la pantalla, con las marcas de referencia
del gabinete en la parte central superior, inferior,
izquierda y derecha.
Marcas dereferenda
Frente del
gabinete
PRESIONE CH Y VOL PARA
AUNEAR LAS LINEAS CONTRA
• LAS MARCAS DEL GAB_NETE
_'_ ARRIBA
IZQUIERDA 4 I_ DERECHA
ABAJO
PRESIONE ACTtON PARA CONT}NUAR
ACTION
Presione _ para desplegar.
Nota:
Use los botones de navegacion para alinear la cruz
ROJA con el patron blanco.
Nora: PARA PREVENIR DAI_IO AL TUBO DE LA IMAGEN
NO DEJE ENCENDIDO EL PATRON DE PRUEBA
POR UN PERIODO DE TIEMPO PROLONGADO.
Presione "0" en el teclado de control remoto para
desplegar la pantalla para correccion del AZUL,
despues repita el procedimiento para ajustar el azul. De
ser necesario presione "0" nuevamente para regresar a
la pantalla para corregir el ROJO.
Un patr6n de cruz ajustado aparece blanco con un
minimo de color saliente.
S_ EL COLOR ROJO SALE DE LA
CRUZ DEL CENTRO PRES ONAR
CH Y VOL PARA CORREG_RLO
H ARRABA
ZQUERDA • _" DERECHA
ABAJO
PRES;ONE 0 pAPA AJUSTAR AZUL
PRES_ONE ACTION pAPA CONT_NUAR
Presione
"0"
S EL COLOR AZUL SALE DE LA
CRUZ DEL CENTRO PRES ONAR
OH Y VOL PARA CORREG_RLO
H ARR 8A
ZQUERDA • _ DERECHA
ABAJO
PRES_ONE 0 PARA A JUSTAR ROJO
PRES_ONE ACTION PARA CONT_NUAR
Correcci6n de convergencia en nueve puntos
Nota: El control remoto debe estar en modo de TV.
Procedimiento
ACTION
Presione para desplegar el menQ convergencia
ROJO.
Presione los botones de 1 al 9 en el control remoto para
seleccionar posici6n de correccion de convergencia.
Use los botones de navegacion para alinear la cruz
ROJA con la cruz blanca.
Nora: Un patr6n de cruz ajustado aparece blanco con un
minimo de color saliente.
OPERACION DEL MENU DE ICONOS
Presione "0" en el teclado del control remoto para
desplegar la pantalla para correcci6n de AZUL, despues
repita el procedimiento.
Presione
"0"
ACTION
Para salir presione repetidamente, despues
presione CH &.
[] zoo.AoJ
Esta caracteristica le permite ajustar el tama_o de la
imagen ACERC y posicionaria verticalmente.
Nota: Esta caracteristica es seleccionable solo en modo
ACERC. Presione el bot6n ASPECT en el control
remoto para seleccionar el modo ACERC.
[] OTROS AJ.
Seleccione la opcion OTROS AJ. y presione VOL u para
entrar al compo del sub sub-men&
Nota: Mientras las opciones del sub-menb estan
seleccionadas, presione VOL • para ajustar o activar.
MODO - Para seleccionar la modalidad de TV (antena) o
CABLE dependiendo de la fuente de la seSal.
PROGRAMA AUTO - Para programar automaticamente
todos los canales con seSal.
PROGRAMA MANUAL - Para manualmente incluir o
borrar canales.
AUTOENCENDIDO - Seleccione SI para encender la
television al mismo tiempo que el Decodificador de
Cable u otros componentes, 6 seleccione NO, para no
hacerlo.
CANAL INFO - Seleccione Sl para desplegar la
informaci6n cuando cambie de canal.
IMAGEN e - Es recomendado seleccionar Sl para esta
opcion para prevenir la retencion permanente de la
imagen en la pantalla.
25 •

CUADRO DE LOCAMZACION DE FALLAS
Cuadro de Localizacion de Fallas
Antes de solicitar servicio, establezca los sintomas y Ileve a cabo las siguientes posibles soluciones.
\
Sonido Ruidoso
\
Sonido Ruidoso
\
Sonido Ruidoso
Sin Sonido
\
Sonido Ruidoso
X
Sin Sonido
Normal Audio
\
Sonido Normal
;<
Sonido Erroneo
Sonido Normal
d,
\
Sonido Normal
Imagen Moteada
A
Imagen MOltiple /
Corrimiento de color en im&gen
Interferencia
Imagen Normal
:: : :..'.
• ,, , • , •
Sin Imagen/Con Motas
Sin Imagen / Sin SPLIT
La imagen se recorre ligeramente
al encender el receptor, cuando
se cambia de canal o dentro de
un periodo de 2 horas.
Z
Sin Color
Imagen Normal
Caja Negra en Pantalla
Imagen Normal
Ajuste la Ubicacion y/o Conexion de la Antena
Ajuste la Ubicacion y la Conexion de la Antena
Revise el Cable de Entrada de la Antena
Ajuste la convergencia de la imagen (ver p&gs. 24 y 25)
Aleje la TV de los Aparatos Electrodomesticos,
Luces, Vehiculos y Equipo Medico
Aumente el VolOmen
Revise Mute (Mudo)
Revise en el Ment_ de Audio: ALTAVOCES > SI
Cambie el Canal
Ajuste apropiadamente la modalidad de TV o del Cable
Revise los Cables de la Antena
Revise que el Cable de Corriente este Enchufado a una toma de Corriente
Activa
Ajuste los Controles de Brillo y Audio
Cambie el Canal
Revise las Conexiones del Cable
Programe el Control Remoto otra vez
Revise la Operaci6n de la Segunda Fuente de Video
Asegurese de no conectar la PC a la entrada HDMII (ENT. HDMI.)
Esta es una condicion normal• Esta funcion puede ser desactivada. Sin
embargo, el desactivar esta funcion puede causar retencion en la
imagen por Io cual no es recommendado. (ver pag. 25)
Ajuste el Color
Cambie el Canal
Revise en el menQ de AUDIO que el Ajuste se encuentre en Estereo o
Mono, no en SPA
Cambie CC (Subtitulos) de la Modalidad de Texto a NO
Reemplace las Pilas del Control Remoto
Operacion Intermitente del Control Remoto
26 •

Indice
Numerales
3D Y/C Filtro 19
A
Ajuste 24
AItavoces 20
Altos 19
Apagado 20
Audio 19
Autoencendido 25
B
Bajos 19
Balance 19
BBE 19
BBE Viva 3D 19
BIoqueo 21
Bot6n Aspect 10
Bot6n BBE 10
Bot6n Freeze 11
Bot6n SAP 10
Bot6n Search 11
Bot6n TV/VIDEO 11
Botones de la Operacion
de Pantalla de Split 11
Brillo 19
Busqueda 20
C
Cable de Suministro de
Corriente AIterna 5
Canal 21
Canal lnfo 25
Canales 20
Caracteristicas especiales 10
CC EN Mudo 24
C6digos de Componentes 15, 16, 17
C6digos para CD Player 17
C6digos para DBS 16
C6digos para Decodificador de
Cable 16
C6digos para DVD 16
C6digos para Equipos de Casete 17
C6digos para Grabadoras
Personales de Video 17
C6digos para Receptores 17
C6digos para VCR 16
Color 19
Color Natural 19
Conexion de Antena 5
Conexion de cable 5
Conexion de Cable / Antena 5
Conexion de entrada HDMI 9
Conexion de la Videocasetera 7
Conexion de Salida del
Programa (PROG OUT) 9
Conexi6n del Amplificador de
Sonido 8
Conexion del Decodificador
de Cable 7
Conexi6n del Decodificador de
Television Digital 6 DVD 8
Conexiones de Cable Opcional 5
Conexiones de Equipo
Opcional 7
Conexiones del Decodificador de
Cable y Videocasetera 7
Converge 24, 25
Convergencia 6
Correccion de convergencia en
nueve puntos 25
Crear Clave 21
Cronom 1 y Cronom 2 20
Cronometro 20
Cuadro de Localizacion de Fallas 26
Cuidado y Limpieza 4
E
Envolvente 19
Especificaciones 4
F
Favoritos 20
Felicidades 4
FIJE Convergencia 25
Formatos compatible 9
Frances de Canada 23
Funci6n de congelamiento
de imagen principal 11
G
Gabinete y Control Remoto 4
H
HDMt tn 20
I
Idioma/langue 6, 24
Imagen 19, 25
Informacion de la FCC 2
Informaci6n sobre la Convergencia 2
Information Regarding Auto
Convergence 2
Ingles de Canada 23
Instalacion 5
Instalaci6n de Pilas en el
Control Remoto 5
J
Juego 21
M
Matriz Color 19
Mensaje de BIoqueo de lmagen
Principal y SPLIT 24
MenQ de Programacion Inicial 6
Modo CC 24
Modulaci6n de velocidad 19
MPEG NR 19
N
Navegacion basica del menu 18
Normal 19
_NDICE
0
Operacion de Componentes con el
control remoto 13
Operacion de DBS 13
Operacion de decodificador
de Cable 14
Operacion de DTV 14
Operacion de DVD 13
Operacion de PVR 14
Operacion de receptor de audio 14
Operacion de reproductor
de casetes 14
Operacion de Split 10
Operacion de Split con un
Decodificador de Cable 10
Operacion de una Videocasetera 13
Operacion del Control Remoto 12
Operaci6n del Menu de Iconos 19
Operating a DVD 13
P
Panel de Control Frontal 8
Pantalla de Proyeccion 4
Ponga Titulo 20
Prefijado 20
Programa Auto 6, 25
Programa Manual 25
Programacion del Control Remoto 15
Programacion Sin C6digo 15
Programas de EEUU 21
R
Reduc de Ruido 19
Registro del Usuario 4
S
Seleccion directa de la
fuente de video 11
Sobre HDMI 9
Sonido IA 19
T
Tabla de Caracteristicas 4
Tabla de Clasificacion De
Peliculas de EEUU 22
Tabla de Clasificaciones Para
el Frances de Canada 23
Tabla de Contenido 3
Tabla de Ingles de Canada 23
Tabla de Programas de EEUU 22
Temp Color 19
Tinte 19
U
Ubicaci6n de la Television 5
V
V-Chip 21
Z
ZOOM ADJ. 25
i ii!!ii!ii!i!iii!iiii!
iiiii!:!:i!iiii_i!i!:!:i!iiii_i!i!:!:i!iiii_i!i!ilJ
27 •

NOTAS
28 •

NOTAS
i_ii!!ii!ii!i!iii!iiii!
iiiii!:!ii!iiii_i!i!:!ii!iiii_i!i!:!ii!iiii_i!i!ilJ
29 •

LIMiTeD WARRANTY(FOR MODELS SOLD IN USA ONLY)
PANASONIC CONSUMER ELECTRONICS COMPANY,
DIVISION OF
MATSUSHITA ELECTRIC CORPORATION OF AMERICA
One Panasonic Way
Secaucus, New Jersey 07094
PANASONIC SALES COMPANY,
DIVISION OF
MATSUSHITA ELECTRIC OF PUERTO RICO,
INC., Ave. 65 de Infanteria, Km. 9.5
San Gabriel Industrial Park
Carolina, Puerto Rico 00985
Panasonic Video Projection System
Limited Warranty
Limited Warranty Coverage
If your product does not work properly because of a defect in materials or workmanship, Panasonic
Consumer Electronics Company or Panasonic Sales Company (collectively referred to as "the warran-
tor") will, for the length of the period indicated on the chart below, which starts with the date of original
purchase ("warranty period"), at its option either (a) repair your product with new or refurbished parts,
or (b) replace it with a new or a refurbished product. The decision to repair or replace will be made by
the warrantor.
TV CATEGORY ALL PARTS LABOR SERVICE
ALL Projection TV 1 (ONE) YEAR 1 (ONE) YEAR IN-HOME OR CARRY-IN
During the "Labor" warranty period there will be no charge for labor. During the "Parts" warranty
period, there will be no charge for parts. You must carry-in your product or arrange for in-home service
during the warranty period. If non-rechargeable batteries are included, they are not warranted. This
warranty only applies to products purchased and serviced in the United States or Puerto Rico. This
warranty is extended only to the original purchaser of a new product which was not sold "as is". A pur-
chase receipt or other proof of the original purchase date is required for warranty service.
Carry-in or In-Home Service
For In-Home or Carry-In Service in the United States call 1-888-VIEW-PTV (1-888-843-9788).
For assistance in Puerto Rico call Panasonic Sales Company (787)-750-4300 or fax (787)-768-2910.
In-Home service requires clear, complete and easy access to the product by the authorized servicer
and does not include removal or re-installation of an installed product. It is possible that certain in-
home repairs will not be completed in-home, but will require that the product, or parts of the product,
be removed for shop diagnosis and/or repair and then returned.
Limited Warranty continued on next page

LIMITED WARRANTY (FOR MODELS SOLD IN USA ONLY)
Limited Warranty continued from previous page
Limited Warranty Limits And Exclusions
This warranty ONLY COVERS failures due to defects in materials or workmanship, and DOES NOT
COVER normal wear and tear or cosmetic damage, nor does it cover markings or retained images on
the picture tube resulting from viewing fixed images (including, among other things, letterbox pictures
on standard 4:3 screen TV's, or non-expanded standard 4:3 pictures on wide screen TV's, or onscreen
data in a stationary and fixed location). The warranty ALSO DOES NOT COVER damages which
occurred in shipment, or failures which are caused by products not supplied by the warrantor, or fail-
ures which result from accidents, misuse, abuse, neglect, mishandling, misapplication, alteration,
faulty installation, set-up adjustments, misadjustment of consumer
controls, improper maintenance, power line surge, lightning damage, modification, or commercial use
(such as in a hotel, office, restaurant, or other business), rental use of the product, service by anyone
other than a Factory
Servicenter or other Authorized Servicer, or damage that is attributable to acts of God.
THERE ARE NO EXPRESS WARRANTIES EXCEPT AS LISTED UNDER "LIMITED WARRANTY
COVERAGE". THE WARRANTOR IS NOT LIABLE FOR INCIDENTAL OR CONSEQUENTIAL
DAMAGES RESULTING FROM THE USE OF THIS PRODUCT, OR ARISING OUT OF ANY
BREACH OF THIS WARRANTY. (As examples, this excludes damages for lost time, cost of having
someone remove or re-install an installed unit if applicable, or travel to and from the servicer. The
items listed are not exclusive, but are for illustration only.) ALL EXPRESS AND IMPLIED WARRAN-
TIES, INCLUDING THE WARRANTY OF MERCHANTABILITY, ARE LIMITED TO THE PERIOD OF
THE LIMITED WARRANTY.
Some states do not allow the exclusion or limitation of incidental or consequential damages, or limita-
tions on how long an implied warranty lasts, so the exclusions may not apply to you.
This warranty gives you specific legal rights and you may also have others rights which vary from state
to state. If a problem with this product develops during or after the warranty period, you may contact
your dealer or Servicenter. If the problem is not handled to your satisfaction, then write to the warran-
tor's Consumer Affairs Department at the addresses listed for the warrantor.
PARTS AND SERVICE (INCLUDING COST OF AN IN-HOME SERVICE CALL, WHERE
APPLICABLE) WHICH ARE NOT COVERED BY THIS LIMITED WARRANTY ARE YOUR
RESPONSIBILITY.

CUSTOMER SERVICES D/RECTORY (FOR MODELS SOLD IN USA ONLY)
Obtain Product Information and Operating Assistance; locate your nearest Dealer or
Servicenter; purchase Parts and Accessories; or make Customer Service and
Literature requests by visiting our Web Site at:
http://www.panasonic, com/support
or, contact us via the web at:
http ://www.panasonic.com/contactinfo
You may also contact us directly at:
1-888-VIEW-PTV (1-888-843-9788)
Monday-Friday 9 am-9 pm; Saturday-Sunday 10 am-7 pm, EST.
For hearing or speech impaired TTY users, TTY : 1-877-833-8855
Purchase Parts, Accessories and Instruction Books on line for all Panasonic
Products by visiting our Web Site at:
http://www.pasc.panasonic, com
or, send your request by E-mail to:
npcparts@panasonic, corn
You may also contact us directly at:
1-800-332-5368 (Phone) 1-800-237-9080 (Fax Only) (Monday- Friday 9 am to 8 pm, EST.)
Panasonic Services Company
20421 84th Avenue South,
Kent, WA 98032
(We Accept Visa, MasterCard, Discover Card, American Express, and Personal Checks)
For hearing or speech impaired TTY users, TTY : 1-866-605-1277
Matsushita Electronic of Puerto Rico, Inc. Panasonic Sales Company
Factory Servicenter:
Ave. 65 de Infanteria, Kin. 9.5, San Gabriel Industrial Park,
Carolina, Puerto Rico 00985
Phone (787) 750-4300, Fax (787) 768-2910

LIMITED WARRANTY (FOR MODELS SOLD IN CANADA ONLY)
Panasonic Canada Inc.
5770 Ambler Drive, Mississauga, Ontario L4W 2T3
PANASONIC PRODUCT - LIMITED WARRANTY
Panasonic Canada Inc. warrants this product to be free from defects in material and workmanship and agrees to remedy
any such defect for a period as stated below from the date of original purchase.
TELEVISION:
22" and over In-home Service One (1) year, parts (including Picture Tube) and labour
In-home Service will be carried out only to locations accessible by roads and within 50 Km of an authorized Panasonic
service facility.
LIMITATIONS AND EXCLUSIONS
This warranty does not apply to products purchased outside Canada or to any product which has been improperly installed,
subjected to usage for which the product was not designed, misused or abused, damaged during shipping, or which has
been altered or repaired in any way that affects the reliability or detracts from the performance, nor does it cover any
product which is used commercially. Dry cell batteries are also excluded from coverage under this warranty.
This warranty is extended to the original end user purchaser only. A purchase receipt or other proof of date of original
purchase is required before warranty service is performed.
THIS EXPRESS, LIMITED WARRANTY IS IN LIEU OF ALL OTHER WARRANTIES, EXPRESS OR IMPLIED,
EXCLUDING ANY IMPLIED WARRANTIES OF MERCHANTABILITY OR FITNESS FOR A PARTICULAR PURPOSE.
IN NO EVENT WILL PANASONIC CANADA INC. BE LIABLE FOR ANY SPECIAL, INDIRECT OR CONSEQUENTIAL
DAMAGES.
In certain instances, some jurisdictions do not allow the exclusion or limitation of incidental or consequential damages, or
the exclusion of implied warranties, so the above limitations and exclusions may not be applicable.
WARRANTY SERVICE
For product operation and information assistance, please contact your Dealer or our Customer Care Centre at:
Telephone #: (905) 624-5505 Fax #: (905) 238-2360 Web: www.panasonic.ca
For product repairs, please contact one of the following:
• Your Dealer who will inform you of an authorized Servicentre nearest you.
• Our Customer Care Centre at (905) 624-5505 or www.panasonic.ca
• A Panasonic Factory Servicentre listed below:
Richmond. British Columbia Calaarv. Alberta Mississauaa. Ontario Lachine. Quebec
Panasonic Canada Inc.
12111 Riverside Way
Richmond, BC V6W 1K8
Tel: (604) 278-4211
Fax: (604) 278-5627
Panasonic Canada Inc.
6835-8 th St. N. E.
Calgary, AB T2E 7H7
Tel: (403) 295-3955
Fax: (403) 274-5493
Panasonic Canada Inc.
5770 Ambler Dr.
Mississauga, ON L4W 2T3
Tel: (905) 624-8447
Fax: (905) 238-2418
Panasonic Canada Inc.
3075, rue Louis A. Amos
Lachine, QC H8T 1C4
Tel: (514) 633-8684
Fax: (514) 633-8020
IF YOU SHIP THE PRODUCT TO A SERVICENTRE
Carefully pack and send prepaid, adequately insured and preferably in the original carton.
Include details of the defect claimed, and proof of date of original purchase.

GARANTIELtMtTEE (POUR LES MODELES VENDUS AU CANADA SEULEMENT)
Garantie Limit#e (Pour les modeles vendus au Canada seulement)
Panasonic Canada Inc.
5770 Ambler Drive, Mississauga, Ontario L4W 2T3
Certificat de garantie limitee Panasonic
Panasonic Canada Inc. garantit cet appareil contre tout vice de fabrication et accepte, le cas 6cheant, de remedier a toute
d6fectuosite pendant la periode indiquee ci-dessous et commen£ant a partir de la date d'achat original.
TI_LI_VISEURS
22 po et plus Service a domicile Un (1) an, pi_ces, main-d'oeuvre et lampe-ecran comprises
Le service a domicile ne sera offert que dans les regions accessibles par routes et situees dans un rayon 50 km d'un centre
de service agr6e Panasonic.
LIMITATIONS ET EXCLUSIONS
Cette garantie n'est valide que pour les appareils achetes au Canada et ne couvre pas les dommages resultant d'une
installation incorrecte, d'un usage abusif ou impropre ainsi que ceux decoulant d'un accident en transit ou de manipulation.
De plus, si I'appareil a et6 alter6 ou transforme de fa£on a modifier I'usage pour lequel il a et6 con£u ou utilise a des fins
commerciales, cette garantie devient nulle et sans effet. Les piles seches ne sont pas couvertes sous cette garantie.
Cette garantie est octroyee a I'utilisateur original seulement. La facture ou autre preuve de la date d'achat original sera
exigee pour toute reparation sous le couvert de cette garantie.
CETTE GARANTIE LIMITleE ET EXPRESSE REMPLACE TOUTE AUTRE GARANTIE, EXPRESSE OU IMPLIClTE,
EXCLUANT LES GARANTIES IMPLIClTES DU CARACTI_RE ADleQUAT POUR LA COMMERClALISATION OU UN
USAGE PARTICULIER.
PANASONIC N'AURA D'OBLIGATION EN AUCUNE ClRCONSTANCE POUR TOUT DOMMAGE DIRECT, INDIRECT
OU CONSI_CUTIR
Certaines juridictions ne reconnaissent pas les exclusions ou limitations de dommages indirects ou consecutifs, ou les
exclusions de garanties implicites. Dans de tels cas, les limitations stipulees ci-dessus peuvent ne pas 6tre applicables.
RI_PARATION SOUS GARANTIE
Pour de I'aide sur le fonctionnement de I'appareil ou pour toute demande d'information, veuillez contacter votre
detaillant ou notre service a la clientele au :
N° de tel6phone : (905) 624-5505 N° de tel6copieur : (905) 238-2360 Site Internet :www.panasonic.ca
Pour la reparation des appareils, veuillez consulter :
votre detaillant, lequel pourra vous renseigner sur le centre de service agr6e le plus pres de votre domicile ;
notre service a la clientele au (905) 624-5505 ou www.panasonic.ca ;
un de nos centres de service de la liste ci-dessous :
Richmond, Colombie-Britannique Calqary, Alberta Mississauqa. Ontario
Lachine, Quebec
Panasonic Canada Inc.
12111 Riverside Way
Richmond, BC V6W 1K8
Tel. : (604) 278-4211
Tel6c. : (604) 278-5627
Panasonic Canada lnc.
6835-8 th St. N.E.
Calgary, AB T2E 7H7
Tel.: (403) 295-3955
Tel6c.:(403) 274-5493
Panasonic Canada Inc.
5770 Ambler Dr.
Mississauga, ON L4W 2T3
Tel. : (905) 624-8447
Tel6c. : (905) 238-2418
Panasonic Canada Inc.
3075, rue Louis A. Amos
Lachine, QC H8T 1C4
Tel. : (514) 633-8684
Tel6c. : (514) 633-8020
Expedition de rappareil a un centre de service
Emballer soigneusement I'appareil, de pref6rence dans le carton d'origine, et I'expedier port paye et assure au centre de service.
Inclure la description detaill6e de la panne et la preuve de la date d'achat original.

GU_ DE' SERWCfOS TECNICOS
Nota: La hoja de garantia y la informaci6n de centros de servicio para e! modelo PT-X4734X est_ !ocalizada
en la bolsa de documentos.

Panasonic Consumer Electronics Company,
Division of Matsushita
Electric Corporation of America
One Panasonic Way
Secaucus, New Jersey 07094
www.panasonic.com
Panasonic Sales Company,
Division of Matsushita Electric
of Puerto Rico Inc. ("PSC")
Ave 65 de Infanteria, Km 9.5
San Gabriel Industrial Park Carolina,
Puerto Rico 00985
Tel (787) 750-4300
Fax (787) 768-2910
Panasonic Canada Inc.
5770 Ambler Drive
Mississauga, Ontario
Canada L4W 2T3
Tel.: (905) 624-5010
Fax: (905) 624-9714
www.panasonic.ca
Panasonic de Mexico, S.A, de C.V.
Amores No 1120
Col Del Valle CR 03100
Mexico, D.F.
Tel. (0155) 5488-1000
Fax (0155) 5575-6763, 5575-6765
-
 1
1
-
 2
2
-
 3
3
-
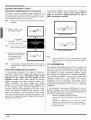 4
4
-
 5
5
-
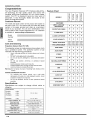 6
6
-
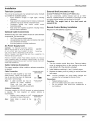 7
7
-
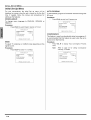 8
8
-
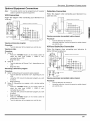 9
9
-
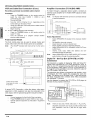 10
10
-
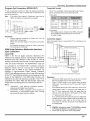 11
11
-
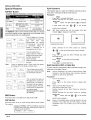 12
12
-
 13
13
-
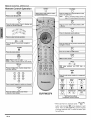 14
14
-
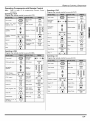 15
15
-
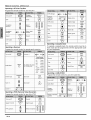 16
16
-
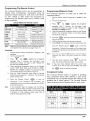 17
17
-
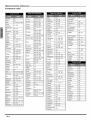 18
18
-
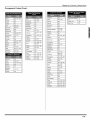 19
19
-
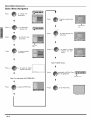 20
20
-
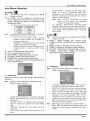 21
21
-
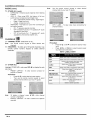 22
22
-
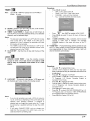 23
23
-
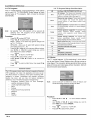 24
24
-
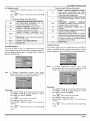 25
25
-
 26
26
-
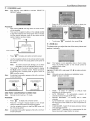 27
27
-
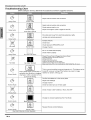 28
28
-
 29
29
-
 30
30
-
 31
31
-
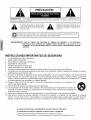 32
32
-
 33
33
-
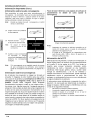 34
34
-
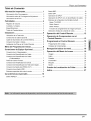 35
35
-
 36
36
-
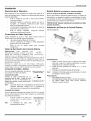 37
37
-
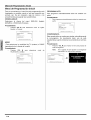 38
38
-
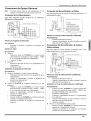 39
39
-
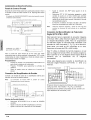 40
40
-
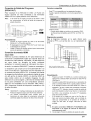 41
41
-
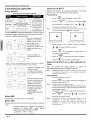 42
42
-
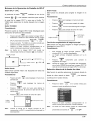 43
43
-
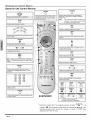 44
44
-
 45
45
-
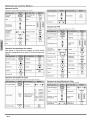 46
46
-
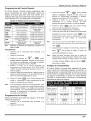 47
47
-
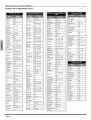 48
48
-
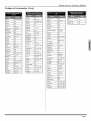 49
49
-
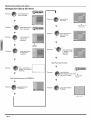 50
50
-
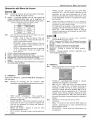 51
51
-
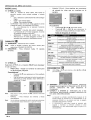 52
52
-
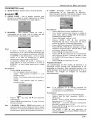 53
53
-
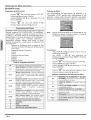 54
54
-
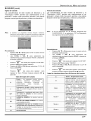 55
55
-
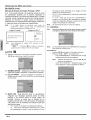 56
56
-
 57
57
-
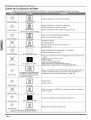 58
58
-
 59
59
-
 60
60
-
 61
61
-
 62
62
-
 63
63
-
 64
64
-
 65
65
-
 66
66
-
 67
67
-
 68
68


Panasonic PT-53X54J El manual del propietario
- Tipo
- El manual del propietario
en otros idiomas
- English: Panasonic PT-53X54J Owner's manual
Artículos relacionados
-
Panasonic PT 47WXD64 Manual de usuario
-
-
-
-
-
-
-
-
-
Otros documentos
-
Quasar Projection Television SR-5144 Manual de usuario
-
Philips 46-HDTV MONITOR PROJECTION TV 46PP9302H - Instrucciones de operación
-
Philips 26PF5320/28 Manual de usuario
-
Sony KP-41T35 Manual de usuario
-
-
-
 Work Pro ZENITH 6000 Manual de usuario
