Yamaha TW-E7A Manual de usuario
- Categoría
- Auriculares
- Tipo
- Manual de usuario
Este manual también es adecuado para
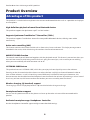
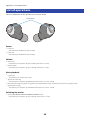
Los Yamaha TW-E7A Truly Wireless Earphones ofrecen una experiencia auditiva de alta definición con soporte para los codecs Qualcomm aptX™ y AAC. Disfruta de una conexión estable con Qualcomm TrueWireless™ Stereo Plus (TWS+). La función de cancelación activa de ruido (ANC) te permite sumergirte en la música sin distracciones. Con la función AMBIENT SOUND, puedes mezclar los sonidos del entorno con la música. La función LISTENING CARE te permite disfrutar de un sonido rico incluso a bajo volumen.
Los Yamaha TW-E7A Truly Wireless Earphones ofrecen una experiencia auditiva de alta definición con soporte para los codecs Qualcomm aptX™ y AAC. Disfruta de una conexión estable con Qualcomm TrueWireless™ Stereo Plus (TWS+). La función de cancelación activa de ruido (ANC) te permite sumergirte en la música sin distracciones. Con la función AMBIENT SOUND, puedes mezclar los sonidos del entorno con la música. La función LISTENING CARE te permite disfrutar de un sonido rico incluso a bajo volumen.


-
 1
1
-
 2
2
-
 3
3
-
 4
4
-
 5
5
-
 6
6
-
 7
7
-
 8
8
-
 9
9
-
 10
10
-
 11
11
-
 12
12
-
 13
13
-
 14
14
-
 15
15
-
 16
16
-
 17
17
-
 18
18
-
 19
19
-
 20
20
-
 21
21
-
 22
22
-
 23
23
-
 24
24
-
 25
25
-
 26
26
-
 27
27
-
 28
28
-
 29
29
-
 30
30
-
 31
31
-
 32
32
-
 33
33
-
 34
34
-
 35
35
-
 36
36
-
 37
37
-
 38
38
-
 39
39
-
 40
40
-
 41
41
-
 42
42
-
 43
43
-
 44
44
-
 45
45
-
 46
46
-
 47
47
-
 48
48
-
 49
49
-
 50
50
-
 51
51
-
 52
52
-
 53
53
-
 54
54
-
 55
55
-
 56
56
-
 57
57
-
 58
58
-
 59
59
-
 60
60
-
 61
61
-
 62
62


Yamaha TW-E7A Manual de usuario
- Categoría
- Auriculares
- Tipo
- Manual de usuario
- Este manual también es adecuado para
Los Yamaha TW-E7A Truly Wireless Earphones ofrecen una experiencia auditiva de alta definición con soporte para los codecs Qualcomm aptX™ y AAC. Disfruta de una conexión estable con Qualcomm TrueWireless™ Stereo Plus (TWS+). La función de cancelación activa de ruido (ANC) te permite sumergirte en la música sin distracciones. Con la función AMBIENT SOUND, puedes mezclar los sonidos del entorno con la música. La función LISTENING CARE te permite disfrutar de un sonido rico incluso a bajo volumen.
en otros idiomas
- français: Yamaha TW-E7A Manuel utilisateur
- italiano: Yamaha TW-E7A Manuale utente
- English: Yamaha TW-E7A User manual
- Deutsch: Yamaha TW-E7A Benutzerhandbuch
- Nederlands: Yamaha TW-E7A Handleiding
- dansk: Yamaha TW-E7A Brugermanual
Artículos relacionados
-
Yamaha TW-E3A Guía del usuario
-
-
-
Yamaha YH-E700A Manual de usuario
-
-
Yamaha TW-E3B Guía del usuario
-
Yamaha YH-L700A Guía del usuario
-
-
-