Infinity Drain XS 4 ORB Instrucciones de operación
- Tipo
- Instrucciones de operación

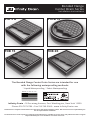
Bonded Flange
Center Drain Series
Installation Instructions
The Bonded Flange Center Drain Series are intended for use
with the following waterproong methods:
°
Liquid Waterproofing
°
Fabric Waterproofing
Dimension are subject to Manufacturers tolerance and change without notice. We can assume no responsibility for
use of superseded or void data.
Las dimensiones están sujetos a la tolerancia del fabricante y cambio sin previo aviso. No podemos asumir ninguna
responsabilidad por el uso de datos a sustituir los nulos.
Infinity Drain • 18 Secatoag Avenue, Port Washington, New York 11050
Phone 516.767.6786 • Fax 516.740.3066 • www.InfinityDrain.com
Made in the U.S.A.
LTD 5 B
TDB 15
RTDB 15
TDB 20

2
Series Components:
TDB 15 Series
T15 A SS 5" x 5" Strainer Only with Satin Stainless Finish
T15 A PS 5" x 5" Strainer Only with Polished Stainless Finish
BFA 42 Bonded Flange ABS Drain
BFP 42 Bonded Flange PVC Drain
TKEY Lift Out Key
HS 4 4" Hair Strainer
TDB 20 Series
T20 A SS 8" x 8" Strainer Only with Satin Stainless Finish
T20 A PS 8" x 8" Strainer Only with Polished Stainless Finish
BFA 42 Bonded Flange ABS Drain
BFP 42 Bonded Flange PVC Drain
TKEY Lift Out Key
HS 4 4" Hair Strainer
RTDB 15 Series
RT 15 B 5" Round Tile Drain Strainer
BFA 42 Bonded Flange ABS Drain
BFP 42 Bonded Flange PVC Drain
LTD 5 B Series
LT5-2 SS 5" x 5" Strainer Only with Satin Stainless Finish
LT5-2 PS 5" x 5" Strainer Only with Polished Stainless Finish
BFA 22 Bonded Flange ABS Drain
BFP 22 Bonded Flange PVC Drain
Note: Installer must verify all rough-in
dimensions prior to installation and consult
local and national codes. Conformity and
compliance to local and national codes are
the responsibility of the installer.
Tenga en cuenta: Instalador debe comprobar
todas las dimensiones en las partes previa
a la instalación y consultar localmente y
nacionalmente los códigos. La conformidad y
el cumplimiento de códigos local y nacional es
responsabilidad del instalador.
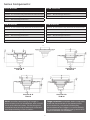
Section A-A
LTD 5 B
Section A-A
TDB 15
Section A-A
RTDB 15
Section A-A
TDB 20

3
Installation
1. Set bonded ange into a wet pre laid bed of
mortar and allow bonded ange drain body (C)
to recess into suboor. Connect the drain body
(C) to existing waste line using PVC cement or
ABS pipe cement. If no access to drain pipe is
available from below, prep outlet of the bonded
ange (C) with PVC or ABS primer and cement
and push t into existing waste line as you
set the bonded ange into the mortar. Ensure
that drain assembly (C) is level. Remove top
threaded ring (C1) from drain body (C2).
Instalación
1. Coloque bonded ange en el húmedo
pre-establecido de mortero y permita el
drenaje de bonded ange (C) que rebaje
en el subsuelo. Conecte el drenaje (C) a la
actual línea de desecho usando cemento de
PVC o cemento de tubería de ABS. Si no hay
acceso al tubo de desagüe de abajo, preparar
la salida del bonded ange en el mortero.
Asegure que la ensamble para desagüe (C)
este nivelado. Elimine la parte superior del
anillo roscador (C1) del desagüe (C2).
Note: The outlet of the bonded ange
drain body (C2) can be made to be used
with a 2”, 3” OR 4” waste line by cutting
the outlet section down to the desired
section size.
Tenga en cuenta: La salida del bonded
ange desagüe (C2) se puede hacer
para ser utilizado con 2”, 3” U 4” línea de
desechos cortando la sección de salida al
tamaño de la sección deseada.
2.Install backer board, cement board, or
other desired backing material on to framed
walls as per local code.
3. Spread a mortar bed across the intended
shower area. Ensure the starting height of
the mortar bed at the drain is ush with the
ange of the drain body (C2) at the drain. Pitch
this mortar bed in four directions towards the
drain body (C2).
2. Instale los paneles, tablero de cemento,
u otro material de soporte deseada a los
marcos de paredes según las normas locales.
3. Propagación el mortero a través de la zona
de ducha prevista. Asegure que la altura
inicial del mortero en el drenaje este a ras con
el desagüe (C2). Inclina esta capa de mortero
en cuatro direcciones hacia el cuerpo de
desagüe (C2).
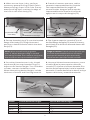
(A) Strainer
(B) Throat
Liquid/Fabric Waterproong
(C) Bonded Flange Drain
Body BFA/BFP
(C1)
(C2)
(C2) Bonded Flange
Drain Body
Waste Line Pipe
Suboor
Flange
4” Section
3” Section
2” Section

4
4. When mortar layer is dry, perform
necessary waterproofing (Liquid /Fabric
Waterproofing) as per local code. Ensure
waterproofing layer reaches the edge of
the hole in the drain body (C2).
4. Cuando el mortero este seco, realice
necesario impermeabilización (Liquida/
Tela impermeabilización) según las
normas locales. Asegure que la capa de
impermeabilización alcance el borde del
agujero en el cuerpo del desagüe (C2).
5. Set top threaded ring (C1) onto the bonded
ange drain body (C2) using thinset and
position to desired location within the drain
body (C2).
5. Fijar la parte superior roscada (C1) en el
bonded ange desagüe (C2) usando thinset y
posiciónelo a la ubicación deseada dentro del
desagüe (C2).
Note: When overall build up greater
than ¼” above waterproong is needed
(excluding nished oor material thickness)
use mortar to set top threaded ring (C1).
Tenga en cuenta: Cuando construya más que
¼” arriba impermeabilización es necesaria
(excluyendo material de piso terminado)
Utilice mortero para jar el anillo roscado.
6. Once the thinset/mortar is dry, thread
the throat (B) into top threaded ring (C1).
Adjust to the desired height. Turn clockwise
to lower, counter-clockwise to raise.
When determining desired height, include
thickness of thinset and nishing material.
6. Una vez el thinset/mortero este seco, rosca
el cuello (B) en la parte superior del anillo
roscado (C1). Ajustar a la altura deseada. Gire
hacia la derecha para bajar, hacia la izquierda
para subir. Cuando determine la altura, incluya
espesor del thinset y material terminado.
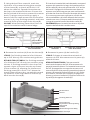
Liquid/Fabric
Waterproong
Suboor
Motar Bed
Backer Board
Waste Line Pipe
(C2) Bonded Flange
Drain Body
4
Liquid/Fabric
Waterproong
Motar Bed
Thinset/Motar
Waste Line Pipe
(C2) Bonded
Flange
Drain Body
(C1) Top Threaded
Ring
5
Bonded Flange
Drain Body
Waste Line Pipe
(B) Throat
(C2)
(C1)
6
Model Overall Minimum Height Overall Maximum Height*
LTD 5 B 1” 2”
RTDB 15 ¹³⁄
¹⁶
” 1 ⁷⁄
¹⁶
”
TDB 15 1 ⁵⁄
¹⁶
” 1 ¹⁵⁄
¹⁶
”
TDB 20 1 ⁵⁄
¹⁶
” 2 ¹⁄
¹⁶
”

5
Before nishing
material
Antes que el material
esté terminado
After nishing
material
Después que el material
esté terminado
7. Using desired oor material, mark the
thickness of the material along the outside
of the throat (B), so that it will nish 1/16”
above the channel. Spread thinset/mortar
bed up to the marked thickness. Ensure this
bed is pitched all directions toward the center
drain. If using a mortar build up, apply a
bead of silicone caulk around the throat after
mortar is dry. Lay nishing material, and have
material nish to the edge of the throat (B).
DO NOT allow nishing material to nish on
top of the stainless steel channel edge.
7. Usando el material del suelo deseado, marque el
espesor del material a lo largo de la parte exterior
del el cuello (B), de modo que termine 1/16” arriba
del canal. Propagación thinset/mortero hasta el
espesor marcada. Asegure que esto esté lanzado
en todas las direcciones hacia el drenaje del centro.
Si se construye mortero, aplique un cordón de
silicona alrededor del cuello después del mortero
cuando este seco. Coloque material terminado,
y tenga el material hasta el borde de cuello (B).
NO PERMITA que el material termine en la parte
superior del borde del canal de acero.
8. Remove the strainer (A) from the throat (B).
LTDB 5: Set nishing material of a thickness
up to 3/8” directly into strainer using thinset.
RTDB15/TDB15/TDB20: Set nishing material
of a thickness 3/4” directly into strainer using
thinset. If nishing material is less than 3/4”,
spread a layer of mortar into the top frame
of the strainer (A), allowing for thinset and
nishing material to nish 1/16” above the
metal frame. Allow to dry, spread thinset and
lay material. Place top frame of strainer (A)
back into the throat (B).
8. Remueva la parte (A) del cuello (B).
LTDB 5: Coloque el material terminado al
espesor de 3/8” directamente en la parte (A)
usando thinset.
RTDB15/TDB15/TDB20: Coloque material
terminado al espesor de 3/4” directamente a la
parte (A) usando thinset. Si el material esta menos
de 3/4”, propagación una capa de mortero en el
marco superior de la parte (A), permitiendo que el
thinset y el material esté terminado a 1/16” arriba
en el marco. Permita que se seque, propagación
thinsey y colocar el material. Coloque el marco de
la parte (A) de regreso al cuello (B).
Suboor
Thinset/Mortar
Waste Line Pipe
Bonded Flange Drain Body
Mortar Bed
Liquid/Fabric Waterproong
Finishing Material
Backer Board
Thinset
Mortar Bed
Sub-oor
Assurenishing material is NOT installed
over edge of throat
Thinset
Liquid/Fabric
Waterproong
Membrane

-
 1
1
-
 2
2
-
 3
3
-
 4
4
-
 5
5
-
 6
6


Infinity Drain XS 4 ORB Instrucciones de operación
- Tipo
- Instrucciones de operación
en otros idiomas
Artículos relacionados
-
Infinity Drain LTD5 BA SS Guía de instalación
-
Infinity Drain T 42-SS Instrucciones de operación
-
Infinity Drain D 3860 SS Instrucciones de operación
-
Infinity Drain FFAS 6536 SS Guía de instalación
-
Infinity Drain FFDG Instrucciones de operación
-
Infinity Drain UTIF-A 36 SS Guía de instalación
-
Infinity Drain S-LAG 6536 BK Guía de instalación
-
Infinity Drain FXSG 6548 SS Guía de instalación
-
Infinity Drain STIF AS 6540 SS Guía de instalación
