
Adventurer
TM
Balances
Instruction Manual


ADVENTURER BALANCES EN-1
TABLE OF CONTENTS
1. INTRODUCTION ....................................................................................................................3
1.1 Description ................................................................................................................................................... 3
1.2 Features ....................................................................................................................................................... 3
1.3 Definition of Signal Warnings and Symbols ................................................................................................. 3
1.4 Safety Precautions ....................................................................................................................................... 3
2. INSTALLATION .....................................................................................................................4
2.1 Unpacking .................................................................................................................................................... 4
2.2 Selecting the Location .................................................................................................................................. 4
2.3 Leveling the Equipment ................................................................................................................................ 4
2.4 Connecting Power ........................................................................................................................................ 5
2.5 Connecting the Interface .............................................................................................................................. 5
2.6 Initial Calibration ........................................................................................................................................... 5
3. OPERATION ..........................................................................................................................6
3.1 Overview of Display, Home Screen ............................................................................................................. 6
3.2 Principal Functions and Main Menu ............................................................................................................ 7
3.3 Overview of Parts and Features – Draft Shield Models ............................................................................... 8
3.4 Overview of Parts and Features – Non Draft Shield Models ....................................................................... 8
4. APPLICATIONS .....................................................................................................................9
4.1 Weighing ...................................................................................................................................................... 9
4.1.1 Item Settings .......................................................................................................................................... 10
4.1.2 Sample Name ......................................................................................................................................... 11
4.1.3 Save to USB ........................................................................................................................................... 11
4.2 Parts Counting............................................................................................................................................ 11
4.2.1 Item Settings .......................................................................................................................................... 12
4.3 Percent Weighing ....................................................................................................................................... 14
4.3.1 Item Settings .......................................................................................................................................... 14
4.4 Dynamic Weighing ..................................................................................................................................... 15
4.4.1 Item Settings .......................................................................................................................................... 15
4.5 Density Determination ................................................................................................................................ 16
4.5.1 Measuring the Density of a Solid Using Water (default) ........................................................................ 16
4.5.2 Measuring the Density of a Buoyant Material Using Water ................................................................... 17
4.5.3 Measuring the Density of a Solid Using an Auxiliary Liquid ................................................................... 17
4.5.4 Measuring the Density of a liquid using a Calibrated Sinker (not supplied) ........................................... 18
4.5.5 Measuring the Density of Porous Material Using Oil ............................................................................. 19
4.6 Check Weighing ......................................................................................................................................... 22
4.6.1 Item Settings .......................................................................................................................................... 22
4.7 Display Hold ............................................................................................................................................... 23
4.7.1 Display Hold ........................................................................................................................................... 23
4.7.2 Peak Hold ............................................................................................................................................... 23
4.7.3 Item Settings .......................................................................................................................................... 24
4.8 Totalization ................................................................................................................................................. 24
4.9 Formulation ................................................................................................................................................ 25
4.9.1 Item Settings .......................................................................................................................................... 25
4.10 Additional Features .................................................................................................................................... 26
4.10.1 Weigh Below .......................................................................................................................................... 26
5. MENU SETTINGS ................................................................................................................ 27
5.1 Menu Navigation ........................................................................................................................................ 27
5.1.1 Changing Settings .................................................................................................................................. 28
5.2 Calibration .................................................................................................................................................. 29
5.2.1 Calibration sub-menu (InCal models) ..................................................................................................... 29
5.2.2 Internal Calibration ................................................................................................................................. 29
5.2.3 Automatic Calibration ............................................................................................................................. 29
5.2.4 AutoCal™ Adjustment ............................................................................................................................ 30
5.2.5 Span Calibration ..................................................................................................................................... 30
5.2.6 Linearity Calibration................................................................................................................................ 31
5.2.7 Calibration Test ...................................................................................................................................... 31
5.3 Balance Setup ............................................................................................................................................ 31
5.3.1 Balance Set-up sub-menu ...................................................................................................................... 31
5.3.2 Language ............................................................................................................................................... 31
5.3.3 User Setting ............................................................................................................................................ 32

EN-2 ADVENTURER BALANCES
5.3.4 Filter Level .............................................................................................................................................. 32
5.3.5 Auto Zero Tracking ................................................................................................................................. 32
5.3.6 Auto Tare ................................................................................................................................................ 32
5.3.7 Graduations ............................................................................................................................................ 32
5.3.8 Date & Time ........................................................................................................................................... 33
5.3.9 Approved Mode ...................................................................................................................................... 33
5.4 Weighing Units ........................................................................................................................................... 34
5.4.1 Units Sub-menu ...................................................................................................................................... 34
5.5 Data Maintenance ...................................................................................................................................... 34
5.5.1 Data Maintenance sub-menu ..................................................................................................................... 34
5.6 Communication .......................................................................................................................................... 35
5.6.1 Communication Sub-menu ..................................................................................................................... 35
5.6.2 Baud Rate .............................................................................................................................................. 35
5.6.3 Transmission .......................................................................................................................................... 36
5.6.4 Handshake ............................................................................................................................................. 36
5.6.5 Print Output ............................................................................................................................................ 36
5.6.6 Auto Print ................................................................................................................................................ 36
5.6.7 Print Content .......................................................................................................................................... 36
5.6.8 Feed.. ..................................................................................................................................................... 36
5.6.9 Format.. .................................................................................................................................................. 36
5.6.10 Print Calibration Data.. ........................................................................................................................... 36
5.7 GLP and GMP Data ................................................................................................................................... 38
5.7.1 GLP Data Sub-menu .............................................................................................................................. 38
5.7.2 Header .................................................................................................................................................... 38
5.7.3 Balance Name ........................................................................................................................................ 38
5.7.4 User Name ............................................................................................................................................. 38
5.7.5 Project Name .......................................................................................................................................... 38
5.8 Factory Reset ............................................................................................................................................. 38
5.9 Lockout ....................................................................................................................................................... 38
6. LEGAL FOR TRADE (LFT) .................................................................................................. 39
6.1 Settings ...................................................................................................................................................... 39
6.2 Verification .................................................................................................................................................. 39
6.3 Sealing ....................................................................................................................................................... 39
7. PRINTING ............................................................................................................................ 40
7.1 Connecting, Configuring and Testing the Printer/Computer Interface ....................................................... 40
7.2 Output Format ............................................................................................................................................ 40
7.3 Printout Examples ...................................................................................................................................... 41
8. MAINTENANCE ................................................................................................................... 44
8.1 Calibration .................................................................................................................................................. 44
8.2 Cleaning ..................................................................................................................................................... 44
8.3 Troubleshooting ......................................................................................................................................... 44
8.4 Service Information .................................................................................................................................... 44
9. TECHNICAL DATA .............................................................................................................. 45
9.1 Specifications ............................................................................................................................................. 45
9.2 Drawings and Dimensions ......................................................................................................................... 54
9.3 Parts and Accessories ............................................................................................................................... 54
9.4 Communication .......................................................................................................................................... 55
9.4.1 Interface Commands .............................................................................................................................. 55
9.4.2 RS232 (DB9) Pin Connections ............................................................................................................... 56
9.5 The USB Interface ...................................................................................................................................... 56
10. SOFTWARE UPDATES ....................................................................................................... 57
11. COMPLIANCE...................................................................................................................... 58

ADVENTURER BALANCES EN-3
1. INTRODUCTION
1.1 Description
The Adventurer balance is a precision weighing instrument that will provide you with years of service if properly
cared for. The Ohaus Adventurer balances are available in capacities from 120 grams to 8,200 grams.
1.2 Features
Touch Controls: Quick, graphical access to all control
functions, over a dozen applications and many features.
1.3 Definition of Signal Warnings and Symbols
Safety notes are marked with signal words and warning symbols. These show safety issues and warnings. Ignoring
the safety notes may lead to personal injury, damage to the instrument, malfunctions and false results.
Signal Words
WARNING For a hazardous situation with medium risk, possibly resulting in injuries or death if not
avoided.
CAUTION For a hazardous situation with low risk, resulting in damage to the device or
the property or in loss of data, or injuries if not avoided.
Attention For important information about the product
Note For useful information about the product
Warning Symbols
General Hazard Electrical Shock Hazard
1.4 Safety Precautions
CAUTION: Read all safety warnings before installing, making connections, or servicing this
equipment. Failure to comply with these warnings could result in personal injury and/or
property damage. Retain all instructions for future reference.
Verify that the AC adapter’s input voltage range and plug type are compatible with the local AC power
to be used.
Make sure that the power cord does not pose a potential obstacle or tripping hazard.
The balance is for indoor use only.
Use the balance only in dry locations.
Do not drop loads on the pan.
Use only approved accessories and peripherals.
Operate the equipment only under ambient conditions specified in these instructions.
Disconnect the equipment from the power supply when cleaning.
Do not operate the equipment in hazardous or unstable environments.
Service should only be performed by authorized personnel.
Do not position the balance such that it is difficult to reach the power connection.
Direct current
Alternating current

EN-4 ADVENTURER BALANCES
2. INSTALLATION
2.1 Unpacking
Carefully remove your Adventurer balance and each of its components from the package. The included
components vary depending on the balance model (see table below). Save the packaging to ensure safe storage
and transport. Please read the manual completely before installing and using the Adventurer balance to avoid
incorrect operation.
Included Components
Balance
Power Adapter
Wind Ring (only for 0.1 mg and 1 mg models)
Warranty Card
Software Compact Disk
2.2 Selecting the Location
Avoid excessive vibrations, heat sources, air current, or rapid temperature changes. Allow sufficient space.
2.3 Leveling the Equipment
The Adventurer has a level bubble in a small round window beside the display.
To level the balance, adjust the 4 Leveling Feet until the bubble is centered in the
circle. See the Level Assist section below on information about how and which feet to
turn. Be sure the equipment is level each time its location is changed.
Level Assist
A level assist function is available to help leveling the Adventurer. There are two ways to access the function:
1. Weighing Application -> Item Settings -> Level Assist. See section 4.1.1 for more information.
2. Main Menu -> Balance Setup -> User Settings -> Level Assist. See section 5.3.3 for more information.
Rotate the feet according to the image above depending on the location of the level bubble until the bubble is
centered.

ADVENTURER BALANCES EN-5
2.4 Connecting Power
Connect the DC output connector to the power receptacle on the rear of the balance. Then connect the AC power
cord to a suitable electrical outlet.
CAUTION: For use with CSA certified (or equivalent approved) power source,
which must have a limited current output.
Attention: For optimal weighing performance, allow the balance to warm up for 60 minutes
prior to use.
2.5 Connecting the Interface
Use the built-in RS-232 Port to connect either to a computer or a printer with a standard (straight-through)
serial cable. Or connect using the scale’s USB port.
Interface connections on the rear of the balance: USB connection on the front of the balance:
.
USB1: Used to connect to PC only
USB2: Used to connect a USB flash driver only
RS232: Used to connect to PC or Printer
Note: For configuration and interface commands, see the Communication Menu Settings section.
For Connecting, Configuring and Testing the Printer/Computer Interface, and for sample Print Output Formats,
see the Printing section.
2.6 Initial Calibration
When the Balance is first installed, and when it is moved to another location, it must be calibrated to ensure
accurate weighing results. Most Adventurer Balances have built in AutoCal which can calibrate the balance
automatically and does not require calibration masses. If preferred, the balance can be manually calibrated with
external masses. Have the appropriate calibration masses available before beginning calibration. Refer to the
Calibration Section for masses and calibration procedure.
¤ AutoCal™
Fully automatic internal calibration system that assists with routine maintenance by automatically calibrating the
balance daily is available on most models.
Automatically calibrates the system when it senses a temperature change sufficient enough to affect weighing
accuracy (>1.5°C), or every 11 hours.
¤ External Calibration
Select precision models feature traditional external calibration in which external weights (user’s choice of calibration
weight values) are used to calibrate the balance to ensure accuracy.
USB1
RS232
USB2

EN-6 ADVENTURER BALANCES
3. OPERATION
3.1 Overview of Display, Home Screen
This equipment utilizes a touch-sensitive display with Touch areas and Buttons to control the equipment’s functions.
CONTROLS
Button
Action
Short Press (if powered Off): Turns on the scale
Long Press (if powered On): Turns off the scale
Note:
The balance will automatically power on when power is connected.
Short Press: Prints the present data to a printer or a computer.
Short Press: Perform Zero operation
Short Press: Perform Calibration operation
Short Press: Perform Tare operation
Main Application Screen
Application
Instructional Messages
Stability (*), Net (NET),
Gross (G) and/or center
of zero (>0<) indicators
Reference Fields
Application Buttons:
Functions vary by
application
Result Field: Information
varies by application
Touch g to change unit
Capacity and readability

ADVENTURER BALANCES EN-7
3.2 Principal Functions and Main Menu
Weighing: Press Zero to set the display to zero. Place an item on the pan. Display indicates gross weight.
Taring: With no load on the pan, press Zero to set the display to zero. Place an empty container on the pan
and press Tare. Add material to the container and its net weight is displayed. Remove container and
container’s weight appears as a negative number. Press Tare to clear.
Zero: Press Zero to zero the balance
MENU & SCREEN NAVIGATION
Touch Menu to open the menu list.
Calibration:
Touch to view calibration options.
Balance Setup:
Touch to view and change balance settings.
Weighing Units:
Touch to view and change weighing units.
Data Maintenance:
Touch to view data maintenance settings.
GLP and GMP Data:
Insert user data for traceability.
Factory Reset:
Touch to do a Factory reset of menu
settings.
Communication:
Touch to view COM Device Settings and
Print Settings.
Lockout:
Touch to view lockout options.

EN-8 ADVENTURER BALANCES
3.3 Overview of Parts and Features – Draft Shield Models
3.4 Overview of Parts and Features – Non Draft Shield Models
USB Host
USB Device
Power Input
RS232
LFT Switch
Adjustable Foot
Level Indicator
Level Indicator
USB Host
Adjustable Foot
USB Device
LFT Switch
RS232
Power Input
Pan
Adjustable Foot
Pan
Wing Ring
Adjustable Foot

ADVENTURER BALANCES EN-9
4. APPLICATIONS
The balance can be configured to operate in various Application modes.
Touch the top left Application field (weighing in the example below):
The Adventurer Balance has 9 application modes, as follows:
Weighing
Parts Counting
Percent
Weighing
Dynamic
(Animal)
Weighing
Density
Determination
Check
Weighing
Display Hold
Totalization
Formulation
4.1 Weighing
Note: Before using any application, be sure the balance has been leveled and calibrated.
Use this application to determine the weight of items in the selected unit of measure.
Weighing
1. In the upper left portion of the home screen, select Weighing (this application is the default).
2. Press Tare or Zero if necessary to begin.
3. Place objects on the pan to display the weight. When stable, the * appears.
4. The resulting value is displayed in the main Display Line in the active unit of measure.
The WEIGHING Home screen
Main Display Line
Reference Fields
Application Buttons
Application Icon
Touch g to change unit

EN-10 ADVENTURER BALANCES
4.1.1 Item Settings
To view or adjust the current settings
Touch the
Item Settings
button. The Settings screen appears.
Minimum Weight: establish a minimum weight value to
be used to verify a reading. If an actual weight is below
the established Minimum Weight value, it is flagged by
a color change: yellow.
To adjust the Minimum Weight value, touch the
Minimum Weight
button.
A numeric input window appears.
Use the keys to enter the desired Minimum Weight,
then press Save.
The display reverts to the previous screen.
To return to the Weighing home screen, touch
Exit at the bottom of that screen.
Capacity Bar: When set to ON, a capacity bar is
displayed in the reference field. The capacity guide will
show the current weight as a percentage of balance
capacity.
If Capacity Bar is set to OFF, the reference field will
show Minimum Weight and Sample Name.
Weighing Units: Change the displayed unit. See
section 5.4 for more information
Note: Touching the weighing unit from application
home screen will also open the Weighing Units screen.
Filter Level: Change Filtering level. See section 5.3.4
for more information
GLP & GMP Data: See section 5.7 for more
information
Print settings: Change printing settings. See section 7
for more information.
Level Assist: Instructions on how to move the balance
feet to level the balance.

ADVENTURER BALANCES EN-11
4.1.2 Sample Name
Press this button to add a sample name. An alphanumeric input window appears. Press to alternate
between Lower and Upper case characters.
Lower Case: Upper Case:
Key in the desired sample name and press Save to save the name and return to weighing home screen.
4.1.3 Save to USB
Insert the USB flash drive into the USB slot located on the front of the balance. Next, press the Save to
USB button to save the data to the USB flash drive. Once saved, the button will momentarily change color
to orange.
Notes: The first time a USB flash drive is connected to the balance there might be some delay time
before the button Save to USB works. This is due to that the balance is creating the necessary
folders on the USB flash drive where the data will be stored.
The Density Determination and Check Weighing applications do not have a Save to USB button.
CAUTION:
The weighing data will be saved to USB every day. However, if different weighing modes are used the
data will be separately saved to individual files.
Depending on the USB drive used, all data might not be transferred from the balance or the display
might freeze. If this happens, unplug the USB flash drive and try another USB flash drive.
Ohaus takes no responsibility if data on USB flash drive is erased or if the USB flash drive breaks while
it is connected to the balance.
To minimize the risk of problems arising, Ohaus suggests using a high quality USB flash drive.
4.2 Parts Counting
Note: Before using any application, be sure the balance has been leveled and calibrated.
Use this application to count samples of uniform weight.
Parts Counting
1. In the upper left portion of the home screen, select Parts Counting
2. Press Tare or Zero if necessary to begin.
3. Place objects on the pan to display the weight. When stable, the * appears.
4. The resulting value is displayed in the main Display Line in pieces (PCS).
The Parts Counting Home screen
Main Display Line
Reference Fields
Application Buttons
Application
Icon

EN-12 ADVENTURER BALANCES
4.2.1 Item Settings
To view or adjust the current settings
Touch the
Item Settings
button. The Settings screen appears.
Samples: The sample size can be 1 to 10 000 pieces.
The default sample size is 10. Once a sample size is
changed, the balance will immediately open the
recalculate APW screen, expecting to establish a new
APW.
To adjust the sample size, touch the
Samples
button.
A numeric input window appears.
Use the keys to enter the desired sample size,
then press Save.
The next screen appears, with the message to place
the reference weight on the pan.
Place the reference weight on the pan, then touch
Accept to capture the value, the screen shows number
of pcs.
Establish an Average Piece Weight (APW):
Each time a new type of part is counted, the
nominal weight of one piece (Average Piece
Weight or APW) must be established using a
small quantity of pieces. This APW is stored
until replaced by another APW.
There are two methods to establish the APW
value:
1. The actual APW is known
2. The APW must be derived by weight. For
this case the current sample size will be used

ADVENTURER BALANCES EN-13
Set a known Average Piece Weight (APW)
To adjust the APW value directly, touch the
APW
button.
A numeric input window appears.
Key in the desired APW Weight, then press Save.
The display returns to the application home screen with the
new APW value in the reference field.
Set a new Average Piece Weight (APW) – Derived
To establish a new APW, place the reference weight on the pan
and press Accept to continue.
Note: The sample size that is displayed will be used.
To use a different sample size, change that first. (See above.)
The home screen shows the number of pieces at the new APW
Auto Optimization: When set to On, improves counting accuracy by re-calculating the piece weight
automatically as parts are added. Default is Off.
Notes:
APW Optimization occurs only when the number of pieces added to the pan is between one and three times the
number already on the pan.
If the APW is entered manually by the numeric keypad, APW auto optimization will not occur.
Print settings: Change printing settings. See section 7 for more information.
Note: The Save to USB button will only appear after a USB flash drive has been connected to the balance.
See section 4.1.3 for more information.

EN-14 ADVENTURER BALANCES
4.3 Percent Weighing
Note: Before using any application, be sure the balance has been leveled and calibrated.
Use Percent Weighing to measure the weight of a sample displayed as a percentage of a pre-established
reference weight.
The default (or last) reference weight is displayed.
Percent Weighing
1. In the upper left portion of the home screen, select Percent Weighing.
2. Place an object on the pan. The difference between the sample and the reference weight is displayed as a
percentage.
The Percent Weighing Home screen
Main Display Line
Reference Fields
Application Buttons
Application
Icon
4.3.1 Item Settings
To view or adjust the current settings
Touch the
Item Settings
button. The Settings screen
appears.
Recalculate Ref. Wgt: To establish a new
reference weight value, touch the recalculate
reference weight button.
Follow the screen instructions to establish a new
reference weight.
Alternatively, press the
Ref. Weight
button from
the Percent Weighing Recalculate Ref. Wgt
screen to establish a new reference weight
manually through a numerical keypad.
Print settings: Change printing settings. See section 7
for more information.
Note: The Save to USB button will only appear after a
USB flash drive has been connected to the balance.
See section 4.1.3 for more information.

ADVENTURER BALANCES EN-15
4.4 Dynamic Weighing
Note: Before using any application, be sure the balance has been leveled and calibrated.
Use this application to weigh an unstable load, such as a moving animal. Two different start/reset modes can be
selected: Manual (start and stop via key press) and Automatic (start and stop automatically).
Dynamic Weighing – Manual (default)
1. In the upper left portion of the home screen, select Dynamic Weighing
2. Place objects on the pan and press the Start button.
The Dynamic Weighing Home screen
Main Display Line
Reference Fields
Application Buttons
Application
Icon
3. The balance begins a countdown (averaging process). During the countdown, the information line
displays the time remaining.
If necessary, press Stop to quit.
4. When the countdown ends, the result line is displayed and held. Press Clear to clear the held weight and
return to the initial screen.
Note: Clear the pan before beginning a new Dynamic weighing cycle.
4.4.1 Item Settings
To view or adjust the current settings
Touch the
Item Settings
button. The Settings screen
appears.
Averaging Time: Set the averaging time to a value
between 1 and 99 seconds. Default is 5 seconds.
Automatic Mode: When set to On, the cycle begins
when an object is placed on the pan, and the held value
is automatically reset when the object is removed from
the pan.
Sample Name: Assign a name to the sample.
Print settings: Change printing settings. See section 7
for more information.
Note: The Save to USB button will only appear after a
USB flash drive has been connected to the balance.
See section 4.1.3 for more information.

EN-16 ADVENTURER BALANCES
4.5 Density Determination
Note: Before using any application, be sure the balance has been leveled and calibrated.
Use this application to determine an object’s density. Four types of density determination can be made:
1. Solids more dense than water
2. Solid less dense than water
3. Liquid density
4. Porous material (impregnated with oil)
The Density Determination Home screen
Main Display Line
Reference Fields
Function Buttons
Application
Icon
4.5.1 Measuring the Density of a Solid Using Water (default)
Press the Item Settings button to open the Density
Determination Settings screen.
Confirm the following Setups are selected:
Density Type: Solid
Auxiliary Liquid: Water
Porous Material: Off
To adjust the water temperature value,
touch the Water Temp. button.
The balance calculates water density based on the water
temperature value entered.
Measure the actual water temperature using a precision
thermometer.
A numeric input window appears.
Enter the actual water temperature, then press Save.
To return to the Density Determination home screen,
touch Back.
Step 1 of 2 –
Weigh the
Sample in Air.
Press
Start
.
Follow screen
instructions,
then press
Accept
to store the dry
sample weight
(“in air”).

ADVENTURER BALANCES EN-17
Step 2 of 2 –
Weigh the
Sample
Submerged in
the Liquid.
Follow the
screen
instructions,
then press
Accept
to store the
sample weight
(submerged
in liquid).
Once the necessary weights have been determined, the density of the sample is displayed in g/cm
3
(along with the weight in air, weight in water) on the Application screen.
Press
Start
to reset all the weight values and restart the process.
4.5.2 Measuring the Density of a Buoyant Material Using Water
Press the Item Settings button to open Settings screen.
Confirm the following Setups are selected:
Density Type: Solid
Liquid Type: Water
Porous Material: Off
Press
Back
to return to the Density Determination home
screen.
Follow the same procedure as Solid Material above, except
in Density Determination step 2, push the sample down
into the liquid until it is fully submerged.
4.5.3 Measuring the Density of a Solid Using an Auxiliary Liquid
To enable this feature, enter the Density Determination Setup menu and select the following:
Density Type: Solid; Liquid Type: Other; Porous Material: Off.
Confirm the default values displayed (Liquid Density, etc) are
correct.
To adjust the Liquid Density value, touch the Auxiliary liquid
button and select Other.
A numeric input window appears.
Key in the density in g/cm
3
, then press Save.
The display returns to the previous screen.
To return to the Density Determination home screen,
touch Back.
Begin the Density determination process as per above.

EN-18 ADVENTURER BALANCES
4.5.4 Measuring the Density of a liquid using a Calibrated Sinker (not supplied)
To enable this feature, enter the Density Setup menu and select the following; Density Type: Liquid.
Note: when the Density Type is set to Liquid, the Liquid type and Porous material selections are disabled.
The DENSITY DETERMINATION – LIQUID Home screen
Main Display Line
Reference Fields
Function Buttons
Application Icon
Confirm that the default value displayed (sinker volume) is
correct. To edit the default values, touch
Sinker Volume
.
To adjust the Sinker volume value, touch the
Sinker Volume
button.
A numeric input window is displayed.
Key in the desired value, then press Save.
The display returns to the previous screen with the new value
highlighted.
To return to the Density Determination home screen,
touch Back.
Press
Start
to start the process.
Step 1 of 2 – Weigh the Sinker in Air.
Follow the screen instructions, then press
Accept
to store the sinker weight (“in air”).

ADVENTURER BALANCES EN-19
Step 2 of 2 – Weigh the Sinker Submerged in the Test
Liquid.
Follow the screen instructions, then press Accept
to store the sinker weight (submerged in liquid).
Once the necessary weights have been determined,
the density of the Liquid sample is displayed in g/cm
3
(along with the weight in air, weight in water)
on the Application screen.
Press
Start
to reset all the weight values and restart the
process.
4.5.5 Measuring the Density of Porous Material Using Oil
To enable this feature, enter the Density Determination
Setup menu, and set the following:
Density Type: Solid
Liquid Type: Water
Porous Material: On
The DENSITY DETERMINATION – POROUS
Home screen
Main Display Line
Reference Fields
Functions Application Icon

EN-20 ADVENTURER BALANCES
Confirm the default values displayed (Water Temp)
are correct.
To edit the default values, touch
Item Settings
.
The Settings screen appears.
The balance calculates water density based on the
water temperature value entered (look-up table).
Measure the actual water temperature using a
precision thermometer.
To adjust the Water Temperature or Oil Density
values,
touch the Water Temp or Oil Density button.
Numeric input windows appear.
Key in the desired value,
then press Save.
The display returns to the previous
screen with the new value
highlighted.
To return to the Density
Determination home screen, touch
Exit.
Press Begin Density Calculation.
Step 1 of 3 – Weigh the Un-Oiled Sample in Air.
Follow the screen instructions then press
Accept
to store the
dry sample weight (in air).

ADVENTURER BALANCES EN-21
Step 2 of 3 – Weigh the Oiled Sample in Air.
Follow the screen instructions then press
Accept
to store the sample weight (oiled).
Step 3 of 3 – Weigh the Oiled Sample Submerged in Liquid.
Follow the screen instructions then press
Accept
to store the oiled sample weight (submerged in liquid).
Once the necessary weights have been determined, the density
of the sample is displayed in g/cm
3
(along with the weight in air,
un-oiled and oiled, and weight in water) on the Application
screen.
The value stays on the display until Start is touched.
Press
Start
to reset all the weight values and restart the
process.

EN-22 ADVENTURER BALANCES
4.6 Check Weighing
Note: Before using any application, be sure the balance has been leveled and calibrated.
Check Weighing is used to compare the weight of a sample against target limits.
Check Weighing
1. In the upper left portion of the home screen, select Check Weighing
2. The default (or last) Check weight limits are displayed.
3. Place objects on the pan.
4. The Under/Accept/Over status is shown in the progress bar area while the actual weight of the item is
shown on the main Display Line.
The Check Weighing Home screen
Main Display Line
Reference Fields
Function Buttons
Application
Icon
To set the Over Limit value, touch the Over Limit button
To set the Under Limit value, touch the
Under Limit
button
A numeric input window appears.
Enter the desired Limit Weight, then press Save.
To return to the CHECK WEIGHING home screen,
touch
Exit
.
4.6.1 Item Settings
To view or adjust the current settings
Touch the
Item Settings
button. The Settings screen appears.
Sample Name: Assign a name to the sample.
Print settings: Change printing settings. See section
7 for more information.

ADVENTURER BALANCES EN-23
4.7 Display Hold
Note: Before using any application, be sure the balance has been leveled and calibrated.
Two Modes are available:
Display Hold - allows the user to capture and store a stable weight.
Peak Hold - allows the user to capture and store the highest stable weight.
The Display Hold Home screen
Main Display Line
Reference Fields
Function Buttons
Application Icon
Display Hold
4.7.1 Display Hold
1. In the upper left portion of the home screen, select Display Hold
2. Place the sample on the pan and press Hold at any time while the weight is being captured.
3. The Main Display Line now shows the first stable weight.
4. Press Clear to remove the hold and return to Display Hold Home screen.
Peak Hold
4.7.2 Peak Hold
1. In the upper left portion of the home screen, select Display Hold
2. Choose Peak Hold Mode in Item Settings (see section 4.7.3).
3. Place sample on the pan and press Start to begin.
4. Continue to weigh samples. The highest stable weight will be held.
5. To remove the hold and return to normal operation press Stop.

EN-24 ADVENTURER BALANCES
4.7.3 Item Settings
To view or adjust the current settings
Touch the
Item Settings
button. The Settings screen appears.
Mode: Choose between Peak Hold and Display
Hold (default).
Sample Name: Assign a name to the sample.
Print settings: Change printing settings. See section
7 for more information.
Note: The Save to USB button will only appear after a USB
flash drive has been connected to the balance. See section
4.1.3 for more information.
4.8 Totalization
Note: Before using any application, be sure the balance has been leveled and calibrated.
Totalization measures the cumulative weight of a sequence of items. The cumulative total may exceed the
capacity of the Balance. The maximum number of samples (n) is 99.
The Totalization Home screen
Main Display Line
Reference Fields
Application Buttons
Application
Icon
Totalization
1. In the upper left portion of the home screen, select Totalization
2. Place item on the pan to begin. The sample weight is shown on the Main Display Line.
3. Press Accumulate to add the weight (when stable) of the item to the total.
4. Remove the item from the weighing pan, then add the next item and continue as above.
5. Press Result to view the results from the totalization.
6. When finished, press the Clear Total button to reset the accumulated weight to zero.
7. Press Save to USB to save the result to a USB flash drive or Exit to return to the Totalization Home
screen.
Note: Changing units converts the Accumulation results to the selected unit.

ADVENTURER BALANCES EN-25
4.9 Formulation
Note: Before using any application, be sure the balance has been leveled and calibrated.
Use this application for compounding and recipe making. The maximum number of components is 50.
The Formulation Home screen
Main Display Line
Reference Fields
Application Buttons
Application
Icon
Formulation
1. In the upper left portion of the home screen, select Formulation
2. Press Start to begin the compounding process.
3. Place the first ingredient on the pan (or in a tared container) and press Accept to store the component.
4. Continue adding components and pressing Accept to store the weight of the individual components until
the formula is complete. The Total line shows the total weight of all the components.
5. Press Stop to finish the Formulation. The Formulation results are displayed:
Note: If Filler is set to On (see section 4.9.1 below), the balance will ask to add a filler material to complete
the formulation. Add the filler material and press Accept to complete the formulation and display the results.
6. Press Save to USB to save the results to a USB flash drive or Exit to return to the Formulation Home
screen.
Note: The formulation results will be cleared when a new formulation starts.
4.9.1 Item Settings
To view or adjust the current settings
Touch the
Item Settings
button. The Settings screen
appears.
Filler: If set to On, a filler material is asked for at
the end of the formulation.
Automatic Mode: If set to On, the balance will
automatically Tare after the component weight
has been accepted.
Print settings: Change printing settings. See
section 7 for more information.

EN-26 ADVENTURER BALANCES
4.10 Additional Features
4.10.1 Weigh Below
The Adventurer balance is equipped with a weigh below hook for weighing below the balance.
Note: Before turning the balance over, remove the pan and draft shield elements (if present) to prevent damage
Attention: Do not place the balance on the pan support cone or Load cell Pins
To use this feature, remove power from the balance, then remove the protective cover for the weigh below opening.
The balance can be supported using lab jacks or any other convenient method. Ensure the balance is level and
secure. Power on the balance, then use a string or wire to attach items to be weighed.
Weigh below
protective cover
Weigh below hook

ADVENTURER BALANCES EN-27
5. MENU SETTINGS
5.1 Menu Navigation
User menu structure:
Application Modes
Main Menu
Calibration
Balance Setup
Weighing Units
Data Maintenance
Communication
GLP and GMP
Data
Factory
Reset
Lockout
Weighing App
Calibration
Internal Cal
Language
Milligram
Export to USB
RS232 Standard
Headers
Calibration
Min Weight
Balance Setup
Automatic Cal
User Settings
Gram
App. Mode Settings
Baud Rate
Header 1
Balance Setup
Capacity Guide
Weighing Units
AutoCal
TM
Touch Calibrate
Kilogram
Menu Settings
2400
Header 2
Weighing Units
Units
Data Maintenance
Span Cal
Brightness
Carat
Import from USB
4800
Header 3
Data Maintenance
Filter Level
Communication
Linearity Cal
Beep
Ounce
App. Mode Settings
9600
Header 4
Communication
GLP and GMP Data
GLP and GMP Data
Cal Test
Auto Dim
OunceTroy
Menu Settings
19200
Header 5
GLP and GMP data
Print Settings
Factory Reset
Level Assist
Pound
Balance_Info
38400
Balance Name
Factory Reset
Level Assist
Lockout
Filter Level
Pennyweight
Transmission
User Name
Counting App
Auto Zero Tracking
Grain
7 E 1
Project Name
Sample Size
Auto_Tare
Newton
7 E 2
APW
Graduation
Momme
7 N1
Auto Opt
Date & Time
Mesghal
7 N2
Print Settings
Date
HKTael
7 O 1
Percent App
Time
SGTael
7 O2
Recalculate Ref Wgt
Approved Mode
TWTael
8 N1
Print Settings
Tical
8 N 2
Dynamic App
Tola
Handshake
Average Time
Baht
Print Settings
Auto Mode
Custom1
Print Output
Sample Name
Unit Name
Stable Weight
Only
Print Settings
Factor
Numeric Value
Only
Density App
Exponent
Single Header
Only
Density Type
10
-3
Print Options
Auxiliary Liquid
10
-2
Auto Print
Water Temp.
10
-1
Auto Print Off
Porous Material
10
0
On Stability
Oil Density
10
1
Interval (seconds)
Sinker Volume
10
2
Continuous
Liquid Temp.
10
3
Print Content
Print Settings
LSD
Selection
CheckWeighing App
0.5
Header
Sample Name
1
Date & Time
Print Settings
2
Balance ID
DisplayHold App
5
Balance Name
Display Hold Mode
10
User Name
Sample Name
100
Project Name
Print Settings
Application Name
Totalization App
Sample Name
Formulation App
Result
Filler
Gross
Automatic Mode
Net
Print Settings
Tare
Information
Signature Line
Line Feed
Save To USB

EN-28 ADVENTURER BALANCES
All menu navigation is performed by touching the display. To enter the Menu, touch Menu from any Application
Home screen. The Main menu appears, with buttons for Back and Exit. Continue touching the appropriate list
item to navigate to the Menu items.
5.1.1 Changing Settings
To change a menu setting, navigate to that setting using the following steps:
Enter the Menu
From any Application screen, Touch Menu.
The Main Menu List appears on the display.
Select the Sub-Menu
Find the item of the Main Menu List and touch it.
The Sub-Menu appears.
Select the Menu Item
Continue until the desired setting is chosen in the
Menu list. Touch the setting to change it.
The changed setting will be displayed as
highlighted yellow for about 1 second to confirm
the changed value.
Exit the Menu and Return to the Current Application
After the setting is confirmed, touch Exit to return to the Application.
Note: at any time the Back & Exit buttons can be touched to navigate to the desired area of the menu or return to
the current Application. Continue until the desired setting is chose in the menu list.
The Adventurer balance Main menu structure is illustrated below.
Calibration
Balance Setup
Weighing
Units
Data
Maintenance
Communication
GLP and GMP
Data
Factory
Reset
Lockout

ADVENTURER BALANCES EN-29
5.2 Calibration
Adventurer Balances (InCal models) offer a choice of six calibration methods: Internal Calibration,
Automatic Calibration, AutoCal™ Adjustment, Span Calibration, Linearity Calibration and Cal Test
(Calibration Test).
Note: The calibration unit is always in grams.
Attention: Do not disturb the balance during any calibration.
5.2.1 Calibration sub-menu (InCal models)
Internal
Calibration
Automatic
Calibration
AutoCal™
Adjustment
Span
Calibration
Linearity
Calibration
Cal
Test
Note: /E models only have Span Calibration, Linearity Calibration and Cal Test.
5.2.2 Internal Calibration
Calibration is accomplished with the internal calibration mass. Internal Calibration can be performed at
any time, provided the balance has warmed up to operating temperature and is level.
With the Balance turned ON and no load on the pan, touch Internal Calibration. Alternatively, press the
Cal key on the balance.
The Balance begins to calibrate. And no load on the pan, touch Internal Calibration.
The display shows the status, then returns to the current application.
To cancel at any time, press Save.
5.2.3 Automatic Calibration
When Automatic Calibration is set ON, the balance performs a self-calibration:
• when it senses a temperature change of 1.5°C
• or every 11 hours
AutoCal will automatically calibrate the Balance (using the internal mass) each time there is a change in
temperature significant enough to affect accuracy or every 11 hours.
An information screen will appear when an Automatic Calibration is about to start. Three option buttons
will be displayed:
Now – Press to perform the calibration directly.
5 min – Press to perform the calibration after 5 minutes.
Deactivate – Press to deactivate the Automatic Calibration function.

EN-30 ADVENTURER BALANCES
5.2.4 AutoCal™ Adjustment
Use this calibration method to adjust the span calibration point, without affecting the span or linearity
calibration.
Calibration Adjust may be used to adjust the result of the Internal Calibration by +100 divisions.
Note: Before making a calibration adjustment, perform an Internal Calibration. To verify whether an
adjustment is needed, place a test mass equal to the span calibration value on the pan and note the
difference (in divisions) between the nominal mass value and the actual Balance reading. If the difference
is within +1 division, calibration adjustment is not required. If the difference exceeds +1 division,
calibration adjustment is recommended.
Example:
Actual weight reading: 200.014
Expected weight reading: 200.000 (Test mass value)
Difference Weight (d): 0.014
Difference weight in digits: –14 (Adjust value)
To perform a Calibration Adjustment, touch AutoCal Adjustment from the Calibration Menu; Enter the
value (positive or negative divisions) to match the difference noted earlier in the procedure.
Recalibrate using Internal Calibration. After calibration, place the test mass on the pan and verify that the
mass value now matches the displayed value. If not, repeat the procedure until Internal Calibration
reading agrees with the test mass.
Once completed, the balance stores the Adjustment value and the display returns to the current
application.
5.2.5 Span Calibration
Span calibration uses two calibration points, one at zero load and the other at specified full load (span).
For detailed calibration mass information please see the specification tables in section 9.
With the balance turned ON and no load on the pan, touch Span Calibration to initiate the procedure.
Additional calibration values to be used are shown on the display. The best accuracy is achieved using
the mass closest to the full span value.
Note: To change the span calibration point, touch the alternate weight shown on the display.
Follow the screen instructions and place the specified calibration weight on the scale when prompted to
do so. When complete, the display shows the Span calibration status and returns to the current
application.

ADVENTURER BALANCES EN-31
5.2.6 Linearity Calibration
Linearity calibration uses three calibration points, one at zero load and the others at specified loads.
With no load on the scale, press Linearity Calibration to begin the process.
The balance captures the zero point, and then prompts for the next weight.
Continue to follow the instructions on the display until the calibration is completed.
To cancel at any time, press Cancel.
5.2.7 Calibration Test
Use Calibration Test to compare a known calibration weight against the stored span calibration data.
With no load on the scale, press Cal Test to begin the process.
The balance captures the zero point, then prompts for the span value.
The display shows status, followed by the difference between the current calibration weight and the
stored calibration data.
5.3 Balance Setup
Enter this sub-menu to customize Balance functionality.
5.3.1 Balance Set-up sub-menu
Language
User Settings
Filter Level
Auto Zero
Tracking
Auto Tare
Graduations
Date & Time
Approved Mode
Factory default settings are shown below in bold.
5.3.2 Language
Set the language displayed for menus and displayed
messages.
English
German
French
Spanish
Italian
Polish
Turkish
Czech
Hungarian

EN-32 ADVENTURER BALANCES
5.3.3 User Setting
Use this sub-menu to change the setting for:
Touch Calibrate
“Runtime calibration, please touch the screen at the center of the ring”
(First top-left, then bottom-right.)
Screen Brightness:
LOW = low screen brightness.
MEDIUM = normal screen brightness.
HIGH = high screen brightness.
Beep:
OFF = disabled
ON = enabled
Auto Dim (Dims the display if no Screen Activity for x minutes)
OFF = disabled
10 min
20 min
30 min
Level Assist: Instructions on how to move the balance feet to level the balance.
5.3.4 Filter Level
Set the amount of signal filtering.
LOW = faster stabilization time with less stability.
MEDIUM = normal stabilization time with normal stability.
HIGH = slower stabilization time with more stability.
5.3.5 Auto Zero Tracking
Set the automatic zero tracking functionality.
OFF = disabled.
0.5 D = display maintains zero up to a drift of 0.5 graduation
per second
1 D = display maintains zero up to a drift of 1 graduation
per second.
3 D = display maintains zero up to a drift of 3 graduations
per second.
5.3.6 Auto Tare
Set the automatic Tare.
OFF = disabled.
ON = enabled.
‘Place container on the pan’ will be displayed when an Automatic Tare is about to
start.
A Deactivate button is displayed underneath the text. Press this button to
deactivate the Automatic Tare function
5.3.7 Graduations
Set the displayed readability of the balance.
1 Division = standard readability.
10 Divisions = readability is increased by a factor of 10.
For example, if the standard readability is 0.01g, selecting 10 Divisions will result in a
displayed reading of 0.1g.

ADVENTURER BALANCES EN-33
5.3.8 Date & Time
Set the current Date and Time.
Change the format (if desired),
then enter the current value.
Press Save to confirm the new value.
5.3.9 Approved Mode
Use this menu to set the Legal for Trade status.
OFF = standard operation.
ON = operation complies with Legal Metrology regulations.
Note: When Approved Mode is set to ON, the menu settings are affected as follows:
Calibration Menu:
AutoCal internal Calibration is forced to ON and hidden. Internal Calibration and
Calibration Test functions are available. All other functions are hidden.
Balance Setup Menu:
Filter Level is locked at the current setting.
Auto Zero Tracking is limited to 0.5 Division and OFF. The selected setting is
locked.
Auto Tare is locked at current setting.
Graduations is forced to 1 Division and the menu item is hidden.
Communication Menu (Communication->Print Settings->Print Output):
Stable Weight Only is locked ON.
Numeric Value Only is locked OFF.
Communication Menu (Communication->Print Settings->Auto Print):
Auto print mode selections are limited to OFF, On Stability, and Interval.
Continuous is not available.
Data Maintenance Menu:
Export to USB is hidden
Import from USB is hidden
Lockout Menu:
Menu is hidden
Note: The security switch located at the rear of the balance must be in the locked
position to set Approved Mode to ON. The security switch must be in the unlocked
position to set Approved Mode to OFF. See Section 6.
Weighing application main screen with LFT turned ON.

EN-34 ADVENTURER BALANCES
5.4 Weighing Units
Enter this sub-menu to activate the desired units of measure. This menu can also be accessed by
pressing the unit symbol in an application home screen.
Note: Due to national laws, the balance may not include some of the units of measure listed.
5.4.1 Units Sub-menu
Milligram
gram
Kilogram
carat
ounce
ounce troy
Pound
pennyweight
Grain
Newton
momme
mesghal
Tael (HK)
Tael (SG)
Tael (TW)
tical
tola
baht
Custom Unit 1
Note: If Approved Mode is set to ON, some units will not be displayed.
Use the Custom Unit to display weight in an alternative unit of measure. The custom unit is defined using a
conversion factor, where the conversion factor is the number of custom units per gram expressed in scientific
notation (Factor x 10^Exponent).
For example: To display weight in troy ounces (0.03215075 troy ounces per gram)
enter a Factor of 0.3215075 and an Exponent of -1.
The Custom Unit’s name can be customized up to 3 characters.
5.5 Data Maintenance
Enter this sub-menu to customize data transfer settings.
5.5.1 Data Maintenance sub-menu
The Export and Import functions
Setting up multiple balances is simple by exporting the profile from a master balance via a USB drive. The data
maintenance tool allows you to save user and application settings to a USB, which can be easily transferred to
other Adventurer balances. The data can then be used to configure additional Adventurer balances with the data
imported from original balance.
Export to USB
Import from
USB
Balance Info

ADVENTURER BALANCES EN-35
5.5.2 Export to USB
Export weighing data to a USB flash drive. Two types of data can be exported:
- Application settings (APW, Ref. weight and etc.)
- Menu settings (balance setup function and etc.)
Note: The function Save to USB needs to be set to ON to enable data transfer to
USB. Please see section 5.6 for more information.
5.5.3 Import from USB
Import weighing data from a USB flash drive.
5.5.4 Balance Info
Enter to view information about the balance. Information displayed includes:
Balance Type, Balance ID, Capacity, Readability and Software Version.
5.6 Communication
Enter this menu to define external communication methods and to set printing
parameters. Data may be output to either a printer or PC.
Factory default settings are shown in bold. Enter to view information about the balance.
5.6.1 Communication Sub-menu
RS-232 Standard
Print Settings
Save to USB
RS-232 Standard:
Enter this sub-menu to customize RS-232 Standard settings.
5.6.2 Baud Rate
Set the baud rate (bits per second).
2400 = 2400 bps
4800 = 4800 bps
9600 = 9600 bps
19200 = 19200 bps
38400 = 38400 bps

EN-36 ADVENTURER BALANCES
5.6.3 Transmission
Set the data bits, stop bit, and parity.
7 EVEN 1 = 7 data bits, even parity, stop bit 1
7 ODD 1 = 7 data bits, odd parity, stop bit 1
7 EVEN 2 = 7 data bits, even parity, stop bit 2
7 ODD 2 = 7 data bits, odd parity, stop bit 2
7 NONE 1 = 7 data bits, no parity, stop bit 1
8 NONE 1 = 8 data bits, no parity, stop bit 1
7 NONE 2 = 7 data bits, no parity, stop bit 2
8 NONE 2 = 8 data bits, no parity, stop bit 2
5.6.4 Handshake
Set the flow control method.
NONE = no handshaking
XON-XOFF = XON/XOFF handshaking
HARDWARE = hardware handshaking
Print Settings
Enter this sub-menu to customize data transfer settings.
Print Settings sub-menu
5.6.5 Print Output
Stable Weight Only
Set the printing criteria.
OFF = values are printed immediately, regardless of stability.
ON = values are printed only when the stability criteria are met.
Numeric Value Only
Set the printing criteria.
OFF = All Result and G/N/T data values are printed. See
section 7.2 for more information
ON = Only numeric data values are printed
Single Header Only
Set the printing criteria.
OFF = Headers will be printed for every print requirement
ON = Headers will be printed once a day
Print Options
Set the printing criteria.
Printer = Print data to a printer
PC = Print data to a PC

ADVENTURER BALANCES EN-37
5.6.6 Auto Print
Set the automatic printing functionality.
OFF = disabled
ON STABILITY
1
= printing occurs each time the stability criteria are met.
INTERVAL
2
= printing occurs at the defined time interval.
CONTINUOUS = printing occurs continuously.
1
When ON STABILITY is selected, set the conditions for printing.
LOAD = Prints when the displayed load is stable.
LOAD ZERO = Prints when the displayed load and zero reading is stable.
2
When INTERVAL is selected, set the time interval using the numeric keypad.
Settings of 1 to 3600 seconds are available. Default is 0.
5.6.7 Print Content
Define the content of the printed data.
Selection
Set the status.
Deselect All = all are set to OFF
Select All = all are set to ON
Header
Date & Time
Balance ID
Balance Name
User Name
Project Name
Application Name
Sample Name
Result
Gross
Net
Tare
Information
Signature Line
5.6.8 Feed
Set the paper feed.
1 LINE = move the paper up one line after printing.
4 LINE = move the paper up four lines after printing.
5.6.9 Format
Set the printing format.
Single Line = prints on a single line.
Multiple Lines = prints on multiple lines.
5.6.10 Print Calibration Data
Set the printing criteria.
Off = disabled
On = enabled.
Save to USB
Set the status.
OFF = the data will not be saved to USB
ON = the data will be saved to USB

EN-38 ADVENTURER BALANCES
5.7 GLP and GMP Data
Enter this menu to set the Good Laboratory Practices (GLP) data and the Good Manufacturing Practices data.
5.7.1 GLP Data Sub-menu
Header
Balance Name
User Name
Project Name
5.7.2 Header
Enables the printing of GLP headings. There are up to 5 headings available.
Alphanumeric settings up to 25 characters are available for
each Header setting.
5.7.3 Balance Name
Set the balance identification.
Alphanumeric settings up to 25 characters are available. The default
setting is Adventurer.
5.7.4 User Name
Set the user identification.
Alphanumeric settings up to 25 characters are available. The default
setting is blank.
5.7.5 Project Name
Enter this menu to set the Project identification.
Alphanumeric settings up to 25 characters are available. The default setting is blank.
5.8 Factory Reset
Use this sub-menu to reset the all menu settings to their Factory default settings.
Note: Calibration data is not affected.
Reset All = resets all menus to their factory default settings.
Exit = return to application main screen without resetting any menus.
5.9 Lockout
Use this sub-menu to lock/unlock certain menus. Once locked, a small lock will appear on the menu icon
and the user will not be able to enter that menu.
Click on a menu and choose:
OFF = the menu is unlocked
ON = the menu is locked

ADVENTURER BALANCES EN-39
6. LEGAL FOR TRADE (LFT)
When the balance is used in trade or a legally controlled application it must be set up, verified and sealed in
accordance with local weights and measures regulations. It is the responsibility of the purchaser to ensure that all
pertinent legal requirements are met.
6.1 Settings
Before verification and sealing, perform the following steps in order:
1. Verify that the menu settings meet the local weights and measures regulations.
2. Verify the units turned On meet the local weights and measures regulations.
3. Perform a calibration as explained in Section 5.
4. Set the position of the Security Switch to the locked position.
5. Set Approved Mode to ON in the Balance Setup menu.
Note: When Approved Mode is set to ON, external calibration can’t be performed.
6.2 Verification
A weights and measures official or authorized service agent must perform the verification procedure.
6.3 Sealing
After the Balance has been verified, it must be sealed to prevent undetected access to the legally controlled
settings. Before sealing the device, ensure that the security switch is in the Locked position and the Approved
Mode setting in the Balance Setup menu has been set to ON.
If using a paper seal, place the seal over the security switch and Bottom Housing as shown.
If using a wire seal, pass the sealing wire through the holes in the security switch and Bottom Housing as shown.
Un-Locked
Locked with Paper Seal
Locked with Wire Seal

EN-40 ADVENTURER BALANCES
7. PRINTING
7.1 Connecting, Configuring and Testing the Printer/Computer Interface
Use the built-in RS-232 Port to connect either to a computer or a printer.
If connecting to a computer, use HyperTerminal or similar software like SPDC described
below.
(Find HyperTerminal under Accessories/Communications in Windows XP.)
Connect to the computer with a standard (straight-through) serial cable.
Choose New Connection, “connect using” COM1 (or available COM port).
Select Baud=9600; Parity=8 None; Stop=1; Handshaking=None. Click OK.
Choose Properties/Settings, then ASCII Setup. Check boxes as illustrated:
(Send line ends…; Echo typed characters…; Wrap lines…)
Use RS232 Interface Commands (Section 9.6.1) to control the balance from a PC.
Note: When the HyperTerminal configuration is complete, it will automatically
print the results of a Cal Test operation, and echo print commands sent to the scale.
SPDC Software
The Serial Port Data Collection or SPDC software is provided by Ohaus and can be used on
operating systems that do not have the HyperTerminal software mentioned above.
Choose the export file type and export file path and then press Run as shown below.
Note: The SPDC software only supports English language.
7.2 Output Format
The Result Data, and G/N/T data, is output in the following format.
Field:
Label
1
Space
2
Weight
3
Space
2
Unit
4
Space
Stability
5
Space
G/N
6
Space
Term.
Characters
7
Length:
1
11
1
5
1
1
1
3
0
8
1. The length of the label field is not fixed.
2. Each field is followed by a single delimiting space (ASCII 32).
3. The Weight field is 11 right justified characters. If the value is negative, the “–“ character is located at
the immediate left of the most significant digit.
4. The Unit field contains the unit of measure abbreviation up to 5 characters, right justified.
5. The Stability field contains the “?” character if the weight reading is not stable. The Stability field and the
following Space field are omitted if the weight reading is stable.
6. The G/N field contains the net or gross indication. For net weights, the field contains “NET”. For gross
weights, the field contains nothing, “G”.
7. The Termination Characters field contains CRLF, Four CRLF or Form Feed (ASCII 12), depending on
the LINE FEED menu setting.

ADVENTURER BALANCES EN-41
7.3 Printout Examples
Weighing
Parts Counting
Percent Weighing
Header 1
Header 2
Header 3
Header 4
Header 5
1/15/2014 13:16
Balance ID: B234567890
Balance Type: AX224N
Balance Name: Adventurer
User Name: ohaus
Project Name: ax
Weighing
Sample Name: apple
1.3651 g NET
Gross: 3.9199 g G
Net: 1.3651 g NET
Tare: 2.5548 g T
Minimum Weight: 0.0000 g
Signature:____________
Verified By:____________
Header 1
Header 2
Header 3
Header 4
Header 5
1/15/2014 13:19
Balance ID: B234567890
Balance Type: AX224N
Balance Name: Adventurer
User Name: ohaus
Project Name: ax
Parts Counting
Sample Name: apple
Quantity: 4 PCS NET
Gross: 94.3343 g G
Net: 91.7795 g NET
Tare: 2.5548 g T
APW: 23.09999 g
Sample Size: 23 PCS
Signature:____________
Verified By:____________
Header 1
Header 2
Header 3
Header 4
Header 5
1/15/2014 13:19
Balance ID: B234567890
Balance Type: AX224N
Balance Name: Adventurer
User Name: ohaus
Project Name: ax
Percent Weighing
Sample Name: apple
Percentage: 91.7795 % NET
Gross: 94.3342 g G
Net: 91.7795 g NET
Tare: 2.5548 g T
Reference Weight: 100.0000 g
Signature:____________
Verified By:____________
Dynamic Weighing
Density
Type==Solid
Auxiliary liquid==water
Porous material==off
Density
Type==Solid
Auxiliary liquid==water
Porous material==on)
Header 1
Header 2
Header 3
Header 4
Header 5
1/15/2014 13:22
Balance ID: B234567890
Balance Type: AX224N
Balance Name: Adventurer
User Name: ohaus
Project Name: ax
Dynamic Weighing
Sample Name: cat
Final wt.: 90.4146 g
Gross: 94.3362 g G
Net: 90.4144 g NET
Tare: 3.9218 g T
Averaging Time: 5 s
Signature:____________
Verified By:____________
Header 1
Header 2
Header 3
Header 4
Header 5
1/15/2014 13:31
Balance ID: B234567890
Balance Type: AX224N
Balance Name: Adventurer
User Name: ohaus
Project Name: ax
Density Determination
Density Determination: 34.1592
g/cm3
Gross: 97.1644 g G
Net: 93.2426 g NET
Tare: 3.9218 g T
Weight in air: 96.0491 g Header 1
Header 2
Header 3
Header 4
Header 5
1/15/2014 13:37
Balance ID: B234567890
Balance Type: AX224N
Balance Name: Adventurer
User Name: ohaus
Project Name: ax
Density Determination
Density Determination: 13.6849
g/cm3

EN-42 ADVENTURER BALANCES
Gross: 95.7991 g G
Net: 91.8773 g NET
Tare: 3.9218 g T
Oiled Weight: 98.8827 g
Weight in liquid: 91.8773 g
Auxiliary liquid: Water
Liquid Density: 0.9982 g/cm3
Water Temp.: 20.0 ℃
Porous Material: On
Oil Density: 0.8000 g/cm3
Dry Weight: 96.0490 g
Signature:____________
Verified By:____________
Weight in liquid: 93.2426 g
Auxiliary liquid: Water
Liquid Density: 0.9982 g/cm3
Water Temp.: 20.0 ℃
Porous Material: Off
Signature:____________
Verified By:____________
Density
Type==Solid
Auxiliary liquid==other
Porous material==on
Density
Type==liquid
Sinker volume==10ml
Liquid temp==26℃
Check Weighing
Type==liquid
Sinker volume==10ml
Liquid temp==26℃
Header 1
Header 2
Header 3
Header 4
Header 5
1/15/2014 13:50
Balance ID: B234567890
Balance Type: AX224N
Balance Name: Adventurer
User Name: ohaus
Project Name: ax
Density Determination
Density Determination:
4.7794 g/cm3
Gross: 93.2556 g G
Net: 89.3338 g NET
Tare: 3.9218 g T
Oiled Weight: 110.5639 g
Weight in liquid: 89.3338 g
Auxiliary liquid: Other
Liquid Density: 1.0000
g/cm3
Porous Material: On
Oil Density: 0.8000 g/cm3
Dry Weight: 101.7253 g
Signature:____________
Verified By:____________
Header 1
Header 2
Header 3
Header 4
Header 5
1/15/2014 13:56
Balance ID: B234567890
Balance Type: AX224N
Balance Name: Adventurer
User Name: ohaus
Project Name: ax
Density Determination
Density Determination: 0.7171
g/cm3
Gross: 97.5185 g G
Net: 93.5967 g NET
Tare: 3.9218 g T
Sinker weight in air: 100.7676 g
Sinker weight in liquid: 93.5963 g
Sinker Volume: 10.0 ml
Liquid Temp.: 26.0 ℃
Signature:____________
Verified By:____________
Header 1
Header 2
Header 3
Header 4
Header 5
1/15/2014 13:57
Balance ID: B234567890
Balance Type: AX224N
Balance Name: Adventurer
User Name: ohaus
Project Name: ax
Check Weighing
Sample Name: apple
93.5966 g NET
Result: Accept
Gross: 97.5184 g G
Net: 93.5966 g NET
Tare: 3.9218 g T
Over Limit: 4199.9900 g
Under Limit: 0.1000 g
Signature:____________
Verified By:____________
Signature:____________
Verified By:____________

ADVENTURER BALANCES EN-43
Display Hold
Header 1
Header 2
Header 3
Header 4
Header 5
1/15/2014 13:59
Balance ID: B234567890
Balance Type: AX224N
Balance Name: Adventurer
User Name: ohaus
Project Name: ax
Display Hold
Sample Name: apple
Hold Weight: 93.5968 g
Gross: 97.5185 g G
Net: 93.5967 g NET
Tare: 3.9218 g T
Mode: Display Hold
Signature:____________
Verified By:____________
Totalization
Formulation
Header 1
Header 2
Header 3
Header 4
Header 5
1/15/2014 14:11
Balance ID: B234567890
Balance Type: AX224N
Balance Name: Adventurer
User Name: ohaus
Project Name: ax
Totalization
Total: 734.6187 g Net
Gross: 93.2557 g G
Net: 89.3339 g NET
Tare: 3.9218 g T
Samples: 8
Average: 91.8273 g
Standard Deviation: 1.9790 g
Minimum: 89.3339 g
Maximum: 93.5965 g
Range: 4.2626 g
-----Sample Data (g)----
1 93.5964
2 93.5964
3 93.5964
4 93.5965
5 92.2312
6 89.3340
7 89.3339
8 89.3339
Signature:____________
Verified By:____________
Header 1
Header 2
Header 3
Header 4
Header 5
1/15/2014 14:22
Balance ID: B234567890
Balance Type: AX224N
Balance Name: Adventurer
User Name: ohaus
Project Name: ax
Formulation
Comp. Total: 11.4528 g
Filler: 2.8063 g
Total: 14.2590 g
Gross: 18.1806 g ? G
Net: 2.8063 g ? NET
Tare: 15.3742 g T
-----Sample Data (g)-----
Item 1: 1.7529 g
Item 2: 2.5569 g
Item 3: 1.3553 g
Item 4: 1.3070 g
Item 5: 1.6743 g
Item 6: 2.8062 g
Signature:____________
Verified By:____________

EN-44 ADVENTURER BALANCES
8. MAINTENANCE
8.1 Calibration
Periodically verify calibration by placing an accurate weight on the balance and viewing the result. If calibration is
required, refer to section 5.2 for instructions.
8.2 Cleaning
WARNING: Disconnect the Adventurer Balance from the power supply before cleaning.
Make sure that no liquid enters the interior of the balance.
Clean the Balance at regular intervals.
Housing surfaces may be cleaned with a lint-free cloth slightly dampened with water or a mild
cleaning agent.
Glass surfaces may be cleaned with a commercial glass cleaner. Please follow the steps below
on how to remove and install the sliding doors.
Attention: Do not use solvents, harsh chemicals, ammonia or abrasive cleaning agents.
Removing and reinstalling the glass doors for cleaning:
Step 1.
On the back of the balance, press
the pin and slide out the door.
Step 2.
After cleaning, slide the doors into
the slot while pressing the pin
mentioned in step 1.
Step 3.
Slide the doors into the slot until the
back stopper aligns with the other
door.
8.3 Troubleshooting
TABLE 8-1. TROUBLESHOOTING
Symptom / Display
Possible Cause
Remedy
Balance will not turn on
No power to Balance
Verify connection and voltage
Poor accuracy
Improper calibration
Unstable environment
Perform calibration
Move balance to suitable location
Cannot calibrate
Calibration Menu locked
Approved Mode set to on
Unstable environment
Incorrect calibration masses
Turn Calibration menu lock off
Turn Approved Mode off
Move balance to suitable location
Use correct calibration masses
Cannot change menu
settings
Sub-menu locked
Approved Mode set to on
Unlock sub-menu
Turn Approved Mode off
Low Reference weight
Reference weight too small
The weight on the pan is too small to
define a valid reference weight.
Increase sample size
Invalid Piece Weight
Average piece weight is too small
Increase average piece weight
Operation Timeout
Weight reading is not stable
Move balance to suitable location
------
Busy (tare, zero, printing, waiting for a
stable weight)
Wait until completion
8.4 Service Information
If the troubleshooting section does not resolve your problem, contact an Authorized Ohaus Service Agent. Please
visit our website www.ohaus.com to locate the Ohaus office nearest you. An Ohaus Product Service Specialist will
be available to assist you.

ADVENTURER BALANCES EN-45
9. TECHNICAL DATA
9.1 Specifications
Ambient conditions
Indoor use only
Altitude: Up to 2000 m
Specified Temperature range: 10°C to 30°C
Humidity: maximum relative humidity 80 % for temperatures up to 30°C
decreasing linearly to 50% relative humidity at 40°C
Mains supply voltage fluctuations: up to ±10% of the nominal voltage
Installation category II
Pollution degree: 2
Materials
Bottom Housing; die-cast Aluminum, Painted
Top Housing: Plastic (ABS)
Weighing Platforms: 18/10 stainless steel
Draft Shield: Glass, plastic (ABS)
Feet: Plastic (ABS)

EN-46 ADVENTURER BALANCES
TABLE 9-1. SPECIFICATIONS
Model:
AX124
AX124/E
AX224
AX224/E
AX324
Capacity
120g
120g
220g
220g
320g
Readability d
0.0001g
Repeatability (std. dev.) (g)
0.0001g
Linearity (g)
±0.0002g
Span Calibration Points (g)
25g, 50g
75g, 100g
25g, 50g
75g,
100g
50g, 100g
150g,
200g
50g,
100g
150g,
200g
100g
200g, 300g
Calibration
Auto-Cal
External
Auto-Cal
External
Auto-Cal
Weighing units
Baht, carat, grain, gram, milligram, mesgal, momme, Newton,
ounce, pennyweight, pound, Tael (Hong Kong), Tael,
(Singapore), Tael (Taiwan), tical, tola, troy ounce, custom (1)
Applications
Weighing, Parts Counting, Percent Weighing, Check Weighing,
Animal Weighing, Formulation, Density Determination,
Totalization, Display Hold
Stabilization time (typical)
≤ 3 seconds
Sensitivity Temperature Drift
(PPM/K)
1.5
Typical Min-Weight
USP (u=0.10%,k=2)
0.20 g
Optimized Min-Weight
USP (u=0.10%,k=2)
0.082 g
Display
Full-Color WQVGA Graphic LCD
Display size
4.3 in / 10.9 cm (diagonal)
Backlight
White LED
Controls
4-wire resistive touch screen + 6 membrane keys
Communication
RS-232, USBx2
Balance power input
12 VDC, 0.5A
Power supply
AC Adapter Input: 100-240 VAC 0.3A 50-60 Hz
AC Adapter Output: 12 VDC 0.84A
Platform size (diameter)
90 mm / 3.5 in
Assembled dimensions
(W x D x H)
230 x 354 x 340 mm
9.1 x 13.9 x 13.4 inch
Shipping dimensions
(W x D x H)
387 x 507 x 531 mm
15.4 x 20.0 x 20.9 inch
Net weight
5.1 Kg / 11.3 lb
Shipping weight
7.8 Kg / 17.2 lb

ADVENTURER BALANCES EN-47
TABLE 9-2. SPECIFICATIONS (continued)
Model:
AX223
AX223/E
AX423
AX423/E
AX523
AX523/E
Capacity
220g
220g
420g
420g
520g
520g
Readability d
0.001g
Repeatability (std.
dev.) (g)
0.001g
Linearity (g)
±0.002g
Span Calibration
Points (g)
50g,
100g
150g,
200g
50g, 100g
150g,
200g
100g,
200g
300g,
400g
100g, 200g
300g, 400g
200g, 300g
400g, 500g
200g, 300g
400g, 500g
Calibration
Auto-Cal
External
Auto-Cal
External
Auto-Cal
External
Weighing units
Baht, carat, grain, gram, milligram, mesgal, momme, Newton, ounce,
pennyweight, pound, Tael (Hong Kong), Tael, (Singapore), Tael (Taiwan), tical,
tola, troy ounce, custom (1)
Applications
Weighing, Parts Counting, Percent Weighing, Check Weighing, Animal Weighing,
Formulation, Density Determination, Totalization, Display Hold
Stabilization time
(typical)
≤ 2 seconds
Sensitivity
Temperature Drift
(PPM/K)
3
Typical Min-Weight
USP (u=0.10%,k=2)
2.0 g
Optimized Min-
Weight
USP (u=0.10%,k=2)
0.82 g
Display
Full-Color WQVGA Graphic LCD
Display size
4.3 in / 10.9 cm (diagonal)
Backlight
White LED
Controls
4-wire resistive touch screen + 6 membrane keys
Communication
RS-232, USBx2
Balance power input
12 VDC, 0.5A
Power supply
AC Adapter Input: 100-240 VAC 0.3A 50-60 Hz
AC Adapter Output: 12 VDC 0.84A
Platform size
(diameter)
130 mm / 5.1 in
Assembled
dimensions
(W x D x H)
230 x 354 x 340 mm
9.1 x 13.9 x 13.4 inch
Shipping dimensions
(W x D x H)
387 507 x 531 mm
15.4 x 20.0 x 20.9 inch
Net weight
5.8Kg/12.8lb
5.6Kg/12.4lb
5.8Kg/12.8lb
5.6Kg/12.4lb
5.8Kg/12.8lb
5.6Kg/12.4lb
Shipping weight
8.5Kg/18.8lb
8.3Kg/18.3lb
8.5Kg/18.8lb
8.3Kg/18.3lb
8.5Kg/18.8lb
8.3Kg/18.3lb

EN-48 ADVENTURER BALANCES
TABLE 9-3. SPECIFICATIONS (continued)
Model:
AX422
AX422/E
AX822
AX822/E
Capacity
420g
420g
820g
820g
Readability d
0.01g
Repeatability
(std. dev.) (g)
0.01g
Linearity (g)
±0.02g
Span Calibration
Points (g)
100g, 200g
300g,400g
100g, 200g
300g,400g
200g, 400g
600g, 800g
200g, 400g
600g, 800g
Calibration
Auto-Cal
External
Auto-Cal
External
Weighing units
Baht, carat, grain, gram, kilogram, mesgal, momme, Newton, ounce,
pennyweight, pound, Tael (Hong Kong), Tael, (Singapore), Tael (Taiwan),
tical, tola, troy ounce, custom (1)
Applications
Weighing, Parts Counting, Percent Weighing, Check Weighing, Animal
Weighing, Formulation, Density Determination, Totalization, Display Hold
Stabilization time
(typical)
≤ 1.5 seconds
Sensitivity
Temperature Drift
(PPM/K)
3
Typical Min-Weight
USP(u=0.10%,k=2)
20.0 g
Optimal Min-
Weight
USP(u=0.10%,k=2)
8.2 g
Display
Full-Color WQVGA Graphic LCD
Display size
4.3 in / 10.9 cm (diagonal)
Backlight
White LED
Controls
4-wire resistive touch screen + 6 membrane keys
Communication
RS-232, USBx2
Balance power
input
12 VDC, 0.5A
Power supply
AC Adapter Input: 100-240 VAC 0.3A 50-60 Hz
AC Adapter Output: 12 VDC 0.84A
Platform size
175 x 195 mm / 6.9 x 7.7 in
Assembled
dimensions
(W x D x H)
230 x 354 x100 mm
9.1 x 13.9 x 4.0 inch
Shipping
dimensions
(W x D x H)
392 x 557 x 301 mm
15.5 x 22.0 x 11.9 inch
Net weight
4.6Kg/10.2lb
3.9Kg/8.6lb
4.6Kg/10.2lb
3.9Kg/8.6lb
Shipping weight
6.5Kg/14.4b
5.8Kg/12.8b
6.5Kg/14.4b
5.8Kg/12.8b

ADVENTURER BALANCES EN-49
TABLE 9-4. SPECIFICATIONS (continued)
Model:
AX1502
AX1502/E
AX2202
AX2202/E
AX4202
AX4202/E
AX5202
Capacity
1520g
1520g
2200g
2200g
4200g
4200g
5200g
Readability d
0.01g
Repeatability (std.
dev.) (g)
0.01g
Linearity (g)
±0.02g
Span Calibration
Points (g)
500g
1000g,
1500g
500g
1000g,
1500g
500g,
1000g
1500g,
2000g
500g,
1000g
1500g,
2000g
1000g,
2000g
3000g,
4000g
1000g,
2000g
3000g,
4000g
2000g,
3000g
4000g,
5000g
Calibration
Auto-Cal
External
Auto-Cal
External
Auto-Cal
External
Auto-Cal
Weighing units
Baht, carat, grain, gram, kilogram, mesgal, momme, Newton, ounce, pennyweight, pound,
Tael (Hong Kong), Tael, (Singapore), Tael (Taiwan), tical, tola, troy ounce, custom (1)
Applications
Weighing, Parts Counting, Percent Weighing, Check Weighing, Animal Weighing,
Formulation, Density Determination, Totalization, Display Hold
Stabilization time
(typical)
≤ 1.5 seconds
Sensitivity
Temperature Drift
(PPM/K)
3
1.9
Typical Min-Weight
USP(u=0.10%,k=2)
20.0 g
Optimal Min-
Weight
USP(u=0.10%,k=2)
8.2 g
Display
Full-Color WQVGA Graphic LCD
Display size
4.3 in / 10.9 cm (diagonal)
Backlight
White LED
Controls
4-wire resistive touch screen + 6 membrane keys
Communication
RS-232, USBx2
Balance power
input
12 VDC, 0.5A
Power supply
AC Adapter Input: 100-240 VAC 0.3A 50-60 Hz
AC Adapter Output: 12 VDC 0.84A
Platform size
175 x 195 mm / 6.9 x 7.7 in
Assembled
dimensions
(W x D x H)
230 x 354 x100 mm
9.1 x 13.9 x 4.0 inch
Shipping
dimensions
(W x D x H)
392 x 557 x 301 mm
15.5 x 22.0 x 11.9 inch
Net weight
4.6Kg/
10.2lb
3.9Kg/
8.6lb
4.6Kg/
10.2lb
3.9K/
8.6lb
4.6Kg/
10.2lb
3.9Kg/
8.6lb
3.8Kg/
8.4lb
Shipping weight
6.5Kg/
14.4b
5.8Kg/
12.8b
6.5Kg/
14.4b
5.8Kg/
12.8b
6.5Kg/
14.4b
5.8Kg/
12.8b
5.7Kg/
12.6lb

EN-50 ADVENTURER BALANCES
TABLE 9-5. SPECIFICATIONS (continued)
Model:
AX2201
AX2201/E
AX4201
AX4201/E
AX8201
AX8201/E
Capacity
2200g
2200g
4200g
4200g
8200g
8200g
Readability d
0.1g
Repeatability (std.
dev.) (g)
0.1g
Linearity (g)
±0.2g
Span Calibration
Points (g)
500g, 1000g
1500g, 2000g
500g, 1000g
1500g, 2000g
1000g,
2000g
3000g,
4000g
1000g,
2000g
3000g,
4000g
2000g,
4000g
6000g,
8000g
2000g,
4000g
6000g,
8000g
Calibration
Auto-Cal
External
Auto-Cal
External
Auto-Cal
External
Weighing units
Baht, carat, grain, gram, kilogram, mesgal, momme, Newton, ounce, pennyweight, pound,
Tael (Hong Kong), Tael, (Singapore), Tael (Taiwan), tical, tola, troy ounce, custom (1)
Applications
Weighing, Parts Counting, Percent Weighing, Check Weighing, Animal Weighing,
Formulation, Density Determination, Totalization, Display Hold
Stabilization time
(typical)
≤ 1.5 seconds
Sensitivity
Temperature Drift
(PPM/K)
9
Typical Min-
Weight
USP
(u=0.10%,k=2)
200.0 g
Optimized Min-
Weight
USP
(u=0.10%,k=2)
82 g
Display
Full-Color WQVGA Graphic LCD
Display size
4.3 in / 10.9 cm (diagonal)
Backlight
White LED
Controls
4-wire resistive touch screen + 6 membrane keys
Communication
RS-232, USBx2
Balance power
input
12 VDC, 0.5A
Power supply
AC Adapter Input: 100-240 VAC 0.3A 50-60 Hz
AC Adapter Output: 12 VDC 0.84A
Platform size
175 x 195 mm / 6.9 x 7.7 in
Assembled
dimensions
(W x D x H)
230 x 354 x 100 mm
9.1 x 13.9 x 4.0 inch
Shipping
dimensions
(W x D x H)
392 x 557 x 301 mm
15.5 x 22.0 x 11.9inch
Net weight
4.6Kg/10.2lb
3.9Kg/8.6lb
4.6Kg/10.2lb
3.9Kg/8.6lb
3.8Kg/8.4lb
3.4Kg/7.5lb
Shipping weight
6.5Kg/14.4b
5.8Kg/12.8b
6.5Kg/14.4b
5.8Kg/12.8b
5.7Kg/12.6lb
5.3Kg/11.6lb

ADVENTURER BALANCES EN-51
TABLE 9-6. SPECIFICATIONS (continued)
MODEL
AX124M
AX224M
AX324M
AX223M
AX423M
AX523M
AX1502M
AX2202M
AX4202M
AX5202M
AX8201M
Max
120g
220g
320g
220g
420g
520g
1520g
2200g
4200g
5200g
8200g
Min
0.01g
0.01g
0.01g
0.02g
0.02g
0.02g
0.5g
0.5g
0.5g
0.5g
5g
d=
0.0001g
0.001g
0.01g
0.1g
e=
0.001g
0.01g
0.1g
1g
Approval Class
I
II
Repeatability
(std. dev.) (g)
0.0001g
0.001g
0.01g
0.1g
Linearity (g)
±0.0002g
±0.002g
±0.02g
± 0.2g
Span Calibration
Points (g)
25g, 50g
75g,
100g
50g,
100g
150g,
200g
100g
200g,
300g
50g,
100g
150g,
200g
100g,
200g
300g,
400g
200g,
300g
400g,
500g
500g
1000g,
1500g
500g,
1000g
1500g,
2000g
1000g,
2000g
3000g,
4000g
2000g,
3000g
4000g,
5000g
2000g,
4000g
6000g,
8000g
Calibration
Auto-Cal
Auto-Cal
Auto-Cal
Auto-Cal
Auto-Cal
Auto-Cal
Auto-Cal
Auto-Cal
Auto-Cal
Auto-Cal
Auto-Cal
Weighing units
milligram, gram, carat
kilogram, gram, carat
Applications
Weighing, Parts Counting, Percent Weighing, Check Weighing, Animal Weighing, Formulation, Density
Determination, Totalization, Display Hold
Stabilization time
(typical)
≤ 3 seconds
≤2 seconds
≤1.5 seconds
Sensitivity
Temperature Drift
(PPM/K)
1.5
3
3
1.9
Typical Min-
Weight USP
(u=0.10%,k=2)
0.20 g
0.20 g
0.20 g
2.0 g
2.0 g
2.0 g
20.0 g
20.0 g
20.0 g
20.0 g
200.0 g
Optimal Min-
Weight USP
(u=0.10%,k=2)
0.082 g
0.082 g
0.082
0.82 g
0.82 g
0.82 g
8.2 g
8.2 g
8.2 g
8.2 g
82 g
Display
Full-Color WQVGA Graphic LCD
Display size
4.3 in / 10.9 cm (diagonal)
Backlight
White LED
Controls
4-wire resistive touch screen + 6 membrane keys
Communication
RS-232, USBx2
Balance power
input
12 VDC, 0.5A
Power supply
AC Adapter Input: 100-240 VAC 0.3A 50-60 Hz
AC Adapter Output: 12 VDC 0.84A
Platform size
(diameter)
90 mm / 3.5 in
130 mm / 5.1 in
175x195 mm / 6.9x7.7 in
Assembled
dimensions
(W x D x H)
230 x 354 x 340 mm
9.1 x 13.9 x 13.4 inch
230 x 354 x 340 mm
9.1 x 13.9 x 13.4 inch
230 x 354 x 100 mm
9.1 x 13.9 x 4.0 inch
Shipping
dimensions
(W x D x H)
387 x 507 x 531 mm
15.4 x 20.0 x 20.9 inch
387 x 507 x 531 mm
15.4 x 20.0 x 20.9 inch
392 x 557 x 301 mm
15.5 x 22.0 x 11.9 inch
Net weight
5.1 Kg / 11.3 lb
5.8 Kg / 12.8 lb
4.6 Kg / 10.2 lb
3.8 Kg / 8.4 lb
Shipping weight
7.8 Kg / 17.2 lb
8.5 Kg / 18.8 lb
6.5 Kg / 14.4 lb
5.7 Kg / 12.6 lb
Note: M = OIML Approved

EN-52 ADVENTURER BALANCES
TABLE 9-7. SPECIFICATIONS (continued)
Model
AX224N
AX223N/E
AX423N
AX 423N/E
AX523N/E
AX1502N/E
AX2202N/E
AX4202N/E
AX8201N/E
Max
220g
220g
420g
420g
520g
1520g
2200g
4200g
8200g
Min
0.01g
0.02g
0.02g
0.02g
0.02g
0.5g
0.5g
0.5g
5g
d=
0.0001g
0.001g
0.01g
0.1g
e=
0.001g
0.01g
0.1g
1g
Approval Class
I
II
Repeatability
(std. dev.) (g)
0.0001g
0.001g
0.01g
0.1g
Linearity (g)
±0.0002g
±0.002g
±0.02g
±0.2g
Span Calibration
Points (g)
50g, 100g
150g,
200g
50g, 100g
150g,
200g
100g,
200g
300g,
400g
100g, 200g
300g, 400g
200g, 300g
400g, 500g
500g
1000g, 1500g
500g, 1000g
1500g, 2000g
1000g, 2000g
3000g, 4000g
2000g, 4000g
6000g, 8000g
Calibration
Auto-Cal
External
Auto-Cal
External
External
External
External
External
External
Weighing units
gram, milligram, carat, pennyweight,
grain, ounce, troy ounce
gram, kilogram, carat, pennyweight,
grain, pound, ounce, troy ounce
Applications
Weighing, Parts Counting, Percent Weighing, Check Weighing, Animal Weighing, Formulation, Density Determination,
Totalization
Stabilization time
(typical)
≤ 3
seconds
≤2 seconds
≤1.5 seconds
Sensitivity
Temperature
Drift (PPM/K)
1.5
3
3
9
Typical
Min-Weight
USP
(u=0.10%,k=2)
0.20g
2.0 g
2.0 g
2.0 g
2.0 g
20.0 g
20.0 g
20.0 g
200.0 g
Optimal
Min-Weight
USP
(u=0.10%,k=2)
0.082 g
0.82 g
0.82 g
0.82 g
0.82 g
8.2 g
8.2 g
8.2 g
82 g
Display
Full-Color WQVGA Graphic LCD
Display size
4.3 in / 10.9 cm (diagonal)
Backlight
White LED
Controls
4-wire resistive touch screen + 6 membrane keys
Communication
RS-232, USBx2
Balance power
input
12 VDC, 0.5A
Power supply
AC Adapter Input: 100-240 VAC 0.3A 50-60 Hz
AC Adapter Output: 12 VDC 0.84A
Platform size
(diameter)
90 mm /
3.5 in
130 mm / 5.1 in
175x195 mm / 6.9x7.7 in
Assembled
dimensions
(W x D x H)
354x230x340 mm
13.9x9.1x13.4 inch
354x230x100 mm
13.9x9.1x4.0 inch
Shipping
dimensions
(W x D x H)
557x392x301 mm
22.0x15.5x11.9 inch
Net weight
5.1 Kg /
11.3 lb
5.6 Kg /
12.4 lb
5.8 Kg /
12.8 lb
5.6 Kg / 12.4 lb
3.9 Kg / 8.6 lb
3.4 Kg /
7.5 lb
Shipping weight
7.8 Kg /
17.2 lb
8.3 Kg /
18.3 lb
8.5 Kg /
18.8 lb
8.3 Kg / 18.3 lb
5.8 Kg / 12.8 lb
5.3 Kg /
11.6 lb
Note: N = NTEP Approved

ADVENTURER BALANCES EN-53
TABLE 9-8. SPECIFICATIONS (continued)
MODEL
AX124AU
AX224AU
AX324AU
AX223AU
AX423AU
AX523AU
AX1502AU
AX2202AU
AX4202AU
AX5202AU
AX8201AU
Max
120g
220g
320g
220g
420g
520g
1520g
2200g
4200g
5200g
8200g
Min
0.01g
0.01g
0.01g
0.02g
0.02g
0.02g
0.5g
0.5g
0.5g
0.5g
5g
d=
0.0001g
0.001g
0.01g
0.1g
e=
0.001g
0.01g
0.1g
1g
Approval Class
I
II
Repeatability
(std. dev.) (g)
0.0001g
0.001g
0.01g
0.1g
Linearity (g)
±0.0002g
±0.002g
±0.02g
± 0.2g
Span Calibration
Points (g)
25g, 50g
75g,
100g
50g,
100g
150g,
200g
100g
200g,
300g
50g,
100g
150g,
200g
100g,
200g
300g,
400g
200g,
300g
400g,
500g
500g
1000g,
1500g
500g,
1000g
1500g,
2000g
1000g,
2000g
3000g,
4000g
2000g,
3000g
4000g,
5000g
2000g,
4000g
6000g,
8000g
Calibration
Auto-Cal
Auto-Cal
Auto-Cal
Auto-Cal
Auto-Cal
Auto-Cal
Auto-Cal
Auto-Cal
Auto-Cal
Auto-Cal
Auto-Cal
Weighing units
milligram, gram, carat
kilogram, gram, carat
Applications
Weighing, Parts Counting, Percent Weighing, Check Weighing, Animal Weighing, Formulation, Density
Determination, Totalization, Display Hold
Stabilization time
(typical)
≤ 3 seconds
≤2 seconds
≤1.5 seconds
Sensitivity
Temperature Drift
(PPM/K)
1.5
3
3
1.9
Typical Min-
Weight USP
(u=0.10%,k=2)
0.20 g
0.20 g
0.20 g
2.0 g
2.0 g
2.0 g
20.0 g
20.0 g
20.0 g
20.0 g
200.0 g
Optimal Min-
Weight USP
(u=0.10%,k=2)
0.082 g
0.082 g
0.082
0.82 g
0.82 g
0.82 g
8.2 g
8.2 g
8.2 g
8.2 g
82 g
Display
Full-Color WQVGA Graphic LCD
Display size
4.3 in / 10.9 cm (diagonal)
Backlight
White LED
Controls
4-wire resistive touch screen
Communication
RS-232, USBx2
Balance power
input
12 VDC, 0.5A
Power supply
AC Adapter Input: 100-240 VAC 0.3A 50-60 Hz
AC Adapter Output: 12 VDC 0.84A
Platform size
(diameter)
90 mm / 3.5 in
130 mm / 5.1 in
175x195 mm / 6.9x7.7 in
Assembled
dimensions
(W x D x H)
230 x 354 x 340 mm
9.1 x 13.9 x 13.4 inch
230 x 354 x 340 mm
9.1 x 13.9 x 13.4 inch
230 x 354 x 100 mm
9.1 x 13.9 x 4.0 inch
Shipping
dimensions
(W x D x H)
387 x 507 x 531 mm
15.4 x 20.0 x 20.9 inch
387 x 507 x 531 mm
15.4 x 20.0 x 20.9 inch
392 x 557 x 301 mm
15.5 x 22.0 x 11.9 inch
Net weight
5.1 Kg / 11.3 lb
5.8 Kg / 12.8 lb
4.6 Kg / 10.2 lb
3.8 Kg / 8.4 lb
Shipping weight
7.8 Kg / 17.2 lb
8.5 Kg / 18.8 lb
6.5 Kg / 14.4 lb
5.7 Kg / 12.6 lb

EN-54 ADVENTURER BALANCES
9.2 Drawings and Dimensions
Fully assembled dimensions
Figure 9-1. Draft Shield models
Figure 9-2. Non-Draft Shield models
9.3 Parts and Accessories
TABLE 9-5. ACCESSORIES
DESCRIPTION
PART NUMBER
Auxiliary Display
80251396
Density Kit
80253384
Cable, USB Device (Type A-B)
83021085
Security Device (Laptop Lock)
80850043
RS232 Cable, PC 25 Pin
80500524
RS232 Cable, PC 9 Pin
80500525
Dust Cover
30093334

ADVENTURER BALANCES EN-55
9.4 Communication
9.4.1 Interface Commands
Commands listed in the following table will be acknowledged by the balance.
The balance will return “ES” for invalid commands.
TABLE 9-6. ADVENTURER INTERFACE COMMAND LIST
Command
Characters
Function
IP
Immediate Print of displayed weight (stable or unstable).
P
Print displayed weight (stable or unstable).
CP
Continuous Print.
SP
Print on Stability.
SLP
Auto Print stable non-zero displayed weight.
SLZP
Auto Print stable non-zero weight and stable zero reading.
xP
Interval Print x = Print Interval (1-3600 sec) 0P ends interval Print
0P
See above
H
Enter Print Header Lines
Z
Same as pressing Zero Key
T
Same as pressing Tare Key.
xT
Establish a preset Tare value in displayed unit. X = preset tare value. Sending 0T clears tare (if
allowed).
PT
Prints Tare weight stored in memory.
ON
Brings out of Standby
OFF
Goes to Standby.
C
Begin Span Calibration
IC
Begin internal Calibration, same as trigger from calibration menu.
AC
Abort Calibration. Attention: when LFT ON, the operation is not allowed.
PSN
Print Serial Number.
PV
Print terminal software version, base software version and LFT ON (if LFT is set ON).
x#
Set Counting APW (x) in grams. (must have APW stored)
P#
Print Counting application APW.
x%
Set Percent application reference weight (x) in grams. (must have reference weight stored)
P%
Print Percent application reference weight.
xS
0 = print unstable data, same as IP; 1 = print stable only
1)
, same as SP.
xRL
0 = disable response; 1 = enable response. This command only controls the “OK!” response.

EN-56 ADVENTURER BALANCES
9.4.2 RS232 (DB9) Pin Connections
Pin 2: Balance transmit line (TxD)
Pin 3: Balance receive line (RxD)
Pin 5: Ground signal (GND)
Pin 7: Clear to send (hardware handshake) (CTS)
Pin 8: Request to send (hardware handshake) (RTS)
9.5 The USB Interface
The Ohaus USB Interface is a unique solution to the problem of connecting a balance to a computer using a
Universal Serial Bus (USB). USB devices are categorized into classes such as disk drives, digital cameras, printers,
etc. Balances do not have a commonly used class so the Ohaus USB interface uses a generic interface based on
the RS232 serial standard.
Data sent from the balance to a computer is in USB format. The USB data is directed to a virtual port. This port
then appears as an RS232 port to the application program.
When sending a command from a computer to the balance, the application program sends a command to the
virtual port as if it were an RS232 port. The computer then directs the command from the virtual port to the
computers USB connector where the balance is connected. The port receives the USB signal and reacts to the
command.
The USB Interface includes a CD with the software drivers to create the required virtual port on the computer.
System Requirements
PC running Windows 98
®
, Windows 98SE
®
, Windows ME
®
, Windows 2000
®
, Windows XP
®
, Windows 7
®
or
Windows 8
®
(32-bit).
Available USB port (Type A, 4-pin, female)
USB Connection
The balance’s USB port terminates with a 4-pin, female, USB Type B connector.
A USB Cable (type B/male to type A/male) is required (not supplied).
1. Ensure that the balance is powered on and working properly.
2. Power on the computer and verify that its USB port is enabled and working properly.
3. Plug the cable’s USB connectors into the computer’s USB port and the balance’s USB port. Windows®
should detect a USB device and the New Hardware Wizard will be initialized.
Virtual Port Software Installation
1. Insert the supplied CD into the computer’s CD
drive.
Different versions of Windows
®
have slightly
different steps to load the driver that is on the
CD. In all versions the New Hardware Wizard
guides you through the required steps to select
the driver that is located on the CD.
2. After clicking Finish, the virtual port should be
ready for use.
Windows
®
typically adds the virtual port in
sequence after the highest number COM port.
For example, on PC’s equipped with up to 4
COM ports, the virtual port will be COM5.
When using the USB interface with programs
that limit the number of COM port designations
(e.g. Ohaus MassTracker allows only COM1, 2,
3, & 4), it may be necessary to assign one of
these port numbers to the new virtual port.
Example of Windows XP Hardware Wizard
This can be done in the Port Settings of the Device Manager utility, found in the Windows Control Panel.
1
5
69
Data
GND
Handshake
Female

ADVENTURER BALANCES EN-57
USB INPUT
The balance will respond to various commands sent via the interface adapter.
Terminate the following commands when with a [CR] or [CRLF].
Adventurer Commands
zC perform span calibration
0S print unstable data
1S print stable data only
P same as pressing Print
SP print stable weight only
IP immediate print of displayed weight (stable or unstable)
CP Continuous print of weights
SLP Auto-print stable non-zero weight only
SLZP Auto-print stable non-zero weight and zero reading
xP Auto-print on 1 to 3600 second intervals (x = 1 to 3600)
0P Ends interval print
T same as pressing Tare
Z same as pressing Zero
PV print software version
Auto-Print Operation
Once Auto-Print is activated in the menu, the balance will send data as required.
If there is data in the print buffer the printer will finish printing this data.
10. SOFTWARE UPDATES
Ohaus is continuously improving its balance software. To obtain the latest release, please contact your Authorized
Ohaus Dealer or Ohaus Corporation.

EN-58 ADVENTURER BALANCES
11. COMPLIANCE
Compliance to the following standards is indicated by the corresponding mark on the product.
Mark
Standard
This product conforms to the EMC Directive 2004/108/EC, the Low Voltage Directive 2006/95/EC
and the Non-automatic Weighing Instruments Directive 2009/23/EC. The complete Declaration of
Conformity is available online at
http://europe.ohaus.com/europe/en/home/support/compliance/ce-declaration-of-conformity.aspx.
AS/NZS CISPR 11, AS/NZS 61000.4.3
CAN/CSA-C22.2 No. 61010-1-12
UL Std. No. 61010-1 (3rd edition)
Important notice for verified weighing instruments
Weighing instruments verified at the place of manufacture bear one of the preceding marks on the
packing label and the green ‘M’ (metrology) sticker on the descriptive plate. They may be put into
service immediately.
Weighing instruments to be verified in two stages have no green ‘M’ (metrology) on the descriptive
plate and bear one of the preceding identification marks on the packing label.
The second stage of the initial verification must be carried out by the approved service
organization of the authorized representative within the EC or by the national weights and
measures (W+M) authorities.
The first stage of the initial verification has been carried out at the manufacturer’s work.
It comprises all tests according to the adopted European standard EN45501:1992, paragraph
8.2.2.
If national regulations limit the validity period of the verification, the user of the weighing instrument
must strictly observe the re-verification period and inform the respective W+M authorities.
FCC Note
This equipment has been tested and found to comply with the limits for a Class A digital device, pursuant to Part 15
of the FCC Rules. These limits are designed to provide reasonable protection against harmful interference when
the equipment is operated in a commercial environment. This equipment generates, uses, and can radiate radio
frequency energy and, if not installed and used in accordance with the instruction manual, may cause harmful
interference to radio communications. Operation of this equipment in a residential area is likely to cause harmful
interference in which case the user will be required to correct the interference at his own expense.
Industry Canada Note
This Class A digital apparatus complies with Canadian ICES-001.

ADVENTURER BALANCES EN-59
ISO 9001 Registration
In 1994, OHAUS Corporation, USA, was awarded a certificate of registration to ISO 9001 by Bureau Veritus Quality
International (BVQI), confirming that the OHAUS quality management system is compliant with the ISO 9001
standard’s requirements. On June 21, 2012, OHAUS Corporation, USA, was re-registered to the ISO 9001:2008
standard. In conformance with the European
Disposal
In conformance with the European Directive 2002/96/EC on Waste Electrical and Electronic
Equipment (WEEE) this device may not be disposed of in domestic waste. This also applies to
countries outside the EU, per their specific requirements.
The Batteries Directive 2006/66/EC introduces new requirements from September 2008 on
removability of batteries from waste equipment in EU Member States. To comply with this
Directive, this device has been designed for safe removal of the batteries at end-of-life by a
waste treatment facility.
Please dispose of this product in accordance with local regulations at the collecting point
specified for electrical and electronic equipment.
If you have any questions, please contact the responsible authority or the distributor from which
you purchased this device.
Should this device be passed on to other parties (for private or professional use), the content of
this regulation must also be related.
For disposal instructions in Europe, refer to
http://europe.ohaus.com/europe/en/home/support/weee.aspx
Thank you for your contribution to environmental protection.

EN-60 ADVENTURER BALANCES
LIMITED WARRANTY
Ohaus products are warranted against defects in materials and workmanship from the date of delivery through the
duration of the warranty period. During the warranty period Ohaus will repair, or, at its option, replace any
component(s) that proves to be defective at no charge, provided that the product is returned, freight prepaid, to
Ohaus.
This warranty does not apply if the product has been damaged by accident or misuse, exposed to radioactive or
corrosive materials, has foreign material penetrating to the inside of the product, or as a result of service or
modification by other than Ohaus. In lieu of a properly returned warranty registration card, the warranty period shall
begin on the date of shipment to the authorized dealer. No other express or implied warranty is given by Ohaus
Corporation. Ohaus Corporation shall not be liable for any consequential damages.
As warranty legislation differs from state to state and country to country, please contact Ohaus or your local Ohaus
dealer for further details.

BALANZAS ADVENTURER ES-1
ÍNDICE
1. INTRODUCCIÓN ....................................................................................................................3
1.1 Descripción ................................................................................................................................................... 3
1.2 Características ............................................................................................................................................. 3
1.3 Definición de palabras de advertencia y símbolos de advertencia .............................................................. 3
1.4 Precauciones de seguridad .......................................................................................................................... 3
2. INSTALACIÓN .......................................................................................................................4
2.1 Desempaquetado ......................................................................................................................................... 4
2.2 Selección de la ubicación ............................................................................................................................. 4
2.3 Nivelación del equipo ................................................................................................................................... 4
2.4 Conexión a la red eléctrica ........................................................................................................................... 5
2.5 Conexión de la interfaz ................................................................................................................................ 5
2.6 Calibración inicial ......................................................................................................................................... 5
3. FUNCIONAMIENTO ...............................................................................................................6
3.1 Resumen de la pantalla, pantalla de inicio .................................................................................................. 6
3.2 Funciones más importantes y Menú de Inicio .............................................................................................. 7
3.3 Resumen de piezas y funciones – Modelos con protección contra corrientes de aire ................................ 8
3.4 Resumen de piezas y funciones – Modelos sin protección contra corrientes de aire ................................. 8
4. APLICACIONES.....................................................................................................................9
4.1 Pesaje .......................................................................................................................................................... 9
4.1.1 Configuración de los elementos ............................................................................................................. 10
4.1.2 Nombre de la muestra ............................................................................................................................ 11
4.1.3 Guardar en USB ..................................................................................................................................... 11
4.2 Recuento de piezas ................................................................................................................................... 11
4.2.1 Configuración de los elementos ............................................................................................................. 12
4.3 Pesaje porcentual ...................................................................................................................................... 14
4.3.1 Configuración de los elementos ............................................................................................................. 14
4.4 Pesaje dinámico ......................................................................................................................................... 15
4.4.1 Configuración de los elementos ............................................................................................................. 15
4.5 Determinación de la densidad.................................................................................................................... 16
4.5.1 Medición de la densidad de un sólido utilizando agua (predeterminada) .............................................. 16
4.5.2 Medición de la densidad de un material flotante utilizando agua .......................................................... 17
4.5.3 Medición de la densidad de un sólido utilizando un líquido auxiliar ...................................................... 17
4.5.4 Medición de la densidad de un líquido utilizando un dispositivo de inmersión
calibrado (no suministrado) .................................................................................................................... 18
4.5.5 Medición de la densidad de un material poroso utilizando aceite ......................................................... 19
4.6 Control dinámico del peso .......................................................................................................................... 21
4.6.1 Configuración de los elementos ............................................................................................................. 22
4.7 Control de la pantalla ................................................................................................................................. 22
4.7.1 Control de la pantalla– Manual (predeterminado) .................................................................................. 22
4.7.2 Control de la pantalla – Automático ....................................................................................................... 23
4.7.3 Configuración de los elementos ............................................................................................................. 23
4.8 Totalización ................................................................................................................................................ 23
4.9 Formulación................................................................................................................................................ 24
4.9.1 Configuración de los elementos ............................................................................................................. 25
4.10 Funciones adicionales ................................................................................................................................ 26
4.10.1 Peso bajo ............................................................................................................................................... 26
5. CONFIGURACIÓN DEL MENÚ ........................................................................................... 27
5.1 Navegación por menú ................................................................................................................................ 27
5.1.1 Cambio de configuraciones .................................................................................................................... 28
5.2 Calibración ................................................................................................................................................. 29
5.2.1 Submenú de calibración (modelos INCAL) ............................................................................................ 29
5.2.2 Calibración Interna ................................................................................................................................. 29
5.2.3 Calibración Automática .......................................................................................................................... 29
5.2.4 Ajuste de ™ AutoCal .............................................................................................................................. 30
5.2.5 Calibración de amplitud .......................................................................................................................... 30
5.2.6 Calibración de Linealidad ....................................................................................................................... 30
5.2.7 Prueba de calibración............................................................................................................................. 30
5.3 Ajuste de la balanza ................................................................................................................................... 31
5.3.1 Submenú de ajuste de la balanza .......................................................................................................... 31
5.3.2 Idioma ..................................................................................................................................................... 31
5.3.3 Configuración del usuario ...................................................................................................................... 31

ES-2 BALANZAS ADVENTURER
5.3.4 Nivel de filtro ........................................................................................................................................... 32
5.3.5 Rastreo de cero automático ................................................................................................................... 32
5.3.6 Tara automática ..................................................................................................................................... 32
5.3.7 Graduaciones ......................................................................................................................................... 32
5.3.8 Fecha y hora .......................................................................................................................................... 32
5.3.9 Modo aprobado ...................................................................................................................................... 33
5.4 Unidades de pesaje ................................................................................................................................... 34
5.4.1 Submenú de unidades ........................................................................................................................... 34
5.5 Mantenimiento de datos ............................................................................................................................. 34
5.5.1 Submenú de mantenimiento de datos ................................................................................................... 34
5.5.2 Exportar a USB ...................................................................................................................................... 35
5.5.3 Importar desde USB ............................................................................................................................... 35
5.5.4 Información de la balanza ...................................................................................................................... 36
5.6 Comunicación............................................................................................................................................. 35
5.6.1 Submenú de comunicación .................................................................................................................... 35
5.6.2 Tasa de baudios ..................................................................................................................................... 35
5.6.3 Transmisión ............................................................................................................................................ 36
5.6.4 Protocolo de enlace................................................................................................................................ 36
5.6.5 Salida de impresión ................................................................................................................................ 36
5.6.6 Impresión automática ............................................................................................................................. 36
5.6.7 Impresión de contenidos ........................................................................................................................ 38
5.6.8 Alimentación ........................................................................................................................................... 38
5.6.9 Formato .................................................................................................................................................. 38
5.6.10 Impresión Datos Calibración .................................................................................................................. 38
5.7 Datos de BPL y GMP ................................................................................................................................. 38
5.7.1 Submenú de datos de BPL .................................................................................................................... 38
5.7.2 Encabezado ........................................................................................................................................... 38
5.7.3 Nombre de la balanza ............................................................................................................................ 38
5.7.4 Nombre de usuario ................................................................................................................................. 38
5.7.5 Nombre del proyecto .............................................................................................................................. 38
5.8 Restablecimiento de los valores de fábrica ............................................................................................... 38
5.9 Bloqueo ...................................................................................................................................................... 38
6. COMERCIO LEGAL ............................................................................................................. 39
6.1 Configuración ............................................................................................................................................. 39
6.2 Verificación ................................................................................................................................................. 39
6.3 Sellado ....................................................................................................................................................... 39
7. IMPRIMIR ............................................................................................................................. 40
7.1 Conexión, configuración y prueba de la interfaz de la impresora y ordenador ......................................... 40
7.2 Formato de salida ...................................................................................................................................... 40
8. MANTENIMIENTO ............................................................................................................... 41
8.1 Calibración ................................................................................................................................................. 41
8.2 Limpieza ..................................................................................................................................................... 41
8.3 Resolución de problemas ........................................................................................................................... 42
8.4 Información de mantenimiento ................................................................................................................... 42
9. DATOS TÉCNICOS .............................................................................................................. 43
9.1 Especificaciones ........................................................................................................................................ 43
9.2 Dibujos y dimensiones ............................................................................................................................... 52
9.3 Piezas y accesorios ................................................................................................................................... 52
9.4 Comunicación............................................................................................................................................. 53
9.4.1 Comandos de la interfaz ........................................................................................................................ 53
9.4.2 Conexiones de patillas RS232 (DB9) ..................................................................................................... 54
9.5 La interfaz USB .......................................................................................................................................... 54
10. ACTUALIZACIONES DE SOFTWARE ................................................................................ 55
11. CONFORMIDAD .................................................................................................................. 56

BALANZAS ADVENTURER ES-3
1. INTRODUCCIÓN
1.1 Descripción
La balanza Adventurer es un instrumento de pesaje de precisión que podrá utilizar durante muchos años si se
emplea adecuadamente. Las balanzas Adventurer de Ohaus están disponibles en capacidades de 120 gramos a
8.200 gramos.
1.2 Características
Controles táctiles: Acceso gráfico rápido a todas las
funciones de control, a más de una docena de
aplicaciones y a numerosas características.
1.3 Definición de palabras de advertencia y símbolos de advertencia
Las indicaciones de seguridad están marcadas con palabras de señalización y símbolos de advertencia. Muestran
cuestiones y advertencias de seguridad. Hacer caso omiso de las indicaciones de seguridad puede provocar
lesiones personales, daños en el equipo, fallos de funcionamiento y resultados falsos.
Palabras de señalización
ADVERTENCIA para una situación de peligro con riesgo medio, que podría ocasionar lesiones o la muerte
si no se evita.
PRECAUCIÓN para una situación de peligro con riesgo bajo, que podría ocasionar daño al dispositivo o
a la propiedad o la pérdida de datos, o lesiones si no se evita.
Atención Para información importante sobre el producto.
Nota Para información útil sobre el producto
Símbolos de advertencia
Peligro general Peligro de descarga eléctrica
1.4 Precauciones de seguridad
PRECAUCIÓN: lea todas las advertencias de seguridad antes de la instalación, conexión o
reparación del equipo. No cumplir con estas advertencias podría causar daños corporales y/o
daños en la propiedad. Guarde las instrucciones para futuras consultas.
Verifique que el rango de voltaje de entrada del adaptador de CA y el tipo de enchufe sean compatibles
con la alimentación de CA utilizada.
Asegúrese de que el cable de corriente no represente un posible obstáculo o peligro de tropiezo.
Utilice la balanza solo en ambientes secos.
Esta balanza es solo para uso en interiores.
No deje caer objetos en el plato.
Utilice solo los accesorios y periféricos aprobados.
Use el equipo solo en las condiciones ambientales especificadas en estas instrucciones.
Desconecte el equipo de la fuente de alimentación cuando lo esté limpiando.
No utilice el equipo en entornos peligrosos o inestables.
El mantenimiento debe ser realizado solamente por personal autorizado.
No coloque la balanza de forma que resulte difícil alcanzar la conexión de corriente.
Corriente continua
Corriente alterna

ES-4 BALANZAS ADVENTURER
2. INSTALACIÓN
2.1 Desempaquetado
Desembale con cuidado la balanza Adventurer y todos sus componentes. Los componentes incluidos varían
dependiendo del modelo de la balanza (consulte la tabla a continuación). Guarde el empaquetado para garantizar
un almacenamiento y transporte seguros. Para evitar el funcionamiento incorrecto, lea el manual completamente
antes de instalar y utilizar la balanza Adventurer.
Componentes incluidos
Balanza
Adaptador de corriente
Anillo bobinado (solo para los modelos de 0,1 mg y 1 mg)
Tarjeta de garantía
Disco compacto
2.2 Selección de la ubicación
Evite vibraciones excesivas, fuentes de calor, corrientes de aire o cambios bruscos de temperatura. Deje
suficiente espacio libre.
2.3 Nivelación del equipo
Hay una burbuja de nivel en una pequeña ventana circular al lado de la pantalla de la balanza Adventurer.
Para nivelar la balanza, ajuste los pies de nivelado hasta que la burbuja esté centrada en el círculo. Para más
información sobre qué pie girar, consulte la sección de Asistencia de nivel a continuación. Asegúrese de que el
equipo esté nivelado cada vez que cambia su ubicación.
Asistencia de nivel
Hay disponible una función de asistencia de nivel para ayudarle a nivelar la balanza Adventurer. Hay dos maneras
de acceder a la función:
1. Aplicaciones de pesaje -> Configuración de elementos -> Asistencia de nivel. Consulte la sección 4.1.1
para más información.
2. Menú principal -> Ajuste de la balanza -> Configuración del usuario -> Asistencia de nivel. Consulte la
sección 5.3.3 para más información.
Gire los pies como indica la imagen anterior según la localización de la burbuja de nivel hasta que la burbuja esté
centrada.

BALANZAS ADVENTURER ES-5
2.4 Conexión a la red eléctrica
Conecte el conector de salida de CC a la toma de corriente en la parte trasera de la balanza. Después conecte el
cable de corriente de CA la toma eléctrica adecuada.
PRECAUCIÓN: para uso con una fuente de alimentación certificada por la CSA (o similar
aprobación),
con salida de corriente limitada.
Atención: para obtener un rendimiento de pesaje óptimo, deje que la balanza se caliente
durante 60 minutos antes de utilizarla.
2.5 Conexión de la interfaz
Utilice el puerto RS-232 integrado para conectarla a un ordenador o una impresora con un cable de serie
estándar (intermedio). O conéctela utilizando el puerto USB de la balanza.
Conexiones de la interfaz en la parte Conexión UBS en la parte frontal
posterior de la balanza. de la balanza.
.
USB1: solo se utiliza para conectar al PC
USB1: solo se utiliza para conectar a la unidad de memoria USB
RS232: solo se utiliza para conectar al PC o a la impresora
Nota: para los comandos de configuración e interfaz, consulte la sección de ajustes del menú de
comunicaciones.
Para conectar, configurar y probar la interfaz de la impresora u ordenador y para los formatos de salida de
impresión, consulte la sección de impresión.
2.6 Calibración inicial
Si se instala la balanza por primera vez y si se desplaza a otra ubicación, se debe calibrar para garantizar
resultados de pesaje exactos. La mayoría de balanzas Adventurer tienen Calibración automática integrada que
permite calibrar la balanza automáticamente y no requiere masas de calibración. Si así se prefiere, la balanza se
puede calibrar manualmente con pesos externos. Disponga de las pesas de calibración adecuadas antes de iniciar
la calibración. Consulte la sección de calibración para procedimiento de pesos y calibración.
¤ AutoCal™
En la mayoría de modelos está disponible el sistema de calibración interna completamente automática que ayuda
en el mantenimiento de rutina calibrando automáticamente la balanza de forma diaria.
Calibra automáticamente el sistema cuando se detecta un cambio de temperatura lo suficientemente importante
como para afectar la precisión del pesaje (> 1,5 ºC) o cada 11 horas.
¤ Calibración externa
Algunos modelos de precisión disponen de la calibración externa tradicional en la que se utilizan pesos externos
(valores de peso de calibración a elección del usuario) para calibrar la balanza y asegurar la precisión.
USB1
RS232
USB2

ES-6 BALANZAS ADVENTURER
3. FUNCIONAMIENTO
3.1 Resumen de la pantalla, pantalla de inicio
Este equipo utiliza una pantalla táctil con áreas de tacto y botones para controlar las funciones del equipo.
CONTROLES
Botón
Acción
Pulsación corta (si está apagada): enciende la báscula
Pulsación larga (si está encendida): apaga la báscula
Imprime los datos en una impresora u ordenador.
Realiza la puesta a cero
Realiza funcionamiento de calibración
Realiza una operación de tara
Pantalla
principal de
aplicaciones
Aplicación
Indicadores de
estabilidad (*), neto
(NETO), bruto (B) y/o
centro de cero (>0<)
Campos de referencia
Botones de
aplicaciones:
Las funciones varían
según la aplicación
Campo de resultados: La
información varía según
la aplicación.
Toque g para cambiar
unidad
Mensajes instructivos
Capacidad y sensibilidad

BALANZAS ADVENTURER ES-7
3.2 Funciones más importantes y Menú de Inicio
Pesaje: Pulse Cero para ajustar la pantalla a cero. Coloque un elemento en el plato. La pantalla indica el
peso bruto.
Determinación de tara: Sin carga en el plato, pulse Cero para ajustar la pantalla en cero. Coloque un recipiente
vacío en el plato y pulse Tara. Añada material al recipiente y se mostrará el peso neto. Retire el
recipiente y el peso del recipiente aparecerá como un número negativo. Pulse Tara para borrar el
valor.
Cero: Pulse Cero para poner a cero la balanza.
NAVEGACIÓN POR EL MENÚ Y LA PANTALLA
Toque Menú para abrir la lista de menú.
Toque y arrastre la Barra de desplazamiento para ver
elementos adicionales.
Calibración:
Toque la pantalla para ver las opciones de
calibración.
Ajuste de la balanza:
Toque la pantalla para ver y cambiar la
configuración de la balanza.
Unidades de pesaje:
Toque la pantalla para ver y cambiar las
unidades de pesaje.
Mantenimiento de datos:
Toque para ver las configuraciones de
mantenimiento de datos.
Datos de BPL y GMP:
Introduzca datos de usuario para su
trazabilidad.
Restablecimiento de valores de fábrica:
Toque la pantalla para restablecer los
valores de fábrica de la configuración del
menú.
Comunicación:
Toque la pantalla para restablecer los
valores de fábrica de la configuración del
menú.
Bloqueo:
Toque la pantalla para ver las opciones de
bloqueo.

ES-8 BALANZAS ADVENTURER
3.3 Resumen de piezas y funciones – Modelos con protección contra corrientes de aire
3.4 Resumen de piezas y funciones – Modelos sin protección contra corrientes de aire
Servidor USB
USB esclavo
Entrada de
corriente
RS232
Interruptor
LFT
Pie ajustable
Indicador de
nivel
Indicador de
nivel
Servidor USB
Pie ajustable
USB esclavo
Interruptor LFT
RS232
Entrada de
corriente
Plato
Pie ajustable
Plato
Anillo
bobinado
Pie ajustable

BALANZAS ADVENTURER ES-9
4. APLICACIONES
La balanza se puede configurar para funcionar en varios modos de aplicaciones.
Toque el campo de aplicación superior izquierdo (pesaje en el ejemplo que aparece a continuación):
La balanza Adventurer tiene los siguientes 9 modos de aplicación:
Pesaje
Recuento de
piezas
Pesaje
porcentual
Pesaje dinámico
(de animales)
Determinación
de la densidad
Control
dinámico
del peso
Control de la
pantalla
Totalización
Formulación
4.1 Pesaje
Nota: antes de utilizar cualquier aplicación, asegúrese de haber nivelado y calibrado la balanza.
Utilice esta aplicación para determinar el peso de elementos en la unidad de medición seleccionada.
Pesaje
1. En la porción superior izquierda de la pantalla de inicio, seleccione Pesaje (esta aplicación es la
predeterminada).
2. Pulse Tara o Cero si fuera necesario para dar inicio.
3. Coloque objetos en el plato para ver el peso. Cuando esté estable, aparecerá *.
4. El valor resultante se muestra en la línea de pantalla principal de la unidad activa de medición.
La pantalla de inicio de PESAJE
Línea de pantalla Inicio
Toque g para cambiar unidad
Campos de referencia
Botones de aplicaciones
Icono de
aplicación

ES-10 BALANZAS ADVENTURER
4.1.1 Configuración de los elementos
Para ver o ajustar la configuración actual
Toque el botón
Configuración de elementos
. Aparecerá la
pantalla de configuración.
Peso mínimo: establece un valor de peso mínimo
utilizado para comprobar una lectura. Si un peso actual
se encuentra por debajo del valor de peso mínimo
establecido, aparece marcado con un color diferente:
amarillo.
Para ajustar el valor de peso mínimo, toque el botón
Peso mínimo
.
Aparecerá una ventana de entrada numérica.
Utilice las teclas para introducir el peso mínimo
deseado, luego pulse Guardar.
La pantalla regresa a la pantalla anterior.
Para regresar a la pantalla de inicio de pesaje, toque
Salir en la parte inferior de la pantalla.
Barra de capacidad: Cuando está ACTIVADA, se
mostrará una barra de capacidad en la campo de
referencia. La guía de capacidad mostrará el peso
actual como porcentaje de la capacidad de la balanza.
Si la barra de capacidad esta DESACTIVADA, el
campo de referencia mostrará el Peso Mínimo y el
Nombre de la Muestra.
Unidades de pesaje: Cambia la unidad mostrada.
Consulte la sección 5.4 para más información
Nivel de filtro: Cambia en nivel de filtro. Consulte la
sección 5.5.3 para más información
Datos de BPL y GMP: Consulte la sección 5.9 para
más información
Configuraciones de impresión: Cambia las
configuraciones de impresión. Consulte la sección 7
para más información
Asistencia de nivel: instrucciones sobre cómo mover
los pies de la balanza para nivelarla.

BALANZAS ADVENTURER ES-11
4.1.2 Nombre de la muestra
Pulse el botón para añadir el nombre de la muestra. Aparecerá una ventana de entrada alfanumérica.
Pulse para alternar entre mayúsculas y minúsculas.
Minúsculas: Mayúsculas:
Pulse en el nombre de la muestra deseada y luego pulse en Guardar para guardar el nombre y volver a
la pantalla de inicio de pesaje.
4.1.3 Guardar en USB
Inserte la unidad flash USB en la ranura de USB localizada en la parte frontal de la balanza. Después,
pulse el botón guardar en USB para guardar los datos en la unidad flash de USB. Una vez guardados, el
botón cambiará momentáneamente a color naranja.
Notas: Puede que la primera vez que se conecte una unidad flash USB haya algún tiempo de retardo
antes de que el botón guardar en USB funcione. Esto es debido a que la balanza está creando
las carpetas necesarias en la unidad flash de USB donde se van a almacenar los datos. Las
aplicaciones Determinación de la densidad y Pesaje de comprobación no tienen un botón de
guardar a USB.
PRECAUCIÓN:
Los datos de pesaje de guardarán en el USB todos los días. Sin embargo, si se utilizan diferentes
modos de pesaje los datos se guardarán de forma separada en campos individuales.
Dependiendo de la unidad USB utilizada, podrían no transferirse todos los datos de la balanza o la
pantalla podría bloquearse. Si esto ocurriera, desconecte la unidad flash USB y conecte otra unidad
flash USB.
Ohaus no se responsabiliza de la pérdida de datos en la unidad flash USB o si la unidad flash USB se
rompiera mientras está conectada a la balanza.
Para minimizar el riesgo de problemas, Ohaus sugiere utilizar una unidad flash USB de alta calidad.
4.2 Recuento de piezas
Nota: antes de utilizar cualquier aplicación, asegúrese de haber nivelado y calibrado la balanza.
Utilice esta aplicación para contar muestras de peso uniforme.
4.2.1 Recuento de piezas
1. En la porción superior izquierda de la pantalla de inicio, seleccione Recuento de piezas.
2. Pulse Tara o Cero si fuera necesario para dar inicio.
3. Coloque objetos en el plato para ver el peso. Cuando esté estable, aparecerá *.
4. El valor resultante se muestra en la línea de pantalla principal en piezas (PCS).

ES-12 BALANZAS ADVENTURER
La pantalla de inicio de Recuento de
piezas
Línea de pantalla Inicio
Campos de referencia
Botones de aplicaciones
Icono de
aplicación
Configuración de los elementos
Para ver o ajustar la configuración actual
Toque el botón
Configuración de elementos
. Aparecerá la
pantalla de configuración.
Muestras: El tamaño de la muestra puede ser de 1 a
10.000 piezas. El valor de la muestra predeterminado es
10. Una vez que se modifica el tamaño de la muestra, la
balanza abre automáticamente la pantalla Recalcular
APW, esperando establecer un nuevo APW.
Para ajustar el tamaño de la muestra, toque el botón
Muestras
.
Aparecerá una ventana de entrada numérica.
Utilice las teclas para introducir el tamaño de muestra
deseado,
luego pulse Guardar.
Aparecerá la siguiente pantalla, con el mensaje para
colocar el peso de referencia en el plato.
Coloque el peso objetivo en el plato. Después pulse
Aceptar para capturar el valor y volver a la pantalla de
configuración.

BALANZAS ADVENTURER ES-13
Establecer un peso de pieza medio (APW)
Cada vez que se cuenta un nuevo tipo de pieza,
se debe establecer el peso nominal de una
pieza (peso de pieza medio o APW) utilizando
una pequeña cantidad de piezas. Este APW se
almacena hasta que se sustituye por otro APW.
Existen dos métodos para establecer el valor
de APW:
1. El APW real se conoce
2. el APW se debe derivar por peso. Para
este caso, se utilizará el tamaño de muestra
actual
Establecer un peso de pieza medio (APW) conocido
Para ajustar el valor APW directamente, toque el
botón
APW.
Aparecerá una ventana de entrada numérica.
Pulse la tecla del peso APW deseado y luego pulse Guardar.
La pantalla vuelve a la pantalla de inicio mostrando en
el campo de referencia el nuevo valor APW.
Establecimiento de un nuevo peso de pieza medio
(APW) – Derivado
Para establecer un nuevo APW, coloque en el plato el peso de
referencia y pulse Aceptar para continuar.
Nota: se utilizará el tamaño de la muestra mostrado.
Para utilizar un tamaño de muestra diferente, cámbiela en
primer lugar (consulte arriba).
La pantalla de inicio muestra el número de piezas en el nuevo
APW
Optimización automática: cuando está Activada, mejora la exactitud del recuento volviendo a calcular
automáticamente el peso de la pieza a medida que se añaden las piezas. De manera predeterminada está
Desactivada.
Notas: Se produce la optimización solo cuando el número de piezas añadido al plato se encuentra entre uno y
tres veces el número que se encuentra en el plato.
Si el APW se introduce de forma manual mediante el teclado numérico, la optimización automática no se
producirá.
Configuraciones de impresión: cambia las configuraciones de impresión. Consulte la sección 7 para más
información.
Nota: El botón de Guardar en un USB solo aparecerá cuando se haya conectado una unidad flash USB a la
balanza.
Consulte la sección 4.1.3 para más información.

ES-14 BALANZAS ADVENTURER
4.3 Pesaje porcentual
Nota: antes de utilizar cualquier aplicación, asegúrese de haber nivelado y calibrado la balanza.
Utilice el pesaje porcentual para medir el peso de una muestra como porcentaje de un peso de referencia
preestablecido.
Aparecerá el peso de referencia predeterminado (o último).
Pesaje porcentual
1. En la porción superior izquierda de la pantalla de inicio, seleccione Pesaje porcentual.
2. Coloque un elemento en el plato. La diferencia entre la muestra y el peso de referencia se muestra como
porcentaje.
La pantalla de inicio de Pesaje
porcentual
Línea de pantalla Inicio
Campos de referencia
Botones de aplicaciones
Icono de
aplicación
4.3.1 Configuración de los elementos
Para ver o ajustar la configuración actual
Toque el botón
Configuración de elementos
.
Aparecerá la pantalla de configuración.
Recalcular P. de Ref.: para establecer un
nuevo valor de peso de referencia, toque el
botón Recalcular peso de referencia.
Siga las instrucciones de la pantalla para
establecer un nuevo peso de referencia.
De forma alternativa, pulse el botón
Peso de
ref.
de la pantalla pesaje porcentual Recalcular
peso de referencia para establecer
manualmente un nuevo peso de referencia
mediante el teclado numérico.
Configuraciones de impresión: cambia las
configuraciones de impresión. Consulte la sección 7
para más información.
Nota: El botón de Guardar en un USB solo aparecerá
cuando se haya conectado una unidad flash USB a la
balanza.
Consulte la sección 4.1.3 para más información.

BALANZAS ADVENTURER ES-15
4.4 Pesaje dinámico
Nota: antes de utilizar cualquier aplicación, asegúrese de haber nivelado y calibrado la balanza.
Utilice esta aplicación para pesar una carga inestable como por ejemplo un animal que se mueve. Se pueden
seleccionar dos modos diferentes de inicio o restablecimiento: Manual (se inicia y detiene pulsando la techa) y
Automático (se inicia y detiene automáticamente).
Pesaje dinámico – Manual (predeterminado)
1. En la porción superior izquierda de la pantalla de inicio, seleccione Pesaje Dinámico.
2. Coloque los objetos en el plato y pulse el botón Inicio.
La pantalla de inicio de Pesaje
dinámico
Línea de pantalla Inicio
Campos de referencia
Botones de aplicaciones
Icono de
aplicación
3. La balanza inicia una cuenta atrás (proceso de promediación). Durante la cuenta atrás, la línea de
información muestra el tiempo restante.
Si fuera necesario, pulse Detener para detener.
4. Cuando finaliza la cuenta atrás, la línea de resultado permanece en pantalla. Pulse Borrar para borrar el
peso en pantalla y volver a la pantalla inicial.
Nota: no deje ningún objeto en el plato antes de iniciar un nuevo ciclo de pesaje dinámico.
4.4.1 Configuración de los elementos
Para ver o ajustar la configuración actual
Toque el botón
Configuración de elementos
. Aparecerá
la pantalla de configuración.
Tiempo de promediación: establece el tiempo
promedio para un valor entre 1 y 99 segundos.
Por defecto son 5 segundos.
Modo automático: Cuando se Activa, el ciclo
comienza cuando se coloca un objeto en el plato
y el valor en pantalla se restablece
automáticamente cuando el objeto se quita del
plato.
Nombre de la muestra: Asigna un nombre a la
muestra.
Configuraciones de impresión: Cambia las
configuraciones de impresión. Consulte la sección 7
para más información.
Nota: El botón de Guardar en un USB solo aparecerá
cuando se haya conectado una unidad de memoria
USB a la balanza. Consulte la sección 4.1.3 para más
información.

ES-16 BALANZAS ADVENTURER
4.5 Determinación de la densidad
Nota: antes de utilizar cualquier aplicación, asegúrese de haber nivelado y calibrado la balanza.
Utilice esta aplicación para determinar la densidad de un objeto. Se pueden realizar cuatro tipos de
determinación de densidad:
1. Sólidos más densos que el agua
2. Sólidos menos densos que el agua
3. Densidad líquida
4. Material poroso (impregnado de aceite)
La pantalla de inicio de Determinación de
densidad
Línea de pantalla Inicio
Campos de referencia
Botones de función
Icono de
aplicación
4.5.1 Medición de la densidad de un sólido utilizando agua (predeterminada)
Pulse el botón Configuración de elementos para abrir la
pantalla de los ajustes de la determinación de densidad.
Confirme que los siguientes Ajustes estén seleccionados:
Tipo de densidad: Sólida
Líquido auxiliar: Agua
Material poroso: Off
Para ajustar el valor de la temperatura del agua, toque el botón
Temperatura del agua.
La balanza calcula la densidad del agua basándose en el valor
de la temperatura del agua introducido.
Mida la temperatura del agua real utilizando un termómetro de
precisión.
Aparecerá una ventana de entrada numérica.
Introduzca la temperatura del agua real, luego pulse Guardar.
Para regresar a la pantalla de inicio de determinación de densidad,
toque Regresar.
Paso 1 de 2 –
Pesar la muestra
en aire.
Pulse
Iniciar
. Siga
las instrucciones y
luego pulse
Aceptar
para almacenar el
peso de la
muestra en seco
(“en aire”).

BALANZAS ADVENTURER ES-17
Paso 2 de 2 –
Pesar la
muestra
sumergida en
líquido.
Siga las
instrucciones y
luego pulse
Aceptar
para almacenar
el peso de la
muestra
(sumergida
en líquido).
Una vez que se han determinado los pesos necesarios, la densidad de la muestra aparece en g/cm
3
(junto con el peso en aire y peso en agua) en la pantalla de aplicaciones.
Pulse
Iniciar
para restablecer todos los valores de peso e reiniciar el proceso.
4.5.2 Medición de la densidad de un material flotante utilizando agua
Pulse el botón Configuración de elementos para abrir la
pantalla Configuración.
Confirme que los siguientes Ajustes estén seleccionados:
Tipo de densidad: Sólida
Tipo de líquido: Agua
Material poroso: Off
Pulse
Volver
para regresar a la pantalla de inicio de
determinación de densidad.
Siga el mismo procedimiento de los materiales sólidos,
excepto el paso 2 de determinación de densidad. Empuje
la muestra hacia abajo hasta que esté completamente
sumergida.
4.5.3 Medición de la densidad de un sólido utilizando un líquido auxiliar
Para activar esta función, ingrese al menú de ajuste de determinación de densidad y seleccione lo siguiente:
Tipo de densidad: Sólido; Tipo de líquido: Otros; Material poroso: Off.
Confirme que los valores predeterminados mostrados
(densidad líquida, etc.) sean correctos.
Para ajustar el valor de la densidad líquida, toque el botón
líquidos auxiliares.
Aparecerá una ventana de entrada numérica.
Pulse la densidad en g/cm
3
, después pulse Guardar.
La pantalla regresa a la pantalla anterior.
Para regresar a la pantalla de inicio de determinación de
densidad,
toque Regresar.
Inicie el proceso de determinación de la densidad según lo
indicado anteriormente.

ES-18 BALANZAS ADVENTURER
4.5.4 Medición de la densidad de un líquido utilizando un dispositivo de inmersión calibrado (no
suministrado)
Active esta función, ingrese al menú de ajuste de densidad y seleccione lo siguiente: Tipo de densidad: Líquida
Nota: si el tipo de densidad se ajusta en líquido, se desactivan las selecciones de tipo de líquido y material
poroso.
La pantalla de inicio de DETERMINACIÓN DE
DENSIDAD - LÍQUIDOS
Línea de pantalla Inicio
Campos de referencia
Botones de función
Icono de aplicación
Confirme que el valor predeterminado mostrado (volumen de
dispositivo de inmersión) sea correcto. Para editar los valores
predeterminados, toque
Volumen de dispositivo de
inmersión
.
Para ajustar el valor del volumen del dispositivo de inmersión,
toque el botón
Volumen de dispositivo de inmersión
.
Aparecerá una ventana de entrada numérica.
Pulse la tecla del valor deseado y después pulse Guardar.
La pantalla vuelve a la pantalla anterior con el nuevo valor
resaltado.
Para regresar a la pantalla principal de la determinación de la
densidad toque
Volver.
Pulse
Iniciar
para iniciar el proceso.
Paso 1 de 2 – Pesar el dispositivo de inmersión en aire.
Siga las instrucciones en pantalla y luego pulse
Aceptar
para almacenar el peso del dispositivo
de inmersión ("en aire").

BALANZAS ADVENTURER ES-19
Paso 2 de 2 – Pesar el dispositivo de inmersión sumergido
en el líquido de prueba.
Siga las instrucciones y luego pulse Aceptar para almacenar el
peso del dispositivo de inmersión (sumergido en líquido).
Una vez que se han determinado los pesos necesarios,
la densidad de la muestra líquida aparece en g/cm
3
(junto con el peso en aire y peso en agua)
en la pantalla de la aplicación.
Pulse
Iniciar
para restablecer todos los valores de peso e
reiniciar el proceso.
4.5.5 Medición de la densidad de un material poroso utilizando aceite
Para activar esta función, ingrese al menú de Ajuste de
determinación de densidad y ajuste lo siguiente:
Tipo de densidad: Sólida
Tipo de líquido: Agua
Material poroso: Encendido
La pantalla de inicio de DETERMINACIÓN DE
DENSIDAD - POROSOS
Línea de pantalla Inicio
Campos de referencia
Funciones Icono de aplicación

ES-20 BALANZAS ADVENTURER
Confirme que los valores predeterminados
mostrados (temperatura del agua) sean correctos.
Para editar los valores predeterminados, toque
Configuración de elementos
.
Aparecerá la pantalla de configuración.
La balanza calcula la densidad del agua basándose
en el valor de la temperatura del agua introducido
(tabla de búsqueda).
Mida la temperatura del agua real utilizando un
termómetro de precisión.
Para ajustar los valores de temperatura del agua o
densidad del aceite, toque el botón Temperatura del
agua o Densidad del aceite.
Aparecerán ventanas de
introducción numérica.
Pulse la tecla del valor deseado y
luego pulse Guardar.
La pantalla vuelve a la pantalla
anterior con el nuevo valor
resaltado.
Para volver a la pantalla principal de
la Determinación de la densidad,
toque Salir.
Pulse Iniciar cálculo de densidad.
Paso 1 de 3 – Pesar la muestra no lubricada en aire.
Siga las instrucciones y luego pulse
Aceptar
para almacenar el
peso de la muestra en seco (en aire).
Paso 2 de 3 – Pesar la muestra lubricada en aire.
Siga las instrucciones y luego pulse
Aceptar
para almacenar el peso de la muestra (lubricada).

BALANZAS ADVENTURER ES-21
Paso 3 de 3 – Pesar la muestra lubricada sumergida en
líquido.
Siga las instrucciones y luego pulse
Aceptar
para almacenar el peso de la muestra lubricada (sumergida en
líquido).
Una vez que se han determinado los pesos necesarios, la
densidad de la muestra aparece en g/cm
3
(junto con el peso en
aire, no lubricada y lubricada y peso en agua) en la pantalla de
la aplicación.
El valor permanece en pantalla hasta que se toca Iniciar.
Pulse
Iniciar
para restablecer todos los valores de peso e
reiniciar el proceso.
4.6 Control dinámico del peso
Nota: antes de utilizar cualquier aplicación, asegúrese de haber nivelado y calibrado la balanza.
El pesaje de comprobación se utiliza para comparar el peso de una muestra con los límites del objetivo.
Control dinámico del peso
1. En la porción superior izquierda de la pantalla de inicio, seleccione Pesaje de comprobación.
2. Aparecerán los límites predeterminados (o últimos) de peso de comprobación.
3. Coloque objetos en el plato.
4. El estado Defecto/Aceptación/Exceso se muestra en la barra de progreso mientras que el peso real del
elemento se muestra en la línea de pantalla de Inicio.
La pantalla de inicio de Pesaje de
comprobación
Línea de pantalla Inicio
Campos de referencia
Botones de función
Icono de
aplicación
Para ajustar el Valor de exceso, toque el botón Exceso
Para ajustar el Valor defecto, toque el botón
Defecto
Aparecerá una ventana de entrada numérica.
Introduzca el peso límite deseado, luego pulse Guardar.
Tara regresar a la pantalla de inicio de PESAJE DE
COMPROBACIÓN,
toque
Salir
.

ES-22 BALANZAS ADVENTURER
4.6.1 Configuración de los elementos
Para ver o ajustar la configuración actual
Toque el botón
Configuración de elementos
. Aparecerá la
pantalla de configuración.
Nombre de la muestra: Asigna un nombre a la muestra.
Configuraciones de impresión: Cambia las
configuraciones de impresión. Consulte la sección 7
para más información
4.7 Control de la pantalla
Nota: antes de utilizar cualquier aplicación, asegúrese de haber nivelado y calibrado la balanza.
Hay dos modelos disponibles:
Control de la pantalla - permite al usuario capturar y almacenar un peso estable.
Mantenimiento del pico - permite al usuario capturar y almacenar el peso estable más alto.
La pantalla de inicio del Control de
la pantalla
Línea de pantalla Inicio
Campos de referencia
Botones de función
Icono de
aplicación
Control de la pantalla
4.7.1 Control de la pantalla– Manual (predeterminado)
1. En la porción superior izquierda de la pantalla de inicio, seleccione Control de la pantalla.
2. Coloque la muestra en el plato y pulse Mantener en cualquier momento mientras se está capturando el
peso.
3. Ahora la línea de la pantalla principal muestra el peso estable actual.
4. Pulse Borrar para eliminarlo y volver a la pantalla de inicio de Control de la pantalla.

BALANZAS ADVENTURER ES-23
Mantenimiento del pico
4.7.2 Control de la pantalla – Automático
1. En la porción superior izquierda de la pantalla de inicio, seleccione Control de la pantalla.
2. Establezca el Modos automático en Activado en configuración de elementos (consulte la sección 4.7.3).
3. Coloque la muestra en el plato para dar inicio.
4. Continúe pesando muestras. El peso estable se mantiene automáticamente.
5. Pulse Detener para limpiar y vuelva al funcionamiento normal.
4.7.3 Configuración de los elementos
Para ver o ajustar la configuración actual
Toque el botón
Configuración de elementos
. Aparecerá la
pantalla de configuración.
Modo: escoge entre Mantenimiento del pico y
mantenimiento de la pantalla (de manera
predeterminada).
Nombre de la muestra: asigna un nombre a la
muestra.
Configuraciones de impresión: cambia las
configuraciones de impresión. Consulte la sección 7
para más información.
Nota: El botón de Guardar en un USB solo aparecerá cuando
se haya conectado una unidad de memoria USB a la balanza.
Consulte la sección 4.1.3 para más información.
4.8 Totalización
Nota: antes de utilizar cualquier aplicación, asegúrese de haber nivelado y calibrado la balanza.
La totalización mide el peso acumulado de una secuencia de elementos. El total acumulado puede exceder la
capacidad de la balanza. El número máximo de muestras (n) es 99.

ES-24 BALANZAS ADVENTURER
La pantalla de inicio de Totalización
Línea de pantalla Inicio
Campos de referencia
Botones de aplicaciones
Icono de
aplicación
Totalización
1. En la porción superior izquierda de la pantalla de inicio, seleccione Totalización.
2. Coloque el elemento en el plato para dar inicio. El peso de la muestra aparece en la línea de pantalla
principal.
3. Pulse Acumular para añadir el peso (cuando sea estable) del elemento del total.
4. Retire el elemento del plato de pesaje, luego añada el siguiente elemento y continúe según lo indicado
anteriormente.
5. Pulse Resultado para ver los resultados de la totalización.
6. Una vez que finalice, pulse el botón Borrar total para restablecer el peso acumulado en cero.
7. Pulse Guardar en USB para guardar el resultado en una unidad de memoria USB o Salir para volver a la
pantalla de inicio de Totalización.
Nota: Cambiar las unidades convierte los resultados de Acumulación en la unidad seleccionada.
4.9 Formulación
Nota: antes de utilizar cualquier aplicación, asegúrese de haber nivelado y calibrado la balanza.
Utilice esta aplicación para la síntesis de compuestos y formulación de recetas. El número máximo de
componentes es 50.
La pantalla de inicio de Formulación
Línea de pantalla Inicio
Campos de referencia
Botones de aplicaciones
Icono de
aplicación
Formulación
1. En la porción superior izquierda de la pantalla de inicio, seleccione Formulación.
2. Pulse Inicio para comenzar el proceso de síntesis de compuestos.
3. Coloque el primer ingrediente en el plato (o en un recipiente tarado) y pulse Aceptar para almacenar el
componente.
4. Continúe añadiendo componentes y pulsando Aceptar para guardar el peso de los componentes
individuales hasta que la fórmula esté completa. La línea Total muestra el peso total de todos los
componentes.

BALANZAS ADVENTURER ES-25
5. Pulse Parar para finalizar la formulación. Se muestran los resultados de Formulación:
Nota: si Rellenado está Activado (consulte la sección 4.9.1 que aparece a continuación), la balanza le
pedirá añadir un material de relleno para completar la formulación. Añada el material de relleno y pulse
Aceptar para completar la formulación y mostrar los resultados.
6. Pulse Guardar en USB para guardar los resultados en una unidad de memoria USB o Salir para volver a
la pantalla de inicio de Totalización.
Nota: Los resultados de la formulación se eliminarán cuando comience una nueva formulación.
4.9.1 Configuración de los elementos
Para ver o ajustar la configuración actual
Toque el botón
Configuración de elementos
. Aparecerá
la pantalla de configuración.
Relleno: si está Activado, se solicita un material de
relleno al final de la formulación.
Tara Automática: si está activada, la balanza realizará
la Tara automáticamente después de aceptar el peso
del componente.
Configuraciones de impresión: cambia las
configuraciones de impresión. Consulte la sección 7 para
más información

ES-26 BALANZAS ADVENTURER
4.10 Funciones adicionales
4.10.1 Peso bajo
La balanza Adventurer está equipada con un gancho de peso bajo para pesaje por debajo de la balanza.
Nota: para evitar daños, antes de apagar la balanza, retire el plato y los elementos de protección contra
corrientes de aire (si os hubiera).
Atención: no coloque la balanza sobre el cono de soporte para el plato o patillas de células de carga
Para usar esta función, desenchufe la balanza y retire la cubierta protectora de la abertura para peso bajo.
La balanza se puede apoyar utilizando un gato u otro método adecuado. Asegúrese de que la balanza
esté nivelada y firme. Enchufe la balanza y luego utilice una cuerda o alambre para sujetar los elementos
que desee pesar.
Peso bajo
Cubierta
protectora
Pesos con
gancho

BALANZAS ADVENTURER ES-27
5. CONFIGURACIÓN DEL MENÚ
5.1 Navegación por menú
Estructura del menú de usuario:
Modos de Aplicació n
Menú principal
Calibració n
Ajuste de la balanza
Unidades de
pesaje
Mantenimiento
de datos
Comunicació n
Datos de
BPL y GMP
Valores
de
fá brica
Bloqueo
Ap. de pesaje
Calibració n
Cal. interna
Idioma
Miligramo
Exportar a USB
RS232
está ndar
Encabezados
Calibració n
Peso mínimo
Ajuste de la
balanza
Cal.
automá tica
Configuració n del usuario
Gramo
Configuració n de
modo de ap.
Tasa de
baudios
Encabezado
1
Ajuste de la
balanza
Guía de capacidad
Unidades de
pesaje
AutoCal
TM
Calibració n de funció n tá ctil
Kilogramo
Configuració n de
menú
2400
Encabezado
2
Unidades de
pesaje
Unidades
Mantenimiento
de datos
Cal. de
amplitud
Brillo
Quilate
Importar desde
USB
4800
Encabezado
3
Mantenimiento
de datos
Nivel de filtro
Comunicació n
Cal. de
linealidad
Pitido
Onza
Configuració n de
modo de ap.
9600
Encabezado
4
Comunicació n
Datos de BPL y
GMP
Datos de BPL y
GMP
Prueba de
calibració n
Atenuació n auto.
onza troy
Configuració n de
menú
19200
Encabezado
5
Datos de BPL y
GMP
Configuraciones de impresió n
Restablecimiento
de valores de
fá brica
Asistencia de nivel
Libra
inf. de balance
38400
Nombre de la
balanza
Restablecimiento
de valores de
fá brica
Asistencia de nivel
Bloqueo
Nivel de filtro
Pennyweight
Transmisió n
Nombre de
usuario
Ap. de recuento
Rastreo de cero automá tico
Grano
7 E 1
Nombre del
proyecto
Tamañ o de la muestra
Tara auto.
Newton
7 E 2
APW
Graduació n
Momme
7 N1
Auto Opt
Fecha y hora
Mesghal
7 N2
Configuraciones de impresió n
Fecha
HKTael
7 O 1
Ap. de porcentaje
Hora
SGTael
7 O2
Volver a calcular P. de Ref.
Modo aprobado
TWTael
8 N1
Configuraciones de impresió n
Tical
8 N2
Ap. diná mica
Tola
Protocolo de
enlace
Tiempo promedio
Baht
Configuraciones
de impresió n
Modo auto.
Personalizada1
Salida de
impresió n
Nombre de la muestra
Nombre de la
unidad
Solo peso
estable
Configuraciones de impresió n
Factor
Solo valor
numé rico
Ap. densidad
Exponente
Solo un
encabezado
individual
Tipo de densidad
10
-3
Opciones de
impresió n
Líquido auxiliar
10
-2
Impresió n
automá tica
Temp. del agua
10
-1
impresió n auto.
desactivada
Material poroso
10
0
Estabilidad On
Densidad del aceite
10
1
Intervalo
(segundos)
Volumen de dispositivo de inmersió n
10
2
Continuo
Temp. del líquido
10
3
Impresió n de
contenidos
Configuraciones de impresió n
LSD
Selecció n
Ap. control de peso
0.5
Encabezado
Nombre de la muestra
1
Fecha y hora
Configuraciones de impresió n
2
ID de la
balanza
Ap. control de la pantalla
5
Nombre de la
balanza
Modo control de la pantalla
10
Nombre de
usuario
Nombre de la muestra
100
Nombre del
proyecto
Configuraciones de impresió n
Nombre de la
aplicació n
Ap. totalizació n
Nombre de la
muestra
Ap. formulació n
Resultado
Relleno
Bruto
Modo automá tico
Neto
Configuraciones de impresió n
Tara
Informació n
Línea de firma
Salto de línea
Guardar en
USB

ES-28 BALANZAS ADVENTURER
Toda la navegación por el menú se realiza tocando la pantalla. Para acceder al menú, toque Menú en la pantalla
de inicio de la aplicación. Aparece el menú principal con los botones Volver y Salir. Continúe tocando el
elemento adecuado de la lista para navegar por los elementos del menú.
5.1.1 Cambio de configuraciones
Para cambiar una configuración del menú, navegue por esa configuración siguiendo los siguientes pasos:
Acceda al menú
Desde la pantalla de cualquier aplicación, toque
Menú.
Aparece en pantalla la lista del menú principal.
Seleccione el submenú
Localice y toque el elemento seleccionado de la lista
del menú principal. Aparecerá el submenú.
Seleccione el elemento del menú
Continúe hasta que se haya seleccionado la
configuración deseada en la lista del menú. Toque
la configuración para cambiarla.
La configuración cambiada aparecerá resaltada en
amarillo durante 1 segundo para confirmar el valor
cambiado.
Salga del menú y regrese a la aplicación actual
Después de confirmar la configuración, toque Salir para regresar a la aplicación.
Nota: en cualquier momento, se pueden tocar los botones Volver y Salir para navegar por el área deseada del
menú o regresar a la aplicación actual. Continúe hasta que se haya seleccionado la configuración deseada en la
lista del menú.
La estructura del menú principal de la balanza Adventurer se ilustra a continuación.
Calibración
Ajuste de la balanza
Unidades de pesaje
Mantenimiento
de datos
Comunicación
GLP/GMP Data
(Datos de BPL y
GMP)
Restablecimiento de
valores de fábrica
Bloqueo

BALANZAS ADVENTURER ES-29
5.2 Calibración
Las balanzas Adventurer (modelos INCAL) ofrecen la posibilidad de elegir entre seis métodos de
calibración: Calibración Interna
Calibración automática, Calibración AutoCal™ Ajuste, Calibración de amplitud, Calibración de Linealidad
y Prueba de calibración.
Nota: La unidad de calibración es siempre en gramos.
Atención: no toque la balanza durante una calibración.
5.2.1 Submenú de calibración (modelos INCAL)
Calibración
Interna
Automático
Calibración
AutoCal™
Ajuste
Amplitud
Calibración
Calibración de
Linealidad
Cal
(Calibración)
Prueba
Nota: Solo los modelos /E solo tienen Calibración de amplitud, Calibración de Linealidad
y Prueba de calibración.
5.2.2 Calibración Interna
La calibración se logra con la masa de calibración interna. La calibración interna se puede realizar en
cualquier momento, siempre que la balanza esté caliente para el funcionamiento de la temperatura y esté
nivelada.
Con la balanza en ENCENDIDO y sin carga en el plato, toque Calibración interna.
La balanza empieza a calibrarse. Y sin carga en el plato, toque Calibración interna.
La pantalla muestra el estado y luego regresa a la aplicación actual.
Para cancelar en cualquier momento, pulse Salir.
5.2.3 Calibración Automática
Cuando Calibración automática está ACTIVADA la balanza realiza una autocalibración:
• cuando detecta un cambio de temperatura de1 °C
• o cada 11 horas
AutoCal calibra automáticamente la balanza (utilizando la masa interna) cada vez que hay un cambio de
temperatura lo suficientemente significativo como para afectar su precisión o cada 11 horas.
Cuando esté a punto de comenzar una Calibración automática, aparecerá una pantalla de información.
Se mostrarán tres botones de opciones:
Ahora - Pulse para realizar la calibración directamente.
5 min - Pulse para realizar la calibración después de 5 minutos.
Desactivar - Pulse para desactivar la función Calibración automática.

ES-30 BALANZAS ADVENTURER
5.2.4 Ajuste de ™ AutoCal
Utilice este método de calibración para ajustar el punto de calibración de amplitud sin afectar la
calibración de la amplitud o linealidad.
Se puede utilizar el ajuste de calibración para ajustar el resultado de la Calibración interna en +100
divisiones.
Nota: antes de realizar un ajuste de calibración, realice una calibración interna. Para comprobar si se
necesita un ajuste, coloque una masa de prueba igual al valor de calibración de amplitud en el plato y
compruebe la diferencia (en divisiones) entre el valor de masa nominal y la lectura real de la balanza. Si
la diferencia se encuentra dentro de +1 división, no se requiere un ajuste de calibración. Si la diferencia
excede +1 división, se recomienda un ajuste de calibración
Ejemplo:
Lectura de peso real: 200.014
Lectura de peso esperada: 200.000 (valor de masa de prueba)
Diferencia de peso (d): 0,014
Diferencia de peso en dígitos: –14 (ajustar valor)
Para realizar un ajuste de calibración, toque el ajuste AutoCal del menú de calibración, introduzca el
valor (divisiones positivas o negativas) para igualar la diferencia percibida en el procedimiento anterior.
Realice una nueva calibración utilizando la calibración interna. Después de la calibración, coloque la
masa de prueba en el plato y compruebe que el valor de la masa es ahora igual al valor mostrado. De no
ser así, repita el procedimiento hasta que la lectura de calibración interna concuerde con la masa de
prueba.
Una vez finalizado, la balanza guarda el valor de ajuste y la pantalla regresa a la aplicación actual.
5.2.5 Calibración de amplitud
La calibración de amplitud utiliza dos puntos de calibración: uno en la carga de cero y otro en la carga
completa especificada (amplitud). Para conocer información detallada sobre la masa de calibración,
consulte las tablas de especificación en la sección 9.
Nota: las configuraciones predeterminadas de fábrica aparecen en negrita.
Con la balanza ajustada en ENCENDIDO y sin carga en el plato, toque Calibración de amplitud para
iniciar el procedimiento. Los valores de calibración adicionales utilizados se muestran en la pantalla. La
mayor exactitud se logra utilizando la masa más cercana al valor de amplitud total.
Nota: para cambiar el punto de calibración de amplitud, toque el peso alternativo que se muestra en
pantalla. Siga las instrucciones en pantalla y coloque el peso de calibración especificado en la balanza,
cuando así se lo solicite. Una vez finalizado, la pantalla muestra el estado de la calibración de amplitud y
regresa a la aplicación actual.
5.2.6 Calibración de Linealidad
La calibración de Linealidad utiliza tres puntos de calibración: uno en la carga de cero y los otros en
cargas específicas.
Sin carga en la báscula, pulse calibración de linealidad para iniciar el proceso.
La balanza captura el punto de puesta a cero y luego pasa al siguiente peso.
Siga las instrucciones que se muestran en la pantalla hasta que finalice la calibración.
Para cancelar en cualquier momento, pulse Salir.
5.2.7 Prueba de calibración
Utilice la prueba de calibración para comparar un peso de calibración conocido con los datos de
calibración de extensión almacenados.
Sin peso en la báscula, pulse Prueba de calibración para comenzar el proceso.
La balanza captura e punto cero, después muestra el valor de amplitud.
La pantalla muestra el estado, seguido de la diferencia entre el peso de calibración actual y los datos de
calibración almacenados.

BALANZAS ADVENTURER ES-31
5.3 Ajuste de la balanza
Ingrese a este submenú para personalizar la funcionalidad de la balanza.
5.3.1 Submenú de ajuste de la balanza
Idioma
Configuración
del usuario
Nivel de filtro
Rastreo de cero
automático
Tara automática
Graduaciones
Fecha y hora
Modo aprobado
Las configuraciones predeterminadas de fábrica aparecen a continuación en negrita.
5.3.2 Idioma
Ajuste el idioma para los menús y mensajes.
Inglés
Alemán
Francés
Español
Italiano
Polaco
Turco
Checo
Húngaro
5.3.3 Configuración del usuario
Utilice este submenú para cambiar el ajuste de:
Calibración de función táctil
“Calibración en ejecución, toque la pantalla en el centro del círculo”
(primero en parte superior izquierda, luego en parte inferior derecha.)
Brillo de la pantalla:
BAJO = brillo de pantalla bajo
MEDIO = brillo de pantalla normal
ALTO = brillo de pantalla alto.
Pitido:
APAGADO = desactivado
ACTIVADO = activado
Atenuación automática (atenúa la pantalla si no hay actividad durante x minutos)
APAGADO = desactivado
10 min
20 min
30 min
Asistencia de nivel: instrucciones sobre cómo mover los pies de la balanza para
nivelarla.

ES-32 BALANZAS ADVENTURER
5.3.4 Nivel de filtro
Configura la cantidad de filtrado de señales.
BAJO = tiempo de estabilización más rápido con menos
estabilidad.
MEDIO = tiempo de estabilización normal con estabilidad
normal.
ALTO = tiempo de estabilización más lento con más
estabilidad.
5.3.5 Rastreo de cero automático
Configura la funcionalidad de seguimiento de la puesta a cero automática.
APAGADO = desactivado.
0,5 D = la pantalla mantiene la puesta a cero hasta una
deriva de 0,5 graduación por segundo.
1 D = la pantalla mantiene la puesta a cero hasta una
deriva de 1 graduación por segundo.
3 D = la pantalla mantiene la puesta a cero hasta una
deriva de 3 graduaciones por segundo.
5.3.6 Tara automática
Ajuste la tara automática.
APAGADO= desactivado.
ENCENDIDO = activado.
Cuando esté a punto de comenzar la Tara automática, se mostrará en la pantalla
'Coloque el contenedor en el plato'.
Debajo del texto se mostrará el botón Desactivar. Pulse el botón para
desactivar la función Tara automática
5.3.7 Graduaciones
Ajusta la sensibilidad mostrada de la balanza.
División 1= sensibilidad estándar.
Divisiones 10 = la sensibilidad aumenta por un factor de 10.
Por ejemplo: si la sensibilidad estándar es 0,01 g seleccionando Divisiones por 10, la
sensibilidad mostrada será de 0,1 g.
5.3.8 Fecha y hora
Ajusta la fecha y hora actual.
Cambie el formato (si así se desea)
y luego introduzca el valor actual.
Pulse Guardar para confirmar el nuevo valor.

BALANZAS ADVENTURER ES-33
5.3.9 Modo aprobado
Utilice este menú para ajustar el estado del comercio legal.
APAGADO = funcionamiento estándar.
ENCENDIDO = el funcionamiento cumple con las normas de
Metrología Legal.
Nota: Si se ajusta Modo aprobado en ENCENDIDO, la configuración del menú se ve
afectada de la siguiente manera:
Menú de calibración:
La calibración interna AutoCal está forzada en ENCENDIDO y oculta. Están
disponibles las funciones de Calibración interna y Prueba de calibración. Todas
las demás funciones están ocultas.
Menú de ajuste de la balanza:
En la configuración actual se bloquea el Nivel de filtro.
El rastreo de cero automático se limita a la división 0,5 y APAGADO. Se bloquea
la configuración seleccionada.
La Tara automática está bloqueada en la configuración actual.
Las graduaciones están forzadas en la división 1 y el elemento del menú está
oculto.
El Menú comunicación (Comunicación->Configuraciones de impresión->Salida de
impresión):
El peso estable solo se bloquea en ENCENDIDO.
El valor numérico solo se bloquea en APAGADO.
El Menú comunicación (Comunicación->Configuraciones de impresión-> Impresión
automática):
Las selecciones de modo de impresión automática se limitan a APAGADO, en
estabilidad e intervalo. El modo continuo no está disponible.
Menú de mantenimiento de datos:
Exportar a USB está oculto
Importar de USB está oculto
Menú de bloqueo:
el Menú está oculto
Nota: El interruptor de seguridad ubicado en la parte trasera de la balanza debe estar
en la posición de bloqueado para establecer el Modo aprobado en ENCENDIDO. El
interruptor de seguridad debe estar en la posición desbloqueada para fijar el Modo
aprobado en APAGADO. Consulte la sección 6.
Pantalla principal de la aplicación de pesaje con el LFT en ENCENDIDO.

ES-34 BALANZAS ADVENTURER
5.4 Unidades de pesaje
Acceda a este submenú para activar las unidades de medición deseadas. Además, a este menú se
puede acceder pulsando el símbolo unidad en la pantalla principal de la aplicación.
Nota: De acuerdo a las leyes nacionales, la balanza no puede incluir las unidades de medición
enumeradas.
5.4.1 Submenú de unidades
Miligramo
gramo
kilogramo
quilate
onza
onza troy
Libra
pennyweight
grain
Newton
momme
mesghal
Tael (Hong
Kong)
Tael
(Singapur)
Tael (Taiwán)
tical
tola
baht
Unidad personalizada 1
Nota: Si el Modo aprobado está fijado en ENCENDIDO algunas unidades no se mostrarán.
Utilice cada Unidad personalizada para mostrar el peso en una unidad alternativa de medición. La unidad
personalizada se define utilizando un factor de conversión, en el que el factor de conversión es el número de
unidades personalizadas por gramo expresado en la notación científica (factor x exponente 10^).
Por ejemplo: Para mostrar el peso en onzas Troy (0,03215075 onzas Troy por gramo), introduzca un
factor de 0,3215075 y un exponente de -1.
Los nombres de las Unidades personalizadas pueden personalizarse con un máximo de 3 caracteres.
5.5 Mantenimiento de datos
Acceda a este submenú para personalizar la configuración de transferencia de datos.
5.5.1 Submenú de mantenimiento de datos
Para exportar e importar funciones
La configuración de varias balanzas se realiza simplemente exportando el perfil de una balanza maestra a través
de la unidad USB. La herramienta de mantenimiento de datos le permite guardar la configuración del usuario y la
aplicación en un USB, que puede transferirse fácilmente a otras balanzas Adventurer. Después, los datos pueden
utilizarse para configurar balanzas Adventurer con datos importados de la balanza original.
Exportar a USB
Importar desde
USB
Información de la
balanza

BALANZAS ADVENTURER ES-35
5.5.2 Exportar a USB
Exporta los datos de pesaje a la unidad Flash USB. Se pueden exportar dos tipos de datos:
- Configuración de la aplicación (APW, Peso de ref., etc.)
- Configuración de menú (Función de ajuste de la balanza, etc.).
Nota: La función Guardar en USB tiene que estar ajustada en ENCENDIDO para
permitir la transferencia de datos a USB. Consulte la sección 5.6 para más información
5.5.3 Importar desde USB
Importa los datos de pesaje desde la unidad Flash USB.
5.5.4 Información de la balanza
Acceda para ver la información sobre la balanza. La información que se muestra
incluye:
Tipo de balanza, ID de balanza, Capacidad, Sensibilidad y Versión del software.
5.6 Comunicación
Acceda a este submenú para definir los métodos de comunicación externa y para ajustar
los parámetros de impresión. Los datos pueden enviarse a una impresora o un PC.
Las configuraciones predeterminadas de fábrica aparecen en negrita. Acceda para ver la
información sobre la balanza.
5.6.1 Submenú de comunicación
RS -232 estándar
Configuraciones de impresión
Guardar en USB
RS -232 estándar:
Entre en este submenú para personalizar la configuración estándar de RS-232.
5.6.2 Tasa de baudios
Ajusta la tasa de baudios (bits por segundo).
2400 = 2400 bps
4800 = 4800 bps
9600 = 9600 bps
19200 = 19200 bps
38400 = 38400 bps

ES-36 BALANZAS ADVENTURER
5.6.3 Transmisión
Ajuste los bits de datos, bit de parada y paridad.
7 PAR 1 = 7 bits de datos, paridad par, bit de parada 1
7 IMPAR 1 = 7 bits de datos, paridad impar, bit de parada 1
7 PAR 2 = 7 bits de datos, paridad par, bit de parada 2
7 IMPAR 2 = 7 bits de datos, paridad impar, bit de parada 2
7 NNGUNO 1 = 7 bits de datos, sin paridad , bit de parada 1
8 NINGUNO 1 = 8 bits de datos, sin paridad, bit de parada 1
7 NNGUNO 2 = 7 bits de datos, sin paridad , bit de parada 2
8 NINGUNO 2 = 8 bits de datos, sin paridad, bit de parada 2
5.6.4 Protocolo de enlace
Ajusta el método de control de flujo.
NINGUNO = sin protocolo de enlace
XON-XOFF = XON/XOFF del protocolo de enlace
HARDWARE = método de control de flujo de hardware
Configuraciones de impresión
Ingrese a este submenú para personalizar la configuración de transferencia de datos.
Submenú Configuración de la impresora
Salida de
impresión
Impresión
automática
Impresión de
contenidos
Alimentación
Formato
Impresión Datos
Calibración
5.6.5 Salida de impresión
Solo peso estable
Configura los criterios de impresión.
DESACTIVADO = los valores se imprimen inmediatamente,
independientemente de la estabilidad.
ACTIVADO = los valores se imprimen solo si se cumplen los
criterios de estabilidad.
Solo valor numérico
Configura los criterios de impresión.
DESACTIVADO = se imprimen todos los resultados y los valores de
los datos de B/N/T. Consulte la
sección 7.2 para más información
ACTIVADO = solo se imprimen valores de datos numéricos
Solo un encabezado individual
Configura los criterios de impresión.
DESACTIVADO = cada vez que se mande imprimir, se imprimirán
los encabezados
ACTIVADO = los encabezados se imprimirán una vez al día
Opciones de impresión
Configura los criterios de impresión.
Impresora = imprimir datos en una impresora
PC = imprimir datos en un PC
5.6.6 Impresión automática
Configura la funcionalidad de impresión automática.
DESACTIVADO = deshabilitado
ESTABILIDAD ON
1
= la impresión ocurre cada vez que se cumplen los
criterios de estabilidad.
INTERVALO
2
= la impresión ocurre en el intervalo de tiempo definido.

BALANZAS ADVENTURER ES-37
CONTINUO = la impresión ocurre en forma continua.
1
Si selecciona CON ESTABILIDAD, ajuste las condiciones para la impresión.
CARGA = se imprime cuando la carga mostrada es estable.
PUESTA A CERO, CARGA = se imprime cuando la lectura de carga o de
puesta a cero mostrada es estable.
2
Si selecciona INTERVALO, ajuste el intervalo de tiempo utilizando el teclado numérico.
Están disponibles las configuraciones de 1 a 3600 segundos. El valor
predeterminado es 0.
5.6.7 Impresión de contenidos
Define el contenido de los datos de impresión.
Selección
Configura el estado.
Desmarcar todo = Todo se establece en DESACTIVADO
Seleccionar todo = Todo se establece en ACTIVADO
Encabezado
Fecha y hora
ID de la balanza
Nombre de la balanza
Nombre de usuario
Nombre del proyecto
Nombre de la aplicación
Nombre de la muestra
Resultado
Bruto
Neto
Tara
Información
Línea de firma
5.6.8 Alimentación
Ajuste la alimentación del papel.
1 LÍNEA = sube el papel una línea después de la impresión.
4 LÍNEAS = sube el papel cuatro líneas después de la impresión.
5.6.9 Formato
Establecer el formato de impresión.
Línea única = impresiones en una sola línea.
Líneas múltiples = prints on multiple lines.
5.6.10 Print Calibration Data
Configura los criterios de impresión.
Off = desactivado
On = activado
Guardar en USB
Configura el estado.
DESACTIVADO = los datos no se guardarán en el USB
ACTIVADO = los datos se guardarán en el USB

ES-38 BALANZAS ADVENTURER
5.7 Datos de BPL y GMP
Acceda a este menú para ajustar los datos de las buenas prácticas de laboratorio (BPL y las
buenas prácticas de fabricación (GMP)).
5.7.1 Submenú de datos de BPL
Encabezado
Nombre de la
balanza
Nombre de
usuario
Nombre del
proyecto
5.7.2 Encabezado
Permite la impresión de encabezados de BPL. Hay hasta 5 encabezados
disponibles.
Hay configuraciones alfanuméricas de hasta 25 caracteres
disponibles para la configuración de cada encabezado.
5.7.3 Nombre de la balanza
Ajuste la identificación de la balanza.
Hay configuraciones alfanuméricas de hasta 25 caracteres. El ajuste
predeterminado está en Adventurer.
5.7.4 Nombre de usuario
Ajuste la identificación del usuario.
Hay configuraciones alfanuméricas de hasta 25 caracteres. El ajuste
predeterminado está en blanco.
5.7.5 Nombre del proyecto
Ingrese a este submenú para ajustar la identificación del proyecto.
Hay configuraciones alfanuméricas de hasta 25 caracteres. El ajuste predeterminado está
en blanco.
5.8 Restablecimiento de los valores de fábrica
Utilice este submenú para restablecer todos los menús a sus configuraciones predeterminadas de fábrica.
Nota: Los datos de calibración no se verán afectados.
Restablecimiento de todo = restablece todos los menús a sus configuraciones predeterminadas
de fábrica.
Salir = vuelve a la pantalla principal de la aplicación sin reiniciar ningún menú.
5.9 Bloqueo
Utilice este submenú para bloquear/desbloquear algunos menús. Una vez bloqueado, aparecerá una
pequeña llave en el icono menú y el usuario no será capaz de entrar en ese menú.
Haga clic en un menú y seleccione:
DESACTIVADO = el menú está desbloqueado
ACTIVADO = el menú está bloqueado

BALANZAS ADVENTURER ES-39
6. COMERCIO LEGAL
Si la balanza se utiliza en el comercio o una aplicación controlada legalmente, se debe ajustar, verificar y sellar
según las normas de medición y pesaje locales. Es responsabilidad del comprador garantizar que se cumplan
todos los requisitos legales pertinentes.
6.1 Configuración
Antes de la verificación y sellado, realice los siguientes pasos en orden:
1. Compruebe que la configuración del menú cumple con las normativas locales de pesos y medidas.
2. Compruebe que las unidades encendidas cumplen con las normativas locales de pesos y medidas.
3. Realice una calibración según se explica en la sección 5.
4. Ajuste la posición del interruptor de seguridad en la posición bloqueada.
5. Ajuste el Modo aprobado a ENCENDIDO en el menú de configuración de la balanza.
Nota: Cuando el Modo aprobado esta ajustado en ENCENDIDO, la calibración externa no se puede realizar.
6.2 Verificación
El personal autorizado de pesos y medidas o un agente de mantenimiento autorizado deben realizar el
procedimiento de verificación.
6.3 Sellado
Después de verificar la balanza, se debe sellar para prevenir un acceso no detectado a la configuración
legalmente controlada. Antes de sellar el dispositivo, asegúrese de que el interruptor de seguridad se encuentre en
la posición bloqueada y que la configuración del Modo aprobado en el menú de ajuste de la balanza se ajuste en
ACTIVADO.
Si se utiliza un sello de papel, coloque el sello sobre el interruptor de seguridad y caja inferior como se indica.
Si se utiliza un sello de alambre, atraviese el cable de sellado en las aberturas del interruptor de seguridad y caja
inferior como se indica.
Desbloqueado
Bloqueado con sello de papel
Bloqueado con sello de alambre

ES-40 BALANZAS ADVENTURER
7. IMPRIMIR
7.1 Conexión, configuración y prueba de la interfaz de la impresora y ordenador
Utilice el puerto RS-232 integrado para conectarla a un ordenador o una impresora.
Si se conecta a un ordenador, utilice HyperTerminal o un software similar como SPDC
que se describe a continuación.
(busque HyperTerminal en Accesorios/Comunicaciones en Windows XP).
Conecte al ordenador con un cable de serie estándar (intermedio).
Elija Nueva conexión, “conectar utilizando” COM1 (o puerto COM disponible).
Seleccione Baud=9600; Paridad=8 ninguno; Parada=1; Protocolo de
enlace=Ninguno. Haga clic en ACEPTAR.
Elija Propiedades / Configuración y, luego, ajuste ASCII. Seleccione las opciones
según la ilustración:
(Enviar extremos de línea…; caracteres con eco…; líneas de conexión…)
Utilice los comandos de la interfaz RS232 (sección 9.6.1) para controlar la balanza
desde un ordenador.
Nota: cuando finaliza la configuración de HyperTerminal, se imprimirán
automáticamente los resultados de la Prueba de calibración y comando de impresión
de eco enviados a la báscula.
Software SPDC
Ohaus proporciona el software Serial Port Data Collection, o SPDC, y puede utilizarse
en sistemas operativos que no tengan el software HyperTerminal mencionado
anteriormente.
Seleccione el tipo de archivo a exportar y la ruta del archivo a exportar y después pulse
Ejecutar como se muestra a continuación.
Nota: El software SPDC solo admite el idioma inglés.
7.2 Formato de salida
Los datos de los resultados y los datos de B/N/T se envían en el siguiente formato.
Campo:
Etiqueta
1
Espacio
2
Peso
3
Espacio
2
Unidad
4
Espacio
Estabilidad
5
Espacio
B/N
6
Espacio
Term.
Caracteres
7
Longitud:
1
11
1
5
1
1
1
3
0
8
1. La longitud del campo etiqueta no está fijada.
2. Cada campo está seguido de un espacio delimitador único (ASCII 32).
3. El campo de peso está formado por 11 caracteres justificados a la derecha. Si el valor es negativo, el
carácter “–“ se ubica a la izquierda inmediata del dígito más importante.
4. El campo de unidad contiene la abreviatura de la unidad de medición de hasta 5 caracteres.

BALANZAS ADVENTURER ES-41
5. El campo Estabilidad contiene el carácter “?” si la lectura del peso no es estable. El campo Estabilidad
y el siguiente campo Espacio se omiten si la lectura del peso es estable.
6. El campo B/N contiene la indicación de neto o bruto. En el caso de pesos netos, el campo contiene
“NETO”. En el caso de pesos netos, el campo contiene “G”.
7. El campo Caracteres de terminación contiene CRLF, cuatro CRLF o salto de impresión (ASCII 12),
dependiendo de la configuración del menú de SALTO DE LÍNEA.
8. MANTENIMIENTO
8.1 Calibración
Compruebe la calibración periódicamente colocando un peso exacto en la balanza y viendo el resultado. Si es
necesario realizar la calibración, consulte la sección 5.2 para más información.
8.2 Limpieza
ADVERTENCIA: Desconecte la balanza Adventurer de la fuente de alimentación antes de
su limpieza.
Asegúrese de que no entre líquido en el interior de la balanza.
Limpie la balanza a intervalos periódicos.
La superficie de la caja puede limpiarse con un paño humedecido con agua o un producto de
limpieza suave.
La superficie de cristal puede limpiarse con un limpiador de cristales. Siga los pasos que
aparecen a continuación sobre cómo eliminar e instalar las puertas deslizantes
Atención: No utilice disolventes, productos químicos fuertes, amoniaco o productos de
limpieza abrasivos.
Eliminar y reinstalar las puertas de cristal para limpieza:
Paso 1.
En la parte trasera de la balanza,
pulse el pasador y saque la puerta
deslizándola.
Paso 2.
Después de limpiarla, deslice la
puerta por la ranura mientras
presiona el pasador mencionado en
el paso 1.
Paso 3.
Deslice las puertas por la ranura
hasta que el tope trasero se alinee
con la otra puerta.

ES-42 BALANZAS ADVENTURER
8.3 Resolución de problemas
TABLA 8-1. RESOLUCIÓN DE PROBLEMAS
Síntoma / Pantalla
Causa posible
Solución
La balanza no se
enciende
A la balanza no le llega corriente
Verifique la conexión y el voltaje
Exactitud baja
Calibración incorrecta
Entorno inestable
Realice una calibración
Mueva la báscula a una ubicación
apropiada
No se puede calibrar
Menú de calibración bloqueado
El Modo aprobado está encendido
Entorno inestable
Masa de calibración incorrecta
Desactive el bloqueo del menú de
calibración
Apague el Modo aprobado
Mueva la balanza a una ubicación
apropiada
Utilice la masa de calibración correcta
No se pueden cambiar
las configuraciones del
menú
Submenú bloqueado
El Modo aprobado está encendido
Submenú de desbloqueo
Apague el Modo aprobado
Peso de referencia
bajo
Peso de referencia demasiado bajo
El peso del plato es demasiado bajo
como para definir un peso de referencia
válido.
Aumente el tamaño de la muestra
Peso de pieza no
válido
El peso de pieza medio es demasiado
bajo
Aumente el peso de pieza medio
Tiempo límite de
funcionamiento
La lectura del peso no es estable
Mueva la balanza a una localización
adecuada
------
Ocupado (tara, puesta a cero,
impresión, esperando un peso estable)
Espere hasta que finalice
8.4 Información de mantenimiento
Si la sección de solución de problemas no resuelve, póngase en contacto con un servicio técnico Ohaus
autorizado. Visite nuestra página web, www.ohaus.com, para localizar la oficina de Ohaus más cercana a usted.
Un técnico especialista de productos Ohaus estará a su disposición para ofrecerle asistencia.

BALANZAS ADVENTURER ES-43
9. DATOS TÉCNICOS
9.1 Especificaciones
Condiciones ambientales
Solo para uso en interiores
Altitud: Hasta 2.000 m
Rango de temperatura especificado: 10
℃
a 30
℃
Humedad: humedad máxima relativa del 80 % para temperaturas de hasta 30
℃
Reducción de linealidad hasta una humedad relativa del 50% al 40 ºC
Fluctuaciones en el voltaje de la alimentación eléctrica: hasta ±10% del voltaje nominal
Categoría de instalación II
Grado de polución: 2
Materiales
Caja inferior; aluminio fundido moldeado, pintado
Carcasa superior: plástico (ABS)
Plataformas de pesaje: 18/10 acero inoxidable
Protección contra corrientes de aire; cristal, plástico (ABS)
Pies: plástico (ABS)

ES-44 BALANZAS ADVENTURER
TABLA 9-1. ESPECIFICACIONES
Modelo:
AX124
AX124/E
AX224
AX224/E
AX324
Capacidad
120 g
120 g
220 g
220 g
320 g
Sensibilidad d
0,0001 g
Repetibilidad (desv.
típica) (g)
0,0001 g
Linealidad (g)
± 0,0002 g
Puntos de
calibración de
amplitud (g)
25 g, 50 g
75 g, 100 g
25 g, 50
g
75 g,
100 g
50 g, 100 g
150 g, 200 g
50 g,
100 g
150 g,
200 g
100 g
200g, 300 g
Calibración
CALIBRACIÓN
automática
Externo
CALIBRACIÓN
automática
Externo
CALIBRACIÓN
automática
Unidades de pesaje
Baht, quilate, grain, gramo, miligramo, mesgal, momme, Newton, onza,
pennyweight, libra, tael (Hong Kong), tael, (Singapur), tael (Taiwán), tical,
tola, onza troy, programable (1)
Aplicaciones
Pesaje, recuento de piezas, pesaje porcentual, pesaje de comprobación,
pesaje de animales, formulación, determinación de la densidad,
totalización, control de la pantalla
Tiempo de
estabilización
(típico)
≤ 3 segundos
Deriva de la
temperatura de
sensibilidad
(PPM/K)
1,5
Peso mínimo típico
del USB
(u=0,10%,k=2)
0,20 g
0,20 g
0,20 g
0,20 g
0,20 g
Peso mínimo óptimo
del USB
(u=0,10%,k=2)
0,082 g
0,082 g
0,082 g
0,082 g
0,082 g
Pantalla
LCD gráfico WQVGA a todo color
Tamaño de la
pantalla
4,3 pulgadas / 10,9 cm (diagonal)
Retroiluminación
LED blanco
Controles
Pantalla táctil resistiva de 4 hilos + 6 teclas de membrana
Comunicación
RS-232, USBx2
Entrada de corriente
de la balanza
12 V CC, 0,5A
Suministro de
corriente
Entrada para adaptador de CA: 100-240 VCA 0,3A 50-60 Hz
Salida para adaptador de CA: 12 V CC 0,84 A
Tamaño de la
plataforma
(diámetro)
90 mm / 3,5 libras
Dimensiones
montada
(A x P x A)
230 x 354 x 340 mm
9,1 x 13 x 13 pulgadas
Dimensiones de
envío
(A x P x A)
387 x 507 x 531 mm
15,4 x 20,0 x 20,9 pulgadas
Peso neto
5,8 kg / 12,8 libras
Peso de envío
8,5 kg / 18,8 libras

BALANZAS ADVENTURER ES-45
TABLA 9-2. ESPECIFICACIONES (continuación)
Modelo:
AX223
AX223/E
AX423
AX423/E
AX523
AX523/E
Capacidad
220 g
220 g
420 g
420 g
520 g
520 g
Sensibilidad d
0,001 g
Repetibilidad (desv.
típica) (g)
0,001 g
Linealidad (g)
± 0,002 g
Puntos de
calibración de
amplitud (g)
50 g, 100 g
150 g, 200 g
50 g,
100 g
150 g,
200 g
100 g, 200 g
300 g, 400 g
200 g,
400 g
200 g, 300 g
400 g, 500 g
200 g,
300 g
400 g,
500 g
Calibración
CALIBRACIÓN
automática
Externo
CALIBRACIÓN
automática
Externo
CALIBRACIÓN
automática
Externo
Unidades de pesaje
Baht, quilate, grain, gramo, miligramo, mesgal, momme, Newton, onza, pennyweight,
libra, tael (Hong Kong), tael, (Singapur), tael (Taiwán), tical, tola, onza troy,
programable (1)
Aplicaciones
Pesaje, recuento de piezas, pesaje porcentual, pesaje de comprobación, pesaje de
animales, formulación, determinación de la densidad, totalización, control de la
pantalla
Tiempo de
estabilización
(típico)
≤ 2 segundos
Deriva de la
temperatura de
sensibilidad
(PPM/K)
3
Peso mínimo típico
del USB
(u=0,10%,k=2)
2.0 g
2.0 g
2.0 g
2.0 g
2.0 g
Peso mínimo óptimo
del USB
(u=0,10%,k=2)
0.82 g
0.82 g
0.82 g
0.82 g
0.82 g
Pantalla
LCD gráfico WQVGA a todo color
Tamaño de la
pantalla
4,3 pulgadas / 10,9 cm (diagonal)
Retroiluminación
LED blanco
Controles
Pantalla táctil resistiva de 4 hilos + 6 teclas de membrana
Comunicación
RS-232, USBx2
Entrada de corriente
de la balanza
12 V CC, 0,5A
Suministro de
corriente
Entrada para adaptador de CA: 100-240 VCA 0,3A 50-60 Hz
Salida para adaptador de CA: 12 V CC 0,84 A
Tamaño de la
plataforma
(diámetro)
130 mm / 5,1 pulg
Dimensiones
montada
(A x P x A)
230 x 354 x 340 mm
9,1 x 13,9 x 13,4 pulgadas
Dimensiones de
envío
(A x P x A)
387 507 x 531 mm
15,4 x 20,0 x 20,9 pulgadas
Peso neto
5,8 kg /
12,8 libras
5,6 kg /
12,4 libras
5,8 kg /
12,8 libras
5,6 kg /
12,4 libras
5,8 kg /
12,8 libras
5,6 kg /
12,4 libras
Peso de envío
8,5 kg /
18,8 libras
8,3 kg /
18,3 libras
8,5 kg /
18,8 libras
8,3 kg /
18,3 libras
8,5 kg /
18,8 libras
8,3 kg /
18,3 libras

ES-46 BALANZAS ADVENTURER
TABLA 9-3. ESPECIFICACIONES (continuación)
Modelo:
AX422
AX422/E
AX822
AX822/E
Capacidad
420g
420g
820g
820g
Sensibilidad d
0,01 g
Repetibilidad
(desv. típica)
(g)
0,01 g
Linealidad (g)
± 0,02 g
Puntos de
calibración de
amplitud (g)
100g, 200g
300g,400g
100g, 200g
300g,400g
200g, 400g
600g, 800g
200g, 400g
600g, 800g
Calibración
CALIBRACIÓN
automática
Externo
CALIBRACIÓN
automática
Externo
Unidades de
pesaje
Baht, quilate, grain, gramo, kilogramo, mesgal, momme, Newton, onza, pennyweight, libra,
tael (Hong Kong), tael, (Singapur), tael (Taiwán), tical, tola, onza troy, programable (1)
Aplicaciones
Pesaje, recuento de piezas, pesaje porcentual, pesaje de comprobación, pesaje de animales,
formulación, determinación de la densidad, totalización, control de la pantalla
Tiempo de
estabilización
(típico)
≤ 1,5 segundos
Deriva de la
temperatura
de sensibilidad
(PPM/K)
3
Peso mínimo
típico del USB
(u=0,10%,k=2)
20,0 g
20,0 g
20,0 g
20,0 g
Peso mínimo
óptimo del
USB
(u=0,10%,k=2)
8,2 g
8,2 g
8,2 g
8,2 g
Pantalla
LCD gráfico WQVGA a todo color
Tamaño de la
pantalla
4,3 pulgadas / 10,9 cm (diagonal)
Retroiluminaci
ón
LED blanco
Controles
Pantalla táctil resistiva de 4 hilos + 6 teclas de membrana
Comunicación
RS-232, USBx2
Entrada de
corriente de la
balanza
12 VCC, 0,5 A
Suministro de
corriente
Entrada para adaptador de CA: 100-240 VCA 0,3A 50-60 Hz
Salida para adaptador de CA: 12 V CC 0,84 A
Tamaño de la
plataforma
175 x 195 mm / 6,9 x 7,7 pulgadas
Dimensiones
montada
(A x P x A)
230 x 354 x100 mm
9,1 x 13,9 x 4,0 pulgadas
Dimensiones
de envío
(A x P x A)
392 x 557 x 301 mm
15,5 x 22,0 x 11,9 pulgadas
Peso neto
4.6Kg/10.2lb
3.9Kg/8.6lb
4.6Kg/10.2lb
3.9Kg/8.6lb
Peso de envío
6.5Kg/14.4b
5.8Kg/12.8b
6.5Kg/14.4b
5.8Kg/12.8b

BALANZAS ADVENTURER ES-47
TABLA 9-4. ESPECIFICACIONES (continuación)
Modelo:
AX1502
AX1502/E
AX2202
AX2202/E
AX4202
AX4202/E
AX5202
Capacidad
1.520 g
1.520 g
2.200 g
2.200 g
4.200 g
4.200 g
5.200 g
Sensibilidad d
0,01 g
Repetibilidad
(desv. típica)
(g)
0,01 g
Linealidad (g)
± 0,02 g
Puntos de
calibración de
amplitud (g)
300 g, 400 g
500 g, 600 g
500 g
1000 g,
1500 g
500 g,
1000 g
1500 g,
2000 g
500 g,
1000 g
1500 g,
2000 g
1000 g,
2000 g
3000 g,
4000 g
1000 g,
2000 g
3000 g,
4000 g
2000 g,
3000 g
4000 g,
5000 g
Calibración
CALIBRACIÓN
automática
Externo
CALIBRACIÓN
automática
Externo
CALIBRACIÓN
automática
Externo
CALIBRACIÓN
automática
Unidades de
pesaje
Baht, quilate, grain, gramo, kilogramo, mesgal, momme, Newton, onza, pennyweight, libra, tael (Hong Kong),
tael, (Singapur), tael (Taiwán), tical, tola, onza troy, programable (1)
Aplicaciones
Pesaje, recuento de piezas, pesaje porcentual, pesaje de comprobación, pesaje de animales, formulación,
determinación de la densidad, totalización, control de la pantalla
Tiempo de
estabilización
(típico)
≤ 1,5 segundos
Deriva de la
temperatura de
sensibilidad
(PPM/K)
3
1,9
Peso mínimo
típico del USB
(u=0,10%,k=2)
20,0 g
20,0 g
20,0 g
20,0 g
20,0 g
20,0 g
20,0 g
Peso mínimo
óptimo del
USB
(u=0,10%,k=2)
8,2 g
8,2 g
8,2 g
8,2 g
8,2 g
8,2 g
8,2 g
Pantalla
LCD gráfico WQVGA a todo color
Tamaño de la
pantalla
4,3 pulgadas / 10,9 cm (diagonal)
Retroiluminació
n
LED blanco
Controles
Pantalla táctil resistiva de 4 hilos + 6 teclas de membrana
Comunicación
RS-232, USBx2
Entrada de
corriente de la
balanza
12 VCC, 0,5 A
Suministro de
corriente
Entrada para adaptador de CA: 100-240 VCA 0,3A 50-60 Hz
Salida para adaptador de CA: 12 V CC 0,84 A
Tamaño de la
plataforma
175 x 195 mm / 6,9 x 7,7 pulgadas
Dimensiones
montada
(A x P x A)
230 x 354 x100 mm
9,1 x 13,9 x 4,0 pulgadas
Dimensiones
de envío
(A x P x A)
392 x 557 x 301 mm
15,5 x 22,0 x 11,9 pulgadas
Peso neto
4,6 Kg/
10 2 lb
3,9 Kg/
8 6 lb
4,6 Kg/
10,2 lb
3,9K /
8,6 lb
4,6 Kg/
10,2 lb
3,9 Kg/
8,6 lb
3,8 Kg/
8,4 lb
Peso de envío
6,5 Kg/
14,4 b
5,8 Kg/
12,8 b
6,5 Kg/
14,4 b
5,8 Kg/
12,8 b
6,5 Kg/
14,4 b
5,8 Kg/
12,8 b
5,7 Kg/
12,6 lb

ES-48 BALANZAS ADVENTURER
TABLA 9-5. ESPECIFICACIONES (continuación)
Modelo:
AX2201
AX2201/E
AX4201
AX4201/E
AX8201
AX8201/E
Capacidad
2200g
2200g
4.200 g
4.200 g
8.200 g
8.200 g
Sensibilidad d
0,1 g
Repetibilidad (desv.
típica) (g)
0,1 g
Linealidad (g)
± 0,2 g
Puntos de
calibració n de
amplitud (g)
500g, 1000g
1500g, 2000g
500g, 1000g
1500g, 2000g
1000g, 2000g
3000g, 4000g
1000g, 2000g
3000g, 4000g
2000g, 4000g
6000g, 8000g
2000g, 4000g
6000g, 8000g
Calibració n
CALIBRACIÓ N
automá tica
Externo
CALIBRACIÓ N
automá tica
Externo
CALIBRACIÓ N
automá tica
Externo
Unidades de pesaje
Baht, quilate, grain, gramo, kilogramo, mesgal, momme, Newton, onza, pennyweight, libra, tael (Hong Kong), tael,
(Singapur), tael (Taiwá n), tical, tola, onza troy, programable (1)
Aplicaciones
Pesaje, recuento de piezas, pesaje porcentual, pesaje de comprobació n, pesaje de animales, formulació n,
determinació n de la densidad, totalizació n, control de la pantalla
Tiempo de
estabilizació n
(típico)
≤ 1,5 segundos
Deriva de la
temperatura de
sensibilidad
(PPM/K)
9
Peso mínimo típico
del USB
(u=0,10%,k=2)
200,0 g
200,0 g
200,0 g
200,0 g
200,0 g
200,0 g
Peso mínimo ó ptimo
del USB
(u=0,10%,k=2)
82 g
82 g
82 g
82 g
82 g
82 g
Pantalla
LCD grá fico WQVGA a todo color
Tamañ o de la
pantalla
4,3 pulgadas / 10,9 cm (diagonal)
Retroiluminació n
LED blanco
Controles
Pantalla tá ctil resistiva de 4 hilos + 6 teclas de membrana
Comunicació n
RS-232, USBx2
Entrada de corriente
de la balanza
12 VCC, 0,5 A
Suministro de
corriente
Entrada para adaptador de CA: 100-240 VAC 0,3A 50-60 Hz Salida para adaptador de CA: 12 V CC 0,84A
Tamañ o de la
plataforma
175x195 mm/ 6,9x7,7 pulgadas
Dimensiones
montada
(A x P x A)
230 x 354 x 100 mm
9,1 x 13,9 x 4,0 pulgadas
Dimensiones de
envío
(A x P x A)
392 x 557 x 301 mm
15,5 x 22,0 x 11,9 pulgadas
Peso neto
4.6Kg/10.2lb
3.9Kg/8.6lb
4,6 Kg / 10,2 lb
3,9 Kg / 8,6 lb
3,8 Kg / 8,4 lb
3,4 Kg / 7,5 lb
Peso de envío
6.5Kg/14.4b
5.8Kg/12.8b
6,5 Kg / 14,4 b
5,8 Kg / 12,8 b
5,7 Kg / 12,6 lb
5,3 Kg / 11,6 lb

BALANZAS ADVENTURER ES-49
TABLA 9-6. ESPECIFICACIONES (continuación)
Modelo:
AX124M
AX224M
AX324M
AX223M
AX423M
AX523M
AX1502M
AX2202M
AX4202M
AX5202M
AX8201M
Má x.
120 g
220 g
320 g
220 g
420 g
520 g
1.520 g
2.200 g
4.200 g
5.200g
8.200 g
Mín.
0,01 g
0,01 g
0,01 g
0,02 g
0,02 g
0,02 g
0,5 g
0,5 g
0,5 g
0,5 g
5 g
d =
0,0001
0,001 g
0,01 g
0,1 g
e =
0,001 g
0,01 g
0,1 g
1 g
Clase de
aprobació n
I
II
Repetibilidad
(desv. típica) (g)
0,0001 g
0,001 g
0,01 g
0,1 g
Linealidad (g)
± 0,0002 g
± 0,002 g
± 0,02 g
± 0,2g
Puntos de
calibració n de
amplitud (g)
25 g,
50 g
75 g,
100 g
50 g, 100
g
150 g,
200 g
100 g
200 g,
300 g
50 g, 100 g
150 g, 200
g
100 g,
200 g
300 g,
400 g
200 g,
300 g
400 g,
500 g
500 g
1000 g,
1500 g
500 g,
1000 g
1500 g,
2000 g
1000 g,
2000 g
3000 g,
4000 g
2000 g,
3000 g
4000 g,
5000 g
2000 g,
4000 g
6000 g,
8000 g
Calibració n
Calibració n
automá tica
Calibració n
automá tica
Calibració n
automá tica
Calibració n
automá tica
Calibració n
automá tica
Calibració n
automá tica
Calibració n
automá tica
Calibració n
automá tica
Calibració n
automá tica
Calibració
n
automá tica
Calibració n
automá tica
Unidades de
pesaje
miligramo, gramo, quilate
miligramo, gramo, quilate
Aplicaciones
Pesaje, recuento de piezas, pesaje porcentual, pesaje de comprobació n, pesaje de animales, formulació n, determinació n de la densidad, totalizació n,
control de la pantalla
Tiempo de
estabilizació n
(típico)
≤ 3 segundos
≤ 2 segundos
≤ 1,5 segundos
Deriva de la
temperatura de
sensibilidad
(PPM/K)
1,5
3
3
1,9
Peso mínimo
típico del USB
(u=0,10%,k=2)
0,20 g
0,20 g
0,20 g
2,0 g
2,0 g
2,0 g
20,0 g
20,0 g
20,0 g
20,0 g
200,0 g
Peso mínimo
ó ptimo del USB
(u=0,10%,k=2)
0,082 g
0,082 g
0,082 g
0,82 g
0,82 g
0,82 g
8,2 g
8,2 g
8,2 g
8,2 g
82 g
Pantalla
LCD grá fico WQVGA a todo color
Tamañ o de la
pantalla
4,3 pulgadas / 10,9 cm (diagonal)
Retroiluminació n
LED blanco
Controles
Pantalla tá ctil resistiva de 4 hilos + 6 teclas de membrana
Comunicació n
RS-232, USBx2
Entrada de
corriente de la
balanza
12 V CC, 0,5A
Suministro de
corriente
Entrada para adaptador de CA: 100-240 VAC 0,3A 50-60 Hz Salida para adaptador de CA: 12 V CC 0,84A
Tamañ o de la
plataforma
(diá metro)
90 mm / 3,5 pulgadas
130 mm / 5,1 pulgadas
175x195 mm/ 6,9x7,7 pulgadas
Dimensiones
montada(A x P x
A)
230 x 354 x 340 mm
9,1 x 13,9 x 13,4 pulgadas
230 x 354 x 340 mm
9,1 x 13,9 x 13,4 pulgadas
230 x 354 x 100 mm
9,1 x 13,9 x 4,0 pulgadas
Dimensiones del
envío (A x P x A)
387 x 507 x 531 mm
15,4 x 20,0 x 20,9 pulgadas
387 x 507 x 531 mm
15,4 x 20,0 x 20,9 pulgadas
392 x 557 x 301 mm
15,5 x 22,0 x 11,9 pulgadas
Peso neto
5,1 Kg / 11,3 lb
5,8 Kg / 12,8 lb
4,6 Kg / 10,2 lb
3,8 Kg / 8,4 lb
Peso de envío
7,8 Kg / 17,2 lb
8,5 Kg / 18,8 lb
6,5 Kg / 14,4 lb
5,7 Kg / 12,6 lb
Nota: M = aprobación OILM

ES-50 BALANZAS ADVENTURER
TABLA 9-7. ESPECIFICACIONES (continuación)
Modelo:
AX224N
AX223N/E
AX423N
AX 423N/E
AX523N/E
AX1502N/E
AX2202N/E
AX4202N/E
AX8201N/E
Má x.
220 g
220 g
420 g
420 g
520 g
1520 g
2200 g
4200 g
8200 g
Mín.
0,01 g
0,02 g
0,02 g
0,02 g
0,02 g
0,5 g
0,5 g
0,5 g
5 g
d =
0,0001 g
0,001 g
0,01 g
0,1 g
e =
0,001 g
0,01 g
0,1 g
1 g
Clase de
aprobació n
I
II
Repetibilidad
(desv. típica) (g)
0,0001 g
0,001 g
0,01 g
0,1 g
Linealidad (g)
± 0,0002 g
± 0,002 g
± 0,02 g
± 0,2 g
Puntos de
calibració n de
amplitud (g)
50 g,
100 g
150 g,
200 g
50 g,
100 g
150 g,
200 g
100 g,
200 g
300 g,
400 g
100 g,
200 g
300 g,
400 g
200 g,
300 g
400 g,
500 g
500 g
1000 g,
1500 g
500 g,
1000 g
1500 g,
2000 g
1000 g,
2000 g
3000 g,
4000 g
2000 g,
4000 g
6000 g,
8000 g
Calibració n
Calibració
n
automá tica
Externo
Calibració n
automá tica
Externo
Externo
Externo
Externo
Externo
Externo
Unidades de pesaje
gramo, miligramo, quilate, pennyweight,
grain, onza, onza troy
gramo, kilogramo, quilate, pennyweight,
grain, libra, onza, onza troy
Aplicaciones
Pesaje, recuento de piezas, pesaje porcentual, pesaje de comprobació n, pesaje de animales, formulació n, determinació n de la densidad,
totalizació n
Tiempo de
estabilizació n
(típico)
≤ 3
segundos
≤ 2 segundos
≤ 1,5 segundos
Deriva de la
temperatura de
sensibilidad
(PPM/K)
1.5
3
3
9
Peso mínimo típico
del USB
(u=0,10%,k=2)
0,20 g
2,0 g
2,0 g
2,0 g
2,0 g
20,0 g
20,0 g
20,0 g
200,0 g
Peso mínimo ó ptim
o del USB
(u=0,10%,k=2)
0,082 g
0,82 g
0,82 g
0,82 g
0,82 g
8,2 g
8,2 g
8,2 g
82 g
Pantalla
LCD grá fico WQVGA a todo color
Tamañ o de la
pantalla
4,3 pulgadas / 10,9 cm (diagonal)
Retroiluminació n
LED blanco
Controles
Pantalla tá ctil resistiva de 4 hilos + 6 teclas de membrana
Comunicació n
RS-232, USBx2
Entrada de corriente
de la balanza
12 V CC, 0,5A
Suministro de
corriente
Entrada para adaptador de CA: 100-240 VCA 0,3A 50-60 Hz Salida para adaptador de CA: 12 V CC 0,84A
Tamañ o de la
plataforma
(diá metro)
90 mm /
3,5 pulg
130 mm / 5,1 pulg
175x195 mm / 6,9x7,7 pulg
Dimensiones
montada
(A x P x A)
354x230x340 mm
13,9x9,1x13,4 pulgadas
354x230x100 mm
13,9x9,1x4,0 pulgadas
Dimensiones del
envío (A x P x A)
557x392x301 mm
22,0x15,5x11,9 pulgadas
Peso neto
5,1 Kg /
11,3 lb
5,6 Kg /
12,4 lb
5,8 Kg /
12,8 lb
5,6 Kg / 12,4 lb
3,9 Kg / 8,6 lb
3,4 Kg /
7,5 lb
Peso de envío
7,8 Kg /
17,2 lb
8,3 Kg /
18,3 lb
8,5 Kg /
18,8 lb
8,3 Kg / 18,3 lb
5,8 Kg / 12,8 lb
5,3 Kg /
11,6 lb
Nota: N = aprobado por la NTEP

BALANZAS ADVENTURER ES-51
TABLA 9-8. ESPECIFICACIONES (continuación)
Modelo:
AX124AU
AX224AU
AX324AU
AX223AU
AX423AU
AX523AU
AX1502AU
AX2202AU
AX4202AU
AX5202AU
AX8201AU
Má x.
120 g
220 g
320 g
220 g
420 g
520 g
1.520 g
2.200 g
4.200 g
5.200g
8.200 g
Mín.
0,01 g
0,01 g
0,01 g
0,02 g
0,02 g
0,02 g
0,5 g
0,5 g
0,5 g
0,5 g
5 g
d =
0,0001
0,001 g
0,01 g
0,1 g
e =
0,001 g
0,01 g
0,1 g
1 g
Clase de
aprobació n
I
II
Repetibilidad
(desv. típica) (g)
0,0001 g
0,001 g
0,01 g
0,1 g
Linealidad (g)
± 0,0002 g
± 0,002 g
± 0,02 g
± 0,2g
Puntos de
calibració n de
amplitud (g)
25 g,
50 g
75 g,
100 g
50 g,
100 g
150 g,
200 g
100 g
200 g,
300 g
50 g,
100 g
150 g,
200 g
100 g,
200 g
300 g,
400 g
200 g,
300 g
400 g,
500 g
500 g
1000 g,
1500 g
500 g,
1000 g
1500 g,
2000 g
1000 g,
2000 g
3000 g,
4000 g
2000 g,
3000 g
4000 g,
5000 g
2000 g,
4000 g
6000 g,
8000 g
Calibració n
Calibració n
automá tica
Calibració n
automá tica
Calibració n
automá tica
Calibració n
automá tica
Calibració n
automá tica
Calibració n
automá tica
Calibració n
automá tica
Calibració n
automá tica
Calibració n
automá tica
Calibració n
automá tica
Calibració n
automá tica
Unidades de
pesaje
miligramo, gramo, quilate
miligramo, gramo, quilate
Aplicaciones
Pesaje, recuento de piezas, pesaje porcentual, pesaje de comprobació n, pesaje de animales, formulació n, determinació n de la densidad, totalizació n, control
de la pantalla
Tiempo de
estabilizació n
(típico)
≤ 3 segundos
≤ 2 segundos
≤ 1,5 segundos
Deriva de la
temperatura de
sensibilidad
(PPM/K)
1,5
3
3
1,9
Peso mínimo
típico del USB
(u=0,10%,k=2)
0,20 g
0,20 g
0,20 g
2,0 g
2,0 g
2,0 g
20,0 g
20,0 g
20,0 g
20,0 g
200,0 g
Peso mínimo
ó ptimo del USB
(u=0,10%,k=2)
0,082 g
0,082 g
0,082 g
0,82 g
0,82 g
0,82 g
8,2 g
8,2 g
8,2 g
8,2 g
82 g
Pantalla
LCD grá fico WQVGA a todo color
Tamañ o de la
pantalla
4,3 pulgadas / 10,9 cm (diagonal)
Retroiluminació n
LED blanco
Controles
Pantalla tá ctil resistiva de 4 hilos + 6 teclas de membrana
Comunicació n
RS-232, USBx2
Entrada de
corriente de la
balanza
12 V CC, 0,5A
Suministro de
corriente
Entrada para adaptador de CA: 100-240 VAC 0,3A 50-60 Hz Salida para adaptador de CA: 12 V CC 0,84A
Tamañ o de la
plataforma
(diá metro)
90 mm / 3,5 pulgadas
130 mm / 5,1 pulgadas
175x195 mm/ 6,9x7,7 pulgadas
Dimensiones
montada(A x P x
A)
230 x 354 x 340 mm
9,1 x 13,9 x 13,4 pulgadas
230 x 354 x 340 mm
9,1 x 13,9 x 13,4 pulgadas
230 x 354 x 100 mm
9,1 x 13,9 x 4,0 pulgadas
Dimensiones del
envío (A x P x A)
387 x 507 x 531 mm
15,4 x 20,0 x 20,9 pulgadas
387 x 507 x 531 mm
15,4 x 20,0 x 20,9 pulgadas
392 x 557 x 301 mm
15,5 x 22,0 x 11,9 pulgadas
Peso neto
5,1 Kg / 11,3 lb
5,8 Kg / 12,8 lb
4,6 Kg / 10,2 lb
3,8 Kg / 8,4 lb
Peso de envío
7,8 Kg / 17,2 lb
8,5 Kg / 18,8 lb
6,5 Kg / 14,4 lb
5,7 Kg / 12,6 lb

ES-52 BALANZAS ADVENTURER
9.2 Dibujos y dimensiones
Dimensiones completamente montada
Figura 9-1. Modelos con protección contra corrientes de aire
Figura 9-2. Modelos sin protección contra corrientes de aire
9.3 Piezas y accesorios
TABLA 9-5. ACCESORIOS
DESCRIPCIÓN
NÚMERO DE PIEZA
Pantalla auxiliar
80251396
Kit de densidad
80253384
Cable, dispositivo USB (tipo A-B)
83021085
Dispositivo de seguridad (bloqueo de ordenador
portátil)
80850043
Cable RS232, PC de 25 patillas
80500524
Cable RS232, PC de 9 patillas
80500525
Cubierta antipolvo
30093334
Pantalla auxiliar
80251396

BALANZAS ADVENTURER ES-53
9.4 Comunicación
9.4.1 Comandos de la interfaz
La balanza debe reconocer los comandos enumerados en la siguiente tabla.
La balanza mostrará “ES” para los comandos no válidos.
TABLA 9-6. LISTA DE INSTRUCCIONES DE LA INTERFAZ DE ADVENTURER
Caracteres
de comandos
Función
IP
Impresión inmediata del peso mostrado (estable o inestable).
P
Imprime el peso mostrado (estable o inestable).
CP
Impresión continua.
SP
Impresión en estabilidad.
SLP
Impresión automática de peso mostrado estable que no es cero.
SLZP
Impresión automática de peso estable que no es cero y lectura estable de puesta a cero.
xP
Impresión a intervalos x = impresión a intervalos (1-3600 s) 0P finaliza la impresión a
intervalos.
0P
Consulte arriba.
H
introduzca Imprimir líneas de encabezado
Z
Igual que pulsar la tecla de puesta a cero
T
Igual que pulsar la tecla de tara
xT***
Establezca un valor de tara preestablecido en la unidad mostrada. X = valor de tara
preestablecido. El envío de 0T borra la tara (si se permite).
PT
Imprime el peso de tara almacenado en la memoria.
ACTIVADO
Sale de Espera
APAGADO
Entra en Espera.
C
Empezar la calibración de amplitud
IC
Empieza la calibración interna, igual al activador del menú de calibración.
AC
Cancelar la calibración. Atención: si LFT se ajusta en ON, no se permite su funcionamiento.
PSN
Imprimir número de serie.
PV
Imprimir versión del software del terminal, versión de software de la base y LFT ON (si LFT se
ajusta en ACTIVADO).
x#
Ajustar recuento de APW (x) en gramos. (APW debe estar almacenado)
P#
Imprimir APW de aplicación de recuento.
x%
Ajustar peso de referencia de la aplicación porcentual (x) en gramos. (el peso de referencia
debe estar almacenado)
P%
Imprimir peso de referencia de la aplicación porcentual.
xS
0 = imprimir datos inestables, igual a IP; 1 = imprimir solo estables
1)
, igual a SP.
xRL
0 = desactivar respuesta; 1 = activar respuesta. Este comando solo controla la respuesta
“¡OK!”.

ES-54 BALANZAS ADVENTURER
9.4.2 Conexiones de patillas RS232 (DB9)
Pin 2: Línea de transmisión de la balanza (TxD)
Pin 3: Línea de recepción de la balanza (RxD)
Pin 5: Señal a tierra (GND)
Pin 7: Borrar para enviar (protocolo de enlace de hardware) (CTS)
Pin 8: Solicitar para enviar (protocolo de enlace de hardware) (RTS)
9.5 La interfaz USB
La interfaz USB de Ohaus es una solución única al problema de la conexión de la balanza a un ordenador
utilizando un bus serial universal (USB). Los dispositivos USB están categorizados en clases como unidades de
disco, cámaras digitales, impresoras, etc. Las balanzas no tienen una clase comúnmente utilizada; por lo tanto, la
interfaz USB de Ohaus utiliza una interfaz genérica basada en el estándar serial RS232.
Los datos enviados desde la balanza a un ordenador son en formato USB. Los datos USB se dirigen a un puerto
virtual. Este puerto aparece entonces como un puerto RS232 en el programa de la aplicación.
Si se envía un comando desde un ordenador a la balanza, el programa de la aplicación envía un comando al
puerto virtual como si fuera un puerto RS232. El ordenador luego dirige el comando desde el puerto virtual al
conector USB del ordenador al que está conectado la balanza. El puerto recibe la señal USB y reacciona al
comando.
La interfaz USB incluye un CD con los controladores del software para crear el puerto virtual necesario en el
ordenador.
Requisitos del sistema
PC con Windows 98
®
, Windows 98SE
®
, Windows ME
®
, Windows 2000
®
, Windows XP
®
o
Windows 8
®
(32-bit).
Puerto USB disponible (tipo A, de 4 patillas, hembra)
Conexión USB
El puerto USB de la balanza termina en un conector tipo B USB hembra de 4 patillas.
Es necesario un cable USB (tipo B / macho a tipo A / macho) (no suministrado).
1. Asegúrese de que la balanza esté encendida y funcionando correctamente.
2. Conecte el ordenador y compruebe que el puerto USB esté activado y funcionando correctamente.
3. Enchufe los conectores USB del cable al puerto USB del ordenador y el puerto USB de la balanza.
Windows® detectará el dispositivo USB y se iniciará el asistente de nuevo hardware encontrado.
Instalación del software del puerto virtual
1. Introduzca el CD suministrado en la unidad de
CD del ordenador.
Las diferentes versiones de Windows
®
tienen
pasos levemente diferentes para cargar el
controlador que se encuentra en el CD. En
todas las versiones, el asistente de nuevo
hardware encontrado le guiará a través de los
pasos necesarios para seleccionar el
controlador ubicado en el CD.
2. Después de hacer clic en Finalizar, el puerto
virtual debería estar listo para su uso.
Windows
®
generalmente añade el puerto
virtual en la secuencia después del puerto
COM de número más alto. Por ejemplo, en un
ordenador con 4 puertos COM, el puerto virtual
será el COM5.
Si se utiliza la interfaz USB con programas que
limitan el número de designaciones de puertos
COM (por ejemplo: el Ohaus Mass Tracker
solo permite COM1, 2, 3 y 4), es necesario
asignar uno de estos números de puertos al
Ejemplo de asistente de nuevo hardware
en Windows XP
1
5
69
Data
GND
Handshake
Female

BALANZAS ADVENTURER ES-55
nuevo puerto virtual.
Se puede realizar en la configuración de puertos de la utilidad de administrador del dispositivo, encontrado en
el panel de control de Windows.
ENTRADA USB
La balanza responderá a varios comandos enviados a través del adaptador de la interfaz.
Finalice los siguientes comandos con un [CR] o [CRLF].
Instrucciones de la Adventurer
C realizar calibración de amplitud
0S imprimir datos inestables
1S imprimir solo datos estables
P igual que pulsar Imprimir
SP imprimir solo peso estable
IP impresión inmediata del peso mostrado (estable o inestable)
CP impresión continua de pesos
SLP impresión automática solo de peso estable que no es cero
SLZP impresión automática de peso estable que no es cero y lectura estable de puesta a cero.
xP impresión automática en intervalos de 1 a 3600 segundos (x = 1 a 3600)
0P finaliza la impresión en intervalos
T igual que pulsar tara
Z igual que pulsar Cero
PV imprimir versión de software
Funcionamiento de la impresión automática
Una vez que se activa la impresión automática en el menú, la balanza envía datos según sea necesario.
Si hay datos en buffer de impresión, la impresora dejará de imprimir estos datos.
10. ACTUALIZACIONES DE SOFTWARE
Ohaus mejora continuamente el software de su balanza. Para obtener la última versión, póngase en contacto con
el distribuidor autorizado de Ohaus o con Ohaus Corporation.

ES-56 BALANZAS ADVENTURER
11. CONFORMIDAD
La conformidad con las siguientes normas se indica con la marca correspondiente en el producto.
Marca
Standard (Estándar)
Este producto cumple con la directiva EMC 2004/108/EC, la directiva de baja tensión 2006/95/EC
y la directiva de instrumento de pesaje no automático 2009/23/EC. La Declaración de conformidad
está disponible en internet a través de
http://europe.ohaus.com/europe/en/home/support/compliance/ce-declaration-of-conformity.aspx.
AS/NZS CISPR 11, AS/NZS 61000.4.3
CAN/CSA-C22.2 N.º 61010-1-12
UL Std. N.º 61010-1 (3º edición)
Aviso importante para instrumentos de pesaje verificados
Los instrumentos de pesaje verificados en el lugar de fabricación presentan una de las marcas
anteriores en la etiqueta de empaquetado y la etiqueta ‘M’ (metrología) en la placa descriptiva. Se
pueden poner en funcionamiento inmediatamente.
Los instrumentos de pesaje que se deben verificar en dos etapas no tienen la ‘M’ (metrología)
verde en la placa descriptiva y presentan una de las marcas de identificación anteriores en la
etiqueta de empaquetado.
La segunda etapa de la verificación inicial la debe realizar la organización de servicio aprobada
del representante autorizado que pertenezca a la CE o pueden realizarla las autoridades
nacionales de pesos y medidas (W+M).
La primera etapa de la verificación inicial se ha realiza en el trabajo del fabricante.
Incluye todas las pruebas según la norma europea adoptada EN45501:1992, párrafo 8.2.2.
Si las normativas nacionales limitan el periodo de validez de la verificación, el usuario del
instrumento de pesaje debe comprobar el periodo de una nueva verificación e informar a las
autoridades de W+M respectivas.
Nota sobre FCC
Este equipo ha sido sometido a pruebas y ha demostrado cumplir con los límites para dispositivos digitales de
clase A, según la Parte 15 de las normas de la FCC. Estos límites están diseñados para proporcionar una
protección razonable frente a interferencias perjudiciales cuando se utiliza el equipo en un entorno comercial. Este
equipo genera, utiliza y puede emitir energía de radiofrecuencia y, si no se instala y utiliza según las instrucciones
del manual puede provocar interferencias perjudiciales a las comunicaciones por radio. La utilización de este
equipo en un área residencial puede provocar interferencias perjudiciales. En este caso, el usuario deberá corregir
la interferencia por su cuenta.
Nota sobre la Industry Canada
Este aparato digital de clase A cumple con la norma canadiense ICES-001.

BALANZAS ADVENTURER ES-57
Registro en ISO 9001
En 1994, OHAUS Corporation, EEUU, recibió el certificado de registro en la ISO 9001 del Bureau Veritus Quality
International (BVQI), confirmando que el sistema de gestión de calidad de OHAUS cumple con los requisitos de la
norma ISO 9001. El 21 de junio de 2012, OHAUS Corporation, EEUU, se registró nuevamente en la norma ISO
9001:2008. En cumplimiento con la Directiva Europea:
Eliminación
En cumplimiento con la Directiva europea 2002/96/CE sobre residuos de aparatos eléctricos y
electrónicos (WEEE), este dispositivo no se puede eliminar como residuo doméstico. También se
aplica en países fuera de la UE, según sus requisitos específicos.
La directiva de baterías 2006/66/EC presenta nuevos requisitos desde septiembre de 2008 sobre
la desmontabilidad de las baterías de los residuos de aparatos en los estados miembros de la
UE. Para cumplir esta directiva, se ha diseñado este dispositivo para retirar las baterías de
manera segura al final de su vida mediante una planta de tratamiento de residuos.
Elimine este producto según las normativas locales en el punto de recolección especificado para
equipos eléctricos y electrónicos.
Si tiene alguna pregunta, póngase en contacto con la autoridad responsable o el distribuidor del
que adquirió este dispositivo.
En caso de que este dispositivo se entregará a un tercero (para uso privado o profesional), se
debe hacer referencia al contenido de esta regulación.
Para más información sobre las instrucciones de eliminación en Europa consulte la página web
http://europe.ohaus.com/europe/en/home/support/weee.aspx.
Gracias por su contribución a la protección del medioambiente.

ES-58 BALANZAS ADVENTURER
GARANTÍA LIMITADA
Los productos de Ohaus están en garantía por defectos en los materiales o de construcción desde la fecha de
entrega hasta la duración del periodo de la garantía. Durante el periodo de validez de la garantía, Ohaus reparará
o, según su criterio, sustituirá cualquier componente que sea defectuoso sin cargo adicional siempre que el
producto se entregue, con envío pagado, a Ohaus.
Esta garantía no es de aplicación si el producto ha recibido daños por accidentes o mal uso, ha sido expuesto a
materiales radioactivos o corrosivos, ha recibido materiales extraños en su interior o como resultado del servicio o
modificación por un tercero que no sea Ohaus. En lugar de una tarjeta de registro de garantía debidamente
devuelta, el periodo de la garantía se iniciará en la fecha de envío al distribuidor autorizado. Ohaus Corporation no
entrega otro tipo de garantía expresa o implícita. Ohaus Corporation no es responsable de daños indirectos.
Puesto que la legislación sobre garantías difiere de un estado a otro y de un país a otro, póngase en contacto con
Ohaus o con su distribuidor loca de Ohaus para obtener más información.

BALANCES ADVENTURER FR-1
TABLE DES MATIÈRES
1. INTRODUCTION ....................................................................................................................3
1.1 Description ................................................................................................................................................... 3
1.2 Caractéristiques ........................................................................................................................................... 3
1.3 Définition des symboles et des indicateurs d'avertissements ...................................................................... 3
1.4 Consignes de sécurité .................................................................................................................................. 3
2. INSTALLATION .....................................................................................................................4
2.1 Déballage ..................................................................................................................................................... 4
2.2 Sélection de l'emplacement ......................................................................................................................... 4
2.3 Mise de niveau de l'équipement ................................................................................................................... 4
2.4 Connexion de l’alimentation ......................................................................................................................... 5
2.5 Connexion de l'interface ............................................................................................................................... 5
2.6 Étalonnage initial .......................................................................................................................................... 5
3. FONCTIONNEMENT .............................................................................................................7
3.1 Aperçu général de l'affichage et de l'écran d'accueil ................................................................................... 7
3.2 Fonctions principales et Menu principal ...................................................................................................... 8
3.3 Vue d'ensemble des pièces et des caractéristiques - Modèles avec pare-vent .......................................... 9
3.4 Vue d'ensemble des pièces et des caractéristiques - Modèles sans pare-vent .......................................... 9
4. APPLICATIONS ................................................................................................................... 10
4.1 Pesage ....................................................................................................................................................... 10
4.1.1 Paramétrage articles .............................................................................................................................. 11
4.1.2 Nom de l'échantillon ............................................................................................................................... 13
4.1.3 Enregistrer vers USB.............................................................................................................................. 13
4.2 Comptage des pièces ................................................................................................................................ 12
4.2.1 Paramétrage articles .............................................................................................................................. 13
4.3 Pesage en pourcentage ............................................................................................................................. 15
4.3.1 Paramétrage articles .............................................................................................................................. 15
4.4 Pesage dynamique .................................................................................................................................... 16
4.4.1 Paramétrage articles .............................................................................................................................. 16
4.5 Détermination de la densité ....................................................................................................................... 17
4.5.1 Mesure de la densité d'un solide en utilisant de l'eau (par défaut) ........................................................ 17
4.5.2 Mesure de la densité d'un matériau flottant en utilisant de l'eau ........................................................... 18
4.5.3 Mesure de la densité d'un solide en utilisant un liquide auxiliaire.......................................................... 19
4.5.4 Mesure de la densité d'un liquide en utilisant un plongeur étalonné (non fourni) .................................. 19
4.5.5 Mesure de la densité des matériaux poreux en utilisant de l'huile ......................................................... 21
4.6 Pesage de vérification ................................................................................................................................ 24
4.6.1 Paramétrage articles .............................................................................................................................. 24
4.7 Maintien de l'affichage................................................................................................................................ 25
4.7.1 Maintien de l'affichage ............................................................................................................................ 25
4.7.2 Maintien de la valeur crête ..................................................................................................................... 26
4.7.3 Paramétrage articles .............................................................................................................................. 27
4.8 Totalisation ................................................................................................................................................. 26
4.9 Formulation ................................................................................................................................................ 27
4.9.1 Paramétrage articles .............................................................................................................................. 27
4.10 Autres fonctions ......................................................................................................................................... 28
4.10.1 Pesée sous la balance ........................................................................................................................... 28
5. PARAMÈTRES DES MENUS .............................................................................................. 29
5.1 Navigation dans le menu ............................................................................................................................ 29
5.1.1 Changement des paramètres ................................................................................................................. 30
5.2 Étalonnage ................................................................................................................................................. 31
5.2.1 Sous-menu d'étalonnage (modèles INCAL) ........................................................................................... 31
5.2.2 Étalonnage interne ................................................................................................................................. 31
5.2.3 Étalonnage automatique ........................................................................................................................ 31
5.2.4 Réglage AutoCal™ ................................................................................................................................. 32
5.2.5 Étalonnage de l'intervalle de mesure ..................................................................................................... 32
5.2.6 Étalonnage de la linéarité ....................................................................................................................... 33
5.2.7 Test d’étalonnage ................................................................................................................................... 33
5.3 Configuration de la balance ....................................................................................................................... 33
5.3.1 Sous-menu de configuration de la balance ............................................................................................ 33
5.3.2 Langue ................................................................................................................................................... 33
5.3.3 Paramètre utilisateur .............................................................................................................................. 34

FR-2 BALANCES ADVENTURER
5.3.4 Niveau du filtre ....................................................................................................................................... 34
5.3.5 Suivi automatique du zéro ...................................................................................................................... 34
5.3.6 Tare automatique ................................................................................................................................... 34
5.3.7 Graduations ............................................................................................................................................ 34
5.3.8 Date et heure .......................................................................................................................................... 35
5.3.9 Mode approuvé ...................................................................................................................................... 35
5.4 Unités de pesage ....................................................................................................................................... 36
5.4.1 Sous-menu des unités............................................................................................................................ 36
5.5 Maintenance des données ......................................................................................................................... 36
5.5.1 Sous-menu de maintenance des données ................................................................................................ 37
5.5.2 Exportation vers USBs ............................................................................................................................... 38
5.5.3 Importations depuis USB ........................................................................................................................... 38
5.5.4 Informations sur la balance ........................................................................................................................ 38
5.6 Communications ........................................................................................................................................ 37
5.6.1 Sous-menu Communication ................................................................................................................... 37
5.6.2 Débit en bauds ....................................................................................................................................... 38
5.6.3 Transmission .......................................................................................................................................... 38
5.6.4 Établissement de liaison ........................................................................................................................ 38
5.6.5 Sortie impression .................................................................................................................................... 38
5.6.6 Impression automatique ......................................................................................................................... 40
5.6.7 Impression du contenu ........................................................................................................................... 40
5.6.8 Alimentation ............................................................................................................................................ 40
5.6.9 Format .................................................................................................................................................... 40
5.6.10 Impression étalonnage ........................................................................................................................... 40
5.7 Données BPL et BPFGLP .......................................................................................................................... 40
5.7.1 Sous-menu des données BPL ............................................................................................................... 40
5.7.2 En-tête .................................................................................................................................................... 40
5.7.3 Nom de la balance ................................................................................................................................. 40
5.7.4 Nom de l’utilisateur ................................................................................................................................. 40
5.7.5 Nom du projet ......................................................................................................................................... 40
5.8 Réinitialisation usine .................................................................................................................................. 40
5.9 Verrouillage ................................................................................................................................................ 40
6. MÉTROLOGIE LÉGALE ...................................................................................................... 41
6.1 Réglages .................................................................................................................................................... 41
6.2 Vérification .................................................................................................................................................. 41
6.3 Plombage ................................................................................................................................................... 41
7 IMPRIMER ............................................................................................................................ 42
7.1 Connexion, Configuration et Tests de l'imprimante/de l'interface ordinateur ............................................ 42
7.2 Format de sortie ......................................................................................................................................... 42
8. MAINTENANCE ................................................................................................................... 43
8.1 Étalonnage ................................................................................................................................................. 43
8.2 Nettoyage ................................................................................................................................................... 43
8.3 Dépannage ................................................................................................................................................. 44
8.4 Informations de maintenance ..................................................................................................................... 44
9. DONNÉES TECHNIQUES ................................................................................................... 45
9.1 Spécifications ............................................................................................................................................. 45
9.2 Schémas et dimensions ............................................................................................................................. 54
9.3 Pièces et accessoires ................................................................................................................................ 54
9.4 Communications ........................................................................................................................................ 55
9.4.1 Commandes de l’interface ..................................................................................................................... 55
9.4.2 RS232 (DB9) Connexion des broches ................................................................................................... 56
9.5 Interface USB ............................................................................................................................................. 56
10. MISE À JOUR DE LOGICIELS ............................................................................................ 57
11. CONFORMITÉ...................................................................................................................... 58

BALANCES ADVENTURER FR-3
1. INTRODUCTION
1.1 Description
La balance Adventurer est un instrument de pesée de précision qui offrira de longues années de service si son
entretien est correctement assuré. Les balances Ohaus Adventurer disponibles peuvent effectuer des pesées entre
120 et 8 200 grammes.
1.2 Caractéristiques
Contrôles tactiles : Accès graphique rapide à toutes
les fonctions de contrôle au moyen d'une douzaine
d'applications et de nombreuses caractéristiques.
1.3 Définition des symboles et des indicateurs d'avertissements
Les remarques de sécurité sont signalées par des mots indicateurs et par des symboles d'avertissement. Elles
présentent les problèmes et les avertissements de sécurité. L'inobservation des remarques de sécurité peut
conduire à des accidents, à l'endommagement de l'instrument, à des dysfonctionnements et à des résultats
erronés.
Mots indicateurs
AVERTISSEMENT Pour une situation dangereuse avec un risque moyen pouvant être à l'origine d'un
accident ou d'un décès, s'il n'est pas évité.
ATTENTION Pour une situation dangereuse avec un faible risque pouvant être à l'origine de dommages
au dispositif ou aux biens, à une perte des données, ou à un accident, s'il n'est pas évité.
Attention Pour des informations importantes sur le produit
Remarque Pour des informations utiles sur le produit
Symboles d'avertissement
Danger général Risque d'électrocution
1.4 Consignes de sécurité
ATTENTION: Lire tous les avertissements de sécurité avant d’effectuer l’installation, les
connexions ou la maintenance de cet équipement. Si ces avertissements ne sont pas
respectés, des accidents et/ou des dommages matériels peuvent en résulter. Conserver
toutes les instructions pour référence ultérieure.
Vérifier que la plage de tension d'entrée de l'adaptateur CA et le type de prise sont compatibles avec
l'alimentation alternative locale devant être utilisée.
S'assurer que le cordon d'alimentation n’est pas un obstacle potentiel ou ne présente aucun danger de
chute.
L'équipement ne doit être utilisé qu'en intérieur.
Utiliser la balance seulement dans des lieux secs.
Ne pas laisser tomber de charges sur le plateau.
Utiliser uniquement les accessoires et les périphériques approuvés.
Faire uniquement fonctionner l'équipement dans les conditions ambiantes spécifiées dans ces instructions.
Déconnecter l'équipement de l'alimentation électrique pour le nettoyer.
Ne pas utiliser l'équipement dans des environnements dangereux ou instables.
La maintenance doit être exclusivement exécutée par un personnel autorisé.
Ne pas installer la balance sur un emplacement pouvant difficilement atteindre une prise d'alimentation.
Courant continu
Tension alternative

FR-4 BALANCES ADVENTURER
2. INSTALLATION
2.1 Déballage
Sortir avec préATTENTION la balance Adventurer et chacun de ses composants hors de l'emballage. Les
composants inclus varient en fonction du modèle de la balance (voir le tableau ci-dessous). Conserver l'emballage
afin d'assurer un stockage et un transport en toute sécurité. Veuillez lire le manuel intégralement avant d'utiliser la
balance Adventurer afin d'éviter un fonctionnement incorrect.
Les composants comprennent
Balance
Alimentation
Anneau en aile (seulement pour les modèles 0,1 et 1 mg)
Carte de garantie
Disque compact
2.2 Sélection de l'emplacement
Éviter les vibrations excessives, les sources de chaleur, les courants d'air ou les variations rapides de
température. Fournir suffisamment d'espace.
2.3 Mise de niveau de l'équipement
L'Adventurer est équipée d'un niveau à bulle dans une petite fenêtre ronde à côté de l'affichage.
Pour mettre la balance de niveau, régler les pieds de mise à niveau jusqu'à ce que la bulle soit centrée dans le
cercle. Se reporter à la section Aide à la mise de niveau ci-dessous pour des informations sur quel pied agir afin
d'y parvenir.
Assurez-vous que l'équipement est de niveau lors de chaque changement d'emplacement.
Assistance à la mise de niveau :
Une fonction d'aide à la mise de niveau est disponible pour mettre de niveau l'Adventurer. Il existe deux moyens
d'accéder à la fonction :
1. Applications de Pesage -> Paramétrage des éléments-> Assistance à la mise de niveau. Se reporter à
la section 4.1.1 pour de plus amples informations.
2. Menu principal -> Configuration de la balance -> Paramètres utilisateur -> Aide à la mise de niveau. Se
reporter à la section 5.3.3 pour de plus amples informations.

BALANCES ADVENTURER FR-5
Faire tourner le pied conformément à l'image ci-dessus en fonction de la position de la bulle de niveau jusqu'à ce
qu'elle soit centrée.
2.4 Connexion de l’alimentation
Brancher le connecteur de sortie CC sur la prise à l'arrière de la balance. Brancher ensuite la fiche de l'adaptateur
CA dans une prise secteur.
ATTENTION: Utilisation avec une source d'alimentation certifiée CSA (ou approbation équivalente),
qui doit présenter une sortie limitée en courant.
ATTENTION: laisser l'equipement se mettre en temperature pendant 60 minutes pour des
performances de pesage optimum.
2.5 Connexion de l'interface
Utiliser le port intégré RS-232 pour une connexion à un ordinateur ou à une imprimante avec un câble série
standard (direct). La connexion est aussi possible en utilisant le port USB de la balance.
Connexions d'interface à l'arrière de la balance. Connexion USB sur l'avant de la balance.
.
USB1 : Utilisé seulement pour une connexion à un PC
USB2 : Utilisé seulement pour connecter une clé USB
RS232 : Utilisé seulement pour une connexion à un PC ou à une imprimante
Remarque : Pour la configuration et les commandes d'interface, se reporter à la section Paramètres du menu
de communication.
Pour la connexion, la configuration et les tests de l'interface de l'imprimante/de l'ordinateur, et pour un
échantillon des formats de sortie de l'impression, consulter la section Impression.
2.6 Étalonnage initial
Lorsque la balance est installée pour la première fois, ou si elle est déplacée vers un autre emplacement, elle doit
être étalonnée afin d'assurer des résultats précis de pesage. La plupart des balances Adventurer sont équipées
d'un système AutoCal qui peut étalonner automatiquement la balance sans devoir utiliser de masses d'étalonnage..
En cas de préférence, la balance peut être manuellement étalonnée avec des masses externes. Avoir à disposition
les masses d'étalonnage appropriées avant de commencer cette opération. Se reporter à la section Étalonnage
pour les procédures de masse et d'étalonnage.
USB1
RS232
USB2

FR-6 BALANCES ADVENTURER
¤ AutoCal™
Un système automatique et complet d'étalonnage interne qui facilite la maintenance de routine en étalonnant
automatiquement tous les jours la balance est disponible sur la plupart des modèles.
Il étalonne automatiquement le système lorsqu'il détecte une variation de température suffisante pour affecter la
précision du pesage (>1,5 °C), ou toutes les 11 heures.
¤ Étalonnage externe
Sélectionner des modèles de précision spécifiques à un étalonnage externe traditionnel pour lequel des poids
externes (choix par l'utilisateur des valeurs des poids d'étalonnage) sont utilisés pour étalonner la balance afin
d'assurer sa précision.

BALANCES ADVENTURER FR-7
3. FONCTIONNEMENT
3.1 Aperçu général de l'affichage et de l'écran d'accueil
Cet équipement utilise un affichage tactile avec des zones Tactiles ainsi que des boutons permettant de contrôler
les fonctions de l'équipement.
CONTRÔLES
Bouton
Action
Appui court (si hors alimentation) : Met la balance sous tension
Appui long (si sous tension) : Met la balance hors tension
Imprime les données présentes vers une imprimante ou un ordinateur.
Réalisation du zéro
Réalisation de l'étalonnage
Réalisation de la tare
Écran de l'application principale
Application
Messages d'instructions
Indicateurs de Stabilité
(*), Net (NET), Brut (B)
et/ou de centrage du
zéro (>0<)
Champs de référence
Boutons d'applications :
Les fonctions varient
par application
Champs de résultats :
Les informations varient
par application
Appuyer sur g pour
changer d'unité
Capacité et précision
d’affichage

FR-8 BALANCES ADVENTURER
3.2 Fonctions principales et Menu principal
Pesage : Appuyer sur Zéro pour mettre l’affichage à zéro. Placer un article sur le plateau. L'affichage indique le
poids brut.
Tarage : Sans charge sur le plateau, appuyer sur Zéro pour régler l'affichage sur zéro. Placer un récipient vide
sur le plateau et appuyer sur Tare. Ajouter un objet dans le récipient et son poids net s'affichera.
Retirer le récipient et le poids du récipient apparaîtra sous forme d'un nombre négatif. Appuyer sur
tare pour effacer.
Zero: Appuyez sur Zéro pour mettre à zéro la balance
NAVIGATION PARMI LES MENUS ET LES ÉCRANS
Appuyer sur Menu pour ouvrir la liste des menus.
Appuyer et faire glisser la barre de défilement pour
examiner des articles complémentaires
Étalonnage :
Appuyer pour voir les options d'étalonnage.
Paramétrage balance :
Appuyer pour voir et modifier les paramètres
de la balance.
Unités de pesage :
Appuyer pour voir et modifier les unités de
pesage.
Maintenance des données :
Appuyer pour voir les paramètres de
maintenance des données.
Données BPL et BPF :
Insérer les données utilisateur pour la
traçabilité.
Réinitialisation usine :
Appuyer pour effectuer une réinitialisation
usine des paramètres du menu.
Communications :
Appuyer pour voir les paramètres COM de
l'appareil et les paramètres d'impression.
Verrouillage:
Appuyer pour voir options Verrouillage.

BALANCES ADVENTURER FR-9
3.3 Vue d'ensemble des pièces et des caractéristiques - Modèles avec pare-vent
3.4 Vue d'ensemble des pièces et des caractéristiques - Modèles sans pare-vent
USB hôte
USB
esclave
Puissance
d’entrée
RS232
Commutateur
LFT
Pied réglable
Indicateur de
niveau
USB hôte
Pied réglable
USB
esclave
Commutateur
LFT
RS232
Puissance
d’entrée
Indicateur de
niveau
Plateau
Pied réglable
Plateau
Anneau en
aile
Pied réglable

FR-10 BALANCES ADVENTURER
4. APPLICATIONS
La balance peut être configurée pour fonctionner dans différents modes d'applications.
Appuyer sur le champ Application en haut et à gauche (pesage dans l'exemple ci-dessous) :
La balance Adventurer possède 9 modes d'application, comme suit :
Pesage
Comptage des
pièces
Pesage en
pourcentage
Pesée
dynamique
(animaux)
Détermination
de la densité
Pesage de
vérification
Maintien de
l'affichage
Totalisation
Formulation
4.1 Pesage
Remarque : Avant d'utiliser une application, s'assurer que la balance est de niveau et étalonnée.
Utiliser cette application pour déterminer le poids des articles dans l'unité de mesure retenue.
Pesage
1. Dans la partie supérieure de l'écran d'accueil, sélectionner Pesée (il s'agit de l'application par défaut).
2. Appuyer au besoin sur Tare ou sur Zéro pour commencer.
3. Placer des objets sur le plateau pour en afficher le poids. Une fois la stabilité obtenue, * apparaîtra.
4. La valeur résultante est affichée sur la Ligne d'affichage principale dans l'unité active de mesure.
Écran d'accueil de PESAGE
Ligne d'affichage principale
Appuyer sur g pour changer d'unité
Champs de référence
Boutons d'applications
Icône de
l'application

BALANCES ADVENTURER FR-11
4.1.1 Paramétrage articles
Pour visualiser ou ajuster les paramètres en cours
Appuyer sur le bouton
Paramétrage articles.
L'écran
Paramétrage apparaît.
Poids minimum : détermine une valeur de poids
minimum devant être utilisée pour vérifier une lecture.
S'il s'avère que le poids réel est inférieur au poids
minimum, il apparaîtra avec sa couleur modifiée en
jaune.
Pour régler la valeur du poids minimum, appuyer sur
Bouton
Poids minimum
.
Une fenêtre d'entrée numérique apparaît.
Utiliser les touches pour introduire le poids minimum
désiré et appuyer ensuite sur
Enregistrer.
L'affichage revient à l'écran précédent.
Pour revenir à l'écran d'accueil du Pesage, appuyer sur
Quitter
en partie inférieure de cet écran.
Barres de capacité : Si sur MARCHE, une barre de
capacité s'affiche dans le champ de référence. Le
guide des capacités présentera le poids en cours sous
la forme d'un pourcentage de la capacité de la balance.
Si la Barre de capacité est définie sur ARRÊT, le
champ de référence indiquera le poids minimum et le
nom de l'échantillon.
Unités de pesage : Changement de l'unité affichée. Se
reporter à la section 5.4 pour de plus amples
informations.
Niveau du filtre : Changement du niveau de filtrage. Se
reporter à la section 5.5.3 pour de plus amples
informations.
Données GLP et GMP : Se reporter à la section 5.9
pour de plus amples informations.
Paramètres d’impression : Modifications des réglages
d'impression. Se reporter à la section 7 pour de plus
amples informations.
Assistance à la mise de niveau : Instructions sur la
manière de régler les pieds de la balance afin de la
mettre de niveau.

FR-12 BALANCES ADVENTURER
4.1.2 Nom de l'échantillon
Appuyer sur ce bouton pour ajouter le nom d'un échantillon. Une fenêtre d'entrée alphanumérique apparaît.
Appuyer sur pour naviguer entre les minuscules et les majuscules.
Minuscules : Majuscules :
Saisissez le nom de l'échantillon désiré et appuyez sur Enregistrer pour enregistrer le nom et revenir à
l'écran d'accueil de pesage.
4.1.3 Enregistrer vers USB
Insérer la clé USB dans le port USB situé à l'avant de la balance. Appuyer ensuite sur le bouton
Enregistrer vers USB pour enregistrer les données vers la clé USB. Après l'enregistrement, le bouton
passera momentanément sur la couleur orange.
Remarques : Lors de la première connexion sur la balance d'une clé USB, un léger retard peut se
produire avant que le bouton Enregistrer vers USB ne fonctionne. Ceci est dû au fait que la balance
génère les dossiers nécessaires sur l'emplacement de stockage des données de la clé USB.
ATTENTION:
Les données de pesage seront enregistrées en USB tous les jours. Néanmoins, si différents modes de
pesage sont utilisés, les données seront enregistrées séparément vers des fichiers individuels.
En fonction de la clé USB utilisée, toutes les données peuvent ne pas être transférées depuis la balance
ou un gel de l'écran peut se produire. Si tel est le cas, débrancher la clé USB et en essayer une autre.
Ohaus n'est pas responsable de l'effacement de données sur une clé USB ou en cas de panne de la clé
USB lorsqu'elle est connectée à la balance.
Afin de minimiser le risque d'apparition d'un tel problème, Ohaus suggère l'utilisation d'une clé USB de
haute qualité.
4.2 Comptage des pièces
Remarque : Avant d'utiliser une application, s'assurer que la balance est de niveau et étalonnée.
Utiliser cette application pour compter les échantillons d'un poids uniforme.
Comptage des pièces
1. Dans la partie supérieure gauche de l'écran d'accueil, sélectionner Comptage de pièces.
2. Appuyer au besoin sur Tare ou sur Zéro pour commencer.
3. Placer des objets sur le plateau pour en afficher le poids. Une fois la stabilité obtenue, * apparaîtra.
4. La valeur résultante est affichée sur la Ligne d'affichage principale en pièces (PCS).

BALANCES ADVENTURER FR-13
Écran d'accueil Comptage des pièces
Ligne d'affichage principale
Champs de référence
Boutons d'applications
Icône de
l'application
4.2.1 Paramétrage articles
Pour visualiser ou ajuster les paramètres en cours
Appuyer sur le bouton
Paramétrage articles.
L'écran
Paramétrage apparaît.
Échantillons : La dimension de l'échantillon peut se
situer entre 1 et 10 000 pièces. La valeur par défaut de
l'échantillon est de 10. Une fois que la taille de
l'échantillon est modifiée, la balance ouvrira
immédiatement l'écran Recalcul de l'APW en attendant
de définir un nouveau APW.
Pour régler la taille de l'échantillon, appuyer sur le
Bouton
Échantillons
.
Une fenêtre d'entrée numérique apparaît.
Utiliser les touches pour introduire les dimensions de
l'échantillon désiré, ensuite appuyer sur Enregistrer.
L'écran suivant apparaît avec le message demandant
de placer le poids de référence sur le plateau.
Placer le poids de référence sur le plateau.
Appuyer sur Accepter pour capturer la valeur et
revenir à l'écran d'accueil.

FR-14 BALANCES ADVENTURER
Définition du poids moyen des pièces
(APW) :
À chaque fois qu'un nouveau type de pièce est
compté, le poids nominal d'une pièce (poids
moyen unitaire ou APW) doit être défini en
utilisant une petite quantité de pièces. L'APW
est stocké jusqu'à ce qu'il soit remplacé par un
autre APW.
Il existe deux méthodes de définition de la
valeur APW :
1. Le poids moyen unitaire (APW) réel est
connu
2. l'APW doit être déduit par pesée. Dans
ce cas, la taille de l'échantillon en cours sera
utilisée.
Définition d'un poids moyen unitaire (APW) connu
Pour régler directement la valeur de l'APW, appuyer sur le
bouton
APW
.
Une fenêtre d'entrée numérique apparaît.
Introduire le poids moyen unitaire et appuyer sur Enregistrer.
L'affichage revient à l'écran d'accueil avec la
nouvelle valeur APW affichée dans le champ de référence.
Définition d'un nouveau poids moyen unitaire (APW) de
la pièce - Calcul
Pour déterminer un nouveau poids moyen unitaire, placer le
poids de référence sur le plateau et appuyer sur Accepter
pour poursuivre.
Remarque : La taille d'échantillon qui s'affiche sera utilisée.
Pour utiliser une taille d'échantillon différente, modifier ceci en
premier. (Voir ci-dessus).
L'écran d'accueil affiche le nombre de pièces avec le nouveau
poids moyen unitaire.
Optimisation automatique : Si réglée sur Marche, elle améliore la précision du comptage en recalculant le
poids des pièces au fur et à mesure de l'ajout d'autres pièces. Par défaut sur Arrêt.
Remarques:
Remarque : L'optimisation APW se produit lorsque le nombre de pièces ajoutées sur le plateau se trouve entre
une et trois fois celui des pièces s'y trouvant déjà. Si l'APW (poids moyen unitaire) est introduit manuellement
avec le clavier numérique, aucune optimisation automatique de l'APW ne se produira.
Paramètres d’impression : Modifications des réglages d'impression. Se reporter à la section 7 pour de plus
amples informations.
Remarque : Le bouton Enregistrer vers USB n'apparaîtra qu'après avoir connecté une clé USB à la balance.

BALANCES ADVENTURER FR-15
Reportez-vous à la section 4.1.3 pour de plus amples informations.
4.3 Pesage en pourcentage
Remarque : Avant d'utiliser une application, s'assurer que la balance est de niveau et étalonnée.
Utiliser Pesage en pourcentage pour mesurer le poids d'un échantillon affiché en tant que pourcentage d'un poids
de référence préétabli.
Le poids moyen unitaire (APW) par défaut (ou le dernier entré) s'affiche.
Pesage en pourcentage
1. Dans la partie supérieure gauche de l'écran d'accueil, sélectionner Pesage par pourcentage.
2. Placer un objet sur le plateau. La différence entre l'échantillon et le poids de référence est affichée en tant
que pourcentage.
Écran d'accueil Pesage en
pourcentage
Ligne d'affichage principale
Champs de référence
Boutons d'applications
Icône de
l'application
4.3.1 Paramétrage articles
Pour visualiser ou ajuster les paramètres en cours
Appuyer sur le bouton
Paramétrage articles.
L'écran
Paramétrage apparaît.
Recalcul de la référence Poids : Pour définir
un nouveau poids de référence, appuyer sur le
bouton de recalcul de la référence pondérale.
Suivre les instructions à l'écran afin de définir
un nouveau poids de référence.
À titre d'alternative, appuyer sur le bouton
Référence pondérale
de l'écran Recalcul de la
référence pondérale du pesage en pourcentage
pour établir manuellement une nouvelle
référence pondérale au moyen du clavier
numérique.
Paramètres d’impression : Modifications des
réglages d'impression. Se reporter à la section 7 pour
de plus amples informations.
Remarque : Le bouton Enregistrer vers USB
n'apparaîtra qu'après avoir connecté une clé USB à
la balance. Reportez-vous à la section 4.1.3 pour de
plus amples informations.

FR-16 BALANCES ADVENTURER
4.4 Pesage dynamique
Remarque : Avant d'utiliser une application, s'assurer que la balance est de niveau et étalonnée.
Utiliser cette application pour peser une charge instable comme un animal qui bouge. Il est possible de
sélectionner deux modes différents de démarrage/réinitialisation : Manuel (démarrage et arrêt en appuyant sur
une touche) et Automatique (démarrage et arrêt automatiques).
Pesage dynamique - Manuel (par défaut)
1. Dans la partie supérieure gauche de l'écran d'accueil, sélectionner Pesage dynamique.
2. Placer des objets sur le plateau et appuyer sur le bouton Démarrage.
Écran d'accueil de Pesée
dynamique
Ligne d'affichage principale
Champs de référence
Boutons d'applications
Icône de
l'application
3. La balance commence un décompte (processus de moyennage). Pendant le décompte, la ligne
d'informations affiche la durée restante.
Si nécessaire, appuyer sur Stop pour quitter.
4. Lorsque le décompte se termine, la ligne de résultat est affichée et conservée. Appuyer sur Effacement
pour effacer le poids conservé et revenir à l'écran initial..
Remarque : Vider le plateau avant de commencer un nouveau cycle de pesage dynamique.
4.4.1 Paramétrage articles
Pour visualiser ou ajuster les paramètres en cours
Appuyer sur le bouton
Paramétrage articles.
L'écran
Paramétrage apparaît.
Durée moyenne :Définir la durée moyenne sur
une valeur entre 1 et 99 secondes. La valeur par
défaut est 5 secondes.
Mode automatique :S'il est réglé sur Marche, le
cycle commence avec un objet placé sur le
plateau et la valeur conservée est
automatiquement réinitialisée lorsque l'objet est
retiré du plateau.
Nom d'échantillon : Attribution d'un nom à
l'échantillon.
Paramètres d’impression : Modifications des réglages
d'impression. Se reporter à la section 7 pour de plus
amples informations.
Remarque : Le bouton Enregistrer vers USB
n'apparaîtra qu'après avoir connecté une clé USB à la
balance. Reportez-vous à la section 4.1.3 pour de plus

BALANCES ADVENTURER FR-17
amples informations.
4.5 Détermination de la densité
Remarque : Avant d'utiliser une application, s'assurer que la balance est de niveau et étalonnée.
Utiliser cette application pour déterminer la densité d'un objet. Quatre types de détermination de la densité
peuvent être réalisés :
1. Solides plus denses que l'eau
2. Solides moins denses que l'eau
3. Densité du Liquide.
4. Matière poreuse (imprégnés d'huile)
Écran d'accueil Détermination de la
densité
Ligne d'affichage principale
Champs de référence
Boutons de fonction
Icône de
l'application
4.5.1 Mesure de la densité d'un solide en utilisant de l'eau (par défaut)
Appuyer sur le bouton Paramétrage articles pour accéder à
l'écran Paramétrages de la détermination de la densité.
Confirmer la sélection des Paramétrages suivants :
Type de densité : Solide
Liquide auxiliaire : Eau
Matière poreuse : Arrêt
Pour régler la valeur de la température de l'eau, appuyer sur le
bouton Température de l'eau.
La balance calcule la densité de l'eau en se référant à la valeur
entrée de la température de l'eau.
Mesurer la température réelle de l'eau en utilisant un
thermomètre de précision.
Une fenêtre d'entrée numérique apparaît.
Entrer la température actuelle de l'eau et appuyer sur
Enregistrer.
Pour revenir à l'écran d'accueil Détermination de la densité,
appuyer sur Retour.

FR-18 BALANCES ADVENTURER
Étape 1 sur 2 -
Pesée de
l'échantillon
dans l'air.
Appuyer sur
Démarrage
.
Suivre les
instructions à
l’écran et
appuyer sur
Accepter
pour stocker le
poids de
l'échantillon sec
(dans l'air).
Étape 2 sur 2
- Pesée de
l'échantillon
submergé
dans un
liquide.
Suivre les
instructions à
l’écran et
appuyer sur
Accepter
pour stocker le
poids de
l'échantillon
(submergé
dans le
liquide).
Une fois que les poids nécessaires ont été déterminés, la densité de l'échantillon liquide est affichée en g/cm
3
(conjointement au poids dans l'air, et au poids dans l'eau) sur l'écran Application.
Appuyer sur
Démarrage
pour réinitialiser toutes les valeurs de pesée et redémarrer le traitement
.
4.5.2 Mesure de la densité d'un matériau flottant en utilisant de l'eau
Appuyer sur le bouton Paramétrage articles pour accéder
à l'écran Paramétrages.
Confirmer la sélection des Paramétrages suivants :
Type de densité : Solide
Type de Liquide : Eau
Matière poreuse : Arrêt
Pour revenir à l'écran d'accueil Détermination de la densité,
appuyer sur
Retour
.
Suivre la même procédure que pour Matériaux solides ci-
dessus, à l'exception de l'étape 2, introduire l'échantillon
dans le liquide jusqu'à ce qu'il soit complètement
submergé.

BALANCES ADVENTURER FR-19
4.5.3 Mesure de la densité d'un solide en utilisant un liquide auxiliaire
Pour activer cette caractéristique, entrer dans le menu Paramétrage de détermination de la densité et
sélectionner ce qui suit :
Type de densité : Solide ; Type de Liquide : Autre ; Matière poreuse : Arrêt.
Confirmer que les valeurs par défaut affichées (densité du
liquide, etc.) sont correctes.
Pour régler la valeur de Densité du liquide, appuyer sur le
bouton Liquide auxiliaire et sélectionner Autre.
Une fenêtre d'entrée numérique apparaît.
Introduire la densité en g/cm
3
et appuyer sur Enregistrer.
L'affichage revient à l'écran précédent.
Pour revenir à l'écran d'accueil Détermination de la densité,
appuyer sur Retour.
Commencer le processus de détermination de la densité
comme ci-dessus.
4.5.4 Mesure de la densité d'un liquide en utilisant un plongeur étalonné (non fourni)
Pour activer cette fonctionnalité, entrer dans le menu Paramétrage de la densité et sélectionner ce qui suit ; Type
de densité : Liquide.
Remarque : lorsque le type de densité est défini sur liquide, Type de liquide et Matériaux poreux sont désactivés.
Ligne d'affichage principale de l'écran d'accueil
DÉTERMINATION DE LA DENSITÉ- LIQUIDE.
Ligne d'affichage principale
Champs de référence
Boutons de fonction
Icône de
l'application
Confirmer que la valeur par défaut affichée (volume du
plongeur) est correcte. Pour modifier les valeurs par défaut,
appuyer sur
Volume du plongeur
.
Pour régler la valeur du volume du Plongeur, appuyer sur le
bouton
Volume plongeur
.

FR-20 BALANCES ADVENTURER
Une fenêtre d'entrée numérique apparaît.
Introduire la valeur désirée et appuyer sur Enregistrer.
L'affichage revient à l'écran précédent avec la nouvelle valeur
en surbrillance.
Pour revenir à l'écran d'accueil Détermination de la densité,
appuyer sur Retour.
Appuyer sur
Démarrage
pour démarrer le processus.
Étape 1 sur 2 - Pesée du plongeur dans l'air.
Suivre les instructions à l’écran et appuyer sur
Accepter
pour mémoriser le poids du plongeur (dans l'air).
Étape 2 sur 2 - Pesée du plongeur submergé dans un
liquide de test.
Suivre les instructions à l’écran et
appuyer sur Accepter
pour stocker le poids de l'échantillon
lesté (submergé dans un liquide).
Une fois que les poids nécessaires ont été déterminés,
la densité de l'échantillon liquide est affichée en g/cm
3
(conjointement au poids dans l'air, au poids dans l'eau)
sur l'écran Application.
Appuyer sur
Démarrage
pour réinitialiser toutes les valeurs de
pesée et redémarrer le traitement
.

BALANCES ADVENTURER FR-21
4.5.5 Mesure de la densité des matériaux poreux en utilisant de l'huile
Pour activer cette fonctionnalité, entrer dans le menu
Paramétrage de détermination de la densité, et définir ce qui
suit :
Type de densité : Solide
Type de Liquide : Eau
Matière poreuse : Marche
Ligne d'affichage principale de l'écran d'accueil
DÉTERMINATION DE LA DENSITÉ - POREUX.
Ligne d'affichage principale
Champs de référence
Fonctions Icône
d'application
Confirmer que les valeurs par défaut affichées (température
de l'eau) sont correctes.
Pour modifier les valeurs par défaut, appuyer sur
Paramétrage articles
.
L'écran Paramétrage apparaît.
La balance calcule la densité de l'eau en se référant à la
valeur entrée de la température de l'eau (tableau de
consultation).
Mesurer la température réelle de l'eau en utilisant un
thermomètre de précision.
Pour régler la température de l'eau ou la densité de l'huile,
appuyer sur le bouton Température de l'eau ou Densité de
l'huile.

FR-22 BALANCES ADVENTURER
Une fenêtre d'entrée numérique apparaît.
Introduire la valeur désirée,
ensuite appuyer sur Enregistrer.
L'affichage revient à l'écran précédent avec
la nouvelle valeur en surbrillance.
Pour revenir à l'écran d'accueil de
Détermination de la densité, appuyer sur
Quitter.
Appuyer sur Début du calcul de la densité.
Étape 1 sur 3 - Pesée de l'échantillon sans huile dans l'air.
Suivre les instructions à l’écran et appuyer sur
Accepter
pour
mémoriser le poids de l'échantillon sec (dans l'air).
Étape 2 sur 3 - Pesée de l'échantillon huilé dans l'air.
Suivre les instructions à l’écran et appuyer sur
Accepter
pour stocker le poids de l'échantillon (huilé).
Étape 3 sur 3 - Pesée de l'échantillon huilé submergé dans
un liquide.
Suivre les instructions à l’écran et appuyer sur
Accepter
pour stocker le poids de l'échantillon huilé (submergé dans un
liquide).

BALANCES ADVENTURER FR-23
Une fois que les poids nécessaires ont été déterminés, la
densité de l'échantillon est affichée en g/cm
3
(conjointement au
poids dans l'air, avec et sans huile, et au poids dans l'eau) sur
l'écran Application.
La valeur reste affichée jusqu'au prochain appui sur
Démarrage.
Appuyer sur
Démarrage
pour réinitialiser toutes les valeurs de
pesée et redémarrer le traitement
.

FR-24 BALANCES ADVENTURER
4.6 Pesage de vérification
Remarque : Avant d'utiliser une application, s'assurer que la balance est de niveau et étalonnée.
Le pesage de vérification est utilisé pour comparer le poids d'un échantillon aux limites de la cible.
Pesage de vérification
1. Dans la partie supérieure gauche de l'écran d'accueil, sélectionner Pesage de vérification
2. Les limites de pesée par défaut ou la dernière vérification sont affichées.
3. Placer des objets sur le plateau.
4. L'état Inférieur/Acceptable/Supérieur est présenté sur la barre de progression pendant que le poids réel de
l'article s'affiche sur la ligne d'affichage principale.
Écran d'accueil de Pesage de vérification
Ligne d'affichage principale
Champs de référence
Boutons de fonction
Icône de
l'application
Pour définir la valeur de Limite supérieure, appuyer sur le
bouton Limite supérieure
Pour définir la valeur de Limite inférieure, appuyer sur le
bouton
Limite inférieure
Une fenêtre d'entrée numérique apparaît.
Entrer le poids limite désiré et appuyer sur Enregistrer.
Pour revenir à l'écran d'accueil PESAGE DE VÉRIFICATION,
appuyer sur
Quitter
.
4.6.1 Paramétrage articles
Pour visualiser ou ajuster les paramètres en cours
Appuyer sur le bouton
Paramétrage articles.
L'écran
Paramétrage apparaît.
Nom d'échantillon : Attribution d'un nom à
l'échantillon.
Paramètres d’impression : Modifications des
réglages d'impression. Se reporter à la section 7 pour
de plus amples informations.

BALANCES ADVENTURER FR-25
4.7 Maintien de l'affichage
Remarque : Avant d'utiliser une application, s'assurer que la balance est de niveau et étalonnée.
Deux modes sont possibles :
Maintien de l'affichage – Permet à l'utilisateur de capturer et de mémoriser un poids stable.
Maintien de la valeur de crête – Permet à l'utilisateur de capturer et de mémoriser le poids stable le plus élevé.
Écran d'accueil Maintien de
l'affichage
Ligne d'affichage principale
Champs de référence
Boutons de fonction
Icône de
l'application
Maintien de l'affichage
4.7.1 Maintien de l'affichage
1. Dans la partie supérieure gauche de l'écran d'accueil, sélectionner Maintien de l'affichage.
2. Placer l'échantillon sur le plateau et appuyer sur Maintenir à tout moment pendant la capture du poids
3. La ligne d'affichage principale présente maintenant le premier poids stable.
4. Appuyer sur Effacer pour terminer le maintien et revenir à l'écran d'accueil Maintien de l'affichage.
Maintien de la valeur crête
4.7.2 Maintien de la valeur crête
1. Dans la partie supérieure gauche de l'écran d'accueil, sélectionner Maintien de l'affichage.
2. Définir le mode Automatique sur Marche dans Paramétrage articles (se reporter à la section 4.7.5).
3. Placer un échantillon sur le plateau pour commencer.
4. Continuer de peser les échantillons. Le poids stable est automatiquement maintenu.
5. Appuyer sur Stop pour éliminer le maintien et revenir au fonctionnement normal.

FR-26 BALANCES ADVENTURER
Maintien poids maximum
4.7.3 Paramétrage articles
Pour visualiser ou ajuster les paramètres en cours
Appuyer sur le bouton
Paramétrage articles.
L'écran
Paramétrage apparaît.
Mode : Choisir entre Maintien poids maximum et
Maintien de l' affichage (par défaut).
Nom d'échantillon : Attribution d'un nom à
l'échantillon.
Paramètres d’impression : Modifications des
réglages d'impression. Se reporter à la section 7 pour
de plus amples informations.
Remarque : Le bouton Enregistrer vers USB n'apparaîtra
qu'après avoir connecté une clé USB à la balance.
Reportez-vous à la section 4.1.3 pour de plus amples
informations.
4.8 Totalisation
Remarque : Avant d'utiliser une application, s'assurer que la balance est de niveau et étalonnée.
La totalisation mesure le poids cumulé d'une séquence d'articles. Le total cumulatif peut dépasser la capacité de
la balance. Le nombre maximum d'échantillons (n) s'élève à 99.
Écran d’accueil Totalisation
Ligne d'affichage principale
Champs de référence
Boutons d'applications
Icône de
l'application
Totalisation
1. Dans la partie supérieure gauche de l'écran d'accueil, sélectionner Totalisation.
2. Placer un article sur le plateau pour commencer. Le poids de l'échantillon s'inscrit sur la ligne d'affichage
principale.
3. Appuyer sur ACCUMULATION pour ajouter le poids (lorsque stable) de l'article au total.
4. Retirer l'élément du plateau de pesée et ajouter l'élément suivant en continuant comme ci-dessus.
5. Appuyer sur Résultats pour visualiser les résultats de la totalisation.
6. Une fois l'opération terminée, appuyer sur le bouton Effacement total pour réinitialiser le poids accumulé
sur zéro.
7. Appuyer sur Enregistrer vers USB pour enregistrer le résultat sur une clé USB ou sur Quitter pour revenir
à l'écran d'accueil Totalisation.
Remarque : Le changement d'unité convertit les résultats de l'accumulation dans l'unité sélectionnée

BALANCES ADVENTURER FR-27
4.9 Formulation
Remarque : Avant d'utiliser une application, s'assurer que la balance est de niveau et étalonnée.
Utiliser cette application pour mélanger et réaliser des recettes. Le nombre maximum de composants s'élève à 50.
Écran d'accueil Formulation
Ligne d'affichage principale
Champs de référence
Boutons d'applications
Icône de
l'application
Formulation
1. Dans la partie supérieure gauche de l'écran d'accueil, sélectionner Formulation.
2. Appuyer sur Démarrage pour commencer le processus de mélange.
3. Placer le premier ingrédient sur le plateau ou dans un conteneur taré et appuyer ensuite sur Accepter pour
stocker le composant.
4. Continuer d'ajouter des composants et appuyer sur Accepter pour enregistrer le poids des composants
individuels jusqu'à ce que la formule soit complète. La ligne Total présente le poids total de tous les
composants.
5. Appuyer sur Stop pour terminer la Formulation. Les résultats de la Formulation sont affichés :
Remarque : Si Matériel de remplissage est défini sur Marche (voir la section 4.9.1 ci-dessous), la balance
demandera d'ajouter du matériel de remplissage afin de compléter la formulation. Ajouter le matériel de
remplissage et appuyer sur Accepter pour terminer la formulation et afficher les résultats.
6. Appuyer sur Enregistrer vers USB pour enregistrer le résultat sur une clé USB ou sur Quitter pour revenir
à l'écran d'accueil Formulation.
Remarque : Les résultats de la formulation seront effacés aussitôt le démarrage d'une nouvelle formulation.
4.9.1 Paramétrage articles
Pour visualiser ou ajuster les paramètres en cours
Appuyer sur le bouton
Paramétrage articles.
L'écran
Paramétrage apparaît.
Remplissage : S'il est défini sur Marche, un
matériau de remplissage est demandé à la fin
de la formulation.
Tare automatique : Si elle est définie sur
Marche, la balance effectuera
automatiquement une Tare après que le poids
du composant a été accepté.
Paramètres d’impression : Modifications des

FR-28 BALANCES ADVENTURER
réglages d'impression. Se reporter à la section 7
pour de plus amples informations.
4.10 Autres fonctions
4.10.1 Pesée sous la balance
La balance Adventurer est équipée d'un crochet pour peser sous la balance.
Remarque : Avant de retourner la balance, déposer le plateau et les éléments du pare-vent (le cas échéant) pour
éviter tout endommagement.
Attention : Ne pas poser la balance sur le cône de support du plateau ou sur les broches du
capteur.
Pour utiliser cette caractéristique, déconnecter l'alimentation de la balance et démonter ensuite le couvercle de
protection de l'ouverture de la pesée sous la balance.
La balance peut être supportée par des chandelles ou par toute autre méthode pratique. S'assurer que la balance
est de niveau et sécurisée. Mettre la balance sous tension et utiliser un cordon ou un câble pour attacher les
articles à peser.
Pesée sous la balance
couvercle de protection
Pesée sous le
crochet

BALANCES ADVENTURER FR-29
5. PARAMÈTRES DES MENUS
5.1 Navigation dans le menu
Structure du menu de l'utilisateur:
Modes d'applications
Menu principal
É talonnage
Configuration de la balance
Unité s de pesage
Maintenance des
donné es
Communication
Donné es BPL
et BPF
Ré initialis-
ation usine
Verrouillage
Application Pesage
É talonnage
É talonnage
interne
Langue
Milligramme
Exportation vers
USB
RS232 Standard
En-tê te
É talonnage
Poids minimum
Configuration de la
balance
É talonnage
automatique
Paramè tre utilisateur
gramme
Ré glages du
mode de
l'application
Dé bit en bauds
En-tê te 1
Configuration
de la balance
Guide des capacité s
Unité s de pesage
AutoCal
TM
É talonnage tactile
kilogramme
Paramè tres du
menu
2400
En-tê te 2
Unité s de
pesage
Unité s
Maintenance des
donné es
É talonnage de
l'intervalle de
mesure
Luminosité
carat
Importation
depuis USB
4800
En-tê te 3
Maintenance
des donné es
Niveau du filtre
Communications
É talonnage de la
liné arité
Bip
once
Ré glages du mode
de l'application
9600
En-tê te 4
Communication
Donné es
BPL et BPF
Donné es BPL et
BPF
Test
d’étalonnage
Ré duction automatique de l'é clairage
ounce troy
Paramè tres du
menu
19200
En-tê te 5
Donné es
GLP et GMP
Paramètres d’impression
Ré initialisation usine
Assistance à la mise de niveau
Livre
Balance_Info
38400
Nom de la
balance
Ré initialisation
usine
Assistance à la mise de niveau
Verrouillage
Niveau du filtre
pennyweight
Transmission
Nom de
l’utilisateur
Application de comptage
Suivi du Zé ro automatique
grain
7 E 1
Nom du projet
Taille de l’échantillon
Tare automatique
Newton
7 E 2
Poids moyen unitaire (APW)
Graduations
momme
7 N1
Option automatique
Date et heure
mesghal
7 N2
Paramètres d’impression
Date
Tael (HK)
7 O 1
Application Pourcentage
Heure
Tae (SG)l
7 O2
Recalcul de la ré fé rence
pondé rale
Mode approuvé
Tael (TW)
8 N1
Paramètres d’impression
tical
8 N 2
Application dynamique
tola
É tablissement de
liaison
Duré e moyenne
baht
Paramè tres de
l’impression
Mode automatique
Unité personnalisé e 1
Sortie impression
Nom de l'é chantillon
Nom de l’unité
Poids stabilisé
seulement
Paramètres d’impression
Facteur
Valeurs numé riques
uniquement
Application de la Densité
Exposant
En-tê te unique
seulement
Type de densité
10
-3
Options
d'impression
Liquide auxiliaire
10
-2
Impression
automatique
Tempé rature de l'eau.
10
-1
Impression
automatique :arrê t
Matiè re poreuse
10
0
Dè s stabilité
Densité de l'huile
10
1
Intervalle
(secondes)
Volume plongeur
10
2
Continuel
Tempé rature du liquide
10
3
Impression du
contenu
Paramètres d’impression
LSD
Sé lection
Application Pesage de vé rification
0.5
En-tê te
Nom de l'é chantillon
1
Date et heure
Paramètres d’impression
2
ID Balance
Application Maintien de l'affichage
5
Nom de la balance
Mode Maintien de l’affichage
10
Nom de l'utilisateur
Nom de l'é chantillon
100
Nom du projet
Paramètres d’impression
Nom de l'application
Application Totalisation
Nom de l'é chantillon
Application Formulation
Ré sultats
Remplissage
Brut
Mode automatique
Net
Paramètres d’impression
Tare
Informations
Ligne de signature
Retour à la ligne
Enregistrer vers
USB

FR-30 BALANCES ADVENTURER
La navigation dans les menus s'effectue en appuyant sur l'affichage. Pour entrer dans le menu, appuyer sur
Menu de n'importe quel écran d'accueil d'une application. Le menu principal s’affiche avec des boutons pour
Retour et Quitter. Continuer d'appuyer sur l'article approprié de la liste pour naviguer vers les éléments de menu.
5.1.1 Changement des paramètres
Pour modifier un paramètre du menu, naviguer vers le paramètre conformément aux étapes suivantes :
Entrée dans le Menu
Depuis n'importe quel écran d'application, appuyer
sur Menu.
La liste du menu principal apparaît à l’écran.
Sélection du sous-menu
Trouver l'élément de la liste du menu principal et
appuyer dessus. Le sous-menu apparaît.
Sélection de l'élément de menu
Continuer jusqu'à ce que le paramètre désiré soit
choisi dans la liste du menu. Appuyer sur le
paramètre pour le modifier.
Le paramètre modifié sera affiché pendant 1
seconde en surbrillance jaune afin de confirmer la
modification de la valeur.
Quitter le menu et revenir à l'application en cours.
Après confirmation du réglage, appuyer sur Quitter pour revenir à l'application.
Remarque : à tout moment les boutons Retour et Quitter peuvent être appuyés pour naviguer vers la zone
retenue du menu ou pour revenir vers l'application en cours. Continuer jusqu'à ce que le paramètre désiré soit
choisi dans la liste du menu.
La structure du menu principal de la balance Adventurer est illustrée ci-dessous.
Étalonnage
Configuration
de la balance
Unités de
pesage
Maintenance
des données
Communications
Données BPL
et BPF
Réinitialisation
usine
Verrouillage

BALANCES ADVENTURER FR-31
5.2 Étalonnage
Les balances Adventurer (modèles INCAL) offrent le choix parmi six méthodes d'étalonnage : Étalonnage interne,
Étalonnage automatique, Réglage AutoCal™, Étalonnage de l'intervalle de mesure, Étalonnage de la
linéarité et Cal Test (test étalonnage).
Remarque : L'unité d'étalonnage est toujours le gramme.
Attention : Pendant un étalonnage, éviter de « déranger » la balance.
5.2.1 Sous-menu d'étalonnage (modèles INCAL)
Étalonnage
interne
Automatique
Étalonnage
AutoCal™
Réglages
Intervalle
Étalonnage
Étalonnage de
la linéarité
Étalonnage
Test
Remarque : seuls les modèles /E détiennent l'étalonnage de l'intervalle de mesure,
l'étalonnage de la linéarité et le Cal Test.
5.2.2 Étalonnage interne
L'étalonnage s'effectue au moyen de la masse interne d'étalonnage. L'étalonnage interne peut être
réalisé à tout moment si la balance est de niveau et à sa température de fonctionnement.
La balance étant SOUS TENSION avec son plateau vide, appuyer sur Étalonnage interne.
La balance commence son étalonnage. Son plateau étant vide, appuyer sur Étalonnage interne.
L'affichage présente l'état et revient à l'application en cours.
Pour annuler à tout moment, appuyer sur Quitter.
5.2.3 Étalonnage automatique
Lorsque Étalonnage automatique est défini sur MARCHE, la balance effectue un auto-étalonnage :
• dès qu'elle détecte une variation de température de 1,5 °C
• ou toutes les 11 heures
AutoCal étalonnera automatiquement la balance (en utilisant la masse interne) chaque fois qu'une
variation suffisamment significative de la température pourrait affecter la précision, ou toutes les 11
heures.
Des informations apparaîtront à l'écran lorsqu'un étalonnage automatique est sur le point de démarrer.
Trois boutons d'options s'afficheront :
Maintenant – Appuyer pour effectuer directement l’étalonnage.
5 min – Appuyer pour effectuer l'étalonnage dans 5 minutes.
Désactivation – Appuyer pour désactiver la fonction d'étalonnage automatique.

FR-32 BALANCES ADVENTURER
5.2.4 Réglage AutoCal™
Utiliser cette méthode d'étalonnage pour régler l'intervalle d'étalonnage sans affecter l'intervalle de
mesure ou la linéarité.
Le réglage de l'étalonnage peut être utilisé pour ajuster le résultat de l'étalonnage interne par ± 100
divisions.
Remarque : Avant de procéder à un ajustement de l'étalonnage, réaliser un étalonnage interne. Pour
vérifier la nécessité d'un réglage, placer une masse de test égale à la valeur d'étalonnage de
l'intervalle de mesure sur le plateau et noter la différence (en divisions) entre la valeur de la masse
nominale et la mesure affichée sur la balance. Si la différence équivaut à +1 division, le réglage de
l'étalonnage n'est pas nécessaire. Si la différence est supérieure à +1 division, le réglage de l'étalonnage
est recommandé.
Exemple :
Mesure du poids tel qu'affiché : 200.014
Mesure du poids attendue : 200.000 (valeur de la masse de test)
Différence en poids (d) : 0,014
Différence de poids en chiffres : -14 (valeur ajustée)
Pour effectuer un réglage de l'étalonnage, appuyer sur Réglage AutoCal depuis le menu Étalonnage ;
entrer la valeur (divisions positives ou négatives) pour correspondre à la différence précédemment notée
au cours de la procédure.
Procéder à un nouvel étalonnage à l'aide de l'Étalonnage interne. L'étalonnage étant terminé, positionner
la masse de test sur le plateau et vérifier que son poids correspond maintenant à la valeur affichée. Si tel
n'est pas le cas, répéter la procédure jusqu'à ce que la lecture de l'étalonnage interne corresponde à
celle de la masse de test.
Une fois terminée, la balance mémorise la valeur d'ajustement et l'affichage revient sur l'application en
cours.
5.2.5 Étalonnage de l'intervalle de mesure
L'étalonnage de l'intervalle de mesure utilise deux points d'étalonnage, l'un avec une charge zéro et
l'autre avec une charge complète spécifiée (intervalle). Pour des informations détaillées sur les masses
d'étalonnage, se reporter au tableau des spécifications à la section 9.
Remarque : Les paramètres usine par défaut sont indiqués en caractères gras.
La balance étant sous tension et sans charge sur le plateau, appuyer sur Étalonnage de l'intervalle de
mesure pour commencer la procédure. Des valeurs d'étalonnage supplémentaires pouvant être utilisées
sont présentées sur l'affichage. La meilleure précision est obtenue en utilisant la masse la plus proche de
l'intervalle de mesure total.
Remarque : Pour modifier le point d'étalonnage de l'intervalle de mesure, appuyer sur l'autre poids
présenté sur l'affichage.
Suivre les instructions à l'écran et à l'invite, placer le poids d'étalonnage spécifié sur la balance. Une fois
terminé, l'affichage présente l'état de l'étalonnage de l'intervalle de mesure et revient à l'application en
cours.

BALANCES ADVENTURER FR-33
5.2.6 Étalonnage de la linéarité
L'étalonnage de la linéarité utilise deux points d'étalonnage, l'un à charge zéro et l'autre à des charges
spécifiées.
Sans charge sur la balance, appuyer sur Étalonnage de la linéarité pour commencer le processus.
La balance capture le point zéro et demande alors le poids suivant.
Continuer de suivre les instructions à l'écran jusqu'à ce que l'étalonnage soit terminé.
Pour annuler à tout moment, appuyer sur Quitter.
5.2.7 Test d’étalonnage
Le test d'étalonnage est utilisé pour comparer une masse d'étalonnage connue aux données mémorisées
d'étalonnage de l'intervalle.
Sans charge sur la balance, appuyer sur Test étalonnage pour poursuivre le processus.
La balance capture le point zéro et demande alors la valeur de l'intervalle de mesure.
L'affichage présente l'état, suivi de la différence entre le poids d'étalonnage en cours et les données
d'étalonnage mémorisées.
5.3 Configuration de la balance
Entrer dans ce sous-menu pour personnaliser la fonctionnalité de la balance.
5.3.1 Sous-menu de configuration de la balance
Langue
Paramètres de
l'utilisateur
Niveau du filtre
Suivi
automatique du
zéro
Tare
automatique
Graduations
Date et heure
Mode approuvé
Les paramètres par défaut sont indiqués ci-dessous en caractères gras.
5.3.2 Langue
Définition de la langue affichée pour les menus et les
messages présentés.
Anglais
Allemand
Français
Espagnol
Italien
Polonais
Turc
Tchèque
Hongrois

FR-34 BALANCES ADVENTURER
5.3.3 Paramètre utilisateur
Utiliser ce sous-menu pour modifier le paramétrage de :
Toucher étalonnage
« Exé cution de l'é talonnage, appuyer sur l'é cran au centre de l'anneau »
(Premier en haut et à gauche, puis en bas et à droite.)
Luminosité de l'écran
FAIBLE = faible luminosité de l'écran.
MOYEN = luminosité normale de l'écran.
ÉLEVÉ = luminosité élevée de l'écran.
Bip :
ARRÊT = désactivé
MARCHE = activé
Réduction automatique de l'éclairage (réduit l'éclairage après x minutes sans
activité sur l'écran)
OFF = disabled
10 min
20 min
30 min
Assistance à la mise de niveau : Instructions sur la manière de régler les pieds de la
balance afin de la mettre de niveau.
5.3.4 Niveau du filtre
Définition du niveau de filtrage du signal.
FAIBLE = durée de stabilisation plus rapide avec moins de
stabilité.
MOYEN = durée de stabilisation normale avec stabilité normale.
ÉLEVÉ = durée de stabilisation plus lente avec plus de stabilité.
5.3.5 Suivi automatique du zéro
Définition de la fonctionnalité de suivi automatique du zéro.
OFF = Désactivé
0,5 D = L'affichage maintient le zéro jusqu'à une variation de
0,5 graduation par seconde
1 D = L'affichage maintient le zéro jusqu'à une variation de
1 graduation par seconde.
3 D = L'affichage maintient le zéro jusqu'à une variation de
3 graduations par seconde.
5.3.6 Tare automatique
Définition de la tare automatique.
OFF = Désactivé
ON = Activé.
« Positionner le récipient sur le plateau » s'affichera lorsqu'une Tare automatique est
sur le point de démarrer.
Un bouton Désactivation s'affiche sous le texte. Appuyer sur ce
bouton pour désactiver la fonction de tare automatique
5.3.7 Graduations
Définit la précision d'affichage de la balance.
1 Division = précision d'affichage standard.
10 Divisions = la précision d'affichage est augmentée d'un facteur de
10.
Par exemple, si la précision d'affichage standard est de 0,01 g, la sélection de 10
Divisions provoquera un affichage de 0,1 g.

BALANCES ADVENTURER FR-35
5.3.8 Date et heure
Définition des dates et heures actuelles.
Changement de format (le cas échéant),
entrer alors la valeur en cours.
Appuyer sur Enregistrer pour confirmer la nouvelle valeur.
5.3.9 Mode approuvé
Utiliser ce menu pour définir l'état de la métrologie légale.
INACTIF = Fonctionnement standard
MARCHE = l'opération est conforme aux réglementations des Poids
et mesures.
Remarque: Lorsque le Mode approuvé est défini sur MARCHE, les paramètres du
menu sont ainsi affectés :
Menu Étalonnage:
L'étalonnage interne AutoCal est forcé sur ACTIF et masqué. Les fonctions
Étalonnage interne et Test d'étalonnage sont disponibles. Toutes les autres
fonctions sont masquées.
Menu du Paramétrage balance :
Le niveau du filtre est verrouillé sur le réglage en cours.
Le Suivi Zéro automatique est limité à 0,5 division et à INACTIF. Le paramètre
sélectionné est verrouillé.
La Tare automatique est verrouillée sur le réglage actuel.
Les graduations sont forcées sur 1 division et l'élément de menu est masqué.
Menu Communications (Communications->Paramètres d'impression->Sortie
Impression) :
« Poids stabilisé seulement » est verrouillé sur MARCHE.
« Valeurs numériques uniquement » est verrouillée sur ARRÊT.
Menu Communications (Communications->Paramètres d'impression->Impression
Automatique) :
Les sélections du mode Impression automatique sont limitées à INACTIF, Dès
stabilité et Intervalles. Continuel n'est pas disponible.
Menu Maintenance des données :
Exporter vers USB est masqué
Importer depuis USB est masqué
Menu Verrouillage :
Le menu est masqué
Remarque : Le contacteur de sécurité situé à l'arrière de la balance doit être sur la
position verrouillée pour définir le Mode Approuvé sur MARCHE. Le contacteur de
sécurité doit être sur la position non verrouillée pour définir Mode approuvé sur
ARRÊT. Voir la Section 6.
L'écran principal des applications de pesage avec LFT est sur MARCHE.

FR-36 BALANCES ADVENTURER
5.4 Unités de pesage
Entrer dans ce sous-menu pour activer les unités de mesure désirées. Il est aussi possible d'accéder à ce
menu en appuyant sur le symbole de l'unité de l'écran d'accueil de l'application.
Remarque : Conformément aux réglementations nationales, l'indicateur peut ne pas inclure certaines des
unités de mesure répertoriées.
5.4.1 Sous-menu des unités
Milligramme
gramme
kilogramme
carat
once
once troy
Livre
pennyweight
grain
Newton
momme
mesghal
Tael (HK)
Tael (SG)
Tael (TW)
tical
tola
baht
Unité personnalisée 1
Remarque : Si le Mode approuvé est réglé sur MARCHE, certaines unités ne seront
pas affichées.
Utiliser l'unité personnalisée pour afficher un poids dans une unité de mesure alternative. Si l'unité personnalisée
est définie en utilisant un facteur de conversion qui correspond au nombre d'unités personnalisées par gramme
exprimé selon une notation scientifique (facteur x 10^ exposant).
For example: Pour afficher le poids en onces troy (0,03215075 once troy par gramme),
entrer un facteur de 0,3215075 et un exposant de -1.
Le nom des unités personnalisées peut se composer d'un maximum de 3 caractères.
5.5 Maintenance des données
Entrer dans ce sous-menu pour personnaliser les réglages du transfert des données.
5.5.1 Sous-menu de maintenance des données
Fonctions Exportation et Importation
L'installation de plusieurs balances est simple en exportant le profil d'une balance « maîtresse » au moyen d'une
clé USB. L'outil de maintenance des données vous permet d'enregistrer les paramètres de l'utilisateur et de
l'application sur une clé USB qui peuvent être facilement transférés vers d'autres balances Adventurer. Les
données peuvent alors être utilisées pour configurer des balances Adventurer supplémentaires avec des données
importées de la balance d'origine.
Exportation
vers USB
Importations
depuis USB
Informations sur
la balance

BALANCES ADVENTURER FR-37
5.5.2 Exportation vers USB
Exportation des données de pesage vers une clé USB.Deux types de données peuvent être
exportés :
- Paramètres d'une application (APW, poids de référence, etc.)
- Paramètres de menu (fonction de configuration de la balance, etc.)
Remarque : La fonction Enregistrer vers USB doit être définie sur MARCHE afin
d'activer le transfert des données vers USB. Se reporter à la section 5.6 pour de
plus amples informations.
5.5.3 Importations depuis USB
Importations des données de pesage depuis une clé USB.
5.5.4 Informations sur la balance
Entrer pour consulter des informations sur la balance. Les informations affichées
comprennent :
Type de balance, Identification de la balance, Capacité, Précision de la lecture et
Version du logiciel.
5.6 Communications
Entrer dans ce menu pour définir les méthodes de communication externe ainsi que les
paramètres d'impression. Les données peuvent être émises vers une imprimante ou vers
un PC.
Les paramètres usine par défaut sont indiqués en caractères gras. Entrer pour consulter
des informations sur la balance.
5.6.1 Sous-menu Communication
RS-232 standard
Paramètres d’impression
Enregistrer vers USB
RS-232 standard :
Entrer dans ce sous-menu pour personnaliser les paramètres standard RS-232.

FR-38 BALANCES ADVENTURER
5.6.2 Débit en bauds
Définition du débit en bauds (bits par seconde).
2400 = 2400 bps
4800 = 4800 bps
9600 = 9600 bps
19200 = 19200 bps
38400 = 38400 bps
5.6.3 Transmission
Définition du nombre de bits de données, du bit d'arrêt et de la parité.
7 paire 1 = 7 bits de données, parité paire, bit d'arrêt 1
7 impaire 1 = 7 bits de données, parité impaire, bit d'arrêt 1
7 paire 2 = 7 bits de données, parité paire, bit d'arrêt 2
7 impaire 2 = 7 bits de données, parité impaire, bit d'arrêt 2
7 sans parité 1 = 7 bits de données, sans parité, bit d'arrêt 1
8 AUCUNE 1 = 8 bits de données, sans parité, bit d'arrêt 1
7 sans parité 2 = 7 bits de données, sans parité, bit d'arrêt 2
8 AUCUNE 2 = 8 bits de données, sans parité, bit d'arrêt 2
5.6.4 Établissement de liaison
Définition de la méthode de contrôle du débit.
AUCUN = pas d'établissement de liaison
XON-XOFF = Protocole de liaison XON/XOFF
MATÉRIEL = Établissement d'une liaison matérielle
Paramètres d’impression
Entrer dans ce sous-menu pour personnaliser les réglages du transfert des données.
Sous-menu de réglage de l’impression
Sortie
impression
Impression
automatique
Impression du
contenu
Alimentation
Format
Impression
étalonnage
5.6.5 Sortie impression
Poids stabilisé seulement
Définition des critères d'impression.
OFF = les valeurs sont immédiatement imprimées, quelle que
soit la stabilité.
ON = les valeurs ne sont imprimées que lorsque les critères de
stabilité sont satisfaits.
Valeurs numériques uniquement
Définition des critères d'impression.
ARRÊT = Tous les résultats et les données G/N/T sont imprimés.
Se reporter à la section 7.2 pour de plus amples informations.
ACTIF = Seules les données numériques sont imprimées
En-tête unique seulement
Définition des critères d'impression.
ARRÊT = Les en-têtes seront imprimés lors de chaque demande
d'impression
Marche = Les en-têtes seront imprimés une fois par jour

BALANCES ADVENTURER FR-39
Options d'impression
Définition des critères d'impression.
Imprimante = Impression des données vers une imprimante
PC = Impression des données vers un PC
5.6.6 Impression automatique
Définition de la fonctionnalité automatique d'impression.
OFF = Désactivé
DÈS STABILITÉ
1
= l'impression a lieu chaque fois que les critères de
stabilité sont satisfaits.
INTERVALLE
2
= l'impression a lieu à des intervalles définis.
CONTINUOUS = l'impression se produit continuellement.
1
Lorsque DÈS STABILITÉ est sélectionné, définir les conditions d'impression.
CHARGE = l'impression a lieu lorsque la charge affichée est stable.
CHARGE ZÉRO = l'impression a lieu lorsque la charge affichée ou le zéro
est stable.
2
Lorsque INTERVALLE est sélectionné, définir l'intervalle de durée en utilisant le
clavier numérique.
Des réglages de 1 à 3600 secondes sont disponibles. La valeur par défaut
est 0.
5.6.7 Impression du contenu
Définir le contenu des données imprimées.
Selection
Set the status.
Deselect All = all are set to OFF
Select All = all are set to ON
En-tête
Date et heure
ID Balance
Nom de la balance
Nom de l’utilisateur
Nom du projet
Nom de l'application
Nom de l'échantillon
Résultats
Brut
Net
Tare
Informations
Ligne de signature
5.6.8 Alimentation
Définition de l'alimentation du papier.
1 LIGNE = remonte le papier d'une ligne après impression.
4 LIGNES = remonte le papier de quatre lignes
après impression.
5.6.9 Format
Définir le format d'impression.
Ligne Unique = tirages sur une seule ligne.
Multi lignes = imprime sur plusieurs lignes.
5.6.10 Impression étalonnage
Définition des critères d'impression.
Inactif = désactivée.
Actif = active.

FR-40 BALANCES ADVENTURER
Enregistrer vers USB
Définition de l'état.
ARRÊT = les données ne seront pas enregistrées vers USB
MARCHE = les données seront enregistrées vers USB
5.7 Données BPL et BPFGLP
Entrer dans ce menu pour définir les données des Bonnes pratiques de laboratoire (BPL) et
des Bonnes pratiques de fabrication (BPF).
5.7.1 Sous-menu des données BPL
En-tête
Nom de la balance
Nom de l’utilisateur
Nom du projet
5.7.2 En-tête
Permet l'impression des en-têtes BPL. Cinq en-têtes au maximum sont
disponibles.
Des paramètres alphanumériques jusqu’à 25 caractères
sont disponibles pour chaque en-tête.
5.7.3 Nom de la balance
Définition de l'identification de la balance.
Des paramètres alphanumériques jusqu’à 25 caractères sont disponibles.
Le réglage par défaut est Adventurer.
5.7.4 Nom de l’utilisateur
Définition de l'identification de l'utilisateur.
Des paramètres alphanumériques jusqu’à 25 caractères sont disponibles.
Le réglage par défaut est vide.
5.7.5 Nom du projet
Entrer dans ce menu pour définir l'identification du projet.
Des paramètres alphanumériques jusqu’à 25 caractères sont disponibles. Le réglage par
défaut est vide.
5.8 Réinitialisation usine
Utiliser ce sous-menu pour réinitialiser tous les menus selon leurs réglages par défaut d'usine.
Remarque : Les données d'étalonnage ne sont pas affectées.
Tout réinitialiser = réinitialise tous les menus selon leurs réglages par défaut.
Quitter = retour vers l'écran principal de l'application sans réinitialiser aucun menu.
5.9 Verrouillage
Utiliser ce sous-menu pour verrouiller/déverrouiller certains menus. Après le verrouillage, un petit
cadenas apparaîtra sur l'icône du menu et l'utilisateur ne sera pas en mesure d'entrer dans ce menu.
Cliquer sur un menu et choisir :
ARRÊT = le menu est déverrouillé
MARCHE = le menu est verrouillé

BALANCES ADVENTURER FR-41
6. MÉTROLOGIE LÉGALE
Lorsque la balance est utilisée dans une application commerciale ou légalement contrôlée, elle doit être configurée,
inspectée et scellée conformément à la réglementation locale des poids et mesures. Il incombe à l'acheteur de
s'assurer que toutes les conditions légales pertinentes sont satisfaites.
6.1 Réglages
Avant de procéder à l'inspection et au plombage, réaliser les étapes suivantes dans l'ordre :
1. Vérifier que les paramètres du menu satisfont à la réglementation locale des poids et mesures.
2. Vérifier que les unités réglées sur Marche satisfont à la réglementation locale des poids et mesures.
3. Effectuer un étalonnage conformément à la section 5.
4. Mettre le contacteur de sécurité sur la position verrouillée.
5. Définir le Mode approuvé sur MARCHE du menu de paramétrage de la balance.
Remarque : Lorsque le Mode approuvé est défini sur MARCHE, il est impossible de réaliser un étalonnage
externe.
6.2 Vérification
L'agent de service agréé ou l'agent officiel des poids et mesures doit exécuter la procédure de vérification.
6.3 Plombage
Une fois la balance vérifiée, elle doit être plombée afin d'interdire un accès non détecté aux paramètres contrôlés
conformément à la loi. Avant de plomber le dispositif, s'assurer que le contacteur de sécurité se trouve sur la
position Verrouillé et que le paramètre Mode approuvé du menu Paramétrage balance est défini sur MARCHE.
S'il s'agit d'un sceau en papier, placer ce dernier par-dessus le contacteur de sécurité et le boîtier inférieur, comme
illustré.
Si le plombage s'effectue avec un fil à plomb de sécurité, il doit être passé à travers les orifices du contacteur de
sécurité et à travers le boîtier inférieur, comme illustré.
Déverrouillé
Verrouillé avec un sceau en papier
Verrouillé avec un plomb de sécurité

FR-42 BALANCES ADVENTURER
7 IMPRIMER
7.1 Connexion, Configuration et Tests de l'imprimante/de l'interface ordinateur
Utiliser le port RS-232 intégré pour une connexion vers un ordinateur ou vers une
imprimante. Pour une connexion à un ordinateur, utiliser HyperTerminal ou un logiciel
similaire tel que SPDC décrit ci-dessous.
(HyperTerminal se trouve sous Accessoires/Communications de Windows XP).
Connecter l'ordinateur au moyen d'un câble série standard (direct).
Choisir Nouvelle connexion, « connexion en utilisant » COM1 (ou un port COM
disponible).
Sélectionner Baud = 9 600 ; Parité = 8 Aucune ; Bit de Stop = 1 ; Établissement
d'une liaison = Aucun. Cliquer sur OK.
Choisir Propriétés/Paramètres, puis Paramétrage ASCII. Cocher les cases, comme
illustré :
(Envoi fin de ligne... Caractères tapés en écho...Retour à la ligne...)
Utiliser les commandes de l'interface RS232 (section 9.6.1) pour contrôler la balance
depuis un PC.
Remarque : Lorsque la configuration HyperTerminal est terminée, ce dernier
imprimera automatiquement les résultats d'un Test d'étalonnage et les commandes
d'impression en écho seront envoyées vers la balance.
Logiciel SPDC
Le logiciel de recueil des données du port série ou SPDC est fourni par Ohaus et peut
être utilisé sur des systèmes d'exploitation qui ne sont pas équipés du logiciel
HyperTerminal mentionné ci-dessus.
Choisir le type et le chemin d'exportation du fichier et appuyer ensuite sur Exécution
conformément à l'affichage ci-dessous.
Remarque : Le logiciel SPDC ne prend en charge que la langue anglaise.
7.2 Format de sortie
Les données des résultats et les données G/N/T sont sorties au format suivant.
Champ :
Étiquette
1
Espace
2
Poids
3
Espace
2
Unité
4
Espace
Stabilité
5
Espace
G/N
6
Espace
Caractères de
terminaison
7
Longueur :
1
11
1
5
1
1
1
3
0
8
1. La longueur du champ d'étiquette n'est pas fixée.
2. Chaque champ est suivi d'un seul espace délimiteur (ASCII 32).
3. Le champ Poids est composé de 11 caractères justifiés à droite. Si la valeur est négative, le caractère
« » est situé immédiatement à gauche du chiffre le plus significatif.
4. Le champ Unité contient l'unité de mesure abrégée, jusqu'à 5 caractères.
5. Le champ Stabilité contient le caractère « ? » si la lecture du poids n'est pas stable. Le champ Stabilité
et le champ Espace suivant sont ignorés si la lecture du poids est stable.
6. Le champ B/N contient l'indication du poids Net ou Brut. Pour les poids nets, le champ contient
« NET ». Pour les poids bruts, le champ ne contient rien, G.
7. Le champ Caractères de fin contient CRLF (retour chariot, retour à la ligne), quatre CRLF ou Page
suivante (ASCII 12), selon le paramètre du menu SAUT DE LIGNE.

BALANCES ADVENTURER FR-43
8. MAINTENANCE
8.1 Étalonnage
Vérifier périodiquement l'étalonnage en plaçant un poids précis sur la balance et en observant le résultat. Se
reporter à la Section 5.2 pour des instructions si un étalonnage est nécessaire.
8.2 Nettoyage
AVERTISSEMENT : Déconnecter la balance Adventurer de l'alimentation électrique avant
de la nettoyer. S'assurer qu'aucun liquide ne pénètre à l'intérieur de la balance.
Nettoyer régulièrement la balance.
Les surfaces du boîtier peuvent être nettoyées avec un chiffon non pelucheux, légèrement
trempé dans de l'eau ou dans un détergent doux.
Les surfaces en verre peuvent être nettoyées avec un produit commercial pour le verre.
Veuillez suivre les étapes ci-dessous pour démonter et installer les portes coulissantes.
Attention : Ne pas utiliser de solvants, de produits chimiques puissants, d'ammoniac ou
d'agents de nettoyage abrasifs.
Retrait et réinstallation des portes en verre pour nettoyage :
Étape 1.
Sur l'arrière de la balance, appuyer
sur la broche et faire glisser la porte.
Étape 2.
Après un nettoyage, faire glisser les
portes dans les fentes tout en
appuyant sur la broche mentionnée
à l'étape 1.
Étape 3.
Faire glisser les portes dans les
fentes jusqu'à ce que la butée
arrière s'aligne avec l'autre porte.

FR-44 BALANCES ADVENTURER
8.3 Dépannage
TABLEAU 8-1. DÉPANNAGE
Symptôme/affichage
Cause possible
Solution
La balance ne se met
pas en marche
La balance n’est pas alimentée
Vérifier la connexion et la tension
Précision médiocre
Étalonnage incorrect
Environnement instable
Effectuer un étalonnage
Placer la balance à un emplacement
approprié
Étalonnage impossible
Menu étalonnage verrouillé
Mode approuvé défini sur Marche
Environnement instable
Masses d'étalonnage incorrectes
Déverrouiller le menu Étalonnage
Mode approuvé sur arrêt
Placer la balance à un emplacement
approprié
Utiliser des masses d'étalonnage
appropriées
Impossible de changer
les paramètres de
menu
Sous-menu verrouillé
Mode approuvé défini sur Marche
Déverrouiller le sous-menu
Mode approuvé sur arrêt
Poids de référence
faible
Poids de référence trop petit
Le poids sur le plateau est trop petit
pour définir un poids de référence
valide.
Augmenter la dimension de l'échantillon
Poids de la pièce non
valide
Le poids moyen de la pièce est trop
petit
Augmenter le poids moyen de la pièce
Durée de
fonctionnement
dépassée
La lecture de la pesée n'est pas stable
Placer la balance à un emplacement
approprié
------
Occupé (tare, zéro, impression, attente
d'une pesée stable)
Attendre jusqu'à achèvement
8.4 Informations de maintenance
Si la section de dépannage n'aide pas à résoudre le problème, contacter un technicien agréé Ohaus. Visiter le site
Web à l’adresse www.ohaus.com pour trouver le plus proche bureau Ohaus. Un spécialiste des produits Ohaus
est à disposition pour vous aider.

BALANCES ADVENTURER FR-45
9. DONNÉES TECHNIQUES
9.1 Spécifications
Conditions ambiantes
Utilisation en intérieur seulement
Altitude : Jusqu'à 2000 m
Plage de température spécifiée : 10 à 30 °C
Humidité : humidité relative maximum à 80 % avec des températures jusqu'à 30 °C
avec diminution linéaire jusqu'à 50 % de l'humidité relative à 40 °C
Variations secteur jusqu'à ± 10 % de la tension nominale.
Installation de Catégorie II
Degré de pollution : 2
Matériaux
Boîtier inférieur : fonte d'aluminium peinte
Partie supérieure du boîtier : Plastique (ABS)
Plateformes de pesée : Acier inoxydable 18/10
Pare-vent ; verre, plastique (ABS)
Pied : Plastique (ABS)

FR-46 BALANCES ADVENTURER
TABLEAU 9-1. SPÉCIFICATIONS
Modèle:
AX124
AX124/E
AX224
AX224/E
AX324
Capacité
120 g
120 g
220 g
220 g
320 g
Lisibilité d
0,0001 g
Reproductibilité (écart
type.) (g)
0,0001 g
Linéarité (g)
±0,0002 g
Points d'étalonnage
de l'intervalle de
mesure (g)
25 g, 50 g
75 g, 100 g
25 g, 50
g
75 g,
100 g
50 g, 100 g
150 g,
200 g
50 g,
100 g
150 g,
200 g
100 g
200 g, 300 g
Étalonnage
Étalonnage
automatique
Externe
Étalonnage
automatique
Externe
Étalonnage
automatique
Unités de pesage
Baht, carat, grain, gramme, milligramme, mesgal, momme,
Newton, once, pennyweight, livre, Tael (Hong Kong), Tael,
(Singapour), Tael (Taiwan), tical, tola, once troy, personnalisé (1)
Applications
Pesage, Comptage de pièces, Pesage par pourcentage, Pesage
de vérification, Pesage d'animaux, Formulation, Détermination de
la densité, Totalisation, Maintien de l'affichage
Durée de stabilisation
typique
≤ 3 secondes
Dérive de la sensibilité
de la température
(PPM/K)
1,5
Poids Minimum
Typique
USP (µ = 0,10 %, k = 2)
0,20 g
0,20 g
0,20 g
0,20 g
0,20 g
Poids Minium optimum
USP (µ = 0,10 %, k = 2)
0,082 g
0,082 g
0,082 g
0,082 g
0,082 g
Affichage
ACL graphique WQVGA couleur
Dimensions de
l'affichage
4,3 po / 10,9 cm (diagonale)
Rétro-éclairage
DEL blanche
Contrôles
Écran tactile résistif à 4 fils + 6 touches à membrane
Communication
RS-232, USBx2
Alimentation d'entrée
de la balance
12 V CC, 0,5A
Alimentation
Entrée Adaptateur CA 100-240 V CA 0,3 A 50-60 Hz
Sortie Adaptateur CA 12 V CC 0,84 A
Dimension de la plate-
forme (diamètre)
90 mm / 3,5 po
Dimensions après
assemblage
(Largeur x Profondeur
x Hauteur)
230 x 354 x 340 mm
9,1 x 13,9 x 13,4 po
Dimensions
d'expédition
(Largeur x Profondeur
x Hauteur)
387 x 507 x 531 mm
15,4 x 20,0 x 20,9 po
Poids net
5,1 Kg / 11,3 lb
Poids à l'expédition
7,8 Kg / 17,2 lb

BALANCES ADVENTURER FR-47
TABLEAU 9-2. SPÉCIFICATIONS (suite)
Modèle:
AX223
AX223/E
AX423
AX423/E
AX523
AX523/E
Capacité
220 g
220 g
4200 g
4200 g
520 g
520 g
Lisibilité d
0,001 g
Reproductibilité (écart
type.) (g)
0,001 g
Linéarité (g)
±0,002 g
Points d'étalonnage
de l'intervalle de
mesure (g)
50 g, 100 g
150 g, 200 g
50 g,
100 g
150 g,
200 g
100 g, 200 g
300 g, 400 g
100 g,
200 g
300 g,
400 g
200 g, 300 g
400 g, 500 g
200 g,
300 g
400 g,
500 g
Étalonnage
Étalonnage
automatique
Externe
Étalonnage
automatique
Externe
Étalonnage
automatique
Externe
Unités de pesage
Baht, carat, grain, gramme, milligramme, mesgal, momme, Newton, once,
pennyweight, livre, Tael (Hong Kong), Tael, (Singapour), Tael (Taiwan), tical,
tola, once troy, personnalisé (1)
Applications
Pesage, Comptage de pièces, Pesage par pourcentage, Pesage de vérification,
Pesage d'animaux, Formulation, Détermination de la densité, Totalisation,
Maintien de l'affichage
Durée de stabilisation
typique
≤ 2 secondes
Dérive de la
sensibilité de la
température (PPM/K)
3
Poids Minimum
Typique
USP (µ = 0,10 %, k = 2)
2,0 g
2,0 g
2,0 g
2,0 g
2,0 g
2,0 g
Poids Minium optimum
USP (µ = 0,10 %, k = 2)
0,82 g
0,82 g
0,82 g
0,82 g
0,82 g
0,82 g
Affichage
ACL graphique WQVGA couleur
Dimensions de
l'affichage
4,3 po / 10,9 cm (diagonale)
Rétro-éclairage
DEL blanche
Contrôles
Écran tactile résistif à 4 fils + 6 touches à membrane
Communication
RS-232, USBx2
Alimentation d'entrée
de la balance
12 V CC, 0,5A
Alimentation
Entrée Adaptateur CA 100-240 V CA 0,3 A 50-60 Hz
Sortie Adaptateur CA 12 V CC 0,84 A
Dimension de la
plate-forme (diamètre)
130 mm/5,1 po
Dimensions après
assemblage
(Largeur x Profondeur
x Hauteur)
230 x 354 x 340 mm
9,1 x 13,9 x 13,4 po
Dimensions
d'expédition
(Largeur x Profondeur
x Hauteur)
387 507 x 531 mm
15,4 x 20,0 x 20,9 po
Poids net
5,8 Kg/12,8 lb
5,6 Kg/12,4 lb
5,8 Kg/12,8 lb
5,6 Kg/12,4 lb
5,8 Kg/12,8 lb
5,6 Kg/12,4 lb
Poids à l'expédition
8,5 Kg/18,8 lb
8,3 Kg/18,3 lb
8,5 Kg/18,8 lb
8,3 Kg/18,3 lb
8,5 Kg/18,8 lb
8,3 Kg/18,3 lb

FR-48 BALANCES ADVENTURER
TABLEAU 9-3. SPÉCIFICATIONS (suite)
Modèle:
AX422
AX422/E
AX822
AX822/E
Capacité
420g
420g
820g
820g
Lisibilité d
0,01 g
Reproductibilité (écart
type.) (g)
0,01 g
Linéarité (g)
±0,02 g
Points d'étalonnage de
l'intervalle de mesure
(g)
100g, 200g
300g,400g
100g, 200g
300g,400g
200g, 400g
600g, 800g
200g, 400g
600g, 800g
Étalonnage
Étalonnage automatique
Externe
Étalonnage automatique
Externe
Unités de pesage
Baht, carat, grain, gramme, milligramme, mesgal, momme, Newton, once,
pennyweight, livre, Tael (Hong Kong), Tael, (Singapour), Tael (Taiwan), tical, tola,
once troy, personnalisé (1)
Applications
Pesage, Comptage de pièces, Pesage par pourcentage, Pesage de vérification,
Pesage d'animaux, Formulation, Détermination de la densité, Totalisation, Maintien
de l'affichage
Durée de stabilisation
typique
≤ 1,5 seconde
Dérive de la sensibilité
de la température
(PPM/K)
3
Poids Minimum Typique
USP (µ = 0,10 %, k = 2)
20,0 g
Poids Minium optimum
USP (µ = 0,10 %, k = 2)
8,2 g
Affichage
ACL graphique WQVGA couleur
Dimensions de
l'affichage
4,3 po / 10,9 cm (diagonale)
Rétro-éclairage
DEL blanche
Contrôles
Écran tactile résistif à 4 fils + 6 touches à membrane
Communication
RS-232, USBx2
Alimentation d'entrée
de la balance
12 V CC, 0,5A
Alimentation
Entrée Adaptateur CA 100-240 V CA 0,3 A 50-60 Hz
Sortie Adaptateur CA 12 V CC 0,84 A
Dimension de la plate-
forme
175 mm x 195 mm (6,9 x 7,7 po)
Dimensions après
assemblage
(Largeur x Profondeur x
Hauteur)
230 x 354 x 100 mm
9,1 x 13,9 x 4,0 po
Dimensions d'expédition
(Largeur x Profondeur x
Hauteur)
392 x 557 x 301 mm
15,5 x 22,0 x 11,9 po
Poids net
4.6Kg/10.2lb
3.9Kg/8.6lb
4.6Kg/10.2lb
3.9Kg/8.6lb
Poids à l'expédition
6.5Kg/14.4b
5.8Kg/12.8b
6.5Kg/14.4b
5.8Kg/12.8b

BALANCES ADVENTURER FR-49
TABLEAU 9-4. SPÉCIFICATIONS (suite)
Modèle:
AX1502
AX1502/ E
AX2202
AX2202/ E
AX4202
AX4202/ E
AX5202
Capacité
1520 g
1520 g
2200 g
2200 g
4200 g
4200 g
5200 g
Lisibilité d
0,01 g
Reproductibilité
(écart type.) (g)
0,01 g
Linéarité (g)
±0,02 g
Points
d'étalonnage de
l'intervalle de
mesure (g)
300 g,
400 g
500 g,
600 g
500 g
1000 g,
1500 g
500 g,
1000 g
1500 g,
2000 g
500 g,
1000 g
1500 g,
2000 g
1000 g,
2000 g
3000 g,
4000 g
1000 g,
2000 g
3000 g,
4000 g
2000 g,
3000 g
4000 g,
5000 g
Étalonnage
Étalonnage
automatique
Externe
Étalonnage
automatique
Externe
Étalonnage
automatique
Externe
Étalonnage
automatique
Unités de
pesage
Baht, carat, grain, gramme, milligramme, mesgal, momme, Newton, once, pennyweight, livre,
Tael (Hong Kong), Tael, (Singapour), Tael (Taiwan), tical, tola, once troy, personnalisé (1)
Applications
Pesage, Comptage de pièces, Pesage par pourcentage, Pesage de vérification, Pesage
d'animaux, Formulation, Détermination de la densité, Totalisation, Maintien de l'affichage
Durée de
stabilisation
typique
≤ 1,5 seconde
Dérive de la
sensibilité de la
température
(PPM/K)
3
1,9
Poids Minimum
Typique
USP (µ = 0,10 %,
k = 2)
20,0 g
20,0 g
20,0 g
20,0 g
20,0 g
20,0 g
20,0 g
Poids Minium
optimum
USP (µ = 0,10 %,
k = 2)
8,2 g
8,2 g
8,2 g
8,2 g
8,2 g
8,2 g
8,2 g
Affichage
ACL graphique WQVGA couleur
Dimensions de
l'affichage
4,3 po / 10,9 cm (diagonale)
Rétro-éclairage
DEL blanche
Contrôles
Écran tactile résistif à 4 fils + 6 touches à membrane
Communication
RS-232, USBx2
Alimentation
d'entrée de la
balance
12 V CC, 0,5A
Alimentation
Entrée Adaptateur CA 100-240 V CA 0,3 A 50-60 Hz
Sortie Adaptateur CA 12 V CC 0,84 A
Dimension de la
plate-forme
175 mm x 195 mm (6,9 x 7,7 po)
Dimensions après
assemblage
(Largeur x
Profondeur x
Hauteur)
230 x 354 x 100 mm
9,1 x 13,9 x 4,0 po
Dimensions
d'expédition
(Largeur x
Profondeur x
Hauteur)
392 x 557 x 301 mm
15,5 x 22,0 x 11,9 po
Poids net
4,6 Kg/
10,2 lb
3,9 Kg/
8,6 lb
4,6 Kg/
10,2 lb
3,9 Kg/
8,6 lb
4,6 Kg/
10,2 lb
3,9 Kg/
8,6 lb
3,8 Kg/
8,4 lb
Poids à
l'expédition
6,5Kg/
14,4 lb
5,8Kg/
12,8 lb
6,5 Kg/
14,4 lb
5,8 Kg/
12,8 lb
6,5 Kg/
14,4 lb
5,8 Kg/
12,8 lb
5,7 Kg/
12,6 lb

FR-50 BALANCES ADVENTURER
TABLEAU 9-5. SPÉCIFICATIONS (suite)
Modèle:
AX2201
AX2201/E
AX4201
AX4201/E
AX8201
AX8201/E
Capacité
2200g
2200g
4200 g
4200 g
8200 g
8200 g
Lisibilité d
0,1 g
Reproductibilité (écart
type.) (g)
0,1 g
Linéarité (g)
±0,2 g
Points d'étalonnage de
l'intervalle de mesure
(g)
500g, 1000g
1500g, 2000g
500g, 1000g
1500g, 2000g
1000 g,
2000 g
3000 g,
4000 g
1000 g,
2000 g
3000 g,
4000 g
2000 g,
4000 g
6000 g,
8000 g
2000 g,
4000 g
6000 g,
8000 g
Étalonnage
Étalonnage
automatique
Externe
Étalonnage
automatique
Externe
Étalonnage
automatique
Externe
Unités de pesage
Baht, carat, grain, gramme, milligramme, mesgal, momme, Newton, once,
pennyweight, livre, Tael (Hong Kong), Tael, (Singapour), Tael (Taiwan), tical, tola, once
troy, personnalisé (1)
Applications
Pesage, Comptage de pièces, Pesage par pourcentage, Pesage de vérification,
Pesage d'animaux, Formulation, Détermination de la densité, Totalisation, Maintien de
l'affichage
Durée de stabilisation
typique
≤ 1,5 seconde
Dérive de la sensibilité
de la température
(PPM/K)
9
Poids Minimum Typique
USP (µ = 0,10 %, k = 2)
200,0 g
200,0 g
200,0 g
200,0 g
200,0 g
200,0 g
Poids Minium optimum
USP (µ = 0,10 %, k = 2)
82 g
82 g
82 g
82 g
82 g
82 g
Affichage
ACL graphique WQVGA couleur
Dimensions de
l'affichage
4,3 po/10,9 cm (diagonale)
Rétro-éclairage
DEL blanche
Contrôles
Écran tactile résistif à 4 fils + 6 touches à membrane
Communication
RS-232, USBx2
Alimentation d'entrée
de la balance
12 V CC, 0,5A
Alimentation
Entrée Adaptateur CA 100-240 V CA 0,3 A 50-60 Hz
Sortie Adaptateur CA 12 V CC 0,84 A
Dimension de la plate-
forme (diamètre)
175x195 mm/6,9x7,7 po
Dimensions après
assemblage
(Largeur x Profondeur x
Hauteur)
230 x 354 x 100 mm
9,1 x 13,9 x 4,0 po
Dimensions
d'expédition
(Largeur x Profondeur x
Hauteur)
392 x 557 x 301 mm
15,5 x 22,0 x 11,9 po
Poids net
4.6Kg/10.2lb
3.9Kg/8.6lb
4,6 Kg /
10,2 lb
3,9 Kg /
8,6 lb
3,8 Kg /
8,4 lb
3,4Kg /
7,5 lb
Poids à l'expédition
6.5Kg/14.4b
5.8Kg/12.8b
6,5 Kg /
14,4 lb
5,8 Kg /
12,8 lb
5,7 Kg /
12,6 lb
5,3 Kg /
11,6 lb

BALANCES ADVENTURER FR-51
TABLEAU 9-6. SPÉCIFICATIONS (suite)
Modèle
AX124M
AX224M
AX324M
AX223M
AX423M
AX523M
AX1502M
AX2202M
AX4202M
AX5202M
AX8201M
Maxi
120 g
220 g
320 g
220 g
420 g
520 g
1520 g
2200 g
4200 g
5200 g
8200 g
Mini
0,01g
0,01 g
0,01 g
0,02 g
0,02 g
0,02 g
0,5 g
0,5 g
0,5g
0,5 g
5 g
d=
0,0001 g
0,001 g
0,01 g
0,1 g
e=
0,001 g
0,01 g
0,1 g
1 g
Classe
d'approbation
I
II
Reproductibilité
(écart type.) (g)
0,0001 g
0,001 g
0,01 g
0,1 g
Linéarité (g)
±0,0002 g
±0,002 g
±0,02 g
± 0,2 g
Points
d'étalonnage de
l'intervalle de
mesure (g)
25 g, 50 g
75 g,
100 g
50 g,
100 g
150 g, 200
g
100 g
200 g, 300
g
50 g,
100 g
150 g, 200
g
100 g, 200
g
300 g, 400
g
200 g, 300
g
400 g, 500
g
500 g
1000 g,
1500 g
500 g,
1000 g
1500 g,
2000 g
1000 g,
2000 g
3000 g,
4000 g
2000 g,
3000 g
4000 g,
5000 g
2000 g,
4000 g
6000 g,
8000 g
Étalonnage
Étalonnage
automatique
Étalonnage
automatique
Étalonnage
automatique
Étalonnage
automatique
Étalonnage
automatique
Étalonnage
automatique
Étalonnage
automatique
Étalonnage
automatique
Étalonnage
automatique
Étalonnage
automatique
Étalonnage
automatique
Unités de pesage
milligramme, gramme, carat
kilogramme, gramme, carat
Applications
Pesage, Comptage de pièces, Pesage par pourcentage, Pesage de vérification, Pesage d'animaux, Formulation,
Détermination de la densité, Totalisation, Maintien de l'affichage
Durée de stabilization
(normale)
≤ 3 secondes
≤2 secondes
≤1,5 secondes
Dérive de la
sensibilité en
temperature (PPM/K)
1,5
3
3
1,9
Poids Minimum
Typique
USP (µ = 0,10 %, k =
2)
0,20 g
0,20 g
0,20 g
2,0 g
2,0 g
2,0 g
20,0 g
20,0 g
20,0 g
20,0 g
200,0 g
Poids Minium
optimum
USP (µ = 0,10 %, k =
2)
0,082 g
0,082 g
0,082 g
0,82 g
0,82 g
0,82 g
8,2 g
8,2 g
8,2 g
8,2 g
82 g
Affichage
ACL graphique WQVGA couleur
Dimensions de
l'affichage
4,3 po / 10,9 cm (diagonale)
Rétro-éclairage
DEL blanche
Contrôles
Écran tactile résistif à 4 fils + 6 touches à membrane
Communication
RS-232, USBx2
Alimentation d'entrée
de la balance
12 V CC, 0,5 A
Alimentation
Entrée Adaptateur CA : 100-240 V CA 0,3 A 50-60 Hz
Sortie Adaptateur CA : 12 V CC 0,84 A
Dimensions de la
plate-forme
(diamètre)
90 mm / 3,5 po
130 mm / 5,1 po
175x195 mm / 6,9x7,7 po
Dimensions après
assemblage
(Largeur x
Profondeur x
Hauteur)
230 x 354 x 340 mm
9,1 x 13,9 x 13,4 po
230 x 354 x 340 mm
9,1 x 13,9 x 13,4 po
230 x 354 x 100 mm
9,1 x 13,9 x 4,0 po
Dimensions
d'expédition
(Largeur x
Profondeur x
Hauteur)
387 x 507 x 531 mm
15.4 x 20,0 x 20,9 po
387 x 507 x 531 mm
15,4 x 20,0 x 20,9 po
392 x 557 x 301 mm
15,5 x 22,0 x 11,9 po
Poids net
5,1 Kg / 11,3 lb
5,8 Kg / 12,8 lb
4,6 Kg / 10,2 lb
3,8 Kg / 8,4 lb
Poids à
l'expédition
7,8 Kg / 17,2 lb
8,5 Kg / 18,8 lb
6,5 Kg / 14,4 lb
5,7 Kg / 12,6 lb
Remarque : M = Approuvé OIML

FR-52 BALANCES ADVENTURER
TABLEAU 9-7. SPÉCIFICATIONS (suite)
Modèle
AX224N
AX223N/E
AX423N
AX 423N/E
AX523N/E
AX1502N/E
AX2202N/E
AX4202N/E
AX8201N/E
Maxi
220 g
220 g
420 g
420 g
520 g
1520 g
2200 g
4200 g
8200 g
Mini
0,01 g
0,02 g
0,02 g
0,02 g
0,02 g
0,5 g
0,5 g
0,5 g
5 g
d=
0,0001 g
0,001 g
0,01 g
0,1 g
e=
0,001 g
0,01 g
0,1 g
1 g
Classe
d'approbation
I
II
Reproductibilité
(écart type.) (g)
0,0001 g
0,001 g
0,01 g
0,1 g
Linéarité (g)
±0,0002 g
±0,002 g
±0,02 g
±0,2 g
Points
d'étalonnage de
l'intervalle de
mesure (g)
50 g,
100 g
150 g,
200 g
50 g,
100 g
150 g,
200 g
100 g,
200 g
300 g,
400 g
100 g, 200 g
300 g, 400 g
200 g, 300 g
400 g, 500 g
500 g
1000 g,
1500 g
500 g,
1000 g
1500 g,
2000 g
1000 g,
2000 g
3000 g,
4000 g
2000 g,
4000 g
6000 g,
8000 g
Étalonnage
Étalonnage
automatique
Externe
Étalonnage
automatique
Externe
Externe
Externe
Externe
Externe
Externe
Unités de
pesage
gramme, milligramme, carat, pennyweight,
grain, once, once troy
gramme, kilogramme, carat, pennyweight,
grain, livre, once, once troy
Applications
Pesage, Comptage de pièces, Pesage par pourcentage, Pesage de vérification, Pesage d'animaux, Formulation,
Détermination de la densité, Totalisation
Durée de
stabilisation
(normale)
≤ 3
secondes
≤2 secondes
≤1.5 secondes
Dérive de la
sensibilité en
température
(PPM/K)
1.5
3
3
9
Poids Minimum
Typique
USP (µ = 0,10 %,
k = 2)
0,20 g
2,0 g
2,0 g
2,0 g
2,0 g
20,0 g
20,0 g
20,0 g
200,0 g
Poids Minium
optimum
USP (µ = 0,10 %,
k = 2)
0,082 g
0,82 g
0,82 g
0,82 g
0,82 g
8,2 g
8,2 g
8,2 g
82 g
Affichage
ACL graphique WQVGA couleur
Dimensions de
l'affichage
4,3 po / 10,9 cm (diagonale)
Rétro-éclairage
DEL blanche
Contrôles
Écran tactile résistif à 4 fils + 6 touches à membrane
Communication
RS-232, USBx2
Alimentation
d'entrée de la
balance
12 V CC, 0,5 A
Alimentation
Entrée Adaptateur CA : 100-240 V CA 0,3 A 50-60 Hz
Sortie Adaptateur CA : 12 V CC 0,84 A
Dimensions de
la plate-forme
(diamètre)
90 mm / 3,5 po
130 mm / 5,1 po
175x195 mm / 6.9x7.7 po
Dimensions après
assemblage
(Largeur x
Profondeur x
Hauteur)
354x230x340 mm
13,9x9,1x13,4 po
354x230x100 mm
13,9x9,1x4,0 po
Dimensions
d'expédition
(Largeur x
Profondeur x
Hauteur)
557x392x301 mm
22,0x15,5x11,9 po
Poids net
5,1 Kg /
11,3 lb
5,6 Kg /
12,4 lb
5,8 Kg /
12,8 lb
5,6 Kg / 12,4 lb
3,9 Kg / 8,6 lb
3,4 Kg /
7,5 lb
Poids à
l'expédition
7,8 Kg /
17,2 lb
8,3 Kg /
18,3 lb
8,5 Kg /
18,8 lb
8,3 Kg / 18,3 lb
5,8 Kg / 12,8 lb
5,3 Kg /
11,6 lb
Remarque : N = Approuvé NTEP

BALANCES ADVENTURER FR-53
TABLEAU 9-8. SPÉCIFICATIONS (suite)
Modèle
AX124AU
AX224AU
AX324AU
AX223AU
AX423AU
AX523AU
AX1502AU
AX2202AU
AX4202AU
AX5202AU
AX8201AU
Maxi
120 g
220 g
320 g
220 g
420 g
520 g
1520 g
2200 g
4200 g
5200 g
8200 g
Mini
0,01g
0,01 g
0,01 g
0,02 g
0,02 g
0,02 g
0,5 g
0,5 g
0,5g
0,5 g
5 g
d=
0,0001 g
0,001 g
0,01 g
0,1 g
e=
0,001 g
0,01 g
0,1 g
1 g
Classe
d'approbation
I
II
Reproductibilité
(écart type.) (g)
0,0001 g
0,001 g
0,01 g
0,1 g
Linéarité (g)
±0,0002 g
±0,002 g
±0,02 g
± 0,2 g
Points
d'étalonnage de
l'intervalle de
mesure (g)
25 g, 50 g
75 g,
100 g
50 g,
100 g
150 g, 200
g
100 g
200 g, 300
g
50 g,
100 g
150 g, 200
g
100 g, 200
g
300 g, 400
g
200 g, 300
g
400 g, 500
g
500 g
1000 g,
1500 g
500 g,
1000 g
1500 g,
2000 g
1000 g,
2000 g
3000 g,
4000 g
2000 g,
3000 g
4000 g,
5000 g
2000 g,
4000 g
6000 g,
8000 g
Étalonnage
Étalonnage
automatique
Étalonnage
automatique
Étalonnage
automatique
Étalonnage
automatique
Étalonnage
automatique
Étalonnage
automatique
Étalonnage
automatique
Étalonnage
automatique
Étalonnage
automatique
Étalonnage
automatique
Étalonnage
automatique
Unités de pesage
milligramme, gramme, carat
kilogramme, gramme, carat
Applications
Pesage, Comptage de pièces, Pesage par pourcentage, Pesage de vérification, Pesage d'animaux, Formulation,
Détermination de la densité, Totalisation, Maintien de l'affichage
Durée de stabilization
(normale)
≤ 3 secondes
≤2 secondes
≤1,5 secondes
Dérive de la
sensibilité en
temperature (PPM/K)
1,5
3
3
1,9
Poids Minimum
Typique
USP (µ = 0,10 %, k =
2)
0,20 g
0,20 g
0,20 g
2,0 g
2,0 g
2,0 g
20,0 g
20,0 g
20,0 g
20,0 g
200,0 g
Poids Minium
optimum
USP (µ = 0,10 %, k =
2)
0,082 g
0,082 g
0,082 g
0,82 g
0,82 g
0,82 g
8,2 g
8,2 g
8,2 g
8,2 g
82 g
Affichage
ACL graphique WQVGA couleur
Dimensions de
l'affichage
4,3 po / 10,9 cm (diagonale)
Rétro-éclairage
DEL blanche
Contrôles
Écran tactile résistif à 4 fils + 6 touches à membrane
Communication
RS-232, USBx2
Alimentation d'entrée
de la balance
12 V CC, 0,5 A
Alimentation
Entrée Adaptateur CA : 100-240 V CA 0,3 A 50-60 Hz
Sortie Adaptateur CA : 12 V CC 0,84 A
Dimensions de la
plate-forme
(diamètre)
90 mm / 3,5 po
130 mm / 5,1 po
175x195 mm / 6,9x7,7 po
Dimensions après
assemblage
(Largeur x
Profondeur x
Hauteur)
230 x 354 x 340 mm
9,1 x 13,9 x 13,4 po
230 x 354 x 340 mm
9,1 x 13,9 x 13,4 po
230 x 354 x 100 mm
9,1 x 13,9 x 4,0 po
Dimensions
d'expédition
(Largeur x
Profondeur x
Hauteur)
387 x 507 x 531 mm
15.4 x 20,0 x 20,9 po
387 x 507 x 531 mm
15,4 x 20,0 x 20,9 po
392 x 557 x 301 mm
15,5 x 22,0 x 11,9 po
Poids net
5,1 Kg / 11,3 lb
5,8 Kg / 12,8 lb
4,6 Kg / 10,2 lb
3,8 Kg / 8,4 lb
Poids à
l'expédition
7,8 Kg / 17,2 lb
8,5 Kg / 18,8 lb
6,5 Kg / 14,4 lb
5,7 Kg / 12,6 lb

FR-54 BALANCES ADVENTURER
9.2 Schémas et dimensions
Dimensions complètement assemblée
Figure 9-1 Modèles avec pare-vent
Figure 9-2 Modèles sans pare-vent
9.3 Pièces et accessoires
TABLEAU 9-7. ACCESSOIRES
DESCRIPTION
RÉFÉRENCE
Affichage auxiliaire
80251396
Kit de densité
80253384
Câble, dispositif USB (Type A-B)
83021085
Dispositif de sécurité (verrouillage ordinateur portable)
80850043
Câble RS232, PC 25 broches
80500524
Câble RS232, PC 9 broches
80500525
Cache antipoussière
30093334
Affichage auxiliaire
80251396

BALANCES ADVENTURER FR-55
9.4 Communications
9.4.1 Commandes de l’interface
Les commandes répertoriées sur le tableau suivant seront reconnues par la balance.
La balance renverra un « ES » pour les commandes non valides.
TABLEAU 9-8. LISTE DES COMMANDES DE L’INTERFACE ADVENTURER
Caractère de
commande
Fonction
IP
Impression immédiate du poids affiché (stable ou instable)
P
Impression du poids affiché (stable ou instable)
CP
Impression continuelle.
SP
Impression si stable.
SLP
Poids affiché stable différent de zéro en Impression automatique.
SLZP
Impression automatique pour poids stable différents de zéro et mesures du zéro stables
xP
Impression d'intervalle x = impression d'intervalle (1 à 3600 s) 0P termine l'intervalle
d'impression
0P
Voir ci-dessus
H
Entrer les lignes de l'en-tête d'impression
Z
Similaire à l'appui sur la touche Zéro
T
Similaire à l'appui sur la touche Tare.
xT***
Établir une tare prédéfinie dans l'unité affichée. Valeur de tare prédéfinie = X. Envoi de 0T
efface la tare (si autorisé).
PT
Imprime le poids de la tare mémorisée.
MARCHE
Sort de veille
ARRÊT
Passe sur veille.
C
Commencement de l'intervalle de mesure
CI
Début de l'Étalonnage interne, équivalent au déclenchement du menu d'étalonnage.
CA
Interrompre étalonnage. Attention : si LFT est Actif, l'opération n'est pas autorisée.
PSN
Imprimer le numéro de série.
PV
Imprimer la version logicielle du terminal, la version logicielle de la base et LFT ACTIF (si LFT
est défini sur ACTIF).
x#
Définition du comptage Poids moyen unitaire (x) en grammes (Poids moyen unitaire doit être
mémorisé).
P#
Imprimer le Poids moyen unitaire de l'application de comptage.
x%
Définition du poids de référence de l'application Pourcentage (x) en grammes (le poids de
référence doit être mémorisé).
P%
Imprimer le poids de référence de l'application Pourcentage.
xS
0 = imprimer les données instables, similaire à IP ; 1 = imprimer les données stables
seulement
1)
, similaire à SP.
xRL
0 = réponse désactivée ; 1 = réponse activée. Cette commande contrôle seulement la réponse
« OK ! »

FR-56 BALANCES ADVENTURER
9.4.2 RS232 (DB9) Connexion des broches
Broche 2 : Ligne de transmission de la balance (TxD)
Broche 3 : Ligne de réception de la balance (RxD)
Broche 5 : Signal de masse
Broche 7 : Prêt à envoyer (établissement de liaisons) (CTS)
Broche 8 : Demande d'envoi (établissement matériel de liaisons) (RTS)
9.5 Interface USB
Le kit d'interface USB Ohaus reste la solution unique au problème de connexion d'une balance sur un ordinateur
en utilisant USB (Universal Serial Bus). Les dispositifs USB sont classés selon des catégories telles que des
lecteurs de disques, des caméras numériques, des imprimantes, etc. Les balances n'ont pas de classification
communément utilisée, c'est pourquoi l'interface USB d'Ohaus utilise une interface générique basée sur l'interface
série RS232 standard.
Les données sont envoyées de la balance vers un ordinateur au format USB. Les données USB sont dirigées vers
un port virtuel. Ce port apparaît alors comme un port RS232 pour le programme d'application.
Lors de l'envoi d'une commande depuis un ordinateur vers la balance, le programme d'application envoie une
commande vers le port virtuel comme s'il s'agissait d'un port RS232. L'ordinateur dirige alors la commande depuis
le port virtuel vers le connecteur USB de l'ordinateur sur lequel la balance est connectée. Le port reçoit le signal
USB et réagit à la commande.
Le kit d'interface USB comprend un CD avec les pilotes logiciels afin de créer le port USB virtuel nécessaire sur
l'ordinateur.
Spécification du système
PC fonctionnant sous Windows 98®, Windows 98SE®, Windows ME®, Windows 2000®, Windows XP® ou
Windows 8
®
(32-bit).
Port USB disponible (type A, 4 broches, femelle)
Connexion USB
Le port USB de la balance se termine par un connecteur B femelle à 4 broches de type USB
Un câble USB (type B/mâle vers type A/mâle) est nécessaire (non fourni).
1. S'assurer que la balance est sous tension et fonctionne correctement.
2. Mettre l'ordinateur sous tension, et vérifier que le port USB est activé et fonctionne correctement.
3. Brancher le connecteur USB du câble au connecteur USB de l'ordinateur et à celui de la balance. Windows®
détectera un dispositif USB et l'assistant Nouveau matériel sera initialisé.
1
5
69
Data
GND
Handshake
Female

BALANCES ADVENTURER FR-57
Installation du logiciel du port virtuel
1. Insérer le CD fourni dans le lecteur de CD de
l'ordinateur.
Les diverses versions de Windows® présentent
des étapes légèrement différentes lors du
chargement des pilotes se trouvant sur le CD.
Dans toutes les versions, l'assistant Nouveau
matériel vous guidera au cours des étapes
requises afin de sélectionner le pilote se
trouvant sur le CD.
2. Après avoir cliqué sur Terminé, le port virtuel
doit être prêt à l'utilisation.
Windows® ajoute généralement le port virtuel
en séquence après le numéro de port COM le
plus élevé. Par exemple, sur un PC équipé
avec 4 ports COM, le port virtuel deviendra
COM5.
Lors de l'utilisation de l'interface USB avec des
programmes qui limitent le nombre de
désignations de ports COM (par exemple,
Ohaus MassTracker n'autorise que COM1, 2, 3
et 4), il peut s'avérer nécessaire d'attribuer un
de ces numéros de port au nouveau port
virtuel.
Exemple de l'assistant Matériel de Windows XP
Ceci peut être réalisé dans Paramètres des ports de l'utilitaire Gestionnaire de périphériques se trouvant sur le
panneau de configuration de Windows.
ENTREE USB
La balance répondra aux diverses commandes envoyées par le biais de l'adaptateur d'interface.
Terminer les commandes suivantes en présence d'un [CR] or [CRLF] (retour chariot ou retour chariot, retour à la
ligne.
Commandes de l'Adventurer
C réalise un étalonnage de l'intervalle de mesure
0S impression de données instables
1S impression exclusive de données stables
P Similaire à l'appui sur Imprimer
SP impression exclusive de pesées stables
IP Impression immédiate du poids affiché (stable ou instable)
CP Impression continuelle des poids
SLP Impression stable automatique seulement pour poids différent de zéro
SLZP Impression automatique pour poids stable différents de zéro et lecture du zéro
xP Impression automatique avec des intervalles de 1 à 3 600 secondes (x = 1 à 3600)
0P Termine l'impression d'intervalle
T Similaire à l'appui sur Tare
Z Similaire à l'appui sur Zero
PV impression de la version logicielle
Fonctionnement en impression automatique
Une fois que l'impression automatique est activée dans le menu, la balance enverra des données selon le besoin.
Si des données se trouvent dans le tampon d'impression, l'imprimante finira d'imprimer ces données.
10. MISE À JOUR DE LOGICIELS
Ohaus améliore continuellement le logiciel de ses balances. Pour obtenir la version la plus récente, contacter un
représentant Ohaus agréé ou Ohaus Corporation.

FR-58 BALANCES ADVENTURER
11. CONFORMITÉ
La conformité aux normes suivantes est indiquée par le marquage correspondant sur le produit.
Marque
Standard
Ce produit est conforme à la directive EMC 2004/108/EC, à la directive de basse tension
2006/95/EC et à la directive des instruments de pesée non automatique 2009/23/EC. La
Déclaration de conformité complète est disponible en ligne sur
http://europe.ohaus.com/europe/en/home/support/compliance/ce-declaration-of-conformity.aspx.
AS/NZS CISPR 11, AS/NZS 61000.4.3
CAN/CSA-C22.2 61010-1-12
Standard UL N° 61010-1 (3e édition)
Avis important pour les instruments de pesage vérifiés
Les instruments de pesage vérifiés sur le site de fabrication portent l’une des marques
précédentes sur l’étiquette de l’emballage avec un autocollant M (pour Métrolologie) vert sur la
plaque descriptive. Ils peuvent être immédiatement mis en service.
Les instruments de pesage devant être vérifiés en deux étapes ne portent pas d’autocollant M
(pour Métrolologie) vert sur la plaque descriptive et portent l’une des marques d'identification
précédentes sur l’étiquette de l’emballage.
La deuxième étape de la vérification initiale doit être exécutée par l’organisation de service
homologuée du représentant agréé au sein de la CE ou par les autorités nationales de poids et
mesures.
La première étape de la vérification initiale a été exécutée sur le site du fabricant.
Elle se compose de tous les tests requis par la norme européenne adoptée EN 45501:1992,
paragraphe 8.2.2.
Si des règlements nationaux limitent la durée de validité de la vérification, il incombe à l’utilisateur
dudit instrument de mesure de respecter strictement la période de re-vérification et d'informer les
autorités des poids et mesures respectives.
Remarque FCC
Ce matériel a été testé et s’est révélé conforme aux normes des appareils numériques de la classe A, en vertu de
la section 15 de la réglementation FCC. Ces limites ont pour objectif de fournir une protection raisonnable contre
des interférences dangereuses lorsque l'équipement est utilisé dans un environnement commercial. Cet
équipement génère, utilise et peut rayonner des hautes fréquences et s'il n'est pas installé et utilisé conformément
au guide de l'utilisateur, il peut générer des interférences préjudiciables aux communications radio. L'utilisation de
cet équipement dans une zone résidentielle risque de générer des interférences préjudiciables, auquel cas
l'utilisateur se verra dans l'obligation de rectifier la situation à ses frais.
Remarque d’Industrie Canada
Cet appareil numérique de classe B est conforme à la norme canadienne ICES-001.

BALANCES ADVENTURER FR-59
Enregistrement ISO 9001
En 1994, le Bureau Veritus Quality International (BVQI) a octroyé la certification d'enregistrement ISO 9001 à
Ohaus Corporation, États-Unis d'Amérique, confirmant que le système de gestion de la qualité d'OHAUS était
conforme aux conditions normalisées de l'ISO 9001. Le 21 juin 2012, Ohaus Corporation, USA, a été ré-
enregistrée à la norme ISO 9001:2008. Conforme avec l'Europe :
Mise au rebut
Conformément à la directive européenne 2002/96/CE sur les déchets d’équipements électriques
et électroniques (WEEE), cet appareil ne doit pas être mis au rebut comme des ordures
ménagères. Ceci est également valable pour les pays en dehors de l’UE, selon leurs impératifs
spécifiques.
La directive 2006/66/EC sur les batteries a introduit de nouveaux impératifs depuis septembre
2008 sur le retrait des batteries d'un équipement destiné au rebut dans tous les États membres
de l'Union européenne. Pour être conforme à cette directive, cet appareil a été conçu pour un
retrait sans danger des batteries aussitôt sa fin d'utilisation par une installation de traitement des
déchets.
Veuillez mettre au rebut ce produit conformément à la réglementation locale au point de collecte
spécifié pour les équipements électriques et électroniques.
Pour de plus amples informations, contacter l’autorité responsable ou le distributeur auprès
duquel cet appareil a été acheté.
Si cet appareil change de propriétaire (pour des raisons personnelles ou professionnelles), cette
consigne doit lui être communiquée.
Pour des instructions de mise au rebut en Europe, voir
http://europe.ohaus.com/europe/en/home/support/weee.aspx.
Nous vous remercions de votre contribution à la protection de l’environnement.

FR-60 BALANCES ADVENTURER
GARANTIE LIMITÉE
Ohaus garantit que ses produits sont exempts de défauts matériels et de fabrication à compter de la date de
livraison pendant toute la durée de la garantie. Selon les termes de cette garantie, Ohaus s'engage, sans frais de
votre part, à réparer ou, selon son choix, remplacer toutes les pièces déterminées défectueuses, sous réserve que
le produit soit retourné, tous frais payés, à Ohaus.
Cette garantie ne s'applique que si le produit a subi des dommages suite à un accident ou un mésusage, a été
exposé à des matériaux radioactifs ou corrosifs, contient des matériaux étrangers ayant pénétré à l'intérieur ou
après une maintenance ou des modifications apportées par quiconque autre qu’Ohaus. En l’absence d’une carte
d'enregistrement de garantie dûment remplie, la période de garantie commence à la date de l'expédition au
revendeur agréé. Aucune autre garantie expresse ou implicite n'est offerte par Ohaus Corporation. En aucun cas,
Ohaus Corporation ne peut être tenu responsable des dommages indirects.
Dans la mesure où les lois régissant les garanties varient d'un État à un autre et d'un pays à un autre, veuillez
contacter Ohaus ou votre représentant local agréé Ohaus pour de plus amples informations.

ADVENTURER-WAAGEN DE-1
INHALTSVERZEICHNIS
1. EINLEITUNG ..........................................................................................................................3
1.1 Beschreibung ............................................................................................................................................... 3
1.2 Ausstattung .................................................................................................................................................. 3
1.3 Bedeutung der Signalwörter und Warnsymbole .......................................................................................... 3
1.4 Sicherheitsmaßnahmen ............................................................................................................................... 4
2. INSTALLATION .....................................................................................................................4
2.1 Auspacken .................................................................................................................................................... 4
2.2 Auswahl des Aufstellorts .............................................................................................................................. 4
2.3 Nivellieren des Geräts .................................................................................................................................. 4
2.4 Anschluss der Stromversorgung .................................................................................................................. 5
2.5 Verbindung mit der Schnittstelle .................................................................................................................. 5
2.6 Erstkalibrierung ............................................................................................................................................ 5
3. BETRIEB ................................................................................................................................7
3.1 Übersichtsanzeige, Startbildschirm .............................................................................................................. 7
3.2 Hauptfunktionen und Hauptmenü ................................................................................................................ 8
3.3 Übersicht über Teile und Funktionen - Zugluftschutz für die Modelle .......................................................... 8
3.4 Übersicht über Teile und Funktionen - Modelle ohne Zugluftschutz............................................................ 9
4. ANWENDUNGEN ................................................................................................................. 11
4.1 Wägen ........................................................................................................................................................ 10
4.1.1. Optionseinstellungen .............................................................................................................................. 11
4.1.1. Sample Name (Probenname) ................................................................................................................ 13
4.1.1. Save to USB (Auf USB speichern) ......................................................................................................... 13
4.2. Stückzählung .............................................................................................................................................. 12
4.2.1. Optionseinstellungen .............................................................................................................................. 13
4.3 Prozentwägung .......................................................................................................................................... 15
4.3.1 Optionseinstellungen .............................................................................................................................. 15
4.4 Dynamisches Wägen ................................................................................................................................. 16
4.4.1 Optionseinstellungen .............................................................................................................................. 16
4.5 Dichtebestimmung ..................................................................................................................................... 17
4.5.1 Messung der Dichte eines Feststoffs mit Wasser (Standardvorgabe) ................................................... 17
4.5.2 Messung der Dichte eines schwimmfähigen Materials mit Wasser ....................................................... 18
4.5.3 Messung der Dichte eines Feststoffs mit einer Hilfsflüssigkeit .............................................................. 18
4.5.4. Messung der Dichte einer Flüssigkeit mit einem kalibrierten Sinkgewicht (wird nicht mitgeliefert). ...... 19
4.5.5 Messen der Dichte eines porösen Materials mit Öl ............................................................................... 20
4.6 Prüfwägen .................................................................................................................................................. 23
4.6.1 Optionseinstellungen .............................................................................................................................. 23
4.7 Anzeige mit Standbild ................................................................................................................................ 23
4.7.1 Display Hold ........................................................................................................................................... 24
4.7.2 Peak Hold ............................................................................................................................................... 24
4.7.3 Optionseinstellungen .............................................................................................................................. 24
4.8 Summierung ............................................................................................................................................... 25
4.9 Rezeptur ..................................................................................................................................................... 27
4.9.1 Optionseinstellungen .............................................................................................................................. 26
4.10 Zusätzliche Funktionen .............................................................................................................................. 27
4.10.1 Unterflurwägehaken ............................................................................................................................... 27
5. MENÜEINSTELLUNGEN ..................................................................................................... 28
5.1 Menünavigation .......................................................................................................................................... 28
5.1.1 Änderung von Einstellungen .................................................................................................................. 29
5.2 Kalibrierung ................................................................................................................................................ 30
5.2.1 Kalibrieruntermenü (INCAL-Modelle) ..................................................................................................... 30
5.2.2 Interne Kalibrierung ................................................................................................................................ 30
5.2.3 Automatische Kalibrierung ..................................................................................................................... 30
5.2.4. AutoCal™-Einstellung ............................................................................................................................ 31
5.2.5 Messspannenkalibrierung ...................................................................................................................... 31
5.2.6 Linearitätskalibrierung ............................................................................................................................ 32
5.2.7 Kalibrierprüfung ...................................................................................................................................... 32
5.3 Waagen-Setup ........................................................................................................................................... 32
5.3.1 Konfigurationsuntermenü der Waage .................................................................................................... 32
5.3.2 Sprache .................................................................................................................................................. 32
5.3.3 Benutzereinstellung ................................................................................................................................ 33

DE-2 ADVENTURER-WAAGEN
5.3.4 Filterebene ............................................................................................................................................. 33
5.3.5 Automatische Nullpunktnachführung ..................................................................................................... 33
5.3.6 Autom. Tarieren ...................................................................................................................................... 33
5.3.7 Teilstriche ............................................................................................................................................... 33
5.3.8 Datum & Zeit .......................................................................................................................................... 34
5.3.9 Eichmodus .............................................................................................................................................. 34
5.4 Wägeeinheiten ........................................................................................................................................... 35
5.4.1 Untermenü mit den Maßeinheiten .......................................................................................................... 35
5.5 Datenpflege ................................................................................................................................................ 35
5.5.1 Untermenü „Data Maintenance“ (Datenpflege) .......................................................................................... 35
5.5.2 Export auf USB ........................................................................................................................................... 36
5.5.3 Import von USB .......................................................................................................................................... 36
5.5.4 Informationen zur Waage ........................................................................................................................... 36
5.6 Kommunikation........................................................................................................................................... 36
5.6.1 Untermenü Kommunikation .................................................................................................................... 36
5.6.2 Baudrate ................................................................................................................................................. 36
5.6.3 Übertragung ........................................................................................................................................... 38
5.6.4 Handshake ............................................................................................................................................. 37
5.6.5 Druckausgabe ........................................................................................................................................ 37
5.6.6 Automatischer Druck .............................................................................................................................. 39
5.6.7 Druckinhalt ............................................................................................................................................. 39
5.6.8 Papiervorschub ...................................................................................................................................... 39
5.6.9 Format .................................................................................................................................................... 39
5.6.10 Cal.-Daten drucken ................................................................................................................................ 39
5.7 GLP- und GMP-Daten ................................................................................................................................ 39
5.7.1 Untermenü GLP-Daten........................................................................................................................... 39
5.7.2 Kopfzeilen ............................................................................................................................................... 39
5.7.3 Name der Waage ................................................................................................................................... 39
5.7.4 Name des Benutzers .............................................................................................................................. 39
5.7.5 Projektname ........................................................................................................................................... 39
5.8 Zurücksetzen auf die Werkeinstellung ....................................................................................................... 39
5.9 Sperre ......................................................................................................................................................... 39
6. EICHUNG ............................................................................................................................. 40
6.1 Einstellungen .............................................................................................................................................. 40
6.2 Verifizierung ............................................................................................................................................... 40
6.3 Versiegelung .............................................................................................................................................. 40
7. DRUCKEN ............................................................................................................................ 41
7.1 Anschlusskonfiguration und Prüfung der Drucker-/Computerschnittstelle................................................. 41
7.2 Ausgabeformat ........................................................................................................................................... 42
8. WARTUNG ........................................................................................................................... 42
8.1 Kalibrierung ................................................................................................................................................ 42
8.2 Reinigung ................................................................................................................................................... 42
8.3 Fehlerbehebung ......................................................................................................................................... 45
8.4 Serviceinformationen ................................................................................................................................. 43
9. TECHNISCHE DATEN ......................................................................................................... 44
9.1 Spezifikationen ........................................................................................................................................... 44
9.2 Zeichnungen und Abmessungen ............................................................................................................... 53
9.3 Teile und Zubehör ...................................................................................................................................... 54
9.4 Kommunikation........................................................................................................................................... 55
9.4.1. Schnittstellenbefehle .............................................................................................................................. 55
9.4.2. RS232 (DB9)-Pinbelegung ..................................................................................................................... 55
9.5 USB-Schnittstelle ....................................................................................................................................... 57
10. SOFTWARE-UPDATES ....................................................................................................... 57
11. COMPLIANCE...................................................................................................................... 58

ADVENTURER-WAAGEN DE-3
1. EINLEITUNG
1.1 Beschreibung
Die Adventurer-Waage ist ein Präzisionswägeinstrument, das Ihnen bei entsprechender Pflege viele Jahre lang
gute Dienste leisten wird. Die Adventurer-Waage von Ohaus ist für Wägebereiche von 120 g bis 8.200 g lieferbar.
1.2 Ausstattung
Steuerung über Touch-Elemente: Schneller,
grafischer Zugriff auf alle Steuerfunktionen, über ein
Dutzend Anwendungen und viele Optionen.
1.3 Bedeutung der Signalwörter und Warnsymbole
Sicherheitshinweise sind durch Signalwörter und Warnsymbole gekennzeichnet. Diese weisen auf
Sicherheitsgefahren und Warnungen hin. Die Nichtbeachtung der Sicherheitshinweise kann zu Verletzungen, zur
Beschädigung des Geräts, zu Fehlfunktionen und zu falschen Ergebnissen führen.
Signalwörter
VORSICHT Wird für gefährliche Situationen mit mittlerem Risiko verwendet, die zu Verletzungen oder
zum Tod führen können.
ACHTUNG Wird für gefährliche Situationen mit geringem Risiko verwendet, die zu Schäden am Gerät
oder anderen Sachbeschädigungen, zum Verlust von Daten oder zu Verletzungen führen
können.
Wichtiger Hinweis Wird für wichtige Informationen zum Produkt verwendet
Hinweis Wird für nützliche Informationen zum Produkt verwendet
Warnsymbole
Allgemeine Gefahr Gefahr eines Stromschlags
1.4 Sicherheitsmaßnahmen
ACHTUNG: Lesen Sie alle Sicherheits- und Warnhinweise vor der Installation durch, bevor
Sie das Gerät anschließen oder reparieren. Wenn Sie die Warnhinweise nicht einhalten, kann
es zu Personen- bzw. Sachschäden kommen. Bewahren Sie alle Anleitungen als Referenz auf.
Prüfen Sie, ob die Eingangsspannung und der Netzstecker des Netzgeräts zu der Netzversorgung vor Ort
passen.
Das Netzkabel darf keine Stolpergefahr und kein Hindernis darstellen.
Verwenden Sie die Waage nur in trockenen Räumen.
Diese Waage ist nur für die Verwendung in Räumen vorgesehen.
Lassen Sie keine Last auf die Schale der Wägeplattform fallen.
Verwenden Sie nur zugelassene Zubehörteile und Peripheriegeräte.
Verwenden Sie die Waage nur unter den in der Anleitung angegebenen Umgebungsbedingungen.
Trennen Sie die Waage vor dem Reinigen von der Stromversorgung.
Verwenden Sie die Waage nicht in gefährlichen oder instabilen Umgebungen.
Servicearbeiten dürfen nur durch Fachpersonal durchgeführt werden.
Gleichstrom
Wechselstrom

DE-4 ADVENTURER-WAAGEN
Stellen Sie die Waage so auf, dass der Netzanschluss gut zu erreichen ist.
2. INSTALLATION
2.1 Auspacken
Nehmen Sie die Adventurer-Waage und ihre Teile vorsichtig aus der Verpackung. Die mitgelieferten Komponenten
sind je nach dem Waagenmodell verschieden (siehe folgende Tabelle). Bewahren Sie die Verpackung als sichere
Versand- und Lagerverpackung auf. Lesen Sie diese Anleitung komplett durch, bevor Sie die Adventurer-Waage
installieren und verwenden, um eine falsche Bedienung zu vermeiden.
Mitgelieferte Teile
Waage
Netzteil
Windring (nur für 0,1 mg- und 1 mg-Modelle)
Garantiekarte
CD
2.2 Auswahl des Aufstellorts
Vermeiden Sie Orte mit starken Schwingungen, Wärmequellen, Luftzug oder schnellen
Temperaturschwankungen. Achten Sie auf ausreichend Platz.
2.3 Nivellieren des Geräts
Die Adventurer-Waage hat in einem kleinen runden Fenster neben dem Display eine Nivellierungslibelle.
Um die Waage zu nivellieren, stellen Sie die Füße so ein, dass die Nivellierlibelle genau in der Kreismitte liegt.
Informationen zum Einstellen der Füße finden Sie im folgenden Abschnitt „Nivellierhilfe“.. Nivellieren Sie das Gerät
nach jedem Standortwechsel.
Nivellierhilfe
Mit der Nivellierhilfefunktion können Sie die Adventurer-Waage nivellieren. Sie haben zwei Möglichkeiten, um
diese Funktion aufzurufen:
1. Weighing Application -> Item Settings -> Level Assist (Wägeanwendung -> Elementeinstellungen ->
Nivellierhilfe). Weitere Informationen dazu siehe Abschnitt 4.1.1.
2. Main Menu -> Balance Setup -> User Settings -> Level Assist (Hauptmenü -> Konfiguration der
Waage -> Benutzereinstellungen -> Nivellierhilfe). Weitere Informationen dazu siehe Abschnitt 5.3.3.

ADVENTURER-WAAGEN DE-5
Drehen Sie die Füße wie dargestellt, bis die Nivellierlibelle genau in der Kreismitte liegt.
2.4 Anschluss der Stromversorgung
Verbinden Sie den Gleichspannungs-Ausgangsstecker mit der entsprechenden Buchse an der Rückseite der
Waage. Verbinden Sie dann das Netzkabel mit einer Steckdose.
ACHTUNG: Bei Verwendung eines CSA-zertifizierten Netzteils (oder eines Netzteils mit
vergleichbarer Zulassung) muss der Ausgangsstrom begrenzt werden.
Wichtiger hinweis: Lassen sie das gerät 60 minuten vor der verwendung aufwärmen, um optimale
wägeergebnisse zu erreichen
2.5 Verbindung mit der Schnittstelle
Verbinden Sie den integrierten Anschluss RS-232 die Waage über ein serielles Standardkabel (mit
durchgehenden, unvertauschten Adern) mit einem Computer oder Drucker. Sie können auch den USB-
Anschluss der Waage verwenden.
Anschlüsse an der Rückseite der Waage. USB-Anschluss an der Vorderseite der Waage.
.
USB1: Nur für PC-Anschluss
USB2: Nur für Anschluss eines USB-Speichersticks
RS-232: Für PC- oder Druckeranschluss
Hinweis: Informationen zur Konfiguration und zu den Schnittstellenbefehlen siehe Abschnitt zu den
Kommunikationsmenüeinstellungen.
Informationen zum Anschluss, zur Konfiguration und Prüfung der Schnittstelle mit dem Drucker oder
Computer sowie zu den Ausgabeformaten des Druckers siehe Abschnitt „Drucken“.
2.6 Erstkalibrierung
Wenn Sie die Waage erstmals installiert haben und dann an einen anderen Ort umsetzen, müssen Sie die Waage
kalibrieren, um exakte Wägeergebnisse sicherzustellen. Die meisten Adventurer-Waagen verfügen über eine
integrierte AutoCal-Funktion zur automatischen Kalibrierung der Waage ohne Kalibriergewichte. Bei Bedarf können
Sie die Waage manuell mit externen Gewichten kalibrieren. Legen Sie vor Beginn der Kalibrierung geeignete
Kalibriergewichte bereit. Informationen zu den Kalibriergewichten und zur Vorgehensweise bei der Kalibrierung
siehe Abschnitt „Kalibrierung“.
¤ AutoCal™
USB1
RS232
USB2

DE-6 ADVENTURER-WAAGEN
Das vollautomatische System zur internen Kalibrierung, das die regelmäßige Wartung unterstützt und die Waage
täglich kalibriert, ist in fast jedem Modell enthalten.
Kalibriert das System automatisch, wenn ein Temperaturunterschied festgestellt wird, der die Wägegenauigkeit
beeinflusst (>1,5 °C), bzw. alle 11 Stunden.
¤ Externe Kalibrierung
Ausgewählte Präzisionsmodelle besitzen eine Funktion zur traditionellen externen Kalibrierung, bei die Waage mit
externen Gewichten (Kalibriergewichtswerte nach Wahl des Benutzers) kalibriert wird, um die Genauigkeit
sicherzustellen.

ADVENTURER-WAAGEN DE-7
3. BETRIEB
3.1 Übersichtsanzeige, Startbildschirm
Dieses Gerät arbeitet mit einem Touchscreen-Display mit berührungsempfindlichen Flächen und Tasten zur
Steuerung der Gerätefunktionen.
STEUERELEMENTE
Taste
Aktion
Kurzer Tastendruck (in ausgeschaltetem Zustand): Schaltet die Waage ein.
Langer Tastendruck (in eingeschaltetem Zustand): Schaltet die Waage aus.
Druckt die aktuellen Daten auf einem Drucker oder sendet sie an einen Computer.
Führt eine Nullstellung aus.
Führt eine Kalibrierung aus.
Führt die Tarierung aus.
Hauptanwendungsbildschirm
Anwendung
Anweisung
Symbole für Stabilität
(*), Netto (NET), Brutto
(G) und/oder Nullmitte
(>0<)
Referenzfelder
Anwendungstasten:
Die Funktionen sind
von der Anwendung
abhängig.
Ergebnisfeld: Die
Informationen hängen
von der Anwendung ab.
Berühren Sie g, um die
Einheit zu ändern.
Wägebereich und
Ablesbarkeit

DE-8 ADVENTURER-WAAGEN
3.2 Hauptfunktionen und Hauptmenü
Wägen: Drücken Sie auf Zero (Nullstellung), um das Display auf null zu setzen. Legen Sie einen Gegenstand
auf die Wägeplattform. Die Anzeige zeigt das Bruttogewicht an.
Tarieren: Drücken Sie auf Zero (Nullstellung), wenn keine Last auf der Wägeplattform liegt, um das Display auf
null zu setzen. Stellen Sie einen leeren Behälter auf die Wägeplattform und drücken Sie auf Tare
(Tara). Geben Sie Material in den Behälter: Das Nettogewicht wird angezeigt. Entfernen Sie den
Behälter: Das Behältergewicht wird als negative Zahl angezeigt. Drücken Sie die Taste Tare (Tara),
um die Anzeige zu löschen.
MENÜ & BILDSCHIRMNAVIGATION
Drücken Sie auf die Option Menu (Menü), um die
Menüliste zu öffnen. Zeigen Sie durch Drücken und
Ziehen des Rollbalkens weitere Optionen an.
Kalibrierung:
Zur Anzeige der Kalibrieroptionen
Waagen-Setup:
Zur Anzeige und Änderung der
Waageneinstellungen.
Wägeeinheiten:
Zur Anzeige und Änderung der
Wägeeinheiten.
Datenpflege:
Zur Anzeige der Datenpflegeeinstellungen.
GLP- und GMP-Daten:
Zur Rückverfolgung die Benutzerdaten
eingeben
Zurücksetzen auf die Werkseinstellung:
Zum Zurücksetzen der Menüeinstellungen
auf die Werkseinstellungen.
Kommunikation:
Zur Anzeige der Geräteeinstellungen für den
COM-Anschluss und der Druckeinstellungen
Sperre:
Zur Anzeige Sperreoptionen.
3.3 Übersicht über Teile und Funktionen - Zugluftschutz für die Modelle

ADVENTURER-WAAGEN DE-9
3.4 Übersicht über Teile und Funktionen – Modelle ohne Zugluftschutz
USB-Host
USB-Slave
Netzeingang
RS232
Eich-
Schalter
Einstellbare
Füße
Nivellier-
anzeige
Nivellieranzeige
USB-Host
Einstellbare Füsse
USB-slave
Eich-schalter
RS232
Netzeingang
Wägeplattform
Einstellbarer
Fuß
Wägeplattform
Netzeingang
Einstellbarer
Fuß

DE-10 ADVENTURER-WAAGEN
4. ANWENDUNGEN
Die Waage kann für verschiedene Anwendungsmodi konfiguriert werden. Berühren Sie das obere linke
Anwendungsfeld („Wägen“ im folgenden Beispiel):
Die Adventurer-Waage besitzt folgende 9 Anwendungsmodi:
Wägen
Stückzählung
Prozentwägung
Dynamisches
Wägen
(lebende
Tiere)
Dichtebestimmung
Prüfwägen
Anzeige mit
Standbild
Summierung
Rezeptur
4.1 Wägen
Hinweis: Vor Auswahl einer Anwendung müssen Sie die Waage kalibrieren und nivellieren.
Mit dieser Anwendung ermitteln Sie das Stückgewicht in der ausgewählten Maßeinheit.
Wägen
1. Im oberen linken Teil des Startbildschirms wählen Sie Weighing (Wägen) aus (diese Anwendung ist die
Standardanwendung).
2. Drücken Sie ggf. zuerst die Option Tare (Tara) oder Zero (Nullstellung).
3. Legen Sie Gegenstände auf die Wägeplattform, um das Gewicht anzuzeigen. Sobald die Anzeige stabil ist,
wird ein * angezeigt.
4. Der Ergebniswert wird in der Hauptzeile in der aktiven Maßeinheit angezeigt.
Der Startbildschirm für WEIGHING (Wägen)
Hauptzeile
Berühren Sie g, um die Maßeinheit zu
ändern.
Referenz-Felder
Anwendungstasten
Symbol der
Anwendung

ADVENTURER-WAAGEN DE-11
4.1.1. Optionseinstellungen
Zur Einstellung bzw. Anpassung der aktuellen Einstellungen
Drücken Sie die Taste
Item Settings
(Elementeinstellungen).
Der Bildschirm
Settings
(Einstellungen) wird angezeigt.
Minimum Weight:
Zur Einstellung des Mindestgewichts bei Überprüfung
eines Messwerts. Wenn das Ist-Gewicht unter dem
festgelegten Mindestgewicht liegt, wird dieser Fehler
gelb markiert.
Zur Einstellung des Wertes für das Mindestgewicht
drücken Sie die Taste
Minimum Weight.
Es wird ein Zifferneingabefenster angezeigt.
Geben Sie mit den Tasten das gewünschte
Mindestgewicht ein und drücken Sie dann auf Save
(Speichern). Die Anzeige kehrt wieder zurück zum
vorhergehenden Bildschirm.
Drücken Sie zur Rückkehr zum Startbildschirm
Um zum Ausgangsbildschirm der Wägeanwendung
zurückzukehren, berühren Sie Exit (Beenden) am
unteren Rand des Bildschirms.
Wägebereichsbalken: Wenn diese Funktion aktiviert
ist, erscheint ein Wägebereichsbalken im
Referenzfeld. Die Wägebereichsanzeige zeigt das Ist-
Gewicht in Prozent des Wägebereichs an.
Ist der Wägebereichsbalken deaktiviert, stehen im
Referenzfeld das Mindestgewicht und der Probenname.
Weighing Units: Ändert die angezeigte Maßeinheit.
Weitere Informationen dazu siehe Kapitel 5.4.
Filter Level: Ändert die Filterebene. Weitere
Informationen dazu siehe Kapitel 5.5.3.
GLP & GMP Data: Weitere Informationen zu den GLP-
& GMP-Daten: siehe Abschnitt 5.9.
Print Settings: Ändert die Druckeinstellungen. Weitere
Informationen dazu siehe Kapitel 7.
Nivellierhilfe: Liefert Anweisungen zur Einstellung der
Füße, um die Waage zu nivellieren.

DE-12 ADVENTURER-WAAGEN
4.1.2 Sample Name (Probenname)
Drücken Sie diese Schaltfläche, um einen Probennamen hinzuzufügen. Es erscheint ein
alphanummerisches Eingabefenster. Drücken Sie auf um zwischen Klein- und Großbuchstaben zu
wechseln.
Kleinbuchstaben: Großbuchstaben:
Geben Sie den gewünschten Probennamen ein und drücken Sie auf "Save" (Speichern), um den Namen
zu speichern und zum Ausgangsbildschirm der Wägeanwendung zurückzukehren.
4.1.3 Save to USB (Auf USB speichern)
Schließen Sie einen USB-Stick am USB-Anschluss auf der Vorderseite der Waage an. Drücken Sie als
Nächstes auf die Schaltfläche „Save to USB“ (Auf USB speichern), um die Daten auf dem USB-Stick zu
speichern. Nach dem Speichern wird die Schaltfläche kurzzeitig orange.
Hinweise: Wenn der USB-Stick das erste Mal angeschlossen wird, dauert es möglicherweise etwas,
bevor die Schaltfläche Save to USB (Auf USB speichern) funktioniert. Die Waage muss
zunächst die notwendigen Ordner auf dem USB-Stick erstellen, in denen die Daten
gespeichert werden.
WICHTIGER HINWEIS:
Die Wägedaten werden täglich auf einen USB-Speicherstick gespeichert. Die Daten werden jedoch bei
Verwendung mehrerer Wägemodi separat in einzelne Dateien gespeichert.
Je nach USB-Speicherstick werden möglicherweise nicht alle Daten von der Waage übertragen oder
das Display bleibt stehen. In diesem Fall müssen Sie den USB-Speicherstick trennen und den Vorgang
mit einem anderen USB-Speicherstick wiederholen.
Ohaus übernimmt keine Haftung, wenn Daten auf dem USB-Speicherstick gelöscht werden oder der
USB-Speicherstick beim Anschluss an die Waage bricht.
Um Probleme mit dem USB-Speicherstick möglichst auszuschließen, empfiehlt Ohaus die Verwendung
eines hochwertigen Speichersticks..
4.2. Stückzählung
Hinweis: Vor Auswahl einer Anwendung müssen Sie die Waage kalibrieren und nivellieren.
Mit dieser Anwendung zählen Sie Artikel mit gleichem Gewicht.
Stückzählung
1. Wählen Sie im oberen linken Teil des Startbildschirms die Option Parts Counting (Stückzählung) aus.
2. Drücken Sie ggf. zuerst die Option Tare (Tara) oder Zero (Nullstellung).
3. Legen Sie Gegenstände auf die Wägeplattform, um das Gewicht anzuzeigen. Sobald die Anzeige stabil ist,
wird ein * angezeigt.
4. Der Ergebniswert wird in der Hauptzeile mit dem Vermerk PCS (Stück) angezeigt.

ADVENTURER-WAAGEN DE-13
Der Startbildschirm Parts Counting
(Stückzählung)
Hauptzeile
Referenz-Felder
Anwendungstasten
Symbol der
Anwendung
4.2.1. Optionseinstellungen
Einstellung bzw. Anpassung der aktuellen Einstellungen
Drücken Sie die Taste
Item Settings
(Elementeinstellungen).
Der Bildschirm
Settings
(Einstellungen) wird angezeigt.
Samples: Die Probengröße kann zwischen 1 und 10.000
Stück liegen. Die Standardprobengröße ist 10. Wenn die
Probengröße geändert wird, öffnet die Waage sofort den
Bildschirm für das Durchschnitts-Stückgewicht (APW),
damit ein neues Durchschnittstückgewicht berechnet
werden kann.
Drücken Sie zur Einstellung der Probengröße die Taste
Samples
(Proben).
Es wird ein Zifferneingabefenster angezeigt.
Geben Sie mit den Tasten die gewünschte
Probengröße ein. Drücken Sie dann auf Save
(Speichern).
Auf dem nächsten Bildschirm wird der Hinweis
angezeigt, dass Sie das Referenzgewicht auf die
Wägeplattform legen sollen.
Legen Sie das Referenzgewicht auf die Wägeplattform.
Drücken Sie dann die Taste Accept (Akzeptieren), um
den Wert zu erfassen und wieder zum Startbildschirm
zurückzukehren.
Bestimmen des Durchschnitts-Stückgewichts
(APW):
Immer, wenn ein neues Teil gezählt werden soll,
müssen Sie das Nenngewicht eines Teils
(Durchschnitts-Stückgewicht, abgekürzt APW) aus
einer kleinen Zahl von Teilen bestimmen. Das
Durchschnitts-Stückgewicht wird gespeichert, bis es
durch ein anderes Durchschnitts-Stückgewicht
ersetzt wird.

DE-14 ADVENTURER-WAAGEN
Es gibt zwei Methoden, das Durchschnitts-
Stückgewicht zu bestimmen:
1. Das Ist-Durchschnitts-Stückgewicht ist bekannt.
2. Das Durchschnitts-Stückgewicht muss aus dem
Gewicht ermittelt werden. In diesem Fall wird die
aktuelle Probengröße verwendet.
Einstellen eines bekannten Durchschnitts-Stückgewichts
(APW)
Drücken Sie zur direkten Einstellung des Durchschnitts-
Stückgewichts (APW) die Taste
APW
: Es wird ein
Zifferneingabefenster angezeigt.
Geben Sie über die Tasten das gewünschte Durchschnitts-
Stückgewicht ein, und drücken Sie dann Save (Speichern).
Die Anzeige schaltet zurück zum Anwendungsstartbildschirm
und zeigt das neue Durchschnitts-Stückgewicht in dem
Referenzfeld an.
Einstellen eines neuen Durchschnitts-Stückgewichts
(APW) – Ermittlung des Durchschnitts-Stückgewichts
Um ein neues Durchschnitts-Stückgewicht zu bestimmen,
legen Sie das Referenzgewicht auf die Wägeplattform und
drücken dann die Taste Accept (Akzeptieren).
Hinweis: Es wird die Probengröße verwendet, die angezeigt
wird. Wenn Sie eine andere Probengröße verwenden wollen,
ändern Sie zunächst diese Einstellung. (Siehe oben.)
Der Startbildschirm zeigt die Stückzahl für das neue
Durchschnitts-Stückgewicht an.
Auto Optimization: Wenn diese Funktion aktiviert ist, verbessert sich die Genauigkeit, da das Stückgewicht bei
Zugabe weiterer Teile automatisch neu berechnet wird. Standard ist Off.
Anmerkungen: Die Optimierung des Durchschnitts-Stückgewichts (APW) erfolgt nur, wenn Sie die auf der
Wägeplattform liegenden Proben durch ein bis drei weitere Proben ergänzen.
Bei der manuellen Eingabe des Durchschnitts-Stückgewichts mit dem nummerischen Tastenfeld erfolgt keine
automatische Optimierung des APW.
Print Settings: Ändert die Druckeinstellungen. Weitere Informationen dazu siehe Kapitel 7.
Hinweis: Die Schaltfläche Save to USB (Auf USB speichern) erscheint erst, wenn ein USB-Speicherstick an der
Waage angeschlossen ist. Weitere Informationen dazu siehe Abschnitt 4.1.3.

ADVENTURER-WAAGEN DE-15
4.3 Prozentwägung
Hinweis: Vor Auswahl einer Anwendung müssen Sie die Waage kalibrieren und nivellieren.
Benutzen Sie zur Messung des Gewichts einer Probe die Option Percent Weighing (Prozentwägung): Das
Gewicht wird dann als Prozentsatz des vorher definierten Referenzgewichts angezeigt.
Das Standardreferenzgewicht bzw. letzte Referenzgewicht wird angezeigt.
Prozentwägung
1. Wählen Sie in der oberen linken Ecke des Startbildschirms die Option Percent Weighing
(Prozentwägung).
2. Legen Sie einen Gegenstand auf die Wägeplattform. Der Unterschied zwischen der Probe und dem
Referenzgewicht wird in Prozent angezeigt.
Der Startbildschirm Percent Weighing
(Prozentwägung)
Hauptzeile
Referenz-Felder
Anwendungstasten
Symbol der
Anwendung
4.3.1 Optionseinstellungen
Zur Einstellung bzw. Anpassung der aktuellen Einstellungen
Drücken Sie die Taste
Item Settings
(Elementeinstellungen). Der Bildschirm
Settings
(Einstellungen) wird angezeigt.
Recalculate Ref. Wgt: Um ein neues
Referenzgewicht festzulegen, drücken Sie die
Taste zur Neuberechnung des
Referenzgewichts.
Folgen Sie den Anweisungen auf dem
Bildschirm, um ein neues Referenzgewicht zu
bestimmen.
Drücken Sie alternativ auf die Schaltfläche
Ref.
Weight
(Referenzgewicht) im Bildschirm
„Percent Weighing Recalculate Ref. Wgt
(Referenzgewicht für Prozentwägen neu
berechnen), um ein Referenzgewicht manuell
mit dem nummerischen Tastenfeld einzugeben.
Print Settings: Ändert die Druckeinstellungen.
Weitere Informationen dazu siehe Kapitel 7.
Hinweis: Die Schaltfläche Save to USB (Auf USB
speichern) erscheint erst, wenn ein USB-Speicherstick
an der Waage angeschlossen ist. Weitere
Informationen dazu siehe Abschnitt 4.1.

DE-16 ADVENTURER-WAAGEN
4.4 Dynamisches Wägen
Hinweis: Vor Auswahl einer Anwendung müssen Sie die Waage kalibrieren und nivellieren.
Mit dieser Anwendung wiegen Sie instabile Lasten, beispielsweise lebende Tiere. Sie können zwei verschiedene
Modi für Start und Reset auswählen: manuell (Start und Stopp per Tastendruck) und automatisch (Start und
Stopp automatisch).
Dynamisches Wägen – manuell (Standardeinstellung)
1. Wählen Sie in der oberen linken Ecke des Startbildschirms Dynamic Weighing (Dynamisches Wägen)
aus.
2. Platzieren Sie die Objekte auf der Wägeplattform und drücken Sie die Taste Start.
Der Startbildschirm für Dynamisches
Wägen
Hauptzeile
Referenz-Felder
Anwendungstasten
Symbol der
Anwendung
3. Die Waage beginnt, rückwärts zu zählen (zur Bestimmung des Durchschnittswertes). Während des
Rückwärtszählens zeigt die Informationszeile die Restzeit an.
Drücken Sie gegebenenfalls die Taste Stop, um den Vorgang abzubrechen.
4. Wenn die Rückwärtszählung beendet ist, wird die Ergebniszeile angezeigt. Drücken Sie auf Clear
(Löschen), um das gehaltene Gewicht zu löschen und zum Ausgangsbildschirm zurückzukehren.
Hinweis: Reinigen Sie die Wägeplattform, bevor Sie mit einem neuen dynamischen Wägezyklus beginnen.
4.4.1 Optionseinstellungen
Zur Einstellung bzw. Anpassung der aktuellen Einstellungen
Drücken Sie die Taste
Item Settings
(Elementeinstellungen). Der Bildschirm
Settings
(Einstellungen) wird angezeigt.
Averaging Time: Zum Einstellen der Durchschnittszeit
auf einen Wert zwischen 1 und 99 Sekunden Die
Standardvorgabe sind 5 Sekunden.
Automatic Mode: Wenn der automatische Modus
aktiviert ist, beginnt der Zyklus, sobald ein Objekt auf der
Wägeplattform platziert ist; der gespeicherte Wert wird
automatisch zurückgesetzt, wenn das Objekt von der
Wägeplattform entfernt wird.
Sample Name: Ordnet einer Probe einen Namen zu.
Print Settings: Ändert die Druckeinstellungen. Weitere
Informationen dazu siehe Kapitel 7.
Hinweis: Die Schaltfläche Save to USB (Auf USB
speichern) erscheint erst, wenn ein USB-Speicherstick
an der Waage angeschlossen ist. Weitere Informationen
dazu siehe Abschnitt 4.1.

ADVENTURER-WAAGEN DE-17
4.5 Dichtebestimmung
Hinweis: Vor Auswahl einer Anwendung müssen Sie die Waage kalibrieren und nivellieren.
Mit dieser Anwendung bestimmen Sie die Dichte eines Objekts. Sie haben vier Möglichkeiten zur Bestimmung
der Dichte:
1. Feststoffe, die schwerer sind als Wasser
2. Feststoffe, die leichter sind als Wasser
3. Bestimmung der Dichte von Flüssigkeiten
4. Poröse Materialien (die mit Öl getränkt sind.)
Der Startbildschirm Density
Determination (Dichtebestimmung)
Hauptzeile
Referenz-Felder
Funktionstasten
Symbol der
Anwendung
4.5.1 Messung der Dichte eines Feststoffs mit Wasser (Standardvorgabe)
Drücken Sie die Taste Item Settings (Elementeinstellungen),
um den Einstellbildschirm für die Dichtebestimmung zu
öffnen.
Bestätigen Sie, dass die folgenden
Konfigurationseinstellungen ausgewählt sind:
Density Type: Solid (Dichteart: Feststoff)
Auxiuliary Liquid: Water (Hilfsflüssigkeit: Wasser)
Porous Material: Off (Poröses Material: OFF)
Um den Wert der Wassertemperatur anzupassen, berühren Sie
die Schaltfläche Water Temp. (Wassertemperatur).
Die Waage berechnet die Wasserdichte in Abhängigkeit von der
eingegebenen Wassertemperatur (interne Suchtabelle).
Messen Sie die Ist-Temperatur des Wassers mit einem
Präzisionsthermometer.
Es wird ein Zifferneingabefenster angezeigt.
Geben Sie die Ist-Temperatur des Wassers ein, und drücken Sie
dann Save (Speichern).
Drücken Sie zur Rückkehr zum Startbildschirm für die
Dichtebestimmung auf Back (Zurück).
Schritt 1 von 2 –
Wägen der Probe
an der Luft
Drücken Sie
Start
.
Folgen Sie den
Anweisungen, und
speichern Sie mit
Accept
(Akzeptieren), das
Gewicht der
trockenen Probe
(„an der Luft“).

DE-18 ADVENTURER-WAAGEN
Schritt 2 von 2 –
Wiegen Sie die
Probe nach dem
Eintauchen.
Folgen Sie den
Anweisungen auf
dem Bildschirm;
speichern Sie mit
Accept
(Akzeptieren) das
Probengewicht
nach dem
Eintauchen.
Sobald die nötigen Gewichte bestimmt sind, wird die Dichte der Probe in g/cm
3
(zusammen mit dem Gewicht an
der Luft und dem Gewicht in Wasser) auf dem Anwendungsbildschirm angezeigt.
Drücken Sie
Start
, um alle Gewichtswerte zurückzusetzen und den Vorgang neu zu beginnen.
4.5.2 Messung der Dichte eines schwimmfähigen Materials mit Wasser
Drücken Sie die Taste Item Settings
(Elementeinstellungen), um den Bildschirm Settings
(Einstellungen) zu öffnen.
Bestätigen Sie, dass die folgenden
Konfigurationseinstellungen ausgewählt sind:
Density Type: Solid (Dichteart: Feststoff)
Liquid Type: Water (Art der Flüssigkeit: Wasser)
Porous Material: Off (Poröses Material: OFF)
Drücken Sie die Taste
Back
(Zurück), um zum
Startbildschirm für die Dichtebestimmung zurückzuschalten.
Führen Sie die gleichen Schritte wie bei einem festen
Material aus, ausgenommen Schritt 2 zur
Dichtebestimmung. Drücken Sie die Probe in die
Flüssigkeit, bis sie ganz eingetaucht ist.
4.5.3 Messung der Dichte eines Feststoffs mit einer Hilfsflüssigkeit
Um diese Funktion zu nutzen, rufen Sie das Setup-Menü für die Dichtebestimmung auf und wählen folgende
Option aus:
Density Type: Solid; Liquid Type: Other; Porous Material: Off (Dichteart: Feststoff, Flüssigkeitsart: andere;
Porous Material: Off (Poröses Material: OFF).
Bestätigen Sie die angezeigten Standardvorgaben
(Flüssigkeitsdichte usw.).
Zur Einstellung des Wertes für die Flüssigkeitsdichte drücken
Sie die Taste Auxiliary liquid (Hilfsflüssigkeit) und wählen
dann Other (Andere) aus.

ADVENTURER-WAAGEN DE-19
Es wird ein Zifferneingabefenster angezeigt.
Geben Sie die Dichte in g/cm
3
ein, und drücken Sie dann auf
Save (Speichern).
Die Anzeige schaltet zurück zum vorhergehenden Bildschirm.
Drücken Sie zur Rückkehr zum Startbildschirm für die
Dichtebestimmung auf Back (Zurück).
Beginnen Sie den Vorgang zur Dichtebestimmung wie oben
beschrieben.
4.5.4. Messung der Dichte einer Flüssigkeit mit einem kalibrierten Sinkgewicht (wird nicht
mitgeliefert).
Rufen Sie zur Aktivierung dieser Funktion das Setup-Menü für die Dichtebestimmung auf und wählen Sie
die Einstellung Density Type: Liquid (Dichteart: Flüssigkeit).
Hinweis: Wenn Sie die Dichteart auf „Flüssigkeit“ eingestellt haben, sind die Auswahlmöglichkeiten für die
Flüssigkeitsart und poröses Material deaktiviert.
Der Startbildschirm für die DICHTEBESTIMMUNG –
FLÜSSIGKEIT
Hauptzeile
Referenz-Felder
Funktionstasten
Symbol der
Anwendung
Bestätigen Sie, dass der angezeigte Standardwert (Volumen
des Senkgewichts), richtig ist. Drücken Sie zur Bearbeitung der
Standardvorgaben auf die Option
Sinker Volume
(Senkgewichtvolumen).
Um den Wert für das Senkgewichtvolumen einzustellen,
drücken Sie die Taste
Sinker Volume
(Senkgewichtvolumen).
Es wird ein Zifferneingabefenster angezeigt.
Geben Sie den gewünschten Wert mit den Tasten ein, und
drücken Sie auf Save (Speichern).
Die Anzeige schaltet dann zurück zum vorhergehenden
Bildschirm, wobei der neue Wert hervorgehoben wird.
Um zum Startbildschirm der Dichtebestimmung
zurückzukehren, drücken Sie auf Back (Zurück).
Drücken Sie auf
Start,
um den Vorgang zu beginnen.

DE-20 ADVENTURER-WAAGEN
Schritt 1 von 2 – Bestimmung des Sinkgewichts an der Luft.
Folgen Sie den Anweisungen auf dem Bildschirm, und drücken
Sie dann
Accept
(Akzeptieren), um das Sinkgewicht („an der
Luft“) zu speichern.
Schritt 2 von 2 – Bestimmung des Sinkgewichts beim
Eintauchen in die Prüfflüssigkeit
Folgen Sie den Anweisungen auf dem Bildschirm, und drücken
Sie dann auf
Accept
(Akzeptieren), um das Sinkgewicht nach
dem Eintauchen in die Prüfflüssigkeit zu speichern.
Sobald die betreffenden Gewichte bestimmt sind, wird die
Dichte der Flüssigkeitsprobe in g/cm³ (zusammen mit dem
Gewicht an der Luft und dem Gewicht in Wasser)
auf dem
Anwendungsbildschirm angezeigt.
Drücken Sie
Start
, um alle Gewichtswerte zurückzusetzen und
den Vorgang neu zu beginnen.
4.5.5 Messen der Dichte eines porösen Materials mit Öl
Um diese Funktion zu aktivieren, rufen Sie das Setup-Menü
Density Determination (Dichtebestimmung) auf und wählen
folgende Optionen aus:
Density Type: Solid (Dichteart: Feststoff)
Liquid Type: Water (Art der Flüssigkeit: Wasser)
Porous Material: ON (Poröses Material: ON)

ADVENTURER-WAAGEN DE-21
Der Startbildschirm DICHTEBESTIMMUNG –
PORÖSES MATERIAL
Hauptzeile
Referenz-Felder
Funktionen Symbol der
Anwendung
Bestätigen Sie die angezeigten Standardvorgaben
(Wassertemperatur).
Drücken Sie zur Bearbeitung der Standardvorgaben auf
Item Settings
(Elementeinstellungen). Der Bildschirm
Settings
(Einstellungen) wird angezeigt.
Die Waage berechnet die Wasserdichte anhand der
eingegebenen Wassertemperatur.
Messen Sie die Ist-Temperatur des Wassers mit einem
Präzisionsthermometer.
Um die Wassertemperatur oder die Öldichte anzupassen,
berühren Sie die Schaltfläche Water Temp
(Wassertemperatur) oder Oil Density (Öldichte).
Es wird ein Zifferneingabefenster angezeigt.
Geben Sie den gewünschten Wert ein. Drücken Sie dann auf
Save (Speichern).
Die Anzeige schaltet dann zurück zum vorhergehenden
Bildschirm, wobei der neue Wert hervorgehoben wird.
Um zum Ausgangsbildschirm der Dichtebestimmung
zurückzukehren, berühren Sie die Schaltfläche Exit
(Beenden)..
Dichteberechnung beginnen
Schritt 1 von 3 – Wiegen der ölfreien Probe an der Luft
Folgen Sie den Anweisungen auf dem Bildschirm und drücken
Sie dann
Accept
(Akzeptieren), um das Gewicht der trockenen
Probe (an der Luft) zu speichern.

DE-22 ADVENTURER-WAAGEN
Schritt 2 von 3 – Wiegen der ölfgefüllten Probe an der Luft
Folgen Sie den Anweisungen auf dem Bildschirm und drücken
Sie dann auf
Accept
(Akzeptieren), um das Probengewicht mit
Öl zu speichern.
Schritt 3 von 3 – Wiegen der ölgefüllten Probe nach
Eintauchen in Flüssigkeit
Folgen Sie den Anweisungen auf dem Bildschirm und drücken
Sie dann auf
Accept
(Akzeptieren), um das Gewicht der
ölgefüllten Probe nach dem Eintauchen von Flüssigkeit zu
speichern.
Sobald die erforderlichen Gewichte bestimmt wurden, wird die
Dichte der Probe in g/cm
3
(zusammen mit dem Gewicht an der
Luft, mit und ohne Ölfüllung und dem Gewicht in Wasser) auf
dem Anwendungsbildschirm angezeigt.
Der Wert bleibt auf der Anzeige, bis Sie die Taste Start drücken.
Drücken Sie
Start
, um alle Gewichtswerte zurückzusetzen und
den Vorgang neu zu beginnen.

ADVENTURER-WAAGEN DE-23
4.6 Prüfwägen
Hinweis: Vor Auswahl einer Anwendung müssen Sie die Waage kalibrieren und nivellieren.
Beim Prüfwägen wird das Gewicht einer Probe mit Sollgrenzwerten verglichen.
Prüfwägen
1. Wählen Sie in der oberen linken Ecke des Startbildschirms Check Weighing (Prüfwägen) aus.
2. Die Standardgrenzwerte für das Prüfwägen bzw. die letzten Grenzwerte werden angezeigt.
3. Legen Sie die Gegenstände auf die Wägeplattform.
4. In dem Feld mit der Fortschrittsanzeige wird als Status Under/Accept/Over (zu niedrig/akzeptabel/zu hoch)
angezeigt. Das Ist-Gewicht des Teils wird in der Hauptzeile ausgegeben.
Der Startbildschirm Check Weighing
(Prüfwägen)
Hauptzeile
Referenz-Felder
Funktionstasten
Symbol der
Anwendung
Drücken Sie zur Einstellung des Werts für die Obergrenze die
Taste Over Limit (Obergrenze).
Drücken Sie zur Einstellung des Werts für die Untergrenze die
Taste
Under Limit
(Untergrenze).
Es wird ein Zifferneingabefenster angezeigt.
Geben Sie das gewünschte Grenzgewicht ein und drücken Sie
dann auf Save (Speichern).
Um zum Startbildschirm
CHECK WEIGHING
(PRÜFWÄGEN)
zurückzukehren, drücken Sie auf
Exit
(Beenden).
4.6.1 Optionseinstellungen
Zur Einstellung bzw. Anpassung der aktuellen Einstellungen
Drücken Sie die Taste
Item Settings
(Elementeinstellungen).
Der Bildschirm
Settings
(Einstellungen) wird angezeigt.
Sample Name: Ordnet einer Probe einen Namen zu.
Print Settings: Ändert die Druckeinstellungen. Weitere
Informationen dazu siehe Kapitel 7.
4.7 Anzeige mit Standbild
Hinweis: Vor Auswahl einer Anwendung müssen Sie die Waage kalibrieren und nivellieren.

DE-24 ADVENTURER-WAAGEN
Es werden zwei Betriebsmodi unterstützt:
Display Hold (Anzeige mit Standbild): erlaubt dem Benutzer, ein stabiles Gewicht zu erfassen
und zu speichern.
Peak Hold (Anzeige des Höchstgewichts): erlaubt dem Benutzer, die Bestimmung des höchsten
stabilen Gewichts zu erfassen und zu speichern.
Der Startbildschirm für die Anzeige
mit Standbild
Hauptzeile
Referenz-Felder
Funktionstasten
Symbol der
Anwendung
Display Hold
4.7.1 Display Hold
1. Wählen Sie in der oberen linken Ecke des Startbildschirms die Option Display Hold.
2. Legen Sie die Probe auf die Wägeplattform und drücken Sie die Taste Hold (Halten), während das
Gewicht erfasst wird.
3. In der Hauptzeile steht jetzt das erste stabile Gewicht.
4. Drücken Sie Clear (Löschen), um die Anzeige zu löschen und wieder den Startbildschirm Display Hold
(Anzeige mit Standbild) aufzurufen.
Peak Hold
4.7.2 Peak Hold
1. Wählen Sie in der oberen linken Ecke des Startbildschirms die Option Display Hold (Anzeige mit Standbild).
2. Aktivieren Sie den automatischen Modus in den Elementeinstellungen (siehe Abschnitt 4.7.5).
3. Legen Sie die Probe auf die Wägeplattform, um zu beginnen.
4. Wägen Sie weitere Proben. Das stabile Gewicht wird automatisch angezeigt.
5. Um die Standbildfunktion zu beenden und zum normalen Betrieb zurückzukehren, drücken Sie Stop.
4.7.3 Optionseinstellungen
Zur Einstellung bzw. Anpassung der aktuellen Einstellungen

ADVENTURER-WAAGEN DE-25
Drücken Sie die Taste
Item Settings
(Elementeinstellungen).
Der Bildschirm
Settings
(Einstellungen) wird angezeigt.
Mode: Zur Umschaltung zwischen Peak Hold und
Display Hold (Anzeige des Spitzengewichts und Anzeige
des gemerkten Gewichts).
Sample Name: Ordnet einer Probe einen Namen zu.
Print Settings: Ändert die Druckeinstellungen. Weitere
Informationen dazu siehe Kapitel 7.
Hinweis: Die Schaltfläche Save to USB (Auf USB speichern)
erscheint erst, wenn ein USB-Speicherstick an der Waage
angeschlossen ist. Weitere Informationen dazu siehe
Abschnitt 4.1.3.
4.8 Summierung
Hinweis: Vor Auswahl einer Anwendung müssen Sie die Waage kalibrieren und nivellieren.
Die Option Totalization (Summierung) misst das kumulierte Gewicht mehrerer Proben. Das kumulierte
Gesamtgewicht kann größer sein als der Wägebereich der Waage. Die maximale Probenanzahl (n) beträgt 99.
Der Startbildschirm Totalization
(Summierung)
Hauptzeile
Referenz-Felder
Anwendungstasten
Symbol der
Anwendung
Summierung
1. Wählen Sie in der oberen linken Ecke des Startbildschirms die Option Totalization (Summierung) aus.
2. Legen Sie eine Probe auf die Wägeplattform, um zu beginnen. Das Probengewicht erscheint in der
Hauptzeile.
3. Drücken Sie Accumulate (Kumulieren), um das (stabile) Gewicht der Probe zum Gesamtgewicht zu
addieren.
4. Nehmen Sie die Probe von der Wägeschale, legen Sie die nächste Probe auf die Wägeschale und setzen
Sie wie oben beschrieben fort.
5. Drücken Sie auf Result (Ergebnis), um die Ergebnisse der Summierung anzuzeigen.
6. Wenn Sie fertig sind, drücken Sie die Taste Clear Total (Summierung löschen), um das kumulierte
Gewicht auf null zurückzusetzen.
7. Drücken Sie Save to USB (Auf USB speichern), um das Ergebnis auf einen USB-Speicherstick zu
speichern, oder auf Exit (Beenden), um zum Ausgangsbildschirm der Summierung zurückzukehren.
Hinweis: Wenn Sie die Einheit ändern, ändert sich auch das Akkumulierungsergebnis entsprechend der
ausgewählten Einheit.
4.9 Rezeptur
Hinweis: Vor Auswahl einer Anwendung müssen Sie die Waage kalibrieren und nivellieren.

DE-26 ADVENTURER-WAAGEN
Mit dieser Anwendung erstellen Sie Rezepte und Zusammensetzungen. Sie können maximal 50 Komponenten
verwenden.
Der Startbildschirm Formulation
(Rezeptur)
Hauptzeile
Referenz-Felder
Anwendungstasten
Symbol der
Anwendung
Rezeptur
1. Wählen Sie in der oberen linken Ecke des Startbildschirms die Option Formulation (Rezeptur) aus.
2. Drücken Sie Start, um mit der Erfassung der Komponenten zu beginnen.
3. Legen Sie die erste Zutat auf die Wägeplattform (oder in einen tarierten Behälter), und drücken Sie Accept
(Akzeptieren), um die Komponente zu speichern.
4. Geben Sie weitere Komponenten hinzu, und drücken Sie jeweils Accept (Akzeptieren), um das Gewicht
der einzelnen Komponenten zu speichern, bis das Rezept komplett ist. Die Zeile Total (Gesamt) zeigt das
Gesamtgewicht aller Komponenten an.
5. Drücken Sie auf Stopp (Stopp), um die Rezeptur zu beenden. Die Rezepturergebnisse werden angezeigt:
Hinweis: Wenn die Option Filler (Füllmittel) aktiviert ist (siehe Abschnitt 4.9.1), fragt die Waage nach
einem Füllmaterial, um die Rezeptur fertigzustellen. Ergänzen Sie das Füllmaterial, und drücken Sie
Accept (Akzeptieren), um die Rezeptur abzuschließen und die Ergebnisse anzuzeigen.
6. Drücken Sie Save to USB (Auf USB speichern), um die Ergebnisse auf einen USB-Speicherstick zu
speichern, oder auf Exit (Beenden), um zum Ausgangsbildschirm der Rezeptur zurückzukehren.
Hinweis: Rezepturergebnisse werden gelöscht, wenn eine neue Rezeptur beginnt.
4.9.1 Optionseinstellungen
Zur Einstellung bzw. Anpassung der aktuellen Einstellungen
Drücken Sie die Taste
Item
Settings
(Elementeinstellungen). Der Bildschirm
Settings
(Einstellungen) wird angezeigt.
Filler (Füllmaterial): Wenn diese Option aktiviert ist,
wird nach Ende der Rezepturerstellung ein
Füllmaterial verlangt.
Auto Tare (Automatisch Tarieren): Wenn diese
Option aktiviert ist, tariert die Waage automatisch,
sobald das Komponentengewicht akzeptiert ist.
Print Settings: Ändert die Druckeinstellungen.
Weitere Informationen dazu siehe Kapitel 7.

ADVENTURER-WAAGEN DE-27
4.10 Zusätzliche Funktionen
4.10.1 Unterflurwägehaken
Die Adventurer-Waage ist mit einem Unterflurwägehaken zum Wägen von Teilen unter der Waage ausgestattet.
Hinweis: Nehmen Sie die Wägeplattform und den Zugluftschutz ab (sofern vorhanden), um Schäden beim
Umdrehen der Waage zu vermeiden.
Wichtiger Hinweis: Legen Sie die Waage nicht auf dem Wägeplattformträgerkonus oder
den Wägezellenstiften ab.
Schalten Sie zur Verwendung dieser Funktion die Waage aus und nehmen Sie die Schutzabdeckung der Öffnung
für den Unterflurwägehaken ab.
Die Waage kann mit Laborstützböcken oder anderen geeigneten Mitteln abgestützt werden. Achten Sie darauf,
dass die Waage nivelliert und sicher ist. Schalten Sie die Waage ein, und hängen Sie dann mit einem Seil oder
Gurt die zu wiegenden Teile an.
Unterflurwäge-
Schutzabdeckung
Unterflurwägehaken

DE-28 ADVENTURER-WAAGEN
5. MENÜEINSTELLUNGEN
5.1 Menünavigation
Struktur des Benutzermenüs:
Anwendungsmodi
Hauptmenü
Kalibrierung
Konfiguration der Waage
Wä geeinheiten
Datenpflege
Kommuni-
kation
GLP- und
GMP-Daten
Wiederher-
stellung der
Werksein-
stellungen
Sperre
Wä geanwendung
Kalibrierung
Interne Kalibrierung
Sprache
Milligramm
Export an USB
RS-232-Standard
Kopfzeilen
Kalibrierung
Mindestgewicht
Konfiguration
der Waage
Automatische
Kalibrierung
Benutzereinstellungen
Gramm
Einstellungen des
Anwendungs-
modus
Baudrate
Kopfzeile 1
Kapazitä tsanzeige
Wä geeinheiten
AutoCal
TM
Touchscreen kalibrieren
Kilogramm
Menü einstellungen
2400
Kopfzeile 2
Wä geeinheiten
Einheiten
Datenpflege
Messspannen-
kalibrierung
Helligkeit
Karat
Import von USB
4800
Kopfzeile 3
Datenpflege
Filterebene
Kommunikation
Linearitä ts-
kalibrierung
Signalton
Ounce
Einstellungen des
Anwendungs-
modus
9600
Kopfzeile 4
Kommunikation
GLP- und
GMP-Daten
GLP- und
GMP-Daten
Kalibrierprü fung
Automatische Verdunkelung
Troy-Unze
Menü einstellungen
19200
Kopfzeile 5
GLP- und
GMP-Daten
Druckeinstellungen
Wiederher-
stellung der
Werksein-
stellungen
Nivellierhilfe
Pound
Waagen-
informationen
38400
Waagen-
name
Wiederher-
stellung der
Werksein-
stellungen
Nivellierhilfe
Sperre
Filterebene
Pennyweight
Ü bertragung
Benutzername
Zä hlanwendung
Automatische Nullpunktnachfü hrung
Grain
7 E 1
Projektname
Probengrö ß e
Autom.
Tarieren
Newton
7 E 2
Durchschnittsstü ckgewicht
Teilstrich
Momme
7 N1
Autom. Optimierung
Datum und Uhrzeit
Mesghal
7 N2
Druckeinstellungen
Datum
HKTael
7 O 1
Prozentanwendung
Uhrzeit
SGTael
7 O2
Referenzgewicht neu
berechnen
Eichmodus
TWTael
8 N1
Druckeinstellungen
Tical
8 N 2
Dynamische Anwendung
Tola
Handshake
Zeit der Durchschnittsbildung
Baht
Druckein-
stellungen
Automatischer Modus
Benutzer-
definiert1
Druckausgabe
Probenname
Name der
Einheit
Nur stabiles
Gewicht
Druckeinstellungen
Faktor
Nur num-
merischer Wert
Dichteanwendung
Exponent
Nur eine
Kopfzeile
Dichtetyp
10
-3
Druckoptionen
Hilfsflü ssigkeit
10
-2
Autom. Drucken
Wassertemperatur
10
-1
Autom.
Drucken aus
Porö ses Material
10
0
Bei Stabilitä t
Ö ldichte
10
1
Intervall
(Sekunden)
Senkkö rpervolumen
10
2
Kontinuierlich
Flü ssigkeitstemperatur
10
3
Druckinhalt
Druckeinstellungen
LSD
Auswahl
Kontrollwä geanwendung
0,5
Kopfzeile
Probenname
1
Datum und
Uhrzeit
Druckeinstellungen
2
Waagen-ID
Anwendung Anzeige mit Standbild
5
Waagenname
Modus Anzeige mit Standbild
10
Benutzername
Probenname
100
Projektname
Druckeinstellungen
Anwen-
dungsname
Summierungsanwendung
Probenname
Rezepturanwendung
Ergebnis
Fü ller
Brutto
Autom. Modus
Netto
Druckeinstellungen
Tara
Informationen
Unterschriften-
zeile
Zeilenvorschub
Auf USB
speichern

ADVENTURER-WAAGEN DE-29
Die gesamte Menünavigation erfolgt durch Berührung des Displays. Berühren Sie zum Aufruf des Menüs die
Taste Menu (Menü) in einem beliebigen Start- oder Anwendungsbildschirm. Das Hauptmenü wird mit den Tasten
Back (Zurück) und Exit (Beenden) angezeigt. Berühren Sie die entsprechenden Listenoptionen, um die
Menüeinstellungen zu durchsuchen.
5.1.1 Änderung von Einstellungen
Zur Änderung einer Menüeinstellung navigieren Sie mit den folgenden Schritten zu dieser Einstellung:
Rufen Sie das Menü auf.
Drücken Sie in einem Anwendungsbildschirm auf
die Option Menu (Menü).
Auf der Anzeige erscheint die Liste des
Hauptmenüs.
Wählen Sie das Untermenü aus.
Suchen Sie die Option in der Hauptmenüliste, und
drücken Sie darauf. Das Untermenü wird angezeigt.
Wählen Sie die Menüoption aus.
Fahren Sie entsprechend fort, bis Sie die
gewünschte Einstellung in der Menüliste gewählt
haben. Drücken Sie auf die Einstellung, um sie zu
ändern.
Die geänderte Einstellung wird etwa eine Sekunde
lang gelb markiert, um die Werteänderung zu
bestätigen.
Verlassen Sie das Menü und kehren Sie zurück zur aktuellen Anwendung.
Nach Bestätigung der Einstellung drücken Sie Exit (Beenden), um zur Anwendung zurückzukehren.
Hinweis: Sie können jederzeit die Tasten Back & Exit (Zurück & Beenden) benutzen, um zu dem gewünschten
Menü oder zur aktuellen Anwendung zurückzukehren. Fahren Sie mit der Auswahl fort, bis Sie die gewünschte
Einstellung der Menüliste ausgewählt haben.
Die Struktur des Hauptmenüs der Adventurer-Waage ist im Folgenden dargestellt.
Kalibrierung
Waagen-Setup
Wägeeinheiten
Datenpflege
Kommunikation
GLP- und GMP-
Daten
Zurücksetzen
auf die
Werkeinstellung
Sperre

DE-30 ADVENTURER-WAAGEN
5.2 Kalibrierung
Die Adventurer-Waagen (INCAL-Modelle) bieten sechs Kalibrierverfahren an: interne Kalibrierung,
automatische Kalibrierung, AutoCal™-Einstellung, Messbereichskalibrierung, Linearitätskalibrierung und
Kalibrierprüfung.
Hinweis: Die Einheit der Kalibrierung ist immer Gramm.
Wichtiger Hinweis: Berühren Sie die Waage während der Kalibrierung nicht.
5.2.1 Kalibrieruntermenü (INCAL-Modelle)
Interne
Kalibrierung
Automatische
Kalibrierung
AutoCal™
Einstellung
Messspannen-
Kalibrierung
Linearitätskalibrierung
Kalibrier-
prüfung
Hinweis: Bei /E-Modellen steht nur die Messspannenkalibrierung, die Linearitätskalibrierung und die
Kalibrierprüfung zur Verfügung.
5.2.2 Interne Kalibrierung
Die Kalibrierung erfolgt mit den internen Kalibriergewichten. Die interne Kalibrierung kann jederzeit
durchgeführt werden, vorausgesetzt, dass die Waage auf Betriebstemperatur erwärmt und nivelliert ist.
Schalten Sie die Waage ein, ohne ein Gewicht auf die Wägeplattform zu legen, und drücken Sie dann auf
Internal Calibration (interne Kalibrierung). Die Waage beginnt mit der Kalibrierung. Drücken Sie auf
„Internal Calibration“ (Interne Kalibrierung), wenn sich keine Last auf der Wägeplattform befindet.
Auf der Anzeige wird der Status angezeigt, anschließend schaltet die Waage wieder zurück zur aktuellen
Anwendung.
Zum Abbruch können Sie jederzeit Exit (Beenden) drücken.
5.2.3 Automatische Kalibrierung
Wenn die automatische Kalibrierung aktiviert ist, führt die Waage in folgenden Fällen eine Selbstkalibrierung aus:
• bei Erkennung einer Temperaturänderung von 1,5 °C bzw.
• alle 11 Stunden.
Die Option AutoCal kalibriert die Waage bei einer signifikanten Temperaturänderung, welche die
Genauigkeit beeinträchtigt, oder alle 11 Stunden automatisch mit den internen Kalibriergewichten.
Kurz bevor die automatische Kalibrierung beginnt, erscheint ein Informationsbildschirm. Es werden drei
Optionsschaltflächen angezeigt:
Now – (Jetzt) Drücken Sie auf diese Option, um die Kalibrierung sofort durchzuführen.
5 min – Drücken Sie auf diese Option, um die Kalibrierung in 5 Minuten durchzuführen.
Deactivate – (Deaktivieren) Drücken Sie auf diese Option, um die automatische
Kalibrierfunktion zu deaktivieren.

ADVENTURER-WAAGEN DE-31
5.2.4. AutoCal™-Einstellung
Mit diesem Kalibrierverfahren passen Sie den Messspannenkalibrierpunkt an, ohne die Messspannen-
oder Linearitätskalibrierung zu beeinflussen.
Mit der Kalibriereinstellfunktion kann das Ergebnis der internen Kalibrierung um ±100 Teilstriche
angepasst werden.
Hinweis: Führen Sie zuerst die interne Kalibrierung durch, und nehmen Sie dann eine
Kalibrieranpassung vor. Um zu überprüfen, ob eine Anpassung erforderlich ist, legen Sie ein Prüfgewicht
entsprechend dem Wert für die Messspannenkalibrierung auf die Wägeplattform und notieren die
Abweichung in Teilungswerten (zwischen dem Nenngewicht und der aktuellen Waagenanzeige). Liegt die
Abweichung bei maximal +1 Teilungswert, ist keine Kalibrieranpassung erforderlich. Wenn die
Abweichung mehr als +1 Teilungswert beträgt, sollte eine Kalibrieranpassung vorgenommen werden.
Beispiel:
Ist-Gewichtsanzeige:
200.014
Soll-Gewichtsanzeige:
200.000 (Prüfgewichtswert)
Differenzgewicht (d):
0,014
Differenzgewicht in Ziffern:
–14 (Anpassungswert)
Um eine Kalibrieranpassung vorzunehmen, drücken Sie die Option AutoCal Adjustment (Automatische
Kalibrieranpassung) im Kalibriermenü und geben den (negativen oder positiven) Teilungswert für die
zuvor festgestellte Abweichung ein.
Wiederholen Sie die interne Kalibrierung. Legen Sie nach der Kalibrierung das Prüfgewicht auf die
Wägeplattform, und kontrollieren Sie, ob das Prüfgewicht jetzt mit dem Anzeigewert übereinstimmt. Ist
das nicht der Fall, wiederholen Sie die Schritte, bis der Wert nach der internen Kalibrierung mit dem
Prüfgewicht übereinstimmt.
Nach Abschluss der Schritte speichert die Waage den Einstellwert, und die Anzeige schaltet zurück zur
aktuellen Anwendung.
5.2.5 Messspannenkalibrierung
Die Messspannenkalibrierung arbeitet mit zwei Kalibrierpunkten, einem bei Nulllast und dem anderen bei
der definierten Volllast (Messspanne). Detaillierte Informationen über die Messspannenkalibrierung siehe
den Spezifikationstabellen in Kapitel 9.
Hinweis: Die Werkeinstellungen sind fett gedruckt.
Wenn die Waage eingeschaltet ist und kein Gewicht auf der Wägeplattform liegt, drücken Sie die Taste
Span Calibration (Messspannenkalibrierung), um mit der Kalibrierung zu beginnen. Auf der Anzeige
erscheinen weitere verwendbare Kalibrierwerte. Die höchste Genauigkeit wird mit einem Gewicht erreicht,
das möglichst genau der vollen Messspanne entspricht.
Hinweis:
Um den Messspannen-Kalibrierpunkt zu ändern, drücken Sie auf die Option zur Gewichtsänderung auf
der Anzeige.
Folgen Sie den Anweisungen auf dem Bildschirm und legen Sie das angegebene Kalibriergewicht auf die
Waage, sobald Sie dazu aufgefordert werden. Nach Abschluss der Schritte erscheint der Messspannen-
Kalibrierstatus, und die Waage schaltet zurück zur aktuellen Anwendung.

DE-32 ADVENTURER-WAAGEN
5.2.6 Linearitätskalibrierung
Bei der Linearitätskalibrierung werden drei Kalibrierpunkte verwendet, einer für Nulllast, die anderen für
definierte Lasten.
Drücken Sie die Taste Linearity Calibration (Linearitätskalibrierung), um den Vorgang zu beginnen,
wenn keine Last auf der Waage liegt.
Die Waage erfasst den Nullpunkt und fordert dann das nächste Gewicht an.
Folgen Sie den Anweisungen, bis die Kalibrierung abgeschlossen ist.
Zum Abbruch können Sie jederzeit Exit (Beenden) drücken.
5.2.7 Kalibrierprüfung
Mit der Kalibrierprüfung vergleichen Sie ein bekanntes Kalibriergewicht mit den gespeicherten
Messspannenkalibrierdaten.
Drücken Sie die Option Cal Test (Kalibrierprüfung), um den Vorgang zu beginnen, wenn keine Last auf
der Waage liegt. Die Waage erfasst den Nullpunkt und fordert dann eine Eingabe für die Messspanne an.
Auf der Anzeige erscheinen der Status und die Abweichung zwischen dem aktuellen Kalibriergewicht und
den gespeicherten Kalibrierdaten.
5.3 Waagen-Setup
Mit diesem Untermenü passen Sie die Funktionen der Waage individuell an.
5.3.1 Konfigurationsuntermenü der Waage
Sprache
Benutzereinstellungen
Filterebene
Automatische
Nullpunktnachführung
Autom.
Tarieren
Teilstriche
Datum &
Zeit
Eichmodus
Die Werkeinstellungen werden fett dargestellt.
5.3.2 Sprache
Stellen Sie die Sprache für die Menüs
und die Anzeigemeldungen ein.
English
Deutsch
Französisch
Spanisch
Italienisch
Polnisch
Türkisch
Tschechisch
Ungarisch

ADVENTURER-WAAGEN DE-33
5.3.3 Benutzereinstellung
In diesem Untermenü ändern Sie die Einstellungen für:
Kalibrieren per Tastendruck
„Kalibrierung während des Betriebs, dazu den Bildschirm in der Ringmitte
berühren“.
(erst oben links, dann unten rechts)
Bildschirmhelligkeit:
LOW = niedrige Bildschirmhelligkeit.
MEDIUM = normale Bildschirmhelligkeit.
HIGH = hohe Bildschirmhelligkeit.
Piepton:
OFF = deaktiviert
ON = aktiviert
Auto Dim: Reduziert die Helligkeit, wenn für x Minuten keine
Bildschirmaktivität vorhanden ist.
OFF = deaktiviert
10 min
20 min
30 min
Nivellierhilfe: Liefert Anweisungen zur Einstellung der Füße, um die Waage zu
nivellieren.
5.3.4 Filterebene
Legt die Höhe der Signalfilterung fest.
LOW = kürzere Stabilisierungszeit, aber geringere Stabilität.
MEDIUM = normal Stabilisierungszeit mit normaler Stabilität
HIGH = längere Stabilisierungszeit mit höherer Stabilität
5.3.5 Automatische Nullpunktnachführung
Stellt die automatische Nullpunktnachführung ein.
OFF = Deaktiviert.
0,5 D = Hält den Nullpunkt bis zu einer Drift von 0,5
Teilstrichen pro Sekunde aufrecht.
1 D = Display hält den Nullpunkt bis zu einer Drift von 1
Teilstrich pro Sekunde aufrecht.
3 D = Display hält den Nullpunkt bis zu einer Drift von 3
Teilstrichen pro Sekunde aufrecht.
5.3.6 Autom. Tarieren
Legt die automatische Tarierung fest.
OFF = deaktiviert.
ON= aktiviert.
Kurz bevor das automatische Tarieren beginnt, erscheint auf dem Display „Place
container on the pan“ (Behälter auf Wägeplattform stellen).
Unter dem Text erscheint die Schaltfläche Deactivate (Deaktivieren).
Drücken Sie diese Schaltfläche, um die automatische Tarierfunktion
zu deaktivieren.
5.3.7 Teilstriche
Einstellung der Ablesegenauigkeit des Displays der Waage
1 Teilstrich = Standard-Ablesegenauigkeit.
10 Teilstriche = 10-fach niedrigere Ablesegenauigkeit
Wenn die Standard-Ablesegenauigkeit beispielsweise bei 0,01 g liegt, lassen
sich mit der Option für 10 Teilstriche Messwerte bis auf 0,1 g genau anzeigen.

DE-34 ADVENTURER-WAAGEN
5.3.8 Datum & Zeit
Einstellung des aktuellen Datums und der Zeit
Ändern Sie das Format nach Wunsch, geben Sie dann den aktuellen Wert ein.
Drücken Sie Save (Speichern), um den neuen Wert zu bestätigen.
5.3.9 Eichmodus
Mit diesem Menü stellen Sie die Eichpflichtigkeit ein.
OFF = Standardbetrieb
ON = Betrieb erfüllt die Vorschriften für eichpflichtige
Anwendungen..
Hinweis: Wenn der Eichmodus aktiviert ist, werden die
Menüeinstellungen wie folgt geändert::
Kalibriermenü:
AutoCal die interne Kalibrierung wird aktiviert und ausgeblendet. Die
Funktionen Interne Kalibrierung und Kalibrierprüfung sind verfügbar
Alle anderen Funktionen sind ausgeblendet.
Waagen-Setupmenu:
Die Filterebene ist in der aktuellen Einstellung verriegelt.
Die automatische Nullpunktnachführung wird auf 0,5 Teilstriche
begrenzt und deaktiviert. Die ausgewählte Einstellung ist verriegelt.
Automatisches Tarieren ist fest auf die aktuelle Einstellung
eingestellt.
Die Teilstrichanzeigen werden auf 1 Teilstrich fest eingestellt, die
Menüoption wird ausgeblendet.
Kommunikationsmenü (Kommunikation->Druckeinstellung -
>Druckausgabe:
Die Option „Weight Only“ (Nur stabil) ist aktiviert.
Die Einstellung „Numeric Value Only“ (nur nummerische Werte) ist
gesperrt und deaktiviert.
Kommunikationsmenü (Kommunikation->Druckeinstellungen-
>Automatischer Druck):
Die automatischen Auswahlen für den Druckmodus sind auf die
Optionen „OFF“, „Bei Stabilität“ und „Intervall“ beschränkt.
Laufender Druck ist nicht verfügbar.
Datenpflegesmenü:
Export zu USB ist ausgeblendet.
Import von USB ist ausgeblendet.
Sperrmenü:
Menü ist ausgeblendet.
Hinweis: Der Sicherheitsschalter auf der Rückseite der Waage muss in
der verriegelten Position stehen, um den Eichmodus zu aktivieren. Der
Sicherheitsschalter muss in der entriegelten Position stehen, um den
Eichmodus zu deaktivieren. Siehe Kapitel 6.
Wägeanwendung Hauptbildschirm mit EICHUNG (LFT) eingeschaltet.

ADVENTURER-WAAGEN DE-35
5.4 Wägeeinheiten
Rufen Sie dieses Untermenü auf, um die gewünschte Maßeinheit zu aktivieren. Dieses Menü kann auch
durch Drücken des Einheitensymbols im Ausgangsbildschirm der Anwendung aufgerufen werden.
Hinweis: Aufgrund von nationalen Vorschriften verwendet die Waage möglicherweise nicht alle der hier
aufgeführten Einheiten.
5.4.1 Untermenü mit den Maßeinheiten
Milligramm
Gramm
Kilogramm
Karat
Ounce
Ounce troy
Pound
Pennyweight
Grain
Newton
momme
Mesghal
Tael (HK)
Tael (SG)
Tael (TW)
Tical
Tola
Baht
Benutzerdefinierte Einheit 1
Hinweis: Ist der Eichmodus aktiviert, werden einige Einheiten nicht angezeigt.
Um das Gewicht in einer alternativen Einheit anzuzeigen, verwenden Sie die Option „Benutzerdefinierte
Einheit“. Die benutzerdefinierte Einheit wird mit einem Umrechnungsfaktor bestimmt, wobei der
Umrechnungsfaktor die Zahl der benutzerdefinierten Einheiten pro Gramm in Exponentialschreibweise ist
(Faktor x 10^Exponent).
Beispiel: Um das Gewicht in Troy-Unzen anzuzeigen (0,03215075 Troy-Unzen pro Gramm)
geben Sie den Faktor 0,3215075 und den Exponent -1 ein.
Der Name der benutzerdefinierten Einheit kann mit maximal 3 Zeichen angegeben werden.
5.5 Datenpflege
Rufen Sie dieses Untermenü auf, um die Datenübertragungseinstellungen nach Wunsch anzupassen.
5.5.1 Untermenü „Data Maintenance“ (Datenpflege)
Die Export- und Importfunktion
Um mehrere Waagen einzurichten, können Sie einfach das Profil der Hauptwaage auf einen USB-Speicherstick
exportieren. Mit dem Tool zur Datenpflege können Sie die Benutzer- und Anwendungseinstellungen auf einen
USB-Speicherstick speichern und so ganz einfach auf andere Adventurer-Waagen übertragen. Die Daten können
Sie anschließend zur Konfiguration weiterer Adventurer-Waagen nutzen, indem Sie die Daten der ursprünglichen
Waage importieren.
Export auf USB
Import von USB
Informationen zur
Waage

DE-36 ADVENTURER-WAAGEN
5.5.2 Export auf USB
Export der Wägedaten auf einen USB-Speicherstick. Es können zwei Datentypen exportiert
werden:
- Anwendungseinstellungen (Durchschnittsstückgewicht, Referenzgewicht usw.)
- Menüeinstellungen (Waagenkonfiguration usw.)
Hinweis: Die Funktion „Save to USB“ (Auf USB speichern) muss aktiviert sein, um
Daten auf einen USB-Speicherstick zu übertragen. Weitere Informationen dazu
finden Sie in Abschnitt 5.6.
5.5.3 Import von USB
Import von Wägedaten von einem USB-Flash-Laufwerk
5.5.4 Informationen zur Waage
Rufen Sie dieses Menü auf, um Informationen zur Waage anzuzeigen. Es werden
folgende Informationen angezeigt: Waagentyp, Waagen-ID, Wägebereich,
Ablesbarkeit und Softwareversion.
5.6 Kommunikation
Rufen Sie dieses Menü auf, um externe Kommunikationsverfahren zu definieren und
Druckparameter einzustellen.
Die Daten können entweder auf einem Drucker oder einem PC ausgegeben werden
(Beispiele für die Ausgabe siehe Abschnitt 5.9.8).
Die Werkeinstellungen sind fett dargestellt.
5.6.1 Untermenü Kommunikation
RS-232 Standard
Druckeinstellungen
Speichern
auf USB
RS-232 Standard:
Rufen Sie dieses Untermenü auf, um die RS-232-Standardeinstellungen anzupassen.
5.6.2 Baudrate
Stellt die Baudrate (Bit pro Sekunde) ein.
2400 = 2400 bps
4800 = 4800 bps
9600 = 9600 bps
19200 = 19200 bps
38400 = 38400 bps

ADVENTURER-WAAGEN DE-37
5.6.3 Übertragung
Legt die Datenbits. Stoppbit und Parität fest.
7 EVEN 1 = 7 Datenbits, gerade Parität, Stoppbit 1
7 ODD 1 = 7 Datenbits, ungerade Parität, Stoppbit 1
7 EVEN 2 = 7 Datenbits, gerade Parität, Stoppbit 2
7 ODD 2 = 7 Datenbits, ungerade Parität, Stoppbit 2
7 NONE 1 = 7 Datenbits, keine Parität, Stoppbit 1
8 NONE 1 = 8 Datenbits, keine Parität, Stoppbit 1
7 NONE 2 = 7 Datenbits, keine Parität, Stoppbit 2
8 NONE 2 = 8 Datenbits, keine Parität, Stoppbit 2
5.6.4 Handshake
Legt die Flusssteuerungsmethode fest.
NONE = kein Handshake
XON-XOFF = XON/XOFF-Handshaking
HARDWARE = Hardware Handshaking
Druckeinstellungen
Rufen Sie dieses Untermenü auf, um die Datenübertragungseinstellungen nach Wunsch anzupassen.
Untermenü „Print Settings“ (Druckeinstellungen)
Druckausgabe
Autom.
Drucken
Druckinhalt
Feed
(Zufuhr)
Format
Cal.-Daten
drucken
5.6.5 Druckausgabe
Nur bei stabilem Gewicht
Legt die Druckkriterien fest.
OFF = Die Werte werden sofort gedruckt, auch wenn noch keine
Stabilisierung eingetreten ist.
ON = Werte werden nur gedruckt, wenn die Stabilitätskriterien
erfüllt sind.
Nur Zahlenwerte
Legt die Druckkriterien fest.
OFF = Es werden alle Ergebnisse und die G/N/T-Datenwerte
gedruckt. Weitere Informationen dazu siehe Kapitel
7.2.
ON = Es werden nur Daten gedruckt, die Zahlenwerte sind.
Nur eine Kopfzeile
Legt die Druckkriterien fest.
OFF = Die Kopfzeilen werden bei jedem Druckauftrag gedruckt.
ON = Die Kopfzeile wird nur einmal am Tag gedruckt
Druckoptionen
Legt die Druckkriterien fest.
Printer = Daten an einen Drucker senden
PC = Daten an einen PC senden

DE-38 ADVENTURER-WAAGEN
5.6.6 Automatischer Druck
Stellt die automatische Druckfunktion ein.
OFF = Deaktiviert
ON.STAB
1
= Es wird immer gedruckt, wenn die Stabilitätskriterien
erfüllt sind.
INTER
2
= Es wird in einem festgelegten Intervall gedruckt.
CONTINUOUS = Es wird laufend gedruckt.
1
Bei Auswahl der Option „ON STABILITY“ (Bei Stabilität) legen Sie die Bedingungen
für den Druck fest.
LOAD = Druckt, sobald das angezeigte Gewicht sich stabilisiert hat.
LOAD ZERO = Druckt, sobald sich das angezeigte Gewicht oder der
Nullwert stabilisiert haben.
2
Bei Auswahl der Option „INTERVAL“ (INTERVALL) geben Sie die Zeit für das Intervall
mit dem nummerischen Tastenfeld ein.
Sie können Werte zwischen 1 und 3.600 Sekunden einstellen. Standard ist 0.
5.6.7 Druckinhalt
Definiert den Inhalt der Druckdaten.
Auswahl
Legt den Status fest.
Alle deaktivieren = Alle Einstellungen werden auf OFF gesetzt.
Alle aktivieren = Alle Werte werden auf ON gesetzt.
Header (Kopfzeile)
Date & Time (Datum und Uhrzeit)
Balance ID (Waagen-ID)
Balance Name (Waagenname)
User Name (Benutzername)
Project Name (Projektname)
Application Name (Anwendungsname)
Sample Name (Probenname)
Result (Ergebnis)
Gross (Brutto)
Net (Netto)
Tare (Tara)
Information
Signature Line (Unterschriftenzeile)
5.6.8 Papiervorschub
Legt die Papierzufuhr fest.
1 LINE = Schiebt das Papier nach dem Druck eine Zeile nach oben.
4 LINE = Schiebt das Papier nach dem Druck vier Zeilen nach oben.
5.6.9 Format
Legen Sie das Druckformat.
Eine Zeile = druckt in einer einzigen Zeile.
Mehrere Zeilen = Drucke in mehreren Zeilen.
5.6.10 Cal.-Daten drucken
Legt die Druckkriterien fest..
Aus = deaktiviert
Ein = aktiviert

ADVENTURER-WAAGEN DE-39
Auf USB speichern
Legt den Status fest.
OFF = Die Daten werden nicht auf einem USB-Laufwerk gespeichert.
ON = Die Daten werden auf einem USB-Laufwerk gespeichert.
5.7 GLP- und GMP-Daten
Rufen Sie dieses Menü auf, um die Daten der Guten Laborpraxis (GLP) sowie der Guten Herstellungspraxis (GMP)
zu konfigurieren.
5.7.1 Untermenü GLP-Daten
Header (Kopfzeile)
Name der Waage
Name des
Benutzers
Projektname
5.7.2 Kopfzeilen
Aktiviert den Ausdruck der GLP-Kopfzeilen. Es stehen bis zu 5 Kopfzeilen zur
Verfügung.
Für jede Kopfzeile können Sie bis zu 25 alphanummerische
Zeichen einstellen.
5.7.3 Name der Waage
Definieren Sie den Namen für die Waage.
Sie können bis zu 25 alphanummerische Zeichen verwenden. Die
Standardeinstellung ist Adventurer.
5.7.4 Name des Benutzers
Definiert den Namen des Benutzers.
Sie können bis zu 25 alphanummerische Zeichen verwenden. Die
Standardeinstellung ist leer.
5.7.5 Projektname
Zur Definition der Bezeichnung des Projekts
Sie können bis zu 25 alphanummerische Zeichen verwenden. Die Standardeinstellung
ist leer.
5.8 Zurücksetzen auf die Werkeinstellung
Mit diesem Untermenü setzen Sie alle Menüeinstellungen auf die Werkseinstellungen zurück.
Hinweis: Die Kalibrierdaten sind davon nicht betroffen.
Reset
All
= setzt alle Menüs auf die Werkeinstellungen zurück.
Exit
= schaltet zurück zum Hauptbildschirm einer Anwendung, ohne Menüs
zurückzusetzen.
5.9 Sperre
Mit diesem Untermenü sperren/entsperren Sie bestimmte Menüs. Bei einem gesperrten Menü erscheint
ein kleines Schlosssymbol an dem Menüsymbol, und der Benutzer kann dieses Menü nicht aufrufen.
Klicken Sie auf ein Menü, und wählen Sie folgende Option:
OFF = Das Menü ist entsperrt.
ON = das Menü ist gesperrt.

DE-40 ADVENTURER-WAAGEN
6. EICHUNG
Wenn die Waage für eichpflichtige Anwendungen oder im Handel eingesetzt wird, muss sie entsprechend der vor
Ort geltenden Eichordnung konfiguriert, überprüft und versiegelt sein. Der Käufer muss sicherstellen, dass alle
geltenden rechtlichen Vorschriften eingehalten werden.
6.1 Einstellungen
Führen Sie vor der Überprüfung und Versiegelung folgende Schritte in dieser Reihenfolge durch:
1. Prüfen Sie, ob die Menüeinstellungen der vor Ort geltenden Eichordnung entsprechen.
2. Prüfen Sie, ob die aktivierten Einheiten der vor Ort geltenden Eichordnung entsprechen.
3. Führen Sie eine Kalibrierung wie in Abschnitt 5 beschrieben durch.
4. Stellen Sie den Sicherheitsschalter in die verriegelte Position.
5. Aktivieren Sie den Eichmodus im Konfigurationsmenü der Waage.
Hinweis: Ist der Eichmodus aktiviert, können keine externen Kalibrierungen durchgeführt werden.
6.2 Verifizierung
Die Verifizierung muss ein Mitarbeiter der lokalen Eichbehörde oder ein autorisierter Servicevertreter durchführen.
6.3 Versiegelung
Nach Überprüfung der Waage muss die Waage versiegelt werden, um den Zugriff Unbefugter auf die
eichpflichtigen Einstellungen zu verhindern. Vor der Versiegelung des Geräts müssen Sie den Sicherheitsschalter
in die verriegelte Position schieben und im Konfigurationsmenü der Waage den Eichmodus aktivieren.
Bei Verwendung eines Papiersiegels platzieren Sie das Siegel über dem Sicherheitsschalter und dem
Gehäuseboden wie in der Abbildung..
Bei Verwendung einer Drahtplombe führen Sie den Siegeldraht durch die Bohrungen im Sicherheitsschalter und im
Gehäuseboden wie in der Abbildung.
Entsiegelt
Mit Papiersiegel versiegelt
Mit Drahtplombe versiegelt

ADVENTURER-WAAGEN DE-41
7. DRUCKEN
7.1 Anschlusskonfiguration und Prüfung der Drucker-/Computerschnittstelle
Verbinden Sie das Gerät über den integrierten Anschluss RS-232 mit einem Computer
oder Drucker. Verwenden Sie HyperTerminal oder eine ähnliche Software wie SPDC,
die im Folgenden beschrieben wird, um die Waage an einen Computer anzuschließen.
(HyperTerminal finden Sie bei Windows XP unter Zubehör/Kommunikation.)
Schließen Sie das Gerät über ein normales serielles Kabel (mit unvertauschten Adern)
am Computer an.
Wählen Sie unter Neue Verbindung „Verbindung über“ COM1 (bzw. den verfügbaren
COM-Anschluss).
Nehmen Sie folgende Einstellungen vor Baud=9600; Parität (Parität)=8 Keine;
Stoppbit=1; Handshaking=Keine. Klicken Sie auf OK.
Wählen Sie die Eigenschaften und Einstellungen aus und dann ASCII Setup. Markieren
Sie die Kontrollkästchen wie in der Abbildung: (Sendezeile endet … ; Echozeichen …;
Zeilen überspringen …)
Steuern Sie die Waage mit einem PC über die Befehle für die Schnittstelle RS232
(siehe Abschnitt 9.6.1).
Hinweis: Nach der Konfiguration von HyperTerminal werden automatisch
die Ergebnisse einer Kalibrierprüfung gedruckt und die an die Waage gesendete
SPDC-Software
Die SPDC-Software (Serial Port Data Collection) wird von Ohaus zur Verfügung gestellt
und kann auf Betriebssystemen verwendet werden, auf denen die oben erwähnte
HyperTerminal-Software nicht vorhanden ist.
Wählen Sie den Exportdateityp (Export File Type) und den Exportdateipfad (Export File
Path) und drücken Sie auf „Run“ (Durchführen) (siehe folgende Abbildung).
Hinweis: Die SPDC-Software unterstützt nur die englische Sprache.

DE-42 ADVENTURER-WAAGEN
7.2 Ausgabeformat
Die Ergebnisdaten und die G/N/T-Daten werden in folgendem Format ausgegeben.
Feld:
Etikett
1
Leerzeichen
2
Gewicht
3
Leerzeichen
2
Einheit
4
Leerzeichen
Stabilitä t
5
Leerzeichen
G/N
6
Leerzeichen
Term. Zeichen
7
Lä nge:
1
11
1
5
1
1
1
3
0
8
1. Die Länge des Etikettenfelds ist nicht begrenzt.
2. Jedem Feld folgt ein einzelner Leerschritt als Trennzeichen (ASCII 32).
3. Das Gewichtsfeld enthält 11 rechtsbündige Zeichen. Wenn der Wert negativ ist, steht das
„Minuszeichen“ ganz links von der signifikantesten Ziffer.
4. Das Einheitenfeld enthält die Maßeinheit als Abkürzung mit 5 Zeichen.
5. Das Stabilitätsfeld enthält als Zeichen das „?“, wenn die Gewichtsmessung nicht stabil war. Das
Stabilitätsfeld und das folgende Leerzeichenfeld werden übersprungen, wenn der Gewichtsmesswert
stabil ist.
6. Das G/N-Feld enthält die Anzeige für Netto bzw. Brutto. Bei Nettogewichten steht in dem Feld die
Abkürzung „NET“. Bei Bruttogewichten enthält das Feld keine Abkürzung, nur den Buchstaben „G“.
7. Das Feld mit den Abschlusszeichen enthält CRLF, Four CRLF oder Form Feed (ASCII 12), je nach den
Menüeinstellungen für den Zeilenvorschub.
8. WARTUNG
8.1 Kalibrierung
Überprüfen Sie regelmäßig die Wartung, indem Sie ein exaktes Gewicht auf die Waage legen und das
Ergebnis anzeigen. Wenn eine Kalibrierung erforderlich ist, beachten Sie die Anweisungen in Abschnitt 5.2.
8.2 Reinigung
VORSICHT: Trennen Sie die Adventurer-Waage vor dem Reinigen von der
Stromversorgung. Es darf keine Flüssigkeit in das Innere der Waage eindringen.
Reinigen Sie die Waage in regelmäßigen Abständen.
Die Gehäuseflächen können Sie mit einem fusselfreien Tuch abwischen, das mit Wasser oder
einem milden Reinigungsmittel angefeuchtet ist.
Glasflächen können Sie mit einem handelsüblichen Glasreiniger säubern. Bauen Sie die
Schiebetüren wie folgt aus und wieder ein.
Wichtiger Hinweis: Verwenden Sie keine Lösungsmittel, aggressiven Chemikalien, Ammoniak
oder Scheuermittel.
Glastür zur Reinigung ausbauen und wieder einbauen:
Schritt 1.
Drücken Sie den Stift auf der
Rückseite der Waage und schieben
Sie die Tür heraus.
Schritt 2.
Schieben Sie die Türen nach der
Reinigung in den Schlitz und halten
Sie dabei den Stift aus Schritt 1.
Schritt 3.
Schieben Sie die Türen soweit in
den Schlitz, bis der Anschlag mit der
anderen Tür abschließt.

ADVENTURER-WAAGEN DE-43
8.3 Fehlerbehebung
TABELLE 8-1. FEHLERBEHEBUNG
Symptom/Anzeige
Mögliche Ursache
Abhilfe
Waage schaltet sich
nicht ein.
Es liegt keine Betriebsspannung für die
Waage an.
Anschlüsse und Spannung prüfen
Ungenaue Messwerte
Unsachgemäße Kalibrierung
Instabile Umgebung
Kalibrierung durchführen
Waage an einen geeigneten Ort stellen
Kalibrierung nicht
möglich
Kalibriermenü gesperrt
Eichmodus aktiviert Instabile
Umgebung
Falsche Kalibriergewichte
Kalibriermenüsperre deaktivieren
Eichmodus deaktivieren
Waage an einen geeigneten Ort stellen
Korrektes Kalibriergewicht verwenden
Menüeinstellungen
können nicht geändert
werden.
Untermenü gesperrt
Eichmodus aktiviert
Untermenü entsperren
Eichmodus deaktivieren
Niedriges
Referenzgewicht
Referenzgewicht zu niedrig
Das Gewicht auf der Wägeplattform ist
zu klein, um ein gültiges
Referenzgewicht festzulegen:
Probengröße erhöhen
Ungültiges
Stückgewicht
Durchschnitts-Stückgewicht zu klein
Durchschnitts-Stückgewicht erhöhen
Zeitüberlauf während
des Betriebs
Gewichtsmesswert instabil
Waage an einen geeigneten Ort stellen
------
Gerät beschäftigt (Tarieren,
Nullpunkteinstellung, Druck, Warten auf
eine Stabilisierung des Gewichts)
Bis zum Abschluss warten
8.4 Serviceinformationen
Wenn Sie Ihr Problem mit dem Abschnitt zur Fehlerbehebung nicht lösen konnten, wenden Sie sich an Ihren
autorisierten OHAUS-Servicemitarbeiter. Die nächste Ohaus-Niederlassung finden Sie auf unserer Website unter
www.ohaus.com. Ein OHAUS-Produktservicespezialist unterstützt Sie gern.

DE-44 ADVENTURER-WAAGEN
9. TECHNISCHE DATEN
9.1 Spezifikationen
Umgebungsbedingungen
Nur zur Verwendung in geschlossenen Räumen
Zulässige Höhe: bis 2.000 m
Definierter Temperaturbereich: 10 °C bis 30 °C
Luftfeuchtigkeit: maximale relative Luftfeuchtigkeit 80 % bei Temperaturen bis 30 °C,
linear abnehmend bis 50 % relativer Luftfeuchtigkeit bei 40 °C
Netzspannungsschwankungen: bis ± 10 % der Nennspannung
Installationskategorie: II
Verschmutzungsgrad: 2
Materialien
Gehäusesockel aus Gussaluminium mit Lackierung
Oberes Gehäuse: Kunststoff (ABS)
Wägeplattformen: Edelstahl 18/10
Zugluftschutz; Glas, Kunststoff (ABS)
Füße: Kunststoff (ABS)

ADVENTURER-WAAGEN DE-45
TABELLE 9-1. SPEZIFIKATIONEN
Modell:
AX124
AX124/E
AX224
AX224/E
AX324
Höchstlast
120 g
120 g
220 g
220 g
320 g
Ablesbarkeit d
0,0001 g
Wiederholbarkeit
(Standardabweichung) (g)
0,0001 g
Linearität (g)
±0,0002 g
Messspannen-
kalibrierpunkt (g)
25 g,
50 g
75 g,
100 g
25 g,
50 g
75 g,
100 g
50 g,
100 g
150 g,
200 g
50 g,
100 g
150 g,
200 g
100 g
200 g, 300 g
Kalibrierung
Auto-Cal
Externe
Auto-Cal
Externe
Auto-Cal
Wägeeinheiten
Baht, Karat, Grain, Gramm, Milligramm, Mesgal, Momme,
Newton, Ounce, Pennyweight, Pound, Tael (Hong Kong),
Tael, (Singapore), Tael (Taiwan), Tical, Tola, Troy-Ounces,
benutzerdefiniert (1)
Anwendung
Wiegen, Wägen, Stückzählung, Prozentwägung, Check
Wiegen, Wägen, Wiegen von Tieren, Wägen, Rezeptur,
Dichtebestimmung, Summierung, Anzeige mit Standbild
Stabilisierungszeit (typisch)
≤ 3 Sekunden
Empfindlichkeit gegen
Temperaturdrift (PPM/K)
1,5
Typische Mindestgewicht
USP (u=0,10 %, k=2)
0,20 g
0,20 g
0,20 g
0,20
0,20 g
Optimale Mindestgewicht
USP (u=0,10 %, k=2)
0,082 g
0,082 g
0,082 g
0,082 g
0,082 g
Anzeige
Vollfarb-WQVGA Graphik-LCD
Anzeigegröße
4,3 in / 10,9 cm (diagonal)
Hinterleuchtung
Weiße LED
Steuerelemente
Resistiver 4-Draht-Touchscreen mit 6
Membranschaltflächen
Kommunikation
RS-232, USBx2
Waagen-
Spannungseingang
12 VDC, 0,5 A
Netzteil
Netzteileingang: 100-240 VAC 0,3A 50-60 Hz
Netzteilausgang: 12 VDC 0,84 A
Plattformgröße
(Durchmesser)
90 mm / 3,5 zoll
Maße nach Zusammenbau
(B x T x H)
230 x 354 x 340 mm
9,1 x 13,9 x 13,4 zoll
Versandmaße
(B x T x H)
230 x 354 x 340 mm
9,1 x 13,9 x 13,4 zoll
Nettogewicht
5,1 Kg / 11,3 lb
Versandgewicht
7,8 Kg / 17,2 lb

DE-46 ADVENTURER-WAAGEN
TABELLE 9-2. SPEZIFIKATIONEN (Fortsetzung)
Modell:
AX223
AX223/E
AX423
AX423/E
AX523
AX523/E
Höchstlast
220 g
220 g
420 g
420 g
520 g
520 g
Ablesbarkeit d
0,001 g
Wiederholbarkeit
(Standardabweichung)
(g)
0,001 g
Linearität (g)
±0,002 g
Messspannen-
kalibrierpunkt (g)
50 g,
100 g
150 g,
200 g
50 g,
100 g
150 g,
200 g
100 g,
200 g
300 g,
400 g
100 g,
200 g
300 g,
400 g
200 g, 300 g
400 g, 500 g
200 g, 300
g
400 g, 500
g
Kalibrierung
Auto-Cal
Externe
Auto-Cal
Externe
Auto-Cal
Externe
Wägeeinheiten
Baht, Karat, Grain, Gramm, Milligramm, Mesgal, Momme, Newton, Ounce,
Pennyweight, Pound, Tael (Hong Kong), Tael, (Singapore), Tael (Taiwan),
Tical, Tola, Troy-Ounces, benutzerdefiniert (1)
Anwendung
Wiegen, Wägen, Stückzählung, Prozentwägung, Check Wiegen, Wägen,
Wiegen von Tieren, Wägen, Rezeptur, Dichtebestimmung, Summierung,
Anzeige mit Standbild
Stabilisierungszeit
(typisch)
≤ 2 Sekunden
Empfindlichkeit gegen
Temperaturdrift (PPM/K)
3
Typische Mindestgewicht
USP (u=0,10 %, k=2)
2,0 g
2,0 g
2,0 g
2,0 g
2,0 g
2,0 g
Optimale Mindestgewicht
USP (u=0,10 %, k=2)
0,82 g
0,82 g
0,82 g
0,82 g
0,82 g
0,82 g
Anzeige
Vollfarb-WQVGA Graphik-LCD
Anzeigegröße
4,3 in / 10,9 cm (diagonal)
Hinterleuchtung
Weiße LED
Steuerelemente
Resistiver 4-Draht-Touchscreen mit 6 Membranschaltflächen
Kommunikation
RS-232, USBx2
Waagen-
Spannungseingang
12 VDC, 0,5 A
Netzteil
Netzteileingang: 100-240 VAC 0,3A 50-60 Hz
Netzteilausgang: 12 VDC 0,84 A
Plattformgröße
(Durchmesser)
130 mm/5,1 inch
Maße nach
Zusammenbau
(B x T x H)
230 x 354 x 340 mm
9,1 x 13,9 x 13,4 zoll
Versandmaße
(B x T x H)
387 507 x 531 mm
15,4 x 20,0 x 20,9 zoll
Nettogewicht
5,8 Kg/12,8
lb
5,6 Kg/12,4
lb
5,8 Kg/12,8
lb
5,6 Kg/12,4
lb
5,8 Kg/12,8
lb
5,6 Kg/12,4
lb
Versandgewicht
8,5 Kg/18,8
lb
8,3 Kg/18,3
lb
8,5 Kg/18,8
lb
8,3 Kg/18,3
lb
8,5 Kg/18,8
lb
8,3 Kg/18,3
lb

ADVENTURER-WAAGEN DE-47
TABELLE 9-3. SPEZIFIKATIONEN (Fortsetzung)
Modell:
AX422
AX422/E
AX822
AX822/E
Höchstlast
420g
420g
820g
820g
Ablesbarkeit d
0,01 g
Wiederholbarkeit
(Standard-
abweichung) (g)
0,01 g
Linearität (g)
±0,02 g
Messspannen-
kalibrierpunkt (g)
100g, 200g
300g,400g
100g, 200g
300g,400g
200g, 400g
600g, 800g
200g, 400g
600g, 800g
Kalibrierung
Auto-Cal
Externe
Auto-Cal
Externe
Wägeeinheiten
Baht, Karat, Grain, Gramm, Kilogramm, Mesgal, Momme, Newton,
Ounce, Pennyweight, Pound, Tael (Hong Kong), Tael, (Singapore), Tael
(Taiwan), Tical, Tola, Troy-Ounces, benutzerdefiniert (1)
Anwendung
Wiegen, Wägen, Stückzählung, Prozentwägung, Check Wiegen, Wägen,
Wiegen von Tieren, Wägen, Rezeptur, Dichtebestimmung, Summierung,
Anzeige mit Standbild
Stabilisierungszeit
(typisch)
≤ 1,5 Sekunden
Empfindlichkeit
gegen
Temperaturdrift
(PPM/K)
3
Typische
Mindestgewicht
USP (u=0,10 %,
k=2)
20,0 g
20,0 g
20,0 g
20,0 g
Optimale
Mindestgewicht
USP (u=0,10 %,
k=2)
8,2g
8,2g
8,2g
8,2g
Anzeige
Vollfarb-WQVGA Graphik-LCD
Anzeigegröße
4,3 in / 10,9 cm (diagonal)
Hinterleuchtung
Weiße LED
Steuerelemente
Resistiver 4-Draht-Touchscreen mit 6 Membranschaltflächen
Kommunikation
RS-232, USBx2
Waagen-
Spannungseingang
12 VDC, 0,5 A
Netzteil
Netzteileingang: 100-240 VAC 0,3A 50-60 Hz
Netzteilausgang: 12 VDC 0,84 A
Plattformgröße
175 x 195 mm / 6,9 x 7,7 inch
Maße nach
Zusammenbau
(B x T x H)
230 x 354 x100 mm
9,1 x 13,9 x 4,0 zoll
Versandmaße
(B x T x H)
392 x 557 x 301 mm
15,5 x 22,0 x 11,9 zoll
Nettogewicht
4.6Kg/10.2lb
3.9Kg/8.6lb
4.6Kg/10.2lb
3.9Kg/8.6lb
Versandgewicht
6.5Kg/14.4b
5.8Kg/12.8b
6.5Kg/14.4b
5.8Kg/12.8b

DE-48 ADVENTURER-WAAGEN
TABELLE 9-4. SPEZIFIKATIONEN (Fortsetzung)
Modell:
AX1502
AX1502/E
AX2202
AX2202/E
AX4202
AX4202/E
AX5202
Höchstlast
1520 g
1520 g
2200 g
2200 g
4200 g
4200 g
5200 g
Ablesbarkeit d
0,01 g
Wiederholbarkeit
(Standard-
abweichung) (g)
0,01 g
Linearität (g)
±0,02 g
Messspannen-
kalibrierpunkt (g)
300 g
400 g
500 g
600 g
500 g
1000 g,
1500 g
500 g
1000 g
1500 g
2000 g
500 g
1000 g
1500 g
2000 g
1000 g
2000 g
3000 g
4000 g
1000 g
2000 g
3000 g
4000 g
2000 g
3000 g
4000 g
5000 g
Kalibrierung
Auto-Cal
Externe
Auto-Cal
Externe
Auto-Cal
Externe
Auto-Cal
Wägeeinheiten
Baht, Karat, Grain, Gramm, Kilogramm, Mesgal, Momme, Newton, Ounce, Pennyweight,
Pound, Tael (Hong Kong), Tael, (Singapore), Tael (Taiwan), Tical, Tola, Troy-Ounces,
benutzerdefiniert (1)
Anwendung
Wiegen, Wägen, Stückzählung, Prozentwägung, Check Wiegen, Wägen, Wiegen von
Tieren, Wägen, Rezeptur, Dichtebestimmung, Summierung, Anzeige mit Standbild
Stabilisierungszeit
(typisch)
≤ 1,5 Sekunden
Empfindlichkeit
gegen
Temperaturdrift
(PPM/K)
3
1.9
Typische
Mindestgewicht
USP (u=0,10 %,
k=2)
20,0 g
20,0 g
20,0 g
20,0 g
20,0 g
20,0 g
20,0 g
Optimale
Mindestgewicht
USP (u=0,10 %,
k=2)
8,2 g
8,2 g
8,2 g
8,2 g
8,.2 g
8,2 g
8,2 g
Anzeige
Vollfarb-WQVGA Graphik-LCD
Anzeigegröße
4,3 in / 10,9 cm (diagonal)
Hinterleuchtung
Weiße LED
Steuerelemente
Resistiver 4-Draht-Touchscreen mit 6 Membranschaltflächen
Kommunikation
RS-232, USBx2
Waagen-
Spannungseingan
g
12 VDC, 0,5 A
Netzteil
Netzteileingang: 100-240 VAC 0,3A 50-60 Hz
Netzteilausgang: 12 VDC 0,84 A
Plattformgröße
175 x 195 mm / 6,9 x 7,7 inch
Maße nach
Zusammenbau
(B x T x H)
230 x 354 x100 mm
9,1 x 13,9 x 4,0 zoll
Versandmaße
(B x T x H)
392 x 557 x 301 mm
15,5 x 22,0 x 11,9 zoll
Nettogewicht
4,6 Kg/
10,2 lb
3,9,Kg/
8,6 lb
4,6 Kg/
10,2 lb
3,9 Kg/
8,6 lb
4,6 Kg/
10,2 lb
3,9 Kg/
8,6 lb
3,8 Kg/
8,4 lb
Versandgewicht
6,5 Kg/
14,4 lb
5,8 Kg/
12,8 lb
6,5 Kg/
14,4 lb
5,8 Kg/
12,8 lb
6,5 Kg/
14,4 lb
5,8 Kg/
12,8 lb
5,7 Kg/
12,6 lb

ADVENTURER-WAAGEN DE-49
TABELLE 9-5. SPEZIFIKATIONEN (Fortsetzung)
Modell:
AX2201
AX2201/E
AX4201
AX4201/E
AX8201
AX8201/E
Höchstlast
2200g
2200g
4200 g
4200 g
8200 g
8200 g
Ablesbarkeit d
0,1 g
Wiederholbarkeit
(Standardabweichung) (g)
0,1 g
Linearität (g)
±0,2 g
Messspannen-
kalibrierpunkt (g)
500g, 1000g
1500g,
2000g
500g,
1000g
1500g,
2000g
1000 g,
2000 g
3000 g,
4000 g
1000 g,
2000 g
3000 g,
4000 g
2000 g,
4000 g
6000 g,
8000 g
2000 g,
4000 g
6000 g,
8000 g
Kalibrierung
Auto-Cal
Externe
Auto-Cal
Externe
Auto-Cal
Externe
Wägeeinheiten
Baht, Karat, Grain, Gramm, Kilogramm, Mesgal, Momme, Newton, Ounce,
Pennyweight, Pound, Tael (Hong Kong), Tael, (Singapore), Tael (Taiwan),
Tical, Tola, Troy-Ounces, benutzerdefiniert (1)
Anwendung
Wiegen, Wägen, Stückzählung, Prozentwägung, Check Wiegen, Wägen,
Wiegen von Tieren, Wägen, Rezeptur, Dichtebestimmung, Summierung,
Anzeige mit Standbild
Stabilisierungszeit
(typisch)
≤ 1,5 Sekunden
Empfindlichkeit gegen
Temperaturdrift (PPM/K)
9
Typische Mindestgewicht
USP (u=0,10 %, k=2)
200,0 g
200,0 g
200,0 g
200,0 g
200,0 g
200,0 g
Optimale Mindestgewicht
USP (u=0,10 %, k=2)
82 g
82 g
82 g
82 g
82 g
82 g
Anzeige
Vollfarb-WQVGA Graphik-LCD
Anzeigegröße
4,3 in / 10,9 cm (diagonal)
Hinterleuchtung
Weiße LED
Steuerelemente
Resistiver 4-Draht-Touchscreen mit 6 Membranschaltflächen
Kommunikation
RS-232, USBx2
Waagen-
Spannungseingang
12 VDC, 0,5 A
Netzteil
Netzteileingang: 100-240 VAC 0,3A 50-60 Hz
Netzteilausgang: 12 VDC 0,84 A
Plattformgröße
(Durchmesser)
175x195 mm/6,9x7,7 inch
Maße nach
Zusammenbau
(B x T x H)
230 x 354 x 100 mm
9,1 x 13,9 x 4,0 zoll
Versandmaße
(B x T x H)
392 x 557 x 301 mm
15,5 x 22,0 x 11,9 zoll
Nettogewicht
4.6Kg/10.2lb
3.9Kg/8.6lb
4,6 Kg /
10,2 lb
3,9 Kg /
8,6 lb
3,8 Kg /
8,4 lb
3,4 Kg /
7,5 lb
Versandgewicht
6.5Kg/14.4b
5.8Kg/12.8b
6,5 Kg /
14,4 lb
5,8 Kg /
12,8 lb
5,7 Kg /
12,6 lb
5,3 Kg /
11,6 lb

DE-50 ADVENTURER-WAAGEN
TABELLE 9-6. SPEZIFIKATIONEN (Fortsetzung)
Modell
AX124M
AX224M
AX324M
AX223M
AX423M
AX523M
AX1502M
AX2202M
AX4202M
AX5202M
AX8201M
Max.
120 g
220 g
320 g
220 g
420 g
520 g
1520 g
2200 g
4200 g
5200 g
8200 g
Min.
0,01 g
0,01 g
0,01 g
0,02 g
0,02 g
0,02 g
0,5 g
0,5 g
0,5 g
0,5 g
5 g
d=
0,0001 g
0,001 g
0,01 g
0,1 g
e=
0,001 g
0,01 g
0,1 g
1 g
Zulassungsklasse
I
II
Wiederholbarkeit
(Standardabweichung)
(g)
0,0001 g
0,001 g
0,01 g
0,1 g
Linearitä t (g)
± 0,0002 g
±0,002 g
±0,02 g
±0,2 g
Messspannen-
kalibrierpunkte (g)
25 g, 50 g
75 g, 100 g
50 g, 100 g
150 g,
200 g
100 g
200 g,
300 g
50 g, 100 g
150 g,
200 g
100 g,
200 g
300 g,
400 g
200 g,
300 g
400 g,
500 g
500 g
1000 g,
1500 g
500 g,
1000 g
1500 g,
2000 g
1000 g,
2000 g
3000 g,
4000 g
2000 g,
3000 g
4000 g,
5000 g
2000 g,
4000 g
6000 g,
8000 g
Kalibrierung
Autom. Kal.
Autom. Kal.
Autom. Kal.
Autom. Kal.
Autom. Kal.
Autom. Kal.
Autom. Kal.
Autom. Kal.
Autom. Kal.
Autom. Kal.
Autom. Kal.
Wä geeinheiten
Milligramm, Gramm, Karat
Kilogramm, Gramm, Karat
Anwendungen
Wä gen, Stü ckzä hlung, Prozentwä gen, Prü fwä gen, Tierwä gen, Rezeptur, Dichtebestimmung, Summierung, Anzeige mit Standbild
Stabilisierungszeit
(typisch)
≤ 3 Sekunden
≤2 Sekunden
≤1,5 Sekunden
Empfindlichkeit bei
Temperaturä nderung
(PPM/K)
1,5
3
3
1,9
Typische
Mindestgewicht
USP (u=0,10 %,
k=2)
0,20 g
0,20 g
0,20 g
2,0 g
2,0 g
2,0 g
20,0 g
20,0 g
20,0 g
20,0 g
200,0 g
Optimale
Mindestgewicht
USP (u=0,10 %,
k=2)
0,082 g
0,082 g
0,082 g
0,82 g
0,82 g
0,82 g
8,2 g
8,.2 g
8,2 g
8,2 g
82 g
Display
Grafischer WQVGA LCD-Vollfarbbildschirm
Displaygrö ß e
4,3 in / 10,9 cm (diagonal)
Hintergrundbeleuchtung
Weiß e LED
Steuerelemente
Resistiver 4-Draht-Touchscreen mit 6 Membranschaltflä chen
Kommunikation
RS-232, USBx2
Netzeingang der
Waage
12 V–, 0,5 A
Stromversorgung
Netzgerä teingang: 100-240 V~, 0,3 A, 50-60 Hz
Netzgerä tausgang: 12 V–, 0,84 A
Plattformgrö ß e
(Durchmesser)
90 mm / 3,5 zoll
130 mm / 5,1 zoll
175x195 mm / 6,9x7,7 zoll
Abmessungen im
zusammengebauten
Zustand (B x T x H)
230 x 354 x 340 mm
9,1 x 13,9 x 13,4 zoll
230 x 354 x 340 mm
9,1 x 13,9 x 13,4 zoll
230 x 354 x 100 mm
9,1 x 13,9 x 4,0 zoll
Versandabmessungen
(B x T x H)
387 x 507 x 531 mm
15,4 x 20,0 x 20,9 zoll
387 x 507 x 531 mm
15,4 x 20,0 x 20,9 zoll
392 x 557 x 301 mm
15,5 x 22,0 x 11,9 zoll
Nettogewicht
5,1 Kg / 11,3 lb
5,8 Kg / 12,8 lb
4,6 Kg / 10,2 lb
3,8 Kg / 8,4 lb
Versandgewicht
7,8 Kg / 17,2 lb
8,5 Kg / 18,8 lb
6,5 Kg / 14,4 lb
5,7 Kg / 12,6 lb
Hinweis: M = OIML-Zulassung

ADVENTURER-WAAGEN DE-51
TABELLE 9-7. SPEZIFIKATIONEN (Fortsetzung)
Modell
AX224N
AX223N/E
AX423N
AX 423N/E
AX523N/E
AX1502N/E
AX2202N/E
AX4202N/E
AX8201N/E
Max.
220 g
220 g
420 g
420 g
520 g
1520 g
2200 g
4200g
8200 g
Min.
0,01 g
0,02 g
0,02 g
0,02 g
0,02 g
0,5 g
0,5 g
0,.5g
5 g
d=
0,.0001 g
0,001 g
0,01 g
0,1 g
e=
0,001 g
0,01 g
0,1 g
1 g
Zulassungsklasse
I
II
Wiederholbarkeit
(Standardabweichung)
(g)
0,0001 g
0,001 g
0,01 g
0,1 g
Linearitä t (g)
±0,0002 g
±0,002 g
±0,02 g
±0,2 g
Messspannen-
kalibrierpunkte (g)
50 g, 100 g
150 g, 200 g
50g, 100g
150g, 200g
100g, 200g
300g, 400g
100g, 200g
300g, 400g
200g, 300g
400g, 500g
500g
1000g, 1500g
500g, 1000g
1500g, 2000g
1000g, 2000g
3000g, 4000g
2000g, 4000g
6000g, 8000g
Kalibrierung
Autom. Kal.
Externe
Autom. Kal.
Externe
Externe
Externe
Externe
Externe
Externe
Wä geeinheiten
Gramm, Kilogramm, Karat, Pennyweight,
Grain, Pound, Unze, Troy-Unze
Gramm, Kilogramm, Karat, Pennyweight,
Grain, Pound, Unze, Troy-Unze
Anwendungen
Wä gen, Stü ckzä hlung, Prozentwä gen, Prü fwä gen, Tierwä gen, Rezeptur, Dichtebestimmung, Summierung
Stabilisierungszeit
(typisch)
≤ 3
Sekunden
≤2 Sekunden
≤1,5 Sekunden
Empfindlichkeit bei
Temperaturä nderung
(PPM/K)
1.5
3
3
9
Typische
Mindestgewicht
USP (u=0,10 %,
k=2)
0,20 g
2,0 g
2,0 g
2,0 g
2,0 g
20,0 g
20,0 g
20,0 g
200,0 g
Optimale
Mindestgewicht
USP (u=0,10 %,
k=2)
0,082 g
0,82 g
0,82 g
0,82 g
0,82 g
8,2 g
8,2 g
8,2 g
82 g
Display
Grafischer WQVGA LCD-Vollfarbbildschirm
Displaygrö ß e
4,3 in / 10,9 cm (diagonal)
Hintergrundbeleuchtung
Weiß e LED
Steuerelemente
Resistiver 4-Draht-Touchscreen mit 6 Membranschaltflä chen
Kommunikation
RS-232, USBx2
Netzeingang der
Waage
12 V–, 0,5 A
Stromversorgung
Netzgerä teingang: 100-240 V~, 0,3 A, 50-60 Hz
Netzgerä tausgang: 12 V–, 0,84 A
Plattformgrö ß e
(Durchmesser)
90 mm / 3,5 zoll
130 mm / 5,1 zoll
175x195 mm / 6,9x7,7 zoll
Abmessungen im
zusammengebauten
Zustand (B x T x H)
354x230x340 mm
13,9x9,1x13,4 zoll
354x230x100 mm
13,9x9,1x4,0 zoll
Versandabmessungen
(B x T x H)
557x392x301 mm
22,0x15,5x11,9 zoll
Nettogewicht
5,1 Kg /
11,3 lb
5,6 Kg /
12,4 lb
5,8 Kg /
12,8 lb
5,6 Kg / 12.4 lb
3,9 Kg / 8,6 lb
3,4 Kg /
7,5 lb
Versandgewicht
7,8 Kg /
17,2 lb
8,3 Kg /
18,3 lb
8,5 Kg /
18,8 lb
8,3 Kg / 18,3 lb
5,8 Kg / 12,8 lb
5,3 Kg /
11,6 lb
Hinweis: N = NTEP-Zulassung

DE-52 ADVENTURER-WAAGEN
TABELLE 9-8. SPEZIFIKATIONEN (Fortsetzung)
Modell
AX124AU
AX224AU
AX324AU
AX223AU
AX423AU
AX523AU
AX1502AU
AX2202AU
AX4202AU
AX5202AU
AX8201AU
Max.
120 g
220 g
320 g
220 g
420 g
520 g
1520 g
2200 g
4200 g
5200 g
8200 g
Min.
0,01 g
0,01 g
0,01 g
0,02 g
0,02 g
0,02 g
0,5 g
0,5 g
0,5 g
0,5 g
5 g
d=
0,0001 g
0,001 g
0,01 g
0,1 g
e=
0,001 g
0,01 g
0,1 g
1 g
Zulassungsklasse
I
II
Wiederholbarkeit
(Standardabweichung)
(g)
0,0001 g
0,001 g
0,01 g
0,1 g
Linearitä t (g)
± 0,0002 g
± 0,002 g
± 0,02 g
± 0,2 g
Messspannen-
kalibrierpunkte (g)
25 g, 50 g
75 g, 100 g
50 g, 100 g
150 g,
200 g
100 g
200 g,
300 g
50 g, 100 g
150 g,
200 g
100 g,
200 g
300 g,
400 g
200 g,
300 g
400 g,
500 g
500 g
1000 g,
1500 g
500 g,
1000 g
1500 g,
2000 g
1000 g,
2000 g
3000 g,
4000 g
2000 g,
3000 g
4000 g,
5000 g
2000 g,
4000 g
6000 g,
8000 g
Kalibrierung
Autom. Kal.
Autom. Kal.
Autom. Kal.
Autom. Kal.
Autom. Kal.
Autom. Kal.
Autom. Kal.
Autom. Kal.
Autom. Kal.
Autom. Kal.
Autom. Kal.
Wä geeinheiten
Milligramm, Gramm, Karat
Kilogramm, Gramm, Karat
Anwendungen
Wä gen, Stü ckzä hlung, Prozentwä gen, Prü fwä gen, Tierwä gen, Rezeptur, Dichtebestimmung, Summierung, Anzeige mit Standbild
Stabilisierungszeit
(typisch)
≤ 3 Sekunden
≤2 Sekunden
≤1,5 Sekunden
Empfindlichkeit bei
Temperaturä nderung
(PPM/K)
1,5
3
3
1,9
Typische
Mindestgewicht
USP (u=0,10 %,
k=2)
0,20 g
0,20 g
0,20 g
2,0 g
2,0 g
2,0 g
20,0 g
20,0 g
20,0 g
20,0 g
200,0 g
Optimale
Mindestgewicht
USP (u=0,10 %,
k=2)
0,082 g
0,082 g
0,082 g
0,82 g
0,82 g
0,82 g
8,2 g
8,.2 g
8,2 g
8,2 g
82 g
Display
Grafischer WQVGA LCD-Vollfarbbildschirm
Displaygrö ß e
4,3 in / 10,9 cm (diagonal)
Hintergrundbeleuchtung
Weiß e LED
Steuerelemente
Resistiver 4-Draht-Touchscreen mit 6 Membranschaltflä chen
Kommunikation
RS-232, USBx2
Netzeingang der
Waage
12 V–, 0,5 A
Stromversorgung
Netzgerä teingang: 100-240 V~, 0,3 A, 50-60 Hz
Netzgerä tausgang: 12 V–, 0,84 A
Plattformgrö ß e
(Durchmesser)
90 mm / 3,5 zoll
130 mm / 5,1 zoll
175x195 mm / 6,9x7,7 zoll
Abmessungen im
zusammengebauten
Zustand (B x T x H)
230 x 354 x 340 mm
9,1 x 13,9 x 13,4 zoll
230 x 354 x 340 mm
9,1 x 13,9 x 13,4 zoll
230 x 354 x 100 mm
9,1 x 13,9 x 4,0 zoll
Versandabmessungen
(B x T x H)
387 x 507 x 531 mm
15,4 x 20,0 x 20,9 zoll
387 x 507 x 531 mm
15,4 x 20,0 x 20,9 zoll
392 x 557 x 301 mm
15,5 x 22,0 x 11,9 zoll
Nettogewicht
5,1 Kg / 11,3 lb
5,8 Kg / 12,8 lb
4,6 Kg / 10,2 lb
3,8 Kg / 8,4 lb
Versandgewicht
7,8 Kg / 17,2 lb
8,5 Kg / 18,8 lb
6,5 Kg / 14,4 lb
5,7 Kg / 12,6 lb

ADVENTURER-WAAGEN DE-53
9.2 Zeichnungen und Abmessungen
Abmessungen in vollständig montiertem Zustand
Abb. 9-1. Modelle mit Zugluftschutz
Abb. 9-2. Modelle ohne Zugluftschutz

DE-54 ADVENTURER-WAAGEN
9.3 Teile und Zubehör
TABELLE 9-7. ZUBEHÖR
BESCHREIBUNG
TEILENUMMER
Zusätzliches Display
80251396
Dichtebestimmungsset
80253384
Kabel, USB-Gerät (Typ A-B)
83021085
Sicherheitsvorrichtung (Laptopverriegelung)
80850043
RS-232-Kabel, PC 25-polig
80500524
RS-232-Kabel, PC 9-polig
80500525
Staubschutzhülle
30093334
Zusätzliches Display
80251396

ADVENTURER-WAAGEN DE-55
9.4 Kommunikation
9.4.1. Schnittstellenbefehle
Die in der folgenden Tabelle aufgeführten Befehle werden von der Waage erkannt.
Bei ungültigen Befehlen liefert die Waage die Meldung „ES“ zurück.
TABELLE 9-8. ADVENTURER-SCHNITTSTELLENBEFEHLSLISTE
Befehlszeichen
Funktion
IP
Sofortdruck des angezeigten Gewichts (stabil oder instabil)
P
Druck des angezeigten Gewichts (stabil oder instabil)
CP
Fortlaufender Druck
SP
Druck bei Stabilität
SLP
Automatischer Ausdruck stabiler Gewichte ohne Nullen.
SLZP
Automatischer Ausdruck stabiler Gewichte ohne Nullen sowie einer stabilen Nullanzeige.
xP
Intervalldruck; x = Druckintervall (1-3600 Sekunden), 0P beendet den Intervalldruck.
0P
Siehe oben.
H
Geben Sie die Kopfzeilen für den Druck ein.
Z
Gleiche Funktion wie Drücken der Taste „Zero“ (Nullstellung).
T
Gleiche Funktion wie Drücken der Taste „Tare“ (Tara)
xT***
Legen Sie einen Tara-Wert für die Anzeigeeinheit fest. X = voreingestellter Tara-Wert 0T
löscht den Tarawert (falls zulässig).
PT
Druckt das Tara-Gewicht, das im Speicher abgelegt ist.
ON
Schaltet auf Standby zurück.
OFF
Schaltet auf Standby.
C
Beginn der Messspannenkalibrierung
IC
Beginn der internen Kalibrierung, identisch mit der Auslösung über das Kalibriermenü.
AC
Kalibrierung abbrechen. Achtung: Bei aktiviertem Eich-Schalter ist diese Operation nicht
zulässig.
PSN
Seriennummer drucken.
PV
Druckt die Version der Terminalsoftware, der Basissoftware und LFT ON (wenn der Eich-
Schalter aktiviert ist).
x#
Zählung des Durchschnittstückgewichts APW (x) in Gramm einstellen. (Das Durchschnitts-
Stückgewicht muss gespeichert sein)
P#
Zählung mit dem Durchschnitts-Stückgewicht drucken.
x%
Prozentuales Referenzgewicht (x) in Gramm einstellen. (Referenzgewicht muss gespeichert
sein)
P%
Prozentuales Referenzgewicht drucken
xS
0 = instabile Daten drucken, entspricht IP; 1 = nur stabile Daten drucken
1)
, entspricht SP.
xRL
0 = Antwort deaktivieren; 1 = Antwort aktivieren. Dieser Befehl steuert nur die Antwort „OK!“.
9.4.2. RS232 (DB9)-Pinbelegung
Pin 2: Waagenausgangsdaten (TxD)
Pin 3: Waageneingangsdaten (RxD)
Pin 5: Massesignal (GND)
Pin 7: Sendeerlaubnis (Hardware-Handshake) (CTS)
Pin 8: Sendeanforderung (Hardware-Handshake) (RTS)
1
5
69
Data
GND
Handshake
Female

DE-56 ADVENTURER-WAAGEN
9.5 USB-Schnittstelle
Die USB-Schnittstelle von Ohaus ist eine spezielle Lösung für den Anschluss einer Waage an einen Computer mit
einem USB-Kabel. Es gibt verschiedene Kategorien von USB-Geräten, z. B. USB-Sticks, Digitalkameras, Drucker
usw. Da Waagen nicht einer gemeinsamen Kategorie zugeordnet werden können, ist die USB-Schnittstelle von
Ohaus eine allgemeine Schnittstelle auf Basis des seriellen RS232-Standards.
Die Daten werden von der Waage im USB-Format an einen Computer gesendet. Die USB-Daten werden an einen
virtuellen Port geleitet. Dieser Port erscheint dann als RS232-Anschluss im Anwendungsprogramm.
Wenn Sie einen Befehl von einem Computer an die Waage ausgeben, sendet das Anwendungsprogramm einen
Befehl an den virtuellen Port, als ob es sich dabei um einen RS232-Anschluss handeln würde. Der Computer leitet
dann den Befehl vom virtuellen Port an den USB-Anschluss des Computers, an den die Waage angeschlossen ist.
Der Anschluss empfängt das USB-Signal und reagiert auf den Befehl.
Zur USB-Schnittstelle gehört eine CD mit den Softwaretreibern, um den benötigten virtuellen Port auf dem
Computer zu erstellen.
Systemanforderungen
PC mit Windows 98
®
, Windows 98SE
®
, Windows ME
®
, Windows 2000
®
, Windows XP
®
oder
Windows 8
®
(32-bit).
Verfügbarer USB-Anschluss (Typ A, 4-poliger Anschluss)
USB-Anschluss
Der USB-Anschluss der Waage endet mit einem 4-poligen USB-Stecker vom Typ B.
Es wird ein USB-Kabel (Typ B/Stecker – Typ A/Stecker) benötigt (nicht im Lieferumfang enthalten).
1. Stellen Sie sicher, dass die Waage eingeschaltet ist und ordnungsgemäß funktioniert.
2. Schalten Sie den Computer ein und prüfen Sie, ob der USB-Anschluss aktiviert ist und ordnungsgemäß
funktioniert.
3. Verbinden Sie den USB-Anschluss des Computers und den USB-Anschluss der Waage mit dem USB-Kabel.
Windows® sollte ein USB-Gerät erkennen und den Assistenten für neue Hardware starten.
Installation der virtuellen Anschlusssoftware
1. Legen Sie die mitgelieferte CD in das CD-
Laufwerk des Computers.
Die einzelnen Schritte zum Laden des Treibers
auf der CD weichen in den unterschiedlichen
Windows
®
-Versionen leicht voneinander ab.
Bei allen Versionen führt Sie der Assistent für
neue Hardware durch die erforderlichen
Schritte, um den Treiber auszuwählen, der sich
auf der CD befindet.
2. Nach dem Klick auf „Fertig stellen“ sollte der
virtuelle Port einsatzbereit sein.
Windows
®
fügt den virtuellen Port in der Regel
nach dem COM-Anschluss mit der höchsten
Nummer ein. Beispielsweise ist ein PC mit 4
COM-Anschlüssen ausgestattet; der virtuelle
Port ist dann COM5.
Wenn Sie die USB-Schnittstelle mit
Programmen verwenden, die die Anzahl der
COM-Anschlusszuordnungen beschränken
(Ohaus MassTracker erlaubt beispielsweise
nur COM1, 2, 3 und 4), muss u. U. eine dieser
Anschlussnummern dem virtuellen Port
zugewiesen werden.
Beispiele für den Hardware-Assistenten
von Windows XP
Dies erfolgt in den Anschlusseinstellungen des Gerätemanagers in der Windows-Systemsteuerung.

ADVENTURER-WAAGEN DE-57
USB-EINGANG
Die Waage reagiert auf verschiedene Befehle, die über den Schnittstellenadapter versendet werden.
Die folgenden Befehle mit [CR] oder [CRLF] abschließen.
Adventurer-Befehle
C Messspannenkalibrierung durchführen
0S Instabile Daten drucken
1S Nur stabile Daten drucken
P Identisch mit der Option Drucken
SP Nur stabile Gewichtsdaten drucken
IP Sofortdruck des angezeigten Gewichts (stabil oder instabil)
CP Gewichtsdaten laufend drucken
SLP Nur automatischer Ausdruck von stabilen Gewichtsdaten ohne Nullen
SLZP Automatischer Ausdruck von stabilen Gewichtsdaten ohne Nullen und Nullmesswerte
xP Automatischer Ausdruck in Intervallen von 1 bis 3600 Sekunden ( x = 1 to 3600)
0P Beendet den Intervalldruck
T Identisch mit der Option Tare (Tara)
Z Identisch mit der Option Zero (Nullstellung)
PV Softwareversion drucken
Automatischer Ausdruck
Sobald die Option Auto-Print (Automatisch Drucken) im Menü aktiviert ist, versendet die Waage die Daten wie
angegeben.
Wenn sich noch Daten im Druckerpuffer befinden, druckt der Drucker zunächst diese Daten.
10. SOFTWARE-UPDATES
Ohaus verbessert seine Waagensoftware laufend. Um das neueste Release zu erhalten, wenden Sie sich bitte an
Ihren autorisierten Ohaus-Händler oder die Ohaus Corporation.

DE-58 ADVENTURER-WAAGEN
11. COMPLIANCE
Die Einhaltung folgender Normen ist durch eine entsprechende Kennzeichnung auf dem Produkt vermerkt.
Markierung
Norm
Dieses Produkt entspricht der EMV-Richtlinie 2004/108/EG, der Niederspannungsrichtlinie
2006/95/EG und der Richtlinie über nichtselbsttätige Waagen 2009/23/EG. Die vollständige
Konformitätserklärung finden Sie online unter
http://europe.ohaus.com/europe/en/home/support/compliance/ce-declaration-of-conformity.
AS/NZS CISPR 11, AS/NZS 61000.4.3
CAN/CSA-C22.2 No. 61010-1-12
UL Std. No. 61010-1 (3. Ausgabe)
Wichtige Mitteilung für verifizierte Waagen
Bei Waagen, die am Herstellungsort verifiziert werden, ist eine der oben erwähnten
Kennzeichnungen auf dem Verpackungsetikett aufgedruckt, und der grüne Aufkleber
„M“ (Messtechnik) befindet sich auf dem beschreibenden Typenschild. Sie können sofort
verwendet werden.
Noch zu verifizierende Waagen besitzen kein grünes „M“ (für Messtechnik) auf dem
beschreibenden Typenschild und keine der oben erwähnten Kennzeichnungen auf dem
Verpackungsetikett.
Die zweite Phase der Erstverifizierung muss durch einen zugelassenen Servicebetrieb des
autorisierten Vertreters in der EU oder durch die nationalen Eichbehörden für Maße und
Gewichte durchgeführt werden.
Die erste Stufe der Verifizierung erfolgte im Herstellerwerk.
Sie umfasst alle Prüfungen entsprechend der übernommenen Europäischen Norm EN
45501:1992, Absatz 8.2.2.
Wenn nationale Vorschriften den Gültigkeitszeitraum der Verifizierung begrenzen, muss der
Benutzer der Waage den Zeitraum für die erneute Verifizierung genau einhalten und die
entsprechende Eichbehörde informieren.
FCC-Hinweis
Jedes Gerät wurde geprüft und entspricht den Grenzwerten für Digitalgeräte der Klasse A gemäß Abschnitt 15 der
FCC-Vorschriften. Diese Bestimmungen dienen dazu, in kommerziellen Umgebungen einen angemessenen Schutz
gegen Funkstörungen zu gewährleisten. Dieses Gerät erzeugt und verwendet HF-Energie und strahlt diese u. U.
auch ab; wird es nicht entsprechend der Anweisung installiert und verwendet, kann eine Funkstörung auftreten. Bei
Betrieb des Geräts in Wohngebieten ist die Wahrscheinlichkeit solcher Störungen hoch, und der Benutzer ist
verpflichtet, diese Störungen auf eigene Kosten zu beheben.
Hinweis für Kanada
Das Digitalgerät der Klasse A entspricht den kanadischen Vorschriften ICES-003.

ADVENTURER-WAAGEN DE-59
ISO 9001-Registrierung
OHAUS Corporation erhielt seine erste registrierte Zertifizierung gemäß ISO 9001 im Jahr 1994 durch die
akkreditierte Registrierstelle Bureau Veritus Quality International (BVQI). Damit erfüllt das OHAUS-
Qualitätsmanagementsystem die Anforderungen der Norm ISO 9001. Am 21. Juni 2012 wurde OHAUS
Corporation, USA, erneut gemäß der Norm ISO 9001:2008 registriert. In Übereinstimmung mit der europäischen
Richtlinie:
Entsorgung
Entsprechend der Europäischen Richtlinie 2002/96/EG über Elektro- und Elektronik-Altgeräte
(WEEE) darf dieses Gerät nicht im Hausmüll entsorgt werden. Dies gilt auch für Länder
außerhalb der EU entsprechend den jeweiligen Vorschriften.
Gemäß der Batterierichtlinie 2006/66/EG gibt es seit September 2008 neue Anforderungen zur
Entnahme von Batterien in Altgeräten in den EU-Mitgliedsstaaten. In Übereinstimmung mit der
Richtlinie wurde das Gerät so gestaltet, dass die Batterien am Ende der Nutzungsdauer von
einem Entsorgungsunternehmen sicher entfernt werden können.
Entsorgen Sie dieses Produkt entsprechend den lokalen Vorschriften an der Sammelstelle für
Elektro- und Elektronikgeräte.
Bei Fragen wenden Sie sich bitte an die entsprechende Behörde oder an den Händler, von dem
Sie das Gerät erworben haben.
Wenn Sie das Gerät an andere weitergeben (zur privaten oder beruflichen Nutzung), muss der
Inhalt dieser Vorschriften ebenfalls weitergeben werden.
Für die Entsorgung Anweisungen in Europa finden Sie auf
http://europe.ohaus.com/europe/en/home/support/weee.aspx.
Vielen Dank für Ihren Beitrag zum Umweltschutz.

DE-60 ADVENTURER-WAAGEN
BESCHRÄNKTE GARANTIE
Auf OHAUS-Produkte wird ab dem Datum der Auslieferung für den Garantiezeitraum eine Garantie auf
Materialmängel und Herstellungsfehler gewährt. Während des Garantiezeitraums wird Ohaus alle defekten
Komponenten kostenlos reparieren oder nach eigenem Ermessen ersetzen, sofern das Produkt mit Vorauszahlung
der Frachtkosten an OHAUS zurückgeschickt wird.
Diese Garantie gilt nicht, wenn das Produkt durch Unfall oder Missbrauch beschädigt wurde, radioaktiven oder
korrosiven Materialien ausgesetzt wurde, Fremdkörper in das Innere des Produkts eingedrungen sind oder wenn
eine Reparatur oder Änderung erfolgte, die nicht von OHAUS durchgeführt wurde. Wenn die Garantiekarte nicht
ordnungsgemäß zurückgeschickt wurde, beginnt der Garantiezeitraum am Datum des Versands an den
autorisierten Händler. OHAUS Corporation gibt keine weiteren ausdrücklichen oder stillschweigenden Garantien.
OHAUS Corporation ist für keinerlei Folgeschäden haftbar.
Da die Gesetzgebung zu Garantieleistungen von Bundesstaat zu Bundesstaat und von Land zu Land anders ist,
wenden Sie sich bitte an OHAUS oder Ihren OHAUS-Händler vor Ort, wenn Sie weitere Einzelheiten benötigen.

BILANCE ADVENTURER IT-1
INDICE
1. INTRODUZIONE ....................................................................................................................3
1.1 Descrizione ................................................................................................................................................... 3
1.2 Caratteristiche .............................................................................................................................................. 3
1.3 Precauzioni di sicurezza .............................................................................................................................. 3
1.4 Precauzioni di sicurezza .............................................................................................................................. 4
2. INSTALLAZIONE ...................................................................................................................5
2.1 Disimballaggio .............................................................................................................................................. 5
2.2 Scelta dell'ubicazione ................................................................................................................................... 5
2.3 Messa a livello dell'apparecchiatura ............................................................................................................ 5
2.4 Collegamento dell'alimentazione elettrica .................................................................................................... 7
2.5 Collegamento dell'interfaccia ....................................................................................................................... 7
2.6 Regolazione iniziale ..................................................................................................................................... 7
3. FUNZIONAMENTO ................................................................................................................8
3.1 Panoramica sul display, schermata iniziale ................................................................................................. 8
3.2 Funzioni principali e menu principale .......................................................................................................... 9
3.3 Panoramica sui componenti e sulle funzionalità – Modelli con paravento ................................................ 10
3.4 Panoramica sui componenti e sulle funzionalità – Modelli senza paravento ............................................. 10
4. APPLICAZIONI .................................................................................................................... 11
4.1 Pesatura ..................................................................................................................................................... 11
4.1.1 Modifica impostazioni ............................................................................................................................. 12
4.1.2 Nome campione ..................................................................................................................................... 11
4.1.3 Salvataggio su USB ............................................................................................................................... 11
4.2 Conteggio pezzi ......................................................................................................................................... 14
4.2.1 Modifica impostazioni ............................................................................................................................. 13
4.3 Pesatura percentuale ................................................................................................................................. 16
4.3.1 Modifica impostazioni ............................................................................................................................. 15
4.4 Pesatura dinamica ..................................................................................................................................... 17
4.4.1 Modifica impostazioni ............................................................................................................................. 18
4.5 Determinazione della densità ..................................................................................................................... 18
4.5.1 Misurazione della Densità di un solido con l’acqua (predefinita) ........................................................... 19
4.5.2 Misurazione della Densità di un materiale galleggiante con l’acqua ..................................................... 20
4.5.3 Misurazione della Densità di un solido con un liquido ausiliario ............................................................ 20
4.5.4 Misurazione della Densità di un liquido tramite un affondatore regolato (non in dotazione) ................. 20
4.5.5 Misurazione della Densità di materiale poroso tramite olio.................................................................... 21
4.6 Controllo del peso ...................................................................................................................................... 23
4.6.1 Modifica impostazioni ............................................................................................................................. 23
4.7 Memoria display ......................................................................................................................................... 24
4.7.1 Memoria display ..................................................................................................................................... 25
4.7.2 Valore di picco ........................................................................................................................................ 25
4.7.3 Modifica impostazioni ............................................................................................................................. 26
4.8 Totalizzazione ............................................................................................................................................ 26
4.9 Formulazione.............................................................................................................................................. 27
4.9.1 Modifica impostazioni ............................................................................................................................. 27
4.10 Funzionalità aggiuntive .............................................................................................................................. 28
4.10.1 Pesatura da sotto ................................................................................................................................... 28
5. IMPOSTAZIONI DI MENU .................................................................................................... 29
5.1 Navigazione nei menu ................................................................................................................................ 29
5.1.1 Modifica delle impostazioni .................................................................................................................... 29
5.2 Regolazione ............................................................................................................................................... 31
5.2.1 Sottomenu regolazione (modelli INCAL) ................................................................................................ 31
5.2.2 Regolazione interna ............................................................................................................................... 31
5.2.3 Regolazione automatica ......................................................................................................................... 31
5.2.4 Regolazione AutoCal™ .......................................................................................................................... 31
5.2.5 Regolazione a intervallo ......................................................................................................................... 32
5.2.6 Regolazione di linearità .......................................................................................................................... 32
5.2.7 Test di regolazione ................................................................................................................................. 32
5.3 Configurazione della bilancia ..................................................................................................................... 33
5.3.1 Sottomenu di configurazione della bilancia ............................................................................................ 33
5.3.2 Lingua ..................................................................................................................................................... 33
5.3.3 Impostazioni utente ................................................................................................................................ 33

IT-2 BILANCE ADVENTURER
5.3.4 Livello filtro ............................................................................................................................................. 34
5.3.5 Controllo zero automatico ...................................................................................................................... 34
5.3.6 Tara automatica ..................................................................................................................................... 34
5.3.7 Graduazione ........................................................................................................................................... 34
5.3.8 Data e ora ............................................................................................................................................... 34
5.3.9 Omologazione per transazioni commerciali ........................................................................................... 35
5.4 Unità di pesatura ........................................................................................................................................ 36
5.4.1 Sottomenu unità ..................................................................................................................................... 36
5.5 Conservazione dei dati ............................................................................................................................... 36
5.5.1 Sotto menu configurazione bilancia ........................................................................................................... 36
5.5.2 Esportazione su USB ................................................................................................................................. 37
5.5.3 Importazione da USB ................................................................................................................................. 37
5.5.4 Informazioni sulla bilancia .......................................................................................................................... 37
5.6 Comunicazione........................................................................................................................................... 37
5.6.1 Sottomenu Comunicazione .................................................................................................................... 37
5.6.2 Baud Rate .............................................................................................................................................. 37
5.6.3 Trasmissione .......................................................................................................................................... 37
5.6.4 Sincronizzazione .................................................................................................................................... 38
5.6.5 Uscita di stampa ..................................................................................................................................... 38
5.6.6 Stampa automatica ................................................................................................................................ 39
5.6.7 Stampa contenuto .................................................................................................................................. 39
5.6.8 Alimentazione ......................................................................................................................................... 39
5.6.9 Formato .................................................................................................................................................. 39
5.6.10 Stampa dati di Regolazione. .................................................................................................................. 39
5.7 Dati GLP e GMP ........................................................................................................................................ 40
5.7.1 Sottomenu Dati GLP .............................................................................................................................. 40
5.7.2 Intestazione ............................................................................................................................................ 40
5.7.3 Nome bilancia ......................................................................................................................................... 40
5.7.4 Nome utente ........................................................................................................................................... 40
5.7.5 Nome progetto ........................................................................................................................................ 40
5.8 Ripristino di fabbrica ................................................................................................................................... 40
5.9 Blocco ......................................................................................................................................................... 40
6. OMOLOGAZIONE PER TRANSAZIONI COMMERCIALI ................................................... 41
6.1 Impostazioni ............................................................................................................................................... 41
6.2 Verifica ....................................................................................................................................................... 41
6.3 Sigillatura .................................................................................................................................................... 41
7. STAMPA .............................................................................................................................. 42
7.1 Collegamento, configurazione e prova dell'interfaccia stampante/computer ............................................. 42
7.2 Formato di uscita ........................................................................................................................................ 42
8. MANUTENZIONE ................................................................................................................. 44
8.1 Regolazione ............................................................................................................................................... 44
8.2 Pulizia ......................................................................................................................................................... 44
8.3 Risoluzione dei problemi ............................................................................................................................ 45
8.4 Informazioni relative all'assistenza ............................................................................................................. 44
9. DATI TECNICI ...................................................................................................................... 45
9.1 Specifiche ................................................................................................................................................... 45
9.2 Illustrazioni e dati dimensionali .................................................................................................................. 54
9.3 Componenti e accessori ............................................................................................................................. 54
9.4 Comunicazione........................................................................................................................................... 55
9.4.1 Comandi interfaccia................................................................................................................................ 55
9.4.2 Collegamenti dei pin della RS-232 (DB9) .............................................................................................. 56
9.5 L'interfaccia USB ........................................................................................................................................ 56
10. AGGIORNAMENTI SOFTWARE ......................................................................................... 57
11. CONFORMITÀ ..................................................................................................................... 58

BILANCE ADVENTURER IT-3
1. INTRODUZIONE
1.1 Descrizione
La bilancia Adventurer è uno strumento di pesatura di precisione che, se conservato in condizioni ottimali, vi
garantirà numerosi anni di funzionamento. Le bilance Adventurer Ohaus sono disponibili con portate da 120
grammi a 8.200 grammi.
1.2 Caratteristiche
Controlli touch: Accesso grafico rapido a tutte le
funzioni di controllo, su oltre una dozzina di applicazioni
e molte funzionalità.
1.3 Definizione dei segnali di avvertenza e dei simboli
Le note sulla sicurezza sono contrassegnate da parole di segnalazione o simboli di avvertenza. Queste note
indicano aspetti e avvertenze in relazione alla sicurezza. Ignorare le note sulla sicurezza può provocare lesioni
personali, danni allo strumento, malfunzionamenti e risultati falsi.
Parole di segnalazione
AVVERTENZA Per una situazione di pericolo con rischio medio che può provocare lesioni o morte se
non evitata.
ATTENZIONE Per una situazione di pericolo con rischio basso che può provocare danni al dispositivo
o alla proprietà oppure perdita di dati o lesioni, se non evitata.
Avviso Per informazioni importanti sul prodotto
Nota Per informazioni utili sul prodotto
Simboli di avvertenza
Pericolo generico Pericolo di scossa elettrica
1.4 Precauzioni di sicurezza
ATTENZIONE: leggere tutte le avvertenze di sicurezza prima di procedere all'installazione,
alla realizzazione dei collegamenti o alla manutenzione dell'apparecchiatura. Il mancato
rispetto delle avvertenze suddette può provocare lesioni personali e/o danni alla proprietà.
Conservare tutte le istruzioni per poterle consultare in caso di necessità.
Verificare che l'intervallo di tensione in ingresso e il tipo di spina dell'adattatore CA siano adatti
all'alimentazione elettrica locale.
Accertarsi che il cavo di alimentazione non rappresenti un potenziale ostacolo o non costituisca un intralcio
al passaggio.
La bilancia è solo per uso interno.
Utilizzare la bilancia solo in luoghi asciutti.
Non far cadere pesi sul vassoio di pesatura.
Utilizzare solo accessori e periferiche approvate.
Utilizzare l’apparecchiatura solo nelle condizioni ambientali specificate in queste istruzioni.
Prima di effettuare la pulizia dell’apparecchiatura, scollegare l'alimentazione elettrica.
Non utilizzare l’apparecchiatura in ambienti instabili o pericolosi.
La manutenzione deve essere eseguita soltanto da personale autorizzato.
Non posizionare la bilancia in modo che sia difficile raggiungere il collegamento dell'alimentazione.
Corrente diretta
Corrente alternata

IT-4 BILANCE ADVENTURER
2. INSTALLAZIONE
2.1 Disimballaggio
Rimuovere con attenzione la bilancia Adventurer e i relativi componenti dalla confezione. I componenti inclusi nella
confezione variano a seconda del modello della bilancia (vedere tabella sotto). Conservare i materiali di
imballaggio per assicurare la conservazione o il trasporto in sicurezza del prodotto. Leggere il manuale per intero
prima di installare e utilizzare la bilancia Adventurer, al fine di evitare un uso improprio.
Componente incluso
Bilancia
Adattatore di rete
Anello paravento (solo per i modelli da 0,1 mg e 1)1
Scheda di garanzia
CD
2.2 Scelta dell'ubicazione
Evitare la presenza di vibrazioni, fonti di calore, correnti d'aria eccessive o brusche variazioni di temperatura.
Lasciare uno spazio sufficiente.
2.3 Messa a livello dell'apparecchiatura
La bilancia Adventurer è dotata di un indicatore a bolla d'aria posizionato all'interno di una finestrella accanto al
display.
Per mettere a livello la bilancia, regolare i piedini fino a quando la bolla di livello non si trova al centro del cerchio.
Per ulteriori informazioni sulla tipologia dei piedini e sulla relativa modalità di rotazione, consultare la sezione
"Level Assist" riportata in basso. Accertarsi che l'apparecchiatura si trovi in piano ogni volta che la sua posizione
viene modificata.
Level Assist
Per la messa a livello della bilancia Adventurer, è disponibile la funzione Level Assist. Sono disponibili due
modalità per accedere alla funzione:
1. Applicazione pesatura -> Modifica impostazioni -> Level Assist. Per ulteriori informazioni, consultare la
sezione 4.1.1.
2. Menu principale -> Configurazione bilancia -> Impostazioni utente -> Level Assist. Per ulteriori informazioni,
consultare la sezione 5.3.3.

BILANCE ADVENTURER IT-5
Ruotare i piedini come mostrato nell'immagine in alto, a seconda della posizione della bolla di livello, fino a
centrarla.

IT-6 BILANCE ADVENTURER
2.4 Collegamento dell'alimentazione elettrica
Collegare il connettore di uscita CC alla presa di alimentazione sul retro della bilancia. Quindi, collegare il cavo di
alimentazione a una presa elettrica idonea.
ATTENZIONE: da usare con un'alimentazione certificata CSA (o approvazione equivalente)
che deve avere un'uscita a circuito limitato.
Attenzione: per prestazioni di pesatura ottimali, far riscaldare la bilancia per 60 minuti prima
dell'uso.
2.5 Collegamento dell'interfaccia
Utilizzare la porta RS-232 integrata per collegare lo strumento a un computer o ad una stampante mediante
un cavo seriale standard (diretto), oppure utilizzare la porta USB della bilancia.
Collegamenti di interfaccia sul retro della bilancia. Collegamento USB sulla parte anteriore della bilancia.
USB1: Utilizzato esclusivamente per la connessione al PC
USB2: Utilizzato esclusivamente per la connessione all'unità flash USB
RS232: Utilizzato per la connessione al PC o alla stampante
Nota: Per i comandi di configurazione e di interfaccia, consultare la sezione Impostazioni del menu
Comunicazione.
Per il collegamento, la configurazione e il test dell'interfaccia stampante/computer e per i formati di stampa
campione, consultare la sezione Stampa.
2.6 Regolazione iniziale
Quando la bilancia viene installata per la prima volta o spostata in un'altra posizione, va tarata per assicurare
risultati di pesatura accurati. La maggior parte delle bilance Adventurer è dotata di sistema AutoCal integrato, che
consente la taratura automatica della bilancia e non richiede l'utilizzo di masse di regolazione. Se si preferisce, la
bilancia può essere tarata manualmente con masse esterne. In questo caso, prima di procedere è necessario
dotarsi di masse di regolazione idonee. Consultare la Sezione dedicata alla regolazione per informazioni sulle
masse e sulle procedure specifiche.
¤ AutoCal™
Molti modelli vantano un sistema di taratura integrato e completamente automatico che assiste la manutenzione
ordinaria tarando automaticamente la bilancia ogni giorno.
Regola automaticamente la bilancia se viene rilevata una variazione di temperatura che può incidere sulla
precisione della pesata (>1.5 °C), o a intervalli di 11 ore.
¤ Regolazione esterna
I modelli ad alta precisione vantano un tradizionale sistema di taratura esterno grazie al quale, per la regolazione
della bilancia, vengono utilizzati pesi esterni (valori di pesa per taratura a scelta dell'utente) al fine di garantire la
massima precisione.

BILANCE ADVENTURER IT-7
3. FUNZIONAMENTO
3.1 Panoramica sul display, schermata iniziale
Questa bilancia utilizza un display sensibile al tocco con aree e pulsanti touch per controllare le funzioni
dell'apparecchiatura.
COMANDI
Pulsante
Azione
Pressione breve (a bilancia spenta): Accende la bilancia
Pressione breve (a bilancia accesa): Spegne la bilancia
Invia i dati a una stampante o a un computer.
Esegue la procedura di azzeramento
Esegue la procedura di regolazione
Esegue la procedura di tara
Schermata principale dell'applicazione
Applicazione
Messaggi di istruzioni
Spie di stabilità (*),
Netto (NET), Lordo (G)
e/o centro dello zero
(>0<)
Campi di riferimento
Pulsanti
dell'applicazione:
Le funzioni variano a
seconda
dell'applicazione
Campo dei risultati: le
informazioni variano a
secondadell'applicazione
Toccare g per modificare
l'unità
Capacità e leggibilità

IT-8 BILANCE ADVENTURER
3.2 Funzioni principali e menu principale
Pesatura: Premere Zero per azzerare il display. Sistemare un articolo sul vassoio. Sul display viene visualizzato
il peso lordo.
Determinare la tara: Senza carico sul piatto, premere Zero per azzerare il display. Collocare un contenitore vuoto
sul vassoio della bilancia e premere Tara. Aggiungere del materiale nel contenitore, viene
visualizzato il peso netto. Rimuovere il contenitore e il peso viene visualizzato come numero
negativo. Premere Tara per cancellarlo.
Zero: Premere Zero per azzerare la bilancia.
NAVIGAZIONE NEI MENU E NELLE SCHERMATE
Toccare Menu per visualizzare l'elenco dei menu.
Regolazione:
toccare per visualizzare le opzioni di
regolazione.
Configurazione bilancia:
Toccare per visualizzare e modificare le
impostazioni della bilancia.
Unità di pesatura:
Toccare per visualizzare e modificare le unità
di pesatura.
Conservazione dei dati:
Toccare per visualizzare le impostazioni di
conservazione dei dati.
Impostazioni di stampa:
toccare per visualizzare le impostazioni di
stampa.
Dati GLP e GMP:
inserire i dati dell'utente per la tracciabilità.
Ripristino di fabbrica:
toccare per eseguire un Ripristino di
fabbrica delle impostazioni del menu.
Comunicazione:
toccare per visualizzare le impostazioni del
dispositivo COM e le impostazioni di stampa.
Blocco:
toccare per visualizzare le opzioni di blocco.

BILANCE ADVENTURER IT-9
3.3 Panoramica sui componenti e sulle funzionalità – Modelli con paravento
3.4 Panoramica sui componenti e sulle funzionalità – Modelli senza paravento
Host USBt
Dispositivo
USB
Ingresso
alimentazione
RS-232
Interruttore
LFT
Piedino
regolabile
Spia di livello
Piatto
Piedino
regolabile
Indicatore di
livello
Piatto
Ala
circolare
Host USB
Piedino
regolabile
Dispositivo
USB
Interruttore
LFT
RS232
Ingresso
alimentazione
Piedino
regolabile

IT-10 BILANCE ADVENTURER
4. APPLICAZIONI
La bilancia può essere configurata con diverse modalità applicative. Toccare il campo in alto a sinistra nell'area
Applicazioni (pesatura, nell'esempio riportato in basso):
La bilancia Adventurer vanta 9 modalità applicative, come riportato di seguito:
Pesatura
Conteggio
pezzi
Pesatura
percentuale
Pesatura
dinamica
(animali)
Determinazione
della densità
Controllo del
peso
Memoria
display
Totalizzazione
Formulazione
4.1 Pesatura
Nota: prima di utilizzare qualsiasi applicazione, assicurarsi che la bilancia sia stata messa in bolla e regolata.
Utilizzare questa applicazione per determinare il peso degli articoli utilizzando l'unità di misura selezionata.
Pesatura
1. Nella parte in alto a sinistra della schermata iniziale, selezionare Pesatura (applicazione predefinita).
2. Se necessario, premere Tara oppure Zero per iniziare.
3. Posizionare gli oggetti da pesare sul vassoio per visualizzarne il peso. Quando il valore è stabile, viene
visualizzato il simbolo * .
4. Il valore risultante viene visualizzato sulla riga principale del display ed espresso nell'unità di misura attiva.
Schermata iniziale della PESATURA
Riga principale del display
Toccare g per modificare l'unità
Campi di riferimento
Pulsanti dell'applicazione
Icona
dell'applicazione

BILANCE ADVENTURER IT-11
4.1.1 Modifica impostazioni
Per visualizzare o regolare le impostazioni correnti
Toccare il pulsante
Modifica impostazioni
. Viene visualizzata
la schermata delle Impostazioni.
Peso minimo: stabilire un valore di peso minimo da
utilizzare per verificare una lettura. Se un peso effettivo
è inferiore al valore di peso minimo stabilito, viene
segnalato da una variazione di colore: giallo.
Per regolare il valore di peso minimo, toccare il pulsante
Peso minimo
.
Viene visualizzata una finestra per l'immissione di valori
numerici
Digitare il peso minimo desiderato,
quindi premere Salva.
Il display torna alla schermata precedente.
Per tornare alla schermata iniziale della pesatura,
toccare Esci nella parte inferiore della schermata.
Barra della portata: Se impostata su ON, viene
visualizzata la barra della portata nel campo di
riferimento. La guida della portata mostrerà il peso
corrente come percentuale della portata della bilancia.
Se la barra della portata è impostata su OFF, il campo
di riferimento visualizza il Peso minimo e il Nome del
campione.
Unità di pesatura: Cambiare l’unità visualizzata.
Consultare la sezione 5,4 per ulteriori informazioni.
Livello filtro: Cambiare il livello di filtraggio. Consultare
la sezione 5.5.3 per ulteriori informazioni
Dati GLP e GMP: Consultare la sezione 5,9 per
ulteriori informazioni.
Impostazioni di stampa: Modificare le impostazioni di
stampa. Consultare la sezione 7 per ulteriori
informazioni.
Level Assist: Istruzioni sulle modalità di spostamento
dei piedini della bilancia per la messa a livello.

IT-12 BILANCE ADVENTURER
4.1.2 Nome campione
Premere questo pulsante aggiungere un nome al campione. Viene visualizzata una finestra per
l'immissione di valori alfanumerici. Premere per passare da caratteri maiuscoli a caratteri minuscoli.
Minuscolo: Maiuscolo:
Digitare il nome del campione desiderato e premere Salva per salvare il nome e ritornare alla schermata
principale della pesatura.
4.1.3 Salvataggio su USB
Inserire l'unità flash USB nella slot USB situata sulla parte anteriore della bilancia. A questo punto, premere
il pulsante "Salva su USB" per salvare i dati sull'unità flash USB. Una volta eseguito il salvataggio, il
pulsante diventa improvvisamente arancione.
Note: La prima volta che si connette un'unità flash USB alla bilancia, potrebbe verificarsi un ritardo nel
funzionamento del pulsante "Salva su USB". Tale ritardo è causato dalla creazione, da parte
della bilancia, delle cartelle sull'unità flash USB per la conservazione dei dati. Le applicazioni
Determinazione densità e Controllo peso non sono dotate del pulsante "Salva su USB"
ATTENZIONE:
I dati di pesatura vengono salvati su USB con cadenza giornaliera. Tuttavia, in caso di utilizzo di
molteplici modalità di pesatura, i dati verranno salvati su file individuali separati.
A seconda dell'unità USB in uso, è possibile che non tutti i dati siano trasferibili dalla bilancia oppure il
display potrebbe bloccarsi. In tal caso, scollegare l'unità flash USB e provare con un'altra.
Ohaus non si assume alcuna responsabilità sull'eventuale cancellazione dei dati dall'unità flash USB o
nel caso in cui l'unità flash USB si rompa durante il collegamento alla bilancia.
Per ridurre al minimo il rischio di problemi, Ohaus consiglia l'utilizzo di unità flash USB di alta qualità.

BILANCE ADVENTURER IT-13
4.2 Conteggio pezzi
Nota: prima di utilizzare qualsiasi applicazione, assicurarsi che la bilancia sia stata messa in bolla e regolata.
Utilizzare quest’applicazione per il conteggio di campioni di peso uniforme.
Conteggio pezzi
1. Nella parte in alto a sinistra della schermata iniziale, selezionare Conteggio pezzi.
2. Se necessario, premere Tara oppure Zero per iniziare.
3. Posizionare gli oggetti da pesare sul vassoio per visualizzarne il peso. Quando il valore è stabile, viene
visualizzato il simbolo * .
4. Il valore risultante viene visualizzato sulla riga principale del display ed espresso in pezzi (PCS).
Schermata iniziale del Conteggio
pezzi
Riga principale del display
Campi di riferimento
Pulsanti dell'applicazione
Icona
dell'applicazione
4.2.1 Modifica impostazioni
Per visualizzare o regolare le impostazioni correnti
Toccare il pulsante
Modifica impostazioni
. Viene visualizzata
la schermata delle Impostazioni.
Campione: La dimensione del campione può essere
compresa tra 1 e 10 000 pezzi. La dimensione
predefinita è 10. Quando si modificano le dimensioni del
campione, la bilancia visualizza la schermata APW, in
attesa di stabilire un nuovo peso medio dei pezzi.
Per regolare la dimensione del campione, toccare il
pulsante
Campione
.
Viene visualizzata una finestra per l'immissione di
valori numerici
Digitare la dimensione del campione desiderato,
quindi premere Salva.
Viene visualizzata la schermata successiva, e un
messaggio che richiede di posizionare il peso di
riferimento sul vassoio.
Posizionare il peso di riferimento sul vassoio.

IT-14 BILANCE ADVENTURER
Quindi toccare Accetta per acquisire il valore e tornare
alla schermata iniziale.
Determinare il peso medio dei pezzi (APW):
Ogni volta che si deve contare un nuovo tipo di
pezzo, è necessario determinare il peso
nominale di un pezzo (peso medio dei pezzi o
APW) utilizzando una piccola quantità di pezzi.
Questo peso medio viene conservato in
memoria fino a che non viene sostituito da un
altro.
Esistono due metodi per determinare il valore
APW:
1. L'APW effettivo è noto
2. L'APW deve essere derivato dal peso. In
tal caso, viene utilizzata la dimensione
effettiva del campione
Impostare il peso medio dei pezzi (APW) noto.
Per regolare il valore APW direttamente, toccare il pulsante
APW
.
Viene visualizzata una finestra per l'immissione di valori
numerici.
Digitare il peso APW, quindi premere Salva.
Il display torna alla schermata dell'applicazione con il
nuovo valore APW nel campo di riferimento.
Impostare un nuovo peso medio dei pezzi (APW) –
derivato.
Per stabilire un nuovo APW, posizionare il peso di riferimento
sul vassoio e premere Accetta per continuare.
Nota: La dimensione del campione visualizzata è quella
utilizzata.
Per utilizzare una dimensione del campione diversa, cambiarla
prima. (Vedere sopra.)

BILANCE ADVENTURER IT-15
La schermata iniziale mostra il numero di pezzi con il nuovo
APW.
Auto ottimizzazione: Quando impostata su On , l'auto ottimizzazione migliora l'accuratezza del conteggio
ricalcolando automaticamente il peso man mano che vengono aggiunti pezzi. L'impostazione predefinita è Off.
Nota: l'ottimizzazione APW avviene solo quando il numero di pezzi aggiunti è almeno pari o è al massimo un
valore triplo di quello già sul vassoio.
Se l'APW viene inserito manualmente tramite il tastierino numerico, l'Auto ottimizzazione dell'APW non si attiva.
Impostazioni di stampa: Modificare le impostazioni di stampa. Consultare la sezione 7 per ulteriori informazioni.
Nota: Il pulsante Salva su USB sarà visualizzato solo dopo il collegamento dell'unità flash USB alla bilancia. Per
ulteriori informazioni, consultare la sezione 4.1.3.
4.3 Pesatura percentuale
Nota: prima di utilizzare qualsiasi applicazione, assicurarsi che la bilancia sia stata messa in bolla e regolata.
Utilizzare Pesatura percentuale per misurare il peso di un campione come percentuale di un peso di riferimento
predeterminato.
Viene visualizzato il peso di riferimento predefinito (o il più recente).
Pesatura percentuale
1. Nella parte in alto a sinistra della schermata iniziale, selezionare Pesatura percentuale.
2. Posizionare un oggetto sul vassoio. Viene visualizzata la differenza tra il campione e il peso di riferimento
sotto forma di percentuale.
Schermata iniziale della Pesatura
percentuale
Riga principale del display
Campi di riferimento
Pulsanti dell'applicazione
Icona
dell'applicazione
4.3.1 Modifica impostazioni
Per visualizzare o regolare le impostazioni correnti
Toccare il pulsante
Modifica impostazioni
. Viene
visualizzata la schermata delle Impostazioni.
Ricalcolare il peso di riferimento: Per
determinare un nuovo valore del peso di
riferimento, toccare il pulsante per ricalcolare
del peso di riferimento.

IT-16 BILANCE ADVENTURER
Seguire le istruzioni sullo schermo per
determinare un nuovo peso di riferimento.
In alternativa, premere il pulsante
Peso rif.
dalla
schermata Pesatura percentuale, Ricalcolare il
peso di riferimento per impostare manualmente
un nuovo peso di riferimento tramite il tastierino
numerico.
Impostazioni di stampa: Modificare le impostazioni di
stampa. Consultare la sezione 7 per ulteriori
informazioni.
Nota: Il pulsante Salva su USB sarà visualizzato solo
dopo il collegamento dell'unità flash USB alla bilancia.
Per ulteriori informazioni, consultare la sezione 4.1.3.
4.4 Pesatura dinamica
Nota: prima di utilizzare qualsiasi applicazione, assicurarsi che la bilancia sia stata messa in bolla e regolata.
Utilizzare questa applicazione per pesare carichi instabili, come ad esempio un animale che si muove. È possibile
selezionare due diverse modalità di avvio/ripristino: Manuale (avvio e arresto tramite pressione di un tasto), e
Automatica (avvio e arresto automatico).
Pesatura dinamica – Manuale (predefinita)
1. Nella parte in alto a sinistra della schermata iniziale, selezionare Pesatura dinamica.
2. Posizionare gli oggetti sul vassoio e premere il pulsante Avvio.
Schermata iniziale della Pesatura
dinamica
Riga principale del display
Campi di riferimento
Pulsanti dell'applicazione
Icona
dell'applicazione
3. La bilancia avvia un conto alla rovescia (processo di media). Durante il conto alla rovescia, sulla riga delle
informazioni viene visualizzato il tempo residuo.
Se necessario, premere Stop per uscire.
4. Al termine del conto alla rovescia, viene visualizzata e memorizzata la riga del risultato. Premere Cancella
per cancellare il peso salvato e tornare alla schermata iniziale.
Nota: svuotare il vassoio prima di iniziare un nuovo ciclo di pesatura dinamica.

BILANCE ADVENTURER IT-17
4.4.1 Modifica impostazioni
Per visualizzare o regolare le impostazioni correnti
Toccare il pulsante
Modifica impostazioni
. Viene
visualizzata la schermata delle Impostazioni.
Tempo medio: Impostare il tempo medio su un
valore compreso tra 1 e 99 secondi. Il valore
predefinito è 5 secondi.
Modalità Automatica: Se impostata su On, il
ciclo inizia quando un oggetto viene posizionato
sul vassoio e il valore memorizzato viene
automaticamente ripristinato quando l'oggetto è
rimosso dal vassoio (dopo 10 secondi).
Nome del campione: Assegnare un nome al
campione.
Impostazioni di stampa: Modificare le impostazioni di
stampa. Consultare la sezione 7 per ulteriori
informazioni.
Nota: Il pulsante Salva su USB sarà visualizzato solo
dopo il collegamento dell'unità flash USB alla bilancia.
Per ulteriori informazioni, consultare la sezione 4.1.3.
4.5 Determinazione della densità
Nota: prima di utilizzare qualsiasi applicazione, assicurarsi che la bilancia sia stata messa in bolla e regolata.
Utilizzare quest'applicazione per determinare la densità di un oggetto. È possibile eseguire quattro tipi di
determinazione della densità:
1. Solidi più densi dell’acqua
2. Solidi meno densi dell’acqua
3. Densità del liquido
4. Materiale poroso (impregnato d'olio)
Schermata iniziale della
Determinazione della densità
Riga principale del display
Campi di riferimento
Pulsanti funzione
Icona
dell'applicazione

IT-18 BILANCE ADVENTURER
4.5.1 Misurazione della Densità di un solido con l’acqua (predefinita)
Premere il pulsante Modifica impostazioni per aprire la
schermata Configurazione dell'applicazione di determinazione
della densità.
Confermare la selezione delle seguenti Configurazioni:
Tipo di densità: Solido
Liquido ausiliario: Acqua
Materiale poroso: Off
Per regolare il valore di temperatura dell'acqua, toccare il
pulsante Temp. acqua.
La bilancia calcola la densità dell'acqua in base al valore della
temperatura dell'acqua immesso (tabella di ricerca interna).
Misurare la temperatura effettiva dell'acqua con un termometro
di precisione.
Viene visualizzata una finestra per l'immissione di valori
numerici.
Immettere il valore corrente della temperatura dell'acqua, quindi
premere Salva.
Per tornare alla schermata iniziale di Determinazione della
densità, toccare Indietro.
Fase 1 di 2 -
Pesare il
campione in
aria.
Premere
Avvio
.
Seguire le
istruzioni sullo
schermo, quindi
premere
Accetta
per memorizzare
il peso del
campione secco
("in aria").
Fase 2 di 2 -
Pesare il
campione
immerso nel
liquido.
Seguire le
istruzioni sullo
schermo, quindi
premere Accetta
per memorizzare
il peso del
campione
(immerso
nel liquido).
Dopo aver determinato i pesi necessari, la densità del campione viene visualizzata in g/cm
3
(insieme al peso in aria e in acqua) sulla schermata dell'applicazione.
Premere
Avvio
per ripristinare tutti i valori di peso e riavviare il processo.

BILANCE ADVENTURER IT-19
4.5.2 Misurazione della Densità di un materiale galleggiante con l’acqua
Premere il pulsante Modifica impostazioni per aprire la
schermata Configurazione.
Confermare la selezione delle seguenti Configurazioni:
Tipo di densità: Solido
Tipo di liquido: Acqua
Materiale poroso: Off
Premere
Indietro
per tornare alla schermata di
determinazione della densità.
Seguire la stessa procedura utilizzata per i solidi, tranne
che per la fase 2 di determinazione della densità, spingere
il campione immergendolo completamente nel liquido.
4.5.3 Misurazione della Densità di un solido con un liquido ausiliario
Per abilitare questa funzione, accedere al menu Configurazione dell'applicazione di determinazione della densità
e selezionare:
Tipo di densità: Solido; Tipo di liquido: Altro; Materiale poroso: Off.
Confermare la correttezza dei valori predefiniti visualizzati
(densità del liquido, ecc.).
Per regolare il valore della densità del liquido, toccare il
pulsante Liquido ausiliario e selezionare Altro.
Viene visualizzata una finestra per l'immissione di valori
numerici.
Digitare la densità in g/cm
3
, quindi premere Salva.
Il display torna alla schermata precedente.
Per tornare alla schermata iniziale di Determinazione della
densità, toccare Indietro.
Avviare il processo per la determinazione della densità come
sopra.
4.5.4 Misurazione della Densità di un liquido tramite un affondatore regolato (non in dotazione)
Abilitare questa funzione, accedere al menu di Configurazione densità e selezionare Tipo densità: Liquido.
Nota: quando il Tipo di densità è impostato su Liquido, le opzioni di selezione Tipo di liquido e Materiale poroso
non sono abilitate.
Schermata iniziale della DETERMINAZIONE DENSITÀ –
LIQUIDO
Riga principale del display
Riga secondaria del display
Campi di riferimento
Pulsanti funzione
Icona dell'applicazione

IT-20 BILANCE ADVENTURER
Confermare la correttezza del valore predefinito visualizzato
(volume affondatore). Per modificare i valori predefiniti, toccare
Volume affondatore
.
Per regolare il valore del volume affondatore, toccare il pulsante
Volume affondatore
.
Viene visualizzata una finestra per l'immissione di valori
numerici.
Digitare il valore desiderato, quindi premere Salva.
Il display torna alla schermata precedente e viene evidenziato il
nuovo valore.
Per tornare alla schermata iniziale di Determinazione Densità,
toccare Indietro.
Premere
Avvio
per avviare la procedura.
Fase 1 di 2 - Pesare l'affondatore in aria.
Seguire le istruzioni sullo schermo, quindi premere
Accetta
per memorizzare il peso dell'affondatore (“in aria”).
Fase 2 di 2 - Pesare l'affondatore immerso nel liquido di
prova.
Seguire le istruzioni sullo schermo, quindi premere Accetta
per memorizzare il peso del campione (immerso nel liquido).

BILANCE ADVENTURER IT-21
Dopo aver determinato i pesi necessari,
la densità del campione viene visualizzata in g/cm
3
(insieme al peso in aria e al peso in acqua)
sulla schermata dell'applicazione.
Premere
Avvio
per ripristinare tutti i valori di peso e riavviare il
processo.
4.5.5 Misurazione della Densità di materiale poroso tramite olio
Per abilitare questa funzione, accedere al menu di
Configurazione della determinazione densità e impostare i
valori seguenti:
Tipo di densità: Solido
Tipo di liquido: Acqua
Materiale poroso: On
Schermata iniziale della DETERMINAZIONE
DELLA DENSITÀ – POROSO
Riga principale del display
Riga secondaria del display
Campi di riferimento
Funzioni Icona dell'applicazione
Confermare la correttezza dei valori predefiniti
visualizzati (temperatura dell'acqua).
Per modificare i valori predefiniti, toccare
Modifica
Impostazioni
.
Viene visualizzata la schermata delle Impostazioni.
La bilancia calcola la densità dell'acqua in base al
valore della temperatura dell'acqua immesso (tabella di
ricerca).
Misurare la temperatura effettiva dell'acqua con un
termometro di precisione.
Per regolare i valori Temperatura acqua o Densità olio,
toccare il pulsante Temp. acqua o Densità olio.
Viene visualizzata una finestra per
l'immissione di valori numerici.
Digitare il valore desiderato, quindi
premere Salva.
Il display torna alla schermata
precedente e viene evidenziato il
nuovo valore.

IT-22 BILANCE ADVENTURER
Per tornare alla schermata iniziale di
Determinazione densità, toccare Esci.
Premere Avvia calcolo densità.
Fase 1 di 3 - Pesare il campione non oleato in aria.
Seguire le istruzioni sullo schermo, quindi premere
Accetta
per
memorizzare il peso secco del campione secco (in aria).
Fase 2 di 3 - Pesare il campione oleato in aria.
Seguire le istruzioni sullo schermo, quindi premere
Accetta
per memorizzare il peso del campione (oleato).
Fase 3 di 3 - Pesare il campione oleato immerso in nel
liquido.
Seguire le istruzioni sullo schermo, quindi premere
Accetta
per memorizzare il peso del campione oleato (immerso nel
liquido).
Dopo aver determinato i pesi necessari, la densità del campione
viene visualizzata in g/cm
3
(insieme al peso in aria, oleato, non
oleato e in acqua) sulla schermata dell'applicazione.
Il valore rimane visualizzato sul display fino a quando non si
tocca Avvio.
Premere
Avvio
per ripristinare tutti i valori di peso e riavviare il
processo.

BILANCE ADVENTURER IT-23
4.6 Controllo del peso
Nota: prima di utilizzare qualsiasi applicazione, assicurarsi che la bilancia sia stata messa in bolla e regolata.
Il controllo peso consente di confrontare il peso di un campione rispetto a dei limiti obiettivo.
Controllo del peso
1. Nella parte in alto a sinistra della schermata iniziale, selezionare Controllo peso.
2. Vengono visualizzati i limiti di controllo peso predefiniti (o più recenti).
3. Posizionare gli oggetti sul vassoio.
4. Lo stato Inferiore/Accetta/Superiore viene visualizzato nell'area della barra di avanzamento, mentre il peso
effettivo dell'articolo viene visualizzato sulla riga principale del display.
Schermata iniziale del Controllo Peso
Riga principale del display
Campi di riferimento
Pulsanti funzione
Icona
dell'applicazione
Per impostare il valore Limite superiore, toccare il pulsante
Limite superiore.
Per impostare il valore Limite inferiore, toccare il pulsante
Limite inferiore
.
Viene visualizzata una finestra per l'immissione di valori
numerici.
Digitare il limite di peso desiderato quindi premere Salva.
Per tornare alla schermata iniziale del CONTROLLO PESO
toccare
Esci
.
4.6.1 Modifica impostazioni
Per visualizzare o regolare le impostazioni correnti
Toccare il pulsante
Modifica impostazioni
. Viene visualizzata
la schermata delle Impostazioni.
Nome del campione: Assegnare un nome al campione.
Impostazioni di stampa: Modificare le impostazioni di
stampa. Consultare la sezione 7 per ulteriori informazioni.

IT-24 BILANCE ADVENTURER
4.7 Memoria display
Nota: prima di utilizzare qualsiasi applicazione, assicurarsi che la bilancia sia stata messa in bolla e regolata.
Sono previste due modalità di funzionamento:
La funzionalità Memoria display - consente all'utente di catturare e memorizzare un peso stabile.
La funzionalità Valore di picco - consente all'utente di catturare e memorizzare il peso stabile più alto.
Schermata iniziale della Memoria
display
Riga principale del display
Campi di riferimento
Pulsanti funzione
Icona
dell'applicazione
Memoria display
4.7.1 Memoria display
1. Nella parte in alto a sinistra della schermata iniziale, selezionare Memoria display.
2. Posizionare il campione sul piatto e premere in qualsiasi momento Memoria durante la rilevazione del
peso.
3. La riga principale del display visualizza ora il primo peso stabile.
4. Premere Cancella per eliminare il valore memorizzato e tornare alla schermata Memoria display.
Valore di picco
4.7.2 Valore di picco
1. Nella parte in alto a sinistra della schermata iniziale, selezionare Memoria display.
2. Selezionare la modalità Memoria picco in Modifica impostazioni (consultare la sezione 4.7.3).
3. Posizionare il campione sul vassoio e premere Avvio per avviare la procedura.
4. Continuare a pesare i campioni. Il peso stabile più alto viene memorizzato automaticamente.
5. Premere Stop per eliminare il valore memorizzato e tornare al normale funzionamento.

BILANCE ADVENTURER IT-25
4.7.3 Modifica impostazioni
Per visualizzare o regolare le impostazioni correnti
Toccare il pulsante
Modifica impostazioni
. Viene visualizzata
la schermata delle Impostazioni.
Modalità: Scegliere tra Memoria picco e Memoria display
(predefinita).
Modalità Automatica: Impostare su On o Off
(predefinito).
Nome del campione: Assegnare un nome al campione.
Impostazioni di stampa: Modificare le impostazioni di
stampa. Consultare la sezione 7 per ulteriori informazioni.
Nota: Il pulsante Salva su USB sarà visualizzato solo dopo il collegamento dell'unità flash USB alla bilancia. Per
ulteriori informazioni, consultare la sezione 4.1.3.
4.8 Totalizzazione
Nota: prima di utilizzare qualsiasi applicazione, assicurarsi che la bilancia sia stata messa in bolla e regolata.
La Totalizzazione misura il peso cumulativo di una sequenza di articoli. Il peso cumulativo potrebbe superare la
portata della bilancia. Il numero massimo di campioni (n) è 99.
Schermata iniziale della
Totalizzazione
Riga principale del display
Campi di riferimento
Pulsanti dell'applicazione
Icona
dell'applicazione
Totalizzazione
1. Nella parte in alto a sinistra della schermata iniziale, selezionare Totalizzazione.
2. Posizionare l'articolo sul vassoio per avviare la procedura. Il peso campione viene visualizzato sulla riga
principale del display.
3. Premere Accumula per aggiungere il peso (quando stabile) dell’articolo al totale.
4. Rimuovere l'articolo dal vassoio di pesatura e aggiungere il successivo, continuando come illustrato in
precedenza.
5. Premere Risultato per visualizzare i risultati della totalizzazione.
6. Al termine, premere il pulsante Cancella totale per ripristinare il peso accumulato a zero.

IT-26 BILANCE ADVENTURER
7. Premere Salva su USB per salvare i risultati su un'unità flash USB oppure Esci per ritornare alla
schermata iniziale della Totalizzazione.
Nota: La modifica delle unità converte i risultati di Accumulazione nell'unità selezionata.
4.9 Formulazione
Nota: prima di utilizzare qualsiasi applicazione, assicurarsi che la bilancia sia stata messa in bolla e regolata.
Utilizzare questa applicazione per la composizione e la realizzazione delle ricette. Il numero massimo di
componenti è 50.
Schermata iniziale della Formulazione
Riga principale del display
Campi di riferimento
Pulsanti dell'applicazione
Icona
dell'applicazio
ne
Formulazione
1. Nella parte in alto a sinistra della schermata iniziale, selezionare Formulazione.
2. Premere Avvio per avviare il processo di composizione.
3. Posizionare il primo ingrediente sul vassoio (o in un contenitore tarato) e premere Accetta per memorizzare
il componente.
4. Continuare ad aggiungere componenti e premere Accetta per memorizzare il peso dei singoli componenti,
fino a quando la formula non è completa. Sulla riga Totale viene visualizzato il peso di tutti i componenti.
5. Premere Stop per terminare la Formulazione. Vengono visualizzati i risultati della Formulazione.
Nota: Se la modalità Riempimento è impostata su On (consultare la sezione 4.9.1 di seguito), la bilancia
chiederà di aggiungere un componente di riempimento per completare la formulazione. Aggiungere il
componente di riempimento e premere Accetta per completare la formulazione e visualizzare i risultati.
6. Premere Salva su USB per salvare i risultati su un'unità flash USB oppure Esci per ritornare alla
schermata iniziale della Formulazione.
Nota: I risultati della formulazione verranno cancellati all'avvio di una nuova formulazione.

BILANCE ADVENTURER IT-27
4.9.1 Modifica impostazioni
Per visualizzare o regolare le impostazioni correnti
Toccare il pulsante
Modifica impostazioni
. Viene
visualizzata la schermata delle Impostazioni.
Riempimento: Se impostato su On, al termine della
formulazione viene richiesto un componente di
riempimento.
Tara automatica: Se impostata su On, la bilancia
esegue automaticamente la Tara dopo aver accettato il
peso del componente.
Impostazioni di stampa: Modificare le impostazioni di
stampa. Consultare la sezione 7 per ulteriori informazioni.
4.10 Funzionalità aggiuntive
4.10.1 Pesatura da sotto
La bilancia Adventurer è dotata di un gancio per la pesatura da sotto.
Nota: prima di capovolgere la bilancia, asportare il vassoio e il paravento (se presenti), per prevenirne il
danneggiamento.
ATTENZIONE: non appoggiare la bilancia sul cono di supporto del vassoio o sui pin
della cella di carico.
Per utilizzare questa funzione, staccare l'alimentazione elettrica dalla bilancia e rimuovere il coperchio di
protezione dall'apertura della pesatura da sotto.
La bilancia può essere supportata usando dei martinetti da laboratorio o un altro sistema adatto. Accertarsi che la
bilancia sia ferma ed in bolla. Accendere la bilancia, quindi usare un filo o un cavo per appendere gli articoli da
pesare.
Pesatura da sotto
capottina di
protezione
Gancio per la
pesatura da sotto

IT-28 BILANCE ADVENTURER
5. IMPOSTAZIONI DI MENU
5.1 Navigazione nei menu
Struttura del menu utente
Modalità applicative
Menu
Principale
Regolazione
Configurazione della bilancia
Unità di pesatura
Conservazione dei
dati
Comunicazione
Dati GLP e
GMP
Ripristino
di
fabbrica
Blocco
Applicazione pesatura
Regolazione
Taratura interna
Lingua
Milligrammo
Esportazione su USB
Standard RS232
Intestazioni
Regolazione
Peso min
Configurazione
della bilancia
Regolazione
automatica
Impostazioni utente
Grammo
App. Impostazioni
modalità
Baud rate
(Velocità di
trasmissione)
Intestazione 1
Configurazione
della bilancia
Guida portata
Unità di
pesatura
AutoCal
TM
Regolazione Touch
Chilogrammi
Impostazioni di menu
2400
Intestazione 2
Unità di
pesatura
Unità di pesatura
Conservazione
dei dati
Taratura span
Luminosità
Carato
Importazione da USB
4800
Intestazione 3
Conservazione
dei dati
Livello filtro
Comunicazione
Taratura lineare
Beep (Segnalatore acustico)
Oncia
App. Impostazioni
modalità
9600
Intestazione 4
Comunicazione
Dati GLP e
GMP
Dati GLP e
GMP
Test di
regolazione
Dim auto
Oncia troy
Impostazioni di menu
19200
Intestazione 5
Dati GLP e
GMP
Impostazioni di stampa
Ripristino di
fabbrica
Level Assist
Libbra
Info_bilancia
38400
Nome
bilancia
Ripristino di
fabbrica
Level Assist
Blocco
Livello filtro
Pennyweight
Trasmissione
Nome
utente
Applicazione conteggio
Controllo zero automatico
Grani
7 E 1
Nome
progetto
Dimensioni campione
Tara_autom
atica
Newton
7 E 2
APW
Graduazione
Momme
7 N1
Auto Opt* (Ottimizzazione
automatica)
Data e ora
Mesghal
7 N2
Impostazioni di stampa
Data
HKTael
7 O 1
Applicazione percentuale
Ora
SGTael
7 O2
Ricalcolare il peso di
riferimento
Omologazione per transazioni commerciali
TWTael
8 N1
Impostazioni di stampa
Tical
8 N 2
Applicazione dinamica
Tola
Sincronizzazione
Tempo medio
Baht
Impostazioni di
stampa
Modalità automatica
Personalizzato1
Uscita di stampa
Nome campione
Nome unità di
misura
Solo peso stabile
Impostazioni di stampa
Fattore
Solo valori
numerici
Applicazione densità
Esponente
Solo intestazione
singola.
Tipo di densità
10-3
Opzioni di stampa
Liquido ausiliario
10-2
Stampa
automatica
Temperatura acqua
10-1
Stampa
automatica
Materiale poroso
100
Alla stabilità
Densità olio
101
Intervallo
(secondi)
Volume affondatore
10
2
Continuo
Temp. liquido
10
3
Stampa
contenuto
Impostazioni di stampa
LSD
Selezione
Applicazione controllo peso
0,5
Intestazione
Nome campione
1
Data e ora
Impostazioni di stampa
2
ID bilancia
Applicazione memoria display
5
Nome bilancia
Modalità memoria display
10
Nome utente
Nome campione
100
Nome progetto
Impostazioni di stampa
Nome
applicazione
Applicazione totalizzazione
Nome campione
Applicazione formulazione
Risultato
Componente di riempimento
Lordo
Modalità automatica
Netto
Impostazioni di stampa
Tara
Informazioni
Riga per la firma
Avanzamento riga
Salva su USB

BILANCE ADVENTURER IT-29
La navigazione nei menu avviene toccando il display. Per accedere al menu, toccare Menu da qualsiasi
schermata iniziale di applicazione. Viene visualizzato il Menu principale, con i pulsanti Indietro e Esci.
Continuare a toccare la voce appropriata dell'elenco per navigare tra le voci di menu.
5.1.1 Modifica delle impostazioni
Per modificare un'impostazione di menu, navigare tra le impostazioni attraverso la procedura seguente:
Accedere al menu
Dalla schermata di qualsiasi applicazione, toccare
Menu.
Sul display viene visualizzato l'elenco del menu
principale.
Selezionare il sottomenu
Scorrere fino alla voce selezionata nell'elenco del
menu principale e toccarla. Viene visualizzato il
sottomenu.
Selezionare la voce di menu.
Procedere con la selezione di tutte le impostazioni
desiderate nell'elenco menu. Toccare
l'impostazione per modificarla.
L'impostazione modificata sarà visualizzata
evidenziata in giallo per circa 1 secondo, per
confermare il cambiamento del valore.
Uscire dal menu e tornare all'applicazione corrente.
Dopo aver confermato l'impostazione, toccare Esci per tornare all'applicazione.
Nota: è possibile toccare i pulsanti Indietro ed Esci in qualsiasi momento, per navigare all'area desiderata del
menu o tornare all'applicazione corrente. Procedere con la selezione di tutte le impostazioni desiderate
nell'elenco menu.
Di seguito è illustrata la struttura del menu principale della bilancia Adventurer.
Regolazione
Configurazione della
bilancia
Unità di
pesatura
Conservazione
dei dati
Comunicazione
GLP and GMP Data
(Dati GLP e GMP)
Ripristino
di fabbrica
Blocco

IT-30 BILANCE ADVENTURER
5.2 Regolazione
Le bilance Adventurer (modelli INCAL) prevedono sei metodi di regolazione: Regolazione interna,
regolazione automatica regolazione AutoCal regolazione ad intervallo, regolazione di linearità, e test di
regolazione.
Note: L'unità di taratura è sempre espressa in grammi.
Attenzione: non interrompere la procedura di regolazione della bilancia.
5.2.1 Sottomenu regolazione (modelli INCAL)
Regolazione
interna
Automatica
AutoCal™
Intervallo
Regolazione di
linearità
Test di
regolazione
Note: i modelli /E dispongono solo di funzione Taratura span, Taratura lineare e Test di
regolazione.
5.2.2 Regolazione interna
La regolazione avviene mediante l'apposita massa interna. La Regolazione interna può essere eseguita
in qualsiasi momento, purché la bilancia abbia raggiunto la temperatura di funzionamento e il livellamento.
Con la bilancia accesa e senza carichi sul vassoio, selezionare Regolazione interna.
La bilancia avvia il processo di regolazione. A piatto libero, toccare Regolazione interna.
Il display visualizza lo stato e ritorna alla modalità applicativa corrente.
Per annullare in qualsiasi momento, premere Esci.
5.2.3 Regolazione automatica
Quando la Regolazione automatica è impostata su ON, la bilancia esegue una regolazione automatica:
• quando rileva una variazione di temperatura di 1,5°C
• oppure ogni 11 ore
La funzione AutoCal tara automaticamente la bilancia (utilizzando la massa interna) ogni volta che si
verifica una variazione di temperatura, significativa al punto da incidere sull'accuratezza, oppure ogni 11
ore.
Verrà visualizzata una schermata informativa prima dell'avvio della Regolazione automatica. Vengono
visualizzati tre pulsanti opzione:
Ora – Premere per eseguire direttamente la regolazione.
5 min – Premere per eseguire la regolazione dopo 5 minuti.
Disattiva – Premere per disattivare la funzione di Regolazione automatica.
5.2.4 Regolazione AutoCal™
Utilizzare questa modalità per regolare il punto di calibrazione span, senza compromettere l'ampiezza o la taratura
lineare. La Regolazione della taratura può essere utilizzata per tarare i risultati della Regolazione interna su +100
divisioni.
Nota: prima di eseguire una regolazione eseguire una regolazione interna. Per verificare se è necessaria
una regolazione, posizionare una massa di prova equivalente al valore della regolazione ad intervallo
sul vassoio e annotare la differenza (in divisioni) tra il valore della massa nominale e la lettura effettiva
della bilancia. Se la differenza rientra in +1 divisione, non sono necessarie regolazioni. Se la differenza
supera +1 divisione, è consigliabile eseguire una regolazione.
Esempio:
Lettura effettiva del peso: 200,014
Lettura attesa del peso: 200,000 (valore della massa di prova)
Differenza in peso (d): 0,014
Differenza in peso in cifre: –14 (Regolare valore)

BILANCE ADVENTURER IT-31
Per eseguire una regolazione, toccare Regolazione AutoCal dal menu Regolazione; immettere il valore
(divisioni positive o negative) per ottenere la corrispondenza con la differenza notata in precedenza nella
procedura.
Nuova regolazione tramite regolazione interna. Dopo la regolazione, posizionare la massa di prova sul
vassoio e verificare che il valore corrisponda a quello visualizzato. In caso contrario, ripetere la procedura
fino a quando la lettura della regolazione interna non corrisponde alla massa di prova.
Al termine, la bilancia memorizza il valore di regolazione il display ritorna all'applicazione corrente.
5.2.5 Regolazione a intervallo
La regolazione a intervallo utilizza due punti di regolazione, uno a carico zero e l'altro al pieno carico
specificato (intervallo). Fare riferimento alla Tabella della sezione 9 per dettagli sulle masse di
regolazione.
Nota: le impostazioni predefinite di fabbrica sono visualizzate in grassetto.
Con la bilancia accesa e senza carichi sul vassoio, toccare Regolazione ad intervallo per avviare la
procedura. I valori di regolazione aggiuntivi da utilizzare vengono visualizzati sul display. La massima
accuratezza si ottiene utilizzando la massa che più si avvicina al valore dell'intervallo completo.
Nota: per modificare il punto di regolazione ad intervallo, toccare il peso alternativo visualizzato sul
display. Seguire le istruzioni sullo schermo e posizionare il peso di regolazione specificato sulla bilancia
quando richiesto. Al termine, il display visualizza lo stato della regolazione ad intervallo e ritorna
all'applicazione corrente.
5.2.6 Regolazione di linearità
La regolazione di linearità utilizza tre punti di regolazione, uno a carico zero e gli altri a carichi specifici.
Senza carichi sul vassoio, premere Regolazione di linearità per avviare il processo.
La bilancia cattura il punto zero, quindi richiede il peso successivo.
Continuare a seguire le istruzioni sul display fino al termine della regolazione.
Per annullare in qualsiasi momento, premere Esci.
5.2.7 Test di regolazione
Il test di regolazione viene utilizzato per confrontare un peso di regolazione noto rispetto ai dati di
regolazione ad intervallo memorizzati.
Senza carichi sulla bilancia, premere Test di regolazione per avviare il processo.
La bilancia cattura il punto zero, quindi richiede il valore di intervallo.
Il display visualizza lo stato e la differenza tra il peso di regolazione corrente e i dati di regolazione
memorizzati.

IT-32 BILANCE ADVENTURER
5.3 Configurazione della bilancia
Accedere a questo sottomenu per personalizzare le funzionalità della bilancia.
5.3.1 Sottomenu di configurazione della bilancia
Lingua
Impostazioni
utente
Livello filtro
Controllo zero
automatico
Tara automatica
Graduazione
Data e ora
Omologazione
per transazioni
commerciali
Le impostazioni predefinite di fabbrica sono visualizzare in grassetto di seguito.
5.3.2 Lingua
Impostare la lingua in cui saranno visualizzati i menu e i
messaggi.
Inglese
Tedesco
Francese
Spagnolo
Italiano
Polacco
Turco
Ceco
Ungherese
5.3.3 Impostazioni utente
Utilizzare questo sottomenu per modificare le impostazioni per:
Regolazione Touch
"Regolazione Runtime, toccare la schermata al centro dell'anello"
(prima in alto a sinistra, poi in basso a destra).
Luminosità schermo:
BASSO = luminosità dello schermo bassa.
MEDIO = luminosità dello schermo normale.
ALTO = luminosità dello schermo alta.
Segnale acustico:
OFF = disabilitato
ON = abilitato
Dim Auto (attenua la luminosità del display in caso d'inattività dello schermo per x
minuti)
OFF = disabilitato
10 min
20 min
30 min
Level Assist: Istruzioni sulle modalità di spostamento dei piedini della bilancia per la
messa a livello.

BILANCE ADVENTURER IT-33
5.3.4 Livello filtro
Impostazione del valore di filtraggio del segnale.
BASSO = tempo di stabilizzazione più rapido con minore
stabilità.
MEDIO = tempo di stabilizzazione normale con stabilità normale.
ALTO = tempo di stabilizzazione più lento con maggiore
stabilità.
5.3.5 Controllo zero automatico
Impostazione della funzionalità di controllo zero automatico.
OFF = disabilitato.
0,5 D = sul display viene visualizzato lo zero fino al
superamento di una deriva di 0,5 graduazioni al
secondo.
1 D = sul display viene visualizzato lo zero fino al
superamento di una deriva di 1 graduazioni al
secondo.
3 D = sul display viene visualizzato lo zero fino al
superamento di una deriva di 3 graduazioni al
secondo.
5.3.6 Tara automatica
Impostazione della tara automatica.
OFF = disabilitato.
ON = abilitato.
All'avvio di una tara automatica, sullo schermo viene visualizzato il messaggio
"Posizionare un contenitore sul piatto".
Sotto il messaggio viene visualizzato il pulsante Disattiva. Premere questo
pulsante per disattivare la funzione di Tara automatica
5.3.7 Graduazione
Impostazione della leggibilità della bilancia.
1 divisione = leggibilità standard.
10 divisioni = = la leggibilità è aumentata da un fattore pari a 10.
Ad esempio, se la leggibilità standard è 0,01 g, selezionando 10 divisioni viene
visualizzata una lettura di 0,1 g.
5.3.8 Data e ora
Impostare data e ora correnti.
Cambiare il formato (se necessario),
quindi immettere il valore corrente.
Premere Salva per confermare il nuovo valore.

IT-34 BILANCE ADVENTURER
5.3.9 Omologazione per transazioni commerciali
Utilizzare questo menu per impostare lo stato Omologazione per transazioni
commerciali.
OFF = funzionamento standard.
ON = il funzionamento è conforme alle norme della OIML
(Organizzazione Internazionale di Metrologia Legale).
Nota: Se la funzione Modalità approvata è impostata su ON, le impostazioni del menu
si modificano come segue:
Menu Regolazione:
La funzione Regolazione interna AutoCal si attiva e non viene visualizzata. Sono
disponibili le funzioni Regolazione interna e Test di regolazione. Tutte le altre funzioni
non vengono visualizzate.
Menu di configurazione della bilancia:
Il Livello filtro è bloccato all'impostazione corrente.
Il Controllo dello zero automatico è limitato a 0,5 divisioni e non è attivo.
L'impostazione selezionata è bloccata.
La Tara automatica è bloccata sull'impostazione corrente.
La graduazione è forzata su 1 divisione e la voce di menu non viene visualizzata.
Menu comunicazione(Comunicazione> Impostazioni di stampa-> output di stampa):
Solo peso stabile è bloccato su ON.
Solo valori numerici è bloccato su OFF.
Menu comunicazione(Comunicazione> Impostazioni di stampa-> Stampa automatica):
Le selezioni della modalità di Stampa automatica sono limitate a OFF, Alla stabilità
e Intervallo. Continuo non è disponibile.
Conservazione dei dati:
Esportazione verso USB nascosta
Importazione da USB nascosta
Menu Sblocco
Menu nascosto
Nota: L'interruttore di sicurezza situato sulla parte posteriore della bilancia deve
rimanere in posizione bloccata per attivare la Modalità approvata. L'interruttore di
sicurezza deve rimanere in posizione sbloccata per disattivare la Modalità approvata.
Consultare la sezione 6.
Pesatura schermata principale dell'applicazione con LFT (Omologazione per
Transazioni Commerciali) ON.

BILANCE ADVENTURER IT-35
5.4 Unità di pesatura
Entrare in questo sottomenu per attivare le unità di pesatura desiderate. È inoltre possibile accedere a
questo menu premendo il simbolo dell'unità presente sulla schermata principale di qualsiasi applicazione.
Nota: In virtù delle norme vigenti, la bilancia potrebbe non supportare alcune delle unità di misura
elencate di seguito.
5.4.1 Sottomenu unità
milligrammo
grammo
chilogrammo
carato
oncia
oncia Troy
libbra
Pennyweight
grano
Newton
momme
mesghal
Tael (HK)
Tael (SG)
Tael (TW)
tical
tola
baht
Unità personalizzata 1
Nota: Se la Modalità approvata è attiva, alcune unità di misura non vengono
visualizzate.
Per visualizzare il peso con un'unità di misura differente, utilizzare la funzione Unità personalizzata.
L'unità di misura personalizzata viene definita mediante un fattore di conversione, ossia il numero di unità
di misura personalizzate per grammo espresso con una notazione scientifica (Fattore x 10^Esponente).
Ad esempio: Per visualizzare il peso in once troy (0,03215075 once troy per grammo)
inserire un Fattore di 0,3215075 e un Esponente di -1.
Il nome delle unità di misura personalizzate può includere fino a 3 caratteri.
5.5 Conservazione dei dati
Accedere a questo sottomenu per personalizzare le impostazioni di trasferimento dati.
5.5.1 Sottomenu Conservazione dati
Le funzioni di Esportazione e Importazione
La configurazione di più bilance può essere effettuata in modo semplice esportando il profilo da una bilancia madre
tramite l'unità USB. Lo strumento di manutenzione dei dati consente di salvare le impostazioni dell'utente e delle
applicazioni su un'unità USB, per eseguire il trasferimento su un'altra bilancia Adventurer. I dati importati dalla
bilancia originale possono essere utilizzati per configurare le nuove bilance Adventurer.
Esportazione
su USB
Importazione
da USB
Informazioni
sulla bilancia

IT-36 BILANCE ADVENTURER
5.5.2 Esportazione su USB
Esportare i dati di pesatura su un'unità flash USB. È possibile esportare due tipologie di dati:
- Le impostazioni dell'applicazione (APW, Peso rif., ecc.)
- Le impostazioni del menu (funzione di configurazione della bilancia, ecc.)
Nota: Per abilitare il trasferimento dei dati sulla memoria USB, è necessario
attivare la funzione "Salva su USB". Per ulteriori informazioni, consultare la
sezione 5.6.
5.5.3 Importazione da USB
Importazione dei dati di pesatura da un'unità flash USB.
5.5.4 Informazioni sulla bilancia
Accedere questo menu per visualizzare informazioni sulla bilancia. Le
informazioni visualizzate sono: Tipo bilancia, ID bilancia, Portata, leggibilità e
versione del software.
5.6 Comunicazione
Accedere a questo menu per definire i metodi di comunicazione esterna e impostare i
parametri di stampa.
È possibile inviare i dati a una stampante o a un PC (per i campioni di output, vedere la
Sezione 5.9.8).
le impostazioni predefinite di fabbrica sono visualizzate in grassetto.
5.6.1 Sottomenu Comunicazione
Standard RS-232
Impostazioni di
stampa
Salvataggio su
USB
Standard RS-232:
Accedere a questo sottomenu per personalizzare le impostazioni della bilancia RS-232.
5.6.2 Baud Rate
Impostare la velocità di trasmissione (bit al secondo).
2400 = 2400 bps
4800 = 4800 bps
9600 = 9600 bps
19200 = 19200 bps
38400 = 38400 bps

BILANCE ADVENTURER IT-37
5.6.3 Trasmissione
Impostare i bit di dati, i bit di arresto e la parità.
7 PARI 1 = 7 bit di dati, parità pari, bit di arresto 1
7 DISPARI 1 = 7 bit di dati, parità dispari, bit di arresto 1
7 PARI 2 = 7 bit di dati, parità pari, bit di arresto 2
7 DISPARI 2 = 7 bit di dati, parità dispari, bit di arresto 2
7 NESSUNA 1 = 7 bit di dati, nessuna parità, bit di arresto 1
8 NESSUNA 1 = 8 bit di dati, nessuna parità, bit di arresto 1
7 NESSUNA 2 = 7 bit di dati, nessuna parità, bit di arresto 2
8 NESSUNA 2 = 8 bit di dati, nessuna parità, bit di arresto 2
5.6.4 Sincronizzazione
Impostazione del metodo di controllo del flusso.
NESSUNO = nessuna sincronizzazione
XON-XOFF = sincronizzazione XON/XOFF
HARDWARE = sincronizzazione hardware
Impostazioni di stampa
Accedere a questo sottomenu per personalizzare le impostazioni di trasferimento dati.
Sottomenu Impostazioni di stampa
Uscita di
stampa
Stampa
automatica
Stampa
contenuto
Alimentazione
Format
Stampa dati
di
Regolazione
5.6.5 Uscita di stampa
Solo peso stabile
Impostazione dei criteri di stampa.
OFF = i valori vengono stampati immediatamente, a
prescindere dalla stabilità.
ON = i valori vengono stampati solo se vengono
soddisfatti i criteri di stabilità.
Solo valori numerici
Impostazione dei criteri di stampa.
OFF = Tutti i risultati e i valori dei dati G/N/T vengono
stampati. Consultare la sezione 7.2 per ulteriori informazioni.
ON = vengono stampanti solo i valori dei dati numerici
Solo intestazione singola.
Impostazione dei criteri di stampa.
OFF = Le intestazioni vengono stampate per tutti
i requisiti di stampa
ON = Le intestazioni vengono stampate una
volta al giorno
Opzioni di stampa
Impostazione dei criteri di stampa.
Stampante = Invia dati di stampa a una
stampante
PC = Invia dati di stampa a un PC

IT-38 BILANCE ADVENTURER
5.6.6 Stampa automatica
Impostazione della funzionalità di stampa automatica.
OFF = disabilitato
SE STABILE
1
= la stampa viene effettuata ogni qualvolta
vengono soddisfatti i criteri di stabilità.
INTERVALLO
2
= la stampa viene effettuata in base a un
intervallo temporale stabilito.
CONTINUO = la stampa viene eseguita continuamente.
1
Quando è selezionato SE STABILE, impostare la condizione di
stampa.
CARICO = stampa quando il carico visualizzato è stabile.
CARICO ZERO = stampa quando il carico visualizzato o la
lettura dello zero è stabile.
2
Quando è selezionato INTERVALLO, impostare l'intervallo di tempo
utilizzando il tastierino numerico.
I valori consentiti sono compresi tra 1 e 3600 secondi. Il valore
predefinito è 0.
5.6.7 Stampa contenuto
Definizione del contenuto dei dati stampati.
Selezione
Per impostare lo stato.
Deseleziona tutto= tutto impostato su OFF
Seleziona tutto = tutto impostato su ON
Intestazione
Data e ora
ID bilancia
Nome bilancia
Nome utente
Nome progetto
Nome applicazione
Nome campione
Risultato
Lordo
Netto
Tara
Informazioni
Riga per la firma
5.6.8 Alimentazione
Impostazione dell’avanzamento della carta.
1 RIGA = fa avanzare la carta di una riga dopo la stampa.
4 RIGHE = fa avanzare la carta di
quattro righe dopo la stampa.
5.6.9 Formato
Impostare il formato di stampa.
Riga Singola = stampe su una sola riga.
Linee Multiple = stampe su più righe.
5.6.10 Stampa dati di Regolazione
Impostazione dei criteri di stampa.
Acceso = disabilitato
Spento = abilitato

BILANCE ADVENTURER IT-39
Salvataggio su USB
Per impostare lo stato.
OFF = i dati non vengono salvati su USB
ON = i dati vengono salvati su USB
5.7 Dati GLP e GMP
Accedere a questo menu per impostare i dati corretti di GLP (Good Laboratory Practices) e GMP (Good
Manufacturing Practices).
5.7.1 Sottomenu Dati GLP
Intestazione
Nome bilancia
Nome utente
Nome progetto
5.7.2 Intestazione
Abilita la stampa delle intestazioni GLP. Sono disponibili 5 intestazioni.
Le impostazioni alfanumeriche consentite raggiungono i 25
caratteri per l'impostazione di ciascuna intestazione.
5.7.3 Nome bilancia
Impostazione dell'identificativo della bilancia.
Le impostazioni alfanumeriche consentite sono fino a 25 caratteri.
L'impostazione predefinita è Adventurer.
5.7.4 Nome utente
Impostazione dell’identificativo dell’utente.
Le impostazioni alfanumeriche consentite sono fino a 25 caratteri.
L'impostazione predefinita è vuoto.
5.7.5 Nome progetto
Accedere a questo menu per impostare l'identificativo del progetto.
Le impostazioni alfanumeriche consentite sono fino a 25 caratteri. L'impostazione predefinita
è vuoto.
5.8 Ripristino di fabbrica
Utilizzare questo sottomenu per ripristinare le impostazioni del menu ai valori predefiniti di fabbrica.
Nota: I dati di taratura non vengono modificati.
Ripristina tutto = per ripristinare tutti i menu ai valori predefiniti di fabbrica.
Esci = per tornare alla schermata principale dell'applicazione senza ripristinare alcun menu.
5.9 Blocco
Utilizzare questo sottomenu per bloccare/sbloccare determinati menu. Quando un menu è bloccato, viene
visualizzato un piccolo lucchetto sull'icona del menu e l'utente non è in grado di accedere a quel menu.
Fare clic su un menu e selezionare:
OFF = il menu non è bloccato.
ON = il menu è bloccato.

IT-40 BILANCE ADVENTURER
6. OMOLOGAZIONE PER TRANSAZIONI COMMERCIALI
Quando la bilancia viene utilizzata per il commercio o per un'applicazione con approvazione legale, deve essere
configurata, verificata e sigillata nel rispetto delle normative locali su pesi e misure. Ricade sotto la responsabilità
dell'acquirente accertarsi che vengano soddisfatti tutti i requisiti normativi necessari.
6.1 Impostazioni
Prima della verifica e della sigillatura, effettuare le seguenti operazioni nell'ordine indicato:
1. Verificare che le impostazioni del menu rispettino le normative locali su pesi e misure.
2. Verificare che le unità rispettino le normative locali su pesi e misure.
3. Eseguire la regolazione, come illustrato nella Sezione 5.
3. Impostare l'interruttore di sicurezza in posizione bloccata.
4. Attivare Omologazione per transazioni commerciali nel menu di configurazione della bilancia.
5. Attivare Modalità approvata nel menu di configurazione della bilancia.
Nota: Se è attiva la funzione Modalità approvata, non è possibile eseguire una taratura esterna.
6.2 Verifica
La procedura di verifica deve essere eseguita da un responsabile delle normative su pesi e misure o da un agente
autorizzato.
6.3 Sigillatura
Dopo la verifica, la bilancia deve essere sigillata per impedire accessi non rilevati ai parametri di omologazione.
Prima di procedere alla sigillatura del dispositivo, accertarsi che l'interruttore di sicurezza si trovi in posizione
bloccata e che l'impostazione Modalità approvata sia attivata nel menu di Configurazione della bilancia.
Se si utilizza un sigillo in carta, posizionarlo sull'interruttore di sicurezza e sull'alloggiamento inferiore, come
illustrato
Se si utilizza un sigillo a filo, passarlo attraverso i fori dell'interruttore di sicurezza e dell'alloggiamento inferiore,
come illustrato.
Non bloccato
Bloccato con sigillo di carta
Bloccato con sigillo a filo

BILANCE ADVENTURER IT-41
7. STAMPA
7.1 Collegamento, configurazione e prova dell'interfaccia stampante/computer
Utilizzare la porta RS-232 integrata per collegare la bilancia a un computer o ad una
stampante.
In caso di collegamento a un computer, utilizzare HyperTerminal o un software simile
come SPDC, descritto di seguito.(Trovare HyperTerminal in Accessori/Comunicazioni
in Windows XP).
Collegare la bilancia al computer con un cavo seriale standard (diretto).
Selezionare Nuova connessione, "connetti tramite", "COM1" (o porta COM
disponibile).
Selezionare Baud=9600, Parità=8 nessuna; Arresto = 1; Sincronizzazione =
Nessuna. Fare clic su OK.
Selezionare Proprietà/Impostazioni, quindi Configurazione ASCII. Selezionare le caselle
di controllo come illustrato:
(Aggiungi avanzamento riga…; Eco dei caratteri digitati…; Righe a capo…)
Utilizzare i comandi dell'interfaccia RS-232 (Sezione 9.6.1) per controllare la bilancia da
un PC.
Nota: una volta terminata la configurazione di HyperTerminal, vengono
automaticamente stampati i risultati di un test di regolazione e i comandi di stampa
eco inviati alla bilancia.
Connessione della stampante
Presso Ohaus sono disponibili due stampanti compatibili con le bilance Adventurer.
(Consultare la Sezione 9). Collegare un cavo seriale diretto alla porta RS-232 della
bilancia.
Vedere i formati di output della stampa campione illustrati di seguito. Presso Ohaus
sono disponibili due stampanti compatibili con le bilance Adventurer Pro.
Software SPDC
Il software Serial Port Data Collection (SPDC) viene fornito da Ohaus in dotazione e
può essere utilizzato su sistemi operativi sprovvisti del software HyperTerminal
menzionato in alto.
Scegliere il tipo di file da esportare e il percorso dei file da esportare, quindi premere il
pulsante Run (Esegui) come mostrato in basso.
Nota: Il software SPDC supporta solo la lingua inglese.

IT-42 BILANCE ADVENTURER
7.2 Formato di uscita
I risultati e i dati G/N/T sono visualizzati nel formato seguente.
Campo:
Etichetta
1
Spazio
2
Peso
3
Spazio
2
Unità
4
Spazio
Stabilità
5
Spazio
G/N
6
Spazio
Tipo di
Caratteri
7
Lunghezza:
1
11
1
5
1
1
1
3
0
8
1. La lunghezza del campo etichetta è variabile.
2. Ogni campo è seguito da uno spazio di delimitazione singolo (ASCII 32).
3. Il campo Peso è di 11 caratteri giustificati a destra. Se il valore è negativo il carattere "–"si trova a
sinistra della cifra maggiormente significativa.
4. Il campo Unità contiene l'abbreviazione dell'unità di misura di fino a 5 caratteri.
5. Il campo Stabilità contiene il carattere “?” se la lettura del peso non è stabile. Il campo Stabilità e il
campo Spazio sono omessi se la lettura del peso è stabile.
6. Il campo G/N contiene l'indicazione del peso lordo o del peso netto. Per i pesi netti, il campo contiene
"NET". Per i pesi netti, il campo contiene nulla o "G".
7. Il campo dei caratteri di terminazione contiene CRLF, quattro CRLF o alimentazione moduli (ASCII 12),
in base alle impostazioni di avanzamento riga.

BILANCE ADVENTURER IT-43
8. MANUTENZIONE
8.1 Regolazione
Verificare periodicamente la regolazione, collocando un peso accurato sulla bilancia e visualizzando il risultato. Se
è necessario eseguire la taratura, consultare le istruzioni riportate nella sezione 5.2.
8.2 Pulizia
AVVERTENZA: Prima di effettuare la pulizia della bilancia Adventurer, scollegare
l'alimentazione elettrica. Accertarsi che non entrino liquidi all'interno della bilancia.
Pulire regolarmente la bilancia.
È possibile pulire le superfici dell'alloggiamento con un panno privo di filacce inumidito con
acqua e detergente delicato.
È possibile pulire le superfici in vetro con un detergente commerciale per vetri.
Non utilizzare solventi, prodotti chimici aggressivi, ammoniaca o detergenti abrasivi. Per la
rimozione e la pulizia degli sportelli scorrevoli, seguire i passaggi riportati in basso.
Attenzione: Non utilizzare solventi, prodotti chimici aggressivi, ammoniaca o detergenti abrasivi.
Rimozione e riposizionamento degli sportelli in vetro per la pulizia:
Passaggio 1
Sul retro della bilancia, premere il
perno e far scorrere gli sportelli
verso l'esterno.
Passaggio 2
Dopo la pulizia, far scorrere gli
sportelli nella fessura tenendo
premuto il perno di cui al passaggio 1.
Passaggio 3
Far scorrere gli sportelli nella
fessura fino ad allineare il fermo
posteriore con l'altro sportello.

IT-44 BILANCE ADVENTURER
8.3 Risoluzione dei problemi
TABELLA 8-1. RISOLUZIONE DEI PROBLEMI
Sintomo/Visualizzazione
Causa possibile
Soluzione
La bilancia non si accende
Bilancia non alimentata
Verificare connessioni e tensione
Scarsa precisione
Regolazione impropria
Ambiente non stabile
Eseguire regolazione
Spostare la bilancia in una posizione
adatta
Impossibile eseguire la
regolazione.
Menu Regolazione bloccato
Modalità approvata impostata su ON
Ambiente non stabile
Masse di regolazione non corrette
Sbloccare il Menu Regolazione
Disattivare la Modalità approvata
Spostare la bilancia in una posizione
adatta
Utilizzare masse di regolazione corrette
Impossibile modificare le
impostazioni di menu
Sottomenu bloccato
Modalità approvata impostata su ON
Sbloccare il sottomenu
Disattivare la Modalità approvata
Peso di riferimento basso.
Il peso di riferimento è troppo piccolo
Peso sul vassoio troppo basso per la
determinazione di un peso di
riferimento valido.
Aumentare le dimensioni del campione.
Peso del pezzo non valido
Il peso medio per pezzo è troppo
piccolo
Aumentare il peso medio del pezzo
Timeout funzionamento
La lettura del peso non è stabile
Spostare la bilancia in una posizione
adatta
------
Occupato (tara, zero, stampa, in
attesa di peso stabile)
Attendere il completamento
8.4 Informazioni relative all'assistenza
Se nella sezione dedicata alla risoluzione dei problemi non è possibile trovare una soluzione al problema,
contattare un agente Ohaus autorizzato. Consultare il sito Web www.ohaus.com per individuare l'ufficio OHAUS
più vicino. Il personale specializzato Ohaus addetto alla manutenzione dei prodotti sarà disponibile per l'assistenza.

BILANCE ADVENTURER IT-45
9. DATI TECNICI
9.1 Specifiche
Condizioni ambientali
Solo per uso interno
Altitudine: fino a 2000 m
Intervallo di temperatura specificato: da 10°C a 30°C
Umidità: umidità relativa massima 80% per temperature fino a 30℃
riduzione lineare fino al 50% di umidità relativa a 40℃
Fluttuazioni di tensione della rete elettrica: fino al ± 10% rispetto alla tensione nominale
Categoria di installazione II
Grado di inquinamento: 2
Materiali
Alloggiamento della base: alluminio pressofuso, verniciato
Alloggiamento, parte superiore: Plastica (ABS)
Piattaforme di pesatura: acciaio inossidabile 18/10
Paravento per correnti d'aria; vetro, plastica (ABS)
Piedini: Plastica (ABS)

IT-46 BILANCE ADVENTURER
TABELLA 9-1. SPECIFICHE TECNICHE
Modelli:
AX124
AX124/E
AX224
AX224/E
AX324
Portata
120 g
120 g
220 g
220 g
320 g
Risoluzione d
0,0001 g
Ripetibilità (dev standard)
(g)
0,0001 g
Linearità (g)
±0,0002 g
Punti di regolazione ad
intervallo (g)
25 g,
50 g
75 g,
100 g
25 g,
50 g
75 g,
100 g
50 g,
100 g
150 g,
200 g
50 g,
100 g
150 g,
200 g
100 g
200 g, 300 g
Regolazione
Auto-Cal
Esterna
Auto-Cal
Esterna
Auto-Cal
Unità di pesatura
Baht, carato, grano, grammo, milligrammo, mesghal,
momme, Newton, oncia, pennyweight, libbra, Tael (Hong
Kong), Tael, (Singapore), Tael (Taiwan), tical, tola, oncia
troy, personalizzata (1)
Applicazioni
Pesatura, conteggio pezzi, pesatura percentuale, controllo
peso, pesatura dinamica, formulazione, determinazione
della densità, totalizzazione, memoria display
Tempo di stabilizzazione
(tipico)
≤ 3 secondi
Coefficiente di deriva
termica (PPM/K)
1,5
Peso minimo tipico
USP (u=0,10%, k=2)
0,20 g
0,20 g
0,20 g
0,20 g
0,20 g
Peso minimo ottimale
USP (u=0,10%, k=2)
0,082 g
0,082 g
0,082 g
0,082 g
0,082 g
Display
LCD grafico a colori WQVGA
Dimensioni dello schermo
4,3 in/10,9 cm (diagonale)
Retroilluminazione
LED bianco
Comandi
Touch screen con tecnologia resistiva a 4 fili + 6 tasti a
membrana
Comunicazione
RS-232, USBx2
Alimentazione di ingresso
della bilancia
12 Vcc, 0,5A
Alimentazione
Ingresso adattatore CA: 100-240 Vca 0,3A 50-60 Hz
Uscita adattatore CA: 12 Vcc 0,84A
Dimensioni piattaforma
(diametro)
90 mm/3,5 in
Dimensioni bilancia
assemblata
(L x P x A)
230 x 354 x 340 mm
Dimensioni di spedizione
(P x L x A)
230 x 354 x 340 mm
Peso netto
5,1 kg
Peso di spedizione
7,8 kg

BILANCE ADVENTURER IT-47
TABELLA 9-2. SPECIFICHE TECNICHE (continua)
Modelli:
AX223
AX223/E
AX423
AX423/E
AX523
AX523/E
Portata
220 g
220 g
420 g
420 g
520 g
520 g
Risoluzione d
0,001 g
Ripetibilità (dev standard)
(g)
0,001 g
Linearità (g)
±0,002 g
Punti di regolazione ad
intervallo (g)
50 g,
100 g
150 g,
200 g
50 g,
100 g
150 g,
200 g
100 g,
200 g
300 g,
400 g
100 g,
200 g
300 g,
400 g
200 g, 300 g
400 g, 500 g
200 g, 300 g
400 g, 500 g
Regolazione
Auto-Cal
Esterna
Auto-Cal
Esterna
Auto-Cal
Esterna
Unità di pesatura
Baht, carato, grano, grammo, milligrammo, mesghal, momme, Newton,
oncia, pennyweight, libbra, Tael (Hong Kong), Tael, (Singapore), Tael
(Taiwan), tical, tola, oncia troy, personalizzata (1)
Applicazioni
Pesatura, conteggio pezzi, pesatura percentuale, controllo peso, pesatura
dinamica, formulazione, determinazione della densità, totalizzazione,
memoria display
Tempo di stabilizzazione
(tipico)
≤ 2 secondi
Coefficiente di deriva
termica (PPM/K)
3
Peso minimo tipico
USP (u=0,10%, k=2)
2,0 g
2,0 g
2,0 g
2,0 g
2,0 g
Peso minimo ottimale
USP (u=0,10%, k=2)
0,82 g
0,82 g
0,82 g
0,82 g
0,82 g
Display
LCD grafico a colori WQVGA
Dimensioni dello schermo
4,3 in/10,9 cm (diagonale)
Retroilluminazione
LED bianco
Comandi
Touch screen con tecnologia resistiva a 4 fili + 6 tasti a membrana
Comunicazione
RS-232, USBx2
Alimentazione di ingresso
della bilancia
12 Vcc, 0,5A
Alimentazione
Ingresso adattatore CA: 100-240 Vca 0,3A 50-60 Hz
Uscita adattatore CA: 12 Vcc 0,84A
Dimensioni piattaforma
(diametro)
130 mm/12,95 cm
Dimensioni bilancia
assemblata
(L x P x A)
230 x 354 x 340 mm
Dimensioni di spedizione
(P x L x A)
387 507 x 531 mm
Peso netto
5,8 kg
5,6 kg
5,8 kg
5,6 kg
5,8 kg
5,6 kg
Peso di spedizione
8,5 kg
8,3 kg
8,5 kg
8,3 kg
8,5 kg
8,3 kg

IT-48 BILANCE ADVENTURER
TABELLA 9-3. SPECIFICHE (continua)
Modelli:
AX422
AX422/E
AX822
AX822/E
Portata
420g
420g
820g
820g
Risoluzione d
0,01 g
Ripetibilità (dev
standard) (g)
0,01 g
Linearità (g)
±0.02 g
Punti di regolazione
ad intervallo (g)
100g, 200g
300g,400g
100g, 200g
300g,400g
200g, 400g
600g, 800g
200g, 400g
600g, 800g
Regolazione
Auto-Cal
Esterna
Auto-Cal
Esterna
Unità di pesatura
Baht, carato, grano, grammo, chilogrammo, mesghal, momme, Newton, oncia,
pennyweight, libbra, Tael (Hong Kong), Tael, (Singapore), Tael (Taiwan), tical, tola,
oncia troy, personalizzata (1)
Applicazioni
Pesatura, conteggio pezzi, pesatura percentuale, controllo peso, pesatura
dinamica, formulazione, determinazione della densità, totalizzazione, memoria
display
Tempo di
stabilizzazione
(tipico)
≤ 1,5 secondi
Coefficiente di deriva
termica (PPM/K)
3
Peso minimo tipico
USP (u=0,10%, k=2)
20,0 g
20,0 g
20,0 g
20,0 g
Peso minimo ottimale
USP (u=0,10%, k=2)
8,2 g
8,2 g
8,2 g
8,2 g
Display
LCD grafico a colori WQVGA
Dimensioni dello
schermo
4,3 in/10,9 cm (diagonale)
Retroilluminazione
LED bianco
Comandi
Touch screen con tecnologia resistiva a 4 fili + 6 tasti a membrana
Comunicazione
RS-232, USBx2
Alimentazione di
ingresso della
bilancia
12 Vcc, 0,5A
Alimentazione
Ingresso adattatore CA: 100-240 Vca 0,3A 50-60 Hz
Uscita adattatore CA: 12 Vcc 0,84A
Dimensioni
piattaforma
175 x 195 mm/6,9 x 19,56 cm
Dimensioni bilancia
assemblata
(L x P x A)
230 x 354 x100 mm
Dimensioni di
spedizione
(P x L x A)
392 x 557 x 301 mm
Peso netto
4.6 kg
3.9 kg
4,6 kg
3,9 kg
Peso di spedizione
6.5 kg
5.8 kg
6,5 kg
5,8 kg

BILANCE ADVENTURER IT-49
TABELLA 9-4. SPECIFICHE (continua)
Modelli:
AX1502
AX1502/E
AX2202
AX2202/E
AX4202
AX4202/E
AX5202
Portata
1.520 g
1.520 g
2.200 g
2.200 g
4.200 g
4.200 g
5.200 g
Risoluzione d
0,01 g
Ripetibilità (dev
standard) (g)
0,01 g
Linearità (g)
±0.02 g
Punti di regolazione
ad intervallo (g)
300 g,
400 g
500 g,
600 g
500 g
1000 g,
1500 g
500 g,
1000 g
1500 g,
2000 g
500 g,
1000 g
1500 g,
2000 g
1000 g,
2000 g
3000 g,
4000 g
1000 g,
2000 g
3000 g,
4000 g
2000 g,
3000 g
4000 g,
5000 g
Regolazione
Auto-Cal
Esterna
Auto-Cal
Esterna
Auto-Cal
Esterna
Auto-Cal
Unità di pesatura
Baht, carato, grano, grammo, chilogrammo, mesghal, momme, Newton, oncia,
pennyweight, libbra, Tael (Hong Kong), Tael, (Singapore), Tael (Taiwan), tical, tola,
oncia troy, personalizzata (1)
Applicazioni
Pesatura, conteggio pezzi, pesatura percentuale, controllo peso, pesatura dinamica,
formulazione, determinazione della densità, totalizzazione, memoria display
Tempo di
stabilizzazione
(tipico)
≤ 1,5 secondi
Coefficiente di deriva
termica (PPM/K)
3
1,9
Peso minimo tipico
USP (u=0,10%, k=2)
20,0 g
20,0 g
20,0 g
20,0 g
20,0 g
20,0 g
20,0 g
Peso minimo ottimale
USP (u=0,10%, k=2)
8,2 g
8,2 g
8,2 g
8,2 g
8,2 g
8,2 g
8,2 g
Display
LCD grafico a colori WQVGA
Dimensioni dello
schermo
4,3 in/10,9 cm (diagonale)
Retroilluminazione
LED bianco
Comandi
Touch screen con tecnologia resistiva a 4 fili + 6 tasti a membrana
Comunicazione
RS-232, USBx2
Alimentazione di
ingresso della
bilancia
12 Vcc, 0,5A
Alimentazione
Ingresso adattatore CA: 100-240 Vca 0,3A 50-60 Hz
Uscita adattatore CA: 12 Vcc 0,84A
Dimensioni
piattaforma
175 x 195 mm/6,9 x 19,56 cm
Dimensioni bilancia
assemblata
(L x P x A)
230 x 354 x100 mm
Dimensioni di
spedizione
(P x L x A)
392 x 557 x 301 mm
Peso netto
4,6 kg
3,9 kg
4,6 kg
3,9 kg
4,6 kg
3,9 kg
3,8 kg
Peso di spedizione
6,5 kg
5,8 kg
6,5 kg
5,8 kg
6,5 kg
5,8 kg
5,7 kg

IT-50 BILANCE ADVENTURER
TABELLA 9-5. SPECIFICHE (continua)
Modelli:
AX2201
AX2201/E
AX4201
AX4201/E
AX8201
AX8201/E
Portata
2200g
2200g
4.200 g
4.200 g
8.200 g
8.200 g
Risoluzione d
0,1 g
Ripetibilità (dev
standard) (g)
0,1 g
Linearità (g)
±0,2 g
Punti di regolazione
ad intervallo (g)
500g, 1000g
1500g, 2000g
500g, 1000g
1500g, 2000g
1000 g,
2000 g
3000 g,
4000 g
1000 g,
2000 g
3000 g,
4000 g
2000 g,
4000 g
6000 g,
8000 g
2000 g,
4000 g
6000 g,
8000 g
Regolazione
Auto-Cal
Esterna
Auto-Cal
Esterna
Auto-Cal
Esterna
Unità di pesatura
Baht, carato, grano, grammo, chilogrammo, mesghal, momme, Newton, oncia,
pennyweight, libbra, Tael (Hong Kong), Tael, (Singapore), Tael (Taiwan), tical, tola, oncia
troy, personalizzata (1)
Applicazioni
Pesatura, conteggio pezzi, pesatura percentuale, controllo peso, pesatura dinamica,
formulazione, determinazione della densità, totalizzazione, memoria display
Tempo di
stabilizzazione
(tipico)
≤ 1,5 secondi
Coefficiente di deriva
termica (PPM/K)
9
Peso minimo tipico
USP (u=0,10%, k=2)
200.0 g
200.0 g
200.0 g
200.0 g
200.0 g
200.0 g
Peso minimo ottimale
USP (u=0,10%, k=2)
82 g
82 g
82 g
82 g
82 g
82 g
Display
LCD grafico a colori WQVGA
Dimensioni dello
schermo
LCD grafico a colori WQVGA
Retroilluminazione
4,3 in/10,9 cm (diagonale)
Comandi
LED bianco
Comunicazione
Touch screen con tecnologia resistiva a 4 fili + 6 tasti a membrana
Alimentazione di
ingresso della
bilancia
RS-232, USBx2
Alimentazione
12 Vcc, 0,5A
Dimensioni
piattaforma
(diametro)
Ingresso adattatore CA: 100-240 Vca 0,3A 50-60 Hz
Uscita adattatore CA: 12 Vcc 0,84A
Dimensioni bilancia
assemblata
(L x P x A)
230 x 354 x 100 mm
Dimensioni di
spedizione
(P x L x A)
392 x 557 x 301 mm
Peso netto
4.6 kg
3.9 kg
4,6 kg
3,9 kg
3,8 kg
3,4 kg
Peso di spedizione
6.5 kg
5.8 kg
6,5 kg
5,8 kg
5,7 kg
5,3 kg

BILANCE ADVENTURER IT-51
TABELLA 9-6. SPECIFICHE TECNICHE (continua)
MODELLO
AX124M
AX224M
AX324M
AX223M
AX423M
AX523M
AX1502M
AX2202M
AX4202M
AX5202M
AX8201M
Max
120 g
220 g
320 g
220 g
420 g
520 g
1520 g
2200 g
4200 g
5200 g
8200 g
Min
0,01 g
0,01 g
0,01 g
0,02 g
0,02 g
0,02 g
0,5 g
0,5 g
0,5 g
0,5 g
5 g
d=
0,0001 g
0,001 g
0,01 g
0,1 g
e=
0,001 g
0,01 g
0,1 g
1 g
Classe di
approvazione
I
II
Ripetibilità
(disp. std.) (g)
0,0001 g
0,001 g
0,01 g
0,1 g
Linearità (g)
±0,0002 g
±0,002 g
±0,02 g
±0,2 g
Punti di
regolazione ad
intervallo (g)
25 g,
50 g
75 g,
100 g
50 g,
100 g
150 g,
200 g
100 g
200 g,
300 g
50 g,
100 g
150 g,
200 g
100 g,
200 g
300 g,
400 g
200 g,
300 g
400 g,
500 g
500 g
1000 g,
1500 g
500 g,
1000 g
1500 g,
2000 g
1000 g,
2000 g
3000 g,
4000 g
2000 g,
3000 g
4000 g,
5000 g
2000 g,
4000 g
6000 g,
8000 g
Regolazione
Auto-Cal
Auto-Cal
Auto-Cal
Auto-Cal
Auto-Cal
Auto-Cal
Auto-Cal
Auto-Cal
Auto-Cal
Auto-Cal
Auto-Cal
Unità di pesatura
milligrammi, grammi, carato
chilogrammi, grammi, carato
Applicazioni
Pesatura, conteggio pezzi, pesatura percentuale, controllo peso, pesatura animali, formulazione, determinazione
della densità, totalizzazione, memoria display
Tempo di
stabilizzazione
(tipico)
≤ 3 secondi
≤2 secondi
≤1,5 secondi
Coefficiente di
deriva termica
(PPM/K)
1,5
3
3
1,9
Peso minimo
tipico
USP (u=0,10%,
k=2)
0,20 g
0,20 g
0,20 g
2,0 g
2,0 g
2,0 g
20,0 g
20,0 g
20,0 g
20,0 g
200,0 g
Peso minimo
ottimale
USP (u=0,10%,
k=2)
0,082 g
0,082 g
0,082 g
0,82 g
0,82 g
0,82 g
8,2 g
8,2 g
8,2 g
8,2 g
82 g
Display
LCD grafico a colori WQVGA
Dimensioni dello
schermo
4,3 in/10,9 cm (diagonale)
Retroilluminazione
LED bianco
Comandi
Touch screen con tecnologia resistiva a 4 fili + 6 tasti a membrana
Comunicazione
RS-232, USBx2
Alimentazione di
ingresso della
bilancia
12 VDC, 0,5A
Alimentazione
Ingresso adattatore CA: 100-240 Vca 0,3A 50-60 Hz
Uscita adattatore CA: 12 VCC 0,84 A
Dimensioni
piattaforma
(diametro)
90 mm
130 mm
175x195 mm
Dimensioni
bilancia
assemblata
(L x P x A)
230 x 354 x 340 mm
230 x 354 x 340 mm
230 x 354 x 100 mm
Dimensioni di
spedizione
(P x L x A)
387 x 507 x 531 mm
387 x 507 x 531 mm
392 x 557 x 301 mm
Peso netto
5,1 kg
5,8 kg
4,6 kg
3,8 kg
Peso di
spedizione
7,8 kg
8,5 kg
6,5 kg
5,7 kg
Nota: M = Omologazione OIM

IT-52 BILANCE ADVENTURER
TABELLA 9-7. SPECIFICHE TECNICHE (continua)
Modello
AX224N
AX223N/E
AX423N
AX 423N/E
AX523N/E
AX1502N/E
AX2202N/E
AX4202N/E
AX8201N/E
Max
220 g
220 g
420 g
420 g
520 g
1520 g
2200 g
4200 g
8200 g
Min
0,01 g
0,02 g
0,02 g
0,02 g
0,02 g
0,5 g
0,5 g
0,5 g
5 g
d=
0,0001 g
0,001 g
0,01 g
0,1 g
e=
0,001 g
0,01 g
0,1 g
1 g
Classe di
approvazione
I
II
Ripetibilità (disp.
std.) (g)
0,0001 g
0,001 g
0,01 g
0,1 g
Linearità (g)
±0,0002 g
±0,002 g
±0,02 g
±0,2 g
Punti di
regolazione ad
intervallo (g)
50 g, 100
g
150 g, 200
g
50 g, 100
g
150 g, 200
g
100 g, 200
g
300 g, 400
g
100 g, 200 g
300 g, 400 g
200 g, 300 g
400 g, 500 g
500 g
1000 g,
1500 g
500 g, 1000 g
1500 g, 2000 g
1000 g, 2000 g
3000 g, 4000 g
2000 g, 4000 g
6000 g, 8000 g
Regolazione
Auto-Cal
Esterna
Auto-Cal
Esterna
Esterna
Esterna
Esterna
Esterna
Esterna
Unità di pesatura
grammi, milligrammi, carato, pennyweight,
grano, oncia, oncia troy
grammo, chilogrammo, carato, pennyweight,
grano, libbra, oncia, oncia troy
Applicazioni
Pesatura, conteggio pezzi, pesatura percentuale, controllo peso, pesatura animali, formulazione, determinazione della
densità, totalizzazione
Tempo di
stabilizzazione
(tipico)
≤ 3
secondi
≤2 secondi
≤1,5 secondi
Coefficiente di
deriva termica
(PPM/K)
1,5
3
3
9
Peso minimo
tipico
USP (u=0,10%,
k=2)
0,20 g
2,0 g
2,0 g
2,0 g
2,0 g
20,0 g
20,0 g
20,0 g
200,0 g
Peso minimo
ottimale
USP (u=0,10%,
k=2)
0,082 g
0,82 g
0,82 g
0,82 g
0,82 g
8,2 g
8,2 g
8,2 g
82 g
Display
LCD grafico a colori WQVGA
Dimensioni dello
schermo
4,3 in/10,9 cm (diagonale)
Retroilluminazio
ne
LED bianco
Comandi
Touch screen con tecnologia resistiva a 4 fili + 6 tasti a membrana
Comunicazione
RS-232, USBx2
Alimentazione di
ingresso della
bilancia
12 VDC, 0.5A
Alimentazione
Ingresso adattatore CA: 100-240 Vca 0,3A 50-60 Hz
Uscita adattatore CA: 12 VCC 0,84 A
Dimensioni
piattaforma
(diametro)
90 mm
130 mm
175x195 mm
Dimensioni
bilancia
assemblata
(L x P x A)
354x230x340 mm
354x230x100 mm
Dimensioni di
spedizione
(P x L x A)
557x392x301 mm
Peso netto
5,1 kg
5,6 kg
5,8 kg
5,6 kg
3,9 kg
3,4 kg
Peso di
spedizione
7,8 kg
8,3 kg
8,5 kg
8,3 kg
5,8 kg
5,3 kg
Nota: N = Omologazione NTEP

BILANCE ADVENTURER IT-53
TABELLA 9-8. SPECIFICHE TECNICHE (continua)
MODELLO
AX124AU
AX224AU
AX324AU
AX223AU
AX423AU
AX523AU
AX1502AU
AX2202AU
AX4202AU
AX5202AU
AX8201AU
Max
120 g
220 g
320 g
220 g
420 g
520 g
1520 g
2200 g
4200 g
5200 g
8200 g
Min
0,01 g
0,01 g
0,01 g
0,02 g
0,02 g
0,02 g
0,5 g
0,5 g
0,5 g
0,5 g
5 g
d=
0,0001 g
0,001 g
0,01 g
0,1 g
e=
0,001 g
0,01 g
0,1 g
1 g
Classe di
approvazione
I
II
Ripetibilità
(disp. std.) (g)
0,0001 g
0,001 g
0,01 g
0,1 g
Linearità (g)
±0,0002 g
±0,002 g
±0,02 g
±0,2 g
Punti di
regolazione ad
intervallo (g)
25 g,
50 g
75 g,
100 g
50 g,
100 g
150 g,
200 g
100 g
200 g,
300 g
50 g,
100 g
150 g,
200 g
100 g,
200 g
300 g,
400 g
200 g,
300 g
400 g,
500 g
500 g
1000 g,
1500 g
500 g,
1000 g
1500 g,
2000 g
1000 g,
2000 g
3000 g,
4000 g
2000 g,
3000 g
4000 g,
5000 g
2000 g,
4000 g
6000 g,
8000 g
Regolazione
Auto-Cal
Auto-Cal
Auto-Cal
Auto-Cal
Auto-Cal
Auto-Cal
Auto-Cal
Auto-Cal
Auto-Cal
Auto-Cal
Auto-Cal
Unità di pesatura
milligrammi, grammi, carato
chilogrammi, grammi, carato
Applicazioni
Pesatura, conteggio pezzi, pesatura percentuale, controllo peso, pesatura animali, formulazione, determinazione
della densità, totalizzazione, memoria display
Tempo di
stabilizzazione
(tipico)
≤ 3 secondi
≤2 secondi
≤1,5 secondi
Coefficiente di
deriva termica
(PPM/K)
1,5
3
3
1,9
Peso minimo
tipico
USP (u=0,10%,
k=2)
0,20 g
0,20 g
0,20 g
2,0 g
2,0 g
2,0 g
20,0 g
20,0 g
20,0 g
20,0 g
200,0 g
Peso minimo
ottimale
USP (u=0,10%,
k=2)
0,082 g
0,082 g
0,082 g
0,82 g
0,82 g
0,82 g
8,2 g
8,2 g
8,2 g
8,2 g
82 g
Display
LCD grafico a colori WQVGA
Dimensioni dello
schermo
4,3 in/10,9 cm (diagonale)
Retroilluminazione
LED bianco
Comandi
Touch screen con tecnologia resistiva a 4 fili + 6 tasti a membrana
Comunicazione
RS-232, USBx2
Alimentazione di
ingresso della
bilancia
12 VDC, 0,5A
Alimentazione
Ingresso adattatore CA: 100-240 Vca 0,3A 50-60 Hz
Uscita adattatore CA: 12 VCC 0,84 A
Dimensioni
piattaforma
(diametro)
90 mm
130 mm
175x195 mm
Dimensioni
bilancia
assemblata
(L x P x A)
230 x 354 x 340 mm
230 x 354 x 340 mm
230 x 354 x 100 mm
Dimensioni di
spedizione
(P x L x A)
387 x 507 x 531 mm
387 x 507 x 531 mm
392 x 557 x 301 mm
Peso netto
5,1 kg
5,8 kg
4,6 kg
3,8 kg
Peso di
spedizione
7,8 kg
8,5 kg
6,5 kg
5,7 kg

IT-54 BILANCE ADVENTURER
9.2 Illustrazioni e dati dimensionali
Dimensioni bilancia completamente assemblata
Figura 9-1. Modelli con paravento
Figura 9-2. Modelli senza paravento
9.3 Componenti e accessori
TABELLA 9-7. ACCESSORI
DESCRIZIONE
NUMERO PARTE
Display ausiliario
80251396
Kit di densità
80253384
Cavo, Dispositivo USB (tipo A-B)
83021085
Dispositivo di sicurezza (blocco laptop)
80850043
Cavo RS232, PC 25 pin
80500524
Cavo RS232, PC 9 pin
80500525
Cappottina di protezione
30093334
Display ausiliario
80251396

BILANCE ADVENTURER IT-55
9.4 Comunicazione
9.4.1 Comandi interfaccia
I Comandi elencati nella tabella seguente saranno confermati dalla bilancia.
La bilancia visualizzerà "ES" per i comandi non validi.
TABELLA 9-8. ELENCO COMANDI INTERFACCIA ADVENTURER
Caratteri dei
comandi
Funzione
IP
Stampa immediata del peso visualizzato (stabile o non stabile).
P
Stampa del peso visualizzato (stabile o non stabile).
CP
Stampa continua.
SP
Stampa in caso di peso stabile.
SLP
Stampa automatica del peso visualizzato stabile non zero.
SLZP
Stampa automatica del peso visualizzato stabile non zero e lettura zero stabile.
xP
Stampa intervallo x = Intervallo stampa (1-3600 sec) 0P termina la stampa dell'intervallo.
0P
Vedere sopra
H
Immettere le righe dell'intestazione di stampa
Z
Equivale a premere il pulsante Zero.
T
Equivale a premere il tasto Tara.
xT***
Stabilisce un valore di tara preimpostato nell'unità visualizzata. X= valore di tara preimpostato.
L'invio di 0T cancella la tara (se consentito).
PT
Stampa il peso Tara memorizzato.
ON
Esce dalla modalità Standby
OFF
Accede alla modalità Standby
C
Avvia la regolazione a intervallo
IC
Avvia la regolazione interna, come attivazione dal menu Regolazione.
AC
Interrompe la regolazione. Attenzione: quando LFT è attivo, l'operazione non è consentita.
PSN
Stampa il numero di serie.
PV
Stampa la versione del software del terminale, versione del software della base e LFT ON (se
LFT è impostato su ON).
x#
Imposta il peso medio del pezzo del conteggio (x) in grammi. (Deve essere memorizzato un
valore APW ).
P#
Stampa del peso medio per pezzo dell'applicazione conteggio
x%
Imposta il peso di riferimento dell'applicazione percentuale (x) in grammi. (Deve avere un peso
di riferimento memorizzato).
P%
Stampa il peso di riferimento percentuale dell'applicazione.
xS
0 = stampa di dati non stabili, come IP; 1 = stampa solo stabile
1)
, come SP.
xRL
0 = disabilita risposta; 1 = abilita risposta. Questo comando controlla solo la risposta "OK!".

IT-56 BILANCE ADVENTURER
9.4.2 Collegamenti dei pin della RS-232 (DB9)
Pin 2: Linea di trasmissione bilancia (TxD)
Pin 3: Linea di ricezione bilancia (RxD)
Pin 5: Segnale di terra (GND)
Pin 7: Pronto per invio (sincronizzazione hardware) (CTS)
Pin 8: Richiesta di invio (sincronizzazione hardware) (RTS)
9.5 L'interfaccia USB
L’interfaccia USB Ohaus rappresenta una soluzione unica per consentire il collegamento di una bilancia a un
computer tramite USB (Universal Serial Bus). I dispositivi USB sono catalogati in classi come le unità disco, le
fotocamere digitali, le stampanti, ecc. Le bilance non prevedono una classe comunemente utilizzata, quindi
l'interfaccia USB Ohaus adotta un'interfaccia generica basata sullo standard seriale RS232.
I dati inviati dalla bilancia al computer sono in formato USB. I dati USB vengono inviati a una porta virtuale. Questa
porta viene rilevata come porta RS232 dal programma dell'applicazione.
Quando si invia un comando da un computer alla bilancia, il programma invia un comando alla porta virtuale come
se fosse una porta RS-232. Il computer quindi indirizza il comando dalla porta virtuale al connettore USB del
computer dove è collegata la bilancia. La porta riceve il segnale USB e risponde al comando.
L'interfaccia USB include un CD con i driver del software per creare la porta virtuale richiesta sul computer.
Requisiti di sistema
Per PC con Windows 98
®
, Windows 98SE
®
, Windows ME
®
, Windows 2000
®
, Windows XP
®
o Windows 8
®
(32 bit).
Porta USB disponibile (tipo A, 4 pin, femmina)
Connessione USB
La porta USB della bilancia termina con un connettore di tipo B USB, femmina a 4 pin.
È necessario un cavo USB (tipo B/maschio – tipo A/maschio) (non fornito).
1. Assicurarsi che la bilancia sia accesa e funzioni correttamente.
2. Accendere il computer e verificare che la porta USB sia abilitata e funzioni correttamente.
3. Collegare i connettori USB del cavo alla porta USB del computer e alla porta USB della bilancia. Windows®
rileva un dispositivo USB e viene avviata la finestra Installazione nuovo hardware.
Installazione del software della porta virtuale
1. Inserire il CD in dotazione nell'unità del
computer.
Le diverse versioni di Windows
®
prevedono
procedure lievemente diverse per caricare il
driver sul CD. In tutte le versioni l'Installazione
nuovo hardware indica le operazioni richieste
per selezionare il driver che si trova sul CD.
2. Dopo aver fatto clic su Fine, la porta virtuale
dovrebbe essere pronta per l'uso.
Windows
®
tipicamente aggiunge la porta
virtuale in sequenza dopo la porta COM con il
numero più alto. Ad esempio, su PC dotati di
fino a 4 porte COM, la porta virtuale sarà
COM5.
Quando si utilizza l'interfaccia USB con
programmi che limitano il numero per le
designazioni delle porte COM (ad esempio,
Ohaus MassTracker consente solo COM1, 2, 3
e 4), può essere necessario assegnare uno di
questi numeri alla nuova porta virtuale.
Esempio di Installazione nuovo hardware
su Windows XP
Questa installazione può essere impostata in Impostazioni porta dell'utilità Gestione dispositivi nel Pannello di
controllo di Windows.
1
5
69
Data
GND
Handshake
Female

BILANCE ADVENTURER IT-57
INGRESSO USB
La bilancia risponderà a svariati comandi inviati tramite l'adattatore di interfaccia.
Terminare i comandi seguenti in presenza di [CR] o [CRLF].
Comandi Adventurer
C eseguire regolazione a intervallo
0S stampa i dati non stabili
1S stampa solo i dati stabili
P equivale alla pressione di Stampa
SP stampa solo peso stabile
IP stampa immediata del peso visualizzato (stabile o instabile).
CP stampa continua dei pesi.
SLP stampa automatica solo del peso stabile non zero.
SLZP stampa automatica del peso non zero e della lettura zero stabili.
xP stampa automatica per intervalli di 1-3600 secondi (x = 1-3600)
0P termina stampa a intervallo
T equivale alla pressione di Tara
Z equivale alla pressione di Zero
PV stampa la versione del software
Funzionamento stampa automatica
Quando nel menu viene attivata la stampa automatica, la bilancia invia i dati come richiesto.
Se sono presenti dati nel buffer di stampa, la stampante porterà a termine la stampa di questi dati.
10. AGGIORNAMENTI SOFTWARE
Ohaus migliora costantemente il software delle proprie bilance. Per richiedere l'ultima versione, si prega di
contattare il rivenditore autorizzato Ohaus o Ohaus Corporation.

IT-58 BILANCE ADVENTURER
11. CONFORMITÀ
La conformità agli standard seguenti viene indicata dalla presenza del marchio corrispondente sul prodotto.
Marchio
Standard
Questo prodotto è conforme alla direttiva EMC 2004/108/CE, alla Direttiva Bassa Tensione
2006/95/CE e alla Direttiva per gli strumenti di pesa non automatici 2009/23/CE. La Dichiarazione
di Conformità completa è disponibile online all'indirizzo
http://europe.ohaus.com/europe/en/home/support/compliance/ce-declaration-of-conformity.
AS/NZS CISPR 11, AS/NZS 61000.4.3
CAN/CSA-C22.2 No. 61010-1-04
UL Std. No. 61010-1 (3a edizione)
Nota importante per gli strumenti di pesatura certificati
Gli strumenti di pesatura certificati sul luogo di fabbricazione recano sull'etichetta della confezione
uno dei marchi mostrati qui accanto e l'adesivo con la ‘M’ verde (metrologia) sulla targa descrittiva.
Tali apparecchiature possono essere messe in funzione immediatamente.
Gli strumenti di pesatura che devono essere certificati in due fasi non recano la ‘M’ verde
(metrologia) sulla targa descrittiva, ma solo il marchio di identificazione mostrato qui accanto,
sull'etichetta della confezione.
La seconda fase della certificazione iniziale deve essere condotta da un centro di assistenza
approvato dal rappresentante autorizzato nell'ambito dell’Unione Europea o dalle autorità nazionali
per i pesi e le misure.
La prima fase della certificazione iniziale è stata condotta presso gli stabilimenti di produzione.
Durante tale fase, vengono eseguiti tutti i test previsti dallo standard europeo adottato
EN45501:1992, paragrafo 8.2.2.
Se la normativa nazionale limita il periodo di validità della certificazione, l'utente dello strumento di
pesatura deve osservare rigorosamente il periodo di ulteriore certificazione e informare l’Autorità
per i Pesi e Misure del paese di appartenenza.
Nota per FCC
Questa apparecchiatura è stata collaudata e ritenuta conforme ai limiti dei dispositivi digitali di Classe A, in
conformità con la Parte 15 delle norme FCC. Tali limiti sono previsti per fornire un’adeguata protezione contro
interferenze dannose durante il funzionamento dell'apparecchiatura in un ambiente commerciale.
L’apparecchiatura genera, utilizza e può irradiare energia nella banda delle radiofrequenze, per cui, se non
installata e utilizzata in conformità al manuale di istruzioni, potrebbe causare interferenze dannose con le
comunicazioni radio. L'uso del presente apparecchio in una zona residenziale può causare interferenze dannose e
in questo caso l'utente deve correggere l'interferenza a proprie spese.
Nota per il Canada
Questa apparecchiatura digitale di classe A è conforme alla normativa canadese ICES-003.

BILANCE ADVENTURER IT-59
Registrazione ISO 9001
Nel 1994, a OHAUS Corporation, USA, è stato rilasciato il certificato di registrazione ISO 9001 da BVQI (Bureau
Veritus Quality International), confermando che il sistema di gestione qualità di OHAUS è conforme ai requisiti degli
standard ISO 9001. Il 21 giugno 2012, OHAUS Corporation, USA, ha ottenuto una nuova registrazione
conformemente allo standard ISO 9001:2008. In conformità alle norme europee:
Smaltimento
In conformità alla Direttiva Europea 2002/96/CE sullo smaltimento delle apparecchiature
elettriche ed elettroniche (RAEE), l’apparecchiatura non deve essere smaltita assieme ad altri
rifiuti domestici. Queste disposizioni sono valide anche nei paesi esterni all'UE, in base ai
requisiti delle varie legislazioni.
La direttiva sullo smaltimento delle pile 2006/66/CE ha introdotto dei nuovi requisiti, in vigore dal
settembre 2008, sulla rimovibilità delle batterie dalle apparecchiature da gettare negli stati
membri dell'Unione Europea. In conformità con questa direttiva, questo dispositivo è stato ideato
per rimuovere in modo sicuro le batterie scariche in una struttura di smaltimento rifiuti.
Smaltire questo prodotto secondo le normative locali, presso il punto di raccolta specificato per le
apparecchiature elettriche ed elettroniche.
In caso di dubbi, rivolgersi all'ente responsabile o al distributore da cui è stato acquistato questo
dispositivo.
Qualora l’apparecchio venga trasferito a terzi (per uso privato o professionale), il contenuto della
presente normativa deve ritenersi valido anche per terzi.
Le istruzioni di smaltimento in Europa sono disponibili all'indirizzo
http://europe.ohaus.com/europe/en/home/support/weee.aspx.
Grazie per il contributo alla salvaguardia dell'ambiente.

IT-60 BILANCE ADVENTURER
GARANZIA LIMITATA
I prodotti Ohaus sono garantiti contro difetti dei materiali e difetti di fabbrica dalla data di consegna per tutta la
durata del periodo di garanzia. Durante il periodo di garanzia Ohaus riparerà o, a sua scelta, sostituirà tutti i
componenti che siano difettosi senza costo alcuno, purché il prodotto venga rinviato, con spese prepagate, alla
Ohaus.
Questa garanzia non è valida se il prodotto è stato danneggiato o trattato con poca cura, esposto a materiali
radioattivi o corrosivi, se vi siano penetrati materiali estranei o in seguito ad assistenza eseguita da personale non
Ohaus. In mancanza della scheda di garanzia spedita correttamente assieme al prodotto, il periodo di garanzia
avrà inizio dalla data di spedizione al rivenditore autorizzato. Non viene rilasciata altra garanzia espressa o
implicita da parte di Ohaus Corporation. Ohaus Corporation non sarà responsabile per qualsiasi danno indiretto.
A causa delle diversità delle norme che regolano la garanzia nei vari paesi, contattare direttamente Ohaus o il
rivenditore locale Ohaus per ulteriori dettagli.


Ohaus Corporation
7 Campus Drive
Suite 310
Parsippany, NJ 07054 USA
Tel: +1 973 377 9000
Fax: +1 973 944 7177
With offices worldwide.
www.ohaus.com
* 30206078*
P/N 30206078 B © 2018 Ohaus Corporation, all rights reserved.
Transcripción de documentos
AdventurerTM Balances Instruction Manual ADVENTURER BALANCES EN-1 TABLE OF CONTENTS 1. INTRODUCTION ....................................................................................................................3 1.1 1.2 1.3 1.4 Description ................................................................................................................................................... 3 Features ....................................................................................................................................................... 3 Definition of Signal Warnings and Symbols ................................................................................................. 3 Safety Precautions ....................................................................................................................................... 3 2. INSTALLATION .....................................................................................................................4 2.1 2.2 2.3 2.4 2.5 2.6 Unpacking .................................................................................................................................................... 4 Selecting the Location .................................................................................................................................. 4 Leveling the Equipment ................................................................................................................................ 4 Connecting Power ........................................................................................................................................ 5 Connecting the Interface .............................................................................................................................. 5 Initial Calibration ........................................................................................................................................... 5 3. OPERATION ..........................................................................................................................6 3.1 3.2 3.3 3.4 Overview of Display, Home Screen ............................................................................................................. 6 Principal Functions and Main Menu ............................................................................................................ 7 Overview of Parts and Features – Draft Shield Models ............................................................................... 8 Overview of Parts and Features – Non Draft Shield Models ....................................................................... 8 4. APPLICATIONS .....................................................................................................................9 4.1 Weighing ...................................................................................................................................................... 9 4.1.1 Item Settings .......................................................................................................................................... 10 4.1.2 Sample Name......................................................................................................................................... 11 4.1.3 Save to USB ........................................................................................................................................... 11 4.2 Parts Counting............................................................................................................................................ 11 4.2.1 Item Settings .......................................................................................................................................... 12 4.3 Percent Weighing ....................................................................................................................................... 14 4.3.1 Item Settings .......................................................................................................................................... 14 4.4 Dynamic Weighing ..................................................................................................................................... 15 4.4.1 Item Settings .......................................................................................................................................... 15 4.5 Density Determination ................................................................................................................................ 16 4.5.1 Measuring the Density of a Solid Using Water (default) ........................................................................ 16 4.5.2 Measuring the Density of a Buoyant Material Using Water ................................................................... 17 4.5.3 Measuring the Density of a Solid Using an Auxiliary Liquid ................................................................... 17 4.5.4 Measuring the Density of a liquid using a Calibrated Sinker (not supplied) ........................................... 18 4.5.5 Measuring the Density of Porous Material Using Oil ............................................................................. 19 4.6 Check Weighing ......................................................................................................................................... 22 4.6.1 Item Settings .......................................................................................................................................... 22 4.7 Display Hold ............................................................................................................................................... 23 4.7.1 Display Hold ........................................................................................................................................... 23 4.7.2 Peak Hold ............................................................................................................................................... 23 4.7.3 Item Settings .......................................................................................................................................... 24 4.8 Totalization ................................................................................................................................................. 24 4.9 Formulation ................................................................................................................................................ 25 4.9.1 Item Settings .......................................................................................................................................... 25 4.10 Additional Features .................................................................................................................................... 26 4.10.1 Weigh Below .......................................................................................................................................... 26 5. MENU SETTINGS ................................................................................................................27 5.1 Menu Navigation ........................................................................................................................................ 27 5.1.1 Changing Settings .................................................................................................................................. 28 5.2 Calibration .................................................................................................................................................. 29 5.2.1 Calibration sub-menu (InCal models)..................................................................................................... 29 5.2.2 Internal Calibration ................................................................................................................................. 29 5.2.3 Automatic Calibration ............................................................................................................................. 29 5.2.4 AutoCal™ Adjustment ............................................................................................................................ 30 5.2.5 Span Calibration ..................................................................................................................................... 30 5.2.6 Linearity Calibration................................................................................................................................ 31 5.2.7 Calibration Test ...................................................................................................................................... 31 5.3 Balance Setup ............................................................................................................................................ 31 5.3.1 Balance Set-up sub-menu ...................................................................................................................... 31 5.3.2 Language ............................................................................................................................................... 31 5.3.3 User Setting ............................................................................................................................................ 32 EN-2 ADVENTURER BALANCES 5.3.4 Filter Level .............................................................................................................................................. 32 5.3.5 Auto Zero Tracking ................................................................................................................................. 32 5.3.6 Auto Tare ................................................................................................................................................ 32 5.3.7 Graduations ............................................................................................................................................ 32 5.3.8 Date & Time ........................................................................................................................................... 33 5.3.9 Approved Mode ...................................................................................................................................... 33 5.4 Weighing Units ........................................................................................................................................... 34 5.4.1 Units Sub-menu...................................................................................................................................... 34 5.5 Data Maintenance ...................................................................................................................................... 34 5.5.1 Data Maintenance sub-menu ..................................................................................................................... 34 5.6 Communication .......................................................................................................................................... 35 5.6.1 Communication Sub-menu ..................................................................................................................... 35 5.6.2 Baud Rate .............................................................................................................................................. 35 5.6.3 Transmission .......................................................................................................................................... 36 5.6.4 Handshake ............................................................................................................................................. 36 5.6.5 Print Output ............................................................................................................................................ 36 5.6.6 Auto Print ................................................................................................................................................ 36 5.6.7 Print Content .......................................................................................................................................... 36 5.6.8 Feed.. ..................................................................................................................................................... 36 5.6.9 Format.. .................................................................................................................................................. 36 5.6.10 Print Calibration Data.. ........................................................................................................................... 36 5.7 GLP and GMP Data ................................................................................................................................... 38 5.7.1 GLP Data Sub-menu .............................................................................................................................. 38 5.7.2 Header .................................................................................................................................................... 38 5.7.3 Balance Name ........................................................................................................................................ 38 5.7.4 User Name ............................................................................................................................................. 38 5.7.5 Project Name.......................................................................................................................................... 38 5.8 Factory Reset ............................................................................................................................................. 38 5.9 Lockout ....................................................................................................................................................... 38 6. LEGAL FOR TRADE (LFT) ..................................................................................................39 6.1 6.2 6.3 Settings ...................................................................................................................................................... 39 Verification.................................................................................................................................................. 39 Sealing ....................................................................................................................................................... 39 7. PRINTING ............................................................................................................................40 7.1 7.2 7.3 Connecting, Configuring and Testing the Printer/Computer Interface ....................................................... 40 Output Format ............................................................................................................................................ 40 Printout Examples ...................................................................................................................................... 41 8. MAINTENANCE ...................................................................................................................44 8.1 8.2 8.3 8.4 Calibration .................................................................................................................................................. 44 Cleaning ..................................................................................................................................................... 44 Troubleshooting ......................................................................................................................................... 44 Service Information .................................................................................................................................... 44 9. TECHNICAL DATA ..............................................................................................................45 9.1 9.2 9.3 9.4 9.4.1 9.4.2 9.5 Specifications ............................................................................................................................................. 45 Drawings and Dimensions ......................................................................................................................... 54 Parts and Accessories ............................................................................................................................... 54 Communication .......................................................................................................................................... 55 Interface Commands .............................................................................................................................. 55 RS232 (DB9) Pin Connections ............................................................................................................... 56 The USB Interface ...................................................................................................................................... 56 10. SOFTWARE UPDATES .......................................................................................................57 11. COMPLIANCE......................................................................................................................58 ADVENTURER BALANCES 1. INTRODUCTION 1.1 Description EN-3 The Adventurer balance is a precision weighing instrument that will provide you with years of service if properly cared for. The Ohaus Adventurer balances are available in capacities from 120 grams to 8,200 grams. 1.2 Features Touch Controls: Quick, graphical access to all control functions, over a dozen applications and many features. 1.3 Definition of Signal Warnings and Symbols Safety notes are marked with signal words and warning symbols. These show safety issues and warnings. Ignoring the safety notes may lead to personal injury, damage to the instrument, malfunctions and false results. Signal Words WARNING CAUTION Attention Note For a hazardous situation with medium risk, possibly resulting in injuries or death if not avoided. For a hazardous situation with low risk, resulting in damage to the device or the property or in loss of data, or injuries if not avoided. For important information about the product For useful information about the product Warning Symbols General Hazard Alternating current 1.4 Electrical Shock Hazard Direct current Safety Precautions CAUTION: Read all safety warnings before installing, making connections, or servicing this equipment. Failure to comply with these warnings could result in personal injury and/or property damage. Retain all instructions for future reference. Verify that the AC adapter’s input voltage range and plug type are compatible with the local AC power to be used. Make sure that the power cord does not pose a potential obstacle or tripping hazard. The balance is for indoor use only. Use the balance only in dry locations. Do not drop loads on the pan. Use only approved accessories and peripherals. Operate the equipment only under ambient conditions specified in these instructions. Disconnect the equipment from the power supply when cleaning. Do not operate the equipment in hazardous or unstable environments. Service should only be performed by authorized personnel. Do not position the balance such that it is difficult to reach the power connection. EN-4 2. 2.1 ADVENTURER BALANCES INSTALLATION Unpacking Carefully remove your Adventurer balance and each of its components from the package. The included components vary depending on the balance model (see table below). Save the packaging to ensure safe storage and transport. Please read the manual completely before installing and using the Adventurer balance to avoid incorrect operation. Included Components Balance Power Adapter Wind Ring (only for 0.1 mg and 1 mg models) Warranty Card Software Compact Disk 2.2 Selecting the Location Avoid excessive vibrations, heat sources, air current, or rapid temperature changes. Allow sufficient space. 2.3 Leveling the Equipment The Adventurer has a level bubble in a small round window beside the display. To level the balance, adjust the 4 Leveling Feet until the bubble is centered in the circle. See the Level Assist section below on information about how and which feet to turn. Be sure the equipment is level each time its location is changed. Level Assist A level assist function is available to help leveling the Adventurer. There are two ways to access the function: 1. Weighing Application -> Item Settings -> Level Assist. See section 4.1.1 for more information. 2. Main Menu -> Balance Setup -> User Settings -> Level Assist. See section 5.3.3 for more information. Rotate the feet according to the image above depending on the location of the level bubble until the bubble is centered. ADVENTURER BALANCES 2.4 EN-5 Connecting Power Connect the DC output connector to the power receptacle on the rear of the balance. Then connect the AC power cord to a suitable electrical outlet. CAUTION: For use with CSA certified (or equivalent approved) power source, which must have a limited current output. Attention: For optimal weighing performance, allow the balance to warm up for 60 minutes prior to use. 2.5 Connecting the Interface Use the built-in RS-232 Port to connect either to a computer or a printer with a standard (straight-through) serial cable. Or connect using the scale’s USB port. Interface connections on the rear of the balance: USB connection on the front of the balance: . USB1 RS232 USB2 USB1: Used to connect to PC only USB2: Used to connect a USB flash driver only RS232: Used to connect to PC or Printer Note: For configuration and interface commands, see the Communication Menu Settings section. For Connecting, Configuring and Testing the Printer/Computer Interface, and for sample Print Output Formats, see the Printing section. 2.6 Initial Calibration When the Balance is first installed, and when it is moved to another location, it must be calibrated to ensure accurate weighing results. Most Adventurer Balances have built in AutoCal which can calibrate the balance automatically and does not require calibration masses. If preferred, the balance can be manually calibrated with external masses. Have the appropriate calibration masses available before beginning calibration. Refer to the Calibration Section for masses and calibration procedure. ¤ AutoCal™ Fully automatic internal calibration system that assists with routine maintenance by automatically calibrating the balance daily is available on most models. Automatically calibrates the system when it senses a temperature change sufficient enough to affect weighing accuracy (>1.5°C), or every 11 hours. ¤ External Calibration Select precision models feature traditional external calibration in which external weights (user’s choice of calibration weight values) are used to calibrate the balance to ensure accuracy. EN-6 3. ADVENTURER BALANCES OPERATION 3.1 Overview of Display, Home Screen This equipment utilizes a touch-sensitive display with Touch areas and Buttons to control the equipment’s functions. CONTROLS Button Action Short Press (if powered Off): Turns on the scale Long Press (if powered On): Turns off the scale Note: The balance will automatically power on when power is connected. Short Press: Prints the present data to a printer or a computer. Short Press: Perform Zero operation Short Press: Perform Calibration operation Short Press: Perform Tare operation Main Application Screen Application Capacity and readability Instructional Messages Stability (*), Net (NET), Gross (G) and/or center of zero (>0<) indicators Result Field: Information varies by application Touch g to change unit Reference Fields Application Buttons: Functions vary by application ADVENTURER BALANCES 3.2 Principal Functions and Main Menu Weighing: Taring: Zero: EN-7 Press Zero to set the display to zero. Place an item on the pan. Display indicates gross weight. With no load on the pan, press Zero to set the display to zero. Place an empty container on the pan and press Tare. Add material to the container and its net weight is displayed. Remove container and container’s weight appears as a negative number. Press Tare to clear. Press Zero to zero the balance MENU & SCREEN NAVIGATION Touch Menu to open the menu list. Calibration: Touch to view calibration options. Balance Setup: Touch to view and change balance settings. Weighing Units: Touch to view and change weighing units. Data Maintenance: Touch to view data maintenance settings. GLP and GMP Data: Insert user data for traceability. Factory Reset: Communication: Lockout: Touch to view COM Device Settings and Print Settings. Touch to view lockout options. Touch to do a Factory reset of menu settings. EN-8 3.3 ADVENTURER BALANCES Overview of Parts and Features – Draft Shield Models Pan Level Indicator Adjustable Foot Adjustable Foot USB Host USB Device LFT Switch RS232 Power Input 3.4 Overview of Parts and Features – Non Draft Shield Models Pan Wing Ring Level Indicator Adjustable Foot USB Host Adjustable Foot USB Device LFT Switch RS232 Power Input ADVENTURER BALANCES 4. EN-9 APPLICATIONS The balance can be configured to operate in various Application modes. Touch the top left Application field (weighing in the example below): The Adventurer Balance has 9 application modes, as follows: Weighing Parts Counting Percent Weighing Display Hold Totalization Formulation 4.1 Dynamic (Animal) Weighing Density Determination Check Weighing Weighing Note: Before using any application, be sure the balance has been leveled and calibrated. Use this application to determine the weight of items in the selected unit of measure. Weighing 1. In the upper left portion of the home screen, select Weighing (this application is the default). 2. Press Tare or Zero if necessary to begin. 3. Place objects on the pan to display the weight. When stable, the * appears. 4. The resulting value is displayed in the main Display Line in the active unit of measure. The WEIGHING Home screen Main Display Line Touch g to change unit Reference Fields Application Icon Application Buttons EN-10 4.1.1 ADVENTURER BALANCES Item Settings To view or adjust the current settings Touch the Item Settings button. The Settings screen appears. Minimum Weight: establish a minimum weight value to be used to verify a reading. If an actual weight is below the established Minimum Weight value, it is flagged by a color change: yellow. To adjust the Minimum Weight value, touch the Minimum Weight button. A numeric input window appears. Use the keys to enter the desired Minimum Weight, then press Save. The display reverts to the previous screen. To return to the Weighing home screen, touch Exit at the bottom of that screen. Capacity Bar: When set to ON, a capacity bar is displayed in the reference field. The capacity guide will show the current weight as a percentage of balance capacity. If Capacity Bar is set to OFF, the reference field will show Minimum Weight and Sample Name. Weighing Units: Change the displayed unit. See section 5.4 for more information Note: Touching the weighing unit from application home screen will also open the Weighing Units screen. Filter Level: Change Filtering level. See section 5.3.4 for more information GLP & GMP Data: See section 5.7 for more information Print settings: Change printing settings. See section 7 for more information. Level Assist: Instructions on how to move the balance feet to level the balance. ADVENTURER BALANCES 4.1.2 EN-11 Sample Name Press this button to add a sample name. An alphanumeric input window appears. Press between Lower and Upper case characters. Lower Case: Upper Case: to alternate Key in the desired sample name and press Save to save the name and return to weighing home screen. 4.1.3 Save to USB Insert the USB flash drive into the USB slot located on the front of the balance. Next, press the Save to USB button to save the data to the USB flash drive. Once saved, the button will momentarily change color to orange. Notes: The first time a USB flash drive is connected to the balance there might be some delay time before the button Save to USB works. This is due to that the balance is creating the necessary folders on the USB flash drive where the data will be stored. The Density Determination and Check Weighing applications do not have a Save to USB button. CAUTION: The weighing data will be saved to USB every day. However, if different weighing modes are used the data will be separately saved to individual files. Depending on the USB drive used, all data might not be transferred from the balance or the display might freeze. If this happens, unplug the USB flash drive and try another USB flash drive. Ohaus takes no responsibility if data on USB flash drive is erased or if the USB flash drive breaks while it is connected to the balance. To minimize the risk of problems arising, Ohaus suggests using a high quality USB flash drive. 4.2 Parts Counting Note: Before using any application, be sure the balance has been leveled and calibrated. Use this application to count samples of uniform weight. Parts Counting 1. In the upper left portion of the home screen, select Parts Counting 2. Press Tare or Zero if necessary to begin. 3. Place objects on the pan to display the weight. When stable, the * appears. 4. The resulting value is displayed in the main Display Line in pieces (PCS). The Parts Counting Home screen Main Display Line Reference Fields Application Buttons Application Icon EN-12 4.2.1 ADVENTURER BALANCES Item Settings To view or adjust the current settings Touch the Item Settings button. The Settings screen appears. Samples: The sample size can be 1 to 10 000 pieces. The default sample size is 10. Once a sample size is changed, the balance will immediately open the recalculate APW screen, expecting to establish a new APW. To adjust the sample size, touch the Samples button. A numeric input window appears. Use the keys to enter the desired sample size, then press Save. The next screen appears, with the message to place the reference weight on the pan. Place the reference weight on the pan, then touch Accept to capture the value, the screen shows number of pcs. Establish an Average Piece Weight (APW): Each time a new type of part is counted, the nominal weight of one piece (Average Piece Weight or APW) must be established using a small quantity of pieces. This APW is stored until replaced by another APW. There are two methods to establish the APW value: 1. The actual APW is known 2. The APW must be derived by weight. For this case the current sample size will be used ADVENTURER BALANCES EN-13 Set a known Average Piece Weight (APW) To adjust the APW value directly, touch the APW button. A numeric input window appears. Key in the desired APW Weight, then press Save. The display returns to the application home screen with the new APW value in the reference field. Set a new Average Piece Weight (APW) – Derived To establish a new APW, place the reference weight on the pan and press Accept to continue. Note: The sample size that is displayed will be used. To use a different sample size, change that first. (See above.) The home screen shows the number of pieces at the new APW Auto Optimization: When set to On, improves counting accuracy by re-calculating the piece weight automatically as parts are added. Default is Off. Notes: APW Optimization occurs only when the number of pieces added to the pan is between one and three times the number already on the pan. If the APW is entered manually by the numeric keypad, APW auto optimization will not occur. Print settings: Change printing settings. See section 7 for more information. Note: The Save to USB button will only appear after a USB flash drive has been connected to the balance. See section 4.1.3 for more information. EN-14 4.3 ADVENTURER BALANCES Percent Weighing Note: Before using any application, be sure the balance has been leveled and calibrated. Use Percent Weighing to measure the weight of a sample displayed as a percentage of a pre-established reference weight. The default (or last) reference weight is displayed. Percent Weighing 1. In the upper left portion of the home screen, select Percent Weighing. 2. Place an object on the pan. The difference between the sample and the reference weight is displayed as a percentage. The Percent Weighing Home screen Main Display Line Reference Fields Application Buttons 4.3.1 Item Settings To view or adjust the current settings Touch the Item Settings button. The Settings screen appears. Recalculate Ref. Wgt: To establish a new reference weight value, touch the recalculate reference weight button. Follow the screen instructions to establish a new reference weight. Alternatively, press the Ref. Weight button from the Percent Weighing Recalculate Ref. Wgt screen to establish a new reference weight manually through a numerical keypad. Print settings: Change printing settings. See section 7 for more information. Note: The Save to USB button will only appear after a USB flash drive has been connected to the balance. See section 4.1.3 for more information. Application Icon ADVENTURER BALANCES 4.4 EN-15 Dynamic Weighing Note: Before using any application, be sure the balance has been leveled and calibrated. Use this application to weigh an unstable load, such as a moving animal. Two different start/reset modes can be selected: Manual (start and stop via key press) and Automatic (start and stop automatically). Dynamic Weighing – Manual (default) 1. In the upper left portion of the home screen, select Dynamic Weighing 2. Place objects on the pan and press the Start button. The Dynamic Weighing Home screen Main Display Line Reference Fields Application Buttons Application Icon 3. The balance begins a countdown (averaging process). During the countdown, the information line displays the time remaining. If necessary, press Stop to quit. 4. When the countdown ends, the result line is displayed and held. Press Clear to clear the held weight and return to the initial screen. Note: Clear the pan before beginning a new Dynamic weighing cycle. 4.4.1 Item Settings To view or adjust the current settings Touch the Item Settings button. The Settings screen appears. Averaging Time: Set the averaging time to a value between 1 and 99 seconds. Default is 5 seconds. Automatic Mode: When set to On, the cycle begins when an object is placed on the pan, and the held value is automatically reset when the object is removed from the pan. Sample Name: Assign a name to the sample. Print settings: Change printing settings. See section 7 for more information. Note: The Save to USB button will only appear after a USB flash drive has been connected to the balance. See section 4.1.3 for more information. EN-16 4.5 ADVENTURER BALANCES Density Determination Note: Before using any application, be sure the balance has been leveled and calibrated. Use this application to determine an object’s density. Four types of density determination can be made: 1. 2. 3. 4. Solids more dense than water Solid less dense than water Liquid density Porous material (impregnated with oil) The Density Determination Home screen Main Display Line Reference Fields Function Buttons 4.5.1 Measuring the Density of a Solid Using Water (default) Press the Item Settings button to open the Density Determination Settings screen. Confirm the following Setups are selected: Density Type: Solid Auxiliary Liquid: Water Porous Material: Off To adjust the water temperature value, touch the Water Temp. button. The balance calculates water density based on the water temperature value entered. Measure the actual water temperature using a precision thermometer. A numeric input window appears. Enter the actual water temperature, then press Save. To return to the Density Determination home screen, touch Back. Step 1 of 2 – Weigh the Sample in Air. Press Start. Follow screen instructions, then press Accept to store the dry sample weight (“in air”). Application Icon ADVENTURER BALANCES EN-17 Step 2 of 2 – Weigh the Sample Submerged in the Liquid. Follow the screen instructions, then press Accept to store the sample weight (submerged in liquid). Once the necessary weights have been determined, the density of the sample is displayed in g/cm3 (along with the weight in air, weight in water) on the Application screen. Press Start to reset all the weight values and restart the process. 4.5.2 Measuring the Density of a Buoyant Material Using Water Press the Item Settings button to open Settings screen. Confirm the following Setups are selected: Density Type: Solid Liquid Type: Water Porous Material: Off Press Back to return to the Density Determination home screen. Follow the same procedure as Solid Material above, except in Density Determination step 2, push the sample down into the liquid until it is fully submerged. 4.5.3 Measuring the Density of a Solid Using an Auxiliary Liquid To enable this feature, enter the Density Determination Setup menu and select the following: Density Type: Solid; Liquid Type: Other; Porous Material: Off. Confirm the default values displayed (Liquid Density, etc) are correct. To adjust the Liquid Density value, touch the Auxiliary liquid button and select Other. A numeric input window appears. Key in the density in g/cm 3, then press Save. The display returns to the previous screen. To return to the Density Determination home screen, touch Back. Begin the Density determination process as per above. EN-18 4.5.4 ADVENTURER BALANCES Measuring the Density of a liquid using a Calibrated Sinker (not supplied) To enable this feature, enter the Density Setup menu and select the following; Density Type: Liquid. Note: when the Density Type is set to Liquid, the Liquid type and Porous material selections are disabled. The DENSITY DETERMINATION – LIQUID Home screen Main Display Line Reference Fields Function Buttons Application Icon Confirm that the default value displayed (sinker volume) is correct. To edit the default values, touch Sinker Volume. To adjust the Sinker volume value, touch the Sinker Volume button. A numeric input window is displayed. Key in the desired value, then press Save. The display returns to the previous screen with the new value highlighted. To return to the Density Determination home screen, touch Back. Press Start to start the process. Step 1 of 2 – Weigh the Sinker in Air. Follow the screen instructions, then press Accept to store the sinker weight (“in air”). ADVENTURER BALANCES EN-19 Step 2 of 2 – Weigh the Sinker Submerged in the Test Liquid. Follow the screen instructions, then press Accept to store the sinker weight (submerged in liquid). Once the necessary weights have been determined, the density of the Liquid sample is displayed in g/cm3 (along with the weight in air, weight in water) on the Application screen. Press Start to reset all the weight values and restart the process. 4.5.5 Measuring the Density of Porous Material Using Oil To enable this feature, enter the Density Determination Setup menu, and set the following: Density Type: Solid Liquid Type: Water Porous Material: On The DENSITY DETERMINATION – POROUS Home screen Main Display Line Reference Fields Functions Application Icon EN-20 Confirm the default values displayed (Water Temp) are correct. To edit the default values, touch Item Settings. The Settings screen appears. The balance calculates water density based on the water temperature value entered (look-up table). Measure the actual water temperature using a precision thermometer. To adjust the Water Temperature or Oil Density values, touch the Water Temp or Oil Density button. Numeric input windows appear. Key in the desired value, then press Save. The display returns to the previous screen with the new value highlighted. To return to the Density Determination home screen, touch Exit. Press Begin Density Calculation. Step 1 of 3 – Weigh the Un-Oiled Sample in Air. Follow the screen instructions then press Accept to store the dry sample weight (in air). ADVENTURER BALANCES ADVENTURER BALANCES Step 2 of 3 – Weigh the Oiled Sample in Air. Follow the screen instructions then press Accept to store the sample weight (oiled). Step 3 of 3 – Weigh the Oiled Sample Submerged in Liquid. Follow the screen instructions then press Accept to store the oiled sample weight (submerged in liquid). Once the necessary weights have been determined, the density of the sample is displayed in g/cm3 (along with the weight in air, un-oiled and oiled, and weight in water) on the Application screen. The value stays on the display until Start is touched. Press Start to reset all the weight values and restart the process. EN-21 EN-22 4.6 ADVENTURER BALANCES Check Weighing Note: Before using any application, be sure the balance has been leveled and calibrated. Check Weighing is used to compare the weight of a sample against target limits. Check Weighing 1. In the upper left portion of the home screen, select Check Weighing 2. The default (or last) Check weight limits are displayed. 3. Place objects on the pan. 4. The Under/Accept/Over status is shown in the progress bar area while the actual weight of the item is shown on the main Display Line. The Check Weighing Home screen Main Display Line Reference Fields Function Buttons To set the Over Limit value, touch the Over Limit button To set the Under Limit value, touch the Under Limit button A numeric input window appears. Enter the desired Limit Weight, then press Save. To return to the CHECK WEIGHING home screen, touch Exit. 4.6.1 Item Settings To view or adjust the current settings Touch the Item Settings button. The Settings screen appears. Sample Name: Assign a name to the sample. Print settings: Change printing settings. See section 7 for more information. Application Icon ADVENTURER BALANCES EN-23 4.7 Display Hold Note: Before using any application, be sure the balance has been leveled and calibrated. Two Modes are available: Display Hold - allows the user to capture and store a stable weight. Peak Hold - allows the user to capture and store the highest stable weight. The Display Hold Home screen Main Display Line Reference Fields Application Icon Function Buttons Display Hold 4.7.1 1. 2. 3. 4. Display Hold In the upper left portion of the home screen, select Display Hold Place the sample on the pan and press Hold at any time while the weight is being captured. The Main Display Line now shows the first stable weight. Press Clear to remove the hold and return to Display Hold Home screen. Peak Hold 4.7.2 1. 2. 3. 4. 5. Peak Hold In the upper left portion of the home screen, select Display Hold Choose Peak Hold Mode in Item Settings (see section 4.7.3). Place sample on the pan and press Start to begin. Continue to weigh samples. The highest stable weight will be held. To remove the hold and return to normal operation press Stop. EN-24 4.7.3 ADVENTURER BALANCES Item Settings To view or adjust the current settings Touch the Item Settings button. The Settings screen appears. Mode: Choose between Peak Hold and Display Hold (default). Sample Name: Assign a name to the sample. Print settings: Change printing settings. See section 7 for more information. Note: The Save to USB button will only appear after a USB flash drive has been connected to the balance. See section 4.1.3 for more information. 4.8 Totalization Note: Before using any application, be sure the balance has been leveled and calibrated. Totalization measures the cumulative weight of a sequence of items. The cumulative total may exceed the capacity of the Balance. The maximum number of samples (n) is 99. The Totalization Home screen Main Display Line Reference Fields Application Buttons Application Icon Totalization 1. In the upper left portion of the home screen, select Totalization 2. Place item on the pan to begin. The sample weight is shown on the Main Display Line. 3. Press Accumulate to add the weight (when stable) of the item to the total. 4. Remove the item from the weighing pan, then add the next item and continue as above. 5. Press Result to view the results from the totalization. 6. When finished, press the Clear Total button to reset the accumulated weight to zero. 7. Press Save to USB to save the result to a USB flash drive or Exit to return to the Totalization Home screen. Note: Changing units converts the Accumulation results to the selected unit. ADVENTURER BALANCES EN-25 4.9 Formulation Note: Before using any application, be sure the balance has been leveled and calibrated. Use this application for compounding and recipe making. The maximum number of components is 50. The Formulation Home screen Main Display Line Reference Fields Application Buttons Application Icon Formulation 1. In the upper left portion of the home screen, select Formulation 2. Press Start to begin the compounding process. 3. Place the first ingredient on the pan (or in a tared container) and press Accept to store the component. 4. Continue adding components and pressing Accept to store the weight of the individual components until the formula is complete. The Total line shows the total weight of all the components. 5. Press Stop to finish the Formulation. The Formulation results are displayed: Note: If Filler is set to On (see section 4.9.1 below), the balance will ask to add a filler material to complete the formulation. Add the filler material and press Accept to complete the formulation and display the results. 6. Press Save to USB to save the results to a USB flash drive or Exit to return to the Formulation Home screen. Note: The formulation results will be cleared when a new formulation starts. 4.9.1 Item Settings To view or adjust the current settings Touch the Item Settings button. The Settings screen appears. Filler: If set to On, a filler material is asked for at the end of the formulation. Automatic Mode: If set to On, the balance will automatically Tare after the component weight has been accepted. Print settings: Change printing settings. See section 7 for more information. EN-26 4.10 ADVENTURER BALANCES Additional Features 4.10.1 Weigh Below The Adventurer balance is equipped with a weigh below hook for weighing below the balance. Note: Before turning the balance over, remove the pan and draft shield elements (if present) to prevent damage Attention: Do not place the balance on the pan support cone or Load cell Pins To use this feature, remove power from the balance, then remove the protective cover for the weigh below opening. Weigh below protective cover Weigh below hook The balance can be supported using lab jacks or any other convenient method. Ensure the balance is level and secure. Power on the balance, then use a string or wire to attach items to be weighed. ADVENTURER BALANCES 5. EN-27 MENU SETTINGS 5.1 Menu Navigation User menu structure: Application Modes Weighing App Main Menu Calibration Calibration Internal Cal Min Weight Balance Setup Automatic Cal Capacity Guide Weighing Units AutoCalTM Units Filter Level GLP and GMP Data Print Settings Level Assist Counting App Data Maintenance Span Cal Communication Linearity Cal GLP and GMP Data Factory Reset Lockout Balance Setup Cal Test Weighing Units Language Milligram User Settings Gram Touch Calibrate Kilogram Brightness Beep Auto Dim Export to USB App. Mode Settings Communication GLP and GMP Data RS232 Standard Headers Data Maintenance Header 4 Communication 19200 Header 5 GLP and GMP data 38400 Balance Name Carat Import from USB App. Mode Settings 9600 Menu Settings Balance_Info Filter Level Pennyweight Auto Zero Tracking Grain 7E1 Transmission User Name Sample Size Auto_Tare Newton 7E2 APW Graduation Momme 7 N1 Date & Time Mesghal 7 N2 Date HKTael 7O1 Time Approved Mode SGTael 7 O2 TWTael 8 N1 Tical 8N2 Auto Opt Print Settings Percent App Recalculate Ref Wgt Print Settings Dynamic App Tola Average Time Auto Mode Print Settings Custom1 Print Output Stable Weight Only Numeric Value Only Single Header Only Unit Name Print Settings Factor Density App Handshake Baht Sample Name Exponent Density Type 10-3 Auxiliary Liquid 10-2 Water Temp. 10-1 Porous Material 100 On Stability Oil Density 101 Interval (seconds) Sinker Volume 102 Liquid Temp. 103 Print Settings CheckWeighing App LSD Print Options Auto Print Auto Print Off Continuous Print Content Selection 0.5 Header Sample Name 1 Date & Time Print Settings 2 Balance ID 5 Balance Name DisplayHold App Display Hold Mode Sample Name Print Settings 10 User Name 100 Project Name Application Name Totalization App Sample Name Formulation App Result Filler Gross Automatic Mode Net Print Settings Calibration Header 2 Header 3 Ounce Pound Lockout Header 1 Baud Rate Menu Settings Factory Reset Balance Setup 2400 4800 OunceTroy Level Assist Data Maintenance Tare Information Signature Line Line Feed Save To USB Project Name Weighing Units Factory Reset EN-28 ADVENTURER BALANCES All menu navigation is performed by touching the display. To enter the Menu, touch Menu from any Application Home screen. The Main menu appears, with buttons for Back and Exit. Continue touching the appropriate list item to navigate to the Menu items. 5.1.1 Changing Settings To change a menu setting, navigate to that setting using the following steps: Enter the Menu From any Application screen, Touch Menu. The Main Menu List appears on the display. Select the Sub-Menu Find the item of the Main Menu List and touch it. The Sub-Menu appears. Select the Menu Item Continue until the desired setting is chosen in the Menu list. Touch the setting to change it. The changed setting will be displayed as highlighted yellow for about 1 second to confirm the changed value. Exit the Menu and Return to the Current Application After the setting is confirmed, touch Exit to return to the Application. Note: at any time the Back & Exit buttons can be touched to navigate to the desired area of the menu or return to the current Application. Continue until the desired setting is chose in the menu list. The Adventurer balance Main menu structure is illustrated below. Calibration Balance Setup Weighing Units Communication GLP and GMP Data Factory Reset Data Maintenance Lockout ADVENTURER BALANCES EN-29 5.2 Calibration Adventurer Balances (InCal models) offer a choice of six calibration methods: Internal Calibration, Automatic Calibration, AutoCal™ Adjustment, Span Calibration, Linearity Calibration and Cal Test (Calibration Test). Note: The calibration unit is always in grams. Attention: Do not disturb the balance during any calibration. 5.2.1 Calibration sub-menu (InCal models) Internal Calibration Automatic Calibration AutoCal™ Adjustment Span Calibration Linearity Calibration Cal Test Note: /E models only have Span Calibration, Linearity Calibration and Cal Test. 5.2.2 Internal Calibration Calibration is accomplished with the internal calibration mass. Internal Calibration can be performed at any time, provided the balance has warmed up to operating temperature and is level. With the Balance turned ON and no load on the pan, touch Internal Calibration. Alternatively, press the Cal key on the balance. The Balance begins to calibrate. And no load on the pan, touch Internal Calibration. The display shows the status, then returns to the current application. To cancel at any time, press Save. 5.2.3 Automatic Calibration When Automatic Calibration is set ON, the balance performs a self-calibration: • when it senses a temperature change of 1.5°C • or every 11 hours AutoCal will automatically calibrate the Balance (using the internal mass) each time there is a change in temperature significant enough to affect accuracy or every 11 hours. An information screen will appear when an Automatic Calibration is about to start. Three option buttons will be displayed: Now – Press to perform the calibration directly. 5 min – Press to perform the calibration after 5 minutes. Deactivate – Press to deactivate the Automatic Calibration function. EN-30 ADVENTURER BALANCES 5.2.4 AutoCal™ Adjustment Use this calibration method to adjust the span calibration point, without affecting the span or linearity calibration. Calibration Adjust may be used to adjust the result of the Internal Calibration by +100 divisions. Note: Before making a calibration adjustment, perform an Internal Calibration. To verify whether an adjustment is needed, place a test mass equal to the span calibration value on the pan and note the difference (in divisions) between the nominal mass value and the actual Balance reading. If the difference is within +1 division, calibration adjustment is not required. If the difference exceeds +1 division, calibration adjustment is recommended. Example: Actual weight reading: Expected weight reading: Difference Weight (d): Difference weight in digits: 200.014 200.000 (Test mass value) 0.014 –14 (Adjust value) To perform a Calibration Adjustment, touch AutoCal Adjustment from the Calibration Menu; Enter the value (positive or negative divisions) to match the difference noted earlier in the procedure. Recalibrate using Internal Calibration. After calibration, place the test mass on the pan and verify that the mass value now matches the displayed value. If not, repeat the procedure until Internal Calibration reading agrees with the test mass. Once completed, the balance stores the Adjustment value and the display returns to the current application. 5.2.5 Span Calibration Span calibration uses two calibration points, one at zero load and the other at specified full load (span). For detailed calibration mass information please see the specification tables in section 9. With the balance turned ON and no load on the pan, touch Span Calibration to initiate the procedure. Additional calibration values to be used are shown on the display. The best accuracy is achieved using the mass closest to the full span value. Note: To change the span calibration point, touch the alternate weight shown on the display. Follow the screen instructions and place the specified calibration weight on the scale when prompted to do so. When complete, the display shows the Span calibration status and returns to the current application. ADVENTURER BALANCES EN-31 5.2.6 Linearity Calibration Linearity calibration uses three calibration points, one at zero load and the others at specified loads. With no load on the scale, press Linearity Calibration to begin the process. The balance captures the zero point, and then prompts for the next weight. Continue to follow the instructions on the display until the calibration is completed. To cancel at any time, press Cancel. 5.2.7 Calibration Test Use Calibration Test to compare a known calibration weight against the stored span calibration data. With no load on the scale, press Cal Test to begin the process. The balance captures the zero point, then prompts for the span value. The display shows status, followed by the difference between the current calibration weight and the stored calibration data. 5.3 Balance Setup Enter this sub-menu to customize Balance functionality. 5.3.1 Balance Set-up sub-menu Language User Settings Filter Level Auto Zero Tracking Auto Tare Graduations Date & Time Approved Mode Factory default settings are shown below in bold. 5.3.2 Language Set the language displayed for menus and displayed messages. English German French Spanish Italian Polish Turkish Czech Hungarian EN-32 ADVENTURER BALANCES 5.3.3 User Setting Use this sub-menu to change the setting for: Touch Calibrate “Runtime calibration, please touch the screen at the center of the ring” (First top-left, then bottom-right.) Screen Brightness: LOW = low screen brightness. MEDIUM = normal screen brightness. HIGH = high screen brightness. Beep: OFF = disabled ON = enabled Auto Dim (Dims the display if no Screen Activity for x minutes) OFF = disabled 10 min 20 min 30 min Level Assist: Instructions on how to move the balance feet to level the balance. 5.3.4 Filter Level Set the amount of signal filtering. LOW MEDIUM HIGH = faster stabilization time with less stability. = normal stabilization time with normal stability. = slower stabilization time with more stability. 5.3.5 Auto Zero Tracking Set the automatic zero tracking functionality. OFF 0.5 D = = 1D = 3D = disabled. display maintains zero up to a drift of 0.5 graduation per second display maintains zero up to a drift of 1 graduation per second. display maintains zero up to a drift of 3 graduations per second. 5.3.6 Auto Tare Set the automatic Tare. OFF = disabled. ON = enabled. ‘Place container on the pan’ will be displayed when an Automatic Tare is about to start. A Deactivate button is displayed underneath the text. Press this button to deactivate the Automatic Tare function 5.3.7 Graduations Set the displayed readability of the balance. 1 Division = standard readability. 10 Divisions = readability is increased by a factor of 10. For example, if the standard readability is 0.01g, selecting 10 Divisions will result in a displayed reading of 0.1g. ADVENTURER BALANCES EN-33 5.3.8 Date & Time Set the current Date and Time. Change the format (if desired), then enter the current value. Press Save to confirm the new value. 5.3.9 Approved Mode Use this menu to set the Legal for Trade status. OFF = standard operation. ON = operation complies with Legal Metrology regulations. Note: When Approved Mode is set to ON, the menu settings are affected as follows: Calibration Menu: AutoCal internal Calibration is forced to ON and hidden. Internal Calibration and Calibration Test functions are available. All other functions are hidden. Balance Setup Menu: Filter Level is locked at the current setting. Auto Zero Tracking is limited to 0.5 Division and OFF. The selected setting is locked. Auto Tare is locked at current setting. Graduations is forced to 1 Division and the menu item is hidden. Communication Menu (Communication->Print Settings->Print Output): Stable Weight Only is locked ON. Numeric Value Only is locked OFF. Communication Menu (Communication->Print Settings->Auto Print): Auto print mode selections are limited to OFF, On Stability, and Interval. Continuous is not available. Data Maintenance Menu: Export to USB is hidden Import from USB is hidden Lockout Menu: Menu is hidden Note: The security switch located at the rear of the balance must be in the locked position to set Approved Mode to ON. The security switch must be in the unlocked position to set Approved Mode to OFF. See Section 6. Weighing application main screen with LFT turned ON. EN-34 ADVENTURER BALANCES 5.4 Weighing Units Enter this sub-menu to activate the desired units of measure. This menu can also be accessed by pressing the unit symbol in an application home screen. Note: Due to national laws, the balance may not include some of the units of measure listed. 5.4.1 Units Sub-menu Milligram gram Kilogram carat ounce ounce troy Pound pennyweight Grain Newton momme mesghal Tael (HK) Tael (SG) Tael (TW) tical tola baht Custom Unit 1 Note: If Approved Mode is set to ON, some units will not be displayed. Use the Custom Unit to display weight in an alternative unit of measure. The custom unit is defined using a conversion factor, where the conversion factor is the number of custom units per gram expressed in scientific notation (Factor x 10^Exponent). For example: To display weight in troy ounces (0.03215075 troy ounces per gram) enter a Factor of 0.3215075 and an Exponent of -1. The Custom Unit’s name can be customized up to 3 characters. 5.5 Data Maintenance Enter this sub-menu to customize data transfer settings. 5.5.1 Data Maintenance sub-menu The Export and Import functions Setting up multiple balances is simple by exporting the profile from a master balance via a USB drive. The data maintenance tool allows you to save user and application settings to a USB, which can be easily transferred to other Adventurer balances. The data can then be used to configure additional Adventurer balances with the data imported from original balance. Export to USB Import from USB Balance Info ADVENTURER BALANCES EN-35 5.5.2 Export to USB Export weighing data to a USB flash drive. Two types of data can be exported: - Application settings (APW, Ref. weight and etc.) - Menu settings (balance setup function and etc.) Note: The function Save to USB needs to be set to ON to enable data transfer to USB. Please see section 5.6 for more information. 5.5.3 Import from USB Import weighing data from a USB flash drive. 5.5.4 Balance Info Enter to view information about the balance. Information displayed includes: Balance Type, Balance ID, Capacity, Readability and Software Version. 5.6 Communication Enter this menu to define external communication methods and to set printing parameters. Data may be output to either a printer or PC. Factory default settings are shown in bold. Enter to view information about the balance. 5.6.1 Communication Sub-menu RS-232 Standard Print Settings RS-232 Standard: Enter this sub-menu to customize RS-232 Standard settings. 5.6.2 Baud Rate Set the baud rate (bits per second). 2400 4800 9600 19200 38400 = 2400 bps = 4800 bps = 9600 bps = 19200 bps = 38400 bps Save to USB EN-36 ADVENTURER BALANCES 5.6.3 Transmission Set the data bits, stop bit, and parity. 7 EVEN 1 7 ODD 1 7 EVEN 2 7 ODD 2 7 NONE 1 8 NONE 1 7 NONE 2 8 NONE 2 = 7 data bits, even parity, stop bit 1 = 7 data bits, odd parity, stop bit 1 = 7 data bits, even parity, stop bit 2 = 7 data bits, odd parity, stop bit 2 = 7 data bits, no parity, stop bit 1 = 8 data bits, no parity, stop bit 1 = 7 data bits, no parity, stop bit 2 = 8 data bits, no parity, stop bit 2 5.6.4 Handshake Set the flow control method. NONE XON-XOFF HARDWARE = no handshaking = XON/XOFF handshaking = hardware handshaking Print Settings Enter this sub-menu to customize data transfer settings. Print Settings sub-menu 5.6.5 Print Output Stable Weight Only Set the printing criteria. OFF ON = values are printed immediately, regardless of stability. = values are printed only when the stability criteria are met. Numeric Value Only Set the printing criteria. OFF ON = All Result and G/N/T data values are printed. See section 7.2 for more information = Only numeric data values are printed Single Header Only Set the printing criteria. OFF ON = Headers will be printed for every print requirement = Headers will be printed once a day Print Options Set the printing criteria. Printer PC = Print data to a printer = Print data to a PC ADVENTURER BALANCES EN-37 5.6.6 Auto Print Set the automatic printing functionality. OFF = disabled ON STABILITY1 = printing occurs each time the stability criteria are met. INTERVAL2 = printing occurs at the defined time interval. CONTINUOUS = printing occurs continuously. 1When ON STABILITY is selected, set the conditions for printing. LOAD LOAD ZERO 2When = Prints when the displayed load is stable. = Prints when the displayed load and zero reading is stable. INTERVAL is selected, set the time interval using the numeric keypad. Settings of 1 to 3600 seconds are available. Default is 0. 5.6.7 Print Content Define the content of the printed data. Selection Set the status. Deselect All Select All = all are set to OFF = all are set to ON Header Date & Time Balance ID Balance Name User Name Project Name Application Name Sample Name Result Gross Net Tare Information Signature Line 5.6.8 Feed Set the paper feed. 1 LINE 4 LINE = move the paper up one line after printing. = move the paper up four lines after printing. 5.6.9 Format Set the printing format. Single Line = prints on a single line. Multiple Lines = prints on multiple lines. 5.6.10 Print Calibration Data Set the printing criteria. Off On = disabled = enabled. Save to USB Set the status. OFF = the data will not be saved to USB ON = the data will be saved to USB EN-38 ADVENTURER BALANCES 5.7 GLP and GMP Data Enter this menu to set the Good Laboratory Practices (GLP) data and the Good Manufacturing Practices data. 5.7.1 GLP Data Sub-menu Header Balance Name User Name Project Name 5.7.2 Header Enables the printing of GLP headings. There are up to 5 headings available. Alphanumeric settings up to 25 characters are available for each Header setting. 5.7.3 Balance Name Set the balance identification. Alphanumeric settings up to 25 characters are available. The default setting is Adventurer. 5.7.4 User Name Set the user identification. Alphanumeric settings up to 25 characters are available. The default setting is blank. 5.7.5 Project Name Enter this menu to set the Project identification. Alphanumeric settings up to 25 characters are available. The default setting is blank. 5.8 Factory Reset Use this sub-menu to reset the all menu settings to their Factory default settings. Note: Calibration data is not affected. Reset All Exit 5.9 = resets all menus to their factory default settings. = return to application main screen without resetting any menus. Lockout Use this sub-menu to lock/unlock certain menus. Once locked, a small lock will appear on the menu icon and the user will not be able to enter that menu. Click on a menu and choose: OFF = the menu is unlocked ON = the menu is locked ADVENTURER BALANCES 6. EN-39 LEGAL FOR TRADE (LFT) When the balance is used in trade or a legally controlled application it must be set up, verified and sealed in accordance with local weights and measures regulations. It is the responsibility of the purchaser to ensure that all pertinent legal requirements are met. 6.1 Settings Before verification and sealing, perform the following steps in order: 1. Verify that the menu settings meet the local weights and measures regulations. 2. Verify the units turned On meet the local weights and measures regulations. 3. Perform a calibration as explained in Section 5. 4. Set the position of the Security Switch to the locked position. 5. Set Approved Mode to ON in the Balance Setup menu. Note: When Approved Mode is set to ON, external calibration can’t be performed. 6.2 Verification A weights and measures official or authorized service agent must perform the verification procedure. 6.3 Sealing After the Balance has been verified, it must be sealed to prevent undetected access to the legally controlled settings. Before sealing the device, ensure that the security switch is in the Locked position and the Approved Mode setting in the Balance Setup menu has been set to ON. If using a paper seal, place the seal over the security switch and Bottom Housing as shown. If using a wire seal, pass the sealing wire through the holes in the security switch and Bottom Housing as shown. Un-Locked Locked with Paper Seal Locked with Wire Seal EN-40 7. ADVENTURER BALANCES PRINTING 7.1 Connecting, Configuring and Testing the Printer/Computer Interface Use the built-in RS-232 Port to connect either to a computer or a printer. If connecting to a computer, use HyperTerminal or similar software like SPDC described below. (Find HyperTerminal under Accessories/Communications in Windows XP.) Connect to the computer with a standard (straight-through) serial cable. Choose New Connection, “connect using” COM1 (or available COM port). Select Baud=9600; Parity=8 None; Stop=1; Handshaking=None. Click OK. Choose Properties/Settings, then ASCII Setup. Check boxes as illustrated: (Send line ends…; Echo typed characters…; Wrap lines…) Use RS232 Interface Commands (Section 9.6.1) to control the balance from a PC. Note: When the HyperTerminal configuration is complete, it will automatically print the results of a Cal Test operation, and echo print commands sent to the scale. SPDC Software The Serial Port Data Collection or SPDC software is provided by Ohaus and can be used on operating systems that do not have the HyperTerminal software mentioned above. Choose the export file type and export file path and then press Run as shown below. Note: The SPDC software only supports English language. 7.2 Output Format The Result Data, and G/N/T data, is output in the following format. Field: Length: Label 1 Space 2 Weight 3 Space2 Unit 4 1 11 1 5 Space Stability 5 Space G/N 6 Space 1 1 1 3 0 Term. Characters 7 8 1. The length of the label field is not fixed. 2. Each field is followed by a single delimiting space (ASCII 32). 3. The Weight field is 11 right justified characters. If the value is negative, the “–“ character is located at the immediate left of the most significant digit. 4. The Unit field contains the unit of measure abbreviation up to 5 characters, right justified. 5. The Stability field contains the “?” character if the weight reading is not stable. The Stability field and the following Space field are omitted if the weight reading is stable. 6. The G/N field contains the net or gross indication. For net weights, the field contains “NET”. For gross weights, the field contains nothing, “G”. 7. The Termination Characters field contains CRLF, Four CRLF or Form Feed (ASCII 12), depending on the LINE FEED menu setting. ADVENTURER BALANCES 7.3 EN-41 Printout Examples Percent Weighing Header 1 Header 2 Header 3 Header 4 Header 5 1/15/2014 13:16 Balance ID: B234567890 Balance Type: AX224N Balance Name: Adventurer User Name: ohaus Project Name: ax Weighing Sample Name: apple 1.3651 g NET Gross: 3.9199 g G Net: 1.3651 g NET Tare: 2.5548 g T Minimum Weight: 0.0000 g Signature:____________ Verified By:____________ Parts Counting Header 1 Header 2 Header 3 Header 4 Header 5 1/15/2014 13:19 Balance ID: B234567890 Balance Type: AX224N Balance Name: Adventurer User Name: ohaus Project Name: ax Parts Counting Sample Name: apple Quantity: 4 PCS NET Gross: 94.3343 g G Net: 91.7795 g NET Tare: 2.5548 g T APW: 23.09999 g Sample Size: 23 PCS Signature:____________ Verified By:____________ Dynamic Weighing Density Density Type==Solid Auxiliary liquid==water Porous material==off Header 1 Header 2 Header 3 Header 4 Header 5 1/15/2014 13:31 Balance ID: B234567890 Balance Type: AX224N Balance Name: Adventurer User Name: ohaus Project Name: ax Density Determination Density Determination: 34.1592 g/cm3 Gross: 97.1644 g G Net: 93.2426 g NET Tare: 3.9218 g T Weight in air: 96.0491 g Header 1 Header 2 Header 3 Header 4 Header 5 1/15/2014 13:37 Balance ID: B234567890 Balance Type: AX224N Balance Name: Adventurer User Name: ohaus Project Name: ax Density Determination Density Determination: 13.6849 g/cm3 Type==Solid Auxiliary liquid==water Porous material==on) Weighing Header 1 Header 2 Header 3 Header 4 Header 5 1/15/2014 13:22 Balance ID: B234567890 Balance Type: AX224N Balance Name: Adventurer User Name: ohaus Project Name: ax Dynamic Weighing Sample Name: cat Final wt.: 90.4146 g Gross: 94.3362 g G Net: 90.4144 g NET Tare: 3.9218 g T Averaging Time: 5 s Signature:____________ Verified By:____________ Header 1 Header 2 Header 3 Header 4 Header 5 1/15/2014 13:19 Balance ID: B234567890 Balance Type: AX224N Balance Name: Adventurer User Name: ohaus Project Name: ax Percent Weighing Sample Name: apple Percentage: 91.7795 % NET Gross: 94.3342 g G Net: 91.7795 g NET Tare: 2.5548 g T Reference Weight: 100.0000 g Signature:____________ Verified By:____________ EN-42 ADVENTURER BALANCES Gross: 95.7991 g G Net: 91.8773 g NET Tare: 3.9218 g T Oiled Weight: 98.8827 g Weight in liquid: 91.8773 g Auxiliary liquid: Water Liquid Density: 0.9982 g/cm3 Water Temp.: 20.0 ℃ Porous Material: On Oil Density: 0.8000 g/cm3 Dry Weight: 96.0490 g Signature:____________ Verified By:____________ Weight in liquid: 93.2426 g Auxiliary liquid: Water Liquid Density: 0.9982 g/cm3 Water Temp.: 20.0 ℃ Porous Material: Off Signature:____________ Verified By:____________ Density Density Check Weighing Type==Solid Auxiliary liquid==other Porous material==on Header 1 Header 2 Header 3 Header 4 Header 5 1/15/2014 13:50 Balance ID: B234567890 Balance Type: AX224N Balance Name: Adventurer User Name: ohaus Project Name: ax Density Determination Density Determination: 4.7794 g/cm3 Gross: 93.2556 g G Net: 89.3338 g NET Tare: 3.9218 g T Oiled Weight: 110.5639 g Weight in liquid: 89.3338 g Auxiliary liquid: Other Liquid Density: 1.0000 g/cm3 Porous Material: On Oil Density: 0.8000 g/cm3 Dry Weight: 101.7253 g Signature:____________ Verified By:____________ Type==liquid Sinker volume==10ml Liquid temp==26℃ Header 1 Header 2 Header 3 Header 4 Header 5 1/15/2014 13:56 Balance ID: B234567890 Balance Type: AX224N Balance Name: Adventurer User Name: ohaus Project Name: ax Density Determination Density Determination: 0.7171 g/cm3 Gross: 97.5185 g G Net: 93.5967 g NET Tare: 3.9218 g T Sinker weight in air: 100.7676 g Sinker weight in liquid: 93.5963 g Sinker Volume: 10.0 ml Liquid Temp.: 26.0 ℃ Signature:____________ Verified By:____________ Type==liquid Sinker volume==10ml Liquid temp==26℃ Header 1 Header 2 Header 3 Header 4 Header 5 1/15/2014 13:57 Balance ID: B234567890 Balance Type: AX224N Balance Name: Adventurer User Name: ohaus Project Name: ax Check Weighing Sample Name: apple 93.5966 g NET Result: Accept Gross: 97.5184 g G Net: 93.5966 g NET Tare: 3.9218 g T Over Limit: 4199.9900 g Under Limit: 0.1000 g Signature:____________ Verified By:____________ Signature:____________ Verified By:____________ ADVENTURER BALANCES EN-43 Display Hold Header 1 Header 2 Header 3 Header 4 Header 5 1/15/2014 13:59 Balance ID: B234567890 Balance Type: AX224N Balance Name: Adventurer User Name: ohaus Project Name: ax Display Hold Sample Name: apple Hold Weight: 93.5968 g Gross: 97.5185 g G Net: 93.5967 g NET Tare: 3.9218 g T Mode: Display Hold Signature:____________ Verified By:____________ Totalization Formulation Header 1 Header 2 Header 3 Header 4 Header 5 1/15/2014 14:11 Balance ID: B234567890 Balance Type: AX224N Balance Name: Adventurer User Name: ohaus Project Name: ax Totalization Total: 734.6187 g Net Gross: 93.2557 g G Net: 89.3339 g NET Tare: 3.9218 g T Samples: 8 Average: 91.8273 g Standard Deviation: 1.9790 g Minimum: 89.3339 g Maximum: 93.5965 g Range: 4.2626 g -----Sample Data (g)---1 93.5964 2 93.5964 3 93.5964 4 93.5965 5 92.2312 6 89.3340 7 89.3339 8 89.3339 Signature:____________ Verified By:____________ Header 1 Header 2 Header 3 Header 4 Header 5 1/15/2014 14:22 Balance ID: B234567890 Balance Type: AX224N Balance Name: Adventurer User Name: ohaus Project Name: ax Formulation Comp. Total: 11.4528 g Filler: 2.8063 g Total: 14.2590 g Gross: 18.1806 g ? G Net: 2.8063 g ? NET Tare: 15.3742 g T -----Sample Data (g)----Item 1: 1.7529 g Item 2: 2.5569 g Item 3: 1.3553 g Item 4: 1.3070 g Item 5: 1.6743 g Item 6: 2.8062 g Signature:____________ Verified By:____________ EN-44 ADVENTURER BALANCES 8. MAINTENANCE 8.1 Calibration Periodically verify calibration by placing an accurate weight on the balance and viewing the result. If calibration is required, refer to section 5.2 for instructions. 8.2 Cleaning WARNING: Disconnect the Adventurer Balance from the power supply before cleaning. Make sure that no liquid enters the interior of the balance. Clean the Balance at regular intervals. Housing surfaces may be cleaned with a lint-free cloth slightly dampened with water or a mild cleaning agent. Glass surfaces may be cleaned with a commercial glass cleaner. Please follow the steps below on how to remove and install the sliding doors. Attention: Do not use solvents, harsh chemicals, ammonia or abrasive cleaning agents. Removing and reinstalling the glass doors for cleaning: Step 1. On the back of the balance, press the pin and slide out the door. 8.3 Step 2. After cleaning, slide the doors into the slot while pressing the pin mentioned in step 1. Step 3. Slide the doors into the slot until the back stopper aligns with the other door. Troubleshooting TABLE 8-1. TROUBLESHOOTING Symptom / Display 8.4 Possible Cause Remedy Balance will not turn on No power to Balance Verify connection and voltage Poor accuracy Improper calibration Unstable environment Perform calibration Move balance to suitable location Cannot calibrate Calibration Menu locked Approved Mode set to on Unstable environment Incorrect calibration masses Turn Calibration menu lock off Turn Approved Mode off Move balance to suitable location Use correct calibration masses Cannot change menu settings Sub-menu locked Approved Mode set to on Unlock sub-menu Turn Approved Mode off Low Reference weight Reference weight too small The weight on the pan is too small to define a valid reference weight. Increase sample size Invalid Piece Weight Average piece weight is too small Increase average piece weight Operation Timeout Weight reading is not stable Move balance to suitable location ------ Busy (tare, zero, printing, waiting for a stable weight) Wait until completion Service Information If the troubleshooting section does not resolve your problem, contact an Authorized Ohaus Service Agent. Please visit our website www.ohaus.com to locate the Ohaus office nearest you. An Ohaus Product Service Specialist will be available to assist you. ADVENTURER BALANCES 9. TECHNICAL DATA 9.1 Specifications Ambient conditions Indoor use only Altitude: Up to 2000 m Specified Temperature range: 10°C to 30°C Humidity: maximum relative humidity 80 % for temperatures up to 30°C decreasing linearly to 50% relative humidity at 40°C Mains supply voltage fluctuations: up to ±10% of the nominal voltage Installation category II Pollution degree: 2 Materials Bottom Housing; die-cast Aluminum, Painted Top Housing: Plastic (ABS) Weighing Platforms: 18/10 stainless steel Draft Shield: Glass, plastic (ABS) Feet: Plastic (ABS) EN-45 EN-46 ADVENTURER BALANCES TABLE 9-1. SPECIFICATIONS Model: Capacity Readability d Repeatability (std. dev.) (g) Linearity (g) Span Calibration Points (g) Calibration Weighing units Applications Stabilization time (typical) Sensitivity Temperature Drift (PPM/K) Typical Min-Weight USP (u=0.10%,k=2) Optimized Min-Weight USP (u=0.10%,k=2) Display Display size Backlight Controls Communication Balance power input Power supply AX124 120g AX124/E 120g AX224 220g 0.0001g 0.0001g ±0.0002g AX224/E 220g AX324 320g 50g, 100g 100g 150g, 200g, 300g 200g Auto-Cal External Auto-Cal External Auto-Cal Baht, carat, grain, gram, milligram, mesgal, momme, Newton, ounce, pennyweight, pound, Tael (Hong Kong), Tael, (Singapore), Tael (Taiwan), tical, tola, troy ounce, custom (1) Weighing, Parts Counting, Percent Weighing, Check Weighing, Animal Weighing, Formulation, Density Determination, Totalization, Display Hold ≤ 3 seconds 25g, 50g 75g, 100g 25g, 50g 75g, 100g 50g, 100g 150g, 200g 1.5 0.20 g 0.082 g Full-Color WQVGA Graphic LCD 4.3 in / 10.9 cm (diagonal) White LED 4-wire resistive touch screen + 6 membrane keys RS-232, USBx2 12 VDC, 0.5A AC Adapter Input: 100-240 VAC 0.3A 50-60 Hz AC Adapter Output: 12 VDC 0.84A Platform size (diameter) 90 mm / 3.5 in Assembled dimensions (W x D x H) Shipping dimensions (W x D x H) Net weight Shipping weight 230 x 354 x 340 mm 9.1 x 13.9 x 13.4 inch 387 x 507 x 531 mm 15.4 x 20.0 x 20.9 inch 5.1 Kg / 11.3 lb 7.8 Kg / 17.2 lb ADVENTURER BALANCES Model: Capacity Readability d Repeatability (std. dev.) (g) Linearity (g) Span Calibration Points (g) Calibration Weighing units Applications EN-47 TABLE 9-2. SPECIFICATIONS (continued) AX223 AX223/E AX423 AX423/E 220g 220g 420g 420g 0.001g AX523/E 520g 0.001g ±0.002g 50g, 100g, 50g, 100g 100g 200g 100g, 200g 200g, 300g 200g, 300g 150g, 150g, 300g, 300g, 400g 400g, 500g 400g, 500g 200g 200g 400g Auto-Cal External Auto-Cal External Auto-Cal External Baht, carat, grain, gram, milligram, mesgal, momme, Newton, ounce, pennyweight, pound, Tael (Hong Kong), Tael, (Singapore), Tael (Taiwan), tical, tola, troy ounce, custom (1) Weighing, Parts Counting, Percent Weighing, Check Weighing, Animal Weighing, Formulation, Density Determination, Totalization, Display Hold Stabilization time (typical) Sensitivity Temperature Drift (PPM/K) Typical Min-Weight USP (u=0.10%,k=2) Optimized MinWeight USP (u=0.10%,k=2) ≤ 2 seconds 3 2.0 g 0.82 g Display Full-Color WQVGA Graphic LCD Display size Backlight Controls Communication Balance power input 4.3 in / 10.9 cm (diagonal) White LED 4-wire resistive touch screen + 6 membrane keys RS-232, USBx2 12 VDC, 0.5A AC Adapter Input: 100-240 VAC 0.3A 50-60 Hz AC Adapter Output: 12 VDC 0.84A Power supply Platform size (diameter) Assembled dimensions (W x D x H) Shipping dimensions (W x D x H) Net weight Shipping weight AX523 520g 130 mm / 5.1 in 230 x 354 x 340 mm 9.1 x 13.9 x 13.4 inch 387 507 x 531 mm 15.4 x 20.0 x 20.9 inch 5.8Kg/12.8lb 8.5Kg/18.8lb 5.6Kg/12.4lb 8.3Kg/18.3lb 5.8Kg/12.8lb 8.5Kg/18.8lb 5.6Kg/12.4lb 8.3Kg/18.3lb 5.8Kg/12.8lb 8.5Kg/18.8lb 5.6Kg/12.4lb 8.3Kg/18.3lb EN-48 ADVENTURER BALANCES TABLE 9-3. SPECIFICATIONS (continued) Model: Capacity Readability d Repeatability (std. dev.) (g) Linearity (g) Span Calibration Points (g) Calibration Weighing units Applications AX422 420g AX422/E 420g AX822/E 820g 200g, 400g 600g, 800g Auto-Cal 200g, 400g 600g, 800g External 0.01g 0.01g ±0.02g 100g, 200g 300g,400g Auto-Cal 100g, 200g 300g,400g External Baht, carat, grain, gram, kilogram, mesgal, momme, Newton, ounce, pennyweight, pound, Tael (Hong Kong), Tael, (Singapore), Tael (Taiwan), tical, tola, troy ounce, custom (1) Weighing, Parts Counting, Percent Weighing, Check Weighing, Animal Weighing, Formulation, Density Determination, Totalization, Display Hold Stabilization time (typical) Sensitivity Temperature Drift (PPM/K) ≤ 1.5 seconds 3 Typical Min-Weight USP(u=0.10%,k=2) 20.0 g Optimal MinWeight USP(u=0.10%,k=2) 8.2 g Display Display size Backlight Controls Communication Balance power input AX822 820g Full-Color WQVGA Graphic LCD 4.3 in / 10.9 cm (diagonal) White LED 4-wire resistive touch screen + 6 membrane keys RS-232, USBx2 12 VDC, 0.5A Power supply AC Adapter Input: 100-240 VAC 0.3A 50-60 Hz AC Adapter Output: 12 VDC 0.84A Platform size 175 x 195 mm / 6.9 x 7.7 in Assembled dimensions (W x D x H) Shipping dimensions (W x D x H) Net weight Shipping weight 230 x 354 x100 mm 9.1 x 13.9 x 4.0 inch 392 x 557 x 301 mm 15.5 x 22.0 x 11.9 inch 4.6Kg/10.2lb 6.5Kg/14.4b 3.9Kg/8.6lb 5.8Kg/12.8b 4.6Kg/10.2lb 6.5Kg/14.4b 3.9Kg/8.6lb 5.8Kg/12.8b ADVENTURER BALANCES EN-49 TABLE 9-4. SPECIFICATIONS (continued) Model: Capacity Readability d Repeatability (std. dev.) (g) Linearity (g) Span Calibration Points (g) Calibration Weighing units Applications AX1502 1520g AX1502/E 1520g AX2202 2200g AX2202/E 2200g 0.01g AX4202 4200g AX4202/E AX5202 4200g 5200g 0.01g ±0.02g 500g, 500g, 1000g, 1000g, 2000g, 500g 500g 1000g 1000g 2000g 2000g 3000g 1000g, 1000g, 1500g, 1500g, 3000g, 3000g, 4000g, 1500g 1500g 2000g 2000g 4000g 4000g 5000g Auto-Cal External Auto-Cal External Auto-Cal External Auto-Cal Baht, carat, grain, gram, kilogram, mesgal, momme, Newton, ounce, pennyweight, pound, Tael (Hong Kong), Tael, (Singapore), Tael (Taiwan), tical, tola, troy ounce, custom (1) Weighing, Parts Counting, Percent Weighing, Check Weighing, Animal Weighing, Formulation, Density Determination, Totalization, Display Hold Stabilization time (typical) Sensitivity Temperature Drift (PPM/K) ≤ 1.5 seconds 3 1.9 Typical Min-Weight USP(u=0.10%,k=2) 20.0 g Optimal MinWeight USP(u=0.10%,k=2) 8.2 g Display Full-Color WQVGA Graphic LCD Display size Backlight Controls Communication Balance power input 4.3 in / 10.9 cm (diagonal) White LED 4-wire resistive touch screen + 6 membrane keys RS-232, USBx2 12 VDC, 0.5A Power supply AC Adapter Input: 100-240 VAC 0.3A 50-60 Hz AC Adapter Output: 12 VDC 0.84A Platform size 175 x 195 mm / 6.9 x 7.7 in Assembled dimensions (W x D x H) Shipping dimensions (W x D x H) Net weight Shipping weight 230 x 354 x100 mm 9.1 x 13.9 x 4.0 inch 392 x 557 x 301 mm 15.5 x 22.0 x 11.9 inch 4.6Kg/ 10.2lb 6.5Kg/ 14.4b 3.9Kg/ 8.6lb 5.8Kg/ 12.8b 4.6Kg/ 10.2lb 6.5Kg/ 14.4b 3.9K/ 8.6lb 5.8Kg/ 12.8b 4.6Kg/ 10.2lb 6.5Kg/ 14.4b 3.9Kg/ 8.6lb 5.8Kg/ 12.8b 3.8Kg/ 8.4lb 5.7Kg/ 12.6lb EN-50 Model: Capacity Readability d Repeatability (std. dev.) (g) Linearity (g) Span Calibration Points (g) Calibration Weighing units Applications ADVENTURER BALANCES AX2201 2200g TABLE 9-5. SPECIFICATIONS (continued) AX4201 AX4201/E AX2201/E 4200g 4200g 2200g 0.1g AX8201 8200g 0.1g ±0.2g 1000g, 1000g, 2000g, 2000g, 500g, 1000g 500g, 1000g 2000g 2000g 4000g 4000g 3000g, 3000g, 6000g, 6000g, 1500g, 2000g 1500g, 2000g 4000g 4000g 8000g 8000g Auto-Cal External Auto-Cal External Auto-Cal External Baht, carat, grain, gram, kilogram, mesgal, momme, Newton, ounce, pennyweight, pound, Tael (Hong Kong), Tael, (Singapore), Tael (Taiwan), tical, tola, troy ounce, custom (1) Weighing, Parts Counting, Percent Weighing, Check Weighing, Animal Weighing, Formulation, Density Determination, Totalization, Display Hold Stabilization time (typical) Sensitivity Temperature Drift (PPM/K) Typical MinWeight USP (u=0.10%,k=2) Optimized MinWeight USP (u=0.10%,k=2) ≤ 1.5 seconds 9 200.0 g 82 g Display Full-Color WQVGA Graphic LCD Display size Backlight Controls Communication Balance power input 4.3 in / 10.9 cm (diagonal) White LED 4-wire resistive touch screen + 6 membrane keys RS-232, USBx2 12 VDC, 0.5A Power supply AC Adapter Input: 100-240 VAC 0.3A 50-60 Hz AC Adapter Output: 12 VDC 0.84A Platform size 175 x 195 mm / 6.9 x 7.7 in Assembled dimensions (W x D x H) Shipping dimensions (W x D x H) Net weight Shipping weight AX8201/E 8200g 230 x 354 x 100 mm 9.1 x 13.9 x 4.0 inch 392 x 557 x 301 mm 15.5 x 22.0 x 11.9inch 4.6Kg/10.2lb 6.5Kg/14.4b 3.9Kg/8.6lb 5.8Kg/12.8b 4.6Kg/10.2lb 6.5Kg/14.4b 3.9Kg/8.6lb 5.8Kg/12.8b 3.8Kg/8.4lb 5.7Kg/12.6lb 3.4Kg/7.5lb 5.3Kg/11.6lb ADVENTURER BALANCES EN-51 TABLE 9-6. SPECIFICATIONS (continued) MODEL AX124M AX224M AX324M AX223M AX423M AX523M AX1502M AX2202M AX4202M AX5202M AX8201M Max 120g 220g 320g 220g 420g 520g 1520g 2200g 4200g 5200g 8200g Min 0.01g 0.01g 0.01g 0.02g 0.02g 0.02g 0.5g 0.5g 0.5g 0.5g 5g d= 0.0001g 0.001g 0.01g 0.1g e= 0.001g 0.01g 0.1g 1g 0.01g 0.1g Approval Class I Repeatability (std. dev.) (g) 0.0001g Linearity (g) ±0.0002g II 0.001g ±0.002g 50g, 100g 150g, 200g ± 0.2g ±0.02g Span Calibration Points (g) 25g, 50g 75g, 100g 2000g, 3000g 4000g, 5000g 2000g, 4000g 6000g, 8000g Calibration Auto-Cal Auto-Cal Auto-Cal Auto-Cal Auto-Cal Auto-Cal Auto-Cal Auto-Cal Auto-Cal Auto-Cal Auto-Cal Weighing units Applications 100g 200g, 300g 50g, 100g 150g, 200g 100g, 200g 300g, 400g 200g, 300g 400g, 500g 500g 1000g, 1500g 500g, 1000g 1500g, 2000g milligram, gram, carat kilogram, gram, carat Weighing, Parts Counting, Percent Weighing, Check Weighing, Animal Weighing, Formulation, Density Determination, Totalization, Display Hold Stabilization time ≤ 3 seconds (typical) Sensitivity Temperature Drift 1.5 (PPM/K) Typical MinWeight USP 0.20 g 0.20 g 0.20 g (u=0.10%,k=2) Optimal MinWeight USP 0.082 g 0.082 g 0.082 (u=0.10%,k=2) Display ≤2 seconds ≤1.5 seconds 3 3 1.9 2.0 g 2.0 g 2.0 g 20.0 g 20.0 g 20.0 g 20.0 g 200.0 g 0.82 g 0.82 g 0.82 g 8.2 g 8.2 g 8.2 g 8.2 g 82 g Full-Color WQVGA Graphic LCD Display size 4.3 in / 10.9 cm (diagonal) Backlight White LED Controls 4-wire resistive touch screen + 6 membrane keys Communication RS-232, USBx2 Balance power input 12 VDC, 0.5A Power supply AC Adapter Input: 100-240 VAC 0.3A 50-60 Hz AC Adapter Output: 12 VDC 0.84A Platform size (diameter) Assembled dimensions (W x D x H) Shipping dimensions (W x D x H) 1000g, 2000g 3000g, 4000g 90 mm / 3.5 in 130 mm / 5.1 in 175x195 mm / 6.9x7.7 in 230 x 354 x 340 mm 9.1 x 13.9 x 13.4 inch 230 x 354 x 340 mm 9.1 x 13.9 x 13.4 inch 230 x 354 x 100 mm 9.1 x 13.9 x 4.0 inch 387 x 507 x 531 mm 15.4 x 20.0 x 20.9 inch 387 x 507 x 531 mm 15.4 x 20.0 x 20.9 inch 392 x 557 x 301 mm 15.5 x 22.0 x 11.9 inch Net weight 5.1 Kg / 11.3 lb 5.8 Kg / 12.8 lb 4.6 Kg / 10.2 lb 3.8 Kg / 8.4 lb Shipping weight 7.8 Kg / 17.2 lb 8.5 Kg / 18.8 lb 6.5 Kg / 14.4 lb 5.7 Kg / 12.6 lb Note: M = OIML Approved EN-52 ADVENTURER BALANCES TABLE 9-7. SPECIFICATIONS (continued) Model AX224N AX223N/E AX423N AX 423N/E AX523N/E AX1502N/E AX2202N/E AX4202N/E AX8201N/E Max 220g 220g 420g 420g 520g 1520g 2200g 4200g 8200g Min 0.01g 0.02g 0.02g 0.02g 0.02g 0.5g 0.5g 0.5g 5g d= 0.0001g 0.001g 0.01g 0.1g e= 0.001g 0.01g 0.1g 1g 0.001g 0.01g 0.1g ±0.002g ±0.02g ±0.2g 500g 500g, 1000g 1000g, 2000g 1000g, 1500g 1500g, 2000g 3000g, 4000g 2000g, 4000g 6000g, 8000g Approval Class I Repeatability (std. dev.) (g) 0.0001g Linearity (g) ±0.0002g II Span Calibration Points (g) 50g, 100g 50g, 100g 150g, 150g, 200g 200g Calibration Auto-Cal Stabilization time (typical) Sensitivity Temperature Drift (PPM/K) Typical Min-Weight USP (u=0.10%,k=2) Optimal Min-Weight USP (u=0.10%,k=2) 100g, 200g 300g, 400g 200g, 300g 400g, 500g Auto-Cal External External External gram, milligram, carat, pennyweight, grain, ounce, troy ounce Weighing units Applications External 100g, 200g 300g, 400g External 1.5 gram, kilogram, carat, pennyweight, grain, pound, ounce, troy ounce 3 3 2.0 g 2.0 g 2.0 g 2.0 g 20.0 g 20.0 g 20.0 g 200.0 g 0.082 g 0.82 g 0.82 g 0.82 g 0.82 g 8.2 g 8.2 g 8.2 g 82 g Full-Color WQVGA Graphic LCD 4.3 in / 10.9 cm (diagonal) Backlight White LED Controls 4-wire resistive touch screen + 6 membrane keys Communication RS-232, USBx2 Balance power input 12 VDC, 0.5A Power supply AC Adapter Input: 100-240 VAC 0.3A 50-60 Hz AC Adapter Output: 12 VDC 0.84A 90 mm / 3.5 in 130 mm / 5.1 in Assembled dimensions (W x D x H) 175x195 mm / 6.9x7.7 in 354x230x340 mm 13.9x9.1x13.4 inch Shipping dimensions (W x D x H) Shipping weight 9 0.20g Display size Net weight External Weighing, Parts Counting, Percent Weighing, Check Weighing, Animal Weighing, Formulation, Density Determination, Totalization ≤3 ≤2 seconds ≤1.5 seconds seconds Display Platform size (diameter) External 354x230x100 mm 13.9x9.1x4.0 inch 557x392x301 mm 22.0x15.5x11.9 inch 5.1 Kg / 11.3 lb 7.8 Kg / 17.2 lb 5.6 Kg / 12.4 lb 8.3 Kg / 18.3 lb Note: N = NTEP Approved 5.8 Kg / 12.8 lb 8.5 Kg / 18.8 lb 5.6 Kg / 12.4 lb 3.9 Kg / 8.6 lb 8.3 Kg / 18.3 lb 5.8 Kg / 12.8 lb 3.4 Kg / 7.5 lb 5.3 Kg / 11.6 lb ADVENTURER BALANCES EN-53 TABLE 9-8. SPECIFICATIONS (continued) MODEL AX124AU AX224AU AX324AU AX223AU AX423AU AX523AU AX1502AU AX2202AU AX4202AU AX5202AU AX8201AU Max 120g 220g 320g 220g 420g 520g 1520g 2200g 4200g 5200g 8200g Min 0.01g 0.01g 0.01g 0.02g 0.02g 0.02g 0.5g 0.5g 0.5g 0.5g 5g d= 0.0001g 0.001g 0.01g 0.1g e= 0.001g 0.01g 0.1g 1g 0.01g 0.1g Approval Class I Repeatability (std. dev.) (g) 0.0001g Linearity (g) ±0.0002g II 0.001g ±0.002g ± 0.2g Span Calibration Points (g) 25g, 50g 75g, 100g 2000g, 4000g 6000g, 8000g Calibration Auto-Cal Auto-Cal Auto-Cal Auto-Cal Auto-Cal Auto-Cal Auto-Cal Auto-Cal Auto-Cal Auto-Cal Auto-Cal Applications 100g 200g, 300g 50g, 100g 150g, 200g ±0.02g 2000g, 3000g 4000g, 5000g Weighing units 50g, 100g 150g, 200g 100g, 200g 300g, 400g 200g, 300g 400g, 500g 500g 1000g, 1500g 500g, 1000g 1500g, 2000g milligram, gram, carat kilogram, gram, carat Weighing, Parts Counting, Percent Weighing, Check Weighing, Animal Weighing, Formulation, Density Determination, Totalization, Display Hold Stabilization time ≤ 3 seconds (typical) Sensitivity Temperature Drift 1.5 (PPM/K) Typical MinWeight USP 0.20 g 0.20 g 0.20 g (u=0.10%,k=2) Optimal MinWeight USP 0.082 g 0.082 g 0.082 (u=0.10%,k=2) Display ≤2 seconds ≤1.5 seconds 3 3 1.9 2.0 g 2.0 g 2.0 g 20.0 g 20.0 g 20.0 g 20.0 g 200.0 g 0.82 g 0.82 g 0.82 g 8.2 g 8.2 g 8.2 g 8.2 g 82 g Full-Color WQVGA Graphic LCD Display size 4.3 in / 10.9 cm (diagonal) Backlight White LED Controls 4-wire resistive touch screen Communication RS-232, USBx2 Balance power input 12 VDC, 0.5A Power supply AC Adapter Input: 100-240 VAC 0.3A 50-60 Hz AC Adapter Output: 12 VDC 0.84A Platform size (diameter) Assembled dimensions (W x D x H) Shipping dimensions (W x D x H) 1000g, 2000g 3000g, 4000g 90 mm / 3.5 in 130 mm / 5.1 in 175x195 mm / 6.9x7.7 in 230 x 354 x 340 mm 9.1 x 13.9 x 13.4 inch 230 x 354 x 340 mm 9.1 x 13.9 x 13.4 inch 230 x 354 x 100 mm 9.1 x 13.9 x 4.0 inch 387 x 507 x 531 mm 15.4 x 20.0 x 20.9 inch 387 x 507 x 531 mm 15.4 x 20.0 x 20.9 inch 392 x 557 x 301 mm 15.5 x 22.0 x 11.9 inch Net weight 5.1 Kg / 11.3 lb 5.8 Kg / 12.8 lb 4.6 Kg / 10.2 lb 3.8 Kg / 8.4 lb Shipping weight 7.8 Kg / 17.2 lb 8.5 Kg / 18.8 lb 6.5 Kg / 14.4 lb 5.7 Kg / 12.6 lb EN-54 9.2 ADVENTURER BALANCES Drawings and Dimensions Fully assembled dimensions Figure 9-1. Draft Shield models Figure 9-2. Non-Draft Shield models 9.3 Parts and Accessories TABLE 9-5. ACCESSORIES DESCRIPTION Auxiliary Display Density Kit Cable, USB Device (Type A-B) Security Device (Laptop Lock) RS232 Cable, PC 25 Pin RS232 Cable, PC 9 Pin Dust Cover PART NUMBER 80251396 80253384 83021085 80850043 80500524 80500525 30093334 ADVENTURER BALANCES 9.4 EN-55 Communication 9.4.1 Interface Commands Commands listed in the following table will be acknowledged by the balance. The balance will return “ES” for invalid commands. TABLE 9-6. ADVENTURER INTERFACE COMMAND LIST Command Characters IP P CP SP SLP SLZP xP 0P H Z T xT PT ON OFF C IC AC PSN PV x# P# x% P% xS xRL Function Immediate Print of displayed weight (stable or unstable). Print displayed weight (stable or unstable). Continuous Print. Print on Stability. Auto Print stable non-zero displayed weight. Auto Print stable non-zero weight and stable zero reading. Interval Print x = Print Interval (1-3600 sec) 0P ends interval Print See above Enter Print Header Lines Same as pressing Zero Key Same as pressing Tare Key. Establish a preset Tare value in displayed unit. X = preset tare value. Sending 0T clears tare (if allowed). Prints Tare weight stored in memory. Brings out of Standby Goes to Standby. Begin Span Calibration Begin internal Calibration, same as trigger from calibration menu. Abort Calibration. Attention: when LFT ON, the operation is not allowed. Print Serial Number. Print terminal software version, base software version and LFT ON (if LFT is set ON). Set Counting APW (x) in grams. (must have APW stored) Print Counting application APW. Set Percent application reference weight (x) in grams. (must have reference weight stored) Print Percent application reference weight. 0 = print unstable data, same as IP; 1 = print stable only1), same as SP. 0 = disable response; 1 = enable response. This command only controls the “OK!” response. EN-56 9.4.2 ADVENTURER BALANCES RS232 (DB9) Pin Connections Data GND Pin 2: Balance transmit line (TxD) Pin 3: Balance receive line (RxD) Pin 5: Ground signal (GND) Pin 7: Clear to send (hardware handshake) (CTS) Pin 8: Request to send (hardware handshake) (RTS) 9.5 1 5 9 Female 6 Handshake The USB Interface The Ohaus USB Interface is a unique solution to the problem of connecting a balance to a computer using a Universal Serial Bus (USB). USB devices are categorized into classes such as disk drives, digital cameras, printers, etc. Balances do not have a commonly used class so the Ohaus USB interface uses a generic interface based on the RS232 serial standard. Data sent from the balance to a computer is in USB format. The USB data is directed to a virtual port. This port then appears as an RS232 port to the application program. When sending a command from a computer to the balance, the application program sends a command to the virtual port as if it were an RS232 port. The computer then directs the command from the virtual port to the computers USB connector where the balance is connected. The port receives the USB signal and reacts to the command. The USB Interface includes a CD with the software drivers to create the required virtual port on the computer. System Requirements PC running Windows 98®, Windows 98SE®, Windows ME®, Windows 2000®, Windows XP®, Windows 7® or Windows 8® (32-bit). Available USB port (Type A, 4-pin, female) USB Connection The balance’s USB port terminates with a 4-pin, female, USB Type B connector. A USB Cable (type B/male to type A/male) is required (not supplied). 1. Ensure that the balance is powered on and working properly. 2. Power on the computer and verify that its USB port is enabled and working properly. 3. Plug the cable’s USB connectors into the computer’s USB port and the balance’s USB port. Windows® should detect a USB device and the New Hardware Wizard will be initialized. Virtual Port Software Installation 1. Insert the supplied CD into the computer’s CD drive. Different versions of Windows® have slightly different steps to load the driver that is on the CD. In all versions the New Hardware Wizard guides you through the required steps to select the driver that is located on the CD. 2. After clicking Finish, the virtual port should be ready for use. Windows® typically adds the virtual port in sequence after the highest number COM port. For example, on PC’s equipped with up to 4 COM ports, the virtual port will be COM5. When using the USB interface with programs that limit the number of COM port designations (e.g. Ohaus MassTracker allows only COM1, 2, 3, & 4), it may be necessary to assign one of these port numbers to the new virtual port. Example of Windows XP Hardware Wizard This can be done in the Port Settings of the Device Manager utility, found in the Windows Control Panel. ADVENTURER BALANCES EN-57 USB INPUT The balance will respond to various commands sent via the interface adapter. Terminate the following commands when with a [CR] or [CRLF]. Adventurer Commands zC perform span calibration 0S print unstable data 1S print stable data only P same as pressing Print SP print stable weight only IP immediate print of displayed weight (stable or unstable) CP Continuous print of weights SLP Auto-print stable non-zero weight only SLZP Auto-print stable non-zero weight and zero reading xP Auto-print on 1 to 3600 second intervals (x = 1 to 3600) 0P Ends interval print T same as pressing Tare Z same as pressing Zero PV print software version Auto-Print Operation Once Auto-Print is activated in the menu, the balance will send data as required. If there is data in the print buffer the printer will finish printing this data. 10. SOFTWARE UPDATES Ohaus is continuously improving its balance software. To obtain the latest release, please contact your Authorized Ohaus Dealer or Ohaus Corporation. EN-58 11. ADVENTURER BALANCES COMPLIANCE Compliance to the following standards is indicated by the corresponding mark on the product. Mark Standard This product conforms to the EMC Directive 2004/108/EC, the Low Voltage Directive 2006/95/EC and the Non-automatic Weighing Instruments Directive 2009/23/EC. The complete Declaration of Conformity is available online at http://europe.ohaus.com/europe/en/home/support/compliance/ce-declaration-of-conformity.aspx. AS/NZS CISPR 11, AS/NZS 61000.4.3 CAN/CSA-C22.2 No. 61010-1-12 UL Std. No. 61010-1 (3rd edition) Important notice for verified weighing instruments Weighing instruments verified at the place of manufacture bear one of the preceding marks on the packing label and the green ‘M’ (metrology) sticker on the descriptive plate. They may be put into service immediately. Weighing instruments to be verified in two stages have no green ‘M’ (metrology) on the descriptive plate and bear one of the preceding identification marks on the packing label. The second stage of the initial verification must be carried out by the approved service organization of the authorized representative within the EC or by the national weights and measures (W+M) authorities. The first stage of the initial verification has been carried out at the manufacturer’s work. It comprises all tests according to the adopted European standard EN45501:1992, paragraph 8.2.2. If national regulations limit the validity period of the verification, the user of the weighing instrument must strictly observe the re-verification period and inform the respective W+M authorities. FCC Note This equipment has been tested and found to comply with the limits for a Class A digital device, pursuant to Part 15 of the FCC Rules. These limits are designed to provide reasonable protection against harmful interference when the equipment is operated in a commercial environment. This equipment generates, uses, and can radiate radio frequency energy and, if not installed and used in accordance with the instruction manual, may cause harmful interference to radio communications. Operation of this equipment in a residential area is likely to cause harmful interference in which case the user will be required to correct the interference at his own expense. Industry Canada Note This Class A digital apparatus complies with Canadian ICES-001. ADVENTURER BALANCES EN-59 ISO 9001 Registration In 1994, OHAUS Corporation, USA, was awarded a certificate of registration to ISO 9001 by Bureau Veritus Quality International (BVQI), confirming that the OHAUS quality management system is compliant with the ISO 9001 standard’s requirements. On June 21, 2012, OHAUS Corporation, USA, was re-registered to the ISO 9001:2008 standard. In conformance with the European Disposal In conformance with the European Directive 2002/96/EC on Waste Electrical and Electronic Equipment (WEEE) this device may not be disposed of in domestic waste. This also applies to countries outside the EU, per their specific requirements. The Batteries Directive 2006/66/EC introduces new requirements from September 2008 on removability of batteries from waste equipment in EU Member States. To comply with this Directive, this device has been designed for safe removal of the batteries at end-of-life by a waste treatment facility. Please dispose of this product in accordance with local regulations at the collecting point specified for electrical and electronic equipment. If you have any questions, please contact the responsible authority or the distributor from which you purchased this device. Should this device be passed on to other parties (for private or professional use), the content of this regulation must also be related. For disposal instructions in Europe, refer to http://europe.ohaus.com/europe/en/home/support/weee.aspx Thank you for your contribution to environmental protection. EN-60 ADVENTURER BALANCES LIMITED WARRANTY Ohaus products are warranted against defects in materials and workmanship from the date of delivery through the duration of the warranty period. During the warranty period Ohaus will repair, or, at its option, replace any component(s) that proves to be defective at no charge, provided that the product is returned, freight prepaid, to Ohaus. This warranty does not apply if the product has been damaged by accident or misuse, exposed to radioactive or corrosive materials, has foreign material penetrating to the inside of the product, or as a result of service or modification by other than Ohaus. In lieu of a properly returned warranty registration card, the warranty period shall begin on the date of shipment to the authorized dealer. No other express or implied warranty is given by Ohaus Corporation. Ohaus Corporation shall not be liable for any consequential damages. As warranty legislation differs from state to state and country to country, please contact Ohaus or your local Ohaus dealer for further details. BALANZAS ADVENTURER ES-1 ÍNDICE 1. INTRODUCCIÓN ....................................................................................................................3 1.1 1.2 1.3 1.4 Descripción................................................................................................................................................... 3 Características ............................................................................................................................................. 3 Definición de palabras de advertencia y símbolos de advertencia .............................................................. 3 Precauciones de seguridad .......................................................................................................................... 3 2. INSTALACIÓN .......................................................................................................................4 2.1 2.2 2.3 2.4 2.5 2.6 Desempaquetado ......................................................................................................................................... 4 Selección de la ubicación ............................................................................................................................. 4 Nivelación del equipo ................................................................................................................................... 4 Conexión a la red eléctrica........................................................................................................................... 5 Conexión de la interfaz ................................................................................................................................ 5 Calibración inicial ......................................................................................................................................... 5 3. FUNCIONAMIENTO ...............................................................................................................6 3.1 3.2 3.3 3.4 Resumen de la pantalla, pantalla de inicio .................................................................................................. 6 Funciones más importantes y Menú de Inicio .............................................................................................. 7 Resumen de piezas y funciones – Modelos con protección contra corrientes de aire ................................ 8 Resumen de piezas y funciones – Modelos sin protección contra corrientes de aire ................................. 8 4. APLICACIONES.....................................................................................................................9 4.1 4.1.1 4.1.2 4.1.3 4.2 4.2.1 4.3 4.3.1 4.4 4.4.1 4.5 4.5.1 4.5.2 4.5.3 4.5.4 Pesaje .......................................................................................................................................................... 9 Configuración de los elementos ............................................................................................................. 10 Nombre de la muestra ............................................................................................................................ 11 Guardar en USB ..................................................................................................................................... 11 Recuento de piezas ................................................................................................................................... 11 Configuración de los elementos ............................................................................................................. 12 Pesaje porcentual ...................................................................................................................................... 14 Configuración de los elementos ............................................................................................................. 14 Pesaje dinámico ......................................................................................................................................... 15 Configuración de los elementos ............................................................................................................. 15 Determinación de la densidad.................................................................................................................... 16 Medición de la densidad de un sólido utilizando agua (predeterminada) .............................................. 16 Medición de la densidad de un material flotante utilizando agua .......................................................... 17 Medición de la densidad de un sólido utilizando un líquido auxiliar ...................................................... 17 Medición de la densidad de un líquido utilizando un dispositivo de inmersión calibrado (no suministrado) .................................................................................................................... 18 4.5.5 Medición de la densidad de un material poroso utilizando aceite ......................................................... 19 4.6 Control dinámico del peso .......................................................................................................................... 21 4.6.1 Configuración de los elementos ............................................................................................................. 22 4.7 Control de la pantalla ................................................................................................................................. 22 4.7.1 Control de la pantalla– Manual (predeterminado) .................................................................................. 22 4.7.2 Control de la pantalla – Automático ....................................................................................................... 23 4.7.3 Configuración de los elementos ............................................................................................................. 23 4.8 Totalización ................................................................................................................................................ 23 4.9 Formulación................................................................................................................................................ 24 4.9.1 Configuración de los elementos ............................................................................................................. 25 4.10 Funciones adicionales ................................................................................................................................ 26 4.10.1 Peso bajo ............................................................................................................................................... 26 5. CONFIGURACIÓN DEL MENÚ ...........................................................................................27 5.1 Navegación por menú................................................................................................................................ 27 5.1.1 Cambio de configuraciones .................................................................................................................... 28 5.2 Calibración ................................................................................................................................................. 29 5.2.1 Submenú de calibración (modelos INCAL) ............................................................................................ 29 5.2.2 Calibración Interna ................................................................................................................................. 29 5.2.3 Calibración Automática .......................................................................................................................... 29 5.2.4 Ajuste de ™ AutoCal .............................................................................................................................. 30 5.2.5 Calibración de amplitud .......................................................................................................................... 30 5.2.6 Calibración de Linealidad ....................................................................................................................... 30 5.2.7 Prueba de calibración............................................................................................................................. 30 5.3 Ajuste de la balanza ................................................................................................................................... 31 5.3.1 Submenú de ajuste de la balanza .......................................................................................................... 31 5.3.2 Idioma ..................................................................................................................................................... 31 5.3.3 Configuración del usuario ...................................................................................................................... 31 ES-2 BALANZAS ADVENTURER 5.3.4 Nivel de filtro ........................................................................................................................................... 32 5.3.5 Rastreo de cero automático ................................................................................................................... 32 5.3.6 Tara automática ..................................................................................................................................... 32 5.3.7 Graduaciones ......................................................................................................................................... 32 5.3.8 Fecha y hora .......................................................................................................................................... 32 5.3.9 Modo aprobado ...................................................................................................................................... 33 5.4 Unidades de pesaje ................................................................................................................................... 34 5.4.1 Submenú de unidades ........................................................................................................................... 34 5.5 Mantenimiento de datos ............................................................................................................................. 34 5.5.1 Submenú de mantenimiento de datos ................................................................................................... 34 5.5.2 Exportar a USB ...................................................................................................................................... 35 5.5.3 Importar desde USB ............................................................................................................................... 35 5.5.4 Información de la balanza ...................................................................................................................... 36 5.6 Comunicación............................................................................................................................................. 35 5.6.1 Submenú de comunicación .................................................................................................................... 35 5.6.2 Tasa de baudios ..................................................................................................................................... 35 5.6.3 Transmisión ............................................................................................................................................ 36 5.6.4 Protocolo de enlace................................................................................................................................ 36 5.6.5 Salida de impresión ................................................................................................................................ 36 5.6.6 Impresión automática ............................................................................................................................. 36 5.6.7 Impresión de contenidos ........................................................................................................................ 38 5.6.8 Alimentación ........................................................................................................................................... 38 5.6.9 Formato .................................................................................................................................................. 38 5.6.10 Impresión Datos Calibración .................................................................................................................. 38 5.7 Datos de BPL y GMP ................................................................................................................................. 38 5.7.1 Submenú de datos de BPL .................................................................................................................... 38 5.7.2 Encabezado ........................................................................................................................................... 38 5.7.3 Nombre de la balanza ............................................................................................................................ 38 5.7.4 Nombre de usuario ................................................................................................................................. 38 5.7.5 Nombre del proyecto .............................................................................................................................. 38 5.8 Restablecimiento de los valores de fábrica ............................................................................................... 38 5.9 Bloqueo ...................................................................................................................................................... 38 6. COMERCIO LEGAL .............................................................................................................39 6.1 6.2 6.3 Configuración ............................................................................................................................................. 39 Verificación ................................................................................................................................................. 39 Sellado ....................................................................................................................................................... 39 7. IMPRIMIR .............................................................................................................................40 7.1 7.2 Conexión, configuración y prueba de la interfaz de la impresora y ordenador ......................................... 40 Formato de salida ...................................................................................................................................... 40 8. MANTENIMIENTO ...............................................................................................................41 8.1 8.2 8.3 8.4 Calibración ................................................................................................................................................. 41 Limpieza ..................................................................................................................................................... 41 Resolución de problemas........................................................................................................................... 42 Información de mantenimiento ................................................................................................................... 42 9. DATOS TÉCNICOS..............................................................................................................43 9.1 9.2 9.3 9.4 9.4.1 9.4.2 9.5 Especificaciones ........................................................................................................................................ 43 Dibujos y dimensiones ............................................................................................................................... 52 Piezas y accesorios ................................................................................................................................... 52 Comunicación............................................................................................................................................. 53 Comandos de la interfaz ........................................................................................................................ 53 Conexiones de patillas RS232 (DB9) ..................................................................................................... 54 La interfaz USB .......................................................................................................................................... 54 10. ACTUALIZACIONES DE SOFTWARE ................................................................................55 11. CONFORMIDAD ..................................................................................................................56 BALANZAS ADVENTURER 1. INTRODUCCIÓN 1.1 Descripción ES-3 La balanza Adventurer es un instrumento de pesaje de precisión que podrá utilizar durante muchos años si se emplea adecuadamente. Las balanzas Adventurer de Ohaus están disponibles en capacidades de 120 gramos a 8.200 gramos. 1.2 Características Controles táctiles: Acceso gráfico rápido a todas las funciones de control, a más de una docena de aplicaciones y a numerosas características. 1.3 Definición de palabras de advertencia y símbolos de advertencia Las indicaciones de seguridad están marcadas con palabras de señalización y símbolos de advertencia. Muestran cuestiones y advertencias de seguridad. Hacer caso omiso de las indicaciones de seguridad puede provocar lesiones personales, daños en el equipo, fallos de funcionamiento y resultados falsos. Palabras de señalización ADVERTENCIA para una situación de peligro con riesgo medio, que podría ocasionar lesiones o la muerte si no se evita. PRECAUCIÓN para una situación de peligro con riesgo bajo, que podría ocasionar daño al dispositivo o a la propiedad o la pérdida de datos, o lesiones si no se evita. Atención Para información importante sobre el producto. Nota Para información útil sobre el producto Símbolos de advertencia Peligro general Corriente alterna 1.4 Peligro de descarga eléctrica Corriente continua Precauciones de seguridad PRECAUCIÓN: lea todas las advertencias de seguridad antes de la instalación, conexión o reparación del equipo. No cumplir con estas advertencias podría causar daños corporales y/o daños en la propiedad. Guarde las instrucciones para futuras consultas. Verifique que el rango de voltaje de entrada del adaptador de CA y el tipo de enchufe sean compatibles con la alimentación de CA utilizada. Asegúrese de que el cable de corriente no represente un posible obstáculo o peligro de tropiezo. Utilice la balanza solo en ambientes secos. Esta balanza es solo para uso en interiores. No deje caer objetos en el plato. Utilice solo los accesorios y periféricos aprobados. Use el equipo solo en las condiciones ambientales especificadas en estas instrucciones. Desconecte el equipo de la fuente de alimentación cuando lo esté limpiando. No utilice el equipo en entornos peligrosos o inestables. El mantenimiento debe ser realizado solamente por personal autorizado. No coloque la balanza de forma que resulte difícil alcanzar la conexión de corriente. ES-4 2. 2.1 BALANZAS ADVENTURER INSTALACIÓN Desempaquetado Desembale con cuidado la balanza Adventurer y todos sus componentes. Los componentes incluidos varían dependiendo del modelo de la balanza (consulte la tabla a continuación). Guarde el empaquetado para garantizar un almacenamiento y transporte seguros. Para evitar el funcionamiento incorrecto, lea el manual completamente antes de instalar y utilizar la balanza Adventurer. Componentes incluidos 2.2 Balanza Adaptador de corriente Anillo bobinado (solo para los modelos de 0,1 mg y 1 mg) Tarjeta de garantía Disco compacto Selección de la ubicación Evite vibraciones excesivas, fuentes de calor, corrientes de aire o cambios bruscos de temperatura. Deje suficiente espacio libre. 2.3 Nivelación del equipo Hay una burbuja de nivel en una pequeña ventana circular al lado de la pantalla de la balanza Adventurer. Para nivelar la balanza, ajuste los pies de nivelado hasta que la burbuja esté centrada en el círculo. Para más información sobre qué pie girar, consulte la sección de Asistencia de nivel a continuación. Asegúrese de que el equipo esté nivelado cada vez que cambia su ubicación. Asistencia de nivel Hay disponible una función de asistencia de nivel para ayudarle a nivelar la balanza Adventurer. Hay dos maneras de acceder a la función: 1. Aplicaciones de pesaje -> Configuración de elementos -> Asistencia de nivel. Consulte la sección 4.1.1 para más información. 2. Menú principal -> Ajuste de la balanza -> Configuración del usuario -> Asistencia de nivel. Consulte la sección 5.3.3 para más información. Gire los pies como indica la imagen anterior según la localización de la burbuja de nivel hasta que la burbuja esté centrada. BALANZAS ADVENTURER 2.4 ES-5 Conexión a la red eléctrica Conecte el conector de salida de CC a la toma de corriente en la parte trasera de la balanza. Después conecte el cable de corriente de CA la toma eléctrica adecuada. PRECAUCIÓN: para uso con una fuente de alimentación certificada por la CSA (o similar aprobación), con salida de corriente limitada. Atención: para obtener un rendimiento de pesaje óptimo, deje que la balanza se caliente durante 60 minutos antes de utilizarla. 2.5 Conexión de la interfaz Utilice el puerto RS-232 integrado para conectarla a un ordenador o una impresora con un cable de serie estándar (intermedio). O conéctela utilizando el puerto USB de la balanza. Conexiones de la interfaz en la parte posterior de la balanza. Conexión UBS en la parte frontal de la balanza. . USB1 RS232 USB2 USB1: solo se utiliza para conectar al PC USB1: solo se utiliza para conectar a la unidad de memoria USB RS232: solo se utiliza para conectar al PC o a la impresora Nota: para los comandos de configuración e interfaz, consulte la sección de ajustes del menú de comunicaciones. Para conectar, configurar y probar la interfaz de la impresora u ordenador y para los formatos de salida de impresión, consulte la sección de impresión. 2.6 Calibración inicial Si se instala la balanza por primera vez y si se desplaza a otra ubicación, se debe calibrar para garantizar resultados de pesaje exactos. La mayoría de balanzas Adventurer tienen Calibración automática integrada que permite calibrar la balanza automáticamente y no requiere masas de calibración. Si asíse prefiere, la balanza se puede calibrar manualmente con pesos externos. Disponga de las pesas de calibración adecuadas antes de iniciar la calibración. Consulte la sección de calibración para procedimiento de pesos y calibración. ¤ AutoCal™ En la mayoría de modelos está disponible el sistema de calibración interna completamente automática que ayuda en el mantenimiento de rutina calibrando automáticamente la balanza de forma diaria. Calibra automáticamente el sistema cuando se detecta un cambio de temperatura lo suficientemente importante como para afectar la precisión del pesaje (> 1,5 ºC) o cada 11 horas. ¤ Calibración externa Algunos modelos de precisión disponen de la calibración externa tradicional en la que se utilizan pesos externos (valores de peso de calibración a elección del usuario) para calibrar la balanza y asegurar la precisión. ES-6 3. BALANZAS ADVENTURER FUNCIONAMIENTO 3.1 Resumen de la pantalla, pantalla de inicio Este equipo utiliza una pantalla táctil con áreas de tacto y botones para controlar las funciones del equipo. CONTROLES Botón Acción Pulsación corta (si está apagada): enciende la báscula Pulsación larga (si está encendida): apaga la báscula Imprime los datos en una impresora u ordenador. Realiza la puesta a cero Realiza funcionamiento de calibración Realiza una operación de tara Pantalla principal de aplicaciones Aplicación Capacidad y sensibilidad Mensajes instructivos Indicadores de estabilidad (*), neto (NETO), bruto (B) y/o centro de cero (>0<) Campo de resultados: La información varía según la aplicación. Toque g para cambiar unidad Campos de referencia Botones de aplicaciones: Las funciones varían según la aplicación BALANZAS ADVENTURER 3.2 ES-7 Funciones más importantes y Menú de Inicio Pesaje: Pulse Cero para ajustar la pantalla a cero. Coloque un elemento en el plato. La pantalla indica el peso bruto. Determinación de tara: Sin carga en el plato, pulse Cero para ajustar la pantalla en cero. Coloque un recipiente vacío en el plato y pulse Tara. Añada material al recipiente y se mostrará el peso neto. Retire el recipiente y el peso del recipiente aparecerá como un número negativo. Pulse Tara para borrar el valor. Cero: Pulse Cero para poner a cero la balanza. NAVEGACIÓN POR EL MENÚ Y LA PANTALLA Toque Menú para abrir la lista de menú. Toque y arrastre la Barra de desplazamiento para ver elementos adicionales. Calibración: Toque la pantalla para ver las opciones de calibración. Ajuste de la balanza: Toque la pantalla para ver y cambiar la configuración de la balanza. Unidades de pesaje: Toque la pantalla para ver y cambiar las unidades de pesaje. Mantenimiento de datos: Toque para ver las configuraciones de mantenimiento de datos. Datos de BPL y GMP: Introduzca datos de usuario para su trazabilidad. Restablecimiento de valores de fábrica: Toque la pantalla para restablecer los valores de fábrica de la configuración del menú. Comunicación: Bloqueo: Toque la pantalla para restablecer los valores de fábrica de la configuración del menú. Toque la pantalla para ver las opciones de bloqueo. ES-8 3.3 BALANZAS ADVENTURER Resumen de piezas y funciones – Modelos con protección contra corrientes de aire Plato Indicador de nivel Servidor USB Pie ajustable Pie ajustable USB esclavo Interruptor LFT RS232 Entrada de corriente 3.4 Resumen de piezas y funciones – Modelos sin protección contra corrientes de aire Plato Anillo bobinado Indicador de nivel Pie ajustable Servidor USB Pie ajustable USB esclavo Interruptor LFT RS232 Entrada de corriente BALANZAS ADVENTURER 4. ES-9 APLICACIONES La balanza se puede configurar para funcionar en varios modos de aplicaciones. Toque el campo de aplicación superior izquierdo (pesaje en el ejemplo que aparece a continuación): La balanza Adventurer tiene los siguientes 9 modos de aplicación: Pesaje Recuento de piezas Pesaje porcentual Pesaje dinámico Determinación (de animales) de la densidad Control de la pantalla Totalización Formulación Control dinámico del peso 4.1 Pesaje Nota: antes de utilizar cualquier aplicación, asegúrese de haber nivelado y calibrado la balanza. Utilice esta aplicación para determinar el peso de elementos en la unidad de medición seleccionada. Pesaje 1. En la porción superior izquierda de la pantalla de inicio, seleccione Pesaje (esta aplicación es la predeterminada). 2. Pulse Tara o Cero si fuera necesario para dar inicio. 3. Coloque objetos en el plato para ver el peso. Cuando esté estable, aparecerá *. 4. El valor resultante se muestra en la línea de pantalla principal de la unidad activa de medición. La pantalla de inicio de PESAJE Línea de pantalla Inicio Toque g para cambiar unidad Campos de referencia Botones de aplicaciones Icono de aplicación ES-10 BALANZAS ADVENTURER 4.1.1 Configuración de los elementos Para ver o ajustar la configuración actual Toque el botón Configuración de elementos. Aparecerá la pantalla de configuración. Peso mínimo: establece un valor de peso mínimo utilizado para comprobar una lectura. Si un peso actual se encuentra por debajo del valor de peso mínimo establecido, aparece marcado con un color diferente: amarillo. Para ajustar el valor de peso mínimo, toque el botón Peso mínimo. Aparecerá una ventana de entrada numérica. Utilice las teclas para introducir el peso mínimo deseado, luego pulse Guardar. La pantalla regresa a la pantalla anterior. Para regresar a la pantalla de inicio de pesaje, toque Salir en la parte inferior de la pantalla. Barra de capacidad: Cuando está ACTIVADA, se mostrará una barra de capacidad en la campo de referencia. La guía de capacidad mostrará el peso actual como porcentaje de la capacidad de la balanza. Si la barra de capacidad esta DESACTIVADA, el campo de referencia mostrará el Peso Mínimo y el Nombre de la Muestra. Unidades de pesaje: Cambia la unidad mostrada. Consulte la sección 5.4 para más información Nivel de filtro: Cambia en nivel de filtro. Consulte la sección 5.5.3 para más información Datos de BPL y GMP: Consulte la sección 5.9 para más información Configuraciones de impresión: Cambia las configuraciones de impresión. Consulte la sección 7 para más información Asistencia de nivel: instrucciones sobre cómo mover los pies de la balanza para nivelarla. BALANZAS ADVENTURER 4.1.2 ES-11 Nombre de la muestra Pulse el botón para añadir el nombre de la muestra. Aparecerá una ventana de entrada alfanumérica. Pulse para alternar entre mayúsculas y minúsculas. Minúsculas: Mayúsculas: Pulse en el nombre de la muestra deseada y luego pulse en Guardar para guardar el nombre y volver a la pantalla de inicio de pesaje. 4.1.3 Guardar en USB Inserte la unidad flash USB en la ranura de USB localizada en la parte frontal de la balanza. Después, pulse el botón guardar en USB para guardar los datos en la unidad flash de USB. Una vez guardados, el botón cambiará momentáneamente a color naranja. Notas: Puede que la primera vez que se conecte una unidad flash USB haya algún tiempo de retardo antes de que el botón guardar en USB funcione. Esto es debido a que la balanza está creando las carpetas necesarias en la unidad flash de USB donde se van a almacenar los datos. Las aplicaciones Determinación de la densidad y Pesaje de comprobación no tienen un botón de guardar a USB. PRECAUCIÓN: Los datos de pesaje de guardarán en el USB todos los días. Sin embargo, si se utilizan diferentes modos de pesaje los datos se guardarán de forma separada en campos individuales. Dependiendo de la unidad USB utilizada, podrían no transferirse todos los datos de la balanza o la pantalla podría bloquearse. Si esto ocurriera, desconecte la unidad flash USB y conecte otra unidad flash USB. Ohaus no se responsabiliza de la pérdida de datos en la unidad flash USB o si la unidad flash USB se rompiera mientras está conectada a la balanza. Para minimizar el riesgo de problemas, Ohaus sugiere utilizar una unidad flash USB de alta calidad. 4.2 Recuento de piezas Nota: antes de utilizar cualquier aplicación, asegúrese de haber nivelado y calibrado la balanza. Utilice esta aplicación para contar muestras de peso uniforme. 4.2.1 1. 2. 3. 4. Recuento de piezas En la porción superior izquierda de la pantalla de inicio, seleccione Recuento de piezas. Pulse Tara o Cero si fuera necesario para dar inicio. Coloque objetos en el plato para ver el peso. Cuando esté estable, aparecerá *. El valor resultante se muestra en la línea de pantalla principal en piezas (PCS). ES-12 BALANZAS ADVENTURER La pantalla de inicio de Recuento de piezas Línea de pantalla Inicio Campos de referencia Botones de aplicaciones Configuración de los elementos Para ver o ajustar la configuración actual Toque el botón Configuración de elementos. Aparecerá la pantalla de configuración. Muestras: El tamaño de la muestra puede ser de 1 a 10.000 piezas. El valor de la muestra predeterminado es 10. Una vez que se modifica el tamaño de la muestra, la balanza abre automáticamente la pantalla Recalcular APW, esperando establecer un nuevo APW. Para ajustar el tamaño de la muestra, toque el botón Muestras. Aparecerá una ventana de entrada numérica. Utilice las teclas para introducir el tamaño de muestra deseado, luego pulse Guardar. Aparecerá la siguiente pantalla, con el mensaje para colocar el peso de referencia en el plato. Coloque el peso objetivo en el plato. Después pulse Aceptar para capturar el valor y volver a la pantalla de configuración. Icono de aplicación BALANZAS ADVENTURER ES-13 Establecer un peso de pieza medio (APW) Cada vez que se cuenta un nuevo tipo de pieza, se debe establecer el peso nominal de una pieza (peso de pieza medio o APW) utilizando una pequeña cantidad de piezas. Este APW se almacena hasta que se sustituye por otro APW. Existen dos métodos para establecer el valor de APW: 1. El APW real se conoce 2. el APW se debe derivar por peso. Para este caso, se utilizará el tamaño de muestra actual Establecer un peso de pieza medio (APW) conocido Para ajustar el valor APW directamente, toque el botón APW. Aparecerá una ventana de entrada numérica. Pulse la tecla del peso APW deseado y luego pulse Guardar. La pantalla vuelve a la pantalla de inicio mostrando en el campo de referencia el nuevo valor APW. Establecimiento de un nuevo peso de pieza medio (APW) – Derivado Para establecer un nuevo APW, coloque en el plato el peso de referencia y pulse Aceptar para continuar. Nota: se utilizará el tamaño de la muestra mostrado. Para utilizar un tamaño de muestra diferente, cámbiela en primer lugar (consulte arriba). La pantalla de inicio muestra el número de piezas en el nuevo APW Optimización automática: cuando está Activada, mejora la exactitud del recuento volviendo a calcular automáticamente el peso de la pieza a medida que se añaden las piezas. De manera predeterminada está Desactivada. Notas: Se produce la optimización solo cuando el número de piezas añadido al plato se encuentra entre uno y tres veces el número que se encuentra en el plato. Si el APW se introduce de forma manual mediante el teclado numérico, la optimización automática no se producirá. Configuraciones de impresión: cambia las configuraciones de impresión. Consulte la sección 7 para más información. Nota: El botón de Guardar en un USB solo aparecerá cuando se haya conectado una unidad flash USB a la balanza. Consulte la sección 4.1.3 para más información. ES-14 BALANZAS ADVENTURER 4.3 Pesaje porcentual Nota: antes de utilizar cualquier aplicación, asegúrese de haber nivelado y calibrado la balanza. Utilice el pesaje porcentual para medir el peso de una muestra como porcentaje de un peso de referencia preestablecido. Aparecerá el peso de referencia predeterminado (o último). Pesaje porcentual 1. En la porción superior izquierda de la pantalla de inicio, seleccione Pesaje porcentual. 2. Coloque un elemento en el plato. La diferencia entre la muestra y el peso de referencia se muestra como porcentaje. La pantalla de inicio de Pesaje porcentual Línea de pantalla Inicio Campos de referencia Botones de aplicaciones 4.3.1 Configuración de los elementos Para ver o ajustar la configuración actual Toque el botón Configuración de elementos. Aparecerá la pantalla de configuración. Recalcular P. de Ref.: para establecer un nuevo valor de peso de referencia, toque el botón Recalcular peso de referencia. Siga las instrucciones de la pantalla para establecer un nuevo peso de referencia. De forma alternativa, pulse el botón Peso de ref. de la pantalla pesaje porcentual Recalcular peso de referencia para establecer manualmente un nuevo peso de referencia mediante el teclado numérico. Configuraciones de impresión: cambia las configuraciones de impresión. Consulte la sección 7 para más información. Nota: El botón de Guardar en un USB solo aparecerá cuando se haya conectado una unidad flash USB a la balanza. Consulte la sección 4.1.3 para más información. Icono de aplicación BALANZAS ADVENTURER ES-15 4.4 Pesaje dinámico Nota: antes de utilizar cualquier aplicación, asegúrese de haber nivelado y calibrado la balanza. Utilice esta aplicación para pesar una carga inestable como por ejemplo un animal que se mueve. Se pueden seleccionar dos modos diferentes de inicio o restablecimiento: Manual (se inicia y detiene pulsando la techa) y Automático (se inicia y detiene automáticamente). Pesaje dinámico – Manual (predeterminado) 1. En la porción superior izquierda de la pantalla de inicio, seleccione Pesaje Dinámico. 2. Coloque los objetos en el plato y pulse el botón Inicio. La pantalla de inicio de Pesaje dinámico Línea de pantalla Inicio Campos de referencia Icono de aplicación Botones de aplicaciones 3. La balanza inicia una cuenta atrás (proceso de promediación). Durante la cuenta atrás, la línea de información muestra el tiempo restante. Si fuera necesario, pulse Detener para detener. 4. Cuando finaliza la cuenta atrás, la línea de resultado permanece en pantalla. Pulse Borrar para borrar el peso en pantalla y volver a la pantalla inicial. Nota: no deje ningún objeto en el plato antes de iniciar un nuevo ciclo de pesaje dinámico. 4.4.1 Configuración de los elementos Para ver o ajustar la configuración actual Toque el botón Configuración de elementos. Aparecerá la pantalla de configuración. Tiempo de promediación: establece el tiempo promedio para un valor entre 1 y 99 segundos. Por defecto son 5 segundos. Modo automático: Cuando se Activa, el ciclo comienza cuando se coloca un objeto en el plato y el valor en pantalla se restablece automáticamente cuando el objeto se quita del plato. Nombre de la muestra: Asigna un nombre a la muestra. Configuraciones de impresión: Cambia las configuraciones de impresión. Consulte la sección 7 para más información. Nota: El botón de Guardar en un USB solo aparecerá cuando se haya conectado una unidad de memoria USB a la balanza. Consulte la sección 4.1.3 para más información. ES-16 BALANZAS ADVENTURER 4.5 Determinación de la densidad Nota: antes de utilizar cualquier aplicación, asegúrese de haber nivelado y calibrado la balanza. Utilice esta aplicación para determinar la densidad de un objeto. Se pueden realizar cuatro tipos de determinación de densidad: 1. 2. 3. 4. Sólidos más densos que el agua Sólidos menos densos que el agua Densidad líquida Material poroso (impregnado de aceite) La pantalla de inicio de Determinación de densidad Línea de pantalla Inicio Campos de referencia Botones de función 4.5.1 Medición de la densidad de un sólido utilizando agua (predeterminada) Pulse el botón Configuración de elementos para abrir la pantalla de los ajustes de la determinación de densidad. Confirme que los siguientes Ajustes estén seleccionados: Tipo de densidad: Sólida Líquido auxiliar: Agua Material poroso: Off Para ajustar el valor de la temperatura del agua, toque el botón Temperatura del agua. La balanza calcula la densidad del agua basándose en el valor de la temperatura del agua introducido. Mida la temperatura del agua real utilizando un termómetro de precisión. Aparecerá una ventana de entrada numérica. Introduzca la temperatura del agua real, luego pulse Guardar. Para regresar a la pantalla de inicio de determinación de densidad, toque Regresar. Paso 1 de 2 – Pesar la muestra en aire. Pulse Iniciar. Siga las instrucciones y luego pulse Aceptar para almacenar el peso de la muestra en seco (“en aire”). Icono de aplicación BALANZAS ADVENTURER ES-17 Paso 2 de 2 – Pesar la muestra sumergida en líquido. Siga las instrucciones y luego pulse Aceptar para almacenar el peso de la muestra (sumergida en líquido). Una vez que se han determinado los pesos necesarios, la densidad de la muestra aparece en g/cm3 (junto con el peso en aire y peso en agua) en la pantalla de aplicaciones. Pulse Iniciar para restablecer todos los valores de peso e reiniciar el proceso. 4.5.2 Medición de la densidad de un material flotante utilizando agua Pulse el botón Configuración de elementos para abrir la pantalla Configuración. Confirme que los siguientes Ajustes estén seleccionados: Tipo de densidad: Sólida Tipo de líquido: Agua Material poroso: Off Pulse Volver para regresar a la pantalla de inicio de determinación de densidad. Siga el mismo procedimiento de los materiales sólidos, excepto el paso 2 de determinación de densidad. Empuje la muestra hacia abajo hasta que esté completamente sumergida. 4.5.3 Medición de la densidad de un sólido utilizando un líquido auxiliar Para activar esta función, ingrese al menú de ajuste de determinación de densidad y seleccione lo siguiente: Tipo de densidad: Sólido; Tipo de líquido: Otros; Material poroso: Off. Confirme que los valores predeterminados mostrados (densidad líquida, etc.) sean correctos. Para ajustar el valor de la densidad líquida, toque el botón líquidos auxiliares. Aparecerá una ventana de entrada numérica. Pulse la densidad en g/cm 3, después pulse Guardar. La pantalla regresa a la pantalla anterior. Para regresar a la pantalla de inicio de determinación de densidad, toque Regresar. Inicie el proceso de determinación de la densidad según lo indicado anteriormente. ES-18 4.5.4 BALANZAS ADVENTURER Medición de la densidad de un líquido utilizando un dispositivo de inmersión calibrado (no suministrado) Active esta función, ingrese al menú de ajuste de densidad y seleccione lo siguiente: Tipo de densidad: Líquida Nota: si el tipo de densidad se ajusta en líquido, se desactivan las selecciones de tipo de líquido y material poroso. La pantalla de inicio de DETERMINACIÓN DE DENSIDAD - LÍQUIDOS Línea de pantalla Inicio Campos de referencia Botones de función Icono de aplicación Confirme que el valor predeterminado mostrado (volumen de dispositivo de inmersión) sea correcto. Para editar los valores predeterminados, toque Volumen de dispositivo de inmersión. Para ajustar el valor del volumen del dispositivo de inmersión, toque el botón Volumen de dispositivo de inmersión. Aparecerá una ventana de entrada numérica. Pulse la tecla del valor deseado y después pulse Guardar. La pantalla vuelve a la pantalla anterior con el nuevo valor resaltado. Para regresar a la pantalla principal de la determinación de la densidad toque Volver. Pulse Iniciar para iniciar el proceso. Paso 1 de 2 – Pesar el dispositivo de inmersión en aire. Siga las instrucciones en pantalla y luego pulse Aceptar para almacenar el peso del dispositivo de inmersión ("en aire"). BALANZAS ADVENTURER ES-19 Paso 2 de 2 – Pesar el dispositivo de inmersión sumergido en el líquido de prueba. Siga las instrucciones y luego pulse Aceptar para almacenar el peso del dispositivo de inmersión (sumergido en líquido). Una vez que se han determinado los pesos necesarios, la densidad de la muestra líquida aparece en g/cm3 (junto con el peso en aire y peso en agua) en la pantalla de la aplicación. Pulse Iniciar para restablecer todos los valores de peso e reiniciar el proceso. 4.5.5 Medición de la densidad de un material poroso utilizando aceite Para activar esta función, ingrese al menú de Ajuste de determinación de densidad y ajuste lo siguiente: Tipo de densidad: Sólida Tipo de líquido: Agua Material poroso: Encendido La pantalla de inicio de DETERMINACIÓN DE DENSIDAD - POROSOS Línea de pantalla Inicio Campos de referencia Funciones Icono de aplicación ES-20 Confirme que los valores predeterminados mostrados (temperatura del agua) sean correctos. Para editar los valores predeterminados, toque Configuración de elementos. Aparecerá la pantalla de configuración. La balanza calcula la densidad del agua basándose en el valor de la temperatura del agua introducido (tabla de búsqueda). Mida la temperatura del agua real utilizando un termómetro de precisión. Para ajustar los valores de temperatura del agua o densidad del aceite, toque el botón Temperatura del agua o Densidad del aceite. Aparecerán ventanas de introducción numérica. Pulse la tecla del valor deseado y luego pulse Guardar. La pantalla vuelve a la pantalla anterior con el nuevo valor resaltado. Para volver a la pantalla principal de la Determinación de la densidad, toque Salir. Pulse Iniciar cálculo de densidad. Paso 1 de 3 – Pesar la muestra no lubricada en aire. Siga las instrucciones y luego pulse Aceptar para almacenar el peso de la muestra en seco (en aire). Paso 2 de 3 – Pesar la muestra lubricada en aire. Siga las instrucciones y luego pulse Aceptar para almacenar el peso de la muestra (lubricada). BALANZAS ADVENTURER BALANZAS ADVENTURER ES-21 Paso 3 de 3 – Pesar la muestra lubricada sumergida en líquido. Siga las instrucciones y luego pulse Aceptar para almacenar el peso de la muestra lubricada (sumergida en líquido). Una vez que se han determinado los pesos necesarios, la densidad de la muestra aparece en g/cm3 (junto con el peso en aire, no lubricada y lubricada y peso en agua) en la pantalla de la aplicación. El valor permanece en pantalla hasta que se toca Iniciar. Pulse Iniciar para restablecer todos los valores de peso e reiniciar el proceso. 4.6 Control dinámico del peso Nota: antes de utilizar cualquier aplicación, asegúrese de haber nivelado y calibrado la balanza. El pesaje de comprobación se utiliza para comparar el peso de una muestra con los límites del objetivo. Control dinámico del peso 1. En la porción superior izquierda de la pantalla de inicio, seleccione Pesaje de comprobación. 2. Aparecerán los límites predeterminados (o últimos) de peso de comprobación. 3. Coloque objetos en el plato. 4. El estado Defecto/Aceptación/Exceso se muestra en la barra de progreso mientras que el peso real del elemento se muestra en la línea de pantalla de Inicio. La pantalla de inicio de Pesaje de comprobación Línea de pantalla Inicio Campos de referencia Botones de función Para ajustar el Valor de exceso, toque el botón Exceso Para ajustar el Valor defecto, toque el botón Defecto Aparecerá una ventana de entrada numérica. Introduzca el peso límite deseado, luego pulse Guardar. Tara regresar a la pantalla de inicio de PESAJE DE COMPROBACIÓN, toque Salir. Icono de aplicación ES-22 4.6.1 BALANZAS ADVENTURER Configuración de los elementos Para ver o ajustar la configuración actual Toque el botón Configuración de elementos. Aparecerá la pantalla de configuración. Nombre de la muestra: Asigna un nombre a la muestra. Configuraciones de impresión: Cambia las configuraciones de impresión. Consulte la sección 7 para más información 4.7 Control de la pantalla Nota: antes de utilizar cualquier aplicación, asegúrese de haber nivelado y calibrado la balanza. Hay dos modelos disponibles: Control de la pantalla - permite al usuario capturar y almacenar un peso estable. Mantenimiento del pico - permite al usuario capturar y almacenar el peso estable más alto. La pantalla de inicio del Control de la pantalla Línea de pantalla Inicio Campos de referencia Botones de función Icono de aplicación Control de la pantalla 4.7.1 Control de la pantalla– Manual (predeterminado) 1. En la porción superior izquierda de la pantalla de inicio, seleccione Control de la pantalla. 2. Coloque la muestra en el plato y pulse Mantener en cualquier momento mientras se está capturando el peso. 3. Ahora la línea de la pantalla principal muestra el peso estable actual. 4. Pulse Borrar para eliminarlo y volver a la pantalla de inicio de Control de la pantalla. BALANZAS ADVENTURER ES-23 Mantenimiento del pico 4.7.2 Control de la pantalla – Automático 1. En la porción superior izquierda de la pantalla de inicio, seleccione Control de la pantalla. 2. Establezca el Modos automático en Activado en configuración de elementos (consulte la sección 4.7.3). 3. Coloque la muestra en el plato para dar inicio. 4. Continúe pesando muestras. El peso estable se mantiene automáticamente. 5. Pulse Detener para limpiar y vuelva al funcionamiento normal. 4.7.3 Configuración de los elementos Para ver o ajustar la configuración actual Toque el botón Configuración de elementos. Aparecerá la pantalla de configuración. Modo: escoge entre Mantenimiento del pico y mantenimiento de la pantalla (de manera predeterminada). Nombre de la muestra: asigna un nombre a la muestra. Configuraciones de impresión: cambia las configuraciones de impresión. Consulte la sección 7 para más información. Nota: El botón de Guardar en un USB solo aparecerá cuando se haya conectado una unidad de memoria USB a la balanza. Consulte la sección 4.1.3 para más información. 4.8 Totalización Nota: antes de utilizar cualquier aplicación, asegúrese de haber nivelado y calibrado la balanza. La totalización mide el peso acumulado de una secuencia de elementos. El total acumulado puede exceder la capacidad de la balanza. El número máximo de muestras (n) es 99. ES-24 BALANZAS ADVENTURER La pantalla de inicio de Totalización Línea de pantalla Inicio Campos de referencia Icono de aplicación Botones de aplicaciones Totalización 1. En la porción superior izquierda de la pantalla de inicio, seleccione Totalización. 2. Coloque el elemento en el plato para dar inicio. El peso de la muestra aparece en la línea de pantalla principal. 3. Pulse Acumular para añadir el peso (cuando sea estable) del elemento del total. 4. Retire el elemento del plato de pesaje, luego añada el siguiente elemento y continúe según lo indicado anteriormente. 5. Pulse Resultado para ver los resultados de la totalización. 6. Una vez que finalice, pulse el botón Borrar total para restablecer el peso acumulado en cero. 7. Pulse Guardar en USB para guardar el resultado en una unidad de memoria USB o Salir para volver a la pantalla de inicio de Totalización. Nota: Cambiar las unidades convierte los resultados de Acumulación en la unidad seleccionada. 4.9 Formulación Nota: antes de utilizar cualquier aplicación, asegúrese de haber nivelado y calibrado la balanza. Utilice esta aplicación para la síntesis de compuestos y formulación de recetas. El número máximo de componentes es 50. La pantalla de inicio de Formulación Línea de pantalla Inicio Campos de referencia Icono de aplicación Botones de aplicaciones Formulación 1. En la porción superior izquierda de la pantalla de inicio, seleccione Formulación. 2. Pulse Inicio para comenzar el proceso de síntesis de compuestos. 3. Coloque el primer ingrediente en el plato (o en un recipiente tarado) y pulse Aceptar para almacenar el componente. 4. Continúe añadiendo componentes y pulsando Aceptar para guardar el peso de los componentes individuales hasta que la fórmula esté completa. La línea Total muestra el peso total de todos los componentes. BALANZAS ADVENTURER ES-25 5. Pulse Parar para finalizar la formulación. Se muestran los resultados de Formulación: Nota: si Rellenado está Activado (consulte la sección 4.9.1 que aparece a continuación), la balanza le pedirá añadir un material de relleno para completar la formulación. Añada el material de relleno y pulse Aceptar para completar la formulación y mostrar los resultados. 6. Pulse Guardar en USB para guardar los resultados en una unidad de memoria USB o Salir para volver a la pantalla de inicio de Totalización. Nota: Los resultados de la formulación se eliminarán cuando comience una nueva formulación. 4.9.1 Configuración de los elementos Para ver o ajustar la configuración actual Toque el botón Configuración de elementos. Aparecerá la pantalla de configuración. Relleno: si está Activado, se solicita un material de relleno al final de la formulación. Tara Automática: si está activada, la balanza realizará la Tara automáticamente después de aceptar el peso del componente. Configuraciones de impresión: cambia las configuraciones de impresión. Consulte la sección 7 para más información ES-26 4.10 BALANZAS ADVENTURER Funciones adicionales 4.10.1 Peso bajo La balanza Adventurer está equipada con un gancho de peso bajo para pesaje por debajo de la balanza. Nota: para evitar daños, antes de apagar la balanza, retire el plato y los elementos de protección contra corrientes de aire (si os hubiera). Atención: no coloque la balanza sobre el cono de soporte para el plato o patillas de células de carga Para usar esta función, desenchufe la balanza y retire la cubierta protectora de la abertura para peso bajo. Peso bajo Cubierta protectora Pesos con gancho La balanza se puede apoyar utilizando un gato u otro método adecuado. Asegúrese de que la balanza esté nivelada y firme. Enchufe la balanza y luego utilice una cuerda o alambre para sujetar los elementos que desee pesar. BALANZAS ADVENTURER 5. ES-27 CONFIGURACIÓN DEL MENÚ 5.1 Navegación por menú Estructura del menú de usuario: Modos de Aplicació n Ap. de pesaje Peso mínimo Guía de capacidad Unidades Nivel de filtro Datos de BPL y GMP Configuraciones de impresió n Menú principal Calibració n Calibració n Ajuste de la balanza Unidades de pesaje Mantenimiento de datos Comunicació n Datos de BPL y GMP Restablecimiento de valores de fá brica Cal. interna Cal. automá tica AutoCalTM Calibració n de funció n tá ctil Cal. de amplitud Brillo Cal. de linealidad Pitido Prueba de calibració n Atenuació n auto. Asistencia de nivel Ap. de recuento Libra Pennyweight Rastreo de cero automá tico Tamañ o de la muestra Grano Tara auto. APW Auto Opt Configuraciones de impresió n Ap. de porcentaje 7E2 Momme 7 N1 Fecha y hora Mesghal 7 N2 HKTael 7O1 Fecha Hora SGTael 7 O2 TWTael 8 N1 Tical 8 N2 Protocolo de enlace Configuraciones de impresió n Salida de impresió n Solo peso estable Solo valor numé rico Solo un encabezado individual Opciones de impresió n Impresió n automá tica impresió n auto. desactivada Ap. diná mica Tola Tiempo promedio Baht Nombre de la muestra Personalizada1 Nombre de la unidad Configuraciones de impresió n Factor Ap. densidad Nombre de la balanza Nombre de Transmisió n usuario Nombre del 7E1 proyecto 38400 Graduació n Configuraciones de impresió n Modo auto. inf. de balance Newton Modo aprobado Volver a calcular P. de Ref. Exponente Tipo de densidad 10-3 Líquido auxiliar 10-2 Temp. del agua 10-1 Material poroso 100 Densidad del aceite 101 Volumen de dispositivo de inmersió n 102 Estabilidad On Intervalo (segundos) 103 Continuo Impresió n de contenidos 0.5 Encabezado Nombre de la muestra 1 Configuraciones de impresió n 2 Ap. totalizació n Fecha y hora ID de la balanza Nombre de la balanza Nombre de usuario Nombre del proyecto Nombre de la aplicació n Nombre de la muestra Ap. formulació n Resultado Temp. del líquido Configuraciones de impresió n Ap. control de peso Ap. control de la pantalla Modo control de la pantalla Nombre de la muestra LSD Selecció n 5 10 100 Configuraciones de impresió n Relleno Bruto Modo automá tico Neto Configuraciones de impresió n Valores de fá brica Bloqueo Calibració n Miligramo Configuració n del usuario Nivel de filtro Mantenimiento Datos de Comunicació n de datos BPL y GMP RS232 Exportar a USB está ndar Encabezados Configuració n de Tasa de Encabezado Gramo modo de ap. baudios 1 Configuració n de Encabezado Kilogramo menú 2400 2 Importar desde Encabezado 4800 Quilate USB 3 Configuració n de Encabezado Onza modo de ap. 9600 4 Configuració n de Encabezado onza troy menú 19200 5 Idioma Bloqueo Asistencia de nivel Unidades de pesaje Ajuste de la balanza Tara Informació n Línea de firma Salto de línea Guardar en USB Ajuste de la balanza Unidades de pesaje Mantenimiento de datos Comunicació n Datos de BPL y GMP Restablecimiento de valores de fá brica ES-28 BALANZAS ADVENTURER Toda la navegación por el menú se realiza tocando la pantalla. Para acceder al menú, toque Menú en la pantalla de inicio de la aplicación. Aparece el menú principal con los botones Volver y Salir. Continúe tocando el elemento adecuado de la lista para navegar por los elementos del menú. 5.1.1 Cambio de configuraciones Para cambiar una configuración del menú, navegue por esa configuración siguiendo los siguientes pasos: Acceda al menú Desde la pantalla de cualquier aplicación, toque Menú. Aparece en pantalla la lista del menú principal. Seleccione el submenú Localice y toque el elemento seleccionado de la lista del menú principal. Aparecerá el submenú. Seleccione el elemento del menú Continúe hasta que se haya seleccionado la configuración deseada en la lista del menú. Toque la configuración para cambiarla. La configuración cambiada aparecerá resaltada en amarillo durante 1 segundo para confirmar el valor cambiado. Salga del menú y regrese a la aplicación actual Después de confirmar la configuración, toque Salir para regresar a la aplicación. Nota: en cualquier momento, se pueden tocar los botones Volver y Salir para navegar por el área deseada del menú o regresar a la aplicación actual. Continúe hasta que se haya seleccionado la configuración deseada en la lista del menú. La estructura del menú principal de la balanza Adventurer se ilustra a continuación. Calibración Ajuste de la balanza Unidades de pesaje Comunicación GLP/GMP Data (Datos de BPL y GMP) Restablecimiento de valores de fábrica Mantenimiento de datos Bloqueo BALANZAS ADVENTURER ES-29 5.2 Calibración Las balanzas Adventurer (modelos INCAL) ofrecen la posibilidad de elegir entre seis métodos de calibración: Calibración Interna Calibración automática, Calibración AutoCal™ Ajuste, Calibración de amplitud, y Prueba de calibración. Nota: La unidad de calibración es siempre en gramos. Calibración de Linealidad Atención: no toque la balanza durante una calibración. 5.2.1 Submenú de calibración (modelos INCAL) Calibración Interna Automático Calibración AutoCal™ Ajuste Amplitud Calibración Calibración de Linealidad Cal (Calibración) Prueba Nota: Solo los modelos /E solo tienen Calibración de amplitud, Calibración de Linealidad y Prueba de calibración. 5.2.2 Calibración Interna La calibración se logra con la masa de calibración interna. La calibración interna se puede realizar en cualquier momento, siempre que la balanza esté caliente para el funcionamiento de la temperatura y esté nivelada. Con la balanza en ENCENDIDO y sin carga en el plato, toque Calibración interna. La balanza empieza a calibrarse. Y sin carga en el plato, toque Calibración interna. La pantalla muestra el estado y luego regresa a la aplicación actual. Para cancelar en cualquier momento, pulse Salir. 5.2.3 Calibración Automática Cuando Calibración automática está ACTIVADA la balanza realiza una autocalibración: • cuando detecta un cambio de temperatura de1 °C • o cada 11 horas AutoCal calibra automáticamente la balanza (utilizando la masa interna) cada vez que hay un cambio de temperatura lo suficientemente significativo como para afectar su precisión o cada 11 horas. Cuando esté a punto de comenzar una Calibración automática, aparecerá una pantalla de información. Se mostrarán tres botones de opciones: Ahora - Pulse para realizar la calibración directamente. 5 min - Pulse para realizar la calibración después de 5 minutos. Desactivar - Pulse para desactivar la función Calibración automática. ES-30 5.2.4 BALANZAS ADVENTURER Ajuste de ™ AutoCal Utilice este método de calibración para ajustar el punto de calibración de amplitud sin afectar la calibración de la amplitud o linealidad. Se puede utilizar el ajuste de calibración para ajustar el resultado de la Calibración interna en +100 divisiones. Nota: antes de realizar un ajuste de calibración, realice una calibración interna. Para comprobar si se necesita un ajuste, coloque una masa de prueba igual al valor de calibración de amplitud en el plato y compruebe la diferencia (en divisiones) entre el valor de masa nominal y la lectura real de la balanza. Si la diferencia se encuentra dentro de +1 división, no se requiere un ajuste de calibración. Si la diferencia excede +1 división, se recomienda un ajuste de calibración Ejemplo: Lectura de peso real: Lectura de peso esperada: Diferencia de peso (d): Diferencia de peso en dígitos: 200.014 200.000 (valor de masa de prueba) 0,014 –14 (ajustar valor) Para realizar un ajuste de calibración, toque el ajuste AutoCal del menú de calibración, introduzca el valor (divisiones positivas o negativas) para igualar la diferencia percibida en el procedimiento anterior. Realice una nueva calibración utilizando la calibración interna. Después de la calibración, coloque la masa de prueba en el plato y compruebe que el valor de la masa es ahora igual al valor mostrado. De no ser así, repita el procedimiento hasta que la lectura de calibración interna concuerde con la masa de prueba. Una vez finalizado, la balanza guarda el valor de ajuste y la pantalla regresa a la aplicación actual. 5.2.5 Calibración de amplitud La calibración de amplitud utiliza dos puntos de calibración: uno en la carga de cero y otro en la carga completa especificada (amplitud). Para conocer información detallada sobre la masa de calibración, consulte las tablas de especificación en la sección 9. Nota: las configuraciones predeterminadas de fábrica aparecen en negrita. Con la balanza ajustada en ENCENDIDO y sin carga en el plato, toque Calibración de amplitud para iniciar el procedimiento. Los valores de calibración adicionales utilizados se muestran en la pantalla. La mayor exactitud se logra utilizando la masa más cercana al valor de amplitud total. Nota: para cambiar el punto de calibración de amplitud, toque el peso alternativo que se muestra en pantalla. Siga las instrucciones en pantalla y coloque el peso de calibración especificado en la balanza, cuando asíse lo solicite. Una vez finalizado, la pantalla muestra el estado de la calibración de amplitud y regresa a la aplicación actual. 5.2.6 Calibración de Linealidad La calibración de Linealidad utiliza tres puntos de calibración: uno en la carga de cero y los otros en cargas específicas. Sin carga en la báscula, pulse calibración de linealidad para iniciar el proceso. La balanza captura el punto de puesta a cero y luego pasa al siguiente peso. Siga las instrucciones que se muestran en la pantalla hasta que finalice la calibración. Para cancelar en cualquier momento, pulse Salir. 5.2.7 Prueba de calibración Utilice la prueba de calibración para comparar un peso de calibración conocido con los datos de calibración de extensión almacenados. Sin peso en la báscula, pulse Prueba de calibración para comenzar el proceso. La balanza captura e punto cero, después muestra el valor de amplitud. La pantalla muestra el estado, seguido de la diferencia entre el peso de calibración actual y los datos de calibración almacenados. BALANZAS ADVENTURER ES-31 5.3 Ajuste de la balanza Ingrese a este submenú para personalizar la funcionalidad de la balanza. 5.3.1 Submenú de ajuste de la balanza Idioma Configuración del usuario Nivel de filtro Rastreo de cero automático Tara automática Graduaciones Fecha y hora Modo aprobado Las configuraciones predeterminadas de fábrica aparecen a continuación en negrita. 5.3.2 Idioma Ajuste el idioma para los menús y mensajes. Inglés Alemán Francés Español Italiano Polaco Turco Checo Húngaro 5.3.3 Configuración del usuario Utilice este submenú para cambiar el ajuste de: Calibración de función táctil “Calibración en ejecución, toque la pantalla en el centro del círculo” (primero en parte superior izquierda, luego en parte inferior derecha.) Brillo de la pantalla: BAJO = brillo de pantalla bajo MEDIO = brillo de pantalla normal ALTO = brillo de pantalla alto. Pitido: APAGADO = desactivado ACTIVADO = activado Atenuación automática (atenúa la pantalla si no hay actividad durante x minutos) APAGADO = desactivado 10 min 20 min 30 min Asistencia de nivel: instrucciones sobre cómo mover los pies de la balanza para nivelarla. ES-32 BALANZAS ADVENTURER 5.3.4 Nivel de filtro Configura la cantidad de filtrado de señales. BAJO MEDIO ALTO 5.3.5 = tiempo de estabilización más rápido con menos estabilidad. = tiempo de estabilización normal con estabilidad normal. = tiempo de estabilización más lento con más estabilidad. Rastreo de cero automático Configura la funcionalidad de seguimiento de la puesta a cero automática. APAGADO = 0,5 D = 5.3.6 1D = 3D = desactivado. la pantalla mantiene la puesta a cero hasta una deriva de 0,5 graduación por segundo. la pantalla mantiene la puesta a cero hasta una deriva de 1 graduación por segundo. la pantalla mantiene la puesta a cero hasta una deriva de 3 graduaciones por segundo. Tara automática Ajuste la tara automática. APAGADO= desactivado. ENCENDIDO = activado. Cuando esté a punto de comenzar la Tara automática, se mostrará en la pantalla 'Coloque el contenedor en el plato'. Debajo del texto se mostrará el botón Desactivar. Pulse el botón para desactivar la función Tara automática 5.3.7 Graduaciones Ajusta la sensibilidad mostrada de la balanza. División 1= sensibilidad estándar. Divisiones 10 = la sensibilidad aumenta por un factor de 10. Por ejemplo: si la sensibilidad estándar es 0,01 g seleccionando Divisiones por 10, la sensibilidad mostrada será de 0,1 g. 5.3.8 Fecha y hora Ajusta la fecha y hora actual. Cambie el formato (si asíse desea) y luego introduzca el valor actual. Pulse Guardar para confirmar el nuevo valor. BALANZAS ADVENTURER 5.3.9 ES-33 Modo aprobado Utilice este menú para ajustar el estado del comercio legal. APAGADO = funcionamiento estándar. ENCENDIDO = el funcionamiento cumple con las normas de Metrología Legal. Nota: Si se ajusta Modo aprobado en ENCENDIDO, la configuración del menú se ve afectada de la siguiente manera: Menú de calibración: La calibración interna AutoCal está forzada en ENCENDIDO y oculta. Están disponibles las funciones de Calibración interna y Prueba de calibración. Todas las demás funciones están ocultas. Menú de ajuste de la balanza: En la configuración actual se bloquea el Nivel de filtro. El rastreo de cero automático se limita a la división 0,5 y APAGADO. Se bloquea la configuración seleccionada. La Tara automática está bloqueada en la configuración actual. Las graduaciones están forzadas en la división 1 y el elemento del menú está oculto. El Menú comunicación (Comunicación->Configuraciones de impresión->Salida de impresión): El peso estable solo se bloquea en ENCENDIDO. El valor numérico solo se bloquea en APAGADO. El Menú comunicación (Comunicación->Configuraciones de impresión-> Impresión automática): Las selecciones de modo de impresión automática se limitan a APAGADO, en estabilidad e intervalo. El modo continuo no está disponible. Menú de mantenimiento de datos: Exportar a USB está oculto Importar de USB está oculto Menú de bloqueo: el Menú está oculto Nota: El interruptor de seguridad ubicado en la parte trasera de la balanza debe estar en la posición de bloqueado para establecer el Modo aprobado en ENCENDIDO. El interruptor de seguridad debe estar en la posición desbloqueada para fijar el Modo aprobado en APAGADO. Consulte la sección 6. Pantalla principal de la aplicación de pesaje con el LFT en ENCENDIDO. ES-34 BALANZAS ADVENTURER 5.4 Unidades de pesaje Acceda a este submenú para activar las unidades de medición deseadas. Además, a este menú se puede acceder pulsando el símbolo unidad en la pantalla principal de la aplicación. Nota: De acuerdo a las leyes nacionales, la balanza no puede incluir las unidades de medición enumeradas. 5.4.1 Submenú de unidades Miligramo gramo kilogramo quilate onza onza troy Libra pennyweight grain Newton momme mesghal Tael (Hong Kong) Tael (Singapur) Tael (Taiwán) tical tola baht Unidad personalizada 1 Nota: Si el Modo aprobado está fijado en ENCENDIDO algunas unidades no se mostrarán. Utilice cada Unidad personalizada para mostrar el peso en una unidad alternativa de medición. La unidad personalizada se define utilizando un factor de conversión, en el que el factor de conversión es el número de unidades personalizadas por gramo expresado en la notación científica (factor x exponente 10^). Por ejemplo: Para mostrar el peso en onzas Troy (0,03215075 onzas Troy por gramo), introduzca un factor de 0,3215075 y un exponente de -1. Los nombres de las Unidades personalizadas pueden personalizarse con un máximo de 3 caracteres. 5.5 Mantenimiento de datos Acceda a este submenú para personalizar la configuración de transferencia de datos. 5.5.1 Submenú de mantenimiento de datos Para exportar e importar funciones La configuración de varias balanzas se realiza simplemente exportando el perfil de una balanza maestra a través de la unidad USB. La herramienta de mantenimiento de datos le permite guardar la configuración del usuario y la aplicación en un USB, que puede transferirse fácilmente a otras balanzas Adventurer. Después, los datos pueden utilizarse para configurar balanzas Adventurer con datos importados de la balanza original. Exportar a USB Importar desde USB Información de la balanza BALANZAS ADVENTURER ES-35 5.5.2 Exportar a USB Exporta los datos de pesaje a la unidad Flash USB. Se pueden exportar dos tipos de datos: - Configuración de la aplicación (APW, Peso de ref., etc.) - Configuración de menú (Función de ajuste de la balanza, etc.). Nota: La función Guardar en USB tiene que estar ajustada en ENCENDIDO para permitir la transferencia de datos a USB. Consulte la sección 5.6 para más información 5.5.3 Importar desde USB Importa los datos de pesaje desde la unidad Flash USB. 5.5.4 Información de la balanza Acceda para ver la información sobre la balanza. La información que se muestra incluye: Tipo de balanza, ID de balanza, Capacidad, Sensibilidad y Versión del software. 5.6 Comunicación Acceda a este submenú para definir los métodos de comunicación externa y para ajustar los parámetros de impresión. Los datos pueden enviarse a una impresora o un PC. Las configuraciones predeterminadas de fábrica aparecen en negrita. Acceda para ver la información sobre la balanza. 5.6.1 Submenú de comunicación RS -232 estándar Configuraciones de impresión Guardar en USB RS -232 estándar: Entre en este submenú para personalizar la configuración estándar de RS-232. 5.6.2 Tasa de baudios Ajusta la tasa de baudios (bits por segundo). 2400 4800 9600 19200 38400 = 2400 bps = 4800 bps = 9600 bps = 19200 bps = 38400 bps ES-36 BALANZAS ADVENTURER 5.6.3 Transmisión Ajuste los bits de datos, bit de parada y paridad. 7 PAR 1 7 IMPAR 1 7 PAR 2 7 IMPAR 2 7 NNGUNO 1 8 NINGUNO 1 7 NNGUNO 2 8 NINGUNO 2 5.6.4 = 7 bits de datos, paridad par, bit de parada 1 = 7 bits de datos, paridad impar, bit de parada 1 = 7 bits de datos, paridad par, bit de parada 2 = 7 bits de datos, paridad impar, bit de parada 2 = 7 bits de datos, sin paridad , bit de parada 1 = 8 bits de datos, sin paridad, bit de parada 1 = 7 bits de datos, sin paridad , bit de parada 2 = 8 bits de datos, sin paridad, bit de parada 2 Protocolo de enlace Ajusta el método de control de flujo. NINGUNO XON-XOFF HARDWARE = sin protocolo de enlace = XON/XOFF del protocolo de enlace = método de control de flujo de hardware Configuraciones de impresión Ingrese a este submenú para personalizar la configuración de transferencia de datos. Submenú Configuración de la impresora Salida de impresión Impresión automática Impresión de contenidos Alimentación Formato Impresión Datos Calibración 5.6.5 Salida de impresión Solo peso estable Configura los criterios de impresión. DESACTIVADO ACTIVADO = los valores se imprimen inmediatamente, independientemente de la estabilidad. = los valores se imprimen solo si se cumplen los criterios de estabilidad. Solo valor numérico Configura los criterios de impresión. DESACTIVADO ACTIVADO = se imprimen todos los resultados y los valores de los datos de B/N/T. Consulte la sección 7.2 para más información = solo se imprimen valores de datos numéricos Solo un encabezado individual Configura los criterios de impresión. DESACTIVADO ACTIVADO = cada vez que se mande imprimir, se imprimirán los encabezados = los encabezados se imprimirán una vez al día Opciones de impresión Configura los criterios de impresión. Impresora PC = imprimir datos en una impresora = imprimir datos en un PC 5.6.6 Impresión automática Configura la funcionalidad de impresión automática. DESACTIVADO = deshabilitado ESTABILIDAD ON1 = la impresión ocurre cada vez que se cumplen los criterios de estabilidad. INTERVALO2 = la impresión ocurre en el intervalo de tiempo definido. BALANZAS ADVENTURER ES-37 CONTINUO 1Si = la impresión ocurre en forma continua. selecciona CON ESTABILIDAD, ajuste las condiciones para la impresión. CARGA = se imprime cuando la carga mostrada es estable. PUESTA A CERO, CARGA = se imprime cuando la lectura de carga o de puesta a cero mostrada es estable. 2Si selecciona INTERVALO, ajuste el intervalo de tiempo utilizando el teclado numérico. Están disponibles las configuraciones de 1 a 3600 segundos. El valor predeterminado es 0. 5.6.7 Impresión de contenidos Define el contenido de los datos de impresión. Selección Configura el estado. Desmarcar todo = Todo se establece en DESACTIVADO Seleccionar todo = Todo se establece en ACTIVADO Encabezado Fecha y hora ID de la balanza Nombre de la balanza Nombre de usuario Nombre del proyecto Nombre de la aplicación Nombre de la muestra Resultado Bruto Neto Tara Información Línea de firma 5.6.8 Alimentación Ajuste la alimentación del papel. 1 LÍNEA 4 LÍNEAS = sube el papel una línea después de la impresión. = sube el papel cuatro líneas después de la impresión. 5.6.9 Formato Establecer el formato de impresión. Línea única = impresiones en una sola línea. Líneas múltiples = prints on multiple lines. 5.6.10 Print Calibration Data Configura los criterios de impresión. Off On = desactivado = activado Guardar en USB Configura el estado. DESACTIVADO = los datos no se guardarán en el USB ACTIVADO = los datos se guardarán en el USB ES-38 BALANZAS ADVENTURER 5.7 Datos de BPL y GMP Acceda a este menú para ajustar los datos de las buenas prácticas de laboratorio (BPL y las buenas prácticas de fabricación (GMP)). 5.7.1 Submenú de datos de BPL Encabezado 5.7.2 Nombre de la balanza Nombre de usuario Nombre del proyecto Encabezado Permite la impresión de encabezados de BPL. Hay hasta 5 encabezados disponibles. Hay configuraciones alfanuméricas de hasta 25 caracteres disponibles para la configuración de cada encabezado. 5.7.3 Nombre de la balanza Ajuste la identificación de la balanza. Hay configuraciones alfanuméricas de hasta 25 caracteres. El ajuste predeterminado está en Adventurer. 5.7.4 Nombre de usuario Ajuste la identificación del usuario. Hay configuraciones alfanuméricas de hasta 25 caracteres. El ajuste predeterminado está en blanco. 5.7.5 Nombre del proyecto Ingrese a este submenú para ajustar la identificación del proyecto. Hay configuraciones alfanuméricas de hasta 25 caracteres. El ajuste predeterminado está en blanco. 5.8 Restablecimiento de los valores de fábrica Utilice este submenú para restablecer todos los menús a sus configuraciones predeterminadas de fábrica. Nota: Los datos de calibración no se verán afectados. Restablecimiento de todo = restablece todos los menús a sus configuraciones predeterminadas de fábrica. Salir = vuelve a la pantalla principal de la aplicación sin reiniciar ningún menú. 5.9 Bloqueo Utilice este submenú para bloquear/desbloquear algunos menús. Una vez bloqueado, aparecerá una pequeña llave en el icono menú y el usuario no será capaz de entrar en ese menú. Haga clic en un menú y seleccione: DESACTIVADO = el menú está desbloqueado ACTIVADO = el menú está bloqueado BALANZAS ADVENTURER 6. ES-39 COMERCIO LEGAL Si la balanza se utiliza en el comercio o una aplicación controlada legalmente, se debe ajustar, verificar y sellar según las normas de medición y pesaje locales. Es responsabilidad del comprador garantizar que se cumplan todos los requisitos legales pertinentes. 6.1 Configuración Antes de la verificación y sellado, realice los siguientes pasos en orden: 1. Compruebe que la configuración del menú cumple con las normativas locales de pesos y medidas. 2. Compruebe que las unidades encendidas cumplen con las normativas locales de pesos y medidas. 3. Realice una calibración según se explica en la sección 5. 4. Ajuste la posición del interruptor de seguridad en la posición bloqueada. 5. Ajuste el Modo aprobado a ENCENDIDO en el menú de configuración de la balanza. Nota: Cuando el Modo aprobado esta ajustado en ENCENDIDO, la calibración externa no se puede realizar. 6.2 Verificación El personal autorizado de pesos y medidas o un agente de mantenimiento autorizado deben realizar el procedimiento de verificación. 6.3 Sellado Después de verificar la balanza, se debe sellar para prevenir un acceso no detectado a la configuración legalmente controlada. Antes de sellar el dispositivo, asegúrese de que el interruptor de seguridad se encuentre en la posición bloqueada y que la configuración del Modo aprobado en el menú de ajuste de la balanza se ajuste en ACTIVADO. Si se utiliza un sello de papel, coloque el sello sobre el interruptor de seguridad y caja inferior como se indica. Si se utiliza un sello de alambre, atraviese el cable de sellado en las aberturas del interruptor de seguridad y caja inferior como se indica. Desbloqueado Bloqueado con sello de papel Bloqueado con sello de alambre ES-40 7. BALANZAS ADVENTURER IMPRIMIR 7.1 Conexión, configuración y prueba de la interfaz de la impresora y ordenador Utilice el puerto RS-232 integrado para conectarla a un ordenador o una impresora. Si se conecta a un ordenador, utilice HyperTerminal o un software similar como SPDC que se describe a continuación. (busque HyperTerminal en Accesorios/Comunicaciones en Windows XP). Conecte al ordenador con un cable de serie estándar (intermedio). Elija Nueva conexión, “conectar utilizando” COM1 (o puerto COM disponible). Seleccione Baud=9600; Paridad=8 ninguno; Parada=1; Protocolo de enlace=Ninguno. Haga clic en ACEPTAR. Elija Propiedades / Configuración y, luego, ajuste ASCII. Seleccione las opciones según la ilustración: (Enviar extremos de línea…; caracteres con eco…; líneas de conexión…) Utilice los comandos de la interfaz RS232 (sección 9.6.1) para controlar la balanza desde un ordenador. Nota: cuando finaliza la configuración de HyperTerminal, se imprimirán automáticamente los resultados de la Prueba de calibración y comando de impresión de eco enviados a la báscula. Software SPDC Ohaus proporciona el software Serial Port Data Collection, o SPDC, y puede utilizarse en sistemas operativos que no tengan el software HyperTerminal mencionado anteriormente. Seleccione el tipo de archivo a exportar y la ruta del archivo a exportar y después pulse Ejecutar como se muestra a continuación. Nota: El software SPDC solo admite el idioma inglés. 7.2 Formato de salida Los datos de los resultados y los datos de B/N/T se envían en el siguiente formato. Campo: Longitud: Etiqueta 1 Espacio 2 Peso 3 Espacio 2 Unidad 4 Espacio 1 11 1 5 1 Estabilidad 5 Espacio B/N 6 Espacio Term. Caracteres 7 1 1 3 0 8 1. La longitud del campo etiqueta no está fijada. 2. Cada campo está seguido de un espacio delimitador único (ASCII 32). 3. El campo de peso está formado por 11 caracteres justificados a la derecha. Si el valor es negativo, el carácter “–“ se ubica a la izquierda inmediata del dígito más importante. 4. El campo de unidad contiene la abreviatura de la unidad de medición de hasta 5 caracteres. BALANZAS ADVENTURER ES-41 5. El campo Estabilidad contiene el carácter “?” si la lectura del peso no es estable. El campo Estabilidad y el siguiente campo Espacio se omiten si la lectura del peso es estable. 6. El campo B/N contiene la indicación de neto o bruto. En el caso de pesos netos, el campo contiene “NETO”. En el caso de pesos netos, el campo contiene “G”. 7. El campo Caracteres de terminación contiene CRLF, cuatro CRLF o salto de impresión (ASCII 12), dependiendo de la configuración del menú de SALTO DE LÍNEA. 8. 8.1 MANTENIMIENTO Calibración Compruebe la calibración periódicamente colocando un peso exacto en la balanza y viendo el resultado. Si es necesario realizar la calibración, consulte la sección 5.2 para más información. 8.2 Limpieza ADVERTENCIA: Desconecte la balanza Adventurer de la fuente de alimentación antes de su limpieza. Asegúrese de que no entre líquido en el interior de la balanza. Limpie la balanza a intervalos periódicos. La superficie de la caja puede limpiarse con un paño humedecido con agua o un producto de limpieza suave. La superficie de cristal puede limpiarse con un limpiador de cristales. Siga los pasos que aparecen a continuación sobre cómo eliminar e instalar las puertas deslizantes Atención: No utilice disolventes, productos químicos fuertes, amoniaco o productos de limpieza abrasivos. Eliminar y reinstalar las puertas de cristal para limpieza: Paso 1. En la parte trasera de la balanza, pulse el pasador y saque la puerta deslizándola. Paso 2. Después de limpiarla, deslice la puerta por la ranura mientras presiona el pasador mencionado en el paso 1. Paso 3. Deslice las puertas por la ranura hasta que el tope trasero se alinee con la otra puerta. ES-42 8.3 BALANZAS ADVENTURER Resolución de problemas TABLA 8-1. RESOLUCIÓN DE PROBLEMAS Síntoma / Pantalla Causa posible Solución La balanza no se enciende A la balanza no le llega corriente Verifique la conexión y el voltaje Exactitud baja Calibración incorrecta Entorno inestable Realice una calibración Mueva la báscula a una ubicación apropiada No se puede calibrar Menú de calibración bloqueado El Modo aprobado está encendido Entorno inestable Masa de calibración incorrecta Desactive el bloqueo del menú de calibración Apague el Modo aprobado Mueva la balanza a una ubicación apropiada Utilice la masa de calibración correcta No se pueden cambiar Submenú bloqueado las configuraciones del El Modo aprobado está encendido menú 8.4 Submenú de desbloqueo Apague el Modo aprobado Peso de referencia bajo Peso de referencia demasiado bajo Aumente el tamaño de la muestra El peso del plato es demasiado bajo como para definir un peso de referencia válido. Peso de pieza no válido El peso de pieza medio es demasiado bajo Aumente el peso de pieza medio Tiempo límite de funcionamiento La lectura del peso no es estable Mueva la balanza a una localización adecuada ------ Ocupado (tara, puesta a cero, impresión, esperando un peso estable) Espere hasta que finalice Información de mantenimiento Si la sección de solución de problemas no resuelve, póngase en contacto con un servicio técnico Ohaus autorizado. Visite nuestra página web, www.ohaus.com, para localizar la oficina de Ohaus más cercana a usted. Un técnico especialista de productos Ohaus estará a su disposición para ofrecerle asistencia. BALANZAS ADVENTURER 9. 9.1 DATOS TÉCNICOS Especificaciones Condiciones ambientales Solo para uso en interiores Altitud: Hasta 2.000 m Rango de temperatura especificado: 10 ℃ a 30 ℃ Humedad: humedad máxima relativa del 80 % para temperaturas de hasta 30℃ Reducción de linealidad hasta una humedad relativa del 50% al 40 ºC Fluctuaciones en el voltaje de la alimentación eléctrica: hasta ±10% del voltaje nominal Categoría de instalación II Grado de polución: 2 Materiales Caja inferior; aluminio fundido moldeado, pintado Carcasa superior: plástico (ABS) Plataformas de pesaje: 18/10 acero inoxidable Protección contra corrientes de aire; cristal, plástico (ABS) Pies: plástico (ABS) ES-43 ES-44 BALANZAS ADVENTURER TABLA 9-1. ESPECIFICACIONES Modelo: Capacidad Sensibilidad d Repetibilidad (desv. típica) (g) Linealidad (g) Puntos de calibración de amplitud (g) Calibración Unidades de pesaje Aplicaciones Tiempo de estabilización (típico) Deriva de la temperatura de sensibilidad (PPM/K) Peso mínimo típico del USB (u=0,10%,k=2) Peso mínimo óptimo del USB (u=0,10%,k=2) Pantalla Tamaño de la pantalla Retroiluminación Controles Comunicación Entrada de corriente de la balanza Suministro de corriente Tamaño de la plataforma (diámetro) Dimensiones montada (A x P x A) Dimensiones de envío (A x P x A) Peso neto Peso de envío AX124 120 g AX124/E 120 g AX224 220 g 0,0001 g AX224/E 220 g AX324 320 g 50 g, 100 g 150 g, 200 g 100 g 200g, 300 g 0,0001 g ± 0,0002 g 25 g, 50 g 75 g, 100 g 25 g, 50 g 75 g, 100 g 50 g, 100 g 150 g, 200 g CALIBRACIÓN CALIBRACIÓN CALIBRACIÓN Externo Externo automática automática automática Baht, quilate, grain, gramo, miligramo, mesgal, momme, Newton, onza, pennyweight, libra, tael (Hong Kong), tael, (Singapur), tael (Taiwán), tical, tola, onza troy, programable (1) Pesaje, recuento de piezas, pesaje porcentual, pesaje de comprobación, pesaje de animales, formulación, determinación de la densidad, totalización, control de la pantalla ≤ 3 segundos 1,5 0,20 g 0,20 g 0,20 g 0,20 g 0,20 g 0,082 g 0,082 g 0,082 g 0,082 g 0,082 g LCD gráfico WQVGA a todo color 4,3 pulgadas / 10,9 cm (diagonal) LED blanco Pantalla táctil resistiva de 4 hilos + 6 teclas de membrana RS-232, USBx2 12 V CC, 0,5A Entrada para adaptador de CA: 100-240 VCA 0,3A 50-60 Hz Salida para adaptador de CA: 12 V CC 0,84 A 90 mm / 3,5 libras 230 x 354 x 340 mm 9,1 x 13 x 13 pulgadas 387 x 507 x 531 mm 15,4 x 20,0 x 20,9 pulgadas 5,8 kg / 12,8 libras 8,5 kg / 18,8 libras BALANZAS ADVENTURER ES-45 TABLA 9-2. ESPECIFICACIONES (continuación) Modelo: Capacidad Sensibilidad d Repetibilidad (desv. típica) (g) Linealidad (g) Puntos de calibración de amplitud (g) Calibración Unidades de pesaje Aplicaciones Tiempo de estabilización (típico) Deriva de la temperatura de sensibilidad (PPM/K) Peso mínimo típico del USB (u=0,10%,k=2) Peso mínimo óptimo del USB (u=0,10%,k=2) AX223 220 g AX523 520 g AX523/E 520 g ± 0,002 g 50 g, 100 g 150 g, 200 g 50 g, 100 g 150 g, 200 g 100 g, 200 g 300 g, 400 g 200 g, 400 g 200 g, 300 g 400 g, 500 g 200 g, 300 g 400 g, 500 g CALIBRACIÓN CALIBRACIÓN CALIBRACIÓN Externo Externo Externo automática automática automática Baht, quilate, grain, gramo, miligramo, mesgal, momme, Newton, onza, pennyweight, libra, tael (Hong Kong), tael, (Singapur), tael (Taiwán), tical, tola, onza troy, programable (1) Pesaje, recuento de piezas, pesaje porcentual, pesaje de comprobación, pesaje de animales, formulación, determinación de la densidad, totalización, control de la pantalla ≤ 2 segundos 3 2.0 g 2.0 g 2.0 g 2.0 g 2.0 g 0.82 g 0.82 g 0.82 g 0.82 g 0.82 g LCD gráfico WQVGA a todo color Tamaño de la pantalla Retroiluminación Controles Comunicación Entrada de corriente de la balanza Suministro de corriente Tamaño de la plataforma (diámetro) Dimensiones montada (A x P x A) Dimensiones de envío (A x P x A) Peso de envío AX423 AX423/E 420 g 420 g 0,001 g 0,001 g Pantalla Peso neto AX223/E 220 g 4,3 pulgadas / 10,9 cm (diagonal) LED blanco Pantalla táctil resistiva de 4 hilos + 6 teclas de membrana RS-232, USBx2 12 V CC, 0,5A Entrada para adaptador de CA: 100-240 VCA 0,3A 50-60 Hz Salida para adaptador de CA: 12 V CC 0,84 A 130 mm / 5,1 pulg 230 x 354 x 340 mm 9,1 x 13,9 x 13,4 pulgadas 387 507 x 531 mm 15,4 x 20,0 x 20,9 pulgadas 5,8 kg / 12,8 libras 8,5 kg / 18,8 libras 5,6 kg / 12,4 libras 8,3 kg / 18,3 libras 5,8 kg / 12,8 libras 8,5 kg / 18,8 libras 5,6 kg / 12,4 libras 8,3 kg / 18,3 libras 5,8 kg / 12,8 libras 8,5 kg / 18,8 libras 5,6 kg / 12,4 libras 8,3 kg / 18,3 libras ES-46 BALANZAS ADVENTURER TABLA 9-3. ESPECIFICACIONES (continuación) Modelo: Capacidad Sensibilidad d Repetibilidad (desv. típica) (g) Linealidad (g) Puntos de calibración de amplitud (g) Calibración Unidades de pesaje Aplicaciones Tiempo de estabilización (típico) Deriva de la temperatura de sensibilidad (PPM/K) Peso mínimo típico del USB (u=0,10%,k=2) Peso mínimo óptimo del USB (u=0,10%,k=2) Pantalla Tamaño de la pantalla Retroiluminaci ón Controles Comunicación Entrada de corriente de la balanza Suministro de corriente Tamaño de la plataforma Dimensiones montada (A x P x A) Dimensiones de envío (A x P x A) Peso neto Peso de envío AX422 420g AX422/E 420g AX822 820g AX822/E 820g 200g, 400g 600g, 800g 200g, 400g 600g, 800g 0,01 g 0,01 g ± 0,02 g 100g, 200g 300g,400g 100g, 200g 300g,400g CALIBRACIÓN CALIBRACIÓN Externo Externo automática automática Baht, quilate, grain, gramo, kilogramo, mesgal, momme, Newton, onza, pennyweight, libra, tael (Hong Kong), tael, (Singapur), tael (Taiwán), tical, tola, onza troy, programable (1) Pesaje, recuento de piezas, pesaje porcentual, pesaje de comprobación, pesaje de animales, formulación, determinación de la densidad, totalización, control de la pantalla ≤ 1,5 segundos 3 20,0 g 20,0 g 20,0 g 20,0 g 8,2 g 8,2 g 8,2 g 8,2 g LCD gráfico WQVGA a todo color 4,3 pulgadas / 10,9 cm (diagonal) LED blanco Pantalla táctil resistiva de 4 hilos + 6 teclas de membrana RS-232, USBx2 12 VCC, 0,5 A Entrada para adaptador de CA: 100-240 VCA 0,3A 50-60 Hz Salida para adaptador de CA: 12 V CC 0,84 A 175 x 195 mm / 6,9 x 7,7 pulgadas 230 x 354 x100 mm 9,1 x 13,9 x 4,0 pulgadas 392 x 557 x 301 mm 15,5 x 22,0 x 11,9 pulgadas 4.6Kg/10.2lb 6.5Kg/14.4b 3.9Kg/8.6lb 5.8Kg/12.8b 4.6Kg/10.2lb 6.5Kg/14.4b 3.9Kg/8.6lb 5.8Kg/12.8b BALANZAS ADVENTURER ES-47 TABLA 9-4. ESPECIFICACIONES (continuación) Modelo: Capacidad Sensibilidad d Repetibilidad (desv. típica) (g) Linealidad (g) Puntos de calibración de amplitud (g) Calibración Unidades de pesaje Aplicaciones Tiempo de estabilización (típico) Deriva de la temperatura de sensibilidad (PPM/K) Peso mínimo típico del USB (u=0,10%,k=2) Peso mínimo óptimo del USB (u=0,10%,k=2) Pantalla Tamaño de la pantalla Retroiluminació n Controles Comunicación Entrada de corriente de la balanza Suministro de corriente Tamaño de la plataforma Dimensiones montada (A x P x A) Dimensiones de envío (A x P x A) Peso neto Peso de envío AX1502 1.520 g AX1502/E 1.520 g AX2202 2.200 g AX2202/E 2.200 g 0,01 g AX4202 4.200 g AX4202/E 4.200 g AX5202 5.200 g 0,01 g ± 0,02 g 500 g, 500 g, 1000 g, 1000 g, 2000 g, 500 g 300 g, 400 g 1000 g 1000 g 2000 g 2000 g 3000 g 1000 g, 500 g, 600 g 1500 g, 1500 g, 3000 g, 3000 g, 4000 g, 1500 g 2000 g 2000 g 4000 g 4000 g 5000 g CALIBRACIÓN CALIBRACIÓN CALIBRACIÓN CALIBRACIÓN Externo Externo Externo automática automática automática automática Baht, quilate, grain, gramo, kilogramo, mesgal, momme, Newton, onza, pennyweight, libra, tael (Hong Kong), tael, (Singapur), tael (Taiwán), tical, tola, onza troy, programable (1) Pesaje, recuento de piezas, pesaje porcentual, pesaje de comprobación, pesaje de animales, formulación, determinación de la densidad, totalización, control de la pantalla ≤ 1,5 segundos 3 1,9 20,0 g 20,0 g 20,0 g 20,0 g 20,0 g 20,0 g 20,0 g 8,2 g 8,2 g 8,2 g 8,2 g 8,2 g 8,2 g 8,2 g LCD gráfico WQVGA a todo color 4,3 pulgadas / 10,9 cm (diagonal) LED blanco Pantalla táctil resistiva de 4 hilos + 6 teclas de membrana RS-232, USBx2 12 VCC, 0,5 A Entrada para adaptador de CA: 100-240 VCA 0,3A 50-60 Hz Salida para adaptador de CA: 12 V CC 0,84 A 175 x 195 mm / 6,9 x 7,7 pulgadas 230 x 354 x100 mm 9,1 x 13,9 x 4,0 pulgadas 392 x 557 x 301 mm 15,5 x 22,0 x 11,9 pulgadas 4,6 Kg/ 10 2 lb 6,5 Kg/ 14,4 b 3,9 Kg/ 8 6 lb 5,8 Kg/ 12,8 b 4,6 Kg/ 10,2 lb 6,5 Kg/ 14,4 b 3,9K / 8,6 lb 5,8 Kg/ 12,8 b 4,6 Kg/ 10,2 lb 6,5 Kg/ 14,4 b 3,9 Kg/ 8,6 lb 5,8 Kg/ 12,8 b 3,8 Kg/ 8,4 lb 5,7 Kg/ 12,6 lb ES-48 BALANZAS ADVENTURER TABLA 9-5. ESPECIFICACIONES (continuación) Modelo: Capacidad Sensibilidad d Repetibilidad (desv. típica) (g) Linealidad (g) Puntos de calibració n de amplitud (g) Calibració n Unidades de pesaje Aplicaciones Tiempo de estabilizació n (típico) Deriva de la temperatura de sensibilidad (PPM/K) Peso mínimo típico del USB (u=0,10%,k=2) Peso mínimo ó ptimo del USB (u=0,10%,k=2) AX2201 2200g AX2201/E 2200g AX4201 4.200 g AX4201/E 4.200 g AX8201 8.200 g AX8201/E 8.200 g 1000g, 2000g 3000g, 4000g 2000g, 4000g 6000g, 8000g 2000g, 4000g 6000g, 8000g 0,1 g 0,1 g ± 0,2 g 500g, 1000g 1500g, 2000g 500g, 1000g 1500g, 2000g 1000g, 2000g 3000g, 4000g CALIBRACIÓ N CALIBRACIÓ N CALIBRACIÓ N Externo Externo Externo automá tica automá tica automá tica Baht, quilate, grain, gramo, kilogramo, mesgal, momme, Newton, onza, pennyweight, libra, tael (Hong Kong), tael, (Singapur), tael (Taiwá n), tical, tola, onza troy, programable (1) Pesaje, recuento de piezas, pesaje porcentual, pesaje de comprobació n, pesaje de animales, formulació n, determinació n de la densidad, totalizació n, control de la pantalla ≤ 1,5 segundos 9 200,0 g 200,0 g 200,0 g 200,0 g 200,0 g 200,0 g 82 g 82 g 82 g 82 g 82 g 82 g Pantalla LCD grá fico WQVGA a todo color Tamañ o de la pantalla 4,3 pulgadas / 10,9 cm (diagonal) Retroiluminació n Controles Comunicació n Entrada de corriente de la balanza Suministro de corriente Tamañ o de la plataforma Dimensiones montada (A x P x A) Dimensiones de envío (A x P x A) Peso neto Peso de envío LED blanco Pantalla tá ctil resistiva de 4 hilos + 6 teclas de membrana RS-232, USBx2 12 VCC, 0,5 A Entrada para adaptador de CA: 100-240 VAC 0,3A 50-60 Hz Salida para adaptador de CA: 12 V CC 0,84A 175x195 mm/ 6,9x7,7 pulgadas 230 x 354 x 100 mm 9,1 x 13,9 x 4,0 pulgadas 392 x 557 x 301 mm 15,5 x 22,0 x 11,9 pulgadas 4.6Kg/10.2lb 6.5Kg/14.4b 3.9Kg/8.6lb 5.8Kg/12.8b 4,6 Kg / 10,2 lb 6,5 Kg / 14,4 b 3,9 Kg / 8,6 lb 5,8 Kg / 12,8 b 3,8 Kg / 8,4 lb 5,7 Kg / 12,6 lb 3,4 Kg / 7,5 lb 5,3 Kg / 11,6 lb BALANZAS ADVENTURER ES-49 TABLA 9-6. ESPECIFICACIONES (continuación) Modelo: AX124M AX224M AX324M AX223M AX423M AX523M AX1502M AX2202M AX4202M AX5202M AX8201M Má x. 120 g 220 g 320 g 220 g 420 g 520 g 1.520 g 2.200 g 4.200 g 5.200g 8.200 g Mín. 0,01 g 0,01 g 0,01 g 0,02 g 0,02 g 0,02 g 0,5 g 0,5 g 0,5 g 0,5 g 5g d= 0,0001 0,001 g 0,01 g 0,1 g e= Clase de aprobació n Repetibilidad (desv. típica) (g) Linealidad (g) 0,001 g 0,01 g 0,1 g 1g 0,01 g 0,1 g Puntos de calibració n de amplitud (g) Calibració n I 25 g, 50 g 75 g, 100 g Calibració n automá tica II 0,0001 g 0,001 g ± 0,0002 g 50 g, 100 g 150 g, 200 g ± 0,002 g 100 g, 200 g 300 g, 400 g 200 g, 300 g 400 g, 500 g 500 g 1000 g, 1500 g Calibració n automá tica Calibració n automá tica Calibració n automá tica Calibració n automá tica Unidades de pesaje Aplicaciones Tiempo de estabilizació n (típico) Deriva de la temperatura de sensibilidad (PPM/K) Peso mínimo típico del USB (u=0,10%,k=2) Peso mínimo ó ptimo del USB (u=0,10%,k=2) Pantalla Tamañ o de la pantalla Retroiluminació n 100 g 200 g, 300 g 50 g, 100 g 150 g, 200 g Calibració n automá tica Calibració n automá tica Peso de envío Calibració n automá tica miligramo, gramo, quilate 1000 g, 2000 g 3000 g, 4000 g 2000 g, 3000 g 4000 g, 5000 g Calibració n automá tica Calibració n automá tica ± 0,2g 2000 g, 4000 g 6000 g, 8000 g Calibració n automá tica miligramo, gramo, quilate Pesaje, recuento de piezas, pesaje porcentual, pesaje de comprobació n, pesaje de animales, formulació n, determinació n de la densidad, totalizació n, control de la pantalla ≤ 3 segundos ≤ 2 segundos 1,5 3 ≤ 1,5 segundos 3 1,9 0,20 g 0,20 g 0,20 g 2,0 g 2,0 g 2,0 g 20,0 g 20,0 g 20,0 g 20,0 g 200,0 g 0,082 g 0,082 g 0,082 g 0,82 g 0,82 g 0,82 g 8,2 g 8,2 g 8,2 g 8,2 g 82 g LCD grá fico WQVGA a todo color 4,3 pulgadas / 10,9 cm (diagonal) LED blanco Controles Comunicació n Entrada de corriente de la balanza Suministro de corriente Tamañ o de la plataforma (diá metro) Dimensiones montada(A x P x A) Dimensiones del envío (A x P x A) Peso neto ± 0,02 g 500 g, 1000 g 1500 g, 2000 g Pantalla tá ctil resistiva de 4 hilos + 6 teclas de membrana RS-232, USBx2 12 V CC, 0,5A Entrada para adaptador de CA: 100-240 VAC 0,3A 50-60 Hz Salida para adaptador de CA: 12 V CC 0,84A 90 mm / 3,5 pulgadas 130 mm / 5,1 pulgadas 175x195 mm/ 6,9x7,7 pulgadas 230 x 354 x 340 mm 9,1 x 13,9 x 13,4 pulgadas 230 x 354 x 340 mm 9,1 x 13,9 x 13,4 pulgadas 230 x 354 x 100 mm 9,1 x 13,9 x 4,0 pulgadas 387 x 507 x 531 mm 15,4 x 20,0 x 20,9 pulgadas 5,1 Kg / 11,3 lb 387 x 507 x 531 mm 15,4 x 20,0 x 20,9 pulgadas 5,8 Kg / 12,8 lb 7,8 Kg / 17,2 lb 8,5 Kg / 18,8 lb Nota: M = aprobación OILM 392 x 557 x 301 mm 15,5 x 22,0 x 11,9 pulgadas 4,6 Kg / 10,2 lb 3,8 Kg / 8,4 lb 6,5 Kg / 14,4 lb 5,7 Kg / 12,6 lb ES-50 BALANZAS ADVENTURER TABLA 9-7. ESPECIFICACIONES (continuación) Modelo: AX224N AX223N/E AX423N AX 423N/E AX523N/E AX1502N/E AX2202N/E AX4202N/E AX8201N/E Má x. 220 g 220 g 420 g 420 g 520 g 1520 g 2200 g 4200 g 8200 g Mín. 0,01 g 0,02 g 0,02 g 0,02 g 0,02 g 0,5 g 0,5 g 0,5 g 5g d= 0,0001 g 0,001 g 0,01 g 0,1 g e= Clase de aprobació n Repetibilidad (desv. típica) (g) Linealidad (g) 0,001 g 0,01 g 0,1 g 1g 0,01 g 0,1 g Puntos de calibració n de amplitud (g) Calibració n I 0,0001 g ± 0,0002 g 50 g, 100 g 150 g, 200 g Calibració n automá tica Tiempo de estabilizació n (típico) Deriva de la temperatura de sensibilidad (PPM/K) Peso mínimo típico del USB (u=0,10%,k=2) Peso mínimo ó ptim o del USB (u=0,10%,k=2) Pantalla Tamañ o de la pantalla Retroiluminació n 0,001 g ± 0,002 g 100 g, 100 g, 200 g 200 g 300 g, 300 g, 400 g 400 g 50 g, 100 g 150 g, 200 g Externo Peso neto Peso de envío Externo 500 g 1000 g, 1500 g Externo Externo ± 0,02 g 500 g, 1000 g 1500 g, 2000 g 1000 g, 2000 g 3000 g, 4000 g ± 0,2 g 2000 g, 4000 g 6000 g, 8000 g Externo Externo Externo gramo, kilogramo, quilate, pennyweight, grain, libra, onza, onza troy Pesaje, recuento de piezas, pesaje porcentual, pesaje de comprobació n, pesaje de animales, formulació n, determinació n de la densidad, totalizació n ≤3 segundos ≤ 2 segundos 1.5 3 ≤ 1,5 segundos 3 9 0,20 g 2,0 g 2,0 g 2,0 g 2,0 g 20,0 g 20,0 g 20,0 g 200,0 g 0,082 g 0,82 g 0,82 g 0,82 g 0,82 g 8,2 g 8,2 g 8,2 g 82 g LCD grá fico WQVGA a todo color 4,3 pulgadas / 10,9 cm (diagonal) LED blanco Controles Comunicació n Entrada de corriente de la balanza Suministro de corriente Tamañ o de la plataforma (diá metro) Dimensiones montada (A x P x A) Dimensiones del envío (A x P x A) Calibració n automá tica 200 g, 300 g 400 g, 500 g gramo, miligramo, quilate, pennyweight, grain, onza, onza troy Unidades de pesaje Aplicaciones II Pantalla tá ctil resistiva de 4 hilos + 6 teclas de membrana RS-232, USBx2 12 V CC, 0,5A Entrada para adaptador de CA: 100-240 VCA 0,3A 50-60 Hz Salida para adaptador de CA: 12 V CC 0,84A 90 mm / 3,5 pulg 130 mm / 5,1 pulg 175x195 mm / 6,9x7,7 pulg 354x230x340 mm 13,9x9,1x13,4 pulgadas 354x230x100 mm 13,9x9,1x4,0 pulgadas 557x392x301 mm 22,0x15,5x11,9 pulgadas 5,1 Kg / 11,3 lb 7,8 Kg / 17,2 lb 5,6 Kg / 12,4 lb 8,3 Kg / 18,3 lb Nota: N = aprobado por la NTEP 5,8 Kg / 12,8 lb 8,5 Kg / 18,8 lb 5,6 Kg / 12,4 lb 3,9 Kg / 8,6 lb 8,3 Kg / 18,3 lb 5,8 Kg / 12,8 lb 3,4 Kg / 7,5 lb 5,3 Kg / 11,6 lb BALANZAS ADVENTURER ES-51 TABLA 9-8. ESPECIFICACIONES (continuación) Modelo: AX124AU AX224AU AX324AU AX223AU AX423AU AX523AU AX1502AU AX2202AU AX4202AU AX5202AU AX8201AU Má x. 120 g 220 g 320 g 220 g 420 g 520 g 1.520 g 2.200 g 4.200 g 5.200g 8.200 g Mín. 0,01 g 0,01 g 0,01 g 0,02 g 0,02 g 0,02 g 0,5 g 0,5 g 0,5 g 0,5 g 5g d= 0,0001 0,001 g 0,01 g 0,1 g e= Clase de aprobació n Repetibilidad (desv. típica) (g) Linealidad (g) 0,001 g 0,01 g 0,1 g 1g 0,01 g 0,1 g Puntos de calibració n de amplitud (g) Calibració n I II 0,0001 g 25 g, 50 g 75 g, 100 g ± 0,0002 g 50 g, 100 g 150 g, 200 g Calibració n automá tica Calibració n automá tica 0,001 g Unidades de pesaje Aplicaciones Tiempo de estabilizació n (típico) Deriva de la temperatura de sensibilidad (PPM/K) Peso mínimo típico del USB (u=0,10%,k=2) Peso mínimo ó ptimo del USB (u=0,10%,k=2) Pantalla Tamañ o de la pantalla Retroiluminació n 100 g 200 g, 300 g 50 g, 100 g 150 g, 200 g ± 0,002 g 100 g, 200 g 300 g, 400 g 200 g, 300 g 400 g, 500 g 500 g 1000 g, 1500 g 500 g, 1000 g 1500 g, 2000 g Calibració n automá tica Calibració n automá tica Calibració n automá tica Calibració n automá tica Calibració n automá tica Calibració n automá tica miligramo, gramo, quilate Peso de envío Calibració n automá tica 2000 g, 3000 g 4000 g, 5000 g ± 0,2g 2000 g, 4000 g 6000 g, 8000 g Calibració n automá tica Calibració n automá tica miligramo, gramo, quilate Pesaje, recuento de piezas, pesaje porcentual, pesaje de comprobació n, pesaje de animales, formulació n, determinació n de la densidad, totalizació n, control de la pantalla ≤ 3 segundos ≤ 2 segundos 1,5 3 ≤ 1,5 segundos 3 1,9 0,20 g 0,20 g 0,20 g 2,0 g 2,0 g 2,0 g 20,0 g 20,0 g 20,0 g 20,0 g 200,0 g 0,082 g 0,082 g 0,082 g 0,82 g 0,82 g 0,82 g 8,2 g 8,2 g 8,2 g 8,2 g 82 g LCD grá fico WQVGA a todo color 4,3 pulgadas / 10,9 cm (diagonal) LED blanco Controles Comunicació n Entrada de corriente de la balanza Suministro de corriente Tamañ o de la plataforma (diá metro) Dimensiones montada(A x P x A) Dimensiones del envío (A x P x A) Peso neto ± 0,02 g 1000 g, 2000 g 3000 g, 4000 g Pantalla tá ctil resistiva de 4 hilos + 6 teclas de membrana RS-232, USBx2 12 V CC, 0,5A Entrada para adaptador de CA: 100-240 VAC 0,3A 50-60 Hz Salida para adaptador de CA: 12 V CC 0,84A 90 mm / 3,5 pulgadas 130 mm / 5,1 pulgadas 175x195 mm/ 6,9x7,7 pulgadas 230 x 354 x 340 mm 9,1 x 13,9 x 13,4 pulgadas 230 x 354 x 340 mm 9,1 x 13,9 x 13,4 pulgadas 230 x 354 x 100 mm 9,1 x 13,9 x 4,0 pulgadas 387 x 507 x 531 mm 15,4 x 20,0 x 20,9 pulgadas 5,1 Kg / 11,3 lb 387 x 507 x 531 mm 15,4 x 20,0 x 20,9 pulgadas 5,8 Kg / 12,8 lb 7,8 Kg / 17,2 lb 8,5 Kg / 18,8 lb 392 x 557 x 301 mm 15,5 x 22,0 x 11,9 pulgadas 4,6 Kg / 10,2 lb 3,8 Kg / 8,4 lb 6,5 Kg / 14,4 lb 5,7 Kg / 12,6 lb ES-52 BALANZAS ADVENTURER 9.2 Dibujos y dimensiones Dimensiones completamente montada Figura 9-1. Modelos con protección contra corrientes de aire Figura 9-2. Modelos sin protección contra corrientes de aire 9.3 Piezas y accesorios TABLA 9-5. ACCESORIOS DESCRIPCIÓN Pantalla auxiliar Kit de densidad Cable, dispositivo USB (tipo A-B) Dispositivo de seguridad (bloqueo de ordenador portátil) Cable RS232, PC de 25 patillas Cable RS232, PC de 9 patillas Cubierta antipolvo Pantalla auxiliar NÚMERO DE PIEZA 80251396 80253384 83021085 80850043 80500524 80500525 30093334 80251396 BALANZAS ADVENTURER 9.4 ES-53 Comunicación 9.4.1 Comandos de la interfaz La balanza debe reconocer los comandos enumerados en la siguiente tabla. La balanza mostrará “ES” para los comandos no válidos. TABLA 9-6. LISTA DE INSTRUCCIONES DE LA INTERFAZ DE ADVENTURER Caracteres de comandos IP P CP SP SLP SLZP xP 0P H Z T xT*** PT ACTIVADO APAGADO C IC AC PSN PV x# P# x% P% xS xRL Función Impresión inmediata del peso mostrado (estable o inestable). Imprime el peso mostrado (estable o inestable). Impresión continua. Impresión en estabilidad. Impresión automática de peso mostrado estable que no es cero. Impresión automática de peso estable que no es cero y lectura estable de puesta a cero. Impresión a intervalos x = impresión a intervalos (1-3600 s) 0P finaliza la impresión a intervalos. Consulte arriba. introduzca Imprimir líneas de encabezado Igual que pulsar la tecla de puesta a cero Igual que pulsar la tecla de tara Establezca un valor de tara preestablecido en la unidad mostrada. X = valor de tara preestablecido. El envío de 0T borra la tara (si se permite). Imprime el peso de tara almacenado en la memoria. Sale de Espera Entra en Espera. Empezar la calibración de amplitud Empieza la calibración interna, igual al activador del menú de calibración. Cancelar la calibración. Atención: si LFT se ajusta en ON, no se permite su funcionamiento. Imprimir número de serie. Imprimir versión del software del terminal, versión de software de la base y LFT ON (si LFT se ajusta en ACTIVADO). Ajustar recuento de APW (x) en gramos. (APW debe estar almacenado) Imprimir APW de aplicación de recuento. Ajustar peso de referencia de la aplicación porcentual (x) en gramos. (el peso de referencia debe estar almacenado) Imprimir peso de referencia de la aplicación porcentual. 0 = imprimir datos inestables, igual a IP; 1 = imprimir solo estables 1), igual a SP. 0 = desactivar respuesta; 1 = activar respuesta. Este comando solo controla la respuesta “¡OK!”. ES-54 BALANZAS ADVENTURER 9.4.2 Conexiones de patillas RS232 (DB9) Pin 2: Línea de transmisión de la balanza (TxD) Pin 3: Línea de recepción de la balanza (RxD) Pin 5: Señal a tierra (GND) Pin 7: Borrar para enviar (protocolo de enlace de hardware) (CTS) Pin 8: Solicitar para enviar (protocolo de enlace de hardware) (RTS) Data GND 1 5 9 Female 9.5 6 Handshake La interfaz USB La interfaz USB de Ohaus es una solución única al problema de la conexión de la balanza a un ordenador utilizando un bus serial universal (USB). Los dispositivos USB están categorizados en clases como unidades de disco, cámaras digitales, impresoras, etc. Las balanzas no tienen una clase comúnmente utilizada; por lo tanto, la interfaz USB de Ohaus utiliza una interfaz genérica basada en el estándar serial RS232. Los datos enviados desde la balanza a un ordenador son en formato USB. Los datos USB se dirigen a un puerto virtual. Este puerto aparece entonces como un puerto RS232 en el programa de la aplicación. Si se envía un comando desde un ordenador a la balanza, el programa de la aplicación envía un comando al puerto virtual como si fuera un puerto RS232. El ordenador luego dirige el comando desde el puerto virtual al conector USB del ordenador al que está conectado la balanza. El puerto recibe la señal USB y reacciona al comando. La interfaz USB incluye un CD con los controladores del software para crear el puerto virtual necesario en el ordenador. Requisitos del sistema PC con Windows 98®, Windows 98SE®, Windows ME®, Windows 2000®, Windows XP® o Windows 8® (32-bit). Puerto USB disponible (tipo A, de 4 patillas, hembra) Conexión USB El puerto USB de la balanza termina en un conector tipo B USB hembra de 4 patillas. Es necesario un cable USB (tipo B / macho a tipo A / macho) (no suministrado). 1. Asegúrese de que la balanza esté encendida y funcionando correctamente. 2. Conecte el ordenador y compruebe que el puerto USB esté activado y funcionando correctamente. 3. Enchufe los conectores USB del cable al puerto USB del ordenador y el puerto USB de la balanza. Windows® detectará el dispositivo USB y se iniciará el asistente de nuevo hardware encontrado. Instalación del software del puerto virtual 1. Introduzca el CD suministrado en la unidad de CD del ordenador. Las diferentes versiones de Windows® tienen pasos levemente diferentes para cargar el controlador que se encuentra en el CD. En todas las versiones, el asistente de nuevo hardware encontrado le guiará a través de los pasos necesarios para seleccionar el controlador ubicado en el CD. 2. Después de hacer clic en Finalizar, el puerto virtual debería estar listo para su uso. Windows® generalmente añade el puerto virtual en la secuencia después del puerto COM de número más alto. Por ejemplo, en un ordenador con 4 puertos COM, el puerto virtual será el COM5. Si se utiliza la interfaz USB con programas que limitan el número de designaciones de puertos COM (por ejemplo: el Ohaus Mass Tracker solo permite COM1, 2, 3 y 4), es necesario asignar uno de estos números de puertos al Ejemplo de asistente de nuevo hardware en Windows XP BALANZAS ADVENTURER ES-55 nuevo puerto virtual. Se puede realizar en la configuración de puertos de la utilidad de administrador del dispositivo, encontrado en el panel de control de Windows. ENTRADA USB La balanza responderá a varios comandos enviados a través del adaptador de la interfaz. Finalice los siguientes comandos con un [CR] o [CRLF]. Instrucciones de la Adventurer C realizar calibración de amplitud 0S imprimir datos inestables 1S imprimir solo datos estables P igual que pulsar Imprimir SP imprimir solo peso estable IP impresión inmediata del peso mostrado (estable o inestable) CP impresión continua de pesos SLP impresión automática solo de peso estable que no es cero SLZP impresión automática de peso estable que no es cero y lectura estable de puesta a cero. xP impresión automática en intervalos de 1 a 3600 segundos (x = 1 a 3600) 0P finaliza la impresión en intervalos T igual que pulsar tara Z igual que pulsar Cero PV imprimir versión de software Funcionamiento de la impresión automática Una vez que se activa la impresión automática en el menú, la balanza envía datos según sea necesario. Si hay datos en buffer de impresión, la impresora dejará de imprimir estos datos. 10. ACTUALIZACIONES DE SOFTWARE Ohaus mejora continuamente el software de su balanza. Para obtener la última versión, póngase en contacto con el distribuidor autorizado de Ohaus o con Ohaus Corporation. ES-56 11. BALANZAS ADVENTURER CONFORMIDAD La conformidad con las siguientes normas se indica con la marca correspondiente en el producto. Marca Standard (Estándar) Este producto cumple con la directiva EMC 2004/108/EC, la directiva de baja tensión 2006/95/EC y la directiva de instrumento de pesaje no automático 2009/23/EC. La Declaración de conformidad está disponible en internet a través de http://europe.ohaus.com/europe/en/home/support/compliance/ce-declaration-of-conformity.aspx. AS/NZS CISPR 11, AS/NZS 61000.4.3 CAN/CSA-C22.2 N.º61010-1-12 UL Std. N.º61010-1 (3ºedición) Aviso importante para instrumentos de pesaje verificados Los instrumentos de pesaje verificados en el lugar de fabricación presentan una de las marcas anteriores en la etiqueta de empaquetado y la etiqueta ‘M’ (metrología) en la placa descriptiva. Se pueden poner en funcionamiento inmediatamente. Los instrumentos de pesaje que se deben verificar en dos etapas no tienen la ‘M’ (metrología) verde en la placa descriptiva y presentan una de las marcas de identificación anteriores en la etiqueta de empaquetado. La segunda etapa de la verificación inicial la debe realizar la organización de servicio aprobada del representante autorizado que pertenezca a la CE o pueden realizarla las autoridades nacionales de pesos y medidas (W+M). La primera etapa de la verificación inicial se ha realiza en el trabajo del fabricante. Incluye todas las pruebas según la norma europea adoptada EN45501:1992, párrafo 8.2.2. Si las normativas nacionales limitan el periodo de validez de la verificación, el usuario del instrumento de pesaje debe comprobar el periodo de una nueva verificación e informar a las autoridades de W+M respectivas. Nota sobre FCC Este equipo ha sido sometido a pruebas y ha demostrado cumplir con los límites para dispositivos digitales de clase A, según la Parte 15 de las normas de la FCC. Estos límites están diseñados para proporcionar una protección razonable frente a interferencias perjudiciales cuando se utiliza el equipo en un entorno comercial. Este equipo genera, utiliza y puede emitir energía de radiofrecuencia y, si no se instala y utiliza según las instrucciones del manual puede provocar interferencias perjudiciales a las comunicaciones por radio. La utilización de este equipo en un área residencial puede provocar interferencias perjudiciales. En este caso, el usuario deberá corregir la interferencia por su cuenta. Nota sobre la Industry Canada Este aparato digital de clase A cumple con la norma canadiense ICES-001. BALANZAS ADVENTURER ES-57 Registro en ISO 9001 En 1994, OHAUS Corporation, EEUU, recibió el certificado de registro en la ISO 9001 del Bureau Veritus Quality International (BVQI), confirmando que el sistema de gestión de calidad de OHAUS cumple con los requisitos de la norma ISO 9001. El 21 de junio de 2012, OHAUS Corporation, EEUU, se registró nuevamente en la norma ISO 9001:2008. En cumplimiento con la Directiva Europea: Eliminación En cumplimiento con la Directiva europea 2002/96/CE sobre residuos de aparatos eléctricos y electrónicos (WEEE), este dispositivo no se puede eliminar como residuo doméstico. También se aplica en países fuera de la UE, según sus requisitos específicos. La directiva de baterías 2006/66/EC presenta nuevos requisitos desde septiembre de 2008 sobre la desmontabilidad de las baterías de los residuos de aparatos en los estados miembros de la UE. Para cumplir esta directiva, se ha diseñado este dispositivo para retirar las baterías de manera segura al final de su vida mediante una planta de tratamiento de residuos. Elimine este producto según las normativas locales en el punto de recolección especificado para equipos eléctricos y electrónicos. Si tiene alguna pregunta, póngase en contacto con la autoridad responsable o el distribuidor del que adquirió este dispositivo. En caso de que este dispositivo se entregará a un tercero (para uso privado o profesional), se debe hacer referencia al contenido de esta regulación. Para más información sobre las instrucciones de eliminación en Europa consulte la página web http://europe.ohaus.com/europe/en/home/support/weee.aspx. Gracias por su contribución a la protección del medioambiente. ES-58 BALANZAS ADVENTURER GARANTÍA LIMITADA Los productos de Ohaus están en garantía por defectos en los materiales o de construcción desde la fecha de entrega hasta la duración del periodo de la garantía. Durante el periodo de validez de la garantía, Ohaus reparará o, según su criterio, sustituirá cualquier componente que sea defectuoso sin cargo adicional siempre que el producto se entregue, con envío pagado, a Ohaus. Esta garantía no es de aplicación si el producto ha recibido daños por accidentes o mal uso, ha sido expuesto a materiales radioactivos o corrosivos, ha recibido materiales extraños en su interior o como resultado del servicio o modificación por un tercero que no sea Ohaus. En lugar de una tarjeta de registro de garantía debidamente devuelta, el periodo de la garantía se iniciará en la fecha de envío al distribuidor autorizado. Ohaus Corporation no entrega otro tipo de garantía expresa o implícita. Ohaus Corporation no es responsable de daños indirectos. Puesto que la legislación sobre garantías difiere de un estado a otro y de un país a otro, póngase en contacto con Ohaus o con su distribuidor loca de Ohaus para obtener más información. BALANCES ADVENTURER FR-1 TABLE DES MATIÈRES 1. INTRODUCTION ....................................................................................................................3 1.1 1.2 1.3 1.4 Description ................................................................................................................................................... 3 Caractéristiques ........................................................................................................................................... 3 Définition des symboles et des indicateurs d'avertissements ...................................................................... 3 Consignes de sécurité.................................................................................................................................. 3 2. INSTALLATION .....................................................................................................................4 2.1 2.2 2.3 2.4 2.5 2.6 Déballage ..................................................................................................................................................... 4 Sélection de l'emplacement ......................................................................................................................... 4 Mise de niveau de l'équipement ................................................................................................................... 4 Connexion de l’alimentation ......................................................................................................................... 5 Connexion de l'interface ............................................................................................................................... 5 Étalonnage initial .......................................................................................................................................... 5 3. FONCTIONNEMENT .............................................................................................................7 3.1 3.2 3.3 3.4 Aperçu général de l'affichage et de l'écran d'accueil ................................................................................... 7 Fonctions principales et Menu principal ...................................................................................................... 8 Vue d'ensemble des pièces et des caractéristiques - Modèles avec pare-vent .......................................... 9 Vue d'ensemble des pièces et des caractéristiques - Modèles sans pare-vent .......................................... 9 4. APPLICATIONS ...................................................................................................................10 4.1 Pesage ....................................................................................................................................................... 10 4.1.1 Paramétrage articles .............................................................................................................................. 11 4.1.2 Nom de l'échantillon ............................................................................................................................... 13 4.1.3 Enregistrer vers USB.............................................................................................................................. 13 4.2 Comptage des pièces ................................................................................................................................ 12 4.2.1 Paramétrage articles .............................................................................................................................. 13 4.3 Pesage en pourcentage ............................................................................................................................. 15 4.3.1 Paramétrage articles .............................................................................................................................. 15 4.4 Pesage dynamique .................................................................................................................................... 16 4.4.1 Paramétrage articles .............................................................................................................................. 16 4.5 Détermination de la densité ....................................................................................................................... 17 4.5.1 Mesure de la densité d'un solide en utilisant de l'eau (par défaut) ........................................................ 17 4.5.2 Mesure de la densité d'un matériau flottant en utilisant de l'eau ........................................................... 18 4.5.3 Mesure de la densité d'un solide en utilisant un liquide auxiliaire.......................................................... 19 4.5.4 Mesure de la densité d'un liquide en utilisant un plongeur étalonné (non fourni) .................................. 19 4.5.5 Mesure de la densité des matériaux poreux en utilisant de l'huile ......................................................... 21 4.6 Pesage de vérification ................................................................................................................................ 24 4.6.1 Paramétrage articles .............................................................................................................................. 24 4.7 Maintien de l'affichage................................................................................................................................ 25 4.7.1 Maintien de l'affichage ............................................................................................................................ 25 4.7.2 Maintien de la valeur crête ..................................................................................................................... 26 4.7.3 Paramétrage articles .............................................................................................................................. 27 4.8 Totalisation ................................................................................................................................................. 26 4.9 Formulation ................................................................................................................................................ 27 4.9.1 Paramétrage articles .............................................................................................................................. 27 4.10 Autres fonctions ......................................................................................................................................... 28 4.10.1 Pesée sous la balance ........................................................................................................................... 28 5. PARAMÈTRES DES MENUS ..............................................................................................29 5.1 Navigation dans le menu ............................................................................................................................ 29 5.1.1 Changement des paramètres ................................................................................................................. 30 5.2 Étalonnage ................................................................................................................................................. 31 5.2.1 Sous-menu d'étalonnage (modèles INCAL) ........................................................................................... 31 5.2.2 Étalonnage interne ................................................................................................................................. 31 5.2.3 Étalonnage automatique ........................................................................................................................ 31 5.2.4 Réglage AutoCal™................................................................................................................................. 32 5.2.5 Étalonnage de l'intervalle de mesure ..................................................................................................... 32 5.2.6 Étalonnage de la linéarité....................................................................................................................... 33 5.2.7 Test d’étalonnage ................................................................................................................................... 33 5.3 Configuration de la balance ....................................................................................................................... 33 5.3.1 Sous-menu de configuration de la balance ............................................................................................ 33 5.3.2 Langue ................................................................................................................................................... 33 5.3.3 Paramètre utilisateur .............................................................................................................................. 34 FR-2 BALANCES ADVENTURER 5.3.4 Niveau du filtre ....................................................................................................................................... 34 5.3.5 Suivi automatique du zéro ...................................................................................................................... 34 5.3.6 Tare automatique ................................................................................................................................... 34 5.3.7 Graduations ............................................................................................................................................ 34 5.3.8 Date et heure .......................................................................................................................................... 35 5.3.9 Mode approuvé ...................................................................................................................................... 35 5.4 Unités de pesage ....................................................................................................................................... 36 5.4.1 Sous-menu des unités............................................................................................................................ 36 5.5 Maintenance des données ......................................................................................................................... 36 5.5.1 Sous-menu de maintenance des données ................................................................................................ 37 5.5.2 Exportation vers USBs ............................................................................................................................... 38 5.5.3 Importations depuis USB ........................................................................................................................... 38 5.5.4 Informations sur la balance ........................................................................................................................ 38 5.6 Communications ........................................................................................................................................ 37 5.6.1 Sous-menu Communication ................................................................................................................... 37 5.6.2 Débit en bauds ....................................................................................................................................... 38 5.6.3 Transmission .......................................................................................................................................... 38 5.6.4 Établissement de liaison ........................................................................................................................ 38 5.6.5 Sortie impression.................................................................................................................................... 38 5.6.6 Impression automatique ......................................................................................................................... 40 5.6.7 Impression du contenu ........................................................................................................................... 40 5.6.8 Alimentation ............................................................................................................................................ 40 5.6.9 Format .................................................................................................................................................... 40 5.6.10 Impression étalonnage ........................................................................................................................... 40 5.7 Données BPL et BPFGLP .......................................................................................................................... 40 5.7.1 Sous-menu des données BPL ............................................................................................................... 40 5.7.2 En-tête .................................................................................................................................................... 40 5.7.3 Nom de la balance ................................................................................................................................. 40 5.7.4 Nom de l’utilisateur ................................................................................................................................. 40 5.7.5 Nom du projet ......................................................................................................................................... 40 5.8 Réinitialisation usine .................................................................................................................................. 40 5.9 Verrouillage ................................................................................................................................................ 40 6. MÉTROLOGIE LÉGALE ......................................................................................................41 6.1 6.2 6.3 Réglages .................................................................................................................................................... 41 Vérification.................................................................................................................................................. 41 Plombage ................................................................................................................................................... 41 7 IMPRIMER ............................................................................................................................42 7.1 7.2 Connexion, Configuration et Tests de l'imprimante/de l'interface ordinateur ............................................ 42 Format de sortie ......................................................................................................................................... 42 8. MAINTENANCE ...................................................................................................................43 8.1 8.2 8.3 8.4 Étalonnage ................................................................................................................................................. 43 Nettoyage ................................................................................................................................................... 43 Dépannage ................................................................................................................................................. 44 Informations de maintenance ..................................................................................................................... 44 9. DONNÉES TECHNIQUES ...................................................................................................45 9.1 9.2 9.3 9.4 9.4.1 9.4.2 9.5 Spécifications ............................................................................................................................................. 45 Schémas et dimensions ............................................................................................................................. 54 Pièces et accessoires ................................................................................................................................ 54 Communications ........................................................................................................................................ 55 Commandes de l’interface ..................................................................................................................... 55 RS232 (DB9) Connexion des broches ................................................................................................... 56 Interface USB ............................................................................................................................................. 56 10. MISE À JOUR DE LOGICIELS ............................................................................................57 11. CONFORMITÉ......................................................................................................................58 BALANCES ADVENTURER 1. INTRODUCTION 1.1 Description FR-3 La balance Adventurer est un instrument de pesée de précision qui offrira de longues années de service si son entretien est correctement assuré. Les balances Ohaus Adventurer disponibles peuvent effectuer des pesées entre 120 et 8 200 grammes. 1.2 Caractéristiques Contrôles tactiles : Accès graphique rapide à toutes les fonctions de contrôle au moyen d'une douzaine d'applications et de nombreuses caractéristiques. 1.3 Définition des symboles et des indicateurs d'avertissements Les remarques de sécurité sont signalées par des mots indicateurs et par des symboles d'avertissement. Elles présentent les problèmes et les avertissements de sécurité. L'inobservation des remarques de sécurité peut conduire à des accidents, à l'endommagement de l'instrument, à des dysfonctionnements et à des résultats erronés. Mots indicateurs AVERTISSEMENT Pour une situation dangereuse avec un risque moyen pouvant être à l'origine d'un accident ou d'un décès, s'il n'est pas évité. ATTENTION Pour une situation dangereuse avec un faible risque pouvant être à l'origine de dommages au dispositif ou aux biens, à une perte des données, ou à un accident, s'il n'est pas évité. Attention Pour des informations importantes sur le produit Remarque Pour des informations utiles sur le produit Symboles d'avertissement Danger général Tension alternative 1.4 Risque d'électrocution Courant continu Consignes de sécurité ATTENTION: Lire tous les avertissements de sécurité avant d’effectuer l’installation, les connexions ou la maintenance de cet équipement. Si ces avertissements ne sont pas respectés, des accidents et/ou des dommages matériels peuvent en résulter. Conserver toutes les instructions pour référence ultérieure. Vérifier que la plage de tension d'entrée de l'adaptateur CA et le type de prise sont compatibles avec l'alimentation alternative locale devant être utilisée. S'assurer que le cordon d'alimentation n’est pas un obstacle potentiel ou ne présente aucun danger de chute. L'équipement ne doit être utilisé qu'en intérieur. Utiliser la balance seulement dans des lieux secs. Ne pas laisser tomber de charges sur le plateau. Utiliser uniquement les accessoires et les périphériques approuvés. Faire uniquement fonctionner l'équipement dans les conditions ambiantes spécifiées dans ces instructions. Déconnecter l'équipement de l'alimentation électrique pour le nettoyer. Ne pas utiliser l'équipement dans des environnements dangereux ou instables. La maintenance doit être exclusivement exécutée par un personnel autorisé. Ne pas installer la balance sur un emplacement pouvant difficilement atteindre une prise d'alimentation. FR-4 2. 2.1 BALANCES ADVENTURER INSTALLATION Déballage Sortir avec préATTENTION la balance Adventurer et chacun de ses composants hors de l'emballage. Les composants inclus varient en fonction du modèle de la balance (voir le tableau ci-dessous). Conserver l'emballage afin d'assurer un stockage et un transport en toute sécurité. Veuillez lire le manuel intégralement avant d'utiliser la balance Adventurer afin d'éviter un fonctionnement incorrect. Les composants comprennent Balance Alimentation Anneau en aile (seulement pour les modèles 0,1 et 1 mg) Carte de garantie Disque compact 2.2 Sélection de l'emplacement Éviter les vibrations excessives, les sources de chaleur, les courants d'air ou les variations rapides de température. Fournir suffisamment d'espace. 2.3 Mise de niveau de l'équipement L'Adventurer est équipée d'un niveau à bulle dans une petite fenêtre ronde à côté de l'affichage. Pour mettre la balance de niveau, régler les pieds de mise à niveau jusqu'à ce que la bulle soit centrée dans le cercle. Se reporter à la section Aide à la mise de niveau ci-dessous pour des informations sur quel pied agir afin d'y parvenir. Assurez-vous que l'équipement est de niveau lors de chaque changement d'emplacement. Assistance à la mise de niveau : Une fonction d'aide à la mise de niveau est disponible pour mettre de niveau l'Adventurer. Il existe deux moyens d'accéder à la fonction : 1. Applications de Pesage -> Paramétrage des éléments-> Assistance à la mise de niveau. Se reporter à la section 4.1.1 pour de plus amples informations. 2. Menu principal -> Configuration de la balance -> Paramètres utilisateur -> Aide à la mise de niveau. Se reporter à la section 5.3.3 pour de plus amples informations. BALANCES ADVENTURER FR-5 Faire tourner le pied conformément à l'image ci-dessus en fonction de la position de la bulle de niveau jusqu'à ce qu'elle soit centrée. 2.4 Connexion de l’alimentation Brancher le connecteur de sortie CC sur la prise à l'arrière de la balance. Brancher ensuite la fiche de l'adaptateur CA dans une prise secteur. ATTENTION: Utilisation avec une source d'alimentation certifiée CSA (ou approbation équivalente), qui doit présenter une sortie limitée en courant. ATTENTION: laisser l'equipement se mettre en temperature pendant 60 minutes pour des performances de pesage optimum. 2.5 Connexion de l'interface Utiliser le port intégré RS-232 pour une connexion à un ordinateur ou à une imprimante avec un câble série standard (direct). La connexion est aussi possible en utilisant le port USB de la balance. Connexions d'interface à l'arrière de la balance. Connexion USB sur l'avant de la balance. . USB1 RS232 USB2 USB1 : Utilisé seulement pour une connexion à un PC USB2 : Utilisé seulement pour connecter une clé USB RS232 : Utilisé seulement pour une connexion à un PC ou à une imprimante Remarque : Pour la configuration et les commandes d'interface, se reporter à la section Paramètres du menu de communication. Pour la connexion, la configuration et les tests de l'interface de l'imprimante/de l'ordinateur, et pour un échantillon des formats de sortie de l'impression, consulter la section Impression. 2.6 Étalonnage initial Lorsque la balance est installée pour la première fois, ou si elle est déplacée vers un autre emplacement, elle doit être étalonnée afin d'assurer des résultats précis de pesage. La plupart des balances Adventurer sont équipées d'un système AutoCal qui peut étalonner automatiquement la balance sans devoir utiliser de masses d'étalonnage.. En cas de préférence, la balance peut être manuellement étalonnée avec des masses externes. Avoir à disposition les masses d'étalonnage appropriées avant de commencer cette opération. Se reporter à la section Étalonnage pour les procédures de masse et d'étalonnage. FR-6 BALANCES ADVENTURER ¤ AutoCal™ Un système automatique et complet d'étalonnage interne qui facilite la maintenance de routine en étalonnant automatiquement tous les jours la balance est disponible sur la plupart des modèles. Il étalonne automatiquement le système lorsqu'il détecte une variation de température suffisante pour affecter la précision du pesage (>1,5 °C), ou toutes les 11 heures. ¤ Étalonnage externe Sélectionner des modèles de précision spécifiques à un étalonnage externe traditionnel pour lequel des poids externes (choix par l'utilisateur des valeurs des poids d'étalonnage) sont utilisés pour étalonner la balance afin d'assurer sa précision. BALANCES ADVENTURER 3. FR-7 FONCTIONNEMENT 3.1 Aperçu général de l'affichage et de l'écran d'accueil Cet équipement utilise un affichage tactile avec des zones Tactiles ainsi que des boutons permettant de contrôler les fonctions de l'équipement. CONTRÔLES Bouton Action Appui court (si hors alimentation) : Met la balance sous tension Appui long (si sous tension) : Met la balance hors tension Imprime les données présentes vers une imprimante ou un ordinateur. Réalisation du zéro Réalisation de l'étalonnage Réalisation de la tare Écran de l'application principale Application Messages d'instructions Capacité et précision d’affichage Indicateurs de Stabilité (*), Net (NET), Brut (B) et/ou de centrage du zéro (>0<) Champs de résultats : Les informations varient par application Appuyer sur g pour changer d'unité Champs de référence Boutons d'applications : Les fonctions varient par application FR-8 BALANCES ADVENTURER 3.2 Fonctions principales et Menu principal Pesage : Tarage : Zero: Appuyer sur Zéro pour mettre l’affichage à zéro. Placer un article sur le plateau. L'affichage indique le poids brut. Sans charge sur le plateau, appuyer sur Zéro pour régler l'affichage sur zéro. Placer un récipient vide sur le plateau et appuyer sur Tare. Ajouter un objet dans le récipient et son poids net s'affichera. Retirer le récipient et le poids du récipient apparaîtra sous forme d'un nombre négatif. Appuyer sur tare pour effacer. Appuyez sur Zéro pour mettre à zéro la balance NAVIGATION PARMI LES MENUS ET LES ÉCRANS Appuyer sur Menu pour ouvrir la liste des menus. Appuyer et faire glisser la barre de défilement pour examiner des articles complémentaires Étalonnage : Appuyer pour voir les options d'étalonnage. Paramétrage balance : Appuyer pour voir et modifier les paramètres de la balance. Unités de pesage : Appuyer pour voir et modifier les unités de pesage. Maintenance des données : Appuyer pour voir les paramètres de maintenance des données. Données BPL et BPF : Insérer les données utilisateur pour la traçabilité. Réinitialisation usine : Appuyer pour effectuer une réinitialisation usine des paramètres du menu. Communications : Verrouillage: Appuyer pour voir les paramètres COM de l'appareil et les paramètres d'impression. Appuyer pour voir options Verrouillage. BALANCES ADVENTURER FR-9 3.3 Vue d'ensemble des pièces et des caractéristiques - Modèles avec pare-vent Plateau Indicateur de niveau Pied réglable USB hôte Pied réglable USB esclave Commutateur RS232 LFT Puissance d’entrée 3.4 Vue d'ensemble des pièces et des caractéristiques - Modèles sans pare-vent Plateau Anneau en aile Indicateur de niveau Pied réglable USB hôte Pied réglable USB esclave Commutateur RS232 LFT Puissance d’entrée FR-10 4. BALANCES ADVENTURER APPLICATIONS La balance peut être configurée pour fonctionner dans différents modes d'applications. Appuyer sur le champ Application en haut et à gauche (pesage dans l'exemple ci-dessous) : La balance Adventurer possède 9 modes d'application, comme suit : Pesage Comptage des pièces Pesage en pourcentage Maintien de l'affichage Totalisation Formulation Pesée dynamique (animaux) Détermination de la densité Pesage de vérification 4.1 Pesage Remarque : Avant d'utiliser une application, s'assurer que la balance est de niveau et étalonnée. Utiliser cette application pour déterminer le poids des articles dans l'unité de mesure retenue. Pesage 1. Dans la partie supérieure de l'écran d'accueil, sélectionner Pesée (il s'agit de l'application par défaut). 2. Appuyer au besoin sur Tare ou sur Zéro pour commencer. 3. Placer des objets sur le plateau pour en afficher le poids. Une fois la stabilité obtenue, * apparaîtra. 4. La valeur résultante est affichée sur la Ligne d'affichage principale dans l'unité active de mesure. Écran d'accueil de PESAGE Ligne d'affichage principale Appuyer sur g pour changer d'unité Champs de référence Boutons d'applications Icône de l'application BALANCES ADVENTURER 4.1.1 Paramétrage articles Pour visualiser ou ajuster les paramètres en cours Appuyer sur le bouton Paramétrage articles. L'écran Paramétrage apparaît. Poids minimum : détermine une valeur de poids minimum devant être utilisée pour vérifier une lecture. S'il s'avère que le poids réel est inférieur au poids minimum, il apparaîtra avec sa couleur modifiée en jaune. Pour régler la valeur du poids minimum, appuyer sur Bouton Poids minimum. Une fenêtre d'entrée numérique apparaît. Utiliser les touches pour introduire le poids minimum désiré et appuyer ensuite sur Enregistrer. L'affichage revient à l'écran précédent. Pour revenir à l'écran d'accueil du Pesage, appuyer sur Quitter en partie inférieure de cet écran. Barres de capacité : Si sur MARCHE, une barre de capacité s'affiche dans le champ de référence. Le guide des capacités présentera le poids en cours sous la forme d'un pourcentage de la capacité de la balance. Si la Barre de capacité est définie sur ARRÊT, le champ de référence indiquera le poids minimum et le nom de l'échantillon. Unités de pesage : Changement de l'unité affichée. Se reporter à la section 5.4 pour de plus amples informations. Niveau du filtre : Changement du niveau de filtrage. Se reporter à la section 5.5.3 pour de plus amples informations. Données GLP et GMP : Se reporter à la section 5.9 pour de plus amples informations. Paramètres d’impression : Modifications des réglages d'impression. Se reporter à la section 7 pour de plus amples informations. Assistance à la mise de niveau : Instructions sur la manière de régler les pieds de la balance afin de la mettre de niveau. FR-11 FR-12 BALANCES ADVENTURER 4.1.2 Nom de l'échantillon Appuyer sur ce bouton pour ajouter le nom d'un échantillon. Une fenêtre d'entrée alphanumérique apparaît. Appuyer sur Minuscules : pour naviguer entre les minuscules et les majuscules. Majuscules : Saisissez le nom de l'échantillon désiré et appuyez sur Enregistrer pour enregistrer le nom et revenir à l'écran d'accueil de pesage. 4.1.3 Enregistrer vers USB Insérer la clé USB dans le port USB situé à l'avant de la balance. Appuyer ensuite sur le bouton Enregistrer vers USB pour enregistrer les données vers la clé USB. Après l'enregistrement, le bouton passera momentanément sur la couleur orange. Remarques : Lors de la première connexion sur la balance d'une clé USB, un léger retard peut se produire avant que le bouton Enregistrer vers USB ne fonctionne. Ceci est dû au fait que la balance génère les dossiers nécessaires sur l'emplacement de stockage des données de la clé USB. ATTENTION: Les données de pesage seront enregistrées en USB tous les jours. Néanmoins, si différents modes de pesage sont utilisés, les données seront enregistrées séparément vers des fichiers individuels. En fonction de la clé USB utilisée, toutes les données peuvent ne pas être transférées depuis la balance ou un gel de l'écran peut se produire. Si tel est le cas, débrancher la clé USB et en essayer une autre. Ohaus n'est pas responsable de l'effacement de données sur une clé USB ou en cas de panne de la clé USB lorsqu'elle est connectée à la balance. Afin de minimiser le risque d'apparition d'un tel problème, Ohaus suggère l'utilisation d'une clé USB de haute qualité. 4.2 Comptage des pièces Remarque : Avant d'utiliser une application, s'assurer que la balance est de niveau et étalonnée. Utiliser cette application pour compter les échantillons d'un poids uniforme. Comptage des pièces 1. Dans la partie supérieure gauche de l'écran d'accueil, sélectionner Comptage de pièces. 2. Appuyer au besoin sur Tare ou sur Zéro pour commencer. 3. Placer des objets sur le plateau pour en afficher le poids. Une fois la stabilité obtenue, * apparaîtra. 4. La valeur résultante est affichée sur la Ligne d'affichage principale en pièces (PCS). BALANCES ADVENTURER FR-13 Écran d'accueil Comptage des pièces Ligne d'affichage principale Champs de référence Boutons d'applications 4.2.1 Paramétrage articles Pour visualiser ou ajuster les paramètres en cours Appuyer sur le bouton Paramétrage articles. L'écran Paramétrage apparaît. Échantillons : La dimension de l'échantillon peut se situer entre 1 et 10 000 pièces. La valeur par défaut de l'échantillon est de 10. Une fois que la taille de l'échantillon est modifiée, la balance ouvrira immédiatement l'écran Recalcul de l'APW en attendant de définir un nouveau APW. Pour régler la taille de l'échantillon, appuyer sur le Bouton Échantillons. Une fenêtre d'entrée numérique apparaît. Utiliser les touches pour introduire les dimensions de l'échantillon désiré, ensuite appuyer sur Enregistrer. L'écran suivant apparaît avec le message demandant de placer le poids de référence sur le plateau. Placer le poids de référence sur le plateau. Appuyer sur Accepter pour capturer la valeur et revenir à l'écran d'accueil. Icône de l'application FR-14 BALANCES ADVENTURER Définition du poids moyen des pièces (APW) : À chaque fois qu'un nouveau type de pièce est compté, le poids nominal d'une pièce (poids moyen unitaire ou APW) doit être défini en utilisant une petite quantité de pièces. L'APW est stocké jusqu'à ce qu'il soit remplacé par un autre APW. Il existe deux méthodes de définition de la valeur APW : 1. Le poids moyen unitaire (APW) réel est connu 2. l'APW doit être déduit par pesée. Dans ce cas, la taille de l'échantillon en cours sera utilisée. Définition d'un poids moyen unitaire (APW) connu Pour régler directement la valeur de l'APW, appuyer sur le bouton APW. Une fenêtre d'entrée numérique apparaît. Introduire le poids moyen unitaire et appuyer sur Enregistrer. L'affichage revient à l'écran d'accueil avec la nouvelle valeur APW affichée dans le champ de référence. Définition d'un nouveau poids moyen unitaire (APW) de la pièce - Calcul Pour déterminer un nouveau poids moyen unitaire, placer le poids de référence sur le plateau et appuyer sur Accepter pour poursuivre. Remarque : La taille d'échantillon qui s'affiche sera utilisée. Pour utiliser une taille d'échantillon différente, modifier ceci en premier. (Voir ci-dessus). L'écran d'accueil affiche le nombre de pièces avec le nouveau poids moyen unitaire. Optimisation automatique : Si réglée sur Marche, elle améliore la précision du comptage en recalculant le poids des pièces au fur et à mesure de l'ajout d'autres pièces. Par défaut sur Arrêt. Remarques: Remarque : L'optimisation APW se produit lorsque le nombre de pièces ajoutées sur le plateau se trouve entre une et trois fois celui des pièces s'y trouvant déjà. Si l'APW (poids moyen unitaire) est introduit manuellement avec le clavier numérique, aucune optimisation automatique de l'APW ne se produira. Paramètres d’impression : Modifications des réglages d'impression. Se reporter à la section 7 pour de plus amples informations. Remarque : Le bouton Enregistrer vers USB n'apparaîtra qu'après avoir connecté une clé USB à la balance. BALANCES ADVENTURER FR-15 Reportez-vous à la section 4.1.3 pour de plus amples informations. 4.3 Pesage en pourcentage Remarque : Avant d'utiliser une application, s'assurer que la balance est de niveau et étalonnée. Utiliser Pesage en pourcentage pour mesurer le poids d'un échantillon affiché en tant que pourcentage d'un poids de référence préétabli. Le poids moyen unitaire (APW) par défaut (ou le dernier entré) s'affiche. Pesage en pourcentage 1. Dans la partie supérieure gauche de l'écran d'accueil, sélectionner Pesage par pourcentage. 2. Placer un objet sur le plateau. La différence entre l'échantillon et le poids de référence est affichée en tant que pourcentage. Écran d'accueil Pesage en pourcentage Ligne d'affichage principale Champs de référence Boutons d'applications 4.3.1 Paramétrage articles Pour visualiser ou ajuster les paramètres en cours Appuyer sur le bouton Paramétrage articles. L'écran Paramétrage apparaît. Recalcul de la référence Poids : Pour définir un nouveau poids de référence, appuyer sur le bouton de recalcul de la référence pondérale. Suivre les instructions à l'écran afin de définir un nouveau poids de référence. À titre d'alternative, appuyer sur le bouton Référence pondérale de l'écran Recalcul de la référence pondérale du pesage en pourcentage pour établir manuellement une nouvelle référence pondérale au moyen du clavier numérique. Paramètres d’impression : Modifications des réglages d'impression. Se reporter à la section 7 pour de plus amples informations. Remarque : Le bouton Enregistrer vers USB n'apparaîtra qu'après avoir connecté une clé USB à la balance. Reportez-vous à la section 4.1.3 pour de plus amples informations. Icône de l'application FR-16 BALANCES ADVENTURER 4.4 Pesage dynamique Remarque : Avant d'utiliser une application, s'assurer que la balance est de niveau et étalonnée. Utiliser cette application pour peser une charge instable comme un animal qui bouge. Il est possible de sélectionner deux modes différents de démarrage/réinitialisation : Manuel (démarrage et arrêt en appuyant sur une touche) et Automatique (démarrage et arrêt automatiques). Pesage dynamique - Manuel (par défaut) 1. Dans la partie supérieure gauche de l'écran d'accueil, sélectionner Pesage dynamique. 2. Placer des objets sur le plateau et appuyer sur le bouton Démarrage. Écran d'accueil de Pesée dynamique Ligne d'affichage principale Champs de référence Boutons d'applications Icône de l'application 3. La balance commence un décompte (processus de moyennage). Pendant le décompte, la ligne d'informations affiche la durée restante. Si nécessaire, appuyer sur Stop pour quitter. 4. Lorsque le décompte se termine, la ligne de résultat est affichée et conservée. Appuyer sur Effacement pour effacer le poids conservé et revenir à l'écran initial.. Remarque : Vider le plateau avant de commencer un nouveau cycle de pesage dynamique. 4.4.1 Paramétrage articles Pour visualiser ou ajuster les paramètres en cours Appuyer sur le bouton Paramétrage articles. L'écran Paramétrage apparaît. Durée moyenne :Définir la durée moyenne sur une valeur entre 1 et 99 secondes. La valeur par défaut est 5 secondes. Mode automatique :S'il est réglé sur Marche, le cycle commence avec un objet placé sur le plateau et la valeur conservée est automatiquement réinitialisée lorsque l'objet est retiré du plateau. Nom d'échantillon : Attribution d'un nom à l'échantillon. Paramètres d’impression : Modifications des réglages d'impression. Se reporter à la section 7 pour de plus amples informations. Remarque : Le bouton Enregistrer vers USB n'apparaîtra qu'après avoir connecté une clé USB à la balance. Reportez-vous à la section 4.1.3 pour de plus BALANCES ADVENTURER FR-17 amples informations. 4.5 Détermination de la densité Remarque : Avant d'utiliser une application, s'assurer que la balance est de niveau et étalonnée. Utiliser cette application pour déterminer la densité d'un objet. Quatre types de détermination de la densité peuvent être réalisés : 1. 2. 3. 4. Solides plus denses que l'eau Solides moins denses que l'eau Densité du Liquide. Matière poreuse (imprégnés d'huile) Écran d'accueil Détermination de la densité Ligne d'affichage principale Champs de référence Boutons de fonction 4.5.1 Mesure de la densité d'un solide en utilisant de l'eau (par défaut) Appuyer sur le bouton Paramétrage articles pour accéder à l'écran Paramétrages de la détermination de la densité. Confirmer la sélection des Paramétrages suivants : Type de densité : Solide Liquide auxiliaire : Eau Matière poreuse : Arrêt Pour régler la valeur de la température de l'eau, appuyer sur le bouton Température de l'eau. La balance calcule la densité de l'eau en se référant à la valeur entrée de la température de l'eau. Mesurer la température réelle de l'eau en utilisant un thermomètre de précision. Une fenêtre d'entrée numérique apparaît. Entrer la température actuelle de l'eau et appuyer sur Enregistrer. Pour revenir à l'écran d'accueil Détermination de la densité, appuyer sur Retour. Icône de l'application FR-18 BALANCES ADVENTURER Étape 1 sur 2 Pesée de l'échantillon dans l'air. Appuyer sur Démarrage. Suivre les instructions à l’écran et appuyer sur Accepter pour stocker le poids de l'échantillon sec (dans l'air). Étape 2 sur 2 - Pesée de l'échantillon submergé dans un liquide. Suivre les instructions à l’écran et appuyer sur Accepter pour stocker le poids de l'échantillon (submergé dans le liquide). Une fois que les poids nécessaires ont été déterminés, la densité de l'échantillon liquide est affichée en g/cm3 (conjointement au poids dans l'air, et au poids dans l'eau) sur l'écran Application. Appuyer sur Démarrage pour réinitialiser toutes les valeurs de pesée et redémarrer le traitement. 4.5.2 Mesure de la densité d'un matériau flottant en utilisant de l'eau Appuyer sur le bouton Paramétrage articles pour accéder à l'écran Paramétrages. Confirmer la sélection des Paramétrages suivants : Type de densité : Solide Type de Liquide : Eau Matière poreuse : Arrêt Pour revenir à l'écran d'accueil Détermination de la densité, appuyer sur Retour. Suivre la même procédure que pour Matériaux solides cidessus, à l'exception de l'étape 2, introduire l'échantillon dans le liquide jusqu'à ce qu'il soit complètement submergé. BALANCES ADVENTURER 4.5.3 FR-19 Mesure de la densité d'un solide en utilisant un liquide auxiliaire Pour activer cette caractéristique, entrer dans le menu Paramétrage de détermination de la densité et sélectionner ce qui suit : Type de densité : Solide ; Type de Liquide : Autre ; Matière poreuse : Arrêt. Confirmer que les valeurs par défaut affichées (densité du liquide, etc.) sont correctes. Pour régler la valeur de Densité du liquide, appuyer sur le bouton Liquide auxiliaire et sélectionner Autre. Une fenêtre d'entrée numérique apparaît. Introduire la densité en g/cm 3 et appuyer sur Enregistrer. L'affichage revient à l'écran précédent. Pour revenir à l'écran d'accueil Détermination de la densité, appuyer sur Retour. Commencer le processus de détermination de la densité comme ci-dessus. 4.5.4 Mesure de la densité d'un liquide en utilisant un plongeur étalonné (non fourni) Pour activer cette fonctionnalité, entrer dans le menu Paramétrage de la densité et sélectionner ce qui suit ; Type de densité : Liquide. Remarque : lorsque le type de densité est défini sur liquide, Type de liquide et Matériaux poreux sont désactivés. Ligne d'affichage principale de l'écran d'accueil DÉTERMINATION DE LA DENSITÉ- LIQUIDE. Ligne d'affichage principale Champs de référence Boutons de fonction Icône de l'application Confirmer que la valeur par défaut affichée (volume du plongeur) est correcte. Pour modifier les valeurs par défaut, appuyer sur Volume du plongeur. Pour régler la valeur du volume du Plongeur, appuyer sur le bouton Volume plongeur. FR-20 Une fenêtre d'entrée numérique apparaît. Introduire la valeur désirée et appuyer sur Enregistrer. L'affichage revient à l'écran précédent avec la nouvelle valeur en surbrillance. Pour revenir à l'écran d'accueil Détermination de la densité, appuyer sur Retour. Appuyer sur Démarrage pour démarrer le processus. Étape 1 sur 2 - Pesée du plongeur dans l'air. Suivre les instructions à l’écran et appuyer sur Accepter pour mémoriser le poids du plongeur (dans l'air). Étape 2 sur 2 - Pesée du plongeur submergé dans un liquide de test. Suivre les instructions à l’écran et appuyer sur Accepter pour stocker le poids de l'échantillon lesté (submergé dans un liquide). Une fois que les poids nécessaires ont été déterminés, la densité de l'échantillon liquide est affichée en g/cm3 (conjointement au poids dans l'air, au poids dans l'eau) sur l'écran Application. Appuyer sur Démarrage pour réinitialiser toutes les valeurs de pesée et redémarrer le traitement. BALANCES ADVENTURER BALANCES ADVENTURER 4.5.5 FR-21 Mesure de la densité des matériaux poreux en utilisant de l'huile Pour activer cette fonctionnalité, entrer dans le menu Paramétrage de détermination de la densité, et définir ce qui suit : Type de densité : Solide Type de Liquide : Eau Matière poreuse : Marche Ligne d'affichage principale de l'écran d'accueil DÉTERMINATION DE LA DENSITÉ - POREUX. Ligne d'affichage principale Champs de référence Fonctions Confirmer que les valeurs par défaut affichées (température de l'eau) sont correctes. Pour modifier les valeurs par défaut, appuyer sur Paramétrage articles. L'écran Paramétrage apparaît. La balance calcule la densité de l'eau en se référant à la valeur entrée de la température de l'eau (tableau de consultation). Mesurer la température réelle de l'eau en utilisant un thermomètre de précision. Pour régler la température de l'eau ou la densité de l'huile, appuyer sur le bouton Température de l'eau ou Densité de l'huile. Icône d'application FR-22 Une fenêtre d'entrée numérique apparaît. Introduire la valeur désirée, ensuite appuyer sur Enregistrer. L'affichage revient à l'écran précédent avec la nouvelle valeur en surbrillance. Pour revenir à l'écran d'accueil de Détermination de la densité, appuyer sur Quitter. Appuyer sur Début du calcul de la densité. Étape 1 sur 3 - Pesée de l'échantillon sans huile dans l'air. Suivre les instructions à l’écran et appuyer sur Accepter pour mémoriser le poids de l'échantillon sec (dans l'air). Étape 2 sur 3 - Pesée de l'échantillon huilé dans l'air. Suivre les instructions à l’écran et appuyer sur Accepter pour stocker le poids de l'échantillon (huilé). Étape 3 sur 3 - Pesée de l'échantillon huilé submergé dans un liquide. Suivre les instructions à l’écran et appuyer sur Accepter pour stocker le poids de l'échantillon huilé (submergé dans un liquide). BALANCES ADVENTURER BALANCES ADVENTURER Une fois que les poids nécessaires ont été déterminés, la densité de l'échantillon est affichée en g/cm3 (conjointement au poids dans l'air, avec et sans huile, et au poids dans l'eau) sur l'écran Application. La valeur reste affichée jusqu'au prochain appui sur Démarrage. Appuyer sur Démarrage pour réinitialiser toutes les valeurs de pesée et redémarrer le traitement. FR-23 FR-24 BALANCES ADVENTURER 4.6 Pesage de vérification Remarque : Avant d'utiliser une application, s'assurer que la balance est de niveau et étalonnée. Le pesage de vérification est utilisé pour comparer le poids d'un échantillon aux limites de la cible. Pesage de vérification 1. Dans la partie supérieure gauche de l'écran d'accueil, sélectionner Pesage de vérification 2. Les limites de pesée par défaut ou la dernière vérification sont affichées. 3. Placer des objets sur le plateau. 4. L'état Inférieur/Acceptable/Supérieur est présenté sur la barre de progression pendant que le poids réel de l'article s'affiche sur la ligne d'affichage principale. Écran d'accueil de Pesage de vérification Ligne d'affichage principale Champs de référence Boutons de fonction Pour définir la valeur de Limite supérieure, appuyer sur le bouton Limite supérieure Pour définir la valeur de Limite inférieure, appuyer sur le bouton Limite inférieure Une fenêtre d'entrée numérique apparaît. Entrer le poids limite désiré et appuyer sur Enregistrer. Pour revenir à l'écran d'accueil PESAGE DE VÉRIFICATION, appuyer sur Quitter. 4.6.1 Paramétrage articles Pour visualiser ou ajuster les paramètres en cours Appuyer sur le bouton Paramétrage articles. L'écran Paramétrage apparaît. Nom d'échantillon : Attribution d'un nom à l'échantillon. Paramètres d’impression : Modifications des réglages d'impression. Se reporter à la section 7 pour de plus amples informations. Icône de l'application BALANCES ADVENTURER FR-25 4.7 Maintien de l'affichage Remarque : Avant d'utiliser une application, s'assurer que la balance est de niveau et étalonnée. Deux modes sont possibles : Maintien de l'affichage – Permet à l'utilisateur de capturer et de mémoriser un poids stable. Maintien de la valeur de crête – Permet à l'utilisateur de capturer et de mémoriser le poids stable le plus élevé. Écran d'accueil Maintien de l'affichage Ligne d'affichage principale Champs de référence Icône de l'application Boutons de fonction Maintien de l'affichage 4.7.1 1. 2. 3. 4. Maintien de l'affichage Dans la partie supérieure gauche de l'écran d'accueil, sélectionner Maintien de l'affichage. Placer l'échantillon sur le plateau et appuyer sur Maintenir à tout moment pendant la capture du poids La ligne d'affichage principale présente maintenant le premier poids stable. Appuyer sur Effacer pour terminer le maintien et revenir à l'écran d'accueil Maintien de l'affichage. Maintien de la valeur crête 4.7.2 1. 2. 3. 4. 5. Maintien de la valeur crête Dans la partie supérieure gauche de l'écran d'accueil, sélectionner Maintien de l'affichage. Définir le mode Automatique sur Marche dans Paramétrage articles (se reporter à la section 4.7.5). Placer un échantillon sur le plateau pour commencer. Continuer de peser les échantillons. Le poids stable est automatiquement maintenu. Appuyer sur Stop pour éliminer le maintien et revenir au fonctionnement normal. FR-26 BALANCES ADVENTURER Maintien poids maximum 4.7.3 Paramétrage articles Pour visualiser ou ajuster les paramètres en cours Appuyer sur le bouton Paramétrage articles. L'écran Paramétrage apparaît. Mode : Choisir entre Maintien poids maximum et Maintien de l' affichage (par défaut). Nom d'échantillon : Attribution d'un nom à l'échantillon. Paramètres d’impression : Modifications des réglages d'impression. Se reporter à la section 7 pour de plus amples informations. Remarque : Le bouton Enregistrer vers USB n'apparaîtra qu'après avoir connecté une clé USB à la balance. Reportez-vous à la section 4.1.3 pour de plus amples informations. 4.8 Totalisation Remarque : Avant d'utiliser une application, s'assurer que la balance est de niveau et étalonnée. La totalisation mesure le poids cumulé d'une séquence d'articles. Le total cumulatif peut dépasser la capacité de la balance. Le nombre maximum d'échantillons (n) s'élève à 99. Écran d’accueil Totalisation Ligne d'affichage principale Champs de référence Boutons d'applications Icône de l'application Totalisation 1. Dans la partie supérieure gauche de l'écran d'accueil, sélectionner Totalisation. 2. Placer un article sur le plateau pour commencer. Le poids de l'échantillon s'inscrit sur la ligne d'affichage principale. 3. Appuyer sur ACCUMULATION pour ajouter le poids (lorsque stable) de l'article au total. 4. Retirer l'élément du plateau de pesée et ajouter l'élément suivant en continuant comme ci-dessus. 5. Appuyer sur Résultats pour visualiser les résultats de la totalisation. 6. Une fois l'opération terminée, appuyer sur le bouton Effacement total pour réinitialiser le poids accumulé sur zéro. 7. Appuyer sur Enregistrer vers USB pour enregistrer le résultat sur une clé USB ou sur Quitter pour revenir à l'écran d'accueil Totalisation. Remarque : Le changement d'unité convertit les résultats de l'accumulation dans l'unité sélectionnée BALANCES ADVENTURER FR-27 4.9 Formulation Remarque : Avant d'utiliser une application, s'assurer que la balance est de niveau et étalonnée. Utiliser cette application pour mélanger et réaliser des recettes. Le nombre maximum de composants s'élève à 50. Écran d'accueil Formulation Ligne d'affichage principale Champs de référence Boutons d'applications Icône de l'application Formulation 1. Dans la partie supérieure gauche de l'écran d'accueil, sélectionner Formulation. 2. Appuyer sur Démarrage pour commencer le processus de mélange. 3. Placer le premier ingrédient sur le plateau ou dans un conteneur taré et appuyer ensuite sur Accepter pour stocker le composant. 4. Continuer d'ajouter des composants et appuyer sur Accepter pour enregistrer le poids des composants individuels jusqu'à ce que la formule soit complète. La ligne Total présente le poids total de tous les composants. 5. Appuyer sur Stop pour terminer la Formulation. Les résultats de la Formulation sont affichés : Remarque : Si Matériel de remplissage est défini sur Marche (voir la section 4.9.1 ci-dessous), la balance demandera d'ajouter du matériel de remplissage afin de compléter la formulation. Ajouter le matériel de remplissage et appuyer sur Accepter pour terminer la formulation et afficher les résultats. 6. Appuyer sur Enregistrer vers USB pour enregistrer le résultat sur une clé USB ou sur Quitter pour revenir à l'écran d'accueil Formulation. Remarque : Les résultats de la formulation seront effacés aussitôt le démarrage d'une nouvelle formulation. 4.9.1 Paramétrage articles Pour visualiser ou ajuster les paramètres en cours Appuyer sur le bouton Paramétrage articles. L'écran Paramétrage apparaît. Remplissage : S'il est défini sur Marche, un matériau de remplissage est demandé à la fin de la formulation. Tare automatique : Si elle est définie sur Marche, la balance effectuera automatiquement une Tare après que le poids du composant a été accepté. Paramètres d’impression : Modifications des FR-28 BALANCES ADVENTURER réglages d'impression. Se reporter à la section 7 pour de plus amples informations. 4.10 Autres fonctions 4.10.1 Pesée sous la balance La balance Adventurer est équipée d'un crochet pour peser sous la balance. Remarque : Avant de retourner la balance, déposer le plateau et les éléments du pare-vent (le cas échéant) pour éviter tout endommagement. Attention : Ne pas poser la balance sur le cône de support du plateau ou sur les broches du capteur. Pour utiliser cette caractéristique, déconnecter l'alimentation de la balance et démonter ensuite le couvercle de protection de l'ouverture de la pesée sous la balance. Pesée sous la balance couvercle de protection Pesée sous le crochet La balance peut être supportée par des chandelles ou par toute autre méthode pratique. S'assurer que la balance est de niveau et sécurisée. Mettre la balance sous tension et utiliser un cordon ou un câble pour attacher les articles à peser. BALANCES ADVENTURER 5. FR-29 PARAMÈTRES DES MENUS 5.1 Navigation dans le menu Structure du menu de l'utilisateur: Modes d'applications Application Pesage Poids minimum Guide des capacité s Menu principal Donné es BPL et BPF Paramètres d’impression Assistance à la mise de niveau Langue Configuration de la balance É talonnage automatique Paramè tre utilisateur Communications Donné es BPL et BPF Ré initialisation usine AutoCalTM É talonnage tactile Assistance à la mise de niveau Niveau du filtre Suivi du Zé ro automatique Tare automatique Poids moyen unitaire (APW) Option automatique Paramètres d’impression Date Application Pourcentage Recalcul de la ré fé rence pondé rale Heure Paramètres d’impression Application dynamique Duré e moyenne Mode automatique gramme carat É talonnage de la liné arité Bip Test d’étalonnage Ré duction automatique de l'é clairage Verrouillage Milligramme kilogramme É talonnage de l'intervalle de mesure Luminosité Application de comptage Taille de l’échantillon Unité s de pesage É talonnage interne Maintenance des donné es Niveau du filtre Configuration de la balance É talonnage Unité s de pesage Unité s É talonnage Maintenance des Donné es BPL Ré initialisCommunication Verrouillage donné es et BPF ation usine Exportation vers É talonnage USB RS232 Standard En-tê te Ré glages du Configuration mode de de la balance l'application Dé bit en bauds En-tê te 1 Paramè tres du Unité s de menu 2400 En-tê te 2 pesage Maintenance Importation 4800 En-tê te 3 des donné es depuis USB Communication once Ré glages du mode de l'application 9600 ounce troy Paramè tres du menu 19200 Livre Balance_Info pennyweight grain En-tê te 5 Nom de la 38400 balance Nom de Transmission l’utilisateur 7 E 1 Nom du projet Newton 7E2 Graduations momme 7 N1 Date et heure mesghal 7 N2 Tael (HK) 7O1 Tae (SG)l 7 O2 Mode approuvé Tael (TW) tical tola baht 8 N1 8N2 É tablissement de liaison Paramè tres de l’impression Type de densité 10-3 Liquide auxiliaire 10-2 Sortie impression Poids stabilisé seulement Valeurs numé riques uniquement En-tê te unique seulement Options d'impression Impression automatique Tempé rature de l'eau. 10-1 Impression automatique :arrê t Matiè re poreuse 100 Densité de l'huile 101 Volume plongeur 102 Tempé rature du liquide 10 Paramètres d’impression LSD Application Pesage de vé rification 0.5 Nom de l'é chantillon Paramètres d’impression Application de la Densité Unité personnalisé e 1 Nom de l’unité Facteur Exposant 3 Dè s stabilité Intervalle (secondes) Continuel Impression du contenu Sé lection En-tê te Nom de l'é chantillon 1 Paramètres d’impression 2 ID Balance Application Maintien de l'affichage 5 Nom de la balance Mode Maintien de l’affichage 10 Nom de l'utilisateur Nom de l'é chantillon 100 Paramètres d’impression En-tê te 4 Date et heure Nom du projet Nom de l'application Application Totalisation Nom de l'é chantillon Application Formulation Ré sultats Remplissage Brut Mode automatique Net Paramètres d’impression Tare Informations Ligne de signature Retour à la ligne Enregistrer vers USB Donné es GLP et GMP Ré initialisation usine FR-30 BALANCES ADVENTURER La navigation dans les menus s'effectue en appuyant sur l'affichage. Pour entrer dans le menu, appuyer sur Menu de n'importe quel écran d'accueil d'une application. Le menu principal s’affiche avec des boutons pour Retour et Quitter. Continuer d'appuyer sur l'article approprié de la liste pour naviguer vers les éléments de menu. 5.1.1 Changement des paramètres Pour modifier un paramètre du menu, naviguer vers le paramètre conformément aux étapes suivantes : Entrée dans le Menu Depuis n'importe quel écran d'application, appuyer sur Menu. La liste du menu principal apparaît à l’écran. Sélection du sous-menu Trouver l'élément de la liste du menu principal et appuyer dessus. Le sous-menu apparaît. Sélection de l'élément de menu Continuer jusqu'à ce que le paramètre désiré soit choisi dans la liste du menu. Appuyer sur le paramètre pour le modifier. Le paramètre modifié sera affiché pendant 1 seconde en surbrillance jaune afin de confirmer la modification de la valeur. Quitter le menu et revenir à l'application en cours. Après confirmation du réglage, appuyer sur Quitter pour revenir à l'application. Remarque : à tout moment les boutons Retour et Quitter peuvent être appuyés pour naviguer vers la zone retenue du menu ou pour revenir vers l'application en cours. Continuer jusqu'à ce que le paramètre désiré soit choisi dans la liste du menu. La structure du menu principal de la balance Adventurer est illustrée ci-dessous. Étalonnage Configuration de la balance Unités de pesage Communications Données BPL et BPF Réinitialisation usine Maintenance des données Verrouillage BALANCES ADVENTURER FR-31 5.2 Étalonnage Les balances Adventurer (modèles INCAL) offrent le choix parmi six méthodes d'étalonnage : Étalonnage interne, Étalonnage automatique, Réglage AutoCal™, Étalonnage de l'intervalle de mesure, Étalonnage de la linéarité et Cal Test (test étalonnage). Remarque : L'unité d'étalonnage est toujours le gramme. Attention : Pendant un étalonnage, éviter de « déranger » la balance. 5.2.1 Sous-menu d'étalonnage (modèles INCAL) Étalonnage interne Automatique Étalonnage AutoCal™ Réglages Intervalle Étalonnage Étalonnage de la linéarité Étalonnage Test Remarque : seuls les modèles /E détiennent l'étalonnage de l'intervalle de mesure, l'étalonnage de la linéarité et le Cal Test. 5.2.2 Étalonnage interne L'étalonnage s'effectue au moyen de la masse interne d'étalonnage. L'étalonnage interne peut être réalisé à tout moment si la balance est de niveau et à sa température de fonctionnement. La balance étant SOUS TENSION avec son plateau vide, appuyer sur Étalonnage interne. La balance commence son étalonnage. Son plateau étant vide, appuyer sur Étalonnage interne. L'affichage présente l'état et revient à l'application en cours. Pour annuler à tout moment, appuyer sur Quitter. 5.2.3 Étalonnage automatique Lorsque Étalonnage automatique est défini sur MARCHE, la balance effectue un auto-étalonnage : • dès qu'elle détecte une variation de température de 1,5 °C • ou toutes les 11 heures AutoCal étalonnera automatiquement la balance (en utilisant la masse interne) chaque fois qu'une variation suffisamment significative de la température pourrait affecter la précision, ou toutes les 11 heures. Des informations apparaîtront à l'écran lorsqu'un étalonnage automatique est sur le point de démarrer. Trois boutons d'options s'afficheront : Maintenant – Appuyer pour effectuer directement l’étalonnage. 5 min – Appuyer pour effectuer l'étalonnage dans 5 minutes. Désactivation – Appuyer pour désactiver la fonction d'étalonnage automatique. FR-32 BALANCES ADVENTURER 5.2.4 Réglage AutoCal™ Utiliser cette méthode d'étalonnage pour régler l'intervalle d'étalonnage sans affecter l'intervalle de mesure ou la linéarité. Le réglage de l'étalonnage peut être utilisé pour ajuster le résultat de l'étalonnage interne par ± 100 divisions. Remarque : Avant de procéder à un ajustement de l'étalonnage, réaliser un étalonnage interne. Pour vérifier la nécessité d'un réglage, placer une masse de test égale à la valeur d'étalonnage de l'intervalle de mesure sur le plateau et noter la différence (en divisions) entre la valeur de la masse nominale et la mesure affichée sur la balance. Si la différence équivaut à +1 division, le réglage de l'étalonnage n'est pas nécessaire. Si la différence est supérieure à +1 division, le réglage de l'étalonnage est recommandé. Exemple : Mesure du poids tel qu'affiché : Mesure du poids attendue : Différence en poids (d) : Différence de poids en chiffres : 200.014 200.000 (valeur de la masse de test) 0,014 -14 (valeur ajustée) Pour effectuer un réglage de l'étalonnage, appuyer sur Réglage AutoCal depuis le menu Étalonnage ; entrer la valeur (divisions positives ou négatives) pour correspondre à la différence précédemment notée au cours de la procédure. Procéder à un nouvel étalonnage à l'aide de l'Étalonnage interne. L'étalonnage étant terminé, positionner la masse de test sur le plateau et vérifier que son poids correspond maintenant à la valeur affichée. Si tel n'est pas le cas, répéter la procédure jusqu'à ce que la lecture de l'étalonnage interne corresponde à celle de la masse de test. Une fois terminée, la balance mémorise la valeur d'ajustement et l'affichage revient sur l'application en cours. 5.2.5 Étalonnage de l'intervalle de mesure L'étalonnage de l'intervalle de mesure utilise deux points d'étalonnage, l'un avec une charge zéro et l'autre avec une charge complète spécifiée (intervalle). Pour des informations détaillées sur les masses d'étalonnage, se reporter au tableau des spécifications à la section 9. Remarque : Les paramètres usine par défaut sont indiqués en caractères gras. La balance étant sous tension et sans charge sur le plateau, appuyer sur Étalonnage de l'intervalle de mesure pour commencer la procédure. Des valeurs d'étalonnage supplémentaires pouvant être utilisées sont présentées sur l'affichage. La meilleure précision est obtenue en utilisant la masse la plus proche de l'intervalle de mesure total. Remarque : Pour modifier le point d'étalonnage de l'intervalle de mesure, appuyer sur l'autre poids présenté sur l'affichage. Suivre les instructions à l'écran et à l'invite, placer le poids d'étalonnage spécifié sur la balance. Une fois terminé, l'affichage présente l'état de l'étalonnage de l'intervalle de mesure et revient à l'application en cours. BALANCES ADVENTURER FR-33 5.2.6 Étalonnage de la linéarité L'étalonnage de la linéarité utilise deux points d'étalonnage, l'un à charge zéro et l'autre à des charges spécifiées. Sans charge sur la balance, appuyer sur Étalonnage de la linéarité pour commencer le processus. La balance capture le point zéro et demande alors le poids suivant. Continuer de suivre les instructions à l'écran jusqu'à ce que l'étalonnage soit terminé. Pour annuler à tout moment, appuyer sur Quitter. 5.2.7 Test d’étalonnage Le test d'étalonnage est utilisé pour comparer une masse d'étalonnage connue aux données mémorisées d'étalonnage de l'intervalle. Sans charge sur la balance, appuyer sur Test étalonnage pour poursuivre le processus. La balance capture le point zéro et demande alors la valeur de l'intervalle de mesure. L'affichage présente l'état, suivi de la différence entre le poids d'étalonnage en cours et les données d'étalonnage mémorisées. 5.3 Configuration de la balance Entrer dans ce sous-menu pour personnaliser la fonctionnalité de la balance. 5.3.1 Sous-menu de configuration de la balance Langue Paramètres de l'utilisateur Niveau du filtre Suivi automatique du zéro Tare automatique Graduations Date et heure Mode approuvé Les paramètres par défaut sont indiqués ci-dessous en caractères gras. 5.3.2 Langue Définition de la langue affichée pour les menus et les messages présentés. Anglais Allemand Français Espagnol Italien Polonais Turc Tchèque Hongrois FR-34 BALANCES ADVENTURER 5.3.3 Paramètre utilisateur Utiliser ce sous-menu pour modifier le paramétrage de : Toucher étalonnage « Exé cution de l'é talonnage, appuyer sur l'é cran au centre de l'anneau » (Premier en haut et à gauche, puis en bas et à droite.) Luminosité de l'écran FAIBLE = faible luminosité de l'écran. MOYEN = luminosité normale de l'écran. ÉLEVÉ = luminosité élevée de l'écran. Bip : ARRÊT = désactivé MARCHE = activé Réduction automatique de l'éclairage (réduit l'éclairage après x minutes sans activité sur l'écran) OFF = disabled 10 min 20 min 30 min Assistance à la mise de niveau : Instructions sur la manière de régler les pieds de la balance afin de la mettre de niveau. 5.3.4 Niveau du filtre Définition du niveau de filtrage du signal. FAIBLE MOYEN ÉLEVÉ = durée de stabilisation plus rapide avec moins de stabilité. = durée de stabilisation normale avec stabilité normale. = durée de stabilisation plus lente avec plus de stabilité. 5.3.5 Suivi automatique du zéro Définition de la fonctionnalité de suivi automatique du zéro. OFF 0,5 D 1D 3D = Désactivé = L'affichage maintient le zéro jusqu'à une variation de 0,5 graduation par seconde = L'affichage maintient le zéro jusqu'à une variation de 1 graduation par seconde. = L'affichage maintient le zéro jusqu'à une variation de 3 graduations par seconde. 5.3.6 Tare automatique Définition de la tare automatique. OFF = Désactivé ON = Activé. « Positionner le récipient sur le plateau » s'affichera lorsqu'une Tare automatique est sur le point de démarrer. Un bouton Désactivation s'affiche sous le texte. Appuyer sur ce bouton pour désactiver la fonction de tare automatique 5.3.7 Graduations Définit la précision d'affichage de la balance. 1 Division = précision d'affichage standard. 10 Divisions = la précision d'affichage est augmentée d'un facteur de 10. Par exemple, si la précision d'affichage standard est de 0,01 g, la sélection de 10 Divisions provoquera un affichage de 0,1 g. BALANCES ADVENTURER FR-35 5.3.8 Date et heure Définition des dates et heures actuelles. Changement de format (le cas échéant), entrer alors la valeur en cours. Appuyer sur Enregistrer pour confirmer la nouvelle valeur. 5.3.9 Mode approuvé Utiliser ce menu pour définir l'état de la métrologie légale. INACTIF = Fonctionnement standard MARCHE = l'opération est conforme aux réglementations des Poids et mesures. Remarque: Lorsque le Mode approuvé est défini sur MARCHE, les paramètres du menu sont ainsi affectés : Menu Étalonnage: L'étalonnage interne AutoCal est forcé sur ACTIF et masqué. Les fonctions Étalonnage interne et Test d'étalonnage sont disponibles. Toutes les autres fonctions sont masquées. Menu du Paramétrage balance : Le niveau du filtre est verrouillé sur le réglage en cours. Le Suivi Zéro automatique est limité à 0,5 division et à INACTIF. Le paramètre sélectionné est verrouillé. La Tare automatique est verrouillée sur le réglage actuel. Les graduations sont forcées sur 1 division et l'élément de menu est masqué. Menu Communications (Communications->Paramètres d'impression->Sortie Impression) : « Poids stabilisé seulement » est verrouillé sur MARCHE. « Valeurs numériques uniquement » est verrouillée sur ARRÊT. Menu Communications (Communications->Paramètres d'impression->Impression Automatique) : Les sélections du mode Impression automatique sont limitées à INACTIF, Dès stabilité et Intervalles. Continuel n'est pas disponible. Menu Maintenance des données : Exporter vers USB est masqué Importer depuis USB est masqué Menu Verrouillage : Le menu est masqué Remarque : Le contacteur de sécurité situé à l'arrière de la balance doit être sur la position verrouillée pour définir le Mode Approuvé sur MARCHE. Le contacteur de sécurité doit être sur la position non verrouillée pour définir Mode approuvé sur ARRÊT. Voir la Section 6. L'écran principal des applications de pesage avec LFT est sur MARCHE. FR-36 BALANCES ADVENTURER 5.4 Unités de pesage Entrer dans ce sous-menu pour activer les unités de mesure désirées. Il est aussi possible d'accéder à ce menu en appuyant sur le symbole de l'unité de l'écran d'accueil de l'application. Remarque : Conformément aux réglementations nationales, l'indicateur peut ne pas inclure certaines des unités de mesure répertoriées. 5.4.1 Sous-menu des unités Milligramme gramme kilogramme carat once once troy Livre pennyweight grain Newton momme mesghal Tael (HK) Tael (SG) Tael (TW) tical tola baht Unité personnalisée 1 Remarque : pas affichées. Si le Mode approuvé est réglé sur MARCHE, certaines unités ne seront Utiliser l'unité personnalisée pour afficher un poids dans une unité de mesure alternative. Si l'unité personnalisée est définie en utilisant un facteur de conversion qui correspond au nombre d'unités personnalisées par gramme exprimé selon une notation scientifique (facteur x 10^ exposant). For example: Pour afficher le poids en onces troy (0,03215075 once troy par gramme), entrer un facteur de 0,3215075 et un exposant de -1. Le nom des unités personnalisées peut se composer d'un maximum de 3 caractères. 5.5 Maintenance des données Entrer dans ce sous-menu pour personnaliser les réglages du transfert des données. 5.5.1 Sous-menu de maintenance des données Fonctions Exportation et Importation L'installation de plusieurs balances est simple en exportant le profil d'une balance « maîtresse » au moyen d'une clé USB. L'outil de maintenance des données vous permet d'enregistrer les paramètres de l'utilisateur et de l'application sur une clé USB qui peuvent être facilement transférés vers d'autres balances Adventurer. Les données peuvent alors être utilisées pour configurer des balances Adventurer supplémentaires avec des données importées de la balance d'origine. Exportation vers USB Importations depuis USB Informations sur la balance BALANCES ADVENTURER FR-37 5.5.2 Exportation vers USB Exportation des données de pesage vers une clé USB.Deux types de données peuvent être exportés : - Paramètres d'une application (APW, poids de référence, etc.) - Paramètres de menu (fonction de configuration de la balance, etc.) Remarque : La fonction Enregistrer vers USB doit être définie sur MARCHE afin d'activer le transfert des données vers USB. Se reporter à la section 5.6 pour de plus amples informations. 5.5.3 Importations depuis USB Importations des données de pesage depuis une clé USB. 5.5.4 Informations sur la balance Entrer pour consulter des informations sur la balance. Les informations affichées comprennent : Type de balance, Identification de la balance, Capacité, Précision de la lecture et Version du logiciel. 5.6 Communications Entrer dans ce menu pour définir les méthodes de communication externe ainsi que les paramètres d'impression. Les données peuvent être émises vers une imprimante ou vers un PC. Les paramètres usine par défaut sont indiqués en caractères gras. Entrer pour consulter des informations sur la balance. 5.6.1 Sous-menu Communication RS-232 standard Paramètres d’impression Enregistrer vers USB RS-232 standard : Entrer dans ce sous-menu pour personnaliser les paramètres standard RS-232. FR-38 BALANCES ADVENTURER 5.6.2 Débit en bauds Définition du débit en bauds (bits par seconde). 2400 4800 9600 19200 38400 = 2400 bps = 4800 bps = 9600 bps = 19200 bps = 38400 bps 5.6.3 Transmission Définition du nombre de bits de données, du bit d'arrêt et de la parité. 7 paire 1 7 impaire 1 7 paire 2 7 impaire 2 7 sans parité 1 8 AUCUNE 1 7 sans parité 2 8 AUCUNE 2 = 7 bits de données, parité paire, bit d'arrêt 1 = 7 bits de données, parité impaire, bit d'arrêt 1 = 7 bits de données, parité paire, bit d'arrêt 2 = 7 bits de données, parité impaire, bit d'arrêt 2 = 7 bits de données, sans parité, bit d'arrêt 1 = 8 bits de données, sans parité, bit d'arrêt 1 = 7 bits de données, sans parité, bit d'arrêt 2 = 8 bits de données, sans parité, bit d'arrêt 2 5.6.4 Établissement de liaison Définition de la méthode de contrôle du débit. AUCUN XON-XOFF MATÉRIEL = pas d'établissement de liaison = Protocole de liaison XON/XOFF = Établissement d'une liaison matérielle Paramètres d’impression Entrer dans ce sous-menu pour personnaliser les réglages du transfert des données. Sous-menu de réglage de l’impression Sortie impression Impression automatique Impression du contenu Alimentation Format Impression étalonnage 5.6.5 Sortie impression Poids stabilisé seulement Définition des critères d'impression. OFF ON = les valeurs sont immédiatement imprimées, quelle que soit la stabilité. = les valeurs ne sont imprimées que lorsque les critères de stabilité sont satisfaits. Valeurs numériques uniquement Définition des critères d'impression. ARRÊT = Tous les résultats et les données G/N/T sont imprimés. Se reporter à la section 7.2 pour de plus amples informations. ACTIF = Seules les données numériques sont imprimées En-tête unique seulement Définition des critères d'impression. ARRÊT Marche = Les en-têtes seront imprimés lors de chaque demande d'impression = Les en-têtes seront imprimés une fois par jour BALANCES ADVENTURER FR-39 Options d'impression Définition des critères d'impression. Imprimante PC = Impression des données vers une imprimante = Impression des données vers un PC 5.6.6 Impression automatique Définition de la fonctionnalité automatique d'impression. OFF = Désactivé DÈS STABILITÉ1 = l'impression a lieu chaque fois que les critères de stabilité sont satisfaits. INTERVALLE2 = l'impression a lieu à des intervalles définis. CONTINUOUS = l'impression se produit continuellement. 1Lorsque DÈS STABILITÉ est sélectionné, définir les conditions d'impression. CHARGE = l'impression a lieu lorsque la charge affichée est stable. CHARGE ZÉRO = l'impression a lieu lorsque la charge affichée ou le zéro est stable. 2Lorsque INTERVALLE est sélectionné, définir l'intervalle de durée en utilisant le clavier numérique. Des réglages de 1 à 3600 secondes sont disponibles. La valeur par défaut est 0. 5.6.7 Impression du contenu Définir le contenu des données imprimées. Selection Set the status. Deselect All Select All = all are set to OFF = all are set to ON En-tête Date et heure ID Balance Nom de la balance Nom de l’utilisateur Nom du projet Nom de l'application Nom de l'échantillon Résultats Brut Net Tare Informations Ligne de signature 5.6.8 Alimentation Définition de l'alimentation du papier. 1 LIGNE 4 LIGNES = remonte le papier d'une ligne après impression. = remonte le papier de quatre lignes après impression. 5.6.9 Format Définir le format d'impression. Ligne Unique Multi lignes = tirages sur une seule ligne. = imprime sur plusieurs lignes. 5.6.10 Impression étalonnage Définition des critères d'impression. Inactif = désactivée. Actif = active. FR-40 BALANCES ADVENTURER Enregistrer vers USB Définition de l'état. ARRÊT MARCHE = les données ne seront pas enregistrées vers USB = les données seront enregistrées vers USB 5.7 Données BPL et BPFGLP Entrer dans ce menu pour définir les données des Bonnes pratiques de laboratoire (BPL) et des Bonnes pratiques de fabrication (BPF). 5.7.1 Sous-menu des données BPL En-tête Nom de la balance Nom de l’utilisateur Nom du projet 5.7.2 En-tête Permet l'impression des en-têtes BPL. Cinq en-têtes au maximum sont disponibles. Des paramètres alphanumériques jusqu’à 25 caractères sont disponibles pour chaque en-tête. 5.7.3 Nom de la balance Définition de l'identification de la balance. Des paramètres alphanumériques jusqu’à 25 caractères sont disponibles. Le réglage par défaut est Adventurer. 5.7.4 Nom de l’utilisateur Définition de l'identification de l'utilisateur. Des paramètres alphanumériques jusqu’à 25 caractères sont disponibles. Le réglage par défaut est vide. 5.7.5 Nom du projet Entrer dans ce menu pour définir l'identification du projet. Des paramètres alphanumériques jusqu’à 25 caractères sont disponibles. Le réglage par défaut est vide. 5.8 Réinitialisation usine Utiliser ce sous-menu pour réinitialiser tous les menus selon leurs réglages par défaut d'usine. Remarque : Les données d'étalonnage ne sont pas affectées. Tout réinitialiser Quitter = réinitialise tous les menus selon leurs réglages par défaut. = retour vers l'écran principal de l'application sans réinitialiser aucun menu. 5.9 Verrouillage Utiliser ce sous-menu pour verrouiller/déverrouiller certains menus. Après le verrouillage, un petit cadenas apparaîtra sur l'icône du menu et l'utilisateur ne sera pas en mesure d'entrer dans ce menu. Cliquer sur un menu et choisir : ARRÊT = le menu est déverrouillé MARCHE = le menu est verrouillé BALANCES ADVENTURER 6. FR-41 MÉTROLOGIE LÉGALE Lorsque la balance est utilisée dans une application commerciale ou légalement contrôlée, elle doit être configurée, inspectée et scellée conformément à la réglementation locale des poids et mesures. Il incombe à l'acheteur de s'assurer que toutes les conditions légales pertinentes sont satisfaites. 6.1 Réglages Avant de procéder à l'inspection et au plombage, réaliser les étapes suivantes dans l'ordre : 1. Vérifier que les paramètres du menu satisfont à la réglementation locale des poids et mesures. 2. Vérifier que les unités réglées sur Marche satisfont à la réglementation locale des poids et mesures. 3. Effectuer un étalonnage conformément à la section 5. 4. Mettre le contacteur de sécurité sur la position verrouillée. 5. Définir le Mode approuvé sur MARCHE du menu de paramétrage de la balance. Remarque : Lorsque le Mode approuvé est défini sur MARCHE, il est impossible de réaliser un étalonnage externe. 6.2 Vérification L'agent de service agréé ou l'agent officiel des poids et mesures doit exécuter la procédure de vérification. 6.3 Plombage Une fois la balance vérifiée, elle doit être plombée afin d'interdire un accès non détecté aux paramètres contrôlés conformément à la loi. Avant de plomber le dispositif, s'assurer que le contacteur de sécurité se trouve sur la position Verrouillé et que le paramètre Mode approuvé du menu Paramétrage balance est défini sur MARCHE. S'il s'agit d'un sceau en papier, placer ce dernier par-dessus le contacteur de sécurité et le boîtier inférieur, comme illustré. Si le plombage s'effectue avec un fil à plomb de sécurité, il doit être passé à travers les orifices du contacteur de sécurité et à travers le boîtier inférieur, comme illustré. Déverrouillé Verrouillé avec un sceau en papier Verrouillé avec un plomb de sécurité FR-42 7 BALANCES ADVENTURER IMPRIMER 7.1 Connexion, Configuration et Tests de l'imprimante/de l'interface ordinateur Utiliser le port RS-232 intégré pour une connexion vers un ordinateur ou vers une imprimante. Pour une connexion à un ordinateur, utiliser HyperTerminal ou un logiciel similaire tel que SPDC décrit ci-dessous. (HyperTerminal se trouve sous Accessoires/Communications de Windows XP). Connecter l'ordinateur au moyen d'un câble série standard (direct). Choisir Nouvelle connexion, « connexion en utilisant » COM1 (ou un port COM disponible). Sélectionner Baud = 9 600 ; Parité = 8 Aucune ; Bit de Stop = 1 ; Établissement d'une liaison = Aucun. Cliquer sur OK. Choisir Propriétés/Paramètres, puis Paramétrage ASCII. Cocher les cases, comme illustré : (Envoi fin de ligne... Caractères tapés en écho...Retour à la ligne...) Utiliser les commandes de l'interface RS232 (section 9.6.1) pour contrôler la balance depuis un PC. Remarque : Lorsque la configuration HyperTerminal est terminée, ce dernier imprimera automatiquement les résultats d'un Test d'étalonnage et les commandes d'impression en écho seront envoyées vers la balance. Logiciel SPDC Le logiciel de recueil des données du port série ou SPDC est fourni par Ohaus et peut être utilisé sur des systèmes d'exploitation qui ne sont pas équipés du logiciel HyperTerminal mentionné ci-dessus. Choisir le type et le chemin d'exportation du fichier et appuyer ensuite sur Exécution conformément à l'affichage ci-dessous. Remarque : Le logiciel SPDC ne prend en charge que la langue anglaise. 7.2 Format de sortie Les données des résultats et les données G/N/T sont sorties au format suivant. Champ : Longueur : Étiquette1 Espace 2 1 Poids 3 11 Espace2 1 Unité 4 Espace 5 1 Stabilité 5 1 Espace 1 G/N 6 3 Espace Caractères de terminaison 7 0 8 1. La longueur du champ d'étiquette n'est pas fixée. 2. Chaque champ est suivi d'un seul espace délimiteur (ASCII 32). 3. Le champ Poids est composé de 11 caractères justifiés à droite. Si la valeur est négative, le caractère « » est situé immédiatement à gauche du chiffre le plus significatif. 4. Le champ Unité contient l'unité de mesure abrégée, jusqu'à 5 caractères. 5. Le champ Stabilité contient le caractère « ? » si la lecture du poids n'est pas stable. Le champ Stabilité et le champ Espace suivant sont ignorés si la lecture du poids est stable. 6. Le champ B/N contient l'indication du poids Net ou Brut. Pour les poids nets, le champ contient « NET ». Pour les poids bruts, le champ ne contient rien, G. 7. Le champ Caractères de fin contient CRLF (retour chariot, retour à la ligne), quatre CRLF ou Page suivante (ASCII 12), selon le paramètre du menu SAUT DE LIGNE. BALANCES ADVENTURER 8. FR-43 MAINTENANCE 8.1 Étalonnage Vérifier périodiquement l'étalonnage en plaçant un poids précis sur la balance et en observant le résultat. Se reporter à la Section 5.2 pour des instructions si un étalonnage est nécessaire. 8.2 Nettoyage AVERTISSEMENT : Déconnecter la balance Adventurer de l'alimentation électrique avant de la nettoyer. S'assurer qu'aucun liquide ne pénètre à l'intérieur de la balance. Nettoyer régulièrement la balance. Les surfaces du boîtier peuvent être nettoyées avec un chiffon non pelucheux, légèrement trempé dans de l'eau ou dans un détergent doux. Les surfaces en verre peuvent être nettoyées avec un produit commercial pour le verre. Veuillez suivre les étapes ci-dessous pour démonter et installer les portes coulissantes. Attention : Ne pas utiliser de solvants, de produits chimiques puissants, d'ammoniac ou d'agents de nettoyage abrasifs. Retrait et réinstallation des portes en verre pour nettoyage : Étape 1. Sur l'arrière de la balance, appuyer sur la broche et faire glisser la porte. Étape 2. Après un nettoyage, faire glisser les portes dans les fentes tout en appuyant sur la broche mentionnée à l'étape 1. Étape 3. Faire glisser les portes dans les fentes jusqu'à ce que la butée arrière s'aligne avec l'autre porte. FR-44 BALANCES ADVENTURER 8.3 Dépannage TABLEAU 8-1. DÉPANNAGE Symptôme/affichage Cause possible Solution La balance ne se met pas en marche La balance n’est pas alimentée Vérifier la connexion et la tension Précision médiocre Étalonnage incorrect Environnement instable Effectuer un étalonnage Placer la balance à un emplacement approprié Étalonnage impossible Menu étalonnage verrouillé Mode approuvé défini sur Marche Environnement instable Masses d'étalonnage incorrectes Déverrouiller le menu Étalonnage Mode approuvé sur arrêt Placer la balance à un emplacement approprié Utiliser des masses d'étalonnage appropriées Impossible de changer les paramètres de menu Sous-menu verrouillé Mode approuvé défini sur Marche Déverrouiller le sous-menu Mode approuvé sur arrêt Poids de référence faible Poids de référence trop petit Le poids sur le plateau est trop petit pour définir un poids de référence valide. Augmenter la dimension de l'échantillon Poids de la pièce non valide Le poids moyen de la pièce est trop petit Augmenter le poids moyen de la pièce Durée de fonctionnement dépassée La lecture de la pesée n'est pas stable Placer la balance à un emplacement approprié ------ Occupé (tare, zéro, impression, attente d'une pesée stable) Attendre jusqu'à achèvement 8.4 Informations de maintenance Si la section de dépannage n'aide pas à résoudre le problème, contacter un technicien agréé Ohaus. Visiter le site Web à l’adresse www.ohaus.com pour trouver le plus proche bureau Ohaus. Un spécialiste des produits Ohaus est à disposition pour vous aider. BALANCES ADVENTURER 9. DONNÉES TECHNIQUES 9.1 Spécifications Conditions ambiantes Utilisation en intérieur seulement Altitude : Jusqu'à 2000 m Plage de température spécifiée : 10 à 30 °C Humidité : humidité relative maximum à 80 % avec des températures jusqu'à 30 °C avec diminution linéaire jusqu'à 50 % de l'humidité relative à 40 °C Variations secteur jusqu'à ± 10 % de la tension nominale. Installation de Catégorie II Degré de pollution : 2 Matériaux Boîtier inférieur : fonte d'aluminium peinte Partie supérieure du boîtier : Plastique (ABS) Plateformes de pesée : Acier inoxydable 18/10 Pare-vent ; verre, plastique (ABS) Pied : Plastique (ABS) FR-45 FR-46 BALANCES ADVENTURER TABLEAU 9-1. SPÉCIFICATIONS Modèle: Capacité Lisibilité d Reproductibilité (écart type.) (g) Linéarité (g) Points d'étalonnage de l'intervalle de mesure (g) Étalonnage Unités de pesage Applications Durée de stabilisation typique Dérive de la sensibilité de la température (PPM/K) Poids Minimum Typique USP (µ = 0,10 %, k = 2) Poids Minium optimum USP (µ = 0,10 %, k = 2) Affichage AX124 120 g AX124/E 120 g AX224 220 g 0,0001 g AX224/E 220 g AX324 320 g 50 g, 100 g 150 g, 200 g 100 g 200 g, 300 g 0,0001 g ±0,0002 g 25 g, 50 g 75 g, 100 g 25 g, 50 g 75 g, 100 g 50 g, 100 g 150 g, 200 g Étalonnage Étalonnage Étalonnage Externe Externe automatique automatique automatique Baht, carat, grain, gramme, milligramme, mesgal, momme, Newton, once, pennyweight, livre, Tael (Hong Kong), Tael, (Singapour), Tael (Taiwan), tical, tola, once troy, personnalisé (1) Pesage, Comptage de pièces, Pesage par pourcentage, Pesage de vérification, Pesage d'animaux, Formulation, Détermination de la densité, Totalisation, Maintien de l'affichage ≤ 3 secondes 1,5 0,20 g 0,20 g 0,20 g 0,20 g 0,20 g 0,082 g 0,082 g 0,082 g 0,082 g 0,082 g ACL graphique WQVGA couleur Dimensions de l'affichage Rétro-éclairage Contrôles Communication Alimentation d'entrée de la balance DEL blanche Écran tactile résistif à 4 fils + 6 touches à membrane RS-232, USBx2 Alimentation Entrée Adaptateur CA 100-240 V CA 0,3 A 50-60 Hz Sortie Adaptateur CA 12 V CC 0,84 A Dimension de la plateforme (diamètre) Dimensions après assemblage (Largeur x Profondeur x Hauteur) Dimensions d'expédition (Largeur x Profondeur x Hauteur) Poids net Poids à l'expédition 4,3 po / 10,9 cm (diagonale) 12 V CC, 0,5A 90 mm / 3,5 po 230 x 354 x 340 mm 9,1 x 13,9 x 13,4 po 387 x 507 x 531 mm 15,4 x 20,0 x 20,9 po 5,1 Kg / 11,3 lb 7,8 Kg / 17,2 lb BALANCES ADVENTURER FR-47 TABLEAU 9-2. SPÉCIFICATIONS (suite) Modèle: Capacité Lisibilité d Reproductibilité (écart type.) (g) Linéarité (g) Points d'étalonnage de l'intervalle de mesure (g) Étalonnage Unités de pesage Applications Durée de stabilisation typique Dérive de la sensibilité de la température (PPM/K) Poids Minimum Typique USP (µ = 0,10 %, k = 2) Poids Minium optimum USP (µ = 0,10 %, k = 2) AX223 220 g AX223/E 220 g AX423 4200 g AX423/E 4200 g 0,001 g AX523 520 g 520 g 0,001 g ±0,002 g 50 g, 100 g, 200 g, 50 g, 100 g 100 g 100 g, 200 g 200 g 200 g, 300 g 300 g 150 g, 200 g 150 g, 300 g, 400 g 300 g, 400 g, 500 g 400 g, 200 g 400 g 500 g Étalonnage Étalonnage Étalonnage Externe Externe Externe automatique automatique automatique Baht, carat, grain, gramme, milligramme, mesgal, momme, Newton, once, pennyweight, livre, Tael (Hong Kong), Tael, (Singapour), Tael (Taiwan), tical, tola, once troy, personnalisé (1) Pesage, Comptage de pièces, Pesage par pourcentage, Pesage de vérification, Pesage d'animaux, Formulation, Détermination de la densité, Totalisation, Maintien de l'affichage ≤ 2 secondes 3 2,0 g 2,0 g 2,0 g 2,0 g 2,0 g 2,0 g 0,82 g 0,82 g 0,82 g 0,82 g 0,82 g 0,82 g Affichage ACL graphique WQVGA couleur Dimensions de l'affichage Rétro-éclairage Contrôles Communication Alimentation d'entrée de la balance DEL blanche Écran tactile résistif à 4 fils + 6 touches à membrane RS-232, USBx2 Alimentation Entrée Adaptateur CA 100-240 V CA 0,3 A 50-60 Hz Sortie Adaptateur CA 12 V CC 0,84 A Dimension de la plate-forme (diamètre) Dimensions après assemblage (Largeur x Profondeur x Hauteur) Dimensions d'expédition (Largeur x Profondeur x Hauteur) Poids net Poids à l'expédition AX523/E 4,3 po / 10,9 cm (diagonale) 12 V CC, 0,5A 130 mm/5,1 po 230 x 354 x 340 mm 9,1 x 13,9 x 13,4 po 387 507 x 531 mm 15,4 x 20,0 x 20,9 po 5,8 Kg/12,8 lb 8,5 Kg/18,8 lb 5,6 Kg/12,4 lb 8,3 Kg/18,3 lb 5,8 Kg/12,8 lb 8,5 Kg/18,8 lb 5,6 Kg/12,4 lb 8,3 Kg/18,3 lb 5,8 Kg/12,8 lb 8,5 Kg/18,8 lb 5,6 Kg/12,4 lb 8,3 Kg/18,3 lb FR-48 BALANCES ADVENTURER TABLEAU 9-3. SPÉCIFICATIONS (suite) Modèle: AX422 AX422/E AX822 AX822/E Capacité 420g 420g 820g 820g Lisibilité d 0,01 g Reproductibilité (écart 0,01 g type.) (g) Linéarité (g) ±0,02 g Points d'étalonnage de 100g, 200g 100g, 200g 200g, 400g 200g, 400g l'intervalle de mesure 300g,400g 300g,400g 600g, 800g 600g, 800g (g) Étalonnage automatique Externe Étalonnage automatique Externe Étalonnage Baht, carat, grain, gramme, milligramme, mesgal, momme, Newton, once, Unités de pesage pennyweight, livre, Tael (Hong Kong), Tael, (Singapour), Tael (Taiwan), tical, tola, once troy, personnalisé (1) Pesage, Comptage de pièces, Pesage par pourcentage, Pesage de vérification, Applications Pesage d'animaux, Formulation, Détermination de la densité, Totalisation, Maintien de l'affichage Durée de stabilisation ≤ 1,5 seconde typique Dérive de la sensibilité de la température 3 (PPM/K) Poids Minimum Typique USP (µ = 0,10 %, k = 2) 20,0 g Poids Minium optimum USP (µ = 0,10 %, k = 2) 8,2 g Affichage ACL graphique WQVGA couleur Dimensions de l'affichage Rétro-éclairage Contrôles Communication Alimentation d'entrée de la balance DEL blanche Écran tactile résistif à 4 fils + 6 touches à membrane RS-232, USBx2 Alimentation Entrée Adaptateur CA 100-240 V CA 0,3 A 50-60 Hz Sortie Adaptateur CA 12 V CC 0,84 A 4,3 po / 10,9 cm (diagonale) 12 V CC, 0,5A Dimension de la plateforme 175 mm x 195 mm (6,9 x 7,7 po) Dimensions après assemblage (Largeur x Profondeur x Hauteur) Dimensions d'expédition (Largeur x Profondeur x Hauteur) Poids net Poids à l'expédition 230 x 354 x 100 mm 9,1 x 13,9 x 4,0 po 392 x 557 x 301 mm 15,5 x 22,0 x 11,9 po 4.6Kg/10.2lb 6.5Kg/14.4b 3.9Kg/8.6lb 5.8Kg/12.8b 4.6Kg/10.2lb 6.5Kg/14.4b 3.9Kg/8.6lb 5.8Kg/12.8b BALANCES ADVENTURER FR-49 TABLEAU 9-4. SPÉCIFICATIONS (suite) Modèle: Capacité Lisibilité d Reproductibilité (écart type.) (g) Linéarité (g) Points d'étalonnage de l'intervalle de mesure (g) Étalonnage Unités de pesage Applications AX1502 AX1502/ E AX2202 AX2202/ E AX4202 AX4202/ E AX5202 1520 g 1520 g 2200 g 2200 g 0,01 g 4200 g 4200 g 5200 g 1000 g, 2000 g 3000 g, 4000 g 1000 g, 2000 g 3000 g, 4000 g 2000 g, 3000 g 4000 g, 5000 g Étalonnage automatique Externe Étalonnage automatique 0,01 g 500 g 1000 g, 1500 g 500 g, 1000 g 1500 g, 2000 g Étalonnage automatique Externe Étalonnage automatique ≤ 1,5 seconde 3 1,9 20,0 g 20,0 g 20,0 g 20,0 g 20,0 g 20,0 g 20,0 g 8,2 g 8,2 g 8,2 g 8,2 g 8,2 g 8,2 g 8,2 g Affichage ACL graphique WQVGA couleur Dimensions de l'affichage Rétro-éclairage Contrôles Communication Alimentation d'entrée de la balance 4,3 po / 10,9 cm (diagonale) DEL blanche Écran tactile résistif à 4 fils + 6 touches à membrane RS-232, USBx2 12 V CC, 0,5A Entrée Adaptateur CA 100-240 V CA 0,3 A 50-60 Hz Sortie Adaptateur CA 12 V CC 0,84 A Alimentation Dimension de la plate-forme 175 mm x 195 mm (6,9 x 7,7 po) Dimensions après assemblage (Largeur x Profondeur x Hauteur) Dimensions d'expédition (Largeur x Profondeur x Hauteur) Poids à l'expédition Externe Baht, carat, grain, gramme, milligramme, mesgal, momme, Newton, once, pennyweight, livre, Tael (Hong Kong), Tael, (Singapour), Tael (Taiwan), tical, tola, once troy, personnalisé (1) Pesage, Comptage de pièces, Pesage par pourcentage, Pesage de vérification, Pesage d'animaux, Formulation, Détermination de la densité, Totalisation, Maintien de l'affichage Durée de stabilisation typique Dérive de la sensibilité de la température (PPM/K) Poids Minimum Typique USP (µ = 0,10 %, k = 2) Poids Minium optimum USP (µ = 0,10 %, k = 2) Poids net ±0,02 g 500 g, 1000 g 1500 g, 2000 g 300 g, 400 g 500 g, 600 g 230 x 354 x 100 mm 9,1 x 13,9 x 4,0 po 392 x 557 x 301 mm 15,5 x 22,0 x 11,9 po 4,6 Kg/ 10,2 lb 6,5Kg/ 14,4 lb 3,9 Kg/ 8,6 lb 5,8Kg/ 12,8 lb 4,6 Kg/ 10,2 lb 6,5 Kg/ 14,4 lb 3,9 Kg/ 8,6 lb 5,8 Kg/ 12,8 lb 4,6 Kg/ 10,2 lb 6,5 Kg/ 14,4 lb 3,9 Kg/ 8,6 lb 5,8 Kg/ 12,8 lb 3,8 Kg/ 8,4 lb 5,7 Kg/ 12,6 lb FR-50 Modèle: Capacité Lisibilité d Reproductibilité (écart type.) (g) Linéarité (g) Points d'étalonnage de l'intervalle de mesure (g) Étalonnage Unités de pesage Applications Durée de stabilisation typique Dérive de la sensibilité de la température (PPM/K) Poids Minimum Typique USP (µ = 0,10 %, k = 2) Poids Minium optimum USP (µ = 0,10 %, k = 2) BALANCES ADVENTURER TABLEAU 9-5. SPÉCIFICATIONS (suite) AX4201 AX4201/E AX2201 AX2201/E 4200 g 4200 g 2200g 2200g 0,1 g AX8201 8200 g AX8201/E 8200 g 0,1 g ±0,2 g 1000 g, 1000 g, 2000 g, 2000 g, 500g, 1000g 500g, 1000g 2000 g 2000 g 4000 g 4000 g 3000 g, 3000 g, 6000 g, 6000 g, 1500g, 2000g 1500g, 2000g 4000 g 4000 g 8000 g 8000 g Étalonnage Étalonnage Étalonnage Externe Externe Externe automatique automatique automatique Baht, carat, grain, gramme, milligramme, mesgal, momme, Newton, once, pennyweight, livre, Tael (Hong Kong), Tael, (Singapour), Tael (Taiwan), tical, tola, once troy, personnalisé (1) Pesage, Comptage de pièces, Pesage par pourcentage, Pesage de vérification, Pesage d'animaux, Formulation, Détermination de la densité, Totalisation, Maintien de l'affichage ≤ 1,5 seconde 9 200,0 g 200,0 g 200,0 g 200,0 g 200,0 g 200,0 g 82 g 82 g 82 g 82 g 82 g 82 g Affichage ACL graphique WQVGA couleur Dimensions de l'affichage Rétro-éclairage Contrôles Communication Alimentation d'entrée de la balance DEL blanche Écran tactile résistif à 4 fils + 6 touches à membrane RS-232, USBx2 Alimentation Entrée Adaptateur CA 100-240 V CA 0,3 A 50-60 Hz Sortie Adaptateur CA 12 V CC 0,84 A 4,3 po/10,9 cm (diagonale) 12 V CC, 0,5A Dimension de la plateforme (diamètre) Dimensions après assemblage (Largeur x Profondeur x Hauteur) Dimensions d'expédition (Largeur x Profondeur x Hauteur) 175x195 mm/6,9x7,7 po 230 x 354 x 100 mm 9,1 x 13,9 x 4,0 po 392 x 557 x 301 mm 15,5 x 22,0 x 11,9 po Poids net 4.6Kg/10.2lb 3.9Kg/8.6lb Poids à l'expédition 6.5Kg/14.4b 5.8Kg/12.8b 4,6 Kg / 10,2 lb 6,5 Kg / 14,4 lb 3,9 Kg / 8,6 lb 5,8 Kg / 12,8 lb 3,8 Kg / 8,4 lb 5,7 Kg / 12,6 lb 3,4Kg / 7,5 lb 5,3 Kg / 11,6 lb BALANCES ADVENTURER FR-51 TABLEAU 9-6. SPÉCIFICATIONS (suite) Modèle AX523M AX1502M AX2202M AX4202M AX5202M AX8201M AX124M AX224M AX324M AX223M AX423M Maxi 120 g 220 g 320 g 220 g 420 g 520 g 1520 g 2200 g 4200 g 5200 g 8200 g Mini 0,01g 0,01 g 0,01 g 0,02 g 0,02 g 0,02 g 0,5 g 0,5 g 0,5g 0,5 g 5g d= 0,0001 g 0,001 g 0,01 g 0,1 g e= 0,001 g 0,01 g 0,1 g 1g 0,01 g 0,1 g Classe d'approbation Reproductibilité (écart type.) (g) Linéarité (g) I II 0,0001 g 0,001 g ±0,0002 g ±0,002 g ± 0,2 g ±0,02 g Points d'étalonnage de l'intervalle de mesure (g) 50 g, 50 g, 100 g, 200 200 g, 300 25 g, 50 g 100 g 500 g 100 g 100 g g g 75 g, 200 g, 300 1000 g, 150 g, 200 150 g, 200 300 g, 400 400 g, 500 100 g g 1500 g g g g g Étalonnage Étalonnage Étalonnage Étalonnage Étalonnage Étalonnage Étalonnage Étalonnage Étalonnage Étalonnage Étalonnage Étalonnage automatique automatique automatique automatique automatique automatique automatique automatique automatique automatique automatique Unités de pesage Applications milligramme, gramme, carat 1000 g, 2000 g 3000 g, 4000 g 2000 g, 3000 g 4000 g, 5000 g 2000 g, 4000 g 6000 g, 8000 g kilogramme, gramme, carat Pesage, Comptage de pièces, Pesage par pourcentage, Pesage de vérification, Pesage d'animaux, Formulation, Détermination de la densité, Totalisation, Maintien de l'affichage Durée de stabilization ≤ 3 secondes (normale) Dérive de la sensibilité en 1,5 temperature (PPM/K) Poids Minimum Typique 0,20 g 0,20 g 0,20 g USP (µ = 0,10 %, k = 2) Poids Minium optimum 0,082 g 0,082 g 0,082 g USP (µ = 0,10 %, k = 2) Affichage ≤2 secondes ≤1,5 secondes 3 3 1,9 2,0 g 2,0 g 2,0 g 20,0 g 20,0 g 20,0 g 20,0 g 200,0 g 0,82 g 0,82 g 0,82 g 8,2 g 8,2 g 8,2 g 8,2 g 82 g ACL graphique WQVGA couleur Dimensions de l'affichage 4,3 po / 10,9 cm (diagonale) Rétro-éclairage DEL blanche Contrôles Écran tactile résistif à 4 fils + 6 touches à membrane Communication RS-232, USBx2 Alimentation d'entrée de la balance 12 V CC, 0,5 A Entrée Adaptateur CA : 100-240 V CA 0,3 A 50-60 Hz Sortie Adaptateur CA : 12 V CC 0,84 A Alimentation Dimensions de la plate-forme (diamètre) Dimensions après assemblage (Largeur x Profondeur x Hauteur) Dimensions d'expédition (Largeur x Profondeur x Hauteur) 500 g, 1000 g 1500 g, 2000 g 90 mm / 3,5 po 130 mm / 5,1 po 175x195 mm / 6,9x7,7 po 230 x 354 x 340 mm 9,1 x 13,9 x 13,4 po 230 x 354 x 340 mm 9,1 x 13,9 x 13,4 po 230 x 354 x 100 mm 9,1 x 13,9 x 4,0 po 387 x 507 x 531 mm 15.4 x 20,0 x 20,9 po 387 x 507 x 531 mm 15,4 x 20,0 x 20,9 po 392 x 557 x 301 mm 15,5 x 22,0 x 11,9 po Poids net 5,1 Kg / 11,3 lb 5,8 Kg / 12,8 lb 4,6 Kg / 10,2 lb 3,8 Kg / 8,4 lb Poids à l'expédition 7,8 Kg / 17,2 lb 8,5 Kg / 18,8 lb 6,5 Kg / 14,4 lb 5,7 Kg / 12,6 lb Remarque : M = Approuvé OIML FR-52 BALANCES ADVENTURER TABLEAU 9-7. SPÉCIFICATIONS (suite) Modèle AX224N AX223N/E AX423N AX 423N/E AX523N/E AX1502N/E AX2202N/E AX4202N/E AX8201N/E Maxi 220 g 220 g 420 g 420 g 520 g 1520 g 2200 g 4200 g 8200 g Mini 0,01 g 0,02 g 0,02 g 0,02 g 0,02 g 0,5 g 0,5 g 0,5 g 5g d= 0,0001 g 0,001 g 0,01 g 0,1 g e= 0,001 g 0,01 g 0,1 g 1g 0,001 g 0,01 g 0,1 g ±0,002 g ±0,02 g Classe I d'approbation Reproductibilité 0,0001 g (écart type.) (g) Linéarité (g) Points d'étalonnage de l'intervalle de mesure (g) Étalonnage ±0,0002 g 50 g, 100 g 150 g, 200 g 50 g, 100 g 150 g, 200 g 100 g, 200 g 300 g, 400 g Étalonnage automatique Externe Étalonnage automatique Unités de pesage Applications II 100 g, 200 g 200 g, 300 g 300 g, 400 g 400 g, 500 g Externe Externe ±0,2 g 500 g 1000 g, 1500 g 500 g, 1000 g 1500 g, 2000 g 1000 g, 2000 g 3000 g, 4000 g 2000 g, 4000 g 6000 g, 8000 g Externe Externe Externe Externe gramme, milligramme, carat, pennyweight, grain, once, once troy gramme, kilogramme, carat, pennyweight, grain, livre, once, once troy Pesage, Comptage de pièces, Pesage par pourcentage, Pesage de vérification, Pesage d'animaux, Formulation, Détermination de la densité, Totalisation Durée de ≤3 stabilisation secondes (normale) Dérive de la sensibilitéen 1.5 température (PPM/K) Poids Minimum Typique 0,20 g USP (µ = 0,10 %, k = 2) Poids Minium optimum 0,082 g USP (µ = 0,10 %, k = 2) ≤2 secondes ≤1.5 secondes 3 3 9 2,0 g 2,0 g 2,0 g 2,0 g 20,0 g 20,0 g 20,0 g 200,0 g 0,82 g 0,82 g 0,82 g 0,82 g 8,2 g 8,2 g 8,2 g 82 g Affichage ACL graphique WQVGA couleur Dimensions de l'affichage 4,3 po / 10,9 cm (diagonale) Rétro-éclairage DEL blanche Contrôles Écran tactile résistif à 4 fils + 6 touches à membrane Communication RS-232, USBx2 Alimentation d'entrée de la balance 12 V CC, 0,5 A Alimentation Entrée Adaptateur CA : 100-240 V CA 0,3 A 50-60 Hz Sortie Adaptateur CA : 12 V CC 0,84 A Dimensions de la plate-forme 90 mm / 3,5 po (diamètre) Dimensions après assemblage (Largeur x Profondeur x Hauteur) 130 mm / 5,1 po 175x195 mm / 6.9x7.7 po 354x230x340 mm 13,9x9,1x13,4 po 354x230x100 mm 13,9x9,1x4,0 po Dimensions d'expédition 557x392x301 mm 22,0x15,5x11,9 po (Largeur x Profondeur x Hauteur) Poids net Poids à l'expédition 5,1 Kg / 11,3 lb 7,8 Kg / 17,2 lb 5,6 Kg / 12,4 lb 8,3 Kg / 18,3 lb Remarque : N = Approuvé NTEP 5,8 Kg / 12,8 lb 8,5 Kg / 18,8 lb 5,6 Kg / 12,4 lb 3,9 Kg / 8,6 lb 8,3 Kg / 18,3 lb 5,8 Kg / 12,8 lb 3,4 Kg / 7,5 lb 5,3 Kg / 11,6 lb BALANCES ADVENTURER FR-53 TABLEAU 9-8. SPÉCIFICATIONS (suite) Modèle AX124AU AX224AU AX324AU AX223AU AX423AU AX523AU AX1502AU AX2202AU AX4202AU AX5202AU AX8201AU Maxi 120 g 220 g 320 g 220 g 420 g 520 g 1520 g 2200 g 4200 g 5200 g 8200 g Mini 0,01g 0,01 g 0,01 g 0,02 g 0,02 g 0,02 g 0,5 g 0,5 g 0,5g 0,5 g 5g d= 0,0001 g 0,001 g 0,01 g 0,1 g e= 0,001 g 0,01 g 0,1 g 1g 0,01 g 0,1 g Classe d'approbation Reproductibilité (écart type.) (g) Linéarité (g) I II 0,0001 g 0,001 g ±0,0002 g ±0,002 g ± 0,2 g ±0,02 g Points d'étalonnage de l'intervalle de mesure (g) 50 g, 50 g, 100 g, 200 200 g, 300 25 g, 50 g 100 g 500 g 100 g 100 g g g 75 g, 200 g, 300 1000 g, 150 g, 200 150 g, 200 300 g, 400 400 g, 500 100 g g 1500 g g g g g Étalonnage Étalonnage Étalonnage Étalonnage Étalonnage Étalonnage Étalonnage Étalonnage Étalonnage Étalonnage Étalonnage Étalonnage automatique automatique automatique automatique automatique automatique automatique automatique automatique automatique automatique Unités de pesage Applications milligramme, gramme, carat 1000 g, 2000 g 3000 g, 4000 g 2000 g, 3000 g 4000 g, 5000 g 2000 g, 4000 g 6000 g, 8000 g kilogramme, gramme, carat Pesage, Comptage de pièces, Pesage par pourcentage, Pesage de vérification, Pesage d'animaux, Formulation, Détermination de la densité, Totalisation, Maintien de l'affichage Durée de stabilization ≤ 3 secondes (normale) Dérive de la sensibilité en 1,5 temperature (PPM/K) Poids Minimum Typique 0,20 g 0,20 g 0,20 g USP (µ = 0,10 %, k = 2) Poids Minium optimum 0,082 g 0,082 g 0,082 g USP (µ = 0,10 %, k = 2) Affichage ≤2 secondes ≤1,5 secondes 3 3 1,9 2,0 g 2,0 g 2,0 g 20,0 g 20,0 g 20,0 g 20,0 g 200,0 g 0,82 g 0,82 g 0,82 g 8,2 g 8,2 g 8,2 g 8,2 g 82 g ACL graphique WQVGA couleur Dimensions de l'affichage 4,3 po / 10,9 cm (diagonale) Rétro-éclairage DEL blanche Contrôles Écran tactile résistif à 4 fils + 6 touches à membrane Communication RS-232, USBx2 Alimentation d'entrée de la balance 12 V CC, 0,5 A Entrée Adaptateur CA : 100-240 V CA 0,3 A 50-60 Hz Sortie Adaptateur CA : 12 V CC 0,84 A Alimentation Dimensions de la plate-forme (diamètre) Dimensions après assemblage (Largeur x Profondeur x Hauteur) Dimensions d'expédition (Largeur x Profondeur x Hauteur) 500 g, 1000 g 1500 g, 2000 g 90 mm / 3,5 po 130 mm / 5,1 po 175x195 mm / 6,9x7,7 po 230 x 354 x 340 mm 9,1 x 13,9 x 13,4 po 230 x 354 x 340 mm 9,1 x 13,9 x 13,4 po 230 x 354 x 100 mm 9,1 x 13,9 x 4,0 po 387 x 507 x 531 mm 15.4 x 20,0 x 20,9 po 387 x 507 x 531 mm 15,4 x 20,0 x 20,9 po 392 x 557 x 301 mm 15,5 x 22,0 x 11,9 po Poids net 5,1 Kg / 11,3 lb 5,8 Kg / 12,8 lb 4,6 Kg / 10,2 lb 3,8 Kg / 8,4 lb Poids à l'expédition 7,8 Kg / 17,2 lb 8,5 Kg / 18,8 lb 6,5 Kg / 14,4 lb 5,7 Kg / 12,6 lb FR-54 BALANCES ADVENTURER 9.2 Schémas et dimensions Dimensions complètement assemblée Figure 9-1 Modèles avec pare-vent Figure 9-2 Modèles sans pare-vent 9.3 Pièces et accessoires TABLEAU 9-7. ACCESSOIRES DESCRIPTION Affichage auxiliaire Kit de densité Câble, dispositif USB (Type A-B) Dispositif de sécurité (verrouillage ordinateur portable) Câble RS232, PC 25 broches Câble RS232, PC 9 broches Cache antipoussière Affichage auxiliaire RÉFÉRENCE 80251396 80253384 83021085 80850043 80500524 80500525 30093334 80251396 BALANCES ADVENTURER FR-55 9.4 Communications 9.4.1 Commandes de l’interface Les commandes répertoriées sur le tableau suivant seront reconnues par la balance. La balance renverra un « ES » pour les commandes non valides. TABLEAU 9-8. LISTE DES COMMANDES DE L’INTERFACE ADVENTURER Caractère de commande IP P CP SP SLP SLZP xP 0P H Z T xT*** PT MARCHE ARRÊT C CI CA PSN PV x# P# x% P% xS xRL Fonction Impression immédiate du poids affiché (stable ou instable) Impression du poids affiché (stable ou instable) Impression continuelle. Impression si stable. Poids affiché stable différent de zéro en Impression automatique. Impression automatique pour poids stable différents de zéro et mesures du zéro stables Impression d'intervalle x = impression d'intervalle (1 à 3600 s) 0P termine l'intervalle d'impression Voir ci-dessus Entrer les lignes de l'en-tête d'impression Similaire à l'appui sur la touche Zéro Similaire à l'appui sur la touche Tare. Établir une tare prédéfinie dans l'unité affichée. Valeur de tare prédéfinie = X. Envoi de 0T efface la tare (si autorisé). Imprime le poids de la tare mémorisée. Sort de veille Passe sur veille. Commencement de l'intervalle de mesure Début de l'Étalonnage interne, équivalent au déclenchement du menu d'étalonnage. Interrompre étalonnage. Attention : si LFT est Actif, l'opération n'est pas autorisée. Imprimer le numéro de série. Imprimer la version logicielle du terminal, la version logicielle de la base et LFT ACTIF (si LFT est défini sur ACTIF). Définition du comptage Poids moyen unitaire (x) en grammes (Poids moyen unitaire doit être mémorisé). Imprimer le Poids moyen unitaire de l'application de comptage. Définition du poids de référence de l'application Pourcentage (x) en grammes (le poids de référence doit être mémorisé). Imprimer le poids de référence de l'application Pourcentage. 0 = imprimer les données instables, similaire à IP ; 1 = imprimer les données stables seulement 1), similaire à SP. 0 = réponse désactivée ; 1 = réponse activée. Cette commande contrôle seulement la réponse « OK ! » FR-56 9.4.2 BALANCES ADVENTURER RS232 (DB9) Connexion des broches Data GND Broche 2 : Ligne de transmission de la balance (TxD) Broche 3 : Ligne de réception de la balance (RxD) Broche 5 : Signal de masse Broche 7 : Prêt à envoyer (établissement de liaisons) (CTS) Broche 8 : Demande d'envoi (établissement matériel de liaisons) (RTS) 1 5 9 Female 6 Handshake 9.5 Interface USB Le kit d'interface USB Ohaus reste la solution unique au problème de connexion d'une balance sur un ordinateur en utilisant USB (Universal Serial Bus). Les dispositifs USB sont classés selon des catégories telles que des lecteurs de disques, des caméras numériques, des imprimantes, etc. Les balances n'ont pas de classification communément utilisée, c'est pourquoi l'interface USB d'Ohaus utilise une interface générique basée sur l'interface série RS232 standard. Les données sont envoyées de la balance vers un ordinateur au format USB. Les données USB sont dirigées vers un port virtuel. Ce port apparaît alors comme un port RS232 pour le programme d'application. Lors de l'envoi d'une commande depuis un ordinateur vers la balance, le programme d'application envoie une commande vers le port virtuel comme s'il s'agissait d'un port RS232. L'ordinateur dirige alors la commande depuis le port virtuel vers le connecteur USB de l'ordinateur sur lequel la balance est connectée. Le port reçoit le signal USB et réagit à la commande. Le kit d'interface USB comprend un CD avec les pilotes logiciels afin de créer le port USB virtuel nécessaire sur l'ordinateur. Spécification du système PC fonctionnant sous Windows 98®, Windows 98SE®, Windows ME®, Windows 2000®, Windows XP® ou Windows 8® (32-bit). Port USB disponible (type A, 4 broches, femelle) Connexion USB Le port USB de la balance se termine par un connecteur B femelle à 4 broches de type USB Un câble USB (type B/mâle vers type A/mâle) est nécessaire (non fourni). 1. S'assurer que la balance est sous tension et fonctionne correctement. 2. Mettre l'ordinateur sous tension, et vérifier que le port USB est activé et fonctionne correctement. 3. Brancher le connecteur USB du câble au connecteur USB de l'ordinateur et à celui de la balance. Windows® détectera un dispositif USB et l'assistant Nouveau matériel sera initialisé. BALANCES ADVENTURER FR-57 Installation du logiciel du port virtuel 1. Insérer le CD fourni dans le lecteur de CD de l'ordinateur. Les diverses versions de Windows® présentent des étapes légèrement différentes lors du chargement des pilotes se trouvant sur le CD. Dans toutes les versions, l'assistant Nouveau matériel vous guidera au cours des étapes requises afin de sélectionner le pilote se trouvant sur le CD. 2. Après avoir cliqué sur Terminé, le port virtuel doit être prêt à l'utilisation. Windows® ajoute généralement le port virtuel en séquence après le numéro de port COM le plus élevé. Par exemple, sur un PC équipé avec 4 ports COM, le port virtuel deviendra COM5. Lors de l'utilisation de l'interface USB avec des programmes qui limitent le nombre de désignations de ports COM (par exemple, Ohaus MassTracker n'autorise que COM1, 2, 3 et 4), il peut s'avérer nécessaire d'attribuer un de ces numéros de port au nouveau port virtuel. Exemple de l'assistant Matériel de Windows XP Ceci peut être réalisé dans Paramètres des ports de l'utilitaire Gestionnaire de périphériques se trouvant sur le panneau de configuration de Windows. ENTREE USB La balance répondra aux diverses commandes envoyées par le biais de l'adaptateur d'interface. Terminer les commandes suivantes en présence d'un [CR] or [CRLF] (retour chariot ou retour chariot, retour à la ligne. Commandes de l'Adventurer C réalise un étalonnage de l'intervalle de mesure 0S impression de données instables 1S impression exclusive de données stables P Similaire à l'appui sur Imprimer SP impression exclusive de pesées stables IP Impression immédiate du poids affiché (stable ou instable) CP Impression continuelle des poids SLP Impression stable automatique seulement pour poids différent de zéro SLZP Impression automatique pour poids stable différents de zéro et lecture du zéro xP Impression automatique avec des intervalles de 1 à 3 600 secondes (x = 1 à 3600) 0P Termine l'impression d'intervalle T Similaire à l'appui sur Tare Z Similaire à l'appui sur Zero PV impression de la version logicielle Fonctionnement en impression automatique Une fois que l'impression automatique est activée dans le menu, la balance enverra des données selon le besoin. Si des données se trouvent dans le tampon d'impression, l'imprimante finira d'imprimer ces données. 10. MISE À JOUR DE LOGICIELS Ohaus améliore continuellement le logiciel de ses balances. Pour obtenir la version la plus récente, contacter un représentant Ohaus agréé ou Ohaus Corporation. FR-58 11. BALANCES ADVENTURER CONFORMITÉ La conformité aux normes suivantes est indiquée par le marquage correspondant sur le produit. Marque Standard Ce produit est conforme à la directive EMC 2004/108/EC, à la directive de basse tension 2006/95/EC et à la directive des instruments de pesée non automatique 2009/23/EC. La Déclaration de conformité complète est disponible en ligne sur http://europe.ohaus.com/europe/en/home/support/compliance/ce-declaration-of-conformity.aspx. AS/NZS CISPR 11, AS/NZS 61000.4.3 CAN/CSA-C22.2 61010-1-12 Standard UL N°61010-1 (3e édition) Avis important pour les instruments de pesage vérifiés Les instruments de pesage vérifiés sur le site de fabrication portent l’une des marques précédentes sur l’étiquette de l’emballage avec un autocollant M (pour Métrolologie) vert sur la plaque descriptive. Ils peuvent être immédiatement mis en service. Les instruments de pesage devant être vérifiés en deux étapes ne portent pas d’autocollant M (pour Métrolologie) vert sur la plaque descriptive et portent l’une des marques d'identification précédentes sur l’étiquette de l’emballage. La deuxième étape de la vérification initiale doit être exécutée par l’organisation de service homologuée du représentant agréé au sein de la CE ou par les autorités nationales de poids et mesures. La première étape de la vérification initiale a été exécutée sur le site du fabricant. Elle se compose de tous les tests requis par la norme européenne adoptée EN 45501:1992, paragraphe 8.2.2. Si des règlements nationaux limitent la durée de validité de la vérification, il incombe à l’utilisateur dudit instrument de mesure de respecter strictement la période de re-vérification et d'informer les autorités des poids et mesures respectives. Remarque FCC Ce matériel a été testé et s’est révélé conforme aux normes des appareils numériques de la classe A, en vertu de la section 15 de la réglementation FCC. Ces limites ont pour objectif de fournir une protection raisonnable contre des interférences dangereuses lorsque l'équipement est utilisé dans un environnement commercial. Cet équipement génère, utilise et peut rayonner des hautes fréquences et s'il n'est pas installé et utilisé conformément au guide de l'utilisateur, il peut générer des interférences préjudiciables aux communications radio. L'utilisation de cet équipement dans une zone résidentielle risque de générer des interférences préjudiciables, auquel cas l'utilisateur se verra dans l'obligation de rectifier la situation à ses frais. Remarque d’Industrie Canada Cet appareil numérique de classe B est conforme à la norme canadienne ICES-001. BALANCES ADVENTURER FR-59 Enregistrement ISO 9001 En 1994, le Bureau Veritus Quality International (BVQI) a octroyé la certification d'enregistrement ISO 9001 à Ohaus Corporation, États-Unis d'Amérique, confirmant que le système de gestion de la qualité d'OHAUS était conforme aux conditions normalisées de l'ISO 9001. Le 21 juin 2012, Ohaus Corporation, USA, a été réenregistrée à la norme ISO 9001:2008. Conforme avec l'Europe : Mise au rebut Conformément à la directive européenne 2002/96/CE sur les déchets d’équipements électriques et électroniques (WEEE), cet appareil ne doit pas être mis au rebut comme des ordures ménagères. Ceci est également valable pour les pays en dehors de l’UE, selon leurs impératifs spécifiques. La directive 2006/66/EC sur les batteries a introduit de nouveaux impératifs depuis septembre 2008 sur le retrait des batteries d'un équipement destiné au rebut dans tous les États membres de l'Union européenne. Pour être conforme à cette directive, cet appareil a été conçu pour un retrait sans danger des batteries aussitôt sa fin d'utilisation par une installation de traitement des déchets. Veuillez mettre au rebut ce produit conformément à la réglementation locale au point de collecte spécifié pour les équipements électriques et électroniques. Pour de plus amples informations, contacter l’autorité responsable ou le distributeur auprès duquel cet appareil a été acheté. Si cet appareil change de propriétaire (pour des raisons personnelles ou professionnelles), cette consigne doit lui être communiquée. Pour des instructions de mise au rebut en Europe, voir http://europe.ohaus.com/europe/en/home/support/weee.aspx. Nous vous remercions de votre contribution à la protection de l’environnement. FR-60 BALANCES ADVENTURER GARANTIE LIMITÉE Ohaus garantit que ses produits sont exempts de défauts matériels et de fabrication à compter de la date de livraison pendant toute la durée de la garantie. Selon les termes de cette garantie, Ohaus s'engage, sans frais de votre part, à réparer ou, selon son choix, remplacer toutes les pièces déterminées défectueuses, sous réserve que le produit soit retourné, tous frais payés, à Ohaus. Cette garantie ne s'applique que si le produit a subi des dommages suite à un accident ou un mésusage, a été exposé à des matériaux radioactifs ou corrosifs, contient des matériaux étrangers ayant pénétré à l'intérieur ou après une maintenance ou des modifications apportées par quiconque autre qu’Ohaus. En l’absence d’une carte d'enregistrement de garantie dûment remplie, la période de garantie commence à la date de l'expédition au revendeur agréé. Aucune autre garantie expresse ou implicite n'est offerte par Ohaus Corporation. En aucun cas, Ohaus Corporation ne peut être tenu responsable des dommages indirects. Dans la mesure où les lois régissant les garanties varient d'un État à un autre et d'un pays à un autre, veuillez contacter Ohaus ou votre représentant local agréé Ohaus pour de plus amples informations. ADVENTURER-WAAGEN DE-1 INHALTSVERZEICHNIS 1. EINLEITUNG ..........................................................................................................................3 1.1 1.2 1.3 1.4 Beschreibung ............................................................................................................................................... 3 Ausstattung .................................................................................................................................................. 3 Bedeutung der Signalwörter und Warnsymbole .......................................................................................... 3 Sicherheitsmaßnahmen ............................................................................................................................... 4 2. INSTALLATION .....................................................................................................................4 2.1 2.2 2.3 2.4 2.5 2.6 Auspacken.................................................................................................................................................... 4 Auswahl des Aufstellorts .............................................................................................................................. 4 Nivellieren des Geräts .................................................................................................................................. 4 Anschluss der Stromversorgung .................................................................................................................. 5 Verbindung mit der Schnittstelle .................................................................................................................. 5 Erstkalibrierung ............................................................................................................................................ 5 3. BETRIEB ................................................................................................................................7 3.1 3.2 3.3 3.4 Übersichtsanzeige, Startbildschirm .............................................................................................................. 7 Hauptfunktionen und Hauptmenü................................................................................................................ 8 Übersicht über Teile und Funktionen - Zugluftschutz für die Modelle .......................................................... 8 Übersicht über Teile und Funktionen - Modelle ohne Zugluftschutz............................................................ 9 4. ANWENDUNGEN.................................................................................................................11 4.1 Wägen ........................................................................................................................................................ 10 4.1.1. Optionseinstellungen .............................................................................................................................. 11 4.1.1. Sample Name (Probenname) ................................................................................................................ 13 4.1.1. Save to USB (Auf USB speichern) ......................................................................................................... 13 4.2. Stückzählung .............................................................................................................................................. 12 4.2.1. Optionseinstellungen .............................................................................................................................. 13 4.3 Prozentwägung .......................................................................................................................................... 15 4.3.1 Optionseinstellungen .............................................................................................................................. 15 4.4 Dynamisches Wägen ................................................................................................................................. 16 4.4.1 Optionseinstellungen .............................................................................................................................. 16 4.5 Dichtebestimmung ..................................................................................................................................... 17 4.5.1 Messung der Dichte eines Feststoffs mit Wasser (Standardvorgabe) ................................................... 17 4.5.2 Messung der Dichte eines schwimmfähigen Materials mit Wasser ....................................................... 18 4.5.3 Messung der Dichte eines Feststoffs mit einer Hilfsflüssigkeit .............................................................. 18 4.5.4. Messung der Dichte einer Flüssigkeit mit einem kalibrierten Sinkgewicht (wird nicht mitgeliefert). ...... 19 4.5.5 Messen der Dichte eines porösen Materials mit Öl ............................................................................... 20 4.6 Prüfwägen .................................................................................................................................................. 23 4.6.1 Optionseinstellungen .............................................................................................................................. 23 4.7 Anzeige mit Standbild ................................................................................................................................ 23 4.7.1 Display Hold ........................................................................................................................................... 24 4.7.2 Peak Hold ............................................................................................................................................... 24 4.7.3 Optionseinstellungen .............................................................................................................................. 24 4.8 Summierung ............................................................................................................................................... 25 4.9 Rezeptur ..................................................................................................................................................... 27 4.9.1 Optionseinstellungen .............................................................................................................................. 26 4.10 Zusätzliche Funktionen .............................................................................................................................. 27 4.10.1 Unterflurwägehaken ............................................................................................................................... 27 5. MENÜEINSTELLUNGEN .....................................................................................................28 5.1 Menünavigation .......................................................................................................................................... 28 5.1.1 Änderung von Einstellungen .................................................................................................................. 29 5.2 Kalibrierung ................................................................................................................................................ 30 5.2.1 Kalibrieruntermenü (INCAL-Modelle) ..................................................................................................... 30 5.2.2 Interne Kalibrierung ................................................................................................................................ 30 5.2.3 Automatische Kalibrierung ..................................................................................................................... 30 5.2.4. AutoCal™-Einstellung ............................................................................................................................ 31 5.2.5 Messspannenkalibrierung ...................................................................................................................... 31 5.2.6 Linearitätskalibrierung ............................................................................................................................ 32 5.2.7 Kalibrierprüfung ...................................................................................................................................... 32 5.3 Waagen-Setup ........................................................................................................................................... 32 5.3.1 Konfigurationsuntermenü der Waage .................................................................................................... 32 5.3.2 Sprache .................................................................................................................................................. 32 5.3.3 Benutzereinstellung ................................................................................................................................ 33 DE-2 ADVENTURER-WAAGEN 5.3.4 Filterebene ............................................................................................................................................. 33 5.3.5 Automatische Nullpunktnachführung ..................................................................................................... 33 5.3.6 Autom. Tarieren...................................................................................................................................... 33 5.3.7 Teilstriche ............................................................................................................................................... 33 5.3.8 Datum & Zeit .......................................................................................................................................... 34 5.3.9 Eichmodus .............................................................................................................................................. 34 5.4 Wägeeinheiten ........................................................................................................................................... 35 5.4.1 Untermenü mit den Maßeinheiten .......................................................................................................... 35 5.5 Datenpflege ................................................................................................................................................ 35 5.5.1 Untermenü „Data Maintenance“ (Datenpflege) .......................................................................................... 35 5.5.2 Export auf USB........................................................................................................................................... 36 5.5.3 Import von USB .......................................................................................................................................... 36 5.5.4 Informationen zur Waage ........................................................................................................................... 36 5.6 Kommunikation........................................................................................................................................... 36 5.6.1 Untermenü Kommunikation .................................................................................................................... 36 5.6.2 Baudrate ................................................................................................................................................. 36 5.6.3 Übertragung ........................................................................................................................................... 38 5.6.4 Handshake ............................................................................................................................................. 37 5.6.5 Druckausgabe ........................................................................................................................................ 37 5.6.6 Automatischer Druck .............................................................................................................................. 39 5.6.7 Druckinhalt ............................................................................................................................................. 39 5.6.8 Papiervorschub ...................................................................................................................................... 39 5.6.9 Format .................................................................................................................................................... 39 5.6.10 Cal.-Daten drucken ................................................................................................................................ 39 5.7 GLP- und GMP-Daten ................................................................................................................................ 39 5.7.1 Untermenü GLP-Daten........................................................................................................................... 39 5.7.2 Kopfzeilen ............................................................................................................................................... 39 5.7.3 Name der Waage ................................................................................................................................... 39 5.7.4 Name des Benutzers .............................................................................................................................. 39 5.7.5 Projektname ........................................................................................................................................... 39 5.8 Zurücksetzen auf die Werkeinstellung ....................................................................................................... 39 5.9 Sperre ......................................................................................................................................................... 39 6. EICHUNG .............................................................................................................................40 6.1 6.2 6.3 Einstellungen .............................................................................................................................................. 40 Verifizierung ............................................................................................................................................... 40 Versiegelung .............................................................................................................................................. 40 7. DRUCKEN ............................................................................................................................41 7.1 7.2 Anschlusskonfiguration und Prüfung der Drucker-/Computerschnittstelle................................................. 41 Ausgabeformat ........................................................................................................................................... 42 8. WARTUNG ...........................................................................................................................42 8.1 8.2 8.3 8.4 Kalibrierung ................................................................................................................................................ 42 Reinigung ................................................................................................................................................... 42 Fehlerbehebung ......................................................................................................................................... 45 Serviceinformationen ................................................................................................................................. 43 9. TECHNISCHE DATEN .........................................................................................................44 9.1 Spezifikationen ........................................................................................................................................... 44 9.2 Zeichnungen und Abmessungen ............................................................................................................... 53 9.3 Teile und Zubehör ...................................................................................................................................... 54 9.4 Kommunikation........................................................................................................................................... 55 9.4.1. Schnittstellenbefehle .............................................................................................................................. 55 9.4.2. RS232 (DB9)-Pinbelegung ..................................................................................................................... 55 9.5 USB-Schnittstelle ....................................................................................................................................... 57 10. SOFTWARE-UPDATES .......................................................................................................57 11. COMPLIANCE......................................................................................................................58 ADVENTURER-WAAGEN 1. EINLEITUNG 1.1 Beschreibung DE-3 Die Adventurer-Waage ist ein Präzisionswägeinstrument, das Ihnen bei entsprechender Pflege viele Jahre lang gute Dienste leisten wird. Die Adventurer-Waage von Ohaus ist für Wägebereiche von 120 g bis 8.200 g lieferbar. 1.2 Ausstattung Steuerung über Touch-Elemente: Schneller, grafischer Zugriff auf alle Steuerfunktionen, über ein Dutzend Anwendungen und viele Optionen. 1.3 Bedeutung der Signalwörter und Warnsymbole Sicherheitshinweise sind durch Signalwörter und Warnsymbole gekennzeichnet. Diese weisen auf Sicherheitsgefahren und Warnungen hin. Die Nichtbeachtung der Sicherheitshinweise kann zu Verletzungen, zur Beschädigung des Geräts, zu Fehlfunktionen und zu falschen Ergebnissen führen. Signalwörter VORSICHT Wird für gefährliche Situationen mit mittlerem Risiko verwendet, die zu Verletzungen oder zum Tod führen können. ACHTUNG Wird für gefährliche Situationen mit geringem Risiko verwendet, die zu Schäden am Gerät oder anderen Sachbeschädigungen, zum Verlust von Daten oder zu Verletzungen führen können. Wichtiger Hinweis Wird für wichtige Informationen zum Produkt verwendet Hinweis Wird für nützliche Informationen zum Produkt verwendet Warnsymbole Allgemeine Gefahr Wechselstrom 1.4 Gefahr eines Stromschlags Gleichstrom Sicherheitsmaßnahmen ACHTUNG: Lesen Sie alle Sicherheits- und Warnhinweise vor der Installation durch, bevor Sie das Gerät anschließen oder reparieren. Wenn Sie die Warnhinweise nicht einhalten, kann es zu Personen- bzw. Sachschäden kommen. Bewahren Sie alle Anleitungen als Referenz auf. Prüfen Sie, ob die Eingangsspannung und der Netzstecker des Netzgeräts zu der Netzversorgung vor Ort passen. Das Netzkabel darf keine Stolpergefahr und kein Hindernis darstellen. Verwenden Sie die Waage nur in trockenen Räumen. Diese Waage ist nur für die Verwendung in Räumen vorgesehen. Lassen Sie keine Last auf die Schale der Wägeplattform fallen. Verwenden Sie nur zugelassene Zubehörteile und Peripheriegeräte. Verwenden Sie die Waage nur unter den in der Anleitung angegebenen Umgebungsbedingungen. Trennen Sie die Waage vor dem Reinigen von der Stromversorgung. Verwenden Sie die Waage nicht in gefährlichen oder instabilen Umgebungen. Servicearbeiten dürfen nur durch Fachpersonal durchgeführt werden. DE-4 ADVENTURER-WAAGEN Stellen Sie die Waage so auf, dass der Netzanschluss gut zu erreichen ist. 2. INSTALLATION 2.1 Auspacken Nehmen Sie die Adventurer-Waage und ihre Teile vorsichtig aus der Verpackung. Die mitgelieferten Komponenten sind je nach dem Waagenmodell verschieden (siehe folgende Tabelle). Bewahren Sie die Verpackung als sichere Versand- und Lagerverpackung auf. Lesen Sie diese Anleitung komplett durch, bevor Sie die Adventurer-Waage installieren und verwenden, um eine falsche Bedienung zu vermeiden. Mitgelieferte Teile Waage Netzteil Windring (nur für 0,1 mg- und 1 mg-Modelle) Garantiekarte CD 2.2 Auswahl des Aufstellorts Vermeiden Sie Orte mit starken Schwingungen, Wärmequellen, Luftzug oder schnellen Temperaturschwankungen. Achten Sie auf ausreichend Platz. 2.3 Nivellieren des Geräts Die Adventurer-Waage hat in einem kleinen runden Fenster neben dem Display eine Nivellierungslibelle. Um die Waage zu nivellieren, stellen Sie die Füße so ein, dass die Nivellierlibelle genau in der Kreismitte liegt. Informationen zum Einstellen der Füße finden Sie im folgenden Abschnitt „Nivellierhilfe“.. Nivellieren Sie das Gerät nach jedem Standortwechsel. Nivellierhilfe Mit der Nivellierhilfefunktion können Sie die Adventurer-Waage nivellieren. Sie haben zwei Möglichkeiten, um diese Funktion aufzurufen: 1. Weighing Application -> Item Settings -> Level Assist (Wägeanwendung -> Elementeinstellungen -> Nivellierhilfe). Weitere Informationen dazu siehe Abschnitt 4.1.1. 2. Main Menu -> Balance Setup -> User Settings -> Level Assist (Hauptmenü -> Konfiguration der Waage -> Benutzereinstellungen -> Nivellierhilfe). Weitere Informationen dazu siehe Abschnitt 5.3.3. ADVENTURER-WAAGEN DE-5 Drehen Sie die Füße wie dargestellt, bis die Nivellierlibelle genau in der Kreismitte liegt. 2.4 Anschluss der Stromversorgung Verbinden Sie den Gleichspannungs-Ausgangsstecker mit der entsprechenden Buchse an der Rückseite der Waage. Verbinden Sie dann das Netzkabel mit einer Steckdose. ACHTUNG: Bei Verwendung eines CSA-zertifizierten Netzteils (oder eines Netzteils mit vergleichbarer Zulassung) muss der Ausgangsstrom begrenzt werden. Wichtiger hinweis: Lassen sie das gerät 60 minuten vor der verwendung aufwärmen, um optimale wägeergebnisse zu erreichen 2.5 Verbindung mit der Schnittstelle Verbinden Sie den integrierten Anschluss RS-232 die Waage über ein serielles Standardkabel (mit durchgehenden, unvertauschten Adern) mit einem Computer oder Drucker. Sie können auch den USBAnschluss der Waage verwenden. Anschlüsse an der Rückseite der Waage. USB-Anschluss an der Vorderseite der Waage. . USB1 RS232 USB2 USB1: Nur für PC-Anschluss USB2: Nur für Anschluss eines USB-Speichersticks RS-232: Für PC- oder Druckeranschluss Hinweis: Informationen zur Konfiguration und zu den Schnittstellenbefehlen siehe Abschnitt zu den Kommunikationsmenüeinstellungen. Informationen zum Anschluss, zur Konfiguration und Prüfung der Schnittstelle mit dem Drucker oder Computer sowie zu den Ausgabeformaten des Druckers siehe Abschnitt „Drucken“. 2.6 Erstkalibrierung Wenn Sie die Waage erstmals installiert haben und dann an einen anderen Ort umsetzen, müssen Sie die Waage kalibrieren, um exakte Wägeergebnisse sicherzustellen. Die meisten Adventurer-Waagen verfügen über eine integrierte AutoCal-Funktion zur automatischen Kalibrierung der Waage ohne Kalibriergewichte. Bei Bedarf können Sie die Waage manuell mit externen Gewichten kalibrieren. Legen Sie vor Beginn der Kalibrierung geeignete Kalibriergewichte bereit. Informationen zu den Kalibriergewichten und zur Vorgehensweise bei der Kalibrierung siehe Abschnitt „Kalibrierung“. ¤ AutoCal™ DE-6 ADVENTURER-WAAGEN Das vollautomatische System zur internen Kalibrierung, das die regelmäßige Wartung unterstützt und die Waage täglich kalibriert, ist in fast jedem Modell enthalten. Kalibriert das System automatisch, wenn ein Temperaturunterschied festgestellt wird, der die Wägegenauigkeit beeinflusst (>1,5 °C), bzw. alle 11 Stunden. ¤ Externe Kalibrierung Ausgewählte Präzisionsmodelle besitzen eine Funktion zur traditionellen externen Kalibrierung, bei die Waage mit externen Gewichten (Kalibriergewichtswerte nach Wahl des Benutzers) kalibriert wird, um die Genauigkeit sicherzustellen. ADVENTURER-WAAGEN 3. BETRIEB 3.1 Übersichtsanzeige, Startbildschirm DE-7 Dieses Gerät arbeitet mit einem Touchscreen-Display mit berührungsempfindlichen Flächen und Tasten zur Steuerung der Gerätefunktionen. STEUERELEMENTE Taste Aktion Kurzer Tastendruck (in ausgeschaltetem Zustand): Schaltet die Waage ein. Langer Tastendruck (in eingeschaltetem Zustand): Schaltet die Waage aus. Druckt die aktuellen Daten auf einem Drucker oder sendet sie an einen Computer. Führt eine Nullstellung aus. Führt eine Kalibrierung aus. Führt die Tarierung aus. Hauptanwendungsbildschirm Anwendung Wägebereich und Ablesbarkeit Anweisung Symbole für Stabilität (*), Netto (NET), Brutto (G) und/oder Nullmitte (>0<) Ergebnisfeld: Die Informationen hängen von der Anwendung ab. Berühren Sie g, um die Einheit zu ändern. Referenzfelder Anwendungstasten: Die Funktionen sind von der Anwendung abhängig. DE-8 3.2 ADVENTURER-WAAGEN Hauptfunktionen und Hauptmenü Wägen: Tarieren: Drücken Sie auf Zero (Nullstellung), um das Display auf null zu setzen. Legen Sie einen Gegenstand auf die Wägeplattform. Die Anzeige zeigt das Bruttogewicht an. Drücken Sie auf Zero (Nullstellung), wenn keine Last auf der Wägeplattform liegt, um das Display auf null zu setzen. Stellen Sie einen leeren Behälter auf die Wägeplattform und drücken Sie auf Tare (Tara). Geben Sie Material in den Behälter: Das Nettogewicht wird angezeigt. Entfernen Sie den Behälter: Das Behältergewicht wird als negative Zahl angezeigt. Drücken Sie die Taste Tare (Tara), um die Anzeige zu löschen. MENÜ & BILDSCHIRMNAVIGATION Drücken Sie auf die Option Menu (Menü), um die Menüliste zu öffnen. Zeigen Sie durch Drücken und Ziehen des Rollbalkens weitere Optionen an. Kalibrierung: Zur Anzeige der Kalibrieroptionen Waagen-Setup: Zur Anzeige und Änderung der Waageneinstellungen. Wägeeinheiten: Zur Anzeige Wägeeinheiten. und Änderung der Datenpflege: Zur Anzeige der Datenpflegeeinstellungen. GLP- und GMP-Daten: Zur Rückverfolgung die Benutzerdaten eingeben 3.3 Zurücksetzen auf die Werkseinstellung: Zum Zurücksetzen der Menüeinstellungen auf die Werkseinstellungen. Kommunikation: Sperre: Zur Anzeige der Geräteeinstellungen für den COM-Anschluss und der Druckeinstellungen Zur Anzeige Sperreoptionen. Übersicht über Teile und Funktionen - Zugluftschutz für die Modelle ADVENTURER-WAAGEN DE-9 Wägeplattform Nivellieranzeige Einstellbarer Fuß 3.4 USB-Host Einstellbare Füße USB-Slave EichSchalter RS232 Netzeingang RS232 Netzeingang Übersicht über Teile und Funktionen – Modelle ohne Zugluftschutz Wägeplattform Netzeingang Nivellieranzeige Einstellbarer Fuß USB-Host Einstellbare Füsse USB-slave Eich-schalter DE-10 4. ADVENTURER-WAAGEN ANWENDUNGEN Die Waage kann für verschiedene Anwendungsmodi konfiguriert werden. Berühren Sie das obere linke Anwendungsfeld („Wägen“ im folgenden Beispiel): Die Adventurer-Waage besitzt folgende 9 Anwendungsmodi: Wägen Stückzählung Prozentwägung Anzeige mit Standbild Summierung Rezeptur 4.1 Dynamisches Wägen (lebende Tiere) Dichtebestimmung Prüfwägen Wägen Hinweis: Vor Auswahl einer Anwendung müssen Sie die Waage kalibrieren und nivellieren. Mit dieser Anwendung ermitteln Sie das Stückgewicht in der ausgewählten Maßeinheit. Wägen 1. Im oberen linken Teil des Startbildschirms wählen Sie Weighing (Wägen) aus (diese Anwendung ist die Standardanwendung). 2. Drücken Sie ggf. zuerst die Option Tare (Tara) oder Zero (Nullstellung). 3. Legen Sie Gegenstände auf die Wägeplattform, um das Gewicht anzuzeigen. Sobald die Anzeige stabil ist, wird ein * angezeigt. 4. Der Ergebniswert wird in der Hauptzeile in der aktiven Maßeinheit angezeigt. Der Startbildschirm für WEIGHING (Wägen) Hauptzeile Berühren Sie g, um die Maßeinheit zu ändern. Referenz-Felder Anwendungstasten Symbol der Anwendung ADVENTURER-WAAGEN 4.1.1. Optionseinstellungen Zur Einstellung bzw. Anpassung der aktuellen Einstellungen Drücken Sie die Taste Item Settings (Elementeinstellungen). Der Bildschirm Settings (Einstellungen) wird angezeigt. Minimum Weight: Zur Einstellung des Mindestgewichts bei Überprüfung eines Messwerts. Wenn das Ist-Gewicht unter dem festgelegten Mindestgewicht liegt, wird dieser Fehler gelb markiert. Zur Einstellung des Wertes für das Mindestgewicht drücken Sie die Taste Minimum Weight. Es wird ein Zifferneingabefenster angezeigt. Geben Sie mit den Tasten das gewünschte Mindestgewicht ein und drücken Sie dann auf Save (Speichern). Die Anzeige kehrt wieder zurück zum vorhergehenden Bildschirm. Drücken Sie zur Rückkehr zum Startbildschirm Um zum Ausgangsbildschirm der Wägeanwendung zurückzukehren, berühren Sie Exit (Beenden) am unteren Rand des Bildschirms. Wägebereichsbalken: Wenn diese Funktion aktiviert ist, erscheint ein Wägebereichsbalken im Referenzfeld. Die Wägebereichsanzeige zeigt das IstGewicht in Prozent des Wägebereichs an. Ist der Wägebereichsbalken deaktiviert, stehen im Referenzfeld das Mindestgewicht und der Probenname. Weighing Units: Ändert die angezeigte Maßeinheit. Weitere Informationen dazu siehe Kapitel 5.4. Filter Level: Ändert die Filterebene. Weitere Informationen dazu siehe Kapitel 5.5.3. GLP & GMP Data: Weitere Informationen zu den GLP& GMP-Daten: siehe Abschnitt 5.9. Print Settings: Ändert die Druckeinstellungen. Weitere Informationen dazu siehe Kapitel 7. Nivellierhilfe: Liefert Anweisungen zur Einstellung der Füße, um die Waage zu nivellieren. DE-11 DE-12 4.1.2 ADVENTURER-WAAGEN Sample Name (Probenname) Drücken Sie diese Schaltfläche, um einen Probennamen hinzuzufügen. Es erscheint ein alphanummerisches Eingabefenster. Drücken Sie auf um zwischen Klein- und Großbuchstaben zu wechseln. Kleinbuchstaben: Großbuchstaben: Geben Sie den gewünschten Probennamen ein und drücken Sie auf "Save" (Speichern), um den Namen zu speichern und zum Ausgangsbildschirm der Wägeanwendung zurückzukehren. 4.1.3 Save to USB (Auf USB speichern) Schließen Sie einen USB-Stick am USB-Anschluss auf der Vorderseite der Waage an. Drücken Sie als Nächstes auf die Schaltfläche „Save to USB“ (Auf USB speichern), um die Daten auf dem USB-Stick zu speichern. Nach dem Speichern wird die Schaltfläche kurzzeitig orange. Hinweise: Wenn der USB-Stick das erste Mal angeschlossen wird, dauert es möglicherweise etwas, bevor die Schaltfläche Save to USB (Auf USB speichern) funktioniert. Die Waage muss zunächst die notwendigen Ordner auf dem USB-Stick erstellen, in denen die Daten gespeichert werden. WICHTIGER HINWEIS: Die Wägedaten werden täglich auf einen USB-Speicherstick gespeichert. Die Daten werden jedoch bei Verwendung mehrerer Wägemodi separat in einzelne Dateien gespeichert. Je nach USB-Speicherstick werden möglicherweise nicht alle Daten von der Waage übertragen oder das Display bleibt stehen. In diesem Fall müssen Sie den USB-Speicherstick trennen und den Vorgang mit einem anderen USB-Speicherstick wiederholen. Ohaus übernimmt keine Haftung, wenn Daten auf dem USB-Speicherstick gelöscht werden oder der USB-Speicherstick beim Anschluss an die Waage bricht. Um Probleme mit dem USB-Speicherstick möglichst auszuschließen, empfiehlt Ohaus die Verwendung eines hochwertigen Speichersticks.. 4.2. Stückzählung Hinweis: Vor Auswahl einer Anwendung müssen Sie die Waage kalibrieren und nivellieren. Mit dieser Anwendung zählen Sie Artikel mit gleichem Gewicht. Stückzählung 1. Wählen Sie im oberen linken Teil des Startbildschirms die Option Parts Counting (Stückzählung) aus. 2. Drücken Sie ggf. zuerst die Option Tare (Tara) oder Zero (Nullstellung). 3. Legen Sie Gegenstände auf die Wägeplattform, um das Gewicht anzuzeigen. Sobald die Anzeige stabil ist, wird ein * angezeigt. 4. Der Ergebniswert wird in der Hauptzeile mit dem Vermerk PCS (Stück) angezeigt. ADVENTURER-WAAGEN DE-13 Der Startbildschirm Parts Counting (Stückzählung) Hauptzeile Referenz-Felder Anwendungstasten 4.2.1. Optionseinstellungen Einstellung bzw. Anpassung der aktuellen Einstellungen Drücken Sie die Taste Item Settings (Elementeinstellungen). Der Bildschirm Settings (Einstellungen) wird angezeigt. Samples: Die Probengröße kann zwischen 1 und 10.000 Stück liegen. Die Standardprobengröße ist 10. Wenn die Probengröße geändert wird, öffnet die Waage sofort den Bildschirm für das Durchschnitts-Stückgewicht (APW), damit ein neues Durchschnittstückgewicht berechnet werden kann. Drücken Sie zur Einstellung der Probengröße die Taste Samples (Proben). Es wird ein Zifferneingabefenster angezeigt. Geben Sie mit den Tasten die gewünschte Probengröße ein. Drücken Sie dann auf Save (Speichern). Auf dem nächsten Bildschirm wird der Hinweis angezeigt, dass Sie das Referenzgewicht auf die Wägeplattform legen sollen. Legen Sie das Referenzgewicht auf die Wägeplattform. Drücken Sie dann die Taste Accept (Akzeptieren), um den Wert zu erfassen und wieder zum Startbildschirm zurückzukehren. Bestimmen des Durchschnitts-Stückgewichts (APW): Immer, wenn ein neues Teil gezählt werden soll, müssen Sie das Nenngewicht eines Teils (Durchschnitts-Stückgewicht, abgekürzt APW) aus einer kleinen Zahl von Teilen bestimmen. Das Durchschnitts-Stückgewicht wird gespeichert, bis es durch ein anderes Durchschnitts-Stückgewicht ersetzt wird. Symbol der Anwendung DE-14 ADVENTURER-WAAGEN Es gibt zwei Methoden, das DurchschnittsStückgewicht zu bestimmen: 1. Das Ist-Durchschnitts-Stückgewicht ist bekannt. 2. Das Durchschnitts-Stückgewicht muss aus dem Gewicht ermittelt werden. In diesem Fall wird die aktuelle Probengröße verwendet. Einstellen eines bekannten Durchschnitts-Stückgewichts (APW) Drücken Sie zur direkten Einstellung des DurchschnittsStückgewichts (APW) die Taste APW: Es wird ein Zifferneingabefenster angezeigt. Geben Sie über die Tasten das gewünschte DurchschnittsStückgewicht ein, und drücken Sie dann Save (Speichern). Die Anzeige schaltet zurück zum Anwendungsstartbildschirm und zeigt das neue Durchschnitts-Stückgewicht in dem Referenzfeld an. Einstellen eines neuen Durchschnitts-Stückgewichts (APW) – Ermittlung des Durchschnitts-Stückgewichts Um ein neues Durchschnitts-Stückgewicht zu bestimmen, legen Sie das Referenzgewicht auf die Wägeplattform und drücken dann die Taste Accept (Akzeptieren). Hinweis: Es wird die Probengröße verwendet, die angezeigt wird. Wenn Sie eine andere Probengröße verwenden wollen, ändern Sie zunächst diese Einstellung. (Siehe oben.) Der Startbildschirm zeigt die Stückzahl für das neue Durchschnitts-Stückgewicht an. Auto Optimization: Wenn diese Funktion aktiviert ist, verbessert sich die Genauigkeit, da das Stückgewicht bei Zugabe weiterer Teile automatisch neu berechnet wird. Standard ist Off. Anmerkungen: Die Optimierung des Durchschnitts-Stückgewichts (APW) erfolgt nur, wenn Sie die auf der Wägeplattform liegenden Proben durch ein bis drei weitere Proben ergänzen. Bei der manuellen Eingabe des Durchschnitts-Stückgewichts mit dem nummerischen Tastenfeld erfolgt keine automatische Optimierung des APW. Print Settings: Ändert die Druckeinstellungen. Weitere Informationen dazu siehe Kapitel 7. Hinweis: Die Schaltfläche Save to USB (Auf USB speichern) erscheint erst, wenn ein USB-Speicherstick an der Waage angeschlossen ist. Weitere Informationen dazu siehe Abschnitt 4.1.3. ADVENTURER-WAAGEN 4.3 DE-15 Prozentwägung Hinweis: Vor Auswahl einer Anwendung müssen Sie die Waage kalibrieren und nivellieren. Benutzen Sie zur Messung des Gewichts einer Probe die Option Percent Weighing (Prozentwägung): Das Gewicht wird dann als Prozentsatz des vorher definierten Referenzgewichts angezeigt. Das Standardreferenzgewicht bzw. letzte Referenzgewicht wird angezeigt. Prozentwägung 1. Wählen Sie in der oberen linken Ecke des Startbildschirms die Option Percent Weighing (Prozentwägung). 2. Legen Sie einen Gegenstand auf die Wägeplattform. Der Unterschied zwischen der Probe und dem Referenzgewicht wird in Prozent angezeigt. Der Startbildschirm Percent Weighing (Prozentwägung) Hauptzeile Referenz-Felder Anwendungstasten 4.3.1 Optionseinstellungen Zur Einstellung bzw. Anpassung der aktuellen Einstellungen Drücken Sie die Taste Item Settings (Elementeinstellungen). Der Bildschirm Settings (Einstellungen) wird angezeigt. Recalculate Ref. Wgt: Um ein neues Referenzgewicht festzulegen, drücken Sie die Taste zur Neuberechnung des Referenzgewichts. Folgen Sie den Anweisungen auf dem Bildschirm, um ein neues Referenzgewicht zu bestimmen. Drücken Sie alternativ auf die Schaltfläche Ref. Weight (Referenzgewicht) im Bildschirm „Percent Weighing Recalculate Ref. Wgt (Referenzgewicht für Prozentwägen neu berechnen), um ein Referenzgewicht manuell mit dem nummerischen Tastenfeld einzugeben. Print Settings: Ändert die Druckeinstellungen. Weitere Informationen dazu siehe Kapitel 7. Hinweis: Die Schaltfläche Save to USB (Auf USB speichern) erscheint erst, wenn ein USB-Speicherstick an der Waage angeschlossen ist. Weitere Informationen dazu siehe Abschnitt 4.1. Symbol der Anwendung DE-16 4.4 ADVENTURER-WAAGEN Dynamisches Wägen Hinweis: Vor Auswahl einer Anwendung müssen Sie die Waage kalibrieren und nivellieren. Mit dieser Anwendung wiegen Sie instabile Lasten, beispielsweise lebende Tiere. Sie können zwei verschiedene Modi für Start und Reset auswählen: manuell (Start und Stopp per Tastendruck) und automatisch (Start und Stopp automatisch). Dynamisches Wägen – manuell (Standardeinstellung) 1. Wählen Sie in der oberen linken Ecke des Startbildschirms Dynamic Weighing (Dynamisches Wägen) aus. 2. Platzieren Sie die Objekte auf der Wägeplattform und drücken Sie die Taste Start. Der Startbildschirm für Dynamisches Wägen Hauptzeile Referenz-Felder Anwendungstasten Symbol der Anwendung 3. Die Waage beginnt, rückwärts zu zählen (zur Bestimmung des Durchschnittswertes). Während des Rückwärtszählens zeigt die Informationszeile die Restzeit an. Drücken Sie gegebenenfalls die Taste Stop, um den Vorgang abzubrechen. 4. Wenn die Rückwärtszählung beendet ist, wird die Ergebniszeile angezeigt. Drücken Sie auf Clear (Löschen), um das gehaltene Gewicht zu löschen und zum Ausgangsbildschirm zurückzukehren. Hinweis: Reinigen Sie die Wägeplattform, bevor Sie mit einem neuen dynamischen Wägezyklus beginnen. 4.4.1 Optionseinstellungen Zur Einstellung bzw. Anpassung der aktuellen Einstellungen Drücken Sie die Taste Item Settings (Elementeinstellungen). Der Bildschirm Settings (Einstellungen) wird angezeigt. Averaging Time: Zum Einstellen der Durchschnittszeit auf einen Wert zwischen 1 und 99 Sekunden Die Standardvorgabe sind 5 Sekunden. Automatic Mode: Wenn der automatische Modus aktiviert ist, beginnt der Zyklus, sobald ein Objekt auf der Wägeplattform platziert ist; der gespeicherte Wert wird automatisch zurückgesetzt, wenn das Objekt von der Wägeplattform entfernt wird. Sample Name: Ordnet einer Probe einen Namen zu. Print Settings: Ändert die Druckeinstellungen. Weitere Informationen dazu siehe Kapitel 7. Hinweis: Die Schaltfläche Save to USB (Auf USB speichern) erscheint erst, wenn ein USB-Speicherstick an der Waage angeschlossen ist. Weitere Informationen dazu siehe Abschnitt 4.1. ADVENTURER-WAAGEN 4.5 DE-17 Dichtebestimmung Hinweis: Vor Auswahl einer Anwendung müssen Sie die Waage kalibrieren und nivellieren. Mit dieser Anwendung bestimmen Sie die Dichte eines Objekts. Sie haben vier Möglichkeiten zur Bestimmung der Dichte: 1. 2. 3. 4. Feststoffe, die schwerer sind als Wasser Feststoffe, die leichter sind als Wasser Bestimmung der Dichte von Flüssigkeiten Poröse Materialien (die mit Öl getränkt sind.) Der Startbildschirm Density Determination (Dichtebestimmung) Hauptzeile Referenz-Felder Funktionstasten 4.5.1 Messung der Dichte eines Feststoffs mit Wasser (Standardvorgabe) Drücken Sie die Taste Item Settings (Elementeinstellungen), um den Einstellbildschirm für die Dichtebestimmung zu öffnen. Bestätigen Sie, dass die folgenden Konfigurationseinstellungen ausgewählt sind: Density Type: Solid (Dichteart: Feststoff) Auxiuliary Liquid: Water (Hilfsflüssigkeit: Wasser) Porous Material: Off (Poröses Material: OFF) Um den Wert der Wassertemperatur anzupassen, berühren Sie die Schaltfläche Water Temp. (Wassertemperatur). Die Waage berechnet die Wasserdichte in Abhängigkeit von der eingegebenen Wassertemperatur (interne Suchtabelle). Messen Sie die Ist-Temperatur des Wassers mit einem Präzisionsthermometer. Es wird ein Zifferneingabefenster angezeigt. Geben Sie die Ist-Temperatur des Wassers ein, und drücken Sie dann Save (Speichern). Drücken Sie zur Rückkehr zum Startbildschirm für die Dichtebestimmung auf Back (Zurück). Schritt 1 von 2 – Wägen der Probe an der Luft Drücken Sie Start. Folgen Sie den Anweisungen, und speichern Sie mit Accept (Akzeptieren), das Gewicht der trockenen Probe („an der Luft“). Symbol der Anwendung DE-18 ADVENTURER-WAAGEN Schritt 2 von 2 – Wiegen Sie die Probe nach dem Eintauchen. Folgen Sie den Anweisungen auf dem Bildschirm; speichern Sie mit Accept (Akzeptieren) das Probengewicht nach dem Eintauchen. Sobald die nötigen Gewichte bestimmt sind, wird die Dichte der Probe in g/cm3 (zusammen mit dem Gewicht an der Luft und dem Gewicht in Wasser) auf dem Anwendungsbildschirm angezeigt. Drücken Sie Start, um alle Gewichtswerte zurückzusetzen und den Vorgang neu zu beginnen. 4.5.2 Messung der Dichte eines schwimmfähigen Materials mit Wasser Drücken Sie die Taste Item Settings (Elementeinstellungen), um den Bildschirm Settings (Einstellungen) zu öffnen. Bestätigen Sie, dass die folgenden Konfigurationseinstellungen ausgewählt sind: Density Type: Solid (Dichteart: Feststoff) Liquid Type: Water (Art der Flüssigkeit: Wasser) Porous Material: Off (Poröses Material: OFF) Drücken Sie die Taste Back (Zurück), um zum Startbildschirm für die Dichtebestimmung zurückzuschalten. Führen Sie die gleichen Schritte wie bei einem festen Material aus, ausgenommen Schritt 2 zur Dichtebestimmung. Drücken Sie die Probe in die Flüssigkeit, bis sie ganz eingetaucht ist. 4.5.3 Messung der Dichte eines Feststoffs mit einer Hilfsflüssigkeit Um diese Funktion zu nutzen, rufen Sie das Setup-Menü für die Dichtebestimmung auf und wählen folgende Option aus: Density Type: Solid; Liquid Type: Other; Porous Material: Off (Dichteart: Feststoff, Flüssigkeitsart: andere; Porous Material: Off (Poröses Material: OFF). Bestätigen Sie die angezeigten Standardvorgaben (Flüssigkeitsdichte usw.). Zur Einstellung des Wertes für die Flüssigkeitsdichte drücken Sie die Taste Auxiliary liquid (Hilfsflüssigkeit) und wählen dann Other (Andere) aus. ADVENTURER-WAAGEN DE-19 Es wird ein Zifferneingabefenster angezeigt. Geben Sie die Dichte in g/cm 3 ein, und drücken Sie dann auf Save (Speichern). Die Anzeige schaltet zurück zum vorhergehenden Bildschirm. Drücken Sie zur Rückkehr zum Startbildschirm für die Dichtebestimmung auf Back (Zurück). Beginnen Sie den Vorgang zur Dichtebestimmung wie oben beschrieben. 4.5.4. Messung der Dichte einer Flüssigkeit mit einem kalibrierten Sinkgewicht (wird nicht mitgeliefert). Rufen Sie zur Aktivierung dieser Funktion das Setup-Menü für die Dichtebestimmung auf und wählen Sie die Einstellung Density Type: Liquid (Dichteart: Flüssigkeit). Hinweis: Wenn Sie die Dichteart auf „Flüssigkeit“ eingestellt haben, sind die Auswahlmöglichkeiten für die Flüssigkeitsart und poröses Material deaktiviert. Der Startbildschirm für die DICHTEBESTIMMUNG – FLÜSSIGKEIT Hauptzeile Referenz-Felder Funktionstasten Symbol der Anwendung Bestätigen Sie, dass der angezeigte Standardwert (Volumen des Senkgewichts), richtig ist. Drücken Sie zur Bearbeitung der Standardvorgaben auf die Option Sinker Volume (Senkgewichtvolumen). Um den Wert für das Senkgewichtvolumen einzustellen, drücken Sie die Taste Sinker Volume (Senkgewichtvolumen). Es wird ein Zifferneingabefenster angezeigt. Geben Sie den gewünschten Wert mit den Tasten ein, und drücken Sie auf Save (Speichern). Die Anzeige schaltet dann zurück zum vorhergehenden Bildschirm, wobei der neue Wert hervorgehoben wird. Um zum Startbildschirm der Dichtebestimmung zurückzukehren, drücken Sie auf Back (Zurück). Drücken Sie auf Start, um den Vorgang zu beginnen. DE-20 ADVENTURER-WAAGEN Schritt 1 von 2 – Bestimmung des Sinkgewichts an der Luft. Folgen Sie den Anweisungen auf dem Bildschirm, und drücken Sie dann Accept (Akzeptieren), um das Sinkgewicht („an der Luft“) zu speichern. Schritt 2 von 2 – Bestimmung des Sinkgewichts beim Eintauchen in die Prüfflüssigkeit Folgen Sie den Anweisungen auf dem Bildschirm, und drücken Sie dann auf Accept (Akzeptieren), um das Sinkgewicht nach dem Eintauchen in die Prüfflüssigkeit zu speichern. Sobald die betreffenden Gewichte bestimmt sind, wird die Dichte der Flüssigkeitsprobe in g/cm³(zusammen mit dem Gewicht an der Luft und dem Gewicht in Wasser) auf dem Anwendungsbildschirm angezeigt. Drücken Sie Start, um alle Gewichtswerte zurückzusetzen und den Vorgang neu zu beginnen. 4.5.5 Messen der Dichte eines porösen Materials mit Öl Um diese Funktion zu aktivieren, rufen Sie das Setup-Menü Density Determination (Dichtebestimmung) auf und wählen folgende Optionen aus: Density Type: Solid (Dichteart: Feststoff) Liquid Type: Water (Art der Flüssigkeit: Wasser) Porous Material: ON (Poröses Material: ON) ADVENTURER-WAAGEN DE-21 Der Startbildschirm DICHTEBESTIMMUNG – PORÖSES MATERIAL Hauptzeile Referenz-Felder Funktionen Bestätigen Sie die angezeigten Standardvorgaben (Wassertemperatur). Drücken Sie zur Bearbeitung der Standardvorgaben auf Item Settings (Elementeinstellungen). Der Bildschirm Settings (Einstellungen) wird angezeigt. Die Waage berechnet die Wasserdichte anhand der eingegebenen Wassertemperatur. Messen Sie die Ist-Temperatur des Wassers mit einem Präzisionsthermometer. Um die Wassertemperatur oder die Öldichte anzupassen, berühren Sie die Schaltfläche Water Temp (Wassertemperatur) oder Oil Density (Öldichte). Es wird ein Zifferneingabefenster angezeigt. Geben Sie den gewünschten Wert ein. Drücken Sie dann auf Save (Speichern). Die Anzeige schaltet dann zurück zum vorhergehenden Bildschirm, wobei der neue Wert hervorgehoben wird. Um zum Ausgangsbildschirm der Dichtebestimmung zurückzukehren, berühren Sie die Schaltfläche Exit (Beenden).. Dichteberechnung beginnen Schritt 1 von 3 – Wiegen der ölfreien Probe an der Luft Folgen Sie den Anweisungen auf dem Bildschirm und drücken Sie dann Accept (Akzeptieren), um das Gewicht der trockenen Probe (an der Luft) zu speichern. Symbol der Anwendung DE-22 Schritt 2 von 3 – Wiegen der ölfgefüllten Probe an der Luft Folgen Sie den Anweisungen auf dem Bildschirm und drücken Sie dann auf Accept (Akzeptieren), um das Probengewicht mit Öl zu speichern. Schritt 3 von 3 – Wiegen der ölgefüllten Probe nach Eintauchen in Flüssigkeit Folgen Sie den Anweisungen auf dem Bildschirm und drücken Sie dann auf Accept (Akzeptieren), um das Gewicht der ölgefüllten Probe nach dem Eintauchen von Flüssigkeit zu speichern. Sobald die erforderlichen Gewichte bestimmt wurden, wird die Dichte der Probe in g/cm3 (zusammen mit dem Gewicht an der Luft, mit und ohne Ölfüllung und dem Gewicht in Wasser) auf dem Anwendungsbildschirm angezeigt. Der Wert bleibt auf der Anzeige, bis Sie die Taste Start drücken. Drücken Sie Start, um alle Gewichtswerte zurückzusetzen und den Vorgang neu zu beginnen. ADVENTURER-WAAGEN ADVENTURER-WAAGEN DE-23 4.6 Prüfwägen Hinweis: Vor Auswahl einer Anwendung müssen Sie die Waage kalibrieren und nivellieren. Beim Prüfwägen wird das Gewicht einer Probe mit Sollgrenzwerten verglichen. Prüfwägen 1. Wählen Sie in der oberen linken Ecke des Startbildschirms Check Weighing (Prüfwägen) aus. 2. Die Standardgrenzwerte für das Prüfwägen bzw. die letzten Grenzwerte werden angezeigt. 3. Legen Sie die Gegenstände auf die Wägeplattform. 4. In dem Feld mit der Fortschrittsanzeige wird als Status Under/Accept/Over (zu niedrig/akzeptabel/zu hoch) angezeigt. Das Ist-Gewicht des Teils wird in der Hauptzeile ausgegeben. Der Startbildschirm Check Weighing (Prüfwägen) Hauptzeile Referenz-Felder Funktionstasten Drücken Sie zur Einstellung des Werts für die Obergrenze die Taste Over Limit (Obergrenze). Drücken Sie zur Einstellung des Werts für die Untergrenze die Taste Under Limit (Untergrenze). Es wird ein Zifferneingabefenster angezeigt. Geben Sie das gewünschte Grenzgewicht ein und drücken Sie dann auf Save (Speichern). Um zum Startbildschirm CHECK WEIGHING (PRÜFWÄGEN) zurückzukehren, drücken Sie auf Exit (Beenden). 4.6.1 Optionseinstellungen Zur Einstellung bzw. Anpassung der aktuellen Einstellungen Drücken Sie die Taste Item Settings (Elementeinstellungen). Der Bildschirm Settings (Einstellungen) wird angezeigt. Sample Name: Ordnet einer Probe einen Namen zu. Print Settings: Ändert die Druckeinstellungen. Weitere Informationen dazu siehe Kapitel 7. 4.7 Anzeige mit Standbild Hinweis: Vor Auswahl einer Anwendung müssen Sie die Waage kalibrieren und nivellieren. Symbol der Anwendung DE-24 ADVENTURER-WAAGEN Es werden zwei Betriebsmodi unterstützt: Display Hold (Anzeige mit Standbild): erlaubt dem Benutzer, ein stabiles Gewicht zu erfassen und zu speichern. Peak Hold (Anzeige des Höchstgewichts): erlaubt dem Benutzer, die Bestimmung des höchsten stabilen Gewichts zu erfassen und zu speichern. Der Startbildschirm für die Anzeige mit Standbild Hauptzeile Referenz-Felder Funktionstasten Symbol der Anwendung Display Hold 4.7.1 Display Hold 1. Wählen Sie in der oberen linken Ecke des Startbildschirms die Option Display Hold. 2. Legen Sie die Probe auf die Wägeplattform und drücken Sie die Taste Hold (Halten), während das Gewicht erfasst wird. 3. In der Hauptzeile steht jetzt das erste stabile Gewicht. 4. Drücken Sie Clear (Löschen), um die Anzeige zu löschen und wieder den Startbildschirm Display Hold (Anzeige mit Standbild) aufzurufen. Peak Hold 4.7.2 1. 2. 3. 4. 5. 4.7.3 Peak Hold Wählen Sie in der oberen linken Ecke des Startbildschirms die Option Display Hold (Anzeige mit Standbild). Aktivieren Sie den automatischen Modus in den Elementeinstellungen (siehe Abschnitt 4.7.5). Legen Sie die Probe auf die Wägeplattform, um zu beginnen. Wägen Sie weitere Proben. Das stabile Gewicht wird automatisch angezeigt. Um die Standbildfunktion zu beenden und zum normalen Betrieb zurückzukehren, drücken Sie Stop. Optionseinstellungen Zur Einstellung bzw. Anpassung der aktuellen Einstellungen ADVENTURER-WAAGEN DE-25 Drücken Sie die Taste Item Settings (Elementeinstellungen). Der Bildschirm Settings (Einstellungen) wird angezeigt. Mode: Zur Umschaltung zwischen Peak Hold und Display Hold (Anzeige des Spitzengewichts und Anzeige des gemerkten Gewichts). Sample Name: Ordnet einer Probe einen Namen zu. Print Settings: Ändert die Druckeinstellungen. Weitere Informationen dazu siehe Kapitel 7. Hinweis: Die Schaltfläche Save to USB (Auf USB speichern) erscheint erst, wenn ein USB-Speicherstick an der Waage angeschlossen ist. Weitere Informationen dazu siehe Abschnitt 4.1.3. 4.8 Summierung Hinweis: Vor Auswahl einer Anwendung müssen Sie die Waage kalibrieren und nivellieren. Die Option Totalization (Summierung) misst das kumulierte Gewicht mehrerer Proben. Das kumulierte Gesamtgewicht kann größer sein als der Wägebereich der Waage. Die maximale Probenanzahl (n) beträgt 99. Der Startbildschirm Totalization (Summierung) Hauptzeile Referenz-Felder Symbol der Anwendung Anwendungstasten Summierung 1. Wählen Sie in der oberen linken Ecke des Startbildschirms die Option Totalization (Summierung) aus. 2. Legen Sie eine Probe auf die Wägeplattform, um zu beginnen. Das Probengewicht erscheint in der Hauptzeile. 3. Drücken Sie Accumulate (Kumulieren), um das (stabile) Gewicht der Probe zum Gesamtgewicht zu addieren. 4. Nehmen Sie die Probe von der Wägeschale, legen Sie die nächste Probe auf die Wägeschale und setzen Sie wie oben beschrieben fort. 5. Drücken Sie auf Result (Ergebnis), um die Ergebnisse der Summierung anzuzeigen. 6. Wenn Sie fertig sind, drücken Sie die Taste Clear Total (Summierung löschen), um das kumulierte Gewicht auf null zurückzusetzen. 7. Drücken Sie Save to USB (Auf USB speichern), um das Ergebnis auf einen USB-Speicherstick zu speichern, oder auf Exit (Beenden), um zum Ausgangsbildschirm der Summierung zurückzukehren. Hinweis: Wenn Sie die Einheit ändern, ändert sich auch das Akkumulierungsergebnis entsprechend der ausgewählten Einheit. 4.9 Rezeptur Hinweis: Vor Auswahl einer Anwendung müssen Sie die Waage kalibrieren und nivellieren. DE-26 ADVENTURER-WAAGEN Mit dieser Anwendung erstellen Sie Rezepte und Zusammensetzungen. Sie können maximal 50 Komponenten verwenden. Der Startbildschirm Formulation (Rezeptur) Hauptzeile Referenz-Felder Symbol der Anwendung Anwendungstasten Rezeptur 1. Wählen Sie in der oberen linken Ecke des Startbildschirms die Option Formulation (Rezeptur) aus. 2. Drücken Sie Start, um mit der Erfassung der Komponenten zu beginnen. 3. Legen Sie die erste Zutat auf die Wägeplattform (oder in einen tarierten Behälter), und drücken Sie Accept (Akzeptieren), um die Komponente zu speichern. 4. Geben Sie weitere Komponenten hinzu, und drücken Sie jeweils Accept (Akzeptieren), um das Gewicht der einzelnen Komponenten zu speichern, bis das Rezept komplett ist. Die Zeile Total (Gesamt) zeigt das Gesamtgewicht aller Komponenten an. 5. Drücken Sie auf Stopp (Stopp), um die Rezeptur zu beenden. Die Rezepturergebnisse werden angezeigt: Hinweis: Wenn die Option Filler (Füllmittel) aktiviert ist (siehe Abschnitt 4.9.1), fragt die Waage nach einem Füllmaterial, um die Rezeptur fertigzustellen. Ergänzen Sie das Füllmaterial, und drücken Sie Accept (Akzeptieren), um die Rezeptur abzuschließen und die Ergebnisse anzuzeigen. 6. Drücken Sie Save to USB (Auf USB speichern), um die Ergebnisse auf einen USB-Speicherstick zu speichern, oder auf Exit (Beenden), um zum Ausgangsbildschirm der Rezeptur zurückzukehren. Hinweis: Rezepturergebnisse werden gelöscht, wenn eine neue Rezeptur beginnt. 4.9.1 Optionseinstellungen Zur Einstellung bzw. Anpassung der aktuellen Einstellungen Drücken Sie die Taste Item Settings(Elementeinstellungen). Der Bildschirm Settings (Einstellungen) wird angezeigt. Filler (Füllmaterial): Wenn diese Option aktiviert ist, wird nach Ende der Rezepturerstellung ein Füllmaterial verlangt. Auto Tare (Automatisch Tarieren): Wenn diese Option aktiviert ist, tariert die Waage automatisch, sobald das Komponentengewicht akzeptiert ist. Print Settings: Ändert die Druckeinstellungen. Weitere Informationen dazu siehe Kapitel 7. ADVENTURER-WAAGEN 4.10 DE-27 Zusätzliche Funktionen 4.10.1 Unterflurwägehaken Die Adventurer-Waage ist mit einem Unterflurwägehaken zum Wägen von Teilen unter der Waage ausgestattet. Hinweis: Nehmen Sie die Wägeplattform und den Zugluftschutz ab (sofern vorhanden), um Schäden beim Umdrehen der Waage zu vermeiden. Wichtiger Hinweis: Legen Sie die Waage nicht auf dem Wägeplattformträgerkonus oder den Wägezellenstiften ab. Schalten Sie zur Verwendung dieser Funktion die Waage aus und nehmen Sie die Schutzabdeckung der Öffnung für den Unterflurwägehaken ab. UnterflurwägeSchutzabdeckung Unterflurwägehaken Die Waage kann mit Laborstützböcken oder anderen geeigneten Mitteln abgestützt werden. Achten Sie darauf, dass die Waage nivelliert und sicher ist. Schalten Sie die Waage ein, und hängen Sie dann mit einem Seil oder Gurt die zu wiegenden Teile an. DE-28 ADVENTURER-WAAGEN 5. MENÜEINSTELLUNGEN 5.1 Menünavigation Struktur des Benutzermenüs: Anwendungsmodi Wä geanwendung Mindestgewicht Kapazitä tsanzeige Einheiten Hauptmenü GLP- und GMP-Daten Druckeinstellungen Nivellierhilfe Zä hlanwendung Probengrö ß e Konfiguration der Waage Kalibrierung Interne Kalibrierung Konfiguration der Waage Wä geeinheiten Datenpflege Filterebene Kalibrierung Kommunikation GLP- und GMP-Daten Wiederherstellung der Werkseinstellungen Sperre Wä geeinheiten Sprache Automatische Kalibrierung Datenpflege Kommunikation Milligramm Export an USB RS-232-Standard Kopfzeilen Einstellungen des AnwendungsGramm modus Baudrate Kopfzeile 1 Benutzereinstellungen AutoCalTM Touchscreen kalibrieren Messspannenkalibrierung Helligkeit Kilogramm Menü einstellungen Karat Import von USB Einstellungen des AnwendungsOunce modus Linearitä tskalibrierung Signalton Kalibrierprü fung Automatische Verdunkelung Troy-Unze Menü einstellungen Nivellierhilfe Pound Waageninformationen 2400 Kopfzeile 2 4800 Kopfzeile 3 19200 Kopfzeile 5 38400 Pennyweight Grain Newton 7E2 Teilstrich Momme 7 N1 Datum und Uhrzeit Mesghal 7 N2 HKTael 7O1 SGTael 7 O2 Druckeinstellungen Datum Prozentanwendung Referenzgewicht neu berechnen Uhrzeit Ü bertragung TWTael 8 N1 Tical 8N2 Dynamische Anwendung Tola Zeit der Durchschnittsbildung Probenname Baht Benutzerdefiniert1 Name der Einheit Handshake Druckeinstellungen Druckeinstellungen Faktor Automatischer Modus Dichteanwendung Exponent Druckausgabe Nur stabiles Gewicht Nur nummerischer Wert Nur eine Kopfzeile Dichtetyp 10-3 Druckoptionen Hilfsflü ssigkeit 10-2 Wassertemperatur 10-1 Autom. Drucken Autom. Drucken aus Porö ses Material 100 Ö ldichte 101 Senkkö rpervolumen 102 Flü ssigkeitstemperatur 103 Druckeinstellungen Kontrollwä geanwendung LSD Bei Stabilitä t Intervall (Sekunden) Kontinuierlich Druckinhalt Auswahl 0,5 Kopfzeile Datum und Uhrzeit Probenname 1 Druckeinstellungen 2 Waagen-ID 5 Waagenname 10 Benutzername 100 Projektname Anwendungsname Anwendung Anzeige mit Standbild Modus Anzeige mit Standbild Probenname Druckeinstellungen Summierungsanwendung Probenname Rezepturanwendung Ergebnis Fü ller Brutto Autom. Modus Netto Druckeinstellungen Waagenname Benutzername 7 E 1 Projektname Eichmodus Druckeinstellungen Sperre Kalibrierung Wä geeinheiten Datenpflege 9600 Kopfzeile 4 Filterebene Autom. Optimierung Wiederherstellung der Werkseinstellungen Kommunikation Automatische Nullpunktnachfü hrung Autom. Tarieren Durchschnittsstü ckgewicht GLP- und GMP-Daten Tara Informationen Unterschriftenzeile Zeilenvorschub Auf USB speichern GLP- und GMP-Daten Wiederherstellung der Werkseinstellungen ADVENTURER-WAAGEN DE-29 Die gesamte Menünavigation erfolgt durch Berührung des Displays. Berühren Sie zum Aufruf des Menüs die Taste Menu (Menü) in einem beliebigen Start- oder Anwendungsbildschirm. Das Hauptmenü wird mit den Tasten Back (Zurück) und Exit (Beenden) angezeigt. Berühren Sie die entsprechenden Listenoptionen, um die Menüeinstellungen zu durchsuchen. 5.1.1 Änderung von Einstellungen Zur Änderung einer Menüeinstellung navigieren Sie mit den folgenden Schritten zu dieser Einstellung: Rufen Sie das Menü auf. Drücken Sie in einem Anwendungsbildschirm auf die Option Menu (Menü). Auf der Anzeige erscheint die Liste des Hauptmenüs. Wählen Sie das Untermenü aus. Suchen Sie die Option in der Hauptmenüliste, und drücken Sie darauf. Das Untermenü wird angezeigt. Wählen Sie die Menüoption aus. Fahren Sie entsprechend fort, bis Sie die gewünschte Einstellung in der Menüliste gewählt haben. Drücken Sie auf die Einstellung, um sie zu ändern. Die geänderte Einstellung wird etwa eine Sekunde lang gelb markiert, um die Werteänderung zu bestätigen. Verlassen Sie das Menü und kehren Sie zurück zur aktuellen Anwendung. Nach Bestätigung der Einstellung drücken Sie Exit (Beenden), um zur Anwendung zurückzukehren. Hinweis: Sie können jederzeit die Tasten Back & Exit (Zurück & Beenden) benutzen, um zu dem gewünschten Menü oder zur aktuellen Anwendung zurückzukehren. Fahren Sie mit der Auswahl fort, bis Sie die gewünschte Einstellung der Menüliste ausgewählt haben. Die Struktur des Hauptmenüs der Adventurer-Waage ist im Folgenden dargestellt. Kalibrierung Waagen-Setup Wägeeinheiten Kommunikation GLP- und GMPDaten Zurücksetzen auf die Werkeinstellung Datenpflege Sperre DE-30 5.2 ADVENTURER-WAAGEN Kalibrierung Die Adventurer-Waagen (INCAL-Modelle) bieten sechs Kalibrierverfahren an: interne Kalibrierung, automatische Kalibrierung, AutoCal™-Einstellung, Messbereichskalibrierung, Linearitätskalibrierung und Kalibrierprüfung. Hinweis: Die Einheit der Kalibrierung ist immer Gramm. Wichtiger Hinweis: Berühren Sie die Waage während der Kalibrierung nicht. 5.2.1 Kalibrieruntermenü (INCAL-Modelle) Interne Kalibrierung Automatische Kalibrierung AutoCal™ Einstellung MessspannenKalibrierung Linearitätskalibrierung Kalibrierprüfung Hinweis: Bei /E-Modellen steht nur die Messspannenkalibrierung, die Linearitätskalibrierung und die Kalibrierprüfung zur Verfügung. 5.2.2 Interne Kalibrierung Die Kalibrierung erfolgt mit den internen Kalibriergewichten. Die interne Kalibrierung kann jederzeit durchgeführt werden, vorausgesetzt, dass die Waage auf Betriebstemperatur erwärmt und nivelliert ist. Schalten Sie die Waage ein, ohne ein Gewicht auf die Wägeplattform zu legen, und drücken Sie dann auf Internal Calibration (interne Kalibrierung). Die Waage beginnt mit der Kalibrierung. Drücken Sie auf „Internal Calibration“ (Interne Kalibrierung), wenn sich keine Last auf der Wägeplattform befindet. Auf der Anzeige wird der Status angezeigt, anschließend schaltet die Waage wieder zurück zur aktuellen Anwendung. Zum Abbruch können Sie jederzeit Exit (Beenden) drücken. 5.2.3 Automatische Kalibrierung Wenn die automatische Kalibrierung aktiviert ist, führt die Waage in folgenden Fällen eine Selbstkalibrierung aus: • • bei Erkennung einer Temperaturänderung von 1,5 °C bzw. alle 11 Stunden. Die Option AutoCal kalibriert die Waage bei einer signifikanten Temperaturänderung, welche die Genauigkeit beeinträchtigt, oder alle 11 Stunden automatisch mit den internen Kalibriergewichten. Kurz bevor die automatische Kalibrierung beginnt, erscheint ein Informationsbildschirm. Es werden drei Optionsschaltflächen angezeigt: Now – (Jetzt) Drücken Sie auf diese Option, um die Kalibrierung sofort durchzuführen. 5 min – Drücken Sie auf diese Option, um die Kalibrierung in 5 Minuten durchzuführen. Deactivate – (Deaktivieren) Drücken Sie auf diese Option, um die automatische Kalibrierfunktion zu deaktivieren. ADVENTURER-WAAGEN DE-31 5.2.4. AutoCal™-Einstellung Mit diesem Kalibrierverfahren passen Sie den Messspannenkalibrierpunkt an, ohne die Messspannenoder Linearitätskalibrierung zu beeinflussen. Mit der Kalibriereinstellfunktion kann das Ergebnis der internen Kalibrierung um ±100 Teilstriche angepasst werden. Hinweis: Führen Sie zuerst die interne Kalibrierung durch, und nehmen Sie dann eine Kalibrieranpassung vor. Um zu überprüfen, ob eine Anpassung erforderlich ist, legen Sie ein Prüfgewicht entsprechend dem Wert für die Messspannenkalibrierung auf die Wägeplattform und notieren die Abweichung in Teilungswerten (zwischen dem Nenngewicht und der aktuellen Waagenanzeige). Liegt die Abweichung bei maximal +1 Teilungswert, ist keine Kalibrieranpassung erforderlich. Wenn die Abweichung mehr als +1 Teilungswert beträgt, sollte eine Kalibrieranpassung vorgenommen werden. Beispiel: Ist-Gewichtsanzeige: Soll-Gewichtsanzeige: Differenzgewicht (d): Differenzgewicht in Ziffern: 200.014 200.000 (Prüfgewichtswert) 0,014 –14 (Anpassungswert) Um eine Kalibrieranpassung vorzunehmen, drücken Sie die Option AutoCal Adjustment (Automatische Kalibrieranpassung) im Kalibriermenü und geben den (negativen oder positiven) Teilungswert für die zuvor festgestellte Abweichung ein. Wiederholen Sie die interne Kalibrierung. Legen Sie nach der Kalibrierung das Prüfgewicht auf die Wägeplattform, und kontrollieren Sie, ob das Prüfgewicht jetzt mit dem Anzeigewert übereinstimmt. Ist das nicht der Fall, wiederholen Sie die Schritte, bis der Wert nach der internen Kalibrierung mit dem Prüfgewicht übereinstimmt. Nach Abschluss der Schritte speichert die Waage den Einstellwert, und die Anzeige schaltet zurück zur aktuellen Anwendung. 5.2.5 Messspannenkalibrierung Die Messspannenkalibrierung arbeitet mit zwei Kalibrierpunkten, einem bei Nulllast und dem anderen bei der definierten Volllast (Messspanne). Detaillierte Informationen über die Messspannenkalibrierung siehe den Spezifikationstabellen in Kapitel 9. Hinweis: Die Werkeinstellungen sind fett gedruckt. Wenn die Waage eingeschaltet ist und kein Gewicht auf der Wägeplattform liegt, drücken Sie die Taste Span Calibration (Messspannenkalibrierung), um mit der Kalibrierung zu beginnen. Auf der Anzeige erscheinen weitere verwendbare Kalibrierwerte. Die höchste Genauigkeit wird mit einem Gewicht erreicht, das möglichst genau der vollen Messspanne entspricht. Hinweis: Um den Messspannen-Kalibrierpunkt zu ändern, drücken Sie auf die Option zur Gewichtsänderung auf der Anzeige. Folgen Sie den Anweisungen auf dem Bildschirm und legen Sie das angegebene Kalibriergewicht auf die Waage, sobald Sie dazu aufgefordert werden. Nach Abschluss der Schritte erscheint der MessspannenKalibrierstatus, und die Waage schaltet zurück zur aktuellen Anwendung. DE-32 5.2.6 ADVENTURER-WAAGEN Linearitätskalibrierung Bei der Linearitätskalibrierung werden drei Kalibrierpunkte verwendet, einer für Nulllast, die anderen für definierte Lasten. Drücken Sie die Taste Linearity Calibration (Linearitätskalibrierung), um den Vorgang zu beginnen, wenn keine Last auf der Waage liegt. Die Waage erfasst den Nullpunkt und fordert dann das nächste Gewicht an. Folgen Sie den Anweisungen, bis die Kalibrierung abgeschlossen ist. Zum Abbruch können Sie jederzeit Exit (Beenden) drücken. 5.2.7 Kalibrierprüfung Mit der Kalibrierprüfung vergleichen Sie ein bekanntes Kalibriergewicht mit den gespeicherten Messspannenkalibrierdaten. Drücken Sie die Option Cal Test (Kalibrierprüfung), um den Vorgang zu beginnen, wenn keine Last auf der Waage liegt. Die Waage erfasst den Nullpunkt und fordert dann eine Eingabe für die Messspanne an. Auf der Anzeige erscheinen der Status und die Abweichung zwischen dem aktuellen Kalibriergewicht und den gespeicherten Kalibrierdaten. 5.3 Waagen-Setup Mit diesem Untermenü passen Sie die Funktionen der Waage individuell an. 5.3.1 Konfigurationsuntermenü der Waage Sprache Benutzereinstellungen Filterebene Automatische Nullpunktnachführung Autom. Tarieren Teilstriche Datum & Zeit Eichmodus Die Werkeinstellungen werden fett dargestellt. 5.3.2 Sprache Stellen Sie die Sprache für die Menüs und die Anzeigemeldungen ein. English Deutsch Französisch Spanisch Italienisch Polnisch Türkisch Tschechisch Ungarisch ADVENTURER-WAAGEN 5.3.3 DE-33 Benutzereinstellung In diesem Untermenü ändern Sie die Einstellungen für: Kalibrieren per Tastendruck „Kalibrierung während des Betriebs, dazu den Bildschirm in der Ringmitte berühren“. (erst oben links, dann unten rechts) Bildschirmhelligkeit: LOW = niedrige Bildschirmhelligkeit. MEDIUM = normale Bildschirmhelligkeit. HIGH = hohe Bildschirmhelligkeit. Piepton: OFF = deaktiviert ON = aktiviert Auto Dim: Reduziert die Helligkeit, wenn für x Minuten keine Bildschirmaktivität vorhanden ist. OFF = deaktiviert 10 min 20 min 30 min Nivellierhilfe: Liefert Anweisungen zur Einstellung der Füße, um die Waage zu nivellieren. 5.3.4 Filterebene Legt die Höhe der Signalfilterung fest. LOW MEDIUM HIGH 5.3.5 = kürzere Stabilisierungszeit, aber geringere Stabilität. = normal Stabilisierungszeit mit normaler Stabilität = längere Stabilisierungszeit mit höherer Stabilität Automatische Nullpunktnachführung Stellt die automatische Nullpunktnachführung ein. 5.3.6 OFF 0,5 D = = 1D = 3D = Deaktiviert. Hält den Nullpunkt bis zu einer Drift von 0,5 Teilstrichen pro Sekunde aufrecht. Display hält den Nullpunkt bis zu einer Drift von 1 Teilstrich pro Sekunde aufrecht. Display hält den Nullpunkt bis zu einer Drift von 3 Teilstrichen pro Sekunde aufrecht. Autom. Tarieren Legt die automatische Tarierung fest. OFF = deaktiviert. ON= aktiviert. Kurz bevor das automatische Tarieren beginnt, erscheint auf dem Display „Place container on the pan“ (Behälter auf Wägeplattform stellen). Unter dem Text erscheint die Schaltfläche Deactivate (Deaktivieren). Drücken Sie diese Schaltfläche, um die automatische Tarierfunktion zu deaktivieren. 5.3.7 Teilstriche Einstellung der Ablesegenauigkeit des Displays der Waage 1 Teilstrich = Standard-Ablesegenauigkeit. 10 Teilstriche = 10-fach niedrigere Ablesegenauigkeit Wenn die Standard-Ablesegenauigkeit beispielsweise bei 0,01 g liegt, lassen sich mit der Option für 10 Teilstriche Messwerte bis auf 0,1 g genau anzeigen. DE-34 5.3.8 ADVENTURER-WAAGEN Datum & Zeit Einstellung des aktuellen Datums und der Zeit Ändern Sie das Format nach Wunsch, geben Sie dann den aktuellen Wert ein. Drücken Sie Save (Speichern), um den neuen Wert zu bestätigen. 5.3.9 Eichmodus Mit diesem Menü stellen Sie die Eichpflichtigkeit ein. OFF = Standardbetrieb ON = Betrieb erfüllt die Vorschriften für eichpflichtige Anwendungen.. Hinweis: Wenn der Eichmodus aktiviert ist, werden die Menüeinstellungen wie folgt geändert:: Kalibriermenü: AutoCal die interne Kalibrierung wird aktiviert und ausgeblendet. Die Funktionen Interne Kalibrierung und Kalibrierprüfung sind verfügbar Alle anderen Funktionen sind ausgeblendet. Waagen-Setupmenu: Die Filterebene ist in der aktuellen Einstellung verriegelt. Die automatische Nullpunktnachführung wird auf 0,5 Teilstriche begrenzt und deaktiviert. Die ausgewählte Einstellung ist verriegelt. Automatisches Tarieren ist fest auf die aktuelle Einstellung eingestellt. Die Teilstrichanzeigen werden auf 1 Teilstrich fest eingestellt, die Menüoption wird ausgeblendet. Kommunikationsmenü (Kommunikation->Druckeinstellung >Druckausgabe: Die Option „Weight Only“ (Nur stabil) ist aktiviert. Die Einstellung „Numeric Value Only“ (nur nummerische Werte) ist gesperrt und deaktiviert. Kommunikationsmenü (Kommunikation->Druckeinstellungen>Automatischer Druck): Die automatischen Auswahlen für den Druckmodus sind auf die Optionen „OFF“, „Bei Stabilität“ und „Intervall“ beschränkt. Laufender Druck ist nicht verfügbar. Datenpflegesmenü: Export zu USB ist ausgeblendet. Import von USB ist ausgeblendet. Sperrmenü: Menü ist ausgeblendet. Hinweis: Der Sicherheitsschalter auf der Rückseite der Waage muss in der verriegelten Position stehen, um den Eichmodus zu aktivieren. Der Sicherheitsschalter muss in der entriegelten Position stehen, um den Eichmodus zu deaktivieren. Siehe Kapitel 6. Wägeanwendung Hauptbildschirm mit EICHUNG (LFT) eingeschaltet. ADVENTURER-WAAGEN 5.4 DE-35 Wägeeinheiten Rufen Sie dieses Untermenü auf, um die gewünschte Maßeinheit zu aktivieren. Dieses Menü kann auch durch Drücken des Einheitensymbols im Ausgangsbildschirm der Anwendung aufgerufen werden. Hinweis: Aufgrund von nationalen Vorschriften verwendet die Waage möglicherweise nicht alle der hier aufgeführten Einheiten. 5.4.1 Untermenü mit den Maßeinheiten Milligramm Gramm Kilogramm Karat Ounce Ounce troy Pound Pennyweight Grain Newton momme Mesghal Tael (HK) Tael (SG) Tael (TW) Tical Tola Baht Benutzerdefinierte Einheit 1 Hinweis: Ist der Eichmodus aktiviert, werden einige Einheiten nicht angezeigt. Um das Gewicht in einer alternativen Einheit anzuzeigen, verwenden Sie die Option „Benutzerdefinierte Einheit“. Die benutzerdefinierte Einheit wird mit einem Umrechnungsfaktor bestimmt, wobei der Umrechnungsfaktor die Zahl der benutzerdefinierten Einheiten pro Gramm in Exponentialschreibweise ist (Faktor x 10^Exponent). Beispiel: Um das Gewicht in Troy-Unzen anzuzeigen (0,03215075 Troy-Unzen pro Gramm) geben Sie den Faktor 0,3215075 und den Exponent -1 ein. Der Name der benutzerdefinierten Einheit kann mit maximal 3 Zeichen angegeben werden. 5.5 Datenpflege Rufen Sie dieses Untermenü auf, um die Datenübertragungseinstellungen nach Wunsch anzupassen. 5.5.1 Untermenü „Data Maintenance“ (Datenpflege) Die Export- und Importfunktion Um mehrere Waagen einzurichten, können Sie einfach das Profil der Hauptwaage auf einen USB-Speicherstick exportieren. Mit dem Tool zur Datenpflege können Sie die Benutzer- und Anwendungseinstellungen auf einen USB-Speicherstick speichern und so ganz einfach auf andere Adventurer-Waagen übertragen. Die Daten können Sie anschließend zur Konfiguration weiterer Adventurer-Waagen nutzen, indem Sie die Daten der ursprünglichen Waage importieren. Export auf USB Import von USB Informationen zur Waage DE-36 ADVENTURER-WAAGEN 5.5.2 Export auf USB Export der Wägedaten auf einen USB-Speicherstick. Es können zwei Datentypen exportiert werden: - Anwendungseinstellungen (Durchschnittsstückgewicht, Referenzgewicht usw.) - Menüeinstellungen (Waagenkonfiguration usw.) Hinweis: Die Funktion „Save to USB“ (Auf USB speichern) muss aktiviert sein, um Daten auf einen USB-Speicherstick zu übertragen. Weitere Informationen dazu finden Sie in Abschnitt 5.6. 5.5.3 Import von USB Import von Wägedaten von einem USB-Flash-Laufwerk 5.5.4 Informationen zur Waage Rufen Sie dieses Menü auf, um Informationen zur Waage anzuzeigen. Es werden folgende Informationen angezeigt: Waagentyp, Waagen-ID, Wägebereich, Ablesbarkeit und Softwareversion. 5.6 Kommunikation Rufen Sie dieses Menü auf, um externe Kommunikationsverfahren zu definieren und Druckparameter einzustellen. Die Daten können entweder auf einem Drucker oder einem PC ausgegeben werden (Beispiele für die Ausgabe siehe Abschnitt 5.9.8). Die Werkeinstellungen sind fett dargestellt. 5.6.1 Untermenü Kommunikation RS-232 Standard Druckeinstellungen Speichern auf USB RS-232 Standard: Rufen Sie dieses Untermenü auf, um die RS-232-Standardeinstellungen anzupassen. 5.6.2 Baudrate Stellt die Baudrate (Bit pro Sekunde) ein. 2400 4800 9600 19200 38400 = 2400 bps = 4800 bps = 9600 bps = 19200 bps = 38400 bps ADVENTURER-WAAGEN 5.6.3 DE-37 Übertragung Legt die Datenbits. Stoppbit und Parität fest. 7 EVEN 1 7 ODD 1 7 EVEN 2 7 ODD 2 7 NONE 1 8 NONE 1 7 NONE 2 8 NONE 2 5.6.4 = 7 Datenbits, gerade Parität, Stoppbit 1 = 7 Datenbits, ungerade Parität, Stoppbit 1 = 7 Datenbits, gerade Parität, Stoppbit 2 = 7 Datenbits, ungerade Parität, Stoppbit 2 = 7 Datenbits, keine Parität, Stoppbit 1 = 8 Datenbits, keine Parität, Stoppbit 1 = 7 Datenbits, keine Parität, Stoppbit 2 = 8 Datenbits, keine Parität, Stoppbit 2 Handshake Legt die Flusssteuerungsmethode fest. NONE XON-XOFF HARDWARE = kein Handshake = XON/XOFF-Handshaking = Hardware Handshaking Druckeinstellungen Rufen Sie dieses Untermenü auf, um die Datenübertragungseinstellungen nach Wunsch anzupassen. Untermenü „Print Settings“ (Druckeinstellungen) Druckausgabe 5.6.5 Autom. Drucken Druckinhalt Feed (Zufuhr) Format Cal.-Daten drucken Druckausgabe Nur bei stabilem Gewicht Legt die Druckkriterien fest. OFF = Die Werte werden sofort gedruckt, auch wenn noch keine Stabilisierung eingetreten ist. ON = Werte werden nur gedruckt, wenn die Stabilitätskriterien erfüllt sind. Nur Zahlenwerte Legt die Druckkriterien fest. OFF = Es werden alle Ergebnisse und die G/N/T-Datenwerte gedruckt. Weitere Informationen dazu siehe Kapitel 7.2. ON = Es werden nur Daten gedruckt, die Zahlenwerte sind. Nur eine Kopfzeile Legt die Druckkriterien fest. OFF ON = Die Kopfzeilen werden bei jedem Druckauftrag gedruckt. = Die Kopfzeile wird nur einmal am Tag gedruckt Druckoptionen Legt die Druckkriterien fest. Printer PC = Daten an einen Drucker senden = Daten an einen PC senden DE-38 ADVENTURER-WAAGEN 5.6.6 Automatischer Druck Stellt die automatische Druckfunktion ein. OFF ON.STAB1 = Deaktiviert = Es wird immer gedruckt, wenn die Stabilitätskriterien erfüllt sind. INTER2 = Es wird in einem festgelegten Intervall gedruckt. CONTINUOUS = Es wird laufend gedruckt. 1Bei Auswahl der Option „ON STABILITY“ (Bei Stabilität) legen Sie die Bedingungen für den Druck fest. LOAD LOAD ZERO = Druckt, sobald das angezeigte Gewicht sich stabilisiert hat. = Druckt, sobald sich das angezeigte Gewicht oder der Nullwert stabilisiert haben. 2Bei Auswahl der Option „INTERVAL“ (INTERVALL) geben Sie die Zeit für das Intervall mit dem nummerischen Tastenfeld ein. Sie können Werte zwischen 1 und 3.600 Sekunden einstellen. Standard ist 0. 5.6.7 Druckinhalt Definiert den Inhalt der Druckdaten. Auswahl Legt den Status fest. Alle deaktivieren = Alle Einstellungen werden auf OFF gesetzt. Alle aktivieren = Alle Werte werden auf ON gesetzt. Header (Kopfzeile) Date & Time (Datum und Uhrzeit) Balance ID (Waagen-ID) Balance Name (Waagenname) User Name (Benutzername) Project Name (Projektname) Application Name (Anwendungsname) Sample Name (Probenname) Result (Ergebnis) Gross (Brutto) Net (Netto) Tare (Tara) Information Signature Line (Unterschriftenzeile) 5.6.8 Papiervorschub Legt die Papierzufuhr fest. 1 LINE 4 LINE = Schiebt das Papier nach dem Druck eine Zeile nach oben. = Schiebt das Papier nach dem Druck vier Zeilen nach oben. 5.6.9 Format Legen Sie das Druckformat. Eine Zeile Mehrere Zeilen = druckt in einer einzigen Zeile. = Drucke in mehreren Zeilen. 5.6.10 Cal.-Daten drucken Legt die Druckkriterien fest.. Aus Ein = deaktiviert = aktiviert ADVENTURER-WAAGEN DE-39 Auf USB speichern Legt den Status fest. OFF = Die Daten werden nicht auf einem USB-Laufwerk gespeichert. ON = Die Daten werden auf einem USB-Laufwerk gespeichert. 5.7 GLP- und GMP-Daten Rufen Sie dieses Menü auf, um die Daten der Guten Laborpraxis (GLP) sowie der Guten Herstellungspraxis (GMP) zu konfigurieren. 5.7.1 Untermenü GLP-Daten Header (Kopfzeile) 5.7.2 Name der Waage Name des Benutzers Projektname Kopfzeilen Aktiviert den Ausdruck der GLP-Kopfzeilen. Es stehen bis zu 5 Kopfzeilen zur Verfügung. Für jede Kopfzeile können Sie bis zu 25 alphanummerische Zeichen einstellen. 5.7.3 Name der Waage Definieren Sie den Namen für die Waage. Sie können bis zu 25 alphanummerische Zeichen verwenden. Die Standardeinstellung ist Adventurer. 5.7.4 Name des Benutzers Definiert den Namen des Benutzers. Sie können bis zu 25 alphanummerische Zeichen verwenden. Die Standardeinstellung ist leer. 5.7.5 Projektname Zur Definition der Bezeichnung des Projekts Sie können bis zu 25 alphanummerische Zeichen verwenden. Die Standardeinstellung ist leer. 5.8 Zurücksetzen auf die Werkeinstellung Mit diesem Untermenü setzen Sie alle Menüeinstellungen auf die Werkseinstellungen zurück. Hinweis: Die Kalibrierdaten sind davon nicht betroffen. Reset All Exit 5.9 = setzt alle Menüs auf die Werkeinstellungen zurück. = schaltet zurück zum Hauptbildschirm einer Anwendung, ohne Menüs zurückzusetzen. Sperre Mit diesem Untermenü sperren/entsperren Sie bestimmte Menüs. Bei einem gesperrten Menü erscheint ein kleines Schlosssymbol an dem Menüsymbol, und der Benutzer kann dieses Menü nicht aufrufen. Klicken Sie auf ein Menü, und wählen Sie folgende Option: OFF = Das Menü ist entsperrt. ON = das Menü ist gesperrt. DE-40 6. ADVENTURER-WAAGEN EICHUNG Wenn die Waage für eichpflichtige Anwendungen oder im Handel eingesetzt wird, muss sie entsprechend der vor Ort geltenden Eichordnung konfiguriert, überprüft und versiegelt sein. Der Käufer muss sicherstellen, dass alle geltenden rechtlichen Vorschriften eingehalten werden. 6.1 Einstellungen Führen Sie vor der Überprüfung und Versiegelung folgende Schritte in dieser Reihenfolge durch: 1. Prüfen Sie, ob die Menüeinstellungen der vor Ort geltenden Eichordnung entsprechen. 2. Prüfen Sie, ob die aktivierten Einheiten der vor Ort geltenden Eichordnung entsprechen. 3. Führen Sie eine Kalibrierung wie in Abschnitt 5 beschrieben durch. 4. Stellen Sie den Sicherheitsschalter in die verriegelte Position. 5. Aktivieren Sie den Eichmodus im Konfigurationsmenü der Waage. Hinweis: Ist der Eichmodus aktiviert, können keine externen Kalibrierungen durchgeführt werden. 6.2 Verifizierung Die Verifizierung muss ein Mitarbeiter der lokalen Eichbehörde oder ein autorisierter Servicevertreter durchführen. 6.3 Versiegelung Nach Überprüfung der Waage muss die Waage versiegelt werden, um den Zugriff Unbefugter auf die eichpflichtigen Einstellungen zu verhindern. Vor der Versiegelung des Geräts müssen Sie den Sicherheitsschalter in die verriegelte Position schieben und im Konfigurationsmenü der Waage den Eichmodus aktivieren. Bei Verwendung eines Papiersiegels platzieren Sie das Siegel über dem Sicherheitsschalter und dem Gehäuseboden wie in der Abbildung.. Bei Verwendung einer Drahtplombe führen Sie den Siegeldraht durch die Bohrungen im Sicherheitsschalter und im Gehäuseboden wie in der Abbildung. Entsiegelt Mit Papiersiegel versiegelt Mit Drahtplombe versiegelt ADVENTURER-WAAGEN 7. DRUCKEN 7.1 Anschlusskonfiguration und Prüfung der Drucker-/Computerschnittstelle Verbinden Sie das Gerät über den integrierten Anschluss RS-232 mit einem Computer oder Drucker. Verwenden Sie HyperTerminal oder eine ähnliche Software wie SPDC, die im Folgenden beschrieben wird, um die Waage an einen Computer anzuschließen. (HyperTerminal finden Sie bei Windows XP unter Zubehör/Kommunikation.) Schließen Sie das Gerät über ein normales serielles Kabel (mit unvertauschten Adern) am Computer an. Wählen Sie unter Neue Verbindung „Verbindung über“ COM1 (bzw. den verfügbaren COM-Anschluss). Nehmen Sie folgende Einstellungen vor Baud=9600; Parität (Parität)=8 Keine; Stoppbit=1; Handshaking=Keine. Klicken Sie auf OK. Wählen Sie die Eigenschaften und Einstellungen aus und dann ASCII Setup. Markieren Sie die Kontrollkästchen wie in der Abbildung: (Sendezeile endet … ; Echozeichen …; Zeilen überspringen …) Steuern Sie die Waage mit einem PC über die Befehle für die Schnittstelle RS232 (siehe Abschnitt 9.6.1). Hinweis: Nach der Konfiguration von HyperTerminal werden automatisch die Ergebnisse einer Kalibrierprüfung gedruckt und die an die Waage gesendete SPDC-Software Die SPDC-Software (Serial Port Data Collection) wird von Ohaus zur Verfügung gestellt und kann auf Betriebssystemen verwendet werden, auf denen die oben erwähnte HyperTerminal-Software nicht vorhanden ist. Wählen Sie den Exportdateityp (Export File Type) und den Exportdateipfad (Export File Path) und drücken Sie auf „Run“ (Durchführen) (siehe folgende Abbildung). Hinweis: Die SPDC-Software unterstützt nur die englische Sprache. DE-41 DE-42 7.2 ADVENTURER-WAAGEN Ausgabeformat Die Ergebnisdaten und die G/N/T-Daten werden in folgendem Format ausgegeben. Feld: Etikett 1 Lä nge: Leerzeichen 2 Gewicht 3 1 11 Leerzeichen2 1 Einheit 4 5 Leerzeichen 1 Stabilitä t 5 Leerzeichen G/N 6 1 1 3 Leerzeichen Term. Zeichen 7 0 8 1. Die Länge des Etikettenfelds ist nicht begrenzt. 2. Jedem Feld folgt ein einzelner Leerschritt als Trennzeichen (ASCII 32). 3. Das Gewichtsfeld enthält 11 rechtsbündige Zeichen. Wenn der Wert negativ ist, steht das „Minuszeichen“ ganz links von der signifikantesten Ziffer. 4. Das Einheitenfeld enthält die Maßeinheit als Abkürzung mit 5 Zeichen. 5. Das Stabilitätsfeld enthält als Zeichen das „?“, wenn die Gewichtsmessung nicht stabil war. Das Stabilitätsfeld und das folgende Leerzeichenfeld werden übersprungen, wenn der Gewichtsmesswert stabil ist. 6. Das G/N-Feld enthält die Anzeige für Netto bzw. Brutto. Bei Nettogewichten steht in dem Feld die Abkürzung „NET“. Bei Bruttogewichten enthält das Feld keine Abkürzung, nur den Buchstaben „G“. 7. Das Feld mit den Abschlusszeichen enthält CRLF, Four CRLF oder Form Feed (ASCII 12), je nach den Menüeinstellungen für den Zeilenvorschub. 8. WARTUNG 8.1 Kalibrierung Überprüfen Sie regelmäßig die Wartung, indem Sie ein exaktes Gewicht auf die Waage legen und das Ergebnis anzeigen. Wenn eine Kalibrierung erforderlich ist, beachten Sie die Anweisungen in Abschnitt 5.2. 8.2 Reinigung VORSICHT: Trennen Sie die Adventurer-Waage vor dem Reinigen von der Stromversorgung. Es darf keine Flüssigkeit in das Innere der Waage eindringen. Reinigen Sie die Waage in regelmäßigen Abständen. Die Gehäuseflächen können Sie mit einem fusselfreien Tuch abwischen, das mit Wasser oder einem milden Reinigungsmittel angefeuchtet ist. Glasflächen können Sie mit einem handelsüblichen Glasreiniger säubern. Bauen Sie die Schiebetüren wie folgt aus und wieder ein. Wichtiger Hinweis: Verwenden Sie keine Lösungsmittel, aggressiven Chemikalien, Ammoniak oder Scheuermittel. Glastür zur Reinigung ausbauen und wieder einbauen: Schritt 1. Drücken Sie den Stift auf der Rückseite der Waage und schieben Sie die Tür heraus. Schritt 2. Schieben Sie die Türen nach der Reinigung in den Schlitz und halten Sie dabei den Stift aus Schritt 1. Schritt 3. Schieben Sie die Türen soweit in den Schlitz, bis der Anschlag mit der anderen Tür abschließt. ADVENTURER-WAAGEN 8.3 DE-43 Fehlerbehebung TABELLE 8-1. FEHLERBEHEBUNG Symptom/Anzeige Mögliche Ursache 8.4 Abhilfe Waage schaltet sich nicht ein. Es liegt keine Betriebsspannung für die Waage an. Anschlüsse und Spannung prüfen Ungenaue Messwerte Unsachgemäße Kalibrierung Instabile Umgebung Kalibrierung durchführen Waage an einen geeigneten Ort stellen Kalibrierung nicht möglich Kalibriermenü gesperrt Eichmodus aktiviert Instabile Umgebung Falsche Kalibriergewichte Kalibriermenüsperre deaktivieren Eichmodus deaktivieren Waage an einen geeigneten Ort stellen Korrektes Kalibriergewicht verwenden Menüeinstellungen können nicht geändert werden. Untermenü gesperrt Eichmodus aktiviert Untermenü entsperren Eichmodus deaktivieren Niedriges Referenzgewicht Referenzgewicht zu niedrig Das Gewicht auf der Wägeplattform ist zu klein, um ein gültiges Referenzgewicht festzulegen: Probengröße erhöhen Ungültiges Stückgewicht Durchschnitts-Stückgewicht zu klein Durchschnitts-Stückgewicht erhöhen Zeitüberlauf während des Betriebs Gewichtsmesswert instabil Waage an einen geeigneten Ort stellen ------ Gerät beschäftigt (Tarieren, Bis zum Abschluss warten Nullpunkteinstellung, Druck, Warten auf eine Stabilisierung des Gewichts) Serviceinformationen Wenn Sie Ihr Problem mit dem Abschnitt zur Fehlerbehebung nicht lösen konnten, wenden Sie sich an Ihren autorisierten OHAUS-Servicemitarbeiter. Die nächste Ohaus-Niederlassung finden Sie auf unserer Website unter www.ohaus.com. Ein OHAUS-Produktservicespezialist unterstützt Sie gern. DE-44 ADVENTURER-WAAGEN 9. TECHNISCHE DATEN 9.1 Spezifikationen Umgebungsbedingungen Nur zur Verwendung in geschlossenen Räumen Zulässige Höhe: bis 2.000 m Definierter Temperaturbereich: 10 °C bis 30 °C Luftfeuchtigkeit: maximale relative Luftfeuchtigkeit 80 % bei Temperaturen bis 30 °C, linear abnehmend bis 50 % relativer Luftfeuchtigkeit bei 40 °C Netzspannungsschwankungen: bis ± 10 % der Nennspannung Installationskategorie: II Verschmutzungsgrad: 2 Materialien Gehäusesockel aus Gussaluminium mit Lackierung Oberes Gehäuse: Kunststoff (ABS) Wägeplattformen: Edelstahl 18/10 Zugluftschutz; Glas, Kunststoff (ABS) Füße: Kunststoff (ABS) ADVENTURER-WAAGEN Modell: Höchstlast Ablesbarkeit d Wiederholbarkeit (Standardabweichung) (g) Linearität (g) Messspannenkalibrierpunkt (g) Kalibrierung Wägeeinheiten Anwendung Stabilisierungszeit (typisch) Empfindlichkeit gegen Temperaturdrift (PPM/K) Typische Mindestgewicht USP (u=0,10 %, k=2) Optimale Mindestgewicht USP (u=0,10 %, k=2) Anzeige Anzeigegröße Hinterleuchtung Steuerelemente Kommunikation WaagenSpannungseingang Netzteil Plattformgröße (Durchmesser) Maße nach Zusammenbau (B x T x H) Versandmaße (B x T x H) Nettogewicht Versandgewicht DE-45 TABELLE 9-1. SPEZIFIKATIONEN AX124 AX124/E AX224 AX224/E 120 g 120 g 220 g 220 g 0,0001 g AX324 320 g 0,0001 g ±0,0002 g 25 g, 25 g, 50 g, 50 g, 50 g 50 g 100 g 100 g 100 g 75 g, 75 g, 150 g, 150 g, 200 g, 300 g 100 g 100 g 200 g 200 g Auto-Cal Externe Auto-Cal Externe Auto-Cal Baht, Karat, Grain, Gramm, Milligramm, Mesgal, Momme, Newton, Ounce, Pennyweight, Pound, Tael (Hong Kong), Tael, (Singapore), Tael (Taiwan), Tical, Tola, Troy-Ounces, benutzerdefiniert (1) Wiegen, Wägen, Stückzählung, Prozentwägung, Check Wiegen, Wägen, Wiegen von Tieren, Wägen, Rezeptur, Dichtebestimmung, Summierung, Anzeige mit Standbild ≤ 3 Sekunden 1,5 0,20 g 0,20 g 0,20 g 0,20 0,20 g 0,082 g 0,082 g 0,082 g 0,082 g 0,082 g Vollfarb-WQVGA Graphik-LCD 4,3 in / 10,9 cm (diagonal) Weiße LED Resistiver 4-Draht-Touchscreen mit 6 Membranschaltflächen RS-232, USBx2 12 VDC, 0,5 A Netzteileingang: 100-240 VAC 0,3A 50-60 Hz Netzteilausgang: 12 VDC 0,84 A 90 mm / 3,5 zoll 230 x 354 x 340 mm 9,1 x 13,9 x 13,4 zoll 230 x 354 x 340 mm 9,1 x 13,9 x 13,4 zoll 5,1 Kg / 11,3 lb 7,8 Kg / 17,2 lb DE-46 Modell: Höchstlast Ablesbarkeit d Wiederholbarkeit (Standardabweichung) (g) Linearität (g) Messspannenkalibrierpunkt (g) Kalibrierung Wägeeinheiten Anwendung Stabilisierungszeit (typisch) Empfindlichkeit gegen Temperaturdrift (PPM/K) Typische Mindestgewicht USP (u=0,10 %, k=2) Optimale Mindestgewicht USP (u=0,10 %, k=2) ADVENTURER-WAAGEN TABELLE 9-2. SPEZIFIKATIONEN (Fortsetzung) AX223 AX223/E AX423 AX423/E 220 g 220 g 420 g 420 g 0,001 g ±0,002 g 50 g, 50 g, 100 g, 100 g, 200 g, 300 100 g 100 g 200 g 200 g 200 g, 300 g g 150 g, 150 g, 300 g, 300 g, 400 g, 500 g 400 g, 500 200 g 200 g 400 g 400 g g Auto-Cal Externe Auto-Cal Externe Auto-Cal Externe Baht, Karat, Grain, Gramm, Milligramm, Mesgal, Momme, Newton, Ounce, Pennyweight, Pound, Tael (Hong Kong), Tael, (Singapore), Tael (Taiwan), Tical, Tola, Troy-Ounces, benutzerdefiniert (1) Wiegen, Wägen, Stückzählung, Prozentwägung, Check Wiegen, Wägen, Wiegen von Tieren, Wägen, Rezeptur, Dichtebestimmung, Summierung, Anzeige mit Standbild ≤ 2 Sekunden 3 2,0 g 2,0 g 2,0 g 2,0 g 2,0 g 2,0 g 0,82 g 0,82 g 0,82 g 0,82 g 0,82 g 0,82 g Vollfarb-WQVGA Graphik-LCD 4,3 in / 10,9 cm (diagonal) Weiße LED Resistiver 4-Draht-Touchscreen mit 6 Membranschaltflächen RS-232, USBx2 12 VDC, 0,5 A Netzteileingang: 100-240 VAC 0,3A 50-60 Hz Netzteilausgang: 12 VDC 0,84 A Netzteil Plattformgröße (Durchmesser) Maße nach Zusammenbau (B x T x H) Versandmaße (B x T x H) Nettogewicht Versandgewicht AX523/E 520 g 0,001 g Anzeige Anzeigegröße Hinterleuchtung Steuerelemente Kommunikation WaagenSpannungseingang AX523 520 g 130 mm/5,1 inch 230 x 354 x 340 mm 9,1 x 13,9 x 13,4 zoll 5,8 Kg/12,8 lb 8,5 Kg/18,8 lb 5,6 Kg/12,4 lb 8,3 Kg/18,3 lb 387 507 x 531 mm 15,4 x 20,0 x 20,9 zoll 5,8 Kg/12,8 5,6 Kg/12,4 lb lb 8,5 Kg/18,8 8,3 Kg/18,3 lb lb 5,8 Kg/12,8 lb 8,5 Kg/18,8 lb 5,6 Kg/12,4 lb 8,3 Kg/18,3 lb ADVENTURER-WAAGEN DE-47 TABELLE 9-3. SPEZIFIKATIONEN (Fortsetzung) Modell: Höchstlast Ablesbarkeit d Wiederholbarkeit (Standardabweichung) (g) Linearität (g) Messspannenkalibrierpunkt (g) Kalibrierung Wägeeinheiten Anwendung Stabilisierungszeit (typisch) Empfindlichkeit gegen Temperaturdrift (PPM/K) Typische Mindestgewicht USP (u=0,10 %, k=2) Optimale Mindestgewicht USP (u=0,10 %, k=2) AX422 420g AX422/E 420g Netzteil 200g, 400g 600g, 800g 200g, 400g 600g, 800g 0,01 g ±0,02 g 100g, 200g 300g,400g 100g, 200g 300g,400g Auto-Cal Externe Auto-Cal Externe Baht, Karat, Grain, Gramm, Kilogramm, Mesgal, Momme, Newton, Ounce, Pennyweight, Pound, Tael (Hong Kong), Tael, (Singapore), Tael (Taiwan), Tical, Tola, Troy-Ounces, benutzerdefiniert (1) Wiegen, Wägen, Stückzählung, Prozentwägung, Check Wiegen, Wägen, Wiegen von Tieren, Wägen, Rezeptur, Dichtebestimmung, Summierung, Anzeige mit Standbild ≤ 1,5 Sekunden 3 20,0 g 20,0 g 20,0 g 20,0 g 8,2g 8,2g 8,2g 8,2g Vollfarb-WQVGA Graphik-LCD 4,3 in / 10,9 cm (diagonal) Weiße LED Resistiver 4-Draht-Touchscreen mit 6 Membranschaltflächen RS-232, USBx2 12 VDC, 0,5 A Netzteileingang: 100-240 VAC 0,3A 50-60 Hz Netzteilausgang: 12 VDC 0,84 A Plattformgröße Maße nach Zusammenbau (B x T x H) Versandmaße (B x T x H) Nettogewicht Versandgewicht AX822/E 820g 0,01 g Anzeige Anzeigegröße Hinterleuchtung Steuerelemente Kommunikation WaagenSpannungseingang AX822 820g 175 x 195 mm / 6,9 x 7,7 inch 230 x 354 x100 mm 9,1 x 13,9 x 4,0 zoll 4.6Kg/10.2lb 6.5Kg/14.4b 392 x 557 x 301 mm 15,5 x 22,0 x 11,9 zoll 3.9Kg/8.6lb 4.6Kg/10.2lb 5.8Kg/12.8b 6.5Kg/14.4b 3.9Kg/8.6lb 5.8Kg/12.8b DE-48 ADVENTURER-WAAGEN TABELLE 9-4. SPEZIFIKATIONEN (Fortsetzung) Modell: Höchstlast Ablesbarkeit d Wiederholbarkeit (Standardabweichung) (g) Linearität (g) Messspannenkalibrierpunkt (g) Kalibrierung Wägeeinheiten Anwendung Stabilisierungszeit (typisch) Empfindlichkeit gegen Temperaturdrift (PPM/K) Typische Mindestgewicht USP (u=0,10 %, k=2) Optimale Mindestgewicht USP (u=0,10 %, k=2) AX1502 1520 g AX1502/E 1520 g AX4202 4200 g AX4202/E 4200 g AX5202 5200 g ±0,02 g 300 g 500 g 500 g 1000 g 1000 g 2000 g 500 g 400 g 1000 g 1000 g 2000 g 2000 g 3000 g 1000 g, 500 g 1500 g 1500 g 3000 g 3000 g 4000 g 1500 g 600 g 2000 g 2000 g 4000 g 4000 g 5000 g Auto-Cal Externe Auto-Cal Externe Auto-Cal Externe Auto-Cal Baht, Karat, Grain, Gramm, Kilogramm, Mesgal, Momme, Newton, Ounce, Pennyweight, Pound, Tael (Hong Kong), Tael, (Singapore), Tael (Taiwan), Tical, Tola, Troy-Ounces, benutzerdefiniert (1) Wiegen, Wägen, Stückzählung, Prozentwägung, Check Wiegen, Wägen, Wiegen von Tieren, Wägen, Rezeptur, Dichtebestimmung, Summierung, Anzeige mit Standbild ≤ 1,5 Sekunden 3 1.9 20,0 g 20,0 g 20,0 g 20,0 g 20,0 g 20,0 g 20,0 g 8,2 g 8,2 g 8,2 g 8,2 g 8,.2 g 8,2 g 8,2 g Vollfarb-WQVGA Graphik-LCD Anzeigegröße Hinterleuchtung Steuerelemente Kommunikation WaagenSpannungseingan g 4,3 in / 10,9 cm (diagonal) Weiße LED Resistiver 4-Draht-Touchscreen mit 6 Membranschaltflächen RS-232, USBx2 12 VDC, 0,5 A Netzteileingang: 100-240 VAC 0,3A 50-60 Hz Netzteilausgang: 12 VDC 0,84 A Netzteil Plattformgröße 175 x 195 mm / 6,9 x 7,7 inch Maße nach Zusammenbau (B x T x H) Versandmaße (B x T x H) Versandgewicht AX2202/E 2200 g 0,01 g 0,01 g Anzeige Nettogewicht AX2202 2200 g 230 x 354 x100 mm 9,1 x 13,9 x 4,0 zoll 4,6 Kg/ 10,2 lb 6,5 Kg/ 14,4 lb 3,9,Kg/ 8,6 lb 5,8 Kg/ 12,8 lb 392 x 557 x 301 mm 15,5 x 22,0 x 11,9 zoll 4,6 Kg/ 3,9 Kg/ 4,6 Kg/ 10,2 lb 8,6 lb 10,2 lb 6,5 Kg/ 5,8 Kg/ 6,5 Kg/ 14,4 lb 12,8 lb 14,4 lb 3,9 Kg/ 8,6 lb 5,8 Kg/ 12,8 lb 3,8 Kg/ 8,4 lb 5,7 Kg/ 12,6 lb ADVENTURER-WAAGEN Modell: Höchstlast Ablesbarkeit d Wiederholbarkeit (Standardabweichung) (g) Linearität (g) Messspannenkalibrierpunkt (g) Kalibrierung Wägeeinheiten Anwendung Stabilisierungszeit (typisch) Empfindlichkeit gegen Temperaturdrift (PPM/K) Typische Mindestgewicht USP (u=0,10 %, k=2) Optimale Mindestgewicht USP (u=0,10 %, k=2) DE-49 TABELLE 9-5. SPEZIFIKATIONEN (Fortsetzung) AX2201 AX2201/E AX4201 AX4201/E 2200g 2200g 4200 g 4200 g 0,1 g AX8201/E 8200 g 0,1 g ±0,2 g 500g, 1000 g, 1000 g, 2000 g, 2000 g, 500g, 1000g 1000g 2000 g 2000 g 4000 g 4000 g 1500g, 1500g, 3000 g, 3000 g, 6000 g, 6000 g, 2000g 2000g 4000 g 4000 g 8000 g 8000 g Auto-Cal Externe Auto-Cal Externe Auto-Cal Externe Baht, Karat, Grain, Gramm, Kilogramm, Mesgal, Momme, Newton, Ounce, Pennyweight, Pound, Tael (Hong Kong), Tael, (Singapore), Tael (Taiwan), Tical, Tola, Troy-Ounces, benutzerdefiniert (1) Wiegen, Wägen, Stückzählung, Prozentwägung, Check Wiegen, Wägen, Wiegen von Tieren, Wägen, Rezeptur, Dichtebestimmung, Summierung, Anzeige mit Standbild ≤ 1,5 Sekunden 9 200,0 g 200,0 g 200,0 g 200,0 g 200,0 g 200,0 g 82 g 82 g 82 g 82 g 82 g 82 g Anzeige Anzeigegröße Hinterleuchtung Steuerelemente Kommunikation WaagenSpannungseingang AX8201 8200 g Vollfarb-WQVGA Graphik-LCD 4,3 in / 10,9 cm (diagonal) Weiße LED Resistiver 4-Draht-Touchscreen mit 6 Membranschaltflächen RS-232, USBx2 12 VDC, 0,5 A Netzteileingang: 100-240 VAC 0,3A 50-60 Hz Netzteilausgang: 12 VDC 0,84 A Netzteil Plattformgröße (Durchmesser) Maße nach Zusammenbau (B x T x H) Versandmaße (B x T x H) 175x195 mm/6,9x7,7 inch 230 x 354 x 100 mm 9,1 x 13,9 x 4,0 zoll Nettogewicht 4.6Kg/10.2lb Versandgewicht 6.5Kg/14.4b 392 x 557 x 301 mm 15,5 x 22,0 x 11,9 zoll 4,6 Kg / 3,9 Kg / 3.9Kg/8.6lb 10,2 lb 8,6 lb 6,5 Kg / 5,8 Kg / 5.8Kg/12.8b 14,4 lb 12,8 lb 3,8 Kg / 8,4 lb 5,7 Kg / 12,6 lb 3,4 Kg / 7,5 lb 5,3 Kg / 11,6 lb DE-50 ADVENTURER-WAAGEN TABELLE 9-6. SPEZIFIKATIONEN (Fortsetzung) Modell AX124M AX224M AX324M AX223M AX423M AX523M AX1502M AX2202M AX4202M AX5202M AX8201M Max. 120 g 220 g 320 g 220 g 420 g 520 g 1520 g 2200 g 4200 g 5200 g 8200 g Min. 0,01 g 0,01 g 0,01 g 0,02 g 0,02 g 0,02 g 0,5 g 0,5 g 0,5 g 0,5 g 5g d= 0,0001 g 0,001 g 0,01 g 0,1 g e= 0,001 g 0,01 g 0,1 g 1g Zulassungsklasse I Wiederholbarkeit (Standardabweichung) (g) Linearitä t (g) II 0,0001 g 0,001 g 0,01 g 0,1 g ± 0,0002 g ± 0,002 g ± 0,02 g ± 0,2 g 50 g, 100 g 150 g, 200 g 100 g 200 g, 300 g 50 g, 100 g 150 g, 200 g 100 g, 200 g 300 g, 400 g 200 g, 300 g 400 g, 500 g 500 g, 1000 g 1500 g, 2000 g 500 g 1000 g, 1500 g 1000 g, 2000 g 3000 g, 4000 g 2000 g, 3000 g 4000 g, 5000 g 2000 g, 4000 g 6000 g, 8000 g Messspannenkalibrierpunkte (g) 25 g, 50 g 75 g, 100 g Kalibrierung Autom. Kal. Autom. Kal. Autom. Kal. Autom. Kal. Autom. Kal. Autom. Kal. Autom. Kal. Autom. Kal. Autom. Kal. Autom. Kal. Autom. Kal. Wä geeinheiten Anwendungen Milligramm, Gramm, Karat Wä gen, Stü ckzä hlung, Prozentwä gen, Prü fwä gen, Tierwä gen, Rezeptur, Dichtebestimmung, Summierung, Anzeige mit Standbild Stabilisierungszeit (typisch) Empfindlichkeit bei Temperaturä nderung (PPM/K) Typische Mindestgewicht USP (u=0,10 %, k=2) Optimale Mindestgewicht USP (u=0,10 %, k=2) Kilogramm, Gramm, Karat ≤ 3 Sekunden ≤2 Sekunden 1,5 3 ≤1,5 Sekunden 3 1,9 0,20 g 0,20 g 0,20 g 2,0 g 2,0 g 2,0 g 20,0 g 20,0 g 20,0 g 20,0 g 200,0 g 0,082 g 0,082 g 0,082 g 0,82 g 0,82 g 0,82 g 8,2 g 8,.2 g 8,2 g 8,2 g 82 g Display Grafischer WQVGA LCD-Vollfarbbildschirm Displaygrö ß e 4,3 in / 10,9 cm (diagonal) Weiß e LED Hintergrundbeleuchtung Steuerelemente Resistiver 4-Draht-Touchscreen mit 6 Membranschaltflä chen Kommunikation RS-232, USBx2 Netzeingang der Waage 12 V–, 0,5 A Stromversorgung Netzgerä teingang: 100-240 V~, 0,3 A, 50-60 Hz Netzgerä tausgang: 12 V–, 0,84 A Plattformgrö ß e (Durchmesser) Abmessungen im zusammengebauten Zustand (B x T x H) 90 mm / 3,5 zoll 130 mm / 5,1 zoll 175x195 mm / 6,9x7,7 zoll 230 x 354 x 340 mm 9,1 x 13,9 x 13,4 zoll 230 x 354 x 340 mm 9,1 x 13,9 x 13,4 zoll 230 x 354 x 100 mm 9,1 x 13,9 x 4,0 zoll 387 x 507 x 531 mm 15,4 x 20,0 x 20,9 zoll 387 x 507 x 531 mm 15,4 x 20,0 x 20,9 zoll 392 x 557 x 301 mm 15,5 x 22,0 x 11,9 zoll Nettogewicht 5,1 Kg / 11,3 lb 5,8 Kg / 12,8 lb 4,6 Kg / 10,2 lb 3,8 Kg / 8,4 lb Versandgewicht 7,8 Kg / 17,2 lb 8,5 Kg / 18,8 lb 6,5 Kg / 14,4 lb 5,7 Kg / 12,6 lb Versandabmessungen (B x T x H) Hinweis: M = OIML-Zulassung ADVENTURER-WAAGEN DE-51 TABELLE 9-7. SPEZIFIKATIONEN (Fortsetzung) Modell AX224N AX223N/E AX423N AX 423N/E AX523N/E AX1502N/E AX2202N/E AX4202N/E AX8201N/E Max. 220 g 220 g 420 g 420 g 520 g 1520 g 2200 g 4200g 8200 g Min. 0,01 g 0,02 g 0,02 g 0,02 g 0,02 g 0,5 g 0,5 g 0,.5g 5g d= 0,.0001 g 0,001 g 0,01 g 0,1 g e= 0,001 g 0,01 g 0,1 g 1g Zulassungsklasse Wiederholbarkeit (Standardabweichung) (g) Linearitä t (g) I II 0,0001 g 0,001 g 0,01 g 0,1 g ± 0,0002 g ± 0,002 g ± 0,02 g ± 0,2 g Messspannenkalibrierpunkte (g) 50 g, 100 g 50g, 100g 150 g, 200 g 150g, 200g 100g, 200g 300g, 400g 100g, 200g 300g, 400g 200g, 300g 400g, 500g 500g 1000g, 1500g 500g, 1000g 1500g, 2000g 1000g, 2000g 3000g, 4000g 2000g, 4000g 6000g, 8000g Kalibrierung Autom. Kal. Autom. Kal. Externe Externe Externe Externe Externe Externe Gramm, Kilogramm, Karat, Pennyweight, Grain, Pound, Unze, Troy-Unze Wä geeinheiten Anwendungen Stabilisierungszeit (typisch) Empfindlichkeit bei Temperaturä nderung (PPM/K) Typische Mindestgewicht USP (u=0,10 %, k=2) Optimale Mindestgewicht USP (u=0,10 %, k=2) Externe Gramm, Kilogramm, Karat, Pennyweight, Grain, Pound, Unze, Troy-Unze Wä gen, Stü ckzä hlung, Prozentwä gen, Prü fwä gen, Tierwä gen, Rezeptur, Dichtebestimmung, Summierung ≤3 Sekunden ≤2 Sekunden 1.5 3 ≤1,5 Sekunden 3 0,20 g 2,0 g 2,0 g 2,0 g 2,0 g 20,0 g 20,0 g 20,0 g 200,0 g 0,082 g 0,82 g 0,82 g 0,82 g 0,82 g 8,2 g 8,2 g 8,2 g 82 g Display Grafischer WQVGA LCD-Vollfarbbildschirm Displaygrö ß e 4,3 in / 10,9 cm (diagonal) Weiß e LED Hintergrundbeleuchtung Steuerelemente Resistiver 4-Draht-Touchscreen mit 6 Membranschaltflä chen Kommunikation RS-232, USBx2 Netzeingang der Waage 12 V–, 0,5 A Stromversorgung Netzgerä teingang: 100-240 V~, 0,3 A, 50-60 Hz Netzgerä tausgang: 12 V–, 0,84 A Plattformgrö ß e (Durchmesser) 90 mm / 3,5 zoll 130 mm / 5,1 zoll Abmessungen im zusammengebauten Zustand (B x T x H) Versandgewicht 175x195 mm / 6,9x7,7 zoll 354x230x340 mm 13,9x9,1x13,4 zoll Versandabmessungen (B x T x H) Nettogewicht 9 354x230x100 mm 13,9x9,1x4,0 zoll 557x392x301 mm 22,0x15,5x11,9 zoll 5,1 Kg / 11,3 lb 7,8 Kg / 17,2 lb 5,6 Kg / 12,4 lb 8,3 Kg / 18,3 lb 5,8 Kg / 12,8 lb 8,5 Kg / 18,8 lb Hinweis: N = NTEP-Zulassung 5,6 Kg / 12.4 lb 3,9 Kg / 8,6 lb 8,3 Kg / 18,3 lb 5,8 Kg / 12,8 lb 3,4 Kg / 7,5 lb 5,3 Kg / 11,6 lb DE-52 ADVENTURER-WAAGEN TABELLE 9-8. SPEZIFIKATIONEN (Fortsetzung) Modell AX124AU AX224AU AX324AU AX223AU AX423AU AX523AU AX1502AU AX2202AU AX4202AU AX5202AU AX8201AU Max. 120 g 220 g 320 g 220 g 420 g 520 g 1520 g 2200 g 4200 g 5200 g 8200 g Min. 0,01 g 0,01 g 0,01 g 0,02 g 0,02 g 0,02 g 0,5 g 0,5 g 0,5 g 0,5 g 5g d= 0,0001 g 0,001 g 0,01 g 0,1 g e= 0,001 g 0,01 g 0,1 g 1g Zulassungsklasse I Wiederholbarkeit (Standardabweichung) (g) Linearitä t (g) II 0,0001 g 0,001 g 0,01 g 0,1 g ± 0,0002 g ± 0,002 g ± 0,02 g ± 0,2 g 50 g, 100 g 150 g, 200 g 100 g 200 g, 300 g 50 g, 100 g 150 g, 200 g 100 g, 200 g 300 g, 400 g 200 g, 300 g 400 g, 500 g 500 g, 1000 g 1500 g, 2000 g 500 g 1000 g, 1500 g 1000 g, 2000 g 3000 g, 4000 g 2000 g, 3000 g 4000 g, 5000 g 2000 g, 4000 g 6000 g, 8000 g Messspannenkalibrierpunkte (g) 25 g, 50 g 75 g, 100 g Kalibrierung Autom. Kal. Autom. Kal. Autom. Kal. Autom. Kal. Autom. Kal. Autom. Kal. Autom. Kal. Autom. Kal. Autom. Kal. Autom. Kal. Autom. Kal. Wä geeinheiten Anwendungen Milligramm, Gramm, Karat Wä gen, Stü ckzä hlung, Prozentwä gen, Prü fwä gen, Tierwä gen, Rezeptur, Dichtebestimmung, Summierung, Anzeige mit Standbild Stabilisierungszeit (typisch) Empfindlichkeit bei Temperaturä nderung (PPM/K) Typische Mindestgewicht USP (u=0,10 %, k=2) Optimale Mindestgewicht USP (u=0,10 %, k=2) Kilogramm, Gramm, Karat ≤ 3 Sekunden ≤2 Sekunden 1,5 3 ≤1,5 Sekunden 3 1,9 0,20 g 0,20 g 0,20 g 2,0 g 2,0 g 2,0 g 20,0 g 20,0 g 20,0 g 20,0 g 200,0 g 0,082 g 0,082 g 0,082 g 0,82 g 0,82 g 0,82 g 8,2 g 8,.2 g 8,2 g 8,2 g 82 g Display Grafischer WQVGA LCD-Vollfarbbildschirm Displaygrö ß e 4,3 in / 10,9 cm (diagonal) Weiß e LED Hintergrundbeleuchtung Steuerelemente Resistiver 4-Draht-Touchscreen mit 6 Membranschaltflä chen Kommunikation RS-232, USBx2 Netzeingang der Waage 12 V–, 0,5 A Stromversorgung Netzgerä teingang: 100-240 V~, 0,3 A, 50-60 Hz Netzgerä tausgang: 12 V–, 0,84 A Plattformgrö ß e (Durchmesser) Abmessungen im zusammengebauten Zustand (B x T x H) 90 mm / 3,5 zoll 130 mm / 5,1 zoll 175x195 mm / 6,9x7,7 zoll 230 x 354 x 340 mm 9,1 x 13,9 x 13,4 zoll 230 x 354 x 340 mm 9,1 x 13,9 x 13,4 zoll 230 x 354 x 100 mm 9,1 x 13,9 x 4,0 zoll 387 x 507 x 531 mm 15,4 x 20,0 x 20,9 zoll 387 x 507 x 531 mm 15,4 x 20,0 x 20,9 zoll 392 x 557 x 301 mm 15,5 x 22,0 x 11,9 zoll Nettogewicht 5,1 Kg / 11,3 lb 5,8 Kg / 12,8 lb 4,6 Kg / 10,2 lb 3,8 Kg / 8,4 lb Versandgewicht 7,8 Kg / 17,2 lb 8,5 Kg / 18,8 lb 6,5 Kg / 14,4 lb 5,7 Kg / 12,6 lb Versandabmessungen (B x T x H) ADVENTURER-WAAGEN 9.2 DE-53 Zeichnungen und Abmessungen Abmessungen in vollständig montiertem Zustand Abb. 9-1. Modelle mit Zugluftschutz Abb. 9-2. Modelle ohne Zugluftschutz DE-54 9.3 ADVENTURER-WAAGEN Teile und Zubehör TABELLE 9-7. ZUBEHÖR BESCHREIBUNG Zusätzliches Display Dichtebestimmungsset Kabel, USB-Gerät (Typ A-B) Sicherheitsvorrichtung (Laptopverriegelung) RS-232-Kabel, PC 25-polig RS-232-Kabel, PC 9-polig Staubschutzhülle Zusätzliches Display TEILENUMMER 80251396 80253384 83021085 80850043 80500524 80500525 30093334 80251396 ADVENTURER-WAAGEN 9.4 DE-55 Kommunikation 9.4.1. Schnittstellenbefehle Die in der folgenden Tabelle aufgeführten Befehle werden von der Waage erkannt. Bei ungültigen Befehlen liefert die Waage die Meldung „ES“ zurück. TABELLE 9-8. ADVENTURER-SCHNITTSTELLENBEFEHLSLISTE Befehlszeichen IP P CP SP SLP SLZP xP 0P H Z T xT*** PT ON OFF C IC AC PSN PV x# P# x% P% xS xRL Funktion Sofortdruck des angezeigten Gewichts (stabil oder instabil) Druck des angezeigten Gewichts (stabil oder instabil) Fortlaufender Druck Druck bei Stabilität Automatischer Ausdruck stabiler Gewichte ohne Nullen. Automatischer Ausdruck stabiler Gewichte ohne Nullen sowie einer stabilen Nullanzeige. Intervalldruck; x = Druckintervall (1-3600 Sekunden), 0P beendet den Intervalldruck. Siehe oben. Geben Sie die Kopfzeilen für den Druck ein. Gleiche Funktion wie Drücken der Taste „Zero“ (Nullstellung). Gleiche Funktion wie Drücken der Taste „Tare“ (Tara) Legen Sie einen Tara-Wert für die Anzeigeeinheit fest. X = voreingestellter Tara-Wert 0T löscht den Tarawert (falls zulässig). Druckt das Tara-Gewicht, das im Speicher abgelegt ist. Schaltet auf Standby zurück. Schaltet auf Standby. Beginn der Messspannenkalibrierung Beginn der internen Kalibrierung, identisch mit der Auslösung über das Kalibriermenü. Kalibrierung abbrechen. Achtung: Bei aktiviertem Eich-Schalter ist diese Operation nicht zulässig. Seriennummer drucken. Druckt die Version der Terminalsoftware, der Basissoftware und LFT ON (wenn der EichSchalter aktiviert ist). Zählung des Durchschnittstückgewichts APW (x) in Gramm einstellen. (Das DurchschnittsStückgewicht muss gespeichert sein) Zählung mit dem Durchschnitts-Stückgewicht drucken. Prozentuales Referenzgewicht (x) in Gramm einstellen. (Referenzgewicht muss gespeichert sein) Prozentuales Referenzgewicht drucken 0 = instabile Daten drucken, entspricht IP; 1 = nur stabile Daten drucken1), entspricht SP. 0 = Antwort deaktivieren; 1 = Antwort aktivieren. Dieser Befehl steuert nur die Antwort „OK!“. 9.4.2. RS232 (DB9)-Pinbelegung Data GND Pin 2: Waagenausgangsdaten (TxD) Pin 3: Waageneingangsdaten (RxD) 1 5 Pin 5: Massesignal (GND) 9 6 Pin 7: Sendeerlaubnis (Hardware-Handshake) (CTS) Pin 8: Sendeanforderung (Hardware-Handshake) (RTS) Female Handshake DE-56 9.5 ADVENTURER-WAAGEN USB-Schnittstelle Die USB-Schnittstelle von Ohaus ist eine spezielle Lösung für den Anschluss einer Waage an einen Computer mit einem USB-Kabel. Es gibt verschiedene Kategorien von USB-Geräten, z. B. USB-Sticks, Digitalkameras, Drucker usw. Da Waagen nicht einer gemeinsamen Kategorie zugeordnet werden können, ist die USB-Schnittstelle von Ohaus eine allgemeine Schnittstelle auf Basis des seriellen RS232-Standards. Die Daten werden von der Waage im USB-Format an einen Computer gesendet. Die USB-Daten werden an einen virtuellen Port geleitet. Dieser Port erscheint dann als RS232-Anschluss im Anwendungsprogramm. Wenn Sie einen Befehl von einem Computer an die Waage ausgeben, sendet das Anwendungsprogramm einen Befehl an den virtuellen Port, als ob es sich dabei um einen RS232-Anschluss handeln würde. Der Computer leitet dann den Befehl vom virtuellen Port an den USB-Anschluss des Computers, an den die Waage angeschlossen ist. Der Anschluss empfängt das USB-Signal und reagiert auf den Befehl. Zur USB-Schnittstelle gehört eine CD mit den Softwaretreibern, um den benötigten virtuellen Port auf dem Computer zu erstellen. Systemanforderungen PC mit Windows 98®, Windows 98SE®, Windows ME®, Windows 2000®, Windows XP® oder Windows 8® (32-bit). Verfügbarer USB-Anschluss (Typ A, 4-poliger Anschluss) USB-Anschluss Der USB-Anschluss der Waage endet mit einem 4-poligen USB-Stecker vom Typ B. Es wird ein USB-Kabel (Typ B/Stecker – Typ A/Stecker) benötigt (nicht im Lieferumfang enthalten). 1. Stellen Sie sicher, dass die Waage eingeschaltet ist und ordnungsgemäß funktioniert. 2. Schalten Sie den Computer ein und prüfen Sie, ob der USB-Anschluss aktiviert ist und ordnungsgemäß funktioniert. 3. Verbinden Sie den USB-Anschluss des Computers und den USB-Anschluss der Waage mit dem USB-Kabel. Windows® sollte ein USB-Gerät erkennen und den Assistenten für neue Hardware starten. Installation der virtuellen Anschlusssoftware 1. Legen Sie die mitgelieferte CD in das CDLaufwerk des Computers. Die einzelnen Schritte zum Laden des Treibers auf der CD weichen in den unterschiedlichen Windows®-Versionen leicht voneinander ab. Bei allen Versionen führt Sie der Assistent für neue Hardware durch die erforderlichen Schritte, um den Treiber auszuwählen, der sich auf der CD befindet. 2. Nach dem Klick auf „Fertig stellen“ sollte der virtuelle Port einsatzbereit sein. Windows® fügt den virtuellen Port in der Regel nach dem COM-Anschluss mit der höchsten Nummer ein. Beispielsweise ist ein PC mit 4 COM-Anschlüssen ausgestattet; der virtuelle Port ist dann COM5. Wenn Sie die USB-Schnittstelle mit Programmen verwenden, die die Anzahl der COM-Anschlusszuordnungen beschränken (Ohaus MassTracker erlaubt beispielsweise nur COM1, 2, 3 und 4), muss u. U. eine dieser Anschlussnummern dem virtuellen Port zugewiesen werden. Beispiele für den Hardware-Assistenten von Windows XP Dies erfolgt in den Anschlusseinstellungen des Gerätemanagers in der Windows-Systemsteuerung. ADVENTURER-WAAGEN DE-57 USB-EINGANG Die Waage reagiert auf verschiedene Befehle, die über den Schnittstellenadapter versendet werden. Die folgenden Befehle mit [CR] oder [CRLF] abschließen. Adventurer-Befehle C Messspannenkalibrierung durchführen 0S Instabile Daten drucken 1S Nur stabile Daten drucken P Identisch mit der Option Drucken SP Nur stabile Gewichtsdaten drucken IP Sofortdruck des angezeigten Gewichts (stabil oder instabil) CP Gewichtsdaten laufend drucken SLP Nur automatischer Ausdruck von stabilen Gewichtsdaten ohne Nullen SLZP Automatischer Ausdruck von stabilen Gewichtsdaten ohne Nullen und Nullmesswerte xP Automatischer Ausdruck in Intervallen von 1 bis 3600 Sekunden ( x = 1 to 3600) 0P Beendet den Intervalldruck T Identisch mit der Option Tare (Tara) Z Identisch mit der Option Zero (Nullstellung) PV Softwareversion drucken Automatischer Ausdruck Sobald die Option Auto-Print (Automatisch Drucken) im Menü aktiviert ist, versendet die Waage die Daten wie angegeben. Wenn sich noch Daten im Druckerpuffer befinden, druckt der Drucker zunächst diese Daten. 10. SOFTWARE-UPDATES Ohaus verbessert seine Waagensoftware laufend. Um das neueste Release zu erhalten, wenden Sie sich bitte an Ihren autorisierten Ohaus-Händler oder die Ohaus Corporation. DE-58 11. ADVENTURER-WAAGEN COMPLIANCE Die Einhaltung folgender Normen ist durch eine entsprechende Kennzeichnung auf dem Produkt vermerkt. Markierung Norm Dieses Produkt entspricht der EMV-Richtlinie 2004/108/EG, der Niederspannungsrichtlinie 2006/95/EG und der Richtlinie über nichtselbsttätige Waagen 2009/23/EG. Die vollständige Konformitätserklärung finden Sie online unter http://europe.ohaus.com/europe/en/home/support/compliance/ce-declaration-of-conformity. AS/NZS CISPR 11, AS/NZS 61000.4.3 CAN/CSA-C22.2 No. 61010-1-12 UL Std. No. 61010-1 (3. Ausgabe) Wichtige Mitteilung für verifizierte Waagen Bei Waagen, die am Herstellungsort verifiziert werden, ist eine der oben erwähnten Kennzeichnungen auf dem Verpackungsetikett aufgedruckt, und der grüne Aufkleber „M“ (Messtechnik) befindet sich auf dem beschreibenden Typenschild. Sie können sofort verwendet werden. Noch zu verifizierende Waagen besitzen kein grünes „M“ (für Messtechnik) auf dem beschreibenden Typenschild und keine der oben erwähnten Kennzeichnungen auf dem Verpackungsetikett. Die zweite Phase der Erstverifizierung muss durch einen zugelassenen Servicebetrieb des autorisierten Vertreters in der EU oder durch die nationalen Eichbehörden für Maße und Gewichte durchgeführt werden. Die erste Stufe der Verifizierung erfolgte im Herstellerwerk. Sie umfasst alle Prüfungen entsprechend der übernommenen Europäischen Norm EN 45501:1992, Absatz 8.2.2. Wenn nationale Vorschriften den Gültigkeitszeitraum der Verifizierung begrenzen, muss der Benutzer der Waage den Zeitraum für die erneute Verifizierung genau einhalten und die entsprechende Eichbehörde informieren. FCC-Hinweis Jedes Gerät wurde geprüft und entspricht den Grenzwerten für Digitalgeräte der Klasse A gemäß Abschnitt 15 der FCC-Vorschriften. Diese Bestimmungen dienen dazu, in kommerziellen Umgebungen einen angemessenen Schutz gegen Funkstörungen zu gewährleisten. Dieses Gerät erzeugt und verwendet HF-Energie und strahlt diese u. U. auch ab; wird es nicht entsprechend der Anweisung installiert und verwendet, kann eine Funkstörung auftreten. Bei Betrieb des Geräts in Wohngebieten ist die Wahrscheinlichkeit solcher Störungen hoch, und der Benutzer ist verpflichtet, diese Störungen auf eigene Kosten zu beheben. Hinweis für Kanada Das Digitalgerät der Klasse A entspricht den kanadischen Vorschriften ICES-003. ADVENTURER-WAAGEN DE-59 ISO 9001-Registrierung OHAUS Corporation erhielt seine erste registrierte Zertifizierung gemäß ISO 9001 im Jahr 1994 durch die akkreditierte Registrierstelle Bureau Veritus Quality International (BVQI). Damit erfüllt das OHAUSQualitätsmanagementsystem die Anforderungen der Norm ISO 9001. Am 21. Juni 2012 wurde OHAUS Corporation, USA, erneut gemäß der Norm ISO 9001:2008 registriert. In Übereinstimmung mit der europäischen Richtlinie: Entsorgung Entsprechend der Europäischen Richtlinie 2002/96/EG über Elektro- und Elektronik-Altgeräte (WEEE) darf dieses Gerät nicht im Hausmüll entsorgt werden. Dies gilt auch für Länder außerhalb der EU entsprechend den jeweiligen Vorschriften. Gemäß der Batterierichtlinie 2006/66/EG gibt es seit September 2008 neue Anforderungen zur Entnahme von Batterien in Altgeräten in den EU-Mitgliedsstaaten. In Übereinstimmung mit der Richtlinie wurde das Gerät so gestaltet, dass die Batterien am Ende der Nutzungsdauer von einem Entsorgungsunternehmen sicher entfernt werden können. Entsorgen Sie dieses Produkt entsprechend den lokalen Vorschriften an der Sammelstelle für Elektro- und Elektronikgeräte. Bei Fragen wenden Sie sich bitte an die entsprechende Behörde oder an den Händler, von dem Sie das Gerät erworben haben. Wenn Sie das Gerät an andere weitergeben (zur privaten oder beruflichen Nutzung), muss der Inhalt dieser Vorschriften ebenfalls weitergeben werden. Für die Entsorgung Anweisungen in Europa finden Sie auf http://europe.ohaus.com/europe/en/home/support/weee.aspx. Vielen Dank für Ihren Beitrag zum Umweltschutz. DE-60 ADVENTURER-WAAGEN BESCHRÄNKTE GARANTIE Auf OHAUS-Produkte wird ab dem Datum der Auslieferung für den Garantiezeitraum eine Garantie auf Materialmängel und Herstellungsfehler gewährt. Während des Garantiezeitraums wird Ohaus alle defekten Komponenten kostenlos reparieren oder nach eigenem Ermessen ersetzen, sofern das Produkt mit Vorauszahlung der Frachtkosten an OHAUS zurückgeschickt wird. Diese Garantie gilt nicht, wenn das Produkt durch Unfall oder Missbrauch beschädigt wurde, radioaktiven oder korrosiven Materialien ausgesetzt wurde, Fremdkörper in das Innere des Produkts eingedrungen sind oder wenn eine Reparatur oder Änderung erfolgte, die nicht von OHAUS durchgeführt wurde. Wenn die Garantiekarte nicht ordnungsgemäß zurückgeschickt wurde, beginnt der Garantiezeitraum am Datum des Versands an den autorisierten Händler. OHAUS Corporation gibt keine weiteren ausdrücklichen oder stillschweigenden Garantien. OHAUS Corporation ist für keinerlei Folgeschäden haftbar. Da die Gesetzgebung zu Garantieleistungen von Bundesstaat zu Bundesstaat und von Land zu Land anders ist, wenden Sie sich bitte an OHAUS oder Ihren OHAUS-Händler vor Ort, wenn Sie weitere Einzelheiten benötigen. BILANCE ADVENTURER IT-1 INDICE 1. INTRODUZIONE ....................................................................................................................3 1.1 1.2 1.3 1.4 Descrizione................................................................................................................................................... 3 Caratteristiche .............................................................................................................................................. 3 Precauzioni di sicurezza .............................................................................................................................. 3 Precauzioni di sicurezza .............................................................................................................................. 4 2. INSTALLAZIONE ...................................................................................................................5 2.1 2.2 2.3 2.4 2.5 2.6 Disimballaggio .............................................................................................................................................. 5 Scelta dell'ubicazione ................................................................................................................................... 5 Messa a livello dell'apparecchiatura ............................................................................................................ 5 Collegamento dell'alimentazione elettrica .................................................................................................... 7 Collegamento dell'interfaccia ....................................................................................................................... 7 Regolazione iniziale ..................................................................................................................................... 7 3. FUNZIONAMENTO ................................................................................................................8 3.1 3.2 3.3 3.4 Panoramica sul display, schermata iniziale ................................................................................................. 8 Funzioni principali e menu principale .......................................................................................................... 9 Panoramica sui componenti e sulle funzionalità – Modelli con paravento ................................................ 10 Panoramica sui componenti e sulle funzionalità – Modelli senza paravento ............................................. 10 4. APPLICAZIONI ....................................................................................................................11 4.1 Pesatura ..................................................................................................................................................... 11 4.1.1 Modifica impostazioni ............................................................................................................................. 12 4.1.2 Nome campione ..................................................................................................................................... 11 4.1.3 Salvataggio su USB ............................................................................................................................... 11 4.2 Conteggio pezzi ......................................................................................................................................... 14 4.2.1 Modifica impostazioni ............................................................................................................................. 13 4.3 Pesatura percentuale ................................................................................................................................. 16 4.3.1 Modifica impostazioni ............................................................................................................................. 15 4.4 Pesatura dinamica ..................................................................................................................................... 17 4.4.1 Modifica impostazioni ............................................................................................................................. 18 4.5 Determinazione della densità..................................................................................................................... 18 4.5.1 Misurazione della Densità di un solido con l’acqua (predefinita) ........................................................... 19 4.5.2 Misurazione della Densità di un materiale galleggiante con l’acqua ..................................................... 20 4.5.3 Misurazione della Densità di un solido con un liquido ausiliario ............................................................ 20 4.5.4 Misurazione della Densità di un liquido tramite un affondatore regolato (non in dotazione) ................. 20 4.5.5 Misurazione della Densità di materiale poroso tramite olio.................................................................... 21 4.6 Controllo del peso ...................................................................................................................................... 23 4.6.1 Modifica impostazioni ............................................................................................................................. 23 4.7 Memoria display ......................................................................................................................................... 24 4.7.1 Memoria display ..................................................................................................................................... 25 4.7.2 Valore di picco ........................................................................................................................................ 25 4.7.3 Modifica impostazioni ............................................................................................................................. 26 4.8 Totalizzazione ............................................................................................................................................ 26 4.9 Formulazione.............................................................................................................................................. 27 4.9.1 Modifica impostazioni ............................................................................................................................. 27 4.10 Funzionalità aggiuntive .............................................................................................................................. 28 4.10.1 Pesatura da sotto ................................................................................................................................... 28 5. IMPOSTAZIONI DI MENU ....................................................................................................29 5.1 Navigazione nei menu ................................................................................................................................ 29 5.1.1 Modifica delle impostazioni .................................................................................................................... 29 5.2 Regolazione ............................................................................................................................................... 31 5.2.1 Sottomenu regolazione (modelli INCAL) ................................................................................................ 31 5.2.2 Regolazione interna ............................................................................................................................... 31 5.2.3 Regolazione automatica ......................................................................................................................... 31 5.2.4 Regolazione AutoCal™ .......................................................................................................................... 31 5.2.5 Regolazione a intervallo ......................................................................................................................... 32 5.2.6 Regolazione di linearità.......................................................................................................................... 32 5.2.7 Test di regolazione ................................................................................................................................. 32 5.3 Configurazione della bilancia ..................................................................................................................... 33 5.3.1 Sottomenu di configurazione della bilancia ............................................................................................ 33 5.3.2 Lingua ..................................................................................................................................................... 33 5.3.3 Impostazioni utente ................................................................................................................................ 33 IT-2 BILANCE ADVENTURER 5.3.4 Livello filtro ............................................................................................................................................. 34 5.3.5 Controllo zero automatico ...................................................................................................................... 34 5.3.6 Tara automatica ..................................................................................................................................... 34 5.3.7 Graduazione ........................................................................................................................................... 34 5.3.8 Data e ora ............................................................................................................................................... 34 5.3.9 Omologazione per transazioni commerciali ........................................................................................... 35 5.4 Unità di pesatura ........................................................................................................................................ 36 5.4.1 Sottomenu unità..................................................................................................................................... 36 5.5 Conservazione dei dati ............................................................................................................................... 36 5.5.1 Sotto menu configurazione bilancia ........................................................................................................... 36 5.5.2 Esportazione su USB ................................................................................................................................. 37 5.5.3 Importazione da USB ................................................................................................................................. 37 5.5.4 Informazioni sulla bilancia .......................................................................................................................... 37 5.6 Comunicazione........................................................................................................................................... 37 5.6.1 Sottomenu Comunicazione .................................................................................................................... 37 5.6.2 Baud Rate .............................................................................................................................................. 37 5.6.3 Trasmissione .......................................................................................................................................... 37 5.6.4 Sincronizzazione .................................................................................................................................... 38 5.6.5 Uscita di stampa ..................................................................................................................................... 38 5.6.6 Stampa automatica ................................................................................................................................ 39 5.6.7 Stampa contenuto .................................................................................................................................. 39 5.6.8 Alimentazione ......................................................................................................................................... 39 5.6.9 Formato .................................................................................................................................................. 39 5.6.10 Stampa dati di Regolazione. .................................................................................................................. 39 5.7 Dati GLP e GMP ........................................................................................................................................ 40 5.7.1 Sottomenu Dati GLP .............................................................................................................................. 40 5.7.2 Intestazione ............................................................................................................................................ 40 5.7.3 Nome bilancia ......................................................................................................................................... 40 5.7.4 Nome utente ........................................................................................................................................... 40 5.7.5 Nome progetto ........................................................................................................................................ 40 5.8 Ripristino di fabbrica ................................................................................................................................... 40 5.9 Blocco ......................................................................................................................................................... 40 6. OMOLOGAZIONE PER TRANSAZIONI COMMERCIALI ...................................................41 6.1 6.2 6.3 Impostazioni ............................................................................................................................................... 41 Verifica ....................................................................................................................................................... 41 Sigillatura.................................................................................................................................................... 41 7. STAMPA ..............................................................................................................................42 7.1 7.2 Collegamento, configurazione e prova dell'interfaccia stampante/computer............................................. 42 Formato di uscita ........................................................................................................................................ 42 8. MANUTENZIONE .................................................................................................................44 8.1 8.2 8.3 8.4 Regolazione ............................................................................................................................................... 44 Pulizia ......................................................................................................................................................... 44 Risoluzione dei problemi ............................................................................................................................ 45 Informazioni relative all'assistenza ............................................................................................................. 44 9. DATI TECNICI ......................................................................................................................45 9.1 9.2 9.3 9.4 9.4.1 9.4.2 9.5 Specifiche ................................................................................................................................................... 45 Illustrazioni e dati dimensionali .................................................................................................................. 54 Componenti e accessori ............................................................................................................................. 54 Comunicazione........................................................................................................................................... 55 Comandi interfaccia................................................................................................................................ 55 Collegamenti dei pin della RS-232 (DB9) .............................................................................................. 56 L'interfaccia USB ........................................................................................................................................ 56 10. AGGIORNAMENTI SOFTWARE .........................................................................................57 11. CONFORMITÀ .....................................................................................................................58 BILANCE ADVENTURER 1. IT-3 INTRODUZIONE 1.1 Descrizione La bilancia Adventurer è uno strumento di pesatura di precisione che, se conservato in condizioni ottimali, vi garantirà numerosi anni di funzionamento. Le bilance Adventurer Ohaus sono disponibili con portate da 120 grammi a 8.200 grammi. 1.2 Caratteristiche Controlli touch: Accesso grafico rapido a tutte le funzioni di controllo, su oltre una dozzina di applicazioni e molte funzionalità. 1.3 Definizione dei segnali di avvertenza e dei simboli Le note sulla sicurezza sono contrassegnate da parole di segnalazione o simboli di avvertenza. Queste note indicano aspetti e avvertenze in relazione alla sicurezza. Ignorare le note sulla sicurezza può provocare lesioni personali, danni allo strumento, malfunzionamenti e risultati falsi. Parole di segnalazione AVVERTENZA ATTENZIONE Avviso Nota Per una situazione di pericolo con rischio medio che può provocare lesioni o morte se non evitata. Per una situazione di pericolo con rischio basso che può provocare danni al dispositivo o alla proprietà oppure perdita di dati o lesioni, se non evitata. Per informazioni importanti sul prodotto Per informazioni utili sul prodotto Simboli di avvertenza Pericolo generico Corrente alternata 1.4 Pericolo di scossa elettrica Corrente diretta Precauzioni di sicurezza ATTENZIONE: leggere tutte le avvertenze di sicurezza prima di procedere all'installazione, alla realizzazione dei collegamenti o alla manutenzione dell'apparecchiatura. Il mancato rispetto delle avvertenze suddette può provocare lesioni personali e/o danni alla proprietà. Conservare tutte le istruzioni per poterle consultare in caso di necessità. Verificare che l'intervallo di tensione in ingresso e il tipo di spina dell'adattatore CA siano adatti all'alimentazione elettrica locale. Accertarsi che il cavo di alimentazione non rappresenti un potenziale ostacolo o non costituisca un intralcio al passaggio. La bilancia è solo per uso interno. Utilizzare la bilancia solo in luoghi asciutti. Non far cadere pesi sul vassoio di pesatura. Utilizzare solo accessori e periferiche approvate. Utilizzare l’apparecchiatura solo nelle condizioni ambientali specificate in queste istruzioni. Prima di effettuare la pulizia dell’apparecchiatura, scollegare l'alimentazione elettrica. Non utilizzare l’apparecchiatura in ambienti instabili o pericolosi. La manutenzione deve essere eseguita soltanto da personale autorizzato. Non posizionare la bilancia in modo che sia difficile raggiungere il collegamento dell'alimentazione. IT-4 2. 2.1 BILANCE ADVENTURER INSTALLAZIONE Disimballaggio Rimuovere con attenzione la bilancia Adventurer e i relativi componenti dalla confezione. I componenti inclusi nella confezione variano a seconda del modello della bilancia (vedere tabella sotto). Conservare i materiali di imballaggio per assicurare la conservazione o il trasporto in sicurezza del prodotto. Leggere il manuale per intero prima di installare e utilizzare la bilancia Adventurer, al fine di evitare un uso improprio. Componente incluso Bilancia Adattatore di rete Anello paravento (solo per i modelli da 0,1 mg e 1)1 Scheda di garanzia CD 2.2 Scelta dell'ubicazione Evitare la presenza di vibrazioni, fonti di calore, correnti d'aria eccessive o brusche variazioni di temperatura. Lasciare uno spazio sufficiente. 2.3 Messa a livello dell'apparecchiatura La bilancia Adventurer è dotata di un indicatore a bolla d'aria posizionato all'interno di una finestrella accanto al display. Per mettere a livello la bilancia, regolare i piedini fino a quando la bolla di livello non si trova al centro del cerchio. Per ulteriori informazioni sulla tipologia dei piedini e sulla relativa modalità di rotazione, consultare la sezione "Level Assist" riportata in basso. Accertarsi che l'apparecchiatura si trovi in piano ogni volta che la sua posizione viene modificata. Level Assist Per la messa a livello della bilancia Adventurer, è disponibile la funzione Level Assist. Sono disponibili due modalità per accedere alla funzione: 1. Applicazione pesatura -> Modifica impostazioni -> Level Assist. Per ulteriori informazioni, consultare la sezione 4.1.1. 2. Menu principale -> Configurazione bilancia -> Impostazioni utente -> Level Assist. Per ulteriori informazioni, consultare la sezione 5.3.3. BILANCE ADVENTURER Ruotare i piedini come mostrato nell'immagine in alto, a seconda della posizione della bolla di livello, fino a centrarla. IT-5 IT-6 2.4 BILANCE ADVENTURER Collegamento dell'alimentazione elettrica Collegare il connettore di uscita CC alla presa di alimentazione sul retro della bilancia. Quindi, collegare il cavo di alimentazione a una presa elettrica idonea. ATTENZIONE: da usare con un'alimentazione certificata CSA (o approvazione equivalente) che deve avere un'uscita a circuito limitato. Attenzione: per prestazioni di pesatura ottimali, far riscaldare la bilancia per 60 minuti prima dell'uso. 2.5 Collegamento dell'interfaccia Utilizzare la porta RS-232 integrata per collegare lo strumento a un computer o ad una stampante mediante un cavo seriale standard (diretto), oppure utilizzare la porta USB della bilancia. Collegamenti di interfaccia sul retro della bilancia. Collegamento USB sulla parte anteriore della bilancia. USB1: Utilizzato esclusivamente per la connessione al PC USB2: Utilizzato esclusivamente per la connessione all'unità flash USB RS232: Utilizzato per la connessione al PC o alla stampante Nota: Per i comandi di configurazione e di interfaccia, consultare la sezione Impostazioni del menu Comunicazione. Per il collegamento, la configurazione e il test dell'interfaccia stampante/computer e per i formati di stampa campione, consultare la sezione Stampa. 2.6 Regolazione iniziale Quando la bilancia viene installata per la prima volta o spostata in un'altra posizione, va tarata per assicurare risultati di pesatura accurati. La maggior parte delle bilance Adventurer è dotata di sistema AutoCal integrato, che consente la taratura automatica della bilancia e non richiede l'utilizzo di masse di regolazione. Se si preferisce, la bilancia può essere tarata manualmente con masse esterne. In questo caso, prima di procedere è necessario dotarsi di masse di regolazione idonee. Consultare la Sezione dedicata alla regolazione per informazioni sulle masse e sulle procedure specifiche. ¤ AutoCal™ Molti modelli vantano un sistema di taratura integrato e completamente automatico che assiste la manutenzione ordinaria tarando automaticamente la bilancia ogni giorno. Regola automaticamente la bilancia se viene rilevata una variazione di temperatura che può incidere sulla precisione della pesata (>1.5 °C), o a intervalli di 11 ore. ¤ Regolazione esterna I modelli ad alta precisione vantano un tradizionale sistema di taratura esterno grazie al quale, per la regolazione della bilancia, vengono utilizzati pesi esterni (valori di pesa per taratura a scelta dell'utente) al fine di garantire la massima precisione. BILANCE ADVENTURER 3. IT-7 FUNZIONAMENTO 3.1 Panoramica sul display, schermata iniziale Questa bilancia utilizza un display sensibile al tocco con aree e pulsanti touch per controllare le funzioni dell'apparecchiatura. COMANDI Pulsante Azione Pressione breve (a bilancia spenta): Accende la bilancia Pressione breve (a bilancia accesa): Spegne la bilancia Invia i dati a una stampante o a un computer. Esegue la procedura di azzeramento Esegue la procedura di regolazione Esegue la procedura di tara Schermata principale dell'applicazione Applicazione Capacità e leggibilità Messaggi di istruzioni Spie di stabilità (*), Netto (NET), Lordo (G) e/o centro dello zero (>0<) Campo dei risultati: le informazioni variano a secondadell'applicazione Toccare g per modificare l'unità Campi di riferimento Pulsanti dell'applicazione: Le funzioni variano a seconda dell'applicazione IT-8 3.2 BILANCE ADVENTURER Funzioni principali e menu principale Pesatura: Premere Zero per azzerare il display. Sistemare un articolo sul vassoio. Sul display viene visualizzato il peso lordo. Determinare la tara: Senza carico sul piatto, premere Zero per azzerare il display. Collocare un contenitore vuoto sul vassoio della bilancia e premere Tara. Aggiungere del materiale nel contenitore, viene visualizzato il peso netto. Rimuovere il contenitore e il peso viene visualizzato come numero negativo. Premere Tara per cancellarlo. Zero: Premere Zero per azzerare la bilancia. NAVIGAZIONE NEI MENU E NELLE SCHERMATE Toccare Menu per visualizzare l'elenco dei menu. Regolazione: toccare per visualizzare le opzioni di regolazione. Configurazione bilancia: Toccare per visualizzare e modificare le impostazioni della bilancia. Unità di pesatura: Toccare per visualizzare e modificare le unità di pesatura. Conservazione dei dati: Toccare per visualizzare le impostazioni di conservazione dei dati. Impostazioni di stampa: toccare per visualizzare le impostazioni di stampa. Ripristino di fabbrica: Dati GLP e GMP: inserire i dati dell'utente per la tracciabilità. toccare per eseguire un Ripristino di fabbrica delle impostazioni del menu. Comunicazione: Blocco: toccare per visualizzare le impostazioni del dispositivo COM e le impostazioni di stampa. toccare per visualizzare le opzioni di blocco. BILANCE ADVENTURER 3.3 IT-9 Panoramica sui componenti e sulle funzionalità – Modelli con paravento Piatto Spia di livello Piedino regolabile Host USBt Piedino regolabile Dispositivo USB Interruttore RS-232 Ingresso alimentazione LFT 3.4 Panoramica sui componenti e sulle funzionalità – Modelli senza paravento Piatto Ala circolare Indicatore di livello Piedino regolabile Host USB Piedino regolabile Dispositivo USB Interruttore LFT RS232 Ingresso alimentazione IT-10 4. BILANCE ADVENTURER APPLICAZIONI La bilancia può essere configurata con diverse modalità applicative. Toccare il campo in alto a sinistra nell'area Applicazioni (pesatura, nell'esempio riportato in basso): La bilancia Adventurer vanta 9 modalità applicative, come riportato di seguito: Pesatura Conteggio pezzi Pesatura percentuale Memoria display Totalizzazione Formulazione 4.1 Pesatura dinamica (animali) Determinazione della densità Controllo del peso Pesatura Nota: prima di utilizzare qualsiasi applicazione, assicurarsi che la bilancia sia stata messa in bolla e regolata. Utilizzare questa applicazione per determinare il peso degli articoli utilizzando l'unità di misura selezionata. Pesatura 1. Nella parte in alto a sinistra della schermata iniziale, selezionare Pesatura (applicazione predefinita). 2. Se necessario, premere Tara oppure Zero per iniziare. 3. Posizionare gli oggetti da pesare sul vassoio per visualizzarne il peso. Quando il valore è stabile, viene visualizzato il simbolo * . 4. Il valore risultante viene visualizzato sulla riga principale del display ed espresso nell'unità di misura attiva. Schermata iniziale della PESATURA Riga principale del display Toccare g per modificare l'unità Campi di riferimento Pulsanti dell'applicazione Icona dell'applicazione BILANCE ADVENTURER 4.1.1 Modifica impostazioni Per visualizzare o regolare le impostazioni correnti Toccare il pulsante Modifica impostazioni. Viene visualizzata la schermata delle Impostazioni. Peso minimo: stabilire un valore di peso minimo da utilizzare per verificare una lettura. Se un peso effettivo è inferiore al valore di peso minimo stabilito, viene segnalato da una variazione di colore: giallo. Per regolare il valore di peso minimo, toccare il pulsante Peso minimo. Viene visualizzata una finestra per l'immissione di valori numerici Digitare il peso minimo desiderato, quindi premere Salva. Il display torna alla schermata precedente. Per tornare alla schermata iniziale della pesatura, toccare Esci nella parte inferiore della schermata. Barra della portata: Se impostata su ON, viene visualizzata la barra della portata nel campo di riferimento. La guida della portata mostrerà il peso corrente come percentuale della portata della bilancia. Se la barra della portata è impostata su OFF, il campo di riferimento visualizza il Peso minimo e il Nome del campione. Unità di pesatura: Cambiare l’unità visualizzata. Consultare la sezione 5,4 per ulteriori informazioni. Livello filtro: Cambiare il livello di filtraggio. Consultare la sezione 5.5.3 per ulteriori informazioni Dati GLP e GMP: Consultare la sezione 5,9 per ulteriori informazioni. Impostazioni di stampa: Modificare le impostazioni di stampa. Consultare la sezione 7 per ulteriori informazioni. Level Assist: Istruzioni sulle modalità di spostamento dei piedini della bilancia per la messa a livello. IT-11 IT-12 4.1.2 BILANCE ADVENTURER Nome campione Premere questo pulsante aggiungere un nome al campione. Viene visualizzata una finestra per l'immissione di valori alfanumerici. Premere Minuscolo: per passare da caratteri maiuscoli a caratteri minuscoli. Maiuscolo: Digitare il nome del campione desiderato e premere Salva per salvare il nome e ritornare alla schermata principale della pesatura. 4.1.3 Salvataggio su USB Inserire l'unità flash USB nella slot USB situata sulla parte anteriore della bilancia. A questo punto, premere il pulsante "Salva su USB" per salvare i dati sull'unità flash USB. Una volta eseguito il salvataggio, il pulsante diventa improvvisamente arancione. Note: La prima volta che si connette un'unità flash USB alla bilancia, potrebbe verificarsi un ritardo nel funzionamento del pulsante "Salva su USB". Tale ritardo è causato dalla creazione, da parte della bilancia, delle cartelle sull'unità flash USB per la conservazione dei dati. Le applicazioni Determinazione densità e Controllo peso non sono dotate del pulsante "Salva su USB" ATTENZIONE: I dati di pesatura vengono salvati su USB con cadenza giornaliera. Tuttavia, in caso di utilizzo di molteplici modalità di pesatura, i dati verranno salvati su file individuali separati. A seconda dell'unità USB in uso, è possibile che non tutti i dati siano trasferibili dalla bilancia oppure il display potrebbe bloccarsi. In tal caso, scollegare l'unità flash USB e provare con un'altra. Ohaus non si assume alcuna responsabilità sull'eventuale cancellazione dei dati dall'unità flash USB o nel caso in cui l'unità flash USB si rompa durante il collegamento alla bilancia. Per ridurre al minimo il rischio di problemi, Ohaus consiglia l'utilizzo di unità flash USB di alta qualità. BILANCE ADVENTURER 4.2 IT-13 Conteggio pezzi Nota: prima di utilizzare qualsiasi applicazione, assicurarsi che la bilancia sia stata messa in bolla e regolata. Utilizzare quest’applicazione per il conteggio di campioni di peso uniforme. Conteggio pezzi 1. Nella parte in alto a sinistra della schermata iniziale, selezionare Conteggio pezzi. 2. Se necessario, premere Tara oppure Zero per iniziare. 3. Posizionare gli oggetti da pesare sul vassoio per visualizzarne il peso. Quando il valore è stabile, viene visualizzato il simbolo * . 4. Il valore risultante viene visualizzato sulla riga principale del display ed espresso in pezzi (PCS). Schermata iniziale del Conteggio pezzi Riga principale del display Campi di riferimento Pulsanti dell'applicazione 4.2.1 Modifica impostazioni Per visualizzare o regolare le impostazioni correnti Toccare il pulsante Modifica impostazioni. Viene visualizzata la schermata delle Impostazioni. Campione: La dimensione del campione può essere compresa tra 1 e 10 000 pezzi. La dimensione predefinita è 10. Quando si modificano le dimensioni del campione, la bilancia visualizza la schermata APW, in attesa di stabilire un nuovo peso medio dei pezzi. Per regolare la dimensione del campione, toccare il pulsante Campione. Viene visualizzata una finestra per l'immissione di valori numerici Digitare la dimensione del campione desiderato, quindi premere Salva. Viene visualizzata la schermata successiva, e un messaggio che richiede di posizionare il peso di riferimento sul vassoio. Posizionare il peso di riferimento sul vassoio. Icona dell'applicazione IT-14 BILANCE ADVENTURER Quindi toccare Accetta per acquisire il valore e tornare alla schermata iniziale. Determinare il peso medio dei pezzi (APW): Ogni volta che si deve contare un nuovo tipo di pezzo, è necessario determinare il peso nominale di un pezzo (peso medio dei pezzi o APW) utilizzando una piccola quantità di pezzi. Questo peso medio viene conservato in memoria fino a che non viene sostituito da un altro. Esistono due metodi per determinare il valore APW: 1. L'APW effettivo è noto 2. L'APW deve essere derivato dal peso. In tal caso, viene utilizzata la dimensione effettiva del campione Impostare il peso medio dei pezzi (APW) noto. Per regolare il valore APW direttamente, toccare il pulsante APW. Viene visualizzata una finestra per l'immissione di valori numerici. Digitare il peso APW, quindi premere Salva. Il display torna alla schermata dell'applicazione con il nuovo valore APW nel campo di riferimento. Impostare un nuovo peso medio dei pezzi (APW) – derivato. Per stabilire un nuovo APW, posizionare il peso di riferimento sul vassoio e premere Accetta per continuare. Nota: La dimensione del campione visualizzata è quella utilizzata. Per utilizzare una dimensione del campione diversa, cambiarla prima. (Vedere sopra.) BILANCE ADVENTURER IT-15 La schermata iniziale mostra il numero di pezzi con il nuovo APW. Auto ottimizzazione: Quando impostata su On , l'auto ottimizzazione migliora l'accuratezza del conteggio ricalcolando automaticamente il peso man mano che vengono aggiunti pezzi. L'impostazione predefinita è Off. Nota: l'ottimizzazione APW avviene solo quando il numero di pezzi aggiunti è almeno pari o è al massimo un valore triplo di quello già sul vassoio. Se l'APW viene inserito manualmente tramite il tastierino numerico, l'Auto ottimizzazione dell'APW non si attiva. Impostazioni di stampa: Modificare le impostazioni di stampa. Consultare la sezione 7 per ulteriori informazioni. Nota: Il pulsante Salva su USB sarà visualizzato solo dopo il collegamento dell'unità flash USB alla bilancia. Per ulteriori informazioni, consultare la sezione 4.1.3. 4.3 Pesatura percentuale Nota: prima di utilizzare qualsiasi applicazione, assicurarsi che la bilancia sia stata messa in bolla e regolata. Utilizzare Pesatura percentuale per misurare il peso di un campione come percentuale di un peso di riferimento predeterminato. Viene visualizzato il peso di riferimento predefinito (o il più recente). Pesatura percentuale 1. Nella parte in alto a sinistra della schermata iniziale, selezionare Pesatura percentuale. 2. Posizionare un oggetto sul vassoio. Viene visualizzata la differenza tra il campione e il peso di riferimento sotto forma di percentuale. Schermata iniziale della Pesatura percentuale Riga principale del display Campi di riferimento Pulsanti dell'applicazione 4.3.1 Modifica impostazioni Per visualizzare o regolare le impostazioni correnti Toccare il pulsante Modifica impostazioni. Viene visualizzata la schermata delle Impostazioni. Ricalcolare il peso di riferimento: Per determinare un nuovo valore del peso di riferimento, toccare il pulsante per ricalcolare del peso di riferimento. Icona dell'applicazione IT-16 BILANCE ADVENTURER Seguire le istruzioni sullo schermo per determinare un nuovo peso di riferimento. In alternativa, premere il pulsante Peso rif. dalla schermata Pesatura percentuale, Ricalcolare il peso di riferimento per impostare manualmente un nuovo peso di riferimento tramite il tastierino numerico. Impostazioni di stampa: Modificare le impostazioni di stampa. Consultare la sezione 7 per ulteriori informazioni. Nota: Il pulsante Salva su USB sarà visualizzato solo dopo il collegamento dell'unità flash USB alla bilancia. Per ulteriori informazioni, consultare la sezione 4.1.3. 4.4 Pesatura dinamica Nota: prima di utilizzare qualsiasi applicazione, assicurarsi che la bilancia sia stata messa in bolla e regolata. Utilizzare questa applicazione per pesare carichi instabili, come ad esempio un animale che si muove. È possibile selezionare due diverse modalità di avvio/ripristino: Manuale (avvio e arresto tramite pressione di un tasto), e Automatica (avvio e arresto automatico). Pesatura dinamica – Manuale (predefinita) 1. Nella parte in alto a sinistra della schermata iniziale, selezionare Pesatura dinamica. 2. Posizionare gli oggetti sul vassoio e premere il pulsante Avvio. Schermata iniziale della Pesatura dinamica Riga principale del display Campi di riferimento Pulsanti dell'applicazione Icona dell'applicazione 3. La bilancia avvia un conto alla rovescia (processo di media). Durante il conto alla rovescia, sulla riga delle informazioni viene visualizzato il tempo residuo. Se necessario, premere Stop per uscire. 4. Al termine del conto alla rovescia, viene visualizzata e memorizzata la riga del risultato. Premere Cancella per cancellare il peso salvato e tornare alla schermata iniziale. Nota: svuotare il vassoio prima di iniziare un nuovo ciclo di pesatura dinamica. BILANCE ADVENTURER 4.4.1 IT-17 Modifica impostazioni Per visualizzare o regolare le impostazioni correnti Toccare il pulsante Modifica impostazioni. Viene visualizzata la schermata delle Impostazioni. Tempo medio: Impostare il tempo medio su un valore compreso tra 1 e 99 secondi. Il valore predefinito è 5 secondi. Modalità Automatica: Se impostata su On, il ciclo inizia quando un oggetto viene posizionato sul vassoio e il valore memorizzato viene automaticamente ripristinato quando l'oggetto è rimosso dal vassoio (dopo 10 secondi). Nome del campione: Assegnare un nome al campione. Impostazioni di stampa: Modificare le impostazioni di stampa. Consultare la sezione 7 per ulteriori informazioni. Nota: Il pulsante Salva su USB sarà visualizzato solo dopo il collegamento dell'unità flash USB alla bilancia. Per ulteriori informazioni, consultare la sezione 4.1.3. 4.5 Determinazione della densità Nota: prima di utilizzare qualsiasi applicazione, assicurarsi che la bilancia sia stata messa in bolla e regolata. Utilizzare quest'applicazione per determinare la densità di un oggetto. È possibile eseguire quattro tipi di determinazione della densità: 1. Solidi più densi dell’acqua 2. Solidi meno densi dell’acqua 3. Densità del liquido 4. Materiale poroso (impregnato d'olio) Schermata iniziale della Determinazione della densità Riga principale del display Campi di riferimento Pulsanti funzione Icona dell'applicazione IT-18 4.5.1 BILANCE ADVENTURER Misurazione della Densità di un solido con l’acqua (predefinita) Premere il pulsante Modifica impostazioni per aprire la schermata Configurazione dell'applicazione di determinazione della densità. Confermare la selezione delle seguenti Configurazioni: Tipo di densità: Solido Liquido ausiliario: Acqua Materiale poroso: Off Per regolare il valore di temperatura dell'acqua, toccare il pulsante Temp. acqua. La bilancia calcola la densità dell'acqua in base al valore della temperatura dell'acqua immesso (tabella di ricerca interna). Misurare la temperatura effettiva dell'acqua con un termometro di precisione. Viene visualizzata una finestra per l'immissione di valori numerici. Immettere il valore corrente della temperatura dell'acqua, quindi premere Salva. Per tornare alla schermata iniziale di Determinazione della densità, toccare Indietro. Fase 1 di 2 Pesare il campione in aria. Premere Avvio. Seguire le istruzioni sullo schermo, quindi premere Accetta per memorizzare il peso del campione secco ("in aria"). Fase 2 di 2 Pesare il campione immerso nel liquido. Seguire le istruzioni sullo schermo, quindi premere Accetta per memorizzare il peso del campione (immerso nel liquido). Dopo aver determinato i pesi necessari, la densità del campione viene visualizzata in g/cm3 (insieme al peso in aria e in acqua) sulla schermata dell'applicazione. Premere Avvio per ripristinare tutti i valori di peso e riavviare il processo. BILANCE ADVENTURER 4.5.2 IT-19 Misurazione della Densità di un materiale galleggiante con l’acqua Premere il pulsante Modifica impostazioni per aprire la schermata Configurazione. Confermare la selezione delle seguenti Configurazioni: Tipo di densità: Solido Tipo di liquido: Acqua Materiale poroso: Off Premere Indietro per tornare alla schermata di determinazione della densità. Seguire la stessa procedura utilizzata per i solidi, tranne che per la fase 2 di determinazione della densità, spingere il campione immergendolo completamente nel liquido. 4.5.3 Misurazione della Densità di un solido con un liquido ausiliario Per abilitare questa funzione, accedere al menu Configurazione dell'applicazione di determinazione della densità e selezionare: Tipo di densità: Solido; Tipo di liquido: Altro; Materiale poroso: Off. Confermare la correttezza dei valori predefiniti visualizzati (densità del liquido, ecc.). Per regolare il valore della densità del liquido, toccare il pulsante Liquido ausiliario e selezionare Altro. Viene visualizzata una finestra per l'immissione di valori numerici. Digitare la densità in g/cm 3, quindi premere Salva. Il display torna alla schermata precedente. Per tornare alla schermata iniziale di Determinazione della densità, toccare Indietro. Avviare il processo per la determinazione della densità come sopra. 4.5.4 Misurazione della Densità di un liquido tramite un affondatore regolato (non in dotazione) Abilitare questa funzione, accedere al menu di Configurazione densità e selezionare Tipo densità: Liquido. Nota: quando il Tipo di densità è impostato su Liquido, le opzioni di selezione Tipo di liquido e Materiale poroso non sono abilitate. Schermata iniziale della DETERMINAZIONE DENSITÀ – LIQUIDO Riga principale del display Riga secondaria del display Campi di riferimento Pulsanti funzione Icona dell'applicazione IT-20 Confermare la correttezza del valore predefinito visualizzato (volume affondatore). Per modificare i valori predefiniti, toccare Volume affondatore. Per regolare il valore del volume affondatore, toccare il pulsante Volume affondatore. Viene visualizzata una finestra per l'immissione di valori numerici. Digitare il valore desiderato, quindi premere Salva. Il display torna alla schermata precedente e viene evidenziato il nuovo valore. Per tornare alla schermata iniziale di Determinazione Densità, toccare Indietro. Premere Avvio per avviare la procedura. Fase 1 di 2 - Pesare l'affondatore in aria. Seguire le istruzioni sullo schermo, quindi premere Accetta per memorizzare il peso dell'affondatore (“in aria”). Fase 2 di 2 - Pesare l'affondatore immerso nel liquido di prova. Seguire le istruzioni sullo schermo, quindi premere Accetta per memorizzare il peso del campione (immerso nel liquido). BILANCE ADVENTURER BILANCE ADVENTURER IT-21 Dopo aver determinato i pesi necessari, la densità del campione viene visualizzata in g/cm3 (insieme al peso in aria e al peso in acqua) sulla schermata dell'applicazione. Premere Avvio per ripristinare tutti i valori di peso e riavviare il processo. 4.5.5 Misurazione della Densità di materiale poroso tramite olio Per abilitare questa funzione, accedere al menu di Configurazione della determinazione densità e impostare i valori seguenti: Tipo di densità: Solido Tipo di liquido: Acqua Materiale poroso: On Schermata iniziale della DETERMINAZIONE DELLA DENSITÀ – POROSO Riga principale del display Riga secondaria del display Campi di riferimento Funzioni Confermare la correttezza dei valori predefiniti visualizzati (temperatura dell'acqua). Per modificare i valori predefiniti, toccare Modifica Impostazioni. Viene visualizzata la schermata delle Impostazioni. La bilancia calcola la densità dell'acqua in base al valore della temperatura dell'acqua immesso (tabella di ricerca). Misurare la temperatura effettiva dell'acqua con un termometro di precisione. Per regolare i valori Temperatura acqua o Densità olio, toccare il pulsante Temp. acqua o Densità olio. Viene visualizzata una finestra per l'immissione di valori numerici. Digitare il valore desiderato, quindi premere Salva. Il display torna alla schermata precedente e viene evidenziato il nuovo valore. Icona dell'applicazione IT-22 Per tornare alla schermata iniziale di Determinazione densità, toccare Esci. Premere Avvia calcolo densità. Fase 1 di 3 - Pesare il campione non oleato in aria. Seguire le istruzioni sullo schermo, quindi premere Accetta per memorizzare il peso secco del campione secco (in aria). Fase 2 di 3 - Pesare il campione oleato in aria. Seguire le istruzioni sullo schermo, quindi premere Accetta per memorizzare il peso del campione (oleato). Fase 3 di 3 - Pesare il campione oleato immerso in nel liquido. Seguire le istruzioni sullo schermo, quindi premere Accetta per memorizzare il peso del campione oleato (immerso nel liquido). Dopo aver determinato i pesi necessari, la densità del campione viene visualizzata in g/cm3 (insieme al peso in aria, oleato, non oleato e in acqua) sulla schermata dell'applicazione. Il valore rimane visualizzato sul display fino a quando non si tocca Avvio. Premere Avvio per ripristinare tutti i valori di peso e riavviare il processo. BILANCE ADVENTURER BILANCE ADVENTURER 4.6 IT-23 Controllo del peso Nota: prima di utilizzare qualsiasi applicazione, assicurarsi che la bilancia sia stata messa in bolla e regolata. Il controllo peso consente di confrontare il peso di un campione rispetto a dei limiti obiettivo. Controllo del peso 1. Nella parte in alto a sinistra della schermata iniziale, selezionare Controllo peso. 2. Vengono visualizzati i limiti di controllo peso predefiniti (o più recenti). 3. Posizionare gli oggetti sul vassoio. 4. Lo stato Inferiore/Accetta/Superiore viene visualizzato nell'area della barra di avanzamento, mentre il peso effettivo dell'articolo viene visualizzato sulla riga principale del display. Schermata iniziale del Controllo Peso Riga principale del display Campi di riferimento Pulsanti funzione Per impostare il valore Limite superiore, toccare il pulsante Limite superiore. Per impostare il valore Limite inferiore, toccare il pulsante Limite inferiore. Viene visualizzata una finestra per l'immissione di valori numerici. Digitare il limite di peso desiderato quindi premere Salva. Per tornare alla schermata iniziale del CONTROLLO PESO toccare Esci. 4.6.1 Modifica impostazioni Per visualizzare o regolare le impostazioni correnti Toccare il pulsante Modifica impostazioni. Viene visualizzata la schermata delle Impostazioni. Nome del campione: Assegnare un nome al campione. Impostazioni di stampa: Modificare le impostazioni di stampa. Consultare la sezione 7 per ulteriori informazioni. Icona dell'applicazione IT-24 BILANCE ADVENTURER 4.7 Memoria display Nota: prima di utilizzare qualsiasi applicazione, assicurarsi che la bilancia sia stata messa in bolla e regolata. Sono previste due modalità di funzionamento: La funzionalità Memoria display - consente all'utente di catturare e memorizzare un peso stabile. La funzionalità Valore di picco - consente all'utente di catturare e memorizzare il peso stabile più alto. Schermata iniziale della Memoria display Riga principale del display Campi di riferimento Icona dell'applicazione Pulsanti funzione Memoria display 4.7.1 Memoria display 1. Nella parte in alto a sinistra della schermata iniziale, selezionare Memoria display. 2. Posizionare il campione sul piatto e premere in qualsiasi momento Memoria durante la rilevazione del peso. 3. La riga principale del display visualizza ora il primo peso stabile. 4. Premere Cancella per eliminare il valore memorizzato e tornare alla schermata Memoria display. Valore di picco 4.7.2 1. 2. 3. 4. 5. Valore di picco Nella parte in alto a sinistra della schermata iniziale, selezionare Memoria display. Selezionare la modalità Memoria picco in Modifica impostazioni (consultare la sezione 4.7.3). Posizionare il campione sul vassoio e premere Avvio per avviare la procedura. Continuare a pesare i campioni. Il peso stabile più alto viene memorizzato automaticamente. Premere Stop per eliminare il valore memorizzato e tornare al normale funzionamento. BILANCE ADVENTURER 4.7.3 IT-25 Modifica impostazioni Per visualizzare o regolare le impostazioni correnti Toccare il pulsante Modifica impostazioni. Viene visualizzata la schermata delle Impostazioni. Modalità: Scegliere tra Memoria picco e Memoria display (predefinita). Modalità Automatica: Impostare su On o Off (predefinito). Nome del campione: Assegnare un nome al campione. Impostazioni di stampa: Modificare le impostazioni di stampa. Consultare la sezione 7 per ulteriori informazioni. Nota: Il pulsante Salva su USB sarà visualizzato solo dopo il collegamento dell'unità flash USB alla bilancia. Per ulteriori informazioni, consultare la sezione 4.1.3. 4.8 Totalizzazione Nota: prima di utilizzare qualsiasi applicazione, assicurarsi che la bilancia sia stata messa in bolla e regolata. La Totalizzazione misura il peso cumulativo di una sequenza di articoli. Il peso cumulativo potrebbe superare la portata della bilancia. Il numero massimo di campioni (n) è 99. Schermata iniziale della Totalizzazione Riga principale del display Campi di riferimento Icona dell'applicazione Pulsanti dell'applicazione Totalizzazione 1. Nella parte in alto a sinistra della schermata iniziale, selezionare Totalizzazione. 2. Posizionare l'articolo sul vassoio per avviare la procedura. Il peso campione viene visualizzato sulla riga principale del display. 3. Premere Accumula per aggiungere il peso (quando stabile) dell’articolo al totale. 4. Rimuovere l'articolo dal vassoio di pesatura e aggiungere il successivo, continuando come illustrato in precedenza. 5. Premere Risultato per visualizzare i risultati della totalizzazione. 6. Al termine, premere il pulsante Cancella totale per ripristinare il peso accumulato a zero. IT-26 BILANCE ADVENTURER 7. Premere Salva su USB per salvare i risultati su un'unità flash USB oppure Esci per ritornare alla schermata iniziale della Totalizzazione. Nota: La modifica delle unità converte i risultati di Accumulazione nell'unità selezionata. 4.9 Formulazione Nota: prima di utilizzare qualsiasi applicazione, assicurarsi che la bilancia sia stata messa in bolla e regolata. Utilizzare questa applicazione per la composizione e la realizzazione delle ricette. Il numero massimo di componenti è 50. Schermata iniziale della Formulazione Riga principale del display Campi di riferimento Pulsanti dell'applicazione Icona dell'applicazio ne Formulazione 1. Nella parte in alto a sinistra della schermata iniziale, selezionare Formulazione. 2. Premere Avvio per avviare il processo di composizione. 3. Posizionare il primo ingrediente sul vassoio (o in un contenitore tarato) e premere Accetta per memorizzare il componente. 4. Continuare ad aggiungere componenti e premere Accetta per memorizzare il peso dei singoli componenti, fino a quando la formula non è completa. Sulla riga Totale viene visualizzato il peso di tutti i componenti. 5. Premere Stop per terminare la Formulazione. Vengono visualizzati i risultati della Formulazione. Nota: Se la modalità Riempimento è impostata su On (consultare la sezione 4.9.1 di seguito), la bilancia chiederà di aggiungere un componente di riempimento per completare la formulazione. Aggiungere il componente di riempimento e premere Accetta per completare la formulazione e visualizzare i risultati. 6. Premere Salva su USB per salvare i risultati su un'unità flash USB oppure Esci per ritornare alla schermata iniziale della Formulazione. Nota: I risultati della formulazione verranno cancellati all'avvio di una nuova formulazione. BILANCE ADVENTURER 4.9.1 IT-27 Modifica impostazioni Per visualizzare o regolare le impostazioni correnti Toccare il pulsante Modifica impostazioni. Viene visualizzata la schermata delle Impostazioni. Riempimento: Se impostato su On, al termine della formulazione viene richiesto un componente di riempimento. Tara automatica: Se impostata su On, la bilancia esegue automaticamente la Tara dopo aver accettato il peso del componente. Impostazioni di stampa: Modificare le impostazioni di stampa. Consultare la sezione 7 per ulteriori informazioni. 4.10 Funzionalità aggiuntive 4.10.1 Pesatura da sotto La bilancia Adventurer è dotata di un gancio per la pesatura da sotto. Nota: prima di capovolgere la bilancia, asportare il vassoio e il paravento (se presenti), per prevenirne il danneggiamento. ATTENZIONE: non appoggiare la bilancia sul cono di supporto del vassoio o sui pin della cella di carico. Per utilizzare questa funzione, staccare l'alimentazione elettrica dalla bilancia e rimuovere il coperchio di protezione dall'apertura della pesatura da sotto. Pesatura da sotto capottina di protezione Gancio per la pesatura da sotto La bilancia può essere supportata usando dei martinetti da laboratorio o un altro sistema adatto. Accertarsi che la bilancia sia ferma ed in bolla. Accendere la bilancia, quindi usare un filo o un cavo per appendere gli articoli da pesare. IT-28 5. BILANCE ADVENTURER IMPOSTAZIONI DI MENU 5.1 Navigazione nei menu Struttura del menu utente Modalità applicative Applicazione pesatura Peso min Menu Principale Regolazione Regolazione Taratura interna Configurazione della bilancia Regolazione automatica Unità di pesatura Conservazione dei dati Guida portata Unità di pesatura Livello filtro Dati GLP e GMP Impostazioni di stampa Level Assist AutoCalTM Taratura span Comunicazione Taratura lineare Dati GLP e GMP Ripristino di fabbrica Test di regolazione Configurazione della bilancia Lingua Luminosità Beep (Segnalatore acustico) Dim auto Level Assist Blocco Livello filtro Applicazione conteggio Dimensioni campione Controllo zero automatico Tara_autom atica APW Auto Opt* (Ottimizzazione automatica) Graduazione Data e ora Impostazioni di stampa Data Applicazione percentuale Ricalcolare il peso di riferimento Ora Impostazioni di stampa Applicazione dinamica Tempo medio Modalità automatica Nome campione Conservazione dei dati Milligrammo Esportazione su USB Grammo App. Impostazioni modalità Chilogrammi Impostazioni di menu Carato Importazione da USB Oncia App. Impostazioni modalità 9600 Intestazione 4 Oncia troy Impostazioni di menu 19200 Intestazione 5 Libbra Info_bilancia 38400 Impostazioni utente Regolazione Touch Omologazione per transazioni commerciali Ripristino Unità di pesatura Dati GLP e di Blocco GMP fabbrica Standard RS232 Intestazioni Regolazione Baud rate Configurazione Intestazione 1 (Velocità di della bilancia trasmissione) Unità di Intestazione 2 2400 pesatura Conservazione Intestazione 3 4800 dei dati Comunicazione Pennyweight Trasmissione Grani 7E1 Newton 7E2 Momme 7 N1 Mesghal 7 N2 HKTael 7O1 SGTael 7 O2 TWTael 8 N1 Tical 8N2 Tola Sincronizzazione Impostazioni di stampa Uscita di stampa Baht Personalizzato1 Nome unità di misura Solo peso stabile LSD Solo valori numerici Solo intestazione singola. Opzioni di stampa Stampa automatica Stampa automatica Alla stabilità Intervallo (secondi) Continuo Stampa contenuto Selezione 0,5 Intestazione Nome campione 1 Data e ora Impostazioni di stampa 2 ID bilancia Applicazione memoria display 5 Nome bilancia Impostazioni di stampa Applicazione densità Tipo di densità Liquido ausiliario Temperatura acqua Materiale poroso Densità olio Volume affondatore Temp. liquido Impostazioni di stampa Applicazione controllo peso Fattore Esponente 10-3 10-2 10-1 100 101 102 103 Modalità memoria display 10 Nome utente Nome campione 100 Applicazione totalizzazione Nome progetto Nome applicazione Nome campione Applicazione formulazione Risultato Impostazioni di stampa Componente di riempimento Lordo Modalità automatica Netto Impostazioni di stampa Tara Informazioni Riga per la firma Avanzamento riga Salva su USB Nome bilancia Nome utente Nome progetto Comunicazione Dati GLP e GMP Ripristino di fabbrica BILANCE ADVENTURER IT-29 La navigazione nei menu avviene toccando il display. Per accedere al menu, toccare Menu da qualsiasi schermata iniziale di applicazione. Viene visualizzato il Menu principale, con i pulsanti Indietro e Esci. Continuare a toccare la voce appropriata dell'elenco per navigare tra le voci di menu. 5.1.1 Modifica delle impostazioni Per modificare un'impostazione di menu, navigare tra le impostazioni attraverso la procedura seguente: Accedere al menu Dalla schermata di qualsiasi applicazione, toccare Menu. Sul display viene visualizzato l'elenco del menu principale. Selezionare il sottomenu Scorrere fino alla voce selezionata nell'elenco del menu principale e toccarla. Viene visualizzato il sottomenu. Selezionare la voce di menu. Procedere con la selezione di tutte le impostazioni desiderate nell'elenco menu. Toccare l'impostazione per modificarla. L'impostazione modificata sarà visualizzata evidenziata in giallo per circa 1 secondo, per confermare il cambiamento del valore. Uscire dal menu e tornare all'applicazione corrente. Dopo aver confermato l'impostazione, toccare Esci per tornare all'applicazione. Nota: è possibile toccare i pulsanti Indietro ed Esci in qualsiasi momento, per navigare all'area desiderata del menu o tornare all'applicazione corrente. Procedere con la selezione di tutte le impostazioni desiderate nell'elenco menu. Di seguito è illustrata la struttura del menu principale della bilancia Adventurer. Regolazione Configurazione della bilancia Unità di pesatura Comunicazione GLP and GMP Data (Dati GLP e GMP) Ripristino di fabbrica Conservazione dei dati Blocco IT-30 BILANCE ADVENTURER 5.2 Regolazione Le bilance Adventurer (modelli INCAL) prevedono sei metodi di regolazione: Regolazione interna, regolazione automatica regolazione AutoCal regolazione ad intervallo, regolazione di linearità, e test di regolazione. Note: L'unità di taratura è sempre espressa in grammi. Attenzione: non interrompere la procedura di regolazione della bilancia. 5.2.1 Sottomenu regolazione (modelli INCAL) Regolazione interna Automatica AutoCal™ Intervallo Regolazione di linearità Test di regolazione Note: i modelli /E dispongono solo di funzione Taratura span, Taratura lineare e Test di regolazione. 5.2.2 Regolazione interna La regolazione avviene mediante l'apposita massa interna. La Regolazione interna può essere eseguita in qualsiasi momento, purché la bilancia abbia raggiunto la temperatura di funzionamento e il livellamento. Con la bilancia accesa e senza carichi sul vassoio, selezionare Regolazione interna. La bilancia avvia il processo di regolazione. A piatto libero, toccare Regolazione interna. Il display visualizza lo stato e ritorna alla modalità applicativa corrente. Per annullare in qualsiasi momento, premere Esci. 5.2.3 Regolazione automatica Quando la Regolazione automatica è impostata su ON, la bilancia esegue una regolazione automatica: • quando rileva una variazione di temperatura di 1,5°C • oppure ogni 11 ore La funzione AutoCal tara automaticamente la bilancia (utilizzando la massa interna) ogni volta che si verifica una variazione di temperatura, significativa al punto da incidere sull'accuratezza, oppure ogni 11 ore. Verrà visualizzata una schermata informativa prima dell'avvio della Regolazione automatica. Vengono visualizzati tre pulsanti opzione: Ora – Premere per eseguire direttamente la regolazione. 5 min – Premere per eseguire la regolazione dopo 5 minuti. Disattiva – Premere per disattivare la funzione di Regolazione automatica. 5.2.4 Regolazione AutoCal™ Utilizzare questa modalità per regolare il punto di calibrazione span, senza compromettere l'ampiezza o la taratura lineare. La Regolazione della taratura può essere utilizzata per tarare i risultati della Regolazione interna su +100 divisioni. Nota: prima di eseguire una regolazione eseguire una regolazione interna. Per verificare se è necessaria una regolazione, posizionare una massa di prova equivalente al valore della regolazione ad intervallo sul vassoio e annotare la differenza (in divisioni) tra il valore della massa nominale e la lettura effettiva della bilancia. Se la differenza rientra in +1 divisione, non sono necessarie regolazioni. Se la differenza supera +1 divisione, è consigliabile eseguire una regolazione. Esempio: Lettura effettiva del peso: Lettura attesa del peso: Differenza in peso (d): Differenza in peso in cifre: 200,014 200,000 (valore della massa di prova) 0,014 –14 (Regolare valore) BILANCE ADVENTURER Per eseguire una regolazione, toccare Regolazione AutoCal dal menu Regolazione; immettere il valore (divisioni positive o negative) per ottenere la corrispondenza con la differenza notata in precedenza nella procedura. Nuova regolazione tramite regolazione interna. Dopo la regolazione, posizionare la massa di prova sul vassoio e verificare che il valore corrisponda a quello visualizzato. In caso contrario, ripetere la procedura fino a quando la lettura della regolazione interna non corrisponde alla massa di prova. Al termine, la bilancia memorizza il valore di regolazione il display ritorna all'applicazione corrente. 5.2.5 Regolazione a intervallo La regolazione a intervallo utilizza due punti di regolazione, uno a carico zero e l'altro al pieno carico specificato (intervallo). Fare riferimento alla Tabella della sezione 9 per dettagli sulle masse di regolazione. Nota: le impostazioni predefinite di fabbrica sono visualizzate in grassetto. Con la bilancia accesa e senza carichi sul vassoio, toccare Regolazione ad intervallo per avviare la procedura. I valori di regolazione aggiuntivi da utilizzare vengono visualizzati sul display. La massima accuratezza si ottiene utilizzando la massa che più si avvicina al valore dell'intervallo completo. Nota: per modificare il punto di regolazione ad intervallo, toccare il peso alternativo visualizzato sul display. Seguire le istruzioni sullo schermo e posizionare il peso di regolazione specificato sulla bilancia quando richiesto. Al termine, il display visualizza lo stato della regolazione ad intervallo e ritorna all'applicazione corrente. 5.2.6 Regolazione di linearità La regolazione di linearità utilizza tre punti di regolazione, uno a carico zero e gli altri a carichi specifici. Senza carichi sul vassoio, premere Regolazione di linearità per avviare il processo. La bilancia cattura il punto zero, quindi richiede il peso successivo. Continuare a seguire le istruzioni sul display fino al termine della regolazione. Per annullare in qualsiasi momento, premere Esci. 5.2.7 Test di regolazione Il test di regolazione viene utilizzato per confrontare un peso di regolazione noto rispetto ai dati di regolazione ad intervallo memorizzati. Senza carichi sulla bilancia, premere Test di regolazione per avviare il processo. La bilancia cattura il punto zero, quindi richiede il valore di intervallo. Il display visualizza lo stato e la differenza tra il peso di regolazione corrente e i dati di regolazione memorizzati. IT-31 IT-32 BILANCE ADVENTURER 5.3 Configurazione della bilancia Accedere a questo sottomenu per personalizzare le funzionalità della bilancia. 5.3.1 Sottomenu di configurazione della bilancia Lingua Impostazioni utente Livello filtro Controllo zero automatico Tara automatica Graduazione Data e ora Omologazione per transazioni commerciali Le impostazioni predefinite di fabbrica sono visualizzare in grassetto di seguito. 5.3.2 Lingua Impostare la lingua in cui saranno visualizzati i menu e i messaggi. Inglese Tedesco Francese Spagnolo Italiano Polacco Turco Ceco Ungherese 5.3.3 Impostazioni utente Utilizzare questo sottomenu per modificare le impostazioni per: Regolazione Touch "Regolazione Runtime, toccare la schermata al centro dell'anello" (prima in alto a sinistra, poi in basso a destra). Luminosità schermo: BASSO = luminosità dello schermo bassa. MEDIO = luminosità dello schermo normale. ALTO = luminosità dello schermo alta. Segnale acustico: OFF = disabilitato ON = abilitato Dim Auto (attenua la luminosità del display in caso d'inattività dello schermo per x minuti) OFF = disabilitato 10 min 20 min 30 min Level Assist: Istruzioni sulle modalità di spostamento dei piedini della bilancia per la messa a livello. BILANCE ADVENTURER IT-33 5.3.4 Livello filtro Impostazione del valore di filtraggio del segnale. BASSO MEDIO ALTO = tempo di stabilizzazione più rapido con minore stabilità. = tempo di stabilizzazione normale con stabilità normale. = tempo di stabilizzazione più lento con maggiore stabilità. 5.3.5 Controllo zero automatico Impostazione della funzionalità di controllo zero automatico. OFF 0,5 D = = 1D = 3D = disabilitato. sul display viene visualizzato lo zero fino al superamento di una deriva di 0,5 graduazioni al secondo. sul display viene visualizzato lo zero fino al superamento di una deriva di 1 graduazioni al secondo. sul display viene visualizzato lo zero fino al superamento di una deriva di 3 graduazioni al secondo. 5.3.6 Tara automatica Impostazione della tara automatica. OFF = disabilitato. ON = abilitato. All'avvio di una tara automatica, sullo schermo viene visualizzato il messaggio "Posizionare un contenitore sul piatto". Sotto il messaggio viene visualizzato il pulsante Disattiva. Premere questo pulsante per disattivare la funzione di Tara automatica 5.3.7 Graduazione Impostazione della leggibilità della bilancia. 1 divisione = leggibilità standard. 10 divisioni = = la leggibilità è aumentata da un fattore pari a 10. Ad esempio, se la leggibilità standard è 0,01 g, selezionando 10 divisioni viene visualizzata una lettura di 0,1 g. 5.3.8 Data e ora Impostare data e ora correnti. Cambiare il formato (se necessario), quindi immettere il valore corrente. Premere Salva per confermare il nuovo valore. IT-34 BILANCE ADVENTURER 5.3.9 Omologazione per transazioni commerciali Utilizzare questo menu per impostare lo stato Omologazione per transazioni commerciali. OFF = funzionamento standard. ON = il funzionamento è conforme alle norme della OIML (Organizzazione Internazionale di Metrologia Legale). Nota: Se la funzione Modalità approvata è impostata su ON, le impostazioni del menu si modificano come segue: Menu Regolazione: La funzione Regolazione interna AutoCal si attiva e non viene visualizzata. Sono disponibili le funzioni Regolazione interna e Test di regolazione. Tutte le altre funzioni non vengono visualizzate. Menu di configurazione della bilancia: Il Livello filtro è bloccato all'impostazione corrente. Il Controllo dello zero automatico è limitato a 0,5 divisioni e non è attivo. L'impostazione selezionata è bloccata. La Tara automatica è bloccata sull'impostazione corrente. La graduazione è forzata su 1 divisione e la voce di menu non viene visualizzata. Menu comunicazione(Comunicazione> Impostazioni di stampa-> output di stampa): Solo peso stabile è bloccato su ON. Solo valori numerici è bloccato su OFF. Menu comunicazione(Comunicazione> Impostazioni di stampa-> Stampa automatica): Le selezioni della modalità di Stampa automatica sono limitate a OFF, Alla stabilità e Intervallo. Continuo non è disponibile. Conservazione dei dati: Esportazione verso USB nascosta Importazione da USB nascosta Menu Sblocco Menu nascosto Nota: L'interruttore di sicurezza situato sulla parte posteriore della bilancia deve rimanere in posizione bloccata per attivare la Modalità approvata. L'interruttore di sicurezza deve rimanere in posizione sbloccata per disattivare la Modalità approvata. Consultare la sezione 6. Pesatura schermata principale dell'applicazione con LFT (Omologazione per Transazioni Commerciali) ON. BILANCE ADVENTURER IT-35 5.4 Unità di pesatura Entrare in questo sottomenu per attivare le unità di pesatura desiderate. È inoltre possibile accedere a questo menu premendo il simbolo dell'unità presente sulla schermata principale di qualsiasi applicazione. Nota: In virtù delle norme vigenti, la bilancia potrebbe non supportare alcune delle unità di misura elencate di seguito. 5.4.1 Sottomenu unità milligrammo grammo chilogrammo carato oncia oncia Troy libbra Pennyweight grano Newton momme mesghal Tael (HK) Tael (SG) Tael (TW) tical tola baht Unità personalizzata 1 Nota: Se la Modalità approvata è attiva, alcune unità di misura non vengono visualizzate. Per visualizzare il peso con un'unità di misura differente, utilizzare la funzione Unità personalizzata. L'unità di misura personalizzata viene definita mediante un fattore di conversione, ossia il numero di unità di misura personalizzate per grammo espresso con una notazione scientifica (Fattore x 10^Esponente). Ad esempio: Per visualizzare il peso in once troy (0,03215075 once troy per grammo) inserire un Fattore di 0,3215075 e un Esponente di -1. Il nome delle unità di misura personalizzate può includere fino a 3 caratteri. 5.5 Conservazione dei dati Accedere a questo sottomenu per personalizzare le impostazioni di trasferimento dati. 5.5.1 Sottomenu Conservazione dati Le funzioni di Esportazione e Importazione La configurazione di più bilance può essere effettuata in modo semplice esportando il profilo da una bilancia madre tramite l'unità USB. Lo strumento di manutenzione dei dati consente di salvare le impostazioni dell'utente e delle applicazioni su un'unità USB, per eseguire il trasferimento su un'altra bilancia Adventurer. I dati importati dalla bilancia originale possono essere utilizzati per configurare le nuove bilance Adventurer. Esportazione su USB Importazione da USB Informazioni sulla bilancia IT-36 BILANCE ADVENTURER 5.5.2 Esportazione su USB Esportare i dati di pesatura su un'unità flash USB. È possibile esportare due tipologie di dati: - Le impostazioni dell'applicazione (APW, Peso rif., ecc.) - Le impostazioni del menu (funzione di configurazione della bilancia, ecc.) Nota: Per abilitare il trasferimento dei dati sulla memoria USB, è necessario attivare la funzione "Salva su USB". Per ulteriori informazioni, consultare la sezione 5.6. 5.5.3 Importazione da USB Importazione dei dati di pesatura da un'unità flash USB. 5.5.4 Informazioni sulla bilancia Accedere questo menu per visualizzare informazioni sulla bilancia. Le informazioni visualizzate sono: Tipo bilancia, ID bilancia, Portata, leggibilità e versione del software. 5.6 Comunicazione Accedere a questo menu per definire i metodi di comunicazione esterna e impostare i parametri di stampa. È possibile inviare i dati a una stampante o a un PC (per i campioni di output, vedere la Sezione 5.9.8). le impostazioni predefinite di fabbrica sono visualizzate in grassetto. 5.6.1 Sottomenu Comunicazione Standard RS-232 Impostazioni di stampa Salvataggio su USB Standard RS-232: Accedere a questo sottomenu per personalizzare le impostazioni della bilancia RS-232. 5.6.2 Baud Rate Impostare la velocità di trasmissione (bit al secondo). 2400 = 2400 bps 4800 = 4800 bps 9600 = 9600 bps 19200 = 19200 bps 38400 = 38400 bps BILANCE ADVENTURER IT-37 5.6.3 Trasmissione Impostare i bit di dati, i bit di arresto e la parità. 7 PARI 1 7 DISPARI 1 7 PARI 2 7 DISPARI 2 7 NESSUNA 1 8 NESSUNA 1 7 NESSUNA 2 8 NESSUNA 2 = 7 bit di dati, parità pari, bit di arresto 1 = 7 bit di dati, parità dispari, bit di arresto 1 = 7 bit di dati, parità pari, bit di arresto 2 = 7 bit di dati, parità dispari, bit di arresto 2 = 7 bit di dati, nessuna parità, bit di arresto 1 = 8 bit di dati, nessuna parità, bit di arresto 1 = 7 bit di dati, nessuna parità, bit di arresto 2 = 8 bit di dati, nessuna parità, bit di arresto 2 5.6.4 Sincronizzazione Impostazione del metodo di controllo del flusso. NESSUNO XON-XOFF HARDWARE = nessuna sincronizzazione = sincronizzazione XON/XOFF = sincronizzazione hardware Impostazioni di stampa Accedere a questo sottomenu per personalizzare le impostazioni di trasferimento dati. Sottomenu Impostazioni di stampa Uscita di stampa Stampa automatica Stampa contenuto Alimentazione Format Stampa dati di Regolazione 5.6.5 Uscita di stampa Solo peso stabile Impostazione dei criteri di stampa. OFF ON = i valori vengono stampati immediatamente, a prescindere dalla stabilità. = i valori vengono stampati solo se vengono soddisfatti i criteri di stabilità. Solo valori numerici Impostazione dei criteri di stampa. OFF = Tutti i risultati e i valori dei dati G/N/T vengono stampati. Consultare la sezione 7.2 per ulteriori informazioni. ON = vengono stampanti solo i valori dei dati numerici Solo intestazione singola. Impostazione dei criteri di stampa. OFF ON = Le intestazioni vengono stampate per tutti i requisiti di stampa = Le intestazioni vengono stampate una volta al giorno Opzioni di stampa Impostazione dei criteri di stampa. Stampante PC = Invia dati di stampa a una stampante = Invia dati di stampa a un PC IT-38 BILANCE ADVENTURER 5.6.6 Stampa automatica Impostazione della funzionalità di stampa automatica. OFF SE STABILE1 = disabilitato = la stampa viene effettuata ogni qualvolta vengono soddisfatti i criteri di stabilità. INTERVALLO2 = la stampa viene effettuata in base a un intervallo temporale stabilito. CONTINUO = la stampa viene eseguita continuamente. 1Quando è selezionato SE STABILE, impostare la condizione di stampa. CARICO = stampa quando il carico visualizzato è stabile. CARICO ZERO = stampa quando il carico visualizzato o la lettura dello zero è stabile. 2Quando è selezionato INTERVALLO, impostare l'intervallo di tempo utilizzando il tastierino numerico. I valori consentiti sono compresi tra 1 e 3600 secondi. Il valore predefinito è 0. 5.6.7 Stampa contenuto Definizione del contenuto dei dati stampati. Selezione Per impostare lo stato. Deseleziona tutto= tutto impostato su OFF Seleziona tutto = tutto impostato su ON Intestazione Data e ora ID bilancia Nome bilancia Nome utente Nome progetto Nome applicazione Nome campione Risultato Lordo Netto Tara Informazioni Riga per la firma 5.6.8 Alimentazione Impostazione dell’avanzamento della carta. 1 RIGA 4 RIGHE = fa avanzare la carta di una riga dopo la stampa. = fa avanzare la carta di quattro righe dopo la stampa. 5.6.9 Formato Impostare il formato di stampa. Riga Singola = stampe su una sola riga. Linee Multiple = stampe su più righe. 5.6.10 Stampa dati di Regolazione Impostazione dei criteri di stampa. Acceso = disabilitato Spento = abilitato BILANCE ADVENTURER IT-39 Salvataggio su USB Per impostare lo stato. OFF = i dati non vengono salvati su USB ON = i dati vengono salvati su USB 5.7 Dati GLP e GMP Accedere a questo menu per impostare i dati corretti di GLP (Good Laboratory Practices) e GMP (Good Manufacturing Practices). 5.7.1 Sottomenu Dati GLP Intestazione Nome bilancia Nome utente Nome progetto 5.7.2 Intestazione Abilita la stampa delle intestazioni GLP. Sono disponibili 5 intestazioni. Le impostazioni alfanumeriche consentite raggiungono i 25 caratteri per l'impostazione di ciascuna intestazione. 5.7.3 Nome bilancia Impostazione dell'identificativo della bilancia. Le impostazioni alfanumeriche consentite sono fino a 25 caratteri. L'impostazione predefinita è Adventurer. 5.7.4 Nome utente Impostazione dell’identificativo dell’utente. Le impostazioni alfanumeriche consentite sono fino a 25 caratteri. L'impostazione predefinita è vuoto. 5.7.5 Nome progetto Accedere a questo menu per impostare l'identificativo del progetto. Le impostazioni alfanumeriche consentite sono fino a 25 caratteri. L'impostazione predefinita è vuoto. 5.8 Ripristino di fabbrica Utilizzare questo sottomenu per ripristinare le impostazioni del menu ai valori predefiniti di fabbrica. Nota: I dati di taratura non vengono modificati. Ripristina tutto = per ripristinare tutti i menu ai valori predefiniti di fabbrica. Esci = per tornare alla schermata principale dell'applicazione senza ripristinare alcun menu. 5.9 Blocco Utilizzare questo sottomenu per bloccare/sbloccare determinati menu. Quando un menu è bloccato, viene visualizzato un piccolo lucchetto sull'icona del menu e l'utente non è in grado di accedere a quel menu. Fare clic su un menu e selezionare: OFF = il menu non è bloccato. ON = il menu è bloccato. IT-40 6. BILANCE ADVENTURER OMOLOGAZIONE PER TRANSAZIONI COMMERCIALI Quando la bilancia viene utilizzata per il commercio o per un'applicazione con approvazione legale, deve essere configurata, verificata e sigillata nel rispetto delle normative locali su pesi e misure. Ricade sotto la responsabilità dell'acquirente accertarsi che vengano soddisfatti tutti i requisiti normativi necessari. 6.1 Impostazioni Prima della verifica e della sigillatura, effettuare le seguenti operazioni nell'ordine indicato: 1. Verificare che le impostazioni del menu rispettino le normative locali su pesi e misure. 2. Verificare che le unità rispettino le normative locali su pesi e misure. 3. Eseguire la regolazione, come illustrato nella Sezione 5. 3. Impostare l'interruttore di sicurezza in posizione bloccata. 4. Attivare Omologazione per transazioni commerciali nel menu di configurazione della bilancia. 5. Attivare Modalità approvata nel menu di configurazione della bilancia. Nota: Se è attiva la funzione Modalità approvata, non è possibile eseguire una taratura esterna. 6.2 Verifica La procedura di verifica deve essere eseguita da un responsabile delle normative su pesi e misure o da un agente autorizzato. 6.3 Sigillatura Dopo la verifica, la bilancia deve essere sigillata per impedire accessi non rilevati ai parametri di omologazione. Prima di procedere alla sigillatura del dispositivo, accertarsi che l'interruttore di sicurezza si trovi in posizione bloccata e che l'impostazione Modalità approvata sia attivata nel menu di Configurazione della bilancia. Se si utilizza un sigillo in carta, posizionarlo sull'interruttore di sicurezza e sull'alloggiamento inferiore, come illustrato Se si utilizza un sigillo a filo, passarlo attraverso i fori dell'interruttore di sicurezza e dell'alloggiamento inferiore, come illustrato. Non bloccato Bloccato con sigillo di carta Bloccato con sigillo a filo BILANCE ADVENTURER 7. 7.1 STAMPA Collegamento, configurazione e prova dell'interfaccia stampante/computer Utilizzare la porta RS-232 integrata per collegare la bilancia a un computer o ad una stampante. In caso di collegamento a un computer, utilizzare HyperTerminal o un software simile come SPDC, descritto di seguito.(Trovare HyperTerminal in Accessori/Comunicazioni in Windows XP). Collegare la bilancia al computer con un cavo seriale standard (diretto). Selezionare Nuova connessione, "connetti tramite", "COM1" (o porta COM disponibile). Selezionare Baud=9600, Parità=8 nessuna; Arresto = 1; Sincronizzazione = Nessuna. Fare clic su OK. Selezionare Proprietà/Impostazioni, quindi Configurazione ASCII. Selezionare le caselle di controllo come illustrato: (Aggiungi avanzamento riga…; Eco dei caratteri digitati…; Righe a capo…) Utilizzare i comandi dell'interfaccia RS-232 (Sezione 9.6.1) per controllare la bilancia da un PC. Nota: una volta terminata la configurazione di HyperTerminal, vengono automaticamente stampati i risultati di un test di regolazione e i comandi di stampa eco inviati alla bilancia. Connessione della stampante Presso Ohaus sono disponibili due stampanti compatibili con le bilance Adventurer. (Consultare la Sezione 9). Collegare un cavo seriale diretto alla porta RS-232 della bilancia. Vedere i formati di output della stampa campione illustrati di seguito. Presso Ohaus sono disponibili due stampanti compatibili con le bilance Adventurer Pro. Software SPDC Il software Serial Port Data Collection (SPDC) viene fornito da Ohaus in dotazione e può essere utilizzato su sistemi operativi sprovvisti del software HyperTerminal menzionato in alto. Scegliere il tipo di file da esportare e il percorso dei file da esportare, quindi premere il pulsante Run (Esegui) come mostrato in basso. Nota: Il software SPDC supporta solo la lingua inglese. IT-41 IT-42 BILANCE ADVENTURER 7.2 Formato di uscita I risultati e i dati G/N/T sono visualizzati nel formato seguente. Campo: Lunghezza: Etichetta 1 Spazio 2 1 Peso 3 11 Spazio 2 Unità 4 Spazio 1 5 1 Stabilità 5 1 Spazio G/N 6 Spazio Tipo di Caratteri 7 1 3 0 8 1. La lunghezza del campo etichetta è variabile. 2. Ogni campo è seguito da uno spazio di delimitazione singolo (ASCII 32). 3. Il campo Peso è di 11 caratteri giustificati a destra. Se il valore è negativo il carattere "–"si trova a sinistra della cifra maggiormente significativa. 4. Il campo Unità contiene l'abbreviazione dell'unità di misura di fino a 5 caratteri. 5. Il campo Stabilità contiene il carattere “?” se la lettura del peso non è stabile. Il campo Stabilità e il campo Spazio sono omessi se la lettura del peso è stabile. 6. Il campo G/N contiene l'indicazione del peso lordo o del peso netto. Per i pesi netti, il campo contiene "NET". Per i pesi netti, il campo contiene nulla o "G". 7. Il campo dei caratteri di terminazione contiene CRLF, quattro CRLF o alimentazione moduli (ASCII 12), in base alle impostazioni di avanzamento riga. BILANCE ADVENTURER 8. MANUTENZIONE 8.1 Regolazione IT-43 Verificare periodicamente la regolazione, collocando un peso accurato sulla bilancia e visualizzando il risultato. Se è necessario eseguire la taratura, consultare le istruzioni riportate nella sezione 5.2. 8.2 Pulizia AVVERTENZA: Prima di effettuare la pulizia della bilancia Adventurer, scollegare l'alimentazione elettrica. Accertarsi che non entrino liquidi all'interno della bilancia. Pulire regolarmente la bilancia. È possibile pulire le superfici dell'alloggiamento con un panno privo di filacce inumidito con acqua e detergente delicato. È possibile pulire le superfici in vetro con un detergente commerciale per vetri. Non utilizzare solventi, prodotti chimici aggressivi, ammoniaca o detergenti abrasivi. Per la rimozione e la pulizia degli sportelli scorrevoli, seguire i passaggi riportati in basso. Attenzione: Non utilizzare solventi, prodotti chimici aggressivi, ammoniaca o detergenti abrasivi. Rimozione e riposizionamento degli sportelli in vetro per la pulizia: Passaggio 1 Sul retro della bilancia, premere il perno e far scorrere gli sportelli verso l'esterno. Passaggio 2 Dopo la pulizia, far scorrere gli sportelli nella fessura tenendo premuto il perno di cui al passaggio 1. Passaggio 3 Far scorrere gli sportelli nella fessura fino ad allineare il fermo posteriore con l'altro sportello. IT-44 8.3 BILANCE ADVENTURER Risoluzione dei problemi TABELLA 8-1. RISOLUZIONE DEI PROBLEMI 8.4 Sintomo/Visualizzazione Causa possibile Soluzione La bilancia non si accende Bilancia non alimentata Verificare connessioni e tensione Scarsa precisione Regolazione impropria Ambiente non stabile Eseguire regolazione Spostare la bilancia in una posizione adatta Impossibile eseguire la regolazione. Menu Regolazione bloccato Modalità approvata impostata su ON Ambiente non stabile Masse di regolazione non corrette Sbloccare il Menu Regolazione Disattivare la Modalità approvata Spostare la bilancia in una posizione adatta Utilizzare masse di regolazione corrette Impossibile modificare le impostazioni di menu Sottomenu bloccato Modalità approvata impostata su ON Sbloccare il sottomenu Disattivare la Modalità approvata Peso di riferimento basso. Il peso di riferimento è troppo piccolo Peso sul vassoio troppo basso per la determinazione di un peso di riferimento valido. Aumentare le dimensioni del campione. Peso del pezzo non valido Il peso medio per pezzo è troppo piccolo Aumentare il peso medio del pezzo Timeout funzionamento La lettura del peso non è stabile Spostare la bilancia in una posizione adatta ------ Occupato (tara, zero, stampa, in attesa di peso stabile) Attendere il completamento Informazioni relative all'assistenza Se nella sezione dedicata alla risoluzione dei problemi non è possibile trovare una soluzione al problema, contattare un agente Ohaus autorizzato. Consultare il sito Web www.ohaus.com per individuare l'ufficio OHAUS più vicino. Il personale specializzato Ohaus addetto alla manutenzione dei prodotti sarà disponibile per l'assistenza. BILANCE ADVENTURER 9. DATI TECNICI 9.1 Specifiche Condizioni ambientali Solo per uso interno Altitudine: fino a 2000 m Intervallo di temperatura specificato: da 10°C a 30°C Umidità: umidità relativa massima 80% per temperature fino a 30℃ riduzione lineare fino al 50% di umidità relativa a 40℃ Fluttuazioni di tensione della rete elettrica: fino al ± 10% rispetto alla tensione nominale Categoria di installazione II Grado di inquinamento: 2 Materiali Alloggiamento della base: alluminio pressofuso, verniciato Alloggiamento, parte superiore: Plastica (ABS) Piattaforme di pesatura: acciaio inossidabile 18/10 Paravento per correnti d'aria; vetro, plastica (ABS) Piedini: Plastica (ABS) IT-45 IT-46 BILANCE ADVENTURER TABELLA 9-1. SPECIFICHE TECNICHE Modelli: Portata Risoluzione d Ripetibilità (dev standard) (g) Linearità (g) Punti di regolazione ad intervallo (g) Regolazione Unità di pesatura Applicazioni Tempo di stabilizzazione (tipico) Coefficiente di deriva termica (PPM/K) Peso minimo tipico USP (u=0,10%, k=2) Peso minimo ottimale USP (u=0,10%, k=2) Display Dimensioni dello schermo Retroilluminazione Comandi Comunicazione Alimentazione di ingresso della bilancia Alimentazione Dimensioni piattaforma (diametro) Dimensioni bilancia assemblata (L x P x A) Dimensioni di spedizione (P x L x A) Peso netto Peso di spedizione AX124 120 g AX124/E 120 g AX224 AX224/E 220 g 220 g 0,0001 g AX324 320 g 0,0001 g ±0,0002 g 25 g, 25 g, 50 g, 50 g, 50 g 50 g 100 g 100 g 100 g 75 g, 75 g, 150 g, 150 g, 200 g, 300 g 100 g 100 g 200 g 200 g Auto-Cal Esterna Auto-Cal Esterna Auto-Cal Baht, carato, grano, grammo, milligrammo, mesghal, momme, Newton, oncia, pennyweight, libbra, Tael (Hong Kong), Tael, (Singapore), Tael (Taiwan), tical, tola, oncia troy, personalizzata (1) Pesatura, conteggio pezzi, pesatura percentuale, controllo peso, pesatura dinamica, formulazione, determinazione della densità, totalizzazione, memoria display ≤ 3 secondi 1,5 0,20 g 0,20 g 0,20 g 0,20 g 0,20 g 0,082 g 0,082 g 0,082 g 0,082 g 0,082 g LCD grafico a colori WQVGA 4,3 in/10,9 cm (diagonale) LED bianco Touch screen con tecnologia resistiva a 4 fili + 6 tasti a membrana RS-232, USBx2 12 Vcc, 0,5A Ingresso adattatore CA: 100-240 Vca 0,3A 50-60 Hz Uscita adattatore CA: 12 Vcc 0,84A 90 mm/3,5 in 230 x 354 x 340 mm 230 x 354 x 340 mm 5,1 kg 7,8 kg BILANCE ADVENTURER Modelli: Portata Risoluzione d Ripetibilità (dev standard) (g) Linearità (g) Punti di regolazione ad intervallo (g) Regolazione Unità di pesatura Applicazioni Tempo di stabilizzazione (tipico) Coefficiente di deriva termica (PPM/K) Peso minimo tipico USP (u=0,10%, k=2) Peso minimo ottimale USP (u=0,10%, k=2) IT-47 TABELLA 9-2. SPECIFICHE TECNICHE (continua) AX223 AX223/E AX423 AX423/E AX523 220 g 220 g 420 g 420 g 520 g 0,001 g ±0,002 g 50 g, 50 g, 100 g, 100 g, 100 g 100 g 200 g 200 g 200 g, 300 g 200 g, 300 g 150 g, 150 g, 300 g, 300 g, 400 g, 500 g 400 g, 500 g 200 g 200 g 400 g 400 g Auto-Cal Esterna Auto-Cal Esterna Auto-Cal Esterna Baht, carato, grano, grammo, milligrammo, mesghal, momme, Newton, oncia, pennyweight, libbra, Tael (Hong Kong), Tael, (Singapore), Tael (Taiwan), tical, tola, oncia troy, personalizzata (1) Pesatura, conteggio pezzi, pesatura percentuale, controllo peso, pesatura dinamica, formulazione, determinazione della densità, totalizzazione, memoria display ≤ 2 secondi 3 2,0 g 2,0 g 2,0 g 2,0 g 2,0 g 0,82 g 0,82 g 0,82 g 0,82 g 0,82 g LCD grafico a colori WQVGA 4,3 in/10,9 cm (diagonale) LED bianco Touch screen con tecnologia resistiva a 4 fili + 6 tasti a membrana RS-232, USBx2 12 Vcc, 0,5A Ingresso adattatore CA: 100-240 Vca 0,3A 50-60 Hz Uscita adattatore CA: 12 Vcc 0,84A Alimentazione Dimensioni piattaforma (diametro) Dimensioni bilancia assemblata (L x P x A) Dimensioni di spedizione (P x L x A) Peso netto Peso di spedizione 520 g 0,001 g Display Dimensioni dello schermo Retroilluminazione Comandi Comunicazione Alimentazione di ingresso della bilancia AX523/E 130 mm/12,95 cm 230 x 354 x 340 mm 387 507 x 531 mm 5,8 kg 8,5 kg 5,6 kg 8,3 kg 5,8 kg 8,5 kg 5,6 kg 8,3 kg 5,8 kg 8,5 kg 5,6 kg 8,3 kg IT-48 BILANCE ADVENTURER TABELLA 9-3. SPECIFICHE (continua) Modelli: Portata Risoluzione d Ripetibilità (dev standard) (g) Linearità (g) Punti di regolazione ad intervallo (g) Regolazione Unità di pesatura Applicazioni AX422 420g AX422/E 420g AX822 820g AX822/E 820g 200g, 400g 600g, 800g 200g, 400g 600g, 800g 0,01 g 0,01 g ±0.02 g 100g, 200g 300g,400g 100g, 200g 300g,400g Auto-Cal Esterna Auto-Cal Esterna Baht, carato, grano, grammo, chilogrammo, mesghal, momme, Newton, oncia, pennyweight, libbra, Tael (Hong Kong), Tael, (Singapore), Tael (Taiwan), tical, tola, oncia troy, personalizzata (1) Pesatura, conteggio pezzi, pesatura percentuale, controllo peso, pesatura dinamica, formulazione, determinazione della densità, totalizzazione, memoria display Tempo di stabilizzazione (tipico) Coefficiente di deriva termica (PPM/K) ≤ 1,5 secondi 3 Peso minimo tipico USP (u=0,10%, k=2) 20,0 g 20,0 g 20,0 g 20,0 g Peso minimo ottimale USP (u=0,10%, k=2) 8,2 g 8,2 g 8,2 g 8,2 g Display Dimensioni dello schermo Retroilluminazione Comandi Comunicazione Alimentazione di ingresso della bilancia LCD grafico a colori WQVGA 4,3 in/10,9 cm (diagonale) LED bianco Touch screen con tecnologia resistiva a 4 fili + 6 tasti a membrana RS-232, USBx2 12 Vcc, 0,5A Ingresso adattatore CA: 100-240 Vca 0,3A 50-60 Hz Uscita adattatore CA: 12 Vcc 0,84A Alimentazione Dimensioni piattaforma Dimensioni bilancia assemblata (L x P x A) Dimensioni di spedizione (P x L x A) Peso netto Peso di spedizione 175 x 195 mm/6,9 x 19,56 cm 230 x 354 x100 mm 392 x 557 x 301 mm 4.6 kg 6.5 kg 3.9 kg 5.8 kg 4,6 kg 6,5 kg 3,9 kg 5,8 kg BILANCE ADVENTURER IT-49 TABELLA 9-4. SPECIFICHE (continua) Modelli: Portata Risoluzione d Ripetibilità (dev standard) (g) Linearità (g) Punti di regolazione ad intervallo (g) Regolazione Unità di pesatura Applicazioni AX1502 1.520 g AX1502/E 1.520 g AX2202 2.200 g AX2202/E 2.200 g 0,01 g AX4202 4.200 g AX4202/E AX5202 4.200 g 5.200 g 0,01 g ±0.02 g 300 g, 500 g, 500 g, 1000 g, 1000 g, 2000 g, 500 g 400 g 1000 g 1000 g 2000 g 2000 g 3000 g 1000 g, 500 g, 1500 g, 1500 g, 3000 g, 3000 g, 4000 g, 1500 g 600 g 2000 g 2000 g 4000 g 4000 g 5000 g Auto-Cal Esterna Auto-Cal Esterna Auto-Cal Esterna Auto-Cal Baht, carato, grano, grammo, chilogrammo, mesghal, momme, Newton, oncia, pennyweight, libbra, Tael (Hong Kong), Tael, (Singapore), Tael (Taiwan), tical, tola, oncia troy, personalizzata (1) Pesatura, conteggio pezzi, pesatura percentuale, controllo peso, pesatura dinamica, formulazione, determinazione della densità, totalizzazione, memoria display Tempo di stabilizzazione (tipico) Coefficiente di deriva termica (PPM/K) ≤ 1,5 secondi 3 1,9 Peso minimo tipico USP (u=0,10%, k=2) 20,0 g 20,0 g 20,0 g 20,0 g 20,0 g 20,0 g 20,0 g Peso minimo ottimale USP (u=0,10%, k=2) 8,2 g 8,2 g 8,2 g 8,2 g 8,2 g 8,2 g 8,2 g Display LCD grafico a colori WQVGA Dimensioni dello schermo Retroilluminazione Comandi Comunicazione Alimentazione di ingresso della bilancia 4,3 in/10,9 cm (diagonale) LED bianco Touch screen con tecnologia resistiva a 4 fili + 6 tasti a membrana RS-232, USBx2 12 Vcc, 0,5A Ingresso adattatore CA: 100-240 Vca 0,3A 50-60 Hz Uscita adattatore CA: 12 Vcc 0,84A Alimentazione Dimensioni piattaforma Dimensioni bilancia assemblata (L x P x A) Dimensioni di spedizione (P x L x A) Peso netto Peso di spedizione 175 x 195 mm/6,9 x 19,56 cm 230 x 354 x100 mm 392 x 557 x 301 mm 4,6 kg 6,5 kg 3,9 kg 5,8 kg 4,6 kg 6,5 kg 3,9 kg 5,8 kg 4,6 kg 6,5 kg 3,9 kg 5,8 kg 3,8 kg 5,7 kg IT-50 Modelli: Portata Risoluzione d Ripetibilità (dev standard) (g) Linearità (g) Punti di regolazione ad intervallo (g) Regolazione Unità di pesatura Applicazioni Tempo di stabilizzazione (tipico) Coefficiente di deriva termica (PPM/K) Peso minimo tipico USP (u=0,10%, k=2) Peso minimo ottimale USP (u=0,10%, k=2) BILANCE ADVENTURER AX2201 2200g TABELLA 9-5. SPECIFICHE (continua) AX4201 AX4201/E AX2201/E 4.200 g 4.200 g 2200g 0,1 g AX8201/E 8.200 g 0,1 g ±0,2 g 1000 g, 1000 g, 2000 g, 2000 g, 500g, 1000g 500g, 1000g 2000 g 2000 g 4000 g 4000 g 3000 g, 3000 g, 6000 g, 6000 g, 1500g, 2000g 1500g, 2000g 4000 g 4000 g 8000 g 8000 g Auto-Cal Esterna Auto-Cal Esterna Auto-Cal Esterna Baht, carato, grano, grammo, chilogrammo, mesghal, momme, Newton, oncia, pennyweight, libbra, Tael (Hong Kong), Tael, (Singapore), Tael (Taiwan), tical, tola, oncia troy, personalizzata (1) Pesatura, conteggio pezzi, pesatura percentuale, controllo peso, pesatura dinamica, formulazione, determinazione della densità, totalizzazione, memoria display ≤ 1,5 secondi 9 200.0 g 200.0 g 200.0 g 200.0 g 200.0 g 200.0 g 82 g 82 g 82 g 82 g 82 g 82 g Display LCD grafico a colori WQVGA Dimensioni dello schermo Retroilluminazione Comandi Comunicazione Alimentazione di ingresso della bilancia LCD grafico a colori WQVGA 4,3 in/10,9 cm (diagonale) LED bianco Touch screen con tecnologia resistiva a 4 fili + 6 tasti a membrana RS-232, USBx2 Alimentazione Dimensioni piattaforma (diametro) Dimensioni bilancia assemblata (L x P x A) Dimensioni di spedizione (P x L x A) Peso netto Peso di spedizione AX8201 8.200 g 12 Vcc, 0,5A Ingresso adattatore CA: 100-240 Vca 0,3A 50-60 Hz Uscita adattatore CA: 12 Vcc 0,84A 230 x 354 x 100 mm 392 x 557 x 301 mm 4.6 kg 6.5 kg 3.9 kg 5.8 kg 4,6 kg 6,5 kg 3,9 kg 5,8 kg 3,8 kg 5,7 kg 3,4 kg 5,3 kg BILANCE ADVENTURER IT-51 TABELLA 9-6. SPECIFICHE TECNICHE (continua) MODELLO AX124M AX224M AX324M AX223M AX423M AX523M AX1502M AX2202M AX4202M AX5202M AX8201M Max 120 g 220 g 320 g 220 g 420 g 520 g 1520 g 2200 g 4200 g 5200 g 8200 g Min 0,01 g 0,01 g 0,01 g 0,02 g 0,02 g 0,02 g 0,5 g 0,5 g 0,5 g 0,5 g 5g d= 0,0001 g 0,001 g 0,01 g 0,1 g e= 0,001 g 0,01 g 0,1 g 1g Classe di approvazione Ripetibilità (disp. std.) (g) I Linearità (g) Punti di regolazione ad intervallo (g) Regolazione 25 g, 50 g 75 g, 100 g 0,0001 g 0,001 g 0,01 g 0,1 g ±0,0002 g ±0,002 g ±0,02 g ±0,2 g 50 g, 100 g 150 g, 200 g 100 g 200 g, 300 g 50 g, 100 g 150 g, 200 g 100 g, 200 g 300 g, 400 g 200 g, 300 g 400 g, 500 g 500 g, 1000 g, 2000 g, 2000 g, 500 g 1000 g 2000 g 3000 g 4000 g 1000 g, 1500 g, 3000 g, 4000 g, 6000 g, 1500 g 2000 g 4000 g 5000 g 8000 g Auto-Cal Auto-Cal Auto-Cal Auto-Cal Auto-Cal Auto-Cal Auto-Cal Auto-Cal Auto-Cal Auto-Cal Auto-Cal Unità di pesatura Applicazioni II milligrammi, grammi, carato chilogrammi, grammi, carato Pesatura, conteggio pezzi, pesatura percentuale, controllo peso, pesatura animali, formulazione, determinazione della densità, totalizzazione, memoria display Tempo di stabilizzazione (tipico) Coefficiente di deriva termica (PPM/K) Peso minimo tipico 0,20 g USP (u=0,10%, k=2) Peso minimo ottimale 0,082 g USP (u=0,10%, k=2) ≤ 3 secondi ≤2 secondi 1,5 3 ≤1,5 secondi 3 0,20 g 0,20 g 2,0 g 2,0 g 2,0 g 20,0 g 20,0 g 20,0 g 20,0 g 200,0 g 0,082 g 0,082 g 0,82 g 0,82 g 0,82 g 8,2 g 8,2 g 8,2 g 8,2 g 82 g Display LCD grafico a colori WQVGA Dimensioni dello schermo 4,3 in/10,9 cm (diagonale) Retroilluminazione LED bianco Comandi Touch screen con tecnologia resistiva a 4 fili + 6 tasti a membrana Comunicazione RS-232, USBx2 Alimentazione di ingresso della bilancia 12 VDC, 0,5A Ingresso adattatore CA: 100-240 Vca 0,3A 50-60 Hz Uscita adattatore CA: 12 VCC 0,84 A Alimentazione Dimensioni piattaforma (diametro) Dimensioni bilancia assemblata (L x P x A) Dimensioni di spedizione (P x L x A) 1,9 90 mm 130 mm 175x195 mm 230 x 354 x 340 mm 230 x 354 x 340 mm 230 x 354 x 100 mm 387 x 507 x 531 mm 387 x 507 x 531 mm 392 x 557 x 301 mm Peso netto 5,1 kg 5,8 kg 4,6 kg 3,8 kg Peso di spedizione 7,8 kg 8,5 kg 6,5 kg 5,7 kg Nota: M = Omologazione OIM IT-52 BILANCE ADVENTURER TABELLA 9-7. SPECIFICHE TECNICHE (continua) Modello AX224N AX223N/E AX423N AX 423N/E Max 220 g 220 g 420 g 420 g 520 g Min 0,01 g 0,02 g 0,02 g 0,02 g 0,02 g d= 0,0001 g 0,001 g 0,01 g 0,1 g e= 0,001 g 0,01 g 0,1 g 1g Classe di approvazione AX523N/E AX1502N/E I AX2202N/E AX4202N/E AX8201N/E 1520 g 2200 g 4200 g 8200 g 0,5 g 0,5 g 0,5 g 5g II Ripetibilità (disp. std.) (g) 0,0001 g 0,001 g 0,01 g 0,1 g Linearità (g) ±0,0002 g ±0,002 g ±0,02 g ±0,2 g Punti di regolazione ad intervallo (g) 50 g, 100 50 g, 100 100 g, 200 g g g 100 g, 200 g 200 g, 300 g 150 g, 200 150 g, 200 300 g, 400 300 g, 400 g 400 g, 500 g g g g Regolazione Auto-Cal Tempo di stabilizzazione (tipico) Coefficiente di deriva termica (PPM/K) Peso minimo tipico USP (u=0,10%, k=2) Peso minimo ottimale USP (u=0,10%, k=2) Auto-Cal Esterna Esterna Esterna grammi, milligrammi, carato, pennyweight, grano, oncia, oncia troy Unità di pesatura Applicazioni Esterna 500 g 1000 g, 1500 g Esterna Esterna Esterna grammo, chilogrammo, carato, pennyweight, grano, libbra, oncia, oncia troy Pesatura, conteggio pezzi, pesatura percentuale, controllo peso, pesatura animali, formulazione, determinazione della densità, totalizzazione ≤3 secondi ≤2 secondi 1,5 3 ≤1,5 secondi 3 9 0,20 g 2,0 g 2,0 g 2,0 g 2,0 g 20,0 g 20,0 g 20,0 g 200,0 g 0,082 g 0,82 g 0,82 g 0,82 g 0,82 g 8,2 g 8,2 g 8,2 g 82 g Display LCD grafico a colori WQVGA Dimensioni dello schermo Retroilluminazio ne 4,3 in/10,9 cm (diagonale) LED bianco Comandi Touch screen con tecnologia resistiva a 4 fili + 6 tasti a membrana Comunicazione RS-232, USBx2 Alimentazione di ingresso della bilancia 12 VDC, 0.5A Ingresso adattatore CA: 100-240 Vca 0,3A 50-60 Hz Uscita adattatore CA: 12 VCC 0,84 A Alimentazione Dimensioni piattaforma (diametro) Dimensioni bilancia assemblata (L x P x A) 500 g, 1000 g 1000 g, 2000 g 2000 g, 4000 g 1500 g, 2000 g 3000 g, 4000 g 6000 g, 8000 g 90 mm 130 mm 175x195 mm 354x230x340 mm 354x230x100 mm Dimensioni di spedizione (P x L x A) 557x392x301 mm Peso netto 5,1 kg 5,6 kg 5,8 kg 5,6 kg 3,9 kg 3,4 kg Peso di spedizione 7,8 kg 8,3 kg 8,5 kg 8,3 kg 5,8 kg 5,3 kg Nota: N = Omologazione NTEP BILANCE ADVENTURER IT-53 TABELLA 9-8. SPECIFICHE TECNICHE (continua) MODELLO AX124AU AX224AU AX324AU AX223AU AX423AU AX523AU AX1502AU AX2202AU AX4202AU AX5202AU AX8201AU Max 120 g 220 g 320 g 220 g 420 g 520 g 1520 g 2200 g 4200 g 5200 g 8200 g Min 0,01 g 0,01 g 0,01 g 0,02 g 0,02 g 0,02 g 0,5 g 0,5 g 0,5 g 0,5 g 5g d= 0,0001 g 0,001 g 0,01 g 0,1 g e= 0,001 g 0,01 g 0,1 g 1g 0,01 g 0,1 g ±0,02 g ±0,2 g Classe di approvazione Ripetibilità (disp. std.) (g) I 0,0001 g Linearità (g) Punti di regolazione ad intervallo (g) Regolazione 0,001 g ±0,0002 g 25 g, 50 g 75 g, 100 g 50 g, 100 g 150 g, 200 g ±0,002 g 100 g 200 g, 300 g 50 g, 100 g 150 g, 200 g 100 g, 200 g 300 g, 400 g 200 g, 300 g 400 g, 500 g 500 g, 1000 g, 2000 g, 2000 g, 500 g 1000 g 2000 g 3000 g 4000 g 1000 g, 1500 g, 3000 g, 4000 g, 6000 g, 1500 g 2000 g 4000 g 5000 g 8000 g Auto-Cal Auto-Cal Auto-Cal Auto-Cal Auto-Cal Auto-Cal Auto-Cal Auto-Cal Auto-Cal Auto-Cal Auto-Cal Unità di pesatura Applicazioni II milligrammi, grammi, carato chilogrammi, grammi, carato Pesatura, conteggio pezzi, pesatura percentuale, controllo peso, pesatura animali, formulazione, determinazione della densità, totalizzazione, memoria display Tempo di stabilizzazione (tipico) Coefficiente di deriva termica (PPM/K) Peso minimo tipico 0,20 g USP (u=0,10%, k=2) Peso minimo ottimale 0,082 g USP (u=0,10%, k=2) ≤ 3 secondi ≤2 secondi 1,5 3 ≤1,5 secondi 3 0,20 g 0,20 g 2,0 g 2,0 g 2,0 g 20,0 g 20,0 g 20,0 g 20,0 g 200,0 g 0,082 g 0,082 g 0,82 g 0,82 g 0,82 g 8,2 g 8,2 g 8,2 g 8,2 g 82 g Display LCD grafico a colori WQVGA Dimensioni dello schermo 4,3 in/10,9 cm (diagonale) Retroilluminazione LED bianco Comandi Touch screen con tecnologia resistiva a 4 fili + 6 tasti a membrana Comunicazione RS-232, USBx2 Alimentazione di ingresso della bilancia 12 VDC, 0,5A Ingresso adattatore CA: 100-240 Vca 0,3A 50-60 Hz Uscita adattatore CA: 12 VCC 0,84 A Alimentazione Dimensioni piattaforma (diametro) Dimensioni bilancia assemblata (L x P x A) Dimensioni di spedizione (P x L x A) 1,9 90 mm 130 mm 175x195 mm 230 x 354 x 340 mm 230 x 354 x 340 mm 230 x 354 x 100 mm 387 x 507 x 531 mm 387 x 507 x 531 mm 392 x 557 x 301 mm Peso netto 5,1 kg 5,8 kg 4,6 kg 3,8 kg Peso di spedizione 7,8 kg 8,5 kg 6,5 kg 5,7 kg IT-54 9.2 BILANCE ADVENTURER Illustrazioni e dati dimensionali Dimensioni bilancia completamente assemblata Figura 9-1. Modelli con paravento Figura 9-2. Modelli senza paravento 9.3 Componenti e accessori TABELLA 9-7. ACCESSORI DESCRIZIONE Display ausiliario Kit di densità Cavo, Dispositivo USB (tipo A-B) Dispositivo di sicurezza (blocco laptop) Cavo RS232, PC 25 pin Cavo RS232, PC 9 pin Cappottina di protezione Display ausiliario NUMERO PARTE 80251396 80253384 83021085 80850043 80500524 80500525 30093334 80251396 BILANCE ADVENTURER 9.4 IT-55 Comunicazione 9.4.1 Comandi interfaccia I Comandi elencati nella tabella seguente saranno confermati dalla bilancia. La bilancia visualizzerà "ES" per i comandi non validi. TABELLA 9-8. ELENCO COMANDI INTERFACCIA ADVENTURER Caratteri dei comandi IP P CP SP SLP SLZP xP 0P H Z T xT*** PT ON OFF C IC AC PSN PV x# P# x% P% xS xRL Funzione Stampa immediata del peso visualizzato (stabile o non stabile). Stampa del peso visualizzato (stabile o non stabile). Stampa continua. Stampa in caso di peso stabile. Stampa automatica del peso visualizzato stabile non zero. Stampa automatica del peso visualizzato stabile non zero e lettura zero stabile. Stampa intervallo x = Intervallo stampa (1-3600 sec) 0P termina la stampa dell'intervallo. Vedere sopra Immettere le righe dell'intestazione di stampa Equivale a premere il pulsante Zero. Equivale a premere il tasto Tara. Stabilisce un valore di tara preimpostato nell'unità visualizzata. X= valore di tara preimpostato. L'invio di 0T cancella la tara (se consentito). Stampa il peso Tara memorizzato. Esce dalla modalità Standby Accede alla modalità Standby Avvia la regolazione a intervallo Avvia la regolazione interna, come attivazione dal menu Regolazione. Interrompe la regolazione. Attenzione: quando LFT è attivo, l'operazione non è consentita. Stampa il numero di serie. Stampa la versione del software del terminale, versione del software della base e LFT ON (se LFT è impostato su ON). Imposta il peso medio del pezzo del conteggio (x) in grammi. (Deve essere memorizzato un valore APW ). Stampa del peso medio per pezzo dell'applicazione conteggio Imposta il peso di riferimento dell'applicazione percentuale (x) in grammi. (Deve avere un peso di riferimento memorizzato). Stampa il peso di riferimento percentuale dell'applicazione. 0 = stampa di dati non stabili, come IP; 1 = stampa solo stabile 1), come SP. 0 = disabilita risposta; 1 = abilita risposta. Questo comando controlla solo la risposta "OK!". IT-56 9.4.2 BILANCE ADVENTURER Collegamenti dei pin della RS-232 (DB9) Data GND Pin 2: Linea di trasmissione bilancia (TxD) Pin 3: Linea di ricezione bilancia (RxD) Pin 5: Segnale di terra (GND) Pin 7: Pronto per invio (sincronizzazione hardware) (CTS) Pin 8: Richiesta di invio (sincronizzazione hardware) (RTS) 9.5 1 5 9 Female 6 Handshake L'interfaccia USB L’interfaccia USB Ohaus rappresenta una soluzione unica per consentire il collegamento di una bilancia a un computer tramite USB (Universal Serial Bus). I dispositivi USB sono catalogati in classi come le unità disco, le fotocamere digitali, le stampanti, ecc. Le bilance non prevedono una classe comunemente utilizzata, quindi l'interfaccia USB Ohaus adotta un'interfaccia generica basata sullo standard seriale RS232. I dati inviati dalla bilancia al computer sono in formato USB. I dati USB vengono inviati a una porta virtuale. Questa porta viene rilevata come porta RS232 dal programma dell'applicazione. Quando si invia un comando da un computer alla bilancia, il programma invia un comando alla porta virtuale come se fosse una porta RS-232. Il computer quindi indirizza il comando dalla porta virtuale al connettore USB del computer dove è collegata la bilancia. La porta riceve il segnale USB e risponde al comando. L'interfaccia USB include un CD con i driver del software per creare la porta virtuale richiesta sul computer. Requisiti di sistema Per PC con Windows 98®, Windows 98SE®, Windows ME®, Windows 2000®, Windows XP® o Windows 8® (32 bit). Porta USB disponibile (tipo A, 4 pin, femmina) Connessione USB La porta USB della bilancia termina con un connettore di tipo B USB, femmina a 4 pin. È necessario un cavo USB (tipo B/maschio – tipo A/maschio) (non fornito). 1. Assicurarsi che la bilancia sia accesa e funzioni correttamente. 2. Accendere il computer e verificare che la porta USB sia abilitata e funzioni correttamente. 3. Collegare i connettori USB del cavo alla porta USB del computer e alla porta USB della bilancia. Windows® rileva un dispositivo USB e viene avviata la finestra Installazione nuovo hardware. Installazione del software della porta virtuale 1. Inserire il CD in dotazione nell'unità del computer. Le diverse versioni di Windows® prevedono procedure lievemente diverse per caricare il driver sul CD. In tutte le versioni l'Installazione nuovo hardware indica le operazioni richieste per selezionare il driver che si trova sul CD. 2. Dopo aver fatto clic su Fine, la porta virtuale dovrebbe essere pronta per l'uso. Windows® tipicamente aggiunge la porta virtuale in sequenza dopo la porta COM con il numero più alto. Ad esempio, su PC dotati di fino a 4 porte COM, la porta virtuale sarà COM5. Quando si utilizza l'interfaccia USB con programmi che limitano il numero per le designazioni delle porte COM (ad esempio, Ohaus MassTracker consente solo COM1, 2, 3 e 4), può essere necessario assegnare uno di questi numeri alla nuova porta virtuale. Esempio di Installazione nuovo hardware su Windows XP Questa installazione può essere impostata in Impostazioni porta dell'utilità Gestione dispositivi nel Pannello di controllo di Windows. BILANCE ADVENTURER INGRESSO USB La bilancia risponderà a svariati comandi inviati tramite l'adattatore di interfaccia. Terminare i comandi seguenti in presenza di [CR] o [CRLF]. Comandi Adventurer C eseguire regolazione a intervallo 0S stampa i dati non stabili 1S stampa solo i dati stabili P equivale alla pressione di Stampa SP stampa solo peso stabile IP stampa immediata del peso visualizzato (stabile o instabile). CP stampa continua dei pesi. SLP stampa automatica solo del peso stabile non zero. SLZP stampa automatica del peso non zero e della lettura zero stabili. xP stampa automatica per intervalli di 1-3600 secondi (x = 1-3600) 0P termina stampa a intervallo T equivale alla pressione di Tara Z equivale alla pressione di Zero PV stampa la versione del software Funzionamento stampa automatica Quando nel menu viene attivata la stampa automatica, la bilancia invia i dati come richiesto. Se sono presenti dati nel buffer di stampa, la stampante porterà a termine la stampa di questi dati. 10. AGGIORNAMENTI SOFTWARE Ohaus migliora costantemente il software delle proprie bilance. Per richiedere l'ultima versione, si prega di contattare il rivenditore autorizzato Ohaus o Ohaus Corporation. IT-57 IT-58 11. BILANCE ADVENTURER CONFORMITÀ La conformità agli standard seguenti viene indicata dalla presenza del marchio corrispondente sul prodotto. Marchio Standard Questo prodotto è conforme alla direttiva EMC 2004/108/CE, alla Direttiva Bassa Tensione 2006/95/CE e alla Direttiva per gli strumenti di pesa non automatici 2009/23/CE. La Dichiarazione di Conformità completa è disponibile online all'indirizzo http://europe.ohaus.com/europe/en/home/support/compliance/ce-declaration-of-conformity. AS/NZS CISPR 11, AS/NZS 61000.4.3 CAN/CSA-C22.2 No. 61010-1-04 UL Std. No. 61010-1 (3a edizione) Nota importante per gli strumenti di pesatura certificati Gli strumenti di pesatura certificati sul luogo di fabbricazione recano sull'etichetta della confezione uno dei marchi mostrati qui accanto e l'adesivo con la ‘M’ verde (metrologia) sulla targa descrittiva. Tali apparecchiature possono essere messe in funzione immediatamente. Gli strumenti di pesatura che devono essere certificati in due fasi non recano la ‘M’ verde (metrologia) sulla targa descrittiva, ma solo il marchio di identificazione mostrato qui accanto, sull'etichetta della confezione. La seconda fase della certificazione iniziale deve essere condotta da un centro di assistenza approvato dal rappresentante autorizzato nell'ambito dell’Unione Europea o dalle autorità nazionali per i pesi e le misure. La prima fase della certificazione iniziale è stata condotta presso gli stabilimenti di produzione. Durante tale fase, vengono eseguiti tutti i test previsti dallo standard europeo adottato EN45501:1992, paragrafo 8.2.2. Se la normativa nazionale limita il periodo di validità della certificazione, l'utente dello strumento di pesatura deve osservare rigorosamente il periodo di ulteriore certificazione e informare l’Autorità per i Pesi e Misure del paese di appartenenza. Nota per FCC Questa apparecchiatura è stata collaudata e ritenuta conforme ai limiti dei dispositivi digitali di Classe A, in conformità con la Parte 15 delle norme FCC. Tali limiti sono previsti per fornire un’adeguata protezione contro interferenze dannose durante il funzionamento dell'apparecchiatura in un ambiente commerciale. L’apparecchiatura genera, utilizza e può irradiare energia nella banda delle radiofrequenze, per cui, se non installata e utilizzata in conformità al manuale di istruzioni, potrebbe causare interferenze dannose con le comunicazioni radio. L'uso del presente apparecchio in una zona residenziale può causare interferenze dannose e in questo caso l'utente deve correggere l'interferenza a proprie spese. Nota per il Canada Questa apparecchiatura digitale di classe A è conforme alla normativa canadese ICES-003. BILANCE ADVENTURER IT-59 Registrazione ISO 9001 Nel 1994, a OHAUS Corporation, USA, è stato rilasciato il certificato di registrazione ISO 9001 da BVQI (Bureau Veritus Quality International), confermando che il sistema di gestione qualità di OHAUS è conforme ai requisiti degli standard ISO 9001. Il 21 giugno 2012, OHAUS Corporation, USA, ha ottenuto una nuova registrazione conformemente allo standard ISO 9001:2008. In conformità alle norme europee: Smaltimento In conformità alla Direttiva Europea 2002/96/CE sullo smaltimento delle apparecchiature elettriche ed elettroniche (RAEE), l’apparecchiatura non deve essere smaltita assieme ad altri rifiuti domestici. Queste disposizioni sono valide anche nei paesi esterni all'UE, in base ai requisiti delle varie legislazioni. La direttiva sullo smaltimento delle pile 2006/66/CE ha introdotto dei nuovi requisiti, in vigore dal settembre 2008, sulla rimovibilità delle batterie dalle apparecchiature da gettare negli stati membri dell'Unione Europea. In conformità con questa direttiva, questo dispositivo è stato ideato per rimuovere in modo sicuro le batterie scariche in una struttura di smaltimento rifiuti. Smaltire questo prodotto secondo le normative locali, presso il punto di raccolta specificato per le apparecchiature elettriche ed elettroniche. In caso di dubbi, rivolgersi all'ente responsabile o al distributore da cui è stato acquistato questo dispositivo. Qualora l’apparecchio venga trasferito a terzi (per uso privato o professionale), il contenuto della presente normativa deve ritenersi valido anche per terzi. Le istruzioni di smaltimento in Europa sono disponibili all'indirizzo http://europe.ohaus.com/europe/en/home/support/weee.aspx. Grazie per il contributo alla salvaguardia dell'ambiente. IT-60 BILANCE ADVENTURER GARANZIA LIMITATA I prodotti Ohaus sono garantiti contro difetti dei materiali e difetti di fabbrica dalla data di consegna per tutta la durata del periodo di garanzia. Durante il periodo di garanzia Ohaus riparerà o, a sua scelta, sostituirà tutti i componenti che siano difettosi senza costo alcuno, purché il prodotto venga rinviato, con spese prepagate, alla Ohaus. Questa garanzia non è valida se il prodotto è stato danneggiato o trattato con poca cura, esposto a materiali radioattivi o corrosivi, se vi siano penetrati materiali estranei o in seguito ad assistenza eseguita da personale non Ohaus. In mancanza della scheda di garanzia spedita correttamente assieme al prodotto, il periodo di garanzia avrà inizio dalla data di spedizione al rivenditore autorizzato. Non viene rilasciata altra garanzia espressa o implicita da parte di Ohaus Corporation. Ohaus Corporation non sarà responsabile per qualsiasi danno indiretto. A causa delle diversità delle norme che regolano la garanzia nei vari paesi, contattare direttamente Ohaus o il rivenditore locale Ohaus per ulteriori dettagli. Ohaus Corporation 7 Campus Drive Suite 310 Parsippany, NJ 07054 USA Tel: +1 973 377 9000 Fax: +1 973 944 7177 With offices worldwide. www.ohaus.com * 30206078* P/N 30206078 B © 2018 Ohaus Corporation, all rights reserved.-
 1
1
-
 2
2
-
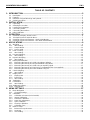 3
3
-
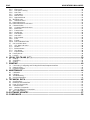 4
4
-
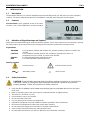 5
5
-
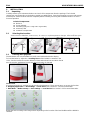 6
6
-
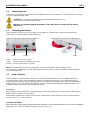 7
7
-
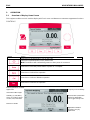 8
8
-
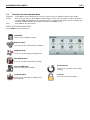 9
9
-
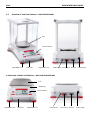 10
10
-
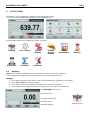 11
11
-
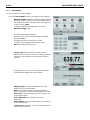 12
12
-
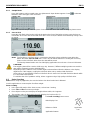 13
13
-
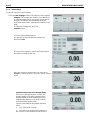 14
14
-
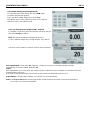 15
15
-
 16
16
-
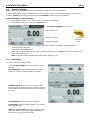 17
17
-
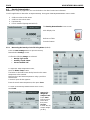 18
18
-
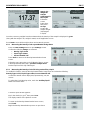 19
19
-
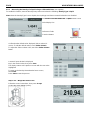 20
20
-
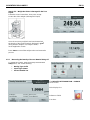 21
21
-
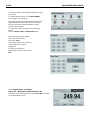 22
22
-
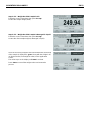 23
23
-
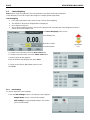 24
24
-
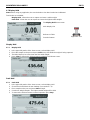 25
25
-
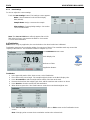 26
26
-
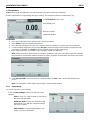 27
27
-
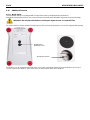 28
28
-
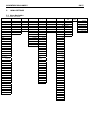 29
29
-
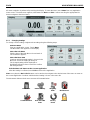 30
30
-
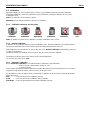 31
31
-
 32
32
-
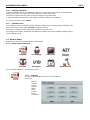 33
33
-
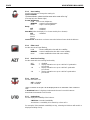 34
34
-
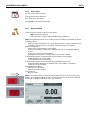 35
35
-
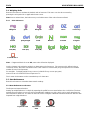 36
36
-
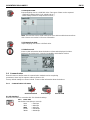 37
37
-
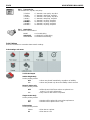 38
38
-
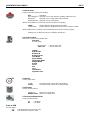 39
39
-
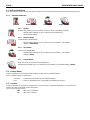 40
40
-
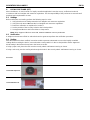 41
41
-
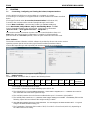 42
42
-
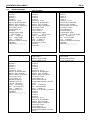 43
43
-
 44
44
-
 45
45
-
 46
46
-
 47
47
-
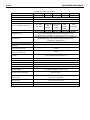 48
48
-
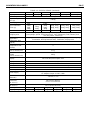 49
49
-
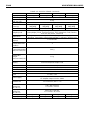 50
50
-
 51
51
-
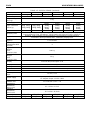 52
52
-
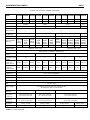 53
53
-
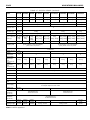 54
54
-
 55
55
-
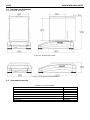 56
56
-
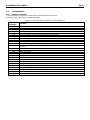 57
57
-
 58
58
-
 59
59
-
 60
60
-
 61
61
-
 62
62
-
 63
63
-
 64
64
-
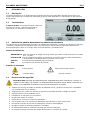 65
65
-
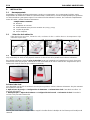 66
66
-
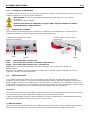 67
67
-
 68
68
-
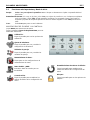 69
69
-
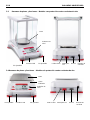 70
70
-
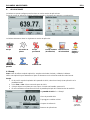 71
71
-
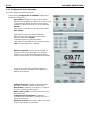 72
72
-
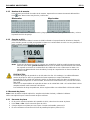 73
73
-
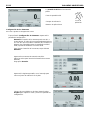 74
74
-
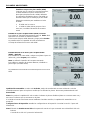 75
75
-
 76
76
-
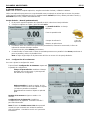 77
77
-
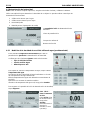 78
78
-
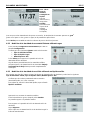 79
79
-
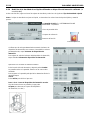 80
80
-
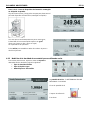 81
81
-
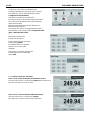 82
82
-
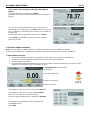 83
83
-
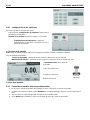 84
84
-
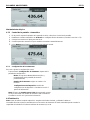 85
85
-
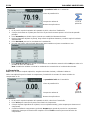 86
86
-
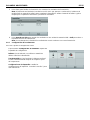 87
87
-
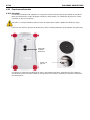 88
88
-
 89
89
-
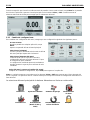 90
90
-
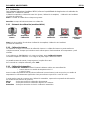 91
91
-
 92
92
-
 93
93
-
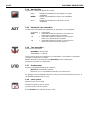 94
94
-
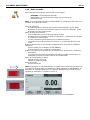 95
95
-
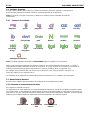 96
96
-
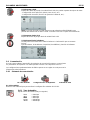 97
97
-
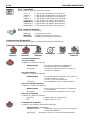 98
98
-
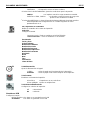 99
99
-
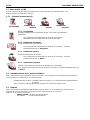 100
100
-
 101
101
-
 102
102
-
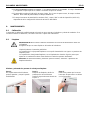 103
103
-
 104
104
-
 105
105
-
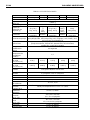 106
106
-
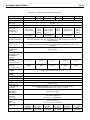 107
107
-
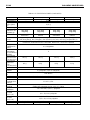 108
108
-
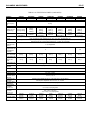 109
109
-
 110
110
-
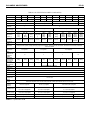 111
111
-
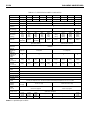 112
112
-
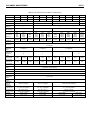 113
113
-
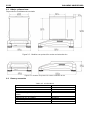 114
114
-
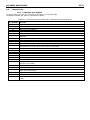 115
115
-
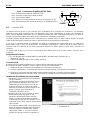 116
116
-
 117
117
-
 118
118
-
 119
119
-
 120
120
-
 121
121
-
 122
122
-
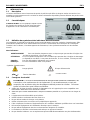 123
123
-
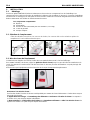 124
124
-
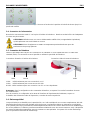 125
125
-
 126
126
-
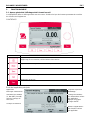 127
127
-
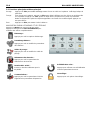 128
128
-
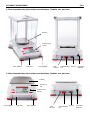 129
129
-
 130
130
-
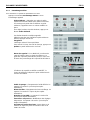 131
131
-
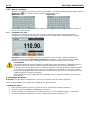 132
132
-
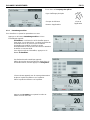 133
133
-
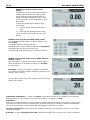 134
134
-
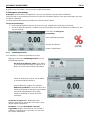 135
135
-
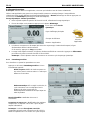 136
136
-
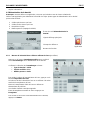 137
137
-
 138
138
-
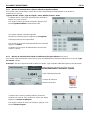 139
139
-
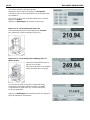 140
140
-
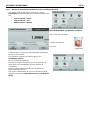 141
141
-
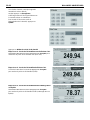 142
142
-
 143
143
-
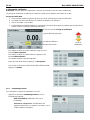 144
144
-
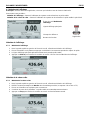 145
145
-
 146
146
-
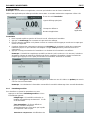 147
147
-
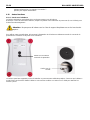 148
148
-
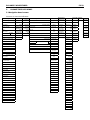 149
149
-
 150
150
-
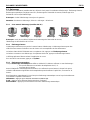 151
151
-
 152
152
-
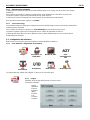 153
153
-
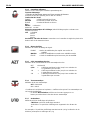 154
154
-
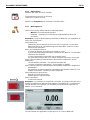 155
155
-
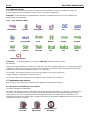 156
156
-
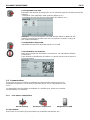 157
157
-
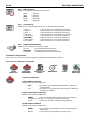 158
158
-
 159
159
-
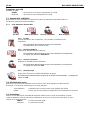 160
160
-
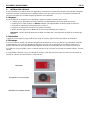 161
161
-
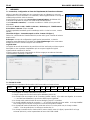 162
162
-
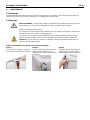 163
163
-
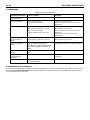 164
164
-
 165
165
-
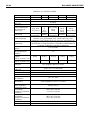 166
166
-
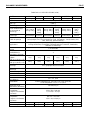 167
167
-
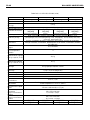 168
168
-
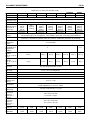 169
169
-
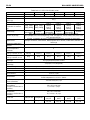 170
170
-
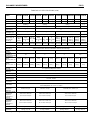 171
171
-
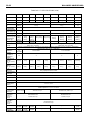 172
172
-
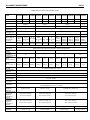 173
173
-
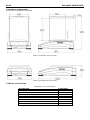 174
174
-
 175
175
-
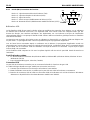 176
176
-
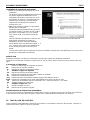 177
177
-
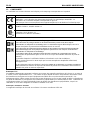 178
178
-
 179
179
-
 180
180
-
 181
181
-
 182
182
-
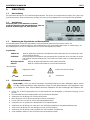 183
183
-
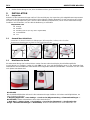 184
184
-
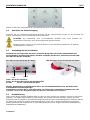 185
185
-
 186
186
-
 187
187
-
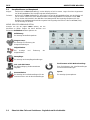 188
188
-
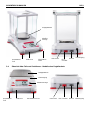 189
189
-
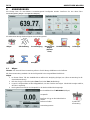 190
190
-
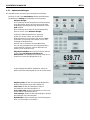 191
191
-
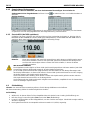 192
192
-
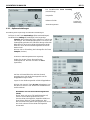 193
193
-
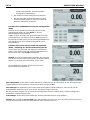 194
194
-
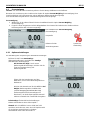 195
195
-
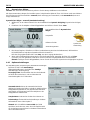 196
196
-
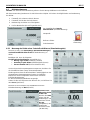 197
197
-
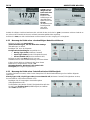 198
198
-
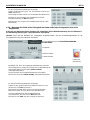 199
199
-
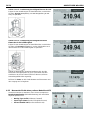 200
200
-
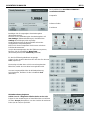 201
201
-
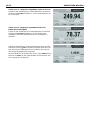 202
202
-
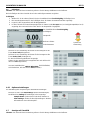 203
203
-
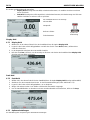 204
204
-
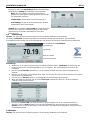 205
205
-
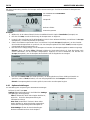 206
206
-
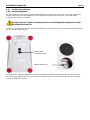 207
207
-
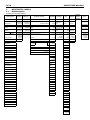 208
208
-
 209
209
-
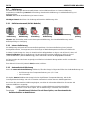 210
210
-
 211
211
-
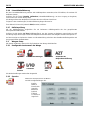 212
212
-
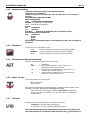 213
213
-
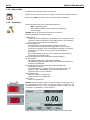 214
214
-
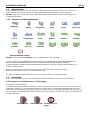 215
215
-
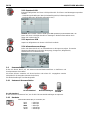 216
216
-
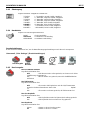 217
217
-
 218
218
-
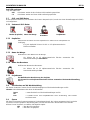 219
219
-
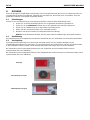 220
220
-
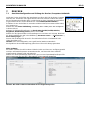 221
221
-
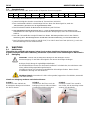 222
222
-
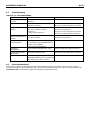 223
223
-
 224
224
-
 225
225
-
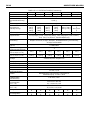 226
226
-
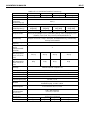 227
227
-
 228
228
-
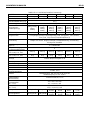 229
229
-
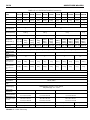 230
230
-
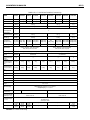 231
231
-
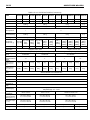 232
232
-
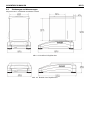 233
233
-
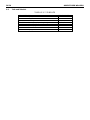 234
234
-
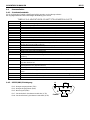 235
235
-
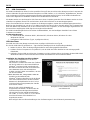 236
236
-
 237
237
-
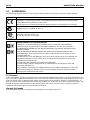 238
238
-
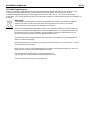 239
239
-
 240
240
-
 241
241
-
 242
242
-
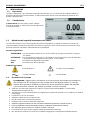 243
243
-
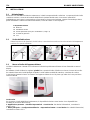 244
244
-
 245
245
-
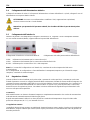 246
246
-
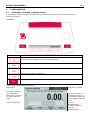 247
247
-
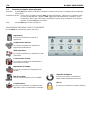 248
248
-
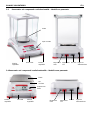 249
249
-
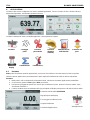 250
250
-
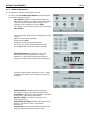 251
251
-
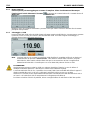 252
252
-
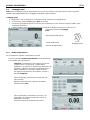 253
253
-
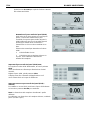 254
254
-
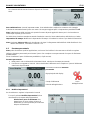 255
255
-
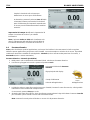 256
256
-
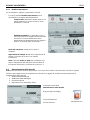 257
257
-
 258
258
-
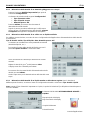 259
259
-
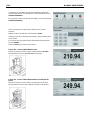 260
260
-
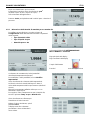 261
261
-
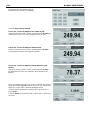 262
262
-
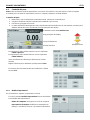 263
263
-
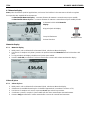 264
264
-
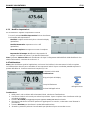 265
265
-
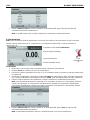 266
266
-
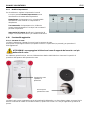 267
267
-
 268
268
-
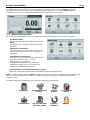 269
269
-
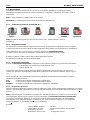 270
270
-
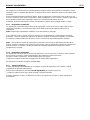 271
271
-
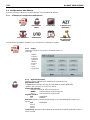 272
272
-
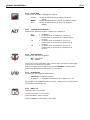 273
273
-
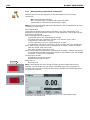 274
274
-
 275
275
-
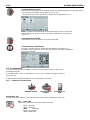 276
276
-
 277
277
-
 278
278
-
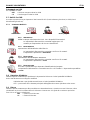 279
279
-
 280
280
-
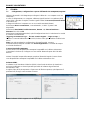 281
281
-
 282
282
-
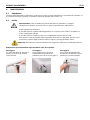 283
283
-
 284
284
-
 285
285
-
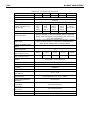 286
286
-
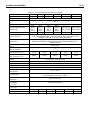 287
287
-
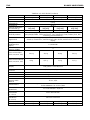 288
288
-
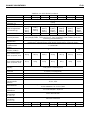 289
289
-
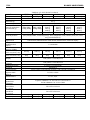 290
290
-
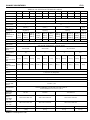 291
291
-
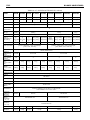 292
292
-
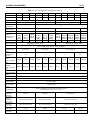 293
293
-
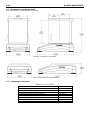 294
294
-
 295
295
-
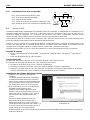 296
296
-
 297
297
-
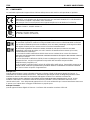 298
298
-
 299
299
-
 300
300
-
 301
301
-
 302
302
-
 303
303
-
 304
304


en otros idiomas
- français: Ohaus AX4202N/E Manuel utilisateur
- italiano: Ohaus AX4202N/E Manuale utente
- English: Ohaus AX4202N/E User manual
- Deutsch: Ohaus AX4202N/E Benutzerhandbuch
Artículos relacionados
-
Ohaus PX5202E Manual de usuario
-
Ohaus STX2201 Manual de usuario
-
Ohaus Defender T24PE Manual de usuario
-
-
Ohaus AX4202 Guía de inicio rápido
-
Ohaus MB27 El manual del propietario
-
-
Ohaus SKX1202 Manual de usuario
-
Ohaus AD7-MD Manual de usuario
-
Ohaus MB23 Manual de usuario
Otros documentos
-
A D HR-250AZ Guía del usuario
-
Gram EK El manual del propietario
-
American Weigh Scales LB-3000 Manual de usuario
-
A&D Weighing FX-200iWP Manual de usuario
-
Baxtran ABS Manual de usuario
-
A&D Weighing SK-10KWP Manual de usuario
-
 On Balance CBS-3000 Manual de usuario
-
Mettler Toledo For PE360 DeltaRange & PE3600 DeltaRange Electronic Precision Balances Instrucciones de operación
-
-
Vernier OHAUS Scout 420 g Manual de usuario
