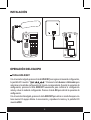
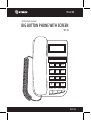
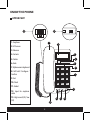
El Steren TEL-225 es un teléfono con pantalla y teclado grande que ofrece funciones prácticas para facilitar su uso y comunicación. Con su pantalla LCD, podrás visualizar claramente los números marcados, las llamadas entrantes y salientes, y la fecha y hora. Además, cuenta con botones grandes y bien espaciados para facilitar la marcación, especialmente para personas con problemas de visión o movilidad reducida. Este teléfono también permite almacenar números de marcado rápido para acceder fácilmente a tus contactos frecuentes.
El Steren TEL-225 es un teléfono con pantalla y teclado grande que ofrece funciones prácticas para facilitar su uso y comunicación. Con su pantalla LCD, podrás visualizar claramente los números marcados, las llamadas entrantes y salientes, y la fecha y hora. Además, cuenta con botones grandes y bien espaciados para facilitar la marcación, especialmente para personas con problemas de visión o movilidad reducida. Este teléfono también permite almacenar números de marcado rápido para acceder fácilmente a tus contactos frecuentes.


-
 1
1
-
 2
2
-
 3
3
-
 4
4
-
 5
5
-
 6
6
-
 7
7
-
 8
8
-
 9
9
-
 10
10
-
 11
11
-
 12
12
-
 13
13
-
 14
14
-
 15
15
-
 16
16
-
 17
17
-
 18
18
-
 19
19
-
 20
20
-
 21
21
-
 22
22
-
 23
23
-
 24
24
-
 25
25
-
 26
26


El Steren TEL-225 es un teléfono con pantalla y teclado grande que ofrece funciones prácticas para facilitar su uso y comunicación. Con su pantalla LCD, podrás visualizar claramente los números marcados, las llamadas entrantes y salientes, y la fecha y hora. Además, cuenta con botones grandes y bien espaciados para facilitar la marcación, especialmente para personas con problemas de visión o movilidad reducida. Este teléfono también permite almacenar números de marcado rápido para acceder fácilmente a tus contactos frecuentes.
en otros idiomas
- English: Steren TEL-225 Owner's manual
Artículos relacionados
-
Steren TEL-235 El manual del propietario
-
Steren TEL-2410 El manual del propietario
-
-
-
-
-
-
-
-