Steren TEL-2492 El manual del propietario
- Categoría
- Telefonos
- Tipo
- El manual del propietario

1

2
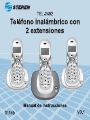
TEL-2492
Gracias por la compra de este producto Steren.
Este manual contiene todas las indicaciones necesarias para manejar su
nuevo Teléfono inalámbrico con 2 extensiones.
Por favor, revíselo completamente para estar seguro de cómo utilizar
apropiadamente el producto.
Para apoyo, compras y todo lo nuevo que tiene Steren,
visite nuestro sitio web:
www.steren.com
T
elé
f
ono inalámbrico con 2 exten
s
ione
s
La información que se muestra en este manual sirve únicamente
como referencia sobre el producto. Debido a actualizaciones pueden
existir diferencias.
Por favor, consulte nuestra página web (www.steren.com) para
obtener la versión más reciente del instructivo.

3
INSTRUCCIONES IMPORTANTES DE SEGURIDAD
• Desconecte los equipos del contacto eléctrico antes de limpiarlos.
• Use un paño húmedo para la limpieza. No utilice limpiadores líquidos o
en aerosol.
• Nunca utilice estos equipos cerca de fuentes de agua.
• Coloque el teléfono inalámbrico sobre una superfi cie fi rme, donde las
aberturas y ranuras de la parte posterior reciban ventilación adecuada.
• Opere el teléfono inalámbrico únicamente con el tipo de suministro
eléctrico indicado en la etiqueta. De no estar seguro del tipo de suministro
eléctrico en su hogar, consulte con su distribuidor o compañía eléctrica
local.
• No desarme el teléfono, podría exponerse a voltajes peligrosos. En caso de
requerir servicio acuda a un centro autorizado.

4
C
ARA
C
TERÍ
S
TI
C
A
S
•
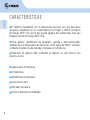
• El teléfono inalámbrico con 2 extensiones funciona con una sola base
receptora, ampliando así la conectividad en su hogar u ofi cina. Incorpora
tecnología DECT 6,0, por lo que puede agregar dos extensiones más que
también utilicen tecnología DECT 6.0.
•
• Tiene altavoz, identifi cador de llamadas*, agenda e intercomunicador,
además de una amplia gama de funciones, como ajuste de timbre, volumen,
contraste, trasferencia de llamada y llamada en conferencia.
•
• Fabricado en plástico ABS resistente al impacto en color blanco con
insertos en gris.
•
• Agenda para 50 números.
•
• 29 memorias.
•
• Identifi cador de llamadas.
•
• Intercomunicador.
•
• Indicador de batería.
•
• 10 tonos diferentes de timbrado.

5
IN
S
TALA
C
I
Ó
N DE LA BA
S
E Y LA EXTEN
S
I
ÓN
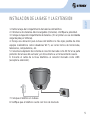
1. Retire la tapa del compartimento de baterías del teléfono.
2. Introduzca dos baterías AAA recargables (incluidas). Verifi que la polaridad.
3. Coloque la tapa del compartimento de baterías. (En el primer uso se recomienda
cargar las pilas por 14 horas).
4. Escoja una ubicación para la base del teléfono lo más lejos posible de otros
equipos inalámbricos como ruteadores Wi Fi, así como hornos de microondas,
televisores, computadoras, etc.
5. Conecte el adaptador de corriente al conector marcado como DC 6V en la parte
posterior de la base del auricular y el otro extremo a un tomacorriente casero.
6. Conecte el cable de la línea telefónica al conector marcado como LINE.
(excepto la extensión).
7. Coloque el teléfono en la base.
8. Verifi que que el teléfono cuente con tono de marcado.
DC 6V
LINE

6
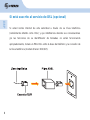
Si usted recibe Internet de alta velocidad a través de su línea telefónica
(comúnmente referido como DSL) y oye interferencia durante sus conversaciones
y/o las funciones de su identifi cador de llamadas no están funcionando
apropiadamente, instale un fi ltro DSL entre la base del teléfono y la conexión de
la línea telefónica (modelo Steren 300-997).
Si está suscrito al servicio de DSL (opcional)

7
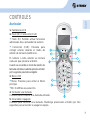
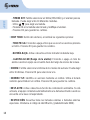
1. Pantalla de LCD
2. Flash (R) / Corrección (CLR)
• Flash (R): Permite activar funciones
adicionales de su proveedor de servicio.
• Corrección (CLR): Presione para
corregir errores durante el modo de
edición de números telefónicos.
El número o letra anterior se borrará
cada vez que presione el botón.
Cuando se encuentre en modo de revisión de
llamadas entrantes o salientes presione el botón
por 3 segundos para borrar el registro.
3. Menú / OK
• Menú: Presione para entrar al Menú
principal.
• OK: Confi rme una selección.
CO
NTR
O
LE
S
Auricular
4. Contestar una llamada
Presione para contestar una llamada entrante.
5. Encendido / Apagado
Presione para terminar una llamada. Mantenga presionado el botón por tres
segundos para encender o apagar el equipo.

8
6. Teclado numérico
7. Intercomunicador (INT)
Permite realizar llamadas internas entre el teléfono y sus extensiones. (Esta
función sólo está activa si se cuenta con extensiones conectadas).
8. Bloqueo de teclas (*)
En modo de espera, presione el botón por 3 segundos para bloquear el teclado.
De esta manera no se presionarán los botones de manera accidental.
Presione por 3 segundos más para regresar al modo normal.
9. Arriba / Revisión de llamadas entrantes
Permite desplazarse hacia arriba en los menús. Al descolgar, permite aumentar
el nivel de volumen del auricular (Nivel 1 a 5). En el modo de espera, muestra las
llamadas recibidas.
10. Abajo / Revisión de llamadas salientes
Permite desplazarse hacia abajo en los menús. Muestra los números telefónicos
marcados previamente.
En modo de uso, permite disminuir el nivel de volumen (Nivel 5 a 1).
11. Agenda
Permite buscar un contacto en la agenda telefónica y regresar a una opción
dentro del menú.
12. Redial (RD) / Pausa (P)
Permite volver a marcar el último número.
Permite realizar una pausa en el marcado de números usando un conmutador.
13. Activar / desactivar el timbre (#)
Mantenga presionado durante 3 segundos para activar o desactivar el sonido del
timbre de una llamada entrante.
14. Manos libres
Presione para contestar una llamada entrante sin necesidad de usar el auricular.
15. Silenciar (MUTE)
Presione para silenciar el micrófono durante una llamada.

9
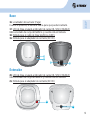
16. Localizador del auricular (Page)
Cuando lo presiona, el auricular suena para que pueda localizarlo.
17. LED de línea ocupada e indicador de carga (IN / USE-CHARGE)
Indica el estado de carga del teléfono y cuando está en llamada.
18. Entrada para el cable de línea telefónica (LINE).
19. Entrada para el adaptador de corriente (DC 6V).
Extensión
Base
20. LED de línea ocupada e indicador de carga (IN / USE-CHARGE)
Indica el estado de carga del teléfono y cuando está en llamada.
21. Entrada para el adaptador de corriente (DC 6V)
20
21

10
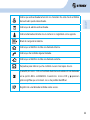
Íconos del teléfono inalámbrico
Íconos Función
Señal: Indica que el auricular está registrado y que se encuentra en la
zona de cobertura de la base. Parpadea si el auricular está fuera de
alcance o buscando su base.
Indica que ha accedido al menú principal.
Aparece cuando el teléfono está en modo de manos libres.
Aparece al consultar el directorio.

11
Indica que está activada la función no molestar. De este modo el timbre
del auricular queda desactivado.
Indica que la alarma está activada.
Indica la llamada entrante de un número no registrado en la agenda.
Nivel de carga de la batería.
Indica que el teléfono recibe una llamada interna.
Indica que ha recibido alguna llamada.
Indica que el teléfono recibe una llamada externa.
Parpadea para indicar que ha recibido nuevos mensajes de voz.
(CallerID) El ícono CID se mostrará durante la visualización de llamadas
en la opción REG. LLAMADAS. Cuando los íconos CID y
aparecen
juntos signifi ca que el número no se ha podido identifi car.
Registro de una llamada recibida varias veces.

12
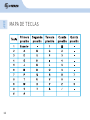
MAPA DE TE
C
LA
S

13
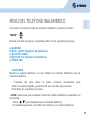
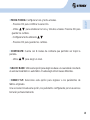
Para entrar al menú principal del auricular inalámbrico, presione el botón
“MENÚ”
Durante el modo de espera, en pantalla podrá ver las siguientes opciones:
a) AGENDA
b) REG. LLAM. (Registro de llamadas)
c) AJUSTES BASE
d) AJUSTE TLF (Ajustes del teléfono)
e) REGISTRO
a) AGENDA
Muestra la agenda telefónica, la cual contiene los números telefónicos de sus
contactos favoritos:
- Presione OK para entrar al menú. Presione nuevamente para
entrar a la opción Agenda y presione OK una vez más para acceder.
Encontrará las siguientes opciones:
• LISTA: Seleccione para visualizar la lista de números telefónicos guardados en
la memoria:
- Utilice para desplazarse por la lista de teléfonos.
- En pantalla aparecerá, el nombre del contacto y su número telefónico.
MEN
Ú
DEL TELÉF
O
N
O
INALÁMBRI
CO

14
• NUEVA ENTR. (Nueva entrada): Introduzca un nuevo número telefónico a la
agenda:
- Presione OK para introducir el nombre del contacto. Al aparecer NOMBRE?,
utilice las teclas numéricas para ingresar el nombre y presione OK para guardar
los cambios.
- Utilice las teclas numéricas para introducir el número telefónico del contacto.
- Presione OK para elegir una melodía distintiva. Utilice
para elegirla.
Presione OK para guardar los cambios.
• EDIT REGIS. (Editar registro): Utilice esta opción para modifi car un contacto
de la agenda telefónica:
- Utilice para seleccionar el contacto que desee modifi car.
- Presione OK para realizar la corrección.
- Utilice para seleccionar el carácter a editar, introduzca la letra
correspondiente.
- Presione OK para guardar los cambios.
- Repita el procedimiento para la edición del número telefónico.
- Seleccione un tipo de Melodía y presione OK para guardar los cambios.
(en caso de error, presione R/CLR).
• BORR. REGIS. (Borrar registro): Borre un contacto de la agenda telefónica:
- Utilice
para seleccionar el número que desea borrar.
- Presione OK para confi rmar la selección.
- En pantalla aparecerá el mensaje CONFIRMAR?
- Presione OK, el contacto será borrado permanentemente de la agenda
telefónica.
• BORRAR TODOS: Borre todos los números telefónicos almacenados en la
memoria de la agenda:
- Presione OK para confi rmar que desea borrar todos los números.

15
- En pantalla aparecerá el mensaje CONFIRMAR?, presione OK para que todos
los números telefónicos y contactos sean borrados de la memoria.
• ESTADO MEM (Estado de la memoria): Seleccione esta opción para saber
cuántos contactos existen en la agenda telefónica. Puede almacenar hasta 50.
- Si en pantalla aparece 10/50, signifi ca que existen 10 contactos almacenados.
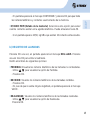
b ) REGISTRO DE LLAMADAS
Presione OK una vez, en pantalla aparecerá el mensaje REG.LLAM. Presione
una vez más OK para entrar al submenú.
Dentro encontrará las siguientes opciones:
• PERDIDAS: Visualice los números telefónicos de las llamadas no contestadas.
- Utilice para visualizar la opción de Perdidas.
- Presione OK.
• RECIBIDO: Visualice los números telefónicos de las llamadas recibidas.
- Presione OK.
- En caso de que no exista ninguno registrado, en pantalla aparecerá el mensaje
VACÍO.
• REALIZADAS: Visualice los números telefónicos de las llamadas realizadas.
- Utilice para visualizar la opción de Realizadas.
Presione OK.

16
c) AJUSTES BASE
Permite hacer ajustes a la base del teléfono inalámbrico. El equipo debe estar
registrado en la base para hacer cualquier ajuste:
• ELIMINAR TLF (Eliminar teléfono): Esta opción le permitirá dar de baja un
auricular de la base en uso:
- Presione OK.
- Ingrese su PIN. El número predeterminado es 0000 (cuatro ceros).
- Seleccione el número de identifi cación del auricular que quiere eliminar.
• MODO MARC (Marcación): Seleccione las opciones de marcado, ya sea por
tonos o por pulsos.
• TIEMPO FLASH: Cambie el tiempo de fl ash (servicios especiales). Elija entre
100, 300, 600 y 1000 ms.
• MODIFICA PIN (Modifi car PIN): Cambie el número de identifi cación (PIN) que se
utiliza para modifi car ciertos parámetros del teléfono:
- Presione OK para ingresar al submenú.
- Al aparecer el mensaje PIN? introduzca el número actual de identifi cación
(el número predeterminado es 0000, cuatro ceros).
- Presione OK para confi rmar.
- Al aparecer el mensaje NUEVO PIN, introduzca un nuevo número de
identifi cación de 4 dígitos.
- Presione OK para confi rmar, repita el número de identifi cación y presione OK
para guardar los cambios.

17
• RESET BASE: Restaura los ajustes predeterminados de la base:
- Seleccione el submenú con la tecla OK
- Al aparecer el mensaje PIN?, introduzca el número de identifi cación.
- Presione OK para reestablecer los valores predeterminados de fábrica de la
base.
- Una vez seleccionada esta opción, los parámetros confi gurados por el usuario se
borrarán permanentemente.
d) AJUSTES DEL TELÉFONO
Modifi que la confi guración del auricular, dentro del submenú encontrará los
siguientes valores:
• ALARMA: Seleccione esta opción para encender o apagar la alarma del
teléfono.
- Utilice para seleccionar una opción.
- Presione OK para activar la opción ENCENDER.
- Introduzca la hora en que la alarma se encenderá utilizando y OK para
ir a la siguiente opción.
- Presione OK, en pantalla aparecerá el mensaje ZUMBIDO ENCE, ZUMBIDO APAG.
• CONF. TIMBRE: Dentro del menú encontrará las siguientes opciones:
- TIMBRE INT: Permite seleccionar un timbre (MELODÍA) y el volumen para las
llamadas internas. Puede elegir entre 10 diferentes melodías.
- Utilice
para elegir una melodía.
- Presione OK en la melodía seleccionada y modifi que el volumen.
- Presione OK para guardar los cambios.

18
- TIMBRE EXT: Permite seleccionar un timbre (MELODÍA) y el volumen para las
llamadas. Puede elegir entre 10 diferentes melodías.
- Utilice para elegir una melodía.
- Presione OK en la melodía seleccionada y modifi que el volumen.
- Presione OK para guardar los cambios.
• CONF TONO: Dentro del submenú, encontrará las siguientes opciones:
- TONO TECLA: Enciende o apaga el tono que se escucha cuando se presiona
un botón. Presione OK para guardar los cambios.
- BATERÍA BAJA: Activa o desactiva el tono indicador de batería baja.
- ALARMA ALCAN (Rango de la alarma): Enciende o apaga un tono de
alarma cuando el equipo se encuentra fuera del rango de alcance de la base.
• IDIOMA: Permite seleccionar el idioma de los menús del auricular. Puede elegir
entre 16 idiomas. Presione OK para seleccionar uno.
• NOMBRE TLF: Identifi ca un auricular mediante un nombre. Utilice el teclado
numérico para introducir un nombre. Presione OK para guardar los cambios.
• RESP. AUTO: Activa o desactiva la función de contestación automática. Si está
activada, el equipo contestará automáticamente una llamada entrante cuando se
encuentre en la base correspondiente.
• RESTRICCIÓN: Desactiva todas las llamadas externas o llamadas externas
especiales. Introduzca el código de identifi cación, (predeterminado 0000).

19
• FECHA Y HORA: Confi gure la hora y fecha actuales.
- Presione OK para confi rmar la selección.
- Utilice
para establecer la hora y minutos actuales. Presione OK para
guardar los cambios.
- Confi gure la fecha utilizando
- Presione OK para guardar los cambios.
• CONTRASTE: Cuenta con 8 niveles de contraste que permiten ver mejor la
pantalla.
- Utilice
para elegir un nivel.
• SELECC BASE: Utilice esta opción para elegir una base a la cual estará conectado
el auricular inalámbrico o automático. Puede elegir entre 4 bases diferentes.
• REINICI TLF: Seleccione esta opción para regresar a los parámetros de
fábrica originales.
Una vez seleccionada esta opción, los parámetros confi gurados por el usuario se
borrarán permanentemente.

20
RE
G
I
S
TR
O
DE EXTEN
S
I
ÓN
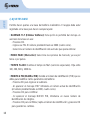
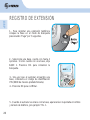
1.- Para registrar una extensión telefónica
coloque la base en el modo de búsqueda
presionando “Page” por 5 segundos.
2.- Seleccione una base, cuenta con hasta 4
opciones. Si sólo cuenta con una base, elija
BASE 1. Presione OK. para comenzar la
búsqueda.
3.- Una vez que el auricular encuentre una
base, introduzca el código de identifi cación
PIN (0000 de manera predeterminada).
4.- Presione OK para confi rmar.
5.- Cuando el auricular se enlace con la base, aparecerá en la pantalla el nombre
y número de teléfono, por ejemplo: TEL. 1.
INT
OK
BASE 1 +

21
O
PERA
C
I
Ó
N DEL TELÉF
O
N
O
INALÁMBRI
CO
CÓMO REALIZAR LLAMADAS
1. Presione “ ” una vez para obtener tono de llamada.
2. Utilice el teclado numérico para marcar un teléfono.
3. Una vez establecida la comunicación, hable a través del auricular o del
micrófono del altavoz.
4. Cuando requiera terminar la conversación, presione “ ”.
CÓMO COLOCAR EL AURICULAR SOBRE LA BASE
1. Coloque el auricular haciendo coincidir las entradas del auricular con las de la
base. Asegúrese que haya sido colocado fi rmemente para evitar deslizamientos.
CÓMO CONTESTAR LLAMADAS
1. Cuando reciba una llamada, presione “ ” (si cuenta con la función de
contestación automática, el equipo lo hará inmediatamente después de que entre
una llamada).
2. Para concluir la llamada, presione “ ”.

22
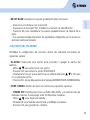
REMARCADO
1. Utilice para visualizar los últimos diez números que fueron marcados desde
el teléfono o
para ver las últimas llamadas recibidas.
2. Oprima “
” para marcar el número visualizado en pantalla.
OTRAS OPERACIONES
GUARDAR NÚMEROS TELEFÓNICOS ENTRANTES A LA AGENDA
TELEFÓNICA
Si cuenta con el servicio de Identifi cador de llamadas, puede guardar los números
telefónicos de las llamadas recibidas.
- Utilice
para visualizar los últimos diez números que fueron marcados
desde el teléfono o
para ver las últimas llamadas recibidas.
- Al encontrar el número presione OK.
- En pantalla aparecerá el mensaje AÑ. A AGEND?. Presione OK para
confi rmar.
Llamar a una extensión
Para comunicarse con una extensión, presione INT seguido del número de
extensión al que quiere llamar (los números aparecerán en pantalla).

23
PR
O
BLEMA
S
Y
SO
L
UC
I
O
NE
S
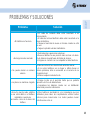
Problema Solución
• Mi teléfono no funciona
• El cable de corriente debe estar conectado a un
tomacorriente.
• El cable de la línea telefónica debe estar conectado a la
base del teléfono.
• Coloque el auricular de nuevo en la base cuando no esté
en uso.
• Cargue la pila del auricular inalámbrico.
• No tengo tono de marcado
• Trate todas las sugerencias anteriores.
• Mueva el teléfono a una posición más cercana a la base.
Pudo haberse movido fuera del límite de alcance.
• Póngase en contacto con su compañía local de telefonía.
• No puedo marcar un número
externo
• Debe escuchar el tono de marcado antes de marcar.
• Si los otros teléfonos en su hogar u ofi cina tienen el
mismo problema, éste se encuentra en el servicio de su
compañía local.
• Elimine cualquier ruido de fondo.
• La pila no se mantiene cargada
• Cargue la pila en el auricular hasta que en pantalla
aparezca el ícono de batería llena.
• Reemplace las baterías. Acuda con un distribuidor
autorizado para más información.
• Escucho mucho ruido, estática
o una señal débil en el teléfono
inalámbrico cuando me
encuentro cerca de la base del
teléfono
• Otros teléfonos inalámbricos y los ruteadores que son
utilizados para redes de computadoras utilizan radios
internos para comunicarse. Los radios pueden causar
interferencia entre sí.

24
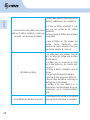
v
• Escucho mucho ruido, estática o una señal
débil en el teléfono inalámbrico cuando me
encuentro cerca de la base del teléfono
• Usted puede mejorar el rendimiento de sus
teléfonos inalámbricos y de su enrutador si:
a) Coloca su teléfono inalámbrico lo más
lejos que sea posible de otro sistema
inalámbrico.
b) Coloca la base del teléfono lejos de alguna
computadora.
• Aleje el teléfono de otros equipos que
puedan causar interferencia, como
monitores de cuartos, televisores, hornos de
microondas, aparatos de cocina, etc.
• Mi teléfono no timbra
• El timbre debe estar activado. Consulte
la(s) sección(es) de confi guración de timbre
de este manual.
• Verifi que que las conexiones del cable
de la línea telefónica y de corriente estén
correctos.
• Coloque el teléfono inalámbrico cerca de
la base.
• Cargue la pila del auricular inalámbrico.
• Desconecte otras extensiones telefónicas.
• Mueva la base del teléfono a otro lugar, de
preferencia a un piso elevado.
• Verifi que si los otros teléfonos en su
hogar tienen el mismo problema, de ser así,
comuníquese con su compañía telefónica
local.
• El identifi cador de llamadas no funciona
• Usted debe estar suscrito a este servicio
para que esta función trabaje en su teléfono.

25
MANTENIMIENT
O
DEL TELÉF
O
N
O
INALÁMBRI
CO
Cómo cuidar de su teléfono
• Cuelgue el auricular inalámbrico con cuidado.
• Conserve el material de empaque original para proteger su equipo si necesita
transportarlo posteriormente.
• Evite el contacto con el agua.
• No utilice los equipos en exteriores, bajo la lluvia ni los manipule con las
manos mojadas.
Tormentas eléctricas
Las tormentas eléctricas en ocasiones pueden provocar sobretensiones
dañinas para los equipos electrónicos.
Tome precaución cuando use aparatos eléctricos durante las tormentas.
Limpieza de su teléfono
• Limpie con un paño ligeramente humedecido con agua y jabón suave.
• No use agua en exceso ni solventes limpiadores de ningún tipo.

26
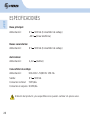
Base principal:
Alimentación: 6 V--- 500 mA (Convertidor de voltaje)
-48 V--- (línea telefónica)
Bases secundarias:
Alimentación: 6 V--- 500 mA (Convertidor de voltaje)
Auriculares:
Alimentación: 2,4 V--- (2xAAA)
Convertidor de voltaje:
Alimentación: 100-240 V~ 50/60 Hz 150 mA
Salida: 6 V--- 500 mA
Consumo nominal: 5 Wh/día
Consumo en espera: 16 Wh/día
ES
PE
C
IFI
C
A
C
I
O
NE
S
El diseño del producto y las especifi caciones pueden cambiar sin previo aviso.

27
Producto: Teléfono inalámbrico con 2 extensiones
Modelo: Tel-2492
Marca: Steren
PÓLIZA DE GARANTÍA
Esta póliza garantiza el producto por el término de un año en todas sus partes y mano de obra, contra
cualquier defecto de fabricación y funcionamiento, a partir de la fecha de entrega.
CONDICIONES
1. Para hacer efectiva la garantía, presente esta póliza y el producto, en donde fue adquirido o en
Electrónica Steren S.A. de C.V.
2. Electrónica Steren S.A de C.V. se compromete a reparar el producto en caso de estar defectuoso sin
ningún cargo al consumidor. Los gastos de transportación serán cubiertos por el proveedor.
3. El tiempo de reparación en ningún caso será mayor a 30 días, contados a partir de la recepción del
producto en cualquiera de los sitios donde pueda hacerse efectiva la garantía.
4. El lugar donde puede adquirir partes, componentes, consumibles y accesorios, así como hacer válida esta
garantía es en cualquiera de las direcciones mencionadas posteriormente.
ESTA PÓLIZA NO SE HARÁ EFECTIVA EN LOS SIGUIENTES CASOS:
1. Cuando el producto ha sido utilizado en condiciones distintas a las normales.
2. Cuando el producto no ha sido operado de acuerdo con el instructivo de uso.
3. Cuando el producto ha sido alterado o reparado por personal no autorizado por Electrónica Steren S.A.
de C.V.
El consumidor podrá solicitar que se haga efectiva la garantía ante la propia casa comercial donde adquirió
el producto. Si la presente garantía se extraviara, el consumidor puede recurrir a su proveedor para que le
expida otra póliza, previa presentación de la nota de compra o factura respectiva.
DATOS DEL DISTRIBUIDOR
Nombre del Distribuidor __________________________
Domicilio ______________________________________
Producto ______________________________________
Marca ________________________________________
Modelo _______________________________________
Número de serie ________________________________
Fecha de entrega ________________________________
ELECTRÓNICA STEREN S.A. DE C.V.
Camarones 112, Obrero Popular, 02840, México, D.F.
RFC: EST850628-K51
STEREN PRODUCTO EMPACADO S.A. DE C.V.
Biólogo Maximino Martínez No. 3408 Int. 2, 3 y 4, San
Salvador Xochimanca, México, D.F. 02870,
RFC: SPE941215H43
ELECTRÓNICA STEREN DEL CENTRO, S.A. DE C.V.
Rep. del Salvador 20 A y B, Centro, 06000, México. D.F.
RFC: ESC9610259N4
ELECTRÓNICA STEREN DE GUADALAJARA, S.A.
López Cotilla No. 51, Centro, 44100, Guadalajara, Jal.
RFC: ESG810511HT6
ELECTRÓNICA STEREN DE MONTERREY, S.A.
Colón 130 Pte., Centro, 64000, Monterrey, N.L. RFC:
ESM830202MF8
ELECTRÓNICA STEREN DE TIJUANA, S.A. de C.V.
Calle 2a, Juárez 7636, Centro, 22000, Tijuana, B.C.N.
RFC: EST980909NU5
En caso de que su producto presente alguna
falla, acuda al centro de distribución más
cercano a su domicilio y en caso de tener alguna
duda o pregunta por favor llame a nuestro Centro
de Atención a Clientes, en donde con gusto le
atenderemos en todo lo relacionado con su
producto Steren.
Centro de Atención a Clientes
01 800 500 9000

1

2
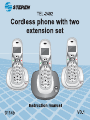
Thank You on purchasing your new Steren product.
This manual includes all the feature operations and troubleshooting
necessary to install and operate your new Steren´s Cordless phone with
two extension set .
Please review this manual thoroughly to ensure proper
installation and operation of this product. For support, shopping,
and everything new at Steren, visit our website:
www.steren.com
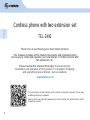
TEL-2492
Cordless phone with two extension set
The instructions of this manual are for reference about the product. There may
be differences due to updates.
Please check our web site (www.steren.com) to obtain the latest version of the
instruction manual.

3
SAFETY INSTRUCTIONS
• Disconnect the device from the electrical outlet before cleaning.
• Use a damp cloth for cleaning. Do not use liquid cleaners.
• Never use it near water sources.
• Place the handset on a fi rm surface, and where the openings and slots in the
back of the unit receive ventilation.
• This product should be operated only from the type of power source indicated
on the marking label, consult your dealer or local power company.
• Do not disassemble this product. Opening or removing parts of the telephone
base or handset may expose you to dangerous voltages or other risks.

4
HI
G
HLI
G
HT
S
•
• The cordless set has two extensions and it works with one single base,
expanding connectivity at home or offi ce. It features DECT 6.0 technology,
so you can add two additional extensions, in case you need.
•
• It has speaker, caller ID*, contact list, and intercom, plus ringer, volume,
contrast, call transfer and conference.
•
• Manufactured in ABS white plastic.
•
• 50 numbers contact list
•
• 29 memories.
•
• Caller ID
•
• Intercom.
•
• Battery indicator.
•
• 10 ringtones.

5
1. Remove the battery compartment cover.
2. Place two rechargeable AAA batteries (included), pay attention to polarity.
3. Replace the battery compartment cover.
4. Choose a location for your cordless telephone as far away as possible from
any other cordless (wireless) devices such as cordless telephones, 802.11
wireless routers (i.e., Wi Fi), microwave ovens, televisions, computers, etc.
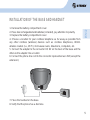
5. Connect the adapter to the connector DC 6V on the back of the base and the
other end to adapter into an outlet.
6. Connect the phone line cord to the connector represented as LINE (except the
extension).
IN
S
TALLATI
O
N
O
F THE BA
S
E AND HAND
S
ET
7. Place the handset on the base.
8. Verify that the phone has a dial tone.
DC 6V
LINE

6
IF YOU ARE SUBSCRIBER TO A DSL SERVICE (OPTIONAL)
If you receive high speed Internet through your telephone line (commonly
referred as DSL), and you are experiencing interference during
conversations, your caller ID features are not functioning properly, and you
are subscribed to DSL service from your telephone company, install a DSL
fi lter to the telephone line between the telephone base and the telephone line
jack (
Steren 300-997).

7
CO
NTR
O
L
S
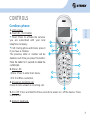
Cordless phone
1. LCD screen
2. Flash (R) / CLR button
• Flash: Press to activate the services
you are subscribed with your local
telephone company.
• CLR: During phone edit mode, press it
if you have a mistake.
The previous letter or number will be
deleted, each time you press this button.
Press the button for 3 seconds to delete the
current input.
3. Menu / OK
• Menu: Press to enter main menu.
• OK: Confi rms a selection.
4. Answer an incoming call
Press once to answer an incoming call.
5. On / Off. Press and hold for three seconds to power on / off the device. Press
to end a call.
6. Numeric keyboard.

8
7. INT
Allows you to make internal calls between the headsets. This function will be
activated only if you have many wireless phones.
8. Keylock (*)
In idle mode, press and hold the button for three seconds, the keyboard will be
blocked. Using this you cannot press the keys accidentally. Press and hold for
three seconds, once again, to reestablish the keyboard.
9. Up / Incoming call review
Use it to move it between submenus.
Press to increase the volume level (5 levels).
Press to check the previously incoming numbers.
10. Down / Outgoing call review
Use it to move it between submenus.
Press to check the previously dialed numbers.
Press to decrease the volume level, while using the speaker (5 levels).
11. Phonebook
Press to search a contact into the phonebook and exit from a function during
menu operation.
12. Redial (RD) / Pause (P)
Redial the last dialed number.
Press to make a pause while dialing (especially useful when calling a PBX).
13. Ring on / off
Press and hold the button for 3 seconds to turn the ringer on an incoming call.
14. Speaker
Press to activate the hands free function.
15. Mute
During a conversation, press to mute the microphone. Press it again to activate
the microphone.

9
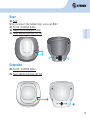
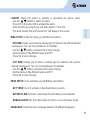
16. Page
When you press it, the handset rings, so you can fi nd it.
17. IN USE / CHARGE button
18. Telephone line input jack (LINE).
19. Power adapter input jack (DC 6V).
Extension
Base
20. IN USE / CHARGE button
21. Power adapter input jack (DC 6V).
20
21

10
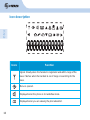
Icons Function
Signal: Steady when the handset is registered and within range of the
base. Flashes when the handset is out of range or searching for the
base.
Menu is opened.
Displayed when the phone is in handsfree mode.
Displayed when you are viewing the phonebook list.
Icon description

11
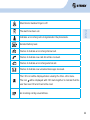
Silent mode: Handset ringer is off.
The alarm has been set.
Indicates an incoming call not registered in the phonebook.
Handset battery level.
Flashes to indicate an incoming internal call.
Flashes to indicate new calls list entries received.
Flashes to indicate an incoming external call.
Flashes to indicate new voicemail messages received.
The CID icon will be displayed when viewing the CALL LOG menu.
The icon
will be displayed with CID mark together to indicate that the
user has new CID and it cannot be read.
An incoming call log several times.

12
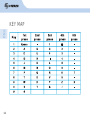
K
EY MA
P

13
To enter main menu, press
During idle mode, you will see next options:
a) PHONEBOOK
b) CALL LOG
c) BS SETTINGS
d) HS SETTINGS
e) REGISTRATION
a) PHONEBOOK
Use this menu to see the stored contacts in the phone.
- Press OK once, use Down button to select PHONEBOOK option, press OK
to confi rm.
Here you will fi nd next options:
• LIST: Select this option to view a list of the stored phone numbers in
phonebook.
- Use to move in through the list. In the screen you will see the name of
the contact and the phone number.
CO
RDLE
SS
PH
O
NE MEN
U

14
• NEW ENTRY: Use the option to enter a new phone number in the phonebook.
- Use numeric keys to enter the name of the contact. Press OK to store changes.
- Use the numeric keys to enter a phone number.
- Press OK to select a Melody use the buttons and press OK once again
to store all changes.
• EDIT RECORD: Use this option to modify the information of a current contact
in the phonebook.
- Use the
buttons to select the desired contact to edit.
- Press OK to make the correction.
- Use buttons to select the desired character to edit, enter the right letter.
- Press OK to save the changes.
- Repeat the process to edit the phone number.
- Select the Melody type and Press OK to store the changes. In case of mistake
press R/CLR.
• DEL RECORD: Select this option to delete a contact in the phonebook.
- Use
buttons to select the desired number to erase.
- Press OK to confi rm the selection.
- In the screen you will see the message: CONFIRM?
- Press OK to delete the contact.
• DELETE ALL: With this option you can delete all phone numbers stored in the
phonebook.
- Press OK to confi rm the action, you will see all the phone numbers in the
phonebook.
- Press OK, in the screen will appear the CONFIRM? message. Press OK.

15
• MEM STATUS: Select this option to know how many contacts are stored in the
phonebook.
- You can store up to 50 contacts. If you see 10/50 in the screen, means that
you have 10 stored phone numbers.
b) CALL LOG
Press OK once, in the screen you will see CALL LOG. Press OK once again to
enter the submenu. There you will see next options:
• MISSED: Allows you to check the unanswered calls.
- Use to check the missed calls. Press OK.
• RECEIVED: Allows you to check the incoming phone calls.
- Press OK
- If any number is in memory, you will see: EMPTY.
• DIALED: Allows you to check the outgoing phone calls.
- Use buttons to check all the dialed phone calls.
- Press OK.
c) BS SETTINGS
Use this option to set the wireless phone base. In case the handset is unregistered,
you cannot make any change.
• DELETE HS: This option let you delete a handset from the base in use.
- Press OK.
- Insert the PIN the predetermined number is 0000.
- Select the identifi cation number of the handset you want to delete.

16
• DIAL MODE: With this option, you can choose the dial options, either tone or
pulse.
• FLASH TIME: With this option, you may change the fl ash time. You can choose
between 100, 300, 600 and 1000 ms.
• MODIFY PIN: With this option you can change the PIN, that it is used to set
some parameters.
- Press OK to enter in the submenu.
- In the screen will display PIN?, type the current PIN (predetermined number
is 0000).
- Press OK to confi rm the option.
- In the screen will be displayed NEW PIN, type the new one.
- Press OK to confi rm. Repeat the number, fi nally press OK to store the changes.
• BS DEFAULT: This option will allows you to reset the phone to default
parameters.
- Select the submenu by pressing OK.
- Type 0000 (or the current ID number) when the word PIN? displays in the
screen.
- Press OK to confi rm.
- Once the option is selected, the parameters set by the user are deleted
permanently.
d) HS SETTINGS
With this option you can set parameters in the handset, in the submenu you will
see next options:

17
• ALARM: Select this option to activate or deactivate the phone alarm.
- Use the buttons to select an option.
- Press OK in the option ON to activate the alarm.
- Enter the time by using the up and down buttons. Press OK.
- The word Snooze ON and Snooze OFF will display in the screen.
• RING SETUP: Inside the menu, you will fi nd next options:
- INT RING: Allows you to select a melody type for internal calls and the desired
volume level. You can choose between 10 melodies.
- Use the buttons, and press OK to store changes.
- Set the volume in fi ve different levels and OFF.
- Press OK to store changes.
- EXT RING: Allows you to select a melody type for external calls and the
desired volume level. You can choose between 10 melodies.
- Use the buttons, and press OK to store changes.
- Set the volume in fi ve different levels and OFF.
- Press OK to store changes.
• TONE SETUP: In the submenu you will fi nd the next options:
- KEY TONE: Use it to activate or deactivate the key sounds.
- BATTERY LOW: Activate or deactivate the low battery sound indicator.
- RANGE ALARM: Use this option when the phone is out of the base range.
• LANGUAGE: Select the menu language between 16 different languages.

18
• HS NAME: Select this option to identify the handset with a name.
- Use the numeric keys to type a name.
- Press OK to store changes.
• AUTO ANSWER: Activate or deactivate the auto answering function.
• BARRING: Block all outgoing calls or special outgoing calls.
- Enter the current PIN (0000 predetermined) to activate the function
• DATE & TIME: Use to set the current date and time.
- Press OK to change the time and date.
- Use the UP and DOWN buttons to enter the date and press OK to storage
changes.
- Use the UP and DOWN buttons to enter the actual time.
- Press OK to storage changes.
• CONTRAST: You have 8 different levels to set the display.
- Use the
buttons to select a level.
- Press OK to save changes.
• SELECT BASE: Select the base where the handset will be linked. You have up
to 4 different bases to select. Automatic option is available.
- HS DEFAULT: Press to reset the handset to default parameters. Once you select
this option, the user settings are completely erased.

19
RE
G
I
S
TER THE EXTEN
S
I
ON
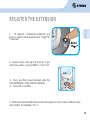
1. - To register a telephone extension put
base in search mode pressing the “Page” for
5 seconds.
2.- Select a base, has up to 4 choices. If you
only have a base, choose BASE 1. Press OK.
3. - Once you fi nd a base handset, enter the
PIN identifi cation code (0000 by default).
4. - Press OK to confi rm.
5.- When the handset with the base link will appear on the screen handset name
and number, for example: TEL. 1.
INT
OK
BASE 1 +

20
H
O
W T
O
O
PERATE THE
CO
RDLE
SS
PH
O
NE
MAKING CALLS
1. Press “ ” key once to get dial tone.
2. Use the numeric keys to dial a phone number.
3. Speak through the handset or speaker.
4. After the conversation, press “
” to end the call.
ANSWERING CALLS
1. When you receive an incoming call, press “ ” (if you have the Automatic
Answer option, the phone will answer automatically after an incoming call).
2. To end the call, press “
”.

21
PLACING THE HANDSET ON THE BASE
1. Place the handset contacts over the base terminals, make sure it has been
placed fi rmly to prevent slippery.
REDIAL
1. When the handset is idle, use button to display the last ten phone numbers
dialed from the handset or to display the received calls.
2. Press “
” to dial the displayed phone number.
OTHER OPERATIONS
STORING INCOMING PHONE NUMBERS INTO PHONEBOOK
If you have Caller ID service, you can store the incoming phone numbers into
phonebook.
- Use the buttons to check incoming phone numbers.
- Press OK once you fi nd the number. In the screen you will see: Add to PB?.
- Press OK to confi rm the option.
Call an extension
To communicate with an extension, press INT followed by the extension
number to which you want to call (the numbers will be displayed on the
screen).

22
T
R
OU
BLE
S
H
OO
TIN
G
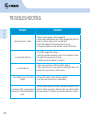
Trouble Solution
• My phone doesn´t work
• Make sure the power cord is plugged in.
• Make sure the telephone line cord is plugged fi rmly into the
corded / cordless phone base and wall jack.
• Place the handset on the base when not in use.
• Charge the batteries in the wireless handset (included).
• I cannot get dial tone
• Try all the suggestions above.
• Move the wireless handset closer to the telephone base.
You might have moved out of range.
• Contact your local telephone company.
• I cannot dial out
• Make sure you have a dial tone before dialing.
• If the other phones in your home are having the issue, the
problem is in your wiring or local service.
• The battery does not hold a
charge
• Charge the battery in the wireless handset.
• You may need to purchase a new battery,
• I get noise, static, or weak signal
even when I’m near the telephone
base.
• Other cordless phones and 802.11 wireless routers that are
used for home computer networks both use internal radios
to communicate. The radios may interfere with one another.

23
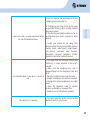
v
• I get noise, static, or weak signal even when
I’m near the telephone base.
• You can improve the performance of your
cordless phone and router by:
a) Positioning your new phone as far away
as possible from any other existing cordless
telephone system.
b) Positioning your telephone base as far as
possible from your router, computer or other
devices.
• Install your phone as far away from
these electronic devices as possible: wireless
routers, radios, radio towers, pager towers,
cell phones, intercoms, room monitors,
televisions, personal computers, kitchen
appliances and other cordless phones.
• My handset doesn´t ring when I recieve a
call
• The ringer must be activated. Refer to the
section(s) on ringer selection in this user’s
manual.
• Make sure the telephone line cord is
plugged fi rmly into the telephone base and
jack.
• Place the cordless phone near the base.
• Charge the battery in the wireless handset.
• Unplug other phone extensions you might
have.
• Move the telephone base to another
location, preferably on an upper fl oor.
• Contact your local telephone company.
• My caller ID isn´t working
• You must subscribe to this service for this
feature to work on your phone.

24
MAINTENAN
C
E
Taking care of your telephone
• Place the handset down gently.
• Save the original packing materials to protect your telephone if you
ever need to ship it.
• Avoid water.
• Do not use the handset outdoors in the rain, or handle it with wet hands.
Electrical storms
• Be careful when using electric appliances during storms.
Cleaning your telephone
• Clean it only with a soft cloth slightly dampened with water or a mild
soap.
• Do not use excess water or cleaning solvents of any kind.

25
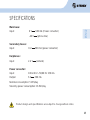
S
PE
C
IFI
C
ATI
O
N
S
Product design and specifi cations are subject to change without notice
Main base:
Input: 6 V- - - 500 mA (Power converter)
-48 V- - - (phone line)
Secondary bases:
Input: 6 V- - - 500 mA (power converter)
Earphones:
Input: 2.4 V- - - (2xAAA)
Power converter:
Input: 100-240 V~ 50/60 Hz 150 mA
Output: 6 V- - - 500 mA
Nominal consumption: 5 Wh/day
Stand-by power consumption: 16 Wh/day

26
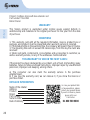
WARRANTY
This Steren product is warranted under normal usage against defects in
workmanship and materials to the original purchaser for one year from the date
of purchase.
CONDITIONS
1. This warranty card with all the required information, invoice, product box or
package, and product, must be presented when warranty service is required.
2. If the product stills on the warranty time, the company will repair it free of charge.
3. The repairing time will not exceed 30 natural days, from the day the claim was
received.
4. Steren sell parts, components, consumables and accessories to customer, as
well as warranty service, at any of the addresses mentioned later.
THIS WARRANTY IS VOID IN THE NEXT CASES:
If the product has been damaged by an accident, acts of God, mishandling, leaky
batteries, failure to follow enclosed instructions, improper repair by unauthorized
personnel, improper safe keeping, among others.
a) The consumer can also claim the warranty service in the purchase
establishment.
b) If you lose the warranty card, we can reissue it, if you show the invoice or
purchase ticket.
RETAILER INFORMATION
Name of the retailer
Address
Product
Brand
Part number
Serial number
Date of delivery
Product: Cordless phone with two extension set
Part number: TEL-2492
Brand: Steren
In case your product fails
or have questions, please
contact your nearest dealer.
If you are in Mexico, please
give a call to our
Call Center.
01 800 500 9000

27
-
 1
1
-
 2
2
-
 3
3
-
 4
4
-
 5
5
-
 6
6
-
 7
7
-
 8
8
-
 9
9
-
 10
10
-
 11
11
-
 12
12
-
 13
13
-
 14
14
-
 15
15
-
 16
16
-
 17
17
-
 18
18
-
 19
19
-
 20
20
-
 21
21
-
 22
22
-
 23
23
-
 24
24
-
 25
25
-
 26
26
-
 27
27
-
 28
28
-
 29
29
-
 30
30
-
 31
31
-
 32
32
-
 33
33
-
 34
34
-
 35
35
-
 36
36
-
 37
37
-
 38
38
-
 39
39
-
 40
40
-
 41
41
-
 42
42
-
 43
43
-
 44
44
-
 45
45
-
 46
46
-
 47
47
-
 48
48
-
 49
49
-
 50
50
-
 51
51
-
 52
52
-
 53
53
-
 54
54


Steren TEL-2492 El manual del propietario
- Categoría
- Telefonos
- Tipo
- El manual del propietario
en otros idiomas
- English: Steren TEL-2492 Owner's manual
Artículos relacionados
-
Steren TEL-600 El manual del propietario
-
Steren TEL-2414 El manual del propietario
-
Steren TEL-2480 El manual del propietario
-
-
-
-
Steren TEL-235 El manual del propietario
-
-
Steren INT-200 El manual del propietario
-