

2
TIM- 250
Gracias
por la compra de este producto Steren.
Este manual contiene todas las funciones
de operación y solución de problemas
necesarias para instalar y operar su nuevo
Timbre inalámbrico Steren. Por favor revise el
manual completamente para estar seguro de
instalar y poder operar
apropiadamente este producto.
Para apoyo, compras y todo lo
nuevo que tiene Steren, visite nuestro sitio
Web en:
www.steren.com
Timbre inalámbrico

3
• El sistema de su nuevo timbre es completamente inalámbrico.
• No necesita de cables para conectar a la corriente eléctrica,
solamente inserte las baterías, colóquelo en el lugar que desee y
estará listo para comenzar a utilizarlo.
• Tiene un alcance de hasta 50 metros.
• Cuenta con 16 tonos de timbre diferentes.
IMPORTANTE
• El equipo se debe colocar en un lugar seco.
• Limpie con un paño seco. No utilice solventes.
• No intente abrir el equipo, puede ocasionar malfuncionamiento
y se anulará la garantía.
• No exponga el equipo a temperaturas extremas.
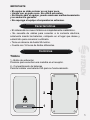
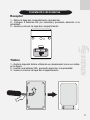
Características
Controles
Timbre
1.- Botón de activación
Presione para escuchar una melodía en el receptor.
2.- Compartimiento de baterías
Permite instalar una batería 23A para su funcionamiento.
2
1

4
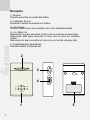
Receptor
1.- Bocina
Permite escuchar el sonido del timbre
2.- Indicador de uso
Enciende cuando se presiona el timbre
3.- Up / Down
Permite seleccionar una melodía como tono predeterminado
4.- Lo / Med / Hi
Seleccione Lo para escuchar el tono con un nivel de volumen bajo
Seleccione Med para escuchar el tono con un nivel de volumen
medio
Seleccione Hi para escuchar el tono con un nivel de volumen alto
5.-Compartimiento de baterías
Permite instalar 2 baterías AA
3
1
2
4
5

5
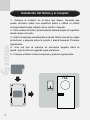
Instalación de baterías
Receptor
1.- Retire la tapa del compartimiento de baterías.
2.- Coloque 2 baterías AA (no incluidas), poniendo atención a la
polaridad.
3.- Vuelva a colocar la tapa del compartimiento.
Timbre
1.- Quite la tapa del timbre utilizando un desarmador como se indica
en la gura.
2.- Inserte una batería 23A, poniendo atención a la polaridad.
3.- Vuelva a colocar la tapa del compartimiento.

6
Instalación del timbre y el receptor
1.- Coloque el receptor en el área que desee, recuerde que
puede colocarlo sobre una supercie plana o utilizar el oricio
correspondiente para colgarlo de un tornillo o taquete.
2.- Para instalar el timbre, primeramente deberá limpiar la supercie
donde desee colocarlo.
3.- Utilice la esponja autoadherible incluída. Retire una de las capas
protectoras y péguela sobre la puerta o pared deseada. Presione
ligeramente.
4.- Una vez que la esponja se encuentre pegada sobre la
pared / puerta retire la segunda capa protectora.
5.- Coloque el timbre sobre la esponja y presione ligeramente.
112

7
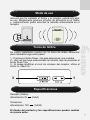
Modo de uso
Una vez que ha instalado el timbre y el receptor, estará listo para
su uso. Simplemente presione el botón de activación en el timbre
y posteriormente podrá escuchar la melodía seleccionada en el
receptor.
Tonos de timbre
Su timbre inalámbrico cuenta con 16 tonos de timbre diferentes,
para cambiarlos siga estos pasos:
1.- Presione el botón Down / Up para seleccionar una melodía.
2.- Una vez que haya seleccionado la melodía, deje de presionar el
botón Down / Up.
3.- Si desea modicar el nivel de volumen del receptor, utilice el
botón Lo / Med / Hi.
Especicaciones
Receptor (timbre)
Alimentación:3V - - - (2xAA)
Transmisor
Alimentación: 12V - - - (1x23A)
El diseño del producto y las especicaciones pueden cambiar
sin previo aviso.
1
3

8
PÓLIZA DE GARANTÍA
Esta póliza garantiza el producto por el término de un año en todas sus partes y mano
de obra, contra cualquier defecto de fabricación y funcionamiento, a partir de la fecha de
entrega.
CONDICIONES
1.- Para hacer efectiva la garantía, presente ésta póliza y el producto, en donde fue ad-
quirido o en Electrónica Steren S.A. de C.V.
2.- Electrónica Steren S.A de C.V. se compromete a reparar el producto en caso de estar
defectuoso sin ningún cargo al consumidor. Los gastos de transportación serán cubiertos
por el proveedor.
3.- El tiempo de reparación en ningún caso será mayor a 30 días, contados a partir de
la recepción del producto en cualquiera de los sitios donde pueda hacerse efectiva la
garantía.
4.- El lugar donde puede adquirir partes, componentes, consumibles y accesorios,
así como hacer válida esta garantía es en cualquiera de las direcciones mencionadas
posteriormente.
ESTA PÓLIZA NO SE HARA EFECTIVA EN LOS SIGUIENTES CASOS:
1.- Cuando el producto ha sido utilizado en condiciones distintas a las normales.
2.- Cuando el producto no ha sido operado de acuerdo con el instructivo de uso.
3.- Cuando el producto ha sido alterado o reparado por personal no autorizado por
Electrónica Steren S.A. de C.V.
El consumidor podrá solicitar que se haga efectiva la garantía ante la propia casa comercial
donde adquirió el producto. Si la presente garantía se extraviara, el consumidor puede
recurrir a su proveedor para que le expida otra póliza de garantía, previa presentación de
la nota de compra o factura respectiva.
DATOS DEL DISTRIBUIDOR
Nombre del Distribuidor
Número de serie
Fecha de entrega
Producto: Timbre inalámbrico
Modelo: TIM-250
Marca: Steren
ELECTRONICA STEREN S.A. DE C.V.
Camarones 112, Obrero Popular, 02840, México, D.F.
RFC: EST850628-K51
STEREN PRODUCTO EMPACADO S.A. DE C.V.
Biólogo MaximIno Martínez No. 3408 Int. 3 y 4, San
Salvador Xochimanca, México, D.F. 02870,
RFC: SPE941215H43
ELECTRONICA STEREN DEL CENTRO, S.A. DE C.V.
Rep. del Salvador 20 A y B, Centro, 06000, México.
D.F. RFC: ESC9610259N4
ELECTRONICA STEREN DE GUADALAJARA, S.A.
López Cotilla No. 51, Centro, 44100, Guadalajara, Jal.
RFC: ESG810511HT6
ELECTRONICA STEREN DE MONTERREY, S.A.
Colón 130 Pte., Centro, 64000, Monterrey, N.L. RFC:
ESM830202MF8
ELECTRONICA STEREN DE TIJUANA, S.A. de C.V.
Calle 2a, Juárez 7636, Centro, 22000, Tijuana, B.C.N.
RFC: EST980909NU5
En caso de que su producto presente alguna falla,
acuda al centro de distribución más cercano a su
domicilio y en caso de tener alguna duda o pregunta
por favor llame a nuestro Centro de Atención a Cli-
entes, en donde con gusto le atenderemos en todo lo
relacionado con su producto Steren.
Centro de Atención a Clientes
01 800 500 9000

9


11
TIM-250
Thank You
on purchasing your new Steren product.
This manual includes all the feature
operations and troubleshooting necessary
to install and operate your new Wireless
door bell Steren. Please review this manual
thoroughly to ensure proper installation
and operation of this product. For support,
shopping, and everything new at Steren, visit
our website:
www.steren.com
Wireless door bell

12
•Wireless
•You don’t need any cable, only batteries
•50 metres wide range
•16 tones
IMPORTANT
Install it in a dry place
Clean with a soft, dry cloth
Do not try to open the device, may cause damages and warranty
will be void
Do not expose to extreme temperatures
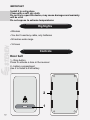
Highlights
Controls
Door bell
1.- Ring button
Press to activate a tone in the receiver
2.- battery compartment
Use it to install a 23A battery
2
1

13
Receiver
1.- Speaker
Allows you to hear s door bell sound
2.- In use indicator
Lights on when somebody press the door bell
3.- Up / Down
Use it to select a tone
4.- Lo / Med / Hi
Select Lo to listen to the tone, with low volume level
Select Med to listen to the tone, with medium volume level
Select Hi to listen to the tone, with high volume level
5.- Battery compartment
Use it to install two AA batteries
3
1
2
4
5

14
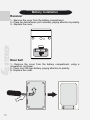
Battery installation
Receiver
1.- Remove the cover from the battery compartment.
2.- Place two AA batteries (not included), paying attention to polarity.
3.- Replace the cover.
Door bell
1.- Remove the cover from the battery compartment, using a
screwdriver, as shown.
2.- Place one 23A type battery, paying attention to polarity.
3.- Replace the cover.

15
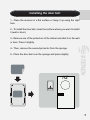
Installing the door bell
1.- Place the receiver in a at surface or hang it up using the right
hole.
2.- To install the door bell, clean the surface where you want to install
it (wall or door).
3.- Remove one of the protectors of the sticker and stick it on the wall
or door. Press it slightly.
4.- Then, remove the second protector from the sponge.
5.- Place the door bell over the sponge and press slightly.
112

16
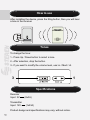
How to use
After installing the device, press the Ring button, then you will hear
a tone in the receiver.
Tones
To change the tone:
1.- Press Up / Down button to select a tone.
2.- After selection, drop the button.
3.- If you want to modify the volume level, use Lo / Med / Hi.
Specications
Receiver
Input: 3V - - - (2xAA)
Transmitter
Input: 12V - - - (1x23A)
Product design and specications may vary, without notice.
1
3

17
WARRANTY
This Steren product is warranted under normal usage against defects in
workmanship and materials to the original purchaser for one year from the
date of purchase.
CONDITIONS
1.- This warranty card with all the required information, invoice, product
box or package, and product, must be presented when warranty service is
required.
2.- If the product stills on the warranty time, the company will repair it free
of charge.
3.- The repairing time will not exceed 30 natural days, from the day the
claim was received.
4.- Steren sell parts, components, consumables and accessories to
customer, as well as warranty service, at any of the addresses mentioned
later.
THIS WARRANTY IS VOID IN THE NEXT CASES:
If the product has been damaged by an accident, acts of God, mishan-
dling, leaky batteries, failure to follow enclosed instructions, improper
repair by unauthorized personnel, improper safe keeping, among others.
a) The consumer can also claim the warranty service in the purchase
establishment.
b) If you lose the warranty card, we can reissue it, if you show the invoice
or purchase ticket.
Product: Wireless door bell
Part number: TIM-250
Brand: Steren

Este instructivo puede mejorar con tu ayuda,
llamanos a:
Help us to improve this instruction manual,
call us to:
www.steren.com
01800 500 9000
-
 1
1
-
 2
2
-
 3
3
-
 4
4
-
 5
5
-
 6
6
-
 7
7
-
 8
8
-
 9
9
-
 10
10
-
 11
11
-
 12
12
-
 13
13
-
 14
14
-
 15
15
-
 16
16
-
 17
17
-
 18
18


en otros idiomas
- English: Steren TIM-250 Owner's manual
Artículos relacionados
-
Steren TIM-305 El manual del propietario
-
-
-
-
-
-
-
-
-