Infinity Drain FFAS 2542 SS Guía de instalación
- Tipo
- Guía de instalación

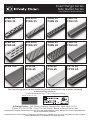
Fixed Flange Series
Side Outlet Series
Installation Instructions
The Fixed Flange Series & Side Outlet Series are intended for use with the following
waterproong methods:
°
Liquid Waterproofing
°
Fabric Waterproofing
Dimension are subject to Manufacturers tolerance and change without notice. We can assume no responsibility for
use of superseded or void data.
Las dimensiones están sujetos a la tolerancia del fabricante y cambio sin previo aviso. No podemos asumir ninguna
responsabilidad por el uso de datos a sustituir los nulos.
Infinity Drain • 145 Dixon Avenue, Amityville, New York 11701
Phone 516.767.6786 • Fax 516.740.3066 • www.InfinityDrain.com
Made in the U.S.A.
FFED 25
FTED 25
FFED 65
FTED 65
FFAS 125
FFMN 25
FTMN 25
FFMN 65
FTMN 65
FFSG 65
FTSG 65
FFDG 25
FTDG 25
FFDG 65
FTDG 65
FFIG 65
FTIG 65
FFAS 25
FTAS 25
FFAS 65
FTAS 65
FFTIF 65
FTTIF 65

2
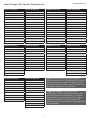
Fixed Flange (FF) Series Components:
SS=Stainless Steel
FFED 25 Series
EA 6532 32″ SS Grate
EA 6536 36″ SS Grate
EA 6542 42″ SS Grate
EA 6548 48" SS Grate
EA 6560 60" SS Grate
FC 6532 32" SS Fixed Channel
FC 6536 36" SS Fixed Channel
FC 6542 42" SS Fixed Channel
FC 6548 48" SS Fixed Channel
FC 6560 60" SS Fixed Channel
CI 2532 32" SS Channel Insert
CI 2536 36" SS Channel Insert
CI 2542 42" SS Channel Insert
CI 2548 48" SS Channel Insert
CI 2560 60" SS Channel Insert
FFED 65 Series
EA 6524 24" SS Grate
EA 6532 32″ SS Grate
EA 6536 36″ SS Grate
EA 6542 42″ SS Grate
EA 6548 48" SS Grate
EA 6560 60" SS Grate
FC 6524 24"SS Fixed Channel
FC 6532 32" SS Fixed Channel
FC 6536 36" SS Fixed Channel
FC 6542 42" SS Fixed Channel
FC 6548 48" SS Fixed Channel
FC 6560 60" SS Fixed Channel
HF 2 2" Hair Strainer
FFTIF 65 Series
LA 6524 24" SS Grate
LA 6532 32″ SS Grate
LA 6536 36″ SS Grate
LA 6542 42″ SS Grate
LA 6548 48" SS Grate
LA 6560 60" SS Grate
FC 6524 24"SS Fixed Channel
FC 6532 32" SS Fixed Channel
FC 6536 36" SS Fixed Channel
FC 6542 42" SS Fixed Channel
FC 6548 48" SS Fixed Channel
FC 6560 60" SS Fixed Channel
HF 2 2" Hair Strainer
FFDG 65 Series
DA 6532 32″ SS Grate
DA 6536 36″ SS Grate
DA 6542 42″ SS Grate
DA 6548 48" SS Grate
DA 6560 60" SS Grate
FC 6532 32" SS Fixed Channel
FC 6536 36" SS Fixed Channel
FC 6542 42" SS Fixed Channel
FC 6548 48" SS Fixed Channel
FC 6560 60" SS Fixed Channel
HF 2 2" Hair Strainer
FFAS 125 Series
SA 12532 32" SS Grate
SA 12536 36" SS Grate
SA 12542 42" SS Grate
SA 12548 48" SS Grate
SA 12560 60" SS Grate
FC 12532 32" SS Fixed Channel
FC 12536 36" SS Fixed Channel
FC 12542 42" SS Fixed Channel
FC 12548 48" SS Fixed Channel
FC 12560 60" SS Fixed Channel
FFDG 25 Series
DA 6532 32″ SS Grate
DA 6536 36″ SS Grate
DA 6542 42″ SS Grate
DA 6548 48" SS Grate
DA 6560 60" SS Grate
FC 6532 32" SS Fixed Channel
FC 6536 36" SS Fixed Channel
FC 6542 42" SS Fixed Channel
FC 6548 48" SS Fixed Channel
FC 6560 60" SS Fixed Channel
CI 2532 32" SS Channel Insert
CI 2536 36" SS Channel Insert
CI 2542 42" SS Channel Insert
CI 2548 48" SS Channel Insert
CI 2560 60" SS Channel Insert
FFMN 25 Series
MA 6532 32″ SS Grate
MA 6536 36″ SS Grate
MA 6542 42″ SS Grate
MA 6548 48" SS Grate
MA 6560 60" SS Grate
FC 6532 32" SS Fixed Channel
FC 6536 36" SS Fixed Channel
FC 6542 42" SS Fixed Channel
FC 6548 48" SS Fixed Channel
FC 6560 60" SS Fixed Channel
CI 2532 32" SS Channel Insert
CI 2536 36" SS Channel Insert
CI 2542 42" SS Channel Insert
CI 2548 48" SS Channel Insert
CI 2560 60" SS Channel Insert
FFAS 25 Series
SA 6532 32″ SS Grate
SA 6536 36″ SS Grate
SA 6542 42″ SS Grate
SA 6548 48" SS Grate
SA 6560 60" SS Grate
FC 6532 32" SS Fixed Channel
FC 6536 36" SS Fixed Channel
FC 6542 42" SS Fixed Channel
FC 6548 48" SS Fixed Channel
FC 6560 60" SS Fixed Channel
CI 2532 32" SS Channel Insert
CI 2536 36" SS Channel Insert
CI 2542 42" SS Channel Insert
CI 2548 48" SS Channel Insert
CI 2560 60" SS Channel Insert
FFMN 65 Series
MA 6532 32″ SS Grate
MA 6536 36″ SS Grate
MA 6542 42″ SS Grate
MA 6548 48" SS Grate
MA 6560 60" SS Grate
FC 6532 32" SS Fixed Channel
FC 6536 36" SS Fixed Channel
FC 6542 42" SS Fixed Channel
FC 6548 48" SS Fixed Channel
FC 6560 60" SS Fixed Channel
HF 2 2" Hair Strainer
FFAS 65 Series
SA 6524 24" SS Grate
SA 6532 32″ SS Grate
SA 6536 36″ SS Grate
SA 6542 42″ SS Grate
SA 6548 48" SS Grate
SA 6560 60" SS Grate
FC 6524 24"SS Fixed Channel
FC 6532 32" SS Fixed Channel
FC 6536 36" SS Fixed Channel
FC 6542 42" SS Fixed Channel
FC 6548 48" SS Fixed Channel
FC 6560 60" SS Fixed Channel
HF 2 2" Hair Strainer
Note: Installer must verify all rough-in
dimensions prior to installation and consult
local and national codes. Conformity and
compliance to local and national codes are
the responsibility of the installer.
Tenga en cuenta: Instalador debe
comprobar todas las dimensiones en las
partes previa a la instalación y consultar
localmente y nacionalmente los códigos.
La conformidad y el cumplimiento de
códigos local y nacional es responsabilidad
del instalador.

3
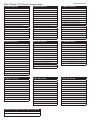
FTED 25 Series
EA 6532 32″ SS Grate
EA 6536 36″ SS Grate
EA 6542 42″ SS Grate
EA 6548 48" SS Grate
EA 6560 60" SS Grate
OC 6532 32" SS Fixed Channel
OC 6536 36" SS Fixed Channel
OC 6542 42" SS Fixed Channel
OC 6548 48" SS Fixed Channel
OC 6560 60" SS Fixed Channel
CI 2532 32" SS Channel Insert
CI 2536 36" SS Channel Insert
CI 2542 42" SS Channel Insert
CI 2548 48" SS Channel Insert
CI 2560 60" SS Channel Insert
CF 65 Adjustable Feet for FT Series
FTDG 25 Series
DA 6532 32″ SS Grate
DA 6536 36″ SS Grate
DA 6542 42″ SS Grate
DA 6548 48" SS Grate
DA 6560 60" SS Grate
OC 6532 32" SS Fixed Channel
OC 6536 36" SS Fixed Channel
OC 6542 42" SS Fixed Channel
OC 6548 48" SS Fixed Channel
OC 6560 60" SS Fixed Channel
CI 2532 32" SS Channel Insert
CI 2536 36" SS Channel Insert
CI 2542 42" SS Channel Insert
CI 2548 48" SS Channel Insert
CI 2560 60" SS Channel Insert
CF 65 Adjustable Feet for FT Series
FTMN 25 Series
MA 6532 32″ SS Grate
MA 6536 36″ SS Grate
MA 6542 42″ SS Grate
MA 6548 48" SS Grate
MA 6560 60" SS Grate
OC 6532 32" SS Fixed Channel
OC 6536 36" SS Fixed Channel
OC 6542 42" SS Fixed Channel
OC 6548 48" SS Fixed Channel
OC 6560 60" SS Fixed Channel
CI 2532 32" SS Channel Insert
CI 2536 36" SS Channel Insert
CI 2542 42" SS Channel Insert
CI 2548 48" SS Channel Insert
CI 2560 60" SS Channel Insert
CF 65 Adjustable Feet for FT Series
FTAS 25 Series
SA 6532 32″ SS Grate
SA 6536 36″ SS Grate
SA 6542 42″ SS Grate
SA 6548 48" SS Grate
SA 6560 60" SS Grate
OC 6532 32" SS Fixed Channel
OC 6536 36" SS Fixed Channel
OC 6542 42" SS Fixed Channel
OC 6548 48" SS Fixed Channel
OC 6560 60" SS Fixed Channel
CI 2532 32" SS Channel Insert
CI 2536 36" SS Channel Insert
CI 2542 42" SS Channel Insert
CI 2548 48" SS Channel Insert
CI 2560 60" SS Channel Insert
CF 65 Adjustable Feet for FT Series
FTED 65 Series
EA 6524 24" SS Grate
EA 6532 32″ SS Grate
EA 6536 36″ SS Grate
EA 6542 42″ SS Grate
EA 6548 48" SS Grate
EA 6560 60" SS Grate
OC 6524 24"SS Fixed Channel
OC 6532 32" SS Fixed Channel
OC 6536 36" SS Fixed Channel
OC 6542 42" SS Fixed Channel
OC 6548 48" SS Fixed Channel
OC 6560 60" SS Fixed Channel
CF 65 Adjustable Feet for FT Series
FTTIF 65 Series
LA 6524 24" SS Grate
LA 6532 32″ SS Grate
LA 6536 36″ SS Grate
LA 6542 42″ SS Grate
LA 6548 48" SS Grate
LA 6560 60" SS Grate
OC 6524 24"SS Fixed Channel
OC 6532 32" SS Fixed Channel
OC 6536 36" SS Fixed Channel
OC 6542 42" SS Fixed Channel
OC 6548 48" SS Fixed Channel
OC 6560 60" SS Fixed Channel
CF 65 Adjustable Feet for FT Series
FTDG 65 Series
DA 6532 32″ SS Grate
DA 6536 36″ SS Grate
DA 6542 42″ SS Grate
DA 6548 48" SS Grate
DA 6560 60" SS Grate
OC 6532 32" SS Fixed Channel
OC 6536 36" SS Fixed Channel
OC 6542 42" SS Fixed Channel
OC 6548 48" SS Fixed Channel
OC 6560 60" SS Fixed Channel
CF 65 Adjustable Feet for FT Series
FTMN 65 Series
MA 6532 32″ SS Grate
MA 6536 36″ SS Grate
MA 6542 42″ SS Grate
MA 6548 48" SS Grate
MA 6560 60" SS Grate
OC 6532 32" SS Fixed Channel
OC 6536 36" SS Fixed Channel
OC 6542 42" SS Fixed Channel
OC 6548 48" SS Fixed Channel
OC 6560 60" SS Fixed Channel
CF 65 Adjustable Feet for FT Series
FTAS 65 Series
SA 6524 24" SS Grate
SA 6532 32″ SS Grate
SA 6536 36″ SS Grate
SA 6542 42″ SS Grate
SA 6548 48" SS Grate
SA 6560 60" SS Grate
OC 6524 24"SS Fixed Channel
OC 6532 32" SS Fixed Channel
OC 6536 36" SS Fixed Channel
OC 6542 42" SS Fixed Channel
OC 6548 48" SS Fixed Channel
OC 6560 60" SS Fixed Channel
CF 65 Adjustable Feet for FT Series
Optional Components: (Not Included)
ST 65 Placement Brackets for FF25/FF65 Series
ST 125 Placement Brackets for FF125 Series
Side Outlet (FT) Series Components:
SS=Stainless Steel

4
Note: Installer must verify all rough-
in dimensions prior to installation
and consult local and national codes.
Conformity and compliance to local and
national codes are the responsibility of
the installer.
Tenga en cuenta: Instalador debe
comprobar todas las dimensiones en las
partes previa a la instalación y consultar
localmente y nacionalmente los códigos.
La conformidad y el cumplimiento de
códigos local y nacional es responsabilidad
del instalador.
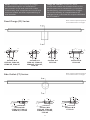
Drain can be adjusted upward
for an additional ½” in height.
Drain can be adjusted upward
for an additional ½” in height.
Section A-A
FFED 25, FFDG 25,
FFMN 25, FFAS 25
Section A-A
FFED 65, FFDG 65,
FFMN 65, FFAS 65,
FFIG 65
Section A-A
FFTIF 65
Section A-A
FFAS 125
1¹⁄
¹⁶
"
¹³⁄
¹⁶
"
1"
2¼"
3"
1¹⁄
¹⁶
"
¹³⁄
¹⁶
"
2½"
2¼"
3"
1³⁄
¹⁶
"
¹³⁄
¹⁶
"
2½"
2"
⅜"
2¼"
3"
1¹⁄
¹⁶
"
4¹³⁄
¹⁶
"
¹³⁄
¹⁶
"
3¼"
3"
Side Outlet (FT) Series:
Section B-B
FTED 25, FTDG 25,
FTMN 25, FTAS 25
Section B-B
FTED 65, FTDG 65,
FTMN 65, FTAS 65,
FTIG 65
Section B-B
FTTIF 65
1¹⁄
¹⁶
"
1"
2¼"
2⅞"
1¹⁄
¹⁶
"
2½"
2¼"
2⅞"
1³⁄
¹⁶
"
2½"
2"
⅜"
2¼"
2⅞"
Fixed Flange (FF) Series:

5
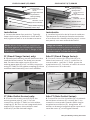
Installation
1. Locate the waste line position. Typically
linear drains span a dimension from wall to
wall, against a wall or at a shower entrance.
FF (Fixed Flange Series) only:
2. Spread a prelimainary mortar bed across the
intended drain location. Set drain into mortar
bed. Connect the outlet section (D) to the
existing waste pipe (F) via 2” no hub connection
using a 2” DWV no hub rubber coupling (E). Allow
stainless steel channel (C) to sit onto suboor.
FT (Side Outlet Series) only:
2. Connect the outlet section (D) to the
existing waste pipe (F) via 2” no hub
connection using a 2” DWV no hub rubber
coupling (E). Be sure to use integrated drain
supports to support the stainless steel
channel (C) at the desired height.
Note: When drain install is required to
be ush against the nished wall, backer
board will install over the 1” ange of the
drain body.
Instalación
1. Localize la posición de la línea de residuos.
Típicamente los drenajes lineales extienden
a una dimensión desde pared a pared, contra
una pared, o en una entrada del baño.
Solo FT (Side Outlet Series):
2. Conecte la sección de salida (D) a la tubería
de residuos existente (F) a través de 2” sin
conexión concentrado usando DWV ningún
acoplamiento elástico (E). Asegúrese de
utilizar un drenaje integrado para soportar el
canal de acero (C) a la longitud desea.
Solo FF (Fixed Flange Series):
2. Conecte la sección de salida (D) a la
tubería existente (F) vía 2” conexión sin
concentrador usando 2” DWV goma de
acoplamiento (E). Permita el canal de acero
(C) sentarse en el subsuelo.
Tenga en cuenta: Cuando el drenaje se
instale es necesario que este contra la
pared terminada, placa de cemento se
instalara sobre 1” brida del drenaje.
*Not provided by Innity Drain kits
FIXED FLANGE (FF) SERES
(A) Top Grate –
EA/DA/MA/SA/LA/
UA/BA/
(B) Adjustable Feet
Liquid/Fabric
Waterproong
(C) Bottom
Channel – FC 65
(D) Vertical Outlet
(E) Rubber Coupling*
(F) Waste Pipe
KEY
SIDE OUTLET (FT) SERIES
KEY
Liquid/Fabric
Waterproong
(A) Top Grate –
EA/DA/MA/SA/LA
UA/BA
(B) Adjustable Feet
(C) Bottom
Channel – OC 65
(D) Side Outlet
(E) Rubber Coupling*
(F) Waste Pipe
(C) Bottom Channel – FC 65
(D) Vertical
Outlet
(E) Rubber
Coupling*
(F) Waste Pipe
FF Series
(C) Bottom Channel – OC 65
(D) Side Outlet
Drain
Supports
(E) Rubber Coupling*
(F) Waste Pipe
FT Series

6
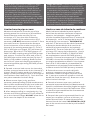
Limited waste pipe access:
Measure the distance from the top of the
existing waste line to the top of the suboor.
Ensure that the outlet section (D) is at
minimum of 2” less than this dimension,
cut the 3” length of the outlet section (D) if
necessary. DO NOT remove more than 2” from
the outlet section. Determine the distance
from the bottom of the outlet section (D) to
the top of the existing waste pipe (F). Cut a 2”
PVC or ABS pipe to a length 1/8” less than this
dimension. Bond the 2” PVC/ABS pipe to a 2”
DWV PVC/ABS coupling using PVC/ABS primer
and cement. Connect the other end of the 2”
PVC/ABS pipe to the outlet section (D) via a 2”
DWV no hub rubber coupling. Bond the free
end of the 2” pipe and coupling assembly to
the existing waste pipe using PVC/ABS primer
and cement.
3. Spread a mortar bed across the intended
shower area and ensure the drain channel (C)
is level. Back ll region under the channel 1”
ange so that pitch begins level to the edge of
the stainless steel channel (C). Pitch this bed
one plane towards the drain body.
4. When mortar layer is dry, perform
necessary waterproong (liquid membrane or
fabric sheet membrane) as per local code and
manufacturers’ instructions. Paint or bond
waterproong directly to the channels ange.
5. After waterproong is completely dry, lay
thinset and nishing material. Finish material
on to the channel ange. DO NOT allow tile to
nish over the depth of the channel.
Límite acceso de tubería de residuos:
Medir la distancia desde la parte superior
de la línea de residuos existentes a la parte
superior del subsuelo. Asegúrese que la
sección de salida (D) este mínimo 2” menos de
la dimensión, corte 3” de largo de la sección
de salida (D) si es necesario. NO REMUEVE
más de 2.5” de la sección de salida. Determine
la distancia desde debajo de la sección de
salida (D) a la parte superior de la tubería
existente (F). Corte un tubo de PVC o ABS a 2”
a lo largo 1/8” menos de la dimensión. Una la
2” de tubería de PVC/ABS a 2” DWV PVC/ABS
de acoplamiento usando PVC/ABS primer y
cemento. Conecte la otra parte de 2” de tubería
PVC/ABS a la sección de salida (D) vía a 2” DWV
sin ningún acoplamiento elástico. Una la parte
nal de la 2” de la tubería y la asamblea de
acoplamiento a la existencia de la tubería de
residuos usando PVC/ABS primer y cemento.
3. Extienda mortero a través del baño
previsto y asegure que el canal (C) este
anivelado. Rellene la región baja del canal
de 1” para que comience a brear a nivel del
borde del canal de acero (C). Bree esto a un
plano hacia el drenaje.
4. Cuando el motero este seco, realice la
necesaria impermeabilización (Membrana de
liquidó o membrana de tejido) según las reglas
locales y las instrucciones del fabricante. Pinte
o enlace la impermeabilización directamente
al reborde del canal.
5. Después de que la impermeabilización se
seque por completo, colocar el thinset y el
material terminado. El material terminado
hasta el borde del canal. NO PERMITA o DEJE
que el tile termine encima de la profundidad
del canal.
Note: When oor pitch is needed to begin
at a zero level, determine the length of
the channel (B) less the 1” ange around
it’s perimeter. Cut a hole in the suboor to
the measured dimensions at the desired
location. Place the ST65/ST125 Placement
Brackets (Optional Component) in the newly
created hole and screw into suboor. Recess
the stainless steel channel (C) into the
suboor and bracket. Allow the 1” ange to
sit onto the suboor.
Tenga en cuenta: Cuando el piso sea pitch
es necesario que comienza a un cero nivel,
determine la longitud del canal (B) menos de
1” alrededor del perímetro. Corte un agujero
en el subsuelo a la dimensión medida de la
ubicación deseada. Colocar el ST65/ST125
soportes de colocación (Componentes
Opcionales) en el recién agujero y atornille en
el subsuelo. Empotrar el canal de acero (C)
en el subsuelo y soporte. Permita el 1”brida
que este sentado en el subsuelo.

7
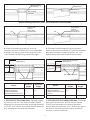
Mortar Bed
Sub-oor
Waterproong
Membrane
Mortar Bed
Sub-oor
Waterproong
Membrane
Before nishing material • Antes que el material esté terminado
Tile
Assure that
grate is
lower than
installed tile
Tile
Assure that
grate is
lower than
installed tile
After nishing material • Después que el material esté terminado
6. Place nished top grate (A) into the
installed bottom channel (C). Use adjustable
feet (B) to raise or lower the top grate to be
1/16” below the nishing material height.
6. Coloque la rejilla superior (A) en la parte
inferior del canal instalado (C). Utilicé ajustables
pies para levantar o bajar la rejilla a ser 1/16”
debajo de la altura del material terminado.
Model
Minimum
Height
Maximum
Height
FFED25/FFED65/
FFDG25/FFDG65/
FFMN25/FFMN65/
FFAS25/FFAS65/FFAS125
1/” 1/”
FFTIF 65
1³/” 1/”
Model
Minimum
Height
Maximum
Height
FTED25/FTED65/FTDG25/
FTDG65/FTMN25/
FTMN65/FTAS25/FTAS65/
FTAS125
1/” 1/”
FTTIF 65
1³/” 1/”
(B) Adjustable Feet
Grate can be raised an
additional ½”
(B) Adjustable Feet
Grate can be raised an
additional ½”
7. FFTIF 65/FTTIF 65 INSTALL. Spread a layer
of mortar into the Tile Insert Frame (TA65),
allowing for thinset and and nishing material
to nish 1/16” above the metal frame. Allow to
dry, spread thinset and lay material.
7. FFTIF 65/FTTIF 65 INSTALACION. Extender
una capa de mortero en Tile Insert Frame
(TA65), permitiendo el thinset y material
terminado que termine 1/16” arriba del marco
del metal. Permita que se seque, extienda
thinset y coloca material.

8
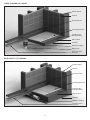
FIXED FLANGE (FF) SERES
Suboor
Stainless Steel
Channel
Waste Line
Rubber Coupling
Mortar Bed
Liquid/Fabric
Waterproong
Finishing Material
Backer Board
Thinset
Finished Grate
SIDE OUTLET (FT) SERIES
Suboor
Stainless Steel
Channel
Rubber Coupling
Mortar Bed
Liquid/Fabric
Waterproong
Finishing Material
Backer Board
Thinset
Finished Grate
-
 1
1
-
 2
2
-
 3
3
-
 4
4
-
 5
5
-
 6
6
-
 7
7
-
 8
8


Infinity Drain FFAS 2542 SS Guía de instalación
- Tipo
- Guía de instalación
Artículos relacionados
-
Infinity Drain FFDG Instrucciones de operación
-
Infinity Drain FXSG 6548 SS Guía de instalación
-
Infinity Drain S-LAG 6536 BK Guía de instalación
-
Infinity Drain XS 4 ORB Instrucciones de operación
-
Infinity Drain UTIF-A 36 SS Guía de instalación
-
Infinity Drain STIF AS 6540 SS Guía de instalación
-
Infinity Drain D 3860 SS Instrucciones de operación
-
Infinity Drain LTD5 BA SS Guía de instalación
-

