LG RV1329CN7P El manual del propietario
- Categoría
- Secadoras
- Tipo
- El manual del propietario

OWNER’S MANUAL
COMMERCIAL DRYER
MFL67863723
MODEL
RV1329CN7P
ENGLISH ESPAÑOL
www.lg.com
Copyright © 2018 LG Electronics Inc. All Rights Reserved.
Before beginning installation, read these instructions carefully.
this will simplify installation and ensure that the dryer is
installed correctly and safely. leave these instructions near the
dryer after installation for future reference.

2
PRODUCT FEATURES
PRODUCT FEATURES
OUTSTANDING PERFORMANCE
The dryer features the largest capacity, quick drying times, quiet operation, and an energy-saving system.
ARTISTIC DESIGN
Modern front panel look and big clear glass door make your dryer look stylish
EASY OF USE
An entire selection of user-friendly functions makes operating the dryer easy.
ULTRA CAPACITY
The larger drum enables better tumbling and less tangling and wrinkling of the laundry.

3
ENGLISH
IMPORTANT SAFETY INSTRUCTIONS
IMPORTANT SAFETY INSTRUCTIONS
READ ALL INSTRUCTIONS BEFORE USE
WARNING
For your safety, the information in this manual must be followed to minimize the risk of fire or explosion, electric
shock, or to prevent property damage, Injury to persons, or death.
Your Safety and the safety of others is very important.
We have provided many important safety messages in this manual and on your appliance.
Always read and obey all safety messages.
This is the safety alert symbol.
This symbol alerts you to potential hazards that can kill or hurt you and others.
All safety messages will follow the safety alert symbol and either the word DANGER, WARNING, or CAUTION.
These words mean:
DANGER
You will be killed or seriously injured if you don’t immediately follow instructions.
WARNING
You can be killed or seriously injured if you don’t follow instructions.
CAUTION
You may be slightly injured or cause damage to the product if you do not follow instructions.
All safety messages will tell you what the potential hazard is, tell you how to reduce the chance of injury, and tell
you what can happen if the instructions are not followed.
This appliance can be used by children aged from
8 years and above and persons with reduced
physical, sensory or mental capabilities or lack
of experience and knowledge if they have been
given supervision or instruction concerning use
of the appliance in a safe way and understand the
hazards involved. Children shall not play with the
appliance. Cleaning and user maintenance shall
not be made by children without supervision.
Children of less than 3 years should be kept away
unless continuously supervised.

4
IMPORTANT SAFETY INSTRUCTIONS
• Read all instructions before using the dryer.
• Before use, the dryer must be properly installed as described in
this manual.
• Do not place items exposed to cooking oils in your dryer. Items
contaminated with cooking oils may contribute to a chemical
reaction that could cause a load to catch fire.
• Do not dry articles that have been previously cleaned in, washed
in, soaked in, or spotted with gasoline, dry-cleaning solvents, or
other flammable or explosive substances as they give off vapors
that could ignite or explode.
• Do not reach into the dryer if the drum or any other part is
moving.
• Do not repair or replace any part of the dryer or attempt any
servicing unless specifically recommended in this Owner’s Manual
or in published user-repair instructions that you understand and
have the skills to carry out.
• Do not tamper with controls.
• Before the dryer is removed from service or discarded, remove
the door to the drying compartment.
• Do not allow children to play on or in the dryer. Close supervision
of children is necessary when the dryer is used near children.
• Do not use fabric softeners or products to eliminate static unless
recommended by the manufacturer of the fabric softener or
product.
• Do not use heat to dry articles containing foam rubber or
similarly textured rubber-like materials.
• Keep area around the exhaust opening and adjacent surrounding
areas free from the accumulation of lint, dust, and dirt.
• The interior of the dryer and exhaust vent should be cleaned
periodically by qualified service personnel.
• Do not install or store the dryer where it will be exposed to the
weather.
• Always check the inside of the dryer for foreign objects.
• Clean lint screen before or after each load.
•
Do not dry unwashed items in the
tumble dryer.
•
Items that have been soiled with
substances such as cooking oil,
acetone, alcohol,petrol,kerosene,spot
removers, turpentine, waxes and
wax removers should be washed in
hot water with an extra amount of
detergent before being dried in the
tumble dryer.
•
Items such as foam rubber(latex
foam), shower caps, waterproof
textiles, rubber backed articles and
clothes or pillows fitted with foam
rubber pads should not be dried in
the tumble dryer.
•
Fabric softeners, or similar products,
should be used as specified by the
fabric softener instructions.
• The final part of a tumble dryer cycle occurs without heat(cool
down cycle) to ensure that the items are left at a temperature that
ensures that the items will not be damaged.
•
If the supply cord is damaged, it must
be replaced by the manufacturer, its
service agent or similarly qualified
persons in order to avoid a hazard.
• Never operate the dryer without lint filter in place. Never operate
the dryer with a wet lint filter.
•
The lint trap has to be cleaned
frequently.
•
Lint must not to be allowed to
accumulate around the tumble dryer.
•
Adequate ventilation has to be provided
to avoid the back flow of gases into the
room from appliances burning other
fuels, including open fires.
• Electric Dryer Max capacity is 10kg
• Gas Dryer Max capacity is 10,2kg
• This appliance is not intended for use by persons (including
children) with reduced physical, sensory or mental
capabilities, or lack of experience and knowledge, unless they
have been given supervision or instruction concerning use of
the appliance by a person responsible for their safety.
• Children should be supervised not to play with the appliance.
•
The tumble dryer is not to be used if
industrial chemicals have been used
for cleaning
IMPORTANT SAFETY INSTRUCTIONS
READ ALL INSTRUCTIONS BEFORE USE
BASIC SAFETY PRECAUTIONS
WARNING
To reduce the risk of fire, electric shock, or injury to persons when using this appliance, follow basic precautions,
including the following:
WARNING
Never stop a tumble dryer before the end of the drying cycle unless all
items are quickly removed and spread out so that the heat is dissipated.

5
ENGLISH
IMPORTANT SAFETY INSTRUCTIONS
IMPORTANT SAFETY INSTRUCTIONS
READ ALL INSTRUCTIONS BEFORE USE
WHAT IS NOT COVERED.
Service trips to your home to instruct you on the product.
If the product is connected to any voltage other than that shown on the rating plate.
If the fault is caused by accidents, neglects, misuses of Acts of God.
If the fault is caused by reasons except for normal domestic use or use in accordance with the owner’s manual.
If the fault is caused by pests, for example, rats or cockroaches etc..
Noise or vibration that is considered normal,for example, water drain sound, spin sound or warning beeps.
Correcting the installation for example, leveling the product, adjustment of drain.
Normal maintenance recommended by the owner’s manual.
Removal of foreign objects/substances from the machine including the pump and inlet hose filter, for example,
grit,nails, bra wires and buttons etc..
Replace fuses in or correct wiring or correct house plumbing.
Correction of unauthorized repairs.
Incidental or consequential damage to personal property caused by possible defects with this appliance.
If this product is used for commercial purposes, it is not warranted.
(Example:Public places such as public bathroom, lodging house, training center, dormitory)
If the product is installed outside the normal service area, any cost of transportation involved in the repair of the
products, or the replacement of a defective part, shall be borne by the owner.
READ ALL INSTRUCTIONS BEFORE USE
WARNING
For your safety, the information in this manual must be followed to minimize the risk of fire or explosion,
electric shock, or to prevent property damage, Injury to persons, or death.
• Do not store or use gasoline or other flammable
vapors and liquids in the vicinity of this appliance
or any other appliances.
• Installation and service must be performed by
a qualified installer, service agency, or the gas
supplier.

6
IMPORTANT SAFETY INSTRUCTIONS
IMPORTANT SAFETY INSTRUCTIONS
READ ALL INSTRUCTIONS BEFORE USE
WARNING
For your safety, the information in this manual must be followed to minimize the risk of fire or explosion,
electric shock, or to prevent property damage, injury to persons, or death.
GROUNDING INSTRUCTIONS
This appliance must be grounded. In the event of
malfunction or breakdown, grounding will reduce
the risk of electric shock by providing a path of least
resistance for electric current. This appliance must be
equipped with a cord having an equipmentgrounding
conductor and a grounding plug. The plug must be
plugged into an appropriate outlet that is properly
installed and grounded in accordance with all local
codes and ordinances. Do not use an adapter or
extension cord. Do not remove ground prong. If you
don’t have the proper outlet, consult an electrician.
Do not modify the plug provided with the appliance.
If it will not fit the outlet, have a proper outlet installed
by a qualified electrician.
This appliance must be connected to a grounded metal,
permanent wiring system or an equipmentgrounding
conductor must be run with the circuit conductors and
connected to the equipmentgrounding terminal or lead
on the appliance. Electric shock can result if the dryer
is not properly grounded. The appliance may only be
installed in a room if the room meets the appropriate
ventilation requirements specified in the national
installation regulations. Minimum required spacing of
2,54cm to adjacent appliances, walls and furniture.
WARNING
Improper connection of the equipment-grounding conductor can result in a risk of electric shock. Check with
a qualified electrician or service person if you are in doubt as to whether the appliance is properly grounded.
SAFETY INSTRUCTIONS FOR INSTALLATION
WARNING
To reduce the risk of fire, electric shock, or injury to persons when using this appliance, follow basic precautions,
including the following:
• Properly ground dryer to conform with all
governing codes and ordinances. Follow details in
the installation instructions. Electric shock can result
if the dryer is not properly grounded.
• Before use, the dryer must be properly installed as
described in this manual. Electric shock can result if
the dryer is not properly grounded.
• Install and store the dryer where it will not be
exposed to temperatures below freezing or exposed
to the weather.
• All repairs and servicing must be performed
by an authorized servicer unless specifically
recommended in this Owner’s Manual. Use only
authorized factory parts. Failure to follow this
warning can cause serious injury, fire, electric shock, or
death.
• To reduce the risk of electric shock, do not install
the dryer in humid spaces. Failure to follow this
warning can cause serious injury, fire, electric shock, or
death.
• Connect to a properly rated, protected, and sized
power circuit to avoid electrical overload. Improper
power circuit can melt, creating electric shock and/or
fire hazard.
• Remove all packing items and dispose of all
shipping materials properly. Failure to do so can
result in death, explosion, fire, or burns.
• Place dryer at least 18 in. above the floor for a
garage installation. Failure to do so can result in
death, explosion, fire, or burns.
• Keep all packaging from children. Packaging
material can be dangerous for children. There is a
risk of suffocation.
• Keep the area underneath and around your
appliances free of combustible materials such as
lint, paper, rags, chemicals, etc. Failure to do so can
result in fire.
• Do not place candles, smoking materials, or other
flammables on to top of the product. Dripping wax,
smoke, or fire can result.
• Remove all protective vinyl film from the product.
Failure to do so can cause product damage, smoke or
fire.
• Means for disconnection with contact separation at
least 3mm is that the means for disconnection must
be incorporated in the fixed wiring according to the
wiring rules.

7
ENGLISH
IMPORTANT SAFETY INSTRUCTIONS
IMPORTANT SAFETY INSTRUCTIONS
READ ALL INSTRUCTIONS BEFORE USE
WARNING
For your safety, the information in this manual must be followed to minimize the risk of fire or explosion,
electric shock, or to prevent property damage, injury to persons, or death.
SAFETY INSTRUCTIONS FOR INSTALLATION
• The appliance is not to be used by children or persons
with reduced physical, sensory or mental capabilities,
or lack of experience and knowledge, unless they have
been given supervision or instruction.
Children being supervised not to play with the
appliance.
•
That the appliance must not
be installed behind a lockable
door, a sliding door or a door
with a hinge on the opposite
side to that of the tumble
dryer, in such a way that a full
opening of the tumble dryer
door is restricted.
Exhaust/Ducting:
• The dryer exhaust system must be exhausted to the
outside of the dwelling. If the dryer is not exhausted
outdoors, some fine lint and large amounts of
moisture will be expelled into the laundry area. An
accumulation of lint in any area of the home can create
a health and fire hazard.
• Use only rigid metal or flexible metal 4-inch (10.2
cm) diameter ductwork inside the dryer cabinet or
for exhausting to the outside. Use of plastic or other
combustible ductwork can cause a fire. Punctured
ductwork can cause a fire if it collapses or becomes
otherwise restricted in use or during installation.
• Ductwork is not provided with the dryer, and you
should obtain the necessary ductwork locally. The
end cap should have hinged dampers to prevent
backdraft when the dryer is not in use. Failure to
follow these instructions can result in fire or death.
•
For washing machines
having ventilation openings
in the base, the installation
instructions shall state that
the openings must not be
obstructed by a carpet.
• Exhaust air must not be discharged into a flue
which Is used for exhausting fumes from appliances
burning gas or other fuels.
• The exhaust duct must be 4 inches (10.2 cm) in
diameter with no obstructions. The exhaust duct
should be kept as short as possible. Make sure
to clean any old ducts before installing your new
dryer. Failure to follow these instructions can result in
fire or death.
• DO NOT use sheet metal screws or other fasteners
which extend into the duct that could catch lint and
reduce the efficiency of the exhaust system. Secure
all joints with duct tape. For complete details,
follow the Installation Instructions. Failure to follow
these instructions can result in fire or death.
• In the appliance enclosure or in the built-in
structure, keep ventilation opening clear of
obstruction.
• Adequate ventilation has to be provided to avoid
the back flow of gases into the room from appliances
burning other fuels, including open fires Do not dry
unwashed items in the tumble dryer.

8
IMPORTANT SAFETY INSTRUCTIONS
IMPORTANT SAFETY INSTRUCTIONS
READ ALL INSTRUCTIONS BEFORE USE
WARNING
For your safety, the information in this manual must be followed to minimize the risk of fire or explosion,
electric shock, or to prevent property damage, injury to persons, or death.
SAFETY INSTRUCTIONS FOR CONNECTING ELECTRICITY
WARNING
To reduce the risk of fire, electric shock, or injury to persons when using this appliance, follow basic precautions,
including the following:
• Do not, under any circumstances, cut or remove the
ground prong from the power cord. To prevent injury
to persons or damage to the dryer, the electrical power
cord must be plugged into a properly grounded outlet.
• For personal safety, this dryer must be properly
grounded. Failure to do so can result in electric shock
or injury.
• Refer to the installation instructions in this manual
for specific electrical requirements for your model.
Failure to follow these instructions can create an
electric shock hazard and/or a fire hazard.
• This dryer must be plugged into a properly
grounded outlet. Electric shock can result if the
dryer is not properly grounded. Have the wall outlet
and circuit checked by a qualified electrician to
make sure the outlet is properly grounded. Failure
to follow these instructions can create an electric shock
hazard and/or a fire hazard.
• The dryer should always be plugged into its own
individual electrical outlet which has a voltage
rating that matches the rating plate. This provides
the best performance and also prevents overloading
house wiring circuits which could cause a fire hazard
from overheated wires.
• Never unplug your dryer by pulling on the power
cord. Always grip plug firmly and pull straight out
from the outlet. The power cord can be damaged,
resulting in a risk of fire and electric shock.
• Repair or replace immediately all power cords that
have become frayed or otherwise damaged. Do not
use a cord that shows cracks or abrasion damage
along its length or at either end. The power cord can
melt, creating electric shock and/or fire hazard.
• When installing or moving the dryer, be careful not
to pinch, crush, or damage the power cord. This will
prevent injury and prevent damage to the dryer from
fire and electric shock.
• To reduce the risk of injury to persons, adhere
to all industry recommended safety procedures
including the use of long sleeved gloves and safety
glasses. Failure to follow all of the safety warnings in
this manual could result in property damage, injury to
persons or death.
• The final part of the tumble dryer cycle occurs without
heat (cool down cycle) to ensure that the items are left
at a temperature that ensures that the items will not be
damaged.
SAVE THESE INSTRUCTIONS

9
ENGLISH
IMPORTANT SAFETY INSTRUCTIONS
IMPORTANT SAFETY INSTRUCTIONS
READ ALL INSTRUCTIONS BEFORE USE
CAUTION
These instructions are only valid if the following country code is on the appliance. If this code is not present on
the appliance, it is necessary to refer to the technical instructions which will provide the necessary information
concerning the modification of the appliance to the condition of use for the country Before installation, check that
the local distribution conditions, nature of gas and pressure, and the adjustment of the appliance are compatible.
• the method of connection and the installation regulations in the country where the appliance is to be installed
(if such regulations exist); also the ventilation dimensions shall be given for the purposes of installation in those
countries where there are no appropriate regulations.
WARNING
Never stop a tumble dryer before the end of the drying cycle unless
all items are quickly removed and spread out so that the heat is
dissipated.
SAVE THESE INSTRUCTIONS

10
CONTENTS
CONTENTS
2 PRODUCT FEATURES
3 IMPORTANT SAFETY
INSTRUCTIONS
4 BASIC SAFETY PRECAUTIONS
6 GROUNDING INSTRUCTIONS
6 SAFETY INSTRUCTIONS FOR INSTALLATION
8 SAFETY INSTRUCTIONS FOR CONNECTING
ELECTRICITY
11
INTRODUCING YOUR DRYER
11 Specification
12 Control panel features
14 OPERATING YOUR DRYER
15 PROGRAMMING MODE
16 PROGRAMMING MODE - Card / Coin type
17 PROGRAMMING MODE - OPL type
18 PROGRAMMING MODE - Setup Mode
18 1. How to change regular price.
19 2. How to change special price
20 3. How to enter the FEA1
21 3-1. Special price day setup
22 3-2. Vend type setup - card type or coin
type setup
23 3-3. Top off apply or not setup
24 4. How to enter the FEA2
25 4-1. Pause function setup
26 5. How to enter the special price day setup
27 5-1. How to change sunday
28 6. Special price beginning time setup
29 7. Special price ending time setup
30 8. Regular priced dryer cycle time
31 9. Special priced dryer cycle time
32 10. Value of coin 1
33 11. Value of coin 2 (Set up for top off price
and e-suds coin pulse)
34 12. Penny increment pricing offset
35 13. Top off time
36 14. Beep volume
37 15. Time to keep the coin (Use only for coin
type)
38 16. How to enter the tyPE
39 PROGRAMMING MODE - Test Mode
40 1. LqC1
41 2. Factory reset - EEPt
42 3. Time Set Up
43 4. Courtesy cycle
44 5. Cycle Kill
45 PROGRAMMING MODE - Collect Mode
47 MAINTENANCE
48 STACK MACHINE INSTALLATION
INSTRUCTIONS
50 ERROR MODE
50 POWER FAIL RECOVERY
50 DEFAULT DRYER SETTINGS

11
ENGLISH
INTRODUCING YOUR DRYER
INTRODUCING YOUR DRYER
Specification
Type : Electric and Gas Dryer
Rating : Please refer to the rating label regarding detailed information.
Single dryer size : 686 mm(W) x 764 mm(D) x 983 mm(H)
Stack dryer size : 686 mm(W) x 764 mm(D) x 1954 mm(H)
Electric Dryer Max. capacity : 10 kg
Weight : 59.4 kg
Specifications are subject to change by manufacturer.
Specifications subject to change by manufacturer.
NOTE

12
INTRODUCING YOUR DRYER
- Stack upper
(RV1329CN7P)
1 24
3
1 24
3
1 24
3
1 24
3
1 24
3
1 24
3
1. Display LED
2. Cycle button
3. Start/Pause button
4. Status LED
Control panel features

13
ENGLISH
INTRODUCING YOUR DRYER
1 24
3
1 24
3
1 24
3
1 24
3
1 24
3
1 24
3
Display LED Cycle button
Start/Pause button
Status LED
Display LED
The Display shows the vend price, remaining time, and
programming options.
Error codes are also displayed here.
Cycle button
Press the cycle button to Select the desired cycle based
on laundry types and conditions.
High Temp.
Use this cycle to get high heat for heavy fabrics, such
as jeans corduroys or work clothes (High heat).
Med Temp.
Use for drying sturdy fabrics such as work casual
clothes (Medium heat).
Low Temp.
Use for drying synthetic fabrics,washable knit fabrics
and noiron finishes (Low heat).
No Heat
Use for items that require heat-free drying such as
plastics or rubber.
Start/Pause button
The Start LED flashes when the full vend price has been
satisfied then the cycle has been chosen or the machine
is paused.
The Start LED flashes when a card is inserted to add time
to the current cycle.
If you press the Start/Pause button while dryer is
working, machine will be paused.
Status LED
LED Description
LED flashes when the duct is blocked by
lint.
Check and clean the duct.
LED flashes whenever the heating cycle
is in operation.
LED flashes whenever the cool down
cycle is in operation.

14
OPERATING YOUR DRYER
OPERATING YOUR DRYER
1. Ready mode
1) Coin / Card type
- The cycle LEDs flash at the same time, when the
price of cycles are equal.
2) OPL type
- The cycle LEDs is lit at the same time, and displayed
‘PUSH’.
• Price setting varies by country.
• Set your country from
mode.
(Refer How to enter the
)
• After EEPT, reset your country.
(Default country is KOR)
NOTE
2. Insert card/coin (not for OPL type)
Insert a cash card that has a sufficient balance.
The card balance should be more than the
programmed vend price for a selected cycle.
When the card balance is not enough, machine
displays the balance for 5 seconds and then displays
message repetitively
NOTE
Insert a sufficient amount of change that is a more
than the programmed vend price for a selected cycle.
When the coin amount is not enough, the machine
will not start.
NOTE
3. Select the cycle
Press the desired cycle and the start button. The display
LED will show the remaining time and the selected cycle
starts.
The last 2 minutes of the remaining time are always
for the cool down portion.
NOTE
4. Top off (To add more time)
After a debit card is inserted, the operating time can
be increased to 20 minutes / 500, when the
Start button or the chosen course button has been
pressed.
(The card should have enough balance to satisfy
increasing time.)
The operating time can be increased to 20 minutes /
500 (default) by adding more coins.
When the COOL DOWN has been working, if time is
added, it goes back to the Dry.
Time can be added up 99 minutes.
5. Change cycle
You cannot change the cycle while the machine is
running.
But if the door is opened, the machine stops
temporarily and the cycle can be changed.
Press the Pause button then you can change the
cycle.
6. Cycle finish
After the COOL DOWN of cycle, the machine stops
and LED display shows End.
If you press any key or open the door, the dryer
defaults to the ready mode.
Owner can control the additional time and money
setting (top off price).
NOTE

15
ENGLISH
PROGRAMMING MODE
PROGRAMMING MODE
1. Programming mode
You can check machine information or change setting on Program setup or Diagnostic test.
There are two methods that you can enter programming mode.
How to enter “Programming mode”
You can enter programming mode only for Idle state
and pause state.
- Card Type
1) Insert service card.
2) Display will show
- Coin Type
1) Disassemble upper coin box key.
2) Take out the coin drop from the coin box.
3) Turn on/off the toggle switch at the back of the coin
box.
4) Display will show “
”.
- OPL/Coin Type
1) Push the High Temp. and Low Temp. button at the
same time.
2) Push the Med Temp. button 3 times.
3) Push the Srart button.
4) Display will show “
”
How to use button
You can change Dryer vend price, cycle time and Cycle
parameters, etc.
Press button Description
High Temp. Move to upper level
Med Temp.
Move to the mode in the
same level (+)
Low Temp.
Move to the modes in the
same level (-)
No Heat -
Start Enter the selected mode
• If you turn on the power without connecting the meter case for the first time, the machine will display .
• When the machine comes from the factory, it is set in the coin type. You can change Card/Coin type by button.
(For more information refer to SETUP mode’s
.)
• The machine will display “PUSH” for OPL type
• Price setting varies by country.
• Set your country from
mode. (Refer How to enter the )
• After EEPT, reset your country. (Default country is KOR)
NOTE
Coin Box Key
Coin Vault
Coin type
Insert debit card
Card type
OPL type

16
PROGRAMMING MODE
Card / Coin type
Algorithm Flow Chart shows how to control programming mode.
Before program set, check the structure of programming mode.
1. Turn on/off toggle switch or Insert the service card to entering set up mode.
2. Press High Temp. button to move the upper level.
3. Press Med Temp.(+) or Low Temp.(-) button if you want to be at the same level.
4. Press Start button to enter the details of Set up, Diagnostic Tests mode.
is to set price value, time value and vend type etc.
consists of line test, reset, free cycle and kill cycle.
Is to collect the usage data.
Structure of Programming mode
• Do not use , .
• It is only used in inspecting the machine.
NOTE

17
ENGLISH
PROGRAMMING MODE
OPL type
Algorithm Flow Chart shows how to control programming mode.
Before program set, check the structure of programming mode.
1) Push the High Temp. and Low Temp. button at the same time.
2) Push the Med Temp. button 3 times.
3) Push the Start button.
4) Display will show “
“
is to set price value, time value and vend type etc.
consists of line test, reset, free cycle and kill cycle.
Is to collect the usage data.
Structure of Programming mode
• Do not use , .
• It is only used in inspecting the machine.
NOTE

18
PROGRAMMING MODE
PROGRAMMING MODE - Setup Mode
Setup Mode : (display)
You can change dryer vend price, cycle time, and cycle parameters, etc.
Entering set up mode
• Coin type - Turn on/off toggle switch.
• Card type - Insert the service card.
• Stack type - Take off control panel, and turn on/off toggle switch.
• OPL/Coin Type – Push “High Temp.” + “Low Temp.” and then enter password “3”.
• Then, dryer displays
.
1. How to change regular price.
• rgCP(regular delicate price) is not available in dryer.
• rgrP(regular warm/cold price) is not available in dryer.
• rgHP (regular hot price) is not available in dryer.
• Price setting varies by country.
• Set your country from
mode. (Refer How to enter the )
• After EEPT, reset your country. (Default country is KOR)
NOTE
Entering set up
mode.
You will see LqC1
Button Display
Press the High Temp. button.
Press the Med Temp. or the Low Temp. button until
appears in the display.
Press the Start button.
Press the Start button.
Display previous regular price.
Press Med Temp.(+) or Low Temp.(-) button to set regular price.
(The vend price can be set from 0 to 9900 in 100 increments.)
Press the Start button.
The machine sets up the regular price, then advances to the
next process automatically.
1. Continue to set up the next price.
2. Stop the change of setup value and go back to ready mode.
• Coin type - Turn on/o toggle switch.
• Card type - Pull the service card.
• Stack type - 1. Control panel open.
2. Turn on/o toggle switch.
• OPL/Coin Type – Press “High Temp.” twice.

19
ENGLISH
PROGRAMMING MODE
2. How to change special price
• SPCP(special delicate price) is not available in dryer.
• SPrP(special warm/cold price) is not available in dryer.
• SPHP (special hot price) is not available in dryer.
• SCPA(add super cycle price) is not available in dryer.
• SPCt(add super wash type) is not available in dryer.
• Price setting varies by country.
• Set your country from
mode. (Refer How to enter the )
• After EEPT, reset your country. (Default country is KOR)
NOTE
Entering set up
mode.
You will see LqC1
Button Display
Press the High Temp. button.
Press the Med Temp. or the Low Temp. button until
appears in the display.
Press the Start button.
Press the Med Temp. or the Low Temp. button until
appears in the display.
Press the Start button.
Display previous special price.
Press Med Temp.(+) or Low Temp.(-) button to set special price.
(The vend price can be set from 0 to 9900 in 100 increments.)
Press the Start button.
The machine sets up the special price, then advances to the
next process automatically.
1. Continue to set up the next mode.
2. Stop the change of setup value and go back to ready mode.
• Coin type - Turn on/o toggle switch.
• Card type - Pull the service card.
• Stack type - 1. Control panel open.
2. Turn on/o toggle switch.
• OPL/Coin Type – Press “High temp.” twice.

20
PROGRAMMING MODE
3. How to enter the
Entering set up
mode.
You will see LqC1
Button Display
Press the High Temp. button.
Press the Med Temp. or the Low Temp. button until
appears in the display.
Press the Start button.
Press the Med Temp. or the Low Temp. button until
appears in the display.
Structure of
Content of
• Special price days apply or not
• Disabled
• Add super wash apply or not
• Select vend type
• This function is not available
• Pre-wash apply or not
• Top off apply or not (only for dryer)
• Twin spray apply or not
• Disable
• Enable

21
ENGLISH
PROGRAMMING MODE
3-1. Special price day setup
• noSt (Non-stop wash apply or not) is not available in dryer.
• SUUE (add super wash apply or not) is not available in dryer.
NOTE
Entering set up
mode.
You will see LqC1
Button Display
Press the High Temp. button.
Press the Med Temp. or the Low Temp. button until
appears in the display.
Press the Start button.
Press the Med Temp. or the Low Temp. button until
appears in the display.
Press the Start button.
Display
.
Press the Start button.
Press Med Temp. or Low Temp. button and then select
or
.
Disable
Enable
One or the other will
display.
Press the Start button.
The machine sets up the special price day, then advances to the
next process automatically.
1. Continue to set up the next mode.
2. Stop the change of setup value and go back to ready mode.
• Coin type - Turn on/o toggle switch.
• Card type - Pull the service card.
• Stack type - 1. Control panel open.
2. Turn on/o toggle switch.
• OPL/Coin Type – Press “High Temp.” twice.

22
PROGRAMMING MODE
3-2. Vend type setup - card type or coin type setup
• SEdE (sensor dry apply or not) is not available in dryer.
• PrSH (Pre-wash apply or not) is not available in dryer.
• After setting the Value to VEND, vend type is changed directly without power on/off.
NOTE
Entering set up
mode.
You will see LqC1
Button Display
Press the High Temp. button.
Press the Med Temp. or the Low Temp. button until
appears in the display.
Press the Start button.
Press the Med Temp. or the Low Temp. button until
appears in the display.
Press the Start button.
Display
.
Press the Med Temp. or the Low Temp. button until
appears in the display.
Press the Start button.
Press Med Temp. or Low Temp. button and then select
or .
Coin type
Card type
One or the other will
display.
Press the Start button.
The machine sets up the vend type, then go to the idle mode
automatically.

23
ENGLISH
PROGRAMMING MODE
3-3. Top off apply or not setup
Entering set up
mode.
You will see LqC1
Button Display
Press the High Temp. button.
Press the Med Temp. or the Low Temp. button until
appears in the display.
Press the Start button.
Press the Med Temp. or the Low Temp. button until
appears in the display.
Press the Start button.
Display
.
Press the Med Temp. or the Low Temp. button until
appears in the display.
Press the Start button.
Press Med Temp. or Low Temp. button and then select
or .
Disable
Enable
One or the other will
display.
Press the Start button.
The machine sets up top o function, then advances to the next
process automatically.
1. Continue to set up the next mode.
2. Stop the change of setup value and go back to ready mode.
• Coin type - Turn on/o toggle switch.
• Card type - Pull the service card.
• Stack type - 1. Control panel open.
2. Turn on/o toggle switch.
• OPL/Coin Type – Press “High Temp.” twice.
• tEIn (Twin spray apply or not) is not available in dryer.
NOTE

24
PROGRAMMING MODE
4. How to enter the
Enter setup mode.
You will see LqC1
Button Display
Press the High Temp. button.
Press the Med Temp. or the Low Temp. button until
appears in the display.
Press the Start button.
Press the Med Temp. or the Low Temp. button until
appears in the display.
Structure of
Content of
• Pause function apply or not

25
ENGLISH
PROGRAMMING MODE
4-1. Pause function setup
Enter setup mode.
You will see LqC1
Button Display
Press the High Temp. button.
Press the Med Temp. or the Low Temp. button until
appears in the display.
Press the Start button.
Press the Med Temp. or the Low Temp. button until
appears in the display.
Press the Start button.
Display
.
Press the Start button.
Press Med Temp. or Low Temp. button and then select
or .
Disable
Enable
One or the other will
display.
Press the Start button.
The machine sets up the pause function, then advances to the
next process automatically.
1. Continue to set up the next mode.
2. Stop the change of setup value and go back to ready mode.
• Coin type - Turn on/o toggle switch.
• Card type - Pull the service card.
• Stack type - 1. Control panel open.
2. Turn on/o toggle switch.
• OPL/Coin Type - Press “High Temp.” twice.

26
PROGRAMMING MODE
5. How to enter the special price day setup
Entering set up
mode.
You will see LqC1
Button Display
Press the High Temp. button.
Press the Med Temp. or the Low Temp. button until
appears in the display.
Press the Start button.
Press the Med Temp. or the Low Temp. button until
appears in the display.
Press the Start button.
Display
.
Structure of
Sunday
Monday
Tuesday
Wednesday
Thursday
Friday
Saturday

27
ENGLISH
PROGRAMMING MODE
5-1. How to change sunday
As explained on the previous page, other days can be set up by the same method.
NOTE
Entering set up
mode.
You will see LqC1
Button Display
Press the High Temp. button.
Press the Med Temp. or the Low Temp. button until
appears in the display.
Press the Start button.
Press the Med Temp. or the Low Temp. button until
appears in the display.
Press the Start button.
Display
.
Press the Start button.
Press Med Temp.(+) or Low Temp. button and then select
or .
Disable
Enable
One or the other will
display.
Press the Start button.
The machine sets up the special price day (Sunday), then
advances to the next process automatically.
1. Continue to set up the next mode.
2. Stop the change of setup value and go back to ready mode.
• Coin type - Turn on/o toggle switch.
• Card type - Pull the service card.
• Stack type - 1. Control panel open.
2. Turn on/o toggle switch.
• OPL/Coin Type – Press “High Temp.” twice.

28
PROGRAMMING MODE
6. Special price beginning time setup
Entering set up
mode.
You will see LqC1
Button Display
Press the High Temp. button.
Press the Med Temp. or the Low Temp. button until
appears in the display.
Press the Start button.
Press the Med Temp. or the Low Temp. button until
appears in the display.
Press the Start button.
Display previous special price beginning time.
Press Med Temp.(+) or Low Temp.(-) button to select time be-
tween 0 and 23.
Press the Start button.
The machine sets up the special price beginning time, then
advances to the next process automatically.
1. Continue to set up the next mode.
2. Stop the change of setup value and go back to ready mode.
• Coin type - Turn on/o toggle switch.
• Card type - Pull the service card.
• Stack type - 1. Control panel open.
2. Turn on/o toggle switch.
• OPL/Coin Type – Press “High Temp.” twice.

29
ENGLISH
PROGRAMMING MODE
7. Special price ending time setup
Entering set up
mode.
You will see LqC1
Button Display
Press the High Temp. button.
Press the Med Temp. or the Low Temp. button until
appears in the display.
Press the Start button.
Press the Med Temp. or the Low Temp. button until
appears in the display.
Press the Start button.
Display previous special price ending time.
Press Med Temp.(+) or Low Temp.(-) button to select time be-
tween 1 and 24.
Press the Start button.
The machine sets up the special price ending time, then advances
to the next process automatically.
1. Continue to set up the next mode.
2. Stop the change of setup value and go back to ready mode.
• Coin type - Turn on/o toggle switch.
• Card type - Pull the service card.
• Stack type - 1. Control panel open.
2. Turn on/o toggle switch.
• OPL/Coin Type – Press “High Temp.” twice.
When setting up a special price period, the ending time must be later than the beginning time.
NOTE

30
PROGRAMMING MODE
8. Regular priced dryer cycle time
Entering set up
mode.
You will see LqC1
Button Display
Press the High Temp. button.
Press the Med Temp. or the Low Temp. button until
appears in the display.
Press the Start button.
Press the Med Temp. or the Low Temp. button until
appears in the display.
Press the Start button.
Display previous regular priced dryer cycle time.
Press Med Temp.(+) or Low Temp.(-) button to select time be-
tween 5 and 99.
Press the Start button.
The machine sets up the regular priced dryer cycle time, then
advances to the next process automatically.
1. Continue to set up the next mode.
2. Stop the change of setup value and go back to ready mode.
• Coin type - Turn on/o toggle switch.
• Card type - Pull the service card.
• Stack type - 1. Control panel open.
2. Turn on/o toggle switch.
• OPL/Coin Type – Press “High Temp.” twice.

31
ENGLISH
PROGRAMMING MODE
9. Special priced dryer cycle time
Entering set up
mode.
You will see LqC1
Button Display
Press the High Temp. button.
Press the Med Temp. or the Low Temp. button until
appears in the display.
Press the Start button.
Press the Med Temp. or the Low Temp. button until
appears in the display.
Press the Start button.
Display previous special priced dryer cycle time.
Press Med Temp.(+) or Low Temp.(-) button to select time be-
tween 5 and 99.
Press the Start button.
The machine sets up the special priced dryer cycle time, then
advances to the next process automatically.
1. Continue to set up the next mode.
2. Stop the change of setup value and go back to ready mode.
• Coin type - Turn on/o toggle switch.
• Card type - Pull the service card.
• Stack type - 1. Control panel open.
2. Turn on/o toggle switch.
• OPL/Coin Type – Press “High Temp.” twice.
• CCCC (washing time) is not available in dryer.
• nrPC (rinsing times per cycle) is not available in dryer.
• rt (rinsing time setup) is not available in dryer.
• tSSd (top spin speed) is not available in dryer.
NOTE

32
PROGRAMMING MODE
10. Value of coin 1
Entering set up
mode.
You will see LqC1
Button Display
Press the High Temp. button.
Press the Med Temp. or the Low Temp. button until
appears in the display.
Press the Start button.
Press the Med Temp. or the Low Temp. button until
appears in the display.
Press the Start button.
Display previous coin 1 value.
Press Med Temp.(+) or Low Temp.(-) button to select value
of coin 1 (The vend price can be set from 10 to 1000 in 10
increments.)
Press the Start button.
The machine sets up the value of coin 1, then advances to the
next process automatically.
1. Continue to set up the next mode.
2. Stop the change of setup value and go back to ready mode.
• Coin type - Turn on/o toggle switch.
• Card type - Pull the service card.
• Stack type - 1. Control panel open.
2. Turn on/o toggle switch.
• OPL/Coin Type – Press “High Temp.” twice.
• Price setting varies by country.
• Set your country from
mode. (Refer How to enter the )
• After EEPT, reset your country. (Default country is KOR)
NOTE

33
ENGLISH
PROGRAMMING MODE
11. Value of coin 2 (Set up for top off price and e-suds coin pulse)
Entering set up
mode.
You will see LqC1
Button Display
Press the High Temp. button.
Press the Med Temp. or the Low Temp. button until
appears in the display.
Press the Start button.
Press the Med Temp. or the Low Temp. button until
appears in the display.
Press the Start button.
Display previous coin 2 value.
Press Med Temp.(+) or Low Temp.(-) button to select value
of coin 2 (The vend price can be set from 10 to 1000 in 10
increments.)
Press the Start button.
The machine sets up the value of coin 2, then advances to the
next process automatically.
1. Continue to set up the next mode.
2. Stop the change of setup value and go back to ready mode.
• Coin type - Turn on/o toggle switch.
• Card type - Pull the service card.
• Stack type - 1. Control panel open.
2. Turn on/o toggle switch.
• OPL/Coin Type – Press “High Temp.” twice.
• Coin type : Value of coin 2 is same function as setting for the e-Suds coin pulse.
• Card type : Value of coin 2 is same function as the top off price.
(As changing the value of coin 2, you can change the top off price and e-Suds coin pulse.)
• Price setting varies by country.
• Set your country from
mode. (Refer How to enter the )
• After EEPT, reset your country. (Default country is KOR)
NOTE

34
PROGRAMMING MODE
12. Penny increment pricing offset
This represents the cent increment price offset used when debit card is setup.
Entering set up
mode.
You will see LqC1
Button Display
Press the High Temp. button.
Press the Med Temp. or the Low Temp. button until
appears in the display.
Press the Start button.
Press the Med Temp. or the Low Temp. button until
appears in the display.
Press the Start button.
Display previous penny increment pricing oset.
Press Med Temp.(+) or Low Temp.(-) button to select value of
PIPo. (0~4)
Press the Start button.
The machine sets up the PIPo, then advances to the next process
automatically.
1. Continue to set up the next mode.
2. Stop the change of setup value and go back to ready mode.
• Coin type - Turn on/o toggle switch.
• Card type - Pull the service card.
• Stack type - 1. Control panel open.
2. Turn on/o toggle switch.
• OPL/Coin Type – Press “High Temp.” twice.
• Pence increment pricing offset is available only in card type.
(It hasn’t affected on the coin type’s price setting.)
NOTE

35
ENGLISH
PROGRAMMING MODE
13. Top off time
Entering set up
mode.
You will see LqC1
Button Display
Press the High Temp. button.
Press the Med Temp. or the Low Temp. button until
appears in the display.
Press the Start button.
Press the Med Temp. or the Low Temp. button until
appears in the display.
Press the Start button.
Display previous top o time.
Press Med Temp.(+) or Low Temp.(-) button to select time be-
tween 1 and 30.
Press the Start button.
The machine sets up the top o time, then advances to the
next process automatically.
1. Continue to set up the next mode.
2. Stop the change of setup value and go back to ready mode.
• Coin type - Turn on/o toggle switch.
• Card type - Pull the service card.
• Stack type - 1. Control panel open.
2. Turn on/o toggle switch.
• OPL/Coin Type – Press “High Temp.” twice.
• UULE(water level) is not available in dryer.
NOTE

36
PROGRAMMING MODE
14. Beep volume
Entering set up
mode.
You will see LqC1
Button Display
Press the High Temp. button.
Press the Med Temp. or the Low Temp. button until
appears in the display.
Press the Start button.
Press the Med Temp. or the Low Temp. button until
appears in the display.
Press the Start button.
Display previous value.
Press Med Temp.(+) or Low Temp.(-) button to select High or
Low or O.
Press the Start button.
The machine sets up the beep volume, then advances to the next
process automatically.
1. Continue to set up the next mode.
2. Stop the change of setup value and go back to ready mode.
• Coin type - Turn on/o toggle switch.
• Card type - Pull the service card.
• Stack type - 1. Control panel open.
2. Turn on/o toggle switch.
• OPL/Coin Type – Press “High Temp.” twice.

37
ENGLISH
PROGRAMMING MODE
15. Time to keep the coin (Use only for coin type)
Entering set up
mode.
You will see LqC1
Button Display
Press the High Temp. button.
Press the Med Temp. or the Low Temp. button until
appears in the display.
Press the Start button.
Press the Med Temp. or the Low Temp. button until
appears in the display.
Press the Start button.
Display previous value.
Press Med Temp.(+) or Low Temp.(-) button to select time be-
tween 0 ~ 180.
Press the Start button.
The machine sets up the time to keep the coin, then advances to
the next process automatically.
1. Continue to set up the next mode.
2. Stop the change of setup value and go back to ready mode.
• Coin type - Turn on/o toggle switch.
• Card type - Pull the service card.
• Stack type - 1. Control panel open.
2. Turn on/o toggle switch.
• OPL/Coin Type – Press “High Temp.” twice.
• dHUE(drop count) is not available in dryer.
• rSEn(rinse spin enable) is not available in dryer.
NOTE

38
PROGRAMMING MODE
16. How to enter the
Entering set up
mode.
You will see LqC1
Button Display
Press the High Temp. button.
Press the Med Temp. or the Low Temp. button until
appears in the display.
Press the Start button.
Press the Med Temp. or the Low Temp. button until
appears in the display.
Structure of
Content of
• Product type
• Currency choice
• Card reader type
• Coin drop type
0 EUK (England)
1 EAP (Australia)
2 ELC (USA)
3 EPN (China)
4 KOR (Korea)
5 EJP (Japan)
6 ECI (Canada)
7 GSC (Philippines)
0 (Pharos)
1 (HP)
0 (Greenwald)
1 (Heartland, ESD)
0 (ESD, Greenwald, Munzprufer) - Signal Pulse : 50ms
1 (Korea) - Signal Pulse : 100ms
• Pay means card or coin type.
• Default type is coin type. If you want to change coin type to card type, you need to setup vend type in fea1. (refer
to FEA1 function)
• Free means OPL type.
• CUSt (Custom program) is not available in dryer.
• Price setting varies by country.
• Set your country from
mode. (Refer How to enter the )
• After EEPT, reset your country. (Default country is KOR)
NOTE

39
ENGLISH
PROGRAMMING MODE
PROGRAMMING MODE - Test Mode
Diagnostic tests : (display)
This program has been added for testing the dryer and detecting errors.
Entering the test mode
Machine
Data
Name
Button Display Description
CARD /
COIN
Enter-
ing
the test
mode
1. Entering
programming
mode
Insert service card (Card type), Turn on/o toggle switch
(Coin type).
2. High Temp.
Press the High Temp. button.
Then
appears in the display.
3. Start
Enter the diagnostic test mode.
OPL
1. Entering
programming
mode.
Push and hold the High Temp. and Low Temp. at the same time.
After that push Med Temp. button for 3 times. Push Start but-
ton.
2. High Temp.
Press the High Temp. button.
Then
appears in the display.
3. Start
Enter the diagnostic test mode.

40
PROGRAMMING MODE
1.
Pressing the Start button cycles to the next test function.
Number of times
the Start
button is pressed
Checking point Display
None LqC 1
1 time
Check the version and code of ma-
chine.
Electric Coin type : P4:OE
Electric Card type : P4:CE
Electric OPL type : P4:PE
Version and code of machine (All LED on)
Display P4:XX and gU:XX and gd:XX alternately.
XX is product type or the version number.
2 time PDA CHECK Ir--
3 time Motor runs. Measured moisture value (70~239)
4 time
ELECTRIC TYPE: Heater runs.
Motor + Heater 1
Current temperature (5~70)
(Displays the temperature inside the drum in ° Celsius.)
5 time
ELECTRIC TYPE: Heater runs.
Motor + Heater 1 +Heater 2
Current temperature (5~70)
(Displays the temperature inside the drum in ° Celsius.)
6 time
LED & KEY CHECK
Press High Temp. button.
Press Med Temp. button.
Press Low Temp. button.
Press No Heat button.
Version and code of machine
7 time Test ends. LqC1
During check, if the
door is open.
Door switch
(Motor & Heater Off, Buzzer beeps
seven times)
dE
(The door is open. Please close the door completely)
During check, if the
door is closed
Test goes back at step 3.
(Motor on & Heater Off)
Measured moisture value (70~239)
NOTE
Do not use .

41
ENGLISH
PROGRAMMING MODE
2. Factory reset - EEPt
After a factory reset, all values are reset to the default values.
Entering set up
mode.
You will see LqC1
Button Display
Press the Med Temp. or the Low Temp. Button until
appears in the display.
Press the Start button.
Press the Med Temp. button until appears in the
display.
Press the Start button, then factory reset is done.
is displayed.
1. Continue to set up the next mode.
2. Stop the change of setup value and go back to ready mode.
• Coin type - Turn on/o toggle switch.
• Card type - Pull the service card.
• Stack type - 1. Control panel open.
2. Turn on/o toggle switch.
• OPL/Coin Type – Press “High Temp.” twice.
• Dryer default value for CARD/COIN machine
- Drying time 45 Minute
- Top off time 5 Minute
• Drying time in OPL machine can be changed from 1 to 100 Minutes by pressing the cycle button.
• Price setting varies by country.
• Set your country from
mode. (Refer How to enter the )
• After EEPT, reset your country. (Default country is KOR)
NOTE

42
PROGRAMMING MODE
3. Time Set Up
Entering set up
mode.
You will see LqC1
Button Display
Press the Med Temp. or the Low Temp. button until
appears in the display.
Press the Start button.
The display cycles through 2000 --> 0101 --> Sat --> 0000.
Press the Start button.
Press Med Temp. (+) or Low Temp.(-) button to select year
between 2000 and 2099.
Press the Start button.
The machine sets up the year, then advances to the next
process automatically.
Press Med Temp. (+) or Low Temp.(-) button to select month
between 01 and 12.
Press the Start button.
The machine sets up the month, then advances to the next
process automatically.
Press Med Temp. (+) or Low Temp.(-) button to select day
between 01 and 31.
Press the Start button.
The machine sets up the day, then advances to the next
process automatically.
Press Med Temp. (+) or Low Temp.(-) button to select hour
between 00 and 23.
Press the Start button.
The machine sets up the hour, then advances to the next
process automatically.
Press Med Temp. (+) or Low Temp.(-) button to select minute
between 00 and 59.
Press the Start button.
The machine sets up the minute.
1. Continue to set up the next mode.
2. Stop the change of setup value and go back to ready mode.
• Coin type - Turn on/o toggle switch.
• Card type - Pull the service card.
• Stack type - 1. Control panel open.
2. Turn on/o toggle switch.
• OPL/Coin Type – Press “High Temp.” twice.

43
ENGLISH
PROGRAMMING MODE
4. Courtesy cycle
Courtesy cycle is like a complimentary cycle given to the customer when the dryer goes out of order when
the customer has made the payment to dry one’s clothes.
Entering set up
mode.
You will see LqC1
Button Display
Press the Med Temp. or the Low Temp. Button until
appears in the display.
Press the Start button.
Press the Med Temp. button until appears in the
display.
Press the Start button.
Display will show
.
Select the course you desire.
• In case of dryer card type, it has to insert the cash card after
removing the service card. Then press the cycle course and
the start button. (It is only applicable to the dryer’s card type
specially and there is no subtraction in card balance at the
Courtesy cycle.)
NOTE
Press the Start button.
Display will show the remaining time and start.

44
PROGRAMMING MODE
5. Cycle Kill
Coin type
Card type
Entering set up
mode.
You will see LqC1
Button Display
Press the Med Temp. or the Low Temp. Button until
appears in the display.
Press the Start button.
Press the Med Temp. button until appears in the
display.
Press the Start button.
Display
with beeping.
Go back to ready mode.
Insert
cycle kill card.
Descriptions Display
Display the current time and
.
Display with beeping.
Go back to ready mode.
OPL type
- Dryer machine will end the cycle by opening the door.
NOTE

45
ENGLISH
PROGRAMMING MODE
Data Name Step (Button) LED Display Description
Entering
the collect
mode
1. Entering the
programming mode.
Insert service card(Card type), Turn on/o toggle switch
(Coin type).
2. High Temp.
Press the High Temp. button until “tESt” appears in the
display.
3. Med Temp.(+) or Low
Temp.(-)
Press the Med Temp. or Low Temp. button until “CLCt”
appears in the display.
4. Start
Enter the Collect information data.
5. Med Temp.(+) or Low
Temp.(-)
Move to each data list that you want to check by pressing
with Med Temp. or Low Temp. button.
6. Start Display the value of selected data list
7. High Temp.
Move to upper level or Comes back to Idle State
Check the collect information reference to the follow lists. The Lists are displayed by abbreviations.
PROGRAMMING MODE - Collect Mode
Collect Information Data : CLCt (display)
The dryer collects the usage data so that the owner can check various information like number of various cycles
used, how many times card or coins used, etc.
Entering the collect mode
Collect Mode Data lists
No.
Abbreviation
Meaning Description
1 rgPr Regular Price 100~9900
2 rgCP Regular Cold Price rgCP is not available in dryer. (It can’t enter.)
3 rgrP Regular Warm Price rgrP is not available in dryer. (It can’t enter.)
4 rgHP Regular Hot Price rgHP is not available in dryer. (It can’t enter.)
5 dELC Dryer Moisture Sense dELC is not available in dryer. (It can’t enter.)
6 ItrC Interval Regular Cycles Number of Regular cycles (0 ~ 65535)
7 ItCC Interval Regular Cold Cycles ItCC is not available in dryer. (It can’t enter.)
8 ItAC Interval Regular Warm Cycles ItAC is not available in dryer. (It can’t enter.)
9 ItHC Interval Regular Hot Cycles ItHC is not available in dryer. (It can’t enter.)
10 ItSC Interval Super Cycles ItSC is not available in dryer. (It can’t enter.)
11 IttF Interval Topo Cycles (Dryer Only) Number of Topo cycles (0 ~ 65535)
12 ItUC Interval Service Cycles Number of Service cycles (0 ~ 65535)
13 ItFC Interval Token Cycles Number of Token cycles (0 ~ 65535)
14 ACrC Accumulated Regular Cycles Number of Regular cycles (0 ~ 65535)
15 ACCC Accumulated Regular Cold Cycles ACCC is not available in dryer. (It can’t enter.)
16 ACAC Accumulated Regular Warm Cycles ACAC is not available in dryer. (It can’t enter.)
17 ACHC Accumulated Regular Hot Cycles ACHC is not available in dryer. (It can’t enter.)
18 ACSC Accumulated Super Cycles (Washer Only) ACSC is not available in dryer. (It can’t enter.)
19 ACtF Accumulated Topo Cycles (Dryer Only) Number of Topo cycles (0 ~ 65535)
20 ACUC Accumulated Service Cycles Number of Service cycles (0 ~ 65535)
21 ACFC Accumulated Token Cycles Number of Token cycles (0 ~ 65535)
22 ACrt Accumulated Run Time Number of Running minutes (0 ~ 65535)

46
PROGRAMMING MODE
Collect Mode Data lists
No.
Abbreviation
Meaning Description
23 Itnr Interval No Runs Itnr is not available in dryer.
24 Ittb Interval Trouble Cycles Ittb is not available in dryer.
25 ItPd Interval Power Downs Number of power down
26 Itdd
Interval Unauthorized Service Door
Openings
Number of Unauthorized Service Door Openings
( 0~ 255)
27 ItAd
Interval Authorized Service Door
Openings
Number of Unauthorized Service Door Openings
( 0~ 255)
28 ItUC
Interval Unauthorized Coin Vault Open-
ings
Number of Authorized Service Door Openings
( 0~ 255)
29 ItAC Interval Authorized Coin Vault Openings
Number of Authorized Service Door Openings
( 0~ 255)
30 Ittl Interval Total Income
Amount of money for Total Income
( 0 ~ 65535)
31 ACtl Accumulated Total Income
Amount of money for Total Income
( 0 ~ 65535)
32 IttC Interval Total Cycles Number of Total cycles ( 0~65535 )
33 ACtC Accumulated Total Cycles Number of Total cycles ( 0~65535 )
34 SCPr Super Cycle Price Scpr is not available in dryer. (It can’t enter.)
35 toPr Top O Price 0.05 ~ 9.95
36 Itd Interval Money
Amount of money for regular cycle
( 0 ~ 65535)
37 ACd Accumulated Money
Amount of money for regular cycle
( 0 ~ 65535)
38 Ittd Interval Topo Money Amount of money for Topo( 0 ~ 65535)
39 ACtd Accumulated Topo Money Amount of money for Topo( 0 ~ 65535)
INTERVAL means collecting since last data collection.
ACCUMULATED means collecting over a period of time since last factory reset (EEPt).
Authorized: Turning on/o the toggle switch with PDA Communication.
(Turning on/o the toggle switch within 30 minutes after Communicating with PDA)
Unauthorized: Turning on/o the toggle switch without PDA Communication.
Price setting varies by country.
Set your country from
mode. (Refer How to enter the )
After EEPT, reset your country. (Default country is KOR)

47
ENGLISH
MAINTENANCE
MAINTENANCE
Regular cleaning
WARNING
To reduce the risk of fire, electric shock, or injury
to persons when using this appliance, follow basic
precautions, including the following:
• Unplug the dryer before cleaning to avoid the risk
ofelectric shock. Failure to follow this warning can
causeserious injury, fire, Electric shock, or death.
• Never use harsh chemicals, abrasive cleaners or
solvents to clean the dryer. They will damage the
finish.
Cleaning the Exterior
Proper care of your dryer can extend its life.
The outside of the machine can be cleaned with warm
water and a mild, nonabrasive household detergent.
Immediately wipe off any spills with a soft, damp cloth.
Do not use methylated spirits, solvents, or similar products.
Never use steel wool or abrasive cleansers; they can damage
the surface.
NOTE
Cleaning the Interior
Wipe around the door opening and seal with a soft,
damp cloth to prevent lint and dust buildup that could
damage the door seal.
Clean the window with a soft cloth dampened with
warm water and a mild, nonabrasive household
detergent; then wipe dry.
The stainless steel drum can be cleaned with a
conventional stainless steel cleaner, used according to
the manufacturer’s specifications.
Never use steel wool or abrasive cleansers; they can
scratch or damage the surface.
Cleaning Around and Under the Dryer
Vacuum lint and dust from around the dryer and
underneath it regularly. Vent ductwork should be
checked for lint buildup and cleaned at least once per
year. If any noticeable reduction in airflow or drying
performance occurs, immediately check ductwork for
obstructions and blockages.
Maintaining Ductwork
Vent ductwork should be checked for lint buildup
and cleaned at least once per year. If any noticeable
reduction in airflow or drying performance occurs,
immediately check ductwork for obstructions and
blockages. Contact a qualified technician or service
provider.
Cleaning the Lint Filter
Always clean the lint filter after every cycle.
To clean, open the dryer door and pull the lint filter
straight up.Then:
1. Roll any lint off the filter with your fingers, or
2. Vacuum the lint filter, or
3. If the lint filter has become very dirty or clogged with
fabric softener, wash the lint filter in warm, soapy
water and allow to dry thoroughly before reinstalling.
Lint Filter
NEVER operate the dryer without the lint filter in place.
NEVER operate the dryer with a wet lint filter. Recommended
frequency of periodic servicing is once a year
NOTE

48
STACK MACHINE INSTALLATION INSTRUCTIONS
STACK MACHINE INSTALLATION INSTRUCTIONS
1. Suitable model for stacking
Stack type Upper Dryer Lower Washer
Model Name
RV1329CN7P
FH069FDP
RP1329AN7S
FH069FDF
RP1329A7S
FH069FD2P
FH069FD2F
2. Stacking kit
- Stacking kit is provided in the upper dryer.
- Stacking kit includes the stacking bracket(1), security bracket(3), bolt(1), screw(9).
- Sliding kit includes the slide bracket(2), sliding pad(4), screw(18).
1) Stacking bracket 2) bolt 3) Screw 4) security bracket
- The machine can be stacked only on the model designated as suitable by LGE.
- Do not stack the washer on the top.
- You can order the parts for stacking from Qualified dealer or Qualified SVS agent of LGE.
NOTE
1) Stacking bracket 2) Sliding pad 3) Screw

49
ENGLISH
STACK MACHINE INSTALLATION INSTRUCTIONS
Please refer to Service Manual for detail to explain how to stack and fix the machine
NOTE
3. Stacking the machine
- Install two sliding brackets on the top plate of lower washer.
- Remove the legs from the leg brackets.
- Remove the four(4) leg brackets from the bottom of upper dryer.
- Assemble the four(4) slide pads on the base.
- Lift and stack the upper dryer on the lower washer.
- Set the rear of the upper dryer and the rear of the lower washer in the same position.
- Push the upper dryer matching the slide & stacking bracket to make upper and lower front parallel.
- Install the stacking bracket at the rear of the stacked dryer and washer.
- Assemble the six(6) screw to fix the lower machine and upper dryer.
*Security bracket installation (Only coin model)
- Install two security bracket on the panel frame and top plate in the lower
washer.
- Install one security bracket on the lower panel frame in the upper dryer.

50
ERROR MODE / POWER FAIL RECOVERY / DEFAULT DRYER SETTINGS
PROBLEM POSSIBLE CAUSE SOLUTION
It is displayed when thermistor is opened or
shorted
Thermistor should be replaced.
ELECTRIC TYPE
It is displayed when thermistor temperature
have increased about 5 degrees for 3 seconds
Thermistor should be replaced.
Disconnection of card reader wire. Check the card reader wire.
ERROR MODE
Meaning of Error Codes that LED displays during occurrence or
problem.
Dryer error code
POWER FAIL RECOVERY
In case of power failure the machine stops running but the time display remains on, showing the time just before
power failure.
Press the START button after the power is restored, then the machine will restart.
DEFAULT DRYER SETTINGS
Default Settings Default
Cycle Time (Minutes) 45 Minutes
Cool Down Time Cycle 2 Minutes
High Temperature 68° C
Medium Temperature 60° C
Low Temperature
ELECTRIC TYPE 52° C
GAS TYPE 47° C
Top O Time (Minutes per coin) 20 Minutes
Coin #1 Value 100
Coin #2 Value 100
Minutes/Minutes and seconds Minutes
Fahrenheit/Celsius Celcius
Error Mode On
• Price setting varies by country.
• Set your country from
mode. (Refer How to enter the )
• After EEPT, reset your country. (Default country is KOR)
NOTE

51
ENGLISH


MANUAL DE USUARIO
SECADORA COMERCIAL
ESPAÑOL
www.lg.com
Copyright © 2018 LG Electronics Inc. Todos los Derechos Reservados.
MODELOS
RV1329CN7P
Antes de instalar, lea atentamente estas instrucciones. Esto
simplificará la instalación y garantizará que la secadora se
instale de forma correcta y segura. Tras la instalación, conserve
estas instrucciones cerca de la secadora para futura referencia.

2
CARACTERÍSTICAS DEL PRODUCTO
CARACTERÍSTICAS DEL PRODUCTO
DESEMPEÑO SOBRESALIENTE
La secadora cuenta con la capacidad mas grande, tiempos de secado rapidos, funcionamiento silencioso y sistema
de ahorro de energia.
DISEÑO ARTÍSTICO
Vista del panel frontal de diseño moderno y un cristal grande para hacer que su secadora se vea a la vanguardia.
FACILIDAD DE USO
Una selección completa de funciones amigables facilitan la operación de la secadora.
MUCHA MÁS CAPACIDAD
El tambor mas grande mejora el lavado de las prendas, con menos enredos y arrugas en las prendas.

3
ESPAÑOL
INSTRUCIONES IMPORTANTES DE SEGURIDAD
INSTRUCIONES IMPORTANTES DE SEGURIDAD
LEER TODAS LAS INSTRUCCIONES ANTES DE SU USO
ADVERTENCIA
Para su seguridad, debe seguir la información de este manual para disminuir el riesgo de fuego, explosión,
descargas eléctricas o para prevenir daños a la propiedad, lesiones a personas o pérdida de la vida.
Su Seguridad y la Seguridad de Otros son muy importantes
Hemos colocado muchos mensajes importantes de seguridad en este manual y en su aparato. Siempre lea y
obedezca todos los mensajes de seguridad.
Este es el símbolo de alerta de seguridad
Este símbolo le advierte de los peligros potenciales que pueden matar o herir a usted o a otros.
Todos los mensajes de seguridad tendrán el símbolo y también las palabras PELIGRO o ADVERTENCIA.
PELIGRO
Puede morir o salir lesionado seriamente si no sigue las instrucciones.
ADVERTENCIA
Puede morir o salir lesionado seriamente si no sigue las instrucciones. Todos los mensajes de seguridad le dicen
cuál es el peligro potencial, le dicen cómo reducir el riesgo de lesión y le dicen qué puede pasar si no se siguen las
instrucciones.

4
INSTRUCIONES IMPORTANTES DE SEGURIDAD
INSTRUCIONES IMPORTANTES DE SEGURIDAD
LEER TODAS LAS INSTRUCCIONES ANTES DE SU USO
PRECAUCIONES BÁSICAS DE SEGURIDAD
ADVERTENCIA
Para reducir el riesgo de fuego o descargas eléctricas o daños a las personas cuando se utilice este aparato, siga las
precauciones básicas, incluyendo las siguientes:
• Lea todas las instrucciones antes de utilizar la secadora.
• Antes de su uso, la secadora debe estar correctamente
instalada como se describe en este manual.
• No coloque en su secadora artículos expuestos al
aceite de cocina. Estos artículos pueden contribuir a
una reacción química que puede causar que la carga
prenda fuego.
• No lave artículos que hayan sido previamente
lavados, sumergidos, recubiertos o desmanchados
con gasolina, solventes para lavado en seco, u otra
sustancia inflamable o explosiva, debido a que
emanan vapores que pueden encenderse o explotar.
• No meta las manos en el interior si la canasta o
cualquier otra parte está en movimiento.
• No jugar con los controles.
• Antes de retirar del servicio la secadora o su
eliminación, quite la puerta de la canasta.
• No permita que los niños jueguen encima o dentro de
la secadora.
Se requiere de un cuidado cercano de los niños
cuando la lavadora se utiliza donde haya niños.
• No instale o guarde la secadora donde pueda estar
expuesta al exterior.
• No utilice suavizantes de tela o productos para
eliminar la estática a menos que sea recomendado por
el fabricante de la prenda o del suavizante.
• No utilice calor para secar artículos que contengan
hule espuma o materiales similares.
• Mantener el área alrededor del ducto de extracción
y áreas adyacentes libres de acumulación de pelusa,
polvo y suciedad.
• El interior de la secadora y el ducto de extracción
deben limpiarse periódicamente por un técnico
calificado.
• No instalar o guardar la secadora donde esté expuesta
al ambiente.
• Siempre revise que no haya objetos extraños en el
interior de la secadora.
• Limpiar la trampa de pelusa antes o después de cada
carga.
• No guardar plásticos, papel o telas que se puedan
quemar o derretir encima de la secadora durante su
operación.
• Las prendas con manchas de sustancias como
acetona, aceite de cocina, alcohol, gasolina,
kerosene, removedores de manchas, aguarrás ceras y
removedores de cera deben lavarse con agua caliente
con una cantidad adicional de detergente antes de
colocarse en la secadora.
• Artículos como goma espuma (espuma de látex),
gorros de ducha, telas impermeables, artículos con
forro de goma y prendas o almohadas rellenas de
goma espuma no deben secarse en la secadora.
• Los suavizantes, o productos similares, deben utilizarse
conforme a las especificaciones de los fabricantes.
• El final del ciclo de una secadora se realiza sin calor
(ciclo de enfriamiento) para garantizar que las prendas
queden a una temperatura que no les produzca daño.
• En el caso de aparatos con anexos en Y, si el cable de
alimentación está dañado deberá ser reemplazado
por el fabricante, su agente de servicio o una persona
igualmente calificada con el fin de evitar un peligro.
• Nunca opera la secadora sin el filtro de pelusa en su
lugar. Nunca opere la secadora con un filtro de pelusa
húmedo.
ADVERTENCIA
Nunca detenga una secadora antes del final del ciclo, a menos que retire todas las prendas y las coloque
separadas para que el calor se disipe.
• El filtro de pelusa debe limpiarse con frecuencia, si
corresponde.
• No debe dejar que la pelusa se acumule en la secadora.
• Debe proporcionarse una ventilación adecuada para
evitar el flujo de retorno de gases provenientes de
aparatos que queman otros combustibles, incluidas las
llamas expuestas, en la habitación.
• La capacidad máxima de la secadora eléctrica es de 10 kg
• La capacidad máxima de la secadora a gas es de 10,2 kg
• Este aparato no está diseñado para su uso por parte
de personas (incluidos niños) con capacidad física
reducida, o incapacidad mental o sensorial, o con falta de
experiencia y conocimiento, a menos que hayan contado
con supervisión o recibido instrucciones con respecto al
uso del aparato por parte de una persona responsable de
su seguridad.
• Se debe vigilar que los niños no jueguen con el aparato.
• La secadora no se debe utilizar si se han usado productos
químicos industriales para su limpieza.

5
ESPAÑOL
INSTRUCIONES IMPORTANTES DE SEGURIDAD
INSTRUCIONES IMPORTANTES DE SEGURIDAD
LEER TODAS LAS INSTRUCCIONES ANTES DE SU USO
CE QUI N’EST PAS COUVERT.
Les interventions à domicile pour vous former à l’utilisation du produit.
Si le produit est branché sur une autre tension que celle indiquée sur la plaque nominale.
Si la panne est causée par des accidents, des négligences ou des mauvaises utilisations ou des catastrophes naturelles.
Si la panne est causée par des raisons autres qu’une utilisation domestique normale ou conforme au manuel d’utilisation.
Si la panne est causée par des nuisibles, par exemple, des rats ou des cafards, etc.
Les bruits ou vibrations considérés comme normaux, par exemple, le son de l’évacuation d’eau, le bruit de la rotation du
tambour ou des bips d’avertissement.
La correction de l’installation, par exemple, le nivellement du produit, l’ajustement de l’évacuation.
La maintenance normale recommandée par le manuel d’utilisation.
Le retrait hors de la machine d’objets/substances étrangers, y compris la pompe et le filtre du tuyau d’admission, par
exemple, saletés, ongles, armatures de soutien-gorge et boutons, etc.
Le remplacement de fusibles, de câbles ou les réparations de plomberie.
La correction de réparations non autorisées.
Les dommages accidentels ou consécutifs à des effets personnels, causés par de possibles défectuosités de cet appareil.
Si ce produit est utilisé à des fins commerciales, il n’est pas couvert par la garantie.
(Exemple: lieux publics comme des bains publics, des pensions, des centres de formation, des dortoirs).
Si le produit est installé en dehors de la zone normale de dépannage, les coûts de transport impliqués dans la réparation
des produits ou le remplacement de pièces défectueuses sera à la charge du propriétaire du produit.
LEER TODAS LAS INSTRUCCIONES ANTES DE SU USO
ADVERTENCIA
Para su seguridad, debe seguir la información de este manual para disminuir el riesgo de fuego, explosión,
descargas eléctricas o para prevenir daños a la propiedad, lesiones a personas o pérdida de la vida.
•Noguardeoutilicegasolinauotrosvaporesy
liquidos inflamables en la cercania de este aparato
o cualquier otro aparato.
•Lainstalaciónyelserviciosedebenllevaracabo
por un instalador calificado, agencia de servicio o
el proveedor de gas.

6
INSTRUCIONES IMPORTANTES DE SEGURIDAD
INSTRUCIONES IMPORTANTES DE SEGURIDAD
LEER TODAS LAS INSTRUCCIONES ANTES DE SU USO
ADVERTENCIA
Para su seguridad, debe seguir la información de este manual para disminuir el riesgo de fuego, explosión,
descargas eléctricas o para prevenir daños a la propiedad, lesiones a personas o pérdida de la vida.
INSTRUCCIONES DE CONEXIÓN DE TIERRA FISICA
Este aparato debe conectarse a tierra física. En el
evento de un mal funcionamiento o falla, la conexión
a tierra reducirá el riesgo de recibir una descarga
eléctrica dando una ruta de menor resistencia para la
corriente eléctrica. Este aparato está equipado con un
cable con un conductor y conector a tierra. La clavija
debe conectarse al contacto apropiado que haya sido
debidamente instalado y aterrizado de acuerdo a los
códigos y ordenanzas locales.
No modifique la clavija suministrada, si no entra en
el contacto, que un electricista calificado le cambie el
contacto apropiado.
Este aparato debe ser conectado a un metal aterrizado,
un sistema permanente de tierra o a un conductor a
tierra junto con los conductores del circuito y conectado
a una terminal de tierra del aparato.
Puede resultar una descarga eléctrica si la secadora no
está correctamente aterrizada.
El aparato solo puede instalarse en una habitación si
esta cumple con los requisitos de ventilación apropiada
que se especifican en las reglamentaciones nacionales
de instalación. El espacio mínimo requerido es de 2,54
cm para aparatos adyacentes, paredes y muebles.
ADVERTENCIA
Laconexiónincorrectadelconductordetierrapuederesultarenunriesgodedescargaeléctrica.Revisar con
un electricista calificado o técnico de servicio si tiene dudas de la conexión a tierra de su aparato.
INSTRUCCIONESDESEGURIDADPARALAINSTALACIÓN
ADVERTENCIA
Para reducir el riesgo de fuego, descarga eléctrica o daños a las personas cuando utilizan este aparato, seguir las
precauciones básicas incluyendo las siguientes:
• Conectar la secadora a tierra física correctamente
de acuerdo a los códigos y ordenanzas locales.
Seguir los detalles en las instrucciones de
instalación. Puede resultar una descarga eléctrica si la
secadora no está conectada a tierra física.
• Antes de utilizar la secadora, debe estar
correctamente instalada como se describe en este
manual. Puede resultar una descarga eléctrica si la
secadora no está conectada a tierra física.
• Instalar y guardad la secadora donde no esté
expuesta a temperaturas de congelación o
expuesta a la intemperie.
• Todas las reparaciones y servicio deben llevarse
a cabo por un servicio autorizado a menos que
se recomiende lo contrario en esta guía del
propietario. De no hacer esta advertencia puede
causar serios daños, fuego, descarga eléctrica o la
muerte.
• Para reducir el riesgo de una descarga eléctrica, no
instalar la secadora en espacios mojados.
De no hacer esta advertencia puede causar serios
daños, fuego, descarga eléctrica o la muerte.
• Conectar a un circuito adecuado en capacidad y
protegido para evitar la sobrecarga eléctrica. Un
circuito eléctrico inadecuado puede derretirse creando
un corto y/o fuego.
• Remover todo el material de empaque y desecharlo
adecuadamente. De no hacer esta advertencia puede
causar serios daños, fuego, descarga eléctrica o la
muerte.
• Colocar la secadora al menos a 18” arriba del
suelo en una instalación en la cochera. De no hacer
esta advertencia puede causar serios daños, fuego,
descarga eléctrica o la muerte.
• Mantener alejado de los niños el material de
empaque. Puede ser peligroso para los niños. Hay
un riesgo de sofocación.
• Mantener el área debajo y alrededor de su aparato
libre de materiales combustibles como la pelusa,
papel, trapos, químicos, etc. De no hacerlo puede
resultar en fuego.
• No colocar velas, material para fumar u otros
inflamables encima del equipo. Puede resultar un
escurrimiento de Cera, humo o fuego.
• Quitar toda la película de vinilo del equipo. De no
hacerlo se pueden causar daños al producto, humo o
fuego.
• Medios de desconexión con separación de contacto
de al menos 3 mm. Los medios de desconexión deben
estar incorporados en el cableado fijo de conformidad
con las normas de cableado.

7
ESPAÑOL
INSTRUCIONES IMPORTANTES DE SEGURIDAD
INSTRUCIONES IMPORTANTES DE SEGURIDAD
LEER TODAS LAS INSTRUCCIONES ANTES DE SU USO
ADVERTENCIA
Para su seguridad, debe seguir la información de este manual para disminuir el riesgo de fuego, explosión,
descargas eléctricas o para prevenir daños a la propiedad, lesiones a personas o pérdida de la vida.
INSTRUCCIONESDESEGURIDADPARALAINSTALACIÓN
• Se deben usar los nuevos juegos de mangueras
suministrados con el aparato y las mangueras viejas
no deben volver a utilizarse.
• El aparato no está diseñado para su uso por parte de
personas con capacidad física reducida o incapacidad
mental o sensorial, o con falta de experiencia y
conocimiento, a menos que hayan contado con
supervisión o recibido instrucciones con respecto al
uso del aparato.
• El aparato no debe instalarse detrás de una puerta que
pueda trabarse, una puerta corrediza o una puerta con
bisagras del lado opuesto a la secadora, para que la
puerta de la secadora pueda abrirse completamente..
Ducto de Extracción:
• El sistema de ducto de extracción debe descargar
en el exterior del edificio. Si no se descarga al
exterior, alguna pelusa fina y grandes cantidades
de humedad serán expelidas en el área de la
lavandería. Una acumulación de pelusa en cualquier
área del edificio puede crear u peligro a la salud o
fuego.
• Utilizar solamente ducto rígido o flexible metálico
de 4 pulgadas de diámetro. El uso de ductos de
plástico u otro material puede causar fuego. Un
ducto con agujeros puede causar fuego si se colapsa o
se tapa durante el uso o instalación.
• El ducto de extracción no se suministra con la
secadora y se debe conseguir localmente. El
tramo final debe tener un dámper para prevenir
la entrada de aire en sentido contrario cuando
la secadora no esté en uso. De no seguir estas
instrucciones se puede causar fuego o la muerte.
• El aire de escape no debe descargarse en una
chimenea que se use para aparatos que queman
gas u otros combustibles.
• El ducto de extracción debe ser de 4” (10 cm) de
diámetro sin obstrucciones. Debe ser lo más corto
posible. Asegurarse de limpiar cualquier ducto
viejo antes de instalar su nueva secadora. De no
seguir estas instrucciones se puede causar fuego o la
muerte.
• El ducto metálico rígido o semirrígido está
recomendado para utilizarse entre la secadora
y la pared. En instalaciones especiales cuando
sea imposible hacer la conexión con las
recomendaciones anteriores, puede usarse
un ducto metálico flexible de transición, con
aprobaciónUL,entrelasecadoraylaconexiónde
la pared. El uso de este tipo de ducto puede afectar
el tiempo de secado. De no seguir estas instrucciones
se puede causar fuego o la muerte.
• No utilizar tornillos para metal u otros sujetadores
que se introduzcan al interior del ducto. Pueden
atrapar pelusa y reducir la eficiencia del sistema
de extracción. Asegurar las uniones con cinta
para ducto. Para los detalles completos, seguir
las instrucciones de instalación. De no seguir estas
instrucciones se puede causar fuego o la muerte.
• El aire de escape no debe descargarse en una
chimenea que se use para aparatos que queman
gas u otros combustibles.
• Debe proporcionarse una ventilación adecuada para
evitar el flujo de retorno de gases provenientes de
aparatos que queman otros combustibles, incluidas las
llamas expuestas, en la habitación. No seque prendas
sin lavar en la secadora.

8
INSTRUCIONES IMPORTANTES DE SEGURIDAD
INSTRUCIONES IMPORTANTES DE SEGURIDAD
LEER TODAS LAS INSTRUCCIONES ANTES DE SU USO
ADVERTENCIA
Para su seguridad, debe seguir la información de este manual para disminuir el riesgo de fuego, explosión,
descargas eléctricas o para prevenir daños a la propiedad, lesiones a personas o pérdida de la vida.
INSTRUCCIONESDESEGURIDADPARALACONEXIÓNELÉCTRICA
ADVERTENCIA
Para reducir el riesgo de fuego o descargas eléctricas o daños a las personas cuando se utilice este aparato, siga las
precauciones básicas, incluyendo las siguientes:
• Bajo ninguna circunstancia corte o remueva la
punta de conexión a tierra de la clavija del cable.
Para prevenir daños personales o a la secadora, el
cable de conexión eléctrica debe ser conectado a un
contacto debidamente aterrizado.
• Por Seguridad personal, esta secadora debe
conectarse a tierra física. De no hacer esto, puede
resultar una descarga eléctrica o lesiones.
• Referirse a las instrucciones de instalación de
este manual para los requerimientos eléctricos
específicos de su modelo. De no seguir estas
instrucciones, se puede crear una descarga eléctrica y/
o un peligro de fuego.
• Esta secadora debe ser conectada a un contacto
debidamente aterrizado. Puede resultar una
descarga eléctrica si la secadora no está conectada
a tierra física. Hacer que un electricista calificado
revise el contacto y el circuito para asegurarse
que está conectado a tierra. De no seguir estas
instrucciones, se puede crear una descarga eléctrica y/
o un peligro de fuego.
• Lasecadoradebeserconectadaauncontacto
individual que tenga el voltaje que coincida
con la placa de la máquina. Esto provee el mejor
desempeño y previene sobrecargar los circuitos, lo
que podría causar un peligro de fuego por cables
sobrecalentados.
• Nunca desconectar la secadora jalando el cable.
Sujetar la clavija firmemente y jalar para sacarla
del contacto. El cable se puede dañar, resultando en
un riesgo de fuego o descarga eléctrica.
• Reparar o reemplazar inmediatamente el cable que
se haya dañado. No utilizar un cable que muestre
daños en su longitud o en la punta. El cable puede
derretirse, creando un peligro de descarga eléctrica o
fuego.
• Cuando se instale o se mueva la secadora, tener
cuidado de no pinchar, aplastar o dañar el cable de
conexión eléctrica. Esto prevendrá lesio9nes y daños
a la secadora como fuego o descarga eléctrica.
• Para reducir el riesgo de lesiones personales,
practicar todos los procedimientos de seguridad
de la industria incluyendo el uso de guantes
largos y gafas de seguridad. De no seguir todas las
advertencias de seguridad de este manual, puede
resultar en daños a la propiedad, lesiones personales o
la muerte.
• El final del ciclo de la secadora se realiza sin calor (ciclo
de enfriamiento) para garantizar que las prendas
queden a una temperatura que no les produzca daño.
GUARDAR ESTAS INSTRUCCIONES

9
ESPAÑOL
INSTRUCIONES IMPORTANTES DE SEGURIDAD
INSTRUCIONES IMPORTANTES DE SEGURIDAD
LEER TODAS LAS INSTRUCCIONES ANTES DE SU USO
PRECAUCIÓN
Estas instrucciones solo son válidas si el siguiente código de país figura en el aparato. Si este código no está presente
en el aparato, es necesario que consulte las instrucciones técnicas que le brindarán la información necesaria
con respecto a la modificación del aparato conforme a las condiciones de uso del país. Antes de la instalación,
compruebe si las condiciones de distribución locales, el gas y la presión, y el ajuste del aparato son compatibles.
• Además, revise este método de conexión y las reglamentaciones de instalación del país donde se va a instalar el
aparato (si tales reglamentaciones existen), y también deben darse las dimensiones de ventilación a los fines de la
instalación en aquellos países en los que no existen reglamentaciones adecuadas.
ADVERTENCIA
Nunca detenga una secadora antes del final del ciclo, a menos que retire todas las prendas y las coloque separadas
para que el calor se disipe.
GUARDAR ESTAS INSTRUCCIONES

10
CONTENIDO
CONTENIDO
2 CARACTERÍSTICAS DEL
PRODUCTO
3 INSTRUCIONES IMPORTANTES
DE SEGURIDAD
4 PRECAUCIONES BÁSICAS DE SEGURIDAD.
6 INSTRUCCIONES DE CONEXIÓN DE TIERRA
FISICA
6 INSTRUCCIONES DE SEGURIDAD PARA LA
INSTALACIÓN
8 INSTRUCCIONES DE SEGURIDAD PARA LA
CONEXIÓN ELÉCTRICA
11
PRESENTACIÓN DE SU
SECADORA
11 Especificaciones
12 Funciones del panel de control
14 OPERANDO SU SECADORA
15 MODO PROGRAMACIÓN
16 MODO PROGRAMACIÓN - Tipo Tarjeta /
Moneda
17 MODO PROGRAMACIÓN - Tipo OPL
18 MODO PROGRAMACIÓN - Modo Setup
(Ajustes)
18 1. Cómo cambiar el precio regular.
19 2. Cómo cambiar el precio especial
20 3. Cómo entrar a FEA1
21 3-1. Selección del día de precio especial
22 3-2. Selección del tipo de contol - Tarjeta
o Moneda
23 3-3. Selección de la función de
Completado (para agregar tiempo)
24 4. Cómo ingresar el FEA2
25 4-1. Configuración de la función Pausa
26 5. Cómo introducir el día del precio especial
27 5-1. Cómo cambiar a Domingo
28 6. Ajuste del tiempo de inicio del precio
especial
29 7. Ajuste del tiempo para finalizar el precio
especial
30 8. Tiempo del ciclo de secado de precio
regular
31 9. Tiempo del ciclo de secado de precio
especial
32 10. Valor de la moneda 1
33 11. Valor de la moneda 2 (Ajuste del precio
para completar y pulso moneda e-suds)
34 12. Incremento para alcanzar el precio
35 13. Tiempo para la función de completado
36 14. Volumen de la señal acústica (beep)
37 15. Tiempo para mantener el valor de la
moneda (Sólo para tipo moneda)
38 16. Cómo ingresar el tyPE
39 MODO PROGRAMACIÓN - Modo de Prueba
40 1. LqC1
41 2. Restablecimiento a valores de fábrica -
EEPt
42 3. Ajuste del reloj.
43 4. Ciclo de cortesía.
44 5. Terminación de un ciclo.
45 MODO PROGRAMACIÓN - Modo de Datos
47 MANTENIMIENTO
48 INSTRUCCIONES DE
INSTALACIÓN DE SECADORA
APILABLE
50 MODO ERRORES
50 RECUPERACIÓN DESPUÉS DE
INTERRUPCIÓN ELÉCTRICA
50 AJUSTES DE FÁBRICA

11
ESPAÑOL
PRESENTACIÓN DE SU SECADORA
PRESENTACIÓN DE SU SECADORA
Especificaciones
Tipo : Secadora Eléctrica y de Gas
Voltaje : Por favor verifique las características eléctricas en la placa de datos
de su producto
Dimensiones : 686mm(W) x 764mm(D) x 983mm(H)
Dimensiones Secadoras Apiladas : 686mm(W) x764mm(D) x 1954mm(H)
La capacidad máxima de la secadora eléctrica : 10kg
Peso : 59.4kg
Especificaciones sujetas a cambio por el fabricante.
Especificaciones sujetas a cambio por el fabricante.
NOTA

12
PRESENTACIÓN DE SU SECADORA
1.DISPLAY
2. Selección de ciclos
3. Botón de inicio / pausa
4. Indicadores de proceso
Funciones del panel de control
- Apilable Superior
(RV1329CN7P)
1 24
3
1 24
3
1 24
3
1 24
3
1 24
3
1 24
3

13
ESPAÑOL
PRESENTACIÓN DE SU SECADORA
1 24
3
1 24
3
1 24
3
1 24
3
1 24
3
1 24
3
Display Selección de ciclos
Botón de inicio / pausa
Indicadores de proceso
Display
El display muestra el precio, el tiempo remanente y las
opciones de programación. También se muestran los
códigos de error.
Selección de ciclos
Presionar el botón del ciclo para seleccionar el ciclo
deseado basándose en el tipo de ropa y su condición.
Temp. Alta (High Temp.)
Utilizar este ciclo para tener Calor Alto para prendas
pesadas como mezclillas, panas o ropa de trabajo
(Calor alto).
Temp.Media (Med Temp.)
Utilizado para secar telas firmes como Temp.Media
(Med Temp.) de trabajo (Calor medio).
Temp.Baja(LowTemp.)
Utilizado para secar telas sintéticas, tejido de punto y
ropa que no se plancha.
Sin Calefacción (No Heat)
Para artículos que no requieren calor para el secado
como plásticos o hule.
Botón de inicio / pausa
El indicador Inicio (Start) parpadea cuando se ha
completado el precio y se ha seleccionado el ciclo o la
máquina está en pausa.
El indicador Inicio (Start) parpadea cuando una tarjeta
es insertada para agregar tiempo al ciclo actual.
Si pulsa el botón de inicio / pausa mientras la secadora
está funcionando, la máquina se detiene.
Indicadores de proceso
LED Description
El LED parpadea cuando el conducto
está bloqueada por pelusas.
Verifique y limpie el conducto.
LED parpadea cuando el ciclo de secado
está en operación.
LED parpadea cuando el ciclo de
enfriamiento está en operación.

14
OPERANDO SU SECADORA
OPERANDO SU SECADORA
1. Modo listo
1) Tipo Tarjeta / Moneda
- Los leds indicadores de los ciclos se encienden
parpadeando al mismo tiempo, cuando el precio de
los ciclos son iguales.
2) Tipo OPL
- Los leds indicadores se encienden al mismo tiempo,
y aparece la palabra “PUSH”
• La configuración de los precios varía según el país.
• Seleccione su país en el modo
(consulte la sección Cómo ingresar el
).
• Después de EEPT, restablezca el país (el país
predeterminado es KOR).
NOTA
2. Insertar tarjeta/moneda (opción
no para el tipo OPL)
Insertar una tarjeta que tenga el suciente crédito.
El crédito de la tarjeta debe ser mayor que el precio
programado del ciclo seleccionado.
Cuando el crédito de la tarjeta no es suficiente, la
máquina muestra el saldo de la tarjeta 5 segundos y
luego muestra
repetidamente.
NOTA
Introducir la cantidad suficiente hasta completar el
precio programado para el ciclo seleccionado.
La máquina no arrancará hasta que se hayan insertado
las monedas suficientes.
NOTA
3. Seleccionar el ciclo
Presionar el botón deseado y presionar el botón de
inicio. El display mostrará el tiempo remanente e inicia
el ciclo seleccionado.
Los últimos 2 minutos del tiempo remanente siempre
son para el ciclo de enfriamiento.
NOTA
4.
Completado (Para agregar tiempo)
Después de insertar una tarjeta de débito, el tiempo
de operación puede ser incrementado a 20 minutos /
500, cuando sea presionado el botón de Inicio (Start)
o el del ciclo seleccionado. (La tarjeta debe tener
suficiente crédito para poder incrementar el tiempo.)
El tiempo de operación puede ser incrementado a 20
minutos / 500 agregando más monedas.
Cuando ya está en Enfriamiento, si se agrega más
tiempo, se regresa al ciclo de Secado. El tiempo puede
ser agregado hasta 99 minutos.
5. Cambio de programa
No se puede cambiar de programa mientras la
máquina esté en funcionamiento.
Pero si la puerta se abre, la máquina se detiene
temporalmente y el ciclo puede ser cambiado.
Presione el botón de pausa, entonces puede cambiar
el ciclo.
6. Fin del Ciclo
Después del ciclo de Enfriamiento, la máquina se
detiene y el display indica “End” (fin).
Si se presiona cualquier tecla o se abre la puerta, la
secadora regresa al modo de lista.
El dueño puede controlar el tiempo adicional y la
cantidad de dinero (precio para completar).
NOTA

15
ESPAÑOL
MODO PROGRAMACIÓN
MODO PROGRAMACIÓN
1. Modo Programación
Usted puede cambiar información de la máquina o cambiar un ajuste en “Ajuste de Programa”, “Contadores”
“Diagnóstico”. Hay dos métodos para entrar al modo de programación.
2. Modo Programación por botón
Cómo entrar al “Modo Programación”
Solamente se puede entrar al modo de programación
con la máquina parada.
- Tipo Tarjeta
1) Insertar la tarjeta de servicio.
2) El display mostrará
.
- Tipo Moneda
1) Quitar la tapa del tragamonedas.
2) Sacar el tragamonedas.
3) Encienda el interruptor de la parte posterior de la caja
del tragamonedas.
4) El display mostrará
.
-OPL/tipodemoneda
1) Oprima al mismo tiempo los botones Temp. Alta (High
Temp.) Y Temp. Baja (Low Temp.)
2) Oprima 3 veces el botón Temp.Media (Med Temp.)
3) Oprima el botón de Inicio (Start)
4) En la pantalla aparecerá
.
Cómo utilizar el botón
Puede cambiar el precio de secado, el tiempo del ciclo,
los parámetros del ciclo, etc.
Botón Descripción
High Temp.
(Temp. Alta)
Mover a un nivel superior
Med Temp.
(Temp. Media)
Mover en el mismo nivel (+)
Low Temp.
(Temp. Baja)
Mover en el mismo nivel (-)
No Heat
(Sin Calefacción)
-
Start (Inicio) Aceptar la selección
• Si conecta la máquina sin colocar el tragamonedas por primera vez, el display muestra .
• Cuando la máquina sale de fábrica, está preparada para tragamonedas. Puede cambiar el tipo (Tarjeta/Monedas)
con un botón. (Para mayor información referirse al modo de AJUSTE, modo
.)
• La máquina mostrará “PUSH” para las tipo OPL.
• La configuración de los precios varía según el país.
• Seleccione su país en el modo
(consulte la sección Cómo ingresar el ).
• Después de EEPT, restablezca el país (el país predeterminado es KOR).
NOTA
Llave de la caja
Cajón de monedas:
Tipo Moneda
Insertar Tarjeta de Débito
Tipo Tarjeta
TipoOPL

16
MODO PROGRAMACIÓN
Tipo Tarjeta / Moneda
El diagrama de flujo muestra cómo controlar el modo de programación.
Antes de programar, revise la estructura del modo de programación.
1. Encender el interruptor o insertar la tarjeta de servicio para entrar al modo de ajustes.
2. Presionar el botón Temp. Alta (High Temp.) para moverse a un nivel superior.
3. Presionar Temp.Media(MedTemp.)(+)oTemp.Baja(LowTemp.)(-) si quiere mantenerse en el mismo nivel.
4. Presionar el botón Inicio (Start) para entrar a los detalles del Ajuste, Diagnóstico, Pruebas.
Es para ajustar el valor del precio, del tiempo, tipo de venta, etc.
Es para la línea de prueba, restablecer, ciclo libre y terminación de un ciclo.
Es para colectar datos del uso del equipo.
Estructura de modo Programación
• No utilizar , .
• Solamente se usan para inspeccionar la máquina.
NOTA

17
ESPAÑOL
MODO PROGRAMACIÓN
Tipo OPL
El diagrama de flujo muestra cómo controlar el modo de programación.
Antes de programar, revise la estructura del modo de programación.
Tipo OPL
1) Oprima al mismo tiempo los botones Temp. Alta (High Temp.) Y Temp. Baja (Low Temp.)
2) Oprima 3 veces el botón Temp.Media (Med Temp.)
3) Oprima el botón de Inicio (Start)
4) En la pantalla aparecerá “
“
Es para ajustar el valor del precio, del tiempo, tipo de venta, etc.
Es para la línea de prueba, restablecer, ciclo libre y terminación de un ciclo.
Es para colectar datos del uso del equipo.
Estructura de modo Programación
• No utilizar , .
• Solamente se usan para inspeccionar la máquina.
NOTA

18
MODO PROGRAMACIÓN
MODO PROGRAMACIÓN - Modo Setup (Ajustes)
Modo Setup (Ajustes): El display indica:
Puede cambiar el precio, el tiempo del ciclo, los parámetros del ciclo, etc.
Para Entrar al modo de Setup (Ajustes):
• Tipo Moneda - Encienda el interruptor correspondiente.
• Tipo Tarjeta - Inserte la tarjeta de servicio.
• Tipo apilable - Quitar el panel de control y encender el interruptor correspondiente.
• En las tipo OPL – Oprima al mismo tiempo los botones de Temp. Alta (High Temp.) y Temp. Baja (Low Temp.) y
oprima tres veces el botón de Temp. Media (Med. Temp.)
• El display indicará:
.
1. Cómo cambiar el precio regular.
• rgCP (Precio regular delicado) no está disponible en la secadora.
• rgrP (Precio regular caliente / frío) no está disponible en la secadora.
• rgHP (precio regular ciclo caliente) no está disponible en la secadora.
• La configuración de los precios varía según el país.
• Seleccione su país en el modo
(consulte la sección Cómo ingresar el ).
• Después de EEPT, restablezca el país (el país predeterminado es KOR).
NOTA
Al inicio del Setup
VeráLqC1enel
display
BOTÓN DISPLAY
Presionar el botón Temp. Alta (High Temp.).
Presionar Temp.Media (Med Temp.) o Temp.Baja(LowTemp.)
hasta que aparezca
en el display.
Presionar el botón Inicio (Start).
Presionar el botón Inicio (Start).
Se muestra el precio regular anterior.
Presionar Temp.Media (Med Temp.) (+) o Temp.Baja(Low
Temp.) (-) para modicar el precio.
(El precio puede ajustarse de 0 a 9900 en incrementos de 100)
Presionar el botón Inicio (Start).
La máquina acepta el precio y avanza al siguiente proceso
automáticamente.
1. Continuar ajustando el siguiente parámetro, o
2. Detener la programación y regresar al modo de operación.
• Tipo Moneda - Apagar el interruptor.
• Tipo Tarjeta - Sacar la tarjeta de servicio.
• Tipo Apilable - 1. Panel de control abierto.
2. Apagar el interruptor.
• OPL / tipo de moneda - Presione “Alta Temperatura” dos veces.

19
ESPAÑOL
MODO PROGRAMACIÓN
2. Cómo cambiar el precio especial
• SPCP (Precio especial delicado) no está disponible en la secadora.
• SPrP (Precio especial caliente / frío) no está disponible en la secadora.
• SPHP (precio especial ciclo caliente) no está disponible en la secadora.
• SCPA (precio de agregar el super ciclo) no está disponible en la secadora.
• SPCt (tipo de super lavado) no está disponible en la secadora.
• La configuración de los precios varía según el país.
• Seleccione su país en el modo
(consulte la sección Cómo ingresar el ).
• Después de EEPT, restablezca el país (el país predeterminado es KOR).
NOTA
Al inicio del Setup
VeráLqC1enel
display
BOTÓN DISPLAY
Presionar el botón Temp. Alta (High Temp.).
Presionar Temp.Media (Med Temp.) o Temp.Baja(LowTemp.)
hasta que aparezca
en el display.
Presionar el botón Inicio (Start).
Presionar Temp.Media (Med Temp.) o Temp.Baja(LowTemp.)
hasta que aparezca
en el display.
Presionar el botón Inicio (Start).
Se muestra el precio anterior del especial.
Presionar Temp.Media (Med Temp.) (+) o Temp.Baja(Low
Temp.) (-) para modicar el precio del especial.
(El precio puede ajustarse de 0 a 9900 en incrementos de 100)
Presionar el botón Inicio (Start).
La máquina acepta el precio y avanza al siguiente proceso
automáticamente.
1. Continuar ajustando el siguiente parámetro, o
2. Detener la programación y regresar al modo de operación.
• Tipo Moneda - Apagar el interruptor
• Tipo Tarjeta - Sacar la tarjeta de servicio
• Tipo Apilable - 1. Panel de control abierto.
2. Apagar el interruptor
• OPL / tipo de moneda - Presione “Alta Temperatura” dos veces.

20
MODO PROGRAMACIÓN
3. Cómo entrar a
Al inicio del Setup
VeráLqC1enel
display
BOTÓN DISPLAY
Presionar el botón Temp. Alta (High Temp.).
Presionar Temp.Media (Med Temp.) o Temp.Baja(LowTemp.)
hasta que aparezca
en el display.
Presionar el botón Inicio (Start).
Presionar Temp.Media (Med Temp.) o Temp.Baja(LowTemp.)
hasta que aparezca
en el display.
Estructura de
Contenido
• Aplica o no días de precio especial.
• Habilitado
• Aplicación o no del super lavado.
• Seleccionar tipo de venta.
• Aplicación o no del sensor de secado.
(Sólo para secadora).
• Aplicación o no de prelavado.
• Completado o no (para agregar
tiempo). (Sólo para secadora)
• Aplicar aerosol doble o no
• Deshabilitado
• Habilitado

21
ESPAÑOL
MODO PROGRAMACIÓN
3-1. Selección del día de precio especial
• noSt(Aplicar lavado sin parar o no) no está disponible en la secadora.
• SUUE (aplicación o no del super lavado) no está disponible en la secadora.
NOTA
Al inicio del Setup
VeráLqC1enel
display
BOTÓN DISPLAY
Presionar el botón Temp. Alta (High Temp.).
Presionar Temp.Media (Med Temp.) o Temp.Baja(LowTemp.)
hasta que aparezca
en el display.
Presionar el botón Inicio (Start).
Presionar Temp.Media (Med Temp.) oTemp.Baja(LowTemp.)
hasta que aparezca
en el display.
Presionar el botón Inicio (Start).
Se muestra
.
Presionar el botón Inicio (Start).
Presionar Temp.Media (Med Temp.) o Temp.Baja(LowTemp.) y
seleccionar
o .
Deshabilitado
Habilitado
Y se mostrará
cualquiera de estas
dos indicaciones:
Presionar el botón Inicio (Start).
La máquina acepta el cambio y avanza al siguiente proceso
automáticamente.
1. Continuar ajustando el siguiente parámetro, o
2. Detener la programación y regresar al modo de operación.
• Tipo Moneda - Apagar el interruptor
• Tipo Tarjeta - Sacar la tarjeta de servicio
• Tipo Apilable - 1. Panel de control abierto.
2. Apagar el interruptor
• OPL / tipo de moneda - Presione “Alta Temperatura” dos veces.

22
MODO PROGRAMACIÓN
3-2. Selección del tipo de contol - Tarjeta o Moneda
• SEdE (Aplicación o no del sensor de secado) no está disponible en la secadora.
• PrSH (Aplicación o no del prelavado) no está disponible en la secadora.
• Después de ajustar el valor a EXPENDER, el tipo de expendición se cambia directamente sin necesidad de
encendido / apagado.
NOTA
Al inicio del Setup
VeráLqC1enel
display
BOTÓN DISPLAY
Presionar el botón Temp. Alta (High Temp.).
Presionar Temp.Media (Med Temp.) o Temp.Baja(LowTemp.)
hasta que aparezca
en el display.
Presionar el botón Inicio (Start).
Presionar Temp.Media (Med Temp.) o Temp.Baja(LowTemp.)
hasta que aparezca
en el display.
Presionar el botón Inicio (Start).
Se muestra
.
Presionar Temp.Media (Med Temp.) oTemp.Baja(LowTemp.)
hasta que aparezca
en el display.
Presionar el botón Inicio (Start).
Presionar Temp.Media (Med Temp.) o Temp.Baja(LowTemp.) y
seleccionar
o .
Moneda
Tarjeta
Y se mostrará
cualquiera de estas
dos indicaciones:
Presionar el botón Inicio (Start).
La máquina acepta el cambio y avanza al siguiente proceso
automáticamente.

23
ESPAÑOL
MODO PROGRAMACIÓN
3-3. Selección de la función de Completado (para agregar tiempo)
Al inicio del Setup
VeráLqC1enel
display
BOTÓN DISPLAY
Presionar el botón Temp. Alta (High Temp.).
Presionar Temp.Media (Med Temp.) o Temp.Baja(LowTemp.)
hasta que aparezca
en el display.
Presionar el botón Inicio (Start).
Presionar Temp.Media (Med Temp.) o Temp.Baja(LowTemp.)
hasta que aparezca
en el display.
Presionar el botón Inicio (Start).
Se muestra
.
Presionar Temp.Media (Med Temp.) oTemp.Baja(LowTemp.)
hasta que aparezca
en el display.
Presionar el botón Inicio (Start).
Presionar Temp.Media (Med Temp.) oTemp.Baja(LowTemp.) y
seleccionar
o .
Deshabilitado
Habilitado
Y se mostrará
cualquiera de estas
dos indicaciones:
Presionar el botón Inicio (Start).
La máquina acepta el cambio y avanza al siguiente proceso
automáticamente.
1. Continuar ajustando el siguiente parámetro, o
2. Detener la programación y regresar al modo de operación.
• Tipo Moneda - Apagar el interruptor
• Tipo Tarjeta - Sacar la tarjeta de servicio
• Tipo Apilable - 1. Panel de control abierto.
2. Apagar el interruptor
• OPL / tipo de moneda - Presione “Alta Temperatura” dos veces.
• tEIn (Aplicar aerosol doble o no) no está disponible en la secadora.
NOTA

24
MODO PROGRAMACIÓN
4. Cómo ingresar el
Al inicio del Setup
VeráLqC1enel
display
Button Display
Presionar el botón Temp. Alta (High Temp.).
Presionar Temp. Media (Med Temp.) o Temp.Baja(LowTemp.)
hasta que aparezca
en el display.
Presionar el botón Inicio (Start).
Presionar Temp. Media (Med Temp.) o Temp.Baja(LowTemp.)
hasta que aparezca
en el display.
Estructura de
Contenido de
• Función Pausa aplica o no

25
ESPAÑOL
MODO PROGRAMACIÓN
4-1. Configuración de la función Pausa
Al inicio del Setup
VeráLqC1enel
display
BOTÓN DISPLAY
Presionar el botón Temp. Alta (High Temp.).
Presionar Temp.Media (Med Temp.) o Temp.Baja(LowTemp.)
hasta que aparezca
en el display.
Presionar el botón Inicio (Start).
Presionar Temp.Media (Med Temp.) oTemp.Baja(LowTemp.)
hasta que aparezca
en el display.
Presionar el botón Inicio (Start).
Se muestra
.
Presionar el botón Inicio (Start).
Presionar Temp.Media (Med Temp.) oTemp.Baja(LowTemp.) y
seleccionar
o .
Deshabilitado
Habilitado
Y se mostrará
cualquiera de estas
dos indicaciones:
Presionar el botón Start(Inicio).
La máquina acepta el cambio y avanza al siguiente
proceso automáticamente.
1. Continuar ajustando el siguiente modo o parámetro, o
2. Parar el cambio de valores y regresar al modo de operación.
• Tipo Moneda - Apagar el interruptor
• Tipo Tarjeta - Sacar la tarjeta de servicio
• Tipo Apilable - 1. Panel de control abierto.
2. Apagar el interruptor
• OPL / tipo de moneda - Presione “Alta Temperatura” dos veces.

26
MODO PROGRAMACIÓN
5. Cómo introducir el día del precio especial
Al inicio del Setup
VeráLqC1enel
display
BOTÓN DISPLAY
Presionar el botón Temp. Alta (High Temp.).
Presionar Temp.Media (Med Temp.) o Temp.Baja(LowTemp.)
hasta que aparezca
en el display.
Presionar el botón Inicio (Start).
Presionar Temp.Media (Med Temp.) oTemp.Baja(LowTemp.)
hasta que aparezca
en el display.
Presionar el botón Inicio (Start).
Se muestra
.
Estructura de
Domingo
Lunes
Martes
Miércoles
Jueves
Viernes
Sábado

27
ESPAÑOL
MODO PROGRAMACIÓN
5-1. Cómo cambiar a Domingo
Como se explica en la página previa, se pueden seleccionar otros días siguiendo el mismo método.
NOTA
Al inicio del Setup
VeráLqC1enel
display
BOTÓN DISPLAY
Presionar el botón Temp. Alta (High Temp.).
Presionar Temp.Media (Med Temp.) o Temp.Baja(LowTemp.)
hasta que aparezca
en el display.
Presionar el botón Inicio (Start).
Presionar Temp.Media (Med Temp.) oTemp.Baja(LowTemp.)
hasta que aparezca
en el display.
Presionar el botón Inicio (Start).
Se muestra
.
Presionar el botón Inicio (Start).
Presionar Temp.Media (Med Temp.) oTemp.Baja(LowTemp.) y
seleccionar
o .
Deshabilitado
Habilitado
Y se mostrará
cualquiera de estas
dos indicaciones:
Presionar el botón Inicio (Start).
La máquina acepta el cambio y avanza al siguiente proceso
automáticamente.
1. Continuar ajustando el siguiente parámetro, o
2. Detener la programación y regresar al modo de operación.
• Tipo Moneda - Apagar el interruptor
• Tipo Tarjeta - Sacar la tarjeta de servicio
• Tipo Apilable - 1. Panel de control abierto.
2. Apagar el interruptor
• OPL / tipo de moneda - Presione “Alta Temperatura” dos veces.

28
MODO PROGRAMACIÓN
6. Ajuste del tiempo de inicio del precio especial
Al inicio del Setup
VeráLqC1enel
display
BOTÓN DISPLAY
Presionar el botón Temp. Alta (High Temp.).
Presionar Temp.Media (Med Temp.) o Temp.Baja(LowTemp.)
hasta que aparezca
en el display.
Presionar el botón Inicio (Start).
Presionar Temp.Media (Med Temp.) oTemp.Baja(LowTemp.)
hasta que aparezca
en el display.
Presionar el botón Inicio (Start).
Se muestra el tiempo de inicio del precio especial.
Presionar Temp.Media (Med Temp.) (+) oTemp.Baja(Low
Temp.) (-) para seleccionar el tiempo entre 0 y 23.
Presionar el botón Inicio (Start).
La máquina acepta el cambio y avanza al siguiente proceso
automáticamente.
1. Continuar ajustando el siguiente parámetro, o
2. Detener la programación y regresar al modo de operación.
• Tipo Moneda - Apagar el interruptor
• Tipo Tarjeta - Sacar la tarjeta de servicio
• Tipo Apilable - 1. Panel de control abierto.
2. Apagar el interruptor
• OPL / tipo de moneda - Presione “Alta Temperatura” dos veces.

29
ESPAÑOL
MODO PROGRAMACIÓN
7. Ajuste del tiempo para finalizar el precio especial
Al inicio del Setup
VeráLqC1enel
display
BOTÓN Display
Presionar el botón Temp. Alta (High Temp.).
Presionar Temp.Media (Med Temp.) o Temp.Baja(LowTemp.)
hasta que aparezca
en el display.
Presionar el botón Inicio (Start).
Presionar Temp.Media (Med Temp.) oTemp.Baja(LowTemp.)
hasta que aparezca
en el display.
Presionar el botón Inicio (Start).
Se muestra el tiempo de nalización del precio especial.
Presionar Temp.Media (Med Temp.) (+) oTemp.Baja(Low
Temp.) (-) para seleccionar el tiempo entre 1 y 24.
Presionar el botón Inicio (Start).
La máquina acepta el cambio y avanza al siguiente proceso
automáticamente.
1. Continuar ajustando el siguiente parámetro, o
2. Detener la programación y regresar al modo de operación.
• Tipo Moneda - Apagar el interruptor
• Tipo Tarjeta - Sacar la tarjeta de servicio
• Tipo Apilable - 1. Panel de control abierto.
2. Apagar el interruptor
• OPL / tipo de moneda - Presione “Alta Temperatura” dos veces.
Cuando se ajusta un periodo de precio especial, el tiempo de finalización debe ser más tarde que el de inicio.
NOTA

30
MODO PROGRAMACIÓN
8. Tiempo del ciclo de secado de precio regular
Al inicio del Setup
VeráLqC1enel
display
BOTÓN DISPLAY
Presionar el botón Temp. Alta (High Temp.).
Presionar Temp.Media (Med Temp.) o Temp.Baja(LowTemp.)
hasta que aparezca
en el display.
Presionar el botón Inicio (Start).
Presionar Temp.Media (Med Temp.) oTemp.Baja(LowTemp.)
hasta que aparezca
en el display.
Presionar el botón Inicio (Start).
Se muestra el tiempo previo del ciclo de secado de precio regular.
Presionar Temp.Media (Med Temp.) (+) oTemp.Baja(Low
Temp.) (-) para seleccionar el tiempo entre 5 y 99.
Presionar el botón Inicio (Start).
La máquina acepta el cambio y avanza al siguiente proceso
automáticamente.
1. Continuar ajustando el siguiente parámetro, o
2. Detener la programación y regresar al modo de operación.
• Tipo Moneda - Apagar el interruptor
• Tipo Tarjeta - Sacar la tarjeta de servicio
• Tipo Apilable - 1. Panel de control abierto.
2. Apagar el interruptor
• OPL / tipo de moneda - Presione “Alta Temperatura” dos veces.

31
ESPAÑOL
MODO PROGRAMACIÓN
9. Tiempo del ciclo de secado de precio especial
• CCCC (tiempo de lavado) no está disponible en la secadora.
• nrPC (número de enjuagues por ciclo) no está disponible en la secadora.
• rt (ajuste del tiempo de enjuague) no está disponible en la secadora.
• tSSd (velocidad máxima de centrifugado) no está disponible en la secadora.
NOTA
Al inicio del Setup
VeráLqC1enel
display
BOTÓN DISPLAY
Presionar el botón Temp. Alta (High Temp.).
Presionar Temp.Media (Med Temp.) o Temp.Baja(LowTemp.)
hasta que aparezca
en el display.
Presionar el botón Inicio (Start).
Presionar Temp.Media (Med Temp.) oTemp.Baja(LowTemp.)
hasta que aparezca
en el display.
Presionar el botón Inicio (Start).
Se muestra el tiempo previo del ciclo de secado de precio
especial.
Presionar Temp.Media (Med Temp.) (+) oTemp.Baja(Low
Temp.) (-) para seleccionar el tiempo entre 5 y 99.
Presionar el botón Inicio (Start).
La máquina acepta el cambio y avanza al siguiente proceso
automáticamente.
1. Continuar ajustando el siguiente parámetro, o
2. Detener la programación y regresar al modo de operación.
• Tipo Moneda - Apagar el interruptor
• Tipo Tarjeta - Sacar la tarjeta de servicio
• Tipo Apilable - 1. Panel de control abierto.
2. Apagar el interruptor
• OPL / tipo de moneda - Presione “Alta Temperatura” dos veces.

32
MODO PROGRAMACIÓN
10. Valor de la moneda 1
Al inicio del Setup
VeráLqC1enel
display
BOTÓN DISPLAY
Presionar el botón Temp. Alta (High Temp.).
Presionar Temp.Media (Med Temp.) o Temp.Baja(LowTemp.)
hasta que aparezca
en el display.
Presionar el botón Inicio (Start).
Presionar Temp.Media (Med Temp.) oTemp.Baja(LowTemp.)
hasta que aparezca
en el display.
Presionar el botón Inicio (Start).
Se muestra el valor previo de la moneda 1.
Presionar Temp.Media (Med Temp.) (+) oTemp.Baja(Low
Temp.) (-) para seleccionar el valor de la moneda 1.
(El precio puede ajustarse de 10 a 1000 en incrementos de 10)
Presionar el botón Inicio (Start).
La máquina acepta el cambio y avanza al siguiente proceso
automáticamente.
1. Continuar ajustando el siguiente parámetro, o
2. Detener la programación y regresar al modo de operación.
• Tipo Moneda - Apagar el interruptor
• Tipo Tarjeta - Sacar la tarjeta de servicio
• Tipo Apilable - 1. Panel de control abierto.
2. Apagar el interruptor
• OPL / tipo de moneda - Presione “Alta Temperatura” dos veces.
• La configuración de los precios varía según el país.
• Seleccione su país en el modo
(consulte la sección Cómo ingresar el ).
• Después de EEPT, restablezca el país (el país predeterminado es KOR).
NOTA

33
ESPAÑOL
MODO PROGRAMACIÓN
11. Valor de la moneda 2 (Ajuste del precio para completar y pulso moneda e-suds)
• Tipo Moneda: El valor de la moneda 2 tiene la misma función que el ajuste para el pulso de moneda de e- Suds.
• Tipo Tarjeta: El valor de la moneda 2 tiene la misma función que el precio para completar.
(Tal como se cambia el valor de la moneda 2, se puede cambiar el precio para completar y pulso
moneda e-Suds.)
• La configuración de los precios varía según el país.
• Seleccione su país en el modo
(consulte la sección Cómo ingresar el ).
• Después de EEPT, restablezca el país (el país predeterminado es KOR).
NOTA
Al inicio del Setup
VeráLqC1enel
display
BOTÓN DISPLAY
Presionar el botón Temp. Alta (High Temp.).
Presionar Temp.Media (Med Temp.) o Temp.Baja(LowTemp.)
hasta que aparezca
en el display.
Presionar el botón Inicio (Start).
Presionar Temp.Media (Med Temp.) oTemp.Baja(LowTemp.)
hasta que aparezca
en el display.
Presionar el botón Inicio (Start).
Se muestra el valor previo de la moneda 2.
Presionar Temp.Media (Med Temp.) (+) oTemp.Baja(Low
Temp.) (-) para seleccionar el valor de la moneda 2.
(El precio puede ajustarse de 10 a 1000 en incrementos de 10)
Presionar el botón Inicio (Start).
La máquina acepta el cambio y avanza al siguiente proceso
automáticamente.
1. Continuar ajustando el siguiente parámetro, o
2. Detener la programación y regresar al modo de operación.
• Tipo Moneda - Apagar el interruptor
• Tipo Tarjeta - Sacar la tarjeta de servicio
• Tipo Apilable - 1. Panel de control abierto.
2. Apagar el interruptor
• OPL / tipo de moneda - Presione “Alta Temperatura” dos veces.

34
MODO PROGRAMACIÓN
12. Incremento para alcanzar el precio
Esto representa el incremento en centravos para alcanzar el precio cuando se usa tarjeta de débito.
• El incremento para alcanzar el precio sólo está disponible el control tipo tarjeta.
(No afecta el ajuste de precio el el tipo de control de moneda.)
NOTA
Al inicio del Setup
VeráLqC1enel
display
BOTÓN DISPLAY
Presionar el botón Temp. Alta (High Temp.).
Presionar Temp.Media (Med Temp.) o Temp.Baja(LowTemp.)
hasta que aparezca
en el display.
Presionar el botón Inicio (Start).
Presionar Temp.Media (Med Temp.) oTemp.Baja(LowTemp.)
hasta que aparezca
en el display.
Presionar el botón Inicio (Start).
Se muestra el valor del incremento en centavos.
Presionar Temp.Media (Med Temp.) (+) o Temp.Baja(Low
Temp.) (-) para seleccionar el valor de PIPo. (0 - 4)
Presionar el botón Inicio (Start).
La máquina acepta el cambio y avanza al siguiente proceso
automáticamente.
1. Continuar ajustando el siguiente parámetro, o
2. Detener la programación y regresar al modo de operación.
• Tipo Moneda - Apagar el interruptor
• Tipo Tarjeta - Sacar la tarjeta de servicio
• Tipo Apilable - 1. Panel de control abierto.
2. Apagar el interruptor
• OPL / tipo de moneda - Presione “Alta Temperatura” dos veces.

35
ESPAÑOL
MODO PROGRAMACIÓN
13. Tiempo para la función de completado
Al inicio del Setup
VeráLqC1enel
display
BOTÓN DISPLAY
Presionar el botón Temp. Alta (High Temp.).
Presionar Temp.Media (Med Temp.) o Temp.Baja(LowTemp.)
hasta que aparezca
en el display.
Presionar el botón Inicio (Start).
Presionar Temp.Media (Med Temp.) oTemp.Baja(LowTemp.)
hasta que aparezca
en el display.
Presionar el botón Inicio (Start).
Se muestra el valor previo del tiempo de la función de comple-
tado.
Presionar Temp.Media (Med Temp.) (+) oTemp.Baja(Low
Temp.) (-) para seleccionar el tiempo entre 1 y 30.
Presionar el botón Inicio (Start).
La máquina acepta el cambio y avanza al siguiente proceso
automáticamente.
1. Continuar ajustando el siguiente parámetro, o
2. Detener la programación y regresar al modo de operación.
• Tipo Moneda - Apagar el interruptor
• Tipo Tarjeta - Sacar la tarjeta de servicio
• Tipo Apilable - 1. Panel de control abierto.
2. Apagar el interruptor
• OPL / tipo de moneda - Presione “Alta Temperatura” dos veces.
• UULE (nivel de agua) no está disponible en la secadora.
NOTA

36
MODO PROGRAMACIÓN
14. Volumen de la señal acústica (beep)
Al inicio del Setup
VeráLqC1enel
display
BOTÓN DISPLAY
Presionar el botón Temp. Alta (High Temp.).
Presionar Temp.Media (Med Temp.) o Temp.Baja(LowTemp.)
hasta que aparezca
en el display.
Presionar el botón Inicio (Start).
Presionar Temp.Media (Med Temp.) oTemp.Baja(LowTemp.)
hasta que aparezca
en el display.
Presionar el botón Inicio (Start).
Se muestra el valor previo.
Presionar Temp.Media (Med Temp.) (+) oTemp.Baja(Low
Temp.) (-) para seleccionar el valor entre Alto (HIGH), Bajo (LOW)
o Apagado (OFF)
Presionar el botón Inicio (Start).
La máquina acepta el cambio y avanza al siguiente proceso
automáticamente.
1. Continuar ajustando el siguiente modo o parámetro, o
2. Detener el cambio de valores y regresar al modo de operación.
• Tipo Moneda - Apagar el interruptor.
• Tipo Tarjeta - Sacar la tarjeta de servicio.
• Tipo Apilable - 1. Panel de control abierto.
2. Apagar el interruptor.
• OPL / tipo de moneda - Presione “Alta Temperatura” dos veces.

37
ESPAÑOL
MODO PROGRAMACIÓN
15. Tiempo para mantener el valor de la moneda (Sólo para tipo moneda)
Al inicio del Setup
VeráLqC1enel
display
BOTÓN DISPLAY
Presionar el botón Temp. Alta (High Temp.).
Presionar Temp.Media (Med Temp.) o Temp.Baja(LowTemp.)
hasta que aparezca
en el display.
Presionar el botón Inicio (Start).
Presionar Temp.Media (Med Temp.) oTemp.Baja(LowTemp.)
hasta que aparezca
en el display.
Presionar el botón Inicio (Start).
Se muestra el valor previo.
Presionar Temp.Media (Med Temp.) (+) oTemp.Baja(Low
Temp.) (-) para seleccionar el valor entre 0 – 180
Presionar el botón Inicio (Start).
La máquina acepta el cambio y avanza al siguiente proceso
automáticamente.
1. Continuar ajustando el siguiente modo o parámetro, o
2. Detener el cambio de valores y regresar al modo de operación.
• Tipo Moneda - Apagar el interruptor.
• Tipo Tarjeta - Sacar la tarjeta de servicio.
• Tipo Apilable - 1. Panel de control abierto.
2. Apagar el interruptor.
• OPL / tipo de moneda - Presione “Alta Temperatura” dos veces.
• dHUE (recuento de gotas) no está disponible en la secadora.
• rSEn (permitir giro de enjuague) no está disponible en la secadora.
NOTA

38
MODO PROGRAMACIÓN
16. Cómo ingresar el
Al inicio del Setup
VeráLqC1enel
display
BOTÓN DISPLAY
Presionar el botón Temp. Alta (High Temp.).
Presionar Temp.Media (Med Temp.) o Temp.Baja(LowTemp.)
hasta que aparezca
en el display.
Presionar el botón Inicio (Start).
Presionar Temp.Media (Med Temp.) o Temp.Baja(LowTemp.)
hasta que aparezca
en el display.
Estructura de
Contenido de
• Tipo de producto
• Tipo de moneda
• Tipo de lector de tarjeta
• Tipo de moneda de caída
0 EUK (Inglaterra)
1 EAP (Australia)
2 ELC (USA)
3 EPN (China)
4 KOR (Corea)
5 EJP (Japón)
6 ECI (Cánada)
7 GSC (Filipinas)
0 (Faros)
1 (HP)
0 (Greenwald)
1 (Heartland, ESD)
0 (ESD, Greenwald, Munzprufer) - Pulso de señal : 50ms
1 (Korea) - Pulso de señal : 100ms
• Pagar significa tipo de tarjeta o moneda.
• Tipo predeterminado es tipo de moneda. Si quiere cambiar tipo de moneda a tipo de tarjeta, debe ajustar tipo
vend en fea1. (Refiérase a la función FEA1)
• Libre significa tipo OPL
• La configuración de los precios varía según el país.
• Seleccione su país en el modo
(consulte la sección Cómo ingresar el ).
• Después de EEPT, restablezca el país (el país predeterminado es KOR).
NOTA

39
ESPAÑOL
MODO PROGRAMACIÓN
MODO PROGRAMACIÓN - Modo de Prueba
Pruebas de Diagnóstico: (En el display)
Este programa ha sido agregado para probar la secadora y detectar errores.
Entrando al modo de prueba
Machine Nombre Botón Display Descripción
tarjeta/
moneda
Entrando
al modo
de
prueba
1. Entrando
al modo de
programación.
Insertar la tarjeta de servicio (tipo tarjeta) o encender el
interruptor (tipo moneda)
2. Temp. Alta
(High Temp.)
Presionar Temp. Alta (High Temp.) y
aparece en
el display.
3. Inicio (Start)
Entrar al modo de prueba de diagnóstico.
OPL
1. Entrando
al modo de
programación.
Oprima y sostenga al mismo tiempo el botón Temp. Alta (High
Temp.) y Temp. Baja (Low Temp.). Después de eso, oprima 3
veces el botón Temp.Media (Med Temp.). Oprima el botón de
Inicio (Start)
2. Temp. Alta
(High Temp.)
Presione el botón Temp. Alta (High Temp.). Luego aparece
en la pantalla.
3. Inicio (Start)
Entrar al modo de prueba de diagnóstico.

40
MODO PROGRAMACIÓN
1.
De acuerdo al número de veces que se presione INICIO se avanzará al siguiente paso.
Número de veces
que se presiona
INICIO
Punto a revisar Display
Ninguna
1 vez
Verificar el modelo y código de la
máquina
Tipo de Moneda eléctrica : P4:OE
Tipo de Tarjeta eléctrica : P4:CE
Tipo de OPL eléctrico : P4:PE
Versión y código de la máquina(Todos los leds encen-
didos).
Pantalla P4:XX y gU:XX y gd:XX alternativamente.
XX es el tipo de producto o el número de versión.
2 veces Revisión PDA
3 veces Funcionamiento del motor Valor de la humedad (70-239)
4 veces
TIPO ELECTRICO: Se enciende el
calentador.
Motor + calentador 1
Temperatura actual (5-70)
Se muestra la temperatura dentro de la canasta en
°Celsius)
5 veces
TIPO ELECTRICO: Se enciende el
calentador.
Motor + calentador 1+ calentador 2
Temperatura actual (5-70)
Se muestra la temperatura dentro de la canasta en
°Celsius)
6 veces
REVISION DE LEDS Y TECLAS
Presionar Temp. Alta (High Temp.).
Presionar Temp.Media (Med Temp.).
Presionar Temp. Baja (Low Temp.)
Presionar Sin Calefacción (No Heat).
Versión y código de la máquina
7 veces Fin de la prueba
Si durante la
prueba, se abre la
puerta.
Interruptor de la puerta
(El motor y el calentador se apagan y
suena la alarma siete veces)
dE
(Indicación de que la puerta está abierta. Favor de cer-
rarla completamente)
Si durante la prueba
se cierra la puerta.
La prueba se regresa al paso 3.
(Motor encendido, calentador
apagado)
Valor de la humedad (70-239)
NOTA
No utilizar .

41
ESPAÑOL
MODO PROGRAMACIÓN
2. Restablecimiento a valores de fábrica - EEPt
Después de restablecer, la información de la máquina cambia a los valores de origen.
Al inicio del Setup
VeráLqC1enel
display
BOTÓN DISPLAY
Presionar Temp.Media (Med Temp.) o Temp.Baja(LowTemp.)
hasta que aparezca
en el display.
Presionar el botón Inicio (Start).
Presionar Temp.Media (Med Temp.) hasta que aparezca
en el display
Presionar el botón Inicio (Start).
Se ha llevado a cabo el restablecimiento a valores de fábrica.
Se muestra
en el display.
1. Continuar ajustando el siguiente parámetro, o
2. Detener la programación y regresar al modo de operación.
• Tipo Moneda - Apagar el interruptor
• Tipo Tarjeta - Sacar la tarjeta de servicio
• Tipo Apilable - 1. Panel de control abierto.
2. Apagar el interruptor
• OPL / tipo de moneda - Presione “Alta Temperatura” dos veces.
• Valores por defecto con control de Tarjeta o Moneda
- Tiempo de Secado 45 Minutos
- Tiempo para completar 5 minutes
• El tiempo de secado en maquinas OPL se puede modificar de 1 a 100 minutos oprimiendo el botón del ciclo.
• La configuración de los precios varía según el país.
• Seleccione su país en el modo
(consulte la sección Cómo ingresar el ).
• Después de EEPT, restablezca el país (el país predeterminado es KOR).
NOTA

42
MODO PROGRAMACIÓN
3. Ajuste del reloj.
Al inicio del Setup
VeráLqC1enel
display
BOTÓN DISPLAY
Presionar Temp.Media (Med Temp.) oTemp.Baja(LowTemp.)
hasta que
aparezca en el display.
Presionar el botón Inicio (Start).
El display muestra en secuencia 2000-->0101-->Sat-->0000
Presionar el botón Inicio (Start).
Presionar Temp.Media (Med Temp.) (+) oTemp.Baja(Low
Temp.) (-) para seleccionar el año entre 2000 y 2099.
Presionar el botón Inicio (Start).
La máquina acepta el año y avanza automáticamente al siguiente
paso
Presionar Temp.Media (Med Temp.) (+) oTemp.Baja(Low
Temp.) (-) para seleccionar el mes entre 01 y 12.
Presionar el botón Inicio (Start).
La máquina acepta el mes y avanza automáticamente al siguiente
paso.
Presionar Temp.Media (Med Temp.) (+) oTemp.Baja(Low
Temp.) (-) para seleccionar el día entre 01 y 31.
Presionar el botón Inicio (Start).
La máquina acepta el día y avanza automáticamente al siguiente
paso.
Presionar Temp.Media (Med Temp.) (+) o Temp.Baja(Low
Temp.) (-) para seleccionar la hora entre 00 y 23.
Presionar el botón Inicio (Start).
La máquina acepta la hora y avanza automáticamente al siguiente
paso.
Presionar Temp.Media (Med Temp.) (+) oTemp.Baja(Low
Temp.) (-) para seleccionar los minutos entre 00 y 59.
Presionar el botón Inicio (Start).
La máquina acepta los minutos y avanza automáticamente al
siguiente paso.
1. Continuar ajustando el siguiente parámetro, o
2. Detener la programación y regresar al modo de operación.
• Tipo Moneda - Apagar el interruptor
• Tipo Tarjeta - Sacar la tarjeta de servicio
• Tipo Apilable - 1. Panel de control abierto.
2. Apagar el interruptor
• OPL / tipo de moneda - Presione “Alta Temperatura” dos veces.

43
ESPAÑOL
MODO PROGRAMACIÓN
4. Ciclo de cortesía.
El ciclo de cortesía se le da al cliente cuando la secadora no funcione después de que el cliente ha hecho el
pago para el secado de su ropa.
Al inicio del Setup
VeráLqC1enel
display
BOTÓN DISPLAY
Presionar Temp.Media (Med Temp.) o Temp.Baja(LowTemp.)
hasta que aparezca
en el display.
Presionar el botón Inicio (Start).
Presionar Temp.Media (Med Temp.) hasta que aparezca
en el display.
Presionar el botón Inicio (Start).
Se muestra
en el display.
Seleccionar el ciclo que desee.
• En el caso de control de tarjeta, se debe insertar la tarjeta de
débito después de quitar la tarjeta de servicio.
Entonces, seleccionar el ciclo y presionar INICIO. (Sólo es
aplicable en la secadora con control de tarjeta y no hay
sustracción en el balance de la tarjeta en este ciclo.)
NOTA
Presionar el botón Inicio (Start).
El display muestra el tiempo restante y arranca.

44
MODO PROGRAMACIÓN
5. Terminación de un ciclo.
Tipo Moneda
Tipo Tarjeta
Al inicio del Setup
VeráLqC1enel
display
BOTÓN DISPLAY
Presionar Temp.Media (Med Temp.) oTemp.Baja(LowTemp.)
hasta que aparezca
en el display.
Presionar el botón Inicio (Start).
Presionar Temp.Media (Med Temp.) hasta que aparezca
en el display.
Presionar el botón Inicio (Start).
Se mostrará
y sonará una alarma (Beep).
Regresa al modo normal de operación
Insertar la tarjeta de
terminación de ciclo
BOTÓN DISPLAY
Se muestra el tiempo en el display y
.
Se mostrará y sonará una alarma (Beep).
Regresa al modo normal de operación
■
Tipo OPL
- La secadora terminará con el ciclo al abrir la puerta.
NOTA

45
ESPAÑOL
MODO PROGRAMACIÓN
MODO PROGRAMACIÓN - Modo de Datos
Datosacumulados:CLCt(display)
La secadora acumula información que el usuario puede revisar como el número de veces que se han utilizado los
diferentes ciclos, cuántas veces se han utilizado las tarjetas o monedas, etc.
Entrando al modo de datos
Nombre Botón Display Descripción
Entrando
al modo de
datos
1. Entrando al modo de
programación.
Insertar la tarjeta de servicio (tipo tarjeta) o encender el
interruptor (tipo moneda)
2. Temp. Alta (High Temp.)
Presionar Temp. Alta (High Temp.) hasta que aparezca
en el display.
3. Temp.Media (Med Temp.)
(+) o, Temp. Baja (Low
Temp.) (-)
Presionar Temp.Media (Med Temp.) o Temp. Baja (Low Temp.)
hasta que aparezca en el display.
4. Inicio (Start)
Entrar al modo de datos.
5. Temp.Media (Med Temp.) (+)
o, Temp. Baja (Low Temp.) (-)
Moverse a cada dato de la lista que quiera revisar presionando
Temp.Media (Med Temp.) (+) o Temp. Baja (Low Temp.) (-).
6. Inicio (Start) Se muestra el valor del dato seleccionado.
7. Temp. Alta (High Temp.)
Moverse a un nivel superior o regresar al modo de operación.
Revisar la referencia en la lista siguiente. Los datos se muestran con abreviaturas.
ListadeDatosAcumulados
No. Abreviatura Signicado Descripción
1 rgPr Precio Regular 0 ~ 9900
2 rgCP Precio Regular Ciclo Frío rgCP no aplicable para secadora. (No hay entrada)
3 rgrP Precio Regular Ciclo Tibio rgrP no aplicable para secadora. (No hay entrada)
4 rgHP Precio Regular Ciclo Caliente rgHP no aplicable para secadora. (No hay entrada)
5 dELC Sensor de Humedad Secadora dELC no aplicable para secadora. (No hay entrada)
6 ItrC Intervalo Ciclos Regulares Número de Ciclos Regulares ( 0-65535 )
7 ItCC Intervalo Ciclos Regulares Fríos ItCC no aplicable para secadora. (No hay entrada)
8 ItAC Intervalo Ciclos Regulares Tibios ItAC no aplicable para secadora. (No hay entrada)
9 ItHC Intervalo Ciclos Regulares Calientes ItHC no aplicable para secadora. (No hay entrada)
10 ItSC Intervalo Super Ciclos ItSC no es aplicable para secadora. (No hay entrada)
11 IttF
Intervalo Ciclos Acompletados
(Sólo Secadora)
Número de ciclos Acompletados (0-65535 )
12 ItUC Intervalo Ciclos de Servicio Número de ciclos de Servicio (0-65535)
13 ItFC Intervalo Ciclos con Fichas Número de ciclos de Fichas (0-65535)
14 ACrC Acumulado Ciclos Regulares Número de ciclos de Regulares ( 0-65535 )
15 ACCC Acumulado Ciclos Regulares Fríos ACCC no es aplicable para secadora. (No hay entrada)
16 ACAC Acumulado Ciclos Regulares Tibios ACAC no es aplicable para secadora. (No hay entrada)
17 ACHC
Acumulado Ciclos Regulares
Calientes
ACHC no es aplicable para secadora.
(No hay entrada)
18 ACSC
Acumulado Super Ciclos (Sólo
Lavadora)
ACSC no es aplicable para secadora. (No hay entrada)

46
MODO PROGRAMACIÓN
ListadeDatosAcumulados
No. Abreviatura Signicado Descripción
19 ACtF
Acumulado Ciclos Acompletados
(Sólo Secadora)
Número de ciclos Acompletados (0 ~ 65535)
20 ACUC Acumulado Ciclos de Servicio Número de ciclos de Servicio (0 ~ 65535)
21 ACFC Acumulado Ciclos con Fichas Número de ciclos con Fichas (0 ~ 65535)
22 ACrt Acumulado de Tiempo de Operación Número de Minutos de Operación (0 ~ 65535)
23 Itnr Intervalo sin Funcionar Itnr no es aplicable para secadora.
24 Ittb Intervalo de Ciclos con Problema Ittb no es aplicable para secadora.
25 ItPd Intervalo de interrupción eléctrica Número de interrupciones eléctricas
26 Itdd
Intervalo de Aperturas No
Autorizadas de las Puertas de
Servicio
Número de Aperturas No Autorizadas de las Puertas
de Servicio (0-255)
27 ItAd
Intervalo de Aperturas Autorizadas
de las Puertas de Servicio
Número de Aperturas Autorizadas de las Puertas de
Servicio (0-255)
28 ItUC
Intervalo de Aperturas No
Autorizadas del Cajón de Monedas
Número de Aperturas No Autorizadas del Cajón de
Monedas (0-255)
29 ItAC
Intervalo de Aperturas Autorizadas
del Cajón de Monedas
Número de Aperturas Autorizadas del Cajón de
Monedas (0-255)
30 Ittl Intervalo Ingreso total Cantidad de dinero ciclo (0 ~ 65535)
31 ACtl Ingreso total acumulado Cantidad de dinero ciclo (0 ~ 65535)
32 IttC Intervalo ciclos totales Número total de ciclos (0 ~ 65535)
33 ACtC Ciclos totales acumulados Número total de ciclos (0 ~ 65535)
34 SCPr Precio del Super Ciclo Scpr no aplicable para secadora. (No hay entrada)
35 toPr Precio del Acompletado 0.05 ~ 9.95
36 Itd Intervalo de dinero Cantidad de dinero para ciclos regulares (0 ~ 65535)
37 Acd Dinero Acumulado Cantidad de dinero para ciclos regulares (0 ~ 65535)
38 Ittd Intervalo de dinero Completado Cantidad de dinero para ciclos regulares (0 ~ 65535)
39 Actd Dinero acumulado Completado Cantidad de dinero para ciclos regulares (0 ~ 65535)
Intervalo de Ciclos(‘Intervalo’ signica ‘Desde el último acumulado’)
Acumulado de Ciclos(‘Acumulado’ signica ‘Total de ciclos en la vida del aparato, no incluye ciclos de servicio o
en problema’)
Autorizado: Encendido del interruptor on/o con comunicación PDA.
(Encendido del interruptor on/o en un lapso de 30 minutos después de la Comunicación con PDA)
No Autorizado: Encendido del interruptor on/o sin comunicación con PDA
La conguración de los precios varía según el país.
Seleccione su país en el modo
(consulte la sección Cómo ingresar el ).
Después de EEPT, restablezca el país (el país predeterminado es KOR).

47
ESPAÑOL
MANTENIMIENTO
LIMPIEZADELFILTRODEPELUSA
Limpiar siempre el filtro de pelusa después de cada ciclo.
Para limpiar, abra la puerta y jale hacia arriba el filtro de
pelusa, luego:
1. Haga rodar la pelusa con sus dedos, o
2. Aspire el filtro de pelusa, o
3. Si el filtro de pelusa está demasiado sucio u obstruido
a causa del suavizante de telas, lavarlo con agua
tibia jabonosa y dejar secar completamente antes de
volverlo a instalar.
LIMPIEZAREGULAR
PRECAUCIÓN:
para evitar el riesgo de incendio, shock eléctrico, o
algún otro daño a las personas cuando utilicen este
aparato, siga las siguientes recomendaciones básicas:
•Desconectelasecadoraantesdecualquierlimpieza
para evitar un posible choque eléctrico. No seguir
estas indicaciones puede provocar graves daños,
incendio, choque eléctrico o muerte.
•Nuncautilicequímicosagresivos,productos
abrasivos, o solventes para limpiar la lavadora.
Pueden dañarla.
LIMPIEZADELEXTERIOR
Un adecuado cuidado de su secadora puede alargar su
vida. El exterior de la máquina puede limpiarse con agua
tibia y jabón suave no abrasivo.
Limpie inmediatamente cualquier derrame con un trapo
suave y seco.
No utilice alcohol metílico, solventes o productos
similares. Nunca utilice fibra metálica o limpiadores
abrasivos; pueden dañar la superficie.
NOTA
LIMPIEZADELINTERIOR
Limpie alrededor de toda la puerta y del sello con un
trapo húmedo para evitar que la pelusa y el polvo se
incrusten y puedan dañar el sello de la puerta.
Limpie la ventana con un trapo humedecido con agua
tibia y jabón suave, luego seque. La canasta de acero
inoxidable se puede limpiar con un limpiador común
para acero inoxidable, utilizándolo de acuerdo a las
especificaciones del fabricante.
Nunca utilice fibra metálica o productos abrasivos;
pueden rayar o dañar la superficie.
LIMPIEZADEBAJOYALREDEDORDELA
SECADORA
Aspire regularmente la pelusa y el polvo debajo y
alrededor de la secadora. Revisar la acumulación de
pelusa del ducto de extracción y limpiarlo al menos una
vez al año. Si nota una disminución en el flujo de aire o
en el desempeño del secado, inmediatamente revise la
condición del ducto de extracción debido a que puede
haber una obstrucción. Contacte a un técnico calificado o
a un centro de servicio.
MANTENIMIENTODELDUCTO
Revisar la acumulación de pelusa del ducto de extracción
y limpiarlo al menos una vez al año. Si nota una
disminución en el flujo de aire o en el desempeño del
secado, inmediatamente revise la condición del ducto de
extracción debido a que puede haber una obstrucción.
Contacte a un técnico calificado o a un centro de servicio.
MANTENIMIENTO
NUNCA ponga a funcionar la secadora sin el filtro
de pelusa en su lugar. NUNCA ponga a funcionar
la secadora con el filtro de pelusa húmedo. Se
recomienda una frecuencia de mantenimiento
periódico de una vez al año.
NOTA
filtro de pelusa

48
INSTRUCCIONES DE INSTALACIÓN DE SECADORA APILABLE
- La máquina puede ser apilada solamente en los modelos designados por LG como compatibles
- No apile la lavadora en la parte superior.
- Puede ordenar las partes para apilar con los Distribuidores autorizados o con los agentes de LGE.
NOTA
INSTRUCCIONES DE INSTALACIÓN DE SECADORA APILABLE
1.MODELOSCOMPATIBLESPARAAPILAR
2.KITPARAAPILAR
-ELKITPARAAPILARvieneincluidoenlasecadorasuperior
-ELKITPARAAPILARincluyeelsoporteparaapilar(1),soportedeseguridad(3),perno(1),tornillos(9).
-ELKITDESLIZANTEincluyeelsoportedeslizante(2),placadeslizante(4),tornillos(18).
1) soporte para apilar 2) perno 3) tornillos 4) soporte de
seguridad
frontal
frontal
derecho
izquierda
1) soporte deslizante
frontal
frontal
derecho
izquierda
2) placa deslizante 3) ornillos
Posición apilable Secadora Superior LavadoraInferior
Modelo
RV1329CN7P
FH069FDP
RP1329AN7S
FH069FDF
RP1329A7S
FH069FD2P
FH069FD2F

49
ESPAÑOL
INSTRUCCIONES DE INSTALACIÓN DE SECADORA APILABLE
3. Apilar la máquina
- Instale dos soportes deslizantes en la placa superior de la lavadora inferior
- Quite las patas de los soportes.
- Quiete los 4 soportes de patas de la parte inferior de la secadora superior.
- Ensamble las 4 placas deslizantes en la base.
- Levante y coloque la secadora superior sobre la lavadora.
- Coloque la parte trasera de la secadora con la lavadora quedando en la misma posición
- Empuje la secadora superior para que coincida con la corredera y el soporte hasta alinear paralelamente los
paneles frontales superior e inferior.
- Instale el soporte apilador en la parte trasera de la secadora y la lavadora.
- Coloque los seis(6) tornillos para fijar la lavadora y secadora.
*
Instalación de soporte de seguridad (solamente para modelos de ficha)
- Instale dos soportes de seguridad en la estructura del panel y en la placa
superior de la lavadora inferior.
- Instale un soporte de seguridad en la estructura del panel inferior de la
secadora superior.
Consulte el manual de servicio para más detalles de cómo apilar y sujetar la máquina.-
NOTA

50
MODO ERRORES / RECUPERACIÓN DESPUÉS DE INTERRUPCIÓN ELÉCTRICA / AJUSTES DE FÁBRICA
Problema Causa Posible Solución
Se muestra en el display cuando el termistor
está en corto o abierto.
El termistor debe reemplazarse.
TIPO ELÉCTRICO
Se muestra cuando la temperatura del termistor
han aumentado unos 5 grados durante 3 segundos
El termistor debe reemplazarse.
Desconexión del cable del lector de tarjeta. Revisar el cableado del lector de tarjeta.
MODO ERRORES
Significado de los Códigos de Error que se muestran cuando hay un
problema.
RECUPERACIÓN DESPUÉS DE INTERRUPCIÓN ELÉCTRICA
En caso de una interrupción eléctrica, la máquina detiene su funcionamiento pero la indicación de tiempo en el
display permanece, mostrando el tiempo justo antes de la interrupción.Una vez restablecido el suministro eléctrico,
presionar el botón Start(Inicio) para reanudar el funcionamiento de la máquina.
AJUSTES DE FÁBRICA
Ajustes de Fábrica Valor de origen
Tiempo del ciclo (Minutos) 45 Minutos
Tiempo del ciclo de enfriamiento (Minutos) 2 Minutos
Temperatura Alta 68 °C
Temperatura Media 60 °C
Temperatura Baja
TIPO ELÉCTRICO 52 °C
TIPO GAS 47 °C
Tiempo del Completado (Minutos por moneda) 20 Minutos
Valor moneda 1 100
Valor moneda 2 100
Minutos/Minutos y segundos Minutos
Fahrenheit/Celsius Celcius
Modo Errores Encendido
• La configuración de los precios varía según el país.
• Seleccione su país en el modo
(consulte la sección Cómo ingresar el ).
• Después de EEPT, restablezca el país (el país predeterminado es KOR).
NOTA

51
ESPAÑOL

52

53
ESPAÑOL

54


-
 1
1
-
 2
2
-
 3
3
-
 4
4
-
 5
5
-
 6
6
-
 7
7
-
 8
8
-
 9
9
-
 10
10
-
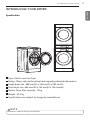 11
11
-
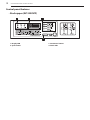 12
12
-
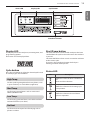 13
13
-
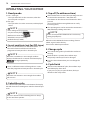 14
14
-
 15
15
-
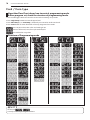 16
16
-
 17
17
-
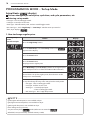 18
18
-
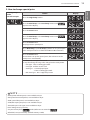 19
19
-
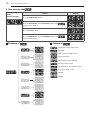 20
20
-
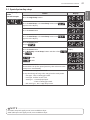 21
21
-
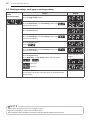 22
22
-
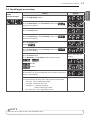 23
23
-
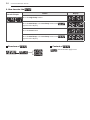 24
24
-
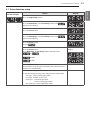 25
25
-
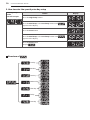 26
26
-
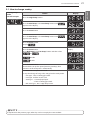 27
27
-
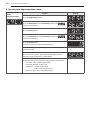 28
28
-
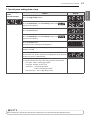 29
29
-
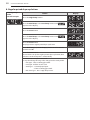 30
30
-
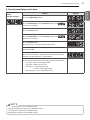 31
31
-
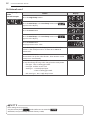 32
32
-
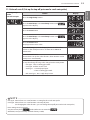 33
33
-
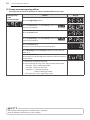 34
34
-
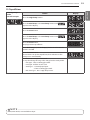 35
35
-
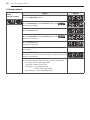 36
36
-
 37
37
-
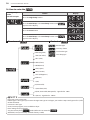 38
38
-
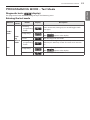 39
39
-
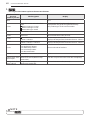 40
40
-
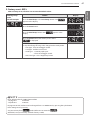 41
41
-
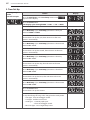 42
42
-
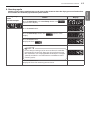 43
43
-
 44
44
-
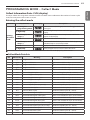 45
45
-
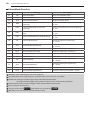 46
46
-
 47
47
-
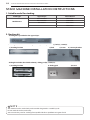 48
48
-
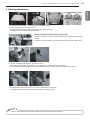 49
49
-
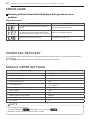 50
50
-
 51
51
-
 52
52
-
 53
53
-
 54
54
-
 55
55
-
 56
56
-
 57
57
-
 58
58
-
 59
59
-
 60
60
-
 61
61
-
 62
62
-
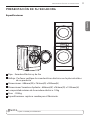 63
63
-
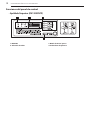 64
64
-
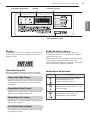 65
65
-
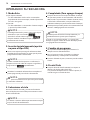 66
66
-
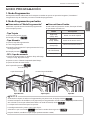 67
67
-
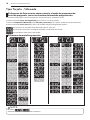 68
68
-
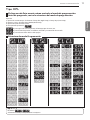 69
69
-
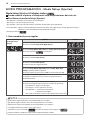 70
70
-
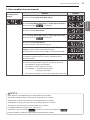 71
71
-
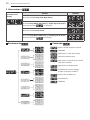 72
72
-
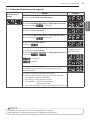 73
73
-
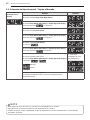 74
74
-
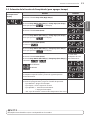 75
75
-
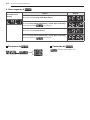 76
76
-
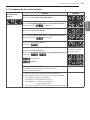 77
77
-
 78
78
-
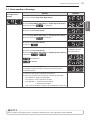 79
79
-
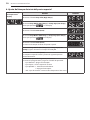 80
80
-
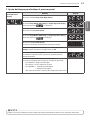 81
81
-
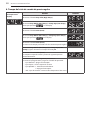 82
82
-
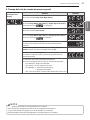 83
83
-
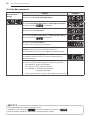 84
84
-
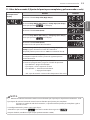 85
85
-
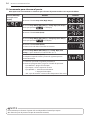 86
86
-
 87
87
-
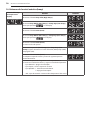 88
88
-
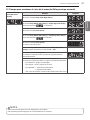 89
89
-
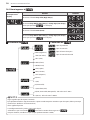 90
90
-
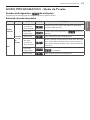 91
91
-
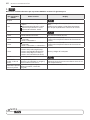 92
92
-
 93
93
-
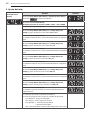 94
94
-
 95
95
-
 96
96
-
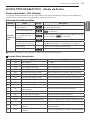 97
97
-
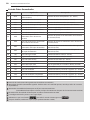 98
98
-
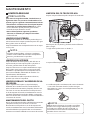 99
99
-
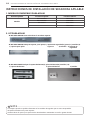 100
100
-
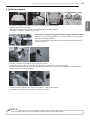 101
101
-
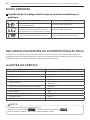 102
102
-
 103
103
-
 104
104
-
 105
105
-
 106
106
-
 107
107
-
 108
108


LG RV1329CN7P El manual del propietario
- Categoría
- Secadoras
- Tipo
- El manual del propietario
En otros idiomas
- English: LG RV1329CN7P Owner's manual
Documentos relacionados
Otros documentos
-
Caple T453I Manual de usuario
-
Maytag MDE25PN Installation Instructions Manual
-
Whirlpool CGT9000GQ Guía de instalación
-
Kenmore 91952 El manual del propietario
-
Alliance Laundry Systems Stacked Clothes Dryer Manual de usuario
-
-
GE VFA31SCDT Guía de instalación
-
-
-
Primus / Lavamac FS6 Parts Manual