Panasonic TC-26LX70 El manual del propietario
- Categoría
- Televisores de plasma
- Tipo
- El manual del propietario
Este manual también es adecuado para

Pa.aso.ic
TV DE
Operating Instructions
26"/32" DIAGONAL LCD TV
Manual de instrucciones
LCD DE 26"/32" DIAGONAL
ModelNo. TC 26LX70
NQmero de modelo
TC-32LX70
(See page
(vea la p4gina 6)
de inicio
@ For assistance (U.S.A.), please call:
1-800-211-PANA (7262)
or visit us at www.panasonic.com/contactinfo
For assistance (Puerto Rico), please call:
787-750-4300
or visit us at www.panasonic.com
For assistance (Canada), please call:
1-800-561-5505
or visit us at www.panasonic.ca
@ Pare solicitar ayuda (EE.UU.), Ilame at:
1-800-211 -PANA (7262)
6 visitenos en www.panasonic.com/contactinfo
@ Pare soIicitar ayuda (Puerto Rico), Ilame el:
787-750-4300
6 visitenos en www.panasonic.com
i..i;:3rrlll TM
-'] Please read these instructions before operating your set and retain them for future reference.
English
J
The images shown in this manual are for illustrative purposes only.
__f EspaSol ] Lea estas instrucciones antes de utilizer su televisor y guardelas pare consultarlas en el futuro.
J
Las im&genes mostradas en este manual tienen solamente fines ilustrativos.
TQB2AA0782

Turn your own living room into a movie theater!
Experience an amazing level of multimedia excitement
HDMI, the HDMI logo and High-Definition Multimedia Interface are
trademarks
or registered trademarks of HDMI Licensing LLC.
HDAVI
Control TM
HDAVt ControtTMisa trademark of
Matsushita Electric IndustrialCo., Ltd.
EZ Sync TM
EZ SyncTMis atrademark of
Matsushita Electric Industrial
Co., Ltd.
2

system
DVD recorder
Contents
Please read before using the unit
@Safety Precautions ....................................... 4
Enjoy your TV!
Basic Features
@Watching TV............................................... 18
@Watching Videos and DVDs ....................... 20
Advanced Features
@How to Use Menu Functions
(picture, sound quality, etc.) ....................... 22
@EZ Sync TM "HDAVt Control TM''-.................... 26
@Lock ........................................................... 28
@Editing and Setting Channels .................... 30
@Input Labels/Monitor out/Closed Caption ....... 32
@Using Timer ................................................ 34
@Operating Peripheral Equipment ............... 35
@Recommended AV Connections ................ 36
Manufactured under license from Dolby Laboratories.
DOLBY and the doubte-D symbol are trademarks of Dolby
Laboratories.
FAQs, etc.
@Remote Control Operation/Code List ......... 38
@Ratings List for Lock .................................. 42
@Technical Information ................................. 43
@Maintenance .............................................. 45
@FAQ ............................................................ 46
@Specifications ............................................. 48
@Limited Warranty (for U.S.A.) ..................... 49
@Customer Services Directory (for U.S. A.)---- 50
@Limited Warranty (for Canada) ................... 51
3

Safety Precautions
CAUTION
WARNING: To reduce the risk of electric shock, do not remove cover or back.
No user-serviceable parts inside. Refer servicing to qualified service personnel.
,_The lightning flash with arrow
head within a triangle is intended
to teII the user that parts inside the
product are a risk of electric shock
to persons.
,_The exclamation point within a
triangle is intended to teIl the
user that important operating and
servicing instructions are in the
papers with the appliance.
This reminder is provided to direct the CATV system installer's attention to Article 820-40 of the NEC that provides guidelines for
proper grounding and, in particular, specifies that the cable ground shall be connected to the grounding system of the building, as
close to the point of cable entry as practical.
Slots and openings in the cabinet and the back or bottom are provided for ventilation, and to ensure reliable operation of the LCD
TV and to protect it from overheating. These openings must not be blocked or covered. There should be at least 10 cm of space
from these openings. The openings should never be blocked by placing the LCD TV on a bed, sofa, rug or other similar surface.
This LCD TV should not be placed in a built-in installation such as a bookcase unless proper ventilation is provided.
4
1) Read these instructions.
2) Keep these instructions.
3) Heed all warnings.
4) Follow all instructions.
5) Do not use this apparatus near water.
6) Clean only with dry cloth.
7) Do not block any ventilation openings. Install in accordance with the manufacturer's instructions.
8) Do not install near any heat sources such as radiators, heat registers, stoves, or other apparatus (including amplifiers) that
produce heat.
9) Do not defeat the safety purpose of the polarized or grounding-type plug. A polarized plug has two blades with one wider than
the other. A grounding type plug has two blades and a third grounding prong. The wide blade or the third prong are provided for
your safety. If the provided plug does not fit into your outlet, consult an electrician for replacement of the obsolete outlet.
your home consult your television dealer or local power company.
16)Follow all warnings and instructions marked on the LCD TV.
17) Never push objects of any kind into this LCD TV through cabinet
slots as they may touch dangerous voltage points or short out parts
that could result in a fire or electric shock. Never spill liquid of any
kind on the LCD TV.
18) If an outside antenna is connected to the television equipment,
be sure the antenna system is grounded so as to provide some
protection against voltage surges and built up static charges.
In the U.S. Section 810-21 of the National Electrical Code
provides information with respect to proper grounding of the mast
and supporting structure, grounding of the lead-in wire to an
antenna discharge unit, size of grounding conductors, location of
antenna discharge unit, connection to grounding electrodes, and
requirements for the grounding electrode.
EXAMPLE OF ANTENNA
GROUNDING AS PER
(NEC) NATIONAL
ELECTRICAL
CODE
.... ANTENNA
LEADqN WIRE
ANTENNA
DISCHARGE UNIT
(NEC SECTION 810-20)
GROUNDING
CONDUCTORS
(NECSECTION810-21)
GROUND CLAMPS
POWER SERVICE GROUNDING
ELECTRODE SYSTEM
(NEC ART 250, PART H)
10)Protect the power cord from being walked on or pinched particularly at plugs, convenience receptacles,
and the point where they exit from the apparatus.
11) Only use attachments / accessories specified by the manufacturer.
12)Use only with the cart, stand, tripod, bracket, or table specified by the manufacturer, or sold with the
apparatus. When a cart is used, use caution when moving the cart / apparatus combination to avoid injury
from tip-over.
13) Unplug this apparatus during lightning storms or when unused for long periods of time.
14)Refer all servicing to qualified service personnel. Servicing is required when the apparatus has been damaged in any way,
such as power-supply cord or plug is damaged, liquid has been spilled or objects have fallen into the apparatus, the apparatus
has been exposed to rain or moisture, does not operate normally, or has been dropped.
15) Operate only from the type of power source indicated on the marking label. If you are not sure of the type of power supplied to

19)Anoutsideantennasystemshouldnotbelocatedinthevicinityofoverheadpowerlines,otherelectriclight,powercircuits,or
whereitcanfallintosuchpowerlinesorcircuits.Wheninstallinganoutsideantennasystem,extremecareshouldbetakento
keepfromtouchingsuchpowerlinesorcircuitsascontactwiththemmightbefatal.
20)UnplugthisLCDTVfromthewalloutletandreferservicingtoqualifiedservicepersonnelunderthefollowingconditions:
a. Whenthepowercordorplugisdamagedorfrayed.
b. IfliquidhasbeenspilledintotheLCDTV.
c. IftheLCDTVhasbeenexposedtorainorwater.
d. IftheLCDTVdoesnotoperatenormallybyfollowingtheoperatinginstructions.
Adjustonlythosecontrolsthatarecoveredbytheoperatinginstructionsasimproperadjustmentofother
controlsmayresultindamageandwilloftenrequireextensiveworkbyaqualifiedtechniciantorestoretheLCD
TVtonormaloperation.
e. IftheLCDTVhasbeendroppedorthecabinethasbeendamaged.
f. WhentheLCDTVexhibitsadistinctchangeinperformance-thisindicatesaneedforservice.
21)Whenreplacementpartsarerequired,besuretheservicetechnicianusesreplacementpartsspecifiedbythemanufacturer
thathavethesamecharacteristicsastheoriginalparts.Unauthorizedsubstitutionsmayresultinfire,electricshock,orother
hazards.
22)WARNING:TO REDUCE THE RISK OF FIRE OR ELECTRIC SHOCK, DO NOT EXPOSE THIS APPARATUS TO RAIN,
MOISTURE, DRIPPING OR SPLASHING.
DO NOT PLACE LIQUID CONTAINERS (FLOWER VASES, CUPS, COSMETICS, ETC.) ABOVE THE SET
(INCLUDING ON SHELVES ABOVE, ETC.).
23)WARNING: SMALL PARTS CAN PRESENT CHOKING HAZARD IF ACCIDENTALLY SWALLOWED. KEEP SMALL PARTS
AWAY FROM YOUNG CHILDREN.
DISCARD UNNEEDED SMALL PARTS AND OTHER OBJECTS, INCLUDING PACKAGING MATERIALS
AND PLASTIC BAGS/SHEETS TO PREVENT THEM FROM BEING PLAYED WITH BY YOUNG CHILDREN,
CREATING THE POTENTIAL RISK OF SUFFOCATION.
24)CAUTION: TO PREVENT ELECTRIC SHOCK, DO NOT USE THIS PLUG WITH A RECEPTACLE OR OTHER OUTLET
UNLESS THE BLADES CAN BE FULLY INSERTED TO PREVENT BLADE EXPOSURE.
25)CAUTION: USE WITH OTHER STAND MAY RESULT IN INSTABiLiTY POSSIBLY CAUSING INJURY.
26)CAUTION: DANGER OF EXPLOSION IF BATTERY IS iNCORRECTLY REPLACED. REPLACE ONLY WITH THE SAME OR
EQUIVALENT TYPE.
27)CAUTION: This LCD TV is for use only with the following optional accessory. Use with any other type of optional
accessories may cause instability which could result in the possibility of injury.
(All of the following accessories are manufactured by Matsushita Electric Industrial Co., Ltd.)
• Wall-hanging bracket (Vertical): TY-WK32LR2W
Always be sure to ask a qualified technician to carry out set-up.
• This product utilizes tin-lead solder and has a fluorescent lamp containing a small amount of mercury. Disposal of
these materials may be regulated in your community due to environmental considerations. For disposal or recycling
information, please contact your local authorities or the Electronics Industries Alliance: www.eiae.org.
This equipment has been tested and found to comply with the limits for a TV Broadcast Receiver, pursuant to Part 15 of the
FCC Rules. These limits are designed to provide reasonable protection against harmful interference in a residential installation.
This equipment generates, uses and can radiate radio frequency energy and, if not installed and used in accordance with the
instructions, may cause harmful interference to radio communications. However, there is no guarantee that interference will
not occur in a particular installation. If this equipment does cause or receive interference, which can be determined by turning
equipment off and on, the user is encouraged to try to correct the interference by one or more of the following measures:
Reorient or relocate the TV antenna.
Increase the separation between TV and other equipment.
Connect TV into separate outlet from other equipment.
Consult the dealer or an experienced radio / TV technician for help.
FCC Caution: Any changes or modifications not expressly approved by the party responsible for compliance could void the
user's authority to operate this equipment.
5

Accessories/Optional Accessory
Check you have all the items shown.
_cessories
[] Remote Control
Transmitter
@N2QAYBOOO102
[] Batteries for the Remote
Control Transmitter (2)
@AA Battery
[]Operating Instructions
[] Product Registration Card
(U.S.A.)
•Customer Care Plan Card
(U.S.A.)
•Notice sheet (Demo mode
[]Warranty Card (Mexico) []Quick Setup Guide
(For viewing HD programming)
_ ,,,_
t Open
Close
Hook
Note the correct polarity (+ or -).
Caution j
@Incorrect installation may cause battery leakage and corrosion, resulting in damage to the remote control unit.
÷Do not mix old and new batteries.
÷Do not mix different battery types (such as alkaline and manganese batteries).
÷Do not use rechargeable (Ni-Cd) batteries.
@Do not burn or break batteries.
@Make a note of the remote control codes before changing batteries in case the codes are reset. (p. 39-41)
Place the TV at a comfortable distance for viewing. Avoid placing it where sunlight or other bright light (including
reflections) will fall on the screen.
Use of some types of fluorescent lighting can reduce remote control transmitter range.
Adequate ventilation is essential to prevent an internal component failure. Keep away from areas of excessive
heat or moisture.
6

Please contact your nearest Panasonic dealer to purchase
the recommended wall-hanging bracket. For additional details,
please refer to the wall-hanging bracket installation manual.
Wall-hanging bracket (vertical)
@TY-WK32L R2W
Before mounting the TV on the wall, you must remove the TV-Stand from the TV.
Follow the steps below:
Disconnect all the cables from the TV.
Remove the TV-Stand.
_': Remove four screws
",B,"Pull out the TV-Stand
®
@
3>
O
O
d)
o0
o0
o
Co
O
"O
i.
o
93
3>
0
0
00
Co
o
Foam mat or thick
soft cloth
WARNING
@Failure to use a Panasonic bracket or choosing to mount the unit yourself will be done at the risk of the consumer.
Any damage resulting from not having a professional installer mount will void your unit's warranty.
@Always be sure to ask a qualified technician to carry out set-up.
Incorrect fitting may cause equipment to fall, resulting in injury and product damage.
@Do not mount this LCD Television directly below ceiling lights (such as spotlights, floodlights, or halogen lights)
which typically give off high heat. Doing so may warp or damage plastic cabinet parts.
7

Before Connection
==Watching TV
@VHF/UHF Antenna
÷NTSC (National Television System Committee):
Conventional broadcasting or
÷ATSC (Advanced Television Systems Committee):
Digital TV Standards include digital high-definition television (HDTV),
standard-definition television (SDTV), data broadcasting, multi-channel
surround-sound audio and interactive television. VHF/UHF Antenna Cable Box/
@Cable Box/Cable Cable
÷You need to subscribe to a cable TV service to enjoy viewing their
programming.
÷You can enjoy high-definition programming by subscribing to a high-definition cable box. The connection can be
done with the use of HDMI or Component Video cable.
• Recording/playing back with DVD recorder or VCR
@DVD Recorder
This source has higher resolution through interlace or progressive signal.
Connection can be done with the use of Component Video or HDMI cable. DVD Recorder
@VCR
Connection can be done with the use of an RF cable and Composite Video/S Video cable.
or
VCR
• Watching Satellite
@You can enjoy high-definition programming by subscribing to
high-definition satellite source. Connection can be done with the use of
HDMI or Component Video cable.
Satellite Antenna
Satellite
Receiver
• Enjoying Home theater and DVD recorder with
HDMI connection
@Home theater and DVD Recorder
HDMI connection enables you to enjoy higher quality audio and video with
a single cable.
Home Theater DVD Recorder
Note _,
/
@If your Panasonic DVD Recorder is compatible with EZ Sync (HDAVI control 2), you can operate your Panasonic
DVD Recorder with this TV's remote control (p. 21 EZ SyncTM).
@All cables and external equipment shown in this book are not supplied with the TV.
@For the details of the external equipment's connections, please refer to the operating manuals of the equipment.
==Antenna terminal
@
@Firmly tighten by hand.
==Pinterminals
_) _ 2_ ree
red blue
@Matchcolors of plugsand terminals.
@Insert firmly.
• HDMI terminal
@Insert firmli_

Basic Connection
TV
VHF/UHF Antenna
AC 120-127V
60Hz
VHF/UHF Antenna
TV or
Power Cord
(Connect after all the
Back of the TV other connections.) I"
!
Antenna
terminal W
t
[
/
iiii
!
/
This slot is for services by the Panasonic dealer.
, (If no Cable Box) [
or}
ANT OUT ANT IN
® If using Cable Box
÷Set the TV channel to CH3 or CH4.
Cable Box
®®
(1) 93
o?
0
g_
>
93
+
<
\
Note
@For additional assistance, visit us at: www.panasonic.com
www.panasonic.ca
9

Basic Connection (Continued)
TV
DVD Recorder
or
VCR
VHF/UHF Antenna
AC120-127V
60Hz
Power Cord
v
To use HDMI
terminals
(next page)
To use S VIDEO terminals
(next page)
To use OUTPUT terminals
(p. 36, 37)
To use COMPOSITE terminals
(next page)
To use COMPONENT terminals
(next page)
Antenna
terminal
VHF/UHF Antenna
ANT OUT ANT IN
DVD Recorder or VCR
(with "IV tuner)
10 _ 1

==To use HDMI terminals
AV IN I
i NII:::3N'II| 2
v Y
@Connecting to HDMI terminals will enable you to enjoy high-definition digital images and high-quality
sound.
• To use COMPONENT terminals
green
=_/_ PB COMPONENT
VIDEO OUT
blue
red red red
@Recorders may also be connected to COMPOSITE or S VIDEO terminals. (see below)
• To use COMPOSITE terminals
DVD Recorder
• To use S VIDEO terminals
white
red red
DVD Recorder
or
VCR
S VIDEO or
,, ,.............
, e AUDIO
red red red S
@The S Video input will override the composite
video signal when S Video cable is connected.
Connect either S Video or Video cable.
@Connecting to S VIDEO terminals will enable
you to enjoy greater picture quality than using
Composite terminals.
Note
@Some programs contain a copyright protection signal to prevent recording.
@When the copyright protection program is displayed, do not connect the other TV monitor through a VCR. Video
signals fed through VCRs may be affected by copyright protection systems and the picture will be distorted on the
other TV monitor.
+o
EJC)
<o
O
<
©
;;U
11

Basic Connection (Continued)
TV
DVD
Recorder
or VCR
Satellite
Receiver
AC120-127V
60Hz
Power Cord
VHF/UHF Antenna
To use HDMI
terminals
(p. 11)
Antenna
terminal
To use S VIDEO terminals
(p. 11)
To use COMPOSITE terminals
(p. 11)
ANT OUT ANT IN ANT IN
To use COMPONENT terminals
(p. 11)
DVD Recorder or VCR
(with TV tuner)
Satellite Receiver
12

==To use HDMI terminals
Receiver
@Connecting to HDMIterminals willenable youto enjoy high-definition digitalimages and high-quality
sound.
==To use COMPONENT terminals
DVD Recorder Y_:_-__
'@'_i green
X_IIII COMPONENTPB_;_)c
VIDEO tN blue
PR/'->,
by °
red
%,........................... ¢
red red
red
green
__e,;_)PB COMPONENT
blue VIDEO OUT
red red
........ J
Satellite
Receiver
@Satellite Receiver may also be connected to COMPOSITE or S VIDEO terminals. (see below)
==To use COMPOSITE terminals
VCR
yellow
COMPOSITE
IN
white
red red
yellow
_;_,..L COMPOSITE
white OUT
red red
==To use S VIDEO terminals
Satellite
Receiver
,,, S VIDEO if:._,_ _ ._-:_ S VIDEO _.
_S_ IN _,_i:i_ ___ OUT %_,
=
VCR Satellite
Receiver
@The S Video input will override the composite
video signal when S Video cable is connected.
Connect either S Video or Video cable.
@Connecting to S VIDEO terminals will enable
you to enjoy greater picture quality than using
Composite terminals.
+o
<o
O
<
©
33
+
O3
0
<
d)
13

Basic Connection (Continued)
TV Home Theater
DVD recorder
Back of the TV
Note
@ It is recommended that you use
Panasonic's HDMI cable. (R26)
@When Using the COMPONENT
VIDEO OUT terminals or the
S VIDEO OUT terminal, refer to p.13
"To use COMPONENT terminals" or
"To use S VIDEO terminals".
@ If you connect RAM theater or Player
theater with HDMI cable, use audio
cable instead of the optical digital
audio cable. (see p.37)
HDMI
AV OUT
DVD Recorder
14

Identifying Controls
POWER button
Volume up/down
navigations
Demonstrates picture quality in vivid mode.
Switches TV/Vl DEO L
..... m__S (Press any key to cancel the demo.)
I- Remote control sensor
Within about 23 feet (7 meters) in front of the TV set.
Power indicator (on: red, off: no light)
Note
@The TV consumes a limited amount of power as long as the power cord is inserted into the wall outlet.
Selects channels
in sequence
Switches TV to On or Standby
The equipment selection button (p. 20) --
Changes the input mode (p. 20)
Displays Sub Menu (p. 18, 24)
Colored buttons
(used for various functions)
(for example p. 30)
Channel up/down
EZ Sync menu (p. 21,26-27)
Selects Audio Mode for TV viewing
(p. 18)
Displays Main Menu (p. 22)
Exits menus
Selects/OK/Change
Returns to previous menu
Volume up/down
®®
uu_-
(I)
00.:::3
O
oN-
_ o
Changes aspect ratio (p. 19)
Operates the Favorite channel list
function. (p. 19)
Switches to previously viewed channel --
and input modes.
Displays or removes the channel
banner (p. 18)
Sound mute On/Off
Numeric keypad to select any
channel (p. 18) or press to enter
alphanumeric input in menus.
(p. 21,28, 30, 35)
Direct channel access for DTV and
DBS (p. 18)
External equipment operations
(VCRs, DVDs, etc.) (p. 20)
15

First Time Setup
"First time setup" is displayed only when the TV is turned on for the first time after the power cord is
inserted into a wall outlet and when "Auto power on" (p. 24-25) is set to "No".
Turn the TV On with the POWER button
POWER
or
(TV) (Remote)
Select your language
[_ English <-->Espa_ol <-->Fran£ais_j
RETURN
@--Go back to previous screen.
==Press to exit from _ Adjust the clock
menu screen
EXIT
@
• Press to return to
previous screen
RETURN
@
16
Note
@To change setting
(Language/Clock/Auto
program/Picture) later,
go to Menu screen
(p. 22,24)
Year: Select the year
Month: Select the month
Day: Select the day
Hour: Adjust the hour
Minute: Adjust the minute
RETURN
Go back to previous screen.
A

Auto channel setup
_i_Select "Auto program"
_2_Select "ANT in"
)set
)select
[ ANT in I
Cable: Cable TV
Antenna: Antenna
_Select "Auto"
@Select scanning mode (ALL channels/Analog only/Digital only)
-13
03
t-
"O
Start scanning the channels
@Available channels (analog/digital)
are automatically set.
• Press to exit from
menu screen
EXIT
Note
@About broadcasting
systems
Analog (NTSC):
traditional TV
programming
Digital (ATSC):
new programming
that allows you to
view more channels
featuring high-quality
video and sound
All channels: Scans digital and analog channels
Analog only: Scans Analog channels only
Digital only: Scans Digital channels only
@Confirm registered channels
q_,select
"Apply"
@ok
@If OK is not pressed after selecting "Apply", the channels will not be saved.
@If you perform scanning more than twice, previously saved channels are erased.
(Refer to p. 22) 17

Watching TV
Connect the TV to a cable box/cable, set-top-box, satellite box, or antenna cable (p. 8-9)
Turn power on
POWER
/
@If the mode is not TV, press
v$o and select TV. (p 20)
• To directly input the digital channel
number
_When tuning to a digital
channel, press the button to
enter the minor number in a
compound channel number.
example: CH15-1: __
• Other Useful Functions (Operate after @)
• Selects Audio Mode for watching TV
SAP
® Digital mode
Press SAP to select the next audio track (if available) when receiving a digital channel.
@Analog mode
Press SAP to select the desired audio mode.
• Each press of SAP will change the audio mode. (Stereo/SAP/Mono)
• Press SUB MENU to show sub menu screen. (p.24)
This menu consists of shortcuts to convenient functions.
SUB
MENU
• Displays or removes the channel banner.
RECALL Channei
Clock
Station SAP Signal Picture Sleep timer
identifier indication resolution mode remaining time
Closed caption Rating Level Aspect ratio
18

• Press ASPECT to cycle through the aspect modes. (p. 43)
ASPECT L_ 4 _
• 480i, 480p: FULL/JUST/4:3iZOOM
• 1080p, 1080i, 720p: FULL/H-FILL/JUST/4:3/ZOOM
FAVORITE
• FAVORITE
Channel numbers registered in Favorite are displayed on the favorite tune
screen. Select the desired broadcast station with the cursor or use number
buttons. (see below)
f Note
\
@Reselect "Cable" or "Antenna" in "ANT in" of "Program channel" to switch the signal reception between cable TV
and antenna. (p. 17, 31)
@The channel number and volume level remain the same even after the TV is turned off.
Display the SUB MENU.
SUB
MENU
2
0_.select
', "Set favorite
oK9
42_ok
• Press FAVORITE repeatedly
to change between pages (1/3,
2/3, 3/3, or exit).
Press • •to highlight a position
on the list.
Then, press OK to save the
displayed channel in that position.
• You can also use the NUMBER
buttons (1-9 and 0) to select a
list number (1-9 and 0). By doing
so, the displayed channel will
be saved on that list number
without pressing OK.
@ To delete a favorite channel
A saved channel can be removed from the list by holding
down OK while its position is highlighted.
1
FAVORITE
2
3
,i!i;il¸ _ ok
Press FAVORITE.
• Press FAVORITE repeatedly
to change between pages (1/3,
2/3, 3/3, or exit).
Press • • or a Numbered key
(1-9 and 0) to highlight a channel
on the list.
• Selecting a channel number
from the list with the number
button will display the channel
directly.
Press OK to display the
highlighted channel.
@
O
:::3-
CQ
-t
<
@To change the page
Pressing ,4 changes the page backward. Pressing I_ changes the page forward.
19

Watching Videos and DVDs
If you have some equipment connected to the TV, you can easily watch videos and DVDs using the TV's
remote control.
You can select the external equipment to access.
To operate other manufacturers' equipment, you need to register the code of the equipment. (p. 35)
With the connected equipment turned On
Display the Input select menu
TV
VIDEO
(example)
or
Press corresponding NUMBER
button on the remote control to
select the input of your choice.
select
- @ enter
Select the input of your choice,
then press OK.
@During the selection, if no action
is taken for several seconds, the
"Input select" menu disappears.
Label
Terminal
(example)
@The terminal and label of
the connected equipment is
indicated.
To label each of the input please
refer to R 32-34
Select the remote control mode
Press the key to select
Operate the connected equipment, pointing remote control
at the equipment. (example)
• Press to return to TV
TV
woEo
@
Note
@For details, see the
manual of the
equipment,
Rewind/Fast Forward
Stop
Pause
Play
Record
Skip Reverse/Forward
Reverse/Forward
Stop
Pause
Play
20 (For other operations, see p. 38)

If you connect equipment that has "HDAVI Control 2" function to a TV with HDMI cable, you can
enjoy using more convenient functions. For details, "EZ Sync Control" on p. 26-27.
Display EZ Sync menu
Ez_gnc
Select the equipment
Operate
Now you can operate the selected equipment with the TV's remote
control.
Follow the menu of the equipment and enjoy watching.
For the remote control operations, refer to p. 27.
Note
@For details, see the manual of the equipment or ask your local dealer.
• Press to return to TV
R/
@
0
<
Q..
(1)
©
6O
Q_
<
6O
21

How to Use Menu Functions
Various menus allow you to make settings for the picture, sound, and
other functions so that you can enjoy watching TV in your own way.
@Displays the functions that can be set
(varies according to the input signal)
Select the menu
Select the item
(example: Picture menu)
==PreSSmenuscreent°exit from _ Adjust or select
EXIT
@
• Press to return
to the previous
screen
RETURN
@
(example: Picture menu)
• Menu list
Menu Item
DVD recorder,
Home theater,
HD camcorder,
Speaker output
Normal
Picture mode
Back light
Picture, Brightness,
Color, Tint, Sharpness
Color temp.
Color mgmt.
AI picture
Zoom adjust
Video NR
3D Y/C filter
Color matrix
MPEG NR
Black level
Normal
Bass
Treble
Balance
AI sound
Surround
Speaker output
HDMI 1 in
HDMI 2 in
Audio leveler
Sleep, Timer 1-5
22

Adjustments/Configu rations (alternatives)
[DVD recorder/Home theater/HD camcorder]
Select equipment to access and operate. (p. 26-27)
[Speaker output]
Select audio output. (Home theater/TV) (p. 26-27)
EZSyFIC
EZ Sync menu is accessible directly by pressing the EZ Sync button on the remote control. _' _ (p. 21)
Resets all picture adjustments to factory default settings except for "Other adjust" (Set/No)
Basic picture mode (VividlStandardlCinemalCustom) (p. 45)
Adjusts luminance of the back light.
Adjusts color, brightness, etc. for each picture mode to suit your taste
[Back light _1
[P,ct°re
][Sha,poe.s
[co,or
[Co,orte,"p.
[Co,or,"g,"t.
[A,p,ctu,e
[zoo,.°djust ]
Selects level of warm colors (red) and cool colors (blue) (Cool/Normal/Warm)
On: Enhances green and blue color reproduction, especially outdoor scenes. (On/Off)
Controls dark areas without affecting the black level or brightness in the overall picture (On/Off)
Adjusts vertical alignment and size when aspect setting is "ZOOM" (p. 43)
Reduces noise, commonly called snow. Leave it off when receiving a strong signal. (Off/On)
Minimizes noise and cross-color in the picture. (On/Off)
Selects image resolution of component-connected devices (HD/SD)
_ SD: Standard Definition HD: High Definition
@ Only 480p signal accepted; regular TV (NTSC) is not available.
Reduces noise of specific digital signals of DVD, STB, etc. (On/Off)
Selects Dark or Light. Valid only for external input signals. (Dark/Light)
Resets Bass, Treble and Balance adjustments to factory default settings. (Set/No)
Increases or decreases the bass response.
Increases or decreases the treble response.
Emphasizes the left / right speaker volume.
Equalizes overall volume levels across all channels and external inputs. (On/Off)
Enhances audio response when listening to stereo. (On/Off)
Switches to "Off" when using external speakers (On/Off)
_ "AI sound", "Surround", and "Audio leveler" do not work if "Off" is selected
Selects according to the signal when HDMI is connected (Auto/Digital/Analog)
®_Auto: Automatically selects Analog / Digital signal
Minimizes volume disparity after switching to external inputs
The TV can automatically turn On/Off at the designated date and time (p. 34)
[Speaker output _ ]
[Sleep _]
Locks the channels and programs (p. 28)
@
......-F
"O O
Pc
t-
"33
m'_: t--
v_
@In AV mode, the Audio menu and Setup menu give fewer options.
23

How to Use Menu Functions
Various menus allow you to make settings for the picture, sound, and
other functions so that you can enjoy watching TV in the way best
suited for you.
@Displays the functions that can be set
(varies according to the input signal)
Select "Setup"
==Menu list
Menu Item "
Surf mode
Language
Clock
Program channel
Input labels
Monitor out
EZ Sync
Power off link
Power on link
Default speakers
Auto power on
Select the item
CC
• Press to exit from
menu screen
EXiT
@
• Press to return
to the previous
screen
RETURN
@
_ Display Sub MenuSUB
MENU
No signal shut-off
No action shut-off
Power Save
About
Reset
24
Select the item •Sub menu list
=
Menu Item "
Surf mode
Set favorite
next
CC
Caption select
...................................................Signal meter

(Continued)
Adjustments/Configu rations (alternatives)
Sets the mode to select the channel with Channel up/down button (Favorite./AII)
@ Favorite.: Only channels registered as FAVORITE (p. 31)
Selects the screen menu language (p. 16)
Language
Adjusts the clock (p. 16)
Sets channels (p. 30)
Program channel ]
Selects the terminal and label of the external equipment (p. 32)
[Comp./HDMI I/HDMI 2/Video l/Video 2Nideo 3]
To prevent howling and image oscillation, stops output of the pictures and audio specified in this menu.
(p. 32) (On/Off)
Displays subtitles (Closed Caption) (p. 32)
Controls equipment connected to HDMI terminals (p. 26) (On/Off)
@ "Power off link", "Power on link", and "Default speakers" cannot be selected if "Off" is set.
Sets "Power off link" of HDMI connection equipment (p. 26) (Set/No)
Sets "Power on link" of HDMI connection equipment (p. 26) (Set/No)
Selects the default speakers (p. 26) (TV/Theater)
Turns TV On automatically when the cable box or a connected device is turned On (No/Set)
_ The "Sleep" timer, "On / Off timer", and "First time setup" will not function if "Auto power on" is set.
(p. 34)
To conserve energy, the TV automatically turns off when NO SIGNAL continues more than 10 minutes.
(Set/No)
Note
@ Not in use when setting "Auto power on", "On!OffTimer", "Lock", or Digital channel.
®. "No signal shut-off was activated" will be displayed for about 10 seconds when the TV is turned on for
the first time after turning the power off by "No signal shut-off".
@ The on-screen display will flash 3, 2 and 1 to indicate the last three (3) remaining minutes prior to the shut-off.
To conserve energy, the TV automatically turns off when no operation of remote or front panel key
continues more than 3 hours. (No/Set)
Note
® Not in use when setting "Auto power on" or "On/Off Timer".
@ "No action shut-off was activated" will be displayed for about 10 seconds when the TV is turned on for
the first time after turning the power off by "No action shut off".
_®The on-screen display will flash 3, 2 and 1 to indicate the last three (3) remaining minutes prior to the shut-off.
Reduces screen brightness to lower power consumption. Eye-friendly for viewing in a dark room.
(Standard/Saving)
Displays TV version and software license.
EEZ Sync
[ Defaultspeakers_ ]
[Auto power on _ ]
[No signalshut-off_ ]
Performing Reset will clear all items set with Setup, such as channel settings. (p. 30)
Adjustments/Configu rations (alternatives)
Sets the mode to select the channel with Channel up/down button (Favorite./All)
Sets favorite channels. (p. 19)
Displays Closed Caption. (p. 32-33)
Changes the station identifier. (p. 30-31 )
Checks the signal strength if interference or freezing occurs on a digital image. (p. 30-31 )
@
..-.. -F
"O O
-=,6
Pc
Q..
t-
"33
o 5,-*.
vOo
25

EZ Sync TM"HDAVI Control TM''*
>_Simultaneously control all Panasonic "HDAVI Control" equipped components using one button
on one remote.
Enjoy additional HDMI Inter-Operability with Panasonic products which have "HDAVl Control"
function.
This TV supports "HDAVt Control 2" function.
Connections to some Panasonic equipment (DVD Recorder DIGA, HD Camcorder, RAM theater,
Player theater, Amplifier, etc.) with HDMI cables allow you to interface automatically.
The equipment with "HDAVl Control" function enables the following operations:
Automatic Input Switching, Power on link, Power off link and Speaker control (p. 27).
In addition, the equipment with "HDAVl Control 2" function enables the following operation:
EZ Sync Control only with TV's remote control (for "HDAVl Control 2") (p. 27).
The operations with other manufacturer's equipment cannot be guaranteed.
mFor the first time /When adding new equipment, reconnecting the equipment, or
changing setup.
After the connection turn the equipment on and then switch the TV on.
Select the input mode to HDMI 1 or HDMI 2 (p. 20), and make sure that an image is
displayed correctly.
@This function needs an HDMI compliant (fully wired) cable. Non-HDMI-compliant cables cannot
be utilized.
It is recommended that you use Panasonic's HDMI cable.
Recommended part number:
RP-CDHG15 (4.9 ft./1.5 m), RP-CDHG30 (9.8 ft./3.0 m), RP-CDHG50 (16.4 ft./5.0 m)
Display menu
Select "Setup"
select
Select "EZ Sync setting"
26
• Press to exit from
menu screen
EXIT
@
• Press to return
to the previous
screen
RETURN
@
Select "EZ Sync"
Select "On" J-_J'_J;:'"
(default is On) _ "_ change
@If no HDMI equipment is connected or standard HDMI
equipment (non- "EZ Sync") is used, set to "Off".

AtthestartoftheDtGA,Playertheater,orRAMtheaterplayback,theTV'sinputautomaticallyswitchestotheinput
basedontheplaybackequipment.
@FortheRAMtheater,thespeakersautomaticallyswitchtothetheatersystem.
IfusingtheDIGAoperation,theTV'sinputautomaticallyswitchestotheDIGAandDIGAmenuisdisplayed.
YoucanselectHometheater,orTVspeakersforaudiooutput.
ControltheaterspeakerswiththeTV'sremotecontrol.
ThisfunctionisavailableonlywhenPanasonicAmplifierorPlayertheaterisconnected.
_OPressE_c
_Select "Speakeroutput"
_Select "Home theater" or "TV"
• Home theater: Adjustment for equipment
Volume up / down ÷
MUTE
Mute ÷
@The sound of TV is muted.
@When the equipment is turned off, TV speakers
become active.
@Selecting "Home theater" turns the equipment on
automatically if it is in standby mode.
• TV: The TV speakers are active.
In the EZ Sync menu, you can select an HDMI connected Panasonic equipment and access it quickly. Continue
using your TV's remote control to operate the equipment, pointing it at the TV.
_i_Press F_c
_2_Select the equipment you want to access.
-- ,q_select
OK
iii _access
You can select available
items only.
_3_Operate the equipment with the TV's remote
control, pointing it at the TV.
@To operate the equipment, read the manual of the
equipment.
• Available TV's remote control buttons
RE-RJRN
sub
Move the cursor/Select
Set/Access
Return to the previous menu
Display the Functions menu on the
equipment
Available when the purpose of the keys
are displayed on screen
When "Set" is selected (p.25), TV is turned on automatically and switches to the appropriate HDMI input whenever
EZ Sync compatible equipment is initially turned on and Play mode is selected.
When "Set" is selected (p.25) and the TV is turned off, all connected EZ Sync compatible equipment is also
automatically turned off.
@DIGA (Panasonic DVD Recorder) will not turn off if it is still in rec mode.
Caution: The TV remains on even if the EZ Sync compatible equipment is turned off.
"TV" is the default setting. To set the Home Theater system as default speakers, change the default speakers
setting from "TV" to "Theater". Sound will be output from the Home Theater whenever the TV is powered on.
If the "ONE TOUCH PLAY" key is pressed on the remote control for Panasonic Home Theater system, the following
sequence of operations is performed automatically.
(i_ Home Theater power switches On, and playback begins.
_2pTV power switches On, and the playback screen is displayed.
{3_Audio is muted on the TV and switches to the theater system.
,J
@
m
N
03
,<
O
-1
E3
<>
O
o
o
-1
27

Lock
You can lock specified channels or shows to prevent children from watching objectionable content.
nu
Select "Lock"
You will be asked to enter your
password each time you display the
Lock menu.
2
5
8
0
Input your 4-digit password
A 4-digit code must be entered to view a blocked program or change rating settings.
U_Q
UBB
HQB
@If it is the first time to enter the
password, enter the code twice in
order to register it.
• Press to exit from
menu screen
EXIT
@Make a note of your
password in case
you forget it. (If you
have forgotten your
password, consult your
local dealer.)
Select the Lock mode
select
@Off: Unlocks all the lock setting
of "Channel", "Game" and
"Program".
@All: Locks all the inputs regardless
of the lock setting of "Channel",
"Game" and "Program".
@Custom: Locks specified inputs of
"Channel", "Game" and
"Program".
Note
@When you select a
locked channel,
a message will be
displayed that allows
you to view the
channel if you input
your password.
Select the item
@"Channel", "Game" and "Program"
will grey out unless "Custom" is
selected in "Mode".
Set
28

==To select the channel or the rating of the program to be locked
Select up to 7 (1-7) channels to be blocked. These channels will be blocked regardless of the
program rating.
_Select "Mode" and set to "Custom"
@_Select channel to lock.
@select @ To lock/unlock all channels:
Select "Mode" and set to "All" or "Off".
,22_set
All: Locks all channels
Off: Unlocks all channels
Locks Channel 3, Channel 4 and external inputs. /""_'_,_(oselect
Select "Game" in Q and set to "On". i_ (ill"! _/ On: Locks
" ;_ ' _'-_set Off: Unlocks
==To set a rating level
"V-chip" technology enables restricted shows
to be locked according to TV ratings.
_i_Select "Mode" and set to "On".
@_Select the rating category you wish
to follow
_,P_7_ _ C3_next
oK m- @set
'i _-i_select
@ MPAA:
@ U.S.TV:
@C.E.LR.:
@C.F.LR.:
U.S movie ratings
U.S TV program ratings
Canadian English ratings
Canadian French ratings
_Select the rating to be locked
Example of "MPAA" (U.S movie ratings)
NR I No rating
i
G I
Pe I
PG-13 I
i
R I
NC-17 I
i
x I Adults only
@ To get other information (p. 42)
IITo disable recording of the locked
program
Select "Monitor out" and set to "On".
On: Turns on the monitor
terminal output
Monitorout_ for programs that
have been set to
"Blocked."
Off: Turns off the monitor
terminal output
for programs that
have been set to
"Blocked."
General Audience: All ages admitted
i
Parental Guidance Suggested
Parents Strongly Cautioned: Inappropriate for
children under !3
Restricted: Under 17 requires accompanying
parent or adult guardian
No one 17 and under admitted
==To change the password
_ln ®, select "Change password" and press OK
(_lnput the new 4-digit password twice
®
t-
o
c)
@Thistelevision isdesigned to supportthe "Downloadable U.S. Region Rating System" when available. (Available only in U.S.A.)
@The Off rating is independent of other ratings.
@Whenplacinga blockon a specific-age-based-ratinglevel,the Offratingandanyother morerestrictiveratingswillalsobe blocked.
29

30
Editing and Setting Channels
The current channel settings can be changed according to your needs and reception
conditions.
Select "Setup"
Select "Program channel"
Select the function
• Press to exit from
menu screen
EXiT
@
Set
"To reset the settings of setup menu |
_1_Select "Reset" in Setup menu (_) and press OK 1
i
Input your 4_digit password with number buttons 1
67Select "YES on the confirmation screen and press OK
Auto
Manual
m
Signal
meter

Automatically searches and adds active channels to memory.
(_0Select "ANT in" ÷Select Cable orAntenna _3_Select scanning mode (p. 17)
(p. 17)
(_Select "Auto"
Settings are made automatically
@After completing the setting, select "Apply". (see below @).
@All previously saved channels are erased.
Use this procedure when changing setting of receiving
channels or changing the channel display.
Also, use to add or skip channels from channel list
manually.
_OSelect "Edit"
_Select the item to be edited
Favorite
Caption
r--¢--J
Add
R G
_ Proceed to
next page
Go back to previous page
@Caption:
Changes the station identifier
@Favorite:
Registers channel to Favorite
List
@Add:
Adds or skips channels
_Edit
I Capti°n I I Caption detail I
Select the station identifier Rename(maximum7charactersavailable)
@Favorite
,next
I Set favorite I
Select the number
@Add
PressOKto select"Yes(add)"or "No(skip)"
@Move cursor to a channel number
,select "Apply"
RETURN
(23Press OK to tune
to the channel.
(i_=select "Apply"
,_ ok
To cancel the Edit
Check the signal strength if interference is found or freezing occurs on a digital image.
@If the signal is weak, check the antenna.
If no problem is found, consult your
local dealer.
Signal intensity
Note
@Not available if "Cable" is selected in "ANT in"
(see above).
@Effective only for digital antenna channels.
J
m
O_
tt_
93
O_
03
£Q
©
C3-
93
O0
@If"Lock" (p. 28)is activated and "Auto", "Manual" or "Signal meter" is selected, "Enter password." will be displayed. 3 1

Input Labels/Monitor out/
Display menu
Select "Setup"
Select "External devices" or "CC"
• Press to exit from
menu screen
EXiT
@
_ (External devices)
Select "Input Labels" or "Monitor out"
Set
32
Input labels
CC

Closed Caption
Devices connected to external input terminals can be labeled for easier identification during input selection.
(In selecting input mode from p. 20 ¢_.;})
• Select the terminal and label of the external equipment
@Terminals: Comp./HDMI 1-2/ -Label Terminal
Video1-3
@Label: SKIP*/VCR/DVD/CABLE/ ......
DBSIPVRIGAMEIAUXI[BLANK]
* If"SKIP" is selected, the TV/VlDEO
button press will skip its input.
[example]
To prevent howling and image oscillation, stops output of the pictures and audio specified in this menu. (p. 24)
==Select the terminal and set "Off"
@Select "Off' to stop output of picture and audio.
(Video l/Video 2/Video 3)
@Comp./HDMI I/HDMI 2 cannot output video signals
regardless of "Monitor out" setting.
When equipment (STB, DVD, etc.) is connected to HDMt
or COMPONENT terminals, only audio signals can be
obtained. From the output terminals, no video signals can be
passed.
The television includes a built-in decoder that is capable of providing a text display of the audio. The program being
viewed must be transmitting Closed Caption (CC) information. (p. 43)
• Select the item and set
@The settings in "Analog" or "Digital"
depend on the broadcaster.
] Select "On" (when not using, select "Off").
Mode
Analog (Choose the Closed Caption service of Analog
broadcast ng.)
CCl-4: Information related to pictures
(Appears at bottom of screen)
T1-4: Textual information
(Appears over entire screen)
Digital (The Digital Closed Caption menu lets you
' configure the way you choose to view the digital
captioning.)
Select the setting.
@"Primary", "Second.", "Service 3", "Service 4", "Service 5",
"Service 6"
• To make more in-depth display settings in digital programs
Select "Digital setting" and press OK
@ Select the item and set
select
set
@Size: Text size
@Font: Text font
@Style: Text style (Raised, Depressed, etc.)
@Foreground: Color of text
@Fore opacity: Opacity of text
@Background: Color of text box
@Back opacity: Opacity of text box
@Outline: Outline color of text
(Identify the setting options on the screen.)
• To reset the settings
Select "CC reset" and press OK
@
t-
93
O-
CO
o
i,
O
o
t-
C)
o
t..D
0)
o..
©
93
"o
o
33

Using Timer
The TV can automatically turn On/Off at the designated date and time.
@The Clock must be set before On time/Off time settings. (p. 16)
@The "Sleep" timer and "On / Off timer" will not function if "Auto power on" (p. 25) is set.
Display menu
Select "Timer"
O Timer
Select the timer to set
34
• Press to exit from
menu screen
EXIT
@
• Press to return
to the previous
screen
RETURN
@
Note
@The TV automatically
turns Off after 90
minutes when turned
On by the Timer.
This operation will be
cancelled if the Off
time is selected or if a
key is pressed.
Set the timer
I
I
Sleep ITurns Off automatically
Timer 1 ITurns On/Off automatically
(5 timers can be set.)
Timer 5 I
• To set "Sleep" (Off Timer)
Set to shut the unit offafter a pre-selected amount of time.
@0/30/60/90 (minutes)
• To set "Timer 1-5" (On/Off Timer)
Select the item and set
select
set
I Channel ISelect the channel
I Day ISelect the day
IiV N/MON/TUE/WED/THU/FRt/SAT
isplays the nearest future date)
ON-FRI/SAT-SUN/DAILY/EVR SUN/EVR MON/
R TUE/EVR WED/EVR THU/EVR FRI/EVR SAT
I On time IThe time to turn On
I Off time IThe time to turn Off
I Set ITimer setting (On/Off)

Operating PeripheralEquipment
You can operate other manufacturers' equipment using this TV's remote control.
Connect the external equipment to the TV and
Power Off the external equipment
POWER
VCR
6
DVD
DBS/CBL
Press both buttons simultaneously for
more than 3 seconds.
@Release the buttons when the equipment selection
buttons start flashing.
Select the equipment
with the equipment selection button
@The selected button remains lit (other buttons are not lit).
U_B
DBQ
HDB
Input the equipment's 4-digit remote
control code (p.39-41)
POWER
Operate the equipment with the remote
control (p.38)
@The external equipment turns On.
• Press to return to the TV
mode
TV
• If the equipment does not operate with the
remote control
@When your equipment has a single code
® Input the remote control code again
@When your equipment has multiple codes
÷ Change the code with 0 above and test again
@Registration will fail if the wrong code is input or it takes more than 30 seconds to register.
@
O
"O
(D
i.
"13
(D
i.
"O
:::3"
@_
_.t-o
This procedure searches all codes and is called the "sequence method."
_i_After step @ above, change the code and
test
POWER
Operate the equipment with the remote
control (p. 38)
@Repeat until the code is found
@It may take many attempts before the correct
code is found
_2_When the correct code is found
store
35

Recommended AV Connections
These diagrams show our recommendations for how to connect the TV unit to your various equipment.
For other connections, consult the instructions of each piece of equipment and the specifications (p. 48).
For additional assistance, please visit our website at: www.panasonic.com
www.panasonic.ca
Back of the TV
AC120-127V i. i
60Hz Cable TV
Power Cord or
(Connectafteralltheother _ ir_CableBox
connections are complete.) !
• To watch
camcorder
images
Camcorder
VCR
DVD Player
Headphones/
Earphones
(notsupptied)
Connect with
®or®
r q
or
_ IIUIUIUIUIUIUIUl_
or
or
• DVD Recorder /
VCR
-- (_) HDMI cable
_) HDMI-DVl
Conversion cable
+ Audio cable
Amplifier OPTICAL IN
Optical digital audio cable
Note
@The picture and audio input signals connected to a
terminal specified in "Monitor out" (p. 32) cannot be
output from "OUTPUT" terminals.
However, audio output can be obtained from "DIGITAL
AUDIO OUT" terminal.
@To prevent howling and image oscillation, set the
"Monitor out" setting when connecting the VCR with
loop-connection. (p. 24, 32)
• To watch DVDs
DVD Player/Set Top Box
@When equipment (STB, DVD, etc.) is connected to
HDMI or COMPONENT terminals, only audio signals
can be obtained. From the output terminals, no video
signals can be passed.
@When receiving digital channel signals, all digital
formats are down-converted to composite NTSC
video to be output through the OUTPUT terminals.
36

Follow the connection diagrams below for HDAVI control of
a single AV piece of equipment such as a Panasonic DIGA-
DVD recorder, RAM theater, or Player theater system.
Refer to page 26-27 for Setup Menu settings and additional
control information.
_ Optional HDMI and/or optical cables are not provided.
I If connection (or setting) of equipment compatible with HDAVI
control is changed, switch the power of this unit Off then On
again while the power of all equipment is On (so that the
unit can correctly recognize the connected equipment) and
check that DIGA, RAM theater, and Player theater playback
operate.
f
\ Note
@HDMI 1is recommended.
When connecting to HDMI 2, set the input mode to HDMI 2 (p. 20) initially before connecting to HDMI 2. After
connection, confirm the HDMI control functions (p. 26-27).
==Connecting this unit to a DVD
recorder and AV amp
When using an "EZ Sync" audio-video
amplifier and a compatible DIGA recorder,
use a daisy chain connection as shown
below.
• Connecting this unit to the DIGA, RAM theater, or Player
theater
@For DIGA: Connect with HDMI cable
@For RAM theater and Player theater:
Connect with the HDMI and audio cables.
If audio cable is not connected, you cannot listen to the TV
program through the theater system.
or
Digital Audio out
HDMI
(AVOUT)
or
HDMI
(AVOUT)
Panasonic AV amp DIGA Panasonic RAM theater / DIGA Panasonic
(Panasonic DVD Panasonic Player theater (Panasonic DVD HD Camcorder
Recorder) Recorder)
;;U
(1)
C)
O
d)
Q.
Q.
<>
©
0
:::3
0
0
@One AV amp and one DtGA recorder can be operated with this unit.
@Be sure to connect the AV amp between this unit and the DIGA recorder.
• Setting of this unit after connection
After making connections as shown above, set "EZ Sync" (under "EZ Sync setting") to "On" using the Setup menu.
(p. 26-27).
J Note
\
@Individual HDMI equipment may require additional menu settings specific to each model. Please refer to their
respective operating instruction manuals.
@When audio from other equipment connected to this unit via HDMI is output using "DIGITAL AUDIO OUT" of this
unit, the system switches to 2CH audio.
(When connecting to an AV amp via HDMI, you can enjoy higher sound quality.)
37

RemoteControlOperation/CodeList
The following explains how to operate external devices with the remote control.
@Register the remote control codes (p. 35) ifyou want to operate an external device of another manufacturer. (p. 39-41 )
@Operation may not be possible depending on the available memory size of the remote control.
This remote control is not designed to cover operation of all functions of all models.
• Remote Control Operation List
This chart defines which keys are operational after programming (if needed) while in the selected remote control
mode, CABLE, DBS, VCR, or DVD.
38
POWER
Power
W
VIDEO
Exn"
Power Power Power
LIST LIST DVD AUDIO
TV Input Switch TV Input Switch TV Input Switch TV Input Switch
-- Menu Menu Functions
-- Exit Exit --
Up/Down/Left/Right Up/Down/Right/Left Up/Down/Right/Left
Select Select Enter
, -- Guide Guide Sub Menu
RE'I_JRt4
, -- PPV/VOD PPV/VOD Return
R
-- Red A Red
G
. -- Green B Green
B
Blue C Blue
Y
. -- Yellow D Yellow
Channe,Up/Down ChanneIUp/Down Channe,Op_Down Channe,_p/Down
TVVe,umeOp_DownTVVo,umeOp_DewnTVVo,u_eUp/DownTVVo,u_eOp_Down
. -- Aspect Aspect --
FAV_
, -- Favorite Favorite Direct Navigator
R_
Onscreen Display Info Info/Disptay/OSD Onscreen Display
TV Mute TV Mute TV Mute TV Mute
- _ 0-9 0-9 0-9 0-9
• -- Last Channel Last Channei Drive Select
. -- Sub Channel Music PROG (Sub Channel)
mSKIPm
_ -- Page Down/Up Page Down/Up Skip ReverselForward
TVNCR
TV/VCR Switch TV/DBS Switch TV/CBL Switch --
i
_8_H_
_ Rewind/Fast Forward Rewind/Fast Forward Rewind/Fast Forward Reverse/Forward
REC
VCR Record PVR Record *_ PVR Record *_ Record
_OP
_ Stop Stop Stop Stop
PAUSE
Pause Pause Pause Pause
P_Y
_ Play Play Play Play
"1: Combination type

• Remote Control Code List
[.'_'I .'It?l[,,_.],L.z_. _I-4 | :'_'_'i
A-Mark 0008, 0144
Accuphase 0003
Action 0237
Americast 0899
BCC 0276
British Telecom
Clearmaster
Gibratter
GoldStar
Hitachi
Jerrold
Mitsubishi
0003
0883 Multitech
RCA
0883 Scientific Atlanta
OOOB:,:
0317,1305
0012
0000
1256
0000
0000,0003,0008,
0012,0237,0477,
Tom 3003
Tristar 3883
Un_
US Eiect_nics 3003, 0008, 0276
Videoway 3000
Vision 3883
Zenith 3000,0525,0899
Cool Box
Director
GE
Americast
Jerrold
0476 Pace
0144
0883 Novaplex 0008 0877, 1877
0008, 0237, 0877, Sprucer 0144
1877 ::_03)
0000,000&0525 Thomson
0869General
1109 InstrumentCrossdic Next Level
Hitachi 0749, 0819, 1250 Panasonic
HTS 0775, 1775 PhiIips
Dish Network 0775, 100& 1505, Innova 0099
System 1775
JVC 0775, 1775 Primestar
Echostar 0775, 1005, 1505, 0722, 0724 RadioShack
0276
1256
1006
1256
Samsung
0869
0247,0701,1786 Sony
_i24if_ii_,i!i_:!ig!iii[i!!i!!}[i!!i!!}[i!!i!!}[i!!i!!}[i!!i!!}[i!!__iSta;_Choicei!_!!!iii!!iiiiiiiiiiiiiiiiii!
0099, 0722, 0724, StarTrak
0749, 0775, 0819, _ SO : }}}}
1076, 1142, 1442, Tivo
1749
0869
0566,0775,0869
UltimateTV
Voom
1108,1109,1142,
1276,1377,1442,
1609
3639, 1639, 1640
86:
3869
1442
1392,1640
3869
Funai
DirecTV
A-Mark
Admiral
Aiko
Alba
AI_
American Hi(
1775
_!_75ii[!ii_i!_iii!_!}[i!!i!}[i!!i!}[i!!i!}[i!!i!Memorex
1377
0099,0392,0639,
1076,1142,1377,
0039,0047,0048,
0060,0209,0479 Beaumark
O278
O0®;fiO Broksonic
0209, 0278
0039 Candle
0081
086_: '
0724
024O
0002,0121,0209,
0479,1479
0038
0002
0392
1442
Star Choice 3869
Daewoo
Dell
DirecTV
Durabrand
3240
3037,0045,0278,
1278
1972
3739
3038,0039
®
;u
B
O
d)
©
O
O
O
d)
i,
O
©
O
cb
d)
Co
39

RemoteControlOperation/CodeList(Continued)
Electrohome
Emerald
• Remote Control Code List
LvL_ :i| _ I
0000_0037, 0043_ Magnin
0060, 0209, 0240 _rantZ ::
_:_ }}}}}}} Marta
Emerson 0000,0002,0037,
0043, 0121, 0184, MEI
0209, 0240, 0278,
0479,1278,1479
0033,0035
Funai 0000_0037,0278
1972
Gemini 0060
Go Video
O240
0037 RadioShack
D000,0035,0037,
D047,0048,0162,
Thomson
Tiso I _
Tivo
0060
0618_0636, 0739_
1996
Goodmans
Granada
Hewlett Packard
Hitachi
0035_0162, 0081
[972 _ '
0035 Randex
D240
D037
TNIX 0037
Toshiba 0000, 0043, 0045,
0209_0240, 0845,
100& 114& 1972,
1996
Metz 0037 3000, 0035, 0037,
3047, 0048, 0121, Totevision 0037, 0240
0240 D162_0240, 0278
Trix 0037
Midland 0240 Ricavision 1972
Unitech 0240
Minolta 0042
MTX
O000,0037, 0081_ i!!Mut_i
0278 NAD
0042, 0081 Nikko
0000 Nishi
1972 Noblex
0O :U_35_}047: }:
0000,0035,0037,
0042,0045,0089
Realistic
HP 1972
003&0048
0000
0240
Sanyo
D000,0038,0045,
3060, 0240, 0432,
3739,1014
0048
Vector Research 0038, 0184
_]Ct }}}}}}
0045
Humax 0739
_usil¢{} } } } } } } i972, , Panasonic
000O,0047
ITT Nokia 0240
Jensen 0067
KEC 0037, 0278
Kodak
LG
LXt
Magnasonic
Pentax
0035_0037
Philips
0037, 0038, 0240
0000, 0038, 0240
/iot}
000O,0240 Pioneer
_ 8: }}}}}}}}}}}}}}}}}}}}}}
0000, 0037, 0042,
0067 Portland
0000, 0037, 0240, Proscan
0278, 1278
0240 Sears
0240
0035, 0162
0000,0002,0121,
0184,0209,0240,
027&0479,1479
0000,0035,0t62,
022&0614,0616,
103&1062,1244
0042
Shintom
Siemens
Videosonic
Singer
oni :BI
Sony
_dmadte_ }}
Stack 9
SV2000
0000_0035,0048,
0045,0081,0162,
0209, 0616, 0618, ii,¢mi_i_i!_!iiii!i_!!!iiii!!iiiiiiiiiiiiiiiiii!I
0739
Systemax
_;_iiil_!)}ii!!i!!}ii!!i!!}ii!!i!!}ii!!i!!}ii!!i!!}ii!!i!!}ii!!i!!}ii!i:Ta_i_Vst_mSil,ii_i(ii!i_
0042, 0067, 0081, Tand
0162
0278 Teac
0060_ 1060
Teknika
Pulsar 0039_0240, 0278
Tevion
Quartz 0035_0047
Villain
3000, 0047, 0240_
D479 Wards
D000,0033,0035,
D037,0039,0042,
D043,0045,0047,
D048,0060,0067,
3162,0209,1237
D037
D037_0240
D000,0032,0033,
D035,0047,0067,
3636,1232,1972
1972
D000
Sylvania 3000, 0035, 0043,
3081, 1781
1972
t97_
DOOO
DO00,0067
D000_0035, 0037
D479
World
000O,0240
0000
000O,0060, 0033_
Yamaha
0240
ZT Group
0035,0037,0038,
0042,0043,0045,
0047,0048,0081,
0240_0479
0002_0209,0479
0038
1972
40

Hughes Network
Systems
ABS
DirecTV
Hewlett Packard
HP
3D LAB
Akai
Aico
Apex Digital
Audiovox
_iu a_ad_ }}
Blue Sky
Broksonic
Celestial
CineVision
Creative
Daewoo
Digitrex
Dual
Emerson
Entivo
Firstline
0739
0739
1972
Mind
GE 0522,0815
069& 0899
0790 GoidStar 0741_0869
0533, 0672, 1020_ Gradiente 0490_0651
105& 1061 _53_
Harman/Kardon 0582 Patsonic
0790
Hiteker 0672
0695
Inteqra 0571,0627
0695
JVC 0558, 0623, 0867_
1164
1020
Kenwood 0490_0534
0869 i00
Kloss 0533
0503, 0539
1972
1008,1972,1996
1972
1972
0695
0752
053&0839
0573,0869
0675,1268
0651
0522
Lasonic
0784, 0869, 1172 LG
0672 Loewe
:M
0675 Magnavox
0591_0675, 1268
Mclntosh
]503, 0539
168 Uemorex
0651
O627
i:5_ii[i:_i!_'i!i_:!ig!iii{i!!i!!}{i!!i!!}{i!!i!!}{i!!i!!}{i!!i!!}{i!!i_iiRadionette
0591_0741,0869
0741
!iD6_!_!i_,o_i!iiii,i!ii!!}[_!!i!!}[_!!i!!}[_!!_
0503_0539,0646_
0675,1268
1533
36!_iiiiili_i!_'i!i_:(ii!ii;[i!!i!}}[i!!i!}}[i!!i!}}[i!!i!}}[i!!i!}}[i!!i_iiSampo
0695
ilMJ!c_o_oft!:iiiiii_i_}i_i!ii:i_:!ii:i_:!ii:i_:!ii:i_:!ii:i_:!i_iii!ii!i!_!_i_iiii:i_:!ii:i_:!ii:i_:!ii:i_:!ii:i_:!ii:i_:!ii:i_:!ii:i_:!ii:i_:!ii
ZT Group
Stack 9 1972
Mitsubishi 1521,0521
NA_:} _:_74ii : }} Sansui
NEC 0785_0869
0571
0672 Shinsonic
Philips 0503, 0539, 0646, Sylvania
0675, 1267, 1354
Polaroid 1020, 1061
Tevion
Presidian 0675
Thomson
Proscan 0522
0741 Universum
RCA 0522, 0571,0790, US Loqic
0822,1022,1132 :vent rer_:}}}}}}
Xbox
Reoc 0752
Zenith
Rotel 0623
0752
0591
0839
0522
0503,0591,0741_
0869
O675
Funai
JVC
1164 PhiIips 0646
0675
®
;u
B
O
©
O
O
O
i.
O
©
O
Q.
d)
Co
41

Ratings List for Lock
"V-chip" technology enables you to lock channels or shows according to standard ratings set by the
entertainment industry. (p. 29)
• U.S. MOVIE RATINGS (MPAA)
NR
G
PG
PG-13
R
NC-17
X
NO RATING (NOT RATED)AND NA (NOT APPLICABLE) PROGRAMS. Movie has not been rated or
rating does not apply.
GENERALAUDIENCES. All ages admitted.
PARENTAL GUIDANCE SUGGESTED. Some material may not be suitable for children.
PARENTS STRONGLY CAUTIONED. Some material may be inappropriate for children under 13.
RESTRICTED. Under !7 requires accompanying parent or adult guardian.
NO ONE 17 AND UNDER ADMITTED.
ADULTS ONLY.
• U.S. TV PROGRAMS RATINGS (U. S. TV)
Not Rated.
All children. The themes and elements in this program are specifically
designed for a very young audience, including children from ages 2-6.
Directed to older children. Themes and elements in this program may
include mild physical or comedic violence, or may frighten children under
the age of 7.
General audience. It contains little or no violence, no strong language,
TV-G and little or no sexual dialogue or situations.
Parental guidance suggested. The program may contain infrequent
TV-PG coarse language, limited violence, some suggestive sexual dialogue and
situations.
Parents strongly cautioned. This program may contain sophisticated
TV-14 themes, sexual content, strong language and more intense violence.
TV-NR
(Not Rated)
TV-Y
Youth
TV-Y7
Guidance
TV-MA
@Viewable
@Blocked
@Viewable
@Blocked
@FV Blocked
@Viewable
@Blocked
@Viewable
@Blocked
@D,L,S,V (all selected)
@Any combination of D,
L,S,V
@D,L,S,V (all selected)
@Any combination of D,
L,S,V
@L,S,V (all selected)
@Any combination of L,
S,V
Mature audiences only. This program may contain mature themes,
profane language, graphic violence, and explicit sexual content.
FV: Fantasy/Cartoon Violence. V: Violence S: Sex L: Offensive Language D: Dialogue with sexual content.
• CANADIAN
E
C
C8+
G
PG
18+
ENGLISH RATINGS (C. E. L. R.)
Exempt - Exempt programming includes: news, sports, documentaries and other information programming,
talk shows, music videos, and variety programming.
Programming intended for children under age 8. No offensive language, nudity or sexual content.
Programming generally considered acceptable for children 8 years and over. No profanity, nudity or sexual content.
General programming, suitable for all audiences.
Parental Guidance suggested. Some material may not be suitable for children.
Programming contains themes or content which may not be suitable for viewers under the age of 14. Parents are
strongly cautioned to exercise discretion in permitting viewing by pre-teens and early teens.
18+ years old. Programming restricted to adults. Contains constant violence or scenes of extreme violence.
• CANADIAN FRENCH RATINGS (C. F. L. R.)
E Exempt - Exempt programming.
G General- Programming intended for audience of all ages. Contains no violence, or the violence content is minimal
or is depicted appropriately.
8 ans÷ 8+ General - Not recommended for young children. Programming intended for a broad audience but contains light
or occasional violence. Aduit supervision recommended.
13 ans÷ Programming may not be suitable for children under the age of !3 - Contains either a few violent scenes or one or
more sufficiently violent scenes to affect them. Adult supervision strongly suggested.
16 ans+ Programming may not be suitable for children under the age of !6 - Contains frequent scenes of violence or intense
violence.
18 ans+ Programming restricted to adults. Contains constant violence or scenes of extreme violence.
42
Caution
@The V-Chip system that is used in this set is capable of blocking "NR" programs (non rated, not applicable and
none) as per FCC Rules Section15.120(e)(2). If the option of blocking "NR" programs is chosen "unexpected and
possibly confusing results may occur, and you may not receive emergency bulletins or any of the following types of
programming:"
• Emergency Bulletins (Such as EAS messages, weather warnings and others)
• Locally originated programming • News • Political • Public Service Announcements • Religious • Sports • Weather

Technical Information
@For viewing Closed Caption of digital broadcasting, set the aspect ratio to FULL.
(If viewing with H-FILL, JUST, ZOOM or 4:3, characters will be cut off.)
@The Closed Caption is not displayed when you use HDMI connection.
@If analog connected equipment is used for displaying or recording, Closed Caption (CC) should be set On/Off on
the connected equipment.
The CC mode setting of the TV will not affect the analog input.
If a digital program is being output in analog format, the CC data will also be output in analog format.
If digital connected equipment is used for input, CC should be set On on either the connected equipment or the TV.
If CC is set On on both the connected equipment and the TV, captions from each unit will overlap.
Lets you choose the aspect depending on the format of the received signal and your preference. (p. 19)
(e.g.: in case of 4:3 image)
@FULL
1_4 ---ii_l
i_ 16--iii-_ I
Enlarges the 4:3 image horizontally to the screen's side edges.
(Recommended for anamorphic picture)
@JUST
I 4_1 I_16_1
Stretches to justify the 4:3 image to the four corners of the
screen.
(Recommended for normal TV broadcast)
@H-FILL
I_ 4 _1 1_16--------_1
Enlarges the 4:3 image horizontally to the screen's side edges.
The side edges of the image are cut off.
Standard
bar
@ZOOM
1_.........--4_1 I_16_1
Enlarges the 4:3 image to the entire screen.
(Recommended for Letter Box)
Note
@480i (4:3), 480i (16:9), 480p (4:3), 480p (16:9):
FULL, JUST, 4:3 or ZOOM
@1080p / 1080i/720p:
FULL, H-FILL, JUST, 4:3 or ZOOM
@When the signal is 720p/1080i/1080p, the aspect mode
automatically defaults to Full after turning off the TV,
after changing input mode, or after changed signal
resolution other than 720p/1080i/1080p.
@Zoom adjust
Vertical image position and size can be adjusted in "ZOOM".
_Select "Zoom adjust"on the "Picture"menu. (p. 22-23)
@V-position: Vertical position adjustment _3_V-size: Vertical size adjustment
®@
O
r---_
r---n_
©,-*
05"
@To reset the aspect ,_,,., _ (OK)
43

Technical Information (Continued)
You can enjoy your home theater by connecting a Dolby Digital (5.1 channel) decoder and "Multi Channel" amplifier
to the DIGITAL AUDIO OUT terminals.
Caution -)
@Depending on your DVD player and DVD-Audio software the copyright protection function may operate and disable
optical output.
@External speakers cannot be connected directly to OUTPUT terminals.
@When an ATSC channel is selected, the output from the DIGITAL AUDIO OUT jack will be Dolby Digital. When an
NTSC channel is selected, the output will be PCM
HDMI connections to some Panasonic equipment allow you to interface automatically. (p. 26)
@This function may not work normally depending on the equipment condition.
@The equipment can be operated by other remote controls with this function on even if TV is in Standby mode.
@Image or sound may not be available for the first few seconds when the playback starts.
@Image or sound may not be available for the first few seconds when Input mode is switched.
@Volume function will be displayed when adjusting the volume of the equipment.
@If you connect the same kind of equipment at once (for example: one DIGA to HDMI 1 / another DIGA to HDMI 2),
EZ Sync TM is available for the terminal with the smaller number.
@If you connect the equipment that has "HDAVl Control 2" function to the TV with HDMI cable, the sound from
DIGITAL AUDIO OUT terminal can be output as multi channel surround.
; II]_VAIi.,[o] il i[_@ | [o]i
HDMI (high-definition multimedia interface) allows you to enjoy high-definition digital images and high-quality sound by connecting
the TV unit and the devices.
HDMI-compatible equipment ('1) with an HDMI or DVl output terminal, such as a set-top box or a DVD player, can be connected
to the HDMI connector using an HDMI compliant (fully wired) cable.
@ HDMI is the world's first complete digital consumer AV interface complying with a non-compression standard.
@ If the external equipment has only a DVl output, connect to the HDMI terminal via a DVl to HDMI adapter cable (*2).
@When the DVl to HDMI adapter cable is used, connect the audio cable to the audio input terminal.
@Audio settings can be made on the "HDMI 1 in" or "HDMI 2 in" menu screen. (p. 22)
Applicable audio signal sampling frequencies (L.PCM): 48 kHz, 44.1 kHz, 32 kHz
('1): The HDMt logo is displayedon an HDMFcompliant device
-_ (*2): Enquire at your local digital equipment retailer shop
Caution
J
@ Use with a PC is not assumed.
@All signals are reformatted before being displayed on the screen.
@ If the connected device has an aspect adjustment function, set the aspect ratio to "16:9".
@This HDMI connector is "type A".
@These HDMI connectors are compatible with HDCP (High-Bandwidth Digital Content Protection) copyright protection.
@A device having no digital output terminal may be connected to the input terminal of either "COMPONENT", "S VIDEO", or
"VIDEO" to receive analog signals.
@The HDMI input terminal can be used with only the following image signals: 480i, 480p, 720p, 1080i and 1080p.
Match the output setting of the digital device.
@ For details of the applicable HDMI signals, see next page.
44

* Mark: Applicable input signal for Component (Y, PB, PR) and HDMI
59.94 * *
45.00 59.94 * *
Z_Q (720) Z§QP .....
) ,1123_!_080)/60p 67.43 59.94 *
1,125 (1,080)160p i ................... 67.50 _ ................... 60.00 _ *
Note
@Signals other than those shown above may not be displayed properly.
@The above signals are reformatted for optimal viewing on your display.
@Vivid (default): Provides enhanced picture contrast and sharpness for viewing in a well-lit room.
@Standard:
@Cinema:
@Custom:
Recommended for normal viewing conditions with subdued room lighting.
For watching movies in a darkened room. It provides a soft, film-like picture.
Customizes each item according to your taste.
Maintenance
First, unplug the Power cord plug from the wall outlet.
The front of the display panel has been specially treated. Wipe the panel surface gently using only a cleaning cloth or
a soft, lint-free cloth.
@If the surface is particularly dirty, soak a soft, lint-free cloth in a weak detergent solution and then wring the cloth to
remove excess liquid. Use this cloth to wipe the surface of the display panel, then wipe it evenly with a dry cloth of
the same type until the surface is dry.
@Do not scratch or hit the surface of the panel with fingernails or other hard objects. Furthermore, avoid contact
with volatile substances such as insect sprays, solvents, and thinner; otherwise, the quality of the surface may be
adversely affected.
C)
c3-
If the cabinet becomes dirty, wipe it with a soft, dry cloth.
@If the cabinet is particularly dirty, soak the cloth in a weak detergent solution and then wring the cloth dry. _" @
Use this cloth to wipe the cabinet and then wipe it dry with a dry cloth. --
@Do not allow any detergent to come into direct contact with the surface of the LCD TV. _- _.
If water droplets get inside the unit, operating problems may result. _'
@Avoid contact with volatile substances such as insect sprays, solvents, and thinner; otherwise, the quality of the __
cabinet surface may be adversely affected or the coating may peel off. Furthermore, do not leave it for long periods _
--"_'t::3
in contact with articles made from rubber or PVC. O o
@Cleaning
Wipe the surfaces with a soft, dry cloth. If the unit is particularly dirty, clean it using a cloth soaked with water to
which a small amount of neutral detergent has been added and then wipe with a dry cloth.
Do not use products such as solvents, thinner, or household wax for cleaning, as they can damage the surface
coating. (If using a chemically-treated cloth, follow the instructions supplied with the cloth.)
@Do not attach sticky tape or labels, as they can make the surface of the pedestal dirty. Do not allow long-term
contact with rubber, vinyl products, or the like. (Doing so will cause deterioration.)
Wipe the plug with a dry cloth at regular intervals. (Moisture and dust can lead to fire or electrical shock.)
45

FAQ
46
Before requesting service or assistance, please follow these simple guides to resolve the problem.
If problemstill persists, please contact your local Panasonic dealer or Panasonic Service Center for assistance.
For details (p. 50-51)
For additional assistance, please contact us via the website at:
www.panasonic.com/conta ctinfo
www.panasonic.ca
JWhite spots or
,'shadow images
'(noise)
, @Check the position, direction,
, and connection of the aerial.
, Interference or
0'frozen digital
°channels
(intermittent sound)
w
I
I
@Change the direction of antenna
for digital channels.
@Check "Signal meter" (p. 31).
If the signal is weak, check the
antenna and consult your local
dealer.
The LCD panel
moves slightly when
it is pushed with a
finger
A clattered sound
might be heard
This is not a malfunction.
@There is some looseness around
the panel to prevent the damage to
the panel.
j_
Pictures from external
0equipment are distorted 0
° when the unit is °
° connected via HDMI °
@Is the HDMI cable connected properly?
(p. 36-37)
@Turn Off the TV unit and equipment, then
turn them On again.
@Check an input signal from the equipment.
(p. 45)
@Use equipment compliant with
EIA/CEA-861/861B.
° The remote control does
0not work °
_ @Are the batteries installed correctly? (p. 6) _
@Has the battery run down?
I_ @To operate external equipment of other
manufacturers, register the
I_ remote control codes. (p. 35)
g

If there is a problem with your TV, please refer to the table below to determine the symptoms, then carry out the
suggested check. If this does not solve the problem, please contact your local Panasonic dealer, quoting the model
number and serial number (both found on the rear of the TV).
Chaotic image, noisy
No image can be
displayed
Only spots are displayed
Neither image nor
sound is produced
No sound is produced
Sound is unusual
The main unit is hot.
@Check nearby electrical products
(car, motorcycle, fluorescent lamp).
@Check the channel settings. (p. 30)
@Check the antenna cables.
@Is the power cord plugged into the outlet?
@Is the TV unit turned On?
@Check Picture menu (p. 22) and volume.
@Are the remote control codes correct? (p. 39-41 )
D,
@Are the speakers' cables connected correctly?
@Is "Sound Mute" active? (p. 15)
@Is the volume set to the minimum?
@Is "Speaker output" set to "Off"? (p. 22)
@Change "SAP" settings. (p. 18)
@Check "HDMI 1 in" or "HDMI 2 in" settings.
(p. 22)
setting to "Stereo" or "Mono."
p,
@The main unit radiates heat and some of the parts may
become hot. This is not a problem for performance or
quality.
Set up in a location with good ventilation.
Do not cover the ventilation holes of the TV with
a tablecloth, etc., and do not place on top of other
equipment.
73
c_
C
>
D
C
o
47

Specifications
AC120 -127 V, 60Hz
Average use 116W
Maximum Current 2.1 A
Standby condition i 0.1 W
Aspect Ratio ' 16:9
132 W
2.3A
0.1W
V s b e screen s ze , 26.0 " DIAGONAL (66.1 cm DIAGONAL) 31.5 " DIAGONAL (80.0 cm DIAGONAL)
{
(W x H x Diagonal) 22.7 " x 12.8 " x 26.0 " 27.5 " x 15.4 " x 31.5 "
(576 mm x 324 mm x 661 mm) (698 mm x 392 mm x 800 mm)
(No. of pixe!s) 1,049,088 (1,366 (W) x 768(H)) [4,098 x 768 dots]
J
Speaker 1 way 2 speakers
Audio Output 20 W (10 W x 2) ( 10 % THD )
Headphones M3 (3.5 mm) Jack x 1
VHF/UHF: 2-69, CATV: 1-135
Temperature: 32 °F - 95 °F (0 °C - 35°C)
Humidity: 20 % - 80 % RH (non-condensing)
v
INPUT 1,2 S VIDEO: Mini DIN 4-pin Y: 1.0 V[p-p] (75 _) C: 0.286 V[p-p] (75 C2)
AUDIO L - R: RCA PIN Type x 2 0.5 V [rms]
= AUDIO L - R: RCA PIN Type x 2 0.5 V [rms]
COMPONENT Y: 1.0 V [p-p] (including synchronization)
VIDEO INPUT PB, PR: +0.35 V [p-p]
.............. AUDIO L-R: RCA PIN Type x 2 0.5 V [rms]
HDMI 1:2 TYPE A Connector x 2
AUDIO IN @ This TV supports "HDAVl Control 2" function.
AUDIO L - R: RCA PIN Type x 2 0.5 V [rms]
i AUDIOL-R: RCAPINTypex 1 0.5V[rms]
DIGITALAUDIO OUT PCM / Dolby Digital, Fiber Optic
3D YiC Digital Comb Filter, CLOSED CAPTION, V-Chip
HDMI (HDAVl Control 2)
Vesa compatible
_559mmx515mmx239mm) (791 mmx592mmx239mm)
uding TV Stand " x 20.3 "x 9.4 " 31.1 "x 23.3 " x 9.4 "
= 25.9 " x 18.4 " x 4.6 "
TVSeton!y i_ (657mmx468mmx117mm)
31.1"x21.5"x4.6"
(791 mmx 545 mm x 117 mm)
31.1 lb. (14.0 kg) NET 36.7 lb. (16.5 kg) NET
48
Note
[TC-26LX70]
25.9 " (657 ram)
i_ i i n
17.3 " (440 ram)
4.6" (117mm)
9.4 " (239 ram)
[TC-32LX70]
31.1 " (791 mm)
4.6" (117 ram)
9.4 " (239 ram)
@Design and Specifications are subject to change without notice. Weight and Dimensions shown are approximate.

Limited Warranty (for U.S.A.)
PANASONIC CONSUMER ELECTRONICS COMPANY,
DIVISION OF:
PANASONIC CORPORATION OF NORTH AMERICA
One Panasonic Way
Secaucus, New Jersey 07094
PANASONIC SALES COMPANY,
DIVISION OF:
PANASONIC PUERTO RICO, INC.
Ave. 65 de Infanteria, Kin. 9.5
San Gabriel Industrial Park
Carolina, Puerto Rico 00985
Panasonic LCD Televisions
Limited Warranty
Limited Warranty Coverage
If your product does not work properly because of a defect in materials or workmanship, Panasonic Consumer
Electronics Company or Panasonic Puerto Rico, Inc.(collectively referred to as "the warrantor") will, for the length
of the period indicated on the chart below, which starts with the date of original purchase ("warranty period"), at
its option either (a) repair your product with new or refurbished parts, or (b) replace it with a new or a refurbished
product. The decision to repair or replace will be made by the warrantor.
LCD TV CATEGORIES
Up to 20_(diagonal)
21" (diagonal) and larger
PARTS
1 (ONE) YEAR
LABOR
! (ONE) YEAR
SERVICE
Carry-In or Mail-in
In Home or Carry-in / Mail in
During the "Labor" warranty period there will be no charge for labor. During the "Parts" warranty period, there will
be no charge for parts. You must carry-in or mail-in your product during the warranty period, tf non-rechargeable
batteries are included, they are not warranted. This warranty only applies to products purchased and serviced in the
United States or Puerto Rico. This warranty is extended only to the original purchaser of a new product which was
not sold "as is". A purchase receipt or other proof of the original purchase date is required for warranty service.
In-Home or Carry-in Service
For In-Home or Carry-In Service in the United States call 1-800-211-PANA(7262) or visit the Panasonic web Site:
http://www.panasonic.com.
For assistance in Puerto Rico call Panasonic Puerto Rico, Inc.(787)-750-4300 or fax (787)-768-2910.
In-Home service requires clear, complete and easy access to the product by the authorized servicer and does
not include removal or re-installation of an installed product. It is possible that certain in-home repairs will not be
completed in-home, but will require that the product, or parts of the product, be removed for shop diagnosis and/or
repair and then returned.
Limited Warranty Limits And Exclusions
This warranty ONLY COVERS failures due to defects in materials or workmanship, and DOES NOT COVER normal
wear and tear or cosmetic damage, nor does it cover markings or retained images on the LCD panel resulting
from viewing fixed images (including, among other things, letterbox pictures on standard 4:3 screen TV's, or non-
expanded standard 4:3 pictures on wide screen TV's, or onscreen data in a stationary and fixed location). The
warranty ALSO DOES NOT COVER damages which occurred in shipment, or failures which are caused by products
not supplied by the warrantor, or failures which result from accidents, misuse, abuse, neglect, bug infestation,
mishandling, misapplication, alteration, faulty installation, set-up adjustments, misadjustment of consumer
controls, improper maintenance, power line surge, lightning damage, modification, or commercial use (such as
in a hotel, office, restaurant, or other business), rental use of the product, service by anyone other than a Factory
Service Center or other Authorized Servicer, or damage that is attributable to acts of God.
THERE ARE NO EXPRESS WARRANTIES EXCEPT AS LISTED UNDER "LIMITED WARRANTY COVERAGE".
THE WARRANTOR IS NOT LIABLE FOR INCIDENTAL OR CONSEQUENTIAL DAMAGES RESULTING FROM
THE USE OF THIS PRODUCT, OR ARISING OUT OF ANY BREACH OF THIS WARRANTY. (As examples, this
excludes damages for lost time, cost of having someone remove or re-install an installed unit if applicable, or travel to
and from the servicer. The items listed are not exclusive, but are for illustration only.) ALL EXPRESS AND IMPLIED
WARRANTIES, INCLUDING THE WARRANTY OF MERCHANTABILITY, ARE LIMITED TO THE PERIOD OF THE
LIMITED WARRANTY.
Some states do not allow the exclusion or limitation of incidental or consequential damages, or limitations on how
long an implied warranty lasts, so the exclusions may not apply to you.
This warranty gives you specific legal rights and you may also have others rights which vary from state to state.
If a problem with this product develops during or after the warranty period, you may contact your dealer or
Service Center. If the problem is not handled to your satisfaction, then write to the warrantor's Consumer Affairs
Department at the addresses listed for the warrantor.
PARTS AND SERVICE (INCLUDING COST OF AN IN-HOME SERVICE CALL, WHERE APPLICABLE) WHICH
ARE NOT COVERED BY THIS LIMITED WARRANTY ARE YOUR RESPONSIBILITY.
2
i=
(t)
O..
93
oo
o(C
93
=Lo
O
0ov
49

CustomerServicesDirectory(forU.S.A.)
Obtain Product Information and Operating Assistance; locate your nearest Dealer or Service Center;
purchase Parts and Accessories; or make Customer Service and Literature requests by visiting our Web
Site at:
http://www.panasonic.com/consumersu pport
or, contact us via the web at:
http://www.panasonic.com/contactinfo
You may also contact us directly at:
1-800-211-PANA (7262)
Monday-Friday 9 am-9 pm; Saturday-Sunday 10 am-7 pm, EST.
IFor hearing or speech impaired TTY users, TTY: 1-877-833-8855
Purchase Parts, Accessories and Instruction Books on line for all Panasonic Products by visiting our Web
Site at:
http://www.pstc.panasonic.com
or, send your request by E-mail to:
You may also contact us directly at:
1-800-332-5368 (Phone) 1-800-237-9080 (Fax Only) (Monday - Friday 9 am to 8 pm, EST.)
Panasonic Services and Technology Company
20421 84th Avenue South,
Kent, WA 98032
(We Accept Visa, MasterCard, Discover Card, American Express, and Personal Checks)
IFor hearing or speech impaired TTY users, TTY: 1-866-605-1277
Panasonic Puerto Rico, Inc.
Ave. 65 de lnfanteria, Km. 9.5, San Gabriel Industrial Park,
Carolina, Puerto Rico 00985
Phone (787)750-4300, Fax (787)768-2910
5O

Limited Warranty (forCanada)
Panasonic Canada Inc.
PANASONIC PRODUCT - LIMITED WARRANTY
Panasonic Canada Inc. warrants this product to be free from defects in material and workmanship and agrees to
remedy any such defect for a period as stated below from the date of original purchase.
Plasma TV / Monitor In-home service One (1) year, parts (including Plasma Panel) and labour.
LCD TV (26 in & over) In-home service One (1) year, parts (including LCD Panel) and labour.
LCD TV (25 in & under) Carry-in service only One (1) year, parts (including LCD Panel) and labour.
In-home Service will be carried out only to locations accessible by roads and within 50 km of an authorized
Panasonic service facility.
LIMITATIONS AND EXCLUSIONS
This warranty does not apply to products purchased outside Canada or to any product which has been improperly
installed, subjected to usage for which the product was not designed, misused or abused, damaged during shipping,
or which has been altered or repaired in any way that affects the reliability or detracts from the performance, nor
does it cover any product which is used commercially. Dry cell batteries are also excluded from coverage under this
warranty.
This warranty is extended to the original end user purchaser only. A purchase receipt or other proof of date of original
purchase is required before warranty service is performed.
THIS EXPRESS, LIMITED WARRANTY IS IN LIEU OF ALL OTHER WARRANTIES, EXPRESS OR IMPLIED,
INCLUDING ANY IMPLIED WARRANTIES OF MERCHANTABILITY AND FITNESS FOR A PARTICULAR
PURPOSE. IN NO EVENT WILL PANASONIC CANADA INC. BE LIABLE FOR ANY SPECIAL, INDIRECT OR
CONSEQUENTIAL DAMAGES.
In certain instances, some jurisdictions do not allow the exclusion or limitation of incidental or consequential
damages, or the exclusion of implied warranties, so the above limitations and exclusions may not be applicable.
In-home service requires clear, complete and easy access to the product by the Authorized Servicentre and does not
include removal or re-installation of an installed product. If removal is required to service the product, it will be at the
discretion of the Servicentre and in no event will Panasonic Canada Inc. or the Servicentre be liable for any special,
indirect or consequential damages.
WARRANTY SERVICE
For product operation and information assistance, please contact:
Our Customer Care Centre: Telephone #: (905) 624-5505
1-800 #: 1-800-561-5505
Fax #: (905) 236-2360
Email link: "Customer support" on www.panasonic.ca
FOR PRODUCT REPAIRS, please locate your nearest Authorized Servicentre at www.panasonic.ca:
Link: "Servicentres TM Iocator" under "Customer support"
IF YOU SHIP THE PRODUCT TO A SERVlCENTRE
Carefully pack and send prepaid, adequately insured and preferably in the original carton.
Include details of the defect claimed, and proof of date of original purchase.
C)
t-
OO
p..._
o
B
r-
< _._
_o.
---o
o
vv
51

Customer's Record
The model number and serial number of this product can be found on its back cover. You should note this serial
number in the space provided below and retain this book, plus your purchase receipt, as a permanent record of
your purchase to aid in identification in the event of theft or loss, and for Warranty Service purposes.
Model Number Serial Number
Anotacion del cliente
El modelo y el nQmero de serie de este producto se encuentran en su panel posterior. Debera anotarlos en el
espacio provisto a continuaci6n y guardar este manual, mas el recibo de su compra, como prueba permanente de
su adquisici6n, para que le sirva de ayuda al identificarlo en el caso de que le sea sustraido o Io pierda, y tambien
para disponer de los servicios que le ofrece la garantia.
Modelo NQmero de serie
Panasonic Consumer Electronics
Company,
Division of Panasonic Corporation
of North America
One Panasonic Way, Secaucus
New Jersey 07094 U.S.A.
Panasonic Puerto Rico, Inc.
Ave. 65 de lnfanteria, Km. 9.5
San Gabriel Industrial Park
Carolina, Puerto Rico 00985
Panasonic Canada Inc.
5770 Ambler Drive
Mississauga, Ontario
L4W 2T3 CANADA
© 2007 Panasonic Corporation of North America. All Rights Reserved.
© 2007 Panasonic Corporation of North America. Todos los Derechos Reservados. Printed in U.S.A.
Impreso en EE.UU.

Instrucciones en Espa_ol
TV DE LCD DE 26"/32" DIAGONAL
Numero de modelo TC-26LX70
TC-32LX70

iConvierta su propia sala de estar en un cine!
Sienta un nivei increible de excitaci6n multimedia
I--1_:3m|
HDMI, el simbolo HDMI y la Interface de
Multmledlos de Alta Defin_cron
son malcas comelclales O marcas
reglstradas de HDMI Licensing LLC
HDAV! Control TM
HDAVI Control 'r_es una marca de fabnca de
Matsushlta ELectric Industnal Co Ltd
EZ Sync TM
EZ Sync THes una maloa de fabnca de
Matsushlta Electric Industrial Co Ltd
2

Disfrute de multimedia
i
r
irk
]
_' 'l_,J_Videograbadora
Amphficador
dnldad de cEne
para oasa
Grabadora DVD
Reproddctor
DVD
CSmara de video
Receptor dlgttal
mLil:lmedla
Fabncado bajo licencia de Dolby Laboratones
DOLBY y el simbolo de la D doble son marcas
comerclales de Do[by Laboratones
f
Indice
AsegQrese de leer
Precauc[ones para su segundad
Guia de inicio rapido
• Accesorios/Accesorio opcional .., 6
OAntes de conectar ......................... 8
• Conexi6n b_sica ........................... 9
Q Identificacibn de los controles.., 15
• Configuracibn pot primera vez,,, 16
iDisfrute de su televisor!
Caracteristicas b_sicas
Para ver la telev[s[6n
Para ver video y DVDs
18
2O
Funciones avanzadas
C6mo ut[hzar las func[ones de los menQs
0magen, son[do, cahdad, etc ) 22
EZ SyncTM "HDAVI Control T''' 26
Bloqueo 28
Ed[c[6n y configurac[6n de canales 30
Titulos de entradas/Sahda a monitor/
Subtitulos 32
Utlhzacl6n del temponzador 34
Operacl6n del equlpo penfenco 35
Conexlones AV recomendadas 36
Preguntas frecuentes, etc.
Operaclones del mando a dlstancla/
Lista de c6dlgos 38
Lista de claslficaclones para el bloqueo 42
Informacl6n tecnlca 43
Mantenlmlento 46
Especlficaclones 47
Preguntas frecuentes 48
Gula de Servlclos Tecnlcos 50
3

Pre ad
ADVERTENCIA
ADVERTENCIA: Para reducir el riesgo de sufrir una descarga el_ctrica,
no retire ia cubierta ni el panel posterior. En el interior no hay piezas que
deba reparar el usuario. Solicite las reparaciones al personal de servicio
calificado.
,_EI simbolo de descarga electrica
en forma de flecha, dentro de un
triangulo sefiata al usuario que
existen partes dentro del aparato
que presentan un riesgo de
descargas el¢ctricas peligrosas,
las cuales pueden constituir un
riesgo de choques el¢ctricos
hacia ias personas
,_EI signo de exclamaci6n dentro
del triangulo sefiala al usuario
que el manual anexo al aparato
tiene instrucciones importantes,
referentes a su funcionamieBto
y mantenimiento (servicio) de!
mismo
Este recordatorio se ofrece para que el instalador del sistema CATV preste atenci6n al Articulo 820-40 de la NEC,
el cual proporciona directrices para realizar una conexi6n a tierra apropiada y, en particular, especifica que la tierra
del cable debe estar conectada al sistema de tierra del edificio, tan cerca del punto de entrada del cable como sea
practico.
Las ranuras y aberturas en el gabinete en la parte posterior 6 inferior se han colocado para ventilar y asegurar una
operaci6n confiable de la TV LCD y para protegerla de un sobre-calentamiento. Estas aberturas no deberan ser
bloqueadas 6 cubiertas.
Debera existir un espacio de por Io menos 10 cm entre estas aberturas. Las aberturas nunca deberan ser
bloqueadas al porter la TV LCD sobre una cama, sol& alfombra 6 superficie similar.
Esta TV LCD no debera ser colocada en una instalaci6n pre-fabricada tal como un librero a menos que tenga una
ventilaci6n apropiada.
I) Leer las instrucciones.
2) Guardar las instrucciones.
3) Atender todas las advertencias.
4) Seguir todas las instrucciones.
5) No hacer uso de este aparato cerca del agua.
6) Limpiar solo con un paso seco.
7) No bloquear ninguna de las aperturas de ventitaci6n. Instale segQn las instrucciones del fabricante.
8) No instalar cerca de ninguna fuente de calor como radiadores, regutadores de calefacci6n, estufas u otros aparatos (inctuyendo amplifi_
cadores) que generen calor.
9) No desechar el prop6sito de seguridad del enchufe polarizado o de encalladura. Un enchufe polarizado posee dos cuchillas, una mas
ancha que la otra. Un enchufe de encattadura posee dos cuchillas y una tercera punta de encatladura. La cuchitla ancha o la tercera punta
son proporcionadas por su propia seguridad. Si el enchufe proporcionado no cabe en su salida de corriente, consulte a un electrico para
reemplazar ta salida de corriente obsoleta.
I0) Proteger el cable de corriente de ser pisado o peltizcado, especialmente atrededor del enchufe, tos receptaculos y e! punto en el que saten del
aparato.
I1 ) Usar solo accesorios especificados por el fabricante.
I2) Usar el aparato solo con el carro, plataforma, triple, soporte o mesa especificado por el fabricante, o vendido con el
aparato. Cuando un carro sea usado, tenga cuidado al mover dicho carro junto con el aparato para evitar tesiones por
volcaduras.
I3) Desconectar este aparato durante tormentas el{sctricas o cuando no vaya a ser usado por largos periodos de tiempo.
I4) Referir toda necesidad de servicio a personal de servicio calificado. El servicio se requiere cuando el aparato ha sido
da_ado en cualquier manera, como cuando el cable de corriente o el enchufe ha sido dafiado, tiquido ha sido derramado,
objetos han caido dentro del aparato, el aparato ha sido expuesto a
humedad o tluvia, no opera normalmente o ha caido.
I5) Operar sotamente desde el tipo de fuente de energia indicada en la etiqueta.
Si usted no esta seguro del tipo de abastecimiento de energia de su casa,
consultar a su distribuidor {5a la compa_ia de energia local.
I6) Seguir todas las advertencias e instrucciones marcadas en la TV LCD.
I7) Nunca echar objetos de ninguna clase dentro del TV LCD a trav{ss de las
ranuras del gabinete ya que pueden tocar puntos de voltaje peligroso {5
cortar partes que pudieran ocasionar un incendio {5choque el{sctrico. Nunca
derramar liquido de ningOn tipo dentro del TV LCD.
I8) Si una antena exterior es conectada al equipo de la televisi{sn, asegurar
que el sistema de antena sea a tierra para proporcionar protecci{sn contra
subidas de voltaje y cargas de estatica. En los E.U.A. la Secci6n 810 21
de la "National Electrical Code" proporciona informaci6n con respecto a
ta conexi6n a tierra apropiada para el mastil y la estructura de soporte,
el cable principal a ta unidad de descarga de la antena, et tama_o de los
conductores a tierra, ubicaci{sn de ta unidad de descarga de la antena, la
conexi6n a los electrodos a tierra y requisitos para tos electrodos a tierra.
EJEMPLO DE ANTENAA
TERRA DE ACUERDO A
(NEC)
"NATIONAL ELECTRICAL
CODE"
ATIERRA
.... CABLE PRINCIPAL
ATIERRA
UNIDAD DE
DESCARGA
A TIERRA (SECCION
NEC 810-20)
CONDUCTORES A
TIERRA (SECCION NEC
810-21)
ABRAZADERAS A TIERRA
SERVICIO DE ENERGIA DEL SISTEMA DE
ELECTROD©S A TIERRA
(ART. 250 NEC. PARTE H)
4

19) Un sistema de exterior no debera debera ser colocado cerca de las lineas de poder O otros circuitos de energia 6 tuz 6 donde esta paeda
caer en tales Iineas de poder 6 circuitos. Cuando se instale un sistema de antena exterior, extremar cuidados para evitar tocar tales tineas 6
circaitos ya que este contacto pudiese tener consecuencias fatales.
20) Desconectar la TV de LCD del contacto de pared, y referir a personal de servicio catificado en la condiciones siguientes:
a. Cuando el cable de poder 6 contacto este da_ado 6 desgastado.
b. Si se ha derramado Iiquido dentro de la TV de LCD
c. Si ta TV de LCD ha sido expuesta a Iluvia 6 agua.
d. Si ta TV de LCD no opera normatmente, siguiendo las instrucciones de operaci6n.
Ajustar solamente aquellos controles que estan cubiertos per tas instrucciones de operaci6n ya que el ajuste inapropiado de
otros controles puede ocasionar dave y a menudo requerira de mayor trabajo para un tecnico especializado para restaurar la
operaci6n normal del TV de LCD.
e. Si la TV de LCD se ha caido 6 el gabinete se encuentra da_ado.
f. Cuando la TV de LCD exhibe an cambio distinto en sa fancionamiento - esto indica que requiere de servicio.
2I) Cuando partes de repuesto sean requeridas, asegurarse que el tecnico de servicio utitice partes especificadas por el fabricante que tengan
las mismas caracteristicas de las partes originates. Sustitutos no autorizados paeden ocasionar un incendio, choque electrico L_otros riesgos.
22) ADVERTENCIA: PARA REDUCIR EL RIESGO DE INCENDIO O DESCARGA EL_:CTRICA, NO EXPONGA F:STF: APARATO A LA
LLUVIA, HUMEDAD, GOTEO O SALPICADURA.
NO COLOCAR ENVASES CON LIQUIDO (FLOREROS, COPAS, COSM_:TICOS, ETC.) SOBRE EL TELEVISOR.
(INCLUYENDO ANAQUELES COLOCADOS ARRIBA DE ESTE, ETC.}
23) ADVERTENCIA: RETIRAR PIEZAS PEEQUE_IAS INNECESARIAS Y OTROS OBJETOS FUERA DEL ALCANCE DE LOS NINOS
PEQUENOS. ESTOS OBJETOS PUEDEN SER TRAGADOS ACCIDENTALMENTE. TAMBIEN TENER CUIDADO AL
EMPACAR MATERIALES Y HOJAS DE PLASTICO.
24) PRECAUCI6N: PARA EVtTAR CHOQUE ELECTRICO NO USAR ESTE ENCHUFE CON UN RECEPTACULO 00TRA SAMOAA MENOS
QUE LAS CLAVIJAS PUEDAN SER INSERTADAS FIRMEMENTE PARA EVlTAR QUE LA CLAVIJA QUEDE EXPUESTA.
25) PREOAUCION: USAR OTRA BASE PUEDE RESULTAR INESTABLE Y CAUSAR POSIBLEMENTE ALGUN DANO.
26) PRECAUCION: PELIGRO DE EXPLOSION SI LA BATERiA ES COLOCADA INCORRECTAMENTE. REPONER SOLAMENTE CON EL
MISMO TIPO 0 EL EQUIVALENTE.
27) PRECAUCION: Este televisor de LCD ha sido dise_ado para ser utilizado solamente con los aeeesorios opcionales siguientes.
La utilizacibn con cualquier otro tipo de accesorio opcional puede causar ineatabilidad que, a su vez, podria tener
como resultado posibles lesionea.
(Todos los accesorios siguientes son fabricados por Matsushita Electric Industrial Co., Ltd.)
• Soporte de montaje en pared (Vertical): TY-WK32LR2W
Asegurese siempre de solicitar a un tecnico catificado que le haga la instataci6n.
[] Este producto utiliza soldadura de estaSo y plomo, y tiene una I_mpara fluorescente que contiene una pequeSa
cantidad de mercurio. Debido a consideraciones ambientales, puede que deshacerse de estos materiales est_
regulado en su comunidad. Para obtener informaci6n sobre c6mo deshacerse o reciclar estos materiales, p6ngase en
contacto con las autoridadee de su Iocalidad o con Electronics Industries Alliance: www.eiae.org.
Este equipo ha sido probado y ha demostrado cumplir con las limitaciones para los dispositivos digitales de la Clase B, de conformidad
con el Apartado I5 de las Normas de la FCC. Estos limites han sido diseSados para proporcionar una protecci6n razonable contra
las interferencias perjudiciales en una instalaci6n residencial. Este equipo genera, utiliza y puede radiar energia radioelectrica, y si no
se instala y utiliza de acuerdo con las instrucciones, puede causar interferencias perjudiciales en las comunicaciones por radio. Sin
embargo, no existe ninguna garantia de que las interferencias no se produzcan en una instalaci6n particular. Si este equipo causa
interferencias perjudiciales en la recepci6n de la radio o televisi6n, Io que se puede determinar apagando y encendiendo el equipo, al
usuario se le recomienda intentar corregir la interferencia tomando una o mas de las medidas siguientes:
Cambie la orientacion o el lugar de instalacion de la antena de television.
Aumente la separacion entre el televisor y otros equipos.
Conecte el televisor a una toma de corriente separada de otro equipo.
Consulte a su concesionario o tecnico con experiencia en radio/television para solicitar su ayuda.
Aviso de la FCC: Cualquier cambio o modificacion que no haya sido aprobado expresamente por la parte responsable del
cumplimiento podria anular la autorizacion que tiene el usuario de utilizar este equipo.
5

Accesorios/Acceso "
op
Compruebe que ha recibido todos los elementos que se indican,
I
NTransmisor de
mando a distancia
e N2QAYB000102
NPilas para el transmisor
de mando a distancia (2)
® Pila AA
FIManual de instrucciones
NTarjeta del cliente
(para EE. UU.)
NTarjeta para el plan de
asistencia al cliente
(para EE. UU.)
FIGuia de configuraci6n rapida NTarjeta de garantia (Mexico) NHoja de aviso
(Para ver programas de HD) (Modo de demostraci6n)
t Abrir.
Cierre
Gancho
Ponga las polaridades (+ 8 -)
en las posiciones correctas
® La instalaci6n mal hecha puede causar fugas de electrolito y corrosi6n, Io que podria dafiar el mando a distancia.
_No mezcle pilas viejas y nuevas.
_No mezcle pilas de tipos diferentes (pilas alcalinas y de manganeso, pot ejemplo).
No utilice baterias (Ni-Cd).
®No queme ni rompa las pilas.
®Anote los c6digos de mando a distancia antes de cambiar las pilas en el caso de que tenga que restablecer los
c6digos. (pag. 39-41)
Coloque el receptor a una distancia confortable para ver. Evite colocarlo donde la luz solar directa u otra luz
brillante (incluidos reflejos) caiga sobre la pantalla.
La utilizaci6n dealgOntipo de iluminaci6nfluorescente puede reducir elalcance del transmisor delmando a distancia.
La ventilaciSn adecuada es esencial para impedir el fallo de los componentes internos. Mantengase alejado de
las areas donde el calor o la humedad sea excesivo.
6

P6ngase en contacto con su concesionario Panasonic
mas cercano para adquirir la mensula de montaje en pared
recomendada. Para conocer mas detatles, consulte et manual
de instataci6n de la mensuta de montaje en pared.
Soporte para colgar en pared (vertical)
@TY-WK32LR2W
Antes de montar el televisor en una pared tendr_ que quitar la base del televisor del rnismo.
Siga Jos pasos siguientes:
Desconecte todos los cables del televisor.
Quite la base del televisor.
(__Retire cuatro tomillos.
_B_Saque la base del televisor
®
>
0
0
(1)
GO
0
o
c_0
0
0
c_
©
=_
o
©
223
o
Estera de espuma 6 paso
blando y grueso
ADVERTENCIA)
@No utilizar una mensula de Panasonic 6 montar la unidad usted mismo puede ser la causa de que el consumidor
corra riesgos.
Cualquier da_o resultante de no haber sido un instalador profesional quien haya realizado el montaje anulara la
garantia de su unidad.
@AsegQrese de pedir siempre a un tecnico calificado que Ileve a cabo la instalaci6n. Una instalaci6n incorrecta
podria ser la causa de que el equipo cayera, causando lesiones a personas y da_os en el producto.
@No monte el televisor LCD directamente debajo de las luces del techo (luces direccionales, reflectores 6 luces
hal6genas) que producen tipicamente mucho calor. De Io contrario podrian deformarse 6 da_arse las piezas de
plastico de la caja.
7

Antes conectar
mPara vet la televisi6n
@Antena de VHF/UHF
_*NTSC (National Television System Committee):
Emisi6n convencional
_*ATSC(Advanced Television Systems Committee):
Las normas de televisi6n digital incluyen la televisi6n de alta definici6n
digital (HDTV), la televisi6n de definici6n estandar (SDTV), la emisi6n de
datos, el audio multicanal de sonido envolvente y la televisi6n interactiva.
® Receptor de televisi6n por cable/cable
,_*Ustednecesita suscribirse a un servicio de televisi6n por cable para
poder versus programas.
Antena de Receptor de
VHF / UHF televisi6n pot
cable/Cable
_,Podra disfrutar de los programas de alta definici6n suscribiendose a los servicios de una emisora de televisi6n
pot cable de alta definici6n. La conexi6n podra realizarla utilizando HDMI 6 video componente.
_Grabaci6n/reproducci6n con grabadora DVD 6
videograbadora
® Grabadora DVD
La conexi6n se puede hacer utilizando video componente o HDMI.
® Videograbadora
La conexi6n se puede hacer utilizando un cable RF y video compuesto/S Video.
6
Grabadora Videograbadora
DVD
m Para ver prograrnas de sat_lite
® Puede disfrutar de los programas de alta definici6n suscribiendose a los
servicios de compa_ias de emisi6n pot satelite de alta definici6n.
La conexi6n se puede hacer utilizando HDMI o video componente.
Antena de sat_lite
Receptor de
sat_lite
mPara disfrutar de un reproductor de cine para casa y
Grabadora DVD con conexi6n HDMI
_ Cine para casa y Grabadora DVD
La conexi6n HDMI le permite disfrutar de audio y video de calidad mas
alta con un solo cable.
Cine para casa
Grabadora
DVD
Nota
®Si su grabadora DVD de Panasonic es compatible con el EZ Sync, usted podra controlarla con el control remoto
de este televisor (pagina 21 EZ SyncTM).
® Con el televisor no se suministran todos los cables y equipos externos mostrados en este manual.
® Para conocer los detalles de las conexiones de los equipos externos, consulte los manuales de instrucciones de
cada equipo.
==Terminal de antena
®
@Apriete firmemente a mane.
mTerminal de contactos
(_) _ ver_de_ verd
rojo azul
® Haga queconcuerden los colores
de las clavijas y losterminales.
® Inserte firmemente.
mTerminal HDMI
® Inserte firmemente.

C
f
TV
Parte posterior
de la unidad
,,iiiiiiiiiiiiiiiiiiiiiiiiiiiiiiiiiiiiiiiiiiiiiiiiiiiiiiiiiiiiiiiiiii_:i,,
120-127 V CA
60Hz
Cable de alimentaci6n de CA
(Conecte despues de haber
terminado todas las demas
conexiones.)
Esta ranura es para que elconcesionario de
Panasonic haga revisiones.
TV per
cable
Terminal de antena
(Si no se utiliza receptor
de televisi6n por cable)
6
Antena de VHF / UHF
/
6
ANT OUT ANT IN
®Si se utiliza un receptor de televisi6n por cable
÷Ponga el canal de televisi6n CH3 6 CH4.
Receptor de televisi6n por cable
®®
3>O
O
0_ X
o o
+
-4
<
® Para obtener mas ayuda, visitenos en www.panasonic.com
9

Conexi6n b sica {coot oo.c 6o
TV
Grabadora DVD
6
Videograbadora
120-127 V CA
60Hz
Cable de
alimentaci6n de CA
VIDEO
Para utilizar
terminales HDMI
(p&gina siguiente)
Terminal de antena
Para utilizar terminales S VIDEO
(p&gina siguiente)
Para utilizar terminales OUTPUT
(pag. 36, 37)
Para utilizar terminales COMPOSITE
(pagina siguiente)
Para utilizar terminales COMPONENT
(pagina siguiente)
Antena de VHF / UHF
[]
ANT OUT ANT IN
Grabadora DVD/Videograbadora
(con sintonizador de televisi6n)
10 _" 1

mPara utilizar terrninales HDMI
I AV IN I
H_3m! 2
v v
HDMI
AV OUT
® La conexi6n a las terminales HDMI le permitira disfrutar de imagenes digitales de alta definici6n y de
sonido de alta calidad.
mPara utilizar terrninales COMPONENT
verde
. (_;_) PB COMPONENT
VIDEO OUT
azul
Grabadora
DVD
rojo rojo
®Las grabadoras tambi6n se pueden conectar a los terminales COMPOSITE 6 S VIDEO, (vea mas abajo)
[] Para utilizar terrninales COMPOSITE
rojo
Grabadora DVD
6
Videograbadora
S VIDEO 6
, ,..............
= anco
m _ / _ AUDIO
K UU/ _ .
w.................. ___ _.Vldeograbadora
' rojo i rojo /
roj o \ ¢
®La entrada de S Video anulara la sepal de video ® La conexi6n a los terminales S VIDEO le permitira
compuesto cuando se conecte un cable de SVideo. disfrutar de una calidad de imagen masalta que si
Conecte un cable de S Video 6 uno de video, utilizara los terminales de video compuesto.
Nora
®AIgunos programas contienen una sepal de protecci6n de derechos de autor para impedir la grabaci6n.
®Cuando se visualiza el programa de protecci6n de los derechos de autor, no conecte el otro monitor de TV a traves
de una videograbadora. Las se_ales de video enviadas a traves de una videograbadora pueden ser afectadas por
los sistemas de protecci6n de los derechos de autor, y las imagenes se distorsionaran en el otro monitor de TV.
.m
CL
E]
<
E_
o,
<
CL
o
(.Q
o=
Q=
o
==_
93
11

Conexi6n b sica {coot oo.c 6o
TV
Grabadora DVD
6
Videograbadora
Receptor de
sat_lite
VHF/UHF
iiiiiiiiiii_
iiiiiiiiiiiii
iiiiiiiiiiiii
Parte posterior
de la unidad
120-127 V CA
60Hz
Cable de
alimentaci6n de CA
Para utilizar terminales HDMI
(p&g. 11)
Terminal de antena
Antena de VHF / UHF
/
/
/
E3
/
Para utilizar terminales S VIDEO
(pag. 11)
Para utilizar terminales COMPOSITE
(pag. 11)
ANT OUT ANT IN
Para utilizar terminales COMPONENT
(pag. 11)
Grabadora DVD/Videograbadora
(con sintonizador de televisi6n)
Receptor de sat61ite
J
12

mPara utilizar terminales HDMI
4,==
HDMI
AV OUT
Receptor de
DVD sat_lite
® La conexi6n alas terminales HDMI le permitira disfrutar de imagenes digitales de alta definici6n y de
sonido de alta calidad.
mPara utilizar terminales COMPONENT
Grabadora
DVD
rojo rojo
verde verde
COMPONENT PB(_'_:hJ,
C
VIDEO IN _Y
azul azul
rojo rojo
verde verde
PB
azul
rojo rojo
OUT
COMPONENT
VIDEO OUT
Receptor de
sat61ite
®Las grabadoras tambi6n se pueden conectar a los terminales COMPOSITE 6 S VIDEO. (vea m_s abajo)
mPara utilizar terrninales COMPOSITE
compuesto cuando se conecte un cable de SVideo.
Conecte un cable de S Video 6 uno de video.
disfrutar de una calidad de imagen mas alta que si
utilizara los terminales de video compuesto.
,m
CL
o_.
<
O,
<
_L
o
o=
Q=
o
==_
-t-
;U
©
o
==_
t_
C_
¢0
13

Conexi6n b sica {coot o..c 6o
TV Cine para casa
Grabadora DVD
Parte posterior de la unidad
|
N ota
@ Se le recomienda utilizar un cable
HDMI de Panasonic. (P&gina 26)
@ Cuando utilice las terminales
COMPONENT VIDEO OUT 6 el
terminal S VIDEO OUT, consulte
la pagina 13 "Para utilizar las
terminales COMPONENT" o "Para
utilizar las terminales S VIDEO".
@ Si conecta un dispositivo RAM de
cine para casa o un reproductor de
cine para casa con un cable HDMI,
utilice un cable de audio en lugar del
cable de audio digital 6ptico. (vea la
pagina 37)
AV)
Grabadora
DVD
14

identificacibn de los controles
El bot6n POWER
Subida/bajada del volumen
aciones ctel menQ
Cambia TV/VIDEO L
_[ h Demuestra la calidad de la imagen en el modo vivido.
o_ _J (Pulse cualquier tecla para cancelar la demostraci6n.)
'_ Sensor del control remote
Dentro de unos 7 metros enfrente del televisor.
Indicador de alimentaci6n (conectada: rojo, desconectada: apagado)
@Eltelevisorconsumiraalgo de corriente siempreque el enchufedel cablede alimentaci6neste introducidoen la toma de corriente.
Selecciona canales en orden,
Conecta la alimentaci6n del
televisor 6 la pone en espera
El bot6n selector de equipo (pag. 20)
Cambia la sepal de entrada. (pag. 20)
Visualizaci6n de submenQ (pag. 18, 24) --
Botones de color
(utilizados para varias funciones)
(pot ejemplo, paginas 30)
Selecciona canales en orden.
Cambia la relaci6n de aspecto (pag. 19)
f
Controla la funci6n de la lista de canales J
favoritos. (pag. 19)
Cambia al canal visto previamente.
MenQ EZ Sync (pag. 21,26-27)
Seleccione el modo de audio para
vet la televisi6n. (pag. 18)
Visualiza el menQ principal. (pag. 22)
MenQs de salida
Selecci6n/OK/Cambio
v'uelve al menQ anterior
Subida/bajada del volumen
Visualiza 6 elimina la bandera de
canal, (pag, 18)
/ Apagado del
silenciamiento del sonido
Teclado numerico para seleccionar
cualquier canal (pag. 18)6 para hacer
introducciones alfanumericas en los
menQs.(p_g. 21,28, 30, 35)
directo a canales para DTV
y DBS (pag. 18)
Operaciones de equipos externos
(Videograbadoras, DVDs, eta)
(pag. 20)
®®
O
X
6: £
o
c_
0
©
15

Configuraci6n por primera vez
"Ajuste inicial" se visuatiza solamente cuando el TV se enciende pot primera vez despues de enchufar el
cable de atimentaci6n en una toma de corriente y cuando "Autoencendido" (pags. 24-25) se pone en "No".
Encienda el televisor con el interruptor POWER.
POWER
6
(TV) (mando a distancia)
Seleccione su idioma.
[-->English <-->Espafiol 4-> Frangais_ ]
RETURN
-- Vuelva a la pantalla anterior.
[] Pulse para salir
de la pantalla de
menu
EXIT
@
[] Para volver a la
pantalla anterior
RETURN
@
Nota
® Para cambiar la
configuraci6n (Idioma/
Reloj/Programa auto/
Imagen) mas adelante,
vaya a la pantalla de
ment_. (pag. 22, 24).
Ajuste el reloj.
elemento
A_o: Seleccione el a_o
Mes: Seleccione el mes
Dia: Seleccione el dia
Hora: Ajuste la hora
Minuto: Ajuste el minuto
RETURN
-- Vuelva a la pantalla anterior.
16

Configuraci6n automatica de canales
(_Seleccione "Programa auto"
_2_Seleccione "Entrada ANT"
[Entrada ANT l
Cable: Televisi6n por cable
Antena: Antena
®Seleccione "Auto"
[] Pulse para salir de
la pantalla de menu
EXiT
@
Nota
®Acerca de los sistemas
de emisi6n
anal6gico (NTSC):
programaci6n de TV
tradicional
Digital (ATSC):
nueva programaci6n
que le permite ver mas
canales con imagen y
sonido de alta calidad
_4_Seleccione el modo de exploraci6n (Todos los canales/S61o anal6gico/S61o digital)
Inicie la e×ploraci6n de los canales.
® Los canales disponibles (anal6gicos/digitales) se
establecen automaticamente.
Todos los canales: Explora canales digitales y anal6gicos
$61o anal6gico: Explora canales anal6gicos solamente
$61o digital: Explora canales digitales solamente
_Confirme los canales registrados.
_0) Seleccione
"Aceptar"
(2)Aceptar
®Si no se pulsa OK despues de seleccionar "Aceptar", los canales no se
memorizaran.
® Si realiza la exploraci6n mas de 2 veces, los canales guardados previamente se
borraran.
@
©
O
m,
t-
O
O,
0
B
=_
N
(Consulte la pag. 22) 17

ver l
Conecte el TV a un receptor de televisi6n per cable, receptor digital multimedia, receptor de satelite o cable de
antena (pags. 8-9).
O Conecte la alirnentaci6n
POWER
Nota
J w
VIDEO
@Si el modo no es TV, pulse @ y
seleccione TV. (pag. 20)
Seleccione un n_mero de
canal,
D_m
DBB
6 HDm
m
[] Para introducir directamente el n6mero
de un canal digital
_ Cuando se sintonicen canales
digitales, presione el bot6n para
introducir el nQmero
menor en un nQmero de canal
complejo.
Ejemplo: CH15-1: __
[] Otras funciones Qtiles (Utilicelas despues de 0)
[] Seleccione el modo de audio para ver la televisi6n.
SAP
@Modo digital
PulseSAPparaseteccionarlasiguientepistade audio(siestadisponible)cuandoserecibeun canaldigital.
@Modo anal6gico
Pulse SAP para seleccionar el modo de audio como se describe a continuaci6n.
• Cada vez que se pulsa el bot6n SAP,el modo de audio cambiaracomo se muestra acontinuaci6n.
(Estereo/S PA/Mono)
[] Pulse SUB MENU para mostrar la pantalla del submen_. (pag. 24)
Este menQ consiste en atajos a funciones de uso convenientes.
SUB
MENU
•Visualice 6 elimine la bandera de canales.
RECALL Canal
reioj
Identificador Indicaci6n Resoluci6n Modo de Tiemporestantedel
de emisora SAP de sefiales imagen temporizadorparaacostarse
Subtitulos ocultos Nivel de clasificaci6n Relaci6n de aspecto
18

[] Pulse ASPECT para cambiar entre los modos de aspecto. (pag. 43)
ASPECT 1_ 4 _1
• 480i, 480p: COMP/JUSTO/4:3/ACERC
• 1080p, 1080i, 720p: COMP/H-LLENO/JUSTO/4:3/ACERC
FAVORITE
[] FAVORITOS
Los nOmeros de canales de Favoritos se visualizan en la pantalla de
sintonizaci6n de favoritos. Seleccione la emisora deseada con el cursor 6
usando las teclas de nOmeros. (vea debajo)
®Vuelva a seleccionar "Cable" 6 "Antena" en "Entrada ANT" de "Programa canal" para cambiar la recepci6n de la
serial entre televisi6n por cable y antena. (pag. 17, 31)
® El nQmero del canal y el nivel del volQmen se fijan incluso despues de apagar el televisor.
Visualice el menO
SUB
MENU
2
• Pulse repetidamente FAVORITE
para cambiar entre las paginas
(1/3, 2/3, 3/3 6 salir).
Pulse _, _' para resaltar una
posicion en la lista. Y luego pulse
OK para memorizar el canal
visualizado en esa posici6n.
• Tambien puede utilizar las tectas
numericas (1-9 y 0) para seteccionar
tos n0meros de lista grabados (1-9
y 0). AI hacer esto, tos n0meros se
grabaran directamente sin tener que
pulsar ta tecla OK.
® Para eliminar un canal favorito
Un canal memorizado se podra eliminar de la lista
manteniendo pulsado OK mientras su posicion esta resaltada.
FAVORITE
Pulse FAVORITE.
• Pulse repetidamente FAVORITE
para cambiar entre las paginas
(1/3, 2/3, 3/3 6 salir).
2
Pulse a T 6 una tecla numerada
(1-9 y 0 ) para resaltar un canal
de la list&
• AI seleccionar un nOmero de
canal de la lista con las teclas
numeradas se visualizara
dffectamente el canal.
3
Pulse OK para visualizar el canal
resaltado.
®
"U
93
93
<
m
93
<.
O3
O"
® Para cambiar la pagina
Pulsando _ se cambia de pagina hacia atras. Pulsando I_ se cambia de pagina hacia adelante. 19

ver v" y DVDs
Si tiene alg_n equipo conectado al televisor podra ver facilmente videos y DVDs usando el mando a
distancia det televisor.
Puede seteccionar el equipo externo al que quiera acceder.
Para utilizar un equipo de otro fabricante tendra que registrar et c6digo det equipo (pag. 35).
Con el equipo conectado encendido
Visualizaci6n del men_ de selecci6n de entrada
TV
VIDEO
Seleccione el modo de entrada.
UBB
m
6
(Pantatla inicia!)
Pulse la tecla de nOmero
correspondiente en el mando
a distancia para seleccionar la
entrada de su elecci6n.
Etiqueta
Terminal
(ejemplo)
/
Selecci0nePulse laflecha ascendente/descendente
para seleccionarla entrada de su
elecci6n,y luego pulse OK.
Intr0ducir@Durante la selecci6n, el
menO "Seleccionar entrada"
desaparece si no se realiza
ninguna acci6n durante varios
segundos.
@La terminal y la etiqueta del
dispositivo conectado se indican.
Para cambiar la etiqueta de
entrada (pag. 32-33)
Seleccione el rnodo del mando a distancia
Pulse la tecla para seteccionar.
Utilice el equipo conectado apuntando el rnando a distancia
al equipo. (ejemplo)
20
[] Para volver al TV
TV
VIDEO
@Para conocer detalles,
vea el manual del
equipo 6 pregunte a su
concesionario local.
Grabaci6n de videograbadora
Retroceso/Avance rapido
Parada
Pausa
Reproducci6n
(Para hacer otras operaciones, vea la pag. 38.)
Grabacidn
Satto hacia adetante/atras
Retroceso/Avance
Parada
Pausa
Reproducci6n

Siconectael equipoquetienelafunci6n"HDAVI Control 2" al televisor con un cable HDMI, usted
puede disfrutar utilizando la funci6n mas conveniente. Para conocer mas detalles consulte
"Control EZ Sync" en las paginas 26-27.
Visualizaci6n del men_ EZ Sync
Ez_unc
Seleccione el equipo
Seleccione
Introducir
Utilizaci6n
Ahora puede utilizar el equipo seteccionado con el mando a distancia
del televisor.
Siga el ment_ det equipo y disfrute viendo. Para las operaciones det
control remoto, consutte la pagina 27.
Nota
@Para conocer detalles, yea el manual del equipo 6 pregunte a su
concesionario local.
[] Para volver al TV
TV
VIDEO
@÷÷
®
=_
<
=_
<
r_
o
<
21

C6m0utilizarlasfunci0nesde10smen s
Varios menus le permiten seleccionar configuraciones para la imagen,
el sonido y otras funciones, para que usted pueda disfrutar viendo la
tetevisi6n como usted desee.
Visualice el men_
®Visualiza las funciones que pueden
establecerse (cambia segOn la sepal de
entrada).
Seleccione el men_
Seleccione el elemento
(Ejemplo: MenQ Imagen)
[] Pulse para salir
de la pantalla de
rnen_
EXiT
Ajuste 6 seleccione
@
[] Para volver a la
pantalla anterior
RETURN
@
(Ejempto: MenQ Imagen)
[] Lista de rnen_s
Men_ Elemento "
Grabador DVD,
Cine para casa,
Videocamara HD,
Salida altavoz
Normal
Modo
Luz de atras
Contraste, Brillo,
Color, Tinte, Nitidez
Temp. color
Admi. colores
Imagen IA
Ajuste acercamiento
Reduc de ruido
3D Y/C filtro
Matriz color
MPEG NR
Nivel obscuro
Normal
Bajos
Altos
Balance
Sonido IA
Envolvente
Salida altavoz
Entrada HDMI 1
Entrada HDMI 2
Norm. de audio
Apagado, Cron6metrol-5
22

Ajustes / Configuraciones (altemativas)
[Grabadora DVD/Cine para casalVideoc_,mara HD]
Seleccione el equipo y utilicelo. (pag. 26-27)
[Salida altavoz]
Seleccione la salida de audio. (Externo/Interno) (pag. 26-27)
Ez_nc
® At men_ EZ Sync se puede acceder directamente pulsando el bot6n EZ Sync del controt remoto. _ _ (pag. 2t)
Restablece la configuraci6n del menu de imagen (excepto para "Otros ajustes"). (Si/No)
Modo de imagen b&sico (VividolEst_ndadCinemalUsuario) (p&g. 45)
Ajusta la luminancia de la luz de fondo.
Ajusta el color, el brillo, etc. para que cada modo de imagen se ajuste a sus
gustos.
Brillo
Color
Selecciona el nivel de los colores c&lidos (rojo) y de los colores frios (azul). (Azul/Normal/Ro]o)
Admi. colores realza la reproducci6n de los colores verde y azut, especialmente tas escenas exteriores. (Si/No)
Controla las areas oscuras sin afectar al nivel del negro ni al brillo de la imagen en general. (Si/No)
Ajusta la alineaci6n vertical y el tamaSo cuando el ajuste del aspecto es "ACERC" (p&g. 43)
Reduce el ruido eneJcanat, comunmente tJamadoefecto de nJeve.Permanece en No cuando se recJbeuna seSaJintensa.(No/SJ)
Minimiza el ruido y la diafotia cromatica de la imagen. (SJ/No)
Selecciona la resoluci6n de la imagen de los dispositivos conectados a componentes. (HD/SD)
® SD: Visi6n normal HD: Visi6n de alta definici6n
® S61o se acepta la serial 480p, la televisi6n convencional (NTSC) no se est& disponible.
Reduce el ruido de las set, ales digitales especificas de DVD, STB, etc. (Si/No)
Seleccione Obscuro 6 Claro. $61o es valido para las seSales de entrada externas. (Obscuro/Claro)
Repone los ajustes de Bajos, Altos y Balance a los ajustes predeterminados en la f&brica. (SJ/No)
Aumenta 6 disminuye la respuesta de los graves. [Bajos
Aumenta 6 disminuye la respuesta de los agudos.
Realza el voIQmen de los altavoces izquierdo / derecho. Balance
Iguale los niveles del sonido en todos los canales y entradas VIDEO. (Si/No) _ IA
Mejora la respuesta de audio cuando se escucha sonido estereo. (SJ/No)
Cambia a "No" cuando se utilizan altavoces externos. (Si/No) Salida altavo_
® "Sonido IA", "Envolvente" y "Norm. de audio" no funcionan si se selecciona "No".
Selecciona seg0n la seSal cuando est& conectado HDMI. (Auto/Digital/An_logo)
® Auto: Selecciona automaticamente la seSal anal6gica/digital.
Minimiza la diferencia de volQmen despues de cambiar a entradas externas.
Enciende/Apaga automaticamente el televisor (pag. 34)
O,
3
]i Tint---e _] O
O co
-.=t(,9
[Apagado _]
Bloquea canales y programas. (p&g. 28)
_ En el modo AV, el menQ Audio y el menQ Ajuste ofrecen un nQmero menor de opciones.
23

C6m0utilizarlasfunci0nesde10smen s
Varios ment_s le permiten hacer ajustes para la imagen, el sonido y
otras funciones, para poder disfrutar viendo la TV de la forma que a
usted mas le convenga.
Visualice el men_
_ Visualizalasfuncionesquepuedenestablecerse
(cambiasegOnla sepalde entrada).
Seleccione "Ajuste".
[] Lista de menus
Men_ Elemento "
Modo surf
Idioma
Reloj
Programa canal
Titulos de entradas
Salida a monitor
CC
EZ Sync
Apaga control
Prende control
Altavoz inicial
AutoencendidoSeleccione el elemento
[] Pulse para salir de
la pantalla de menu
EXiT
@
[] Para volver a la
pantalla anterior
RETURN
@
Apaga sin seSal
Apaga sin operaci6n
Visualizaci6n de submen_
SUB
MENU
Economia de energia
Acerca de
Restaurar
24
Seleccionar titulos
Medidor de seSal

(Continuaci6n)
Ajustes / Configuraciones (altemativas)
Selecciona el canal con el bot6n "Channel up/down". (Favoritos/Todos)
,_ Favoritos: S61o cuando se registran canales come FAVORITE (p&g. 31 ).
Selecciena el idioma para los men_s de la pantalla. (pag. 16)
Ajusta el reloj (pag. 16)
Establece los canales (p&g. 30)
]
[Reloj ]
[Programa canal ]
Seleccione la terminal y la etiqueta del equipo externo. (pag. 32)
[Comp./HDMI I/HDMI 2/Video l/Video 2/Video 3]
Para impedir et aultido y la oscilaci6n de la imagen, detenga la salida de la imagen y el sonido especificados en este
menQ (p&g. 32). (Si/No)
Visualiza subtitulos (pag. 32).
Controla el equipo conectado a los terminales HDMI (pag. 26) (Si/No)
® "Apaga control", "Prende control" y "Altavoz inicial" no se pueden seleccionar siesta seleccionado "No".
Establece "Apaga control" de los equipos de conexion HDMi (pag. 26). (Fijar/No)
Establece "Prende control" de los equipos de conexi6n HDMI (pag. 26). (Fijar/No)
Selecciona los altavoces predeterminados (p&g. 26) (Interno/Externo)
Enciende autom&ticamente el televisor cuando se enciende el receptor de television por cable 6 un
dispositivo conectado. (No/Fijar)
® El cronometro de apagado y el temporizador de encendido / apagado no funcionara si se establece "
Autoencendido". (p&g. 34)
Para ahorrar energia, el televisor se apaga automaticamente cuando no se recibe ninguna serial durante
mas de 10 minutos. (Si/No)
Nora
_9 No se utiliza cuando se configura "Autoencendido", "Cron6metro", "Bloqueo", o el canal digital.
_ "Apaga sin serial fue activado" se visualizar& durante unos 10 segundos cuando el televisor se
encienda por primera vez despues de desconectarse la alimentaci6n mediante "Apaga sin seSal".
®; La visualizaci6n en pantalla mostrara parpadeando los n0meros 3, 2 y 1 para indicar los Oltimos tres
(3) minutos que quedan hasta que se produzca el apagado.
Para ahorrar energia, el TV se apaga autom&ticamente cuando no se realiza ninguna operaci6n con las
teclas del mande a distancia o del panel delantero durante mas de 3 horas. (No/Si)
Nota
_, No se utiliza cuando se configura "Autoencendido" o "Cron6metro'.
® "Apaga sin operaci6n rue activado" se visualizara durante unos 10 segundos cuando el televisor se
encienda por primera vez despues de desconectarse la alimentaci6n mediante "Apaga sin operaci6n".
® La visualizaci6n en pantalla mostrara parpadeando los n0meros 3, 2 y 1 para indicar los Oltimos tres
(3) minutos que quedan hasta que se produzca el apagado.
Reduce el brillo de la pantalla para disminuir el consumo de energia. Para vet programas en
habitacienes oscuras sin que se canse la vista. (Est_ndar/Ahorra)
Visualiza la versi6n del televisor y la licencia del software.
AI realizar la reposici6n se cancelar&n todos los elementos establecidos con Ajuste come, por ejemple,
los ajustes de canales. (p&g. 30)
[EZ Sync _]
[Apaga control_ ]
[Apaga sin sei_al _ ]
EApagasin0peraci6n_ ]
_gia ]
@
©
O,
B
0
C
m,
m
m,
(I)
cn o
m
0 C,
Ajustes 1Configuraciones (altemativas)
Selecciona el medo para seleccionar canales con el boton de canal arriba/abajo (Favoritos/Todos)
Llama a un canal favorito. (pag. 19)
Visualiza subtitulos ocultos. (pag. 32-33)
Cambia el identificador de emisora. (pag. 30-31 )
Compruebe la intensidad de la serial si se encuentran interferencias o se congela una imagen digital. (p&g. 30-31 )
25

EZ Sync TM"HDAVI Control TM''
:_ Control simuttaneo de todos los componentes de Panasonic equipados con "HDAVI
Control" utitizando un botdn de un mando a distancia.
Disfrutede lainteroperabilidadHDMIadiciona(conlosproductosPanasonicquetienentafunci6n"HDAV(Control".
Este televisor soporta la funci6n "HDAVI Control 2".
Lasconexionesa algunosequiposdePanasonic(grabadoraDVDDIGA,videocamaraHD,dispositivodecineparacasa
RAM,reproductordecineparacasa,amplificador,etc.)concablesHDMItepermitenhacerinterfazautomaticamente.
El equipo con la funci6n "HDAVI Control" permite las operaciones siguientes:
Cambio de entrada automatico, control de altavoces, prende control, apaga control. (pag. 27)
Ademas, el equipo con la funci6n "HDAVI Control 2" permite realizar la operaci6n siguiente:
Control EZ Sync (para "HDAVI Control 2") (pag. 27)
Las operaciones con equipos de otros fabricantes no se pueden garantizar.
mPara la primera vez / Cuando se agrega un equipo nuevo, se reconecta un equipo o se
cambia la instalaci6n
Despu_s de hacer la cone×i6n, encienda el equipo y luego encienda el televisor.
Seleccione el modo de entrada al HDMI 1 o HDMI 2 (pag. 20) y aseg(Jrese de que la
imagen se visualice correctamente.
® Esta funci6n necesita de un cable que cumpla con la norma HDMI (completamente cableado).
Los cables que no cumplan con la norma HDMI no se pueden utilizar.
Se recomienda utilizar un cable HDMI de Panasonic.
NQmero de pieza recomendada: RP-CDHG15 (4,9 pies/1,5 m), RP-CDHG30 (9,8 pies/3,0 m),
RP-CDHG50 (16,4 pies/5,0 m)
Visualice el men_.
Seleccione "Ajuste".
Seleccione "Ajuste EZ Sync".
[] Pulse para saiir
de la pantaila de
menu
EXiT
@
[] Para volver a la
pantalla anterior
RETURN
@
Seleccione "EZ Sync"
Seleccione "Si".
(La opci6n
predeterminada es "Si")
Cambie
®Si no se ha conectado un equipo HDMI o si se utiliza un
equipo HDMI estandar (sin "EZ Sync"), seleccione "No".
26

AI empezar la reproduccidn de DIGA, reproductor de cine para casa 6 equipo de cine para casa RAM, la entrada
del televisor cambia automaticamente a la entrada correspondiente al equipo de reproduccidn.
®Para el equipo de cine para casa RAM, los altavoces cambian automaticamente al modo de cine para casa.
Si se utiliza la operacidn DIGA, la entrada del televisor cambia automaticamente a DIGA y se visualiza el menQ DIGA.
Para la salida de audio puede seleccionar los altavoces de cine para casa o del televisor,
Controle los altavoces de cine para casa con el control remoto del televisor,
Esta funcidn sdlo esta disponible cuando esta conectado un amplificador o reproductor de cine para casa de Panasonic.
_1}Pulse Ez_unc
l [] Externo: Ajuste para el equipo
(2}Seleccione "Salida altavoz"
Volume up / down ÷
(3)Seleccione "Externo" 6 "lnterno"
MUTE
Mute ÷
® El sonido del televisor se silencia.
®Cuando se apaga el equipo, los altavoces del
televisor se activan.
®AI seleccionar "Externo", el equipo se enciende
automaticamente si esta en el modo de espera.
[] Interno: Los altavoces del televisor estan activados.
En el menQ EZ Sync, usted puede seleccionar el equipo Panasonic conectado mediante HDMI y acceder a 61
rapidamente. ContinQe utilizando el control remoto de su televisor para utilizar el equipo, apuntandolo al televisor.
_i_Pulse Ez_gnc
@Seleccione el equipo al que quiera acceder.
-- (1)Seleccione
@Acceder
Sdlo puede seleccionar los
elementos disponibles.
(3)Utilice el equipo con el control remoto del
televisor, apunt_ndolo al televisor.
@Para utilizar el equipo, lea el manual del mismo.
[] Control remoto del televisor disponible
Moverelcursor,Selecc onar
RETURN
SUB
MENU
Configurar/Acceder
Volver al menQ anterior
Visualizar el menQ de funciones del
equipo
Disponible cuando se visualiza la finalidad
de las teclas
Cuando se selecciona "Fijar" (pag. 25), el televisor se enciende automaticamente y cambia a la entrada HDMI
apropiada siempre que el equipo compatible con "EZ Sync" se enciende inicialmente y se selecciona el modo de
reproduccidn.
Cuando se selecciona "Fijar" (pag. 25) y se apaga el televisor, todos los equipos compatibles con EZ Sync que
estan conectados se apagan tambien automaticamente.
®La DIGA (Grabadora DVD de Panasonic) no se apagara si aQn esta en el modo de grabacidn.
Aviso: El televisor permanece encendido aunque se apague el equipo compatible con EZ Sync.
"lnterno" es el ajuste predeterminado. Para poner el sistema de cine para casa como altavoces predeterminados,
cambie la configuracidn de altavoces predeterminada de "lnterno" a "Externo". El sonido saldra del sistema de cine
para casa siempre que se suministre alimentacidn al televisor.
Si se pulsa la tecla "ONE TOUCH PLAY" en el control remoto del equipo para el sistema de cine para casa, la
secuencia de operaciones siguientes se realiza automaticamente.
(i) La alimentacidn del sistema de cine para casa se conecta y empieza la reproduccidn.
_2_El televisor se enciende y se muestra la pantalla de reproduccidn.
_3)El audio se silencia y el televisor cambia al modo de cine para casa.
®
FFI
N
O3
0
<-
©
o
=_
©
---t
N
27

I
Puede btoquear canales 6 programas especificados para impedir que los ni_os vean su contenido
censurable.
Visualice el men_
Seleccione "Bloqueo".
Bloqueo
Cada vez que visualice el menO
Bloqueo se le pedira que introduzca
su contrase_a.
2
5
8
0
Introduzca su contraseSa de 4 digitos.
Para ver un programa bloqueado 6 cambiar los ajustes de calificaci6n debera
introducir un c6digo de 4 digitos.
D _ m @Si es la primera vez que introduce
D B B una contrase_a, introduzca el
H D B nQmero dos veces en orden para
m registrarlo.
[] Pulse para salir
de la pantalla de
menu
EXIT
@
@Anote su contrase_a
por si la olvida.
(Si ha olvidado su
contrase_a, consulte
a su concesionario
local.)
Nota
@Cuando seleccione un
canal bloqueado
se visualizara un
mensaje que le
permitira ver el canal
si usted introduce su
contrase5a.
Seleccione el modo de bloqueo.
€No:
@Total:
@Usuario:
Desbloquea toda la
configuraci6nde bloqueo
de "Canal","Juego" y
"Programa".
Bloquea todas las entradas
independientemente
de la configuraci6n de
bloqueo "Canal", "Juego"y
"Programa".
Bloquea las entradas
especificadas de "Canal",
"Juego"y "Programa".
Seleccione el elemento
@"Canal", "Juego" y "Programa" se
pondran grises a menos que se
seleccione "Usuario" en "Modo".
Establezca
Establezca
28

[] Para seleccionar el canal 6 la clasificaciSn del programa que va a bloquear
Seleccione hasta 7 (1-7) canales para bloquearlos. Estos canales se bloquearan
independientemente de la clasificaci6n del programa.
(i}Seleccione "Modo" y p6ngalo en "Usuario'.
_2}Seleccione el canal que va a bloquear.
0}Seleccione
@ Establezca
® Para bloquear/desbloquear todos los canales:
Seleccione "Modo" y p6ngalo en "Total" o en "No".
Total: BIoquea todos los canales
No: Desbloquea todos los canales
BIoquea Canal 3, Canal 4 y las entradas externas.
Seleccione "Juego" en Q y p6ngalo
en "Si'.
Seleccione
@£ Establezca
S{: BIoquea
No: Desbloquea
[] Para establecer el nivel de clasificaci6n
La tecnologia "V-chip" permite que los
programas restringidos sean bloqueados
segOn las clasificaciones de televisi6n.
_i}Select "Mode" and set to "Si'.
@ Establezca
d}Seleccione
®Seleccione la categoria de
calificaci6n que quiera seguir.
@Siguiente
(2}Establezca
01}Seleccione
® MPAA:
Clasificaciones para peliculas de los EE.UU.
® U.S.TV: Clasificaciones para programas de
television de los EE.UU.
® C.E.L.R.: Clasificaciones para el ingles de Canada
® C.F.L.R.: Clasificaciones para el frances de Canada
_3_Seleccionela ¢lasificaci6n que va a bloquear.
N° I Sin clasificacidn
G I PQblico en general: Todos los pQblicos
PG ISe recomienda el acompai]amiento de los padres
i
PG-13 Aviso para los padres: No es apropiado para
' menores de 13 a_os
i
i Restringido: Los menores de 17 alios necesitan set
R acompaliados por los padres 6 una persona adulta
NC-171NoseadmitequeningSnmenorde17aaosyea el pr0grama
X IAdultos solamente
@Para obtener otra informaci6n (pag. 42)
[] Para desactivar la grabaci6n del
programa bloqueado
÷ Sebccione"Salidaa monitor"yp6ngatoen"sr'.
si: Activalasalidadelterminal
delmonitorparalos
programasquehansido
establecidosen"Bloqueo".
No:Desactivalasalidadel
terminatdeimonitorpara
losprogramasquehan
sidoestablecidosen
"Bloqueo".
[] Para cambiar la contraseSa
(_En @, seleccione "Cambiar c6digo" y pulse OK
_2)lntroduzca dos veces la nueva contraseSa de 4
d{gitos.
IIIIIl_Jll,
03
O
_{:3
C
o
@Estetelevisor ha sido diseSadopara soportarel "DownloadableU.S. RegionRating System"cuandose encuentre disponible.
($61oesta disponible en los EE.UU.)
@La clasificaci6n No es independiente de otras clasificaciones.
@Cuando bloquee una edad especifica basandose en el nivel de clasificaci6n, la clasificaci6n No y cualquier otra
clasificaci6n mas restrictiva tambien se bloquear&
29

[] f [] f
Y
nfigu
Los ajustes del canal actual se pueden cambiar segOn sus necesidades y las
condiciones de la recepci6n.
Visualice el menu
Seleccione "Ajuste".
Seleccione "Programa canal".
Seleccione la funci6n
[] Pulse para salir de
la pantalla de menu
EXiT
@
Auto
Manual
Establezca
_Para restablecer los ajustes del menu Ajuste
_0Seteccione "Restaurar" en el menu Ajuste (Q) y pulse
OK.
Introduzca su contrase_a de 4 digitos con los botones
de nOmeros.
Seleccione "Si" en la pantalla de confirmaci6n y pulse
3O

Busca y agrega automaticamente los canales que pueden recibirse a la memoria.
(_Seleccione "Entrada ANT" _3_Seleccione el modo de exploraci6n (pag. 17)
÷ Seleccione Cable 6 Antena (pag. 17)
(_)Seleccione "Auto"
Las configuraciones se hacen automaticamente
@Vaya al paso _5_de abajo despues de completar el ajuste.
@Todos los canales memorizados previamente se borraran.
Utilice este procedimiento cuando cambie la
configuraci6n de los canales de recepci6n 6 cuando
cambie la visualizaci6n de los canales. Ademas,
utilicelo tambien para agregar 6 brincar manualmente
canales que se encuentran en la lista de canales.
(_Seleccione "Editar"
_Seleccione el elemento que quiera editar.
Favoritos
Titulos Agregar
R G
_Vaya a
la pagina
siguiente.
Vueiva a ta pagina anterior.
@Titulos:
Cambio del identificador de
emisoras
@Favoritos:
Registra los canales en la
lista de favoritos.
@Agregar:
Agrega 6 brinca canales
Encendido/apagado de
sintonia secuencial
_3_Edite
@Titulos
Siguiente
I Titul°sI [ Tit.lo,.a.°al ]
Seleccione el identificador Cambiode n0mbre(maximade7
de emisora, caracteresdisp0nibles)
@Favorito
I Configurar favorito I Seleccione el nQmero.
@Agregar _:_@
@PulseOKparaselecci0nar"Si"(agregar)6"No"(brincar).;;; RETURN
@Mueva el cursor al n_mero del canal
_Seleccione "Aceptar"
_2)Aceptar
Para cancelar la edici6n
(retorno a "Programa
canal"
_i)Seleccione "Si"
Compruebe la intensidad de la sedal si se encuentra interferencia 6 se congela una imagen digital.
@Si la sedal es debil compruebe la antena.
Si no encuentra ningQn problema, consulte a su
concesionario local.
Nota
Intensidad de la serial @No esta disponible si se selecciona "Cable" en
"Entrada ANT" (vea mas arriba).
@$61o es eficaz para los canales digitales.
J
®
Frl
O
O,
,.<:
O
O
(.{3
c
93
O
O,
CL
C3
93
93
(1)
00
@Mientrasesta activado "Bloqueo"(pag. 28),si se seleccionaAuto/Manual/Medidorde serial, se visualizara"lngresar contraseria".
31

Titulos eentradas/Salida itod
Visualice el men_
Seleccione "Ajuste".
Seleccione "Dispositi. Extemos" 6
"CC".
[] Pulse para salir de
la pantalla de menu
EXiT
@
(Dispositi. Externos)
Seleccione "Titulos de entradas" 6
"Salida a monitor"
Establezca
32
CC

Subtitulos
Los dispositivos conectados a los terminales de entrada externos se pueden etiquetar para identificarlos mas
facilmente durante la selecci6n de entrada, (En el modo de selecci6n de entrada de la pagina 20 @)
[] Seleccione el terminal y la etiqueta del equipo externo.
@Terminales: Comp./HDMI1-2/Videol-3-Etiqueta Terminal
@Etiqueta: BRINCAR*/VCR/DVD/
CABLE/DBS/PVR/
JU EGO/AUX/[BLANCO]
* Si se selecciona "BRINCAR", al pulsar
el bot6n TV/VIDEO se omitir_ la entrada.
[ejemplo]
Para impedir el aullido y la oscilaci6n de la imagen, detenga la salida de la imagen y el sonido especificados
en este menQ (pag. 24)
[] Seleccione el terminal y ponga "No"
@Seleccione "No" para detener la salida de imagen y sonido.
(Video l/Video 2/Video 3)
@Comp.I/HDMI I/HDMI 2 no pueden dar salida a se_ales de
video, independientemente del ajuste de "Salida a monitor".
Cuando se conecte un equipo (STB, DVD, etc.) a los
terminales HDMI 6 COMPONENT s61ose podran obtener
se_ales de audio. Por los terminales de salida no pueden
pasar se_ales de video.
La televisi6n incluye un decodificador incorporado capaz de proporcionar una visualizaci6n de texto del audio. El
programa que este siendo transmitido debera tener informaci6n de subtitulos ocultos (CC). (pag. 43)
[] Seleccione el elemento y establ_zcalo.
@La configuraci6n en "Analogo" 6 "Digital"
depende de la emisora.
] Seleccione "Si" (cuando no se utilice "No").
Modo
Analogo (Elija el servicio de subtitulos de las emisiones
ana 6g cas.)
CC1-4: Informaci6n relacionada con las imagenes
(Aparece en la parte inferior de la pantalla.)
T1-4: Informaci6n textual
(Aparece en toda la pantalla.)
] (El menQ Subtitulos digitales le permite
Digital
configurar la forma en que va aver los
subtitulos digitales.)
Presione para seleccionar la opci6n.
@"Principal", "Secund.", "Servicio 3", "Servicio 4",
"Servicio 5", "Servicio 6"
[] Para hacer configuraciones de visualizaci6n m&s a fondo en los programas digitales
Seleccione "Ajustes digitales" y pulse OK.
@)Seteccione et etemento y establezcalo.
@Tama_o: Tama_o del texto
@Letra: Fuente del texto
@Estilo: Estilo del texto (Elevado, Deprimido, etc.)
@Frente: Color del texto
@Opacidad frontal: Opacidad del texto
@Fondo: Color de la caja de texto
@Fondo obscuro: Opacidad de la caja de texto
@Contorno: Color del contorno del texto
(Identifique las opciones de configuraci6n en la
pantalla.)
[] Para restablecer la configuraci6n
Seleccione "lnicializar CC" y pulse OK.
@
-4
t--
o
GO
Q=
93
db
93
00
03
93
db
93
93
B
O
m,
O
03
t-
O"
t'-
o
GO
33

[]
Ii
[] f
del te
[]
po
r
El televisor se puede encender/apagar automaticamente en la fecha y a la hora designadas.
® El reloj debera estar puesto en hora antes de hacer los ajustes de la hora de encendido/apagado. (pag. 16)
@El cron6metrode apagadoy el temporizador de encendido/ apagado nofuncionara si se establece "Autoencendido". (pag. 25)
_ Visualice el men_
/
_J
Seleccione "Cron6metro".
0 Cron6metro
Seleccione el temporizador que va a establecer.
34
[] Pulse para salir
de la pantalla de
menu
EXIT
@
[] Para volver a la
pantalla anterior
RETURN
@
Nota
¢ El televisor se apaga
automaticamente
despues de pasar 90
minutos cuando se
enciende mediante
el Cronometro. Esto
se cancelara si se
selecciona Apagar 6 se
presiona una tecla.
Se apaga automaticamente.
ICr0n6metro1 ISe enciende automaticamente.
t (Se pueden establecer 5 temporizadores.)
ICr0nometro5 I
Establezca el temporizador.
[] Para establecer "Apagado" (Temporizador de apagado)
Pulse para que la unidad se apague automaticamente despues de transcurrir un
tiempo preseleccionado.
@0/30/60/90 (minutos)
Establezca
[] Para establecer "Cron6metro 1-5" (Temporizador de encendido/apagado)
Seleccione el elemento y establezcalo.
I Canal IEl canal que va a encenderse
I Dia IEl dia de encendido
OM, LUN, MAR, MIE, JUE, VIE, SAB,
isualiza la fecha futura mas pr6xima)
UN-VIE, SAB-DOM, DIARIO, C/U DOM, C/U LUN,
/U MAR, C/U MIE, C/U JUE, C/U VIE, C/U SAB
I Encender ISeleccione el canal
Seleccione el dia
I Fijar IAjuste del temporizador (Si/No)

Ope
[] f
leq
ipo perif rico
Puede controlar los componentes de otros fabricantes utilizando el control remote de este televisor.
Conecte el equipo extemo al televisor y
apague los equipos externos.
POWER
+
VCR DBS/CBL
G
DVD
HmB
UmB
_DB
m
Pulse simultaneamente ambos botones
durante mas de 3 segundos.
_ Suelte los botones cuando los botones de selecci6n de
equipo empiecen a parpadear.
Seleccione el equipo
con el bot6n de setecci6n de equipo.
@El bot6n seleccionado permanece encendido (los demas
botones no se encienden).
Introduzca el equipo con un c6dige de
mando a distancia de 4 digitos. (pag.39-41)
Confirme el equipo con el mando a
distancia. (pag. 38)
@El dispositivo externo se enciende.
[] Pulse para volver al mode
de TV
TV
mSi el equipo no funciona con mando a distancia
@Cuando su dispositivo tenga un solo c6digo
,@Introduzca de nuevo el c6digo de mando a
distancia.
@Cuando su dispositivo tenga mQltiples c6digos
,@Cambie el c6digo con 0 mas arriba y pruebe de
nuevo
Precauci6n
@El registro fallara si se introduce el c6digo equivocado 6 si tarda mas de 30 segundos en registrarse.
a_
m-=--tC)
C)
::::3__
o-cI)
_..Q
,. t-
Be
"t:3 =C_
0
---_...._
=_
Este procedimiento busca todos los c6digos, y recibe et nombre de "metodo secuencial".
_Despu_s del paso Q de m&s arriba, cambie
el c6digo y pruebe.
POWER
Opere et equipo con et mando a
distancia. (pag. 38)
@Repita hasta encontrar el c6digo.
@Puede que tengan que hacerse muchos intentos
antes de encontrar el c6digo correcto.
_2_Cuando se encuentre el c6digo correcto.
Guardar
35

Conexiones AV recomendadas
Estos diagramas muestran nuestras recomendaciones sobre c6mo conectar et televisor a varios equipos.
Para hacer otras conexiones, consulte las instrucciones de cada equips y las especificaciones (pag. 48).
Para obtener ayuda adicional, visite nuestro sitio Web www.panasonic.com.
[] Para ver im&genes
de c&mara de video
Camara de video
Parte posterior de esta unidad
V CA 60Hz
Cable de alimentacion de
CA (Conecte despues de
haber terminado todas las
demas conexiones.)
Videograbadora
Reproductor DVD _ _
_ _ _ iiiiiiiiiiiiiiiiiiiiiiiiiiiiiiiiiiiiiiiiiiiiii _
/_ Ctavija M3 _ I m AUDO _
I ,ossas os
/ _ J_l auriculares/ I
I _(_ auriculai[es. , , I
L..4_p_.ibJ__' _no summts[raaos} I_ _.lJ
\!L.J"J
Tv por 1
ReceptordeI
0
[] Grabadora DVD /
Videograbadora
6
f_
--_,_' Cable HDMI
Cable
HDMI-DVI
conversi6n +
Cable de audio
36
Amplificador OPTICAL IN
Cable 6ptico digital de audio
Nota
_ Las sefiales de entrada de video y audio conectadas
a un terminal especificado en "Salida a monitor" (p_gs.
32) no pueden salir por los terminales "OUTPUT".
Sin embargo, si se obtendra salida de audio por el
terminal "DIGITALAUDIO OUT".
®Para impedir el aullido y la oscilaci6n de la imagen,
establezca la configuraci6n "Salida a monitor" cuando
conecte la videograbadora mediante una conexi6n en
bucle. (pag. 24, 32)
[] Para ver DVDs
Reproductor DVD
Receptor digital multimedia
@Cuando se conecte un equips (STB, DVD, etc.) a los
terminales HDMI 6 COMPONENT s61ose podran
obtener sefiales de audio. Por los terminales de
salida no pueden pasar sefiales de video.
@Cuando se reciban sefiales de canales digitales,
todos los formatos digitales se convertiran en sentido
descendente a video NTSC compuesto para salir por
los terminales OUTPUT.

Siga los diagramas de conexiones de abajo para hacer el
control HDAVI de un solo equipo AV como, pot ejemplo, una
grabadora DIGA/DVD, un equipo de cine para casa RAM 6
un reproductor de cine para casa de Panasonic.
Consulte la p&gina 26-27 para conocer la configuracion del
merit] Ajuste e informaci6n de control adicional.
® Los cables HDMI y/u opticos no son suministrados.
se cambia la conexi6n (o configuraci6n) del equipo
i compatible con el control HDAVl, desconecte la alimentaci6n
i de esta unidad y vuelva a conectarla mientras la alimentacion
i de todos los equipos esta conectada (para que esta unidad
reconozca correctamente el equipo conectado) y compruebe
que funcione el equipo DIGA, el equipo de cine para casa
RAM y el reproductor de cine para casa.
Nota
@Se recomienda HDMI 1.
Cuando se conecta a HDMI 2, ponga el modo de entrada en HDMI 2 (pag. 20)inicialmente antes de conectar a
HDMI 2. Despues de hacer la conexi6n, confirme las funciones de control de HDMI (pags 26-27).
mConexi6n de esta unidad a una
grabadora DVD y amplificador AV
Cuando utilice un receptor de audio-
video "EZ Sync" y una grabadora DIGA
compatible, utilice una conexi6n en
cadena como se muestra abajo.
Salida de audio
digital
HDMI
(AV OUT)
[] ConexiSn de esta unidad a DIGA, sistema de cine para
casa RAM o reproductor de cine para casa
@Para DIGA: Conecte con cable HDMI
@Para equipo de cine para casa RAM 6 reproductor de cine para casa:
Conecte con cable HDMI y con cable de audio.
Si no conecta el cable de audio no puede oir el programa de
televisi6n a traves del sistema de cine para casa.
6
° o
Cable HDMI i
HDMI AUDIO HDMI
(AV IN) IN (AV OUT)
HDMI
(AVOUT)
®
©
O
(1)
x
0
o9
<-
=_
o
B
Amplificador AV de DIGA Equipo de cine para casa DIGA VideocSmara HD
Panasonic (Grabadora DVD de RAM de Panasonic/ (Grabadora DVD de de Panasonic
Panasonic) Reproductor de cine para Panasonic)
casa de Panasonic
@Con esta unidad se puede controlar un amplificador AV y un equipo DIGA.
@Aseg0rese de conectar el amplificador AV entre esta unidad y el equipo DIGA.
[] Configuraci6n de esta unidad despu_s de la conexi6n
Despues de hacer las conexiones como se muestra arriba, ponga "EZ Sync" (bajo "Ajuste EZ Sync") en "Si"
utilizando el men0 Ajuste (pag. 26-27).
Nota
@Los equipos HDMI individuales tal vez requieran configuraciones de ment_s especificas adicionales para cada
modelo. Consulte sus manuales de instrucciones respectivos.
@Cuando el audio de otro equipo conectado a esta unidad a traves de HDMI salga utilizando "DIGITALAUDIO OUT"
de esta unidad, el sistema cambiara a audio 2CH.
(Cuando conecte a un amplificador AV a traves de HDMI podra disfrutar de un sonido de calidad mas alto.)
37

0peracionesdeimando
istancia/Listadec6dig0s
A continuaci6n se explica c6mo controlar dispositivos externos con el mando a distancia.
® Registre los c6digos de mando a distancia (pag. 35) si quiere controlar un dispositivo externo de otro fabricante. (pag. 39-41)
Nota
® La operaci6n puede resultar imposible dependiendo de la capacidad de memoria disponible del mando a
distancia. Este mando a distancia no ha sido disedado para controlar todas las operaciones de todos los modelos.
I Lista de operaciones del mando a distancia
Esta tabla define que teclas pueden utilizarse despues de la programaciSn (si resulta necesario)
estando en el modo de mando a distancia seleccionado, VCR, DBS/CBL, DVD.
38
POWER
Alimentaci6n
SAP
_ ' __
TV
v_ televisidnC°nmutad°rde entrada de
EXIT
RNIJ_I
_ ' --
R
-
G
B
Y
oo a,so eriorii erior
el ° i a' aja °televisorvolume
_PEffr
_ ' __
FAVORITE
_ ' --
REe#_kL
Visualizaci6n en pantalla
_ Silenciamiento de televisidn
_B 0-9
_ ' _
r_S_P--n
WNCR
Conmutador TV/VCR
_ SEARCH-_
_ Retroceso/Avance rapido
Grabaci0n de videograbadora
STOP
Parada
PAUSE
Pausa
PLAY
\ Reproducci6n
Atimentaci6n
Lista
Conmutador de entrada de
televisi6n
MenQ
Salida
arriba!abajo/derecha/
izquierda
Seleccione
Guia
PPV/VOD
Rojo
Verde
Azul
Amarillo
Canal superior/inferior
Subida/bajada del volumen
del televisor
Aspecto
Favorito
Informaci6n
Sitenciamiento de televisi6n
0-9
01timo canal
Subcanal
Pagina abajo/arriba
Conmutador TV/DBS
Retroceso/Avance rapido
Grabaci6n PVR *_
Parada
Pausa
Reproducci6n
Atimentaci6n
Lista
Conmutador de entrada de
televisi6n
MenQ
Salida
arriba!abajo/derecha/
izquierda
Seleccione
Guia
PPV/VOD
A
B
C
D
Canal superior/inferior
Subida/bajada del volumen
det televisor
Aspecto
Favorito
Informaci6n/Visualizaci6n/
OSD
Silenciamiento de televisi6n
0-9
01timo canal
MQsica
Pagina abajo/arriba
Conamutador TV/CBL
Retroceso/Avance rapido
Grabaci6n PVR *_
Parada
Pausa
Reproducci6n
Alimentaci6n
DVD AUDIO
Conmutador de entrada de
televisi6n
Funciones
arriba/abajo/derecha/
izquierda
Introducir
SubmenQ
Retorno
Rojo
Verde
Azu!
Amarillo
Canal superior/inferior
Subida/bajada det volumen
del televisor
Navegador directo
Visualizaci6n en pantalla
Silenciamiento de televisi6n
0-9
Selecci6n de unidad
PROG (Subcanal)
Salto hacia adelante/atras
Retroceso/Avance
Grabaci6n
Parada
Pausa
Reproducci6n
_1: Tipo de combinacion

[] Lista de c6digos de rnando a distancia
A-Mark 0008, 0144 Gibralter 0003
Phifipa Torx 3003
GoldStar 0144
Tristar 3883
Action 0237 Hitachi 0012
ii_i_iiiiiiiiiiiiiiiiiiiiiiiiiiiiiiiiiiiiiiiiiiiii
Americast
0317,1305
0003, 0008, 0009 Prism
US Electronics 3003, 0008, 0276
0899 Jerrold 0003, 0012, 0276, Quasar 0000 ,
i
BCC 0276 Me
Mitsubishi
British Telecom 0003 _to_i
Clearmaster 0883 Multitech
Cool Box 0883 Novaptex 0008
son,!
Pace 0008, 0237, 0877, Sprucer
Director 0476
GE 0144
Belt ExpressVu
Crossdic
0476, 0810
RCA
0003
Runoo
0883 Scientific Atlanta
1877
Pace 0237, 1877
Videoway
1256
Vision
oooo
Zenith
0000,0003,0008,
0012,0237,0477,
0877,1877
0144
3OOO
3883
3000,0525,0899
ii
0276
1256
Sony 1006
RCA 1256 Thomson
Motorola
.............................................Generat 0869
1109 instrument Next Level
Hitachi 0749, 0819, 1250 Panasonic
HTS 0775, 1775 Phifips
Dish Network 0775, 1005, 1505,
System 1775
Echostar 0775, 1005, 1505,
1775
Funai 1377
lnnova
JVC
Magnavox
Memorex
DirecTV
1392, 1442, 1640
A-Mark
Admiral
0099, 0392, 0639, Dishpro
1076, 1142, 1377,
Aiko
Alba
Allegro
American High 0035, 0081 Capehart
_ra :
0099
Primestar
0722, 0724 RadioShack
0724
1256
0856, 0869 Samsung
0869
0247, 0701, 1786 Sony
0099, 0722,0724, StarTrak
0749, 0775,0819,
1076, 1142, 1442, Tivo
1749
0869 UltimateTV
0566, 0775_0869 Voom
1108,1109_1142_
1276,1377,1442,
1609
3639, 1639, 1640
3869
1142,1442
3869
0000, 0037, 0240, Asha 0240 Carver
0278
Audiovox 0037, 0038, 0278 Cineral 0278
0039, 0047, 0048, i!i :: Cybernex
0060, 020910479 Beaumaik 0240
_ Daewoo
0278 _ 0_
Broksonic 0002, 0121,0209,
0209, 0278 0479, 1479 Dell
Colt 0000
0039 Candle 0037, 0038 DirecTV
................................................Criterion 0000 B i
Durabrand
0278
3240
3037, 004& 0278,
1278
1972
3739
3038, 0039
O
o.
0
oo
('D
©
F-
©,
©
39

Operacionesdelmando
distancia/Listadec6dig0sic00t 0, c 6°l
[] Lista de c6digos de rnando a distancia
Eiectrohome 0000, 0037, 0043, Maqnin
0060, 0209, 0240
Marta
Emerald 0121,0184
Matsushita
Emerson 0000, 0002, 0037,
0943, 0121, 0184, MEI
0209, 0240, 0278,
0479, 1278, 1479
Fuji 0033, 0035
Metz
Funai 0000, 0037, 0278
O24O
ay
Midland 0240 Ricavision
Minoita 004,2 Samsang
Gemini 0060
Go Video 0240, 0432, 0614
iiiiiiiiiiiiiiiiiiiiiiiiiiiiiiiiiiiiiiiiiiiiiiiiiiiiiiiiiiiiiiiiiiiiiiiiiiiiiiiiiiiiiiiiiiiiiiiiiiiiiiiiiiiiiiiiiiiiiiiiiiiiiiiiiiiiiiiiiiiiiii
Goodmans
te:
Granada
0240 Thomson
0037 RadioShack 0000, 0035, 0037 Tivo
0947, 0048, 0162,
0035, 0162, 0081 0240
............................................ TNIX
0035 Randex 0037
0037 Realistic 0000, 0035, 0037,
0047, 0048, 0121,
0162, 0240, 0278
1972
Unitech 0240
0000, 0038, 0045,
0060, 0240, 0432, Vector Research 0038, 0184
0739, 1014
0045
Motorola
MTX
0000, 0037, 0081,
0278 NAD
0042, 0081 Nikko
0000 Nishi
Ni
Hewlett Packard 1972 Noblex
Hitachi 0000, 0035, 0037,
0042, 0045, 0089
t972
HP 1972
Humax 0739
0060
0618, 0636, 0739,
1996
0037
To
Toshiba 0O00,0043, 0045,
0209, 0240, 0845,
1008, 1145, 1972,
1996
To i ._
Totevlsion 0037, 0240
To_
Trix 0037
0000, 0240
0000
0035, 0048 Sanky 0039, 0048
Videosonic
oooo iew i
VHIBiB
0240 Sanyo 0000, 0047, 0240, Vo_
0479 Wards
0037, 0278
Sears 0000, 0033, 0035,
0037, 0039, 0042,
0043, 0045, 0047,
0048, 0060, 0067,
0162, 0209, 1237
World
Yamaha 0038
Shintom 0000, 0039, 0240
24_
Siemens 0037
1972
Orion
0240
0240
0035, 0162
Panasonic
Hytek 0000, 0047
BU
ITT Nokia 0240
Jensen
KEC 0037, 0278 Pentax
0000,0002,0121,
0184, 0209, 0240,
0278 0479 1479 .......................................................................................................................................
, , ZT Group
0000,0035,0162, Singer
0225,06t4,0616, iii_i_i_i_i!_iij_!_!ii!!i!!i!!i!!i!!i!!i!!i!!i!!i!!i!!i!!i!!i!!i!!i!!i!!i!!i!!i!!i!!i!!i!!i!!i!!i!!i!!i!!i!
1035,1062,1244 Sony
Stack 9
0037, 0240
0000,0032,0033,
0035,0047,0067,
0636,1232,1972
1972
OO42
iiii_i_!;_! !_!_ii_!_:_!g_i_i_i_i_i_i_i_i_i_i_i_i_i_i_i_i_i_i_i_i_i_i_i_i_i_i_i_i_i_i¸iii_iiB_!i!i!i!i!i!i!i!i!i!i!i!i!i!i!i!i!i!i!i!i!i!i!i!i!i!i!i!i!i!i!i!i!i!i!i!i!i!i!i!i!i!i!i!i!i!i!i!ii_:_:_i_iiiii!ii_:_!_i_!i_i:ii_;i_ii_i_i_i::_;iii!i!!!j!sv2ooo
Kodak 0035, 0037 EVA
........................................................................................................................................................Philips OOO0,0035, 0048, Sylvania
LG
Lloyd's
Logik
LXI
0037, 0038, 0240 0045, 0081, 0162,
0209, 0616,0618,
0739
0000, 0038, 0240 Systemax
_iJ_
0000, 0240 Pioneer
0O00,0037, 0042,
0067 Portland 0278 Teac
Profit
0000
0000,0035,0043,
0081,1781
1972
OOO0
0000,0067
iJ!!iiiiiiiiiiiiiiiiiiiiiiiiiiiiiiiiiiiiiiiiiiiiiiiiiiiiiiiiiiiiiiii_i,
0000, 0037, 0240, Proscan 0060, 1060 ................................................................................................................................................
0278, 1278 Teknika 0000, 0035, 0037
Pulsar 0039, 0240, 0278 ....................................................
_24_: Tevion 0479
Quartz 0035, 0047
0000,0060,0033,
0035,0037,0038,
0042,0043,0045,
0047,0048,0081,
0240, 0479
0002,0209,0479
Magnasonic
40

_ _ _ __ _ _ -, , _s¸¸ _-_ _, _
Hughes Network 0739
Systems 0739
ADS 1972
Humax 0739 1972, 1996
DirecTV iBUYPOWER 1972 1972
Hewtett Packard Media Center PC 1972 ZT Group 1972
Mind 1972 Stack 9 1972
HP 1972
3D LAB
Akai 0695, 0899
Sansai 0695
AIco 0790 GoldStar 0741, 0869 NEC 0785_0869
Schwaiger 0752
Apex Digital 0533, 0672_1020, eradiente 0490, 0651 Optimus 0571
1056_1061
Harman/Kardon 0582 Palsonic 0672 Shinsonic 0533_0839
Audiovox 0790 0_
................................................................................................Hiteker 0672 Sonic Blue 0573_0869
Blue Sky 0695
.....................................................................................................lntegra 0571, 0627
Broksonic 0695 Philips 0503_0539, 0646, Sylvania 067& 1268
JVC 0558, 062& 0867, 0675, 1267, 1354
1164 Teac 0571,0790
Celestial 1020 Polaroid 1020_1061
Kenwood 0490, 0534 Tevion 0651
CineVision 0869 Presidian 0675
Kloss 0533 Thomson 0522
Creative 0503, 0539 Proscan 0522
Lasonic 0627
Radionette 0741 Universum 0591
Daewoo 0784, 0869_1172 LG 0591, 0741_0869
RCA 0522 0571, 0790, US Logic 0839
Digitrex 0672 Loewe 0741 082£ 1022, 1132 Ve i_r r
_ii_i ::,_:_ Xbox 0522
Dual 0675 Magnavox 0503, 0539_0646, Reoc 0752 Ya _
0675, 1268 Zenith 0503, 0591, 0741_
Emerson 0591, 0675_1268 _ _tz Rotei 0623 0869
Mclntosh 1533
Entivo 0503, 0539 Sampo 0752
Memorex 0695
Firstiine 0651
O675
Funai
JVC
1164 Philips 0646
O675
O
"Z3
93
o.
0
co
t_
('D
3
0_
0
0
F-
0
©
41

Listadeclasificacio
paraelblo
La tecnotogia "V-chip" le permite bloquear canales 6 programas segOn calificaciones estandar
estabtecidas por la industria del entretenimiento. (pag. 29)
[] GRAFICA DE CLASIFICACIONES DE PELiCULAS PAPA LOS EEUU (MPAA)
CONTIENE PROGRAMAS SIN RESTRICCIONES Y PROGRAMAS NA (NO APLICABLES). Las pelicutas no tienen restricciones
No 6 tas restricciones no son aplicables.
G POBLICO EN GENERAL. Se admiten a todos tos pL_blicos.
PG SE SUGIERE LA SUPERVISION DE LOS PADRES. AlgOn material puede no ser apropiado para tos nimos.
PG.13 SE RECOMtENDA ENCARECIDAMENTE hA SUPERVISION DE LOS PADRES. AIgQn material puede no ser apropiado para los
nimes menores de I3 amos.
R RESTRINGIDAS. Losj6venes menores de 17afios y los niSosnecesitanestar acompafiados de sus padres 6 unapersona adultaque los supervise
NC-17 NO SE ADMITE AL POBLICO MENOR DE I7 ANOS.
X ADULTOS SOLAMENTE.
m GRAFICA DE CLASIFICACIONES DE PROGRAMAS DE TV PAPA LOS EEUU (U. S. TV)
NR m TV-NR No clasificado.
(Siclasificaci6n
TV-Y Todos tos nimos. Los temas y etementos en este programa estan especialmente
disefiados para un pt_blico infantil, incluyendo nimosde 2-6 amos.
Youth
TV-Y7 Dirigido a nifios mayores. Los temas y elementos en este programa pueden incluir
Iigera violencia fisica 6 c6mica, 6 puede asustar a nifios menores de 7 afios.
Audiencia General. Contiene poca 6 nada de violencia, nada de lenguaje
TV-G fuerte, y poco 6 nada de dialogo 6 situaciones con contenido sexual.
Guia de los padres sugerida. El programa puede contener lenguaje obscene
TV-PG infrecuente, violencia timitada, diatogos 6 situaciones sexualmente sugestivas.
Guidance
TV-14 Advertencia a tos padres. Este programa puede contener temas sofisticados,
contenido sexual, lenguaje inapropiado, y violencia mas intensa.
TV-MA
42
@Viewable (Visible)
@Blocked (Bloqueado)
@Viewable (Visible)
@Blocked (Bloqueado)
@FV (BIoquear FV)
@Viewable (Visible)
@Blocked (Bloqueado)
@Viewable (Visible)
@Blocked (Bloqueado)
@D,L,S,V (Todas seleccionadas)
@Cualquier combinaci6n de D, L, S,V
@D,L,S,V
(Todas seleccionadas)
@Cualquier combinaci6n de D, L, S, V
@L,S,V (Todas seleccionadas)
@Cualquier combinaci6n de L, S, V
$61o audiencia Madura. Este programa puede contener temas para adultos,
lenguaje profano, violencia grafica y contenido sexual expticito.
FV: FANTASIA/CARICATURAS CONVIOLENCIA V: VIOLENCIA S: SEXO L: LENGUAJE OFENSIVO D: DIALOGO CON CONTENIDO SEXUAL
m GRAFICA DE CLASIFICACIONES PAPA INGLC:S DE CANADA (C. E. L. R.)
Exenta - La programaci6n exenta incluye: noticias, deportes, documentales y otros programas de informaci6n, entrevistas,
E videos musicales y programas de variedades.
C Programaci6n para nimes menores de 8 amos. Sin tenguaje ofensivo, desnudos ni contenido sexual.
C8+ Programaci6n considerada generalmente aceptable para niSos de 8 aSosy rnenos. Sin bIasfemias, desnudos ni contenido sexual.
G Programaci6n general para todos los pL_blicos.
PG Se sugiere ta supervisi6n de los padres. AIgt3n material puede no ser apropiado para tos nimes.
14+ La programaci6n contiene temas que pueden no ser apropiados para el pL_blicomenor de I4 amos. A los padres setes avisa que
no deben dejar ver estos programas a tos nimos ni a los j6venes menores de 14 amos.
18+ Mayores de 18 amos. Programaci6n limitada a tos adultos. Contiene escenas de violencia constante 6 de excesiva violencia.
m GR/_,FICA DE CLASIFICACIONES PAPA FRANCES DE CANADA (C. F. L. R.)
E Exenta - La programaci6n exenta.
G General- Programaci6npara pOblicodetodas lasedades. Nocontieneviolencia, 6el contenidodela misma es rninirno6se muestraapropiadamente.
8 ans+ 8+ General - No se recomienda para los nimes pequemos. La programaci6n es para un pL_bticodiverse, pero contiene violencia de
vez en cuando. Se recomienda la supervisi6n de aduttos.
La programaci6n tal vez no sea adecuada para nimos menores de 13 amos. Contiene pocas escenas de violencia 6 una 6 mas
13 ans+ escenas suficientemente violentas como para afectarlos.
Se recomienda encarecidamente ta supervisi6n de personas adultas.
i 6 ans+ La programaci0n puede que no sea apropiada para menores de 16 amos.Contiene frecuentes escenas de violencia 0 de mucha violencia.
18 ans+ Programaci6n limitada a tos adultos. Contiene escenas de violencia constante 6 de mucha violencia.
Precauci6n
@El sistema V-Chip que se utiliza en este aparato es capaz de bloquear los programas "NR" (no clasificados, no
aplicables y ninguno) de acuerdo con las normas de la FCC indicadas en la Secci6n 15.120(e)(2). Si se elige la
opci6n de bloqueo de programas "NR", "podran producirse resultados inesperados y posiblemente confusos, y
usted tal vez no pueda recibir anuncios de emergencia 6 ninguno de los tipos de programaci6n siguientes".
• Anuncios de emergencia (mensajes EAS, avisos del tiempo y otros)
• Programas locales • Noticias • Politica • Anuncios de servicios pQblicos • Religi6n • Deportes • Tiempo

Informacibn t cnica
@Para ver los subtitulos de la emisi6n digital, coloque la relaci6n de aspecto en "COMP".
(Si esta viendo con H-LLENO, JUSTO, ACERC 6 4:3 faltaran caracteres.)
@Los subtitulos no se visualizan cuando usted utiliza la conexi6n HDMI.
@Si se utiliza para visualizar 6 grabar un equipo anal6gico conectado, los subtitulos (CC) deberan encenderse/
apagarse en el equipo conectado.
El ajuste del modo CC del televisor no afectara a la entrada anal6gica.
Si un programa digital sale en formato anal6gico, los datos de CC tambien saldran en formato anal6gico.
Si se utiliza un equipo conectado digitalmente para la entrada, los datos de CC deberan activarse en el quipo
conectado o en el televisor.
Si se activan los CC en el equipo conectado yen el televisor, los subtitulos de cada unidad se superpondran.
Los controles de aspecto le permiten elegir el aspecto dependiendo del formato de la seSal recibida y sus
preferencias. (pag, 19) (ej.: en el caso de una imagen 4:3)
@COMP
1_4_1 I-*------------------16------_1
Amplia horizontalmente la imagen 4:3 hasta los bordes
laterales de la pantalla.
(Recomendada para la imagen anamorfica)
@JUSTO
I_ 4 _1 1_16_1
" lo\.__Jo!
Alarga para justificar la imagen 4:3 alas cuatro esquinas
de la pantalla.
(Recomendada para la emision de television normal)
@H-LLENO
I 4 I I 16 I
Amplia horizontalmente la imagen 4:3 hasta los bordes laterales
de la pantalla. Los bordes taterales de ta imagen se recortan.
@4:3
1_4_
Estandar
@ACERC
1_------4------_1 I 16_1
Amplia la imagen 4:3 para que ocupe toda la pantalla.
(Recomendada para Letter Box)
Nota
@480i (4:3), 480i (16:9), 480p (4:3), 480p (16:9):
COMP, JUSTO, 4:3 6 ACERC
@1080p/ 1080i/ 720p: COMP,H-LLENO,JUSTO,4:36ACERC.
@Cuando la seSal es de 720p/1080i/1080p, el modo de
aspecto cambia automaticamente a "COMP" despues
de apagar el televisor, despues de cambiar el modo de
entrada o despues de cambiar la resoluci6n de la seSal
a otra que no sea de 720p/1080i/1080p.
@Ajuste Acerc.
La posici6n y el tamaSo vertical de la imagen se pueden ajustar en "ACERC".
_Seleccione "Autoencendido" en el menQ "lmagen". (pkg. 22-23)
_2_Posici6n V: Ajuste de posici6n vertical _3)TamaSo V: Ajuste de tama5o vertical
@
r_
o3
o
0o
...._
©
0
6"@
m
",\\
@Para restablecer la relaci6n de aspecto ,@ ,, (OK)
43

I
m
t cnl
(Continuaci6n)
Puede disfrutar de su equipo de cine para casa conectando un decodificador Dolby Digital (5.1 canales) y un
amplificador "Multi Canal" a los terminales DIGITALAUDIO OUT.
Precauci6n
® Dependiendo de su reproductor DVD y del software DVD-Audio, la funci6n de protecci6n del copyright tal vez se
active y apague la salida 6ptica.
@Los altavoces externos no se pueden conectar directamente a los terminales OUTPUT.
@Cuando se seleccione un canal ATSC, la salida procedente de la toma DIGITALAUDIO OUT sera Dolby Digital.
Cuando se seleccione un canal NTSC, la salida sera PCM
Las conexiones HDMI para algunos equipos Panasonic le permiten hacer interfaz automaticamente. (p_g. 26)
® Esta funci6n puede no funcionar normalmente dependiendo de la condici6n del equipo.
®Con esta funci6n activada, aunque el televisor este en el modo de espera, el equipo podra set controlado pot otros
mandos a distancia.
@Cuando empieza la reproducci6n puede que no se disponga de imagen ni sonido durante los primeros segundos.
@Cuando se cambia el modo de entrada puede que no se disponga de imagen ni sonido durante los primeros
segundos.
@Cuando se ajuste el volQmen del equipo se visualizara la funci6n del volQmen.
®Si conecta la misma clase de equipo al mismo tiempo (por ejemplo: una DIGA a HDMI 1 ! otra DIGA a HDMI 2),
EZ Sync TMestara disponible para el terminal que tiene el nOmero mas pequefio.
@Si conecta el equipo que tiene la funci6n "HDAVI Control 2" al televisor con un cable HDMI, el sonido procedente
del terminal DIGITAL AUDIO OUT podra salir como sonido ambiental multicanal.
HDMI (interfaz multimedia de alta definici6n) le permite disfrutar de imagenes digitales de alta definici6n y de sonido
de alta calidad conectando el televisor y los dispositivos.
El equipo compatible con HDMI ('1) que tenga un terminal de salida HDMI o DVl, como, por ejemplo, un receptor
digital multimedia 6 un reproductor DVD, podra ser conectado al terminal HDMI utilizando un cable que cumpla con
HDMI (funci6n completa).
@HDMI es la primera interfaz AV completamente digital del mundo para el consumidor que cumple con un estandar
de no compresi6n.
@Si el dispositivo externo s61otiene una salida DVI, conecte al terminal HDMI mediante un cable adaptador DVI a
HDMI (*2).
@Cuando se utiliza el cable adaptador DVI a HDMI, conecte el cable de audio al terminal de entrada de audio.
@Los ajustes de audio se pueden hacer en la pantalla del menO "Entrada HDMI I" 6 "Entrada HDMI 2" (pag. 22)
Frecuencias de muestreo de la serial de audio aplicable (LPCM): 48 kHz, 44,1 kHz, 32 kHz
('1): El Iogotipo HDMI se visualiza en un equipo compatible con HDMI.
('2): Pregunte en el establecimiento del vendedor de equipos digitales local.
@No se asume el funcionamiento con un PC.
@Todas las sefiales se reformatean antes de visualizarse en la pantalla.
@Si el equipo conectado tiene una funci6n de ajuste de relaci6n de aspecto, ajuste la relaci6n de aspecto a "16:9".
@Este conector HDMI es de "tipo A".
@Estos conectores HDMI son compatibles con la protecci6n de los derechos de autor de HDCP (protecci6n de
contenido digital de elevado ancho de banda).
@Un dispositivo que no tenga terminal de salida digital podra conectarse al terminal de entrada de
"COMPONENT", '% VIDEO" 6 "VIDEO" para recibir sefiales anal6gicas.
@El terminal de entrada HDMI s61opuede utilizarse con las sefiales de imagen siguientes:
480i, 480p, 720p, 1080i y 1080p. Procure que concuerde con el ajuste de salida del dispositivo digital.
@Para conocer detalles de las sefiales HDMI aplicables, vea la pagina siguiente.
44

* Marca: SeSal de entrada aplicable para componente (Y, PB, PR) HDMI
525 (480) /60i 15,73 59_94 * * ...............
525 (480) 160p 31,47 59,94 * *
750 (720)/60p 45,00 59,94 ............... .............................* ...................................................._ ....................
1125(1080) t60{ [ 33,75 [ 59,94 * *
1.125 (1:080)160p 67,50 60,00
Nota
@Las seSales que no sean las mostradas arriba pueden no visualizarse correctamente.
@Las se5ales de arriba son reformateadas para poder verlas de forma 6ptima en su pantalla.
@Vivid0(predeterminad0):Proveeuncontrastey una nitidezde imagenrealzadosparaver programasen una habitaci6nbieniluminada.
@Estandar: Recomendado para ver bajo condiciones normales en una habitaci6n con iluminaci6n atenuada.
@Cinema: Para ver peliculas en una habitaci6n oscura. Proporciona una imagen suave, como la del cine.
@Usuario: Personaliza cada elemento segOn sus preferencias.
rite
m
|
m
|
to
Desenchufe primero la clavija del cable de alimentaci6n de CA del toma de corriente.
El frente del panel de la pantalla ha recibido un tratamiento especial. Limpie suavemente la superficie del panel
utilizando un paso suave.
@Si la superficie esta especialmente sucia, limpie con un paso suave empapado en agua 6 agua mezclada con
una peque_a cantidad de detergente neutro, frote uniformemente con un paso seco del mismo tipo hasta que la
superficie quede completamente seca.
@No raye 6 golpee la superficie del panel con sus u_as u otros objetos duros ya que la superficie puede da_arse.
Ademas, evite el contacto con sustancias volatiles tales como rociadores de insecticida, disolventes y diluyentes
de pintura, de Io contrario puede verse afectada la calidad de la superficie.
®
-""h
Si el mueble se ensucia, limpie con un paso suave y seco. o @
@Si el mueble esta muy sucio, empape el paso en agua mezclada con una pequeSa cantidad de detergente neutro y 3
escurra el paso hasta eJiminar el agua. Utilice el paso para limpiar el mueble y seque frotando con un paso seco.
0.::3
@No permita que ningOn detergente entre en contacto directo con la superficie del televisor LCD. o, _"
Si las gotas de agua entran en el interior del aparato, pueden surgir problemas en el funcionamiento. _
@Evite el contacto con sustancias volatiles tales como rociadores de insecticida, disolventes y diluyentes de pintura _,, _"
debido a que puede verse afectada la superficie del mueble y puede desprenderse el revestimiento. Tampoco deje o _=.
la superficie por mucho tiempo en contacto con articulos de caucho 6 PVC. _.
O
@Limpieza
Limpie las superficies pasando un paso blando y seco. Si la unidad esta muy sucia, limpie con un paso empapado
en agua con una peque_a cantidad de detergente neutro y frote con un paso seco. No utilice productos tales como
disolventes, diluyente 6 cera del hogar para la limpieza ya que pueden da_ar el revestimiento de la superficie.
(Si utiliza un paso con tratamiento quimico, siga las instrucciones que vienen con el paso.)
@No pegue cinta adhesiva 6 etiquetas ya que pueden ensuciar la superficie del pedestal. No permita el contacto
durante mucho tiempo con productos de goma, vinilo 6 similares. (Hacerlo puede causar deterioros.)
Limpie la clavija con un paso seco a intervalos frecuentes. (La humedad y el polvo pueden causar un incendio o una
descarga electrica.)
45

tas frecuentes
Antes de solicitar reparaciones 6 ayuda, siga las indicaciones siguientes para solucionar el problema.
Si el probtema persiste, p6ngase en contacto con su concesionario de Panasonic 6 con et centro de
servicio de Panasonic local para soticitar ayuda. Para obtener ayuda adicionat,
p6ngase en contacto con nuestro sitio Web en www.panasonic.com/contactinfo
46
0_6 imageries con _
° sombra (ruido) 0
@Compruebe la posici6n, la
orientaci6n y la conexi6n de la
antena.
Interferencia 6
canales digitales
congelados
(sonido intermitente)
@Cambie la orientaci6n de la antena
para los canales digitales.
@Compruebe "Medidor de sepal"
(pkg. 31). Si la sepal es debil,
compruebe la antena y consulte a
su concesionario local.
El panel LCD se
mueve un poco
cuando se empuja
con un dedo, y es
posible que se oiga
un ruido.
Esto no es un fallo de funcionamiento.
@Para impedir que se daSe el panel
al moverlo este esta instalado con
un poco de flojedad.
i
,'La irnagen se ve
distorsionada cuando
el equipo se conecta a
tray,s de HDMI.
@Esta conectado correctamente el cable
HDMI? (pkg. 36-37)
@Apague el televisor y el equipo y luego
vuelva a encenderlos.
@Compruebe una seSal de entrada
procedente del equipo. (pkg. 45)
@Utilice un dispositivo que cumpla con la
norma EIA/CEA-861/861B.
El mando a distancia no
funciona.
%
@&Estan instaladas correctamente las
pilas? (pkg. 6)
@&Se ha agotado la bateria?
@Para controlar equipos externos de otros
I_ fabricantes, registro los c6digos de mando
a distancia. (pkg. 35)

Si hay un problema con su televisor, consutte la tabla de abajo para determinar los sintomas, y luego
efectQe la comprobaci6n sugerida. Si eso no resuetve el problema, p6ngase en contacto con su
concesionario Panasonic, indicandole el nQmero det modeto y el nQmero de serie del televisor (ambos
situados en la parte posterior del televisor).
imagen desordenada y f:_ ®Compruebe os productos eectrcos cercanos
ruidosa: " "
p (automov , motoc c eta, ampara f uorescente) /
Solo se visualizan puntos
en lugar de imagenes.
No se produce imagen
ni sonido.
® &Esta el cable de alimentaci6n de CA enchufado en la
toma de corriente?
® &Esta encendido el televisor?
@Compruebe el menQ Imagen (pag. 22) y el volQmen.
No se produce sonido.
El sonido es extraho.
La unidad principal est_
caliente.
s"
@&Estanconectadoscorrectamenteloscablesdelosaltavoces?(pag.36)
® &Esta activo "Silenciamiento del sonido"? (pag. 15)
®&Esta ajustado al minimo el volOmen?
® &Esta "Salida altavoz" en "No"? (pag. 22)
®Cambie los ajustes "SAP". (pag. 18)
@Compruebe los ajustes "Entrada HDMI 1"ou "Entrada HDMI 2".
® Ponga "SAP" en "Estereo" 6 "Mono".
®Compruebe el dispositivo HDMI conectado a la unidad.
® Ponga el ajuste de audio deldispositivo HDMI en "Linear
PCM."
®Si la conexi6n de sonido digital tiene un problema,
CLa unidad ,principal radia calor y algunas piezas se
calientan. Este no es un problema de rendimiento o
oalidad.
Haga la instalaclon en un lugar blen ventdado.
No tape los orificios de ventilaci6n del TV con un mantel,
, etc., y no Io ponga encima de ningQn otro equipo.
®
"O
@
(.{3
t-
Oo
ci)
0
C
Go
47

pec
[]
|
48
AC 120V, 60Hz
Uso medio 116W 132W
Corriente rn_×ima 2,1A 2,3A
Condici6n de espera 0,1 W 0,1 W
Relaci6n de aspecto 16:9
Tama6o de pa,taiia _isible 26,0" DIAGONAL (66,1 cm DIAGONAL) 31,5 " DIAGONAL (80,0 cm DIAGONAL)
;: :: X_:., 576mm x 324mm x 661 mm 698 mm x 392mm x 800 mm
!_n! x AL U!agOna!! (22,7 " x 12,8 " x 26,0 ") (27,5 " x 15,4 " x 31,5 ")
(N merodepi,eles)ilo491088ii1366iwix768iH))[41098x768Punios]
Aitavoces 2 altavoces de I vias
Salida de audio 20 W (10 W x 2) (10% de distorsi6narm6nica total)
Auriculares Conector M3 (3,5 ram) x I
VHF/UHF: 2-69, CATV: 1-135
Temperatura:
Humedad:
32 °F- 95 °F (0 °C- 35°C)
20 % - 80 % RH (sin condensaci6n)
VIDEO:
INPUT 1.2 S VIDEO:
AUDIO L - R:
iNPUT 3 VIDEO:
AUDIO L - R:
TIpoRCAPINx 1 1,OV[p-p](7513)
Mini DIN de 4 contactos Y: 1,0 V [p-p] (75 [3), C: 0,286 V [p-p] (75 [3)
TipoRCAPINx2 0,5V[rms]
TipoRCAPINx 1 1,0 V [p-p] (7513)
TipoRCAPINx2 0,5V[rms]
COMPONENT Y: 1,0 V [p-p] (incluyendo sincronizacion)
VIDEO INPUT PB, PR: +0,35 V [p-p]
AUDIO L-R: Tipo RCA PIN x 2 0,5 V [rms]
HDMI 1-2 Conecter tipo A para HDMI x 2
@Este televisor soporta la funcion "HDAVI Control 2".
AUDIO IN AUDIO L - R: Tipo RCA PIN x 2 0,5 V [rms]
Ranura de tarjeta 1 ranura de tarjeta SD
OUTPUT VIDEO: Tipo RCA PIN x 1 1,0 V [p-p] (75 [3)
AUDIOL-R: TipoRCAPINx2 0,5V[rms]
DIGITALAUDIO OUT PCM / Dolby Digital, Fibra 6ptica
i
Incluyendo pedestal
Filtro en peine digital Y/C 3D, SUBTITULOS, V-Chip
HDAVI Control 2
Compatible con Vesa
657 mm x 515 mm x 239 mm
(25,9 " x 20,3" x 9,4 ")
791 mm x 592 mm x 239 mm
(31,1 " x 23,3" x 9,4 ")
657 mm x 468 mm x 117 mm
Televisor solamente (25,9 " x 18,4 " x 4,6 ")
14,0 kg (31,1 lb.) NETO
791 mm x 545 mm x 117 mm
(31,1 " x 21,5 " x 4,6 ")
16,5 kg (36,7 lb.) NETO
[TC=26LX70]
657 mm(25,9 ")
446 mm (t7,3 ")
117mm (4,6 ")
239 mm (9,4 ")
[TC=32LX70]
791 mm (31,1 ")
440_m(17,3"!
117mm (4,6 ")
239 mm (9,4 ")
@ El diseho y las especificaciones estan sujetos a cambios sin previo aviso. La masa y dimensiones son
aproximadas.

G
m
|
[]
|
Tecnicos
En caso que su unidad deba ser reparada en cualquier otro pals que no sea el de compra, se ruega ponerse en
contacto con uno de los centros de servicio mencionados por pals en esta Guia. Recuerde que la presente Guia
de Servicios Tecnicos no es garantia y que la presentaci6n de la misma no acondiciona en ningQn momento a que
el servicio prestado sea gratuito, sino con pagos correspondientes, salvo aquellos que se presten de acuerdo con
las condiciones estipuladas en esta Guia y que se realicen en los paises de su aplicaci6n. En caso que la pieza o
piezas requeridas esten sujetas a restricciones de importaci6n, rogamos tener presente que se podria requerir mas
tiempo para la reparaci6n del producto. En algunos casos, el servicio no podra realizarse, por no disponer de las
piezas necesarias debido a restriciones de importaci6n o porque las tecnicas o herramientas para tales reparaciones
no existen en paises donde estos productos no estan a la venta en nuestros distribuidores de ventas autorizados.
Panasonic do Brasil Ltda Manuel Garcia 352 C.R 1284-Buenos
ARGENTINA Sucursal Argentina Aires Tel. (5411) 4308-1610
Rod. Presidente Dutra, KM155 Zip
BRASlL Panasonic do Brasil Ltda 12230-971 Tel. (5512) 3935-9000
S_o Jose Dos Campos-SP-Brasil
Soc. de Servicios Electronicos Santa Elena 1722, Casilla 401, Correo 3 Tel. (56) 02 -540 1481
CHILE Ltda. Santiago
Panasonic Centroamericana, 2 kilometros al oeste de la Plaza de Tel. (506) 239-49-11
COSTA RICA S.A. Deportes de San Antonio Belen Servicio al Cliente:
Ext. 160
Panasonic Centroamericana, Final Boulevard Orden de Malta Frente a
EL SALVADOR S.A. Bosques de Santa Elena #700, Antiguo Tel. (503) 2241-5141
Sucursal El Salvador Cuscatlan, La Libertad
Panasonic Centroamericana,
GUATEMALA S.A. 46 Calle 20-56, Zona 12, Guatemala Tel. (502) 2477-5641
Sucursal Guatemala
PANAMA Panasonic Latin America, S.A.
El area de caribe y otros
paises Latino americanos
excepto Mexico.
Favor de contactar Panasonic
Latin America,
S.A. (PANAMA)
Via Simon Bolivar (Transistmica).
Contiguo Colegio la Salle
Tel. (507) 229-2955
Fax. (507) 229-2536
Av. Alfredo Mendiola 1600-1ndependencia
PERU Panasonic Peruana S.A. (Panamericana Nte. Km 14.5) Casilla Tel. (511) 614-0000
Postal 2544, Lima, PerO
Av. El hatillo, Con Av. Gonzalez Rincones
VENEZUELA Panasonic de Venezuela, C.A. Edf. Panasonic, La Trinidad, Caracas RO. Tel. (02) 945-30-22
BOX 4758
MEXICO Panasonic de Mexico, S.A. de Moras No. 313 Esq. Miquel Laurent, Col.
del Valle, Tlacoquemecatl, C.P. 03200 Tel. (55) 5488-1000
C.V. Mexico, D.F.
©
c-
®00
<
s:
OO
.._400
C) C)
6__.
¢1) O
Go Go
LaGaran_deq_ ustedsiempreser_undiente_o
Panasonic de M6xico,S.A. deC.V.
Moras No.313 Col. Tlacoquemecatl DelValle,
Deleg. Benito Juarez C.P.03200 M6xico, D.F.
Tel:5488-1000 con 30 lineas
49
-
 1
1
-
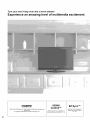 2
2
-
 3
3
-
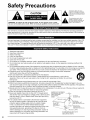 4
4
-
 5
5
-
 6
6
-
 7
7
-
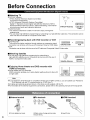 8
8
-
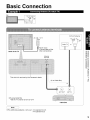 9
9
-
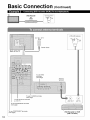 10
10
-
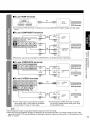 11
11
-
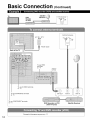 12
12
-
 13
13
-
 14
14
-
 15
15
-
 16
16
-
 17
17
-
 18
18
-
 19
19
-
 20
20
-
 21
21
-
 22
22
-
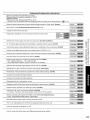 23
23
-
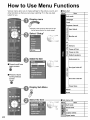 24
24
-
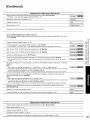 25
25
-
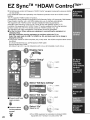 26
26
-
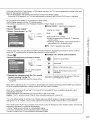 27
27
-
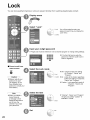 28
28
-
 29
29
-
 30
30
-
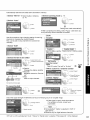 31
31
-
 32
32
-
 33
33
-
 34
34
-
 35
35
-
 36
36
-
 37
37
-
 38
38
-
 39
39
-
 40
40
-
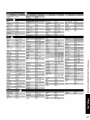 41
41
-
 42
42
-
 43
43
-
 44
44
-
 45
45
-
 46
46
-
 47
47
-
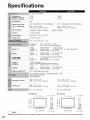 48
48
-
 49
49
-
 50
50
-
 51
51
-
 52
52
-
 53
53
-
 54
54
-
 55
55
-
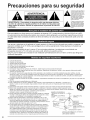 56
56
-
 57
57
-
 58
58
-
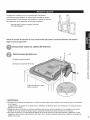 59
59
-
 60
60
-
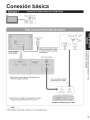 61
61
-
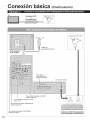 62
62
-
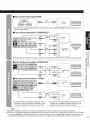 63
63
-
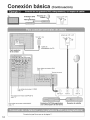 64
64
-
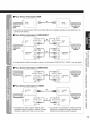 65
65
-
 66
66
-
 67
67
-
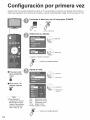 68
68
-
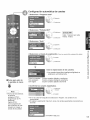 69
69
-
 70
70
-
 71
71
-
 72
72
-
 73
73
-
 74
74
-
 75
75
-
 76
76
-
 77
77
-
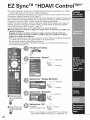 78
78
-
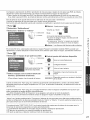 79
79
-
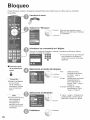 80
80
-
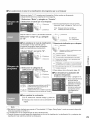 81
81
-
 82
82
-
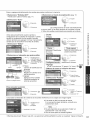 83
83
-
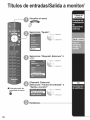 84
84
-
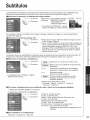 85
85
-
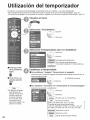 86
86
-
 87
87
-
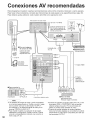 88
88
-
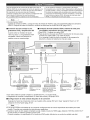 89
89
-
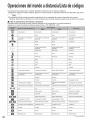 90
90
-
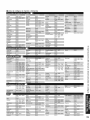 91
91
-
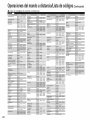 92
92
-
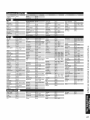 93
93
-
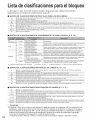 94
94
-
 95
95
-
 96
96
-
 97
97
-
 98
98
-
 99
99
-
 100
100
-
 101
101


Panasonic TC-26LX70 El manual del propietario
- Categoría
- Televisores de plasma
- Tipo
- El manual del propietario
- Este manual también es adecuado para
en otros idiomas
- English: Panasonic TC-26LX70 Owner's manual
Artículos relacionados
-
Panasonic TC-23LX60, TC-26LX60C, TC-26LX60L, TC-32LX60C, TC-32LX60L Manual de usuario
-
-
-
-
-
-
-
-
-
Otros documentos
-
Philips TC-P42X1X Manual de usuario
-
Sharp LB-1085 El manual del propietario
-
Zenith TV Converter Box DTT901 Manual de usuario
-
-
Magnavox 22MF330B - Manual de usuario
-
-
-
Sylvania A01PDUH Manual de usuario
-
HP LC3200N Manual de usuario
-
Memorex MLT4221P El manual del propietario