PPA Dz Hub R 350 Legero Manual de usuario
- Categoría
- Abridor de puerta
- Tipo
- Manual de usuario

OPERATOR FOR
GATES
SLIDING | OVERHEAD | PIVOTING
P31264 - 12/2022
Rev. 0
ATTENTION
Do not use the equipment without
reading the instruction manual.
USER MANUAL
Before using the OPERATOR, read and strictly follow all the instructions contained
in this manual.
This appliance is not intended for use by persons (including children) with reduced physical, sensory or
mental capabilities or by persons lacking experience and knowledge, unless they have received instructions
on how to use the appliance or are supervised by a person responsible for your safety. It is recommended that
children are supervised and guided, ensuring that they do not play with the product.
It is important for people's safety to follow all instructions. Please keep these
instructions.
-For correct use, read this user manual carefully.
-All data referred to in this manual are for information purposes only.
-PPA reserves the right to modify this information without prior notice.
IMPORTANT SAFETY INSTRUCTIONS
WARNING: Important Safety Instructions. Follow all instructions in this manual.
Incorrect installation can lead to serious injury.
-Do not allow children to handle the equipment's remote control. Keep the remote
control away from children, avoiding unnecessary openings and, consequently, reducing
the safety of the place;
-Do not activate the operator, at least when you are sure that there are no children,
animals, objects or obstacles in the path of the gate or in its vicinity;
-Do not automate gates that have built-in pedestrian doors;
-Turn o the mains (power supply) when performing cleaning or any maintenance. Maintenance/installation
of the operators by a PPA specialized technician is mandatory;
-Frequently, examine the installation, security system, xing brackets, mechanical wear, damage or
imbalance, good mechanical condition (proper opening and closing). Periodically clean the gate guide to
prevent it from rusting and requiring more power from the operator. Do not carry out repairs or adaptations
at your own expense. Look for a specialized technician to carry out the repairs, as a failure in the installation
or improper repair can cause injury to the user;
-This appliance is considered suitable for use in countries with a hot climate and constant humidity. It can also
be used in other countries as long as the temperature range described in the technical specications found in
the technical manual available at www.ppa.com.br is respected;
-It is very important to wait for the end of the operator's movement course and keep people away until the
gate is completely open or closed;
WARNING: Gate operator- The gate may operate unexpectedly, so do not allow
anything to get in the way of the mover.
-If the power cord is damaged, ask the specialized technician for its replacement, in order to avoid risks. The
use of the Ground Wire is mandatory;
-Before installation, it is necessary to check, on the identication label, if the temperature range of the
equipment is suitable for the installation location;
-Be careful when using the operator unlocking system for manual movement of the gate;
-Operators must be installed internally and must not move onto public roads.
REMOTE CONTROL
The PPA remote control is made of special and sturdy material. When it is not responding
to commands and the LED signals with reduced intensity or, depending on the model, the LED
changes to red, it may be necessary to change the battery.
When inserting the new battery, observe the polarity (+ and -) indicated on the base of the
transmitter.
Remote control functions:
Depending on the model, PPA remotes have two to four command buttons. In this way, a single control
can open two or more dierent gates.
The remote control functions are descibed below:
Note: To encode the remote control, look for a PPA specialized technician.
OPERATOR FOR SLIDING GATES
Equipment identication:
For greater user safety, the PPA OPERATOR has some marking, identication and attention labels.
ATTENTION
Always check the condition of the labels. If the stickers become damaged or
illegible, purchase others from a PPA Dealer.
Shutdown means:
For the total shutdown of the operator, it is necessary to use a shutdown device that must be
incorporated into the xed wiring and located close to the operator.
Examples of total shutdown devices: Circuit breakers, ON/OFF switch, etc.
Note: The total disconnection device incorporated in the xed wiring must guarantee the disconnection
of all mains conductors, except the Earth.
Functioning:
To activate your operator, press
the PPA remote control button that
comes with the machine for 1 second.
If the remote control is activated while the gate is opening, the operator will stop and remain in this way
until the remote control is activated again. When this happens, the gate will be closed
.
If the remote control is activated while the gate is closing, for safety
reasons, the gate will stop and open automatically.
Unlocking system:
In the event of a power outage, the equipment has an unlocking system that allows you to manually
open and close the gate. To do this, check the model of your operator below:
DZ HOME
1) To operate the gate in manual mode, turn the key in the unlocking hole and move
the gate leaf.
2) To operate the gate in automatic mode, turn the key in the opposite direction.
DZ HUB, DZ CUBE, DZ RIO, DZ RIO NEXUS, DZ PREDIAL, DZ PREDIAL NEXUS, DZ FORT, EURUS 2000,
DZ 1300 IND, DZ 1500 IND, DZ 800 CONDOMINIUM, DZ CONDOMINIUM, DZ 1500 NEXUS, DZ IND 2.2
BRUSHLESS, DZ BRUTALLE
1) To operate the gate in manual mode, turn the key counterclockwise;
2) Move the lever to the left;
3) Move the gate leaf;
4) To operate in automatic mode again, return the handle to the starting position and
turn the key clockwise.
EURUS STEEL
1) To operate the gate in manual mode, remove the
unlocking cover;
2) Turn the key clockwise;
3) Move the lever to the right;
4) Move the gate leaf;
5) To operate in automatic mode again, return the
handle to the starting position, turn the key clockwise
and counterclockwise and t the cover.
DZ IND 2.2 ROBUST HARDWORKING
1) Using a tool, open and remove the front cover;
2) To operate the gate in manual mode, turn the key counterclockwise;
3) Move the lever to the left;
4) Move the gate leaf;
5) To operate in automatic mode again, return the handle to the
starting position and turn the key clockwise and reposition the front
cover.
2500 HARDWORKING
1) To operate in manual mode, remove the front cover by removing
the screw using a 4mm allen wrench;
2) Insert the key and turn it counterclockwise;
3) Move the lever to the left;
4) Move the gate leaf;
5) To operate in automatic mode again, return the handle to the
starting position, turn the key clockwise, re-insert the front cover
and return the xing screw.
LIGER UNIVERSAL
1) To operate the gate in manual mode,
remove the unlocking cover;
2) Unlocking is done by turning the Allen key
6 mm.
DZCT PORTAL
OPERATOR
1) Remove the Cotter pin
from the Unlock Pin
Housing.
2) Remove the Unlocking Pin.
3) Pull back the Unlocking Lever.
4) Manually move the Gate Leaf.
5) To operate in Automatic Mode, carry out the reverse process.
AUTOMATIZADOR DF
1 - Remove the cotter pin from the unlocking pin seat.
2 - Remove the unlocking pin.
3 - Turn the unlocking lever.
4 - Manually move the gate leaf.
5 - to operate in automatic mode, reverse the process.
Command board:
The electronic board allows the installation of other accessories that add functions to the operator and
provide more comfort and safety to the user:
PHOTOCELL: Prevents a person or vehicle from
being caught by surprise on the way to the gate.
When detecting an obstruction in its line of pas-
sage, the photocell (active infrared sensor) prevents the
closing or stops the closing movement by automatically
opening the gate, thus avoiding collision with people,
objects, cars or animals.
GARAGE LIGHT: Turns on the light of the garage where the automation is installed, as soon as it is
activated for opening, making it possible to check if there is someone close to the residence.
The light turns o only after the gate is completely closed, with an adjustable delay time.
SIGNAL: Alerts the pedestrian of the exit or
entry of vehicles in a certain location.
The signal goes into operation when the gate
is activated for opening and turns o as soon as it
is fully closed.
The accessories described above are optional and are not included with the product.
The use of photocells and signals is recommended to increase safety in the operator’s
operation. Contact a representative or visit the website (www.ppa.com.br) to learn
about the models available..
OPERATOR FOR OVERHEAR GATES
Equipment identication:
For greater user safety, the PPA OPERATOR has some marking, identication and attention labels.
Identication tag
Slide unlock identication label
CODE
MODEL
LOT
WINDING
INSULATION Class
RATED VOLTAGE
NOMINAL CHAIN
RATED POWER
NOMINAL FREQUENCY
TEMPERATURE RANGE
OPERATION
CYCLE cycles/h
NOMINAL LOAD
TIME OF OPERATIONS
LINEAR SPEED
DEGREE OF PROTECTION
WARNING
Automatic activation
Keep away from the drive area as it may move
unexpectedly.
Command
button 1
Command
button 1
Command
button 3
Command
button 2
Command
button 4
Command
button 2
Identication tag
CODE
MODEL
LOT
WINDING
INSULATION Class
RATED VOLTAGE
NOMINAL CHAIN
RATED POWER
NOMINAL FREQUENCY
TEMPERATURE RANGE
OPERATION
CYCLE cycles/h
NOMINAL LOAD
TIME OF OPERATIONS
LINEAR SPEED
DEGREE OF PROTECTION
WARNING
Automatic activation
Keep away from the drive area as it may move
unexpectedly.
Overhead unlock identication label
Chave
Alavanca
Conduit
Shutdown device
Key
Key
Key
Lever
Lever
Cover
Manual Unlocking
M
A
N
U
A
L
S
Y
S
T
E
M
Insert the key into the
lever by turning it
Pull the lever until
the end
Remove the cupula and remove
the down unlocking pin
Lift the lever latch Release the lever
by pushing
ATTENTION
For greater
security,
replace the
cotter pin with
a padlock.
ATTENTION
Always check the condition of the labels. If the stickers become damaged or
illegible, purchase others from a PPA Dealer.
Equipment shutdown:
For the total shutdown of the operator, it is necessary to use a shutdown device that must be
incorporated into the xed wiring and located close to the operator.
Examples of total shutdown devices: Circuit breakers, ON/OFF switch, etc.
Note: The total disconnection device incorporated in the xed wiring must guarantee the disconnection
of all mains conductors, except the Earth.
Functioning:
To activate your
automation, press the PPA
remote control button
that comes with the
machine for 1 second.
If the remote control is activated while the gate is opening, the operator will stop and remain in this way
until the remote control is activated again. When this happens, the gate will be closed.
If the remote control is
activated while the gate is closing,
for safety reasons, the gate will
stop and open automatically.
Unlocking syem:
In the event of a power outage, the equipment has an unlocking syem that allows you to
manually open and close the gate. To do this, check your operator model below:
PISTON SHARK
To operate the gate in manual mode:
1) Remove the protective cover from the unlocking hole;
2) Insert the key;
3) Turn the key 90° (a quarter turn) clockwise;
4) Raise the lever completely;
5) Move the gate leaf;
6) To operate in automatic mode again, return the lever to its original position, turn the key
counterclockwise and insert the protective cap of the unlocking hole back in.
ATTENTION
Always check the condition of the labels. If the stickers become damaged or
illegible, purchase others from a PPA Dealer.
Equipment shutdown:
For the total shutdown of the operator, it is necessary to use a shutdown device that must be
incorporated into the xed wiring and located close to the operator.
Examples of total shutdown devices: Circuit breakers, ON/OFF switch, etc.
Note: The total disconnection device incorporated in the xed wiring must guarantee the disconnection
of all mains conductors, except the Earth.
Functioning:
To activate your operator, press the PPA remote control button that comes with the machine for 1
second.
If the remote control is activated while the gate is opening, the operator will stop and remain in this way
until the remote control is activated again. When this happens, the gate will be closed.
If the remote control is activated while the gate is closing, for safety
reasons, the gate will stop and open automatically.
Unlocking system:
In the event of a power outage, the equipment has an unlocking system that allows you to manually
open and close the gate. To do this, check your operator model below:
VERTICAL OVERHEAD OPERATOR UNLOCKING BV PRIME
To operate the gate in manual mode:
1) Remove the protective cover from the unlocking hole;
2) Insert the key;
3) Turn the key 90° (a quarter turn) clockwise;
4) Raise the lever completely;
5) Move the gate leaf;
6) To operate in automatic mode again, return the lever to its original position, turn the key
counterclockwise and insert the protective cap of the unlocking hole back in.
AUTOMATIZER WITH UNLOCKING SYSTEM BY COTTER PIN OR PADLOCK
1) To operate the gate in manual mode, remove the cotter pin;
2) Remove the unlocking pin;
3) Move the lever tongue upwards;
4) Release the lever by pushing it down.
5) To operate in automatic mode again, ret the lever and pawl on the drive nut pin, insert the pin and
nally the cotter pin.
HORIZONTAL OVERHEAD OPERATOR
1) To operate the gate in manual mode, pull
the release cord downwards;
2) Firmly pull the cord away from the gate;
3) Move the gate leaf;
4) To operate in automatic mode again,
perform the reverse procedure, pulling the cord
towards the gate.
BH POWER CHAIN OPERATOR
1) To operate the gate in manual mode, pull the
release cord downwards so that the trigger is parked in
an upright position.
2) Move the gate manually.
3) To operate in automatic mode again, perform the
reverse procedure.
TORSION OPERATOR
1) To operate the gate in manual mode, turn the
unlocking lever clockwise (upwards) so that the lever is in
the vertical position.
2) Move the gate manually.
3) To operate in automatic mode again, perform the
reverse procedure.
Command board:
The electronic board allows the installation of other accessories that add functions to the operator and
provide more comfort and safety to the user:
Photocell: Prevents a person or vehicle from
being caught by surprise on the way to the gate.
When detecting an obstruction in its
line of passage, the photocell (active infrared
sensor) prevents the closing or stops the closing
movement, automatically opening the gate, thus
avoiding collision with people, objects, cars or
animals.
Garage light: Turns on the light of the garage where the operator is installed, as soon as it is activated
for opening, making it possible to check if there is any individual close to the residence.
The light turns o only after the gate is completely closed, with an adjustable delay time.
Signal: Alerts the pedestrian of the exit or
entry of vehicles in a certain location.
The signal comes on when the gate is
activated for opening and turns o as soon as it is
fully closed.
The accessories described above are optional and are not included with the product.
The use of photocells and signals is recommended to increase safety in the operator’s
operation. Contact a representative or visit the website (www.ppa.com.br) to learn
about the models available.
OPERATORS FOR SWING GATES
Equipment identication:
For greater user safety, the PPA OPERATOR has some marking, identication and attention labels.
DESTRAVADO
TRAVADO
Made by: Motoppar Indústria e Comércio de Automatizadores Ltda
Av. Dr. Labieno da Costa Machado, 3526 - Distrito Industrial - Garça - SP - CEP 17406-200 - Brasil
CNPJ: 52.605.821/0001-55
www.ppa.com.br | +55 14 3407 1000
1) To operate the gate in manual mode, t the key in the unlocking hole with the latch facing
upwards;
2) Turn the key, moving it downwards by 180°, so that the latch is facing downwards;
3) To operate in automatic mode again, turn the key in the opposite direction, turning it up.
Command board:
The electronic board allows the installation of other accessories that add functions to the operator and
provide more comfort and safety to the user:
Fotocélula: Photocell:
Prevents a person or vehicle
from being caught by
surprise on the way to the
gate.
When detecting an obstruction in its line of passage, the photocell (active infrared sensor) prevents the
closing or stops the closing movement by automatically opening the gate, thus avoiding collision with people,
objects, cars or animals.
Garage light: Turns on the light of the garage where the automation is installed, as soon as it is
activated for opening, making it possible to check if there is any individual close to the residence.
The light turns o only after the gate is completely closed, with an adjustable delay time.
Signal: Alerts the pedestrian of the exit or entry of vehicles in a certain location.
The signal goes into operation when the gate is activated to open and turns o as soon as it is fully
closed.
The accessories described above are optional and are not included with the product.
The use of photocells and signals is recommended to increase safety in the operator’s
operation. Contact a representative or visit the website (www.ppa.com.br) to see the
models available.
Identication tag
CODE
MODEL
LOT
WINDING
INSULATION Class
RATED VOLTAGE
NOMINAL CHAIN
RATED POWER
NOMINAL FREQUENCY
TEMPERATURE RANGE
OPERATION
CYCLE cycles/h
NOMINAL LOAD
TIME OF OPERATIONS
LINEAR SPEED
DEGREE OF PROTECTION
WARNING
Automatic activation
Keep away from the drive area as it may move
unexpectedly.
Manual Unlocked
Step 1: Remove the protective cover from
the unlocking hole.
Step 2: Insert the key
Step 3: Turn the key 90° clockwise. Step 4: Raise the lever completely.
Swing unlocking identication label
(depending on the operator model) PIVO HOME PIVO AVIÃO
PIVO PISTON PREDIAL E
PIVO CONDOMINIUM
Conduit
Conduit
Shutdown device
Shutdown device
Lever
Cotter pin
Unlock pin
UNLOCKED
GENERAL TERMS AND CONDITIONS OF WARRANTY
MOTOPPAR, Indury and Commerce of Automatic Gate Operators Ltd., regiered with the CNPJ (National Regiry of
Legal Entities) under Number 52.605.821/0001-55, located at 3526 Dr. Labieno da Coa Machado Avenue, Indurial
Dirict, Garça – SP – Brazil, Zip Code 17400-000, manufacturer of PPA Products, hereby guarantees this product
again design, manufacturing or assembly defects and/or supportively as a result of material quality aws that could
make its intended use improper or inadequate, within a legal period of ninety days from time of acquisition, provided
that the inallation inructions described in the inruction manual are observed.
Due to the credibility and tru placed on PPA products, we will add 275 more days to the period mentioned above,
reaching a warranty period of one year, likewise counted from the time of acquisition proven by consumer through
proof of purchase (Cuomer Receipt).
In case of defect, within the warranty period, PPA responsibilities are rericted to the repair or subitution of the
product manufactured by the company, under the following conditions:
1. Repair and readjument of equipment may only be carried out by PPA Technical Assiance, which is qualied to
open, remove, and subitute parts or components, as well as repair defects covered by this warranty; thus, failure
on observing this guideline and the veried use of any non-original parts will cause the resignation of this warranty
on the part of the user;
2. The warranty will not extend to accessories such as cables, screw kit, xing brackets, power supplies etc.;
3. Expenses for packaging, transportation and product reinallation will be sole responsibility of the consumer;
4. The equipment mu be sent directly to the Company responsible for the sale (manufacturer's representative),
through the address contained in the purchase invoice, properly packed, thus avoiding loss of the warranty;
5. Within the additional period of 275 days, visits and transportation in places where authorized technical assiance is
not available will be charged. The co of transportation of the product and/or technician will be sole responsibility
of the consumer and
6. The subitution or repair of the product does not prolong the warranty time.
This warranty will be terminated if the product:
1. Is damaged by natural agents, such as atmospheric discharges, oods, wildres, landslides etc.;
2. Is inalled in an improper electric power supply or if it is not according to any of the inallation inructions
displayed on the manual;
3. Shows defects caused by droppings, collisions or any other physical accident;
4. Shows signs of product violation or attempted repair by unauthorized personnel;
5. Is not used for its intended purpose;
6. Is not used under normal conditions;
7. Is damaged by accessories or equipment connected to it.
Recommendation:
We recommend that both the inallation and the maintenance of the operator to be performed by an authorized
PPA technical service. If the product fails or has an improper operation, seek an Authorized Technical Service to x it.
Insert the key into the
lever by turning it
Manual Unlocking
Step 1: Fit the key into the hole,
with the tab facing up.
2 Step: turn the key down 180º so
that the latch is facing down.
ATTENTION
For greater
security,
replace the
cotter pin with
a padlock.
ATTENTION
Always check the condition of the labels. If the stickers become damaged or
illegible, purchase others from a PPA Dealer.
Equipment shutdown:
For the total shutdown of the operator, it is necessary to use a shutdown device that must be
incorporated into the xed wiring and located close to the operator.
Examples of total shutdown devices: Circuit breakers, ON/OFF switch, etc.
Note: The total disconnection device incorporated in the xed wiring must guarantee the disconnection
of all mains conductors, except the Earth.
Functioning:
To activate your
automation, press the PPA
remote control button
that comes with the
machine for 1 second.
If the remote control is activated while the gate is opening, the operator will stop and remain in this way
until the remote control is activated again. When this happens, the gate will be closed.
If the remote control is
activated while the gate is closing,
for safety reasons, the gate will
stop and open automatically.
Unlocking syem:
In the event of a power outage, the equipment has an unlocking syem that allows you to
manually open and close the gate. To do this, check your operator model below:
PISTON SHARK
To operate the gate in manual mode:
1) Remove the protective cover from the unlocking hole;
2) Insert the key;
3) Turn the key 90° (a quarter turn) clockwise;
4) Raise the lever completely;
5) Move the gate leaf;
6) To operate in automatic mode again, return the lever to its original position, turn the key
counterclockwise and insert the protective cap of the unlocking hole back in.
ATTENTION
Always check the condition of the labels. If the stickers become damaged or
illegible, purchase others from a PPA Dealer.
Equipment shutdown:
For the total shutdown of the operator, it is necessary to use a shutdown device that must be
incorporated into the xed wiring and located close to the operator.
Examples of total shutdown devices: Circuit breakers, ON/OFF switch, etc.
Note: The total disconnection device incorporated in the xed wiring must guarantee the disconnection
of all mains conductors, except the Earth.
Functioning:
To activate your operator, press the PPA remote control button that comes with the machine for 1
second.
If the remote control is activated while the gate is opening, the operator will stop and remain in this way
until the remote control is activated again. When this happens, the gate will be closed.
If the remote control is activated while the gate is closing, for safety
reasons, the gate will stop and open automatically.
Unlocking system:
In the event of a power outage, the equipment has an unlocking system that allows you to manually
open and close the gate. To do this, check your operator model below:
VERTICAL OVERHEAD OPERATOR UNLOCKING BV PRIME
To operate the gate in manual mode:
1) Remove the protective cover from the unlocking hole;
2) Insert the key;
3) Turn the key 90° (a quarter turn) clockwise;
4) Raise the lever completely;
5) Move the gate leaf;
6) To operate in automatic mode again, return the lever to its original position, turn the key
counterclockwise and insert the protective cap of the unlocking hole back in.
AUTOMATIZER WITH UNLOCKING SYSTEM BY COTTER PIN OR PADLOCK
1) To operate the gate in manual mode, remove the cotter pin;
2) Remove the unlocking pin;
3) Move the lever tongue upwards;
4) Release the lever by pushing it down.
5) To operate in automatic mode again, ret the lever and pawl on the drive nut pin, insert the pin and
nally the cotter pin.
HORIZONTAL OVERHEAD OPERATOR
1) To operate the gate in manual mode, pull
the release cord downwards;
2) Firmly pull the cord away from the gate;
3) Move the gate leaf;
4) To operate in automatic mode again,
perform the reverse procedure, pulling the cord
towards the gate.
BH POWER CHAIN OPERATOR
1) To operate the gate in manual mode, pull the
release cord downwards so that the trigger is parked in
an upright position.
2) Move the gate manually.
3) To operate in automatic mode again, perform the
reverse procedure.
TORSION OPERATOR
1) To operate the gate in manual mode, turn the
unlocking lever clockwise (upwards) so that the lever is in
the vertical position.
2) Move the gate manually.
3) To operate in automatic mode again, perform the
reverse procedure.
Command board:
The electronic board allows the installation of other accessories that add functions to the operator and
provide more comfort and safety to the user:
Photocell: Prevents a person or vehicle from
being caught by surprise on the way to the gate.
When detecting an obstruction in its
line of passage, the photocell (active infrared
sensor) prevents the closing or stops the closing
movement, automatically opening the gate, thus
avoiding collision with people, objects, cars or
animals.
Garage light: Turns on the light of the garage where the operator is installed, as soon as it is activated
for opening, making it possible to check if there is any individual close to the residence.
The light turns o only after the gate is completely closed, with an adjustable delay time.
Signal: Alerts the pedestrian of the exit or
entry of vehicles in a certain location.
The signal comes on when the gate is
activated for opening and turns o as soon as it is
fully closed.
The accessories described above are optional and are not included with the product.
The use of photocells and signals is recommended to increase safety in the operator’s
operation. Contact a representative or visit the website (www.ppa.com.br) to learn
about the models available.
OPERATORS FOR SWING GATES
Equipment identication:
For greater user safety, the PPA OPERATOR has some marking, identication and attention labels.
DESTRAVADO
TRAVADO
Made by: Motoppar Indústria e Comércio de Automatizadores Ltda
Av. Dr. Labieno da Costa Machado, 3526 - Distrito Industrial - Garça - SP - CEP 17406-200 - Brasil
CNPJ: 52.605.821/0001-55
www.ppa.com.br | +55 14 3407 1000
1) To operate the gate in manual mode, t the key in the unlocking hole with the latch facing
upwards;
2) Turn the key, moving it downwards by 180°, so that the latch is facing downwards;
3) To operate in automatic mode again, turn the key in the opposite direction, turning it up.
Command board:
The electronic board allows the installation of other accessories that add functions to the operator and
provide more comfort and safety to the user:
Fotocélula: Photocell:
Prevents a person or vehicle
from being caught by
surprise on the way to the
gate.
When detecting an obstruction in its line of passage, the photocell (active infrared sensor) prevents the
closing or stops the closing movement by automatically opening the gate, thus avoiding collision with people,
objects, cars or animals.
Garage light: Turns on the light of the garage where the automation is installed, as soon as it is
activated for opening, making it possible to check if there is any individual close to the residence.
The light turns o only after the gate is completely closed, with an adjustable delay time.
Signal: Alerts the pedestrian of the exit or entry of vehicles in a certain location.
The signal goes into operation when the gate is activated to open and turns o as soon as it is fully
closed.
The accessories described above are optional and are not included with the product.
The use of photocells and signals is recommended to increase safety in the operator’s
operation. Contact a representative or visit the website (www.ppa.com.br) to see the
models available.
Identication tag
CODE
MODEL
LOT
WINDING
INSULATION Class
RATED VOLTAGE
NOMINAL CHAIN
RATED POWER
NOMINAL FREQUENCY
TEMPERATURE RANGE
OPERATION
CYCLE cycles/h
NOMINAL LOAD
TIME OF OPERATIONS
LINEAR SPEED
DEGREE OF PROTECTION
WARNING
Automatic activation
Keep away from the drive area as it may move
unexpectedly.
Manual Unlocked
Step 1: Remove the protective cover from
the unlocking hole.
Step 2: Insert the key
Step 3: Turn the key 90° clockwise. Step 4: Raise the lever completely.
Swing unlocking identication label
(depending on the operator model)
PIVO HOME PIVO AVIÃO
PIVO PISTON PREDIAL E
PIVO CONDOMINIUM
Conduit
Conduit
Shutdown device
Shutdown device
Lever
Cotter pin
Unlock pin
UNLOCKED
GENERAL TERMS AND CONDITIONS OF WARRANTY
MOTOPPAR, Indury and Commerce of Automatic Gate Operators Ltd., regiered with the CNPJ (National Regiry of
Legal Entities) under Number 52.605.821/0001-55, located at 3526 Dr. Labieno da Coa Machado Avenue, Indurial
Dirict, Garça – SP – Brazil, Zip Code 17400-000, manufacturer of PPA Products, hereby guarantees this product
again design, manufacturing or assembly defects and/or supportively as a result of material quality aws that could
make its intended use improper or inadequate, within a legal period of ninety days from time of acquisition, provided
that the inallation inructions described in the inruction manual are observed.
Due to the credibility and tru placed on PPA products, we will add 275 more days to the period mentioned above,
reaching a warranty period of one year, likewise counted from the time of acquisition proven by consumer through
proof of purchase (Cuomer Receipt).
In case of defect, within the warranty period, PPA responsibilities are rericted to the repair or subitution of the
product manufactured by the company, under the following conditions:
1. Repair and readjument of equipment may only be carried out by PPA Technical Assiance, which is qualied to
open, remove, and subitute parts or components, as well as repair defects covered by this warranty; thus, failure
on observing this guideline and the veried use of any non-original parts will cause the resignation of this warranty
on the part of the user;
2. The warranty will not extend to accessories such as cables, screw kit, xing brackets, power supplies etc.;
3. Expenses for packaging, transportation and product reinallation will be sole responsibility of the consumer;
4. The equipment mu be sent directly to the Company responsible for the sale (manufacturer's representative),
through the address contained in the purchase invoice, properly packed, thus avoiding loss of the warranty;
5. Within the additional period of 275 days, visits and transportation in places where authorized technical assiance is
not available will be charged. The co of transportation of the product and/or technician will be sole responsibility
of the consumer and
6. The subitution or repair of the product does not prolong the warranty time.
This warranty will be terminated if the product:
1. Is damaged by natural agents, such as atmospheric discharges, oods, wildres, landslides etc.;
2. Is inalled in an improper electric power supply or if it is not according to any of the inallation inructions
displayed on the manual;
3. Shows defects caused by droppings, collisions or any other physical accident;
4. Shows signs of product violation or attempted repair by unauthorized personnel;
5. Is not used for its intended purpose;
6. Is not used under normal conditions;
7. Is damaged by accessories or equipment connected to it.
Recommendation:
We recommend that both the inallation and the maintenance of the operator to be performed by an authorized
PPA technical service. If the product fails or has an improper operation, seek an Authorized Technical Service to x it.
Insert the key into the
lever by turning it
Manual Unlocking
Step 1: Fit the key into the hole,
with the tab facing up.
2 Step: turn the key down 180º so
that the latch is facing down.

AUTOMATISMO
PARA PUERTAS
CORREDIZO | BASCULANTE |
ABATIBLE
P31264 - 12/2022
Rev. 0
ATENCIÓN
No utilice el equipo sin leer el manual
de instrucciones.
MANUAL DE USUARIO
Antes de utilizar el AUTOMATISMO, lea y siga estrictamente todas las instrucciones
contenidas en este manual.
Este aparato no está diseñado para ser utilizado por personas (incluidos los niños) con capacidades
físicas, sensoriales o mentales reducidas o por personas que carezcan de experiencia y conocimiento, a
menos que hayan recibido instrucciones sobre cómo utilizar el aparato o estén supervisadas por una persona
responsable de su seguridad. Se recomienda que los niños sean supervisados y guiados, asegurándose de
que no jueguen con el producto.
Es importante para la seguridad de las personas seguir todas las instrucciones.
Guarde estas instrucciones.
-Para un uso correcto, lea atentamente este manual de usuario.
-Todos los datos a los que se hace referencia en este manual son sólo para nes
informativos.
-PPA se reserva el derecho de modicar esta información sin previo aviso.
INSTRUCCIONES DE SEGURIDAD IMPORTANTES
ADVERTENCIA: Instrucciones de seguridad importantes. Siga todas las
instrucciones de este manual. Una instalación incorrecta puede provocar lesiones
graves.
- No permita que los niños manipulen el control remoto del equipo. Mantenga el
control remoto fuera del alcance de los niños, evitando aperturas innecesarias y, en
consecuencia, reduciendo la seguridad del lugar;
-No active el operador, al menos cuando esté seguro de que no hay niños, animales,
objetos u obstáculos en el camino de la puerta o en sus proximidades;
-No automatice portones que tengan puertas peatonales incorporadas;
-Apague la red eléctrica (fuente de alimentación) cuando realice una limpieza o cualquier mantenimiento. El
mantenimiento/instalación de los operadores por un técnico especializado en PPA es obligatorio;
-Revisar periódicamente la instalación, sistema de seguridad, soportes de jación, desgaste mecánico, daño o
desequilibrio, buen estado mecánico (apertura y cierre correctos). Limpie periódicamente la guía de la puerta
para evitar que se oxide y requiera más potencia del operador. No realice reparaciones o adaptaciones por su
cuenta. Busque un técnico especializado para realizar las reparaciones, ya que una falla en la instalación o una
reparación inadecuada puede causar lesiones al usuario;
-Este aparato se considera adecuado para su uso en países con clima cálido y humedad constante. También
puede ser utilizado en otros países siempre que se respete el rango de temperatura descrito en las
especicaciones técnicas que se encuentran en el manual técnico disponible en www.ppa.com.br;
-Es muy importante esperar el nal del curso de movimiento del operador y mantener alejadas a las personas
hasta que la puerta esté completamente abierta o cerrada;
ADVERTENCIA: Automatismo de la puerta: la puerta puede funcionar
inesperadamente, así que no permita que nada se interponga en el camino del
motor.
-Si el cable de alimentación está dañado, pida al técnico especializado que lo reemplace, para evitar riesgos.
El uso del Cable de Tierra es obligatorio;
-Antes de la instalación, es necesario vericar, en la etiqueta de identicación, si el rango de temperatura del
equipo es adecuado para el lugar de instalación;
-Tenga cuidado al utilizar el sistema de desbloqueo del automatismo para el movimiento manual de la puerta;
-Los automatismos deben instalarse internamente y no deben moverse a la vía pública.
CONTROL REMOTO
El mando a distancia PPA está fabricado con un material especial y resistente. Cuando no
responde a los mandos y el LED señala con intensidad reducida o, según el modelo, el LED cambia
a rojo, puede ser necesario cambiar la batería.
Al insertar la batería nueva, observe la polaridad (+ y -) indicada en la base del transmisor.
Funciones de control remoto:
Según el modelo, los controles remotos PPA tienen de dos a cuatro botones de mando. De esta forma,
un solo mando puede abrir dos o más puertas diferentes:
Nota: Para codicar el control remoto, busque un técnico especializado de PPA.
AUTOMATISMO PARA PUERTAS CORREDERAS
Identicación del equipo:
Para mayor seguridad del usuario, el AUTOMATISMO PPA dispone de unas etiquetas de marcaje,
identicación y atención.
ATENCIÓN
Compruebe siempre el estado de las etiquetas. Si las pegatinas se dañan o son
ilegibles, compre otras en un distribuidor de PPA.
Medios de apagado:
Para el paro total del automatismo, es necesario utilizar un dispositivo de paro que debe ser incorporado
al cableado jo y ubicado cerca del automatismo.
Ejemplos de dispositivos de apagado total: Disyuntores, interruptor ON/OFF, etc.
Nota: El dispositivo de desconexión total incorporado en el cableado jo debe garantizar la desconexión
de todos los conductores de red, excepto la Tierra.
Operación:
Para activar su automatismo,
presione el control remoto PPA botón
que viene con la máquina durante 1
segundo.
Si se acciona el mando a distancia mientras la puerta se está abriendo, el automatismo se detendrá y
permanecerá así hasta que se active de nuevo el mando a distancia. Cuando esto suceda, la puerta se cerrará.
Si el control remoto se activa mientras la puerta se está cerrando, por
razones de seguridad, la puerta se detendrá y se abrirá automáticamente.
Sistema de desbloqueo:
En caso de corte de energía, el equipo cuenta con un sistema de desbloqueo que permite abrir y cerrar
manualmente la puerta. Para ello, consulta el modelo de tu automatismo a continuación:
DZ HOME
1) Para accionar la puerta en modo manual, gire la llave en el oricio de desbloqueo y
mueva la hoja de la puerta.
2) Para operar la puerta en modo automático, gire la llave en la dirección opuesta.
DZ HUB, DZ CUBE, DZ RIO, DZ RIO NEXUS, DZ PREDIAL, DZ PREDIAL NEXUS, DZ FORT, EURUS 2000,
DZ 1300 IND, DZ 1500 IND, DZ 800 CONDOMINIUM, DZ CONDOMINIUM, DZ 1500 NEXUS, DZ IND 2.2
BRUSHLESS, DZ BRUTALLE
1) Para operar la puerta en modo manual, gire la llave en sentido antihorario;
2) Mueva la palanca hacia la izquierda;
3) Mover la hoja de la puerta;
4) Para volver a operar en modo automático, regrese la manija a la posición inicial y
gire la llave en el sentido de las agujas del reloj.
EURUS STEEL
1) Para accionar la puerta en modo manual, quitar la
tapa de desbloqueo;
2) Girar la llave en el sentido de las agujas del reloj;
3) Mueva la palanca hacia la derecha;
4) Mover la hoja de la puerta;
5) Para volver a operar en modo automático, regrese
la manija a la posición inicial, gire la llave en sentido
horario y antihorario y coloque la tapa.
DZ IND 2.2 ROBUST HARDWORKING
1) Usando una herramienta, abra y retire la tapa frontal;
2) Para operar la puerta en modo manual, gire la llave en sentido
antihorario;
3) Mueva la palanca hacia la izquierda;
4) Mover la hoja de la puerta;
5) Para volver a operar en modo automático, regrese la manija a la
posición inicial y gire la llave en el sentido de las agujas del reloj y
vuelva a colocar la cubierta frontal.
2500 HARDWORKING
1) Para operar en modo manual, retire la cubierta frontal quitando
el tornillo con una llave allen de 4 mm;
2) Inserte la llave y gírela en sentido antihorario;
3) Mueva la palanca hacia la izquierda;
4) Mover la hoja de la puerta;
5) Para volver a operar en modo automático, regrese la manija a
la posición inicial, gire la llave en el sentido de las agujas del re-
loj, vuelva a colocar la tapa frontal y vuelva a colocar el tornillo de
jación.
LIGER UNIVERSAL
1) Para accionar la puerta en modo manual,
quitar la tapa de desbloqueo;
2) El desbloqueo se realiza girando la llave
Allen 6 mm.
AUTOMATISMO
DZCT PORTAL
1) Retire el pasador de
chaveta del alojamiento
del pasador de desbloqueo.
2) Retire el pasador de desbloqueo.
3) Tire hacia atrás de la palanca de desbloqueo.
4) Mueva manualmente la hoja de la puerta.
5) Para operar en Modo Automático, realizar el proceso inverso.
AUTOMATIZADOR DF
1- Retire la chaveta del asiento del pasador
de desbloqueo.
2 - Retire el pasador de desbloqueo
3 - Gire la palanca de desbloqueo.
4 - Mueva manualmente la hoja del portón
5 - Para operar en modo automático, haga el
proceso inverso
Central de mando:
La central electrónica permite la instalación de otros accesorios que añaden funciones al automatismo
y brindan mayor comodidad y seguridad al usuario:
FOTOCELULA: Evita que una persona o vehículo sea sor-
prendido en el camino hacia la puerta.
Al detectar una obstrucción en su línea de paso, la fotocé-
lula (sensor infrarrojo activo) impide el cierre o detiene el movi-
miento de cierre abriendo automáticamente la puerta, evitan-
do colisiones con personas, objetos, automóviles o animales.
LUZ DE GARAJE: Enciende la luz del garaje donde está instalada la automatización, tan pronto como se
activa para la apertura, lo que permite comprobar si hay alguien cerca de la residencia.
La luz se apaga solo después de que la puerta está completamente cerrada, con un tiempo de retardo
ajustable.
SEÑALIZACIÓN: Alerta al peatón de la salida
o entrada de vehículos en un lugar determinado.
La señal entra en funcionamiento cuando
la puerta se activa para la apertura y se apaga tan
pronto como se cierra por completo.
Los accesorios descritos anteriormente son opcionales y no están incluidos con el
producto.
Se recomienda el uso de fotocélulas y señales para aumentar la seguridad en la ope-
ración del operador. Póngase en contacto con un representante o visite el sitio web
(www.ppa.com.br) para conocer los modelos disponibles.
AUTOMATISMO PARA PUERTAS BASCULANTES
Identicación del equipo:
Para mayor seguridad del usuario, el AUTOMATISMO PPA dispone de unas etiquetas de marcaje,
identicación y atención.
Etiqueta de identicación
Deslice la etiqueta de identicación de
desbloqueo
Botón de
mando 1
Botón de
mando 1
Botón de
mando 3
Botón de
mando 2
Botón de
mando 4
Botón de
mando 2
Etiqueta de identicación
Etiqueta de identicación de desbloqueo basculante
CÓDIGO
Clase X
RANGO DE TEMPERATURA
CARGA NOMINAL
TIEMPO DE OPERACIONES
VELOCIDAD LINEAL
GRADO DE PROTECCIÓN
MODELO
LOTE
AISLAMIENTO DE
DEVANADOS
TENSIÓN NOMINAL
CADENA NOMINAL
POTENCIA NOMINAL
CICLO DE
OPERACIÓN
XX ciclos/h
ADVERTENCIA
Activación automática
Manténgase alejado del área de la unidad, ya que
puede moverse inesperadamente.
Desbloqueo Manual
Inserte la llave en la
palanca girándola
Tire de la palanca
hasta el nal
Conducto
Dispositivo
de apagado
Llave
Llave
Llave
Palanca
Tapa Palanca
CÓDIGO
Clase X
RANGO DE TEMPERATURA
CARGA NOMINAL
TIEMPO DE OPERACIONES
VELOCIDAD LINEAL
GRADO DE PROTECCIÓN
MODELO
LOTE
AISLAMIENTO DE
DEVANADOS
TENSIÓN NOMINAL
CADENA NOMINAL
POTENCIA NOMINAL
CICLO DE
OPERACIÓN
XX ciclos/h
ADVERTENCIA
Activación automática
Manténgase alejado del área de la unidad, ya que
puede moverse inesperadamente.
Quitar la cupula y quitar el
pin desbloqueo
Levante el pestillo
de la palanca
Suelte la palanca
empujando hacia abajo
AUTOMATISMO
PARA PUERTAS
CORREDIZO | BASCULANTE |
ABATIBLE
P31264 - 12/2022
Rev. 0
ATENCIÓN
No utilice el equipo sin leer el manual
de instrucciones.
MANUAL DE USUARIO
Antes de utilizar el AUTOMATISMO, lea y siga estrictamente todas las instrucciones
contenidas en este manual.
Este aparato no está diseñado para ser utilizado por personas (incluidos los niños) con capacidades
físicas, sensoriales o mentales reducidas o por personas que carezcan de experiencia y conocimiento, a
menos que hayan recibido instrucciones sobre cómo utilizar el aparato o estén supervisadas por una persona
responsable de su seguridad. Se recomienda que los niños sean supervisados y guiados, asegurándose de
que no jueguen con el producto.
Es importante para la seguridad de las personas seguir todas las instrucciones.
Guarde estas instrucciones.
-Para un uso correcto, lea atentamente este manual de usuario.
-Todos los datos a los que se hace referencia en este manual son sólo para nes
informativos.
-PPA se reserva el derecho de modicar esta información sin previo aviso.
INSTRUCCIONES DE SEGURIDAD IMPORTANTES
ADVERTENCIA: Instrucciones de seguridad importantes. Siga todas las
instrucciones de este manual. Una instalación incorrecta puede provocar lesiones
graves.
- No permita que los niños manipulen el control remoto del equipo. Mantenga el
control remoto fuera del alcance de los niños, evitando aperturas innecesarias y, en
consecuencia, reduciendo la seguridad del lugar;
-No active el operador, al menos cuando esté seguro de que no hay niños, animales,
objetos u obstáculos en el camino de la puerta o en sus proximidades;
-No automatice portones que tengan puertas peatonales incorporadas;
-Apague la red eléctrica (fuente de alimentación) cuando realice una limpieza o cualquier mantenimiento. El
mantenimiento/instalación de los operadores por un técnico especializado en PPA es obligatorio;
-Revisar periódicamente la instalación, sistema de seguridad, soportes de jación, desgaste mecánico, daño o
desequilibrio, buen estado mecánico (apertura y cierre correctos). Limpie periódicamente la guía de la puerta
para evitar que se oxide y requiera más potencia del operador. No realice reparaciones o adaptaciones por su
cuenta. Busque un técnico especializado para realizar las reparaciones, ya que una falla en la instalación o una
reparación inadecuada puede causar lesiones al usuario;
-Este aparato se considera adecuado para su uso en países con clima cálido y humedad constante. También
puede ser utilizado en otros países siempre que se respete el rango de temperatura descrito en las
especicaciones técnicas que se encuentran en el manual técnico disponible en www.ppa.com.br;
-Es muy importante esperar el nal del curso de movimiento del operador y mantener alejadas a las personas
hasta que la puerta esté completamente abierta o cerrada;
ADVERTENCIA: Automatismo de la puerta: la puerta puede funcionar
inesperadamente, así que no permita que nada se interponga en el camino del
motor.
-Si el cable de alimentación está dañado, pida al técnico especializado que lo reemplace, para evitar riesgos.
El uso del Cable de Tierra es obligatorio;
-Antes de la instalación, es necesario vericar, en la etiqueta de identicación, si el rango de temperatura del
equipo es adecuado para el lugar de instalación;
-Tenga cuidado al utilizar el sistema de desbloqueo del automatismo para el movimiento manual de la puerta;
-Los automatismos deben instalarse internamente y no deben moverse a la vía pública.
CONTROL REMOTO
El mando a distancia PPA está fabricado con un material especial y resistente. Cuando no
responde a los mandos y el LED señala con intensidad reducida o, según el modelo, el LED cambia
a rojo, puede ser necesario cambiar la batería.
Al insertar la batería nueva, observe la polaridad (+ y -) indicada en la base del transmisor.
Funciones de control remoto:
Según el modelo, los controles remotos PPA tienen de dos a cuatro botones de mando. De esta forma,
un solo mando puede abrir dos o más puertas diferentes:
Nota: Para codicar el control remoto, busque un técnico especializado de PPA.
AUTOMATISMO PARA PUERTAS CORREDERAS
Identicación del equipo:
Para mayor seguridad del usuario, el AUTOMATISMO PPA dispone de unas etiquetas de marcaje,
identicación y atención.
ATENCIÓN
Compruebe siempre el estado de las etiquetas. Si las pegatinas se dañan o son
ilegibles, compre otras en un distribuidor de PPA.
Medios de apagado:
Para el paro total del automatismo, es necesario utilizar un dispositivo de paro que debe ser incorporado
al cableado jo y ubicado cerca del automatismo.
Ejemplos de dispositivos de apagado total: Disyuntores, interruptor ON/OFF, etc.
Nota: El dispositivo de desconexión total incorporado en el cableado jo debe garantizar la desconexión
de todos los conductores de red, excepto la Tierra.
Operación:
Para activar su automatismo,
presione el control remoto PPA botón
que viene con la máquina durante 1
segundo.
Si se acciona el mando a distancia mientras la puerta se está abriendo, el automatismo se detendrá y
permanecerá así hasta que se active de nuevo el mando a distancia. Cuando esto suceda, la puerta se cerrará.
Si el control remoto se activa mientras la puerta se está cerrando, por
razones de seguridad, la puerta se detendrá y se abrirá automáticamente.
Sistema de desbloqueo:
En caso de corte de energía, el equipo cuenta con un sistema de desbloqueo que permite abrir y cerrar
manualmente la puerta. Para ello, consulta el modelo de tu automatismo a continuación:
DZ HOME
1) Para accionar la puerta en modo manual, gire la llave en el oricio de desbloqueo y
mueva la hoja de la puerta.
2) Para operar la puerta en modo automático, gire la llave en la dirección opuesta.
DZ HUB, DZ CUBE, DZ RIO, DZ RIO NEXUS, DZ PREDIAL, DZ PREDIAL NEXUS, DZ FORT, EURUS 2000,
DZ 1300 IND, DZ 1500 IND, DZ 800 CONDOMINIUM, DZ CONDOMINIUM, DZ 1500 NEXUS, DZ IND 2.2
BRUSHLESS, DZ BRUTALLE
1) Para operar la puerta en modo manual, gire la llave en sentido antihorario;
2) Mueva la palanca hacia la izquierda;
3) Mover la hoja de la puerta;
4) Para volver a operar en modo automático, regrese la manija a la posición inicial y
gire la llave en el sentido de las agujas del reloj.
EURUS STEEL
1) Para accionar la puerta en modo manual, quitar la
tapa de desbloqueo;
2) Girar la llave en el sentido de las agujas del reloj;
3) Mueva la palanca hacia la derecha;
4) Mover la hoja de la puerta;
5) Para volver a operar en modo automático, regrese
la manija a la posición inicial, gire la llave en sentido
horario y antihorario y coloque la tapa.
DZ IND 2.2 ROBUST HARDWORKING
1) Usando una herramienta, abra y retire la tapa frontal;
2) Para operar la puerta en modo manual, gire la llave en sentido
antihorario;
3) Mueva la palanca hacia la izquierda;
4) Mover la hoja de la puerta;
5) Para volver a operar en modo automático, regrese la manija a la
posición inicial y gire la llave en el sentido de las agujas del reloj y
vuelva a colocar la cubierta frontal.
2500 HARDWORKING
1) Para operar en modo manual, retire la cubierta frontal quitando
el tornillo con una llave allen de 4 mm;
2) Inserte la llave y gírela en sentido antihorario;
3) Mueva la palanca hacia la izquierda;
4) Mover la hoja de la puerta;
5) Para volver a operar en modo automático, regrese la manija a
la posición inicial, gire la llave en el sentido de las agujas del re-
loj, vuelva a colocar la tapa frontal y vuelva a colocar el tornillo de
jación.
LIGER UNIVERSAL
1) Para accionar la puerta en modo manual,
quitar la tapa de desbloqueo;
2) El desbloqueo se realiza girando la llave
Allen 6 mm.
AUTOMATISMO
DZCT PORTAL
1) Retire el pasador de
chaveta del alojamiento
del pasador de desbloqueo.
2) Retire el pasador de desbloqueo.
3) Tire hacia atrás de la palanca de desbloqueo.
4) Mueva manualmente la hoja de la puerta.
5) Para operar en Modo Automático, realizar el proceso inverso.
AUTOMATIZADOR DF
1- Retire la chaveta del asiento del pasador
de desbloqueo.
2 - Retire el pasador de desbloqueo
3 - Gire la palanca de desbloqueo.
4 - Mueva manualmente la hoja del portón
5 - Para operar en modo automático, haga el
proceso inverso
Central de mando:
La central electrónica permite la instalación de otros accesorios que añaden funciones al automatismo
y brindan mayor comodidad y seguridad al usuario:
FOTOCELULA: Evita que una persona o vehículo sea sor-
prendido en el camino hacia la puerta.
Al detectar una obstrucción en su línea de paso, la fotocé-
lula (sensor infrarrojo activo) impide el cierre o detiene el movi-
miento de cierre abriendo automáticamente la puerta, evitan-
do colisiones con personas, objetos, automóviles o animales.
LUZ DE GARAJE: Enciende la luz del garaje donde está instalada la automatización, tan pronto como se
activa para la apertura, lo que permite comprobar si hay alguien cerca de la residencia.
La luz se apaga solo después de que la puerta está completamente cerrada, con un tiempo de retardo
ajustable.
SEÑALIZACIÓN: Alerta al peatón de la salida
o entrada de vehículos en un lugar determinado.
La señal entra en funcionamiento cuando
la puerta se activa para la apertura y se apaga tan
pronto como se cierra por completo.
Los accesorios descritos anteriormente son opcionales y no están incluidos con el
producto.
Se recomienda el uso de fotocélulas y señales para aumentar la seguridad en la ope-
ración del operador. Póngase en contacto con un representante o visite el sitio web
(www.ppa.com.br) para conocer los modelos disponibles.
AUTOMATISMO PARA PUERTAS BASCULANTES
Identicación del equipo:
Para mayor seguridad del usuario, el AUTOMATISMO PPA dispone de unas etiquetas de marcaje,
identicación y atención.
Etiqueta de identicación
Deslice la etiqueta de identicación de
desbloqueo
Botón de
mando 1
Botón de
mando 1
Botón de
mando 3
Botón de
mando 2
Botón de
mando 4
Botón de
mando 2
Etiqueta de identicación
Etiqueta de identicación de desbloqueo basculante
CÓDIGO
Clase X
RANGO DE TEMPERATURA
CARGA NOMINAL
TIEMPO DE OPERACIONES
VELOCIDAD LINEAL
GRADO DE PROTECCIÓN
MODELO
LOTE
AISLAMIENTO DE
DEVANADOS
TENSIÓN NOMINAL
CADENA NOMINAL
POTENCIA NOMINAL
CICLO DE
OPERACIÓN
XX ciclos/h
ADVERTENCIA
Activación automática
Manténgase alejado del área de la unidad, ya que
puede moverse inesperadamente.
Desbloqueo Manual
Inserte la llave en la
palanca girándola
Tire de la palanca
hasta el nal
Conducto
Dispositivo
de apagado
Llave
Llave
Llave
Palanca
Tapa Palanca
CÓDIGO
Clase X
RANGO DE TEMPERATURA
CARGA NOMINAL
TIEMPO DE OPERACIONES
VELOCIDAD LINEAL
GRADO DE PROTECCIÓN
MODELO
LOTE
AISLAMIENTO DE
DEVANADOS
TENSIÓN NOMINAL
CADENA NOMINAL
POTENCIA NOMINAL
CICLO DE
OPERACIÓN
XX ciclos/h
ADVERTENCIA
Activación automática
Manténgase alejado del área de la unidad, ya que
puede moverse inesperadamente.
Quitar la cupula y quitar el
pin desbloqueo
Levante el pestillo
de la palanca
Suelte la palanca
empujando hacia abajo
ATENCIÓN
Para mayor
seguridad,
reemplace la
chaveta con
un candado.
ATENCIÓN
Compruebe siempre el estado de las etiquetas. Si las pegatinas se dañan o son
ilegibles, compre otras en un distribuidor de PPA.
Apagado del equipo:
Para el paro total del automatismo, es necesario utilizar un dispositivo de paro que debe ser incorporado
al cableado jo y ubicado cerca del automatismo.
Ejemplos de dispositivos de apagado total: Disyuntores, interruptor ON/OFF, etc.
Nota: El dispositivo de desconexión total incorporado en el cableado jo debe garantizar la desconexión
de todos los conductores de red, excepto el de Tierra.
Funcionamiento:
Para activar su opera-
dor, presione el botón del
control remoto PPA que vie-
ne con la máquina durante 1
segundo.
Si se acciona el mando a distancia mientras la puerta se está abriendo, el automatismo se detendrá y
permanecerá así hasta que se active de nuevo el mando a distancia. Cuando esto suceda, la puerta se cerrará.
Si el control remoto se
activa mientras la puerta se
está cerrando, por razones de
seguridad, la puerta se detendrá y
se abrirá automáticamente.
Siema de desbloqueo:
En caso de corte de energía, el equipo cuenta con un siema de desbloqueo que permite abrir y
cerrar manualmente la puerta. Para ello, consulta a continuación tu modelo de automatismo:
PISTON SHARK
Para operar la puerta en modo manual:
1) Retire la cubierta protectora del oricio de desbloqueo;
2) Insertar la llave;
3) Girar la llave 90° (un cuarto de vuelta) en el sentido de las agujas del reloj;
4) Levante la palanca completamente;
5) Mover la hoja de la puerta;
6) Para volver a operar en modo automático, regrese la palanca a su posición original, gire la
llave en el sentido contrario a las agujas del reloj y vuelva a insertar la tapa protectora del oricio de
desbloqueo.
ATENCIÓN
Compruebe siempre el estado de las etiquetas. Si las pegatinas se dañan o son
ilegibles, compre otras en un distribuidor de PPA.
Apagado del equipo:
Para el paro total del automatismo, es necesario utilizar un dispositivo de paro que debe ser incorporado
al cableado jo y ubicado cerca del automatismo.
Ejemplos de dispositivos de apagado total: Disyuntores, interruptor ON/OFF, etc.
Nota: El dispositivo de desconexión total incorporado en el cableado jo debe garantizar la desconexión
de todos los conductores de red, excepto el de Tierra.
Funcionamiento:
Para activar su operador, presione el botón del control remoto PPA que viene con la máquina durante
1 segundo.
Si se acciona el mando a distancia mientras la puerta se está abriendo, el automatismo se detendrá y
permanecerá así hasta que se active de nuevo el mando a distancia. Cuando esto suceda, la puerta se cerrará
.
Si el control remoto se activa mientras la puerta se está cerrando, por
razones de seguridad, la puerta se detendrá y se abrirá automáticamente.
Sistema de desbloqueo:
En caso de corte de energía, el equipo cuenta con un sistema de desbloqueo que permite abrir y cerrar
manualmente la puerta. Para ello, consulta a continuación tu modelo de automatismo:
AUTOMATISMO BASCULANTE VERTICAL DESBLOQUEO BV PRIME
Para operar la puerta en modo manual:
1) Retire la cubierta protectora del oricio de desbloqueo;
2) Insertar la llave;
3) Girar la llave 90° (un cuarto de vuelta) en el sentido de las agujas del reloj;
4) Levante la palanca completamente;
5) Mover la hoja de la puerta;
6) Para volver a operar en modo automático, regrese la palanca a su posición original, gire la llave en
el sentido contrario a las agujas del reloj y vuelva a insertar la tapa protectora del oricio de desbloqueo.
AUTOMATISMO CON SISTEMA DE DESBLOQUEO POR CHAVETA O CANDADO
1) Para operar la puerta en modo manual, retire la chaveta;
2) Retire el pasador de desbloqueo;
3) Mueva la lengüeta de la palanca hacia arriba;
4) Suelte la palanca empujándola hacia abajo.
5) Para volver a operar en modo automático, vuelva a colocar la palanca y el trinquete en el pasador de
la tuerca de arrastre, inserte el pasador y nalmente la chaveta.
AUTOMATISMO BASCULANTE
HORIZONTAL
1) Para accionar la puerta en modo manual,
tire hacia abajo del cordón de desbloqueo;
2) Tire rmemente del cable para alejarlo de
la puerta;
3) Mover la hoja de la puerta;
4) Para volver a operar en modo automático,
realice el procedimiento inverso, tirando del cordón
hacia la puerta.
AUTOMATISMO BH POWER CHAIN
1) Para operar la puerta en modo manual, jale
el cordón de liberación hacia abajo para que el gatillo
quede estacionado en posición vertical.
2) Mueva la puerta manualmente.
3) Para volver a operar en modo automático, realice
el procedimiento inverso.
AUTOMATISMO TORSION
1) Para operar la puerta en modo manual, gire la
palanca de desbloqueo en el sentido de las agujas del
reloj (hacia arriba) para que la palanca quede en posición
vertical.
2) Mueva la puerta manualmente.
3) Para volver a operar en modo automático, realice el
procedimiento inverso.
Central de mando:
La central electrónica permite la instalación de otros accesorios que añaden funciones al automatismo
y brindan mayor comodidad y seguridad al usuario:
Fotocélula: Evita que una persona o vehículo
sea sorprendido en el camino hacia la puerta.
Al detectar una obstrucción en su línea
de paso, la fotocélula (sensor infrarrojo activo)
impide el cierre o detiene el movimiento de cierre,
abriendo automáticamente la puerta, evitando
colisiones con personas, objetos, automóviles o
animales.
Luz de garaje: Enciende la luz del garaje donde está instalado el automatismo, tan pronto como se
activa para la apertura, lo que permite comprobar si hay algún individuo cerca de la vivienda.
La luz se apaga solo después de que la puerta está completamente cerrada, con un tiempo de retardo
ajustable.
Señal: Alerta al peatón de la salida o entrada
de vehículos en un lugar determinado.
La señal se enciende cuando la puerta se
activa para abrir y se apaga tan pronto como está
completamente cerrado.
Los accesorios descritos anteriormente son opcionales y no están incluidos con el
producto.
Se recomienda el uso de fotocélulas y señales para aumentar la seguridad en la opera-
ción del automatismo. Póngase en contacto con un representante o visite el sitio web
(www.ppa.com.br) para conocer los modelos disponibles.
AUTOMATISMO PARA PUERTAS BATIENTES
Identicación del equipo:
Para mayor seguridad del usuario, el AUTOMATISMO PPA dispone de unas etiquetas de marcaje,
identicación y atención.
Fabricado por: Motoppar Indústria e Comércio de Automatizadores Ltda
Av. Dr. Labieno da Costa Machado, 3526 - Distrito Industrial - Garça - SP - CEP 17406-200 - Brasil
CNPJ: 52.605.821/0001-55
www.ppa.com.br | +55 14 3407 1000
1) Para accionar la puerta en modo manual, introduzca la llave en el oricio de desbloqueo con
el picaporte hacia arriba;
2) Girar la llave, desplazándola 180° hacia abajo, de modo que el picaporte quede hacia abajo;
3) Para volver a funcionar en modo automático, gire la llave en el sentido contrario, girándola
hacia arriba.
Central de mando:
La central electrónica permite la instalación de otros accesorios que añaden funciones al automatismo
y brindan mayor comodidad y seguridad al usuario:
Fotocélula: Evita que
una persona o vehículo sea
sorprendido en el camino
hacia la puerta.
Al detectar una obstrucción en su línea de paso, la fotocélula (sensor infrarrojo activo) impide el cierre
o detiene el movimiento de cierre, abriendo automáticamente la puerta, evitando colisiones con personas,
objetos, automóviles o animales.
Luz de garaje: Enciende la luz del garaje donde está instalado el automatismo, tan pronto como se
activa para la apertura, lo que permite comprobar si hay algún individuo cerca de la vivienda.
La luz se apaga solo después de que la puerta está completamente cerrada, con un tiempo de retardo
ajustable.
Señal: Alerta al peatón de la salida o entrada de vehículos en un lugar determinado.
La señal se enciende cuando la puerta se activa para abrir y se apaga tan pronto como está
completamente cerrado.
Los accesorios descritos anteriormente son opcionales y no están incluidos con el
producto.
Se recomienda el uso de fotocélulas y señales para aumentar la seguridad en la opera-
ción del automatismo. Póngase en contacto con un representante o visite el sitio web
(www.ppa.com.br) para ver los modelos disponibles.
Etiqueta de identicação
Etiqueta de identicación de desbloqueo de giro
(dependiendo del modelo de automatismo)
Destravamento Manual
1.º Passo: encaixe a chave no orifício,
com a lingueta voltada para cima.
2.º Passo: gire a chave para baixo em 180º,
de modo que a lingueta fique voltada para baixo.
PIVO HOME PIVO AVIÃO
PIVO PISTON PREDIAL E
PIVO CONDOMINIUM
Conducto
Dispositivo
de apagado
Chaveta
Pin de
desbloqueo
Palanca
DESTRAVADO
DESTRAVADO
TRAVADO
DESBLOQUEADO
Manual desbloqueado
Manual desbloqueado
Paso 1: retire la tapa protectora del oricio
de desbloqueo.
Paso 3: Gire la llave 90° en el sentido de las
agujas del reloj.
Paso 1: coloque la llave en el oricio, con la
pestaña hacia arriba.
Paso 2: gire la llave 180º hacia abajo para que el pestillo
quede hacia abajo.
Paso 4: Levante la palanca por
completo.
Paso 2: Inserta la llave
CÓDIGO
Clase X
RANGO DE TEMPERATURA
CARGA NOMINAL
TIEMPO DE OPERACIONES
VELOCIDAD LINEAL
GRADO DE PROTECCIÓN
MODELO
LOTE
AISLAMIENTO DE
DEVANADOS
TENSIÓN NOMINAL
CADENA NOMINAL
POTENCIA NOMINAL
CICLO DE
OPERACIÓN
XX ciclos/h
ADVERTENCIA
Activación automática
Manténgase alejado del área de la unidad, ya que
puede moverse inesperadamente.
Conducto
Dispositivo
de apagado
PLAZO DE GARANTÍA
MOTOPPAR, Induria y Comercio de Automatizadores Ltda., regirada con CNPJ (CIF) 52.605.821/0001-55, localizada
en la Avenida Dr. Labieno da Coa Machado número 3526, Dirito Indurial, Garça – SP – Brasil, Código Poal 17.400-
000, fabricante de los productos PPA, garantiza eo aparato contra defectos de proyectos, fabricación, montaje y/o
solidariamente en consecuencia de vicios de calidad de material que se lo hagan impropio o inadecuado al consumo
a cual se deina por el plazo legal de noventa días desde la fecha de adquisición, siempre que se cumplan las
orientaciones de inalación descritas en el manual de inrucciones.
Como consecuencia de la credibilidad y de la conanza depositada en los productos PPA, añadimos al plazo
anteriormente descrito más 275 días, alcanzando el total de un año, igualmente contados desde que la fecha de
adquisición pueda ser comprobada por el consumidor a través do comprobante de compra (Recibo).
En caso de defecto, en el período cubierto por la garantía, la responsabilidad de PPA se queda reringida a la
reparación o reemplazo del aparato por ella fabricada, bajo las siguientes condiciones:
1. La reparación y reajue de aparatos solo pueden realizarse por la Asiencia Técnica de PPA, que eá habilitada a
abrir, remover, suituir piezas o componentes, así como arreglar los defectos cubiertos por la garantía, siendo que el
incumplimiento de ee y cualquier utilización de piezas no originales observadas en el uso, implicará en la exclusión
de la garantía por parte del consumidor;
2. La garantía no se extenderá a accesorios como cables, kit de tornillos, soportes de jación, fuentes de alimentación
etc.;
3. Los coos de embalaje, transporte y reinalación del producto son responsabilidad exclusiva de los consumidores
nales;
4. Se debe enviar el aparato directamente a la empresa responsable de la venta (representante del fabricante), a través
de la dirección que gura en el recibo de compra, debidamente embalado, evitando así la pérdida de la garantía;
5. En el período adicional de 275 días, las visitas y los transportes donde no haya servicios autorizados serán cargadas.
Los gaos de transporte del aparato y/o técnico son responsabilidad del propietario y
6. La reparación o reemplazo del aparato no prorroga el plazo de garantía.
Ea garantía perderá su validez si el producto:
1. Sufrir daños provocados por agentes de la naturaleza, como descargas atmosféricas, inundaciones, incendios,
desmoronamientos etc.;
2. Sea inalado en red eléctrica inadecuada o en desacuerdo con cualquiera de las inrucciones de inalación
descritas en el manual;
3. Presenta defectos causados por caídas, golpes o cualquier otro accidente físico;
4. Presenta violación o intento de reparación o mantenimiento por parte de personal no autorizado;
5. No sea usado para lo que ha sido proyectado;
6. No sea usado en condiciones normales;
7. Sufrir daños causados por accesorios o aparatos conectados al producto.
Recomendación:
Recomendamos que la inalación y mantenimientos del aparato sean efectuados por servicio técnico autorizado PPA.
Caso el producto presente defecto o funcionamiento anormal, busque un Servicio Técnico especializado para los
debidos arreglos.
ATENCIÓN
Para mayor
seguridad,
reemplace la
chaveta con
un candado.
ATENCIÓN
Compruebe siempre el estado de las etiquetas. Si las pegatinas se dañan o son
ilegibles, compre otras en un distribuidor de PPA.
Apagado del equipo:
Para el paro total del automatismo, es necesario utilizar un dispositivo de paro que debe ser incorporado
al cableado jo y ubicado cerca del automatismo.
Ejemplos de dispositivos de apagado total: Disyuntores, interruptor ON/OFF, etc.
Nota: El dispositivo de desconexión total incorporado en el cableado jo debe garantizar la desconexión
de todos los conductores de red, excepto el de Tierra.
Funcionamiento:
Para activar su opera-
dor, presione el botón del
control remoto PPA que vie-
ne con la máquina durante 1
segundo.
Si se acciona el mando a distancia mientras la puerta se está abriendo, el automatismo se detendrá y
permanecerá así hasta que se active de nuevo el mando a distancia. Cuando esto suceda, la puerta se cerrará.
Si el control remoto se
activa mientras la puerta se
está cerrando, por razones de
seguridad, la puerta se detendrá y
se abrirá automáticamente.
Siema de desbloqueo:
En caso de corte de energía, el equipo cuenta con un siema de desbloqueo que permite abrir y
cerrar manualmente la puerta. Para ello, consulta a continuación tu modelo de automatismo:
PISTON SHARK
Para operar la puerta en modo manual:
1) Retire la cubierta protectora del oricio de desbloqueo;
2) Insertar la llave;
3) Girar la llave 90° (un cuarto de vuelta) en el sentido de las agujas del reloj;
4) Levante la palanca completamente;
5) Mover la hoja de la puerta;
6) Para volver a operar en modo automático, regrese la palanca a su posición original, gire la
llave en el sentido contrario a las agujas del reloj y vuelva a insertar la tapa protectora del oricio de
desbloqueo.
ATENCIÓN
Compruebe siempre el estado de las etiquetas. Si las pegatinas se dañan o son
ilegibles, compre otras en un distribuidor de PPA.
Apagado del equipo:
Para el paro total del automatismo, es necesario utilizar un dispositivo de paro que debe ser incorporado
al cableado jo y ubicado cerca del automatismo.
Ejemplos de dispositivos de apagado total: Disyuntores, interruptor ON/OFF, etc.
Nota: El dispositivo de desconexión total incorporado en el cableado jo debe garantizar la desconexión
de todos los conductores de red, excepto el de Tierra.
Funcionamiento:
Para activar su operador, presione el botón del control remoto PPA que viene con la máquina durante
1 segundo.
Si se acciona el mando a distancia mientras la puerta se está abriendo, el automatismo se detendrá y
permanecerá así hasta que se active de nuevo el mando a distancia. Cuando esto suceda, la puerta se cerrará
.
Si el control remoto se activa mientras la puerta se está cerrando, por
razones de seguridad, la puerta se detendrá y se abrirá automáticamente.
Sistema de desbloqueo:
En caso de corte de energía, el equipo cuenta con un sistema de desbloqueo que permite abrir y cerrar
manualmente la puerta. Para ello, consulta a continuación tu modelo de automatismo:
AUTOMATISMO BASCULANTE VERTICAL DESBLOQUEO BV PRIME
Para operar la puerta en modo manual:
1) Retire la cubierta protectora del oricio de desbloqueo;
2) Insertar la llave;
3) Girar la llave 90° (un cuarto de vuelta) en el sentido de las agujas del reloj;
4) Levante la palanca completamente;
5) Mover la hoja de la puerta;
6) Para volver a operar en modo automático, regrese la palanca a su posición original, gire la llave en
el sentido contrario a las agujas del reloj y vuelva a insertar la tapa protectora del oricio de desbloqueo.
AUTOMATISMO CON SISTEMA DE DESBLOQUEO POR CHAVETA O CANDADO
1) Para operar la puerta en modo manual, retire la chaveta;
2) Retire el pasador de desbloqueo;
3) Mueva la lengüeta de la palanca hacia arriba;
4) Suelte la palanca empujándola hacia abajo.
5) Para volver a operar en modo automático, vuelva a colocar la palanca y el trinquete en el pasador de
la tuerca de arrastre, inserte el pasador y nalmente la chaveta.
AUTOMATISMO BASCULANTE
HORIZONTAL
1) Para accionar la puerta en modo manual,
tire hacia abajo del cordón de desbloqueo;
2) Tire rmemente del cable para alejarlo de
la puerta;
3) Mover la hoja de la puerta;
4) Para volver a operar en modo automático,
realice el procedimiento inverso, tirando del cordón
hacia la puerta.
AUTOMATISMO BH POWER CHAIN
1) Para operar la puerta en modo manual, jale
el cordón de liberación hacia abajo para que el gatillo
quede estacionado en posición vertical.
2) Mueva la puerta manualmente.
3) Para volver a operar en modo automático, realice
el procedimiento inverso.
AUTOMATISMO TORSION
1) Para operar la puerta en modo manual, gire la
palanca de desbloqueo en el sentido de las agujas del
reloj (hacia arriba) para que la palanca quede en posición
vertical.
2) Mueva la puerta manualmente.
3) Para volver a operar en modo automático, realice el
procedimiento inverso.
Central de mando:
La central electrónica permite la instalación de otros accesorios que añaden funciones al automatismo
y brindan mayor comodidad y seguridad al usuario:
Fotocélula: Evita que una persona o vehículo
sea sorprendido en el camino hacia la puerta.
Al detectar una obstrucción en su línea
de paso, la fotocélula (sensor infrarrojo activo)
impide el cierre o detiene el movimiento de cierre,
abriendo automáticamente la puerta, evitando
colisiones con personas, objetos, automóviles o
animales.
Luz de garaje: Enciende la luz del garaje donde está instalado el automatismo, tan pronto como se
activa para la apertura, lo que permite comprobar si hay algún individuo cerca de la vivienda.
La luz se apaga solo después de que la puerta está completamente cerrada, con un tiempo de retardo
ajustable.
Señal: Alerta al peatón de la salida o entrada
de vehículos en un lugar determinado.
La señal se enciende cuando la puerta se
activa para abrir y se apaga tan pronto como está
completamente cerrado.
Los accesorios descritos anteriormente son opcionales y no están incluidos con el
producto.
Se recomienda el uso de fotocélulas y señales para aumentar la seguridad en la opera-
ción del automatismo. Póngase en contacto con un representante o visite el sitio web
(www.ppa.com.br) para conocer los modelos disponibles.
AUTOMATISMO PARA PUERTAS BATIENTES
Identicación del equipo:
Para mayor seguridad del usuario, el AUTOMATISMO PPA dispone de unas etiquetas de marcaje,
identicación y atención.
Fabricado por: Motoppar Indústria e Comércio de Automatizadores Ltda
Av. Dr. Labieno da Costa Machado, 3526 - Distrito Industrial - Garça - SP - CEP 17406-200 - Brasil
CNPJ: 52.605.821/0001-55
www.ppa.com.br | +55 14 3407 1000
1) Para accionar la puerta en modo manual, introduzca la llave en el oricio de desbloqueo con
el picaporte hacia arriba;
2) Girar la llave, desplazándola 180° hacia abajo, de modo que el picaporte quede hacia abajo;
3) Para volver a funcionar en modo automático, gire la llave en el sentido contrario, girándola
hacia arriba.
Central de mando:
La central electrónica permite la instalación de otros accesorios que añaden funciones al automatismo
y brindan mayor comodidad y seguridad al usuario:
Fotocélula: Evita que
una persona o vehículo sea
sorprendido en el camino
hacia la puerta.
Al detectar una obstrucción en su línea de paso, la fotocélula (sensor infrarrojo activo) impide el cierre
o detiene el movimiento de cierre, abriendo automáticamente la puerta, evitando colisiones con personas,
objetos, automóviles o animales.
Luz de garaje: Enciende la luz del garaje donde está instalado el automatismo, tan pronto como se
activa para la apertura, lo que permite comprobar si hay algún individuo cerca de la vivienda.
La luz se apaga solo después de que la puerta está completamente cerrada, con un tiempo de retardo
ajustable.
Señal: Alerta al peatón de la salida o entrada de vehículos en un lugar determinado.
La señal se enciende cuando la puerta se activa para abrir y se apaga tan pronto como está
completamente cerrado.
Los accesorios descritos anteriormente son opcionales y no están incluidos con el
producto.
Se recomienda el uso de fotocélulas y señales para aumentar la seguridad en la opera-
ción del automatismo. Póngase en contacto con un representante o visite el sitio web
(www.ppa.com.br) para ver los modelos disponibles.
Etiqueta de identicação
Etiqueta de identicación de desbloqueo de giro
(dependiendo del modelo de automatismo)
Destravamento Manual
1.º Passo: encaixe a chave no orifício,
com a lingueta voltada para cima.
2.º Passo: gire a chave para baixo em 180º,
de modo que a lingueta fique voltada para baixo.
PIVO HOME PIVO AVIÃO
PIVO PISTON PREDIAL E
PIVO CONDOMINIUM
Conducto
Dispositivo
de apagado
Chaveta
Pin de
desbloqueo
Palanca
DESTRAVADO
DESTRAVADO
TRAVADO
DESBLOQUEADO
Manual desbloqueado
Manual desbloqueado
Paso 1: retire la tapa protectora del oricio
de desbloqueo.
Paso 3: Gire la llave 90° en el sentido de las
agujas del reloj.
Paso 1: coloque la llave en el oricio, con la
pestaña hacia arriba.
Paso 2: gire la llave 180º hacia abajo para que el pestillo
quede hacia abajo.
Paso 4: Levante la palanca por
completo.
Paso 2: Inserta la llave
CÓDIGO
Clase X
RANGO DE TEMPERATURA
CARGA NOMINAL
TIEMPO DE OPERACIONES
VELOCIDAD LINEAL
GRADO DE PROTECCIÓN
MODELO
LOTE
AISLAMIENTO DE
DEVANADOS
TENSIÓN NOMINAL
CADENA NOMINAL
POTENCIA NOMINAL
CICLO DE
OPERACIÓN
XX ciclos/h
ADVERTENCIA
Activación automática
Manténgase alejado del área de la unidad, ya que
puede moverse inesperadamente.
Conducto
Dispositivo
de apagado
PLAZO DE GARANTÍA
MOTOPPAR, Induria y Comercio de Automatizadores Ltda., regirada con CNPJ (CIF) 52.605.821/0001-55, localizada
en la Avenida Dr. Labieno da Coa Machado número 3526, Dirito Indurial, Garça – SP – Brasil, Código Poal 17.400-
000, fabricante de los productos PPA, garantiza eo aparato contra defectos de proyectos, fabricación, montaje y/o
solidariamente en consecuencia de vicios de calidad de material que se lo hagan impropio o inadecuado al consumo
a cual se deina por el plazo legal de noventa días desde la fecha de adquisición, siempre que se cumplan las
orientaciones de inalación descritas en el manual de inrucciones.
Como consecuencia de la credibilidad y de la conanza depositada en los productos PPA, añadimos al plazo
anteriormente descrito más 275 días, alcanzando el total de un año, igualmente contados desde que la fecha de
adquisición pueda ser comprobada por el consumidor a través do comprobante de compra (Recibo).
En caso de defecto, en el período cubierto por la garantía, la responsabilidad de PPA se queda reringida a la
reparación o reemplazo del aparato por ella fabricada, bajo las siguientes condiciones:
1. La reparación y reajue de aparatos solo pueden realizarse por la Asiencia Técnica de PPA, que eá habilitada a
abrir, remover, suituir piezas o componentes, así como arreglar los defectos cubiertos por la garantía, siendo que el
incumplimiento de ee y cualquier utilización de piezas no originales observadas en el uso, implicará en la exclusión
de la garantía por parte del consumidor;
2. La garantía no se extenderá a accesorios como cables, kit de tornillos, soportes de jación, fuentes de alimentación
etc.;
3. Los coos de embalaje, transporte y reinalación del producto son responsabilidad exclusiva de los consumidores
nales;
4. Se debe enviar el aparato directamente a la empresa responsable de la venta (representante del fabricante), a través
de la dirección que gura en el recibo de compra, debidamente embalado, evitando así la pérdida de la garantía;
5. En el período adicional de 275 días, las visitas y los transportes donde no haya servicios autorizados serán cargadas.
Los gaos de transporte del aparato y/o técnico son responsabilidad del propietario y
6. La reparación o reemplazo del aparato no prorroga el plazo de garantía.
Ea garantía perderá su validez si el producto:
1. Sufrir daños provocados por agentes de la naturaleza, como descargas atmosféricas, inundaciones, incendios,
desmoronamientos etc.;
2. Sea inalado en red eléctrica inadecuada o en desacuerdo con cualquiera de las inrucciones de inalación
descritas en el manual;
3. Presenta defectos causados por caídas, golpes o cualquier otro accidente físico;
4. Presenta violación o intento de reparación o mantenimiento por parte de personal no autorizado;
5. No sea usado para lo que ha sido proyectado;
6. No sea usado en condiciones normales;
7. Sufrir daños causados por accesorios o aparatos conectados al producto.
Recomendación:
Recomendamos que la inalación y mantenimientos del aparato sean efectuados por servicio técnico autorizado PPA.
Caso el producto presente defecto o funcionamiento anormal, busque un Servicio Técnico especializado para los
debidos arreglos.
-
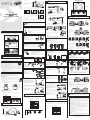 1
1
-
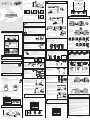 2
2


PPA Dz Hub R 350 Legero Manual de usuario
- Categoría
- Abridor de puerta
- Tipo
- Manual de usuario
en otros idiomas
- English: PPA Dz Hub R 350 Legero User manual
Artículos relacionados
-
 PPA Deton Siren El manual del propietario
-
 PPA BR1 - 500 Manual de usuario
-
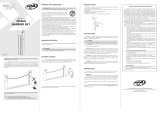 PPA BC1 - Plastic Chain Manual de usuario
-
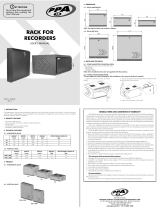 PPA Rack for Recorders Manual de usuario
-
 PPA Good Light Plus Manual de usuario
-
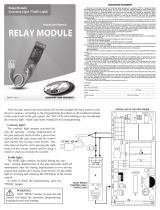 PPA Relay Module Manual de usuario
-
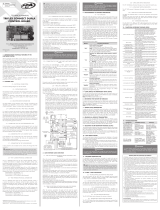 PPA Triflex Connect Fullrange Dupla Manual de usuario
-
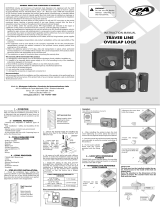 PPA Traver Uno Manual de usuario
-
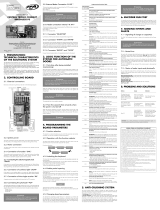 PPA Triflex Connect Brushless PS Manual de usuario
-
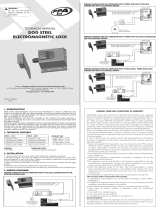 PPA Dog Steel Lock Manual de usuario


