La página se está cargando...

GENERAL TERMS AND CONDITIONS OF WARRANTY
MOTOPPAR, Indury and Commerce of Automatic Gate Operators Ltd., regiered with the CNPJ
(National Regiry of Legal Entities) under Number 52.605.821/0001-55, located at 3526 Dr. Labieno
da Coa Machado Avenue, Indurial Dirict, Garça – SP – Brazil, Zip Code 17406-200, manufacturer
of PPA Products, hereby guarantees this product again design, manufacturing or assembly defects
and/or supportively as a result of material quality aws that could make its intended use improper or
inadequate, within a legal period of ninety days from time of acquisition, provided that the inallation
inructions described in the inruction manual are observed.
Due to the credibility and tru placed on PPA products, we will add 275 more days to the period
mentioned above, reaching a warranty period of one year, likewise counted from the time of
acquisition proven by consumer through proof of purchase (Cuomer Receipt).
In case of defect, within the warranty period, PPA responsibilities are rericted to the repair or
subitution of the product manufactured by the company, under the following conditions:
1. Repair and readjument of equipment may only be carried out by PPA Technical Assiance, which is
qualied to open, remove, and subitute parts or components, as well as repair defects covered by
this warranty; thus, failure on observing this guideline and the veried use of any non-original parts
will cause the resignation of this warranty on the part of the user;
2. The warranty will not extend to accessories such as cables, screw kit, xing brackets, power supplies
etc.;
3. Expenses for packaging, transportation and product reinallation will be sole responsibility of the
consumer;
4. The equipment mu be sent directly to the Company responsible for the sale (manufacturer's
representative), through the address contained in the purchase invoice, properly packed, thus
avoiding loss of the warranty;
5. Within the additional period of 275 days, visits and transportation in places where authorized
technical assiance is not available will be charged. The co of transportation of the product and/or
technician will be sole responsibility of the consumer and
6. The subitution or repair of the product does not prolong the warranty time.
This warranty will be terminated if the product:
1. Is damaged by natural agents, such as atmospheric discharges, oods, wildres, landslides etc.;
2. Is inalled in an improper electric power supply or if it is not according to any of the inallation
inructions displayed on the manual;
3. Shows defects caused by droppings, collisions or any other physical accident;
4. Shows signs of product violation or attempted repair by unauthorized personnel;
5. Is not used for its intended purpose;
6. Is not used under normal conditions;
7. Is damaged by accessories or equipment connected to it.
Recommendation:
We recommend that both the inallation and the maintenance of the operator to be performed by an
authorized PPA technical service. If the product fails or has an improper operation, seek an Authorized
Technical Service to x it.
Made by: Motoppar Indústria e Comércio de Automatizadores Ltda
Av. Dr. Labieno da Costa Machado, 3526 - Distrito Industrial
Garça - SP - CEP 17406-200 - Brasil
CNPJ: 52.605.821/0001-55
www.ppa.com.br | +55 14 3407 1000
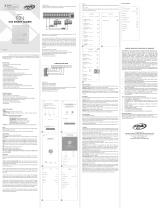
TRAVER LINE
OVERLAP LOCK
INSTRUCTION MANUAL
P09755 - 03/2023
Rev. 2
WARNING:
Do not use the device
without referring to
this manual rst.
1 – OVERVIEW:
Dear installer, this manual has been developed to
help you with the installation procedures. First, it
is important that you properly x your items, so
that all the expectations of our customers can be
met!
2 – GENERAL FEATURES:
- Overlap lock, adaptable to dierent types of
doors
- Easy installation - Safety and durability of the
product
- Ideal for access control to any environment
- 12V/6W power supply
- Its kit provides the user with 2 opening keys, as
well as the xing screws
3 – TOOLS REQUIRED FOR
INSTALLATION:
- Drilling template
- Duct tape – Hammer
- Bradawl
- Marker pen
- Phillips screwdriver
- Cup saw Ø25mm (1”)
- Drill
- Wiring
4 – ITEMS PROVIDED:
- ‘TRAVER UNO’ Electric lock
- 2 keys
- Screw kit
- External nishing kit
- Stopper
- Instruction manual
- Template
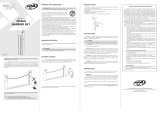
5 – STEP-BY-STEP INSTALLATION:
1 – Check the installation type, whether the
opening is RIGHT or LEFT with INWARDS opening;
observe if the face of the DOOR FRAME and the
face where the lock will be installed are in perfect
alignment as shown in the image below.
6 – After installing the product, place the lock
cover tightening its screws above the latch to
ensure security against tampering by third parties.
7 – Run the manual test of the keys both internally
and externally to verify the manual unlocking of
the product.
8 – Fix the outer cylinder
nish with the screws
provided with the xing
kit.
6 - LOCK WITH REVERSIBLE
TONGUE
TRAVER UNO comes with the option of a reversible
tongue that allows opening inwards or outwards
and also to the left or right.
7 - REVERSING THE REVERSIBLE
LOCK TONGUE
1-Remove the side
screws from the
cover.
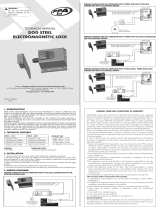
2 – Choose the desired height for installing the
electric lock, then x the drilling template with
adhesive tape.
3 – Using both the
bradawl and the
hammer, mark the
center of the holes,
remove the drilling
template, and check
the markings.
4 – By means of a drill, drill a hole with a Ø3mm
drill bit; to make the installation easier, by using
the screws from the xing kit, and with the use of
a cup saw, make a hole to pass the xing cylinder.
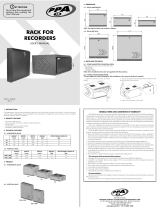
5 – Install the wiring of the lock actuator
(PUSHBUTTON, INTERCOM SYSTEM ETC), in a
way that the passage of wires or pipes for each
installation is independent from one another
and the lock can be reached when triggered
at 12V/6W, so that the device has a proper
performance.
CABLE DIMENSION ACCORDING TO
DISTANCE
0 UP TO 50m
(0 up to ~164.1ft) 1-mm Gauge
50 UP TO 100m
(~164.1 up to ~328.1ft) 2.5-mm Gauge
100m + (~328.1ft +) 4-mm Gauge
Right ‘opening’
door
Being inwards,
when opening
the door, the leaf
rotates clockwise.
Left ‘opening’ door
Being inwards, when
opening the door,
the leaf rotates
counterclockwise.
Hammer
Bradawl
Direct connection to the network + button
12v power supply
Example 2
Note: Refer to the doorphone manual to
proceed with the connection
2-Remove the screw that
holds the tongue.
3-invert the tongue
position.
4-screw the tongue and
cover again to nish the
reversal.
SAFETY TIP!
The lock must not be installed outside the ga-
tes. Avoid access to the inside of the lock on
hollow gates.
Note: Pay attention to the dimensions of the
column or frame. The counter frame must be
ush with the frame.
OPENING
DIRECTION
FRAME
COUNTER
FRAME

PLAZO DE GARANTÍA
MOTOPPAR, Induria y Comercio de Automatizadores Ltda., regirada con CNPJ (CIF) 52.605.821/0001-
55, localizada en la Avenida Dr. Labieno da Coa Machado número 3526, Dirito Indurial, Garça –
SP – Brasil, Código Poal 17406-200, fabricante de los productos PPA, garantiza eo aparato contra
defectos de proyectos, fabricación, montaje y/o solidariamente en consecuencia de vicios de calidad
de material que se lo hagan impropio o inadecuado al consumo a cual se deina por el plazo legal de
noventa días desde la fecha de adquisición, siempre que se cumplan las orientaciones de inalación
descritas en el manual de inrucciones.
Como consecuencia de la credibilidad y de la conanza depositada en los productos PPA, añadimos al
plazo anteriormente descrito más 275 días, alcanzando el total de un año, igualmente contados desde
que la fecha de adquisición pueda ser comprobada por el consumidor a través do comprobante de
compra (Recibo).
En caso de defecto, en el período cubierto por la garantía, la responsabilidad de PPA se queda
reringida a la reparación o reemplazo del aparato por ella fabricada, bajo las siguientes condiciones:
1. La reparación y reajue de aparatos solo pueden realizarse por la Asiencia Técnica de PPA, que eá
habilitada a abrir, remover, suituir piezas o componentes, así como arreglar los defectos cubiertos
por la garantía, siendo que el incumplimiento de ee y cualquier utilización de piezas no originales
observadas en el uso, implicará en la exclusión de la garantía por parte del consumidor;
2. La garantía no se extenderá a accesorios como cables, kit de tornillos, soportes de jación, fuentes
de alimentación etc.;
3. Los coos de embalaje, transporte y reinalación del producto son responsabilidad exclusiva de
los consumidores nales;
4. Se debe enviar el aparato directamente a la empresa responsable de la venta (representante del
fabricante), a través de la dirección que gura en el recibo de compra, debidamente embalado,
evitando así la pérdida de la garantía;
5. En el período adicional de 275 días, las visitas y los transportes donde no haya servicios autorizados
serán cargadas. Los gaos de transporte del aparato y/o técnico son responsabilidad del propietario
y
6. La reparación o reemplazo del aparato no prorroga el plazo de garantía.
Ea garantía perderá su validez si el producto:
1. Sufrir daños provocados por agentes de la naturaleza, como descargas atmosféricas, inundaciones,
incendios, desmoronamientos etc.;
2. Sea inalado en red eléctrica inadecuada o en desacuerdo con cualquiera de las inrucciones de
inalación descritas en el manual;
3. Presenta defectos causados por caídas, golpes o cualquier otro accidente físico;
4. Presenta violación o intento de reparación o mantenimiento por parte de personal no autorizado;
5. No sea usado para lo que ha sido proyectado;
6. No sea usado en condiciones normales;
7. Sufrir daños causados por accesorios o aparatos conectados al producto.
Recomendación:
Recomendamos que la inalación y mantenimientos del aparato sean efectuados por servicio técnico
autorizado PPA.
Caso el producto presente defecto o funcionamiento anormal, busque un Servicio Técnico
especializado para los debidos arreglos.
Made by: Motoppar Indústria e Comércio de Automatizadores Ltda
Av. Dr. Labieno da Costa Machado, 3526 - Distrito Industrial
Garça - SP - CEP 17406-200 - Brasil
CNPJ: 52.605.821/0001-55
www.ppa.com.br | +55 14 3407 1000
CERRADURA DE SOBREPONER
LÍNEA TRAVER
MANUAL DE INSTRUCCIONES
P09755 - 03/2023
Rev. 2
ADVERTENCIA:
No utilice el equipo sin
antes leer este manual
de instrucciones.
1 – INFORMACIÓN GENERAL:
Estimado instalador, este manual ha sido
desarrollado para ayudarle con los procedimientos
de instalación. Primero, es importante que arregle
adecuadamente sus ítems, para que se puedan
cumplir todas las expectativas de nuestros
clientes.
2 – CARACTERISTICAS GENERALES:
- Cerradura sobreponer, adaptable a diferentes
tipos de puertas
- Fácil instalación - Seguridad y durabilidad del
producto
- Ideal para control de acceso a cualquier entorno
- Alimentación 12V/6W
- Su kit suministra 2 llaves de apertura al usuario,
así como los tornillos de jación
3 – HERRAMIENTAS NECESARIAS
PARA LA INSTALACIÓN:
- Plantilla de perforación
- Cinta adhesiva - Martillo
- Punzón
- Plumón
- Destornillador Phillips
- Sierra copa Ø25mm (1”)
- Taladro de mano
- Cableado
4 – ÍTEMS SUMINISTRADOS:
- Cerradura eléctrica ‘TRAVER UNO’
- 2 llaves
- Kit de tornillos
- Kit de acabado externo
- Batiente
- Manual de instrucciones
- Plantilla
5 – INSTALACIÓN PASO A PASO:
1 – Vericar el tipo de instalación, si la apertura
es DERECHA o IZQUIERDA con apertura HACIA
ADENTRO; observe si la cara del MARCO DE LA
PUERTA y la cara donde se instalará la cerradura
están en perfecta alineación como se muestra en
la imagen a continuación.
2 – Elija la altura deseada para la instalación de
la cerradura eléctrica, y luego je la plantilla de
perforación con cinta adhesiva.
3 – Utilizando el
punzón y el martillo,
marque el centro
de los agujeros,
retire la plantilla de
perforación y verique
los marcados.
4 – Perforar un agujero con taladro y una broca
de Ø3mm; para facilitar la instalación, utilice los
tornillos del kit de jación, y con el uso de una
sierra copa, hacer un agujero para pasar el cilindro
de jación.
5 – Instale el cableado del actuador de la
cerradura (BOTONERA, INTERCOMUNICADOR
ETC), de manera que el paso de cables o tuberías
para cada instalación sea independiente entre
sí y se pueda llegar a la cerradura al dispararse a
12V/6W, de manera que el dispositivo tiene un
rendimiento adecuado.
DIMENSIÓN DEL CABLE SEGÚN LA DISTANCIA
0 HASTA 50 m
(0 hasta ~164.1 pies)
Calibre de
1mm
50 HASTA 100m
(~164.1 hasta ~328.1 pies)
Calibre de
2.5mm
100m o más
(~ 328.1 pies o más)
Calibre de
4mm
Puerta de
‘apertura’ derecha
Al estar hacia el
interior, al abrir la
puerta, la hoja gira
en sentido horario.
Puerta de ‘apertura’
izquierda
Al estar hacia adentro,
al abrir la puerta, la
hoja gira en sentido
antihorario.
Martillo
Punzón
Conexión directa a la red + botón
Fuente de alimentación 12v
6 – Tras instalar el producto, coloque la tapa de
la cerradura apretando sus tornillos por encima
del pestillo para garantizar la seguridad contra la
manipulación por parte de terceros.
7 – Ejecute la prueba manual de las llaves tanto
interna como externamente para vericar el
desbloqueo manual del producto.
8 – Fije el acabado
exterior del cilindro
con los tornillos
suministrados con el kit
de jación.
6 - CERRADURA CON LENGÜETA
REVERSIBLE
TRAVA UNO viene con la opción de una lengüeta
reversible que permite abrir hacia adentro o ha-
cia afuera y también hacia la izquierda o hacia la
derecha.
7 - INVERSIÓN DE LA LENGÜETA
DE CIERRE REVERSIBLE
1-Quitar los tornillos
laterales de la tapa.
Ejemplo 2
Nota: Consulte el manual del interfono
(intercomunicador) para continuar con la conexión
2-Retirar el tornillo que
sujeta la lengüeta.
3-invertir la posición
de la lengüeta.
4-Atornillar la lengüeta
y tapar nuevamente
para terminar la
inversión.
¡CONSEJO DE SEGURIDAD!
La cerradura no debe instalarse fuera de las
puertas. Evite el acceso al interior de la cerra-
dura en puertas huecas.
Nota: Preste atención a las dimensiones de la
columna o marco. El contra marco debe estar al
ras con el marco.
SENTIDO DE
APERTURA
MARCO
CONTRA
MARCO
1/2