
Under license from Goodyear manufactured by:
873 E. Citation Court
Boise, Idaho 83716 USA
800-874-5771
GOODYEAR (and winged foot design) is a trademark of The Goodyear Tire & Rubber Company,
Akron, Ohio USA used under license by Bon-Aire Industries, Inc.
Owner’s Manual
12 Volt Truck & SUV
Air Inflator
Model: i7000
This Manual contains information regarding the safety
and operation of this product. Before you use, read and
understand all instructions, cautions, and warnings.
Failure to do so can result in serious injury or property
damage.

TABLE OF CONTENTS
General Safety Rules.................................................2
Safety Symbols, Words and Labels...........................2
Specifications.............................................................3
Important Safety Information......................................3
Parts Diagram............................................................4
Operating Instructions................................................5
Warranty Information .................................................6
1
WARRANTY INFORMATION
LIMITED ONE YEAR WARRANTY POLICY
Every product is thoroughly inspected and tested before leaving the factory. It is warranted
to be free of defects from workmanship and materials for the period of ONE YEAR from
date of original purchase. Should any trouble develop during this one year period, please
contact our Customer Service Center at 1-800-874-5771 between 800 a.m. and 5:00 p.m.
Mountain Standard Time, Monday through Friday. This warranty does not apply to the
following: Where repairs have been made or attempted by others; where repairs are
required because of normal wear and tear; if the product has been abused, misused,
or improperly maintained; any alterations have been made to the product. IN NO
EVENT SHALL BON-AIRE INDUSTRIES, INC. BE LIABLE FOR ANY INDIRECT,
INCIDENTAL OR CONSEQUENTIAL DAMAGES FROM THE SALE OR USE OF THE
PRODUCT. THIS DISCLAIMER APPLIES BOTH DURING AND AFTER THE TERM OF
THIS WARRANTY. This warranty gives you specific legal rights, and you may also have
other rights which vary from state to state in the United States. Some states do not allow
the exclusion or limitation of incidental of consequential damages, and/or some states do
not allow limitation on how long an implied warranty lasts, so the above limitation may not
apply to you.
PÓLIZA DE GARANTÍA LIMITADA DE UN AÑO
Cada uno de nuestros productos ha sido cuidadosamente inspeccionado y probado antes
de salir de la fábrica. Le garantizamos que va a estar libre de defectos en su mano de obra
y materiales durante un período de UN AÑO, contado a partir de la fecha de compra
original. En el caso en que surja algún problema durante este período de un año, póngase
en contacto por favor con nuestro Centro de Servicio al Cliente, llamando al 1-800-874-
5771(Válido para llamadas gratis en los E.U.A.) de lunes a viernes de 8:00 a.m. a 5:00
p.m. (Horario estándar de las montañas). Esta garantía no es aplicable en los
siguientes casos: en casos en los que se haya hecho o intentado hacer una
reparación por partes ajenas; en caso en que sea necesaria una reparación por
causa del uso y desgaste normales de la unidad; si el producto hubiera sido objeto
de abuso uso indebido, o sujeto a un mantenimiento inadecuado; que se hubiera
hecho algún tipo de modificación en el producto. EN NINGÚN CASO BON-AIRE
INDUSTRIES, INC. SERÁ RESPONSABLE DE ALGÚN TIPO DE DAÑO, SEA
INDIRECTO, INCIDENTAL O CONSECUENCIAL, PRODUCIDOS POR CAUSA DE LA
VENTA O EL USO DE ESTE PRODUCTO. ESTA EXENCIÓN DE RESPONSABILIDAD
ES APLICABLE DURANTE Y DESPUÉS DEL PERÍODO DE VALIDEZ DE ESTA
GARANTÍA. Esta garantía le otorga derechos legales específicos; es posible que a usted
le asistan otros derechos legales de acuerdo con las leyes de cada estado de los Estados
Unidos. Algunos estados no permiten limitaciones en el tiempo de duración de una
garantía implícita ni la exclusión o limitación de daños fortuitos o consecuentes, por lo que
las limitaciones o exclusio-nes mencionadas en esta garantía pueden no ser aplicables en
su caso. Esta garantía en México es reemplazada por la del importador.
6

OPERATING INSTRUCTIONS
CAUTION DO NOT OVER-INFLATE ITEM BEING INFLATED.
To inflate vehicle tire:
1. Remove the inflator from two compartment carrying bag and place evenly on
the ground.
2. Connect the 16 ft. PVC coil air hose to the inflator by pulling back on the
quick connect coupler and inserting this to valve located to the end of the 1
ft. rubber air hose which is coming off of the inflator. Push in firmly and pull
the quick connect coupler back until you hear a click to lock the PVC coil air
hose in place.
3. Connect the 12 Volt 10 ft. power cord into DC 12 Volt power outlet.
4. Connect the screw-on valve connector to tire air valve, twisting the rubber
protector clockwise until it is securely attached to the tire air valve.
5. Move the On/Off switch to “On” position and the Inflator will begin to
operate. Monitor the PSI on the gauge to fill your item to desired pressure.
Once you’ve reached the desired air pressure, move the On/Off switch to
the “Off” position.
6. To remove the PVC coil air hose from your vehicle tire, twist the rubber
proctor on the screw-on valve connector counter clockwise.
7. To remove the PVC coil air hose from the inflator by pulling back on the
quick connect coupler and pulling the PVC coil air hose away from coupler.
8. Remove the 12 Volt power cord from the DC 12 Volt power outlet.
9. Store your inflator and parts in the two compartment carrying bag so you
don’t loose any parts.
To inflate sports ball, air mattress, rubber raft, etc.:
1. Remove the inflator from two compartment carrying bag and place evenly on
the ground.
2. Connect the 16 ft. PVC coil air hose to the inflator by pulling back on the
quick connect coupler and inserting this to valve located to the end of the 1
ft. rubber hose which is coming off of the inflator. Push in firmly and pull the
quick connect coupler back until you hear a click to lock the PVC coil air
hose in place.
3. Connect the 12 Volt 10 ft. power cord into DC 12 Volt power outlet.
4. Select the appropriate inflation accessory and screw onto end of the screw-
on valve.
5. Insert the inflation accessory into appropriate item you are inflating.
6. Move the On/Off switch to “On” position and the Inflator will begin to
operate. Inflate your desired item to the correct pressure and move the
On/Off switch to the “Off” position.
7. To remove the PVC coil air hose from the inflator by pulling back on the
quick connect coupler and pulling the PVC coil air hose away from coupler.
8. Remove the 12 Volt power cord from the DC 12 Volt power outlet.
9. Store your inflator and parts in the two compartment carrying bag so you
don’t loose any parts.
5
GENERAL SAFETY RULES
WARNING
Read and understand all instructions. Failure to follow instructions can result
in electric shock, fire and/or serious personal injury. SAVE THESE
INSTRUCTIONS FOR FUTURE REFERENCE.
SAFETY SYMBOLS, WORDS AND LABELS
The safety instructions provided in this manual are not intended to cover all
possible conditions that may occur during product operation. Always use
common sense and pay attention to all WARNING and CAUTION statements in
this manual.
WARNING WARNING indicates a potentially hazardous
situation. Failure to avoid may result in serious
injury or death.
CAUTION CAUTION indicates a potentially hazardous
situation. Failure to avoid may result in minor
personal injury.
INTENDED USE
This product is intended for consumer use only.
2

SPECIFICATIONS
CAUTION
THIS INFLATOR OPERATES ONLY ON DC 12 VOLT. DO NOT ATTEMPT TO
OPERATE THIS INFLATOR WITH ANY OTHER SOURCE OR VOLTAGE. DO
NOT REWIRE OR RECONFIGURE INFLATOR FROM ITS ORIGINAL DESIGN
OR PERSONAL INJURY OR BODILY HARM MAY OCCUR.
Voltage DC 12 V
Power Requirement DC 12V – For use with 12 Volt DC
Power Outlet Only
Note: This unit is equipped with fuse protection. If at some point your
Inflator fails to operate, check the fuse in the end of the 12 Volt plug. To replace
the fuse, simply unscrew the 12 Volt power plug tip, remove existing fuse, install
new fuse and reassemble power plug tip. Use only an AGC - 15 amp
replacement fuse.
IMPORTANT SAFETY INFORMATION
WARNING
1. Use 12 Volt DC only. Make sure that your vehicle 12 Volt power outlet is free of
any ash residue or debris. A dirty 12 Volt power outlet can cause the inflator and
power cord to overheat. Overheating can cause damage to your inflator/vehicle
and could cause bodily harm or injury (Disconnect power when not in use).
2. This inflator is designed to inflate car tires, bike tires, ATV tires, sports equipment, air
mattresses, beach toys and other inflatables. Do not use for any purpose other than
inflating. If you do so, bodily harm or personal injury can occur.
3. Caution, allow inflator to cool down 10 minutes after each 12 minutes of
continuous operation.
4. After using, turn off power.
5. The inflator is not a toy. Keep away from children at all times.
6. Do not carry inflator by the air hose or power cord or damage may occur.
7. Do not leave the inflator unattended while in operation.
8. Do not over inflate. Please follow the manufacturer’s instructions for the item you
are inflating
9. Keep the inflator away from flammable areas/liquids at all times.
10. Do not operate the inflator in wet or damp areas.
11. Operate the inflator only with the accessories that are included.
12. USE SAFETY GLASSES. Also use face or dust mask if operation is dusty.
13. It is recommended that your vehicle’s 12 Volt battery be fully charged to get best
performance from your air inflator. If your vehicle battery is weak, the inflator will
not work at its maximum output level.
14. For best results and more efficient power, it is recommended that you operate
your air inflator with your VEHICLE’S ENGINE RUNNING, making absolutely
sure you are outside or in an open, well-ventilated area and NOT INSIDE A
CONFINED AREA, SUCH AS A GARAGE or bodily injury or asphyxiation
resulting in death could occur. ALWAYS ALLOW FOR PROPER VENTILATION.
Most vehicle 12 Volt power outlets will operate with vehicle ignition off; however,
some vehicles require that the ignition be turned on.
3
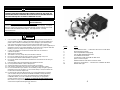
PARTS DIAGRAM
Item # Name
1 1 ft. Rubber Air Hose … Connects to 16 ft. PVC Coil Air Hose
2 Analog Pressure Gauge
3 Two Compartment Carrying Bag
4 Two 15 AMP Replacement Fuses
5 Four Inflation Accessories
6 12 Volt 10 ft. Power Cord with 15 AMP Fuse
7 Quick Connect Coupler
8 Rubber Protector Over Brass Screw-On Valve
9 16 ft. PVC Coil Air Hose … Connects to 1 ft. Rubber Air Hose
10 Built-In LED Light
4
-
 1
1
-
 2
2
-
 3
3
-
 4
4


en otros idiomas
- English: Goodyear i7000 Owner's manual
Otros documentos
-
 Bon-Aire i8000 Guía del usuario
-
Craftsman 75122 El manual del propietario
-
 BONAIRE T600 Manual de usuario
-
Kobalt KL12120 Dual Power Inflator Manual de usuario
-
Husky HD12120B Guía del usuario
-
PEAK PKC0VG El manual del propietario
-
-
-

