Aqara CHC01 Manual de usuario
- Categoría
- Cámaras de seguridad
- Tipo
- Manual de usuario


Camera Hub G2H Pro User Manual
Bedienungsanleitung für Kamera-Hub G2H Pro
Caméra Hub G2H ProManuel d’utilisation
Manual de instrucciones paraCámara Hub G2H Pro
Camera Hub G2H Pro Manuale di Istruzioni
Камера Хаб G2H ProРуководство по эксплуатации
智能攝像機G�H Pro使用説明書
스마트�허브 G2H Pro 사용자�매뉴얼
· 01
· 11
· 20
· 30
· 39
· 48
· 56
· 64

01
Product introduction
Aqara Camera Hub G2H Pro is an intelligent product that integrates dual functions
of camera and hub. It has functions such as video intercom, motion detection,
sound detection, MicroSD card recording, NAS storage, timelapse, privacy area
covering and so on.It can also be used as a Zigbee hub in collaboration with other
sensors, controllers, and otheraccessoriesto realize the functions such as home
guard, data reporting, and smart control. It also supports for HomeKit Secure
Video.
Speaker hole
Micro USB slot
Function button
Indicator light
Micro SD card slot
Lens
Microphone
pickup hole
Reset button

02
Preparation before Use
Download the Aqara Home app
Power up and turn on the Camera Hub G2H Pro
Quick Setup
1. A smartphone or tablet that supports Wi-Fi or a cellularnetwork (with iOS or
Android system) is required.
2. Please make sure that there is a Wi-Fi connection and yourinternet connection
is stable.
Search for "Aqara Home" in the Apple App Store, Google
Play,Xiaomi GetApps, Huawei App Gallery,or scan the
following QR code to download the Aqara Homeapp.
1
2
Add the product to the Aqara Home app
3
Choose the installation location of the hub: Ensure that the hub and the routing
connection are not disturbed, and avoid metal obstacles between the hub and
the router or around thehub.
Locate the power interface at the backof the product andplug theMicroUSB
power cord to connect the power adapter. When the Camera HubG2H Pro is
started, the status indicator will turn yellow and flash quickly. Make sure your
mobile phone is connected to a Wi-Fi network in the 2.4 GHz frequency band.
Please open the Aqara Home app, tap “Home” and then tap “+” in the topright
corner to enter the “Add Device (Accessory)” page, select “Camera Hub G2H Pro”,
and add it according to instructions in the Aqara Home app. Aer a successful
connection, the status indicator of the device willturn blue and keep the light
constant.

03
Aer theCamera Hub G2H Prois added successfully, please open the Aqara Home
app and refer to the user manual of the accessory to add.
Add accessory
4
Open the Apple Home app, click “+” on the upper right corner, and then enter the
“Add Accessory” page. Scan or manually enter the HomeKit Setup Code at the
bottom of the camera to bind the camera to HomeKit.
If the camera is failed to add to the HomeKit:
* “Failed to add accessory”. Due to multiple adding failures, the error information of the iOS
cache cannot be removed. Please restart the iOS device and reset the camera;
* “Accessory already added”. Aer restarting the iOS device and reset the camera, you can
manually enter the HomeKit setup code and add it again;
Connect to Apple HomeKit
5
NOTICE: If the device addition fails, please confirm the following points
* The Wi-Fi name or password contains an unsupported special character, such as, @, #, %, -, $,
etc., resulting in a failure to connect to the router. Please change it to a commonly used
character and try again.
* If the camera cannot recognize the QR code generated by the mobile phone. Please make sure
that the screen size of the mobile phone is not less than 4.7 inches, and make sure that you
don't use the backlight of the camera to shoot the QR code.
* Check whether the router has enabled the Wi-Fi anti-squatter setting, which causes the camera
to be unable to connect to the Internet.
* Check whether the router has enabled AP isolation, which leads to the failure to search the
camera on the mobile phone in the LAN.
*Make sure the camera is connected to the 2.4GHz Wi-Fi network.

04
4
3
2
1
Notice
Product Installation
Use of the Works with Apple badge means that an accessory has been designed to work
specifically with the technology identified in the badge and has been certified by the developer to
meet Apple performance standards. Apple is not responsible for the operation of this device or its
compliance with safety and regulatory standards.
A 10-day recording history from your Camera Hub G2H Pro is securely stored in iCloud and
available to view in the Apple Home app on your iPhone, iPad, or Mac. You can add one camera to
your 200GB plan or up to five cameras to your 2TB plan at no additional cost. Camera recordings
don’t count against your iCloud storage limit.
Communication between iPhone, iPad, Apple Watch, HomePod, or Mac and the HomeKit-
enabled Camera Hub G2H Prois secured by HomeKit technology.
Please make sure the camera is added successfully, and then install it onto
the wall.
You can place the camera on a horizontal surface, such as a desk, table,
bookcase, and so on.
The base of the camera contains a magnet, which can be attached to the
surface of ferrous material, such as refrigerator, iron door, and so on. Do not
place it near the main unit of the computer or hard disc.
You can also use double-sided tape to attach the magnet to the surface of
smooth materials, such as glass, tile, latex wall, and so on, or fastening
screws can be used to fix the magnet sheet on the wall, and then attach the
camera to the magnet.
* “Accessory not found”. Please wait for 3 minutes aer resetting the camera. You can manually
enter the HomeKit setup code and add it again.

05
*Please make sure the installation position is
within the coverage range of the Wi-Fi.
* Do not place it near strong electromagnetic
interference sources.
* The product is only limited to be used indoors.
Please do not use it in humid environments or
outdoors.
* Please make sure there is no obstacle around
the device.
Warnings
*This product is NOT a toy. Please keep children away from this product.
*This product is designed for indoor use only. Do NOT use in humid environments or outdoors.
*Beware of moisture, do NOT spill water or other liquids onto the product.
*Do NOT place this product near a heat source.
*Do NOT place it in an enclosure unless there is normal ventilation.
* Do NOT attempt to repair this product by yourself. All repairs should be performed by an
authorized professional.
*This product is only suitable for improving the convenience of your home life and reminding
you about the status of your devices. It should NOT be used as security equipment for homes,
buildings, warehouses, or any other places. If a user violates the product use instructions, the
manufacturer will NOT be liable for any risks and property losses.
*The base of this product has been designed with strong magnetic properties, which can ensure
that product will not fall off when it is installed on the wall. In order to prevent falling off and
possibly causing personal injury, we recommend that the installation of the device should be
less than 2 meters.
* This product does not come with a power adapter by default. Please purchase a separate
adapter from a regular source.

06
Description ofButton Operations
Description of Indicator Light Status
Button Operations
Click the function button one time
Click the function button three times
Click the reset button five times
Long press the reset button for 5seconds
Long pressthe function button for 3 seconds
Status Description
Turn off alert
Initiate a child device access request
Reset the device but clear local information
Reset the device but retain local information
Initiate a voice call request
Indicator Light Status
Yellow light is on steady
Yellow light flashes quickly
Yellow light flashes slowly
Blue light flashes quickly
Blue light flashes slowly
Status Description
The camera is turning on
Waiting to connect to the network
The camera is being resetting/OTA upgrading
Connecting to the network
Connected to the network successfully and the account is being boun
Blue light is on steady Working properly
Red light is on steady Live video is in progress
White light is on steady No network is connected in 10 minutes aer starting
Purple light flashes slowly Accessories are allowed to be added
Off The indicator is turned off/the device sleeps/the device is not powered

07
Specifications
Product Model: CH-C01
Video Coding: H.264
Resolution: 1080p
Power Supply Input:5V 1A
Viewing Angle: 146° (diagonal)
Overall Power Consumption: 5 W
Product Dimensions: 82.4×56.5×50.5 mm (3.24×2.33×1.99 in.)
Working Temperature:-10°C~40°C (14°F~104°F)
Operating Humidity:15%~85%RH, no condensation
WirelessProtocols: Zigbee 3.0 IEEE 802.15.4, Wi-Fi IEEE 802.11 b/g/n 2.4 GHz
Local Storage: MicroSD card (CLASS 4 or above is supported, up to 512 GB storage)
Supported Device: Android 4.0 or iOS 13.2 and above
What is in the Box: G2H Pro Camera Hub × 1, User Manual × 1, Screw × 2, Metal
Plate × 1, Micro USB to USB-A Cable × 1, Ejector Tool × 1, Sticker × 1
Wi-Fi Operation Frequency 2412-2472 MHz
≤ 20 dBm
2405-2480 MHz
≤ 13 dBm
Wi-Fi Maximum Output Power
ZigbeeOperation Frequency
Zigbee Maximum Output Power
Under normal use of condition, this equipment should be kept a separation distance
of at least 20cm between the antenna and the body of the user.

08
Hereby, Lumi United Technology Co., Ltd declares that the radio equipment type
Camera Hub G2H Pro, CH-C01 is in compliance with Directive 2014/53/EU. The full
text of the EU declaration of conformity is available at the following internet address:
https://www.aqara.com/DoC/
All products bearing this symbol are waste electrical and electronic equipment (WEEE
as in directive 2012/19/EU) which should not be mixed with unsorted household
waste. Instead, you should protect human health and the environment by handing
over your waste equipment to a designated collection point for the recycling of waste electrical
and electronic equipment, appointed by the government or local authorities. Correct disposal
and recycling will help prevent potential negative consequences to the environment and
human health. Please contact the installer or local authorities for more information about the
location as well as terms and conditions of such collection points.
FCC ID:2AKIT-CHC01
Federal Communications Commission (FCC) compliance statement:
1. This device complies with part 15 of the FCC Rules. Operation is subject to the following two
conditions: (1) This device may not cause harmful interference, and (2) this device must accept
any interference received, including interference that may cause undesired operation. 2.
Changes or modifications not expressly approved by the party responsible for compliance
could void the user's authority to operate the equipment.
EU Declaration of Conformity
UK Declaration of Conformity
Hereby, Lumi United Technology Co., Ltd declares that the radio equipment type
Camera Hub G2H Pro, CH-C01 is in compliance with Directive 2017 (SI 2017 No. 1206, as
amended by SI 2019 No. 696).
WEEE Disposal and Recycling Information
The full text of the UK declaration of conformity is available at the following internet address:
http://www.aqara.com/DoC/.

09
Note: This equipment has been tested and found to comply with the limits for a CLASS B digital
device, pursuant to part 15 of the FCC Rules. These limits are designed to provide reasonable
protection against harmful interference in a residential installation. This equipment generates,
uses and can radiate radio frequency energy and, if not installed and used in accordance with
the instructions, may cause harmful interference to radio communications. However, there is
no guarantee that interference will not occur in a particular installation. If this equipment does
cause harmful interference to radio or television reception, which can be determined by turning
the equipment off and on, the user is encouraged to try to correct the interference by one or
more of the following measures:
—Reorient or relocate the receiving antenna.
—Increase the separation between the equipment and receiver.
—Connect the equipment into an outlet on a circuit different from that to which the receiver is
connected.
—Consult the dealer or an experienced radio/TV technician for help.
IC: 22635-CHC01
IC NOTICE TO CANADIAN USERS
This device contains licence-exempt transmitter(s)/receiver(s) that comply with Innovation,
Science and Economic Development Canada’s licence-exempt RSS(s). Operation is subject to
the following two conditions:
(1) This device may not cause interference.
(2) This device must accept any interference, including interference that may cause undesired
RF Exposure statement:
This equipment complies with FCC radiation exposure limits set forth for an uncontrolled
environment. This equipment should be installed and operated with minimum distance of 20
cm between the radiator and your body. This transmitter must not be co-located or operating in
conjunction with any other antenna or transmitter.

10
This equipment complies with IC radiation exposure limits set forth for an uncontrolled
environment. This equipment should be installed and operated with minimum distance of 20
cm between the radiator and your body. This transmitter must not be co-located or operating in
conjunction with any other antenna or transmitter.
Online Customer Service:www.aqara.com/support
Manufacturer:LumiUnited Technology Co., Ltd.
Address: 8th Floor,JinQiWisdom Valley, No.1 Tangling Road,LiuxianAve, Taoyuan Residential
District, Nanshan District, Shenzhen, China.
Email:[email protected]om
operation of the device.
This CLASS B digital apparatus complies with Canadian ICES003.
This device complies with RSS247 of Industry Canada. Operation is subject to the condition
that this device does not cause harmful interference.

11
Produktbeschreibung
Aqara Kamera-Hub G2H Pro ist ein intelligentes Produkt, das zwei Funktionen
von Kamera und Hub integriert, darunter Video-Gegensprechanlage,
Bewegungserkennung, Tonerkennung, MicroSD-Kartenaufzeichnung,
NAS-Speicher, Zeitraffer, Abdeckung des Privatsphärebereichs usw. Es kann auch
als Zigbee-Hub in Zusammenarbeit mit anderen Sensoren, Controllern und
anderem Zubehör verwendet werden, um die Funktionen wie Homeguard,
Datenberichte und intelligente Steuerung sowie die Unterstützung des HomeKit
Secure Video zu realisieren
Loch für
Lautsprecher
Micro USB Slot
Schaltfläche
Funktion
Licht des Indikators
Micro SD Card Slot
Linsen
Loch für Mikrofone
Knopf zurücksetzen

12
Vorbereitung vor Gebrauch
Schnelleinrichtung
1. Ein Smartphone oder Tablet, das Wi-Fi oder ein Mobilfunknetz unterstützt (mit
iOS- oder Android-System) .
2. Bitte stellen Sie sicher, dass eine stabile WLAN-Verbindung besteht.
Laden Sie die Aqara Home-App herunter
1
Suchen Sie im Apple App Store, Google Play, Xiaomi
GetApps, Huawei App Gallery nach „Aqara Home“ oder
scannen Sie den folgenden QR-Code, um die Aqara Home
App herunterzuladen.
Schalten Sie den Kamer-Hub G2H Pro ein und schalten Sie ihn ein
2
Fügen Sie das Produkt der Aqara Home-App hinzu
3
Wählen Sie den Installationsort des Hubs: Stellen Sie sicher, dass der Hub und
die Routing-Verbindung nicht gestört werden und vermeiden Sie metallische
Hindernisse zwischen Hub und Router oder um den Hub herum.
Suchen Sie die Stromschnittstelle auf der Rückseite des Produkts und stecken
Sie das MicroUSB-Kabel ein, um den Adapter anzuschließen. Wenn der
Kamera-Hub G2H Pro gestartet wird, wird die Anzeige gelb und blinkt schnell.
Stellen Sie sicher, dass Ihr Mobiltelefon mit einem Wi-Fi-Netzwerk im
2,4-GHz-Frequenzband verbunden ist.
Öffnen Sie die Aqara Home-App, tippen Sie auf die Schaltfläche „Home“ und
dann oben rechts auf „+“, um die Schnittstelle „Gerät hinzufügen (Zubehör)“

13
Zubehör hinzufügen
4
HINWEIS: Wenn das Hinzufügen des Geräts fehlschlägt, überprüfen Sie die
folgenden Punkte:
* Der Wi-Fi-Name oder das Passwort enthält ein nicht unterstütztes Sonderzeichen wie @, #, %,
-, $ usw., was dazu führt, dass die Verbindung zum Router fehlschlägt. Ändern Sie es in das
normale Zeichen und versuchen Sie es erneut.
* Wenn die Kamera den vom Mobiltelefon generierten QR-Code nicht erkennen kann. Stellen
Sie sicher, dass die Bildschirmgröße des Mobiltelefons nicht weniger als 4,7 Zoll beträgt und
Sie nicht die Hintergrundbeleuchtung der Kamera verwenden, um den QR-Code
aufzunehmen.
* Check whether the router has enabled the Wi-Fi anti-squatter setting, which causes the
camera to be unable to connect to the Internet.
* Prüfen Sie, ob die AP-Isolation des Routers aktiviert ist, was dazu führt, dass die Kamera des
Mobiltelefons im LAN nicht gesucht wird.
*Stellen Sie sicher, dass die Kamera mit dem 2,4-GHz-WLAN-Netzwerk verbunden ist.
Nachdem Sie den Kamera-Hub G2H Pro hinzugefügt haben, öffnen Sie bitte die
Aqara Home App und lesen Sie das Benutzerhandbuch.
Mit Apple HomeKit verbinden
5
Öffnen Sie die Apple Home App, klicken Sie oben rechts auf die Schaltfläche „+“
und rufen Sie die Schnittstelle „Zubehör hinzufügen“ auf. Scannen Sie den
HomeKit-Setup-Code an der Unterseite der Kamera oder geben Sie ihn manuell
ein, um die Kamera an HomeKit zu binden.
aufzurufen, wählen Sie „Kamera-Hub G2H Pro“ und fügen Sie es gemäß den
Anweisungen in der Aqara Home App hinzu. Nach der Verbindung wird die
Anzeige des Geräts blau und das Licht ist immer an.

14
Wenn Sie dem HomeKit keine Kamera hinzufügen konnten:
* “"Zubehör konnte nicht hinzugefügt werden". Aufgrund mehrerer Fehler können die
Fehlerinformationen des iOS-Cache nicht entfernt werden. Bitte starten Sie das iOS-Gerät neu
und setzen Sie die Kamera zurück;
* „Zubehör bereits hinzugefügt“. Nach dem Neustart des iOS-Geräts und dem Zurücksetzen der
Kamera können Sie den HomeKit-Setup-Code manuell eingeben und erneut hinzufügen.
* „Zubehör nicht gefunden“. Bitte warten Sie 3 Minuten nach dem Zurücksetzen der Kamera,
dann können Sie den HomeKit-Setup-Code manuell eingeben und erneut hinzufügen.
Hinweis
Produktinstallation
Die Verwendung des Abzeichens „Works with Apple“ bedeutet, dass ein Zubehörteil speziell für
die im Abzeichen angegebene Technologie entwickelt wurde und vom Entwickler für die
Erfüllung der Apple-Leistungsstandards zertifiziert wurde. Apple ist nicht verantwortlich für
den Betrieb dieses Geräts oder seine Einhaltung von Sicherheits- und behördlichen Standards.
Ein 10-tägiger Aufnahmeverlauf von Ihrem Kamera-Hub G2H Pro wird sicher in iCloud
gespeichert und kann in der Apple Home App auf Ihrem iPhone, iPad oder Mac angezeigt
werden. Sie können Ihrem 200-GB-Plan eine Kamera oder bis zu fünf Kameras zu Ihrem 2
TB-Plan hinzufügen ohne zusätzliche Kosten. Die Kameraaufnahmen werden nicht auf Ihr
iCloud-Speicherlimit angerechnet.
Die Kommunikation zwischen iPhone, iPad, Apple Watch, HomePod oder Mac und dem
HomeKit-fähigen Kamera-Hub G2H Pro wird durch die HomeKit-Technologie gesichert.
Bitte stellen Sie sicher, dass die Kamera hinzugefügt wird, und installieren
Sie sie dann an der Wand.
Sie können die Kamera auf einer horizontalen Fläche wie einem
Schreibtisch, Tisch, Bücherregal usw. platzieren.
2
1

15
Warnungen
4
3
* Stellen Sie sicher, dass sich die
Installationsposition innerhalb des
Abdeckungsbereichs des Wi-Fi befindet.
* Stellen Sie es nicht in der Nähe von starken
elektromagnetischen Störquellen auf.
* Das Produkt darf nur in Innenräumen
verwendet werden. Bitte verwenden Sie es
nicht in feuchten Umgebungen sowie im Freien.
* Stellen Sie sicher, dass sich um das Gerät herum
keine Hindernisse befinden.
*Dieses Produkt ist KEIN Spielzeug. Bitte halten Sie Kinder von diesem Produkt fern.
*Dieses Produkt ist nur für den Innenbereich bestimmt. Verwenden Sie es NICHT in feuchten
Umgebungen oder im Freien.
*Achten Sie auf Feuchtigkeit, verschütten Sie KEIN Wasser oder Flüssigkeiten auf das Produkt.
*Stellen Sie dieses Produkt NICHT in der Nähe einer Wärmequelle auf. Stellen Sie es NICHT in
ein Gehäuse, es sei denn, es gibt eine normale Belüung.
Die Basis der Kamera enthält einen Magneten, der an der Oberfläche von
eisenhaltigem Material wie Kühlschrank, Eisentür usw. befestigt werden
kann. Stellen Sie sie nicht in der Nähe des Hauptgeräts des Computers oder
der Festplatte auf.
Sie können den Magneten auch mit doppelseitigem Klebeband an der
Oberfläche glatter Materialien wie Glas, Fliesen, Latexwand usw. befestigen
oder Befestigungsschrauben verwenden, um die Magnetfolie an der Wand
zu befestigen, und dann die Kamera anbringen der Magnet.

16
Beschreibung der Tastenfunktionen
Tastenfunktionen
Klicken Sie einmal auf die Funktionstaste
Klicken Sie dreimal auf die Funktionstaste
Klicke fünfmal auf den Reset-Button
Halten Sie die Reset-Taste 5
Sekunden lang gedrückt
Halten Sie die Funktionstaste 3
Sekunden lang gedrückt
Gerätestatus
Benachrichtigung deaktivieren
Initiieren einer Zugriffsanfrage für ein
untergeordnetes Gerät
Setzen Sie das Gerät zurück, aber löschen
Sie die lokalen Informationen
Setzen Sie das Gerät zurück, aber behalten
Sie die lokalen Informationen bei
Initiieren einer Sprachanrufanforderung
*Reparieren Sie das Produkt NICHT selbst. Alle Reparaturen müssen von einem autorisierten
Fachmann durchgeführt werden.
*Dieses Produkt ist nur dazu geeignet, den Komfort Ihres Privatlebens zu verbessern und Sie an
den Status Ihrer Geräte zu erinnern. Es sollte NICHT als Sicherheitsausrüstung für
Wohnungen, Gebäude, Lagerhallen usw. verwendet werden. Wenn ein Benutzer gegen die
Gebrauchsanweisung verstößt, haet der Hersteller NICHT für Risiken und Sachschäden.
*Die Basis dieses Produkts ist mit starken magnetischen Eigenschaen ausgestattet, die
sicherstellen, dass das Produkt bei der Wandmontage nicht herunterfällt. Um ein
Herunterfallen und mögliche Personenschäden zu vermeiden, empfehlen wir eine
Montagehöhe des Gerätes von weniger als 2 Metern.
*Die Appliance wird standardmäßig nicht mit einem Netzteil geliefert. Bitte kaufen Sie einen
separaten Adapter von einer normalen Quelle.

17
Beschreibung des Anzeigestatus
Status der Kontrollleuchte
Gelbes Licht ist eingeschaltet
Gelbes Licht blinkt schnell
Gelbes Licht blinkt langsam
Blaues Licht blinkt schnell
Blaues Licht blinkt langsam
Blaues Licht ist eingeschaltet
Rotes Licht ist eingeschaltet
Weißes Licht ist eingeschaltet
Lila Licht blinkt langsam
Ausgeschaltet
Gerätestatus
Die Kamera schaltet sich ein
Warten auf die Verbindung mit dem
Netzwerk
Die Kamera wird zurückgesetzt/OTA
aktualisiert
Mit dem Netzwerk verbinden
Der Indikator ist ausgeschaltet/das Gerät
schlä/das Gerät wird nicht mit Strom versorgt
Zubehör darf hinzugefügt werden
10 Minuten nach dem Start ist kein Netzwerk verbunden
Live-Video läu
Funktioniert normal
Das Netzwerk wurde erfolgreich
verbunden und das Konto wird gebunden

18
Spezifikationen
WLAN-Betriebsfrequenz 2412-2472 MHz
≤20 dBm
2405-2480 MHz
≤ 13 dBm
Maximale WLAN-Ausgangsleistung
Zigbee-Betriebsfrequenz
Maximale Zigbee-Ausgangsleistung
Produktmodell: CH-C01
Videocodierung: H.264
Auflösung: 1080p
Stromversorgungseingang:5V 1A
Betrachtungswinkel: 146° (diagonal)
Gesamtleistungsaufnahme: 5 W
Produktabmessungen: 82,4×56,5×50,5 mm (3,24×2,33×1,99 Zoll)
Arbeitstemperatur:-10°C~40°C (14°F~104°F)
Betriebsfeuchtigkeit:15%~85%RH, keine Kondensation
Wireless-Protokolle: Zigbee 3.0 IEEE 802.15.4, Wi-Fi IEEE 802.11 b/g/n 2.4 GHz
Lokaler Speicher: MicroSD-Karte (Klasse 4 oder höher wird unterstützt, bis zu
512 GB Speicher)
Kompatibilität: Android 4.0 oder iOS 13.2 und höher
Lieferumfang: Kamera-Hub G2H Pro× 1; Benutzerhandbuch × 1; Schraube× 2;
Metallplatte × 1; Micro-USB-auf-USB-A-Kabel × 1; Auswerferwerkzeug× 1;
Aufkleber× 1
Unter normalen Einsatzbedingungen muss dieses Gerät einen Abstand von
mindestens 20cm zwischen der Antenne und dem Körper des Benutzers einhalten.

19
Hiermit bestätigt Lumi United Technology co., LTD, dass das Funkgerät des Typs
Kamera-Hub G2H Pro, CH-C01 mit der Verordnung 2014/53/EU in Einklang steht. Der
vollständige Wortlaut der EU-Konformitätserklärung ist unter der folgenden
Internetadresse abrufbar: http://www.mi.com/global/service/support/declaration.html
Alle mit diesem Symbol gekennzeichneten Produkte sind Elektroschrott und
Elektrogeräte (WEEE entsprechend EU-Richtlinie 2012/19/EU) und dürfen nicht mit
unsortiertem Haushaltsmüll vermischt werden. Schützen Sie stattdessen Ihre
EU-Konformitätserklärung
WEEE-Informationen zur Entsorgung und zum Recycling
Mitmenschen und die Umwelt, indem Sie Ihre zu entsorgenden Geräte an eine dafür
vorgesehene, von der Regierung oder einer lokalen Behörde eingerichtete Sammelstelle zum
Recycling von Elektroschrott und Elektrogeräten bringen. Eine ordnungsgemäße Entsorgung
und Recycling helfen, negative Auswirkungen auf die Gesundheit von Umwelt und Menschen zu
vermeiden. Wenden Sie sich bitte an den Installateur oder lokale Behörden, um Informationen
zum Standort und den allgemeinen Geschäsbedingungen solcher Sammelstellen zu erhalten.
Service-URL: www.aqara.com/support
Hersteller: Lumi United Technology co., LTD.
Anschri: 8/F, Jinqi Wisdom Valley Building, No.1 Tangling Road, Liuxian Avenue, Taoyuan
Street, Nanshan District, Shenzhen

20
Présentation du produit
Aqara Caméra Hub G2H Pro est un produit intelligent qui intègre la double
fonction de caméra et de hub. Il présente des fonctions telles que l'interphone
vidéo, la détection de mouvement, la détection du son, l'enregistrement sur
carte MicroSD, le stockage NAS, la photographieaccélérée, la couverture de la
zone de confidentialité, etc. Il peut également être utilisé comme hub Zigbee en
collaboration avec d'autres capteurs, contrôleurs et autres accessoires pour
réaliser des fonctions telles que la surveillance à domicile, la communication de
données et le contrôle intelligent. Il prend également en charge la vidéo
sécurisée HomeKit.
Trou du Haut
- parleur
Mini USB slot
Bouton de
fonction
Feu indicateur
Fente de carte
mini SD
Objectif
Microphone
pick - up
Réinitialiser le bouton

21
Préparation avant utilisation
Installation Rapide
1.Un smartphone ou une tablette prenant en charge le Wi-Fi ou un réseau
cellulaire (avec système iOS ou Android) est requis.
2.Veuillez-vous assurer qu'il existe une connexion Wi-Fi et que votre connexion
internet est stable.
Téléchargez l'application Aqara Home
1
Recherchez « Aqara Home » dans l'Apple App Store,
Google Play, Xiaomi GetApps, Huawei App Gallery, ou
scannez le code QR suivant pour télécharger l'application
Aqara Home.
Mettez sous tension et allumez le Caméra Hub G2H Pro
2
Ajoutez le produit à l'application Aqara Home
3
Choisissez l'emplacement d'installation du hub : Assurez-vous que le hub et la
connexion de routage ne sont pas perturbés, et évitez les obstacles métalliques
entre le hub et le routeur ou autour du hub.
Localisez l'interface d'alimentation à l'arrière du produit et branchez le cordon
d'alimentation MicroUSB pour connecter l'adaptateur secteur. Lorsque le
Caméra Hub G2H Pro est démarré, l'indicateur d'état devient jaune et clignote
rapidement. Assurez-vous que votre téléphone mobile est connecté à un réseau
Wi-Fi dans la bande de fréquence 2,4 GHz.
Veuillez ouvrir l'application Aqara Home, appuyez sur «Accueil», puis sur «+»
dans le coin supérieur droit pour accéder à la page «Ajouter un appareil

22
Ajouter un accessoire
4
AVIS: Si l'ajout de l'appareil échoue, veuillez confirmer les points suivants
* Le nom ou le mot de passe Wi-Fi contient un caractère spécial non pris en charge, tel que @, #,
%, -, $, etc., ce qui entraîne un échec de connexion au routeur. Veuillez le remplacer par un
caractère couramment utilisé et réessayer.
* Si l'appareil photo ne peut pas reconnaître le code QR généré par le téléphone mobile.
Veuillez-vous assurer que la taille de l'écran du téléphone mobile n'est pas inférieure à 4,7
pouces, et assurez-vous que vous n'utilisez pas le rétroéclairage de l'appareil photo pour
prendre le code QR.
* Vérifiez si le routeur a activé le paramètre anti-squatter Wi-Fi, ce qui empêche la caméra de se
connecter à Internet.
* Vérifiez si le routeur a activé l'isolation des AP, ce qui entraîne l'échec de la recherche de la
caméra sur le téléphone mobile dans le réseau local.
*Assurez-vous que la caméra est connectée au réseau Wi-Fi 2,4 GHz.
Une fois le Caméra Hub G2H Pro ajouté avec succès, veuillez ouvrir l'application
Aqara Home et référez-vous au manuel d'utilisation de l'accessoire à ajouter.
Connectez-vous à Apple HomeKit
5
Ouvrez l'application Apple Home, cliquez sur «+» dans le coin supérieur droit,
puis accédez à la page «Ajouter un accessoire». Scannez ou saisissez
manuellement le code de configuration HomeKit au bas de la caméra pour lier la
caméra à HomeKit.
(Accessoire)», sélectionnez «Caméra Hub G2H Pro», et ajoutez-le selon les
instructions dans le Application Aqara Home. Après une connexion réussie,
l'indicateur d'état de l'appareil deviendra bleu et gardera la lumière constante.

23
Si l'ajout de la caméra au HomeKit échoue :
* ''Échec de l'ajout d'un accessoire''. En raison des multiples échecs d'ajout, les informations
d'erreur du cache iOS ne peuvent pas être supprimées. Veuillez redémarrer l'appareil iOS et
réinitialiser la caméra;
* "Accessoire déjà ajouté". Après avoir redémarré l'appareil iOS et réinitialisé la caméra, vous
pouvez saisir manuellement le code de configuration HomeKit et l'ajouter à nouveau;
* "Accessoire introuvable". Veuillez patienter pendant 3 minutes après avoir réinitialisé la
caméra. Vous pouvez saisir manuellement le code de configuration HomeKit et l'ajouter à
nouveau.
Avis
Installation du produit
L'utilisation du badge Works with Apple signifie qu'un accessoire a été conçu pour fonctionner
spécifiquement avec la technique identifiée dans le badge et a été certifié par le développeur
pour répondre aux normes de performance Apple. Apple n'est pas responsable du
fonctionnement de cet appareil ou de sa conformité aux normes de sécurité et réglementaires.
Un historique d'enregistrement de 10 jours de votre Caméra Hub G2H Pro est stocké en toute
sécurité dans iCloud et peut être consulté dans l'application Apple Home sur votre iPhone,
iPad ou Mac. Vous pouvez ajouter une caméra à votre forfait de 200 Go ou jusqu'à cinq caméras
à votre forfait de 2 To sans frais supplémentaires. Les enregistrements de la caméra ne sont pas
déduits de votre limite de stockage iCloud.
La communication entre iPhone, iPad, Apple Watch, HomePod, ou Mac et le Caméra Hub G2H
Pro compatible HomeKit est sécurisée par la technique HomeKit.
Assurez-vous que la caméra est ajoutée avec succès, puis installez-la sur le mur.
Vous pouvez placer la caméra sur une surface horizontale, comme un bureau,
une table, une bibliothèque, etc.
2
1

24
Avertissements
4
3
* Veuillez-vous assurer que la position
d'installation se trouve dans la zone de
couverture du Wi-Fi.
* Ne le placez pas à proximité de sources de
fortes interférences électromagnétiques.
* Le produit ne peut être utilisé qu'à l'intérieur.
Veuillez ne pas l'utiliser dans des
environnements humides ou à l'extérieur.
* Veuillez-vous assurer qu'il n'y a aucun obstacle
autour de l'appareil.
* Ce produit n'est PAS un jouet. Veuillez tenir les enfants à l'écart de ce produit.
* Ce produit est conçu pour une utilisation en intérieur uniquement. NE PAS l'utiliser dans des
environnements humides ou à l'extérieur.
* Attention à l'humidité, ne renversez PAS d'eau ou d'autres liquides sur le produit.
* Ne placez PAS ce produit près d'une source de chaleur. Ne le placez PAS dans une enceinte à
moins qu'il n'y ait une ventilation normale.
* N'essayez PAS de réparer ce produit par vous-même. Toutes les réparations doivent être
effectuées par un professionnel agréé.
La base de la caméra contient un aimant, qui peut être fixé à la surface d'un
matériau ferreux, comme un réfrigérateur, une porte en fer, etc. Ne le placez
pas près de l'unité principale de l'ordinateur ou du disque dur.
Vous pouvez également utiliser du ruban adhésif double face pour fixer
l'aimant à la surface de matériaux lisses, comme le verre, le carrelage, le mur
en latex, etc, ou des vis de fixation peuvent être utilisées pour fixer la feuille
magnétique sur le mur, puis attacher la caméra à l'aimant.

25
Description des opérations des boutons
Opérations des boutons
Cliquez une fois sur le bouton de fonction
Cliquez trois fois sur le bouton de fonction
Cliquez cinq fois sur le bouton de
réinitialisation
Appuyez longuement sur le bouton de
réinitialisation pendant 5 secondes
Appuyez longuement sur le bouton de
fonction pendant 3 secondes
Gerätestatus
Désactiver l'alerte
Initier une demande d'accès à un appareil
dépendant.
Réinitialiser l'appareil mais effacer les
informations locales
Réinitialiser l'appareil mais conserver les
informations locales
Demande d'appel vocal
* Ce produit est uniquement destiné à améliorer le confort de votre vie domestique et à vous
rappeler l'état de vos appareils. Il ne doit PAS être utilisé comme équipement de sécurité pour
les maisons, les bâtiments, les entrepôts, ou tout autre endroit. Si un utilisateur enfreint les
instructions d'utilisation du produit, le fabricant NE sera PAS responsable des risques et des
pertes matérielles.
* La base de ce produit a été conçue avec de fortes propriétés magnétiques, ce qui peut garantir
que le produit ne tombera pas lorsqu'il est installé sur le mur. Afin d'éviter de tomber et de
provoquer des blessures corporelles, nous recommandons d'installer l'appareil à moins de 2
mètres.
* Ce produit n'est pas fourni par défaut avec un adaptateur secteur. Veuillez acheter un
adaptateur séparé auprès d'une vendeur ordinaire.

26
Description de l'état du voyant lumineux
État du voyant lumineux
Le voyant jaune reste allumé
Le voyant jaune clignote rapidement
Le voyant jaune clignote lentement
Le voyant bleue clignote rapidement
Le voyant bleu clignote lentement
Le voyant bleu reste allumé
Le voyant rouge reste allumé
Le voyant blanc reste allumé
Le voyant violet clignote lentement
Désactivé
Description du statut
La caméra s'allume
En attente de connexion au réseau
La caméra est en cours de
réinitialisation/mise à niveau OTA
Connexion au réseau
Indicateur éteint/l'appareil se met en
veille/l'appareil n'est pas alimenté
Les accessoires sont autorisés à être ajoutés
Aucun réseau n'est connecté en 10 minutes
après le démarrage
La vidéo en direct est en cours
Fonctionne correctement
Connecté au réseau avec succès et le
compte est en cours de boun

27
Spécifications
Fréquence de fonctionnement Wi-Fi 2412-2472 MHz
≤20 dBm
2405-2480 MHz
≤ 13 dBm
Puissance maximale en sortie Wi-Fi
Fréquence de fonctionnement Zigbee
Puissance maximale en sortie Zigbee
Modèle de produit : CH-C01
Codage vidéo : H.264
Résolution : 1080p
Tension d'alimentation: 5V1A
Angle de vision : 146° (diagonale)
Consommation électrique totale : 5 W
Dimensions du produit: 82,4 × 56,5 × 50,5 mm (3,24 × 2,33 × 1,99 po)
Température de fonctionnement: -10°C ~ 40°C (14°F ~ 104°F)
Humidité de fonctionnement : 15%~85% RH, pas de condensation
Protocoles sans fil : Zigbee 3.0 IEEE 802.15.4, Wi-Fi IEEE 802.11 b/g/n 2,4 GHz
Stockage local : carte MicroSD (la CLASSe 4 ou supérieure est prise en charge,
jusqu'à 512 Go de stockage)
Appareil pris en charge : Android 4.0 ou iOS 13.2 et supérieur
Contenu de la boîte: Caméra Hub G2H Pro × 1, Manuel d'utilisation × 1, Vis × 2,
Plaque métallique × 1, Câble Micro USB vers USB-A × 1, Outil d'éjection × 1,
Autocollant × 1
Dans des conditions normales d’utilisation, cet équipement doit être maintenu à
une distance d’au moins 20cm entre l’antenne et le corps de l’utilisateur.

28
Par la présente, Lumi United Technology co., LTD déclare que cet équipement radio
de type Caméra Hub G2H Pro,CH-C01 est conforme à la Directive européenne
2014/53/UE. L’intégralité de la déclaration de conformité pour l’UE est disponible à
l’adresse suivante: https://www.aqara.com/DoC/
Informations sur la réglementation DEEE sur la mise au rebut et le recyclage
Tous les produits portant ce symbole deviennent des déchets d’équipements
électriques et électroniques (DEEE dans la Directive européenne2012/19/UE) qui ne
Déclaration de conformité pour l’Union européenne
doivent pas être mélangés aux déchets ménagers non triés. Vous devez contribuer à la
protection de l’environnement et de la santé humaine en apportant l’équipement usagé à un
point de collecte dédié au recyclage des équipements électriques et électroniques, agréé par le
gouvernement ou les autorités locales. Le recyclage et la destruction appropriés permettront
d’éviter tout impact potentiellement négatif sur l’environnement et la santé humaine.
Contactez l’installateur ou les autorités locales pour obtenir plus d’informations concernant
l’emplacement ainsi que les conditions d’utilisation de ce type de point de collecte.
IC:22635-CHC01
L'émetteur/récepteur exempt de licence contenu dans le présent appareil est conforme aux
CNR d’Innovation, Sciences et Développement économique Canada applicables aux appareils
radio exempts de licence. L'exploitation est autorisée aux deux conditions suivantes :
(1) L'appareil ne doit pas produire de brouillage;
(2) L'appareil doit accepter tout brouillage radioélectrique subi, même si le brouillage est
susceptible d'en compromettre le fonctionnement.
Cet appareil numérique de la CLASSe B conforme à la norme NMB003 du Canada.
Cet appareil est conforme à la norme RSS 247 d'Industrie Canada. Le fonctionnement est
soumis à la condition que cet appareil ne provoque pas d'interférences nuisibles.

29
Website de service: www.aqara.com/support
Fabricant: Lumi United Technology co., LTD.
Adresse: Étage 8, Immeuble Jinqizhigu, 1 Route Tangling, Avenue Liuxian , Rue Taoyuan,
District Nanshan, Shenzhen
Cet équipement est conforme aux limites d’exposition aux rayonnements de la IC établies pour
unenvironnement non contrôé. Cet équipement doit être installé et fonctionner à au moins
20cm de distance d’un radiateur ou de votre corps.Cet émetteur ne doit pas être co-localisé ou
fonctionner en conjonction avec une autre antenne ou un autre émetteur.

30
Descripción del producto
La Cámara Hub G2H Pro de Aqara es un producto inteligente que integra la doble
función de cámara y concentrador(hub). Cuenta con funciones como
intercomunicación de vídeo, detección de movimiento, detección de sonido,
grabación en tarjeta MicroSD, almacenamiento NAS, timelapse, cobertura de
área de privacidad, etc. También se puede utilizar como un concentrador (hub)
Zigbee en colaboración con otros sensores, controladores y otros accesorios
para realizar las funciones como la protección del hogar, el informe de datos y el
control inteligente. También es compatible con HomeKit Secure Video.
Agujero del
altavoz
Ranura USB
miniatura
Botón de
función
Luz indicadora
Ranura de tarjeta
SD miniatura
Lente
Micrófonos
Botón de reinicio

31
Preparación antes del uso
Configuración rápida
1.Se requiere un smartphone o una tableta que admita Wi-Fi o una red celular
(con sistema iOS o Android).
2.Por favor, asegúrate de que hay una conexión Wi-Fi y de que tu conexión a
internet es estable.
Descarga la aplicación Aqara Home
1
Busca "Aqara Home" en la App Store de Apple, Google Play,
Xiaomi GetApps, Huawei App Gallery, o escanea el siguiente
código QR para descargar la aplicación Aqara Home.
Prender o encender la Cámara Hub G2H Pro
2
Añade el producto a la aplicación Aqara Home
3
Elige el lugar de instalación del concentrador(hub): Asegúrate de que el
concentrador(hub) y la conexión de enrutamiento no se vean alterados, y evita
los obstáculos metálicos entre el concentrador(hub) y el enrutador(router) o
alrededor del concentrador(hub).
Localiza la interfaz de alimentación en la parte trasera del producto y conecta el
cable de alimentación MicroUSB con el adaptador de corriente. Cuando la
Cámara Hub G2H Pro se encienda,el indicador de estado se volverá amarillo y
parpadeará rápidamente.. Asegúrate de que tu teléfono móvil está conectado a
una red Wi-Fi en la banda de frecuencia de 2,4 GHz.
Por favor, abre la aplicación Aqara Home, haz clic en "Home" y luego en el
símbolo "+" en la esquina superior derecha para entrar en la página "Añadir

32
Añadir accesorio
4
AVISO: Si la conexión del dispositivo falla, por favor, comprueba lo siguientes
* El nombre o la contraseña del Wi-Fi contiene un carácter especial no admitido, como @, #, %,
-, $, etc., lo que provoca un fallo en la conexión con el router. Por favor, cámbialo por un
carácter de uso común e inténtalo de nuevo.
* Si la cámara no puede reconocer el código QR generado en el teléfono móvil. Por favor,
asegúrate de que el tamaño de la pantalla del teléfono móvil no es inferior a 4,7 pulgadas, y
asegúrate de no utilizar la luz de fondo de la cámara para capturar el código QR.
* Comprueba si el router ha habilitado el ajuste antisquatter del Wi-Fi, lo que provoca que la
cámara no pueda conectarse a Internet.
* Comprueba si el router ha habilitado el aislamiento de AP, lo que provoca que no se pueda
buscar la cámara en el móvil en la LAN.
*Asegúrate de que la cámara está conectada a la red Wi-Fi de 2,4 GHz.
Una vez que la Cámara Hub G2H Pro se haya añadido correctamente, abre la
aplicación Aqara Home y consulta el manual de usuario del accesorio para
añadirlo.
Conectar con Apple HomeKit
5
Abre la app Apple Home, haz clic en el símbolo "+" en la esquina superior
derecha y entra en la página "Añadir accesorio". Escanea o introduce
manualmente el código de configuración de HomeKit que aparece en la parte
inferior de la cámara para vincularla a HomeKit.
dispositivo (accesorio)", selecciona "Cámara Hub G2H Pro" y añádela según las
instrucciones de la aplicación Aqara Home. Una vez realizada la instalación con
éxito, el indicador de estado del dispositivo se volverá azul y mantendrá la luz
constante.

33
Si la cámara no se puede añadir al HomeKit:
* “Error al añadir el accesorio”. Debido a los múltiples fallos de adición, la información de error de
la caché de iOS no se puede eliminar. Por favor, reinicia el dispositivo iOS y restablece la
cámara;
* “Accesorio ya añadido”. Después de reiniciar el dispositivo iOS y reiniciar la cámara, puedes
introducir manualmente el código de configuración de HomeKit y añadirlo nuevamente;
* “Accesorio no encontrado”. Por favor, espera 3 minutos después de reiniciar la cámara. Puede
ingresar manualmente el código de configuración de HomeKit y agregarlo nuevamente.
Aviso
Instalación de producto
La utilización del distintivo "Works with Apple" significa que un accesorio ha sido diseñado
para funcionar específicamente con la tecnología identificada en dicho distintivo y ha sido
certificado por el desarrollador para cumplir con los estándares de funcionamiento de Apple.
Apple no es responsable del funcionamiento de este dispositivo ni de su cumplimiento de las
normas de seguridad y reglamentación.
El historial de grabaciones de 10 días de tu Cámara Hub G2H Pro se almacena de forma segura
en iCloud y está disponible para su visualización en la app Apple Home de tu iPhone, iPad o
Mac. Puedes añadir una cámara a tu plan de 200 GB o hasta cinco cámaras a tu plan de 2 TB sin
coste adicional. Las grabaciones de la cámara no se contabilizan en el límite de
almacenamiento de iCloud.
La comunicación entre el iPhone, el iPad, el Apple Watch, el HomePod o el Mac y la Cámara
Hub G2H Pro habilitada para HomeKit está protegida por la tecnología HomeKit.
Por favor, asegúrate de que la cámara se ha añadido correctamente, y luego
instálala en la pared.
1

34
4
3
2
Precauciones
* Por favor, asegúrate de que la ubicación de
la instalación está dentro del rango de
cobertura del Wi-Fi.
* No lo instales cerca de fuentes de
interferencia electromagnética fuertes.
* Por favor, no lo utilices en ambientes
húmedos o al aire libre. Está diseñado
únicamente para uso en interiores.
* Asegúrate de que no hay ningún obstáculo
alrededor del dispositivo.
* Por favor, mantener a los niños alejados de este producto. Este producto NO es un juguete.
* Este producto está diseñado para ser utilizado únicamente en interiores. NO lo utilices en
ambientes húmedos o al aire libre.
* Alejar el producto de cualquier humedad, NO derrames agua u otros líquidos sobre el
producto.
* NO colocar este producto cerca de una fuente de calor. NO lo pongas en un lugar cerrado a
menos que haya una ventilación normal.
Puedes instalar la cámara en una superficie horizontal, por ejemplo, un
escritorio, una mesa, una estantería, etc.
La base de la cámara contiene un imán, que puede fijarse a la superficie de
un material metálico, como un frigorífico, una puerta de metal, etc. No la
coloques cerca de la unidad principal del ordenador o del disco duro.
También puedes utilizar cinta adhesiva de doble cara para fijar el imán a la
superficie de materiales lisos, como cristal, baldosas, paredes de látex, etc., o
bien puedes utilizar tornillos de fijación para adherir la lámina del imán a la
pared, y luego fijar la cámara al imán.

35
Descripción del funcionamiento de los botones
Funcionamiento de los botones
Haz clic en el botón de función una vez
Haz clic en el botón de función tres veces
Haz clic en el botón de reinicio cinco
veces
Pulsa prolongadamente el botón de
reinicio durante 5 segundos
Pulsa prolongadamente el botón de
función durante 3 segundos
Gerätestatus
Se desactiva la alerta
Se inicia una solicitud de acceso a un
dispositivo secundario
Reinicie el dispositivo pero borre la
información local
Reinicie el dispositivo pero conserve la
información local
Se inicia una solicitud de llamada de voz
* NO intentes reparar este producto por ti mismo. Todas las reparaciones deben ser realizadas
por un profesional autorizado.
* Este producto sólo es adecuado para mejorar la comodidad de tu estilo de vida en casa y
funciona para recordarte sobre el estado de tus dispositivos. NO debe utilizarse como equipo
de seguridad para casas, edificios, almacenes o cualquier otro lugar. Si un usuario viola las
instrucciones de uso del producto, el fabricante NO se hará responsable de los riesgos y
pérdidas materiales.
* La base de este producto ha sido diseñada con propiedades magnéticas que permiten
asegurar que el producto no se caerá cuando sea instalado en la pared. Para evitar que se
caiga y pueda causar daños personales, se recomienda que la instalación del dispositivo sea
inferior a 2 metros.
* Este producto no viene con un adaptador de corriente por defecto. Por favor, adquirir un
adaptador por separado de una fuente habitual.

36
Descripción del estado de los indicadores de luz
Estado del indicador de luz
La luz amarilla está encendida de
forma constante
La luz amarilla parpadea rápidamente
La luz amarilla parpadea lentamente
La luz azul parpadea rápidamente
La luz azul parpadea lentamente
La luz azul está encendida de forma
constante
La luz roja está encendida de forma
constante
La luz blanca está encendida de
forma constante
La luz púrpura parpadea lentamente
Désactivé
Descripción del estado
La cámara se está encendiendo
La cámara está esperando para conectarse
a la red
La cámara se está reiniciando/ actualizando OTA
La cámara está conectándose a la red
Luz indicadora apagada/ el dispositivo está
inactivo / el dispositivo no está encendido
Se permite añadir accesorios
Después de 10 minutos de haber
empezado, no se ha conectado ninguna red
El vídeo en directo está en curso
Se encuentra funcionando correctamente
Está conectada a la red con éxito y la
cuenta está siendo boun

37
Especificaciones
Frecuencia de operación Wi-Fi 2412-2472 MHz
≤20 dBm
2405-2480 MHz
≤ 13 dBm
Potencia máxima de salida Wi-Fi
Frecuencia de operación Zigbee
Potencia máxima de salida Zigbee
Modelo de producto: CH-C01
Codificación de video: H.264
Resolución: 1080p
Entrada de fuente de alimentación:5V1A
Ángulo de visión: 146° (diagonal)
Consumo total de energía: 5 W
Dimensiones del producto: 82.4×56.5×50.5 mm (3.24×2.33×1.99 in.)
Temperatura de funcionamiento:-10°C~40°C (14°F~104°F)
Humedad de funcionamiento:15%~85%RH, sin condensación
Protocolos inalámbricos: Zigbee 3.0 IEEE 802.15.4, Wi-Fi IEEE 802.11 b/g/n 2.4 GHz
Almacenamiento local: Tarjeta MicroSD (soporta nivel 4 o superior, hasta 512 GB
de almacenamiento)
Dispositivo compatible: Android 4.0 o iOS 13.2 y superior
Contenido de la caja: Cámara Hub G2H Pro × 1, Manual de usuario × 1, Tornillo × 2,
Placa metálica × 1, Cable micro USB a USB-A × 1, Herramienta de expulsión × 1,
Pegatina × 1
En condiciones normales de uso, este equipo debe mantenerse a una distancia de,
al menos, 20 cm entre la antena y el cuerpo del usuario.

38
Por la presente,Lumi United Technology co., LTD declara que el tipo de equipo
radioeléctrico Cámara Hub G2H Pro,CH-C01 cumple con la Directiva 2014/53/UE.
Encontrará el texto completo de la declaración de conformidad de la UE en esta
dirección de Internet: http://www.mi.com/global/service/support/declaration.html
Directiva RAEE de información de eliminación y reciclaje
Todos los productos que llevan este símbolo son residuos de aparatos eléctricos y
electrónicos (RAEE según la directiva 2012/19/UE) que no deben mezclarse con residuos
Declaración de conformidad de la UE
domésticos sin clasificar. En su lugar, debe proteger la salud humana y el medio ambiente
entregando sus equipos de desecho a un punto de recogida para el reciclaje de residuos de
equipos eléctricos y electrónicos, designado por el gobierno o las autoridades locales. La
eliminación y el reciclado correctos ayudarán a evitar posibles consecuencias negativas para el
medio ambiente y la salud humana. Póngase en contacto con el instalador o con las
autoridades locales para obtener más información sobre la ubicación y las condiciones de
dichos puntos de recogida.
URL de servicio: www.aqara.com/support
Fabricante: Lumi United Technology co., LTD.
Domicilio: Edificio 8, Edificio Jinqizhigu, No.1, Avenida Tangling, Avenida Liuxian, Calle
Taoyuan, Distrito Nanshan, Ciudad Shenzhen,China

39
Presentazione del prodotto
Aqara Camera Hub G2H Pro è un prodotto intelligente che integra le doppie
funzioni di fotocamera e hub.Ha funzioni come videocitofono, rilevamento del
movimento, rilevamento del suono, registrazione su scheda MicroSD, archivio
NAS, timelapse, copertura dell'area privacy e così via.Può anche essere
utilizzato come hub Zigbee in collaborazione con altri sensori, controller e altri
accessori per realizzare funzioni come home guard, report dei dati e controllo
intelligente.Supporta anche HomeKit Secure Video.
Buco del
Presidente
Micro slot USB
Pulsante di
funzione
Indicatore luce
Micro scheda SD slot
Lenti
Buco di raccolta
Microphone
Azzera il pulsante

40
Preparazione prima dell’uso
Configurazione rapida
1.È necessario uno smartphone o un tablet che supporti il Wi-Fi o una rete
cellulare (con sistema iOS o Android).
2.Assicurati che ci sia una connessione Wi-Fi e che la tua connessione Internet
sia stabile.
Scarica l'app Aqara Home
1
Cerca "Aqara Home" nell'App Store di Apple, Google Play,
Xiaomi GetApps, Huawei App Gallery o scansiona il seguente
codice QR per scaricare l'app Aqara Home.
Alimenta e accendi Camera Hub G2H Pro
2
Aggiungi il prodotto all'app Aqara Home
3
Scegliere la posizione di installazione dell'hub: assicurarsi che l'hub e la
connessione di routing non siano disturbati ed evitare ostacoli metallici tra
l'hub e il router o intorno all'hub.
Individua l'interfaccia di alimentazione sul retro del prodotto e collega il cavo di
alimentazione MicroUSB per collegare l'adattatore di alimentazione.Quando si
avvia Camera Hub G2H Pro, l'indicatore di stato diventa giallo e lampeggia
rapidamente.Assicurati che il tuo telefono cellulare sia connesso a una rete
Wi-Fi nella banda di frequenza a 2,4 GHz.
Apri l'app Aqara Home, tocca "Home" e quindi tocca "+" nell'angolo in alto a
destra per accedere alla pagina "Aggiungi dispositivo (accessorio)", seleziona
"Camera Hub G2H Pro" e aggiungilo secondo le istruzioni nellaapp Aqara

41
Aggiungi accessorio
4
AVVISO: se l'aggiunta del dispositivo non riesce, confermare i seguenti punti:
* Il nome o la password Wi-Fi contiene un carattere speciale non supportato, ad esempio @, #, %,
-, $, ecc., che causa l'impossibilità di connettersi al router. Modificalo con un carattere
comunemente usato e riprova.
* Se la fotocamera non è in grado di riconoscere il codice QR generato dal telefono cellulare.
Assicurati che la dimensione dello schermo del telefono cellulare non sia inferiore a 4,7 pollici
e assicurati di non utilizzare la retroilluminazione della fotocamera per scattare il codice QR.
* Verificare se il router ha abilitato l'impostazione Wi-Fi anti-squatter, che impedisce alla
telecamera di connettersi a Internet.
* Verificare se il router ha abilitato l'isolamento AP, che porta alla mancata ricerca della
telecamera sul telefono cellulare nella LAN.
* Assicurati che la videocamera sia connessa alla rete Wi-Fi a 2.4 GHz.
Dopo che Camera Hub G2H Pro è stata aggiunta con successo, apri l'app Aqara
Home e fai riferimento al manuale utente dell'accessorio da aggiungere.
Connessione a Apple HomeKit
5
Apri l'app Apple Home, fai clic su "+" nell'angolo in alto a destra, quindi accedi
alla pagina "Aggiungi accessorio".Scansiona o inserisci manualmente il codice
di configurazione di HomeKit nella parte inferiore della videocamera per
associare la videocamera a HomeKit.
Home.Dopo una connessione riuscita, l'indicatore di stato del dispositivo
diventerà blu e manterrà la luce costante.

42
Se la fotocamera non riesce ad aggiungere a HomeKit:
* “Impossibile aggiungere l'accessorio”. A causa di più errori di aggiunta, le informazioni
sull'errore della cache iOS non possono essere rimosse.Riavvia il dispositivo iOS e ripristina la
fotocamera;
* “Accessorio già aggiunto”.Dopo aver riavviato il dispositivo iOS e ripristinato la videocamera, è
possibile inserire manualmente il codice di configurazione di HomeKit e aggiungerlo
nuovamente;
* “Accessorio non trovato”.Si prega di attendere 3 minuti dopo aver ripristinato la fotocamera.
Puoi inserire manualmente il codice di configurazione di HomeKit e aggiungerlo di nuovo.
Avviso
L'uso del badge Works with Apple significa che un accessorio è stato progettato per funzionare
in modo specifico con la tecnologia identificata nel badge ed è stato certificato dallo
sviluppatore per soddisfare gli standard di prestazioni Apple.Apple non è responsabile del
funzionamento di questo dispositivo o della sua conformità agli standard di sicurezza e
normativi.
Una cronologia di registrazione di 10 giorni dal tuo Camera Hub G2H Pro è archiviata in modo
sicuro in iCloud e disponibile per la visualizzazione nell'app Apple Home sul tuo iPhone, iPad o
Mac.Puoi aggiungere una videocamera al tuo piano da 200 GB o fino a cinque telecamere al
tuo piano da 2 TB senza costi aggiuntivi.Le registrazioni della videocamera non vengono
conteggiate nel limite di archiviazione di iCloud.
La comunicazione tra iPhone, iPad, Apple Watch, HomePod o Mac e Camera Hub G2H Pro
compatibile con HomeKit è protetta dalla tecnologia HomeKit.

43
Installazione del prodotto
Assicurati che la fotocamera sia stata aggiunta correttamente, quindi installala
sul muro.
È possibile posizionare la fotocamera su una superficie orizzontale, come una
scrivania, un tavolo, una libreria e così via.
La base della fotocamera contiene un magnete, che può essere fissato alla
superficie di materiale ferroso, come frigorifero, porta di ferro e così via.Non
posizionarlo vicino all'unità principale del computer o al disco rigido.
È inoltre possibile utilizzare nastro biadesivo per fissare il magnete alla
superficie di materiali lisci, come vetro, piastrelle, pareti in lattice e così via,
oppure è possibile utilizzare viti di fissaggio per fissare il foglio magnetico alla
parete equindi collegare la fotocamera al magnete.
4
3
2
1
Avvertenze
* Assicurarsi che la posizione di installazione
rientri nel raggio di copertura del Wi-Fi.
* Non posizionarlo vicino a forti fonti di
interferenza elettromagnetica.
* Il prodotto può essere utilizzato solo in
ambienti chiusi.Si prega di non utilizzarlo
in ambienti umidi o all'aperto.
* Assicurati che non ci siano ostacoli intorno
al dispositivo.
* Questo prodotto non è un giocattolo.Si prega di tenere i bambini lontani da questo prodotto.
* Questo prodotto è progettato solo per uso interno.NON utilizzare in ambienti umidi o all'aperto.
* Fare attenzione all'umidità, NON versare acqua o altri liquidi sul prodotto.

44
Descrizione delle operazioni dei pulsanti
Operazioni dei pulsanti
Fare clic una volta sul pulsante funzione
Fare clic tre volte sul pulsante funzione
Fare clic sul pulsante di ripristino cinque
volte
Premere a lungo il pulsante di ripristino
per 5 secondi
Premere a lungo il pulsante funzione per
3 secondi
Descrizione dello stato
Disattiva avviso
Avvia una richiesta di accesso al dispositivo
per bambini
Ripristina il dispositivo ma cancella le
informazioni locali
Ripristina il dispositivo ma conserva le
informazioni locali
Avvia una richiesta di chiamata vocale
* NON posizionare questo prodotto vicino a una fonte di calore.NON collocarlo in un recinto a meno
che non vi sia una normale ventilazione.
* NON tentare di riparare questo prodotto da soli.Tutte le riparazioni devono essere eseguite da un
professionista autorizzato.
* Questo prodotto è adatto solo per migliorare la comodità della tua vita domestica e per ricordarti lo
stato dei tuoi dispositivi.NON deve essere utilizzato come attrezzatura di sicurezza per case, edifici,
magazzini o altri luoghi.Se un utente viola le istruzioni per l'uso del prodotto, il produttore NON
sarà responsabile per eventuali rischi e perdite di proprietà.
* La base di questo prodotto è stata progettata con forti proprietà magnetiche, che possono garantire
che il prodotto non cada quando viene installato a parete.Per evitare cadute e possibili lesioni
personali, si consiglia di installare il dispositivo a una distanza inferiore a 2 metri.
* Questo prodotto non viene fornito con un adattatore di alimentazione per impostazione predefinita.
Si prega di acquistare un adattatore separato da una fonte normale.

45
Descrizione stato indicatore luminoso
Stato indicatore luminoso
La spia gialla è accesa fissa
La luce gialla lampeggia velocemente
La luce gialla lampeggia lentamente
La luce blu lampeggia velocemente
La luce blu lampeggia lentamente
La luce blu è accesa fissa
La luce rossa è accesa fissa
La luce bianca è accesa fissa
La luce viola lampeggia lentamente
Spento
Descrizione stato
La fotocamera si sta accendendo
In attesa di connettersi alla rete
La fotocamera è in fase di
ripristino/aggiornamento OTA
Connessione alla rete
L'indicatore è spento/il dispositivo è in
standby/il dispositivo non è alimentato
Gli accessori possono essere aggiunti
Nessuna rete è connessa in 10 minuti dopo
l'avvio
Il video in diretta è in corso
Funziona correttamente
Connesso alla rete con successo e
l'account è in fase di associazione

46
Specifiche
Frequenza d’esercizio Wi-Fi 2412-2472 MHz
≤20 dBm
2405-2480 MHz
≤ 13 dBm
Potenza in uscita massima Wi-Fi
Frequenza d’esercizio Zigbee
Potenza in uscita massima Zigbee
Modello prodotto: CH-C01
Codifica video: H.264
Risoluzione: 1080p
Ingresso alimentazione: 5V1A
Angolo di visione: 146° (diagonale)
Consumo energetico complessivo: 5 W
Dimensioni del prodotto: 82,4 × 56,5 × 50,5 mm (3,24 × 2,33 × 1,99 pollici)
Temperatura di lavoro: -10°C ~ 40°C (14°F ~ 104°F)
Umidità operativa: 15%~85% RH, senza condensa
Protocolli wireless: Zigbee 3.0 IEEE 802.15.4, Wi-Fi IEEE 802.11 b/g/n 2,4 GHz
Archiviazione locale: scheda MicroSD (è supportata la CLASSe 4 o superiore, fino
a 512 GB di spazio di archiviazione)
Dispositivo supportato: Android 4.0 o iOS 13.2 e versioni successive
Contenuto della confezione: Camera Hub G2H Pro × 1, manuale utente × 1, vite
× 2, piastra metallica × 1, cavo da micro USB a USB-A × 1, strumento di
espulsione × 1, adesivo × 1
In condizioni d'uso normali, questa apparecchiatura deve essere tenuta a una
distanza minima di 20 cm tra l’antenna e il corpo dell’utente.

47
Con la presente, Lumi United Technology co., LTD dichiara che l'apparecchiatura
radio di tipo Camera Hub G2H Pro,CH-C01 è conforme alla Direttiva 2014/53/UE. Il
testo completo della dichiarazione di conformità UE è disponibile al seguente
indirizzo Internet: http://www.mi.com/global/service/support/declaration.html
Informazioni sullo smaltimento e sul riciclaggio dei RAEE
Tutti i prodotti contrassegnati da questo simbolo sono rifiuti di apparecchiature
elettriche ed elettroniche (RAEE in base alla direttiva 2012/19/UE) che non devono
Dichiarazione di conformità europea
essere smaltiti assieme a rifiuti domestici non differenziati. Al contrario, è necessario
proteggere l’ambiente e la salute umana consegnando i rifiuti a un punto di raccolta
autorizzato al riciclaggio di rifiuti di apparecchiature elettriche ed elettroniche, predisposto
dalla pubblica amministrazione o dalle autorità locali. Lo smaltimento e il riciclaggio corretti
aiutano a prevenire conseguenze potenzialmente negative all’ambiente e alla salute umana.
Contattare l’installatore o le autorità locali per ulteriori informazioni sulla sede e per i termini e
le condizioni di tali punti di raccolta.
Sito del servizio: www.aqara.com/support
Produttore: Lumi United Technology co., LTD.
Indirizzo: Piano 8, Edificio Jinqi Zhigu, No.1 Via Tangling, Corso Liuxian, Taoyuan, Distretto
Nanshan , Shenzhen.

48
Описание устройства
Камера Хаб G2H Pro Aqara – это умное устройство, одновременно
выполняющее функции камеры и хаба. Оно имеет такие функции, как
двусторонняя аудио связь, обнаружение движения, обнаружение звука,
запись на карту MicroSD, хранилище NAS, таймлапс, сигнализация
приватной зоны и т. д. Его также можно использовать в качестве хаба
Zigbee вместе с другими датчиками, контроллерами и аксессуарами для
реализации таких функций, как домашний охранник, передача данных и
умное управление. Оно также поддерживает HomeKit Secure Video.
отверстие для
динамика
разъём MicroUSB
функциональ
ная кнопка
индикатор
отсек для карты
памяти
объектив
микрофон
кнопка сброса

49
Подготовка перед использованием
Быстрая установка
1.Требуется смартфон или планшет с поддержкой Wi-Fi или сотовой сети
(с системой iOS или Android).
2. Убедитесь в наличии соединения Wi-Fi и стабильности Вашего
интернет-соединения.
Загрузите приложение Aqara Home.
1
Найдите «Aqara Home» в Apple App Store, Google Play,
Xiaomi GetApps, Huawei App Gallery или отсканируйте
следующий QR-код для загрузки приложения Aqara
Home.
Включите питание и включите Камеру Хаб G2H Pro.
2
Выберите место установки хаба: не нарушены, а также избегайте
металлических препятствий между хабом и роутером или вокруг хаба.
Установите блок питания позади устройства и подключите его шнур
питания MicroUSB к устройству. При запуске Камера Хаб G2H Pro
индикатор состояния начнет быстро мигать желтым. Убедитесь, что Ваш
мобильный телефон подключен к сети Wi-Fi в диапазоне частот 2,4 ГГц.

50
Добавьте устройство в приложение Aqara Home.
3
Откройте приложение Aqara Home, нажмите «Дом», а затем нажмите «+» в
правом верхнем углу для перехода на страницу «Добавить устройство
(аксессуар)», выберите «Камера Хаб G2H Pro» и добавьте его в соответствии
с инструкциями в приложение Aqara Home. После успешного подключения
индикатор состояния устройства начнет непрерывно гореть синим.
Добавьте аксессуар
4
ВНИМАНИЕ: если не удалось добавить устройство, проверьте следующие
моменты:
* Имя или пароль Wi-Fi содержит неподдерживаемый специальный символ, например, @,
#, %, -, $ и т. д., что приводит к невозможности подключения к роутеру. Измените его на
общеупотребительный символ и повторите попытку.
* Если камера не может распознать QR-код, сгенерированный мобильным телефоном,
убедитесь, что размер экрана мобильного телефона не менее 4,7 дюйма, а также
убедитесь, что Вы не используете фоновую подсветку камеры, чтобы снять QR-код.
* Проверьте, не включены ли настройки Wi-Fi Anti-Squatter на роутере, из-за чего камера
не может подключиться к Интернету.
* Проверьте, не включена ли изоляция AP на роутере, из-за чего возникает сбой поиска
камеры на мобильном телефоне в локальной сети.
*Убедитесь, что Вы используете сеть Wi-Fi 2,4 ГГц.
После успешного добавления Камера Хаб G2H Pro откройте приложение
Aqara Home и обратитесь к руководству пользователя аксессуара для
добавления.

51
Подключитесь к Apple HomeKit.
5
Откройте приложение Apple Home, в правом верхнем углу нажмите «+» и
перейдите на страницу «Добавить аксессуар». Отсканируйте или вручную
введите код настройки HomeKit в нижней части камеры, чтобы привязать
камеру к HomeKit.
Если не удалось добавить камеру к HomeKit:
* «Не удалось добавить аксессуар». Из-за нескольких ошибок добавления информация об
ошибках в кэше iOS не может быть удалена. Перезагрузите устройство iOS и сбросьте
камеру;
* «Аксессуар уже добавлен». После перезапуска устройства iOS и сброса камеры Вы можете
вручную ввести код настройки HomeKit и добавить его снова;
* «Аксессуар не найден». Подождите 3 минуты после сброса камеры. Вы можете вручную
ввести код настройки HomeKit и добавить его снова.
Уведомление
Использование значка «Работает с Apple» означает, что аксессуар был разработан
специально для работы с технологией, указанной на значке, и был сертифицирован
разработчиком на соответствие стандартам производительности Apple. Apple не несет
ответственности за работу данного устройства или его соответствие нормам
безопасности и нормативным стандартам.
10-дневная история записи из Вашего Камера Хаб G2H Pro надежно хранится в iCloud и
доступна для просмотра в приложении Apple Home на Вашем iPhone, iPad или Mac. Вы
можете добавить одну камеру в свой тарифный план на 200 ГБ или до пяти камер в план
на 2 ТБ без дополнительных затрат. Записи с камеры не учитываются при ограничении
Вашего хранилища iCloud.
Связь между iPhone, iPad, Apple Watch, HomePod или Mac и Камера Хаб G2H Pro с
поддержкой HomeKit обеспечена технологией HomeKit.

52
Установка устройства
Убедитесь, что камера успешно добавлена, а затем установите ее на стену.
Вы можете разместить камеру на горизонтальной поверхности, например
на письменном столе, столике, книжном шкафу и т. д.
Основание камеры содержит магнит, который может быть прикреплен к
поверхности из черных металлов, например, холодильник, железная
дверь и т. д. Не размещайте устройство рядом с основным блоком
компьютера или жестким диском.
Можно также использовать двусторонний скотч для прикрепления
магнита к поверхности гладких материалов, таких как стекло, плитка,
латексная стена и т. д., либо можно использовать крепежные винты,
чтобы закрепить магнитный лист на стене, и затем прикрепить камеру к
магниту.
4
3
2
1
Предупреждение
* Убедитесь, что место установки находится в
зоне действия Wi-Fi.
* Не размещайте устройство рядом с
источниками сильных электромагнитных помех.
* Устройство можно использовать только в
помещении. Не используйте его во влажной
среде или на открытом воздухе.
* Убедитесь, что вокруг устройства не находится
препятствий.
* Это устройство НЕ игрушка. Пожалуйста, держите детей подальше от этого устройства.
* Это устройство предназначено только для внутреннего использования. Не используйте во
влажных средах или на открытом воздухе.

53
Описание операций с кнопками
Операция с кнопками
Нажмите функциональную кнопку один раз
Нажмите функциональную кнопку три раза
Нажмите кнопку сброса пять раз
Нажмите и удерживайте кнопку сброса
в течение 5 секунд
Нажмите и удерживайте функциональную
кнопку в течение 3 секунд
Описание функции
Отключить оповещение
Подключение дочернего устройства
Полный сброс и возврат к заводским
настройкам
Сброс настроек Wi-Fi (список
подключенных устройств и иные
данные будут сохранены)
Записать видео-сообщение
* Оберегайте устройство от влаги, не проливайте на устройство воду или другие жидкости.
* Не размещайте это устройство возле источника тепла.
* Не размещайте его в корпусе, если нет нормальной вентиляции.
* НЕ пытайтесь самостоятельно отремонтировать это устройство. Все ремонтные работы
должны выполняться квалифицированным специалистом.
* Это устройство подходит только для повышения удобства Вашей домашней жизни и
напоминает Вам о состоянии Ваших устройств. Оно НЕ должно использоваться в качестве
охранного оборудования для дома, зданий, складов или любых других мест. Если
пользователь нарушает инструкции по использованию устройства, производитель НЕ несет
ответственности за любые риски и потери имущества.
* Основание данного устройства было разработано с сильными магнитными свойствами,
которые обеспечивают, чтобы устройство не падало, когда оно установлено на стене. Для
предотвращения падения и возможного нанесения телесных повреждений мы рекомендуем
установить устройство на высоте менее 2 метров.
* Устройство поставляется без блока питания. Для питания устройства используйте
стандартный блок питания с портом USB, напряжением 5 В и силой тока 1 A.

54
Описание статусов светового индикатора
Статус светового индикатора
Непрерывно горит желтым
Быстро мигает желтым
Медленно мигает желтым
Быстро мигает синим
Медленно мигает синим
Непрерывно горит синим
Непрерывно горит красным
Непрерывно горит белым
Медленно мигает фиолетовым
Выключен
Описание статуса
Камера включается
Ожидание подключения к сети
Камера сбрасывается/обновление ОТА
Подключение к сети
Индикаторная лампа выключена/устройство
находится в спящем режиме/устройство
отключено от источника питания
Подключение нового устройства
Нет подключенной сети через 10 минут
после запуска
Выполняется видеосъемка в реальном времени
Работает исправно
Успешно подключен к сети, и аккаунт
привязан
Спецификации
Модель устройства: CH-C01
Кодировка видео: H.264
Разрешение: 1080p
Питание: 5V 1А
Угол обзора: 146° (по диагонали)
Общая потребляемая мощность: 5 Вт

55
Информация о мерах при неисправности оборудования
Размеры устройства: 82,4×56,5×50,5 мм (3,24×2,33×1,99 дюйма)
Рабочая температура: -10°C ~ 40°C (14°F ~ 104°F)
Рабочая влажность:15%~85% относительной влажности, без конденсации
Беспроводные протоколы: Zigbee 3.0 IEEE 802.15.4, Wi-Fi IEEE 802.11 b/g/n 2.4 ГГц
Локальное хранилище: карта MicroSD (поддерживается класс 4 или выше, до
512 ГБ памяти)
Поддерживаемое устройство: Android 4.0 или iOS 13.2 и выше
Комплектация: Камера Хаб G2H Pro ×1, Руководство пользователя ×1, Винт ×2,
Металлическая пластина ×1, Кабель Micro USB на USB-A ×1, Инструмент
"скрепка" ×1, Наклейка ×1
Правила и условия хранения и транспортировки
Оборудование должно быть защищено от внешних воздействий. Допустимая
температура окружающего воздуха -10°C – +40°C (14°F – 104°F)
В случае обнаружения неисправности оборудования:
* Оборудование не нуждается в периодическом обслуживании в течение срока службы
Онлайн-служба поддержки: www.aqara.com/support
Изготовитель: Lumi United Technology Co., Ltd.
Адрес: 8th Floor, JinQi Wisdom Valley, No.1 Tangling Road, Liuxian Ave,
Taoyuan Residential District, Nanshan District, Shenzhen, China.
Сделано в Китае
1. Отключите оборудование от электрической сети;
2. Обратитесь в сервисный центр для получения консультации или ремонта оборудования.
Дата производства указана на упаковке

56
產品簡介

57
下載Aqara Home app
上電並打開攝像機
在Aqara Home app上添加產品
使用前準備:
快速設定
1
2
3

58
添加子設備
4
連接Apple HomeKit
5

59
注意
安裝攝像機

60
按鍵操作描述
按鍵操作
狀態描述

61
按鍵操作描述
指示燈狀態
黃燈常亮
黃燈快閃
黃燈慢閃
藍燈快閃
藍燈慢閃
藍燈常亮
攝像機正在打開
等待連接網絡
攝像機正在重置/OTA陞級
連接網絡
網絡連接成功,帳號正在綁定中
正常工作
紅燈穩定 視頻直播中
白燈常亮 啟動後10分鐘內無網絡連接
紫燈慢閃 允許添加配件
燈滅 指示燈被關閉/設備休眠/設備未上電
狀態描述

62
基本參數
警告

63

64
제품소개
설치�전�확인�사항
Aqara 스마트�허브 G2H Pro는�카메라와�스마트�허브의�기능을�통합한�제품입니다.
카메라를�통해�영상�통화, 동작�감지, 소리�감지, MicroSD 카드를�통한�영상�녹화,
NAS 스토리지, 타임랩스, 사생활�보호�영역�설정�등�다양한�기능을�지원합니다. 또한
Zigbee 통신�방식을�통해�센서, 컨트롤러�등�다양한�하위�장치를�연결하여�홈�보안,
데이터�확인, 원격�제어�등�다양한�스마트�시나리오를�구성할�수�있습니다. Apple 홈
공식�액세서리로 HomeKit 보안�비디오를�지원합니다.
1. Wi-Fi 또는�데이터�통신�방식을�지원하는�스마트폰이나�태블릿이�필요합니다. (iOS,
Android 모두�가능)
2. Wi-Fi에�연결이�되어�있고�네트워크�연결이�안정적인지�확인해�주세요.
스피�커
Micro USB 슬롯
설정�버튼
지시�등
MicroSD 카드�슬롯
렌즈
마이크
리셋�버튼

65
빠른�설정�하기
Aqara Home 앱�다운로드
허브�설치하기
Aqara Home 앱에�허브�추가하기
허브�설치�위치�선택: 허브와�공유기�사이�그리고�허브�주변에�금속�차폐물과�같은�방해
물질이�없는�것이�좋습니다.
허브에�전원�연결하기: 전원선을�전원�어댑터를�연결한�후�제품�뒷면의 MicroUSB 슬롯에
연결해�주세요. 전원이�연결되면�지시등이�노란색으로�빠르게�깜빡입니다. 스마트폰이나
태블릿이 2.4GHz 대역의 Wi-Fi에�연결되어�있는지�확인해�주세요.
Aqara Home 앱에서�첫�페이지�오른쪽�상단의 ‘+’를�눌러 ‘장치�추가'를�누른�뒤 ‘
스마트�허브 G2H Pro’를�선택해�주세요. 앱의�지시�사항에�따라�장치를�추가하고,
연결이�완료되면�지시등이�파란색으로�변경됩니다.
장치�추가에�실패하는�경우�아래의�사항을�확인해�주세요.
* Wi-Fi 이름�또는�암호에는 @, #, %, -, $ 와�같은�특수�문자를�지원하지�않습니다. 일반�문자로�변경한�후
다시�시도해�주세요.
* 카메라가�스마트폰에서�생성된 QR코드를�인식하지�못하는�경우�화면�크기가 4.7인치�이상인지
확인하고, 백라이트�기능이�켜져있지�않은지�확인해�주세요.
* 공유기에 Wi-Fi 무단�사용�방지�기능이�켜져�있다면�이를�끄고�시도하세요.
* 공유기의 AP 격리�기능으로�인해�스마트폰이 LAN 내부에서�디바이스를�찾을�수�없는지�확인하세요.
* 장치가 2.4GHz 대역의 Wi-Fi에�연결되어�있는지�확인하세요.
앱스토어에서 “Aqara Home”을�검색하거나�우측의 QR
코드를�스캔하여�전용�앱을�다운로드해�주세요.

66
하위�장치�추가하기
허브를�성공적으로�추가한�후 Aqara Home 앱의�안내�사항에�따라�하위�장치들을
추가해�주세요.
Apple 홈�앱에서�오른쪽�상단의 ‘+’를�눌러 ‘액세서리�추가' 페이지로�이동�하세요.
제품�하단의 HomeKit 코드를�스캔하거나�수동으로�코드를�입력하여�허브를
HomeKit에�연결합니다.
HomeKit 연결에�실패하는�경우�아래의�사항을�확인해�주세요:
Apple HomeKit 연결하기
안내�사항
Works with Apple 로고의�사용은�이�제품이�로고에�표시된�기술과�연동하여�사용할�수�있도록�디자인
되었다는�것을�의미하며, Apple의�성능�기준에�부합함을�인정�받았다는�것을�의미합니다. Apple은�해당
제품에�대한�사용이나�이에�적합한�안전�기준에�책임을�지지�않습니다.
스마트�허브 G2H Pro를�통해�녹화한�영상�데이터는�최대 10일까지 iCloud에�저장되며 iPhone, iPad
또는 Mac의 Apple Home 앱에서�확인할�수�있습니다. 200GB 요금제를�이용할�경우�스마트�허브 G2H
Pro 1대를�등록할�수�있으며, 2TB 요금제를�이용할�경우�최대 5개의�허브를�등록할�수�있습니다. 녹화한
영상�데이터는 iCloud 저장�용량에�포함되지�않습니다.
스마트�허브 G2H Pro와 iPhone, iPad, Apple Watch, HomePod, Mac 등의 Apple 기기와의�통신에는
HomeKit 기술이�적용됩니다.
* 액세서리�추가�실패�시�반복적인�실패로�인한�캐시�문제로�오류가�발생할�수�있습니다. iOS 장비를
재부팅한�후�초기화하여�다시�시도하세요.
* 액세서리가�이미�추가되었다는�메시지가�나오는�경우 iOS 장비를�재부팅하고�초기화한�후, HomeKit
설치�코드를�수동으로�입력해�다시�추가해�주세요.
* 액세서리�찾기�실패�시�장비를�초기화하고�약 3분�후에 HomeKit 설치�코드를�수동으로�입력하여�다시
추가해�주세요.

67
제품�설치하기
스마트�허브 G2H Pro가�정상적으로�앱에�추가되었는지�확인�후에�벽에�설치해
주세요.
책상, 테이블, 책장�같은�수평�공간에�제품을�올려두고�사용할�수�있습니다.
하단부의�받침대에는�냉장고, 철문�등과�같은�철제�물질의�표면에�부착할�수
있도록�자석이�포함되어�있습니다. 단, 컴퓨터�본체나�하드�드라이브�근처에
설치하지�마세요.
양면�테이프로�유리, 타일, 라텍스�소재�벽면과�같이�매끄러운�표면에�자석을
부착하여�사용할�수�있습니다. 또는�동봉된�나사로�메탈�플레이트를�고정한�후
제품을�부착해서�사용할�수�있습니다.
* 제품이 Wi-Fi 연결이�가능한�범위�내에�있는지�확인해
주세요.
* 제품�근처에�장애물이나�전자파장애를�일으킬�수�있는
물체가�없는지�확인해�주세요.
* 본�제품은�실내에서만�사용할�수�있습니다. 습기가�많은
환경이나�실외에서�사용하지�마세요.

68
사용�방법
설정�버튼�한�번�누르기
설정�버튼�세�번�누르기
리셋�버튼�다섯�번�누르기
리셋�버튼 5초간�길게�누르기
기능�버튼 3초간�길게�누르기
상태�설명
경고음을�종료합니다.
하위�장치�액세스를�허용합니다.
장치를�재설정하고, 하위�장치�연결�정보를
포함한�로컬�데이터를�초기화�합니다.
장치를�재설정하지만, 하위�장치�연결
정보를�포함한�로컬�데이터는�유지합니다.
음성�통화를�요청합니다.
버튼�사용�방법
제품�사양
모델명: CH-C01
비디오�인코딩: H.264
해상도: 1080p
입력전압: 5V 1A
시야각: 146° (대각선)
총�전력소비량: 5 W
제품크기: 82.4×56.5×50.5 mm (3.24×2.33×1.99 인치)
작업온도: -10°C ~ 40°C (14°F ~ 104°F)
작업습도: 15% ~ 85% RH, 비결로�조건
무선�프로토콜: Zigbee 3.0 IEEE 802.15.4, Wi-Fi IEEE 802.11 b/g/n 2.4 GHz
로컬�스토리지: MicroSD 카드(클래스4 및�이상�지원, 최대 512GB)
지원�장치: Android 4.0 또는 iOS 13.2 이상
제품�구성: 스마트�허브 G2H Pro × 1, 사용자�설명서 × 1, 나사 × 2, 메탈�플레이트 × 1,
Micro USB-USB-A 케이블 × 1, 인젝터�도구 × 1, 스티커 × 1

69
지시등�상태�설명
지시등�상태
노란불�켜져�있음
노란불�빠르게�깜빡임
노란불�천천히�깜빡임
파란불�빠르게�깜빡임
파란불�천천히�깜빡임
파란불�켜져�있음
기기�켜지는�중
네트워크�연결�대기�중
장치�리셋/OTA 업그레이드�중
네트워크�연결�중
네트워크�연결�완료�및�계정�연결�중
정상�작동�중
빨간불�켜져�있음 영상�스트리밍�중
하얀불�켜져�있음 장치가�켜진�상태에서 10분�이상�어떠한
네트워크에도�연결되지�않음
보라색불�천천히�깜빡임 하위�장치�추가�준비
지시등�꺼짐 지시등�끄기가�설정된�상태�프라이버시
모드�전원이�연결되지�않은�상태
기기�상태

70
주의�사항
1. 본�제품은�어린이가�사용할�경우�위험할�수�있으므로, 어린이의�손이�닿지�않는�곳에�두십시오.
2. 본�제품은�실내�사용�용도로�설계되었습니다 . 습한�환경이나�실외에서�사용하지�마십시오.
3. 비바람에�노출된�장소, 물이�튀는�곳에�설치하지�마십시오. 물�또는�액체류를�제품에�엎지를�경우�고장,
감전�및�화재의�위험이�있습니다.
4. 본�제품을�열원�부근에�설치하거나�환기가�잘�되지�않는�밀폐된�공간에서�사용하지�마십시오.
5. 본�제품을�임의로�분해, 수리, 개조하지�마십시오. 수리가�필요한�경우support@aqara.kr로
연락하십시오 .
6. 본�제품은�생활의�편리�및�편의성을�개선하기�위한�용도로�적합합니다. 가정, 건물, 창고�또는�다른
장소의�방범�용도로사용하는�것을�권장하지�않습니다. 사용자가�상기�사용�지침을�따르지�않고�해당
제품을�사용할�경우에�발생하는�어떠한�위험�및�재산�손실에도�제조사는귀책이�없음을�알려드립니다 .
7. 제품을�벽면에�고정시키기�위해�하단부의�거치대에�강력한자석이�내장되어�있습니다. 그럼에도
불구하고�제품이�떨어지는경우에�부상을�방지하기�위하여 2m 이하의�높이에�설치하는�것을
권장합니다.
8. 해당�제품에는�전원�어댑터가�포함되어�있지�않습니다. 별도로�구매�후�사용해�주시기�바랍니다.
기기�명칭: 특정소출력무선기기 (무선데이터통신시스템용�무선기기)
KC인증번호: R-C-LUt-CHC01
제조사: Lumi United Technology Co., Ltd.
제조국가: 중국
수입/판매자: 아카라코리아(주)


-
 1
1
-
 2
2
-
 3
3
-
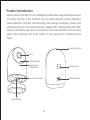 4
4
-
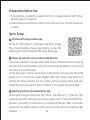 5
5
-
 6
6
-
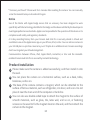 7
7
-
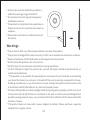 8
8
-
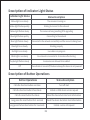 9
9
-
 10
10
-
 11
11
-
 12
12
-
 13
13
-
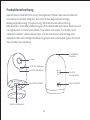 14
14
-
 15
15
-
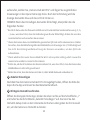 16
16
-
 17
17
-
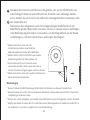 18
18
-
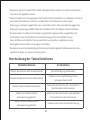 19
19
-
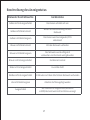 20
20
-
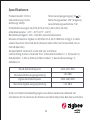 21
21
-
 22
22
-
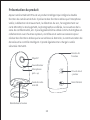 23
23
-
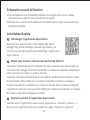 24
24
-
 25
25
-
 26
26
-
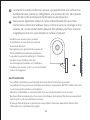 27
27
-
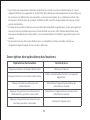 28
28
-
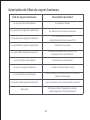 29
29
-
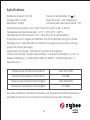 30
30
-
 31
31
-
 32
32
-
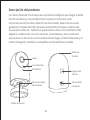 33
33
-
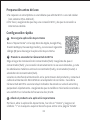 34
34
-
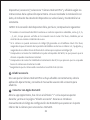 35
35
-
 36
36
-
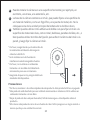 37
37
-
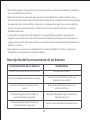 38
38
-
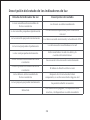 39
39
-
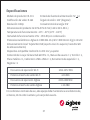 40
40
-
 41
41
-
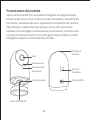 42
42
-
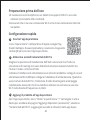 43
43
-
 44
44
-
 45
45
-
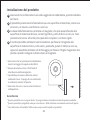 46
46
-
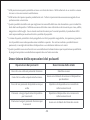 47
47
-
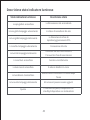 48
48
-
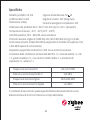 49
49
-
 50
50
-
 51
51
-
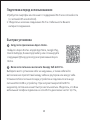 52
52
-
 53
53
-
 54
54
-
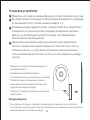 55
55
-
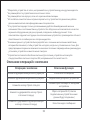 56
56
-
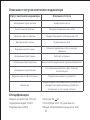 57
57
-
 58
58
-
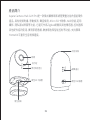 59
59
-
 60
60
-
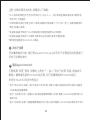 61
61
-
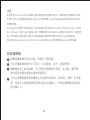 62
62
-
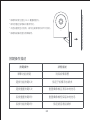 63
63
-
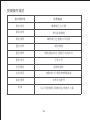 64
64
-
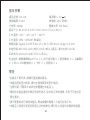 65
65
-
 66
66
-
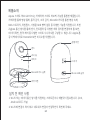 67
67
-
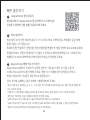 68
68
-
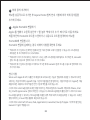 69
69
-
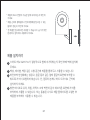 70
70
-
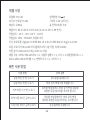 71
71
-
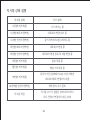 72
72
-
 73
73
-
 74
74
-
 75
75


Aqara CHC01 Manual de usuario
- Categoría
- Cámaras de seguridad
- Tipo
- Manual de usuario
En otros idiomas
- français: Aqara CHC01 Manuel utilisateur
- italiano: Aqara CHC01 Manuale utente
- Deutsch: Aqara CHC01 Benutzerhandbuch
Documentos relacionados
-
Aqara E1 El manual del propietario
-
Aqara G2H Manual de usuario
-
Aqara Hub Guía del usuario
-
 Aqara Hub M1S Gen 2 Smart Home Control Center Guía del usuario
-
 Aqara HM1S-G01 для умного дома M1S Manual de usuario
-
Aqara Hub M2 Guía del usuario
-
Aqara M1S Guía del usuario
-
-
 Aqara Motion Sensor Guía del usuario
-
Aqara RLS-K01D Manual de usuario


