
54*67mm
80g
V5
pantone cool gray 11c


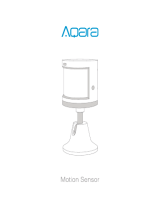
Motion Sensor P1User Manual
Bedienungsanleitung für den Bewegungsmelder P1
Manuel d'utilisation du détecteur de mouvement P1
Manual de uso del sensor de movimiento P1
Manuale Utente del Sensore di Movimento P1
Датчик движения P1 Руководство пользователя
모션�센서 P1 사용자�설명서
人體傳感器P1使用說明書
. 01
. 14
. 26
. 39
. 51
. 62
. 73
. 82

01
*
*
An Aqara Zigbee 3.0 Hub or device with the function of Zigbee 3.0 Hub is
required for use.
If using with Apple HomeKit, an Apple Home Hub is required. Please visit
www.aqara.com/support for more details.
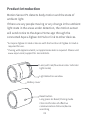
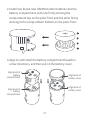
Motion Sensor P1 detects body motion and the state of
ambient light.
If there are any people moving or any change in the ambient
light state in the areas under detection, the motion sensor
will send notice to the Aqara Home app through the
connected Aqara Zigbee 3.0 Hub or link to other devices.
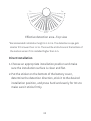
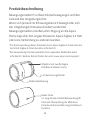
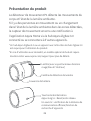
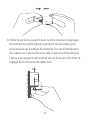
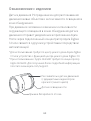
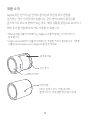
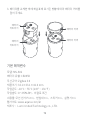
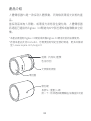
Product Introduction
Reset button
Long press 5s: Reset/Pairing mode
Click: Verification of effective
communication distance/device
searching
Lens (with red/blue dual-color indicator
light inside)
Light detection window
Battery cover

02
*If adding fails, please move the product closer to thehub
and try again.
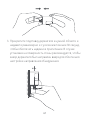
1.
2.
3.
4.
Before activating the accessory, please make sure you
have the Aqara Home app downloaded and an Aqara
Zigbee 3.0 hub installed.
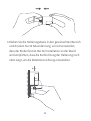
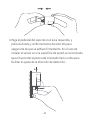
Remove the insulating pull tab.
Pull the tab out from under the battery contact to the
direction of the arrow to activate the product.
Please open the app, tap “Home” and then tap “+” in the
top right corner to enter the “Add Device (Accessory)”
page. Select “Motion Sensor P1” and add it according to
instructions in the Aqara Home app.
Please see www.aqara.com/support for additional information.
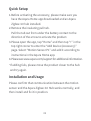
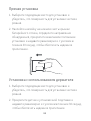
Quick Setup
Please confirm that communication between the motion
sensor and the Aqara Zigbee 3.0 Hub works normally, and
then install and fix it in position.
Installation and Usage

03
1.
2.
3.
4.
Please do not install on tile, glass, marble, or other
smooth and easy-to-moisten objects to avoid the sticker
from loosening.
Please do not install on the surface of a lighting tube or
other high-temperature and heating objects to avoidthe
sticker from loosening.
Please do not install on the surface of wall coverings and
other rough and uneven objects to avoid the sticker from
loosening.
Please do not face it against electrical appliances and
other heating sources to prevent infrared jamming from
causing a false trigger.
Installation Instructions:
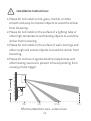
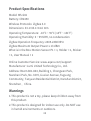
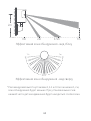
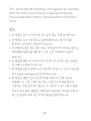
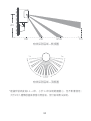
Effective detection area--Lateral view
2m
7m4.5m2m0m

04
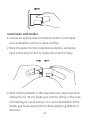
1.Choose an appropriate installation position and make
sure the installation surface is clean and flat.
Direct Installation
*Recommended installation height is 1.2-2m. The detection scope gets
smaller if it is lower than 1.2m. There will be a blind zone at the bottom of
the motion sensor if it is installed higher than 2m.
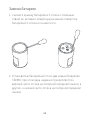
Effective detection area--Top view
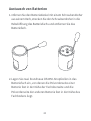
2.Put the sticker on the bottom of the battery cover,
determine the detection direction, stick it to the desired
installation position, and press hard and evenly for 30 s to
make sure it sticks firmly.
170°
7m
7m

05
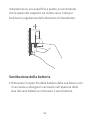
3.Stick holder pedestal in the required area, and press hard
and evenly for 30 s to make sure it sticks firmly. In the case
of installing on a wall surface, it is recommended that the
holder gap faces upward to facilitate adjusting detection
direction.
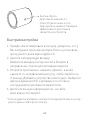
1.Choose an appropriate installation position and make
sure installation surface is clean and flat.
Installation with Holder
2.Stick the sensor to the installation pedestal, and press
hard and evenly for 30 s to make sure it sticks firmly.

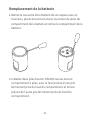
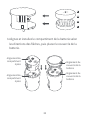
06
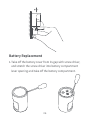
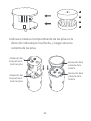
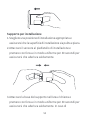
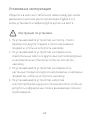
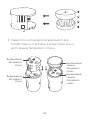
1.Take off the battery cover from its gap with screw driver,
and stretch the screw driver into battery compartment
lever opening and take off the battery compartment.
Battery Replacement

07
2.Install two brand-new CR2450 button batteries into the
battery compartment, with one firmly sticking the
compartment top on the polar front and the other firmly
sticking to the compartment bottom on the polar front.
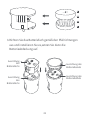
3.Align to and install the battery compartment based on
arrow directions, and then put on the battery cover.
Alignment of
battery
compartment Alignment of
battery cover
Alignment of
battery cover
Alignment of
battery
compartment

08
Online Customer Service:www.aqara.com/support
Manufacturer:LumiUnited Technology Co., Ltd.
Address: Room 801-804, Building 1, Chongwen Park,
Nanshan iPark, No. 3370, Liuxian Avenue, Fuguang
Community, Taoyuan Residential District, Nanshan District,
ShenzhenChina.
Model:MS-S02
Battery:CR2450
WirelessProtocols:Zigbee 3.0
Dimensions:33.1×33.1×41.6mm
Operating Temperature: -10°C ~ 55°C (14°F ~ 131°F )
Operating Humidity:0~95%RH, no condensation
Zigbee Operation Frequency: 2405-2480 MHz
Zigbee Maximum Output Power ≤ 13 dBm
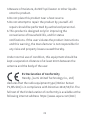
What is in the Box:Motion Sensor P1 × 1, Holder × 1, Sticker
× 1, User Manual × 1
Product Specifications
1.
2.
This product is not a toy, please keep children away from
this product.
This product is designed for indoor use only. Do NOT use
in humid environments or outdoors.
Warnings

09
Under normal use of condition, this equipment should be
kept a separation distance of at least 20cm between the
antenna and the body of the user.
Hereby, [Lumi United Technology Co., Ltd]
EU Declaration of Conformity
declares that the radio equipment type [Motion Sensor
P1,MS-S02] is in compliance with Directive 2014/53/EU. The
full text of the EU declaration of conformity is available at the
following internet address: https://www.aqara.com/DoC/
Beware of moisture, do NOT spill water or other liquids
onto the product.
Do not place this product near a heat source.
Do not attempt to repair the product by yourself. All
repairs should be performed by authorized personnel.
This product is designed only for improving the
convenience of household life, and for status
notifications. If the user violates the product instructions
and this warning, the manufacturer is not responsible for
any risks and property losses caused thereby.
3.
4.
5.
6.

10
Hereby, [Lumi United Technology Co., Ltd]
UK Declaration of Conformity
declares that the radio equipment type[Motion Sensor
P1,MS-S02] is in compliance with Directive 2017 (SI 2017 No.
1206, as amended by SI 2019 No. 696).
The full text of the UK declaration of conformity is available at
the following internet address: http://www.aqara.com/DoC/.
All products bearing this symbol are waste
electrical and electronic equipment (WEEE as in
WEEE Disposal and Recycling Information
directive 2012/19/EU) which should not be mixed with
unsorted household waste. Instead, you should protect
human health and the environment by handing over your
waste equipment to a designated collection point for the
recycling of waste electrical and electronic equipment,
appointed by the government or local authorities. Correct
disposal and recycling will help prevent potential negative
consequences to the environment and human health.
Please contact the installer or local authorities for more
information about the location as well as terms and
conditions of such collection points.

11
Federal Communications Commission (FCC) compliance
statement:
1.This device complies with part 15 of the FCC Rules.
Operation is subject to the following two conditions:
(1) This device may not cause harmful interference, and
(2) this device must accept any interference received,
including interference that may cause undesired operation.
2.Changes or modifications not expressly approved by the
party responsible for compliance could void the user's
authority to operate the equipment.
Note: This equipment has been tested and found to comply
with the limits for a Class B digital device, pursuant to part
15 of the FCC Rules. These limits are designed to provide
reasonable protection against harmful interference in a
residential installation. This equipment generates, uses and
can radiate radio frequency energy and, if not installed and
used in accordance with the instructions, may cause
harmful interference to radio communications. However,
there is no guarantee that interference will not occur in a
particular installation. If this equipment does cause harmful
interference to radio or television reception, which can be
determined by turning the equipment off and on, the user is
FCC ID:2AKIT-MSS02

12
encouraged to try to correct the interference by one or
more of the following measures:
—Reorient or relocate the receiving antenna.
—Increase the separation between the equipment and
receiver.
—Connect the equipment into an outlet on a circuit
different from that to which the receiver is connected.
—Consult the dealer or an experienced radio/TV technician
for help.
RF Exposure statement:
This equipment complies with FCC radiation exposure limits
set forth for an uncontrolled environment. This equipment
should be installed and operated with minimum distance of
20 cm between the radiator and your body. This transmitter
must not be co-located or operating in conjunction with any
other antenna or transmitter.
IC NOTICE TO CANADIAN USERS
This device contains licence-exempt transmitter(s)/receiv-
er(s) that comply with Innovation, Science and Economic
Development Canada’s licence-exempt RSS(s). Operation is
subject to the following two conditions:
(1) This device may not cause interference.
IC:22635-MSS02

13
*
*
Please read this manual carefully and keep it in a safe place.
If necessary, the contents of this manual will be modified or adjusted
without special notice.
Scan to get the Zigbee 3.0 Install Code on the last page of
the manual.
(2) This device must accept any interference, including
interference that may cause undesired operation of the device.
This Class B digital apparatus complies with Canadian
ICES003.
This device complies with RSS247 of Industry Canada.
Operation is subject to the condition that this device does
not cause harmful interference.
This equipment complies with IC radiation exposure limits
set forth for an uncontrolled environment. This equipment
should be installed and operated with minimum distance of
20 cm between the radiator and your body. This transmitter
must not be co-located or operating in conjunction with any
other antenna or transmitter.

14
*
*
Für die Verwendung dieses Produkts ist ein Aqara Zigbee 3.0 Hub oder ein
Gerät mit Zigbee 3.0 Hub Funktion erforderlich.
Bei Verwendung mit dem HomeKit ist ein spezielles Modell des Hubs
erforderlich. Weitere Details finden Sie unter www.aqara.com/support.
Bewegungsmelder P1 erfasst Körperbewegungen und den
Zustand des Umgebungslichts.
Wenn sich jemand im Erfassungsbereich bewegt oder sich
der Umgebungslichtzustand ändert,sendet der
Bewegungsmelder eine Benachrichtigung an die Aqara
Home App über den angeschlossenen Aqara Zigbee 3.0 Hub
oder eine Verbindung zu anderen Geräten.
Produktbeschreibung
Reset-Taste
5 s lang drücken: Reset/Netzwerkzugriff
Klick auf: Überprüfung der effektiven
Kommunikationsentfernung/Gerätesuch-
funktion
Batterieabdeckung
Lichterkennungsfenster
Objektiv (mit zweifarbigem
Rot/Blau-Indikator innen)

15
*Wenn das Hinzufügen fehlschlägt, bringen Sie das Produkt
näher an den Hub und versuchen Sie es erneut.
1.
2.
3.
4.
Bevor Sie das Produkt aktivieren, bestätigen Sie bitte,
dass Sie die Aqara Home App heruntergeladen und den
Aqara Zigbee 3.0 Hub installiert haben.
Isolierstreifen entfernen: Aktivieren Sie das Produkt,
indem Sie den Isolierstreifen in Pfeilrichtung unter den
Batteriekontakten herausziehen.
Öffnen Sie die App, klicken Sie auf „Home“ und dann auf „+“
in der oberen rechten Ecke, um die Seite „Gerät hinzufügen“
aufzurufen . Wählen Sie "Bewegungsmelder P1" und fügen
Sie gemäß den Anweisungen auf der Seite hinzu.
Für weitere Informationen besuchen Sie bitte
www.aqara.com/support.
Schnelle Einrichtung
Stellen Sie sicher, dass die Kommunikation zwischen dem
Bewegungsmelder und dem Aqara Zigbee 3.0 Hub normal
ist, und installieren und befestigen Sie den
Bewegungsmelder in der Einsatzposition.
Installation und Verwendung

16
1.
2.
3.
4.
Bitte montieren Sie den Bewegungsmelder nicht auf der
Oberfläche von Fliesen, Glas, Marmor oder anderen
glatten und feuchten Objekten, um zu verhindern, dass
sich der Aufkleber löst.
Installieren Sie den Bewegungsmelder nicht auf der
Oberfläche von Lampenröhren oder anderen
hitzebeheizten Objekten, um zu verhindern, dass sich der
Aufkleber löst.
Bitte montieren Sie den Bewegungsmelder nicht auf der
Oberfläche von rauhen und unebenen Gegenständen wie
Wandverkleidungen, um zu verhindern, dass sich der
Aufkleber löst.
Stellen Sie den Bewegungsmelder nicht auf eine
Wärmequelle wie ein elektrisches Gerät, um eine
Fehlauslösung durch Infrarot-Interferenz zu verhindern.
Hinweise zur Installation

17
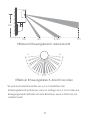
Effektiver Erfassungsbereich -Seitenansicht
*Es wird eine Installationshöhe von 1,2-2 m empfohlen. Der
Erfassungsbereich wird kleiner, wenn er niedriger als 1,2 m ist. Unten am
Bewegungsmelder befindet sich eine Blindzone, wenn er höher als 2,m
installiert wird.
Effektiver Erfassungsbereich -Ansicht von oben
2m
7m4.5m2m0m
170°
7m
7m

18
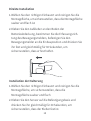
1.Wählen Sie den richtigen Einbauort und reinigen Sie die
Montagefläche, um sicherzustellen, dass die Montagefläche
sauber und flach ist.
Direkte Installation
1.Wählen Sie den richtigen Einbauort und reinigen Sie die
Montagefläche, um sicherzustellen, dass die
Montagefläche sauber und flach
Installation der Halterung
2.Kleben Sie den Sensor auf die Befestigungsbasis und
drücken Sie ihn gleichmäßig für 30 Sekunden, um
sicherzustellen, dass der Kleber fest ist.
2.Kleben Sie den Aufkleber an den Boden der
Batterieabdeckung, bestimmen Sie die Erfassungsrich-
tung des Bewegungsmelders, befestigen Sie den
Bewegungsmelder an die Einbauposition und drücken Sie
ihn fest und gleichmäßig für 30 Sekunden, um
sicherzustellen, dass er fest haet.

19
3.Kleben Sie die Halterungsbasis in den gewünschten Bereich
und drücken Sie 30 Sekunden lang, um sicherzustellen,
dass der Kleber fest ist. Bei der Installation an der Wand
wird empfohlen, dass die Kerbrichtung der Halterung nach
oben zeigt, um die Detektionsrichtung einzustellen.

20
1.ntfernen Sie den Batteriedeckel mit einem Schraubendreher
aus seinem Kerb, strecken Sie den Schraubendreher in die
Hebelöffnung des Batteriefachs und entfernen Sie das
Batteriefach.
Austausch von Batterien
2.Legen Sie zwei brandneue CR2450-Knopfzellen in das
Batteriefach ein, von denen die Polvorderseite einer
Batterie fest in der Nähe der Fachoberseite und die
Polvorderseite der anderen Batterie fest in der Nähe des
Fachbodens liegt.

21
3.Richten Sie das Batteriefach gemäß den Pfeilrichtungen
aus und installieren Sie es,setzen Sie dann die
Batterieabdeckung auf.
Ausrichtung
des
Batteriefachs Ausrichtung des
Batteriedeckels
Ausrichtung des
Batteriedeckels
Ausrichtung
des
Batteriefachs

22
Online-Kundendienst:www.aqara.com/support
Hersteller: Lumi United Technology Co. Ltd.
Adresse: Room 801-804, Building 1, Chongwen Park,
Nanshan iPark, No. 3370, Liuxian Avenue, Fuguang
Community, Taoyuan Residential District, Nanshan District,
ShenzhenChina.
Modell:MS-S02
Batterietyp:CR2450
Drahtlose Protokolle:Zigbee 3.0
Maße:33.1×33.1×41.6mm
Betriebstemperatur: -10°C ~ 55°C (14°F ~ 131°F )
Betriebsfeuchtigkeit: 0 ~ 95 % RH, keine Kondensation
Zigbee-Betriebsfrequenz: 2405-2480 MHz
Maximale Zigbee-Ausgangsleistung≤ 13 dBm
Das Paket enthält: Bewegungsmelder P1 × 1, Halter × 1,
Aufkleber × 1, Benutzerhandbuch × 1
Spezifikationen

23
1.
2.
3.
4.
5.
6.
Dieses Produkt ist KEIN Spielzeug. Bewahren Sie das
Produkt bitte außerhalb der Reichweite von Kindern auf.
Dieses Produkt ist ausschließlich für die Anwendung in
Innenräumen bestimmt. Verwenden Sie es NICHT in
feuchten Umgebungen oder im Freien.
Das Gerät darf nicht feucht werden, wasser oder andere
Flüssigkeiten dürfen KEINEN Kontakt mit dem Produkt
haben.
Stellen Sie dieses Produkt NICHT nahe einer Heizquelle
auf. Platzieren Sie das Gerät ausschließlich dann in einem
Gehäuse, wenn für AUSREICHENDE Belüung gesorgt
wurde.
Versuchen Sie NIEMALS dieses Produkt selbst zu
reparieren. Reparaturen müssen qualifiziertem
Fachpersonal vorbehalten sein.
Dieses Produkt eignet sich lediglich für die Verbesserung
von Unterhaltungsgeräten, es dient der Bequemlichkeit
und verfügt über eine Erinnerungsfunktion für die Geräte
im Heim. Bei Zuwiderhandlung gegen die
Bedienungslei-tung für das Produkt schließt der Hersteller
jegliche Haung für Risiken sowie für Eigentumsverluste
aus.
Warnhinweise

24
Hiermit bestätigt [Lumi United Technology Co.,
EU-Konformitätserklärung
Ltd.], dass das Funkgerät des Typs [Bewegungsmelder
P1,MS-S02] mit der Verordnung 2014/53/EU in Einklang
steht. Der vollständige Wortlaut der EU-Konformität-
serklärung ist unter der folgenden Internetadresse
abrufbar: https://www.aqara.com/DoC/
Alle mit diesem Symbol gekennzeichneten
WEEE-Informationen zur Entsorgung und zum
Recycling
Produkte sind Elektroschrott und Elektrogeräte (WEEE
entsprechend EU-Richtlinie 2012/19/EU) und dürfen nicht
mit unsortiertem Haushaltsmüll vermischt werden.
Schützen Sie stattdessen Ihre Mitmenschen und die
Umwelt, indem Sie Ihre zu entsorgenden Geräte an eine
dafür vorgesehene, von der Regierung oder einer lokalen
Behörde eingerichtete Sammelstelle zum Recycling von
Elektroschrott und Elektrogeräten bringen. Eine
ordnungsgemäße Entsorgung und Recycling helfen,
Unter normalen Einsatzbedingungen muss dieses Gerät
einen Abstand von mindestens 20cm zwischen der Antenne
und dem Körper des Benutzers einhalten.

25
Scannen Sie, um den Zigbee 3.0-Installationscode auf der
letzten Seite der Bedienungsanleitung zu erhalten.
*
*
Bitte lesen Sie dieser Bedienungsanleitung sorgfältig durch und bewahren
Sie sie ordnungsgemäß auf.
Änderungen oder Anpassungen des Inhalts dieser Bedienungsanleitung
werden nicht ausdrücklich mitgeteilt, wenn dies erforderlich ist.
negative Auswirkungen auf die Gesundheit von Umwelt und
Menschen zu vermeiden. Wenden Sie sich bitte an den
Installateur oder lokale Behörden, um Informationen zum
Standort und den allgemeinen Geschäsbedingungen
solcher Sammelstellen zu erhalten.

26
*
*
Un hub Aqara Zigbee 3.0 ou un appareil avec la fonction de hub Zigbee 3.0
est requis pour l'utilisation du produit.
En cas d'utilisation avec HomeKit, un modèle spécial de hub est requis.
Veuillez visiter www.aqara.com/support pour plus de détails.
Le détecteur de mouvement P1 détecte les mouvements du
corps et l'état de la lumière ambiante.
S'il y a des personnes en mouvement ou un changement
dans l'état de la lumière ambiante dans les zones détectées,
le capteur de mouvement enverra une notification à
l'application Aqara Home via le hub Aqara Zigbee 3.0
connecté ou se connectera à d'autres appareils.
Présentation du produit
Couvercle de batterie
Fenêtre de détection de lumière
Touche de réinitialisation
Appui long 5 s : Reset/accès réseau
Un seul clic: vérification de la distance de
communication efficace/fonction de
recherche d'appareils
Lentille (avec voyant lumineux bicolore
rouge/bleu à l'intérieur)

27
*Si l'ajout échoue, veuillez rapprocher le produit du hub et
réessayer.
1.
2.
3.
4.
Avant d'activer le produit, assurez-vous d'avoir téléchargé
Aqara Home APP et installé le hub Aqara Zigbee 3.0.
Retirez la bande isolante : retirez la bande isolante du
dessous du contact de la batterie dans le sens de la flèche
pour activer le produit.
Veuillez activer l'application, cliquez sur «Accueil», puis
sur «+» dans le coin supérieur droit pour accéder à la
page «Ajouter un appareil». Sélectionnez « Détecteur de
mouvement P1 » et ajoutez-le selon les instructions de la
page.
Veuillez visiter www.aqara.com/support pour plus
d'informations.
Installation rapide
Veuillez confirmer que la communication entre le capteur
de mouvement et le hub Aqara Zigbee 3.0 fonctionne
normalement avant d'installer et de fixer le capteur de
mouvement en position d'utilisation.
Installation et utilisation

28
1.
2.
3.
4.
Veuillez ne pas installer le capteur de mouvement sur la
surface des carreaux, du verre, du marbre ou d'autres
objets lisses et faciles à humidifier pour éviter que
l'autocollant ne se détache.
Veuillez ne pas installer le capteur de mouvement sur la
surface d'un tube d'éclairage ou d'autres objets à haute
température et chauffants pour éviter que l'autocollant ne
se détache.
Veuillez ne pas installer le capteur de mouvement sur la
surface des revêtements muraux et autres objets rugueux
et inégaux pour éviter que l'autocollant ne se détache.
Veuillez ne pas placer le détecteur de mouvement contre
des appareils électriques et d'autres sources de chaleur
pour éviter que le brouillage infrarouge ne provoque un
faux déclenchement.
Instructions d'installation:

29
Zone de détection effective—Vue latérale
*Il est recommandé que la hauteur d'installation soit de 1,2 à 2 m. La
portée de détection deviendra petite si elle est inférieure à 1,2 m. Il y aura
une zone aveugle au bas du détecteur de mouvement s'il est installé à
plus de 2 m.
Zone de détection effective—Vue de dessus
2m
7m4.5m2m0m
170°
7m
7m

30
1.Choisissez une position d'installation appropriée et
assurez-vous que la surface d'installation est propre et
plane.
Installation directe
1.Choisissez une position d'installation appropriée et
assurez-vous que la surface d'installation est propre et
plane.
Installation du support
2.Collez le capteur sur le socle d'installation et appuyez
fermement et uniformément pendant 30 secondes pour
vous assurer qu'il adhère fermement.
2.Placez l'autocollant au bas du couvercle de la batterie,
déterminez la direction de détection, collez le capteur de
mouvement à la position d'installation souhaitée et
appuyez fermement et uniformément pendant 30
secondes pour vous assurer qu'il adhère fermement.

31
3.Collez le socle du support dans la zone requise et appuyez
fermement et uniformément pendant 30 secondes pour
vous assurer qu'il adhère fermement. En cas d'installation
du capteur sur une surface murale, il est recommandé que
l'espace du support soit orienté vers le haut pour faciliter le
réglage de la direction de détection.

32
1.Retirez le couvercle de la batterie de son espace avec un
tournevis, placez le tournevis dans l'ouverture du levier du
compartiment de la batterie et retirez le compartiment de la
batterie.
Remplacement de la batterie
2.Installez deux piles bouton CR2450 neuves dans le
compartiment à piles, avec la face polaire d'une pile
fermement près du haut du compartiment et la face
polaire de l'autre pile fermement près du fond du
compartiment.

33
3.Alignez et installez le compartiment de la batterie selon
les directions des flèches, puis placez le couvercle de la
batterie.
Alignement du
compartiment
à piles Alignement du
couvercle de la
batterie
Alignement du
couvercle de la
batterie
Alignement du
compartiment
à piles

34
Service Clientèle en Ligne:www.aqara.com/support
Fabricant: Lumi United Technology Co., Ltd.
Adresse: Room 801-804, Building 1, Chongwen Park,
Nanshan iPark, No. 3370, Liuxian Avenue, Fuguang
Community, Taoyuan Residential District, Nanshan District,
ShenzhenChina.
Modèle:MS-S02
Type de batterie:CR2450
Protocoles sans fil:Zigbee 3.0
Dimensions:33.1×33.1×41.6mm
Température de fonctionnement: -10°C ~ 55°C (14°F ~ 131°F )
Humidité de fonctionnement : 0 ~ 95%, pas de condensation
Fréquence de fonctionnement Zigbee: 2405-2480MHz
Puissance maximale en sortie Zigbee≤ 13 dBm
Emballage contenant: Détecteur de mouvement P1 × 1,
support × 1, autocollant × 1, manuel d'utilisation × 1
Spécifications

35
1.
2.
3.
4.
5.
6.
Ce produit N'EST PAS un jouet Maintenez-le hors de
portée des enfants.
Cet appareil ne doit être utilisé qu'à l'intérieur. Ne
l'utilisez PAS à l'extérieur ou dans des environnements
humides.
Méfiez-vous de l'humidité, et n'éclaboussez pas l'appareil
d'eau ni d'autres liquides.
Ne placez PAS ce produit près d'une source de chaleur. Ne
le mettez PAS dans un lieu clos, à moins qu'il ne soit
suffffisamment ventilé.
N'essayez PAS de réparer vous-même cet appareil. Toute
réparation doit être effffectuée par un professionnel
agréé.
Ce produit n'est destiné qu'à un usage domestique de
divertissement, de praticité ou d'aide-mémoire. Si un
utilisateur enfreint les instructions d'utilisation du
produit, le fabricant ne sera responsable d'AUCUN risque
ni perte de biens.
Avertissements

36
Par la présente, [Lumi United Technology Co., Ltd.] déclare
que cet équipement radio de type [Détecteur de
mouvement P1,MS-S02] est conforme à la Directive
européenne2014/53/UE. L’intégralité de la déclaration de
conformité pour l’UE est disponible à l’adresse suivante:
https://www.aqara.com/DoC/
Déclaration de conformité pour l’Union
européenne
Informations sur la réglementation DEEE sur la
mise au rebut et le recyclage
WEEE Disposal and Recycling Information
Tous les produits portant ce symbole deviennent des
déchets d’équipements électriques et électroniques (DEEE
dans la Directive européenne2012/19/UE) qui ne doivent
pas être mélangés aux déchets ménagers non triés. Vous
devez contribuer à la protection de l’environnement et de la
santé humaine en apportant l’équipement usagé à un point
de collecte dédié au recyclage des équipements électriques
et électroniques, agréé par le gouvernement ou les
Dans des conditions normales d’utilisation, cet équipement
doit être maintenu à une distance d’au moins 20cm entre
l’antenne et le corps de l’utilisateur.

37
autorités locales. Le recyclage et la destruction appropriés
permettront d’éviter tout impact potentiellement négatif
sur l’environnement et la santé humaine. Contactez
l’installateur ou les autorités locales pour obtenir plus
d’informations concernant l’emplacement ainsi que les
conditions d’utilisation de ce type de point de collecte.
L'émetteur/récepteur exempt de licence contenu dans le
présent appareil est conforme aux CNR d’Innovation,
Sciences et Développement économique Canada
applicables aux appareils radio exempts de licence.
L'exploitation est autorisée aux deux conditions suivantes :
(1) L'appareil ne doit pas produire de brouillage;
(2) L'appareil doit accepter tout brouillage radioélectrique
subi, même si le brouillage est susceptible d'en
compromettre le fonctionnement.
Cet appareil numérique de la Classe B conforme à la norme
NMB003 du Canada.
Cet appareil est conforme à la norme RSS 247 d'Industrie
Canada. Le fonctionnement est soumis à la condition que
cet appareil ne provoque pas d'interférences nuisibles.
Cet équipement est conforme aux limites d’exposition aux
rayonnements de la IC établies pour unenvironnement non
IC:22635-MSS02

38
contrôé. Cet équipement doit être installé et fonctionner à
au moins 20cm de distance d’un radiateur ou de votre
corps.Cet émetteur ne doit pas être co-localisé ou
fonctionner en conjonction avec une autre antenne ou un
autre émetteur.
*
*
Veuillez lire attentivement ce manuel et le conserver dans un endroit sûr.
Si nécessaire, le contenu de ce manuel sera modifié ou ajusté sans préavis
particulier.
Scannez pour obtenir le code d'installation Zigbee 3.0 sur la
dernière page du manuel.

*
*
Es necesario un Hub Aqara Zigbee 3.0 o un dispositivo con la función de
Hub Zigbee 3.0 para poder usar el producto.
Si se utiliza con HomeKit, es necesario un modelo especial de hub. Por
favor, visita www.aqara.com/support para obtener más detalles.
El sensor de movimiento P1 detecta el movimiento corporal
y el estado de la luz ambiental.
Si hay alguien moviéndose o se produce cualquier cambio
en el estado de la luz ambiental en las zonas detectadas, el
sensor de movimiento enviará un aviso a la APP Aqara
Home a través del Hub Aqara Zigbee 3.0 conectado o
vinculado a otros dispositivos.
Instrucción del producto
39
Tecla de reinicio
Pulsar prolongadamente durante 5 s:
Reinicio/acceso a la red
Pulsar una sola vez: Verificación de la
distancia de comunicación efectiva/función
de búsqueda de dispositivos
Lente (con luz indicadora roja/azul
en el interior)
Ventana de detección de luz
Cubierta de la batería

40
*Si no consigues añadirlo, por favor, acerca el producto al
hub e inténtalo de nuevo."
1.
2.
3.
4.
Antes de activar el producto, asegúrate de haber
descargado la APP Aqara Home e instalado el hub Aqara
Zigbee 3.0.
Retira la tira aislante: Tira de la tira aislante de debajo del
contacto de la batería en la dirección indicada por la
flecha para activar el producto.
Por favor, enciende la app, haz clic en "Home" y luego en
"+" en la esquina superior derecha para entrar en la
página "Add Device". Selecciona "Sensor de movimiento
P1" y añádelo siguiendo las instrucciones de la página.
Por favor, visita www.aqara.com/support para más
información.
Configuración rápida
Por favor, comprueba que la comunicación entre el sensor
de movimiento y el Hub Aqara Zigbee 3.0 funciona con
normalidad antes de instalar y fijar el sensor de movimiento
en la posición de uso.
Instalación y uso

41
1.
2.
3.
4.
Por favor, no instales el sensor de movimiento en la
superficie de azulejos, vidrio, mármol u otros objetos lisos
y que se humedezcan con facilidad para evitar que el
adhesivo se afloje de la superficie.
Por favor, no instales el sensor de movimiento en la
superficie de un tubo de luz u otros objetos que puedan
alcanzar altas temperaturas y que se puedan calentar
para evitar que la pegatina se afloje de la superficie.
Por favor, no instales el sensor de movimiento en la
superficie de revestimientos de pared y otros objetos
ásperos y desiguales para evitar que la pegatina se afloje
de la superficie..
Por favor, no coloques el sensor de movimiento frente a
aparatos eléctricos y otras fuentes de calor para evitar
que las interferencias de los infrarrojos den lugar a un
falso trigger.
Instrucciones de instalación:

42
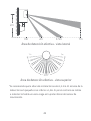
Área de detección efectiva - vista lateral
*Se recomienda que la altura de instalación sea de 1,2-2 m. El alcance de la
detección será pequeño si es inferior a 1,2m. Si por el contrario se instala
a más de 2 m habrá una zona ciega en la parte inferior del sensor de
movimiento.
Área de detección efectiva - vista superior
2m
7m4.5m2m0m
170°
7m
7m

43
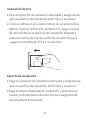
1.Elije una posición de instalación adecuada y asegúrate de
que la superficie de instalación esté limpia y sea plana.
Instalación directa
1.Elige una posición de instalación adecuada y asegúrate de
que la superficie de instalación esté limpia y sea plana.
Soporte de instalación
2.Pega el sensor al pedestal de instalación, y presiona con
fuerza y uniformemente durante 30s para asegurarte de
que se adhiere firmemente.
2.Coloca el adhesivo en la parte inferior de la cubierta de la
batería, fíjate en la dirección de detección, pega el sensor
de movimiento en la posición de instalación deseada y
presiona fuerte y de manera uniforme durante 30s para
asegurar una adhesión firme a la superficie.

44
3.Pega el pedestal del soporte en el área requerida, y
presiona fuerte y uniformemente durante 30s para
asegurarte de que se adhiere firmemente. En el caso de
instalar el sensor en una superficie de pared, se recomienda
que el hueco del soporte esté orientado hacia arriba para
facilitar el ajuste de la dirección de detección.

45
2.Instala dos pilas de botón CR2450 nuevas en el
compartimento de las pilas, con el frente polar de una pila
firmemente cerca de la parte superior del compartimento
y el frente polar de la otra pila firmemente cerca del fondo
del compartimento.
1.Saca la cubierta de la batería de su hueco con un
destornillador, introduce el destornillador en la apertura de
la palanca del compartimento de la batería y saca el
compartimento de la batería.
Sustitución de la batería

46
3.Alinea e instala el compartimento de las pilas en la
dirección indicada por las flecha, y luego coloca la
cubierta de las pilas.
Alineación del
compartimen-
to de las pilas Alineación de la
cubierta de la
batería
Alineación de la
cubierta de la
batería
Alineación del
compartimen-
to de las pilas

47
Atención al Cliente en línea:www.aqara.com/support
Fabricante: Lumi United Technology Co., Ltd.
Dirección: Room 801-804, Building 1, Chongwen Park,
Nanshan iPark, No. 3370, Liuxian Avenue, Fuguang
Community, Taoyuan Residential District, Nanshan District,
ShenzhenChina.
Modelo:MS-S02
Tipo de batería:CR2450
Protocolos inalámbricos:Zigbee 3.0
Dimensiones:33.1×33.1×41.6mm
Temperatura de funcionamiento: -10°C ~ 55°C (14°F ~ 131°F )
Humedad de funcionamiento: 0 ~ 95% RH, sin condensación
Frecuencia de operación Zigbee: 2405-2480 MHz
Potencia máxima de salida Zigbee ≤ 13 dBm
El paquete contiene: Sensor de movimiento P1 × 1, Soporte
× 1, Pegatina × 1, Manual de usuario × 1
Especificaciones

48
1.
2.
3.
4.
5.
6.
Este producto NO es un juguete. Mantenga este producto
fuera del alcance de los niños.
Este producto ha sido diseñado únicamente para uso en
interiores NO lo utilice en el exterior ni en entornos
húmedos.
Evite la humedad y NO vierta agua ni otro líquidos sobre el
producto.
NO instale el producto cerca de una fuente de calor. NO lo
instale en lugares confinados, a menos que haya
ventilación suficiente.
NO intente reparar este producto usted mismo. Las
reparaciones deben ser realizadas por un profesional
autorizado.
Este producto ha sido diseñado para mejorar la vida en el
hogar. Si el usuario no sigue las instrucciones del
producto, el fabricante NO se hace responsable de los
daños o pérdidas que puedan originarse en consecuencia.
Advertencias

49
En condiciones normales de uso, este equipo debe
mantenerse a una distancia de, al menos, 20 cm entre la
antena y el cuerpo del usuario.
Por la presente, [Lumi United Technology Co.,
Declaración de conformidad de la UE
Ltd.] declara que el tipo de equipo radioeléctrico [Sensor de
movimiento P1,MS-S02] cumple con la Directiva
2014/53/UE. Encontrará el texto completo de la declaración
de conformidad de la UE en esta dirección de Internet:
https://www.aqara.com/DoC/
Todos los productos que llevan este símbolo son
Directiva RAEE de información de eliminación y
reciclaje
residuos de aparatos eléctricos y electrónicos (RAEE según
la directiva 2012/19/UE) que no deben mezclarse con
residuos domésticos sin clasificar. En su lugar, debe
proteger la salud humana y el medio ambiente entregando
sus equipos de desecho a un punto de recogida para el
reciclaje de residuos de equipos eléctricos y electrónicos,
designado por el gobierno o las autoridades locales. La
eliminación y el reciclado correctos ayudarán a evitar
posibles consecuencias negativas para el medio ambiente y

50
la salud humana. Póngase en contacto con el instalador o
con las autoridades locales para obtener más información
sobre la ubicación y las condiciones de dichos puntos de
recogida.
*
*
Por favor, lee atentamente este manual y guárdalo en un lugar seguro.
Si fuera necesario, el contenido de este manual se puede modificar o
ajustar sin previo aviso.
Escanea para obtener el código de instalación de Zigbee 3.0
en la última página del manual.

51
*
*
Per l'uso è necessario un hub o un dispositivo Aqara Zigbee 3.0 con la
funzione di hub Zigbee 3.0.
Se si utilizza con Apple HomeKit, è necessario un Apple Home Hub.
Visitare www.aqara.com/support per maggiori dettagli.
Il Sensore di Movimento P1 rileva il movimento del corpo e
lo stato della luce ambientale.
Se ci sono persone in movimento o qualsiasi cambiamento
nello stato di luce ambientale nelle aree sotto rilevamento,
il sensore di movimento invierà un avviso all'app Aqara
Home tramite l'hub Aqara Zigbee 3.0 collegato o si
collegherà ad altri dispositivi.
Introduzione al prodotto
Tasto di ripristino
Pressione lunga di 5 secondi:
ripristino/accesso alla rete
Clic: Verifica della distanza di
comunicazione effettiva/ricerca del
dispositivo
Lente (con indicatore luminoso
bicolore rosso/blu all'interno)
Finestra di rilevamento della luce
Coperchio della batteria

52
*Se l'aggiunta non riesce, avvicinare il prodotto all'hub e
riprovare.
1.
2.
3.
4.
Prima di attivare l'accessorio, assicurati di aver scaricato
l'app Aqara Home e di aver installato un hub Aqara Zigbee
3.0.
Rimuovere la linguetta isolante.
Estrarre la linguetta da sotto il contatto della batteria
nella direzione della freccia per attivare il prodotto.
Aprire l'app, toccare "Home" e quindi toccare "+"
nell'angolo in alto a destra per accedere alla pagina
"Aggiungi dispositivo (accessorio)". Seleziona "Sensore di
Movimento P1" e aggiungilo secondo le istruzioni nell'app
Aqara Home.
Consultare www.aqara.com/support per ulteriori
informazioni.
Configurazione rapida
Confermare che la comunicazione tra il sensore di
movimento e l'hub Aqara Zigbee 3.0 funzioni normalmente,
quindi installarlo e fissarlo in posizione.
Installazione e utilizzo

53
1.
2.
3.
4.
Si prega di non installare su piastrelle, vetro, marmo o
altri oggetti lisci e facili da inumidire per evitare che
l'adesivo si allenti.
Si prega di non installare sulla superficie di un tubo di
illuminazione o altri oggetti ad alta temperatura e
riscaldamento per evitare che l'adesivo si allenti.
Si prega di non installare sulla superficie di rivestimenti
murali e altri oggetti ruvidi e irregolari per evitare che
l'adesivo si allenti.
Si prega di non affrontarlo contro apparecchi elettrici e
altre fonti di calore per evitare che l'inceppamento a
infrarossi possa causare un falso innesco.
Istruzioni per l'installazione:
Area di rilevamento effettiva--Vista laterale
2m
7m4.5m2m0m

54
1.Scegliere una posizione di installazione appropriata e
assicurarsi che la superficie di installazione sia pulita e
piana.
Installazione diretta
*L'altezza di installazione consigliata è 1,2-2 m. Il campo di rilevamento si
riduce se è inferiore a 1,2 m. Ci sarà una zona cieca nella parte inferiore
del sensore di movimento se è installato a un'altezza superiore a 2 m.
Area di rilevamento effettiva--Vista dall'alto
2.Applicare l'adesivo sulla parte inferiore del coperchio
della batteria, determinare la direzione di rilevamento,
incollarlo nella posizione di installazione desiderata e
premere con forza e in modo uniforme per 30 secondi per
assicurarsi che aderisca saldamente.
170°
7m
7m

55
3.Attaccare la base del supporto nell'area richiesta e
premere con forza e in modo uniforme per 30 secondi per
assicurarsi che aderisca saldamente. In caso di
1.Scegliere una posizione di installazione appropriata e
assicurarsi che la superficie di installazione sia pulita e piana.
Supporto per installazione
2.Attaccare il sensore al piedistallo di installazione e
premere con forza e in modo uniforme per 30 secondi per
assicurarsi che aderisca saldamente.

56
installazione su una superficie a parete, si raccomanda
che lo spazio del supporto sia rivolto verso l'alto per
facilitare la regolazione della direzione di rilevamento.
1.Rimuovere il coperchio della batteria dalla sua fessura con
il cacciavite e allungare il cacciavite nell'apertura della
leva del vano batteria e rimuovere il vano batteria.
Sostituzione della batteria

57
2.Installare due batterie a bottone CR2450 nuove di zecca
nel vano batterie, con una attaccata saldamente alla parte
superiore del vano sul fronte polare e l'altra attaccata
saldamente alla parte inferiore del vano sul fronte polare.

58
3.Allineare e installare il vano batteria in base alle direzioni
della freccia, quindi posizionare il coperchio della
batteria.
Allineamento
del vano
batteria
Allineamento
del coperchio
della batteria
Allineamento
del coperchio
della batteria
Allineamento
del vano
batteria
MModello:MS-S02
Tipo di batteria:CR2450
Protocolli senza fili:Zigbee 3.0
Dimensioni:33,1×33,1×41,6mm
Temperatura di esercizio: -10°C ~ 55°C (14°F ~ 131°F )
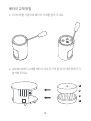
Umidità operativa: 0 ~ 95% RH, senza condensa
Frequenza d’esercizio Zigbee: 2405-2480 MHz
Specifiche

59
Servizio Clienti Online:www.aqara.com/support
Produttore: Lumi United Technology Co., Ltd.
Indirizzo: Room 801-804, Building 1, Chongwen Park,
Nanshan iPark, No. 3370, Liuxian Avenue, Fuguang
Community, Taoyuan Residential District, Nanshan District,
ShenzhenChina.
1.
2.
3.
4.
5.
Questo prodotto NON è un giocattolo. Tenere i bambini
lontani da questo prodotto.
Questo prodotto è stato pensato unicamente per essere
usato all’interno. NON usare in ambienti umidi o
all’aperto.
Attenzione all’umidità: non versare acqua o altri liquidi sul
prodotto.
Non mettere il prodotto vicino a una sorgente di calore.
Non mettere in aree chiuse a meno che non vi sia un
livello di ventilazione normale.
Non cercare di riparare il prodotto autonomamente. Tutti
gli interventi di riparazione dovrebbero essere eseguiti da
Avvertenze!
Potenza in uscita massima Zigbee ≤ 13 dBm
Contenuto della confezione: Sensore di Movimento P1 × 1,
Supporto × 1, Colla × 1, Manuale Utente × 1

60
Tutti i prodotti contrassegnati da questo simbolo
Informazioni sullo smaltimento e sul riciclaggio
dei RAEE
Con la presente, [Lumi United Technology Co.,
Dichiarazione di conformità europea
Ltd.] dichiara che l'apparecchiatura radio di tipo [Sensore di
Movimento P1,MS-S02] è conforme alla Direttiva
2014/53/UE. Il testo completo della dichiarazione di
conformità UE è disponibile al seguente indirizzo Internet:
https://www.aqara.com/DoC/
In condizioni d'uso normali, questa apparecchiatura deve
essere tenuta a una distanza minima di 20 cm tra l’antenna
e il corpo dell’utente.
6.
professionisti autorizzati.
Questo prodotto è adatto solo per migliorare
l’intrattenimento, la comodità della vita in casa oltre che
per comunicarvi lo stato del dispositivo. Qualora un
utente violi le istruzioni d’uso del prodotto, il produttore
NON sarà responsabile di eventuali rischi e perdite di
proprietà.

61
sono rifiuti di apparecchiature elettriche ed elettroniche
(RAEE in base alla direttiva 2012/19/UE) che non devono
essere smaltiti assieme a rifiuti domestici non differenziati.
Al contrario, è necessario proteggere l’ambiente e la salute
umana consegnando i rifiuti a un punto di raccolta
autorizzato al riciclaggio di rifiuti di apparecchiature
elettriche ed elettroniche, predisposto dalla pubblica
amministrazione o dalle autorità locali. Lo smaltimento e il
riciclaggio corretti aiutano a prevenire conseguenze
potenzialmente negative all’ambiente e alla salute umana.
Contattare l’installatore o le autorità locali per ulteriori
informazioni sulla sede e per i termini e le condizioni di tali
punti di raccolta.
Scansiona per ottenere il codice di installazione di Zigbee
3.0 nell'ultima pagina del manuale.
*
*
Si prega di leggere attentamente questo manuale e di conservarlo in un
luogo sicuro.
Se necessario, i contenuti di questo manuale verranno modificati o
adattati senza preavviso.

62
*
*
Для использования требуется центр умного дома Aqara Zigbee
3.0 или устройство с функцией центра умного дома Zigbee 3.0.
При использовании с Apple HomeKit требуется концентратор
Apple HomeKit. Для получения более подробной информации
посетите www.aqara.com/support.
Датчик движения P1 предназначен для распознавания
движения живых объектов и интенсивности освещения в
зоне обнаружения.
При движении человека и изменении интенсивности
окружающего освещения в зонах обнаружения датчик
движения отправит уведомление в приложение Aqara
Home через подключенный концентратор Aqara Zigbee
3.0 или свяжется с другими устройствами посредством
автоматизаций.
Ознакомление с изделием
Рассеиватель и датчик движения
(с двухцветным индикатором
красного/синего цвета)
Датчик освещенности
Крышка батарейного отсека

63
*Если не удалось добавить, переместите изделие ближе к центру
умного дома и повторите попытку.
1.
2.
3.
4.
Прежде чем активировать аксессуар, убедитесь, что у
Вас загружено приложение Aqara Home и установлен
центр умного дома Aqara Zigbee 3.0.
Удалите изолирующую вкладку.
Извлеките вкладку из-под контакта батареи в
направлении стрелки для активации изделия.
Откройте приложение, нажмите «Домой», а затем
нажмите «+» в правом верхнем углу, чтобы перейти на
страницу «Добавить устройство (аксессуар)». Выберите
«Датчик движения P1» и добавьте его согласно
инструкциям в приложении Aqara Home.
Дополнительную информацию см. на сайте
www.aqara.com/support.
Быстрая настройка
Кнопка сброса
Длительное нажатие 5 с.:
Сброс/Подключение к сети
Однократное нажатие: Проверка
эффективного расстояния
связи/Поиск устройств

64
Убедитесь в наличии стабильной связи между датчиком
движения и центром умного дома Aqara Zigbee 3.0, а
затем установите и зафиксируйте датчик на месте.
Установка и эксплуатация
1.
2.
3.
4.
Не устанавливайте устройство на плитку, стекло,
мрамор или другие гладкие и легко намокаемые
предметы, чтобы не испортить наклейку.
Не устанавливайте устройство на поверхность
осветительных ламп или других высокотемпературных
и нагревательных объектов, чтобы не испортить
наклейку.
Не устанавливайте устройство на поверхность
настенных покрытий и других шероховатых и неровных
предметов, чтобы не испортить наклейку.
Не устанавливайте устройство напротив
электроприборов и других источников тепла, чтобы не
допустить инфракрасных помех, вызывающих ложное
срабатывание.
Инструкции по установке:

65
Эффективная зона обнаружения - вид сбоку
Эффективная зона обнаружения - вид сверху
*Рекомендуемая высота установки 1,2-2 м. Если она менее 1,2 м,
зона обнаружения будет меньше. При установке выше 2 м в
нижней части датчика движения будет находиться слепая зона.
2m
7m4.5m2m0m
170°
7m
7m

66
1. Выберите подходящее место для установки и
убедитесь, что поверхность для установки чистая и
ровная.
2. Наклейте наклейку на нижнюю часть крышки
батарейного отсека, определите направление
обнаружения, прикрепите в желаемое положение
установки и надавите равномерно и с усилием в
течение 30 секунд, чтобы обеспечить надежное
прилипание.
Прямая установка
1. Выберите подходящее место для установки и
убедитесь, что поверхность для установки чистая и
ровная.
2. Прикрепите датчик к установочной подставке и
надавите равномерно и с усилием в течение 30 секунд,
чтобы обеспечить надежное прилипание.
Установка с использованием держателя

67
3. Прикрепите подставку держателя к нужной области и
надавите равномерно и с усилием в течение 30 секунд,
чтобы обеспечить надежное прилипание. В случае
установки на поверхность стены рекомендуется, чтобы
зазор держателя был направлен вверх для облегчения
настройки направления обнаружения.

68
1. Снимите крышку батарейного отсека с помощью
отвертки, вставьте отвертку в рычажное отверстие
батарейного отсека и снимите его.
Замена батареек
2. Установите в батарейный отсек две новые батарейки
CR2450, при этом одна надежно прикрепляется к
верхней части отсека на полярной передней панели, а
другая - к нижней части отсека на полярной передней
панели.

69
Выравнивание
батарейного
отсека
Выравнивание
батарейного
отсека
Выравнивание
крышки
батарейного
отсека
Выравнивание
крышки
батарейного
отсека
3. Совместите и установите батарейный отсек в
соответствии со стрелками, а затем поместите на
место крышку батарейного отсека.

70
Модель: MS-S02
Тип батарейки: CR2450
Беспроводные протоколы: Zigbee 3.0
Размеры: 33.1×33.1×41.6 мм
Температура эксплуатации: -10°C ~ 55°C (14°F ~ 131°F )
Рабочая влажность: 0 ~ 95% RH, без конденсации
Комплектация: Датчик движения P1 ×1, Держатель ×1,
Наклейка ×1, Руководство пользователя ×1
Онлайн-служба поддержки: www.aqara.com/support
Производитель: Lumi United Technology Co., Ltd.
Адрес: Room 801-804, Building 1, Chongwen Park, Nanshan
iPark, No. 3370, Liuxian Avenue, Fuguang Community,
Taoyuan Residential District, Nanshan District, Shenzhen,
China.
Сделано в Китае
Спецификации
1.
2.
Этот прибор - НЕ игрушка. Пожалуйста, не допускайте к
нему детей.
Данный прибор предназначен для использования
только внутри помещений. Не используйте его во
влажных средах или на открытом воздухе.
Внимание!

71
Оборудование должно быть защищено от внешних
воздействий. Допустимая температура окружающего
воздуха -10°C ~ 55°C (14°F ~ 131°F )
Правила и условия хранения и транспортировки
Оберегайте прибор от воздействия влаги, не
допускайте попадания воды или других жидкостей на
устройство.
Не размещайте прибор вблизи источников тепла.
Не помещайте прибор в закрытый корпус, если там нет
нормальной вентиляции.
Не пытайтесь отремонтировать прибор
самостоятельно. Все ремонтные работы должны
выполняться авторизованным специалистом.
Этот прибор предназначен только для повышения
удобства, качества домашних развлечений и
напоминания о статусе устройства. Он не
предназначен для использования в качестве
охранного оборудования дома, здания, склада или
любых других мест. Если пользователь нарушает
инструкции по использованию прибора,
производитель не несет никакой ответственности за
риски и повреждения имущества.
3.
4.
5.
6.

72
В случае обнаружения неисправности оборудования:
Дата производства указана на упаковке
Информация о мерах при неисправности оборудования
1.
2.
Извлеките элемент питания;
Обратитесь в сервисный центр для получения
консультации или ремонта оборудования.
*Оборудование не нуждается в периодическом обслуживании в
течение срока службы
Отсканируйте код на последней странице руководства,
чтобы добавить устройство с помощью кода установки
Zigbee 3.0.
*
*
Пожалуйста, внимательно прочтите данное руководство и
храните его в надежном месте.
При необходимости содержание данного руководства будет
изменено или скорректировано без специального
уведомления.

73
*
*
해당 장치를 사용하기 위해서는 Zigbee 3.0을 지원하는 아카라 허브가
필요합니다.
Apple HomeKit에서 사용하기 위해서는 특정한 허브가 필요합니다. 자세한
내용은 www.aqara.com/support 를 참조 하세요.
Aqara 모션 센서 P1은 인체의 움직임과 주변의 조도 환경을
감지하는 센서가 내장되어 있습니다. 감지 영역 내에서 움직임을
감지하거나 조도의 변화가 있는 경우, 해당 상황을 알림으로 보내거나
해당 조건을 자동화 트리거로 사용할 수 있습니다.
제품 소개
리셋 버튼
5초간 길게 누르기: 연결/초기화
짧게 누르기: 연결 범위 확인/장치 검색
상태 표시등
감지 센서
배터리 커버

74
*연결에 실패하는 경우 장치를 허브에 더 가까이 이동시킨 후 다시 시도해
주세요.
1.
2.
3.
4.
제품을 설치하기 전에 Aqara Home 앱을 다운로드 하고 아카라
허브를 설치해 주세요.
제품에 붙어 있는 파란색 보호 필름을 제거합니다.
Aqara Home 앱을 열고 홈 탭을 선택한 다음 오른쪽 상단의 “+”를
눌러 장치 추가 페이지로 이동합니다. “모션 센서 P1”을 선택한 후
앱의 안내 사항에 따라 장치를 추가해 주세요.
추가 문의가 있으신 경우 www.aqara.com/support 를 방문해
주세요.
빠른 설정하기
모션 센서가 허브와 정상적으로 통신하는 지 확인한 후에 제품을
고정하여 사용해 주세요.
설치 및 사용 방법
1.
2.
스티커가 떨어질 수 있으므로 타일, 유리, 대리석 등 미끄럽거나
습한 표면에 설치하지 마세요.
스티커가 떨어질 수 있으므로 조명이나 열원 근처에 설치하지
마세요.
설치 시 주의 사항

75
스티커가 떨어질 수 있으므로 거칠거나 울퉁불퉁한 물체 표면에
설치하지 마세요.
적외선 간섭으로 인해 잘못된 트리거가 발생할 수 있으므로
전자제품 및 열원 근처에 설치하지 마세요.
3.
4.
유효 감지 영역—측면 View
유효 감지 영역—평면 View
2m
7m4.5m2m0m
170°
7m
7m

76
*권장 설치 높이는 1.2 ~ 2m입니다. 1.2m 미만으로 설치 시 감지 영역이
줄어들 수 있으며 2m 이상의 높이에 설치할 경우 센서 하단부에 사각지대가
형성 되어 일부 영역을 감지하지 못할 수 있습니다.
1. 설치를 희망하는 위치를 선택한 후 표면을 깨끗하게 청소해
주세요.
2. 센서로 감지할 방향을 설정한 후, 배터리 커버 하단에 스티커를
붙인 다음 30초 이상 세게 눌러 센서를 부착해 주세요.
설치 옵션 1
1. 설치를 희망하는 위치를 선택한 후 표면을 깨끗하게 청소해
주세요.
2. 동봉된 스티커를 사용하여 모션 센서와 거치대를 붙인 후, 약 30
초간 세게 눌러 단단하게 고정해 주세요.
설치 옵션 2

77
3. 모션 센서가 부착된 거치대에 스티커를 붙인 후, 평평한 표면에서
약 30초간 세게 눌러 단단하게 고정해 주세요. 벽면에 설치하는
경우 감지 방향을 조정할 수 있도록, 받침대 방향이 위로 향하는
것을 권장합니다.

78
1. 드라이버를 사용하여 배터리 커버를 열어 주세요.
배터리 교체 방법
2. CR2450 배터리 2개를 배터리 카트리지의 맨 위와 아래 쪽에 각각
설치해 주세요.

79
3. 배터리를 교체한 후에 화살표에 표시된 방향에 따라 배터리 커버를
덮어 주세요.
배터리
카트리지 배터리 커버
배터리 커버
배터리
카트리지
모델: MS-S02
배터리 유형: CR2450
무선규약: Zigbee 3.0
제품크기: 33.1×33.1×41.6 mm
작업온도: -10°C ~ 55°C (14°F ~ 131°F )
작업습도: 0~95% RH,비결로 조건
내용물: 모션 센서 P1×1,받침대×1,스티커×1,설명서×1
웹사이트: www.aqara.com/kr
제조사: Lumi United Technology co., LTD.
기본 매개변수

80
주소:Room 801-804, Building 1, Chongwen Park, Nanshan
iPark, No. 3370, Liuxian Avenue, Fuguang Community,
Taoyuan Residential District, Nanshan District, Shenzhen,
China.
1.
2.
3.
4.
5.
6.
본 제품은 반드시 어린이의 손이 닿지 않는 곳에 보관하세요.
본 제품은 실내 사용 용도로 설계되었습니다. 습기가 많은
환경이나 실외에서 사용하지 마십시오.
비바람에 노출된 장소, 물이 튀는 곳에 설치하지 마세요. 물 또는
액체류를 제품에 엎지를 경우 고장, 감전 및 화재의 위험이
있습니다.
본 제품을 열원 부근에 설치하거나 환기가 잘 되지 않는 밀폐된
공간에서 사용하지 마십시오.
본 제품을 임의로 분해, 수리, 개조하지 마십시오. 수리가 필요한
경우 [email protected]로 연락하십시오.
본 제품은 생활의 편리 및 편의성을 개선하기 위한 용도로
적합합니다. 가정, 건물, 창고 또는 다른 장소의 방범 용도로
사용하는 것을 권장하지 않습니다. 사용자가 상기 사용 지침을
따르지 않고 해당 제품을 사용할 경우 발생하는 어떠한 위험 및
재산 손실에도 제조사는 귀책이 없음을 알려드립니다.
경고

81
*
*
해당 설명서를 상세하게 읽어보신 후 안전한 곳에 보관해 주세요.
해당 설명서의 내용은 별도의 공지 없이 업데이트될 수 있습니다.
해당 설명서의 마지막장에서 QR코드를 스캔하여 Zigbee 3.0 설치
코드를 확인 하세요.

82
*
*
本產品需搭配Zigbee 3.0閘道或具備Zigbee 3.0閘道功能的設備使用。
若使本產品支持HomeKit,您需要搭配特定型號的閘道,更多詳情請
登入www.aqara.com/support
人體傳感器P1是一款探測人體移動,同時檢測環境光狀態的產
品。
當探測區域有人移動,或環境光狀態發生變化時,人體傳感器
將通過已連接的Zigbee 3.0閘道向APP發送通知或者聯動其它設
備。
產品介紹
復位鍵
長按5s:重置/入網
按一下:有效通訊距離驗證/設備查找功能
透鏡(內有紅/藍雙
色指示燈)
光照檢測視窗
電池蓋

83
*如果添加失敗,請將設備靠近閘道,然後重試。
1.
2.
3.
4.
啟動產品前,請確保您已下載Aqara Home APP並安裝Aqara
Zigbee 3.0閘道。
取下電池絕緣片:從電池觸點下方按箭頭方向拉出電池絕緣
片以啟動產品。
請打開app,點擊“首頁”,然後點擊右上角的“+”,進入
“添加設備”頁面。選擇“人體傳感器P1”並根據頁面提示
進行添加。
請訪問www.aqara.com/support瞭解更多資訊。
快速設定
請確認人體傳感器與Zigbee 3.0閘道通信正常後,再安裝固定於
使用位置。
安裝使用
1.
2.
3.
4.
請勿安裝在瓷磚、玻璃、大理石等光滑及易潮濕的物體表面,
以免粘膠脫落。
請勿安裝在照明燈管等高溫、發熱物體表面,以免粘膠脫落。
請勿安裝在牆布等粗糙、不平整的物體表面,以免粘膠脫落。
安裝時請勿面向電器等發熱物體,避免紅外干擾造成誤觸發
安裝須知:

84
*建議安裝高度為1.2—2米,小於1.2米探測範圍變小,但不影響使用;
大於2米人體傳感器底部會出現盲區,部分區域無法探測。
有效探測區域—側視圖
有效探測區域—頂視圖
2m
7m4.5m2m0m
170°
7m
7m

85
1. 擇適當的安裝位置,清潔安裝表面,確保安裝表面乾淨、平
整。
2. 將膠貼粘貼在電池蓋底部,確定好人體傳感器探測方向,將
人體傳感器粘貼在安裝位置,用力均勻按壓30秒確保粘貼牢
固。
直接安裝
1. 選擇適當的安裝位置,清潔安裝表面,確保安裝表面乾淨、
平整。
2. 將感測器粘貼在安裝底座上,用力均勻按壓30秒確保粘貼牢
固。
支架安裝

86
3. 將支架底座粘貼在所需區域,用力按壓30秒確保粘貼牢固,
安裝在牆壁上時,建議支架缺口方向朝上,以便調整探測方
向。

87
1. 使用螺絲刀從電池蓋缺口位置打開電池蓋,然後使用螺絲刀
從電池倉撬口伸入並拆下電池倉。
更換電池
2. 將兩枚全新的CR2450類型紐扣電池裝入電池倉,一枚電池極
面緊貼電池倉頂部,另一枚電池極面緊貼電池倉底部。

88
3. 根據箭頭所示方向對齊並安裝好電池倉,然後蓋上電池蓋。
電池倉對位
電池蓋對位
電池蓋對位
電池倉對位
型號: MS-S02
電池類型:CR2450
無線協定:Zigbee 3.0
產品尺寸:33.1×33.1×41.6 mm
工作溫度:-10°C ~ 55°C (14°F ~ 131°F )
工作濕度:0~95% RH,無冷凝
包裝內含:人體傳感器P1×1,支架×1,膠貼×1,說明書×1
基本參數

89
制造商:深圳綠米聯創科技有限公司
地 址:中國廣東省深圳市南山區桃源街道福光社區留仙大道
3370號南山智園崇文園區1號樓801-804
服務網址: www.aqara.com/support
1.
2.
3.
4.
5.
6.
此產品不是玩具,請讓兒童遠離此產品。
本產品僅供室内使用,請勿在潮濕環境或室外使用。
注意防潮,不要降水或其他液體灑在本產品上。
請勿將本產品置放於靠近熱源的地方。除非有正常的通風,
否則不可放在密閉位置中。
請不要嘗試自行維修本產品,應由授權的專業人士進行此項
工作。
本產品只適用於提高您家庭生活的娛樂性、便利性以及用於
設備狀態提醒,如有用戶違反產品使用説明及本注意事項,
製造商對此造成的任何風險和財產損失不承擔責任。
警告

90
*
*
請仔細閱讀本說明書並妥善保管。
如出現必要情形,而對本說明書內容進行修改或調整,恕不專門通知。
請在說明書的最後一頁掃碼獲取Zigbee 3.0 Install Code

*
*
Please read this manual carefully and keep it in a safe place.
If necessary, the contents of this manual will be modified or adjusted
without special notice.
Scan to get the Zigbee 3.0 Install Code


-
 1
1
-
 2
2
-
 3
3
-
 4
4
-
 5
5
-
 6
6
-
 7
7
-
 8
8
-
 9
9
-
 10
10
-
 11
11
-
 12
12
-
 13
13
-
 14
14
-
 15
15
-
 16
16
-
 17
17
-
 18
18
-
 19
19
-
 20
20
-
 21
21
-
 22
22
-
 23
23
-
 24
24
-
 25
25
-
 26
26
-
 27
27
-
 28
28
-
 29
29
-
 30
30
-
 31
31
-
 32
32
-
 33
33
-
 34
34
-
 35
35
-
 36
36
-
 37
37
-
 38
38
-
 39
39
-
 40
40
-
 41
41
-
 42
42
-
 43
43
-
 44
44
-
 45
45
-
 46
46
-
 47
47
-
 48
48
-
 49
49
-
 50
50
-
 51
51
-
 52
52
-
 53
53
-
 54
54
-
 55
55
-
 56
56
-
 57
57
-
 58
58
-
 59
59
-
 60
60
-
 61
61
-
 62
62
-
 63
63
-
 64
64
-
 65
65
-
 66
66
-
 67
67
-
 68
68
-
 69
69
-
 70
70
-
 71
71
-
 72
72
-
 73
73
-
 74
74
-
 75
75
-
 76
76
-
 77
77
-
 78
78
-
 79
79
-
 80
80
-
 81
81
-
 82
82
-
 83
83
-
 84
84
-
 85
85
-
 86
86
-
 87
87
-
 88
88
-
 89
89
-
 90
90
-
 91
91
-
 92
92
-
 93
93
-
 94
94
-
 95
95
-
 96
96
-
 97
97


en otros idiomas
- français: Aqara Motion Sensor Mode d'emploi
- italiano: Aqara Motion Sensor Guida utente
- Deutsch: Aqara Motion Sensor Benutzerhandbuch
Artículos relacionados
-
Aqara T1 Guía del usuario
-
-
Aqara Cube T1 Pro Manual de usuario
-
 Aqara датчик движения и освещения (RTCGQ11LM) Manual de usuario
-
 Aqara E1 Curtain Driver Manual de usuario
-
Aqara Hub Guía del usuario
-
Aqara H1 Manual de usuario
-
-
 Aqara Hub M1S Gen 2 Smart Home Control Center Guía del usuario
-
 Aqara LED Strip T1 El manual del propietario


