Panasonic SCHTB680EG Instrucciones de operación
- Categoría
- Juegos de altavoces
- Tipo
- Instrucciones de operación

2014/03/04
EG
RQT9920-1H
Operating Instructions
Instrucciones de funcionamiento
Käyttöohjeet
Home Theater Audio System
Sistema de Cine en Casa
Kotiteatterin äänentoistojärjestelmä
Model No./Modelo N./Malli nro SC-HTB680
Thank you for purchasing this product.
Please read these instructions carefully before using this product, and save this manual for future use.
Le agradecemos haber adquirido este producto.
Lea cuidadosamente estas instrucciones antes de usar este producto, y guarde este manual para usarlo en el futuro.
Kiitos, että ostit tämän tuotteen.
Lue nämä ohjeet huolellisesti ennen tämän tuotteen käyttämistä ja säilytä tämä käsikirja tulevaa tarvetta varten.
Included Installation Instructions
The installation work should be done by a qualified installation specialist. (> 13 to 18)
Before commencing work, carefully read these installation instructions and the operating instructions to ensure that installation is performed correctly.
(Please keep these instructions. You may need them when maintaining or moving this system.)
Acerca de las instrucciones de instalación.
La instalación debe ser realizada por un especialista calificado. ( > 43 a 48)
Antes de iniciar el trabajo, lea con cuidado estas instrucciones de montaje y las de funcionamiento para asegurarse
de que el montaje se lleve a cabo correctamente.
(Guarde estas instrucciones. Puede necesitarlas cuando realice reparaciones de mantenimiento o cambie de lugar este sistema).
Sisältyvät asennusohjeet
Asennus on annettava tehtäväksi ammattitaitoiselle asentajalle. (> 73 sitä 78)
Ennen työn aloittamista lue huolellisesti nämä asennusohjeet ja käyttöohjeet, jotta taataan asennuksen oikea suorittaminen.
(Säilytä nämä ohjeet. Saatat tarvita niitä, kun suoritetaan huoltotoimenpiteitä tai siirretään tämä järjestelmä.)
SC-HTB680EG_RQT9920-H.book 1 ページ 2014年3月5日 水曜日 午前10時39分

2
RQT9920
Safety precautions
Unit
≥ To reduce the risk of fire, electric shock or
product damage,
jDo not expose this unit to rain, moisture,
dripping or splashing.
jDo not place objects filled with liquids, such as
vases, on this unit.
jUse only the recommended accessories.
jDo not remove covers.
jDo not repair this unit by yourself. Refer
servicing to qualified service personnel.
≥ To prevent injury, this apparatus must be
securely attached to the wall in accordance with
the installation instructions.
AC mains lead
≥ To reduce the risk of fire, electric shock or
product damage,
jEnsure that the power supply voltage
corresponds to the voltage printed on this unit.
j
Insert the mains plug fully into the socket outlet.
j
Do not pull, bend, or place heavy items on the lead.
jDo not handle the plug with wet hands.
jHold onto the mains plug body when
disconnecting the plug.
jDo not use a damaged mains plug or socket
outlet.
≥ The mains plug is the disconnecting device.
Install this unit so that the mains plug can be
unplugged from the socket outlet immediately.
Button-type battery (Lithium battery)
≥ Risk of fire, explosion and burns. Do not
recharge, disassemble, heat above 60
o
C or
incinerate.
≥ Keep the Button-Type battery out of the reach of
children. Never put Button-Type battery in
mouth. If swallowed call your doctor.
Small object
≥ Keep the screws out of reach of children to
prevent swallowing.
≥ Keep the adhesive tape out of reach of children
to prevent swallowing.
≥ Keep the button-type battery out of reach of
children to prevent swallowing.
Unit
≥ Do not place sources of naked flames, such as
lighted candles, on this unit.
≥ This unit may receive radio interference caused
by mobile telephones during use. If such
interference occurs, please increase separation
between this unit and the mobile telephone.
≥ This unit is intended for use in moderate
climates.
≥ Product Identification Marking is located on the
bottom of the unit.
Placement
≥ Place this unit on an even surface.
≥ To reduce the risk of fire, electric shock or
product damage,
jDo not install or place this unit in a bookcase,
built-in cabinet or in another confined space.
Ensure this unit is well ventilated.
jDo not obstruct this unit’s ventilation openings
with newspapers, tablecloths, curtains, and
similar items.
jDo not expose this unit to direct sunlight, high
temperatures, high humidity, and excessive
vibration.
Button-type battery (Lithium battery)
≥ Danger of explosion if battery is incorrectly
replaced. Replace only with the type
recommended by the manufacturer.
≥ Insert with poles aligned.
≥ Mishandling of batteries can cause electrolyte
leakage and may cause a fire.
jRemove the battery if you do not intend to use
the remote control for a long period of time.
Store in a cool, dark place.
jDo not heat or expose to flame.
jDo not leave the battery(ies) in a car exposed
to direct sunlight for a long period of time with
doors and windows closed.
≥ When disposing of the batteries, please contact
your local authorities or dealer and ask for the
correct method of disposal.
WARNING CAUTION
SC-HTB680EG_RQT9920-H.book 2 ページ 2014年3月5日 水曜日 午前10時39分

Precautions
ENGLISH
RQT9920
3
Declaration of Conformity (DoC)
Hereby, “Panasonic Corporation” declares that this product is in compliance with the essential requirements and other relevant provisions
of Directive 1999/5/EC.
Customers can download a copy of the original DoC to our R&TTE products from our DoC server:
http://www.doc.panasonic.de
Contact to Authorised Representative: Panasonic Marketing Europe GmbH,
Panasonic Testing Centre, Winsbergring 15, 22525 Hamburg, Germany
This product is intended for general consumer. (Category 3)
Disposal of Old Equipment and Batteries
Only for European Union and countries with recycling systems
These symbols on the products, packaging, and/or accompanying documents
mean that used electrical and electronic products and batteries must not be mixed
with general household waste.
For proper treatment, recovery and recycling of old products and used batteries,
please take them to applicable collection points in accordance with your national
legislation.
By disposing of them correctly, you will help to save valuable resources and prevent
any potential negative effects on human health and the environment.
For more information about collection and recycling, please contact your local
municipality.
Penalties may be applicable for incorrect disposal of this waste, in accordance with
national legislation.
Note for the battery symbol (bottom symbol):
This symbol might be used in combination with a chemical symbol. In this case it
complies with the requirement set by the Directive for the chemical involved.
SC-HTB680EG_RQT9920-H.book 3 ページ 2014年3月5日 水曜日 午前10時39分

4
RQT9920
Table of contents
Safety precautions............................................................................................ 2
Before use
Supplied items .................................................................................................. 5
This system (SC-HTB680) ...................................................................................................5
Accessories .........................................................................................................................5
Control reference guide ................................................................................... 6
This system (Front) ..............................................................................................................6
This system (Rear) ..............................................................................................................7
Remote control ....................................................................................................................8
Getting started
Step 1 Connections ......................................................................................... 9
Connection with the TV .......................................................................................................9
Connection from an HDMI compatible device ...................................................................10
Connection to a 4K Ultra HD TV ........................................................................................11
Using the IR Blaster ...........................................................................................................11
AC mains lead connection .................................................................................................12
Step 2 Placement........................................................................................... 13
Safety Precautions ............................................................................................................13
The active subwoofer ........................................................................................................13
Wireless interference .........................................................................................................13
Selecting the placement method .......................................................................................14
When placing the main unit in a rack or on a table ............................................................15
When attaching the main unit to a wall ..............................................................................16
Step 3 Wireless connections........................................................................ 19
Active subwoofer wireless connection ...............................................................................19
Bluetooth
®
connection .......................................................................................................19
Remote control code ......................................................................................20
Operations
Using this system ...........................................................................................21
3D sound .........................................................................................................22
Sound menu ....................................................................................................22
Audio format ......................................................................................................................23
Setup menu .....................................................................................................24
Linked operations with the TV (VIERA Link “HDAVI Control
TM
”) ............... 25
Reference
Troubleshooting .............................................................................................26
About Bluetooth
®
............................................................................................29
Unit care ..........................................................................................................29
Licenses ..........................................................................................................29
Specifications ................................................................................................. 30
SC-HTB680EG_RQT9920-H.book 4 ページ 2014年3月5日 水曜日 午前10時39分

Getting started
Operations
Reference
Before use
Precautions
RQT9920
5
Before use
Supplied items
Check the supplied accessories before using this system.
≥ Product numbers are correct as of December 2013. These may be subject to change.
≥ The supplied AC mains lead is for use with this system only.
Do not use it with other equipment. Also, do not use cords from other equipment with this system.
≥ The illustrations shown may differ from your unit.
≥ Operations in this operating instructions are described mainly with the remote control, but
you can perform the operations on the main unit if the controls are the same.
This system (SC-HTB680)
∏ 1 Main unit (speaker)
(SU-HTB680)
∏ 1 Active subwoofer
(SB-HWA680)
Accessories
∏ 1 Remote control (with a
battery)
(N2QAYC000098)
∏ 1 IR Blaster ∏ 2 Wall mount brackets
∏ 2 AC mains leads ∏ 2 Screws
SC-HTB680EG_RQT9920-H.book 5 ページ 2014年3月5日 水曜日 午前10時39分

6
RQT9920
Control reference guide
1 Standby/on switch (Í/I)
Touch to switch the unit from on to standby
mode or vice versa. In standby mode, the unit
is still consuming a small amount of power.
2 Adjust the volume of this system (> 21)
3 Select the input source (> 21)
“TV” --# “BD/DVD” --# “BLUETOOTH”
^--------------------------------------------------------}
4 Select the Bluetooth
®
device as the source
(> 21)
5 NFC touch area (> 20)
6 Remote control signal sensor (> 8)
7 Display
8 WIRELESS LINK indicator (> 19)
§
These switches work just by touching the marks. Each time you touch the switch, there will be a beep sound.
This system (Front)
7
8
5
6
2341
Main unit
Active subwoofer
SC-HTB680EG_RQT9920-H.book 6 ページ 2014年3月5日 水曜日 午前10時39分

Before use
RQT9920
7
1 HDMI AV IN (BD/DVD) terminal (> 10)
2 HDMI AV OUT (TV (ARC)) terminal (ARC
compatible) (> 9, 10)
3 OPTICAL DIGITAL AUDIO IN (TV) terminal
(> 10)
4 Ir SYSTEM terminal (> 11, 12)
5 USB port (for service use only)
6 AC IN terminal (> 12)
7 Active subwoofer on/off button (> 19)
§ The I/D SET button is only used when the main unit is not paired with the active subwoofer. (> 28)
This system (Rear)
7
6
2
1
3
4
5
6
Main unit
Active subwoofer
SC-HTB680EG_RQT9920-H.book 7 ページ 2014年3月5日 水曜日 午前10時39分

8
RQT9920
1 Turn the main unit on or off (> 21)
2 Select the input source (> 21)
“TV” --# “BD/DVD” --# “BLUETOOTH”
^--------------------------------------------------------}
3 Select the setup menu (> 24)
4 Select the sound menu (> 22)
5 Select the Bluetooth
®
device as the source
(> 21)
6 Adjust the volume of this system (> 21)
7 Mute the sound (> 21)
8 Select and confirm the option
∫ About remote control signal sensor
The remote control signal sensor is located on the main unit.
≥Use the remote control within the correct operation range.
Distance: Within approx. 7 m directly in front
Angle: Approx. 30
o
left and right
B Remote control signal sensor for table top layout
C Remote control signal sensor for wall mounting layout
Remote control
SOUND
1
5
6
7
8
2
INPUT
SETUP
OK
3
4
∫ Before using for the first time
Remove the insulation sheet A.
∫ To replace a button-type battery
Battery type: CR2025 (Lithium battery)
≥ Set the button-type battery with its (i) mark
facing upward.
For table top layout
For wall mounting layout
SC-HTB680EG_RQT9920-H.book 8 ページ 2014年3月5日 水曜日 午前10時39分

Getting started
Before use
RQT9920
9
Getting started
Step 1 Connections
≥Turn off all equipment before connection and read the appropriate operating instructions.
Do not connect the AC mains lead until all other connections are completed.
∫ HDMI (High-Definition Multimedia Interface)
≥ The HDMI connection supports VIERA Link “HDAVI Control” (> 25) when used with a compatible Panasonic TV.
≥ Use the ARC compatible High Speed HDMI Cables. Non-HDMI-compliant cables cannot be utilised.
≥ It is recommended that you use Panasonic’s HDMI cable.
∫ IR (Infrared) Blaster
≥ Do not use the IR Blaster if the TV’s remote control sensor is not blocked by the main unit. (> 14)
Verify if the TV’s HDMI terminal is labelled “HDMI (ARC)”.
∫ What is ARC?
ARC is an abbreviation of Audio Return Channel, also known as HDMI ARC. It refers to one of the HDMI functions. When you
connect the main unit to the terminal labelled “HDMI (ARC)” on the TV, the optical digital audio cable that is usually required in
order to listen to sound from a TV is no longer required, and TV pictures and sound can be enjoyed with a single HDMI cable.
Make the connection.
A HDMI cable
Connection with the TV
Connection differs depending on the label printed next to the HDMI terminal.
Labelled “HDMI (ARC)”: Connection [A]
Not Labelled “HDMI (ARC)”: Connection [B]
[A] Labelled “HDMI (ARC)”
HDMI IN (ARC)
AV OUT
TV(ARC)
A
Be sure to connect to
the TV’s ARC
compatible terminal.
(Refer to the operating
instructions for the TV.)
TV
SC-HTB680EG_RQT9920-H.book 9 ページ 2014年3月5日 水曜日 午前10時39分

10
RQT9920
A HDMI cable
B Optical digital audio cable
≥ When you use the optical digital audio cable, insert
the tip correctly into the terminal.
You can direct the audio signal from the connected Blu-ray Disc player, DVD player, Set Top Box, etc. to
this system.
Preparation
≥Connect the main unit to the TV. (> 9)
A HDMI cable
≥ Refer to the operating instructions of the connected HDMI compatible device for the necessary setting, to output the video and
audio signals.
[B] Not labelled “HDMI (ARC)”
HDMI IN
OPTICAL
OUT
TV
OPTICAL
DIGITAL
AUDIO IN
AV OUT
TV(ARC)
B
A
TV
Connection from an HDMI compatible device
∫ HDMI standby pass-through
Even if the main unit is in standby mode, the audio and/or video signal from the device connected to the HDMI AV IN terminal
will be sent to the TV connected to the HDMI AV OUT terminal (the sound will not be output from this system).
∫ 3D compatibility
Compatible with FULL HD 3D TV and Blu-ray Disc player.
≥ The main unit can pass-through the 3D video signal from a 3D compatible Blu-ray Disc player to a FULL HD 3D TV.
HDMI OUT
BD/DVD
AV IN
A
e.g., Blu-ray Disc player
SC-HTB680EG_RQT9920-H.book 10 ページ 2014年3月5日 水曜日 午前10時39分

Getting started
RQT9920
11
This system cannot pass-through the 4K content of a 4K compatible equipment to a 4K Ultra HD TV.
However, you can connect the system to a 4K Ultra HD TV to enjoy the 4K content.
A HDMI cable
≥ Refer to the operating instructions of the 4K Ultra HD TV (VIERA) and the 4K/60p compatible equipment for setup and for
playing the 4K content.
≥ To enjoy multi-channel output from this system, set the audio output of other equipment to Bitstream.
≥ The audio signal input to this system is up to 5.1 channels.
With the IR Blaster connection, it is possible to send the IR signal received by this system’s remote
control signal sensor to the TV’s sensor.
Use the TV’s remote control within the operation range of this system’s remote control signal sensor.
≥For the operation range, refer to page 8.
Connect the jack plug to the main unit’s Ir SYSTEM terminal.
Connection to a 4K Ultra HD TV
Using the IR Blaster
HDMI IN (ARC)
HDMI OUT
HDMI IN (4K)
AV OUT
TV(ARC)
A
A
e.g., Blu-ray Disc player
(4K compatible)
TV
Connect both ends
to ARC compatible
HDMI terminals.
(4K compatible)
Ir SYSTEM
Infrared emitter
SC-HTB680EG_RQT9920-H.book 11 ページ 2014年3月5日 水曜日 午前10時39分

12
RQT9920
Place the infrared emitter in sight of the TV’s remote control signal
sensor.
≥ For the location of the TV’s remote control signal sensor, refer to the operating instructions for the TV.
Aim the TV’s remote control at this system’s remote control sensor and
operate the TV.
≥ For the location of this system’s remote control signal sensor, refer to page 8.
≥ Make sure to clean the surface, where the adhesive tape is to be attached.
≥ If you peel off the adhesive tape, the surface may become damaged and exposed adhesive may remain. Once you have
confirmed the TV is operating correctly, secure it by attaching the adhesive tape.
≥ The supplied IR Blaster is only compatible with Panasonic TVs.
∫ Placement example
On the rear of the main unit:
≥ Connect only after all other connections are completed.
A To a household mains socket
B AC mains lead (supplied)
≥
This system consumes a small amount of AC power (
>
30) even when it is turned off. In the interest of power
conservation, if you will not be using this system for a long time, unplug it from the household mains socket.
AC mains lead connection
TV remote control
signal sensor
Adhesive tape (supplied)
AC IN
Saving energy
The main unit is designed to conserve its power consumption and save energy.
≥
The main unit will automatically switch to standby mode when no signal is input and no operation is
performed for approx. 20 minutes. Refer to page 24, “AUTO POWER DOWN” to turn this function off.
SC-HTB680EG_RQT9920-H.book 12 ページ 2014年3月5日 水曜日 午前10時39分

Getting started
Precautions
RQT9920
13
Step 2 Placement
≥ Do not hold the main unit in one hand to avoid injury, you may drop the main unit when carrying it.
≥ To prevent damage or scratches, lay down a soft cloth and perform the assembly on it.
When carrying the active subwoofer
To avoid interference, maintain the following distances between the main unit/active subwoofer
and other electronic devices that use the same radio frequency (2.4 GHz band).
Safety Precautions
Professional installation is required.
The installation should never be done by any other than a qualified installation specialist.
PANASONIC DISCLAIMS ANY PROPERTY DAMAGE AND/OR SERIOUS INJURY, INCLUDING
DEATH RESULTING FROM IMPROPER INSTALLATION OR INCORRECT HANDLING.
≥ Be sure to install the main unit as indicated within this operating Instructions.
≥ Attach using techniques suited to the structure and materials of the installation location.
Caution
≥ This system is to be used only as indicated in these instructions. Failure to do so may lead to
damage to the amplifier and/or the speaker, and may result in the risk of fire. Consult a qualified
service person if damage has occurred or if you experience a sudden change in performance.
≥ Do not attempt to attach the main unit to a wall using methods other than those described in this
manual.
The active subwoofer
A Do not hold the active subwoofer from this
opening.
The parts inside may get damaged.
B Always hold the bottom of the active subwoofer when
moving it.
Wireless interference
C Main unit/active subwoofer
D Wireless router, cordless phone and
other electronic devices: approx. 2 m
A
B
D
C
SC-HTB680EG_RQT9920-H.book 13 ページ 2014年3月5日 水曜日 午前10時39分

14
RQT9920
Choose a placement method that suits you best.
∫ When placing the main unit in front of the TV
The main unit may block or interfere with the TV’s various sensors (C.A.T.S. (Contrast Automatic
Tracking System) sensor, remote control sensor, etc.) and the 3D Eyewear transmitters on a 3D
compatible TV.
≥If interference occurs, move the main unit further away from the TV. If the TV still does not function
correctly, try using it in a rack or in the wall mount position.
∫ If the TV’s remote control sensor is blocked by the main unit
Try using the TV’s remote control from a different angle. If the problem persists, you can use the supplied
IR Blaster to relay the signal to the TV. (> 11, 12)
≥ Place the active subwoofer within a few meters of the main unit and in a horizontal position with the top panel facing upward.
≥ Do not use the main unit or the active subwoofer in a metal cabinet.
≥ Placing the active subwoofer too close to the walls and corners can result in excessive bass. Cover walls and windows with
thick curtains.
≥ If irregular colouring occurs on your TV, turn the TV off for about 30 minutes. If it persists, move the main unit and active
subwoofer further away from the TV.
≥ Keep magnetised items away. Magnetised cards, watches, etc., can be damaged if placed too close to the main unit and active
subwoofer.
Selecting the placement method
When placing the main unit
in a rack or on a table
≥ Place the main unit on a flat
and horizontal surface.
When attaching the main
unit to a wall
≥ Place the main unit on a
flat and vertical surface.
Page 15
Page 16
SC-HTB680EG_RQT9920-H.book 14 ページ 2014年3月5日 水曜日 午前10時39分

Getting started
Precautions
RQT9920
15
Additionally required accessories (commercially available)
≥Fall prevention cord ...................................................................................................................... k 2
≥Screw eyes (to attach the fall prevention cord) ............................................................................. k 2
≥ Use commercially available screws that are capable of supporting over 26 kg.
≥ Use a cord that is capable of supporting over 26 kg (with a diameter of about 1.5 mm).
Attach the cord to the main unit.
A Cord
§
§ If the cord cannot be threaded through the holes, try bending the cord in 2 locations,
about 5 mm apart from the tip, at an angle of 45
o
(as
illustrated above).
Place the main unit in the desired position and attach each cord onto the
rack or table.
≥ Make sure that the slack of the cord is minimal.
≥ Do not lean the main unit against the TV or wall.
B Screw eye
≥Attach at a position capable of supporting over 26 kg.
≥Depending on the placement of the main unit, the screwing position of the screw eye may differ.
When placing the main unit in a rack or on a table
SC-HTB680EG_RQT9920-H.book 15 ページ 2014年3月5日 水曜日 午前10時39分

16
RQT9920
The main unit can be wall mounted using the supplied wall mount brackets, etc. Make sure that the
screw used and the wall are strong enough to support the weight of at least 26 kg.
The screws and other items are not supplied as the type and size will vary with each installation.
≥Refer to step 3 for details about the required screws.
≥Be sure to attach the fall prevention cord as a secondary safety measure.
Supplied accessories
Additionally required accessories (commercially available)
≥Screws for wall mounting............................................................................................................. k 2
≥Fall prevention cord ..................................................................................................................... k 2
≥Screw eyes (to attach the fall prevention cord)............................................................................ k 2
≥ Use a cord that is capable of supporting over 26 kg (with a diameter of about 1.5 mm).
Attach the cord to the main unit.
A Cord
§
§ If the cord cannot be threaded through the holes, try bending the cord in 2 locations,
about 5 mm apart from the tip, at an angle of 45
o
(as
illustrated above).
When attaching the main unit to a wall
∏ 2 Screws ∏ 2 Wall mount brackets
SC-HTB680EG_RQT9920-H.book 16 ページ 2014年3月5日 水曜日 午前10時39分

Getting started
Precautions
RQT9920
17
Attach the wall mount brackets to the main unit.
A Wall mount bracket (supplied)
B Screw (supplied)
Drive a screw into the wall.
≥ Use the measurements indicated below to identify the screwing positions on the wall.
≥ Leave at least 100 mm of space above of the main unit to allow enough space for fitting the main unit.
≥ Position the main unit with at least 50 mm of free space to its right. If not, it may not be possible to access the touch keys.
≥ Be sure to use a level to ensure that both mounting holes are level to each other.
Front view (semi-transparent image)
C At least 30 mm
D ‰4.0 mm
E ‰7.0 mm to ‰9.4 mm
F Wall or pillar
G 1.6 mm to 2.5 mm
H 400 mm I 275 mm J 275 mm
K 27 mm L 110 mm M Wall mounting hole
SC-HTB680EG_RQT9920-H.book 17 ページ 2014年3月5日 水曜日 午前10時39分

18
RQT9920
Fit the main unit securely onto the screw(s).
Secure the cord to the wall.
≥ Make sure that the slack of the cord is minimal.
A Screw eye
B Cord
DO DO NOT
≥ Move the speaker so
that the screw is in
this position.
≥ In this position, the
speaker will likely fall
if moved to the left or
right.
SC-HTB680EG_RQT9920-H.book 18 ページ 2014年3月5日 水曜日 午前10時39分

Getting started
Precautions
RQT9920
19
Step 3 Wireless connections
Preparation
≥ Turn on the main unit.
Press [BÍ CI].
Active subwoofer on/off button [B Í C I]
Use this button to turn the active subwoofer on
and off.
C I:
The active subwoofer is on.
B Í:
The active subwoofer is off.
The active subwoofer will still consume a small
amount of power even when it is turned off (
B
,
Í
).
Check that the wireless link is
activated.
WIRELESS LINK indicator
Lights red:
The wireless link is not activated.
Lights green:
The wireless link is activated.
Blinks green:
The active subwoofer is trying to activate the
wireless link with the main unit.
The wireless link will be activated when the main unit and the
active subwoofer are both turned on.
By using the Bluetooth
®
connection, you can listen
to the sound from the Bluetooth
®
audio device
from this system wirelessly.
≥
Refer to the operating instructions of the Bluetooth
®
device for
further instruction on how to connect a Bluetooth
®
device.
Preparation
≥ Turn on the Bluetooth
®
feature of the device and
place the device near the main unit.
Press [ ] to select “BLUETOOTH”.
≥ If “PAIRING” is indicated on the display, go to step 3.
Press and hold [ ] until “PAIRING”
is indicated on the display.
Select “SC-HTB680” from the
Bluetooth
®
device’s Bluetooth
®
menu.
≥ If prompted for the passkey on the Bluetooth
®
device, enter
“0000”.
≥ Once the Bluetooth
®
device is connected, the name of the
connected device will be indicated on the display for a few
seconds.
≥ You can register up to 8 devices with this system. If a 9th
device is paired, the device that has not been used for the
longest time will be replaced.
Press [ ] to enter Bluetooth
®
mode.
“BLUETOOTH READY” is indicated on the display.
Select “SC-HTB680” from the
Bluetooth
®
device’s Bluetooth
®
menu.
∫ Disconnecting a Bluetooth
®
device
Press and hold [ ] until the “BLUETOOTH
READY” is indicated on the display.
≥ When “BLUETOOTH” is selected as the source, this
system will automatically try and connect to the last
connected Bluetooth
®
device.
≥ The Bluetooth
®
device will be disconnected if a different
audio source (e.g. “TV”) is selected.
≥
This system can only be connected to one device at a time.
≥
To change the sound quality, refer to page 24 “LINK MODE”.
Active subwoofer
wireless connection
Bluetooth
®
connection
Bluetooth
®
pairing
Connecting a paired
Bluetooth
®
device
SC-HTB680EG_RQT9920-H.book 19 ページ 2014年3月5日 水曜日 午前10時39分

20
RQT9920
For NFC-compatible Bluetooth
®
devices
(Android
TM
devices) only
Simply by touching an NFC (Near Field
Communication)-compatible Bluetooth
®
device on
the main unit, you can complete all preparations,
from registering a Bluetooth
®
device to
establishing a connection.
Preparation
≥ Turn on the NFC feature of the device.
≥ Android device version lower than 4.1 requires
the installation of the app “Panasonic Music
Streaming” (free of charge).
1
Enter “Panasonic Music Streaming” in the search
box of Google Play
TM
to search, and then select
“Panasonic Music Streaming”.
2 Start the app “Panasonic Music Streaming” on the
device.
– Follow on-screen instructions on your device.
– Always use the latest version of the app.
Press [ ] to select “BLUETOOTH”.
Touch and hold your device on the
NFC touch area of the main unit [ ].
(> 6)
Do not move the Bluetooth
®
device until it beeps,
displays a message or reacts in some way.
Once the Bluetooth
®
device has reacted, move the
device away from the main unit.
≥When the registration and connection of the Bluetooth
®
device is complete, the name of the connected device is
indicated on the display for a few seconds.
≥The location of the NFC touch area differs depending on
the device. When a connection cannot be established
even if your Bluetooth
®
device has touched the NFC
touch area of the main unit, change the position of the
device. The condition may also improve if you download
the dedicated app “Panasonic Music Streaming” and
start it up.
Start playback on the Bluetooth
®
device.
≥ If you touch another device to the main unit, you can
update the Bluetooth
®
connection. The previously
connected device will be disconnected automatically.
≥ When the connection is established, playback may start
automatically depending on the type of device being used.
≥ The One-Touch Connection may not work properly
depending on the type of device being used.
Remote control code
When other Panasonic devices respond to this
system’s remote control, change the remote
control code on this system and the remote
control.
Preparation
≥ Turn off all other Panasonic products.
≥ Turn on the main unit.
∫ To set the code to “REMOTE 2”
Press and hold [MUTE] and [OK] for more than
4 sec.
“REMOTE 2” is indicated on the display.
∫ To set the code to “REMOTE 1”
Press and hold [MUTE] and [4] for more than
4 sec.
“REMOTE 1” is indicated on the display.
One-Touch Connection
(Connecting by NFC)
SC-HTB680EG_RQT9920-H.book 20 ページ 2014年3月5日 水曜日 午前10時39分

Getting started
Operations
RQT9920
21
Operations
Using this system
Preparation
≥ Turn on the active subwoofer.
≥ Turn on the TV and/or connected device.
Press [Í] to turn on the main unit.
Select the source.
≥ This remote control cannot be used to control the
operations of the connected devices.
∫ When “BLUETOOTH” is selected as
the source
On the Bluetooth
®
device:
Select this system as the output source of the
connected Bluetooth
®
device and start the
playback.
∫ When “BD/DVD” is selected as the
source
On the TV and the connected device:
Select the TV’s input for this system and start the
playback on the connected device.
∫ To adjust the volume of this system
Press [i VOL j].
≥ Volume range: 0 to 100
∫ To mute the sound
Press [MUTE].
≥ While muting, “MUTE” is indicated on the display.
≥ To cancel, press the button again or adjust the volume.
≥ Muting is cancelled if the main unit is turned off.
≥ If there is sound coming out of the TV’s speakers, reduce
the volume of the TV to its minimum.
Press To select
[INPUT]
“TV” --------------# “BD/DVD”
^--- “BLUETOOTH”(---}
[] “BLUETOOTH”
SOUND
INPUT
SETUP
OK
If this system does not operate as
expected or sound is unusual, returning
the settings to the factory preset may
solve the problem. (> 26)
SC-HTB680EG_RQT9920-H.book 21 ページ 2014年3月5日 水曜日 午前10時39分

22
RQT9920
3D sound
This system provides a feeling that the sound and
the image are as one.
≥ To change the applied effect, refer to “Sound
menu”. (> right)
≥ Dolby Virtual Speaker effect is ON except STEREO mode.
≥ To turn off Dolby Virtual Speaker and the 3D surround
effects, select “STEREO” as the sound mode. (> right)
≥ To turn off the 3D surround and the Clear-mode dialog
effects, refer to “3D CLR DIALOG”. (> 23)
Sound menu
Press [SOUND] repeatedly to select
the sound effect.
Press [3, 4] repeatedly to select
the desired setting and then press
[OK].
3D sound
Dolby
®
Virtual
Speaker
With this effect you can enjoy
a surround sound effect
similar to 5.1ch.
3D surround
effect
Adding to the Dolby Virtual
Speaker effect, Panasonic
has applied its own sound
field controlling technology to
expand the sound field
forwards, backwards,
upwards, and downwards,
providing a sound with depth
and force that better matches
3D images.
Clear-mode
dialog
Sports commentary and
dialogs from TV dramas are
heard as if the sound is
coming from the TV, giving
the feeling that the sound and
the image are one.
Also, the dialog will stand out
from the other sounds during
normal volume playback and
when the volume is lowered
for night time viewing.
e.g., Image of 3D sound field
SOUND
MODE
STANDARD
: Best suited
for dramas and comedy
shows.
STADIUM: Produces a
realistic sound for live
sports broadcasts.
MUSIC: Enhance the
sound of musical
instruments and songs.
CINEMA: Produces three-
dimensional sound unique
to movies.
NEWS: Enhance the voice
of news and sports
commentaries.
STEREO: Play any source
of sound in stereo.
SUBWOOFER
You can adjust the amount
of bass. This system
automatically selects the
most suitable setting
according to the type of
playback source.
LEVEL 1
LEVEL 2
: Default for
2 channel audio source
LEVEL 3
: Default for multi-
channel audio source
LEVEL 4
The setting you make is
retained and recalled every
time you play the same
type of source.
DIALOG
Adjust the dialog level.
LEVEL 1
LEVEL 2
LEVEL 3
LEVEL 4
“DIALOG” is not indicated
on the display when “3D
CLR DIALOG” is set to
“OFF”.
SC-HTB680EG_RQT9920-H.book 22 ページ 2014年3月5日 水曜日 午前10時39分

Operations
RQT9920
23
≥ The default setting is underlined. Changed settings will be
kept until it is changed again, unless otherwise indicated.
You can view the current audio format.
Press and hold [SOUND] for more than 4 sec.
H.BASS
Enhance the harmonic
bass effect.
ON
OFF
3D CLR
DIALOG
The 3D Clear Mode Dialog
feature creates a sound field
similar to the sound coming
from a TV screen and
makes dialogues clearer.
ON: 3D Surround, Clear
Mode Dialog and Dolby
Virtual Speaker effect
OFF: Dolby Virtual
Speaker effect
The setting is set back to
“ON” every time you turn
the main unit on.
DUAL
AUDIO
Sets the preferred audio
channel mode when there
are two audio modes
received by this system.
M1
: Main
M2: Secondary
M1 + M2:
Main + Secondary
This effect only works if the
audio output of the TV or
player is set to “Bitstream”
and “Dolby Dual Mono” is
available in the sound source.
AGC
Auto gain control prevents
sudden loud sound by
reducing the sound level
automatically when the
input is too high.
This function is suitable for
TV broadcast that has
sound level difference.
ON
OFF
If the sound becomes
unnatural, select “OFF”.
LOW VOL
MODE
Enhance the dialog in low
volume condition.
ON
OFF
Select “OFF” to cancel this
effect if the dialog does not
sound natural in low
volume condition.
Audio format
DOLBY
DIGITAL
Dolby Digital is the audio
source.
DTS DTS is the audio source.
PCM MULTI
Linear pulse-code
modulation is the audio
source.
PCM
2 channel pulse-code
modulation is the audio
source.
SC-HTB680EG_RQT9920-H.book 23 ページ 2014年3月5日 水曜日 午前10時39分

24
RQT9920
Setup menu
Press [SETUP] repeatedly to select
the setup item.
Press [3, 4] repeatedly to select
the desired setting and then press
[OK].
≥ The default setting is underlined. Changed settings will be
kept until it is changed again, unless otherwise indicated.
DIMMER
Dims the display after
5 seconds of inactivity.
ON
OFF
AUTO
POWER
DOWN
The main unit
automatically is turned off if
there is no audio input and
when you do not use it for
approx. 20 minutes.
ON
OFF
VOL
LIMITATION
Sets the volume limit to 50
when you turn on the main
unit although the volume is
set to above 50 before it is
turned off.
ON
OFF
BLUETOOTH
STANDBY
This function allows you to
connect a paired
Bluetooth
®
device when
the main unit is in standby
mode.
ON
OFF
The main unit will be
turned on automatically
when you connect a paired
Bluetooth
®
device.
LINK
MODE
Change the Bluetooth
®
connection link mode to
suit the connection type.
Make sure to disconnect
the current connected
device (“BLUETOOTH
READY” is indicated on the
display).
MODE 1: Emphasis on
connectivity.
MODE 2
: Emphasis on
sound quality.
VIERA
LINK
Turn on the VIERA Link
function.
ON
OFF
Select “OFF” when your
HDAVI Control device does
not work correctly with this
system. ARC will be
disabled. Connect an
optical digital audio cable.
Turn off all connected
devices and then turn them
on again after changing the
setting.
SC-HTB680EG_RQT9920-H.book 24 ページ 2014年3月5日 水曜日 午前10時39分

Operations
RQT9920
25
Linked operations with the TV
(VIERA Link “HDAVI Control
TM
”)
Preparation
1 Confirm that the HDMI connection has been
made. (> 9, 10)
2 Set the “HDAVI Control” operations on the
connected equipment (e.g., TV).
3 For the optimal “HDAVI Control” operations
change the following settings on the
connected TV
§1
.
≥ Set the default speaker settings to this system.
§2
≥ Set the speaker selection settings to this system.
4 Turn on all “HDAVI Control” compatible
equipment and select the TV’s input for this
system so that the “HDAVI Control” function
works properly.
5 If a device is connected to the HDMI AV IN
terminal, start play to check that the picture is
displayed on the TV correctly.
When the connection or settings are changed,
repeat this procedure.
§1 The availability and function of the settings may vary
depending on the TV. Refer to the operating instructions
for the TV for details.
§2 If the TV has a default speaker setting within the VIERA
Link setting items, choosing this system as the default
speaker will automatically change the speaker selection
to this system.
≥ VIERA Link “HDAVI Control”, based on the control
functions provided by HDMI which is an industry standard
known as HDMI CEC (Consumer Electronics Control), is a
unique function that we have developed and added. As
such, its operation with other manufacturers’ equipment
that supports HDMI CEC cannot be guaranteed.
≥ This unit supports “HDAVI Control 5” function.
“HDAVI Control 5” is the standard for Panasonic’s HDAVI
Control compatible equipment. This standard is compatible
with Panasonic’s conventional HDAVI equipment.
≥ Please refer to individual manuals for other manufacturers’
equipment supporting VIERA Link function.
To make sure that the audio is output from this
system, turn the main unit on by using the TV’s
remote control and selecting home cinema from
the speaker menu of VIERA Link menu.
The availability and function of the settings may
vary depending on the TV. Refer to the operating
instructions for the TV for details.
∫ Speaker control
You can select whether audio output is from this system
or the TV speakers by using the TV menu settings.
Home cinema
This system is active.
≥ When the main unit is in standby mode, changing the TV
speakers to this system in the VIERA Link menu will
automatically turn the main unit on.
≥ You can control the volume setting of this system using the
volume or mute button on the TV remote control.
≥ If you turn off the main unit, TV speakers will be
automatically activated.
≥ Audio will automatically be output from this system if the TV
is compatible to VIERA Link “HDAVI Control 4” or later.
TV
TV speakers are active.
≥ The volume of this system is set to its minimum.
∫ Automatic input switching
When the following operations are performed, the
main unit will automatically change the input to
the corresponding source.
jWhen play starts on an HDMI connected
device.
§3
j
When the TV input or the TV channel is changed.
§3 If the speaker output setting on the TV is set to this
system, the TV and the main unit turn on automatically
(Power on link).
∫ Power off link
When the TV is turned off, the main unit also turns
off automatically. (This function does not work
when Bluetooth
®
is the source.)
∫ Automatic lip-sync function
(for HDAVI Control 3 or later)
Delay between audio and video is automatically
adjusted by adding time-lag to the audio output,
enabling you to enjoy smooth audio for the picture.
The delay information is automatically set if the TV is
compatible to VIERA Link “HDAVI Control 3” or later and the
VIERA Link is set to on.
What is VIERA Link “HDAVI
Control”?
VIERA Link “HDAVI Control” is a convenient
function that offers linked operations of this
system, and a Panasonic TV (VIERA) under
“HDAVI Control”.
You can use this function by connecting the
equipment with an HDMI cable. See the
operating instructions for connected
equipment for operational details.
What you can do with
VIERA Link “HDAVI Control”
SC-HTB680EG_RQT9920-H.book 25 ページ 2014年3月5日 水曜日 午前10時39分

26
RQT9920
Referenc e
Troubleshooting
Before requesting service, make the following
checks. If you are in doubt about some of the
check points, or if the solutions indicated in the
following guide do not solve the problem, consult
your dealer for instructions.
No power.
≥ Unplug the AC mains lead for 10 sec before
plug in again.
≥ After turning the main unit on, if the main unit
immediately turns off, unplug the AC mains lead
and consult your dealer.
≥
If the main unit does not turn on by turning on TV
(HDAVI control), turn on the main unit manually.
If the problem persists, refer to “HDMI” in
“Troubleshooting”.
The remote control does not work properly.
≥ The battery is depleted. Replace it with a new
one. (> 8)
≥ It is possible that the insulation sheet has not
been removed. Remove the insulation sheet.
(> 8)
≥ It may be necessary to set the code of the
remote control again after changing the battery
of the remote control. (> 20)
≥ Use the remote control within the correct
operation range. (> 8)
≥ Check which remote control signal sensor is
working by the following operation.
jTouch and hold [INPUT] on the main unit for
more than 4 sec. “ON TABLE” or “ON WALL”
is indicated on the display for 4 sec.
jRefer to page 8 “About remote control signal
sensor” for the remote control signal sensor
location.
The main unit is automatically switched to
standby mode.
“AUTO POWER DOWN” function is on.
The main unit will automatically switch to standby
mode when no signal is input and no operation is
performed for approx. 20 minutes. Refer to page
24 to turn this function off.
The main unit is turned off when the TV’s
speakers are selected in the speaker control.
This is a normal feature when using VIERA Link
(HDAVI Control 4 or later). Please read the
operating instructions for the TV for details about
its power save feature. (> 25)
The switches on the main unit do not work.
[Í/I], [j VOL i], [INPUT], and [ ] on the main
unit are touch keys. Touch the switches with your
finger. They may not work if operated with your
fingernails or hands wearing gloves.
This system does not operate correctly.
If the HDMI cable is connected to the wrong
terminal (HDMI AV IN or HDMI AV OUT), this
system will not operate correctly. Turn the main
unit off, disconnect the AC mains lead and
reconnect the HDMI cable(s). (> 9, 10)
VIERA Link related operations no longer
function properly.
≥ Check the VIERA Link setting on the connected
devices.
jTurn on VIERA Link function on the
connected devices.
jSelect this system as the speaker in the TV's
VIERA Link menu.
≥ Have you turned the VIERA Link settings off?
(> 24)
≥ When the HDMI connections are changed, after
a power failure or after the AC mains lead has
been removed, VIERA Link operations may not
function properly.
jTurn on all the devices that are connected to
the TV with an HDMI cable and then turn the
TV on.
jTurn off the VIERA Link settings of the TV and
turn it on again. For details refer to the
operating instructions for the TV.
jWhile the main unit and the TV are connected
with the HDMI cable, turn on the TV and then
remove the main unit’s AC mains lead and
reconnect it again.
To return to the factory preset.
While the main unit is on, touch and hold [Í/I] on
the main unit for more than 4 sec.
(“RESET” is indicated on the display when this
system is reset.)
If this system does not operate as expected,
returning the settings to the factory preset
may solve the problem.
≥ The remote control code will return to
“REMOTE 1” when this system is returned to
the factory preset. To change the remote
control code, refer to page 20.
General operation
HDMI
SC-HTB680EG_RQT9920-H.book 26 ページ 2014年3月5日 水曜日 午前10時39分

Reference
RQT9920
27
The first few seconds of audio cannot be
heard when using the HDMI connection.
This may occur during DVD-Video chapter
playback. Change the digital audio output setting on
the connected device from “Bitstream” to “PCM”.
When operating an HDMI compatible device of
a different brand, the main unit reacts in an
unwanted manner.
HDAVI Control commands may use a different
signal depending on the brand of the device. In
this case, turn VIERA Link off. (> 24)
When the main unit is turned on or off, audio
and video are temporarily disabled
When the main unit is turned on or off it is normal for
the audio and video to be temporarily disabled. This is
not a malfunction. This can occur when the device it is
connected to, via HDMI, does not support Panasonic’s
VIERA Link feature (HDAVI Control 3 or later).
Pairing cannot be done.
Check the Bluetooth
®
device condition.
The device cannot be connected.
≥ The pairing of the device was unsuccessful or
the registration has been replaced. Try pairing
the device again. (> 19)
≥ This system might be connected to a different
device. Disconnect the other device and try
pairing the device again.
The device is connected but audio cannot be
heard through this system.
For some built-in Bluetooth
®
devices, you have to set
the audio output to “SC-HTB680” manually. Read the
operating instructions for the device for details.
The sound is interrupted.
≥ The device is out of the 10 m communication
range. Bring the Bluetooth
®
device closer to the
main unit.
≥ Remove any obstacle between the main unit
and the device.
≥ Other devices that use the 2.4 GHz frequency
band (wireless router, microwaves, cordless
phones, etc.) are interfering. Bring the
Bluetooth
®
device closer to the main unit and
distance it from the other devices.
≥
Select “MODE1” for stable communication. (
>
24)
The One-Touch Connection (NFC feature) is
not working.
Make sure the main unit and the NFC feature of
the device are turned on. (> 20)
No sound (or image).
≥ Turn muting off. (> 21)
≥ Check the connections to the other devices.
(> 9, 10)
≥ Make sure that the received audio signal is
compatible with this system. (> 30)
≥ Turn this system off and then on again.
≥ If the main unit is connected to the TV with only
an HDMI cable, make sure that the TV’s HDMI
terminal is labelled “HDMI (ARC)”. If not,
connect using the optical digital audio cable.
(> 9, 10)
≥ If the main unit is connected to a Panasonic TV
and turned on using the remote control or the
touch key on the main unit, sound might not be
output from this system. In this case, turn the
main unit on using the TV’s remote control.
(> 25)
≥ If the connections are correct, there might be a
problem with the cables. Redo the connections
with different cables.
≥ Check the audio output settings on the
connected device.
The dual audio cannot be changed from main
to secondary.
If the audio received from the connected device is
not “Dolby Dual Mono” or the output setting is not
“Bitstream”, the setting cannot be changed from
this system. Change the setting on the connected
device.
The volume is lowered when the main unit is
turned on.
“VOL LIMITATION” is on.
If the main unit is turned off with the volume
setting in the greater half (above 50), the main
unit will automatically lower the volume to the
middle (50) when the main unit is turned on.
(> 24)
The dialog is too persistent or the dialog does
not sound natural.
This system has a function to make the dialog
stand out when the volume is low. (> 23)
Bluetooth
®
Sound
SC-HTB680EG_RQT9920-H.book 27 ページ 2014年3月5日 水曜日 午前10時39分

28
RQT9920
There is no audio.
The power of the main unit turns off
automatically.
(When the main unit detects a problem, a safety
measure is activated and the main unit
automatically switches to standby mode.)
≥ There is a problem with the amplifier.
≥ Is the volume extremely high?
If so, lower the volume.
≥ Is this system placed in an extremely hot place?
If so, move this system to a cooler place and
wait a few moments and then try to turn it on
again.
If the problem persists, confirm the display, turn
this system off, remove the AC mains lead cord
and consult your dealer. Please be sure to
remember the display that was indicated and
inform the dealer.
“F61”
≥ There is a problem with the amplifier of the
system.
≥ Disconnect the AC mains lead and consult the
dealer.
“F70 HDMI”
≥ Check HDMI connection.
≥ Turn off the main unit and then switch it on
again.
≥ Disconnect the HDMI cable.
“F76”
≥ There is a problem with the power supply.
≥ Disconnect the AC mains lead and consult the
dealer.
No power.
Ensure the AC mains lead of the active subwoofer
is connected properly.
After turning the subwoofer on, it immediately
turns off.
Unplug the AC mains lead and consult your
dealer.
No sound from the subwoofer.
≥ Check that the active subwoofer is turned on.
≥ Check that the WIRELESS LINK indicator lights
green. (> 19)
The WIRELESS LINK indicator lights red.
≥ There is no link between the main unit and the
active subwoofer.
jCheck that the main unit is turned on.
jTurn the active subwoofer off and then back
on. Alternatively, turn the active subwoofer off,
disconnect the AC mains lead and then
reconnect it.
≥ The active subwoofer and the main unit may not
be paired correctly. Try the following operation.
(Wireless pairing)
1 Turn on the main unit and active subwoofer.
2 Press and hold [ID SET] on the rear of the
active subwoofer for more than 3 sec.
(The WIRELESS LINK indicator will blink in
red.)
3 While pressing and holding [INPUT] on
remote control, touch and hold [VOL i] on
the main unit for more than 4 sec.
(“SUBWOOFER PAIRING” will be indicated
on the display.)
≥ When the wireless pairing is successful, “PAIRED”
will be indicated on the display for 2 sec and
WIRELESS LINK indicator lights green.
4 Turn the main unit off and on.
≥ Consult your dealer if the problem persists.
Main unit displays
Active Subwoofer
SC-HTB680EG_RQT9920-H.book 28 ページ 2014年3月5日 水曜日 午前10時39分

Reference
RQT9920
29
About Bluetooth
®
∫ Frequency band used
This system uses the 2.4 GHz frequency band.
∫ Certification of this device
≥ This system conforms to frequency restrictions
and has received certification based on
frequency laws. Thus, a wireless permit is not
necessary.
≥ The action below are punishable by law in some
countries:
jTaking apart or modifying the unit.
jRemoving specification indications.
∫ Restrictions of use
≥ Wireless transmission and/or usage with all
Bluetooth
®
equipped devices is not guaranteed.
≥ All devices must conform to standards set by
Bluetooth SIG, Inc.
≥ Depending on the specifications and settings of
a device, it can fail to connect or some
operations can be different.
≥ This system supports Bluetooth
®
security
features. But depending on the operating
environment and/or settings, this security is
possibly not sufficient. Transmit data wirelessly
to this system with caution.
≥ This system cannot transmit data to a
Bluetooth
®
device.
∫ Range of use
Use this device at a maximum range of 10 m.
The range can decrease depending on the
environment, obstacles or interference.
∫ Interference from other devices
≥ This system may not function properly and
troubles such as noise and sound jumps may
arise due to radio wave interference if the main
unit is located too close to other Bluetooth
®
devices or the devices that use the 2.4 GHz
band.
≥ This system may not function properly if radio
waves from a nearby broadcasting station, etc.
are too strong.
∫ Intended usage
≥ This system is for normal, general use only.
≥ Do not use this system near equipment or in an
environment that is sensitive to radio frequency
interference (example: airports, hospitals,
laboratories, etc.).
Unit care
∫ Clean this system with a soft, dry
cloth
≥ When dirt is heavy, wring a cloth moistened in
water tightly to wipe the dirt, and then wipe it
with a dry cloth.
≥ When cleaning the speakers, use a fine cloth.
Do not use tissues or other materials (towels,
etc.) that can fall apart. Small grains may get
stuck inside the speaker cover.
≥ Never use alcohol, paint thinner or benzine to
clean this system.
≥ Before using chemically-treated cloth, carefully
read the instructions that came with the cloth.
∫ To dispose or transfer this system
This system may keep the user settings
information in the main unit. If you discard the
main unit either by disposal or transfer, then follow
the procedure to return all the settings to the
factory presets to delete the user settings. (> 26,
“To return to the factory preset.”)
≥ The operation history may be recorded in the
memory of the main unit.
Licenses
Panasonic bears no responsibility for data
and/or information that is compromised
during a wireless transmission.
Manufactured under license from Dolby Laboratories.
Dolby, Pro Logic, and the double-D symbol are trademarks of
Dolby Laboratories.
Manufactured under license under U.S. Patent Nos:
5,956,674; 5,974,380; 6,487,535 & other U.S. and worldwide
patents issued & pending. DTS, the Symbol, & DTS and the
Symbol together are registered trademarks & DTS Digital
Surround and the DTS logos are trademarks of DTS, Inc.
Product includes software. © DTS, Inc. All Rights Reserved.
HDMI, the HDMI Logo, and High-Definition Multimedia
Interface are trademarks or registered trademarks of HDMI
Licensing LLC in the United States and other countries.
HDAVI Control
TM
is a trademark of Panasonic Corporation.
The Bluetooth
®
word mark and logos are owned by the
Bluetooth SIG, Inc. and any use of such marks by Panasonic
Corporation is under license. Other trademarks and trade
names are those of their respective owners.
Google Play and Android are trademarks of Google Inc.
SC-HTB680EG_RQT9920-H.book 29 ページ 2014年3月5日 水曜日 午前10時39分

30
RQT9920
Specifications
§1 When the other connected devices are turned off.
AMPLIFIER SECTION
RMS output power: Dolby Digital Mode
Front ch (L, R ch)
70 W per channel (6 ≠), 1 kHz, 10 % THD
Centre ch (C ch)
70 W per channel (6 ≠), 1 kHz, 10 % THD
Subwoofer ch
140 W per channel (8 ≠), 100 Hz, 10 % THD
Total RMS Dolby Digital mode power
350 W
TERMINAL SECTION
HDAVI Control
This unit supports “HDAVI Control 5” function.
HDMI AV input (BD/DVD)
1
Input connector
Type A (19 pin)
HDMI AV output (TV (ARC))
1
Output connector
Type A (19 pin)
Digital audio input (TV)
Optical digital input
Optical terminal
Sampling frequency
32 kHz, 44.1 kHz, 48 kHz
88.2 kHz, 96 kHz (only LPCM)
Audio format
LPCM, Dolby Digital, DTS Digital Surround
IR Blaster
Terminal Type
3.5 mm jack
USB Port
For service use only.
GENERAL
Power consumption
Main unit
36 W
Active subwoofer
23 W
In standby condition
Main unit
§1
When “BLUETOOTH STANDBY” is “OFF”
Approx. 0.48 W
When “BLUETOOTH STANDBY” is “ON”
Approx. 3 W
Active subwoofer
Power switch off
Approx. 0.25 W
The wireless link is not activated
Approx. 1.3 W
Power supply
AC 220 V to 240 V, 50 Hz
Dimensions (WkHkD)
Main unit
For table top layout
950 mmk53 mmk110 mm
For wall mounting layout
950 mmk110 mmk57 mm
Active subwoofer
180 mmk408 mmk306 mm
Mass
Main unit
For table top layout
Approx. 2.6 kg
For wall mounting layout
Approx. 2.7 kg
Active subwoofer
Approx. 5.0 kg
Operating temperature range
0
o
C to i40
o
C
Operating humidity range
20 % to 80 % RH (no condensation)
SC-HTB680EG_RQT9920-H.book 30 ページ 2014年3月5日 水曜日 午前10時39分

Reference
RQT9920
31
≥ Specifications are subject to change without notice.
≥ Mass and dimensions are approximate.
≥ Total harmonic distortion is measured by a digital spectrum
analyzer.
SPEAKER SECTION
Front speakers (Built-in)
Full range
6.5 cm cone type k1/ch
Centre speaker (Built-in)
Full range
6.5 cm cone type k1
Active subwoofer
Woofer
16 cm cone type k1
WIRELESS SECTION
Wireless module
Frequency Range
2.40335 GHz to 2.47735 GHz
No. of channels
38
Bluetooth
®
SECTION
Bluetooth
®
system specification
Bluetooth
®
Ver.3.0
Wireless equipment classification
Class 2
Supported profiles
A2DP
Operating frequency
2.4 GHz band FH-SS
Operating distance
10 m Line of Sight
SC-HTB680EG_RQT9920-H.book 31 ページ 2014年3月5日 水曜日 午前10時39分

32
RQT9920
Precauciones de seguridad
Unidad
≥ Para reducir el riesgo de incendio, descarga eléctrica o
daño del producto,
j No exponga esta unidad a la lluvia, humedad, goteo
ni salpicaduras.
j No coloque objetos llenos con líquidos, como
floreros, sobre esta unidad.
j Use solamente los accesorios recomendados.
j No saque las cubiertas.
j No repare esta unidad usted mismo. Consulte al
personal de servicio calificado para la reparación.
≥ Para evitar lesiones, la unidad debe sujetarse con
firmeza siguiendo las instrucciones de instalación.
Cable de alimentación de CA
≥ Para reducir el riesgo de incendio, descarga eléctrica o
daño del producto,
j Asegúrese de que el voltaje de alimentación
corresponda al voltaje impreso en esta unidad.
j Inserte por completo el enchufe del cable de
alimentación en la toma de CA.
j No tire, doble o coloque elementos pesados sobre el
cable de alimentación.
j No manipule el enchufe con las manos mojadas.
j Agarre el cuerpo del enchufe del cable de
alimentación al desconectar el enchufe.
j No use un enchufe del cable de alimentación o toma
de CA dañado.
≥ El enchufe de conexión a la red eléctrica es el
dispositivo de desconexión.
Instale esta unidad de forma que el enchufe de
conexión a la red eléctrica pueda desenchufarse de la
toma de forma inmediata.
Batería tipo botón (Batería de litio)
≥ Riesgo de incendio, explosión o quemaduras. No
cargue, desarme, caliente a más de 60
o
C ni incinere.
≥ Mantenga la pila tipo botón fuera del alcance de los
niños. No la ponga nunca en la boca. Si alguien la
traga, llame a un médico.
Objeto pequeño
≥ Mantenga los tornillos lejos del alcance de los niños
para evitar que sean tragados.
≥ Mantenga la cinta adhesiva fuera del alcance de los
niños para evitar que se los traguen.
≥ Mantenga la batería tipo botón fuera del alcance de los
niños para evitar que se la traguen.
Unidad
≥ No coloque objetos con llama descubierta, una vela por
ejemplo, encima de la unidad.
≥ Esta unidad puede tener interferencias de radio
causadas por teléfonos móviles durante su utilización.
Si tales interferencias resultan evidentes, aumente la
separación entre la unidad y el teléfono móvil.
≥ Esta unidad ha sido diseñada para ser utilizada en
climas moderados.
≥ La marca de identificación de producto está situada en
la parte inferior de la unidad.
Ubicación
≥ Coloque esta unidad sobre una superficie pareja.
≥ Para reducir el riesgo de incendio, descarga eléctrica o
daño del producto,
j Para mantener bien ventilada esta unidad, no la
instale ni ponga en un estante de libros, mueble
empotrado u otro espacio de dimensiones reducidas.
j No obstruya las aberturas de ventilación de la unidad
con periódicos, manteles, cortinas u objetos
similares.
j No exponga esta unidad a la luz solar directa, altas
temperaturas, mucha humedad y vibración excesiva.
Batería tipo botón (Batería de litio)
≥ Existe un daño de explosión si la batería no se
reemplaza correctamente. Reemplace sólo con el tipo
recomendado por el fabricante.
≥ Insertar con los polos alineados.
≥ La mala manipulación de las baterías puede causar
una pérdida de electrolito y puede causar un incendio.
j Retire la batería si piensa no usar el mando a
distancia durante un período largo de tiempo.
Almacene en lugares oscuros y frescos.
j No caliente ni exponga las pilas a las llamas.
j No deje la(s) batería(s) en un automóvil expuesto a
la luz solar directa por un período prolongado de
tiempo con las puertas y ventanas cerradas.
≥ Al desechar las baterías, comuníquese con sus
autoridades locales o distribuidores y pregunte por el
método de eliminación correcto.
AVISO ADVERTENCIA
SC-HTB680EG_RQT9920-H_spa.book 32 ページ 2014年3月4日 火曜日 午後6時56分

Precauciones
ESPAÑOL
RQT9920
33
Declaración de conformidad (DoC, por sus siglas en inglés)
Por la presente, “Panasonic Corporation” declara que este producto se encuentra en conformidad con los requerimientos esenciales y
otras disposiciones relevantes de la Directiva 1999/5/EC.
Los clientes pueden descargar una copia de la DoC original hacia nuestros productos R&TTE desde nuestro servidor DoC:
http://www.doc.panasonic.de
Contacto con un representante autorizado: Panasonic Marketing Europe GmbH,
Panasonic Testing Centre, Winsbergring 15, 22525 Hamburg, Alemania
Este producto se encuentra diseñado para el consumidor general. (Categoría 3)
Eliminación de Aparatos Viejos y de Pilas y Baterías
Solamente para la Unión Europea y países con sistemas de reciclado
Estos símbolos en los productos, su embalaje o en los documentos que los
acompañen significan que los productos eléctricos y electrónicos y pilas y baterías
usadas no deben mezclarse con los residuos domésticos.
Para el adecuado tratamiento, recuperación y reciclaje de los productos viejos y
pilas y baterías usadas llévelos a los puntos de recogida de acuerdo con su
legislación nacional.
Si los elimina correctamente ayudará a preservar valuosos recursos y evitará
potenciales efectos negativos sobre la salud de las personas y sobre el medio
ambiente.
Para más información sobre la recogida u reciclaje, por favor contacte con su
ayuntamiento.
Puede haber sanciones por una incorrecta eliminación de este residuo, de acuerdo
con la legislación nacional.
Nota para el símbolo de pilas y baterías (símbolo debajo):
Este símbolo puede usarse en combinación con el símbolo químico. En este caso,
cumple con los requisitos de la Directiva del producto químico indicado.
SC-HTB680EG_RQT9920-H_spa.book 33 ページ 2014年3月4日 火曜日 午後6時56分

34
RQT9920
Índice
Precauciones de seguridad............................................................................32
Antes del uso
Artículos suministrados..................................................................................35
Este sistema (SC-HTB680) ...............................................................................................35
Accesorios .........................................................................................................................35
Guía de referencia de control.........................................................................36
Este sistema (parte frontal) ...............................................................................................36
Este sistema (parte trasera) ..............................................................................................37
Mando a distancia .............................................................................................................38
Cómo empezar
Paso 1 Conexiones..........................................................................................39
Conexión con el televisor ..................................................................................................39
Conexión desde un dispositivo compatible con HDMI ......................................................40
Conexión a un TV Ultra HD 4K ..........................................................................................41
Cómo usar el IR Blaster ....................................................................................................41
Cable de alimentación de CA ............................................................................................42
Paso 2 Ubicación.............................................................................................43
Precauciones de seguridad ...............................................................................................43
Subwoofer activo ...............................................................................................................43
Interferencia inalámbrica ...................................................................................................43
Seleccionar el método de ubicación ..................................................................................44
Cuando se coloca la unidad principal en un bastidor o una mesa ....................................45
Al sujetar la unidad principal en una pared .......................................................................46
Paso 3 Conexiones inalámbricas...................................................................49
Conexión inalámbrica del subwoofer activo ......................................................................49
Conexión Bluetooth
®
..........................................................................................................49
Código del mando a distancia .......................................................................50
Operaciones
Uso de este sistema .......................................................................................51
Sonido 3D ........................................................................................................52
Menú de sonido ..............................................................................................52
Formato del audio ..............................................................................................................53
Menú de configuración ..................................................................................54
Operaciones entrelazadas con el televisor
(VIERA Link “HDAVI Control
TM
”) ...............................................................55
Referencias
Resolución de problemas ..............................................................................56
Acerca de Bluetooth
®
.....................................................................................59
Cuidados de la unidad ...................................................................................59
Licencias .........................................................................................................59
Especificaciones..............................................................................................60
SC-HTB680EG_RQT9920-H_spa.book 34 ページ 2014年3月4日 火曜日 午後6時56分

Cómo empezar
Operaciones
Referencias
Antes del uso
Precauciones
RQT9920
35
Antes del uso
Artículos suministrados
Verificar los accesorios suministrados antes de utilizar este sistema.
≥ Números de productos correctos a partir de diciembre de 2013. Pueden estar sujetos a cambios.
≥ El cable de alimentación de CA incluido se usa solamente con este sistema.
No lo use con otro equipo. Además, no use cables de otro equipo con este sistema.
≥ Las ilustraciones que se muestran pueden ser distintas a las de su aparato.
≥ Las operaciones en estas instrucciones de funcionamiento se describen principalmente con
el mando a distancia, pero puede realizar las operaciones en el subwoofer activo si los
colores son los mismos.
Este sistema (SC-HTB680)
∏ 1 Unidad
principal (altavoz)
(SU-HTB680)
∏ 1 Subwoofer activo
(SB-HWA680)
Accesorios
∏ 1 Mando a distancia
(Con una batería)
(N2QAYC000098)
∏ 1 IR Blaster ∏ 2 Soporte para el montaje
a pared
∏ 2 Cable de alimentación
de CA
∏ 2 Tornillos
SC-HTB680EG_RQT9920-H_spa.book 35 ページ 2014年3月4日 火曜日 午後6時56分

36
RQT9920
Guía de referencia de control
1 Interruptor de espera/encendido (Í/I)
Toque para cambiar el dispositivo de estado
encendido a modo de espera o viceversa. En
modo de espera, el dispositivo sigue
consumiendo una pequeña cantidad de
energía.
2 Ajuste el volumen de este sistema (> 51)
3 Seleccione la fuente de entrada (> 51)
“TV” --# “BD/DVD” --# “BLUETOOTH”
^--------------------------------------------------------}
4 Seleccione el dispositivo Bluetooth
®
como la
fuente (> 51)
5 Área de toque NFC (> 50)
6 Ajuste el volumen de este sistema (> 38)
7 Pantalla
8 Indicador del WIRELESS LINK (> 49)
§ Estos interruptores funcionan con sólo tocar las marcas. Cada vez que se toca el interruptor, sonará
un pitido.
Este sistema (parte frontal)
7
8
5
6
2341
Unidad principal
Subwoofer activo
SC-HTB680EG_RQT9920-H_spa.book 36 ページ 2014年3月4日 火曜日 午後6時56分

Antes del uso
RQT9920
37
1 HDMI AV IN (BD/DVD) terminal (> 40)
2 Terminal HDMI AV OUT (TV (ARC))
(compatible con ARC) (> 39, 40)
3 OPTICAL DIGITAL AUDIO IN (TV) terminal
(> 40)
4 Ir SYSTEM terminal (> 41, 42)
5 Puerto USB (para el uso del servicio
solamente)
6 Terminal AC IN (> 42)
7 Botón de encendido/apagado del subwoofer
activo (> 49)
§ El botón I/D SET se usa solamente cuando la unidad principal no se sincroniza con el subwoofer
activo. (> 58)
Este sistema (parte trasera)
7
6
2
1
3
4
5
6
Unidad principal
Subwoofer activo
SC-HTB680EG_RQT9920-H_spa.book 37 ページ 2014年3月4日 火曜日 午後6時56分

38
RQT9920
1 Encienda o apague la unidad principal (
>
51)
2 Seleccione la fuente de entrada (> 51)
“TV” --# “BD/DVD” --# “BLUETOOTH”
^--------------------------------------------------------}
3 Seleccione el menú de instalación (> 54)
4 Seleccione el menú de sonido (> 52)
5 Seleccione el dispositivo Bluetooth
®
como la
fuente (> 51)
6 Ajuste el volumen de este sistema (> 51)
7 Silencie el sonido (> 51)
8 Seleccione y confirme la opción
∫ Sobre el sensor de señal del mando a distancia
El sensor de señal del mando a distancia está ubicado en la unidad principal.
≥Use el mando a distancia dentro del rango de funcionamiento correcto.
Distancia: En aprox. 7 m directamente en frente
Ángulo: Aprox. 30
o
a la izquierda y derecha
B Disposición de la colocación sobre la mesa del sensor de señal del mando a distancia
C Disposición del montaje en la pared del sensor de señal del mando a distancia
Mando a distancia
SOUND
1
5
6
7
8
2
INPUT
SETUP
OK
3
4
∫ Antes de usar por primera vez
Saque la hoja de aislamiento A.
∫ Para reemplazar una batería tipo
botón
Tipo de batería: CR2025 (Batería de litio)
≥ Coloque la batería tipo botón con su marca
(i) hacia arriba.
Para la disposición de colocación sobre la mesa
Para la disposición de montaje en la pared
SC-HTB680EG_RQT9920-H_spa.book 38 ページ 2014年3月4日 火曜日 午後6時56分

Cómo empezar
Antes del uso
RQT9920
39
Cómo empe zar
Paso 1 Conexiones
≥Antes de hacer la conexión, apague todos los equipos y lea los manuales de instrucciones apropiados.
No conecte el cable de corriente de CA si no se han finalizado todas las demás conexiones.
∫ HDMI (Interfaz multimedia de alta definición)
≥ La conexión HDMI es compatible con VIERA Link “HDAVI Control” (> 55) si se utiliza con un TV Panasonic que sea
compatible.
≥ Use cables HDMI de Alta Velocidad compatibles con ARC. No pueden utilizarse cables que no cumplan con la HDMI.
≥ Se le recomienda utilizar un cable HDMI de Panasonic.
∫ Emisor de IR (Infrarrojos)
≥ No use el emisor de rayos infrarrojos si el sensor del control remoto no está bloqueado por la unidad principal. (> 44)
Verifique si el terminal HDMI del TV tiene una etiqueta que dice “HDMI (ARC)”.
∫ ¿Qué es un ARC?
ARC es la abreviatura de Canal de retorno de audio, también conocido como HDMI ARC. Se refiere a una de las funciones de
HDMI. Cuando conecta la unidad principal al terminal con la etiqueta que dice “HDMI (ARC)”, ya no se requiere el cable óptico
de audio digital que se requiere generalmente para escuchar el sonido del TV y las imágenes y sonidos del TV se pueden
disfrutar con un cable HDMI simple.
Realice la conexión.
A Cable HDMI
Conexión con el televisor
La conexión difiere según la etiqueta impresa al lado del terminal HDMI.
Etiqueta “HDMI (ARC)”: Conexión [A]
Sin etiqueta “HDMI (ARC)”: Conexión [B]
[A] Etiqueta “HDMI (ARC)”
HDMI IN (ARC)
AV OUT
TV(ARC)
A
Asegúrese de conectar
al terminal compatible
con ARC del TV.
(Consulte las
instrucciones
operativas del TV.)
TV
SC-HTB680EG_RQT9920-H_spa.book 39 ページ 2014年3月4日 火曜日 午後6時56分

40
RQT9920
A Cable HDMI
B Cable de audio digital óptico
≥ Cuando usa el cable de audio digital óptico, inserte
la punta correctamente en el terminal.
Puede dirigir la señal de audio desde el reproductor de Blu-ray Disc conectado, reproductor de DVD,
decodificador, etc. a este sistema.
Preparación
≥Conecte la unidad principal al TV. (> 39)
A Cable HDMI
≥ Para los necesarios ajustes se refiera a las instrucciones de funcionamiento del dispositivo compatible HDMI conectado, para
producir las señales de vídeo y audio.
[B] Sin etiqueta “HDMI (ARC)”
HDMI IN
OPTICAL
OUT
TV
OPTICAL
DIGITAL
AUDIO IN
AV OUT
TV(ARC)
B
A
TV
Conexión desde un dispositivo compatible con HDMI
∫ Pasaje de HDMI en espera
Incluso si la unidad principal está en el modo en espera, la señal de audio o video del dispositivo conectado al terminal HDMI
AV IN se enviará al TV conectado al terminal HDMI AV OUT (el sonido no saldrá de este sistema).
∫ Compatibilidad con 3D
Compatible con el TV FULL HD 3D y el reproductor de Blu-ray Disc.
≥
La unidad principal puede pasar a través de la señal 3D de un reproductor Blu-ray Disc compatible con 3D a un TV FULL HD 3D.
HDMI OUT
BD/DVD
AV IN
A
Ej., Reproductor de
Blu-ray Disc
SC-HTB680EG_RQT9920-H_spa.book 40 ページ 2014年3月4日 火曜日 午後6時56分

Cómo empezar
RQT9920
41
Este sistema no puede transmitir los contenidos 4K de un aparato compatible con 4K a un TV Ultra HD
4K. Sin embargo, puede conectar el aparato a un TV Ultra HD 4K para disfrutar del contenido 4K.
A Cable HDMI
≥ Consulte las instrucciones de funcionamiento del TV Ultra HD 4K (VIERA) y el aparato compatible 4K/60p, para la instalación
y para la reproducción del contenido 4K.
≥ Para disfrutar de la salida multicanal de este sistema, ajuste la salida de audio del otro dispositivo a Bitstream.
≥ La entrada de señal de audio para este sistema es hasta los canales 5.1.
Con la conexión del emisor de rayos infrarrojos, se puede enviar la señal de rayos infrarrojos recibida
por el sensor de señales del control remoto del sistema al sensor del TV.
Use el control remoto del TV en el rango de funcionamiento de este sensor de señal de control
remoto del sistema.
≥Para conocer el rango de funcionamiento, consulte la página 38.
Conecte el enchufe al terminal Ir SYSTEM de la unidad principal.
Conexión a un TV Ultra HD 4K
Cómo usar el IR Blaster
HDMI IN (ARC)
HDMI OUT
HDMI IN (4K)
AV OUT
TV(ARC)
A
A
Ej., Reproductor de Blu-ray Disc
(Compatible con 4K)
TV
Conecte ambos
extremos a los
terminales HDMI
compatibles con
ARC.
(Compatible con 4K)
Ir SYSTEM
Emisor de rayos infrarrojos
SC-HTB680EG_RQT9920-H_spa.book 41 ページ 2014年3月4日 火曜日 午後6時56分

42
RQT9920
Ubique el emisor de rayos infrarrojos en frente del sensor de señales del
mando a distancia del TV.
≥
Para conocer la ubicación del sensor de señales del mando a distancia del TV, consulte las instrucciones de funcionamiento para el TV.
Apunte el control remoto del TV al sensor del control remoto del sistema
y haga funcionar el TV.
≥ Para conocer la ubicación del sensor de señales del control remoto del sistema, consulte la página 38.
≥ Asegúrese de limpiar la superficie, donde se va a colocar la cinta adhesiva.
≥ Si saca la cinta adhesiva, la superficie se puede dañar y pueden quedar restos de adhesivo. Cuando haya confirmado que el
TV está funcionando correctamente, asegúrelo colocando cinta adhesiva.
≥ El IR Blaster suministrado sólo es compatible con los TV Panasonic.
∫ Ejemplo de la ubicación
En la parte trasera de la unidad principal:
≥ Conecte solamente después de haber finalizado todas las demás conexiones.
A A una toma de corriente de casa
B Cable de alimentación de CA (suministrado)
≥
Este sistema consume poca corriente CA, (
>
60) incluso cuando está apagado. Para ahorrar energía, si no va a
usar este sistema durante mucho tiempo, desenchúfelo del tomacorriente de alimentación principal.
Cable de alimentación de CA
Sensor de señales
del mando a
distancia del TV
Cinta adhesiva (suministrada)
AC IN
Ahorro de energía
Esta unidad principal está diseñada para conservar su consumo de energía y ahorrar energía.
≥ La unidad principal cambia automáticamente al modo en espera cuando no detecta una señal y
no se realiza ninguna operación durante 20 minutos aproximadamente. Consulte la página 54,
“AUTO POWER DOWN” para desactivar esta función.
SC-HTB680EG_RQT9920-H_spa.book 42 ページ 2014年3月4日 火曜日 午後6時56分

Cómo empezar
Precauciones
RQT9920
43
Paso 2 Ubicación
≥ No sostenga la unidad principal con una mano para evitar una lesión, podría hacer caer la unidad principal al transportarla.
≥ Para evitar daños o rayones, coloque un paño suave y realice el armado sobre él.
Al transportar el subwoofer activo
Para evitar interferencia, mantenga las distancias a continuación entre la unidad principal y el
subwoofer activo y otros dispositivos electrónicos que utilizan la misma frecuencia radio (banda
de 2,4 GHz).
Precauciones de seguridad
Es imprescindible un montaje profesional.
El montaje nunca debe ser realizado por una persona quien no sea especialista cualificado
para la instalación.
PANASONIC RECHAZA TODO DAÑO A LA PROPIEDAD Y/O SERIAS LESIONES INCLUYENDO LA
MUERTE DEBIDOS A UN MONTAJE ERRÓNEO O UN MANEJO INCORRECTO.
≥ Asegúrese de instalar la unidad principal como se indica en las instrucciones de funcionamiento.
≥ Monte usando técnicas convenientes para la estructura y para los materiales del lugar de instalación.
Advertencia
≥ Este sistema se debe usar sólo como se indica en estas instrucciones. De lo contrario, se pueden
provocar daños en el amplificador y/o en el altavoz, y puede resultar en un riesgo de incendio.
Consulte a una persona de servicio calificada si el daño ocurrió o si experimentó un cambio
brusco en el rendimiento.
≥ No intente sujetar la unidad principal a una pared usando métodos que no son los descritos en
este manual.
Subwoofer activo
A No sostenga el subwoofer activo desde esta
apertura.
Las piezas del interior se pueden dañar.
B Siempre sostenga la parte inferior del subwoofer
activo al moverlo.
Interferencia inalámbrica
C Unidad principal/Subwoofer activo
D Router inalámbrico, teléfono
inalámbrico y otros dispositivos
electrónicos: aprox. 2 m
A
B
D
C
SC-HTB680EG_RQT9920-H_spa.book 43 ページ 2014年3月4日 火曜日 午後6時56分

44
RQT9920
Elija un método de colocación que sea mejor para usted.
∫ Al ubicar la unidad principal en frente del TV
La unidad principal puede bloquear o interferir con los diferentes sensores del TV (sensor C.A.T.S -
Sistema de localización automática de contraste, sensor del control remoto, etc.) y los transmisores de
los anteojos para 3D en un TV compatible con 3D.
≥Si se produce una interferencia, aleje la unidad principal de la televisión. Si el televisor aún no funciona
correctamente, colóquele sobre un bastidor o en la posición de montaje en la pared.
∫ Si se bloquea el sensor del control remoto con la unidad principal
Intente usar el mando a distancia desde un ángulo diferente. Si el problema persiste, puede usar el IR
Blaster para enviar la señal al TV. (> 41, 42)
≥ Ubique el subwoofer activo a algunos metros de la unidad principal y en una posición horizontal con el panel superior mirando
hacia arriba.
≥ No use la unidad principal o el subwoofer activo en un gabinete de metal.
≥ Si se ubica el subwoofer activo muy cerca de las paredes y esquinas se puede producir un sonido grave excesivo. Cubra las
paredes y ventanas con cortinas gruesas.
≥ Si la coloración del televisor no es la correcta, apague el televisor durante 30 minutos aproximadamente. Si sigue ocurriendo,
aleje el subwoofer del televisor.
≥ Mantenga los elementos imantados lejos. Las tarjetas imantadas, relojes, etc. se pueden averiar si se dejan demasiado cerca
de la unidad principal y del subwoofer activo.
Seleccionar el método de ubicación
Cuando se coloca la unidad
principal en un bastidor o
una mesa
≥ Coloque la unidad principal
en una base plana y
horizontal.
Al sujetar la unidad
principal en una pared
≥ Coloque la unidad principal
en una base plana y
vertical.
Página 45
Página 46
SC-HTB680EG_RQT9920-H_spa.book 44 ページ 2014年3月4日 火曜日 午後6時56分

Cómo empezar
Precauciones
RQT9920
45
Accesorios requeridos adicionalmente (disponibles en comercios)
≥Tornillos para colocar el cable de prevención contra las caídas en la pared ................................ k 2
≥Ojos de los tornillos (para pasar el cable de prevención de caídas)............................................. k 2
≥ Use tornillos disponibles en comercios que sean capaces de soportar más de 26 kg.
≥ Use un cable que sea capaz de soportar más de 26 kg (con un diámetro de aproximadamente 1,5 mm).
Sujete el cable a la unidad principal.
A Cable
§
§
Si el cable no se puede pasar por los orificios, intente doblar el cable de 2 ubicaciones, aproximadamente a
5 mm de distancia de la punta, a un ángulo de 45
o
(como se ilustra a continuación).
Coloque la unidad principal en la posición deseada y sujete los cables al
bastidor o a la mesa.
≥ Asegúrese de que el huelgo de la cuerda sea mínimo.
≥ No apoye la unidad principal contra el televisor o la pared.
B Armella roscada
≥Sujete en una posición capaz de soportar más de 26 kg.
≥Según la ubicación de la unidad principal, puede diferir la posición de atornillado de la armella roscada.
Cuando se coloca la unidad principal en un bastidor o una mesa
SC-HTB680EG_RQT9920-H_spa.book 45 ページ 2014年3月4日 火曜日 午後6時56分

46
RQT9920
Este aparato se puede montar en la pared con los soportes de montaje en la pared suministrados, etc.
Asegúrese de que el tornillo que utiliza y la pared sean lo suficientemente fuertes como para soportar el
peso de al menos 26 kg.
Los tornillos y otros elementos no se suministran ya que el tipo y tamaño variarán con cada instalación.
≥Consulte el paso 3 para conocer los detalles sobre los tornillos requeridos.
≥Asegúrese de sujetar el cable de prevención de caídas como la medida de seguridad secundaria.
Accesorios suministrados
Accesorios requeridos adicionalmente (disponibles en comercios)
≥Tornillos para el montaje a pared.................................................................................................. k 2
≥Cable de prevención contra las caídas......................................................................................... k 2
≥Ojos de los tornillos (para pasar el cable de prevención de caídas) ............................................ k 2
≥ Use un cable que sea capaz de soportar más de 26 kg (con un diámetro de aproximadamente 1,5 mm).
Sujete el cable a la unidad principal.
A Cable
§
§ Si el cable no se puede pasar por los orificios, intente doblar el cable de 2 ubicaciones,
aproximadamente a 5 mm de distancia de la punta, a un ángulo de 45
o
(como se ilustra a
continuación).
Al sujetar la unidad principal en una pared
∏ 2 Tornillos ∏ 2 Soporte para el montaje
a pared
SC-HTB680EG_RQT9920-H_spa.book 46 ページ 2014年3月4日 火曜日 午後6時56分

Cómo empezar
Precauciones
RQT9920
47
Coloque los soportes de montaje en la unidad principal.
A Soporte para el montaje a pared (suministrado)
B Tornillo (suministrado)
Clave un tornillo en la pared.
≥ Utilice las medidas a continuación para ver el punto de los tornillos en la pared.
≥
Deje por lo menos 100 mm de espacio sobre la unidad principal para que haya el espacio suficiente para colocar la unidad principal.
≥ Coloque la unidad principal con un espacio mínimo de 50 mm a la derecha. De lo contrario, es posible que no se pueda
acceder a los botones.
≥ No olvide usar un nivel para garantizar que ambos orificios de montaje estén horizontales.
Vista frontal (imagen semitransparente)
C Al menos 30 mm
D ‰4,0 mm
E ‰7,0 mm a ‰9,4 mm
F Pared o columna
G 1,6 mm a 2,5 mm
H 400 mm I 275 mm J 275 mm
K 27 mm L 110 mm M Orificio de montaje en la
pared
SC-HTB680EG_RQT9920-H_spa.book 47 ページ 2014年3月4日 火曜日 午後6時56分

48
RQT9920
Ajuste correctamente la unidad principal en los tornillos.
Sujete el cable a la pared.
≥ Asegúrese de que el huelgo de la cuerda sea mínimo.
A Armella roscada
B Cable
CORRECTO INCORRECTO
≥ Mueva el altavoz
para que el tornillo
quede en esta
posición.
≥ En esta posición, el
altavoz caerá
posiblemente si se
mueve hacia la
derecha o hacia la
izquierda.
SC-HTB680EG_RQT9920-H_spa.book 48 ページ 2014年3月4日 火曜日 午後6時56分

Cómo empezar
Precauciones
RQT9920
49
Paso 3 Conexiones inalámbricas
Preparación
≥ Encienda esta unidad.
Pulse [BÍ CI].
Botón de encendido/apagado del subwoofer activo
[
B
Í
C
I]
Utilice este botón para encender y apagar el
subwoofer activo.
C I:
El subwoofer está encendido.
B Í:
El subwoofer está apagado.
El subwoofer activo consumirá una pequeña cantidad
de corriente, incluso cuando se apaga (
B
,
Í
).
Revise que el enlace inalámbrico
esté activado.
WIRELESS LINK el indicador se ilumina
Se ilumina en rojo:
El enlace inalámbrico no está activado.
Se ilumina en verde:
El enlace inalámbrico está activado.
Parpadea en verde:
El subwoofer activo está intentando activar el
enlace inalámbrico con la unidad principal.
El enlace inalámbrico se activará cuando la unidad principal y
el subwoofer activo estén encendidos.
Al usar la conexión Bluetooth
®
, puede escuchar el
sonido desde el dispositivo de audio Bluetooth
®
desde
este sistema, de forma inalámbrica.
≥ Consulte las instrucciones de funcionamiento del
dispositivo Bluetooth
®
para obtener más instrucciones
sobre cómo conectar un dispositivo Bluetooth
®
.
Preparación
≥
Encienda la función Bluetooth
®
del dispositivo y
coloque el dispositivo cerca de la unidad principal.
Pulse [ ] para seleccionar “BLUETOOTH”.
≥ Si aparece “PAIRING” en la pantalla, vaya al paso 3.
Mantenga pulsado [ ] hasta que
aparezca “PAIRING” en la pantalla.
Seleccione “SC-HTB680” desde el menú
Bluetooth
®
del dispositivo Bluetooth
®
.
≥ Si se le solicita una contraseña en el dispositivo
Bluetooth
®
, ingrese “0000”.
≥ Una vez se conecta el dispositivo Bluetooth
®
, aparecerá el
nombre del dispositivo conectado en la pantalla durante
unos segundos.
≥ Puede registrar hasta 8 dispositivos con este sistema. Si
se sincroniza un 9no dispositivo, se reemplazará el
dispositivo que no se utilizó durante más tiempo.
Pulse [ ] para entrar en el modo Bluetooth
®
.
Aparece “BLUETOOTH READY” en la pantalla.
Seleccione “SC-HTB680” desde el menú
Bluetooth
®
del dispositivo Bluetooth
®
.
∫
Desconexión del dispositivo Bluetooth
®
Mantenga pulsado [ ] hasta que aparezca
“BLUETOOTH READY” en la pantalla.
≥ Cuando se selecciona “BLUETOOTH” como la fuente, este
sistema intentará conectarse automáticamente al último
dispositivo conectado Bluetooth
®
.
≥ El dispositivo Bluetooth
®
se desconectará si se selecciona
una fuente de audio diferente (por ej. “TV”).
≥ Este sistema se puede conectar solamente a un dispositivo
por vez.
≥
Para cambiar la calidad de sonido, consulte la página 54 “LINK MODE”.
Conexión inalámbrica del
subwoofer activo
Conexión Bluetooth
®
Sincronización Bluetooth
®
Conexión de un dispositivo
Bluetooth
®
sincronizado
SC-HTB680EG_RQT9920-H_spa.book 49 ページ 2014年3月4日 火曜日 午後6時56分

50
RQT9920
Para dispositivos Bluetooth
®
compatibles con
NFC (dispositivos
TM
Android) solamente
Con tan solo tocar un dispositivo NFC (Near Field
Communication) compatible con Bluetooth
®
en la
unidad principal, se pueden completar todos los
preparativos, desde registrar un dispositivo
Bluetooth
®
hasta establecer una conexión.
Preparación
≥ Encienda la función NFC del dispositivo.
≥ En un dispositivo Android con una versión
inferior a 4.1 es necesario instalar la aplicación
“Panasonic Music Streaming” (Gratuita).
1
Introduzca “Panasonic Music Streaming” en el
cuadro de búsqueda de Google Play
TM
para buscar,
y a continuación seleccione “Panasonic Music
Streaming”.
2 Inicie la aplicación “Panasonic Music Streaming” en
el dispositivo.
– Siga las instrucciones que aparecen en la pantalla
de su dispositivo.
– Utilice siempre la última versión de la aplicación.
Pulse [ ] para seleccionar
“BLUETOOTH”.
Toque y mantenga presionado su
dispositivo en la zona táctil NFC de
esta unidad principal [ ]. (> 36)
No mueva el dispositivo Bluetooth
®
hasta que suene un
pitido, aparezca un mensaje o reaccione de alguna
manera. Una vez haya reaccionado el dispositivo
Bluetooth
®
, aleje el dispositivo de la unidad principal.
≥ Una vez se ha completado el registro y la conexión del
dispositivo Bluetooth
®
, aparece el nombre del dispositivo
en la pantalla durante algunos segundos.
≥ La ubicación de la zona de contacto de NFC varía en
función del dispositivo. Cuando no se pueda establecer
una conexión incluso si el dispositivo Bluetooth
®
ha
tocado el área de contacto NFC de la unidad principal,
cambie el dispositivo de posición. La condición también
puede mejorar si se descarga la aplicación específica
“Panasonic Music Streaming” y se pone en marcha.
Inicie la reproducción en el
dispositivo Bluetooth
®
.
≥ Si toca otro dispositivo en esta unidad principal, puede
actualizar la conexión Bluetooth
®
. El dispositivo que se
conectó anteriormente se desconectará automáticamente.
≥ Cuando se establece la conexión, la reproducción puede
comenzar automáticamente en función del tipo de
dispositivo que se utilice.
≥ Es posible que la conexión de un solo toque no funcione
correctamente dependiendo del tipo de dispositivo
utilizado.
Código del mando a
distancia
Cuando otros dispositivos Panasonic responden
al control remoto de este sistema, cambie el
código de control remoto en este sistema y en
control remoto.
Preparación
≥ Apague todos los otros productos Panasonic.
≥ Encienda esta unidad.
∫
Para establece el código “REMOTE 2”
Mantenga pulsado [MUTE] y [OK] durante más
de 4 segundos.
Aparece “REMOTE 2” en la pantalla.
∫
Para establece el código “REMOTE 1”
Mantenga pulsado [MUTE] y [4] durante más
de 4 segundos.
Aparece “REMOTE 1” en la pantalla.
Conexión de un solo toque
(conexión vía NFC)
SC-HTB680EG_RQT9920-H_spa.book 50 ページ 2014年3月4日 火曜日 午後6時56分

Cómo empezar
Operaciones
RQT9920
51
Operaci ones
Uso de este sistema
Preparación
≥ Encienda el subwoofer activo.
≥ Encienda el TV o/el dispositivo conectado.
Pulse [Í] para encender la unidad
principal.
Seleccione la fuente.
≥ Este mando a distancia no se puede usar para controlar las
operaciones de los dispositivos conectados.
∫ Cuando “BLUETOOTH” se selecciona
como la fuente
En el Bluetooth
®
dispositivo:
Seleccione este sistema como la fuente de salida
del dispositivo Bluetooth
®
conectado y comience
la reproducción.
∫ Cuando “BD/DVD” se selecciona
como la fuente
Encienda el TV y el dispositivo conectado:
Seleccione la entrada del televisor para este
sistema y comience a reproducir en el dispositivo
conectado.
∫ Para ajustar el volumen de este
sistema
Pulse [i VOL j].
≥ Rango de volumen: de 0 a 100
∫ Para acallar el sonido
Pulse [MUTE].
≥ Mientras se encuentra en silencio, aparece “MUTE” en la
pantalla.
≥ Para cancelar, presione nuevamente el botón y ajuste el
volumen.
≥ El silencio se cancela si se apaga esta unidad.
≥ Si sale sonido de los altavoces del televisor, reduzca el
volumen del televisor al nivel mínimo.
Pulse Para seleccionar
[INPUT]
“TV” --------------# “BD/DVD”
^--- “BLUETOOTH”(}
[] “BLUETOOTH”
SOUND
INPUT
SETUP
OK
Si este sistema no opera como se espera o
el sonido es inusual, volver los ajustes a lo
preestablecido de fábrica puede resolver
el problema. (> 56)
SC-HTB680EG_RQT9920-H_spa.book 51 ページ 2014年3月4日 火曜日 午後6時56分

52
RQT9920
Sonido 3D
Este sistema brinda una sensación de que el
sonido y la imagen son uno solo.
≥ Para cambiar el efecto aplicado, consulte los
“Menú de sonido”. (> derecho)
≥ El efecto Dolby Virtual Speaker está encendido excepto en
modo STEREO.
≥ Para apagar Dolby Virtual Speaker y los efectos
envolventes 3D, seleccione “STEREO” como modo de
sonido. (> derecho)
≥ Para apagar el efecto envolvente 3D y de diálogo de modo
de cancelación, consulte “3D CLR DIALOG”. (> 53)
Menú de sonido
Pulse [SOUND] repetidamente para
seleccionar el efecto de sonido.
Pulse [3, 4] repetidamente para
seleccionar la configuración
deseada y a continuación pulse
[OK].
Sonido 3D
Dolby
®
Virtual
Speaker
Con este efecto puede
disfrutar de un efecto de
sonido envolvente similar a
5.1 canales.
Efecto de
sonido de 3D
Además del efecto del Dolby
Virtual Speaker, Panasonic ha
aplicado su propia tecnología de
control del campo de sonido
para expandir el campo de
sonido hacia adelante, atrás,
arriba y abajo, y se obtiene un
sonido con una profundidad e
intensidad que se asimila más a
las imágenes 3D.
Diálogo del
modo de
cancelación
Los comentarios de deportes
y los diálogos de las novelas
de TV se escuchan como si el
sonido saliera del TV, dando
la sensación de que el sonido
y la imagen son uno solo.
Además, el diálogo va a
sobresalir más que otros
sonidos durante la reproducción
del volumen normal y también
cuando el volumen se baja para
la visualización nocturna.
ej., Imagen del campo de sonido 3D
SOUND
MODE
STANDARD
: Mejor
selección para espectáculos
de comedia y drama.
STADIUM: Produce un
sonido realista para las
retransmisiones deportivas
en directo.
MUSIC: Mejora el sonido
de los instrumentos
musicales y las canciones.
CINEMA: Produce un
sonido único tridimensional
para las películas.
NEWS: Mejora las voces
de los comentarios sobre
noticias y deportes.
STEREO: Reproduce
cualquier fuente de sonido
en estéreo.
SUBWOOFER
Se puede ajustar la cantidad
de graves. Este dispositivo
selecciona automáticamente
la configuración más
adecuada en función del tipo
de fuente de reproducción.
LEVEL 1
LEVEL 2
: Por defecto para
una fuente de sonido de
2 canales
LEVEL 3
: Por defecto para
una fuente de sonido de
varios canales
LEVEL 4
La configuración que se establece
se conserva y se memoriza cada
vez que se reproduce el mismo
tipo de fuente.
DIALOG
Ajuste el nivel de diálogo.
LEVEL 1
LEVEL 2
LEVEL 3
LEVEL 4
“DIALOG” no aparece en
la pantalla cuando “3D
CLR DIALOG” se
establece a “OFF”.
SC-HTB680EG_RQT9920-H_spa.book 52 ページ 2014年3月4日 火曜日 午後6時56分

Operaciones
RQT9920
53
≥
La configuración por defecto se resalta. Los ajustes modificados se mantendrán
hasta que se vuelvan a cambiar, a menos que se indique lo contrario.
Se puede ver el formato de audio actual.
Mantenga pulsado [SOUND] durante
4 segundos.
H.BASS
Mejora el efecto de bajos
armónicos.
ON
OFF
3D CLR
DIALOG
La función 3D Clear Mode
Dialog crea un campo de
sonido similar al sonido
procedente de una pantalla
de televisión y hace que los
diálogos sean más claros.
ON: Efecto 3D Surround,
Clear Mode Dialog y Dolby
Virtual Speaker
OFF: Dolby Virtual
Speaker Efecto
La configuración se establece
de nuevo a “ON” cada vez que
se enciende el dispositivo.
DUAL
AUDIO
Establece el modo de canal de
audio preferido cuando este sistema
recibe dos modos de audio.
M1: Principal
M2: Secundario
M1 + M2:
Principal + Secundario
Este efecto sólo funciona si el
reproductor o la televisión se
establece a “Bitstream” y “Dolby
Dual Mono” se encuentra
disponible en la fuente de sonido.
AGC
El control automático de ganancia
evita el sonido fuerte repentino al
reducir el nivel de sonido de
forma automática cuando la
entrada es demasiada alta.
Esta función es adecuada
para las emisiones de
televisión que tienen
diferentes niveles de sonido.
ON
OFF
Si el sonido se vuelve poco
natural, seleccione “OFF”.
LOW VOL
MODE
Mejora el dialogo en
condiciones de poco volumen.
ON
OFF
Seleccione “OFF” para
cancelar este efecto si el
diálogo no suena natural en
condiciones de poco volumen.
Formato del audio
DOLBY
DIGITAL
Dolby Digital es el formato
de audio.
DTS
DTS es el formato de
audio.
PCM MULTI
La modulación por
impulsos codificados lineal
es la fuente de audio.
PCM
La modulación por
impulsos codificados de
2 canales es la fuente de
audio.
SC-HTB680EG_RQT9920-H_spa.book 53 ページ 2014年3月4日 火曜日 午後6時56分

54
RQT9920
Menú de configuración
Pulse [SETUP] repetidamente para
seleccionar el elemento a instalar.
Pulse [3, 4] repetidamente para
seleccionar la configuración
deseada y a continuación pulse
[OK].
≥ La configuración por defecto se resalta. Los ajustes
modificados se mantendrán hasta que se vuelvan a
cambiar, a menos que se indique lo contrario.
DIMMER
Atenúa la pantalla después
de 5 segundos de
inactividad.
ON
OFF
AUTO
POWER
DOWN
La unidad principal se
apaga automáticamente si
no hay ninguna entrada de
audio y cuando no se
utilice durante 20 minutos
aproximadamente.
ON
OFF
VOL
LIMITATION
Establece el límite de
volumen a 50 cuando se
enciende la unidad
principal, aunque el
volumen esté situado por
encima de 50 antes de que
se apague.
ON
OFF
BLUETOOTH
STANDBY
Esta función permite la
conexión a un dispositivo
Bluetooth
®
sincronizado
cuando la unidad principal
se encuentra en modo en
espera.
ON
OFF
La unidad principal se
encenderá
automáticamente cuando
se conecte un dispositivo
Bluetooth
®
sincronizado.
LINK
MODE
Cambie el modo de enlace
de conexión Bluetooth
®
para que se ajuste el tipo
de conexión. Asegúrese de
desconectar el dispositivo
que se encuentra
actualmente conectado
(aparece “BLUETOOTH
READY” en la pantalla).
MODE 1: Énfasis en la
conectividad.
MODE 2
: Énfasis en la
calidad de sonido.
VIERA
LINK
Encienda la función VIERA
Link.
ON
OFF
Seleccione “OFF” cuando
su dispositivo HDAVI
Control no funcione
correctamente en este
sistema. Se deshabilitará
ARC. Conecte un cable de
audio digital óptico.
Apague todos los
dispositivos conectados y
a continuación, vuelva a
encenderlos después de
cambiar la configuración.
SC-HTB680EG_RQT9920-H_spa.book 54 ページ 2014年3月4日 火曜日 午後6時56分

Operaciones
RQT9920
55
Operaciones entrelazadas con el televisor
(VIERA Link “HDAVI Control
TM
”)
Preparación
1 Confirme que se haya realizado la conexión
HDMI. (> 39, 40)
2 Ajuste las operaciones “HDAVI Control” en el
equipo conectado (Ej., un televisor).
3 Para las operaciones óptimas “HDAVI
Control” cambie los ajustes a continuación en
el TV conectado
§1
.
≥ Fije los ajustes predeterminados del altavoz en esta
unidad.
§2
≥ Fije los ajustes de selección del altavoz en esta
unidad.
4 Encienda todo equipo compatible con el
“HDAVI Control” y seleccione la entrada de
TV para este sistema en forma que la función
“HDAVI Control” obre correctamente.
5 Si se conectó un dispositivo al terminal HDMI
AV IN, comience a reproducir para verificar
que la imagen se visualice correctamente en
el TV.
Repita este procedimiento cuando vaya a
cambiar la conexión o los ajustes.
§1 La disponibilidad y la función de los ajustes pueden variar
según el TV. Refiérase a las instrucciones de
funcionamiento del TV para obtener más detalles.
§2 Si el TV tiene un ajuste predeterminado del altavoz
dentro del detalle de ajuste de VIERA Link, el escoger
esta unidad como altavoz predeterminado cambiará la
respectiva selección de esta unidad.
≥ VIERA Link “HDAVI Control”, basada en las funciones de
control provistas por HDMI, una norma industrial conocida
como HDMI CEC (Consumer Electronics Control), es una
función única que nosotros hemos desarrollado y
agregado. Como tal, su funcionamiento con equipos de
otros fabricantes que soportan HDMI CEC no puede ser
garantizado.
≥ Este aparato soporta la función “HDAVI Control 5”.
“HDAVI Control 5” es la norma más reciente para el equipo
compatible con Panasonic de HDAVI Control. Esta norma
es compatible con el equipo HDAVI convencional de
Panasonic.
≥ Refiérase a los únicos manuales del equipo de otros
fabricantes que soportan la función VIERA Link.
Para asegurarse de que el audio salga de este
sistema, encienda la unidad principal con el
control remoto del TV y seleccione cine en casa
del menú de altavoz del menú VIERA Link.
La disponibilidad y la función de los ajustes pueden
variar según el TV. Consulte las Instrucciones de
funcionamiento del TV para conocer más detalles.
∫ Control del altavoz
Puede seleccionar si la salida de audio es desde esta unidad o
desde los altavoces del TV usando los ajustes del menú del TV.
Cine en casa
Este sistema es activo.
≥
Cuando la unidad principal se encuentra en el modo de espera, al
cambiar los altavoces del TV a este sistema en el menú VIERA
Link, se encenderá automáticamente la unidad principal.
≥
Puede controlar el ajuste del volumen de este sistema usando el
botón de volumen o silencio en el mando a distancia del TV.
≥ Si apaga la unidad principal, los altavoces del TV se
activarán automáticamente.
≥
El audio saldrá automáticamente desde este sistema si el TV
es compatible con VIERA Link “HDAVI Control 4” o posterior.
TV
Los altavoces del TV son activos.
≥ El volumen de esta unidad se ajusta al mínimo.
∫ Selección de entrada automática
Cuando se realizan las siguientes operaciones, la
unidad principal cambiará automáticamente la
entrada a la fuente correspondiente.
j
Cuando la reproducción comienza en un
dispositivo conectado HDMI.
§3
j
Cuando se cambia la entrada del TV al canal del TV.
§3 Si el ajuste de salida del altavoz en el TV se fija en este
sistema, el TV y la unidad principal se encienden
automáticamente (Enlace de encendido).
∫ Enlace de apagado
Cuando el TV se apaga, este sistema también se
apaga automáticamente. (Esta función no
funciona cuando Bluetooth
®
es la fuente.)
∫
Función automática de sincronización
(para HDAVI Control 3 o posterior)
El retraso entre el audio y el video se ajusta automáticamente
al agregar un retraso a la salida de audio, lo que le permite
disfrutar de un audio ininterrumpido para la imagen.
La información de retraso se ajusta automáticamente si el TV
es compatible con el “HDAVI Control 3” o posterior de VIERA
Link y VIERA Link está encendido.
¿Qué es VIERA Link “HDAVI
Control”?
VIERA Link “HDAVI Control” es una función
conveniente que ofrece operaciones
vinculadas de esta unidad y un Panasonic
TV (VIERA) bajo “HDAVI Control”.
Puede usar esta función al conectar el equipo
con un cable HDMI. Consulte las instrucciones
de funcionamiento para el equipo conectado a
fin de obtener detalles operativos.
Lo que puede hacer con
VIERA Link “HDAVI Control”
SC-HTB680EG_RQT9920-H_spa.book 55 ページ 2014年3月4日 火曜日 午後6時56分

56
RQT9920
Referenc ias
Resolución de problemas
Haga las comprobaciones siguientes antes de solicitar el
servicio de reparaciones. Si tiene alguna duda acerca de
los puntos de comprobación, o si las soluciones
indicadas en la siguiente guía no solucionan el problema,
consulte a su concesionario para recibir instrucciones.
Ninguna alimentación.
≥
Desconecte el cable de alimentación de CA durante
10 segundos antes de conectarlo de nuevo.
≥ Si después de encender la unidad principal, se
apaga inmediatamente, desenchufe el cable de
alimentación de CA y consulte a su distribuidor.
≥ Si la unidad principal no se enciende al
encender el (control HDAVI) del televisor,
encienda la unidad principal de forma manual.
Si el problema persiste, consulte “HDMI” en
“Resolución de problemas”.
El mando a distancia no funciona correctamente.
≥
La batería está agotada. Cámbiela por otra nueva. (
>
38)
≥
Es posible que no se haya sacado la hoja de
aislamiento. Saque la hoja de aislamiento. (
>
38)
≥ Puede ser necesario fijar nuevamente el código
del mando a distancia después de cambiar la
batería del mando a distancia. (> 50)
≥ Use el mando a distancia dentro del rango de
operación correcto. (> 38)
≥ Compruebe que el sensor de la señal del
mando a distancia funciona con el
procedimiento que se indica a continuación.
jMantenga pulsado [INPUT] en la unidad
principal durante más de 4 segundos.
Aparecerá “ON TABLE” o “ON WALL” en la
pantalla durante 4 segundos.
jConsulte la página 38 “Sobre el sensor de
señal del mando a distancia” para obtener
información sobre la ubicación del sensor de
señal del mando a distancia.
La unidad principal se pone automáticamente
en el modo de espera.
La función “AUTO POWER DOWN” está encendida.
La unidad principal se pone automáticamente en modo
en espera cuando no recibe una señal y no se realiza
una operación durante 20 minutos aproximadamente.
Consulte la página 54 para desactivar esta función.
La unidad principal se apaga cuando se seleccionan
los altavoces del TV en el control del altavoz.
Esta es una característica normal cuando se usa VIERA
Link (HDAVI Control 4 o posterior). Para obtener más
información lea las instrucciones de funcionamiento del
televisor en su función de ahorro de energía. (
>
55)
Los interruptores de la unidad principal no
funcionan.
[Í/I], [j VOL i], [INPUT], y [ ] en la unidad
principal son botones. Toque los botones con su
dedo. Posiblemente no funcionen si los toca con
sus uñas o con guantes.
Esta unidad no funciona correctamente.
Si el cable HDMI está conectado al terminal
incorrecto (HDMI AV IN o HDMI AV OUT), este
sistema no funcionará correctamente. Apague la
unidad principal, desconecte el cable de
alimentación de CA y vuelva a conectar el/los
cable/s HDMI. (> 39, 40)
Las operaciones relacionadas con VIERA Link
ya no funcionan correctamente.
≥ Revise los ajustes de VIERA Link en los
dispositivos conectados.
jEncienda la función VIERA Link en los
dispositivos conectados.
jSeleccione este sistema como el altavoz en el
menú VIERA Link del televisor.
≥ ¿Apagó los ajustes de VIERA Link? (> 54)
≥
Cuando se cambian las conexiones de HDMI,
después de una falla de energía o después de que
se sacó la alimentación de CA, las operaciones de
VIERA Link pueden no funcionar correctamente.
j
Encienda todos los dispositivos que están conectados
al TV con el cable HDMI y luego encienda el TV.
jApague los ajustes de VIERA Link y vuelva a
encenderlos otra vez. Para obtener detalles
consulte las instrucciones de funcionamiento
para el TV.
j
Mientras la unidad principal y el TV están
conectados con el cable HDMI, encienda el TV y
luego saque el cable de alimentación de CA de
la unidad principal y vuelva a conectarlo.
Para volver a los ajustes de fábrica.
Con la unidad principal encendida, mantenga pulsado
[
Í
/I] durante 4 segundos en la unidad principal.
(“RESET” aparece en la pantalla cuando se
reinicia este sistema.)
Si este sistema no opera como se espera,
volver los ajustes a lo preestablecido de
fábrica puede resolver el problema.
≥ El código del control remoto volverá a
“REMOTE 1” cuando este sistema vuelva al
ajuste de fábrica. Para cambiar el código del
control remoto, consulte la página 50.
Operaciones generales
HDMI
SC-HTB680EG_RQT9920-H_spa.book 56 ページ 2014年3月4日 火曜日 午後6時56分

Referencias
RQT9920
57
Los primeros segundos de audio no se pueden
escuchar cuando se usa la conexión HDMI.
Esto puede ocurrir durante la reproducción del
capítulo de un video de DVD. Cambie el ajuste de
salida de audio digital en el dispositivo conectado
de “Bitstream” a “PCM”.
Al operar un dispositivo compatible con HDMI
de una marca diferente, este sistema
reacciona de manera no deseada.
Los comandos de HDAVI Control pueden usar una
señal diferente según la marca del dispositivo. En
este caso ajuste VIERA Link en apagado. (
>
54)
Cuando se enciende o apaga la unidad principal, el
sonido y el vídeo se deshabilitan temporalmente
Cuando se enciende o apaga la unidad principal, es
normal que el sonido y el vídeo se deshabiliten
temporalmente. Esto no significa un funcionamiento
defectuoso. Puede ocurrir cuando el dispositivo se
conecta a, vía HDMI, no es compatible con la función de
Panasonic VIERA Link (HDAVI Control 3 o posterior).
No se puede realizar la conexión.
Verifique la condición del dispositivo Bluetooth
®
.
El dispositivo no se puede conectar.
≥ La sincronización del dispositivo no fue exitosa
o se reemplazó el registro. Intente sincronizar
de nuevo el dispositivo. (> 49)
≥ Este sistema puede estar conectado a un
dispositivo diferente. Desconecte el otro
dispositivo e intente sincronizarlo de nuevo.
El dispositivo está conectado pero el audio no
se puede escuchar en este sistema.
Para algunos dispositivos Bluetooth
®
incorporados,
tiene que fijar manualmente la salida de audio en
“SC-HTB680”. Lea las instrucciones de
funcionamiento para conocer detalles del dispositivo.
Se interrumpe el sonido.
≥ El dispositivo está fuera del rango de
comunicación de 10 m. Mueva el dispositivo
Bluetooth
®
más cerca de la unidad principal.
≥ Retire los obstáculos entre la unidad principal y
el dispositivo.
≥
Otros dispositivos que usan la banda de frecuencia
de 2,4 GHz (router inalámbrico, microondas,
teléfonos inalámbricos, etc.) están interfiriendo.
Mueva el dispositivo Bluetooth
®
más cerca de unidad
principal y aléjelo de otros dispositivos.
≥ Seleccione “MODO 1” para la comunicación
estable. (> 54)
La conexión de un solo toque (función NFC)
no funciona.
Compruebe que están encendidas la unidad
principal y la función NFC del dispositivo. (> 50)
Sin sonido (o imagen).
≥ Desactive el silencio. (> 51)
≥ Verifique las conexiones a los otros
dispositivos. (> 39, 40)
≥ Asegúrese de que la señal de audio recibida
sea compatible con esta unidad. (> 60)
≥ Apague esta unidad y luego vuelva a prenderla.
≥ Si la unidad principal está conectada al TV con
solamente un cable HDMI, asegúrese de que el
terminal HDMI del TV está identificado como
"HDMI (ARC)". Si no lo está, conecte usando el
cable óptico digital de audio. (> 39, 40)
≥ Si se conecta la unidad principal a un televisor
Panasonic y se enciende con el mando a
distancia o los botones de la unidad principal,
es posible que no se escuche sonido de los
altavoces del sistema. En este caso, encienda
la unidad principal con el mando a distancia del
televisor. (> 55)
≥ Si las conexiones son correctas, es posible que
haya un problema con los cables. Vuelva a
conectar con cables diferentes.
≥ Revise los ajustes de salida de audio en el
dispositivo conectado.
El audio doble no se puede cambiar de
principal a secundario.
Si el audio recibido desde el dispositivo conectado no
es “Dolby Dual Mono” o el ajuste de la salida no es
“Bitstream”, no se puede cambiar el ajuste de este
sistema. Cambie el ajuste en el dispositivo conectado.
El volumen se baja cuando se enciende la
unidad principal.
“VOL LIMITATION” está encendido.
Si la unidad principal se apaga con el ajuste de
volumen en más de la mitad (más de 50), la
unidad principal bajará automáticamente el
volumen a la mitad (50) cuando la unidad
principal está encendida. (> 54)
El diálogo es demasiado persistente o el
diálogo no suena natural.
Este sistema tiene una función para hacer que el diálogo
sobresalga cuando el volumen está bajo. (
>
53)
Bluetooth
®
Sonido
SC-HTB680EG_RQT9920-H_spa.book 57 ページ 2014年3月4日 火曜日 午後6時56分

58
RQT9920
No hay audio.
La energía de la unidad principal se apaga
automáticamente.
(Cuando la unidad principal detecta un problema,
se activa una medida de seguridad y la unidad
principal cambia automáticamente al modo de
espera.)
≥ Hay un problema con el amplificador.
≥ ¿El volumen es extremadamente alto?
Si lo es, baje el volumen.
≥ ¿Esta unidad está ubicada en un lugar
extremadamente caluroso?
Si es así, mueva la unidad a un lugar más frío y
espere un momento y luego vuelva a
encenderla.
Si el problema continúa, confirme la pantalla,
apague el sistema, retire el cable de alimentación
de CA y consulte a su distribuidor. Asegúrese de
recordar la pantalla que aparece e informar al
distribuidor.
“F61”
≥ Hay un problema con el amplificador del
sistema.
≥ Desconecte el cable de alimentación de CA y
consulte a su distribuidor.
“F70 HDMI”
≥ Verifique la conexión HDMI.
≥ Apague la unidad principal y a continuación
vuelva a encenderla.
≥ Desconecte el cable HDMI.
“F76”
≥ Hay un problema con la fuente de alimentación.
≥ Desconecte el cable de alimentación de CA y
consulte a su distribuidor.
Ninguna alimentación.
Asegúrese de que el cable de alimentación de CA
del subwoofer activo esté conectado
correctamente.
Luego de encender el subwoofer, este se
apaga de inmediato.
Desenchufe el cable de alimentación de CA y
consulte a su distribuidor.
No hay sonido desde el subwoofer.
≥ Verifique que el subwoofer activo esté
encendido.
≥ Verifique que el indicador WIRELESS LINK se
ilumine en verde. (> 49)
WIRELESS LINK se ilumina en rojo.
≥ No hay un enlace entre la unidad principal y el
subwoofer activo.
jRevise que la unidad principal esté
encendida.
jApague el subwoofer activo y vuelva a
encenderlo. Alternativamente, apague el
subwoofer activo, desconecte el cable de
alimentación de CA y luego vuelva a
conectarlo.
≥ El subwoofer activo y la unidad principal
pueden no conectarse correctamente. Intente la
siguiente operación. (Conexión inalámbrica)
1 Encienda la unidad principal y el subwoofer
activo.
2 Mantenga pulsado [ID SET] en la parte
posterior del subwoofer activo durante más
de 3 segundos.
(El indicador WIRELESS LINK parpadeará
en color rojo.)
3 Mientras mantiene pulsado [INPUT] en el
mando a distancia, mantenga pulsado
[VOL i] en la unidad principal durante más
de 4 segundos (aparecerá “SUBWOOFER
PAIRING” en la pantalla.)
≥ Cuando no se pueda realizar la sincronización
inalámbrica, aparecerá “PAIRED” en la pantalla
durante más de 2 segundos y el indicador
WIRELESS LINK se iluminará en verde.
4 Apague y encienda la unidad principal.
≥ Consulte con su distribuidor si el problema
persiste.
Pantallas de la unidad
principal
Subwoofer activo
SC-HTB680EG_RQT9920-H_spa.book 58 ページ 2014年3月4日 火曜日 午後6時56分

Referencias
RQT9920
59
Acerca de Bluetooth
®
∫ Banda de frecuencia utilizada
Esta unidad utiliza una banda de frecuencia de 2,4 GHz.
∫ Certificación de este dispositivo
≥ Este sistema se adecua a las restricciones de
frecuencia y ha sido certificada en base a las
leyes de frecuencia. Por lo tanto, no se necesita
un permiso inalámbrico.
≥ Las siguientes acciones son castigables
legalmente en algunos países:
jDesarmar o modificar la unidad.
j
Retirar las indicaciones de las especificaciones.
∫ Restricciones de uso
≥ La transmisión inalámbrica y/o uso de los
dispositivos equipados con Bluetooth
®
no se
encuentra garantizada.
≥ Todos los dispositivos deben cumplir con las
normas establecidas por Bluetooth SIG, Inc.
≥
De acuerdo con las especificaciones o configuraciones
de un dispositivo, es posible que la conexión no se
establezca o que varíen algunas operaciones.
≥
Este sistema admite las funciones de seguridad
Bluetooth
®
. Según el entorno de operación y/o las
configuraciones, es posible que esta seguridad no
sea suficiente. Transmita de forma inalámbrica los
datos a este sistema con cuidado.
≥ Este sistema no puede transmitir datos hacia un
dispositivo Bluetooth
®
.
∫ Rango de uso
Use este dispositivo a un rango máximo de 10 m.
El rango puede disminuir según el entorno, los
obstáculos o la interferencia.
∫
Interferencia desde otros dispositivos
≥
Este sistema puede no funcionar correctamente y
pueden surgir problemas como ruido y saltos de
sonido debido a la interferencia de onda de radio si la
unidad principal está ubicada demasiado cerca de
otros dispositivos Bluetooth
®
o de dispositivos que
usan la banda 2,4 GHz.
≥ Este sistema puede no funcionar correctamente
si las ondas de radio de una emisora cercana,
etc. son demasiado fuertes.
∫ Uso específico
≥ Este sistema es para un uso normal y general
solamente.
≥
No use este sistema cerca de un equipo ni en un entorno
que sea sensible a la interferencia de frecuencia de radio
(Ej.: aeropuertos, hospitales, laboratorios, etc.)
Cuidados de la unidad
∫ Para limpiar este sistema, pase por él
un paño blando y seco.
≥ Cuando la suciedad es difícil de eliminar, moje
un paño en agua, escúrralo y limpie la unidad;
luego repase con un paño seco.
≥ Use un paño fino para limpiar los altavoces. No
use pañuelos de papel u otros materiales
(toallas, etc.) que se puedan deshacer. Las
pequeñas partículas pueden quedar atrapadas
dentro de la cubierta del altavoz.
≥ No utilice alcohol, diluyente de pintura o
bencina para limpiar este sistema.
≥ Antes de utilizar un paño tratado químicamente,
lea cuidadosamente las instrucciones que lo
acompañan.
∫ Para tirar o transferir este sistema
La unidad principal puede guardar información de
la configuración del usuario en ella. Si decide
deshacerse de la unidad principal ya sea
eliminándola o transfiriéndola, siga los
procedimientos para restituir todas las
configuraciones a los ajustes de fábrica para así
borrar la configuración del usuario. (> 56, “Para
volver a los ajustes de fábrica.”)
≥ Se puede grabar el historial de funcionamiento
en la memoria de la unidad principal.
Licencias
Panasonic no se hace responsable de los
daños y/o información que se pueda poner en
peligro durante una transmisión inalámbrica.
Fabricado con la licencia de Dolby Laboratories.
Dolby, Pro Logic, y el símbolo de la doble D son marcas
comerciales de Dolby Laboratories.
Fabricado bajo licencia bajo los números de patente de
Estados Unidos: 5.956.674; 5.974.380; 6.487.535 y otras
patentes mundiales y de los EE.UU. emitidas y próximamente
en vigor. DTS y Symbol y DTS y Symbol juntos son marcas
comerciales registradas, & DTS Digital Surround y los
logotipos de DTS son marcas comerciales registradas de
DTS, Inc. El producto incluye software. © DTS, Inc. Todos los
derechos reservados.
HDMI, el logotipo HDMI y High-Definition Multimedia Interface
son marcas comerciales o marcas comerciales registradas de
HDMI Licensing LLC en Estados Unidos y otros países.
HDAVI Control
TM
es una marca de fábrica de Panasonic
Corporation.
La marca Bluetooth
®
y sus logos son propiedad de Bluetooth
SIG, Inc. y cualquier uso de dichas marcas por parte de
Panasonic Corporation se realiza bajo licencia.
Otros nombres de marcas y marcas comerciales son
propiedad de sus respectivos propietarios.
Google Play y Android son marcas comerciales de
Google Inc.
SC-HTB680EG_RQT9920-H_spa.book 59 ページ 2014年3月4日 火曜日 午後6時56分

60
RQT9920
Especificaciones
§1 Cuando se apagan los otros dispositivos conectados.
SECCIÓN DEL
AMPLIFICADOR
Salida de energía RMS: Dolby Digital Modo
Canal delantero (L, R canal)
70 W por canal (6 ≠), 1 kHz, 10 % THD
Canal central (canal C)
70 W por canal (6 ≠), 1 kHz, 10 % THD
Canal subwoofer
140 W por canal (8 ≠), 100 Hz, 10 % THD
Potencial total del modo RMS Dolby Digital
350 W
SECCIÓN DE TERMINAL
HDAVI Control
Esta unidad soporta la función “HDAVI Control 5”.
Entrada HDMI AV (BD/DVD)
1
Conector de entrada
Tipo A (19 contactos)
Salida AV HDMI (TV (ARC))
1
Conector de salida
Tipo A (19 contactos)
Entrada de audio digital (TV)
Entrada digital óptica
Terminal óptica
Frecuencia de muestreo
32 kHz, 44,1 kHz, 48 kHz
88,2 kHz, 96 kHz (sólo LPCM)
Formato del audio
LPCM, Dolby Digital, DTS Digital Surround
IR Blaster
Tipo de terminal
Toma 3,5 m m
Puerto USB
Para el uso del servicio solamente.
GENERALIDADES
Consumo de energía
Unidad principal
36 W
Subwoofer activo
23 W
En condición de espera
Unidad principal
§1
Cuando “BLUETOOTH STANDBY” se
encuentra en “OFF”
Aprox. 0,48 W
Cuando “BLUETOOTH STANDBY” se
encuentra en “ON”
Aprox. 3 W
Subwoofer activo
Interruptor de encendido apagado
Aprox. 0,25 W
El enlace inalámbrico no está activado
Aprox. 1,3 W
Alimentación
CA 220 V a 240 V, 50 Hz
Dimensiones (AnkAlkProf)
Unidad principal
Para la disposición de colocación sobre la
mesa
950 mmk53 mmk110 mm
Para la disposición de montaje en la pared
950 mmk110 mmk57 mm
Subwoofer activo
180 mmk408 mmk306 mm
Peso
Unidad principal
Para la disposición de colocación sobre la
mesa
Aprox. 2,6 kg
Para la disposición de montaje en la pared
Aprox. 2,7 kg
Subwoofer activo
Aprox. 5,0 kg
Gama de termperaturas de funcionamiento
De 0
o
C a i40
o
C
Gama de humedades de funcionamiento
De 20 % a 80 % RH (sin condensación)
SC-HTB680EG_RQT9920-H_spa.book 60 ページ 2014年3月4日 火曜日 午後6時56分

Referencias
RQT9920
61
≥ Las especificaciones están sujetas a cambios sin aviso
previo.
≥ Los pesos y las dimensiones son aproximados.
≥ La distorsión armónica total se mide con un analizador de
espectro digital.
SECCIÓN ALTAVOCES
Altavocez delanteros (Integrados)
Rango completo
6,5 cm Tipo cono k 1/canal
Altavoz central (Integrados)
Rango completo
6,5 cm Tipo cono k1
Subwoofer activo
Woofer
16 cm Tipo cono k1
SECCIÓN INALÁMBRICA
Módulo sin hilos
Rango de frecuencia
2,40335 GHz a 2,47735 GHz
N. de canales
38
SECCIÓN Bluetooth
®
Especificación del sistema Bluetooth
®
Bluetooth
®
Ver.3.0
Clasificación del equipo inalámbrico
Clase 2
Archivos admitidos
A2DP
Banda de frecuencia
Banda de 2,4 GHz FH-SS
Distancia de operación
10 m Línea de visión
SC-HTB680EG_RQT9920-H_spa.book 61 ページ 2014年3月4日 火曜日 午後6時56分

62
RQT9920
Varotoimet turvallisuuden takaamiseksi
Laite
≥ Tulipalo-, sähköisku- tai vahinkovaaran välttämiseksi,
j Älä anna tämän laitteen altistua sateelle, kosteudelle,
pisaroille tai roiskeille.
j Älä laita laitteen päälle mitään nesteitä sisältäviä
esineitä kuten maljakot.
j Käytä ainoastaan suositeltuja varusteita.
j Älä poista suojuksia.
j Älä korjaa tätä laitetta itse. Anna huoltopalvelut
tehtäväksi pätevälle henkilöstölle.
≥ Onnettomuuden estämiseksi tämä laite on kiinnitettävä
tukevasti seinään asennusohjeiden mukaisesti.
Verkkokaapeli
≥ Tulipalo-, sähköisku- tai vahinkovaaran välttämiseksi,
j Varmista, että virtalähteen jännite vastaa laitteeseen
merkittyä jännitettä.
j Työnnä verkkovirtapistoke kunnollisesti pistorasiaan.
j Älä vedä tai taivuta kaapelia tai aseta sen päälle
painavia esineitä.
j Älä käsittele pistoketta märillä käsillä.
j Pidä kiinni verkkovirtapistokkeen rungosta, kun irrotat
pistokkeen.
j Älä käytä vahingoittunutta verkkovirtapistoketta tai
pistorasiaa.
≥ Pistoketta käytetään virrankatkaisulaitteena.
Asenna yksikkö siten, että pistoke voidaan irrottaa
nopeasti pistorasiasta.
Nappityyppinen paristo (Litiumparisto)
≥ Tulipalon, räjähdyksen ja palovammojen vaara. Ei saa
ladata, purkaa, polttaa tai kuumentaa yli 60°C:n
lämpötilaan.
≥ Nappiparistoja ei saa jättää lasten ulottuville.
Nappiparistoa ei saa koskaan laittaa suuhun. Jos se
niellään, on otettava yhteys lääkäriin.
Pieni esine
≥ Pidä ruuvit lasten ulottumattomissa nielaisemisen
estämiseksi.
≥ Pidä tarranauha lasten ulottumattomissa nielaisemisen
estämiseksi.
≥ Säilyä nappityyppinen paristo lasten ulottumattomissa
nielaisemisen estämiseksi.
Laite
≥ Älä laita avotulisia esineitä kuten kynttilöitä laitteen
päälle.
≥ Laite saattaa kärsiä radiotaajuisista häiriöistä, jotka
aiheutuvat matkapuhelimista käytön aikana. Jos
kyseisiä häiriöitä tapahtuu, lisää matkapuhelimen ja
tuotteen välistä etäisyyttä.
≥ Laite on tarkoitettu käytettäväksi leudoissa ilmastoissa.
≥ Tuotteen tunniste sijaitsee laitteen alapuolella.
Sijoitus
≥ Sijoita laite tasaiselle pinnalle.
≥ Tulipalo-, sähköisku- tai vahinkovaaran välttämiseksi,
j Älä asenna tai sijoita tätä laitetta kirjahyllyyn,
suljettuun kaappiin tai muuhun rajalliseen tilaan.
Varmista laitteen riittävä tuuletus.
j Älä tuki laitteen tuuletusaukkoja lehdillä, pöytäliinalla,
verhoilla tai vastaavilla esineillä.
j Älä anna tämän laitteen altistua suoralle
auringonvalolle, korkeille lämpötiloille, runsaalle
kosteudelle tai liialliselle tärinälle.
Nappityyppinen paristo (Litiumparisto)
≥ On olemassa räjähdysvaara, jos akkua ei vaihdeta
oikein. Käytä ainoastaan valmistajan suosittelemaa
tyyppiä.
≥ Laita navat kohdistettuina.
≥ Paristojen väärä käsittely voi aiheuttaa
elektrolyyttivuodon sekä tulipalon.
j Poista paristo, jos et aio käyttää kaukosäädintä
pitkään aikaa. Varastoi viileään, pimeään paikkaan.
j Älä altista sitä kuumalle tai liekeille.
j Älä jätä paristoa(paristoja) autoon suoraan
auringonvaloon pitkäksi aikaa, kun auton ovet ja
ikkunat ovat kiinni.
≥ Kun hävität paristot, ota yhteyttä paikallisiin
viranomaisiin tai jälleenmyyjään oikean
hävitysmenetelmän selvittämiseksi.
VAROITUS VAARA
SC-HTB680EG_RQT9920-H_fin.book 62 ページ 2014年3月4日 火曜日 午後7時12分

Varotoimet
suomi
RQT9920
63
Vakuutus vaatimustenmukaisuudesta (DoC)
“Panasonic Corporation” vakuuttaa, että tämä tuote on yhdenmukainen direktiiviin 1999/5/EC keskeisten vaatimusten sekä sen
muiden merkityksellisten määräysten kanssa.
Asiakkaat voivat ladata alkuperäisen DoC:n kopion R&TTE-tuotteillemme DoC-palvelimelta:
http://www.doc.panasonic.de
Valtuutetun edustajan yhteystiedot: Panasonic Marketing Europe GmbH,
Panasonic Testing Centre, Winsbergring 15, 22525 Hamburg, Saksa
Tämä tuote on tarkoitettu tavallisille kuluttajille. (Luokka 3)
Vanhojen laitteistojen ja akkujen hävittäminen
Vain Euroopan unionissa ja muissa maissa, joissa käytetään kierrätysjärjestelmiä
Nämä tuotteessa, pakkauksessa ja/tai sen mukana toimitettavissa asiakirjoissa
olevat tunnukset tarkoittavat sitä, ettei käytettyjä sähkö- ja elektroniikkalaitteita sekä
akkuja saa laittaa tavallisen kotitalousjätteen sekaan.
Vanhojen tuotteiden ja käytettyjen akkujen asianmukaista käsittelyä,
uudelleenkäyttöä ja kierrätystä varten toimita ne soveltuviin keräyspisteisiin
kansallisen lainsäädännön mukaisesti.
Kun hävität ne moitteettomasti, autat arvokkaiden resurssien säästämisessä ja
ehkäiset ihmisten terveydelle ja ympäristölle mahdollisesti aiheutuvia
haittavaikutuksia.
Jos haluat lisätietoja keräämisestä ja kierrätyksestä, ota yhteyttä paikallisiin
viranomaisiin.
Tämän romun virheellinen hävittäminen voi johtaa rangaistustuomioon kansallisen
lainsäädännön mukaisesti.
Huomautus akun tunnusta varten (alempi tunnus):
Tätä tunnusta saatetaan käyttää yhdessä kemiallisen merkin kanssa. Siten se on
yhdenmukainen sisältyviä kemikaaleja koskevan direktiivin kanssa.
SC-HTB680EG_RQT9920-H_fin.book 63 ページ 2014年3月4日 火曜日 午後7時12分

64
RQT9920
Sisällysluettelo
Varotoimet turvallisuuden takaamiseksi .......................................................62
Ennen käyttöä
Toimitetut osat .................................................................................................65
Tämä järjestelmä (SC-HTB680) ........................................................................................65
Varusteet ...........................................................................................................................65
Ohjaimien pikaopas.........................................................................................66
Tämä järjestelmä (etupuoli) ...............................................................................................66
Tämä järjestelmä (taustapuoli) ..........................................................................................67
Kaukosäädin ......................................................................................................................68
Alkuohjeet
Vaihe 1 Liitännät ..............................................................................................69
Liitäntä televisioon .............................................................................................................69
Liitäntä HDMI-yhteensopivasta laitteesta ..........................................................................70
Liittäminen 4K ultrateräväpiirtotelevisioon .........................................................................71
Infrapunavastaanottimen käyttö ........................................................................................71
Verkkokaapelin liitäntä .......................................................................................................72
Vaihe 2 Sijoittaminen.......................................................................................73
Varotoimet turvallisuuden takaamiseksi ............................................................................73
Aktiivinen alibassokaiutin ...................................................................................................73
Langattoman häiriöt ...........................................................................................................73
Sijoitusmenetelmän valinta ................................................................................................74
Kun päälaite sijoitetaan telineeseen tai pöydälle ...............................................................75
Kun kiinnitetään päälaite seinään ......................................................................................76
Vaihe 3 Langattomat yhteydet........................................................................79
Aktiivisen alibassokaiuttimen langaton liitäntä ...................................................................79
Bluetooth
®
-liitäntä ..............................................................................................................79
Kaukosäätimen koodi .....................................................................................80
Toimenpiteet
Tämän järjestelmän käyttö .............................................................................81
3D-ääni .............................................................................................................82
Äänivalikko ......................................................................................................82
Äänimuoto .........................................................................................................................83
Asetusvalikko ..................................................................................................84
Linkitetyt toimenpiteet television kanssa
(VIERA Link “HDAVI Control
TM
”) ....................................................................85
Viitetietoja
Vianetsintä .......................................................................................................86
Tietoja Bluetooth
®
:sta ....................................................................................89
Laitteen hoito ..................................................................................................89
Käyttöoikeudet ................................................................................................89
Tekniset tiedot .................................................................................................90
SC-HTB680EG_RQT9920-H_fin.book 64 ページ 2014年3月4日 火曜日 午後7時12分

Alkuohjeet
Toimenpiteet
Viitetietoja
Ennen käyttöä
Varotoimet
RQT9920
65
Ennen kä yttöä
Toimitetut osat
Tarkista toimitetut varusteet ennen tämän järjestelmän käyttöä.
≥ Tuotenumerot ovat joulukuun 2013 mukaisia. Niihin voi tulla muutoksia.
≥ Toimitettu verkkokaapeli on tarkoitettu käytettäväksi ainoastaan tämän järjestelmän kanssa.
Älä käytä sitä muiden laitteiden kanssa. Lisäksi älä käytä muiden laitteiden johtoja tämän järjestelmän kanssa.
≥ Näytettävät kuvat voivat poiketa käytettävästä laitteesta.
≥ Tämän käyttöohjeen toimenpiteet kuvataan pääasiassa kaukosäätimen kanssa, mutta voit
suorittaa kyseiset toimenpiteet päälaitteessa, jos ohjaimet ovat samat.
Tämä järjestelmä (SC-HTB680)
∏ 1 Päälaite (kaiutin)
(SU-HTB680)
∏ 1 Aktiivinen
alibassokaiutin
(SB-HWA680)
Varusteet
∏ 1 Kaukosäädin (pariston
kanssa)
(N2QAYC000098)
∏ 1 Infrapunavastaanotin ∏ 2 seinäasennuspidikettä
∏ 2 verkkokaapelia ∏ 2ruuvia
SC-HTB680EG_RQT9920-H_fin.book 65 ページ 2014年3月4日 火曜日 午後7時12分

66
RQT9920
Ohjaimien pikaopas
1 Valmiustila/päällä -kytkin (Í/I)
Kosketa siirtääksesi yksikkö päällä tilasta
valmiustilaan tai päinvastoin. Valmiustilassa
yksikkö kuluttaa edelleen hieman energiaa.
2 Säädä tämän järjestelmän
äänenvoimakkuutta (> 81)
3 Valitse tulolähde (> 81)
“TV” --# “BD/DVD” --# “BLUETOOTH”
^--------------------------------------------------------}
4 Valitse Bluetooth
®
-laite lähteeksi (> 81)
5 NFC kosketusalue (> 80)
6 Kaukosäätimen signaalianturi (> 68)
7Näyttö
8 WIRELESS LINK osoitin (> 79)
§ Nämä kytkimet toimivat vain koskettamalla merkkejä. Joka kerta kytkintä kosketettaessa voit kuulla
äänimerkin.
Tämä järjestelmä (etupuoli)
7
8
5
6
2341
Päälaite
Aktiivinen
alibassokaiutin
SC-HTB680EG_RQT9920-H_fin.book 66 ページ 2014年3月4日 火曜日 午後7時12分

Ennen käyttöä
RQT9920
67
1 HDMI AV IN (BD/DVD) -liitäntä (> 70)
2 HDMI AV OUT (TV (ARC)) -liitäntä (ARC-
yhteensopiva) (> 69, 70)
3 OPTICAL DIGITAL AUDIO IN (TV)-liitäntä
(> 70)
4 Ir SYSTEM -liitäntä (> 71, 72)
5 USB-portti (vain huoltokäyttöön)
6 AC IN -liitäntä (> 72)
7 Aktiivinen alibassokaiutin päällä/pois päältä
painike (> 79)
§ I/D SET -painiketta käytetään ainoastaan, kun päälaitetta ei ole paritettu aktiivisen alibassokaiuttimen
kanssa. (> 88)
Tämä järjestelmä (taustapuoli)
7
6
2
1
3
4
5
6
Päälaite
Aktiivinen
alibassokaiutin
SC-HTB680EG_RQT9920-H_fin.book 67 ページ 2014年3月4日 火曜日 午後7時12分

68
RQT9920
1 Kytke päälaite päälle ja pois päältä (> 81)
2 Valitse tulolähde (> 81)
“TV” --# “BD/DVD” --# “BLUETOOTH”
^--------------------------------------------------------}
3 Valitse asetusvalikko (> 84)
4 Valitse äänivalikko (> 82)
5 Valitse Bluetooth
®
-laite lähteeksi (> 81)
6 Säädä tämän järjestelmän
äänenvoimakkuutta (> 81)
7 Mykistä ääni (> 81)
8 Valitse ja vahvista vaihtoehto
∫ Tietoja kaukosäätimen signaalianturista
Kaukosäätimen signaalianturi sijaitsee päälaitteessa.
≥Käytä kaukosäädintä oikean toimintasäteen sisällä.
Etäisyys: Suoraan edestä noin 7 m
Kulma: Noin 30
o
vasemmalle ja oikealle
B Kaukosäätimen signaalianturi pöytäasennusasettelua varten
C Kaukosäätimen signaalianturi seinäasennusasettelua varten
Kaukosäädin
SOUND
1
5
6
7
8
2
INPUT
SETUP
OK
3
4
∫ Ennen ensimmäistä käyttökertaa
Poista eristysliuska A.
∫ Nappityyppisen pariston
vaihtaminen
Pariston tyyppi: CR2025 (Litiumparisto)
≥ Aseta nappityyppinen paristo sen (i)-merkki
ylöspäin.
Pöytäasennusasettelua varten
Seinäasennusasettelua varten
SC-HTB680EG_RQT9920-H_fin.book 68 ページ 2014年3月4日 火曜日 午後7時12分

Alkuohjeet
Ennen käyttöä
RQT9920
69
Alkuohjeet
Vaihe 1 Liitännät
≥Kytke pois päältä kaikki laitteet ennen liitännän suorittamista ja lue tarvittavat ohjeet.
Älä liitä verkkokaapelia ennen kuin kaikki muut liitännät on suoritettu.
∫ HDMI (Teräväpiirtoinen tietovälineiden liitäntä)
≥ HDMI-liitäntä tukee toimintoa VIERA Link “HDAVI Control” (> 85), kun käytetään yhteensopivaa Panasonic televisiota.
≥ Käytä ARC-yhteensopivia High Speed HDMI-kaapeleita. Ei voida käyttää yhteensopimattomia HDMI-kaapeleita.
≥ Suositellaan, että käytät Panasonic in HDMI-kaapelia.
∫ Infrapunavastaanotin
≥ Älä käytä infrapunavastaanotinta, jos päälaite ei estä television kaukosäätimen anturia. (> 74)
Varmista, että television HDMI-liitännässä on merkintä “HDMI (ARC)”.
∫ Mikä ARC on?
ARC tarkoittaa äänen paluukanavaa ja se on lyhenne sanoista Audio Return Channel, myös HDMI ARC. Se viittaa yhteen HDMI-
toiminnoista. Kun liität päälaitteen television liitäntään, jossa on merkintä “HDMI (ARC)” , ei tarvita enää optista digitaalista
audiojohtoa, joka tarvitaan yleensä äänen kuuntelemiseksi televisiosta, ja voit nauttia television kuvasta ja äänestä yhdellä
ainoalla HDMI-kaapelilla.
Suorita liitäntä.
A HDMI-kaapeli
Liitäntä televisioon
Liitäntä on erilainen HDMI-liitännän vieressä olevan merkinnän mukaan.
Merkintä “HDMI (ARC)”: Liitäntä [A]
Ei merkintää “HDMI (ARC)”: Liitäntä [B]
[A] Merkintä “HDMI (ARC)”
HDMI IN (ARC)
AV OUT
TV(ARC)
A
Varmista, että liität
television ARC-
yhteensopivaan
liitäntään. (Katso
television
käyttöohjeita.)
Televisio
SC-HTB680EG_RQT9920-H_fin.book 69 ページ 2014年3月4日 火曜日 午後7時12分

70
RQT9920
A HDMI-kaapeli
B Optinen digitaalinen audiojohto
≥ Kun käytät optista digitaalista audiojohtoa, laita kärki
oikein liitäntään.
Voit ohjata audiosignaalin tähän laitteeseen liitetystä laitteesta, kuten Blu-ray levysoitin, DVD-soitin, Set
Top Box, jne.
Valmistelu
≥Liitä päälaite televisioon. (> 69)
A HDMI-kaapeli
≥ Katso liitetyn HDMI-yhteensopivan laitteen käyttöohjeita video- ja audiosignaalin lähettämistä varten tarvittavia asetuksia
varten.
[B] Ei merkintää “HDMI (ARC)”
HDMI IN
OPTICAL
OUT
TV
OPTICAL
DIGITAL
AUDIO IN
AV OUT
TV(ARC)
B
A
Televisio
Liitäntä HDMI-yhteensopivasta laitteesta
HDMI OUT
BD/DVD
AV IN
A
Esim. Blu-ray levysoitin
∫ HDMI-läpivienti valmiustilassa
Vaikka päälaite on valmiustilassa, lähetetään audio- ja/tai videosignaali HDMI AV IN -liitäntään liitetystä laitteesta televisioon,
joka on liitetty HDMI AV OUT -liitäntään (ääntä ei lähetetä tästä järjestelmästä).
∫ 3D-yhteensopivuus
Yhteensopiva täysteräväpiirtoisen 3D-television ja Blu-ray-levysoittimen kanssa.
≥ Päälaite voi läpiviedä 3D-videosignaalia 3D-yhteensopivasta Blu-ray levysoittimesta FULL HD 3D -televisioon.
SC-HTB680EG_RQT9920-H_fin.book 70 ページ 2014年3月4日 火曜日 午後7時12分

Alkuohjeet
RQT9920
71
Tällä järjestelmällä ei voida läpiviedä 4K-sisältöä 4K-yhteensopivasta laitteesta 4K ultrateräväpiirtotelevisioon.
Voit kuitenkin yhdistää järjestelmän 4K ultrateräväpiirtotelevisioon nauttiaksesi 4K-sisällöstä.
A HDMI-kaapeli
≥ Tutustu 4K ultrateräväpiirtotelevision (VIERA) ja 4K/60p-yhteensopivan laitteiston käyttöohjeisiin asetuksia sekä 4K-sisällön
toistoa varten.
≥ Nauttiaksesi monikanavaisesta lähetyksestä tästä järjestelmästä, aseta toisen laitteiston äänilähtö bittivirtaan.
≥ Audiosignaalin tulo tähän järjestelmään on enintään 5.1-kanavainen.
Infrapunavastaanotinyhteyden kanssa voidaan lähettää tämän järjestelmän kaukosäätimen
signaalianturin avulla vastaanotettu signaali television anturiin.
Käytä television kaukosäädintä tämän järjestelmän kaukosäätimen signaalianturin
toimintasäteen sisällä.
≥Jos haluat tietoja toimintasäteestä, katso sivua 68.
Yhdistä jakkiliitin päälaitteen Ir SYSTEM -liitäntään.
Liittäminen 4K ultrateräväpiirtotelevisioon
HDMI IN (ARC)
HDMI OUT
HDMI IN (4K)
AV OUT
TV(ARC)
A
A
Esim.,Blu-ray levysoitin
(4K-yhteensopiva)
Televisio
Yhdistä molemmat
päät ARC-
yhteeensopiviin
HDMI-liittimiin.
(4K-yhteensopiva)
Infrapunavastaanottimen käyttö
Ir SYSTEM
Infrapunalähetin
SC-HTB680EG_RQT9920-H_fin.book 71 ページ 2014年3月4日 火曜日 午後7時12分

72
RQT9920
Sijoita infrapunalähetin television kaukosäätimen signaalianturin
näkyviin.
≥ Jos haluat tietoja television kaukosäätimen signaalianturin sijaintipaikasta, katso television käyttöohjeita.
Tähtää television kaukosäätimellä tämän laitteen kaukosäätimen anturiin
ja ohjaa televisiota.
≥ Jos haluat tietoja tämän järjestelmän kaukosäätimen signaalianturin sijaintipaikasta, katso sivua 68.
≥ Varmista, että puhdistat tarranauhan kiinnityspaikan huolellisesti.
≥ Jos irrotat tarranauhan, pinta voi vahingoittua ja tarttunutta liimaa saattaa jäädä. Kun olet tarkistanut, että televisio toimii
kunnolla, kiinnitä se tarranauhan avulla.
≥ Toimitettu infrapunavastaanotin on yhteensopiva vain Panasonicin televisioiden kanssa.
∫ Sijoitusesimerkki
Päälaitteen takana:
≥ Kytke vasta sen jälkeen, kun kaikki muut liitännät on suoritettu.
A Kodin verkkopistorasiaan
B Verkkokaapeli (toimitettu)
≥Tämä järjestelmä kuluttaa hieman verkkovirtaa (> 90) myös pois päältä kytkettynä. Virran
säästämiseksi, jos et aio käyttää laitetta pitkään aikaan, irrota se verkkopistorasiasta.
Verkkokaapelin liitäntä
Television
kaukosäätimen
signaalianturi
Tarranauha (toimitettu)
AC IN
Energian säästö
Päälaite on suunniteltu siten, että se kuluttaa vähän virtaa ja säästää energiaa.
≥ Päälaite siirtyy automaattisesti valmiustilaan, kun ei syötetä mitään signaalia tai ei suoriteta
mitään toimintoja noin 20 minuuttiin. Katso sivua 84, “AUTO POWER DOWN” tämän toiminnon
pois päältä kytkemiseksi.
SC-HTB680EG_RQT9920-H_fin.book 72 ページ 2014年3月4日 火曜日 午後7時12分

Alkuohjeet
Varotoimet
RQT9920
73
Vaihe 2 Sijoittaminen
≥ Älä kannata päälaitetta yhdellä kädellä, jotta vältetään vammat; saatat pudottaa päälaitteen sitä kannettaessa.
≥ Vaurioiden tai naarmujen estämiseksi aseta tasolle pehmeä kangas ja suorita kokoaminen sen päällä.
Kun kannetaan aktiivista alibassokaiutinta
Jotta vältetään häiriöt, säilytä seuraavat etäisyydet samaa radiotaajuutta (kaista 2,4 GHz)
käyttävien päälaitteen/aktiivisen alibassokaiuttimen ja muiden elektronisten laitteiden välillä.
Varotoimet turvallisuuden takaamiseksi
Vaaditaan ammattitaitoinen asennus.
Asennusta ei saa koskaan suorittaa kukaan muu kuin ammattitaitoinen asentaja.
PANASONIC EI KORVAA MITÄÄN OMAISUUSVAHINKOJA JA/TAI VAKAVIA VAMMOJA,
MUKAAN LUKIEN KUOLEMA, JOTKA AIHEUTUVAT SOPIMATTOMASTA ASENNUKSESTA
TAI VIRHEELLISESTÄ KÄSITTELYSTÄ.
≥ Varmista, että asennat päälaitteen näiden käyttöohjeiden mukaisesti.
≥ Kiinnitä asennuspaikan rakenteeseen ja materiaaleihin sopivilla tekniikoilla.
Varoitus
≥ Tätä järjestelmää on käytettävä ainoastaan näiden ohjeiden mukaisesti. Ohjeiden noudattamatta
jättäminen voi aiheuttaa vahinkoja vahvistimeen ja/tai kaiuttimeen sekä aikaansaada
tulipalovaaran. Ota yhteyttä ammattitaitoiseen huoltohenkilöstöön, jos tapahtuu vahinko tai jos
havaitset äkillisen muutoksen toiminnassa.
≥ Älä yritä kiinnittää päälaitetta seinään muilla menetelmillä kuin mitä on kuvattu tässä oppaassa.
Aktiivinen alibassokaiutin
A Älä kanna aktiivista alibassokaiutinta tästä
aukosta.
Sisällä olevat osat voivat vahingoittua.
B Pidä aina kiinni aktiivisen alibassokaiuttimen pohjasta,
kun siirrät sitä.
Langattoman häiriöt
C Päälaite/Aktiivinen alibassokaiutin
D Langaton reititin, johdoton puhelin ja
muut elektroniset laitteet: noin 2 m
A
B
D
C
SC-HTB680EG_RQT9920-H_fin.book 73 ページ 2014年3月4日 火曜日 午後7時12分

74
RQT9920
Valitse sijoitusmenetelmä, joka sopii sinulle parhaiten.
∫ Kun päälaite sijoitetaan television eteen
Päälaite voi estää tai häiritä television eri antureita (C.A.T.S.-anturi (Contrast Automatic Tracking
System), kaukosäätimen anturi, jne.) ja 3D Eyewear -lähettimiä 3D-yhteensopivassa televisiossa.
≥Jos tapahtuu häiriöitä, siirrä päälaite kauemmaksi televisiosta. Jos televisio ei vieläkään toimi kunnolla,
kokeile teline- tai seinäasennusta.
∫ Jos päälaite estää television kaukosäätimen anturia.
Yritä käyttää television kaukosäädintä eri kulmasta. Jos ongelma jatkuu, voit käyttää toimitettua
infrapunavastaanotinta signaaliyhteytenä televisioon. (> 71, 72)
≥ Sijoita aktiivinen alibassokaiutin muutaman metrin päähän päälaitteesta vaakasuoraan asentoon yläpaneeli ylöspäin.
≥ Älä käytä päälaitetta tai aktiivista alibassokaiutinta metallisessa kaapissa.
≥ Aktiivisen alibassokaiuttimen sijoittaminen liian lähelle seiniä tai nurkkia voi aiheuttaa basson voimistumista. Peitä seinät ja
ikkunat paksuilla verhoilla.
≥ Jos televisiossa havaitaan epäsäännöllisiä värejä, sammuta televisio noin 30 minuutiksi. Jos se jatkuu, siirrä päälaite ja
aktiivinen alibassokaiutin kauemmaksi televisiosta.
≥ Pidä magneettiset esineet kaukana. Magneettiset kortit, kellot, jne. voivat vahingoittua, jos ne laitetaan liian lähelle päälaitetta
ja aktiivista alibassokaiutinta.
Sijoitusmenetelmän valinta
Kun päälaite sijoitetaan
telineeseen tai pöydälle
≥ Sijoita päälaite tasaiselle
vaakasuoralle pinnalle.
Kun kiinnitetään päälaite
seinään
≥ Sijoita päälaite tasaiselle
pystysuoralle pinnalle.
Sivu 75
Sivu 76
SC-HTB680EG_RQT9920-H_fin.book 74 ページ 2014年3月4日 火曜日 午後7時12分

Alkuohjeet
Varotoimet
RQT9920
75
Tarvittavat lisävarusteet (kaupallisesti saatavilla)
≥Putoamista estävä naru................................................................................................................. k 2
≥Silmukkaruuvit (putoamista estävän narun kiinnittämistä varten).................................................. k 2
≥ Käytä kaupallisesti saatavilla olevia ruuveja, jotka kestävät yli 26 kg.
≥ Käytä narua, joka kestää yli 26 kg (jonka halkaisija on noin 1,5 mm).
Kiinnitä naru päälaitteeseen.
A Naru
§
§ Jos narua ei voida pujottaa aukkojen läpi, yritä taivuttamalla narua 2 kohdasta noin 5 mm kärjestä 45
o
:
een kulmassa (kuten osoitetaan yllä).
Sijoita päälaite haluttuun asentoon ja kiinnitä kukin naru telineeseen tai
pöytään.
≥ Varmista, että naru on mahdollisimman tiukalla.
≥ Älä aseta päälaitetta nojaamaan televisioon tai seinään.
B Silmukkaruuvi
≥Kiinnitä paikkaan, joka kestää yli 26 kg.
≥Päälaitteen sijoittamisen mukaan silmukkaruuvin kiinnitysasento voi vaihdella.
Kun päälaite sijoitetaan telineeseen tai pöydälle
SC-HTB680EG_RQT9920-H_fin.book 75 ページ 2014年3月4日 火曜日 午後7時12分

76
RQT9920
Päälaite voidaan asentaa seinälle toimitettujen seinäasennuspidikkeiden ym. avulla. Varmista, että
käytetyt ruuvit ja seinä ovat riittävän vahvoja, jotta ne voivat tukea vähintään 26 kg.
Ruuveja ja muita osia ei toimiteta, koska tyyppi ja koko vaihtelevat suoritettavan asennuksen mukaan.
≥Katso vaihetta 3, jos haluat lisätietoja tarvittavista ruuveista.
≥Muista kiinnittää putoamista estävä naru lisäturvatoimenpiteenä.
Toimitetut varusteet
Tarvittavat lisävarusteet (kaupallisesti saatavilla)
≥Ruuvit seinäasennusta varten ..................................................................................................... k 2
≥Putoamista estävä naru............................................................................................................... k 2
≥Silmukkaruuvit (putoamista estävän narun kiinnittämistä varten)................................................ k 2
≥ Käytä narua, joka kestää yli 26 kg (jonka halkaisija on noin 1,5 mm).
Kiinnitä naru päälaitteeseen.
A Naru
§
§ Jos narua ei voida pujottaa aukkojen läpi, yritä taivuttamalla narua 2 kohdasta noin 5 mm kärjestä
45
o
:een kulmassa (kuten osoitetaan yllä).
Kun kiinnitetään päälaite seinään
∏ 2ruuvia ∏ 2 seinäasennuspidikettä
SC-HTB680EG_RQT9920-H_fin.book 76 ページ 2014年3月4日 火曜日 午後7時12分

Alkuohjeet
Varotoimet
RQT9920
77
Kiinnitä seinäasennuspidikkeet päälaitteeseen.
A Seinäasennuspidike (toimitettu)
B Ruuvi (toimitettu)
Poraa ruuvi seinään.
≥ Käytä alla osoitettuja mittoja ruuvauspisteiden merkitsemiseksi seinään.
≥ Jätä vähintään 100 mm:n tila päälaitteen yläpuolelle, jotta jää riittävästi tilaa päälaitteen kiinnittämistä varten.
≥ Sijoita päälaite siten, että sen oikealla puolella on vähintään 50 mm tyhjää tilaa. Jos ei, mahdollisesti ei voida saavuttaa
kosketusnäppäimiä.
≥ Varmista vesivaakaa käyttämällä, että molemmat asennusaukot ovat samalla vaakatasolla.
Etunäkymä (läpikuultava kuva)
C Vähintään 30 mm
D ‰4,0 mm
E ‰7,0 mm sitä ‰9,4 mm
F Seinä tai pylväs
G 1,6 mm sitä 2,5 mm
H 400 mm I 275 mm J 275 mm
K 27 mm L 110 mm M Seinäasennusaukko
SC-HTB680EG_RQT9920-H_fin.book 77 ページ 2014年3月4日 火曜日 午後7時12分

78
RQT9920
Kiinnitä päälaite tiukasti ruuviin (ruuveihin).
Kiinnitä naru seinään.
≥ Varmista, että naru on mahdollisimman tiukalla.
A Silmukkaruuvi
B Naru
TEE ÄLÄ
≥ Liikuta kaiutinta
siten, että ruuvi
saadaan tähän
asentoon.
≥ Tässä asennossa
kaiutin putoaa
todennäköisesti, jos
sitä liikutetaan
vasemmalle tai
oikealle.
SC-HTB680EG_RQT9920-H_fin.book 78 ページ 2014年3月4日 火曜日 午後7時12分

Alkuohjeet
Varotoimet
RQT9920
79
Vaihe 3 Langattomat yhteydet
Valmistelu
≥ Käynnistä päälaite.
Paina [BÍ CI].
Aktiivisen alibassokaiuttimen päällä/pois
päältä -painike [B Í C I]
Käytä tätä painiketta aktiivisen alibassokaiuttimen
kytkemiseksi päälle ja pois päältä.
C I:
Aktiivinen alibassokaiutin on päällä.
B Í:
Aktiivinen alibassokaiutin on pois päältä.
Aktiivinen alibassokaiutin kuluttaa vielä hieman
virtaa vaikka se sammutetaan (B, Í).
Tarkista, että langaton linkki
aktivoidaan.
WIRELESS LINK -osoitin palaa
Palaa punaisena:
Langatonta linkkiä ei ole aktivoitu.
Palaa vihreänä:
Langaton linkki on aktivoitu.
Vilkkuu vihreänä:
Aktiivinen alibassokaiutin yrittää aktivoida
langatonta linkkiä päälaitteen kanssa.
Langaton linkki aktivoidaan, kun päälaite ja aktiivinen
alibassokaiutin on molemmat kytketty päälle.
Käyttämällä Bluetooth
®
-yhteyttä voit kuunnella
ääntä Bluetooth
®
-audiolaitteesta tällä laitteella
langattomasti.
≥ Katso Bluetooth
®
-laitteen käyttöohjeita, jos haluat lisätietoja
Bluetooth
®
-laitteen liitännästä.
Valmistelu
≥ Kytke päälle Bluetooth
®
-ominaisuus kyseisessä
laitteessa ja sijoita laite lähelle päälaitetta.
Paina [ ] valitaksesi “BLUETOOTH”.
≥ Jos näytöllä osoitetaan “PAIRING”, siirry vaiheeseen 3.
Paina ja pidä painettuna kohtaa [ ],
kunnes näytöllä näytetään “PAIRING” .
Valitse “SC-HTB680” Bluetooth
®
-
laitteen Bluetooth
®
-valikosta.
≥ Jos pyydetään tunnuslukua (passkey) Bluetooth
®
-
laitteessa, syötä “0000”.
≥ Kun yhteys Bluetooth
®
-laitteeseen on valmis, yhdistetyn
laitteen nimi osoitetaan näytöllä muutaman sekunnin ajan.
≥ Voit rekisteröidä jopa 8 laitetta tämän järjestelmän kanssa.
Jos paritetaan 9. laite, korvataan pisimpään
käyttämättömänä ollut laite.
Paina [ ] siirtyäksesi Bluetooth
®
-
tilaan.
“BLUETOOTH READY” osoitetaan näytöllä.
Valitse “SC-HTB680” Bluetooth
®
-
laitteen Bluetooth
®
-valikosta.
∫ Bluetooth
®
-laitteen irti kytkeminen
Paina ja pidä painettuna [ ], kunnes näytöllä
osoitetaan “BLUETOOTH READY”.
≥ Kun valitaan kohta “BLUETOOTH” lähteeksi, tämä
järjestelmä yrittää ja yhdistää automaattisesti viimeksi
yhdistettyyn Bluetooth
®
-laitteeseen.
≥ Bluetooth
®
-laite kytketään irti, jos valitaan eri äänilähde
(esim. “TV”).
≥ Tämä järjestelmä voidaan yhdistää ainoastaan yhteen
laitteeseen kerrallaan.
≥ Äänenlaadun muuttamiseksi katso sivua 84 “LINK MODE”.
Aktiivisen
alibassokaiuttimen
langaton liitäntä
Bluetooth
®
-liitäntä
Bluetooth
®
paritus
Paritetun Bluetooth
®
-
laitteen yhdistäminen
SC-HTB680EG_RQT9920-H_fin.book 79 ページ 2014年3月4日 火曜日 午後7時12分

80
RQT9920
Ainoastaan NFC-yhteensopiville Bluetooth
®
-
laitteille (Android
TM
-laitteet)
Yksinkertaisesti koskettamalla NFC (Near Field
Communication)-yhteensopivaa Bluetooth
®
-
laitetta päälaitteessa, voit suorittaa loppuun kaikki
valmistelut Bluetooth
®
-laitteen rekisteröinnistä
yhteyden luomiseen.
Valmistelu
≥ Kytke päälle laitteen NFC-ominaisuus.
≥ Android-laiteversio, joka on vanhempi kuin 4.1,
vaatii asennettavaksi sovelluksen “Panasonic
Music Streaming” (Ilmainen).
1
Syötä “Panasonic Music Streaming” hakuruutuun
Google Play
TM
-palvelussa haun suorittamiseksi ja
valitse sitten “Panasonic Music Streaming”.
2 Käynnistä sovellus “Panasonic Music Streaming”
laitteessa.
– Noudata laitteen näytöllä näkyviä ohjeita.
– Käytä aina sovelluksen viimeisintä versiota.
Paina [ ] valitaksesi “BLUETOOTH”.
Kosketa jatkuvasti laitettasi
päälaitteen NFC-kosketusalueella
[]. (> 66)
Älä liikuta Bluetooth
®
-laitetta ennen kuin se antaa
äänimerkin, näyttää viestin tai reagoi jollain tavalla.
Kun Bluetooth
®
-laite on reagoinut, siirrä laite
kauemmaksi päälaitteesta.
≥ Kun Bluetooth
®
-laitteen rekisteröinti ja yhteys on valmis,
yhdistetyn laitteen nimi osoitetaan näytöllä muutaman
sekunnin ajan.
≥ NFC-kosketusalueen sijainti vaihtelee laitteen mukaan.
Kun yhteyttä ei voida luoda, vaikka Bluetooth
®
- laite on
koskettanut päälaitteen NFC-kosketusaluetta, muuta
laitteen asentoa. Tilanne voi parantua myös, jos lataat
erityisen sovelluksen “Panasonic Music Streaming” ja
käynnistät sen.
Käynnistä toisto Bluetooth
®
-
laitteessa.
≥ Jos kosketat muulla laitteella päälaitetta, voit päivittää
Bluetooth
®
-yhteyden. Aiemmin yhdistetty laite kytketään irti
automaattisesti.
≥ Kun yhteys on luotu, toisto käynnistyy mahdollisesti
automaattisesti käytettävän laitteen tyypistä riippuen.
≥ One-Touch-yhteys ei mahdollisesti toimi kunnolla
käytettävän laitteen tyypistä riippuen.
Kaukosäätimen koodi
Kun muut Panasonicin laitteet reagoivat tämän
järjestelmän kaukosäätimeen, muuta
kaukosäätimen koodia tässä järjestelmässä ja
kaukosäätimessä.
Valmistelu
≥ Sammuta kaikki muut Panasonic tuotteet.
≥ Käynnistä päälaite.
∫ Koodin asettamiseksi asentoon
“REMOTE 2”
Paina ja pidä painettuna [MUTE] ja [OK]
vähintään 4 sekuntia.
“REMOTE 2” osoitetaan näytöllä.
∫ Koodin asettamiseksi asentoon
“REMOTE 1”
Paina ja pidä painettuna [MUTE] ja [4]
vähintään 4 sekuntia.
“REMOTE 1” osoitetaan näytöllä.
One-Touch-yhteys
(Yhdistäminen toiminnolla
NFC)
SC-HTB680EG_RQT9920-H_fin.book 80 ページ 2014年3月4日 火曜日 午後7時12分

Alkuohjeet
Toimenpiteet
RQT9920
81
Toimenpi teet
Tämän järjestelmän
käyttö
Valmistelu
≥ Kytke päälle aktiivinen alibassokaiutin.
≥ Kytke televisio ja/tai liitetty laite päälle.
Paina [Í] kytkeäksesi päälaite
päälle.
Valitse lähde.
≥ Tätä kaukosäädintä ei voida käyttää liitettyjen laitteiden
toimenpiteitä varten.
∫ Kun valitaan “BLUETOOTH” lähteeksi
Bluetooth
®
-laitteessa:
Valitse tämä järjestelmä lähetyksen lähteeksi
yhdistetylle Bluetooth
®
-laitteelle ja käynnistä
toisto.
∫ Kun valitaan “BD/DVD” lähteeksi
Televisiossa ja yhdistetyssä laitteessa:
Valitse television tulo tälle järjestelmälle ja
käynnistä toisto liitetyssä laitteessa.
∫ Tämän järjestelmän
äänenvoimakkuuden säätäminen
Paina [i VOL j].
≥ Äänenvoimakkuuden alue: 0 sitä 100
∫ Äänen mykistämiseksi
Paina [MUTE].
≥ Mykistyksen aikana näytöllä näkyy “MUTE”.
≥ Peruuttaaksesi paina painiketta uudelleen tai säädä
äänenvoimakkuutta.
≥ Mykistys peruutetaan, jos päälaite kytketään pois päältä.
≥ Jos television kaiuttimista kuullaan ääntä, alenna television
äänenvoimakkuus minimiin.
Paina Valitaksesi
[INPUT]
“TV” --------------# “BD/DVD”
^--- “BLUETOOTH”(}
[] “BLUETOOTH”
SOUND
INPUT
SETUP
OK
Jos tämä järjestelmä ei toimi odotetulla
tavalla tai ääni on epätavallinen, asetusten
palauttaminen tehdasasetuksiin saattaa
ratkaista ongelman. (> 86)
SC-HTB680EG_RQT9920-H_fin.book 81 ページ 2014年3月4日 火曜日 午後7時12分

82
RQT9920
3D-ääni
Tämä järjestelmä tarjoaa tunteen, että ääni ja
kuva ovat yksi kokonaisuus.
≥ Sovellettavan tehosteen muuttamiseksi katso
kohtaa “Äänivalikko”. (> oikea)
≥ Dolby Virtual Speaker -tehoste on PÄÄLLÄ lukuun
ottamatta STEREO-tilaa.
≥ Kytkeäksesi pois päältä Dolby Virtual Speaker ja 3D-
tilaäänitehosteet, valitse “STEREO” äänitilaksi. (> oikea)
≥ Kytkeäksesi pois päältä 3D-tilaääni- ja clear-mode-
keskustelutehosteet, katso “3D CLR DIALOG”. (> 83)
Äänivalikko
Paina [SOUND] toistuvasti
valitaksesi äänitehoste.
Paina [3, 4] toistuvasti valitaksesi
haluttu asetus ja paina sitten [OK].
3D-ääni
Dolby
®
Virtual
Speaker
Tämän tehosteen kanssa voit
nauttia tilaäänitehosteesta,
joka muistuttaa 5.1-kanavaista.
3D-
tilaäänitehoste
Dolby Virtual Speaker-
tehosteen lisäksi Panasonic on
soveltanut omaa äänikentän
ohjaustekniikkaansa
laajentaen äänikenttää
eteenpäin, taaksepäin,
ylöspäin ja alaspäin tarjoten
syvän ja voimakkaan äänen,
joka sopii paremmin 3D-kuviin.
Clear-mode-
keskustelu
Urheiluselostukset ja
keskustelut televisionäytelmissä
kuullaan aivan kuten ääni tulisi
televisiosta aikaansaaden
tunteen, että ääni ja kuva ovat
yksi kokonaisuus.
Lisäksi keskustelu erottuu hyvin
muista äänistä normaalilla
äänenvoimakkuudella
tapahtuvan toiston aikana sekä
alennettaessa
äänenvoimakkuutta yökatselua
varten.
esim., 3D-äänikentän kuva
SOUND
MODE
STANDARD
: Sopii
parhaiten draama- ja
komediaesityksiin.
STADIUM: Tuottaa
realistisen äänen suoriin
urheilulähetyksiin.
MUSIC: Korostaa
soittimien ja laulun ääntä.
CINEMA
: Tuottaa
kolmiulotteisen äänen, joka
on ainutlaatuinen elokuville.
NEWS
: Korostaa uutisten
ja urheiluselostusten ääntä.
STEREO: Toista mitä
tahansa äänilähdettä
stereona.
SUBWOOFER
Voit säätää basson määrää.
Tämä laite valitsee
automaattisesti sopivimman
asetuksen toistettavan
lähteen tyypin mukaisesti.
LEVEL 1
LEVEL 2
: Oletus
2-kanavaiselle
äänilähteelle
LEVEL 3
: Oletus
monikanavaiselle
äänilähteelle
LEVEL 4
Tekemäsi asetus säilytetään
ja kutsutaan uudelleen joka
kerta, kun toistat
samantyyppistä lähdettä.
DIALOG
Säädä keskustelun tasoa.
LEVEL 1
LEVEL 2
LEVEL 3
LEVEL 4
“DIALOG”-kohtaa ei
osoiteta näytöllä, kun “3D
CLR DIALOG” asetetaan
asentoon “OFF”.
SC-HTB680EG_RQT9920-H_fin.book 82 ページ 2014年3月4日 火曜日 午後7時12分

Toimenpiteet
RQT9920
83
≥
Oletusasetus on alleviivattu. Muutetut asetukset säilytetään siihen
saakka, kun niitä muutetaan uudelleen ellei toisin osoiteta.
Voit tarkistaa tämänhetkisen äänimuodon.
Paina ja pidä painettuna [SOUND] vähintään
4 sekuntia.
H.BASS
Korosta harmonista
bassotehostetta.
ON
OFF
3D CLR
DIALOG
3D-selkotilan
keskusteluominaisuus luo
äänikentän, joka muistuttaa
televisioruudusta tulevaa ääntä
ja selventää keskustelua.
ON
:
3D-tilaääni-,
selkotilakeskustelu- ja Dolby
Virtual Speaker -tehoste
OFF: Dolby Virtual
Speaker -tehoste
Asetus asetetaan takaisin
asentoon “ON” joka kerta,
kun kytket päälaitteen päälle.
DUAL
AUDIO
Asettaa suosituimman
äänikanavatilan, kun tämä
järjestelmä vastaanottaa
kahta äänitilaa.
M1
: Ensisijainen
M2: Toissijainen
M1 + M2: Ensisijainen +
Toissijainen
Tämä tehoste toimii ainoastaan,
jos television tai soittimen
äänilähtö asetetaan asentoon
“Bitstream” ja äänilähteessä on
käytettävissä “Dolby Dual Mono”.
AGC
Automaattinen
vahvistuksensäätö estää
äkillisen voimakkaan
äänen vähentämällä
äänenvoimakkuustasoa
automaattisesti, kun tulo
on liian voimakas.
Tämä toiminto soveltuu
televisiolähetyksille, joiden
äänitaso vaihtelee.
ON
OFF
Jos ääni muuttuu
epäluonnolliseksi, valitse
“OFF”.
LOW VOL
MODE
Korostaa keskustelua alhaisella
äänenvoimakkuudella.
ON
OFF
Valitse “OFF” peruuttaaksesi
tämän tehosteen, jos
keskustelu ei kuulosta
luonnolliselta alhaisella
äänenvoimakkuudella.
Äänimuoto
DOLBY
DIGITAL
Äänilähteenä on Dolby
Digital.
DTS Äänilähteenä on DTS.
PCM MULTI
Äänilähteenä on
lineaarinen pulssikoodi.
PCM
Äänilähteenä on
2-kanavainen
pulssikoodimodulaatio.
SC-HTB680EG_RQT9920-H_fin.book 83 ページ 2014年3月4日 火曜日 午後7時12分

84
RQT9920
Asetusvalikko
Paina [SETUP] toistuvasti
valitaksesi asetuskohta.
Paina [3, 4] toistuvasti valitaksesi
haluttu asetus ja paina sitten [OK].
≥ Oletusasetus on alleviivattu. Muutetut asetukset säilytetään
siihen saakka, kun niitä muutetaan uudelleen ellei toisin
osoiteta.
DIMMER
Himmentää näytön
5 sekunnin toimettoman
jakson jälkeen.
ON
OFF
AUTO
POWER
DOWN
Päälaite kytkeytyy
automaattisesti pois
päältä, jos ei havaita
äänituloa etkä käytä sitä
noin 20 minuuttiin.
ON
OFF
VOL
LIMITATION
Asettaa
äänenvoimakkuuden rajan
asentoon 50, kun kytket
päälaitteen päälle, vaikka
ennen laitteen
sammuttamista se on
asetettu asentoon, joka on
enemmän kuin 50.
ON
OFF
BLUETOOTH
STANDBY
Tämän toiminnon avulla
voit yhdistää paritetun
Bluetooth
®
-laitteen, kun
päälaite on valmiustilassa.
ON
OFF
Päälaite kytketään päälle
automaattisesti, kun
yhdistät paritetun
Bluetooth
®
-laitteen.
LINK
MODE
Muuta Bluetooth
®
-
yhteyslinkkitila yhteyden
tyypille sopivaksi.
Varmista, että irrotat
tämänhetkisen yhdistetyn
laitteen (näytöllä näkyy
“BLUETOOTH READY”).
MODE 1: Korostus
liitettävyydessä.
MODE 2
: Korostus äänen
laadussa.
VIERA
LINK
Kytke VIERA Link-toiminto
päälle.
ON
OFF
Valitse “OFF”, kun HDAVI
Control -laitteesi ei toimi
kunnolla tällä
järjestelmällä. ARC
kytketään pois käytöstä.
Yhdistä optinen
digitaalinen audiojohto.
Sammuta kaikki yhdistetyt
laitteet ja kytke ne
uudelleen päälle
asetuksen muuttamisen
jälkeen.
SC-HTB680EG_RQT9920-H_fin.book 84 ページ 2014年3月4日 火曜日 午後7時12分

Toimenpiteet
RQT9920
85
Linkitetyt toimenpiteet television kanssa
(VIERA Link “HDAVI Control
TM
”)
Valmistelu
1
Vahvista, että HDMI-liitäntä on tehty. (
>
69, 70)
2 Aseta “HDAVI Control” toiminnot liitettyyn
laitteeseen (esim., televisio).
3 Optimaalisia “HDAVI Control” -toimenpiteitä
varten muuta seuraavat asetukset liitetyssä
televisiossa
§1
.
≥ Aseta kaiuttimen oletusasetukset tähän
järjestelmään.
§2
≥ Aseta kaiuttimen valinta-asetukset tähän
järjestelmään.
4 Kytke päälle kaikki “HDAVI Control” -
yhteensopivat laitteet ja valitse television tulo
tälle järjestelmälle siten, että “HDAVI Control”
toimii kunnolla.
5 Jos laite on liitetty HDMI AV IN -liitäntään,
käynnistä toisto tarkistaaksesi, että kuva
näytetään televisiossa oikein.
Kun liitäntää tai asetuksia muutetaan, toista
tämä menettelytapa.
§1 Asetusten saatavuus ja toiminta saattavat vaihdella
televisiosta riippuen. Katso television käyttöohjeita, jos
haluat tarkempia tietoja.
§2 Jos televisiossa on oletuskaiutinasetus VIERA Link -
asetuksen kohdissa, tämän järjestelmän valitseminen
oletuskaiuttimeksi muuttaa kaiuttimen valinnan tähän
järjestelmään automaattisesti.
≥ VIERA Link “HDAVI Control” perustuu ohjaustoimintoihin,
joita voidaan käyttää HDMI:llä, joka on puolestaan teollinen
standardi nimeltään HDMI CEC (Consumer Electronics
Control). Kyseessä on ainutlaatuinen toiminto, jonka
olemme kehittäneet ja lisänneet. Siten sen toimintaa ei
voida taata muiden valmistajien laitteissa, jotka tukevat
standardia HDMI CEC.
≥ Tämä laite tukee toimintoa “HDAVI Control 5”.
“HDAVI Control 5” on standardi Panasonicin HDAVI Control
yhteensopiville laitteille. Tämä standardi on yhteensopiva
Panasonicin perinteisten HDAVI-laitteiden kanssa.
≥ Ole hyvä ja tutustu yksittäisiin käyttöoppaisiin muiden
valmistajien laitteiden VIERA Link-toiminnon tuettavuuden
selvittämiseksi.
Varmistaaksesi äänen lähettäminen tästä
järjestelmästä, kytke päälaite päälle käyttämällä
television kaukosäädintä ja valitsemalla kohta
kotiteatteri VIERA Link -valikon kaiutinvalikosta.
Asetusten saatavuus tai toiminta saattavat
vaihdella televisiosta riippuen. Katso television
käyttöohjeita, jos haluat tarkempia tietoja.
∫ Kaiuttimen säätö
Voit valita tuleeko äänilähtö tästä järjestelmästä vai
television kaiuttimista television valikkoasetusten avulla.
Kotiteatteri
Tämä järjestelmä on aktiivinen.
≥ Kun päälaite on valmiustilassa, television kaiuttimien
vaihtaminen tähän järjestelmään VIERA Link -valikossa
kytkee automaattisesti päälaitteen päälle.
≥ Voit säätää tämän järjestelmän äänenvoimakkuuden
asetusta television kaukosäätimen äänenvoimakkuus- tai
mykistyspainikkeella.
≥ Jos kytket päälaitteen pois päältä, television kaiuttimet
aktivoidaan automaattisesti.
≥ Ääni lähetetään automaattisesti tästä järjestelmästä, jos
televisio on yhteensopiva VIERA Link “HDAVI Control 4” -
toiminnon tai uudemman kanssa.
Televisio
Television kaiuttimet ovat aktiivisia.
≥
Tämän järjestelmän äänenvoimakkuus asetetaan minimiin.
∫ Automaattinen tulon vaihto
Kun suoritetaan seuraavat toimenpiteet, päälaite
muuttaa automaattisesti tulon vastaavaan lähteeseen.
j
Kun toisto käynnistyy HDMI-liitetyssä laitteessa.
§3
j
Kun vaihdetaan television tuloa tai television kanavaa.
§3 Jos kaiuttimen lähtöasetus televisiossa asetetaan tähän
järjestelmään, televisio ja päälaite kytkeytyvät päälle
automaattisesti (Virta päällä -linkki).
∫
Virta pois päältä -linkki
Kun televisio sammutetaan, myös päälaite
sammuu automaattisesti. (Tämä toiminto ei toimi,
kun lähteenä on Bluetooth
®
.)
∫
Automaattinen huulisynkronointitoiminto
(toiminnolle HDAVI Control 3 tai uudemmille
versioille)
Viive äänen ja videon välillä säädetään
automaattisesti lisäämällä aikaviivettä äänilähtöön
ja siten voit nauttia sujuvasta äänestä kuvalle.
Viivetiedot asetetaan automaattisesti, jos televisio on
yhteensopiva toiminnon VIERA Link “HDAVI Control 3” tai
uudemman kanssa ja VIERA Link on asetettu päälle.
Mikä VIERA Link “HDAVI Control” on?
VIERA Link “HDAVI Control” on hyödyllinen
toiminto, joka tarjoaa linkitettyjä
toimenpiteitä tämän laitteen ja Panasonic
television (VIERA) kanssa “HDAVI Control”
-toiminnolla.
Voit käyttää tätä toimintoa liittämällä
laitteisto HDMI-kaapelin avulla. Katso
liitetyn laitteen käyttöohjeita toimintaan
liittyviä yksityiskohtia varten.
Mitä voit tehdä toiminnolla
VIERA Link “HDAVI Control”
SC-HTB680EG_RQT9920-H_fin.book 85 ページ 2014年3月4日 火曜日 午後7時12分

86
RQT9920
Viitetietoja
Vianetsintä
Ennen huoltopalvelun pyytämistä suorita
seuraavat tarkistukset. Jos sinulla on kysymyksiä
joistain tarkistuskohdista tai mikäli seuraavan
oppaan osoittamat ratkaisut eivät ratkaise
ongelmaa, pyydä lisäohjeita jälleenmyyjältä.
Ei virtaa.
≥ Irrota verkkokaapeli noin 10 sekunniksi ennen
sen kytkemistä uudelleen.
≥ Päälaitteen päälle kytkemisen jälkeen, jos
päälaite sammuu välittömästi, irrota
verkkokaapeli ja ota yhteyttä jälleenmyyjään.
≥
Jos päälaite ei kytkeydy päälle käynnistämällä
televisio (HDAVI Control), kytke päälaite päälle
manuaalisesti.
Jos ongelma jatkuu, katso kohtaa “HDMI” sivulla
“Vianetsintä”.
Kaukosäädin ei toimi kunnolla.
≥ Akku on tyhjentynyt. Vaihda tilalle uusi. (> 68)
≥ Eristysliuskaa ei mahdollisesti ole poistettu.
Poista eristysliuska. (> 68)
≥ Saatat joutua asettamaan uudelleen
kaukosäätimen koodin kaukosäätimen
paristojen vaihtamisen jälkeen. (> 80)
≥ Käytä kaukosäädintä oikean toimintasäteen
sisällä. (> 68)
≥ Tarkista mikä kaukosäätimen signaalianturi on
toiminnassa seuraavalla toimenpiteellä.
jKosketa jatkuvasti kohtaa [INPUT]
päälaitteessa vähintään 4 sekuntia. Näytöllä
näytetään “ON TABLE” tai “ON WALL”
vähintään 4 sekuntia.
jKatso sivulta 68 “Tietoja kaukosäätimen
signaalianturista” kaukosäätimen
signaalianturin sijainti.
Päälaite siirretään automaattisesti
valmiustilaan.
“AUTO POWER DOWN”-toiminto on päällä.
Päälaite siirtyy automaattisesti valmiustilaan, kun
ei syötetä mitään signaalia tai ei suoriteta mitään
toimintoja noin 20 minuuttiin. Katso sivua 84
tämän toiminnon pois päältä kytkemiseksi.
Päälaite kytketään pois päältä, kun valitaan
television kaiuttimet kaiuttimen säädössä.
Tämä on normaali ominaisuus, kun käytetään
toimintoa VIERA Link (HDAVI Control 4 tai uudempi).
Muista lukea television käyttöohjeista tarkemmat
tiedot sen virransäästöominaisuudesta. (
>
85)
Pääyksikön kytkimet eivät toimi.
[Í/I], [j VOL i], [INPUT] ja [ ] päälaitteessa
ovat kosketusnäppäimiä. Kosketa kytkimiä
sormellasi. Ne eivät mahdollisesti toimi, jos niitä
käytetään kynsillä tai hansikkaiden kanssa.
Tämä järjestelmä ei toimi kunnolla.
Jos HDMI-kaapeli liitetään väärään liitäntään
(HDMI AV IN tai HDMI AV OUT), tämä järjestelmä
ei toimi kunnolla. Kytke päälaite pois päältä, irrota
verkkokaapeli ja liitä HDMI-kaapeli (kaapelit)
uudelleen. (> 69, 70)
VIERA Link -toimintoon liittyvät toimenpiteet
eivät toimi kunnolla.
≥ Tarkista VIERA Link -asetus liitetyssä laitteessa.
j
Kytke VIERA Link -toiminto liitetyssä laitteessa.
jValitse tämä järjestelmä kaiuttimeksi
television VIERA Link -valikossa.
≥ Oletko kytkenyt VIERA Link -asetukset pois
päältä? (> 84)
≥ Kun HDMI-liitäntöjä muutetaan sähkökatkoksen
jälkeen tai sen jälkeen, kun verkkokaapeli on
poistettu, VIERA Link -toimenpiteet eivät
mahdollisesti toimi kunnolla.
jKytke päälle kaikki laitteet, jotka on liitetty
televisioon HDMI-kaapelilla, ja kytke sitten
televisio päälle.
jKytke VIERA Link -asetukset pois päältä
televisiossa ja kytke se sitten päälle
uudelleen. Jos haluat lisätietoja, katso
television käyttöohjeita.
j
Samalla kun päälaite ja televisio on liitetty HDMI-
kaapelilla, kytke televisio päälle ja irrota sitten
päälaitteen verkkokaapeli ja liitä se uudelleen.
Palataksesi tehtaan esiasetuksiin.
Kun päälaite on päällä, kosketa jatkuvasti kohtaa
[Í/I] päälaitteessa vähintään 4 sekuntia.
(“RESET” näytetään näytöllä, kun tämä
järjestelmä resetoidaan.)
Jos tämä järjestelmä ei toimi odotetulla
tavalla, asetusten palauttaminen
tehdasasetuksiin saattaa ratkaista ongelman.
≥ Kaukosäätimen koodi palautuu asentoon
“REMOTE 1”, kun tämä järjestelmä
palautetaan tehdasasetuksiin. Kaukosäätimen
koodin muuttamiseksi katso sivua 80.
Yleinen käyttö
HDMI
SC-HTB680EG_RQT9920-H_fin.book 86 ページ 2014年3月4日 火曜日 午後7時12分

Viitetietoja
RQT9920
87
Ensimmäisten sekuntien aikana ei voida
kuulla ääntä, kun käytetään HDMI-liitäntää.
Tämä saattaa tapahtua DVD-videon
kappaletoiston aikana. Muuta digitaalisen
äänilähdön asetus liitetyssä laitteessa asennosta
“Bitstream” asentoon “PCM”.
Kun käytetään erimerkkistä HDMI-
yhteensopivaa laitetta, päälaite käyttäytyy
mahdollisesti oudolla tavalla.
HDAVI Control-komennot saattavat käyttää erilaista
signaalia laitteen merkistä riippuen. Kyseisessä
tapauksessa kytke VIERA Link pois päältä. (
>
84)
Kun päälaite kytketään päälle tai pois päältä, ääni
tai video saattaa kytkeytyä hetkellisesti pois päältä.
Kun päälaite kytketään päälle tai pois päältä, on
normaalia, että ääni tai video saattaa kytkeytyä
hetkellisesti pois päältä. Tämä ei ole toimintahäiriö.
Näin saattaa tapahtua, kun HDMI-liitännällä
yhdistettävä laite ei tue Panasonicin VIERA Link -
ominaisuutta (HDAVI Control 3 tai uudempi).
Ei voida suorittaa laitteiden paritusta.
Tarkista Bluetooth
®
-laitteen tila.
Laitetta ei voida liittää.
≥ Laitteen paritus ei onnistunut tai rekisteröinti on
korvattu. Yritä parittaa laite uudelleen. (> 79)
≥ Tämä järjestelmä on mahdollisesti liitetty eri
laitteeseen. Irrota toinen laite ja yritä parittaa
laite uudelleen.
Laite on liitetty, mutta ääntä ei voida kuulla
tämän järjestelmän kautta.
Joillekin sisäisille Bluetooth
®
-laitteille sinun tulee
asettaa äänilähtö asentoon “SC-HTB680”
manuaalisesti. Katso laitteen käyttöohjeita, jos
haluat tarkempia tietoja.
Ääni keskeytyy.
≥ Laite on 10 m:n viestintäalueen ulkopuolella.
Tuo Bluetooth
®
-laite lähemmäksi päälaitetta.
≥ Poista mahdolliset esteet päälaitteen ja laitteen
väliltä.
≥
Taajuuskaistaa 2,4 GHz käyttävät muut laitteet
(langaton reititin, mikroaaltouuni, langaton
puhelin, ym.) häiritsevät. Siirrä Bluetooth
®
-laite
lähemmäksi päälaitetta ja etäälle muista laitteista.
≥
Valitse “TILA1” vakaata viestintää varten. (
>
84)
One-Touch-yhteys (NFC-ominaisuus) ei toimi.
Varmista, että päälaite ja toisen laitteen NFC-
ominaisuus on kytketty päälle. (> 80)
Ei ääntä (tai kuvaa).
≥ Kytke mykistys pois päältä. (> 81)
≥ Tarkista liitännät muihin laitteisiin. (> 69, 70)
≥ Varmista, että vastaanotettava audiosignaali on
yhteensopiva tämän järjestelmän kanssa.
(> 90)
≥ Kytke tämä laite pois päältä ja sitten päälle
uudelleen.
≥ Jos päälaite liitetään televisioon ainoastaan
HDMI-kaapelilla, varmista, että television HDMI-
liitännässä on merkintä “HDMI (ARC)”. Mikäli ei,
liitä optisella digitaalisella audiojohdolla.
(> 69, 70)
≥
Jos päälaite liitetään Panasonicin televisioon ja
kytketään päälle päälaitteen kosketusnäppäimellä
tai kaukosäätimellä, ääntä ei mahdollisesti
lähetetä tästä järjestelmästä. Kyseisessä
tapauksessa kytke päälaite päälle television
kaukosäätimellä. (
>
85)
≥ Jos liitännät ovat oikein, ongelma saattaa olla
johdoissa. Suorita liitännät uudelleen eri
johdoilla.
≥ Tarkista äänilähdön asetukset liitetyssä
laitteessa.
Kaksoisääntä ei voida muuttaa pääasiallisesta
toissijaiseen.
Jos liitetystä laitteesta vastaanotettu ääni ei ole
“Dolby Dual Mono” tai lähtöasetus ei ole
“Bitstream”, asetusta ei voida muuttaa tästä
järjestelmästä. Muuta asetus liitetyssä laitteessa.
Äänenvoimakkuutta alennetaan, kun päälaite
kytketään päälle.
“VOL LIMITATION” on päällä.
Jos päälaite kytketään pois päältä
äänenvoimakkuusasetuksen ollessa ylemmässä
puolikkaassa (yli 50), päälaite alentaa
äänenvoimakkuuden automaattisesti keskiasentoon
(50), kun laite kytketään päälle. (
>
84)
Keskustelu on liian hellittämätön tai
keskustelu ei kuulosta luonnolliselta.
Tämän järjestelmän tehtävänä on aikaansaada
keskustelu erottuvaksi, kun äänenvoimakkuus on
alhainen. (> 83)
Bluetooth
®
Ääni
SC-HTB680EG_RQT9920-H_fin.book 87 ページ 2014年3月4日 火曜日 午後7時12分

88
RQT9920
Ei ole ääntä.
Päälaitteen virta kytkeytyy pois päältä
automaattisesti.
(Kun päälaite havaitsee ongelman, aktivoidaan
turvatoimenpide ja päälaite siirtyy automaattisesti
valmiustilaan.)
≥ Vahvistimessa on ongelma.
≥ Onko äänenvoimakkuus erittäin korkea?
Mikäli näin, alenna äänenvoimakkuutta.
≥ Onko järjestelmä sijoitettu erittäin kuumaan
paikkaan?
Mikäli näin, siirrä järjestelmä kylmempään
paikkaan ja odota hetken aikaa sekä yritä sitten
kytkeä uudelleen päälle.
Jos ongelma jatkuu, tarkista näyttö, sammuta
tämä järjestelmä, poista verkkokaapeli ja ota
yhteyttä jälleenmyyjään. Varmista, että muistat
osoitetun näytön, kun otat yhteyttä
jälleenmyyjään.
“F61”
≥ Järjestelmän vahvistimessa on ongelma.
≥ Kytke irti verkkokaapeli ja ota yhteyttä
jälleenmyyjään.
“F70 HDMI”
≥ Tarkista HDMI-yhteys.
≥ Kytke päälaite pois päältä ja sitten kytke se
päälle uudelleen.
≥ Irrota HDMI-kaapeli.
“F76”
≥ Virtalähteessä on ongelma.
≥ Kytke irti verkkokaapeli ja ota yhteyttä
jälleenmyyjään.
Ei virtaa.
Varmista, että aktiivisen alibassokaiuttimen
verkkokaapeli on liitetty kunnolla.
Alibassokaiuttimen päälle kytkemisen jälkeen
se sammuu välittömästi.
Irrota verkkokaapeli ja ota yhteyttä
jälleenmyyjään.
Alibassokaiuttimesta ei tule ääntä.
≥ Tarkista, että aktiivinen alibassokaiutin on
kytketty päälle.
≥ Tarkista, että WIRELESS LINK palaa vihreänä.
(> 79)
WIRELESS LINK osoitin palaa punaisena.
≥ Päälaitteen ja aktiivisen alibassokaiuttimen
välillä ei ole linkkiä.
jTarkista, että päälaite on kytketty päälle.
jKytke aktiivinen alibassokaiutin pois päältä ja
kytke sitten päälle. Vaihtoehtoisesti kytke
aktiivinen alibassokaiutin pois päältä, irrota
verkkokaapeli ja liitä se sitten takaisin.
≥ Aktiivista alibassokaiutinta ja päälaitetta ei
mahdollisesti ole paritettu oikein. Kokeile
seuraavaa toimenpidettä. (Langaton paritus)
1 Kytke päälaite ja aktiivinen alibassokaiutin
päälle.
2 Paina ja pidä painettuna [ID SET] aktiivisen
alibassokaiuttimen takaosassa vähintään
3 sekuntia.
(WIRELESS LINK osoitin vilkkuu
punaisena.)
3 Samalla kun painetaan jatkuvasti kohtaa
[INPUT] kaukosäätimessä, kosketa
jatkuvasti kohtaa [VOL i] päälaitteessa
vähintään 4 sekuntia (näytöllä näytetään
“SUBWOOFER PAIRING”).
≥ Kun langaton paritus onnistuu, näytöllä näytetään
“PAIRED” noin 2 sekuntia ja WIRELESS LINK -
osoitin palaa vihreänä.
4 Kytke päälaite pois päältä ja päälle.
≥ Ota yhteyttä jälleenmyyjään, jos ongelma
jatkuu.
Päälaitteen näytöt
Aktiivinen alibassokaiutin
SC-HTB680EG_RQT9920-H_fin.book 88 ページ 2014年3月4日 火曜日 午後7時12分

Viitetietoja
RQT9920
89
Tietoja Bluetooth
®
:sta
∫ Käytetty taajuuskaista
Tämä järjestelmä käyttää 2,4 GHz:n taajuuskaistaa.
∫ Laitteen sertifiointi
≥ Tämä järjestelmä on taajuuden rajoituksia
koskevien vaatimusten mukainen ja se on
sertifioitu taajuutta koskevien lakien mukaisesti.
Täten ei tarvita langatonta lupaa.
≥ Alla kuvatut toimenpiteet ovat rangaistavia lain
mukaan joissain maissa:
jLaitteen purkaminen tai muokkaaminen.
jTeknisiä tietoja koskevien osoitusten
poistaminen.
∫ Käytön rajoitukset
≥ Langatonta lähetystä ja/tai käytettävyyttä
kaikkien Bluetooth
®
-toiminnollisten laitteiden
kanssa ei taata.
≥
Kaikkien laitteiden tulee olla Bluetooth SIG -yhtiön
asettamien standardien vaatimusten mukaisia.
≥ Laitteen asetuksista ja teknisistä tiedoista
riippuen sitä ei mahdollisesti voida yhdistää tai
jotkut toimenpiteet ovat erilaisia.
≥
Tämä järjestelmä tukee Bluetooth
®
-toiminnon
turvallisuusominaisuuksia. Kuitenkin
käyttöympäristöstä ja/tai asetuksista riippuen tämä
suoja ei mahdollisesti ole riittävä. Lähetä tietoja
langattomasti tähän järjestelmään varovasti.
≥ Tämä järjestelmä ei voi lähettää tietoja
Bluetooth
®
-laitteeseen.
∫ Käyttöalue
Käytä tätä laitetta enintään 10 m:n alueella.
Alue voi pienentyä ympäristön, esteiden tai
häiriöiden vuoksi.
∫ Häiriöt muista laitteista
≥
Tämä järjestelmä ei mahdollisesti toimi kunnolla ja
esiintyy ongelmia kuten kohinaa ja äänen
vaihteluita radioaaltohäiriöiden vuoksi, jos päälaite
sijoitetaan liian lähelle toisia Bluetooth
®
-laitteita tai
laitteita, jotka käyttävät 2,4 GHz:n kaistaa.
≥ Tämä järjestelmä ei mahdollisesti toimi
kunnolla, jos läheisen lähetysaseman ym.
radioaallot ovat liian voimakkaita.
∫ Suunniteltu käyttö
≥ Tämä järjestelmä on tarkoitettu ainoastaan
tavalliseen käyttöön.
≥ Älä käytä tätä järjestelmää lähellä laitteistoa tai
ympäristössä, joka on herkkä radiotaajuuksisille
häiriöille (esimerkiksi lentokentät, sairaalat,
laboratoriot, jne.).
Laitteen hoito
∫ Puhdista tämä järjestelmä pehmeällä
ja kuivalla kankaalla
≥ Kun lika on kovassa, purista veteen kostutettu
kangas hyvin ja pyyhi lika pois. Lopuksi pyyhi
kuivalla kankaalla.
≥
Käytä kaiuttimien puhdistukseen pehmeää
kangasta. Älä käytä paperipyyhkeitä tai muita
materiaaleja (froteeta, jne.), joista voi irrota nukkaa.
Pienet muruset voivat takertua kaiuttimen suojaan.
≥ Älä koskaan käytä alkoholia, liuottimia tai
bensiiniä tämän järjestelmän puhdistukseen.
≥ Ennen kemiallisesti käsitellyn kankaan käyttöä
lue huolellisesti käyttöohjeet, jotka tulivat
kankaan mukana.
∫ Tämän järjestelmän hävittäminen tai
siirtäminen
Päälaite saattaa säilyttää käyttäjän asetustietoja
päälaitteessa. Jos luovut päälaitteesta hävittämällä
tai siirtämällä sen, noudata proseduureja
palauttaaksesi kaikki asetukset tehtaan
esiasetuksiin, jotta poistetaan käyttäjän asetukset.
(
>
86, “Palataksesi tehtaan esiasetuksiin.”)
≥ Käyttöhistoria saatetaan tallentaa päälaitteen
muistiin.
Käyttöoikeudet
Panasonic ei kanna mitään vastuuta
datatiedoista ja/tai muista tiedoista, jotka
vaarantuvat langattoman lähetyksen aikana.
Valmistettu Dolby Laboratories myöntämällä lisenssillä.
Dolby, Pro Logic, ja kaksois-D-symboli ovat Dolby Laboratories
rekisteröimiä tavaramerkkejä.
Valmistettu lisenssillä seuraavan numeroisten Yhdysvaltain
patenttien mukaisesti: 5.956.674; 5.974.380; 6.487.535 & muut
myönnetyt sekä hakemuksen alaiset Yhdysvaltain sekä
maailmanlaajuiset patentit. DTS, tunnus, & DTS ja tunnus yhdessä
ovat rekisteröityjä tavaramerkkejä ja DTS Digital Surround ja DTS
logot ovat tavaramerkkejä, jotka omistaa DTS, Inc. Tuote sisältää
ohjelmiston. © DTS, Inc. Kaikki oikeudet pidätetään.
HDMI, HDMI-logo ja High-Definition Multimedia Interface ovat
tavaramerkkejä tai rekisteröityjä tavaramerkkejä, jotka omistaa
HDMI Licensing LLC Yhdysvalloissa ja muissa maissa.
HDAVI Control
TM
on tavaramerkki, jonka omistaa Panasonic
Corporation.
Bluetooth
®
sanamerkin ja logot omistaa Bluetooth SIG, Inc. ja
Panasonic Corporation käyttää niitä merkkejä
käyttöoikeussopimuksella. Muut tavaramerkit ja kauppanimet
kuuluvat vastaaville omistajille.
Google Play ja Android ovat tavaramerkkejä, jotka omistaa
Google Inc.
SC-HTB680EG_RQT9920-H_fin.book 89 ページ 2014年3月4日 火曜日 午後7時12分

90
RQT9920
Tekniset tiedot
§1 Kun liitetyt muut laitteet kytketään pois päältä.
VAHVISTINOSASTO
RMS-lähtöteho: Dolby Digital tila
Etukanava (V, O kanava)
70 W kanava (6 ≠), 1 kHz, 10 % harmoninen
kok.särö
Keski kanav. (C kanava)
70 W kanava (6 ≠), 1 kHz, 10 % harmoninen
kok.särö
Alibassokaiuttimen
kanava
140 W kanava (8
≠
), 100 Hz, 10 % harmoninen
kok.särö
Dolby Digital -tilan RMS-kokonaisteho
350 W
LIITÄNTÄOSASTO
HDAVI Control
Tämä laite tukee toimintoa “HDAVI Control 5”.
HDMI
AV-tulo (BD/DVD)
1
Tuloliitin
Tyyppi A (19 napainen)
HDMI AV-lähtö (TV (ARC))
1
Lähtöliitin
Tyyppi A (19 napainen)
Digitaalinen äänitulo (TV)
Optinen
digitaalinen tulo
Optinen liitin
Näytteenottotaajuus
32 kHz, 44,1 kHz, 48 kHz
88,2 kHz, 96 kHz (ainoastaan LPCM)
Äänimuoto
LPCM, Dolby Digital, DTS Digital Surround
Infrapunavastaanotin
Liitintyyppi
3,5 mm:n jakki
USB-portti
Vain huoltokäyttöön.
YLEISTÄ
Tehontarve
Päälaite
36 W
Aktiivinen alibassokaiutin
23 W
Valmiustilassa
Päälaite
§1
Kun “BLUETOOTH STANDBY” on
asennossa “OFF”
Noin 0,48 W
Kun “BLUETOOTH STANDBY” on
asennossa “ON”
Noin 3 W
Aktiivinen alibassokaiutin
Virtakytkin pois päältä
Noin 0,25 W
Langatonta linkkiä ei ole aktivoitu
Noin 1,3 W
Virtalähde
AC 220 V sitä 240 V, 50 Hz
Mitat (LkKkS)
Päälaite
Pöytäasennusasettelua varten
950 mmk53 mmk110 mm
Seinäasennusasettelua varten
950 mmk110 mmk57 mm
Aktiivinen alibassokaiutin
180 mmk408 mmk306 mm
Paino
Päälaite
Pöytäasennusasettelua varten
Noin 2,6 kg
Seinäasennusasettelua varten
Noin 2,7 kg
Aktiivinen
alibassokaiutin
Noin 5,0 kg
Käyttölämpötila-alue
0
o
C sitä i40
o
C
Sallittu kosteusalue
20 % sitä 80 % RH (ei tiivistymistä)
SC-HTB680EG_RQT9920-H_fin.book 90 ページ 2014年3月4日 火曜日 午後7時12分

Viitetietoja
RQT9920
91
≥ Tekniset tiedot voivat muuttua ilman eri ilmoitusta.
≥ Paino ja mitat ovat likimääräisiä.
≥ Harmoninen kokonaissärö on mitattu digitaalisella
spektrianalysaattorilla.
KAIUTINOSASTO
Etukaiutin (Sisäänrakennettu)
Täysi alue
6,5 cm kartio tyyppinenk1/kanav.
Keskikaiutin (Sisäänrakennettu)
Täysi alue
6,5 cm kartio tyyppinen k1
Aktiivinen alibassokaiutin
Bassokaiutin
16 cm kartio tyyppinen
k
1
LANGATON OSASTO
Langaton moduuli
Taajuusalue
2,40335 GHz sitä 2,47735 GHz
Kanavien määrä
38
Bluetooth
®
OSASTO
Bluetooth
®
-järjestelmän tiedot
Bluetooth
®
Versio 3.0
Langattoman laitteiston luokittelu
Luokka 2
Tuetut profiilit
A2DP
Taajuuskaista
2,4 GHz:n taajuus FH-SS
Käyttöetäisyys
10 m näköyhteydellä
SC-HTB680EG_RQT9920-H_fin.book 91 ページ 2014年3月4日 火曜日 午後7時12分

92
RQT9920
Ελληνικά
Δήλωση συμμόρφωσης (DoC)
Με την παρούσα, η “Panasonic Corporation” δηλώνει ότι το
προϊόν αυτό είναι σύμφωνο με τις βασικές απαιτήσεις και άλλες
σχετικές διατάξεις της οδηγίας 1999/5/ΕC.
Οι πελάτες μπορούν να κατεβάσουν ένα αντίγραφο του
πρωτοτύπου DoC για τα R&TTE προϊόντα μας από τον DoC
server μας:
http://www.doc.panasonic.de
Στοιχεία επικοινωνίας Eξουσιοδοτημένου Aντιπροσώπου:
Panasonic Marketing Europe GmbH,
Panasonic Testing Centre, Winsbergring 15, 22525 Hamburg,
Γερμανία
Αυτό το προϊόν προορίζεται για καταναλωτές. (Κατηγορία 3)
Português
Declaração de Conformidade (DoC)
Com o presente documento, a “Panasonic Corporation” declara
que este produto é conforme os requisitos específicos e demais
especificações referentes à Directriz 1999/5/EC.
Os clientes podem baixar uma cópia da declaração de
conformidade (DoC) para nossos produtos R&TTE do Server DoC:
http://www.doc.panasonic.de
Contacte o representante autorizado: Panasonic Marketing
Europe GmbH,
Panasonic Testing Centre, Winsbergring 15, 22525 Hamburg,
Alemanha
Este produto destina-se ao consumador geral. (Categoria 3)
Česky
Prohlášení o shodě
Společnost “Panasonic Corporation” tímto prohlašuje, že tento
výrobek je ve shodě se základními požadavky a dalšími
příslušnými ustanoveními směrnice 1999/5/EC.
Zákazníci si mohou stáhnout kopii originálu prohlášení o shodě pro
naše produkty R&TTE z našeho serveru:
http://www.doc.panasonic.de
Oprávněný zástupce: Panasonic Marketing Europe GmbH,
Panasonic Testing Centre, Winsbergring 15, 22525 Hamburg,
Německo
Tento produkt je určen pro běžného zákazníka. (Kategorie 3)
Hrvatski
Deklaracija o podobnosti (DoC)
Ovime, “Panasonic Corporation” izjavljuje da je ovaj proizvod
udovoljava osnovnim zahtjevima i ostalim relevantnim uvjetima
Smjernice 1999/5/EC.
Kupci mogu preuzeti kopiju originalne DoC za naše R&TTE
proizvode s našeg DoC poslužitelja:
http://www.doc.panasonic.de
Kontakti u Europskoj uniji: Panasonic Marketing Europe GmbH,
Panasonic Testing Centre, Winsbergring 15, 22525 Hamburg,
Njemačka
Ovaj proizvod je namijenjen za opću potrošnju. (kategorija 3)
Lietuviškai
Atitikties deklaracija (AD)
Bendrovė “Panasonic Corporation” patvirtina, kad šis gaminys
tenkina direktyvos 1999/5/EB esminius reikalavimus ir kitas
taikytinas nuostatas.
Mūsų R&TTE gaminių originalios atitikties deklaracijos kopiją
klientai gali atsisiųsti iš mūsų AD serverio:
http://www.doc.panasonic.de
Įgaliotojo atstovo adresas: “Panasonic Marketing Europe GmbH”,
Panasonic Testing Centre, Winsbergring 15, 22525 Hamburg,
Vokietija.
Šis gaminys skirtas bendrajam vartojimui. (3 kategorija.)
Slovensko
Izjava o skladnosti (DoC)
S pričujočo izjavo podjetje “Panasonic Corporation” izjavlja, da so
svoji izdelki skladni s poglavitnimi zahtevami in drugimi
odgovarjajočimi predpisi direktive 1999/5/ES.
Stranka lahko naloži izvod izvirnega DoC o naših izdelkih R&TTE s
strežnika DoC:
http://www.doc.panasonic.de
Pooblaščeni zastopnik: Panasonic Marketing Europe GmbH,
Panasonic Testing Centre, Winsbergring 15, 22525 Hamburg,
Nemčija
Izdelek je namenjen splošni uporabi. (Razred 3)
Slovensky
Vyhlásenie o zhode (DoC)
“Panasonic Corporation” týmto prehlasuje, že tento výrobok je v
zhode so základnými požiadavkami a ďalšími príslušnými
ustanoveniami smernice 1999/5/ES.
Zákazníci si môžu stiahnuť kópiu pôvodného DoC na naše
R&TTE výrobky z nášho servera DoC:
http://www.doc.panasonic.de
Kontakt na splnomocneného zástupcu: Panasonic Marketing
Europe GmbH,
Panasonic Testing Centre, Winsbergring 15, 22525 Hamburg,
Nemecko
Tento produkt je určený pre všeobecného spotrebiteľa. (Kategória 3)
Polski
Deklaracja zgodności
Niniejszym “Panasonic Corporation” deklaruje, że ten produkt jest
zgodny z istotnymi wymaganiami i innymi odnośnymi
postanowieniami dyrektywy 1999/5/WE.
Klienci mogą pobrać oryginalną deklarację zgodności naszych
produktów z serwera deklaracji zgodności:
http://www.doc.panasonic.de
Kontakt się z autoryzowanym przedstawicielem: Panasonic
Marketing Europe GmbH,
Panasonic Testing Centre, Winsbergring 15, 22525 Hamburg,
Niemcy
Ten produkt jest przeznaczony dla użytkownika ogólnego.
(Kategoria 3)
SC-HTB680EG_RQT9920-H_fin.book 92 ページ 2014年3月4日 火曜日 午後7時12分

RQT9920
93
Norsk
Samsvarserklæring (DoC)
“Panasonic Corporation” erklærer at utstyret er i samsvar med de
grunnleggende krav og øvrige relevante krav i direktiv 1999/5/EF.
Kundene kan laste ned en kopi av den originale
samsvarserklæringen (DoC) for vårt R&TTE utstyr fra vår DoC
server:
http://www.doc.panasonic.de
Kontakt vår autoriserte representant: Panasonic Marketing Europe
GmbH,
Panasonic Testing Centre, Winsbergring 15, 22525 Hamburg,
Tyskland
Utstyret er beregnet på den vanlige forbruker (klasse 3).
Eesti keel
Vastavusdeklaratsioon (DoC)
“Panasonic Corporation” kinnitab käesolevaga, et see toode on
vastavuses põhiliste nõuete ja muude direktiivi 1999/5/EÜ
asjakohaste sätetega.
Kliendid saavad koopia meie R&TTE toodetele kehtiva
originaalvastavusdeklaratsiooni koopia alla laadida meie DoC-
serverist:
http://www.doc.panasonic.de
Võtke ühendust volitatud esindajaga: Panasonic Marketing
Europe GmbH,
Panasonic Testing Centre, Winsbergring 15, 22525 Hamburg,
Germany
See toode on mõeldud tavakasutajale. (III kategooria)
Български
Декларация за съответствие (DoC)
“Panasonic Corporation” декларира, че този продукт
съответства на съществените изисквания и другите
приложими разпоредби на Директива 1999/5/EC.
Потребителите могат да свалят копие от оригиналните DoC
към нашите продуктите от типа R&TTE от сървъра, на който се
съхраняват DoC:
http://www.doc.panasonic.de
За контакт с оторизиран представител: Panasonic Marketing
Europe GmbH,
Panasonic Testing Centre, Winsbergring 15, 22525 Hamburg,
Германия
Този продукт е предназначен за обща употреба. (Категория 3)
Român
Declaraţie de Conformitate (DoC)
Prin prezenta, societatea “Panasonic Corporation” declară că
produsul este conform cu cerinţele esenţiale şi cu alte norme
corespunzătoare Directivei 1999/5/EC.
Clienţii pot descărca o copie a DoC-ului original al produselor
noastre R&TTE de la adressa noastră DoC din Internet:
http://www.doc.panasonic.de
Contact la Reprezentanţa autorizată: Panasonic Marketing Europe
GmbH,
Panasonic Testing Centre, Winsbergring 15, 22525 Hamburg,
Germania
Acest produs a fost proiectat pentru clientela generală. (Categoria 3)
Magyar
Megfelelőségi Nyilatkozat (DoC)
Ezennel a , “Panasonic Corporation” kijelenti, hogy a jelen termék
kielégíti az 1999/5/EK Irányelv létfontosságú követelményeit és
más vonatkozó rendelkezéseit.
A vásárlók letölthetik az R&TTE termékek eredeti DoC másolatát a
DoC szerverünkről:
http://www.doc.panasonic.de
Forduljon a hivatalos márkaképviselethez: Panasonic Marketing
Europe GmbH,
Panasonic Testing Centre, Winsbergring 15, 22525 Hamburg,
Németország
A terméket általános fogyasztóknak szánták. (3-as kategória)
Latviski
Atbilstības deklarācija (DoC)
Kompānija “Panasonic Corporation” ar šo paziņo, ka šis
izstrādājums atbilst būtiskām prasībām un citām saistošām
Direktīvas 1999/5/EK prasībām.
Pircēji var lejupielādēt oriģinālo DoC kopiju mūsu R&TTE
izstrādājumos no mūsu DoC servera:
http://www.doc.panasonic.de
Lūdzam sazināties ar pilnvaroto parstāvi Panasonic
Marketing Europe GmbH,
Panasonic Testing Centre, Winsbergring 15, 22525
Hamburg, Germany
Šis izstrādājums ir paredzēts parastam patērētājam. (3. kategorija)
SC-HTB680EG_RQT9920-H_fin.book 93 ページ 2014年3月4日 火曜日 午後7時12分

94
RQT9920
SC-HTB680EG_RQT9920-H_fin.book 94 ページ 2014年3月4日 火曜日 午後7時12分

RQT9920
95
SC-HTB680EG_RQT9920-H_fin.book 95 ページ 2014年3月4日 火曜日 午後7時12分

EU
Web Site: http://panasonic.net
Panasonic Corporation 2014
Panasonic Corporation
Panasonic Testing Centre
Winsbergring 15, 22525 Hamburg, Germany
Panasonic Marketing Europe GmbH
Manufactured by:
Importer for Europe:
Panasonic Corporation
Kadoma, Osaka, Japan
RQT9920-1H
F0114SB1034
NORSK
Produkt
≥ For å redusere faren for brann, elektrisk støt
eller skade på apparatet:
jUtsett ikke produktet for regn, fukt, drypping
eller sprut.
jIkke plasser objekter som er fylt med væske,
som vaser, på apparatet.
jBruk kun anbefalt tilbehør.
jFjern ikke deksler.
jReparer ikke denne enheten selv, overlat
service til kvalifisert servicepersonell.
Vekselstrømnett
≥ Nettstøpselet er trukket ut fra denne enheten.
Installer denne enheten slik at nettstøpselet
umiddelbart kan trekkes fra stikkontakten.
Produkt
≥ Plasser ikke åpen ild, slik som levende lys, oppå
apparatet.
≥ Dette apparatet er beregnet for bruk under
moderate klimaforhold.
Plassering
≥ For å redusere faren for brann, elektrisk støt
eller skade på apparatet:
jIkke plasser apparatet i en bokhylle, et
innebygget kabinett eller et annet lukket sted.
Pass på at produktet er godt ventilert.
jApparatets ventilasjonsåpninger må ikke
dekkes til med aviser, duker, gardiner eller
lignende.
ADVARSEL FORSIKTIG
SC-HTB680EG_RQT9920-H_fin.book 96 ページ 2014年3月4日 火曜日 午後7時12分
-
 1
1
-
 2
2
-
 3
3
-
 4
4
-
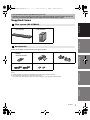 5
5
-
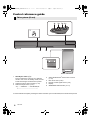 6
6
-
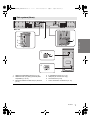 7
7
-
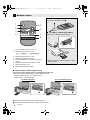 8
8
-
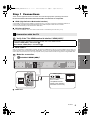 9
9
-
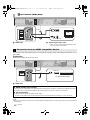 10
10
-
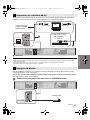 11
11
-
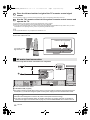 12
12
-
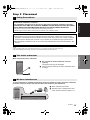 13
13
-
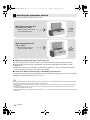 14
14
-
 15
15
-
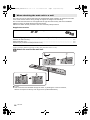 16
16
-
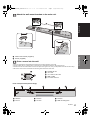 17
17
-
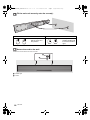 18
18
-
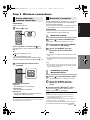 19
19
-
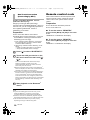 20
20
-
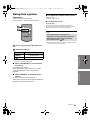 21
21
-
 22
22
-
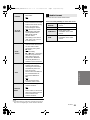 23
23
-
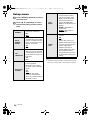 24
24
-
 25
25
-
 26
26
-
 27
27
-
 28
28
-
 29
29
-
 30
30
-
 31
31
-
 32
32
-
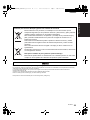 33
33
-
 34
34
-
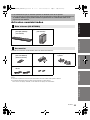 35
35
-
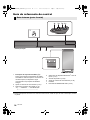 36
36
-
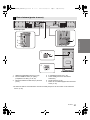 37
37
-
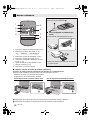 38
38
-
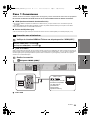 39
39
-
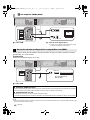 40
40
-
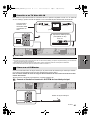 41
41
-
 42
42
-
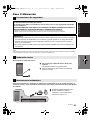 43
43
-
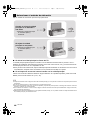 44
44
-
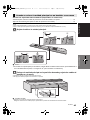 45
45
-
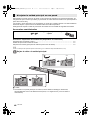 46
46
-
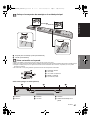 47
47
-
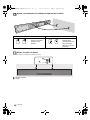 48
48
-
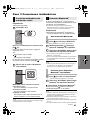 49
49
-
 50
50
-
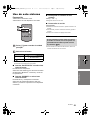 51
51
-
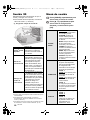 52
52
-
 53
53
-
 54
54
-
 55
55
-
 56
56
-
 57
57
-
 58
58
-
 59
59
-
 60
60
-
 61
61
-
 62
62
-
 63
63
-
 64
64
-
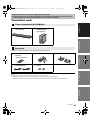 65
65
-
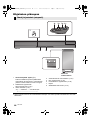 66
66
-
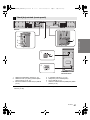 67
67
-
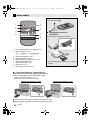 68
68
-
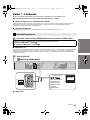 69
69
-
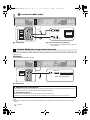 70
70
-
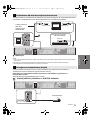 71
71
-
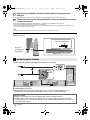 72
72
-
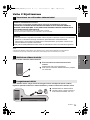 73
73
-
 74
74
-
 75
75
-
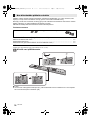 76
76
-
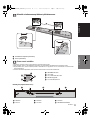 77
77
-
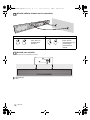 78
78
-
 79
79
-
 80
80
-
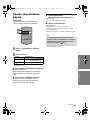 81
81
-
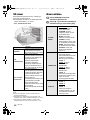 82
82
-
 83
83
-
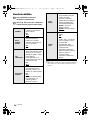 84
84
-
 85
85
-
 86
86
-
 87
87
-
 88
88
-
 89
89
-
 90
90
-
 91
91
-
 92
92
-
 93
93
-
 94
94
-
 95
95
-
 96
96


Panasonic SCHTB680EG Instrucciones de operación
- Categoría
- Juegos de altavoces
- Tipo
- Instrucciones de operación
en otros idiomas
Artículos relacionados
-
Panasonic SCHTB580EG Instrucciones de operación
-
Panasonic SC-HTE80 El manual del propietario
-
Panasonic SC-HTB880 El manual del propietario
-
-
-
-
-
-
Panasonic SFFX82GA El manual del propietario
-