Troybilt 01925 El manual del propietario
- Categoría
- Generadores de poder
- Tipo
- El manual del propietario
Este manual también es adecuado para

O
m L------
ual / Ma
Portabme Generator/Generador Port,tim
Modem / Modemo 0m925
®
IHPORTANT: READ SAFETY RULES AND iNSTRUCTiONS CAREFULLY
mMPORTANTE: LEYO LA SEGURmDAD LAS ORDENESY LAS mNSTRUCCmONES DETENmDAMENTE
Questions? Preguntas?
Helpiine = 1=888=611=6708 M=FS=SCT
Troy-Bilt® is a registered crademarl< ofTroy-Bilt, LLC and is used under license to Bri_s & Str_tcon Power Produces.
Troy-Bilt® es una marca registrada de Troy-Bile, LLC y se usa abaio licencia a Brigs & Stratton Power Products.
BP, IGGS & STRATTON POWER, PRODUCTS GROUP, LLC
JEFFERSON,WISCONSIN, U.S.A.
Printed in USA Manual No. 195594GS Revision 0 (08/26/2004)
6

Safety Rules
TABLE OF CONTENTS
Safety Rules .................................... 2:4
Know Your Generator ............................. 5
Assembiy ...................................... 6-7
Operation .................................... 8- i 3
Maintenance ................................. i 4-i 5
Storage ........................................ i6
TroubHeshooting ................................. i7
Notes ......................................... i8
_A/arranty ...................................... [9
EQU[PNENT
DESCRIPTION
[IlZ];IReadth.manoamoaref.mmyandbeoome
...... familiar with your generator. Know its
applications, its [imitations and any hazards
involved.
This manuai describes an engine-driven, revoMng fieid,
aHternating current (AC) generator designed to suppiy
electrica[ power for operating compaqbHe electrica[ [ighting,
appiiances, toois and motor [oads.The generator's revoMng
fieid is driven at about 3,600 rpm by a singie-cyiinder
engine.
CAUTION! DO NOT exceed the generator's
wattage/amperage capacity. See "Don't Overioad
Generator",
Every effort has been made to ensure that information in
this manua[ is accurate and current. However, we reserve
the right to change, aiter or otherwise improve the product
and this document at any time without prior notice.
The Emission Contro[ System for this generator is
warranted for standards set by the Environmenta[
Protection Agency. For warranty information refer to the
engine owner's manual
SAFETY RULES
This is the safety alert symbol [t is used to
alert you to potential persona[ iniury hazards.
Obey a[[ safety messages that follow this
symbol to avoid possible iniury or death.
The safety alert symboi (_k) is used with a signai word
(DANGER, CAUTION,WARNING), a pictoriai and/or a
safety message to alert you to hazards. DANGER indicates
a hazard which, if not avoided, will resuit in death or serious
injury. WARNING indicates a hazard which, if not avoided,
could result in death or serious injury. CAUTION
indicates a hazard which, if not avoided, might result in
minor or moderate injury. CAUTmON, when used
without the alert symbol, indicates a situation that could
result in equipment damage. Follow safety messages to
avoid or reduce the risk of injury or death.
Hazard Symbols and Meanings
Electrocution Electrical Shock Electrical Shock
Toxic Fumes Explosion Fire
Explosive Pressure Chemical Burn Hot Surface
4@

Section 1: Safety Rules
DANGER
Operate generator ONLY outdoors.
Keep exhaust gas from entering a confined area through
windows, doors, ventilation intakes or other" openings,
DO NOT operate generator inside any building or endosure_
including the generator compartment of a recreational vehicle (RV)_
DANGER
When using generator for backup power, notify utility
company. Use approved transfer equipment to isolate
generator from electric utilit>;
Use a ground circuit fault interrupter (GFCI) in any damp or
highly conductive area, such as metal decking or steel work.
DO NC)T touch bare wires or receptacles.
DO NOT use generator with electrical cords which are worn,
frayed, bare or otherwise damage&
DO NOT operate generator in the rain.
DO NOT handle generator or electrical cords while standing
in water, while barefoot, or while hands or feet are wet.
DO NOT allow unqualified persons or children to operate or
service generator.
DANGER
DO NOT allow any open flame, spark, heat, or lit cigarette
during and for several minutes after charging a battery.
Wear protective goggles, rubber apron, and rubber gloves.
WHEN ADDING OR DRAINING FUEL
Turn generator OFF and let it cool at least 2 minutes before
removing fuel cap. Loosen cap slowly to relieve pressure in
tank.
Fill or drain fuel tank outdoors.
DO NOT overfill tank.AIIow space for fuel expansion.
Keep fuel away from sparks, open flames, pilot lights, heat, and
other ignition sources.
DO NOT light a cigarette or smoke.
VNEN STARTING EQUIPHENT
Ensure spark plug, muffler_ fuel cap and air cleaner are in place.
• DO NOT crank engine with spark plug removed.
If fuel spills, wait until it evaporates before starting engine.
WHEN OPERATING EQUIPNENT
Do not tip engine or equipment at angle which causes fuel to
spill
This generator is not for" use in mobile equipment or marine
applicadons.
VNEN TRANSPORTING OR REPAIRING
EQUmPNENT
iN TANK
Store away from furnaces, stoves, water heaters, clothes
dryers or other appliances that have pilot light or other"
ignition source because they can ignite fuel vapors.
This generator does not meet U, S.Coast Guard Regulation
33CFR-183 and should not be used on marine applications.
Failure to use the appropriate U. S.Coast Guard approved
generator could result in bodily injury and/or property
damage,
0

Section 1: Safety Rules
WARNING
WHEN ADJUSTING OR MAKING REPAiRSTOYOUR
GENERATOR
, Disconnect the spark ptug wh_efrom the spark plug and place
the wire where it cannot contact spark pIu&
WHENTESTING FOR ENGINE SPARK
" Use approved spark plug tester:
DO NOT check for spark with spark plug removed,
WARNING
DO NOT touch hot surfaces.
. Allow equipment to cool before touching.
. The generator must be at least S feet from structures having
combustible walls and/or other combustible materials_
Keep at least 3 feet of clearance on all sides of generator for
adequate cooling, maintenance and servicing.
In the State of California a spark attester is required by law
(Section 4442 of the California Public Resources Code). Other
states may have similar laws. Federal laws apply on federal
lands_ [f you equip the muffler with a spark arresten it must be
maintained in effective working order.
CAUTION
DO NOT tamper with governed spee& Generator supplies
correct rated frequency and voltage when running at governed
speed.
DO NOT modify generator in any way.
See "Don't Overload Generator".
Start generator and let engine stabilize before connecting
electrical Ioads_
Connect electrical loads in OFF posidon_ then turn ON for
operatiom
Turn electrical loads OFF and disconnect from generator
before stopping generator_
Use generator only for intended uses.
If you have questions about intended use, ask dealer or call
1-888-61 1-6708.
Operate generator only on level surfaces_
DO NOT expose generator to excessive moisture, dust, dirt,
or corrosive vapors.
DO NOT insert any objects through cooling slots,
If connected devices overheat, turn them off and disconnect
them from generator:
Shut off generator if:
-electrical output is lost;
-equipment sparks, smokes, or" emits flames;
-unit vibrates excessively.

Features and ContcoIs
KNOWYOLiR GENERATOR
Read this owner's manual and safety rules before operating your generator.
Compare this [HHustrat[onwith your generator to familiarize yourseff with the Hocat[ons of various controHs and
adjustments. Save this manuaHfor future reference.
-_ Rocker Switch Circuit
OiH FirthCap FueHTan[<
Breaker
/
Air CHeaner Circuit Breakers (AC)
H20 Volt AC, 20 Amp
Spar[<Arrester MuffHer DupHex Receptacles
H20/240 Vok AC, 30 Amp
Locking Receptacle
Choke Lever
Data Tag
H2VoHt DC
Receptacle
J
Battery i
\
[2Volt DC Receptacle -- Use this receptacle with
battery charge cabHesto charge a H2VoHt battery.
[20 Volt AC, 20 A_p Duplex Receptacles -- Hay be
used to suppHy eHectricaH power for the operation of H20VoHt
AC, 20 Amp, single phase, 60 Hz electrical lighting appHiance,
tool and motor loads.
[ 20/240 Volt AC, 30 Amp Locking Receptacle- Hay
be used to suppHy eHectricaH power for the operation of
120 and/or 240VoHtAC, 30 Amp, single phase, 60 Hz
electrical Highting, appHiance, tool and motor loads.
Air Cleaner -- Uses a dry type filter element and foam
pre-cHeaner to limit the amount of dirt and dust sucked
into the engine.
Battery- Located behind plastic cover. H2VoHt DC sealed
battery provides power to start the engine.
Choke Lever -- Used when starting a cold engine.
Grounding
Fastener
Start Switch
Circuit Breakers (AC) --The H20VoHtAC_ 20A duplex
receptacles are provided with "push to reset" circuit
breakers to protect the generator against electrical overload.
DataTag - Provides model, revision and serial number of
generator. Please have these readily available if calling for
assistance.
Fuel Tank -- Capacity of seven (7) U.S.gaHHons.
Start Switch --Turn to start the engine.
Grounding Fastener -- If required, please consult a
qualified electrician, electrical inspector, or local agency
Oil Fill Cap --Add oil to engine here.
SparkArrester Muffmer -- Exhaust muffler lowers engine
noise and is equipped with a spark arrester screen.
Rocl(er Switch Circuit Bre_(er --The H20/240VokAC,
30A locking receptacle is provided with a rocker switch circuit
breaker to protect the generator against electrical overload.
This switch also controls all receptacles.

ASSEMBLY
Your generator requires some assembHyand is ready for
use after it has been properHy serviced with the
recommended oiHand fuel
[f you have any probmerns with the assernbmy of your
generator, pmease caromthe generator hempmine at
i=888=6 i i =6708°
Remove Generator From Carton
H. Setcartonon a rigidfiatsurfacewith"ThisSideUp"
arrows pointing upward.
2. Carefully open top flapsof shipping carton.
3. Cut down corners of carton from top to bottom and
Haythat side of carton down fiat.
4. Remove aHHpacking mamriaL carton fiHHers,etc.
5. RoHHgenerator out of shipping carton.
A :ach Handle
You wiHHneed two H/2"or H3 mm wrenches to attach the
handHe.
H. Attach handHeto right side of generator frame (viewing
unit from front), as shown in Figure H,with a 60 mm
capscrew, fiat washers, nyHonwashers, and Hocknut.
60ram Capscrew
i
Nut
' /Vqasher
i HandleBracket
{ Handle Pin
i
NOT_:: DO NOT overtighten. HandHe must be abHe to
move up and down freely.
2. Raise handHeand insert handHepin to move generator.
0

Section 3: Assembly
BEFORE STARTmNG THE
ENGmNE
[ne Oil
° Race genera[or on a level surface.
1
• Refer to engine manuaIfor oil fill information.
Damage to equipment resulting from failure to follow this
instruction will void warranty.
° Refer to engine owner's manuaHand follow oiH
recommendations and instructions.
NOTE: Check oiHoften during engine break-in. Refer to
engine owner's manual for recommendations.
NOTE: The generator assembly rotates on a prehbricated
and sealed ball bearing that requires no additional
lubrication for the life of the bearing.
Add Fuel
NOTE:This gasoline engine is certified to operate on
gasoline.ExhaustEmissionControl System:EP1(Engine
Hodifications).
WHEN ADDING FUEL
Turn generator OFF and let is cool at [east 2 minutes before
removing fueJ cap, Loosen cap slowly to relieve pressure in
_:anI<,
Fillfueltank outdoors,
DO NOT overfill tank.AHow space for" fuel expansion.
Keep fueI away from sparks, open flames, pilot lights, heat, and
other ignition sources
DO NOT light a cigarette or smoke.
1
[. Use c[eam fresh, regular UNLEADED fuel with a
minimum of 85 octane. DO NOT use fuel which
contains HethanoL DO NOT mix oil with fuel
2. Clean area around fuel fill cap_ remove cap.
3. Slowly add regular unleaded fuel to fuel tank. Be careful
not to overfill.Allow about 2.25" of tank space for fuel
expansion (Figure2).
Fuel
4.
Replace "1.5" with "2.25" fuel fill level given in engine manual
FaiIure I:o follow this instruction may cause fueI _:ooverexpand
and spillfrom _:anl<,
Instal[ rue[ cap and wipe up any spiHed fuel
Remove Cover on Stare Switch
A protective plastic cover is placedover the start switch to
prevent the generator from being started.
° Open cap on battery float charger.
° Remove and discard plastic cover over the start switch
(Figure 3).
o Replace cap on battery float charger.
O

Operation
USmNG THE GENERATOR
System Ground
The generator has a system ground that connects the
generator frame components to the ground terminals on
the AC output receptacles.The system ground is connected
to the AC neutral wire (see "Equipment Description",
earlier in this manual).
Special Requirements
There may be Federal or State Occupational Safety and
Health Administration (OSHA) regulations, local codes, or
ordinances that apply to the intended use of the generator.
Please consult a qualified electrician, electrical inspector, or
the local agency having jurisdiction.
" In some areas, generators are required to be registered
with local utility companies.
° If the generator is used at a construction site, there may
be additional regulations which must be observed.
Connecting to a Building's Electrical
System
Connections for standby power to a building's electrical
system must be made by a qualified electrician.The
connection must isolate the generator power from utility
power, and must comply with all applicable laws and
electrical codes.
When using generator for backup power, notify utility
company. Use approved transfer equipment to isolate
generator from electric utility.
* Use a ground fault circuit interrupter (GFC[) in any damp or
highly conductive area_ such as metal decking or steel work:
. DO NC)T touch bare wires or receptacles.
. DO NOT use generator with electrical cords which are worn,
frayed, bare or otherwise damaged.
DO NOT operate generator in the rain.
. DO NOT handle generator or electrical cords while standing
in water, while barefoot, or while hands or feet are wet.
. DO NOT allow unqualified persons or children to operate or
service generato_i
Generator Location
Generator Cmearance
Operate generator ONLY outdoors.
Keep exhaust gas from entering a confined area through
windows, doors, ventilation intakes or other openings.
DO NOT operate generator inside any building or enctosure_
including the generator compartment of a recreational vehicle (RV).
The generator must be at least 5 ft. (I 52 cm) from
structures having combustible walls and/or other
combustible materials. Leave at least 3 ft. (92 cm) all around
generator including overhead, for adequate cooling,
maintenance and servicing.
Place generator in a well ventilated area, which will allow
for removal of deadly exhaust gas. DO NOT place
generator where exhaust gas could accumulate and enter
inside or be drawn into a potentially occupied building.
Ensure exhaust gas is kept away from any windows, doors,
ventilation intakes or other openings that can allow exhaust
gas to collect in a confined area (Figure 4). Prevailing winds
and air currents should be taken into consideration when
positioning generaton
Exhaust Port
\
O

Section 4: Operation
OPERATmNG THE
See"Don't Overload Generator".
Start generator and let engine stabiJize before connecting
electricaJ loads,
Connect eJectricaJ loads in OFF positiom then turn ON for
operation.
* Turn electrical Joads OFF and disconnect from generator
before stopping generator.
iMPORTANT: Always unplug the battery float charger
before starting the generator.
Startin 8 the Engine
Disconnect all electrical loads from the generator. Follow
start instruction steps in numerical order:
I. Hake sure unit is on a level surface.
iMPORTANT: Failure to start and operate unit on a level
surface will cause the unit not to start or shut down during
operation.
2. Follow start instructions given in engine owner's manual
and turn start switch on generator to "Start" position
(Figure 5).To prolong life of starter components, DO
NOT hold starter switch in "Start" position for more
than I S seconds_and pause for I minute.
WARNING
DO NOT touch hot surfaces.
Allow equipment to cool before touching.
The generator must be at least 5feet from structures having
combustible walls and/or other combustible m_terials.
Keep at least 3 feet of clearance on all sides of generator for
adequate cooling, maintenance and servicing.
In the State of California a spark attester is required by I_w
(Section 4442 of the California PuNic Resources Code). Other
states may havesimilar laws.Federal I_wsapply on federal
lands.If you equip the muffler with a spark attester, it must be
maintained in effective woH<ingorder.
Jump Start Procedure
If generator's starting battery fails, use following instructions
to jump start generator.You can jump start generator using
any 12Volt automotive or utility style storage battery.
I. Unscrew fuse holder and remove generator's 10Amp
inoline fuse (Figure 6).Verify fuse is good or replace
with a known good fuse. Reinstall fuse in fuse holder.
2.
3.
/
y
/
/>2: /
],
Slide red rubber boot off generator's battery terminal
and push it onto red wire, thus uncovering POSITIVE
battery terminal.
Using standard automotive jumper cables, connect
RED jumper cable clamp to generator's POSITIVE
battery terminal (Figure 7).
NOTE: If engine starts but fails to run, or if unit shuts down
during operation, make sure unit is on a level surface and
check for proper oil level in crankcase.This unit may be
equipped with a low oil protection device. See engine manual.
O

Section 4: Opecat[on
4. Connect the other RED iumper cable damp to the
starting battery's POSITIVE battery terminal
5. Connect the BLACK jumper cabHe champ to the
starting battery's NEGATIVE battery terminal
6. Connect the other BLACK jumper cabHe champ to the
GROUNDING FASTENER on the generator, as shown
in Figure 7.
7. Start the generator as described in "Starting the
Engine" and remove jumper cabHes in reverse order of
connections.
8. SHide the red rubber boot bacH<onto the generator's
POSITIVE battery terminal
If you have any questions, pHease caHHthe Generator
Heipiine at [=888=6 [ [=6708, M=P 8=5 CT.
IMPORTANT:When jump starting, always wear proper eye
protection and never Heanover battery. Inspect both
batteries before connecting booster cabHes. DO NOT iump
start a damaged battery. Be sure vent caps are tight and HeveL
Connecting Electrical Loads
° Let engine stabiHize and warm up for a few minutes after
starting.
° PHug in and turn on the desired H20 and/or 240VoHtAC,
singHe phase, 60 Hz eHectricaH Hoads.
° DO NOT connect 240VoHt Hoads to the H20VoHt dupHex
receptacles.
° DO NOT connect 3-phase Hoads to the generator.
° DO NOT connect S0 Hz Hoads to the generator.
* DO NOT OVERLOAD GENERATOP_.See "Don't
OverHoad Generator".
the Engine
H. Turn OFF and unpHug atomeHectricaH Hoads from
generator paneH receptacHes. NEVER start or stop engine
with eHectricaH devices plugged in and turned ON.
2. Let engine run at no-Hoad for severaH minutes to
stabiHize internaH temperatures of engine and generator.
3. Turn start switch to "Stop" position.
Charging a Battery
Your generator has the capabi[iW of recharging a discharged
i2Voit automotive or utility style storage battery. DO
NOT use the unit to charge any 6VoHt batteries. DO NOT
use the unit to crank an engine having a discharged battery.
DANGER
DO NOT allow any open flame, spark, heat, or lit cigarette
during and for severaJ minutes after charging a batteD;
Wear protective goggles, rubber aprom and rubber gJoves_
To recharge 12 Volt batteries, proceed as follows. •
I. Check fluid level in all battery cells. If necessary, add
ONLY distiHHedwater to cover separators in battery
ceils. DO NOT use tap water.
2. If battery is equipped with vent caps, make sure they
are instaHHed and are tight.
3. If necessary, dean battery terminaHs.
4. Connect battery charge cabHe connector pHugto paneH
receptacle identified by the words "H2-VOLTS D.C.".
5. Connect battery charge cabHe champ with red handHe
to the positive (+) battery terminaH (Figure 8).
12 VOLT D,C,
RECEPTACLE
+
POS NEG
12 VOLT BATTERY
6. Connect battery charge cabHe champ with bmack handHe
to the negative (-) battery terminal (Figure 8).
7. Start engine. Let engine run whiHe battery recharges.
8. When battery has charged_ shut down engine
NOTE: Use an automotive hydrometer to test battery state
of charge and condition. Follow the hydrometer
manufacturer's instructions carefully. Generally, a battery is
considered to be at H00% state of charge when specific gravity
of its fluid (as measured by hydrometer) is H.260 or higher.

Section 4: Operation
How to Use the Battery Char er
Use batteryfloatchargerjackto keep the startingbattery
charged and ready for use. Battery charging shouHd be done
in a dry Hocation, such as inside agarage.
H. Phg charger into unit's "Battery Roar Charger" jack,
which is Hocated next to starter switch (Figure 9). PHug
battery charger into a 120Volt AC wall receptacle.
2. Unplug charger from unit and wall outlet when
generator is being started and while in operation.
3. Keep this charger plugged in when generator is not in
use to prolong battery life.The charger has a built in
float equalizer and will not overcharge the battery,
even when plugged in for an extended period of time.
iMPORTANT: See "Battery Haintenance" on page 15 for
additional information.
OPERATION
Under certain weather conditions (temperatures below
40°F [4°C] and a high dew point), your generator may
experience icing of the carburetor and/or the crankcase
breather system.
Build a structure that will enclose three sides and top of
generator:
[. Hake sure entire muffleroside of generator is exposed.
Note that your generator may appear different from
that shown in Figure I0.
Wind
2. Ensure a minimum of three feet clearance between
open side of box and nearest object.
3. Face exposed end away from wind and elements.
4. Enclosure should hold enough heat created by
generator to prevent problems.
Operate generator ONLY outdoors.
Keep at least 3 feet of clearance on all sides of generator for
adequate vent.i[adon.
DO NOT operate generator inside any building or enclosure,
including the generator comparu_nent of a recreational vehicle (RV).
Remove generator from sheker when temperature is above
40°F [4°C],
G EN ERATO R ADAPTE R
CORD SET
The generator is equipped with a 25' generator adapter cord
set designed for a 240Vok, 30Amp grounded neutral circuit
(Figure I I).The generator adapter cord set provides a
convenient supply of emergency power into your dwelling so
that your generator can be operated safely outside.

5ectbn 4: Opecatbn
[ 20 Vok AC, 20 Amp, Duple×
Each dupiex recepgacie (Figure i3) is protected against
overioad by a push-to-reset circuit breaker.
The maximum bad on each outlet is 20 Amps.The
maximum toga[ bad on both yellow wire outlets or both
biack wire outiets is 30 Amps.
[NOTE: Follow ali safety precautions when connecting any
extension cord or device to the generator.
RECEPTACLES
CAUTION
o NEVER attempt to power a device requiring more
amperage than generator or recepgacie can suppiy.
o DO NOT overioad the generator. See "Don't Overioad
Generator".
Use each recepgacie to operate [20VoHtAQ singie-phase,
60 Hz electrka[ loads requiring up to 2,400 watts (2A kW)
at 20 Amps of current. Use cord sets that are rated for
[ 25 Voit AC [oads at 20 Amps (or greater).
[ 201240 VoUt AC, 30 Amp, Locking
Receptacle
Use a NEMA L14-30 piug with this receptacHe. Connect a
4-wire cord set rated for 250Voit AC [oads at 30Amps (or
greater) (Figure [4).You can use the same 4-wire cord if
you plan to run a i20Voit load.
[ 2 Volt DC, [0 Amp Receptacle
This receptacle allows you to recharge a [2Vok
automotive or utility styie storage battery with the battery
charge cabies provided (Figure 12).
This receptacle can not recharge 6Voit batteries and can
not be used to crank an engine having a discharged battery.
See the section "Charging a Battery" (page [ 0) before
attempting to recharge a battery.
4oWire Cord Set
/
(Neutral)
Y (Hot) | X (Hot)
NEMA LI 4-30 /-7L7 Ground (Green)
This recepgacie powers i20/240VoitAC, 60 Hz, single
phase loads requiring up to 7,200 watts of power (7.2 kW)
at 30 Amps for 120Volts or 240Volts.The outlet is
protected by a rocker switch circuit breaker.

Section 4: Operation
DON'T OVERLOAD
You must make sure your generator can supply enough
rated (running) and surge (starting) watts for the items you
will power at the same time. Follow these simple steps:
I. Select the items you will power at the same time.
2. Total the rated (running) watts of these items.This is
the amount of power your generator must produce to
keep your items running. See Figure 15.
3. Estimate how many surge (starting) watts you wiil
need. Surge wattage is the short burst of power
needed to start electric motor-driven tools or
appliances such as a circular saw or refrigerator.
Because not all motors start at the same time, total
surge watts can be estimated by adding only the
item(s) with the highest additional surge watts to the
total rated watts from step 2.
Tool or Appliance
Window Air
Conditioner
Refrigerator
Deep Freezer
Television
Light (75 Watts)
Rated (Running)
Watts
1200
8OO
500
500
75
3075 Total
RunningWatts
Total Rated (Running)_A/atts = 3075
HighestAdditionM SurgeWatts = 1800
Total Generator Output Required = 4875
Additional Surge
(Starring) Watts
1800
1600
5OO
1800 Highest
Surge Watts
Power Management
To prolong the life of your generator and attached devices,
it is important to take care when adding electrical loads to
your generator.There should be nothing connected to the
generator outlets before starting it's engine.The correct
and safe way to manage generator power is to sequentially
add loads as follows:
I. With nothing connected to the generator, start the
engine as described in this manual.
2. Plug in and turn on the first load, preferably the largest
load you have.
3. Permit the generator output to stabilize (engine runs
smoothly and attached device operates properly.
4. Plug in and turn on the next load.
5. Again, permit the generator to stabilize.
6. Repeat steps 4 and 5 for each additional load.
NEVER add more loads than the generator capacity.Take
special care to consider surge loads in generator capacity,
as described above.
Tool or Appliance
Rated*
(Running)
Watts
iiii
Additional
Surge
(Starting)
Watts
Essentiams
Lisht Bulb - 75 watt 75
Deep Freezer 500 500
Sump Pump 800 1200
Refrigerator/Freezer - 18 Cu, Ft, 800 1600
Water WeJ[ Pump - 1/3 HP 1000 2000
Heating/Cooling
Window AC - I0,000 BTU 1200 1800
Window Fan 300 600
Furnace Fan Blower - I/2 HP 800 1300
Kitchen
blicrowave Oven - [000 Watt [000
Coffee Haker [500
Electric Stove - Single Element [500
Hot Plate 2500
Family Room
DVD/CD Player 100
VCR IO0
Stereo Receiver 450
Color Television - 27" 500
Personal Computer w/I 7" monitor 800
Other
Security System [80
Abl/FH Clock Radio 300
Garage Door Opener - 1/2 HP 480 520
Electric Water Heater - 40 Gallon 4000
DIYiJob Site
Quartz Halogen Work Light 1000
Airless Sprayer - 1/3 HP 600 1200
Reciprocating Saw 960 960
Electric Drill - I/2 HP 1000 1000
Circular Saw - 7 I/4" IS00 1500
Miter Saw - IO" 1800 1800
Table Planer -6" 1800 1800
Table Saw/Radial Arm Saw - I 0" 2000 2000
Air Compressor - I-I/2 HP 2500 2500
*VVattages listed are approximate only. Check tool
appliance for actual wattage.
or

GENERAL MAmNTENANCE
RECOHHENDATmONS
The Owner/Operator is responsible for malting surethat
all periodic maintenance tasks are completed on a timely
basis; that all discrepandes are corrected; and that the unit
is kept clean and properly stored. NEVER operate a
damaged or defective generators
NOTE: If eqopped with inflatable tires, keep the air
pressure at the value marked on the tire or within 15 and
40 psi,
See engine owner's manual for instructions.
An oil drain tray is provided for your convenience to
change the oil and oil filter. Store tray in a convenient
location for periodic maintenance.
Changing Oil
I Place the half moon notch in the oil drain tray under
the oil drain plug (Figure 16).
tray foot
2. Place the oil drain tray foot tab in the slot on the base
of the generator, as shown.
3. Follow the instructions given in the engine owner's
manual for draining oil.
4. After oil has drained, reinstall the oil drain plug.
S. Remove the oil drain tray from under the oil drain plug
and clean up any spilled oil.
Changing Oil Filter
I. Place the half moon notch in the oil drain tray under
the oil filter (Figure 7).
2. Place the oil drain tray foot tab in the slot on the base
of the generator, as shown.
3. Follow the instructions given in the engine owner's
manual for changing oil filter and adding oil.
4. Remove the oil drain tray from under the oil filter and
clean up any spilled oil.
CAUTION
Used motor oil has been shown to cause skin cancer in
certain laboratory animals,
Thoroughly wash exposed areas with soap and water.
KEEPOUT OF REACH OF CHILDREN. DON'T
POLLUTE.CONSERVERESOURCES.RETURN
USED OILTO COLLECTION CENTERS.

Section 5: Maintenance
Generator Maintenance
Generator maintenance consists of keeping the unit dean
and dry. Operate and store the unit in a dean dry
environment where it wi[[ not be exposed to excessive
dust, dirt, moisture or any corrosive vapors. Cooling air
slots in the generator must not become dogged with snow,
[eaves or any other foreign material
NOTE: DO NOT use a garden hoseto cleangenerator.
'Water can enter engine fuel system and cause problems. In
addition_ if water enters generator through cooling air s[ots_
some of the water wi[[ be retained in voids and cracks of
the rotor and stator winding insulation.Water and dirt
buildup on the generator internal windings will eventually
decrease the insulation resistance of these windings.
WARNING
WHEN ADJUSTING OR MAKING REPAiRSTOYOUR
GENERATOR
, Disconnect the spark plug wire from the spar[< plug and place
the wire where it cannot contact spark plug.
WHENTEST[NG FOR ENGINE SPARK
Use approved spark plug testen
, DO NC)T check for spark with spark plug removed.
Battery Maintenance
Other than float charging, as described in "How to Use the
Battery Charger", no maintenance is required for the
battery. Keep the battery and terminals clean and dry.
IMPORTANT: Battery charging should be performed in a
dry location, such as inside a garage.
° Use a damp cloth to wipe exterior surfaces dean.
DO NOT expose generator to excessive moisture, dust, dirt,
or corrosive vapors,
DO NOT insert any objects through cooling slots,
° Use a soft brisde brush to loosen caked on dirt or oil
° Use a vacuum cleaner to pick up loose dirt and debris.
° Use low pressure air (not to exceed 25 psi) to blow away
dirt. Inspect cooling air slots and opening on generator.
These openings must be kept clean and unobstructed.
D ata Tag
Data tag information is very important if you need help
from our Customer Service Department or an authorized
service dealer.
, The data tag (Figure 18) is located either on the base
plate of the generator. For future reference, please copy
the model, revision, and serial number of the generator in
the space below.
[
MODEL [
REV NO [
SERIAL [
AC VOLTS [
AC AMPS [
AC WATTS [
DC VOLTS [.................................................................................................
DC AMPS [
Single Phase / 60 Hz / 3606RPM
Ratedat 40° C/ Class F hsulation
O TROY BILT
._ Here
Copy Serial
Number Here

Storage
$TO RAG E
The generator should be started at leastonce every seven
days and allowed to run at least 30 minutes. If this cannot
be done and you must store the unit for more than
30 days, use the following guidelines to prepare it for
storage.
Generator Storage
° Clean the generator as oudined in "Generator Cleaning".
° Check that cooling air slots and openings on generator
are open and unobstructed.
o DO NOT place a storage cover over a hot generator,
Let equipment cool for a sufficient time before plsdng the
cover on the eqopment,
Line Storase
See engine owner's manual for instructions.
Other Stora s
° To prevent gum from forming in fuel system or on
essential carburetor parts, add fuel stabilizer into fuel
tank and fill with fresh fuel. Run the unit for several
minutes to circulate the additive through the carburetor,
The unit and fuel can then be stored for up to
24 months, Fuel stabilizer can be purchased locally,
° DO NOT store fuel from one season to another unless
it has been treated as described above,
° Replace fuel container if it startsto rust. Rust and/or dirt
in fuel can cause problems if it's used with this unit.
" Store unit in a dean and dry area.

TROU BLES H OOTi NG
Probmem
No AC output is avaHabme, but
generator is running.
GeneratoP Puns good at no-moad
but "bogs" down _' when loads are
connected.
GenePator will not staPt_ or staPts
and runs rough.
Generator shuts down during
operation.
Generator [acks power.
Cause
I. One of the circuitbreakersis
open.
Z Faultingenerator.
3. Poor connectionor defectivecord
set.
4. Connected deviceisbad.
I. Short circuitina connected load.
Z Generator isoverloaded.
3. Shorted generatorcircuit.
I. lOAmp in°line fuse is blown.
2. Discharged battery.
3. Failed battery.
4. Low oil [eve[.
I. Out of gasoline.
2. Low oil level.
Load is too high.
Correction
Reset circuit breaker.
2. ContactAuthorized service facility.
3. Check and repair.
4. Connect another device that is in
good condition.
Disconnect shorted dectrical load.
2. See "Don't Overload Generator".
3. ContactAuthorized service facility.
Replace fuse.
2. Jump start generator and/or charge
battery.
3. Replace battery.
4. Fill crankcase to proper level or
place generator on level surface.
Fill fuel tank.
2. Fill crankcase to proper level or
place generator on level surface.
See "Don't Overload Generator".

Notes

TROY-BILT® OWNERWARRANTY POLICY Effective November m2,2003
LIMITED WARRANTY
"Troy-BiWD isa registered trademark ofTroy-Bik, LLC and is used under license to Bfiggs & Stratton Power Products. Bfiggs &
Stratton Power Products will repair or rephc< free of charg< any part_or parts of the equipment** that are defective in material
or workmanship or both.Transportation charges on parts submitted for repair or replacement under this warranty must be
borne by purchaser.Thiswarranty is effective for the time periods and subiect to the conditions provided for in this policy.For
warranty service_find your nearest Authorized service dealer by calling 1o888o611:6708?Warranty service mayonly be performed
by a Brigs & Stratton Power ProductsAuthorized service dealer.
THERE ISNO OTHER EXPRESSWARRANTY. IMPLIEDW,ARRANTIES_INCLUDING THOSE OF MERCHANTABILITY AND
FITNESSFORA PARTICULAR PURPOSEARE LIMITEDTOTHETIME PERIOD SPECtFIED_ORTOTHE EXTENT PERMITTED
BY LAWANY AND ALL IMPLIEDWARRANTIES ARE EXCLUDED. LIABILITY FOR CONSEQUENTIAL DAMAGES UNDER
ANYAND ALLVVARRANTIESARE EXCLUDEDTOTHE EXTENT EXCLUSION ISPERMITTEDBY LAW. Some countries or
states do not allow limitations on how long an implied warranty lasts,and some countries or states do not allow the exclusion or
limitation of incidental or consequential damages,so the above limitation and exclusion may not apply to you.This warranty gives
you specific legal rights and you mayalso haveother rights that vary from country to country or state to state."
WARRANTY PERIOD*
Consumer Use Commercial Use
Pressure _A/asher I Year 90 Days
Portable Generator 2Years (2rid year parts only) I Year
*The warranty period begins on the date of purchase by the first retail consumer or commercial end user, and continues for the
period of time stated in the table above. "Consumer use" means personal residential household use by a retail consumer.
"Commercial use" means all other uses, including use for commercial income producing or rental purposes. Once equipment has
been used commercially, it shall thereafter be considered to be in commercial use for purposes of this warranty.
*_%he engine and starting batteries are warranted solely by the manufacturers of those products.
WAR_NTY REGIST_TION IS NOT NECESSA_TO OBTAIN WARP_NTY ON BRIGGS & STP_TTON POWER
PRODUCTS EQUIPNENT.SAVEYOUR PROOF OF PURCHASE RECEIPToIFYOU DO NOT PROVIDE PROOF OFTHE
iNiTiAL PURCHASE DATEATTHETiNEWARRANTY SERVICE iSREQUESTED,THE NANUFACTURiNG DATE OFTHE
EQUIPNENTWILL BE USEDTO DETERNINETHEWARRANTY PERIOD.
About your equipment warranty:
_A/ewelcome warrantyrepairand apologizeto you forbeinginconvenienced.AnyAuthorizedservicedealermay performwarranty
repairs.Most warrantyrepairsarehandledroutinely,but sometimes requestsforwarrantyservicemay not be appropriate.For
exampl< warrantyservicewould not applyifequipment damage occurred becauseof misuse_hck of routinemaintenanc<shipping,
handling,warehousingor improper installation.Simihrly,the warrantyisvoidifthe manufacturingdateor the serialnumber on the
equipment has been removed or the equipment has been altered or modified. During the warranty period_ the Authorized service
dealer, at its option_ will repair or replace any part that_ upon examination_ is found to be defective under normal use and service.This
warranty will not cover following repairs and equipment:
Normam Wear: Outdoor power equipment_ H<eall mechanical devices, needs periodic parts_ service and replacement to perform
well.This warranty does not cover repair when normal use has exhausted the life of a part or the equipment.
Installation and Naintenance: This warranty does not apply to equipment or parts that have been subiected to improper or
unauthorized installation or alteration and modification, misus< negligence, accident_ overloading_ overspeeding_ improper
maintenance, repair or storage so as_in our iudgment, to adversely affect its performance and reliability.This warranty also does
not cover normal maintenance such as adiustments_ fuel system cleaning and obstruction (due to chemical dirt_ carbon or lime_
etc.).
Other Exclusions: Also excluded from this warranty are wear items such as quick couplers, oil gauges, belts, o-rings, filters,
pump packing, etc. pumps which have been run without water supplied or damage or malfunctions resulting from accidents,
abuse, modifications, akerations, or improper servicing or freezing or chemical deterioration.Accessory parts such as guns,
hoses, wands and nozzles are excluded from the product warranty.Also excluded is used, reconditioned, and demonstration
equipment; equipment used for prime power in place of utility power and equipment used in life support applications.
BRIGGS & STRATTON POWER PRODUCTS GROUP, LLC
JEFFERSON,WlSCONSIN, U.S.A.

Reglas de Seguddad
TABLA DE CONTENIDOS
Reghs De Seguridad ............................... 20-22
Conozca Su Generador ................................ 23
Ensamblaie ........................................ 24-25
Funcionamiento .................................... 26-3 U
Han_enimien_o ..................................... 32-33
AImacenamiento ...................................... 34
Diagnosticos De Averias ................................ 35
Garantia ............................................ 36
DESCRIPCI(_N DEL EQUIPO
I!--F-I Lea este manual de manera cuidadosa y:_::j[_ famHiaHcese con su generador, Conozca sus usos_
$us [im[ta¢iones y cua[qu[er pel[gro relac[onado
con e[ m[smo.
Este generador fundona en base a un motor, de campo e[_ctrico
gbatorio y de corriente alterna (AC). Fue disehado con la
finalidad de proveer energia e[_ctrica para Iuces e[6ctricas,
aparatos, herramientas compatibJes y cargas de motor. El campo
giratoHo de[ generador fundona a una veloddad de 3,6000 rpm
usando un motor con tan solo cilindro.
IPRECAUCi6N! NO sobrepase Ia capacidad de vata[e y
ampera]e del generadon Revise "No Sobrecargue Generador'.
Se ha hecho cada esfuerzo posibJe para asegurarse que la
informaci6n que aparece en este manual es exacta y se encuen_ra
actua[izada, Sin embargo, nosotros se reserva e[ derecho a
cambia_; aJterar o de otra manera meiora_; el producto 7"este
documento en cualquier momento, sin previo aviso.
El Sistema de Control de Emisiones para este generador es@.
garantizado Data juegos est_.ndares pot Ia Agencia de Protecci6n
Ambiental. Para mayor informaci6n acerca de la garant[a, consulte
con el manual del propietario deJ motor:
REGLAS DE SEGURIDAD
[_ste es em simbomo de alerta de seguridad. Sirve
para advertir a_ usuario de un posib[e riesgo para
su [ntegridad fis[cao Siga todos los mensajes de
seguridad que figuren despu_s de este s[mbo[o
para ev[tar [esione$ o incluso [a muerte.
Elsimbolo de Merta de seguridad (_k) es usado con una pMabra
(PELiGRO, ADVERTENCiA, PRECAUCiON), un mensaie pot
escrito o una iJustraci6n, para Mertarlo acerca de cua[quier
situaci6n de pe[igro que pueda exisO: PELIGRO indica un riesgo
el cual, si no se evita, causar_ Is muerte o una herida grave.
ADVERTENCiA indica un riesgo el cuaI, si no se evita, puede
causar Ia muerte o una herida grave. PRECAUCI6N in@ca un
riesgo, el cual, si no se evita, puede causar heridas menores o
moderadas. PRECAUCi6N, cuando se usa sin el simbo[o de
alerta, in@ca una situaci6n que podria resultar en e! daffo del
equipo. Siga los mensaies de seguridad para evitar o reducir los
riesgos de heridas e inclusive la muerte.
Electrocutamiento Descarga EI6ctrica
Simbolos de Peligro y Significados
Descarga EI6c_rica
Gases T6xicos Explosi6n
f- ......
Fuego
Presi6n Explosiva Quemaduras Quimica Superficie Caliente
O

5ecd6n 1: RegIas de Seguddad
PEUGRO
Opere el generador SOLAMENTE a! aire lible.
AsegOrese de que los gases de escape no puedan enti_t pot ventanas,
pue_Xas,tomas de aire de vendlaci6n u otFas aberEuras en un espacio
cerrado en e] que puedan acumularse.
NO opele el genelmdo! dentro de un edificio o lugar cerrado, inc]uyendo
el compartimiento del generado! en un vehiculo recreativo o RM
PEUGRO
Cuando use un generador corno podel de enelgia auxiliar, nodfique a
la compa_ia de utilidades. Use el equipo de transfelencia aprobado
para aislar el genelador de otra utilidad el6ctlica.
Use un interruptor pala la falla de[ circuito de qerra (GFCI) en
cualquier _rea bastante h0rneda o que sea altamente conductiva, tales
como tel razas de metal o trabaio hecho con acero.
NO toque los alambres pelados o lecept_culos.
NO use un generadol con cables e]6clslicos que est&n malgastados,
rotos, pelados o daffados de cualquier fo! ma.
NO opele el generador bajo la Iluvia.
NO rnaneie el generador o cables el6ctricos mientlas est& palado en
agua, descalzo o cuando las manos y los pies est6n moiados.
NO pe_miLa que personas descalificadas o nifflos opelen o sirvan al
gene! adoi:
PEUGRO
NO pel mka ninguna llama abierta, chispa, calol: o encienda un
cigarrillo durante y po! varios minutos despues de haber recargado la
bate_ ia.
L[eve puestos las galas protectoras, delantal y guantes de goma.
ADVERTENCIA
CUANDO ANADA COMBUSTIBLE OVAC[E EL
DEP6SITO
Apague el generador (posid6n OFF) y d6jelo enfriar al rnenos por
2 rninutos antes de rernove_ la tapa de la combusdble.Afloje la tapa
lentamente pala dejar que la p_esi6n salga del tanque.
Llene o vacie el dep6sito de cornbustibb a la intemperie.
NO Ilene demasiado el tanque. Permita al menos espacio pala la
expansi6n del combustible.
P1antenga la combustible alejada de chispas, llamas abiertas, pilotos,
calor 7 otras fuentes de igniddn.
NO encienda un cigarlillo o fume.
:UANDO PONGA EN FUNC[ONAM[ENTO EL
EQU[PO
Compruebe que la buiia, el silenciadol; el tap6n de[ dep6sito de
combustible y el filtro de aire est_n instalados.
NO alranque el moto! sin la buiia instalada.
Si se ha derramado combustible, espere a que se evapore antes de
al rancar el moron
:UANDO OPERE EL EQUiPO
NO incline el motor o el equipo, de tal manela que la combustible se
pueda derl aman
. Este genelador no es apto para el uso en equipos m6viles ni en
aplicaciones ma! inas.
CUANDO TRANSPORTE O REPARE EL EQUIPO
• Transpolte o repale el equipo con el tanque de combustible vacio, o
con la v_lvula para apagal el combustible, apagada (posici6n OFF).
• Desconecte el cable de la bujia.
CUANDO ALMACENE O GUARDE EL EQUIPO CON
COHBUST[BLE EN ELTANQUE
Ah-nacene alejado de calderas, estufas, calentadores de agua, secadoras
de ropa u ou*os apalatos electrodom6sticos que posean pilotos u
otras fuentes de ignici6n, polque el!os pueden encender los vapores
de la combustible.
ADVERTENCIA
Este genelador no curnple la norrna 33CFR_183 del cue_ po de
guardacostas de EE.UU. y no debe udlizarse en ap]icaciones marinas.
E! uso de un generador no homologado pot cuerpo de guardacostas
de EE.UU. puede provocar lesiones y da_os mateliales.

Secd6n 1: [nstrucciones de $eguddad
ADVERTENCIA
CUANDO AJUSTE O HAGA REPARACmONES A SU
GENERADOR
Siempre desconecte el alambre de la bujia y col6quelo donde no
pueda en_rar en contacto con la bujia.
CUANDO PRUEBE LA BUJiA DEL MOTOR
Udlice un comp!obador de buiias hornologado.
NO comprueba la chispa sin la buiia instalada.
NO toque las superficies calientes.
Permita que el equipo se enfrie antes de tocarlo.
El generado! debe es_ar situado a un rninimo de 152 cm (5 pies) de
Eoda estluctula con muros combustibles y/o oEras mateHas
combustibles.
blantenga un minimo de 92 cm (3 pies) alrededor de la carcasa (:let
gene_adon para facilita! la ventilaci6n y el man_enimien_o del
genel adoi:
En el estado de California es obligato!io, seglin la ley, el uso de
apagaehispas (Secci6n 4442 del C6digo de Recursos POblicos de
California). Otros estados pueden tenet leyes similares. Las leyes
fedelales se aplican en derlas federales, gi equipa el silenciador con un
apagaehispas, este deber_ set manEenido en buenas condiciones de
_rabajo.
PRECAUCION
NO cambie ninguna velocidad determinada. El generador suministla
uea fl ecuencia y un vokaie ealificado cuando funeiona a una velocidad
de_e_minada.
NO modifique al generado{ en rfieguna folma.
Vea "No soblecargue generado_".
Endenda su generador y deie que el moto! se estabilice antes de
conectar las eargas el6ctrieas.
Conecte las cargas el6c_ricas en la posici6n de apagado (OFF), luego
eneienda (ON) pala su operad6n.
Apague (OFF) las cargas el6etricas y descon6c_elas del generador
antes de para! el genelador.
Use el generador solamente con la finalidad para el cual fue diseffado,
Si usted tiene alguna pregun_a acerca de las finalidades de uso del
generadol: preg0ntele a su concesionario o Ilame 1-888-611 6708.
Ope_e el generadol solamente en superficies niveladas.
NO exponga al generado! a una humedad exeesiva, polvo, sudedad o
vapores corl osivos.
NO inselte cualquie_ objeto a _rav6s de las lanuras de enfriamiento.
Si los aparatos conec_:ados se soblecalientan, ap_guelos Y
descon6ctelos del generado_:
Apague el generador si:
Se pierde la salida el6cErica;
El equipo produce chispas, humo o emite llamas;
La unidad vibla de una manela excesiva.

Caracter[sticas y Mandos
CONOZCA $U GENERADOR
LEA ESTE MANUAL DEL PROPIETARiOY LAS REGLAS DE SEGURIDAD ANTES DE OPERAR SU GENERADOR.
Compare [as ilustraciones con su Generador para familiarizarse con las ubicadones de los diferentes controles y aiustes. Conserve este
manual para referencias futuras.
Aceite Llena iaTara
Depu! ador de Aile
Silenciador Apagachispas
Tanque de[ Combustible
Co! taci! cuitos (AC)
Disyun_o_ basculante
Tornacol riente Dobles de
120VolgiosAC, 20Amperios
Tom,col riente COn
Dispositivo de Segulidad de
120/240 Voltios, 30 Arnperios
Palanca del Cebado!
Placa de Caracter[sticas
Tomacor! ientes de
12 Voltios DC
Bater[a
Ace[re LJena [aTapa = Agrega aceite a[ motor aquL
Bater[a = Loca[izado bajo puerta pl_stica. La bateria seJ[ada de [2V
DC proporciona la energ[a necesaria para arrancar el motor:
Bot6n de Encendido - Cuando es oprimido, hace que el motor se
encienda.
Cortacircuitos (AC) =Cada tomacorriente posee un cortacircuito
para proteger el generador contr_ sobrecargas el6ctricas. Los
cortacircuitos son deI tipo "oprimir para reposicionar'.
Culatazo e[ Principio = Us6 para comenzar motor.
Depurador de Aire - Filtra e! aire de entrada a medida que
penetra en el motor:
Disyuntor basculante - La toma con bloqueo de [20/240V CA,
30 A dispone de un disyuntor basculante que protege el
generador contra sobrecargas el6ctricas. Este interruptor controla
tambi6n todos recept_culos.
P[aca de Caracter_sticas -- Proporciona e[ modelo, revisi6n y
el mSmero de serie de generador.Tenga pot favor estos
prontamente disponible cu_ndo Ilamar para la ayuda.
Pamanca de[ Cebador - Usada cuando se est_ dando arranque a
tan motor frio.
Bot6n de Encendido
Tueica Mariposa para
Conexi6n a Tie! ra
Silenciador Apagachispas = El si[enciador disminuye el ruido
del motor y est_ equipado con una pantalla apagachispas.
Tanque de[ Combustible - E[ tanque tiene una capacidad de
7 galones Americanos de gasolina sin contenido de plomo.
Tomacorriente Dob[es de 120 Vo[tios AC, 20 Amperios =
Pueden set utiiizados para surninistrar alimentaci6n e[_ctrica para
el funcionamiento de cargas det motor; herramientas, aparatos
especiales e i[uminaci6n el_ctrica de [ 20Voldos AC a 20 Amperios,
monof_sica de 60 Hz,
Tomacorriente con Disposidvo de Seguridad de
[ 2.01240 Voldos, 30 Arnperios - Puede set utilizado para
suministrar alimentaci6n eJ6ctrica para el funcionamiento de cargas
del motor, herramientas, aparatos especiales e iJuminaci6n el6ctrica
de 120 7/o 240 VoJtios AC a 30 Amperios, monof_sica de 60 Hz.
Tomacorrientes de 12 Voltios DC = Este tomacorriente le
permite recargar baterias tipo servicio o automotriz de 12 Vokios
o b_teria de aimacenamiento tipo servicio utiJizando los cables
para cargar baterias.
Tuerca Mariposa para Conexi6n aTierra -- Si requiri6,
consuke con un eIectricista cualificado_ un inspector el6ctrico o el
organismo competente.

Montaje
Su generador requiere de ciertos procedimien_os de mon_aie y
solo es_ar_ lis_o para set u_flizado despu6s de haberle
suministrado servicio con el combustible y aceite recomendados.
Si usted dene problemas con emmontaje de su generador,
par favor Harne a la m_nea de ayuda para generadores aJ
t °888°6 J t =6708.
Para Redrar EmGenerador De La Caja
U. Coloque Ia caia sobre una superficie pIana y rigida, con hs
flechas que dicen "this side up" hacia arriba_
2_ Abra con cuidado Ias _apas superiores de Ia caja de envlo_
3. Corte de arriba a aba]o las esquinas de uno de los lados de
la caia y coloque ese Iado de la caja sobre et sueto.
4. Retire todo el material de empaque, reileno, e_c_
5. Saque el generador de la caia de envio_
Fije emAsa
Necesi_ar_ dos Ilaves inglesas de 13 mm o I/2" para fiiar el asa_
I. Fiie el asa at I_teral derecho dei basdcior deJ generador (vis_o
desde Ja par_e deJan_era de Ja unidad), como se muestra en la
Figura 19_Para eIIo u_ilice un 60 mm _ornillo, arandelas,
arandelas de nylon y una tuerca.
60 mm ToH_illo
Tuerca
NOTA: NO apriete exce$ivamente. El asa debe poder subir y
bajar libremen_e_
2. Suba el asa e inserte su pasador para mover el generador.

Secci6n 3: Montaje
ANTES DE DARLE ARRANQUE AL
Agregar Aceite amMotor
Coloque la generador sobre una superficie nivelada,
1
ConsuFte el manual del propietario det moto_ pals a6adir al motor
el aceite recomendado
• EI dado a Is hvadora a presi6n, resultado de la desatenci6n s
esta precaud6n, no ser_ cubierto por la gsranda.
Consulte el manual det propietario de! motor pars adadir ai
motor et aceite recomendado.
NOTA: Verifique el aceite del motor de manera
frecuente cuando _ste se esfuerce demasiado, Consumte em
manual dempropietario del motor para conocer curies
son las recomendaciones al respecto,
NOTA: El campo giratorio deJ generador se encuen_ra en un
cojine_e pre-lubricado y sellado que no requiere lubricaci6n
adicionai por la vida 0til del coiinete.
Agr÷gue Combustible
NOTA: Este motor est_ cerdficado para funcionar con gasolina.
Sistema de control de emisiones de gases de escape: EM
Modificaciones de[ motor).
CUANDO ANADA COMBUSTIBLE
Apague el generador (posici6n OFF) y d6ielo enfriar al menos pot
2 minutos antes de lemover la taps de la cornbustible.Afloie la taps
lentamente pars deiar que la presi6n salgadel tanque.
Llene el dep6sito de combustible a la intempelie.
NO Ilene demasiado el tanque. Permits al menos espacio pars la
expansi6n del combustible.
Mantenga Is combustible aleiada de chispas,llamas abie!tas, pilotos,
calory otlas fuentes de ignici6n.
NO endenda un ciga!ri!lo o fume.
I. Utiiice combustible normal sin plomo, limpia y nueva con un
minimo de 85 octanos. NO udlice combustible que contenga
metanol nJ mezcle aceite con combustible.
2.
3.
Limpie el _rea alrededor de la taps de Ilenado de[
combustible, retire la taps.
Agregue lentamente combustible reguJar "SIN PLObIO" al
tanque de combustible. Use un embudo para evitsr que se
derrame. Llene el tanque lentamente hasta aproximadamente
2.25" por debaio de Is parte la cima del cuetlo del tubo de
llenado (Figura 20).
_NNNNNNNNNNNNNNf"
_NNNNNNN_NNNNNNN
A pesar de queen el manual del motor se indics que el nivel de
Ilenado de combustible debe ser de 3,8 cm (I,S") pot debajo de Is
boca de Ilenado, !16nelo solamente basts una altura de 5,7 cm (2,25")
por deba]o de la boca de Ilenado.
En caso cont_alio, el combustible podiia rebosal del dep6sito debido
la expansi6n.
Instale la tapa deI tsnque de combustible y limpie la
combustible que se hays derramado.
Quite [a Cubierta en el Jnterruptor de[
Arranque
Una cubierta plastics se co!oca sobre et interruptor deJ arranque
pars prevenir el generador de ser empezado durante el envlo.
Abra Ia cubierta en eJ cargador de flotante de la bateria,
Quite y deseche pI_stics cubierta sobre el interruptor de
arranque (Figura 21).
Reemplace la cubierta en et cargaclor de flotante de la bateria,

Operad6n
U$O DEL GENE DOR
Tierra de[ $isterna
Elgenerador dJspone de una conexi6n a tierra del sistema que
conecta los componentes del basddor a los _erminales de derra
de Ios enchufes hembra de salida de CA. La tierra de[ sistema
es_ conec_ada al cabJe de CA neutro que, a su vez, est_
conectado al basddor de[ generador (vea "DescMpi6n del
Equipo").
Requisitos EspeciaIes
Es posibJe que haya normas u ordenanzas locales y nacJonaJes en
materia de seguridad e higiene en el trabaio apJicabJes a[ uso del
generado_: Consulte con un electricista cualificado, un inspector
el6ctrico o et organismo competente,
En algunas zonas, es obJigatorio registrar los generadores en
las compafilas ei6ctricas locales,
Si el generador se utiliza en una obra, puede set necesaMo
cumplir normas y requisitos adicionales_
Cone×i6n am $istema El_ctrico de un
Edificio
Las cone×Jones a efectos de aJimentaci6n de reserva al sistema
el6ctrico de un edificio deben ser realizadas pot un electricista
cualificado. La cone×i6n debe aislar la alimentaci6n deI generador
de la a]imentaci6n de la red publica y debe cumplir todas las leyes
normas e!_ctricas vigentes_
PELIGNO
Cuando use un genelador corno podel de enelgia auxiliar, notifique a
la cornpafiia de utilidades. Use el equipo de transferencia aprobado
para aislar el genetador de otra utilidad el6ctlica.
Use un interruptor para la falla del circuito de tierra (GFCI) ee
cualquie_ _rea bastante h0rneda o que sea altarnente conductiva, tales
como terrazas de metal o trabaio hecho con acero.
NO toque los alarnbres pelados o lecept_culos.
NO use un generador con cables el6ctricos que est6n rnalgastados,
rotos, pelados o dafiados de cualquier fo_rna.
NO ope_e el geeerador baio la Iluvia.
NO rnaneie el generador o cables el6ctricos rnientlas est6 palado en
agua, descalzo o cuando las rnanos y los pies est6n rnoiados.
NO pe_ rnita que personas descalificadas o niffos opeten o sirrah al
generadoi:
Ubicaci6n de[ Generador
Espacio Libre Amrededor del Generador
PELIGNO
Opere el generador SOLAMENTE al aile IDle.
AsegOrese de que los gases de escape no puedan entrar pot ventanas,
puertas, tornas de aire de ventilaci6n u otras aberturas en un espacio
cerrado ee el que puedan acurnularse.
NO opere el generador dentro de un edificio o lugar cerrado, induyendo
el cornpal tirniento del generador en un vehiculo !ecreativo o R_(
El generador debe estar situado a un minimo de 152 cm (5 pies)
de toda estructura con muros combustibles ylo otras materias
combustibles. Mantenga un m/nimo de 92 cm (3 pies) abededor
del generador, incJuido la parte superior, para faciJitar la
ventiJaci6n y e[ mantenimiento de[ generado_
Sittie e[ generador en una zona bien venti[ada que permita [a
eliminaci6n de los gases de escape morta[es. No instale el
generador en Iugares en los que los gases de escape se puedan
acumu[ar o entrar en un edificio que pueda estar ocupado.
Aseg6rese de que los gases de escape no puedan entrar por
ventanas, puertas, tomas de aire de ventilaci6n u otras aberturas
en un espacio cerrado en el que puedan acumularse (Figura 22).
Tenga en cuenta los vientos y Ias corriente de aire
preponderantes cuando eliia la ubicaci6n del generador.
Salida del Escape

Secci6n 4: Operaci6n
OPERANDO EL GENERADOR
Vea "No sobrecargue generador".
Encienda sugeneladol y deie que el motor se estabilice antes de
conectar lascargos el6ct_icas.
Conecte las cargosel6ctricas en la posici6n de apagado (OFF),luego
encienda (ON) para su operaci6n.
Apague (OFF) las calgas el6ctlicas y descon6ctelas det genetador
antes de polar el generado_=
mMPORTANTE: Desenchufe siempre el cargador de flocaci6n de
la baceria antes de arrancar e! generation:
Encienda emMotor
Desconecte codas Ias cargos el6ccricas de! generador: Use las
siguiences inscrucciones para encender:
I. Aseg_rese de que la unidad esc_ en una superficie piano.
IMPORTANTE: Sila unidad no se arranca y udliza en una
superficie piano, se pueden producir problemas de arranque y de
parada durance el funcionamienco,
2. Conforme a Ias insu'ucciones que figuran en el manual del
motor y situe el incerrupcor de arranque en la posici6n
"Start" (Arranque) (Figura 23). Para prolongar la vida de los
componences del sistema de arranque, NO mancenga el
incerrup_or en la posici6n "Start" durance m_s de
15 segundos y realice pausas de I minu_o entre incencos.
ADVERTENCIA
NO toque lassupelficies calientes.
Permicaque el equipo se enfiie antes de tocarlo.
E!gene_ador debe e_tal sJtuadoa un minimo de [52 cm (5 pies) de
toda estructura con muros combustibles y/o OtlaS matelias
combustibles.
Mantenga un minimo de 92 eln (3 pies) alrededol de la carcasa del
generation para facilita_ la vendlaci6n y el mantenimiento del
generation
Enel estado de Califo_nia es obligatorio, seg0n la ley,el uso de
apagachispas(Secci6n 4442 del C6digo de Recul sos P0blicos de
California). Otros estados pueden tenet leyes similares. Las leyes
federales se aplican en tierras federa]es.Si equipa el silenciadol con un
apagaehispas,este debeifi set mantenido en buenascondiciones de
trabaio.
Procedimiento de Arranque en Puente
Si falla la bateria de arranque del generador, siga estas
inscrucciones para arrancarlo en puence Puede arrancar el
generador udlizando una bateria secundaria o de aucomoci6n de
12 vokios.
I. DesacorniIIe el porcafusibles y retire et fusible en linea de 10
A det generador (Figura 24). Compruebe el escado del fusible
_-si es necesario, suscicuyalo, Vuelva a colocar el fusible en el
portafusibles.
NOTA: Si el motor arranca despu_s de cirar _res veces det
arrancador pero no sigue funcionando, o si Ia unidad se para en
funcionamienco, asegurese de que Ia unidad esc_ en una superficie
piano y compruebe queet nivet de aceite del cig(ief_al es correcto.
La unidad puede equiparse con un disposicivo de procecci6n de
baio nive! de aceite.Vea manual de mo_o_:
/
/
Excraiga el recubrimienco aislance rojo del terminal de la
baceria de[ generador y desl/celo pot el cable roio para deiar
aI descubier_o el terminal POSITIVO de la baceria.

Secd6n 4: Operaci6n
3. Conecte Ia pinza ROJA de un cable de puente para
automod6n a[ terminal Posmvo de la bateria dd
generador (Figura 25),
4. Conecte [a otra pinza de[ came de puente ROJO a[ terminM
POS[TP¢O de [a bateria de arranque.
5. Conecte [a otra pinza de[ came de puente NEGRO aJ
terminal NEGAT[VO de [a bateHa de arranque.
6. Conecte }a otra pinza de[ came de puente NEGRO a[
CONECTOR DET[ERRA el generador; como se muestra en
[a Figura 23.
7. Arranque el generador como se describe en "Arranque de[
Hotor" y retire los cables de puente en el orden inverso a[
de la conexi6n.
8,
DesJice el recubrimiento aislante ro[o para vdver a cubrir el
terminal POSmVO de la bateria.
Si tiene alguna pregunta, Ilame a Ia Iinea de asistencia t6cnica de
generadores, aJ t-888-6 t 1-6708, de Junes a viernes y de 8:00 a
17:00, horatio central
[MPORTANTE: Cuando arranque et generador en puente,
uti[ice protecci6n adecuada para los ojos y nunca se incline sobre
Ja bateria, [nspeccione ambas baterias antes de conectar los cables
de puente. No intente arrancar en puente una bateria que est6
daffada.Aseg@ese de que los tapones de ventilaci6n est_n bien
suietos y nivelados.
Conexion De Cargas EJectricas
Deje que e[ motor" se estabiJice 7"se cMiente pot unos
minutos despu6s de[ arranque.
Conecte y encienda [as cargos eJ6ctricas de [20 y/o
240 Voltios AC monof_sicas de 60 Hz que desse.
NO conecte cargas de 240Vokios a tomacorrientes de
[ 20 Vokios.
NO conecte cargas trff4sicas a[ generadon
NO CONECTE car%as de 50 Hz al generador.
NO SOBRECARGUE EL GENERADOR.Vea "No
Sobrecargue Generador'.
Parado De[ Motor
1. Desconecte todas las cargos el6ctricas de los tomacorrientes del
panel de[ generadon NUNCA de arranque o detenga el motor
con todos los dispositivos el6ctricos conectados y encendidos.
2. Deje que el motor funcione sin cargas pot algunos minutos
para estabiJizar Jas temperaturas internas del motor" y el
generador.
3. SitQe eJ interruptor de arranque en Ja posid6n "Stop" (Parada).
Cargo de [a Bateria
Su generador tiene [a capaddad de recargar baterias descargadas
de acumuladores tipo servicio o automotriz de [ 2Vokios. NO
ufiJice la unidad para cargar baterias de 6VoJfios. NO use [a
un[dad para mover motores que tengan [a bateria descar_ada.
PELJGRO
NO permita ninguna llama abielta, chispa, calor, o encienda un
cigal rillo dutartte y por valios minutos despu6s de haber lecalgado la
bateHa.
Lleve puestos las gafas protectoras, delantal y guantes de goma,
Para recargar bater[as de J2Vomtios, re[evea cabo los
siguientes procedimientos:
1. Revise el nivel del [iquido en todas los cddas de la bateria. Si
es necesario, affada agua destiIada UNICAMENTE basra
cubrir los separadores de las celdas de la bateria. NO use
agua de grifo.
2. Si la baterla est_ equipada con tapas de desfogue, asegtir'ese
de que est4.n instaladas y apretadas.
3. Limpie los terminales de la bateria si es necesario,
4. Conecte el enchufe conector de[ cable de carga de la bateria
al tomacorrientes de[ panel identificado con las palabras
"12-VOLTS D,C," output.
5. Conecte el suietador del cable de carga de la bateria que
tiene la maniia roia al terminal positivo (+} de Ja bateria
(Figura 26).
6. Conecte el suietador de[ cable de carga de la bateria que
tiene la maniia negra al terminal negativo (-) de la bater4a
(Figura26),

$ecci6n 4: 0peraci6n
lii,
TOMACORRIENTE DE
12 VOLTIOS DC
+ POSITIVO - NEGAT!VO
7. Arranque e[ motor: Deje que d motor" funcione mientras la
bateria se recarga.
8. Apague el motor cuando Ia bateria se haya cargado.
NOTA: Use un hidr6metro para autom6viJes para probar el
estado de carga y condid6n de la bateria. Siga cuidadosamente Jas
instrucdones del fabricante deJ hidr6metro. Pot Io general, se
considera que una bater{a estA en un estado de carga del
100% cuando la gravedad especifica de su I_quido (medido por el
hidr6metro) es de 1.260 o mayon
Cargador de Bateria
Si el eqopo dispone de 6J,utilice el enchufe hembra dd cargador
de flotaci6n (carga [enta y continua) de la bateria para mantener la
bateria de arranque cargada y preparada para el uso. La carga de
Ja bateria se debe realizar en un lugar seco, como el interior de
un garaje.
I. Conecte cargador aI enchufe hembra "Battery Float Charger"'
(Cargador de flotaci6n de la bateria) de la unidad, que se
encuentra en el interruptor de arranque (Figura 27). Enchufe el
cargador de la bateria a una toma de pared de 120V CA.
mN
\
2. Desconecte el cargador de Ia unidad y deI enchufe de la pared
durante el arranque deJgenerador y mientras est6 funcionando.
3. blantenga eJ cargador enchufado cuando eI generador no se
est_ utilizando, para proJongar la vida de Ia bateria. El
cargador incorpora un ecualizador de flotaci6n que impide Ja
sobrecarga de la bateria, induso aunque est6 enchufado
durante un largo periodo de tiempo.
IMPORTANTE: Para obtener m_.s informaci6n al respecto,
consuJte "blantenimiento de la Bateria" en la p_,gina 33.
OPERACJ6N DURANTE UN
CLJMA FNiO
Bajo ciertas condJciones ambientaJes (temperaturas por deba]o de
los 40°F [4°C] y un punto alto Dew), su generador puede
experimentar congdamiento del carburador ylo el sistema de
respiradero del cigLieBai.
Construya una estructura que pueda cubrir los tres Jados y Ja
parte superior del generador:
I. Aseg_irese que el Iado del amortiguador dei generador es@.
expuesto,Aqui se muestra una unidad tlpica, su unidad puede
tener otra apariencia, corno se muestra en Ja Figura 28.
Viento
2. Asegurese que existe un espacio mlnimo de tres pies entre el
lado abierto de Ja caja y el objeto m4s cercano.
3. Co[oque la parte abierta fuera dd viento y otros dementos.
4. La cobertura deberia aguantar el calor suficiente creado pot
el generador para prevenir problemas.
PELJGNO
Opele el generador SOLAMENTE al aire libre.
P1antengaa! menos 3 pies de espacio libre abededor del generadol;
pala la adecuadaventilaci6n.
NO opere el generador dentro de un edificio o lugarcerrado, induyendo
el cornpartimiento del generador en unvehiculo !ecreadvo o RM
Retire la protecci6n cuando la temperatura sea superior" a
4',c [40',F],

Secci6n 4: Operaci6n
JUEGO DE CABLES DEL
ADAPTADOR DEL GENERADOR
Elgenerador est_ equipado con un Juego de Cables de{Adaptador
de[ Generador de 25 pies, diseF_ado para un circuito neutro a
tierra de 240 voltios, 30 Amperios (Figura 29). El juego de cables
del adaptador del generador provee un suministro conveniente de
energia para cuaJquier emergencia en su propiedad, de ta[ manera
que su generador pueda ser operado seguramente en el exterior:
La car%a m_,xima en cada tomacorriente es de 20 Amperios. La
carga m_xima totaJ tanto en eJ tomacorriente de cabJe amarilJo
como eJtomacorriente de cabJe negro, es de 30 Amperios.
NOTA: Siga todas las instrucciones de seguridad cuando conecte
cualquier cabJe de extensi6n o aparato aJgenerador:
PRECAUCI6N
• NUNCA intente suministrar corriente a un dispositivo de arnperaie
superior al que puede suministrat el genetado! o el enchufe hembra.
• NO sobrecargue el generadoi: Consutte el apaltado "No Sobrecalgue
_eherador".
Tomacorrientes de [ 2 Vomtios DC
Este tomacorriente le permite recargar una bateria de
almacenamiento tipo servicio o automotriz de 12VoItios utilizando
los cables suministrados para car'gar baterias (Figura 30),
Esta toma no puede recargar baterias de 6 voltios ni utilizarse
para arrancar un motor cuya bateria est6 descargada.Vea las
seccione "Carga de la Bateria" (p_,gina 28) antes de intentar
recargar la bateria.
[ 20 Volt A¢, 20 Amp, Recept_culos Dobles
Cada recept_culo (Figura 31) est,. protegido en contra de
sobrecargas pot un corto-circuitos de, det tipo "empuie para
reposJcionar".
Use cada recept_culo para operar 120 Voltios AC, de fase sencilla,
de cargas de 60Hz que requieren hasta 2,400 vatios (2.4 kW) a
corrientes de 20 Amps. Use los juegos de cables que son
calificados para cargas de 125Voltios AC, a 20 Amps (o mayores).
[201240 Voltios AC, 30 Amp, Recept_cu[o
de Seguridad
Use un tap6n NEbIA LI4-30 con este recept_culo. Conecte un
iuego de cable de 4 alambres, clasificado como 250 Voltios AC a
30 Amps (o mayor) (Figura 32). Usted puede usar el mismo cane
de 4-alambres si planea trabaiar con una carga de [20Voltios.
Juego de Cable de 4 Alambres
.J
/ \
(Neutro)
_0 _0_ _ Y (Cargado) X (Cargado)
[
NEMA LI 4-30 /-7L-7 Tierra(Verde)
Este receprAculo [e provee poder a cargas de [ 20/240Voltios AC,
de 60 Hz, fase sencilla, que requieren hasta 7,200 vatios de energia
(7.2 kW) a 30Amps, para [20Vo[tios o 240Voitios. El enchufe
est_ protegido por un disyuntor basculante.

Secd6n 4: Operad6n
NO SOBRECARGUE EL
Capacidad
Usted debe asegurarse que su generador puede proveer el
suficiente vataie calificado (cuando est6 funcionando) y de carga
(aJ encender) para los aparatos a los cuales va a proveer la
energia, al mismo dempo. Siga estos pasos:
I. Seleccione los aparatos que redbir_n la energia, al mismo
dempo.
2. Totalice los ratios calificados (cuando est6 funcionando) de
estos aparatos. Esta es la cantidad de energia que su
generador debe produdr para mantener eso aparatos
fundonando adecuadamente.Vea la Figura 33.
3. CalcuJe la canddad de ratios de carga (a[ encender) que
usted necesitar_. El vataie de carga es la cantidad minima de
eJectricidad, necesaria para encender herramientas o
apar3tos con motores eJ_ctricos, tales como, sierras
circulates o refrigeradores. Debido a que no todos los
motores se encienden aJ mismo momento, el vataie total de
carga se puede estimar a[ afiadir solamente el(los) aparato(s)
con el vataje adicionaJ m4,s alto, al total del vataie calificado,
obtenido en el paso 2,
EjempJo:
HelTamieRta o
Aparato EI6ctrico
Aire Acondicionado
de Ventana
Refrigerador
Congelador industrial
Televisi6n
Luz (75 Vatios)
Vatios Calificados
(cuando est6
funcionando)
J200
800
50O
5OO
75
Total = 3075
Vatios para funcionar
Vataie Total Calificado
Vataje de Carga Adidonal m4,s alto
SalidaTotaJ Requerida dd Generador
Vatios Adicionales de
Carga (al encender)
1800
J600
50O
1800 (Vatios de
Cargam4s alto)
cuando est6 funcionando)= 3075
= 1800
= 4875
Control de Ja Energia
Para prolongar la vida de su generador y los apar_tos que est@n
conectados al mismo, es muy importante cuidarlo cuando se le
afiaden cargas el6ctricas. Nada deberia estar conectado a los
tomacorrientes deJ generador antes de que su motor sea
encendido. La forma correcta y m4s segura para controlar la
energia del generador; es la de afiadir en secuencias las cargas,
como se describe a continuaci6n:
I. Sin tenet nada conectado al generador, encienda el motor de
la manera descrita en este manual.
2. Conecte y encienda la primera car%a, preferibJemente la
mayor que usted tenga,
3. Permita que la salida deJ generador se estabilice (el motor"
funciona suavemente y el aparato conectado al mismo
trabaja adecuadamente).
4. Conecte y encienda Ja pr6xima carga,
S. De nuevo, permita que el generador se estabilice.
6. Repita los pasos 4 y S para cada carga adicional que usted
tenga.
NUNCA afiada m_s cargas sobre la capacidad del generador,
Tome una atenci6n especial en considerar las cargas de corriente
segQn la capacidad dd generador, como se describe arriba,
Herramienta o Aparato E!6ctrico
Esenciales
Bombilla - 75 vatios
Congelador industrial
Bornba de aguas negr_s
Refiigerador / congelador 18 pies
cObicos
Bomba de agua _ J/3 HP
Ca]efacci6n / enfrialrniento
Aire Acond. de ventana - 10,000 BTU
Ventilador de ventana
Calefactor de ealdera - J/2 HP
Cocina
Homo de microondas - J.000 Vatios
Cafetera
Cocina el@ctriea - Elemento simple
Calientaplatos
Habitaci6n Familiar
Tocador de DVD/CD
VCR
Receptor esto'eo
Televisor a color - 27 pulg.
Computadora personal con monitor de
17 pulg.
Otros
Sistema de seguridad
Radio-Relo i AM/FM
AbHdor de gara)e - U2 HP
Calentador el@ctrico de agua - 40
galones
Taller
Luz de hal6geno para trabajar
Rociador sin aire - 1/3 HP
Sie_ra intercambiable
Taladro elOctrico - 1/2 HP
Siel ra cilcular _ 7 ¼ pulg.
Sierra inglete- l0 pulg.
Mesa de phnificaci6n - 6 pulg.
Siel ra de mesa / sierra de brazo radial
- l0 pulg.
Compresol de aire- Id/2 HP HP =
Caballo de fuerza,
J
atlos Vatios
Calificados* Adicionales
(cuando est6 de Carga (al
funcionando) encender)
75
500 500
800 J200
800 J600
1000 2000
1200 J800
300 600
800 J300
IO00
1500
1500
2500
_00
_00
45O
50O
8OO
_80
3OO
480 520
4000
IO00
600 J200
960 960
IO00 J000
1500 JSO0
1800 J800
1800 I800
2000 2000
2500 2500
*El vataje que aparece en la lista es solamente una cantidad
aproximada,Verifique la herramienta o aparato d6ctrico para
obtener el vataje verdadero.

RECOMENDACIONE$
GENERALE$ DE
HANTENIHIENTO
El propietario / operador es responsable por asegurarse de que
todos los traba]os peri6dicos de mantenimiento se Ileven a cabo
adecuadamente; que todos los probiemas son resueltos; y que Ia
unidad se mandene limpia y adecuadamente almacenada. NUNCA
opere un generador que est_ dadado o defectuoso.
NOTA: Si Ia unidad dispone de ruedas inf]ab[es, mantenga Ia
presi6n de aire que se indica en el neum_,dco, o entre U5 }, 40 psi.
Hantenimiento dem Hot:or
Consulte et manual deI propietario deJ motor para las
instrucciones de c6mo mantener adecuadamente et moron
La unidad incluye una bandeia de vaciado de aceite que facilita el
cambio del aceite y deJ fiJtro.AJmac6nela en un lugar adecuado
para utilizarJa para eJ mantenimiento peri6dico.
Cambio deB Aceite
I. Situ6 Ia muesca en forma de media luna de Ia bandeja de
vaciado de acote bajo el tap6n de vaciado de aceite (Fisura 34).
/
2. Inserte la padlla de la bandeia de vaciado de aceite en la
ranura de la base del 8enerado_; como se muestra en la
figura,
3. Para radar el aceite, siga las instrucciones det manuaI del
propietario del moron
4. Una vez vaciado el aceite, vuelva a colocar el tap6n de
vaciado de aceite.
S. Retire Ia bande]a de vaciado de aceite de deba]o det tap6n },
Iimpie los restos de aceite.
Cambio del Fimtro de Aceite
I. Sittie la muesca en forma de media luna de Ia bandeja de
vaciado de aceite ba]o et filtro de aceite (Figura 35).
2. Inserte Ia patilla de la bandeia de vaciado de aceite en la
ranura de la base deI 8enerador, como se muestra en la fisura.
3. Siga las instrucciones de cambio det filtro de aceite 7 de
Ilenado de aceite que se indican en e! manual del propietario
del moron
Retire Ia bandeia de vaciado de aceite de debaio det filtro y
limpie los restos de aceite.
PRECAUCION
E!aceite usado del motor ha sido momado al cancer de la piel de la
causaen ciertos animales del laboratolio.
Completamente lavado expuso _reas con el jab6n y el agua.
FIANTENGA FUERA DE ALCANCE DE Nfl_OS. NO
CONTAPIINE. CONSERVE los RECURSOS.VUELVA
ACEITE USADO A la COLECCION CENTRA

Secci6n 5: Mantenimiento
Mantenimiento deJ Generador
EJrnan_enimiento del gene_dor consiste en conservar Ia unidad
limpia y seca_Opere y aimacene Ia unidad en un ambience limpio y
seco donde no set3. expues_a aJ poJvo, suciedad, humedad o
vapores corrosivos. Las ranuras del aire de enfriamiento dd
generador no deben estar tapadas con nieve, hoias, o cualquier
o_ro material extra_ios_ Revise frecuentemente la Iimpieza del
generador y I_mpieto cuando est6 con polvo, sucio, con aceite,
humedad, o cuando otras substancias extraBas sean visibles en su
superficie exterior:
NOTA: NO recomendamos el uso de mangueras de jardin para
Jimpiar el generador. El agua podria introducirse en eJ sistema de
combusdbIe de[ motor y causar proNemas.Adem_,s, si el agua se
introduce aJgenerador a trav6s de las ranuras para aire de
enfriamiento, algo del agua quedar_ retenida en los espacios vac/os
y grietas deJ aislamien_o del devanado deJ estator y rotor. La
acumuJaci6n de agua y suciedad en los devanados internos del
generador disminuir4 eventuaJmente la resistencia dd aislamiento
de estos devanados.
ADVERTENCIA
CUANDO AJUSTE O NAGA REPARACIONES A SU
GENERADOR
Siempre desconecte el alambre de la bujia y col6quelo donde no
pueda en_rar en contacto con la bujia.
CUANDO PRUEBE LA BUJJA DEL MOTOR
Utilice un comp!obador de buiias homologado.
NO comprueba la chispa sin la buiia instalada.
Mantenimiento de Ja Bateria
De otra manera que chorrea un poco cargaK descrito en
"Cargador de Baterla", la conservaci6n ningun otto se requiere
para la bateria.
IMPORTANTE: Cargar de bater[a se debe reaJizar en una
ubicaci6n seca, taJ como dentro de un garaje.
Para Limpiar el Generador
Utilice un trapo hOmedo para limpiar las superficies exteriores.
NO exponga al generado! a una humedad excesiva, polvo, suciedad o
wpores corrosivos.
NO inserte cualquiet objeto a trav6s de las lanuras de enfriamiento.
Puede usar un cepilJo de cerdas suaves para redrar la suciedad
endurecida, aceite, etc.
Puede usar una m_quina aspiradora para eliminar suciedad y
residuos suettos.
Puede usar aire a baja presi6n (que no exceda los 25 psi) para
eliminar Ia sucieda& Inspeccione Ias ranuras para aire de
enfriamiento y la apertura deJ generadon Estas aperturas
deber_n mantenerse limpias y despeiadas.
PJaca de Caracteristicas
Locaiice la placa de caracteristicas del generador y copie la
informaci6n en el espacio disponible a continuaci6n, Esta
informaci6n es fundamental para poder recibir ayuda de nuestro
departamento de servicio al ciiente o de un distribuidor de
servicio autorizado.
La plata de caracterisdcas (Figura 36) puede ester situada en la
base dd gener_dor. Copie los nQmeros de modelo, versi6n y
serie del generador en eJ espacio disponibJe a condnuaci6n para
futuras consultas,
[
MODEL
REV NO
SERIAL
AC VOLTS
AC AMPS
AC WATTS
DC VOLTS
DC AMPS
Single Phase / 60 Hz / 3600RPM
Rated at40° C/ Class F insulation
Copie aqui
el nOmero
_de moddo
_ opie aqui
el revisi6n
]
]
]

ALMACENAMIENTO
El generador deber_ ser encendido ai menos una vez cada siete
dlas y deber_, deiario fl_ndonar at menos durante 30 minutos. Si
no puede hacer esto y debe almacenar ia unidad por m_s de
30 dias_siga las sigoentes instrucciones pa_ preparar su unidad
para almacenamiento.
Ammacenando el Generador
Limpie el generador como estS.descrito en ("Para Limpiar el
Generador').
Revise que las ranuras para el aire de enfriamiento y las
apertures deI generador se encuentren abiertas y despeiadas.
NO cologue una cubierta encima de un generadol cMiente.
Deie que la unidad se enfrie Io suficiencemente antes de que le
co!oque la cubielta.
Ammacenando el Motor
Consuke el manual det propietario deI motor para las
instrucciones de c6mo preparar adecuadamente el motor para su
almacenamiento.
Otras $ugerencias Para el Almacenando
Para prevenir que se forme una resJna en e[ sistema de
combustible o en partes esenciales del carburadot; vacie
estabilizadores del combustible, suministrados, en et tanque de
gasolina y llene con gasolina fresca, Haga funcionar la unidad
por Mgunos minutos para hacer circular el aditivo a tr_v6s (]el
carburador, La unidad y e! combustible pueden set
almacenados hasta por 24 meses_ Se puede comprar m_.s
estabilizador del combustible, en su tienda local.
NO almacene gasolina de una estaci6n aotra estaci6n, al
menos que haya sido tr_tada como se mencion6 antes.
. Reemplace la caneca de gasolina si comienza a oxidarse_ El
6xido y/o la suciedad en la gasolina le causar_, problemas.
AImacene la unidad en un _rea limpia y seca_

Diagnosticos de Aver[as
DmAGNOSmTmCOS DE AVERJAS
Probierno
E[ motor est5 funcionando pero no
e×iste sa[ida de AC disponsibJe.
E[ motor funciona b[en sin carga pero
"func[ona ma[" cuando se [e contectan
cargas.
El motor no se endende; o se
enciende y funciona real.
El motor se apaga en p[eno
func[onamJento.
AB motor mehace fa[ta potencia.
Causa
[. El interruptor aucom_.dco de drcoto
est,. abJerto,
2. Conexi6n real o defecmosa det iuego
de cables.
3. El dispositivo conectado est,, daff_ado.
4. Averia en el generador.
1. Corto circuito en una de las cargas
conectadas.
Z El generador est,. sobrecarga.
3. Ch'cuito det generador en corto.
I. El fusible en linea de 10A est_ fundido.
2. Bateria descargada.
3. La bater[a defectuosa.
4. Nive[ de aceite insuficiente,
I. Sin gasolina.
2. NiveJ de aceite insuficiente.
La carga es muy alta.
Accion
[. Reposicione e! in_errupto_
2. Revise y repare.
3,
4,
Conecte otro disposi_ivo que est6
buenas condiciones.
Contacte el dis_ribuidor de servicio
autorizado,
Desconecte la carga el6ctrica en corto.
2. Vea "No Sobrerecarque Generador"_
3_ Contacte e[ distribuidor de servicio
autorizado.
I, Sustituya el fusible.
2. Arranque e[ generador en puente y/o
cargue la bater/a.
3_ Reemplace bateria.
4. L[ene e[ c_rter hasta e[ hive[ correcto o
siU_e e[ generador en una superficie
piana.
I, Llene et tanque de combustible.
2. Llene e[ c_rter hasta e[ nivel correcto o
sitOe el generador en una superficie
plana,
Vea "No Sobrerecarque Generador".

POLiTICA PARA EL PROPIETARIO DE EQUIPOSTROYoBILT®
Efecdva desde e[ [ 2 ro de Noviembre, 2003
GARANTIA LiMiTADA
'Troy-Bik® es una marca registrada de Troy-Bik, LLC baio licencia de Briggs & Stratton Power Products. Briggs & Stratton Power Products
_eparar_, o sustituir_i sin cargo alguno cualquier componente de[ equipo *_' que 9resente defectos de materiales y/o mano de obra Los gastos de
transporte de hs piezas enviadas para reparar o sustituir conforme a los t6rminos de esta garantla correr_,n a cargo del comprado_: Esta
garantia tiene efecto durante e[ periodo indicado y conforme alas condiciones estipuladas en Ia misma. Para obtener servicio en garantia,
Iocalice el distribuidor de servicio autorizado m_is pr6ximo Ihmando al 1-888-611-6708. Los distribuidores de servicio autorizado de Bri_s &
_tratton Power Products son los unicos que pueden ofrecer servicio en garantia.
NO EXISTE OTRA GARANTiA EXPRESA.LAS GARANT[AS IHPLJCITAS,INCLUYENDO AQUELLAS DE HERCANTIBILIDAD O CAPACIDAD PAP`AUN
PROPOSITO PARTICULAR, ESTA,N LIHITADAS AL PERIODO DETIEHPO ESPECIFICADO, O HASTA ELLiHITE PERHmDO POP,LA LEY,TODAY
CUALQUIER GARANTiA IHPLiCITA ESTA,EXCLUIDA. RESPONSABILIDAD POP.DAFqOS CONSECUENTES BAJO CUALQUIER YTODAS LAS GARANTJAS,
ESTA,N EXCLUtDAS HASTA EL LJHITE DE EXCLUSION PEP`HITIDO POP,LA LEY.Algunos paiseso e_tados no admiten limi_aciones en cuanto a h vigencia de
Jnagarantia implicita y algunos no admiten laexdusi6n o limitaci6n de daffos lesultantes o deriwdos. Pot Iotanto, es posible que las limitaciones y exclusiones
arliba rnencionadas no se aptiquen a su caso.Estagalantia le otolga determinados detechos legalesyes posible que usted cuente con otros detechos que pueden
car[ar de un paisa otto o de un estado a otro."
PERIODO DE GARANTiA*
Equipo**
Lavador a Presi6n
Generador Port_,til
Para Uso Del Consumidor
I afio
2 aSos (el segundo aSo sohmente para las partes)
Para Uso Cornerciai
90 dfas
I afio
_' El periodo de garanfia comienza en la fecha de compra hecha por el primer consumidor al detal o usuario comerciaI, y contim_a por el periodo
de dempo que aparece en Ia tabla arriba mencionada. "Para uso det consumidor" significa, uso residential pot un consumidor al detal. "Para uso
comercial" significa, todos los otros casos, incluyendo el uso comercial, para generar un ingreso o pot prop6sitos de alquile_: Una vez que el
equipo ha sido usado comercialmente, deberia set considerado como de uso comercial para hs finalidades de esta garantia.
_"_'El motor y hs baterlas para el encendido, est_in garantizados pot el fabricante de esos productos.
EL REGiS'fRO DE LA GARANTiA NO ES NECESAR[O PARA OB.fENER LA GARAN.fiA EN LOS BRIGGS & S.fRA.f.fON
POWER PRODUCTS. GUARDE SU RECmBO DE COHPRA. Si US.fED NO PROVEE LA PRUEBA DE LA FECHA DE LA
COHPRA INmCIAL,AL HOHEN.fO EN QUE SE REQUiERA USAR LA GARAN.fiA, LA FECHA DE LA FABRiCACION DEL
EQUIPO SERA USADA PARA DETERHINAR EL PERIODO DE GARAN.fiA.
Acerca de [a seguridad de su equipo:
Nosotros reciben hs reparaciones ba]o la garant[a y le pide disculpas por cualquier inconveniencia causada. Cualquier Concesionario de Servicio
Autorizado puede Ilevar a cabo reparaciones bajo la garantia, h mayorla de hs reparaciones baio Ia garantla son maneiadas normatmente, pero
algunas veces Ia solicitud del servicio de garantla es posible que no sea apropiada. Pot eiemplo, Ia garantla no ser_ v_lida si el dafio aI equipo
ocurri6 debido al maI uso, falta de mantenimiento adecuado, maneio, env[o, almacenamiento o una instalaci6n inadecuada De manera similar, la
garantia queda anuhda si se ha borrado h fecha de fabricaci6n o el numero de serie de[ equipo o si el equipo ha sido alterado o modificado.
Durante el periodo de Ia garantla, el Comerciante Autorizado del Servicio hace, en es la opci6n, h reparaci6n o reempIaza cuatquier parte eso,
sobre el examen se encuentran para set defectuoso ba]o e! uso y et servicio normales. Es_ garantia no cubrir_, las reparaciones y el equipo
siguientes:
Desgaste normal: Equipo eJ6ctrico a[ aire libre, como todos los aparatos mec_nicos, necesita partes, servicio y reemplazo, peri6dicamente,
para que funcione bien. Esta garantia no cubre la reparaci6n cuando el uso normal ha acabado con la vida de una parte en particular o del
equipo.
insta_a¢i6n y mantenimiento: Esta garantla no se aplica al equipo o parte que ha estado su]eta a una instalaci6n inadecuada, que no haya
sido autorizada o a cuaJquier fipo de a[teraci6n, e[ ma[ uso, neg[igenc[a, accidentes, sobrecarga, veJoddad excesiva, manten[miento inadecuado,
reparac[6n o a[macenam[ento, en nuestro ]u[cio, han afeccado desfavorab[emente su rendimiento y fiab[Jidad. Esta garantia tambi6n no cubre e[
mantenimiento normal tales como a]ustes, [imp[eza de[ sistema de combusti6n 7"[a obstrucci6n (debido a mater[as quim[cas, suciedad, carb6n
o cal, etc.)
Otras exdusiones: Tambi6n se encuentran excluidos de est_ garant[a, e[ desgaste de los art[cu[os tales como, conectadores, medidores de
aceite, correas, ani[[os O, fi[tros, empaque de [a bomba, etc. [as bombas que se hagan funcionar o traba]ar sin agua, o dafios y
maffuncionamientos que resulten de accidentes, abusos, modificaciones, a[teraciones, un servicio inadecuado, congeJamiento o deterioro
qu[mico. Los accesorios tales como pisto[as, mangueras, vari[Jas y boquiJJas estin excJuidos de [a garant[a de[ producto.Tambi_n se excJuye et
equipo usado, reacondicionado y destinado a demostraciones; el equipo uti[izado como fuente principal de energ[a en I%ar det servicio de la
compaff[a proveedora de e[ectricidad y el equipo destinado a ap[icaciones uti[izadas para mantener la vida.
BRIGGS & STRATTON POWER PRODUCTS GROUP, LLC
JEFFERSON,W[SCONS@4, U.S.A.
-
 1
1
-
 2
2
-
 3
3
-
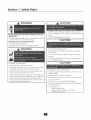 4
4
-
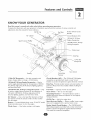 5
5
-
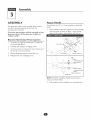 6
6
-
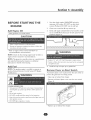 7
7
-
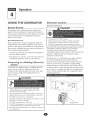 8
8
-
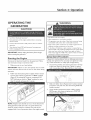 9
9
-
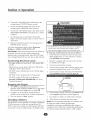 10
10
-
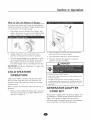 11
11
-
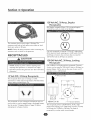 12
12
-
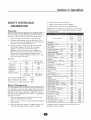 13
13
-
 14
14
-
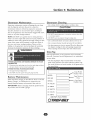 15
15
-
 16
16
-
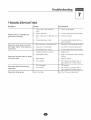 17
17
-
 18
18
-
 19
19
-
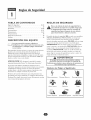 20
20
-
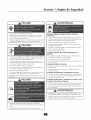 21
21
-
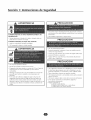 22
22
-
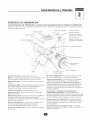 23
23
-
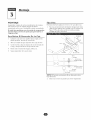 24
24
-
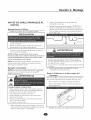 25
25
-
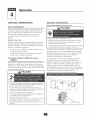 26
26
-
 27
27
-
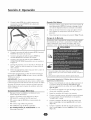 28
28
-
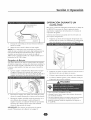 29
29
-
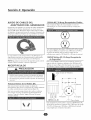 30
30
-
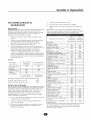 31
31
-
 32
32
-
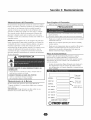 33
33
-
 34
34
-
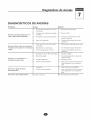 35
35
-
 36
36


Troybilt 01925 El manual del propietario
- Categoría
- Generadores de poder
- Tipo
- El manual del propietario
- Este manual también es adecuado para
en otros idiomas
- English: Troybilt 01925 Owner's manual
Artículos relacionados
-
Troybilt 030248 El manual del propietario
-
-
-
-
-
-
-
-
Otros documentos
-
Troy-Bilt 01919-1 Manual de usuario
-
Briggs & Stratton 030320 El manual del propietario
-
Simplicity 01925-1 El manual del propietario
-
-
HME NEXEO|HDX Crew Communication Platform Quick Reference Installation Guide
-