PRESIDENT MC Kinley TXPR600 El manual del propietario
- Tipo
- El manual del propietario

Manuel d’utilisation / Manual del usuario
Owner’s manual / Instrukcja obsługi
12/24 V
Downloaded from www.cbradio.nl

Un vistazo a vuestro PRESIDENT MC KINLEY
Your PRESIDENT MC KINLEY at a glance
Votre PRESIDENT MC KINLEY en un coup d'œil
Twój PRESIDENT MC KINLEY

3
SUMMARY
INSTALLATION ..........................................................................................40
HOW TO USE YOUR CB ........................................................................... 42
FUNCTION TURNING ON THE UNIT .........................................................46
MENU .......................................................................................................46
TECHNICAL CHARACTERISTICS ..............................................................51
TROUBLE SHOOTING ............................................................................... 51
HOW TO TRANSMIT OR RECEIVE A MESSAGE ......................................51
GLOSSARY ...............................................................................................52
SIMPLIFIED EU DECLARATION OF CONFORMITY ..................................53
WARRANTY ..............................................................................................54
FREQUENCY TABLES ...................................................................... 70 to 72
NORMS • F ..............................................................................................74
English
SOMMAIRE
INSTALLATION ............................................................................................5
UTILISATION ................................................................................................7
FONCTIONS À L’ALLUMAGE DU POSTE ................................................12
MENUS .....................................................................................................12
CARACTÉRISTIQUES TECHNIQUES ..........................................................17
GUIDE DE DÉPANNAGE ..........................................................................17
COMMENT ÉMETTRE OU RECEVOIR UN MESSAGE ..............................17
GLOSSAIRE ..............................................................................................18
GARANTIE ................................................................................................ 20
DÉCLARATION DE CONFORMITÉ EU SIMPLIFIÉE ....................................21
TABLEAUX DES FRÉQUENCES ......................................................... 70 à 72
NORMES • F .............................................................................................74
Français
SUMARIO
INSTALACIÓN ..........................................................................................23
UTILIZACIÓN ............................................................................................25
FUNCIÓN AL ENCENDER LA EMISORA ..................................................29
MENÚS .....................................................................................................30
CARACTERÍSTICAS TÉCNICAS ................................................................ 34
GUÍA DE PROBLEMAS .............................................................................35
COMO EMITIR O RECIBIR UN MENSAJE ................................................35
LÉXICO ..................................................................................................... 35
DECLARACIÓN DE CONFORMIDAD EU SIMPLIFICADA ......................37
GARANTÍA ...............................................................................................38
TABLAS DE FRECUENCIAS .............................................................. 70 a 72
NORMAS • F ............................................................................................ 74
Español
SPIS TREŚCI
INSTALACJA ..............................................................................56
JAK UŻYWAĆ CB RADIO ..........................................................58
WŁĄCZANIE FUNKCJI W URZĄDZENIU .................................. 62
MENU .........................................................................................62
CHARAKTERYSTYKA TECHNICZNA .......................................66
ROZWIĄZYWANIE PROBLEMÓW ............................................67
JAK PRZESYŁAĆ LUB ODBIERAĆ WIADOMOŚĆ ................... 67
SŁOWNICZEK ............................................................................ 67
UPROSZCZONA DEKLARACJA ZGODNOŚCI UE ................... 68
OGÓLNE WARUNKI GWARANCJI ...........................................69
TABELA CZĘSTOTLIWOŚCI .............................................70 ~ 72
NORMY • F ................................................................................. 74
Polski

4
La garantie de ce poste est valable uniquement dans le pays d’achat.
Français
ATTENTION !
APPAREIL MULTI-NORMES !
Avant toute utilisation, prenez garde de ne
jamais émettre sans avoir branché l’antenne
(connecteur B situé sur la face arrière de
l’appareil), ni réglé le TOS (Taux d’Ondes
Stationnaires)! Sinon, vous risquez de détruire
l’amplificateur de puissance, ce qui n’est
pas couvert par la garantie.
Voir «F» page
12 et tableau des Configu-
rations page 74.

5
Bienvenue dans le monde des émetteurs-récepteurs CB de la dernière
génération. Cette nouvelle gamme de postes vous fait accéder à la
communication électronique la plus performante. Grâce à l’utilisation
de technologies de pointe garantissant des qualités sans précédent,
votre PRESIDENT MC KINLEY est un nouveau jalon dans la convivialité
et la solution par excellence pour le pro de la CB le plus exigeant. Pour
tirer le meilleur parti de toutes ses possibilités, nous vous conseillons
de lire attentivement ce mode d’emploi avant d’installer et d’utiliser
votre CB PRESIDENT MC KINLEY.
A) INSTALLATION
1) CHOIX DE L’EMPLACEMENT ET MONTAGE DU POSTE
MOBILE
a) Choisissez l’emplacement le plus approprié à une utilisation simple
et pratique de votre poste mobile.
b) Veillez à ce qu’il ne gêne pas le conducteur ni les passagers du
véhicule.
c) Prévoyez le passage et la protection des différents câbles, (alimen-
tation, antenne, accessoires...) afin qu’ils ne vien nent en aucun
cas perturber la conduite du véhicule.
d) Utilisez pour le montage le berceau (1) livré avec l’appareil, fixez-le
solidement à l’aide des vis auto taraudeuse (2) fournies (diamètre
de perçage 3,2 mm). Prenez garde de ne pas endommager le
système électrique du véhicule lors du perçage du tableau de
bord.
e) Lors du montage, n’oubliez pas d’insérer les rondelles de caout-
chouc (3) entre le poste et son support. Celles-ci jouent en effet
un rôle «d’amortisseur» et permettent une orientation et un serrage
en douceur du poste.
f) Choisissez un emplacement pour le support du micro et prévoyez
le passage de son cordon.
- Attention : Si vous encastrez votre poste, veillez à ce qu’aucun
câble ne touche le châssis.
- NOTE : Votre poste mobile possédant une prise micro en façade
peut être encastré dans le tableau de bord. En plus du haut-parleur
en façade, il est possible d’y adjoindre un haut-parleur externe
pour une meilleure écoute des communications (connecteur
EXT.SP. situé sur la face arrière de l’appareil : C). Renseignez-vous
auprès de votre revendeur le plus proche pour le montage sur
votre appareil.
2) INSTALLATION DE L’ANTENNE
a) Choix de l’antenne
- En CB, plus une antenne est grande, meilleur est son rendement.
Votre Point Conseil saura orienter votre choix.
Français
SCHÉMA GÉNÉRAL
DE MONTAGE

6
b) Antenne mobile
- Il faut l’installer à un endroit du véhicule où il y a un maximum de
surface métallique (plan de masse), en s’éloignant des montants
du pare-brise et de la lunette arrière.
- Dans le cas où une antenne radiotéléphone est déjà installée,
l’antenne CB doit être au-dessus de celle-ci.
- Il existe 2 types d’antennes : les préréglées et les réglables.
- Les préréglées s’utilisent de préférence avec un bon plan de
masse (pavillon de toit ou malle arrière).
- Les réglables offrent une plage d’utilisation beaucoup plus large
et permettent de tirer parti de plans de masse moins importants
(voir § RÉGLAGE DU TOS page 7).
- Pour une antenne à fixation par perçage, il est nécessaire d’avoir
un excellent contact antenne/plan de masse ; pour cela, grattez
légèrement la tôle au ni-
veau de la vis et de l’étoile
de serrage.
- Lors du passage du câble
coaxial, prenez garde de
ne pas le pincer ou l’écraser
(risque de rupture ou de
court-circuit).
- Branchez l’antenne (B).
c) Antenne fixe
- Veillez à ce qu’elle soit dégagée au maximum. En cas de fixation
sur un mât, il faudra éventuellement haubaner conformément
aux normes en vigueur (se renseigner auprès d’un professionnel).
Les antennes et accessoires PRESIDENT sont spécialement conçus
pour un rendement optimal de chaque appareil de la gamme.
3) CONNEXION DE L’ALIMENTATION
Votre PRESIDENT MC KINLEY est muni d’une protection contre
les inversions de polarité. Néanmoins, avant tout branchement,
vérifiez vos connexions.
Votre poste doit être alimenté par une source de courant continu
de 12 ou 24 Volts (A). À l’heure actuelle, la plupart des voitures et
des camions fonctionnent avec une mise à la masse négative.
LOBE DE RAYONNEMENT
Français
On peut s’en assurer en vérifiant que la borne (-) de la batterie
soit bien connectée au bloc moteur ou au châssis. Dans le cas
contraire, consultez votre revendeur.
a) Assurez-vous que l’alimentation soit bien de 12 ou 24 Volts.
b) Repérez les bornes (+) et (-) de la batterie (+ = rouge, - = noir). Dans
le cas où il serait nécessaire de rallonger le cordon d’alimentation,
utilisez un câble de section équivalente ou supérieure.
c) Il est nécessaire de se connecter sur un (+) et un (-) permanents.
Nous vous conseillons donc de brancher directement le cordon
d’alimentation sur la batterie (le branchement sur le cordon de
l’autoradio ou sur d’autres parties du circuit électrique pouvant
dans certains cas favoriser la réception de signaux parasites).
d) Branchez le fil rouge (+) à la borne positive de la batterie et le fil
noir (-) à la borne négative de la batterie.
e) Branchez le cordon
d’alimentation au
poste.
ATTENTION : Ne
jamais remplacer
le fusible d’origine
par un modèle
d’une valeur diffé-
rente !
4) OPÉRATIONS DE BASE À EFFECTUER AVANT LA PREMIÈRE
UTILISATION, SANS PASSER EN ÉMISSION (sans appuyer
sur la pédale du micro)
a) Branchez le micro,
b) Vérifiez le branchement de l’antenne,
c) Mise en marche de l’appareil : tournez le bouton de volume VOL
(1) dans le sens des aiguilles d’une montre jusqu’à entendre un
“clic”.
d) Tournez le bouton du squelch SQ (2) au minimum (position M).
e) Réglez le volume à un niveau convenable.
f) Amenez le poste sur le canal 20 à l’aide du rotateur CH (5) ou des
touches UP/DN (13) du microphone.

7
5) RÉGLAGE DU TOS (Taux d’ondes stationnaires)
ATTENTION : Opération à effectuer impérativement lors de la pre-
mière utilisation de l’appareil ou lors d’un changement d’antenne.
Ce réglage doit être fait dans un endroit dégagé, à l’air libre.
* Réglage avec le TOS-mètre intégré
Voir la fonction CALIBRAGE DU TOS page 14.
* Réglage avec TOS-mètre externe (type TOS-1 PRESIDENT)
a) Branchement du Tos-mètre :
- Brancher le Tos-mètre entre le poste et l’antenne, le plus près
possible du poste (utilisez pour cela un câble de 40 cm maximum
type CA-2C PRESIDENT).
b) Réglage du Tos :
- Amener le poste sur le canal 20 en AM.
- Positionner le commutateur du Tos-mètre en position FWD (ca-
librage).
- Appuyer sur la pédale PTT (12) pour passer en émission.
- Amener l’aiguille sur l’index t à l’aide du bouton de calibrage.
- Basculer le commutateur en position REF (lecture de la valeur du
TOS). La valeur lue sur le vu-mètre doit être très proche de 1. Dans
le cas contraire, rajuster votre antenne jusqu’à obtention d’une
valeur aussi proche que possible de 1 (une valeur de TOS comprise
entre 1 et 1,8 est acceptable).
- Il est nécessaire de recalibrer le Tos-mètre, entre chaque opération
de réglage de l’antenne.
Remarque : Afin d’éviter les pertes et atténuations dans les câbles
de connexion entre la radio et ses accessoires, PRESIDENT recom-
mande une longueur de câble inférieure à 3 m.
Maintenant, votre poste est prêt à fonctionner.
B) UTILISATION
1) MARCHE/ARRÊT - VOLUME
Pour allumer votre poste : tourner le bouton VOL (1) dans le sens
des aiguilles d’une montre. Si la fonction BIP DE TOUCHES est active
(voir menu BIP DE TOUCHES page 13), un bip sonore est émis.
Votre radio est allumée.
L’afficheur montre brièvement le type de microphone (voir menu
TYPE DE MICROPHONE page 14) et la bande de fréquence
utilisée (voir page 12).
Pour éteindre votre poste : tourner le bouton VOL (1) dans
le sens inverse des aiguilles d’une montre jusqu’au clic
d’arrêt. Votre radio est éteinte.
Pour ajuster le volume sonore, tourner le bouton VOL (1)
dans le sens des aiguilles d’une montre. Pour diminuer le
volume, tourner le bouton dans le sens inverse des aiguilles
d’une montre.
2) ASC (Automatic Squelch Control) / SQUELCH
Cette fonction permet de supprimer les bruits de fond indé sirables
en l’absence de communication. Le squelch ne joue ni sur le volume
sonore ni sur la puissance d’émission, mais il permet d’améliorer
considérablement le confort d’écoute.
a) ASC : SQUELCH À RÉGLAGE AUTOMATIQUE
Brevet mondial, exclusivité PRESIDENT
Tourner le bouton du squelch SQ (2) dans le sens contraire des
aiguilles d’une montre en position ASC. apparaît sur l’afficheur.
Aucun réglage manuel répétitif et optimisation permanente entre
la sensibilité et le confort d’écoute lorsque l’ASC est actif. Cette
fonction peut être désactivée par rotation du bouton dans le sens
des aiguilles d’une montre. Dans ce cas le réglage du squelch
redevient manuel. disparaît de l’afficheur.
b) SQUELCH MANUEL
Tourner le bouton du squelch SQ (2) dans le sens des aiguilles
d’une montre jusqu’au point exact où tout bruit de fond disparaît.
C’est un réglage à effectuer avec précision, car mis en position
maximum dans le sens des aiguilles d’une montre, seuls les signaux
les plus forts peuvent être perçus.
Français

8
3) AFFICHEUR
Il permet de visualiser l’ensemble des fonctions
Le bargraphe principal visualise le niveau de réception et le niveau
de puissance émise. Les petits bargraphes visualisent les niveaux
du Mic Gain, RF Gain et RF Power.
4) CLARIFIER
La fonction CLAR. permet le décalage de la fréquence en
réception LSB/USB afin d’améliorer la clarté de la voix de votre
correspondant.
5) BOUTON SÉLECTEUR CH ~ RF POWER
BOUTON SÉLECTEUR CH
- Tourner le bouton rotatif CH (5) permet de monter ou descendre
d’un canal. Un bip sonore est émis à chaque changement de
canal si la fonction BIP DE TOUCHES est activée (voir fonction BIP
DE TOUCHES page 13).
Voir le § BOUTONS UP/DN DU MICROPHONE page 12.
L’afficheur montre la fréquence correspondante. Par exemple
«27.205» pour la canal 40. Voir le menu SPAN page 14.
- Un appui long (3 secondes) sur ce bouton (5) permet d’entrer
dans les MENUS.
- Un appui court sur ce bouton (5) permet de valider les réglages
dans les MENUS.
RF POWER (combinaison 12 / 9 + 5)
En mode TX, le RF POWER permet de d’augmenter/diminuer la
puissance de sortie.
- Appuyer et maintenir appuyée la pédale d’émission PTT (12).
- Appuyer sur les touches •(9) et CH (5). «RF POWER» s’affiche.
- Utiliser le rotateur CH (5) pour ajuster le niveau à l’aide du bargraphe.
- Appuyer sur le bouton CH (5) pendant 1 seconde pour valider le
réglage.
6) MODE ~ PA ~ VOX ~ RÉGLAGE DU VOX
MODE
(pression brève)
Ce commutateur permet de sélectionner le mode de modulation
AM, FM, LSB ou USB. Votre mode de modulation doit correspondre
à celui de votre interlocuteur.
- Modulation d’Amplitude / AM : Communication sur terrain avec
reliefs et obstacles sur moyenne distance (mode le plus utilisé).
- Modulation de Fréquence / FM : Communication rapprochée sur
terrain plat et dégagé.
En configuration U uniquement : en mode FM, un appui long sur le
bouton F (10) permet d’alterner entre les bandes de fréquences
ENG ou CEPT. “UK” s’affiche lorsque la bande de fréquence ENG
est sélectionnée (voir tableau page 70).
- Bandes Supérieures et Inférieures / USB - LSB : Communication
longue distance (selon les conditions de propagation).
PA (Public Address) (pression longue)
Appuyer la touche PA (6) durant 2 secondes pour alterner entre
le mode CB et le mode PA.
MODE PA. Un haut-parleur de sonorisation extérieure peut être
connecté sur le poste par une prise jack située sur le panneau
arrière PA.SP. (D).
Pour plus de détails sur le fonctionnement en mode PA, voir le
menu RÉGLAGE DU PA page 16.
Français

9
VOX (9 + 6 pression brève)
La fonction VOX permet d’émettre en parlant dans le micro d’ori-
gine (ou dans le micro vox optionnel) sans appuyer sur la pédale
PTT (12). L’utilisation d’un micro vox optionnel connecté à l’arrière
de l’appareil (E) désactive le micro d’origine.
Appuyez un fois sur la touche • (9),
clignote, puis appuyer
brièvement sur la touche •VOX (6) pour activer la fonction VOX.
«VOX» apparaît dans l’afficheur. Une nouvelle combinaison des
touches • (9) et •VOX (6) désactive la fonction. «VOX» disparaît.
RÉGLAGE DU VOX (10 + 6 pression longue)
Appuyer brièvement sur la touche • (9) puis appuyer durant 1
seconde sur la touche •VOX (6) pour activer la fonction RÉGLAGE
DU VOX.
Trois réglages sont possibles : Sensibilité SET-L, Niveau Anti-Vox SET-A
et Temporisation SET-T. Le réglage actif clignote, l’afficheur indique
le type de réglage suivi de son niveau , par exemple SET-L1.
1. Tourner le bouton rotatif CH (5) pour augmenter/diminuer le niveau
du réglage actif.
2. Appuyer brièvement sur la touche •VOX (6) pour passer au réglage
suivant.
3. Une fois le VOX correctement paramétré, appuyer durant 1
seconde sur la touche •VOX (6) pour enregistrer les réglages et
sortir de la fonction RÉGLAGE DU VOX.
- Sensibilité «SET-L» : permet de régler la sensibilité du microphone
(original ou vox optionnel) pour une qualité de transmission opti-
mum. Niveau réglable de 1 (niveau haut) à 9 (niveau bas). Valeur
par défaut : 1.
- Anti-Vox «SET-A» : permet d’empêcher l’émission générée par les
bruits ambiants. Niveau réglable: OFF (émet en fonction du niveau
du squelch) et de 0 (sans anti-vox) à 9 (niveau bas). Valeur par
défaut : OFF.
- Temporisation «SET-T» : permet d’éviter la coupure «brutale» de la
transmission en rajoutant une temporisation à la fin de la parole.
Niveau réglable de 1 (délai court) à 9 (délai long). Valeur par
défaut : 5.
Le RÉGLAGE DU VOX active automatiquement la fonction VOX.
«VOX» apparaît dans l’afficheur.
Remarque : L’appareil sort automatiquement du RÉGLAGE DU
VOX au bout de 10 secondes si aucune touche n’est pressée ou à
l’appui de n’importe quelle touche sans enregistrer les paramètres
de réglage.
7) SCAN ~ DW ~ M1
SCAN
(pression brève)
Appuyer sur la touche SCAN (7) pour activer la fonction SCAN
(balayage des Canaux) dans un ordre croissant. «SCAN» s’affiche.
Le balayage s’arrête dès qu’un canal est actif. Le balayage
démarre automatiquement 3 secondes après la fin de l’émission
si aucune touche n’est activée pendant ce temps. Le balayage
redémarre aussi dans un ordre croissant en tournant le bouton
rotateur CH (5) vers la droite ou avec la touche UP (13) du micro,
ou dans un ordre décroissant en tournant le bouton rotateur CH
(5) vers la gauche ou avec la touche DN (13) du micro.
Durant le scan, appuyer une seconde sur la touche • (9) pour
alterner entre les modes balayage des canaux et balayage des
mémoires. Dans le mode BALAYAGE DES MÉMOIRES, seuls les ca-
naux prioritaires (voir § CANAUX PRIORITAIRES page 10) et les
canaux mémorisés (voir § MÉMOIRE page 10) sont scannés.
Appuyer sur la pédale PTT (12) ou sur la touche SCAN (7) pour
sortir de la fonction SCAN.
DW (pression longue)
Une pression longue (1s) sur la touche DW (7) permet d’activer la
fonction DW (double veille). «DW» s’affiche. Elle permet d’effectuer
une veille entre deux canaux.
- Une première pression longue active la fonction double veille entre
le canal prioritaire1 et le canal en cours (voir § CANAL PRIORITAIRE
1 page 15).
- Une seconde pression longue active la fonction double veille entre
le canal prioritaire 2 et le canal en cours (voir § CANAL PRIORITAIRE
2 page 16).
Français

10
- Le numéro du canal en cours et le canal prioritaire s’affichent
alternativement. L’icône «EMG» s’affiche également en même
temps que le canal prioritaire. Le canal en cours peut être modifié
pendant la double veille.
- Une nouvelle pression longue sur la touche DW (7) désactive la
fonction DW. «DW» disparaît de l’afficheur.
M1
Voir § MÉMOIRE page 10.
8) ANL/NB ~ HI-CUT ~ CANAUX PRIORITAIRES ~ M2
ANL/NB
(pression brève)
ANL/NB (Automatic Noise Limiter / Noise Blanker) : ces filtres
permettent de réduire les bruits de fond et certains parasites en
réception.
Appuyer sur la touche ANL/NB (8) pour alterner entre les 4 états
suivants, en boucle : 1. ANL/on - NB/off • 2. ANL/off - NB /on • 3.
ANL/on - NB/on • 4. ANL/off - NB/off.
L’icône du filtre apparaît dans l’afficheur quand le filtre est actif
(on).
HI-CUT (pression longue)
Élimine les parasites haute fréquence.
Appuyer une seconde sur la touche HI-CUT (8) pour activer/
désactiver le filtre HI-CUT.
«HI-CUT» apparaît dans l’afficheur quand le filtre est actif.
CANAUX PRIORITAIRES (9 + 8 pression brève)
- Appuyer brièvement sur la touche • (9) puis sur la touche •EMG
(8) pour combiner ces deux touches.
- Une première combinaison permet d’activer le canal prioritaire
1.
- Une seconde combinaison permet d’activer le canal prioritaire
2.
- Lorsqu’un canal prioritaire est actif, «EMG» s’affiche.
- Une troisième combinaison permet de revenir au canal initial.
«EMG» disparaît de l’afficheur.
Voir CANAL PRIORITAIRE 1 et 2 pages 15.
M2
Voir § MÉMOIRE page 10.
9) Touche «•» ~ MÉMOIRE ~ ÉCHO ~ M3
Touche «•»
(pression brève)
Appuyer sur la touche • (9) permet d’activer le mode FONCTION.
clignote. Combiner avec une autre touche commençant par
• (•VOX, •EMG, •ECHO, •RF POWER ou •MIC/RF GAIN) pour ac-
céder à la fonction.
Remarque : La touche • (9) est toujours combinée à une autre.
L’appui seul de la touche n’a aucun effet si ce n’est de faire cli-
gnoter
durant 10 secondes.
MÉMOIRE (pression longue)
Ce poste permet de mémoriser 3 canaux avec les attributs suivants
: NB/ANL (on/off), HI-CUT (on/off), AM / FM / USB / LSB.
Pour mettre en mémoire :
- Sélectionner le canal et les attributs à mémoriser.
- Appuyer durant une seconde la touche MEM (9). Si la fonction
BIP DE TOUCHES est active, un bip est émis. «MEM» clignote.
- Appuyer durant une seconde l’une des touches M1 (7), M2 (8)
ou M3 (9) pour mémoriser. «MEM» apparaît dans l’afficheur et le
numéro de la mémoire sélectionnée (M1, M2 ou M3) clignote.
- Si la fonction BIP DE TOUCHES est active, un long bip confirme le
succès de l’opération.
Pour appeler une mémoire :
- Appuyer durant une seconde la touche MEM (9). Si la fonction
BIP DE TOUCHES est active, un bip est émis. «MEM» clignote.
- Appuyer brièvement l’une des touches M1 (7), M2 (8) ou M3 (9)
pour afficher la mémoire sélectionnée.
- «MEM» s’affiche, le numéro de la mémoire sélectionnée (M1, M2
ou M3) clignote.
Français

11
Pour effacer une mémoire :
- Éteindre l’appareil.
- Maintenir l’une des touches M1 (7), M2 (8) ou M3 (9) et allumer
l’appareil.
- La mémoire sélectionnée est effacée. «MEM» et le numéro de la
mémoire sélectionnée (M1, M2 ou M3) disparaissent de l’afficheur.
Voir aussi le menu RÉINITIALISATION page 16.
ÉCHO (9 + 9 pression brève)
Appuyez un fois sur la touche • (9), clignote, puis appuyer
brièvement sur la touche •ECHO (9) pour activer la fonction ECHO.
«ECHO» apparaît dans l’afficheur. Une nouvelle combinaison des
touches • (9) et •ECHO (9) désactive la fonction. «ECHO» disparaît.
M3
Voir § MÉMOIRE page 10.
10) F ~ MIC GAIN ~ RF GAIN
F
Voir En configuration U uniquement page 8.
Voir le § TALKBACK page 11.
Voir le § FONCTION À L’ALLUMAGE DU POSTE page 12.
MIC GAIN (combinaison 12 / 9 + 10)
Réglage du niveau de sensibilité du microphone.
- Appuyer et maintenir appuyée la pédale d’émission PTT (12)
- Appuyer sur la touche • (9).
- Appuyer sur la touche •MIC/RF GAIN (10). «MIC GAIN» s’affiche.
- Tourner le bouton rotateur CH (5) pour régler le niveau à l’aide
du bargraphe.
- Appuyer sur le bouton CH (5) pendant 1 seconde pour valider le
réglage.
La position normale de cette fonction se situe au maximum. Le
bargraphe du MIC GAIN s’affiche en émission.
RF GAIN (combinaison 9 + 10)
Réglage de la sensibilité en réception. Position maximum dans
le cas de réception de communications longue distance. Vous
pouvez diminuer le RF GAIN, pour éviter des distorsions, lorsque
l’interlocuteur est proche. Réduisez le gain en réception dans le
cas d’une communication rapprochée avec un correspondant
non équipé d’un RF POWER.
- Appuyer sur la touche • (9).
- Appuyer sur la touche •MIC/RF GAIN (10). «RF GAIN» s’affiche.
- Tourner le bouton rotateur CH (5) pour ajuster le niveau à l’aide
du bargrahe.
- Appuyer sur le bouton CH (5) pendant 1 seconde pour valider le
réglage.
Le bargraphe du RF GAIN sera toujours affiché en réception.
11) PRISE MICRO 6 BROCHES
Elle se situe en façade de votre appareil et facilite ainsi son inté-
gration à bord de votre véhicule.
Voir schéma de branchement en page 73.
12) PTT ~ RF POWER ~ MIC GAIN ~ TALKBACK
PTT (Push To Talk)
Pédale d’émission, appuyer pour parler,
s’affiche. Relâcher
pour recevoir un message.
RF POWER
Voir le § RF POWER page 8.
MIC GAIN
Voir le § MIC GAIN page 11.
TALKBACK (combinaison 12 / 10)
La fonction TALKBACK permet d’entendre votre propre modulation
dans le haut-parleur de la CB.
- Maintenir la pédale PTT (12) appuyée.
- Appuyer sur la touche F (10) pour activer/désactiver la fonction
TALKBACK. «TALKBACK» s’affiche quand la fonction est active.
Français

12
NIVEAU DU TALKBACK (combinaison 12 / 5)
Quand la fonction TALKBACK est active, maintenir la pédale PTT
(12) appuyée et tourner le bouton rotateur CH (5) pour ajuster le
niveau du TALKBACK. 9 niveaux de 01 à 09.
TOT (Time Out Timer)
Si la transmission, (PTT ou VOX) dépasse les 5 minutes, le canal et
clignotent, l’émission se termine.
Un bip de TOT est émis jusqu’à ce que la pédale PTT (12) soit
relâchée.
13) BOUTONS UP/DN DU MICROPHONE
- Ces boutons (13) permettent de monter (UP) ou descendre (DN)
d’un canal. Un bip sonore est émis à chaque changement de
canal si la fonction BIP DE TOUCHES est activée (voir Fonction BIP
DE TOUCHES page 13).
L’afficheur montre la fréquence correspondante. Par exemple
«27.205» pour la canal 40. Voir le menu SPAN page 14.
Voir le § BOUTON SÉLECTEUR CH page 8.
C) FONCTION À L’ALLUMAGE DU POSTE
La SÉLECTION DE LA BANDE DE FRÉQUENCES, se fait à l’allumage
du poste. Éteindre puis rallumer l’appareil en maintenant appuyée
la touche F (10).
(Configuration : EU ; PL ; d ; EC ; U ; In)
Les bandes de fréquences doivent être choisies selon le pays où
vous utilisez votre appareil. N’utilisez en aucun cas une configura-
tion différente. Certains pays nécessitent une licence d’utilisation.
Voir tableau page 75.
1. Allumer l’appareil en maintenant appuyée la touche F (10). La
lettre correspondant à la configuration actuelle clignote.
2. Pour changer de configuration, utiliser le rotateur CH (5) ou les
touches UP/DN du microphone (13).
3. Quand la configuration désirée est affichée, appuyer 1 seconde
sur la touche F (10). La lettre correspondant à la configuration
s’affiche en continu, un bip est émis.
4. À ce stade, confirmer la sélection en éteignant puis en allumant
à nouveau l’appareil.
Voir les bandes de fréquences pages 70 à 72 / tableau de
configuration page 74.
D) MENUS
L’ordre des 14 fonctions est celui décrit dans ce manuel. Toutefois,
la fonction affichée en entrant dans les MENUS sera la dernière
fonction modifiée par l’utilisateur.
Quelle que soit la fonction, la procédure est identique :
Appuyer pendant 3 secondes sur le bouton CH (5) pour entrer
dans les MENUS.
s’affiche.
1. Tourner le bouton rotatif CH (5) ou utiliser les touches UP/DN (13)
du microphone pour sélectionner le menu.
2. Appuyer sur le bouton CH (5) pour valider. Le paramètre de réglage
du menu choisi clignote dans l’afficheur.
3. Tourner le rotateur CH (5) ou utiliser les touches UP/DN (13) du
microphone pour modifier la valeur du paramètre.
4a. Une nouvelle pression brève sur le bouton CH (5) permet de valider
la valeur choisie et de rester dans les MENUS. Si la fonction possède
plus d’un seul paramètre, le paramètre suivant clignote.
4b. Une nouvelle pression longue (1 seconde) permet de valider la
valeur choisie et de sortir des MENUS. disparaît de l’afficheur.
5. Si aucune touche n’est pressée, l’appareil sort des MENUS au bout
de 10 secondes. disparaît de l’afficheur.
Remarque : Les touches UP/DN (13) du microphone ont le même
effet que la rotation du bouton CH (5). La pédale d’émission PTT
(12) sort des MENUS sans valider.
disparaît de l’afficheur.
1) COULEUR
Appuyer pendant 3 secondes sur le bouton CH (5) pour entrer
dans les MENUS. s’affiche.
1. Tourner le bouton rotatif CH (5) ou utiliser les touches UP/DN (13)
du microphone pour sélectionner le menu COLOR.
2. Appuyer sur le bouton CH (5) pour valider. La couleur clignote
dans l’afficheur.
Français

13
3. Tourner le rotateur CH (5) ou utiliser les touches UP/DN (13) du
microphone pour changer la couleur.
4a. Une nouvelle pression brève sur le bouton CH (5) permet de valider
la couleur choisie et de rester dans les MENUS.
4b. Une nouvelle pression longue (1 seconde) permet de valider la
couleur choisie et de sortir des MENUS. disparaît de l’afficheur.
5. Si aucune touche n’est pressée, l’appareil sort des MENUS au bout
de 10 secondes. disparaît de l’afficheur.
La Couleur par défaut est orange :
2) DIMMER
La fonction DIMMER permet d’ajuster la luminosité du rétro éclai-
rage de l’afficheur. 10 niveaux de 0 à 9.
Appuyer pendant 3 secondes sur le bouton CH (5) pour entrer
dans les MENUS.
s’affiche.
1. Tourner le bouton rotatif CH (5) ou utiliser les touches UP/DN (13)
du microphone pour sélectionner le menu DIMMER.
2. Appuyer sur le bouton CH (5) pour valider. La valeur du dimmer
clignote dans l’afficheur.
3. Tourner le rotateur CH (5) ou utiliser les touches UP/DN (13) du
microphone pour changer la valeur du dimmer.
4a. Une nouvelle pression brève sur le bouton CH (5) permet de valider
la valeur choisie et de rester dans les MENUS.
4b. Une nouvelle pression longue (1 seconde) permet de valider la
valeur choisie et de sortir des MENUS. disparaît de l’afficheur.
5. Si aucune touche n’est pressée, l’appareil sort des MENUS au bout
de 10 secondes. disparaît de l’afficheur.
La valeur par défaut du Dimmer est : 5
3) CONTRASTE
La fonction CONTRAST permet d’ajuster le contraste de l’afficheur.
10 niveaux de 0 à 9.
Appuyer pendant 3 secondes sur le bouton CH (5) pour entrer
dans les MENUS.
s’affiche.
1. Tourner le bouton rotatif CH (5) ou utiliser les touches UP/DN (13)
du microphone pour sélectionner le menu CONTRAST.
2. Appuyer sur le bouton CH (5) pour valider. La valeur du contraste
clignote dans l’afficheur.
3. Tourner le rotateur CH (5) ou utiliser les touches UP/DN (13) du
microphone pour changer la valeur du contraste.
4a. Une nouvelle pression brève sur le bouton CH (5) permet de valider
la valeur choisie et de rester dans les MENUS.
4b. Une nouvelle pression longue (1 seconde) permet de valider la
valeur choisie et de sortir des MENUS.
disparaît de l’afficheur.
5. Si aucune touche n’est pressée, l’appareil sort des MENUS au bout
de 10 secondes. disparaît de l’afficheur.
La valeur par défaut du Contraste est : 5
4) BIP DE TOUCHES
Bip sonore au changement de canal, touches etc.
Appuyer pendant 3 secondes sur le bouton CH (5) pour entrer
dans les MENUS.
s’affiche.
1. Tourner le bouton rotatif CH (5) ou utiliser les touches UP/DN (13)
du microphone pour sélectionner le menu KEY BEEP.
2. Appuyer sur le bouton CH (5) pour valider. L’état de la fonction
clignote dans l’afficheur.
3. Tourner le rotateur CH (5) ou utiliser les touches UP/DN (13) du
microphone pour activer on / désactiver oF la fonction.
4a. Une nouvelle pression brève sur le bouton CH (5) permet de valider
et de rester dans les MENUS.
4b. Une nouvelle pression longue (1 seconde) permet de valider et
de sortir des MENUS. disparaît de l’afficheur.
5. Si aucune touche n’est pressée, l’appareil sort des MENUS au bout
de 10 secondes. disparaît de l’afficheur.
Le Bip de touches par défaut est : on.
5) ROGER BEEP
Le ROGER BEEP émet un bip lorsqu’on relâche la pédale PTT (12) du
micro pour laisser la parole à son correspondant. Historiquement,
la CB étant un mode de communication «simplex», c’est-à-dire
qu’il n’est pas possible de parler et d’écouter en même temps
(comme c’est le cas pour le téléphone par exemple), il était
Français

14
d’usage de dire «Roger» une fois que l’on avait fini de parler afin
de prévenir son correspondant qu’il pouvait parler à son tour. Le
mot «Roger» a été remplacé par un bip significatif, d’où son nom
«Roger Beep».
Appuyer pendant 3 secondes sur le bouton CH (5) pour entrer
dans les MENUS.
s’affiche.
1. Tourner le bouton rotatif CH (5) ou utiliser les touches UP/DN (13)
du microphone pour sélectionner le menu ROGER BP.
2. Appuyer sur le bouton CH (5) pour valider. L’état de la fonction
clignote dans l’afficheur.
3. Tourner le rotateur CH (5) ou utiliser les touches UP/DN (13) du
microphone pour activer
on
/ désactiver
oF
la fonction.
4a. Une nouvelle pression brève sur le bouton CH (5) permet de valider
et de rester dans les MENUS.
4b. Une nouvelle pression longue (1 seconde) permet de valider et
de sortir des MENUS. disparaît de l’afficheur.
5. Si aucune touche n’est pressée, l’appareil sort des MENUS au bout
de 10 secondes. disparaît de l’afficheur.
Le Roger beep par défaut est : of.
Remarque : Le ROGER BEEP est également entendu dans le haut-
parleur si la fonction BIP DE TOUCHES est activée. Si la fonction
BIP DE TOUCHES n’est pas activée, seul le correspondant peut
entendre le Roger Beep.
6) SPAN
Quand la fonction est active, la fréquence peut être réglée en
continu. Une pression brève sur le bouton CH (5) affiche une barre
sous la première ou la seconde décimale de la fréquence. Le ro-
tateur CH (5) n’agit plus sur le canal mais sur la fréquence par saut
de 100 kHz (première décimale) ou de 10 kHz (seconde décimale).
Appuyer pendant 3 secondes sur le bouton CH (5) pour entrer
dans les MENUS.
s’affiche.
1. Tourner le bouton rotatif CH (5) ou utiliser les touches UP/DN (13)
du microphone pour sélectionner le menu SPAN.
2. Appuyer sur le bouton CH (5) pour valider. L’état de la fonction
clignote dans l’afficheur.
3. Tourner le rotateur CH (5) ou utiliser les touches UP/DN (13) du
microphone pour activer
on
/ désactiver
oF
la fonction.
4a. Une nouvelle pression brève sur le bouton CH (5) permet de valider
et de rester dans les MENUS.
4b. Une nouvelle pression longue (1 seconde) permet de valider et
de sortir des MENUS.
disparaît de l’afficheur.
5. Si aucune touche n’est pressée, l’appareil sort des MENUS au bout
de 10 secondes. disparaît de l’afficheur.
Le Span par défaut est
of.
7) TYPE DE MICROPHONE
Le PRESIDENT MC KINLEY peut être utilisé tant avec un microphone
electret que dynamique 6 broches PRESIDENT (voir câblage du
microphone page 73). À l’allumage du poste, le type de mi-
crophone s’affiche brièvement.
Appuyer pendant 3 secondes sur le bouton CH (5) pour entrer
dans les MENUS.
s’affiche.
1. Tourner le bouton rotatif CH (5) ou utiliser les touches UP/DN (13)
du microphone pour sélectionner le menu MIC TYPE.
2. Appuyer sur le bouton CH (5) pour valider. Le type de microphone
clignote dans l’afficheur.
3. Tourner le rotateur CH (5) ou utiliser les touches UP/DN (13) du mi-
crophone pour sélectionner le type de microphone (electret)
ou (dynamique).
4a. Une nouvelle pression brève sur le bouton CH (5) permet de valider
et de rester dans les MENUS.
4b. Une nouvelle pression longue (1 seconde) permet de valider et
de sortir des MENUS. disparaît de l’afficheur.
5. Si aucune touche n’est pressée, l’appareil sort des MENUS au bout
de 10 secondes. disparaît de l’afficheur.
Le Type de microphone par défaut est
(electret).
8) CALIBRAGE DU TOS
Appuyer pendant 3 secondes sur le bouton CH (5) pour entrer
dans les MENUS. s’affiche.
1. Tourner le bouton rotatif CH (5) ou utiliser les touches UP/DN (13)
du microphone pour sélectionner le menu SWR.
Français

15
10) RÉGLAGE DE LA TONALITÉ
La fonction TONE permet de changer la tonalité en réception. 11
niveaux de -5 à +5.
Appuyer pendant 3 secondes sur le bouton CH (5) pour entrer
dans les MENUS.
s’affiche.
1. Tourner le bouton rotatif CH (5) ou utiliser les touches UP/DN (13)
du microphone pour sélectionner le menu TONE.
2. Appuyer sur le bouton CH (5) pour valider. La valeur de la tonalité
clignote dans l’afficheur.
3. Tourner le rotateur CH (5) ou utiliser les touches UP/DN (13) du
microphone pour définir la valeur de la tonalité.
4a. Une nouvelle pression brève sur le bouton CH (5) permet de valider
la valeur choisie et de rester dans les MENUS.
4b. Une nouvelle pression longue (1 seconde) permet de valider la
valeur choisie et de sortir des MENUS. disparaît de l’afficheur.
5. Si aucune touche n’est pressée, l’appareil sort des MENUS au bout
de 10 secondes. disparaît de l’afficheur.
La Tonalité par défaut est :
0
.
11) CANAL PRIORITAIRE 1
Appuyer pendant 3 secondes sur le bouton CH (5) pour entrer
dans les MENUS. s’affiche.
1. Tourner le bouton rotatif CH (5) ou utiliser les touches UP/DN (13)
du microphone pour sélectionner le menu EMG 1.
2. Appuyer sur le bouton CH (5) pour valider. Le premier paramètre,
le mode de modulation, clignote dans l’afficheur.
3. Tourner le rotateur CH (5) ou utiliser les touches UP/DN (13) du mi-
crophone pour définir le mode de modulation du canal prioritaire
1 : AM, FM, USB, LSB ou FM UK (en configuration U uniquement).
4. Une nouvelle pression sur le bouton CH (5) permet de valider. Le
mode de modulation cesse de clignoter, le second paramètre,
le canal, clignote dans l’afficheur.
5. Utiliser les touches UP/DN (11) du microphone ou tourner le bouton
CH (5) pour sélectionner le canal prioritaire 1.
6. Une nouvelle pression sur le bouton CH (5) permet de valider le
canal. a) Repartir au point 1 pour régler une autre fonction ou b)
Appuyer sur la pédale PTT (10) pour sortir des MENUS.
Français
2. Appuyer sur le bouton CH (5) pour valider. Le poste passe auto-
matiquement en mode TX sans presser la touche PTT (12) et le
calibrage commence. Le temps de calibrage est de 5 minutes
maximum. Un décompte se fait dans l’afficheur.
3. Ajuster l’antenne.
- Le bip* est continu quand la valeur du TOS est égale à 1,0. L’espace
entre les bip devient de plus en plus grand au fur et à mesure que
la valeur du TOS s’éloigne de 1.0.
- Le volume du bip est réglable avec le bouton VOL (1).
- L’afficheur indique la valeur du TOS. Par exemple 2.5 .
4. Appuyer sur la pédale PTT (12) pour sortir du CALIBRAGE DU TOS.
*Vérifier que le volume du bip soit réglé à un niveau convenable.
Voir § RÉGLAGE DU TOS page 7.
9) RÉGLAGE DE L’ÉCHO
Appuyer pendant 3 secondes sur le bouton CH (5) pour entrer
dans les MENUS. s’affiche.
1. Tourner le bouton rotatif CH (5) ou utiliser les touches UP/DN (13)
du microphone pour sélectionner le menu ECHO SET.
2. Appuyer sur le bouton CH (5) pour valider. Le niveau (LEVEL) de
l’ÉCHO clignote dans l’afficheur.
3. Tourner le rotateur CH (5) ou utiliser les touches UP/DN (13) du
microphone pour définir la valeur du niveau de1 à 32 ( valeur
par défaut, 13).
4. Une nouvelle pression sur le bouton CH (5) permet de valider la
valeur du niveau. Le second paramètre, le retard (DELAY), clignote.
5. Tourner le rotateur CH (5) ou utiliser les touches UP/DN (13) du
microphone pour définir la valeur du retard de1 à 32 (valeur par
défaut, 16).
6. Une nouvelle pression sur le bouton CH (5) permet de valider la
valeur du retard. Le retard cesse de clignoter. a) Repartir au point
1 pour régler une autre fonction ou b) Appuyer sur la pédale PTT
(12) pour sortir des MENUS.
7. Si aucune touche n’est pressée, l’appareil sort des MENUS au bout
de 10 secondes. disparaît de l’afficheur.
Voir § ÉCHO page 11.

16
7. Si aucune touche n’est pressée, l’appareil sort des MENUS au
bout de 10 secondes ou par une nouvelle pression longue sur la
touche F (7). disparaît de l’afficheur.
Le canal prioritaire 1 par défaut est le 9 en AM.
Voir le § CANAUX PRIORITAIRES page 10.
12) CANAL PRIORITAIRE 2
Appuyer pendant 3 secondes sur le bouton CH (5) pour entrer
dans les MENUS. s’affiche.
1. Tourner le bouton rotatif CH (5) ou utiliser les touches UP/DN (13)
du microphone pour sélectionner le menu EMG 2.
Les points 2 à 7 sont identiques à ceux du § CANAL PRIORITAIRE 1.
Le canal prioritaire 2 par défaut est le19 en AM.
Voir le § CANAUX PRIORITAIRES page 10.
13) RÉGLAGE DU PA (Public Address)
Cette fonction permet de sélectionner le mode de fonctionnement
du Public Address PA.
Appuyer pendant 3 secondes sur le bouton CH (5) pour entrer
dans les MENUS.
s’affiche.
1. Tourner le bouton rotatif CH (5) ou utiliser les touches UP/DN (13)
du microphone pour sélectionner le menu PA SET.
2. Appuyer sur le bouton CH (5) pour valider. Le type de PA clignote
dans l’afficheur.
3. Tourner le rotateur CH (5) ou utiliser les touches UP/DN (13) du
microphone pour définir le type de PA, PA, In ou oF.
4a. Une nouvelle pression brève sur le bouton CH (5) permet de valider
le type de PA et de rester dans les MENUS.
4b. Une nouvelle pression longue (1 seconde) permet de valider le
type de PA et de sortir des MENUS. disparaît de l’afficheur.
5. Si aucune touche n’est pressée, l’appareil sort des MENUS au bout
de 10 secondes. disparaît de l’afficheur.
- PA : la modulation du microphone et le signal reçu sont transmis
au haut-parleur du Public Address connecté au jack PA.SP. (D).
«PA» clignote en alternance avec le mode de modulation utilisé
: AM, FM, LSB, SSB ou FM UK (en configuration U uniquement).
- In : la modulation du microphone est transmise au haut-parleur
externe du Public Address connecté au jack PA.SP. (D). Le signal
reçu est renvoyé vers le haut-parleur interne (ou le haut-parleur
externe optionnel connecté au jack EXT.SP. (C)). «PA» clignote en
alternance avec le mode de modulation utilisé : AM, FM, LSB, SSB
ou FM UK (en configuration U uniquement).
- oF : la réception n’est plus fonctionnelle. Seule la modulation
du microphone est transmise au haut-parleur du Public Address
connecté au jack PA.SP. (D). «PA» s’affiche et les canaux sont
remplacés par PA.
En mode PA, appuyer sur la pédale d’émission PTT (12) pour
afficher «PA LEVEL». Tourner alors le rotateur CH (5) pour régler le
niveau audio du PA.
Le type de Public Address par défaut est PA.
Voir le § PA page 8.
14) RÉINITIALISATION
Permet de réinitialiser tous les paramètres définis par l’utilisateur
et de revenir aux valeurs par défaut.
Appuyer pendant 3 secondes sur le bouton CH (5) pour entrer
dans les MENUS.
s’affiche.
1. Tourner le bouton rotatif CH (5) ou utiliser les touches UP/DN (13)
du microphone pour sélectionner le menu RST ALL.
2. Appuyer sur le bouton CH (5) pour valider. «CONFIRM» s’affiche, no
clignote dans l’afficheur.
3. Tourner le rotateur CH (5) ou utiliser les touches UP/DN (13) du
microphone pour afficher .
4. Une nouvelle pression sur le bouton CH (5) permet de valider et
de sortir des MENUS.
5. Si aucune touche n’est pressée, l’appareil sort des MENUS au bout
de 10 secondes. disparaît de l’afficheur.
A) ALIMENTATION (13,8 V / 27,6 V)
B) PRISE D’ANTENNE (SO-239)
C) PRISE POUR HAUT-PARLEUR EXTÉRIEUR (8 Ω, Ø 3,5 mm)
D) PRISE POUR HAUT-PARLEUR PA EXTÉRIEUR (8 Ω, Ø 3,5 MM)
E) PRISE POUR MICRO VOX OPTIONNEL (Ø 2,5 mm)
Français

17
E) CARACTÉRISTIQUES TECHNIQUES
1) GÉNÉRALES
- Canaux : 40
- Modes de modulation : AM / FM / USB / LSB
- Gamme de fréquence : de 26,965 MHz à 27,405 MHz
- Impédance d’antenne : 50 ohms
- Tension d’alimentation : 13,8 V / 27,6 V
- Dimensions (L x P x H) : 170 (L) x 150 (P) x 52 (H) mm
- Poids : 1 kg
- Accessoires inclus : 1 microphone UP/DOWN et son
support, 1 berceau avec vis
de fixation et cordon d’alimentation
avec fusible.
2) ÉMISSION
- Tolérance de fréquence : +/- 300 Hz
- Puissance porteuse : 4 W AM/FM - 12 W USB/LSB
- Émissions parasites : Inférieure à 4 nW (- 54 dBm)
- Réponse en fréquence : 300 Hz à 3 kHz en AM/FM/USB/LSB
- Puissance émise dans le
canal adjacent : inférieure à 20 µW
- Sensibilité du microphone : 3 mV
- Consommation : 3 A (avec modulation)
- Distorsion maximum du
signal modulé : 1,8 %
3) RÉCEPTION
- Sensibilité maxi à 20 dB sinad : 0,5 µV -113 dBm (AM/FM)
0,28 µV -118 dBm (USB/LSB)
- Réponse en fréquence : 300 Hz à 3 kHz en AM/FM
- Sélectivité du canal adj. : 60 dB
- Puissance audio maxi : 3 W
- Sensibilité du squelch : mini 0,2 µV - 120 dBm
maxi 1 mV - 47 dBm
- Taux de réj. fréq. image : 60 dB
- Taux de réjection fréquence
intermédiaire : 70 dB
- Consommation : 400 mA nominal / 1000 mA max
F) GUIDE DE DÉPANNAGE
1) VOTRE POSTE N’ÉMET PAS OU VOTRE ÉMISSION EST DE
MAUVAISE QUALITÉ
Vérifiez que :
- L’antenne soit correctement branchée et que le TOS soit bien
réglé.
- La configuration programmée soit la bonne (voir tableau page
74).
- Le micro soit bien branché.
- Le niveau de RF POWER soit au maximum.
- Le niveau de MIC GAIN soit au maximum.
2) VOTRE POSTE NE REÇOIT PAS OU VOTRE RÉCEPTION
EST DE MAUVAISE QUALITÉ
Vérifiez que :
- Le niveau de RF GAIN soit au maximum.
- Le niveau du SQUELCH soit correctement réglé.
- Le bouton Volume soit réglé à un niveau convenable.
- L’antenne soit correctement branchée et le TOS bien réglé.
- La configuration programmée soit la bonne (voir tableau page
74).
3) VOTRE POSTE NE S’ALLUME PAS
Vérifiez :
- Votre alimentation.
- Qu’il n’y ait pas d’inversion des fils au niveau de votre branche-
ment.
- L’état du fusible.
G) COMMENT ÉMETTRE OU RECEVOIR UN
MESSAGE ?
Maintenant que vous avez lu la notice, assurez-vous que votre
poste est en situation de fonctionner (antenne branchée).
Français

18
Appuyer sur la pédale de votre micro, et lancer le message «At-
tention stations pour un essai TX» ce qui vous permet de vérifier
la clarté et la puissance de votre signal et devra entraîner une
réponse du type «Fort et clair la station».
Relâchez la pédale, et attendez une réponse. Dans le cas où
vous utilisez un canal d’appel (19), et que la communication est
établie avec votre interlocuteur, il est d’usage de choisir un autre
canal disponible afin de ne pas encombrer le canal d’appel.
H) GLOSSAIRE
Au fil de l’utilisation de votre TX, vous découvrirez parfois un langage
particulier employé par certains cibistes. Afin de vous aider à mieux
le comprendre, vous trouverez ci-après dans le glossaire et le code
«Q.» un récapitulatif des termes utilisés. Toutefois, il est évident qu’un
langage clair et précis facilitera le contact entre tous les amateurs
de radiocommunication. C’est la raison pour laquelle les termes
que vous lirez ci-dessous sont donnés à titre indicatif, mais ne sont
pas à utiliser de façon formelle.
ALPHABET PHONÉTIQUE INTERNATIONAL
A Alpha H Hotel O Oscar V Victor
B Bravo I India P Papa W Whiskey
C Charlie J Juliett Q Quebec X X-ray
D Delta K Kilo R Romeo Y Yankee
E Echo L Lima S Sierra Z Zulu
F Foxtrott M Mike T Tango
G Golf N November U Uniform
LANGAGE TECHNIQUE
AM : Amplitude Modulation (modulation d’amplitude)
BLU : Bande latérale unique
BF : Basse fréquence
CB : Citizen Band (canaux banalisés)
CH : Channel (canal)
CQ : Appel général
CW : Continuous waves (morse)
DX : Liaison longue distance
DW : Dual watch (double veille)
FM : Frequency modulation (modulation de fréquence)
GMT : Greenwich Meantime (heure méridien Greenwich)
GP : Ground plane (antenne verticale)
HF : High Frequency (haute fréquence)
LSB : Low Side Band (bande latérale inférieure)
RX : Receiver (récepteur)
SSB : Single Side Band (Bande latérale unique)
SWR : Standing Waves Ratio
SWL : Short waves listening (écoute en ondes courtes)
SW : Short waves (ondes courtes)
TOS : Taux d’ondes stationnaires
TX : Transceiver.Désigne un poste émetteur-récepteur CB. In-
dique aussi l’émission.
UHF : Ultra-haute fréquence
USB : Up Side Band (bande latérale supérieure)
VHF : Very high Frequency (très haute fréquence)
LANGAGE CB
ALPHA LIMA : Amplificateur linéaire
BAC : Poste CB
BASE : Station de base
BREAK : Demande de s’intercaler, s’interrompre
CANNE À PÊCHE : Antenne
CHEERIO BY : Au revoir
CITY NUMBER : Code postal
COPIER : Écouter, capter, recevoir
FIXE MOBILE : Station mobile arrêtée
FB : Fine business (bon, excellent)
INFERIEURS : Canaux en-dessous des 40 canaux autorisés
MAYDAY : Appel de détresse
MIKE : Micro
MOBILE : Station mobile
NÉGATIF : Non
OM : Opérateur radio
SUCETTE : Micro
Français

19
SUPÉRIEURS : Canaux au-dessus des 40 canaux autorisés
TANTE VICTORINE : Télévision
TONTON : Amplificateur de puissance
TPH : Téléphone
TVI : Interférences TV
VISU : Se voir
VX : Vieux copains
WHISKY : Watts
WX : Le temps
XYL : L’épouse de l’opérateur
YL : Opératrice radio
51 : Poignée de mains
73 : Amitiés
88 : Grosses bises
99 : Dégager la fréquence
144 : Polarisation horizontale, aller se coucher
318 : Pipi
600 ohms : le téléphone
813 : Gastro liquide (apéritif)
CODE «Q»
QRA : Emplacement de la station
QRA Familial : Domicile de la station
QRA PRO : Lieu de travail
QRB : Distance entre 2 stations
QRD : Direction
QRE : Heure d’arrivée prévue
QRG : Fréquence
QRH : Fréquence instable
QRI : Tonalité d’émission
QRJ : Me recevez-vous bien ?
QRK : Force des signaux (R1 à R5)
QRL : Je suis occupé
QRM : Parasites, brouillage
QRM DX : Parasites lointains
QRM 22 : Police
QRN : Brouillage atmosphérique (orages)
QRO : Fort, très bien, sympa
QRP : Faible, petit
QRPP : Petit garçon
QRPPette : Petite fille
QRQ : Transmettez plus vite
QRR : Nom de la station
QRRR : Appel de détresse
QRS : Transmettez plus lentement
QRT : Cessez les émissions
QRU : Plus rien à dire
QRV : Je suis prêt
QRW : Avisez que j’appelle
QRX : Restez en écoute un instant
QRZ : Indicatif de la station : par qui suis-je appelé?
QSA : Force de signal (S1 à S9)
QSB : Fading, variation
QSJ : Prix, argent, valeur
QSK : Dois-je continuer la transmission ?
QSL : Carte de confirmation de contact
QSO : Contact radio
QSP : Transmettre à...
QSX : Voulez-vous écouter sur...
QSY : Dégagement de fréquence
QTH : Position de station
QTR : Heure locale
CANAUX D’APPEL
27 AM : appel général en zone urbaine
19 AM : Routiers
9 AM : Appel d’urgence
Français

20
SANS LE CACHET DU DISTRIBUTEUR
LA GARANTIE SERA NULLE
Date d’achat : ...............................................................................................
Type : Radio CB MC KINLEY
N° de série : ..................................................................................................
#
CONDITIONS GÉNÉRALES DE GARANTIE
La Direction Technique
et
Le Service Qualité
Ce poste est garanti 2 ans pièces et main d’œuvre dans son pays d’achat contre tout vice de
fabrication reconnu par notre service technique. *Le Laboratoire SAV de PRESIDENT se réserve
le droit de ne pas appliquer la garantie si une panne est provoquée par une antenne autre que
celles distribuées par la marque PRESIDENT, si la dite antenne est à l’origine de la panne. Une
extension de garantie de 3 ans est proposée systématiquement pour l’achat et l’utilisation d’une
antenne de la marque PRESIDENT, amenant la durée totale de la garantie à 5 ans, et sur justi-
ficatif retourné sous 30 jours suivant l’achat au SAV de la Société Groupe President Electronics,
ou toute filiale étrangère.
Il est recommandé de lire attentivement les conditions ci-après et de les respecter sous peine
d’en perdre le bénéfice.
• Pour être valable, la garantie doit nous être retournée au plus tard 1 mois après l’achat.
• Détacher après l’avoir fait remplir la partie ci-contre et la retourner dûment complétée.
• Toute intervention effectuée dans le cadre de la garantie sera gratuite et les frais de réexpédition
pris en charge par notre Société.
• Une preuve d’achat doit être jointe obligatoirement avec le poste à réparer.
• Les dates inscrites sur le bon de garantie et la preuve d’achat doivent concorder.
• Ne pas procéder à l’installation de votre appareil sans avoir lu ce manuel d’instructions.
• Aucune pièce détachée ne sera envoyée ni échangée par nos services au titre de la garantie.
La garantie est valable dans le pays d’achat.
Ne sont pas couverts :
• Les dommages causés par accident, choc ou emballage insuffisant.
• Les transistors de puissance, les micros, les lampes, les fusibles et les dommages causés par une
mauvaise utilisation (antenne mal réglée, TOS trop important, inversion de polarité, mauvaises
connexions, surtension, etc.)
• La garantie ne peut être prorogée par une immobilisation de l’appareil dans nos ateliers, ni par
un changement d’un ou plusieurs composants ou pièces détachées.
• Les interventions ayant modifiées les caractéristiques d’agrément, les réparations ou modifica-
tions effectuées par des tiers non agréés par notre Société.
Si vous constatez des défauts de fonctionnement :
• Vérifier l’alimentation de votre appareil et la qualité du fusible.
• Contrôlez les différents branchements: jacks, prise d’antenne, prise du microphone...
• Assurez-vous que le niveau du squelch soit correctement réglé ; que la configuration programmée
soit la bonne.
• En cas de non prise en charge au titre de la garantie, l’intervention et la réexpédition du matériel
seront facturés.
• Cette partie doit être conservée même après la fin de la garantie et si vous revendez votre poste,
donnez la au nouveau propriétaire pour le suivi S.A.V.
• En cas de dysfonctionnement réel, mettez-vous d’abord en rapport avec votre revendeur qui
décidera de la conduite à tenir.
• Dans le cas d’une intervention hors garantie, un devis sera établi avant toute réparation.
Vous venez de faire confiance à la qualité et à l’expérience de PRESIDENT et nous vous remer-
cions. Pour que vous soyez pleinement satisfait de votre achat, nous vous conseillons de lire
attentivement ce manuel. N’oubliez pas de nous retourner la partie droite de ce bon de garantie,
c’est très important pour vous car cela permet d’identifier votre appareil lors de son passage
éventuel dans nos ateliers.
Français

21
DÉCLARATION DE CONFORMITÉ
EU SIMPLIFIÉE
Par la présente, Groupe President Electronics, déclare que
l’équipement radio CB:
Marque : PRESIDENT
Type: TXPR600
Nom Commercial : MC KINLEY
Est conforme à la directive 2014/53/UE.
Le texte intégral de la déclaration de conformité de l’UE est
disponible à l’adresse Internet suivante:
https://president-electronics.com/DC/TXPR600.
Français

22
La garantía de este artículo sólo es válida en el país de compra.
¡ ATENCIÓN !
EQUIPO MULTI-NORMAS !
Antes de la utilización tengan cuidado de
nunca emitir sin haber previamente conec-
tado la antena (conector “B” situado en
la parte trasera de su equipo) y ajustada
la ROE (Relación de Ondas Estacionarias).
Sino, se expone a dañar el amplificador de
potencia, no cubierto por la garantía.
Ver la función “F” en pág. 29 y la tabla
de Configuraciones en la pág. 74.
President Electronics Ibérica S.A.U. Declara bajo su responsabilidad, que este aparato cumple con lo dispuesto en la Directiva
2014/53/UE del Parlamento Europeo y del Consejo de 16 de Abril de 2014.
Español

23
Bienvenido al mundo de los emisores-receptores CB de última ge-
neración. Esta nueva gama de estaciones le permite acceder a la
comunicación electrónica más competitiva. Gracias a la utilización
de tecnología punta que garantiza una calidad sin precedentes, su
PRESIDENT MC KINLEY representa un nuevo hito en la facilidad de uso
y la solución por excelencia para el pro más exigente de CB. Para
sacar el máximo partido de todas sus posibilidades, le aconsejamos
leer atentamente estas instrucciones de uso antes de instalar y utilizar
su CB PRESIDENT MC KINLEY.
A) INSTALACIÓN
1) ELEGIR EL EMPLAZAMIENTO Y MONTAJE DEL PUESTO
MÓVIL
a) Escoja el emplazamiento más apropiado para una utilización
simple y práctica de su estación móvil.
b) Procure que no moleste ni al conductor ni a los pasajeros del
vehículo.
c) Prevea el paso y la protección de los diferentes cables, (alimen-
tación, antena, accesorios) con el fin de que en ningún caso
perturben la conducción del vehículo.
d) Utilice para el montaje el soporte (1) entregado con el aparato,
fíjelo sólidamente con ayuda de los tornillos auto-roscantes (2)
proporcionados (diámetro de agujero de 3,2 mm). Tenga cuidado
de no dañar el sistema eléctrico del vehículo en el momento del
taladro del salpicadero.
e) En el momento del montaje, no se olvide de insertar las arande-
las de caucho (3) entre la estación y su soporte. Éstas tienen, en
efecto, un papel “amortiguador” y permiten una orientación y
presión suaves de la estación.
f) Escoja un emplazamiento para el soporte del micro y prevea el
paso de su cable.
- ATENCIÓN: Si empotra su estación, asegúrese de que no haya
cables que toquen el chasis.
- NOTA: Su estación móvil que posee una toma de micro en la parte
frontal puede ser empotrada en el cuadro de mandos. Además
del altavoz en la parte frontal, es posible agregar un altavoz
externo para escuchar mejor las comunicaciones (conector EXT.
SP situado en la cara posterior del aparato: C). Infórmese con su
vendedor más próximo para el montaje en su aparato.
2) INSTALACIÓN DE LA ANTENA
a) Elección de la antena
- En CB, cuanto más grande es una antena, mejor es su rendimiento.
Su Centro de Asesoramiento sabrá orientarle en su elección.
b) Antena móvil
- Hay que instalarla en un lugar del vehículo donde haya un máxi-
mo de superficie metálica (plano de masa), alejándose de los
montantes del parabrisas y de la luneta trasera.
ESQUEMA GENERAL
DE MONTAJE
Español

24
- En caso de que se haya instalado una antena de radio-teléfono,
la antena CB debe estar por encima de ésta.
- Existen 2 tipos de antenas: las preajustadas y las regulables.
- Las preajustadas se utilizan preferentemente con un buen plano
de masa (en el techo o en el maletero).
- Las regulables ofrecen un campo de uso mucho más ancho y
permiten sacar partido de planos de masa menos importantes
(véase § AJUSTE DE LA ROE página 24).
- Para una antena de fijación
por taladro, es necesario
tener un contacto exce-
lente entre la antena y el
plano de masa; para ello,
rasque ligeramente la cha-
pa al nivel del tornillo y de
la estrella de presión.
- En el momento del paso
del cable coaxial, tenga cuidado de no pellizcarlo ni aplastarlo
(riesgo de rotura o cortocircuito).
- Conecte la antena (B).
c) Antena fija
- Procure abrirla al máximo. En caso de fijación sobre un poste,
habrá que sostenerla eventualmente conforme a las normas
vigentes (infórmese con un profesional). Las antenas y los acce-
sorios PRESIDENT han sido especialmente concebidos para un
rendimiento óptimo de todos los aparatos de la gama.
3) CONEXIÓN DEL ALIMENTADOR
Su PRESIDENT MC KINLEY está provista de una protección contra
las inversiones de polaridad.
Vuestra emisora debe estar alimentada por una fuente de co-
rriente continua de 12 o 24 voltios (A). En este momento, la mayor
parte de los coches y camiones funcionan con una toma de tierra
negativa, se puede asegurar verificando que el terminal (-) de la
batería esté bien conectado al bloque del motor o bastidor. En
el caso contrario, consulte con su suministrador.
Todas las operaciones de conexión siguientes, deben efectuarse
con el cable de alimentación no conectado a la emisora:
a) Asegúrense que el alimentador sea de 12 o 24 Voltios.
b) Identifique los polos (+) y (-) de la batería (+ = rojo, - = negro).
En el caso que sea necesario alargar el cable de alimentación
utilice un cable de sección equivalente o superior.
c) Es necesario conectar sobre un (+) y (-) permanentes. Les acon-
sejamos enchufar directamente el cable de alimentación en la
batería (el enchufe sobre
el cable del auto-radio o
sobre otras partes del cir-
cuito electrónico podrán
en ciertos casos favorecer
la recepción de las señales
parásitas).
d) Conecten el hilo rojo (+) al
borne positivo de la batería
y el hilo negro (-) al borne negativo de la batería.
e) Conectar el cable de alimentación a la emisora.
ATENCIÓN: ¡No reemplace jamás el fusible de origen por un mo-
delo de un valor diferente!
4) OPERACIONES DE BASE QUE HAY QUE EFECTUAR ANTES
DE LA PRIMERA UTILIZACIÓN, SIN PASAR POR EMISIÓN
(sin apretar la palanca del micro)
a) Conecte el micro,
b) Verifique la conexión de la antena,
c) Puesta en marcha del aparato: gire el botón del volumen VOL
(1) en el sentido de las agujas del reloj hasta oír un “clic”.
d) Gire el botón del squelch SQ (2) al mínimo (posición M).
e) Ajuste el botón del volumen (1) a un nivel conveniente.
f) Dirija la estación al canal 20 usando las teclas CH (5) o UP/DN (13)
en el micrófono.
5) AJUSTE DE LA ROE (Relación de Ondas Estacionarias)
ATENCIÓN: Esta operación debe efectuarse necesariamente en el
momento de la primera utilización del aparato o en el momento
de un cambio de antena. Este ajuste debe realizarse en un lugar
abierto, al aire libre.
LÓBULO DE RADIACIÓN
Español

25
* Ajuste con el medidor de ROE integrado
Véase la función de CALIBRACIÓN DE LA ROE página 32.
* Ajustes con el medidor de ROE externo (tipo TOS-1
PRESIDENT):
a) Empalme del medidor de ROE:
- Conecte el medidor de ROE entre la estación y la antena, lo más
cerca posible de la estación (utilice para ello un cable de 40 cm
máximo tipo CA-2C PRESIDENT).
b) Ajuste de la ROE:
- Posicione la estación hacia el canal 20 en AM.
- Sitúe el conmutador del medidor de ROE en posición FWD (cali-
bración).
- Apriete la palanca PTT (12) del micro para pasar a emisión.
- Dirija la aguja al índice t con ayuda del botón de calibración.
- Ponga el conmutador en posición REF (lectura del valor de la ROE).
El valor leído en el indicador debe estar muy cerca de 1. En caso
contrario, reajuste su antena hasta obtener un valor lo más cerca
posible a 1 (puede aceptarse un valor de la ROE comprendido
entre 1 y 1,8).
- Es necesario recalibrar el medidor de ROE entre cada operación
de ajuste de la antena.
Observación: Con el fin de evitar las pérdidas y las atenuaciones
en los cables de conexión entre la radio y sus accesorios, PRESIDENT
recomienda una longitud de cable inferior a 3m.
Ahora, su estación está preparada para funcionar.
B) UTILIZACIÓN
1) INTERRUPTOR DE VOLUMEN
Para encender la emisora, gire el botón VOL (1) en el sentido de
las agujas del reloj. Si la función PITIDO DEL TECLADO está activa
(véase el menú PITIDO DEL TECLADO pagina 31), suena un pitido.
Su radio está encendida.
La pantalla muestra brevemente el tipo de micrófono (véase el
menú TIPO DE MICRÓFONO página 32) y la banda de frecuencia
utilizada (véase la página 29).
Para apagar el aparato: gire el botón VOL (1) en sentido contrario
a las agujas del reloj hasta que haga clic. Su radio está apagada.
Para AJUSTAR el volumen, gire el botón VOL (1) hacia la derecha
para aumentar, gire el botón hacia la izquierda Para disminuir.
2) ASC (Automatic Squelch Control)/SQUELCH
Permite suprimir los ruidos de fondo indeseables en la ausencia
de comunicación. El squelch no interviene ni en el volumen ni en
la posición de emisión, pero permite escuchar confortablemente.
a) ASC (AJUSTE AUTOMÁTICO DEL SQUELCH)
Patente mundial, exclusividad de PRESIDENT.
Girar el botón del squelch SQ (2) en el sentido inverso de las
agujas del reloj en la posición ASC. aparece en la pantalla.
En lugar de un ajuste manual repetitivo, se produce una optimi-
zación permanente entre la sensibilidad y la escucha confortable
cuando el ASC está activado. Esta función es conmutable por la
rotación del botón en sentido de las agujas de un reloj, en este
caso el ajuste del squelch vuelve a ser manual. desaparece
de la pantalla.
b) SQUELCH MANUAL
Girar el botón del squelch en el sentido de las agujas del reloj justo
hasta el punto exacto, todos los ruidos de fondo desaparecerán.
Es un ajuste que se ha de hacer con precisión, pues colocado en
posición máxima en el sentido de las agujas del reloj, únicamente
las señales más fuertes pueden ser recibidas
3) PANTALLA
Permite visualizar todas las funciones.
Español

26
El gráfico de barras principal indica el nivel de recepción y la
potencia emitida. los pequeños gráficos de barras visualizan los
niveles del Mic Gain, RF Gain y RF Power.
4) CLARIFIER
La función CLARIFIER (CLAR.) permite el desfase de la frecuencia
en recepción LSB/USB con el fin de mejorar la claridad de la voz
de su interlocutor.
5) SELECTOR DE CANALES CH ~ RF POWER
SELECTOR DE CANALES CH
- Gire el botón CH (5) para subir o bajar un canal. Se emite un pitido
cada vez que se cambia el canal si la función PITIDO DEL TECLADO
está activada (véase el menú PITIDO DEL TECLADO página 31).
Véase el § BOTONES UP/DN DEL MICRÓFONO página 29.
La pantalla muestra la frecuencia correspondiente. Por ejemplo,
27.205 para el canal 40. Véase el menú SPAN página 32.
- Una presión larga (3 segundos) en este botón (5) permite entrar
en los MENÚS.
- Presionando brevemente este botón (5) se validan los ajustes en
los MENÚS.
RF POWER (combinación 12 / 9 + 5)
En el modo TX, permite aumentar/disminuir la potencia de salida.
- Mantenga presionada la palanca de transmisión PTT (12).
- Presione la tecla • (9) y pulse el botón CH (5). Aparece “RF POWER”
en la pantalla.
- Utilice el conmutador rotativo CH (5) para ajustar el nivel con el
gráfico de barras.
- Pulse el botón CH (5) durante 1 segundo para validar el ajuste.
6) MODO ~ PA ~ VOX ~ AJUTE DEL VOX
MODO
(presión breve)
Este interruptor selecciona el modo de modulación AM, FM,
LSB o USB. Su modo de modulación debe coincidir con el de su
interlocutor.
- Modulación de amplitud/ AM: Comunicación sobre el terreno
con relieves y obstáculos a media distancia (el más utilizado).
- Modulación de Frecuencia/FM: Comunicación cercana en terreno
llano y libre.
Solo en configuración U: en modo FM, una pulsación larga en la
tecla F (10) alterna entre las bandas de frecuencia ENG y CEPT.
«UK» aparece en la pantalla cuando se selecciona la banda de
frecuencia ENG (ver tabla de la página 70).
- USB/LSB: Comunicación de larga distancia (según las condiciones
de propagación).
PA (Megafonía) (presión larga)
Presione la tecla PA (6) durante 2 segundos para alternar entre
el modo de CB y el modo de PA (megafonía).
En el modo PA, un altavoz de megafonía exterior se puede co-
nectar al equipo por la toma PA.SP. del panel posterior (D).
Para más detalles sobre la operación en modo PA, véase el menú
TIPO DE PA página 33.
VOX (9 + 6 presión breve)
La función VOX permite emitir hablando en el micro de origen (o
en el micro vox opcional) sin apretar la palanca PTT (12). La utili-
zación de un micro vox opcional conectado detrás del aparato
(E) desactiva el micro de origen.
Presione la tecla • (9),
parpadea, presione la tecla •VOX (6)
para activar la función VOX. “VOX” aparece en la pantalla. Una
nueva presión en la teclas • (9) y •VOX (6) desactiva la función.
“VOX” desaparece.
AJUSTE DEL VOX (10 + 6 presión larga)
Presione la tecla • (9), parpadea, pulse durante1 segundo la
tecla •VOX (6) para activar la función AJUSTE DEL VOX. Hay tres
ajustes posibles: Sensibilidad SET-L / Nivel Anti-Vox SET-A y Tempo-
rización SET-T.
El ajuste actual parpadea. La pantalla muestra el ajuste seguido
de su valor, por ejemplo: SET-L1
1. Gire el conmutador rotativo CH (5) para aumentar/disminuir el
nivel del ajuste activo.
Español

27
2. Pulse la tecla •VOX (6) para pasar al ajuste siguiente.
3. Una vez que el VOX está correctamente ajustado, pulse la tecla
•VOX (6) durante 1 segundo para validar y salir de la función
AJUSTE DEL VOX.
- Sensibilidad “SET-L”: permite ajustar la sensibilidad del micro (de
origen u opcional vox) para una calidad de transmisión óptima.
Nivel regulable de 1 (nivel alto) a 9 (nivel bajo). Valor predetermi-
nado: 1.
- Anti-Vox “SETA”: evita la emisión generada por el ruido ambiental.
Nivel ajustable: OfF (emite según el nivel del squelch) y de 0 (sín
antivox) a 9 (nivel bajo). Valor predeterminado: OFF..
- Temporización “SET-T”: permite evitar el corte “brusco” de la trans-
misión añadiendo un tiempo al final de palabra. Nivel regulable
de 1 (tiempo corto) a 9 (tiempo largo). Valor predeterminado: 5.
El AJUSTE DEL VOX activa automáticamente la función VOX. «VOX»
aparece en la pantalla.
Nota: El equipo sale automáticamente del AJUSTE DEL VOX des-
pués de 10 segundos si no se pulsa ninguna tecla o en apoyo de
cualquier tecla sin guardar los parámetros de ajuste.
7) BARRIDO DE LOS CANALES ~ DOBLE ESCUCHA ~ M1
BARRIDO DE LOS CANALES
(presión breve)
Presione la tecla SCAN (7) para activar la función BARRIDO DE LOS
CANALES en orden ascendente. Aparece «SCAN» en la panta-
lla. El barrido se detiene cuando un canal está activo. Se inicia
automáticamente 3 segundos después del final de la emisión, si
ninguna tecla se activa durante este tiempo. El barrido comienza
de nuevo en un orden ascendente girando el conmutador rotativo
CH (5) a la derecha o con el botón UP (13) del micrófono, o en
orden descendente girando el conmutador rotativo CH (5) a la
izquierda o el botón DN (13) del micrófono.
Durante el escaneo, presione la tecla • (9) durante un segundo
para alternar entre los modos barrido de los canales y barrido de
la memoria. En el modo de BARRIDO DE LA MEMORIA, solo se ex-
ploran los canales prioritarios (véase el § CANALES DE EMERGENCIA
página 28) y los canales memorizados (véase el § MEMORIA
página 28).
Presione la palanca PTT (12) o la tecla SCAN (7) para salir de la
función BARRIDO DE LOS CANALES.
DOBLE ESCUCHA (presión larga)
Una pulsación más larga (1s) en el botón DW (7) activa la función
DW (Doble Escucha). «DW» aparece en la pantalla. Permite mo-
nitorear dos canales.
- Una primera presión prolongada activa la función de doble es-
cucha entre el canal de emergencia1 y el canal activo (véase
el menú AJUSTE DEL CANAL DE EMERGENCIA 1 página 33).
- Una segunda presión prolongada activa la función de doble es-
cucha entre el canal de emergencia 2 y el canal activo (véase
el menú AJUSTE DEL CANAL DE EMERGENCIA 2 página 33).
- El número de canal y el canal de emergencia se muestran al-
ternativamente. El icono «EMG» también aparece junto con el
canal de emergencia. El canal activo se puede cambiar durante
la doble escucha.
- Una nueva presión prolongada de la tecla DW (7) desactiva la
función DW. «DW» desaparece de la pantalla.
M1
Ver § MEMORIA página 28.
8) ANL/NB ~ HI-CUT ~ CANALES DE EMERGENCIA ~ M2
ANL/NB
(presión breve)
ANL (Automatic Noise Limiter) / NB (Noise Blanker) : estos filtros
reducen los ruidos de fondo y algunos parásitos en la recepción.
Presione la tecla ANL/NB (8) para cambiar entre los siguientes 4
estados en un bucle: 1. ANL/on - NB/off • 2. ANL/off - NB/on • 3.
ANL/on - NB/on • 4. ANL/off - NB/off.
El icono de filtro aparece en la pantalla cuando el filtro está activo
(on).
HI-CUT (presión breve)
Eliminación de parásitos de alta frecuencia.
Presione la tecla HI-CUT (8) durante un segundo para activar/
desactivar el filtro HI-CUT.
«HI-CUT» aparece en la pantalla cuando el filtro está activo.
Español

28
CANALES DE EMERGENCIA (9 + 8 presión breve)
- Presione brevemente la tecla • (9) y luego la tecla •EMG (8) para
combinar estas dos teclas.
- Una primera combinación activa el canal prioritario 1.
- Una segunda combinación activa el canal prioritario 2.
Cuando el canal de emergencia 1 o 2 está activo, «EMG» aparece
de la pantalla.
- Una tercera combinación permite volver al canal inicial.
Véase los menús CANAL DE EMERGENCIA 1 y 2 página 33.
M2
Ver § MEMORIA página 28.
9) Tecla “•” ~ MEMORIA ~ ECO ~ M3
Tecla “•”
(presión breve)
Presionando la tecla • (9) se activa el modo FUNCIÓN. par-
padea. Combine con otra tecla que comience con • (•VOX,
•EMG, •ECHO, •RF POWER o •MIC/RF GAIN) para acceder a la
función.
Nota: La tecla • (9) siempre se combina con otra tecla. Presionar
esta tecla solo no tiene ningún efecto, excepto hacer parpadear
durante 10 segundos.
MEMORIA (presión larga)
Este equipo le permite memorizar 3 canales con los siguientes
atributos: NB/ANL (on/off), HI-CUT (on/off), AM / FM / USB / LSB.
Para memorizar:
- Seleccionar el canal y los atributos a memorizar.
- Presionar la tecla MEM (9) durante un segundo. Si la función PITIDO
DEL TECLADO está activa, suena un pitido. «MEM» parpadea.
- Presione por un segundo una de las teclas M1 (7), M2 (8) o M3 (9)
para memorizar. «MEM» aparece en la pantalla y el número de
la memoria seleccionado (M1, M2 o M3) parpadea.
- Si la función PITIDO DEL TECLADO está activa, un pitido largo
confirma el éxito de la operación.
Para llamar a una memoria:
- Presionar la tecla MEM (9) durante un segundo. Si la función PITIDO
DEL TECLADO está activa, suena un pitido. «MEM» parpadea.
- Presione brevemente una de las teclas M1 (7), M2 (8) o M3 (9)
para llamar la memoria seleccionada.
- Aparece «MEM», el número de la memoria seleccionada (M1, M2
o M3) parpadea.
Para borrar una memoria:
- Apague el equipo.
- Mantenga presionada una de las teclas M1 (7), M2 (8) o M3 (9)
y encienda el aparato.
- Borrase la memoria seleccionada. «MEM» y el número de la me-
moria seleccionada (M1, M2 o M3) desaparecen de la pantalla.
Véase también el menú RE INICIALIZACIÓN página 34.
ECO (9 + 9 presión breve)
Presione la tecla • (9) una primera vez, parpadea, luego pre-
sione la tecla •ECHO (9) para activar la función ECHO. «ECHO»
aparece en la pantalla. Una nueva combinación de las teclas •
(9) y • ECHO (9) desactiva la función. «ECHO» desaparece de la
pantalla.
M3
Ver § MEMORIA página 28.
10) F ~ MIC GRAIN ~ RF GAIN
F
(presión breve)
Véase Solo en configuración U página 26.
Véase el § TALKBACK página 29.
Véase el § FUNCIÓN AL ENCENDER LA EMISORA página 29.
MIC GAIN (combinación 12 / 9 + 10)
Ajuste el nivel de sensibilidad del micrófono.
- Mantenga presionado la palanca de transmisión PTT (12)
- Pulse la tecla • (9).
- Pulse la tecla •MIC/RF GAIN (10). «MIC GAIN» aparece en la pantalla.
Español

29
- Gire el conmutador rotativo CH (5) para ajustar el nivel con el
gráfico de barras.
- Pulse el botón CH (5) durante 1 segundo para validar el ajuste.
La posición normal de esta función es la sensibilidad máxima. El
gráfico de barras MIC GAIN aparecerá en emisión.
RF GAIN (combinación 9 + 10)
Ajuste de la sensibilidad de recepción. Posición máxima en el
caso de recepción de llamadas de larga distancia. Puede re-
ducir el RF GAIN, para evitar distorsiones, cuando el interlocutor
está cerca. Reduzca la ganancia en la recepción en el caso de
una comunicación cercana con un corresponsal que no esté
equipado con RF POWER.
- Pulse la tecla • (9).
- Pulse la tecla •MIC/RF GAIN (10). Se muestra «RF GAIN».
- Gire el conmutador rotativo CH (5) para ajustar el nivel con el
gráfico de barras.
- Pulse el botón CH (5) durante 1 segundo para validar el ajuste.
El gráfico de barras de RF GAIN siempre se mostrará en recepción.
11) TOMA DE MICRO DE 6 CONTACTOS
Se encuentra delante del aparato y facilita así su integración a
bordo del vehículo.
Véase esquema de conexión en la página 73.
12) PTT ~ RF POWER ~ MIC GAIN ~ TALKBACK
PTT (Push To Talk)
Palanca de emisión, apriete para hablar, se muestra , y suelte
para recibir un mensaje.
RF POWER
Véase el § RF POWER página 26.
MIC GAIN
Véase el § MIC GAIN página 28.
TALKBACK (combinación 12 / 10)
La función TALKBACK permite escuchar su propria modulación
en el altavoz del equipo.
- Mantener la palanca PTT (12) apretada.
- Apriete la tecla F (10) para activar/desactivar la función TALK-
BACK. Cuando la función está activa, «TALKBACK» aparece en
la pantalla.
NIVEL DE TALKBACK (combinación 12 / 5)
Cuando la función TALKBACK está activa, mantener la palanca
de transmisión PTT (12) apretada y gire el conmutador rotativo
CH (5) para ajustar el nivel. 9 niveles de 01 a 09.
TOT (Time Out Timer)
Si la emisión (PTT (12) o VOX) dura más de 5 minutos, el canal y
empiezan a parpadear y la emisión finaliza.
La confirmación sonora de fin de emisión es audible hasta que
se deje de presionar la palanca PTT (12).
13) BOTONES UP/DN DEL MICRÓFONO
- Estos botones (13) permiten subir (UP) o bajar (DN) de un canal.
Se emite un pitido cada vez que se cambia el canal si la función
PITIDO DEL TECLADO está activada (véase el menú PITIDO DEL
TECLADO en la página 31).
La pantalla muestra la frecuencia correspondiente. Por ejemplo,
“27.205” para el canal 40. Véase el menú SPAN en la página 32.
Véase § SELECTOR DE CANALES CH página26.
C) FUNCIÓN AL ENCENDER LA EMISORA
La SELECCIÓN DE LA BANDA DE FRECUENCIAS, se realiza cuando
se enciende el equipo. Apague y vuelva a encender el equipo
presionando y manteniendo presionada la tecla F (10).
(Configuración: EU; PL; d; EC; U; In)
Deben escogerse las bandas de frecuencias según el país donde
usted usa su dispositivo. En ningún caso debe utilizarse una con-
Español

30
figuración diferente al país de uso. En algunos países se necesita
una licencia para su uso. Véase la tabla de la página 75.
1. Encienda el aparato manteniendo apretada la tecla F (10). La
letra que corresponde a la configuración parpadea.
2. Para cambiar de configuración, utilice el conmutador rotativo
CH (5) o los botones UP/DN (13) del micrófono.
3. Cuando se elija la configuración, apriete 1 segundo la tecla F
(10). La letra que corresponde a la configuración se muestran
de forma continua, se emite un pitido.
4. En esta fase, confirme la selección apagando y luego encen-
diendo de nuevo el aparato.
Véanse las bandas de frecuencias páginas 70 a 72 / tabla
de configuraciones página 74.
5. Si no se presiona ninguna tecla, el equipo sale de los MENÚS
después de 10 segundos.
desaparece de la pantalla.
Nota: Los botones UP/DN (13) en el micrófono tienen el mismo
efecto que la rotación del conmutador rotativo CH (5). La pa-
lanca de transmisión PTT (12) sale de los MENÚS sin validación.
desaparece de la pantalla.
1) COLOR
Presione el botón CH (5) durante 3 segundos para entrar en los
MENÚS.
aparece en la pantalla.
1. Gire el conmutador rotativo CH (5) o use los botones UP/DN (13)
en el micrófono para seleccionar el menú COLOR.
2. Presione el botón CH (5) para confirmar. El color parpadea en la
pantalla.
3. Gire el conmutador rotativo CH (5) o use los botones UP/DN (13)
en el micrófono para cambiar color.
4a. Una nueva presión breve en el botón CH (5) valida el color elegido
y se mantiene en los MENÚS.
4b. Una nueva pulsación larga (1 segundo) valida el color elegido y
sale de los MENÚS. desaparece de la pantalla.
5. Si no se presiona ninguna tecla, el equipo sale de los MENÚS
después de 10 segundos. desaparece de la pantalla.
El Color pre determinado es naranja:
.
2) DIMMER
Esta función permite variar la luminosidad de la pantalla. 10 niveles
de 0 a 9.
Presione el botón CH (5) durante 3 segundos para entrar en los
MENÚS.
aparece en la pantalla.
1. Gire el conmutador rotativo CH (5) o use los botones UP/DN (13)
en el micrófono para seleccionar el menú DIMMER.
2. Presione el botón CH (5) para confirmar. El valor del dimmer par-
padea en la pantalla.
La utilización de la banda correcta en cada país es respon-
sabilidad del usuario.
D) MENÚS
El orden de las 14 funciones es el descrito en este manual. Sin
embargo, la función que se muestra al entrar en los MENÚS será
la última función modificada por el usuario.
Cualquiera que sea la función, el procedimiento es el mismo:
Presione el botón CH (5) durante 3 segundos para entrar en los
MENÚS.
aparece en la pantalla.
1. Gire el conmutador rotativo CH (5) o use los botones UP/DN (13)
en el micrófono para seleccionar el menú.
2. Presione el botón CH (5) para confirmar. El parámetro de ajuste
del menú seleccionado parpadea en la pantalla.
3. Gire el conmutador rotativo CH (5) o use los botones UP/DN (13)
en el micrófono para cambiar el valor del parámetro.
4a. Una nueva presión breve en el botón CH (5) valida el valor elegido
y se mantiene en los MENÚS. El parámetro deja de parpadear y
si la función tiene más de un parámetro, el siguiente parámetro
parpadea ...
4b. Una nueva presión larga (1 segundo) valida el valor elegido y
sale de los MENÚS. desaparece de la pantalla.
Español

31
3. Gire el conmutador rotativo CH (5) o use los botones UP/DN (13)
en el micrófono para activar on/desactivar of la función.
4a. Una nueva presión breve en el botón CH (5) valida y se mantiene
en los MENÚS.
4b. Una nueva pulsación larga (1 segundo) valida y sale de los MENÚS.
desaparece de la pantalla.
5. Si no se presiona ninguna tecla, el equipo sale de los MENÚS
después de 10 segundos. desaparece de la pantalla.
El valor pre determinado del Pitido del teclado es: on.
5) ROGER BEEP
El ROGER BEEP emite un pitido cuando se suelta el pedal del
micro para dejarle la palabra a su interlocutor. Históricamente,
al ser la CB un modo de comunicación “simplex”, es decir que
no es posible hablar y escuchar al mismo tiempo (como en el
caso del teléfono por ejemplo), era usual decir “Roger” cuando
se había terminado de hablar para avisar al interlocutor que ya
podía hablar. La palabra “Roger” ha sido reemplazada por un
“beep” significativo, de ahí su nombre “Roger Beep”.
Presione el botón CH (5) durante 3 segundos para entrar en los
MENÚS.
aparece en la pantalla.
1. Gire el conmutador rotativo CH (5) o use los botones UP/DN (13)
en el micrófono para seleccionar el menú ROGER BP.
2. Presione el botón CH (5) para confirmar. El estado de la función
parpadea en la pantalla.
3. Gire el conmutador rotativo CH (5) o use los botones UP/DN (13)
en el micrófono para activar on/desactivar of la función.
4a. Una nueva presión breve en el botón CH (5) valida y se mantiene
en los MENÚS.
4b. Una nueva pulsación larga (1 segundo) valida y sale de los MENÚS.
desaparece de la pantalla.
5. Si no se presiona ninguna tecla, el equipo sale de los MENÚS
después de 10 segundos. desaparece de la pantalla.
El valor pre determinado del Roger beep es: of.
Observación: El ROGER BEEP también se escucha en el altavoz si
la función PITIDO DEL TECLADO está activada. Si no está activada,
sólo el interlocutor puede escuchar el ROGER BEEP.
3. Gire el conmutador rotativo CH (5) o use los botones UP/DN (13)
en el micrófono para cambiar el valor del dimmer.
4a. Una nueva presión breve en el botón CH (5) valida el valor selec-
cionado y se mantiene en los MENÚS.
4b. Una nueva pulsación larga (1 segundo) valida el valor seleccionado
y sale de los MENÚS.
desaparece de la pantalla.
5. Si no se presiona ninguna tecla, el equipo sale de los MENÚS
después de 10 segundos. desaparece de la pantalla.
El valor pre determinado del Dimmer es: 5.
3) CONTRASTE
La función CONTRAST permite ajustar el contraste entre la retro
iluminación y los caracteres de la pantalla. 10 niveles de 0 a 9.
Presione el botón CH (5) durante 3 segundos para entrar en los
MENÚS.
aparece en la pantalla.
1. Gire el conmutador rotativo CH (5) o use los botones UP/DN (13)
en el micrófono para seleccionar el menú CONTRAST.
2. Presione el botón CH (5) para confirmar. El valor del contraste
parpadea en la pantalla.
3. Gire el conmutador rotativo CH (5) o use los botones UP/DN (13)
en el micrófono para cambiar el valor del contraste.
4a. Una nueva presión breve en el botón CH (5) valida el valor selec-
cionado y se mantiene en los MENÚS.
4b. Una nueva pulsación larga (1 segundo) valida el valor seleccionado
y sale de los MENÚS. desaparece de la pantalla.
5. Si no se presiona ninguna tecla, el equipo sale de los MENÚS
después de 10 segundos.
desaparece de la pantalla.
El valor pre determinado del Contraste es: 5.
4) PITIDO DEL TECLADO
Pitido sonoro cuando se cambia de canales, teclas, etc.
Presione el botón CH (5) durante 3 segundos para entrar en los
MENÚS.
aparece en la pantalla.
1. Gire el conmutador rotativo CH (5) o use los botones UP/DN (13)
en el micrófono para seleccionar el menú KEY BEEP.
2. Presione el botón CH (5) para confirmar. El estado de la función
parpadea en la pantalla.
Español

32
6) SPAN
Cuando la función está activa, la frecuencia se puede ajustar
continuamente. Al presionar brevemente el botón CH (5) se
muestra una barra debajo del primer o segundo decimal de la
frecuencia. El conmutador rotativo CH (5) ya no actúa en el canal
sino en la frecuencia con salto de 100 kHz (primer decimal) o de
10 kHz (segundo decimal).
Presione el botón CH (5) durante 3 segundos para entrar en los
MENÚS.
aparece en la pantalla.
1. Gire el conmutador rotativo CH (5) o use los botones UP/DN (13)
en el micrófono para seleccionar el menú SPAN.
2. Presione el botón CH (5) para confirmar. El estado de la función
parpadea en la pantalla.
3. Gire el conmutador rotativo CH (5) o use los botones UP/DN (13)
en el micrófono para activar on/desactivar of la función.
4a. Una nueva presión breve en el botón CH (5) valida y se mantiene
en los MENÚS.
4b. Una nueva pulsación larga (1 segundo) valida y sale de los MENÚS.
desaparece de la pantalla.
5. Si no se presiona ninguna tecla, el equipo sale de los MENÚS
después de 10 segundos. desaparece de la pantalla.
El valor pre determinado del Span es: of.
7) TIPO DE MICRÓFONO
El PRESIDENT MC KINLEY se puede utilizar tanto con un micrófono
electret como con un micrófono dinámico PRESIDENT de 6 con-
tactos (Véase el cableado del micrófono en la página 73).
Presione el botón CH (5) durante 3 segundos para entrar en los
MENÚS.
aparece en la pantalla.
1. Gire el conmutador rotativo CH (5) o use los botones UP/DN (13)
en el micrófono para seleccionar el menú MIC TYPE.
2. Presione el botón CH (5) para confirmar. El tipo de micrófono
parpadea en la pantalla.
3. Gire el conmutador rotativo CH (5) o use los botones UP/DN (13)
en el micrófono para seleccionar (electret) o (dinámico)
4a. Una nueva presión breve en el botón CH (5) valida y se mantiene
en los MENÚS.
4b. Una nueva pulsación larga (1 segundo) valida y sale de los MENÚS.
desaparece de la pantalla.
5. Si no se presiona ninguna tecla, el equipo sale de los MENÚS
después de 10 segundos. desaparece de la pantalla.
El Tipo de micrófono pre determinado es:
.
8) CALIBRACIÓN DE LA ROE
Presione el botón CH (5) durante 3 segundos para entrar en los
MENÚS. aparece en la pantalla.
1. Gire el conmutador rotativo CH (5) o use los botones UP/DN (13)
en el micrófono para seleccionar el menú SWR.
2. Presione el botón CH (5) para confirmar. El equipo pasa automáti-
camente al modo TX sin presionar la palanca PTT (12) y comienza
la calibración. El tiempo de calibración es de 5 minutos máximo.
Se realiza una cuenta atrás en la pantalla.
3. Ajuste la antena.
- El pitido* es continuo cuando el valor de la ROE es 1.0. El espacio
entre los pitidos se hace cada vez más grande a medida que el
valor de la ROE se aleja de1.0.
- El volumen del pitido es ajustable con el botón VOL (1).
- La pantalla muestra el valor de los TOS. Por ejemplo 2.5.
4. Presione la palanca PTT (12) para salir de la CALIBRACIÓN DE LA
ROE.
*Compruebe que el volumen del pitido esté ajustado a un nivel
adecuado.
Véase el § AJUSTE DE LA ROE página 24.
9) AJUSTE DEL ECO
Presione el botón CH (5) durante 3 segundos para entrar en los
MENÚS. aparece en la pantalla.
1. Gire el conmutador rotativo CH (5) o use los botones UP/DN (13)
en el micrófono para seleccionar el menú ECHO SET.
2. Presione el botón CH (5) para confirmar. El nivel (LEVEL) del eco
parpadea en la pantalla.
3. Gire el conmutador rotativo CH (5) o use los botones UP/DN (13)
en el micrófono para cambiar el valor del nivel de 1 a 32 (valor
pre determinado 13).
Español

33
4. Presione nuevamente el botón CH (5) para validar el valor del
nivel. El segundo parámetro, el atraso (DELAY) parpadea.
5. Gire el conmutador rotativo CH (5) o use los botones UP/DN (13)
en el micrófono para cambiar el valor del atraso de1 a 32 (valor
pre determinado 16).
6. Una nueva presión el botón CH (5) permite validar el valor del
atraso. El atraso deja de parpadear. a) Comience de nuevo en
el punto 1 para configurar otra función o b) Presione la palanca
PTT (12) para salir de los MENÚS.
7. Si no se presiona ninguna tecla, el equipo sale de los MENÚS
después de 10 segundos. desaparece de la pantalla.
Véase el § ECO página 28.
10) AJUSTE DE LA TONALIDAD
La función TONE permite ajustar la tonalidad en recepción. 11
niveles de -5 a +5.
Presione el botón CH (5) durante 3 segundos para entrar en los
MENÚS.
aparece en la pantalla.
1. Gire el conmutador rotativo CH (5) o use los botones UP/DN (13)
en el micrófono para seleccionar el menú TONE.
2. Presione el botón CH (5) para confirmar. El valor de la tonalidad
parpadea en la pantalla.
3. Gire el conmutador rotativo CH (5) o use los botones UP/DN (13)
en el micrófono para cambiar el valor de la tonalidad.
4a. Una nueva presión breve en el botón CH (5) valida el valor selec-
cionado y se mantiene en los MENÚS.
4b. Una nueva pulsación larga (1 segundo) valida el valor seleccionado
y sale de los MENÚS. desaparece de la pantalla.
5. Si no se presiona ninguna tecla, el equipo sale de los MENÚS
después de 10 segundos. desaparece de la pantalla.
El valor pre determinado de la Tonalidad es: 0.
11) AJUSTE DEL CANAL DE EMERGENCIA 1
Presione el botón CH (5) durante 3 segundos para entrar en los
MENÚS. aparece en la pantalla.
1. Gire el conmutador rotativo CH (5) o use los botones UP/DN (13)
en el micrófono para seleccionar el menú EMG 1.
2. Presione el botón CH (5) para confirmar. El primer parámetro, el
modo de modulación, parpadea en la pantalla.
3. Gire el conmutador rotativo CH (5) o use los botones UP/DN (13)
en el micrófono para seleccionar el modo de modulación para
el canal de emergencia 1: AM, FM, USB, LSB o FM UK (solo en la
configuración U).
4. Presione el botón CH (5) nuevamente para confirmar. El modo de
modulación deja de parpadear, el segundo parámetro, el canal,
parpadea en la pantalla.
5. Gire el conmutador rotativo CH (5) o use los botones UP/DN (13)
en el micrófono para seleccionar el canal de emergencia 1
6. Presione el botón CH (5) nuevamente para confirmar. el canal. a)
Comience de nuevo en el punto 1 para configurar otra función
o b) Presione la palanca PTT (12) para salir de los MENÚS.
7. Si no se presiona ninguna tecla, el equipo sale de los MENÚS
después de 10 segundos.
desaparece de la pantalla.
El canal de emergencia 1 pre determinado es el canal 9 en AM.
Ver § CANALES DE EMERGENCIA página 28.
12) AJUSTE DEL CANAL DE EMERGENCIA 2
Presione el botón CH (5) durante 3 segundos para entrar en los
MENÚS. aparece en la pantalla.
1. Gire el conmutador rotativo CH (5) o use los botones UP/DN (13)
en el micrófono para seleccionar el menú EMG 2.
Los ítemes 2 a 7 son idénticos a los del AJUSTE DEL CANAL DE
EMERGENCIA 1.
El canal de emergencia 2 pre determinado es el canal 19 AM.
Ver § CANALES DE EMERGENCIA página 28.
13) TIPO DE PA (Megafonía)
Esta función se utiliza para seleccionar el modo de funcionamiento
del PA (megafonía).
Presione el botón CH (5) durante 3 segundos para entrar en los
MENÚS.
aparece en la pantalla.
1. Gire el conmutador rotativo CH (5) o use los botones UP/DN (13)
en el micrófono para seleccionar el menú PA SET.
Español

34
2. Presione el botón CH (5) para confirmar. El tipo de PA parpadea
en la pantalla.
3. Gire el conmutador rotativo CH (5) o use los botones UP/DN (13)
en el micrófono para seleccionar el tipo de PA, PA, In o oF.
4a. Una nueva presión breve en el botón CH (5) valida el tipo de PA
y se mantiene en los MENÚS.
4b. Una nueva pulsación larga (1 segundo) valida el tipo de PA y sale
de los MENÚS. desaparece de la pantalla.
5. Si no se presiona ninguna tecla, el equipo sale de los MENÚS
después de 10 segundos. desaparece de la pantalla.
- PA: La modulación del micrófono y la señal recibida se transmiten
por el altavoz de PA conectado a la toma PA.SP. (D). «PA» par-
padea alternativamente con el modo de modulación utilizado:
AM, FM, LSB, SSB o FM UK (solo en la configuración U).
- In: La modulación del micrófono se transmite por el altavoz
externo de PA conectado a la toma PA.SP. (D). La señal recibida
se transmite por el altavoz interno [o al altavoz externo opcional
conectado a la toma EXT. SP (C)]. «PA» parpadea alternativamente
con el modo de modulación utilizado: AM, FM, LSB, SSB o FM UK
(solo en la configuración U).
- oF: la recepción ya no es funcional. Solo la modulación del
micrófono se transmite por el altavoz de la dirección pública
conectada a la toma PA.SP. (D). «PA» aparece en la pantalla y
los canales se reemplazan por PA.
En el modo PA, al presionar la palanca de transmisión PTT (12)
aparece “PA LEVEL” en la pantalla. Gire el conmutador rotativo
CH (5) para ajustar el nivel de audio del PA.
El Tipo de PA pre determinado es: PA.
14) RE INICIALIZATION
Restablece todas las configuraciones definidas por el usuario y
vuelve a los valores predeterminados.
Presione el botón CH (5) durante 3 segundos para entrar en los
MENÚS. aparece en la pantalla.
1. Gire el conmutador rotativo CH (5) o use los botones UP/DN (13)
en el micrófono para seleccionar el menú RESET.
2. Presione el botón CH (5) para validar. “CONFIRM” aparece, no
parpadea en la pantalla.
3. Gire el conmutador rotativo CH (5) o use los botones UP/DN (13)
en el micrófono para mostrar
.
4. Presione nuevamente el botón CH (5) para validar.
5. Si no se presiona ninguna tecla, el equipo sale de los MENÚS
después de 10 segundos. desaparece de la pantalla.
A) ALIMENTACIÓN (13,8 V / 27,6 V)
B) ANTENA (SO-239)
C) TOMA ALTAVOZ EXTERNO (8 Ω, Ø 3,5 mm)
D) TOMA ALTAVOZ PA EXTERIOR (8 Ω, Ø 3,5 mm)
E) MICRÓFONO VOX OPCIONAL (Ø 2,5 mm)
E) CARACTERÍSTICAS TÉCNICAS
1) GENERALES
- Canales : 40
- Modos de modulación : AM / FM / BLS / BLI
- Gama de frecuencias : de 26,965 MHz a 27,405 MHz
- Impedancia de la antena : 50 ohms
- Tensión de la alimentación : 13,8 V / 27,6 V
- Dimensiones (L x P x A) : 170 (A) x 150 (P) x 52 (A) mm
- Peso : 1
kg
- Accesorios incluidos : Micrófono UP/DOWN y su
soporte, 1 soporte de montaje,
tornillos, cable de alimentación con
fusible
2) EMISIÓN
- Tolerancia de Frecuencia : +/- 300 Hz
- Potencia portadora : 4 W AM/FM - 12 W USB/LSB
- Emisiones parásitas : Inferior a 4 nW (-54 dBm)
- Respuesta de Frecuencia : 300 Hz a 3 KHz en AM/FM/BLS/BLI
- Potencia emisión en el
canal adyacente. : inferior a 20 µW
- Sensibilidad del micrófono : 3 mV
- Consumo : 3 A (con modulación)
- Distorsión máx. de la señal
modulada : 1,8 %
Español

35
3) RECEPCIÓN
- Sensibilidad máxima a 20 dB
sinad : 0,5 µV - 113 dBm (AM/FM)
0,28 µV - 118 dBm (BLS/BLI)
- Respuesta en frecuencia : 300 Hz a 3 KHz en AM/FM
- Sensibilidad del canal adj. : 60 dB
- Potencia audio máx. : 3 W
- Sensibilidad silenciador SQ : mín. 0,2 µV - 120 dBm /
máximo 1 mV - 47 dBm
- Tasa de rechazo frecuencia
imagen : 60 dB
- Tasa de rechazo frecuencia
intermediara : 70 dB
- Consumo : 400 mA nominal / 1000 mA máximo
F) GUÍA DE PROBLEMAS
1) LA EMISORA NO EMITE O VUESTRA EMISIÓN ES DE
MALA CALIDAD
Verifique que:
- La antena esté correctamente conectada y que la ROE esté bien
ajustada.
- La configuración programada sea la correcta (véase la tabla de
la página 74).
- El micro esté bien conectado.
- El nivel del RF POWER esté al nivel máximo.
- El nivel del MIC POWER esté al nivel máximo.
2) LA EMISORA NO RECIBE O VUESTRA RECEPCIÓN ES DE
MALA CALIDAD
Verifique que:
- El nivel del RF GAIN esté al nivel máximo.
- El nivel del SQUELCH esté correctamente ajustado.
- El botón de volumen VOL (1) esté ajustado a un nivel conveniente.
- La antena esté correctamente conectada y la ROE esté bien
ajustada.
- La configuración programada sea la correcta (véase la tabla de
la página 74).
3) LA EMISORA NO SE ILUMINA
- Verificar el alimentador.
- Verificar que no haya una inversión en los hilos al nivel de la aco-
metida.
- Verificar el fusible.
G) ¿ COMO EMITIR O RECIBIR UN MENSAJE ?
Ahora que ha leído las instrucciones de uso, asegúre se que su
emisora esté lista para funcionar (antena conectada).
Puede entonces apretar sobre la palanca de su micrófono, y
lanzar el mensaje “atención estaciones, ensayo de emisora”, lo
que permite verificar la claridad y la potencia de su señal y debe
provocar una contestación de tipo: “fuerte y claro la estación”.
Suelte la palanca y espere una contestación. Si utiliza un canal de
llamada (19), y la comunicación se establece, es preciso elegir
otro canal disponible para no obstruir el canal de llamada.
H) LÉXICO
Durante la utilización de su emisora, descubrirán un lenguaje
particular empleado por algunos cebeistas. Para ayudarles a
entenderlo mejor, le damos, en el léxico y el código “Q”, un re-
capitulativo de las palabras utilizadas. Sin embargo, es evidente
que un lenguaje claro y preciso facilitará el contacto entre los
aficionados de radiocomunicación. Por eso, las palabras men-
cionadas a continuación son solo indicativas, y no deben ser
utilizadas de manera formal
ALFABETO FONÉTICO INTERNACIONAL
A Alpha H Hotel O Oscar V Victor
B Bravo I India P Papa W Whiskey
C Charlie J Juliett Q Quebec X X-ray
D Delta K Kilo R Romeo Y Yankee
E Echo L Lima S Sierra Z Zulu
F Foxtrott M Mike T Tango
G Golf N November U Uniform
Español

36
TERMINOS DEL ARGOT CEBEISTA
A.L. : Amplificador lineal
ARMONICOS : Hijos
AVE MARIA : Amplitud de modulación
BARBAS : Interferencias de canales próximos
BARRA MOVIL : Estación de movimiento
BASE : Estación fija
BIGOTADA : Reunión de aficionados
BREAK : Solicitar transmisión o entrada
BREAKER : El que interrumpe
CAJA TONTA : Televisión
CHICHARRA : Amplificador lineal
CORTINERO : Radioescucha
CRUCE DE ANTENAS : Comunicación en CB
DOS METROS HORIZONTALES : La cama
ENCENDER FILAMENTOS : Encender el equipo de CB
ESPIRAS : Edad
FOTOCOPIA : Hermano/hermana
FRECUENCIA : Megahertzios que corresponden al
canal
LABORO : Trabajo, ocupación
LADRILLO : Emisora de 27 MHz
LINEA DE BAJA O LINEA
DE 500 : Teléfono
MODULAR : Hablar emitiendo
O.K. : Conforme, de acuerdo
OKAPA : Conforme
P.A. : Megafonia
PASTILLA : Micrófono
P.O. BOX : Apartado de Correos
PRIMERISIMOS : Padres
PUNTITO : Lugar de reunión
PUNTOS VERDES : Guardia Civil
E. : Recibido
RX : Receptor
SAXO : Marido, novia
SECRETARIA : Amplificador lineal
TIA VINAGRE O TIA VIRGINIA : Televisión
TRASMATA : Radioescucha
TX : Transmisor
VERTICAL : Encontrarse en persona
VIA BAJA : Teléfono
VITAMINARSE : Comer, cenar
WISKIES : Watios
ZAPATILLA : Amplificador lineal
33 : Saludos amistosos
51 : Abrazos
55 : Mucho éxito
73 : Saludos
88 : Besos y cariños
CÓDIGO “Q”
QRA : Nombre de estación u operador
QRB : Distancia aproximada en línea recta entre dos estaciones
QRG : Frecuencia exacta
QRI : Tonalidad de una emisión valorada de 1 a 3
QRK : Legibilidad, comprensibilidad de una señal. En CB, Radio
valorado de 1 a 5
QRL : Estar ocupado, trabajando
QRM : Interferencia, valorado de 1 a 5
QRO : Aumentar la potencia del emisor
QRP : Disminuir la potencia del emisor
QRT : Cesar la emisión
QRV : Estar preparado, dispuesto
QRX : Cita para transmitir. En CB, “Manténgase a la Escucha”
QRY : Turno para transmitir
QRZ : Nombre de la estación que llama. En CB, “Quedar a la es-
cucha”
QSA : Fuerza de una señal. En CB Santiago. Valorado de 1 a 9
QSB : Variaciones de la fuerza de señal. Desvanecimiento. Fading.
Valorado de 1 a 5
QSL : Acuse de recibo. Tarjeta confirmando comunicación
QSO : Solicitar comunicación. En CB, además, comunicación directa
entre dos o más estaciones
QSP : Retransmisión a través de estación puente
QSY : Pasar a transmitir en otra frecuencia o canal
Español

37
QTC : Mensaje a transmitir
QTH : Localización geográfica de la estación
QTR : Hora exacta
QUT : Localización geográfica de accidente o siniestro
NOTA: El Código Q es la fusión de las dos definiciones, como pregunta
y como respuesta, es una sola definición aceptada en CB.
Español
DECLARACIÓN DE CONFORMIDAD
EU SIMPLIFICADA
Por este medio, Groupe President Electronics, declara que el
equipo de radio CB:
Marca: PRESIDENT
Tipo: TXPR600
Nombre Comercial : MC KINLEY
Cumple con la Directiva 2014/53 / UE.
El texto completo de la declaración de conformidad de la UE
está disponible en la siguiente dirección de Internet:
https://president-electronics.com/DC/TXPR600

38
SIN SELLO DEL DISTRIBUIDOR LA GARANTÍA NO SERÁ VALIDA.
Fecha de compra:.........................................................................................
Tipo : Radio CB MC KINLEY
N° de serie : ..................................................................................................
#
CONDICIONES GENERALES DE GARANTÍA
La Dirección Técnica y el
Departamento de Calidad
De acuerdo con la Ley 23/2003 de 10 de julio y el artículo 3 de la Directiva 1999/44CE del parla-
mento Europeo y del Consejo sobre las garantías de los bienes de consumo, la garantía incluye
los siguientes derechos:
Reparación gratuita de los vicios o defectos de origen y los daños y perjuicios por ellos ocasionados.
En el supuesto de que la reparación no fuese satisfactoria i el aparato no cumpla las condiciones
de uso para el cual fue diseñado, el titular de la garantía tiene derecho a la substitución por otro de
idénticas características o a la devolución del precio pagado.
Este aparato tiene una garantía de 2 años de piezas y mano de obra. La garantía ampara la repa
-
ración totalmente gratuita de cualquier vicio o defecto de fabricación que sea reconocido por nuestro
departamento técnico, en base a las condiciones siguientes, que aconsejamos leer detenidamente,
para así, observándolas, poder disfrutar de su cobertura.*El laboratorio del SPV de President Elec
-
tronics Ibérica S.A., se reserva el derecho de no aplicar la garantía, si una avería ha sido provocada
por una antena no distribuida por la marca PRESIDENT. Una extensión de garantía de 3 años
se aplicará sistemáticamente, por la compra y utilización de una antena de la marca PRESIDENT,
aumentando la garantía total a 5 años, y cuando el justificante sea remitido al Servicio Postventa de
PRESIDENT, dentro de los 30 días siguientes a la compra. La garantía es valida en el país de compra.
• Para un mejor servicio recorte la parte lateral de esta tarjeta y devuélvanosla debidamente cum
-
plimentada hasta 30 días después de la fecha de compra.
• La prueba de compra, factura de venta, debe ser obligatoriamente adjunta al aparato cuando se
envíe para su reparación.
• Las fechas inscritas en el resguardo de garantía y la prueba de compra deben concordar.
• No instale el aparato antes de leer el Manual de Instrucciones.
• Ninguna pieza de recambio será enviada, por nuestro departamento técnico, en base a la garantía.
Esta garantía no cubre:
• Los daños causados por accidentes o golpes motivados por envoltorios defectuosos al sernos
remitido el aparato (utilice preferentemente el embalaje de origen y una protección suplementaria).
• Los daños que se produzcan por una manipulación indebida, golpes, antena mal ajustada, ROE
(relación de ondas estacionarias) excesiva o demasiado grande (mayor que 2), inversión de pola
-
ridad de la tensión de alimentación, conexiones incorrectas, sobre tensiones, la tensión nominal
de la alimentación no puede superar la de una batería de 12V, etc.
• Las modificaciones de las Normas de Telecomunicaciones, las reparaciones y/o modificaciones
efectuadas por terceros, sin la aprobación de nuestra empresa.
Si Ud. observa defectos de funcionamiento:
• Compruebe la alimentación de su aparato y el estado del fusible.
• Controle los enchufes de los distintos conectores; tomas de antena, micrófono y alimentación.
• Verifique la posición de los distintos mandos del aparato, ganancia de micro al máximo, squelch
al mínimo, conmutador PA/RADIO, etc.
• En el supuesto que la intervención no esté amparada por la garantía, se facturarán las piezas, la
mano de obra y los gastos de envío.
• Conserve este resguardo de su garantía, aunque ésta haya caducado. Si Ud. vende su aparato
entregue el resguardo de su garantía al nuevo propietario a fin de facilitarle el Servicio Post Venta.
• Consulte con su vendedor quien le aconsejará y se ocupará del seguimiento de su aparato, por
intermedio nuestro si ha lugar.
• Para toda intervención, fuera de garantía, cuyo importe se juzgue elevado en relación al valor del
aparato, se hará un presupuesto previo por escrito para su eventual aceptación.
Ud. ha confiado en la experiencia y calidad de PRESIDENT y se lo agradecemos. Para que quede
totalmente satisfecho de su compra, aconsejamos leer atentamente este manual. No olvide de de
-
volvernos la parte derecha de su bono de garantía; es muy importante para Ud., ya que permite una
fácil identificación de su aparato durante una eventual intervención en nuestros servicios técnicos.
Respecto al cuestionario, nuestro objetivo es conocerle mejor y así, contestando a sus aspiraciones,
trabajar juntos para el porvenir de la RADIO.
Español

39
The warranty of this transceiver is valid only in the country of purchase.
WARNING !
MULTI-NORMS TRANSCEIVER!
Before using, be careful never to transmit
without first having connected the antenna
(connection “B” situated on the back panel of
the equipment) or without having set the SWR
(Standing Wave Ratio) ! Failure to do so may
result in destruction of the power amplifier, which
is not covered by the guarantee.
See function “F” on page
46 and the Con-
figuration table on page
74.
English

40
Welcome to the world of the new generation of CB radios. The new
PRESIDENT range gives you access to top performance CB equipment.
With the use of up-to-date technology, which guarantees unprece-
dented quality, your PRESIDENT MC KINLEY is a new step in personal
communication and is the surest choice for the most demanding of
professional CB radio users. To ensure that you make the most of all
its capacities, we advise you to read carefully this manual before
installing and using your PRESIDENT MC KINLEY.
A) INSTALLATION
1) WHERE AND HOW TO MOUNT YOUR MOBILE CB RADIO
a) You should choose the most appropriate setting from a simple
and practical point of view.
b) Your CB radio should not interfere with the driver or the passengers.
c) Remember to provide for the passing and protection of different
wires (e.g. power, antenna, accessory cabling) so that they do
not interfere in any way with the driving of the vehicle.
d) To install your equipment, use the cradle (1) and the self-tapping
screws (2) provided (drilling diameter 3.2 mm). Take care not to
damage the vehicle’s electrical system while drilling the dash
board.
e) Do not forget to insert the rubber joints (3) between the CB and
its support as these have a shock-absorbing effect which permits
gentle orientation and tightening of the set.
f) Choose where to place the microphone support and remember
that the microphone cord must stretch to the driver without inter-
fering with the controls of the vehicle.
- WARNING: If you imbed your radio, please ensure that no cable
is in direct contact with the chassis.
- N.B. : As the transceiver has a frontal microphone socket, it can
be set into the dash board. In addition to the loudspeaker on the
front, it is possible to add an external speaker for better listening of
communications (connector EXT.SP. situated on the back panel:
C). Ask your dealer for advice on mounting your CB radio.
2) ANTENNA INSTALLATION
a) Choosing your antenna
- For CB radios, the longer the antenna, the better its results. Your
dealer will be able to help you with your choice of antenna.
b) Mobile antenna
- Must be fixed to the vehicle where there is a maximum of metallic
surface (ground plane), away from windscreen mountings.
MOUNTING DIAGRAM
English

41
- If you already have a radio-telephone antenna installed, the CB
antenna should be higher than this.
- There are two types of antenna: pre-regulated which should be
used on a good ground plane (e.g. car roof or lid of the boot), and
adjustable which offer a much larger range and can be used on
a smaller ground plane (see § ADJUSTMENT OF SWR page 41).
- For an antenna which must be fixed by drilling, you will need a
good contact be-
tween the antenna
and the ground plane.
To obtain this, you
should lightly scratch
the surface where the
screw and tightening
star are to be placed.
- Be careful not to pinch
or flatten the coaxial
cable (as this runs the risk of break down and/or short-circuiting).
- Connect the antenna (B).
c) Fixed antenna
- A fixed antenna should be installed in a clear space as possible. If it
is fixed to a mast, it will perhaps be necessary to stay it, according
to the laws in force (you should seek professional advice). All PRES-
IDENT antennas and accessories are designed to give maximum
efficiency to each CB radio within the range.
3) POWER CONNECTION
Your PRESIDENT MC KINLEY is protected against an inversion of
polarities. However, before switching it on, you are advised to
check all the connections. Your equipment must be supplied with
a continued current of 12 or 24 volts (A). Today, most cars and
lorries are negative earth. You can check this by making sure that
the negative terminal of the battery is connected either to the
engine block or to the chassis. If this is not the case, you should
consult your dealer.
a) Check that the battery is of 12 or 24 volts.
b) Locate the positive and negative terminals of the battery (+ is
red and - is black). Should it be necessary to lengthen the power
cable, you should use the same or a superior type of cable.
c) It is necessary to connect your CB to a permanent (+) and (-). We
advise you to connect the power cable directly to the battery (as
the connection of the CB cable to the wiring of the car-radio or
other parts of the electrical circuit may, in some cases, increase
the likelihood of interference).
d) Connect the red wire (+)
to the positive terminal
of the battery and the
black (-) wire to the
negative terminal of the
battery.
e) Connect the power
cable to your CB radio.
WARNING: Never re-
place the original fuse by one of a different value.
4) BASIC OPERATIONS TO BE CARRIED OUT BEFORE USING
YOUR SET FOR THE FIRST TIME (without transmitting
and without using the “push-to-talk” switch on the
microphone)
a) Connect the microphone.
b) Check the antenna connections.
c) Turn the set on by turning the VOL knob (1) clockwise.
d) Turn the squelch SQ knob (2) to minimum (M position).
e) Adjust the volume to a comfortable level.
f) Go to channel 20 by using the rotary CH knob (5) or UP/DN buttons
(13) on the microphone.
5) ADJUSTMENT OF SWR (Standing wave ratio)
WARNING: This must be carried out when you use your CB radio
for the first time (and whenever you re-position your antenna). The
adjustment must be carried out in an obstacle-free area.
* Adjustment with internal SWR-meter
See function SWR CALIBRATION page 48.
* Adjustment with external SWR-meter (e.g. TOS-1 PRESIDENT)
OUTPUT RADIUS PATTERN
English

42
a) To connect the SWR meter :
- Connect the SWR meter between the CB radio and the antenna
as close as possible to the CB (use a maximum of 40 cm cable,
type President CA 2C).
b) To adjust the SWR meter:
- Set the CB on channel 20 in AM.
- Put the switch on the SWR-meter to position FWD (calibration).
- Press the “push-to-talk” switch on the microphone to transmit.
- Bring the index needle to by using the calibration key.
- Change the switch to position REF (reading of the SWR level). The
reading on the Meter should be as near as possible to 1. If this is
not the case, readjust your antenna to obtain a reading as close
as possible to 1. (A SWR reading between 1 and 1.8 is acceptable).
- It will be necessary to recalibrate the SWR meter after each ad-
justment of the antenna.
WARNING: In order to avoid any losses and attenuations in cables
used for connection between the radio and its accessories, PRES-
IDENT recommends to use a cable with a length inferior to 3 m.
Your CB is now ready for use.
B) HOW TO USE YOUR CB
1) ON/OFF - VOLUME
To turn on your set: turn the VOL knob (1) clockwise. If the KEY BEEP
function is active (see KEY BEEP menu page 47), a beep sounds.
Your radio is on.
The display briefly shows the type of microphone (see MICROPHONE
TYPE menu on page 48) and the frequency band used (see
page 46).
To turn off your set: turn the VOL knob (1) counter clockwise until
it clicks. Your radio is off.
To adjust the volume, turn the VOL knob (1) clockwise. To decrease
the volume, turn the knob counter clockwise.
2) ASC (Automatic Squelch Control) / SQUELCH
Suppresses undesirable background noises when there is no com-
munication. Squelch does not affect neither sound nor transmission
power, but allows a considerable improvement in listening comfort.
a) ASC: AUTOMATIC SQUELCH CONTROL
Worldwide patent, a PRESIDENT exclusivity.
Turn the SQ knob (2) anti-clockwise into ASC position. appears
on the display. No repetitive manual adjustment and a permanent
improvement between the sensitivity and the listening comfort
when ASC is active. This function can be disconnected by turning
the switch clockwise. In this case the squelch adjustment becomes
manual again. disappears from the display.
b) MANUAL SQUELCH
Turn the SQ knob clockwise to the exact point where all background
noises disappear. This adjustment should be done with precision,
because if set to maximum (fully clockwise), only the strongest
signals will be received.
3) DISPLAY
It shows all functions:
The main bargraph shows the reception level and the output
power level. Smaller bargraph show Mic Gain, RF Gain and RF
Power levels.
4) CLARIFIER
The function CLAR. allows a frequency deviation during LSB/USB
reception in order to improve the clearness of your correspondent’s
voice.
English

43
5) CHANNEL SELECTOR CH ~ RF POWER
CHANNEL SELECTOR CH
- Turn the rotary CH knob (5) to move up or down a channel. A
beep sound is emitted each time the channel is changed if the
KEY BEEP function is activated (see KEY BEEP function on page
47).
See § UP/DN BUTTONS ON MICROPHONE page 46.
The display shows the corresponding frequency. For example
“27.205” for channel 40. See SPAN menu page 48.
- A long press (3 seconds) on this button (5) allows entering the
MENU.
- A short press on this button (5) validates the settings in the MENU.
RF POWER (combination 12 / 9 + 5)
In TX mode, increase/decrease the output power.
- Press and hold the PTT switch (12).
- Press the • (9) and CH (5) buttons. «RF POWER» is displayed.
- Turn the rotary CH knob (5) to adjust the level using the bargraph.
- Press the CH knob (5) for 1 second to confirm the setting.
6) MODE ~ PA ~ •VOX ~ • VOX SETTING
MODE
(short press)
This switch allows selecting the modulation mode AM, FM, LSB or
USB; Your modulation mode has to correspond to the one of your
correspondent.
- Amplitude Modulation / AM: communication on a field with relief
and obstacles at middle distance (the most used).
- Frequency Modulation / FM: for nearby communications on a flat
open field.
In U configuration only: in FM mode, a long press on the F key
(10) alternates between the ENG or CEPT frequency bands. “UK”
is displayed when the ENG frequency band is selected (see table
on page 70).
- Upper and Lower Side Band / USB-LSB: used for long distance
communications (according to the propagation conditions).
PA (Public Address) (long press)
Long press PA key (6) to alternate between CB and PA mode.
An external loud speaker can be connected to the unit
by the PA jack plug located on the back panel PA.SP. (D).
For details on operating in
PA mode, see the PA SETTING
menu on page 50.
VOX (9 + 6 short press)
The VOX function allows transmitting by speaking into the original
microphone (or in the optional vox microphone) without pressing
the PTT switch (12). The use of an optional vox microphone con-
nected to the rear panel of the transceiver (E) disables the original
microphone.
Press • key (9) and short press •VOX key (6) in order to activate
the VOX function. “VOX” appears on the display. Repeat the key
combination to disable the function. “VOX” disappears.
VOX SET (9 + 6 long press)
Press the •key (9) and press during 1 second the •VOX key (6) in
order to activate the function VOX SETTING. “VOX” is displayed.
Three adjustments are possible: Sensitivity SET-L, Anti-vox level SET-A
and Vox delay time SET-T. The
Display shows the type of adjustment followed by its level , for
example SET-L1.
1. Turn the CH knob (5) to increase/decrease the level of the active
setting.
2. Press the • VOX key (6) briefly to go to the next setting.
3. Once the VOX is correctly set, a long press (1 second) on the
• VOX key (6) will save the settings and exit the VOICE SETTING
function.
- Sensitivity “SET-L”: allows the adjustment of the microphone (original
one or optional vox) for an optimum transmission quality. Adjustable
level from 1 (high level) to 9 (low level).Default value: 1.
- Anti-Vox “SET-A”: allows disabling the transmission generated by
the surrounding noise. The level is adjustable. OFF (according the
English

44
squelch level) and from 0 (without anti-vox) to 9 (low level). Default
value: OFF.
- Delay time SET-T: allows avoiding the sudden cut of the transmission
by adding a delay at the end of speaking. The level is adjustable
from 1 (short delay) to 9 (long delay). Default value: 5.
The VOX SETTING automatically activates the VOX function. “VOX”
appears in the display.
Note: The unit will automatically exit VOX SETTING without saving
the setting parameters if no key is pressed after 10 seconds or, if
any key is pressed.
7) SCAN ~ DW ~ M1
SCAN
(short press)
Press the SCAN key (7) to activate the SCAN function in ascending
order. “SCAN” is displayed. The scanning stops as a channel is
active. The scanning automatically starts 3 seconds after the end
of the transmission and no key is activated. In SCANNING mode,
turn the rotary CH knob (5) or use the UP/DN buttons (13) on the
microphone to change scan direction.
During the scan, long press the • key (9) for one second to alternate
between channel scan and memory scan modes. In the MEMORY
SCAN mode, only the emergency channels (see § EMERGENCY
CHANNELS on page 44) and the memorized channels (see §
MEMORY page 45) are scanned.
Press the PTT switch (12) or the SCAN key (7) to exit the SCAN
function.
DW (long press)
A long press (1s) on the DW key (7) activates the DW (Dual Watch)
function. “DW” is displayed. This function lets you watch over
emergency and the current channels.
- The first long press activates the DW function between emergency
channel 1 and the current channel.
- A second long press activates the function between the emergency
channel 2 and the current channel. See § EMERGENCY CHANNEL
1 and 2 page 49.
The current channel number and the emergency channel are
displayed alternately. The “EMG” icon also appears along with
the emergency channel. The selected channel can be changed
during dual watch.
- A new long press of the DW key (7) deactivates the DW function.
“DW” disappears from the display.
M1
See § MEMORY page 45.
8) ANB/ANL ~ HI-CUT ~ EMERGENCY CHANNELS ~ M2
ANB/NL
(short press)
ANL/NB (Automatic Noise Limiter / Noise Blanker): These filters
reduce background noise and some noise on reception.
Press the ANL/NB key (8) to alternate between the following 4
states in a loop: 1. ANL/on - NB/off • 2. ANL/off - NB/on • 3. ANL/
on - NB/on • 4. ANL/off - NB/off.
The filter icon appears in the display when the filter is active (on).
HI-CUT (long press)
Hi-Cut cuts out the high frequency interferences.
Press the HI-CUT key (8) for one second to activate/deactivate the
HI-CUT filter. «HI-CUT» appears in the display when the filter is
active.
EMERGENCY CHANNELS (9 + 8 short press)
- Briefly press the • key (9) then the •EMG (8) key to combine these
two keys.
- A first combination activates emergency channel 1.
- A second combination activates emergency channel 2.
- When an emergency channel is active, «EMG» is displayed.
- A third combination allows to return to the initial channel. «EMG»
disappears from the display.
See § EMERGENCY CHANNEL 1 and 2 pages 49.
M2
See § MEMORY page 45
English

45
ECHO (9 + 9 short press)
Press the • key (9) , flashes, then briefly press the •ECHO key (9)
to activate the ECHO function. “ECHO” appears in the display. A
new combination of the • (9) and •ECHO (9) keys, deactivates
the function. “ECHO” disappears.
M3
See MEMORY page 45.
10) F ~ MIC GAIN ~ RF GAIN
F
See In U configuration only on page 43.
See § TALKBACK page 46.
See § FUNCTION TURNING ON THE UNIT page 46.
MIC GAIN (combination 12 / 9 + 10)
Adjust the microphone sensitivity level.
- Press and hold the PTT switch (12)
- Press the • key (9).
- Press the • MIC/RF GAIN key (10). “MIC GAIN” is displayed.
- Turn the rotary CH knob (5) to adjust the level using the bargraph.
- Press the CH knob (5) for 1 second to confirm the setting.
The normal position of this function is at maximum level. MIC GAIN
bargrah will be displayed on transmission.
RF GAIN (9 + 10)
Setting the reception sensitivity. Maximum position in the case of
long-distance call reception. You can decrease the RF GAIN, to
avoid distortions, when the interlocutor is near. Reduce the gain
on reception in the case of a close communication with a corre-
spondent not equipped with a RF POWER.
- Press the • key (9).
- Press the • MIC/RF GAIN key (10). “RF GAIN” is displayed.
- Turn the rotary CH knob (5) to adjust the level using the bargraph.
- Press the CH knob (5) button for 1 second to confirm the setting.
The bargraph of the RF GAIN will always be displayed in reception.
9) “•” Key ~ MEMORY ~ ECHO ~ M3
“•” Key
(short press)
Pressing the • key (9) activates the FUNCTION mode. flashes.
Combine with another key beginning with • (•VOX, •EMG, •ECHO,
•RF POWER or •MIC/RF GAIN) to access the function.
Note: The • key (9) is always combined with another key. Pressing
the key alone has no effect except to flash
for 10 seconds.
MEMORY (long press)
This CB radio allows you to memorize 3 channels with the following
attributes: NB/ANL (on/off), HI-CUT (on/off), AM / FM / USB / LSB.
To store into memory:
- Select the channel and its attributes.
- Press the MEM key (9) for one second. If the KEY BEEP function is
active, a beep sounds. “MEM” flashes.
- Press for one second one of the keys M1 (7), M2 (8) or M3 (9) to
memorize. “MEM” appears in the display and the number of the
selected memory (M1, M2 or M3) flashes.
- If the KEY BEEP function is active, a long beep confirms the success
of the operation.
To call a memory:
- Press the MEM key (9) for one second. If the KEY BEEP function is
active, a beep sounds. “MEM” flashes.
- Briefly press one of the M1 (7), M2 (8) or M3 (9) keys to display the
selected memory.
- “MEM” is displayed, the number of the selected memory (M1, M2
or M3) flashes.
To erase a memory:
- Turn off the device.
- Hold one of the keys M1 (7), M2 (8) or M3 (9) and switch on the
appliance.
- The selected memory is erased. “MEM” and the number of the
selected memory (M1, M2 or M3) disappear from the display.
See also the RESET menu on page 50.
English

46
11) 6 PIN MICROPHONE PLUG
The plug is located on the front panel of the transceiver and makes
the setting of the equipment into the dashboard easier.
See cabling diagram page 73.
12) PTT ~ RF POWER ~ MIC GAIN ~ TALKBACK
PTT (Push To Talk)
Transmission switch, press to transmit a message, is displayed
and release to listen to an incoming communication.
RF POWER
See § RF POWER page 43
MIC GAIN
See § MIC GAIN page 45
TALKBACK (combination 12 / 10)
The TALKBACK function allows to ear your own modulation with
the CB speaker.
While pressing PTT switch (12),
- Press F key (10) to activate/deactivate TALKBACK function. When
the function is on, “TALKBACK” is displayed.
TALKBACK LEVEL (12 / 5)
When the TALKBACK function is on, press and hold PTT switch (12)
and turn the rotary CH knob (5) to adjust the TALKBACK level. 9
steps from 01 to 09.
TOT (Time Out Timer)
If the transmission (using the PTT (12) key or VOX) is more than 5
minutes, CHANNEL and start blinking, the transmission ends.
The time-out tone will sound until the PTT key is released.
13) UP/DN BUTTONS ON MICROPHONE
- These buttons (13) allow increase (UP) or decrease (DN) the chan-
nel. A beep sound is emitted whenever the channel is changed if
the KEY BEEP function is activated (see BEEP KEY function on page
47).
The display shows the corresponding frequency. For example
“27.205” for channel 40. See SPAN menu page 48.
See § CHANNEL SELECTOR CH on page 43.
C) FUNCTION TURNING ON THE UNIT
To select the FREQUENCY BAND turn off the unit. Press and hold
the F key (10) and then turn the unit on.
(Configuration: EU; PL; d; EC; U; In)
The frequency bands have to be chosen according to the country
of use. Don’t use any other configuration. Some countries need a
user’s licence. See table page 75.
1. Turn on the power while pressing the F key (10). The letter corre-
sponding to the current configuration is blinking.
2. In order to change the configuration, turn the rotary CH knob (5)
on the unit or use the UP/DN buttons (13) on the microphone.
3. When the configuration is selected, press the F key (10) during 1
second. The letter corresponding to the configuration is continu-
ously displayed and a confirmation beep sounds.
4. At this point, confirm the selection by switching off the transceiver
and then switching it on again.
See the frequency bands table at pages 70 to 72 / configu-
ration table page 74.
D) MENU
The order of the 14 functions is the one described in this manual.
However, the function displayed when entering the MENU will be
the last function modified by the user.
Whatever the function, the procedure is the same:
Press the CH knob (5) for 3 seconds to enter MENU.
appears.
1. Turn the rotary CH knob (5) or use the UP/DN buttons (13) on the
microphone to select the menu.
2. Press the CH knob (5) to confirm. The setting parameter of the
selected menu flashes in the display.
3. Turn the rotary CH knob (5) or use the UP/DN buttons (13) on the
microphone to change the parameter value.
English

47
4a. Short press the CH knob (5) again to validate your choice and stay
in the MENU. The parameter stops flashing and, if the function has
more than one parameter, the following parameter flashes...
4b. Long press (1s) the CH knob (5) again to validate your choice and
exit in the MENU. disappears from the display.
5. If no key is pressed, the unit exits MENU after 10 seconds. dis-
appears from the display.
Note: The UP/DN buttons (13) on the microphone have the same
effect as the rotary CH knob (5). The PTT switch (12) exits MENU
without validating.
disappears from the display.
1) COLOR
Press the CH knob (5) for 3 seconds to enter MENU. appears.
1. Turn the rotary CH knob (5) or use the UP/DN buttons (13) on the
microphone to select the COLOR menu.
2. Press the CH knob (5) to confirm. The color flashes in the display.
3. Turn the rotary CH knob (5) or use the UP/DN buttons (13) on the
microphone to change the color.
4a. Short press the CH knob (5) again to validate the color and stay
in the MENU.
4b. Long press (1s) the CH knob (5) again to validate the color and
exit in the MENU. disappears from the display.
5. If no key is pressed, the unit exits MENU after 10 seconds. dis-
appears from the display.
Color default is orange :
2) DIMMER
DIMMER function allows adjusting the brightness of the lighting. 10
steps from 0 to 9.
Press the CH knob (5) for 3 seconds to enter MENU.
appears.
1. Turn the rotary CH knob (5) or use the UP/DN buttons (13) on the
microphone to select the DIMMER menu.
2. Press the CH knob (5) to confirm. The dimmer value flashes in the
display.
3. Turn the rotary CH knob (5) or use the UP/DN buttons (13) on the
microphone to change the value of the dimmer.
4a. Short press the CH knob (5) again to validate the selected value
and stay in the MENU.
4b. Long press (1s) the CH knob (5) again to validate the selected
value and exit in the MENU.
disappears from the display.
5. If no key is pressed, the unit exits MENU after 10 seconds. dis-
appears from the display.
Dimmer default value is : 5.
3) CONTRAST
CONTRAST function allows adjusting the contrast of the display.
10 steps from 0 to 9.
Press the CH knob (5) for 3 seconds to enter MENU.
appears.
1. Turn the rotary CH knob (5) or use the UP/DN buttons (13) on the
microphone to select the CONTRAST menu.
2. Press the CH knob (5) to confirm. The contrast value flashes in the
display.
3. Turn the rotary CH knob (5) or use the UP/DN buttons (13) on the
microphone to change the value of the contrast.
4a. Short press the CH knob (5) again to validate the selected value
and stay in the MENU.
4b. Long press (1s) the CH knob (5) again to validate the selected
value and exit in the MENU. disappears from the display.
5. If no key is pressed, the unit exits MENU after 10 seconds. dis-
appears from the display.
Contrast default value is : 5.
4) KEY BEEP
Beep on changing the channel, keys etc...
Press the CH knob (5) for 3 seconds to enter MENU.
appears.
1. Turn the rotary CH knob (5) or use the UP/DN buttons (13) on the
microphone to select the KEY BEEP menu.
2. Press the CH knob (5) to confirm. The status of the function flashes
in the display.
3. Turn the rotary CH knob (5) or use the UP/DN buttons (13) on the
microphone to activate
on
/ deactivate
of
the function.
English

48
4a. Short press the CH knob (5) again to validate and stay in the MENU.
4b. Long press (1s) the CH knob (5) again to validate and exit in the
MENU. disappears from the display.
5. If no key is pressed, the unit exits MENU after 10 seconds. dis-
appears from the display.
Key beep default setting is : on.
5) ROGER BEEP
The Roger Beep sounds when the PTT switch (12) of the microphone
is released in order to let your correspondent speak. Historically as
CB is a “simplex” communication mode, it is not possible to speak
and listen at the same time (as it is the case with a telephone).
Once the conversation was over, he said “Roger” in order to
prevent his correspondent that it was his turn to talk. The word
“Roger” has been replaced by a significant beep. There comes
“Roger beep” from.
Press the CH knob (5) for 3 seconds to enter MENU.
appears.
1. Turn the rotary CH knob (5) or use the UP/DN buttons (13) on the
microphone to select the ROGER BP menu.
2. Press the CH knob (5) to confirm. The status of the function flashes
in the display.
3. Turn the rotary CH knob (5) or use the UP/DN buttons (13) on the
microphone to activate
on
/ deactivate
of
the function.
4a. Short press the CH knob (5) again to validate and stay in the MENU.
4b. Long press (1s) the CH knob (5) again to validate and exit in the
MENU. disappears from the display.
5. If no key is pressed, the unit exits MENU after 10 seconds. dis-
appears from the display.
Roger beep default setting is :
of
.
6) SPAN
When the function is active, the frequency can be adjusted con-
tinuously. Pressing the CH knob (5) button displays a bar under the
first or second decimal of the frequency. The rotary CH knob (5)
no longer acts on the channel but execute a 100 kHz (first decimal
place) or 10 kHz (decimal second) jump frequency.
Press the CH knob (5) for 3 seconds to enter MENU.
appears.
1. Turn the rotary CH knob (5) or use the UP/DN buttons (13) on the
microphone to select the SPAN menu.
2. Press the CH knob (5) to confirm. The status of the function flashes
in the display.
3. Turn the rotary CH knob (5) or use the UP/DN buttons (13) on the
microphone to activate
on
/ deactivate
of
the function.
4a. Short press the CH knob (5) again to validate and stay in the MENU.
4b. Long press (1s) the CH knob (5) again to validate and exit in the
MENU.
disappears from the display.
5. If no key is pressed, the unit exits MENU after 10 seconds. dis-
appears from the display.
Span default setting is
of
.
7) MICROPHONE TYPE
PRESIDENT MC KINLEY can be used with both a PRESIDENT electret
and dynamic 6-pin microphone (see microphone wiring on page
73). When the unit is turned on, the microphone type is displayed
briefly.
Press the CH knob (5) for 3 seconds to enter MENU.
appears.
1. Turn the rotary CH knob (5) or use the UP/DN buttons (13) on the
microphone to select the MIC TYPE menu.
2. Press the CH knob (5) to confirm. The type of the microphone
flashes in the display.
3. Turn the rotary CH knob (5) or use the UP/DN buttons (13) on the
microphone to select the type of the microphone (electret)
or dynamic.
4a. Short press the CH knob (5) again to validate and stay in the MENU.
4b. Long press (1s) the CH knob (5) again to validate and exit in the
MENU. disappears from the display.
5. If no key is pressed, the unit exits MENU after 10 seconds. dis-
appears from the display.
Microphone type default is
(electret).
8) SWR CALIBRATION
Press the CH knob (5) for 3 seconds to enter MENU. appears.
1. Turn the rotary CH knob (5) or use the UP/DN buttons (13) on the
microphone to select the SWR menu.
English

49
2. Press the CH knob (5) button to confirm. The radio automatically
switches to TX mode without pressing the PTT switch (12) and
calibration begins. Calibration time is 5 minutes maximum. A
countdown is done in the display.
3. Adjust the antenna.
- The beep* is continuous when the SWR value is 1.0. The space
between the beeps becomes larger and larger as the SWR value
moves away from1.0.
- The volume of the beep is adjustable with the VOL button (1).
- The display shows the SWR value, for example 2.5.
4. Press the PTT switch (12) to exit the SWR CALIBRATION.
*Check that the beep volume is set to a suitable level.
See ADJUSTMENT OF SWR page 41.
9) ECHO ADJUSTMENT
Press the CH knob (5) for 3 seconds to enter MENU. appears.
1. Turn the rotary CH knob (5) or use the UP/DN buttons (13) on the
microphone to select the ECHO SET menu.
2. Press the CH knob (5) button to confirm. The LEVEL of the ECHO
flashes in the display.
3. Turn the rotary CH knob (5) or use the UP/DN buttons (13) on the
microphone to set the level value from1 to 32 (default level:13).
4. Press the CH knob (5) button again to validate the level value.
The second parameter, DELAY, flashes.
5. Use the rotary CH knob (5) or the UP/DN buttons (13) on the mi-
crophone to set the delay value from1 to 32 (default value:16).
6. Press the CH knob (5) again to confirm the delay value. The delay
stops flashing. a) Start again at point 1 to set another function or
b) Press the PTT switch (12) to exit MENU.
7. If no key is pressed, the unit exits MENU after 10 seconds. dis-
appears from the display.
See § ECHO page 45.
10) TONE
This function allows to change the RX TONE. 11 steps from -5 to
+5
Press the CH knob (5) for 3 seconds to enter MENU.
appears.
1. Turn the rotary CH knob (5) or use the UP/DN buttons (13) on the
microphone to select the TONE menu.
2. Press the CH knob (5) to confirm. The tone value flashes in the
display.
3. Turn the rotary CH knob (5) or use the UP/DN buttons (13) on the
microphone to change the value of the tone.
4a. Short press the CH knob (5) again to validate the selected value
and stay in the MENU.
4b. Long press (1s) the CH knob (5) again to validate the selected
value and exit in the MENU.
disappears from the display.
5. If no key is pressed, the unit exits MENU after 10 seconds. dis-
appears from the display.
Tone default value is : 0.
11) EMERGENCY CHANNEL 1
Press the CH knob (5) for 3 seconds to enter MENU. appears.
1. Turn the rotary CH knob (5) or use the UP/DN buttons (13) on the
microphone to select the EMG 1 menu.
2. Press the CH knob (5) button to confirm. The first parameter, the
modulation mode, flashes in the display.
3. Turn the rotary CH knob (5) or use the UP/DN buttons (13) on the
microphone to set the modulation mode for emergency channel
1: AM, FM, USB, LSB or FM UK (in U configuration only).
4. Press CH knob (5) again to confirm. The modulation mode stops
flashing, the second parameter, the channel, flashes in the display.
5. Use the rotary CH knob (5) or use the UP/DN buttons (13) on the
microphone to select the emergency channel 1.
6. Press CH knob (5) again to confirm the channel. a) Start again at
point 1 to set another function or b) Press the PTT switch (12) to
exit MENU.
7. If no key is pressed, the unit exits the MENU after 10 seconds.
disappears from the display.
Emergency channel 1 default is 9 in AM.
See § EMERGENCY CHANNELS page 44.
12) EMERGENCY CHANNEL 2
Press the CH knob (5) for 3 seconds to enter MENU. appears.
English

50
1. Turn the rotary CH knob (5) or use the UP/DN buttons (13) on the
microphone to select the EMG 2 menu.
Items 2 to 7 are identical to those in EMERGENCY 1 SET.
Emergency channel 2 default is 19 AM.
See § EMERGENCY CHANNELS page 44.
13) PA SETTING
This function allows to select the operating mode of PA, Public
Address.
Press the CH knob (5) for 3 seconds to enter MENU.
appears.
1. Turn the rotary CH knob (5) or use the UP/DN buttons (13) on the
microphone to select the PA SET menu.
2. Press the CH knob (5) to validate. The PA type blinks on LCD.
3. Turn the rotary CH knob (5) or use the UP/DN buttons (13) on the
microphone to select the operating mode of the PA : PA, In or
OF.
4a. Short press the CH knob (5) again to validate the PA type and stay
in the MENU.
4b. Long press (1s) the CH knob (5) again to validate the PA type and
exit in the MENU. disappears from the display.
5. If no key is pressed, the unit exits MENU after 10 seconds, dis-
appears in the display.
- PA: the modulation of the microphone and the received signal
are transmitted to the Public Address loudspeaker connected to
jack PA.SP. (D). “PA” flashes alternately with the modulation mode
used: AM, FM, LSB, SSB or FM UK (only in U configuration).
- In : the modulation of the microphone is transmitted to external
loudspeaker connected to jack PA.SP. (D). The received signal
is transmitted to the internal loudspeaker [or external optional
loudspeaker connected to jack EXT.SP (C)].“PA” flashes alternately
with the modulation mode used: AM, FM, LSB, SSB or FM UK (only
in U configuration).
- OF: The reception is no more functional. Only the modulation of
the microphone is transmitted to the Public Address loudspeaker
connected to jack PA.SP. (D). “PA” is displayed, channels are
replaced by PA.
In PA mode, press PTT switch to display “PA LEVEL”. Then turn the
rotary CH knob (5) to adjust the audio level of the PA.
PA setting default is: PA.
See § PA (Public Address) page 43.
14) RESET
Resets all user-defined settings and returns to default values.
Press the CH knob (5) for 3 seconds to enter MENU.
appears.
1. Turn the rotary CH knob (5) or use the UP/DN buttons (13) on the
microphone to select the RST ALL menu.
2. Press the CH knob (5) to validate. “CONFIRM” is displayed, no flashes
in the display.
3. Turn the rotary CH knob (5) or use the UP/DN buttons (13) on the
microphone to display .
4. Press CH knob (5) again to confirm.
5. If no key is pressed, the unit exits MENU after 10 seconds, dis-
appears in the display.
A) DC-POWER TERMINAL (13.8 V / 27.6 V)
B) ANTENNA CONNECTOR (SO-239)
C) EXTERNAL SPEAKER JACK (8 Ω, Ø 3.5 mm)
D) PA SPEAKER JACK (
8 Ω, Ø 3.5 mm)
E) JACK FOR OPTIONAL VOX MIKE (Ø 2.5 mm)
English

51
E) TECHNICAL CHARACTERISTICS
1) GENERAL
- Channels : 40
- Modulation modes : AM / FM / USB / LSB
- Frequency ranges : from 26.965 MHz to 27.405 MHz
- Antenna impedance : 50 ohms
- Power supply : 13.8 V / 27.6 V
- Dimensions (W x D x H) : 172 (W) x 150 (D) x 52 (H) mm
- Weight : 1 kg
- Accessories supplied : microphone UP/DOWN with
support, mounting cradle, screws and
fused power cord.
2) TRANSMISSION
- Frequency allowance : +/- 300 Hz
- Carrier power : 4 W AM/FM - 12 W USB/LSB
- Transmission interference : inferior 4nW (- 54 dBm)
- Audio response : 300 Hz to 3 KHz in AM/FM/LSB/USB
- Emitted power in the adj.
channel : Inferior to 20 µW
- Microphone sensitivity : 3 mV
- Drain : 3 A (with modulation)
- Modulated signal distortion : 1.8 %
3) RECEPTION
- Maxi. sensitivity at 20 dB
sinad : 0.5 µV - 113 dBm (AM/FM)
0.28 µV - 118 dBm (USB/LSB)
- Frequency response : 300 Hz to 3 kHz in AM/FM
- Adjacent channel selectivity : 60 dB
- Maximum audio power : 3 W
- Squelch sensitivity : minimum 0.2 µV - 120 dBm
maximum 1 mV - 47 dBm
- Frequency image rejection
rate : 60 dB
- Intermediate frequency
rejection rate : 70 dB
- Drain : 400 mA nominal / 1000 mA maximum
F) TROUBLE SHOOTING
1) YOUR CB RADIO WILL NOT TRANSMIT OR YOUR
TRANSMISSION IS OF POOR QUALITY
- Check that the antenna is correctly connected and that the SWR
is properly adjusted.
- Check that the microphone is properly plugged in.
- Check that the RF POWER bargraph is set on maximum.
- Check that the MIC GAIN bargraph is set on maximum.
2) YOUR CB RADIO WILL NOT RECEIVE OR RECEPTION IS
POOR
- Check that the RF GAIN bargraph is set on maximum.
- Check that the squelch level is properly adjusted.
- Check that the volume is set to a comfortable listening level.
- Check that the antenna is correctly connected and that the SWR
is properly adjusted.
3) YOUR CB WILL NOT LIGHT UP
- Check the power supply.
- Check the connection wiring.
- Check the fuse.
G) HOW TO TRANSMIT OR RECEIVE A MESSAGE
Now that you have read the manual, make sure that your CB
Radio is ready for use (i.e. check that your antenna is connected).
Press the “push-to-talk” switch and announce your message “At-
tention stations, transmission testing” which will allow you to check
the clearness and the power of your signal. Release the switch
and wait for a reply. You should receive a reply like, “Strong and
clear”.
If you use a calling channel (19) and you have established commu-
nication with someone, it is common practice to choose another
available channel so as not to block the calling channel.
English

52
H) GLOSSARY
Below you will find some of the most frequently used CB radio
expressions. Remember this is meant for fun and that you are by
no means obliged to use them. In an emergency, you should be
as clear as possible.
INTERNATIONAL PHONETIC ALPHABET
A Alpha H Hotel O Oscar V Victor
B Bravo I India P Papa W Whiskey
C Charlie J Juliett Q Quebec X-ray
D Delta K Kilo R Romeo Y Yankee
E Echo L Lima S Sierra Z Zulu
F Foxtrott M Mike T Tango
G Golf N November U Uniform
TECHNICAL VOCABULARY
AM : Amplitude Modulation
CB : Citizen’s Band
CH : Channel
CW : Continuous Wave
DX : Long Distance Liaison
DW : Dual Watch
FM : Frequency Modulation
GMT : Greenwich Meantime
HF : High Frequency
LF : Low Frequency
LSB : Lower Side Band
RX : Receiver
SSB : Single Side Band
SWR : Standing Wave Ratio
SWL : Short Wave Listening
SW : Short Wave
TX : CB Transceiver
UHF : Ultra High Frequency
USB : Upper Side Band
VHF : Very High Frequency
CB LANGUAGE
Advertising : Flashing lights of police car
Back off : Slow down
Basement : Channel 1
Base station : A CB set in fixed location
Bear : Policeman
Bear bite : Speeding fine
Bear cage : Police station
Big slab : Motorway
Big 10-4 : Absolutely
Bleeding : Signal from an adjacent channel
interfering with the transmission
Blocking the channel : Pressing the PTT switch without talking
Blue boys : Police
Break : Used to ask permission to join a
conversation
Breaker : A CBer wishing to join a channel
Clean and green : Clear of police
Cleaner channel : Channel with less interference
Coming in loud and proud : Good reception
Doughnut : Tyre
Down and gone : Turning CB off
Down one : Go to a lower channel
Do you copy? : Understand?
DX : Long distance
Eighty eights : Love and kisses
Eye ball : CBers meeting together
Good buddy : Fellow CBer
Hammer : Accelerator
Handle : CBer’s nickname
Harvey wall banger : Dangerous driver
How am I hitting you? : How are you receiving me?
Keying the mike : Pressing the PTT switch without talking
Kojac with a kodak : Police radar
Land line : Telephone
Lunch box : CB set
Man with a gun : Police radar
Mayday : SOS
Meat wagon : Ambulance
Midnight shopper : Thief
English

53
Modulation : Conversation
Negative copy : No reply
Over your shoulder : Right behind you
Part your hair : Behave yourself - police ahead
Pull your hammer back : Slow down
Rat race : Congested traffic
Rubberbander : New CBer
Sail boat fuel : Wind
Smokey dozing : Parked police car
Smokey with a camera : Police radar
Spaghetti bowl : Interchange
Stinger : Antenna
Turkey : Dumb CBer
Up one : Go up one channel
Wall to wall : All over/everywhere
What am I putting to you? : Please give me an S-meter reading
English
SIMPLIFIED EU
DECLARATION OF CONFORMITY
Hereby, Groupe President Electronics, declares that the CB
radio equipment :
Brand: PRESIDENT
Type: TXPR600
Commercial Name: MC KINLEY
is in compliance with Directive 2014/53/EU.
The full text of the EU declaration of conformity is available at
the following internet address:
https://president-electronics.com/DC/TXPR600

54
NOT COVERED BY THE WARRANTY
WITHOUT THE DEALER STAMP
Date of purchase : ........................................................................................
Type : CB Radio MC KINLEY
Serial N°: ......................................................................................................
#
GENERAL WARRANTY CONDITIONS
Technical Manager
and
Quality Manager
This device is guaranteed 2 years parts and labour in its country of purchase against any manu-
facturing defects validated by our technical department. *The After-sales Service of PRESIDENT
reserves the right not to apply the warranty if a breakdown is caused by an antenna other than
those distributed by PRESIDENT, and if said antenna is at the origin of the breakdown. An exten-
sion of 3 years warranty is proposed systematically for the purchase and use of a PRESIDENT
antenna, bringing the total duration of the warranty to 5 years. In order to be valid, the warranty
certificate must be returned within a period of 30 days after the purchase date to the After-sales
Service of the company Groupe President Electronics, or any foreign subsidiary.
It is recommended to carefully read the following conditions and to respect them under penalty
of losing their benefit.
• To be valid the warranty certificate must be returned to us at the latest 1 month after the purchase.
• Please duly complete the warranty certificate on the right hand side of the page, detach it
(portion to be removed marked by dotted line) and send it back.
• Any repair under warranty will be free and the return delivery costs will be borne by our company.
• A purchase proof must be necessarily included with the device to be repaired.
• The dates listed on the warranty certificate and proof of purchase must match.
• Do not proceed with the installation of the device without reading the user manual.
• No spare part will be sent nor exchanged by our services under warranty.
The warranty is only valid in the country of purchase.
Exclusions (are not covered)
• Damages caused by accident, shock or inadequate packaging.
• Power transistors, microphones, lights, fuses and the non respect of the installation and use of
specifications (including but not limited to antenna used with too high power, final output power
transistors (SWR), inversion of polarities, bad connections, overvoltage,….)
• The warranty cannot be extended due to the non-availability of the device while it is being
serviced at our technical services location, nor by a change of one or more components or
spare parts.
• Transceivers which have been modified. The warranty application is excluded in case of
modification or poor maintenance done by a third party not approved by our company.
If you note malfunctions
• Check the power supply of your device and the quality of the fuse.
• Check that the antenna, the microphone…. are correctly connected.
• Check that the squelch level is properly adjusted; the programmed configuration is the correct
one...
• In case the device is not under warranty, the repair and return of the device will be charged.
• All related documents must be preserved even after the end of the warranty period and if you
resell your device, given to the new owner for the After-sales follow-up.
• In case of real malfunction, please contact your dealer first; they will decide action to be taken.
• In case of an intervention not covered by the warranty, an estimate will be established before
any repair.
Thank you for your trust in the PRESIDENT quality and experience. We recommend that you read
this manual carefully so that you are completely satisfied with your purchase. Do not forget to
return the detachable warranty certificate on the right hand side of this page; it is very important
for the identification of your device during a possible rendering of our services.
English

55
UWAGA !
Gwarancja tego CB radia jest ważna tylko w kraju zakupu.
RADIOTELEFON
WIELOSTANDARDOWY!
Przed użyciem należy zwrócić uwagę, aby nigdy
nie rozpoczynać transmisji bez uprzedniego pod-
łączenia anteny (połączenie „B” znajdujące się na
tylnym panelu urządzenia) lub bez ustawiania SWR
(współczynnik fali stojącej) ! Nieprzestrzeganie tego
może spowodować zniszczenie wzmacniacza mocy,
który nie jest objęty gwarancją.
Zobacz funkcję „F” na stronie 62 i tabelę kon-
guracji na stronie 74.
Polski

56
Witamy w świecie nowej generacji radia CB. Nowa gama produktów PRESIDENT
zapewnia dostęp do najwyższej klasy sprzętu CB. Dzięki zastosowaniu nowocze-
snej technologii, która gwarantuje bezprecedensową jakość, PRESIDENT MC
KINLEY to nowy krok w osobistej komunikacji i najpewniejszy wybór dla najbar-
dziej wymagających profesjonalnych użytkowników radia CB. Zalecamy uważne
przeczytanie niniejszej instrukcji przed zainstalowaniem i używaniem PRESIDENT
MC KINLEY, aby w pełni wykorzystać wszystkie możliwości oferowanego sprzętu.
A) INSTALACJA
1) GDZIE I JAK ZAINSTALOWAĆ TWOJE MOBILNE RADIO CB
a) Zpraktycznegopunktuwidzenia,powinieneśwybraćnajbardziejergonomiczne
miejscemontażu,zapewniającełatwydostęp.
b) Twoje radio CB nie powinno zakłócać pracy kierowcy ani przeszkadzać
pasażerom.
c) Należy pamiętać, aby zapewnić odpowiednie ułożenie i zabezpieczenie
różnychprzewodów(np.zasilanie,antena,okablowanieakcesoriów),aby
niezakłócałyonewżadensposóbjazdysamochodem.
d) Abyzainstalowaćsprzęt,należyużyćdostarczonejwzestawieobejmy(1)
i wkrętów samogwintujących (2) (średnica wiercenia 3,2 mm). Podczas
wiercenia deski rozdzielczej należy uważać, aby nie uszkodzić instalacji
elektrycznejpojazdu.
e) Pamiętaj,abywłożyćgumowepodkładki(3)pomiędzyCBradioaobejmę,
ponieważpochłaniająonewstrząsy,aponadtoumożliwiajądokładnedopa-
sowanie i zamocowanie zestawu.
f) Wybierzmiejsce,gdzieumieścićpodpórkęmikrofonuipamiętaj,żeprzewód
mikrofonumusirozciągaćsiędosterownika,nieingerującwelementyste-
rującepojazdu.
- OSTRZEŻENIE:Ostrzeżenie!Jeśliinstalujeszswojąstację,upewnijsię,że
żadneprzewodyniedotykająobudowy.
- Uwaga:Ponieważnadajnik-odbiornikma przednie gniazdo mikrofonowe,
możnagoustawićnatablicyrozdzielczej.Opróczgłośnikanaprzednimpanelu
możnadodaćzewnętrznygłośnikdlalepszejkomunikacji(złączeEXT.SP
ztyłuurządzenia:C).Poprośswojegodealeraoporadęws.montażuradia
CB.
2) INSTALACJA ANTENY
a) Wybór anteny
- WprzypadkuradiotelefonówCBimdłuższaantena,tymlepszewyniki.Twój
dealerbędziewstaniepomócciwwyborzeanteny.
b) Antena przenośna (magnetyczna)
- Musibyć zamocowanana pojeździe, na maksymalnie dużejpowierzchni
metalowej(płaszczyznauziemienia),zdalaodprzedniejszyby.
- Jeślimaszjużzainstalowanąantenęradiową,antenaCBpowinnabyćwyższa.
- Istniejądwarodzajeanten:wstępniestrojone,którepowinnybyćstosowane
nadobrejpłaszczyźniepodłoża(np.dachsamochodulubpokrywabagażnika),
imontażowe(dostrojenia),którezapewniająznaczniewiększyzasięgimogą
SCHEMAT MONTAŻOWY
Polski

57
byćużytenamniejszychpłaszczyznachuziemienia(patrz § REGULACJA
SWR strona 57).
- Wprzypadkuanteny,któramusibyćzamocowanazapomocąwiercenia,
niezbędnyjestdobrykontaktmiędzyantenąapłaszczyznąuziemienia(masą).
Wtymcelunależydelikatnieoczyścićzlakierupowierzchnię,naktórejma
byćumieszczonaśrubaigwiaździstapodkładkadociągająca.
- Uważaj, aby kabel koncentryczny nie został zgnieciony lub spłaszczony
b) Zlokalizujzaciskibaterii:dodatniiujemny(+ /plusjestczerwony,a- /minus
jestczarny).Jeślikoniecznejestwydłużenieprzewoduzasilającego,należy
użyćtegosamegolubkablaolepszychparametrach.
c) KoniecznejestpodłączenieradiaCBdostałego(+)i (-).Zalecasiępodłączenie
kablazasilającegobezpośredniodoakumulatora,ponieważpodłączeniekabla
nadajnikadookablowaniaradiasamochodowegolubinnychczęściobwodu
elektrycznegomoże
w niektórych przy-
padkach zwiększyć
prawdopodobień-
stwozakłóceń.
d) Podłącz czerwony
przewód(+)dobie-
guna dodatniego
akumulatora, a czar-
ny (-) przewód do
ujemnego zacisku
akumulatora.
e) PodłączkabelzasilającydoradiaCB.
OSTRZEŻENIE:Nigdyniezamieniajoryginalnegobezpiecznikanainny,o
innejwartości.
4) PODSTAWOWE CZYNNOŚCI DO WYKONANIA PRZED
PIERWSZYM UŻYCIEM ZESTAWU (bez nadawania i bez
użycia przełącznika „push-to-talk” (naciśnij, by mówić) na
mikrofonie):
a) Podłączmikrofon.
b) Sprawdźpołączeniaantenowe.
c) Włączzestaw,obracającpokrętłoVOL(1)zgodniezruchemwskazówek
zegara.
d) PrzekręcićpokrętłoSQblokady(2)naminimum(pozycjaM).
e) Dostosujgłośnośćdoodpowiedniegopoziomu.
f) Przejdźdokanału20zapomocąobrotowegopokrętłaCH(5)lubprzycisków
UP/DN(13)namikrofonie.
5) REGULACJA SWR (współczynnik fali stojącej)
Uwaga:CzynnośćtęnależywykonaćprzypierwszymużyciuradiaCB,atakże
przykażdejzmianiepozycjianteny.Korektatamusibyćprzeprowadzonaw
obszarzewolnymodprzeszkód.
PRZYKŁADY
PROMIENIOWANIA
SYGNAŁU
(ponieważgrozitoprzerwaniemi/lubzwarciem).
- Podłączantenę(B).
c) Antena stała
Antenastałapowinnabyćzainstalowanawjaknajbardziejotwartej(nieosło-
niętej)przestrzeni. Jeślijest przymocowanado masztu,prawdopodobnie
koniecznebędziepozostawieniejejwmiejscuzamocowania,przyspełnieniu
obowiązującychwymogówprawnych(należyzasięgaćprofesjonalnejpora-
dy).WszystkieantenyiakcesoriaPRESIDENTsązaprojektowanetak,aby
zapewnićmaksymalnąwydajnośćdlakażdegoradiotelefonupozostającego
wzasięgu.
3) PODŁĄCZENIE ZASILANIA
TwójPRESIDENTMCKINLEYjestzabezpieczonyprzedpomyłkowymod-
wróceniempolaryzacjizasilania.Przedwłączeniemnależyjednaksprawdzić
wszystkiepołączenia.Urządzeniemusibyćzasilanenapięciemstałym12
Vlub24V(A).Większośćwspółczesnychsamochodówiciężarówekma
podłączonyminusdomasy.Możnatosprawdzićupewniającsię,żebiegun
ujemnyakumulatorajestpodłączonydoblokusilnikalubdonadwozia/karo-
serii.Wraziewątpliwościnależyskonsultowaćsięzesprzedawcą.
a) Sprawdź,czyakumulatorma12czy24wolt.
Polski

58
* Regulacja za pomocą wewnętrznego miernika SWR
Patrz funkcja KALIBRACJA SWR strona 64.
* Regulacja za pomocą zewnętrznego miernika SWR (np.
PREZYDENT TOS-1)
a) Podłączanie miernika SWR:
- PodłączmiernikSWRmiędzyradiemCBaantenąjaknajbliżejCB(użyj
maksymalniekablaodługości40cm,typuPresidentCA2C).
b) Regulacja miernika SWR:
- UstawCBnakanale20wAM.
- UstawprzełączniknamiernikuSWR,abyustawićFWD(kalibracja).
- Naciśnijpokrętło„push-to-talk”(12)namikrofonie,abyrozpocząćnadawanie.
- Przesuńigłęindeksudopozycjitzapomocąprzyciskukalibracji.
- ZmieńprzełączniknapozycjęREF(odczytpoziomuSWR).Odczytnamierniku
powinienbyćmaksymalniezbliżonydo1.Jeślitakniejest,należyponownie
ustawićantenętak,abyodczytbyłjaknajbliżej1(dopuszczalnyjestodczyt
SWRmiędzy1a1,8).
- Konieczna będzie ponowna kalibracjamiernika SWR po każdej regulacji
anteny.
OSTRZEŻENIE: Aby uniknąć strat i tłumienia w kablach używanych do
połączeniaradia zjego akcesoriami, PRESIDENTzalecaużycie kablao
długościmniejszejniż3m.
RadioCBjestterazgotowedoużycia.
B) JAK UŻYWAĆ CB RADIO
1) WŁĄCZANIE / WYŁĄCZANIE (ON / OFF) - GŁOŚNOŚĆ
(VOLUME)
Abywłączyćzestaw:obróćpokrętłoVOL(1)zgodniezruchemwskazówek
zegara.JeślifunkcjaKEY BEEPjestaktywna(patrz menu KEY BEEP na
stronie 63),rozlegasięsygnałdźwiękowy.Twojeradiojestwłączone.
Wyświetlaczpokazujenakrótkotypmikrofonu(patrz menu TYP MIKROFONU
na stronie 64)iwykorzystywanepasmoczęstotliwości(patrz strona 62).
Abywyłączyćzestaw:obróćpokrętłoVOL(1)przeciwniedoruchuwskazówek
zegara,ażusłyszyszkliknięcie.Twojeradiojestwyłączone.
Abywyregulowaćgłośność,obróćpokrętłoVOL(1)zgodniezruchemwska-
zówekzegara.Abyzmniejszyćgłośność,obróćpokrętłowlewo.
2) ASC (automatyczna blokada szumów) / SQUELCH
Pomijaniepożądanedźwiękiwtle,gdyniemakomunikacji.Blokadaszumów
niewpływaaninadźwięk,aninamocnadawczą,alepozwalanaznaczną
poprawękomfortusłuchania.
a) ASC: AUTOMATYCZNA KONTROLA SZUMÓW
Ogólnoświatowy patent, wyłączność posiada rma PRESIDENT.
ObróćpokrętłoSQ(2)wkierunkuprzeciwnymdoruchuwskazówekzegarado
pozycjiASC.
pojawisięnawyświetlaczu.Niemamożliwościręcznych
ustawieńorazstałejpoprawyczułościikomfortusłuchania,gdyASCjest
aktywne.Funkcjatamożezostaćodłączonapoprzezobrócenieprzełącznika
wprawo,zgodniezruchemwskazówekzegara.Wtakimprzypadkunastępuje
powrótdoręcznejregulacjiszumu.
znikazwyświetlacza.
b) RĘCZNA REGULACJA SZUMÓW
PrzekręćpokrętłoSQ(2)zgodniezruchemwskazówekzegara,dokładnie
do miejsca, w którym znikną wszystkie szumy tła. Tę regulację należy
wykonywaćprecyzyjnie,ponieważjeślizostanieustawionynamaksimum
(całkowiciezgodniezruchemwskazówekzegara),tylkonajsilniejszesygnały
będąodbierane.
3) WYŚWIETLACZ
Pokazujewszystkiefunkcje:
Głównywykressłupkowypokazujepoziomodbioruipoziommocywyjścio-
wej.Mniejszywykressłupkowypokazujepoziomy:wzmocnieniamikrofonu
(MICGAIN),wzmocnieniaczułościodbiornika(RFGAIN)imocywyjściowej
nadajnika(RFPWR).
Polski

59
4) PRECYZYJNE DOSTROJENIE (CLARIFIER)
FunkcjaCLAR.pozwalanaodchylenieczęstotliwościpodczasodbioruLSB
/USBwcelupoprawyczytelnościgłosukorespondenta.
5) WYBÓR KANAŁU CH ~ RF POWER
WYBÓR KANAŁU CH
- Obracać pokrętłem CH(5), aby zmienić kanał w górę lub w dół. Sygnał
dźwiękowyjestemitowanyzakażdymrazem,gdyzmienianyjestkanał,jeśli
aktywowanajestfunkcjaKEY BEEP (patrz funkcja KEY BEEP na stronie
63).
Zobacz § PRZYCISKI UP/DN NA MIKROFONIE strona 62.
Wyświetlaczpokazujeodpowiedniączęstotliwość.Naprzykład„27.205”dla
kanału40.Patrz strona menu SPAN strona 64.
- Dłuższenaciśnięcie(3sekundy)tego przycisku (5)umożliwiawejściedo
MENU.
- Krótkienaciśnięcietegoprzycisku(5)zatwierdzaustawieniawMENU.
REGULACJA MOCY WYJŚCIOWEJ NADAJNIKA / RF
POWER (kombinacja 12/9 + 5)
WtrybieTXzwiększ/zmniejszmocwyjściową.
- NaciśnijiprzytrzymajprzyciskPTT(12).
- Naciśnijprzyciski•(9)i CH(5).Wyświetlanyjestkomunikat„RF POWER”.
- ObracajpokrętłemCH(5),abywyregulowaćpoziomzapomocąwskaźnika
(bargrafu).
- NaciśnijpokrętłoCH(5)przez1sekundę,abypotwierdzićustawienie.
6) TRYB ~ PA ~ VOX ~ USTAWIENIA VOX
TRYB (MODE)
(krótkie naciśnięcie)
TenprzełącznikumożliwiawybórtrybumodulacjiAM,FM,LSBlubUSB;Twój
trybmodulacjimusiodpowiadaćtrybowitwojegokorespondenta.
- Modulacja amplitudy / AM:dokomunikacjinaobszarachobardziejzróż-
nicowanejrzeźbieterenu,naśrednichdystansach(najczęściejużywana).
- Modulacja częstotliwości / FM:dobliskiejkomunikacjinapłaskim,otwartym
terenie.
Tylko w konguracji U:wtrybieFM,długienaciśnięcie klawisza F(10)
służydozmianyzakresuczęstotliwościENGlubCEPT. Komunikat „UK”
wyświetlanyjestpowybraniupasmaczęstotliwościENG (patrz tabela na
stronie 70).
- Górna i dolna wstęga / USB-LSB:używanydokomunikacjinadużeodle-
głości(wzależnościodwarunkówpropagacji,czylirozprzestrzenianiasię
falradiowych).
PA (funkcja megafonu) (długie naciśnięcie)
NaciśnijiprzytrzymajprzyciskPA(6)wceluprzełączeniapomiędzytrybami
CB i PA.
ZewnętrznygłośnikmożnapodłączyćdourządzeniazapomocąwtykuPA
natylnejściancePA.SP.(D).
Aby poznać szczegóły na temat działania w trybie
PA, patrz USTAWIENIA
PA na stronie 65.
VOX (9 + 6 krótkich naciśnięć)
FunkcjaVOXumożliwiakomunikacjęzapomocąoryginalnegomikrofonu(lub
mikrofonuopcjonalnego)beznaciskaniaprzyciskuPTT(12).Użyciemikrofonu
opcjonalnego,podłączonegodotylnegopaneluodbiornika(E), powoduje
wyłączenieoryginalnegomikrofonu.Wciśnijprzycisk•(9),
migaikrótko
naciśnijprzycisk•VOX(6),abyaktywowaćfunkcjęVOX. „VOX”pojawisię
nawyświetlaczu.Powtórzkombinacjęklawiszy,abywyłączyćfunkcję.„VOX”
zniknie.
VOX SET (9 + 6 długich naciśnięć)
Naciśnijprzycisk•(9)inaciśnijprzez1sekundęprzycisk• VOX(6),aby
włączyć funkcję VOX SETTINGS (USTAWIENIA VOX). Wyświetlany jest
komunikat „VOX”.Możliwesątrzyustawienia:SensitivitySET-L, Anti-Vox
SET-A i Vox delay-time SET-T.Wyświetlaczpokazujerodzajregulacji,poktórej
następujejegopoziom,naprzykładSET-L1.
1. ObróćpokrętłoCH(5),abyzwiększyć/zmniejszyćpoziomaktywnegousta-
wienia.
2. Naciśnijkrótkoprzycisk•VOX(6),abyprzejśćdonastępnegoustawienia.
3. PoprawidłowymustawieniuVOXidługimnaciśnięcie(1sekunda)przycisku
•VOX(6)zostanązapisaneustawieniaizakończonebędziedziałaniefunkcji
VOICE SETTING.
- Czułość„SET-L”:umożliwiaregulacjęmikrofonu(oryginalnegolubopcjonal-
nego)wceluuzyskaniaoptymalnejjakościtransmisji.Poziomregulowany
od 1(wysoki)do9(niski).Wartośćdomyślna:1.
- Anti-Vox „SET-A”:umożliwiawyłączenietransmisjigenerowanejprzezhałas
otoczenia.Poziomjestregulowany.OFF(zgodniezpoziomemblokadyszumów)
i od 0(bezfunkcjianti-vox)do9(niskipoziom).Wartośćdomyślna:OFF.
Polski

60
- Czasopóźnienia„SET-T”:pozwalauniknąćnagłegoprzerwaniatransmisji,
poprzezdodanieopóźnienianakońcuwypowiadanejkwestii.Poziommożna
regulowaćod1(krótkieopóźnienie)do9(dużeopóźnienie).Wartośćdomyślna:
5.
VOX SETTINGautomatycznieaktywujefunkcjęVOX. „VOX”pojawisięna
wyświetlaczu.
Uwaga:UrządzenieautomatyczniewyjdziezfunkcjiUSTAWIENIAVOXbez
zapisywania parametrów ustawień,jeślipo10sekundachnie zostanie
naciśniętyżadenprzycisklubjeślizostanienaciśniętydowolnyprzycisk.
7) SKANOWANIE SCAN ~ DW ~ M1
SCAN
(krótkie naciśnięcie)
Naciśnij przycisk SCAN(7), aby włączyć funkcję SCAN (skanowanie) w
kolejności rosnącej. Wyświetlany jest komunikat „SCAN”. Skanowanie
zostaje zatrzymane, gdy kanał jest aktywny. Skanowanie rozpocznie się
automatyczniepo3sekundachodzakończeniatransmisjiiżadenklawisz
niezostanieaktywowany.WtrybieSKANOWANIEobracajpokrętłem CH
(5) lub użyj przyciskówUP/DN(13) na mikrofonie, abyzmienić kierunek
skanowania.
Podczasskanowanianaciśnijiprzytrzymajprzycisk•(9)przezjednąsekun-
dę,abyprzełączaćsięmiędzytrybamiskanowaniakanałówiskanowania
pamięci.WtrybiePAMIĘĆ SKANOWANIA(MEMORYSCAN)skanowane
sątylkokanałyalarmowe(patrz § KANAŁY AWARYJNE na stronie 60) i
zapamiętanekanały(patrz §
PAMIĘĆ Strona 61).
NaciśnijprzyciskPTT(12)lubprzyciskSCAN(7),abywyjśćzfunkcjiSCAN.
DW (dual watch - nasłuch naprzemienny) (długie naciśnięcie)
Długie naciśnięcie (1s) na przycisku DW(7) aktywuje funkcję DW (Dual
Watch).Wyświetlanyjestkomunikat„DW”.Tafunkcjapozwalaobserwować
kanałyawaryjneibieżące.
- PierwszedługienaciśnięcieaktywujefunkcjęDWmiędzykanałemawaryjnym
1akanałembieżącym.
- Drugiedługienaciśnięcieaktywujefunkcjęmiędzykanałemawaryjnym2a
kanałembieżącym.Patrz §
USTAWIENIE KANAŁU AWARYJNEGO
1
i 2 na stronie 65.Aktualnynumerkanałuikanaławaryjnywyświetlanesą
naprzemiennie. Ikona „EMG”pojawiasięrównieżwrazzkanałemawaryjnym.
Wybranykanałmożnazmienićpodczasnasłuchunaprzemiennego.
- NowedługienaciśnięcieprzyciskuDW(7)dezaktywujefunkcjęDW. Komu-
nikat „DW”znikniezwyświetlacza.
M1
Patrz: § PAMIĘĆ strona 61.
8) ANB / ANL ~ HI-CUT ~ KANAŁY AWARYJNE ~ M2
ANB / NL
(krótkie naciśnięcie)
ANL / NB(automatycznyogranicznikszumów/eliminatorszumów):ltryte
redukująszumytłaizakłóceniawodbiorze.
WciśnijprzyciskANL/NB(8),abyprzełączaćsięmiędzynastępującymi4
stanamiwpętli:1.ANL/on-NB/off•2.ANL/off-NB/on•3. ANL/on - NB/on
•4. ANL/off - NB/off.
Ikonaltrapojawiasięnawyświetlaczu,gdyltrjestaktywny(włączony-on).
HI-CUT (długie naciśnięcie)
Hi-Cuteliminujezakłóceniaowysokiejczęstotliwości.
NaciśnijiprzytrzymajprzyciskHI-CUT(8)przezjednąsekundę,abywłączyć
/wyłączyćltrHI-CUT.Komunikat«HI-CUT»pojawiasięnawyświetlaczu,
gdyltrjestaktywny.
KANAŁY AWARYJNE (9 + 8 krótkich naciśnięć)
- Naciśnijnakrótkoprzycisk•(9),anastępnie•przyciskEMG( 8),abypowiązać
te dwa klawisze.
- Pierwszakombinacjaaktywujekanaławaryjny1.
- Drugakombinacjaaktywujekanaławaryjny2.
- Gdykanaławaryjnyjestaktywny,wyświetlanyjestkomunikat„EMG”.
- Trzeciakombinacjapozwalanapowrótdopoczątkowegokanału.Komunikat
„EMG”znikniezwyświetlacza.
Patrz: USTAWIENIE KANAŁU AWARYJNEGO 1 i USTAWIENIE KANAŁU
AWARYJNEGO 2 strona 65.
M2
Patrz: § PAMIĘĆ strona 61.
9) Klucz „•” ~ MEMORY (PAMIĘĆ) ~ ECHO ~ M3
Klucz „•”
(krótkie naciśnięcie)
Naciśnięcieprzycisku•(9)aktywujetrybFUNKCJA(FUNCTION).Migako-
munikat
.Połącztodziałaniezinnymklawiszemzaczynającod•(•VOX,
•EMG,•ECHO,•RF POWERlub• MIC/RF GAIN),abyuzyskaćdostępdo
funkcji.
Polski

61
Uwaga:Przycisk•( 9)jestzawszepowiązanyzinnymprzyciskiem.Naciśnięcie
samegoprzyciskuniedażadnegoefektu,zwyjątkiemmigotaniakomunikatu
przez10sekund.
PAMIĘĆ (MEMORY) (długie naciśnięcie)
Ten modelCB radia umożliwiazapamiętanie 3kanałów z następującymi
atrybutami:NB/ANL(on/off),HI-CUT(on/off),AM/FM/USB/LSB.
Aby zapisać w pamięci:
- Wybierzkanałijegoatrybuty.
- NaciśnijprzyciskMEM(9)najednąsekundę.JeślifunkcjaKEY BEEP jest
aktywna,rozlegasięsygnałdźwiękowy.Migakomunikat„MEM”.
- NaciskajprzezjednąsekundęjedenzprzyciskówM1(7),M2(8)lubM3(9),
aby zapamiętać dokonany wybór.Na wyświetlaczu pojawi siękomunikat
„MEM”izaczniemigaćnumerwybranejpamięci(M1, M2lubM3).
- JeślifunkcjaKEY BEEPjestaktywna,długisygnałdźwiękowypotwierdza
sukcesoperacji.
Aby wywołać pamięć:
- NacisnąćprzyciskMEM(9)przezjednąsekundę.JeślifunkcjaKEY BEEP
jestaktywna,rozlegasięsygnałdźwiękowy.Migakomunikat„MEM”.
- NaciśnijkrótkojedenzprzyciskówM1(7),M2(8)lubM3(9),abywyświetlić
wybranąpamięć.
- Nawyświetlaczupojawisiękomunikat„MEM”izaczniepulsowaćnumer
wybranejpamięci(M1, M2lubM3).
Aby skasować pamięć:
- Wyłączurządzenie.
- PrzytrzymajjedenzklawiszyM1(7),M2(8)lubM3(9)iwłączurządzenie.
- Wybranapamięćzostanieskasowana.Komunikat„MEM”inumerwybranej
pamięci(M1, M2lubM3)zniknązwyświetlacza.
Zobacz także menu RESET na stronie 66.
ECHO (9 + 9 krótkich naciśnięć)
Naciśnijprzycisk•(9),komunikatmiga,anastępnienakrótkonaciśnijprzycisk
•ECHO(9),abywłączyćfunkcjęECHO. Komunikat „ECHO”pojawisięna
wyświetlaczu.Nowakombinacjaklawiszy•(9)i•ECHO (9)dezaktywujeją.
Komunikat „ECHO” zniknie.
M3
Patrz: § PAMIĘĆ strona 61.
10) F ~ MIC GAIN ~ RF GAIN
F
Zobacz jeszcze konguracja U na stronie 59.
Patrz § TALKBACK na stronie 62.
Patrz § WŁĄCZENIE FUNKCJI W URZĄDZENIU strona 62.
MIC GAIN (połączenie 12/9 + 10)
Dostosujpoziomczułościmikrofonu.
- NaciśnijiprzytrzymajprzyciskPTT(12).
- Naciśnijprzycisk•(9).
- Naciśnijprzycisk• MIC/RF GAIN(10).Wyświetlanyjestkomunikat„MIC GAIN”.
- ObracajpokrętłemCH(5),abywyregulowaćpoziomzapomocąwskaźnika
(bargrafu).
- NaciśnijpokrętłoCH(5)przez1sekundę,abyzatwierdzićustawienie.
Normalna pozycja tej funkcji jest na poziomie maksymalnym.
Poziom MIC GAIN zostanie wyświetlony na wskaźniku podczas transmisji.
RF GAIN (9 + 10)
Ustawianie czułości odbioru. Maksymalna pozycja w przypadku odbioru
połączeńnadużeodległości.MożeszzmniejszyćRF GAIN, aby uniknąć
zniekształceń,gdyrozmówcajestblisko.Zmniejszwzmocnienieprzyodbiorze
wprzypadkubliskiejkomunikacjizkorespondentemniewyposażonymwRF
POWER.
- Naciśnijprzycisk•(9).
- Naciśnijprzycisk•MIC/RF GAIN(10).Wyświetlanyjestkomunikat„RF GAIN”.
- ObracajpokrętłemCH(5),abywyregulowaćpoziomzapomocąwskaźnika
(bargrafu).
- NaciśnijpokrętłoCH(5)przez1sekundę,abyzatwierdzićustawienie.
Poziom RF GAIN będzie zawsze wyświetlany na wskaźniku podczas odbioru.
11) GNIAZDO MIKROFONOWE 6 PIN
Gniazdo znajduje się na przednim panelu nadajnika i ułatwia ustawienie
urządzenianadescerozdzielczej.
Patrz schemat okablowania - strona 73.
12) PTT ~ RF POWER ~ MIC GAIN ~ TALKBACK
PTT (Push To Talk - naciśnij, aby mówić)
Przełącznik transmisji; naciśnij, aby wysłać wiadomość; wyświetlany jest
symbol ;zwolnijprzycisk,abyodsłuchaćkomunikatprzychodzący.
Polski

62
RF POWER
Zobacz § RF POWER, strona 59.
MIC GAIN
Zobacz § MIC GAIN, strona 61.
TALKBACK (połączenie 12 / 10)
Funkcja TALKBACK umożliwia słuchanie własnej modulacji za pomocą
głośnikaCB,podczasgdyprzyciskPTT(12)jestnaciśnięty.
- DługienaciśnięcieprzyciskuF( 10)aktywuje/dezaktywujefunkcjęTALKBACK.
Gdyfunkcjajestwłączona,wyświetlanyjestkomunikat„TALKBACK”.
POZIOM TALKBACK (12 / 5)
GdyfunkcjaTALKBACKjestwłączona,naciśnijiprzytrzymajprzyciskPTT
(12)iobracajpokrętłemCH(5),abywyregulowaćpoziomTALKBACK(skala
9stopniowa:od01 do 09).
TOT (Timeout Timer - wyłącznik czasowy)
Jeślitransmisja(przyużyciuprzyciskuPTT(12)lubVOX)trwadłużejniż5
minut, CHANNEL i zacznąmigać,atransmisjasięzakończy.
Dźwięklimituczasubędzierozbrzmiewać,dopókiniezostaniezwolniony
przycisk PTT(12).
13) PRZYCISKI UP/DN NA MIKROFONIE
- Teprzyciski(13)umożliwiajązmianękanałuwgórę(UP)lubwdół(DN).
Sygnałdźwiękowyjestemitowanyzakażdymrazem,gdykanał zostanie
zmieniony, jeśli aktywowana jest funkcja KEY BEEP (patrz funkcja KEY
BEEP na stronie 63).
Wyświetlaczpokazujeodpowiedniączęstotliwość.Naprzykład„27.205” dla
kanału40.Patrz menu SPAN - strona 64.
Patrz § WYBÓR KANAŁU CH na stronie 59.
C) WŁĄCZANIE FUNKCJI W URZĄDZENIU
Aby wybrać PASMO CZĘSTOTLIWOŚCI, wyłącz urządzenie. Naciśnij i
przytrzymajprzyciskF(10),anastępniewłączurządzenie.
(Konguracja: EU; PL; d; EC; U; In)
Pasmaczęstotliwościmusząbyćwybranezgodniezkrajemużytkowania.
Nieużywajżadnejinnejkonguracji.Wniektórychkrajachwymaganajest
licencjanaużywanieCBradia.Patrztabelanastronie75.
1. Włączzasilanie,naciskającklawiszF(10).Literaodpowiadającabieżącej
konguracjimiganawyświetlaczu.
2. Aby zmienić kongurację, obróć pokrętło CH(5) na urządzeniu lub użyj
przyciskówUP/DN(13)namikrofonie.
3. Powybraniukonguracji naciskaj klawiszF(10)przez1 sekundę. Litera
odpowiadającakonguracjijeststalewyświetlanairozlegasięsygnałpo-
twierdzenia.
4. Wtymmomenciepotwierdźwybór,wyłączającCBradio,anastępniewłącz
jeponownie.
Zobacz tabelę pasm częstotliwości na stronach od 70 do 72 / tabela
konguracji na stronie 74.
D) MENU
Kolejność 14 funkcji jest opisana w niniejszej instrukcji. Jednak funkcja
wyświetlanaprzywejściudoMENUbędzieostatniąfunkcjąmodykowaną
przezużytkownika.
Niezależnieodfunkcjiprocedurajesttakasama:
NaciśnijpokrętłoCH(5)iprzytrzymajprzez3sekundy,abywejśćdoMENU.
Pojawiasięsymbol
.
1. ObracajpokrętłoCH(5)lubużyjprzyciskówUP/DN(13)namikrofonie,aby
wybraćmenu.
2. NaciśnijpokrętłoCH(5),abypotwierdzić.Parametrustawieniawybranego
menumiganawyświetlaczu.
3. ObróćpokrętłoCH(5)lubużyjprzyciskówUP/DN(13)namikrofonie,aby
zmienićwartośćparametru.
4a. Naciśnij krótko przez CH(5), aby potwierdzić swój wybór i pozostać w
MENU.Parametrprzestajemigaćijeślifunkcjamakilkaparametrów,miga
następującyparametr...
4b. NaciśnijprzezjednąsekundęprzyciskCH(5),abypotwierdzićwybóriwyjść
z MENU.Symbol
znikazwyświetlacza.
5. Jeśliżadenklawiszniezostanienaciśnięty,urządzeniewyjdziezMENU po
10sekundach.Symbol
znikazwyświetlacza.
Uwaga:UżycieprzyciskówUP/DN(13)namikrofoniedajetakisamefekt
jakużycie pokrętłaCH(5).Przełącznik PTT(12)wychodziz MENUbez
sprawdzaniapoprawności.Symbol
znikazwyświetlacza.
1) KOLOR
NaciśnijpokrętłoCH(5)iprzytrzymajprzez3sekundy,abywejśćdoMENU.
Nawyświetlaczupojawiasięsymbol
.
Polski

63
1. ObracajpokrętłemCH(5)lubużyjprzyciskówUP/DN(13)namikrofonie,
abywybraćmenuCOLOR.
2. NaciśnijpokrętłoCH(5),abypotwierdzić.Kolormiganawyświetlaczu.
3. ObróćpokrętłoCH(5)lubużyjprzyciskówUP/DN(13)namikrofonie,aby
zmienićkolor.
4a. NaciśnijkrótkoprzezCH(5),abyzatwierdzićwybranykoloripozostaćw
MENU.
4b. NaciśnijprzezjednąsekundęprzyciskCH(5),abyzatwierdzićwybranykolor
iwyjśćzMENU.Symbol
znikazwyświetlacza.
5. Jeśliżadenklawiszniezostanienaciśnięty,urządzeniewychodzizMENU
po10sekundach.Symbolznikazwyświetlacza.
Domyślnym kolorem jest pomarańczowy:
2) DIMMER
FunkcjaDIMMERumożliwiaregulacjęjasnościoświetlenia(w10stopniowej
skali: od 0 do 9).
NaciśnijpokrętłoCH(5)iprzytrzymajprzez3sekundy,abywejśćdoMENU.
Pojawiasięsymbol
.
1. ObracajpokrętłemCH(5)lubużyjprzyciskówUP/DN(13)namikrofonie,
abywybraćmenuDIMMER.
2. NaciśnijpokrętłoCH(5),abypotwierdzić.Wartośćregulacjijasnościmiga
nawyświetlaczu.
3. PrzekręćpokrętłoCH(5)lubużyjprzyciskówUP/DN(13)namikrofonie,aby
zmienić/wybraćżądanąjasność.
4a. NaciśnijkrótkoprzezCH(5),abyzatwierdzićwybranąwartośćipozostaćw
MENU.
4b. Naciśnij przez jedną sekundę przycisk CH(5), aby zatwierdzić wybraną
wartośćiwyjśćzMENU.Symbol
znikazwyświetlacza.
5. Jeśliżadenklawiszniezostanienaciśnięty,urządzeniewychodzizMENU
po10sekundach.Symbol
znikazwyświetlacza.
Domyślną wartością regulacji jasności oświetlenia jest: 5.
3) CONTRAST
FunkcjaCONTRASTumożliwiadostosowaniekontrastuwyświetlacza(w10
stopniowejskali:od0 do 9).
NaciśnijpokrętłoCH(5)iprzytrzymajprzez3sekundy,abywejśćdoMENU.
Pojawiasięsymbol
.
1. ObracajpokrętłoCH(5)lubużyjprzyciskówUP/DN(13)namikrofonie,aby
wybraćmenuCONTRAST.
2. NaciśnijpokrętłoCH(5),abypotwierdzić.Wartośćkontrastumiganawy-
świetlaczu.
3. ObróćpokrętłoCH(5)lubużyjprzyciskówUP/DN(13)namikrofonie,aby
zmienićwartośćkontrastu.
4a. NaciśnijkrótkoprzezCH(5),abyzatwierdzićwybranąwartośćipozostaćw
MENU.
4b. Naciśnij przez jedną sekundę przycisk CH(5), aby zatwierdzić wybraną
wartośćiwyjśćzMENU.Symbol
znikazwyświetlacza.
5. Jeśliżadenklawiszniezostanienaciśnięty,urządzeniewychodzizMENU
po10sekundach.Symbol
znikazwyświetlacza.
Domyślna wartość kontrastu to: 5.
4) KEY BEEP
Sygnałdźwiękowywystępującyprzyzmianiekanału,operowaniaprzyciskami
itp.
NaciśnijpokrętłoCH(5)iprzytrzymajprzez3sekundy,abywejśćdoMENU.
Pojawiasięsymbol
.
1. ObracajpokrętłoCH(5)lubużyjprzyciskówUP/DN(13)namikrofonie,aby
wybraćmenuKEY BEEP.
2. NaciśnijpokrętłoCH( 5),abypotwierdzić.Statusfunkcjimiganawyświetlaczu.
3. ObracajpokrętłoCH(5)lubużyjprzyciskówUP/DN(13)namikrofonie,aby
włączyćon/wyłączyćoFtęfunkcję.
4a. NaciśnijkrótkoprzezCH(5),abyzatwierdzićipozostaćwMENU.
4b. Naciśnij przez jedną sekundę przycisk CH(5), aby zatwierdzić i wyjść z
MENU.Symbol
znikazwyświetlacza.
5. Jeśliżadenklawiszniezostanienaciśnięty,urządzeniewychodzizMENU
po10sekundach.Symbol
znikazwyświetlacza.
Domyślne ustawienie klawisza beep to: on.
5) ROGER BEEP
SygnałRogerBeepjestemitowanypozwolnieniuprzyciskuPTT(12)mikro-
fonu,abyrozmówcamógłmówić.
Zhistorycznegopunktuwidzenia,jakożeCBjesttrybemkomunikacji„sim-
plex”,niejestmożliwejednoczesnemówienieisłuchanie(takjakwprzypadku
telefonu).Pozakończeniuwypowiedziwymawianosłowo„Roger”,abywten
Polski

64
sposóbdaćznaćrozmówcy,żeprzyszłajegokolejwprowadzonejkonwersacji.
Słowo„Roger”zostałozastąpionesygnałemdźwiękowym.Stądwywodzisię
nazwa“Rogerbeep”.
NaciśnijpokrętłoCH(5)iprzytrzymajprzez3sekundy,abywejśćdoMENU.
Pojawiasięsymbol
.
1. ObracajpokrętłoCH(5)lubużyjprzyciskówUP/DN(13)namikrofonie,aby
wybraćmenuROGER BP.
2. NaciśnijpokrętłoCH( 5),abypotwierdzić.Statusfunkcjimiganawyświetlaczu.
3. ObracajpokrętłoCH(5)lubużyjprzyciskówUP/DN(13)namikrofonie,aby
włączyćon/wyłączyćoFtęfunkcję.
4a. NaciśnijkrótkoprzezCH(5),abyzatwierdzićipozostaćwMENU.
4b. Naciśnij przez jedną sekundę przycisk CH(5), aby zatwierdzić i wyjśćz
MENU.Symbol
znikazwyświetlacza.
5. Jeśliżadenklawiszniezostanienaciśnięty,urządzeniewychodzizMENU
po10sekundach.Symbol
znikazwyświetlacza.
Domyślnym ustawieniem sygnału dźwiękowego jest: oF.
6) SPAN
Gdyfunkcjajestaktywna,częstotliwośćmożnaregulowaćwsposóbciągły.
NaciśnięciepokrętłaCH(5)powodujewyświetleniepaskapodpierwsząlub
drugącyfrąpoprzecinkuczęstotliwości.
ObrotowepokrętłoCH(5)niedziałajużnakanale,alewykonujeczęstotliwość
skoku100kHz(pierwszemiejscedziesiętne)lub10kHz(drugiedziesiętnie).
NaciśnijpokrętłoCH(5)iprzytrzymajprzez3sekundy,abywejśćdoMENU.
Pojawiasięsymbol
.
1. ObracajpokrętłoCH(5)lubużyjprzyciskówUP/DN(13)namikrofonie,aby
wybraćmenuSPAN.
2. NaciśnijpokrętłoCH( 5),abypotwierdzić.Statusfunkcjimiganawyświetlaczu.
3. ObracajpokrętłoCH(5)lubużyjprzyciskówUP/DN(13)namikrofonie,aby
włączyćon/wyłączyćoFtęfunkcję.
4a. NaciśnijkrótkoprzezCH(5),abyzatwierdzićipozostaćwMENU.
4b. Naciśnij przez jedną sekundę przycisk CH(5), aby zatwierdzić i wyjśćz
MENU.Symbol
znikazwyświetlacza.
5. Jeśliżadenklawiszniezostanienaciśnięty,urządzeniewychodzizMENU
po10sekundach.Symbol
znikazwyświetlacza.
Domyślnym ustawieniem span jest: of.
7) TYP MIKROFONU
PRESIDENTMCKINLEYmożebyćużywanyzarównozmikrofonemelek-
tretowymPRESIDENT,jakizmikrofonemdynamicznym6-pinowym(zob.
okablowanie mikrofonu na stronie 73).Powłączeniuurządzenianakrótko
wyświetlanyjesttypmikrofonu.
NaciśnijpokrętłoCH(5)iprzytrzymajprzez3sekundy,abywejśćdoMENU.
Pojawiasięsymbol
.
1. ObracajpokrętłoCH(5)lubużyjprzyciskówUP/DN(13)namikrofonie,aby
wybraćmenuMIC TYPE.
2. NaciśnijpokrętłoCH(5),abypotwierdzić.Typmikrofonumiganawyświetlaczu.
3. ObracajpokrętłoCH(5)lubużyjprzyciskówUP/DN(13)namikrofonie,aby
wybraćtypmikrofonuEL(elektretowy)lubdy(dynamiczny).
4a. NaciśnijkrótkoprzezCH(5),abyzatwierdzićipozostaćwMENU.
4b. Naciśnij przez jedną sekundę przycisk CH(5), aby zatwierdzić i wyjść z
MENU.Symbol
znikazwyświetlacza.
5. Jeśliżadenklawiszniezostanienaciśnięty,urządzeniewychodzizMENU
po10sekundach.Symbol
znikazwyświetlacza.
DomyślnymtypemmikrofonujestEL(elektretowy).
8) KALIBRACJA SWR
NaciśnijpokrętłoCH(5)iprzytrzymajprzez3sekundy,abywejśćdoMENU.
Pojawiasięsymbol
.
1. ObracajpokrętłoCH(5)lubużyjprzyciskówUP/DN(13)namikrofonie,aby
wybraćmenuSWR.
2. NaciśnijpokrętłoCH(5),abypotwierdzić.Radioautomatycznieprzełączysię
wtrybTXbeznaciskaniaprzełącznikaPTT(12)irozpoczniesiękalibracja.
Czas kalibracji wynosi maksymalnie 5 minut. Odliczanie odbywa się na
wyświetlaczu.
3. Ustawantenę.
- Sygnałdźwiękowybeep*jestciągły,gdywartośćSWRwynosi1,0.Przestrzeń
międzydźwiękamistajesięcorazwiększa,gdywartośćSWRoddalasięod
1,0.
- Głośność sygnału dźwiękowego można regulować za pomocą przycisku
VOL(1).
- WyświetlaczpokazujewartośćSWR,naprzykład2,5.
4. NaciśnijprzyciskPTT(12),abywyjśćzKALIBRACJI SWR.
* Sprawdź, czy głośność sygnału jest ustawiona na odpowiedni poziom.
Zobacz REGULACJA SWR - strona 57.
9) REGULACJA ECHA
NaciśnijpokrętłoCH(5)iprzytrzymajprzez3sekundy,abywejśćdoMENU.
Pojawiasięsymbol
.
Polski

65
1. ObracajpokrętłoCH(5)lubużyjprzyciskówUP/DN(13)namikrofonie,aby
wybraćmenuECHO SET.
2. NaciśnijpokrętłoCH(5),abypotwierdzić.Komunikat:LEVEL(poziomecha)
miganawyświetlaczu.
3. Obracaj pokrętło CH(5) lub użyj przycisków UP/DN(13) na mikrofonie,
ustawićwartośćpoziomuod1 do 32(poziomdomyślny:13).
4. PonownienaciśnijpokrętłoCH(5),abypotwierdzićwartośćpoziomu.Drugi
parametr „DELAY”miganawyświetlaczu.
5. UżyjpokrętłaCH(5)lubprzyciskówUP/DN(13)namikrofonie,abyustawić
wartośćopóźnieniaod1 do 32(wartośćdomyślna:16).
6. Ponownie naciśnij pokrętło CH(5), aby zatwierdzić wartość opóźnienia.
Opóźnienieprzestajemigać.a)Rozpocznijodnowawpunkcie1,abyustawić
innąfunkcjęlubb)NaciśnijprzełącznikPTT(12),abywyjśćzMENU.
7. Jeśliżadenklawiszniezostanienaciśnięty,urządzeniewychodzizMENU
po10sekundach.Symbol
znikazwyświetlacza.
Patrz § ECHO - strona 61.
10) TONE
TafunkcjapozwalazmienićRXTONE(skala11stopniowa:od-5 do +5).
NaciśnijpokrętłoCH(5)iprzytrzymajprzez3sekundy,abywejśćdoMENU.
Pojawiasięsymbol
.
1. ObracajpokrętłoCH(5)lubużyjprzyciskówUP/DN(13)namikrofonie,aby
wybraćmenuTONE.
2. NaciśnijpokrętłoCH( 5),abypotwierdzić.Wartośćtonumiganawyświetlaczu.
3. ObróćpokrętłoCH(5)lubużyjprzyciskówUP/DN(13)namikrofonie,aby
zmienićwartośćtonu.
4a. NaciśnijkrótkoprzezCH(5),abyzatwierdzićwybranąwartośćipozostaćw
MENU.
4b. Naciśnij przez jedną sekundę przycisk CH(5), aby zatwierdzić wybraną
wartośćiwyjśćzMENU.Symbol
znikazwyświetlacza.
5. Jeśliżadenklawiszniezostanienaciśnięty,urządzeniewychodzizMENU
po10sekundach.Symbol
znikazwyświetlacza.
Domyślna wartość tonu to: 0.
11) USTAWIENIE KANAŁU AWARYJNEGO 1
NaciśnijpokrętłoCH(5)iprzytrzymajprzez3sekundy,abywejśćdoMENU.
Pojawiasięsymbol
.
1. ObracajpokrętłoCH(5)lubużyjprzyciskówUP/DN(13)namikrofonie,aby
wybraćmenuEMG 1.
2. Naciśnij pokrętło CH(5), aby potwierdzić. Naciśnij przycisk CH(5), aby
potwierdzić.Pierwszyparametr-trybmodulacji-miganawyświetlaczu.
3. ObracajpokrętłoCH(5)lubużyjprzyciskówUP/DN(13)namikrofonie,aby
ustawićtrybmodulacjidlakanałualarmowego1:AM,FM,USB,LSBlubFM
UK(tylkowkonguracjiU).
4. PonownienaciśnijpokrętłoCH(5),abypotwierdzić.Trybmodulacjiprzestaje
migać,drugiparametr-kanał-miganawyświetlaczu.
5. UżyjpokrętłaCH(5) lub użyjprzyciskówUP/DN(13)namikrofonie, aby
wybraćkanałalarmowy1.
6. PonownienaciśnijpokrętłoCH( 5),abypotwierdzićwybórkanału.a)Rozpocznij
od nowa w punkcie 1,abyustawićinnąfunkcjęlubb)Naciśnijprzełącznik
PTT(12),abywyjśćzMENU.
7. Jeśliniezostanienaciśniętyżadenprzycisk,urządzeniewyjdziezMENU po
10sekundachlubpodługimnaciśnięciuprzyciskuF(7).Symbol
znika z
wyświetlacza.
Domyślnym kanałem awaryjnym 1. jest kanał 9 AM.
Patrz: KANAŁY AWARYJNE - strona 60.
12) USTAWIENIE KANAŁU AWARYJNEGO 2
NaciśnijpokrętłoCH(5)iprzytrzymajprzez3sekundy,abywejśćdoMENU.
Pojawiasięsymbol
.
1. ObracajpokrętłoCH(5)lubużyjprzyciskówUP/DN(13)namikrofonie,aby
wybraćmenuEMG 2.
Kolejneczynnościod2 do 7sąidentycznejakwUSTAWIENIU KANAŁU
AWARYJNEGO 1.
Domyślnymkanałemawaryjnym2.jestkanał19 AM.
Patrz: KANAŁY AWARYJNE - strona 60.
13) USTAWIENIA PA
TafunkcjapozwalawybraćtrybpracyPA(MEGAFON)
NaciśnijpokrętłoCH(5)iprzytrzymajprzez3sekundy,abywejśćdoMENU.
Pojawiasięsymbol
.
1. ObracajpokrętłoCH(5)lubużyjprzyciskówUP/DN(13)namikrofonie,aby
wybraćmenuPA SET.
2. NaciśnijpokrętłoCH(5),aby zatwierdzić.TrybPAmiga na wyświetlaczu
LCD.
3. ObracajpokrętłoCH(5)lubużyjprzyciskówUP/DN(13)namikrofonie,aby
wybraćtrybpracyPA:PA, In lubof.
Polski

66
4a. NaciśnijkrótkoprzezCH(5),abypotwierdzićwybórtypuPAipozostaćw
MENU.
4b. NaciśnijprzezjednąsekundęprzyciskCH(5),abypotwierdzićwybórtypu
PAiwyjśćzMENU.Symbol
znikazwyświetlacza.
5. Jeśliżadenklawiszniezostanienaciśnięty,urządzeniewychodzizMENU
po10sekundach.Symbol
znikazwyświetlacza.
- PA:modulacjamikrofonuiodbieranysygnałsąprzesyłanedogłośnikapodłą-
czonegodogniazdaPA.SP.(D).„PA” miga naprzemiennie z zastosowanym
trybemmodulacji:AM,FM,LSB,SSBlubFMUK(tylkowkonguracjiU).
- In : modulacja mikrofonu jest transmitowana do zewnętrznego głośnika
podłączonegodogniazdaPA.SP.(D).Odebranysygnałjestprzesyłanydo
wewnętrznegogłośnika[lubopcjonalnegogłośnikazewnętrznegopodłączo-
negodogniazdaEXT.SP(C)].„PA” miga naprzemiennie z zastosowanym
trybemmodulacji:AM,FM,LSB,SSBlubFMUK(tylkowkonguracjiU).
- of:Odbiórniedziała.Tylkomodulacjamikrofonujestprzesyłanadogłośnika
podłączonegodogniazdaPA.SP.(D).Wyświetlanyjestsymbol„PA”,kanały
sązastępowaneprzezPA.
Wtrybie
PAnaciśnijprzycisk PTT (12),abywyświetlić„PA LEVEL”.Następnie
obróćpokrętłoCH(5),abywyregulowaćpoziomdźwiękuPA.
Domyślnym ustawieniem PA jest: PA.
Patrz § PA (funkcja megafonu) - strona 59.
14) RESET
Resetujewszystkieustawieniazdeniowaneprzezużytkownikaiprzywraca
wartościdomyślne.
NaciśnijpokrętłoCH(5)iprzytrzymajprzez3sekundy,abywejśćdoMENU.
Pojawiasięsymbol
.
1. ObracajpokrętłoCH(5)lubużyjprzyciskówUP/DN(13)namikrofonie,aby
wybraćmenuRST ALL.
2. NaciśnijprzyciskCH(5),abyzatwierdzić.Wyświetlanyjestnapis„CONFIRM”,
„no”miganawyświetlaczu.
3. ObróćpokrętłoCH(5)lubużyjprzyciskówUP/DN(13)namikrofonie,aby
wyświetlić
.
4. PonownienaciśnijpokrętłoCH(5),abypotwierdzić.
5. Jeśliżadenklawiszniezostanienaciśnięty,urządzeniewychodzizMENU
po10sekundach.Symbol
znikazwyświetlacza.
A) GNIAZDO ZASILANIA PRĄDEM STAŁYM - DC (13,8 V /
27,6 V)
B) ZŁĄCZE ANTENOWE (SO-239)
C) ZEWNĘTRZNE GNIAZDO GŁOŚNIKA (8 Ω, Ø 3,5 mm)
D) GNIAZDO JACK GŁOŚNIKA (8 Ω, Ø 3,5 mm)
E) GNIAZDO JACK MIKROFONU OPCJONALNEGO (Ø 2,5
mm)
E) CHARAKTERYSTYKA TECHNICZNA
1) OGÓLNE
- Liczbakanalów : 40
- Trybymodulacji : AM/FM/USB/LSB
- Zakresyczęstotliwości : od26.965MHzdo27.405MHz
- Impedancjaanteny : 50Ohm
- Zasilanie : 13,8V/27,6V
- Wymiary : 170(S)x150(G)x52(W)mm
- Waga : 1kg
- Dostarczoneakcesoria : 1mikrofonUP/DOWN,uchwytdo
mocowania,śruby,kabelzasilający.
2) NADAWANIE
- Tolerancjaczęstotliwości : +/-300Hz
- Mocprzenoszenia : 4WAM/FM-12WUSB/LSB
- Zakłóceniatransmisji : mniejszeniż4nW(-54dBm)
- Odbieraniedźwięku : 300Hzdo3KHzwtrybieAM/FM/LSB/USB
- Emitowanamoc : poniżej20μW
- Czułośćmikrofonu : 3,0mV
- Pobórprądu : 3A(zmodulacją)
- Zniekształcenia
modulowanegosygnału : 1,8%
3) ODBIÓR
-Maks.czułość20dBsinad : 0,5μV-113dBm(AM/FM)
0,28μV-118dBm(USB/LSB)
-Pasmoprzenoszenia : 300Hzdo3kHzwtrybieAM/FM
-Selektywność
międzykanałowa : 60dB
-Maksymalnamocdźwięku : 3W
Polski

67
-Czułośćblokadyszumów : min.0,2μV-120dBm
maks.1mV-47dBm
-Tłumienieczęstotliwości
lustrzanej : 60dB
-Odpornośćnaintermodulację: 70dB
- Pobórprądu : 400mA(nominal)~500mA
F) ROZWIĄZYWANIE PROBLEMÓW
1) TWOJE RADIO CB NIE FUNKCJONUJE PRAWIDŁOWO
LUB TRANSMISJA JEST ZŁEJ JAKOŚCI
- Sprawdź,czyantenajestprawidłowopodłączonaiczySWRjestprawidłowo
ustawiony.
- Sprawdź,czymikrofonjestprawidłowopodłączony.
- Sprawdź,czywskaźnik(bargraf)RFPOWERjestustawionynamaksimum.
- Sprawdź,czywskaźnik(bargraf)MICGAINjestustawionynamaksimum.
2) TWOJE CB RADIO NIE ODBIERA LUB ODBIÓR JEST ZŁY
- Sprawdź,czywskaźnik(bargraf)RFGAINjestustawionynamaksimum.
- Sprawdź,czypoziomblokadyszumówjestodpowiednioustawiony.
- Sprawdź,czygłośnośćjestustawionanakomfortowypoziomsłuchania.
- Sprawdź,czyantenajestprawidłowopodłączonaiczySWRjestprawidłowo
ustawiony.
3) TWOJE CB RADIO NIE WŁĄCZA SIĘ
- Sprawdźzasilanie.
- Sprawdźokablowaniepołączenia.
- Sprawdźbezpiecznik.
G) JAK PRZESYŁAĆ LUB ODBIERAĆ
WIADOMOŚĆ
Poprzeczytaniuinstrukcjiupewnijsię,żeCBradiojestgotowedoużycia
(tzn.sprawdź,czyantenajestpodłączona).
NaciśnijprzełącznikPTT(12)iwyślijkomunikat„OGÓLNEWYWOŁANIE,
SPRAWDZENIE ŁĄCZNOŚCI „ który pozwoli Ci sprawdzić jakość i moc
sygnału.
ZwolnijprzełącznikPTT(12)ipoczekajnaodpowiedź.Powinieneśotrzymać
odpowiedźwstylu„GŁOŚNOIWYRAŹNIE„.
Jeśliużywaszkanałuwywoławczego(19)inawiązałeśzkimśkomunikację,
powszechną praktyką jest wybranie innego dostępnego kanału, aby nie
blokowaćkanałuwywoławczego.
H) SŁOWNICZEK
PoniżejznajdzieszniektóreznajczęściejużywanychwyrażeńradiowychCB.
Podanesąwyłączniewcelachinformacyjnychiniejesteśwżadensposób
zobowiązanydokorzystaniaznich.Wnagłychwypadkachpowinieneśbyć
takzwięzłyizrozumiały,jaktotylkomożliwe.
MIĘDZYNARODOWY ALFABET FONETYCZNY
A Alpha H Hotel O Oscar V Victor
B Bravo I India P Papa W Whiskey
C Charlie J Juliett Q Quebec X X-ray
D Delta K Kilo R Romeo Y Yankee
E Echo L Lima S Sierra Z Zulu
F Foxtrott M Mike T Tango
G Golf N November U Uniform
TERMINOLOGIA TECHNICZNA
AM : Modulacjaamplitudy
CB : Pasmotzw.obywatelskie[pasmoczęstotliwościdokomunikacjiprywatnej
CH : Kanał
CW : Falaciągła
DX : Łącznośćnabardzodużąodległość
DW : DW (dual watch) - funkcja CB Radia pozwalająca na nasłuchiwanie
dwóchkanałównaprzemian.Jeślinaktórymścośsiępojawitoradio
pozostanie na tym aktywnym kanale
FM : Modulacjaczęstotliwości
GMT : Czas uniwersalny Greenwich
HF : Wysokaczęstotliwość
LF : Niskaczęstotliwość
LSB : WstęgadolnaSSB
RX : Odbiornik
SSB : Modulacjaamplitudowajednowstęgowa
SWR : Współczynnikfalistojącej
Polski

68
UPROSZCZONA DEKLARACJA
ZGODNOŚCI UE
Niniejszym Groupe President Electronics oświadcza, że
sprzęt radiowy:
Marka: PRESIDENT
Typ: TXPR600
Nazwa Handlowa: MC KINLEY
jest zgodny z dyrektywą 2014/53/UE.
Pełny tekst deklaracji zgodności UE jest dostępny pod nastę-
pującym
adresem internetowym:
https://president-electronics.com/DC/TXPR600
SWL : Nasłuchnafalachkrótkich
SW : Falekrótkie
TX : NadajnikCB
UHF : Częstotliwośćultrawysoka
USB : Wstęgagórna(przymodulacjiamplitudowejjednowstęgowej)
VHF : Bardzowysokaczęstotliwości
Polski

69
Udziela się 2-letniej gwarancji na funkcjonowanie i części urządzenia w kraju zakupu w przypadku
wad fabrycznych potwierdzonych przez nasz dział techniczny. * Serwis posprzedażowy firmy
PRESIDENT zastrzega sobie prawo do niestosowania gwarancji, jeśli awaria jest spowodowana
przez antenę inną niż dystrybuowana przez firmę PRESIDENT i jeśli wspomniana antena stanowi
bezpośrednią przyczynę awarii. Oferuje się przedłużenie gwarancji o 3 lata przy równoczesnym
zakupie i używaniu anteny PRESIDENT, co wydłuża całkowity czas trwania gwarancji do 5 lat. W
celu uzyskania ważności gwarancji, certyfikat gwarancyjny musi zostać zwrócony w ciągu 30 dni
od daty zakupu do serwisu posprzedażnego firmy Groupe President Electronics lub jakiejkolwiek
zagranicznej spółki zależnej.
Zaleca się uważnie przeczytanie i przestrzeganie poniższych warunków pod groźbą utraty upraw-
nień z tytułu świadczeń gwarancyjnych.
• Ważność certyfikatu gwarancyjnego musi zostać potwierdzona najpóźniej w przeciągu 1
miesiąca po zakupie.
• Proszę należycie wypełnić świadectwo gwarancyjne po prawej stronie strony, odciąć część
oznaczoną linią przerywaną i odesłać.
• Wszelkie naprawy gwarancyjne będą bezpłatne, a koszty dostawy zostaną poniesione przez
naszą firmę.
• Należy koniecznie dostarczyć dowód zakupu z urządzeniem przeznaczonym do naprawy.
• Terminy wymienione w świadectwie gwarancyjnym oraz dowód zakupu muszą być zgodne.
• Nie kontynuować instalacji bez przeczytania instrukcji obsługi.
• Żadne części zamienne nie będą wysłane bądź wymieniane przez nasz serwis w ramach
gwarancji.
Gwarancja jest ważna tylko w kraju zakupu.
Wyjątki (nie objęte gwarancją):
• Uszkodzenia spowodowane wypadkiem, wstrząsem lub nieodpowiednim opakowaniem.
• Tranzystory mocy, mikrofony, światła, bezpieczniki, a także nieprzestrzeganie zasad instalacji i
warunków użytkowania specyfikacji (w tym m.in. używanie anteny ze zbyt dużą mocą, końcowe
tranzystory mocy wyjściowej (SWR), odwrócenie polaryzacji, złe połączenia, przepięcia itp.).
• Gwarancja nie może zostać przedłużona z uwagi na brak dostępności urządzenia, gdy jest
naprawiane w naszym serwisie technicznym ani przez zmianę jednego lub więcej elementów
lub części zamiennych.
• Nadajniki-odbiorniki, które zostały zmodyfikowane. Gwarancyjna nie obejmuje jakichkolwiek
modyfikacji lub niewłaściwej konserwacji wykonanych przez jednostki usługowe lub osoby
trzecie nie posiadające autoryzacji naszej firmy.
W przypadku zauważenia nieprawidłowości:
• Sprawdzić zasilanie urządzenia i stan bezpiecznika.
OGÓLNE WARUNKI GWARANCJI
• Sprawdzić, czy podłączenie anteny, mikrofony lub inne połączenia są wykonane prawidłowo.
• Sprawdzić, czy poziom szumu jest prawidłowo ustawiony; czy zaprogramowana konfiguracja
jest prawidłowa.
* W przypadku, gdy urządzenie nie jest objęte gwarancją, wszelkie naprawy oraz inne koszty
(np. przesyłka) są płatne.
• Wszystkie powiązane dokumenty muszą być zachowane nawet po zakończeniu okresu gwa
-
rancyjnego, a po ewentualnej odsprzedaży urządzenia, przekazane nowemu właścicielowi w
celu umożliwienia identyfikacji sprzętu.
• W przypadku nieprawidłowego działania należy najpierw skontaktować się ze sprzedawcą,
który zdecyduje o podjęciu niezbędnych działań.
• W przypadku interwencji nieobjętych gwarancją, przed naprawą zostaną poczynione odpo-
wiednie wyceny szacunkowe.
Dziękujemy za zaufanie do jakości i doświadczenia firmy PRESIDENT. Zalecamy dokładne za-
poznanie się z niniejszą instrukcją, dzięki czemu Klient będzie całkowicie zadowolony z zakupu.
Proszę nie zapomnieć, aby odesłać załączony poniżej certyfikat, gdyż bardzo ważne jest, abyśmy
mogli dokonać identyfikacji urządzenia podczas ewentualnego świadczenia naszych usług.
Dyrektor Techniczny
i
Dyrektor ds. Jakości
BEZ PIECZĄTKI SPRZEDAWCY GWARANCJA JEST NIEWAŻNA!
Data zakupu : ..............................................................................................
Typ: CB Radio MC KINLEY
Nrseryjny: ..................................................................................................
Polski

70
N° du canal Fréquences N° du canal Fréquences
Nº Canal Frecuencia Nº Canal Frecuencia
Channel Frequency Channel Frequency
Kanał Częstotliwość Kanał Częstotliwość
1 26,965 MHz 21 27,215 MHz
2 26,975 MHz 22 27,225 MHz
3 26,985 MHz 23 27,255 MHz
4 27,005 MHz 24 27,235 MHz
5 27,015 MHz 25 27,245 MHz
6 27,025 MHz 26 27,265 MHz
7 27,035 MHz 27 27,275 MHz
8 27,055 MHz 28 27,285 MHz
9 27,065 MHz 29 27,295 MHz
10 27,075 MHz 30 27,305 MHz
11 27,085 MHz 31 27,315 MHz
12 27,105 MHz 32 27,325 MHz
13 27,115 MHz 33 27,335 MHz
14 27,125 MHz 34 27,345 MHz
15 27,135 MHz 35 27,355 MHz
16 27,155 MHz 36 27,365 MHz
17 27,165 MHz 37 27,375 MHz
18 27,175 MHz 38 27,385 MHz
19 27,185 MHz 39 27,395 MHz
20 27,205 MHz 40 27,405 MHz
TABLEAU DES FRÉQUENCES pour EU / EC / U (CEPT)
TABLA DE FRECUENCIAS para EU / EC / U (CEPT)
FREQUENCY TABLE for EU / EC / U (CEPT)
TABELA CZĘSTOTLIWOŚCI dla EU / EC / U (CEPT)
TABLEAU DES FRÉQUENCES pour U (ENG)
TABLA DE FRECUENCIAS para U (ENG)
FREQUENCY TABLE for U (ENG)
TABELA CZĘSTOTLIWOŚCI dla U (ENG)
N° du canal Fréquences N° du canal Fréquences
Nº Canal Frecuencia Nº Canal Frecuencia
Channel Frequency Channel Frequency
Kanał Częstotliwość Kanał Częstotliwość
1 27,60125 MHz 21 27,80125 MHz
2 27,61125 MHz 22 27,81125 MHz
3 27,62125 MHz 23 27,82125 MHz
4 27,63125 MHz 24 27,83125 MHz
5 27,64125 MHz 25 27,84125 MHz
6 27,65125 MHz 26 27,85125 MHz
7 27,66125 MHz 27 27,86125 MHz
8 27,67125 MHz 28 27,87125 MHz
9 27,68125 MHz 29 27,88125 MHz
10 27,69125 MHz 30 27,89125 MHz
11 27,70125 MHz 31 27,90125 MHz
12 27,71125 MHz 32 27,91125 MHz
13 27,72125 MHz 33 27,92125 MHz
14 27,73125 MHz 34 27,93125 MHz
15 27,74125 MHz 35 27,94125 MHz
16 27,75125 MHz 36 27,95125 MHz
17 27,76125 MHz 37 27,96125 MHz
18 27,77125 MHz 38 27,97125 MHz
19 27,78125 MHz 39 27,98125 MHz
20 27,79125 MHz 40 27,99125 MHz

71
N° du canal Fréquences N° du canal Fréquences
Nº Canal Frecuencia Nº Canal Frecuencia
Channel Frequency Channel Frequency
Kanał Częstotliwość Kanał Częstotliwość
1 26,965 MHz 21 27,215 MHz
2 26,975 MHz 22 27,225 MHz
3 26,985 MHz 23 27,255 MHz
4 27,005 MHz 24 27,235 MHz
5 27,015 MHz 25 27,245 MHz
6 27,025 MHz 26 27,265 MHz
7 27,035 MHz 27 27,275 MHz
8 27,055 MHz 28 27,285 MHz
9 27,065 MHz 29 27,295 MHz
10 27,075 MHz 30 27,305 MHz
11 27,085 MHz 31 27,315 MHz
12 27,105 MHz 32 27,325 MHz
13 27,115 MHz 33 27,335 MHz
14 27,125 MHz 34 27,345 MHz
15 27,135 MHz 35 27,355 MHz
16 27,155 MHz 36 27,365 MHz
17 27,165 MHz 37 27,375 MHz
18 27,175 MHz 38 27,385 MHz
19 27,185 MHz 39 27,395 MHz
20 27,205 MHz 40 27,405 MHz
N° du canal Fréquences N° du canal Fréquences
Nº Canal Frecuencia Nº Canal Frecuencia
Channel Frequency Channel Frequency
Kanał Częstotliwość Kanał Częstotliwość
41 26,565 MHz 61 26,765 MHz
42 26,575 MHz 62 26,775 MHz
43 26,585 MHz 63 26,785 MHz
44 26,595 MHz 64 26,795 MHz
45 26,605 MHz 65 26,805 MHz
46 26,615 MHz 66 26,815 MHz
47 26,625 MHz 67 26,825 MHz
48 26,635 MHz 68 26,835 MHz
49 26,645 MHz 69 26,845 MHz
50 26,655 MHz 70 26,855 MHz
51 26,665 MHz 71 26,865 MHz
52 26,675 MHz 72 26,875 MHz
53 26,685 MHz 73 26,885 MHz
54 26,695 MHz 74 26,895 MHz
55 26,705 MHz 75 26,905 MHz
56 26,715 MHz 76 26,915 MHz
57 26,725 MHz 77 26,925 MHz
58 26,735 MHz 78 26,935 MHz
59 26,745 MHz 79 26,945 MHz
60 26,755 MHz 80 26,955 MHz
TABLEAU DES FRÉQUENCES pour d
TABLA DE FRECUENCIAS para d
FREQUENCY TABLE for d
TABELA CZĘSTOTLIWOŚCI dla d

72
TABLEAU DES FRÉQUENCES pour PL
TABLA DE FRECUENCIAS para PL
FREQUENCY TABLE for PL
TABELA CZĘSTOTLIWOŚCI dla PL
TABLEAU DES FRÉQUENCES pour In
TABLA DE FRECUENCIAS para In
FREQUENCY TABLE for In
TABELA CZĘSTOTLIWOŚCI dla In
N° du canal Fréquences N° du canal Fréquences
Nº Canal Frecuencia Nº Canal Frecuencia
Channel Frequency Channel Frequency
Kanał Częstotliwość Kanał Częstotliwość
1 26,965 MHz 21 27,215 MHz
2 26,975 MHz 22 27,225 MHz
3 26,985 MHz 23 27,255 MHz
4 27,005 MHz 24 27,235 MHz
5 27,015 MHz 25 27,245 MHz
6 27,025 MHz 26 27,265 MHz
7 27,035 MHz 27 27,275 MHz
8 27,055 MHz
9 27,065 MHz
10 27,075 MHz
11 27,085 MHz
12 27,105 MHz
13 27,115 MHz
14 27,125 MHz
15 27,135 MHz
16 27,155 MHz
17 27,165 MHz
18 27,175 MHz
19 27,185 MHz
20 27,205 MHz
N° du canal Fréquences N° du canal Fréquences
Nº Canal Frecuencia Nº Canal Frecuencia
Channel Frequency Channel Frequency
Kanał Częstotliwość Kanał Częstotliwość
1 26,960 MHz 21 27,210 MHz
2 26,970 MHz 22 27,220 MHz
3 26,980 MHz 23 27,250 MHz
4 27,000 MHz 24 27,230 MHz
5 27,010 MHz 25 27,240 MHz
6 27,020 MHz 26 27,260 MHz
7 27,030 MHz 27 27,270 MHz
8 27,050 MHz 28 27,280 MHz
9 27,060 MHz 29 27,290 MHz
10 27,070 MHz 30 27,300 MHz
11 27,080 MHz 31 27,310 MHz
12 27,100 MHz 32 27,320 MHz
13 27,110 MHz 33 27,330 MHz
14 27,120 MHz 34 27,340 MHz
15 27,130 MHz 35 27,350 MHz
16 27,150 MHz 36 27,360 MHz
17 27,160 MHz 37 27,370 MHz
18 27,170 MHz 38 27,380 MHz
19 27,180 MHz 39 27,390 MHz
20 27,200 MHz 40 27,400 MHz

73
PRISE MICRO 6 BROCHES
TOMA DE MICRO DE 6 CONTACTOS
6-PIN MICROPHONE PLUG
WTYK MIKROFONU 6-PIN
1 Modulation Modulación Modulation Modulacja
2 RX RX RX RX
3 TX - UP/DOWN TX - UP/DOWN TX - UP/DOWN TX - UP/DOWN
4 _ _ _ _
5 Masse Masa Ground Masa
6 Alimentation Alimentación Power Supply Zasilanie

74
La bande de fréquence et la puissance d’émission de votre appareil doivent correspondre à la configuration autorisée dans le pays où il est utilisé.
La banda de frecuencias y la potencia de emisión de su aparato deben corresponder a la configuración autorizada en el país donde él es utilizado.
The frequency band and the transmission power of your transceiver must correspond with the configuration authorized in the country where it is used.
Częstotliwość oraz moc nadawania Twojego radiotelefonu musi być zgodna z wymaganiami kraju, w którym jest on używany.
NORMES • F - NORMAS • F - NORMS • F - NORMY • F
Remarque :
Dans la configuration
U
en mode FM : Pour sélectionner la bande de fréquences
ENG
, appuyer une seconde sur la touche F (
10
) jusqu’à ce que «UK» apparaisse dans
l’afficheur. Pour sélectionner la bande de fréquences
CEPT
, appuyer une seconde sur la touche F (
10
) jusqu’à ce que «UK» disparaisse de l’afficheur
(voir tableau page 70)
.
Observación:
En la configuración
U en el modo FM
: Para seleccionar la banda de frecuencia
ENG
, apriete durante 1 segundo la tecla F (
10
) hasta que “UK” aparezca en la pantalla.
Para seleccionar la banda de frecuencia
CEPT
, apriete durante un segundo la tecla F (
10
) hasta que “UK” desaparezca de la pantalla
(véase cuadro página 70)
.
Note:
In
U
configuration in FM mode: In order to select the frequency band
ENG
, press during one second the F key (
10
) until “UK” appears in the display. In order to select the
CEPT
frequency band, press during one second the F key (
10
) until “UK” disappears from the display
(see table at page 70)
.
Uwaga: W konfiguracji U w trybie FM: W celu wybrania pasma częstotliwości ENG, naciśnij klawisz F (10) przez jedną sekundę, aż „UK” pojawi się na wyświetlaczu. W celu wybrania pasma częstotliwości CEPT, naciśnij klawisz
F (10) przez jedną sekundę, aż „UK” zniknie z wyświetlacza (patrz tabela na stronie 70).

75
Dernière mise à jour de ce tableau sur le site : www.president-electronics.com, rubrique «les Postes Radio-CB» puis, «La CB PRESIDENT et l’Europe».
Le rogamos encontrar la última versión de esta información en nuestro sitio web www.president-electronics.com en la página «Emisoras de radio-cb» / «PRESIDENT y la
reglamentación en Europa».
Please see updated table on website www.president-electronics.com, page «The CB radios» then «President Radio CB and Europe».
Ostatnia aktualizacja tej tabeli na stronie www.president-electronics.com, rubryka “les Postes Radio-CB” i “La CB PRESIDENT et l’Europe”.

1973/12-18-v1.02
FR
ESP
UK
PL
SIEGE SOCIAL/HEAD OFFICE - FRANCE
RoutedeSète-BP100-34540BALARUC
Site Internet : http://www.president-electronics.com
E-mail : [email protected]
PRINTED IN VIETNAM
U01UT567ZZA(0)
Transcripción de documentos
Manuel d’utilisation / Manual del usuario Owner’s manual / Instrukcja obsługi Downloaded from www.cbradio.nl 12/24 V Votre PRESIDENT MC KINLEY en un coup d'œil Your PRESIDENT MC KINLEY at a glance Un vistazo a vuestro PRESIDENT MC KINLEY Twój PRESIDENT MC KINLEY SOMMAIRE is França SUMARIO INSTALACIÓN...........................................................................................23 UTILIZACIÓN.............................................................................................25 FUNCIÓN AL ENCENDER LA EMISORA...................................................29 MENÚS......................................................................................................30 CARACTERÍSTICAS TÉCNICAS.................................................................34 GUÍA DE PROBLEMAS..............................................................................35 COMO EMITIR O RECIBIR UN MENSAJE.................................................35 LÉXICO......................................................................................................35 DECLARACIÓN DE CONFORMIDAD EU SIMPLIFICADA.......................37 GARANTÍA................................................................................................38 TABLAS DE FRECUENCIAS............................................................... 70 a 72 NORMAS • F.............................................................................................74 INSTALLATION.............................................................................................5 UTILISATION.................................................................................................7 FONCTIONS À L’ALLUMAGE DU POSTE.................................................12 MENUS......................................................................................................12 CARACTÉRISTIQUES TECHNIQUES...........................................................17 GUIDE DE DÉPANNAGE...........................................................................17 COMMENT ÉMETTRE OU RECEVOIR UN MESSAGE...............................17 GLOSSAIRE...............................................................................................18 GARANTIE.................................................................................................20 DÉCLARATION DE CONFORMITÉ EU SIMPLIFIÉE.....................................21 TABLEAUX DES FRÉQUENCES.......................................................... 70 à 72 NORMES • F..............................................................................................74 SUMMARY ol Españ English SPIS TREŚCI Polski INSTALACJA...............................................................................56 JAK UŻYWAĆ CB RADIO...........................................................58 WŁĄCZANIE FUNKCJI W URZĄDZENIU...................................62 MENU..........................................................................................62 CHARAKTERYSTYKA TECHNICZNA........................................66 ROZWIĄZYWANIE PROBLEMÓW.............................................67 JAK PRZESYŁAĆ LUB ODBIERAĆ WIADOMOŚĆ....................67 SŁOWNICZEK.............................................................................67 UPROSZCZONA DEKLARACJA ZGODNOŚCI UE....................68 OGÓLNE WARUNKI GWARANCJI ............................................69 TABELA CZĘSTOTLIWOŚCI..............................................70 ~ 72 NORMY • F..................................................................................74 INSTALLATION...........................................................................................40 HOW TO USE YOUR CB............................................................................42 FUNCTION TURNING ON THE UNIT..........................................................46 MENU........................................................................................................46 TECHNICAL CHARACTERISTICS...............................................................51 TROUBLE SHOOTING................................................................................51 HOW TO TRANSMIT OR RECEIVE A MESSAGE.......................................51 GLOSSARY................................................................................................52 SIMPLIFIED EU DECLARATION OF CONFORMITY...................................53 WARRANTY...............................................................................................54 FREQUENCY TABLES....................................................................... 70 to 72 NORMS • F...............................................................................................74 3 Français ATTENTION ! Avant toute utilisation, prenez garde de ne jamais émettre sans avoir branché l’antenne (connecteur B situé sur la face arrière de l’appareil), ni réglé le TOS (Taux d’Ondes Stationnaires)! Sinon, vous risquez de détruire l’amplificateur de puissance, ce qui n’est pas couvert par la garantie. APPAREIL MULTI-NORMES ! Voir «F» page 12 et tableau des Configurations page 74. La garantie de ce poste est valable uniquement dans le pays d’achat. 4 Français Bienvenue dans le monde des émetteurs-récepteurs CB de la dernière génération. Cette nouvelle gamme de postes vous fait accéder à la communication électronique la plus performante. Grâce à l’utilisation de technologies de pointe garantissant des qualités sans précédent, votre PRESIDENT MC KINLEY est un nouveau jalon dans la convivialité et la solution par excellence pour le pro de la CB le plus exigeant. Pour tirer le meilleur parti de toutes ses possibilités, nous vous conseillons de lire attentivement ce mode d’emploi avant d’installer et d’utiliser votre CB PRESIDENT MC KINLEY. A) INSTALLATION 1) CHOIX DE L’EMPLACEMENT ET MONTAGE DU POSTE MOBILE de perçage 3,2 mm). Prenez garde de ne pas endommager le système électrique du véhicule lors du perçage du tableau de bord. e) Lors du montage, n’oubliez pas d’insérer les rondelles de caoutchouc (3) entre le poste et son support. Celles-ci jouent en effet un rôle «d’amortisseur» et permettent une orientation et un serrage en douceur du poste. f) Choisissez un emplacement pour le support du micro et prévoyez le passage de son cordon. a) Choisissez l’emplacement le plus approprié à une utilisation simple et pratique de votre poste mobile. b) Veillez à ce qu’il ne gêne pas le conducteur ni les passagers du véhicule. c) Prévoyez le passage et la protection des différents câbles, (alimentation, antenne, accessoires...) afin qu’ils ne viennent en aucun cas perturber la conduite du véhicule. d) Utilisez pour le montage le berceau (1) livré avec l’appareil, fixez-le solidement à l’aide des vis auto taraudeuse (2) fournies (diamètre SCHÉMA GÉNÉRAL DE MONTAGE - Attention : Si vous encastrez votre poste, veillez à ce qu’aucun câble ne touche le châssis. - NOTE : Votre poste mobile possédant une prise micro en façade peut être encastré dans le tableau de bord. En plus du haut-parleur en façade, il est possible d’y adjoindre un haut-parleur externe pour une meilleure écoute des communications (connecteur EXT.SP. situé sur la face arrière de l’appareil : C). Renseignez-vous auprès de votre revendeur le plus proche pour le montage sur votre appareil. 2) INSTALLATION DE L’ANTENNE a) Choix de l’antenne - 5 En CB, plus une antenne est grande, meilleur est son rendement. Votre Point Conseil saura orienter votre choix. Français b) Antenne mobile - - - Il faut l’installer à un endroit du véhicule où il y a un maximum de surface métallique (plan de masse), en s’éloignant des montants du pare-brise et de la lunette arrière. Dans le cas où une antenne radiotéléphone est déjà installée, l’antenne CB doit être au-dessus de celle-ci. Il existe 2 types d’antennes : les préréglées et les réglables. Les préréglées s’utilisent de préférence avec un bon plan de masse (pavillon de toit ou malle arrière). Les réglables offrent une plage d’utilisation beaucoup plus large et permettent de tirer parti de plans de masse moins importants (voir § RÉGLAGE DU TOS page 7). Pour une antenne à fixation par perçage, il est nécessaire d’avoir un excellent contact antenne/plan de masse ; pour cela, grattez légèrement la tôle au niveau de la vis et de l’étoile de serrage. Lors du passage du câble coaxial, prenez garde de ne pas le pincer ou l’écraser (risque de rupture ou de court-circuit). Branchez l’antenne (B). LOBE DE RAYONNEMENT a) b) c) d) e) ATTENTION : Ne jamais remplacer le fusible d’origine par un modèle d’une valeur différente ! c) Antenne fixe - On peut s’en assurer en vérifiant que la borne (-) de la batterie soit bien connectée au bloc moteur ou au châssis. Dans le cas contraire, consultez votre revendeur. Assurez-vous que l’alimentation soit bien de 12 ou 24 Volts. Repérez les bornes (+) et (-) de la batterie (+ = rouge, - = noir). Dans le cas où il serait nécessaire de rallonger le cordon d’alimentation, utilisez un câble de section équivalente ou supérieure. Il est nécessaire de se connecter sur un (+) et un (-) permanents. Nous vous conseillons donc de brancher directement le cordon d’alimentation sur la batterie (le branchement sur le cordon de l’autoradio ou sur d’autres parties du circuit électrique pouvant dans certains cas favoriser la réception de signaux parasites). Branchez le fil rouge (+) à la borne positive de la batterie et le fil noir (-) à la borne négative de la batterie. Branchez le cordon d’alimentation au poste. 4) OPÉRATIONS DE BASE À EFFECTUER AVANT LA PREMIÈRE UTILISATION, SANS PASSER EN ÉMISSION (sans appuyer sur la pédale du micro) Veillez à ce qu’elle soit dégagée au maximum. En cas de fixation sur un mât, il faudra éventuellement haubaner conformément aux normes en vigueur (se renseigner auprès d’un professionnel). Les antennes et accessoires PRESIDENT sont spécialement conçus pour un rendement optimal de chaque appareil de la gamme. a) Branchez le micro, b) Vérifiez le branchement de l’antenne, c) Mise en marche de l’appareil : tournez le bouton de volume VOL (1) dans le sens des aiguilles d’une montre jusqu’à entendre un “clic”. d) Tournez le bouton du squelch SQ (2) au minimum (position M). e) Réglez le volume à un niveau convenable. f) Amenez le poste sur le canal 20 à l’aide du rotateur CH (5) ou des touches UP/DN (13) du microphone. 3) CONNEXION DE L’ALIMENTATION Votre PRESIDENT MC KINLEY est muni d’une protection contre les inversions de polarité. Néanmoins, avant tout branchement, vérifiez vos connexions. Votre poste doit être alimenté par une source de courant continu de 12 ou 24 Volts (A). À l’heure actuelle, la plupart des voitures et des camions fonctionnent avec une mise à la masse négative. 6 (voir menu BIP DE TOUCHES page 13), un bip sonore est émis. Votre radio est allumée. ATTENTION : Opération à effectuer impérativement lors de la première utilisation de l’appareil ou lors d’un changement d’antenne. Ce réglage doit être fait dans un endroit dégagé, à l’air libre. * L’afficheur montre brièvement le type de microphone (voir menu TYPE DE MICROPHONE page 14) et la bande de fréquence utilisée (voir page 12). Réglage avec le TOS-mètre intégré Pour éteindre votre poste : tourner le bouton VOL (1) dans le sens inverse des aiguilles d’une montre jusqu’au clic d’arrêt. Votre radio est éteinte. Voir la fonction CALIBRAGE DU TOS page 14. * Réglage avec TOS-mètre externe (type TOS-1 PRESIDENT) a) Branchement du Tos-mètre : - Pour ajuster le volume sonore, tourner le bouton VOL (1) dans le sens des aiguilles d’une montre. Pour diminuer le volume, tourner le bouton dans le sens inverse des aiguilles d’une montre. Brancher le Tos-mètre entre le poste et l’antenne, le plus près possible du poste (utilisez pour cela un câble de 40 cm maximum type CA-2C PRESIDENT). b) Réglage du Tos : - - 2) ASC (Automatic Squelch Control) / SQUELCH Amener le poste sur le canal 20 en AM. Positionner le commutateur du Tos-mètre en position FWD (calibrage). Appuyer sur la pédale PTT (12) pour passer en émission. Amener l’aiguille sur l’index t à l’aide du bouton de calibrage. Basculer le commutateur en position REF (lecture de la valeur du TOS). La valeur lue sur le vu-mètre doit être très proche de 1. Dans le cas contraire, rajuster votre antenne jusqu’à obtention d’une valeur aussi proche que possible de 1 (une valeur de TOS comprise entre 1 et 1,8 est acceptable). Il est nécessaire de recalibrer le Tos-mètre, entre chaque opération de réglage de l’antenne. Cette fonction permet de supprimer les bruits de fond indésirables en l’absence de communication. Le squelch ne joue ni sur le volume sonore ni sur la puissance d’émission, mais il permet d’améliorer considérablement le confort d’écoute. a) ASC : SQUELCH À RÉGLAGE AUTOMATIQUE Brevet mondial, exclusivité PRESIDENT Tourner le bouton du squelch SQ (2) dans le sens contraire des aiguilles d’une montre en position ASC. apparaît sur l’afficheur. Aucun réglage manuel répétitif et optimisation permanente entre la sensibilité et le confort d’écoute lorsque l’ASC est actif. Cette fonction peut être désactivée par rotation du bouton dans le sens des aiguilles d’une montre. Dans ce cas le réglage du squelch redevient manuel. disparaît de l’afficheur. Remarque : Afin d’éviter les pertes et atténuations dans les câbles de connexion entre la radio et ses accessoires, PRESIDENT recommande une longueur de câble inférieure à 3 m. b) SQUELCH MANUEL Maintenant, votre poste est prêt à fonctionner. Tourner le bouton du squelch SQ (2) dans le sens des aiguilles d’une montre jusqu’au point exact où tout bruit de fond disparaît. C’est un réglage à effectuer avec précision, car mis en position maximum dans le sens des aiguilles d’une montre, seuls les signaux les plus forts peuvent être perçus. B) UTILISATION 1) MARCHE/ARRÊT - VOLUME Pour allumer votre poste : tourner le bouton VOL (1) dans le sens des aiguilles d’une montre. Si la fonction BIP DE TOUCHES est active 7 Français 5) RÉGLAGE DU TOS (Taux d’ondes stationnaires) Français 3) AFFICHEUR RF POWER (combinaison 12 / 9 + 5) En mode TX, le RF POWER permet de d’augmenter/diminuer la puissance de sortie. Il permet de visualiser l’ensemble des fonctions - Appuyer et maintenir appuyée la pédale d’émission PTT (12). Appuyer sur les touches •(9) et CH (5). «RF POWER» s’affiche. Utiliser le rotateur CH (5) pour ajuster le niveau à l’aide du bargraphe. Appuyer sur le bouton CH (5) pendant 1 seconde pour valider le réglage. 6) MODE ~ PA ~ VOX ~ RÉGLAGE DU VOX MODE (pression brève) Ce commutateur permet de sélectionner le mode de modulation AM, FM, LSB ou USB. Votre mode de modulation doit correspondre à celui de votre interlocuteur. Le bargraphe principal visualise le niveau de réception et le niveau de puissance émise. Les petits bargraphes visualisent les niveaux du Mic Gain, RF Gain et RF Power. 4) CLARIFIER La fonction CLAR. permet le décalage de la fréquence en réception LSB/USB afin d’améliorer la clarté de la voix de votre correspondant. - Modulation d’Amplitude / AM : Communication sur terrain avec reliefs et obstacles sur moyenne distance (mode le plus utilisé). - Modulation de Fréquence / FM : Communication rapprochée sur terrain plat et dégagé. En configuration U uniquement : en mode FM, un appui long sur le bouton F (10) permet d’alterner entre les bandes de fréquences ENG ou CEPT. “UK” s’affiche lorsque la bande de fréquence ENG est sélectionnée (voir tableau page 70). - Bandes Supérieures et Inférieures / USB - LSB : Communication longue distance (selon les conditions de propagation). 5) BOUTON SÉLECTEUR CH ~ RF POWER BOUTON SÉLECTEUR CH - Tourner le bouton rotatif CH (5) permet de monter ou descendre d’un canal. Un bip sonore est émis à chaque changement de canal si la fonction BIP DE TOUCHES est activée (voir fonction BIP DE TOUCHES page 13). PA (Public Address) (pression longue) Appuyer la touche PA (6) durant 2 secondes pour alterner entre le mode CB et le mode PA. MODE PA. Un haut-parleur de sonorisation extérieure peut être connecté sur le poste par une prise jack située sur le panneau arrière PA.SP. (D). Pour plus de détails sur le fonctionnement en mode PA, voir le menu RÉGLAGE DU PA page 16. Voir le § BOUTONS UP/DN DU MICROPHONE page 12. L’afficheur montre la fréquence correspondante. Par exemple «27 .205» pour la canal 40. Voir le menu SPAN page 14. - Un appui long (3 secondes) sur ce bouton (5) permet d’entrer dans les MENUS. - Un appui court sur ce bouton (5) permet de valider les réglages dans les MENUS. 8 Le RÉGLAGE DU VOX active automatiquement la fonction VOX. «VOX» apparaît dans l’afficheur. La fonction VOX permet d’émettre en parlant dans le micro d’origine (ou dans le micro vox optionnel) sans appuyer sur la pédale PTT (12). L’utilisation d’un micro vox optionnel connecté à l’arrière de l’appareil (E) désactive le micro d’origine. Remarque : L’appareil sort automatiquement du RÉGLAGE DU VOX au bout de 10 secondes si aucune touche n’est pressée ou à l’appui de n’importe quelle touche sans enregistrer les paramètres de réglage. Appuyez un fois sur la touche • (9), clignote, puis appuyer brièvement sur la touche •VOX (6) pour activer la fonction VOX. «VOX» apparaît dans l’afficheur. Une nouvelle combinaison des touches • (9) et •VOX (6) désactive la fonction. «VOX» disparaît. 7) SCAN ~ DW ~ M1 SCAN (pression brève) Appuyer sur la touche SCAN (7) pour activer la fonction SCAN (balayage des Canaux) dans un ordre croissant. «SCAN» s’affiche. Le balayage s’arrête dès qu’un canal est actif. Le balayage démarre automatiquement 3 secondes après la fin de l’émission si aucune touche n’est activée pendant ce temps. Le balayage redémarre aussi dans un ordre croissant en tournant le bouton rotateur CH (5) vers la droite ou avec la touche UP (13) du micro, ou dans un ordre décroissant en tournant le bouton rotateur CH (5) vers la gauche ou avec la touche DN (13) du micro. RÉGLAGE DU VOX (10 + 6 pression longue) Appuyer brièvement sur la touche • (9) puis appuyer durant 1 seconde sur la touche •VOX (6) pour activer la fonction RÉGLAGE DU VOX. Trois réglages sont possibles : Sensibilité SET-L, Niveau Anti-Vox SET-A et Temporisation SET-T. Le réglage actif clignote, l’afficheur indique le type de réglage suivi de son niveau , par exemple SET-L1. 1. Tourner le bouton rotatif CH (5) pour augmenter/diminuer le niveau du réglage actif. 2. Appuyer brièvement sur la touche •VOX (6) pour passer au réglage suivant. 3. Une fois le VOX correctement paramétré, appuyer durant 1 seconde sur la touche •VOX (6) pour enregistrer les réglages et sortir de la fonction RÉGLAGE DU VOX. - - - Durant le scan, appuyer une seconde sur la touche • (9) pour alterner entre les modes balayage des canaux et balayage des mémoires. Dans le mode BALAYAGE DES MÉMOIRES, seuls les canaux prioritaires (voir § CANAUX PRIORITAIRES page 10) et les canaux mémorisés (voir § MÉMOIRE page 10) sont scannés. Appuyer sur la pédale PTT (12) ou sur la touche SCAN (7) pour sortir de la fonction SCAN. Sensibilité «SET-L» : permet de régler la sensibilité du microphone (original ou vox optionnel) pour une qualité de transmission optimum. Niveau réglable de 1 (niveau haut) à 9 (niveau bas). Valeur par défaut : 1. DW (pression longue) Anti-Vox «SET-A» : permet d’empêcher l’émission générée par les bruits ambiants. Niveau réglable: OFF (émet en fonction du niveau du squelch) et de 0 (sans anti-vox) à 9 (niveau bas). Valeur par défaut : OFF. - Temporisation «SET-T» : permet d’éviter la coupure «brutale» de la transmission en rajoutant une temporisation à la fin de la parole. Niveau réglable de 1 (délai court) à 9 (délai long). Valeur par défaut : 5. - 9 Une pression longue (1s) sur la touche DW (7) permet d’activer la fonction DW (double veille). «DW» s’affiche. Elle permet d’effectuer une veille entre deux canaux. Une première pression longue active la fonction double veille entre le canal prioritaire1 et le canal en cours (voir § CANAL PRIORITAIRE 1 page 15). Une seconde pression longue active la fonction double veille entre le canal prioritaire 2 et le canal en cours (voir § CANAL PRIORITAIRE 2 page 16). Français VOX (9 + 6 pression brève) Français - - «EMG» disparaît de l’afficheur. Voir CANAL PRIORITAIRE 1 et 2 pages 15. Le numéro du canal en cours et le canal prioritaire s’affichent alternativement. L’icône «EMG» s’affiche également en même temps que le canal prioritaire. Le canal en cours peut être modifié pendant la double veille. Une nouvelle pression longue sur la touche DW (7) désactive la fonction DW. «DW» disparaît de l’afficheur. M2 Voir § MÉMOIRE page 10. 9) Touche «•» ~ MÉMOIRE ~ ÉCHO ~ M3 Touche «•» (pression brève) M1 Voir § MÉMOIRE page 10. Appuyer sur la touche • (9) permet d’activer le mode FONCTION. clignote. Combiner avec une autre touche commençant par • (•VOX, •EMG, •ECHO, •RF POWER ou •MIC/RF GAIN) pour accéder à la fonction. 8) ANL/NB ~ HI-CUT ~ CANAUX PRIORITAIRES ~ M2 ANL/NB (pression brève) ANL/NB (Automatic Noise Limiter / Noise Blanker) : ces filtres permettent de réduire les bruits de fond et certains parasites en réception. Remarque : La touche • (9) est toujours combinée à une autre. L’appui seul de la touche n’a aucun effet si ce n’est de faire clignoter durant 10 secondes. Appuyer sur la touche ANL/NB (8) pour alterner entre les 4 états suivants, en boucle : 1. ANL/on - NB/off • 2. ANL/off - NB /on • 3. ANL/on - NB/on • 4. ANL/off - NB/off. MÉMOIRE (pression longue) Ce poste permet de mémoriser 3 canaux avec les attributs suivants : NB/ANL (on/off), HI-CUT (on/off), AM / FM / USB / LSB. L’icône du filtre apparaît dans l’afficheur quand le filtre est actif (on). HI-CUT (pression longue) - Élimine les parasites haute fréquence. Appuyer une seconde sur la touche HI-CUT (8) pour activer/ désactiver le filtre HI-CUT. «HI-CUT» apparaît dans l’afficheur quand le filtre est actif. - CANAUX PRIORITAIRES (9 + 8 pression brève) - Appuyer brièvement sur la touche • (9) puis sur la touche •EMG (8) pour combiner ces deux touches. Une première combinaison permet d’activer le canal prioritaire 1. Une seconde combinaison permet d’activer le canal prioritaire 2. Lorsqu’un canal prioritaire est actif, «EMG» s’affiche. Une troisième combinaison permet de revenir au canal initial. - 10 Pour mettre en mémoire : Sélectionner le canal et les attributs à mémoriser. Appuyer durant une seconde la touche MEM (9). Si la fonction BIP DE TOUCHES est active, un bip est émis. «MEM» clignote. Appuyer durant une seconde l’une des touches M1 (7), M2 (8) ou M3 (9) pour mémoriser. «MEM» apparaît dans l’afficheur et le numéro de la mémoire sélectionnée (M1, M2 ou M3) clignote. Si la fonction BIP DE TOUCHES est active, un long bip confirme le succès de l’opération. Pour appeler une mémoire : Appuyer durant une seconde la touche MEM (9). Si la fonction BIP DE TOUCHES est active, un bip est émis. «MEM» clignote. Appuyer brièvement l’une des touches M1 (7), M2 (8) ou M3 (9) pour afficher la mémoire sélectionnée. «MEM» s’affiche, le numéro de la mémoire sélectionnée (M1, M2 ou M3) clignote. - RF GAIN (combinaison 9 + 10) Pour effacer une mémoire : Éteindre l’appareil. Maintenir l’une des touches M1 (7), M2 (8) ou M3 (9) et allumer l’appareil. La mémoire sélectionnée est effacée. «MEM» et le numéro de la mémoire sélectionnée (M1, M2 ou M3) disparaissent de l’afficheur. Voir aussi le menu RÉINITIALISATION page 16. - ÉCHO (9 + 9 pression brève) Appuyez un fois sur la touche • (9), clignote, puis appuyer brièvement sur la touche •ECHO (9) pour activer la fonction ECHO. «ECHO» apparaît dans l’afficheur. Une nouvelle combinaison des touches • (9) et •ECHO (9) désactive la fonction. «ECHO» disparaît. - Le bargraphe du RF GAIN sera toujours affiché en réception. M3 11) PRISE MICRO 6 BROCHES Voir § MÉMOIRE page 10. Elle se situe en façade de votre appareil et facilite ainsi son intégration à bord de votre véhicule. Voir schéma de branchement en page 73. 10) F ~ MIC GAIN ~ RF GAIN F Voir En configuration U uniquement page 8. Voir le § TALKBACK page 11. Voir le § FONCTION À L’ALLUMAGE DU POSTE page 12. 12) PTT ~ RF POWER ~ MIC GAIN ~ TALKBACK PTT (Push To Talk) Pédale d’émission, appuyer pour parler, pour recevoir un message. MIC GAIN (combinaison 12 / 9 + 10) - Réglage de la sensibilité en réception. Position maximum dans le cas de réception de communications longue distance. Vous pouvez diminuer le RF GAIN, pour éviter des distorsions, lorsque l’interlocuteur est proche. Réduisez le gain en réception dans le cas d’une communication rapprochée avec un correspondant non équipé d’un RF POWER. Appuyer sur la touche • (9). Appuyer sur la touche •MIC/RF GAIN (10). «RF GAIN» s’affiche. Tourner le bouton rotateur CH (5) pour ajuster le niveau à l’aide du bargrahe. Appuyer sur le bouton CH (5) pendant 1 seconde pour valider le réglage. Réglage du niveau de sensibilité du microphone. Appuyer et maintenir appuyée la pédale d’émission PTT (12) Appuyer sur la touche • (9). Appuyer sur la touche •MIC/RF GAIN (10). «MIC GAIN» s’affiche. Tourner le bouton rotateur CH (5) pour régler le niveau à l’aide du bargraphe. Appuyer sur le bouton CH (5) pendant 1 seconde pour valider le réglage. La position normale de cette fonction se situe au maximum. Le bargraphe du MIC GAIN s’affiche en émission. s’affiche. Relâcher RF POWER Voir le § RF POWER page 8. MIC GAIN Voir le § MIC GAIN page 11. TALKBACK (combinaison 12 / 10) 11 La fonction TALKBACK permet d’entendre votre propre modulation dans le haut-parleur de la CB. Maintenir la pédale PTT (12) appuyée. Appuyer sur la touche F (10) pour activer/désactiver la fonction TALKBACK. «TALKBACK» s’affiche quand la fonction est active. Français - Français NIVEAU DU TALKBACK (combinaison 12 / 5) 4. À ce stade, confirmer la sélection en éteignant puis en allumant à nouveau l’appareil. Quand la fonction TALKBACK est active, maintenir la pédale PTT (12) appuyée et tourner le bouton rotateur CH (5) pour ajuster le niveau du TALKBACK. 9 niveaux de 01 à 09. Voir les bandes de fréquences pages 70 à 72 / tableau de configuration page 74. TOT (Time Out Timer) D) MENUS Si la transmission, (PTT ou VOX) dépasse les 5 minutes, le canal et clignotent, l’émission se termine. Un bip de TOT est émis jusqu’à ce que la pédale PTT (12) soit relâchée. L’ordre des 14 fonctions est celui décrit dans ce manuel. Toutefois, la fonction affichée en entrant dans les MENUS sera la dernière fonction modifiée par l’utilisateur. Quelle que soit la fonction, la procédure est identique : Appuyer pendant 3 secondes sur le bouton CH (5) pour entrer dans les MENUS. s’affiche. 1. Tourner le bouton rotatif CH (5) ou utiliser les touches UP/DN (13) du microphone pour sélectionner le menu. 2. Appuyer sur le bouton CH (5) pour valider. Le paramètre de réglage du menu choisi clignote dans l’afficheur. 3. Tourner le rotateur CH (5) ou utiliser les touches UP/DN (13) du microphone pour modifier la valeur du paramètre. 4a. Une nouvelle pression brève sur le bouton CH (5) permet de valider la valeur choisie et de rester dans les MENUS. Si la fonction possède plus d’un seul paramètre, le paramètre suivant clignote. 4b. Une nouvelle pression longue (1 seconde) permet de valider la valeur choisie et de sortir des MENUS. disparaît de l’afficheur. 5. Si aucune touche n’est pressée, l’appareil sort des MENUS au bout de 10 secondes. disparaît de l’afficheur. Remarque : Les touches UP/DN (13) du microphone ont le même effet que la rotation du bouton CH (5). La pédale d’émission PTT (12) sort des MENUS sans valider. disparaît de l’afficheur. 13) BOUTONS UP/DN DU MICROPHONE - Ces boutons (13) permettent de monter (UP) ou descendre (DN) d’un canal. Un bip sonore est émis à chaque changement de canal si la fonction BIP DE TOUCHES est activée (voir Fonction BIP DE TOUCHES page 13). L’afficheur montre la fréquence correspondante. Par exemple «27 .205» pour la canal 40. Voir le menu SPAN page 14. Voir le § BOUTON SÉLECTEUR CH page 8. C) FONCTION À L’ALLUMAGE DU POSTE La SÉLECTION DE LA BANDE DE FRÉQUENCES, se fait à l’allumage du poste. Éteindre puis rallumer l’appareil en maintenant appuyée la touche F (10). (Configuration : EU ; PL ; d ; EC ; U ; In) Les bandes de fréquences doivent être choisies selon le pays où vous utilisez votre appareil. N’utilisez en aucun cas une configuration différente. Certains pays nécessitent une licence d’utilisation. Voir tableau page 75. 1) COULEUR Appuyer pendant 3 secondes sur le bouton CH (5) pour entrer dans les MENUS. s’affiche. 1. Tourner le bouton rotatif CH (5) ou utiliser les touches UP/DN (13) du microphone pour sélectionner le menu COLOR. 2. Appuyer sur le bouton CH (5) pour valider. La couleur clignote dans l’afficheur. 1. Allumer l’appareil en maintenant appuyée la touche F (10). La lettre correspondant à la configuration actuelle clignote. 2. Pour changer de configuration, utiliser le rotateur CH (5) ou les touches UP/DN du microphone (13). 3. Quand la configuration désirée est affichée, appuyer 1 seconde sur la touche F (10). La lettre correspondant à la configuration s’affiche en continu, un bip est émis. 12 4a. Une nouvelle pression brève sur le bouton CH (5) permet de valider la couleur choisie et de rester dans les MENUS. 4b. Une nouvelle pression longue (1 seconde) permet de valider la couleur choisie et de sortir des MENUS. disparaît de l’afficheur. 5. Si aucune touche n’est pressée, l’appareil sort des MENUS au bout de 10 secondes. disparaît de l’afficheur. La Couleur par défaut est orange : 2) DIMMER 4) BIP DE TOUCHES La fonction DIMMER permet d’ajuster la luminosité du rétro éclairage de l’afficheur. 10 niveaux de 0 à 9. Appuyer pendant 3 secondes sur le bouton CH (5) pour entrer dans les MENUS. s’affiche. 1. Tourner le bouton rotatif CH (5) ou utiliser les touches UP/DN (13) du microphone pour sélectionner le menu DIMMER. 2. Appuyer sur le bouton CH (5) pour valider. La valeur du dimmer clignote dans l’afficheur. 3. Tourner le rotateur CH (5) ou utiliser les touches UP/DN (13) du microphone pour changer la valeur du dimmer. 4a. Une nouvelle pression brève sur le bouton CH (5) permet de valider la valeur choisie et de rester dans les MENUS. 4b. Une nouvelle pression longue (1 seconde) permet de valider la valeur choisie et de sortir des MENUS. disparaît de l’afficheur. 5. Si aucune touche n’est pressée, l’appareil sort des MENUS au bout de 10 secondes. disparaît de l’afficheur. La valeur par défaut du Dimmer est : 5 Bip sonore au changement de canal, touches etc. Appuyer pendant 3 secondes sur le bouton CH (5) pour entrer dans les MENUS. s’affiche. 1. Tourner le bouton rotatif CH (5) ou utiliser les touches UP/DN (13) du microphone pour sélectionner le menu KEY BEEP. 2. Appuyer sur le bouton CH (5) pour valider. L’état de la fonction clignote dans l’afficheur. 3. Tourner le rotateur CH (5) ou utiliser les touches UP/DN (13) du microphone pour activer on / désactiver oF la fonction. 4a. Une nouvelle pression brève sur le bouton CH (5) permet de valider et de rester dans les MENUS. 4b. Une nouvelle pression longue (1 seconde) permet de valider et de sortir des MENUS. disparaît de l’afficheur. 5. Si aucune touche n’est pressée, l’appareil sort des MENUS au bout disparaît de l’afficheur. de 10 secondes. Le Bip de touches par défaut est : on. 3) CONTRASTE 5) ROGER BEEP Le ROGER BEEP émet un bip lorsqu’on relâche la pédale PTT (12) du micro pour laisser la parole à son correspondant. Historiquement, la CB étant un mode de communication «simplex», c’est-à-dire qu’il n’est pas possible de parler et d’écouter en même temps (comme c’est le cas pour le téléphone par exemple), il était La fonction CONTRAST permet d’ajuster le contraste de l’afficheur. 10 niveaux de 0 à 9. Appuyer pendant 3 secondes sur le bouton CH (5) pour entrer dans les MENUS. s’affiche. 13 Français 1. Tourner le bouton rotatif CH (5) ou utiliser les touches UP/DN (13) du microphone pour sélectionner le menu CONTRAST. 2. Appuyer sur le bouton CH (5) pour valider. La valeur du contraste clignote dans l’afficheur. 3. Tourner le rotateur CH (5) ou utiliser les touches UP/DN (13) du microphone pour changer la valeur du contraste. 4a. Une nouvelle pression brève sur le bouton CH (5) permet de valider la valeur choisie et de rester dans les MENUS. 4b. Une nouvelle pression longue (1 seconde) permet de valider la valeur choisie et de sortir des MENUS. disparaît de l’afficheur. 5. Si aucune touche n’est pressée, l’appareil sort des MENUS au bout de 10 secondes. disparaît de l’afficheur. La valeur par défaut du Contraste est : 5 3. Tourner le rotateur CH (5) ou utiliser les touches UP/DN (13) du microphone pour changer la couleur. Français 3. Tourner le rotateur CH (5) ou utiliser les touches UP/DN (13) du microphone pour activer on / désactiver oF la fonction. 4a. Une nouvelle pression brève sur le bouton CH (5) permet de valider et de rester dans les MENUS. 4b. Une nouvelle pression longue (1 seconde) permet de valider et disparaît de l’afficheur. de sortir des MENUS. 5. Si aucune touche n’est pressée, l’appareil sort des MENUS au bout de 10 secondes. disparaît de l’afficheur. d’usage de dire «Roger» une fois que l’on avait fini de parler afin de prévenir son correspondant qu’il pouvait parler à son tour. Le mot «Roger» a été remplacé par un bip significatif, d’où son nom «Roger Beep». Appuyer pendant 3 secondes sur le bouton CH (5) pour entrer dans les MENUS. s’affiche. 1. Tourner le bouton rotatif CH (5) ou utiliser les touches UP/DN (13) du microphone pour sélectionner le menu ROGER BP. 2. Appuyer sur le bouton CH (5) pour valider. L’état de la fonction clignote dans l’afficheur. 3. Tourner le rotateur CH (5) ou utiliser les touches UP/DN (13) du microphone pour activer on / désactiver oF la fonction. 4a. Une nouvelle pression brève sur le bouton CH (5) permet de valider et de rester dans les MENUS. 4b. Une nouvelle pression longue (1 seconde) permet de valider et disparaît de l’afficheur. de sortir des MENUS. 5. Si aucune touche n’est pressée, l’appareil sort des MENUS au bout de 10 secondes. disparaît de l’afficheur. Le Span par défaut est of. 7) TYPE DE MICROPHONE Le PRESIDENT MC KINLEY peut être utilisé tant avec un microphone electret que dynamique 6 broches PRESIDENT (voir câblage du microphone page 73). À l’allumage du poste, le type de microphone s’affiche brièvement. Appuyer pendant 3 secondes sur le bouton CH (5) pour entrer s’affiche. dans les MENUS. 1. Tourner le bouton rotatif CH (5) ou utiliser les touches UP/DN (13) du microphone pour sélectionner le menu MIC TYPE. 2. Appuyer sur le bouton CH (5) pour valider. Le type de microphone clignote dans l’afficheur. 3. Tourner le rotateur CH (5) ou utiliser les touches UP/DN (13) du microphone pour sélectionner le type de microphone (electret) ou (dynamique). 4a. Une nouvelle pression brève sur le bouton CH (5) permet de valider et de rester dans les MENUS. 4b. Une nouvelle pression longue (1 seconde) permet de valider et disparaît de l’afficheur. de sortir des MENUS. 5. Si aucune touche n’est pressée, l’appareil sort des MENUS au bout de 10 secondes. disparaît de l’afficheur. Le Type de microphone par défaut est (electret). Le Roger beep par défaut est : of. Remarque : Le ROGER BEEP est également entendu dans le hautparleur si la fonction BIP DE TOUCHES est activée. Si la fonction BIP DE TOUCHES n’est pas activée, seul le correspondant peut entendre le Roger Beep. 6) SPAN Quand la fonction est active, la fréquence peut être réglée en continu. Une pression brève sur le bouton CH (5) affiche une barre sous la première ou la seconde décimale de la fréquence. Le rotateur CH (5) n’agit plus sur le canal mais sur la fréquence par saut de 100 kHz (première décimale) ou de 10 kHz (seconde décimale). Appuyer pendant 3 secondes sur le bouton CH (5) pour entrer dans les MENUS. s’affiche. 1. Tourner le bouton rotatif CH (5) ou utiliser les touches UP/DN (13) du microphone pour sélectionner le menu SPAN. 2. Appuyer sur le bouton CH (5) pour valider. L’état de la fonction clignote dans l’afficheur. 8) CALIBRAGE DU TOS Appuyer pendant 3 secondes sur le bouton CH (5) pour entrer dans les MENUS. s’affiche. 1. Tourner le bouton rotatif CH (5) ou utiliser les touches UP/DN (13) du microphone pour sélectionner le menu SWR. 14 La fonction TONE permet de changer la tonalité en réception. 11 niveaux de -5 à +5. Appuyer pendant 3 secondes sur le bouton CH (5) pour entrer dans les MENUS. s’affiche. 1. Tourner le bouton rotatif CH (5) ou utiliser les touches UP/DN (13) du microphone pour sélectionner le menu TONE. 2. Appuyer sur le bouton CH (5) pour valider. La valeur de la tonalité clignote dans l’afficheur. 3. Tourner le rotateur CH (5) ou utiliser les touches UP/DN (13) du microphone pour définir la valeur de la tonalité. 4a. Une nouvelle pression brève sur le bouton CH (5) permet de valider la valeur choisie et de rester dans les MENUS. 4b. Une nouvelle pression longue (1 seconde) permet de valider la valeur choisie et de sortir des MENUS. disparaît de l’afficheur. 5. Si aucune touche n’est pressée, l’appareil sort des MENUS au bout de 10 secondes. disparaît de l’afficheur. La Tonalité par défaut est : 0. *Vérifier que le volume du bip soit réglé à un niveau convenable. Voir § RÉGLAGE DU TOS page 7. 9) RÉGLAGE DE L’ÉCHO 1. 2. 3. 4. 5. 6. 7. Appuyer pendant 3 secondes sur le bouton CH (5) pour entrer dans les MENUS. s’affiche. Tourner le bouton rotatif CH (5) ou utiliser les touches UP/DN (13) du microphone pour sélectionner le menu ECHO SET. Appuyer sur le bouton CH (5) pour valider. Le niveau (LEVEL) de l’ÉCHO clignote dans l’afficheur. Tourner le rotateur CH (5) ou utiliser les touches UP/DN (13) du microphone pour définir la valeur du niveau de1 à 32 ( valeur par défaut, 13). Une nouvelle pression sur le bouton CH (5) permet de valider la valeur du niveau. Le second paramètre, le retard (DELAY), clignote. Tourner le rotateur CH (5) ou utiliser les touches UP/DN (13) du microphone pour définir la valeur du retard de1 à 32 (valeur par défaut, 16). Une nouvelle pression sur le bouton CH (5) permet de valider la valeur du retard. Le retard cesse de clignoter. a) Repartir au point 1 pour régler une autre fonction ou b) Appuyer sur la pédale PTT (12) pour sortir des MENUS. Si aucune touche n’est pressée, l’appareil sort des MENUS au bout de 10 secondes. disparaît de l’afficheur. Voir § ÉCHO page 11. 11) CANAL PRIORITAIRE 1 1. 2. 3. 4. 5. 6. 15 Appuyer pendant 3 secondes sur le bouton CH (5) pour entrer dans les MENUS. s’affiche. Tourner le bouton rotatif CH (5) ou utiliser les touches UP/DN (13) du microphone pour sélectionner le menu EMG 1. Appuyer sur le bouton CH (5) pour valider. Le premier paramètre, le mode de modulation, clignote dans l’afficheur. Tourner le rotateur CH (5) ou utiliser les touches UP/DN (13) du microphone pour définir le mode de modulation du canal prioritaire 1 : AM, FM, USB, LSB ou FM UK (en configuration U uniquement). Une nouvelle pression sur le bouton CH (5) permet de valider. Le mode de modulation cesse de clignoter, le second paramètre, le canal, clignote dans l’afficheur. Utiliser les touches UP/DN (11) du microphone ou tourner le bouton CH (5) pour sélectionner le canal prioritaire 1. Une nouvelle pression sur le bouton CH (5) permet de valider le canal. a) Repartir au point 1 pour régler une autre fonction ou b) Appuyer sur la pédale PTT (10) pour sortir des MENUS. Français 10) RÉGLAGE DE LA TONALITÉ 2. Appuyer sur le bouton CH (5) pour valider. Le poste passe automatiquement en mode TX sans presser la touche PTT (12) et le calibrage commence. Le temps de calibrage est de 5 minutes maximum. Un décompte se fait dans l’afficheur. 3. Ajuster l’antenne. - Le bip* est continu quand la valeur du TOS est égale à 1,0. L’espace entre les bip devient de plus en plus grand au fur et à mesure que la valeur du TOS s’éloigne de 1.0. - Le volume du bip est réglable avec le bouton VOL (1). - L’afficheur indique la valeur du TOS. Par exemple 2.5 . 4. Appuyer sur la pédale PTT (12) pour sortir du CALIBRAGE DU TOS. Français 7. Si aucune touche n’est pressée, l’appareil sort des MENUS au bout de 10 secondes ou par une nouvelle pression longue sur la touche F (7). disparaît de l’afficheur. Le canal prioritaire 1 par défaut est le 9 en AM. - Voir le § CANAUX PRIORITAIRES page 10. 12) CANAL PRIORITAIRE 2 - Appuyer pendant 3 secondes sur le bouton CH (5) pour entrer s’affiche. dans les MENUS. 1. Tourner le bouton rotatif CH (5) ou utiliser les touches UP/DN (13) du microphone pour sélectionner le menu EMG 2. Les points 2 à 7 sont identiques à ceux du § CANAL PRIORITAIRE 1. Le canal prioritaire 2 par défaut est le19 en AM. In : la modulation du microphone est transmise au haut-parleur externe du Public Address connecté au jack PA.SP. (D). Le signal reçu est renvoyé vers le haut-parleur interne (ou le haut-parleur externe optionnel connecté au jack EXT.SP. (C)). «PA» clignote en alternance avec le mode de modulation utilisé : AM, FM, LSB, SSB ou FM UK (en configuration U uniquement). oF : la réception n’est plus fonctionnelle. Seule la modulation du microphone est transmise au haut-parleur du Public Address connecté au jack PA.SP. (D). «PA» s’affiche et les canaux sont remplacés par PA. En mode PA, appuyer sur la pédale d’émission PTT (12) pour afficher «PA LEVEL». Tourner alors le rotateur CH (5) pour régler le niveau audio du PA. Le type de Public Address par défaut est PA. Voir le § CANAUX PRIORITAIRES page 10. Voir le § PA page 8. 13) RÉGLAGE DU PA (Public Address) 14) RÉINITIALISATION Cette fonction permet de sélectionner le mode de fonctionnement du Public Address PA. Permet de réinitialiser tous les paramètres définis par l’utilisateur et de revenir aux valeurs par défaut. Appuyer pendant 3 secondes sur le bouton CH (5) pour entrer dans les MENUS. s’affiche. 1. Tourner le bouton rotatif CH (5) ou utiliser les touches UP/DN (13) du microphone pour sélectionner le menu PA SET. 2. Appuyer sur le bouton CH (5) pour valider. Le type de PA clignote dans l’afficheur. 3. Tourner le rotateur CH (5) ou utiliser les touches UP/DN (13) du microphone pour définir le type de PA, PA, In ou oF. 4a. Une nouvelle pression brève sur le bouton CH (5) permet de valider le type de PA et de rester dans les MENUS. 4b. Une nouvelle pression longue (1 seconde) permet de valider le type de PA et de sortir des MENUS. disparaît de l’afficheur. 5. Si aucune touche n’est pressée, l’appareil sort des MENUS au bout de 10 secondes. disparaît de l’afficheur. - PA : la modulation du microphone et le signal reçu sont transmis au haut-parleur du Public Address connecté au jack PA.SP. (D). «PA» clignote en alternance avec le mode de modulation utilisé : AM, FM, LSB, SSB ou FM UK (en configuration U uniquement). 1. 2. 3. 4. 5. Appuyer pendant 3 secondes sur le bouton CH (5) pour entrer dans les MENUS. s’affiche. Tourner le bouton rotatif CH (5) ou utiliser les touches UP/DN (13) du microphone pour sélectionner le menu RST ALL. Appuyer sur le bouton CH (5) pour valider. «CONFIRM» s’affiche, no clignote dans l’afficheur. Tourner le rotateur CH (5) ou utiliser les touches UP/DN (13) du microphone pour afficher . Une nouvelle pression sur le bouton CH (5) permet de valider et de sortir des MENUS. Si aucune touche n’est pressée, l’appareil sort des MENUS au bout de 10 secondes. disparaît de l’afficheur. A) ALIMENTATION (13,8 V / 27,6 V) B) PRISE D’ANTENNE (SO-239) C) PRISE POUR HAUT-PARLEUR EXTÉRIEUR (8 Ω, Ø 3,5 mm) D) PRISE POUR HAUT-PARLEUR PA EXTÉRIEUR (8 Ω, Ø 3,5 MM) E) PRISE POUR MICRO VOX OPTIONNEL (Ø 2,5 mm) 16 F) GUIDE DE DÉPANNAGE 1) GÉNÉRALES 1) VOTRE POSTE N’ÉMET PAS OU VOTRE ÉMISSION EST DE MAUVAISE QUALITÉ - Canaux : - Modes de modulation : - Gamme de fréquence : - Impédance d’antenne : - Tension d’alimentation : - Dimensions (L x P x H) : - Poids : - Accessoires inclus : 40 AM / FM / USB / LSB de 26,965 MHz à 27,405 MHz 50 ohms 13,8 V / 27,6 V 170 (L) x 150 (P) x 52 (H) mm 1 kg 1 microphone UP/DOWN et son support, 1 berceau avec vis de fixation et cordon d’alimentation avec fusible. - 2) VOTRE POSTE NE REÇOIT PAS OU VOTRE RÉCEPTION EST DE MAUVAISE QUALITÉ 2) ÉMISSION - Tolérance de fréquence Puissance porteuse Émissions parasites Réponse en fréquence Puissance émise dans le canal adjacent - Sensibilité du microphone - Consommation - Distorsion maximum du signal modulé : : : : +/- 300 Hz 4 W AM/FM - 12 W USB/LSB Inférieure à 4 nW (- 54 dBm) 300 Hz à 3 kHz en AM/FM/USB/LSB - : inférieure à 20 µW : 3 mV : 3 A (avec modulation) Vérifiez que : Le niveau de RF GAIN soit au maximum. Le niveau du SQUELCH soit correctement réglé. Le bouton Volume soit réglé à un niveau convenable. L’antenne soit correctement branchée et le TOS bien réglé. La configuration programmée soit la bonne (voir tableau page 74). 3) VOTRE POSTE NE S’ALLUME PAS : 1,8 % 3) RÉCEPTION - Sensibilité maxi à 20 dB sinad : - Réponse en fréquence : - Sélectivité du canal adj. : - Puissance audio maxi : - Sensibilité du squelch : - Taux de réj. fréq. image : - Taux de réjection fréquence intermédiaire : - Consommation : Vérifiez que : L’antenne soit correctement branchée et que le TOS soit bien réglé. La configuration programmée soit la bonne (voir tableau page 74). Le micro soit bien branché. Le niveau de RF POWER soit au maximum. Le niveau de MIC GAIN soit au maximum. - 0,5 μV -113 dBm (AM/FM) 0,28 μV -118 dBm (USB/LSB) 300 Hz à 3 kHz en AM/FM 60 dB 3W mini 0,2 µV - 120 dBm maxi 1 mV - 47 dBm 60 dB - Vérifiez : Votre alimentation. Qu’il n’y ait pas d’inversion des fils au niveau de votre branchement. L’état du fusible. G) COMMENT ÉMETTRE OU RECEVOIR UN MESSAGE ? Maintenant que vous avez lu la notice, assurez-vous que votre poste est en situation de fonctionner (antenne branchée). 70 dB 400 mA nominal / 1000 mA max 17 Français E) CARACTÉRISTIQUES TECHNIQUES CW DX DW FM GMT GP HF LSB RX SSB SWR SWL SW TOS TX Français Appuyer sur la pédale de votre micro, et lancer le message «Attention stations pour un essai TX» ce qui vous permet de vérifier la clarté et la puissance de votre signal et devra entraîner une réponse du type «Fort et clair la station». Relâchez la pédale, et attendez une réponse. Dans le cas où vous utilisez un canal d’appel (19), et que la communication est établie avec votre interlocuteur, il est d’usage de choisir un autre canal disponible afin de ne pas encombrer le canal d’appel. H) GLOSSAIRE Au fil de l’utilisation de votre TX, vous découvrirez parfois un langage particulier employé par certains cibistes. Afin de vous aider à mieux le comprendre, vous trouverez ci-après dans le glossaire et le code «Q.» un récapitulatif des termes utilisés. Toutefois, il est évident qu’un langage clair et précis facilitera le contact entre tous les amateurs de radiocommunication. C’est la raison pour laquelle les termes que vous lirez ci-dessous sont donnés à titre indicatif, mais ne sont pas à utiliser de façon formelle. UHF USB VHF Alpha Bravo Charlie Delta Echo Foxtrott Golf H I J K L M N Hotel India Juliett Kilo Lima Mike November O P Q R S T U Oscar Papa Quebec Romeo Sierra Tango Uniform V W X Y Z ALPHA LIMA BAC BASE BREAK CANNE À PÊCHE CHEERIO BY CITY NUMBER COPIER FIXE MOBILE FB INFERIEURS MAYDAY MIKE MOBILE NÉGATIF OM SUCETTE Victor Whiskey X-ray Yankee Zulu LANGAGE TECHNIQUE AM BLU BF CB CH CQ : : : : : : Continuous waves (morse) Liaison longue distance Dual watch (double veille) Frequency modulation (modulation de fréquence) Greenwich Meantime (heure méridien Greenwich) Ground plane (antenne verticale) High Frequency (haute fréquence) Low Side Band (bande latérale inférieure) Receiver (récepteur) Single Side Band (Bande latérale unique) Standing Waves Ratio Short waves listening (écoute en ondes courtes) Short waves (ondes courtes) Taux d’ondes stationnaires Transceiver.Désigne un poste émetteur-récepteur CB. Indique aussi l’émission. : Ultra-haute fréquence : Up Side Band (bande latérale supérieure) : Very high Frequency (très haute fréquence) LANGAGE CB ALPHABET PHONÉTIQUE INTERNATIONAL A B C D E F G : : : : : : : : : : : : : : : Amplitude Modulation (modulation d’amplitude) Bande latérale unique Basse fréquence Citizen Band (canaux banalisés) Channel (canal) Appel général 18 : : : : : : : : : : : : : : : : : Amplificateur linéaire Poste CB Station de base Demande de s’intercaler, s’interrompre Antenne Au revoir Code postal Écouter, capter, recevoir Station mobile arrêtée Fine business (bon, excellent) Canaux en-dessous des 40 canaux autorisés Appel de détresse Micro Station mobile Non Opérateur radio Micro : : : : : : : : : : : : : : : : : : : QRP QRPP QRPPette QRQ QRR QRRR QRS QRT QRU QRV QRW QRX QRZ QSA QSB QSJ QSK QSL QSO QSP QSX QSY QTH QTR Canaux au-dessus des 40 canaux autorisés Télévision Amplificateur de puissance Téléphone Interférences TV Se voir Vieux copains Watts Le temps L’épouse de l’opérateur Opératrice radio Poignée de mains Amitiés Grosses bises Dégager la fréquence Polarisation horizontale, aller se coucher Pipi le téléphone Gastro liquide (apéritif) CODE «Q» QRA QRA Familial QRA PRO QRB QRD QRE QRG QRH QRI QRJ QRK QRL QRM QRM DX QRM 22 QRN QRO : : : : : : : : : : : : : : : : : Emplacement de la station Domicile de la station Lieu de travail Distance entre 2 stations Direction Heure d’arrivée prévue Fréquence Fréquence instable Tonalité d’émission Me recevez-vous bien ? Force des signaux (R1 à R5) Je suis occupé Parasites, brouillage Parasites lointains Police Brouillage atmosphérique (orages) Fort, très bien, sympa : : : : : : : : : : : : : : : : : : : : : : : : Faible, petit Petit garçon Petite fille Transmettez plus vite Nom de la station Appel de détresse Transmettez plus lentement Cessez les émissions Plus rien à dire Je suis prêt Avisez que j’appelle Restez en écoute un instant Indicatif de la station : par qui suis-je appelé? Force de signal (S1 à S9) Fading, variation Prix, argent, valeur Dois-je continuer la transmission ? Carte de confirmation de contact Contact radio Transmettre à... Voulez-vous écouter sur... Dégagement de fréquence Position de station Heure locale CANAUX D’APPEL 27 AM : appel général en zone urbaine 19 AM : Routiers 9 AM : Appel d’urgence 19 Français SUPÉRIEURS TANTE VICTORINE TONTON TPH TVI VISU VX WHISKY WX XYL YL 51 73 88 99 144 318 600 ohms 813 Français • Cette partie doit être conservée même après la fin de la garantie et si vous revendez votre poste, donnez la au nouveau propriétaire pour le suivi S.A.V. • En cas de dysfonctionnement réel, mettez-vous d’abord en rapport avec votre revendeur qui décidera de la conduite à tenir. • Dans le cas d’une intervention hors garantie, un devis sera établi avant toute réparation. Vous venez de faire confiance à la qualité et à l’expérience de PRESIDENT et nous vous remercions. Pour que vous soyez pleinement satisfait de votre achat, nous vous conseillons de lire attentivement ce manuel. N’oubliez pas de nous retourner la partie droite de ce bon de garantie, c’est très important pour vous car cela permet d’identifier votre appareil lors de son passage éventuel dans nos ateliers. CONDITIONS GÉNÉRALES DE GARANTIE Ce poste est garanti 2 ans pièces et main d’œuvre dans son pays d’achat contre tout vice de fabrication reconnu par notre service technique. *Le Laboratoire SAV de PRESIDENT se réserve le droit de ne pas appliquer la garantie si une panne est provoquée par une antenne autre que celles distribuées par la marque PRESIDENT, si la dite antenne est à l’origine de la panne. Une extension de garantie de 3 ans est proposée systématiquement pour l’achat et l’utilisation d’une antenne de la marque PRESIDENT, amenant la durée totale de la garantie à 5 ans, et sur justificatif retourné sous 30 jours suivant l’achat au SAV de la Société Groupe President Electronics, ou toute filiale étrangère. Il est recommandé de lire attentivement les conditions ci-après et de les respecter sous peine d’en perdre le bénéfice. • Pour être valable, la garantie doit nous être retournée au plus tard 1 mois après l’achat. • Détacher après l’avoir fait remplir la partie ci-contre et la retourner dûment complétée. • Toute intervention effectuée dans le cadre de la garantie sera gratuite et les frais de réexpédition pris en charge par notre Société. • Une preuve d’achat doit être jointe obligatoirement avec le poste à réparer. • Les dates inscrites sur le bon de garantie et la preuve d’achat doivent concorder. • Ne pas procéder à l’installation de votre appareil sans avoir lu ce manuel d’instructions. • Aucune pièce détachée ne sera envoyée ni échangée par nos services au titre de la garantie. La garantie est valable dans le pays d’achat. La Direction Technique et Le Service Qualité # Ne sont pas couverts : Date d’achat :................................................................................................ • Les dommages causés par accident, choc ou emballage insuffisant. • Les transistors de puissance, les micros, les lampes, les fusibles et les dommages causés par une mauvaise utilisation (antenne mal réglée, TOS trop important, inversion de polarité, mauvaises connexions, surtension, etc.) • La garantie ne peut être prorogée par une immobilisation de l’appareil dans nos ateliers, ni par un changement d’un ou plusieurs composants ou pièces détachées. • Les interventions ayant modifiées les caractéristiques d’agrément, les réparations ou modifications effectuées par des tiers non agréés par notre Société. Type : Radio CB MC KINLEY N° de série :................................................................................................... SANS LE CACHET DU DISTRIBUTEUR LA GARANTIE SERA NULLE Si vous constatez des défauts de fonctionnement : • Vérifier l’alimentation de votre appareil et la qualité du fusible. • Contrôlez les différents branchements: jacks, prise d’antenne, prise du microphone... • Assurez-vous que le niveau du squelch soit correctement réglé ; que la configuration programmée soit la bonne. • En cas de non prise en charge au titre de la garantie, l’intervention et la réexpédition du matériel seront facturés. 20 Français DÉCLARATION DE CONFORMITÉ EU SIMPLIFIÉE Par la présente, Groupe President Electronics, déclare que l’équipement radio CB: Marque : PRESIDENT Type: TXPR600 Nom Commercial : MC KINLEY Est conforme à la directive 2014/53/UE. Le texte intégral de la déclaration de conformité de l’UE est disponible à l’adresse Internet suivante: https://president-electronics.com/DC/TXPR600. 21 President Electronics Ibérica S.A.U. Declara bajo su responsabilidad, que este aparato cumple con lo dispuesto en la Directiva 2014/53/UE del Parlamento Europeo y del Consejo de 16 de Abril de 2014. ¡ ATENCIÓN ! Español Antes de la utilización tengan cuidado de nunca emitir sin haber previamente conectado la antena (conector “B” situado en la parte trasera de su equipo) y ajustada la ROE (Relación de Ondas Estacionarias). Sino, se expone a dañar el amplificador de potencia, no cubierto por la garantía. EQUIPO MULTI-NORMAS ! Ver la función “F” en pág. 29 y la tabla de Configuraciones en la pág. 74. La garantía de este artículo sólo es válida en el país de compra. 22 Bienvenido al mundo de los emisores-receptores CB de última generación. Esta nueva gama de estaciones le permite acceder a la comunicación electrónica más competitiva. Gracias a la utilización de tecnología punta que garantiza una calidad sin precedentes, su PRESIDENT MC KINLEY representa un nuevo hito en la facilidad de uso y la solución por excelencia para el pro más exigente de CB. Para sacar el máximo partido de todas sus posibilidades, le aconsejamos leer atentamente estas instrucciones de uso antes de instalar y utilizar su CB PRESIDENT MC KINLEY. 1) ELEGIR EL EMPLAZAMIENTO Y MONTAJE DEL PUESTO MÓVIL e) En el momento del montaje, no se olvide de insertar las arandelas de caucho (3) entre la estación y su soporte. Éstas tienen, en efecto, un papel “amortiguador” y permiten una orientación y presión suaves de la estación. f) Escoja un emplazamiento para el soporte del micro y prevea el paso de su cable. a) Escoja el emplazamiento más apropiado para una utilización simple y práctica de su estación móvil. b) Procure que no moleste ni al conductor ni a los pasajeros del vehículo. c) Prevea el paso y la protección de los diferentes cables, (alimentación, antena, accesorios) con el fin de que en ningún caso perturben la conducción del vehículo. d) Utilice para el montaje el soporte (1) entregado con el aparato, fíjelo sólidamente con ayuda de los tornillos auto-roscantes (2) proporcionados (diámetro de agujero de 3,2 mm). Tenga cuidado de no dañar el sistema eléctrico del vehículo en el momento del taladro del salpicadero. - ATENCIÓN: Si empotra su estación, asegúrese de que no haya cables que toquen el chasis. - NOTA: Su estación móvil que posee una toma de micro en la parte frontal puede ser empotrada en el cuadro de mandos. Además del altavoz en la parte frontal, es posible agregar un altavoz externo para escuchar mejor las comunicaciones (conector EXT. SP situado en la cara posterior del aparato: C). Infórmese con su vendedor más próximo para el montaje en su aparato. 2) INSTALACIÓN DE LA ANTENA a) Elección de la antena - En CB, cuanto más grande es una antena, mejor es su rendimiento. Su Centro de Asesoramiento sabrá orientarle en su elección. b) Antena móvil - ESQUEMA GENERAL DE MONTAJE 23 Hay que instalarla en un lugar del vehículo donde haya un máximo de superficie metálica (plano de masa), alejándose de los montantes del parabrisas y de la luneta trasera. Español A) INSTALACIÓN - Español - a) Asegúrense que el alimentador sea de 12 o 24 Voltios. b) Identifique los polos (+) y (-) de la batería (+ = rojo, - = negro). En el caso que sea necesario alargar el cable de alimentación utilice un cable de sección equivalente o superior. c) Es necesario conectar sobre un (+) y (-) permanentes. Les aconsejamos enchufar directamente el cable de alimentación en la batería (el enchufe sobre el cable del auto-radio o sobre otras partes del circuito electrónico podrán en ciertos casos favorecer la recepción de las señales parásitas). d) Conecten el hilo rojo (+) al borne positivo de la batería y el hilo negro (-) al borne negativo de la batería. e) Conectar el cable de alimentación a la emisora. En caso de que se haya instalado una antena de radio-teléfono, la antena CB debe estar por encima de ésta. Existen 2 tipos de antenas: las preajustadas y las regulables. Las preajustadas se utilizan preferentemente con un buen plano de masa (en el techo o en el maletero). Las regulables ofrecen un campo de uso mucho más ancho y permiten sacar partido de planos de masa menos importantes (véase § AJUSTE DE LA ROE página 24). Para una antena de fijación por taladro, es necesario tener un contacto excelente entre la antena y el plano de masa; para ello, rasque ligeramente la chapa al nivel del tornillo y de la estrella de presión. LÓBULO DE RADIACIÓN En el momento del paso del cable coaxial, tenga cuidado de no pellizcarlo ni aplastarlo (riesgo de rotura o cortocircuito). Conecte la antena (B). ATENCIÓN: ¡No reemplace jamás el fusible de origen por un modelo de un valor diferente! 4) OPERACIONES DE BASE QUE HAY QUE EFECTUAR ANTES DE LA PRIMERA UTILIZACIÓN, SIN PASAR POR EMISIÓN (sin apretar la palanca del micro) c) Antena fija - Procure abrirla al máximo. En caso de fijación sobre un poste, habrá que sostenerla eventualmente conforme a las normas vigentes (infórmese con un profesional). Las antenas y los accesorios PRESIDENT han sido especialmente concebidos para un rendimiento óptimo de todos los aparatos de la gama. a) Conecte el micro, b) Verifique la conexión de la antena, c) Puesta en marcha del aparato: gire el botón del volumen VOL (1) en el sentido de las agujas del reloj hasta oír un “clic”. d) Gire el botón del squelch SQ (2) al mínimo (posición M). e) Ajuste el botón del volumen (1) a un nivel conveniente. f) Dirija la estación al canal 20 usando las teclas CH (5) o UP/DN (13) en el micrófono. 3) CONEXIÓN DEL ALIMENTADOR Su PRESIDENT MC KINLEY está provista de una protección contra las inversiones de polaridad. Vuestra emisora debe estar alimentada por una fuente de corriente continua de 12 o 24 voltios (A). En este momento, la mayor parte de los coches y camiones funcionan con una toma de tierra negativa, se puede asegurar verificando que el terminal (-) de la batería esté bien conectado al bloque del motor o bastidor. En el caso contrario, consulte con su suministrador. Todas las operaciones de conexión siguientes, deben efectuarse con el cable de alimentación no conectado a la emisora: 5) AJUSTE DE LA ROE (Relación de Ondas Estacionarias) ATENCIÓN: Esta operación debe efectuarse necesariamente en el momento de la primera utilización del aparato o en el momento de un cambio de antena. Este ajuste debe realizarse en un lugar abierto, al aire libre. 24 Ajuste con el medidor de ROE integrado * Ajustes con el medidor de ROE externo (tipo TOS-1 PRESIDENT): utilizada (véase la página 29). Véase la función de CALIBRACIÓN DE LA ROE página 32. Para apagar el aparato: gire el botón VOL (1) en sentido contrario a las agujas del reloj hasta que haga clic. Su radio está apagada. Para AJUSTAR el volumen, gire el botón VOL (1) hacia la derecha para aumentar, gire el botón hacia la izquierda Para disminuir. a) Empalme del medidor de ROE: - Conecte el medidor de ROE entre la estación y la antena, lo más cerca posible de la estación (utilice para ello un cable de 40 cm máximo tipo CA-2C PRESIDENT). 2) ASC (Automatic Squelch Control)/SQUELCH Permite suprimir los ruidos de fondo indeseables en la ausencia de comunicación. El squelch no interviene ni en el volumen ni en la posición de emisión, pero permite escuchar confortablemente. b) Ajuste de la ROE: - - Posicione la estación hacia el canal 20 en AM. Sitúe el conmutador del medidor de ROE en posición FWD (calibración). Apriete la palanca PTT (12) del micro para pasar a emisión. Dirija la aguja al índice t con ayuda del botón de calibración. Ponga el conmutador en posición REF (lectura del valor de la ROE). El valor leído en el indicador debe estar muy cerca de 1. En caso contrario, reajuste su antena hasta obtener un valor lo más cerca posible a 1 (puede aceptarse un valor de la ROE comprendido entre 1 y 1,8). Es necesario recalibrar el medidor de ROE entre cada operación de ajuste de la antena. a) ASC (AJUSTE AUTOMÁTICO DEL SQUELCH) Patente mundial, exclusividad de PRESIDENT. Girar el botón del squelch SQ (2) en el sentido inverso de las agujas del reloj en la posición ASC. aparece en la pantalla. En lugar de un ajuste manual repetitivo, se produce una optimización permanente entre la sensibilidad y la escucha confortable cuando el ASC está activado. Esta función es conmutable por la rotación del botón en sentido de las agujas de un reloj, en este caso el ajuste del squelch vuelve a ser manual. desaparece de la pantalla. b) SQUELCH MANUAL Girar el botón del squelch en el sentido de las agujas del reloj justo hasta el punto exacto, todos los ruidos de fondo desaparecerán. Es un ajuste que se ha de hacer con precisión, pues colocado en posición máxima en el sentido de las agujas del reloj, únicamente las señales más fuertes pueden ser recibidas Observación: Con el fin de evitar las pérdidas y las atenuaciones en los cables de conexión entre la radio y sus accesorios, PRESIDENT recomienda una longitud de cable inferior a 3m. Ahora, su estación está preparada para funcionar. B) UTILIZACIÓN 3) PANTALLA Permite visualizar todas las funciones. 1) INTERRUPTOR DE VOLUMEN Para encender la emisora, gire el botón VOL (1) en el sentido de las agujas del reloj. Si la función PITIDO DEL TECLADO está activa (véase el menú PITIDO DEL TECLADO pagina 31), suena un pitido. Su radio está encendida. La pantalla muestra brevemente el tipo de micrófono (véase el menú TIPO DE MICRÓFONO página 32) y la banda de frecuencia 25 Español * El gráfico de barras principal indica el nivel de recepción y la potencia emitida. los pequeños gráficos de barras visualizan los niveles del Mic Gain, RF Gain y RF Power. - Modulación de amplitud/ AM: Comunicación sobre el terreno con relieves y obstáculos a media distancia (el más utilizado). - Modulación de Frecuencia/FM: Comunicación cercana en terreno llano y libre. Solo en configuración U: en modo FM, una pulsación larga en la tecla F (10) alterna entre las bandas de frecuencia ENG y CEPT. «UK» aparece en la pantalla cuando se selecciona la banda de frecuencia ENG (ver tabla de la página 70). - USB/LSB: Comunicación de larga distancia (según las condiciones de propagación). 4) CLARIFIER La función CLARIFIER (CLAR.) permite el desfase de la frecuencia en recepción LSB/USB con el fin de mejorar la claridad de la voz de su interlocutor. 5) SELECTOR DE CANALES CH ~ RF POWER SELECTOR DE CANALES CH Español - PA (Megafonía) (presión larga) Gire el botón CH (5) para subir o bajar un canal. Se emite un pitido cada vez que se cambia el canal si la función PITIDO DEL TECLADO está activada (véase el menú PITIDO DEL TECLADO página 31). Presione la tecla PA (6) durante 2 segundos para alternar entre el modo de CB y el modo de PA (megafonía). En el modo PA, un altavoz de megafonía exterior se puede conectar al equipo por la toma PA.SP. del panel posterior (D). Véase el § BOTONES UP/DN DEL MICRÓFONO página 29. La pantalla muestra la frecuencia correspondiente. Por ejemplo, 27.205 para el canal 40. Véase el menú SPAN página 32. - Una presión larga (3 segundos) en este botón (5) permite entrar en los MENÚS. - Presionando brevemente este botón (5) se validan los ajustes en los MENÚS. Para más detalles sobre la operación en modo PA, véase el menú TIPO DE PA página 33. VOX (9 + 6 presión breve) La función VOX permite emitir hablando en el micro de origen (o en el micro vox opcional) sin apretar la palanca PTT (12). La utilización de un micro vox opcional conectado detrás del aparato (E) desactiva el micro de origen. RF POWER (combinación 12 / 9 + 5) - En el modo TX, permite aumentar/disminuir la potencia de salida. Mantenga presionada la palanca de transmisión PTT (12). Presione la tecla • (9) y pulse el botón CH (5). Aparece “RF POWER” en la pantalla. Utilice el conmutador rotativo CH (5) para ajustar el nivel con el gráfico de barras. Pulse el botón CH (5) durante 1 segundo para validar el ajuste. Presione la tecla • (9), parpadea, presione la tecla •VOX (6) para activar la función VOX. “VOX” aparece en la pantalla. Una nueva presión en la teclas • (9) y •VOX (6) desactiva la función. “VOX” desaparece. AJUSTE DEL VOX (10 + 6 presión larga) Presione la tecla • (9), parpadea, pulse durante1 segundo la tecla •VOX (6) para activar la función AJUSTE DEL VOX. Hay tres ajustes posibles: Sensibilidad SET-L / Nivel Anti-Vox SET-A y Temporización SET-T. El ajuste actual parpadea. La pantalla muestra el ajuste seguido de su valor, por ejemplo: SET-L1 1. Gire el conmutador rotativo CH (5) para aumentar/disminuir el nivel del ajuste activo. 6) MODO ~ PA ~ VOX ~ AJUTE DEL VOX MODO (presión breve) Este interruptor selecciona el modo de modulación AM, FM, LSB o USB. Su modo de modulación debe coincidir con el de su interlocutor. 26 Presione la palanca PTT (12) o la tecla SCAN (7) para salir de la función BARRIDO DE LOS CANALES. 2. Pulse la tecla •VOX (6) para pasar al ajuste siguiente. 3. Una vez que el VOX está correctamente ajustado, pulse la tecla •VOX (6) durante 1 segundo para validar y salir de la función AJUSTE DEL VOX. - - DOBLE ESCUCHA (presión larga) Sensibilidad “SET-L”: permite ajustar la sensibilidad del micro (de origen u opcional vox) para una calidad de transmisión óptima. Nivel regulable de 1 (nivel alto) a 9 (nivel bajo). Valor predeterminado: 1. - Anti-Vox “SETA”: evita la emisión generada por el ruido ambiental. Nivel ajustable: OfF (emite según el nivel del squelch) y de 0 (sín antivox) a 9 (nivel bajo). Valor predeterminado: OFF.. - Temporización “SET-T”: permite evitar el corte “brusco” de la transmisión añadiendo un tiempo al final de palabra. Nivel regulable de 1 (tiempo corto) a 9 (tiempo largo). Valor predeterminado: 5. - El AJUSTE DEL VOX activa automáticamente la función VOX. «VOX» aparece en la pantalla. - Nota: El equipo sale automáticamente del AJUSTE DEL VOX después de 10 segundos si no se pulsa ninguna tecla o en apoyo de cualquier tecla sin guardar los parámetros de ajuste. Una pulsación más larga (1s) en el botón DW (7) activa la función DW (Doble Escucha). «DW» aparece en la pantalla. Permite monitorear dos canales. Una primera presión prolongada activa la función de doble escucha entre el canal de emergencia1 y el canal activo (véase el menú AJUSTE DEL CANAL DE EMERGENCIA 1 página 33). Una segunda presión prolongada activa la función de doble escucha entre el canal de emergencia 2 y el canal activo (véase el menú AJUSTE DEL CANAL DE EMERGENCIA 2 página 33). El número de canal y el canal de emergencia se muestran alternativamente. El icono «EMG» también aparece junto con el canal de emergencia. El canal activo se puede cambiar durante la doble escucha. Una nueva presión prolongada de la tecla DW (7) desactiva la función DW. «DW» desaparece de la pantalla. M1 7) BARRIDO DE LOS CANALES ~ DOBLE ESCUCHA ~ M1 BARRIDO DE LOS CANALES (presión breve) Ver § MEMORIA página 28. 8) ANL/NB ~ HI-CUT ~ CANALES DE EMERGENCIA ~ M2 ANL/NB (presión breve) Presione la tecla SCAN (7) para activar la función BARRIDO DE LOS CANALES en orden ascendente. Aparece «SCAN» en la pantalla. El barrido se detiene cuando un canal está activo. Se inicia automáticamente 3 segundos después del final de la emisión, si ninguna tecla se activa durante este tiempo. El barrido comienza de nuevo en un orden ascendente girando el conmutador rotativo CH (5) a la derecha o con el botón UP (13) del micrófono, o en orden descendente girando el conmutador rotativo CH (5) a la izquierda o el botón DN (13) del micrófono. ANL (Automatic Noise Limiter) / NB (Noise Blanker) : estos filtros reducen los ruidos de fondo y algunos parásitos en la recepción. Presione la tecla ANL/NB (8) para cambiar entre los siguientes 4 estados en un bucle: 1. ANL/on - NB/off • 2. ANL/off - NB/on • 3. ANL/on - NB/on • 4. ANL/off - NB/off. El icono de filtro aparece en la pantalla cuando el filtro está activo (on). Durante el escaneo, presione la tecla • (9) durante un segundo para alternar entre los modos barrido de los canales y barrido de la memoria. En el modo de BARRIDO DE LA MEMORIA, solo se exploran los canales prioritarios (véase el § CANALES DE EMERGENCIA página 28) y los canales memorizados (véase el § MEMORIA página 28). HI-CUT (presión breve) Eliminación de parásitos de alta frecuencia. Presione la tecla HI-CUT (8) durante un segundo para activar/ desactivar el filtro HI-CUT. «HI-CUT» aparece en la pantalla cuando el filtro está activo. 27 Español - CANALES DE EMERGENCIA (9 + 8 presión breve) - Presione brevemente la tecla • (9) y luego la tecla •EMG (8) para combinar estas dos teclas. Una primera combinación activa el canal prioritario 1. Una segunda combinación activa el canal prioritario 2. Cuando el canal de emergencia 1 o 2 está activo, «EMG» aparece de la pantalla. Una tercera combinación permite volver al canal inicial. - Véase los menús CANAL DE EMERGENCIA 1 y 2 página 33. - - M2 Español - Ver § MEMORIA página 28. 9) Tecla “•” ~ MEMORIA ~ ECO ~ M3 Tecla “•” (presión breve) Apague el equipo. Mantenga presionada una de las teclas M1 (7), M2 (8) o M3 (9) y encienda el aparato. Borrase la memoria seleccionada. «MEM» y el número de la memoria seleccionada (M1, M2 o M3) desaparecen de la pantalla. Presione la tecla • (9) una primera vez, parpadea, luego presione la tecla •ECHO (9) para activar la función ECHO. «ECHO» aparece en la pantalla. Una nueva combinación de las teclas • (9) y • ECHO (9) desactiva la función. «ECHO» desaparece de la pantalla. M3 Ver § MEMORIA página 28. MEMORIA (presión larga) 10) F ~ MIC GRAIN ~ RF GAIN F (presión breve) Este equipo le permite memorizar 3 canales con los siguientes atributos: NB/ANL (on/off), HI-CUT (on/off), AM / FM / USB / LSB. - Para borrar una memoria: ECO (9 + 9 presión breve) Nota: La tecla • (9) siempre se combina con otra tecla. Presionar esta tecla solo no tiene ningún efecto, excepto hacer parpadear durante 10 segundos. - Presionar la tecla MEM (9) durante un segundo. Si la función PITIDO DEL TECLADO está activa, suena un pitido. «MEM» parpadea. Presione brevemente una de las teclas M1 (7), M2 (8) o M3 (9) para llamar la memoria seleccionada. Aparece «MEM», el número de la memoria seleccionada (M1, M2 o M3) parpadea. Véase también el menú RE INICIALIZACIÓN página 34. Presionando la tecla • (9) se activa el modo FUNCIÓN. parpadea. Combine con otra tecla que comience con • (•VOX, •EMG, •ECHO, •RF POWER o •MIC/RF GAIN) para acceder a la función. - Para llamar a una memoria: Para memorizar: Véase Solo en configuración U página 26. Véase el § TALKBACK página 29. Véase el § FUNCIÓN AL ENCENDER LA EMISORA página 29. Seleccionar el canal y los atributos a memorizar. Presionar la tecla MEM (9) durante un segundo. Si la función PITIDO DEL TECLADO está activa, suena un pitido. «MEM» parpadea. Presione por un segundo una de las teclas M1 (7), M2 (8) o M3 (9) para memorizar. «MEM» aparece en la pantalla y el número de la memoria seleccionado (M1, M2 o M3) parpadea. Si la función PITIDO DEL TECLADO está activa, un pitido largo confirma el éxito de la operación. MIC GAIN (combinación 12 / 9 + 10) Ajuste el nivel de sensibilidad del micrófono. 28 Mantenga presionado la palanca de transmisión PTT (12) Pulse la tecla • (9). Pulse la tecla •MIC/RF GAIN (10). «MIC GAIN» aparece en la pantalla. - TALKBACK (combinación 12 / 10) Gire el conmutador rotativo CH (5) para ajustar el nivel con el gráfico de barras. Pulse el botón CH (5) durante 1 segundo para validar el ajuste. La función TALKBACK permite escuchar su propria modulación en el altavoz del equipo. La posición normal de esta función es la sensibilidad máxima. El gráfico de barras MIC GAIN aparecerá en emisión. - RF GAIN (combinación 9 + 10) - Ajuste de la sensibilidad de recepción. Posición máxima en el caso de recepción de llamadas de larga distancia. Puede reducir el RF GAIN, para evitar distorsiones, cuando el interlocutor está cerca. Reduzca la ganancia en la recepción en el caso de una comunicación cercana con un corresponsal que no esté equipado con RF POWER. Pulse la tecla • (9). Pulse la tecla •MIC/RF GAIN (10). Se muestra «RF GAIN». Gire el conmutador rotativo CH (5) para ajustar el nivel con el gráfico de barras. Pulse el botón CH (5) durante 1 segundo para validar el ajuste. NIVEL DE TALKBACK (combinación 12 / 5) Cuando la función TALKBACK está activa, mantener la palanca de transmisión PTT (12) apretada y gire el conmutador rotativo CH (5) para ajustar el nivel. 9 niveles de 01 a 09. TOT (Time Out Timer) Si la emisión (PTT (12) o VOX) dura más de 5 minutos, el canal y empiezan a parpadear y la emisión finaliza. La confirmación sonora de fin de emisión es audible hasta que se deje de presionar la palanca PTT (12). El gráfico de barras de RF GAIN siempre se mostrará en recepción. 13) BOTONES UP/DN DEL MICRÓFONO 11) TOMA DE MICRO DE 6 CONTACTOS - Se encuentra delante del aparato y facilita así su integración a bordo del vehículo. Véase esquema de conexión en la página 73. Estos botones (13) permiten subir (UP) o bajar (DN) de un canal. Se emite un pitido cada vez que se cambia el canal si la función PITIDO DEL TECLADO está activada (véase el menú PITIDO DEL TECLADO en la página 31). La pantalla muestra la frecuencia correspondiente. Por ejemplo, “27.205” para el canal 40. Véase el menú SPAN en la página 32. 12) PTT ~ RF POWER ~ MIC GAIN ~ TALKBACK PTT (Push To Talk) Palanca de emisión, apriete para hablar, se muestra para recibir un mensaje. Mantener la palanca PTT (12) apretada. Apriete la tecla F (10) para activar/desactivar la función TALKBACK. Cuando la función está activa, «TALKBACK» aparece en la pantalla. Véase § SELECTOR DE CANALES CH página26. , y suelte C) FUNCIÓN AL ENCENDER LA EMISORA RF POWER La SELECCIÓN DE LA BANDA DE FRECUENCIAS, se realiza cuando se enciende el equipo. Apague y vuelva a encender el equipo presionando y manteniendo presionada la tecla F (10). Véase el § RF POWER página 26. MIC GAIN (Configuración: EU; PL; d; EC; U; In) Deben escogerse las bandas de frecuencias según el país donde usted usa su dispositivo. En ningún caso debe utilizarse una con- Véase el § MIC GAIN página 28. 29 Español - figuración diferente al país de uso. En algunos países se necesita una licencia para su uso. Véase la tabla de la página 75. 5. Si no se presiona ninguna tecla, el equipo sale de los MENÚS después de 10 segundos. desaparece de la pantalla. 1. Encienda el aparato manteniendo apretada la tecla F (10). La letra que corresponde a la configuración parpadea. 2. Para cambiar de configuración, utilice el conmutador rotativo CH (5) o los botones UP/DN (13) del micrófono. 3. Cuando se elija la configuración, apriete 1 segundo la tecla F (10). La letra que corresponde a la configuración se muestran de forma continua, se emite un pitido. 4. En esta fase, confirme la selección apagando y luego encendiendo de nuevo el aparato. Nota: Los botones UP/DN (13) en el micrófono tienen el mismo efecto que la rotación del conmutador rotativo CH (5). La palanca de transmisión PTT (12) sale de los MENÚS sin validación. desaparece de la pantalla. 1) COLOR Español Presione el botón CH (5) durante 3 segundos para entrar en los aparece en la pantalla. MENÚS. 1. Gire el conmutador rotativo CH (5) o use los botones UP/DN (13) en el micrófono para seleccionar el menú COLOR. 2. Presione el botón CH (5) para confirmar. El color parpadea en la pantalla. 3. Gire el conmutador rotativo CH (5) o use los botones UP/DN (13) en el micrófono para cambiar color. Véanse las bandas de frecuencias páginas 70 a 72 / tabla de configuraciones página 74. La utilización de la banda correcta en cada país es responsabilidad del usuario. D) MENÚS El orden de las 14 funciones es el descrito en este manual. Sin embargo, la función que se muestra al entrar en los MENÚS será la última función modificada por el usuario. Cualquiera que sea la función, el procedimiento es el mismo: 4a. Una nueva presión breve en el botón CH (5) valida el color elegido y se mantiene en los MENÚS. 4b. Una nueva pulsación larga (1 segundo) valida el color elegido y sale de los MENÚS. desaparece de la pantalla. 5. Si no se presiona ninguna tecla, el equipo sale de los MENÚS después de 10 segundos. desaparece de la pantalla. Presione el botón CH (5) durante 3 segundos para entrar en los MENÚS. aparece en la pantalla. 1. Gire el conmutador rotativo CH (5) o use los botones UP/DN (13) en el micrófono para seleccionar el menú. 2. Presione el botón CH (5) para confirmar. El parámetro de ajuste del menú seleccionado parpadea en la pantalla. 3. Gire el conmutador rotativo CH (5) o use los botones UP/DN (13) en el micrófono para cambiar el valor del parámetro. 4a. Una nueva presión breve en el botón CH (5) valida el valor elegido y se mantiene en los MENÚS. El parámetro deja de parpadear y si la función tiene más de un parámetro, el siguiente parámetro parpadea ... 4b. Una nueva presión larga (1 segundo) valida el valor elegido y sale de los MENÚS. desaparece de la pantalla. El Color pre determinado es naranja: . 2) DIMMER Esta función permite variar la luminosidad de la pantalla. 10 niveles de 0 a 9. Presione el botón CH (5) durante 3 segundos para entrar en los MENÚS. aparece en la pantalla. 1. Gire el conmutador rotativo CH (5) o use los botones UP/DN (13) en el micrófono para seleccionar el menú DIMMER. 2. Presione el botón CH (5) para confirmar. El valor del dimmer parpadea en la pantalla. 30 3. Gire el conmutador rotativo CH (5) o use los botones UP/DN (13) en el micrófono para cambiar el valor del dimmer. 4a. Una nueva presión breve en el botón CH (5) valida el valor seleccionado y se mantiene en los MENÚS. 4b. Una nueva pulsación larga (1 segundo) valida el valor seleccionado y sale de los MENÚS. desaparece de la pantalla. 5. Si no se presiona ninguna tecla, el equipo sale de los MENÚS después de 10 segundos. desaparece de la pantalla. 3. Gire el conmutador rotativo CH (5) o use los botones UP/DN (13) en el micrófono para activar on/desactivar of la función. 4a. Una nueva presión breve en el botón CH (5) valida y se mantiene en los MENÚS. 4b. Una nueva pulsación larga (1 segundo) valida y sale de los MENÚS. desaparece de la pantalla. 5. Si no se presiona ninguna tecla, el equipo sale de los MENÚS después de 10 segundos. desaparece de la pantalla. El valor pre determinado del Dimmer es: 5. El valor pre determinado del Pitido del teclado es: on. 5) ROGER BEEP La función CONTRAST permite ajustar el contraste entre la retro iluminación y los caracteres de la pantalla. 10 niveles de 0 a 9. El ROGER BEEP emite un pitido cuando se suelta el pedal del micro para dejarle la palabra a su interlocutor. Históricamente, al ser la CB un modo de comunicación “simplex”, es decir que no es posible hablar y escuchar al mismo tiempo (como en el caso del teléfono por ejemplo), era usual decir “Roger” cuando se había terminado de hablar para avisar al interlocutor que ya podía hablar. La palabra “Roger” ha sido reemplazada por un “beep” significativo, de ahí su nombre “Roger Beep”. Presione el botón CH (5) durante 3 segundos para entrar en los MENÚS. aparece en la pantalla. 1. Gire el conmutador rotativo CH (5) o use los botones UP/DN (13) en el micrófono para seleccionar el menú CONTRAST. 2. Presione el botón CH (5) para confirmar. El valor del contraste parpadea en la pantalla. 3. Gire el conmutador rotativo CH (5) o use los botones UP/DN (13) en el micrófono para cambiar el valor del contraste. 4a. Una nueva presión breve en el botón CH (5) valida el valor seleccionado y se mantiene en los MENÚS. 4b. Una nueva pulsación larga (1 segundo) valida el valor seleccionado y sale de los MENÚS. desaparece de la pantalla. 5. Si no se presiona ninguna tecla, el equipo sale de los MENÚS después de 10 segundos. desaparece de la pantalla. Presione el botón CH (5) durante 3 segundos para entrar en los MENÚS. aparece en la pantalla. 1. Gire el conmutador rotativo CH (5) o use los botones UP/DN (13) en el micrófono para seleccionar el menú ROGER BP. 2. Presione el botón CH (5) para confirmar. El estado de la función parpadea en la pantalla. 3. Gire el conmutador rotativo CH (5) o use los botones UP/DN (13) en el micrófono para activar on/desactivar of la función. 4a. Una nueva presión breve en el botón CH (5) valida y se mantiene en los MENÚS. 4b. Una nueva pulsación larga (1 segundo) valida y sale de los MENÚS. desaparece de la pantalla. 5. Si no se presiona ninguna tecla, el equipo sale de los MENÚS después de 10 segundos. desaparece de la pantalla. El valor pre determinado del Contraste es: 5. 4) PITIDO DEL TECLADO Pitido sonoro cuando se cambia de canales, teclas, etc. Presione el botón CH (5) durante 3 segundos para entrar en los MENÚS. aparece en la pantalla. 1. Gire el conmutador rotativo CH (5) o use los botones UP/DN (13) en el micrófono para seleccionar el menú KEY BEEP. 2. Presione el botón CH (5) para confirmar. El estado de la función parpadea en la pantalla. El valor pre determinado del Roger beep es: of. Observación: El ROGER BEEP también se escucha en el altavoz si la función PITIDO DEL TECLADO está activada. Si no está activada, sólo el interlocutor puede escuchar el ROGER BEEP. 31 Español 3) CONTRASTE 6) SPAN 4b. Una nueva pulsación larga (1 segundo) valida y sale de los MENÚS. desaparece de la pantalla. 5. Si no se presiona ninguna tecla, el equipo sale de los MENÚS después de 10 segundos. desaparece de la pantalla. Cuando la función está activa, la frecuencia se puede ajustar continuamente. Al presionar brevemente el botón CH (5) se muestra una barra debajo del primer o segundo decimal de la frecuencia. El conmutador rotativo CH (5) ya no actúa en el canal sino en la frecuencia con salto de 100 kHz (primer decimal) o de 10 kHz (segundo decimal). El Tipo de micrófono pre determinado es: . 8) CALIBRACIÓN DE LA ROE Español Presione el botón CH (5) durante 3 segundos para entrar en los MENÚS. aparece en la pantalla. 1. Gire el conmutador rotativo CH (5) o use los botones UP/DN (13) en el micrófono para seleccionar el menú SPAN. 2. Presione el botón CH (5) para confirmar. El estado de la función parpadea en la pantalla. 3. Gire el conmutador rotativo CH (5) o use los botones UP/DN (13) en el micrófono para activar on/desactivar of la función. 4a. Una nueva presión breve en el botón CH (5) valida y se mantiene en los MENÚS. 4b. Una nueva pulsación larga (1 segundo) valida y sale de los MENÚS. desaparece de la pantalla. 5. Si no se presiona ninguna tecla, el equipo sale de los MENÚS después de 10 segundos. desaparece de la pantalla. 1. 2. 3. 4. El valor pre determinado del Span es: of. 7) TIPO DE MICRÓFONO Presione el botón CH (5) durante 3 segundos para entrar en los MENÚS. aparece en la pantalla. Gire el conmutador rotativo CH (5) o use los botones UP/DN (13) en el micrófono para seleccionar el menú SWR. Presione el botón CH (5) para confirmar. El equipo pasa automáticamente al modo TX sin presionar la palanca PTT (12) y comienza la calibración. El tiempo de calibración es de 5 minutos máximo. Se realiza una cuenta atrás en la pantalla. Ajuste la antena. El pitido* es continuo cuando el valor de la ROE es 1.0. El espacio entre los pitidos se hace cada vez más grande a medida que el valor de la ROE se aleja de1.0. El volumen del pitido es ajustable con el botón VOL (1). La pantalla muestra el valor de los TOS. Por ejemplo 2.5. Presione la palanca PTT (12) para salir de la CALIBRACIÓN DE LA ROE. *Compruebe que el volumen del pitido esté ajustado a un nivel adecuado. El PRESIDENT MC KINLEY se puede utilizar tanto con un micrófono electret como con un micrófono dinámico PRESIDENT de 6 contactos (Véase el cableado del micrófono en la página 73). Véase el § AJUSTE DE LA ROE página 24. 9) AJUSTE DEL ECO Presione el botón CH (5) durante 3 segundos para entrar en los MENÚS. aparece en la pantalla. 1. Gire el conmutador rotativo CH (5) o use los botones UP/DN (13) en el micrófono para seleccionar el menú MIC TYPE. 2. Presione el botón CH (5) para confirmar. El tipo de micrófono parpadea en la pantalla. 3. Gire el conmutador rotativo CH (5) o use los botones UP/DN (13) en el micrófono para seleccionar (electret) o (dinámico) 4a. Una nueva presión breve en el botón CH (5) valida y se mantiene en los MENÚS. Presione el botón CH (5) durante 3 segundos para entrar en los MENÚS. aparece en la pantalla. 1. Gire el conmutador rotativo CH (5) o use los botones UP/DN (13) en el micrófono para seleccionar el menú ECHO SET. 2. Presione el botón CH (5) para confirmar. El nivel (LEVEL) del eco parpadea en la pantalla. 3. Gire el conmutador rotativo CH (5) o use los botones UP/DN (13) en el micrófono para cambiar el valor del nivel de 1 a 32 (valor pre determinado 13). 32 Véase el § ECO página 28. 10) AJUSTE DE LA TONALIDAD La función TONE permite ajustar la tonalidad en recepción. 11 niveles de -5 a +5. El canal de emergencia 1 pre determinado es el canal 9 en AM. Presione el botón CH (5) durante 3 segundos para entrar en los MENÚS. aparece en la pantalla. 1. Gire el conmutador rotativo CH (5) o use los botones UP/DN (13) en el micrófono para seleccionar el menú TONE. 2. Presione el botón CH (5) para confirmar. El valor de la tonalidad parpadea en la pantalla. 3. Gire el conmutador rotativo CH (5) o use los botones UP/DN (13) en el micrófono para cambiar el valor de la tonalidad. 4a. Una nueva presión breve en el botón CH (5) valida el valor seleccionado y se mantiene en los MENÚS. 4b. Una nueva pulsación larga (1 segundo) valida el valor seleccionado y sale de los MENÚS. desaparece de la pantalla. 5. Si no se presiona ninguna tecla, el equipo sale de los MENÚS después de 10 segundos. desaparece de la pantalla. Ver § CANALES DE EMERGENCIA página 28. 12) AJUSTE DEL CANAL DE EMERGENCIA 2 Presione el botón CH (5) durante 3 segundos para entrar en los aparece en la pantalla. MENÚS. 1. Gire el conmutador rotativo CH (5) o use los botones UP/DN (13) en el micrófono para seleccionar el menú EMG 2. Los ítemes 2 a 7 son idénticos a los del AJUSTE DEL CANAL DE EMERGENCIA 1. El canal de emergencia 2 pre determinado es el canal 19 AM. Ver § CANALES DE EMERGENCIA página 28. 13) TIPO DE PA (Megafonía) El valor pre determinado de la Tonalidad es: 0. Esta función se utiliza para seleccionar el modo de funcionamiento del PA (megafonía). 11) AJUSTE DEL CANAL DE EMERGENCIA 1 Presione el botón CH (5) durante 3 segundos para entrar en los MENÚS. aparece en la pantalla. 1. Gire el conmutador rotativo CH (5) o use los botones UP/DN (13) en el micrófono para seleccionar el menú PA SET. Presione el botón CH (5) durante 3 segundos para entrar en los MENÚS. aparece en la pantalla. 1. Gire el conmutador rotativo CH (5) o use los botones UP/DN (13) en el micrófono para seleccionar el menú EMG 1. 33 Español 2. Presione el botón CH (5) para confirmar. El primer parámetro, el modo de modulación, parpadea en la pantalla. 3. Gire el conmutador rotativo CH (5) o use los botones UP/DN (13) en el micrófono para seleccionar el modo de modulación para el canal de emergencia 1: AM, FM, USB, LSB o FM UK (solo en la configuración U). 4. Presione el botón CH (5) nuevamente para confirmar. El modo de modulación deja de parpadear, el segundo parámetro, el canal, parpadea en la pantalla. 5. Gire el conmutador rotativo CH (5) o use los botones UP/DN (13) en el micrófono para seleccionar el canal de emergencia 1 6. Presione el botón CH (5) nuevamente para confirmar. el canal. a) Comience de nuevo en el punto 1 para configurar otra función o b) Presione la palanca PTT (12) para salir de los MENÚS. 7. Si no se presiona ninguna tecla, el equipo sale de los MENÚS desaparece de la pantalla. después de 10 segundos. 4. Presione nuevamente el botón CH (5) para validar el valor del nivel. El segundo parámetro, el atraso (DELAY) parpadea. 5. Gire el conmutador rotativo CH (5) o use los botones UP/DN (13) en el micrófono para cambiar el valor del atraso de1 a 32 (valor pre determinado 16). 6. Una nueva presión el botón CH (5) permite validar el valor del atraso. El atraso deja de parpadear. a) Comience de nuevo en el punto 1 para configurar otra función o b) Presione la palanca PTT (12) para salir de los MENÚS. 7. Si no se presiona ninguna tecla, el equipo sale de los MENÚS después de 10 segundos. desaparece de la pantalla. 2. Presione el botón CH (5) para confirmar. El tipo de PA parpadea en la pantalla. 3. Gire el conmutador rotativo CH (5) o use los botones UP/DN (13) en el micrófono para seleccionar el tipo de PA, PA, In o oF. 4a. Una nueva presión breve en el botón CH (5) valida el tipo de PA y se mantiene en los MENÚS. 4b. Una nueva pulsación larga (1 segundo) valida el tipo de PA y sale de los MENÚS. desaparece de la pantalla. 5. Si no se presiona ninguna tecla, el equipo sale de los MENÚS después de 10 segundos. desaparece de la pantalla. Español - PA: La modulación del micrófono y la señal recibida se transmiten por el altavoz de PA conectado a la toma PA.SP. (D). «PA» parpadea alternativamente con el modo de modulación utilizado: AM, FM, LSB, SSB o FM UK (solo en la configuración U). - In: La modulación del micrófono se transmite por el altavoz externo de PA conectado a la toma PA.SP. (D). La señal recibida se transmite por el altavoz interno [o al altavoz externo opcional conectado a la toma EXT. SP (C)]. «PA» parpadea alternativamente con el modo de modulación utilizado: AM, FM, LSB, SSB o FM UK (solo en la configuración U). - oF: la recepción ya no es funcional. Solo la modulación del micrófono se transmite por el altavoz de la dirección pública conectada a la toma PA.SP. (D). «PA» aparece en la pantalla y los canales se reemplazan por PA. 3. Gire el conmutador rotativo CH (5) o use los botones UP/DN (13) . en el micrófono para mostrar 4. Presione nuevamente el botón CH (5) para validar. 5. Si no se presiona ninguna tecla, el equipo sale de los MENÚS después de 10 segundos. desaparece de la pantalla. A) ALIMENTACIÓN (13,8 V / 27,6 V) B) ANTENA (SO-239) C) TOMA ALTAVOZ EXTERNO (8 Ω, Ø 3,5 mm) D) TOMA ALTAVOZ PA EXTERIOR (8 Ω, Ø 3,5 mm) E) MICRÓFONO VOX OPCIONAL (Ø 2,5 mm) E) CARACTERÍSTICAS TÉCNICAS 1) GENERALES - Canales : 40 - Modos de modulación : AM / FM / BLS / BLI - Gama de frecuencias : de 26,965 MHz a 27,405 MHz - Impedancia de la antena : 50 ohms - Tensión de la alimentación : 13,8 V / 27,6 V - Dimensiones (L x P x A) : 170 (A) x 150 (P) x 52 (A) mm - Peso : 1 kg - Accesorios incluidos : Micrófono UP/DOWN y su soporte, 1 soporte de montaje, tornillos, cable de alimentación con fusible 2) EMISIÓN - Tolerancia de Frecuencia : +/- 300 Hz - Potencia portadora : 4 W AM/FM - 12 W USB/LSB - Emisiones parásitas : Inferior a 4 nW (-54 dBm) - Respuesta de Frecuencia : 300 Hz a 3 KHz en AM/FM/BLS/BLI - Potencia emisión en el canal adyacente. : inferior a 20 µW - Sensibilidad del micrófono : 3 mV - Consumo : 3 A (con modulación) - Distorsión máx. de la señal modulada : 1,8 % En el modo PA, al presionar la palanca de transmisión PTT (12) aparece “PA LEVEL” en la pantalla. Gire el conmutador rotativo CH (5) para ajustar el nivel de audio del PA. El Tipo de PA pre determinado es: PA. 14) RE INICIALIZATION Restablece todas las configuraciones definidas por el usuario y vuelve a los valores predeterminados. Presione el botón CH (5) durante 3 segundos para entrar en los aparece en la pantalla. MENÚS. 1. Gire el conmutador rotativo CH (5) o use los botones UP/DN (13) en el micrófono para seleccionar el menú RESET. 2. Presione el botón CH (5) para validar. “CONFIRM” aparece, no parpadea en la pantalla. 34 3) LA EMISORA NO SE ILUMINA - 0,5 µV - 113 dBm (AM/FM) 0,28 µV - 118 dBm (BLS/BLI) 300 Hz a 3 KHz en AM/FM 60 dB 3W mín. 0,2 µV - 120 dBm / máximo 1 mV - 47 dBm Verificar el alimentador. Verificar que no haya una inversión en los hilos al nivel de la acometida. Verificar el fusible. - G) ¿ COMO EMITIR O RECIBIR UN MENSAJE ? Ahora que ha leído las instrucciones de uso, asegúre se que su emisora esté lista para funcionar (antena conectada). Puede entonces apretar sobre la palanca de su micrófono, y lanzar el mensaje “atención estaciones, ensayo de emisora”, lo que permite verificar la claridad y la potencia de su señal y debe provocar una contestación de tipo: “fuerte y claro la estación”. Suelte la palanca y espere una contestación. Si utiliza un canal de llamada (19), y la comunicación se establece, es preciso elegir otro canal disponible para no obstruir el canal de llamada. 60 dB 70 dB 400 mA nominal / 1000 mA máximo F) GUÍA DE PROBLEMAS 1) LA EMISORA NO EMITE O VUESTRA EMISIÓN ES DE MALA CALIDAD H) LÉXICO Verifique que: - La antena esté correctamente conectada y que la ROE esté bien ajustada. - La configuración programada sea la correcta (véase la tabla de la página 74). - El micro esté bien conectado. - El nivel del RF POWER esté al nivel máximo. - El nivel del MIC POWER esté al nivel máximo. Durante la utilización de su emisora, descubrirán un lenguaje particular empleado por algunos cebeistas. Para ayudarles a entenderlo mejor, le damos, en el léxico y el código “Q”, un recapitulativo de las palabras utilizadas. Sin embargo, es evidente que un lenguaje claro y preciso facilitará el contacto entre los aficionados de radiocomunicación. Por eso, las palabras mencionadas a continuación son solo indicativas, y no deben ser utilizadas de manera formal 2) LA EMISORA NO RECIBE O VUESTRA RECEPCIÓN ES DE MALA CALIDAD - ALFABETO FONÉTICO INTERNACIONAL Verifique que: El nivel del RF GAIN esté al nivel máximo. El nivel del SQUELCH esté correctamente ajustado. El botón de volumen VOL (1) esté ajustado a un nivel conveniente. La antena esté correctamente conectada y la ROE esté bien ajustada. La configuración programada sea la correcta (véase la tabla de la página 74). A B C D E F G 35 Alpha Bravo Charlie Delta Echo Foxtrott Golf H I J K L M N Hotel India Juliett Kilo Lima Mike November O P Q R S T U Oscar Papa Quebec Romeo Sierra Tango Uniform V W X Y Z Victor Whiskey X-ray Yankee Zulu Español 3) RECEPCIÓN - Sensibilidad máxima a 20 dB sinad : - Respuesta en frecuencia : - Sensibilidad del canal adj. : - Potencia audio máx. : - Sensibilidad silenciador SQ : - Tasa de rechazo frecuencia imagen : - Tasa de rechazo frecuencia intermediara : - Consumo : TERMINOS DEL ARGOT CEBEISTA Español A.L. ARMONICOS AVE MARIA BARBAS BARRA MOVIL BASE BIGOTADA BREAK BREAKER CAJA TONTA CHICHARRA CORTINERO CRUCE DE ANTENAS DOS METROS HORIZONTALES ENCENDER FILAMENTOS ESPIRAS FOTOCOPIA FRECUENCIA LABORO LADRILLO LINEA DE BAJA O LINEA DE 500 MODULAR O.K. OKAPA P.A. PASTILLA P.O. BOX PRIMERISIMOS PUNTITO PUNTOS VERDES E. RX SAXO SECRETARIA TIA VINAGRE O TIA VIRGINIA TRASMATA TX VERTICAL VIA BAJA VITAMINARSE WISKIES ZAPATILLA 33 51 55 73 88 : : : : : : : : : : : : : : : : : : Amplificador lineal Hijos Amplitud de modulación Interferencias de canales próximos Estación de movimiento Estación fija Reunión de aficionados Solicitar transmisión o entrada El que interrumpe Televisión Amplificador lineal Radioescucha Comunicación en CB La cama Encender el equipo de CB Edad Hermano/hermana Megahertzios que corresponden al canal : Trabajo, ocupación : Emisora de 27 MHz : : : : : : : : : : : : : : : : : : : : : : : : : : : Radioescucha Transmisor Encontrarse en persona Teléfono Comer, cenar Watios Amplificador lineal Saludos amistosos Abrazos Mucho éxito Saludos Besos y cariños CÓDIGO “Q” Teléfono Hablar emitiendo Conforme, de acuerdo Conforme Megafonia Micrófono Apartado de Correos Padres Lugar de reunión Guardia Civil Recibido Receptor Marido, novia Amplificador lineal Televisión QRA QRB QRG QRI QRK : : : : : QRL QRM QRO QRP QRT QRV QRX QRY QRZ : : : : : : : : : QSA QSB : : QSL : QSO : QSP QSY 36 : : Nombre de estación u operador Distancia aproximada en línea recta entre dos estaciones Frecuencia exacta Tonalidad de una emisión valorada de 1 a 3 Legibilidad, comprensibilidad de una señal. En CB, Radio valorado de 1 a 5 Estar ocupado, trabajando Interferencia, valorado de 1 a 5 Aumentar la potencia del emisor Disminuir la potencia del emisor Cesar la emisión Estar preparado, dispuesto Cita para transmitir. En CB, “Manténgase a la Escucha” Turno para transmitir Nombre de la estación que llama. En CB, “Quedar a la escucha” Fuerza de una señal. En CB Santiago. Valorado de 1 a 9 Variaciones de la fuerza de señal. Desvanecimiento. Fading. Valorado de 1 a 5 Acuse de recibo. Tarjeta confirmando comunicación Solicitar comunicación. En CB, además, comunicación directa entre dos o más estaciones Retransmisión a través de estación puente Pasar a transmitir en otra frecuencia o canal : : : : Mensaje a transmitir Localización geográfica de la estación Hora exacta Localización geográfica de accidente o siniestro DECLARACIÓN DE CONFORMIDAD EU SIMPLIFICADA NOTA: El Código Q es la fusión de las dos definiciones, como pregunta y como respuesta, es una sola definición aceptada en CB. Por este medio, Groupe President Electronics, declara que el equipo de radio CB: Marca: PRESIDENT Tipo: TXPR600 Nombre Comercial : MC KINLEY Cumple con la Directiva 2014/53 / UE. El texto completo de la declaración de conformidad de la UE está disponible en la siguiente dirección de Internet: https://president-electronics.com/DC/TXPR600 37 Español QTC QTH QTR QUT • Verifique la posición de los distintos mandos del aparato, ganancia de micro al máximo, squelch al mínimo, conmutador PA/RADIO, etc. • En el supuesto que la intervención no esté amparada por la garantía, se facturarán las piezas, la mano de obra y los gastos de envío. • Conserve este resguardo de su garantía, aunque ésta haya caducado. Si Ud. vende su aparato entregue el resguardo de su garantía al nuevo propietario a fin de facilitarle el Servicio Post Venta. • Consulte con su vendedor quien le aconsejará y se ocupará del seguimiento de su aparato, por intermedio nuestro si ha lugar. • Para toda intervención, fuera de garantía, cuyo importe se juzgue elevado en relación al valor del aparato, se hará un presupuesto previo por escrito para su eventual aceptación. Ud. ha confiado en la experiencia y calidad de PRESIDENT y se lo agradecemos. Para que quede totalmente satisfecho de su compra, aconsejamos leer atentamente este manual. No olvide de devolvernos la parte derecha de su bono de garantía; es muy importante para Ud., ya que permite una fácil identificación de su aparato durante una eventual intervención en nuestros servicios técnicos. Respecto al cuestionario, nuestro objetivo es conocerle mejor y así, contestando a sus aspiraciones, trabajar juntos para el porvenir de la RADIO. CONDICIONES GENERALES DE GARANTÍA Español De acuerdo con la Ley 23/2003 de 10 de julio y el artículo 3 de la Directiva 1999/44CE del parlamento Europeo y del Consejo sobre las garantías de los bienes de consumo, la garantía incluye los siguientes derechos: Reparación gratuita de los vicios o defectos de origen y los daños y perjuicios por ellos ocasionados. En el supuesto de que la reparación no fuese satisfactoria i el aparato no cumpla las condiciones de uso para el cual fue diseñado, el titular de la garantía tiene derecho a la substitución por otro de idénticas características o a la devolución del precio pagado. Este aparato tiene una garantía de 2 años de piezas y mano de obra. La garantía ampara la reparación totalmente gratuita de cualquier vicio o defecto de fabricación que sea reconocido por nuestro departamento técnico, en base a las condiciones siguientes, que aconsejamos leer detenidamente, para así, observándolas, poder disfrutar de su cobertura.*El laboratorio del SPV de President Electronics Ibérica S.A., se reserva el derecho de no aplicar la garantía, si una avería ha sido provocada por una antena no distribuida por la marca PRESIDENT. Una extensión de garantía de 3 años se aplicará sistemáticamente, por la compra y utilización de una antena de la marca PRESIDENT, aumentando la garantía total a 5 años, y cuando el justificante sea remitido al Servicio Postventa de PRESIDENT, dentro de los 30 días siguientes a la compra. La garantía es valida en el país de compra. • Para un mejor servicio recorte la parte lateral de esta tarjeta y devuélvanosla debidamente cumplimentada hasta 30 días después de la fecha de compra. • La prueba de compra, factura de venta, debe ser obligatoriamente adjunta al aparato cuando se envíe para su reparación. • Las fechas inscritas en el resguardo de garantía y la prueba de compra deben concordar. • No instale el aparato antes de leer el Manual de Instrucciones. • Ninguna pieza de recambio será enviada, por nuestro departamento técnico, en base a la garantía. Esta garantía no cubre: • Los daños causados por accidentes o golpes motivados por envoltorios defectuosos al sernos remitido el aparato (utilice preferentemente el embalaje de origen y una protección suplementaria). • Los daños que se produzcan por una manipulación indebida, golpes, antena mal ajustada, ROE (relación de ondas estacionarias) excesiva o demasiado grande (mayor que 2), inversión de polaridad de la tensión de alimentación, conexiones incorrectas, sobre tensiones, la tensión nominal de la alimentación no puede superar la de una batería de 12V, etc. • Las modificaciones de las Normas de Telecomunicaciones, las reparaciones y/o modificaciones efectuadas por terceros, sin la aprobación de nuestra empresa. Si Ud. observa defectos de funcionamiento: • Compruebe la alimentación de su aparato y el estado del fusible. • Controle los enchufes de los distintos conectores; tomas de antena, micrófono y alimentación. La Dirección Técnica y el Departamento de Calidad # Fecha de compra:......................................................................................... Tipo : Radio CB MC KINLEY N° de serie :................................................................................................... SIN SELLO DEL DISTRIBUIDOR LA GARANTÍA NO SERÁ VALIDA. 38 WARNING ! Before using, be careful never to transmit without first having connected the antenna (connection “B” situated on the back panel of the equipment) or without having set the SWR (Standing Wave Ratio) ! Failure to do so may result in destruction of the power amplifier, which MULTI-NORMS TRANSCEIVER! See function “F” on page 46 and the Configuration table on page 74. The warranty of this transceiver is valid only in the country of purchase. 39 English is not covered by the guarantee. Welcome to the world of the new generation of CB radios. The new PRESIDENT range gives you access to top performance CB equipment. With the use of up-to-date technology, which guarantees unprecedented quality, your PRESIDENT MC KINLEY is a new step in personal communication and is the surest choice for the most demanding of professional CB radio users. To ensure that you make the most of all its capacities, we advise you to read carefully this manual before installing and using your PRESIDENT MC KINLEY. A) INSTALLATION 1) WHERE AND HOW TO MOUNT YOUR MOBILE CB RADIO a) You should choose the most appropriate setting from a simple and practical point of view. b) Your CB radio should not interfere with the driver or the passengers. c) Remember to provide for the passing and protection of different wires (e.g. power, antenna, accessory cabling) so that they do not interfere in any way with the driving of the vehicle. d) To install your equipment, use the cradle (1) and the self-tapping screws (2) provided (drilling diameter 3.2 mm). Take care not to damage the vehicle’s electrical system while drilling the dash board. e) Do not forget to insert the rubber joints (3) between the CB and its support as these have a shock-absorbing effect which permits gentle orientation and tightening of the set. f) Choose where to place the microphone support and remember that the microphone cord must stretch to the driver without interfering with the controls of the vehicle. English - WARNING: If you imbed your radio, please ensure that no cable is in direct contact with the chassis. - N.B. : As the transceiver has a frontal microphone socket, it can be set into the dash board. In addition to the loudspeaker on the front, it is possible to add an external speaker for better listening of communications (connector EXT.SP. situated on the back panel: C). Ask your dealer for advice on mounting your CB radio. 2) ANTENNA INSTALLATION a) Choosing your antenna - For CB radios, the longer the antenna, the better its results. Your dealer will be able to help you with your choice of antenna. b) Mobile antenna - MOUNTING DIAGRAM 40 Must be fixed to the vehicle where there is a maximum of metallic surface (ground plane), away from windscreen mountings. - - - cable, you should use the same or a superior type of cable. c) It is necessary to connect your CB to a permanent (+) and (-). We advise you to connect the power cable directly to the battery (as the connection of the CB cable to the wiring of the car-radio or other parts of the electrical circuit may, in some cases, increase the likelihood of interference). d) Connect the red wire (+) to the positive terminal of the battery and the black (-) wire to the negative terminal of the battery. e) Connect the power cable to your CB radio. If you already have a radio-telephone antenna installed, the CB antenna should be higher than this. There are two types of antenna: pre-regulated which should be used on a good ground plane (e.g. car roof or lid of the boot), and adjustable which offer a much larger range and can be used on a smaller ground plane (see § ADJUSTMENT OF SWR page 41). For an antenna which must be fixed by drilling, you will need a good contact between the antenna and the ground plane. To obtain this, you should lightly scratch the surface where the screw and tightening star are to be placed. Be careful not to pinch or flatten the coaxial OUTPUT RADIUS PATTERN cable (as this runs the risk of break down and/or short-circuiting). Connect the antenna (B). WARNING: Never replace the original fuse by one of a different value. 4) BASIC OPERATIONS TO BE CARRIED OUT BEFORE USING YOUR SET FOR THE FIRST TIME (without transmitting and without using the “push-to-talk” switch on the microphone) c) Fixed antenna - A fixed antenna should be installed in a clear space as possible. If it is fixed to a mast, it will perhaps be necessary to stay it, according to the laws in force (you should seek professional advice). All PRESIDENT antennas and accessories are designed to give maximum efficiency to each CB radio within the range. a) b) c) d) e) f) 3) POWER CONNECTION Your PRESIDENT MC KINLEY is protected against an inversion of polarities. However, before switching it on, you are advised to check all the connections. Your equipment must be supplied with a continued current of 12 or 24 volts (A). Today, most cars and lorries are negative earth. You can check this by making sure that the negative terminal of the battery is connected either to the engine block or to the chassis. If this is not the case, you should consult your dealer. a) Check that the battery is of 12 or 24 volts. b) Locate the positive and negative terminals of the battery (+ is red and - is black). Should it be necessary to lengthen the power Connect the microphone. Check the antenna connections. Turn the set on by turning the VOL knob (1) clockwise. Turn the squelch SQ knob (2) to minimum (M position). Adjust the volume to a comfortable level. Go to channel 20 by using the rotary CH knob (5) or UP/DN buttons (13) on the microphone. 5) ADJUSTMENT OF SWR (Standing wave ratio) WARNING: This must be carried out when you use your CB radio for the first time (and whenever you re-position your antenna). The adjustment must be carried out in an obstacle-free area. 41 * Adjustment with internal SWR-meter * Adjustment with external SWR-meter (e.g. TOS-1 PRESIDENT) See function SWR CALIBRATION page 48. English - a) To connect the SWR meter : - munication. Squelch does not affect neither sound nor transmission power, but allows a considerable improvement in listening comfort. Connect the SWR meter between the CB radio and the antenna as close as possible to the CB (use a maximum of 40 cm cable, type President CA 2C). a) ASC: AUTOMATIC SQUELCH CONTROL Worldwide patent, a PRESIDENT exclusivity. Turn the SQ knob (2) anti-clockwise into ASC position. appears on the display. No repetitive manual adjustment and a permanent improvement between the sensitivity and the listening comfort when ASC is active. This function can be disconnected by turning the switch clockwise. In this case the squelch adjustment becomes manual again. disappears from the display. b) To adjust the SWR meter: - - Set the CB on channel 20 in AM. Put the switch on the SWR-meter to position FWD (calibration). Press the “push-to-talk” switch on the microphone to transmit. Bring the index needle to by using the calibration key. Change the switch to position REF (reading of the SWR level). The reading on the Meter should be as near as possible to 1. If this is not the case, readjust your antenna to obtain a reading as close as possible to 1. (A SWR reading between 1 and 1.8 is acceptable). It will be necessary to recalibrate the SWR meter after each adjustment of the antenna. WARNING: In order to avoid any losses and attenuations in cables used for connection between the radio and its accessories, PRESIDENT recommends to use a cable with a length inferior to 3 m. b) MANUAL SQUELCH Turn the SQ knob clockwise to the exact point where all background noises disappear. This adjustment should be done with precision, because if set to maximum (fully clockwise), only the strongest signals will be received. 3) DISPLAY It shows all functions: Your CB is now ready for use. B) HOW TO USE YOUR CB English 1) ON/OFF - VOLUME To turn on your set: turn the VOL knob (1) clockwise. If the KEY BEEP function is active (see KEY BEEP menu page 47), a beep sounds. Your radio is on. The display briefly shows the type of microphone (see MICROPHONE TYPE menu on page 48) and the frequency band used (see page 46). The main bargraph shows the reception level and the output power level. Smaller bargraph show Mic Gain, RF Gain and RF Power levels. To turn off your set: turn the VOL knob (1) counter clockwise until it clicks. Your radio is off. 4) CLARIFIER To adjust the volume, turn the VOL knob (1) clockwise. To decrease the volume, turn the knob counter clockwise. The function CLAR. allows a frequency deviation during LSB/USB reception in order to improve the clearness of your correspondent’s voice. 2) ASC (Automatic Squelch Control) / SQUELCH Suppresses undesirable background noises when there is no com42 5) CHANNEL SELECTOR CH ~ RF POWER CHANNEL SELECTOR CH Long press PA key (6) to alternate between CB and PA mode. An external loud speaker can be connected to the unit by the PA jack plug located on the back panel PA.SP. (D). Turn the rotary CH knob (5) to move up or down a channel. A beep sound is emitted each time the channel is changed if the KEY BEEP function is activated (see KEY BEEP function on page 47). For details on operating in PA mode, see the PA SETTING menu on page 50. See § UP/DN BUTTONS ON MICROPHONE page 46. VOX (9 + 6 short press) The display shows the corresponding frequency. For example “27.205” for channel 40. See SPAN menu page 48. - A long press (3 seconds) on this button (5) allows entering the MENU. - A short press on this button (5) validates the settings in the MENU. The VOX function allows transmitting by speaking into the original microphone (or in the optional vox microphone) without pressing the PTT switch (12). The use of an optional vox microphone connected to the rear panel of the transceiver (E) disables the original microphone. Press • key (9) and short press •VOX key (6) in order to activate the VOX function. “VOX” appears on the display. Repeat the key combination to disable the function. “VOX” disappears. RF POWER (combination 12 / 9 + 5) - In TX mode, increase/decrease the output power. Press and hold the PTT switch (12). Press the • (9) and CH (5) buttons. «RF POWER» is displayed. Turn the rotary CH knob (5) to adjust the level using the bargraph. Press the CH knob (5) for 1 second to confirm the setting. VOX SET (9 + 6 long press) Press the •key (9) and press during 1 second the •VOX key (6) in order to activate the function VOX SETTING. “VOX” is displayed. Three adjustments are possible: Sensitivity SET-L, Anti-vox level SET-A and Vox delay time SET-T. The Display shows the type of adjustment followed by its level , for example SET-L1. 6) MODE ~ PA ~ •VOX ~ • VOX SETTING MODE (short press) - - This switch allows selecting the modulation mode AM, FM, LSB or USB; Your modulation mode has to correspond to the one of your correspondent. Amplitude Modulation / AM: communication on a field with relief and obstacles at middle distance (the most used). 1. Turn the CH knob (5) to increase/decrease the level of the active setting. 2. Press the • VOX key (6) briefly to go to the next setting. 3. Once the VOX is correctly set, a long press (1 second) on the • VOX key (6) will save the settings and exit the VOICE SETTING function. Frequency Modulation / FM: for nearby communications on a flat open field. In U configuration only: in FM mode, a long press on the F key (10) alternates between the ENG or CEPT frequency bands. “UK” is displayed when the ENG frequency band is selected (see table on page 70). Upper and Lower Side Band / USB-LSB: used for long distance communications (according to the propagation conditions). 43 - Sensitivity “SET-L”: allows the adjustment of the microphone (original one or optional vox) for an optimum transmission quality. Adjustable level from 1 (high level) to 9 (low level).Default value: 1. - Anti-Vox “SET-A”: allows disabling the transmission generated by the surrounding noise. The level is adjustable. OFF (according the English - PA (Public Address) (long press) squelch level) and from 0 (without anti-vox) to 9 (low level). Default value: OFF. - Delay time SET-T: allows avoiding the sudden cut of the transmission by adding a delay at the end of speaking. The level is adjustable from 1 (short delay) to 9 (long delay). Default value: 5. - The VOX SETTING automatically activates the VOX function. “VOX” appears in the display. M1 Note: The unit will automatically exit VOX SETTING without saving the setting parameters if no key is pressed after 10 seconds or, if any key is pressed. See § MEMORY page 45. 8) ANB/ANL ~ HI-CUT ~ EMERGENCY CHANNELS ~ M2 ANB/NL (short press) 7) SCAN ~ DW ~ M1 SCAN (short press) ANL/NB (Automatic Noise Limiter / Noise Blanker): These filters reduce background noise and some noise on reception. English Press the SCAN key (7) to activate the SCAN function in ascending order. “SCAN” is displayed. The scanning stops as a channel is active. The scanning automatically starts 3 seconds after the end of the transmission and no key is activated. In SCANNING mode, turn the rotary CH knob (5) or use the UP/DN buttons (13) on the microphone to change scan direction. During the scan, long press the • key (9) for one second to alternate between channel scan and memory scan modes. In the MEMORY SCAN mode, only the emergency channels (see § EMERGENCY CHANNELS on page 44) and the memorized channels (see § MEMORY page 45) are scanned. Press the ANL/NB key (8) to alternate between the following 4 states in a loop: 1. ANL/on - NB/off • 2. ANL/off - NB/on • 3. ANL/ on - NB/on • 4. ANL/off - NB/off. The filter icon appears in the display when the filter is active (on). HI-CUT (long press) Hi-Cut cuts out the high frequency interferences. Press the HI-CUT key (8) for one second to activate/deactivate the HI-CUT filter. «HI-CUT» appears in the display when the filter is active. EMERGENCY CHANNELS (9 + 8 short press) Press the PTT switch (12) or the SCAN key (7) to exit the SCAN function. - DW (long press) - The current channel number and the emergency channel are displayed alternately. The “EMG” icon also appears along with the emergency channel. The selected channel can be changed during dual watch. A new long press of the DW key (7) deactivates the DW function. “DW” disappears from the display. - A long press (1s) on the DW key (7) activates the DW (Dual Watch) function. “DW” is displayed. This function lets you watch over emergency and the current channels. The first long press activates the DW function between emergency channel 1 and the current channel. A second long press activates the function between the emergency channel 2 and the current channel. See § EMERGENCY CHANNEL 1 and 2 page 49. Briefly press the • key (9) then the •EMG (8) key to combine these two keys. A first combination activates emergency channel 1. A second combination activates emergency channel 2. When an emergency channel is active, «EMG» is displayed. A third combination allows to return to the initial channel. «EMG» disappears from the display. See § EMERGENCY CHANNEL 1 and 2 pages 49. M2 See § MEMORY page 45 44 9) “•” Key ~ MEMORY ~ ECHO ~ M3 “•” Key (short press) ECHO (9 + 9 short press) Press the • key (9) , flashes, then briefly press the •ECHO key (9) to activate the ECHO function. “ECHO” appears in the display. A new combination of the • (9) and •ECHO (9) keys, deactivates the function. “ECHO” disappears. Pressing the • key (9) activates the FUNCTION mode. flashes. Combine with another key beginning with • (•VOX, •EMG, •ECHO, •RF POWER or •MIC/RF GAIN) to access the function. M3 Note: The • key (9) is always combined with another key. Pressing the key alone has no effect except to flash for 10 seconds. See MEMORY page 45. MEMORY (long press) 10) F ~ MIC GAIN ~ RF GAIN F This CB radio allows you to memorize 3 channels with the following attributes: NB/ANL (on/off), HI-CUT (on/off), AM / FM / USB / LSB. - - - See In U configuration only on page 43. See § TALKBACK page 46. See § FUNCTION TURNING ON THE To store into memory: Select the channel and its attributes. Press the MEM key (9) for one second. If the KEY BEEP function is active, a beep sounds. “MEM” flashes. Press for one second one of the keys M1 (7), M2 (8) or M3 (9) to memorize. “MEM” appears in the display and the number of the selected memory (M1, M2 or M3) flashes. If the KEY BEEP function is active, a long beep confirms the success of the operation. UNIT page 46. MIC GAIN (combination 12 / 9 + 10) Adjust the microphone sensitivity level. - To call a memory: Press the MEM key (9) for one second. If the KEY BEEP function is active, a beep sounds. “MEM” flashes. Briefly press one of the M1 (7), M2 (8) or M3 (9) keys to display the selected memory. “MEM” is displayed, the number of the selected memory (M1, M2 or M3) flashes. Press and hold the PTT switch (12) Press the • key (9). Press the • MIC/RF GAIN key (10). “MIC GAIN” is displayed. Turn the rotary CH knob (5) to adjust the level using the bargraph. Press the CH knob (5) for 1 second to confirm the setting. The normal position of this function is at maximum level. MIC GAIN bargrah will be displayed on transmission. RF GAIN (9 + 10) Setting the reception sensitivity. Maximum position in the case of long-distance call reception. You can decrease the RF GAIN, to avoid distortions, when the interlocutor is near. Reduce the gain on reception in the case of a close communication with a correspondent not equipped with a RF POWER. To erase a memory: Turn off the device. Hold one of the keys M1 (7), M2 (8) or M3 (9) and switch on the appliance. The selected memory is erased. “MEM” and the number of the selected memory (M1, M2 or M3) disappear from the display. - See also the RESET menu on page 50. Press the • key (9). Press the • MIC/RF GAIN key (10). “RF GAIN” is displayed. Turn the rotary CH knob (5) to adjust the level using the bargraph. Press the CH knob (5) button for 1 second to confirm the setting. The bargraph of the RF GAIN will always be displayed in reception. 45 English - 11) 6 PIN MICROPHONE PLUG The display shows the corresponding frequency. For example “27.205” for channel 40. See SPAN menu page 48. The plug is located on the front panel of the transceiver and makes the setting of the equipment into the dashboard easier. See cabling diagram page 73. See § CHANNEL SELECTOR CH on page 43. C) FUNCTION TURNING ON THE UNIT 12) PTT ~ RF POWER ~ MIC GAIN ~ TALKBACK PTT (Push To Talk) To select the FREQUENCY BAND turn off the unit. Press and hold the F key (10) and then turn the unit on. Transmission switch, press to transmit a message, is displayed and release to listen to an incoming communication. RF POWER See § RF POWER page 43 1. MIC GAIN 2. See § MIC GAIN page 45 3. TALKBACK (combination 12 / 10) - English The TALKBACK function allows to ear your own modulation with the CB speaker. While pressing PTT switch (12), Press F key (10) to activate/deactivate TALKBACK function. When the function is on, “TALKBACK” is displayed. 4. See the frequency bands table at pages 70 to 72 / configuration table page 74. TALKBACK LEVEL (12 / 5) D) MENU When the TALKBACK function is on, press and hold PTT switch (12) and turn the rotary CH knob (5) to adjust the TALKBACK level. 9 steps from 01 to 09. The order of the 14 functions is the one described in this manual. However, the function displayed when entering the MENU will be the last function modified by the user. Whatever the function, the procedure is the same: Press the CH knob (5) for 3 seconds to enter MENU. appears. 1. Turn the rotary CH knob (5) or use the UP/DN buttons (13) on the microphone to select the menu. 2. Press the CH knob (5) to confirm. The setting parameter of the selected menu flashes in the display. 3. Turn the rotary CH knob (5) or use the UP/DN buttons (13) on the microphone to change the parameter value. TOT (Time Out Timer) If the transmission (using the PTT (12) key or VOX) is more than 5 minutes, CHANNEL and start blinking, the transmission ends. The time-out tone will sound until the PTT key is released. 13) UP/DN BUTTONS ON MICROPHONE - These buttons (13) allow increase (UP) or decrease (DN) the channel. A beep sound is emitted whenever the channel is changed if the KEY BEEP function is activated (see BEEP KEY function on page 47). (Configuration: EU; PL; d; EC; U; In) The frequency bands have to be chosen according to the country of use. Don’t use any other configuration. Some countries need a user’s licence. See table page 75. Turn on the power while pressing the F key (10). The letter corresponding to the current configuration is blinking. In order to change the configuration, turn the rotary CH knob (5) on the unit or use the UP/DN buttons (13) on the microphone. When the configuration is selected, press the F key (10) during 1 second. The letter corresponding to the configuration is continuously displayed and a confirmation beep sounds. At this point, confirm the selection by switching off the transceiver and then switching it on again. 46 4a. Short press the CH knob (5) again to validate your choice and stay in the MENU. The parameter stops flashing and, if the function has more than one parameter, the following parameter flashes... 4b. Long press (1s) the CH knob (5) again to validate your choice and exit in the MENU. disappears from the display. 5. If no key is pressed, the unit exits MENU after 10 seconds. disappears from the display. 3. Turn the rotary CH knob (5) or use the UP/DN buttons (13) on the microphone to change the value of the dimmer. 4a. Short press the CH knob (5) again to validate the selected value and stay in the MENU. 4b. Long press (1s) the CH knob (5) again to validate the selected disappears from the display. value and exit in the MENU. 5. If no key is pressed, the unit exits MENU after 10 seconds. disappears from the display. Note: The UP/DN buttons (13) on the microphone have the same effect as the rotary CH knob (5). The PTT switch (12) exits MENU without validating. disappears from the display. Dimmer default value is : 5. 3) CONTRAST 1) COLOR Press the CH knob (5) for 3 seconds to enter MENU. appears. 1. Turn the rotary CH knob (5) or use the UP/DN buttons (13) on the microphone to select the CONTRAST menu. 2. Press the CH knob (5) to confirm. The contrast value flashes in the display. 3. Turn the rotary CH knob (5) or use the UP/DN buttons (13) on the microphone to change the value of the contrast. 4a. Short press the CH knob (5) again to validate the selected value and stay in the MENU. 4b. Long press (1s) the CH knob (5) again to validate the selected disappears from the display. value and exit in the MENU. 5. If no key is pressed, the unit exits MENU after 10 seconds. disappears from the display. 4a. Short press the CH knob (5) again to validate the color and stay in the MENU. 4b. Long press (1s) the CH knob (5) again to validate the color and exit in the MENU. disappears from the display. 5. If no key is pressed, the unit exits MENU after 10 seconds. disappears from the display. Contrast default value is : 5. 4) KEY BEEP Color default is orange : Beep on changing the channel, keys etc... 2) DIMMER Press the CH knob (5) for 3 seconds to enter MENU. appears. 1. Turn the rotary CH knob (5) or use the UP/DN buttons (13) on the microphone to select the KEY BEEP menu. 2. Press the CH knob (5) to confirm. The status of the function flashes in the display. 3. Turn the rotary CH knob (5) or use the UP/DN buttons (13) on the microphone to activate on / deactivate of the function. DIMMER function allows adjusting the brightness of the lighting. 10 steps from 0 to 9. Press the CH knob (5) for 3 seconds to enter MENU. appears. 1. Turn the rotary CH knob (5) or use the UP/DN buttons (13) on the microphone to select the DIMMER menu. 2. Press the CH knob (5) to confirm. The dimmer value flashes in the display. 47 English CONTRAST function allows adjusting the contrast of the display. 10 steps from 0 to 9. Press the CH knob (5) for 3 seconds to enter MENU. appears. 1. Turn the rotary CH knob (5) or use the UP/DN buttons (13) on the microphone to select the COLOR menu. 2. Press the CH knob (5) to confirm. The color flashes in the display. 3. Turn the rotary CH knob (5) or use the UP/DN buttons (13) on the microphone to change the color. 1. Turn the rotary CH knob (5) or use the UP/DN buttons (13) on the microphone to select the SPAN menu. 2. Press the CH knob (5) to confirm. The status of the function flashes in the display. 3. Turn the rotary CH knob (5) or use the UP/DN buttons (13) on the microphone to activate on / deactivate of the function. 4a. Short press the CH knob (5) again to validate and stay in the MENU. 4b. Long press (1s) the CH knob (5) again to validate and exit in the MENU. disappears from the display. 5. If no key is pressed, the unit exits MENU after 10 seconds. disappears from the display. Span default setting is of. 4a. Short press the CH knob (5) again to validate and stay in the MENU. 4b. Long press (1s) the CH knob (5) again to validate and exit in the MENU. disappears from the display. dis5. If no key is pressed, the unit exits MENU after 10 seconds. appears from the display. Key beep default setting is : on. 5) ROGER BEEP The Roger Beep sounds when the PTT switch (12) of the microphone is released in order to let your correspondent speak. Historically as CB is a “simplex” communication mode, it is not possible to speak and listen at the same time (as it is the case with a telephone). Once the conversation was over, he said “Roger” in order to prevent his correspondent that it was his turn to talk. The word “Roger” has been replaced by a significant beep. There comes “Roger beep” from. 7) MICROPHONE TYPE PRESIDENT MC KINLEY can be used with both a PRESIDENT electret and dynamic 6-pin microphone (see microphone wiring on page 73). When the unit is turned on, the microphone type is displayed briefly. English Press the CH knob (5) for 3 seconds to enter MENU. appears. 1. Turn the rotary CH knob (5) or use the UP/DN buttons (13) on the microphone to select the ROGER BP menu. 2. Press the CH knob (5) to confirm. The status of the function flashes in the display. 3. Turn the rotary CH knob (5) or use the UP/DN buttons (13) on the microphone to activate on / deactivate of the function. 4a. Short press the CH knob (5) again to validate and stay in the MENU. 4b. Long press (1s) the CH knob (5) again to validate and exit in the disappears from the display. MENU. 5. If no key is pressed, the unit exits MENU after 10 seconds. disappears from the display. Roger beep default setting is : of. Press the CH knob (5) for 3 seconds to enter MENU. appears. 1. Turn the rotary CH knob (5) or use the UP/DN buttons (13) on the microphone to select the MIC TYPE menu. 2. Press the CH knob (5) to confirm. The type of the microphone flashes in the display. 3. Turn the rotary CH knob (5) or use the UP/DN buttons (13) on the microphone to select the type of the microphone (electret) or dynamic. 4a. Short press the CH knob (5) again to validate and stay in the MENU. 4b. Long press (1s) the CH knob (5) again to validate and exit in the MENU. disappears from the display. 5. If no key is pressed, the unit exits MENU after 10 seconds. disappears from the display. 6) SPAN Microphone type default is When the function is active, the frequency can be adjusted continuously. Pressing the CH knob (5) button displays a bar under the first or second decimal of the frequency. The rotary CH knob (5) no longer acts on the channel but execute a 100 kHz (first decimal place) or 10 kHz (decimal second) jump frequency. Press the CH knob (5) for 3 seconds to enter MENU. (electret). 8) SWR CALIBRATION Press the CH knob (5) for 3 seconds to enter MENU. appears. 1. Turn the rotary CH knob (5) or use the UP/DN buttons (13) on the microphone to select the SWR menu. appears. 48 1. Turn the rotary CH knob (5) or use the UP/DN buttons (13) on the microphone to select the TONE menu. 2. Press the CH knob (5) to confirm. The tone value flashes in the display. 3. Turn the rotary CH knob (5) or use the UP/DN buttons (13) on the microphone to change the value of the tone. 4a. Short press the CH knob (5) again to validate the selected value and stay in the MENU. 4b. Long press (1s) the CH knob (5) again to validate the selected value and exit in the MENU. disappears from the display. dis5. If no key is pressed, the unit exits MENU after 10 seconds. appears from the display. 2. Press the CH knob (5) button to confirm. The radio automatically switches to TX mode without pressing the PTT switch (12) and calibration begins. Calibration time is 5 minutes maximum. A countdown is done in the display. 3. Adjust the antenna. - The beep* is continuous when the SWR value is 1.0. The space between the beeps becomes larger and larger as the SWR value moves away from1.0. - The volume of the beep is adjustable with the VOL button (1). - The display shows the SWR value, for example 2.5. 4. Press the PTT switch (12) to exit the SWR CALIBRATION. *Check that the beep volume is set to a suitable level. Tone default value is : 0. See ADJUSTMENT OF SWR page 41. 1. 2. 3. 4. 5. 6. 7. Press the CH knob (5) for 3 seconds to enter MENU. appears. 1. Turn the rotary CH knob (5) or use the UP/DN buttons (13) on the microphone to select the EMG 1 menu. 2. Press the CH knob (5) button to confirm. The first parameter, the modulation mode, flashes in the display. 3. Turn the rotary CH knob (5) or use the UP/DN buttons (13) on the microphone to set the modulation mode for emergency channel 1: AM, FM, USB, LSB or FM UK (in U configuration only). 4. Press CH knob (5) again to confirm. The modulation mode stops flashing, the second parameter, the channel, flashes in the display. 5. Use the rotary CH knob (5) or use the UP/DN buttons (13) on the microphone to select the emergency channel 1. 6. Press CH knob (5) again to confirm the channel. a) Start again at point 1 to set another function or b) Press the PTT switch (12) to exit MENU. 7. If no key is pressed, the unit exits the MENU after 10 seconds. disappears from the display. Press the CH knob (5) for 3 seconds to enter MENU. appears. Turn the rotary CH knob (5) or use the UP/DN buttons (13) on the microphone to select the ECHO SET menu. Press the CH knob (5) button to confirm. The LEVEL of the ECHO flashes in the display. Turn the rotary CH knob (5) or use the UP/DN buttons (13) on the microphone to set the level value from1 to 32 (default level:13). Press the CH knob (5) button again to validate the level value. The second parameter, DELAY, flashes. Use the rotary CH knob (5) or the UP/DN buttons (13) on the microphone to set the delay value from1 to 32 (default value:16). Press the CH knob (5) again to confirm the delay value. The delay stops flashing. a) Start again at point 1 to set another function or b) Press the PTT switch (12) to exit MENU. If no key is pressed, the unit exits MENU after 10 seconds. disappears from the display. See § ECHO page 45. Emergency channel 1 default is 9 in AM. 10) TONE See § EMERGENCY CHANNELS page 44. This function allows to change the RX TONE. 11 steps from -5 to +5 Press the CH knob (5) for 3 seconds to enter MENU. 12) EMERGENCY CHANNEL 2 Press the CH knob (5) for 3 seconds to enter MENU. appears. 49 appears. English 11) EMERGENCY CHANNEL 1 9) ECHO ADJUSTMENT In PA mode, press PTT switch to display “PA LEVEL”. Then turn the rotary CH knob (5) to adjust the audio level of the PA. 1. Turn the rotary CH knob (5) or use the UP/DN buttons (13) on the microphone to select the EMG 2 menu. Items 2 to 7 are identical to those in EMERGENCY 1 SET. PA setting default is: PA. Emergency channel 2 default is 19 AM. See § PA (Public Address) page 43. See § EMERGENCY CHANNELS page 44. 14) RESET 13) PA SETTING Resets all user-defined settings and returns to default values. This function allows to select the operating mode of PA, Public Address. Press the CH knob (5) for 3 seconds to enter MENU. appears. 1. Turn the rotary CH knob (5) or use the UP/DN buttons (13) on the microphone to select the RST ALL menu. 2. Press the CH knob (5) to validate. “CONFIRM” is displayed, no flashes in the display. 3. Turn the rotary CH knob (5) or use the UP/DN buttons (13) on the microphone to display . 4. Press CH knob (5) again to confirm. dis5. If no key is pressed, the unit exits MENU after 10 seconds, appears in the display. Press the CH knob (5) for 3 seconds to enter MENU. appears. 1. Turn the rotary CH knob (5) or use the UP/DN buttons (13) on the microphone to select the PA SET menu. 2. Press the CH knob (5) to validate. The PA type blinks on LCD. 3. Turn the rotary CH knob (5) or use the UP/DN buttons (13) on the microphone to select the operating mode of the PA : PA, In or OF. 4a. Short press the CH knob (5) again to validate the PA type and stay in the MENU. 4b. Long press (1s) the CH knob (5) again to validate the PA type and disappears from the display. exit in the MENU. 5. If no key is pressed, the unit exits MENU after 10 seconds, disappears in the display. English - PA: the modulation of the microphone and the received signal are transmitted to the Public Address loudspeaker connected to jack PA.SP. (D). “PA” flashes alternately with the modulation mode used: AM, FM, LSB, SSB or FM UK (only in U configuration). - In: the modulation of the microphone is transmitted to external loudspeaker connected to jack PA.SP. (D). The received signal is transmitted to the internal loudspeaker [or external optional loudspeaker connected to jack EXT.SP (C)].“PA” flashes alternately with the modulation mode used: AM, FM, LSB, SSB or FM UK (only in U configuration). - OF: The reception is no more functional. Only the modulation of the microphone is transmitted to the Public Address loudspeaker connected to jack PA.SP. (D). “PA” is displayed, channels are replaced by PA. A) DC-POWER TERMINAL (13.8 V / 27.6 V) B) ANTENNA CONNECTOR (SO-239) C) EXTERNAL SPEAKER JACK (8 Ω, Ø 3.5 mm) D) PA SPEAKER JACK (8 Ω, Ø 3.5 mm) E) JACK FOR OPTIONAL VOX MIKE (Ø 2.5 mm) 50 E) TECHNICAL CHARACTERISTICS F) TROUBLE SHOOTING 1) GENERAL 1) YOUR CB RADIO WILL NOT TRANSMIT OR YOUR TRANSMISSION IS OF POOR QUALITY 40 AM / FM / USB / LSB from 26.965 MHz to 27.405 MHz 50 ohms 13.8 V / 27.6 V 172 (W) x 150 (D) x 52 (H) mm 1 kg microphone UP/DOWN with support, mounting cradle, screws and fused power cord. - 2) YOUR CB RADIO WILL NOT RECEIVE OR RECEPTION IS POOR - 2) TRANSMISSION - Frequency allowance Carrier power Transmission interference Audio response Emitted power in the adj. channel - Microphone sensitivity - Drain - Modulated signal distortion : : : : +/- 300 Hz 4 W AM/FM - 12 W USB/LSB inferior 4nW (- 54 dBm) 300 Hz to 3 KHz in AM/FM/LSB/USB : : : : Inferior to 20 µW 3 mV 3 A (with modulation) 1.8 % Check that the RF GAIN bargraph is set on maximum. Check that the squelch level is properly adjusted. Check that the volume is set to a comfortable listening level. Check that the antenna is correctly connected and that the SWR is properly adjusted. 3) YOUR CB WILL NOT LIGHT UP - 3) RECEPTION - Maxi. sensitivity at 20 dB sinad : - Frequency response : - Adjacent channel selectivity : - Maximum audio power : - Squelch sensitivity : - Frequency image rejection rate : - Intermediate frequency rejection rate : - Drain : Check that the antenna is correctly connected and that the SWR is properly adjusted. Check that the microphone is properly plugged in. Check that the RF POWER bargraph is set on maximum. Check that the MIC GAIN bargraph is set on maximum. Check the power supply. Check the connection wiring. Check the fuse. G) HOW TO TRANSMIT OR RECEIVE A MESSAGE 0.5 µV - 113 dBm (AM/FM) 0.28 µV - 118 dBm (USB/LSB) 300 Hz to 3 kHz in AM/FM 60 dB 3W minimum 0.2 µV - 120 dBm maximum 1 mV - 47 dBm Now that you have read the manual, make sure that your CB Radio is ready for use (i.e. check that your antenna is connected). Press the “push-to-talk” switch and announce your message “Attention stations, transmission testing” which will allow you to check the clearness and the power of your signal. Release the switch and wait for a reply. You should receive a reply like, “Strong and clear”. If you use a calling channel (19) and you have established communication with someone, it is common practice to choose another available channel so as not to block the calling channel. 60 dB 70 dB 400 mA nominal / 1000 mA maximum 51 English - Channels : - Modulation modes : - Frequency ranges : - Antenna impedance : - Power supply : - Dimensions (W x D x H) : - Weight : - Accessories supplied : H) GLOSSARY CB LANGUAGE Advertising : Flashing lights of police car Back off : Slow down Basement : Channel 1 Base station : A CB set in fixed location Bear : Policeman Bear bite : Speeding fine Bear cage : Police station Big slab : Motorway Big 10-4 : Absolutely Bleeding : Signal from an adjacent channel interfering with the transmission Blocking the channel : Pressing the PTT switch without talking Blue boys : Police Break : Used to ask permission to join a conversation Breaker : A CBer wishing to join a channel Clean and green : Clear of police Cleaner channel : Channel with less interference Coming in loud and proud: Good reception Doughnut : Tyre Down and gone : Turning CB off Down one : Go to a lower channel Do you copy? : Understand? DX : Long distance Eighty eights : Love and kisses Eye ball : CBers meeting together Good buddy : Fellow CBer Hammer : Accelerator Handle : CBer’s nickname Harvey wall banger : Dangerous driver How am I hitting you? : How are you receiving me? Keying the mike : Pressing the PTT switch without talking Kojac with a kodak : Police radar Land line : Telephone Lunch box : CB set Man with a gun : Police radar Mayday : SOS Meat wagon : Ambulance Midnight shopper : Thief Below you will find some of the most frequently used CB radio expressions. Remember this is meant for fun and that you are by no means obliged to use them. In an emergency, you should be as clear as possible. INTERNATIONAL PHONETIC ALPHABET A B C D E F G Alpha Bravo Charlie Delta Echo Foxtrott Golf H I J K L M N Hotel India Juliett Kilo Lima Mike November O P Q R S T U Oscar Papa Quebec Romeo Sierra Tango Uniform V Victor W Whiskey X-ray Y Yankee Z Zulu TECHNICAL VOCABULARY English AM CB CH CW DX DW FM GMT HF LF LSB RX SSB SWR SWL SW TX UHF USB VHF : : : : : : : : : : : : : : : : : : : : Amplitude Modulation Citizen’s Band Channel Continuous Wave Long Distance Liaison Dual Watch Frequency Modulation Greenwich Meantime High Frequency Low Frequency Lower Side Band Receiver Single Side Band Standing Wave Ratio Short Wave Listening Short Wave CB Transceiver Ultra High Frequency Upper Side Band Very High Frequency 52 Conversation No reply Right behind you Behave yourself - police ahead Slow down Congested traffic New CBer Wind Parked police car Police radar Interchange Antenna Dumb CBer Go up one channel All over/everywhere Please give me an S-meter reading SIMPLIFIED EU DECLARATION OF CONFORMITY Hereby, Groupe President Electronics, declares that the CB radio equipment : Brand: PRESIDENT Type: TXPR600 Commercial Name: MC KINLEY is in compliance with Directive 2014/53/EU. The full text of the EU declaration of conformity is available at the following internet address: https://president-electronics.com/DC/TXPR600 English Modulation : Negative copy : Over your shoulder : Part your hair : Pull your hammer back : Rat race : Rubberbander : Sail boat fuel : Smokey dozing : Smokey with a camera : Spaghetti bowl : Stinger : Turkey : Up one : Wall to wall : What am I putting to you? : 53 • Check that the squelch level is properly adjusted; the programmed configuration is the correct one... • In case the device is not under warranty, the repair and return of the device will be charged. • All related documents must be preserved even after the end of the warranty period and if you resell your device, given to the new owner for the After-sales follow-up. • In case of real malfunction, please contact your dealer first; they will decide action to be taken. • In case of an intervention not covered by the warranty, an estimate will be established before any repair. Thank you for your trust in the PRESIDENT quality and experience. We recommend that you read this manual carefully so that you are completely satisfied with your purchase. Do not forget to return the detachable warranty certificate on the right hand side of this page; it is very important for the identification of your device during a possible rendering of our services. GENERAL WARRANTY CONDITIONS English This device is guaranteed 2 years parts and labour in its country of purchase against any manufacturing defects validated by our technical department. *The After-sales Service of PRESIDENT reserves the right not to apply the warranty if a breakdown is caused by an antenna other than those distributed by PRESIDENT, and if said antenna is at the origin of the breakdown. An extension of 3 years warranty is proposed systematically for the purchase and use of a PRESIDENT antenna, bringing the total duration of the warranty to 5 years. In order to be valid, the warranty certificate must be returned within a period of 30 days after the purchase date to the After-sales Service of the company Groupe President Electronics, or any foreign subsidiary. It is recommended to carefully read the following conditions and to respect them under penalty of losing their benefit. • To be valid the warranty certificate must be returned to us at the latest 1 month after the purchase. • Please duly complete the warranty certificate on the right hand side of the page, detach it (portion to be removed marked by dotted line) and send it back. • Any repair under warranty will be free and the return delivery costs will be borne by our company. • A purchase proof must be necessarily included with the device to be repaired. • The dates listed on the warranty certificate and proof of purchase must match. • Do not proceed with the installation of the device without reading the user manual. • No spare part will be sent nor exchanged by our services under warranty. The warranty is only valid in the country of purchase. Technical Manager and Quality Manager # Date of purchase :......................................................................................... Type : CB Radio MC KINLEY Exclusions (are not covered) • Damages caused by accident, shock or inadequate packaging. • Power transistors, microphones, lights, fuses and the non respect of the installation and use of specifications (including but not limited to antenna used with too high power, final output power transistors (SWR), inversion of polarities, bad connections, overvoltage,….) • The warranty cannot be extended due to the non-availability of the device while it is being serviced at our technical services location, nor by a change of one or more components or spare parts. • Transceivers which have been modified. The warranty application is excluded in case of modification or poor maintenance done by a third party not approved by our company. Serial N°:....................................................................................................... NOT COVERED BY THE WARRANTY WITHOUT THE DEALER STAMP If you note malfunctions • Check the power supply of your device and the quality of the fuse. • Check that the antenna, the microphone…. are correctly connected. 54 UWAGA ! Przed użyciem należy zwrócić uwagę, aby nigdy nie rozpoczynać transmisji bez uprzedniego podłączenia anteny (połączenie „B” znajdujące się na tylnym panelu urządzenia) lub bez ustawiania SWR (współczynnik fali stojącej) ! Nieprzestrzeganie tego może spowodować zniszczenie wzmacniacza mocy, który nie jest objęty gwarancją. RADIOTELEFON WIELOSTANDARDOWY! Zobacz funkcję „F” na stronie 62 i tabelę konfi- Gwarancja tego CB radia jest ważna tylko w kraju zakupu. 55 Polski guracji na stronie 74. Witamy w świecie nowej generacji radia CB. Nowa gama produktów PRESIDENT zapewnia dostęp do najwyższej klasy sprzętu CB. Dzięki zastosowaniu nowoczesnej technologii, która gwarantuje bezprecedensową jakość, PRESIDENT MC KINLEY to nowy krok w osobistej komunikacji i najpewniejszy wybór dla najbardziej wymagających profesjonalnych użytkowników radia CB. Zalecamy uważne przeczytanie niniejszej instrukcji przed zainstalowaniem i używaniem PRESIDENT MC KINLEY, aby w pełni wykorzystać wszystkie możliwości oferowanego sprzętu. A) INSTALACJA 1) GDZIE I JAK ZAINSTALOWAĆ TWOJE MOBILNE RADIO CB a) b) c) d) e) Z praktycznego punktu widzenia, powinieneś wybrać najbardziej ergonomiczne miejsce montażu, zapewniające łatwy dostęp. Twoje radio CB nie powinno zakłócać pracy kierowcy ani przeszkadzać pasażerom. Należy pamiętać, aby zapewnić odpowiednie ułożenie i zabezpieczenie różnych przewodów (np. zasilanie, antena, okablowanie akcesoriów), aby nie zakłócały one w żaden sposób jazdy samochodem. Aby zainstalować sprzęt, należy użyć dostarczonej w zestawie obejmy (1) i wkrętów samogwintujących (2) (średnica wiercenia 3,2 mm). Podczas wiercenia deski rozdzielczej należy uważać, aby nie uszkodzić instalacji elektrycznej pojazdu. Pamiętaj, aby włożyć gumowe podkładki (3) pomiędzy CB radio a obejmę, ponieważ pochłaniają one wstrząsy, a ponadto umożliwiają dokładne dopasowanie i zamocowanie zestawu. f) Wybierz miejsce, gdzie umieścić podpórkę mikrofonu i pamiętaj, że przewód mikrofonu musi rozciągać się do sterownika, nie ingerując w elementy sterujące pojazdu. - OSTRZEŻENIE: Ostrzeżenie! Jeśli instalujesz swoją stację, upewnij się, że żadne przewody nie dotykają obudowy. - Uwaga: Ponieważ nadajnik-odbiornik ma przednie gniazdo mikrofonowe, można go ustawić na tablicy rozdzielczej. Oprócz głośnika na przednim panelu można dodać zewnętrzny głośnik dla lepszej komunikacji (złącze EXT.SP z tyłu urządzenia: C). Poproś swojego dealera o poradę ws. montażu radia CB. 2) INSTALACJA ANTENY SCHEMAT MONTAŻOWY a) Wybór anteny - W przypadku radiotelefonów CB im dłuższa antena, tym lepsze wyniki. Twój dealer będzie w stanie pomóc ci w wyborze anteny. b) Antena przenośna (magnetyczna) - Polski - 56 Musi być zamocowana na pojeździe, na maksymalnie dużej powierzchni metalowej (płaszczyzna uziemienia), z dala od przedniej szyby. Jeśli masz już zainstalowaną antenę radiową, antena CB powinna być wyższa. Istnieją dwa rodzaje anten: wstępnie strojone, które powinny być stosowane na dobrej płaszczyźnie podłoża (np. dach samochodu lub pokrywa bagażnika), i montażowe (do strojenia), które zapewniają znacznie większy zasięg i mogą - b) Zlokalizuj zaciski baterii: dodatni i ujemny (+ / plus jest czerwony, a - /minus jest czarny). Jeśli konieczne jest wydłużenie przewodu zasilającego, należy użyć tego samego lub kabla o lepszych parametrach. c) Konieczne jest podłączenie radia CB do stałego (+) i (-). Zaleca się podłączenie kabla zasilającego bezpośrednio do akumulatora, ponieważ podłączenie kabla nadajnika do okablowania radia samochodowego lub innych części obwodu elektrycznego może w niektórych przypadkach zwiększyć prawdopodobieństwo zakłóceń. d) Podłącz czerwony przewód (+) do bieguna dodatniego akumulatora, a czarny (-) przewód do ujemnego zacisku akumulatora. e) Podłącz kabel zasilający do radia CB. PRZYKŁADY PROMIENIOWANIA SYGNAŁU - OSTRZEŻENIE: Nigdy nie zamieniaj oryginalnego bezpiecznika na inny, o innej wartości. (ponieważ grozi to przerwaniem i / lub zwarciem). Podłącz antenę (B). c) Antena stała 4) PODSTAWOWE CZYNNOŚCI DO WYKONANIA PRZED PIERWSZYM UŻYCIEM ZESTAWU (bez nadawania i bez użycia przełącznika „push-to-talk” (naciśnij, by mówić) na mikrofonie): Antena stała powinna być zainstalowana w jak najbardziej otwartej (nieosłoniętej) przestrzeni. Jeśli jest przymocowana do masztu, prawdopodobnie konieczne będzie pozostawienie jej w miejscu zamocowania, przy spełnieniu obowiązujących wymogów prawnych (należy zasięgać profesjonalnej porady). Wszystkie anteny i akcesoria PRESIDENT są zaprojektowane tak, aby zapewnić maksymalną wydajność dla każdego radiotelefonu pozostającego w zasięgu. a) Podłącz mikrofon. b) Sprawdź połączenia antenowe. c) Włącz zestaw, obracając pokrętło VOL (1) zgodnie z ruchem wskazówek zegara. d) Przekręcić pokrętło SQ blokady (2) na minimum (pozycja M). e) Dostosuj głośność do odpowiedniego poziomu. f) Przejdź do kanału 20 za pomocą obrotowego pokrętła CH (5) lub przycisków UP/DN (13) na mikrofonie. 3) PODŁĄCZENIE ZASILANIA Twój PRESIDENT MC KINLEY jest zabezpieczony przed pomyłkowym odwróceniem polaryzacji zasilania. Przed włączeniem należy jednak sprawdzić wszystkie połączenia. Urządzenie musi być zasilane napięciem stałym 12 V lub 24 V (A). Większość współczesnych samochodów i ciężarówek ma podłączony minus do masy. Można to sprawdzić upewniając się, że biegun ujemny akumulatora jest podłączony do bloku silnika lub do nadwozia/karoserii. W razie wątpliwości należy skonsultować się ze sprzedawcą. a) Sprawdź, czy akumulator ma 12 czy 24 wolt. 5) REGULACJA SWR (współczynnik fali stojącej) Uwaga: Czynność tę należy wykonać przy pierwszym użyciu radia CB, a także przy każdej zmianie pozycji anteny. Korekta ta musi być przeprowadzona w obszarze wolnym od przeszkód. 57 Polski - być użyte na mniejszych płaszczyznach uziemienia (patrz § REGULACJA SWR strona 57). W przypadku anteny, która musi być zamocowana za pomocą wiercenia, niezbędny jest dobry kontakt między anteną a płaszczyzną uziemienia (masą). W tym celu należy delikatnie oczyścić z lakieru powierzchnię, na której ma być umieszczona śruba i gwiaździsta podkładka dociągająca. Uważaj, aby kabel koncentryczny nie został zgnieciony lub spłaszczony * * 2) ASC (automatyczna blokada szumów) / SQUELCH Regulacja za pomocą wewnętrznego miernika SWR Patrz funkcja KALIBRACJA SWR strona 64. Pomija niepożądane dźwięki w tle, gdy nie ma komunikacji. Blokada szumów nie wpływa ani na dźwięk, ani na moc nadawczą, ale pozwala na znaczną poprawę komfortu słuchania. Regulacja za pomocą zewnętrznego miernika SWR (np. PREZYDENT TOS-1) a) Podłączanie miernika SWR: - a) ASC: AUTOMATYCZNA KONTROLA SZUMÓW Podłącz miernik SWR między radiem CB a anteną jak najbliżej CB (użyj maksymalnie kabla o długości 40 cm, typu President CA 2C). Ogólnoświatowy patent, wyłączność posiada firma PRESIDENT. Obróć pokrętło SQ (2) w kierunku przeciwnym do ruchu wskazówek zegara do pozycji ASC. pojawi się na wyświetlaczu. Nie ma możliwości ręcznych ustawień oraz stałej poprawy czułości i komfortu słuchania, gdy ASC jest aktywne. Funkcja ta może zostać odłączona poprzez obrócenie przełącznika w prawo, zgodnie z ruchem wskazówek zegara. W takim przypadku następuje powrót do ręcznej regulacji szumu. znika z wyświetlacza. b) Regulacja miernika SWR: - - Ustaw CB na kanale 20 w AM. Ustaw przełącznik na mierniku SWR, aby ustawić FWD (kalibracja). Naciśnij pokrętło „push-to-talk” (12) na mikrofonie, aby rozpocząć nadawanie. Przesuń igłę indeksu do pozycji t za pomocą przycisku kalibracji. Zmień przełącznik na pozycję REF (odczyt poziomu SWR). Odczyt na mierniku powinien być maksymalnie zbliżony do 1. Jeśli tak nie jest, należy ponownie ustawić antenę tak, aby odczyt był jak najbliżej 1 (dopuszczalny jest odczyt SWR między 1 a 1,8). Konieczna będzie ponowna kalibracja miernika SWR po każdej regulacji anteny. b) RĘCZNA REGULACJA SZUMÓW Przekręć pokrętło SQ (2) zgodnie z ruchem wskazówek zegara, dokładnie do miejsca, w którym znikną wszystkie szumy tła. Tę regulację należy wykonywać precyzyjnie, ponieważ jeśli zostanie ustawiony na maksimum (całkowicie zgodnie z ruchem wskazówek zegara), tylko najsilniejsze sygnały będą odbierane. OSTRZEŻENIE: Aby uniknąć strat i tłumienia w kablach używanych do połączenia radia z jego akcesoriami, PRESIDENT zaleca użycie kabla o długości mniejszej niż 3 m. 3) WYŚWIETLACZ Radio CB jest teraz gotowe do użycia. Pokazuje wszystkie funkcje: B) JAK UŻYWAĆ CB RADIO 1) WŁĄCZANIE / WYŁĄCZANIE (ON / OFF) - GŁOŚNOŚĆ (VOLUME) Aby włączyć zestaw: obróć pokrętło VOL (1) zgodnie z ruchem wskazówek zegara. Jeśli funkcja KEY BEEP jest aktywna (patrz menu KEY BEEP na stronie 63), rozlega się sygnał dźwiękowy. Twoje radio jest włączone. Wyświetlacz pokazuje na krótko typ mikrofonu (patrz menu TYP MIKROFONU na stronie 64) i wykorzystywane pasmo częstotliwości (patrz strona 62). Polski Główny wykres słupkowy pokazuje poziom odbioru i poziom mocy wyjściowej. Mniejszy wykres słupkowy pokazuje poziomy: wzmocnienia mikrofonu (MIC GAIN), wzmocnienia czułości odbiornika (RF GAIN) i mocy wyjściowej nadajnika (RF PWR). Aby wyłączyć zestaw: obróć pokrętło VOL (1) przeciwnie do ruchu wskazówek zegara, aż usłyszysz kliknięcie. Twoje radio jest wyłączone. Aby wyregulować głośność, obróć pokrętło VOL (1) zgodnie z ruchem wskazówek zegara. Aby zmniejszyć głośność, obróć pokrętło w lewo. 58 4) PRECYZYJNE DOSTROJENIE (CLARIFIER) - Funkcja CLAR. pozwala na odchylenie częstotliwości podczas odbioru LSB / USB w celu poprawy czytelności głosu korespondenta. PA (funkcja megafonu) (długie naciśnięcie) 5) WYBÓR KANAŁU CH ~ RF POWER Naciśnij i przytrzymaj przycisk PA (6) w celu przełączenia pomiędzy trybami WYBÓR KANAŁU CH CB i PA. Obracać pokrętłem CH (5), aby zmienić kanał w górę lub w dół. Sygnał dźwiękowy jest emitowany za każdym razem, gdy zmieniany jest kanał, jeśli aktywowana jest funkcja KEY BEEP (patrz funkcja KEY BEEP na stronie 63). Zewnętrzny głośnik można podłączyć do urządzenia za pomocą wtyku PA na tylnej ściance PA.SP. (D). Aby poznać szczegóły na temat działania w trybie PA, patrz USTAWIENIA PA na stronie 65. Zobacz § PRZYCISKI UP/DN NA MIKROFONIE strona 62. - VOX (9 + 6 krótkich naciśnięć) Wyświetlacz pokazuje odpowiednią częstotliwość. Na przykład „27.205” dla kanału 40. Patrz strona menu SPAN strona 64. Dłuższe naciśnięcie (3 sekundy) tego przycisku (5) umożliwia wejście do MENU. Krótkie naciśnięcie tego przycisku (5) zatwierdza ustawienia w MENU. Funkcja VOX umożliwia komunikację za pomocą oryginalnego mikrofonu (lub mikrofonu opcjonalnego) bez naciskania przycisku PTT (12). Użycie mikrofonu opcjonalnego, podłączonego do tylnego panelu odbiornika (E), powoduje wyłączenie oryginalnego mikrofonu. Wciśnij przycisk • (9), miga i krótko naciśnij przycisk • VOX (6), aby aktywować funkcję VOX. „VOX” pojawi się na wyświetlaczu. Powtórz kombinację klawiszy, aby wyłączyć funkcję. „VOX” zniknie. REGULACJA MOCY WYJŚCIOWEJ NADAJNIKA / RF POWER (kombinacja 12/9 + 5) - W trybie TX zwiększ / zmniejsz moc wyjściową. Naciśnij i przytrzymaj przycisk PTT (12). Naciśnij przyciski • (9) i CH (5). Wyświetlany jest komunikat „RF POWER”. Obracaj pokrętłem CH (5), aby wyregulować poziom za pomocą wskaźnika (bargrafu). Naciśnij pokrętło CH (5) przez 1 sekundę, aby potwierdzić ustawienie. VOX SET (9 + 6 długich naciśnięć) Naciśnij przycisk • (9) i naciśnij przez 1 sekundę przycisk • VOX (6), aby włączyć funkcję VOX SETTINGS (USTAWIENIA VOX). Wyświetlany jest komunikat „VOX”. Możliwe są trzy ustawienia: Sensitivity SET-L, Anti-Vox SET-A i Vox delay-time SET-T. Wyświetlacz pokazuje rodzaj regulacji, po której następuje jego poziom, na przykład SET-L1. 6) TRYB ~ PA ~ VOX ~ USTAWIENIA VOX 1. TRYB (MODE) (krótkie naciśnięcie) 2. 3. Ten przełącznik umożliwia wybór trybu modulacji AM, FM, LSB lub USB; Twój tryb modulacji musi odpowiadać trybowi twojego korespondenta. - Modulacja amplitudy / AM: do komunikacji na obszarach o bardziej zróżnicowanej rzeźbie terenu, na średnich dystansach (najczęściej używana). - Modulacja częstotliwości / FM: do bliskiej komunikacji na płaskim, otwartym terenie. Tylko w konfiguracji U: w trybie FM, długie naciśnięcie klawisza F (10) służy do zmiany zakresu częstotliwości ENG lub CEPT. Komunikat „UK” wyświetlany jest po wybraniu pasma częstotliwości ENG (patrz tabela na stronie 70). 59 Obróć pokrętło CH (5), aby zwiększyć / zmniejszyć poziom aktywnego ustawienia. Naciśnij krótko przycisk • VOX (6), aby przejść do następnego ustawienia. Po prawidłowym ustawieniu VOX i długim naciśnięcie (1 sekunda) przycisku • VOX (6) zostaną zapisane ustawienia i zakończone będzie działanie funkcji VOICE SETTING. - Czułość „SET-L”: umożliwia regulację mikrofonu (oryginalnego lub opcjonalnego) w celu uzyskania optymalnej jakości transmisji. Poziom regulowany od 1 (wysoki) do 9 (niski). Wartość domyślna: 1. - Anti-Vox „SET-A”: umożliwia wyłączenie transmisji generowanej przez hałas otoczenia. Poziom jest regulowany. OFF (zgodnie z poziomem blokady szumów) i od 0 (bez funkcji anti-vox) do 9 (niski poziom). Wartość domyślna: OFF. Polski - Górna i dolna wstęga / USB-LSB: używany do komunikacji na duże odległości (w zależności od warunków propagacji, czyli rozprzestrzeniania się fal radiowych). - M1 Czas opóźnienia „SET-T”: pozwala uniknąć nagłego przerwania transmisji, poprzez dodanie opóźnienia na końcu wypowiadanej kwestii. Poziom można regulować od 1 (krótkie opóźnienie) do 9 (duże opóźnienie). Wartość domyślna: 5. Patrz: § PAMIĘĆ strona 61. 8) ANB / ANL ~ HI-CUT ~ KANAŁY AWARYJNE ~ M2 VOX SETTING automatycznie aktywuje funkcję VOX. „VOX” pojawi się na wyświetlaczu. ANB / NL (krótkie naciśnięcie) ANL / NB (automatyczny ogranicznik szumów / eliminator szumów): filtry te redukują szumy tła i zakłócenia w odbiorze. Uwaga: Urządzenie automatycznie wyjdzie z funkcji USTAWIENIA VOX bez zapisywania parametrów ustawień, jeśli po 10 sekundach nie zostanie naciśnięty żaden przycisk lub jeśli zostanie naciśnięty dowolny przycisk. Wciśnij przycisk ANL/NB (8), aby przełączać się między następującymi 4 stanami w pętli: 1. ANL/on - NB/off • 2. ANL/off - NB/on • 3. ANL/on - NB/on • 4. ANL/off - NB/off. Ikona filtra pojawia się na wyświetlaczu, gdy filtr jest aktywny (włączony - on). 7) SKANOWANIE SCAN ~ DW ~ M1 SCAN (krótkie naciśnięcie) HI-CUT (długie naciśnięcie) Naciśnij przycisk SCAN (7), aby włączyć funkcję SCAN (skanowanie) w kolejności rosnącej. Wyświetlany jest komunikat „SCAN”. Skanowanie zostaje zatrzymane, gdy kanał jest aktywny. Skanowanie rozpocznie się automatycznie po 3 sekundach od zakończenia transmisji i żaden klawisz nie zostanie aktywowany. W trybie SKANOWANIE obracaj pokrętłem CH (5) lub użyj przycisków UP/DN (13) na mikrofonie, aby zmienić kierunek skanowania. Hi-Cut eliminuje zakłócenia o wysokiej częstotliwości. Naciśnij i przytrzymaj przycisk HI-CUT (8) przez jedną sekundę, aby włączyć / wyłączyć filtr HI-CUT. Komunikat «HI-CUT» pojawia się na wyświetlaczu, gdy filtr jest aktywny. KANAŁY AWARYJNE (9 + 8 krótkich naciśnięć) Podczas skanowania naciśnij i przytrzymaj przycisk • (9) przez jedną sekundę, aby przełączać się między trybami skanowania kanałów i skanowania pamięci. W trybie PAMIĘĆ SKANOWANIA (MEMORY SCAN) skanowane są tylko kanały alarmowe (patrz § KANAŁY AWARYJNE na stronie 60) i zapamiętane kanały (patrz § PAMIĘĆ Strona 61). - Naciśnij przycisk PTT (12) lub przycisk SCAN (7), aby wyjść z funkcji SCAN. DW (dual watch - nasłuch naprzemienny) (długie naciśnięcie) - Polski - Naciśnij na krótko przycisk • (9), a następnie • przycisk EMG (8), aby powiązać te dwa klawisze. Pierwsza kombinacja aktywuje kanał awaryjny 1. Druga kombinacja aktywuje kanał awaryjny 2. Gdy kanał awaryjny jest aktywny, wyświetlany jest komunikat „EMG”. Trzecia kombinacja pozwala na powrót do początkowego kanału. Komunikat „EMG” zniknie z wyświetlacza. Patrz: USTAWIENIE KANAŁU AWARYJNEGO 1 i USTAWIENIE KANAŁU AWARYJNEGO 2 strona 65. Długie naciśnięcie (1s) na przycisku DW (7) aktywuje funkcję DW (Dual Watch). Wyświetlany jest komunikat „DW”. Ta funkcja pozwala obserwować kanały awaryjne i bieżące. Pierwsze długie naciśnięcie aktywuje funkcję DW między kanałem awaryjnym 1 a kanałem bieżącym. Drugie długie naciśnięcie aktywuje funkcję między kanałem awaryjnym 2 a kanałem bieżącym. Patrz § USTAWIENIE KANAŁU AWARYJNEGO 1 i 2 na stronie 65. Aktualny numer kanału i kanał awaryjny wyświetlane są naprzemiennie. Ikona „EMG” pojawia się również wraz z kanałem awaryjnym. Wybrany kanał można zmienić podczas nasłuchu naprzemiennego. Nowe długie naciśnięcie przycisku DW (7) dezaktywuje funkcję DW. Komunikat „DW” zniknie z wyświetlacza. M2 Patrz: § PAMIĘĆ strona 61. 9) Klucz „•” ~ MEMORY (PAMIĘĆ) ~ ECHO ~ M3 Klucz „•” (krótkie naciśnięcie) Naciśnięcie przycisku • (9) aktywuje tryb FUNKCJA (FUNCTION). Miga komunikat . Połącz to działanie z innym klawiszem zaczynając od • (• VOX, • EMG, • ECHO, • RF POWER lub • MIC/RF GAIN), aby uzyskać dostęp do funkcji. 60 10) F ~ MIC GAIN ~ RF GAIN Uwaga: Przycisk • (9) jest zawsze powiązany z innym przyciskiem. Naciśnięcie samego przycisku nie da żadnego efektu, z wyjątkiem migotania komunikatu przez 10 sekund. F Zobacz jeszcze konfiguracja U na stronie 59. Patrz § TALKBACK na stronie 62. Patrz § WŁĄCZENIE FUNKCJI W URZĄDZENIU strona 62. PAMIĘĆ (MEMORY) (długie naciśnięcie) Ten model CB radia umożliwia zapamiętanie 3 kanałów z następującymi atrybutami: NB / ANL (on / off), HI-CUT (on / off), AM / FM / USB / LSB. - - - - Dostosuj poziom czułości mikrofonu. Naciśnij i przytrzymaj przycisk PTT (12). Naciśnij przycisk • (9). Naciśnij przycisk • MIC/RF GAIN (10). Wyświetlany jest komunikat „MIC GAIN”. Obracaj pokrętłem CH (5), aby wyregulować poziom za pomocą wskaźnika (bargrafu). Naciśnij pokrętło CH (5) przez 1 sekundę, aby zatwierdzić ustawienie. Normalna pozycja tej funkcji jest na poziomie maksymalnym. Poziom MIC GAIN zostanie wyświetlony na wskaźniku podczas transmisji. Aby wywołać pamięć: Nacisnąć przycisk MEM (9) przez jedną sekundę. Jeśli funkcja KEY BEEP jest aktywna, rozlega się sygnał dźwiękowy. Miga komunikat „MEM”. Naciśnij krótko jeden z przycisków M1 (7), M2 (8) lub M3 (9), aby wyświetlić wybraną pamięć. Na wyświetlaczu pojawi się komunikat „MEM” i zacznie pulsować numer wybranej pamięci (M1, M2 lub M3). RF GAIN (9 + 10) Aby skasować pamięć: Wyłącz urządzenie. Przytrzymaj jeden z klawiszy M1 (7), M2 (8) lub M3 (9) i włącz urządzenie. Wybrana pamięć zostanie skasowana. Komunikat „MEM” i numer wybranej pamięci (M1, M2 lub M3) znikną z wyświetlacza. - Zobacz także menu RESET na stronie 66. Ustawianie czułości odbioru. Maksymalna pozycja w przypadku odbioru połączeń na duże odległości. Możesz zmniejszyć RF GAIN, aby uniknąć zniekształceń, gdy rozmówca jest blisko. Zmniejsz wzmocnienie przy odbiorze w przypadku bliskiej komunikacji z korespondentem nie wyposażonym w RF POWER. Naciśnij przycisk • (9). Naciśnij przycisk • MIC/RF GAIN (10). Wyświetlany jest komunikat „RF GAIN”. Obracaj pokrętłem CH (5), aby wyregulować poziom za pomocą wskaźnika (bargrafu). Naciśnij pokrętło CH (5) przez 1 sekundę, aby zatwierdzić ustawienie. Poziom RF GAIN będzie zawsze wyświetlany na wskaźniku podczas odbioru. ECHO (9 + 9 krótkich naciśnięć) 11) GNIAZDO MIKROFONOWE 6 PIN Naciśnij przycisk • (9), komunikat miga, a następnie na krótko naciśnij przycisk • ECHO (9), aby włączyć funkcję ECHO. Komunikat „ECHO” pojawi się na wyświetlaczu. Nowa kombinacja klawiszy • (9) i • ECHO (9) dezaktywuje ją. Komunikat „ECHO” zniknie. Gniazdo znajduje się na przednim panelu nadajnika i ułatwia ustawienie urządzenia na desce rozdzielczej. Patrz schemat okablowania - strona 73. 12) PTT ~ RF POWER ~ MIC GAIN ~ TALKBACK M3 PTT (Push To Talk - naciśnij, aby mówić) Patrz: § PAMIĘĆ strona 61. Przełącznik transmisji; naciśnij, aby wysłać wiadomość; wyświetlany jest symbol ; zwolnij przycisk, aby odsłuchać komunikat przychodzący. 61 Polski - MIC GAIN (połączenie 12/9 + 10) Aby zapisać w pamięci: Wybierz kanał i jego atrybuty. Naciśnij przycisk MEM (9) na jedną sekundę. Jeśli funkcja KEY BEEP jest aktywna, rozlega się sygnał dźwiękowy. Miga komunikat „MEM”. Naciskaj przez jedną sekundę jeden z przycisków M1 (7), M2 (8) lub M3 (9), aby zapamiętać dokonany wybór. Na wyświetlaczu pojawi się komunikat „MEM” i zacznie migać numer wybranej pamięci (M1, M2 lub M3). Jeśli funkcja KEY BEEP jest aktywna, długi sygnał dźwiękowy potwierdza sukces operacji. RF POWER 1. Zobacz § RF POWER, strona 59. 2. MIC GAIN 3. Zobacz § MIC GAIN, strona 61. TALKBACK (połączenie 12 / 10) - 4. Funkcja TALKBACK umożliwia słuchanie własnej modulacji za pomocą głośnika CB, podczas gdy przycisk PTT (12) jest naciśnięty. Długie naciśnięcie przycisku F (10) aktywuje/ dezaktywuje funkcję TALKBACK. Gdy funkcja jest włączona, wyświetlany jest komunikat „TALKBACK”. Zobacz tabelę pasm częstotliwości na stronach od 70 do 72 / tabela konfiguracji na stronie 74. POZIOM TALKBACK (12 / 5) D) MENU Gdy funkcja TALKBACK jest włączona, naciśnij i przytrzymaj przycisk PTT (12) i obracaj pokrętłem CH (5), aby wyregulować poziom TALKBACK (skala 9 stopniowa: od 01 do 09). Kolejność 14 funkcji jest opisana w niniejszej instrukcji. Jednak funkcja wyświetlana przy wejściu do MENU będzie ostatnią funkcją modyfikowaną przez użytkownika. Niezależnie od funkcji procedura jest taka sama: TOT (Timeout Timer - wyłącznik czasowy) Jeśli transmisja (przy użyciu przycisku PTT (12) lub VOX) trwa dłużej niż 5 minut, CHANNEL i zaczną migać, a transmisja się zakończy. Dźwięk limitu czasu będzie rozbrzmiewać, dopóki nie zostanie zwolniony przycisk PTT (12). Naciśnij pokrętło CH (5) i przytrzymaj przez 3 sekundy, aby wejść do MENU. Pojawia się symbol . 1. Obracaj pokrętło CH (5) lub użyj przycisków UP/DN (13) na mikrofonie, aby wybrać menu. 2. Naciśnij pokrętło CH (5), aby potwierdzić. Parametr ustawienia wybranego menu miga na wyświetlaczu. 3. Obróć pokrętło CH (5) lub użyj przycisków UP/DN (13) na mikrofonie, aby zmienić wartość parametru. 4a. Naciśnij krótko przez CH (5), aby potwierdzić swój wybór i pozostać w MENU. Parametr przestaje migać i jeśli funkcja ma kilka parametrów, miga następujący parametr ... 4b. Naciśnij przez jedną sekundę przycisk CH (5), aby potwierdzić wybór i wyjść z MENU. Symbol znika z wyświetlacza. 5. Jeśli żaden klawisz nie zostanie naciśnięty, urządzenie wyjdzie z MENU po 10 sekundach. Symbol znika z wyświetlacza. 13) PRZYCISKI UP/DN NA MIKROFONIE - Włącz zasilanie, naciskając klawisz F (10). Litera odpowiadająca bieżącej konfiguracji miga na wyświetlaczu. Aby zmienić konfigurację, obróć pokrętło CH (5) na urządzeniu lub użyj przycisków UP/DN (13) na mikrofonie. Po wybraniu konfiguracji naciskaj klawisz F (10) przez 1 sekundę. Litera odpowiadająca konfiguracji jest stale wyświetlana i rozlega się sygnał potwierdzenia. W tym momencie potwierdź wybór, wyłączając CB radio, a następnie włącz je ponownie. Te przyciski (13) umożliwiają zmianę kanału w górę (UP) lub w dół (DN). Sygnał dźwiękowy jest emitowany za każdym razem, gdy kanał zostanie zmieniony, jeśli aktywowana jest funkcja KEY BEEP (patrz funkcja KEY BEEP na stronie 63). Wyświetlacz pokazuje odpowiednią częstotliwość. Na przykład „27.205” dla kanału 40. Patrz menu SPAN - strona 64. Patrz § WYBÓR KANAŁU CH na stronie 59. C) WŁĄCZANIE FUNKCJI W URZĄDZENIU Polski Uwaga: Użycie przycisków UP/DN (13) na mikrofonie daje taki sam efekt jak użycie pokrętła CH (5). Przełącznik PTT (12) wychodzi z MENU bez znika z wyświetlacza. sprawdzania poprawności. Symbol Aby wybrać PASMO CZĘSTOTLIWOŚCI, wyłącz urządzenie. Naciśnij i przytrzymaj przycisk F (10), a następnie włącz urządzenie. (Konfiguracja: EU; PL; d; EC; U; In) Pasma częstotliwości muszą być wybrane zgodnie z krajem użytkowania. Nie używaj żadnej innej konfiguracji. W niektórych krajach wymagana jest licencja na używanie CB radia. Patrz tabela na stronie 75. 1) KOLOR Naciśnij pokrętło CH (5) i przytrzymaj przez 3 sekundy, aby wejść do MENU. Na wyświetlaczu pojawia się symbol . 62 2. 3. Naciśnij pokrętło CH (5) i przytrzymaj przez 3 sekundy, aby wejść do MENU. Pojawia się symbol . 1. Obracaj pokrętło CH (5) lub użyj przycisków UP/DN (13) na mikrofonie, aby wybrać menu CONTRAST. 2. Naciśnij pokrętło CH (5), aby potwierdzić. Wartość kontrastu miga na wyświetlaczu. 3. Obróć pokrętło CH (5) lub użyj przycisków UP/DN (13) na mikrofonie, aby zmienić wartość kontrastu. 4a. Naciśnij krótko przez CH (5), aby zatwierdzić wybraną wartość i pozostać w MENU. 4b. Naciśnij przez jedną sekundę przycisk CH (5), aby zatwierdzić wybraną wartość i wyjść z MENU. Symbol znika z wyświetlacza. 5. Jeśli żaden klawisz nie zostanie naciśnięty, urządzenie wychodzi z MENU po 10 sekundach. Symbol znika z wyświetlacza. Obracaj pokrętłem CH (5) lub użyj przycisków UP/DN (13) na mikrofonie, aby wybrać menu COLOR. Naciśnij pokrętło CH (5), aby potwierdzić. Kolor miga na wyświetlaczu. Obróć pokrętło CH (5) lub użyj przycisków UP/DN (13) na mikrofonie, aby zmienić kolor. 4a. Naciśnij krótko przez CH (5), aby zatwierdzić wybrany kolor i pozostać w MENU. 4b. Naciśnij przez jedną sekundę przycisk CH (5), aby zatwierdzić wybrany kolor i wyjść z MENU. Symbol znika z wyświetlacza. 5. Jeśli żaden klawisz nie zostanie naciśnięty, urządzenie wychodzi z MENU po 10 sekundach. Symbol znika z wyświetlacza. Domyślna wartość kontrastu to: 5. Domyślnym kolorem jest pomarańczowy: 4) KEY BEEP 2) DIMMER Sygnał dźwiękowy występujący przy zmianie kanału, operowania przyciskami itp. Funkcja DIMMER umożliwia regulację jasności oświetlenia (w 10 stopniowej skali: od 0 do 9). Naciśnij pokrętło CH (5) i przytrzymaj przez 3 sekundy, aby wejść do MENU. Pojawia się symbol . 1. Obracaj pokrętło CH (5) lub użyj przycisków UP/DN (13) na mikrofonie, aby wybrać menu KEY BEEP. 2. Naciśnij pokrętło CH (5), aby potwierdzić. Status funkcji miga na wyświetlaczu. 3. Obracaj pokrętło CH (5) lub użyj przycisków UP/DN (13) na mikrofonie, aby włączyć on / wyłączyć oF tę funkcję. 4a. Naciśnij krótko przez CH (5), aby zatwierdzić i pozostać w MENU. 4b. Naciśnij przez jedną sekundę przycisk CH (5), aby zatwierdzić i wyjść z MENU. Symbol znika z wyświetlacza. 5. Jeśli żaden klawisz nie zostanie naciśnięty, urządzenie wychodzi z MENU po 10 sekundach. Symbol znika z wyświetlacza. Naciśnij pokrętło CH (5) i przytrzymaj przez 3 sekundy, aby wejść do MENU. Pojawia się symbol . 1. Obracaj pokrętłem CH (5) lub użyj przycisków UP/DN (13) na mikrofonie, aby wybrać menu DIMMER. 2. Naciśnij pokrętło CH (5), aby potwierdzić. Wartość regulacji jasności miga na wyświetlaczu. 3. Przekręć pokrętło CH (5) lub użyj przycisków UP/DN (13) na mikrofonie, aby zmienić / wybrać żądaną jasność. 4a. Naciśnij krótko przez CH (5), aby zatwierdzić wybraną wartość i pozostać w MENU. 4b. Naciśnij przez jedną sekundę przycisk CH (5), aby zatwierdzić wybraną wartość i wyjść z MENU. Symbol znika z wyświetlacza. 5. Jeśli żaden klawisz nie zostanie naciśnięty, urządzenie wychodzi z MENU po 10 sekundach. Symbol znika z wyświetlacza. Domyślne ustawienie klawisza beep to: on. 5) ROGER BEEP Domyślną wartością regulacji jasności oświetlenia jest: 5. Sygnał Roger Beep jest emitowany po zwolnieniu przycisku PTT (12) mikrofonu, aby rozmówca mógł mówić. Z historycznego punktu widzenia, jako że CB jest trybem komunikacji „simplex”, nie jest możliwe jednoczesne mówienie i słuchanie (tak jak w przypadku telefonu). Po zakończeniu wypowiedzi wymawiano słowo „Roger”, aby w ten 3) CONTRAST Funkcja CONTRAST umożliwia dostosowanie kontrastu wyświetlacza (w 10 stopniowej skali: od 0 do 9). 63 Polski 1. okablowanie mikrofonu na stronie 73). Po włączeniu urządzenia na krótko wyświetlany jest typ mikrofonu. sposób dać znać rozmówcy, że przyszła jego kolej w prowadzonej konwersacji. Słowo „Roger” zostało zastąpione sygnałem dźwiękowym. Stąd wywodzi się nazwa “Roger beep”. Naciśnij pokrętło CH (5) i przytrzymaj przez 3 sekundy, aby wejść do MENU. Pojawia się symbol . 1. Obracaj pokrętło CH (5) lub użyj przycisków UP/DN (13) na mikrofonie, aby wybrać menu MIC TYPE. 2. Naciśnij pokrętło CH (5), aby potwierdzić. Typ mikrofonu miga na wyświetlaczu. 3. Obracaj pokrętło CH (5) lub użyj przycisków UP/DN (13) na mikrofonie, aby wybrać typ mikrofonu EL (elektretowy) lub dy (dynamiczny). 4a. Naciśnij krótko przez CH (5), aby zatwierdzić i pozostać w MENU. 4b. Naciśnij przez jedną sekundę przycisk CH (5), aby zatwierdzić i wyjść z MENU. Symbol znika z wyświetlacza. 5. Jeśli żaden klawisz nie zostanie naciśnięty, urządzenie wychodzi z MENU po 10 sekundach. Symbol znika z wyświetlacza. Naciśnij pokrętło CH (5) i przytrzymaj przez 3 sekundy, aby wejść do MENU. Pojawia się symbol . 1. Obracaj pokrętło CH (5) lub użyj przycisków UP/DN (13) na mikrofonie, aby wybrać menu ROGER BP. 2. Naciśnij pokrętło CH (5), aby potwierdzić. Status funkcji miga na wyświetlaczu. 3. Obracaj pokrętło CH (5) lub użyj przycisków UP/DN (13) na mikrofonie, aby włączyć on / wyłączyć oF tę funkcję. 4a. Naciśnij krótko przez CH (5), aby zatwierdzić i pozostać w MENU. 4b. Naciśnij przez jedną sekundę przycisk CH (5), aby zatwierdzić i wyjść z MENU. Symbol znika z wyświetlacza. 5. Jeśli żaden klawisz nie zostanie naciśnięty, urządzenie wychodzi z MENU po 10 sekundach. Symbol znika z wyświetlacza. Domyślnym typem mikrofonu jest EL (elektretowy). Domyślnym ustawieniem sygnału dźwiękowego jest: oF. 8) KALIBRACJA SWR 6) SPAN Gdy funkcja jest aktywna, częstotliwość można regulować w sposób ciągły. Naciśnięcie pokrętła CH (5) powoduje wyświetlenie paska pod pierwszą lub drugą cyfrą po przecinku częstotliwości. Obrotowe pokrętło CH (5) nie działa już na kanale, ale wykonuje częstotliwość skoku 100 kHz (pierwsze miejsce dziesiętne) lub 10 kHz (drugie dziesiętnie). 1. 2. Naciśnij pokrętło CH (5) i przytrzymaj przez 3 sekundy, aby wejść do MENU. Pojawia się symbol . 1. Obracaj pokrętło CH (5) lub użyj przycisków UP/DN (13) na mikrofonie, aby wybrać menu SPAN. 2. Naciśnij pokrętło CH (5), aby potwierdzić. Status funkcji miga na wyświetlaczu. 3. Obracaj pokrętło CH (5) lub użyj przycisków UP/DN (13) na mikrofonie, aby włączyć on / wyłączyć oF tę funkcję. 4a. Naciśnij krótko przez CH (5), aby zatwierdzić i pozostać w MENU. 4b. Naciśnij przez jedną sekundę przycisk CH (5), aby zatwierdzić i wyjść z MENU. Symbol znika z wyświetlacza. 5. Jeśli żaden klawisz nie zostanie naciśnięty, urządzenie wychodzi z MENU po 10 sekundach. Symbol znika z wyświetlacza. 3. 4. Naciśnij pokrętło CH (5) i przytrzymaj przez 3 sekundy, aby wejść do MENU. Pojawia się symbol . Obracaj pokrętło CH (5) lub użyj przycisków UP/DN (13) na mikrofonie, aby wybrać menu SWR. Naciśnij pokrętło CH (5), aby potwierdzić. Radio automatycznie przełączy się w tryb TX bez naciskania przełącznika PTT (12) i rozpocznie się kalibracja. Czas kalibracji wynosi maksymalnie 5 minut. Odliczanie odbywa się na wyświetlaczu. Ustaw antenę. Sygnał dźwiękowy beep* jest ciągły, gdy wartość SWR wynosi 1,0. Przestrzeń między dźwiękami staje się coraz większa, gdy wartość SWR oddala się od 1,0. Głośność sygnału dźwiękowego można regulować za pomocą przycisku VOL (1). Wyświetlacz pokazuje wartość SWR, na przykład 2,5. Naciśnij przycisk PTT (12), aby wyjść z KALIBRACJI SWR. * Sprawdź, czy głośność sygnału jest ustawiona na odpowiedni poziom. Polski Zobacz REGULACJA SWR - strona 57. Domyślnym ustawieniem span jest: of. 9) REGULACJA ECHA 7) TYP MIKROFONU Naciśnij pokrętło CH (5) i przytrzymaj przez 3 sekundy, aby wejść do MENU. Pojawia się symbol . PRESIDENT MC KINLEY może być używany zarówno z mikrofonem elektretowym PRESIDENT, jak i z mikrofonem dynamicznym 6-pinowym (zob. 64 2. 3. 4. 5. 6. 7. Obracaj pokrętło CH (5) lub użyj przycisków UP/DN (13) na mikrofonie, aby wybrać menu ECHO SET. Naciśnij pokrętło CH (5), aby potwierdzić. Komunikat: LEVEL (poziom echa) miga na wyświetlaczu. Obracaj pokrętło CH (5) lub użyj przycisków UP/DN (13) na mikrofonie, ustawić wartość poziomu od 1 do 32 (poziom domyślny: 13). Ponownie naciśnij pokrętło CH (5), aby potwierdzić wartość poziomu. Drugi parametr „DELAY” miga na wyświetlaczu. Użyj pokrętła CH (5) lub przycisków UP/DN (13) na mikrofonie, aby ustawić wartość opóźnienia od 1 do 32 (wartość domyślna: 16). Ponownie naciśnij pokrętło CH (5), aby zatwierdzić wartość opóźnienia. Opóźnienie przestaje migać. a) Rozpocznij od nowa w punkcie 1, aby ustawić inną funkcję lub b) Naciśnij przełącznik PTT (12), aby wyjść z MENU. Jeśli żaden klawisz nie zostanie naciśnięty, urządzenie wychodzi z MENU po 10 sekundach. Symbol znika z wyświetlacza. 2. 3. 4. 5. 6. 7. Patrz § ECHO - strona 61. Domyślnym kanałem awaryjnym 1. jest kanał 9 AM. Patrz: KANAŁY AWARYJNE - strona 60. 10) TONE 12) USTAWIENIE KANAŁU AWARYJNEGO 2 Ta funkcja pozwala zmienić RX TONE (skala 11 stopniowa: od -5 do +5). Naciśnij pokrętło CH (5) i przytrzymaj przez 3 sekundy, aby wejść do MENU. Pojawia się symbol . 1. Obracaj pokrętło CH (5) lub użyj przycisków UP/DN (13) na mikrofonie, aby wybrać menu TONE. 2. Naciśnij pokrętło CH (5), aby potwierdzić. Wartość tonu miga na wyświetlaczu. 3. Obróć pokrętło CH (5) lub użyj przycisków UP/DN (13) na mikrofonie, aby zmienić wartość tonu. 4a. Naciśnij krótko przez CH (5), aby zatwierdzić wybraną wartość i pozostać w MENU. 4b. Naciśnij przez jedną sekundę przycisk CH (5), aby zatwierdzić wybraną wartość i wyjść z MENU. Symbol znika z wyświetlacza. 5. Jeśli żaden klawisz nie zostanie naciśnięty, urządzenie wychodzi z MENU po 10 sekundach. Symbol znika z wyświetlacza. 1. Naciśnij pokrętło CH (5) i przytrzymaj przez 3 sekundy, aby wejść do MENU. Pojawia się symbol . Obracaj pokrętło CH (5) lub użyj przycisków UP/DN (13) na mikrofonie, aby wybrać menu EMG 2. Kolejne czynności od 2 do 7 są identyczne jak w USTAWIENIU KANAŁU AWARYJNEGO 1. Domyślnym kanałem awaryjnym 2. jest kanał 19 AM. Patrz: KANAŁY AWARYJNE - strona 60. 13) USTAWIENIA PA Ta funkcja pozwala wybrać tryb pracy PA (MEGAFON) Domyślna wartość tonu to: 0. 1. 11) USTAWIENIE KANAŁU AWARYJNEGO 1 1. Naciśnij pokrętło CH (5), aby potwierdzić. Naciśnij przycisk CH (5), aby potwierdzić. Pierwszy parametr - tryb modulacji - miga na wyświetlaczu. Obracaj pokrętło CH (5) lub użyj przycisków UP/DN (13) na mikrofonie, aby ustawić tryb modulacji dla kanału alarmowego 1: AM, FM, USB, LSB lub FM UK (tylko w konfiguracji U). Ponownie naciśnij pokrętło CH (5), aby potwierdzić. Tryb modulacji przestaje migać, drugi parametr - kanał - miga na wyświetlaczu. Użyj pokrętła CH (5) lub użyj przycisków UP/DN (13) na mikrofonie, aby wybrać kanał alarmowy 1. Ponownie naciśnij pokrętło CH (5), aby potwierdzić wybór kanału. a) Rozpocznij od nowa w punkcie 1, aby ustawić inną funkcję lub b) Naciśnij przełącznik PTT (12), aby wyjść z MENU. Jeśli nie zostanie naciśnięty żaden przycisk, urządzenie wyjdzie z MENU po 10 sekundach lub po długim naciśnięciu przycisku F (7). Symbol znika z wyświetlacza. 2. Naciśnij pokrętło CH (5) i przytrzymaj przez 3 sekundy, aby wejść do MENU. Pojawia się symbol . Obracaj pokrętło CH (5) lub użyj przycisków UP/DN (13) na mikrofonie, aby wybrać menu EMG 1. 3. 65 Naciśnij pokrętło CH (5) i przytrzymaj przez 3 sekundy, aby wejść do MENU. Pojawia się symbol . Obracaj pokrętło CH (5) lub użyj przycisków UP/DN (13) na mikrofonie, aby wybrać menu PA SET. Naciśnij pokrętło CH (5), aby zatwierdzić. Tryb PA miga na wyświetlaczu LCD. Obracaj pokrętło CH (5) lub użyj przycisków UP/DN (13) na mikrofonie, aby wybrać tryb pracy PA: PA, In lub of. Polski 1. A) GNIAZDO ZASILANIA PRĄDEM STAŁYM - DC (13,8 V / 27,6 V) 4a. Naciśnij krótko przez CH (5), aby potwierdzić wybór typu PA i pozostać w MENU. 4b. Naciśnij przez jedną sekundę przycisk CH (5), aby potwierdzić wybór typu PA i wyjść z MENU. Symbol znika z wyświetlacza. 5. Jeśli żaden klawisz nie zostanie naciśnięty, urządzenie wychodzi z MENU po 10 sekundach. Symbol znika z wyświetlacza. - PA: modulacja mikrofonu i odbierany sygnał są przesyłane do głośnika podłączonego do gniazda PA.SP. (D). „PA” miga naprzemiennie z zastosowanym trybem modulacji: AM, FM, LSB, SSB lub FM UK (tylko w konfiguracji U). - In: modulacja mikrofonu jest transmitowana do zewnętrznego głośnika podłączonego do gniazda PA.SP. (D). Odebrany sygnał jest przesyłany do wewnętrznego głośnika [lub opcjonalnego głośnika zewnętrznego podłączonego do gniazda EXT. SP (C)]. „PA” miga naprzemiennie z zastosowanym trybem modulacji: AM, FM, LSB, SSB lub FM UK (tylko w konfiguracji U). - B) C) D) E) E) CHARAKTERYSTYKA TECHNICZNA 1) OGÓLNE - Liczba kanalów - Tryby modulacji - Zakresy częstotliwości - Impedancja anteny - Zasilanie - Wymiary - Waga - Dostarczone akcesoria of: Odbiór nie działa. Tylko modulacja mikrofonu jest przesyłana do głośnika podłączonego do gniazda PA.SP. (D). Wyświetlany jest symbol „PA”, kanały są zastępowane przez PA. W trybie PA naciśnij przycisk PTT (12), aby wyświetlić „PA LEVEL”. Następnie obróć pokrętło CH (5), aby wyregulować poziom dźwięku PA. Domyślnym ustawieniem PA jest: PA. Patrz § PA (funkcja megafonu) - strona 59. 2) NADAWANIE - Tolerancja częstotliwości - Moc przenoszenia - Zakłócenia transmisji - Odbieranie dźwięku - Emitowana moc - Czułość mikrofonu - Pobór prądu - Zniekształcenia modulowanego sygnału 14) RESET Resetuje wszystkie ustawienia zdefiniowane przez użytkownika i przywraca wartości domyślne. 1. 2. 3. Polski 4. 5. ZŁĄCZE ANTENOWE (SO-239) ZEWNĘTRZNE GNIAZDO GŁOŚNIKA (8 Ω, Ø 3,5 mm) GNIAZDO JACK GŁOŚNIKA (8 Ω, Ø 3,5 mm) GNIAZDO JACK MIKROFONU OPCJONALNEGO (Ø 2,5 mm) Naciśnij pokrętło CH (5) i przytrzymaj przez 3 sekundy, aby wejść do MENU. Pojawia się symbol . Obracaj pokrętło CH (5) lub użyj przycisków UP/DN (13) na mikrofonie, aby wybrać menu RST ALL. Naciśnij przycisk CH (5), aby zatwierdzić. Wyświetlany jest napis „CONFIRM”, „no” miga na wyświetlaczu. Obróć pokrętło CH (5) lub użyj przycisków UP/DN (13) na mikrofonie, aby . wyświetlić Ponownie naciśnij pokrętło CH (5), aby potwierdzić. Jeśli żaden klawisz nie zostanie naciśnięty, urządzenie wychodzi z MENU po 10 sekundach. Symbol znika z wyświetlacza. 3) 40 AM / FM / USB / LSB od 26.965 MHz do 27.405 MHz 50 Ohm 13,8 V / 27,6 V 170 (S) x 150 (G) x 52 (W) mm 1 kg 1 mikrofon UP/DOWN, uchwyt do mocowania, śruby, kabel zasilający. : : : : : : : +/- 300 Hz 4 W AM/FM - 12 W USB/LSB mniejsze niż 4nW (-54 dBm) 300 Hz do 3 KHz w trybie AM/FM/LSB/USB poniżej 20 μW 3,0 mV 3 A (z modulacją) : 1,8 % ODBIÓR - Maks. czułość 20 dB sinad - Pasmo przenoszenia - Selektywność międzykanałowa - Maksymalna moc dźwięku 66 : : : : : : : : : 0,5 μV - 113 dBm (AM/FM) 0,28 μV - 118 dBm (USB/LSB) : 300 Hz do 3 kHz w trybie AM/FM : 60 dB : 3W : min. 0,2 μV - 120 dBm maks. 1 mV - 47 dBm Zwolnij przełącznik PTT (12) i poczekaj na odpowiedź. Powinieneś otrzymać odpowiedź w stylu „GŁOŚNO I WYRAŹNIE „. Jeśli używasz kanału wywoławczego (19) i nawiązałeś z kimś komunikację, powszechną praktyką jest wybranie innego dostępnego kanału, aby nie blokować kanału wywoławczego. - Tłumienie częstotliwości lustrzanej : 60 dB - Odporność na intermodulację : 70 dB - Pobór prądu : 400 mA (nominal) ~ 500 mA H) SŁOWNICZEK F) ROZWIĄZYWANIE PROBLEMÓW Poniżej znajdziesz niektóre z najczęściej używanych wyrażeń radiowych CB. Podane są wyłącznie w celach informacyjnych i nie jesteś w żaden sposób zobowiązany do korzystania z nich. W nagłych wypadkach powinieneś być tak zwięzły i zrozumiały, jak to tylko możliwe. 1) TWOJE RADIO CB NIE FUNKCJONUJE PRAWIDŁOWO LUB TRANSMISJA JEST ZŁEJ JAKOŚCI - MIĘDZYNARODOWY ALFABET FONETYCZNY A Alpha H Hotel O Oscar B Bravo I India P Papa C Charlie J Juliett Q Quebec D Delta K Kilo R Romeo E Echo L Lima S Sierra F Foxtrott M Mike T Tango G Golf N November U Uniform Sprawdź, czy antena jest prawidłowo podłączona i czy SWR jest prawidłowo ustawiony. Sprawdź, czy mikrofon jest prawidłowo podłączony. Sprawdź, czy wskaźnik (bargraf) RF POWER jest ustawiony na maksimum. Sprawdź, czy wskaźnik (bargraf) MIC GAIN jest ustawiony na maksimum. 2) TWOJE CB RADIO NIE ODBIERA LUB ODBIÓR JEST ZŁY - Sprawdź, czy wskaźnik (bargraf) RF GAIN jest ustawiony na maksimum. Sprawdź, czy poziom blokady szumów jest odpowiednio ustawiony. Sprawdź, czy głośność jest ustawiona na komfortowy poziom słuchania. Sprawdź, czy antena jest prawidłowo podłączona i czy SWR jest prawidłowo ustawiony. Victor Whiskey X-ray Yankee Zulu TERMINOLOGIA TECHNICZNA 3) TWOJE CB RADIO NIE WŁĄCZA SIĘ - V W X Y Z Sprawdź zasilanie. Sprawdź okablowanie połączenia. Sprawdź bezpiecznik. G) JAK PRZESYŁAĆ LUB ODBIERAĆ WIADOMOŚĆ Po przeczytaniu instrukcji upewnij się, że CB radio jest gotowe do użycia (tzn. sprawdź, czy antena jest podłączona). Naciśnij przełącznik PTT (12) i wyślij komunikat „OGÓLNE WYWOŁANIE, SPRAWDZENIE ŁĄCZNOŚCI „ który pozwoli Ci sprawdzić jakość i moc sygnału. 67 AM CB CH CW DX DW : : : : : : FM GMT HF LF LSB RX SSB SWR : : : : : : : Modulacja amplitudy Pasmo tzw. obywatelskie [pasmo częstotliwości do komunikacji prywatnej Kanał Fala ciągła Łączność na bardzo dużą odległość DW (dual watch) - funkcja CB Radia pozwalająca na nasłuchiwanie dwóch kanałów na przemian. Jeśli na którymś coś się pojawi to radio pozostanie na tym aktywnym kanale Modulacja częstotliwości Czas uniwersalny Greenwich Wysoka częstotliwość : Niska częstotliwość Wstęga dolna SSB Odbiornik Modulacja amplitudowa jednowstęgowa Współczynnik fali stojącej Polski - Czułość blokady szumów SWL SW TX UHF USB VHF : : : : : : Nasłuch na falach krótkich Fale krótkie Nadajnik CB Częstotliwość ultra wysoka Wstęga górna (przy modulacji amplitudowej jednowstęgowej) Bardzo wysoka częstotliwości UPROSZCZONA DEKLARACJA ZGODNOŚCI UE Niniejszym Groupe President Electronics oświadcza, że sprzęt radiowy: Marka: PRESIDENT Typ: TXPR600 Nazwa Handlowa: MC KINLEY jest zgodny z dyrektywą 2014/53/UE. Pełny tekst deklaracji zgodności UE jest dostępny pod następującym adresem internetowym: https://president-electronics.com/DC/TXPR600 Polski 68 OGÓLNE WARUNKI GWARANCJI • Sprawdzić, czy podłączenie anteny, mikrofony lub inne połączenia są wykonane prawidłowo. • Sprawdzić, czy poziom szumu jest prawidłowo ustawiony; czy zaprogramowana konfiguracja jest prawidłowa. * W przypadku, gdy urządzenie nie jest objęte gwarancją, wszelkie naprawy oraz inne koszty (np. przesyłka) są płatne. • Wszystkie powiązane dokumenty muszą być zachowane nawet po zakończeniu okresu gwarancyjnego, a po ewentualnej odsprzedaży urządzenia, przekazane nowemu właścicielowi w celu umożliwienia identyfikacji sprzętu. • W przypadku nieprawidłowego działania należy najpierw skontaktować się ze sprzedawcą, który zdecyduje o podjęciu niezbędnych działań. • W przypadku interwencji nieobjętych gwarancją, przed naprawą zostaną poczynione odpowiednie wyceny szacunkowe. Udziela się 2-letniej gwarancji na funkcjonowanie i części urządzenia w kraju zakupu w przypadku wad fabrycznych potwierdzonych przez nasz dział techniczny. * Serwis posprzedażowy firmy PRESIDENT zastrzega sobie prawo do niestosowania gwarancji, jeśli awaria jest spowodowana przez antenę inną niż dystrybuowana przez firmę PRESIDENT i jeśli wspomniana antena stanowi bezpośrednią przyczynę awarii. Oferuje się przedłużenie gwarancji o 3 lata przy równoczesnym zakupie i używaniu anteny PRESIDENT, co wydłuża całkowity czas trwania gwarancji do 5 lat. W celu uzyskania ważności gwarancji, certyfikat gwarancyjny musi zostać zwrócony w ciągu 30 dni od daty zakupu do serwisu posprzedażnego firmy Groupe President Electronics lub jakiejkolwiek zagranicznej spółki zależnej. Zaleca się uważnie przeczytanie i przestrzeganie poniższych warunków pod groźbą utraty uprawnień z tytułu świadczeń gwarancyjnych. Dziękujemy za zaufanie do jakości i doświadczenia firmy PRESIDENT. Zalecamy dokładne zapoznanie się z niniejszą instrukcją, dzięki czemu Klient będzie całkowicie zadowolony z zakupu. Proszę nie zapomnieć, aby odesłać załączony poniżej certyfikat, gdyż bardzo ważne jest, abyśmy mogli dokonać identyfikacji urządzenia podczas ewentualnego świadczenia naszych usług. • Ważność certyfikatu gwarancyjnego musi zostać potwierdzona najpóźniej w przeciągu 1 miesiąca po zakupie. • Proszę należycie wypełnić świadectwo gwarancyjne po prawej stronie strony, odciąć część oznaczoną linią przerywaną i odesłać. • Wszelkie naprawy gwarancyjne będą bezpłatne, a koszty dostawy zostaną poniesione przez naszą firmę. • Należy koniecznie dostarczyć dowód zakupu z urządzeniem przeznaczonym do naprawy. • Terminy wymienione w świadectwie gwarancyjnym oraz dowód zakupu muszą być zgodne. • Nie kontynuować instalacji bez przeczytania instrukcji obsługi. • Żadne części zamienne nie będą wysłane bądź wymieniane przez nasz serwis w ramach gwarancji. Dyrektor Techniczny i Dyrektor ds. Jakości Data zakupu :............................................................................................... Gwarancja jest ważna tylko w kraju zakupu. Typ: CB Radio MC KINLEY Wyjątki (nie objęte gwarancją): Nr seryjny :................................................................................................... • Uszkodzenia spowodowane wypadkiem, wstrząsem lub nieodpowiednim opakowaniem. • Tranzystory mocy, mikrofony, światła, bezpieczniki, a także nieprzestrzeganie zasad instalacji i warunków użytkowania specyfikacji (w tym m.in. używanie anteny ze zbyt dużą mocą, końcowe tranzystory mocy wyjściowej (SWR), odwrócenie polaryzacji, złe połączenia, przepięcia itp.). • Gwarancja nie może zostać przedłużona z uwagi na brak dostępności urządzenia, gdy jest naprawiane w naszym serwisie technicznym ani przez zmianę jednego lub więcej elementów lub części zamiennych. • Nadajniki-odbiorniki, które zostały zmodyfikowane. Gwarancyjna nie obejmuje jakichkolwiek modyfikacji lub niewłaściwej konserwacji wykonanych przez jednostki usługowe lub osoby trzecie nie posiadające autoryzacji naszej firmy. Polski BEZ PIECZĄTKI SPRZEDAWCY GWARANCJA JEST NIEWAŻNA! W przypadku zauważenia nieprawidłowości: • Sprawdzić zasilanie urządzenia i stan bezpiecznika. 69 TABLEAU DES FRÉQUENCES pour EU / EC / U (CEPT) TABLA DE FRECUENCIAS para EU / EC / U (CEPT) FREQUENCY TABLE for EU / EC / U (CEPT) TABELA CZĘSTOTLIWOŚCI dla EU / EC / U (CEPT) TABLEAU DES FRÉQUENCES pour U (ENG) TABLA DE FRECUENCIAS para U (ENG) FREQUENCY TABLE for U (ENG) TABELA CZĘSTOTLIWOŚCI dla U (ENG) N° du canal Fréquences N° du canal Fréquences N° du canal Fréquences N° du canal Fréquences Nº Canal Frecuencia Nº Canal Frecuencia Nº Canal Frecuencia Nº Canal Frecuencia Channel Frequency Channel Frequency Channel Frequency Channel Frequency Kanał Częstotliwość Kanał Częstotliwość Kanał Częstotliwość Kanał Częstotliwość 1 26,965 MHz 21 27,215 MHz 1 27,60125 MHz 21 27,80125 MHz 2 26,975 MHz 22 27,225 MHz 2 27,61125 MHz 22 27,81125 MHz 3 26,985 MHz 23 27,255 MHz 3 27,62125 MHz 23 27,82125 MHz 4 27,005 MHz 24 27,235 MHz 4 27,63125 MHz 24 27,83125 MHz 5 27,015 MHz 25 27,245 MHz 5 27,64125 MHz 25 27,84125 MHz 6 27,025 MHz 26 27,265 MHz 6 27,65125 MHz 26 27,85125 MHz 7 27,035 MHz 27 27,275 MHz 7 27,66125 MHz 27 27,86125 MHz 8 27,055 MHz 28 27,285 MHz 8 27,67125 MHz 28 27,87125 MHz 9 27,065 MHz 29 27,295 MHz 9 27,68125 MHz 29 27,88125 MHz 10 27,075 MHz 30 27,305 MHz 10 27,69125 MHz 30 27,89125 MHz 11 27,085 MHz 31 27,315 MHz 11 27,70125 MHz 31 27,90125 MHz 12 27,105 MHz 32 27,325 MHz 12 27,71125 MHz 32 27,91125 MHz 13 27,115 MHz 33 27,335 MHz 13 27,72125 MHz 33 27,92125 MHz 14 27,125 MHz 34 27,345 MHz 14 27,73125 MHz 34 27,93125 MHz 15 27,135 MHz 35 27,355 MHz 15 27,74125 MHz 35 27,94125 MHz 16 27,155 MHz 36 27,365 MHz 16 27,75125 MHz 36 27,95125 MHz 17 27,165 MHz 37 27,375 MHz 17 27,76125 MHz 37 27,96125 MHz 18 27,175 MHz 38 27,385 MHz 18 27,77125 MHz 38 27,97125 MHz 19 27,185 MHz 39 27,395 MHz 19 27,78125 MHz 39 27,98125 MHz 20 27,205 MHz 40 27,405 MHz 20 27,79125 MHz 40 27,99125 MHz 70 TABLEAU DES FRÉQUENCES pour d TABLA DE FRECUENCIAS para d FREQUENCY TABLE for d TABELA CZĘSTOTLIWOŚCI dla d N° du canal Fréquences N° du canal Fréquences N° du canal Fréquences N° du canal Fréquences Nº Canal Frecuencia Nº Canal Frecuencia Nº Canal Frecuencia Nº Canal Frecuencia Channel Frequency Channel Frequency Channel Frequency Channel Frequency Kanał Częstotliwość Kanał Częstotliwość Kanał Częstotliwość Kanał Częstotliwość 1 26,965 MHz 21 27,215 MHz 41 26,565 MHz 61 26,765 MHz 2 26,975 MHz 22 27,225 MHz 42 26,575 MHz 62 26,775 MHz 3 26,985 MHz 23 27,255 MHz 43 26,585 MHz 63 26,785 MHz 4 27,005 MHz 24 27,235 MHz 44 26,595 MHz 64 26,795 MHz 5 27,015 MHz 25 27,245 MHz 45 26,605 MHz 65 26,805 MHz 6 27,025 MHz 26 27,265 MHz 46 26,615 MHz 66 26,815 MHz 7 27,035 MHz 27 27,275 MHz 47 26,625 MHz 67 26,825 MHz 8 27,055 MHz 28 27,285 MHz 48 26,635 MHz 68 26,835 MHz 9 27,065 MHz 29 27,295 MHz 49 26,645 MHz 69 26,845 MHz 10 27,075 MHz 30 27,305 MHz 50 26,655 MHz 70 26,855 MHz 11 27,085 MHz 31 27,315 MHz 51 26,665 MHz 71 26,865 MHz 12 27,105 MHz 32 27,325 MHz 52 26,675 MHz 72 26,875 MHz 13 27,115 MHz 33 27,335 MHz 53 26,685 MHz 73 26,885 MHz 14 27,125 MHz 34 27,345 MHz 54 26,695 MHz 74 26,895 MHz 15 27,135 MHz 35 27,355 MHz 55 26,705 MHz 75 26,905 MHz 16 27,155 MHz 36 27,365 MHz 56 26,715 MHz 76 26,915 MHz 17 27,165 MHz 37 27,375 MHz 57 26,725 MHz 77 26,925 MHz 18 27,175 MHz 38 27,385 MHz 58 26,735 MHz 78 26,935 MHz 19 27,185 MHz 39 27,395 MHz 59 26,745 MHz 79 26,945 MHz 20 27,205 MHz 40 27,405 MHz 60 26,755 MHz 80 26,955 MHz 71 TABLEAU DES FRÉQUENCES pour PL TABLA DE FRECUENCIAS para PL FREQUENCY TABLE for PL TABELA CZĘSTOTLIWOŚCI dla PL TABLEAU DES FRÉQUENCES pour In TABLA DE FRECUENCIAS para In FREQUENCY TABLE for In TABELA CZĘSTOTLIWOŚCI dla In N° du canal Fréquences N° du canal Fréquences N° du canal Fréquences N° du canal Fréquences Nº Canal Frecuencia Nº Canal Frecuencia Nº Canal Frecuencia Nº Canal Frecuencia Channel Frequency Channel Frequency Channel Frequency Channel Frequency Kanał Częstotliwość Kanał Częstotliwość Kanał Częstotliwość Kanał Częstotliwość 1 26,960 MHz 21 27,210 MHz 1 26,965 MHz 21 27,215 MHz 2 26,970 MHz 22 27,220 MHz 2 26,975 MHz 22 27,225 MHz 3 26,980 MHz 23 27,250 MHz 3 26,985 MHz 23 27,255 MHz 4 27,000 MHz 24 27,230 MHz 4 27,005 MHz 24 27,235 MHz 27,245 MHz 5 27,010 MHz 25 27,240 MHz 5 27,015 MHz 25 6 27,020 MHz 26 27,260 MHz 6 27,025 MHz 26 27,265 MHz 7 27,030 MHz 27 27,270 MHz 7 27,035 MHz 27 27,275 MHz 8 27,050 MHz 28 27,280 MHz 8 27,055 MHz 9 27,060 MHz 29 27,290 MHz 9 27,065 MHz 10 27,070 MHz 30 27,300 MHz 10 27,075 MHz 11 27,080 MHz 31 27,310 MHz 11 27,085 MHz 12 27,100 MHz 32 27,320 MHz 12 27,105 MHz 13 27,110 MHz 33 27,330 MHz 13 27,115 MHz 14 27,120 MHz 34 27,340 MHz 14 27,125 MHz 15 27,130 MHz 35 27,350 MHz 15 27,135 MHz 16 27,150 MHz 36 27,360 MHz 16 27,155 MHz 17 27,160 MHz 37 27,370 MHz 17 27,165 MHz 18 27,170 MHz 38 27,380 MHz 18 27,175 MHz 19 27,180 MHz 39 27,390 MHz 19 27,185 MHz 20 27,200 MHz 40 27,400 MHz 20 27,205 MHz 72 PRISE MICRO 6 BROCHES TOMA DE MICRO DE 6 CONTACTOS 6-PIN MICROPHONE PLUG WTYK MIKROFONU 6-PIN 1 2 3 4 5 6 Modulation RX TX - UP/DOWN _ Masse Alimentation Modulación RX TX - UP/DOWN _ Masa Alimentación Modulation RX TX - UP/DOWN _ Ground Power Supply Modulacja RX TX - UP/DOWN _ Masa Zasilanie 73 NORMES • F - NORMAS • F - NORMS • F - NORMY • F Remarque : Dans la configuration U en mode FM : Pour sélectionner la bande de fréquences ENG, appuyer une seconde sur la touche F (10) jusqu’à ce que «UK» apparaisse dans l’afficheur. Pour sélectionner la bande de fréquences CEPT, appuyer une seconde sur la touche F (10) jusqu’à ce que «UK» disparaisse de l’afficheur (voir tableau page 70). Observación: En la configuración U en el modo FM: Para seleccionar la banda de frecuencia ENG, apriete durante 1 segundo la tecla F (10) hasta que “UK” aparezca en la pantalla. Para seleccionar la banda de frecuencia CEPT, apriete durante un segundo la tecla F (10) hasta que “UK” desaparezca de la pantalla (véase cuadro página 70). Note: In U configuration in FM mode: In order to select the frequency band ENG, press during one second the F key (10) until “UK” appears in the display. In order to select the CEPT frequency band, press during one second the F key (10) until “UK” disappears from the display (see table at page 70). Uwaga: W konfiguracji U w trybie FM: W celu wybrania pasma częstotliwości ENG, naciśnij klawisz F (10) przez jedną sekundę, aż „UK” pojawi się na wyświetlaczu. W celu wybrania pasma częstotliwości CEPT, naciśnij klawisz F (10) przez jedną sekundę, aż „UK” zniknie z wyświetlacza (patrz tabela na stronie 70). La bande de fréquence et la puissance d’émission de votre appareil doivent correspondre à la configuration autorisée dans le pays où il est utilisé. La banda de frecuencias y la potencia de emisión de su aparato deben corresponder a la configuración autorizada en el país donde él es utilizado. The frequency band and the transmission power of your transceiver must correspond with the configuration authorized in the country where it is used. Częstotliwość oraz moc nadawania Twojego radiotelefonu musi być zgodna z wymaganiami kraju, w którym jest on używany. 74 Dernière mise à jour de ce tableau sur le site : www.president-electronics.com, rubrique «les Postes Radio-CB» puis, «La CB PRESIDENT et l’Europe». Le rogamos encontrar la última versión de esta información en nuestro sitio web www.president-electronics.com en la página «Emisoras de radio-cb» / «PRESIDENT y la reglamentación en Europa». Please see updated table on website www.president-electronics.com, page «The CB radios» then «President Radio CB and Europe». Ostatnia aktualizacja tej tabeli na stronie www.president-electronics.com, rubryka “les Postes Radio-CB” i “La CB PRESIDENT et l’Europe”. 75 FR ESP UK PL PRINTED IN VIETNAM U01UT567ZZA(0) 1973 /12-18 - v1.02 SIEGE SOCIAL/HEAD OFFICE - FRANCE Route de Sète - BP 100 - 34540 BALARUC Site Internet : http://www.president-electronics.com E-mail : [email protected]-
 1
1
-
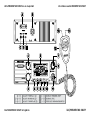 2
2
-
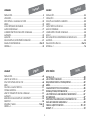 3
3
-
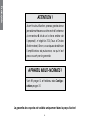 4
4
-
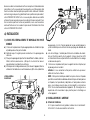 5
5
-
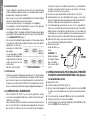 6
6
-
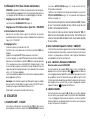 7
7
-
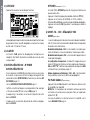 8
8
-
 9
9
-
 10
10
-
 11
11
-
 12
12
-
 13
13
-
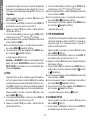 14
14
-
 15
15
-
 16
16
-
 17
17
-
 18
18
-
 19
19
-
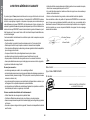 20
20
-
 21
21
-
 22
22
-
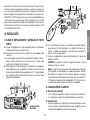 23
23
-
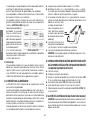 24
24
-
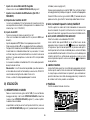 25
25
-
 26
26
-
 27
27
-
 28
28
-
 29
29
-
 30
30
-
 31
31
-
 32
32
-
 33
33
-
 34
34
-
 35
35
-
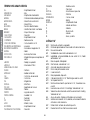 36
36
-
 37
37
-
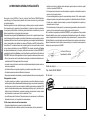 38
38
-
 39
39
-
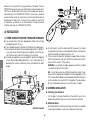 40
40
-
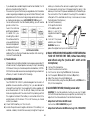 41
41
-
 42
42
-
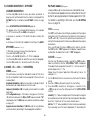 43
43
-
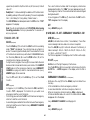 44
44
-
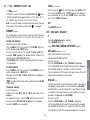 45
45
-
 46
46
-
 47
47
-
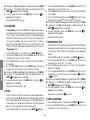 48
48
-
 49
49
-
 50
50
-
 51
51
-
 52
52
-
 53
53
-
 54
54
-
 55
55
-
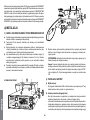 56
56
-
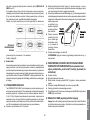 57
57
-
 58
58
-
 59
59
-
 60
60
-
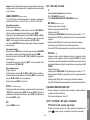 61
61
-
 62
62
-
 63
63
-
 64
64
-
 65
65
-
 66
66
-
 67
67
-
 68
68
-
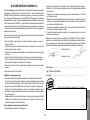 69
69
-
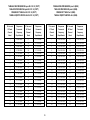 70
70
-
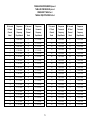 71
71
-
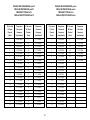 72
72
-
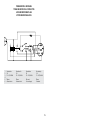 73
73
-
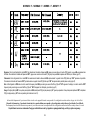 74
74
-
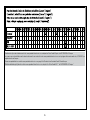 75
75
-
 76
76


PRESIDENT MC Kinley TXPR600 El manual del propietario
- Tipo
- El manual del propietario
En otros idiomas
Documentos relacionados
-
PRESIDENT Bill ASC El manual del propietario
-
-
PRESIDENT MC-KINLEY-USA El manual del propietario
-
PRESIDENT TXUS610 El manual del propietario
-
PRESIDENT Richard El manual del propietario
-
-
-
PRESIDENT JOHNSON II El manual del propietario
-
-