Beurer WL32 WAKE-UP LIGHT El manual del propietario
- Categoría
- Relojes de mesa
- Tipo
- El manual del propietario
Este manual también es adecuado para

DE Lichtwecker
Gebrauchsanweisung ............................................................................2
EN Wake up light
Instructions for use ...............................................................................14
FR Réveil lumineux
Mode d’emploi .....................................................................................26
ES Luz para despertar
Manual de instrucciones ......................................................................39
IT Luce sveglia
Istruzioni per l’uso ................................................................................51
TR Işıklı çalar saat
Kullanım kılavuzu ..................................................................................63
RU Cветовой будильник
Инструкция по применению ..............................................................75
PL Budzik świetlny
Instrukcja obsługi .................................................................................87
WL 32

2
Sehr geehrte Kundin, sehr geehrter Kunde,
wir freuen uns, dass Sie sich für ein Produkt unseres Sor-
timentes entschieden haben. Unser Name steht für hoch-
wertige und eingehend geprüfte Qualitätsprodukte aus den
Bereichen Wärme, Gewicht, Blutdruck, Körpertemperatur,
Puls, Sanfte Therapie, Massage, Luft und Beauty.
Bitte lesen Sie diese Gebrauchsanweisung aufmerksam
durch, bewahren Sie sie für späteren Gebrauch auf, machen
Sie sie anderen Benutzern zugänglich und beachten Sie die
Hinweise.
Mit freundlicher Empfehlung
Ihr Beurer-Team
1. Lieferumfang
• 1 Beurer Lichtwecker WL 32
• 1 Netzadapter
• 1 AUX-Kabel
• 1 Diese Gebrauchsanweisung
2. Zeichenerklärung
In der Gebrauchsanweisung, auf der Verpackung und auf
dem Typenschild des Geräts und des Zubehörs werden fol-
gende Symbole verwendet:
DEUTSCH
Inhalt
1. Lieferumfang............................................................... 2
2. Zeichenerklärung ........................................................ 2
3. Zum Kennenlernen ..................................................... 4
4. Gerätebeschreibung ................................................... 4
5. Inbetriebnahme .......................................................... 6
6. Bedienung .................................................................. 6
7. Reinigung und Pflege ............................................. 10
8. Entsorgung ............................................................. 11
9. Was tun bei Problemen? ........................................ 11
10. Technische Daten ................................................... 11
11. Garantie und Service .............................................. 12

3
WARNUNG
Warnhinweis auf Verletzungsgefahren
oder Gefahren für Ihre Gesundheit
ACHTUNG
Sicherheitshinweis auf mögliche
Schäden an Gerät/Zubehör.
Hinweis
Hinweis auf wichtige Informationen
Entsorgung gemäß Elektro- und
Elektronik-Altgeräte EG-Richtlinie –
WEEE (Waste Electrical and Electro-
nic Equipment)
Hersteller
Dieses Produkt erfüllt die Anforderun-
gen der geltenden europäischen und
nationalen Richtlinien.
20
PAP
Verpackung umweltgerecht entsorgen
Zertifizierungszeichen für Produkte,
die in die Russische Föderation und
in die Länder der GUS exportiert
werden.
VI
Energieeffizienzklasse 6
WARNUNG
• Das Gerät ist nur für den in dieser Gebrauchsanweisung
beschriebenen Zweck vorgesehen. Der Hersteller kann
nicht für Schäden haftbar gemacht werden, die durch
unsachgemäßen oder leichtsinnigen Gebrauch entstehen.
• Das Gerät muss in der Nähe einer leicht zugänglichen
Steckdose aufgestellt werden.
• Betreiben Sie das Gerät nur mit dem mitgelieferten Netz-
adapter und nur mit der auf dem Netzadapter notierten
Netzspannung.
• Überprüfen Sie vor dem Gebrauch das Gerät und Zube-
hör auf sichtbare Schäden. Benutzen Sie es im Zweifels-
fall nicht und wenden Sie sich an Ihren Händler oder an
die angegebene Kundendienstadresse.
• Schalten Sie das Gerät im Falle von Defekten oder
Betriebsstörungen sofort aus und trennen Sie das Gerät
vom Stromanschluss.
• Stecken Sie den Netzadapter niemals ein oder aus, wenn
Sie feuchte Hände haben.
• Halten Sie Kinder vom Verpackungsmaterial fern (Ersti-
ckungsgefahr).
• Verlegen Sie das Stromkabel so, dass niemand darüber
stolpern kann.
• Halten Sie das Gerät, den Netzadapter und das Stromka-
bel von Wasser fern!
• Dieses Gerät ist nicht dafür bestimmt, durch Personen
(einschließlich Kinder) mit eingeschränkten physischen,

4
sensorischen oder geistigen Fähigkeiten oder mangels
Erfahrung und/oder mangels Wissen benutzt zu wer-
den, es sei denn, sie werden durch eine für ihre Sicher-
heit zuständige Person beaufsichtigt oder erhielten von ihr
Anweisungen, wie das Gerät zu benutzen ist.
• Kinder sollten beaufsichtigt werden, damit sie nicht mit
dem Gerät spielen.
ACHTUNG
• Ziehen Sie nicht am Stromkabel oder am Gerät, um den
Netzadapter aus der Steckdose zu ziehen.
• Halten oder tragen Sie das Gerät niemals am Stromkabel.
• Schützen Sie das Gerät vor Stößen, Feuchtigkeit,
Schmutz, starken Temperaturschwankungen und direkter
Sonneneinstrahlung.
• Lassen Sie das Gerät nicht fallen.
3. Zum Kennenlernen
Der Beurer Lichtwecker WL 32 ermöglicht Ihnen ein sanf-
tes und natürliches Erwachen aus Ihrem Schlaf. Durch das
langsam heller werdende LED-Licht wird ein Sonnenauf-
gang simuliert. Auf diese Weise können Sie sich langsam an
die Lichtverhältnisse gewöhnen und Ihr Körper bereitet sich
behutsam auf das Aufwachen vor. Neben dem simulierten
Sonnenaufgang, können Sie einen Weckton einstellen, der
Sie beim Aufwachen akustisch unterstützt. Als Weckton ste-
hen Ihnen Radio und Piepton zur Verfügung.
Der Lichtwecker verhilft Ihnen zu einem ausgeruhten und
zufriedenen Start in den Tag.
4. Gerätebeschreibung
Vorderansicht
LED Licht
Zz (Snooze) / Licht
Für Snooze / Licht die Lampenab-
deckung im vorderen Bereich nach
unten drücken

5
Seitenansicht
1 Up (Auf)
2 Lautstärke (Radio)
3 Down (Runter/Ab)
4 Alarm 1-2
5 Gute-Nacht-Funktion (Sleep) / Radio
6 Set / Memory
Rückansicht
Unterseite
41
52
63
Netzadapter
AUX-Kabel
AUX-Eingang Netzadapterbuchse
Reset (auf Werkseinstel-
lungen zurücksetzen)
3 x AAA Batterien
(nicht im Lieferumfang
enthalten)
Zz (Snooze) / Licht

6
Displaybeschreibung
1 Senderspeicherplatz (Radio)
2 Licht-Symbol
3 Snooze
4 Radio eingeschaltet
5 Alarm 2 Radio
6 Alarm 2 Piepton
7 Alarm 1 Radio
8 Alarm 1 Piepton
9 Erscheint nur im 12-h-Format
10 Sleep Timer (Gute-Nacht-Funktion)
5. Inbetriebnahme
• Entfernen Sie das Verpackungsmaterial.
• Überprüfen Sie, ob alle Teile im Lieferumfang enthalten
sind.
• Überprüfen Sie Gerät, Netzadapter und Stromkabel auf
Beschädigungen.
• Entfernen Sie die Batteriefach-Abdeckung auf der Unter-
seite des Geräts und setzen Sie die Batterien mit der kor-
rekten Polung ein. Die Batterien sorgen für die Stromver-
sorgung im Falle eines Stromausfalls.
• Stellen Sie das Gerät auf eine ebene und feste Fläche.
• Stecken Sie den Netzadapteranschluss in die Netzadap-
terbuchse auf der Rückseite des Geräts.
• Stecken Sie den Netzadapter in eine geeignete Steck-
dose. Auf dem Display des Geräts erscheint die Uhrzeit.
Hinweis
• Wenn Sie das Gerät auf die Werkseinstellung zurückset-
zen möchten, betätigen Sie mit einem spitzen Gegen-
stand die Reset-Taste auf der Geräteunterseite.
6. Bedienung
Hinweis
Das Gerät verlässt das Einstellungsmenü automatisch,
sobald Sie für 10 Sekunden keine Taste drücken.
6.1 Uhrzeit und Snooze-Dauer einstellen
• Drücken Sie die
-Taste.
Die Uhrzeit beginnt zu blinken.
Stellen Sie mit den
/
-Tasten Ihre gewünschte Uhrzeit ein.
Hinweis
Um schneller durch die Stunden oder Minuten zu navigie-
ren, halten Sie die
/
-Taste gedrückt.
1 2 3 4
58
9
10
67

7
• Bestätigen Sie Ihre eingestellte Uhrzeit mit der
-Taste.
Im Display blinkt nun "24 Hr".
Sie können zwischen dem 12- und 24-Stundenformat wäh-
len.
• Wählen Sie mit den
/
-Tasten Ihr gewünschtes Stun-
denformat und bestätigen Sie mit der
-Taste.
Im Display blinkt nun "Zz 05"
• Wählen Sie mit den
/
-Tasten Ihre gewünschte Snooze-
Dauer (wählbar zwischen 5-60 Minuten) und bestätigen
Sie mit der
-Taste.
Hinweis
Wenn Sie die Uhrzeit im Dunkeln ablesen möchten, drücken
Sie die Lampenabdeckung im vorderen Bereich nach unten.
6.2 Alarm einstellen
Sie können am Lichtwecker zwei unterschiedliche Alarmzei-
ten (Alarm 1 und Alarm 2) einstellen.
• Um Alarm 1 einzustellen, drücken Sie die
-Taste ein-
mal.
• Um Alarm 2 einzustellen, drücken Sie die -Taste zwei-
mal.
Die jeweilige Alarmzeit beginnt im Display zu blinken.
• Stellen Sie mit den
/
-Tasten Ihre gewünschte Alarm-
zeit ein.
• Wählen Sie mit der
-Taste Ihren gewünschten Alarm-
ton für Ihre Alarmzeit.
Sie können als Alarmton wählen zwischen Radio (
) und
Piepton ( ).
• Bestätigen Sie mit der
-Taste.
Alarm 1
ausgeschaltet
Alarm 2
ausgeschaltet
Alarm 1 eingeschaltet,
Piepton als Weckton
gewählt
Alarm 2 eingeschaltet,
Radio als Weckton gewählt
6.3 Alarm ausschalten
• Wenn der Alarm ertönt, drücken Sie die -Taste.
Der Alarm ist nun ausgeschaltet und wird erst wieder am
nächsten Tag zur eingestellten Zeit ertönen.
6.4 Alarm dauerhaft deaktivieren
• Um Alarm 1 zu deaktivieren, drücken Sie die
-Taste
einmal.
• Um Alarm 2 zu deaktivieren, drücken Sie die -Taste
zweimal.

8
• Drücken Sie nun die -Taste so oft, bis auf dem Dis-
play neben der Zahl 1 bzw. 2 kein Notensymbol
( ) und kein Glockensymbol ( ) mehr erscheint.
• Bestätigen Sie mit der
-Taste. Alarm 1 bzw. 2 ist nun
deaktiviert.
6.5 Snooze-Funktion
Wenn ein Alarmton ertönt, können Sie ihn durch Drücken
der Zz-Taste vorübergehend stoppen. Der Alarmton wird
dann nach Ihrer eingestellten Snooze-Dauer wieder ertönen.
Wie Sie Ihre Snooze-Dauer einstellen können, erfahren Sie
im Kapitel „6.1 Uhrzeit und Snooze-Dauer einstellen“.
6.6 Sonnenaufgangsfunktion
Wenn Sie einen Alarm eingestellt haben, können Sie sich
zusätzlich zu dem Alarmton mit einer Sonnenaufgangssi-
mulation wecken lassen. Hierbei wird das LED-Licht lang-
sam heller.
Hinweis
Verwenden Sie für diese Funktion den beigefügten Netzad-
apter.
• Halten Sie die Zz-Taste für ca. 5 Sek.gedrückt.
Auf dem Display blinkt "15".
• Stellen Sie mit den
/
-Tasten Ihren gewünschten simu-
lierten Sonnenaufgang ein.
15 = Sonnenaufgangssimulation beginnt 15 min vor einge-
stellter Alarmzeit.
30 = Sonnenaufgangssimulation beginnt 30 min vor einge-
stellter Alarmzeit.
OFF = Sonnenaufgangssimulation deaktiviert. Auf dem Dis-
play wird über der Uhrzeit das Lampen-Symbol (
) ver-
schwinden.
• Um Ihre Wahl zu bestätigen, drücken Sie die Zz-Taste.
6.7 Lampen-Funktion / Stimmungslicht mit Farbwechsel
Sie können den Lichtwecker auch als normale Lampe oder
als Stimmungslicht mit Farbwechsel verwenden.
Hinweis
Verwenden Sie für diese Funktion den beigefügten Netzad-
apter. Wenn Sie Radio hören oder die Gute-Nacht-Funktion
aktivert haben, ist die Funktion "Stimmungslicht mit Farb-
wechsel" deaktiviert. Es kann in diesem Zeitraum nur ein
Licht ohne Farbwechsel dargestellt werden.
• Drücken Sie die Zz-Taste.
Das LED-Licht beginnt leicht zu leuchten.
• Um die Lampen-Funktion zu aktivieren, drücken Sie
erneut die Zz-Taste.
Im Display blinkt "L 09" (Helligkeitsstufe 09).
• Stellen Sie mit den
/
-Tasten Ihre gewünschte Hellig-
keitsstufe ( L 00 bis L 15) ein.
• Wenn Sie das Stimmungslicht mit Farbwechsel aktivieren
möchten, drücken Sie erneut die Zz-Taste.
Das Stimmungslicht mit Farbwechsel beginnt zu leuchten.
Warten Sie einige Sekunden, bis sich die Farben ändern.

9
• Wenn Sie eines der Stimmungslichter dauerhaft fixieren
möchten (ohne Farbwechsel), drücken Sie erneut die Zz-
Taste.
• Um alle Lichtfunktionen auszuschalten, drücken Sie
erneut die Zz-Taste.
6.8 Radio hören
Der Lichtwecker hat eine flexible Wurfantenne auf der Rück-
seite des Geräts. Spulen Sie den Draht ab und legen Sie ihn
in die längste Position um den besten Empfang zu gewähr-
leisten.
• Um das Radio einzuschalten, drücken Sie die
-Taste.
Auf dem Display blinkt zunächst "on". Nach etwa 10 Sekun-
den erscheint mhz und die aktuell eingestellte Frequenz.
• Stellen Sie mit den
/
-Tasten Ihre gewünschte Fre-
quenz ein.
• Um den automatischen Sendersuchlauf zu starten, die
/
-Taste kurz gedrückt halten und dann wieder los-
lassen. Das Gerät startet nun den Sendersuchlauf und
stoppt automatisch sobald es einen Radiosender gefun-
den hat.
• Um die Lautstärke am Radio zu ändern, drücken Sie
die
-Taste. Stellen Sie nun mit den
/
-Tasten Ihre
gewünschte Lautstärke ein.
• Um das Radio wieder auszuschalten, drücken Sie die
Lampenabdeckung im vorderen Bereich nach unten.
Hinweis
Wenn Sie Radio hören ist die Funktion "Stimmungslicht mit
Farbwechsel" deaktiviert. Es kann in diesem Zeitraum nur
ein Licht ohne Farbwechsel dargestellt werden.
6.9 Radiosender speichern
Sie können auf dem Lichtwecker bis zu 10 Radiosender
speichern.
• Um das Radio einzuschalten, drücken Sie die
-Taste.
• Stellen Sie mit den
/
-Tasten die Frequenz des Radio-
senders ein, den Sie speichern wollen.
• Um den ausgewählten Radiosender zu speichern, halten
Sie die
-Taste für ca. 2 Sekunden gedrückt. Auf dem
Display blinkt unter der Frequenz O1 (Speicherplatznum-
mer).
• Wählen Sie durch kurzes Drücken der -Taste Ihre
gewünschte Speicherplatznummer. Um den Sender auf
der gewählten Speicherplatznummer zu speichern, halten
Sie die -Taste 2 Sekunden lang gedrückt.
6.10 Voreingestellten Radiosender auswählen
• Um das Radio einzuschalten, drücken Sie die
-Taste.
Auf dem Display blinkt zunächst "on". Nach etwa 10
Sekunden erscheint mhz und die aktuell eingestellte Fre-
quenz.
• Um zwischen den voreingestellten Radiosendern zu wäh-
len, drücken Sie die -Taste.

10
6.11 Gute-Nacht-Funktion
Bei dieser Funktion können Sie einstellen, dass sich das
Radio automatisch nach einer festgelegten Zeit abschaltet.
• Drücken Sie zweimal die
-Taste.
Auf dem Display erscheint "sleep" und eine blinkende O5.
• Wählen Sie nun mit der
-Taste Ihre gewünschte Minu-
tenzahl, nach der sich das Radio automatisch abschalten
soll.
Sie können wählen zwischen 5, 10, 15, 30, 45, 60, 75 und
90 Minuten.
• Um Ihre gewünschte Minutenzahl zu bestätigen, warten
Sie etwa 5 Sekunden bis das Display automatisch zur
Uhrzeit zurückkehrt. Ihre gewünschte Minutenzahl ist nun
eingestellt. Wenn Sie die aktuell verbleibende Minutenzahl
einsehen möchten, drücken Sie die -Taste.
Hinweis
• Wenn Sie die Gute-Nacht-Funktion vor Ablauf der einge-
stellten Minutenzahl beenden möchten, drücken Sie die
-Taste so oft, bis im Display OFF erscheint.
Hinweis
Wenn Sie die Gute-Nacht-Funktion aktiviert haben, ist die
Funktion "Stimmungslicht mit Farbwechsel" deaktiviert. Es
kann in diesem Zeitraum nur ein Licht ohne Farbwechsel
dargestellt werden.
6.12 Musik hören über AUX-Eingang
Sie können Ihren MP3-Player über den AUX-Eingang mit
dem Lichtwecker verbinden.
• Stecken Sie ein Ende des AUX-Kabels (im Lieferumfang
enthalten) in den AUX-Eingang auf der Rückseite des
Lichtweckers.
• Stecken Sie das andere Ende des AUX-Kabels in die
Kopfhörerbuchse des MP3-Players.
Hinweis
Wenn Sie Musik über den AUX-Eingang hören, können Sie
die Lautstärke nur an Ihrem MP3-Player verändern und
nicht am Lichtwecker.
Wenn am Gerät im AUX-Eingang ein Kabel steckt, ist die
Funktion "Stimmungslicht mit Farbwechsel" deaktiviert. Es
kann in diesem Zeitraum nur ein Licht ohne Farbwechsel
dargestellt werden.
7. Reinigung und Pflege
ACHTUNG
• Achten Sie bitte darauf, dass kein Wasser in das Gerät
eindringt. Falls dies doch einmal der Fall sein sollte, dann
verwenden Sie bitte das Gerät erst dann wieder, wenn es
völlig trocken ist.
• Gerät und Steckernetzteil keinesfalls in Wasser oder
andere Flüssigkeiten tauchen.

11
• Schützen Sie das Gerät vor Stößen, Feuchtigkeit, Staub,
Chemikalien, starken Temperaturschwankungen und zu
nahen Wärmequellen (Öfen, Heizungskörper).
• Reinigen Sie das Gerät mit einem trockenen Tuch.
• Verwenden Sie keine scheuernden Reinigungsmittel.
• Wechseln Sie immer alle Batterien gleichzeitig aus und
verwenden Sie Batterien des gleichen Typs. Verwenden
Sie keine wiederaufladbaren Akkus.
• Auslaufende Batterien können Beschädigungen am
Gerät verursachen. Wenn Sie das Gerät längere Zeit nicht
benutzen, nehmen Sie die Batterien aus dem Batteriefach.
• Ausgelaufene oder beschädigte Batterien können bei
Berührung mit der Haut Verätzungen verursachen. Benut-
zen Sie in diesem Fall geeignete Schutzhandschuhe.
8. Entsorgung
Im Interesse des Umweltschutzes darf das Gerät am Ende
seiner Lebensdauer nicht mit dem Hausmüll entfernt werden.
Die Entsorgung kann über entsprechende Sammel-
stellen in Ihrem Land erfolgen. Befolgen Sie die örtli-
chen Vorschriften bei der Entsorgung der Materialien.
Entsorgen Sie das Gerät gemäß der Elektro- und Elek-
tronik Altgeräte EG-Richtlinie – WEEE (Waste Electrical and
Electronic Equipment). Bei Rückfragen wenden Sie sich an
die für die Entsorgung zuständige kommunale Behörde.
Hinweis: Diese Zeichen finden Sie auf
schadstoffhaltigen Batterien: Pb = Batterie
enthält Blei, Cd = Batterie enthält Cadmium,
Hg = Batterie enthält Quecksilber
9. Was tun bei Problemen?
Wenn die Uhrzeit nicht korrekt angezeigt wird oder das
Gerät nicht korrekt funktioniert, kann dies durch elektrostati-
sche Entladungen oder andere Störungen verursacht wor-
den sein. Stellen Sie das Gerät deshalb nicht in der Nähe
von Geräten wie z. B. WLAN etc auf. Um das Problem zu
lösen, setzen Sie das das Gerät auf die Werkseinstellung
zurück.
Um das Gerät auf die Werkseinstellung zurückzusetzen,
betätigen Sie mit einem spitzen Gegenstand die Reset-Taste
auf der Geräteunterseite.
Sollte das Problem noch immer auftreten, kontaktieren Sie
den Kundendienst.
10. Technische Daten
Lichtweckerfunktion OFF, 15, 30 Minuten vor Alarm
Snooze-Dauer 5 bis 60 Minuten
Gute-Nacht-Funktion wählbar zwischen 5, 10, 15,
30, 45, 60, 75 ,90 Minuten
und OFF.
Maße 12,3 x 12 cm

12
Gewicht 180 g
Versorgung Input: 100 - 240 V; AC
50/60 Hz, max. 200 mA
Output: 5,5 V; DC 500 mA
(0,5 A); 2,75 W
Netzteil
Schutzklasse
Schutzklasse II
Radio-Frequenzbereich UKW 87,5 – 108 MHz
Beleuchtungsstärke ca. 15 Lux (bei 15 cm
Abstand)
Durchschnittliche
Effizienz im Betrieb
≥ 73.80 %
Leistungsaufnahme bei
Nulllast
≤ 0.1 W
Netzteil Hersteller:
Hong Kong Yee Fu Electronic
Enterprises Co., Ltd.
Adresse: Room 6,
Smart-Space 1, Units 401-403,
Level 4, Cyberport 1, 100
Cyberport Road, Hong Kong
Modell-Nr.: L008A055050E
Technische Änderungen vorbehalten.
Wir bestätigen hiermit, dass dieses Produkt der europäi-
schen RED Richtlinie 2014/53/EU entspricht.
Die CE Kon-
formitätserklärung zu diesem Produkt finden Sie unter:
www.beurer.com/web/we-landingpages/de/cedeclarati-
onofconformity.php
11. Garantie und Service
Die Beurer GmbH, Söflinger Straße 218, D-89077 Ulm
(nachfolgend „Beurer“ genannt) gewährt unter den nachste-
henden Voraussetzungen und in dem nachfolgend beschrie-
benen Umfang eine Garantie für dieses Produkt.
Die nachstehenden Garantiebedingungen lassen die
gesetzlichen Gewährleistungsverpflichtungen des Ver-
käufers aus dem Kaufvertrag mit dem Käufer unberührt.
Die Garantie gilt außerdem unbeschadet zwingender
gesetzlicher Haftungsvorschriften.
Beurer garantiert die mangelfreie Funktionstüchtigkeit und
die Vollständigkeit dieses Produktes.
Die weltweite Garantiezeit beträgt 3 Jahre ab Beginn des
Kaufes des neuen, ungebrauchten Produktes durch den
Käufer.
Diese Garantie gilt nur für Produkte, die der Käufer als Ver-
braucher erworben hat und ausschließlich zu persönlichen
Zwecken im Rahmen des häuslichen Gebrauchs verwendet.

13
Irrtum und Änderungen vorbehalten
Es gilt deutsches Recht.
Falls sich dieses Produkt während der Garantiezeit als
unvollständig oder in der Funktionstüchtigkeit als mangel-
haft gemäß der nachfolgenden Bestimmungen erweist, wird
Beurer gemäß diesen Garantiebedingungen eine kostenfreie
Ersatzlieferung oder Reparatur durchführen.
Wenn der Käufer einen Garantiefall melden möchte,
wendet er sich zunächst an den Beurer Kundenservice:
Beurer GmbH, Servicecenter
Tel: +49 731 3989-144
Für eine zügige Bearbeitung nutzen Sie bitte unser Kon-
taktformular auf der Homepage www.beurer.com unter der
Rubrik ‚Service‘.
Der Käufer erhält dann nähere Informationen zur Abwick-
lung des Garantiefalls, z.B. wohin er das Produkt kostenfrei
senden kann und welche Unterlagen erforderlich sind.
Eine Inanspruchnahme der Garantie kommt nur in Betracht,
wenn der Käufer
- eine Rechnungskopie/Kaufquittung und
- das Original-Produkt
Beurer oder einem autorisierten Beurer Partner vorlegen
kann.
Ausdrücklich ausgenommen von dieser Garantie sind
- Verschleiß, der auf normalem Gebrauch oder Verbrauch
des Produktes beruht;
- zu diesem Produkt mitgelieferte Zubehörteile, die sich bei
sachgemäßen Gebrauch abnutzen bzw. verbraucht wer-
den (z.B. Batterien, Akkus, Manschetten, Dichtungen,
Elektroden, Leuchtmittel, Aufsätze, Inhalatorzubehör);
- Produkte, die unsachgemäß und/oder entgegen der
Bestimmungen der Bedienungsanleitung verwendet,
gereinigt, gelagert oder gewartet wurden sowie Produkte,
die vom Käufer oder einem nicht von Beurer autorisierten
Servicecenter geönet, repariert oder umgebaut wurden;
- Schäden, die auf dem Transportweg zwischen Hersteller
und Kunde bzw. zwischen Servicecenter und Kunde ent-
stehen
- Produkte, die als 2.Wahl-Artikel oder als gebrauchte Arti-
kel gekauft wurden;
- Folgeschäden, welche auf einem Mangel dieses Produktes
beruhen (es können für diesen Fall jedoch Ansprüche aus
Produkthaftung oder aus anderen zwingenden gesetzli-
chen Haftungsbestimmungen bestehen).
Reparaturen oder ein Komplettaustausch verlängern in kei-
nem Fall die Garantiezeit.

14
Dear Customer
Thank you for choosing one of our products. Our name
stands for high-quality, thoroughly tested products for
applications related to heating, weight, blood pressure,
body temperature, pulse, gentle therapy, massage, air and
beauty.
Please read these instructions for use carefully and keep
them for later use, be sure to make them accessible to other
users and observe the information they contain.
With kind regards
Your Beurer team
1. Included in delivery
• 1 Beurer WL 32 wake up light
• 1 mains adapter
• 1 AUX cable
• 1 set of instructions for use
2. Signs and symbols
The following symbols are used in these instructions for
use, on the packaging and on the type plate for the device
and the accessories:
ENGLISH
Contents
1. Included in delivery................................................... 14
2. Signs and symbols ................................................... 14
3. Getting to know your instrument .............................. 16
4. Unit description ........................................................ 16
5. Initial use .................................................................. 18
6. Operation .................................................................. 18
7. Cleaning and maintenance ..................................... 22
8. Disposal .................................................................. 22
9. What if there are problems? ................................... 23
10. Technical data ........................................................ 23
11. Warranty / service ................................................... 23

15
WARNING
Warning instruction indicating a risk
of injury or damage to health.
IMPORTANT
Safety note indicating possible
damage to the device/accessory.
Note
Note on important information.
Disposal in accordance with EC
Directive – WEEE (Waste Electrical
and Electronic Equipment)
Manufacturer
This product satisfies the require-
ments of the applicable European
and national directives.
20
PAP
Dispose of packaging in an environ-
mentally friendly manner
Certification symbol for products
that are exported to the Russian
Federation and members of the CIS
VI
Energy eciency class 6
WARNING
• The device is only intended for the purpose described in
these instructions for use. The manufacturer is not liable
for damage resulting from improper or careless use.
• The device must be placed near an easily accessible
socket.
• Only operate the device with the mains adapter provided
and at the mains voltage specified on the mains adapter.
• Before use, inspect the device and accessories for visible
damage. If you have any doubts, do not use the device
and contact your retailer or the specified Customer Ser-
vices address.
• In the case of defects or operational faults, switch the
device off immediately and disconnect the device from
the mains socket.
• Never plug in or unplug the mains adapter when you have
wet hands.
• Keep packaging material away from children (risk of suffo-
cation).
• Arrange the mains cable so that it is not a trip hazard.
• Keep the device, mains adapter and mains cable away
from water.
• This device is not intended for use by people (including
children) with restricted physical, sensory or mental skills
or a lack of experience and/or a lack of knowledge, unless
they are supervised by a person who is responsible for
their safety or are instructed by such a person in how to
use the device.

16
• Children should be supervised around the device to
ensure they do not play with it.
IMPORTANT
• Do not pull on the mains cable or on the device to discon-
nect the mains adapter from the socket.
• Never hold or carry the device by the mains cable.
• Protect the device from impacts, humidity, dirt, marked
temperature fluctuations and direct sunlight.
• Do not drop the device.
3. Getting to know your instrument
The Beurer WL 32 wake up light wakes you from sleep in a
gentle and natural manner. The LED light gradually becomes
brighter like a rising sun, allowing you to slowly become
accustomed to the light conditions and your body to gently
prepare itself for waking up. Along with the simulated sun-
rise, you can set an acoustic alarm to help you wake up.
You can choose between the radio or a beep. The wake up
light provides a rested and pleasant start to your day.
4. Unit description
Front view
LED light
Zz (snooze)/lamp
For snooze/lamp, press the cover
of the lamp (at the front) down-
wards

17
Side view
1 Up
2 Volume (radio)
3 Down
4 Alarm 1-2
5 Goodnight function (sleep)/radio
6 Set/memory
Rear view
Underside
41
52
63
Mains adap-
ter
AUX cable
AUX input Mains adapter
socket
Reset (to factory set-
tings)
3 x AAA batteries
(not included in delivery)
Zz (snooze)/lamp

18
Display description
1 Radio memory space
2 Light symbol
3 Snooze
4 Radio on
5 Alarm 2 radio
6 Alarm 2 beep
7 Alarm 1 radio
8 Alarm 1 beep
9 Displays time in 12h format
10 Sleep timer (goodnight function)
5. Initial use
• Remove the packaging material.
• Check that all parts listed are present.
• Check the device, mains adapter and mains cable for
damage.
• Remove the battery compartment lid on the underside of
the device and insert the batteries with the correct polar-
ity. The batteries supply power to the device in the event
of a power failure.
• Place the device on a firm, even surface.
• Insert the mains adapter connector into the mains adapter
socket on the rear of the device.
• Insert the mains adapter into a suitable socket. The time
is shown on the device display.
Note
• If you would like to reset the device to the factory set-
tings, press in the reset button on the underside of the
device using a pointed object.
6. Operation
Note
The device exits the settings menu automatically if no but-
ton is pressed for 10 seconds.
6.1 Setting the time and snooze duration
• Press the
button.
The time will start to flash.
Using the
/
buttons, select the desired time.
1 2 3 4
58
9
10
67

19
Note
To navigate through the hours or minutes more quickly,
press and hold the
/
button.
• Confirm the selected time with the
button.
“24 Hr” now flashes on the display.
You can now choose between 12 and 24-hour format.
• Using the
/
buttons, select the desired hour format and
confirm with the
button.
“Zz 05” now flashes on the display.
• Using the
/
buttons, select the desired snooze duration
(5-60 minutes) and confirm with the
button.
Note
In order to read the time in the dark, press the cover of the
lamp (at the front) downwards.
6.2 Setting the alarm
You can set two separate alarm times (alarm 1 and alarm 2)
on the wake up light.
• To set alarm 1, press the
button once.
• To set alarm 2, press the button twice.
The corresponding alarm time starts to flash on the display.
• Using the
/
buttons, set the desired alarm time.
• Using the
button, select your desired alarm sound
for this alarm time.
You can choose between radio (
) and a beep ( ).
• Confirm using the
button.
Alarm 1
switched off
Alarm 2
switched off
Alarm 1 switched on,
beep selected as alarm
Alarm 2 switched on,
radio selected as alarm
6.3 Switching off the alarm
• When the alarm sounds, press the button.
The alarm is now switched off and will sound again on the
following day at the set time.
6.4 Permanently deactivating the alarm
• To deactivate alarm 1, press the
button once.
• To deactivate alarm 2, press the
button twice.
• Now press the
button until the note symbol ( ) and
bell symbol ( ) disappear from next to the number 1 or 2
on the screen.
• Confirm using the
button. Alarm 1 or 2 has now been
deactivated.

20
6.5 Snooze function
When an alarm sounds, it can be stopped temporarily by
pressing the Zz button. The alarm will sound again once the
preset snooze duration has elapsed. For information on set-
ting the snooze duration, see chapter “6.1 Setting the time
and snooze duration”.
6.6 Sunrise function
Having set an alarm, you can also wake up to a sunrise
simulation in addition to the alarm. With this function, the
LED light gradually becomes brighter.
Note
For this function, use the mains adapter provided.
• Press and hold the Zz button for approx. 5 seconds.
“15” will flash on the display.
• Using the
/
buttons, set the desired simulated sunrise.
15 = Sunrise simulation begins 15 minutes before the set
alarm time.
30 = Sunrise simulation begins 30 minutes before the set
alarm time.
OFF = Sunrise simulation deactivated. The lamp symbol
(
) disappears from above the time on the display.
• To confirm your selection, press the Zz button.
6.7 Lamp function/mood light with change of colour
The wake up light can also be used as a normal lamp or as
a mood light with change of colour.
Note
For this function, use the mains adapter provided. When you
are listening to the radio or have activated the goodnight
function, the “mood light with change of colour” function is
deactivated. Only light without change of colour is possible
in this mode.
• Press the Zz button.
The LED light begins to light up gradually.
• To activate the lamp function, press the Zz button again.
“L 09” will flash on the display (brightness level 09).
• Using the
/
buttons, set your desired brightness level
(L 00 to L 15).
• To activate the mood light with change of colour, press the
Zz button again.
The mood light with change of colour begins to light up.
Wait a few seconds for the colour to change.
• To set one of the mood lights permanently (without
change of colour), press the Zz button again.
• To switch off all light functions, press the Zz button again.
6.8 Listening to the radio
The wake up light has a flexible wire antenna on the rear of
the device. Uncoil the wire and extend it fully to ensure the
best reception.
• To switch the radio on, press the
button.

21
“on” will flash on the display first. After approx. 10 seconds,
mhz will appear on the display with the currently set fre-
quency.
• Using the
/
buttons, set the desired frequency.
• To start automatic search, press the
/
button down
briefly and then release it. The search will now start and
will stop automatically as soon as a radio station has
been found.
• To change the volume of the radio, press the
button.
Using the
/
buttons, set the desired volume.
• To switch the radio off again, press the cover of the lamp
(at the front) downwards.
Note
When you are listening to the radio, the “mood light with
change of colour” is deactivated. Only light without change
of colour is possible in this mode.
6.9 Storing radio stations
You can store up to 10 radio stations on the wake up light.
• To switch on the radio, press the
button.
• Using the
/
buttons, set the frequency of the radio sta-
tion you would like to store.
• To store the selected radio station, press and hold the
button for approx. 2 seconds. O1 (memory space
number) will flash on the display below the frequency.
• Select the desired memory space number by pressing the
button briefly. To save the transmitter to the desired
memory space number, hold down the
button for 2
seconds.
6.10 Selecting preset radio stations
• To switch the radio on, press the
button. “on” will flash
on the display first. After approx. 10 seconds, mhz will
appear on the display with the currently set frequency.
• To select from the preset radio stations, press the
button.
6.11 Goodnight function
This function automatically switches off the radio after a set
period of time.
• Press the
button twice.
“sleep” will appear on the display with a flashing O5.
• Using the button, select the number of minutes after
which the radio should automatically switch off.
You can choose between 5, 10, 15, 30, 45, 60, 75 and 90
minutes.
• To confirm the number of minutes, wait approx. 5 seconds
until the display returns to the time. The desired number
of minutes is now set. To view the remaining minutes until
the radio switches off, press the button.
Note
• To end the goodnight function before the set number
of minutes has elapsed, press the
button until OFF
appears on the display.

22
Note
If you have activated the goodnight function, the “mood
light with change of colour” function is deactivated. Only
light without change of colour is possible in this mode.
6.12 Listening to music via the AUX input
You can connect your MP3 player to the wake up light using
the AUX input.
• Insert one end of the AUX cable (included in delivery) into
the AUX input on the rear of the wake up light.
• Insert the other end of the AUX cable into the headphone
socket of the MP3 player.
Note
When listening to music via the AUX input, the volume level
can be adjusted on the MP3 player only, and not on the
wake up light.
When a cable is connected to the AUX input on the device,
the “mood light with change of colour” function is deacti-
vated. Only light without change of colour is possible in this
mode.
7. Cleaning and maintenance
IMPORTANT
• Please make sure that no water enters the device. If this
should happen, reuse the device only when it has fully
dried out.
• Never immerse the device or mains part plug in water or
other liquids.
• Protect the device from knocks, damp, dust, chemicals,
marked temperature fluctuations, and nearby sources of
heat (ovens, heaters).
• Clean the device with a dry cloth.
• Do not use any abrasive cleaning products.
• Always replace all batteries at the same time and use bat-
teries of the same type. Do not use rechargeable batter-
ies.
• Leaking batteries may damage the device. If you do not
intend to use the device for longer periods, remove the
batteries from the battery compartment.
• Leaking or damaged batteries may burn the skin therefore
use suitable protective gloves if this is the case.
8. Disposal
For environmental reasons, do not dispose of the device in
the household waste at the end of its useful life. Dispose of
the device at a suitable local collection or recycling point.
Observe the local regulations for material disposal. Dispose
of the device in accordance with EC Directive – WEEE
(Waste Electrical and Electronic Equipment). If you
have any questions, please contact the local
authorities responsible for waste disposal.

23
Note: The codes below are printed on batteries containing
harmful substances:
Pb = Battery contains lead,
Cd = Battery contains cadmium,
Hg = Battery contains mercury.
9. What if there are problems?
If the time is not displayed correctly or the device does not
function correctly, the cause may be attributed to electro-
static discharge or other faults. Therefore, do not position
the device near to other devices, such as WLAN etc. To
remedy the problem, reset the device to the factory settings.
To reset the device to the factory settings, press in the
reset button on the underside of the device using a poin-
ted object.
If the problem persists, contact Customer Services.
10. Technical data
Wake up light function OFF, 15, 30 minutes before
alarm
Snooze duration 5 to 60 minutes
Goodnight function Choose between 5, 10, 15,
30, 45, 60, 75, 90 minutes and
OFF.
Dimensions 12.3 x 12 cm
Weight 180 g
Supply Input: 100 - 240 V; AC 50/60 Hz,
max. 200 mA
Output: 5,5 V; DC 500 mA
(0,5 A); 2,75 W
Mains part
Protection class
Protection class II
Radio frequency range 87,5 – 108 MHz VHF
Illuminance approx. 15 Lux (at distance of
15 cm)
Average active effi-
ciency
≥ 73.80 %
No-load power con-
sumption
≤ 0.1 W
Mains part Manufacturer:
Hong Kong Yee Fu Electronic
Enterprises Co., Ltd.
Adresse: Room 6,
Smart-Space 1, Units 401-403,
Level 4, Cyberport 1, 100
Cyberport Road, Hong Kong
Model no.: L008A055050E
Subject to technical changes.

24
We hereby confirm that this product complies with the
European RED Directive 2014/53/EU. The CE Declaration of
Conformity for this product can be found under:
www.beurer.com/web/we-landingpages/de/cedeclara-
tionofconformity.php.
11. Warranty / service
Beurer GmbH,Söflinger Straße 218, 89077 Ulm, Germany
(hereinafter referred to as “Beurer”) provides a warranty for
this product, subject to the requirements below and to the
extent described as follows.
The warranty conditions below shall not aect the
seller’s statutory warranty obligations which ensue from
the sales agreement with the buyer.
The warranty shall apply without prejudice to any man-
datory statutory provisions on liability.
Beurer guarantees the perfect functionality and complete-
ness of this product.
The worldwide warranty period is 3 years, commencing
from the purchase of the new, unused product from the
seller.
The warranty only applies to products purchased by the
buyer as a consumer and used exclusively for personal pur-
poses in the context of domestic use.
German law shall apply.
During the warranty period, should this product prove to be
incomplete or defective in functionality in accordance with
the following provisions, Beurer shall carry out a repair or
a replacement delivery free of charge, in accordance with
these warranty conditions.
If the buyer wishes to make a warranty claim, they
should approach their local retailer in the first instance:
see the attached “International Service” list of service
addresses.
The buyer will then receive further information about the
processing of the warranty claim, e.g. where they can send
the product and what documentation is required.
A warranty claim shall only be considered if the buyer can
provide Beurer, or an authorised Beurer partner, with
– a copy of the invoice/purchase receipt, and
– the original product.
The following are explicitly excluded from this warranty:
– deterioration due to normal use or consumption of the
product;
– accessories supplied with this product which are worn
out or used up through proper use (e.g. batteries,
rechargeable batteries, cuffs, seals, electrodes, light
sources, attachments and nebuliser accessories);

25
– products that are used, cleaned, stored or maintained
improperly and/or contrary to the provisions of the inst-
ructions for use, as well as products that have been ope-
ned, repaired or modified by the buyer or by a service
centre not authorised by Beurer;
– damage that arises during transport between manufac-
turer and customer, or between service centre and cus-
tomer;
– products purchased as seconds or as used goods;
– consequential damage arising from a fault in this pro-
duct (however, in this case, claims may exist arising from
product liability or other compulsory statutory liability
provisions).
Repairs or an exchange in full do not extend the warranty
period under any circumstances.
Subject to errors and changes

26
Chère cliente, cher client,
Nous vous remercions d’avoir choisi l’un de nos produits.
Notre société est réputée pour l’excellence de ses produ-
its et les contrôles de qualité auxquels ils sont soumis. Nos
produits couvrent les domaines de la chaleur, du poids, de
la pression sanguine, de la température corporelle, de la
thérapie douce, des massages, de l’amélioration de l’air et
de la beauté.
Lisez attentivement ce mode d’emploi, conservez-le pour
un usage ultérieur, mettez-le à disposition des autres utilisa-
teurs et suivez les consignes qui y figurent.
Sincères salutations,
Votre équipe Beurer
1. Contenu
• 1réveil lumineux Beurer WL32
• 1adaptateur secteur
• 1câble AUX
• 1mode d’emploi ci-présent
FRANÇAIS
Sommaire
1. Contenu .................................................................... 26
2. Symboles utilisés ...................................................... 27
3. Familiarisation avec l’appareil .................................. 28
4. Description de l’appareil ........................................... 29
5. Mise en service ......................................................... 31
6. Utilisation .................................................................. 31
7. Nettoyage et entretien ............................................ 35
8. Élimination .............................................................. 35
9. Que faire en cas de problèmes? ............................ 36
10. Données techniques ............................................... 36
11. Garantie / maintenance .......................................... 36

27
2. Symboles utilisés
Les symboles suivants sont utilisés sur le mode d’emploi,
sur l’emballage et sur la plaque signalétique de l’appareil et
des accessoires:
AVERTISSEMENT
Ce symbole vous avertit des
risques de blessures ou des dan-
gers pour votre santé
ATTENTION
Ce symbole vous avertit des éven-
tuels dommages au niveau de
l’appareil ou d’un accessoire.
Remarque
Indication d’informations impor-
tantes
Élimination conformément à
la directive européenne WEEE
(Waste Electrical and Electronic
Equipment) relative aux déchets
d’équipements électriques et élec-
troniques
Fabricant
Ce produit répond aux exigen-
ces des directives européennes et
nationales en vigueur.
20
PAP
Éliminez l’emballage dans le res-
pect de l’environnement
Marque de certification pour les
produits, qui sont exportés en
Fédération de Russie et dans les
pays de la CEI
VI
Classe d’ecacité énergétique6
AVERTISSEMENT
• L’appareil est conçu pour l’utilisation décrite dans ce
mode d’emploi. Le fabricant ne peut être tenu respon-
sable des dommages causés par une utilisation inappro-
priée ou non conforme.
• L’appareil doit rester à proximité d’une prise accessible
facilement.
• Utilisez l’appareil uniquement avec l’adaptateur secteur
fourni et à la tension indiquée sur l’adaptateur secteur.
• Avant l’utilisation, vérifiez si l’appareil et les accessoires
présentent des dégâts visibles. En cas de doute, ne l’utili-
sez pas et adressez-vous à votre revendeur ou au service
client indiqué.
• En cas de défaut ou de panne, éteignez immédiatement
l’appareil et débranchez l’alimentation.

28
• Ne branchez ou débranchez jamais l’adaptateur secteur si
vous avez les mains humides.
• Conservez l’emballage hors de portée des enfants (risque
d’étouffement).
• Placez le câble d’alimentation de manière à ce que per-
sonne ne puisse trébucher dessus.
• Tenez l’appareil, l’adaptateur secteur et le câble à l’écart
de l’eau!
• Cet appareil n’est pas conçu pour être utilisé par une
personne (y compris les enfants) dont les capacités phy-
siques, sensorielles ou intellectuelles sont limitées, ou
n’ayant pas l’expérience et/ou les connaissances néces-
saires. Le cas échéant, cette personne doit, pour sa sécu-
rité, être surveillée par une personne compétente ou doit
recevoir de cette dernière des recommandations sur la
manière d’utiliser l’appareil.
• Surveillez les enfants afin de les empêcher de jouer avec
l’appareil.
ATTENTION
• Ne tirez pas sur le câble d’alimentation ni sur l’appareil
pour débrancher l’adaptateur secteur de la prise.
• Ne tenez ou ne portez jamais l’appareil par le câble
d’alimentation.
• Protégez l’appareil contre les chocs, l’humidité, les sale-
tés, les fortes variations de température et l’ensoleillement
direct.
• Ne laissez pas tomber l’appareil.
3. Familiarisation avec l’appareil
Le réveil lumineux Beurer WL32 vous offre un réveil en dou-
ceur et naturel. La lumière LED, s’intensifiant progressive-
ment, permet de simuler un lever de soleil. Vous pouvez
alors tranquillement vous habituer aux conditions lumineu-
ses et votre corps se préparer doucement au réveil. En plus
de la simulation de lever de soleil, vous pouvez paramét-
rer une sonnerie qui vous accompagne lors de votre réveil.
Pour la sonnerie, vous pouvez choisir entre la radio et un
bip. Le réveil lumineux vous permet de débuter la journée
reposé et du bon pied.

29
4. Description de l’appareil
Vue avant
Vue latérale
1 Up (plus)
2 Volume (radio)
3 Down (moins)
4 Alarme 1-2
5 Fonction bonne nuit (Sleep)/radio
6 Set/Memory
Lumière LED
Zz (Snooze)/lumière
Pour Snooze/lumière, appuyez sur
le couvercle de la lampe à l’avant
41
52
63

30
Vue arrière
Dessous
Description de l’affichage
1 Mémoire des stations (radio)
2 Symbole de lumière
3 Snooze
4 Allumer la radio
5 Alarme 2 radio
6 Alarme 2 bip
7 Alarme 1 radio
8 Alarme 1 bip
9 S’affiche uniquement au format 12h
10 Sleep Timer (fonction bonne nuit)
5. Mise en service
• Retirez le matériel d’emballage.
• Vérifiez que toutes les pièces sont présentes lors de la
livraison.
• Vérifiez que l’appareil, l’adaptateur secteur et le câble ne
sont pas endommagés.
Adaptateur
secteur
Câble AUX
Entrée AUX Prise de l’adaptateur
secteur
Reset (réinitialiser aux
paramètres d’usine)
3 piles AAA
(non incluses dans la liv-
raison)
Zz (Snooze)/lumière
1 2 3 4
58
9
10
67

31
• Retirez le couvercle du compartiment à piles sous l’appa-
reil et insérez les piles en respectant la polarité. Les piles
servent d’alimentation de secours en cas de coupure de
courant.
• Posez l’appareil sur une surface stable et plane.
• Branchez la fiche de l’adaptateur secteur dans la prise de
l’adaptateur secteur à l’arrière de l’appareil.
• Branchez l’adaptateur secteur sur une prise secteur adap-
tée. L’heure s’affiche sur l’écran de l’appareil.
Remarque
• Si vous souhaitez réinitialiser l’appareil aux paramètres
d’usine, appuyez sur la touche Reset située sous
l’appareil à l’aide d’un objet pointu.
6. Utilisation
Remarque
L’appareil quitte automatiquement le menu de réglage si
vous n’appuyez sur aucune touche pendant 10 secondes.
6.1 Régler l’heure et la durée de la fonction snooze.
• Appuyez sur la touche
.
L’heure commence à clignoter.
Réglez l’heure souhaitée avec les touches
/
.
Remarque
Pour naviguer plus rapidement entre les heures ou les minu-
tes, maintenez la touche
/
enfoncée.
• Confirmez l’heure réglée avec la touche
.
À présent, «24Hr» clignote à l’écran.
Vous pouvez choisir entre les formats 12 heures et
24heures.
• Avec les touches
/
, sélectionnez le format d’heure que
vous souhaitez et confirmez avec la touche
.
«Zz 05» clignote à présent à l’écran.
• Avec les touches
/
, sélectionnez la durée souhaitée
pour la fonction snooze (entre 5 et 60minutes) et confir-
mez avec la touche
.
Remarque
Si vous voulez lire l’heure dans l’obscurité, appuyez sur le
couvercle de la lampe à l’avant.
6.2 Régler l’alarme
Vous pouvez régler deux heures d’alarme différentes
(alarme 1 et alarme 2) sur le réveil lumineux.
• Pour régler l’alarme 1, appuyez une fois sur la touche
.
• Pour régler l’alarme 2, appuyez deux fois sur la touche
.
L’heure de l’alarme commence à clignoter sur l’écran.
• Réglez l’heure souhaitée avec les touches
/
.
• Avec la touche
, sélectionnez la sonnerie souhaitée
pour l’heure de l’alarme.
Pour la sonnerie, vous pouvez choisir entre la radio ( ) et
le bip ( ).
• Confirmez avec la touche
.

32
Alarme 1 désactivée Alarme 2 désactivée
Alarme 1 activée,
bip sélectionné comme
sonnerie
Alarme 2 activée,
radio sélectionnée comme
sonnerie
6.3 Désactiver l’alarme
• Quand l’alarme retentit, appuyez sur la touche .
L’alarme est désactivée et ne sonnera de nouveau que le
lendemain à l’heure réglée.
6.4 Désactiver durablement l’alarme
• Pour désactiver l’alarme 1, appuyez une fois sur la touche
.
• Pour désactiver l’alarme 2, appuyez deux fois sur la
touche .
• Appuyez à présent sur la touche
le nombre de fois
nécessaire pour qu’aucun symbole de note ( ) ou de
cloche ( ) ne s’affiche plus à côté du chiffre 1 ou 2.
• Confirmez avec la touche
. L’alarme 1 ou 2 est à pré-
sent désactivée.
6.5 Fonction Snooze
Quand une sonnerie retentit, vous pouvez l’arrêter provi-
soirement en appuyant sur la touche Zz. La sonnerie reten-
tira alors de nouveau après la durée de la fonction snooze
que vous avez réglée. Pour le réglage de la durée de la
fonction snooze, veuillez consulter le chapitre «6.1 Régler
l’heure et la durée de la fonction snooze».
6.6 Fonction lever de soleil
Si vous avez réglé une alarme, vous pouvez également vous
faire réveiller par une simulation de lever de soleil en plus de
la sonnerie. Dans ce cas, la LED devient progressivement
plus lumineuse.
Remarque
Pour cette fonction, utilisez l’adaptateur secteur joint.
• Maintenez la touche Zz enfoncée pendant env. 5sec.
«15» clignote à l’écran.
• Réglez la simulation de lever de soleil que vous souhaitez
avec les touches
/
.
15 = la simulation de lever de soleil commence 15minutes
avant l’heure réglée pour l’alarme.
30 = la simulation de lever de soleil commence 30minutes
avant l’heure réglée pour l’alarme.
OFF = la simulation de lever de soleil est désactivée. Le sym-
bole lampe (
) au-dessus de l’heure disparaît de l’écran.

33
• Pour confirmer votre choix, appuyez sur la touche Zz.
6.7 Fonction de lampe/lumière d’ambiance avec couleur
changeante
Vous pouvez aussi utiliser le réveil lumineux comme une
lampe normale ou comme lumière d’ambiance avec couleur
changeante.
Remarque
Pour cette fonction, utilisez l’adaptateur secteur joint. Si
vous écoutez la radio ou si la fonction Bonne nuit est acti-
vée, la fonction «Lumière d’ambiance avec couleur chan-
geante» est désactivée. Seule une lumière sans change-
ment de couleur peut être émise pendant ce temps.
• Appuyez sur la touche Zz.
La LED commence à éclairer légèrement.
• Pour activer la fonction lampe, appuyez de nouveau sur la
touche Zz.
«L 09» (niveau de luminosité 09) clignote à l’écran.
• À l’aide des touches
/
, réglez le niveau de luminosité
souhaité ( L 00 à L 15).
• Si vous souhaitez activer la lumière d’ambiance avec cou-
leur changeante, appuyez de nouveau sur la touche Zz.
La lumière d’ambiance avec couleur changeante com-
mence à s’allumer.
Attendez quelques secondes pour que les couleurs
changent.
• Si vous souhaitez garder durablement l’une des lumières
d’ambiance (sans changement de couleur), appuyez de
nouveau sur la touche Zz.
• Pour désactiver toutes les fonctions lumineuses, appuyez
de nouveau sur la touche Zz.
6.8 Écouter la radio
Le réveil lumineux dispose d’une antenne volante à l’arrière
de l’appareil. Déroulez le fil et placez-le dans la position la
plus longue pour assurer la meilleure réception.
• Appuyez sur la touche
pour allumer la radio.
«On» clignote alors à l’écran. Après environ 10secondes,
mhz s’affiche ainsi que la fréquence actuellement réglée.
• Réglez la fréquence souhaitée avec les touches
/
.
• Pour lancer la recherche automatique de stations, mainte-
nez la touche
/
enfoncée, puis relâchez-la. L’appareil
commence la recherche de stations et l’arrête automati-
quement dès qu’il a trouvé une station de radio.
• Pour modifier le volume de la radio, appuyez sur la
touche
. Réglez à présent le volume souhaité avec les
touches
/
.
• Pour éteindre la radio, appuyez sur le couvercle de la
lampe à l’avant.
Remarque
Quand vous écoutez la radio, la fonction «Lumière
d’ambiance avec couleur changeante» est désactivée.
Seule une lumière sans changement de couleur peut être
émise pendant ce temps.

34
6.9 Enregistrer les stations de radio
Vous pouvez enregistrer jusqu’à 10stations de radio sur le
réveil lumineux.
• Appuyez sur la touche
pour allumer la radio.
• À l’aide des touches
/
, réglez la fréquence de la sta-
tion de radio que vous souhaitez enregistrer.
• Pour enregistrer la station de radio sélectionnée, mainte-
nez la touche
pendant env. 2secondes. Sur l’écran,
O1 clignote sous la fréquence (numéro de mémoire).
• Sélectionnez le numéro de mémoire souhaité en appuyant
brièvement sur la touche
. Pour enregistrer la station
sous le numéro de mémoire sélectionné, appuyez sur la
touche
pendant 2secondes.
6.10 Sélectionner une station de radio enregistrée
• Appuyez sur la touche
pour allumer la radio. «On»
clignote alors à l’écran. Après environ 10secondes, mhz
s’affiche ainsi que la fréquence actuellement réglée.
• Pour choisir parmi les stations de radio enregistrées,
appuyez sur la touche .
6.11 Fonction bonne nuit
Avec cette fonction, vous pouvez paramétrer l’arrêt automa-
tique de la radio après une durée choisie.
• Appuyez deux fois sur la touche
.
«Sleep» s’affiche à l’écran et O5 clignote.
• Avec la touche
, choisissez le nombre de minutes
après lequel vous souhaitez que la radio s’éteigne auto-
matiquement.
Vous pouvez choisir entre 5, 10, 15, 30, 45, 60, 75 et
90minutes.
• Pour confirmer le nombre de minutes voulu, attendez
environ 5secondes que l’affichage repasse automatique-
ment à l’heure. Le nombre de minutes souhaité est désor-
mais réglé. Si vous voulez consulter le nombre de minutes
restantes, appuyez sur la touche .
Remarque
• Si vous souhaitez arrêter la fonction bonne nuit avant la
fin du nombre de minutes réglé, appuyez sur la touche
le nombre de fois requis pour que OFF apparaisse à
l’écran.
Remarque
Si la fonction Bonne nuit est activée, la fonction «Lumi-
ère d’ambiance avec couleur changeante» est désactivée.
Seule une lumière sans changement de couleur peut être
émise pendant ce temps.
6.12 Écouter de la musique par l’entrée AUX
Vous pouvez connecter votre lecteur MP3 au réveil lumi-
neux par l’entrée AUX.
• Raccordez une extrémité du câble AUX (inclus dans la
livraison) à l’entrée AUX située à l’arrière du réveil lumi-
neux.

35
• Branchez l’autre extrémité du câble AUX dans la prise des
écouteurs du lecteur MP3.
Remarque
Si vous écoutez de la musique par l’entrée AUX, vous pou-
vez uniquement modifier le volume sur votre lecteur MP3 et
non sur le réveil lumineux.
Si un câble est connecté à l’entrée AUX de l’appareil, la fon-
ction «Lumière d’ambiance avec couleur changeante» est
désactivée. Seule une lumière sans changement de couleur
peut être émise pendant ce temps.
7. Nettoyage et entretien
ATTENTION
• Assurez-vous que de l’eau n’entre pas dans l’appareil. Si
cela devait se produire, utilisez de nouveau l’appareil uni-
quement lorsqu’il est complètement sec.
• Ne jamais plonger l’appareil et l’adaptateur secteur dans
de l’eau ou d’autres liquides.
• Protégez l’appareil contre les coups, l’humidité, la pous-
sière, les produits chimiques, les fortes variations de
température et les sources de chaleur trop proches (four,
radiateur).
• Nettoyez l’appareil à l’aide d’un chiffon sec.
• N’utilisez pas de produits nettoyants abrasifs.
• Changez systématiquement les piles en même temps et
utilisez des piles de même type. N’utilisez pas de batte-
ries rechargeables.
• Des piles qui fuient peuvent endommager l’appareil. Si
vous n’utilisez pas l’appareil pendant une période prolon-
gée, retirez les piles du compartiment à piles.
• Les piles usagées ou endommagées peuvent provoquer
des irritations cutanées. Veillez à porter des gants de pro-
tection appropriés.
8. Élimination
Dans l’intérêt de la protection de l’environnement, l’appareil
ne doit pas être jeté avec les ordures ménagères à la fin de sa
durée de service. L’élimination doit se faire par le biais
des points de collecte compétents dans votre pays.
Respectez les réglementations locales en matière
d’élimination des matériaux. Veuillez éliminer l’appareil
conformément à la directive européenne – WEEE (Waste Elec-
trical and Electronic Equipment) relative aux appareils élec-
triques et électroniques usagés. Pour toute question, adres-
sez-vous aux collectivités locales responsables de l’élimination
et du recyclage de ces produits.

36
Remarque: Ces pictogrammes se trouvent sur
les piles à substances nocives: Pb=pile con-
tenant du plomb, Cd=pile contenant du cad-
mium, Hg=pile contenant du mercure
9. Que faire en cas de problèmes?
Si l’heure ne s’affiche pas correctement ou si l’appareil fon-
ctionne mal, cela peut être dû à des décharges électrosta-
tiques ou d’autres perturbations. Ne placez donc pas le
réveil lumineux à proximité d’appareils, par ex. des appareils
Wi-Fi, etc. Pour résoudre le problème, réinitialisez l’appareil
aux paramètres d’usine.
Pour réinitialiser l’appareil aux paramètres d’usine, appuyez
sur la touche Reset située sous l’appareil à l’aide d’un objet
pointu.
Si le problème persiste, contactez le service client.
10. Données techniques
Fonction de réveil
lumineux
OFF, 15, 30 minutes avant
l’alarme
Durée de la fonction
Snooze
5 à 60 minutes
Fonction bonne nuit au choix entre 5, 10, 15, 30,
45, 60, 75, 90minutes et OFF.
Dimensions 12,3x12cm
Poids 180g
Alimentation
Entrée : 100 - 240 V; AC
50/60 Hz, max. 200 mA
Sortie : 5,5 V; DC 500 mA
(0,5 A); 2,75 W
Adaptateur secteur
Classe de sécurité
Classe de sécurité II
Gamme de fréquen-
ces radio
FM 87,5 – 108MHz
Intensité lumineuse env. 15 Lux (pour 15cm de
distance)
Efficacité moyenne en
fonctionnement
≥ 73.80%
Consommation élec-
trique hors charge
≤ 0.1 W
Adaptateur secteur Fabricant :
Hersteller: Hong Kong Yee Fu
Electronic Enterprises Co., Ltd.
Adresse: Room 6,
Smart-Space 1, Units 401-403,
Level 4, Cyberport 1, 100
Cyberport Road, Hong Kong
N° du modèle : L008A055050E
Sous réserve de modifications techniques.

37
Nous garantissons par la présente que ce produit est
conforme à la directive européenne RED 2014/53/EU. Vous
pouvez trouver la déclaration de conformité CE de ce pro-
duit à l’adresse suivante:
www.beurer.com/web/we-landingpages/de/cedeclarationo-
fconformity.php.
11. Garantie / maintenance
La société Beurer GmbH, sise Söflinger Straße 218, 89077
Ulm, Allemagne, (ci-après désignée «Beurer») propose une
garantie pour ce produit dans les conditions suivantes et
dans la mesure prévue ci-après.
Les conditions de garantie suivantes n’aectent en rien
les obligations de garantie du vendeur découlant du
contrat de vente conclu avec l’acheteur.
La garantie s’applique également sans préjudice de la
responsabilité légale obligatoire.
Beurer garantit le bon fonctionnement et l’intégrité de ce
produit.
La période de garantie mondiale est de 3ans à compter de
la date d’achat par l’acheteur du produit neuf et non utilisé.
Cette garantie ne s’applique qu’aux produits achetés par
l’acheteur en tant que consommateur et utilisés unique-
ment à des fins personnelles dans le cadre d’une utilisation
domestique.
Le droit allemand s’applique.
Si, au cours de la période de garantie, ce produit s’avère
incomplet ou défectueux conformément aux dispositions
suivantes, Beurer s’engage à proposer gratuitement un rem-
placement ou une réparation conformément aux présentes
Conditions de garantie.
Si l’acheteur souhaite faire valoir la garantie, il doit
d’abord s’adresser au revendeur local: cf. liste «Ser-
vice client à l’international» ci-jointe pour connaître les
adresses du service après-vente.
L’acheteur recevra ensuite des informations complémen-
taires concernant le déroulement de la demande de garan-
tie, par exemple, l’adresse à laquelle envoyer le produit et
les documents requis.
Une demande de garantie ne peut être prise en compte que
si l’acheteur présente
– une copie de la facture/du reçu et
– le produit d’origine
à Beurer ou à un partenaire autorisé de Beurer.
La présente Garantie exclut expressément
– toute usure découlant de l’utilisation ou de la consom-
mation normale du produit;

38
– les accessoires fournis avec le produit qui s’usent ou qui
sont consommés dans le cadre d’une utilisation normale
du produit (par exemple, piles, piles rechargeables, man-
chettes, joints, électrodes, ampoules, embouts et acces-
soires pour inhalateur);
– les produits utilisés, nettoyés, stockés ou entretenus
de manière inappropriée et/ou contraire aux conditions
d’utilisation, ainsi que les produits ouverts, réparés ou
modifiés par l’acheteur ou par un service client non
agréé par Beurer;
– les dommages survenus lors du transport entre le fabri-
cant et le client ou entre le service client et le client;
– les produits achetés en tant qu’article de second choix
ou d’occasion;
– les dommages consécutifs qui résultent d’une défail-
lance du produit (dans ce cas, toutefois, des réclama-
tions peuvent être soulevées relatives à la responsabilité
du fait des produits ou à d’autres dispositions légales
obligatoires relatives à la responsabilité).
Les réparations ou le remplacement complet ne prolongent
en aucun cas la période de garantie.
Sous réserve d'erreurs et de modifications

39
Estimada clienta, estimado cliente:
Nos alegramos de que haya decidido adquirir un producto
de nuestra colección. Nuestro nombre es sinónimo de pro-
ductos de alta y comprobada calidad en los sectores de
energía térmica, peso, tensión sanguínea, temperatura cor-
poral, pulso, tratamiento suave, masaje, aire y belleza.
Lea detenidamente estas instrucciones para el uso, consér-
velas para su futura utilización, haga que estén accesibles
para otros usuarios y observe las indicaciones.
Atentamente,
El equipo de Beurer
1. Artículos suministrados
• 1 luz para despertar Beurer WL 32
• 1 adaptador de red
• 1 cable AUX
• 1 estas instrucciones de uso
2. Símbolos
En las presentes instrucciones de uso, en el embalaje y en
la placa de características del aparato y de los accesorios
se utilizan los siguientes símbolos:
ADVERTENCIA
Indicación de advertencia sobre
peligro de lesiones o para la
salud
ESPAÑOL
Contenido
1. Artículos suministrados ............................................ 39
2. Símbolos................................................................... 39
3. Información general .................................................. 41
4. Descripción del aparato ........................................... 41
5. Puesta en servicio .................................................... 43
6. Manejo ...................................................................... 43
7. Limpieza y cuidado ................................................ 47
8. Eliminación ............................................................. 48
9. Solución de problemas ........................................... 48
10. Datos técnicos ........................................................ 48
11. Garantía / asistencia ............................................... 49

40
ATENCIÓN
Indicación de seguridad sobre
posibles daños del aparato o de
los accesorios.
Aviso
Aviso sobre información impor-
tante
Eliminación de residuos según la
Directiva europea sobre residuos
de aparatos eléctricos y electró-
nicos (RAEE).
Fabricante
Este producto cumple los requi-
sitos de las directrices europeas
y nacionales vigentes.
20
PAP
Eliminar el embalaje respetando
el medioambiente
Símbolo de certificación para
aquellos productos que se
exportan a la Federación Rusa y
a los países de la CEI
VI
Clase de eficiencia energética 6
ADVERTENCIA
• Este aparato solo está diseñado para el fin descrito en
estas instrucciones de uso. El fabricante no se responsa-
biliza de los daños derivados de un uso indebido o irres-
ponsable.
• El aparato se debe colocar al lado de una toma de corri-
ente con fácil acceso.
• No utilice el aparato con un adaptador de red distinto del
suministrado ni con una tensión de red distinta de la indi-
cada en el mismo.
• Antes de utilizar el equipo, compruebe si el equipo o los
accesorios presentan defectos visibles. En caso de duda
no lo use y póngase en contacto con su distribuidor o con
la dirección de atención al cliente indicada.
• Apague el aparato inmediatamente en caso de defectos
o fallos de funcionamiento y desenchúfelo de la toma de
corriente.
• No enchufe o desenchufe el adaptador de red con las
manos húmedas.
• Mantenga a los niños alejados del material de embalaje
(peligro de asfixia).
• Tienda el cable de corriente de modo que nadie pueda
tropezar con él.
• Mantenga el aparato, el adaptador de red y el cable de
corriente lejos del agua.

41
• Este aparato no debe ser utilizado por personas (niños
incluidos) con facultades físicas, sensoriales o mentales
limitadas, o con poca experiencia o conocimientos, a no
ser que los vigile una persona responsable de su seguri-
dad o que esta persona les indique cómo se debe utilizar
el aparato.
• Se deberá supervisar a los niños para asegurarse de que
no jueguen con el aparato.
ATENCIÓN
• No tire del cable de corriente o del aparato para desen-
chufar el adaptador de red.
• No sujete ni transporte el aparato agarrándolo por el cable
de corriente.
• Proteja el aparato de impactos, humedad, suciedad, gran-
des oscilaciones térmicas y exposición directa a la luz
solar.
• Evite que el aparato se caiga.
3. Información general
La luz para despertar Beurer WL 32 proporciona un des-
pertar suave y natural. Con una luz LED que clarea la habi-
tación lentamente se simula el amanecer. De esta forma,
usted puede acostumbrarse poco a poco a la luz y su
cuerpo se prepara para un plácido despertar. Aparte de
la simulación del amanecer, puede determinar un tono de
alarma que complemente el despertar con sonido. Como
tono de alarma puede elegir entre la radio o un pitido.
La luz para despertar le ayuda a comenzar el día relajado y
contento.
4. Descripción del aparato
Vista de la parte delantera
Luz LED
Zz (repetición de alarma)/luz
Para repetición de alarma/luz, presionar hacia abajo la
cubierta de la lámpara de la parte delantera

42
Vista lateral
1 Up (subir)
2 Volumen (radio)
3 Down (bajar)
4 Alarma 1-2
5 Función de buenas noches (Sleep)/radio
6 Set/Memory
Vista de la parte trasera
Parte inferior
41
52
63
Adaptador
de red
Cable AUX
Entrada AUX Toma para el
adaptador de red
Reset (reposición a la
configuración de fábrica)
3 pilas AAA
(no se incluyen en el
suministro)
Zz (repetición de alarma)/luz

43
Descripción de la pantalla
1 Posición de memoria de emisora (radio)
2 Símbolo de luz
3 Repetición de la alarma
4 Radio conectada
5 Alarma 2 radio
6 Alarma 2 pitido
7 Alarma 1 radio
8 Alarma 1 pitido
9 Aparece solo en el formato de 12 horas
10 Temporizador de desconexión (función de buenas
noches)
5. Puesta en servicio
• Desempaquete el aparato.
• Compruebe que estén todas las piezas enumeradas en el
volumen de suministro.
• Compruebe que el aparato, el adaptador de red y el cable
de corriente no presenten daños.
• Retire la tapa del compartimento para pilas situado en
la parte inferior del aparato e introduzca las pilas con la
polaridad correcta. Las pilas proporcionan alimentación
en caso de fallo del suministro eléctrico.
• Coloque el aparato sobre una superficie plana y estable.
• Enchufe el conector del adaptador de red en la toma para
el adaptador de red de la parte posterior del equipo.
• Enchufe el adaptador de red a una toma de corriente
apta. En la pantalla del aparato aparece la hora.
Nota
• Si desea restablecer el aparato a la configuración de
fábrica, pulse con un objeto puntiagudo la tecla de reini-
cio situada en la parte inferior del aparato.
6. Manejo
Aviso
El aparato sale automáticamente del menú de ajuste si no
se pulsa ninguna tecla durante 10 segundos.
1 2 3 4
58
9
10
67

44
6.1 Ajustar la hora y la duración hasta repetición de la
alarma
• Pulse la tecla .
La hora empieza a parpadear.
Ajuste la hora deseada con las teclas
/
.
Aviso
Para pasar más rápido por las horas o los minutos, man-
tenga pulsada la tecla
/
.
• Confirme la hora ajustada con la tecla
.
Ahora parpadea en la pantalla “
24 Hr
”.
Puede elegir entre el formato de 12 y de 24 horas.
• Seleccione con las teclas
/
el formato de hora
deseado y confirme con la tecla .
Ahora parpadea en la pantalla “
Zz 05
”
• Seleccione con las teclas
/
la duración deseada para
la repetición de la alarma (entre 5 y 60 minutos) y con-
firme con la tecla .
Aviso
Para leer la hora en la oscuridad presione hacia abajo la
parte delantera de la cubierta de la lámpara.
6.2 Ajustar la alarma
En la luz para despertar puede ajustar dos horas diferentes
para alarma (alarma 1 y alarma 2).
• Para ajustar la alarma 1, pulse la tecla
una vez.
• Para ajustar la alarma 2, pulse la tecla
dos veces.
La hora de alarma correspondiente empieza a parpadear en
la pantalla.
• Ajuste la hora de alarma deseada con las teclas
/
.
• Seleccione con la tecla
el tono de alarma deseado
para la hora ajustada.
Puede elegir como tono de alarma entre la radio ( ) y el
pitido ( ).
• Confirme con la tecla
.
Alarma 1
desconectada
Alarma 2
desconectada
Alarm 1 conectada,
pitido como tono de alarma
Alarma 2 conectada,
radio como tono de alarma
6.3 Apagar la alarma
• Cuando suene la alarma, pulse la tecla .
La alarma se apaga y no vuelve a sonar hasta el día sigui-
ente a la hora ajustada.
6.4 Desactivar la alarma permanentemente
• Para desactivar la alarma 1, pulse una vez la tecla
.

45
• Para desactivar la alarma 2, pulse dos veces la tecla .
• A continuación, pulse la tecla
repetidamente hasta
que desaparezca de la pantalla el símbolo de nota musi-
cal (
) o de campana ( ) situado junto al número 1 o 2.
• Confirme con la tecla
. La alarma 1 o 2 queda desacti-
vada.
6.5 Función de repetición de alarma
Cuando suena un tono de alarma, puede interrumpirlo de
forma provisional pulsando la tecla Zz. El tono de alarma
volverá a sonar después de la duración ajustada de repeti-
ción de alarma. Para ajustar la duración de repetición de la
alarma, consulte el capítulo “6.1 Ajustar la hora y la dura-
ción hasta repetición de la alarma”.
6.6 Función de amanecer
Si ha ajustado una alarma, puede activar junto con el tono
de alarma una simulación de amanecer en el despertador.
En este caso, la luz LED se ilumina lentamente.
Aviso
Utilice para esta función el adaptador de red incluido en el
suministro.
• Mantenga la tecla Zz pulsada durante aprox. 5 segundos.
En la pantalla parpadea “
15
”.
•
Ajuste con las teclas
/
. el amanecer simulado deseado.
15
= la simulación de amanecer comienza 15 minutos antes
de la hora de alarma ajustada.
30
= la simulación de amanecer comienza 30 minutos antes
de la hora de alarma ajustada.
OFF
= simulación de amanecer desactivada. En la pantalla
desaparece el símbolo de bombilla encima de la hora (
).
• Para confirmar su selección, pulse la tecla Zz.
6.7 Función de lámpara/luz tenue con cambio de color
También puede utilizar la luz para despertar como una lám-
para normal o como luz tenue con cambio de color.
Aviso
Utilice para esta función el adaptador de red incluido en el
suministro. Cuando escuche la radio o haya activado la fun-
ción de buenas noches, la función “Luz tenue que cambia
de color” estará desactivada. Durante ese tiempo solo será
posible la iluminación sin cambio de color.
• Pulse la tecla Zz.
La luz LED empieza a iluminarse levemente.
• Para activar la función de lámpara, pulse de nuevo la tecla
Zz.
En la pantalla parpadea “
L 09
” (nivel de claridad 09).
• Ajuste con las teclas
/
. el nivel de claridad deseado
(desde L 00 hasta L 15).
• Si desea activar la luz tenue con cambio de color, pulse
de nuevo la tecla Zz.
La luz tenue con cambio de color empieza a iluminarse.
Espere unos segundos hasta que cambien los colores.
•
Si desea activar una de las luces tenues de forma perma-
nente (sin que cambie de color), pulse de nuevo la tecla Zz.
• Para apagar todas las funciones de luz, pulse de nuevo la
tecla Zz.

46
6.8 Escuchar la radio
La luz para despertar tiene una antena flexible en la parte
posterior del aparato. Desenrolle el cable y extiéndalo hasta la
posición más larga para obtener la mejor recepción posible.
• Para encender la radio, pulse la tecla .
En la pantalla parpadea primero “
on
”. Después de unos
10 segundos aparece
mhz
y la frecuencia ajustada en ese
momento.
• Ajuste la frecuencia deseada con las teclas
/
.
•
Para iniciar la búsqueda automática de emisora, mantenga
pulsada brevemente la tecla
/
y vuelva a soltarla.
El aparato inicia la búsqueda automáticamente y la deti-
ene en cuanto encuentra una emisora de radio.
• Para modificar el volumen de la radio, pulse la tecla .
Ajuste a continuación el volumen deseado con las teclas
/
.
• Para volver a apagar la radio, presione hacia abajo la
parte delantera de la cubierta de la lámpara.
Aviso
Cuando escuche la radio la función “Luz tenue que cambia
de color” estará desactivada. Durante ese tiempo solo será
posible la iluminación sin cambio de color.
6.9 Programar emisoras de radio
En la luz para despertar se pueden programar hasta 10 emi-
soras de radio.
• Para encender la radio, pulse la tecla
.
• Ajuste con las teclas
/
la frecuencia de la emisora de
radio que desea programar.
• Para programar la emisora seleccionada, mantenga pul-
sada la tecla durante aprox. 2 segundos. En la pan-
talla parpadea debajo de la frecuencia
O1
(número de
posición de memoria).
• Seleccione el número de posición de memoria que desee
pulsando brevemente la tecla Para guardar la emi-
sora en el número de posición de memoria seleccionado,
mantenga pulsada la tecla durante dos segundos.
6.10 Seleccionar una emisora de radio programada
• Para encender la radio, pulse la tecla
. En la pantalla
parpadea primero “
on
”. Después de unos 10 segundos
aparece
mhz
y la frecuencia ajustada en ese momento.
• Para seleccionar entre las emisoras de radio programa-
das, pulse la tecla .
6.11 Función de buenas noches
Con esta función puede definir un periodo de tiempo deter-
minado tras el que desea que se apague la radio.
• Pulse dos veces la tecla
.
En la pantalla aparece “
sleep
” y parpadea
O5
.
• Seleccione a continuación con la tecla la cantidad de
minutos después de los que desea que se apague auto-
máticamente la radio.
Puede elegir entre 5, 10, 15, 30, 45, 60, 75 y 90 minutos.

47
• Para confirmar la cantidad de minutos especificada,
espere unos 5 segundos hasta que la pantalla retorne
automáticamente a la indicación de la hora. La cantidad
de minutos deseada queda de este modo ajustada. Si
desea consultar la cantidad de minutos restantes en un
momento determinado, pulse la tecla
.
Aviso
• Si desea cancelar la función de buenas noches antes de
que transcurran los minutos ajustados, pulse la tecla
repetidamente hasta que aparezca en la pantalla
OFF
.
Aviso
Cuando haya activado la función de buenas noches, la fun-
ción “Luz tenue que cambia de color” estará desactivada.
Durante ese tiempo solo será posible la iluminación sin
cambio de color.
6.12 Escuchar música a través de la entrada AUX
A la luz para despertar se le puede conectar un reproductor
MP3 en la entrada AUX.
• Enchufe un extremo del cable AUX (incluido en el suminis-
tro) en la entrada AUX de la parte posterior de la luz para
despertar.
• Enchufe el otro extremo del cable AUX en la toma para los
auriculares del reproductor MP3.
Aviso
Al escuchar música a través de la entrada AUX solo se
puede regular el volumen a través del reproductor MP3, y
no en la luz para despertar.
Si en la entrada AUX del aparato está enchufado un cable,
la función “Luz tenue que cambia de color” estará desac-
tivada. Mientras el cable esté enchufado solo será posible
una iluminación sin cambio de color.
7. Limpieza y cuidado
ATENCIÓN
• Tenga cuidado de que no penetre agua en el aparato. Si
esto se produjese, no vuelva a utilizar el aparato hasta
que esté completamente seco.
• No sumerja nunca el aparato ni el bloque de alimentación
en agua ni en ningún otro líquido.
• Proteja el aparato de golpes, humedad, polvo, sustancias
químicas, fuertes cambios de temperatura y de la cerca-
nía de fuentes de calor (hornos o radiadores).
• Limpie el aparato con un trapo seco.
• No use productos abrasivos.
• Cambie siempre todas las pilas al mismo tiempo y utilice
pilas del mismo tipo. No utilice pilas recargables.
• Las baterías o pilas caducadas pueden ocasionar daños
al aparato. Si no va a usar el aparato durante mucho
tiempo, saque las pilas de su compartimento.
• Las fugas de las pilas o las pilas dañadas pueden causar
quemaduras al contacto con la piel. En tal caso, utilice
guantes de protección adecuados.

48
8. Eliminación
Para proteger el medio ambiente, no se debe desechar el
aparato al final de su vida útil junto con la basura
doméstica. Se puede desechar en los puntos de
recogida adecuados disponibles en su zona.
Respete las normas locales referentes a la
eliminación de residuos. Deseche el aparato según
la Directiva europea sobre residuos de aparatos eléctricos y
electrónicos (RAEE). Para más información, póngase en
contacto con la autoridad municipal competente en materia
de eliminación de residuos.
Nota: Estos símbolos se encuentran en pilas
que contienen sustancias tóxicas: Pb = la pila
contiene plomo, Cd = la pila contiene cadmio,
Hg = la pila contiene mercurio.
9. Solución de problemas
Si la hora no se indica correctamente o el aparato no funci-
ona correctamente, puede deberse a descargas electroes-
táticas u otras interferencias. Por este motivo, no lo coloque
cerca de otros aparatos eléctricos, como receptores WLAN,
etc. Para solucionar el problema, restablezca los ajustes de
la configuración de fábrica del aparato.
Si desea restablecer el aparato a la configuración de
fábrica, pulse con un objeto puntiagudo la tecla de reinicio
situada en la parte inferior del aparato.
Si vuelve a surgir el problema, póngase en contacto con el
servicio de atención al cliente.
10. Datos técnicos
Función de luz para
despertar
OFF, 15, 30 minutos antes de
la alarma
Duración de repetición
de la alarma
de 5 a 60 minutos
Función de buenas
noches
puede elegir entre 5, 10, 15, 30,
45, 60, 75, 90 minutos y OFF.
Dimensiones 12,3 x 12 cm
Peso 180 g
Alimentación
Entrada: 100 - 240 V; AC
50/60 Hz, max. 200 mA
Salida: 5,5 V; DC 500 mA
(0,5 A); 2,75 W
Enchufe
Clase de protección
Clase de protección II
Rango de radiofre-
cuencia
UKW 87,5 – 108 MHz
Iluminancia aprox. 15 Iux (a 15 cm de dis-
tancia)
Eficiencia media en
funcionamiento
≥ 73.80 %
Consumo eléctrico sin
carga
≤ 0.1 W

49
Fuente de alimentación Fabricante:
Hong Kong Yee Fu Electronic
Enterprises Co., Ltd.
Adresse: Room 6,
Smart-Space 1, Units 401-403,
Level 4, Cyberport 1, 100
Cyberport Road, Hong Kong
N.º de modelo: L008A055050E
Salvo modificaciones técnicas.
Garantizamos que este producto cumple la Directiva euro-
pea RED 2014/53/EU. Encontrará la declaración de confor-
midad CE de este producto en:
www.beurer.com/web/we-landingpages/de/cedeclaratio-
nofconformity.php.
11. Garantía / asistencia
Beurer GmbH, Söflinger Straße 218, D-89077 Ulm (en lo
sucesivo, «Beurer») concede una garantía para este pro-
ducto. La garantía está sujeta a las siguientes condiciones y
el alcance de la misma se describe a continuación.
Las siguientes condiciones de garantía no afectan a las
obligaciones de garantía que la ley prescribe para el
vendedor y que emanan del contrato de compra celeb-
rado con el comprador.
La garantía se aplicará además sin perjuicio de las nor-
mas legales preceptivas.
Beurer garantiza el perfecto funcionamiento y la integralidad
de este producto.
La garantía mundial tiene una validez de 3 años a partir de
la fecha de compra del producto nuevo y sin utilizar por
parte del comprador.
Esta garantía se ofrece solo para productos que el com-
prador haya adquirido en tanto que consumidor con fines
exclusivamente personales en el marco de una utilización
privada en el hogar.
Se aplica la legislación alemana.
En el caso de que, durante el periodo de garantía, este pro-
ducto resultara estar incompleto o no funcionara correcta-
mente conforme a lo dispuesto en las siguientes disposi-
ciones, Beurer se compromete a sustituir el producto o a
repararlo según las presentes condiciones de garantía.
Cuando el comprador desee recurrir a la garantía lo
hará dirigiéndose en primera instancia al distribuidor
local: véase la lista adjunta «Servicio internacional» que
contiene las distintas direcciones de servicio técnico.
A continuación, el comprador recibirá información porme-
norizada sobre la tramitación de la garantía, como el lugar
al que debe enviar el producto y qué documentos deberá
adjuntar.

50
El comprador solo podrá invocar la garantía cuando pueda
presentar:
– una copia de la factura o del recibo de compra y
– el producto original
a Beurer o a un socio autorizado por Beurer.
Quedan excluidos explícitamente de la presente garantía
– el desgaste que se produce por el uso o el consumo
normal del producto;
– los accesorios suministrados con el producto que se
desgastan o consumen durante un uso normal (p.ej.,
pilas, baterías, brazaletes, juntas, electrodos, luminarias,
cabezales y accesorios de inhalación);
– productos cuyo uso, limpieza, almacenamiento o man-
tenimiento sea indebido o vaya contra lo dispuesto en
las instrucciones de uso, así como productos que hayan
sido abiertos, reparados o modificados por el compra-
dor o por un centro de servicio técnico no autorizado
por Beurer;
– daños que se hayan producido durante el transporte
entre las instalaciones del fabricante y las del cliente o
bien entre el centro de servicio técnico y el cliente;
– productos que se hayan adquirido como productos de
calidad inferior o de segunda mano;
– daños derivados que resulten de una falta del pro-
ducto. En este caso, podrían invocarse eventualmente
derechos derivados de la normativa de responsabilidad
de productos o de otras disposiciones de responsabili-
dad legal preceptiva.
Las reparaciones o la sustitución del producto no prolon-
garán en ningún caso el periodo de garantía.
Salvo errores y modificaciones

51
Gentile cliente,
siamo lieti che Lei abbia scelto un prodotto del nostro
assortimento. Il nostro marchio è garanzia di prodotti di ele-
vata qualità, controllati nei dettagli, relativi ai settori calore,
peso, pressione, temperatura corporea, pulsazioni, terapia
dolce, massaggio, aria e bellezza.
Leggere attentamente le presenti istruzioni per l'uso, con-
servarle per impieghi futuri, renderle accessibili ad altri
utenti e attenersi alle indicazioni.
Cordiali saluti
Team Beurer
1. Fornitura
• 1 luce sveglia Beurer WL 32
• 1 adattatore
• 1 cavo AUX
• Le presenti istruzioni per l'uso
2. Spiegazione dei simboli
I seguenti simboli sono utilizzati nelle istruzioni per l'uso,
sull'imballo e sulla targhetta dell'apparecchio e degli acces-
sori:
AVVERTENZA
Segnalazione di rischi di lesioni o
pericoli per la salute
ITALIANO
Indice
1. Fornitura ................................................................... 51
2. Spiegazione dei simboli ............................................ 51
3. Introduzione .............................................................. 53
4. Descrizione dell'apparecchio ................................... 53
5. Messa in servizio ...................................................... 55
6. Funzionamento ......................................................... 55
7. Pulizia e cura .......................................................... 59
8. Smaltimento ........................................................... 60
9. Che cosa fare in caso di problemi? ........................ 60
10. Dati tecnici .............................................................. 60
11. Garanzia / assistenza ............................................. 61

52
ATTENZIONE
Segnalazione di avviso di pos-
sibili danni all'apparecchio/agli
accessori.
Nota
Indicazione di importanti infor-
mazioni
Smaltimento secondo le norme
previste dalla Direttiva CE sui
rifiuti di apparecchiature elettriche
ed elettroniche (RAEE)
Produttore
Il presente prodotto soddisfa i
requisiti delle direttive europee e
nazionali vigenti.
20
PAP
Smaltire la confezione nel rispetto
dell‘ambiente
Marchio di certificazione per i pro-
dotti esportati nella Federazione
Russa e nei paesi CSI
VI
Classe di ecienza energetica 6
AVVERTENZA
• L'apparecchio è concepito solo per l'uso descritto nelle
presenti istruzioni per l'uso. Il produttore non è da ritenersi
responsabile in caso di danni riconducibili a uso non con-
forme o sconsiderato.
• È necessario posizionare l'apparecchio accanto a una
presa facilmente accessibile.
• Utilizzare l'apparecchio esclusivamente con l'adattatore
in dotazione e con la tensione di rete indicata sull'adatta-
tore.
• Prima dell'utilizzo, verificare che l'apparecchio e gli
accessori non siano danneggiati. In caso di dubbio non
utilizzare e consultare il proprio rivenditore o contattare il
Servizio clienti indicato.
• In caso di difetti o malfunzionamenti, spegnere immedia-
tamente l'apparecchio e staccarlo dalla corrente.
• Non collegare o scollegare l'alimentatore con le mani
umide.
• Tenere lontani i bambini dal materiale d'imballaggio (peri-
colo di soffocamento).
• Posare il cavo di alimentazione in modo tale che nessuno
possa inciamparvi.
• Tenere l'apparecchio, l'adattatore e il cavo di alimenta-
zione lontani dall'acqua!

53
• L'apparecchio non deve essere utilizzato da persone
(compresi bambini) con ridotte capacità fisiche, percettive
o intellettive o non in possesso della necessaria espe-
rienza e/o conoscenza, se non sotto la supervisione di
una persona responsabile per la loro sicurezza o che for-
nisca loro le indicazioni per l'uso dell'apparecchio.
• Controllare che i bambini non utilizzino l'apparecchio per
gioco.
ATTENZIONE
• Non tirare il cavo di alimentazione o l'apparecchio per
estrarre l'adattatore dalla presa.
• Non tenere o trasportare l'apparecchio dal cavo elettrico.
• Non esporre l'apparecchio a urti, umidità, sporcizia, forti
sbalzi di temperatura e direttamente alla luce solare.
• Non far cadere l'apparecchio.
3. Introduzione
La luce sveglia WL 32 di Beurer consente un risveglio dolce
e naturale. Una luce a LED con intensità che aumenta gra-
dualmente simula il sorgere del sole. In questo modo gli
occhi si abituano lentamente alle condizioni di luce e il
corpo si prepara gradualmente al risveglio. Oltre alla simu-
lazione del sorgere del sole, è possibile impostare un tono
sveglia in modo da facilitare il risveglio. Come toni sveglia
è possibile scegliere fra radio e segnale acustico. La luce
sveglia aiuta a svegliarsi riposati e in perfetta forma per
affrontare al meglio la giornata.
4. Descrizione dell'apparecchio
Vista frontale
Luce a LED
Zz (Snooze) / Luce
Per snooze / luce premere la copertura della lampada
nell'area anteriore verso il basso

54
Vista laterale
1 Up (Su)
2 Volume (radio)
3 Down (Giù)
4 Sveglia 1-2
5 Funzione "buona notte" (sleep) / Radio
6 Set / Memory
Vista posteriore
Vista inferiore
41
52
63
Adattatore
Cavo AUX
Ingresso AUX Presa dell'adattatore
Reset (ripristinare le
impostazioni di fabbrica)
3 batterie AAA
(non in dotazione)
Zz (Snooze) / Luce

55
Descrizione del display
1 Posizione di memoria canali (radio)
2 Simbolo luce
3 Snooze
4 Radio accesa
5 Sveglia 2 radio
6 Sveglia 2 segnale acustico
7 Sveglia 1 radio
8 Sveglia 1 segnale acustico
9 Viene visualizzato solo in formato 12 h
10 Sleep Timer (funzione "buona notte")
5. Messa in servizio
• Rimuovere il materiale d'imballaggio.
• Verificare che tutti i componenti siano compresi nella for-
nitura.
• Controllare la presenza di danni sull'apparecchio, l'adatta-
tore e il cavo.
• Rimuovere la copertura del vano batterie sulla parte infe-
riore dell'apparecchio e inserire la batteria rispettando la
corretta polarità. Le batterie forniscono alimentazione in
caso di mancanza di corrente.
• Posizionare l'apparecchio su una superficie piana e sta-
bile.
• Inserire l'attacco dell'adattatore nella presa corrispon-
dente sul retro dell'apparecchio.
• Inserire l'adattatore in una presa di corrente adeguata. Sul
display dell'apparecchio compare l'ora.
Nota
• Per ripristinare le impostazioni di fabbrica, premere il pul-
sante Reset sulla parte inferiore dell'apparecchio con un
oggetto appuntito.
6. Funzionamento
Nota
L'apparecchio esce automaticamente dal menu di imposta-
zione se non viene premuto alcun pulsante per 10 secondi.
1 2 3 4
58
9
10
67

56
6.1 Impostazione dell'ora e della durata dello snooze
• Premere il pulsante .
Inizia a lampeggiare l'ora.
Impostare l'ora desiderata con i pulsanti
/
.
Nota
Per scorrere le ore e i minuti più velocemente, tenere pre-
muto il pulsante
/
.
• Confermare l'ora impostata con il pulsante
.
Sul display lampeggia "24 Hr".
È possibile scegliere i formati 12 e 24 ore.
• Con i pulsanti
/
selezionare il formato dell'ora deside-
rato e confermare con il pulsante
.
Sul display lampeggia "Zz 05"
• Con i pulsanti
/
selezionare la durata dello snooze
desiderata (selezionabile fra 5 e 60 minuti) e confermare
con il pulsante
.
Nota
Se si desidera leggere l'ora al buio, premere la copertura
della lampada nell'area anteriore verso il basso.
6.2 Impostazione della sveglia
È possibile impostare due diversi orari sveglia (sveglia 1 e
sveglia 2).
• Per impostare la sveglia 1, premere il pulsante
una
volta.
• Per impostare la sveglia 2, premere il pulsante due
volte.
L'orario sveglia corrispondente lampeggia sul display.
• Impostare l'orario sveglia desiderato con i pulsanti
/
.
• Con il pulsante
selezionare il tono sveglia deside-
rato.
Come tono sveglia è possibile scegliere fra radio ( ) e seg-
nale acustico ( ).
• Confermare con il pulsante
.
Sveglia 1
spenta
Sveglia 2
spenta
Sveglia 1 accesa,
segnale acustico selezio-
nato come tono sveglia
Sveglia 2 accesa,
radio selezionata come
tono sveglia
6.3 Spegnimento della sveglia
• Quando suona la sveglia, premere il pulsante .
A questo punto la sveglia è spenta e suonerà nuovamente il
giorno dopo all'ora impostata.

57
6.4 Disattivazione permanente della sveglia
• Per disattivare la sveglia 1, premere il pulsante una
volta.
• Per disattivare la sveglia 2, premere il pulsante due
volte.
• Ora premere il pulsante
tante volte finché sul display
vicino al numero 1 o 2 non scompaiono sia il simbolo
della nota ( ) sia quello della campana ( ).
• Confermare con il pulsante
. La Sveglia 1 o 2 è ora
disattivata.
6.5 Funzione snooze
Il suono della sveglia può essere interrotto temporanea-
mente premendo il pulsante Zz. La sveglia suonerà nuova-
mente dopo la durata dello snooze impostata. Per impostare
la durata dello snooze, consultare il capitolo "6.1 Impostazi-
one dell'ora e della durata dello snooze".
6.6 Funzione del sorgere del sole
Se è stata puntata la sveglia, è possibile farsi svegliare dalla
simulazione del sorgere del sole oltre che dal tono sveglia. A
tale scopo la luce a LED diventa sempre più luminosa.
Nota
Per questa funzione utilizzare l'adattatore in dotazione.
• Tenere premuto il pulsante Zz per circa 5 secondi.
Sul display lampeggia "15".
• Con i pulsanti
/
impostare il sorgere del sole simulato.
15 = la simulazione del sorgere del sole inizia 15 minuti
prima dell'orario della sveglia.
30 = la simulazione del sorgere del sole inizia 30 minuti
prima dell'orario della sveglia.
OFF = simulazione del sorgere del sole disattivata. Sul dis-
play scompare il simbolo della lampadina (
) sopra l'ora.
• Per confermare la selezione, premere il pulsante Zz.
6.7 Funzione lampadina / Luce d'atmosfera con funzione
di variazione cromatica
La luce sveglia può essere utilizzata anche come una nor-
male lampada o come luce d'atmosfera con funzione di
variazione cromatica.
Nota
Per questa funzione utilizzare l'adattatore in dotazione.
Quando si ascolta la radio o è attiva la funzione "buona
notte", la funzione "luce d’atmosfera con variazione croma-
tica" è disattivata. È possibile utilizzare solo una luce senza
variazione cromatica.
• Premere il pulsante Zz.
La luce a LED comincia a illuminarsi debolmente.
• Per attivare la funzione di lampada, premere nuovamente
il pulsante Zz.
Sul display lampeggia "L 09" (livello di luminosità 09).
• Con i pulsanti
/
. impostare il livello di luminosità desi-
derato (da L 00 a L 15).

58
• Se si desidera attivare la luce d'atmosfera con funzione di
variazione cromatica, premere nuovamente il pulsante Zz.
La luce d'atmosfera con funzione di variazione cromatica
inizia a illuminarsi.
Attendere alcuni secondi finché i colori non cambiano.
• Se si desidera fissare una delle luci d'atmosfera (senza
variazione cromatica), premere nuovamente il pulsante
Zz.
• Per disattivare tutte le funzioni luminose, premere nuova-
mente il pulsante Zz.
6.8 Ascolto della radio
La luce sveglia è dotata di un'antenna filare flessibile sul
retro. Srotolare il filo completamente per ottenere la migli-
ore ricezione.
• Per accendere la radio, premere il pulsante
.
Sul display lampeggia "on". Dopo circa 10 secondi compare
mhz e la frequenza attualmente impostata.
• Impostare la frequenza desiderata con i pulsanti
/
.
• Per avviare la ricerca automatica dei canali, tenere pre-
muto il pulsante
/
quindi rilasciarlo. L'apparecchio
avvia la ricerca dei canali e la interrompe automatica-
mente quando trova un'emittente.
• Per modificare il volume della radio, premere il pulsante
. Con i pulsanti
/
, impostare il volume desiderato.
• Per spegnere di nuovo la radio, premere la copertura della
lampada nell'area anteriore verso il basso.
Nota
Quando si ascolta la radio, la funzione "luce d’atmosfera
con variazione cromatica" è disattivata. È possibile utilizzare
solo una luce senza variazione cromatica.
6.9 Memorizzazione dei canali
Sulla luce sveglia possono essere memorizzati fino a 10
canali.
• Per accendere la radio, premere il pulsante
.
• Con i pulsanti
/
impostare la frequenza del canale che
si desidera memorizzare.
• Per memorizzare il canale selezionato, tenere premuto il
pulsante per ca. 2 secondi. Sul display lampeggia O1
sotto la frequenza (numero di posizione di memoria).
• Scegliere la posizione di memoria premendo brevemente
il pulsante . Per salvare l'emittente nella posizione di
memoria selezionata, tenere premuto il pulsante per
2 secondi.
6.10 Selezione di canali preimpostati
• Per accendere la radio, premere il pulsante
. Sul display
lampeggia "on". Dopo circa 10 secondi compare mhz e la
frequenza attualmente impostata.
• Per scegliere fra i canali preimpostati, premere il pulsante
.

59
6.11 Funzione "buona notte"
Tramite questa funzione è possibile impostare lo spegni-
mento automatico della radio dopo un periodo di tempo
stabilito.
• Premere due volte il pulsante .
Sul display compaiono "sleep" e O5 lampeggiante.
• Con il pulsante selezionare ora il numero di minuti
dopo i quali la radio si deve spegnere automaticamente.
È possibile scegliere fra 5, 10, 15, 30, 45, 60, 75 e 90
minuti.
• Per confermare il numero di minuti desiderato, attendere
circa 5 secondi finché il display non ritorna automatica-
mente alla visualizzazione dell'ora. Il numero di minuti
desiderato è ora impostato. Per visualizzare il numero di
minuti rimanenti, premere il pulsante .
Nota
• Se si desidera terminare la funzione "buona notte" prima
che trascorra il numero di minuti impostato, premere il
pulsante
finché sul display non compare OFF.
Nota
Quando è attiva la funzione "buona notte", la funzione "luce
d’atmosfera con variazione cromatica" è disattivata. È pos-
sibile utilizzare solo una luce senza variazione cromatica.
6.12 Ascolto di musica mediante l'ingresso AUX
È possibile collegare il lettore MP3 alla luce sveglia medi-
ante l'ingresso AUX.
• Inserire un'estremità del cavo AUX (in dotazione) nell'in-
gresso AUX sul retro della luce sveglia.
• Inserire l'altra estremità del cavo AUX nell'attacco per le
cuffie del lettore MP3.
Nota
Se si ascolta la musica mediante l'ingresso AUX, è possi-
bile regolare il volume solo sul lettore MP3 e non sulla luce
sveglia.
Quando si collega un cavo all’ingresso AUX
dell’apparecchio, la funzione "luce d’atmosfera con variazi-
one cromatica" viene disattivata. È possibile utilizzare solo
una luce senza variazione cromatica.
7. Pulizia e cura
ATTENZIONE
• Accertarsi che non penetri acqua nell'apparecchio. Se
dovesse succedere, utilizzare nuovamente l'apparecchio
solo quando è completamente asciutto.
• Non immergere l'apparecchio e l'alimentatore in acqua o
altri liquidi.
• Non esporre l'apparecchio a urti, umidità, polvere, pro-
dotti chimici, forti sbalzi di temperatura e fonti di calore
troppo vicine (forni, caloriferi).
• Pulire l'apparecchio con un panno asciutto.
• Non utilizzare detergenti abrasivi.
• Sostituire sempre tutte le batterie con altre dello stesso
tipo. Non utilizzare batterie ricaricabili.

60
• La fuoriuscita di liquido dalle batterie può danneggiare
l'apparecchio. Se l'apparecchio non venisse utilizzato per
lunghi periodi, togliere le batterie dall'apposito scomparto.
• Le batterie danneggiate o che hanno subito perdite pos-
sono causare ustione chimica alla pelle in caso di con-
tatto. Usare opportuni guanti protettivi.
8. Smaltimento
A tutela dell'ambiente, al termine del suo utilizzo l'apparecchio
non deve essere smaltito nei rifiuti domestici. Lo smaltimento
deve essere eettuato negli appositi centri di raccolta.
Attenersi alle norme locali vigenti per lo smaltimento
dei materiali. Smaltire l'apparecchio secondo la diret-
tiva europea sui rifiuti di apparecchiature elettriche ed
elettroniche (RAEE). Per eventuali chiarimenti, rivolgersi alle
autorità comunali competenti per lo smaltimento.
Avvertenza: i simboli riportati di seguito indicano
che le batterie contengono sostanze tossiche.
Pb = batteria contenente piombo, Cd = batte-
ria contenente cadmio, Hg = batteria contenente
mercurio
9. Che cosa fare in caso di problemi?
Se l'ora non viene visualizzata correttamente o
l'apparecchio non funziona correttamente, ciò può dipen-
dere da scariche elettrostatiche o da altre anomalie. Non
posizionare quindi l'apparecchio in prossimità di apparecchi
come ad es. WLAN ecc. Per risolvere il problema, ripristi-
nare le impostazioni di fabbrica.
Per ripristinare le impostazioni di fabbrica, premere il pul-
sante Reset sulla parte inferiore dell'apparecchio con un
oggetto appuntito.
Se il problema persiste, contattare il Servizio clienti.
10. Dati tecnici
Funzione di luce
sveglia
OFF, 15, 30 minuti prima della
sveglia
Durata dello snooze Da 5 a 60 minuti
Funzione "buona
notte"
Selezionabile fra 5, 10, 15, 30,
45, 60, 75, 90 minuti e OFF.
Dimensioni 12,3 x 12 cm
Peso 180 g
Alimentazione
Input: 100 - 240 V; AC 50/60 Hz,
max. 200 mA
Output: 5,5 V; DC 500 mA
(0,5 A); 2,75 W
Alimentatore
Classe di protezione
Classe di protezione II
Intervallo radiofre-
quenze
Onde ultracorte 87,5 - 108 MHz
Intensità luce ca. 15 lux (con una distanza di
15 cm)

61
Efficienza media in
funzionamento
≥ 73.80 %
Potenza assorbita in
assenza di carico
≤ 0,1 W
Alimentatore Produttore:
Hong Kong Yee Fu Electronic
Enterprises Co., Ltd.
Adresse: Room 6,
Smart-Space 1, Units 401-403,
Level 4, Cyberport 1, 100 Cyber-
port Road, Hong Kong
Codice: L008A055050E
Salvo modifiche tecniche.
Con la presente confermiamo che il prodotto è conforme
alla direttiva europea RED 2014/53/EU. La Dichiarazione di
Conformità relativa al presente prodotto è reperibile su:
www.beurer.com/web/we-landingpages/de/cedeclaratio-
nofconformity.php.
11. Garanzia / assistenza
Beurer GmbH, Söflinger Strasse 218, D-89077 Ulm (di
seguito denominata "Beurer") offre una garanzia per questo
prodotto, nel rispetto delle seguenti condizioni e nella
misura descritta di seguito.
Le seguenti condizioni di garanzia lasciano invariati gli
obblighi di garanzia di legge del venditore stabiliti nel
contratto di acquisto con l'acquirente.
La garanzia si applica inoltre fatte salve le prescrizioni
di legge obbligatorie in materia di responsabilità.
Beurer garantisce la perfetta funzionalità e la completezza di
questo prodotto.
La garanzia mondiale è di 3 anni a partire dall'acquisto del
prodotto nuovo, non usato, da parte dell'acquirente.
Questa garanzia copre solo i prodotti che l'acquirente ha
acquistato come consumatore e che utilizza esclusivamente
a scopo personale, in ambito domestico.
Vale il diritto tedesco.
Nel caso in cui il prodotto, durante il periodo di garanzia, si
dimostrasse incompleto o presentasse difetti di funziona-
mento in linea con le seguenti disposizioni, Beurer provve-
derà a sostituire o riparare gratuitamente il prodotto in base
alle presenti condizioni di garanzia.
Per segnalare un caso di garanzia, l'acquirente deve
rivolgersi innanzitutto al proprio rivenditore locale:
vedere l'elenco "Service International" in cui sono ripor-
tati gli indirizzi dei centri di assistenza.
L'acquirente riceverà quindi informazioni più dettagliate
sulla gestione del caso di garanzia, ad esempio dove deve
inviare il prodotto e quali documenti sono necessari.

62
L'attivazione della garanzia viene presa in considerazione
solo se l'acquirente può presentare
– una copia della fattura/prova d'acquisto e
– il prodotto originale
a Beurer o a un partner Beurer autorizzato.
Sono espressamente esclusi dalla presente garanzia
– l'usura dovuta al normale utilizzo o al consumo del pro-
dotto;
– gli accessori forniti assieme a questo prodotto che,
in caso di utilizzo conforme, si consumano o si esau-
riscono (ad es. batterie, batterie ricaricabili, manicotti,
guarnizioni, elettrodi, lampadine, accessori e accessori
per inalatore);
– i prodotti che sono stati utilizzati, puliti, conservati o sot-
toposti a manutenzione in modo improprio e/o senza ris-
pettare le disposizioni riportate nelle istruzioni per l'uso,
nonché i prodotti che sono stati aperti, riparati o smon-
tati e rimontati dall'acquirente o da un centro di assis-
tenza non autorizzato da Beurer;
– i danni occorsi nel trasporto dal produttore al cliente o
tra il centro di assistenza e il cliente;
– i prodotti acquistati come articoli di seconda scelta o
usati;
– i danni conseguenti che dipendono da un difetto del
prodotto (in questo caso possono tuttavia esistere diritti
derivanti dalla responsabilità per i prodotti o da altre
disposizioni di legge obbligatorie in materia di respon-
sabilità).
Le riparazioni o la sostituzione completa non prolungano in
alcun caso il periodo di garanzia.
Salvo errori e modifiche

63
Sayın müşterimiz,
Ürünlerimizden birini seçtiğiniz için teşekkür ederiz. Isı,
ağırlık, kan basıncı, vücut sıcaklığı, nabız, yumuşak terapi,
masaj, hava ve güzellik konularında değerli ve titizlikle test
edilmiş kaliteli ürünlerimiz, dünyanın her tarafında tercih edil-
mektedir.
Lütfen bu kullanım kılavuzunu dikkatle okuyun, ileride kul-
lanmak üzere saklayın, diğer kullanıcıların erişebilmesini
sağlayın ve içindeki yönergelere uyun.
Yeni cihazınızı iyi günlerde kullanmanızı dileriz
Beurer Ekibiniz
1. Teslimat kapsamı
• 1 Beurer ışıklı çalar saat WL 32
• 1 Adaptör
• 1 AUX kablosu
• 1 Bu kullanım kılavuzu
2. İşaretlerin açıklaması
Cihazın ve aksesuarların kullanım kılavuzunda, ambalajında
ve model etiketinde aşağıdaki semboller kullanılır:
UYARI
Yaralanma tehlikelerine veya
sağlığınızla ilgili tehlikelere yönelik
uyarılar
TÜRKÇE
İçindekiler
1. Teslimat kapsamı ...................................................... 63
2. İşaretlerin açıklaması ................................................ 63
3. Ürün özellikleri .......................................................... 65
4. Cihaz açıklaması ....................................................... 65
5. Çalıştırma .................................................................. 67
6. Kullanım .................................................................... 67
7. Temizlik ve bakım ................................................... 71
8. Bertaraf etme .......................................................... 72
9. Sorunların giderilmesi ............................................. 72
10. Teknik veriler ........................................................... 72
11. Garanti / servis ....................................................... 73

64
DİKKAT
Cihazda/aksesuarlarda meydana
gelebilecek hasarlara yönelik güven-
lik uyarısı
Açıklama
Önemli bilgilere yönelik açıklama
Elektrikli ve elektronik eski cihaz-
larla ilgili AB Yönetmeliği – WEEE'ye
(Waste Electrical and Electronic
Equipment) uygun şekilde bertaraf
edilmelidir
Üretici
Bu ürün geçerli Avrupa ve ulusal
yönergelerin gereklerini yerine getir-
mektedir.
20
PAP
Ambalaj çevreye zarar vermeyecek
şekilde bertaraf edilmelidir
Rusya ve Bağımsız Devletler
Topluluğu ülkelerine ihraç edilecek
ürünler için sertifika işareti
VI
Enerji verimlilik sınıfı 6
UYARI
• Cihaz sadece kullanım kılavuzunda açıklanan şekilde kul-
lanılmak üzere tasarlanmıştır. Nizami olmayan ve dikkat-
siz kullanımdan ötürü oluşacak hasarlardan üretici firma
sorumlu değildir.
• Cihaz, kolayca erişilebilir durumdaki bir prizin yakınına
kurulmalıdır.
• Cihazı sadece birlikte verilen adaptör ve adaptörün üze-
rinde belirtilen şebeke gerilimi ile çalıştırın.
• Kullanmadan önce, cihazda ve aksesuarlarında gözle
görülür hasarlar olmadığından emin olun. Şüpheli durum-
larda kullanmayın ve satıcınıza veya belirtilen müşteri hiz-
metleri adresine başvurun.
• Arıza veya işlev bozukluğu durumunda cihazı hemen
kapatın ve cihazın fişini prizden çekin.
• Adaptörü asla ıslak elle çıkarıp takmayın.
• Çocukları ambalaj malzemesinden uzak tutun (boğulma
tehlikesi).
• Elektrik kablosunu kimse takılıp düşmeyecek şekilde
döşeyin.
• Cihazı, adaptörü ve elektrik kablosunu sudan uzak tutun!
• Kısıtlı fiziksel, algısal ve akli becerileri nedeniyle ve/veya
tecrübesizlik ve bilgisizliklerinden dolayı cihazı kullanama-
yacak durumda olan kişiler (çocuklar dahil), cihazı güven-
liklerinden sorumlu olabilecek yetkili bir kişinin gözetimi
veya direktifleri olmadan kullanmamalıdır.
• Çocuklar cihazla oynamamaları için gözetim altında tutul-
malıdır.

65
DİKKAT
• Adaptörü prizden çekerken elektrik kablosundan veya
cihazdan tutarak çekmeyin.
• Cihazı elektrik kablosundan tutmayın veya bu şekilde taşı-
mayın.
• Cihazı darbelerden, nemden, kirden, aşırı sıcaklık değişik-
liklerinden ve doğrudan güneş ışığından koruyun.
• Cihazı düşürmeyin.
3. Ürün özellikleri
Beurer ışıklı çalar saat WL 32, uykunuzdan yavaş ve doğal
bir şekilde uyanmanızı sağlar. Yavaşça aydınlanan LED
lambası ile güneşin doğuşu simüle edilir. Bu şekilde gözünüz
ışık koşullarına yavaşça alışır ve vücudunuz dikkatlice uyan-
maya hazırlanır. Simüle edilen güneşin doğuşunun yanı
sıra sizi uyanırken sesli olarak destekleyen bir uyandırma
sesi ayarlayabilirsiniz. Uyandırma sesi olarak radyo ve bip
sesi arasından seçim yapabilirsiniz. Işıklı çalar saat ile güne
dinlenmiş ve huzurlu bir şekilde başlayabilirsiniz.
4. Cihaz açıklaması
Önden görünüm
LED lambası
Zz (Snooze) / Işık
Snooze / Işık için ön kısmındaki lamba muhafazasını
aşağı doğru bastırın

66
Yandan görünüm
1 Up (Yukarı)
2 Ses seviyesi (radyo)
3 Down (Aşağı)
4 Alarm 1-2
5 İyi geceler işlevi (Sleep) / Radyo
6 Set (Ayar) / Memory (Hafıza)
Arkadan görünüm
Alt taraf
41
52
63
Adaptör
AUX kablosu
AUX girişi Adaptör girişi
Sıfırlama (fabrika
ayarlarına geri alma)
3 x AAA pil
(teslimat kapsamında
mevcut değildir)
Zz (Snooze) / Işık

67
Ekran açıklaması
1 Kanal kayıt yeri (radyo)
2 Işık sembolü
3 Snooze
4 Radyo açık
5 Alarm 2 Radyo
6 Alarm 2 Bip sesi
7 Alarm 1 Radyo
8 Alarm 1 Bip sesi
9 Sadece 12 saat formatında görünür
10 Sleep Timer (İyi geceler işlevi)
5. Çalıştırma
• Ambalajı açın.
• Tüm parçaların teslimat kapsamında olup olmadığını kont-
rol edin.
• Cihazda, adaptörde ve elektrik kablosunda hasar olup
olmadığını kontrol edin.
• Cihazın alt tarafındaki pil bölmesi kapağını açın ve pilleri
kutup işaretlerine uygun olarak yerleştirin. Elektrik kesintisi
olduğunda piller, elektrik beslemesini sağlar.
• Cihazı düz ve sağlam bir yüzeyin üzerine koyun.
• Adaptör bağlantısını cihazın arka tarafındaki adaptör giri-
şine takın.
• Adaptörü uygun bir prize takın. Cihaz ekranında saat
görünür.
Açıklama
• Cihazı fabrika ayarlarına geri almak istiyorsanız sivri uçlu
bir nesne ile cihazın alt tarafındaki sıfırlama düğmesine
basın.
6. Kullanım
Açıklama
10 saniye boyunca hiçbir düğmeye basmazsanız cihaz, ayar
menüsünden otomatik olarak çıkar.
6.1 Saatin ve Snooze süresinin ayarlanması
•
düğmesine basın.
Saat yanıp sönmeye başlar.
/
düğmeleri ile istediğiniz saati ayarlayın.
Açıklama
Saatleri ve dakikaları daha hızlı ilerletmek için
/
düğmesini basılı tutun.
•
düğmesi ile ayarladığınız saati onaylayın.
Ekranda “24 Hr” yanı söner.
1 2 3 4
58
9
10
67

68
12 ve 24 saat formatı arasında seçim yapabilirsiniz.
•
/
düğmeleri ile istediğiniz saat formatını seçin ve
düğmesi ile onaylayın.
Ekranda “Zz 05” yanıp söner.
•
/
düğmeleri ile istediğiniz Snooze süresini (5 ila 60
dakika arasında seçilebilir) seçin ve
düğmesi ile
onaylayın.
Açıklama
Karanlıkta saati görmek istiyorsanız, ön kısımdaki lamba
kapağını aşağı doğru bastırın.
6.2 Alarmın ayarlanması
Açıklama
Işıklı çalar saatte iki farklı alarm zamanı (alarm 1 ve alarm 2)
ayarlayabilirsiniz.
• Alarm 1'i ayarlamak için
düğmesine bir defa basın.
• Alarm 2'yi ayarlamak için
düğmesine iki defa basın.
İlgili alarm zamanı ekranda yanıp sönmeye başlar.
•
/
düğmeleri ile istediğiniz alarm zamanını ayarlayın.
•
düğmesi ile alarm zamanı için istediğiniz alarm sesini
ayarlayın.
Alarm sesi olarak radyo ( ) ve bip sesi ( ) arasından seçim
yapabilirsiniz.
•
düğmesi ile onaylayın.
Alarm 1
kapalı
Alarm 2
kapalı
Alarm 1 açık,
Uyandırma sesi olarak bip
sesi seçildi
Alarm 2 açık,
Uyandırma sesi olarak
radyo seçildi
6.3 Alarmın kapatılması
• Alarm çaldığında düğmesine basın.
Alarm şimdi kapalıdır ve ancak ertesi gün ayarlanan
zamanda yeniden çalar.
6.4 Alarmın kalıcı olarak devre dışı bırakılması
• Alarm 1'i devre dışı bırakmak için
düğmesine bir defa
basın.
• Alarm 2'yi devre dışı bırakmak için düğmesine iki defa
basın.
• Ekranda 1 veya 2 sayısının yanında nota sembolü görün-
meyene ( ) ve çan sembolü ( ) görünmeyene kadar
düğmesine basın.

69
• düğmesi ile onaylayın. Alarm 1 veya 2 şimdi devre
dışı.
6.5 Snooze işlevi
Alarm sesi duyduğunuzda Zz düğmesine basarak
geçici olarak durdurabilirsiniz. Alarm sesi, ayarladığınız
Snooze süresinden sonra yeniden çalar. Snooze süre-
sini nasıl ayarlayacağınızı “6.1 Saatin ve Snooze süresinin
ayarlanması” bölümünden öğrenebilirsiniz.
6.6 Güneşin doğuşu işlevi
Alarm ayarladıysanız kendinizi alarm sesinin yanı sıra
güneşin doğuşu simülasyonu ile uyandırtabilirsiniz. Bu
modda LED ışığı yavaş yavaş aydınlanır.
Açıklama
Bu işlev için birlikte verilen adaptörü kullanın.
• Zz düğmesini yakl. 5 sn. basılı tutun.
Ekranda “15” yanıp söner.
•
/
düğmeleri ile istediğiniz güneşin doğuşu simülasyo-
nunu ayarlayın.
15 = Güneşin doğuşu simülasyonu ayarlanan alarm
zamanından 15 dakika önce başlar.
30 = Güneşin doğuşu simülasyonu ayarlanan alarm
zamanından 30 dakika önce başlar.
OFF = Güneşin doğuşu simülasyonu devre dışı. Ekranda saa-
tin üzerindeki lamba sembolü (
) kaybolur.
• Seçiminizi onaylamak için Zz düğmesine basın.
6.7 Lamba işlevi / Renk değişimli ruh hali ışığı
Işıklı çalar saati normal lamba veya renk değişimli ruh hali
ışığı olarak kullanın.
Açıklama
Bu işlev için birlikte verilen adaptörü kullanın. Radyo din-
lerken veya iyi geceler işlevi etkin iken “Renk değişimli ruh
hali ışığı” işlevi devre dışı kalır. Bu süre zarfında sadece renk
değişimsiz ışık görüntülenebilir.
• Zz düğmesine basın.
LED ışık yavaşça yanmaya başlar.
• Lamba işlevini etkinleştirmek için yeniden Zz düğmesine
basın.
Ekranda “L 09” yanıp söner (Parlaklık kademesi 09).
•
/
düğmeleri ile istediğiniz parlaklık kademesini (L 00 ila
L 15 arası) ayarlayın.
• Renk değişimli ruh hali ışığını etkinleştirmek için yeniden
Zz düğmesine basın.
Renk değişimli ruh hali ışığı yanmaya başlar.
Renkler değişene kadar birkaç saniye bekleyin.
• Ruh hali ışıklarından birini sürekli sabitlemek istiyorsanız
(renk değişimi olmadan) yeniden Zz düğmesine basın.
• Tüm ışık fonksiyonlarını kapatmak için yeniden Zz düğme-
sine basın.

70
6.8 Radyo dinleme
Işıklı çalar saatin arka tarafında esnek bir kablolu anten
bulunmaktadır. Teli açın ve en iyi alımı sağlamak için en açık
haliyle serin.
• Radyoyu açmak için düğmesine basın.
Ekranda önce “on” yanıp söner. Yaklaşık 10 saniye sonra mhz
ve güncel olarak ayarlanan frekans görünür.
•
/
düğmeleri ile istediğiniz frekansı ayarlayın.
• Otomatik kanal aramasını başlatmak için
/
düğmesini
kısaca basılı tutun ve tekrar bırakın. Cihaz, şimdi kanal
aramasını başlatır ve bir radyo kanalı bulunca kanal
aramasını otomatik olarak durdurur.
• Radyonun ses seviyesini değiştirmek için
düğmesine
basın.
/
düğmeleri ile istediğiniz ses seviyesini ayarla-
yın.
• Radyoyu tekrar kapatmak için ön kısımdaki lamba
kapağını aşağı doğru bastırın.
Açıklama
Radyo dinlerken “Renk değişimli ruh hali ışığı” işlevi devre
dışı kalır. Bu süre zarfında sadece renk değişimsiz ışık
görüntülenebilir.
6.9 Radyo kanallarının kaydedilmesi
Işıklı çalar saate en fazla 10 adet radyo kanalı kaydedebi-
lirsiniz.
• Radyoyu açmak için
düğmesine basın.
•
/
düğmeleri ile kaydetmek istediğiniz radyo kanalının
frekansını ayarlayın.
• Seçtiğiniz radyo kanalını kaydetmek için
düğmesini
yakl. 2 saniye basılı tutun. Ekranda frekansın altında O1
(hafıza yeri numarası) yanıp söner.
• düğmesine kısaca basarak istediğiniz hafıza yeri
numarasını seçin. Kanalı seçtiğiniz hafıza yeri numarasına
kaydetmek için düğmesini 2 saniye basılı tutun.
6.10 Önceden ayarlanan radyo kanalının seçilmesi
• Radyoyu açmak için
düğmesine basın. Ekranda önce
“on” yanıp söner. Yaklaşık 10 saniye sonra mhz ve güncel
olarak ayarlanan frekans görünür.
• Önceden ayarlanan radyo kanalları arasından seçim yap-
mak için düğmesine basın.
6.11 İyi geceler işlevi
Bu işlevde radyonun belirlenen bir sürenin sonunda otoma-
tik olarak kapanmasını ayarlayabilirsiniz.
•
düğmesine iki defa basın.
Ekranda “sleep” ve yanıp sönen O5 görünür.
• düğmesi ile radyonun kaç dakika sonra otomatik ola-
rak kapanmasını istediğiniz dakikayı ayarlayın.
5, 10, 15, 30, 45, 60, 75 ve 90 dakika arasından seçim
yapabilirsiniz.
• İstediğiniz dakika sayısını onaylamak için ekran otomatik
olarak saat göstergesine dönene kadar yaklaşık 5 saniye
bekleyin. İstediğiniz dakika sayısı şimdi ayarlanmıştır.

71
Güncel olarak kaç dakika kaldığını görmek istiyorsanız
düğmesine basın.
Açıklama
• İyi geceler işlevini ayarlanan süre dolmadan sona erdir-
mek istiyorsanız erkanda OFF görünene kadar
düğme-
sine basın.
Açıklama
İyi geceler işlevi etkin iken “Renk değişimli ruh hali ışığı”
işlevi devre dışı kalır. Bu süre zarfında sadece renk
değişimsiz ışık görüntülenebilir.
6.12 AUX girişi üzerinden müzik dinleme
MP3 çalarınızı AUX girişi üzerinden ışıklı çalar saate
bağlayabilirsiniz.
• AUX kablosunun (teslimat kapsamında mevcuttur) bir
ucunu ışıklı çalar saatin arka tarafındaki AUX girişine takın.
• AUX kablosunun diğer ucunu MP3 çaların kulaklık yuva-
sına takın.
Açıklama
AUX girişi üzerinden müzik dinlerken ses seviyesini sadece
MP3 çalar üzerinden değiştirebilirsiniz, ışıklı çalar saat üze-
rinden değiştiremezsiniz.
Cihazın AUX girişine bir kablo takılı ise “Renk değişimli ruh
hali ışığı” işlevi devre dışı kalır. Bu süre zarfında sadece renk
değişimsiz ışık görüntülenebilir.
7. Temizlik ve bakım
DİKKAT
• Cihazın içine su kaçmamasına dikkat edin. Yine de içine
su kaçacak olursa cihazı ancak, tamamen kuruduğunda
yeniden kullanın.
• Cihazı ve fişli adaptörü asla su veya başka sıvılara daldır-
mayın.
• Cihazı darbelerden, nemden, tozdan, kimyasallardan, aşırı
sıcaklık değişikliklerinden ve çok yakın ısı kaynaklarından
(soba, kalorifer radyatörü) koruyun.
• Cihazı kuru bir bezle temizleyin.
• Aşındırıcı temizlik maddesi kullanmayın.
• Her zaman aynı tip piller kullanın ve tüm pilleri aynı anda
değiştirin. Şarj edilebilen piller kullanmayın.
• Sızıntı yapan piller cihazınızda hasara yol açabilir. Cihazı
uzun bir süre kullanmayacağınız zaman pilleri cihazdan
çıkartın.
• Sızıntı yapan veya hasarlı piller cilde temas ettiğinde
yanıklara yol açabilir. Bu durumda özel koruyucu eldiven
kullanın.

72
8. Bertaraf etme
Kullanım ömrü sona eren cihazlar, çevrenin korunması
amacıyla evsel atıklar ile birlikte atılmamalıdır. Cihaz,
ülkenizdeki uygun atık toplama merkezleri aracılı-
ğıyla bertaraf edilmelidir. Malzemelerin bertaraf
edilmesi sırasında yerel yönetmeliklere uyun. Cihazı
AB Elektrikli ve Elektronik Ekipman Atık Direktifine
(WEEE - Waste Electrical and Electronic Equipment) uygun
olarak bertaraf edin. Bertaraf etme ile ilgili sorularınızı, ilgili
yerel makamlara iletebilirsiniz.
Not: Bu işaretler, zararlı madde içeren pillerin
üzerinde bulunur: Pb = pil kurşun içerir,
Cd = pil kadmiyum içerir, Hg = pil cıva içerir.
9. Sorunların giderilmesi
Saat doğru gösterilmiyorsa veya cihaz doğru çalışmıyorsa
bu durum elektrostatik boşalmadan veya başka arızalardan
kaynaklanıyor olabilir. Bu nedenle cihazı örn. WLAN vs. gibi
cihazların yakınına kurmayın. Sorunu çözmek için cihazı fab-
rika ayarlarına geri alın.
Cihazı fabrika ayarlarına geri almak için sivri uçlu bir nesne
ile cihazın alt tarafındaki sıfırlama düğmesine basın.
Sorun yine de devam edecek olursa müşteri hizmetleri ile
irtibata geçin.
10. Teknik veriler
Işıklı çalar saat işlevi OFF, alarmdan 15, 30 dakika
önce
Snooze süresi 5 – 60 dakika
İyi geceler işlevi 5, 10, 15, 30, 45, 60, 75, 90
dakika ve OFF olarak seçi-
lebilir.
Ölçüler 12,3 x 12 cm
Ağırlık 180 g
Güç kaynağı
Giriş: 100 - 240 V; AC 50/60
Hz, max. 200 mA
Çıkış: 5,5 V; DC 500 mA
(0,5 A); 2,75 W
Elektrik adaptörü
Koruma Sınıfı
Koruma Sınıfı II
Radyo frekans alanı UKW 87,5 – 108 MHz
Aydınlatma gücü yakl. 15 lux (15 cm mesafe
için)
Çalışır durumdaki orta-
lama verim
≥ 73.80 %
Sıfır yükte güç tüketimi ≤ 0,1 W

73
Elektrik adaptörü Üretici:
Hong Kong Yee Fu Electronic
Enterprises Co., Ltd.
Adresse: Room 6,
Smart-Space 1, Units 401-403,
Level 4, Cyberport 1, 100
Cyberport Road, Hong Kong
Model no.: L008A055050E
Teknik değişiklik hakkı saklıdır.
Bu ürünün 2014/53/AB sayılı Avrupa RED direktifine uygun
olduğunu onaylarız. Bu ürünle ilgili CE uyumluluk beyanını
şu konumda bulabilirsiniz:
www.beurer.com/web/we-landingpages/de/cedeclaratio-
nofconformity.php.
11. Garanti / servis
Beurer GmbH, Söflinger Straße 218, D-89077 Ulm (aşağıda
"Beurer" olarak anılacaktır) bu ürün için aşağıdaki koşullar
çerçevesinde ve aşağıda açıklanan kapsamda bir garanti
sunmaktadır.
Aşağıdaki garanti koşulları, satıcının müşteri ile yaptığı
satış sözleşmesinden doğan yasal garanti yükümlülük-
lerini etkilemez.
Garanti, yasalarla zorunlu kılınan sorumlulukların
kapsamında herhangi bir kısıtlamaya neden olmaksızın
geçerlidir.
Beurer, bu ürünün kusursuz bir şekilde çalıştığını ve eksiksiz
olduğunu garanti eder.
Yeni ve kullanılmamış bir ürünün müşteri tarafından satın
alınmasıyla başlayan ve dünya genelinde geçerli olan garanti
süresi 3 yıldır.
Bu garanti sadece tüketici olarak müşteri tarafından satın
alınan ve bireysel amaçlarla sadece evde kullanılan ürünler
için geçerlidir.
Alman yasaları geçerlidir.
Bu ürünün garanti süresi içinde aşağıda belirtilen hüküm-
ler uyarınca eksiksiz olmadığı veya çalışma açısından
kusurlu olduğu saptanırsa, Beurer bu garanti koşulları
kapsamında ücretsiz bir ikame ürün teslimatı veya onarım
gerçekleştirmekle yükümlüdür.
Müşteri bir garanti talebinde bulunmak istediğinde önce
yerel satıcıya başvuracaktır: Servis adreslerinin olduğu
ekteki "Uluslararası Servis" listesini inceleyin.
Bu durumda müşteriye, garanti işlemlerinin yürütülmesiyle
ilgili olarak örneğin ürünün nereye gönderileceği ve hangi
belgelerin gerekli olduğu gibi ayrıntılı bilgiler verilecektir.
Garanti talebi ancak müşterinin
– faturanın/satın alma belgesinin bir kopyasını ve

74
– orijinal ürünü
yetkili bir Beurer iş ortağına sunabilmesi halinde işleme
konabilir.
Aşağıdaki durumlar kesinlikle bu garanti kapsamının
dışındadır:
– Ürünün normal kullanımından veya tüketiminden kayna-
klanan aşınmalar ve yıpranmalar;
– Bu ürün ile birlikte teslim edilen ve usulüne uygun
kullanıldığında da yıpranabilecek veya tükenebilecek
aksesuar parçaları (örneğin piller, şarj edilebilir piller,
manşetler, contalar, elektrotlar, aydınlatma malzemeleri,
başlıklar ve nebulizatör aksesuarları);
– Kullanım kılavuzundaki bilgiler dikkate alınmadan ve/
veya usulüne uygun olmayan bir şekilde kullanılan,
temizlenen, depolanan veya bakımı yapılan ürünler ve
Beurer tarafından yetkilendirilmemiş bir servis merkezi
veya müşterinin kendisi tarafından açılan, onarılan veya
üzerinde değişiklik yapılan ürünler;
– Ürünün üreticiden müşteriye nakliyesi sırasında oluşan
hasarlar;
– İkinci kalite ürün veya kullanılmış ürün olarak satın alınan
ürünler;
– Bu üründeki bir kusurdan kaynaklanan müteakip hasarlar
(ancak bu durumda ürün sorumluluğu veya yasal zorunlu
sorumluluk hükümleri uyarınca tüketici hakları olabilir).
Onarım veya komple değişim garanti süresini hiçbir şekilde
uzatmaz.
Hata ve değişiklik hakkı saklıdır

75
Уважаемый покупатель,
благодарим Вас за выбор продукции нашей фирмы. Мы
производим современные, тщательно протестирован-
ные, высококачественные изделия для обогрева, изме-
рения массы, артериального давления, температуры
тела, пульса, для мягкой терапии, массажа, очистки воз-
духа и косметического ухода.
Внимательно прочтите данную инструкцию по примене-
нию, сохраняйте ее для последующего использования,
храните ее в месте, доступном для других пользовате-
лей, и следуйте ее указаниям.
С наилучшими пожеланиями,
компания Beurer
1. Комплект поставки
• Световой будильник Beurer WL 32 — 1 шт.
• Сетевой адаптер — 1 шт.
• Кабель AUX — 1 шт.
• Данная инструкция по применению — 1 шт.
2. Пояснения к символам
В инструкции по применению, на упаковке и на типо-
вой табличке прибора и принадлежностей используются
следующие символы:
РУССКИЙ
Содержание
1. Комплект поставки ................................................. 75
2. Пояснения к символам ........................................... 75
3. Для ознакомления .................................................. 77
4. Описание прибора .................................................. 78
5. Ввод в эксплуатацию.............................................. 80
6. Применение ............................................................. 80
7. Очистка и уход ...................................................... 84
8. Утилизация ............................................................ 85
9. Что делать при возникновении неполадок? ....... 85
10. Технические характеристики ............................... 85
11. Гарантия/сервисное обслуживание .................... 86

76
ПРЕДОСТЕРЕЖЕНИЕ
Предупреждает об опасности
травмирования или ущерба для
здоровья.
ВНИМАНИЕ
Указывает на возможные
повреждения прибора или при-
надлежностей.
Примечание
Отмечает важную информацию
Утилизация прибора в соответ-
ствии с Директивой по отходам
электрического и электрон-
ного оборудования — WEEE
(Waste Electrical and Electronic
Equipment)
Производитель.
Это изделие выполняет требо-
вания действующих европей-
ских и национальных директив.
20
PAP
Утилизировать упаковку
всоответствии спредписа-
ниями поохране окружаю-
щей среды
Сертификационный знак для
изделий, экспортируемых в
Российскую Федерацию и
страны СНГ
VI
Класс энергоэффективности6
ПРЕДОСТЕРЕЖЕНИЕ
• Допускается использование прибора только в целях,
описываемых в данной инструкции по применению.
Производитель не несет ответственности за ущерб,
причиненный вследствие использования прибора не
по назначению или халатного обращения с ним.
• Прибор следует устанавливать вблизи от розетки,
находящейся в свободном доступе.
• Используйте прибор только с входящим в комплект
поставки сетевым адаптером и только с напряжением,
указанным на адаптере.
• Перед использованием проверьте прибор и его при-
надлежности на наличие видимых повреждений. При
наличии сомнений не используйте прибор и обрати-
тесь к продавцу или по указанному адресу сервисной
службы.
• В случае появления дефектов и неполадок в работе
немедленно отключите прибор и отсоедините его от
сети.

77
• Не подсоединяйте сетевой адаптер к сети и не отсо-
единяйте его от сети влажными руками.
• Не давайте упаковочный материал детям (опасность
удушения).
• Разместите кабель таким образом, чтобы об него
нельзя было споткнуться.
• Не допускайте попадания воды на прибор, сетевой
адаптер и электрический кабель!
• Данный прибор не предназначен для использования
лицами (включая детей) с ограниченными психиче-
скими, сенсорными или умственными способностями,
с недостаточными знаниями или опытом, за исключе-
нием случаев, когда за ними осуществляется надле-
жащий надзор или если они получили от Вас инструк-
цию по использованию прибора.
• Не позволяйте детям играть с прибором и не остав-
ляйте их без присмотра.
ВНИМАНИЕ
• Никогда не тяните за кабель или за прибор, чтобы
вынуть сетевой адаптер из розетки.
• Никогда не держите прибор за сетевой кабель и не
переносите его таким образом.
• Защищайте прибор от ударов, влажности, загрязне-
ния, сильных колебаний температуры и прямых сол-
нечных лучей.
• Не роняйте прибор.
3. Для ознакомления
Световой будильник Beurer WL 32 делает процесс про-
буждения приятным и естественным. Постепенно воз-
растающая интенсивность светодиодного света ими-
тирует восход солнца. Глаза медленно привыкают к
возрастающей яркости, организм не подвергается
стрессу от резкого пробуждения. Помимо имитации
восхода солнца в будильнике можно установить сиг-
нал пробуждения. В качестве такого сигнала можно
выбрать радио или звуковой сигнал. Световой будиль-
ник помогает начать новый день в бодром состоянии
духа и хорошо отдохнувшим.

78
4. Описание прибора
Вид спереди
Вид сбоку
1. Up (Вверх)
2. Громкость звука (радио)
3. Down (Вниз)
4. Сигнал 1-2
5. Функция таймера сна (Sleep)/радио
6. Настройки/память
Светодиодная лампа
Zz (приглушенное освещение)/Snooze
Для приглушенного освещения/Snooze нажмите на
переднюю крышку лампы в направлении вниз
41
52
63

79
Вид сзади
Нижняя часть
Описание дисплея
1. Память радиопередатчика (радио)
2. Символ света
3. Короткий сон
4. Радио включено
5. Сигнал 2 (радио)
6. Сигнал 2 (звук)
7. Сигнал 1 (радио)
8. Сигнал 1 (звук)
9. Появляется только при выбранном 12-часовом фор-
мате времени
10. Функция таймера сна
5. Ввод в эксплуатацию
• Удалите упаковку.
• Проверьте комплектность поставки.
• Убедитесь, что прибор, сетевой адаптер и электриче-
ский кабель не повреждены.
Сетевой
адаптер
Кабель AUX
Вход AUX Гнездо сетевого
адаптера
Сброс (возвращение к завод-
ским настройкам)
3 батарейки типа ААА
(не входят в комплект
поставки)
Zz (приглушенное освещение)/
Snooze
1 2 3 4
58
9
10
67

80
• Снимите крышку с отделения для батареек в нижней
части прибора и вставьте батарейки, соблюдая поляр-
ность. Батарейки обеспечат электропитание в случае
отключения электричества.
• Установите прибор на устойчивую ровную поверх-
ность.
• Вставьте присоединение сетевого адаптера в гнездо в
нижней части прибора.
• Вставьте сетевой адаптер в подходящую розетку. На
дисплее прибора появится время.
Указание
• Чтобы вернуть прибор к заводским настройкам,
нажмите острым предметом на кнопку Reset (сброс) в
нижней части прибора.
6. Применение
Примечание
Если в течение 10 секунд не нажимать ни на одну
из кнопок, прибор автоматически выйдет из меню
настроек.
6.1 Установка времени и длительности короткого сна
• Нажмите кнопку
.
Индикация времени замигает.
С помощью кнопок
/
установите нужное время.
Примечание
Чтобы быстрее переключаться между часами или
минутами, удерживайте нажатой кнопку
/
.
• Подтвердите выбранное время нажатием кнопки
.
На дисплее замигает надпись «24 Hr».
Для выбора доступны 12- или 24-часовой форматы.
• С помощью кнопок
/
выберите нужный часовой
формат и подтвердите его нажатием кнопки
.
На дисплее замигает «Zz 05»
• С помощью кнопок
/
выберите нужное время
короткого сна (от 5 до 60 минут) и подтвердите выбор
нажатием кнопки
.
Примечание
Чтобы узнать время в темноте, нажмите на крышку
лампы спереди в направлении вниз.
6.2 Установка сигнала
На световом будильнике можно выбрать два разных
времени пробуждения (сигнал 1 и сигнал 2).
• Для того, чтобы установить сигнал 1, нажмите кнопку
один раз.

81
• Для того, чтобы установить сигнал 2, нажмите кнопку
два раза.
Соответствующее время сигнала будет мигать на дис-
плее.
• С помощью кнопок
/
установите нужное время
сигнала.
• С помощью кнопки
выберите звук для
установленного времени сигнала.
В качестве сигнала можно выбрать радио ( ) или звуко-
вой сигнал ( ).
• Для подтверждения нажмите кнопку
.
Сигнал 1
выключен
Сигнал 2
выключен
Сигнал 1 включен,
в качестве будильника
выбран звуковой сигнал
Сигнал 2 включен,
в качестве будильника
выбрано радио
6.3 Отключение сигнала
• Когда раздастся сигнал, нажмите кнопку .
Сигнал отключен и раздастся в установленное время на
следующий день.
6.4 Отключение сигнала на длительное время
• Для отключения сигнала 1 нажмите кнопку
один
раз.
• Для отключения сигнала 2 нажмите кнопку два
раза.
• Нажимайте на кнопку
несколько раз до тех пор,
пока символ ноты ( ) или колокольчика ( ) рядом с
цифрой 1 или 2 на дисплее не исчезнет.
• Для подтверждения нажмите кнопку
. Сигнал 1 или
2 отключен.
6.5 Функция Snooze (короткого сна)
Когда раздается звуковой сигнал, его можно временно
остановить, нажав кнопку Zz. Сигнал повторится по
истечении установленного времени короткого сна.
Установка длительности короткого сна описана в главе
«6.1 Установка времени и длительности короткого сна».
6.6 Функция восхода солнца
Если сигнал установлен, можно также использовать
функцию симуляции восхода солнца. При этом медленно
увеличивается яркость светодиода.

82
Примечание
Для этой функции используйте входящий в комплект
сетевой адаптер.
• Удерживайте кнопку Zz нажатой примерно в течение 5
секунд.
На дисплее замигает «15».
• С помощью кнопок
/
установите нужное время
симуляции восхода солнца.
15 = симуляция восхода солнца начинается за 15 минут
до установленного времени сигнала.
30 = симуляция восхода солнца начинается за 30 минут
до установленного времени сигнала.
OFF. = симуляция восхода солнца отключена. Символ
лампы (
), появляющийся на дисплее под индикацией
времени, исчезнет.
• Для подтверждения выбора нажмите кнопку Zz.
6.7 Функция лампы/лампа со сменой цветов
световой будильник также можно использовать как
обычную лампу или лампу со сменой цветов.
Примечание
Для этой функции используйте входящий в комплект
сетевой адаптер. Во время прослушивания радио или
при включении постепенно убывающей яркости света
(функция «Спокойной ночи») функция «Лампа со сме-
ной цветов» отключается. В это время будильник можно
использовать только как обычную лампу (без смены
цветов).
• Нажмите кнопку Zz.
Светодиоды начнут тускло светить.
• Для активации функции лампы вновь нажмите кнопку
Zz.
На дисплее замигает «L 09» (степень яркости 09).
• С помощью кнопок
/
выберите нужную степень
яркости (от L 00 до L 15).
• Для активации лампы со сменой цветов вновь
нажмите на кнопку Zz.
Лампа со сменой цветов начнет светить.
Цвета будут меняться через несколько секунд.
• Для выбора одного цвета (без смены цветов) еще раз
нажмите кнопку Zz.
• Для отключения функции подсветки вновь нажмите
кнопку Zz.
6.8 Прослушивание радио
На обратной стороне светового будильника имеется
гибкая антенна. Для наилучшего приема размотайте
провод и уложите его так, чтобы он был как можно
длиннее.
• Для включения радио нажмите кнопку
.
На дисплее сначала замигает on. Примерно через
10секунд появится mhz с указанием текущей частоты.
• С помощью кнопок
/
установите нужную частоту.

83
• Для автоматического поиска радиоканалов нажмите
и отпустите кнопку
/
Прибор запустит поиск
радиоканалов и автоматически остановит его, как
только радиостанция будет найдена.
• Для изменения громкости радио нажмите кнопку
. С помощью кнопок
/
установите желаемую
громкость звука.
• Чтобы снова выключить радио, нажмите на крышку
лампы спереди в направлении вниз.
Примечание
Во время прослушивания радио функция «Лампа со
сменой цветов» отключается. В это время будильник
можно использовать только как обычную лампу (без
смены цветов).
6.9 Сохранение радиостанций
В памяти светового будильника можно сохранить до 10
радиостанций.
• Для включения радио нажмите кнопку
.
• С помощью кнопок
/
установите частоту
радиостанции, которую хотите сохранить.
• Для сохранения выбранной радиостанции
удерживайте кнопку
нажатой примерно в
течение 2 секунд. Под индикацией частоты на дисплее
будет мигать O1 (номер в памяти).
• Коротким нажатием кнопки выберите нужный
номер ячейки памяти. Чтобы сохранить радиоканал в
ячейке памяти с выбранным номером, удерживайте
кнопку
нажатой в течение 2секунд.
6.10 Выбор предварительно установленных
радиостанций
• Для включения радио нажмите кнопку
. На дисплее
сначала замигает on. Примерно через 10секунд
появится mhz с указанием текущей частоты.
• Для выбора одной из предварительно установленных
радиостанций нажмите кнопку .
6.11 Функция таймера сна
Данная функция позволяет автоматически выключать
радио по истечении заданного времени.
• Два раза нажмите кнопку
.
На дисплее появится сообщение sleep и мигающие
цифры O5.
• С помощью кнопки
- выберите нужное число
минут, по истечении которого радио автоматически
отключится.
Можно установить 5, 10, 15, 30, 45, 60, 75 и 90 минут.
• Для подтверждения установленного числа минут
подождите примерно 5 секунд, пока дисплей
автоматически не вернется к индикации времени.
Нужное число минут установлено. Если вы хотите
просмотреть оставшееся на данный момент
количество минут, нажмите кнопку .

84
Примечание
• Если Вы хотите отключить таймер сна до истечения
установленного времени, нажимайте на кнопку
до
тех пор, пока на дисплее не появится OFF.
Примечание
При включении функции постепенного убывания ярко-
сти света функция «Лампа со сменой цветов» отклю-
чается. В это время будильник можно использовать
только как обычную лампу (без смены цветов).
6.12 Прослушивание музыки через вход AUX
Через вход AUX можно подключить к световому будиль-
нику MP3-плеер.
• Вставьте конец кабеля AUX (входит в комплект
поставки) во вход AUX, расположенный на обратной
стороне светового будильника.
• Вставьте другой конец кабеля AUX в гнездо для науш-
ников на MP3-плеере.
Примечание
Если Вы слушаете музыку через вход AUX, громкость
можно изменить только на MP3-плеере, а не на самом
будильнике.
При подключении кабеля ко входу AUX функция «Лампа
со сменой цветов» отключается. В это время будильник
можно использовать только как обычную лампу.
7. Очистка и уход
ВНИМАНИЕ
• Избегайте попадания воды в прибор. В случае попада-
ния в прибор воды используйте его только после пол-
ного высыхания.
• Ни в коем случае не погружайте прибор и сетевой
адаптер в воду или другие жидкости.
• Прибор следует предохранять от ударов, влажности,
пыли, химикатов, сильных колебаний температуры и
не устанавливать их вблизи источников тепла (печей,
радиаторов отопления).
• Очищайте прибор влажной салфеткой.
• Не используйте абразивные чистящие средства.
• Заменяйте одновременно сразу все элементы пита-
ния. Используйте при этом элементы одного типа. Не
используйте заряжаемые аккумуляторы.
• Потекшие батарейки могут стать причиной неисправ-
ности прибора. Если прибор в течение длительного
времени не используется, необходимо извлечь бата-
рейки из отделения для батареек.
• Разряженные или поврежденные батарейки могут
вызвать химический ожог при соприкосновении с
кожей. В этом случае используйте подходящие защит-
ные перчатки.

85
8. Утилизация
Винтересах защиты окружающей среды поокончании
срока службы следует утилизировать прибор отдельно
отбытового мусора. Утилизация должна произ-
водиться через соответствующие пункты сбора
вВашей стране. Соблюдайте местные законода-
тельные нормы по утилизации отходов. Прибор
следует утилизировать согласно Директиве ЕС поотхо-
дам электрического иэлектронного оборудования—
WEEE (Waste Electrical and Electronic Equipment).
Припоявлении вопросов обращайтесь вместную ком-
мунальную службу, ответственную заутилизацию отхо-
дов.
Примечание: Эти знаки предупреждают о
наличии в батарейках следующих токсичных
веществ: Pb = свинец, Cd = кадмий,
Hg = ртуть
9. Что делать при возникновении
неполадок?
Причиной некорректного отображения времени или
неправильной работы прибора могут быть электро-
статические разряды или другие помехи. Поэтому
не устанавливайте прибор рядом с другими устрой-
ствами, например, использующими беспроводные сети
и т. д. Для решения проблемы восстановите заводские
настройки прибора.
Чтобы вернуть прибор к заводским настройкам,
нажмите острым предметом на кнопку Reset (сброс) в
нижней части прибора.
При повторном возникновении проблемы обратитесь в
сервисную службу.
10. Технические характеристики
Функция светового
будильника
ВЫКЛ., за 15, 30 минут до
сигнала
Время короткого сна от 5 до 60 минут
Функция таймера
сна
5, 10, 15, 30, 45, 60, 75, 90
минут или ВЫКЛ.
Размеры 12,3 x 12 см
Масса 180 г
Электропитание Входная мощность:
100 – 240 B, AC 50/60 Hz, max.
200 mA
Выходная мощность:
5,5 B; DC 500 mA (0,5A); 2,75 W
Блок питания
Класс защиты
Класс защиты II
Диапазон радио-
частот
УКВ 87,5—108 МГц

86
Сила света примерно 15 лк (на расстоя-
нии 15 см)
Средняя эффектив-
ность на предприятии
≥ 73.80 %
Потребляемая мощ-
ность при нулевой
нагрузке
≤ 0,1 W
Блок питания Изготовитель:
Hong Kong Yee Fu Electronic
Enterprises Co., Ltd.
Adresse: Room 6,
Smart-Space 1, Units 401-403,
Level 4, Cyberport 1, 100 Cyber-
port Road, Hong Kong
№ модели: L008A055050E
Возможны технические изменения.
Настоящим подтверждаем, что данное изделие соот-
ветствует требованиям европейской директивы RED
2014/53/EU. С декларацией о соответствии директивам
ЕС для данного устройства можно ознакомиться, пере-
йдя по ссылке:
www.beurer.com/web/we-landingpages/de/
cedeclarationofconformity.php.
11. Гарантия/сервисное обслуживание
Более подробная информация по гарантии/сервису
находится в гарантийном/сервисном талоне, который
входит в комплект поставки.
Возможны ошибки и изменения

87
Szanowna Klientko, szanowny Kliencie!
Dziękujemy, że wybrali Państwo nasz produkt. Firma Beurer
oferuje dokładnie przetestowane produkty wysokiej jakości
przeznaczone do pomiaru ciężaru, ciśnienia, temperatury i
tętna, a także przyrządy do łagodnej terapii, masażu, zabie-
gów upiększających, inhalacji i ogrzewania.
Należy dokładnie przeczytać i zachować niniejszą instrukcję
obsługi, przechowywać ją w miejscu dostępnym dla innych
użytkowników i przestrzegać podanych w niej wskazówek.
Z poważaniem
Zespół Beurer
1. Zakres dostawy
• 1 urządzenie z zastosowaniem światła podczas budzenia
WL 32 marki Beurer
• 1 zasilacz
• 1 kabel AUX
• niniejsza instrukcja obsługi
2. Objaśnienie symboli
W instrukcji obsługi, na opakowaniu i tabliczce znamiono-
wej urządzenia oraz akcesoriów znajdują się następujące
symbole:
POLSKI
Spis treści
1. Zakres dostawy ........................................................ 87
2. Objaśnienie symboli ................................................. 87
3. Zaznajomienie się z urządzeniem ............................. 89
4. Opis urządzenia ........................................................ 89
5. Uruchomienie ........................................................... 91
6. Obsługa .................................................................... 91
7. Czyszczenie i pielęgnacja ....................................... 95
8. Utylizacja ................................................................ 96
9. Co robić w przypadku problemów? ....................... 96
10. Dane techniczne ..................................................... 96
11. Gwarancja / serwis ................................................. 97

88
UWAGA
Ostrzeżenie przed
niebezpieczeństwem obrażeń ciała
lub utraty zdrowia.
UWAGA
Wskazówki bezpieczeństwa
odnoszące się do możliwości uszkod-
zenia urządzenia/akcesoriów.
Wskazówka
Ważne informacje
Utylizacja zgodnie z dyrektywą WE w
sprawie zużytego sprzętu elektryczn-
ego i elektronicznego – WEEE (Waste
Electrical and Electronic Equipment)
Producent
Niniejszy produkt spełnia wymagania
obowiązujących dyrektyw europejs-
kich i krajowych.
20
PAP
Opakowanie zutylizować w sposób
przyjazny dla środowiska
Oznakowanie certyfikacyjne dla pro-
duktów eksportowanych do Federacji
Rosyjskiej oraz państw WNP
VI
Klasa efektywności energetycznej 6
UWAGA
• Urządzenie jest przeznaczone wyłącznie do używania w
celu określonym w niniejszej instrukcji obsługi. Producent
nie ponosi odpowiedzialności za szkody wynikłe z niepra-
widłowego lub lekkomyślnego użytkowania.
• Urządzenie musi być znajdować się w pobliżu łatwo
dostępnego gniazdka.
• Urządzenie należy podłączać do napięcia sieciowego
wyłącznie za pomocą dostarczonego zasilacza. Napię-
cie musi być zgodne z napięciem sieciowym podanym na
zasilaczu.
• Przed użyciem należy sprawdzić urządzenie i akcesoria
pod kątem widocznych uszkodzeń. W razie wątpliwości
należy przestać korzystać z urządzenia oraz zwrócić się
do przedstawiciela handlowego lub serwisu pod podanym
adresem.
• W razie uszkodzeń lub niewłaściwego działania urządze-
nie należy natychmiast wyłączyć i odłączyć od zasilania.
• Nie wkładać ani nie wyjmować zasilacza wilgotnymi
rękami.
• Opakowanie należy przechowywać w miejscu niedostęp-
nym dla dzieci (niebezpieczeństwo uduszenia).
• Kabel sieciowy należy położyć tak, aby uniemożliwić
ewentualne potknięcie się o niego.

89
• Urządzenie, zasilacz i przewód zasilający nie mogą mieć
kontaktu z wodą!
• Urządzenia nie mogą obsługiwać osoby (włącznie z
dziećmi) o ograniczonej sprawności fizycznej, ruchowej
i umysłowej lub z brakiem doświadczenia i/lub wiedzy,
chyba że (w celu zachowania bezpieczeństwa) znajdują
się one pod nadzorem odpowiedniej osoby lub otrzymały
instrukcje, w jaki sposób korzysta się z urządzenia.
• Należy uważać, aby dzieci nie bawiły się urządzeniem.
UWAGA
• Wyciągając wtyczkę zasilacza z gniazdka, nie wolno cią-
gnąć za kabel ani za urządzenie.
• Nie trzymać ani nie nosić urządzenia, trzymając je za
kabel sieciowy.
• Urządzenie należy chronić przed wstrząsami, wilgocią,
zanieczyszczeniem, dużymi wahaniami temperatury i bez-
pośrednim nasłonecznieniem.
• Przyrząd należy chronić przed upadkiem.
3. Zaznajomienie się z urządzeniem
Urządzenie WL 32 firmy Beurer umożliwia delikatną,
naturalną pobudkę. Powolne rozjaśnianie diod LED symu-
luje wschód słońca. W ten sposób można się powoli
przyzwyczaić do warunków świetlnych, a ciało przy-
gotowuje się w tym czasie do przebudzenia. Symulacji
wschodu słońca może towarzyszyć sygnał dźwiękowy. Jako
sygnał dźwiękowy można wybrać radio lub dźwięk „beep”.
Zastosowanie światła podczas budzenia ułatwia delikatną i
radosną pobudkę, bez wywołania efektu zmęczenia samym
dźwiękiem.
4. Opis urządzenia
Widok z przodu
Lampa
LED
Zz (drzemka)/światło
W przypadku funkcji drzemki/światła pokrywę lampki z
przodu należy nacisnąć w dół.

90
Widok z boku
1 Up (w górę/wł.)
2 Głośność (radio)
3 Down (w dół/wył.)
4 Alarm 1–2
5 Funkcja Dobranoc (Sleep)/radio
6 Przycisk „Set/Memory”
Widok z tyłu
Spód
41
52
63
Zasilacz
Kabel AUX
Wejście AUX Gniazdo zasilacza
Reset (przywracanie
ustawień fabrycznych)
3 baterie AAA
(poza zakresem dos-
tawy)
Zz (drzemka)/światło

91
Opis wyświetlacza
1 Pamięć nadajnika (radio)
2 Symbol światła
3 Przycisk „Snooze”
4 Włączone radio
5 Alarm 2 — radio
6 Alarm 2 — dźwięk „beep”
7 Alarm 1 — radio
8 Alarm 1 — dźwięk „beep”
9 Wyświetlane tylko w przypadku formatu 12-godzinnego
10 Minutnik Sleep (funkcja Dobranoc)
5. Uruchomienie
• Zdejmij opakowanie.
• Sprawdź, czy nie brakuje żadnych elementów.
• Sprawdź, czy urządzenie, zasilacz i kabel nie zostały
uszkodzone.
• Zdejmij osłonę przegrody na baterie z tyłu urządzenia i
włóż baterie uważając na odpowiednie skierowanie bie-
gunów. Baterie zapewniają zasilanie urządzenia w przy-
padku awarii prądu.
• Ustaw urządzenie na równej i twardej powierzchni.
• Podłącz złącze zasilacza do gniazda zasilacza z tyłu urzą-
dzenia.
• Podłącz wtyczkę sieciową do odpowiedniego gniazdka.
Na wyświetlaczu urządzenia pojawi się godzina.
Wskazówka
• Jeśli chcesz przywrócić ustawienia fabryczne, wciśnij
ostro zakończonym przedmiotem przycisk Reset na spo-
dzie urządzenia.
6. Obsługa
Wskazówka
Menu ustawień zostaje automatycznie opuszczone, jeśli po
10 sekundach nie zostanie naciśnięty żaden przycisk.
6.1 Ustawianie godziny i długości drzemki
• Naciśnij przycisk
.
Godzina zacznie migać.
Za pomocą przycisków
/
ustaw żądaną godzinę.
Wskazówka
Aby szybciej przestawiać godziny i minuty, należy
przytrzymać przycisk
/
.
• Potwierdź wybraną godzinę przyciskiem
.
1 2 3 4
58
9
10
67

92
Na wyświetlaczu będzie migać symbol „24 Hr.”
Można wybrać format 12- lub 24-godzinny.
• Przyciskami
/
wybierz żądany format godziny i
potwierdź za pomocą przycisku .
Na wyświetlaczu zacznie migać symbol „Zz 05.”
• Za pomocą przycisków
/
wybierz żądaną długość
drzemki (w zakresie 5–60 minut) i potwierdź przyciskiem
.
Wskazówka
Aby móc odczytać w ciemności aktualny czas, naciśnij w
dół przednią część pokrywy lampki.
6.2 Ustawianie alarmu
Urządzenie umożliwia ustawienie dwóch różnych alarmów
(alarm 1 i alarm 2).
• Aby ustawić alarm 1, naciśnij przycisk
raz.
• Aby ustawić alarm 2, naciśnij przycisk
dwa razy.
Odpowiedni czas alarmu zacznie migać na wyświetlaczu.
• Za pomocą przycisków
/
ustaw żądany czas alarmu.
• Za pomocą przycisku
wybierz żądany dźwięk
alarmu dla czasu alarmu.
Jako dźwięk można wybrać radio ( ) lub „beep” ( ).
• Potwierdź przyciskiem
.
Alarm 1
wyłączony
Alarm 2
wyłączony
Alarm 1 włączony,
wybrano „beep” jako
dźwięk budzika
Alarm 2 włączony,
wybrano radio jako dźwięk
budzika
6.3 Wyłączanie alarmu
• Gdy alarm zostanie aktywowany, naciśnij przycisk .
Alarm zostanie wyłączony i będzie włączony dopiero
następnego dnia o ustawionej godzinie.
6.4 Wyłączenie alarmu na stałe
• Aby wyłączyć alarm 1, naciśnij raz przycisk
.
• Aby wyłączyć alarm 2, naciśnij dwa razy przycisk
.
• Teraz naciskaj przycisk
, dopóki wyświetlaczu obok
cyfry 1 lub 2 nie będzie wyświetlany symbol nuty ( ) ani
dzwonka ( ).
• Potwierdź przyciskiem
. Alarm 1 lub 2 został wyłą-
czony.

93
6.5 Funkcja drzemki
Gdy zostanie włączony alarm, można go tymczasowo
wyłączyć za pomocą przycisku Zz. Alarm zostanie ponow-
nie włączony po ustawionym czasie trwania drzemki. Aby
dowiedzieć się, jak ustawić czas drzemki, należy zapoznać
się z rozdziałem 6.1 „Ustawianie godziny i długości
drzemki.”
6.6 Funkcja wschodu słońca
Po ustawieniu alarmu można budzić się dzięki dźwiękowi
oraz symulacji wschodu słońca. Światło LED będzie się
wtedy świeciło coraz jaśniej.
Wskazówka
W tym celu zastosuj dołączony zasilacz.
• Trzymaj przyciśnięty przycisk Zz przez ok. 5 sekund.
Na wyświetlaczu zacznie migać symbol „15.”
• Za pomocą przycisków
/
ustaw żądany symulowany
wschód słońca.
15 = symulacja wschodu słońca rozpocznie się 15 minut
przed ustawionym czasem alarmu.
30 = symulacja wschodu słońca rozpocznie się 30 minut
przed ustawionym czasem alarmu.
OFF = symulacja wschodu słońca jest wyłączona. Z
wyświetlacza zniknie symbol lampki (
) nad godziną.
• Aby potwierdzić wybór, naciśnij przycisk Zz.
6.7 Funkcja lampy/nastrojowe światło zmieniające kolor
Urządzenie może być również używane także jako normalna
lampka lub nastrojowe oświetlenie zmieniające kolor.
Wskazówka
W tym celu zastosuj dołączony zasilacz. Podczas słuchania
radia lub jeżeli aktywowano funkcję Dobranoc, funkcja nast-
rojowego światła ze zmianą koloru jest wyłączona. W tym
czasie może być wyświetlany tylko jeden rodzaj światła bez
zmiany koloru.
• Naciśnij przycisk Zz.
Światło LED zacznie delikatnie świecić.
• Aby włączyć funkcje lampki, naciśnij ponownie przycisk
Zz.
Na wyświetlaczu będzie migać symbol „L 09” (stopień
jasności 09).
• Za pomocą przycisków
/
ustaw żądany stopień
jasności (od L 00 do L 15).
• Jeśli chcesz włączyć nastrojowe oświetlenie ze zmianą
koloru, ponownie naciśnij przycisk Zz.
Nastrojowe światło ze zmianą koloru zacznie się świecić.
Odczekaj kilka sekund, aż kolory zaczną się zmieniać.
• Jeśli chcesz, aby nastrojowe światło miało cały czas ten
sam kolor, ponownie naciśnij przycisk Zz.
• Aby wyłączyć funkcje światła, ponownie naciśnij przycisk
Zz.

94
6.8 Słuchanie radia
Urządzenie ma z tyłu elastyczną antenę kablową. Rozwiń
przewód i rozłóż go jak najbardziej, aby zapewnić jak naj-
lepszy odbiór.
• Aby włączyć radio, naciśnij przycisk .
Na wyświetlaczu zacznie migać symbol „on.” Po mniej
więcej 10 sekundach pojawi się symbol mhz oraz ustawiona
częstotliwość.
• Za pomocą przycisków
/
ustaw wybraną
częstotliwość.
• W celu uruchomienia automatycznego wyszukiwania
stacji przytrzymaj na krótko wciśnięty i następnie puść
przycisk
/
Urządzenie rozpocznie wyszukiwanie stacji
i automatycznie zatrzyma proces wyszukiwania, gdy tylko
znajdzie jakąś stację.
• Aby zmienić głośność radia, naciśnij przycisk
. Za
pomocą przycisków
/
ustaw żądaną głośność.
• Urządzenie rozpocznie wyszukiwanie stacji i automaty-
cznie zatrzyma proces wyszukiwania, gdy tylko znajdzie
jakąś stację.
Wskazówka
Podczas słuchania radia funkcja nastrojowego światła ze
zmianą koloru jest wyłączona. W tym czasie może być
wyświetlany tylko jeden rodzaj światła bez zmiany koloru.
6.9 Zapisywanie stacji radiowej
W pamięci urządzenia można zapisać do 10 stacji
radiowych.
• Aby włączyć radio, naciśnij przycisk
.
• Za pomocą przycisków
/
ustaw częstotliwość stacji,
którą chcesz zapisać.
• Aby zapisać wybraną stację, przytrzymaj wciśnięty przy-
cisk przez mniej więcej 2 sekundy. Na wyświetlaczu
zacznie migać symbol O1 (numer miejsca w pamięci) pod
częstotliwością.
• Wybierz poprzez naciśnięcie przycisku odpowiedni
numer pozycji w pamięci. Aby zapisać stację pod wyb-
ranym numerem, przytrzymaj przez 2 sekundy wciśnięty
przycisk .
6.10 Wybór zapisanej stacji
• Aby włączyć radio, naciśnij przycisk
. Na wyświetlaczu
zacznie migać symbol „on.” Po mniej więcej 10 sekun-
dach pojawi się symbol mhz oraz ustawiona częstotliwość.
• Aby wybrać jedną z zapisanych stacji, naciskaj przycisk
.
6.11 Funkcja Dobranoc
Ta funkcja umożliwia automatyczne wyłączenie radia po
upływie ustalonego czasu.
• Naciśnij dwukrotnie przycisk
.
Na wyświetlaczu pojawi się symbol „sleep” i migający sym-
bol O5.
• Za pomocą przycisku wybierz żądaną liczbę minut,
po jakiej radio ma zostać automatycznie wyłączone.
Możesz wybrać 5, 10, 15, 30, 45, 60, 75 lub 90 minut.

95
• Aby potwierdzić żądaną liczbę minut, odczekaj około 5
sekund, aż wyświetlacz automatycznie wróci do wyświe-
tlania czasu. Żądana liczba minut została ustawiona. Jeśli
chcesz wyświetlić pozostałą liczbę minut, naciśnij przy-
cisk .
Wskazówka
• Jeśli przed upływem ustawionego czasu chcesz wyłączyć
funkcję Dobranoc, naciskaj przycisk
, aż na wyświetla-
czu pojawi się symbol OFF.
Wskazówka
Jeżeli aktywowano funkcję Dobranoc, funkcja nastrojo-
wego światła ze zmianą koloru jest wyłączona. W tym cza-
sie może być wyświetlany tylko jeden rodzaj światła bez
zmiany koloru.
6.12 Odtwarzanie muzyki poprzez wejście AUX
Wejście AUX do urządzenia umożliwia podłączenie odtwarz-
acza MP3.
• Podłącz koniec kabla AUX (dołączony do zestawu) do
wejścia AUX z tyłu urządzenia.
• Drugi koniec kabla AUX podłącz do gniazda słuchawek w
odtwarzaczu MP3.
Wskazówka
Podczas odtwarzania muzyki z wykorzystaniem wejścia
AUX głośność można regulować w odtwarzaczu MP3, a nie
w urządzeniu.
Jeżeli w urządzeniu do gniazda AUX podłączono kabel,
to funkcja nastrojowego światła ze zmianą koloru jest
wyłączona. W tym czasie może być wyświetlany tylko jeden
rodzaj światła bez zmiany koloru.
7. Czyszczenie i pielęgnacja
UWAGA
• Nie wolno dopuścić, aby woda dostała się do wnętrza
urządzenia. Wrazie zmoczenia urządzenia wolno je użyć
ponownie dopiero po całkowitym osuszeniu.
• Nie zanurzać urządzenia ani zasilacza w wodzie lub
innych cieczach.
• Chronić urządzenie przed wstrząsami, wilgocią, kurzem,
chemikaliami, dużymi wahaniami temperatury i zbyt blisko
znajdującymi się źródłami ciepła (np. piec, grzejnik).
• Urządzenie należy czyścić suchą ściereczką.
• Nie używać środków czyszczących do szorowania.
• Zawsze należy wymieniać równocześnie wszystkie baterie
oraz stosować baterie jednego typu. Nie używać ładowal-
nych akumulatorów.
• Wyciekający z baterii elektrolit może spowodować uszko-
dzenie urządzenia. Jeżeli urządzenie nie będzie przez
dłuższy czas używane, należy wyjąć baterie.
• Baterie, z których wycieka elektrolit lub są uszkodzone,
mogą przy zetknięciu ze skórą spowodować oparzenia
chemiczne. W takim przypadku należy nałożyć odpowied-
nie rękawice ochronne.

96
8. Utylizacja
W związku z wymogami w zakresie ochrony środowiska
urządzenia po zakończeniu eksploatacji nie należy wyrzucać
wraz z odpadami domowymi. Utylizację należy
zlecić w odpowiednim punkcie zbiórki wdanym
kraju. Podczas utylizacji należy przestrzegać lokal-
nych przepisów dotyczących utylizacji materiałów.
Urządzenie należy zutylizować zgodnie z dyrektywą o zuży-
tych urządzeniach elektrycznych ielektronicznych – WEEE
(Waste Electrical and Electronic Equipment). W razie pytań
należy zwrócić się do odpowiedniej instytucji odpowiedzial-
nej za utylizację.
Wskazówka: Na bateriach zawierających szkod-
liwe związki znajdują się następujące oznacze-
nia: Pb = bateria zawiera ołów, Cd = bateria
zawiera kadm, Hg = bateria zawiera rtęć.
9. Co robić w przypadku problemów?
Jeśli godzina nie jest wyświetlana prawidłowo lub jeśli
urządzenie nie działa, może być to spowodowane
wyładowaniami elektrostatycznymi lub innymi zakłóceniami.
Dlatego urządzenia nie należy ustawiać w pobliżu takich
urządzeń jak router WLAN itp. Aby rozwiązać problem,
przywróć urządzenie do ustawień fabrycznych.
Jeśli chcesz przywrócić ustawienia fabryczne, wciśnij ostro
zakończonym przedmiotem przycisk Reset na spodzie
urządzenia.
Jeśli problem będzie nadal występował, skontaktuj się z
obsługą klienta.
10. Dane techniczne
Funkcja zastosowania
światła podczas budzenia
Wył., 15, 30 minut przed alar-
mem
Długość drzemki od 5 do 60 minut
Funkcja Dobranoc Można wybrać 5, 10, 15, 30,
45, 60, 75 lub 90 minut oraz
wyłączyć.
Wymiary 12,3 x 12 cm
Masa 180 g
Zasilanie
Wejście: 100 - 240 V; AC 50/60
Hz, max. 200 mA
Wyjście: 5,5V; DC 500 mA
(0,5 A); 2,75 W
Zasilacz
Klasa bezpieczeństwa
Klasa bezpieczeństwa II
Zakres częstotliwości
radiowej
UKW 87,5–108 MHz
Natężenie oświetlenia ok. 15 luksów (przy 15 cm
odległości)
Średnia wydajność pod-
czas eksploatacji
≥ 73.80 %
Pobór mocy przy braku
obciążenia
≤ 0,1 W

97
Zasilacz Producent:
Hong Kong Yee Fu Electronic
Enterprises Co., Ltd.
Adresse: Room 6,
Smart-Space 1, Units 401-403,
Level 4, Cyberport 1, 100
Cyberport Road, Hong Kong
Nr modelu: L008A055050E
Zastrzega się prawo do zmian technicznych.
Potwierdzamy niniejszym, że ten produkt jest zgodny z
dyrektywą europejską RED 2014/53/EU. Certyfikat zgodno-
ści CE dot. tego produktu można znaleźć na stronie:
www.beurer.com/web/we-landingpages/de/cedeclaratio-
nofconformity.php.
11. Gwarancja / serwis
Firma Beurer GmbH, Söflinger Straße 218, D-89077 Ulm
(zwana dalej „Beurer”) udziela gwarancji na ten produkt na
następujących warunkach i w poniżej opisanym zakresie.
Poniższe warunki gwarancji nie naruszają usta-
wowych zobowiązań gwarancyjnych sprzedającego
wynikających z umowy kupna zawartej z kupującym.
Gwarancja obowiązuje również w sposób
nienaruszający bezwzględnie obowiązujących prze-
pisów dot. odpowiedzialności.
Firma Beurer gwarantuje bezawaryjne działanie oraz
kompletność niniejszego produktu.
Obowiązujący na całym świecie okres gwarancji obejmuje 3
lata/lat, licząc od zakupu nowego, nieużywanego produktu
przez kupującego.
Niniejsza gwarancja dotyczy tylko produktów nabytych
przez kupującego jako konsumenta wyłącznie w celach pry-
watnych w ramach użytku domowego.
Obowiązuje prawo niemieckie o ile jest to prawnie dopus-
zczalne.
Jeśli w okresie obowiązywania gwarancji produkt zosta-
nie uznany za niekompletny lub wadliwy w działaniu zgod-
nie z poniższymi postanowieniami, firma Beurer bezpłatnie
wymieni go lub naprawi zgodnie z niniejszymi warunkami
gwarancji.
Jeśli kupujący chce zgłosić reklamację gwarancyjną,
najpierw kontaktuje się z lokalnym dealerem: patrz
załączona lista „Service International” z adresami ser-
wisowymi.
Następnie kupujący otrzymuje dalsze informacje dot. rozpa-
trywania reklamacji gwarancyjnej, np. gdzie wysłać produkt
i jakie dokumenty są wymagane

98
Roszczenie z tytułu gwarancji będzie rozpatrywane tylko
wtedy, gdy kupujący może przedłożyć
– kopię faktury/paragon zakupu oraz
– oryginalny produkt
firmie Beurer lub autoryzowanemu partnerowi firmy Beurer.
Niniejsza gwarancja wyraźnie nie obejmuje:
– zużycia wynikającego z normalnego użytkowania lub
zużywania się produktu;
– dostarczanych z tym produktem akcesoriów, które
zużywają się lub ulegają zużyciu podczas prawidłowego
użytkowania (np. baterii, akumulatorów, mankietów, usz-
czelek, elektrod, źródeł światła, nakładek i akcesoriów
inhalatora);
– produktów, które były używane, czyszczone, przechow-
ywane lub konserwowane w niewłaściwy sposób i/lub
niezgodnie z treścią instrukcji obsługi, a także produk-
tów, które zostały otwarte, naprawione lub zmodyfiko-
wane przez kupującego lub centrum serwisowe nieauto-
ryzowane przez firmę Beurer;
– uszkodzeń powstałych podczas transportu między pro-
ducentem a klientem lub między centrum serwisowym
a klientem;
– produktów, które zostały zakupione jako artykuły grupy
B („B-Ware”) lub jako artykuły używane;
– szkód następczych, które wynikają z wady tego pro-
duktu (w tym przypadku mogą jednak istnieć roszczenia
z tytułu odpowiedzialności za produkt lub wynikające z
innych bezwzględnie obowiązujących przepisów prawa
dot. odpowiedzialności).
Naprawy lub całkowita wymiana w żadnym wypadku nie
przedłużają okresu gwarancji.
Prawo do pomyłek i zmian zastrzeżone

99

100
589.22_WL32_2020-07-02_04_IM1_BEU
BEURER GmbH
•
Söflinger Str. 218
•
89077 Ulm (Germany)
•
www.beurer.com
www.beurer-healthguide.com
•
www.beurer-gesundheitsratgeber.com
-
 1
1
-
 2
2
-
 3
3
-
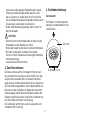 4
4
-
 5
5
-
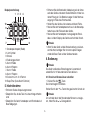 6
6
-
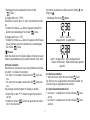 7
7
-
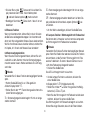 8
8
-
 9
9
-
 10
10
-
 11
11
-
 12
12
-
 13
13
-
 14
14
-
 15
15
-
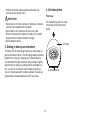 16
16
-
 17
17
-
 18
18
-
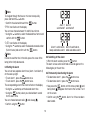 19
19
-
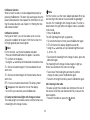 20
20
-
 21
21
-
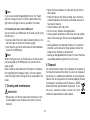 22
22
-
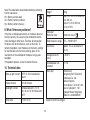 23
23
-
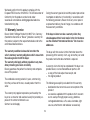 24
24
-
 25
25
-
 26
26
-
 27
27
-
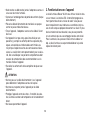 28
28
-
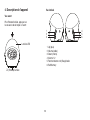 29
29
-
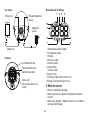 30
30
-
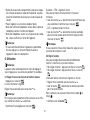 31
31
-
 32
32
-
 33
33
-
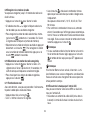 34
34
-
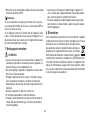 35
35
-
 36
36
-
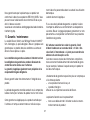 37
37
-
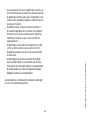 38
38
-
 39
39
-
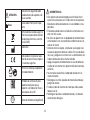 40
40
-
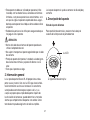 41
41
-
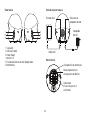 42
42
-
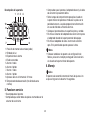 43
43
-
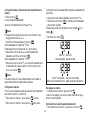 44
44
-
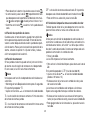 45
45
-
 46
46
-
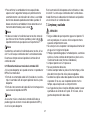 47
47
-
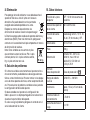 48
48
-
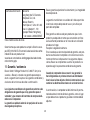 49
49
-
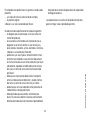 50
50
-
 51
51
-
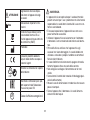 52
52
-
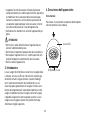 53
53
-
 54
54
-
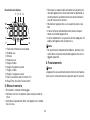 55
55
-
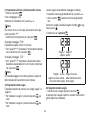 56
56
-
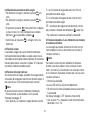 57
57
-
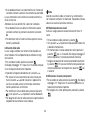 58
58
-
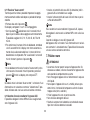 59
59
-
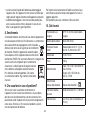 60
60
-
 61
61
-
 62
62
-
 63
63
-
 64
64
-
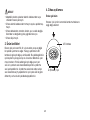 65
65
-
 66
66
-
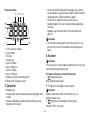 67
67
-
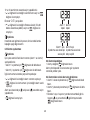 68
68
-
 69
69
-
 70
70
-
 71
71
-
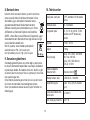 72
72
-
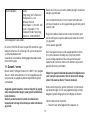 73
73
-
 74
74
-
 75
75
-
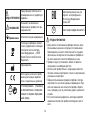 76
76
-
 77
77
-
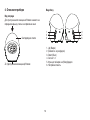 78
78
-
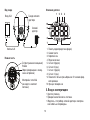 79
79
-
 80
80
-
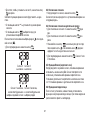 81
81
-
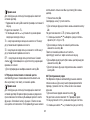 82
82
-
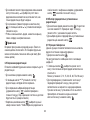 83
83
-
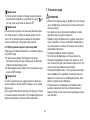 84
84
-
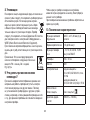 85
85
-
 86
86
-
 87
87
-
 88
88
-
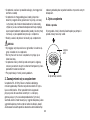 89
89
-
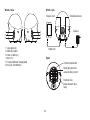 90
90
-
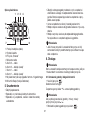 91
91
-
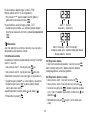 92
92
-
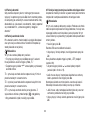 93
93
-
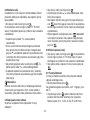 94
94
-
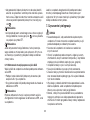 95
95
-
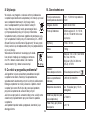 96
96
-
 97
97
-
 98
98
-
 99
99
-
 100
100


Beurer WL32 WAKE-UP LIGHT El manual del propietario
- Categoría
- Relojes de mesa
- Tipo
- El manual del propietario
- Este manual también es adecuado para
en otros idiomas
Artículos relacionados
-
Beurer WL 75 El manual del propietario
-
Beurer WL 32 El manual del propietario
-
Beurer WL 50 El manual del propietario
-
Beurer WL 70 El manual del propietario
-
Beurer WL 90 El manual del propietario
-
-
-
-
-
Otros documentos
-
Medisana WL 444 El manual del propietario
-
TFA Light Alarm Clock with Nature Sounds and Colour Changing Mood Light MOOD LIGHT Manual de usuario
-
-
-
-
TFA Dostmann CHARGE-IT WIRELESS Manual de usuario
-
Medisana WL 450 El manual del propietario
-
-
Medisana WL 460 El manual del propietario
-
OttLite BY200B-FFP Manual de usuario