Kenmore 25310301001 El manual del propietario
- Categoría
- Frigoríficos-congeladores
- Tipo
- El manual del propietario
Este manual también es adecuado para

Freezer
Use & Care Guide
Congelador
Guía para su uso y cuidado
Congélateur
Guide d’utilisation et d’entretien
Sears, Roebuck and Co., Hoffman Estates, IL 60179 U.S.A.
Sears Canada, Inc., Toronto, Ontario, Canada M5B 2B8
ENGLISH
ESPAÑOL
FRANÇAIS
®
www.sears.com
216769200 (0009)

2
ENGLISH
Record Serial/Model Numbers ............ 2
Safety .................................................. 2-3
Warranty .............................................. 3
Canada - Limited Warranty ................. 4
First Steps........................................... 5-6
Energy Saving Tips ............................. 6
Setting the Temperature Control ......... 6
Freezer Optional Features .................. 7-8
Care and Cleaning .............................. 9-10
Power Failure / Freezer Failure ........... 10
Troubleshooting Guide......................... 11-12
Sears Service...................................... 13
Sears Canada Customers................... 13
SERIAL / MODEL NUMBERS
READ AND SAVE THESE INSTRUCTIONS
This Owner’s Guide provides specific operating instructions
for your model. Use your freezer only as instructed in this
guide. These instructions are not meant to cover every
possible condition and situation that may occur. Common
sense and caution must be practiced when installing,
operating, and maintaining any appliance.
Record Your Model and Serial Numbers
Record the model and serial numbers in the space provided
below. The serial plates are located either on the upper left
wall inside the freezer (upright models), or the left exterior
wall (chest models).
Model Number:
or
Serial Number:
Purchase Date:
READ ALL INSTRUCTIONS BEFORE USING THIS
FREEZER.
FOR YOUR SAFETY
Do not store or use gasoline, or other flammable vapors and
liquids in the vicinity of this or any other appliance. Read
product labels for flammability and other warnings.
CHILD SAFETY
• Destroy carton, plastic bags, and any exterior wrapping
material immediately after the freezer is unpacked.
Children should never use these items to play. Cartons
covered with rugs, bedspreads, plastic sheets or stretch
wrap may become airtight chambers, and can quickly
cause suffocation.
• Remove all staples from the carton. Staples can cause
severe cuts, and destroy finishes if they come in contact
with other appliances or furniture.
• An empty, discarded ice box, refrigerator, or freezer is a
very dangerous attraction to children.
• Remove and discard any spacers used to secure the
shelves during shipping. Small objects are a choke
hazard to children.
TABLE OF CONTENTS
IMPORTANT SAFETY INSTRUCTIONS
Proper Disposal of Your
Refrigerator/Freezer
Risk of child entrapment.
Child entrapment and suffocation are
not problems of the past. Junked or
abandoned refrigerators or freezers
are still dangerous — even if they will
sit for "just a few days." If you are
getting rid of your old refrigerator or
freezer, please follow the instructions
below to help prevent accidents.
BEFORE YOU THROW AWAY YOUR
OLD REFRIGERATOR/FREEZER:
• Remove
doors.
• Leave shelves
in place so
children may
not easily
climb inside.
253.
Remove the door(s) of any appliance that is not in use,
even if it is being discarded.
970.

FI3RST
ENGLISH
ELECTRICAL INFORMATION
These guidelines must be followed to ensure that
safety mechanisms in the design of this freezer will
operate properly.
• Refer to the serial plate for correct electrical rating.
The power cord of the appliance is equipped with a
three-prong grounding plug for your protection against
shock hazards. It must be plugged directly into a
properly grounded three-prong receptacle, protected with
a 15 amp time delay fuse or circuit breaker. The
receptacle must be installed in accordance with local
codes and ordinances. Consult a qualified electrician.
Receptacles protected by Ground Fault Circuit
Interrupters (GFIC) are NOT RECOMMENDED. Do not
use an extension cord or adapter plug.
• If voltage varies by 10% or more, freezer performance
may be affected. Operating freezer with insufficient
power can damage the motor. Such damage is not
covered under the warranty. If you suspect your house
hold voltage is high or low, consult your power company
for testing.
• To prevent the freezer from being turned off
accidentically, do not plug unit into an outlet controlled
by a wall switch or pull cord.
• Do not pinch, knot, or bend the cord in any manner.
OTHER PRECAUTIONS
• Never unplug the freezer by pulling on the cord.
Always grip the plug firmly, and pull straight out from
the receptacle.
NOTE: Turning the temperature control to OFF turns off the
compressor, but does not disconnect the power to the light
bulb or other electrical components.
FREEZER WARRANTY
FULL ONE-YEAR WARRANTY ON FREEZER
For one year from the date of purchase, when this freezer
is operated and maintained according to the instructions
provided in this Owner’s Guide, Sears will repair this freezer,
free of charge, if defective in material or workmanship.
FULL FIVE-YEAR WARRANTY ON SEALED
REFRIGERATION SYSTEM
For five years from the date of purchase, when this freezer
is operated and maintained according to the instructions
provided in this Owner’s Guide, Sears will repair the sealed
system (consisting of refrigerant,connecting tube, and
compressor), free of charge, if defective in material or
workmanship.
The above freezer warranty applies only to freezers which
are used for storage of food for private household purposes.
FOOD LOSS COVERAGE LIMITATION
If promptly reported to your nearest Sears store or Service
Center, Sears will reimburse you up to a total of $100.00
for the value of food, as verified by Sears, lost while stored
in the freezer when used for private household purposes
as a result of:
1. Defects that occur during the first year following the date
of purchase.
2. Failure of the sealed refrigeration system (including
refrigerant, connecting tubing, and compressor), due to
defects that occur during the second through fifth year
after purchase. If freezer is used for other than private
household purposes, Sears will not be responsible for
any food loss. Food losses resulting from other than the
above stated defects, such as natural spoilage, power
interruption, inadequate power, manual disconnect of
power supply, fire damage, water damage, theft, etc.,
are beyond our control and are not covered by Sears.
Some states do not allow the exclusion or limitation of
incidental or consequential damages, so the above
limitation or exclusion may not apply to you. This war-
ranty gives you specific legal rights, and you may have
other rights which vary from state to state.
Warranty service is available by contacting the NEAREST
SEARS SERVICE CENTER/DEPARTMENT in the United
States. See the back page of this manual.
Sears, Roebuck and Co.
Dept. 817WA
Hoffman Estates, IL 60179
Avoid fire hazard or
electric shock. Do not use an extension
cord or an adapter plug. Do not remove
any prong from the power cord.

4
ENGLISH
Notes
PRINTED IN U.S.A.
CANADA — LIMITED WARRANTY
PRINTED IN U.S.A.
If any service is required under this warranty, simply call 1-800-4-MY-HOME
SM
(1-800-469-4663).
This warranty is in addition to any statutory warranty. The above warranty covers
Kenmore
Freezers sold and operated in
Canada only and shall not apply if the freezer is used for other than domestic purposes.
Sears Maintenance Agreement
Maintain the value of your
Kenmore
freezer with a Sears Maintenance Agreement.
SEARS CANADA INC. • Toronto, Canada • M5B 2B8
Sears Canada Inc., warrants every new
Kenmore
freezer to be free from defects in material or workmanship. What Sears
will do, free of charge, in case of defect:
?derevocsitahW
?detnarrawgnolwoH
)elasfoetadmorf(
,noitpo'sraeStA:straP
ylppusroriaperrehtie
:roftraptnemecalper
:robaL
roderiaperllatsnI
:roftraptnemecalper
rosserpmoCehTSRAEY)01(NETSRAEY)01(NETSRAEY)5(EVIF
metsySdelaeSe
hT
,tnaregirferfognitsisnoc(
)resnednocdna,rotaropave
SRAEY)5(EVIFSRAEY)5(EVIFSRAEY)5(EVIF
rostraprehtollA
stnemtsujda
RAEY)1(ENORAEY)1(ENORAEY)1(ENO
Freezers
Normal Responsibility of the Customer
The following items, since they are not manufacturing defects, are not included in the warranty, but are the responsibility of
the customer:
1) Damage to finish after delivery.
2) Improper power supply, low voltage, or any defects in the house wiring system or appliance not connected
to electric outlet.
3) Replacement of light bulbs.
4) Damage caused by moving the product from its original installation.
5) Service required as a result of alteration, abuse, fire, floods, or acts of God.
6) Providing adequate air circulation to the refrigerating system.
7) Proper use and care of product as listed in the customer's manual; proper setting of the controls.

FI5RST
ENGLISH
FIRST STEPS
This Owner’s Guide provides specific operating instructions
for your model. Use the freezer only as instructed in this
Owner’s Guide. Before starting the freezer, follow these
important first steps.
INSTALLATION
• Choose a place that is near a grounded electrical outlet.
Do Not use an extension cord or an adapter plug.
• For the most efficient operation, the freezer should be
located where surrounding temperatures will not exceed
110°F (43°C). Temperatures of 32°F (0°C) and below will
NOT affect freezer operation. Additional compressor
heaters are not recommended.
•
Allow space around the unit for good air circulation.
Leave a 3 inch (75 mm) space on all sides of the freezer
for adequate circulation.
NOTE: The exterior walls of the freezer may become quite
warm as the compressor works to transfer heat from the
inside. Temperatures as much as 30° F warmer than room
temperature can be expected. For this reason it is particu-
larly important in hotter climates to allow enough space for
air circulation around your freezer.
LEVELING
The freezer must have all bottom corners resting firmly on
a solid floor. The floor must be strong enough to support a
fully loaded freezer. NOTE: It is Very Important for your
freezer to be level in order to function properly. If the
freezer is not leveled during installation, the door may be
misaligned and not close or seal properly, causing cooling,
frost, or moisture problems.
To Level Upright Models:
After discarding crating screws and wood base, use a
carpenter’s level to level the freezer from front-to-back.
Adjust the plastic leveling feet in front, ½ bubble higher, so
that the door closes easily when left halfway open.
To Level Chest Models:
If needed, add metal or wood shims between foot pads and
floor.
CLEANING
• Wash any removable parts, the freezer interior, and
exterior with mild detergent and warm water. Wipe dry.
Do not use harsh cleaners on these surfaces.
• Do not use razor blades or other sharp instruments,
which can scratch the appliance surface when removing
adhesive labels. Any glue left from the tape can be
removed with a mixture of warm water and mild deter-
gent, or touch the residue with the sticky side of tape
already removed. Do not remove the serial plate.

6
ENGLISH
SETTING THE TEMPERATURE CONTROL
COOL DOWN PERIOD
• For safe food storage, allow 4 hours for the freezer to
cool down completely. The freezer will run continuously
for the first several hours. Foods that are already frozen
may be placed in the freezer after the first few hours of
operation. Unfrozen foods should NOT be loaded into
the freezer until the freezer has operated for 4 hours.
• When loading the freezer, freeze only 3 pounds of
fresh food per cubic foot of freezer space at one time.
Distribute packages to be frozen evenly throughout the
freezer. It is not necessary to turn the control knob to a
colder setting while freezing food.
TEMPERATURE CONTROL
The temperature control is located inside the freezer on
upright models, and on the left outside wall on chest
models. The temperature is factory preset to provide
satisfactory food storage temperatures. However, the
temperature control is adjustable to provide a range of
temperatures for your personal satisfaction. If a colder
temperature is desired, turn the temperature control knob
toward COLDEST and allow several hours for temperatures
to stabilize between adjustments.
DOOR REMOVAL (UPRIGHT MODELS)
If door must be removed to fit through narrow doorways:
1. Gently lay freezer on its back, on a throw rug or
blanket.
2. Remove the base panel by unscrewing two screws
from front of base panel. Remove wire from clips on
bottom of cabinet. (Figure 1)
3. Unplug connector by holding the cabinet connector in
place, and pulling door connector out. (Figure 1)
4. At the top of the cabinet, lift up plastic hinge cover, and
fold back. (Figure 2)
5. Use a Phillips® screwdriver to loosen and retighten
the screws on the top hinge to insure a secure
assembly, and prevent hinge slippage.
6. Remove the top hinge from cabinet, and lift door off
lower hinge pin.
7. After door is removed, remove the two screws from the
bottom hinge.
8. To replace door, reverse above order.
ENERGY SAVING TIPS
• The freezer should be located in the coolest area of the
room, away from heat producing appliances or heating
ducts, and out of direct sunlight.
• Let hot foods cool to room temperature before placing in
the freezer. Overloading the freezer forces the compres-
sor to run longer. Foods that freeze too slowly may lose
quality or spoil.
• Be sure to wrap foods properly, and wipe containers dry
before placing them in the freezer. This cuts down on
frost build-up inside the freezer.
• Freezer shelves should not be lined with aluminum foil,
wax paper, or paper toweling. Liners interfere with cold
air circulation, making the freezer less efficient.
• Organize and label food to reduce door openings and
extended searches. Remove as many items as needed
at one time, and close the door as soon as possible.

FI7RST
ENGLISH
FREEZER OPTIONAL FEATURES
NOTE: Your freezer may have some, or all of the
features listed below. Become familiar with these
features, and their use and care.
POWER ON LIGHT
The yellow
Power On
indicator light indicates that the freezer is
properly connected to electrical power. The light glows even
when the temperature control is turned to OFF. If the light goes
out, refer to
Freezer Does Not Run
Section in the Trouble-
shooting Guide. If the freezer appears to be operating, the
light element may be burned out. Call an authorized servicer
for replacement.
TEMP ALARM (SOME MODELS)
This feature is designed to provide a warning if the inside
temperatures reach an unsafe level. The Temp. Alarm Feature
operates on household electricity. It will not function if house-
hold electricity is interrupted.
When the freezer is initially plugged in, the red Temp. Alarm
Indicator Light blinks. The indicator light will continue to blink
until the freezer has reached a safe freezing temperature. If a
malfunction causes an unsafe temperature inside the freezer,
the red light will blink and the buzzer will sound. To silence the
buzzer, press the ALARM OFF button. The Indicator Light will
continue to blink until a safe freezing temperature is again
reached.
If the ALARM OFF button is not pressed, the buzzer will turn
itself off automatically after 48 hours, but the red Temp Alarm
Light will continue to blink.
mralApmeT
thgiLrotacidnI
noitcnuF
tnelis,tuothgiL
rezzub
noitarepolamroN
,thgilDERgniknilB
rezzubtnelis
dednetxeronoitallatsnilaitinI
mrawset
acidniegatuorewop
.erutarepmet
,thgilDERgniknilB
gnidnuosrezzub
oT.noitidnocerutarepmetmraW
.PMETsserp,rez
zubecnelis
eeS.nottubFFOMRALA
ediuGgnitoohselbuorT rof
.smelborpelbissop
Indicator Lights and
Switches In Handle &
Pop Out Key
Chest Models
Upright Models
HIGH-TEMP ALARM SWITCH (SOME MODELS)
An audible alarm will sound if the freezer temperature reaches
unsafe levels. The alarm operates on household electricity. If
the power fails, the alarm will not perform.
An ON/OFF switch allows the high temperature alarm to be
deactivated if desired. NOTE: You must open the freezer door to
view the alarm switch. The freezer is shipped with the switch in
the OFF position. After the freezer has run long enough to
lower the temperature, you may set the switch to the ON
position.
• To activate the alarm, set the switch to the ON position.
• To deactivate the alarm, set the switch to the OFF position.
Flash Defrost Plunger - Chest Models
Flash Defrost Plunger - Upright Models
Plunger
High-Temp Alarm Switch
BLUE DEFROST BUTTON (SOME CHEST MODELS)
IMPORTANT:It is time to defrost and clean the freezer when the
blue defrost button is completely covered with frost.
QUICK FREEZE (SOME MODELS)
To activate the Quick Freeze feature, push the switch to the ON
position. The green light will appear, and the freezer will run
continuously (except when in Flash Defrost), driving freezer
temperature to the coldest possible temperatures. The switch
automatically turns off after 24 hours. Use this feature just prior
to adding large quantities of unfrozen foods (not to exceed 3
pounds per cubic foot of freezer space).
FLASH DEFROST (SOME MODELS)
NOTE: The Temp Alarm should be turned off when freezer is
being defrosted. The Flash Defrost feature will defrost the
freezer in a fraction of the time usually required. To defrost,
remove all food, and follow these steps:
• Pull out the Flash Defrost plunger. Leave door open while
defrosting. (Closing the freezer lid/door will push in the
plunger, and the Flash Defrost will be turned off.)
• Push the Flash Defrost plunger in to restart freezer after
defrosting.
• Turn on the Temp Alarm after freezer has reached freezing
temperatures.

8
ENGLISH
SLIDE-OUT BASKET OR TRIVET (UPRIGHT MODELS)
A Slide-Out Basket (some models) or Trivet (some models),
located at the bottom of the freezer, provides separate
storage space for items that are difficult to store on freezer
shelves. To remove the basket or trivet, pull out and lift up.
JUICE CAN RACK (UPRIGHT MODELS)
The Juice Can Rack on the freezer door is specially ridged
to store juice cans and prevent them from rolling out of the
shelf.
SECURITY LOCK WITH POP-OUT KEY
This security lock fastens the door snugly, ensuring stored
food is secure. To lock or unlock the freezer, push the key
into the lock and turn. The key pops out of the lock after it
has been turned.
INTERIOR LIGHT
The light comes on automatically when the door is opened.
To replace the light bulb, turn the temperature control to
OFF and unplug the electrical cord. Replace the old bulb
with a bulb of the same wattage.
TILT-OUT SHELF
This shelf is located inside on the freezer door and provides
additional storage space. To access an item, tilt top of
“basket” shelf down.
ADJUSTABLE INTERIOR SHELVES
(UPRIGHT MODELS)
Multi-position adjustable interior shelves can be moved to
any position for larger or smaller packages. The shipping
spacers that stabilize the shelves for shipping may be
removed and discarded.
SLIDE-ASIDE BASKET (SOME CHEST MODELS)
This basket helps organize odd-shaped items. To reach other
packages in the freezer, slide the basket aside, or lift out.
DROP FRONT SHELF (UPRIGHT MODELS)
The Drop Front Shelf, located at the bottom of the freezer,
provides a separate compartment for small irregular
shaped items or large, bulky items. Lift the shelf front up
and out to remove.

FI9RST
ENGLISH
CARE AND CLEANING
Some upright freezers are frost-free and defrost automati-
cally, but should be cleaned occasionally.
BETWEEN DEFROSTINGS
To avoid frequent defrosting, occasionally use a plastic
scraper to remove frost. Scrape with a pulling motion.
Never use a metal instrument to remove frost.
DEFROSTING
It is important to defrost and clean the freezer when ¼ to ½
inch of frost has accumulated. Frost may tend to accumu-
late faster on the upper part of the freezer due to warm,
moist air entering the freezer when the door is opened.
Remove food and leave the door open when defrosting the
freezer.
• On upright models with a defrost drain (Figure 1),
remove the drain plug on the inside floor of the freezer
by pulling straight out. To access the external drain tube
on models with a base panel, first remove the two
screws from the base panel. Locate the drain tube near
the left center under the freezer. Place a shallow pan
under the drain tube. Defrost water will drain out. Check
pan occasionally so water does not overflow. A ½ inch
garden hose adapter can be used to drain the freezer
directly into a floor drain.If your model is not equipped
with an adapter, one can be purchased at most hard-
ware stores. Replace the drain plug when defrosting and
cleaning are completed. If the drain is left open, warm air
may enter the freezer.
• On chest models with a defrost drain, place a shallow
pan or the Divider/Drain Pan (some models) beneath the
drain outlet (Figure 2). A ½ inch garden hose adapter
can be used to drain the freezer directly into a floor drain
(Figure 3). Pull out the drain plug inside the freezer, and
pull off the outside defrost drain plug (Figure 4).
Defrost water will drain out. Check pan occasionally so
water does not overflow. Replace the drain plugs when
defrosting is completed.
• On models without a defrost drain, place towels or
newspapers on the freezer bottom to catch the frost. The
frost will loosen and fall. Remove towels and/or newspapers.
• If the frost is soft, remove it by using a plastic scraper. If
the frost is glazed and hard, fill deep pans with hot water
and place them on the freezer bottom. Close the freezer
door. Frost should soften in about 15 minutes. Repeat
this procedure if necessary.
Damp objects stick to
cold metal surfaces. Do not touch
interior metal surfaces with wet or
damp hands.

10
ENGLISH
CLEANING THE INSIDE
After defrosting, wash inside surfaces of the freezer with a
solution of two tablespoons of baking soda in one quart
(1.136 litres) warm water. Rinse and dry. Wring excess
water out of the sponge or cloth when cleaning in the area
of the controls, or any electrical parts.
Wash the removable parts and door basket with the baking
soda solution mentioned above, or mild detergent and
warm water. Rinse and dry. Never use metallic scouring
pads, brushes, abrasive cleaners, or alkaline solutions on
any surface. Do not wash removable parts in a dishwasher.
CLEANING THE OUTSIDE
Wash the cabinet with warm water and mild liquid deter-
gent. Rinse well and wipe dry with a clean soft cloth.
Replace parts and food.
If leaving the freezer
door open while on vacation, make
certain that children cannot get into
the freezer and become entrapped.
WARNING
VACATION AND MOVING TIPS
Short Vacations:
Leave the freezer operating during vacations of less
than three weeks.
Long Vacations:
If the freezer will not be used for several months:
• Remove all food and unplug the power cord.
• Clean and dry the interior thoroughly.
• Leave the freezer door open slightly, blocking it open if
necessary, to prevent odor and mold growth.
Moving: When moving the freezer, follow these guidelines
to prevent damage:
• Disconnect the power cord plug from the wall outlet.
• Remove foods, then defrost, and clean the freezer.
• Secure all loose items such as base panel, baskets, and
shelves by taping them securely in place to prevent
damage.
• In the moving vehicle, secure freezer in an upright
position to prevent movement. Also protect outside of
freezer with a blanket, or similar item.
POWER FAILURE / FREEZER FAILURE
NOTE: Do not open freezer door
unnecessarily if freezer is off for
several hours.
If a power failure occurs, frozen foods will stay frozen for
at least 24 hours if the freezer is kept closed. If the power
failure continues, pack seven or eight pounds of dry ice into
the freezer every 24 hours. Look in the Yellow Pages under
Dry Ice
,
Dairies
, or
Ice Cream Manufacturers
for local dry
ice suppliers. Always wear gloves and use caution when
handling dry ice.
If the freezer has stopped operating, see
Freezer Does
Not Run
in the Troubleshooting Guide. If you cannot
solve the problem, call an authorized servicer immediately.
If the freezer remains off for several hours, follow the
directions above for the use of dry ice during a power
failure. If necessary, take the food to a local locker plant
until the freezer is ready to operate. Look in the Yellow
Pages under
Frozen Food Locker Plants
.

FI11RST
ENGLISH
GNITOOHSELBUORT
EDIUG
tsilsihT.esnepxednaemituoyevasyamtI.tsilsihtweiver,ecivresrofgnillacerofeB
ropihsnamkrowevitcefedfotlu
serehttoneratahtsecnerucconommocsedulcni
.ecnailppasihtnislairetam
MELBORPESUACNOITCERROC
NURTONSEODREZEERF
.nurtonseodrezeerF
tiucricaotnideggulpsirezeerF•
.tpurretnitluafdnuorgasahtaht
ehtnisilortnocerutarepmeT
•
.noitisopFFO
,nideggulpebtonyamrezeerF•
.esoolebyamgulpro
deppirtronwolbesufesuoH•
.rekaerbtiucric
.egatu
orewoP•
,teltuoehttuobaerusnuerauoyfI.tiucricrehtonaesU•
.naicinhcetdeifitrecaybdekcehctievah
eeS• lortno
CerutarepmeTehtgnitteS .noitceS
.teltuootnidehsupylthgitsigulperusnE•
teseR.esufyaled-emitpma51ahtiwesuf
ecalper/kcehC•
.rekaerbtiucric
.ynapmoCcirtcelElacolllaC.sthgilesuohkcehC•
ootrohcumootsnurrezeerF
.gnol
.
tohsirehtaewedistuoromooR•
neebyltnecersahrezeerF•
fodoireparofdetcennocsid
.emit
tohromrawfostnuomaegraL
•
.yltnecerderotsneebevahdoof
yltneuqerfootdenepoerasrooD•
.gnolootro
ylthgilsebyamroodrezeerF•
.nepo
ootte
ssilortnoCerutarepmeT•
.wol
,nrow,ytridsiteksagrezeerF•
.dettifylroopro,dekcarc
esehtrednuredrahkrowotrez
eerfehtroflamrons'tI•
.snoitidnoc
.yletelpmocnwodloocotrezeerfehtrofsruoh4sekattI•
ehtlitnueromnurotreze
erfesuaclliwdoofmraW•
.dehcaersierutarepmetderised
.eromnurottisesuacrezeerfehtgniretneriamraW•
.netfoss
elsroodnepO
eeS• "SMELBORPROOD" noitceS .
•sruohlareveswollA.gnittesremrawaotbonklortnocnruT
.ezilibatsoteru
tarepmetehtrof
esuaclliwlaesroodehtniskaeL.teksagegnahcronaelC•
derisedniatniamotredroniregnolnurotreze
erf
.erutarepmet
sierutarepmetrezeerFroiretnI
.dlocoot
oottessilortnoCerutarepmeT•
.wol
sruohlareveswollA.g
nittesremrawaotlortnocehtnruT•
.ezilibatsoterutarepmetehtrof
sierutarepmetrezeerFroiretnI
.mrawoot
oottes
silortnoCerutarepmeT•
.mraw
sirognolootnepotpeksirooD•
.yltneuqerfootdenepo
gnitaesebtonyamrooD•
.ylreporp
tohromrawfostnuomaegraL•
derotsneebevahyamdoof
.yltnecer
neebyltnecersahrezeerF•
fodoireparofdetcennocsid
.emit
ehtrofsruohlareveswollA.gnittesredlocaotlortnocnruT•
.ezilibatsoterutarepmet
siroodehtemityreverez
eerfehtsretneriamraW•
.netfosselroodehtnepO.denepo
eeS• "SMELBORPROOD" .noitceS
stihcaerotecnahcadahsahrez
eerfehtlitnutiaW•
.erutarepmetdetceles
.yletelpmocnwodloocotsruoh4seriuqerrezeerF•
ecafruslanretxerezeer
F
.mrawsierutarepmet
nacsllawrezeerflanretxeehT•
remrawF°03sahcumsaeb
.erutarepmetmoornaht
refsnartotskrow
rosserpmocehtelihwlamronsisihT•
.tenibacrezeerfehtedisnimorftaeh
ESIONDNADNUOS
revenehwsleveldnuosreduoL
.nosirezeerf
desaercnievahsrezeerfnredoM•
eromdnayticapacegarots
yehT.serutarep
metelbats
ycneiciffehgihaeriuqer
.rosserpmoc
,wolsilevelesiongnidnuorrusehtnehW.lamronsisihT•
ehtslooctie
lihwgninnurrosserpmocehtraehthgimuoy
.roiretni
nehwsleveldnuosregnoL
.nosemocrosserpmoc
rehgihtasetarepor
ezeerF•
ehtfotratsehtgnirudserusserp
.elcycNO
rezeerfsaraeppasidroffolevellliwdnuoS.lamronsisihT•
.nurots
eunitnoc

12
ENGLISH
MELBORPESUACNOITCERROC
(ESIONDNADNUOS
).tnoC
dnuosgnikcarcrognippoP
.nosemocrosserpmocnehw
noisnapxeogrednustraplateM•
retawtohnisa,noitcartnocdna
.sepip
rezeerfsaraeppasidroffolevellliwdnuoS.lamronsisihT•
.nurotseunitnoc
,dnuosgnilgrugrognilbbuB
.gniliobretawekil
loocotdesu(tnaregirfeR•
tuohguorhtgn
italucricsi)rezeerf
.metsyseht
.lamronsisihT•
.esiongnilttarrognitarbiV
noskcortI.leveltonsirezeerF•
devom
sitinehwroolfeht
.ylthgils
.kaewronevenusiroolF•
sitinehwroolfnoskcorrezeerF
.ylthgilsdevom
.llawehtgnihcuotsirezeerF•
ehtni"gnileveL"otrefeR.tinuehtleveL• spetStsriF
.noitceS
ehtleveL.rezeerftroppusyletauqedana
croolferusnE•
ehtfotraprednusmihslatemrodoowgnittupybrezeerf
.rezeerf
otrefeR.ylthgilsrezeerfevomrorezee
rfehtleveleR•
ehtni"gnileveL" spetStsriF .noitceS
REZEERFEDISNITSORF/ERUTSIOM/RETAW
edisninosmroferutsioM
.sllawrezeerf
,dimuhdnatohsirehtaeW•
foetarlanretnisesaercnihcihw
.pu-dliubtsorf
gni
taesebtonyamrooD•
.ylreporp
siro,gnolootnepotpeksirooD•
.yltneuqerfootdenepo
.lamronsisihT•
"eeS• SMELBORPROOD .noitceS"
.netfosselroodehtnepO•
REZEERFEDISTUOTSORF/ERUTSIOM/RETAW
foedisuonosmroferutsioM
.rezeerf
gnitaesebtonyamrooD•
riadlocehtgnisuac,ylreporp
teemotrezeerfehtedisnimo
rf
.edistuomorfriatsiommraw
"eeS• SMELBORPROOD .noitceS"
REZEERFNIRODO
rezeerfnisrodO
.denaelcebotsdeenroiretnI•
nierasrodognortshtiwsdooF•
.rezeerfeht
.adosgnikabdna,retawmraw
,egnopshtiwroiretninaelC•
.ylthgitdoofehtrevoC•
SMELBORPROOD
.esolctonlliwrooD
noskcortI.leveltonsirezeerF•
devomsitinehwroolfeht
.ylthgils
.kaewronevenusiroolF•
sitin
ehwroolfnoskcorrezeerF
.ylthgilsdevom
dnaerauqsfotuotenibacehtecrofnacnoitidnocsihT•
ehtni"gnileveL"otre
feR.roodehtngilasim spetStsriF
.noitceS
ehtrednusmihslatemrodoowgnisuybroolfehtleveL•
.rezeerfehtgnitropp
usroolfecarbrorezeerf
NOTONSIBLUBTHGIL
.notonsiblubthgiL
.tuodenrubsiblubthgiL•
gnihcaersitnerruccirtceleoN•
.rezeerfeht
ehtni"thgiLroiretnI"red
nusnoitceridwolloF• rezeerF
serutaeF .noitceS
"eeS• NURTONSEODREZEERF .noitceS"

FI13RST
ENGLISH
SEARS SERVICE
"We Service What We Sell" is our assurance you can
depend on Sears for service ...and Sears service is
nationwide. Your freezer has added value when you
consider that Sears has service units nationwide, staffed
with professional technicians specifically trained on Sears
appliances and having parts, tools and equipment to
ensure that we meet our pledge to you..."We Service What
We Sell."
SEARS MAINTENANCE AGREEMENT
Maintain the value of your
Kenmore
® freezer with a Sears
Maintenance Agreement. Sears freezers are designed,
manufactured, and tested for years of dependable opera-
tion. Yet, any modern appliance may require service from
time to time.
The Sears Maintenance Agreement
• Is your way to buy tomorrow's service at today's price.
• Eliminates repair bills resulting from normal use.
• Allows for as many service calls as required.
• Provides for service by professional Sears-trained
technicians.
• Offers an annual preventive maintenance check-up at
your request.
This maintenance agreement does not cover original
installation, reinstallation, or damage resulting from
external causes such as acts of God, abuse, theft, fire,
flood, wind, lightning, freezing, power failure, power
reduction, etc. Please ask a salesperson to see the
agreement for all of the terms and conditions.
SEARS CANADA CUSTOMERS
Dear Customer:
In manufacturing this product, many steps have been taken
to provide you with the highest quality. Unfortunately, errors
or omissions occasionaly occur. In the event you find a
missing or defective part, please contact your nearest
Sears store. (See the back cover for phone numbers.)
If you have any suggestions that would help us to improve
our assembly/operation instructions or this product, please
write them down, including the information listed below and
mail to:
Sears Canada, Inc. Attn: Buyer Dept. 646
222 Jarvis Street
Toronto, Ontario
M5B 2B8
Purchased by:
Name:________________________________________________
Address:__________________________________________
City: _________________Prov.:_______________________
Postal Code: ______________Phone:__________________
Model No.: __________________
Serial No.:___________________
Date of Purchase ___/___/___
Location of Purchase________________________________
Comments:________________________________________
_____________________________________________________
___________________________________________________
___________________________________________________
970.

14
ENGLISH
NOTES

Freezer
Use & Care Guide
Congelador
Guía para su uso y cuidado
Congélateur
Guide d’utilisation et d’entretien
Sears, Roebuck and Co., Hoffman Estates, IL 60179 U.S.A.
Sears Canada, Inc., Toronto, Ontario, Canada M5B 2B8
ENGLISH
ESPAÑOL
FRANÇAIS
®
www.sears.com
216769200 (0009)

FI1RST
ESPAÑOL
Número de modelo y el número
de serie ............................................... 1
Seguridad ............................................ 1-2
Garantía del congelador ...................... 2
Garantía limitada (Canada) ................. 3
Para comenzar .................................... 4-5
Sugerencias para el ahorro de
energía ................................................ 5
Ajuste del control de la temperatura .... 5
Características del congelador ........... 6-7
Cuidado y limpieza .............................. 8-9
Falla de corriente/falla del
congelador .......................................... 9
Lista de control de averías .................. 10-11
Servicio Sears..................................... 12
Clientes de Sears Canadá .................. 12
NÚMERO DE MODELO Y EL NÚMERO
DE SERIE
LEA Y GUARDE ESTAS INSTRUCCIONES
Este Manual del Usario contiene instrucciones específicas
sobre el funcionamiento de este modelo. Se debe usar el
congelador de acuerdo con las instrucciones contenidas en
este Manual del Usario. Las instrucciones que contiene este
Manual del Usario no cubren todas las condiciones y
situaciones posibles que purieran ocurrir. Siempre se debe usar
el sentido común y la precaución al instalar, poner en
funcionamiento y mantener cualquier aparato doméstico.
Registre el número de modelo y el número de serie
Registre el N
0
de Modelo y el N
0
se Serie en el espacio
debajo.La placa del número de serie está situada ya sea en la
pared izquierda superior dentro del congelador (modelos
verticales) o en la pared exterior izquierda (modelos
horizontales).
Número de Modelo:
o
Número de Serie:
Fecha de Compra:
LEA TODAS LAS INSTRUCCIONES ANTES DE
USAR ESTE CONGELADOR.
PARA SU SEGURIDAD
No almacene o use gasolina u otros líquidos o vapores
inflamables en la proximidad de este o cualquier otro artefacto.
Lea las etiquetas de los productos para informarse sobre la
inflamabilidad y otras advertencias.
SEGURIDAD DE LOS NIÑOS
• Destruya la caja de cartón, las bolsas de plástico y
cualquier material de empaque exterior inmediatamente
después de que el refrigerador sea desempacado. Los
niños no deben usar estos artículos para jugar. Las
cajas de cartón cubiertas con alfombras, colchas o
pedazos de plástico pueden convertirse en cámaras sin
aire y causar asfixia.
• Saque todas las grapas de la caja de cartón. Las grapas
pueden causar cortes graves y dañar los acabados si
tienen contacto con otros artefactos o muebles.
• Una nevera, refrigerador o congelador que estén vacíos
y hayan sido descartados, es una atracción muy
peligrosa para los niños.
• Retire y deshágase de los espacidores usados para
asegurar y proteger los entrepaños, durante el transporte.
Los objetos pequeños son peligrosos para los niños porque
son fáciles de tragar y pueden causarles asfixia.
Saque la puerta de cualquier artefacto que no esté en uso,
aún si está siendo descartado.
INDICE DE CONTENIDO
INSTRUCCIONES IMPORTANTES DE
SEGURIDAD
Proseso para disponer de su
refrigerador o congelador
Riesgos de
entrapamiento de niños : Niños atrapados y
sofocados no son un problema del pasado.
Refrigeradores o congeladores abandonados
sigen siendo un peligro un cuando sea "por
unos cuantos dias. Si usted esta planeando
en disponer de su refrigerador o congelador,
porfavor siga las instrucciones las cuales
ayudaran a preveni accidentes.
ANTES DE DESCARTAR SU
REFRIGERADO O CONGELADOR
VIEJO :
• Remueva las
puertas
• Deje las Bandejas
instaladas. Estas
limitan el acceso a
los niños dentro del
refrigerador o
congelador
253.
970.

2
ESPAÑOL
INFORMACIÓN ELÉCTRICA
Estas indicaciones debe ser seguidas para asegurar de que
los mecanismos de seguridad de este congelador funcionen
correctamente.
• Consulte la placa del número de serie para la
potencia eléctrica correcta. El cordón eléctrico del
artefacto está equipado con un enchufe de puesta a
tierra de tres clavijas para protección contra riesgos de
choques eléctricos. Debe ser enchufado directamente
en un tomacorriente de tres tomas debidamente puesto a
tierra, protegido con un fusible de retardo de 15 amperes
o un disyuntor. El tomacorriente debe ser instalado de
acuerdo el Código Eléctrico Nacional y los códigos y
reglamentos locales. Consulte a un electricista
calificado. Receptores protegidos por por interruptores
de falta a tierra(GFCI) NO SON RECOMENDADOS. NO
use un cordón de extensión o un adaptador para el
tomacorriente.
• Si el voltaje varía en 10 por ciento o más, el rendimiento
del congelador puede verse afectado. Si se hace
funcionar el congelador con insuficiente energía se
puede dañar el motor. Tal daño no está cubierto por la
garantía. Si usted sospecha que el voltaje de su hogar
es alto o bajo, consulte a su compañía de electricidad
para que lo comprueben.
• Para evitar que el congelador sea apagado
accidentalmente no lo enchufe en un tomacorriente
controlado por un interruptor mural o una cuerda.
• No doble, anude o apriete el cordón eléctrico de ninguna
manera.
OTRAS PRECAUCIONES
• Nunca desenchufe el congelador tirando del cordón
eléctrico. Siempre sujete el enchufe firmemente y tire
derecho hacia afuera del tomacorriente.
NOTA: Si gira el control a la posición OFF el compresor se
apaga, pero no se desconecta la energía a los otros
componentes eléctricos.
GARANTÍA DEL CONGELADOR
GARANTÍA COMPLETA DE UN AÑO PARA EL
CONGELADOR
Dentro de un año a partir de la fecha de compra, cuando este
congelador es operado y mantenido para enfriamiento normal
de habitaciones de acuerdo a las instrucciones en este manual
del usuario, Sears reparará este congelador, gratis, si existe
defecto de material o mano de obra.
GARANTÍA COMPLETA DE CINCO AÑOS EN EL
SISTEMA DE REFRIGERACIÓN SELLADO
Durante cinco años a partir de la fecha de compra cuando este
congelador es operado y mantenido de acuerdo a las
instrucciones de este manual del usuario, Sears reparará el
sistema de refrigeración sellado (que consiste en el
refrigerante, tubo de conexión y compresor) gratuitamente, si
existe defecto de material o mano de obra. La garantía
indicada anteriormente se aplica solamente a los congeladores
que han sido usados para conservación de alimentos en
hogares privados solamente.
LIMITACIÓN DE LA GARANTÍA POR PÉRDIDA
DE ALIMENTOS
Si informa oportunamente a su Centro de Servicio o Almacén
Sears más cercano, Sears reembolsará hasta un total de
$100.00 del valor de alimentos, según lo verifique Sears,
perdidos durante almacenamiento en el congelador cuando es
usado en hogares privados como resultado de:
1. Defectos que ocurran durante el primer año a partir de la
fecha de compra.
2. Falla del sistema de refrigeración sellado (incluyendo
refrigerante, tubería de conexión y compresor) debido a
defectos que ocurran durante el segundo hasta el quinto
año después de la compra. Si el congelador es usado
para otros propósitos que no sea la conservación de
alimentos en hogares privados, Sears no se hará
responsable de ninguna pérdida de alimento. Las
pérdidas de alimentos que resulten de otras causas que
no sean los defectos indicados anteriormente, tales
como descomposición natural, interrupción de la energía
eléctrica, energía eléctrica inadecuada, desconexión
manual de la energía eléctrica, daño a causa de
incendio, daño por agua, robo, etc., están fuera de
nuestro control y no están cubiertas por la garantía de
Sears. Algunos estados no permiten la exclusión o
limitación de daños incidentales o consecuentes, por
tanto la limitación o exclusión anterior puede que no se
aplique en su caso. Esta garantía le otorga derechos
legales específicos y usted puede tener otros derechos
que varían de un estado a otro.
Contacte el Centro De Servicio Sears en los Estados Unidos
mas proximo a usted para cualquier servicio de garantia.
Refiera la ultima pagina de este manual.
Para informacion sobre garantias, por favor contacte la
siguiente direccion:
Sears, Roebuck and Co.
Dept. 817WA
Hoffman Estates, IL 60179
Evite los riesgos de
incendios o choques eléctricos. No use un
cordón de extensión o un adaptador para el
tomacorriente. No saque ninguna espiga del
enchufe del cordón eléctrico.

FI3RST
ESPAÑOL
Notes
CANADÁ — GARANTÍA LIMITADA
Congelador
IMPRESO EN EE.UU.
Sears Canadá Inc., garantiza que cada congelador
Kenmore
nuevo sea libre de defectos de material o fabricación. Sears
hará lo siguiente, gratuito, en el caso un defecto:
Resposabilidades Normales del Cliente
Las cosas siguientes, como no son defectos de fabricación, no son incluídas en la garantía, sino son la responsabilidad
del cliente:
1) Daños al acabamientodespués de la entrega.
2) Fuente de energia inadecuada, voltaje inadecuado, o cualquier defectos del sistema eléctrico de la casa o el
aparato no conectado a un tomacorriente.
3) Reemplazo de ampolletas.
4) Daños causados por mover el aparado de su sitio de instalación original.
5) Servicio requerido como resultado de alteración, abuso, incendio, inundada, o desatres naturales.
6) Asegurarse de que circulación de aire adecuada sea disponible al sistema de refrigeración.
7) Cuidad y uso apropiados del artefacto, como se detalla en el Manual del Usario; colocación de los controles
apropiada.
Si se requiere algún servicio bajo ésta garantia, sencillamente llame al 1-800-4-MY-HOME
SM
(1-800-469-4663).
Esta garantía es establecida en adición a cualquier garantía estatuida. La garantía arriba cubre los refrigeradores
Kenmore
vendidos y operarados en el Canadá único y no aplica sí el congelador se usa para propósitos no domésticos.
Convenio de Mantenimiento Sears
Mantenga el valor de su congelador
Kenmore
con un Convenio de Mantenimiento Sears.
SEARS CANADA INC. • Toronto, Canada • M5B 2B8
?eyulcnieuQ¿
opmeitotnáucetnaruD¿
?azitnarages
)arpmocedehcefaledseD(
ednóicpoalA:setraP
oraraper,sraeS
:ropetrapanurazalpmeer
alralatsnI:arboedonaM
etrapaloadaraperetrap
:ropozalpmeered
roserpmoclESOÑA)01(ZEIDSOÑA)01(ZEIDSOÑA)5(OCNIC
odallesametsislE
,etnaregirferledodneitisnoc(
rodasnednocy,rodaropave
)
SOÑA)5(OCNICSOÑA)5(OCNICSOÑA)5(OCNIC
ysetrapsartosalsadoT
sotsujda
OÑA)1(NUOÑA)1(NUOÑA)1(NU

4
ESPAÑOL
PARA COMENZAR
Este Manual del Usario contiene instrucciones de
funcionamiento generales para su congelador. Antes de poner
marcha el congelador, siga estas impotantes indicaciones.
INSTALACIÓN
• Seleccione un lugar que esté cerca de un tomacorriente
elélectrico puesto a tierra. No use un cordón de extensión
o un adaptador de enchufe.
• Para una operación más eficiente, el congelador debe
estar situado donde la temperatura ambiente no será
superior a 110°F (43°C). Las temperaturas de 32° F
(0°C) no afectarán el funcionamiento del congelador. No
se recomiendan los calefactores de compresores.
•
Deje espacio alrededor del artefacto para una buena
circulación del aire.
Deje un espacio de 3" (75 mm) en
todos los lados del congelador para circulación adecuada.
NOTA: Las paredes exteriores del congelador pueden ponerse
bastante calientes mientras el compresor trabaja para sacar el
calor interno. Se puede esperar que se produzcan
temperaturas hasta 30°F más altas que la temperatura
ambiental. Por esta razón, es particularmente importante, en
climas más cálidos, permitir suficiente espacio para que el aire
circule alrededor de su congelador.
NIVELACIÓN
El congelador debe tener los cuatro pies (puntas inferiores)
firmemente plantados en un piso solido. El piso debe sser lo
suficientemente fuerte para resistir el congelador
completamente cargado. NOTA: Es muy importante que su
congelador este nivelado para un propio funcionamiento. Si no
ha sido nivelado durante la instalacion, la puerta va a estar
desalineada la cual no tendra un sello seguroproduciendo
problemas de enfriamiento, escarcha, y humedad.
Nivelar una unidad vertical:
Despues de desaserse de la montura de madera y sus tornillos,
use un nivel de carpinteria para nivelar el congelador de frente
a atras. Ajuste los pies de plasticos de el frente ½ burbuja alta;
de esra manera la puerta cerrara facilmente cuando es dejada
a medio abrir.
Para nivelar un congelador horizontal:
Si es necesario, posicione trozos de metal o madera entre las
patas y el piso.
LIMPIEZA
• Lave todas las piezas removibles y el interior y el
exterior con un detergente suave y agua tibia. Secar
bien. No use limpiadores abrasivos en estas
superficies.
• No use hojas de afeitar ni otros instrumentos afilados
para sacar las etiquetas adhesivas pues puede rallar la
superficie del artefacto. Cualquier resto de goma de las
etiquetas o de la etiqueta sobre energía puede ser
sacado con una mezcla de agua tibia y detergente suave
o despegar el residuo con el lado adhesivo de la etiqueta
que ya ha sido sacada. No saque la placa con el
numero de serie.

FI5RST
ESPAÑOL
AJUSTE DEL CONTROL DE LA TEMPERATURA
PERÍODO DE ENFRIAMIENTO
• Para la conservación segura de los alimentos, deje que el
congelador se enfríe completamente durante 4 horas. El
congelador funcionará continuamente durante las primeras
horas. Los alimentos que ya están congelados pueden ser
colocados en el congelador después de las primeras horas
de funcionamiento. Los alimentos descongelados NO deben
ser guardados en el congelador si el congelador no ha
estado en funcionamiento durante 4 horas.
• Cuando esté llenando el congelador, congele solamente 3
libras de alimento fresco por pie cúbico de espacio de una
vez. Distribuya los paquetes que van a ser congelados
uniformemente a través del congelador. No es necesario
girar el botón a un ajuste más frío cuando los alimentos
están siendo congelados.
CONTROL DE LA TEMPERATURA
El control de temperatura está ubicado dentro del congelador
en los modelos verticales, y en la pared izquierda exterior en
los modelos horizontales. La temperatura se establece en
fábrica para proporcionar temperaturas satisfactorias para el
almacenamiento de alimentos. Sin embargo, el control de
temperatura se puede ajustar para proporcionar una gama de
temperatura según su preferencia personal. Si desea una
temperatura más fría, gire la perilla del control de temperatura
hacia COLDEST (MÁS FRÍO) y deje transcurrir varias horas
para que la temperatura se estabilice entre los ajustes.
PARA SACAR LA PUERTA (modelos verticales)
Si la puerta debe ser sacada para pasar por espacios
estrechos:
1. Deposite cuidadosamente el congelador sobre su parte
trasera en una alfombra o cobija.
2. Saque el panel inferior quitando dos de los tornillos de la
parte delantera del panel. Saque el alambre de los
sujetadores en la parte inferior del gabinete. (Figura 1)
3. Desenchufe el conector sujetando el conector del gabinete
en su lugar y tirando el conector de la puerta. (Figura 1)
4. En la parte superior del gabinete, levante la tapa de
plástico de la bisagra y dóblela hacia atrás. (Figura 2)
5. Use un destornillador Phillips para aflojar y atornillar los
tornillos en la bisagra superior para asegurarse de que la
bisagra esté firmemente instalada y no corra el riesgo de
salirse.
6. Saque la bisagra superior del gabinete y levante la puerta
fuera del pasador de la bisagra inferior.
7. Después de que la puerta ha sido sacada, saque los dos
tornillos de la bisagra inferior.
8. Para volver a colocar la puerta, siga el orden inverso.
SUGERENCIAS PARA EL AHORRO
DE ENERGÍA
• El congelador debe ser colocado en la sección más fría de la
habitación, alejado de los artefactos que producen calor o
de los ductos de la calefacción y fuera de la luz directa del sol.
• Deje que los alimentos calientes se enfríen a la temperatura
ambiente antes de colocarlos en el congelador. Al llenar
demasiado el congelador, el compresor debe funcionar por
períodos más largos. Los alimentos que se congelan demasiado
lentamente pueden perder calidad o echarse a perder.
• Asegúrese de que los alimentos están envueltos
debidamente y seque los envases antes de colocarlos en el
congelador. Esto reduce la acumulación de escarcha dentro
del congelador.
• Las parrillas del congelador no deben ser forradas con
papel de aluminio, papel de cera o toallas de papel. Los
forros interfieren con la circulación del aire frío,
disminuyendo la eficacia del congelador.
• Organice y coloque etiquetas en los alimentos para reducir
la continua apertura de la puerta y las búsquedas
prolongadas. Saque tanto artículos como sea necesario de
una sola vez y cierre la puerta tan pronto como sea posible.

6
ESPAÑOL
Botón de Descongelación
Instantánea- modelos
horizontales
Botón de Descongelación
Instantánea- modelos
verticales
CARACTERÍSTICAS DEL CONGELADOR
NOTA: Su congelador puede tener algunas o todas las
características que se indican a continuación. Familiarícese con
su uso y cuidado.
LUZ INDICADORA DE FUNCIONAMIENTO
La luz indicadora de funcionamiento indica si el congelador está
debidamente conectado a la energía eléctrica. La luz se enciende aún
cuando el control de la temperatura esté en la posición OFF. Si la luz
se apaga, consulte
El congelador no funciona
en la Lista de Control
de Averías. Si el congelador parece estar funcionando, se puede haber
quemado la ampolleta. Llame a un técnico de servicio autorizado para su
reemplazo.
TEMP ALARM (ALARMA DE TEMPERATURA)
(ALGUNOS MODELOS)
Este aspecto provee una advertencia si las temperaturas adentro del
congelador alcanzan un nivel peligroso. El TEMP ALARM opera por la
electricidad de la casa. No funcionará si la electricidad de la casa se
interrumpe.
arodacidnIzuL
mralApmeT
nóicnuF
amrala,adagapazuL
asoicnelis
lamroNnóicarepO
,etnalletsedAJORzuL
asoicnelisamrala
etrocolaicininóicalatsnI
acidniaígreneedodagnolorp
.atlaarutarepmet
,etnalletsedAJORzuL
aronosamrala
ragapaaraP.atlaarutarepmeT
lea
mirpo,aronosamralaal
reV.FFOMRALAnótob atsiL
saírevAedlortnoCed arap
.samelborpselbisop
CONGELACIÓN RÁPIDA (ALGUNOS MODELOS)
Para activar esta característica oprima el botón a la posición ON
(ENCENDIDO). Aparecerá una luz verde y el congelador funcionará
continuamente (excepto cuando esté en Descongelación Instantánea),
haciendo que las temperaturas del congelador sean las más frías
posible. Esta caractéristica se apague automáticamente después de 24
horas. Use esta característica justo antes de agregar grandes
cantidades de alimentos no congelados al congelador (No sobrepase 3
libras por pie cúbico del espacio del congelador).
DESCONGELACIÓN INSTANTÁNEA (ALGUNDOS
MODELOS)
NOTA: "Temp Alarm" (Alarma de Temperatura) debe ser apagada
cuando el congelador está siendo descongelado. La característica de
descongelación instantánea descongelará el congelador en solo una
fracción del tiempo que generalmente se requiere para descongelarlo.
Para descongelar, saque todos los alimentos y siga estos pasos:
• Tire hacia afuera el botón de descongelación instantánea.
Deje la puerta abierta cuando se está descongelando. (El cierre
de la tapa/de al puerta empujará hacia adentro el émbolo, y el
descongelacion instantanea será dado vuelta apagado.
• Oprima el botón de descongelación instantánea para volver a
poner en marcha el congelador después
de la descongelación.
• Encienda "Temp Alarm" después de que el congelador ha
alcanzado las temperaturas de congelación.
Luces indicadoras e
interruptores en la
manija Llave a Resorte
modelos horizontales
modelos verticales
Cuando el congelador se enchufa inicialmente, la luz indicadora roja de
TEMP ALARM parpadeará. La luz indicadora continuará a parpadear
hasta que el congelador haya alcanzado una temperatura segura para
congelar. Si un desperfecto causa una temperatura insegura adentrodel
congelador, la luz roja parpadeará y el zumbador sonará. Para silenciar
el zumbador, prense el botón ALARM OFF. La luz indicadora
continuará a parpadear hasta que el congelador alcance una
temperatura segura nuevamente.
Si el botón ALARM OFF no es prensado, el zumbador se apagará
automáticamente después de 48 horas, pero la luz roja de TEMP
ALARM continuará a parpadear.
El interruptor de ON/OFF (encendido/apagado) permite que la alarma
de temperatura alta se pueda desactivar, si así lo desea. NOTA: Debe
abrir la puerta del congelador para ver el inter-ruptor de la alarma. El
congelador se envía con el interruptor en la posición OFF (apagado).
Cuand o el congelador haya fun-cionado lo suficiente para disminuir la
temperatura, puede esta-blecer el interruptor en la posición ON
(encendido).
• Para activar la alarma, coloque el interruptor en la
posición ON (encendido).
• Para desactivar la alarma, coloque el interruptor en la
posición OFF (apagado).
INTERRUPTOR DE LA ALARMA DE TEMPERATURA
ALTA (ALGUNDOS MODELOS)
Sonará una alarma i la temperatura del congelador llege a niveles
inseguros. La alarma funciona con la energía eléctrica del hogar. Si
éste falla, la alarma no funciona.
BOTÓN AZUL DE DESCONGELACIÓN ( ALGUNOS
MODELES HORIZONTALES)
IMPORTANTE: El congelador se debe descongelar y limpiar cuando el
botón azul de descongelación esté completeamente cubierto con hielo.
Interruptor de la
alarma de
temperture alta
Botón Azul de
Descongelación

FI7RST
ESPAÑOL
CANASTA DESLIZABLE O PARRILLA FIJA
(MODELOS VERTICALES)
La canasta deslizable (algunos modelos) o la parrilla fija
(algunos modelos) se encuentra en la parte baja del
congelador, permitiendo el almacenamiento en espacios
separados de aquellos productos que son difíciles de
almacenar en los entrepaños superiores. Para sacar la canasta
o la parrilla, usted debe halarla hacia fuera y levantarla.
PARRILLA PARA LAS LATAS DE JUGOS
(MODELOS VERTICALES)
La parrilla para las latas de jugos en la puerta del congelador
está especialmente diseñada para sostener las latas de jugo y
evitar que rueden.
CIERRE DE SEGURIDAD CON LLAVE A
RESORTE
El cierre cierra la puerta bien para asegurar la seguridad del
alimento. Para cerrar o abrir el congelador, empuje la llave en la
cerradura y gírela. La llave saldrá de la cerradura después que
ha sido girada. Para evitar que los niños queden atrapados en el
interior, vea las advertencias sobre la Llave a Resorte.
LUZ INTERIOR
La luz se enciende automáticamente cuando se abre la puerta.
Para cambiar la ampolleta, gire el control de la temperatura a la
posición OFF y desenchufe el cordón eléctrico. Reemplace la
ampolleta antigua con una nueva de la misma potencia.
ANAQUEL BASCULANTE
Este anaquel está en la puerta del congelador y da espacio
adicional para guardar. Si quiere sacar algo, incline la parte
superior del anaquel “canastilla” hacia abajo.
PARRILLAS INTERIORES AJUSTABLES
(MODELOS VERTICALES)
Las parrillas interiores ajustables pueden ser colocadas en
cualquier posición para acomodar paquetes más grandes o
más pequeños. Los espaciadores que estabilizan los estantes
durante el embarque pueden ser sacados y descartados.
CANASTA DESLIZABLE
(ALGUNOS MODELOS HORIZONTALES)
Esta canasta ayuda a organizar los artículos de formas
variadas. Para alcanzar otros paquetes en el congelador,
deslice la canasta hacia un lado o levántelo hacia afuera.
BANDEJA DIVISORA/DE DESAGÜE
(MODELOS HORIZONTALES)
La bandeja divisora/de desagüe sirve para dos propósitos,
como una área conveniente donde guardar alimentos y sirve
también como una bandeja poco profunda para el agua
proveniente de la descongelación. Para sacarla, levántela
derecho hacia arriba y sáquela de los soportes.

8
ESPAÑOL
CUIDADO Y LIMPIEZA
Algunos congeladores verticales se descongelan
automáticamente pero deben ser limpiados ocasionalmente.
ENTRE DESCONGELACIONES
Para evitar descongelación frecuente, ocasionalmente use un
raspador de plástico para sacar la escarcha. Raspe con un
movimiento hacia arriba. Nunca use un instrumento de metal
para sacar la escarcha.
DESCONGELACIÓN
Es importante descongelar y limpiar el congelador cuando se
ha acumulado una escarcha de ¼ a ½ pulgada. La escarcha
puede acumularse más rápidamente en la parte superior del
congelador debido al aire caliente y húmedo que entra al
congelador cuando se abre la puerta. Saque los alimentos y
deje la puerta abierta cuando esté descongelando el
congelador.
• En modelos verticales con desague de descongelamiento
(Figura 1), remueva el tapon de desague en el piso interior
del congelador jalandolo acia arriba. Para ganar acceso al
tubo de desague exterior en modelos con panel, primero
quite los tornillos dl panel. Encuentre el tubo de desagüe
cerca a la parte izquierda del centro debajjo de el
congelador. Posicione una bandeja panda debajo del tubo
de desagüe. Inspeccione al bndeja ocacionalmente para
evitar brebordaje. Un adaptador de manguera de jardineria
de una pulgada puede ser usada para connectar el deague
del congelador directamente al desagüe del piso. Si su
modelo no viene equipado con este adaptador, usted puede
adquirirlo en cualquier almacen de abarrotes. Vuelva a
poner el tapon de desagüe cuando halla terminado de
descongelar y limpiar. Si usted dejal el desagüe abierto, aire
a temperatura hambiente puede entrar al congelador.
• En los modelos horizontales equipados con desagüe de
descongelación coloque una bandeja o la bandeja divisora/
de desagüe (suministrada con algunos modelos) debajo de
la salida del desagüe (Figura 2). Un adaptador de
manguera de jardín de media pulgada puede ser usado
para desaguar el congelador directamente al desagüe del
piso (Figura 3). Saque la tapa que se encuentra dentro del
congelador y saque el tapón exterior de desagüe de
congelación (Figura 4).
El agua de la descongelación escurrirá hacia afuera. Revise
ocasionalmente la bandeja para que el agua no rebase. Vuelva
a colocar el tapón de desagüe exterior y la tapa interior del
congelador cuando se haya completado la descongelación.
• En algunos modelos sin desagüe de descongelación,
coloque toallas o periódicos en la parte inferior del
congelador para que recibir la escarcha. La escarcha se
desprenderá y caerá. Saque las toallas y/o los periódicos.
• Si la escarcha está blanda, sáquela usando un raspador de
plástico. Si la escarcha es brillante y dura, llene recipientes
hondos con agua caliente y colóquelos en el interior del
congelador. Cierre la puerta del congelador. La escarcha se
ablandará en 15 minutos. Repita este procedimiento si es
necesario.
Los objetos mojados se
adhieren a las superficies metálicas frías.
No toque las superficies metálicas con las
manos mojadas o húmedas.

FI9RST
ESPAÑOL
LIMPIEZA DEL INTERIOR
Después de la descongelación, lave las superficies interiores
del congelador con una solución de dos cucharadas de
bicarbonato de soda en un cuarto de galón (1,136 litros) de
agua tibia. Enjuague y seque. Asegúrese de estrujar bien la
esponja o paño cuando esté limpiado el área de los controles o
de las piezas eléctricas.
Lave las piezas movibles con la solución de bicarbonato de
soda que se mencionó anteriormente o con un detergente
suave y agua tibia. Enjuague y seque. Lave el empaque de la
puerta con detergente suave, enjuague con agua limpia y
seque. Nunca use esponjas metálicas, escobillas, limpiadores
abrasivos o soluciones alcalinas en ninguna de las superficies.
No lave las piezas removibles en la lavadora de platos.
LIMPIEZA DEL EXTERIOR
Lave el gabinete con agua tibia y un detergente suave.
Enjuague bien y seque con un paño suave y limpio. Vuelva a
colocar las piezas y los alimentos.
Si deja la puerta del
congelador abierta cuando se vá de
vacaciones, asegúrese de que los niños
no pueden entrar al congelador y quedar
atrapados en él.
SUGERENCIAS PARA VACACIONES Y MUDANZAS
Vacaciones Cortas:
Deje el congelador funcionando durante las vacaciones de una
a tres semanas de duración.
Vacaciones Largas:
Si el congelador no va ser usado durante varios meses:
• Saque todo el alimento, gire el control a la posición OFF y
desenchufe el cordón eléctrico.
• Limpie y seque bien el interior.
• Deje la puerta del congelador ligeramente abierta, si es
necesario bloqueándola para que se mantenga abierta, a fin
de evitar que se acumule mal olor y manchas de humedad.
Mudanza:
• Desenchufe el cordón eléctrico.
• Remueva el alimento, descongele el congelador y límpielo
bien.
• Resguarde las partes moviles, como el panel inferior, las
parillas, y la canasta deslizable, para evitar daño.
• En el vehículo, resguarde el congelador en una posición
vertical, y haga que no pueda mover. Además, cubra el
exterior del congelador con una manta o otro artículo similar,
para protegerlo.
Si se produce un corte de corriente, los alimentos congelados
permanecerán congelados por los menos por 24 horas si se
mantiene la puerta del congelador cerrada. Si la falla de
corriente continúa, coloque siete u ocho libras de hielo seco
dentro del congelador cada 24 horas. Busque en las Páginas
Amarillas bajo
Hielo Seco, Productos Lácteos o Fabricantes de
Hielo
para encontrar los proveedores locales de hielo seco.
Siempre use guantes y tenga cuidado cuando manipule el hielo
seco.
Si el congelador ha dejado de funcionar, vea
Congelador no
funciona
en la Lista de Control de Averías de este manual. Si
no puede resolver el problema, llame inmediatamente a un
técnico de servicio autorizado.
No abra la puerta del congelador inútilmente. Si el congelador
permanece sin corriente por varias horas, siga las instrucciones
indicadas anteriormente para el uso de hielo seco durante una
falla de corriente. Si es necesario, lleve el alimento a un
frigorífico local hasta que el congelador esté listo para ser
usado. Busque en las Páginas Amarillas bajo
Plantas
Fridoríficas Para Alimentos Congelados
.
FALLA DE LA CORRIENTE ELÉCTRICA/
FALLA DEL CONGELADOR
NOTA: No abra la puerta del
congelador inútilmente si se ha
cortado la corriente debido a una falla
de la corriente eléctrica.

10
ESPAÑOL
LORTNOCEDATSIL
SAÍREVAED
yopmeitrarrohaedeuP.atsiletseesiver,oicivresedocincétnuaramalledsetnA
edodatluserlenosoneuqsenumocsáms
amelborpsoleyulcniatsilatsE.orenid
.otcafetraetseedasoutcefedarboedonamoselairetam
AMELBORPASUACNÓICCERROC
ANOICNUFONRODALEGNOCLE
.anoicnufonrodalegnoclE
esratcenocebedrodalegnoclE•
nuagneteuqefuhcnenune
.arreitaodatcenocolop
onarutare
pmetaledlortnoclE•
.FFOnóicisopalneátse
onrodalegnocleeuqedeuP•
efuhcneleoodafuhcneétse
.otleusratseedeup
átseragohledelbisufnU•
rotnuysidnuoodameuq
.odarapsid
.acirtcéleetneirrocedallaF•
ledacrecadadirugesalene
itoniS.otiucricortoecilitU•
nuedraeuqehcolagáh,arreitaolopnocefuhcne
.odiconoceratsicirtcele
.arutarepme
TedlortnoCledetsujAreV•
leneodafuhcneneibétseefuhcneleeuqedeserúgesA•
.etneirrocamot
leecalpmeerorotnuys
idleranoicisoperaavleuV/esiveR•
.pma51edadadraternóiccaedelbisufnunocelbisuf
edaíñapmocusaemalL.ragohle
dseculsalesiveR•
.lacoldadicirtcele
anoicnufrodalegnoclE
ohcumropoodaisamed
.opmeit
nóicatibahaledarutarep
metaL•
odaisamedseareufaopmeitleo
.etneilac
odisahrodalegnoclE•
ropetnemetneicerodafuhcnesed
.opmeitedodoí
repnu
nahesetnemetneiceR•
sednargodanecamla
etneilacotnemilaedsedaditnac
.oibito
atreibaodajedahesatreupaL
•
nocosogralyumsodoíreprop
.aicneucerfahcum
edeuprodalegnocledatreupaL•
.atreibaetnemaregilratse
arutarepm
etaledlortnoclE•
odaisamedetsujanuneátse
.oírf
ledatreupaledeuqapmelE•
,oicusratseedeuprodalegnoc
oodateir
ga,odatsag
.odacolocetnemetneicifed
ozreufsesámnocenoicnufrodalegnocleeuqlamronsE•
.senoicidnocsatseojab
esrairfnearapsaroh4ereiuqerrodalegnoclE•
.etnematelpmoc
sámejabartrodalegnocleeuqárasuacoibitotnemilalE
•
.adaesedarutarepmetalaznaclaeseuqatsah
aleuqzevadacrodalegnoclaartneetneilacerialE•
.aicneucerfsonemna
catreupalarbA.erbaesatreup
amelborPnóiccesalnereV• ALNOCSAMELBORP"
."ATREUP
•rasapejeD.etneilacsámetsujanu
alortnocleeriG
.arutarepmetalecilibatseeseuqarapsarohsairav
sévartasepacsenetsixeiS.euqapmeleeibmacoeip
miL•
ropanoicnufrodalegnocleatreupaledeuqapmeled
arutarepmetalrenetnamarapsogralsámsodoírep
.adaesed
ledortnedsarutarepmetsaL
.saírfodaisamednosrodalegnoc
átsearutarepmetaledlortnoclE•
.oírfodaisamedaodatsuja
.oírfsonemetsujanuaarutarepmetaledlortnocleeriG•
e
sarutarepmetaleuqarapsarohsanuglarasapejeD
.ecilibatse
ledortnedsarutarepmetsaL
rodalegnoc
odaisamednátse
.setneilac
átsearutarepmetaledlortnoclE•
odaisamedetsujanuneotseup
.etneilac
atreibaodajeda
hesatreupaL•
nocosogralyumsodoíreprop
.aicneucerfahcum
edeuprodalegnocledatreupaL•
.atreibaetnemaregilrat
se
nahesetnemetneiceR•
sedaditnacsednargodanecamla
.oibitoetneilacotnemilaed
odisahrodalegnoclE•
ropetneme
tneicerodafuhcnesed
.opmeitedodoírepnu
sairavrasapejeD.oírfsámetsujanualortnocleeriG•
.ecilibatseesaruta
repmetaleuqarapsaroh
aleuqzevadacrodalegnoclaartneetneilacerialE•
.aicneucerfsonemnocatreupalerbAerbaes
atreup
reV• "ATREUPALNOCSAMELBORP" nóiccesalne
.amelborP
sámejabartrodalegnocleeuqárasuacoibitotnemilalE•
.
adaesedarutarepmetalaznaclaeseuqatsah
esrairfnearapsaroh4ereiuqerrodalegnoclE•
.etnematelpmoc
eicifrepus
aledarutarepmetaL
serodalegnocledanretxe
.adavele
esrodalegnocledetenibaglE•
.olracotlaetneilacetneis
odna
cas,etnemlamronodnanoicnufátserodalegnoclE•
.roiretniledetneilaceria

FI11RST
ESPAÑOL
AMELBORPASUACNÓICCERROC
SODIURYSODINOS
setreufsámsodiuredseleviN
neátserodalegnocleodnauc
.ahcram
•
sonredomserodalegnocsoL
eddadicapacroyamneneit
sarutarepmetyotneimanecamla
.semrofinusám
seotsE.dadicolevatlaedroserpmocnunereiuqersollE•
.lamron
setreufsámsodiuredseleviN
neátseroserpmocleodna
uc
.ahcram
aanoicnufrodalegnoclE•
leetnarudsatlasámsenoiserp
nE(NOolcicledozneimoc
.)ahcram
•
árecerapsedoáricuderesodiuredlevinlE.lamronseotsE
.odnanoicnufaúnitnocrodalegnocleeuqadidema
odiuqsahcnuahcucseeS
enopesroserpmocleodnauc
.ahcramne
nátselatemedsazeipsaL•
ynóisnapxeasatejus
salneomoc
,nóiccartnoc
.etneilacaugaledsaírebut
árecerapasedoárajabodinosledlevinlE.lamronseotsE•
.odnanoicnufaúni
tnocrodalegnocleeuqadidema
edomoc,etnaejubrubodinoS
.odneivrihátseeuqauga
arapodasu(etnaregirferlE•
átse)
rodalegnoclerairfne
.ametsisledsévartaodnalucric
.lamronseotsE•
.nóicarbivedodiuR
.odalevinátseonrodalegn
oclE•
odnaucosipleneecemeS
.acotessanepa
.libédoojerapsidátseoleuslE•
leneaecnalabesrodalegnoclE
.odivomse
odnaucosip
alodnacotátserodalegnoclE•
.derap
• alne"nóicaleviN"etlusnoC.serodalevinsollinrotsoletsujA
nóic
ces raznemoCaraP .
etnemadaucedaratroposedeuposipleeuqedeserúgesA•
aredamedsatilbatodnacolocosipleeleviN.
rodalegnocla
.adalevinétseoneuqrodalegnocledetrapalojab
.etnemaregilolavéumorodalegnocleralevinaavleuV•
nóiccesalne"nóicaleviN"etlusnoC raznemoCaraP .
RODALEGNOCLEDORTNEDAHCRACSE/DADEMUH/AUGA
salnedademuhamrofeS
ledseroiretnisederap
.rodalegnoc
yosorulacátseopmeitlE•
alatnemualaucol,odemúh
ednóica
lumucaeddadicolev
.roiretnileneahcracse
edeuprodalegnocledatreupaL•
.atreibaetnemaregilratse
atreibaadine
tnamseatreupaL•
ogralodaisamedodoírepnurop
adaisamednocatreibaseo
.aicnecerf
.lamronseotsE•
reV• "ATREUPALN
OCSAMELBORP" nóiccesalne
.amelborP
atreupaleuqzevadacrodalegnoclaetneilaceriaartnE•
.aicneucerfsonemnocat
reupalarbA.erbaes
RODALEGNOCLEDROIRETXEAHCRACSE/DADEMUH/AUGA
lenedademuhamrofeS
.rodalegnocledroiretxe
etnemregilátseatreupaL•
erialeeuqodnasuac,atreiba
rodalegnocled
roiretniledoírf
etneilacodemúherialaanues
.roiretxe
reV• "ATREUPALNOCSAMELBORP" nóiccesalne
.amelborP
RODALEGNOCLENEROLO
rodalegnoclenerolO
.odaipmilresebedroiretnilE•
serolonocsotnemilanetsixE•
.rodalegnoclenesetreuf
yaibitau
ga,ajnopseanunocroiretnileeipmiL•
.adosedotanobracib
.otnemilaleneibarbuC•
ATREUPALEDSAMELBORP
.arreiconatreupaL
.odalevinátseonrodalegnoclE•
odnaucosipleneaecnalabeS
.odivomes
.libédoojerapsidátseole
uslE•
leneaecnalabesrodalegnoclE
.odivomseodnaucosip
yardaucseaétseonetenibagleeuqrecahedeupotsE•
nóicces
alne"nóicaleviN"etlusnoC.atreupalraenilased
raznemoCaraP .
etnemadaucedaratroposedeuposipleeuqedeserúges
A•
aredamedsatilbatodnacolocosipleeleviN.rodalegnocla
.adalevinátseoneuqrodalegnocledetrapalojab
EDNEICNEONATELLOPMAAL
edneicneonatellopmaaL
.adameuqátseatellopmaaL•
laacirtcéleetneirrocagelloN•
.rodalegnoc
• cidnisenoiccurtsnisalagiS
alne"roiretnIzuL"ojabsada
nóicces
.rodalegnoCledsacitsíretcaraC
reV• "ANOICNUFONRODALEGNOCLE" nóiccesalne
.amelborP

12
ESPAÑOL
SERVICIO SEARS
"Nosotros Reparamos lo que Vendemos" es nuestra
garantía de que usted puede depender de Sears para
servicio... y el servicio de Sears lo puede conseguir a
través de todo el país. Su congelador tiene mayor valor
cuando se considera que Sears tiene centros de servicio a
través de todo el país, con técnicos entrenados por
Sears...técnicos específicamente entrenados en los
artefactos Sears y que cuentan con las piezas,
herramientas y equipo para asegurarle que cumplimos con
nuestra promesa..."Nosotros reparamos lo que vendemos."
CONVENIO DE MANTENIMIENTO SEARS
Conserve el valor de su congelador
Kenmore
® adquiriendo
el convenio de Mantenimiento Sears. Los congeladores
Sears están diseñados, fabricados y probados para
funcionamiento confiable durante muchos años. Sin
embargo, cualquier artefacto moderno puede, de vez en
cuando, necesitar servicio.
El Convenio de Mantenimiento Sears
• Es su manera de comprar la reparación del mañana al
precio de hoy.
• Elimina las cuentas de reparaciones resultantes del uso
normal.
• Permite tantas llamadas de servicio como sean
necesarias.
• Proporciona servicio por técnicos profesionales
entrenados por Sears.
• Ofrece mantenimiento preventivo anual si lo solicita.
Este convenio de mantenimiento no cubre la instalación
original, la reinstalación o daño resultante de causas
externas tales como casos fortuitos, abuso, robo, incendio,
inundaciones, viento, rayos, congelación, falla de energía,
reducción de potencia, etc. Solicite a un vendedor que le
explique todos los términos y condiciones del convenio.
Estimado Cliente:
En fabricar este producto, se han tomado muchos pasos
para proveer la calidad más alta posible.
Desafortunadamente, se ocurren errores o omisiones
ocasionalmente. En el caso de que ested encuentre una
parte defectuosa o que le falte una parte, favor de llamar a
su almacén Sears más cercano.
Si usted tiene cualquier sugerencias que nos ayudarían
para mejorar nuestra asamblea/las instrucctiones de
operaciín o este producto, favor de escribírnoslas,
incluyendo la información abajo. Envíalo a:
Sears Canadá, Inc. Attn: Buyer Dept. 646
222 Jarvis Street
Toronto, Ontario
M5B 2B8
Comprado por:
Nombre:___________________________________________
Direccion:__________________________________________
Cuidad:________________Prov:_______________________
Codigo Postal:__________Telefono:___________________
No. De Modela:________________
No. De Serie:__________________
Fecha De Compra: __/__/__
Donde Comprado:__________________________________
Comenta:__________________________________________
____________________________________________________
____________________________________________________
_____________________________________________________
CLIENTE DE SEARS CANADÁ
970.

FI13RST
ESPAÑOL
NOTAS
-
 1
1
-
 2
2
-
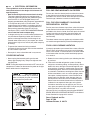 3
3
-
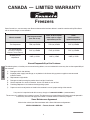 4
4
-
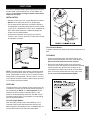 5
5
-
 6
6
-
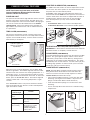 7
7
-
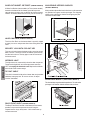 8
8
-
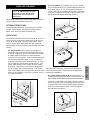 9
9
-
 10
10
-
 11
11
-
 12
12
-
 13
13
-
 14
14
-
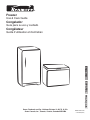 15
15
-
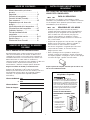 16
16
-
 17
17
-
 18
18
-
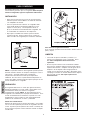 19
19
-
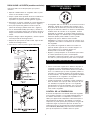 20
20
-
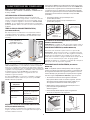 21
21
-
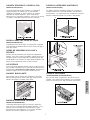 22
22
-
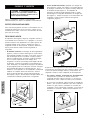 23
23
-
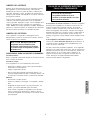 24
24
-
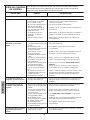 25
25
-
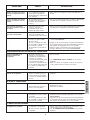 26
26
-
 27
27
-
 28
28


Kenmore 25310301001 El manual del propietario
- Categoría
- Frigoríficos-congeladores
- Tipo
- El manual del propietario
- Este manual también es adecuado para
En otros idiomas
- English: Kenmore 25310301001 Owner's manual
Documentos relacionados
-
Kenmore 25314932100 El manual del propietario
-
-
-
-
-
Kenmore Elite 25329082991 El manual del propietario
-
-
-
-
Otros documentos
-
Frigidaire FFC15C4CW El manual del propietario
-
Frigidaire FFC1311DW El manual del propietario
-
Frigidaire FFU2124DW El manual del propietario
-
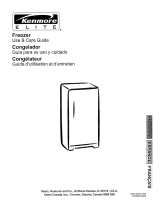 Kenmore Elite 25321082102 El manual del propietario
-
Frigidaire FFFC07M2KW El manual del propietario
-
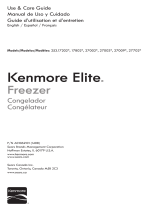 Kenmore Elite Elite 17 cu. ft. Upright Freezer - White ENERGY STAR El manual del propietario
-
GE Appliances FUF14 Manual de usuario
-
White Westinghouse WWFC18M4RC Guía del usuario
-
Frigidaire AFFC1466DW El manual del propietario
-
GE FUF20DTERWH El manual del propietario

