
EN Dear Customer,
Gigaset Communications GmbH is the legal successor to
Siemens Home and Office Communication Devices GmbH &
Co. KG (SHC), which in turn continued the Gigaset business
of Siemens AG. Any statements made by Siemens AG or
SHC that are found in the user guides should therefore be
understood as statements of Gigaset Communications
GmbH
.
We hope you enjoy your Gigaset.
DE Sehr geehrte Kundin, sehr geehrter Kunde,
die Gigaset Communications GmbH ist Rechtsnachfolgerin
der Siemens Home and Office Communication Devices
GmbH & Co. KG (SHC), die ihrerseits das Gigaset-Geschäft
der Siemens AG fortführte. Etwaige Erklärungen der
Siemens AG oder der SHC in den Bedienungsanleitungen
sind daher als Erklärungen der Gigaset Communications
GmbH zu verstehen.
Wir wünschen Ihnen viel Freude mit Ihrem Gigaset.
FR Chère Cliente, Cher Client,
la société Gigaset Communications GmbH succède en droit
à Siemens Home and Office Communication Devices GmbH
& Co. KG (SHC) qui poursuivait elle-même les activités Giga-
set de Siemens AG. Donc les éventuelles explications de Sie-
mens AG ou de SHC figurant dans les modes d’emploi
doivent être comprises comme des explications de Gigaset
Communications GmbH.
Nous vous souhaitons beaucoup d’agrément avec votre
Gigaset.
IT Gentile cliente,
la Gigaset Communications GmbH è successore della Sie-
mens Home and Office Communication Devices GmbH &
Co. KG (SHC) che a sua volta ha proseguito l’attività della
Siemens AG. Eventuali dichiarazioni della Siemens AG o
della SHC nei manuali d’istruzione, vanno pertanto intese
come dichiarazioni della Gigaset Communications GmbH.
Le auguriamo tanta soddisfazione con il vostro Gigaset.
NL Geachte klant,
Gigaset Communications GmbH is de rechtsopvolger van
Siemens Home and Office Communication Devices GmbH &
Co. KG (SHC), de onderneming die de Gigaset-activiteiten
van Siemens AG heeft overgenomen. Eventuele uitspraken
of mededelingen van Siemens AG of SHC in de gebruiksaan-
wijzingen dienen daarom als mededelingen van Gigaset
Communications GmbH te worden gezien.
Wij wensen u veel plezier met uw Gigaset
.
ES Estimado cliente,
la Gigaset Communications GmbH es derechohabiente de la
Siemens Home and Office Communication Devices GmbH &
Co. KG (SHC) que por su parte continuó el negocio Gigaset
de la Siemens AG. Las posibles declaraciones de la
Siemens AG o de la SHC en las instrucciones de uso se
deben entender por lo tanto como declaraciones de la Giga-
set Communications GmbH.
Le deseamos que disfrute con su Gigaset.
PT SCaros clientes,
Gigaset Communications GmbH é a sucessora legal da Sie-
mens Home and Office Communication Devices GmbH &
Co. KG (SHC), que, por sua vez, deu continuidade ao sector
de negócios Gigaset, da Siemens AG. Quaisquer declara-
ções por parte da Siemens AG ou da SHC encontradas nos
manuais de utilização deverão, portanto, ser consideradas
como declarações da Gigaset Communications GmbH.
Desejamos que tenham bons momentos com o seu Gigaset.
DA Kære Kunde,
Gigaset Communications GmbH er retlig efterfølger til Sie-
mens Home and Office Communication Devices GmbH &
Co. KG (SHC), som fra deres side videreførte Siemens AGs
Gigaset-forretninger. Siemens AGs eller SHCs eventuelle
forklaringer i betjeningsvejledningerne skal derfor forstås
som Gigaset Communications GmbHs forklaringer.
Vi håber, du får meget glæde af din Gigaset.
FI Arvoisa asiakkaamme,
Gigaset Communications GmbH on Siemens Home and
Office Communication Devices GmbH & Co. KG (SHC)-yri-
tyksen oikeudenomistaja, joka jatkoi puolestaan Siemens
AG:n Gigaset-liiketoimintaa. Käyttöoppaissa mahdollisesti
esiintyvät Siemens AG:n tai SHC:n selosteet on tämän
vuoksi ymmärrettävä Gigaset Communications GmbH:n
selosteina.
Toivotamme Teille paljon iloa Gigaset-laitteestanne.
SV Kära kund,
Gigaset Communications GmbH övertar rättigheterna från
Siemens Home and Office Communication Devices GmbH &
Co. KG (SHC), som bedrev Gigaset-verksamheten efter Sie-
mens AG. Alla förklaringar från Siemens AG eller SHC i
användarhandboken gäller därför som förklaringar från
Gigaset Communications GmbH.
Vi önskar dig mycket nöje med din Gigaset.
NO Kjære kunde,
Gigaset Communications GmbH er rettslig etterfølger etter
Siemens Home and Office Communication Devices GmbH &
Co. KG (SHC), som i sin tur videreførte Gigaset-geskjeften i
Siemens AG. Eventuelle meddelelser fra Siemens AG eller
SHC i bruksanvisningene er derfor å forstå som meddelelser
fra Gigaset Communications GmbH.
Vi håper du får stor glede av din Gigaset-enhet.
EL Αγαπητή πελάτισσα, αγαπητέ πελάτη,
η Gigaset Communications GmbH είναι η νομική διάδοχος της
Siemens Home and Office Communication Devices GmbH &
Co. KG (SHC), η οποία έχει αναλάβει την εμπορική
δραστηριότητα Gigaset της Siemens AG. Οι δηλώσεις της
Siemens AG ή της SHC στις
οδηγίες χρήσ
ης αποτ
ελούν
επομένως δηλώσεις της Gigaset Communications GmbH.
Σας ευχόμαστε καλή διασκέδαση με τη συσκευή σας Gigaset.
HR Poštovani korisnici,
Gigaset Communications GmbH pravni je sljednik tvrtke
Siemens Home and Office Communication Devices GmbH &
Co. KG (SHC), koji je nastavio Gigaset poslovanje tvrtke
Siemens AG. Zato sve izjave tvrtke Siemens AG ili SHC koje
se nalaze u uputama za upotrebu treba tumačiti kao izjave
tvrtke Gigaset Communications GmbH.
Nadamo se da sa zadovoljstvom koristite svoj Gigaset
uređaj.
SL Spoštovani kupec!
Podjetje Gigaset Communications GmbH je pravni naslednik
podjetja Siemens Home and Office Communication Devices
GmbH & Co. KG (SHC), ki nadaljuje dejavnost znamke
Gigaset podjetja Siemens AG. Vse izjave podjetja Siemens
AG ali SHC v priročnikih za uporabnike torej veljajo kot izjave
podjetja Gigaset Communications GmbH.
Želimo vam veliko užitkov ob uporabi naprave Gigaset.
Issued by
Gigaset Communications GmbH
Schlavenhorst 66, D-46395 Bocholt
Gigaset Communications GmbH is a trademark
licensee of Siemens AG
© Gigaset Communications GmbH 2008
All rights reserved.
Subject to availability. Rights of modifications
reserved.
www.gigaset.com

CS Vážení zákazníci,
společnost Gigaset Communications GmbH je právním
nástupcem společnosti Siemens Home and Office
Communication Devices GmbH & Co. KG (SHC), která dále
přejala segment produktů Gigaset společnosti Siemens AG.
Jakékoli prohlášení společnosti Siemens AG nebo SHC, které
naleznete v uživatelských příručkách, je třeba považovat za
prohlášení společnosti Gigaset Communications GmbH.
Doufáme, že jste s produkty Gigaset spokojeni.
SK Vážený zákazník,
Spoločnosť Gigaset Communications GmbH je právnym
nástupcom spoločnosti Siemens Home and Office
Communication Devices GmbH & Co. KG (SHC), ktorá zasa
pokračovala v činnosti divízie Gigaset spoločnosti Siemens
AG. Z tohto dôvodu je potrebné všetky vyhlásenia
spoločnosti Siemens AG alebo SHC, ktoré sa nachádzajú v
používateľských príručkách, chápať ako vyhlásenia
spoločnosti Gigaset Communications GmbH.
Veríme, že budete so zariadením Gigaset spokojní.
RO Stimate client,
Gigaset Communications GmbH este succesorul legal al
companiei Siemens Home and Office Communication
Devices GmbH & Co. KG (SHC), care, la rândul său, a
continuat activitatea companiei Gigaset a Siemens AG.
Orice afirmaţii efectuate de Siemens AG sau SHC şi incluse
în ghidurile de utilizare vor fi, prin urmare, considerate a
aparţine Gigaset Communications GmbH.
Sperăm ca produsele Gigaset să fie la înălţimea dorinţelor
dvs.
SR Poštovani potrošaču,
Gigaset Communications GmbH je pravni naslednik
kompanije Siemens Home and Office Communication
Devices GmbH & Co. KG (SHC), kroz koju je nastavljeno
poslovanje kompanije Gigaset kao dela Siemens AG. Stoga
sve izjave od strane Siemens AG ili SHC koje se mogu naći u
korisničkim uputstvima treba tuma
čiti kao
izjave kompanije
Gigaset Communications GmbH.
Nadamo se da ćete uživati u korišćenju svog Gigaset
uređaja.
BG Уважаеми потребители,
Gigaset Communications GmbH е правоприемникът на
Siemens Home and Office Communication Devices GmbH
& Co. KG (SHC), която на свой ред продължи бизнеса на
подразделението Siemens AG. По тази причина
всякакви изложения, направени от Siemens AG или
SHC, които се намират в ръководствата за
потребителя, следва да се разбират като изложения на
Gigaset Communications GmbH.
Надяваме се да ползвате с удоволствие вашия Gigaset.
HU T
isztelt Vásárló!
A Siemens Home and Communication Devices GmbH & Co.
KG (SHC) törvényes jogutódja a Gigaset Communications
GmbH, amely a Siemens AG Gigaset üzletágának utódja.
Ebből következően a Siemens AG vagy az SHC felhasználói
kézikönyveiben található bármely kijelentést a Gigaset
Communications GmbH kijelentésének kell tekinteni.
Reméljük, megelégedéssel használja Gigaset készülékét.
PL Szanowny Kliencie,
Firma Gigaset Communications GmbH jest spadkobiercą
prawnym firmy Siemens Home and Office Communication
Devices GmbH & Co. KG (SHC), która z kolei przejęła
segment produktów Gigaset od firmy Siemens AG. Wszelkie
oświadczenia firm Siemens AG i SHC, które można znaleźć
w instrukcjach obsługi, należy traktować jako oświadczenia
firmy Gigaset Communications GmbH.
Życzymy wiele przyjemności z korzystania z produktów
Gigaset.
TR Sayın Müşterimiz,
Gigaset Communications GmbH, Siemens AG'nin Gigaset
işletmesini yürüten Siemens Home and Office
Communication Devices GmbH & Co. KG (SHC)'nin yasal
halefidir. Kullanma kılavuzları nda bulunan ve Siemens AG
veya SHC tarafından yapılan bildiriler Gigaset
Communications GmbH tarafından yapılmış bildiriler olarak
algılanmalıdır.
Gigaset'ten memnun kalmanızı ümit ediyoruz.
RU Уважаемыи покупатель!
Компания Gigaset Communications GmbH является
правопреемником компании Siemens Home and Office
Communication Devices GmbH & Co. KG (SHC), которая,
в св
ою очередь, приняла подразделение Gigaset в свое
управление от компании Siemens AG. Поэтому любые
заявления, сделанные от имени компании Siemens AG
или SHC и встречающиеся в руководствах
пользователя, должны восприниматься как заявления
компании Gigaset Communications GmbH.
Мы надеемся, что продукты Gigaset удовлетворяют
вашим требованиям.
Issued by
Gigaset Communications GmbH
Schlavenhorst 66, D-46395 Bocholt
Gigaset Communications GmbH is a trademark
licensee of Siemens AG
© Gigaset Communications GmbH 2008
All rights reserved.
Subject to availability. Rights of modifications
reserved.
www.gigaset.com

s
Gigaset 4000 Micro, DE-IT-FR-SP-GB, A31008-G4000-
4000co-
13.05.02
Be inspired
Bedienungsanleitung
Istruzioni d’uso
Mode d’emploi
Instrucciones de manejo
Operating instructions

s
Gigaset 4000 Micro, DE-IT-FR-SP-GB, A31008-G4000-
4000co-
17.04.02
Be inspired
DEUTSCH
Bedienungsanleitung
und Sicherheitshinweise
!

Kurzübersicht des Mobilteils
2
Gigaset 4000 Micro, DE-IT-FR-SP-GB, A31008-G4000-B027-
4000COU.FM
05.07.02
Kurzübersicht des Mobilteils
Zusammenhang zwischen Steuer-Taste und Display-Tasten
Das Display ist durch eine Folie geschützt.
Bitte Schutzfolie abziehen!
Ñe
Annabella
19.07.01 13:13
{ ¨
Mikrofon
S
tatus-LED (Leuchtdiode)
leuchtet im Gespräch;
blinkt bei:
–
ankommendem Ruf
–
neuen Nachrichten
–
Weckruf, Termine,
Jahrestage
Empfangsstärke
S
teuer-Taste
A
bheben-Taste
–
Gespräch annehmen
–
Rufnummer wählen
–
Umschalten von
Freisprech- auf
Hörerbetrieb
T
elefonbuch öffnen
T
aste 1
Lang drücken wählt
A
nrufbeantworter/
T
-NetBox
T
asten-Sperre
Ein/aus
lang drücken!
S
tern-Taste
Lang drücken um
Rufton ein- und aus-
z
uschalten.
Freisprech-Taste
Umschalten von Hörer-
a
uf Freisprechbetrieb
Display (Anzeigefeld)
Mit den Display-Tasten
haben Sie Zugriff auf die
im Display dargestellten
Funktionen.
Aktuelle Funktionen
und Display-Tasten
Auflegen- und
Ein-/Aus-Taste
Anruferliste
– Gespräch beenden
– Funktion abbrechen
– Kurz drücken: Eine
Menüebene zurück;
– Lang drücken: Zurück
in Ruhezustand
– Mobilteil ein/aus
(Taste lang drücken)
Zugriff auf Nachrichtenlisten
Netzanbieter-Taste
– Netzanbieter-Liste
öffnen: kurz drücken!
– R-Tastenfunktion (Flash):
lang drücken!
Ladezustand
=
leer
U
voll
blinkt: Akkustand niedrig
Anschlußbuchse
–für Headset,
MP3-Player
INT
Mit der rechten Display-Taste
können Sie Funktionen ausfüh-
ren, die z. T. auch mit der Steuer-
Ta st e gesteuert werden können.
Darstellung der Steuer-Taste in
der Bedienungsanleitung:
F
/
G
(links/rechts)
E
/
D
(oben/unten)
Auf die dunkel dargestellte Seite
drücken.
Steuer-Taste
Display-Tasten

Kurzübersicht des Mobilteils
3
Gigaset 4000 Micro, DE-IT-FR-SP-GB, A31008-G4000-B027-
4000COU.FM
05.07.02
Wichtige Menüs
Display-Symbole
Je nach Bediensituation sehen Sie über den Display-Tasten folgende Symbole:
* nicht in allen Ländern verfügbar
Display-Tasten
Bedeutung
¨
Menü-Taste: Im Ruhezustand das allgemeine Menü aufrufen. Beim
Telefonieren ein situationsabhängiges Menü aufrufen.
Z
Menü-Funktion bestätigen und auswählen.
Eingaben beenden und speichern.
W
Lösch-Taste (Backspace): Eingaben von rechts nach links löschen.
{
Wahlwiederholungs-Taste: Liste der letzten 5 Rufnummern öffnen.
I
Anzeige bei SMS*, Anrufbeantworter, T-Net-Box, Anruferliste
Í
Eine Menüebene zurück, Abbruch
D
<Neuer Eintrag>
Anna
Barbara
Claus
:
©
Nr. verwenden
Eintrag löschen
Eintrag senden
Liste löschen
Liste senden
Speicherplatz
©
Textmeldung*
T-Net-LM
Familie/Freizeit
Termine/Uhr
Audio
Kosten
OKƒ
Einstellungen
Basis einstellen
Anrufbeantw.
Telefonlautst.
Rufton einst.
Hinweistöne

Sicherheitshinweise
4
Gigaset 4000 Micro, DE-IT-FR-SP-GB, A31008-G4000-B027-
4000COU.FM
05.07.02
Sicherheitshinweise
Verwenden Sie nur das mitgelieferte Steckernetzgerät, wie auf der
Unterseite des Gerätes gekennzeichnet.
Legen Sie nur zugelassene, aufladbare Akkus des gleichen Typs ein!
Wiederaufladbaren Akku richtig gepolt einlegen.
Akkutyp gemäß dieser Bedienungsanleitung verwenden
Medizinische Geräte können in ihrer Funktion beeinflusst werden. Beach-
ten Sie die technischen Bedingungen des jeweiligen Umfeldes (z. B. Arzt-
praxis).
Das Mobilteil kann in Hörgeräten einen unangenehmen Brummton verur-
sachen.
Nutzen Sie das Telefon nicht in explosionsgefährdeten Umgebungen (z. B.
Lackierereien).
Das Mobilteil ist nicht spritzwassergeschützt (siehe S. 24).
Während des Autofahrens darf der Fahrer nicht telefonieren (Walkie-Talkie-
Funktion).
Telefon ausschalten, während Sie sich im Flugzeug aufhalten (Walkie-Tal-
kie-Funktion). Gegen versehentliches Einschalten sichern.
Geben Sie Ihr Gigaset nur mit der Bedienungsanleitung an Dritte weiter.
Entsorgen Sie Akkus und Telefon umweltgerecht.
Nicht alle in dieser Bedienungsanleitung beschriebenen Funktionen sind in allen Län-
dern verfügbar.
!
$
‹
Œ
ƒ

Inhaltsverzeichnis
5
Gigaset 4000 Micro, DE-IT-FR-SP-GB, A31008-G4000-B027-
4000CoIVZ.fm
05.07.02
Inhaltsverzeichnis
Kurzübersicht des Mobilteils . . . . . . . . . . . . . . . . . . . . . . . . . . . . . . . . . . . . . . . . . . . . . 2
Zusammenhang zwischen Steuer-Taste und Display-Tasten . . . . . . . . . . . . . . . . .2
Wichtige Menüs . . . . . . . . . . . . . . . . . . . . . . . . . . . . . . . . . . . . . . . . . . . . . . . . . . .3
Display-Symbole . . . . . . . . . . . . . . . . . . . . . . . . . . . . . . . . . . . . . . . . . . . . . . . . . . .3
Sicherheitshinweise . . . . . . . . . . . . . . . . . . . . . . . . . . . . . . . . . . . . . . . . . . . . . . . . . . . . 4
Mobilteil vorbereiten . . . . . . . . . . . . . . . . . . . . . . . . . . . . . . . . . . . . . . . . . . . . . . . . . . . . 6
Verpackungsinhalt . . . . . . . . . . . . . . . . . . . . . . . . . . . . . . . . . . . . . . . . . . . . . . . . . .6
Akku einlegen
. . . . . . . . . . . . . . . . . . . . . . . . . . . . . . . . . . . . . . . . . . . . . . . . . . . . . . . . . . . . . . . .6
Mobilteil anmelden . . . . . . . . . . . . . . . . . . . . . . . . . . . . . . . . . . . . . . . . . . . . . . . . .6
Akku laden. . . . . . . . . . . . . . . . . . . . . . . . . . . . . . . . . . . . . . . . . . . . . . . . . . . . . . . .7
Gürtelclip befestigen . . . . . . . . . . . . . . . . . . . . . . . . . . . . . . . . . . . . . . . . . . . . . . . .7
Datum und Uhrzeit einstellen . . . . . . . . . . . . . . . . . . . . . . . . . . . . . . . . . . . . . . . . .8
Display-Sprache ändern. . . . . . . . . . . . . . . . . . . . . . . . . . . . . . . . . . . . . . . . . . . . . .8
Telefonieren . . . . . . . . . . . . . . . . . . . . . . . . . . . . . . . . . . . . . . . . . . . . . . . . . . . . . . . . . . . 9
Extern anrufen. . . . . . . . . . . . . . . . . . . . . . . . . . . . . . . . . . . . . . . . . . . . . . . . . . . . .9
Intern anrufen . . . . . . . . . . . . . . . . . . . . . . . . . . . . . . . . . . . . . . . . . . . . . . . . . . . . .9
Anruf annehmen . . . . . . . . . . . . . . . . . . . . . . . . . . . . . . . . . . . . . . . . . . . . . . . . . .10
Anrufer-/Nachrichtenliste aufrufen . . . . . . . . . . . . . . . . . . . . . . . . . . . . . . . . . . . .10
Freisprechen . . . . . . . . . . . . . . . . . . . . . . . . . . . . . . . . . . . . . . . . . . . . . . . . . . . . .10
Externes Gespräch verbinden, Rückfrage . . . . . . . . . . . . . . . . . . . . . . . . . . . . . .11
Wahlwiederholung. . . . . . . . . . . . . . . . . . . . . . . . . . . . . . . . . . . . . . . . . . . . . . . . . . . . . 11
Telefonbuch und Netzanbieterliste. . . . . . . . . . . . . . . . . . . . . . . . . . . . . . . . . . . . . . . 12
Schnellwahl aus der Netzanbieterliste. . . . . . . . . . . . . . . . . . . . . . . . . . . . . . . . . .13
Mit der Schnellwahl wählen . . . . . . . . . . . . . . . . . . . . . . . . . . . . . . . . . . . . . . . . .13
Einstellungen. . . . . . . . . . . . . . . . . . . . . . . . . . . . . . . . . . . . . . . . . . . . . . . . . . . . . . . . . .17
Wecker einstellen . . . . . . . . . . . . . . . . . . . . . . . . . . . . . . . . . . . . . . . . . . . . . . . . .17
Wecker deaktivieren . . . . . . . . . . . . . . . . . . . . . . . . . . . . . . . . . . . . . . . . . . . . . . .17
Weckruf ausschalten. . . . . . . . . . . . . . . . . . . . . . . . . . . . . . . . . . . . . . . . . . . . . . .17
Termin einstellen . . . . . . . . . . . . . . . . . . . . . . . . . . . . . . . . . . . . . . . . . . . . . . . . .18
Hörer- und Lautsprecher-Lautstärke . . . . . . . . . . . . . . . . . . . . . . . . . . . . . . . . . . .19
Rufton-Lautstärke/-Melodie einstellen. . . . . . . . . . . . . . . . . . . . . . . . . . . . . . . . . .19
Warn- und Signaltöne ein-/ausschalten . . . . . . . . . . . . . . . . . . . . . . . . . . . . . . . . .20
Vibrationsalarm ein-/ausschalten . . . . . . . . . . . . . . . . . . . . . . . . . . . . . . . . . . . . .21
Automatische Rufannahme ein/aus. . . . . . . . . . . . . . . . . . . . . . . . . . . . . . . . . . . .21
In den Lieferzustand zurücksetzen . . . . . . . . . . . . . . . . . . . . . . . . . . . . . . . . . . . .21
Babyfon . . . . . . . . . . . . . . . . . . . . . . . . . . . . . . . . . . . . . . . . . . . . . . . . . . . . . . . . . . . . . . 22
Babyfon einstellen. . . . . . . . . . . . . . . . . . . . . . . . . . . . . . . . . . . . . . . . . . . . . . . . .22
Walkie-Talkie-Modus . . . . . . . . . . . . . . . . . . . . . . . . . . . . . . . . . . . . . . . . . . . . . . . . . . 23
Anhang. . . . . . . . . . . . . . . . . . . . . . . . . . . . . . . . . . . . . . . . . . . . . . . . . . . . . . . . . . . . . . . 24
Betrieb an Basen der Gigaset-Familie . . . . . . . . . . . . . . . . . . . . . . . . . . . . . . . . . .24
Pflege . . . . . . . . . . . . . . . . . . . . . . . . . . . . . . . . . . . . . . . . . . . . . . . . . . . . . . . . . .24
Kontakt mit Flüssigkeit . . . . . . . . . . . . . . . . . . . . . . . . . . . . . . . . . . . . . . . . . . . . .24
Reichweite. . . . . . . . . . . . . . . . . . . . . . . . . . . . . . . . . . . . . . . . . . . . . . . . . . . . . . .25
Garantie . . . . . . . . . . . . . . . . . . . . . . . . . . . . . . . . . . . . . . . . . . . . . . . . . . . . . . . .26
Service (Customer Care) . . . . . . . . . . . . . . . . . . . . . . . . . . . . . . . . . . . . . . . . . . . .27
Display-Sprachen. . . . . . . . . . . . . . . . . . . . . . . . . . . . . . . . . . . . . . . . . . . . . . . . . .27

6
Tas t en dr ücken:
Mobilteil vorbereiten
Gigaset 4000 Micro, DE-IT-FR-SP-GB, A31008-G4000-B027-1-6419
4000CO.FM
05.07.02
Mobilteil vorbereiten
Verpackungsinhalt
Mobilteil Gigaset 4000i Micro, ein Akku, Steckernetz-
gerät, Ladeschale, Gürtelclip, Bedienungsanleitung.
Akku einlegen
Mobilteil anmelden
Schritt 1:
©
Menü öffnen.
åååååååååååååååååååååååååååååååå
D
Einstellungen
[
Auswählen und bestätigen.
åååååååååååååååååååååååååååååååå
D
MT anmelden
[
Auswählen und bestätigen.
D [
Basis auswählen ( , , oder
).
o
[
PIN eingeben und bestätigen (Lieferzustand: 0000) –
z. B. wird angezeigt.
Schritt 2:
Die Taste an der Rückseite der Basis Gigaset 4010i Mi-
cro (andere Basissysteme siehe Tabelle) lang drücken.
Dem Mobilteil wird automatisch die nächste freie inter-
ne Nummer (1–3) zugeordnet. Sind schon alle Plätze
belegt, wird die interne Nummer 6 überschrieben.
Nach erfolgreichem Anmelden kehrt das Mobilteil in
den Ruhezustand zurück. Am Display wird die interne
Nummer (z. B. „INT1“) angezeigt.
Die Liefereinstellung der Display-Sprache an Ih-
rem Mobilteil ist italienisch. Um die gewünschte
Sprache einzustellen s. Seite 8.
Gigaset
4000
m
ic
ro
Gigaset
4000
m
ic
r
o
o
Basis 1 Basis 2 Basis 3
Basis 4
Anmeldevorgang Basis 1
Gigaset Vorbereitung an der Basis bzw. -telefon
4010/4015 Taste an der Basisunterseite lang drücken.

7
Tas t en dr ücken:
Mobilteil vorbereiten
Gigaset 4000 Micro, DE-IT-FR-SP-GB, A31008-G4000-B027-1-6419
4000CO.FM
05.07.02
Akku laden
Lassen Sie das Mobilteil zum Laden des Ak-
kus ca. 5,5 Stunden in der Ladeschale lie-
gen, denn der Akku ist im Lieferzustand
nicht geladen. Das Aufladen des Akkus wird
am Mobilteil durch Blinken der Ladezu-
standsanzeige angezeigt:
Eine Übersicht der empfohlenen Akkutypen finden Sie
im Anhang.
Gürtelclip befestigen
Gürtelclip auf der Rückseite des Mobilteils andrücken,
bis „seitliche Nasen“ in die Aussparungen einrasten.
3010/3015
Die graue Taste der Basis so lange
drücken, bis Sie Signaltöne hören.
3020/25
3030/35
4030/35
Im Menü des Basistelefons
Einstellungen
,
System-Einstell.
und
Gerät anmelden
aus-
wählen und mit
OK
bestätigen.
3070/75
4070/75
Die Anzeige (LED) drücken – sie blinkt
während der Anmeldung.
Basen
anderer
Hersteller
Zur Anmeldung an „GAP-Basen“ folgen Sie
der jeweiligen Bedienungsanleitung
(Schritt 2 und 3).
●
Der Akku erwärmt sich während des Aufladens;
das ist ein normaler Vorgang und ungefährlich.
●
Damit der Ladezustand des Akkus richtig ange-
zeigt wird, sollten Sie das Akkufach nicht unnötig
öffnen.
5,5

8
Tas t en dr ücken:
Mobilteil vorbereiten
Gigaset 4000 Micro, DE-IT-FR-SP-GB, A31008-G4000-B027-1-6419
4000CO.FM
05.07.02
Datum und Uhrzeit einstellen
Die Datums- und Uhrzeiteinstellung ist notwendig, da-
mit der Zeitpunkt des Eingangs von Nachrichten/ Anru-
fen korrekt angezeigt wird.
©
Menü öffnen.
åååååååååååååååååååååååååååååååå
D
Termine/Uhr
[
Auswählen und bestätigen.
åååååååååååååååååååååååååååååååå
D
Datum/Uhrzeit
[
Auswählen und bestätigen.
Die aktuelle Einstellung wird angezeigt.
Datum eingeben
Tag/Monat/Jahr eingeben.
Beispiel hier: 20.05.2001.
z. B.
ŸÞÞ¢Þ]
D
Eine Zeile nach unten springen.
Uhrzeit eingeben
Stunden/Minuten eingeben.
Beispiel hier: 19.05 Uhr.
z. B.
] ¬ Þ ¢
D
Eine Zeile nach unten springen.
Anzeigemodus auswählen
Wählen Sie mit der linken Seite der Steuertaste zwi-
schen dem 12-Stunden- (am oder pm) oder dem 24-
Stunden-Anzeigemodus (Lieferzustand) aus.
åååååååååååååååååååååååååååååååå
Sichern
[
Einstellungen speichern.
Display-Sprache ändern
©
Menü öffnen.
åååååååååååååååååååååååååååååååå
D
Einstellungen
[
Funktion bestätigen.
åååååååååååååååååååååååååååååååå
D
Sprache
[
Die aktive Sprache ist mit
✓
markiert.
D[
Gewünschte Sprache auswählen und bestätigen.
Notrufnummer wählen
Sie haben die Möglichkeit, die in der Basisstation ge-
speicherten Notrufnummern zu wählen, siehe Bedie-
nungsanleitung der Basisstation!
Eine Tabelle finden Sie auf der letzten Seite dieses
Heftes.

9
Tas t en dr ücken:
Telefonieren
Gigaset 4000 Micro, DE-IT-FR-SP-GB, A31008-G4000-B027-1-6419
4000CO.FM
05.07.02
Telefonieren
Extern anrufen
o Rufnummer eingeben.
Ggf. mit der Display-Taste
X
einzelne Zeichen korri-
gieren.
c
Abheben-Taste drücken.
a
Auflegen-Taste drücken, um das Gespräch zu been-
den.
Intern anrufen
F
Liste der Intern-Teilnehmer öffnen. Das eigene
Mobilteil ist mit „<" gekennzeichnet.
E
D
c
Gewünschtes Mobilteil auswählen und Abheben-Taste
drücken.
oder z. B.
Ÿ
Interne Rufnummer des Mobilteils eingeben.
oder c
oder
«
Es klingeln alle Mobilteile.
a
Auflegen-Taste drücken, um das Gespräch zu been-
den.
●
Sie können auch zuerst die Abheben-Taste
c
drücken und dann die Rufnummer eingeben - jede
Ziffer wird sofort gewählt.
●
Mit der Auflegen-Taste
a
können Sie das
Wählen abbrechen.
●
Sie können eine Wahlpause einfügen: Nach der
Eingabe der Vorwahl öffnen Sie über die Display-
Ta st e
©
das Menü und wählen „Pause einfü-
gen“.
An alle

10
Tas t en dr ücken:
Telefonieren
Gigaset 4000 Micro, DE-IT-FR-SP-GB, A31008-G4000-B027-1-6419
4000CO.FM
05.07.02
Anruf annehmen
Ihr Telefon klingelt (Rufton) und die Status-LED blinkt.
c
/
u
Abheben- oder Freisprech-Taste drücken.
oder
das Mobilteil nur aus der Ladeschale nehmen (Liefer-
zustand: „Automatische Rufannahme“).
Anrufer-/Nachrichtenliste aufrufen
*
Neue Anrufe/Nachrichten werden durch einen Hinweis
im Display und das Blinken der Status-LED angezeigt.
?
Drücken
Freisprechen
Freisprechen beim Wählen
o
Nummer wählen.
u
Die Freisprech-Taste drücken.
Freisprechen während des Gesprächs
u
Freisprechen einschalten.
Lautstärke einstellen:
Freisprech-Taste
u
nochmals drücken.
F G
Lautstärke einstellen.
Sichern
Eingestellte Lautstärke speichern.
c
Von Freisprechen in den Hörerbetrieb wechseln.
a
Gespräch beenden.
* nicht in allen Ländern verfügbar
k
Ö
Bei eingeschaltetem Freisprechen leuchten die
Freisprech-Taste u und die Status-LED.

11
Tas t en dr ücken:
Wahlwiederholung
Gigaset 4000 Micro, DE-IT-FR-SP-GB, A31008-G4000-B027-1-6419
4000CO.FM
05.07.02
Externes Gespräch verbinden,
Rückfrage
Sie können ein externes Gespräch an ein anderes
Mobilteil verbinden oder intern eine Rückfrage halten.
F
Liste der Intern-Teilnehmer öffnen.
E
D
c
Internen Teilnehmer auswählen und anrufen.
Wenn sich der interne Teilnehmer meldet:
●
Gespräch verbinden: Auflegen-Taste
a
drücken.
●
Rückfrage beenden: Mit
Beenden
zum wartenden
Teilnehmer zurückschalten.
Wahlwiederholung
Manuelle Wahlwiederholung
Sie haben Zugriff auf die 5 zuletzt gewählten Rufnum-
mern.
z D
Rufnummer anzeigen und auswählen.
c
Abheben-Taste drücken.
Automatische Wahlwiederholung
Die Freisprech-Taste blinkt und Lauthören ist einge-
schaltet. Die Funktion schaltet sich nach zehn er-
folglosen Wahlversuchen oder nach einem zwi-
schenzeitlich geführten Gespräch aus.
Wenn Ihr Gesprächspartner nicht erreichbar ist, drü-
cken Sie
Aus
oder eine beliebige Taste.
zD
Rufnummer anzeigen und auswählen.
©
Menü öffnen.
åååååååååååååååååååååååååååååååå
Aut. Wahlwiederh.
[
Einschalten.
c
Meldet sich der Teilnehmer: Abheben-Taste drücken.
Diese Funktion ist nicht in allen Ländern verfügbar!

12
Tas t en dr ücken:
Telefonbuch und Netzanbieterliste
Gigaset 4000 Micro, DE-IT-FR-SP-GB, A31008-G4000-B027-1-6419
4000CO.FM
05.07.02
Rufnummer aus Wahlwiederholungsliste
löschen
zD
Rufnummer anzeigen und auswählen.
©
Menü öffnen.
åååååååååååååååååååååååååååååååå
D
Eintrag löschen
[
Rufnummer wird gelöscht.
Rufnummer ins Telefonbuch übernehmen
zD
Rufnummer anzeigen und auswählen.
©
Menü öffnen.
åååååååååååååååååååååååååååååååå
D
Nr. ins Tel.buch
[
Die Rufnummer wird eingetragen.
o Ggf. die Rufnummer ändern, Namen eingeben (ggf.
Jahrestag eingeben s. Seite 16).
Eingabe von Buchstaben und Zeichen, s. Seite 14.
©
Menü öffnen.
åååååååååååååååååååååååååååååååå
Speichern
[
Eintrag speichern.
Telefonbuch und Netzanbieterliste
Das Telefonbuch
D
erleichtert Ihnen das Wählen
von bis zu 200 Rufnummern.
In der Netzanbieterliste C können Sie die Vorwahl-
nummern (Call-by-Call
*
) von Telefongesellschaften
speichern. Die Bedienung von Telefonbuch und Netzan-
bieterliste ist identisch.
Eintrag speichern
D
/
C
Telefonbuch/Netzanbieterliste öffnen.
åååååååååååååååååååååååååååååååå
Neuer Eintrag
[
Auswählen und bestätigen.
o Rufnummer (max. 32 Ziffern) eingeben.
D
o Ins Namensfeld springen und Namen eingeben.
Bei Telefonbuch: ggf. Jahrestag eingeben, siehe auch
Seite 16.
©
Menü öffnen.
åååååååååååååååååååååååååååååååå
Speichern
[
Eintrag speichern.
* nicht in allen Ländern verfügbar

13
Tas t en dr ücken:
Telefonbuch und Netzanbieterliste
Gigaset 4000 Micro, DE-IT-FR-SP-GB, A31008-G4000-B027-1-6419
4000CO.FM
05.07.02
Mit Telefonbuch wählen
D
Telefonbuch öffnen.
z. B.
^^
Anfangsbuchstaben des Namens eingeben, z. B. für
„E“ , die Taste
^
zweimal drücken oder mit der
Tas te
D
blättern.
c
Abheben-Taste drücken.
Mit Netzanbieterliste wählen (Call-by-Call)
C
Netzanbieterliste aufrufen.
D©
Call-by-Call-Nummer auswählen und Menü öffnen.
åååååååååååååååååååååååååååååååå
Nr. verwenden
[
Auswählen und bestätigen.
o Rufnummer des gewünschten Teilnehmers eingeben.
oder
DD[
Rufnummer aus Telefonbuch auswählen und bestäti-
gen.
c
Abheben-Taste drücken. Die Rufnummer wird
gewählt.
Schnellwahl aus der Netzanbieterliste
Sie können sich in der Netzanbieterliste 8 Nummern
für die Schnellwahl speichern. Dabei geben Sie vor
dem Namen eine Schnellwahlnummer (2–9) ein.
Mit der Schnellwahl wählen
z. B.
Ÿ
Tas te lang drücken:
Der gespeicherte Netzanbietername wird angezeigt.
z. B. o Rufnummer eingeben
oder
DD [
Eintrag aus Telefonbuch auswählen und bestätigen.
c
Drücken.
Nach Auswahl des Namens können Sie auch das
Menü öffnen, auswählen, die Num-
mer ergänzen/ändern und mit der Abheben-Taste
c
wählen.
Nr. verwenden
Beispiel: Schnellwahlnummer 2 und danach den
Netzanbieternamen.

14
Tas t en dr ücken:
Telefonbuch und Netzanbieterliste
Gigaset 4000 Micro, DE-IT-FR-SP-GB, A31008-G4000-B027-1-6419
4000CO.FM
05.07.02
Zeichentabelle
Entsprechende Taste mehrmals bzw. lang drücken:
Reihenfolge der Sortierung:
1 x 2 x 3 x 4 x 5 x 6 x 7 x 8 x
9
x
10
x
]
Leer-
zei-
chen
1
â
£$¥¤
Ÿ
a b c 2 ä á à â ã ç
^
def3ëéèê
¡
g h i 4 ï í ì î
¢
jkl5
£
m n o 6 ö ñ ó ò ô õ
¤
pqrs7ß
¥
t u v 8 ü ú ù û
¬
wxyz9ÿýæøå
«
a→
→→
→A
*
/ ( ) <=>%
Þ
. , ? ! 0 + - : ¿
¡
*
*
Weitere Zeichen dieser Taste:
“,‘,;,_
ª
# @ \ & §
Der erste Buchstabe des Namens wird automa-
tisch groß geschrieben, es folgen kleine Buchsta-
ben.
Für ein Zeichen zur Groß-/Kleinschreibung wech-
seln:
«
drücken.
Schreibmarke steuern mit
F G E D
. Zei-
chen löschen mit
X
Das Einfügen von Zeichen erfolgt immer links von der
Schreibmarke (Cursor).
Mit einem vorangestellten Leerzeichen rutscht ein
Eintrag an die erste Stelle (z.B..: „ Karla“).
1. Leerzeichen 3. Buchstaben (alphabe-
tisch)
2. Ziffern (0-9) 4. Restliche Zeichen

15
Tas t en dr ücken:
Telefonbuch und Netzanbieterliste
Gigaset 4000 Micro, DE-IT-FR-SP-GB, A31008-G4000-B027-1-6419
4000CO.FM
05.07.02
Eintrag anzeigen, ändern oder löschen
D
/
C
Telefonbuch/Netzanbieterliste öffnen.
D
Gewünschten Eintrag auswählen.
Ansehen
Alle Informationen zum Eintrag anzeigen.
Ändern
Das Eingabefeld öffnen und die gewünschten Ände-
rungen vornehmen.
o Ggf. Rufnummer ändern.
D
o Ins Namensfeld springen und Name ändern.
Eingabe von Buchstaben und Zeichen, s. Seite 14.
Bei Telefonbuch: ggf. Jahrestag eingeben, s. Seite 16.
©
Menü öffnen.
åååååååååååååååååååååååååååååååå
Speichern
[
Änderungen bestätigen.
oder
D
/
C
Telefonbuch/Netzanbieterliste öffnen.
D
Gewünschten Eintrag auswählen.
©
Menü öffnen.
åååååååååååååååååååååååååååååååå
D
Eintrag löschen
[
Ein Bestätigungston ertönt. Der Eintrag ist gelöscht.
Eintrag an ein anderes Mobilteil senden
Sie können einen Eintrag an ein anderes Micro/
Comfort-Mobilteil übertragen.
D
/
C
Telefonbuch/Netzanbieterliste öffnen.
D
Gewünschten Eintrag auswählen.
©
Menü öffnen.
åååååååååååååååååååååååååååååååå
D
Eintrag senden
[
Auswählen und bestätigen.
D[
Internen Teilnehmer (Empfänger-Mobilteil) auswählen
und bestätigen.
Weiteren Eintrag senden:
Ja
Drücken.
D
Gewünschten Eintrag auswählen.
Senden
Sendevorgang einleiten.

16
Tas t en dr ücken:
Telefonbuch und Netzanbieterliste
Gigaset 4000 Micro, DE-IT-FR-SP-GB, A31008-G4000-B027-1-6419
4000CO.FM
05.07.02
Telefonbuch/Netzanbieterliste senden:
Sie können das ganze Telefonbuch/Netzanbieterliste
an ein anderes Micro/Comfort-Mobilteil übertragen.
Siehe „Eintrag an ein anderes Mobilteil senden“.
Telefonbuch/Netzanbieterliste löschen
D
/
C
Telefonbuch/Netzanbieterliste öffnen.
D
Gewünschten Eintrag auswählen.
©
Menü öffnen.
åååååååååååååååååååååååååååååååå
D
Liste löschen
[
Auswählen und bestätigen.
Ja
Löschen aller Einträge bestätigen.
Jahrestage (z. B. Geburtstage) eingeben
Sie können Datum und Uhrzeit für Jahrestage
abspeichern und sich daran erinnern lassen.
D
Telefonbuch öffnen.
D
Ansehen
Eintrag auswählen und anzeigen.
Ändern
Das Eingabefeld öffnen.
D
Schreibmarke ins Feld für den Geburtstag/Jahrestag
bewegen.
Ändern
Bestätigen.
o Datum (Tag/Monat) eingeben oder ändern.
D
o Eine Zeile nach unten springen und Uhrzeit eingeben.
D
Eine Zeile nach unten springen.
F G
Signalisierung auswählen.
[
Eingaben speichern.
Mit der Display-Taste
Löschen
können Sie den Jahres-
tag-Termin löschen.
Die Übertragung wird abgebrochen, wenn:
●
der Speicher des Empfänger-Mobilteils voll ist.
●
Sie angerufen werden.
Die aktuelle Übertragung eines Eintrags wird zu Ende
gebracht.

17
Tas t en dr ücken:
Einstellungen
Gigaset 4000 Micro, DE-IT-FR-SP-GB, A31008-G4000-B027-1-6419
4000CO.FM
05.07.02
Einstellungen
Wecker einstellen
Ist an Ihrem Mobilteil eine Weckzeit eingestellt
(Symbol
¼
), klingelt es täglich zur gleichen Uhrzeit.
Das Mobilteil befindet sich im Ruhezustand:
©
Menü öffnen.
åååååååååååååååååååååååååååååååå
D
Termine/Uhr
[
Auswählen und bestätigen.
åååååååååååååååååååååååååååååååå
D
Wecker
[
Auswählen und bestätigen.
Die aktuelle Einstellung wird angezeigt.
F G
auswählen.
D
Eine Zeile nach unten springen.
Þ£ÞÞ
Stunden/Minuten eingeben. Beispiel hier: 6.00 Uhr.
D
Eine Zeile nach unten springen.
F G
Weckrufmelodie auswählen.
Sichern
Einstellungen speichern.
Wecker deaktivieren
©
Menü öffnen.
åååååååååååååååååååååååååååååååå
D
Termine/Uhr
[
Auswählen und bestätigen.
åååååååååååååååååååååååååååååååå
D
Wecker
[
Auswählen und bestätigen.
F G
auswählen.
Sichern
Einstellungen speichern.
Weckruf ausschalten
Ein Weckruf wird wie ein ankommender Ruf signali-
siert. Drücken Sie eine beliebige Taste, um den Weck-
ruf auszuschalten.
Ein
Bei eingeschalteter Babyfonfunktion oder während
einer automatischen Wahlwiederholung erfolgt kein
Weckruf.
Aus

18
Tas t en dr ücken:
Einstellungen
Gigaset 4000 Micro, DE-IT-FR-SP-GB, A31008-G4000-B027-1-6419
4000CO.FM
05.07.02
Termin einstellen
Sie können sich von Ihrem Mobilteil an einen Termin
erinnern lassen. Ein eingestellter Termin wird mit dem
Symbol
¼
angezeigt.
Das Mobilteil befindet sich im Ruhezustand.
©
Menü öffnen.
åååååååååååååååååååååååååååååååå
D
Termine/Uhr
[
Auswählen und bestätigen.
åååååååååååååååååååååååååååååååå
Termin eingeben
[
Auswählen und bestätigen.
F G
auswählen, um Terminfunktion einzuschalten.
D
Eine Zeile nach unten springen.
ŸÞÞ¢
Tag/Monat eingeben,
Beispiel hier: 20. Mai.
D
Eine Zeile nach unten springen.
Þ¬^Þ
Stunden/Minuten eingeben,
Beispiel hier: 9.30 Uhr.
D
Eine Zeile nach unten springen.
F G
Ruftonmelodie für Terminfunktion wählen.
Sichern
Einstellungen speichern.
Terminruf ausschalten
Ein Terminruf wird wie ein ankommender Ruf signali-
siert und wird durch Drücken einer beliebigen Taste
ausgeschaltet.
Terminfunktion ausschalten
©
Menü öffnen.
åååååååååååååååååååååååååååååååå
D
Termine/Uhr
[
Auswählen und bestätigen.
åååååååååååååååååååååååååååååååå
Termin eingeben
[
Auswählen und bestätigen.
F G
auswählen, falls aktuelle Einstellung
ist.
Sichern
Einstellungen speichern.
Ein
Ein Terminruf erfolgt nur, wenn sich das Mobilteil im
Ruhezustand befindet. Bei eingeschalteter Babyfon-
funktion oder automatischer Wahlwiederholung er-
folgt kein Terminruf.
Aus Ein

19
Tas t en dr ücken:
Einstellungen
Gigaset 4000 Micro, DE-IT-FR-SP-GB, A31008-G4000-B027-1-6419
4000CO.FM
05.07.02
Nicht angenommene Termine und Jahrestage
Ein Termin und Jahrestage, die vom Mobilteil signali-
siert aber nicht angenommen wurden, werden in einer
Liste gespeichert.
Möchten Sie sich Ihren bereits angeschauten Termin
nochmals anzeigen lassen, gehen Sie wie folgt vor:
©
Menü öffnen.
åååååååååååååååååååååååååååååååå
D
Termine/Uhr
[
Auswählen und bestätigen.
åååååååååååååååååååååååååååååååå
D
Ereignisse
[
Auswählen und bestätigen.
D[
Nicht angenommenen Termin
¼
oder Jahrestag
‚
auswählen. Informationen dazu werden angezeigt.
Mit der Display-Taste
Löschen
können Sie den Termin/
Jahrestag löschen.
Hörer- und Lautsprecher-Lautstärke
©
Menü öffnen.
åååååååååååååååååååååååååååååååå
D
Audio
[
Menü auswählen.
åååååååååååååååååååååååååååååååå
Telefonlautst.
[
Der Hörton ertönt in der aktuellen Lautstärke.
F G
Freisprechlautstärke einstellen.
D
Eine Zeile nach unten springen.
F G
Sichern
Gewünschte Stufe der Hörerlautstärke auswählen und
bestätigen.
Rufton-Lautstärke/-Melodie einstellen
Sie können zwischen fünf Rufton-Lautstärken, „Cre-
scendo“-Ruf (Lautstärke wird lauter), Rufton aus, und
zehn Rufton-Melodien wählen:
©
Menü öffnen.
åååååååååååååååååååååååååååååååå
D
Audio
[
Auswählen und bestätigen.
åååååååååååååååååååååååååååååååå
D
Rufton einst.
[
Die aktuelle Rufton-Lautstärke ertönt und wird ange-
zeigt.
F G
Rufton-Lautstärke auswählen.
D
Eine Zeile nach unten springen.
F G
Sichern
Gewünschte Rufton-Melodie (1–10) auswählen und
bestätigen.
Ein neuer nicht angenommener Termin/Jahrestag
wird mit
Termin
angezeigt. Drücken Sie die rechte
Display-Taste, die Liste der Ereignisse wird ange-
zeigt. Dann
[
auswählen.
Termin
¼

20
Tas t en dr ücken:
Einstellungen
Gigaset 4000 Micro, DE-IT-FR-SP-GB, A31008-G4000-B027-1-6419
4000CO.FM
05.07.02
Zeitsteuerung für Rufton-Lautstärke
Sie können für einen bestimmten Zeitraum eine ande-
re Rufton-Lautstärke einstellen.
©
Menü öffnen.
åååååååååååååååååååååååååååååååå
D
Audio
[
Auswählen und bestätigen.
åååååååååååååååååååååååååååååååå
D
Rufton einst.
[
Die aktuelle Rufton-Lautstärke ertönt und wird ange-
zeigt.
Zeitstrg
Drücken.
F G
Zeitsteuerung ein-/ausschalten.
D
o Zeitraum für den gewünschten Rufton eingeben
z. B.
]]ÞÞ
]¢ÞÞ
(für 11:00 bis 15:00 Uhr)
DF G
Eine Zeile nach unten springen und Rufton-Lautstärke
auswählen.
Sichern
Einstellungen speichern.
Sichern
oder
a
Drücken.
Warn- und Signaltöne ein-/ausschalten
●
Tastenklick: Jeder Tastendruck wird bestätigt.
●
Quittungstöne: Bestätigungston (aufsteigende
Tonfolge) am Ende von Eingaben/Einstellungen und
beim Einlegen des Mobilteils in die Ladeschale; Feh-
lerton (absteigende Tonfolge) bei Fehleingaben.
●
Akkuwarnton: Der Akku muss geladen werden.
©
Menü öffnen.
åååååååååååååååååååååååååååååååå
D
Audio
[
Auswählen und bestätigen.
åååååååååååååååååååååååååååååååå
D
Hinweistöne
[
Auswählen und bestätigen.
D
Gewünschte Funktion auswählen.
F G
, oder (Akkuwarnton im Gespräch)
wählen.
Sichern
Einstellungen speichern.
Ein Aus in Verb.

21
Tas t en dr ücken:
Einstellungen
Gigaset 4000 Micro, DE-IT-FR-SP-GB, A31008-G4000-B027-1-6419
4000CO.FM
05.07.02
Vibrationsalarm ein-/ausschalten
Um durch den Rufton nicht gestört zu werden, können
Sie stattdessen den Vibrationsalarm im Mobilteil ein-
schalten. Er kann auch zusätzlich zum Rufton einge-
schaltet werden (z. B. bei lauter Umgebung).
©
Menü öffnen.
åååååååååååååååååååååååååååååååå
D
Audio
[
Auswählen und bestätigen.
åååååååååååååååååååååååååååååååå
D
Vibration
[
Auswählen und bestätigen.
Sie können durch langes Drücken der
«
-Taste den
Rufton ausschalten. Damit ist nur der Vibrationsalarm
aktiv.
Automatische Rufannahme ein/aus
Bei eingeschalteter Funktion nehmen Sie das Mobilteil
zum Annehmen eines Anrufs aus der Ladeschale
(Lieferzustand), ohne die Taste
c
drücken zu müssen.
©
Menü öffnen.
åååååååååååååååååååååååååååååååå
D
Einstellungen
[
Auswählen und bestätigen.
åååååååååååååååååååååååååååååååå
D
Aut.Rufannahme
[
Mit
[
ein-/ausschalten (
✓
= Funktion ein).
In den Lieferzustand zurücksetzen
Das Telefonbuch, die Netzanbieterliste und die Anrufer-
liste werden beim Zurücksetzen nicht gelöscht. Die An-
meldung an der Basis bleibt erhalten.
©
Menü öffnen.
åååååååååååååååååååååååååååååååå
D
Einstellungen
[
Auswählen und bestätigen.
åååååååååååååååååååååååååååååååå
D
Mobilteil-Reset
[
Auswählen und bestätigen.
Ja
Sicherheitsabfrage bestätigen.
½
Die aktuelle Einstellung ist mit
✓
markiert
Funktion Lieferzustand
Hörer-Lautstärke 1
Rufton-Lautstärke 5
Rufton-Melodie 1
Automatische Rufannahme ein
Akkuwarnton ein
Freisprech-Lautstärke 3

22
Tas t en dr ücken:
Babyfon
Gigaset 4000 Micro, DE-IT-FR-SP-GB, A31008-G4000-B027-1-6419
4000CO.FM
05.07.02
Babyfon
Mit Ihrem Mobilteil können Sie Geräusche im Raum Ihres
Babys von einem anderen Ort aus überwachen.
Der Abstand des Mobilteils zum Baby sollte mindestens
1 bis 2 Meter betragen. Wird ein bestimmter Geräusch-
pegel erreicht (z.B. Baby schreit), wählt das Mobilteil au-
tomatisch eine von Ihnen gespeicherte (interne /exter-
ne) Rufnummer. Ankommende Anrufe werden bei
Babyfonbetrieb nur am Display angezeigt.
Babyfon einstellen
©
Menü öffnen.
åååååååååååååååååååååååååååååååå
D
Familie/Freizeit
[
Auswählen und bestätigen.
åååååååååååååååååååååååååååååååå
D
Babyfon
[
Auswählen und bestätigen.
F G
oder
wählen.
D
Eine Zeile nach unten springen.
Ändern
Eingabefeld für Rufnummer öffnen.
Eine bereits vorhanden externe Rufnummer mit
X
löschen.
Eine bereits vorhanden interne Rufnummer mit
Ja
löschen (Sicherheitsabfrage).
F
o Liste der internen Teilnehmer öffnen und interne
Nummer auswählen.
[
Rufnummer speichern.
oder
D
Telefonbuch öffnen.
D [
Externen Teilnehmer auswählen.
©
Menü öffnen.
åååååååååååååååååååååååååååååååå
Speichern
[
Einstellung bestätigen.
D
Eine Zeile nach unten springen.
F G
Empfindlichkeit „hoch“ oder „niedrig“ einstellen.
Sichern
Einstellung speichern.
Babyfon-Pegel hoch
Zeitsteuerung aus
Display-Sprache landesspezif.
Vibrationsalarm aus
Ein Aus

23
Tas t en dr ücken:
Walkie-Talkie-Modus
Gigaset 4000 Micro, DE-IT-FR-SP-GB, A31008-G4000-B027-1-6419
4000CO.FM
05.07.02
Mit der Display-Taste kann die Babyfon-Funktion
ausgeschaltet werden.
Walkie-Talkie-Modus
Im Walkie-Talkie-Modus sind die Mobilteile für kom-
mende Rufe nicht mehr erreichbar.
Walkie-Talkie-Modus am Mobilteil einschalten
©
Menü öffnen.
åååååååååååååååååååååååååååååååå
D
Familie/Freizeit
[
Funktion auswählen.
åååååååååååååååååååååååååååååååå
D
Walkie-Talkie
[
Walkie-Talkie-Modus einschalten.
Mit der Display-Taste kann der Walkie-Talkie-Mo-
dus ausgeschaltet werden.
Walkie-Talkie-Modus nutzen
Zwei Mobilteile befinden sich im Walkie-Talkie-
Modus:
Rufendes Mobilteil:
Rufen
Drücken.
Gerufenes Mobilteil:
Der Ruf wird am Display mit einer Meldung signalisiert.
Ruf aus
Rufton wird augeschaltet.
c
Drücken.
Die beiden Mobilteile sind miteinander verbunden.
a
Drücken. Gespräch ist beendet.
Babyfon-Funktion von Extern ausschalten
Sie können von Extern (z. B. vom „Handy“) die Baby-
fonfunktion ausschalten. Nehmen Sie den durch die
Babyfon-Funktion ausgelösten Anruf an und drücken
Sie die Tasten
»
, um die Funktion zu deakti-
vieren.
Die Babyfon-Funktion ist nun ausgeschaltet. Vom Ba-
byfon wird kein Anruf mehr ausgelöst.
Voraussetzung:
Die Mobilteile haben die selben Basiseinstellungen
(z. B. Beste Basis), oder sie sind noch an keiner Basis
angemeldet. (Der Walkie-Talkie-Modus verringert die
Betriebszeiten eines Mobilteils erheblich).
Aus
Aus

24
Anhang
Gigaset 4000 Micro, DE-IT-FR-SP-GB, A31008-G4000-B027-1-6419
4000CO.FM
05.07.02
Anhang
Betrieb an Basen der Gigaset-Familie
Gigaset 1000/2000/3000
Folgende Funktionen Ihres 4000i Micro-Mobilteil werden nicht von
Basen dieser Gigaset-Familie unterstützt.
●
Uhrzeiteinstellung (nach Ausschalten des Mobilteils wird die Uhr-
zeit nicht mehr übermittelt)
●
Sprachwahl
●
Babyfon (kann von extern nicht ausgeschaltet werden)
●
SMS Übermittlung (nur SMS-fähige Basen)*
Gigaset 4010/4015 Classic
Folgende Funktionen Ihres 4000i Micro-Mobilteil werden nicht von
den genannten Basen unterstützt.
●
Sprachwahl
●
SMS Übermittlung*
●
Einstellung von Berechtigungsstufen
*
nicht in allen Ländern verfügbar
Pflege
Wischen Sie Basis und Mobilteil mit einem feuchtem Tuch oder ei-
nem Antistatiktuch ab. Benutzen Sie nie ein trockenes Tuch! Es be-
steht die Gefahr der statischen Aufladung!
Kontakt mit Flüssigkeit
Sollte das Mobilteil mit Flüssigkeit in Kontakt gekommen sein,
auf keinen Fall das Gerät einschalten.
Sofort den Akku entnehmen.
Lassen Sie die Flüssigkeit aus dem Gerät abtropfen und tupfen Sie an-
schließend alle Teile trocken.
Lagern Sie das Mobilteil ohne Akku für mindestens 72 Stunden an ei-
nem trockenen, warmen Ort.
Danach ist in vielen Fällen die Inbetriebnahme wieder möglich.
!

25
Anhang
Gigaset 4000 Micro, DE-IT-FR-SP-GB, A31008-
4000CO.FM
05.07.02
Empfohlene Akkus:
Betriebszeiten/Ladezeiten des Mobilteils:
Die Ladekapazität der Akkus reduziert sich technisch bedingt nach
einigen Jahren.
Reichweite
Die Reichweite beträgt im freien Gelände ca. 300 m. In Gebäuden
werden Reichweiten bis 50 m erreicht.
Tischladestation
Die Tischladestation für Siemens Mobiltelefone lässt sich ebenfalls
zum Laden Ihres Mobilteils verwenden.
(Zubehör für Siemens Mobiltelefone C45, ME45, S45)
Bestell-Nr. L36880-N4501-A101
Nickel-Metall-Hydrid (NiMH) , 500 mAh.
Bestell-Nr. V30145-K1310-X125 oder
Bestell-Nr. V30145-K1310-X229
Kapazität
(mAh)
Bereitschafts-
zeit (Stunden)
Gesprächszeit
(Stunden)
Ladezeit
(Stunden)
500 bis zu 300 ca. 16 etwa 5,5
½
Beim Laden eines Gigaset Mobilteils in der Tischladestation
wird ein Reserveakku solange nicht aufgeladen, solange das
Mobilteil in der Ladestation steht.
Die LED Ladeanzeige leuchtet immer.

26
Anhang
Gigaset 4000 Micro, DE-IT-FR-SP-GB, A31008-G4000-B027-1-6419
4000CO.FM
05.07.02
Garantie
Dem Verbraucher (Kunden) wird unbeschadet seiner Mängelansprü-
che gegenüber dem Verkäufer eine Haltbarkeitsgarantie zu den nach-
stehenden Bedingungen eingeräumt:
●
Neugeräte und deren Komponenten, die aufgrund von Fabrikations-
und/oder Materialfehlern innerhalb von 24 Monaten ab Kauf einen
Defekt aufweisen, werden von Siemens nach eigener Wahl gegen
ein dem Stand der Technik entsprechendes Gerät kostenlos ausge-
tauscht oder repariert. Für Verschleißteile (z.B. Akkus, Tastaturen,
Gehäuse) gilt diese Haltbarkeitsgarantie für 6 Monate ab Kauf.
●
Diese Garantie gilt nicht, soweit der Defekt der Geräte auf unsach-
gemäßer Behandlung und/oder Nichtbeachtung der Handbücher
beruht.
●
Diese Garantie erstreckt sich nicht auf vom Vertragshändler oder
vom Kunden selbst erbrachte Leistungen (z.B. Installation, Konfigu-
ration, Softwaredownloads). Handbücher und ggf. auf einem sepa-
raten Datenträger mitgelieferte Software sind ebenfalls von der Ga-
rantie ausgeschlossen.
●
Als Garantienachweis gilt der Kaufbeleg, mit Kaufdatum. Garantie-
ansprüche sind innerhalb von zwei Monaten nach Kenntnis des Ga-
rantiefalles geltend zu machen.
●
Ersetzte Geräte bzw. deren Komponenten, die im Rahmen des Aus-
tauschs an Siemens zurückgeliefert werden, gehen in das Eigen-
tum von Siemens über.
●
Diese Garantie gilt für in Österreich erworbene Neugeräte.
Garantiegeberin für in Österreich erworbene Neugeräte ist die Sie-
mens Aktiengesellschaft, Quellenstraße 2, A - 1100 Wien.
●
Weitergehende oder andere Ansprüche als die in dieser Hersteller-
garantie genannten sind ausgeschlossen. Siemens haftet nicht für
Betriebsunterbrechung, entgangenen Gewinn und den Verlust von
Daten, zusätzlicher vom Kunden aufgespielter Software oder sonsti-
ger Informationen. Die Sicherung derselben obliegt dem Kunden.
Der Haftungsausschluss gilt nicht, soweit zwingend gehaftet wird,
z.B. nach dem Produkthaftungsgesetz, in Fällen des Vorsatzes, der
groben Fahrlässigkeit, wegen der Verletzung des Lebens, des Kör-
pers oder der Gesundheit oder wegen der Verletzung wesentlicher
Vertragspflichten. Der Schadensersatzanspruch für die Verletzung
wesentlicher Vertragspflichten ist jedoch auf den vertragstypi-
schen, vorhersehbaren Schaden begrenzt, soweit nicht Vorsatz
oder grobe Fahrlässigkeit vorliegt oder wegen der Verletzung des
Lebens, des Körpers oder der Gesundheit oder nach dem Produkt-
haftungsgesetz gehaftet wird.

27
Anhang
Gigaset 4000 Micro, DE-IT-FR-SP-GB, A31008-
4000CO.FM
05.07.02
●
Durch eine erbrachte Garantieleistung verlängert sich der Garantie-
zeitraum nicht.
●
Soweit kein Garantiefall vorliegt, behält sich Siemens vor, dem Kun-
den den Austausch oder die Reparatur in Rechnung zu stellen.
●
Eine Änderung der Beweislastregeln zum Nachteil des Kunden ist
mit den vorstehenden Regelungen nicht verbunden.
Service (Customer Care)
Einfache und unkomplizierte Unterstützung bei Fragen zur Technik und
zur Bedienung Ihres Gerätes erhalten Sie über unseren Online Sup-
port im Internet:
www.my-siemens.com/customercare
Im Falle einer notwendigen Reparatur wenden Sie sich bitte an eines
unserer Service Centren.
Service-Telefonnummern s. Umschlagseite hinten.
Die Übereinstimmung des Gerätes mit den grundlegenden Anforde-
rungen der R&TTE-Directive ist durch das CE-Kennzeichen bestätigt.
Das Mobilteil 4000i Micro ist EU-weit und in der Schweiz zugelassen.
Display-Sprachen
Bei Anmeldung des Mobilteils an die Basisstation Gigaset 4010i kön-
nen die mit * gekennzeichneten Sprachen eingestellt werden:
½
Zur Einlösung der Garantie wenden Sie sich bitte an Ihr Custo-
mer Care Center.
Einstellungen Sprache
Deutsch
H/Set Settings Language
English
Réglages comb. Langue
Français
Impostazioni Lingua
Italiano
Ajuste terminal Idioma
Español

28
Gigaset 4000 Micro, DE-IT-FR-SP-GB, A31008-G4000-B027-1-6419
4000CO.FM
05.07.02
Diese Seite muss erhalten bleiben, damit neue Sprache auf rechter Seite beginnt!

s
Gigaset 4000 Micro, De-It-Fr-Sp-GB, A31008-G4000-
4000co-
06.05.02
Be inspired
ITALIANO
Istruzioni d’uso
e di sicurezza
!

Breve descrizione del portatile
2
Gigaset 4000 Micro, De-It-Fr-Sp-GB, A31008-G4000-B027-1-
4000COU.FM
06.05.02
Breve descrizione del portatile
Relazione tra tasto di navigazione e tasti del display
* funzione non disponibile sul prodotto per il mercato italiano
Il display è protetto da una pellicola.
Toglierla!
Ñe
Annabella
19.07.01 13:13
{ ¨
Presa
– per cuffia, ,
MP3-Player
Acceso: in conversazione
Lampeggia in caso di:
– chiamate entranti
– nuovi messaggi *
– sveglia, appuntamen-
ti, anniversari
Aprire la rubrica
Ta s to d i f i n e c h ia ma t a
e acceso/spento
Tasto impegno linea
Tasto rubrica speciale
Lista delle chiamate
–terminare la chiamata
– annullare la funzione
– premere brev.: livello
precedente del menu
– premere a lungo: torna-
re al menu principale
– portatile On/Off (preme-
re a lungo il tasto)
Ta s t o v i va v o c e
Blocco della tastiera
Premere a lungo per
bloccare/sbloccare
– rispondere
– selezionare numeri
– passare da viva voce
ad auricolare
Ta s to a s te r i s c o
Premere a lungo per
spegnere la suoneria
Livello di carica
=
scarica
U
carica
lampeggia: batteria quasi
scarica
Con i tasti del display si
può accedere alle funzioni
indicate
Intensità di campo
Tasto di navigazione
LED di stato
– aprire la lista degli opera-
tori di rete: premere
brevemente.
– funzione del tasto R
(flash): premere a lungo
Funzioni in uso
e tasti del display
Accesso alle liste delle
chiamate
Ta s t o 1
Premere a lungo per segre-
teria telef./chiamare la se-
greteria di rete, che deve
essere stata attivata con il
vostro operatore di rete
Microfono
Display (campo indicazione)
Con i tasti del display si pos-
sono richiamare funzioni che
in alcuni casi possono essere
utilizzate anche con il tasto di
navigazione.
Il lato del tasto di navigazio-
ne da premere è rappresenta-
to nelle istruzioni d’uso con le
seguenti frecce:
F
/
G
(sinistra/destra)
E
/
D
(su/giù)
Tasto di navigazione
Tasti del display
INT

Breve descrizione del portatile
3
Gigaset 4000 Micro, De-It-Fr-Sp-GB, A31008-G4000-B027-1-
4000COU.FM
06.05.02
Menu importanti
* non disponibile in Italia
Simboli del display
A seconda dello stato operativo in cui vi trovate, sopra i tasti del display possono apparire i se-
guenti simboli:
* non disponibile in Italia
** se prevista nel vostro modello (o segreteria di rete)
Attenzione: I „Servizi di rete“ devono essere supportati dalla rete del vostro operatore
ed in alcuni casi soggetti ad abbonamento con l’operatore stesso.
Tasti del
display
Significato
¨
Tasto del menu: in stand by apre il menu generale . Aprire un menu dipendente
dallo stato operativo durante la conversazione.
Z
Scegliere e confermare la funzione del menu.
Concludere l’immissione e salvare.
W
Tasto di cancellazione (backspace): cancellare da destra a sinistra.
{
Tasto di ripetizione della selezione: apre la lista degli ultimi cinque numeri selezio-
nati.
I
Indicazione della presenza di SMS*, messaggi della segreteria telefonica**, numeri
nella lista delle chiamate.
Í
Tornare al menu precedente, annullare.
©
Msg.testo/SMS*
T-Net-LM
BabyC o WalkieT
Appuntam/ora
Audio
Addebiti*
OKƒ
Impostazioni
Impost.base
Segreteria
Telefonlautst.
Impost.suoneria
Toni di avviso
Vibrazione
D
Nuova voce
Anna
Barbara
Claus
:
©
Utilizza Numero
Cancellazione
Trasferisci
Cancella Tutto
Trasfer.Tutto
Memoria Libera

Breve descrizione del portatile
4
Gigaset 4000 Micro, De-It-Fr-Sp-GB, A31008-G4000-B027-1-
4000COU.FM
06.05.02
Istruzioni di sicurezza
Utilizzare soltanto l’alimentatore in dotazione, come indicato sul lato inferiore
dell’apparecchio.
Utilizzare soltanto una batteria consigliata ricaricabile. Ciò significa, non utilizzare
in nessun caso una batteria comune (non ricaricabile), poiché può causare danni alla
salute e alle persone.
Inserire la batteria ricaricabile attenendosi alla polarità indicata.
Utilizzare tipi di batteria riportati nelle presenti istruzioni d’uso.
L’apparecchio può creare interferenze ad apparecchiature medicali. Osservare quindi
le indicazioni presenti nell’ambiente in cui ci si trova (esempio ospedali ecc).
Con apparecchi di ausilio all’udito, il cordless può causare dei fruscii molto fastidiosi.
Non utilizzare il telefono in ambienti dove sussistono pericoli di esplosione (per
esempio luoghi di verniciatura).
Il cordless non è impermeabile (v. pag. 27).
Ricordatevi che alla guida è proibito telefonare (modalità Walkie-Talkie).
Se vi trovate a bordo di un aereo, spegnere il telefono (funzione Walkie-Talkie). Assi-
curarsi che non possa accendersi inavvertitamente.
Se cedete il Gigaset a terze persone, fornite anche le istruzioni d’uso.
Smaltire le batterie e il telefono secondo quanto prescritto dalle norme sulla tutela
dell’ambiente.
Le funzioni descritte nelle presenti istruzioni d’uso non sono disponibili in tutti i Paesi.
!
$
‹
Œ
ƒ

Indice
5
Gigaset 4000 Micro, De-It-Fr-Sp-GB, A31008-G4000-B027-1-
4000CoIVZ.fm
06.05.02
Indice
Breve descrizione del portatile . . . . . . . . . . . . . . . . . . . . . . . . . . . . . . . . . . . . . . . . . . . 2
Relazione tra tasto di navigazione e tasti del display. . . . . . . . . . . . . . . . . . . . . . . .2
Menu importanti . . . . . . . . . . . . . . . . . . . . . . . . . . . . . . . . . . . . . . . . . . . . . . . . . . .3
Simboli del display. . . . . . . . . . . . . . . . . . . . . . . . . . . . . . . . . . . . . . . . . . . . . . . . . .3
Preparare il portatile . . . . . . . . . . . . . . . . . . . . . . . . . . . . . . . . . . . . . . . . . . . . . . . . . . . . 6
Contenuto della confezione. . . . . . . . . . . . . . . . . . . . . . . . . . . . . . . . . . . . . . . . . . .6
Inserire la batteria
. . . . . . . . . . . . . . . . . . . . . . . . . . . . . . . . . . . . . . . . . . . . . . . . . . . . . . . . . . . . . . . .6
Registrare il portatile . . . . . . . . . . . . . . . . . . . . . . . . . . . . . . . . . . . . . . . . . . . . . . . .6
Caricare la batteria. . . . . . . . . . . . . . . . . . . . . . . . . . . . . . . . . . . . . . . . . . . . . . . . . .7
Applicare la clip da cintura . . . . . . . . . . . . . . . . . . . . . . . . . . . . . . . . . . . . . . . . . . . .7
Impostare la data e l’ora . . . . . . . . . . . . . . . . . . . . . . . . . . . . . . . . . . . . . . . . . . . . .8
Bloccare/sbloccare la tastiera . . . . . . . . . . . . . . . . . . . . . . . . . . . . . . . . . . . . . . . . .8
Cambiare la lingua del display . . . . . . . . . . . . . . . . . . . . . . . . . . . . . . . . . . . . . . . .9
Telefonare . . . . . . . . . . . . . . . . . . . . . . . . . . . . . . . . . . . . . . . . . . . . . . . . . . . . . . . . . . . . . 9
Telefonare sulla linea esterna . . . . . . . . . . . . . . . . . . . . . . . . . . . . . . . . . . . . . . . . .9
Telefonare sulla linea interna . . . . . . . . . . . . . . . . . . . . . . . . . . . . . . . . . . . . . . . .10
Rispondere alle chiamate . . . . . . . . . . . . . . . . . . . . . . . . . . . . . . . . . . . . . . . . . . .10
Aprire la lista delle chiamate/messaggi* . . . . . . . . . . . . . . . . . . . . . . . . . . . . . . . .10
Viva voce . . . . . . . . . . . . . . . . . . . . . . . . . . . . . . . . . . . . . . . . . . . . . . . . . . . . . . .11
Trasferire le chiamate esterne, consultazione. . . . . . . . . . . . . . . . . . . . . . . . . . . .11
Ripetizione della selezione . . . . . . . . . . . . . . . . . . . . . . . . . . . . . . . . . . . . . . . . . . . . . . 12
Rubrica e rubrica speciale . . . . . . . . . . . . . . . . . . . . . . . . . . . . . . . . . . . . . . . . . . . . . . 13
Selezione rapida dalla rubrica speciale. . . . . . . . . . . . . . . . . . . . . . . . . . . . . . . . . .14
Uso della selezione rapida . . . . . . . . . . . . . . . . . . . . . . . . . . . . . . . . . . . . . . . . . . .14
Impostazioni . . . . . . . . . . . . . . . . . . . . . . . . . . . . . . . . . . . . . . . . . . . . . . . . . . . . . . . . . .19
Impostare la sveglia. . . . . . . . . . . . . . . . . . . . . . . . . . . . . . . . . . . . . . . . . . . . . . . .19
Disattivare la sveglia . . . . . . . . . . . . . . . . . . . . . . . . . . . . . . . . . . . . . . . . . . . . . . .19
Spegnere la sveglia . . . . . . . . . . . . . . . . . . . . . . . . . . . . . . . . . . . . . . . . . . . . . . . .19
Impostare un appuntamento . . . . . . . . . . . . . . . . . . . . . . . . . . . . . . . . . . . . . . . .20
Volume di auricolare e altoparlante . . . . . . . . . . . . . . . . . . . . . . . . . . . . . . . . . . . .21
Attivare/disattivare i toni di avviso e di segnalazione. . . . . . . . . . . . . . . . . . . . . . .23
Attivare e disattivare l’allarme a vibrazione . . . . . . . . . . . . . . . . . . . . . . . . . . . . . .23
Attivare/disattivare la risposta automatica . . . . . . . . . . . . . . . . . . . . . . . . . . . . . .24
Ripristinare i parametri iniziali . . . . . . . . . . . . . . . . . . . . . . . . . . . . . . . . . . . . . . . .24
Babycall . . . . . . . . . . . . . . . . . . . . . . . . . . . . . . . . . . . . . . . . . . . . . . . . . . . . . . . . . . . . . . 24
Impostare il Babycall . . . . . . . . . . . . . . . . . . . . . . . . . . . . . . . . . . . . . . . . . . . . . . .25
Modalità Walkie-Talkie . . . . . . . . . . . . . . . . . . . . . . . . . . . . . . . . . . . . . . . . . . . . . . . . 26
Appendice . . . . . . . . . . . . . . . . . . . . . . . . . . . . . . . . . . . . . . . . . . . . . . . . . . . . . . . . . . . .27
Funzionamento con le basi della gamma Gigaset . . . . . . . . . . . . . . . . . . . . . . . . .27
Cura . . . . . . . . . . . . . . . . . . . . . . . . . . . . . . . . . . . . . . . . . . . . . . . . . . . . . . . . . . . .27
Contatto con liquidi . . . . . . . . . . . . . . . . . . . . . . . . . . . . . . . . . . . . . . . . . . . . . . . .27
Portata. . . . . . . . . . . . . . . . . . . . . . . . . . . . . . . . . . . . . . . . . . . . . . . . . . . . . . . . . .28
Customer Care (servizio) . . . . . . . . . . . . . . . . . . . . . . . . . . . . . . . . . . . . . . . . . . .29
Lingue a display . . . . . . . . . . . . . . . . . . . . . . . . . . . . . . . . . . . . . . . . . . . . . . . . . .30

6
Premere i tasti:
Preparare il portatile
Gigaset 4000 Micro, De-It-Fr-Sp-GB, A31008-G4000-B027-1-6419
4000CO.FM
06.05.02
Preparare il portatile
Contenuto della confezione
Portatile Gigaset 4000i Micro, una batteria, caricabatte-
rie, clip da cintura, istruzioni d’uso.
Inserire la batteria
Registrare il portatile
Passo 1:
©
Aprire il menu.
åååååååååååååååååååååååååååååååå
D
Impostazioni
[
Scegliere e confermare.
åååååååååååååååååååååååååååååååå
D
Reg. Portatile
[
Scegliere e confermare.
D [
Scegliere la base ( , , o
).
o
[
Digitare e confermare il PIN (impostazione all’acquisto:
0000) – viene visualizzato ad esempio
.
Passo 2:
Se la registrazione avviene sulla base del micro preme-
re a lungo il tasto sul retro della base. Al portatile vie-
ne automaticamente assegnato il primo numero inter-
no libero (1–3). Se tutti i numeri fossero già stati
assegnati viene assegnato nuovamente il numero in-
terno 3.
A registrazione avvenuta il portatile torna in stand by.
Sul display viene visualizzato il numero di interno (ad
esempio “INT1“).
L'impostazione all'acquisto della lingua del dis-
play del vostro portatile è italiano. Per impostare
la lingua desiderata, vedi pagina 9.
Gigaset
4000
micro
Gigaset
4000
micro
o
Base 1 Base 2 Base 3
Base 4
Proced.Registraz Base 1

7
Premere i tasti:
Preparare il portatile
Gigaset 4000 Micro, De-It-Fr-Sp-GB, A31008-G4000-B027-1-6419
4000CO.FM
06.05.02
Caricare la batteria
Per caricare la batteria, lasciare il portatile
per circa cinque ore nel caricabatteria. La ca-
rica viene indicata dal lampeggiamento del
simbolo del livello di carica
:
La tabella dei tipi di batteria raccomandati è riportata
nell’appendice
Applicare la clip da cintura
Appoggiare la clip sul lato posteriore del portatile e in-
castrare i gancetti laterali negli appositi fori.
Gigaset Preparazione della base
4010/4015 Premere a lungo il tasto sul lato inferiore
della base.
3010/3015
Premere il tasto paging
y
della base fino
a quando vengono emessi dei toni di se-
gnalazione.
3020/25
3030/35
4030/35
Nel menu della base scegliere
Impostazio-
ni
,
Impostaz.Sistema
e
Reg.Portatile
. Con-
fermare con
OK
.
3070/75
4070/75
Premere l’indicatore LED – durante la regi-
strazione lampeggia.
Basi di
altri
produttori
Per registrare il portatile su “basi GAP“ con-
sultare le rispettive istruzioni d’uso per la
preparazione della base.
●
Durante la carica, la batteria si riscalda; ciò è
normale e non comporta pericoli.
●
Affinché venga indicato l’esatto livello di carica,
evitare di aprire inutilmente lo scomparto della
batteria.
5,5

8
Premere i tasti:
Preparare il portatile
Gigaset 4000 Micro, De-It-Fr-Sp-GB, A31008-G4000-B027-1-6419
4000CO.FM
06.05.02
Impostare la data e l’ora
L’impostazione della data e dell’ora serve per vedere
quando sono giunti i messaggi/le chiamate.
©
Aprire il menu.
åååååååååååååååååååååååååååååååå
D
Appuntam/ora
[
Scegliere e confermare.
åååååååååååååååååååååååååååååååå
D
Impostare ora
[
Scegliere e confermare.
Viene visualizzata l’impostazione corrente.
Inserire la data
Inserire giorno/mese/anno.
Nell’esempio: 20.05.2001. per esempio
ŸÞÞ¢Þ]
D
Passare alla riga successiva.
Inserire l’ora
Inserire ore/minuti.
Nell’esempio: ore 19.05.
per esempio
] ¬ Þ ¢
D
Passare alla riga successiva.
Scegliere il formato
Con il lato sinistro del tasto di navigazione scegliere il
formato a 12 ore (am oppure pm) o il formato a 24 ore
(impostazione all’acquisto).
Salva
Salvare.
Bloccare/sbloccare la tastiera
La tastiera del portatile può essere “bloccata“. Quando
giunge una chiamata la tastiera si sblocca automatica-
mente e una volta terminata la conversazione si blocca
di nuovo.
ª
Per bloccare/sbloccare la tastiera premere a lungo il
tasto cancelletto
Per rispondere alle chiamate premere il tasto
c
.

9
Premere i tasti:
Telefonare
Gigaset 4000 Micro, De-It-Fr-Sp-GB, A31008-G4000-B027-1-6419
4000CO.FM
06.05.02
Cambiare la lingua del display
©
Aprire il menu.
åååååååååååååååååååååååååååååååå
D
Impostazioni
[
Confermare la funzione.
åååååååååååååååååååååååååååååååå
D
Lingua
[
La lingua attiva riporta il segno
✓
.
D[
Scegliere la lingua desiderata e confermare.
Telefonare
Telefonare sulla linea esterna
o Comporre il numero di telefono.
Se necessario correggere con il tasto del display
X
.
c
Premere il tasto di impegno linea.
a
Per terminare la conversazione, premere il tasto di fine
chiamata.
Una tabella è riportata all'ultima pagina di questo ma-
nuale..
●
Potete anche inserire una pausa di selezione: dopo
aver inserito il prefisso, con il tasto del display
©
aprire il menu e scegliere “Pausa“.
●
Potete anche premere dapprima il tasto di impe-
gno linea
c
e comporre poi il numero di telefono
– le cifre vengono selezionate immediatamente. In
questo caso non è possibile inserire pause all’inter-
no del numero.
●
Con il tasto di fine chiamata
a
potete interrom-
pere la selezione.

10
Premere i tasti:
Telefonare
Gigaset 4000 Micro, De-It-Fr-Sp-GB, A31008-G4000-B027-1-6419
4000CO.FM
06.05.02
Telefonare sulla linea interna
F
Aprire la lista dei portatili registrati. Il proprio apparec-
chio presenta il segno “<“.
D E
c
Scegliere il portatile da chiamare e premere il tasto di
impegno linea.
oppure
Ÿ
Inserire il numero interno del portatile da chiamare.
opp.
c
opp.
«
Squillano tutti i portatili.
a
Per terminare la conversazione, premere il tasto di fine
chiamata. Quando compare per alcuni secondi il
numero dell’interno con il messaggio ”non raggiungi-
bile“ significa che il vostro interlocutore ha chiuso la
conversazione.
Rispondere alle chiamate
Il vostro telefono squilla e il LED di stato lampeggia.
c
/
u
Premere il tasto di impegno linea o quello del viva
voce.
opp.
Sollevare il portatile dal caricabatteria (impostazione
all’acquisto: “Risposta automatica“).
Aprire la lista delle chiamate/messaggi*
La presenza di nuove chiamate viene segnalata da un
simbolo del display e dal lampeggiamento del LED di
stato.
?
Premere
per esempio
An alle
k
Ö

11
Premere i tasti:
Telefonare
Gigaset 4000 Micro, De-It-Fr-Sp-GB, A31008-G4000-B027-1-6419
4000CO.FM
06.05.02
Viva voce
Selezionare in viva voce
o Selezionare il numero.
u
Premere il tasto viva voce.
* non disponibile in tutti i Paesi
Viva voce durante la conversazione
u
Attivare il viva voce.
Per regolare il volume
premere di nuovo il tasto
viva voce
u
.
F
G
Regolare il volume.
Salva
Salvare il volume impostato.
c
Passare dal viva voce all’auricolare.
a
Terminare la chiamata.
Trasferire le chiamate esterne,
consultazione
Il telefono consente di trasferire le chiamate esterne ad
un altro portatile o effettuare consultazioni interne.
Premessa: siete in conversazione con un utente
esterno:
F
Aprire la lista degli apparecchi interni.
E D
c
Scegliere e chiamare l’utente interno.
Quando l’utente interno risponde:
●
Per trasferire la chiamata: premere il tasto
a
.
●
Per terminare la consultazione interna: tornare
all’utente esterno messo in attesa con
Beenden
.
Quando il viva voce è attivato il tasto viva voceu e
il LED di stato sono accesi.

12
Premere i tasti:
Ripetizione della selezione
Gigaset 4000 Micro, De-It-Fr-Sp-GB, A31008-G4000-B027-1-6419
4000CO.FM
06.05.02
Ripetizione della selezione
Ripetizione manuale della selezione
Il telefono memorizza gli ultimi cinque numeri selezio-
nati.
z D
Aprire la lista dei numeri selezionati e scegliere quello
desiderato.
c
Premere il tasto di impegno linea.
Ripetizione automatica della selezione
Durante la richiamata automatica il tasto viva voce lam-
peggia e si attiva l’altoparlante. La funzione si disatti-
va dopo dieci tentativi non riusciti o se nel frattem-
po viene svolta una conversazione telefonica.
Se l’utente chiamato non è raggiungibile, premere
Off
o un tasto qualsiasi.
zD
Aprire la lista dei numeri selezionati e scegliere quello
desiderato.
©
Aprire il menu.
åååååååååååååååååååååååååååååååå
RichiamataAutom.
[
Attivare.
c
Quando l’utente risponde premere il tasto di impegno
linea.
Cancellare numeri dalla lista della ripetizione
della selezione
zD
Aprire la lista dei numeri selezionati e scegliere quello
desiderato.
©
Aprire il menu.
åååååååååååååååååååååååååååååååå
D
Cancellazione
[
Il numero di telefono viene cancellato.
Questa funzione non è disponibile in tutti i Paesi.

13
Premere i tasti:
Rubrica e rubrica speciale
Gigaset 4000 Micro, De-It-Fr-Sp-GB, A31008-G4000-B027-1-6419
4000CO.FM
06.05.02
Registrare un numero nella rubrica
zD
Aprire la lista dei numeri selezionati e scegliere quello
desiderato.
©
Aprire il menu.
åååååååååååååååååååååååååååååååå
D
Copia in Rubrica
[
Il numero viene registrato.
o Se necessario, inserire il nome (eventualmente inse-
rire l’anniversario, v. pag. 18). Per inserire lettere e
segni v. pag. 15.
©
Aprire il menu.
åååååååååååååååååååååååååååååååå
Salva
[
Salvare.
Rubrica e rubrica speciale
*
La rubrica D vi facilita e rende più rapida la selezione
di 200 numeri di telefono.
Nella rubrica speciale
C
potete registrare i prefissi
(Call-by-Call)* degli operatori di rete e telefonare così a
tariffe più convenienti. L’uso delle due rubriche è uguale.
Registrare un numero
D
/
C
Aprire la rubrica/rubrica speciale.
åååååååååååååååååååååååååååååååå
Nuova voce
[
Scegliere e confermare.
o Inserire il numero di telefono.
D
o
Passare al campo del nome e inserire il nome.
Nella rubrica inserire eventualmente anche l’anniversa-
rio, vedi anche pag.18; ciò non è possibile nella rubrica
speciale.
©
Aprire il menu.
åååååååååååååååååååååååååååååååå
Salva
[
Memorizzare la voce.
*
* non disponibile in tutti i Paesi

14
Premere i tasti:
Rubrica e rubrica speciale
Gigaset 4000 Micro, De-It-Fr-Sp-GB, A31008-G4000-B027-1-6419
4000CO.FM
06.05.02
Selezionare numeri dalla rubrica
D
Aprire la rubrica.
^^
Inserire la prima lettera del nome (per esempio per la
“E“ premere due volte il tasto
^
o scorrere conD.
c
Premere il tasto di impegno linea
Selezionare i prefissi dalla rubrica speciale
(Call-by-Call)
C
Aprire la rubrica speciale.
D©
Scegliere il numero Call-by-Call e aprire il menu.
åååååååååååååååååååååååååååååååå
D
Utilizza Numero
[
Scegliere e confermare.
o Comporre il numero di telefono desiderato.
c
Premere il tasto di impegno linea, il numero viene
selezionato.
Selezione rapida dalla rubrica speciale
Nella rubrica speciale possono essere registrati fino a
otto numeri di selezione rapida. A tale riguardo, sempre
seguendo la procedura “registra un numero“ antepor-
re al nome il numero di seleziona rapida
(2–9).
Uso della selezione rapida
Ÿ
Premere a lungo il tasto.
Appare il prefisso dell’operatore in esso programmato.
o Comporre il numero di telefono da aggiungere al pre-
fisso.
oppure
DD [
Scegliere il numero dalla rubrica e confermare.
c
Premere il tasto di impegno linea.
Dopo aver scelto il nome potete aprire anche il menu,
scegliere , completare/modificare il
numero.
Utilizza Numero
Esempio: numero di selezione rapida 2 prima del
nome dell’operatore di rete.

15
Premere i tasti:
Rubrica e rubrica speciale
Gigaset 4000 Micro, De-It-Fr-Sp-GB, A31008-G4000-B027-1-6419
4000CO.FM
06.05.02
Tabella dei caratteri
Premere più volte o a lungo il tasto corrispondente:
Le voci vengono ordinate nel modo seguente:
1 x 2 x 3 x 4 x 5 x 6 x 7 x 8 x 9 x
10
x
]
spa-
zio
1
â
£$¥
Ÿ
a b c 2 ä á à â ã ç
^
def3ëéèê
¡
g h i 4 ï í ì î
¢
jkl5
£
m n o 6 ö ñ ó ò ô õ
¤
pqrs7ß
¥
t u v 8 ü ú ù û
¬
wxyz9ÿýæøå
«
a→A
*
/ ( ) <=>%
Þ
. , ? ! 0 + - : ¿
¡
*
*
Altri caratteri di questo tasto:
“ ’ ;_
ª
# @ \ & §
La prima lettera del nome è automaticamente
maiuscola, quelle seguenti minuscole.
Per cambiare scrittura (maiuscola/minuscola) limitata-
mente ad un carattere premere
«
.
Spostare il cursore con F G E D. Cancellare
con
X
I caratteri vengono inseriti a sinistra del cursore.
Inserendo uno spazio
prima del nome, la voce viene
inserita all’inizio della rubrica (esempio: „ Carla“).
1. s paz io
3.
lettere
(in ordine alfabetico)
2.
cifre (0–9)
4.
segni restanti

16
Premere i tasti:
Rubrica e rubrica speciale
Gigaset 4000 Micro, De-It-Fr-Sp-GB, A31008-G4000-B027-1-6419
4000CO.FM
06.05.02
Visualizzare, modificare o cancellare una voce
D
/
C
Aprire la rubrica/rubrica speciale.
D
Scegliere la voce desiderata.
Visualiz.
Visualizzare tutte le informazioni riguardanti la voce.
Cambia
Aprire l’area da modificare.
o Eventualmente modificare il numero di telefono.
D
o Passare al campo del nome e modificare il nome.
Per inserire lettere e segni, v. pag. 15.
Nella rubrica è possibile inserire eventualmente anche
l’anniversario, v. pag. 18.
©
Aprire il menu.
åååååååååååååååååååååååååååååååå
Salva
[
Confermare le modifiche.
oppure
D
/
C
Aprire la rubrica/rubrica speciale.
D
Scegliere la voce che si desidera cancellare.
©
Aprire il menu.
åååååååååååååååååååååååååååååååå
D
Cancellazione
[
Viene emesso un tono di conferma. La voce viene can-
cellata.

17
Premere i tasti:
Rubrica e rubrica speciale
Gigaset 4000 Micro, De-It-Fr-Sp-GB, A31008-G4000-B027-1-6419
4000CO.FM
06.05.02
Trasferire una voce ad un altro portatile
Le voci possono essere trasferite da un portatile
all’altro.
D
/
C
Aprire la rubrica/rubrica speciale.
D
Scegliere la voce desiderata.
©
Aprire il menu.
åååååååååååååååååååååååååååååååå
D
Trasferisci
[
Scegliere e confermare.
D[
Scegliere l’interno a cui trasferire il numero e confer-
mare.
Per trasferire un’altra voce:
Si
Premere.
D
Scegliere la voce desiderata.
Invio
Avviare il trasferimento.
Trasferire la rubrica/rubrica speciale
Ad un altro portatile micro/comfort può essere trasferi-
ta anche l’intera rubrica/rubrica speciale scegliendo,
nel menu al posto di “trasferisci“ “trasfer. tutto “.
Cancellare la rubrica/rubrica speciale
D
/
C
Aprire la rubrica/rubrica speciale.
D
Scegliere la voce desiderata.
©
Aprire il menu.
åååååååååååååååååååååååååååååååå
D
Cancella Tutto
[
Scegliere e confermare.
Si
Confermare la cancellazione di tutte le voci.
Il trasferimento viene interrotto nei seguenti casi:
●
se la memoria del portatile di destinazione è esau-
rita,
●
se viene ricevuta una chiamata.
Il trasferimento della voce in corso viene portato a
termine.

18
Premere i tasti:
Rubrica e rubrica speciale
Gigaset 4000 Micro, De-It-Fr-Sp-GB, A31008-G4000-B027-1-6419
4000CO.FM
06.05.02
Inserire anniversari (per esempio compleanni)
Il telefono vi consente di memorizzare date da ricordare
che vi verranno segnalate alla scadenza della data e ora
impostate.
D
Aprire la rubrica.
D
Visualiz.
Scegliere e visualizzare la voce.
Cambia
Aprire il numero a cui associare la data da ricordare.
D
Spostare il cursore nel campo del compleanno/anni-
versario (il cursore scompare).
Cambia
Confermare.
o Inserire o modificare la data (giorno/mese).
D
o Passare alla riga successiva e inserire l’ora.
D
Passare alla riga successiva.
F G
Scegliere il tipo di segnalazione desiderata (ottica o il
tipo di melodia).
[
Salvare, accanto al nome compare una torta.
Entrando nella procedura di modifica dell’anniversario
con il tasto del display
Cancella
potete cancellare
l’impostazione della data da ricordare.

19
Premere i tasti:
Impostazioni
Gigaset 4000 Micro, De-It-Fr-Sp-GB, A31008-G4000-B027-1-6419
4000CO.FM
06.05.02
Impostazioni
Impostare la sveglia
Se nel portatile è impostata la sveglia (simbolo
¼
),
essa suonerà tutti i giorni alla stessa ora.
Il portatile è in stand by
©
Aprire il menu.
åååååååååååååååååååååååååååååååå
D
Appuntam/ora
[
Scegliere e confermare.
åååååååååååååååååååååååååååååååå
D
Sveglia
[
Scegliere e confermare.
Appare l’impostazione attuale.
F G
Scegliere
.
D
Passare alla riga successiva.
Þ£ÞÞ
Inserire ore/minuti.
Nell’esempio: ore 6.00.
D
Passare alla riga successiva.
F G
Scegliere la melodia della sveglia.
Salva
Memorizzare l’impostazione.
Disattivare la sveglia
La sveglia è impostata e volete disattivarla.
©
Aprire il menu.
åååååååååååååååååååååååååååååååå
D
Appuntam/ora
[
Scegliere e confermare.
åååååååååååååååååååååååååååååååå
D
Sveglia
[
Scegliere e confermare.
F G
Scegliere .
Salva
Memorizzare l’impostazione.
Spegnere la sveglia
La sveglia viene segnalata come una chiamata in entra-
ta. Per spegnerla premere un tasto a piacere.
On
Se è attivata la funzione Babycall o la ripetizione auto-
matica della selezione, la sveglia non viene segnalata.
Off

20
Premere i tasti:
Impostazioni
Gigaset 4000 Micro, De-It-Fr-Sp-GB, A31008-G4000-B027-1-6419
4000CO.FM
06.05.02
Impostare un appuntamento
Nel portatile potete anche impostare un appuntamen-
to. Esso viene indicato dal simbolo
¼
.
Il portatile è in stand by.
©
Aprire il menu.
åååååååååååååååååååååååååååååååå
D
Appuntam/ora
[
Scegliere e confermare.
åååååååååååååååååååååååååååååååå
Inserire Appunt.
[
Scegliere e confermare.
F G
Scegliere
per attivare la funzione di appunta-
mento.
D
Passare alla riga successiva.
ŸÞÞ¢
Inserire il giorno/mese,
nell’esempio: 20 maggio.
D
Passare alla riga successiva.
Þ¬^Þ
Inserire ore/minuti,
nell’esempio: ore 9.30.
D
Passare alla riga successiva.
F G
Scegliere la melodia della suoneria.
Salva
Memorizzare l’impostazione.
Spegnere la segnalazione dell’appuntamento
L’appuntamento viene segnalato come una chiamata in
entrata. Lo squillo può essere interrotto premendo un
tasto qualsiasi.
On
L’appuntamento viene segnalato solo se il portatile è
in stand by. Se è attivata la funzione Babycall o la ripe-
tizione automatica della selezione, l’appuntamento
non viene segnalato.

21
Premere i tasti:
Impostazioni
Gigaset 4000 Micro, De-It-Fr-Sp-GB, A31008-G4000-B027-1-6419
4000CO.FM
06.05.02
Appuntamenti e anniversari scaduti
Appuntamenti e anniversari segnalati dal telefono in vo-
stra assenza, vengono salvati in una lista.
Se si desidera visualizzare nuovamente l’appuntamen-
to già visto, procedere come descritto qui di seguito:
©
Aprire il menu.
åååååååååååååååååååååååååååååååå
D
Appuntam/ora
[
Scegliere e confermare.
åååååååååååååååååååååååååååååååå
D
Appunt. Scaduti
[
Scegliere e confermare.
D[
Scegliere l’appuntamento
¼
o
l’anniversario
‚
scaduti. Vengono visualizzate data e
ora dell’evento.
Con il tasto del display
Cancella
si può cancellare
l’appuntamento/anniversario scaduto.
Volume di auricolare e altoparlante
©
Aprire il menu.
åååååååååååååååååååååååååååååååå
D
Audio
[
Scegliere il menu.
åååååååååååååååååååååååååååååååå
Volume telefono
[
Viene emesso un tono con il volume impostato.
F G
Impostare il volume desiderato per il viva voce.
D
Passare alla riga successiva.
F G
Salva
Scegliere e confermare il livello desiderato come
volume dell’auricolare.
Un nuovo appuntamento/anniversario scaduto in vostra
assenza viene visualizzato con
Appunt.
. Premere il tasto
destro del display; viene visualizzata la lista degli eventi,
scaduti. In seguito scegliere e
confermare con
[
.
Appunt.Scaduto
¼

22
Premere i tasti:
Impostazioni
Gigaset 4000 Micro, De-It-Fr-Sp-GB, A31008-G4000-B027-1-6419
4000CO.FM
06.05.02
Impostare il volume/la melodia della suoneria
Potete scegliere tra cinque volumi della suoneria,
“Crescendo“ (aumento progressivo del volume), Suo-
neria spenta e tra dieci melodie:
©
Aprire il menu.
åååååååååååååååååååååååååååååååå
D
Audio
[
Scegliere e confermare.
åååååååååååååååååååååååååååååååå
D
Impost.suoneria
[
La suoneria si attiva sul volume impostato e viene
visualizzato il livello attuale.
F G
Scegliere il volume desiderato.
D
Passare alla riga successiva.
F G
Salva
Scegliere e confermare la melodia desiderata (1–10).
Controllo a tempo del volume della suoneria
Per determinati orari potete impostare un volume di-
verso della suoneria.
©
Aprire il menu.
åååååååååååååååååååååååååååååååå
D
Audio
[
Scegliere e confermare.
åååååååååååååååååååååååååååååååå
D
Impost.suoneria
[
La suoneria si attiva sul volume impostato e viene
visualizzato il livello attuale.
C.Tempo
Premere.
F G
Attivare/disattivare il controllo a tempo.
D
o Inserire l’orario desiderato.
per esempio
]]ÞÞ
]¢ÞÞ
(dalle ore 11:00 alle15:00.)
DF G
Passare alla riga successiva e impostare il volume
desiderato.
Salva
Memorizzare l’impostazione.
Salva
opp.
a
Premere.

23
Premere i tasti:
Impostazioni
Gigaset 4000 Micro, De-It-Fr-Sp-GB, A31008-G4000-B027-1-6419
4000CO.FM
06.05.02
Attivare/disattivare i toni di avviso e di
segnalazione
●
To n o t a s t i : la pressione dei tasti viene confermata
acusticamente.
●
To n i d i co n f e r m a : tono di conferma (sequenza cre-
scente) che viene emesso alla fine di un’operazione/
impostazione e quando viene riposto il portatile nel
caricabatteria. Tono d’errore (sequenza decrescente)
in caso di operazioni errate.
●
Tono di avviso batteria scarica: segnala che la ca-
rica della batteria sta per esaurirsi.
©
Aprire il menu.
åååååååååååååååååååååååååååååååå
D
Audio
[
Scegliere e confermare.
åååååååååååååååååååååååååååååååå
D
Toni di avviso
[
Scegliere e confermare.
D
Scegliere la funzione desiderata.
F G
Scegliere , oppure (tono di avviso
batteria scarica durante la conversazione).
Salva
Memorizzare l’impostazione.
Attivare e disattivare l’allarme a
vibrazione
Per non essere disturbati dalla suoneria, al suo posto si
può attivare l’allarme a vibrazione del portatile. Esso
può anche essere attivato contemporaneamente alla
suoneria (ad esempio in ambienti rumorosi).
©
Aprire il menu.
åååååååååååååååååååååååååååååååå
D
Audio
[
Scegliere e confermare.
åååååååååååååååååååååååååååååååå
D
Vibrazione
[
Scegliere e confermare.
La suoneria si può spegnere con una lunga pressione
del tasto
«
. Così facendo sarà attivo solo l’allarme a
vibrazione.
On
Off in conv.
½
L’impostazione corrente è contrassegnata da
✓
.

24
Premere i tasti:
Babycall
Gigaset 4000 Micro, De-It-Fr-Sp-GB, A31008-G4000-B027-1-6419
4000CO.FM
06.05.02
Attivare/disattivare la risposta
automatica
Se la funzione è attivata per rispondere alle chiamate
basta sollevare il portatile dal caricabatteria, senza do-
ver premere il tasto di impegno linea
c
(impostazione
all’acquisto).
©
Aprire il menu.
åååååååååååååååååååååååååååååååå
D
Impostazioni
[
Scegliere e confermare.
åååååååååååååååååååååååååååååååå
D
RispostaAutomat
[
Attivare/disattivare con
[
(
✓
= funzione attivata).
Ripristinare i parametri iniziali
La rubrica, la rubrica speciale e la lista delle chiamate
non vengono cancellate. Il portatile resta registrato nel-
la base.
©
Aprire il menu.
åååååååååååååååååååååååååååååååå
D
Impostazioni
[
Scegliere e confermare.
åååååååååååååååååååååååååååååååå
D
Reset Portatile
[
Scegliere e confermare.
Si
Confermare la richiesta.
Babycall
Il portatile vi consente di controllare la camera del vo-
stro bambino da un altro luogo. La distanza fra il porta-
tile e il bambino deve essere di almeno 1 o 2 metri.
Una volta raggiunto un determinato livello di rumore
(per esempio il bambino piange), il portatile seleziona
automaticamente il numero interno o esterno da voi
programmato. Quando è attivata la funzione Babycall,
le chiamate in entrata vengono segnalate solo sul
display.
Funzione Parametri iniziali
Volume dell’auricolare 1
Volume della suoneria 5
Melodia della suoneria 1
Risposta automatica attivata
Tono di avviso batteria scarica attivato
Volume del viva voce 3
Livello Babycall elevato
Controllo a tempo disattivato
Lingua del display del Paese
Allarme a vibrazione disattivato

25
Premere i tasti:
Babycall
Gigaset 4000 Micro, De-It-Fr-Sp-GB, A31008-G4000-B027-1-6419
4000CO.FM
06.05.02
Impostare il Babycall
©
Aprire il menu.
åååååååååååååååååååååååååååååååå
D
BabyC o WalkieT
[
Scegliere e confermare.
åååååååååååååååååååååååååååååååå
D
Baby Call
[
Scegliere e confermare.
F G
Scegliere
oppure
D
Passare alla riga successiva.
Cambia
Aprire il campo di inserimento del numero di telefono a
cui inviare l’allarme.
Cancellare con
X
eventuali numeri esterni già pre-
senti.
Cancellare con
Si
eventuali numeri interni già presen-
ti.
F
o Aprire la lista degli apparecchi interni e scegliere il nu-
mero interno.
[
Salvare il numero di telefono.
oppure
D
Aprire la rubrica.
D [
Scegliere il numero esterno.
©
Aprire il menu.
åååååååååååååååååååååååååååååååå
Salva
[
Confermare l’impostazione.
D
Passare alla riga successiva.
F G
Impostare il livello “alto“ o “basso“.
Salva
Memorizzare l’impostazione.
Con il tasto del display potete disattivare la funzio-
ne Babycall.
On Off
Dall’esterno (per esempio dal “cellulare“) potete
disattivare la funzione Babycall. Rispondere alla chia-
mata instaurata dalla funzione Babycall.
Disattivare con »
.
La funzione Babycall è disattivata e non instaura più
chiamate, sul display apparirà: allarme a:off.
Off

26
Premere i tasti:
Modalità Walkie-Talkie
Gigaset 4000 Micro, De-It-Fr-Sp-GB, A31008-G4000-B027-1-6419
4000CO.FM
06.05.02
Modalità Walkie-Talkie
Nella modalità Walkie-Talkie i portatili non possono ri-
cevere chiamate.
Attivare la modalità Walkie-Talkie
©
Aprire il menu.
åååååååååååååååååååååååååååååååå
D
BabyC o WalkieT
[
Scegliere la funzione.
åååååååååååååååååååååååååååååååå
D
Walkie-Talkie
[
Attivare la modalità Walkie-Talkie.
Con il tasto del display può essere disattivata.
Uso della modalità Walkie-Talkie
Due portatili sono nella modalità Walkie:
Il portatile che chiama:
Chiama
Premere.
Il portatile chiamato:
La chiamata viene segnalata sul display con un mes-
saggio.
Mute
La suoneria viene disattivata.
c
Premere.
I due portatili sono collegati.
a
Premere. La conversazione è terminata.
Premessa:
I portatili hanno le stesse impostazioni della base (per
esempio Staz.Migliore), o non sono registrati su nes-
suna stazione (la modalità Walkie-Talkie riduce note-
volmente l’autonomia della batteria).
Off

27
Appendice
Gigaset 4000 Micro, De-It-Fr-Sp-GB, A31008-G4000-
4000CO.FM
06.05.0
Appendice
Funzionamento con le basi della gamma Gigaset
Gigaset serie 1000/2000/3000
Le basi delle serie Gigaset suindicate non supportano le seguenti fun-
zioni dei portatili 4000i Micro/Comfort.
●
Impostazione dell’ora (se l’ora e’ inserita viene persa spegnendo il
portatile)
●
Impostazione della lingua
●
Babycall (non può essere disattivato dall’esterno)
●
Trasmissione SMS*
Gigaset 4010/4015 Classic
Queste basi non supportano le seguenti funzioni dei portatili 4000i Mi-
cro/Comfort.
●
Impostazione della lingua
●
Trasmissione SMS*
●
Impostazione delle abilitazioni alla selezione
*
Funzione non compatibile con il servizio attualmente disponibile in Italia
Cura
Pulire la base e il telefono portatile con un panno umido o antistatico.
Non utilizzare in nessun caso un panno asciutto poichè creando cari-
che elettrostatiche si potrebbe danneggiare l’apparato.
Contatto con liquidi
Se il portatile dovesse essere venuto a contatto con dei liquidi, non
accenderlo in nessun caso.
Estrarre immediatamente tutte le batterie.
Lasciar defluire il liquido dall'apparecchio ed asciugare quindi tutte le
parti con un panno.
Lasciare il portatile per almeno 72 ore in un luogo asciutto e caldo.
A questo punto, in molti casi è possibile rimetterlo in funzione.
!

28
Appendice
Gigaset 4000 Micro, De-It-Fr-Sp-GB, A31008-G4000-B027-1-6419
4000CO.FM
06.05.02
Batterie raccomandate
Il Gigaset 4010 Micro utilizza la stessa batteria dei cellulari C35-M35
(codice: L36880-N4001-A100) ed è compatibile con la batteria del cel-
lulare S35 agli ioni di litio (suggerita qualora sia richiesta una autonomia
particolarmente lunga (codice: L36880-N4001-A101)
Autonomia/tempi di ricarica del portatile*:
Dopo alcuni anni la capacità di ricarica della batteria e quindi l’autono-
mia del portatile si riducono a causa dell’usura della batteria stessa.*
*
L’autonomia indicata si riferisce a una batteria nuova
Portata
All’aperto la portata è di circa 300 metri. In ambienti chiusi può arrivare
fino a 50 metri tuttavia in questo caso la distanza raggiungibile è in-
fluenzata moltissimo dall’ambiente d’uso (per esempio presenza di
cemento armato).
Stazione di ricarica da tavolo
La stazione di ricarica da tavolo per alcuni modelli di telefoni cellulari
Siemens, può essere usata anche per caricare il proprio portatile.
(Accessorio per i cellulari C45, ME45, S45)
codice L36880-N4501-A101
Nichel-metal-idrato (NiMH) , 500 mAh.
Lithium ion, 600 mAh
Capacità
(mAh)
Autonomia in
stand by (ore)
Autonomia in
conversazione
(ore)
Te m p i d i
ricarica (ore)
500 fino a 300 circa 16 circa 5,5
½
Quando si carica un portatile Gigaset nella stazione di ricarica da
tavolo per cellulari, fintantoché esso si troverà nella stazione,
non verrà caricata la batteria di riserva.
La spia LED di ricarica è sempre accesa.

29
Appendice
Gigaset 4000 Micro, De-It-Fr-Sp-GB, A31008-G4000-
4000CO.FM
06.05.0
Customer Care (servizio)
Per quanto riguarda le domande tecniche e quelle relative all'uso
dell'apparecchio, potete avere un supporto semplice e senza compli-
cazioni tramite il nostro sito Internet:
www.my-siemens.com/customercare
Nel caso sia necessaria una riparazione, rivolgetevi ad uno dei nostri
centri di servizio.
Numeri di telefono del servizio clienti: vedi la copertina di fondo
Il portatile 4000i Micro gode di approvazioni per la Svizzera e per tutti i
paesi della UE.
La conformità dell’apparecchio alla Direttiva R&TTE (1999/05/CEE) è
confermata dalla presenza del marchio CE.
È possibile richiedere copia integrale della dichiarazione di conformità
alla Direttiva R&TTE (1999/05/CEE) al servizio clienti.

30
Appendice
Gigaset 4000 Micro, De-It-Fr-Sp-GB, A31008-G4000-B027-1-6419
4000CO.FM
06.05.02
Lingue a display
Durante la registrazione del portatile sulla stazione di base del Giga-
set 4010i si possono impostare le lingue identificate con *:
Einstellungen Sprache
Deutsch
H/Set Settings Language
English
Réglages comb. Langue
Français
Impostazioni Lingua
Italiano
Ajuste terminal Idioma
Español

s
Gigaset 4000 Micro, De-It-Fr-Sp-GB, A31008-G4000-
4000co-
13.05.02
Be inspired
FRANÇAIIS
Mode d’emploi
et consignes de sécurité
!

Présentation du combiné
2
Gigaset 4000 Micro, De-It-Fr-Sp-GB, A31008-G4000-B027-1-
4000COU.FM
05.07.02
Présentation du combiné
Touche de navigation et touches écran
L’écran est protégé par un film.
Retirez le film !
Ñe
Annabella
19.07.01 13:13
{ ¨
Ouvrir l’annuaire
Touche "Raccrocher"
et "Marche/Arrêt"
Touche "Décrocher"
To u c h e s p éciale
Journal des appelants
– Fin de communication
– Annuler fonction en cours
– Appuyer brièvement :
Menu précédent ;
Appui prolongé : retour
Menu principal
– Marche/Arrêt :
(appui prolongé depuis
l'état de repos)
Touche Mains-libres
Touche dièse
Verrouillage clavier :
Appui prolongé pour
activer/désactiver
– Accepter communic.
– Composer un
numéro
– Passer de Mains-
libres au combiné
Touche Etoile
Appui prolongé pour
activer/désactiver la
sonnerie
Niveau de charge
=
vide
U
pleine
clignotante : faible
En relation avec les
symboles affichés
à l’écran
Intensité réception
Touche de navigation
LED état (DEL)
– Appui bref :
Annuaire spécial
– Appui prolongé:
Fonction "R"
Touches écran
Fixe :
- en communication
Clignotante :
- Appel entrant
- Nouveaux messages
- Réveil, RDV, anniversaire
Accès listes de messages
To u c h e 1
Appui prolongé : sélection
répondeur/messag. ext.
Microphone
Ecran (affichage)
Prise
– pour micro-casque,
lecteur MP3
A l’aide des touches écran, vous pouvez
exécuter les fonctions en relation avec les
logos qui s'affichent à l'écran. ces fonc-
tions peuvent en partie être aussi exécu-
tées à partir de la touche de navigation.
Le côté de la touche de navigation, sur
lequel vous appuyez est représenté dans
le mode d'emploi par des flèches comme
ci-dessous :
F
/
G
(gauche/droite)
E
/
D
(haut/bas)
Appuyer sur la flèche sombre
Navigateur
Touches écran
INT

Présentation du combiné
3
Gigaset 4000 Micro, De-It-Fr-Sp-GB, A31008-G4000-B027-1-
4000COU.FM
05.07.02
Menus importants
Symboles à l’écran
Selon les situations, les symboles suivants s’affichent au-dessus des touches écran :
* Attention ! Selon les pays et les réseaux, certaines fonctions dans les menus peuvent être masquées car
localement inopérantes (exemple SMS= Service de messages courts).
Touches
écran
Signification
¨
Touche Menu : en mode veille, sélectionner le menu général ; en cours de commu-
nication, sélectionner le menu contextuel.
Z
Valider la fonction menu sélectionnée.
Fin de la saisie et enregistrement.
W
Touche Effacer (retour arrière) : effacer les entrées de la droite vers la gauche.
{
Touche Bis : ouvrir la liste des 5 derniers numéros composés.
I
Journal des appelants; liste des messages (Répondeur / Messagerie externe) /
SMS
*
*
Í
Menu précédent, annuler
©
SMS/Messg. txt *
Services réseau
Famille/Loisirs
RDV/Heure
Sons / Audio
Coûts
OKƒ
Réglages comb.
Réglages base
Répondeur
Volume écoute
Régl. Sonnerie
Tonal. avertis.
D
<Nouv. entrée>
Anna
Barbara
Claus
:
©
Utiliser le N°
Effacer entrée
Copier entrée
Effacer liste
Copier liste
Mémoire dispo.

Consignes de sécurité
4
Gigaset 4000 Micro, De-It-Fr-Sp-GB, A31008-G4000-B027-1-
4000COU.FM
05.07.02
Consignes de sécurité
Utiliser exclusivement le bloc-secteur fourni comme indiqué sous la base par le
symbole.
Utiliser uniquement une batterie homologuée (rechargable)! Ne jamais utiliser une
pile normale (non rechargeable) qui peut endommager l'appareil, représenter un ris-
que pour la santé et provoquer des blessures.
Placer la batterie en respectant la polarité
Utiliser le type de batterie indiqués dans le Mode d’emploi
Le combiné peut perturber le fonctionnement de certains équipements médicaux.
Tenir compte des recommandations émises à ce sujet par le corp médical.
Le combiné peut provoquer un bourdonnement désagréable dans les aides auditi-
ves.
De façon générale ne pas placer d'appareil électronique à proximité immédiate du
téléphone
Ne pas utiliser le téléphone dans un environnement présentant un risque d’explo-
sion (p. ex. ateliers industriels de peinture).
Le combiné n’est pas protégé contre les projections d’eau.
Ne pas utiliser en milieu humide (salle de bains, douche, buanderie etc.)
Ne pas installer le téléphone en extérieur (voir page 31).
Ne jamais téléphoner en conduisant (fonction Talkie-Walkie).
Désactiver le téléphone lorsque vous êtes dans un avion (fonction Talkie-Walkie).
Empêcher une remise en marche involontaire.
Lorsque vous confiez votre Gigaset à un tiers, toujours joindre le mode d’emploi.
Bien respecter les règles concernant la protection de l’environnement lorsque vous
mettez au rebut le téléphone et la batterie.
Ne pas jeter ces dernières au feu, ni les ouvrir ou les mettre en court-circuit.
Toutes les fonctions décrites dans ce mode d’emploi ne sont pas nécessairement disponibles
dans tous les pays.
!
$
‹
Œ
ƒ

Sommaire
5
Gigaset 4000 Micro, De-It-Fr-Sp-GB, A31008-G4000-B027-1-
4000CoIVZ.fm
05.07.02
Sommaire
Présentation du combiné . . . . . . . . . . . . . . . . . . . . . . . . . . . . . . . . . . . . . . . . . . . . . . . . 2
Touche de navigation et touches écran. . . . . . . . . . . . . . . . . . . . . . . . . . . . . . . . . .2
Menus importants . . . . . . . . . . . . . . . . . . . . . . . . . . . . . . . . . . . . . . . . . . . . . . . . . .3
Symboles à l’écran . . . . . . . . . . . . . . . . . . . . . . . . . . . . . . . . . . . . . . . . . . . . . . . . .3
Consignes de sécurité. . . . . . . . . . . . . . . . . . . . . . . . . . . . . . . . . . . . . . . . . . . . . . . . . . . 4
Préparer le combiné . . . . . . . . . . . . . . . . . . . . . . . . . . . . . . . . . . . . . . . . . . . . . . . . . . . . 7
Contenu de l’emballage. . . . . . . . . . . . . . . . . . . . . . . . . . . . . . . . . . . . . . . . . . . . . .7
Insérer la batterie
. . . . . . . . . . . . . . . . . . . . . . . . . . . . . . . . . . . . . . . . . . . . . . . . . . . . . . . . . . . . . . . .7
Inscrire un combiné. . . . . . . . . . . . . . . . . . . . . . . . . . . . . . . . . . . . . . . . . . . . . . . . .7
Charger la batterie . . . . . . . . . . . . . . . . . . . . . . . . . . . . . . . . . . . . . . . . . . . . . . . . . .8
Fixer le clip ceinture . . . . . . . . . . . . . . . . . . . . . . . . . . . . . . . . . . . . . . . . . . . . . . . .9
Régler la date et l’heure . . . . . . . . . . . . . . . . . . . . . . . . . . . . . . . . . . . . . . . . . . . . .9
Affichage : choisir la langue. . . . . . . . . . . . . . . . . . . . . . . . . . . . . . . . . . . . . . . . . .10
Téléphoner . . . . . . . . . . . . . . . . . . . . . . . . . . . . . . . . . . . . . . . . . . . . . . . . . . . . . . . . . . . 11
Appel externe . . . . . . . . . . . . . . . . . . . . . . . . . . . . . . . . . . . . . . . . . . . . . . . . . . . .11
Appeler en interne. . . . . . . . . . . . . . . . . . . . . . . . . . . . . . . . . . . . . . . . . . . . . . . . .11
Accepter un appel entrant . . . . . . . . . . . . . . . . . . . . . . . . . . . . . . . . . . . . . . . . . .12
Journal des appelants/messages . . . . . . . . . . . . . . . . . . . . . . . . . . . . . . . . . . . . .12
Mains-libres . . . . . . . . . . . . . . . . . . . . . . . . . . . . . . . . . . . . . . . . . . . . . . . . . . . . . .12
Double appel interne/Transfert . . . . . . . . . . . . . . . . . . . . . . . . . . . . . . . . . . . . . . .13
Répétition de la numérotation (Bis) . . . . . . . . . . . . . . . . . . . . . . . . . . . . . . . . . . . . . . 13
Annuaire et Annuaire spécial . . . . . . . . . . . . . . . . . . . . . . . . . . . . . . . . . . . . . . . . . . . 15
Annuaire spécial : touches de raccourci . . . . . . . . . . . . . . . . . . . . . . . . . . . . . . . .16
Annuaire spécial : numérotation rapide
(Touches de raccourci). . . . . . . . . . . . . . . . . . . . . . . . . . . . . . . . . . . . . . . . . . . . . .16
Réglages . . . . . . . . . . . . . . . . . . . . . . . . . . . . . . . . . . . . . . . . . . . . . . . . . . . . . . . . . . . . .21
Réveil : régler. . . . . . . . . . . . . . . . . . . . . . . . . . . . . . . . . . . . . . . . . . . . . . . . . . . . .21
Réveil : désactiver . . . . . . . . . . . . . . . . . . . . . . . . . . . . . . . . . . . . . . . . . . . . . . . . .21
Réveil : arrêt de la sonnerie. . . . . . . . . . . . . . . . . . . . . . . . . . . . . . . . . . . . . . . . . .21
Rendez-vous (RDV) : activer . . . . . . . . . . . . . . . . . . . . . . . . . . . . . . . . . . . . . . . . .22

Sommaire
6
Gigaset 4000 Micro, De-It-Fr-Sp-GB, A31008-G4000-B027-1-
4000CoIVZ.fm
05.07.02
Sons/Audio . . . . . . . . . . . . . . . . . . . . . . . . . . . . . . . . . . . . . . . . . . . . . . . . . . . . . . . . . . .24
Volume d'écoute du combiné
Volume du haut-parleur mains-libres . . . . . . . . . . . . . . . . . . . . . . . . . . . . . . . . . . .24
Tonalités d'avertissement . . . . . . . . . . . . . . . . . . . . . . . . . . . . . . . . . . . . . . . . . . .25
Vibreur : activer/désactiver . . . . . . . . . . . . . . . . . . . . . . . . . . . . . . . . . . . . . . . . . .26
Réglages combiné . . . . . . . . . . . . . . . . . . . . . . . . . . . . . . . . . . . . . . . . . . . . . . . . . . . . . 27
Décroché automatique . . . . . . . . . . . . . . . . . . . . . . . . . . . . . . . . . . . . . . . . . . . . .27
Réinitialisation du combiné
(retour à la configuration usine) . . . . . . . . . . . . . . . . . . . . . . . . . . . . . . . . . . . . . . .27
Famille/Loisirs . . . . . . . . . . . . . . . . . . . . . . . . . . . . . . . . . . . . . . . . . . . . . . . . . . . . . . . . .28
Surveillance de pièce. . . . . . . . . . . . . . . . . . . . . . . . . . . . . . . . . . . . . . . . . . . . . . .28
Paramétrer la Surveillance de pièce . . . . . . . . . . . . . . . . . . . . . . . . . . . . . . . . . . .28
Mode Talkie-Walkie . . . . . . . . . . . . . . . . . . . . . . . . . . . . . . . . . . . . . . . . . . . . . . . . . . . 29
Annexe . . . . . . . . . . . . . . . . . . . . . . . . . . . . . . . . . . . . . . . . . . . . . . . . . . . . . . . . . . . . . . . 30
Utilisation sur les bases de la gamme Gigaset . . . . . . . . . . . . . . . . . . . . . . . . . . .30
Entretien . . . . . . . . . . . . . . . . . . . . . . . . . . . . . . . . . . . . . . . . . . . . . . . . . . . . . . . .31
Contact avec les liquides . . . . . . . . . . . . . . . . . . . . . . . . . . . . . . . . . . . . . . . . . . .31
Portée . . . . . . . . . . . . . . . . . . . . . . . . . . . . . . . . . . . . . . . . . . . . . . . . . . . . . . . . . .31
Service Clients . . . . . . . . . . . . . . . . . . . . . . . . . . . . . . . . . . . . . . . . . . . . . . . . . . .32
Langues d'affichage . . . . . . . . . . . . . . . . . . . . . . . . . . . . . . . . . . . . . . . . . . . . . . .33

7
Appuyer sur les touches:
Préparer le combiné
Gigaset 4000 Micro, De-It-Fr-Sp-GB, A31008-G4000-B027-1-6419
4000co.fm
05.07.02
Préparer le combiné
Contenu de l’emballage
Combiné Gigaset 4000i Micro, une batterie, chargeur,
clip ceinture, mode d’emploi.
Insérer la batterie
Inscrire un combiné
Etape 1
©
Ouvrir le menu.
åååååååååååååååååååååååååååååååå
D
Réglages comb.
[
Sélectionner et valider.
åååååååååååååååååååååååååååååååå
D
Inscrire comb.
[
Sélectionner et valider.
D [
Sélectionner la base ( , , ou
).
o
[
Entrer le code PIN et valider (configuration usine :
0000) – Affichage de p. ex.
Etape 2
Appuyer de manière prolongée sur la touche au dos
de la base. Il est attribué au combiné le numéro interne
libre suivant (1–3). Si tous les emplacements sont déjà
occupés, le numéro interne 6 est remplacé.
Une fois l’inscription effectuée avec succès, le combi-
né se replace en position de veille. L’écran affiche le nu-
méro interne (p. ex. "INT1").
A la livraison, la langue d'affichage de votre com-
biné est l'italien. Pour paramétrer la langue
souhaitée, voir page 10.
Gigaset
4000
m
ic
ro
Gigaset
4000
m
ic
r
o
o
Base 1 Base 2 Base 3
Base 4
Processus Inscr. Base 1

8
Appuyer sur les touches :
Préparer le combiné
Gigaset 4000 Micro, De-It-Fr-Sp-GB, A31008-G4000-B027-1-6419
4000co.fm
05.07.02
Charger la batterie
Pour charger la batterie, laisser le combiné
sur la base durant environ 5,5 heures ; à la li-
vraison, la batterie n’est pas chargée. Le
chargement de la batterie est signalé sur le
combiné par le clignotement du témoin de
charge :
Une liste des batteries préconisées figure en annexe.
Gigaset Préparation sur la base ou sur le
téléphone
4010/4015 Appuyer sur la touche située sous la base.
3010/3015
Maintenir appuyée la touche grise de la
base jusqu’à ce que vous entendiez le si-
gnal sonore.
3020/25
3030/35
4030/35
Dans le menu du téléphone de base,
sélectionner
Réglages
,
Régl. système
et
Inscrire
puis valider avec
OK
.
3070/75
4070/75
Appuyer sur le voyant vert allumé (LED).
Celui-ci clignote alors durant toute la pha-
se de déclaration.
Bases
d’autres
construc-
teurs
Pour déclarer le combiné sur d’autres "bases
GAP" conformez-vous au Mode d’emploi
correspondant (étapes 2 et 3).
●
La batterie s’échauffe durant la charge ; il s’agit
d’un phénomène normal et sans danger.
●
Afin que le niveau de charge de la batterie s’affi-
che correctement, vous devez éviter d’ouvrir inu-
tilement le logement de la batterie.
5,5

9
Appuyer sur les touches:
Préparer le combiné
Gigaset 4000 Micro, De-It-Fr-Sp-GB, A31008-G4000-B027-1-6419
4000co.fm
05.07.02
Fixer le clip ceinture
Placer le clip ceinture à l’arrière du combiné et appuyer
jusqu’à ce que les "ergots" disposés latéralement s’en-
clipsent dans les trous.
Régler la date et l’heure
Vous devez régler la date et l’heure afin que soit affiché
correctement le moment de réception des messages/
appels.
©
Ouvrir le menu.
åååååååååååååååååååååååååååååååå
D
RDV/Heure
[
Sélectionner et valider.
åååååååååååååååååååååååååååååååå
Date/Heure
[
Sélectionner et valider.
Le réglage actuel s’affiche.
Entrer la date
Entrer le jour/le mois/l’année.
Exemple ici : 20/05/2001.
p. ex.
ŸÞÞ¢Þ]
D
Sauter à la ligne suivante.
Entrer l’heure
Entrer les heures/minutes.
Exemple ici : 19 h 05.
p. ex.
] ¬ Þ ¢
D
Sauter à la ligne suivante.
Sélectionner le mode d’affichage
F
A l’aide du côté gauche de la touche de navigation,
sélectionner le mode 12 heures (am ou pm) ou le
mode 24 heures (configuration usine).
Sauver
SauverSauver
Sauver
Enregistrer les réglages.

10
Appuyer sur les touches :
Préparer le combiné
Gigaset 4000 Micro, De-It-Fr-Sp-GB, A31008-G4000-B027-1-6419
4000co.fm
05.07.02
Affichage : choisir la langue
©
Ouvrir le menu.
åååååååååååååååååååååååååååååååå
D
Réglages comb.
[
Valider la fonction.
åååååååååååååååååååååååååååååååå
D
Langue
[
La langue activée est identifiée par
✓
.
D[
Sélectionner la langue souhaitée et valider.
Composer le numéro d’urgence
Lorsque le verrouillage du clavier est activé, vous pou-
vez composer les numéros d’urgence enregistrés sur
la base, voir mode d’emploi de la base.
Les combinés supplémentaires sont universels et
identiques quel que soit le pays de destination. ils
sont configurés d'origine en langue Anglaise et doi-
vent de ce fait être localement réglés lors de la mise
en service. Pour ce faire suivre les instructions suivan-
tes en s'aidant du tableau de correspondance.
Vous trouverez un tableau à la dernière page de cette
brochure.

11
Appuyer sur les touches:
Téléphoner
Gigaset 4000 Micro, De-It-Fr-Sp-GB, A31008-G4000-B027-1-6419
4000co.fm
05.07.02
Téléphoner
Appel externe
Cette fonction n'est possible que pour une configura-
tion système multi-combinés (maxi 6 combinés décla-
rés sur la même base).
o Entrer le numéro. Si nécessaire, corriger certains
caractères avec la touche écran
X
.
c
Appuyer sur la touche "Décrocher".
a
Pour mettre fin à la communication, appuyer sur la
touche "Raccrocher".
Appeler en interne
Cette fonction n'est possible que pour une configura-
tion système multi-combinés (maxi 6 combinés décla-
rés sur la même base).
F
Ouvrir la liste des usagers internes. Le combiné per-
sonnel est identifié par "<".
D E
c
Sélectionner le combiné souhaité et appuyer sur la
touche "Décrocher".
ou p. ex.
Ÿ
Entrer le numéro interne du combiné.
ou c
Tous les combinés sonnent.
ou
«
a
Pour mettre fin à la communication, appuyer sur la
touche "Raccrocher".
●
Vous pouvez aussi appuyer tout d’abord sur la
touche "Décrocher"
c
puis composer le numéro
- chaque chiffre est numéroté directement.
●
Appuyez sur la touche "Raccrocher"
a
pour
annuler la numérotation.
●
Vous pouvez insérer une pause interchiffre :
après entrée du préfixe, à l’aide de la touche
écran, ouvrez
©
le menu et sélectionnez
"Insérer une pause".

12
Appuyer sur les touches :
Téléphoner
Gigaset 4000 Micro, De-It-Fr-Sp-GB, A31008-G4000-B027-1-6419
4000co.fm
05.07.02
Accepter un appel entrant
Votre téléphone sonne (sonnerie) et la LED d’état
clignote.
c
/
u
Appuyer sur la touche "Décrocher" ou "Mains-libres".
ou
Soulever uniquement le combiné de la base/du char-
geur (configuration usine : "Décroché automatique").
Journal des appelants/messages
*
Les nouveaux appels/messages sont signalés à l'écran
par le pictogramme
J
et par le clignotement de la LED
d’état.
?
Appuyer
Mains-libres
Mains-libres lors de la numérotation
o Composer le numéro.
u
Appuyer sur la touche "Mains-libres".
Mains-libres en cours de communication
u
Activer la fonction Mains-libres.
Régler le volume :
Appuyer de nouveau sur la touche Mains-libres u.
F
/
G
Régler le volume.
Enregistrer le volume réglé.
Sauver
Passer de l’écoute Mains-libres à l’écoute sur le com-
biné
a
Mettre fin à la communication.
k
Ö
*n’est pas disponible dans tous les pays
Lorsque la fonction Mains-libres est activée, la tou-
che Mains-libres u et la LED d’état sont allumées.

13
Appuyer sur les touches:
Répétition de la numérotation (Bis)
Gigaset 4000 Micro, De-It-Fr-Sp-GB, A31008-G4000-B027-1-6419
4000co.fm
05.07.02
Double appel interne/Transfert
Vous êtes en communication avec un correspondant
externe, vous pouvez établir un double appel interne,
transférer la communication en cours ou revenir à votre
correspondant.
F
Ouvrir la liste des usagers internes.
E
/
D
c
Sélectionner l’usager interne et l’appeler.
Lorsque l’usager interne répond :
●
Effectuer le transfert : appuyer sur la touche "Rac-
crocher"
a
.
●
Mettre fin au double appel : appuyer sur
Fin
pour
reprendre le correspondant en attente.
Répétition de la numérotation
(Bis)
Répétition manuelle de la numérotation
Vous pouvez accéder aux 5 derniers numéros
composés.
z
D
Afficher les numéros et sélectionner.
c
Appuyer sur la touche "Décrocher".
Répétition automatique de la numérotation
A chaque tentative, la touche Mains libres clignote et
l’écoute amplifiée est activée. La fonction se désacti-
ve au bout de dix tentatives de numérotation in-
fructueuses ou si une communication est établie
entre-temps.
Si vous correspondant est injoignable, appuyez sur
Dés.
ou sur une touche quelconque.
z D
Afficher la liste "Bis" et sélectionner le numéro.
©
Ouvrir le menu.
åååååååååååååååååååååååååååååååå
Répét. Auto. No.
[
Activer.
c
Si le correspondant répond : appuyer sur la touche
"Décrocher".
Cette fonction n’est pas disponible dans tous
lespays!

14
Appuyer sur les touches :
Répétition de la numérotation (Bis)
Gigaset 4000 Micro, De-It-Fr-Sp-GB, A31008-G4000-B027-1-6419
4000co.fm
05.07.02
Liste des numéros "Bis"
• Effacer un numéro
z D
Afficher la liste "Bis" et sélectionner le numéro à effacer.
©
Ouvrir le menu.
åååååååååååååååååååååååååååååååå
D
Effacer entrée
[
Le numéro est effacé.
• Enregistrer un numéro dans l’annuaire
z D
Afficher la liste "Bis" et sélectionner le numéro à enre-
gistrer.
©
Ouvrir le menu.
åååååååååååååååååååååååååååååååå
D
No.vers répert.
[
Le numéro est inscrit.
o Si nécessaire, modifier le numéro, entrer le nom (si
nécessaire, indiquer l’anniversaire voir page 20).
Entrée des lettres et caractères, voir page 17.
©
Ouvrir le menu.
åååååååååååååååååååååååååååååååå
Sauvegarder
[
Enregistrer l’entrée.

15
Appuyer sur les touches:
Annuaire et Annuaire spécial
Gigaset 4000 Micro, De-It-Fr-Sp-GB, A31008-G4000-B027-1-6419
4000co.fm
05.07.02
Annuaire et Annuaire spécial
L’ Annuaire
D
vous permet d’appeler de façon sim-
plifiée jusqu’à 200 numéros (nombre fonction de la
taille des entrées et des noms associés ou non dans le
partage de la capacité mémoire).
Dans l’annuaire spécial
C
vous pouvez enregistrer
au choix des numéros spéciaux tels que des numéros
de services réseau, des numéros de têtes de ligne
d'entreprise, les préfixes de sélection de l'opérateur
etc.
Ces numéros peuvent être sélectionnés individuelle-
ment avant chaque appel (sélection appel par appel)
et se chaîner éventuellement à la numérotation
habituelle.
La commande de l'annuaire et celle de l'annuaire spé-
cial sont identiques.
Enregistrer un numéro
D
/
C
Ouvrir Annuaire/Annuaire spécial.
åååååååååååååååååååååååååååååååå
Nouvelle entrée
[
Sélectionner et valider.
o Entrer le numéro
(32 chiffres maxi.).
D
o Entrer dans la zone de saisie du nom et saisir le nom.
Pour l'annuaire, entrer si besoin la date anniversaire
de votre correspondant, voir aussi page 9.
©
Ouvrir le menu.
åååååååååååååååååååååååååååååååå
Sauvegarder
[
Enregistrer l’entrée.
Numéroter à partir de l’annuaire
D
Ouvrir l’annuaire.
p. ex.
^^
Entrer la première lettre du nom et/ou sélectionner à
l'aide de la touche
D
. Par exemple pour un nom
commençant par "E" appuyer deux fois sur la touche
^
.
c
Appuyer sur la touche "Décrocher".
* n’est pas disponible dans tous les pays
Une fois le nom sélectionné, vous pouvez ouvrir le
menu, sélectionner , compléter/modi-
fier le numéro puis numéroter à l’aide de la touche
"Décrocher"
c
.
Utiliser le N°

16
Appuyer sur les touches :
Annuaire et Annuaire spécial
Gigaset 4000 Micro, De-It-Fr-Sp-GB, A31008-G4000-B027-1-6419
4000co.fm
05.07.02
Numéroter à partir de l’Annuaire spécial
(sélection appel par appel)
C
Afficher l’Annuaire spécial.
D©
Sélectionner le numéro spécial et ouvrir le menu.
åååååååååååååååååååååååååååååååå
Utiliser le N°
[
Sélectionner et valider.
o Compléter en entrant le numéro du correspondant
souhaité.
ou
DD [
Compléter avec un numéro sélectionné dans
l'annuaire.
c
Appuyer sur la touche "Décrocher". Le numéro est
composé.
Annuaire spécial : touches de raccourci
Pour une numérotation rapide à partir de l'annuaire
spécial, vous pouvez attribuer 8 de ses numéros aux
touches clavier (touches 2 à 9). Pour cela il suffit d'en-
trer le numéro de touche devant le nom lors de l'enre-
gistrement du numéro spécial.
Annuaire spécial : numérotation rapide
(Touches de raccourci)
p. ex.
Ÿ
Appuyer de manière prolongée sur la touche : le nom
de l’opérateur s’affiche.
p. ex. o Compléter avec le numéro de votre correspondant.
ou
DD[
Compléter avec un numéro sélectionné dans
l'annuaire et valider.
c
Appuyer sur la touche.
Exemple : numéro de numérotation rapide 2 puis
nom de l’opérateur.

17
Appuyer sur les touches:
Annuaire et Annuaire spécial
Gigaset 4000 Micro, De-It-Fr-Sp-GB, A31008-G4000-B027-1-6419
4000co.fm
05.07.02
Editeur de texte et numéros : tableau des
caractères
Appuyer sur la touche correspondante plusieurs fois ou
de manière prolongée :
Ordre de classement :
1 x 2 x 3 x 4 x 5 x 6 x 7 x 8 x 9 x
10
x
]
Espa-
ce-
ment
1
â
£$¥¤
Ÿ
a b c 2 ä á à â ã ç
^
def3ëéèê
¡
g h i 4 ï í ì î
¢
jkl5
£
m n o 6 ö ñ ó ò ô õ
¤
pqrs7ß
¥
t u v 8 ü ú ù û
¬
wxyz9Ÿýæøå
«
a→A
*
/ ( ) <=>%
Þ
. , ? ! 0 + - : ¿
¡
*
*
Autres caractères de cette touche:
“,‘ ,;,_
«
a→A
*
/ ( ) <=>%
La première lettre du nom est automatiquement
inscrite en majuscule suivie de minuscules.
Majuscule/minuscule pour un caractère :
appuyer sur
«
.
Gérer le curseur avec
F G E D
. Effacer un
caractère avec
X
Le caractère est toujours inséré à gauche du pointeur
(curseur).
Placez un espace
avant une entrée pour la classer en
tête de liste (p. ex. : "
Scala").
1. E s p a c e m en t
3.
Lettres (alphabétique)
2.
Chiffres (0-9)
4.
Autres symboles

18
Appuyer sur les touches :
Annuaire et Annuaire spécial
Gigaset 4000 Micro, De-It-Fr-Sp-GB, A31008-G4000-B027-1-6419
4000co.fm
05.07.02
Afficher, modifier ou effacer l’entrée
D
/
C
Ouvrir l’Annuaire/l’Annuaire spécial.
D
Sélectionner l’entrée souhaitée.
Afficher
Afficher toutes les informations concernant l’entrée.
Modifier
Ouvrir le champ de saisie et effectuer les modifica-
tions souhaitées.
o Si nécessaire, modifier le numéro.
D
o Passer dans le champ de saisie du nom et modifier ce
dernier.
Entrée des lettres et caractères, voir page 17.
Pour l’Annuaire, entrer la date anniversaire si néces-
saire, voir page 15.
©
Ouvrir le menu.
åååååååååååååååååååååååååååååååå
Sauvegarder
[
Enregistrer les modifications.
ou
D
/
C
Ouvrir l’Annuaire/l’Annuaire spécial.
D
Sélectionner l’entrée souhaitée.
©
Ouvrir le menu.
åååååååååååååååååååååååååååååååå
D
Effacer entrée
[
Vous entendez une tonalité de confirmation. L’entrée
est effacée.

19
Appuyer sur les touches:
Annuaire et Annuaire spécial
Gigaset 4000 Micro, De-It-Fr-Sp-GB, A31008-G4000-B027-1-6419
4000co.fm
05.07.02
Copier l’entrée sur un autre combiné
Dans une configuration sytème multi-combinés ( maxi
6 combinés déclarés sur la même base), vous pouvez
copier l’entrée sur un autre combiné de confort de la
gamme Gigaset.
D
/
C
Ouvrir l’Annuaire/l’Annuaire spécial.
D
Sélectionner l’entrée souhaitée.
©
Ouvrir le menu.
åååååååååååååååååååååååååååååååå
D
Copier entrée
[
Sélectionner et valider.
D
[
Selectionner l’usager interne (combiné de destination)
et valider.
Copier une autre entrée :
Oui
Appuyer sur la touche.
D
Sélectionner l’entrée souhaitée.
Envoi
Activer la copie.
Copier l’Annuaire/Annuaire spécial
Vous pouvez copier l’Annuaire ou l’Annuaire spécial
complet sur un autre combiné de confort.
Voir "Copier l’entrée sur un autre combiné". Sélection-
ner "Copier liste " au lieu de "Copier entrée".
Effacer l’Annuaire/ l’Annuaire spécial
D
/
C
Ouvrir l’Annuaire/l’Annuaire spécial.
D
Sélectionner une entrée quelconque.
©
Ouvrir le menu.
åååååååååååååååååååååååååååååååå
D
Effacer liste
[
Sélectionner et valider.
Oui
Valider l’effacement de toutes les entrées.
La transmission est interrompue dans les cas
suivants :
●
La mémoire du combiné de destination est pleine.
●
Vous recevez un appel.
La copie d’une entrée est actuellement en cours ; elle
est menée jusqu’au bout.

20
Appuyer sur les touches :
Annuaire et Annuaire spécial
Gigaset 4000 Micro, De-It-Fr-Sp-GB, A31008-G4000-B027-1-6419
4000co.fm
05.07.02
Dates anniversaires
Pour chaque entrée de l'annuaire, vous pouvez enregis-
trer la date et l'heure anniversaire pour qu'elles vous
soient rappelées.
D
Ouvrir l’annuaire.
D
Afficher
Sélectionner l’entrée et l’afficher.
Modifier
Ouvrir la zone de saisie.
D
Placer le curseur dans la zone correspondant à l’anni-
versaire.
Modifier
Valider.
o Entrer ou modifier la date
(jour/mois).
D
o Sauter à la ligne suivante et entrer l’heure.
D
Sauter à la ligne suivante.
F
/
G
Sélectionner le type de mémo sonore (mélodie 1 à 10)
ou visuel.
[
Enregistrer les entrées.
A l’aide de la touche écran
Effacer
vous pouvez effacer
l’anniversaire.

21
Appuyer sur les touches:
Réglages
Gigaset 4000 Micro, De-It-Fr-Sp-GB, A31008-G4000-B027-1-6419
4000co.fm
05.07.02
Réglages
Réveil : régler
Si une heure de réveil est programmée sur votre com-
biné (symbole
¼
), celui-ci sonne tous les jours à la
même heure.
Le téléphone est en mode veille:
©
Ouvrir le menu.
åååååååååååååååååååååååååååååååå
D
RDV/Heure
[
Sélectionner et valider.
åååååååååååååååååååååååååååååååå
D
Réveil/Alarme
[
Sélectionner et valider.
Le réglage actuel s’affiche.
F
/
G
sélectionner.
D
Sauter à la ligne suivante.
Þ£ÞÞ
Entrer Heures/Minutes. Exemple ici : 6 h 00.
D
Sauter à la ligne suivante.
F
/
G
Sélectionner la sonnerie de réveil.
Sauver
Enregistrer les réglages.
Réveil : désactiver
Le réveil est paramétré, mais il ne doit pas sonner.
©
Ouvrir le menu.
åååååååååååååååååååååååååååååååå
D
RDV/Heure
[
Sélectionner et valider.
åååååååååååååååååååååååååååååååå
D
Réveil/Alarme
[
Sélectionner et valider.
F
/
G
sélectionner .
Sauver
Enregistrer les réglages.
Réveil : arrêt de la sonnerie
Appuyer sur une touche quelconque pour interrompre
la sonnerie du réveil.
Act.
Le réveil n’a pas lieu lorsque la fonction Surveillance
de pièce est activée ainsi que durant une répétition
automatique de la numérotation.
Dés
.

22
Appuyer sur les touches :
Réglages
Gigaset 4000 Micro, De-It-Fr-Sp-GB, A31008-G4000-B027-1-6419
4000co.fm
05.07.02
Rendez-vous (RDV) : activer
Vous pouvez paramétrer le combiné de manière à ce
qu’il vous rappelle un RDV. Si vous avez réglé un RDV,
cela est signalé par le symbole
¼
à l’écran.
Le téléphone est en mode veille.
©
Ouvrir le menu.
åååååååååååååååååååååååååååååååå
D
RDV/Heure
[
Sélectionner et valider.
åååååååååååååååååååååååååååååååå
Entrer RDV
[
Sélectionner et valider.
F
/
G
Sélectionner pour activer la fonction RDV.
D
Sauter à la ligne suivante.
ŸÞÞ¢
Entrer Jour/Mois,
Exemple ici : 20 mai.
D
Sauter à la ligne suivante.
Þ¬^Þ
Entrer Heures/Minutes,
Exemple ici : 9 h 30.
D
Sauter à la ligne suivante.
F
/
G
Sélectionner la mélodie de la sonnerie pour la fonction
RDV.
Sauver
Enregistrer les réglages.
Rendez-vous (RDV) : désactiver
Pour arrêter la sonnerie RDV, appuyer sur une touche
quelconque. Le RDV est alors désactivé.
Dates échues non acquittées
(RDV/Anniversaires)
Les RDV ou anniversaires signalés à échéance par le
combiné, mais que vous n'avez pas acquittés (en cas
d'absence par exemple), sont enregistrés dans une lis-
te de dates échues.
Act.
La sonnerie RDV ne se fait entendre que lorsque le
combiné est en mode veille. Lorsque la fonction Sur-
veillance de pièce est activée ainsi que durant une ré-
pétition automatique de la numérotation, le RDV n’est
pas signalé par une sonnerie.
Un nouveau RDV/Anniversaire non acquitté est notifié
sur l'afficheur par
Dates !
. Appuyer sur la touche écran
de droite correspondante, la liste des dates échues
s'affiche. Puis sélectionner
[
.
RDV échu
¼

23
Appuyer sur les touches:
Réglages
Gigaset 4000 Micro, De-It-Fr-Sp-GB, A31008-G4000-B027-1-6419
4000co.fm
05.07.02
Pour afficher un RDV déjà consulté, procédez comme
indiqué ci-après.
©
Ouvrir le menu.
åååååååååååååååååååååååååååååååå
D
RDV/Heure
[
Sélectionner et valider.
åååååååååååååååååååååååååååååååå
D
Dates échues
[
Sélectionner et valider.
D[
Sélectionner les RDV
¼
ou les anniversaires
‚
non
acquittés. Les informations correspondantes s’affi-
chent.
Vous pouvez effacer le RDV/l’anniversaire à l’aide de la
touche écran
Effacer
.

24
Appuyer sur les touches :
Sons/Audio
Gigaset 4000 Micro, De-It-Fr-Sp-GB, A31008-G4000-B027-1-6419
4000co.fm
05.07.02
Sons/Audio
Volume d'écoute du combiné
Volume du haut-parleur mains-libres
©
Ouvrir le menu.
åååååååååååååååååååååååååååååååå
D
Sons / Audio
[
Sélectionner Menu.
åååååååååååååååååååååååååååååååå
Volume écoute
[
Une tonalité se fait entendre à son volume actuel.
F
/
G
Régler le volume souhaité pour Mains-libres u.
D
Sauter à la ligne suivante.
F
/
G
Sauver
Sélectionner le niveau du volume pour le combiné
k
.
Sauvegarder.
Volume de la sonnerie
Mélodie de la sonnerie
Vous avez le choix entre cinq volumes de sonnerie, la
sonnerie "Crescendo" (augmentation progressive du
volume), la coupure de la sonnerie, et dix mélodies
de sonnerie :
©
Ouvrir le menu.
åååååååååååååååååååååååååååååååå
D
Sons / Audio
[
Sélectionner et valider.
åååååååååååååååååååååååååååååååå
D
Régl. Sonnerie
[
La sonnerie se fait entendre et le niveau réglé s’affi-
che.
F
/
G
Sélectionner le volume de la sonnerie.
D
Sauter à la ligne suivante.
F
/
G
Sauver
Sélectionner la mélodie souhaitée (1–10) et sauve-
garder.

25
Appuyer sur les touches:
Sons/Audio
Gigaset 4000 Micro, De-It-Fr-Sp-GB, A31008-G4000-B027-1-6419
4000co.fm
05.07.02
SVC Nuit (Service de nuit)
Pour une plage horaire déterminée, vous pouvez régler
temporairement le volume de sonnerie différemment,
l'atténuer ou le renforcer selon le cas (par exemple la
nuit).
©
Ouvrir le menu.
åååååååååååååååååååååååååååååååå
D
Sons / Audio
[
Sélectionner et valider.
åååååååååååååååååååååååååååååååå
D
Régl. Sonnerie
[
La sonnerie se fait entendre et le niveau réglé s’affi-
che.
SVC Nuit
Appuyer sur la touche écran correspondante.
F
/
G
Activer/désactiver le service.
D
o Indiquer la plage horaire pour la sonnerie différente.
p. ex.
]]ÞÞ
]¢ÞÞ
de 11 h 00 à 15 h 00.
DF
/
G
Sauter à la ligne suivante et sélectionner le volume de
la sonnerie.
Enregistrer les réglages.
Sauver
ou
a
Appuyer sur la touche.
Tonalités d'avertissement
●
Clic clavier : chaque appui sur une touche est
confirmé.
●
To n a l i t és d’acquittement : signal de confirmation
(séquence de tons ascendante) à la fin des entrées/
réglages et lorsque l’on pose le combiné sur la
base ; signal d’erreur (séquence de tons descendan-
te) en cas d’entrée incorrecte.
●
Alarme batterie : chargement de la batterie
nécessaire.
©
Ouvrir le menu.
åååååååååååååååååååååååååååååååå
D
Sons / Audio
[
Sélectionner et valider.
åååååååååååååååååååååååååååååååå
D
Tonal. avertis.
[
Sélectionner et valider.
D
Sélectionner la fonction souhaitée.
F
/
G
, ou
(alarme batterie en cours de communication).
Sauver
Enregistrer les réglages.
Act. Dés. En ligne

26
Appuyer sur les touches :
Sons/Audio
Gigaset 4000 Micro, De-It-Fr-Sp-GB, A31008-G4000-B027-1-6419
4000co.fm
05.07.02
Vibreur : activer/désactiver
Afin de ne pas être dérangé par la sonnerie, vous pou-
vez à la place activer le vibreur de votre combiné. Vous
pouvez aussi activer le vibreur parallèlement à la son-
nerie (par exemple lorsque vous vous trouvez dans un
environnement bruyant).
©
Ouvrir le menu.
åååååååååååååååååååååååååååååååå
D
Sons / Audio
[
Sélectionner et valider.
åååååååååååååååååååååååååååååååå
D
Vibreur
[
Sélectionner et valider.
Appuyer de manière prolongée sur la touche
«
pour
désactiver la sonnerie. Dans ce cas, seul le vibreur est
activé.
½
Le réglage sélectionné est indiqué par le
symbole
✓

27
Appuyer sur les touches:
Réglages combiné
Gigaset 4000 Micro, De-It-Fr-Sp-GB, A31008-G4000-B027-1-6419
4000co.fm
05.07.02
Réglages combiné
Décroché automatique
Lorsque cette fonction est paramétrée, il suffit de
retirer le combiné du chargeur pour prendre l’appel
(configuration usine), sans avoir à appuyer sur la touche
c
.
©
Ouvrir le menu.
åååååååååååååååååååååååååååååååå
D
Réglages comb.
[
Sélectionner et valider.
åååååååååååååååååååååååååååååååå
D
Décroché auto.
[
Activer/désactiver avec
[
(
✓
= fonction activée).
Réinitialisation du combiné
(retour à la configuration usine)
L’annuaire, l’annuaire spécial et la liste des appelants
ne sont pas effacés lors de la réinitialisation. Les décla-
rations effectuées sur la base sont conservées.
©
Ouvrir le menu.
åååååååååååååååååååååååååååååååå
D
Réglages comb.
[
Sélectionner et valider.
åååååååååååååååååååååååååååååååå
D
Réinit. combiné
[
Sélectionner et valider.
Oui
Confirmer pour valider.
Fonction Configuration
usine
Volume du combiné 1
Volume sonnerie 5
Mélodie de la sonnerie 1
Décroché automatique activée
Alarme batterie activée
Volume du haut-parleur 3
Niveau de surveillance de pièce élevé
SVC Nuit désactivé
Langue d’affichage spécifique au
pays
Vibreur désactivé

28
Appuyer sur les touches :
Famille/Loisirs
Gigaset 4000 Micro, De-It-Fr-Sp-GB, A31008-G4000-B027-1-6419
4000co.fm
05.07.02
Famille/Loisirs
Surveillance de pièce
A l’aide de votre combiné, vous pouvez surveiller les
bruits d'ambiance d'une pièce à partir d'une autre pièce
ou à distance depuis l'extérieur.Si un certain niveau de
bruit est atteint, le combiné sélectionne automatique-
ment le numéro (interne /externe) enregistré par
vous. Lorsque la fonction Surveillance de pièce est ac-
tivée, les appels entrants sont uniquement signalés à
l’écran.
Paramétrer la Surveillance de pièce
©
Ouvrir le menu.
åååååååååååååååååååååååååååååååå
D
Famille/Loisirs
[
Sélectionner et valider.
åååååååååååååååååååååååååååååååå
D
Surveill. Pièce
[
Sélectionner et valider.
F
/
G
Sélectionner
ou .
D
Sauter à la ligne suivante.
Modifier
Ouvrir le champ de saisie du numéro. Effacer un
numéro externe déjà enregistré.
F
/
D
Entrer manuellement le numéro interne/ouvrir la liste
des abonnés internes/ouvrir l'annuaire.
E
/
D
[
Sélectionner un usager interne ou externe.
Sauver
Enregistrer un numéro.
D
Sauter à la ligne suivante.
F
/
G
Régler une sensibilité "élevée" ou "faible".
Sauver
Enregistrer le réglage.
Appuyer sur la touche écran pour désactiver la
fonction Surveillance de pièce.
Act. Dés.
Vous pouvez désactiver à distance depuis un poste
externe (p. ex. à partir d’un "portable") la fonction Sur-
veillance de pièce. Acceptez l’appel activé par la fonc-
tion Surveillance de pièce.
Puis, désactivez avec
»
.
La fonction Surveillance de pièce est maintenant dé-
sactivée. La fonction Surveillance de pièce n’active
plus aucun appel.
Dés.

29
Appuyer sur les touches:
Mode Talkie-Walkie
Gigaset 4000 Micro, De-It-Fr-Sp-GB, A31008-G4000-B027-1-6419
4000co.fm
05.07.02
Mode Talkie-Walkie
En mode Talkie-Walkie, les combinés ne sont plus joi-
gnables pour les appels entrants.
Mode Talkie-Walkie : activer sur chaque
combiné
©
Ouvrir le menu.
åååååååååååååååååååååååååååååååå
D
Famille/Loisirs
[
Sélectionner la fonction.
åååååååååååååååååååååååååååååååå
D
Talkie-Walkie
[
Activer le mode Talkie-Walkie.
Avec la touche écran , il est possible de désacti-
ver le mode Talkie-Walkie.
Mode Talkie-Walkie : utiliser
Deux combinés se trouvent en mode Talkie-Walkie :
Combiné appelant :
Appeler
Appuyer sur la touche écran.
Combiné appelé :
L’appel est signalé par un message à l’écran.
c
Appuyer sur la touche.
Les deux combinés sont reliés.
a
Pour mettre fin à la communication, appuyer sur la
touche "Raccrocher".
Condition:
Les combinés possèdent les mêmes réglages de
base (p. ex. meilleure base) ou il ne sont pas encore
enregistrés sur une base. (En mode Talkie-Walkie,
l’autonomie d’un combiné est considérablement
réduite).
Dés.

30
Annexe
Gigaset 4000 Micro, De-It-Fr-Sp-GB, A31008-G4000-B027-1-6419
4000co.fm
05.07.02
Annexe
Utilisation sur les bases de la gamme Gigaset
Gigaset 1000/2000/3000
Les fonctions suivantes de votre combiné 4000i Micro/Comfort ne
sont pas supportées par les bases Gigaset 1000/2000/3000.
●
Réglage de l’heure (après mise à l’arrêt du combiné, l’heure n’est
plus transmise)
●
Sélection de la langue
●
Surveillance de pièce (désactivation en externe impossible)
●
Transmission de minimessages SMS *
Gigaset 4010/4015 Classic
Les fonctions suivantes de votre combiné 4000i Micro/Comfort ne
sont pas supportées par les bases Gigaset 4010/4015 Classic.
●
Sélection de la langue
●
Transmission de minimessages SMS*
●
Réglage des catégories d’accès.
*
n’est pas disponible dans tous les pays

31
Annexe
Gigaset 4000 Micro, De-It-Fr-Sp-GB, A31008-G4000-
4000co.fm
05.07.02
Entretien
Essuyer la base et le combiné avec un chiffon humide ou un chiffon
antistatique. Ne jamais utiliser de chiffon sec ! Risque de charge sta-
tique !
Contact avec les liquides
Si le poste mobile a été mis en contact avec un liquide,
il ne faut en aucun cas le mettre en marche.
Retirer tous les accumulateurs immédiatement.
Laisser le liquide s'écouler, sécher toutes les parties avec un linge ab-
sorbant.
Placer le mobile sans accumulateurs pendant au moins 72 heures
dans un endroit chaud et sec.
Ensuite, dans la plupart des cas le mobile fonctionnera à nouveau.
Batteries recommandées
Temps d’utilisation/temps de charge du combiné
La capacité de charge de la batterie diminue au bout de quelques
années.
Portée
Selon l'environnement, la portée peut atteindre 300 m en champ libre
ou 50 m en intérieur.
Nickel Métal Hydrure (NiMH) , 500 mAh.
France:
N° commande V30145-K1310-X229
Suisse:
N° commande V30145-K1310-X125 ou
N° commande V30145-K1310-X229
Capacité
(mAh)
Autonomie
(heures)
Autonomie en
communica-
tion (heures)
Te m p s d e
charge
(heures)
500 jusqu’à 300 env. 16 env. 5,5
!

32
Annexe
Gigaset 4000 Micro, De-It-Fr-Sp-GB, A31008-G4000-B027-1-6419
4000co.fm
05.07.02
Chargeur de table
Pour recharger votre combiné, vous pouvez aussi vous servir du char-
geur de table.
(Accessoire pour les combinés Siemens voir page\ <$SeiteNum>)
N° commande L36880-N4501-A101
Service Clients
Si vous avez des questions techniques ou d'utilisation de votre appa-
reil, le moyen le plus simple est de solliciter l'assistance de notre site
Internet:
www.my-siemens.com/customercare
Dans le cas où une réparation s'avérerait nécessaire, adressez-vous à
l'un de nos centres de SAV.
Numéro de téléphone du service clientèle voir pages de couverture.
La conformité de l’appareil avec les exigences fondamentales de la directi-
ve européenne R&TTE (99/05/CEE) relative aux terminaux, est confirmée
par le label CE.
Le combiné 4000i Micro est homologué dans toute l’Union européen-
ne et en Suisse.
½
Lors de la charge du combiné Gigaset dans le chargeur de table,
la batterie de réserve n’est plus en charge tant que le combiné
est placé dans le chargeur.
Le témoin de charge (LED) est allumé en permanence.

33
Annexe
Gigaset 4000 Micro, De-It-Fr-Sp-GB, A31008-G4000-
4000co.fm
05.07.02
Langues d'affichage
Lors de l'enregistrement du combiné portatif sur la base Gigaset
4010i, vous pouvez paramétrer les langues marquées d'un *:
Einstellungen Sprache
Deutsch
H/Set Settings Language
English
Réglages comb. Langue
Français
Impostazioni Lingua
Italiano
Ajuste terminal Idioma
Español

34
Gigaset 4000 Micro, De-It-Fr-Sp-GB, A31008-G4000-B027-1-6419
4000co.fm
05.07.02
Diese Seite muss erhalten bleiben, damit die neue Sprache rechts beginnt!

s
Gigase 4000 Micro, De-It-Fr-Sp-GB, A31008-G4000-
4000co-
17.04.02
Be inspired
ESPAÑOL
Instrucciones de manejo
e indicaciones de seguridad
!

Esquema general del terminal inalámbrico
2
Gigase 4000 Micro, De-It-Fr-Sp-GB, A31008-G4000-B027-1-
4000COU.FM
07.05.02
Esquema general del terminal inalámbrico
Relación entre la tecla de control y las teclas de display
El display está protegido con una lámina de plástico. Retire la lámina de protec-
ción.
Ñe
Annabella
19.07.01 13:13
{ ¨
Conector
– para auriculares,
reproductor MP3
Abrir listín telefónico
Tecla de colgar y
tecla act./desact.
Te c l a d e d e s c o l g a r
Tecla de proveedores
Lista de llamantes
– Finalizar llamada
– Cancelar función
– Pulsar brevemente: retro-
ceder un nivel de menú;
pulsación prolongada: re-
troceder al menú principal
– Terminal inalámbrico act./
pulsación prolongada
desact (Pulsar tecla pro-
longadamente)
Bloqueo del teclado
Activar/desactivar
pulsación prolongada
– Aceptar llamada
– Marcar número
– Conmutar de ma-
nos libres a micro-
teléfono
Te c l a d e a st e r i s c o
Pulsar prolongada-
mente para activar/
desactivar timbre
Estado de carga
=
agotada
U
completa
Intermitente: baja
Mediante las teclas del
display puede acceder a las
funciones actuales.
Vol umen de recepción
Tecla de control
LED de estado (diodo)
– Abrir lista de proveedores:
pulsar brevemente.
– Función tecla R:
¡Pulsar prolongadamente!
Funciones actuales
y teclas de display
Iluminado en llamada;
intermitente en caso de:
– Llamada entrante
– Mensajes nuevos
– Llamada de alarma,
citas, aniversarios
Acceso a listas de mensajes
Te c l a 1
Puls. prolong.: contestador
automático/T-NetBox
Micrófono
Display (campo de indicación
)
Te c la ma n o s l i b r e s
Mediante las teclas de display pue-
den realizarse acciones que también
pueden controlarse en parte con la
tecla de control.
La parte de la tecla de control que
se debe pulsar está indicada en las
instrucciones de manejo con fle-
chas:
F
/
G
(izda/dcha)
E
/
D
(arriba/abajo)
Pulsar sobre el lado oscuro.
Tecla de control
Te c l a s d e d i s p l a y
INT

Esquema general del terminal inalámbrico
3
Gigase 4000 Micro, De-It-Fr-Sp-GB, A31008-G4000-B027-1-
4000COU.FM
07.05.02
Menús importantes
Símbolos del display
Según la situación aparecen sobre las teclas de display los siguientes símbolos:
* no está disponible en todos los países
Te c la s
display
Significado
¨
Tecla de menú: abrir en estado de reposo el menú general. Abrir mientras
se realiza una llamada un menú dependiente de la situación.
Z
Confirmar y seleccionar función de menú.
Finalizar y guardar entradas.
W
Tecla de borrar (backspace): borrar entradas de derecha a izquierda.
{
Tecla de rellamada: abrir lista de los 5 últimos números de teléfono.
I
Indicación para contestador, T-Net-Box, lista de llamantes
Í
Retroceder un nivel de menú, cancelar
©
Texto mensaje*
Servicios red
Familia/ocio
Citas/hora
Ajuste audio
Tasas
OKƒ
Ajuste terminal
Ajustes base
Contestador
Vol. teléfono
Ajustar timbre
Tonos de aviso
D
Nuevo registro
Ana
Bárbara
Claus
:
©
Utilizar número
Borrar registro
Enviar registro
Borrar lista
Enviar lista
Memoria libre

Indicaciones de seguridad
4
Gigase 4000 Micro, De-It-Fr-Sp-GB, A31008-G4000-B027-1-
4000COU.FM
07.05.02
Indicaciones de seguridad
Utilice exclusivamente el alimentador enchufable incluido en el sumi-
nistro, tal y como se indica en la parte inferior del equipo.
Utilice sólo baterías recargables homologadas y del mismo tipo. No
utilice en ningún caso pilas normales (no recargables), ya que estas
podrían dañar la salud y causar daños personales.
Coloque la batería recargables con la polaridad correcta
Utilice los tipos de batería indicados en estas instrucciones de manejo
Pueden surgir anomalías en el funcionamiento de equipos médicos.
Observe las condiciones técnicas del entorno de aplicación (p. ej. consul-
tas médicas).
El terminal inalámbrico puede ocasionar un zumbido muy molesto en equi-
pos auditivos.
No utilice el teléfono en entornos expuestos a peligro de explosión (p. ej.
talleres de pintura).
El terminal inalámbrico no es resistente a las salpicaduras (v. pág. 25).
Durante la conducción el conductor no debe telefonear (función walkie-tal-
kie).
Desconecte el teléfono mientras se encuentra en un avión (función walkie-
talkie). Evite que se active de forma involuntaria.
Si transfiere su Gigaset a terceros, entréguelo siempre junto con las ins-
trucciones de manejo.
Elimine las baterías y el teléfono respetando el medio ambiente.
Algunas de las funciones descritas en estas instrucciones de manejo no están dis-
ponibles en todos los países.
!
$
‹
Œ
ƒ

Indice
5
Gigase 4000 Micro, De-It-Fr-Sp-GB, A31008-G4000-B027-1-
4000CoIVZ.fm
07.05.02
Indice
Esquema general del terminal inalámbrico. . . . . . . . . . . . . . . . . . . . . . . . . . . . . . . . . 2
Relación entre la tecla de control y las teclas de display. . . . . . . . . . . . . . . . . . . . .2
Menús importantes . . . . . . . . . . . . . . . . . . . . . . . . . . . . . . . . . . . . . . . . . . . . . . . . .3
Símbolos del display . . . . . . . . . . . . . . . . . . . . . . . . . . . . . . . . . . . . . . . . . . . . . . . .3
Indicaciones de seguridad . . . . . . . . . . . . . . . . . . . . . . . . . . . . . . . . . . . . . . . . . . . . . . . 4
Preparar el terminal. . . . . . . . . . . . . . . . . . . . . . . . . . . . . . . . . . . . . . . . . . . . . . . . . . . . . 6
Contenido del embalaje. . . . . . . . . . . . . . . . . . . . . . . . . . . . . . . . . . . . . . . . . . . . . .6
Colocar la batería
. . . . . . . . . . . . . . . . . . . . . . . . . . . . . . . . . . . . . . . . . . . . . . . . . . . . . . . . . . . . . . . .6
Alta del terminal inalámbrico . . . . . . . . . . . . . . . . . . . . . . . . . . . . . . . . . . . . . . . . . .6
Cargar la batería. . . . . . . . . . . . . . . . . . . . . . . . . . . . . . . . . . . . . . . . . . . . . . . . . . . .7
Sujeción del clip para el cinturón . . . . . . . . . . . . . . . . . . . . . . . . . . . . . . . . . . . . . . .7
Ajustar fecha y hora. . . . . . . . . . . . . . . . . . . . . . . . . . . . . . . . . . . . . . . . . . . . . . . . .8
Modificar el idioma del display . . . . . . . . . . . . . . . . . . . . . . . . . . . . . . . . . . . . . . . .8
Realizar llamadas. . . . . . . . . . . . . . . . . . . . . . . . . . . . . . . . . . . . . . . . . . . . . . . . . . . . . . . 9
Llamadas externas. . . . . . . . . . . . . . . . . . . . . . . . . . . . . . . . . . . . . . . . . . . . . . . . . .9
Llamadas internas . . . . . . . . . . . . . . . . . . . . . . . . . . . . . . . . . . . . . . . . . . . . . . . . . .9
Contestar llamadas . . . . . . . . . . . . . . . . . . . . . . . . . . . . . . . . . . . . . . . . . . . . . . . .10
Lista de llamantes/de mensajes . . . . . . . . . . . . . . . . . . . . . . . . . . . . . . . . . . . . . .10
Manos libres . . . . . . . . . . . . . . . . . . . . . . . . . . . . . . . . . . . . . . . . . . . . . . . . . . . . .10
Transferir una llamada externa, consulta. . . . . . . . . . . . . . . . . . . . . . . . . . . . . . . .11
Rellamada . . . . . . . . . . . . . . . . . . . . . . . . . . . . . . . . . . . . . . . . . . . . . . . . . . . . . . . . . . . .11
Listín telefónico y lista de proveedores de red. . . . . . . . . . . . . . . . . . . . . . . . . . . . . 12
Marcación rápida de la lista de proveedores de red . . . . . . . . . . . . . . . . . . . . . . .13
Marcar con marcación rápida . . . . . . . . . . . . . . . . . . . . . . . . . . . . . . . . . . . . . . . .14
Ajustes . . . . . . . . . . . . . . . . . . . . . . . . . . . . . . . . . . . . . . . . . . . . . . . . . . . . . . . . . . . . . . . 17
Ajustar el despertador . . . . . . . . . . . . . . . . . . . . . . . . . . . . . . . . . . . . . . . . . . . . . .17
Desactivar el despertador . . . . . . . . . . . . . . . . . . . . . . . . . . . . . . . . . . . . . . . . . . .18
Desactivar la llamada de alarma . . . . . . . . . . . . . . . . . . . . . . . . . . . . . . . . . . . . . .18
Ajustar cita. . . . . . . . . . . . . . . . . . . . . . . . . . . . . . . . . . . . . . . . . . . . . . . . . . . . . . .18
Volumen del microteléfono y del altavoz. . . . . . . . . . . . . . . . . . . . . . . . . . . . . . . .19
Activar/desactivar tonos de aviso y señales acústicas . . . . . . . . . . . . . . . . . . . . .21
Activar/desactivar la alarma por vibración . . . . . . . . . . . . . . . . . . . . . . . . . . . . . . .21
Activar/desactivar aceptación automática de llamada . . . . . . . . . . . . . . . . . . . . . .22
Reposición del estado de suministro . . . . . . . . . . . . . . . . . . . . . . . . . . . . . . . . . .22
Babyphone (vigilancia de habitación) . . . . . . . . . . . . . . . . . . . . . . . . . . . . . . . . . . . . 23
Ajustar babyphone. . . . . . . . . . . . . . . . . . . . . . . . . . . . . . . . . . . . . . . . . . . . . . . . .23
Modo walkie-talkie . . . . . . . . . . . . . . . . . . . . . . . . . . . . . . . . . . . . . . . . . . . . . . . . . . . . 24
Anexo . . . . . . . . . . . . . . . . . . . . . . . . . . . . . . . . . . . . . . . . . . . . . . . . . . . . . . . . . . . . . . . . 25
Operación con estaciones base de la gama Gigaset. . . . . . . . . . . . . . . . . . . . . . .25
Cuidados . . . . . . . . . . . . . . . . . . . . . . . . . . . . . . . . . . . . . . . . . . . . . . . . . . . . . . . .25
Contacto con líquido . . . . . . . . . . . . . . . . . . . . . . . . . . . . . . . . . . . . . . . . . . . . . . .25
Alcance . . . . . . . . . . . . . . . . . . . . . . . . . . . . . . . . . . . . . . . . . . . . . . . . . . . . . . . . .26
Customer Care (Service) . . . . . . . . . . . . . . . . . . . . . . . . . . . . . . . . . . . . . . . . . . . .26
Idiomas de display . . . . . . . . . . . . . . . . . . . . . . . . . . . . . . . . . . . . . . . . . . . . . . . .27

6
Pulsar las teclas:
Preparar el terminal
Gigase 4000 Micro, De-It-Fr-Sp-GB, A31008-G4000-B027-1-6419
4000CO.FM
07.05.02
Preparar el terminal
Contenido del embalaje
Terminal Gigaset 4000i Micro, una batería, soporte car-
gador, clip para cinturón, instrucciones de manejo.
Colocar la batería
Alta del terminal inalámbrico
Paso 1:
©
Abrir menú.
åååååååååååååååååååååååååååååååå
D
Ajuste terminal
[
Seleccionar y confirmar.
åååååååååååååååååååååååååååååååå
D
Regist. equipo
[
Seleccionar y confirmar.
D [
Seleccionar la estación base ( , ,
o ).
o
[
Introducir y confirmar el PIN (estado de entrega: 0000)
– se indica p. ej. .
Paso 2:
Pulsar prolongadamente la tecla situada en la cara
posterior de la base. De forma automática se le asigna
al terminal inalámbrico el siguiente número interno li-
bre (1–3). En el caso de que todos los puestos se en-
cuentren ocupados, se sobrescribirá el número interno
3.
Tras la realización exitosa del alta, el terminal inalámbri-
co regresa al estado inactivo. En el display se indicará
el número interno (p. ej. "INT1").
El ajuste de suministro del idioma en el display de
su terminal inalámbrico es el italiano. Para confi-
gurar el idioma deseado ver la página 8.
Gigaset
4000
micro
Gigaset
4000
micro
o
Base 1 Base 2
Base 3 Base 4
Proceso de alta Base 1

7
Pulsar las teclas:
Preparar el terminal
Gigase 4000 Micro, De-It-Fr-Sp-GB, A31008-G4000-B027-1-6419
4000CO.FM
07.05.02
Cargar la batería
Para cargarla batería, mantenga el terminal
aprox. 5,5 horas en la estación soporte car-
gador. La batería no se suministran carga-
das. El proceso de carga se indica en el ter-
minal mediante el parpadeo de la indicación
del estado de carga:
En el anexo se ofrece una relación de los tipos de
batería recomendados.
Sujeción del clip para el cinturón
Empuje el clip para el cinturón sobre la parte posterior
del terminal hasta que los "resaltes“ laterales encajen
en las perforaciones.
Gigaset Preparación en estación base/teléfono
4010/4015 Pulsar prolongadamente la tecla de la par-
te inferior de la estación base.
3010/3015
Pulsar la tecla paging
y
de la estación
base hasta que se escuchen unas señales
acústicas.
3020/25
3030/35
4030/35
Seleccionar en el menú del teléfono base
Ajustes
,
Ajustes sistema
y
Registrar equi-
po
y confirmar con
OK
.
3070/75
4070/75
Pulsar la indicación (LED) que parpadea
durante el proceso de registro.
Bases de
otros fa-
bricantes
Para el registro en "estaciones base GAP“,
siga las instrucciones de manejo
correspondientes (paso 2 y 3).
●
La batería se calientan durante el proceso de carga;
esta alteración es normal y no representa ningún
peligro.
●
Para una correcta indicación del estado de carga,
evite abrir el compartimento de batería innecesaria-
mente.
5,5

8
Pulsar las teclas:
Preparar el terminal
Gigase 4000 Micro, De-It-Fr-Sp-GB, A31008-G4000-B027-1-6419
4000CO.FM
07.05.02
Ajustar fecha y hora
El ajuste de la fecha y la hora es necesario para obtener
una indicación correcta de la hora de entrada de las lla-
madas/los mensajes.
©
Abrir el menú.
åååååååååååååååååååååååååååååååå
D
Citas/hora
[
Seleccionar y confirmar.
åååååååååååååååååååååååååååååååå
D
Fecha/hora
[
Seleccionar y confirmar.
Se visualiza el ajuste actual.
Introducir la fecha
Introducir día/mes/año.
En el ejemplo: 20.05.2001.
p. ej.
ŸÞÞ¢Þ]
D
Saltar una línea hacia abajo.
Introducir la hora
Introducir horas/minutos.
En el ejemplo: 19.05 horas.
p. ej.
] ¬ Þ ¢
D
Saltar una línea hacia abajo.
Seleccionar modo de indicación
Seleccione con el extremo izquierdo de la tecla de
control entre el modo de 12 horas (am o pm) o bien el
modo de 24 horas (estado de suministro).
Guardar
GuardarGuardar
Guardar
Guardar los ajustes.
Modificar el idioma del display
©
Abrir el menú.
åååååååååååååååååååååååååååååååå
D
Ajuste terminal
[
Confirmar función.
åååååååååååååååååååååååååååååååå
D
Idioma
[
El idioma activo está marcado con
✓
.
D[
Seleccionar el idioma deseado y confirmar.
Marcar número de emergencia
Con el bloqueo del teclado activado se pueden marcar
los números de emergencia programados en la esta-
ción base, v. instrucciones de manejo de la estación ba-
se.
Encontrará una tabla en la última página de este ma-
nual.

9
Pulsar las teclas:
Realizar llamadas
Gigase 4000 Micro, De-It-Fr-Sp-GB, A31008-G4000-B027-1-6419
4000CO.FM
07.05.02
Realizar llamadas
Llamadas externas
o Introducir el número de teléfono.
Si es necesario, corregir dígitos con la tecla de
display
X
.
c
Pulsar la tecla de descolgar.
a
Pulsar la tecla de colgar para finalizar la comunicación.
Llamadas internas
F
Abrir lista de extensiones internas. El terminal inalám-
brico propio está marcado con "<".
D E
c
Seleccionar el terminal deseado y pulsar la tecla de
descolgar.
o bien p. ej.
Ÿ
Introducir el número de teléfono interno del terminal
inalámbrico.
o
c
o bien
«
Suenan todos los terminales.
a
Pulsar la tecla de colgar para finalizar la comunicación.
●
Tambi én es posible pulsar primero la tecla de des-
colgar
c
e introducir a continuación el número de
teléfono, las cifras se marcarán entonces de inme-
diato.
●
Con la tecla de colgar
a
puede cancelar la mar-
cación.
●
Puede insertar una pausa de marcación: tras intro-
ducir el prefijo, abra con la tecla de display
©
el
menú adicional y seleccione "Insertar pausa“.
Llam. colectiva

10
Pulsar las teclas:
Realizar llamadas
Gigase 4000 Micro, De-It-Fr-Sp-GB, A31008-G4000-B027-1-6419
4000CO.FM
07.05.02
Contestar llamadas
El teléfono suena (timbre de llamada) y el LED de
estado parpadea.
c
/
u
Pulsar la tecla de descolgar o de manos libres.
o bien
retirar simplemente el terminal de la estación soporte
cargador (estado suministro: "Aceptación automática
de llamadas“).
Lista de llamantes/de mensajes
*
Las llamadas/mensajes nuevos se señalizan mediante
una indicación en el display y el parpadeo del LED de
estado.
?
Pulsar
Manos libres
Marcar con manos libres
o
Marcar número.
u
Pulsar la tecla de manos libres.
Manos libres durante la llamada
u
Activar manos libres.
Ajustar volumen:
Pulsar nuevamente la tecla manos libres u.
F
G
Ajustar volumen.
Guardar
Guardar volumen ajustado.
c
Conmutar de manos libres al
servicio con microteléfono
a
Finalizar la llamada.
* no está disponible en todos los países
k
Ö
Si está activada la función manos libres, se encien-
den la tecla manos libres u y el LED de estado.

11
Pulsar las teclas:
Rellamada
Gigase 4000 Micro, De-It-Fr-Sp-GB, A31008-G4000-B027-1-6419
4000CO.FM
07.05.02
Transferir una llamada externa, consulta
Es posible transferir llamadas externas a otro terminal
inalámbrico o realizar llamadas internas de consulta.
F
Abrir lista de extensiones internas.
E
D
c
Seleccionar extensión interna y llamar.
Al contestar el usuario interno:
●
Pasar la llamada: pulsar la tecla de colgar
a
.
●
Terminar consulta: Conmutar con
Fin
al usuario en
espera.
Rellamada
Rellamada manual
Puede acceder a los 5 últimos números de teléfono
marcados.
z D
Mostrar número de teléfono y seleccionar.
c
Pulsar la tecla de descolgar.
Rellamada automática
La tecla de manos libres parpadea y se activa la escu-
cha por altavoz. La función se desactiva tras diez in-
tentos sin resultado o bien si entretanto se realiza
una llamada.
Si su interlocutor no está localizable, pulse
No
o cual-
quier tecla.
z D
Mostrar número de teléfono y seleccionar.
©
Abrir el menú.
åååååååååååååååååååååååååååååååå
Rellam. autom.
[
Activar.
c
Si el usuario contesta: pulsar la tecla de descolgar.
Borrar número de teléfono de la lista de
rellamada
z D
Mostrar número de teléfono y seleccionar.
©
Abrir el menú.
åååååååååååååååååååååååååååååååå
D
Borrar registro
[
El número de teléfono se borra.
Esta función no está disponible en todos los países.

12
Pulsar las teclas:
Listín telefónico y lista de proveedores de red
Gigase 4000 Micro, De-It-Fr-Sp-GB, A31008-G4000-B027-1-6419
4000CO.FM
07.05.02
Guardar número de teléfono en el listín
telefónico
z D
Mostrar número de teléfono y seleccionar.
©
Abrir el menú.
åååååååååååååååååååååååååååååååå
D
Guardar en list.
[
El número de teléfono se registra.
o Si es necesario, modificar el n° de teléfono, introducir
el nombre (si se desea, con el cumpleaños v. pág. 17).
Introducción de caracteres y números, v. pág. 14.
©
Abrir el menú.
åååååååååååååååååååååååååååååååå
Guardar
[
Guardar el registro.
Listín telefónico y lista de
proveedores de red
El listín telefónico
D
le facilita la marcación de hasta
200 números de teléfono.
En la lista de proveedores de red
C
se pueden pro-
gramar los prefijos (call-by-call)* de diferentes compa-
ñías telefónicas. El manejo del listín telefónico y de la lis-
ta de proveedores de red es idéntico.
Guardar registro
D
/
C
Abrir el listín telefónico/la lista de proveedores de red.
åååååååååååååååååååååååååååååååå
Nuevo registro
[
Seleccionar y confirmar.
o Introducir el número de teléfono (máx. 32 dígitos).
D
o Saltar al campo del nombre e introducir el nombre.
En el listín telefónico: si se desea, agregar cumplea-
ños, v. también pág. 17.
©
Abrir el menú.
åååååååååååååååååååååååååååååååå
Guardar
[
Guardar el registro.
[
Guardar registro.

13
Pulsar las teclas:
Listín telefónico y lista de proveedores de red
Gigase 4000 Micro, De-It-Fr-Sp-GB, A31008-G4000-B027-1-6419
4000CO.FM
07.05.02
Marcar desde el listín telefónico
D
Abrir el listín telefónico.
p. ej.
^^
Introducir la inicial del nombre, p. ej. para "E“, pulse dos
veces la tecla
^
u hojee con la tecla
D
.
c
Pulsar la tecla de descolgar.
_______
* no está disponible en todos los países
Marcar con la lista de proveedores de red
(call-by-call)
C Abrir la lista de proveedores de red.
D©
Seleccionar número call-by-call y abrir el menú.
åååååååååååååååååååååååååååååååå
Utilizar número
[
Seleccionar y confirmar.
o Introducir el n° de teléfono del usuario deseado.
o bien
DD [
Seleccionar el número de teléfono del listín telefónico
y confermar.
c
Pulsar la tecla de descolgar. Se marca el número de
teléfono.
Marcación rápida de la lista de
proveedores de red
En la lista de proveedores de red se pueden guardar
ocho números para la marcación rápida. Para ello, de-
berá introducir antes del nombre del proveedor de red
la cifra para la marcación rápida (2-9).
Tras seleccionar el nombre, puede abrir también el
menú, seleccionar , completar/modifi-
car el número y marcar con la tecla de descolgar
c
.
Utilizar número
Ejemplo: Número de marcación rápida 2 y a continua-
ción el nombre del proveedor de red.

14
Pulsar las teclas:
Listín telefónico y lista de proveedores de red
Gigase 4000 Micro, De-It-Fr-Sp-GB, A31008-G4000-B027-1-6419
4000CO.FM
07.05.02
Marcar con marcación rápida
p. ej.
Ÿ
Pulsar la tecla prolongadamente:
se visualiza el nombre del proveedor de red programa-
do.
p. ej. o Introducir el número de teléfono
o bien
DD[
Seleccionar un registro del listín telefónico y confer-
mar.
c
Pulsar.
Tabla de símbolos
Pulsar la tecla correspondiente varias veces o de forma
prolongada:
1 x 2 x 3 x 4 x 5 x 6 x 7 x 8 x 9 x
10
x
]
Espacios
en blanco
1
â
£$¥¤
Ÿ
a b c 2 ä á à â ã ç
^
def3ëéèê
¡
g h i 4 ï í ì î
¢
jkl5
£
m n o 6 ö ñ ó ò ô õ
¤
pqrs7ß
¥
t u v 8 ü ú ù û
¬
wxyz9ÿý æøå
«
a→
→→
→A
*
/()<=>%
Þ
. , ? ! 0 + - : ¿
¡
*
*
Otros símbolos de esta tecla:
“,‘,;,_
ª
# @ \ & §
La primera letra del nombre se escribe automática-
mente en mayúsculas, le siguen minúsculas.
Cambiar a mayúsculas/minúsculas para un carácter :
pulsar
«
.
Controlar el cursor con
F G E D
. Borrar carácter
con
X

15
Pulsar las teclas:
Listín telefónico y lista de proveedores de red
Gigase 4000 Micro, De-It-Fr-Sp-GB, A31008-G4000-B027-1-6419
4000CO.FM
07.05.02
Orden de clasificación:
Mostrar, modificar o borrar registro
D
/
C
Abrir el listín telefónico/la lista de proveedores de red.
D
Seleccionar el registro deseado.
Ver
Mostrar todos los datos relativos al registro.
Cambiar
Abrir el campo de entrada y efectuar los cambios
necesarios.
o Modificar el número de teléfono.
D
o Saltar al campo de nombre y cambiar el nombre.
Introducción de caracteres y números, v. pág. 14.
En el listín telefónico: si se desea, agregar cumplea-
ños, v. pág. 17.
©
Abrir el menú.
åååååååååååååååååååååååååååååååå
Guardar
[
Confirmar los cambios.
o bien
D
/
C
Abrir el listín telefónico/la lista de proveedores de red.
D
Seleccionar el registro deseado.
©
Abrir el menú.
åååååååååååååååååååååååååååååååå
D
Borrar registro
[
Suena un tono de confirmación. El registro se borra.
La inserción de los caracteres se efectúa siempre a la
izquierda del cursor.
Anteponiendo un espacio en blanco
, el registro
correspondiente salta a la 1ª posición (ej.: " Carla“).
1. Espacios en blanco
3.
Letras (por orden alfabé-
tico)
2.
Cifras (0-9)
4.
Otros caracteres

16
Pulsar las teclas:
Listín telefónico y lista de proveedores de red
Gigase 4000 Micro, De-It-Fr-Sp-GB, A31008-G4000-B027-1-6419
4000CO.FM
07.05.02
Enviar registro a otro terminal inalámbrico
Es posible enviar un registro a otro terminal inalámbrico
Comfort.
D
/
C
Abrir el listín telefónico/la lista de proveedores de red.
D
Seleccionar el registro deseado.
©
Abrir el menú.
åååååååååååååååååååååååååååååååå
D
Enviar registro
[
Seleccionar y confirmar.
D[
Seleccionar extensión interna (terminal inalámbrico del
receptor) y confirmar.
Enviar registros adicionales:
Sí
Pulsar.
D
Seleccionar el registro deseado.
Enviar
Iniciar proceso de transmisión.
Enviar listín telefónico/lista de proveedores de red
Tam bi én puede transmitir el listín telefónico completo
o la lista de proveedores de red a otro terminal Micro/
Comfort.
Véase "Enviar registro a otro terminal inalámbrico“.
Borrar listín telefónico/lista de proveedores de
red
D
/
C
Abrir el listín telefónico/la lista de proveedores de red.
D
Seleccionar el registro deseado.
©
Abrir el menú.
åååååååååååååååååååååååååååååååå
D
Borrar lista
[
Seleccionar y confirmar.
Sí
Confirmar borrado de todos los registros.
La transmisión se interrumpe si:
●
La memoria del terminal receptor está agotada .
●
Ud. obtiene una llamada.
La transmisión en curso de un registro se lleva a cabo
hasta el final.

17
Pulsar las teclas:
Ajustes
Gigase 4000 Micro, De-It-Fr-Sp-GB, A31008-G4000-B027-1-6419
4000CO.FM
07.05.02
Introducir aniversarios (p.ej. cumpleaños)
Puede introducir la fecha y la hora para los datos de
cumpleaños/aniversarios y hacer que el teléfono le avi-
se.
D
Abrir el listín telefónico.
D
Ver
Seleccionar el registro deseado y mostrar.
Cambiar
Abrir campo de entrada.
D
Mover el cursor al campo del cumpleaños/aniversario.
Cambiar
Confirmar.
o Introducir o modificar la fecha (día/mes).
D
o Saltar una línea hacia abajo e introducir la hora.
D
Saltar una línea hacia abajo.
F G
Seleccionar señalización.
[
Guardar entradas.
Mediante la tecla de display
Borrar
puede borrar los
aniversarios.
Ajustes
Ajustar el despertador
Si ha ajustado una hora en el despertador de su termi-
nal inalámbrico (símbolo
¼
), el timbre sonará todos los
días a la misma hora.
El teléfono se encuentra en estado de reposo:
©
Abrir el menú.
åååååååååååååååååååååååååååååååå
D
Citas/hora
[
Seleccionar y confirmar.
åååååååååååååååååååååååååååååååå
D
Despertador
[
Seleccionar y confirmar.
El ajuste actual se visualiza.
F G
Seleccionar .
D
Saltar una línea hacia abajo.
Þ£ÞÞ
Introducir horas/minutos. En el ejemplo: 6.00 horas.
D
Saltar una línea hacia abajo.
F G
Seleccionar melodía de despertador.
Guardar
Guardar los ajustes.
Sí

18
Pulsar las teclas:
Ajustes
Gigase 4000 Micro, De-It-Fr-Sp-GB, A31008-G4000-B027-1-6419
4000CO.FM
07.05.02
Desactivar el despertador
El despertador está ajustado, pero no desea que sue-
ne.
©
Abrir el menú.
åååååååååååååååååååååååååååååååå
D
Citas/hora
[
Seleccionar y confirmar.
åååååååååååååååååååååååååååååååå
D
Despertador
[
Seleccionar y confirmar.
F G
Seleccionar .
Guardar
Guardar los ajustes.
Desactivar la llamada de alarma
La llamada de alarma se indica como una llamada
entrante. Pulse cualquier tecla para apagar el timbre de
alarma.
Ajustar cita
Puede ajustar su terminal móvil para que le recuerde
una cita. Si ha ajustado una cita, ésta se visualizará con
el símbolo
¼
.
El teléfono se encuentra en estado de reposo.
©
Abrir el menú.
åååååååååååååååååååååååååååååååå
D
Citas/hora
[
Seleccionar y confirmar.
åååååååååååååååååååååååååååååååå
Ajustar cita
[
Seleccionar y confirmar.
F G
Seleccionar
para activar la función de cita.
D
Saltar una línea hacia abajo.
ŸÞÞ¢
Introducir día/mes,
en el ejemplo: 20 de mayo.
D
Saltar una línea hacia abajo.
Þ¬^Þ
Introducir horas/minutos,
en el ejemplo: 9.30 horas.
D
Saltar una línea hacia abajo.
F G
Seleccionar melodía del timbre para la función de cita.
Guardar
Guardar los ajustes.
No se emitirá ninguna llamada de alarma si está acti-
vada la función de babyphone (vigilancia de habita-
ción) o la rellamada automática.
No
Sí

19
Pulsar las teclas:
Ajustes
Gigase 4000 Micro, De-It-Fr-Sp-GB, A31008-G4000-B027-1-6419
4000CO.FM
07.05.02
Desactivar llamada de cita
La llamada de cita se señaliza como una llamada en-
trante y se desactiva pulsando cualquier tecla.
Indicar citas y aniversarios no aceptados
Las citas y aniversarios que el terminal inalámbrico ha
indicado pero que Ud. no ha aceptado se guardan en
una lista.
Si desea volver a consultar las citas ya visualizadas,
proceda del siguiente modo:
©
Abrir el menú.
åååååååååååååååååååååååååååååååå
D
Citas/hora
[
Seleccionar y confirmar.
åååååååååååååååååååååååååååååååå
D
Citas vencidas
[
Seleccionar y confirmar.
D[
Seleccionar cita
¼
o aniversario
‚
no aceptados. Se
muestra la información correspondiente.
Mediante la tecla de display
Borrar
puede borrar las citas/aniversarios.
Volumen del microteléfono y del altavoz
©
Abrir el menú.
åååååååååååååååååååååååååååååååå
D
Ajuste audio
[
Seleccionar menú.
åååååååååååååååååååååååååååååååå
Vol. teléfono
[
El timbre de llamada suena con el volumen actual.
F G
Ajustar volumen de manos libres.
D
Saltar una línea hacia abajo.
F G
Guardar
Seleccionar el nivel deseado del volumen del altavoz y
confirmar.
La llamada de cita sólo se activa si el terminal inalám-
brico se encuentra en estado de reposo. No se emitirá
ninguna llamada de cita si está activada la función de
babyphone (vigilancia de habitación) o la rellamada au-
tomática.
Las citas/aniversarios nuevos no aceptados se indican
con
Cita
. Pulsar la tecla derecha del display, se mues-
tra la lista de aniversarios.
Seleccione a continuación
[
.
Citas vencidas
¼

20
Pulsar las teclas:
Ajustes
Gigase 4000 Micro, De-It-Fr-Sp-GB, A31008-G4000-B027-1-6419
4000CO.FM
07.05.02
Ajustar volumen del timbre/melodía
Puede elegir entre cinco niveles de volumen de
timbre, la llamada "progresiva" (volumen en aumen-
to), timbre desactivado, y diez melodías de timbre:
©
Abrir el menú.
åååååååååååååååååååååååååååååååå
D
Ajuste audio
[
Seleccionar y confirmar.
åååååååååååååååååååååååååååååååå
D
Ajustar timbre
[
Se reproduce el volumen del timbre actual y se
visualiza.
F G
Seleccionar volumen del timbre.
D
Saltar una línea hacia abajo.
F G
Guardar
Seleccionar la melodía del timbre deseada (1–10) y
confirmar.
Control de tiempo para el volumen del timbre
Puede ajustar un volumen del timbre diferente para un
intervalo determinado .
©
Abrir el menú.
åååååååååååååååååååååååååååååååå
D
Ajuste audio
[
Seleccionar y confirmar.
åååååååååååååååååååååååååååååååå
D
Ajustar timbre
[
Se reproduce el volumen del timbre actual y se visua-
liza.
C.Hora
Pulsar.
F G
Activar/desactivar control de tiempo.
D
o Introducir intervalo para el timbre de llamada deseado
p. ej.
]]ÞÞ
]¢ÞÞ
para 11:00 hasta 15:00 horas.
DF G
Saltar una línea hacia abajo y seleccionar el volumen
del timbre.
Guardar
Guardar los ajustes.
Guardar
o
a
Pulsar.

21
Pulsar las teclas:
Ajustes
Gigase 4000 Micro, De-It-Fr-Sp-GB, A31008-G4000-B027-1-6419
4000CO.FM
07.05.02
Activar/desactivar tonos de aviso y
señales acústicas
●
Tono de confirmación de teclas: se confirma cada
pulsación de tecla.
●
Tonos de confirmación: Tono de confirmación (se-
cuencia de tonos ascendente) al final de las entra-
das/ajustes y al depositar el terminal en la estación
base; tono de error (secuencia de tonos descenden-
te) en el caso de entradas erróneas.
●
Tono de aviso de batería: la batería debe cargarse.
©
Abrir el menú.
åååååååååååååååååååååååååååååååå
D
Ajuste audio
[
Seleccionar y confirmar.
åååååååååååååååååååååååååååååååå
D
Tonos de aviso
[
Seleccionar y confirmar.
D
Seleccionar función deseada.
F G
Seleccionar
, o (tono de aviso de
batería en llamada).
Guardar
Guardar los ajustes.
Activar/desactivar la alarma por
vibración
Para no ser molestado por un tono de llamada, podrá
activar, en su lugar, la alarma por vibración del terminal
inalámbrico. Dicha alarma también se puede activar en
combinación con el tono de llamada (p. ej. en un entor-
no ruidoso).
©
Abrir menú.
åååååååååååååååååååååååååååååååå
D
Ajuste audio
[
Seleccionar y confirmar.
åååååååååååååååååååååååååååååååå
D
Vibración
[
Seleccionar y confirmar.
Mediante una pusación prolongada de la tecla
«
puede desactivar el tono de llamada. De este modo
sólo se encuentra activa la alarma por vibración.
Sí No
Llam. sí
½
El ajuste actual está marcado mediante
✓

22
Pulsar las teclas:
Ajustes
Gigase 4000 Micro, De-It-Fr-Sp-GB, A31008-G4000-B027-1-6419
4000CO.FM
07.05.02
Activar/desactivar aceptación
automática de llamada
Si está activada esta función, para contestar una llama-
da basta con retirar el terminal inalámbrico del soporte
cargador (estado de suministro), sin necesidad de pul-
sar la tecla
c
.
©
Abrir el menú.
åååååååååååååååååååååååååååååååå
D
Ajuste terminal
[
Seleccionar y confirmar.
åååååååååååååååååååååååååååååååå
D
Acep.llamad.aut
[
Activar/desactivar con
[
(
✓
= función act.).
Reposición del estado de suministro
El listín telefónico, la lista de proveedores de red y la lis-
ta de llamantes no se borran en la reposición. El regis-
tro en la estación base se mantiene.
©
Abrir el menú.
åååååååååååååååååååååååååååååååå
D
Ajuste terminal
[
Seleccionar y confirmar.
åååååååååååååååååååååååååååååååå
D
Reponer teléf.
[
Seleccionar y confirmar.
Sí
Confirmar la consulta de seguridad.
Función Estado de su-
ministro
Volumen del microteléfono 1
Volumen del timbre ("tono del
timbre“, )
5
Melodía del timbre 1
Aceptación automática de llama-
da
act.
Tono de aviso de batería act.
Volumen de manos libres 3
Nivel de babyphone alto
Control de tiempo desact.
Idioma del display inglés
Alarma por vibración desact.

23
Pulsar las teclas:
Babyphone (vigilancia de habitación)
Gigase 4000 Micro, De-It-Fr-Sp-GB, A31008-G4000-B027-1-6419
4000CO.FM
07.05.02
Babyphone (vigilancia de
habitación)
Mediante su terminal inalámbrico puede supervisar los
ruidos de la habitación de su bebé desde otro lugar.
La distancia entre el terminal inalámbrico y su bebé debe
ser de, como mín., 1 a 2 metros. Si se alcanza un nivel de
ruido determinado (p.ej., el bebé llora), el terminal inalám-
brico marca automáticamente el número de teléfono
programado (interno/externo). Con la función babypho-
ne activada las llamadas entrantes se indican sólamente
en el display del terminal.
Ajustar babyphone
©
Abrir el menú.
åååååååååååååååååååååååååååååååå
D
Familia/ocio
[
Seleccionar y confirmar.
åååååååååååååååååååååååååååååååå
D
Vigilan. habit.
[
Seleccionar y confirmar.
F G
Seleccionar
o .
D
Saltar una línea hacia abajo.
Cambiar
Abrir campo de entrada para el n° de teléfono. Borrar
un número externo ya programado.
Borrar un número externo ya programado con
X
.
Borrar un número interno ya programado con
Sí
(con-
sulta de seguridad).
F
o Abrir la lista de extensiones internas e seleccionar nú-
mero interno.
[
Guardar el número de teléfono.
o bien
D
Abrir el listín telefónico.
D [
Seleccionar extensión externa.
©
Abrir el menú.
åååååååååååååååååååååååååååååååå
Guardar
[
Confirmar los ajustes.
D
Saltar una línea hacia abajo.
F G
Ajustar nivel de sensibilidad “alto“ o “bajo“.
Guardar
Guardar los ajustes.
Con la tecla del display puede desactivar la fun-
ción babyphone.
Sí No
No

24
Pulsar las teclas:
Modo walkie-talkie
Gigase 4000 Micro, De-It-Fr-Sp-GB, A31008-G4000-B027-1-6419
4000CO.FM
07.05.02
Modo walkie-talkie
En el modo walkie-talkie, los terminales no pueden re-
cibir llamadas entrantes.
Activar modo walkie-talkie en un terminal
inalámbrico
©
Abrir el menú.
åååååååååååååååååååååååååååååååå
D
Familia/ocio
[
Seleccionar función.
åååååååååååååååååååååååååååååååå
D
Walky-Talky
[
Activar modo walkie-talkie.
Con la tecla del display se puede desactivar el
modo walkie-talkie.
Utilizar modo walkie-talkie
Dos terminales inalámbricos se encuentran en el
modo walkie-talkie:
Terminal inalámbrico llamante:
Llamar
Pulsar.
Terminal inalámbrico llamado:
La llamada se indica en el display con un aviso.
Timb.no
El timbre de llamada se desactiva.
c
Pulsar.
Ambos terminales inalámbricos quedan interconecta-
dos.
a
Pulsar. Finaliza la comunicación.
Ud. puede desactivar desde el exterior (p.ej., desde
el teléfono móvil) la función babyphone. Atienda la lla-
mada activada por la función babyphone.
Desactivar con
»
.
Ahora la función babyphone se encuentra desacti-
vada. Ya no se activan más llamadas por el baby-
phone.
Requisito:
Los terminales tienen los mismos ajustes de estación
base (p. ej. mejor estación), o todavía no están reg-
istrados en ninguna estación base. (El modo walkie-
talkie reduce considerablemente el tiempo de servicio
del terminal).
No

25
Anexo
Gigase 4000 Micro, De-It-Fr-Sp-GB, A31008-G4000-
4000CO.FM
07.05.02
Anexo
Operación con estaciones base de la gama Gigaset
Gigaset 1000/2000/3000
Las siguientes funciones de su teléfono inalámbrico 4000i Micro/
Comfort no se ofrecen en las estaciones base de esta gama Gigaset.
●
Ajuste de la hora (tras apagar el terminal inalámbrico, la hora deja de
visualizarse)
●
Marcación por voz
●
Babyphone (no puede desactivarse desde el exterior)
Gigaset 4010/4015 Classic
Las siguientes funciones de su teléfono inalámbrico 4000i Micro/
Comfort no se ofrecen en estas estaciones base.
●
Marcación por voz
●
Ajuste de niveles de autorización
Cuidados
Limpie la estación base y el terminal inalámbrico con un paño húme-
do o un paño antiestático. No utilice en ningún caso un paño seco.
Existe peligro de que se forme carga estática.
Contacto con líquido
Contacto con líquido:
Si el terminal inalámbrico entrara en contacto con líquido:
no conectar en ningún caso el aparato.
Retirar inmediatamente todas las baterías.
Deje que el líquido escurra fuera del aparato y seque después todas
las piezas.
Almacene el terminal inalámbrico sin baterías durante un mínimo de
72 horas en un lugar seco y caliente
Después es posible en mucho casos la nueva puesta en funciona-
miento.
!

26
Anexo
Gigase 4000 Micro, De-It-Fr-Sp-GB, A31008-G4000-B027-1-6419
4000CO.FM
07.05.02
Baterías recomendadas:
Tiempos de servicio/de carga del terminal:
La capacidad de carga se reduce por el desgaste normal al cabo de
unos años.
Alcance
El alcance en espacios abiertos es de aprox. 300 m. Dentro de edifi-
cios se registran alcances de hasta 50 m.
Cargador de sobremesa
El cargador de sobremesa para teléfonos móviles Siemens también se
puede utilizar para cargar su terminal inalámbrico.
(Accesorio para los teléfonos móviles Siemens C45, ME45, S45)
N
o
de pedido L36880-N4501-A101)
Customer Care (Service)
Obtendrá una asistencia sencilla y sin complicaciones en caso de
cuestiones técnicas y de manejo de su aparato a través de nuestro so-
porte en línea en la página de Internet
www.my-siemens.com/customercare
En caso de ser necesaria una reparación, sírvase dirigirse a uno de
nuestros centros de servicio.
Números de teléfono del servicio técnico v. contraportada.
El sello CE corrobora la conformidad del equipo con los requerimientos
básicos de la directiva R&TTE.
El terminal inalámbrico 4000i Micro está homologado para toda la UE
y Suiza.
Híbrido niquel-metal (NiMH) , 500 mAh.
N
o
de pedido V30145-K1310-X125 o
N
o
de pedido V30145-K1310-X229
Capacidad
(mAh)
Tiempo de
autonomía
(horas)
Tiempo de
conversación
(horas)
Tiempo de
carga (horas)
500 hasta 300 aprox. 16 aprox. 5,5
½
Al realizar la carga de un terminal inalámbrico Gigaset en el
cargador de sobremesa, la batería de reserva no se cargará
mienntras el terminal inalámbrico se encuentre emplazado en
el cargador.
El LED indicador de carga siempre está encendido.

27
Anexo
Gigase 4000 Micro, De-It-Fr-Sp-GB, A31008-G4000-
4000CO.FM
07.05.02
Idiomas de display
Al registrarse en la estación base 4010i pueden ajustarse los idiomas
marcados con *:
Einstellungen Sprache
Deutsch
H/Set Settings Language
English
Réglages comb. Langue
Français
Impostazioni Lingua
Italiano
Ajuste terminal Idioma
Español

28
Gigase 4000 Micro, De-It-Fr-Sp-GB, A31008-G4000-B027-1-6419
4000CO.FM
13.05.02
Diese Seite muss gedruckt werden, damit neue Sprache rechts beginnt!

s
Gigaset 4000 Micro, De-It-Fr-Sp-GB, A31008-G4000-
4000co-
17.04.02
Be inspired
ENGLISH
Operating instructions
and safety precautions
!

Brief overview of the handset
2
Gigaset 4000 Micro, De-It-Fr-Sp-GB, A31008-G4000-B027-1-
4000COU.FM
06.05.02
Brief overview of the handset
Interaction between control key and display keys
The display is protected by a plastic film.
Remove the plastic film.
Ñe
Annabella
19.07.01 13:13
{ ¨
Socket
–for Headset,
MP3-Player
Open the directory
End call and On/
Off key
Ta l k key
Sel Services key
Caller list
–End call
– Cancelling function
– One menu level back
(press briefly)
– Return to idle state
(hold down)
– Handset on/off
(hold key down)
Handsfree key
Keypad protection
On/off
hold key down!
– Accept call
– Dial number
– Switch from hands-
free talking to
handset
Asterisk key
Hold down to acti-
vate and deactivate
the ringer
Charging status
= empty
U
full
flashes: Battery low
With the display keys, you
have access to the current
functions.
Reception strength
Control key
Status LED (light-emitting diode)
– Open network access
list: press briefly!
– R key function:
hold key down!
Current functions
and display keys
lights up during a call;
flashes at:
– Incoming call
–New messages
– Alarm call, appoint-
ments, anniversaries
Access to message lists
Key 1
Hold down to select Answ.
machine/Mailbox
Microphone
Display (display field)
With the display keys you
can carry out functions that
can also be partly controlled
with the control key.
The side of the control key
which you must press is indi-
cated in the operating instruc-
tions by arrows:
F
/
G
(left/right)
E
/
D
(top/bottom)
Control key
Display keys
INT

Brief overview of the handset
3
Gigaset 4000 Micro, De-It-Fr-Sp-GB, A31008-G4000-B027-1-
4000COU.FM
06.05.02
Important menus
Display symbols
The following symbols appear above the display keys depending on the situation:
* Not available in all countries
Display keys
Meaning
¨
Menu key: Activates the main menu when the phone is idle. During a call, it
activates a menu for the particular situation.
Z
Selects and confirms the menu function.
Ends and saves an entry.
W
Delete key (Backspace): Deletes characters from right to left.
{
Automatic redial key: Opens a list of the last five numbers dialled.
I
Displayed if SMS*, answering machine, mail service box or caller list is active
Í
One menu level back, cancel
©
Text Message*
Select Services
Add. Features
Calendar/Clock
Sound Settings
Call Charges
OKƒ
H/Set Settings
Base Settings
Voice Mail
Handset Volume
Ringer Settings
Advisory Tones
D
New Entry
Anne
Barbara
Chris
:
©
Display Number
Delete Entry
Copy Entry
Delete List
Send List
Available Memory

Safety precautions
4
Gigaset 4000 Micro, De-It-Fr-Sp-GB, A31008-G4000-B027-1-
4000COU.FM
06.05.02
Safety precautions
Only use the power supply unit supplied as indicated on the underside of the
device.
Only insert approved rechargeable batteries of the same type. Never use ordi-
nary (non-rechargeable) batteries as they may pose a health hazard or cause injury.
Make sure the rechargeable battery is inserted the right way round
Use the battery specified in these operating instructions
The phone may affect medical equipment so always switch your phone off before
entering hospitals or doctors’ practices.
The handset may cause an unpleasant humming noise in hearing aids.
Do not operate the phone in places where there is a risk of explosion (such as paint
workshops).
The handset is not splash-proof (see page 25).
Drivers must not use the phone while driving (including the Walk and Talk
function).
The phone must be switched off at all times in an aircraft (including the Walk and
Talk function). Make sure it cannot be switched on accidentally.
If you give your Gigaset to someone else you should also give them the operating
instructions.
Dispose of batteries and the phone carefully. Do not pollute the environment.
Not all the functions described in these operating instructions are available in all countries.
!
$
‹
Œ
ƒ

Contents
5
Gigaset 4000 Micro, De-It-Fr-Sp-GB, A31008-G4000-B027-1-
4000coivz.fm
08.03.02
Contents
Brief overview of the handset . . . . . . . . . . . . . . . . . . . . . . . . . . . . . . . . . . . . . . . . . . . . 2
Interaction between control key and display keys. . . . . . . . . . . . . . . . . . . . . . . . . .2
Important menus . . . . . . . . . . . . . . . . . . . . . . . . . . . . . . . . . . . . . . . . . . . . . . . . . .3
Display symbols . . . . . . . . . . . . . . . . . . . . . . . . . . . . . . . . . . . . . . . . . . . . . . . . . . .3
Safety precautions . . . . . . . . . . . . . . . . . . . . . . . . . . . . . . . . . . . . . . . . . . . . . . . . . . . . . 4
Preparing the handset. . . . . . . . . . . . . . . . . . . . . . . . . . . . . . . . . . . . . . . . . . . . . . . . . . . 6
Delivery package . . . . . . . . . . . . . . . . . . . . . . . . . . . . . . . . . . . . . . . . . . . . . . . . . . .6
Inserting the battery
. . . . . . . . . . . . . . . . . . . . . . . . . . . . . . . . . . . . . . . . . . . . . . . . . . . . . . . . . . . . . . . .6
Registering the handset . . . . . . . . . . . . . . . . . . . . . . . . . . . . . . . . . . . . . . . . . . . . .6
Charging the battery . . . . . . . . . . . . . . . . . . . . . . . . . . . . . . . . . . . . . . . . . . . . . . . .7
Attaching the belt clip . . . . . . . . . . . . . . . . . . . . . . . . . . . . . . . . . . . . . . . . . . . . . . .7
Setting the date and time . . . . . . . . . . . . . . . . . . . . . . . . . . . . . . . . . . . . . . . . . . . .8
Changing the display language . . . . . . . . . . . . . . . . . . . . . . . . . . . . . . . . . . . . . . . .8
Making calls . . . . . . . . . . . . . . . . . . . . . . . . . . . . . . . . . . . . . . . . . . . . . . . . . . . . . . . . . . . 9
Making an external call . . . . . . . . . . . . . . . . . . . . . . . . . . . . . . . . . . . . . . . . . . . . . .9
Making internal calls . . . . . . . . . . . . . . . . . . . . . . . . . . . . . . . . . . . . . . . . . . . . . . . .9
Answering a call . . . . . . . . . . . . . . . . . . . . . . . . . . . . . . . . . . . . . . . . . . . . . . . . . . .9
Open caller list/message list . . . . . . . . . . . . . . . . . . . . . . . . . . . . . . . . . . . . . . . . .10
Handsfree talking. . . . . . . . . . . . . . . . . . . . . . . . . . . . . . . . . . . . . . . . . . . . . . . . . .10
Forwarding an external call, enquiry call . . . . . . . . . . . . . . . . . . . . . . . . . . . . . . . .10
Automatic redial . . . . . . . . . . . . . . . . . . . . . . . . . . . . . . . . . . . . . . . . . . . . . . . . . . . . . . . 11
Directory and network access list . . . . . . . . . . . . . . . . . . . . . . . . . . . . . . . . . . . . . . . 12
Speed dialling from the network access list . . . . . . . . . . . . . . . . . . . . . . . . . . . . .13
Dialling with speed dialling . . . . . . . . . . . . . . . . . . . . . . . . . . . . . . . . . . . . . . . . . .13
Settings . . . . . . . . . . . . . . . . . . . . . . . . . . . . . . . . . . . . . . . . . . . . . . . . . . . . . . . . . . . . . . 17
Setting the alarm clock . . . . . . . . . . . . . . . . . . . . . . . . . . . . . . . . . . . . . . . . . . . . .17
Deactivating the alarm clock . . . . . . . . . . . . . . . . . . . . . . . . . . . . . . . . . . . . . . . . .17
Turning off the alarm call. . . . . . . . . . . . . . . . . . . . . . . . . . . . . . . . . . . . . . . . . . . .17
Setting an appointment . . . . . . . . . . . . . . . . . . . . . . . . . . . . . . . . . . . . . . . . . . . .18
Handset and loudspeaker volume. . . . . . . . . . . . . . . . . . . . . . . . . . . . . . . . . . . . .19
Activating/deactivating warning and signal tones . . . . . . . . . . . . . . . . . . . . . . . . .20
Activating/deactivating the vibration alarm . . . . . . . . . . . . . . . . . . . . . . . . . . . . . .21
Auto talk feature on/off . . . . . . . . . . . . . . . . . . . . . . . . . . . . . . . . . . . . . . . . . . . . .21
Resetting to the factory defaults . . . . . . . . . . . . . . . . . . . . . . . . . . . . . . . . . . . . .22
Room monitoring (babyphone). . . . . . . . . . . . . . . . . . . . . . . . . . . . . . . . . . . . . . . . . . . 22
Setting the room monitor . . . . . . . . . . . . . . . . . . . . . . . . . . . . . . . . . . . . . . . . . . .23
Walk and Talk mode . . . . . . . . . . . . . . . . . . . . . . . . . . . . . . . . . . . . . . . . . . . . . . . . . . . 24
Appendix . . . . . . . . . . . . . . . . . . . . . . . . . . . . . . . . . . . . . . . . . . . . . . . . . . . . . . . . . . . . . 25
Operating on base stations in the Gigaset family . . . . . . . . . . . . . . . . . . . . . . . . .25
Contact with liquid. . . . . . . . . . . . . . . . . . . . . . . . . . . . . . . . . . . . . . . . . . . . . . . . .25
Range . . . . . . . . . . . . . . . . . . . . . . . . . . . . . . . . . . . . . . . . . . . . . . . . . . . . . . . . . .26
Guarantee . . . . . . . . . . . . . . . . . . . . . . . . . . . . . . . . . . . . . . . . . . . . . . . . . . . . . . .26
Customer Care Service . . . . . . . . . . . . . . . . . . . . . . . . . . . . . . . . . . . . . . . . . . . . .29
Display languages . . . . . . . . . . . . . . . . . . . . . . . . . . . . . . . . . . . . . . . . . . . . . . . . .30

6
Press Keys:
Preparing the handset
Gigaset 4000 Micro, De-It-Fr-Sp-GB, A31008-G4000-B027-1-6419
4000CO.FM
06.05.02
Preparing the handset
Delivery package
Gigaset 4000 Micro handset, one battery, charging
unit, belt clip, operating instructions.
Inserting the battery
Registering the handset
Step 1:
©
Open the menu.
åååååååååååååååååååååååååååååååå
D
H/Set Settings
[
Select and confirm.
åååååååååååååååååååååååååååååååå
D
Register H/Set
[
Select and confirm.
D [
Select base ( , , or ).
o
[
Key in PIN and confirm (as supplied: 0000):
is displayed, for example.
Step 2:
Press down the key on the back of the Gigaset 4010i
Micro base and keep it pressed down for a while. The
handset will be automatically assigned the next free in-
ternal number (1–3). The internal number 6 will be over-
written if all positions are already occupied.
The handset will return to the idle condition following
successful registration. The internal number (e.g.
“INT1”) is displayed.
The default display language on your handset is
Italian. To set the desired language, see page 8.
Gigaset
4000
micro
Gigaset
4000
micro
o
Base 1 Base 2 Base 3 Base 4
Regstr.Procedure Base 1
Gigaset On the base station or base telephone

7
Press Keys:
Preparing the handset
Gigaset 4000 Micro, De-It-Fr-Sp-GB, A31008-G4000-B027-1-6419
4000CO.FM
06.05.02
Charging the battery
Leave the handset for approx. 5,5 hours in
the charging unit to charge the battery, as
they are not charged when they leave the
factory. The charging status icon flashes on
the handset to indicate that the battery are
being charged:
See the appendix for a list of recommended battery.
Attaching the belt clip
Push the belt clip onto the back of the handset until the
lugs at the side click into place.
4010/4015 Hold down the key on the underside of
the base station.
3010/3015
Hold down the paging-key
y
on the base
station until you hear signal tones.
3020/25
3030/35
4030/35
Select
settings
,
system settings
and
regi-
ster handset
in the menu at the base sta-
tion telephone and confirm with
OK
.
3070/75
4070/75
Press the LED – it will flash during regis-
tration.
Non-Sie-
mens base
stations
To register at “GAP base stations”, follow
the relevant operating instructions
(steps 2 and 3).
●
The battery heat up during charging. This is normal
and not dangerous.
●
Opening the battery compartment unnecessarily
may cause the wrong charging status to be dis-
played.
5,5

8
Press Keys:
Preparing the handset
Gigaset 4000 Micro, De-It-Fr-Sp-GB, A31008-G4000-B027-1-6419
4000CO.FM
06.05.02
Setting the date and time
You need to set the date and time so that the time that
messages and calls are received is shown correctly.
©
Open the menu.
åååååååååååååååååååååååååååååååå
D
Calendar/Clock
[
Select and confirm.
åååååååååååååååååååååååååååååååå
D
Date/Time
[
Select and confirm.
The current setting is shown.
Enter the date
Enter the day/month/year.
In this case 20.05.2001. e. g.
ŸÞÞ¢Þ]
D
Go down one line.
Enter the time
Enter hours and minutes.
In this case 19:05
e. g.
] ¬ Þ ¢
D
Go down one line.
Select the display mode
use the left side of the control key to select the 12-
hour mode (am or pm) or the 24-hour mode (default).
åååååååååååååååååååååååååååååååå
Save
[
Save the settings.
Changing the display language
©
Open the menu.
åååååååååååååååååååååååååååååååå
D
H/Set Settings
[
Confirm the function.
åååååååååååååååååååååååååååååååå
D
Language
[
The current language is marked with a
✓
.
D[
Select the language you want and confirm.
Dialling an emergency number
You can dial the emergency numbers saved in the base
station even if the telephone lock is activated. Please
refer to the operating instructions for your base station.
You will find a.table on the last page of this booklet.

9
Press Keys:
Making calls
Gigaset 4000 Micro, De-It-Fr-Sp-GB, A31008-G4000-B027-1-6419
4000CO.FM
06.05.02
Making calls
Making an external call
o Enter the telephone number. If you make a mistake
use the
X
key
to correct individual digits.
c
Press the talk key.
a
Press the end call key to end the call.
Making internal calls
F
Open the list of internal users. Your own handset is
identified by “<".
D E
c
Select the handset you want and press the talk key.
or
e. g.
Ÿ
Enter the internal number of the handset.
or
c
or
«
All handsets are called.
a
Press the end call key to end the call.
Answering a call
Your telephone will ring (ringing tone) and the status
LED will flash.
c
/
u
Press the talk key or handsfree key.
or
Simply remove the handset from the charging unit
(factory setting: “Auto talk”).
●
You can also press the talk key
c
first and then
enter the telephone number - each digit will be di-
alled immediately.
●
You can cancel the dialling operation by pressing
the end call key
a
.
●
You can insert a pause: After entering the prefix,
open the menu using the display key
©
and se-
lect “insert pause”.
Call All
k
Ö

10
Press Keys:
Making calls
Gigaset 4000 Micro, De-It-Fr-Sp-GB, A31008-G4000-B027-1-6419
4000CO.FM
06.05.02
Open caller list/message list
*
A message appears in the display and the status LED
flashes to indicate that there are new calls/messages.
?
Press
Handsfree talking
Handsfree talking when dialling
o Dial the telephone number.
u
Press the handsfree key.
Handsfree talking during a call
u
Activate handsfree talking.
To s e t t h e v o l u m e :
Press the handsfree key u once more.
F G
Raise or lower the volume.
Save
Save the volume level.
c
Change from handsfree talking to the handset
a
End the call.
Forwarding an external call, enquiry call
You can forward an external call to another handset or
make an internal enquiry call.
F
Open the list of internal users.
E
D
c
Select the internal user and call.
If the internal user answers:
●
To f o r w a r d t h e c a l l : Press the end call key
a
.
●
To end the enquiry call: Use
End
to return to the
waiting party.
* Not available in all countries
When handsfree talking is activated, the handsfree
key u and the status LED are lit.

11
Press Keys:
Automatic redial
Gigaset 4000 Micro, De-It-Fr-Sp-GB, A31008-G4000-B027-1-6419
4000CO.FM
06.05.02
Automatic redial
Manual redial
You have access to the last five telephone numbers di-
alled.
z D
Display and select the telephone number.
c
Press the talk key.
Automatic redial
The handsfree key flashes and open listening is activat-
ed. The function is deactivated after ten unsuc-
cessful call attempts or if a call was made in the
meantime.
Press
Off
or any key if the person you called is not avail-
able.
z D
Display and select the telephone number.
©
Open the menu.
åååååååååååååååååååååååååååååååå
Automatic Redial
[
Activate.
c
If the other person answers press the talk key.
Deleting a number from the redialling list
z D
Display and select the telephone number.
©
Open the menu.
åååååååååååååååååååååååååååååååå
D
Delete Entry
[
The telephone number is deleted.
Copying a telephone number to the directory
z D
Display and select the telephone number.
©
Open the menu.
åååååååååååååååååååååååååååååååå
D
Copy to Directory
[
The telephone number is entered.
o If you like you can change the number and enter a
name (you can also enter an anniversary s. page 16).
For notes on how to enter letters and characters
s. page 14.
©
Open the menu.
åååååååååååååååååååååååååååååååå
Save Entry
[
Save the entry.
This function is not available in all countries.

12
Press Keys:
Directory and network access list
Gigaset 4000 Micro, De-It-Fr-Sp-GB, A31008-G4000-B027-1-6419
4000CO.FM
06.05.02
Directory and network access
list
With the
D
directory
you can store up to 200 tele-
phone numbers and then dial them at the push of a
button.
You can save the prefixes (Call-by-Call)
*
of telephone
companies in the network access list
C
. The direc-
tory and network access list are used in exactly the
same way.
Storing an entry
D
/
C
Open the directory/network access list.
åååååååååååååååååååååååååååååååå
New Entry
[
Select the menu item and confirm.
o Enter the telephone number (no more than 32 dig-
its).
D
o Scroll to the name field and enter the name. You can
also enter an anniversary in the directory, see also
page 16.
©
Open the menu.
åååååååååååååååååååååååååååååååå
Save Entry
[
Store the entry
Dialling with the directory
D
Open the directory.
e. g.
^^
Enter the first letter of the name. For example for “E”
press the
^
key twice or scroll with the
D
key.
c
Press the talk key.
* Not available in all countries
After selecting the name you can also open the menu,
select , extend/change the number
and dial with the talk key
c
.
Display Number

13
Press Keys:
Directory and network access list
Gigaset 4000 Micro, De-It-Fr-Sp-GB, A31008-G4000-B027-1-6419
4000CO.FM
06.05.02
Dialling with the network access list
(Call-by-Call)
C
Open the network access list.
D©
Select call-by-call number and open the menu.
åååååååååååååååååååååååååååååååå
Display Number
[
Select the menu item and confirm.
o Enter the telephone number of the person you want
to call.
or
DD [
Select the telephone number in directory and confirm.
c
Press the talk key. The telephone number is dialled.
Speed dialling from the network
access list
You can store 8 speed dialling numbers in the network
access list. Enter a speed dialling number (2–9) before
the name.
Dialling with speed dialling
e. g.
Ÿ
Hold down the key:
The stored network provider's name is displayed.
e. g.
o Enter the telephone number
or
DD [
Select an entry from the directory and confirm.
c
Press.
Example: Press speed dial key 2 and then enter the
network provider's name.

14
Press Keys:
Directory and network access list
Gigaset 4000 Micro, De-It-Fr-Sp-GB, A31008-G4000-B027-1-6419
4000CO.FM
06.05.02
Character map
Press the relevant key repeatedly or hold down:
Sort sequence:
1 x 2 x 3 x 4 x 5 x 6 x 7 x 8 x 9 x 10 x
]
blank
1
â
£$¥¤
Ÿ
a b c 2 ä á à â ã ç
^
def3ëéèê
¡
g h i 4 ï í ì î
¢
jkl5
£
m n o 6 ö ñ ó ò ô õ
¤
pqrs7ß
¥
t u v 8 ü ú ù û
¬
wxyz9ÿýæøå
«
a→
→→
→A
*
/()<=>%
Þ
. , ? ! 0 + - : ¿
¡
*
*
Other characters on this key:
“,‘,;,_
ª
# @ \ & §
The first letter of the name is automatically written
in uppercase and the rest in lowercase.
To change one letter from uppercase to lowercase or
vice versa press
«
.
Control the cursor with
F G E D
. Delete
characters with
X
Letters are always inserted to the left of the cursor.
Inserting a blank
before a name takes that name to
the top of the directory (for example “ Karla”).
1. Blank
3.
Letters (alphabetical)
2.
Digits (0-9)
4.
Other characters

15
Press Keys:
Directory and network access list
Gigaset 4000 Micro, De-It-Fr-Sp-GB, A31008-G4000-B027-1-6419
4000CO.FM
06.05.02
Displaying, changing or deleting an entry
D
/
C
Open the directory/network access list.
D
Select the entry you want.
View
View all the information for the entry.
Change
Open the input field and make the necessary changes.
o Change the number if necessary.
D
o
Go to the name field and change the name.
For notes on entering letters and characters
s. page 14.
For the directory enter an anniversary if necessary
s. page 16.
©
Open the menu.
åååååååååååååååååååååååååååååååå
Save Entry
[
Confirm the changes.
or
D
/
C
Open the directory/network access list.
D
Select the relevant entry.
©
Open the menu.
åååååååååååååååååååååååååååååååå
D
Delete Entry
[
You will hear a confirmation tone. The entry has been
deleted.
Copying an entry to another handset
You can copy an entry to another Micro/Comfort hand-
set.
D
/
C
Open the directory/network access list.
D
Select the required entry.
©
Open the menu.
åååååååååååååååååååååååååååååååå
D
Delete Entry
[
Select the menu item and confirm.
D
[
Select the internal user (receiving handset) and con-
firm.
Copying a further entry:
YES
Press.
D
Select the required number.
Copy
Initiate the copy process.

16
Press Keys:
Directory and network access list
Gigaset 4000 Micro, De-It-Fr-Sp-GB, A31008-G4000-B027-1-6419
4000CO.FM
06.05.02
Copying the directory/network access list
You can copy the entire directory/network access list
to another Micro/Comfort handset.
See “Copying an entry to another handset”.
Deleting the directory/network access list
D
/
C
Open the directory/network access list.
D
Select the required entry.
©
Open the menu.
åååååååååååååååååååååååååååååååå
D
Delete List
[
Select the menu item and confirm.
YES
Confirm delete all entries.
Entering anniversaries (birthdays and so on)
You can store the date and time of anniversaries so you
can be reminded of them.
D
Open the directory.
D
View
Select and display the entry.
Change
Open the input field.
D
Move the cursor into the birthday/anniversary field.
Change
Confirm.
o Enter or change the date (day/month).
D
o Scroll forward one line and enter the time.
D
Scroll forward one line.
F G
Choose the indicator for the alarm.
[
Store entries.
Use the display key
Delete
to delete the anniversary
alarm.
Transmission is interrupted:
●
if the memory of the receiving handset is full.
●
if you receive a call.
Copying of an entry is terminated.

17
Press Keys:
Settings
Gigaset 4000 Micro, De-It-Fr-Sp-GB, A31008-G4000-B027-1-6419
4000CO.FM
06.05.02
Settings
Setting the alarm clock
If activated, the alarm clock (
¼
icon) on your handset
will ring every day at the time entered.
With the handset idle:
©
Open the menu.
åååååååååååååååååååååååååååååååå
D
Calendar/Clock
[
Select the menu item and confirm.
åååååååååååååååååååååååååååååååå
D
Alarm Clock
[
Select the menu item and confirm.
The current setting is displayed.
F G
Select
.
D
Scroll forward one line.
Þ £Þ Þ
Enter the hours/minutes. The example here is 06.00.
D
Scroll forward one line.
F G
Choose the ringer melody for the alarm call.
Save
Save the settings.
Deactivating the alarm clock
The alarm clock is set but you do not want it to ring.
©
Open the menu.
åååååååååååååååååååååååååååååååå
D
Calendar/Clock
[
Select the menu item and confirm.
åååååååååååååååååååååååååååååååå
D
Alarm Clock
[
Select the menu item and confirm.
F G
Select .
Save
Save the settings.
Turning off the alarm call
An alarm call is signalled like an incoming call. Press
any key to turn it off.
On
An alarm call will not be made if room monitoring (ba-
byphone) is activated or during automatic redialling.
Off

18
Press Keys:
Settings
Gigaset 4000 Micro, De-It-Fr-Sp-GB, A31008-G4000-B027-1-6419
4000CO.FM
06.05.02
Setting an appointment
Your handset is able to remind you of one appoint-
ment. If you have set an appointment, this is indicated
by the
¼
icon in the display.
With the handset idle.
©
Open the menu.
åååååååååååååååååååååååååååååååå
D
Calendar/Clock
[
Select the menu item and confirm.
åååååååååååååååååååååååååååååååå
Set Appoints.
[
Select the menu item and confirm.
F G
Select
to activate the appointment alarm.
D
Scroll forward one line.
Ÿ Þ Þ ¢
Enter the day/month.
The example here is 20th May.
D
Scroll forward one line.
Þ ¬ ^ Þ
Enter the hours/minutes.
The example here is: 9.30.
D
Scroll forward one line.
F
G
Choosing the ringer melody for the appointment
alarm.
Save
Save the settings.
Turning off the appointment alarm
An appointment alarm is signalled in the same way as
an incoming call; press any key to turn it off.
On
An appointment alarm will only ring when the handset
is idle. An appointment alarm is not made when room
monitoring is activated or during automatic redial.

19
Press Keys:
Settings
Gigaset 4000 Micro, De-It-Fr-Sp-GB, A31008-G4000-B027-1-6419
4000CO.FM
06.05.02
Missed appointments and anniversaries
An appointment and anniversaries that have been sig-
nalled on the handset but not been accepted are saved
in a list.
If you want to view your appointment again, proceed
as follows:
©
Open the menu.
åååååååååååååååååååååååååååååååå
D
Calendar/Clock
[
Select the menu item and confirm.
åååååååååååååååååååååååååååååååå
D
Missed Dates
[
Select the menu item and confirm.
D [
Select a missed appointment
¼
or anniversary
‚
Information on this entry is displayed.
Use the display key
Delete
to delete the appointment/
anniversary.
Handset and loudspeaker volume
©
Open the menu.
åååååååååååååååååååååååååååååååå
D
Sound Settings
[
Select the submenu.
åååååååååååååååååååååååååååååååå
Handset Volume
[
You will hear the current handset volume.
F G
Set the required handsfree talking volume.
D
Scroll forward one line.
F G
Save
Select the required level for the handset volume and
confirm.
Setting the ringer volume/melody
You can choose from five ringer volumes, “crescen-
do” ring (increasing volume), ringer off and any of ten
ringer melodies:
©
Open the menu.
åååååååååååååååååååååååååååååååå
D
Sound Settings
[
Select the menu item and confirm.
åååååååååååååååååååååååååååååååå
D
Ringer Settings
[
You will hear the current ringer volume and its level
will be displayed.
F G
Select the ringer volume.
D
Scroll forward one line.
F G
Save
Select the required ringer melody (1–10) and confirm.
A new missed appointment/anniversary is indicated
by
Appt.
. Press the right display key to display the list
Events list. Then select
[
.
Missed Appoint.
¼

20
Press Keys:
Settings
Gigaset 4000 Micro, De-It-Fr-Sp-GB, A31008-G4000-B027-1-6419
4000CO.FM
06.05.02
Time control for ringer volume
You can set a different ringer volume for a particular
time of day.
©
Open the menu.
åååååååååååååååååååååååååååååååå
D
Sound Settings
[
Select the menu item and confirm.
åååååååååååååååååååååååååååååååå
D
Ringer Settings
[
You will hear the current ringer volume and its level
will be displayed.
Time C.
Press.
F G
Activate/deactivate time control.
D
o Enter the period for the different ringer
e. g.
]]ÞÞ
]¢ÞÞ
from 11:00 to 15:00.
DF G
Scroll forward one line and select the ringer volume
Save Entry
Save the settings.
Save
or
a
Press.
Activating/deactivating warning and
signal tones
●
Key beeps: Every keystroke is confirmed.
●
Confirmation beeps: Confirmation beep (a rising
tone sequence) when you make entries/settings and
when you replace the handset in the charging sta-
tion.
●
Battery low beep: The battery must be recharged.
©
Open the menu.
åååååååååååååååååååååååååååååååå
D
Sound Settings
[
Select the menu item and confirm.
åååååååååååååååååååååååååååååååå
D
Advisory Tones
[
Select the menu item and confirm.
D
Select the required function.
F G
, or select (battery low beep in the
call).
Save
Save the settings.
On Off In Call

21
Press Keys:
Settings
Gigaset 4000 Micro, De-It-Fr-Sp-GB, A31008-G4000-B027-1-6419
4000CO.FM
06.05.02
Activating/deactivating the vibration
alarm
If you do not wish to be disturbed by the ringing tone
you can activate the handset’s vibration alarm instead.
This can also be activated in addition to the ringing tone
(in noisy surroundings, for instance).
©
Open the menu.
åååååååååååååååååååååååååååååååå
D
Sound Settings
[
Select and confirm.
åååååååååååååååååååååååååååååååå
D
Silent alert
[
Select and confirm.
You can deactivate the ringing tone by keeping the
«
key pressed down for a while. Only the vibration alarm
will then be active.
Auto talk feature on/off
When this function is activated you can remove the
handset from the charging unit without pressing the
c
key to accept a call (factory setting).
©
Open the menu.
åååååååååååååååååååååååååååååååå
D
H/Set Settings
[
Select the menu item and confirm.
åååååååååååååååååååååååååååååååå
D
Auto Answer
[
Activate/deactivate with
[
(
✓
= function on).
½
The current setting is marked with a
✓

22
Press Keys:
Room monitoring (babyphone)
Gigaset 4000 Micro, De-It-Fr-Sp-GB, A31008-G4000-B027-1-6419
4000CO.FM
06.05.02
Resetting to the factory defaults
The directory, the network access list and the caller list
are not deleted when you reset the handset. Registra-
tion at the base station is not affected.
©
Open the menu.
åååååååååååååååååååååååååååååååå
D
H/Set Settings
[
Select the menu item and confirm.
åååååååååååååååååååååååååååååååå
D
Reset Handset
[
Select the menu item and confirm.
YES
Confirm.
Room monitoring (babyphone)
You can use your handset as a baby monitor.
The handset should be placed at least 1 to 2 meters
away from your baby. If a certain noise level is reached (for
example if your baby is crying) the handset will automati-
cally dial the number you stored (internal or external).
When the room monitor is active, incoming calls are
merely displayed.
Function Factory setting
Handset volume 1
Ringer volume (“ring tone”,) 5
Ringer melody 1
Auto talk On
Battery low beep On
Handsfree volume 3
Room monitor level high
Time control off
Display language local
Vibration alarm off

23
Press Keys:
Room monitoring (babyphone)
Gigaset 4000 Micro, De-It-Fr-Sp-GB, A31008-G4000-B027-1-6419
4000CO.FM
06.05.02
Setting the room monitor
©
Open the menu.
åååååååååååååååååååååååååååååååå
D
Add. Features
[
Select the menu item and confirm.
åååååååååååååååååååååååååååååååå
D
Room Monitor.
[
Select the menu item and confirm.
F G
Select
or .
D
Scroll forward one line.
Change
Open the entry field for the telephone number.
Delete an existing external number with
X
.
Delete an existing internal number with
YES
(you will
be asked to confirm).
F
o Open the list of internal users and select the internal
number.
[
Save the number.
or
D
Open the directory.
D [
Select an external user.
©
Open the menu.
åååååååååååååååååååååååååååååååå
Save Entry
[
Confirm the setting.
D
Go down one line.
F G
Set sensitivity to “high” or “low”.
Save
Save the setting.
Room monitoring can be deactivated with the display
key .
On Off
You can deactivate the room monitor from an exter-
nal number (from your mobile phone for example).
Answer a call made from the room monitor.
Deactivate with
»
.
The room monitor is now deactivated. The room mon-
itor will no longer call.
Off

24
Press Keys:
Walk and Talk mode
Gigaset 4000 Micro, De-It-Fr-Sp-GB, A31008-G4000-B027-1-6419
4000CO.FM
06.05.02
Walk and Talk mode
In Walk and Talk mode, handsets are not available for
incoming calls.
Activating Walk and Talk mode on the handset
©
Open the menu.
åååååååååååååååååååååååååååååååå
D
Add. Features
[
Select the function.
åååååååååååååååååååååååååååååååå
D
Walk and Talk
[
Activate Walk and Talk mode.
Walk and Talk mode can be deactivated with the
display key .
Using Walk and Talk mode
Two handsets are in Walk and Talk mode:
Calling handset:
Call
Press.
Called handset:
The call is indicated by a message on the display.
Silent
Press.
c
Press.
The two handsets are connected to one another.
a
Press. The call is ended.
Requirements:
The handsets must have the same base settings (e.g.
best base station) or they must not be registered at
any base station. (Walk and Talk mode reduces the
handset's talk time considerably).
Off

25
Appendix
Gigaset 4000 Micro, De-It-Fr-Sp-GB, A31008-G4000-
4000CO.FM
06.05.0
Appendix
Operating on base stations in the Gigaset family
Gigaset 1000/2000/3000
The following functions on your 4000i Micro/Comfort handset are not
supported by base stations in this Gigaset family:
●
Setting the time (the time is not transferred after the handset has
been switched off)
●
Changing the display language
●
Room monitoring (cannot be switched off externally)
●
SMS transfer (SMS-compatible base stations only)*
Gigaset 4010/4015 Classic
The following functions on your 4000i Micro/Comfort handset are not
supported by the above-mentioned base stations:
●
Changing the display language
●
SMS transfer*
●
Setting authorisation stages
* Not available in all countries
Looking after your phone
Wipe the base station and handset with a damp cloth or an antistatic
wipe. Never use a dry cloth as this can cause static discharge.
Contact with liquid
If the handset should come into contact with liquid,
on no account switch the device on.
Remove all batteries immediately.
Allow the liquid to drip out of the device, and then dab all parts of the
device dry.
Keep the handset with the batteries removed in a warm, dray place for
at least 72 hours. In many cases, you will then be able to use it again.
!

26
Appendix
Gigaset 4000 Micro, De-It-Fr-Sp-GB, A31008-G4000-B027-1-6419
4000CO.FM
06.05.02
Recommended batteries:
The handset’s operating times/charging time:
Battery charging capacity falls after a number of years.
Range
The handset will operate away from the base station up to about 300
m outdoors and up to 50 m indoors.
Desktop charging station
The desktop charging station for Siemens mobile telephones can also
be used to charge your handset.
(Accessory for Siemens C45, ME45, S45 mobile telephones)
Order No. L36880-N4501-A101
Guarantee
Scope
●
This equipment guarantee applies to end users (“customers”). This
guarantee does not in any way affect the customer's statutory
rights.
●
The guarantee applies to the supplied devices and all their
components but not to their installation or configuration or to the
services provided by the dealer. Manuals and any software supplied
on a separate data medium are excluded from the guarantee. This
guarantee does not apply to decorative covers or any other
personalised parts or software not included in the scope of supply.
The guarantee also does not apply to decorative top or bottom
shells for special editions.
Nickel-Metal-Hydride (NiMH), 500 mAh.
Order No. V30145-K1310-X125 or
Order No. V30145-K1310-X229
Capacity
(mAh)
Standby time
(hours)
Ta l k t i m e
(hours)
Charging time
(hours)
500 up to 300 approx. 16 approx. 5.5
½
When a Gigaset handset is being charged in the desktop charg-
ing station, a spare battery will not be charged up while the
handset is in the charging station.
The charge display LED is always lit.

27
Appendix
Gigaset 4000 Micro, De-It-Fr-Sp-GB, A31008-G4000-
4000CO.FM
06.05.0
●
The guarantee provides for devices or components that, despite
proper care and use, have demonstrably developed defects due to
faulty workmanship and/or faulty materials to be replaced or
repaired at our discretion free of charge. The guarantee does not
cover normal wear and tear. Alternatively, we reserve the right to
replace the defective device with a successor model or reimburse
the original purchase price on return of the defective device. Our
decision is final. Any legal claims are excluded.
●
Claims under the guarantee cannot be made if
– the defect or damage was caused by improper care or use.
Improper care or use includes the following:
– Opening the device (this is classed as third-party intervention)
– Manipulating components on the printed circuit board
– Manipulating the software
– Defects or damage caused by dropping, breaking, lightning or
ingress of moisture. This also applies if defects or damage was
caused by mechanical, chemical, radio interference or thermal
factors (e.g. microwave, sauna, etc.).
– Repairs or other work done by persons not authorised by us.
– Devices fitted with accessories not authorised by Siemens.
●
Any further claims due to damage are excluded, such as damage
arising outside the device, provided this was not due to gross
negligence and/or intent on our part.
●
Claims under the guarantee must be made as soon as the defect is
noticed.
●
A till receipt showing the date of purchase must be presented as
proof. Each claim under the guarantee is accepted with the express
reservation that subsequent investigations confirm the validity of
the claim.
●
Any devices or components that are replaced become our property.
●
The costs of materials and labour will be borne by us, but not the
costs of transport, postage or freight.
●
We are entitled, at our discretion, to make technical changes (such
as firmware updates) beyond repair or replacement in order to
upgrade the device to the latest state of the art. There is no
additional charge to the customer for this work. Our decision is final.
Any legal claims are excluded.
●
The guarantee is valid in the country of purchase. It applies only if
the device is operated in the relevant geographical area in
accordance with the information on the packaging and in the
operating instructions.
●
Any further claims are excluded. Siemens is not liable in any
circumstances for downtime, loss of profits, loss of data or loss of
any other information. The customer alone is responsible for
safeguarding such data and information.

28
Appendix
Gigaset 4000 Micro, De-It-Fr-Sp-GB, A31008-G4000-B027-1-6419
4000CO.FM
06.05.02
●
Changes to this guarantee require prior approval by Siemens in
writing.
Guarantee period
●
The guarantee applies in countries in the EU from 1 January 2002
for a period of 24 months.
●
In all other countries the guarantee period shall be the relevant
minimum statutory guarantee period, but no longer than 24
months.
●
The guarantee period starts on the day of purchase by the
customer.
●
A successful claim under the guarantee does not extend the
guarantee period.
●
Work under the guarantee is handled by our Customer Care
Centers.
The guarantor is Siemens Aktiengesellschaft Deutschland, Schlavenhorst 88, D-46395
Bocholt.
½
To redeem the guarantee please contact your local Customer
Care Center (see back cover).

29
Appendix
Gigaset 4000 Micro, De-It-Fr-Sp-GB, A31008-G4000-
4000CO.FM
06.05.0
Customer Care Service
You can get assistance easily when you have technical questions or
questions about how to use your device by using our online support
service on the Internet at:
www.my-siemens.com/customercare
If the device needs to be repaired, please contact one of our service
centers:
Service telephone number see back cover.
The CE symbol indicates that the telephone complies with the essen-
tial requirements of the R&TTE directive.
The 4000i Micro handset is approved for use in Switzerland and
throughout the EU.

30
Appendix
Gigaset 4000 Micro, De-It-Fr-Sp-GB, A31008-G4000-B027-1-6419
4000CO.FM
06.05.02
Display languages
When registering the handset with the Gigaset 4010i base station,
the languages marked with an * can be set:
Einstellungen Sprache
Deutsch
H/Set Settings Language
English
Réglages comb. Langue
Français
Impostazioni Lingua
Italiano
Ajuste terminal Idioma
Español

31
Appendix
Gigaset 4000 Micro, De-It-Fr-Sp-GB, A31008-G4000-
4000CO.FM
04.07.02
We, Siemens AG, declare, that the above mentioned product is manu-
factured according to our Full Quality Assurance System certified by CE-
TECOM ICT Services GmbH with the registration number „Q810820M“ in
compliance with ANNEX V of the R&TTE-Directive 99/05/EC. The
presumption of conformity with the essential requirements regarding
Council Directive 99/05/EC is ensured.
Senior Approval Manager
The Declaration of Conformity (DoC) has been signed. In case of need,
a copy of the original DoC can be made available via the company hot-
line.
&
0682
U3

Giga 4000 Micro, Inland, A31008-G4000-B027-1-6419
4000MicroCOVER-
07.05.02
Giga 4000 Micro, A31008-G4000-B027-1-6419
4000MicroCOVER-
07.05.02
Issued by
Information and Communication mobile
Haidenauplatz 1
D-81667 München
© Siemens AG 2002
All rights reserved. Subject to availability.
Right of modification reserved.
Printed in Germany (05/2002).
Siemens AG
http://www.my-siemens.com
Best.-Nr.: A31008-G4000-B027-1-6419
A31008- G4000- B027- 1- 6419
Transcripción de documentos
EN Dear Customer, Gigaset Communications GmbH is the legal successor to Siemens Home and Office Communication Devices GmbH & Co. KG (SHC), which in turn continued the Gigaset business of Siemens AG. Any statements made by Siemens AG or SHC that are found in the user guides should therefore be understood as statements of Gigaset Communications GmbH. We hope you enjoy your Gigaset. DE Sehr geehrte Kundin, sehr geehrter Kunde, die Gigaset Communications GmbH ist Rechtsnachfolgerin der Siemens Home and Office Communication Devices GmbH & Co. KG (SHC), die ihrerseits das Gigaset-Geschäft der Siemens AG fortführte. Etwaige Erklärungen der Siemens AG oder der SHC in den Bedienungsanleitungen sind daher als Erklärungen der Gigaset Communications GmbH zu verstehen. Wir wünschen Ihnen viel Freude mit Ihrem Gigaset. FR Chère Cliente, Cher Client, la société Gigaset Communications GmbH succède en droit à Siemens Home and Office Communication Devices GmbH & Co. KG (SHC) qui poursuivait elle-même les activités Gigaset de Siemens AG. Donc les éventuelles explications de Siemens AG ou de SHC figurant dans les modes d’emploi doivent être comprises comme des explications de Gigaset Communications GmbH. Nous vous souhaitons beaucoup d’agrément avec votre Gigaset. IT NL ES PT Gentile cliente, la Gigaset Communications GmbH è successore della Siemens Home and Office Communication Devices GmbH & Co. KG (SHC) che a sua volta ha proseguito l’attività della Siemens AG. Eventuali dichiarazioni della Siemens AG o della SHC nei manuali d’istruzione, vanno pertanto intese come dichiarazioni della Gigaset Communications GmbH. Le auguriamo tanta soddisfazione con il vostro Gigaset. Geachte klant, Gigaset Communications GmbH is de rechtsopvolger van Siemens Home and Office Communication Devices GmbH & Co. KG (SHC), de onderneming die de Gigaset-activiteiten van Siemens AG heeft overgenomen. Eventuele uitspraken of mededelingen van Siemens AG of SHC in de gebruiksaanwijzingen dienen daarom als mededelingen van Gigaset Communications GmbH te worden gezien. Wij wensen u veel plezier met uw Gigaset. Estimado cliente, la Gigaset Communications GmbH es derechohabiente de la Siemens Home and Office Communication Devices GmbH & Co. KG (SHC) que por su parte continuó el negocio Gigaset de la Siemens AG. Las posibles declaraciones de la Siemens AG o de la SHC en las instrucciones de uso se deben entender por lo tanto como declaraciones de la Gigaset Communications GmbH. Le deseamos que disfrute con su Gigaset. SCaros clientes, Gigaset Communications GmbH é a sucessora legal da Siemens Home and Office Communication Devices GmbH & Co. KG (SHC), que, por sua vez, deu continuidade ao sector de negócios Gigaset, da Siemens AG. Quaisquer declarações por parte da Siemens AG ou da SHC encontradas nos manuais de utilização deverão, portanto, ser consideradas como declarações da Gigaset Communications GmbH. Desejamos que tenham bons momentos com o seu Gigaset. Issued by Gigaset Communications GmbH Schlavenhorst 66, D-46395 Bocholt Gigaset Communications GmbH is a trademark licensee of Siemens AG DA Kære Kunde, Gigaset Communications GmbH er retlig efterfølger til Siemens Home and Office Communication Devices GmbH & Co. KG (SHC), som fra deres side videreførte Siemens AGs Gigaset-forretninger. Siemens AGs eller SHCs eventuelle forklaringer i betjeningsvejledningerne skal derfor forstås som Gigaset Communications GmbHs forklaringer. Vi håber, du får meget glæde af din Gigaset. FI Arvoisa asiakkaamme, Gigaset Communications GmbH on Siemens Home and Office Communication Devices GmbH & Co. KG (SHC)-yrityksen oikeudenomistaja, joka jatkoi puolestaan Siemens AG:n Gigaset-liiketoimintaa. Käyttöoppaissa mahdollisesti esiintyvät Siemens AG:n tai SHC:n selosteet on tämän vuoksi ymmärrettävä Gigaset Communications GmbH:n selosteina. Toivotamme Teille paljon iloa Gigaset-laitteestanne. SV Kära kund, Gigaset Communications GmbH övertar rättigheterna från Siemens Home and Office Communication Devices GmbH & Co. KG (SHC), som bedrev Gigaset-verksamheten efter Siemens AG. Alla förklaringar från Siemens AG eller SHC i användarhandboken gäller därför som förklaringar från Gigaset Communications GmbH. Vi önskar dig mycket nöje med din Gigaset. NO Kjære kunde, Gigaset Communications GmbH er rettslig etterfølger etter Siemens Home and Office Communication Devices GmbH & Co. KG (SHC), som i sin tur videreførte Gigaset-geskjeften i Siemens AG. Eventuelle meddelelser fra Siemens AG eller SHC i bruksanvisningene er derfor å forstå som meddelelser fra Gigaset Communications GmbH. Vi håper du får stor glede av din Gigaset-enhet. EL Αγαπητή πελάτισσα, αγαπητέ πελάτη, η Gigaset Communications GmbH είναι η νομική διάδοχος της Siemens Home and Office Communication Devices GmbH & Co. KG (SHC), η οποία έχει αναλάβει την εμπορική δραστηριότητα Gigaset της Siemens AG. Οι δηλώσεις της Siemens AG ή της SHC στις οδηγίες χρήσης αποτελούν επομένως δηλώσεις της Gigaset Communications GmbH. Σας ευχόμαστε καλή διασκέδαση με τη συσκευή σας Gigaset. HR Poštovani korisnici, Gigaset Communications GmbH pravni je sljednik tvrtke Siemens Home and Office Communication Devices GmbH & Co. KG (SHC), koji je nastavio Gigaset poslovanje tvrtke Siemens AG. Zato sve izjave tvrtke Siemens AG ili SHC koje se nalaze u uputama za upotrebu treba tumačiti kao izjave tvrtke Gigaset Communications GmbH. Nadamo se da sa zadovoljstvom koristite svoj Gigaset uređaj. SL Spoštovani kupec! Podjetje Gigaset Communications GmbH je pravni naslednik podjetja Siemens Home and Office Communication Devices GmbH & Co. KG (SHC), ki nadaljuje dejavnost znamke Gigaset podjetja Siemens AG. Vse izjave podjetja Siemens AG ali SHC v priročnikih za uporabnike torej veljajo kot izjave podjetja Gigaset Communications GmbH. Želimo vam veliko užitkov ob uporabi naprave Gigaset. © Gigaset Communications GmbH 2008 All rights reserved. Subject to availability. Rights of modifications reserved. www.gigaset.com CS Vážení zákazníci, společnost Gigaset Communications GmbH je právním nástupcem společnosti Siemens Home and Office Communication Devices GmbH & Co. KG (SHC), která dále přejala segment produktů Gigaset společnosti Siemens AG. Jakékoli prohlášení společnosti Siemens AG nebo SHC, které naleznete v uživatelských příručkách, je třeba považovat za prohlášení společnosti Gigaset Communications GmbH. Doufáme, že jste s produkty Gigaset spokojeni. SK Vážený zákazník, Spoločnosť Gigaset Communications GmbH je právnym nástupcom spoločnosti Siemens Home and Office Communication Devices GmbH & Co. KG (SHC), ktorá zasa pokračovala v činnosti divízie Gigaset spoločnosti Siemens AG. Z tohto dôvodu je potrebné všetky vyhlásenia spoločnosti Siemens AG alebo SHC, ktoré sa nachádzajú v používateľských príručkách, chápať ako vyhlásenia spoločnosti Gigaset Communications GmbH. Veríme, že budete so zariadením Gigaset spokojní. RO Stimate client, Gigaset Communications GmbH este succesorul legal al companiei Siemens Home and Office Communication Devices GmbH & Co. KG (SHC), care, la rândul său, a continuat activitatea companiei Gigaset a Siemens AG. Orice afirmaţii efectuate de Siemens AG sau SHC şi incluse în ghidurile de utilizare vor fi, prin urmare, considerate a aparţine Gigaset Communications GmbH. Sperăm ca produsele Gigaset să fie la înălţimea dorinţelor dvs. SR Poštovani potrošaču, Gigaset Communications GmbH je pravni naslednik kompanije Siemens Home and Office Communication Devices GmbH & Co. KG (SHC), kroz koju je nastavljeno poslovanje kompanije Gigaset kao dela Siemens AG. Stoga sve izjave od strane Siemens AG ili SHC koje se mogu naći u korisničkim uputstvima treba tumačiti kao izjave kompanije Gigaset Communications GmbH. Nadamo se da ćete uživati u korišćenju svog Gigaset uređaja. BG Уважаеми потребители, Gigaset Communications GmbH е правоприемникът на Siemens Home and Office Communication Devices GmbH & Co. KG (SHC), която на свой ред продължи бизнеса на подразделението Siemens AG. По тази причина всякакви изложения, направени от Siemens AG или SHC, които се намират в ръководствата за потребителя, следва да се разбират като изложения на Gigaset Communications GmbH. Надяваме се да ползвате с удоволствие вашия Gigaset. HU Tisztelt Vásárló! A Siemens Home and Communication Devices GmbH & Co. KG (SHC) törvényes jogutódja a Gigaset Communications GmbH, amely a Siemens AG Gigaset üzletágának utódja. Ebből következően a Siemens AG vagy az SHC felhasználói kézikönyveiben található bármely kijelentést a Gigaset Communications GmbH kijelentésének kell tekinteni. Reméljük, megelégedéssel használja Gigaset készülékét. Issued by Gigaset Communications GmbH Schlavenhorst 66, D-46395 Bocholt Gigaset Communications GmbH is a trademark licensee of Siemens AG PL Szanowny Kliencie, Firma Gigaset Communications GmbH jest spadkobiercą prawnym firmy Siemens Home and Office Communication Devices GmbH & Co. KG (SHC), która z kolei przejęła segment produktów Gigaset od firmy Siemens AG. Wszelkie oświadczenia firm Siemens AG i SHC, które można znaleźć w instrukcjach obsługi, należy traktować jako oświadczenia firmy Gigaset Communications GmbH. Życzymy wiele przyjemności z korzystania z produktów Gigaset. TR Sayın Müşterimiz, Gigaset Communications GmbH, Siemens AG'nin Gigaset işletmesini yürüten Siemens Home and Office Communication Devices GmbH & Co. KG (SHC)'nin yasal halefidir. Kullanma kılavuzlarında bulunan ve Siemens AG veya SHC tarafından yapılan bildiriler Gigaset Communications GmbH tarafından yapılmış bildiriler olarak algılanmalıdır. Gigaset'ten memnun kalmanızı ümit ediyoruz. RU Уважаемыи покупатель! Компания Gigaset Communications GmbH является правопреемником компании Siemens Home and Office Communication Devices GmbH & Co. KG (SHC), которая, в свою очередь, приняла подразделение Gigaset в свое управление от компании Siemens AG. Поэтому любые заявления, сделанные от имени компании Siemens AG или SHC и встречающиеся в руководствах пользователя, должны восприниматься как заявления компании Gigaset Communications GmbH. Мы надеемся, что продукты Gigaset удовлетворяют вашим требованиям. © Gigaset Communications GmbH 2008 All rights reserved. Subject to availability. Rights of modifications reserved. www.gigaset.com Gigaset 4000 Micro, DE-IT-FR-SP-GB, A31008-G4000- 4000co- 13.05.02 s Be inspired Bedienungsanleitung Istruzioni d’uso Mode d’emploi Instrucciones de manejo Operating instructions Gigaset 4000 Micro, DE-IT-FR-SP-GB, A31008-G4000- 4000co- 17.04.02 s Be inspired Bedienungsanleitung ! DEUTSCH und Sicherheitshinweise Gigaset 4000 Micro, DE-IT-FR-SP-GB, A31008-G4000-B027- 4000COU.FM 05.07.02 Kurzübersicht des Mobilteils Kurzübersicht des Mobilteils Das Display ist durch eine Folie geschützt. Bitte Schutzfolie abziehen! Status-LED (Leuchtdiode) leuchtet im Gespräch; blinkt bei: – ankommendem Ruf – neuen Nachrichten – Weckruf, Termine, Jahrestage Empfangsstärke Display (Anzeigefeld) Ladezustand = leer U voll blinkt: Akkustand niedrig Steuer-Taste Abheben-Taste – Gespräch annehmen – Rufnummer wählen – Umschalten von Freisprech- auf Hörerbetrieb Ñ e Annabella 19.07.01 { 13:13 ¨ Auflegen- und Ein-/Aus-Taste – Gespräch beenden – Funktion abbrechen – Kurz drücken: Eine Menüebene zurück; – Lang drücken: Zurück in Ruhezustand – Mobilteil ein/aus (Taste lang drücken) Telefonbuch öffnen Taste 1 Lang drücken wählt Anrufbeantworter/ T-NetBox Stern-Taste Lang drücken um Rufton ein- und auszuschalten. Tasten-Sperre Ein/aus lang drücken! Aktuelle Funktionen und Display-Tasten Mit den Display-Tasten haben Sie Zugriff auf die im Display dargestellten Funktionen. Anruferliste Zugriff auf Nachrichtenlisten Mikrofon Anschlußbuchse – für Headset, MP3-Player Freisprech-Taste Umschalten von Hörerauf Freisprechbetrieb Netzanbieter-Taste – Netzanbieter-Liste öffnen: kurz drücken! – R-Tastenfunktion (Flash): lang drücken! Zusammenhang zwischen Steuer-Taste und Display-Tasten Mit der rechten Display-Taste können Sie Funktionen ausführen, die z. T. auch mit der SteuerTaste gesteuert werden können. Display-Tasten Darstellung der Steuer-Taste in der Bedienungsanleitung: Steuer-Taste INT F / G (links/rechts) E / D (oben/unten) Auf die dunkel dargestellte Seite drücken. 2 Gigaset 4000 Micro, DE-IT-FR-SP-GB, A31008-G4000-B027- 4000COU.FM 05.07.02 Kurzübersicht des Mobilteils Wichtige Menüs © D Textmeldung* <Neuer Eintrag> T-Net-LM Anna Familie/Freizeit Barbara Termine/Uhr Claus : Audio Kosten © OKƒ Einstellungen Nr. verwenden Basis einstellen Eintrag löschen Anrufbeantw. Eintrag senden Liste löschen Telefonlautst. Liste senden Rufton einst. Speicherplatz Hinweistöne Display-Symbole Je nach Bediensituation sehen Sie über den Display-Tasten folgende Symbole: Display-Tasten Bedeutung ¨ Menü-Taste: Im Ruhezustand das allgemeine Menü aufrufen. Beim Telefonieren ein situationsabhängiges Menü aufrufen. Z Menü-Funktion bestätigen und auswählen. Eingaben beenden und speichern. W Lösch-Taste (Backspace): Eingaben von rechts nach links löschen. { Wahlwiederholungs-Taste: Liste der letzten 5 Rufnummern öffnen. I Anzeige bei SMS*, Anrufbeantworter, T-Net-Box, Anruferliste Í Eine Menüebene zurück, Abbruch * nicht in allen Ländern verfügbar 3 Gigaset 4000 Micro, DE-IT-FR-SP-GB, A31008-G4000-B027- 4000COU.FM 05.07.02 Sicherheitshinweise Sicherheitshinweise $ ! Verwenden Sie nur das mitgelieferte Steckernetzgerät, wie auf der Unterseite des Gerätes gekennzeichnet. Legen Sie nur zugelassene, aufladbare Akkus des gleichen Typs ein! ‹ Œ Wiederaufladbaren Akku richtig gepolt einlegen. Akkutyp gemäß dieser Bedienungsanleitung verwenden Medizinische Geräte können in ihrer Funktion beeinflusst werden. Beachten Sie die technischen Bedingungen des jeweiligen Umfeldes (z. B. Arztpraxis). Das Mobilteil kann in Hörgeräten einen unangenehmen Brummton verursachen. Nutzen Sie das Telefon nicht in explosionsgefährdeten Umgebungen (z. B. Lackierereien). Das Mobilteil ist nicht spritzwassergeschützt (siehe S. 24). Während des Autofahrens darf der Fahrer nicht telefonieren (Walkie-TalkieFunktion). Telefon ausschalten, während Sie sich im Flugzeug aufhalten (Walkie-Talkie-Funktion). Gegen versehentliches Einschalten sichern. ƒ Geben Sie Ihr Gigaset nur mit der Bedienungsanleitung an Dritte weiter. Entsorgen Sie Akkus und Telefon umweltgerecht. Nicht alle in dieser Bedienungsanleitung beschriebenen Funktionen sind in allen Ländern verfügbar. 4 Gigaset 4000 Micro, DE-IT-FR-SP-GB, A31008-G4000-B027- 4000CoIVZ.fm 05.07.02 Inhaltsverzeichnis Inhaltsverzeichnis Kurzübersicht des Mobilteils . . . . . . . . . . . . . . . . . . . . . . . . . . . . . . . . . . . . . . . . . . . . . 2 Zusammenhang zwischen Steuer-Taste und Display-Tasten . . . . . . . . . . . . . . . . .2 Wichtige Menüs . . . . . . . . . . . . . . . . . . . . . . . . . . . . . . . . . . . . . . . . . . . . . . . . . . .3 Display-Symbole . . . . . . . . . . . . . . . . . . . . . . . . . . . . . . . . . . . . . . . . . . . . . . . . . . .3 Sicherheitshinweise . . . . . . . . . . . . . . . . . . . . . . . . . . . . . . . . . . . . . . . . . . . . . . . . . . . . 4 Mobilteil vorbereiten . . . . . . . . . . . . . . . . . . . . . . . . . . . . . . . . . . . . . . . . . . . . . . . . . . . . 6 Verpackungsinhalt . . . . . . . . . . . . . . . . . . . . . . . . . . . . . . . . . . . . . . . . . . . . . . . . . .6 Akku einlegen . . . . . . . . . . . . . . . . . . . . . . . . . . . . . . . . . . . . . . . . . . . . . . . . . . . . . . . . . . . . . . . .6 Mobilteil anmelden . . . . . . . . . . . . . . . . . . . . . . . . . . . . . . . . . . . . . . . . . . . . . . . . .6 Akku laden. . . . . . . . . . . . . . . . . . . . . . . . . . . . . . . . . . . . . . . . . . . . . . . . . . . . . . . .7 Gürtelclip befestigen . . . . . . . . . . . . . . . . . . . . . . . . . . . . . . . . . . . . . . . . . . . . . . . .7 Datum und Uhrzeit einstellen . . . . . . . . . . . . . . . . . . . . . . . . . . . . . . . . . . . . . . . . .8 Display-Sprache ändern. . . . . . . . . . . . . . . . . . . . . . . . . . . . . . . . . . . . . . . . . . . . . .8 Telefonieren . . . . . . . . . . . . . . . . . . . . . . . . . . . . . . . . . . . . . . . . . . . . . . . . . . . . . . . . . . . 9 Extern anrufen . . . . . . . . . . . . . . . . . . . . . . . . . . . . . . . . . . . . . . . . . . . . . . . . . . . . .9 Intern anrufen . . . . . . . . . . . . . . . . . . . . . . . . . . . . . . . . . . . . . . . . . . . . . . . . . . . . .9 Anruf annehmen . . . . . . . . . . . . . . . . . . . . . . . . . . . . . . . . . . . . . . . . . . . . . . . . . .10 Anrufer-/Nachrichtenliste aufrufen . . . . . . . . . . . . . . . . . . . . . . . . . . . . . . . . . . . .10 Freisprechen . . . . . . . . . . . . . . . . . . . . . . . . . . . . . . . . . . . . . . . . . . . . . . . . . . . . .10 Externes Gespräch verbinden, Rückfrage . . . . . . . . . . . . . . . . . . . . . . . . . . . . . .11 Wahlwiederholung. . . . . . . . . . . . . . . . . . . . . . . . . . . . . . . . . . . . . . . . . . . . . . . . . . . . . 11 Telefonbuch und Netzanbieterliste. . . . . . . . . . . . . . . . . . . . . . . . . . . . . . . . . . . . . . . 12 Schnellwahl aus der Netzanbieterliste. . . . . . . . . . . . . . . . . . . . . . . . . . . . . . . . . .13 Mit der Schnellwahl wählen . . . . . . . . . . . . . . . . . . . . . . . . . . . . . . . . . . . . . . . . .13 Einstellungen. . . . . . . . . . . . . . . . . . . . . . . . . . . . . . . . . . . . . . . . . . . . . . . . . . . . . . . . . . 17 Wecker einstellen . . . . . . . . . . . . . . . . . . . . . . . . . . . . . . . . . . . . . . . . . . . . . . . . .17 Wecker deaktivieren . . . . . . . . . . . . . . . . . . . . . . . . . . . . . . . . . . . . . . . . . . . . . . .17 Weckruf ausschalten . . . . . . . . . . . . . . . . . . . . . . . . . . . . . . . . . . . . . . . . . . . . . . .17 Termin einstellen . . . . . . . . . . . . . . . . . . . . . . . . . . . . . . . . . . . . . . . . . . . . . . . . .18 Hörer- und Lautsprecher-Lautstärke . . . . . . . . . . . . . . . . . . . . . . . . . . . . . . . . . . .19 Rufton-Lautstärke/-Melodie einstellen. . . . . . . . . . . . . . . . . . . . . . . . . . . . . . . . . .19 Warn- und Signaltöne ein-/ausschalten . . . . . . . . . . . . . . . . . . . . . . . . . . . . . . . . .20 Vibrationsalarm ein-/ausschalten . . . . . . . . . . . . . . . . . . . . . . . . . . . . . . . . . . . . .21 Automatische Rufannahme ein/aus. . . . . . . . . . . . . . . . . . . . . . . . . . . . . . . . . . . .21 In den Lieferzustand zurücksetzen . . . . . . . . . . . . . . . . . . . . . . . . . . . . . . . . . . . .21 Babyfon . . . . . . . . . . . . . . . . . . . . . . . . . . . . . . . . . . . . . . . . . . . . . . . . . . . . . . . . . . . . . . 22 Babyfon einstellen . . . . . . . . . . . . . . . . . . . . . . . . . . . . . . . . . . . . . . . . . . . . . . . . .22 Walkie-Talkie-Modus . . . . . . . . . . . . . . . . . . . . . . . . . . . . . . . . . . . . . . . . . . . . . . . . . . 23 Anhang. . . . . . . . . . . . . . . . . . . . . . . . . . . . . . . . . . . . . . . . . . . . . . . . . . . . . . . . . . . . . . . 24 Betrieb an Basen der Gigaset-Familie . . . . . . . . . . . . . . . . . . . . . . . . . . . . . . . . . .24 Pflege . . . . . . . . . . . . . . . . . . . . . . . . . . . . . . . . . . . . . . . . . . . . . . . . . . . . . . . . . .24 Kontakt mit Flüssigkeit . . . . . . . . . . . . . . . . . . . . . . . . . . . . . . . . . . . . . . . . . . . . .24 Reichweite. . . . . . . . . . . . . . . . . . . . . . . . . . . . . . . . . . . . . . . . . . . . . . . . . . . . . . .25 Garantie . . . . . . . . . . . . . . . . . . . . . . . . . . . . . . . . . . . . . . . . . . . . . . . . . . . . . . . .26 Service (Customer Care) . . . . . . . . . . . . . . . . . . . . . . . . . . . . . . . . . . . . . . . . . . . .27 Display-Sprachen. . . . . . . . . . . . . . . . . . . . . . . . . . . . . . . . . . . . . . . . . . . . . . . . . .27 5 4000CO.FM Gigaset 4000 Micro, DE-IT-FR-SP-GB, A31008-G4000-B027-1-6419 05.07.02 Mobilteil vorbereiten Tasten drücken: Mobilteil vorbereiten Verpackungsinhalt Mobilteil Gigaset 4000i Micro, ein Akku, Steckernetzgerät, Ladeschale, Gürtelclip, Bedienungsanleitung. Akku einlegen et as Gig et as 00 40 icro Gig m 00 40 icro m Die Liefereinstellung der Display-Sprache an Ihrem Mobilteil ist italienisch. Um die gewünschte Sprache einzustellen s. Seite 8. Mobilteil anmelden Schritt 1: © Menü öffnen. D åååååååååååååååååååååååååååååååå [ Auswählen und bestätigen. Einstellungen D åååååååååååååååååååååååååååååååå [ Auswählen und bestätigen. MT anmelden D [ Basis auswählen ( Basis 1 , Basis 2 , Basis 3 oder Basis 4 ). o[ PIN eingeben und bestätigen (Lieferzustand: 0000) – z. B. Anmeldevorgang Basis 1 wird angezeigt. Schritt 2: Die Taste an der Rückseite der Basis Gigaset 4010i Micro (andere Basissysteme siehe Tabelle) lang drücken. Dem Mobilteil wird automatisch die nächste freie interne Nummer (1–3) zugeordnet. Sind schon alle Plätze belegt, wird die interne Nummer 6 überschrieben. Nach erfolgreichem Anmelden kehrt das Mobilteil in den Ruhezustand zurück. Am Display wird die interne Nummer (z. B. „INT1“) angezeigt. Gigaset Vorbereitung an der Basis bzw. -telefon 4010/4015 Taste an der Basisunterseite lang drücken. 6 Gigaset 4000 Micro, DE-IT-FR-SP-GB, A31008-G4000-B027-1-6419 4000CO.FM 05.07.02 Mobilteil vorbereiten Tasten drücken: 3010/3015 Die graue Taste der Basis so lange drücken, bis Sie Signaltöne hören. 3020/25 3030/35 4030/35 Im Menü des Basistelefons Einstellungen, System-Einstell. und Gerät anmelden auswählen und mit OK bestätigen. 3070/75 4070/75 Die Anzeige (LED) drücken – sie blinkt während der Anmeldung. Basen Zur Anmeldung an „GAP-Basen“ folgen Sie anderer der jeweiligen Bedienungsanleitung Hersteller (Schritt 2 und 3). Akku laden 5,5 Lassen Sie das Mobilteil zum Laden des Akkus ca. 5,5 Stunden in der Ladeschale liegen, denn der Akku ist im Lieferzustand nicht geladen. Das Aufladen des Akkus wird am Mobilteil durch Blinken der Ladezustandsanzeige angezeigt: Eine Übersicht der empfohlenen Akkutypen finden Sie im Anhang. ● ● Der Akku erwärmt sich während des Aufladens; das ist ein normaler Vorgang und ungefährlich. Damit der Ladezustand des Akkus richtig angezeigt wird, sollten Sie das Akkufach nicht unnötig öffnen. Gürtelclip befestigen Gürtelclip auf der Rückseite des Mobilteils andrücken, bis „seitliche Nasen“ in die Aussparungen einrasten. 7 Gigaset 4000 Micro, DE-IT-FR-SP-GB, A31008-G4000-B027-1-6419 4000CO.FM 05.07.02 Mobilteil vorbereiten Tasten drücken: Datum und Uhrzeit einstellen Die Datums- und Uhrzeiteinstellung ist notwendig, damit der Zeitpunkt des Eingangs von Nachrichten/ Anrufen korrekt angezeigt wird. © Menü öffnen. D åååååååååååååååååååååååååååååååå [ Auswählen und bestätigen. Termine/Uhr D åååååååååååååååååååååååååååååååå [ Auswählen und bestätigen. Datum/Uhrzeit Die aktuelle Einstellung wird angezeigt. Datum eingeben Tag/Monat/Jahr eingeben. Beispiel hier: 20.05.2001. z. B.ŸÞÞ¢Þ] D Eine Zeile nach unten springen. Uhrzeit eingeben Stunden/Minuten eingeben. Beispiel hier: 19.05 Uhr. z. B. ] ¬ Þ ¢ D Eine Zeile nach unten springen. Anzeigemodus auswählen Wählen Sie mit der linken Seite der Steuertaste zwischen dem 12-Stunden- (am oder pm) oder dem 24Stunden-Anzeigemodus (Lieferzustand) aus. [ Einstellungen speichern. Sichern åååååååååååååååååååååååååååååååå Display-Sprache ändern © D åååååååååååååååååååååååååååååååå [ Einstellungen D åååååååååååååååååååååååååååååååå [ Sprache D[ Menü öffnen. Funktion bestätigen. Die aktive Sprache ist mit ✓ markiert. Gewünschte Sprache auswählen und bestätigen. Eine Tabelle finden Sie auf der letzten Seite dieses Heftes. Notrufnummer wählen Sie haben die Möglichkeit, die in der Basisstation gespeicherten Notrufnummern zu wählen, siehe Bedienungsanleitung der Basisstation! 8 Gigaset 4000 Micro, DE-IT-FR-SP-GB, A31008-G4000-B027-1-6419 4000CO.FM 05.07.02 Telefonieren Tasten drücken: Telefonieren Extern anrufen o Rufnummer eingeben. Ggf. mit der Display-Taste X einzelne Zeichen korrigieren. c a Abheben-Taste drücken. Auflegen-Taste drücken, um das Gespräch zu beenden. ● ● ● Sie können auch zuerst die Abheben-Taste c drücken und dann die Rufnummer eingeben - jede Ziffer wird sofort gewählt. Mit der Auflegen-Taste können Sie das Wählen abbrechen. Sie können eine Wahlpause einfügen: Nach der Eingabe der Vorwahl öffnen Sie über die DisplayTaste © das Menü und wählen „Pause einfügen“ . a Intern anrufen F Liste der Intern-Teilnehmer öffnen. Das eigene Mobilteil ist mit „<" gekennzeichnet. E D c Gewünschtes Mobilteil auswählen und Abheben-Taste drücken. oder z. B. Ÿ Interne Rufnummer des Mobilteils eingeben. oder An alle c oder « Es klingeln alle Mobilteile. a Auflegen-Taste drücken, um das Gespräch zu beenden. 9 Gigaset 4000 Micro, DE-IT-FR-SP-GB, A31008-G4000-B027-1-6419 4000CO.FM 05.07.02 Telefonieren Tasten drücken: Anruf annehmen c/u Ihr Telefon klingelt (Rufton) und die Status-LED blinkt. Abheben- oder Freisprech-Taste drücken. oder k Ö das Mobilteil nur aus der Ladeschale nehmen (Lieferzustand: „Automatische Rufannahme“). Anrufer-/Nachrichtenliste aufrufen * Neue Anrufe/Nachrichten werden durch einen Hinweis im Display und das Blinken der Status-LED angezeigt. ? Drücken Freisprechen Freisprechen beim Wählen o Nummer wählen. u Die Freisprech-Taste drücken. Bei eingeschaltetem Freisprechen leuchten die Freisprech-Taste u und die Status-LED. Freisprechen während des Gesprächs u Freisprechen einschalten. Lautstärke einstellen: Freisprech-Taste u nochmals drücken. F G Lautstärke einstellen. Sichern c a Eingestellte Lautstärke speichern. Von Freisprechen in den Hörerbetrieb wechseln. Gespräch beenden. * nicht in allen Ländern verfügbar 10 Gigaset 4000 Micro, DE-IT-FR-SP-GB, A31008-G4000-B027-1-6419 4000CO.FM 05.07.02 Wahlwiederholung Tasten drücken: Externes Gespräch verbinden, Rückfrage Sie können ein externes Gespräch an ein anderes Mobilteil verbinden oder intern eine Rückfrage halten. F Liste der Intern-Teilnehmer öffnen. E D c Internen Teilnehmer auswählen und anrufen. Wenn sich der interne Teilnehmer meldet: ● Gespräch verbinden: Auflegen-Taste a drücken. ● Rückfrage beenden: Mit Beenden zum wartenden Teilnehmer zurückschalten. Wahlwiederholung Manuelle Wahlwiederholung Sie haben Zugriff auf die 5 zuletzt gewählten Rufnummern. z D Rufnummer anzeigen und auswählen. c Abheben-Taste drücken. Automatische Wahlwiederholung Diese Funktion ist nicht in allen Ländern verfügbar! Die Freisprech-Taste blinkt und Lauthören ist eingeschaltet. Die Funktion schaltet sich nach zehn erfolglosen Wahlversuchen oder nach einem zwischenzeitlich geführten Gespräch aus. Wenn Ihr Gesprächspartner nicht erreichbar ist, drücken Sie Aus oder eine beliebige Taste. zD Rufnummer anzeigen und auswählen. © Menü öffnen. Aut. Wahlwiederh. [ Einschalten. åååååååååååååååååååååååååååååååå c Meldet sich der Teilnehmer: Abheben-Taste drücken. 11 Gigaset 4000 Micro, DE-IT-FR-SP-GB, A31008-G4000-B027-1-6419 4000CO.FM 05.07.02 Telefonbuch und Netzanbieterliste Tasten drücken: Rufnummer aus Wahlwiederholungsliste löschen zD Rufnummer anzeigen und auswählen. © Menü öffnen. D åååååååååååååååååååååååååååååååå [ Rufnummer wird gelöscht. Eintrag löschen Rufnummer ins Telefonbuch übernehmen zD Rufnummer anzeigen und auswählen. © Menü öffnen. D åååååååååååååååååååååååååååååååå [ Die Rufnummer wird eingetragen. Nr. ins Tel.buch o Ggf. die Rufnummer ändern, Namen eingeben (ggf. Jahrestag eingeben s. Seite 16). Eingabe von Buchstaben und Zeichen, s. Seite 14. © Menü öffnen. [ Eintrag speichern. Speichern åååååååååååååååååååååååååååååååå Telefonbuch und Netzanbieterliste Das Telefonbuch D erleichtert Ihnen das Wählen von bis zu 200 Rufnummern. In der Netzanbieterliste C können Sie die Vorwahlnummern (Call-by-Call *) von Telefongesellschaften speichern. Die Bedienung von Telefonbuch und Netzanbieterliste ist identisch. Eintrag speichern D / C Telefonbuch/Netzanbieterliste öffnen. [ Auswählen und bestätigen. Neuer Eintrag åååååååååååååååååååååååååååååååå o Rufnummer (max. 32 Ziffern) eingeben. D o Ins Namensfeld springen und Namen eingeben. Bei Telefonbuch: ggf. Jahrestag eingeben, siehe auch Seite 16. © Menü öffnen. [ Eintrag speichern. Speichern åååååååååååååååååååååååååååååååå * nicht in allen Ländern verfügbar 12 Gigaset 4000 Micro, DE-IT-FR-SP-GB, A31008-G4000-B027-1-6419 4000CO.FM 05.07.02 Telefonbuch und Netzanbieterliste Tasten drücken: Mit Telefonbuch wählen D Telefonbuch öffnen. z. B. ^^ Anfangsbuchstaben des Namens eingeben, z. B. für „E“ , die Taste ^ zweimal drücken oder mit der Taste D blättern. c Abheben-Taste drücken. Nach Auswahl des Namens können Sie auch das Menü öffnen, Nr. verwenden auswählen, die Nummer ergänzen/ändern und mit der Abheben-Taste c wählen. Mit Netzanbieterliste wählen (Call-by-Call) C Netzanbieterliste aufrufen. D© Call-by-Call-Nummer auswählen und Menü öffnen. [ Auswählen und bestätigen. Nr. verwenden åååååååååååååååååååååååååååååååå o Rufnummer des gewünschten Teilnehmers eingeben. oder D D [ Rufnummer aus Telefonbuch auswählen und bestätigen. c Abheben-Taste drücken. Die Rufnummer wird gewählt. Schnellwahl aus der Netzanbieterliste Sie können sich in der Netzanbieterliste 8 Nummern für die Schnellwahl speichern. Dabei geben Sie vor dem Namen eine Schnellwahlnummer (2–9) ein. Beispiel: Schnellwahlnummer 2 und danach den Netzanbieternamen. Mit der Schnellwahl wählen z. B. Ÿ Taste lang drücken: Der gespeicherte Netzanbietername wird angezeigt. z. B. o Rufnummer eingeben oder DD [ Eintrag aus Telefonbuch auswählen und bestätigen. c Drücken. 13 4000CO.FM Gigaset 4000 Micro, DE-IT-FR-SP-GB, A31008-G4000-B027-1-6419 05.07.02 Telefonbuch und Netzanbieterliste Tasten drücken: Zeichentabelle Entsprechende Taste mehrmals bzw. lang drücken: ] 1x 2x 3x 4x 5x 6x 7x Leerzeichen 1 â £ $ ¥ ¤ Ÿa ^ d ¡ g ¢j £ m ¤ p ¥t ¬ w →A « a→ Þ. ª # 8x 9 x 10 x ã ç ô õ å b c 2 ä á à â e f 3 ë é è ê ï í ì î ñ ó ò h i 4 k l 5 n o 6 ö q r s 7 ß u v 8 ü ú ù û x y z 9 ÿ ý æ ø * / ( ) < = > % , ? ! 0 + - : ¿ @ \ & § * Weitere Zeichen dieser Taste: ¡* “,‘,;,_ Der erste Buchstabe des Namens wird automatisch groß geschrieben, es folgen kleine Buchstaben. Für ein Zeichen zur Groß-/Kleinschreibung wechseln: « drücken. Schreibmarke steuern mit F G E D. Zeichen löschen mit X Das Einfügen von Zeichen erfolgt immer links von der Schreibmarke (Cursor). Mit einem vorangestellten Leerzeichen rutscht ein Eintrag an die erste Stelle (z.B..: „ Karla“). Reihenfolge der Sortierung: 14 1. Leerzeichen 3. Buchstaben (alphabetisch) 2. Ziffern (0-9) 4. Restliche Zeichen Gigaset 4000 Micro, DE-IT-FR-SP-GB, A31008-G4000-B027-1-6419 4000CO.FM 05.07.02 Telefonbuch und Netzanbieterliste Tasten drücken: Eintrag anzeigen, ändern oder löschen D/C Telefonbuch/Netzanbieterliste öffnen. D Gewünschten Eintrag auswählen. Ansehen Ändern Alle Informationen zum Eintrag anzeigen. Das Eingabefeld öffnen und die gewünschten Änderungen vornehmen. o Ggf. Rufnummer ändern. D o Ins Namensfeld springen und Name ändern. Eingabe von Buchstaben und Zeichen, s. Seite 14. Bei Telefonbuch: ggf. Jahrestag eingeben, s. Seite 16. © Menü öffnen. Speichern [ Änderungen bestätigen. åååååååååååååååååååååååååååååååå oder D/C Telefonbuch/Netzanbieterliste öffnen. D Gewünschten Eintrag auswählen. © Menü öffnen. Eintrag löschen D åååååååååååååååååååååååååååååååå [ Ein Bestätigungston ertönt. Der Eintrag ist gelöscht. Eintrag an ein anderes Mobilteil senden Sie können einen Eintrag an ein anderes Micro/ Comfort-Mobilteil übertragen. D/C Telefonbuch/Netzanbieterliste öffnen. D Gewünschten Eintrag auswählen. © Menü öffnen. Eintrag senden D åååååååååååååååååååååååååååååååå [ Auswählen und bestätigen. D[ Internen Teilnehmer (Empfänger-Mobilteil) auswählen und bestätigen. Weiteren Eintrag senden: Ja Drücken. D Gewünschten Eintrag auswählen. Senden Sendevorgang einleiten. 15 Gigaset 4000 Micro, DE-IT-FR-SP-GB, A31008-G4000-B027-1-6419 4000CO.FM 05.07.02 Telefonbuch und Netzanbieterliste Tasten drücken: Telefonbuch/Netzanbieterliste senden: Sie können das ganze Telefonbuch/Netzanbieterliste an ein anderes Micro/Comfort-Mobilteil übertragen. Siehe „Eintrag an ein anderes Mobilteil senden“ . Die Übertragung wird abgebrochen, wenn: ● der Speicher des Empfänger-Mobilteils voll ist. ● Sie angerufen werden. Die aktuelle Übertragung eines Eintrags wird zu Ende gebracht. Telefonbuch/Netzanbieterliste löschen D/C Telefonbuch/Netzanbieterliste öffnen. D Gewünschten Eintrag auswählen. © Menü öffnen. Liste löschen D åååååååååååååååååååååååååååååååå [ Auswählen und bestätigen. Ja Löschen aller Einträge bestätigen. Jahrestage (z. B. Geburtstage) eingeben Sie können Datum und Uhrzeit für Jahrestage abspeichern und sich daran erinnern lassen. D Telefonbuch öffnen. DAnsehen Eintrag auswählen und anzeigen. Ändern Das Eingabefeld öffnen. D Schreibmarke ins Feld für den Geburtstag/Jahrestag bewegen. Ändern Bestätigen. o Datum (Tag/Monat) eingeben oder ändern. D o Eine Zeile nach unten springen und Uhrzeit eingeben. D Eine Zeile nach unten springen. F G Signalisierung auswählen. [ Eingaben speichern. Mit der Display-Taste Löschen können Sie den Jahrestag-Termin löschen. 16 Gigaset 4000 Micro, DE-IT-FR-SP-GB, A31008-G4000-B027-1-6419 4000CO.FM 05.07.02 Einstellungen Tasten drücken: Einstellungen Wecker einstellen Ist an Ihrem Mobilteil eine Weckzeit eingestellt (Symbol ¼), klingelt es täglich zur gleichen Uhrzeit. Das Mobilteil befindet sich im Ruhezustand: © Menü öffnen. D åååååååååååååååååååååååååååååååå [ Auswählen und bestätigen. Termine/Uhr D åååååååååååååååååååååååååååååååå [ Auswählen und bestätigen. Wecker Die aktuelle Einstellung wird angezeigt. FG Ein auswählen. D Eine Zeile nach unten springen. Þ £Þ Þ Stunden/Minuten eingeben. Beispiel hier: 6.00 Uhr. D Eine Zeile nach unten springen. F G Weckrufmelodie auswählen. Sichern Einstellungen speichern. Bei eingeschalteter Babyfonfunktion oder während einer automatischen Wahlwiederholung erfolgt kein Weckruf. Wecker deaktivieren © Menü öffnen. D åååååååååååååååååååååååååååååååå [ Auswählen und bestätigen. Termine/Uhr D åååååååååååååååååååååååååååååååå [ Auswählen und bestätigen. Wecker F G Aus auswählen. Sichern Einstellungen speichern. Weckruf ausschalten Ein Weckruf wird wie ein ankommender Ruf signalisiert. Drücken Sie eine beliebige Taste, um den Weckruf auszuschalten. 17 Gigaset 4000 Micro, DE-IT-FR-SP-GB, A31008-G4000-B027-1-6419 4000CO.FM 05.07.02 Einstellungen Tasten drücken: Termin einstellen Sie können sich von Ihrem Mobilteil an einen Termin erinnern lassen. Ein eingestellter Termin wird mit dem Symbol ¼ angezeigt. Das Mobilteil befindet sich im Ruhezustand. © Menü öffnen. D åååååååååååååååååååååååååååååååå [ Auswählen und bestätigen. Termine/Uhr Termin eingeben [ Auswählen und bestätigen. åååååååååååååååååååååååååååååååå F G Ein auswählen, um Terminfunktion einzuschalten. D Eine Zeile nach unten springen. Ÿ Þ Þ ¢ Tag/Monat eingeben, Beispiel hier: 20. Mai. D Eine Zeile nach unten springen. Þ ¬ ^ Þ Stunden/Minuten eingeben, Beispiel hier: 9.30 Uhr. D Eine Zeile nach unten springen. F G Ruftonmelodie für Terminfunktion wählen. Sichern Einstellungen speichern. Ein Terminruf erfolgt nur, wenn sich das Mobilteil im Ruhezustand befindet. Bei eingeschalteter Babyfonfunktion oder automatischer Wahlwiederholung erfolgt kein Terminruf. Terminruf ausschalten Ein Terminruf wird wie ein ankommender Ruf signalisiert und wird durch Drücken einer beliebigen Taste ausgeschaltet. Terminfunktion ausschalten © Menü öffnen. D åååååååååååååååååååååååååååååååå [ Auswählen und bestätigen. Termine/Uhr Termin eingeben [ Auswählen und bestätigen. åååååååååååååååååååååååååååååååå F G Aus auswählen, falls aktuelle Einstellung Sichern 18 Einstellungen speichern. Ein ist. Gigaset 4000 Micro, DE-IT-FR-SP-GB, A31008-G4000-B027-1-6419 4000CO.FM 05.07.02 Einstellungen Tasten drücken: Nicht angenommene Termine und Jahrestage Ein Termin und Jahrestage, die vom Mobilteil signalisiert aber nicht angenommen wurden, werden in einer Liste gespeichert. Ein neuer nicht angenommener Termin/Jahrestag wird mit Termin angezeigt. Drücken Sie die rechte Display-Taste, die Liste der Ereignisse wird angezeigt. Dann Termin ¼ [ auswählen. Möchten Sie sich Ihren bereits angeschauten Termin nochmals anzeigen lassen, gehen Sie wie folgt vor: © D åååååååååååååååååååååååååååååååå [ Termine/Uhr D åååååååååååååååååååååååååååååååå [ Ereignisse D[ Menü öffnen. Auswählen und bestätigen. Auswählen und bestätigen. Nicht angenommenen Termin ¼ oder Jahrestag ‚ auswählen. Informationen dazu werden angezeigt. Mit der Display-Taste Löschen können Sie den Termin/ Jahrestag löschen. Hörer- und Lautsprecher-Lautstärke © D åååååååååååååååååååååååååååååååå [ Audio [ Telefonlautst. åååååååååååååååååååååååååååååååå FG Menü öffnen. Menü auswählen. Der Hörton ertönt in der aktuellen Lautstärke. Freisprechlautstärke einstellen. D Eine Zeile nach unten springen. F G Sichern Gewünschte Stufe der Hörerlautstärke auswählen und bestätigen. Rufton-Lautstärke/-Melodie einstellen Sie können zwischen fünf Rufton-Lautstärken, „Crescendo“-Ruf (Lautstärke wird lauter), Rufton aus, und zehn Rufton-Melodien wählen: © Menü öffnen. D åååååååååååååååååååååååååååååååå [ Auswählen und bestätigen. Audio D åååååååååååååååååååååååååååååååå [ Die aktuelle Rufton-Lautstärke ertönt und wird angeRufton einst. zeigt. F G Rufton-Lautstärke auswählen. D Eine Zeile nach unten springen. F G Sichern Gewünschte Rufton-Melodie (1–10) auswählen und bestätigen. 19 Gigaset 4000 Micro, DE-IT-FR-SP-GB, A31008-G4000-B027-1-6419 4000CO.FM 05.07.02 Einstellungen Tasten drücken: Zeitsteuerung für Rufton-Lautstärke Sie können für einen bestimmten Zeitraum eine andere Rufton-Lautstärke einstellen. © Menü öffnen. D åååååååååååååååååååååååååååååååå [ Auswählen und bestätigen. Audio D åååååååååååååååååååååååååååååååå [ Die aktuelle Rufton-Lautstärke ertönt und wird angeRufton einst. zeigt. Zeitstrg Drücken. F G Zeitsteuerung ein-/ausschalten. Do Zeitraum für den gewünschten Rufton eingeben z. B. ]]ÞÞ ]¢ÞÞ (für 11:00 bis 15:00 Uhr) DF G Eine Zeile nach unten springen und Rufton-Lautstärke auswählen. Sichern Sichern oder a Einstellungen speichern. Drücken. Warn- und Signaltöne ein-/ausschalten ● ● ● © D åååååååååååååååååååååååååååååååå [ Audio D åååååååååååååååååååååååååååååååå [ Hinweistöne D FG Sichern 20 Tastenklick: Jeder Tastendruck wird bestätigt. Quittungstöne: Bestätigungston (aufsteigende Tonfolge) am Ende von Eingaben/Einstellungen und beim Einlegen des Mobilteils in die Ladeschale; Fehlerton (absteigende Tonfolge) bei Fehleingaben. Akkuwarnton: Der Akku muss geladen werden. Menü öffnen. Auswählen und bestätigen. Auswählen und bestätigen. Gewünschte Funktion auswählen. Ein , Aus oder in Verb. (Akkuwarnton im Gespräch) wählen. Einstellungen speichern. Gigaset 4000 Micro, DE-IT-FR-SP-GB, A31008-G4000-B027-1-6419 4000CO.FM 05.07.02 Einstellungen Tasten drücken: Vibrationsalarm ein-/ausschalten Um durch den Rufton nicht gestört zu werden, können Sie stattdessen den Vibrationsalarm im Mobilteil einschalten. Er kann auch zusätzlich zum Rufton eingeschaltet werden (z. B. bei lauter Umgebung). © Menü öffnen. D åååååååååååååååååååååååååååååååå [ Auswählen und bestätigen. Audio D åååååååååååååååååååååååååååååååå [ Auswählen und bestätigen. Vibration ½ Die aktuelle Einstellung ist mit ✓ markiert Sie können durch langes Drücken der «-Taste den Rufton ausschalten. Damit ist nur der Vibrationsalarm aktiv. Automatische Rufannahme ein/aus Bei eingeschalteter Funktion nehmen Sie das Mobilteil zum Annehmen eines Anrufs aus der Ladeschale (Lieferzustand), ohne die Taste c drücken zu müssen. © Menü öffnen. D åååååååååååååååååååååååååååååååå [ Auswählen und bestätigen. Einstellungen D åååååååååååååååååååååååååååååååå Aut.Rufannahme [ Mit [ ein-/ausschalten (✓ = Funktion ein). In den Lieferzustand zurücksetzen Das Telefonbuch, die Netzanbieterliste und die Anruferliste werden beim Zurücksetzen nicht gelöscht. Die Anmeldung an der Basis bleibt erhalten. © Menü öffnen. D åååååååååååååååååååååååååååååååå [ Auswählen und bestätigen. Einstellungen D åååååååååååååååååååååååååååååååå [ Auswählen und bestätigen. Mobilteil-Reset Ja Sicherheitsabfrage bestätigen. Funktion Hörer-Lautstärke Rufton-Lautstärke Rufton-Melodie Automatische Rufannahme Akkuwarnton Freisprech-Lautstärke Lieferzustand 1 5 1 ein ein 3 21 Gigaset 4000 Micro, DE-IT-FR-SP-GB, A31008-G4000-B027-1-6419 4000CO.FM 05.07.02 Babyfon Tasten drücken: Babyfon-Pegel Zeitsteuerung Display-Sprache Vibrationsalarm hoch aus landesspezif. aus Babyfon Mit Ihrem Mobilteil können Sie Geräusche im Raum Ihres Babys von einem anderen Ort aus überwachen. Der Abstand des Mobilteils zum Baby sollte mindestens 1 bis 2 Meter betragen. Wird ein bestimmter Geräuschpegel erreicht (z.B. Baby schreit), wählt das Mobilteil automatisch eine von Ihnen gespeicherte (interne /externe) Rufnummer. Ankommende Anrufe werden bei Babyfonbetrieb nur am Display angezeigt. Babyfon einstellen © Menü öffnen. D åååååååååååååååååååååååååååååååå [ Auswählen und bestätigen. Familie/Freizeit D åååååååååååååååååååååååååååååååå [ Auswählen und bestätigen. Babyfon F G Ein oder Aus wählen. D Eine Zeile nach unten springen. Ändern Eingabefeld für Rufnummer öffnen. Eine bereits vorhanden externe Rufnummer mit X löschen. Eine bereits vorhanden interne Rufnummer mit Ja löschen (Sicherheitsabfrage). F o Liste der internen Teilnehmer öffnen und interne Nummer auswählen. [ Rufnummer speichern. oder D Telefonbuch öffnen. D [ Externen Teilnehmer auswählen. © Menü öffnen. [ Einstellung bestätigen. Speichern åååååååååååååååååååååååååååååååå D Eine Zeile nach unten springen. F G Empfindlichkeit „hoch“ oder „niedrig“ einstellen. Sichern 22 Einstellung speichern. Gigaset 4000 Micro, DE-IT-FR-SP-GB, A31008-G4000-B027-1-6419 4000CO.FM 05.07.02 Walkie-Talkie-Modus Tasten drücken: Mit der Display-Taste Aus kann die Babyfon-Funktion ausgeschaltet werden. Babyfon-Funktion von Extern ausschalten Sie können von Extern (z. B. vom „Handy“) die Babyfonfunktion ausschalten. Nehmen Sie den durch die Babyfon-Funktion ausgelösten Anruf an und drücken Sie die Tasten ¬ª, um die Funktion zu deaktivieren. Die Babyfon-Funktion ist nun ausgeschaltet. Vom Babyfon wird kein Anruf mehr ausgelöst. Walkie-Talkie-Modus Voraussetzung: Die Mobilteile haben die selben Basiseinstellungen (z. B. Beste Basis), oder sie sind noch an keiner Basis angemeldet. (Der Walkie-Talkie-Modus verringert die Betriebszeiten eines Mobilteils erheblich). Im Walkie-Talkie-Modus sind die Mobilteile für kommende Rufe nicht mehr erreichbar. Walkie-Talkie-Modus am Mobilteil einschalten © Menü öffnen. D åååååååååååååååååååååååååååååååå [ Funktion auswählen. Familie/Freizeit D åååååååååååååååååååååååååååååååå [ Walkie-Talkie-Modus einschalten. Walkie-Talkie Mit der Display-Taste Aus kann der Walkie-Talkie-Modus ausgeschaltet werden. Walkie-Talkie-Modus nutzen Zwei Mobilteile befinden sich im Walkie-TalkieModus: Rufendes Mobilteil: Rufen Drücken. Gerufenes Mobilteil: Der Ruf wird am Display mit einer Meldung signalisiert. Ruf aus c a Rufton wird augeschaltet. Drücken. Die beiden Mobilteile sind miteinander verbunden. Drücken. Gespräch ist beendet. 23 Gigaset 4000 Micro, DE-IT-FR-SP-GB, A31008-G4000-B027-1-6419 4000CO.FM 05.07.02 Anhang Anhang Betrieb an Basen der Gigaset-Familie Gigaset 1000/2000/3000 Folgende Funktionen Ihres 4000i Micro-Mobilteil werden nicht von Basen dieser Gigaset-Familie unterstützt. ● ● ● ● Uhrzeiteinstellung (nach Ausschalten des Mobilteils wird die Uhrzeit nicht mehr übermittelt) Sprachwahl Babyfon (kann von extern nicht ausgeschaltet werden) SMS Übermittlung (nur SMS-fähige Basen)* Gigaset 4010/4015 Classic Folgende Funktionen Ihres 4000i Micro-Mobilteil werden nicht von den genannten Basen unterstützt. ● ● ● Sprachwahl SMS Übermittlung* Einstellung von Berechtigungsstufen * nicht in allen Ländern verfügbar Pflege Wischen Sie Basis und Mobilteil mit einem feuchtem Tuch oder einem Antistatiktuch ab. Benutzen Sie nie ein trockenes Tuch! Es besteht die Gefahr der statischen Aufladung! Kontakt mit Flüssigkeit ! Sollte das Mobilteil mit Flüssigkeit in Kontakt gekommen sein, auf keinen Fall das Gerät einschalten. Sofort den Akku entnehmen. Lassen Sie die Flüssigkeit aus dem Gerät abtropfen und tupfen Sie anschließend alle Teile trocken. Lagern Sie das Mobilteil ohne Akku für mindestens 72 Stunden an einem trockenen, warmen Ort. Danach ist in vielen Fällen die Inbetriebnahme wieder möglich. 24 4000CO.FM Gigaset 4000 Micro, DE-IT-FR-SP-GB, A31008- 05.07.02 Anhang Empfohlene Akkus: Nickel-Metall-Hydrid (NiMH) , 500 mAh. Bestell-Nr. V30145-K1310-X125 oder Bestell-Nr. V30145-K1310-X229 Betriebszeiten/Ladezeiten des Mobilteils: Kapazität (mAh) Bereitschaftszeit (Stunden) Gesprächszeit Ladezeit (Stunden) (Stunden) 500 bis zu 300 ca. 16 etwa 5,5 Die Ladekapazität der Akkus reduziert sich technisch bedingt nach einigen Jahren. Reichweite Die Reichweite beträgt im freien Gelände ca. 300 m. In Gebäuden werden Reichweiten bis 50 m erreicht. Tischladestation Die Tischladestation für Siemens Mobiltelefone lässt sich ebenfalls zum Laden Ihres Mobilteils verwenden. (Zubehör für Siemens Mobiltelefone C45, ME45, S45) Bestell-Nr. L36880-N4501-A101 ½ Beim Laden eines Gigaset Mobilteils in der Tischladestation wird ein Reserveakku solange nicht aufgeladen, solange das Mobilteil in der Ladestation steht. Die LED Ladeanzeige leuchtet immer. 25 Gigaset 4000 Micro, DE-IT-FR-SP-GB, A31008-G4000-B027-1-6419 4000CO.FM 05.07.02 Anhang Garantie Dem Verbraucher (Kunden) wird unbeschadet seiner Mängelansprüche gegenüber dem Verkäufer eine Haltbarkeitsgarantie zu den nachstehenden Bedingungen eingeräumt: ● ● ● ● ● ● ● 26 Neugeräte und deren Komponenten, die aufgrund von Fabrikationsund/oder Materialfehlern innerhalb von 24 Monaten ab Kauf einen Defekt aufweisen, werden von Siemens nach eigener Wahl gegen ein dem Stand der Technik entsprechendes Gerät kostenlos ausgetauscht oder repariert. Für Verschleißteile (z.B. Akkus, Tastaturen, Gehäuse) gilt diese Haltbarkeitsgarantie für 6 Monate ab Kauf. Diese Garantie gilt nicht, soweit der Defekt der Geräte auf unsachgemäßer Behandlung und/oder Nichtbeachtung der Handbücher beruht. Diese Garantie erstreckt sich nicht auf vom Vertragshändler oder vom Kunden selbst erbrachte Leistungen (z.B. Installation, Konfiguration, Softwaredownloads). Handbücher und ggf. auf einem separaten Datenträger mitgelieferte Software sind ebenfalls von der Garantie ausgeschlossen. Als Garantienachweis gilt der Kaufbeleg, mit Kaufdatum. Garantieansprüche sind innerhalb von zwei Monaten nach Kenntnis des Garantiefalles geltend zu machen. Ersetzte Geräte bzw. deren Komponenten, die im Rahmen des Austauschs an Siemens zurückgeliefert werden, gehen in das Eigentum von Siemens über. Diese Garantie gilt für in Österreich erworbene Neugeräte. Garantiegeberin für in Österreich erworbene Neugeräte ist die Siemens Aktiengesellschaft, Quellenstraße 2, A - 1100 Wien. Weitergehende oder andere Ansprüche als die in dieser Herstellergarantie genannten sind ausgeschlossen. Siemens haftet nicht für Betriebsunterbrechung, entgangenen Gewinn und den Verlust von Daten, zusätzlicher vom Kunden aufgespielter Software oder sonstiger Informationen. Die Sicherung derselben obliegt dem Kunden. Der Haftungsausschluss gilt nicht, soweit zwingend gehaftet wird, z.B. nach dem Produkthaftungsgesetz, in Fällen des Vorsatzes, der groben Fahrlässigkeit, wegen der Verletzung des Lebens, des Körpers oder der Gesundheit oder wegen der Verletzung wesentlicher Vertragspflichten. Der Schadensersatzanspruch für die Verletzung wesentlicher Vertragspflichten ist jedoch auf den vertragstypischen, vorhersehbaren Schaden begrenzt, soweit nicht Vorsatz oder grobe Fahrlässigkeit vorliegt oder wegen der Verletzung des Lebens, des Körpers oder der Gesundheit oder nach dem Produkthaftungsgesetz gehaftet wird. Gigaset 4000 Micro, DE-IT-FR-SP-GB, A31008- 4000CO.FM 05.07.02 Anhang ● ● ● Durch eine erbrachte Garantieleistung verlängert sich der Garantiezeitraum nicht. Soweit kein Garantiefall vorliegt, behält sich Siemens vor, dem Kunden den Austausch oder die Reparatur in Rechnung zu stellen. Eine Änderung der Beweislastregeln zum Nachteil des Kunden ist mit den vorstehenden Regelungen nicht verbunden. ½ Zur Einlösung der Garantie wenden Sie sich bitte an Ihr Customer Care Center. Service (Customer Care) Einfache und unkomplizierte Unterstützung bei Fragen zur Technik und zur Bedienung Ihres Gerätes erhalten Sie über unseren Online Support im Internet: www.my-siemens.com/customercare Im Falle einer notwendigen Reparatur wenden Sie sich bitte an eines unserer Service Centren. Service-Telefonnummern s. Umschlagseite hinten. Die Übereinstimmung des Gerätes mit den grundlegenden Anforderungen der R&TTE-Directive ist durch das CE-Kennzeichen bestätigt. Das Mobilteil 4000i Micro ist EU-weit und in der Schweiz zugelassen. Display-Sprachen Bei Anmeldung des Mobilteils an die Basisstation Gigaset 4010i können die mit * gekennzeichneten Sprachen eingestellt werden: Einstellungen H/Set Settings Réglages comb. Impostazioni Ajuste terminal Sprache Language Langue Lingua Idioma Deutsch English Français Italiano Español 27 Gigaset 4000 Micro, DE-IT-FR-SP-GB, A31008-G4000-B027-1-6419 4000CO.FM 05.07.02 28 Diese Seite muss erhalten bleiben, damit neue Sprache auf rechter Seite beginnt! Gigaset 4000 Micro, De-It-Fr-Sp-GB, A31008-G4000- 4000co- 06.05.02 s Be inspired Istruzioni d’uso ! ITALIANO e di sicurezza Gigaset 4000 Micro, De-It-Fr-Sp-GB, A31008-G4000-B027-1- 4000COU.FM 06.05.02 Breve descrizione del portatile Breve descrizione del portatile Il display è protetto da una pellicola. Toglierla! LED di stato Acceso: in conversazione Lampeggia in caso di: – chiamate entranti – nuovi messaggi * – sveglia, appuntamenti, anniversari Display (campo indicazione) Livello di carica = scarica U carica lampeggia: batteria quasi scarica Funzioni in uso e tasti del display Intensità di campo Tasto di navigazione Tasto impegno linea – rispondere – selezionare numeri – passare da viva voce ad auricolare Ñ e Annabella 19.07.01 { 13:13 ¨ Tasto di fine chiamata e acceso/spento – terminare la chiamata – annullare la funzione – premere brev.: livello precedente del menu – premere a lungo: tornare al menu principale – portatile On/Off (premere a lungo il tasto) Aprire la rubrica Tasto 1 Premere a lungo per segreteria telef./chiamare la segreteria di rete, che deve essere stata attivata con il vostro operatore di rete Tasto asterisco Premere a lungo per spegnere la suoneria Blocco della tastiera Premere a lungo per bloccare/sbloccare Tasto viva voce Con i tasti del display si può accedere alle funzioni indicate Microfono Presa – per cuffia, , MP3-Player Lista delle chiamate Accesso alle liste delle chiamate Tasto rubrica speciale – aprire la lista degli operatori di rete: premere brevemente. – funzione del tasto R (flash): premere a lungo Relazione tra tasto di navigazione e tasti del display Con i tasti del display si possono richiamare funzioni che in alcuni casi possono essere utilizzate anche con il tasto di navigazione. Il lato del tasto di navigazione da premere è rappresentato nelle istruzioni d’uso con le seguenti frecce: Tasti del display Tasto di navigazione * 2 INT funzione non disponibile sul prodotto per il mercato italiano F / G (sinistra/destra) E / D (su/giù) Gigaset 4000 Micro, De-It-Fr-Sp-GB, A31008-G4000-B027-1- 4000COU.FM 06.05.02 Breve descrizione del portatile Menu importanti © D Msg.testo/SMS* Nuova voce T-Net-LM Anna BabyC o WalkieT Barbara Appuntam/ora Claus : Audio © OKƒ Addebiti* Impostazioni Utilizza Numero Impost.base Cancellazione Segreteria Trasferisci Cancella Tutto Telefonlautst. Trasfer.Tutto Impost.suoneria Memoria Libera Toni di avviso Vibrazione Attenzione: I „Servizi di rete“ devono essere supportati dalla rete del vostro operatore ed in alcuni casi soggetti ad abbonamento con l’operatore stesso. * non disponibile in Italia Simboli del display A seconda dello stato operativo in cui vi trovate, sopra i tasti del display possono apparire i seguenti simboli: Tasti del display Significato ¨ Tasto del menu: in stand by apre il menu generale . Aprire un menu dipendente dallo stato operativo durante la conversazione. Z Scegliere e confermare la funzione del menu. Concludere l’immissione e salvare. W Tasto di cancellazione (backspace): cancellare da destra a sinistra. { Tasto di ripetizione della selezione: apre la lista degli ultimi cinque numeri selezionati. I Indicazione della presenza di SMS*, messaggi della segreteria telefonica**, numeri nella lista delle chiamate. Í Tornare al menu precedente, annullare. * non disponibile in Italia ** se prevista nel vostro modello (o segreteria di rete) 3 Gigaset 4000 Micro, De-It-Fr-Sp-GB, A31008-G4000-B027-1- 4000COU.FM 06.05.02 Breve descrizione del portatile Istruzioni di sicurezza $ ! Utilizzare soltanto l’alimentatore in dotazione, come indicato sul lato inferiore dell’apparecchio. Utilizzare soltanto una batteria consigliata ricaricabile. Ciò significa, non utilizzare in nessun caso una batteria comune (non ricaricabile), poiché può causare danni alla salute e alle persone. ‹ Œ Inserire la batteria ricaricabile attenendosi alla polarità indicata. Utilizzare tipi di batteria riportati nelle presenti istruzioni d’uso. L’apparecchio può creare interferenze ad apparecchiature medicali. Osservare quindi le indicazioni presenti nell’ambiente in cui ci si trova (esempio ospedali ecc). Con apparecchi di ausilio all’udito, il cordless può causare dei fruscii molto fastidiosi. Non utilizzare il telefono in ambienti dove sussistono pericoli di esplosione (per esempio luoghi di verniciatura). Il cordless non è impermeabile (v. pag. 27). Ricordatevi che alla guida è proibito telefonare (modalità Walkie-Talkie). Se vi trovate a bordo di un aereo, spegnere il telefono (funzione Walkie-Talkie). Assicurarsi che non possa accendersi inavvertitamente. ƒ Se cedete il Gigaset a terze persone, fornite anche le istruzioni d’uso. Smaltire le batterie e il telefono secondo quanto prescritto dalle norme sulla tutela dell’ambiente. Le funzioni descritte nelle presenti istruzioni d’uso non sono disponibili in tutti i Paesi. 4 Gigaset 4000 Micro, De-It-Fr-Sp-GB, A31008-G4000-B027-1- 4000CoIVZ.fm 06.05.02 Indice Indice Breve descrizione del portatile . . . . . . . . . . . . . . . . . . . . . . . . . . . . . . . . . . . . . . . . . . . 2 Relazione tra tasto di navigazione e tasti del display . . . . . . . . . . . . . . . . . . . . . . . .2 Menu importanti . . . . . . . . . . . . . . . . . . . . . . . . . . . . . . . . . . . . . . . . . . . . . . . . . . .3 Simboli del display. . . . . . . . . . . . . . . . . . . . . . . . . . . . . . . . . . . . . . . . . . . . . . . . . .3 Preparare il portatile . . . . . . . . . . . . . . . . . . . . . . . . . . . . . . . . . . . . . . . . . . . . . . . . . . . . 6 Contenuto della confezione . . . . . . . . . . . . . . . . . . . . . . . . . . . . . . . . . . . . . . . . . . .6 Inserire la batteria . . . . . . . . . . . . . . . . . . . . . . . . . . . . . . . . . . . . . . . . . . . . . . . . . . . . . . . . . . . . . . . .6 Registrare il portatile . . . . . . . . . . . . . . . . . . . . . . . . . . . . . . . . . . . . . . . . . . . . . . . .6 Caricare la batteria . . . . . . . . . . . . . . . . . . . . . . . . . . . . . . . . . . . . . . . . . . . . . . . . . .7 Applicare la clip da cintura . . . . . . . . . . . . . . . . . . . . . . . . . . . . . . . . . . . . . . . . . . . .7 Impostare la data e l’ora . . . . . . . . . . . . . . . . . . . . . . . . . . . . . . . . . . . . . . . . . . . . .8 Bloccare/sbloccare la tastiera . . . . . . . . . . . . . . . . . . . . . . . . . . . . . . . . . . . . . . . . .8 Cambiare la lingua del display . . . . . . . . . . . . . . . . . . . . . . . . . . . . . . . . . . . . . . . .9 Telefonare . . . . . . . . . . . . . . . . . . . . . . . . . . . . . . . . . . . . . . . . . . . . . . . . . . . . . . . . . . . . . 9 Telefonare sulla linea esterna . . . . . . . . . . . . . . . . . . . . . . . . . . . . . . . . . . . . . . . . .9 Telefonare sulla linea interna . . . . . . . . . . . . . . . . . . . . . . . . . . . . . . . . . . . . . . . .10 Rispondere alle chiamate . . . . . . . . . . . . . . . . . . . . . . . . . . . . . . . . . . . . . . . . . . .10 Aprire la lista delle chiamate/messaggi* . . . . . . . . . . . . . . . . . . . . . . . . . . . . . . . .10 Viva voce . . . . . . . . . . . . . . . . . . . . . . . . . . . . . . . . . . . . . . . . . . . . . . . . . . . . . . .11 Trasferire le chiamate esterne, consultazione . . . . . . . . . . . . . . . . . . . . . . . . . . . .11 Ripetizione della selezione . . . . . . . . . . . . . . . . . . . . . . . . . . . . . . . . . . . . . . . . . . . . . . 12 Rubrica e rubrica speciale . . . . . . . . . . . . . . . . . . . . . . . . . . . . . . . . . . . . . . . . . . . . . . 13 Selezione rapida dalla rubrica speciale. . . . . . . . . . . . . . . . . . . . . . . . . . . . . . . . . .14 Uso della selezione rapida . . . . . . . . . . . . . . . . . . . . . . . . . . . . . . . . . . . . . . . . . . .14 Impostazioni . . . . . . . . . . . . . . . . . . . . . . . . . . . . . . . . . . . . . . . . . . . . . . . . . . . . . . . . . . 19 Impostare la sveglia. . . . . . . . . . . . . . . . . . . . . . . . . . . . . . . . . . . . . . . . . . . . . . . .19 Disattivare la sveglia . . . . . . . . . . . . . . . . . . . . . . . . . . . . . . . . . . . . . . . . . . . . . . .19 Spegnere la sveglia . . . . . . . . . . . . . . . . . . . . . . . . . . . . . . . . . . . . . . . . . . . . . . . .19 Impostare un appuntamento . . . . . . . . . . . . . . . . . . . . . . . . . . . . . . . . . . . . . . . .20 Volume di auricolare e altoparlante . . . . . . . . . . . . . . . . . . . . . . . . . . . . . . . . . . . .21 Attivare/disattivare i toni di avviso e di segnalazione. . . . . . . . . . . . . . . . . . . . . . .23 Attivare e disattivare l’allarme a vibrazione . . . . . . . . . . . . . . . . . . . . . . . . . . . . . .23 Attivare/disattivare la risposta automatica . . . . . . . . . . . . . . . . . . . . . . . . . . . . . .24 Ripristinare i parametri iniziali . . . . . . . . . . . . . . . . . . . . . . . . . . . . . . . . . . . . . . . .24 Babycall . . . . . . . . . . . . . . . . . . . . . . . . . . . . . . . . . . . . . . . . . . . . . . . . . . . . . . . . . . . . . . 24 Impostare il Babycall . . . . . . . . . . . . . . . . . . . . . . . . . . . . . . . . . . . . . . . . . . . . . . .25 Modalità Walkie-Talkie . . . . . . . . . . . . . . . . . . . . . . . . . . . . . . . . . . . . . . . . . . . . . . . . 26 Appendice . . . . . . . . . . . . . . . . . . . . . . . . . . . . . . . . . . . . . . . . . . . . . . . . . . . . . . . . . . . . 27 Funzionamento con le basi della gamma Gigaset . . . . . . . . . . . . . . . . . . . . . . . . .27 Cura . . . . . . . . . . . . . . . . . . . . . . . . . . . . . . . . . . . . . . . . . . . . . . . . . . . . . . . . . . . .27 Contatto con liquidi . . . . . . . . . . . . . . . . . . . . . . . . . . . . . . . . . . . . . . . . . . . . . . . .27 Portata . . . . . . . . . . . . . . . . . . . . . . . . . . . . . . . . . . . . . . . . . . . . . . . . . . . . . . . . . .28 Customer Care (servizio) . . . . . . . . . . . . . . . . . . . . . . . . . . . . . . . . . . . . . . . . . . .29 Lingue a display . . . . . . . . . . . . . . . . . . . . . . . . . . . . . . . . . . . . . . . . . . . . . . . . . .30 5 4000CO.FM Gigaset 4000 Micro, De-It-Fr-Sp-GB, A31008-G4000-B027-1-6419 06.05.02 Preparare il portatile Premere i tasti: Preparare il portatile Contenuto della confezione Portatile Gigaset 4000i Micro, una batteria, caricabatterie, clip da cintura, istruzioni d’uso. Inserire la batteria et as Gig 00 40 icro m et as Gig 00 40 icro m L'impostazione all'acquisto della lingua del display del vostro portatile è italiano. Per impostare la lingua desiderata, vedi pagina 9. Registrare il portatile Passo 1: © Aprire il menu. D åååååååååååååååååååååååååååååååå [ Scegliere e confermare. Impostazioni D åååååååååååååååååååååååååååååååå [ Scegliere e confermare. Reg. Portatile D [ Scegliere la base ( Base 1 , Base 2 , Base 3 o Base 4 ). o[ Digitare e confermare il PIN (impostazione all’acquisto: 0000) – viene visualizzato ad esempio Proced.Registraz Base 1 . Passo 2: Se la registrazione avviene sulla base del micro premere a lungo il tasto sul retro della base. Al portatile viene automaticamente assegnato il primo numero interno libero (1–3). Se tutti i numeri fossero già stati assegnati viene assegnato nuovamente il numero interno 3. A registrazione avvenuta il portatile torna in stand by. Sul display viene visualizzato il numero di interno (ad esempio “INT1“). 6 Gigaset 4000 Micro, De-It-Fr-Sp-GB, A31008-G4000-B027-1-6419 4000CO.FM 06.05.02 Preparare il portatile Premere i tasti: Gigaset Preparazione della base 4010/4015 Premere a lungo il tasto sul lato inferiore della base. 3010/3015 Premere il tasto pagingy della base fino a quando vengono emessi dei toni di segnalazione. 3020/25 3030/35 4030/35 Nel menu della base scegliere Impostazioni, Impostaz.Sistema e Reg.Portatile. Confermare con OK. 3070/75 4070/75 Premere l’indicatore LED – durante la registrazione lampeggia. Basi di Per registrare il portatile su “basi GAP“ conaltri sultare le rispettive istruzioni d’uso per la produttori preparazione della base. Caricare la batteria 5,5 Per caricare la batteria, lasciare il portatile per circa cinque ore nel caricabatteria. La carica viene indicata dal lampeggiamento del simbolo del livello di carica: La tabella dei tipi di batteria raccomandati è riportata nell’appendice ● ● Durante la carica, la batteria si riscalda; ciò è normale e non comporta pericoli. Affinché venga indicato l’esatto livello di carica, evitare di aprire inutilmente lo scomparto della batteria. Applicare la clip da cintura Appoggiare la clip sul lato posteriore del portatile e incastrare i gancetti laterali negli appositi fori. 7 Gigaset 4000 Micro, De-It-Fr-Sp-GB, A31008-G4000-B027-1-6419 4000CO.FM 06.05.02 Preparare il portatile Premere i tasti: Impostare la data e l’ora L’impostazione della data e dell’ora serve per vedere quando sono giunti i messaggi/le chiamate. © Aprire il menu. D åååååååååååååååååååååååååååååååå [ Scegliere e confermare. Appuntam/ora D åååååååååååååååååååååååååååååååå [ Scegliere e confermare. Impostare ora Viene visualizzata l’impostazione corrente. Inserire la data Inserire giorno/mese/anno. Nell’esempio: 20.05.2001. per esempio ŸÞÞ¢Þ] D Passare alla riga successiva. Inserire l’ora Inserire ore/minuti. Nell’esempio: ore 19.05. per esempio ] ¬ Þ ¢ D Passare alla riga successiva. Scegliere il formato Con il lato sinistro del tasto di navigazione scegliere il formato a 12 ore (am oppure pm) o il formato a 24 ore (impostazione all’acquisto). Salva Salvare. Bloccare/sbloccare la tastiera La tastiera del portatile può essere “bloccata“. Quando giunge una chiamata la tastiera si sblocca automaticamente e una volta terminata la conversazione si blocca di nuovo. ª Per bloccare/sbloccare la tastiera premere a lungo il tasto cancelletto Per rispondere alle chiamate premere il tasto c . 8 Gigaset 4000 Micro, De-It-Fr-Sp-GB, A31008-G4000-B027-1-6419 4000CO.FM 06.05.02 Telefonare Premere i tasti: Cambiare la lingua del display © Aprire il menu. D åååååååååååååååååååååååååååååååå [ Confermare la funzione. Impostazioni D åååååååååååååååååååååååååååååååå [ La lingua attiva riporta il segno ✓. Lingua D[ Scegliere la lingua desiderata e confermare. Una tabella è riportata all'ultima pagina di questo manuale.. Telefonare Telefonare sulla linea esterna o Comporre il numero di telefono. Se necessario correggere con il tasto del display X. c a Premere il tasto di impegno linea. Per terminare la conversazione, premere il tasto di fine chiamata. ● ● ● Potete anche inserire una pausa di selezione: dopo aver inserito il prefisso, con il tasto del display © aprire il menu e scegliere “Pausa“ . Potete anche premere dapprima il tasto di impegno linea c e comporre poi il numero di telefono – le cifre vengono selezionate immediatamente. In questo caso non è possibile inserire pause all’interno del numero. Con il tasto di fine chiamata a potete interrompere la selezione. 9 Gigaset 4000 Micro, De-It-Fr-Sp-GB, A31008-G4000-B027-1-6419 4000CO.FM 06.05.02 Telefonare Premere i tasti: Telefonare sulla linea interna F Aprire la lista dei portatili registrati. Il proprio apparecchio presenta il segno “<“ . D E c Scegliere il portatile da chiamare e premere il tasto di impegno linea. oppure per esempio opp. An alle Ÿ Inserire il numero interno del portatile da chiamare. c opp. « Squillano tutti i portatili. a Per terminare la conversazione, premere il tasto di fine chiamata. Quando compare per alcuni secondi il numero dell’interno con il messaggio ”non raggiungibile“ significa che il vostro interlocutore ha chiuso la conversazione. Rispondere alle chiamate Il vostro telefono squilla e il LED di stato lampeggia. c/u Premere il tasto di impegno linea o quello del viva voce. opp. k Ö Sollevare il portatile dal caricabatteria (impostazione all’acquisto: “Risposta automatica“). Aprire la lista delle chiamate/messaggi* La presenza di nuove chiamate viene segnalata da un simbolo del display e dal lampeggiamento del LED di stato. ? Premere 10 Gigaset 4000 Micro, De-It-Fr-Sp-GB, A31008-G4000-B027-1-6419 4000CO.FM 06.05.02 Telefonare Premere i tasti: Viva voce Selezionare in viva voce o Selezionare il numero. u Premere il tasto viva voce. Quando il viva voce è attivato il tasto viva voceu e il LED di stato sono accesi. * non disponibile in tutti i Paesi Viva voce durante la conversazione u Attivare il viva voce. Per regolare il volume premere di nuovo il tasto viva voce u. F G Regolare il volume. Salva c a Salvare il volume impostato. Passare dal viva voce all’auricolare. Terminare la chiamata. Trasferire le chiamate esterne, consultazione Il telefono consente di trasferire le chiamate esterne ad un altro portatile o effettuare consultazioni interne. Premessa: siete in conversazione con un utente esterno: F Aprire la lista degli apparecchi interni. E D c Scegliere e chiamare l’utente interno. Quando l’utente interno risponde: ● Per trasferire la chiamata: premere il tasto a. ● Per terminare la consultazione interna: tornare all’utente esterno messo in attesa con Beenden. 11 Gigaset 4000 Micro, De-It-Fr-Sp-GB, A31008-G4000-B027-1-6419 4000CO.FM 06.05.02 Ripetizione della selezione Premere i tasti: Ripetizione della selezione Ripetizione manuale della selezione Il telefono memorizza gli ultimi cinque numeri selezionati. z D Aprire la lista dei numeri selezionati e scegliere quello desiderato. c Premere il tasto di impegno linea. Ripetizione automatica della selezione Questa funzione non è disponibile in tutti i Paesi. Durante la richiamata automatica il tasto viva voce lampeggia e si attiva l’altoparlante. La funzione si disattiva dopo dieci tentativi non riusciti o se nel frattempo viene svolta una conversazione telefonica. Se l’utente chiamato non è raggiungibile, premere Off o un tasto qualsiasi. zD Aprire la lista dei numeri selezionati e scegliere quello desiderato. © Aprire il menu. RichiamataAutom. [ Attivare. åååååååååååååååååååååååååååååååå c Quando l’utente risponde premere il tasto di impegno linea. Cancellare numeri dalla lista della ripetizione della selezione zD Aprire la lista dei numeri selezionati e scegliere quello desiderato. © Aprire il menu. D åååååååååååååååååååååååååååååååå [ Il numero di telefono viene cancellato. Cancellazione 12 Gigaset 4000 Micro, De-It-Fr-Sp-GB, A31008-G4000-B027-1-6419 4000CO.FM 06.05.02 Rubrica e rubrica speciale Premere i tasti: Registrare un numero nella rubrica zD Aprire la lista dei numeri selezionati e scegliere quello desiderato. © Aprire il menu. D åååååååååååååååååååååååååååååååå Copia in Rubrica [ Il numero viene registrato. o Se necessario, inserire il nome (eventualmente inserire l’anniversario, v. pag. 18). Per inserire lettere e segni v. pag. 15. © Aprire il menu. [ Salvare. Salva åååååååååååååååååååååååååååååååå Rubrica e rubrica speciale* La rubrica D vi facilita e rende più rapida la selezione di 200 numeri di telefono. Nella rubrica speciale C potete registrare i prefissi (Call-by-Call)* degli operatori di rete e telefonare così a tariffe più convenienti. L’uso delle due rubriche è uguale. Registrare un numero D / C Aprire la rubrica/rubrica speciale. [ Scegliere e confermare. Nuova voce åååååååååååååååååååååååååååååååå o Inserire il numero di telefono. D o Passare al campo del nome e inserire il nome. Nella rubrica inserire eventualmente anche l’anniversario, vedi anche pag.18; ciò non è possibile nella rubrica speciale. © Aprire il menu. [ Memorizzare la voce. Salva åååååååååååååååååååååååååååååååå * * non disponibile in tutti i Paesi 13 Gigaset 4000 Micro, De-It-Fr-Sp-GB, A31008-G4000-B027-1-6419 4000CO.FM 06.05.02 Rubrica e rubrica speciale Premere i tasti: Selezionare numeri dalla rubrica D Aprire la rubrica. ^^ Inserire la prima lettera del nome (per esempio per la “E“ premere due volte il tasto ^ o scorrere conD. Dopo aver scelto il nome potete aprire anche il menu, scegliere Utilizza Numero , completare/modificare il numero. c Premere il tasto di impegno linea Selezionare i prefissi dalla rubrica speciale (Call-by-Call) C Aprire la rubrica speciale. D© Scegliere il numero Call-by-Call e aprire il menu. D åååååååååååååååååååååååååååååååå [ Scegliere e confermare. Utilizza Numero o Comporre il numero di telefono desiderato. c Premere il tasto di impegno linea, il numero viene selezionato. Selezione rapida dalla rubrica speciale Nella rubrica speciale possono essere registrati fino a otto numeri di selezione rapida. A tale riguardo, sempre seguendo la procedura “registra un numero“ anteporre al nome il numero di seleziona rapida (2–9). Esempio: numero di selezione rapida 2 prima del nome dell’operatore di rete. Uso della selezione rapida Ÿ Premere a lungo il tasto. Appare il prefisso dell’operatore in esso programmato. o Comporre il numero di telefono da aggiungere al prefisso. oppure DD [ Scegliere il numero dalla rubrica e confermare. c 14 Premere il tasto di impegno linea. 4000CO.FM Gigaset 4000 Micro, De-It-Fr-Sp-GB, A31008-G4000-B027-1-6419 06.05.02 Rubrica e rubrica speciale Premere i tasti: Tabella dei caratteri Premere più volte o a lungo il tasto corrispondente: ] 7x 8x 9x 10 x á à â ã ç ë é è ê ï í ì î ó ò ô õ ù û å 1x 2x 3x 4x 5x 6x spazio 1 â £ $ ¥ b c 2 ä e f 3 Ÿa ^ d ¡ g ¢j £ m ¤ p ¥t ¬ w « a→A Þ. ª # h i 4 k l 5 n o 6 ö ñ q r s 7 ß u v 8 ü ú x y z 9 ÿ ý æ ø * / ( ) < = > % , ? ! 0 + - : ¿ @ \ & § * Altri caratteri di questo tasto: ¡* “ ’ ;_ La prima lettera del nome è automaticamente maiuscola, quelle seguenti minuscole. Per cambiare scrittura (maiuscola/minuscola) limitatamente ad un carattere premere « . Spostare il cursore con F G E D. Cancellare con X I caratteri vengono inseriti a sinistra del cursore. Inserendo uno spazio prima del nome, la voce viene inserita all’inizio della rubrica (esempio: „ Carla“). Le voci vengono ordinate nel modo seguente: 1. spazio 3. lettere (in ordine alfabetico) 2. cifre (0–9) 4. segni restanti 15 Gigaset 4000 Micro, De-It-Fr-Sp-GB, A31008-G4000-B027-1-6419 4000CO.FM 06.05.02 Rubrica e rubrica speciale Premere i tasti: Visualizzare, modificare o cancellare una voce D/C Aprire la rubrica/rubrica speciale. D Scegliere la voce desiderata. Visualiz. Cambia Visualizzare tutte le informazioni riguardanti la voce. Aprire l’area da modificare. o Eventualmente modificare il numero di telefono. D o Passare al campo del nome e modificare il nome. Per inserire lettere e segni, v. pag. 15. Nella rubrica è possibile inserire eventualmente anche l’anniversario, v. pag. 18. © Aprire il menu. [ Confermare le modifiche. Salva åååååååååååååååååååååååååååååååå oppure D/C Aprire la rubrica/rubrica speciale. D Scegliere la voce che si desidera cancellare. © Aprire il menu. D åååååååååååååååååååååååååååååååå [ Viene emesso un tono di conferma. La voce viene canCancellazione cellata. 16 Gigaset 4000 Micro, De-It-Fr-Sp-GB, A31008-G4000-B027-1-6419 4000CO.FM 06.05.02 Rubrica e rubrica speciale Premere i tasti: Trasferire una voce ad un altro portatile Le voci possono essere trasferite da un portatile all’altro. D/C Aprire la rubrica/rubrica speciale. D Scegliere la voce desiderata. © Aprire il menu. D åååååååååååååååååååååååååååååååå [ Scegliere e confermare. Trasferisci D[ Scegliere l’interno a cui trasferire il numero e confermare. Per trasferire un’altra voce: Si Premere. D Scegliere la voce desiderata. Invio Avviare il trasferimento. Trasferire la rubrica/rubrica speciale Ad un altro portatile micro/comfort può essere trasferita anche l’intera rubrica/rubrica speciale scegliendo, nel menu al posto di “trasferisci“ “trasfer. tutto “ . Il trasferimento viene interrotto nei seguenti casi: ● ● se la memoria del portatile di destinazione è esaurita, se viene ricevuta una chiamata. Il trasferimento della voce in corso viene portato a termine. Cancellare la rubrica/rubrica speciale D/C Aprire la rubrica/rubrica speciale. D Scegliere la voce desiderata. © Aprire il menu. D åååååååååååååååååååååååååååååååå [ Scegliere e confermare. Cancella Tutto Si Confermare la cancellazione di tutte le voci. 17 Gigaset 4000 Micro, De-It-Fr-Sp-GB, A31008-G4000-B027-1-6419 4000CO.FM 06.05.02 Rubrica e rubrica speciale Premere i tasti: Inserire anniversari (per esempio compleanni) Il telefono vi consente di memorizzare date da ricordare che vi verranno segnalate alla scadenza della data e ora impostate. D Aprire la rubrica. DVisualiz. Scegliere e visualizzare la voce. Cambia Aprire il numero a cui associare la data da ricordare. D Spostare il cursore nel campo del compleanno/anniversario (il cursore scompare). Cambia Confermare. o Inserire o modificare la data (giorno/mese). Do Passare alla riga successiva e inserire l’ora. D Passare alla riga successiva. F G Scegliere il tipo di segnalazione desiderata (ottica o il tipo di melodia). [ Salvare, accanto al nome compare una torta. Entrando nella procedura di modifica dell’anniversario con il tasto del display Cancella potete cancellare l’impostazione della data da ricordare. 18 Gigaset 4000 Micro, De-It-Fr-Sp-GB, A31008-G4000-B027-1-6419 4000CO.FM 06.05.02 Impostazioni Premere i tasti: Impostazioni Impostare la sveglia Se nel portatile è impostata la sveglia (simbolo ¼), essa suonerà tutti i giorni alla stessa ora. Il portatile è in stand by © Aprire il menu. D åååååååååååååååååååååååååååååååå [ Scegliere e confermare. Appuntam/ora D åååååååååååååååååååååååååååååååå [ Scegliere e confermare. Sveglia Appare l’impostazione attuale. F G Scegliere On . D Passare alla riga successiva. Þ £Þ Þ Inserire ore/minuti. Nell’esempio: ore 6.00. D Passare alla riga successiva. F G Scegliere la melodia della sveglia. Salva Memorizzare l’impostazione. Se è attivata la funzione Babycall o la ripetizione automatica della selezione, la sveglia non viene segnalata. Disattivare la sveglia La sveglia è impostata e volete disattivarla. © Aprire il menu. D åååååååååååååååååååååååååååååååå [ Scegliere e confermare. Appuntam/ora D åååååååååååååååååååååååååååååååå [ Scegliere e confermare. Sveglia F G Scegliere Salva Off . Memorizzare l’impostazione. Spegnere la sveglia La sveglia viene segnalata come una chiamata in entrata. Per spegnerla premere un tasto a piacere. 19 Gigaset 4000 Micro, De-It-Fr-Sp-GB, A31008-G4000-B027-1-6419 4000CO.FM 06.05.02 Impostazioni Premere i tasti: Impostare un appuntamento Nel portatile potete anche impostare un appuntamento. Esso viene indicato dal simbolo ¼. Il portatile è in stand by. © Aprire il menu. D åååååååååååååååååååååååååååååååå [ Scegliere e confermare. Appuntam/ora [ Scegliere e confermare. Inserire Appunt. åååååååååååååååååååååååååååååååå F G Scegliere On per attivare la funzione di appunta- mento. D Passare alla riga successiva. Ÿ Þ Þ ¢ Inserire il giorno/mese, nell’esempio: 20 maggio. D Passare alla riga successiva. Þ ¬ ^ Þ Inserire ore/minuti, nell’esempio: ore 9.30. D Passare alla riga successiva. F G Scegliere la melodia della suoneria. Salva Memorizzare l’impostazione. L’appuntamento viene segnalato solo se il portatile è in stand by. Se è attivata la funzione Babycall o la ripetizione automatica della selezione, l’appuntamento non viene segnalato. Spegnere la segnalazione dell’appuntamento L’appuntamento viene segnalato come una chiamata in entrata. Lo squillo può essere interrotto premendo un tasto qualsiasi. 20 Gigaset 4000 Micro, De-It-Fr-Sp-GB, A31008-G4000-B027-1-6419 4000CO.FM 06.05.02 Impostazioni Premere i tasti: Appuntamenti e anniversari scaduti Appuntamenti e anniversari segnalati dal telefono in vostra assenza, vengono salvati in una lista. Un nuovo appuntamento/anniversario scaduto in vostra assenza viene visualizzato con Appunt.. Premere il tasto destro del display; viene visualizzata la lista degli eventi, scaduti. In seguito scegliere Appunt.Scaduto ¼ e confermare con [. Se si desidera visualizzare nuovamente l’appuntamento già visto, procedere come descritto qui di seguito: © Aprire il menu. D åååååååååååååååååååååååååååååååå [ Scegliere e confermare. Appuntam/ora D åååååååååååååååååååååååååååååååå [ Scegliere e confermare. Appunt. Scaduti D[ Scegliere l’appuntamento ¼ o l’anniversario ‚ scaduti. Vengono visualizzate data e ora dell’evento. Con il tasto del display Cancella si può cancellare l’appuntamento/anniversario scaduto. Volume di auricolare e altoparlante © Aprire il menu. D åååååååååååååååååååååååååååååååå [ Scegliere il menu. Audio [ Viene emesso un tono con il volume impostato. Volume telefono åååååååååååååååååååååååååååååååå F G Impostare il volume desiderato per il viva voce. D Passare alla riga successiva. F G Salva Scegliere e confermare il livello desiderato come volume dell’auricolare. 21 Gigaset 4000 Micro, De-It-Fr-Sp-GB, A31008-G4000-B027-1-6419 4000CO.FM 06.05.02 Impostazioni Premere i tasti: Impostare il volume/la melodia della suoneria Potete scegliere tra cinque volumi della suoneria, “Crescendo“ (aumento progressivo del volume), Suoneria spenta e tra dieci melodie: © Aprire il menu. D åååååååååååååååååååååååååååååååå [ Scegliere e confermare. Audio D åååååååååååååååååååååååååååååååå [ La suoneria si attiva sul volume impostato e viene Impost.suoneria visualizzato il livello attuale. F G Scegliere il volume desiderato. D Passare alla riga successiva. F G Salva Scegliere e confermare la melodia desiderata (1–10). Controllo a tempo del volume della suoneria Per determinati orari potete impostare un volume diverso della suoneria. © Aprire il menu. D åååååååååååååååååååååååååååååååå [ Scegliere e confermare. Audio D åååååååååååååååååååååååååååååååå [ La suoneria si attiva sul volume impostato e viene Impost.suoneria visualizzato il livello attuale. C.Tempo Premere. F G Attivare/disattivare il controllo a tempo. Do Inserire l’orario desiderato. per esempio ]]ÞÞ ]¢ÞÞ (dalle ore 11:00 alle15:00.) DF G Passare alla riga successiva e impostare il volume desiderato. Salva Salva opp. 22 a Memorizzare l’impostazione. Premere. Gigaset 4000 Micro, De-It-Fr-Sp-GB, A31008-G4000-B027-1-6419 4000CO.FM 06.05.02 Impostazioni Premere i tasti: Attivare/disattivare i toni di avviso e di segnalazione ● ● Tono tasti: la pressione dei tasti viene confermata acusticamente. Toni di conferma: tono di conferma (sequenza crescente) che viene emesso alla fine di un’operazione/ impostazione e quando viene riposto il portatile nel caricabatteria. Tono d’errore (sequenza decrescente) in caso di operazioni errate. ● Tono di avviso batteria scarica: segnala che la carica della batteria sta per esaurirsi. © Aprire il menu. D åååååååååååååååååååååååååååååååå [ Scegliere e confermare. Audio D åååååååååååååååååååååååååååååååå [ Scegliere e confermare. Toni di avviso D Scegliere la funzione desiderata. F G Scegliere On , Off oppure in conv. (tono di avviso batteria scarica durante la conversazione). Salva Memorizzare l’impostazione. Attivare e disattivare l’allarme a vibrazione Per non essere disturbati dalla suoneria, al suo posto si può attivare l’allarme a vibrazione del portatile. Esso può anche essere attivato contemporaneamente alla suoneria (ad esempio in ambienti rumorosi). © Aprire il menu. D åååååååååååååååååååååååååååååååå [ Scegliere e confermare. Audio D åååååååååååååååååååååååååååååååå [ Scegliere e confermare. Vibrazione ½ L’impostazione corrente è contrassegnata da ✓. La suoneria si può spegnere con una lunga pressione del tasto «. Così facendo sarà attivo solo l’allarme a vibrazione. 23 Gigaset 4000 Micro, De-It-Fr-Sp-GB, A31008-G4000-B027-1-6419 4000CO.FM 06.05.02 Babycall Premere i tasti: Attivare/disattivare la risposta automatica Se la funzione è attivata per rispondere alle chiamate basta sollevare il portatile dal caricabatteria, senza dover premere il tasto di impegno linea c (impostazione all’acquisto). © Aprire il menu. Impostazioni D åååååååååååååååååååååååååååååååå [ Scegliere e confermare. RispostaAutomat [ Attivare/disattivare con [ D åååååååååååååååååååååååååååååååå (✓ = funzione attivata). Ripristinare i parametri iniziali La rubrica, la rubrica speciale e la lista delle chiamate non vengono cancellate. Il portatile resta registrato nella base. © Aprire il menu. Impostazioni D åååååååååååååååååååååååååååååååå [ Scegliere e confermare. Reset Portatile D åååååååååååååååååååååååååååååååå [ Scegliere e confermare. Si Confermare la richiesta. Funzione Volume dell’auricolare Volume della suoneria Melodia della suoneria Risposta automatica Tono di avviso batteria scarica Volume del viva voce Livello Babycall Controllo a tempo Lingua del display Allarme a vibrazione Parametri iniziali 1 5 1 attivata attivato 3 elevato disattivato del Paese disattivato Babycall Il portatile vi consente di controllare la camera del vostro bambino da un altro luogo. La distanza fra il portatile e il bambino deve essere di almeno 1 o 2 metri. Una volta raggiunto un determinato livello di rumore (per esempio il bambino piange), il portatile seleziona automaticamente il numero interno o esterno da voi programmato. Quando è attivata la funzione Babycall, le chiamate in entrata vengono segnalate solo sul display. 24 Gigaset 4000 Micro, De-It-Fr-Sp-GB, A31008-G4000-B027-1-6419 4000CO.FM 06.05.02 Babycall Premere i tasti: Impostare il Babycall © Aprire il menu. D åååååååååååååååååååååååååååååååå BabyC o WalkieT [ Scegliere e confermare. D åååååååååååååååååååååååååååååååå [ Scegliere e confermare. Baby Call F G Scegliere On oppure Off D Passare alla riga successiva. Cambia Aprire il campo di inserimento del numero di telefono a cui inviare l’allarme. Cancellare con X eventuali numeri esterni già presenti. Cancellare con Si eventuali numeri interni già presenti. F o Aprire la lista degli apparecchi interni e scegliere il numero interno. [ Salvare il numero di telefono. oppure D Aprire la rubrica. D [ Scegliere il numero esterno. © Aprire il menu. [ Confermare l’impostazione. Salva åååååååååååååååååååååååååååååååå D Passare alla riga successiva. F G Impostare il livello “alto“ o “basso“. Salva Memorizzare l’impostazione. Con il tasto del display Off potete disattivare la funzione Babycall. Dall’esterno (per esempio dal “cellulare“) potete disattivare la funzione Babycall. Rispondere alla chiamata instaurata dalla funzione Babycall. Disattivare con ¬ª. La funzione Babycall è disattivata e non instaura più chiamate, sul display apparirà: allarme a:off. 25 Gigaset 4000 Micro, De-It-Fr-Sp-GB, A31008-G4000-B027-1-6419 4000CO.FM 06.05.02 Modalità Walkie-Talkie Premere i tasti: Modalità Walkie-Talkie Premessa: I portatili hanno le stesse impostazioni della base (per esempio Staz.Migliore), o non sono registrati su nessuna stazione (la modalità Walkie-Talkie riduce notevolmente l’autonomia della batteria). Nella modalità Walkie-Talkie i portatili non possono ricevere chiamate. Attivare la modalità Walkie-Talkie © Aprire il menu. D åååååååååååååååååååååååååååååååå BabyC o WalkieT [ Scegliere la funzione. D åååååååååååååååååååååååååååååååå [ Attivare la modalità Walkie-Talkie. Walkie-Talkie Con il tasto del display Off può essere disattivata. Uso della modalità Walkie-Talkie Due portatili sono nella modalità Walkie: Il portatile che chiama: Chiama Premere. Il portatile chiamato: La chiamata viene segnalata sul display con un messaggio. Mute La suoneria viene disattivata. c Premere. I due portatili sono collegati. a 26 Premere. La conversazione è terminata. Gigaset 4000 Micro, De-It-Fr-Sp-GB, A31008-G4000- 4000CO.FM 06.05.0 Appendice Appendice Funzionamento con le basi della gamma Gigaset Gigaset serie 1000/2000/3000 Le basi delle serie Gigaset suindicate non supportano le seguenti funzioni dei portatili 4000i Micro/Comfort. ● ● ● ● Impostazione dell’ora (se l’ora e’ inserita viene persa spegnendo il portatile) Impostazione della lingua Babycall (non può essere disattivato dall’esterno) Trasmissione SMS* Gigaset 4010/4015 Classic Queste basi non supportano le seguenti funzioni dei portatili 4000i Micro/Comfort. ● ● ● Impostazione della lingua Trasmissione SMS* Impostazione delle abilitazioni alla selezione * Funzione non compatibile con il servizio attualmente disponibile in Italia Cura Pulire la base e il telefono portatile con un panno umido o antistatico. Non utilizzare in nessun caso un panno asciutto poichè creando cariche elettrostatiche si potrebbe danneggiare l’apparato. Contatto con liquidi ! Se il portatile dovesse essere venuto a contatto con dei liquidi, non accenderlo in nessun caso. Estrarre immediatamente tutte le batterie. Lasciar defluire il liquido dall'apparecchio ed asciugare quindi tutte le parti con un panno. Lasciare il portatile per almeno 72 ore in un luogo asciutto e caldo. A questo punto, in molti casi è possibile rimetterlo in funzione. 27 Gigaset 4000 Micro, De-It-Fr-Sp-GB, A31008-G4000-B027-1-6419 4000CO.FM 06.05.02 Appendice Batterie raccomandate Nichel-metal-idrato (NiMH) , 500 mAh. Lithium ion, 600 mAh Il Gigaset 4010 Micro utilizza la stessa batteria dei cellulari C35-M35 (codice: L36880-N4001-A100) ed è compatibile con la batteria del cellulare S35 agli ioni di litio (suggerita qualora sia richiesta una autonomia particolarmente lunga (codice: L36880-N4001-A101) Autonomia/tempi di ricarica del portatile*: Capacità (mAh) Autonomia in stand by (ore) Autonomia in conversazione (ore) Tempi di ricarica (ore) 500 fino a 300 circa 16 circa 5,5 Dopo alcuni anni la capacità di ricarica della batteria e quindi l’autonomia del portatile si riducono a causa dell’usura della batteria stessa.* * L’autonomia indicata si riferisce a una batteria nuova Portata All’aperto la portata è di circa 300 metri. In ambienti chiusi può arrivare fino a 50 metri tuttavia in questo caso la distanza raggiungibile è influenzata moltissimo dall’ambiente d’uso (per esempio presenza di cemento armato). Stazione di ricarica da tavolo La stazione di ricarica da tavolo per alcuni modelli di telefoni cellulari Siemens, può essere usata anche per caricare il proprio portatile. (Accessorio per i cellulari C45, ME45, S45) codice L36880-N4501-A101 ½ 28 Quando si carica un portatile Gigaset nella stazione di ricarica da tavolo per cellulari, fintantoché esso si troverà nella stazione, non verrà caricata la batteria di riserva. La spia LED di ricarica è sempre accesa. Gigaset 4000 Micro, De-It-Fr-Sp-GB, A31008-G4000- 4000CO.FM 06.05.0 Appendice Customer Care (servizio) Per quanto riguarda le domande tecniche e quelle relative all'uso dell'apparecchio, potete avere un supporto semplice e senza complicazioni tramite il nostro sito Internet: www.my-siemens.com/customercare Nel caso sia necessaria una riparazione, rivolgetevi ad uno dei nostri centri di servizio. Numeri di telefono del servizio clienti: vedi la copertina di fondo Il portatile 4000i Micro gode di approvazioni per la Svizzera e per tutti i paesi della UE. La conformità dell’apparecchio alla Direttiva R&TTE (1999/05/CEE) è confermata dalla presenza del marchio CE. È possibile richiedere copia integrale della dichiarazione di conformità alla Direttiva R&TTE (1999/05/CEE) al servizio clienti. 29 Gigaset 4000 Micro, De-It-Fr-Sp-GB, A31008-G4000-B027-1-6419 4000CO.FM 06.05.02 Appendice Lingue a display Durante la registrazione del portatile sulla stazione di base del Gigaset 4010i si possono impostare le lingue identificate con *: Einstellungen H/Set Settings Réglages comb. Impostazioni Ajuste terminal 30 Sprache Language Langue Lingua Idioma Deutsch English Français Italiano Español Gigaset 4000 Micro, De-It-Fr-Sp-GB, A31008-G4000- 4000co- 13.05.02 s Be inspired Mode d’emploi ! FRANÇAIIS et consignes de sécurité Gigaset 4000 Micro, De-It-Fr-Sp-GB, A31008-G4000-B027-1- 4000COU.FM 05.07.02 Présentation du combiné Présentation du combiné L’écran est protégé par un film. Retirez le film ! Ecran (affichage) LED état (DEL) Fixe : - en communication Clignotante : - Appel entrant - Nouveaux messages - Réveil, RDV, anniversaire Intensité réception Niveau de charge = vide U pleine clignotante : faible Touche de navigation Ñ Touche "Décrocher" – Accepter communic. – Composer un numéro – Passer de Mainslibres au combiné Touche Mains-libres e Annabella 19.07.01 { 13:13 ¨ Touche "Raccrocher" et "Marche/Arrêt" – Fin de communication – Annuler fonction en cours – Appuyer brièvement : Menu précédent ; Appui prolongé : retour Menu principal – Marche/Arrêt : (appui prolongé depuis l'état de repos) Journal des appelants Accès listes de messages Touche 1 Appui prolongé : sélection répondeur/messag. ext. Touche Etoile Appui prolongé pour activer/désactiver la sonnerie Touche dièse Verrouillage clavier : Appui prolongé pour activer/désactiver Ouvrir l’annuaire Touches écran En relation avec les symboles affichés à l’écran Touche spéciale Microphone Prise – pour micro-casque, lecteur MP3 – Appui bref : Annuaire spécial – Appui prolongé: Fonction "R" Touche de navigation et touches écran Touches écran Navigateur INT A l’aide des touches écran, vous pouvez exécuter les fonctions en relation avec les logos qui s'affichent à l'écran. ces fonctions peuvent en partie être aussi exécutées à partir de la touche de navigation. Le côté de la touche de navigation, sur lequel vous appuyez est représenté dans le mode d'emploi par des flèches comme ci-dessous : F / G (gauche/droite) E / D (haut/bas) Appuyer sur la flèche sombre 2 Gigaset 4000 Micro, De-It-Fr-Sp-GB, A31008-G4000-B027-1- 4000COU.FM 05.07.02 Présentation du combiné Menus importants © D SMS/Messg. txt * <Nouv. entrée> Services réseau Anna Famille/Loisirs Barbara RDV/Heure Claus : Sons / Audio © OKƒ Coûts Réglages comb. Utiliser le N° Réglages base Effacer entrée Répondeur Copier entrée Effacer liste Volume écoute Copier liste Régl. Sonnerie Mémoire dispo. Tonal. avertis. Symboles à l’écran Selon les situations, les symboles suivants s’affichent au-dessus des touches écran : Touches écran Signification ¨ Touche Menu : en mode veille, sélectionner le menu général ; en cours de communication, sélectionner le menu contextuel. Z Valider la fonction menu sélectionnée. Fin de la saisie et enregistrement. W Touche Effacer (retour arrière) : effacer les entrées de la droite vers la gauche. { Touche Bis : ouvrir la liste des 5 derniers numéros composés. I Journal des appelants; liste des messages (Répondeur / Messagerie externe) / SMS* Í Menu précédent, annuler * * Attention ! Selon les pays et les réseaux, certaines fonctions dans les menus peuvent être masquées car localement inopérantes (exemple SMS= Service de messages courts). 3 Gigaset 4000 Micro, De-It-Fr-Sp-GB, A31008-G4000-B027-1- 4000COU.FM 05.07.02 Consignes de sécurité Consignes de sécurité $ ! Utiliser exclusivement le bloc-secteur fourni comme indiqué sous la base par le symbole. Utiliser uniquement une batterie homologuée (rechargable)! Ne jamais utiliser une pile normale (non rechargeable) qui peut endommager l'appareil, représenter un risque pour la santé et provoquer des blessures. ‹ Placer la batterie en respectant la polarité Œ Utiliser le type de batterie indiqués dans le Mode d’emploi Le combiné peut perturber le fonctionnement de certains équipements médicaux. Tenir compte des recommandations émises à ce sujet par le corp médical. Le combiné peut provoquer un bourdonnement désagréable dans les aides auditives. De façon générale ne pas placer d'appareil électronique à proximité immédiate du téléphone Ne pas utiliser le téléphone dans un environnement présentant un risque d’explosion (p. ex. ateliers industriels de peinture). Le combiné n’est pas protégé contre les projections d’eau. Ne pas utiliser en milieu humide (salle de bains, douche, buanderie etc.) Ne pas installer le téléphone en extérieur (voir page 31). Ne jamais téléphoner en conduisant (fonction Talkie-Walkie). Désactiver le téléphone lorsque vous êtes dans un avion (fonction Talkie-Walkie). Empêcher une remise en marche involontaire. ƒ Lorsque vous confiez votre Gigaset à un tiers, toujours joindre le mode d’emploi. Bien respecter les règles concernant la protection de l’environnement lorsque vous mettez au rebut le téléphone et la batterie. Ne pas jeter ces dernières au feu, ni les ouvrir ou les mettre en court-circuit. Toutes les fonctions décrites dans ce mode d’emploi ne sont pas nécessairement disponibles dans tous les pays. 4 Gigaset 4000 Micro, De-It-Fr-Sp-GB, A31008-G4000-B027-1- 4000CoIVZ.fm 05.07.02 Sommaire Sommaire Présentation du combiné . . . . . . . . . . . . . . . . . . . . . . . . . . . . . . . . . . . . . . . . . . . . . . . . 2 Touche de navigation et touches écran. . . . . . . . . . . . . . . . . . . . . . . . . . . . . . . . . .2 Menus importants . . . . . . . . . . . . . . . . . . . . . . . . . . . . . . . . . . . . . . . . . . . . . . . . . .3 Symboles à l’écran . . . . . . . . . . . . . . . . . . . . . . . . . . . . . . . . . . . . . . . . . . . . . . . . .3 Consignes de sécurité. . . . . . . . . . . . . . . . . . . . . . . . . . . . . . . . . . . . . . . . . . . . . . . . . . . 4 Préparer le combiné . . . . . . . . . . . . . . . . . . . . . . . . . . . . . . . . . . . . . . . . . . . . . . . . . . . . 7 Contenu de l’emballage. . . . . . . . . . . . . . . . . . . . . . . . . . . . . . . . . . . . . . . . . . . . . .7 Insérer la batterie . . . . . . . . . . . . . . . . . . . . . . . . . . . . . . . . . . . . . . . . . . . . . . . . . . . . . . . . . . . . . . . .7 Inscrire un combiné . . . . . . . . . . . . . . . . . . . . . . . . . . . . . . . . . . . . . . . . . . . . . . . . .7 Charger la batterie . . . . . . . . . . . . . . . . . . . . . . . . . . . . . . . . . . . . . . . . . . . . . . . . . .8 Fixer le clip ceinture . . . . . . . . . . . . . . . . . . . . . . . . . . . . . . . . . . . . . . . . . . . . . . . .9 Régler la date et l’heure . . . . . . . . . . . . . . . . . . . . . . . . . . . . . . . . . . . . . . . . . . . . .9 Affichage : choisir la langue. . . . . . . . . . . . . . . . . . . . . . . . . . . . . . . . . . . . . . . . . .10 Téléphoner . . . . . . . . . . . . . . . . . . . . . . . . . . . . . . . . . . . . . . . . . . . . . . . . . . . . . . . . . . . 11 Appel externe . . . . . . . . . . . . . . . . . . . . . . . . . . . . . . . . . . . . . . . . . . . . . . . . . . . .11 Appeler en interne. . . . . . . . . . . . . . . . . . . . . . . . . . . . . . . . . . . . . . . . . . . . . . . . .11 Accepter un appel entrant . . . . . . . . . . . . . . . . . . . . . . . . . . . . . . . . . . . . . . . . . .12 Journal des appelants/messages . . . . . . . . . . . . . . . . . . . . . . . . . . . . . . . . . . . . .12 Mains-libres . . . . . . . . . . . . . . . . . . . . . . . . . . . . . . . . . . . . . . . . . . . . . . . . . . . . . .12 Double appel interne/Transfert . . . . . . . . . . . . . . . . . . . . . . . . . . . . . . . . . . . . . . .13 Répétition de la numérotation (Bis) . . . . . . . . . . . . . . . . . . . . . . . . . . . . . . . . . . . . . . 13 Annuaire et Annuaire spécial . . . . . . . . . . . . . . . . . . . . . . . . . . . . . . . . . . . . . . . . . . . 15 Annuaire spécial : touches de raccourci . . . . . . . . . . . . . . . . . . . . . . . . . . . . . . . .16 Annuaire spécial : numérotation rapide (Touches de raccourci). . . . . . . . . . . . . . . . . . . . . . . . . . . . . . . . . . . . . . . . . . . . . .16 Réglages . . . . . . . . . . . . . . . . . . . . . . . . . . . . . . . . . . . . . . . . . . . . . . . . . . . . . . . . . . . . . 21 Réveil : régler. . . . . . . . . . . . . . . . . . . . . . . . . . . . . . . . . . . . . . . . . . . . . . . . . . . . .21 Réveil : désactiver . . . . . . . . . . . . . . . . . . . . . . . . . . . . . . . . . . . . . . . . . . . . . . . . .21 Réveil : arrêt de la sonnerie . . . . . . . . . . . . . . . . . . . . . . . . . . . . . . . . . . . . . . . . . .21 Rendez-vous (RDV) : activer . . . . . . . . . . . . . . . . . . . . . . . . . . . . . . . . . . . . . . . . .22 5 Gigaset 4000 Micro, De-It-Fr-Sp-GB, A31008-G4000-B027-1- 4000CoIVZ.fm 05.07.02 Sommaire Sons/Audio . . . . . . . . . . . . . . . . . . . . . . . . . . . . . . . . . . . . . . . . . . . . . . . . . . . . . . . . . . . 24 Volume d'écoute du combiné Volume du haut-parleur mains-libres . . . . . . . . . . . . . . . . . . . . . . . . . . . . . . . . . . .24 Tonalités d'avertissement . . . . . . . . . . . . . . . . . . . . . . . . . . . . . . . . . . . . . . . . . . .25 Vibreur : activer/désactiver . . . . . . . . . . . . . . . . . . . . . . . . . . . . . . . . . . . . . . . . . .26 Réglages combiné . . . . . . . . . . . . . . . . . . . . . . . . . . . . . . . . . . . . . . . . . . . . . . . . . . . . . 27 Décroché automatique . . . . . . . . . . . . . . . . . . . . . . . . . . . . . . . . . . . . . . . . . . . . .27 Réinitialisation du combiné (retour à la configuration usine) . . . . . . . . . . . . . . . . . . . . . . . . . . . . . . . . . . . . . . .27 Famille/Loisirs . . . . . . . . . . . . . . . . . . . . . . . . . . . . . . . . . . . . . . . . . . . . . . . . . . . . . . . . . 28 Surveillance de pièce. . . . . . . . . . . . . . . . . . . . . . . . . . . . . . . . . . . . . . . . . . . . . . .28 Paramétrer la Surveillance de pièce . . . . . . . . . . . . . . . . . . . . . . . . . . . . . . . . . . .28 Mode Talkie-Walkie . . . . . . . . . . . . . . . . . . . . . . . . . . . . . . . . . . . . . . . . . . . . . . . . . . . 29 Annexe . . . . . . . . . . . . . . . . . . . . . . . . . . . . . . . . . . . . . . . . . . . . . . . . . . . . . . . . . . . . . . . 30 Utilisation sur les bases de la gamme Gigaset . . . . . . . . . . . . . . . . . . . . . . . . . . .30 Entretien . . . . . . . . . . . . . . . . . . . . . . . . . . . . . . . . . . . . . . . . . . . . . . . . . . . . . . . .31 Contact avec les liquides . . . . . . . . . . . . . . . . . . . . . . . . . . . . . . . . . . . . . . . . . . .31 Portée . . . . . . . . . . . . . . . . . . . . . . . . . . . . . . . . . . . . . . . . . . . . . . . . . . . . . . . . . .31 Service Clients . . . . . . . . . . . . . . . . . . . . . . . . . . . . . . . . . . . . . . . . . . . . . . . . . . .32 Langues d'affichage . . . . . . . . . . . . . . . . . . . . . . . . . . . . . . . . . . . . . . . . . . . . . . .33 6 Gigaset 4000 Micro, De-It-Fr-Sp-GB, A31008-G4000-B027-1-6419 4000co.fm 05.07.02 Préparer le combiné Appuyer sur les touches: Préparer le combiné Contenu de l’emballage Combiné Gigaset 4000i Micro, une batterie, chargeur, clip ceinture, mode d’emploi. Insérer la batterie et as Gig 00 40 icro m et as Gig 00 40 icro m A la livraison, la langue d'affichage de votre combiné est l'italien. Pour paramétrer la langue souhaitée, voir page 10. Inscrire un combiné Etape 1 © Ouvrir le menu. D åååååååååååååååååååååååååååååååå [ Sélectionner et valider. Réglages comb. D åååååååååååååååååååååååååååååååå [ Sélectionner et valider. Inscrire comb. D [ Sélectionner la base ( Base 1 , Base 2 , Base 3 ou Base 4 ). o[ Entrer le code PIN et valider (configuration usine : 0000) – Affichage de Processus Inscr. Base 1 p. ex. Etape 2 Appuyer de manière prolongée sur la touche au dos de la base. Il est attribué au combiné le numéro interne libre suivant (1–3). Si tous les emplacements sont déjà occupés, le numéro interne 6 est remplacé. Une fois l’inscription effectuée avec succès, le combiné se replace en position de veille. L’écran affiche le numéro interne (p. ex. "INT1"). 7 Gigaset 4000 Micro, De-It-Fr-Sp-GB, A31008-G4000-B027-1-6419 4000co.fm 05.07.02 Préparer le combiné Appuyer sur les touches : Gigaset Préparation sur la base ou sur le téléphone 4010/4015 Appuyer sur la touche située sous la base. 3010/3015 Maintenir appuyée la touche grise de la base jusqu’à ce que vous entendiez le signal sonore. 3020/25 3030/35 4030/35 Dans le menu du téléphone de base, sélectionner Réglages, Régl. système et Inscrire puis valider avec OK. 3070/75 4070/75 Appuyer sur le voyant vert allumé (LED). Celui-ci clignote alors durant toute la phase de déclaration. Bases Pour déclarer le combiné sur d’autres "bases d’autres GAP" conformez-vous au Mode d’emploi construc- correspondant (étapes 2 et 3). teurs Charger la batterie Pour charger la batterie, laisser le combiné sur la base durant environ 5,5 heures ; à la li5,5 vraison, la batterie n’est pas chargée. Le chargement de la batterie est signalé sur le combiné par le clignotement du témoin de charge : Une liste des batteries préconisées figure en annexe. ● ● 8 La batterie s’échauffe durant la charge ; il s’agit d’un phénomène normal et sans danger. Afin que le niveau de charge de la batterie s’affiche correctement, vous devez éviter d’ouvrir inutilement le logement de la batterie. Gigaset 4000 Micro, De-It-Fr-Sp-GB, A31008-G4000-B027-1-6419 4000co.fm 05.07.02 Préparer le combiné Appuyer sur les touches: Fixer le clip ceinture Placer le clip ceinture à l’arrière du combiné et appuyer jusqu’à ce que les "ergots" disposés latéralement s’enclipsent dans les trous. Régler la date et l’heure Vous devez régler la date et l’heure afin que soit affiché correctement le moment de réception des messages/ appels. © Ouvrir le menu. D åååååååååååååååååååååååååååååååå [ Sélectionner et valider. RDV/Heure [ Sélectionner et valider. Date/Heure åååååååååååååååååååååååååååååååå Le réglage actuel s’affiche. Entrer la date Entrer le jour/le mois/l’année. Exemple ici : 20/05/2001. p. ex.ŸÞÞ¢Þ] D Sauter à la ligne suivante. Entrer l’heure Entrer les heures/minutes. Exemple ici : 19 h 05. p. ex. ] ¬ Þ ¢ D Sauter à la ligne suivante. Sélectionner le mode d’affichage F A l’aide du côté gauche de la touche de navigation, sélectionner le mode 12 heures (am ou pm) ou le mode 24 heures (configuration usine). Sauver Enregistrer les réglages. 9 Gigaset 4000 Micro, De-It-Fr-Sp-GB, A31008-G4000-B027-1-6419 4000co.fm 05.07.02 Préparer le combiné Appuyer sur les touches : Affichage : choisir la langue Les combinés supplémentaires sont universels et identiques quel que soit le pays de destination. ils sont configurés d'origine en langue Anglaise et doivent de ce fait être localement réglés lors de la mise en service. Pour ce faire suivre les instructions suivantes en s'aidant du tableau de correspondance. © Ouvrir le menu. D åååååååååååååååååååååååååååååååå [ Valider la fonction. Réglages comb. D åååååååååååååååååååååååååååååååå [ La langue activée est identifiée par ✓. Langue D[ Sélectionner la langue souhaitée et valider. Vous trouverez un tableau à la dernière page de cette brochure. Composer le numéro d’urgence Lorsque le verrouillage du clavier est activé, vous pouvez composer les numéros d’urgence enregistrés sur la base, voir mode d’emploi de la base. 10 Gigaset 4000 Micro, De-It-Fr-Sp-GB, A31008-G4000-B027-1-6419 4000co.fm 05.07.02 Téléphoner Appuyer sur les touches: Téléphoner Appel externe Cette fonction n'est possible que pour une configuration système multi-combinés (maxi 6 combinés déclarés sur la même base). o Entrer le numéro. Si nécessaire, corriger certains caractères avec la touche écran X. c a Appuyer sur la touche "Décrocher". Pour mettre fin à la communication, appuyer sur la touche "Raccrocher". ● ● ● Vous pouvez aussi appuyer tout d’abord sur la touche "Décrocher" c puis composer le numéro - chaque chiffre est numéroté directement. Appuyez sur la touche "Raccrocher" a pour annuler la numérotation. Vous pouvez insérer une pause interchiffre : après entrée du préfixe, à l’aide de la touche écran, ouvrez © le menu et sélectionnez "Insérer une pause". Appeler en interne Cette fonction n'est possible que pour une configuration système multi-combinés (maxi 6 combinés déclarés sur la même base). F Ouvrir la liste des usagers internes. Le combiné personnel est identifié par "<". D E c Sélectionner le combiné souhaité et appuyer sur la touche "Décrocher". ou p. ex. Ÿ Entrer le numéro interne du combiné. ou c Tous les combinés sonnent. a Pour mettre fin à la communication, appuyer sur la touche "Raccrocher". ou « 11 Gigaset 4000 Micro, De-It-Fr-Sp-GB, A31008-G4000-B027-1-6419 4000co.fm 05.07.02 Téléphoner Appuyer sur les touches : Accepter un appel entrant c Votre téléphone sonne (sonnerie) et la LED d’état clignote. / u Appuyer sur la touche "Décrocher" ou "Mains-libres". ou k Ö Soulever uniquement le combiné de la base/du chargeur (configuration usine : "Décroché automatique"). Journal des appelants/messages* Les nouveaux appels/messages sont signalés à l'écran par le pictogramme J et par le clignotement de la LED d’état. ? Appuyer Mains-libres Mains-libres lors de la numérotation o Composer le numéro. u Appuyer sur la touche "Mains-libres". Lorsque la fonction Mains-libres est activée, la touche Mains-libres u et la LED d’état sont allumées. Mains-libres en cours de communication u Activer la fonction Mains-libres. Régler le volume : Appuyer de nouveau sur la touche Mains-libres u. F / G Régler le volume. Enregistrer le volume réglé. Sauver a Passer de l’écoute Mains-libres à l’écoute sur le combiné Mettre fin à la communication. * n’est pas disponible dans tous les pays 12 Gigaset 4000 Micro, De-It-Fr-Sp-GB, A31008-G4000-B027-1-6419 4000co.fm 05.07.02 Répétition de la numérotation (Bis) Appuyer sur les touches: Double appel interne/Transfert Vous êtes en communication avec un correspondant externe, vous pouvez établir un double appel interne, transférer la communication en cours ou revenir à votre correspondant. F Ouvrir la liste des usagers internes. E / D c Sélectionner l’usager interne et l’appeler. Lorsque l’usager interne répond : Effectuer le transfert : appuyer sur la touche "Raccrocher" a. ● Mettre fin au double appel : appuyer sur Fin pour reprendre le correspondant en attente. ● Répétition de la numérotation (Bis) Répétition manuelle de la numérotation Vous pouvez accéder aux 5 derniers numéros composés. z D Afficher les numéros et sélectionner. c Appuyer sur la touche "Décrocher". Répétition automatique de la numérotation Cette fonction n’est pas disponible dans tous les pays ! A chaque tentative, la touche Mains libres clignote et l’écoute amplifiée est activée. La fonction se désactive au bout de dix tentatives de numérotation infructueuses ou si une communication est établie entre-temps. Si vous correspondant est injoignable, appuyez sur Dés. ou sur une touche quelconque. z D Afficher la liste "Bis" et sélectionner le numéro. © Ouvrir le menu. [ Activer. Répét. Auto. No. åååååååååååååååååååååååååååååååå c Si le correspondant répond : appuyer sur la touche "Décrocher". 13 Gigaset 4000 Micro, De-It-Fr-Sp-GB, A31008-G4000-B027-1-6419 4000co.fm 05.07.02 Répétition de la numérotation (Bis) Appuyer sur les touches : Liste des numéros "Bis" • Effacer un numéro z D Afficher la liste "Bis" et sélectionner le numéro à effacer. © Ouvrir le menu. D åååååååååååååååååååååååååååååååå [ Le numéro est effacé. Effacer entrée • Enregistrer un numéro dans l’annuaire z D Afficher la liste "Bis" et sélectionner le numéro à enregistrer. © Ouvrir le menu. D åååååååååååååååååååååååååååååååå [ Le numéro est inscrit. No.vers répert. o Si nécessaire, modifier le numéro, entrer le nom (si nécessaire, indiquer l’anniversaire voir page 20). Entrée des lettres et caractères, voir page 17. © Ouvrir le menu. [ Enregistrer l’entrée. Sauvegarder åååååååååååååååååååååååååååååååå 14 Gigaset 4000 Micro, De-It-Fr-Sp-GB, A31008-G4000-B027-1-6419 4000co.fm 05.07.02 Annuaire et Annuaire spécial Appuyer sur les touches: Annuaire et Annuaire spécial L’ Annuaire D vous permet d’appeler de façon simplifiée jusqu’à 200 numéros (nombre fonction de la taille des entrées et des noms associés ou non dans le partage de la capacité mémoire). Dans l’annuaire spécial C vous pouvez enregistrer au choix des numéros spéciaux tels que des numéros de services réseau, des numéros de têtes de ligne d'entreprise, les préfixes de sélection de l'opérateur etc. Ces numéros peuvent être sélectionnés individuellement avant chaque appel (sélection appel par appel) et se chaîner éventuellement à la numérotation habituelle. La commande de l'annuaire et celle de l'annuaire spécial sont identiques. Enregistrer un numéro D / C Ouvrir Annuaire/Annuaire spécial. [ Sélectionner et valider. Nouvelle entrée åååååååååååååååååååååååååååååååå o Entrer le numéro (32 chiffres maxi.). D o Entrer dans la zone de saisie du nom et saisir le nom. Pour l'annuaire, entrer si besoin la date anniversaire de votre correspondant, voir aussi page 9. © Ouvrir le menu. [ Enregistrer l’entrée. Sauvegarder åååååååååååååååååååååååååååååååå Numéroter à partir de l’annuaire D Ouvrir l’annuaire. p. ex. ^^ Entrer la première lettre du nom et/ou sélectionner à l'aide de la touche D. Par exemple pour un nom commençant par "E" appuyer deux fois sur la touche ^. c Appuyer sur la touche "Décrocher". Une fois le nom sélectionné, vous pouvez ouvrir le menu, sélectionner Utiliser le N° , compléter/modifier le numéro puis numéroter à l’aide de la touche "Décrocher" c. * n’est pas disponible dans tous les pays 15 Gigaset 4000 Micro, De-It-Fr-Sp-GB, A31008-G4000-B027-1-6419 4000co.fm 05.07.02 Annuaire et Annuaire spécial Appuyer sur les touches : Numéroter à partir de l’Annuaire spécial (sélection appel par appel) C Afficher l’Annuaire spécial. D© Sélectionner le numéro spécial et ouvrir le menu. [ Sélectionner et valider. Utiliser le N° åååååååååååååååååååååååååååååååå o Compléter en entrant le numéro du correspondant souhaité. ou DD [ Compléter avec un numéro sélectionné dans l'annuaire. c Appuyer sur la touche "Décrocher". Le numéro est composé. Annuaire spécial : touches de raccourci Pour une numérotation rapide à partir de l'annuaire spécial, vous pouvez attribuer 8 de ses numéros aux touches clavier (touches 2 à 9). Pour cela il suffit d'entrer le numéro de touche devant le nom lors de l'enregistrement du numéro spécial. Exemple : numéro de numérotation rapide 2 puis nom de l’opérateur. Annuaire spécial : numérotation rapide (Touches de raccourci) p. ex. Ÿ Appuyer de manière prolongée sur la touche : le nom de l’opérateur s’affiche. p. ex. o Compléter avec le numéro de votre correspondant. ou DD[ Compléter avec un numéro sélectionné dans l'annuaire et valider. c 16 Appuyer sur la touche. 4000co.fm Gigaset 4000 Micro, De-It-Fr-Sp-GB, A31008-G4000-B027-1-6419 05.07.02 Annuaire et Annuaire spécial Appuyer sur les touches: Editeur de texte et numéros : tableau des caractères Appuyer sur la touche correspondante plusieurs fois ou de manière prolongée : 8x 9x 10 x à â ã ç é è ê í ì î ö ñ ó ò ô õ 7 ß å 1x 2x 3x 4x 5x 6x 7x Espacement 1 â £ $ ¥ ¤ Ÿa ^ d ¡ g ¢j £ m ¤ p ¥t ¬ w « a→A Þ. « a→A b c 2 ä á e f 3 ë h i 4 ï k l 5 n o 6 q r s ] u v 8 ü ú ù û x y z 9 Ÿ ý æ ø * / ( ) < = > % , ? ! 0 + - : ¿ * / ( ) < = > % * Autres caractères de cette touche: ¡* “,‘,;,_ La première lettre du nom est automatiquement inscrite en majuscule suivie de minuscules. Majuscule/minuscule pour un caractère : appuyer sur «. Gérer le curseur avec F G E D. Effacer un caractère avec X Le caractère est toujours inséré à gauche du pointeur (curseur). Placez un espace avant une entrée pour la classer en tête de liste (p. ex. : " Scala"). Ordre de classement : 1. Espacement 3. Lettres (alphabétique) 2. Chiffres (0-9) 4. Autres symboles 17 Gigaset 4000 Micro, De-It-Fr-Sp-GB, A31008-G4000-B027-1-6419 4000co.fm 05.07.02 Annuaire et Annuaire spécial Appuyer sur les touches : Afficher, modifier ou effacer l’entrée D / C Ouvrir l’Annuaire/l’Annuaire spécial. D Sélectionner l’entrée souhaitée. Afficher Afficher toutes les informations concernant l’entrée. Modifier Ouvrir le champ de saisie et effectuer les modifications souhaitées. o Si nécessaire, modifier le numéro. D o Passer dans le champ de saisie du nom et modifier ce dernier. Entrée des lettres et caractères, voir page 17. Pour l’Annuaire, entrer la date anniversaire si nécessaire, voir page 15. © Ouvrir le menu. [ Enregistrer les modifications. Sauvegarder åååååååååååååååååååååååååååååååå ou D/C Ouvrir l’Annuaire/l’Annuaire spécial. D Sélectionner l’entrée souhaitée. © Ouvrir le menu. D åååååååååååååååååååååååååååååååå [ Vous entendez une tonalité de confirmation. L’entrée Effacer entrée est effacée. 18 Gigaset 4000 Micro, De-It-Fr-Sp-GB, A31008-G4000-B027-1-6419 4000co.fm 05.07.02 Annuaire et Annuaire spécial Appuyer sur les touches: Copier l’entrée sur un autre combiné Dans une configuration sytème multi-combinés ( maxi 6 combinés déclarés sur la même base), vous pouvez copier l’entrée sur un autre combiné de confort de la gamme Gigaset. D / C Ouvrir l’Annuaire/l’Annuaire spécial. D Sélectionner l’entrée souhaitée. © Ouvrir le menu. D åååååååååååååååååååååååååååååååå [ Sélectionner et valider. Copier entrée D[ Selectionner l’usager interne (combiné de destination) et valider. Copier une autre entrée : Oui Appuyer sur la touche. D Sélectionner l’entrée souhaitée. Envoi Activer la copie. Copier l’Annuaire/Annuaire spécial Vous pouvez copier l’Annuaire ou l’Annuaire spécial complet sur un autre combiné de confort. Voir "Copier l’entrée sur un autre combiné". Sélectionner "Copier liste " au lieu de "Copier entrée". La transmission est interrompue dans les cas suivants : ● ● La mémoire du combiné de destination est pleine. Vous recevez un appel. La copie d’une entrée est actuellement en cours ; elle est menée jusqu’au bout. Effacer l’Annuaire/ l’Annuaire spécial D / C Ouvrir l’Annuaire/l’Annuaire spécial. D Sélectionner une entrée quelconque. © Ouvrir le menu. D åååååååååååååååååååååååååååååååå [ Sélectionner et valider. Effacer liste Oui Valider l’effacement de toutes les entrées. 19 Gigaset 4000 Micro, De-It-Fr-Sp-GB, A31008-G4000-B027-1-6419 4000co.fm 05.07.02 Annuaire et Annuaire spécial Appuyer sur les touches : Dates anniversaires Pour chaque entrée de l'annuaire, vous pouvez enregistrer la date et l'heure anniversaire pour qu'elles vous soient rappelées. D Ouvrir l’annuaire. DAfficher Sélectionner l’entrée et l’afficher. Modifier Ouvrir la zone de saisie. D Placer le curseur dans la zone correspondant à l’anniversaire. Modifier Valider. o Entrer ou modifier la date (jour/mois). Do Sauter à la ligne suivante et entrer l’heure. D Sauter à la ligne suivante. F / G Sélectionner le type de mémo sonore (mélodie 1 à 10) ou visuel. [ Enregistrer les entrées. A l’aide de la touche écran Effacer vous pouvez effacer l’anniversaire. 20 Gigaset 4000 Micro, De-It-Fr-Sp-GB, A31008-G4000-B027-1-6419 4000co.fm 05.07.02 Réglages Appuyer sur les touches: Réglages Réveil : régler Si une heure de réveil est programmée sur votre combiné (symbole ¼), celui-ci sonne tous les jours à la même heure. Le téléphone est en mode veille: © Ouvrir le menu. D åååååååååååååååååååååååååååååååå [ Sélectionner et valider. RDV/Heure D åååååååååååååååååååååååååååååååå [ Sélectionner et valider. Réveil/Alarme Le réglage actuel s’affiche. F/G Act. sélectionner. D Sauter à la ligne suivante. Þ £Þ Þ Entrer Heures/Minutes. Exemple ici : 6 h 00. D Sauter à la ligne suivante. F / G Sélectionner la sonnerie de réveil. Sauver Enregistrer les réglages. Le réveil n’a pas lieu lorsque la fonction Surveillance de pièce est activée ainsi que durant une répétition automatique de la numérotation. Réveil : désactiver Le réveil est paramétré, mais il ne doit pas sonner. © Ouvrir le menu. D åååååååååååååååååååååååååååååååå [ Sélectionner et valider. RDV/Heure D åååååååååååååååååååååååååååååååå [ Sélectionner et valider. Réveil/Alarme F / G sélectionner Sauver Dés.. Enregistrer les réglages. Réveil : arrêt de la sonnerie Appuyer sur une touche quelconque pour interrompre la sonnerie du réveil. 21 Gigaset 4000 Micro, De-It-Fr-Sp-GB, A31008-G4000-B027-1-6419 4000co.fm 05.07.02 Réglages Appuyer sur les touches : Rendez-vous (RDV) : activer Vous pouvez paramétrer le combiné de manière à ce qu’il vous rappelle un RDV. Si vous avez réglé un RDV, cela est signalé par le symbole ¼ à l’écran. Le téléphone est en mode veille. © Ouvrir le menu. D åååååååååååååååååååååååååååååååå [ Sélectionner et valider. RDV/Heure [ Sélectionner et valider. Entrer RDV åååååååååååååååååååååååååååååååå F / G Sélectionner Act. pour activer la fonction RDV. D Sauter à la ligne suivante. Ÿ Þ Þ ¢ Entrer Jour/Mois, Exemple ici : 20 mai. D Sauter à la ligne suivante. Þ ¬ ^ Þ Entrer Heures/Minutes, Exemple ici : 9 h 30. D Sauter à la ligne suivante. F / G Sélectionner la mélodie de la sonnerie pour la fonction RDV. Sauver Enregistrer les réglages. La sonnerie RDV ne se fait entendre que lorsque le combiné est en mode veille. Lorsque la fonction Surveillance de pièce est activée ainsi que durant une répétition automatique de la numérotation, le RDV n’est pas signalé par une sonnerie. Rendez-vous (RDV) : désactiver Pour arrêter la sonnerie RDV, appuyer sur une touche quelconque. Le RDV est alors désactivé. Dates échues non acquittées (RDV/Anniversaires) Les RDV ou anniversaires signalés à échéance par le combiné, mais que vous n'avez pas acquittés (en cas d'absence par exemple), sont enregistrés dans une liste de dates échues. Un nouveau RDV/Anniversaire non acquitté est notifié sur l'afficheur par Dates !. Appuyer sur la touche écran de droite correspondante, la liste des dates échues [. s'affiche. Puis sélectionner RDV échu ¼ 22 Gigaset 4000 Micro, De-It-Fr-Sp-GB, A31008-G4000-B027-1-6419 4000co.fm 05.07.02 Réglages Appuyer sur les touches: Pour afficher un RDV déjà consulté, procédez comme indiqué ci-après. © Ouvrir le menu. D åååååååååååååååååååååååååååååååå [ Sélectionner et valider. RDV/Heure D åååååååååååååååååååååååååååååååå [ Sélectionner et valider. Dates échues D[ Sélectionner les RDV ¼ ou les anniversaires ‚ non acquittés. Les informations correspondantes s’affichent. Vous pouvez effacer le RDV/l’anniversaire à l’aide de la touche écran Effacer. 23 Gigaset 4000 Micro, De-It-Fr-Sp-GB, A31008-G4000-B027-1-6419 4000co.fm 05.07.02 Sons/Audio Appuyer sur les touches : Sons/Audio Volume d'écoute du combiné Volume du haut-parleur mains-libres © Ouvrir le menu. D åååååååååååååååååååååååååååååååå [ Sélectionner Menu. Sons / Audio [ Une tonalité se fait entendre à son volume actuel. Volume écoute åååååååååååååååååååååååååååååååå F / G Régler le volume souhaité pour Mains-libres u. D Sauter à la ligne suivante. F / G Sauver Sélectionner le niveau du volume pour le combiné k. Sauvegarder. Volume de la sonnerie Mélodie de la sonnerie Vous avez le choix entre cinq volumes de sonnerie, la sonnerie "Crescendo" (augmentation progressive du volume), la coupure de la sonnerie, et dix mélodies de sonnerie : © Ouvrir le menu. D åååååååååååååååååååååååååååååååå [ Sélectionner et valider. Sons / Audio D åååååååååååååååååååååååååååååååå [ La sonnerie se fait entendre et le niveau réglé s’affiRégl. Sonnerie che. F / G Sélectionner le volume de la sonnerie. D Sauter à la ligne suivante. F / G Sauver Sélectionner la mélodie souhaitée (1–10) et sauvegarder. 24 Gigaset 4000 Micro, De-It-Fr-Sp-GB, A31008-G4000-B027-1-6419 4000co.fm 05.07.02 Sons/Audio Appuyer sur les touches: SVC Nuit (Service de nuit) Pour une plage horaire déterminée, vous pouvez régler temporairement le volume de sonnerie différemment, l'atténuer ou le renforcer selon le cas (par exemple la nuit). © Ouvrir le menu. D åååååååååååååååååååååååååååååååå [ Sélectionner et valider. Sons / Audio D åååååååååååååååååååååååååååååååå [ La sonnerie se fait entendre et le niveau réglé s’affiRégl. Sonnerie che. SVC Nuit Appuyer sur la touche écran correspondante. F / G Activer/désactiver le service. Do Indiquer la plage horaire pour la sonnerie différente. p. ex. ]]ÞÞ ]¢ÞÞ de 11 h 00 à 15 h 00. DF / G Sauter à la ligne suivante et sélectionner le volume de la sonnerie. Sauver ou a Enregistrer les réglages. Appuyer sur la touche. Tonalités d'avertissement ● ● ● Clic clavier : chaque appui sur une touche est confirmé. Tonalités d’acquittement : signal de confirmation (séquence de tons ascendante) à la fin des entrées/ réglages et lorsque l’on pose le combiné sur la base ; signal d’erreur (séquence de tons descendante) en cas d’entrée incorrecte. Alarme batterie : chargement de la batterie nécessaire. © Ouvrir le menu. D åååååååååååååååååååååååååååååååå [ Sélectionner et valider. Sons / Audio D åååååååååååååååååååååååååååååååå [ Sélectionner et valider. Tonal. avertis. D Sélectionner la fonction souhaitée. F/G Sauver Act., Dés. ou En ligne (alarme batterie en cours de communication). Enregistrer les réglages. 25 Gigaset 4000 Micro, De-It-Fr-Sp-GB, A31008-G4000-B027-1-6419 4000co.fm 05.07.02 Sons/Audio Appuyer sur les touches : Vibreur : activer/désactiver Afin de ne pas être dérangé par la sonnerie, vous pouvez à la place activer le vibreur de votre combiné. Vous pouvez aussi activer le vibreur parallèlement à la sonnerie (par exemple lorsque vous vous trouvez dans un environnement bruyant). © Ouvrir le menu. D åååååååååååååååååååååååååååååååå [ Sélectionner et valider. Sons / Audio D åååååååååååååååååååååååååååååååå [ Sélectionner et valider. Vibreur ½ Le réglage sélectionné est indiqué par le symbole ✓ Appuyer de manière prolongée sur la touche « pour désactiver la sonnerie. Dans ce cas, seul le vibreur est activé. 26 Gigaset 4000 Micro, De-It-Fr-Sp-GB, A31008-G4000-B027-1-6419 4000co.fm 05.07.02 Réglages combiné Appuyer sur les touches: Réglages combiné Décroché automatique Lorsque cette fonction est paramétrée, il suffit de retirer le combiné du chargeur pour prendre l’appel (configuration usine), sans avoir à appuyer sur la touche c. © Ouvrir le menu. D åååååååååååååååååååååååååååååååå [ Sélectionner et valider. Réglages comb. D åååååååååååååååååååååååååååååååå [ Activer/désactiver avec [ Décroché auto. (✓ = fonction activée). Réinitialisation du combiné (retour à la configuration usine) L’annuaire, l’annuaire spécial et la liste des appelants ne sont pas effacés lors de la réinitialisation. Les déclarations effectuées sur la base sont conservées. © Ouvrir le menu. D åååååååååååååååååååååååååååååååå [ Sélectionner et valider. Réglages comb. D åååååååååååååååååååååååååååååååå [ Sélectionner et valider. Réinit. combiné Oui Confirmer pour valider. Fonction Volume du combiné Volume sonnerie Mélodie de la sonnerie Décroché automatique Alarme batterie Volume du haut-parleur Niveau de surveillance de pièce SVC Nuit Langue d’affichage Vibreur Configuration usine 1 5 1 activée activée 3 élevé désactivé spécifique au pays désactivé 27 Gigaset 4000 Micro, De-It-Fr-Sp-GB, A31008-G4000-B027-1-6419 4000co.fm 05.07.02 Famille/Loisirs Appuyer sur les touches : Famille/Loisirs Surveillance de pièce A l’aide de votre combiné, vous pouvez surveiller les bruits d'ambiance d'une pièce à partir d'une autre pièce ou à distance depuis l'extérieur.Si un certain niveau de bruit est atteint, le combiné sélectionne automatiquement le numéro (interne /externe) enregistré par vous. Lorsque la fonction Surveillance de pièce est activée, les appels entrants sont uniquement signalés à l’écran. Paramétrer la Surveillance de pièce © Ouvrir le menu. D åååååååååååååååååååååååååååååååå [ Sélectionner et valider. Famille/Loisirs D åååååååååååååååååååååååååååååååå [ Sélectionner et valider. Surveill. Pièce F / G Sélectionner Act. ou Dés.. D Sauter à la ligne suivante. Modifier Ouvrir le champ de saisie du numéro. Effacer un numéro externe déjà enregistré. F / D Entrer manuellement le numéro interne/ouvrir la liste des abonnés internes/ouvrir l'annuaire. E / D[ Sélectionner un usager interne ou externe. Sauver Enregistrer un numéro. D Sauter à la ligne suivante. F / G Régler une sensibilité "élevée" ou "faible". Sauver Enregistrer le réglage. Appuyer sur la touche écran Dés. pour désactiver la fonction Surveillance de pièce. Vous pouvez désactiver à distance depuis un poste externe (p. ex. à partir d’un "portable") la fonction Surveillance de pièce. Acceptez l’appel activé par la fonction Surveillance de pièce. Puis, désactivez avec ¬ª. La fonction Surveillance de pièce est maintenant désactivée. La fonction Surveillance de pièce n’active plus aucun appel. 28 Gigaset 4000 Micro, De-It-Fr-Sp-GB, A31008-G4000-B027-1-6419 4000co.fm 05.07.02 Mode Talkie-Walkie Appuyer sur les touches: Mode Talkie-Walkie Condition: Les combinés possèdent les mêmes réglages de base (p. ex. meilleure base) ou il ne sont pas encore enregistrés sur une base. (En mode Talkie-Walkie, l’autonomie d’un combiné est considérablement réduite). En mode Talkie-Walkie, les combinés ne sont plus joignables pour les appels entrants. Mode Talkie-Walkie : activer sur chaque combiné © Ouvrir le menu. D åååååååååååååååååååååååååååååååå [ Sélectionner la fonction. Famille/Loisirs D åååååååååååååååååååååååååååååååå [ Activer le mode Talkie-Walkie. Talkie-Walkie Avec la touche écran Dés. , il est possible de désactiver le mode Talkie-Walkie. Mode Talkie-Walkie : utiliser Deux combinés se trouvent en mode Talkie-Walkie : Combiné appelant : Appeler Appuyer sur la touche écran. Combiné appelé : L’appel est signalé par un message à l’écran. c Appuyer sur la touche. Les deux combinés sont reliés. a Pour mettre fin à la communication, appuyer sur la touche "Raccrocher". 29 Gigaset 4000 Micro, De-It-Fr-Sp-GB, A31008-G4000-B027-1-6419 4000co.fm 05.07.02 Annexe Annexe Utilisation sur les bases de la gamme Gigaset Gigaset 1000/2000/3000 Les fonctions suivantes de votre combiné 4000i Micro/Comfort ne sont pas supportées par les bases Gigaset 1000/2000/3000. ● ● ● ● Réglage de l’heure (après mise à l’arrêt du combiné, l’heure n’est plus transmise) Sélection de la langue Surveillance de pièce (désactivation en externe impossible) Transmission de minimessages SMS * Gigaset 4010/4015 Classic Les fonctions suivantes de votre combiné 4000i Micro/Comfort ne sont pas supportées par les bases Gigaset 4010/4015 Classic. ● ● ● Sélection de la langue Transmission de minimessages SMS* Réglage des catégories d’accès. * n’est pas disponible dans tous les pays 30 4000co.fm Gigaset 4000 Micro, De-It-Fr-Sp-GB, A31008-G4000- 05.07.02 Annexe Entretien Essuyer la base et le combiné avec un chiffon humide ou un chiffon antistatique. Ne jamais utiliser de chiffon sec ! Risque de charge statique ! Contact avec les liquides ! Si le poste mobile a été mis en contact avec un liquide, il ne faut en aucun cas le mettre en marche. Retirer tous les accumulateurs immédiatement. Laisser le liquide s'écouler, sécher toutes les parties avec un linge absorbant. Placer le mobile sans accumulateurs pendant au moins 72 heures dans un endroit chaud et sec. Ensuite, dans la plupart des cas le mobile fonctionnera à nouveau. Batteries recommandées Nickel Métal Hydrure (NiMH) , 500 mAh. France: N° commande V30145-K1310-X229 Suisse: N° commande V30145-K1310-X125 ou N° commande V30145-K1310-X229 Temps d’utilisation/temps de charge du combiné Capacité (mAh) Autonomie (heures) Autonomie en communication (heures) Temps de charge (heures) 500 jusqu’à 300 env. 16 env. 5,5 La capacité de charge de la batterie diminue au bout de quelques années. Portée Selon l'environnement, la portée peut atteindre 300 m en champ libre ou 50 m en intérieur. 31 Gigaset 4000 Micro, De-It-Fr-Sp-GB, A31008-G4000-B027-1-6419 4000co.fm 05.07.02 Annexe Chargeur de table Pour recharger votre combiné, vous pouvez aussi vous servir du chargeur de table. (Accessoire pour les combinés Siemens voir page\ <$SeiteNum>) N° commande L36880-N4501-A101 ½ Lors de la charge du combiné Gigaset dans le chargeur de table, la batterie de réserve n’est plus en charge tant que le combiné est placé dans le chargeur. Le témoin de charge (LED) est allumé en permanence. Service Clients Si vous avez des questions techniques ou d'utilisation de votre appareil, le moyen le plus simple est de solliciter l'assistance de notre site Internet: www.my-siemens.com/customercare Dans le cas où une réparation s'avérerait nécessaire, adressez-vous à l'un de nos centres de SAV. Numéro de téléphone du service clientèle voir pages de couverture. La conformité de l’appareil avec les exigences fondamentales de la directive européenne R&TTE (99/05/CEE) relative aux terminaux, est confirmée par le label CE. Le combiné 4000i Micro est homologué dans toute l’Union européenne et en Suisse. 32 Gigaset 4000 Micro, De-It-Fr-Sp-GB, A31008-G4000- 4000co.fm 05.07.02 Annexe Langues d'affichage Lors de l'enregistrement du combiné portatif sur la base Gigaset 4010i, vous pouvez paramétrer les langues marquées d'un *: Einstellungen H/Set Settings Réglages comb. Impostazioni Ajuste terminal Sprache Language Langue Lingua Idioma Deutsch English Français Italiano Español 33 Gigaset 4000 Micro, De-It-Fr-Sp-GB, A31008-G4000-B027-1-6419 4000co.fm 05.07.02 34 Diese Seite muss erhalten bleiben, damit die neue Sprache rechts beginnt! Gigase 4000 Micro, De-It-Fr-Sp-GB, A31008-G4000- 4000co- 17.04.02 s Be inspired Instrucciones de manejo ! ESPAÑOL e indicaciones de seguridad Gigase 4000 Micro, De-It-Fr-Sp-GB, A31008-G4000-B027-1- 4000COU.FM 07.05.02 Esquema general del terminal inalámbrico Esquema general del terminal inalámbrico El display está protegido con una lámina de plástico. Retire la lámina de protección. LED de estado (diodo) Iluminado en llamada; intermitente en caso de: – Llamada entrante – Mensajes nuevos – Llamada de alarma, citas, aniversarios Display (campo de indicación) Estado de carga = agotada U completa Intermitente: baja Funciones actuales y teclas de display Mediante las teclas del display puede acceder a las funciones actuales. Volumen de recepción Tecla de control Tecla de descolgar – Aceptar llamada – Marcar número – Conmutar de manos libres a microteléfono Ñ e Annabella 19.07.01 { 13:13 ¨ Tecla de colgar y tecla act./desact. – Finalizar llamada – Cancelar función – Pulsar brevemente: retroceder un nivel de menú; pulsación prolongada: retroceder al menú principal – Terminal inalámbrico act./ pulsación prolongada desact (Pulsar tecla prolongadamente) Abrir listín telefónico Tecla 1 Puls. prolong.: contestador automático/T-NetBox Tecla de asterisco Pulsar prolongadamente para activar/ desactivar timbre Bloqueo del teclado Activar/desactivar pulsación prolongada Lista de llamantes Acceso a listas de mensajes Micrófono Conector – para auriculares, reproductor MP3 Tecla manos libres Tecla de proveedores – Abrir lista de proveedores: pulsar brevemente. – Función tecla R: ¡Pulsar prolongadamente! Relación entre la tecla de control y las teclas de display Mediante las teclas de display pueden realizarse acciones que también pueden controlarse en parte con la tecla de control. La parte de la tecla de control que se debe pulsar está indicada en las instrucciones de manejo con flechas: Teclas de display Tecla de control 2 INT F / G (izda/dcha) E / D (arriba/abajo) Pulsar sobre el lado oscuro. Gigase 4000 Micro, De-It-Fr-Sp-GB, A31008-G4000-B027-1- 4000COU.FM 07.05.02 Esquema general del terminal inalámbrico Menús importantes © D Texto mensaje* Nuevo registro Servicios red Ana Familia/ocio Bárbara Citas/hora Claus : Ajuste audio © OKƒ Tasas Ajuste terminal Utilizar número Ajustes base Borrar registro Contestador Enviar registro Borrar lista Vol. teléfono Enviar lista Ajustar timbre Memoria libre Tonos de aviso Símbolos del display Según la situación aparecen sobre las teclas de display los siguientes símbolos: Teclas display Significado ¨ Tecla de menú: abrir en estado de reposo el menú general. Abrir mientras se realiza una llamada un menú dependiente de la situación. Z Confirmar y seleccionar función de menú. Finalizar y guardar entradas. W Tecla de borrar (backspace): borrar entradas de derecha a izquierda. { Tecla de rellamada: abrir lista de los 5 últimos números de teléfono. I Indicación para contestador, T-Net-Box, lista de llamantes Í Retroceder un nivel de menú, cancelar * no está disponible en todos los países 3 Gigase 4000 Micro, De-It-Fr-Sp-GB, A31008-G4000-B027-1- 4000COU.FM 07.05.02 Indicaciones de seguridad Indicaciones de seguridad $ ! Utilice exclusivamente el alimentador enchufable incluido en el suministro, tal y como se indica en la parte inferior del equipo. Utilice sólo baterías recargables homologadas y del mismo tipo. No utilice en ningún caso pilas normales (no recargables), ya que estas podrían dañar la salud y causar daños personales. ‹ Œ Coloque la batería recargables con la polaridad correcta Utilice los tipos de batería indicados en estas instrucciones de manejo Pueden surgir anomalías en el funcionamiento de equipos médicos. Observe las condiciones técnicas del entorno de aplicación (p. ej. consultas médicas). El terminal inalámbrico puede ocasionar un zumbido muy molesto en equipos auditivos. No utilice el teléfono en entornos expuestos a peligro de explosión (p. ej. talleres de pintura). El terminal inalámbrico no es resistente a las salpicaduras (v. pág. 25). Durante la conducción el conductor no debe telefonear (función walkie-talkie). Desconecte el teléfono mientras se encuentra en un avión (función walkietalkie). Evite que se active de forma involuntaria. ƒ Si transfiere su Gigaset a terceros, entréguelo siempre junto con las instrucciones de manejo. Elimine las baterías y el teléfono respetando el medio ambiente. Algunas de las funciones descritas en estas instrucciones de manejo no están disponibles en todos los países. 4 Gigase 4000 Micro, De-It-Fr-Sp-GB, A31008-G4000-B027-1- 4000CoIVZ.fm 07.05.02 Indice Indice Esquema general del terminal inalámbrico. . . . . . . . . . . . . . . . . . . . . . . . . . . . . . . . . 2 Relación entre la tecla de control y las teclas de display. . . . . . . . . . . . . . . . . . . . .2 Menús importantes . . . . . . . . . . . . . . . . . . . . . . . . . . . . . . . . . . . . . . . . . . . . . . . . .3 Símbolos del display . . . . . . . . . . . . . . . . . . . . . . . . . . . . . . . . . . . . . . . . . . . . . . . .3 Indicaciones de seguridad . . . . . . . . . . . . . . . . . . . . . . . . . . . . . . . . . . . . . . . . . . . . . . . 4 Preparar el terminal. . . . . . . . . . . . . . . . . . . . . . . . . . . . . . . . . . . . . . . . . . . . . . . . . . . . . 6 Contenido del embalaje. . . . . . . . . . . . . . . . . . . . . . . . . . . . . . . . . . . . . . . . . . . . . .6 Colocar la batería . . . . . . . . . . . . . . . . . . . . . . . . . . . . . . . . . . . . . . . . . . . . . . . . . . . . . . . . . . . . . . . .6 Alta del terminal inalámbrico . . . . . . . . . . . . . . . . . . . . . . . . . . . . . . . . . . . . . . . . . .6 Cargar la batería. . . . . . . . . . . . . . . . . . . . . . . . . . . . . . . . . . . . . . . . . . . . . . . . . . . .7 Sujeción del clip para el cinturón . . . . . . . . . . . . . . . . . . . . . . . . . . . . . . . . . . . . . . .7 Ajustar fecha y hora. . . . . . . . . . . . . . . . . . . . . . . . . . . . . . . . . . . . . . . . . . . . . . . . .8 Modificar el idioma del display . . . . . . . . . . . . . . . . . . . . . . . . . . . . . . . . . . . . . . . .8 Realizar llamadas . . . . . . . . . . . . . . . . . . . . . . . . . . . . . . . . . . . . . . . . . . . . . . . . . . . . . . . 9 Llamadas externas. . . . . . . . . . . . . . . . . . . . . . . . . . . . . . . . . . . . . . . . . . . . . . . . . .9 Llamadas internas . . . . . . . . . . . . . . . . . . . . . . . . . . . . . . . . . . . . . . . . . . . . . . . . . .9 Contestar llamadas . . . . . . . . . . . . . . . . . . . . . . . . . . . . . . . . . . . . . . . . . . . . . . . .10 Lista de llamantes/de mensajes . . . . . . . . . . . . . . . . . . . . . . . . . . . . . . . . . . . . . .10 Manos libres . . . . . . . . . . . . . . . . . . . . . . . . . . . . . . . . . . . . . . . . . . . . . . . . . . . . .10 Transferir una llamada externa, consulta . . . . . . . . . . . . . . . . . . . . . . . . . . . . . . . .11 Rellamada . . . . . . . . . . . . . . . . . . . . . . . . . . . . . . . . . . . . . . . . . . . . . . . . . . . . . . . . . . . . 11 Listín telefónico y lista de proveedores de red . . . . . . . . . . . . . . . . . . . . . . . . . . . . . 12 Marcación rápida de la lista de proveedores de red . . . . . . . . . . . . . . . . . . . . . . .13 Marcar con marcación rápida . . . . . . . . . . . . . . . . . . . . . . . . . . . . . . . . . . . . . . . .14 Ajustes . . . . . . . . . . . . . . . . . . . . . . . . . . . . . . . . . . . . . . . . . . . . . . . . . . . . . . . . . . . . . . . 17 Ajustar el despertador . . . . . . . . . . . . . . . . . . . . . . . . . . . . . . . . . . . . . . . . . . . . . .17 Desactivar el despertador . . . . . . . . . . . . . . . . . . . . . . . . . . . . . . . . . . . . . . . . . . .18 Desactivar la llamada de alarma . . . . . . . . . . . . . . . . . . . . . . . . . . . . . . . . . . . . . .18 Ajustar cita. . . . . . . . . . . . . . . . . . . . . . . . . . . . . . . . . . . . . . . . . . . . . . . . . . . . . . .18 Volumen del microteléfono y del altavoz. . . . . . . . . . . . . . . . . . . . . . . . . . . . . . . .19 Activar/desactivar tonos de aviso y señales acústicas . . . . . . . . . . . . . . . . . . . . .21 Activar/desactivar la alarma por vibración . . . . . . . . . . . . . . . . . . . . . . . . . . . . . . .21 Activar/desactivar aceptación automática de llamada . . . . . . . . . . . . . . . . . . . . . .22 Reposición del estado de suministro . . . . . . . . . . . . . . . . . . . . . . . . . . . . . . . . . .22 Babyphone (vigilancia de habitación) . . . . . . . . . . . . . . . . . . . . . . . . . . . . . . . . . . . . 23 Ajustar babyphone. . . . . . . . . . . . . . . . . . . . . . . . . . . . . . . . . . . . . . . . . . . . . . . . .23 Modo walkie-talkie . . . . . . . . . . . . . . . . . . . . . . . . . . . . . . . . . . . . . . . . . . . . . . . . . . . . 24 Anexo . . . . . . . . . . . . . . . . . . . . . . . . . . . . . . . . . . . . . . . . . . . . . . . . . . . . . . . . . . . . . . . . 25 Operación con estaciones base de la gama Gigaset . . . . . . . . . . . . . . . . . . . . . . .25 Cuidados . . . . . . . . . . . . . . . . . . . . . . . . . . . . . . . . . . . . . . . . . . . . . . . . . . . . . . . .25 Contacto con líquido . . . . . . . . . . . . . . . . . . . . . . . . . . . . . . . . . . . . . . . . . . . . . . .25 Alcance . . . . . . . . . . . . . . . . . . . . . . . . . . . . . . . . . . . . . . . . . . . . . . . . . . . . . . . . .26 Customer Care (Service) . . . . . . . . . . . . . . . . . . . . . . . . . . . . . . . . . . . . . . . . . . . .26 Idiomas de display . . . . . . . . . . . . . . . . . . . . . . . . . . . . . . . . . . . . . . . . . . . . . . . .27 5 Gigase 4000 Micro, De-It-Fr-Sp-GB, A31008-G4000-B027-1-6419 4000CO.FM 07.05.02 Preparar el terminal Pulsar las teclas: Preparar el terminal Contenido del embalaje Terminal Gigaset 4000i Micro, una batería, soporte cargador, clip para cinturón, instrucciones de manejo. Colocar la batería et as Gig 00 40 icro et as Gig m 00 40 icro m El ajuste de suministro del idioma en el display de su terminal inalámbrico es el italiano. Para configurar el idioma deseado ver la página 8. Alta del terminal inalámbrico Paso 1: © Abrir menú. D åååååååååååååååååååååååååååååååå [ Seleccionar y confirmar. Ajuste terminal D åååååååååååååååååååååååååååååååå [ Seleccionar y confirmar. Regist. equipo D [ Seleccionar la estación base ( Base 1 , Base 2 , Base 3 o Base 4 ). o[ Introducir y confirmar el PIN (estado de entrega: 0000) – se indica p. ej. Proceso de alta Base 1 . Paso 2: Pulsar prolongadamente la tecla situada en la cara posterior de la base. De forma automática se le asigna al terminal inalámbrico el siguiente número interno libre (1–3). En el caso de que todos los puestos se encuentren ocupados, se sobrescribirá el número interno 3. Tras la realización exitosa del alta, el terminal inalámbrico regresa al estado inactivo. En el display se indicará el número interno (p. ej. "INT1"). 6 Gigase 4000 Micro, De-It-Fr-Sp-GB, A31008-G4000-B027-1-6419 4000CO.FM 07.05.02 Preparar el terminal Pulsar las teclas: Gigaset Preparación en estación base/teléfono 4010/4015 Pulsar prolongadamente la tecla de la parte inferior de la estación base. 3010/3015 Pulsar la tecla pagingy de la estación base hasta que se escuchen unas señales acústicas. 3020/25 3030/35 4030/35 Seleccionar en el menú del teléfono base Ajustes, Ajustes sistema y Registrar equipo y confirmar con OK. 3070/75 4070/75 Pulsar la indicación (LED) que parpadea durante el proceso de registro. Bases de Para el registro en "estaciones base GAP“ , otros fa- siga las instrucciones de manejo bricantes correspondientes (paso 2 y 3). Cargar la batería Para cargarla batería, mantenga el terminal aprox. 5,5 horas en la estación soporte cargador. La batería no se suministran cargadas. El proceso de carga se indica en el terminal mediante el parpadeo de la indicación del estado de carga: En el anexo se ofrece una relación de los tipos de batería recomendados. 5,5 ● ● La batería se calientan durante el proceso de carga; esta alteración es normal y no representa ningún peligro. Para una correcta indicación del estado de carga, evite abrir el compartimento de batería innecesariamente. Sujeción del clip para el cinturón Empuje el clip para el cinturón sobre la parte posterior del terminal hasta que los "resaltes“ laterales encajen en las perforaciones. 7 Gigase 4000 Micro, De-It-Fr-Sp-GB, A31008-G4000-B027-1-6419 4000CO.FM 07.05.02 Preparar el terminal Pulsar las teclas: Ajustar fecha y hora El ajuste de la fecha y la hora es necesario para obtener una indicación correcta de la hora de entrada de las llamadas/los mensajes. © Abrir el menú. D åååååååååååååååååååååååååååååååå [ Seleccionar y confirmar. Citas/hora D åååååååååååååååååååååååååååååååå [ Seleccionar y confirmar. Fecha/hora Se visualiza el ajuste actual. Introducir la fecha Introducir día/mes/año. En el ejemplo: 20.05.2001. p. ej.ŸÞÞ¢Þ] D Saltar una línea hacia abajo. Introducir la hora Introducir horas/minutos. En el ejemplo: 19.05 horas. p. ej. ] ¬ Þ ¢ D Saltar una línea hacia abajo. Seleccionar modo de indicación Seleccione con el extremo izquierdo de la tecla de control entre el modo de 12 horas (am o pm) o bien el modo de 24 horas (estado de suministro). Guardar Guardar los ajustes. Modificar el idioma del display © Abrir el menú. D åååååååååååååååååååååååååååååååå [ Confirmar función. Ajuste terminal D åååååååååååååååååååååååååååååååå [ El idioma activo está marcado con ✓. Idioma D[ Seleccionar el idioma deseado y confirmar. Encontrará una tabla en la última página de este manual. Marcar número de emergencia Con el bloqueo del teclado activado se pueden marcar los números de emergencia programados en la estación base, v. instrucciones de manejo de la estación base. 8 Gigase 4000 Micro, De-It-Fr-Sp-GB, A31008-G4000-B027-1-6419 4000CO.FM 07.05.02 Realizar llamadas Pulsar las teclas: Realizar llamadas Llamadas externas o Introducir el número de teléfono. Si es necesario, corregir dígitos con la tecla de display X. c a Pulsar la tecla de descolgar. Pulsar la tecla de colgar para finalizar la comunicación. ● ● ● También es posible pulsar primero la tecla de descolgar c e introducir a continuación el número de teléfono, las cifras se marcarán entonces de inmediato. Con la tecla de colgar a puede cancelar la marcación. Puede insertar una pausa de marcación: tras introducir el prefijo, abra con la tecla de display © el menú adicional y seleccione "Insertar pausa“ . Llamadas internas F Abrir lista de extensiones internas. El terminal inalámbrico propio está marcado con "<". D E c Seleccionar el terminal deseado y pulsar la tecla de descolgar. o bien p. ej. Ÿ Introducir el número de teléfono interno del terminal inalámbrico. o Llam. colectiva c o bien « Suenan todos los terminales. a Pulsar la tecla de colgar para finalizar la comunicación. 9 Gigase 4000 Micro, De-It-Fr-Sp-GB, A31008-G4000-B027-1-6419 4000CO.FM 07.05.02 Realizar llamadas Pulsar las teclas: Contestar llamadas El teléfono suena (timbre de llamada) y el LED de estado parpadea. c/u Pulsar la tecla de descolgar o de manos libres. o bien k Ö retirar simplemente el terminal de la estación soporte cargador (estado suministro: "Aceptación automática de llamadas“). Lista de llamantes/de mensajes* Las llamadas/mensajes nuevos se señalizan mediante una indicación en el display y el parpadeo del LED de estado. ? Pulsar Manos libres Marcar con manos libres o Marcar número. u Pulsar la tecla de manos libres. Si está activada la función manos libres, se encienden la tecla manos libres u y el LED de estado. Manos libres durante la llamada u Activar manos libres. Ajustar volumen: Pulsar nuevamente la tecla manos libres u. F G Ajustar volumen. Guardar c a Guardar volumen ajustado. Conmutar de manos libres al servicio con microteléfono Finalizar la llamada. * no está disponible en todos los países 10 Gigase 4000 Micro, De-It-Fr-Sp-GB, A31008-G4000-B027-1-6419 4000CO.FM 07.05.02 Rellamada Pulsar las teclas: Transferir una llamada externa, consulta Es posible transferir llamadas externas a otro terminal inalámbrico o realizar llamadas internas de consulta. F Abrir lista de extensiones internas. E Dc Seleccionar extensión interna y llamar. Al contestar el usuario interno: ● Pasar la llamada: pulsar la tecla de colgar a. ● Terminar consulta: Conmutar con Fin al usuario en espera. Rellamada Rellamada manual Puede acceder a los 5 últimos números de teléfono marcados. z D Mostrar número de teléfono y seleccionar. c Pulsar la tecla de descolgar. Rellamada automática Esta función no está disponible en todos los países. La tecla de manos libres parpadea y se activa la escucha por altavoz. La función se desactiva tras diez intentos sin resultado o bien si entretanto se realiza una llamada. Si su interlocutor no está localizable, pulse No o cualquier tecla. z D Mostrar número de teléfono y seleccionar. © Abrir el menú. [ Activar. Rellam. autom. åååååååååååååååååååååååååååååååå c Si el usuario contesta: pulsar la tecla de descolgar. Borrar número de teléfono de la lista de rellamada z D Mostrar número de teléfono y seleccionar. © Abrir el menú. D åååååååååååååååååååååååååååååååå [ El número de teléfono se borra. Borrar registro 11 Gigase 4000 Micro, De-It-Fr-Sp-GB, A31008-G4000-B027-1-6419 4000CO.FM 07.05.02 Listín telefónico y lista de proveedores de red Pulsar las teclas: Guardar número de teléfono en el listín telefónico z D Mostrar número de teléfono y seleccionar. © Abrir el menú. D åååååååååååååååååååååååååååååååå [ El número de teléfono se registra. Guardar en list. o Si es necesario, modificar el n° de teléfono, introducir el nombre (si se desea, con el cumpleaños v. pág. 17). Introducción de caracteres y números, v. pág. 14. © Abrir el menú. [ Guardar el registro. Guardar åååååååååååååååååååååååååååååååå Listín telefónico y lista de proveedores de red El listín telefónico D le facilita la marcación de hasta 200 números de teléfono. En la lista de proveedores de red C se pueden programar los prefijos (call-by-call)* de diferentes compañías telefónicas. El manejo del listín telefónico y de la lista de proveedores de red es idéntico. Guardar registro D / C Abrir el listín telefónico/la lista de proveedores de red. [ Seleccionar y confirmar. Nuevo registro åååååååååååååååååååååååååååååååå o Introducir el número de teléfono (máx. 32 dígitos). D o Saltar al campo del nombre e introducir el nombre. En el listín telefónico: si se desea, agregar cumpleaños, v. también pág. 17. © Abrir el menú. [ Guardar el registro. Guardar åååååååååååååååååååååååååååååååå [ 12 Guardar registro. Gigase 4000 Micro, De-It-Fr-Sp-GB, A31008-G4000-B027-1-6419 4000CO.FM 07.05.02 Listín telefónico y lista de proveedores de red Pulsar las teclas: Marcar desde el listín telefónico D Abrir el listín telefónico. , pulse dos p. ej. ^^ Introducir la inicial del nombre, p. ej. para "E“ veces la tecla ^ u hojee con la tecla D. c Pulsar la tecla de descolgar. Tras seleccionar el nombre, puede abrir también el menú, seleccionar Utilizar número , completar/modificar el número y marcar con la tecla de descolgar c. _______ * no está disponible en todos los países Marcar con la lista de proveedores de red (call-by-call) C Abrir la lista de proveedores de red. D© Seleccionar número call-by-call y abrir el menú. [ Seleccionar y confirmar. Utilizar número åååååååååååååååååååååååååååååååå o Introducir el n° de teléfono del usuario deseado. o bien DD [ Seleccionar el número de teléfono del listín telefónico y confermar. c Pulsar la tecla de descolgar. Se marca el número de teléfono. Marcación rápida de la lista de proveedores de red En la lista de proveedores de red se pueden guardar ocho números para la marcación rápida. Para ello, deberá introducir antes del nombre del proveedor de red la cifra para la marcación rápida (2-9). Ejemplo: Número de marcación rápida 2 y a continuación el nombre del proveedor de red. 13 Gigase 4000 Micro, De-It-Fr-Sp-GB, A31008-G4000-B027-1-6419 4000CO.FM 07.05.02 Listín telefónico y lista de proveedores de red Pulsar las teclas: Marcar con marcación rápida p. ej. Ÿ Pulsar la tecla prolongadamente: se visualiza el nombre del proveedor de red programado. p. ej. o Introducir el número de teléfono o bien DD[ Seleccionar un registro del listín telefónico y confermar. c Pulsar. Tabla de símbolos Pulsar la tecla correspondiente varias veces o de forma prolongada: ] 1x 2x 3x 4 x 5 x 6 x 7 x 8 x 9 x 10 x Espacios en blanco 1 â £ $ ¥ ¤ b c 2 ä á à e f 3 ë é è ê h i 4 ï í ì î k l 5 ó ò Ÿa ^ d ¡ g ¢j £ m ¤ p ¥t ¬ w →A « a→ Þ. ª # n o 6 ö ñ q r s 7 ß â ã ç ô õ å u v 8 ü ú ù û x y z 9 ÿ ý æ ø * / ( ) < = > % , ? ! 0 + - : ¿ @ \ & § * Otros símbolos de esta tecla: ¡* “,‘,;,_ La primera letra del nombre se escribe automáticamente en mayúsculas, le siguen minúsculas. Cambiar a mayúsculas/minúsculas para un carácter : pulsar «. Controlar el cursor con F G E D. Borrar carácter con X 14 Gigase 4000 Micro, De-It-Fr-Sp-GB, A31008-G4000-B027-1-6419 4000CO.FM 07.05.02 Listín telefónico y lista de proveedores de red Pulsar las teclas: La inserción de los caracteres se efectúa siempre a la izquierda del cursor. Anteponiendo un espacio en blanco , el registro correspondiente salta a la 1ª posición (ej.: " Carla“). Orden de clasificación: 1. Espacios en blanco 3. Letras (por orden alfabético) 2. Cifras (0-9) 4. Otros caracteres Mostrar, modificar o borrar registro D/C Abrir el listín telefónico/la lista de proveedores de red. D Seleccionar el registro deseado. Ver Cambiar Mostrar todos los datos relativos al registro. Abrir el campo de entrada y efectuar los cambios necesarios. o Modificar el número de teléfono. D o Saltar al campo de nombre y cambiar el nombre. Introducción de caracteres y números, v. pág. 14. En el listín telefónico: si se desea, agregar cumpleaños, v. pág. 17. © Abrir el menú. [ Confirmar los cambios. Guardar åååååååååååååååååååååååååååååååå o bien D/C Abrir el listín telefónico/la lista de proveedores de red. D Seleccionar el registro deseado. © Abrir el menú. D åååååååååååååååååååååååååååååååå [ Suena un tono de confirmación. El registro se borra. Borrar registro 15 Gigase 4000 Micro, De-It-Fr-Sp-GB, A31008-G4000-B027-1-6419 4000CO.FM 07.05.02 Listín telefónico y lista de proveedores de red Pulsar las teclas: Enviar registro a otro terminal inalámbrico Es posible enviar un registro a otro terminal inalámbrico Comfort. D/C Abrir el listín telefónico/la lista de proveedores de red. D Seleccionar el registro deseado. © Abrir el menú. D åååååååååååååååååååååååååååååååå [ Seleccionar y confirmar. Enviar registro D[ Seleccionar extensión interna (terminal inalámbrico del receptor) y confirmar. Enviar registros adicionales: Sí Pulsar. D Seleccionar el registro deseado. Enviar Iniciar proceso de transmisión. Enviar listín telefónico/lista de proveedores de red También puede transmitir el listín telefónico completo o la lista de proveedores de red a otro terminal Micro/ Comfort. Véase "Enviar registro a otro terminal inalámbrico“ . La transmisión se interrumpe si: ● ● La memoria del terminal receptor está agotada . Ud. obtiene una llamada. La transmisión en curso de un registro se lleva a cabo hasta el final. Borrar listín telefónico/lista de proveedores de red D/C Abrir el listín telefónico/la lista de proveedores de red. D Seleccionar el registro deseado. © Abrir el menú. D åååååååååååååååååååååååååååååååå [ Seleccionar y confirmar. Borrar lista Sí 16 Confirmar borrado de todos los registros. Gigase 4000 Micro, De-It-Fr-Sp-GB, A31008-G4000-B027-1-6419 4000CO.FM 07.05.02 Ajustes Pulsar las teclas: Introducir aniversarios (p.ej. cumpleaños) Puede introducir la fecha y la hora para los datos de cumpleaños/aniversarios y hacer que el teléfono le avise.D Abrir el listín telefónico. DVer Seleccionar el registro deseado y mostrar. Cambiar Abrir campo de entrada. D Mover el cursor al campo del cumpleaños/aniversario. Cambiar Confirmar. o Introducir o modificar la fecha (día/mes). D o Saltar una línea hacia abajo e introducir la hora. D Saltar una línea hacia abajo. F G Seleccionar señalización. [ Guardar entradas. Mediante la tecla de display Borrar puede borrar los aniversarios. Ajustes Ajustar el despertador Si ha ajustado una hora en el despertador de su terminal inalámbrico (símbolo ¼), el timbre sonará todos los días a la misma hora. El teléfono se encuentra en estado de reposo: © Abrir el menú. D åååååååååååååååååååååååååååååååå [ Seleccionar y confirmar. Citas/hora D åååååååååååååååååååååååååååååååå [ Seleccionar y confirmar. Despertador El ajuste actual se visualiza. F G Seleccionar Sí . D Saltar una línea hacia abajo. Þ £Þ Þ Introducir horas/minutos. En el ejemplo: 6.00 horas. D Saltar una línea hacia abajo. F G Seleccionar melodía de despertador. Guardar Guardar los ajustes. 17 Gigase 4000 Micro, De-It-Fr-Sp-GB, A31008-G4000-B027-1-6419 4000CO.FM 07.05.02 Ajustes Pulsar las teclas: No se emitirá ninguna llamada de alarma si está activada la función de babyphone (vigilancia de habitación) o la rellamada automática. Desactivar el despertador El despertador está ajustado, pero no desea que suene. © Abrir el menú. D åååååååååååååååååååååååååååååååå [ Seleccionar y confirmar. Citas/hora D åååååååååååååååååååååååååååååååå [ Seleccionar y confirmar. Despertador F G Seleccionar Guardar No . Guardar los ajustes. Desactivar la llamada de alarma La llamada de alarma se indica como una llamada entrante. Pulse cualquier tecla para apagar el timbre de alarma. Ajustar cita Puede ajustar su terminal móvil para que le recuerde una cita. Si ha ajustado una cita, ésta se visualizará con el símbolo ¼. El teléfono se encuentra en estado de reposo. © Abrir el menú. D åååååååååååååååååååååååååååååååå [ Seleccionar y confirmar. Citas/hora [ Seleccionar y confirmar. Ajustar cita åååååååååååååååååååååååååååååååå F G Seleccionar Sí para activar la función de cita. D Saltar una línea hacia abajo. Ÿ Þ Þ ¢ Introducir día/mes, en el ejemplo: 20 de mayo. D Saltar una línea hacia abajo. Þ ¬ ^ Þ Introducir horas/minutos, en el ejemplo: 9.30 horas. D Saltar una línea hacia abajo. F G Seleccionar melodía del timbre para la función de cita. Guardar 18 Guardar los ajustes. Gigase 4000 Micro, De-It-Fr-Sp-GB, A31008-G4000-B027-1-6419 4000CO.FM 07.05.02 Ajustes Pulsar las teclas: La llamada de cita sólo se activa si el terminal inalámbrico se encuentra en estado de reposo. No se emitirá ninguna llamada de cita si está activada la función de babyphone (vigilancia de habitación) o la rellamada automática. Desactivar llamada de cita La llamada de cita se señaliza como una llamada entrante y se desactiva pulsando cualquier tecla. Indicar citas y aniversarios no aceptados Las citas y aniversarios que el terminal inalámbrico ha indicado pero que Ud. no ha aceptado se guardan en una lista. Las citas/aniversarios nuevos no aceptados se indican con Cita. Pulsar la tecla derecha del display, se muestra la lista de aniversarios. Seleccione a continuación Citas vencidas ¼ [. Si desea volver a consultar las citas ya visualizadas, proceda del siguiente modo: © Abrir el menú. D åååååååååååååååååååååååååååååååå [ Seleccionar y confirmar. Citas/hora D åååååååååååååååååååååååååååååååå [ Seleccionar y confirmar. Citas vencidas D[ Seleccionar cita ¼ o aniversario ‚ no aceptados. Se muestra la información correspondiente. Mediante la tecla de display Borrar puede borrar las citas/aniversarios. Volumen del microteléfono y del altavoz © Abrir el menú. D åååååååååååååååååååååååååååååååå [ Seleccionar menú. Ajuste audio [ El timbre de llamada suena con el volumen actual. Vol. teléfono åååååååååååååååååååååååååååååååå F G Ajustar volumen de manos libres. D Saltar una línea hacia abajo. F G Guardar Seleccionar el nivel deseado del volumen del altavoz y confirmar. 19 Gigase 4000 Micro, De-It-Fr-Sp-GB, A31008-G4000-B027-1-6419 4000CO.FM 07.05.02 Ajustes Pulsar las teclas: Ajustar volumen del timbre/melodía Puede elegir entre cinco niveles de volumen de timbre, la llamada "progresiva" (volumen en aumento), timbre desactivado, y diez melodías de timbre: © Abrir el menú. D åååååååååååååååååååååååååååååååå [ Seleccionar y confirmar. Ajuste audio D åååååååååååååååååååååååååååååååå [ Se reproduce el volumen del timbre actual y se Ajustar timbre visualiza. F G Seleccionar volumen del timbre. D Saltar una línea hacia abajo. F G Guardar Seleccionar la melodía del timbre deseada (1–10) y confirmar. Control de tiempo para el volumen del timbre Puede ajustar un volumen del timbre diferente para un intervalo determinado . © Abrir el menú. D åååååååååååååååååååååååååååååååå [ Seleccionar y confirmar. Ajuste audio D åååååååååååååååååååååååååååååååå [ Se reproduce el volumen del timbre actual y se visuaAjustar timbre liza. C.Hora Pulsar. F G Activar/desactivar control de tiempo. Do Introducir intervalo para el timbre de llamada deseado p. ej. ]]ÞÞ ]¢ÞÞ para 11:00 hasta 15:00 horas. DF G Saltar una línea hacia abajo y seleccionar el volumen del timbre. Guardar Guardar o 20 a Guardar los ajustes. Pulsar. Gigase 4000 Micro, De-It-Fr-Sp-GB, A31008-G4000-B027-1-6419 4000CO.FM 07.05.02 Ajustes Pulsar las teclas: Activar/desactivar tonos de aviso y señales acústicas ● Tono de confirmación de teclas: se confirma cada pulsación de tecla. ● Tonos de confirmación: Tono de confirmación (secuencia de tonos ascendente) al final de las entradas/ajustes y al depositar el terminal en la estación base; tono de error (secuencia de tonos descendente) en el caso de entradas erróneas. ● Tono de aviso de batería: la batería debe cargarse. © Abrir el menú. D åååååååååååååååååååååååååååååååå [ Seleccionar y confirmar. Ajuste audio D åååååååååååååååååååååååååååååååå [ Seleccionar y confirmar. Tonos de aviso D Seleccionar función deseada. F G Seleccionar Sí , No o Llam. sí (tono de aviso de batería en llamada). Guardar Guardar los ajustes. Activar/desactivar la alarma por vibración Para no ser molestado por un tono de llamada, podrá activar, en su lugar, la alarma por vibración del terminal inalámbrico. Dicha alarma también se puede activar en combinación con el tono de llamada (p. ej. en un entorno ruidoso). © Abrir menú. D åååååååååååååååååååååååååååååååå [ Seleccionar y confirmar. Ajuste audio D åååååååååååååååååååååååååååååååå [ Seleccionar y confirmar. Vibración ½ El ajuste actual está marcado mediante ✓ Mediante una pusación prolongada de la tecla « puede desactivar el tono de llamada. De este modo sólo se encuentra activa la alarma por vibración. 21 Gigase 4000 Micro, De-It-Fr-Sp-GB, A31008-G4000-B027-1-6419 4000CO.FM 07.05.02 Ajustes Pulsar las teclas: Activar/desactivar aceptación automática de llamada Si está activada esta función, para contestar una llamada basta con retirar el terminal inalámbrico del soporte cargador (estado de suministro), sin necesidad de pulsar la tecla c. © Abrir el menú. Ajuste terminal D åååååååååååååååååååååååååååååååå [ Seleccionar y confirmar. Acep.llamad.aut D åååååååååååååååååååååååååååååååå [ Activar/desactivar con [ (✓ = función act.). Reposición del estado de suministro El listín telefónico, la lista de proveedores de red y la lista de llamantes no se borran en la reposición. El registro en la estación base se mantiene. © Abrir el menú. Ajuste terminal D åååååååååååååååååååååååååååååååå [ Seleccionar y confirmar. Reponer teléf. D åååååååååååååååååååååååååååååååå [ Seleccionar y confirmar. Sí Confirmar la consulta de seguridad. Función Volumen del microteléfono Volumen del timbre ("tono del timbre“ ,) Melodía del timbre Aceptación automática de llamada Tono de aviso de batería Volumen de manos libres Nivel de babyphone Control de tiempo Idioma del display Alarma por vibración 22 Estado de suministro 1 5 1 act. act. 3 alto desact. inglés desact. Gigase 4000 Micro, De-It-Fr-Sp-GB, A31008-G4000-B027-1-6419 4000CO.FM 07.05.02 Babyphone (vigilancia de habitación) Pulsar las teclas: Babyphone (vigilancia de habitación) Mediante su terminal inalámbrico puede supervisar los ruidos de la habitación de su bebé desde otro lugar. La distancia entre el terminal inalámbrico y su bebé debe ser de, como mín., 1 a 2 metros. Si se alcanza un nivel de ruido determinado (p.ej., el bebé llora), el terminal inalámbrico marca automáticamente el número de teléfono programado (interno/externo). Con la función babyphone activada las llamadas entrantes se indican sólamente en el display del terminal. Ajustar babyphone © Abrir el menú. D åååååååååååååååååååååååååååååååå [ Seleccionar y confirmar. Familia/ocio D åååååååååååååååååååååååååååååååå [ Seleccionar y confirmar. Vigilan. habit. F G Seleccionar Sí o No . D Saltar una línea hacia abajo. Cambiar Abrir campo de entrada para el n° de teléfono. Borrar un número externo ya programado. Borrar un número externo ya programado con X. Borrar un número interno ya programado con Sí (consulta de seguridad). F o Abrir la lista de extensiones internas e seleccionar número interno. [ Guardar el número de teléfono. o bien D Abrir el listín telefónico. D [ Seleccionar extensión externa. © Abrir el menú. [ Confirmar los ajustes. Guardar åååååååååååååååååååååååååååååååå D Saltar una línea hacia abajo. F G Ajustar nivel de sensibilidad “alto“ o “bajo“. Guardar Guardar los ajustes. Con la tecla del display No puede desactivar la función babyphone. 23 Gigase 4000 Micro, De-It-Fr-Sp-GB, A31008-G4000-B027-1-6419 4000CO.FM 07.05.02 Modo walkie-talkie Pulsar las teclas: Ud. puede desactivar desde el exterior (p.ej., desde el teléfono móvil) la función babyphone. Atienda la llamada activada por la función babyphone. Desactivar con ¬ª. Ahora la función babyphone se encuentra desactivada. Ya no se activan más llamadas por el babyphone. Modo walkie-talkie Requisito: Los terminales tienen los mismos ajustes de estación base (p. ej. mejor estación), o todavía no están registrados en ninguna estación base. (El modo walkietalkie reduce considerablemente el tiempo de servicio del terminal). En el modo walkie-talkie, los terminales no pueden recibir llamadas entrantes. Activar modo walkie-talkie en un terminal inalámbrico © Abrir el menú. D åååååååååååååååååååååååååååååååå [ Seleccionar función. Familia/ocio D åååååååååååååååååååååååååååååååå [ Activar modo walkie-talkie. Walky-Talky Con la tecla del display No se puede desactivar el modo walkie-talkie. Utilizar modo walkie-talkie Dos terminales inalámbricos se encuentran en el modo walkie-talkie: Terminal inalámbrico llamante: Llamar Pulsar. Terminal inalámbrico llamado: La llamada se indica en el display con un aviso. Timb.no c a 24 El timbre de llamada se desactiva. Pulsar. Ambos terminales inalámbricos quedan interconectados. Pulsar. Finaliza la comunicación. Gigase 4000 Micro, De-It-Fr-Sp-GB, A31008-G4000- 4000CO.FM 07.05.02 Anexo Anexo Operación con estaciones base de la gama Gigaset Gigaset 1000/2000/3000 Las siguientes funciones de su teléfono inalámbrico 4000i Micro/ Comfort no se ofrecen en las estaciones base de esta gama Gigaset. ● ● ● Ajuste de la hora (tras apagar el terminal inalámbrico, la hora deja de visualizarse) Marcación por voz Babyphone (no puede desactivarse desde el exterior) Gigaset 4010/4015 Classic Las siguientes funciones de su teléfono inalámbrico 4000i Micro/ Comfort no se ofrecen en estas estaciones base. ● ● Marcación por voz Ajuste de niveles de autorización Cuidados Limpie la estación base y el terminal inalámbrico con un paño húmedo o un paño antiestático. No utilice en ningún caso un paño seco. Existe peligro de que se forme carga estática. Contacto con líquido ! Contacto con líquido: Si el terminal inalámbrico entrara en contacto con líquido: no conectar en ningún caso el aparato. Retirar inmediatamente todas las baterías. Deje que el líquido escurra fuera del aparato y seque después todas las piezas. Almacene el terminal inalámbrico sin baterías durante un mínimo de 72 horas en un lugar seco y caliente Después es posible en mucho casos la nueva puesta en funcionamiento. 25 4000CO.FM Gigase 4000 Micro, De-It-Fr-Sp-GB, A31008-G4000-B027-1-6419 07.05.02 Anexo Baterías recomendadas: Híbrido niquel-metal (NiMH) , 500 mAh. No de pedido V30145-K1310-X125 o No de pedido V30145-K1310-X229 Tiempos de servicio/de carga del terminal: Capacidad (mAh) Tiempo de autonomía (horas) Tiempo de conversación (horas) Tiempo de carga (horas) 500 hasta 300 aprox. 16 aprox. 5,5 La capacidad de carga se reduce por el desgaste normal al cabo de unos años. Alcance El alcance en espacios abiertos es de aprox. 300 m. Dentro de edificios se registran alcances de hasta 50 m. Cargador de sobremesa El cargador de sobremesa para teléfonos móviles Siemens también se puede utilizar para cargar su terminal inalámbrico. (Accesorio para los teléfonos móviles Siemens C45, ME45, S45) No de pedido L36880-N4501-A101) ½ Al realizar la carga de un terminal inalámbrico Gigaset en el cargador de sobremesa, la batería de reserva no se cargará mienntras el terminal inalámbrico se encuentre emplazado en el cargador. El LED indicador de carga siempre está encendido. Customer Care (Service) Obtendrá una asistencia sencilla y sin complicaciones en caso de cuestiones técnicas y de manejo de su aparato a través de nuestro soporte en línea en la página de Internet www.my-siemens.com/customercare En caso de ser necesaria una reparación, sírvase dirigirse a uno de nuestros centros de servicio. Números de teléfono del servicio técnico v. contraportada. El sello CE corrobora la conformidad del equipo con los requerimientos básicos de la directiva R&TTE. El terminal inalámbrico 4000i Micro está homologado para toda la UE y Suiza. 26 Gigase 4000 Micro, De-It-Fr-Sp-GB, A31008-G4000- 4000CO.FM 07.05.02 Anexo Idiomas de display Al registrarse en la estación base 4010i pueden ajustarse los idiomas marcados con *: Einstellungen H/Set Settings Réglages comb. Impostazioni Ajuste terminal Sprache Language Langue Lingua Idioma Deutsch English Français Italiano Español 27 Gigase 4000 Micro, De-It-Fr-Sp-GB, A31008-G4000-B027-1-6419 4000CO.FM 13.05.02 28 Diese Seite muss gedruckt werden, damit neue Sprache rechts beginnt! Gigaset 4000 Micro, De-It-Fr-Sp-GB, A31008-G4000- 4000co- 17.04.02 s Be inspired Operating instructions ! ENGLISH and safety precautions Gigaset 4000 Micro, De-It-Fr-Sp-GB, A31008-G4000-B027-1- 4000COU.FM 06.05.02 Brief overview of the handset Brief overview of the handset The display is protected by a plastic film. Remove the plastic film. Status LED (light-emitting diode) lights up during a call; flashes at: – Incoming call – New messages – Alarm call, appointments, anniversaries Display (display field) Charging status = empty U full flashes: Battery low Current functions and display keys Reception strength Control key Talk key – Accept call – Dial number – Switch from handsfree talking to handset Open the directory Ñ e Annabella 19.07.01 { 13:13 ¨ End call and On/ Off key – End call – Cancelling function – One menu level back (press briefly) – Return to idle state (hold down) – Handset on/off (hold key down) Key 1 Hold down to select Answ. machine/Mailbox Asterisk key Hold down to activate and deactivate the ringer Keypad protection On/off hold key down! Handsfree key With the display keys, you have access to the current functions. Caller list Access to message lists Microphone Socket – for Headset, MP3-Player Sel Services key – Open network access list: press briefly! – R key function: hold key down! Interaction between control key and display keys With the display keys you can carry out functions that can also be partly controlled with the control key. The side of the control key which you must press is indicated in the operating instructions by arrows: Display keys Control key 2 INT F/ G (left/right) E/ D (top/bottom) Gigaset 4000 Micro, De-It-Fr-Sp-GB, A31008-G4000-B027-1- 4000COU.FM 06.05.02 Brief overview of the handset Important menus © D Text Message* New Entry Select Services Anne Add. Features Barbara Calendar/Clock Chris : Sound Settings Call Charges © OKƒ H/Set Settings Display Number Base Settings Delete Entry Voice Mail Copy Entry Delete List Handset Volume Send List Ringer Settings Available Memory Advisory Tones Display symbols The following symbols appear above the display keys depending on the situation: Display keys Meaning ¨ Menu key: Activates the main menu when the phone is idle. During a call, it activates a menu for the particular situation. Z Selects and confirms the menu function. Ends and saves an entry. W Delete key (Backspace): Deletes characters from right to left. { Automatic redial key: Opens a list of the last five numbers dialled. I Displayed if SMS*, answering machine, mail service box or caller list is active Í One menu level back, cancel * Not available in all countries 3 Gigaset 4000 Micro, De-It-Fr-Sp-GB, A31008-G4000-B027-1- 4000COU.FM 06.05.02 Safety precautions Safety precautions $ ! Only use the power supply unit supplied as indicated on the underside of the device. Only insert approved rechargeable batteries of the same type. Never use ordinary (non-rechargeable) batteries as they may pose a health hazard or cause injury. ‹ Make sure the rechargeable battery is inserted the right way round Œ Use the battery specified in these operating instructions The phone may affect medical equipment so always switch your phone off before entering hospitals or doctors’ practices. The handset may cause an unpleasant humming noise in hearing aids. Do not operate the phone in places where there is a risk of explosion (such as paint workshops). The handset is not splash-proof (see page 25). Drivers must not use the phone while driving (including the Walk and Talk function). The phone must be switched off at all times in an aircraft (including the Walk and Talk function). Make sure it cannot be switched on accidentally. ƒ If you give your Gigaset to someone else you should also give them the operating instructions. Dispose of batteries and the phone carefully. Do not pollute the environment. Not all the functions described in these operating instructions are available in all countries. 4 Gigaset 4000 Micro, De-It-Fr-Sp-GB, A31008-G4000-B027-1- 4000coivz.fm 08.03.02 Contents Contents Brief overview of the handset . . . . . . . . . . . . . . . . . . . . . . . . . . . . . . . . . . . . . . . . . . . . 2 Interaction between control key and display keys. . . . . . . . . . . . . . . . . . . . . . . . . .2 Important menus . . . . . . . . . . . . . . . . . . . . . . . . . . . . . . . . . . . . . . . . . . . . . . . . . .3 Display symbols . . . . . . . . . . . . . . . . . . . . . . . . . . . . . . . . . . . . . . . . . . . . . . . . . . .3 Safety precautions . . . . . . . . . . . . . . . . . . . . . . . . . . . . . . . . . . . . . . . . . . . . . . . . . . . . . 4 Preparing the handset. . . . . . . . . . . . . . . . . . . . . . . . . . . . . . . . . . . . . . . . . . . . . . . . . . . 6 Delivery package . . . . . . . . . . . . . . . . . . . . . . . . . . . . . . . . . . . . . . . . . . . . . . . . . . .6 Inserting the battery . . . . . . . . . . . . . . . . . . . . . . . . . . . . . . . . . . . . . . . . . . . . . . . . . . . . . . . . . . . . . . . .6 Registering the handset . . . . . . . . . . . . . . . . . . . . . . . . . . . . . . . . . . . . . . . . . . . . .6 Charging the battery . . . . . . . . . . . . . . . . . . . . . . . . . . . . . . . . . . . . . . . . . . . . . . . .7 Attaching the belt clip . . . . . . . . . . . . . . . . . . . . . . . . . . . . . . . . . . . . . . . . . . . . . . .7 Setting the date and time . . . . . . . . . . . . . . . . . . . . . . . . . . . . . . . . . . . . . . . . . . . .8 Changing the display language . . . . . . . . . . . . . . . . . . . . . . . . . . . . . . . . . . . . . . . .8 Making calls . . . . . . . . . . . . . . . . . . . . . . . . . . . . . . . . . . . . . . . . . . . . . . . . . . . . . . . . . . . 9 Making an external call . . . . . . . . . . . . . . . . . . . . . . . . . . . . . . . . . . . . . . . . . . . . . .9 Making internal calls . . . . . . . . . . . . . . . . . . . . . . . . . . . . . . . . . . . . . . . . . . . . . . . .9 Answering a call . . . . . . . . . . . . . . . . . . . . . . . . . . . . . . . . . . . . . . . . . . . . . . . . . . .9 Open caller list/message list . . . . . . . . . . . . . . . . . . . . . . . . . . . . . . . . . . . . . . . . .10 Handsfree talking. . . . . . . . . . . . . . . . . . . . . . . . . . . . . . . . . . . . . . . . . . . . . . . . . .10 Forwarding an external call, enquiry call . . . . . . . . . . . . . . . . . . . . . . . . . . . . . . . .10 Automatic redial . . . . . . . . . . . . . . . . . . . . . . . . . . . . . . . . . . . . . . . . . . . . . . . . . . . . . . . 11 Directory and network access list . . . . . . . . . . . . . . . . . . . . . . . . . . . . . . . . . . . . . . . 12 Speed dialling from the network access list . . . . . . . . . . . . . . . . . . . . . . . . . . . . .13 Dialling with speed dialling . . . . . . . . . . . . . . . . . . . . . . . . . . . . . . . . . . . . . . . . . .13 Settings . . . . . . . . . . . . . . . . . . . . . . . . . . . . . . . . . . . . . . . . . . . . . . . . . . . . . . . . . . . . . . 17 Setting the alarm clock . . . . . . . . . . . . . . . . . . . . . . . . . . . . . . . . . . . . . . . . . . . . .17 Deactivating the alarm clock . . . . . . . . . . . . . . . . . . . . . . . . . . . . . . . . . . . . . . . . .17 Turning off the alarm call . . . . . . . . . . . . . . . . . . . . . . . . . . . . . . . . . . . . . . . . . . . .17 Setting an appointment . . . . . . . . . . . . . . . . . . . . . . . . . . . . . . . . . . . . . . . . . . . .18 Handset and loudspeaker volume . . . . . . . . . . . . . . . . . . . . . . . . . . . . . . . . . . . . .19 Activating/deactivating warning and signal tones . . . . . . . . . . . . . . . . . . . . . . . . .20 Activating/deactivating the vibration alarm . . . . . . . . . . . . . . . . . . . . . . . . . . . . . .21 Auto talk feature on/off . . . . . . . . . . . . . . . . . . . . . . . . . . . . . . . . . . . . . . . . . . . . .21 Resetting to the factory defaults . . . . . . . . . . . . . . . . . . . . . . . . . . . . . . . . . . . . .22 Room monitoring (babyphone). . . . . . . . . . . . . . . . . . . . . . . . . . . . . . . . . . . . . . . . . . . 22 Setting the room monitor . . . . . . . . . . . . . . . . . . . . . . . . . . . . . . . . . . . . . . . . . . .23 Walk and Talk mode . . . . . . . . . . . . . . . . . . . . . . . . . . . . . . . . . . . . . . . . . . . . . . . . . . . 24 Appendix . . . . . . . . . . . . . . . . . . . . . . . . . . . . . . . . . . . . . . . . . . . . . . . . . . . . . . . . . . . . . 25 Operating on base stations in the Gigaset family . . . . . . . . . . . . . . . . . . . . . . . . .25 Contact with liquid. . . . . . . . . . . . . . . . . . . . . . . . . . . . . . . . . . . . . . . . . . . . . . . . .25 Range . . . . . . . . . . . . . . . . . . . . . . . . . . . . . . . . . . . . . . . . . . . . . . . . . . . . . . . . . .26 Guarantee . . . . . . . . . . . . . . . . . . . . . . . . . . . . . . . . . . . . . . . . . . . . . . . . . . . . . . .26 Customer Care Service . . . . . . . . . . . . . . . . . . . . . . . . . . . . . . . . . . . . . . . . . . . . .29 Display languages . . . . . . . . . . . . . . . . . . . . . . . . . . . . . . . . . . . . . . . . . . . . . . . . .30 5 4000CO.FM Gigaset 4000 Micro, De-It-Fr-Sp-GB, A31008-G4000-B027-1-6419 06.05.02 Preparing the handset Press Keys: Preparing the handset Delivery package Gigaset 4000 Micro handset, one battery, charging unit, belt clip, operating instructions. Inserting the battery et as Gig et as 00 40 icro Gig m 00 40 icro m The default display language on your handset is Italian. To set the desired language, see page 8. Registering the handset Step 1: © Open the menu. D åååååååååååååååååååååååååååååååå [ Select and confirm. H/Set Settings D åååååååååååååååååååååååååååååååå [ Select and confirm. Register H/Set D [ Select base ( Base 1 , o[ Base 2 , Base 3 or Base 4 ). Key in PIN and confirm (as supplied: 0000): Regstr.Procedure Base 1 is displayed, for example. Step 2: Press down the key on the back of the Gigaset 4010i Micro base and keep it pressed down for a while. The handset will be automatically assigned the next free internal number (1–3). The internal number 6 will be overwritten if all positions are already occupied. The handset will return to the idle condition following successful registration. The internal number (e.g. “INT1”) is displayed. Gigaset 6 On the base station or base telephone Gigaset 4000 Micro, De-It-Fr-Sp-GB, A31008-G4000-B027-1-6419 4000CO.FM 06.05.02 Preparing the handset Press Keys: 4010/4015 Hold down the key on the underside of the base station. 3010/3015 Hold down the paging-keyy on the base station until you hear signal tones. 3020/25 3030/35 4030/35 Select settings, system settings and register handset in the menu at the base station telephone and confirm with OK. 3070/75 4070/75 Press the LED – it will flash during registration. Non-Sie- To register at “GAP base stations” , follow mens base the relevant operating instructions stations (steps 2 and 3). Charging the battery 5,5 Leave the handset for approx. 5,5 hours in the charging unit to charge the battery, as they are not charged when they leave the factory. The charging status icon flashes on the handset to indicate that the battery are being charged: See the appendix for a list of recommended battery. ● ● The battery heat up during charging. This is normal and not dangerous. Opening the battery compartment unnecessarily may cause the wrong charging status to be displayed. Attaching the belt clip Push the belt clip onto the back of the handset until the lugs at the side click into place. 7 Gigaset 4000 Micro, De-It-Fr-Sp-GB, A31008-G4000-B027-1-6419 4000CO.FM 06.05.02 Preparing the handset Press Keys: Setting the date and time You need to set the date and time so that the time that messages and calls are received is shown correctly. © Open the menu. D åååååååååååååååååååååååååååååååå [ Select and confirm. Calendar/Clock D åååååååååååååååååååååååååååååååå [ Select and confirm. Date/Time The current setting is shown. Enter the date Enter the day/month/year. In this case 20.05.2001. e. g.ŸÞÞ¢Þ] D Go down one line. Enter the time Enter hours and minutes. In this case 19:05 e. g. ] ¬ Þ ¢ D Go down one line. Select the display mode use the left side of the control key to select the 12hour mode (am or pm) or the 24-hour mode (default). [ Save the settings. Save åååååååååååååååååååååååååååååååå Changing the display language © Open the menu. D åååååååååååååååååååååååååååååååå [ Confirm the function. H/Set Settings D åååååååååååååååååååååååååååååååå [ The current language is marked with a ✓. Language D[ Select the language you want and confirm. You will find a.table on the last page of this booklet. Dialling an emergency number You can dial the emergency numbers saved in the base station even if the telephone lock is activated. Please refer to the operating instructions for your base station. 8 Gigaset 4000 Micro, De-It-Fr-Sp-GB, A31008-G4000-B027-1-6419 4000CO.FM 06.05.02 Making calls Press Keys: Making calls Making an external call o Enter the telephone number. If you make a mistake use the X key to correct individual digits. c a Press the talk key. Press the end call key to end the call. ● ● ● You can also press the talk key c first and then enter the telephone number - each digit will be dialled immediately. You can cancel the dialling operation by pressing the end call key a. You can insert a pause: After entering the prefix, open the menu using the display key © and select “insert pause” . Making internal calls F Open the list of internal users. Your own handset is identified by “<". D E c Select the handset you want and press the talk key. or e. g. Ÿ Enter the internal number of the handset. or Call All or « All handsets are called. c a Press the end call key to end the call. Answering a call c Your telephone will ring (ringing tone) and the status LED will flash. / u Press the talk key or handsfree key. or k Ö Simply remove the handset from the charging unit (factory setting: “Auto talk”). 9 Gigaset 4000 Micro, De-It-Fr-Sp-GB, A31008-G4000-B027-1-6419 4000CO.FM 06.05.02 Making calls Press Keys: Open caller list/message list* A message appears in the display and the status LED flashes to indicate that there are new calls/messages. ? Press Handsfree talking Handsfree talking when dialling o Dial the telephone number. u Press the handsfree key. When handsfree talking is activated, the handsfree key u and the status LED are lit. Handsfree talking during a call u Activate handsfree talking. To set the volume: Press the handsfree key u once more. F G Raise or lower the volume. Save c a Save the volume level. Change from handsfree talking to the handset End the call. Forwarding an external call, enquiry call You can forward an external call to another handset or make an internal enquiry call. F Open the list of internal users. E D c Select the internal user and call. If the internal user answers: . ● To forward the call: Press the end call key ● To end the enquiry call: Use End to return to the waiting party. a * Not available in all countries 10 Gigaset 4000 Micro, De-It-Fr-Sp-GB, A31008-G4000-B027-1-6419 4000CO.FM 06.05.02 Automatic redial Press Keys: Automatic redial Manual redial You have access to the last five telephone numbers dialled. z D Display and select the telephone number. c Press the talk key. Automatic redial This function is not available in all countries. The handsfree key flashes and open listening is activated. The function is deactivated after ten unsuccessful call attempts or if a call was made in the meantime. Press Off or any key if the person you called is not available. z D Display and select the telephone number. © Open the menu. Automatic Redial [ Activate. åååååååååååååååååååååååååååååååå c If the other person answers press the talk key. Deleting a number from the redialling list z D Display and select the telephone number. © Open the menu. D åååååååååååååååååååååååååååååååå [ The telephone number is deleted. Delete Entry Copying a telephone number to the directory z D Display and select the telephone number. © Open the menu. D åååååååååååååååååååååååååååååååå Copy to Directory [ The telephone number is entered. o If you like you can change the number and enter a name (you can also enter an anniversary s. page 16). For notes on how to enter letters and characters s. page 14. © Open the menu. [ Save the entry. Save Entry åååååååååååååååååååååååååååååååå 11 Gigaset 4000 Micro, De-It-Fr-Sp-GB, A31008-G4000-B027-1-6419 4000CO.FM 06.05.02 Directory and network access list Press Keys: Directory and network access list With the D directory you can store up to 200 telephone numbers and then dial them at the push of a button. You can save the prefixes (Call-by-Call)* of telephone companies in the network access list C. The directory and network access list are used in exactly the same way. Storing an entry D / C Open the directory/network access list. [ Select the menu item and confirm. New Entry åååååååååååååååååååååååååååååååå o Enter the telephone number (no more than 32 digits). D o Scroll to the name field and enter the name. You can also enter an anniversary in the directory, see also page 16. © Open the menu. [ Store the entry Save Entry åååååååååååååååååååååååååååååååå Dialling with the directory D Open the directory. e. g. ^^ c Enter the first letter of the name. For example for “E” press the ^ key twice or scroll with the D key. Press the talk key. After selecting the name you can also open the menu, select Display Number , extend/change the number and dial with the talk key c. * Not available in all countries 12 Gigaset 4000 Micro, De-It-Fr-Sp-GB, A31008-G4000-B027-1-6419 4000CO.FM 06.05.02 Directory and network access list Press Keys: Dialling with the network access list (Call-by-Call) C Open the network access list. D© Select call-by-call number and open the menu. [ Select the menu item and confirm. Display Number åååååååååååååååååååååååååååååååå o Enter the telephone number of the person you want to call. or DD [ Select the telephone number in directory and confirm. c Press the talk key. The telephone number is dialled. Speed dialling from the network access list You can store 8 speed dialling numbers in the network access list. Enter a speed dialling number (2–9) before the name. Example: Press speed dial key 2 and then enter the network provider's name. Dialling with speed dialling e. g. Ÿ Hold down the key: The stored network provider's name is displayed. e. g. o Enter the telephone number or DD [ Select an entry from the directory and confirm. c Press. 13 4000CO.FM Gigaset 4000 Micro, De-It-Fr-Sp-GB, A31008-G4000-B027-1-6419 06.05.02 Directory and network access list Press Keys: Character map Press the relevant key repeatedly or hold down: 1x ] Ÿa ^ d ¡ g ¢j £ m ¤ p ¥t ¬ w →A « a→ Þ. ª # blank 2x 3x 4x 5x 6x 7x 8x 9x 10 x ã ç ô õ å 1 â £ $ ¥ ¤ b c 2 ä á à â e f 3 ë é è ê h i 4 ï í ì î k l 5 n o 6 ö ñ ó ò q r s 7 ß u v 8 ü ú ù û x y z 9 ÿ ý æ ø * / ( ) < = > % , ? ! 0 + - : ¿ @ \ & § * Other characters on this key: ¡* “,‘,;,_ The first letter of the name is automatically written in uppercase and the rest in lowercase. To change one letter from uppercase to lowercase or vice versa press « . Control the cursor with F G E D. Delete characters with X Letters are always inserted to the left of the cursor. Inserting a blank before a name takes that name to the top of the directory (for example “ Karla”). Sort sequence: 14 1. Blank 3. Letters (alphabetical) 2. Digits (0-9) 4. Other characters Gigaset 4000 Micro, De-It-Fr-Sp-GB, A31008-G4000-B027-1-6419 4000CO.FM 06.05.02 Directory and network access list Press Keys: Displaying, changing or deleting an entry D/C Open the directory/network access list. D Select the entry you want. View Change View all the information for the entry. Open the input field and make the necessary changes. o Change the number if necessary. D o Go to the name field and change the name. For notes on entering letters and characters s. page 14. For the directory enter an anniversary if necessary s. page 16. © Open the menu. [ Confirm the changes. Save Entry åååååååååååååååååååååååååååååååå or D/C Open the directory/network access list. D Select the relevant entry. © Open the menu. D åååååååååååååååååååååååååååååååå [ You will hear a confirmation tone. The entry has been Delete Entry deleted. Copying an entry to another handset You can copy an entry to another Micro/Comfort handset. D/C Open the directory/network access list. D Select the required entry. © Open the menu. [ Select the menu item and confirm. Delete Entry D åååååååååååååååååååååååååååååååå D[ Select the internal user (receiving handset) and confirm. Copying a further entry: YES Press. D Select the required number. Copy Initiate the copy process. 15 Gigaset 4000 Micro, De-It-Fr-Sp-GB, A31008-G4000-B027-1-6419 4000CO.FM 06.05.02 Directory and network access list Press Keys: Copying the directory/network access list You can copy the entire directory/network access list to another Micro/Comfort handset. See “Copying an entry to another handset” . Transmission is interrupted: ● ● if the memory of the receiving handset is full. if you receive a call. Copying of an entry is terminated. Deleting the directory/network access list D/C Open the directory/network access list. D Select the required entry. © Open the menu. D åååååååååååååååååååååååååååååååå [ Select the menu item and confirm. Delete List YES Confirm delete all entries. Entering anniversaries (birthdays and so on) You can store the date and time of anniversaries so you can be reminded of them. D Open the directory. DView Select and display the entry. Change Open the input field. D Move the cursor into the birthday/anniversary field. Change Confirm. o Enter or change the date (day/month). D o Scroll forward one line and enter the time. D Scroll forward one line. F G Choose the indicator for the alarm. [ Store entries. Use the display key Delete to delete the anniversary alarm. 16 Gigaset 4000 Micro, De-It-Fr-Sp-GB, A31008-G4000-B027-1-6419 4000CO.FM 06.05.02 Settings Press Keys: Settings Setting the alarm clock If activated, the alarm clock (¼ icon) on your handset will ring every day at the time entered. With the handset idle: © Open the menu. D åååååååååååååååååååååååååååååååå [ Select the menu item and confirm. Calendar/Clock D åååååååååååååååååååååååååååååååå [ Select the menu item and confirm. Alarm Clock The current setting is displayed. FG Select On . D Scroll forward one line. Þ £Þ Þ Enter the hours/minutes. The example here is 06.00. D Scroll forward one line. F G Choose the ringer melody for the alarm call. Save Save the settings. An alarm call will not be made if room monitoring (babyphone) is activated or during automatic redialling. Deactivating the alarm clock The alarm clock is set but you do not want it to ring. © Open the menu. D åååååååååååååååååååååååååååååååå [ Select the menu item and confirm. Calendar/Clock D åååååååååååååååååååååååååååååååå [ Select the menu item and confirm. Alarm Clock F G Select Save Off . Save the settings. Turning off the alarm call An alarm call is signalled like an incoming call. Press any key to turn it off. 17 Gigaset 4000 Micro, De-It-Fr-Sp-GB, A31008-G4000-B027-1-6419 4000CO.FM 06.05.02 Settings Press Keys: Setting an appointment Your handset is able to remind you of one appointment. If you have set an appointment, this is indicated by the ¼ icon in the display. With the handset idle. © Open the menu. D åååååååååååååååååååååååååååååååå [ Select the menu item and confirm. Calendar/Clock [ Select the menu item and confirm. Set Appoints. åååååååååååååååååååååååååååååååå F G Select On to activate the appointment alarm. D Scroll forward one line. Ÿ Þ Þ ¢ Enter the day/month. The example here is 20th May. D Scroll forward one line. Þ ¬ ^ Þ Enter the hours/minutes. The example here is: 9.30. D Scroll forward one line. F G Choosing the ringer melody for the appointment alarm. Save Save the settings. An appointment alarm will only ring when the handset is idle. An appointment alarm is not made when room monitoring is activated or during automatic redial. Turning off the appointment alarm An appointment alarm is signalled in the same way as an incoming call; press any key to turn it off. 18 Gigaset 4000 Micro, De-It-Fr-Sp-GB, A31008-G4000-B027-1-6419 4000CO.FM 06.05.02 Settings Press Keys: Missed appointments and anniversaries An appointment and anniversaries that have been signalled on the handset but not been accepted are saved in a list. A new missed appointment/anniversary is indicated by Appt.. Press the right display key to display the list Events list. Then select Missed Appoint. ¼ [. If you want to view your appointment again, proceed as follows: © Open the menu. D åååååååååååååååååååååååååååååååå [ Select the menu item and confirm. Calendar/Clock D åååååååååååååååååååååååååååååååå [ Select the menu item and confirm. Missed Dates D [ Select a missed appointment ¼ or anniversary ‚ Information on this entry is displayed. Use the display key Delete to delete the appointment/ anniversary. Handset and loudspeaker volume © Open the menu. D åååååååååååååååååååååååååååååååå [ Select the submenu. Sound Settings Handset Volume [ You will hear the current handset volume. åååååååååååååååååååååååååååååååå F G Set the required handsfree talking volume. D Scroll forward one line. F G Save Select the required level for the handset volume and confirm. Setting the ringer volume/melody You can choose from five ringer volumes, “crescendo” ring (increasing volume), ringer off and any of ten ringer melodies: © Open the menu. D åååååååååååååååååååååååååååååååå [ Select the menu item and confirm. Sound Settings D åååååååååååååååååååååååååååååååå [ You will hear the current ringer volume and its level Ringer Settings will be displayed. F G Select the ringer volume. D Scroll forward one line. F G Save Select the required ringer melody (1–10) and confirm. 19 Gigaset 4000 Micro, De-It-Fr-Sp-GB, A31008-G4000-B027-1-6419 4000CO.FM 06.05.02 Settings Press Keys: Time control for ringer volume You can set a different ringer volume for a particular time of day. © Open the menu. D åååååååååååååååååååååååååååååååå [ Select the menu item and confirm. Sound Settings D åååååååååååååååååååååååååååååååå [ You will hear the current ringer volume and its level Ringer Settings will be displayed. Time C. Press. F G Activate/deactivate time control. Do Enter the period for the different ringer e. g. ]]ÞÞ ]¢ÞÞ from 11:00 to 15:00. DF G Scroll forward one line and select the ringer volume Save Entry Save or a Save the settings. Press. Activating/deactivating warning and signal tones ● Key beeps: Every keystroke is confirmed. Confirmation beeps: Confirmation beep (a rising tone sequence) when you make entries/settings and when you replace the handset in the charging station. ● Battery low beep: The battery must be recharged. © Open the menu. ● D åååååååååååååååååååååååååååååååå [ Select the menu item and confirm. Sound Settings D åååååååååååååååååååååååååååååååå [ Select the menu item and confirm. Advisory Tones D Select the required function. FG Save 20 On , Off or select In Call (battery low beep in the call). Save the settings. Gigaset 4000 Micro, De-It-Fr-Sp-GB, A31008-G4000-B027-1-6419 4000CO.FM 06.05.02 Settings Press Keys: Activating/deactivating the vibration alarm If you do not wish to be disturbed by the ringing tone you can activate the handset’s vibration alarm instead. This can also be activated in addition to the ringing tone (in noisy surroundings, for instance). © Open the menu. D åååååååååååååååååååååååååååååååå [ Select and confirm. Sound Settings D åååååååååååååååååååååååååååååååå [ Select and confirm. Silent alert ½ The current setting is marked with a ✓ You can deactivate the ringing tone by keeping the « key pressed down for a while. Only the vibration alarm will then be active. Auto talk feature on/off When this function is activated you can remove the handset from the charging unit without pressing the c key to accept a call (factory setting). © Open the menu. D åååååååååååååååååååååååååååååååå [ Select the menu item and confirm. H/Set Settings D åååååååååååååååååååååååååååååååå [ Activate/deactivate with [ Auto Answer (✓ = function on). 21 Gigaset 4000 Micro, De-It-Fr-Sp-GB, A31008-G4000-B027-1-6419 4000CO.FM 06.05.02 Room monitoring (babyphone) Press Keys: Resetting to the factory defaults The directory, the network access list and the caller list are not deleted when you reset the handset. Registration at the base station is not affected. © Open the menu. D åååååååååååååååååååååååååååååååå [ Select the menu item and confirm. H/Set Settings D åååååååååååååååååååååååååååååååå [ Select the menu item and confirm. Reset Handset YES Confirm. Function Handset volume Ringer volume (“ring tone” ,) Ringer melody Auto talk Battery low beep Handsfree volume Room monitor level Time control Display language Vibration alarm Factory setting 1 5 1 On On 3 high off local off Room monitoring (babyphone) You can use your handset as a baby monitor. The handset should be placed at least 1 to 2 meters away from your baby. If a certain noise level is reached (for example if your baby is crying) the handset will automatically dial the number you stored (internal or external). When the room monitor is active, incoming calls are merely displayed. 22 4000CO.FM Gigaset 4000 Micro, De-It-Fr-Sp-GB, A31008-G4000-B027-1-6419 06.05.02 Room monitoring (babyphone) Press Keys: Setting the room monitor © Open the menu. D åååååååååååååååååååååååååååååååå [ Add. Features D åååååååååååååååååååååååååååååååå [ Room Monitor. FG D Change Select the menu item and confirm. Select the menu item and confirm. Select On or Off . Scroll forward one line. Open the entry field for the telephone number. Delete an existing external number with X. Delete an existing internal number with YES (you will be asked to confirm). F o Open the list of internal users and select the internal number. [ Save the number. or D Open the directory. D [ Select an external user. © Open the menu. [ Confirm the setting. Save Entry åååååååååååååååååååååååååååååååå D Go down one line. F G Set sensitivity to “high” or “low”. Save Save the setting. Room monitoring can be deactivated with the display key Off . You can deactivate the room monitor from an external number (from your mobile phone for example). Answer a call made from the room monitor. Deactivate with ¬ª. The room monitor is now deactivated. The room monitor will no longer call. 23 Gigaset 4000 Micro, De-It-Fr-Sp-GB, A31008-G4000-B027-1-6419 4000CO.FM 06.05.02 Walk and Talk mode Press Keys: Walk and Talk mode Requirements: The handsets must have the same base settings (e.g. best base station) or they must not be registered at any base station. (Walk and Talk mode reduces the handset's talk time considerably). In Walk and Talk mode, handsets are not available for incoming calls. Activating Walk and Talk mode on the handset © Open the menu. D åååååååååååååååååååååååååååååååå [ Select the function. Add. Features D åååååååååååååååååååååååååååååååå [ Activate Walk and Talk mode. Walk and Talk Walk and Talk mode can be deactivated with the display key Off . Using Walk and Talk mode Two handsets are in Walk and Talk mode: Calling handset: Call Press. Called handset: The call is indicated by a message on the display. Silent c a 24 Press. Press. The two handsets are connected to one another. Press. The call is ended. Gigaset 4000 Micro, De-It-Fr-Sp-GB, A31008-G4000- 4000CO.FM 06.05.0 Appendix Appendix Operating on base stations in the Gigaset family Gigaset 1000/2000/3000 The following functions on your 4000i Micro/Comfort handset are not supported by base stations in this Gigaset family: ● ● ● ● Setting the time (the time is not transferred after the handset has been switched off) Changing the display language Room monitoring (cannot be switched off externally) SMS transfer (SMS-compatible base stations only)* Gigaset 4010/4015 Classic The following functions on your 4000i Micro/Comfort handset are not supported by the above-mentioned base stations: ● ● ● Changing the display language SMS transfer* Setting authorisation stages * Not available in all countries Looking after your phone Wipe the base station and handset with a damp cloth or an antistatic wipe. Never use a dry cloth as this can cause static discharge. Contact with liquid ! If the handset should come into contact with liquid, on no account switch the device on. Remove all batteries immediately. Allow the liquid to drip out of the device, and then dab all parts of the device dry. Keep the handset with the batteries removed in a warm, dray place for at least 72 hours. In many cases, you will then be able to use it again. 25 Gigaset 4000 Micro, De-It-Fr-Sp-GB, A31008-G4000-B027-1-6419 4000CO.FM 06.05.02 Appendix Recommended batteries: Nickel-Metal-Hydride (NiMH), 500 mAh. Order No. V30145-K1310-X125 or Order No. V30145-K1310-X229 The handset’s operating times/charging time: Capacity (mAh) Standby time (hours) Talk time (hours) Charging time (hours) 500 up to 300 approx. 16 approx. 5.5 Battery charging capacity falls after a number of years. Range The handset will operate away from the base station up to about 300 m outdoors and up to 50 m indoors. Desktop charging station The desktop charging station for Siemens mobile telephones can also be used to charge your handset. (Accessory for Siemens C45, ME45, S45 mobile telephones) Order No. L36880-N4501-A101 ½ When a Gigaset handset is being charged in the desktop charging station, a spare battery will not be charged up while the handset is in the charging station. The charge display LED is always lit. Guarantee Scope ● ● 26 This equipment guarantee applies to end users (“customers”). This guarantee does not in any way affect the customer's statutory rights. The guarantee applies to the supplied devices and all their components but not to their installation or configuration or to the services provided by the dealer. Manuals and any software supplied on a separate data medium are excluded from the guarantee. This guarantee does not apply to decorative covers or any other personalised parts or software not included in the scope of supply. The guarantee also does not apply to decorative top or bottom shells for special editions. Gigaset 4000 Micro, De-It-Fr-Sp-GB, A31008-G4000- 4000CO.FM 06.05.0 Appendix ● The guarantee provides for devices or components that, despite proper care and use, have demonstrably developed defects due to faulty workmanship and/or faulty materials to be replaced or repaired at our discretion free of charge. The guarantee does not cover normal wear and tear. Alternatively, we reserve the right to replace the defective device with a successor model or reimburse the original purchase price on return of the defective device. Our decision is final. Any legal claims are excluded. ● Claims under the guarantee cannot be made if – the defect or damage was caused by improper care or use. Improper care or use includes the following: Opening the device (this is classed as third-party intervention) Manipulating components on the printed circuit board Manipulating the software Defects or damage caused by dropping, breaking, lightning or ingress of moisture. This also applies if defects or damage was caused by mechanical, chemical, radio interference or thermal factors (e.g. microwave, sauna, etc.). – Repairs or other work done by persons not authorised by us. – Devices fitted with accessories not authorised by Siemens. Any further claims due to damage are excluded, such as damage arising outside the device, provided this was not due to gross negligence and/or intent on our part. Claims under the guarantee must be made as soon as the defect is noticed. A till receipt showing the date of purchase must be presented as proof. Each claim under the guarantee is accepted with the express reservation that subsequent investigations confirm the validity of the claim. Any devices or components that are replaced become our property. The costs of materials and labour will be borne by us, but not the costs of transport, postage or freight. We are entitled, at our discretion, to make technical changes (such as firmware updates) beyond repair or replacement in order to upgrade the device to the latest state of the art. There is no additional charge to the customer for this work. Our decision is final. Any legal claims are excluded. The guarantee is valid in the country of purchase. It applies only if the device is operated in the relevant geographical area in accordance with the information on the packaging and in the operating instructions. Any further claims are excluded. Siemens is not liable in any circumstances for downtime, loss of profits, loss of data or loss of any other information. The customer alone is responsible for safeguarding such data and information. – – – – ● ● ● ● ● ● ● ● 27 Gigaset 4000 Micro, De-It-Fr-Sp-GB, A31008-G4000-B027-1-6419 4000CO.FM 06.05.02 Appendix ● Changes to this guarantee require prior approval by Siemens in writing. Guarantee period ● ● ● ● ● The guarantee applies in countries in the EU from 1 January 2002 for a period of 24 months. In all other countries the guarantee period shall be the relevant minimum statutory guarantee period, but no longer than 24 months. The guarantee period starts on the day of purchase by the customer. A successful claim under the guarantee does not extend the guarantee period. Work under the guarantee is handled by our Customer Care Centers. The guarantor is Siemens Aktiengesellschaft Deutschland, Schlavenhorst 88, D-46395 Bocholt. ½ 28 To redeem the guarantee please contact your local Customer Care Center (see back cover). Gigaset 4000 Micro, De-It-Fr-Sp-GB, A31008-G4000- 4000CO.FM 06.05.0 Appendix Customer Care Service You can get assistance easily when you have technical questions or questions about how to use your device by using our online support service on the Internet at: www.my-siemens.com/customercare If the device needs to be repaired, please contact one of our service centers: Service telephone number see back cover. The CE symbol indicates that the telephone complies with the essential requirements of the R&TTE directive. The 4000i Micro handset is approved for use in Switzerland and throughout the EU. 29 Gigaset 4000 Micro, De-It-Fr-Sp-GB, A31008-G4000-B027-1-6419 4000CO.FM 06.05.02 Appendix Display languages When registering the handset with the Gigaset 4010i base station, the languages marked with an * can be set: Einstellungen H/Set Settings Réglages comb. Impostazioni Ajuste terminal 30 Sprache Language Langue Lingua Idioma Deutsch English Français Italiano Español Gigaset 4000 Micro, De-It-Fr-Sp-GB, A31008-G4000- 4000CO.FM 04.07.02 Appendix We, Siemens AG, declare, that the above mentioned product is manufactured according to our Full Quality Assurance System certified by CETECOM ICT Services GmbH with the registration number „Q810820M“ in compliance with ANNEX V of the R&TTE-Directive 99/05/EC. The presumption of conformity with the essential requirements regarding Council Directive 99/05/EC is ensured. Senior Approval Manager The Declaration of Conformity (DoC) has been signed. In case of need, a copy of the original DoC can be made available via the company hotline. & 0682 31 U3 Giga 4000 Micro, Inland, A31008-G4000-B027-1-6419 A31008-G4000-B027-1-6419 4000MicroCOVER- Issued by Information and Communication mobile Haidenauplatz 1 D-81667 München © Siemens AG 2002 All rights reserved. Subject to availability. Right of modification reserved. Printed in Germany (05/2002). Siemens AG http://www.my-siemens.com Best.-Nr.: A31008-G4000-B027-1-6419 A3 1 0 0 8 - G4 0 0 0 - B0 2 7 - 1 - 6 4 1 9 07.05.02-
 1
1
-
 2
2
-
 3
3
-
 4
4
-
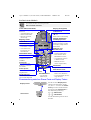 5
5
-
 6
6
-
 7
7
-
 8
8
-
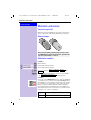 9
9
-
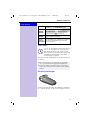 10
10
-
 11
11
-
 12
12
-
 13
13
-
 14
14
-
 15
15
-
 16
16
-
 17
17
-
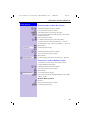 18
18
-
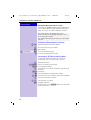 19
19
-
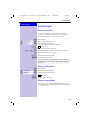 20
20
-
 21
21
-
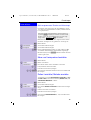 22
22
-
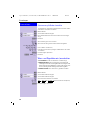 23
23
-
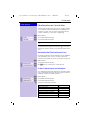 24
24
-
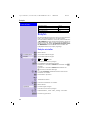 25
25
-
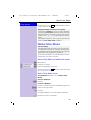 26
26
-
 27
27
-
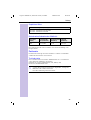 28
28
-
 29
29
-
 30
30
-
 31
31
-
 32
32
-
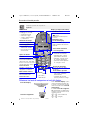 33
33
-
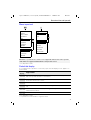 34
34
-
 35
35
-
 36
36
-
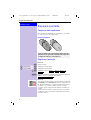 37
37
-
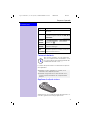 38
38
-
 39
39
-
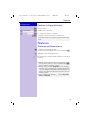 40
40
-
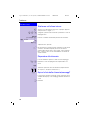 41
41
-
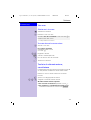 42
42
-
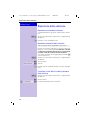 43
43
-
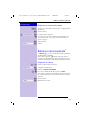 44
44
-
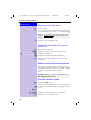 45
45
-
 46
46
-
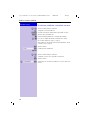 47
47
-
 48
48
-
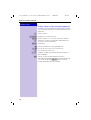 49
49
-
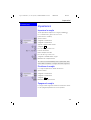 50
50
-
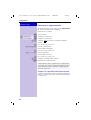 51
51
-
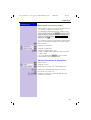 52
52
-
 53
53
-
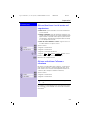 54
54
-
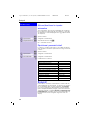 55
55
-
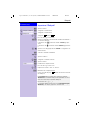 56
56
-
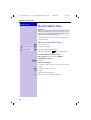 57
57
-
 58
58
-
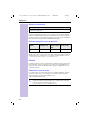 59
59
-
 60
60
-
 61
61
-
 62
62
-
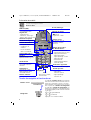 63
63
-
 64
64
-
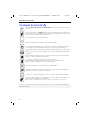 65
65
-
 66
66
-
 67
67
-
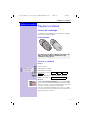 68
68
-
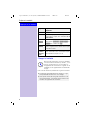 69
69
-
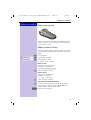 70
70
-
 71
71
-
 72
72
-
 73
73
-
 74
74
-
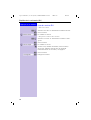 75
75
-
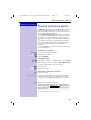 76
76
-
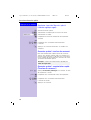 77
77
-
 78
78
-
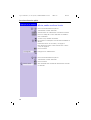 79
79
-
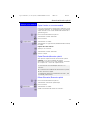 80
80
-
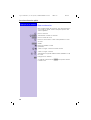 81
81
-
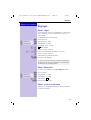 82
82
-
 83
83
-
 84
84
-
 85
85
-
 86
86
-
 87
87
-
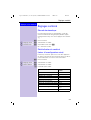 88
88
-
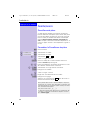 89
89
-
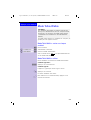 90
90
-
 91
91
-
 92
92
-
 93
93
-
 94
94
-
 95
95
-
 96
96
-
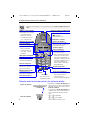 97
97
-
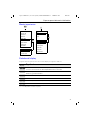 98
98
-
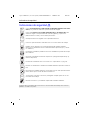 99
99
-
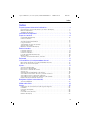 100
100
-
 101
101
-
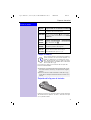 102
102
-
 103
103
-
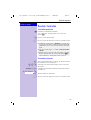 104
104
-
 105
105
-
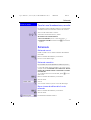 106
106
-
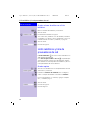 107
107
-
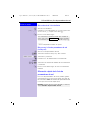 108
108
-
 109
109
-
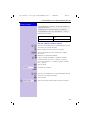 110
110
-
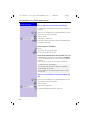 111
111
-
 112
112
-
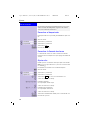 113
113
-
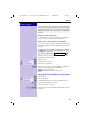 114
114
-
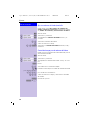 115
115
-
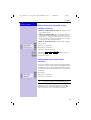 116
116
-
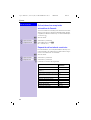 117
117
-
 118
118
-
 119
119
-
 120
120
-
 121
121
-
 122
122
-
 123
123
-
 124
124
-
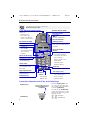 125
125
-
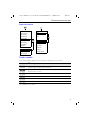 126
126
-
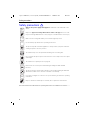 127
127
-
 128
128
-
 129
129
-
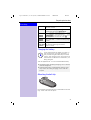 130
130
-
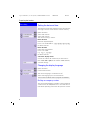 131
131
-
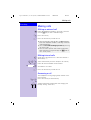 132
132
-
 133
133
-
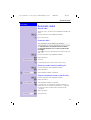 134
134
-
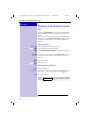 135
135
-
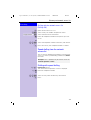 136
136
-
 137
137
-
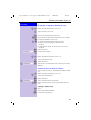 138
138
-
 139
139
-
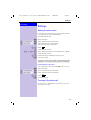 140
140
-
 141
141
-
 142
142
-
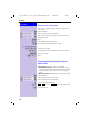 143
143
-
 144
144
-
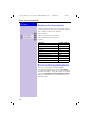 145
145
-
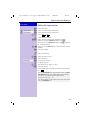 146
146
-
 147
147
-
 148
148
-
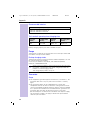 149
149
-
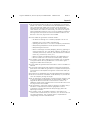 150
150
-
 151
151
-
 152
152
-
 153
153
-
 154
154
-
 155
155


Siemens Gigaset 4000 Micro El manual del propietario
- Tipo
- El manual del propietario
- Este manual también es adecuado para
en otros idiomas
Artículos relacionados
-
Siemens Gigaset 4000 Micro El manual del propietario
-
-
-
-
-
-
-
-
-
Siemens optiPoint WL2 professional Manual de usuario
Otros documentos
-
Nordmende EASYHOME500DECT Manual de usuario
-
Amplicomms PowerTel M6350 Manual de usuario
-
SWITEL M195 Manual de usuario
-
SWITEL M800 Manual de usuario
-
Gigaset L410 Guía del usuario
-
Gigaset Repeater HX El manual del propietario
-
Hager tebis tx460 Manual de usuario
-
-
Eaton ExResistTel ZB Operating Instructions Manual
-
Gigaset DA210 Guía del usuario