Silvercrest 293126 El manual del propietario
- Categoría
- Mezcladores
- Tipo
- El manual del propietario

IAN 293126
Professional 2-in-1 stand Mixer and Blender
Batidora y licuadora Profesional 2 en 1
sKV 600 a1
Professional 2-in-1 stand Mixer and Blender
Operating instructions
Batidora y licuadora Profesional 2 en 1
Instrucciones de uso

Before reading, unfold both pages containing illustrations and familiarize yourself with all functions of the
device.
Antes de empezar a leer abra las dos páginas que contienen las imágenes y, en seguida, familiarícese
con todas las funciones del dispositivo.
US - EN Operating instructions Page 1
US - ES Instrucciones de uso Página 35

A
B

SKV 600 A1 US-EN│1 ■
Table of Contents
Introduction .......................................2
Warning types .....................................2
Safety instructions ..................................3
Electrical 3-conductor Cord Set ..................................7
Intended use .......................................7
Items supplied .....................................8
Unpacking ........................................8
Disposal of the packaging .....................................9
Technical specifications ..............................9
Appliance description ..............................10
Set up ...........................................11
Speed settings ....................................12
Working with kneading hook, whisk and beater .......12
After you have finished using your appliance ..................... 15
Working with the blender ...........................15
Adding more ingredients ..................................... 17
After you have finished using your appliance ..................... 17
Working with special accessories .....................18
After you have finished using your appliance ...........19
Cleaning and maintenance ..........................19
Cleaning the appliance ...................................... 19
Cleaning the accessories .................................... 20
Cleaning the blender ....................................... 20
Storage ..........................................23
Troubleshooting ...................................23
Disposal .........................................23
3 year limited warranty ............................24
Distributor ........................................25
Recipes ..........................................26
Carrot soup ............................................... 26
Tuna spread .............................................. 27
Traditional pancakes ........................................ 28
Sponge cake mixture ........................................ 29
Shortcrust pastry ........................................... 30
Cake mixture .............................................. 31
Yeast dough .............................................. 32
Waffles .................................................. 33
Banana-vanilla shake ....................................... 33
Banana-kiwi smoothie ....................................... 34

SKV 600 A1
■ 2│US-EN
Introduction
Congratulations on the purchase of your new appliance.
You have clearly decided in favor of a quality product. The oper-
ating instructions are part of this product. They contain important
information about safety, usage, and disposal. Before using the
product, please familiarize yourself with all operating and safety
instructions. Use the product only as described and for the specified
range of applications. In addition, please pass these documents
on, together with the product, to any future owner.
Warning types
The following warning types are used in these operating instruc-
tions:
This is the safety alert symbol. It is used to alert you to
potential injury hazards. Obey all safety messages that
follow this symbol to avoid possible injury and death.
DANGER indicates a hazardous situation that, if not avoided, will
result in death or serious injury.
WARNING indicates a hazardous situation that, if not avoided,
could result in death or serious injury.
CAUTION indicates a hazardous situation that, if not avoided,
could result in minor or moderate injury.
NOTICE indicates information that is considered important, but
not hazardous (e. g. messages related to property damage).

SKV 600 A1 US-EN│3 ■
Safety instructions
This section contains important safety instructions for using the ap-
pliance. This appliance complies with statutory safety regulations.
Improper use may result in personal injury and property damage.
IMPORTANT SAFETY INSTRUCTIONS
When using electrical appliances, basic safety precautions should always
be followed, including the following:
1. READ ALL INSTRUCTIONS BEFORE USE.
2. To protect against electric shock, do not immerse cord, plugs
or the appliance in water or other liquids.
3. The appliance must be connected to correctly installed and
grounded power sockets only. Make sure that the rating of
your local power supply corresponds to the details on the
rating plate of the appliance.
4. This appliance should not be used by children and care
should be taken when used near children.
5. The appliance and its connecting cord must be kept away
from children.
6. This appliance may be used by persons with limited physical,
sensory or mental capabilities, or lack of experience and
knowledge, provided that they are under supervision or have
been told how to use the appliance safely and are aware of
the potential risks.
7. Do not perform any repairs on the appliance. All repairs must
be performed by our customer service department or by a
qualified technician.
8. Unplug the appliance from the outlet if it malfunctions, when it
is not in use, unattended, before attaching or removing parts,
and before cleaning.

SKV 600 A1
■ 4│US-EN
9. Allow the appliance to cool down and unplug it before attaching
or removing parts, and before cleaning the appliance.
10. Avoid contact with moving parts.
11. Do not operate any appliance with a damaged cord or
plug or after the appliance malfunctions or has been dropped
or damaged in any manner. Return the appliance to the
nearest authorized service provider for examination, repair or
electrical/mechanical adjustment.
12. The use of attachments not recommended by the appliance
manufacturer may result in fire, electric shock, or injury to
persons.
13. Do not use the appliance outdoors.
14. Do not let the cord hang over edge of table or counter.
15. Do not allow for the cord to come into contact with a hot
surface, including the stove.
16.
Make sure that the power cord never gets wet or damp during
operation. Position the cord so that it cannot be pinched or
otherwise damaged.
17. Arrange for defective power plugs and/or cords to be
replaced as soon as possible by a qualified technician or by
our customer service department to avoid the risk of injury.
18. The blades are sharp. Handle with caution.
19.
To reduce the risk of injury, never place cutting blade on
base without first putting bowl properly in place.
20. Never add to container while appliance is running.
21. Container must be properly in place before operating the
appliance.

SKV 600 A1 US-EN│5 ■
22. Make sure that the mixer is always turned off before you
remove it from the motor unit!
23. Do not place the appliance on or near a hot gas or electric
burner, or in a heated oven.
24.
To disconnect the appliance, pull the plug out of the wall
outlet.
25. Do not use the appliance for anything other than its intended
use.
26. Do not leave the appliance unattended while it is in use.
27.
This appliance is for household use only.
SAVE THESE INSTRUCTIONS
► Never immerse the appliance in liquids or allow liquids
to get into the motor unit housing.
► If any liquid gets into the housing, unplug the appliance imme-
diately and have it repaired by a qualified technician.
► Do not attempt to open the motor casing. This is unsafe and
invalidates the warranty.
► Clean the appliance very carefully. The blades are extremely
sharp!
► Do not open the cover when the appliance is in use.
Otherwise, food may splash out at high speeds!
► When mixing liquids, especially warm liquids process small
quantities at a time to reduce spillage.

SKV 600 A1
■ 6│US-EN
► Keeps hands and utensils out of the container while blending
to prevent the possibility of severe injury to persons or dam-
age to the appliance. A scraper may be used but only when
the appliance is not running.
► Never place any silverware or mixing tools into the container
when the appliance is in use. There is a considerable risk of
injury if they come into contact with the blades, which turn
very quickly!
► Never use the appliance for purposes other than those
described in these instructions. Otherwise there is a risk of
serious injury!
► Before changing accessories or other parts that are in mo-
tion during operation, the appliance must be turned off and
disconnected from the power supply.
► Do not use the appliance in direct sunlight or near appliances
generating heat.
► Never add boiling liquids or very hot foods to the container!
Allow them to cool to a lukewarm temperature first. Other-
wise, the appliance may overheat and the container glass
could crack!
► Never operate the appliance when it is empty, i.e. the container
does not contain ingredients. Risk of overheating!

SKV 600 A1 US-EN│7 ■
Electrical 3-conductor Cord Set
This appliance is equipped with a 3-conductor cord set that has a 3 prong
grounding-type plug. It should be properly connected to a grounding-type
outlet. The plug is designed to fit ONLY a 3-grounding outlet unit, and as
such, the grounding prong should never be removed. If needed, purchase a
2-prong adaptor and ground it to the outlet. Consult a qualified electrician if
in doubt. Do not use an adaptor unless you are confident it is grounded. Do
not modify this plug. If the plug does not fit the outlet securely, call a quali-
fied electrician for assistance.
Intended use
This appliance is intended exclusively for processing food in normal
household quantities.
This appliance is intended solely for use in private households.
It is not suitable for commercial use!
This appliance is only intended for private use in enclosed, dry
spaces. It must not be used outdoors.
Use the appliance only with the original accessories.
Risk from improper use!
Risks may arise if the appliance is used for unintended purposes
and/or other types of use.
Use the appliance exclusively for its intended purposes.
Observe the procedures described in these operating instructions.
Claims of any kind for damage resulting from improper use,
incompetent repairs, unauthorized modifications, or the use of non-
-approved spare parts will not be accepted. The operator alone
bears liability.
► This appliance is not intended for...
■ chopping hard food, such as nuts, seeds, large grains, or
stems.
■ processing non-food materials.
■ commercial or industrial use.
■ use in damp areas or outdoors.

SKV 600 A1
■ 8│US-EN
Items supplied
The items supplied are:
▯ Professional food processor
▯ Mixing bowl with lid
▯ Blender with lid and measuring cup
▯ Kneading hook
▯ Whisk
▯ Beater
▯ Operating instructions
▯ Quick guide
Unpacking
1) Remove all parts of the appliance and these operating instruc-
tions from the box.
2) Remove all packaging material and any protective wrapping
or stickers.
3) Clean all components as described in the section "Cleaning
and maintenance". Ensure that all parts are completely dry.
Check the package for completeness and signs of visible dam-
age. If the delivery is incomplete or damage has occurred as
a result of defective packaging or during transport, contact the
customer service hotline (see 3 year limited warranty section).

SKV 600 A1 US-EN│9 ■
Disposal of the packaging
The packaging protects the appliance from damage during
transport. The packaging materials have been selected for their
environmental friendliness and ease of disposal, and are therefore
recyclable.
The recirculation of packaging into the material cycle conserves
raw materials and reduces the amount of generated waste.
Dispose of packaging materials that are no longer needed in
accordance with applicable local regulations.
If possible, keep the appliance’s original packaging during the
warranty period so that the appliance can be packed properly
for return shipment in the event of a warranty claim.
Technical specifications
Voltage 120V
~
, 50/60Hz
Power consumption 600W
Short time duty
(maximum load)
Food processor: 10 min.
Blender: 3 min.
Max. capacity
Mixing bowl 6:
approx. 1.58 gal (6.0 l)
Blender t:
approx. 0.4 gal (1.5 l)
We recommend the following operating times:
When working with the kneading hook 0, whisk q or beater w,
allow the appliance to cool down after 10 minutes of operation.
When working with the blender t, allow the appliance to cool
down after 3 minutes of operation.
If you exceed these operating times, the appliance can overheat
and be damaged!

SKV 600 A1
■ 10│US-EN
Appliance description
Fold out the flaps on the front and rear covers of this operating
manual.
Front fold-out page
Figure A:
1 Swivel arm
2 Release lever
3 Rotary switch (speed levels)
4 Power cord
5 Base
6 Mixing bowl
7 Socket for attachment tools
Figure B:
8 Cover for the filling opening
9 Lid
0 Kneading hook
q Whisk
w Beater
Rear fold-out page:
Figure C:
e Small measuring cup (incl. scale)
r Blender lid
t Blender (incl. scale)
z Blades
u Drive protection cover
i Blender drive
o
Cover over drive for special accessories

SKV 600 A1 US-EN│11 ■
Set up
RISK OF INJURY!
Do not insert the plug into the power outlet until the appliance is
fully assembled.
The blade is extremely sharp! Handle it with great care.
Once you have cleaned all the parts as described under
"Cleaning and care",
■ set up the appliance in such a way that ...
–the power plug is quickly accessible to unplug it from the
power outlet in case of danger.
–the appliance is firmly seated so the suction cups are
secure to prevent the appliance from tipping over in case of
vibrations.
–the power cord 4 does not stick out into your workspace
so it cannot accidentally be pulled on and cause the appli-
ance to tip over.
1) Place the appliance on a clean and level surface and attach it
firmly in place with the 5 suction cups.
2) Insert the power plug into the outlet.

SKV 600 A1
■ 12│US-EN
Speed settings
Level Use suitable for ...
1 - 2
all
- Starting position for all mixing and stirring
processes
- Adding ingredients
Kneading hook 0
Beater w
- Kneading and mixing of firm dough
or firmer ingredients
2 - 4
Beater w
- Mixing thick cake mixture
-
Mixing butter and flour
- Mixing yeast dough
Kneading hook 0- Kneading yeast dough
-
Kneading thick cake mixture
4 - 6 Beater w
- Cake batter
- Whisking butter with sugar
- Cookie dough
6 - 8 Whisk q
- Whipped cream
-
Egg white
- Mayonnaise
- Whisking butter until fluffy
PBlender t
- Mixing and chopping soft or liquid
ingredients
- Crushing ice
Working with kneading hook, whisk and beater
RISK OF INJURY!
► Never place your hands or fingers in the mixing bowl 6
during operation! Danger of injury due to rotating parts!
► Do not change accessories unless the drive is at a complete
standstill! After being turned off, the drive unit will continue to
run for a short time.
► In cases of malfunction, turn the appliance off and remove the
plug from the power outlet to prevent the appliance from being
turned back on unintentionally.

SKV 600 A1 US-EN│13 ■
PROPERTY DAMAGE!
► When working with the kneading hook 0, whisk q or beater w
we recommend allowing the appliance to cool down after
10 minutes of operation.
When you work with the kneading hook 0, whisk q or beater w,
you should use the lid 9 of the appliance to prevent accidental
leaking of ingredients.
Please proceed as follows to prepare the appliance for operation
with the kneading hook 0, whisk q or beater w:
1) Press down the release lever 2. The swivel arm 1 moves
upwards automatically. If necessary, move the swivel arm 1
to the highest position.
2) Insert the mixing bowl 6 in such a way that the locking tabs
on the mixing bowl 6 lock into the recesses in the base 5. To
do this, one of the handles must be pointing in the direction of
the rotary switch 3. Turn the mixing bowl 6 clockwise so that
it is locked and firmly held in place.
3) To use the lid 9, place it on the part of the housing which
surrounds the socket for attachment tools 7 in such a way that
the filling opening is facing you. On the socket for attachment
tools 7 there is a locking device for the lid 9:

SKV 600 A1
■ 14│US-EN
PROPERTY DAMAGE!
► In order to ensure that it is not damaged, never apply any
pressure to the lid 9 when attaching and removing it.
4) Depending on what you want to do, fit the kneading hook 0,
whisk q or beater w into the socket for attachment tools 7:
–Insert the kneading hook 0, whisk q or beater w into the
socket for attachment tools 7 so that the two metal pins on
the axle of the attachment 0 q w lock into the recesses
of the socket for attachment tools 7.
–Press the attachment 0 q w as far as it will go into the
socket 7 and then turn it counterclockwise as far as it will
go (in the direction of the arrow ).
–Let go of the attachment 0 q w. It is now firmly held in
the socket for attachment tools 7.
5) Add the ingredients you wish to process into the mixing
bowl6.
Please note that during the kneading or mixing process, the
dough in the mixing bowl 6 increases in volume or is pressed
upward slightly as a result of the movement. You should therefore
never fill the mixing bowl 6 all the way up to the top!
DANGER OF CRUSHING!
Make sure that no parts of the body are located under the
swivel arm 1 when you push it down.
6) Press down the release lever 2 and press the swivel arm 1
with the attachment mounted downward into the working
position until the swivel arm 1 locks in place.
If you wish, you can open the cover for the filling opening 8 on
the lid 9 so that you can add ingredients during operation.
7) Turn the rotary switch 3 to the required level (see the section
on Speed settings).

SKV 600 A1 US-EN│15 ■
After you have finished using your appliance
1) Turn the appliance off using the rotary switch 3 (Position "0").
2) Press down the release lever 2 and move the swivel arm 1
to the highest position.
3) Remove the attachment 0 q or w from the socket for
attachment tools 7 by pressing the attachment 0 q or w
lightly against the socket for attachment tools 7 and turning it
clockwise at the same time (in the direction of the arrow ).
Then you can remove the attachment 0 q w.
4) If fitted: remove the lid 9.
5) Remove the mixing bowl 6 by turning it counterclockwise and
then pulling it upward.
6) Clean the appliance (see section on Cleaning and care).
Working with the blender
RISK OF INJURY!
► Always allow hot fluids to cool down to a lukewarm temperature
(approx. 86–104°F [30–40°C]) before adding them into the
blender t.
RISK OF INJURY FROM SHARP
BLADES/ROTATING DRIVE UNIT!
► Never put your hand into the attached blender t!
► Do not remove the blender t unless the blades z are stationary.
► Operate the blender t only when the blender lid r and the
small measuring cup e are attached.
► In cases of malfunction, turn the appliance off and remove the
plug from the power outlet to prevent the appliance from being
turned back on unintentionally.

SKV 600 A1
■ 16│US-EN
PROPERTY DAMAGE!
► Never use the mixing bowl 6 and blender t at the same
time! This will overload the motor!
► When working with the blender t we recommend allowing
the appliance to cool down after 3 minutes of operation.
Proceed as follows to prepare the blender t for operation.
Use figure C on the rear fold-out page as a guide.
1) Press down the release lever 2 and press the swivel arm 1
down into the working position.
2) Turn the drive protection cover u clockwise so that the
arrow on the drive protection cover u is pointing to the
symbol on the appliance. Remove the drive protection
coveru and put it aside.
RISK OF INJURY!
► Ensure that the rotary switch 3 is turned to "0" before you
place the blender t on the blender drive i. Otherwise the
appliance will start immediately as soon as the blender t
has locked into place.
3) Place the blender t on the blender drive i so that the
lock tabs on the underside of the blender t lock into the
recesses on the blender drive i. The symbol on the
blender t must be pointing to the symbol on the appli-
ance. Turn the blender t anticlockwise as far as it will go.
The symbol on the blender t must then be pointing to
the symbol on the appliance.
4) Remove the blender lid r by turning it counterclockwise
until it can be released from the lock on the blender t and
pull it upward to remove it.
5) Add the ingredients.

SKV 600 A1 US-EN│17 ■
6) Press and rotate the blender lid r with small measuring cup e
back onto the blender t. Lock the blender lid r by turning it
clockwise until it locks onto the blender t. Make sure that the
pouring lip on the blender t is sealed.
7) Turn the rotary switch 3 to the desired setting.
►The ideal speed depends on the consistency of the items being
mixed. The more liquid the contents are, the faster you can mix
them.
►For short, powerful pulsed operation, turn the rotary switch 3
counterclockwise to level P. Level P does not lock into place so
as not to overload the motor. You should therefore keep the
rotary switch 3 in this position only for a short time.
►Crushing Ice: In order to produce crushed ice, place ice cubes
in the blender t, close it and turn the rotary switch 3 approx.
7 times to level P for 5 seconds each. You may need to adapt
the above instructions depending on the quantity and size of
the ice cubes.
Adding more ingredients
1) Turn the appliance off using the rotary switch 3.
2) Remove the blender lid r and add the ingredients
or
3) Turn the small measuring cup e in the blender lid r clock-
wise as far as it will go and then remove it. Add the ingredients
gradually through the opening in the blender lid r.
After you have finished using your appliance
1) Turn the appliance off using the rotary switch 3 (Position "0").
2) Turn the blender t clockwise so that the symbol on the
blender t is pointing to the symbol on the appliance and
remove it.

SKV 600 A1
■ 18│US-EN
► Ideally, you should clean the blender t immediately after use
(see the section on Cleaning and care). This makes it easier
to remove food residues.
3) Place the drive protection cover u back on the blender
drivei so that the symbol on the drive protection cover u
is pointing to the symbol on the appliance. Turn the drive
protection cover u counterclockwise so that the symbol on
the drive protection cover u is pointing to the symbol on
the appliance.
Working with special accessories
►The special accessories, such as a meat grinder attachment,
a noodle attachment and vegetable grater, can be ordered
online at www.kompernass.com.
PROPERTY DAMAGE!
► The drive for special accessories should only be used for acces-
sories that are specifically approved for use with this appliance
by the manufacturer.
1) Turn the appliance off using the rotary switch 3 (Position "0").
2) Push the cover over the drive for special accessories o up-
wards and remove it from the appliance.
3) Attach the special accessory to the appliance in accordance
with its operating instructions.
PROPERTY DAMAGE!
► Never use special accessories at the same time as the mixing
bowl 6 or blender t! This will overload the motor.

SKV 600 A1 US-EN│19 ■
After you have finished using your appliance
1) Turn the appliance off using the rotary switch 3 (Position "0").
2) Disconnect the special accessory from the appliance as stated
in its operating instructions.
3) Clean all components as described in the section Cleaning
and maintenance.
4) Place the cover for the drive for special accessories o back in
position.
Cleaning and maintenance
RISK OF ELECTRIC SHOCK!
► Before cleaning the appliance, disconnect the power plug from
the power outlet! There is a risk of electric shock!
► NEVER immerse the appliance in water or any other
liquid!
PROPERTY DAMAGE!
► Do not use abrasive or aggressive cleaning materials.
They may damage the surfaces.
►We recommend cleaning the appliance directly after use.
This makes it easier to remove food residues.
►Processing foods that contain strong pigments, such as carrots,
may lead to staining of the plastic parts. These stains can be
removed using a little cooking oil.
Cleaning the appliance
■ Wipe the appliance with a damp cloth. For stubborn stains use
a mild detergent on the cloth. Wipe off any detergent residue
using a cloth moistened with clean water. Then dry the appli-
ance carefully.

SKV 600 A1
■ 20│US-EN
Cleaning the accessories
■ Clean the mixing bowl 6, the lid 9, the cover of the filling
opening 8, the blender lid r with small measuring cup e,
the drive protection cover u and the attachments 0/q/w
in warm water with a little detergent. Any remaining residues
can be removed with a dishwashing brush. Rinse all parts with
warm, clean water and make sure that all parts are dry before
reusing them.
►The attachments 0 q w, the lid 9, the mixing bowl 6,
the blender jug C and the small measuring cup e are also
suitable for cleaning in the dishwasher.
►If you clean components in the dishwasher, please ensure that
no plastic parts can get jammed or caught anywhere. This may
cause them to become deformed.
►If possible, place all plastic parts in the top basket of the
dishwasher.
Cleaning the blender
RISK OF INJURY!
► Do not touch the blades z with your bare hands. They are
very sharp!
■ Clean the blender t and the blender lid r with small mea-
suring cup e in warm water and add a mild dish detergent.
Then rinse all parts with clean water so that no detergent
residues remain.
■ If this cleaning is not sufficient, you can unscrew the blade
holder A with the blade z from the blender jug C:

SKV 600 A1 US-EN│21 ■
A
B
C
A Blade holder
B Sealing ring
C Blender jug
–For better stability, remove the blender lid r by turning it
counterclockwise until it can be removed from the lock on
the blender t and pull it upward to remove it.
–Place the container on its head and turn the blade holder A
counterclockwise up to the stop using the two intended
handles. Now, pull the blade holder A upward to remove
it.
–Pull the sealing ring B from the blade holder A.
■ Now you can clean all the parts (blender jug C, blade
holderA the blade z and sealing ring B) in warm water
with a little dish detergent using a dishwashing brush. After-
wards, rinse all the parts with clean water so that no detergent
residues remain.

SKV 600 A1
■ 22│US-EN
►The blender jug C and the small measuring cup e are dish-
washer-safe.
If you clean components in the dishwasher, please ensure that
no plastic parts can get jammed or caught anywhere. This may
cause them to become deformed. We recommend using the
top rack of the dishwasher and a washing program with max.
113°F (45°C).
►The blender lid r with the small measuring cup e is not
dishwasher-safe.
■ After cleaning, reassemble the blender:
–Push the sealing ring B back into the recess on the blade
holder A with the blade z.
–Place the blade holder A with the blade z back into
the blender jug C so that the blade z protrudes into the
blender jug C. Pay attention to the recesses on the blender
jug C.
–Turn the blade holder A clockwise as far as possible so
that the blade holder A is once again firmly seated on the
blender jug C.
–Press and rotate the blender lid r with small measuring
cup e back onto the blender t. Lock the blender lid r
by turning it clockwise until it locks onto the blender t.
Make sure that the pouring lip on the blender t is sealed.
In most cases, you can achieve sufficiently hygienic cleaning of
the blender t immediately after use in the following way:
1) Put some water containing a little detergent into the fully
assembled blender t.
2) Place the blender lid r with small measuring cup e rotated
onto the blender t. Lock the blender lid r by turning it clock-
wise until it locks onto the blender t. Make sure that the
pouring lip on the blender t is sealed.

SKV 600 A1 US-EN│23 ■
3) Turn on the blender t for a few seconds.
4) Pour out the dish water. Any remaining residues can be removed
with a dishwashing brush.
5) Then rinse out the blender t with plenty of clean water so
that all detergent residues are removed.
Storage
■ Store the cleaned appliance in a clean, dust-free, and dry
location.
Troubleshooting
If the appliance suddenly stops working:
■ The appliance has overheated and triggered the automatic
cut-off.
–Turn the rotary switch 3 to 0.
–Remove the plug from the power outlet.
–Allow the appliance to cool for 15 minutes.
–If the appliance has not yet cooled off completely after
15 minutes, it will not start.
–Wait another 15 minutes and try turning it on again.
If the appliance cannot be turned on:
–Check that the plug is correctly connected to a power
outlet.
–Check whether the swivel arm 1 is in the correct position.
Disposal
Electrical appliances may not be thrown away as part of normal
household trash. If you can no longer use your electrical appliance,
dispose of it in accordance with the legal provisions applicable
in your state. This will ensure that old electrical appliances are
recycled and environmental pollution is kept to a minimum.
Additional information about disposal is available on the Internet
at www.epa.gov.

SKV 600 A1
■ 24│US-EN
3 year limited warranty
What does this warranty cover?
The warranty covers:
▯ Damage, breakage or inoperability due to defect.
▯ Damage not caused by normal wear and tear or failure to follow
the safety and maintenance instructions provided in the user
manual.
What is not covered by the warranty?
The warranty does not cover damage caused by:
▯ Normal wear and tear of the product, including fragile parts
(such as switches, glass, etc.);
▯ Improper use or transport;
▯ Disregarding safety and maintenance instructions;
▯ Accidents or acts of nature (e.g. lightning, fire, water, etc.);
▯ Tampering with the product (such as removing cover, unscrewing
screws etc.)
Consequential and incidental damages are also not covered under
this warranty. However, some states do not allow the exclusion or
limitation of incidental or consequential damages, so this limitation
or exclusion may not apply to you.
What is the period of coverage and warranty resolution?
The warranty is for 3 years from the date of purchase.
At our discretion, product will either be refunded or replaced.
What will we not do?
We will not:
▯ Start a new warranty period upon product exchange;
▯ Repair product.

SKV 600 A1 US-EN│25 ■
How to process the warranty?
To initiate, please:
▯ Call customer service at 1 (844) 543-5872
▯ Visit the Website Customer Service Platform at
www.lidl.com/contact-us
or
▯ Visit a LIDL store for further assistance
To ensure the quickest warranty return process, please have the
following available:
▯ The original sales receipt that includes the date purchased;
▯ The product and manual in the original package;
▯ A statement of the problem.
What must you do to keep the warranty in effect?
▯ Retain the original receipt;
▯ Follow all product instructions;
▯ Do not repair or modify the product.
How does state law relate to this warranty?
This warranty gives you specific legal rights, and you may also have
other rights which vary from state to state. All implied warranties
are limited by the duration and terms of this warranty. Some states
do not allow limitations on how long an implied warranty lasts, so
the above limitation may not apply to you.
Distributor
LIDL US LLC.
ARLINGTON
VA 22202

SKV 600 A1
■ 26│US-EN
Recipes
Carrot soup
Ingredients:
▯ 18 oz (500 g) carrots
▯ 1 cup (250 ml) water
▯ 2 cups (500 ml) meat stock (jar)
▯ 0.5 cups (125 ml) cream
▯ 0.5 cups (125 ml) white wine
▯ Salt
▯ Pepper
▯ 1/4 cup (1.8 oz) cold butter
▯ Fresh chervil (French parsley)
Preparation:
1) Wash and peel the carrots.
2) Chop them so that they fit easily into the blender t.
3) Transfer 1 cup (250 ml) of water to a pot and cook the carrots
in it for 20 minutes. Then let the cooked carrots cool down
to a luke warm temperature and purée the whole thing in the
blender t. Make sure there are no big chunks left.
4) Then return the pureed carrots to the pot.
5) Now pour in the meat stock, cream and white wine.
6) Heat the soup and season it to taste.
7) Stir the butter into the soup in small pieces and add the chervil
to taste.

SKV 600 A1 US-EN│27 ■
Tuna spread
Ingredients:
▯ 1 can of tuna in sauce with vegetables
▯ 3 tbsp. yogurt
▯ 1 tsp. lemon juice, freshly pressed
▯ 1 pinch salt
▯ Freshly ground pepper
▯ 2 hard-boiled eggs, diced
To serve:
▯ Sliced wholemeal bread
▯ Butter for buttering the bread
▯ 1 hard-boiled egg, diced
▯ Chives, chopped
Preparation:
1) Mix all of the ingredients in the blender t until the desired
consistency is reached (approx. 15 seconds) and season to
taste.
2) Spread the butter and the tuna mixture onto the bread and
sprinkle with chopped egg and chives.

SKV 600 A1
■ 28│US-EN
Traditional pancakes
Ingredients:
▯ 2–3 eggs
▯ 1.6 cups (375 ml) milk
▯ 1 pinch salt
▯ 2 cups (8.8 oz / 250 g) flour
▯ Fat for frying
Preparation:
1) Mix the eggs, milk and salt with the beater w.
2) Sift the flour and add it to the mixture. Mix everything with the
beater w until a smooth dough is produced.
3) Allow the batter to rise for 20 minutes.
4) Heat the fat and use a small ladle to add some batter in the
pan. (Only as much as is needed to thinly cover the pan
bottom.)
5) Fry the pancakes until golden brown on both sides and serve
hot.

SKV 600 A1 US-EN│29 ■
Sponge cake mixture
Ingredients:
▯ 3 eggs
▯ 3–4 tbsp. of hot water
▯ 3/5 cup (5.3 oz / 150 g) sugar
▯ 1 packet of vanilla sugar
▯ 4/5 cup (3.5 oz / 100 g) flour, type 405
▯ 3/4 cup (3.5 oz / 100 g) corn starch
▯ 2-3 level tsp. baking powder
Preparation:
1) Spread parchment paper out on the bottom of a spring-form
cake pan (diameter: 11 in / 28 cm). Do not grease the edges,
as otherwise the surface will not be uniformly smooth and
browned.
2) Beat the whole eggs in the mixing bowl 6 and add hot water.
3) Then beat all the ingredients together for about 1 minute at the
highest level with the beater w until frothy.
4) Stir in the sugar and vanilla sugar and beat everything for
2 minutes on the highest level.
5) Mix the flour, corn starch and baking powder and sieve half
of it onto the egg mixture, mixing everything briefly at level 4.
6) Then stir in the rest of the flour in the same way and fill the
dough into the prepared spring-form cake pan.
7) Bake everything immediately in the preheated oven with top
and bottom heat at 347–392°F (175–200°C) for approx.
20–30 minutes.

SKV 600 A1
■ 30│US-EN
Shortcrust pastry
Ingredients:
▯ 1 1/2 cups (8.8 oz / 250 g) wheat flour
▯ 1/2 level tsp. baking powder
▯ 2/5–1/2 cup (3.5-4.4 oz / 100–125 g) sugar
▯ 1 packet of vanilla sugar
▯ 1 pinch salt
▯ 1 egg
▯ 0.55 cups (4.4 oz / 125 g) butter
Preparation:
1) Mix the flour and baking powder in the mixing bowl 6 and
then add all of the other ingredients.
2) Knead everything with the kneading hook 0 for approx.
1 minute initially at level 2, and then for approx. 3 minutes at
level 2–4.
3) Do not knead the dough for too long, as otherwise the dough
might become too soft.
4) Leave the dough to stand in the refrigerator for half an hour
and then work it into a flan base or a small pastry.
5) To make a flan base, roll out two-thirds of the dough and place
it in a greased spring-form cake pan.
6) Roll the remaining dough into a roll.
7) Place this roll as an edge on the dough and press it against
the edge using two fingers so that an edge of approx. 1.2 in
(3 cm) is created.
8) Prick the flan base with a fork several times.
9) Preheat the oven for approx. 5 minutes and bake the shortcrust
pastry for approx. 15–20 minutes with top and bottom heat at
392–437°F (200–225°C).

SKV 600 A1 US-EN│31 ■
Cake mixture
Ingredients:
▯ 1 cup (8.8 oz / 250 g) soft butter or margarine
▯ 1 cup (8.8 oz / 250 g) sugar
▯ 1 packet of vanilla sugar
▯ 1 pinch salt
▯ 4 eggs
▯ 1 1/2 cups (18 oz / 500 g) wheat flour
▯ 1 pack baking powder
▯ Approx. 0.5 cups (125 ml) milk
Preparation:
1) Place all the ingredients in the mixing bowl 6 and stir every-
thing with the beater w for half a minute at level 1, then for
30 seconds at level 2 and approx. 5 minutes at level 4.
2) Grease the baking dish or line it with parchment paper.
3) Fill the baking dish and bake the mixture for approx. 50–60
minutes with top and bottom heat at 347–392°F (175–
200°C).
4) Before you take the cake out of the oven, you should perform
a taste test: To do this, use a wooden skewer or tooth pick to
prick the middle of the cake. If none of the mixture sticks to it,
the cake is ready.
5) Then turn the cake out onto a cake rack and allow it to cool down.

SKV 600 A1
■ 32│US-EN
Yeast dough
Ingredients:
▯ 1 1/2 cups (18 oz / 500 g) wheat flour
▯ 0.9 oz (25 g) fresh yeast or 1 pack dried yeast
▯ Approx. 1 cup (250 ml) lukewarm milk
▯ 1/3 cup (2.8 oz / 80 g) butter or margarine
(room temperature)
▯ 1/3 cup (2.8 oz / 80 g) sugar
▯ 1 egg
Preparation:
1) Place the flour, dry yeast or crumbled yeast and all other ingre-
dients (not directly onto the yeast) into the mixing bowl 6.
2) Mix everything together slowly with the kneading hook 0 at
level 1, and then for 3–4 minutes at level 3.
3) Cover the bowl 6 with a dishcloth, place it somewhere warm
and let the mixture rise until it has visibly increased in size.
4) Then knead the mixture thoroughly once more.
5) After that, the dough is finished and can be processed further.

SKV 600 A1
US-EN│33 ■
Waffles
Ingredients:
▯ 4/5 cup (7.1 oz / 200 g) sugar
▯ 2 cups (18 oz / 500 g) flour
▯ 1 tsp (0.2 oz / 5 g) baking powder
▯ 5 eggs
▯ 1.7 cups (400 ml) milk
▯ 1 cup (8.8 oz / 250 g) butter (room temperature)
▯ 2 packs of vanilla sugar
Preparation:
1) Add the eggs, sugar and butter to the mixing bowl 6 and stir
everything with the whisk q into a smooth mixture.
2) Add the flour, the vanilla sugar and baking powder.
3) Stir in the milk gradually until the mixture has a smooth and
soft consistency.
4) Bake the waffles in a waffle iron.
Banana-vanilla shake
Ingredients:
▯ 3 bananas
▯ 2 cups (500 ml) milk
▯ 2 packs of vanilla sugar
▯ 1 tbsp. vanilla ice cream
Preparation:
1) Peel the bananas.
2) Add the peeled bananas, milk, vanilla ice cream and vanilla
sugar to the blender t.
3) Mix everything at level 8.

SKV 600 A1
■ 34│US-EN
Banana-kiwi smoothie
Ingredients:
▯ 0.8 cups (200 ml) orange juice (freshly pressed)
▯ 1 kiwi
▯ 1/2 banana
Preparation:
1) Remove the skin from the kiwi.
2) Peel the banana.
3) Add the kiwi, banana and orange juice in the blender t.
4) Mix everything at level 8.
–Recipes subject to change. All ingredients and instructions
are estimates. Adapt these suggested recipes to your own
personal experiences and taste.
–If you are lactose-intolerant, we recommend using lactose-
free milk. However, remember that lactose-free milk is
slightly sweeter.

SKV 600 A1 US-ES│35 ■
Contenido
Introducción ......................................36
Tipos de advertencias ..............................36
Instrucciones de seguridad ..........................37
Juego de cable eléctrico de 3 conductores ...................... 42
Uso previsto ......................................42
Componentes incluidos .............................43
Desempaque .....................................43
Eliminación del embalaje .................................... 44
Especificaciones técnicas ............................44
Descripción del dispositivo ..........................45
Colocación ........................................46
Ajustes de velocidad ...............................47
Trabajo con el gancho de amasar, el globo y el batidor . 48
Una vez que ha terminado de usar su dispositivo ................. 50
Trabajo con la batidora .............................51
Adición de ingredientes ..................................... 53
Una vez que ha terminado de usar su dispositivo ................. 53
Uso de accesorios especiales ........................54
Una vez que ha terminado de usar su dispositivo .......54
Limpieza y mantenimiento ..........................55
Limpieza del dispositivo ..................................... 55
Limpieza de los accesorios ................................... 55
Limpieza de la batidora ..................................... 56
Almacenamiento ..................................59
Solución de problemas .............................59
Eliminación .......................................60
Garantía limitada de 3 años .........................61
Importador .......................................62
Recetas ..........................................63
Sopa de zanahorias ........................................ 63
Crema de atún ............................................ 64
Crepas tradicionales ........................................ 65
Pastel esponjoso ........................................... 66
Pastel de masa quebrada .................................... 67
Mezcla para pastel ......................................... 68
Masa de levadura .......................................... 69
Waffles .................................................. 70
Malteada de plátano con vainilla .............................. 71
Licuado de plátano y kiwi .................................... 72

SKV 600 A1
■ 36│US-ES
Introducción
Felicidades por la compra de su nuevo dispositivo.
Evidentemente ha optado por adquirir un producto de calidad.
El instructivo de uso es parte de este producto. Contiene infor-
mación importante sobre seguridad, uso y eliminación. Antes de
usar el producto, familiarícese con todas las instrucciones de uso y
seguridad. Use el producto solamente como se describe y para la
variedad de aplicaciones especificadas. Asimismo, conserve estos
documentos y entréguelos, junto con el producto, a todo futuro
propietario.
Tipos de advertencias
Los siguientes tipos de advertencias se usan en este instructivo de
operación:
Este es el símbolo de alerta de seguridad. Se utiliza para
alertarle sobre peligros de lesiones potenciales. Obedez-
ca todos los mensajes de seguridad a continuación de
este símbolo para prevenir posibles lesiones y la muerte.
PELIGRO indica una situación peligrosa que, si no se evita, provo-
cará la muerte o lesiones graves.
ADVERTENCIA indica una situación peligrosa que, si no se evita,
podría provocar la muerte o lesiones graves.
PRECAUCIÓN indica una situación peligrosa que, si no se evita,
podría provocar lesiones leves o moderadas.
AVISO indica información que se considera importante, pero no
está relacionada con peligro (por ejemplo, mensajes relaciona-
dos con daños materiales).

SKV 600 A1 US-ES│37 ■
Instrucciones de seguridad
Esta sección contiene instrucciones de seguridad importantes
para el uso del dispositivo. Este dispositivo cumple con las normas
de seguridad legales. El uso inadecuado puede provocar lesiones
personales y daños materiales.
INSTRUCCIONES DE SEGURIDAD
IMPORTANTES
Al usar dispositivos eléctricos, siempre deben seguirse precauciones básicas
de seguridad como las siguientes:
1. LEA TODAS LAS INSTRUCCIONES ANTES DE USAR EL
DISPOSITIVO.
2. Para protegerse contra descargas eléctricas, no sumerja el
cable, el enchufe o el dispositivo en agua u otros líquidos.
3. El dispositivo debe conectarse solo a tomas de corriente
correctamente instaladas y conectadas a tierra. Asegúrese
de que las características de la fuente de alimentación local
correspondan a los detalles de la placa de características del
dispositivo.
4. Los niños no deben usar este dispositivo, y se debe tener
cuidado cuando se use cerca de ellos.
5. El dispositivo y su cable de conexión deben mantenerse lejos
de los niños.
6. Este dispositivo puede ser usado por personas con capacida-
des físicas, sensoriales o mentales limitadas o falta de expe-
riencia o conocimiento, con la condición de que sean super-
visadas o se les haya explicado cómo usar el dispositivo en
forma segura y estén conscientes de los riesgos potenciales.

SKV 600 A1
■ 38│US-ES
7. No haga ninguna reparación en el dispositivo. Todas las
reparaciones tienen que ser realizadas por nuestro departa-
mento de servicio al cliente o por un técnico calificado.
8. Desconecte el dispositivo de la toma eléctrica si funciona
mal, cuando no se use, cuando esté desatendido, antes de
colocar o retirar partes, y antes de limpiarlo.
9. Deje que el dispositivo se enfríe y desconéctelo antes de
colocar o retirar partes, y antes de limpiarlo.
10. Evite el contacto con las partes móviles.
11.
No opere ningún dispositivo con el cable o la clavija daña-
dos o después de que el mismo haya fallado, se haya caído
o haya sido dañado de alguna manera. Devuelva el disposi-
tivo al proveedor de servicios autorizado más cercano para
que lo revise, repare o ajuste eléctrica o mecánicamente.
12.
El uso de accesorios no recomendados por el fabricante del
dispositivo puede provocar un incendio, descargas eléctricas
o lesiones.
13. No use el dispositivo en exteriores.
14. No permita que el cable cuelgue sobre el borde de una
mesa o barra.
15. No permita que el cable entre en contacto con alguna
superficie caliente, incluyendo la estufa.
16.
Asegúrese de que el cable de alimentación nunca se moje
o humedezca durante el uso. Coloque el cable de tal manera
que no quede atrapado o resulte dañado de alguna manera.
17. Solicite que un técnico calificado o el departamento de
Servicio al Cliente sustituya las clavijas y/o cables de
alimentación dañados tan pronto como sea posible para
evitar el riesgo de lesiones.

SKV 600 A1 US-ES│39 ■
18. Las cuchillas son filosas. Manéjelas con cuidado.
19. Para reducir el riesgo de lesiones, nunca coloque la cuchi-
lla de corte sobre la base sin colocar primero el recipiente
correctamente.
20.
Nunca agregue ingredientes al recipiente mientras el dispo-
sitivo esté funcionando.
21. El recipiente debe estar colocado adecuadamente antes de
poner a funcionar el dispositivo.
22. ¡Asegúrese de siempre apagar el procesador de alimentos
antes de retirar la unidad del motor!
23. No coloque el dispositivo sobre o cerca de un quemador
de gas o eléctrico, o sobre un horno caliente.
24.
Para desconectar el dispositivo, desconecte el enchufe de
la toma de corriente.
25. No use el dispositivo para ningún otro fin que no sea el
previsto.
26. No deje el dispositivo desatendido mientras esté funcionando.
27.
Este dispositivo es exclusivo para uso doméstico.

SKV 600 A1
■ 40│US-ES
CONSERVE ESTE INSTRUCTIVO
► Nunca introduzca el dispositivo en líquidos ni permita
que penetren líquidos en la carcasa de la unidad del
motor.
► Si algún líquido penetra en la carcasa, desenchufe de inmedia-
to el dispositivo y pida a un técnico calificado que lo repare.
► No intente abrir la carcasa del motor. Esto es inseguro y
anula la garantía.
► Limpie el dispositivo con mucho cuidado. ¡Las cuchillas son
sumamente filosas!
► No abra la tapa cuando el dispositivo esté en uso.
De lo contrario, ¡es probable que se expulsen los alimentos
a altas velocidades!
► Cuando mezcle líquidos, especialmente líquidos calientes,
use un recipiente alto o procese cantidades pequeñas cada
vez para reducir los derrames.
► Mantenga las manos y utensilios fuera del recipiente mientras
licúa, para prevenir el riesgo de lesiones graves a personas o
daños al dispositivo. Puede usar una espátula, pero solamente
cuando el dispositivo no esté funcionando.
► Nunca coloque cubiertos o herramientas de cocina en el
recipiente cuando el dispositivo esté en uso. ¡Se ocasionará
un gran riesgo de lesión si tales elementos entran en contacto
con las cuchillas, las cuales giran muy rápido!
► Nunca use el dispositivo para propósitos distintos a los descritos
en estas instrucciones. ¡De lo contrario, existe el riesgo de
lesiones serias!

SKV 600 A1 US-ES│41 ■
► Antes de cambiar cualquier accesorio o partes que se mue-
ven durante el funcionamiento, el dispositivo debe estar
apagado y desconectado de la fuente de alimentación.
► No use el dispositivo bajo la luz directa del sol o cerca de
dispositivos que generan calor.
► ¡Nunca agregue líquidos hirviendo o muy calientes al recipien-
te! Primero permita que se enfríen a temperatura ambiente
antes de manejarlos. ¡De lo contrario, el dispositivo puede
sobrecalentarse y el recipiente podría romperse!
► Nunca opere el dispositivo cuando esté vacío, p. ej. cuando el
recipiente no contenga ingredientes. ¡Riesgo de sobrecalenta-
miento!

SKV 600 A1
■ 42│US-ES
Juego de cable eléctrico de 3 conductores
Este dispositivo está equipado con un juego de cable de 3 conductores que
tiene un enchufe con conexión a tierra de 3 espigas. Debería conectarse
adecuadamente a una toma de corriente con conexión a tierra. El enchufe
está diseñado SOLAMENTE para conectarse en una toma de corriente de
3 espigas, y como tal, la espiga de conexión a tierra nunca debe elimi-
narse. Si es necesario, compre un adaptador de 2 espigas y conéctelo a
tierra en la toma de corriente. Si tiene duda, consulte a un técnico eléctrico
calificado. No use un adaptador a menos que sepa que está conectado a
tierra. No modifique este enchufe. Si el enchufe no se conecta en la toma
de corriente en forma segura, llame a un técnico eléctrico calificado para
recibir asistencia.
Uso previsto
Este dispositivo está diseñado exclusivamente para procesar
alimentos en cantidades normales para el hogar.
Este dispositivo está diseñado exclusivamente para usarse en
hogares privados. ¡No es adecuado para uso comercial!
Este dispositivo está diseñado exclusivamente para uso particular
en espacios cerrados y secos. No debe usarse al aire libre.
Opere el dispositivo solamente con los accesorios originales
incluidos.
¡Riesgos debido al uso inadecuado!
Pueden surgir riesgos si el dispositivo se utiliza para fines no
previstos u otros tipos de uso.
Use el dispositivo exclusivamente para sus fines previstos.
Siga los procedimientos descritos en este instructivo de uso.
No se aceptará ningún tipo de reclamación por el uso inadecua-
do, reparaciones incompetentes, modificaciones no autorizadas,
o el uso de refacciones no autorizadas. El operador será la única
persona responsable.

SKV 600 A1 US-ES│43 ■
► Este dispositivo no está diseñado para…
■ cortar alimentos de consistencia dura, tales como nueces,
semillas, tallos o granos grandes
■ procesar materiales no comestibles
■ uso comercial o industrial
■ uso en áreas húmedas o en exteriores
Componentes incluidos
Los componentes incluidos son:
▯ Procesador profesional de alimentos
▯ Recipiente para mezclar con tapa
▯ Batidora con tapa y vaso medidor
▯ Gancho para amasar
▯ Globo
▯ Batidor
▯ Instructivo de operación
▯ Guía rápida
Desempaque
1) Retire todas las partes del dispositivo y este instructivo de uso
de la caja.
2) Retire el material de empaque y cualquier película protectora.
3) Limpie todos los componentes como se describe en la sección
"Limpieza y mantenimiento". Asegúrese de que todas las partes
estén completamente secas.
Verifique que el paquete esté completo y no muestre signos
visibles de daño. Si la entrega está incompleta o dañada debido
al empaque defectuoso o durante el transporte, póngase en
contacto con la línea directa de Servicio al Cliente (consulte la
sección "Garantía limitada de 3 años").

SKV 600 A1
■ 44│US-ES
Eliminación del embalaje
El embalaje protege al dispositivo contra daños durante el trans-
porte. Los materiales de empaque han sido seleccionados por
su compatibilidad ambiental y facilidad de eliminación, y por lo
tanto son reciclables.
El reciclaje del empaque en el ciclo de materiales conserva las
materias primas y reduce la cantidad de desechos que se gene-
ran. Elimine los materiales de empaque que ya no se necesitan
de conformidad con las normas locales aplicables.
Si es posible, conserve el empaque original del electrodoméstico
durante el periodo de garantía para que el dispositivo pueda
ser empaquetado adecuadamente para su devolución en caso
de una reclamación de garantía.
Especificaciones técnicas
Voltaje 120 V ~, 50/60Hz
Consumo de energía 600W
Operación de
tiempo corto
(carga máxima)
Procesador de alimentos: 10 min.
Batidora: 3 min
Capacidad máx.
Recipiente para mezclar 6:
aprox. 1.58 gal (6.0 l)
Batidora t:
aprox. 0.4 gal (1.5 l)
Recomendamos los siguientes tiempos de operación:
Cuando trabaje con un gancho de amasar 0, el globo q o
el batidor w, permita que el dispositivo se enfríe después de
10 minutos de operación.
Cuando trabaje con la batidora t, permita que el dispositivo
se enfríe después de 3 minutos de operación.
¡Si excede estos tiempos de operación, el dispositivo puede
sobrecalentarse y dañarse!

SKV 600 A1 US-ES│45 ■
Descripción del dispositivo
Desdoble las solapas de la portada y la contraportada de este
manual de operación.
Página desplegable frontal
Figura A:
1 Brazo basculante
2 Palanca de liberación
3 Interruptor giratorio (niveles de velocidad)
4 Cable de alimentación
5 Base
6 Recipiente para mezclar
7 Conector para accesorios
Figura B:
8 Cubierta de la abertura de llenado
9 Tapa
0 Gancho para amasar
q Globo
w Batidor
Página desplegable posterior:
Figura C:
e Vaso medidor pequeño (incl. escala)
r Tapa de batidora
t Batidora (incl. escala)
z Cuchillas
u Cubierta de protección del motor
i Motor de la batidora
o
Cubierta sobre motor para accesorios especiales

SKV 600 A1
■ 46│US-ES
Colocación
¡RIESGO DE LESIONES!
No inserte la clavija en la toma de corriente hasta que el dispositivo
esté completamente ensamblado.
¡Las cuchillas son sumamente filosas! Manéjelas con extremo
cuidado.
Después de limpiar todas las partes como se describe en la
sección "Limpieza y cuidado",
■ coloque el dispositivo de tal manera que…
–el enchufe esté en un lugar de fácil acceso a fin de poder
desconectarlo de la toma de corriente en caso de peligro.
–el dispositivo esté apoyado firmemente de manera que
las ventosas estén seguras para evitar que se vuelque si
ocurren vibraciones.
–el cable de alimentación 4 no quede suelto sobre el área
de trabajo; con esto se evitan jalones que pueden volcar el
dispositivo.
1) Coloque el dispositivo sobre una superficie limpia y nivelada,
y asegúrelo con las cinco ventosas.
2) Inserte la clavija en la toma de corriente.

SKV 600 A1 US-ES│47 ■
Ajustes de velocidad
Nivel Uso adecuado para...
1 - 2
Todos los
accesorios
- Posición de inicio para todos los
procesos de mezclado y batido
- Adición de ingredientes
Gancho para
amasar 0
Batidor w
-
Amasar y mezclar masa firme o
ingredientes más duros
2 - 4
Batidor w
-
Mezclar mezcla para pastel espesa
- Mezclar mantequilla y harina
- Mezclar masa con levadura
Gancho para
amasar 0
-
Amasar masa con levadura
- Amasar mezcla para pastel espesa
4 - 6 Batidor w
- Masa para pastel
-
Mezclar con el globo mantequilla
con azúcar
-
Masa para galletas
6 - 8 Globo q
- Crema batida
- Clara de huevo
- Mayonesa
-
Batir con el globo mantequilla
hasta esponjar
PBatidora t
- Mezclar y picar ingredientes
blandos o líquidos
- Triturar hielo

SKV 600 A1
■ 48│US-ES
Trabajo con el gancho de amasar, el globo y el
batidor
¡RIESGO DE LESIONES!
► ¡Nunca meta las manos o los dedos en el recipiente para
mezclar 6 durante la operación! ¡Riesgo de lesiones debido
a partes giratorias!
► ¡No cambie accesorios a menos que el motor esté completa-
mente detenido! El motor continuará funcionando durante un
tiempo breve después de apagarse.
► En caso de funcionamiento inadecuado, apague el dispositivo
y desconecte la clavija de la toma de corriente para evitar
que el dispositivo se encienda de nuevo involuntariamente.
¡DAÑOS MATERIALES!
► Cuando trabaje con el gancho para amasar 0, el globo q
o el batidor w, le recomendamos permitir que el dispositivo
se enfríe después de 10 minutos de operación.
Cuando trabaje con el gancho para amasar 0, el globo q o el
batidor w, deberá usar la tapa 9 del dispositivo para prevenir
derrame accidental de los ingredientes.
Proceda de la siguiente manera para preparar el dispositivo para
operar con el gancho para amasar 0, el globo q o el batidor w:
1) Presione la palanca de liberación 2. El brazo basculante 1
se mueve hacia arriba automáticamente. Si es necesario, mueva
el brazo basculante 1 a la posición más alta.
2) Inserte el recipiente para mezclar 6 de tal forma que las pes-
tañas de bloqueo en el recipiente para mezclar 6 se traben
en las depresiones de la base 5. Para hacer esto, una de las
asas debe apuntar en dirección del interruptor giratorio 3.
Gire el recipiente para mezclar 6 en sentido de las manecillas
del reloj de manera que se bloquee y se sostenga con firmeza
en su lugar.

SKV 600 A1 US-ES│49 ■
3) Para usar la tapa 9, colóquela sobre la parte de la carcasa
que rodea al conector para accesorios 7 de tal forma que la
abertura de llenado quede hacia usted. En el conector para
accesorios 7 hay un dispositivo de bloqueo para la tapa 9:
¡DAÑOS MATERIALES!
► Para que no se dañe, nunca aplique presión a la tapa 9
cuando la fije y la retire.
4) Dependiendo de lo que desea hacer, inserte el gancho para
amasar 0, el globo q o el batidor w en el conector para
accesorios 7:
–Inserte el gancho para amasar 0, el globo q o el bati-
dorw en el conector para accesorios 7 de manera que
los dos pasadores de metal en el eje del accesorio 0 q
w se traben en las depresiones del conector para acceso-
rios7.
–Presione el accesorio 0 q w hasta que llegue al tope en
el conector 7 y luego gírelo en sentido contrario hasta el
tope (en dirección de la flecha ).
–Suelte el accesorio 0 q w. Ahora está sujetado firme-
mente en el conector para accesorios 7.
5) Agregue los ingredientes que desea procesar al recipiente
para mezclar 6.

SKV 600 A1
■ 50│US-ES
Observe que durante el proceso de amasado o mezclado, la
masa en el recipiente para mezclar 6 aumenta de volumen
o es empujada ligeramente hacia arriba como resultado del
movimiento. ¡Por esta razón, nunca llene el recipiente para
mezclar 6 hasta arriba!
¡RIESGO DE APLASTAMIENTO!
Asegúrese de que no haya partes del cuerpo debajo del
brazo basculante 1 cuando lo empuja hacia abajo.
6) Presione la palanca de liberación 2 y presione el brazo
basculante 1 con el accesorio montado hacia abajo hacia
la posición de operación hasta que el brazo basculante 1
se asegure en su lugar.
Si desea, puede abrir la cubierta de la abertura de llenado 8
sobre la tapa 9 de manera que pueda agregar ingredientes
durante el uso.
7) Gire el interruptor giratorio 3 al ajuste requerido (vea la
sección "Ajustes de velocidad").
Una vez que ha terminado de usar su dispositivo
1) Apague el dispositivo con el interruptor giratorio 3
(posición "0").
2) Presione la palanca de liberación 2 y mueva el brazo
basculante 1 a la posición más alta.
3) Retire el accesorio 0 q o w del conector para accesorios 7
presionando el accesorio 0 q o w ligeramente contra el
conector para accesorios 7 y gírelo en sentido de las mane-
cillas del reloj al mismo tiempo (en dirección de la flecha ).
Ahora puede retirar el accesorio 0 q w.
4) Si está colocada, retire la tapa 9.

SKV 600 A1 US-ES│51 ■
5) Retire el recipiente para mezclar 6 girándolo en sentido con-
trario a las manecillas del reloj y después levantándolo hacia
arriba.
6) Limpie el dispositivo (vea la sección "Limpieza y mantenimien-
to").
Trabajo con la batidora
¡RIESGO DE LESIONES!
► Permita siempre que los fluidos calientes se enfríen a tempera-
tura ambiente (aprox. 86–104 °F [30–40 °C]) antes de
agregarlos a la batidora t.
¡RIESGO DE LESIONES POR CUCHI-
LLAS CORTANTES O UNIDAD DE MOTOR GIRANDO!
► ¡Nunca ponga la mano dentro de la batidora conectada t!
► No retire la batidora t a menos que las cuchillas z estén en
reposo.
► Abra la batidora t solo cuando la tapa de la batidora r y
el vaso medidor pequeño e estén colocados.
► En caso de funcionamiento inadecuado, apague el dispositivo
y desconecte la clavija de la toma de corriente para evitar que
el dispositivo se encienda de nuevo involuntariamente.
¡DAÑOS MATERIALES!
► ¡Nunca use el recipiente para mezclar 6 y la batidora t al
mismo tiempo! ¡Esto sobrecargará al motor!
► Cuando trabaje con la batidora t, permita que el dispositivo
se enfríe después de 3 minutos de operación.
Proceda de la siguiente manera para preparar la batidora t para
operación. Use la Figura C en la página posterior desplegable
como guía.
1) Presione la palanca de liberación 2 y presione el brazo
basculante 1 hacia la posición de uso.
2) Gire la cubierta de protección u en sentido de las manecillas
del reloj, de manera que la flecha en la cubierta de protección
del motor u apunte hacia el símbolo en el dispositivo. Retire

SKV 600 A1
■ 52│US-ES
la cubierta de protección del motor u y póngala a un lado.
¡RIESGO DE LESIONES!
► Asegúrese de que el interruptor giratorio 3 esté colocado
en "0" antes de colocar la batidora t sobre el motor de la
batidora i. De lo contrario, el dispositivo arrancará inmedia-
tamente en cuanto la batidora t se fije en su lugar.
3) Coloque la batidora t sobre el motor de la batidora i de
tal forma que las pestañas de inserción en la parte inferior de
la batidora t se inserten en la depresión en el motor de la
batidora i. El símbolo en la batidora t debe apuntar
hacia el símbolo en el dispositivo. Gire la batidora t en
sentido contrario a las manecillas del reloj hasta el tope.
El símbolo en la batidora t debe apuntar hacia el
símbolo en el dispositivo.
4) Retire la tapa de la batidora r al girarla en sentido contrario
a las manecillas del reloj hasta que pueda soltarse del seguro
en la batidora t y jálela hacia arriba para retirarla.
5) Agregue los ingredientes.
6) Presione y gire la tapa de la batidora r con el vaso medidor
pequeño e nuevamente en la batidora t. Asegure la tapa
de la batidora r girándola en el sentido de las manecillas
del reloj hasta que se fije en la batidora t. Asegúrese de que
la boca de vaciado en la batidora t esté sellada.
7) Gire el interruptor giratorio 3 a la posición deseada.
►La velocidad ideal depende de la consistencia de los ingredien-
tes que va a mezclar. Cuanto más líquido sea el contenido, más
rápido puede mezclarlos.
►Para una operación pulsada corta y potente, gire el interruptor
giratorio 3 en sentido contrario a las manecillas del reloj hasta
el nivel P. El nivel P no se traba en su lugar para no sobrecargar
el motor. Por lo tanto, deberá mantener el interruptor girato-
rio3 en esta posición solamente durante un tiempo breve.

SKV 600 A1 US-ES│53 ■
►Triturar hielo: Para producir hielo triturado, coloque cubos de
hielo en la batidora t, ciérrela y gire el interruptor giratorio
3 aprox. 7 veces al nivel P durante 5 segundos cada vez.
Puede ser necesario que adapte las instrucciones anteriores,
dependiendo de la cantidad y el tamaño de los cubos de
hielo.
Adición de ingredientes
1) Apague el dispositivo con el interruptor giratorio 3.
2) Retire la tapa de la batidora r y agregue los ingredientes
o bien
3) Gire el vaso medidor pequeño e en la tapa de la batidora r
en sentido de las manecillas del reloj hasta el tope y retírelo.
Agregue los ingredientes gradualmente a través de la abertura
en la tapa de la batidora r.
Una vez que ha terminado de usar su dispositivo
1) Apague el dispositivo con el interruptor giratorio 3 (posición
"0").
2) Gire la batidora t en sentido de las manecillas del reloj, de
manera que el símbolo en la batidora t apunte hacia el
símbolo en el dispositivo y retírela.
►Idealmente, deberá limpiar la batidora t inmediatamente
después de usarla (vea la sección "Limpieza y cuidado").
Esto facilita la remoción de residuos de comida.
3) Coloque la cubierta de protección u nuevamente en el motor
de la batidora i de manera que el símbolo en la cubierta
de protección del motor u apunte hacia el símbolo en
el dispositivo. Gire la cubierta de protección u en sentido
contrario de las manecillas del reloj de manera que el símbolo
en la cubierta de protección del motor u apunte hacia el
símbolo en el dispositivo.

SKV 600 A1
■ 54│US-ES
Uso de accesorios especiales
►Los accesorios especiales como el moledor de carne, un acceso-
rio para fideos y un rallador de verduras, pueden ordenarse en
Internet en www.kompernass.com.
¡DAÑOS MATERIALES!
► El motor para accesorios especiales solo deberá usarse para
accesorios cuyo uso ha aprobado el fabricante específicamente
con este dispositivo.
1) Apague el dispositivo con el interruptor giratorio 3 (posi-
ción "0").
2) Empuje la cubierta que está sobre el motor para accesorios
especiales o hacia arriba para retirarla del dispositivo.
3) Conecte el accesorio especial al dispositivo de acuerdo con
el instructivo de operación.
¡DAÑOS MATERIALES!
► ¡Nunca use accesorios especiales al mismo tiempo que el reci-
piente para mezclar 6 o la batidora t! Esto sobrecargará al
motor.
Una vez que ha terminado de usar su dispositivo
1) Apague el dispositivo con el interruptor giratorio 3 (posi-
ción "0").
2) Desconecte el accesorio especial del dispositivo como se
indica en el instructivo de operación.
3) Limpie todos los componentes como se describe en la sección
"Limpieza y mantenimiento".
4) Coloque nuevamente la cubierta en el motor para accesorios
especiales o.

SKV 600 A1 US-ES│55 ■
Limpieza y mantenimiento
¡RIESGO DE DESCARGA ELÉCTRICA!
► ¡Antes de limpiar el dispositivo, desconecte la clavija de la
toma de corriente! ¡Existe el riesgo de descarga eléctrica!
► ¡NUNCA sumerja el dispositivo en agua o cualquier otro
líquido!
¡DAÑOS MATERIALES!
► No use materiales de limpieza abrasivos o agresivos.
Estos pueden dañar las superficies.
►Recomendamos limpiar el dispositivo inmediatamente después
de usarlo. Esto facilita la remoción de residuos de comida.
►Procesar alimentos que contienen pigmentos fuertes, como
las zanahorias, puede ocasionar manchas en las partes de
plástico. Estas manchas se pueden eliminar con un poco de
aceite de cocina.
Limpieza del dispositivo
■ Limpie el dispositivo con una tela humedecida. Para manchas
persistentes, use un detergente suave en la tela. Limpie cual-
quier residuo de detergente con un paño humedecido en agua
limpia. Después seque el dispositivo con cuidado.
Limpieza de los accesorios
■ Limpie el recipiente para mezclar 6, la tapa 9, la cubierta
de la abertura de llenado 8, la tapa de la batidora r con
el vaso medidor pequeño e, la cubierta de protección del
motor u y los accesorios 0/q/w en agua tibia con un
poco de detergente. Cualquier residuo restante puede remo-
verse con un cepillo para trastes. Enjuague todas las partes
con agua caliente limpia y asegúrese de que todas las partes
estén secas antes de volver a usarlas.

SKV 600 A1
■ 56│US-ES
►Los accesorios 0 q w, la tapa 9, el recipiente para mez-
clar6, el vaso mezclador C y el vaso medidor pequeño e
también pueden lavarse en máquina lavaplatos.
►Si lava componentes en una máquina lavaplatos, asegúrese
de que no haya piezas de plástico que se atoren o queden
atrapadas en ninguna parte. Esto puede causar que se
deformen.
►Si es posible, coloque todas las piezas de plástico en la
canasta superior de la máquina lavaplatos.
Limpieza de la batidora
¡RIESGO DE LESIONES!
► No toque las cuchillas z con las manos desprotegidas. Son
muy filosas!
■ Limpie la batidora t y la tapa de la batidora r con el vaso
medidor pequeño e en agua tibia y agregue un detergente
suave. Luego enjuague todas las partes con agua tibia para
que no queden residuos de detergente.
■ Si esta limpieza no es suficiente, puede desatornillar el soporte
para cuchillas A con la cuchilla z del vaso mezclador C:

SKV 600 A1 US-ES│57 ■
A
B
C
A Soporte para cuchillas
B Anillo de sello
C Vaso mezclador
–Para mayor estabilidad, retire la tapa de la batidora r girán-
dola en sentido contrario a las manecillas del reloj hasta
que pueda soltarse del seguro en la batidora t y jálela
hacia arriba para retirarla.
–Coloque el recipiente de cabeza y gire el soporte para
cuchillas A en sentido contrario a las manecillas del reloj
hasta el tope con las dos asas incluidas. Ahora, jale el
soporte para cuchillas A hacia arriba para retirarlo.
–Jale el anillo de sello B del soporte para cuchillas A con
la cuchilla z.

SKV 600 A1
■ 58│US-ES
■ Ahora puede limpiar las partes (vaso para mezclar C, soporte
para cuchillas A, la cuchilla z y el anillo de sello B) con
agua tibia y un poco de detergente para trastes con un cepillo
para trastes. Posteriormente, enjuague todas las partes con
agua tibia para que no queden residuos de detergente.
►El vaso mezclador C y el vaso medidor pequeño e pueden
lavarse en máquina lavaplatos.
Si lava componentes en una máquina lavaplatos, asegúrese
de que no haya piezas de plástico que se atoren o queden
atrapadas en ninguna parte. Esto puede causar que se de-
formen. Recomendamos usar la rejilla superior de la máquina
lavaplatos y usar un programa de lavado con un máximo de
113 °F (45 °C).
►La tapa de la batidora r con el vaso medidor pequeño e
no debe lavarse en máquina lavaplatos.
■ Después de la limpieza, vuelva a armar la batidora:
–Empuje el anillo de sello B nuevamente en la depresión
en el soporte para cuchillas A con la cuchilla z.
–Coloque el soporte para cuchillas A con la cuchilla z
nuevamente en el vaso mezclador C de manera que la
cuchilla z sobresalga hacia el vaso mezclador C. Preste
atención a las depresiones en el vaso mezclador C.
–Gire el soporte para cuchillas A en sentido de las maneci-
llas del reloj hasta el tope de manera que el soporte para
cuchillas A quede nuevamente apoyado firmemente en el
vaso mezclador C.
–Presione y gire la tapa de la batidora r con el vaso medi-
dor pequeño e nuevamente sobre la batidora t.
Asegure la tapa de la batidora r girándola en el sentido
de las manecillas del reloj hasta que se fije en la batido-
rat. Asegúrese de que la boca de vaciado en la batido-
ra t esté sellada.

SKV 600 A1 US-ES│59 ■
En la mayoría de los casos, puede lograr una higiene de lavado
suficiente de la batidora t inmediatamente después de usarla de
la forma siguiente:
1) Coloque un poco de agua con algo de detergente en la bati-
dora completamente ensamblada t.
2) Coloque la tapa de la batidora r con el vaso medidor
pequeño e girado en la batidora t. Asegure la tapa de la
batidora r girándola en el sentido de las manecillas del reloj
hasta que se fije en la batidora t. Asegúrese de que la boca
de vaciado en la batidora t esté sellada.
3) Encienda la batidora t durante algunos segundos.
4) Vacíe el agua de lavado. Cualquier residuo restante puede
removerse con un cepillo para trastes.
5) Luego enjuague la batidora t con abundante agua limpia
para remover todos los residuos de detergente.
Almacenamiento
■ Guarde el equipo limpio en un lugar limpio, sin polvo y seco.
Solución de problemas
Si el dispositivo deja de funcionar repentinamente:
■ El dispositivo se ha sobrecalentado y se ha activado el apaga-
do automático.
–Gire el interruptor giratorio 3 a 0.
–Desconecte la clavija de la toma de corriente.
–Espere que el dispositivo se enfríe durante 15 minutos.
–Si el dispositivo no se ha enfriado completamente después
de 15 minutos, no arrancará.
–Espere otros 15 minutos y trate de encenderlo de nuevo.

SKV 600 A1
■ 60│US-ES
Si el dispositivo no se puede encender:
–Revise que la clavija esté conectada correctamente a una
toma de corriente.
–Revise que el brazo basculante 1 esté en la posición
correcta.
Eliminación
Los dispositivos eléctricos no deben desecharse como parte de la
basura doméstica normal. Si ya no puede usar su dispositivo, eli-
mínelo de conformidad con las disposiciones legales aplicables en
su estado. Esto asegura que los dispositivos usados sean recicla-
dos y la contaminación ambiental se mantenga a un nivel mínimo.
Puede encontrar más información acerca de la eliminación de
desechos en Internet en www.epa.gov.

SKV 600 A1 US-ES│61 ■
Garantía limitada de 3 años
Lo que cubre la presente garantía
La garantía incluye:
▯ Daños, quebraduras o incapacidad para funcionar debido a
defectos.
▯ Daños que no hayan sido causados por el desgaste propio del
uso o por no seguir las instrucciones de seguridad y mantención
incluidas en el manual para el usuario.
Lo que no cubre esta garantía
La garantía no cubre daños causados por:
▯ El desgaste propio del uso del producto, incluidas las partes
frágiles (como interruptores, piezas de vidrio, etc.).
▯ Uso o transporte no indicado del producto.
▯ Desatención a las instrucciones de seguridad y mantención.
▯ Accidentes o causas de fuerza mayor (e.g. relámpagos, incendio,
inundación, etc.).
▯ Manipulación mal intencionada del producto (retirar la cubierta,
tornillos, etc.).
La presente garantía tampoco cubre daños indirectos o emergentes.
Sin embargo algunos estados no permiten la exclusión o limitación
de daños indirectos o emergentes, por lo que dicha exclusión o
limitación pudiera no aplicarse en su caso.
Período de cobertura y resolución de la garantía
La garantía es válida por 3 años a partir de la fecha de compra.
La empresa, según lo estime conveniente, devolverá el dinero o
repondrá el producto.
La empresa no:
▯ Dará inicio a un nuevo período de garantía al hacerse el cambio
del producto.
▯ Reparará el producto.

SKV 600 A1
■ 62│US-ES
¿Cómo se tramita la garantía?
Recomendamos que primero usted:
▯ Llame al Servicio de atención al cliente al 1 (844) 543-5872.
▯ Visite el Portal de atención al cliente en
www.lidl.com/contact-us
▯ Visite una de nuestras tiendas LIDL en caso de cualquier inquietud.
A fin de acelerar el trámite de la garantía, tenga a bien contar con
lo siguiente:
▯ Recibo de venta original que incluya la fecha de compra.
▯ Producto y manual en su empaque original.
▯ Descripción del problema.
¿Qué debe hacer usted para mantener la garantía vigente?
▯ Guardar el recibo original.
▯ Seguir todas las instrucciones para el uso del producto.
▯ No realizar ninguna reparación ni alteración al producto.
¿De qué manera influyen las leyes estatales con esta
garantía?
La presente garantía le otorga derechos legales específicos, y
pudiera usted contar con otros derechos los cuales varían de un
estado a otro. Todas las garantías implícitas se encuentran limitadas
a la duración y términos de la presente garantía. Algunos estados
no permiten limitaciones al período de tiempo y términos de la
garantía implícita, por lo que dichas limitaciones pudieran no
aplicarse en su caso.
Importador
LIDL US LLC.
ARLINGTON
VA 22202

SKV 600 A1 US-ES│63 ■
Recetas
Sopa de zanahorias
Ingredientes:
▯ 18oz (500g) de zanahorias
▯ 1 taza (250 ml) de agua
▯ 2 tazas (500 ml) de caldo de carne (vaso)
▯ 0.5 tazas (125ml) de crema
▯ 0.5 tazas (125 ml) de vino blanco
▯ Sal
▯ Pimienta
▯ 1/4 de taza (1.8 oz) de mantequilla fría
▯ Perejil fresco (perejil francés)
Preparación:
1) Lave y pele las zanahorias.
2) Píquelas para que quepan fácilmente en la batidora t.
3) Vierta 1 taza (250 ml) de agua a una olla y cocine las
zanahorias en esta durante 20 minutos. Después deje que las
zanahorias cocidas se enfríen a una temperatura moderada
y haga puré todo en la batidora t. Asegúrese de que no
queden trozos grandes.
4) Luego regrese el puré de zanahoria a la olla.
5) Ahora vierta el caldo de carne, crema y vino blanco.
6) Caliente la sopa y sazone al gusto.
7) Agregue la mantequilla y revuélvala en la sopa en piezas
pequeñas, y agregue el perejil al gusto.

SKV 600 A1
■ 64│US-ES
Crema de atún
Ingredientes:
▯ 1 lata de atún en salsa con verduras
▯ 3 cucharadas de yogurt
▯ 1 cucharaditas de jugo de limón, recién exprimido
▯ 1 pizca de sal
▯ Pimienta molida fresca
▯ 2 huevos cocidos, picados
Para servir:
▯ Pan de harina integral rebanado
▯ Mantequilla para untar en el pan
▯ 1 huevo cocido, picado
▯ Cebolletas, picadas
Preparación:
1) Mezcle todos los ingredientes en la batidora t hasta lograr
la consistencia deseada (aprox. 15 segundos) y sazone al
gusto.
2) Unte la mezcla de mantequilla y atún en el pan y esparza los
huevos y las cebolletas picadas.

SKV 600 A1 US-ES│65 ■
Crepas tradicionales
Ingredientes:
▯ 2–3 huevos
▯ 1.6 tazas (375 ml) de leche
▯ 1 pizca de sal
▯ 2 tazas (8.8 oz / 250 g) de harina
▯ Aceite para freír
Preparación:
1) Bata los huevos, la leche y la sal con el batidor w.
2) Cierna la harina y agregue a la mezcla. Mezcle todo con el
batidor w hasta obtener una masa sin grumos.
3) Permita que la masa aumente de volumen durante 20 minutos.
4) Caliente el aceite y use una espátula pequeña para agregar
algo de masa a la cacerola. (Solo lo necesario para cubrir
con una capa delgada el fondo de la cacerola).
5) Fría las crepas hasta obtener un tostado dorado en ambos
lados y sirva caliente.

SKV 600 A1
■ 66│US-ES
Pastel esponjoso
Ingredientes:
▯ 3 huevos
▯ 3-4 cucharadas de agua caliente
▯ 3/5 de taza (5.3 oz / 150 g) de azúcar
▯ 1 paquete de azúcar de vainilla
▯ 4/5 de taza (3.5 oz / 100 g) de harina, tipo 405
▯ 3/4 de taza (3.5 oz / 100 g) de almidón de maíz
▯ 2-3 cucharaditas de polvo para hornear a ras
Preparación:
1) Coloque papel pergamino en el fondo de un molde para pas-
teles (diámetro de 11 pulg / 28 cm). No engrase las orillas,
ya que la superficie no quedará lisa y dorada de manera
uniforme.
2) Bata los huevos enteros en el recipiente para mezclar 6 y
agregue agua caliente.
3) Luego bata todos los ingredientes juntos durante aproxima-
damente 1 minuto en el máximo nivel con el batidor w hasta
que queden esponjados.
4) Agregue y agite el azúcar y el azúcar de vainilla y bata todo
durante 2 minutos en el máximo nivel.
5) Mezcle la harina, el almidón de maíz y el polvo para hornear,
y cierna la mitad de esta mezcla en la mezcla con huevos, y
mezcle todo brevemente en el nivel 4.
6) Luego agregue y agite el resto de la harina de la misma forma
y vierta la masa en el molde para pasteles preparado.
7) Hornee todo inmediatamente en el horno precalentado con
calor superior e inferior a 347–392 °F (175–200 °C) duran-
te aproximadamente 20–30 minutos.

SKV 600 A1 US-ES│67 ■
Pastel de masa quebrada
Ingredientes:
▯ 1 1/2 tazas (8.8 oz / 250 g) de harina de trigo
▯ 1/2 cucharadita de polvo para hornear a ras
▯ 2/5–1/2 taza (3.5-4.4 oz / 100–125 g) de azúcar
▯ 1 paquete de azúcar de vainilla
▯ 1 pizca de sal
▯ 1 huevo
▯ 0.5 tazas (4.4 oz / 125 g) de mantequilla
Preparación:
1) Mezcle la harina y el polvo para hornear en el recipiente para
mezclar 6 y agregue todos los demás ingredientes.
2) Bata todo con el gancho para amasar 0 durante aproxima-
damente 1 minuto inicialmente en el nivel 2, y luego durante
aproximadamente 3 minutos en el nivel 2–4.
3) No bata la masa durante mucho tiempo, ya que podría quedar
demasiado blanda.
4) Deje reposar la masa en el refrigerador durante media hora y
luego forme una base para flan o un pequeño pastel.
5) Para hacer una base para flan, desenrrolle dos tercios de la
masa y colóquela en un molde para pasteles engrasado.
6) Forme un rollo con la masa restante.
7) Coloque este rollo como una orilla sobre la masa y presiónela
contra la orilla con dos dedos de manera que se cree una
orilla de aproximadamente 1.2 pulg (3 cm).
8) Pique la base para flan con un tenedor varias veces.
9) Precaliente el horno durante aproximadamente 5 minutos y hor-
nee el pastel de masa quebrada durante unos 15–20 minutos
con calor superior e inferior a 392–437 °F (200–225 °C).

SKV 600 A1
■ 68│US-ES
Mezcla para pastel
Ingredientes:
▯ 1 taza (8.8 oz / 250 g) de mantequilla o margarina blanda
▯ 1 taza (8.8 oz / 250 g) de azúcar
▯ 1 paquete de azúcar de vainilla
▯ 1 pizca de sal
▯ 4 huevos
▯ 1 1/2 tazas (18 oz / 500 g) de harina de trigo
▯ 1 paquete de polvo para hornear
▯ Aprox. 0.5 taza (125 ml) de leche
Preparación:
1) Coloque los ingredientes en el recipiente para mezclar 6 y
agite todo con el batidor w durante medio minuto en el nivel 1,
luego durante 30 segundos en el nivel 2 y aproximadamente
5 minutos en el nivel 4.
2) Engrase el plato de hornear o cúbralo con papel pergamino.
3) Llene el plato para hornear y hornee la mezcla durante unos
50–60 minutos con calor superior e inferior a 347–392 °F
(175–200 °C).
4) Antes de sacar el pastel del horno, haga una prueba de
sabor: Para hacerla, use una brocheta de madera o un palillo
de dientes para picar en el centro del pastel. Si la mezcla no
se pega, el pastel está listo.
5) Entonces saque el pastel y colóquelo en una parrilla para
pasteles y deje enfriar.

SKV 600 A1 US-ES│69 ■
Masa de levadura
Ingredientes:
▯ 1 1/2 tazas (18 oz / 500 g) de harina de trigo
▯ 0.9 oz (25 g) de levadura fresca o 1 paquete de levadura
deshidratada
▯ Aprox. 1 taza (250 ml) de leche a temperatura ambiente
▯ 1/3 de taza (2.8 oz / 80 g) de mantequilla o margarina
(a temperatura ambiente)
▯ 1/3 de taza (2.8 oz / 80 g) de azúcar
▯ 1 huevo
Preparación:
1) Coloque la harina, la levadura deshidratada o levadura des-
moronada y todos los demás ingredientes (no directamente en
la levadura) en el recipiente para mezclar 6.
2) Mezcle todo lentamente con el gancho para amasar 0 en
el nivel 1, y luego durante 3-4 minutos en el nivel 3.
3) Cubra el recipiente con un mantel para platos, colóquelo en
un lugar cálido y deje que la mezcla se expanda hasta que
haya aumentado visiblemente de tamaño.
4) Entonces amase la mezcla a fondo una vez más.
5) Después de esto, la masa está terminada y puede procesarse.

SKV 600 A1
■ 70│US-ES
Waffles
Ingredientes:
▯ 4/5 de taza (7.1 oz / 200 g) de azúcar
▯ 2 tazas (18 oz / 500 g) de harina
▯ 1 cucharadita (0.2 oz / 5 g) de polvo para hornear
▯ 5 huevos
▯ 1.7 tazas (400 ml) de leche
▯ 1 taza (8.8 oz / 250 g) de mantequilla (a temperatura
ambiente)
▯ 2 paquetes de azúcar de vainilla
Preparación:
1) Agregue los huevos, el azúcar y la mantequilla al recipiente
para mezclar 6 y bata todo con el globo q hasta formar una
mezcla sin grumos.
2) Agregue la harina, el azúcar con vainilla y el polvo para
hornear.
3) Agregue gradualmente y agite la leche hasta que la mezcla
adquiera una consistencia uniforme y blanda.
4) Hornee los waffles en una wafflera.

SKV 600 A1
US-ES│71 ■
Malteada de plátano con vainilla
Ingredientes:
▯ 3 plátanos
▯ 2 tazas (500 ml) de leche
▯ 2 paquetes de azúcar de vainilla
▯ 1 cucharada de helado de vainilla
Preparación:
1) Pele los plátanos.
2) Agregue los plátanos pelados, la leche, el helado de vainilla
y el azúcar con vainilla a la batidora t.
3) Mezcle todo en el nivel 8.

SKV 600 A1
■ 72│US-ES
Licuado de plátano y kiwi
Ingredientes:
▯ 0.8 tazas (200 ml) de jugo de naranja (recién exprimido)
▯ 1 kiwi
▯ 1/2 plátano
Preparación:
1) Pele el kiwi.
2) Pele el plátano.
3) Agregue el kiwi, el plátano y el jugo de naranja a la
batidora t.
4) Mezcle todo en el nivel 8.
–Recetas sujetas a cambios. Todos los ingredientes e
instrucciones son aproximados. Adapte estas recetas
a su gusto y experiencia.
–Si es intolerante a la lactosa, le recomendamos usar
leche deslactosada. Sin embargo, recuerde que la leche
deslactosada es un poco más dulce.

IAN 293126
LidL US LLC.
ARLINGTON
VA 22202
Made in /Hecho en: China
Last Information Update · Estado de las informaciones:
09 / 2017 · Ident.-No.: SKV600A1-092017-1
9
-
 1
1
-
 2
2
-
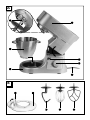 3
3
-
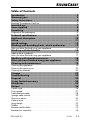 4
4
-
 5
5
-
 6
6
-
 7
7
-
 8
8
-
 9
9
-
 10
10
-
 11
11
-
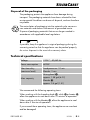 12
12
-
 13
13
-
 14
14
-
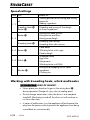 15
15
-
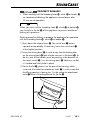 16
16
-
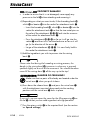 17
17
-
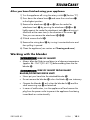 18
18
-
 19
19
-
 20
20
-
 21
21
-
 22
22
-
 23
23
-
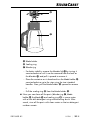 24
24
-
 25
25
-
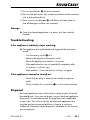 26
26
-
 27
27
-
 28
28
-
 29
29
-
 30
30
-
 31
31
-
 32
32
-
 33
33
-
 34
34
-
 35
35
-
 36
36
-
 37
37
-
 38
38
-
 39
39
-
 40
40
-
 41
41
-
 42
42
-
 43
43
-
 44
44
-
 45
45
-
 46
46
-
 47
47
-
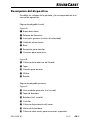 48
48
-
 49
49
-
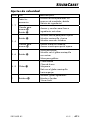 50
50
-
 51
51
-
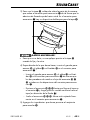 52
52
-
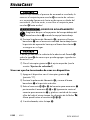 53
53
-
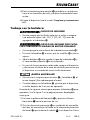 54
54
-
 55
55
-
 56
56
-
 57
57
-
 58
58
-
 59
59
-
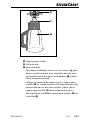 60
60
-
 61
61
-
 62
62
-
 63
63
-
 64
64
-
 65
65
-
 66
66
-
 67
67
-
 68
68
-
 69
69
-
 70
70
-
 71
71
-
 72
72
-
 73
73
-
 74
74
-
 75
75
-
 76
76


Silvercrest 293126 El manual del propietario
- Categoría
- Mezcladores
- Tipo
- El manual del propietario
en otros idiomas
- English: Silvercrest 293126 Owner's manual
Artículos relacionados
-
Silvercrest 292161 El manual del propietario
-
Silvercrest 289647 El manual del propietario
-
Silvercrest SKMP 1300 B3 Operating Instructions Manual
-
-
-
Silvercrest SKMP 1200 A2 Operating Instructions Manual
-
-
-
-