Ambiano GT-SF-KMR-01 Manual de usuario
- Categoría
- Pequeños electrodomésticos de cocina
- Tipo
- Manual de usuario

User Manual
Manual
del usuario
CLASSIC STAND MIXER
BATIDORA CLÁSICA DE PEDESTAL
English........ 02
Español....... 24
User Manual
Manual
del usuario
CLASSIC STAND MIXER
BATIDORA CLÁSICA DE PEDESTAL
English........ 02
Español....... 30

A
B
6
7
9
8
10
4
3
2
1
14 13 12
5
11
1

3
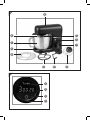
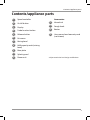
Contents/appliance parts
1Speed controller
2On/off button
3Display
4Turbo function button
5Release button
6Drive arm
7Mixing bowl
8MAX capacity mark (mixing
bowl)
9Base plate
10 Splash guard
11 Power unit
Accessories:
12 Wire whisk
13 Dough hook
14 Beater
15 User manual and warranty card
(not shown)
Subject to technical and design modifications.
Contents/appliance parts

4
Contents
Overview .....................................................................................................2
Contents/appliance parts ...........................................................................3
General information ....................................................................................5
Reading and storing the user manual ..............................................................5
Explanation of symbols and additional information .....................................5
Safety ...........................................................................................................6
Proper use .............................................................................................................6
Safety instructions ............................................................................................... 7
Risks involved in handling electrical appliances ............................................8
Dangers when operating the classic stand mixer ..........................................9
Dangers for children and persons with impaired ability............................. 12
Set-up and assembly ................................................................................. 13
Prior to first use................................................................................................... 13
Operation ................................................................................................... 14
Using the appliance ........................................................................................... 14
Sample recipes ..........................................................................................22
Dough for shortbread cookies .........................................................................22
Sample recipe for making mayonnaise..........................................................22
Basic recipes for using the different accessories ..........................................23
Table of speeds..........................................................................................25
Maintenance, cleaning and care ..............................................................26
Cleaning the accessories ..................................................................................26
Troubleshooting ........................................................................................27
Technical data ...........................................................................................28
Disposal ......................................................................................................28
Disposing of the packaging ..............................................................................28
Disposing of the Product ................................................................................... 28
Contents

5
General information
General information
Reading and storing the user manual
This user manual belongs to this particular classic stand mixer. It contains
important information on start-up and use.
Read the user manual carefully and completely, especially the safety infor-
mation, before using the classic stand mixer. Failure to follow instructions
in the user manual can result in serious injury or damage to the classic stand mixer.
Please keep the user manual for future reference. If you give the classic stand mixer
to someone else, you must also give them the user manual.
Explanation of symbols and additional information
The following symbols and signal words are used in this user manual, on the
appliance, or on the packaging.
Read and store the user manual!
Safety items throughout this manual are labeled with DANGER, WARNING or CAUTI-
ON based on the type of risk involved.
DANGER! Indicates a hazardous situation which, if not avoided,
will result in death or serious injury.
WARNING! Indicates a hazardous situation which, if not avoided,
could result in death or serious injury.
CAUTION! Indicates a hazardous situation which, if not avoided,
could result in minor or moderate injury.
Caution! Crushing hazard!
Indicates installation, operation, or maintenance information that
is important but not safety-related.

6
General information/Safety
This appliance meets US electrical product safety requirements and has
earned the ETL Listed Mark.
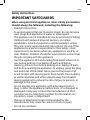
Safety
WARNING!
Please read and comply with all safety instructions listed
below. In case of noncompliance, there is significant risk
of accidents and injuries as well as damage to property
and devices. When using electrical appliances, basic
safety precautions should always be followed, including
the following:
Proper use
The appliance is designed only for whisking, kneading and mixing,
etc., ingredients in the stainless steel bowl. Furthermore, the
appliance is not intended for commercial use, but exclusively for
use in private households; it is not intended for use in employee
canteens in shops, offices or on other business premises, in
agricultural establishments or for customers of hotels, motels, other
residential facilities or guest houses. Only use the appliance in dry
conditions indoors and never outdoors. Any other use or modification
of the device is not intended and generally prohibited. No liability is
accepted for damage resulting from unintended use or the incorrect
operation of the device.
5012210

7
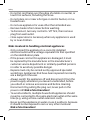
Safety instructions
IMPORTANT SAFEGUARDS
When using electrical appliances, basic safety precautions
should always be followed, including the following:
- Read all instructions.
- To protect against the risk of electric shock, do not immerse
cord, plugs and appliance in water or other liquid.
- This appliance is not intended for use by persons (including
children) with reduced physical, sensory, or mental
capabilities, or lack of experience and knowledge, unless
they are closely supervised and instructed in the use of the
appliance by a person responsible for their safety. Close
supervision is necessary when any appliance is used by or
near children. Children should be supervised to ensure that
they do not play with the appliance.
- Turn the appliance OFF and unplug from outlet when not in
use, before putting on or taking off parts and before
cleaning. Allow to cool before putting on or taking off parts,
and before cleaning the appliance. To unplug, grasp the plug
and pull it out of the outlet. Never pull on the power cord.
- Avoid contact with moving parts. Keep hands, hair, clothing,
as well as spatulas and other utensils away from beaters
during operation to reduce the risk of injury to persons, or
damage to the mixer.
- Do not operate any appliance with a damaged cord or
plug, or after the appliance malfunctions, or is dropped or
damaged in any way. Contact the manufacturer at their
customer service telephone number for information on
inspection, repair, or adjustment.
- The use of attachments not recommended by the
manufacturer may cause fire, electric shock or injury.
- Do not use outdoors.
Safety

8
Safety
- Do not let cord hang over the edge of a table or counter, or
touch hot surfaces, including the stove.
- Do not place on or near a hot gas or electric burner, or in a
heated oven.
- Do not use appliance for uses other than intended use.
- Remove beaters from mixer before washing.
- To disconnect, turn any control to “off” first, then remove
plug from wall outlet.
- Close supervision is necessary when any appliance is used
by or near children.
Risks involved in handling electrical appliances
- Only connect the appliance to a correctly installed
electrical outlet with a voltage equivalent to that specified
on the identification plate.
- If the power cord on this appliance is damaged, it must
be replaced by the manufacturer or the manufacturer’s
customer service department or similarly qualified persons
in order to avoid any possible danger.
- Repairs must only be carried out by approved specialist
workshops. Appliances that have been repaired incorrectly
are a danger to the user.
- Always switch the appliance off and disconnect it from the
power supply whenever you leave it unattended, before
you attach or remove accessories and before cleaning.
Disconnect it by pulling the plug out; never pull on the
power cord! Risk of electrocution!
- To avoid accidents, multiple household appliances should
never be connected to the same electrical outlet at the same
time (e.g. using a three-outlet extension cord).
- Never put the appliance in water or use it outdoors, because
it should not be exposed to rain or any other moisture!
Risk of electrocution!

9
Safety
- If the appliance falls into water, remove the power plug from
the outlet before lifting the appliance out of the water! Do
not turn the appliance on again, but have it checked first at
an approved service center. This also applies if the power
cord or the appliance is damaged, or if the appliance has
fallen or has been dropped. Risk of electrocution!
- Ensure that the power cord or the appliance are never
placed on hot surfaces or near heat sources. Place the power
cord where it will not be in contact with hot objects or sharp
edges. Risk of electrocution!
- Never kink the power cord or wind it around the appliance,
because this could cause the cable to break.
Risk of electrocution!
- Do not use the appliance if you are on a damp surface, or if
your hands or the appliance are wet. Risk of electrocution!
- Do not open the appliance and never attempt to insert metal
objects into it. Risk of electrocution!
- Ensure that the outlet is located near the appliance and is
easily accessible in order to quickly disconnect the appliance
from power if there is a malfunction.
- To avoid accidents, do not leave the appliance unsupervised
while it is in operation.
Dangers when operating the classic stand mixer
- Do not touch moving parts. To prevent personal injury or
material damage, make sure that hands, hair, clothing and
other objects do not get into the mixing bowl during the
mixing process.
- The appliance must be switched off and disconnected from
power before changing accessories or add-ons that move
during operation.
- Always unplug the appliance from the outlet before
cleaning. Risk of electrocution!

10
Safety
- Never attempt to move the appliance while it contains food
or liquids.
- Only use original (OEM) accessories. Using non-original
accessories results in an increased risk of accidents. No
liability will be accepted for accidents or damage that occur
using non-original accessories. If the use of accessories
from another source results in damage to the device, the
warranty is void.
- Place the appliance on a level, splash-proof surface, because
splashing cannot always be avoided. The surface should be
easy to clean.
- Do not fill the mixing bowl above the “MAX” mark.
- Never operate the appliance without ingredients, as the
motor could overheat. When working with heavy doughs or
large quantities etc., do not operate the appliance for more
than 4 minutes at a time and/or follow the instructions for
the basic recipes starting on page 23. Allow the appliance to
cool down to room temperature before using it again.
- The appliance is not designed to be controlled by an
external timer or separate remote control system.
- If the motor overheats, the appliance will be shut off by
its protection against overheating. In this case, switch the
appliance off, disconnect it from power and leave it to cool
down completely before using it again.
- If the motor jams (e.g. ingredients get stuck, are too hard
etc.), switch off the appliance immediately and disconnect it
from the grid. Eliminate the cause of the motor or accessory
blockage (e.g. remove the ingredients in question, reduce
the ingredient quantity etc.). Allow the appliance to cool
down to room temperature before operating it again.
- Ensure that the food processor is not exposed to significant
external electromagnetic influences (e.g. from other
appliances). If problems occur during operation, e.g. a drop
in speed or the appliance shuts down, we recommend that

11
Safety
you switch off the appliance and disconnect it from the
power for a few minutes or find a more suitable location for
the appliance.
- Do not use the appliance without properly positioning the
mixing bowl and splash guard lid. Risk of injury!
- Care must be taken when emptying the bowl and cleaning
the appliance.
- Clean surfaces that come into contact with food as described
in the chapter “Maintenance, cleaning and care”.
WARNING!
No user serviceable parts inside.
Repair should be performed by authorized
service personnel only.
SAVE THESE INSTRUCTIONS
THIS APPLIANCE IS FOR
HOUSEHOLD USE ONLY.
ELECTRICAL SAFETY
THIS APPLIANCE IS FOR HOUSEHOLD USE ONLY.
DO NOT OPERATE THE APPLIANCE IF THE POWER CORD SHOWS
ANY DAMAGE OR IF THE APPLIANCE WORKS INTERMITTENTLY OR
STOPS WORKING ENTIRELY.

12
Safety
POLARIZED PLUG
This appliance has a polarized plug (one blade is wider than
the other). To reduce the risk of electric shock, this plug is
intended to fit into a polarized outlet only one way. If the plug
does not fit fully into the outlet, reverse the plug. If it still does
not fit, contact a qualified electrician. Do not attempt to modify
the plug in any way.
Dangers for children and persons with impaired ability
- The appliance must not be operated by children. Please
keep the appliance and its power cord away from children.
- Children must not be allowed to play with the appliance.
Children do not recognize the danger that can result from
using electrical appliances. For this reason, use and store the
appliance out of the reach of children. To prevent anyone
from pulling the appliance over, do not allow the power cord
to hang down from the worktop surface.
CHILD SAFETY
Packing materials:
- Packing cartons covered with rugs, bedspreads, plastic
sheets, or plastic wrap may become airtight chambers and
can quickly cause suffocation.
- Remove the protective film covering the appliance before
using it.
- Destroy or recycle the appliance’s cardboard box,
plastic bags, and any other exterior wrapping
material immediately after the product is
unpacked. Children should never play with these
items. Danger of suffocation!
- Keep the appliance out of reach of children.

13
Set-up and assembly
Set-up and assembly
Prior to first use
WARNING!
After unpacking, check the appliance and ensure that all
parts are included; also check for shipping damage to
avoid any hazards. In case of doubt, do not use the
appliance and contact our customer service. The service
addresses are listed in our warranty terms and conditions,
as well as on the warranty card.
Your appliance and its accessories are in packaging to protect them from damage
during transport.
• Carefully remove the appliance from its packaging.
• Remove all packaging elements.
• Remove packaging dust and remnants from the appliance and all accessories
according to the information in the chapter “Maintenance, cleaning and care”.
• Set the appliance up close to an outlet. Ensure that the appliance is placed on a
flat, dry, non-slip surface.

14
Operation
Operation
Using the appliance
CAUTION!
When working with heavy doughs or large quantities of
ingredients etc., never operate the appliance for more
than 4 minutes at a time, and allow it to cool down to
room temperature afterwards.
WARNING!
Take care that the bowl is not filled above the “MAX” mark.
WARNING!
Turn off the appliance after each operation using the
speed controller respectively the on/off button before
disconnecting it from power.
WARNING!
Make sure the appliance is switched off before connecting
the appliance to an electrical outlet.
The filling capacity and speed depend mainly on the consistency of the
ingredients (dense, firm dough or watery broth). Adjust the quantity
and speed based on the ingredients you are using. In doing so, you will
prevent unnecessary splashes and a possible overload of the power unit.
WARNING!
Only ever plug the appliance into an outlet when all
parts have been properly connected and correctly
assembled.

15
Operation
The appliance features a turbo function, which runs the appliance at full
power for a short period. To activate this function, press the Turbo button
and hold it pressed for the required period. Use this function if you want
to blend something vigorously for a short time (e.g. to whip a liquid into
a foam). Do not press the Turbo button for more than 10-15 seconds at a
time to avoid overheating the appliance.
WARNING!
Only use the turbo function for low-resistance ingredients
in small quantities.
WARNING!
The appliance must be turned and disconnected from
power before attaching, removing or changing
accessories, and before unfolding or lowering the drive
arm. Wait until all parts have come to a complete
standstill.
WARNING!
Never operate the appliance if the mixing bowl and
splash guard are not correctly positioned and locked
into place.

16
Operation
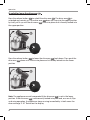
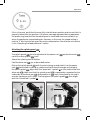
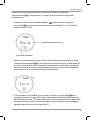
To unfold or lower the drive arm 6:
Press the release button 5 to unfold the drive arm 6. The drive arm 6 is
unlocked and swivels up. If the drive arm 6 does not snap into the upper position
by itself, pull it up until the drive arm 6 clicks into place and is thereby locked into
the upper position.
6
5
Press the release button 5 to lower the drive arm 6 back down. Then push the
drive arm 6 down until it clicks into place and is thereby locked into the lower
position.
6
5
Note: The appliance cannot be operated if the drive arm 6 is not in the lower
position. If the drive arm 6 is not correctly locked into place and, as a result, flips
up during operation, the appliance stops running immediately. In both cases the
error message “E :01” flashes on the display.

17
Operation
If this is the case, push the drive arm fully into the lower position and ensure that it is
properly locked into this position. If the error message appeared during operation,
the processing time that has already elapsed is saved and continues to count up
when the appliance is operated again. However, in this case, the speed setting is
reset to “0” and must be set again for continued operation. See also the instructions
in the “Operating the food processor” section.
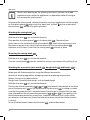
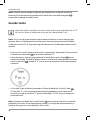
Attaching the splash guard 10 :
The splash guard 10 must be attached to the power unit 11 on the drive arm 6,
not to the mixing bowl 7 itself.
Attach the splash guard as follows:
Fold the drive arm 6 up, as described earlier.
Pick up the splash guard 10 with its points facing up and attach it to the power
unit 11 from below. In doing so, make sure that the small triangle on the top of
the splash guard 10 aligns with the “open lock” symbol on the underside of the
drive arm 6. Make sure that the splash guard 10 is completely supported by the
underside of the drive arm 6 and power unit 11 ; lock it into place by turning it
counter-clockwise until it stops. The triangle on the splash guard 10 then aligns
with the “closed lock” symbol .
10
6
11
6
10

18
There is a fill opening on the splash guard, which you can use to add
ingredients even while the appliance is in operation without having to
first remove the splash guard.
To remove the splash guard, release the lock by turning it clockwise until the triangle
on the splash guard 10 aligns with the “open lock” symbol on the underside of
the drive arm 6; detach it by pulling it down.
Attaching the mixing bowl 7:
Fold the drive arm 6 up, as described earlier.
Then position the mixing bowl 7 on the base plate 9. There are three
protrusions on the underside of the mixing bowl 7. Insert these protrusions into
the recesses on the inner side of the base plate and turn the mixing bowl 7
clockwise until it stops. Check that the mixing bowl 7 is firmly in place.
Removing the mixing bowl 7:
Fold the drive arm 6 up, as described earlier.
Turn the mixing bowl 7 counter-clockwise until you can remove it by pulling it up.
Attaching the accessories (wire whisk 12 , dough hook 13 and beater 14 ):
Below you will find examples for using the different accessories.
Wire whisk: beating egg whites, whipping cream or preparing mayonnaise.
Beater: mixing runny cake mixtures.
Dough hook: kneading firm dough, such as bread dough.
Fold the drive arm 6 up, as described earlier.
Pick up your chosen accessory ( 12 , 13 or 14 ) and attach it from below to the drive
pin on the power unit 11 on the underside of the drive arm 6. In doing so, make
sure that the guide pin that is attached across the drive pin is inserted into the ope-
ning intended for the corresponding accessory ( 12 , 13 or 14 ). Then gently push
the corresponding accessory up and turn it counter-clockwise until it stops. When
you release it, the accessory should be locked into place (check that the connection
is secure).
To use the attachments, lower the drive arm 6, as described earlier.
Operation

19
Operation
Removing the accessories (wire whisk 12 , dough hook 13 and beater 14 ):
Fold the drive arm 6 up, as described earlier.
Push the corresponding accessory ( 12 , 13 or 14 ) up and turn it clockwise until
you can remove it from the appliance.
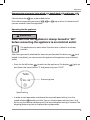
Operating the the appliance
WARNING!
Make sure that the appliance is always turned to “OFF”
before connecting the appliance to an electrical outlet.
The appliance only works when the drive arm is locked in the lower
position.
After having correctly attached the accessory and lowered the drive arm 6 (and
locked it into place), you can connect the appliance the appliance to an electrical
outlet.
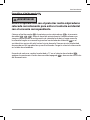
• Press the On/off button 2 to switch on the appliance. The display 3 lights up
and shows the speed setting “0” and processing time “00:00”.
Speed setting
Processing time
• In order to start operation and choose the required speed setting, turn the
speed selector 1 clockwise a little. You can choose speed settings from 1 to 8
by turning the selector clockwise until the required speed setting is reached. The
ongoing processing time is displayed during operation.

20
Operation
• If you want to reduce the speed, turn the speed selector 1 counter-clockwise a
little. You can choose speeds down to the lowest speed setting (“1”) by repeating
the counter-clockwise turns until the required speed setting is reached. You can
also switch the appliance off by choosing the speed setting “0”.
Note: You can also switch off the appliance completely at any time during operation
by pressing the On/off button 2. The display is switched off when you do so.
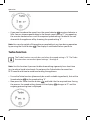
Turbo function
The Turbo function can only be used when the speed setting is “0”. The Turbo
function does not work at speed settings 1 through 8.
Note: Use this function if you want to blend something vigorously for a short time
(e.g. to whip a liquid into a foam). Do not press the Turbo button for more than
10-15 seconds at a time to avoid overheating the appliance.
• To use the Turbo function (please only do so with suitable ingredients), first set the
Speed selector 1 to the speed setting “0”.
• Now press the Turbo function button 4 and hold it for the required time. During
the process, the speed setting shown on the display 3 changes to “P” and the
ongoing processing time is displayed.

21
Operation
• The Turbo function is deactivated when you release the Turbo function button
4. “P” and the processing time flash a few times on the display, and then “0” is
shown for the speed setting and “00:00” for the processing time.
Note: If you push the Turbo function button 4 again while the display is flashing,
the Turbo function starts again and the processing time already elapsed counts up
from the last value.
Using the mixing bowl 7:
WARNING!
Only use the appliance with the splash guard correctly in
place in order to avoid accidental contact with the corres-
ponding accessory.
Attach the mixing bowl 7, the splash guard 10 and the desired accessory ( 12 ,
13 or 14 ), as described earlier. We recommend that you always start with the
lowest speed setting and then increase the speed as needed by using the speed
controller 1 to set the desired setting. Always adjust the speed according to the
ingredients you are using. Please note the information in the table of speeds.
After each use, change the speed setting to “0” with the speed selector 1, shut
the appliance off with the On/off button 2 and remove the power plug from the
outlet.

22
Sample recipes
Sample recipes
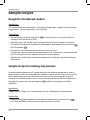
Dough for shortbread cookies
Ingredients:
2/3 cup unsalted very soft butter, 1/2 cup granulated sugar, 1packet of vanilla sugar,
1 egg white, 1 1/2 cups white flour, 1 pinch of salt
Preparation:
• Stir the butter using the wire whisk 12 by continuously running the mixer on
setting 6 until the butter is fluffy.
• Add the sugar, salt, vanilla sugar and egg white and mix for approx. 4 minutes.
• Turn off the stand mixer, disconnect it from power and replace the wire whisk 12
with the beater 14 .
• Connect the stand mixer to power and set it to level 2 or 3.
If necessary, stop the stand mixer from time to time, disconnect it from power and
push the dough from the edges of the bowl using a spatula.
• Add the flour and slowly increase the speed until the dough reaches the correct
consistency.
Sample recipe for making mayonnaise
To make good mayonnaise, all ingredients must be at room temperature, and oil,
lemon juice and salt must be gradually added in small amounts. The result is evenly
emulsified mayonnaise with excellent consistency. The advantage of using the
stand mixer to make mayonnaise is that you can continuously add the ingredients
through the opening in the splash guard 10 , without having to turn off the
appliance.
Ingredients:
6 egg yolks, 1 1/2 cups of oil, 2 tablespoons of salt, 4 tablespoons of lemon juice
Preparation:
• Beat the 6 egg yolks together on the highest setting using the wire whisk 12
until they are fluffy and then leave them to rest for 2 minutes.

23
Sample recipes
• Next, gradually add the oil, salt and lemon juice by the spoonful over a period of
4 minutes. If necessary, stop the stand mixer for a moment and then mix for
another 4 minutes.
You can find other recipes on the Internet or in a cookbook.
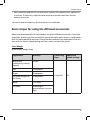
Basic recipes for using the different accessories
Below are some examples of basic recipes using the different accessories. Specified
quantities, processing time and highest speed setting for each recipe in combination
with the corresponding accessory should not be exceeded. We recommend that you
start with the lowest speed setting and then slowly increase the speed.
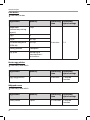
Yeast dough
Accessory: dough hook
Ingredients Quantity Processing
time
Applicable
speed settings
Wheat flour
(without any raising
agents)
5 cups
4 minutes 1-3
Salt 2 teaspoons
Sugar 5 teaspoons
Unsalted margarine
(80%fat)
4 teaspoons
Water 1 2/3 cups
Dry yeast According to
manufacturer’s instruc-
tions

24
Sample recipes
Cake batter
Accessory: beater
Ingredients Quantity Processing
time
Applicable
speed settings
Wheat flour
(without any raising
agents)
1 cup
3 minutes 1-5
Eggs 3
Sugar 3/4 cup
Unsalted margarine
(80%fat)
2/3 cup
Baking powder 1 teaspoon
Dry yeast According to
manufacturer’s
instructions
Beaten egg whites
Accessory: wire whisk
Ingredients Quantity Processing
time
Applicable
speed settings
Eggs (egg whites) 8 3 minutes 1-8/turbo
function
Whipped cream
Accessory: wire whisk
Ingredients Quantity Processing
time
Applicable
speed settings
Heavy cream 2 pints 2-5 minutes 1-8/turbo
function

25
Table of speeds
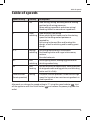
Table of speeds
Speed setting Activity Description
1 Stir Slow stirring, mixing, blending and the starting
position for all mixing processes.
When adding ingredients and when mixing/
blending thicker or more dense ingredients.
2 Slow
whisking
Slow whisking, fast mixing
When whisking thick batter and as the starting
speed for blending cooked potatoes or
vegetables.
For mixing butter and flour and beating thin
dough, as well as whisking and kneading yeast
dough.
3 - 5 Mixing/
whisking
For mixing cookie dough, for example.
For blending butter and sugar into a creamy
mixture.
For cake batter, etc.
6-7 Fast
whisking
For whipping cream, beating egg whites and
whisking cooked icing.
68 Fast
beating
For fast whisking of mayonnaise, small quantities
of whipped cream and egg whites, and whisking
butter until it is fluffy.
Turbo function
(boost operation)
Mixing The pulse function provides a short burst of high
speed for liquids or low-resistance ingredients in
small quantities.
After each use, change the speed setting to “0” using the speed selector 1, shut
off the appliance with the On/off button 2 and remove the power plug from the
outlet.

26
Maintenance, cleaning and care
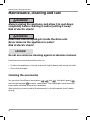
Maintenance, cleaning and care
WARNING!
Always unplug the appliance and allow it to cool down
completely before cleaning it and/or putting it away!
Risk of electric shock!
WARNING!
Make sure that no liquid gets inside the drive unit.
Never immerse the appliance in water!
Risk of electric shock!
CAUTION!
Do not use corrosive cleaning agents or abrasive cleaners.
Clean the classic stand mixer after every use.
• To clean the appliance, use a dry, or at most slightly damp, well wrung-out cloth.
• Then dry thoroughly.
Cleaning the accessories
You can clean the different accessories ( 12 , 13 and 14 ), the splash guard 10
and the mixing bowl 7 in warm, soapy water. Then thoroughly rinse them with
clean water and allow them to dry completely.
Alternatively, you can also clean the accessories in the dishwasher (non-heated-
drying).

27
Troubleshooting
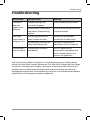
Troubleshooting
Malfunction: Possible cause: Measure:
The device
does not
appear to be
working.
The power plug is not
connected to power.
Insert the plug into the outlet.
The drive arm is not locked
into place in the operating
position.
Fold the drive arm down and let
it snap into place.
The stand
mixer makes a
banging noise.
The mixing bowl has not
been inserted correctly.
Position the mixing bowl
correctly on the base plate.
The accessory used has not
been attached correctly.
Connect the accessory as
described in the user manual.
The appliance
stops suddenly.
The appliance has been
overloaded.
Turn the appliance off,
disconnect it from power and
leave it to cool. Reduce the
amount of ingredients.
If your device has a defect not stated in the troubleshooting chart above, please
contact our After Sales Support Department. Our After Sales Support staff are happy
to help you. The telephone number is printed on the warranty card. Because our
products are constantly being developed and improved, design and technical
modifications are possible. These operating instructions can also be downloaded as
a pdf file from our homepage, www.gt-support.de.

28
Technical data/ Disposal
Technical data
Nominal voltage: 120V (AC)
Nominal frequency: 60Hz
Nominal power: 420W
Disposal
Disposing of the packaging
Sort the packaging before you dispose of it. Dispose of cardboard with
recycled paper and of wrappers with appropriate recycling or garbage.
Disposing of the Product
If the product should no longer work at all, please make sure that it is disposed
of in an environmentally friendly way and according to local regulations.

29

30
A
B
6
7
9
8
10
4
3
2
1
14 13 12
5
11
1

31
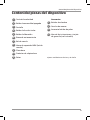
Contenido/piezas del dispositivo
1Control de velocidad
2Botón de encendido/apagado
3Pantalla
4Botón de función turbo
5Botón de liberación
6Brazo de accionamiento
7Bol de mezcla
8Marca de capacidad MÁX (bol de
mezcla)
9Placa base
10 Protector de salpicaduras
11 Rotor
Contenido/piezas del dispositivo
Accesorios:
12 Batidor de alambre
13 Gancho de amasar
14 Accesorio batidor de palas
15 Manual de instrucciones y tarjeta
de garantía (no ilustrados)
Sujeto a modificaciones técnicas y de diseño.

32
Índice
Vista general ...................................................................................................30
Contenido/piezas del dispositivo .....................................................................31
Información general ....................................................................................... 33
Lectura y almacenamiento del manual del usuario ............................................ 33
Explicación de los símbolos e información adicional ..........................................33
Seguridad ........................................................................................................ 34
Uso adecuado .................................................................................................. 34
Instrucciones de seguridad .....................................................................................35
Riesgos relacionados con la manipulación de aparatos eléctricos .................. 36
Riesgos al usar la batidora clásica de pedestal ....................................................38
Riesgos para niños y personas con discapacidades ........................................... 39
Preparación y ensamblaje .............................................................................. 42
Antes del primer uso ................................................................................................42
Funcionamiento ..............................................................................................43
Uso del aparato .........................................................................................................43
Recetas de ejemplo ......................................................................................... 52
Masa para galletas de mantequilla ........................................................................52
Receta de ejemplo para hacer mayonesa.............................................................52
Recetas básicas para utilizar los diferentes accesorios ......................................53
Tabla de velocidades ......................................................................................55
Mantenimiento, limpieza y cuidado ...............................................................56
Limpieza de los accesorios ......................................................................................56
Solución de problemas ................................................................................... 57
Información técnica ........................................................................................58
Eliminación ......................................................................................................58
Eliminación del embalaje .........................................................................................58
Eliminación del producto .......................................................................................... 58
Índice

33
Información general
Información general
Lectura y almacenamiento del manual del usuario
Este manual de usuario pertenece a esta batidora clásica de pedestal en
particular. Contiene información importante sobre el funcionamiento y la
manipulación del aparato.
Lea el manual de usuario con cuidado y por completo, especialmente
la información de seguridad, antes de usar la batidora clásica de pedestal. Si no se
siguen las instrucciones del manual de usuario se pueden producir lesiones graves o
daños en la batidora clásica de pedestal.
Guarde el manual de usuario para consultarlo en el futuro. Si le cede la batidora
clásica de pedestal a otra persona, debe incluir también el manual de usuario.
Explicación de los símbolos e información adicional
Los siguientes símbolos y palabras de advertencia se utilizan en este manual del
usuario, en el aparato o en el embalaje.
¡Lea y siga el manual de instrucciones!
Los puntos relacionados con la seguridad a lo largo de este manual están marcados
con los signos PELIGRO, ADVERTENCIA o PRECAUCIÓN en base al tipo de riesgo.
¡PELIGRO! Indica una situación peligrosa la cual, si no se evita,
provocará la muerte o lesiones graves.
¡ADVERTENCIA! Indica una situación peligrosa la cual, si no se evita,
podría provocar la muerte o lesiones graves.
¡PRECAUCIÓN! Indica una situación peligrosa la cual, si no se evita,
podría provocar lesiones menores o moderadas.
¡Precaución! ¡Peligro de aplastamiento!
Indica información para la instalación, operación o mantenimiento, que
es importante pero no relacionada con los peligros.

34
Información general / Seguridad
Esta batidora clásica de pedestal cumple los requisitos de seguridad de
los productos eléctricos de los Estados Unidos de América y ha ganado la
marca ETL Listed.
Seguridad
¡ADVERTENCIA!
Por favor, lea y cumpla todas las instrucciones que se
muestran a continuación. En caso de incumplimiento, hay
un riesgo significativo de accidentes y lesiones así como de
daños materiales y al aparato. Al usar aparatos electrodo-
mésticos, siempre se deben tener en cuenta precauciones
básicas, entre ellas:
Uso adecuado
El aparato está diseñado solamente para batir, amasar y mezclar in-
gredientes en el bol de acero inoxidable. Además, el aparato no está
destinado para uso comercial, sino exclusivamente para uso privado
en hogares; no está diseñado para ser utilizado en las cantinas de los
empleados en tiendas, oficinas u otros locales comerciales, en esta-
blecimientos agrícolas o para clientes de hoteles, moteles, otras ins-
talaciones residenciales o casas de huéspedes. Utilice el aparato solo
en interiores en condiciones secas y nunca en exteriores. Cualquier
otro uso o modificación del aparato no está previsto y en general está
prohibido. No se acepta ninguna responsabilidad por los daños resul-
tantes del uso no previsto o la operación incorrecta del aparato.
5012210

35
Seguridad
Instrucciones de seguridad
MEDIDAS DE SEGURIDAD IMPORTANTES
Al usar aparatos electrodomésticos, siempre se deben te-
ner en cuenta precauciones básicas, entre ellas:
- Lea todas las instrucciones.
- Para la protección contra fuegos, descarga eléctrica y daños
a personas, no sumerja el cable, enchufes o la batidora de
pedestal en agua u otro líquido.
- Este electrodoméstico no está diseñado para ser utilizado
por personas (incluidos los niños) con capacidades físicas,
sensoriales o mentales disminuidas, o con falta de expe-
riencia y conocimientos, a menos que estén estrechamente
supervisadas e instruidas sobre el uso del aparato por una
persona responsable de su seguridad. Una atenta supervi-
sión es necesaria cuando se utiliza cualquier aparato cerca
de los niños o por estos. Los niños deben ser supervisados
para asegurarse que no jueguen con el aparato.
- APAGUE el aparato y desenchúfelo del tomacorriente cuan-
do no esté en uso, antes de poner o quitar piezas y antes de
limpiarlo. Deje que se enfríe antes de poner o quitar piezas
y antes de limpiar el aparato. Para desconectar, agarre el
enchufe y sáquelo del tomacorriente. Nunca jale por el cable
de alimentación.
- Evite el contacto con las partes móviles. Mantenga las ma-
nos, el cabello, la ropa, así como espátulas y otros utensilios
lejos de los batidores durante el funcionamiento para redu-
cir el riesgo de lesiones personales, o de daños a la batidora
de pedestal.
- No opere ningún aparato con un cable o enchufe dañado o
después de que el electrodoméstico no funcione correcta-
mente, o se caiga o dañe de cualquier manera. Póngase en
contacto con el fabricante llamando al teléfono del servicio

36
Seguridad
de atención al cliente para obtener más información sobre
su revisión, reparación o ajuste.
- El uso de accesorios no recomendado por el fabricante pue-
de provocar incendios, descargas eléctricas o lesiones.
- No utilizar al aire libre.
- No deje que el cable eléctrico cuelgue cerca o sobre el borde
de una mesa o mostrador, o que toque las superficies calien-
tes.
- No colocar sobre o cerca de una hornilla de gas o eléctrica, o
en un horno caliente.
- No utilice el aparato para un uso que no sea el previsto.
- Quite los batidores de la batidora antes de lavarlos.
- Para desconectarlo, coloque el interruptor en la posición
de apagado y a continuación saque el enchufe del tomaco-
rriente.
- Es necesaria una atenta supervisión cuando el aparato es
usado por niños o cerca de estos.
Riesgos relacionados con la manipulación de aparatos
eléctricos
- Conecte el aparato solo a un tomacorriente correctamente
instalado con un voltaje equivalente al especificado en la
placa de identificación.
- Si el cable de alimentación de este aparato está dañado,
debe ser reemplazado por el fabricante o por el departa-
mento de servicio al cliente del fabricante o por personas
con calificaciones similares para evitar cualquier posible
riesgo.
- Solo un taller especialista aprobado debe realizar las
reparaciones. Los aparatos que han sido reparados
incorrectamente representan un riesgo para el usuario.

37
Seguridad
- Siempre apague el aparato y desconéctelo de la fuente de
alimentación cuando lo deje desatendido, antes de colocar
o quitar los accesorios y antes de limpiarlo. Desconéctelo
sacando el enchufe; ¡nunca tire del cable de alimentación!
¡Riesgo de electrocución!
- Para evitar accidentes, nunca se deben conectar múltiples
aparatos domésticos al mismo tomacorriente a la vez (por
ejemplo, utilizando un cable de extensión de tres tomas).
- ¡Nunca sumerja el aparato en agua ni lo utilice al aire libre,
ya que no debe exponerse a la lluvia ni a ninguna otra hu-
medad! ¡Riesgo de electrocución!
- Si el aparato cae al agua, ¡desconecte primero el enchufe del
tomacorriente antes de sacar el aparato del agua! No vuelva
a encender el aparato, haga que lo revisen primero en un
centro de servicio autorizado. Esto también es aplicable si el
cable de alimentación o el aparato está dañado, o si el apa-
rato se ha caído o se ha dejado caer por accidente. ¡Riesgo
de electrocución!
- Asegúrese de que el cable de alimentación o el aparato nun-
ca se coloquen sobre superficies calientes o cerca de fuentes
de calor. Coloque el cable de alimentación donde no esté en
contacto con objetos calientes o bordes afilados. ¡Riesgo de
electrocución!
- Nunca retuerza el cable de alimentación ni lo enrolle alrede-
dor del aparato, ya que podría romper el cable. ¡Riesgo de
electrocución!
- No utilice el aparato si está en una superficie hú-
meda, o si sus manos o el aparato están mojados.
¡Riesgo de electrocución!
- No abra el aparato y nunca intente insertar objetos metálicos
en él. ¡Riesgo de electrocución!
- Asegúrese de que el tomacorriente esté ubicado cerca del
dispositivo y que sea fácilmente accesible para desconectar

38
Seguridad
el aparato rápidamente de la alimentación si se produce un
fallo de funcionamiento.
- Para evitar accidentes, no deje el aparato sin supervisión
mientras está funcionando.
Riesgos al usar la batidora clásica de pedestal
- No toque las piezas móviles. Para evitar lesiones personales o
daños materiales, asegúrese de que las manos, el cabello, la
ropa y otros objetos no entren en el bol de mezcla durante el
proceso de mezclado.
- El aparato debe apagarse y desconectarse antes de cambiar
los accesorios o complementos que se mueven durante el
funcionamiento.
- Desenchufe siempre el aparato antes de limpiarlo.
¡Riesgo de electrocución!
- Nunca intente mover el aparato mientras contenga alimentos
o líquidos.
- Utilice únicamente accesorios originales (OEM). El uso de acce-
sorios no originales conlleva un mayor riesgo de accidentes.
No se aceptará ninguna responsabilidad por accidentes o da-
ños que se produzcan por el uso de accesorios no originales.
La garantía quedará anulada si el uso de accesorios de otra
fuente provoca daños en el aparato.
- Coloque el aparato sobre una superficie nivelada, a prueba de
salpicaduras, ya que no siempre se pueden evitar las salpica-
duras. La superficie debe ser fácil de limpiar.
- Nunca haga funcionar el aparato sin ingredientes, ya que el
motor podría recalentarse. Cuando procese masas densas o
en grandes cantidades, etc., no mantenga el aparato funcio-
nando por más de 4 minutos seguidos y/o siga las instruccio-
nes de las recetas básicas a partir de la página 53. Deje que el
aparato se enfríe a temperatura ambiente antes de volver a
utilizarlo.

39
Seguridad
- El aparato no está diseñado para ser controlado por un tem-
porizador externo o un sistema de control remoto por separa-
do.
- Si el motor se sobrecalienta, el aparato se apagará debido
a su protección contra el sobrecalentamiento. En este caso,
apague el aparato, desconéctelo de la alimentación y deje
que se enfríe completamente antes de volver a utilizarlo.
- Si el motor se traba (por ejemplo, los ingredientes se atascan,
están muy densos, etc.), apague el aparato de inmediato y
desconéctelo de la red. Elimine la causa de la obstrucción en
el motor o el accesorio (por ejemplo, extraiga los ingredientes
atascados, reduzca las cantidades, etc.) Deje que el aparato se
enfríe a temperatura ambiente antes de volver a utilizarlo.
- Asegúrese de que el procesador de alimentos no esté
expuesto a influencias electromagnéticas externas
significativas (por ejemplo, de otros aparatos). Si ocurren
problemas durante el funcionamiento, por ejemplo,
disminución de la velocidad o detención del aparato,
recomendamos que lo apague y desconecte de la
alimentación por unos minutos o encuentre un lugar más
apropiado para el aparato.
- No utilice el aparato sin colocar correctamente el bol de
mezcla y la tapa de la protección contra salpicaduras.
¡Riesgo de lesión!
- Se debe tener cuidado al vaciar el bol y al limpiar el aparato.
- Limpie las superficies que entran en contacto con los
alimentos como se describe en el capítulo “Mantenimiento,
limpieza y cuidado”.

40
Seguridad
¡ADVERTENCIA!
El interior no contiene piezas que el usuario pueda repa-
rar. La reparación únicamente la debe llevar a cabo perso-
nal autorizado.
GUARDE ESTAS INSTRUCCIONES
ESTE APARATO ES PARA USO
DOMÉSTICO SOLAMENTE
SEGURIDAD ELÉCTRICA
ESTE APARATO ES PARA USO DOMÉSTICO SOLAMENTE.
NO USE EL APARATO SI EL CABLE DE ALIMENTACIÓN ESTÁ DAÑADO
O SI EL APARATO FUNCIONA DE FORMA INTERMITENTE O SE DETIE-
NE POR COMPLETO.
ENCHUFE POLARIZADO
Este aparato posee un enchufe polarizado (una clavija es más
ancha que la otra). Para reducir el riesgo de descarga eléctrica,
este enchufe entra en el tomacorriente polarizado en un solo
sentido. Si el enchufe no entra completamente en el toma-
corriente, gire el enchufe. Si aun así no encaja, contacte a un
técnico electricista calificado. No intente modificar el enchufe
de ninguna manera.

41
Seguridad
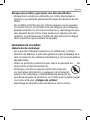
Riesgos para niños y personas con discapacidades
- El aparato no debe ser utilizado por niños. Mantenga el
aparato y su cable de alimentación lejos del alcance de los
niños.
- No se debe permitir que los niños jueguen con el aparato.
Los niños no son conscientes de los peligros de manipular
aparatos eléctricos. Por este motivo use y mantenga el apa-
rato alejado de los niños. Para evitar que alguien jale del
aparato, no permita que el cable de alimentación cuelgue
de la superficie que sostiene al aparato.
SEGURIDAD DE LOS NIÑOS
Materiales de embalaje:
- Las cajas de embalaje cubiertas con alfombras, colchas,
láminas de plástico o películas plásticas para embalaje pue-
den convertirse en cámaras herméticas y provocar la asfixia
rápidamente.
- Retire la película protectora que cubre al aparato an- tes
de ponerlo en funcionamiento.
- Destruya o recicle la caja de cartón del dispositi-
vo, las bolsas de plástico y cualquier otro material
exterior de empaque, inmediatamente después de
que desempaque al producto. Los niños nunca deben jugar
con estos artículos. ¡Peligro de asfixia!
- Mantenga al aparato fuera del alcance de los niños.

42
Preparación y ensamblaje
Preparación y ensamblaje
Antes del primer uso
¡ADVERTENCIA!
Después de desembalar al dispositivo, examínelo y ase-
gúrese de que todas las piezas están completas y no su-
frieron ningún daño en el transporte para evitar cualquier
peligro. En caso de cualquier duda, no use al dispositivo
y póngase en contacto con nuestro servicio al cliente. Las
direcciones de servicio figuran en nuestras condiciones de
la garantía y en la tarjeta de garantía.
Su aparato y sus accesorios están en un embalaje para protegerlos de daños
durante el transporte.
• Sacar con cuidado el aparato de su embalaje.
• Quitar todos los elementos de embalaje.
• Quitar el polvo y residuos de embalaje del aparato y de todos los accesorios de
acuerdo con la información del capítulo “Mantenimiento, limpieza y cuidado”.
• Colocar el aparato cerca de un tomacorriente. Asegúrese de colocar el aparato
sobre una superficie plana, seca y antideslizante.

43
Funcionamiento
Funcionamiento
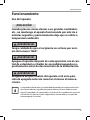
Uso del aparato
¡PRECAUCIÓN!
Cuando procese masas densas o en grandes cantidades,
etc., no mantenga el aparato funcionando por más de 4
minutos seguidos y posteriormente deje que se enfríe a
temperatura ambiente.
¡ADVERTENCIA!
Tenga cuidado de que el recipiente no se llene por enci-
ma de la marca “MAX”.
¡ADVERTENCIA!
Apague el aparato después de cada operación con el con-
trol de velocidad o el botón de encendido/apagado res-
pectivamente antes de desconectarlo de la alimentación.
¡ADVERTENCIA!
Asegúrese de que el botón del aparato esté en la posi-
ción de apagado antes de conectar el mismo al tomaco-
rriente.
La capacidad de llenado y la velocidad dependen principalmente de la
consistencia de los ingredientes (pasta densa y firme o caldo acuoso).
Ajuste la cantidad y la velocidad en función de los ingredientes que está
utilizando. Al hacerlo, evitará salpicaduras innecesarias y una posible
sobrecarga de la unidad.

44
Funcionamiento
¡ADVERTENCIA!
Solo enchufe el aparato a un tomacorriente cuando
todas las piezas se hayan conectado y ensamblado de
manera correcta.
El aparato presenta una función turbo, que permite el funcionamiento
a máxima potencia durante un breve tiempo. Para activar esta función
presione y mantenga presionado el botón Turbo por el tiempo requerido.
Use la función para mezclar vigorosamente durante un breve tiempo (por
ejemplo, batir un líquido para hacer espuma). No mantenga presionado
el botón Turbo por más de 10 a 15 segundos seguidos para evitar el sobre-
calentamiento del aparato.
¡ADVERTENCIA!
Solo use la función turbo para ingredientes de baja resis-
tencia en pequeñas cantidades.
¡ADVERTENCIA!
El aparato debe apagarse y desconectarse de la alimen-
tación antes de poner, quitar o cambiar los accesorios, y
antes de desplegar o bajar el brazo de accionamiento.
Espere hasta que todas las partes se hayan detenido por
completo.
¡ADVERTENCIA!
Nunca opere el aparato si el bol de mezcla y el protector
contra salpicaduras no están colocados correctamente y
trancados en su lugar.

45
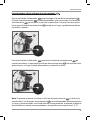
Para desplegar o bajar el brazo de accionamiento 6:
Presione el botón de liberación 5 para desplegar el brazo de accionamiento 6.
El brazo de accionamiento 6 está desbloqueado y gira hacia arriba. Si el brazo de
accionamiento 6 no encaja en la posición superior por sí mismo, tire hacia arriba
hasta que el brazo de accionamiento 6 encaje en su lugar y quede bloqueado en
la posición superior.
6
5
Presione el botón de liberación 5 para llevar al brazo de accionamiento 6 de
nuevo hacia abajo. Luego presione el brazo de accionamiento 6 hacia abajo hasta
que encaje en su lugar y quede bloqueado en la posición inferior.
6
5
Nota: El aparato no puede funcionar si el brazo de accionamiento 6 no está en la
posición baja. Si el brazo de accionamiento 6 no está bloqueado correctamente en
su lugar y, como resultado, se eleva durante el funcionamiento, el aparato se detiene
de inmediato. En ambos casos parpadea en la pantalla el mensaje de error “E :01“.
Funcionamiento

46
Funcionamiento
En ese caso, empuje el brazo completamente a la posición baja y asegúrese que esté
bloqueado correctamente en esa posición. Si el mensaje de error aparece durante
el funcionamiento, el tiempo de procesamiento que ya ha transcurrido se guarda
y se continúa contando cuando el aparato vuelva a ponerse en funcionamiento.
Sin embargo, en ese caso el ajuste de velocidad se restablece a “0” y usted
debe establecerla de nuevo para continuar el procesamiento. Vea además las
instrucciones en la sección “Funcionamiento del procesador de alimentos”.
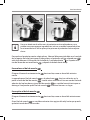
Para colocar el protector contra salpicaduras 7:
La protección contra salpicaduras 7 debe estar fijada al rotor 11 en el brazo de
accionamiento 6, no al bol de mezcla 7.
Coloque el protector contra salpicaduras de la siguiente manera:
Pliegue el brazo de accionamiento 6 hacia arriba, como se describió anterior-
mente.
Ponga el protector contra salpicaduras 10 con sus puntos hacia arriba y conéctelo
al rotor 11 desde abajo. Al hacerlo, asegúrese de que el pequeño triángulo en la
parte superior del protector contra salpicaduras 10 esté alineado con el triángulo
al lado del símbolo de “candado abierto” en la parte inferior del brazo de acciona-
miento 6. Asegúrese de que el protector contra salpicaduras 10 esté completa-
mente apoyado por la parte inferior del brazo de accionamiento 6 y del rotor 11 ;
bloquéelo en su lugar girándolo hacia la izquierda hasta que se detenga. El triángu-
lo en el protector contra salpicaduras 10 está alineado entonces con el símbolo de
“candado cerrado” .

47
Funcionamiento
10
6
11
6
10
Hay una abertura de relleno en el protector contra salpicaduras, que
puede usar para agregar ingredientes incluso cuando el aparato está en
funcionamiento sin tener que quitar primero el protector contra salpica-
duras.
Para quitar el protector contra salpicaduras, libere el bloqueo girándolo en el sentido
de las agujas del reloj hasta que el triángulo en el protector contra salpicaduras 10
esté alineado con el triángulo del símbolo de “candado abierto” en la parte infe-
rior del brazo de accionamiento 6 y sáquelo tirándolo hacia abajo.
Para colocar el bol de mezcla 7:
Pliegue el brazo de accionamiento 6 hacia arriba, como se describió anterior-
mente.
Luego coloque el bol de mezcla 7 en la placa base 9. Hay tres salientes en la
parte inferior del bol de mezcla 7. Inserte estos salientes en las ranuras del lado de
adentro de la placa base y gire el bol de mezcla 7 en sentido horario hasta que se
detenga. Compruebe que el bol de mezcla 7 esté bien firme en su lugar.
Para quitar el bol de mezcla 7:
Pliegue el brazo de accionamiento 6 hacia arriba, como se describió anteriormen-
te.
Gire el bol de mezcla 7 en sentido contrario a las agujas del reloj hasta que pueda
quitarlo tirando de él hacia arriba.

48
Funcionamiento
Colocación de los accesorios (batidor de alambre 12 , gancho de amasar 13
ybatidor 14 ):
A continuación encontrará ejemplos de uso de los diferentes accesorios.
Batidor de alambre: batir claras de huevo, batir crema o preparar mayonesa.
Batidor: combinar las mezclas de pastel.
Gancho para amasar: amasar una masa consistente, como la masa para pan.
Pliegue el brazo de accionamiento 6 hacia arriba, como se describió anteriormen-
te.
Coja el accesorio elegido ( 12 , 13 o 14 ) y conéctelo desde abajo al pasador guía
en el rotor 11 de la parte inferior del brazo de accionamiento 6. Al hacerlo, ase-
gúrese de que el pasador guía que está unido a través del pasador del rotor quede
insertado en la abertura prevista para el accesorio correspondiente ( 12 , 13 o
14 ). Luego, empuje suavemente el accesorio correspondiente hacia arriba y gírelo
hacia la izquierda hasta que se detenga. Cuando lo suelte, el accesorio debe quedar
bloqueado en su lugar (verifique que la conexión esté firme).
Para usar los accesorios, baje el brazo de accionamiento 6, como se describió
anteriormente.
Quitar los accesorios (batidor de alambre 12 , gancho de amasar 13
ybatidor 14 ):
Pliegue el brazo de accionamiento 6 hacia arriba, como se describió anteriormen-
te.
Empuje el accesorio correspondiente ( 12 , 13 o 14 ) hacia arriba y gírelo hacia la
derecha hasta que pueda extraerlo del aparato.
Funcionamiento del aparato:
¡ADVERTENCIA!
Asegúrese de que el aparato siempre esté en la posición
de apagado “0FF” antes de conectarlo a un tomacorriente.
El aparato solo funciona cuando el brazo de accionamiento está bloquea-
do en la posición inferior.

49
Funcionamiento
Después de colocar correctamente el accesorio y de bajar el brazo de
accionamiento 6 (y bloquearlo en su lugar), puede conectar el aparato al
tomacorriente.
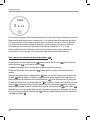
• Presione el botón de encendido/apagado 2 para encender el aparato.
La pantalla 3 se ilumina y muestra el ajuste de velocidad “0” y el tiempo de
procesamiento “00:00”.
Ajuste de velocidad
Tiempo de procesamiento
• Para iniciar la operación y elegir el ajuste de velocidad requerido, gire un poco
el selector de velocidad 1 en el sentido de las agujas del reloj. Puede elegir los
ajustes de velocidad del 1 al 8 girando el selector en el sentido de las agujas del
reloj hasta alcanzar el ajuste de velocidad requerido. El progreso del tiempo de
procesamiento se muestra durante el funcionamiento.
• Si desea reducir la velocidad, gire un poco el selector de velocidad 1 en el
sentido contrario a las agujas del reloj. Puede elegir velocidades hasta el ajuste
de velocidad más bajo (“1”) repitiendo el giro en sentido contrario a las agujas del
reloj hasta alcanzar el ajuste de velocidad requerido. También puede apagar el
aparato eligiendo el ajuste de velocidad “0”.

50
Funcionamiento
Nota: También puede apagar el aparato por completo en cualquier momento
durante el funcionamiento presionando el botón de encendido/apagado 2.
La pantalla se apaga cuando lo hace.
Función Turbo
La función Turbo se puede usar solo cuando el ajuste de velocidad está en “0”.
La Función Turbo no trabaja en los ajustes de velocidad del 1 al 8.
Nota: Use la función para mezclar vigorosamente durante un breve tiempo (por
ejemplo, batir un líquido para hacer espuma). No mantenga presionado el botón
Turbo por más de 10 a 15 segundos seguidos para evitar el sobrecalentamiento del
aparato.
• Para usar la función Turbo (utilice solo los ingredientes adecuados), lleve primero
el selector de velocidad 1 al ajuste de velocidad “0”.
• Ahora presione y mantenga presionado el botón de función Turbo 4 por el
tiempo requerido. Durante el procesamiento, el ajuste de velocidad que se mues-
tra en la pantalla 3 cambia a “P“ y se muestra el progreso del tiempo de proce-
samiento.
• La función Turbo se desactiva cuando se libera el botón de función Turbo 4.
El indicador “P” y el tiempo de procesamiento parpadean varias veces en la
pantalla, y luego se muestra “0” para la velocidad y “00:00” para el tiempo de
procesamiento
Nota: Si presiona el botón de función Turbo 4 nuevamente mientras la pantalla
parpadea, la función Turbo comienza de nuevo y el tiempo de procesamiento ya
transcurrido sigue la cuenta desde el último valor.

51
Funcionamiento
Para utilizar el bol de mezcla 7:
¡ADVERTENCIA!
Utilice el aparato solo con el protector contra salpicaduras
colocado correctamente para evitar el contacto accidental
con el accesorio correspondiente.
Coloque el bol de mezcla 7, el protector contra salpicaduras 10 y el accesorio
deseado ( 12 , 13 , 14 ), como se describió anteriormente. Recomendamos que
siempre comience con la configuración de velocidad más baja y luego aumente
la velocidad según sea necesario girando el controlador de velocidad 1 en el
sentido de las agujas del reloj hasta el ajuste deseado. Siempre ajuste la velocidad
de acuerdo con los ingredientes que está utilizando. Tenga en cuenta la información
en la tabla de velocidades.
Después de cada uso, cambie la velocidad a “0” con el selector de velocidad 1,
apague el aparato con el botón de encendido/apagado 2 y desconecte el enchufe
del tomacorriente.

52
Recetas de ejemplo
Recetas de ejemplo
Masa para galletas de mantequilla
Ingredientes:
2/3 de taza de mantequilla sin sal muy suave, 1/2 taza de azúcar granulada,
1 paquete de azúcar de vainilla, 1 clara de huevo, 1 1/2 taza de harina blanca,
1 pizca de sal
Preparación:
• Revuelva la mantequilla usando el batidor de alambre 12 y haciendo funcionar
la batidora de forma continua en el ajuste 6 hasta que la mantequilla esté espon-
josa.
• Agregue el azúcar, la sal, el azúcar de vainilla y la clara de huevo y mezcle durante
4 minutos aproximadamente.
• Apague la batidora, desconéctela de la alimentación y reemplace el batidor de
alambre 12 con el batidor 14 .
• Conecte la batidora a la alimentación y establezca la velocidad al nivel 2 o 3.
Si es necesario, detenga la batidora de vez en cuando, desconéctela de la corrien-
te y empuje la masa desde los bordes del recipiente con una espátula.
• Agregue la harina y aumente lentamente la velocidad hasta que la masa alcance
la consistencia correcta.
Receta de ejemplo para hacer mayonesa
Para hacer una buena mayonesa, todos los ingredientes deben estar a temperatura
ambiente, y el aceite, el jugo de limón y la sal se deben agregar gradualmente en
pequeñas cantidades. El resultado es una mayonesa emulsionada uniformemente
con excelente consistencia. La ventaja de usar la batidora de pedestal para hacer
mayonesa es que puede agregar continuamente los ingredientes a través de la
abertura en el protector contra salpicaduras 7, sin tener que apagar el aparato.
Ingredientes:
6 yemas de huevo, 1 1/2 taza de aceite, 2 cucharadas de sal,
4 cucharadas de jugo de limón

53
Recetas de ejemplo
Preparación:
• Batir las 6 yemas de huevo en la velocidad más alta con el batidor de alambre 12
hasta que queden esponjosas y luego dejarlas reposar durante 2 minutos.
• Luego, agregue gradualmente el aceite, la sal y el jugo de limón por cucharadas
durante un período de 4 minutos. Si es necesario, detenga la batidora de pedestal
por un momento y luego mezcle durante otros 4 minutos.
Puede encontrar otras recetas en Internet o en un libro de cocina.
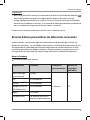
Recetas básicas para utilizar los diferentes accesorios
A continuación, se muestran algunas recetas básicas de ejemplo que utilizan los
diferentes accesorios. Las cantidades especificadas, el tiempo de procesamiento y la
configuración de velocidad más alta para cada receta en combinación con el acce-
sorio correspondiente no deben excederse. Recomendamos que comience con la
configuración de velocidad más baja y luego aumente la velocidad lentamente.
Masa de levadura
Accesorio: gancho de amasar
Ingredientes Cantidad Tiempo de
procesamiento
Ajustes de
velocidad
aplicables
Harina de trigo
(sin levadura)
5 tazas
4 minutos 1-3
Sal 2 cucharaditas
Azúcar 5 cucharaditas
Margarina sin sal
(80% de grasa)
4 cucharaditas
Agua 1 2/3 tazas
Levadura seca De acuerdo con las ins-
trucciones del fabricante

54
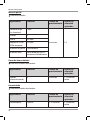
Recetas de ejemplo
Masa de pastel
Accesorio: batidor
Ingredientes Cantidad Tiempo de
procesamiento
Ajustes de
velocidad
aplicables
Harina de trigo
(sin levadura)
1 taza
3 minutos 1-5
Huevos 3
Azúcar 3/4 taza
Margarina sin sal
(80% de grasa)
2/3 taza
Levadura en polvo 1 cucharadita
Levadura seca De acuerdo con las ins-
trucciones del fabricante
Claras de huevo batidas
Accesorio: batidor de alambre
Ingredientes Cantidad Tiempo de
procesamiento
Ajustes de
velocidad
aplicables
Huevos
(claras de huevo)
8 3 minutos 1 - 8/función
turbo
Crema batida
Accesorio: batidor de alambre
Ingredientes Cantidad Tiempo de
procesamiento
Ajustes de
velocidad
aplicables
Crema espesa 2 pintas 2 - 5 minutos 1 - 8/función
turbo

55
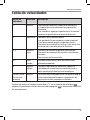
Tabla de velocidades
Tabla de velocidades
Ajuste de
velocidad
Actividad Descripción
1 Mezclar Para revolver, mezclar y combinar lentamente y
es la posición inicial para todos los procesos de
mezclado.
Usar cuando se agregan ingredientes y al mezclar/
combinar ingredientes más espesos o densos.
2 Batir lento Para batir lento, mezclar rápido.
Usar para batir la masa espesa y como velocidad
inicial para mezclar papas o vegetales cocidos.
Para mezclar mantequilla y harina y batir masa fina,
así como batir y amasar masa de levadura.
3 - 5 Mezclar/
batir
Para mezclar la masa de galletas, por ejemplo.
Para mezclar mantequilla y azúcar en una mezcla
cremosa.
Para la masa de las tortas, etc.
6-7 Batir
rápido
Para batir crema, batir claras de huevo y batir
glaseado preparado.
8 Mezclar
rápido
Para batir rápidamente mayonesa, pequeñas
cantidades de crema batida y claras de huevo, y
batir mantequilla hasta que esté esponjosa.
Función turbo
(función de
acelerar)
Mezclar La función de pulso proporciona un breve arranque
a alta velocidad para líquidos o ingredientes de
baja resistencia en pequeñas cantidades.
Después de cada uso, cambie la velocidad a “0” con el selector de velocidad 1,
apague el aparato con el botón de encendido/apagado 2 y desconecte el enchufe
del tomacorriente.

56
Mantenimiento, limpieza y cuidado
Mantenimiento, limpieza y cuidado
¡ADVERTENCIA!
¡Desenchufe siempre el aparato y deje que se en-
fríe completamente antes de limpiarlo y/o guardarlo!
¡Riesgo de descarga eléctrica!
¡ADVERTENCIA!
Asegúrese de que no entre líquido en la unidad del motor.
¡Nunca sumerja el aparato en agua!
¡Riesgo de descarga eléctrica!
¡PRECAUCIÓN!
No utilizar agentes de limpieza corrosivos o limpiadores
abrasivos.
Limpiar la batidora clásica de pedestal después de cada uso.
• Para limpiar el aparato, utilice un paño seco, o a lo sumo, ligeramente húmedo y
bien escurrido.
• Luego secarlo bien.
Limpieza de los accesorios
Puede limpiar los diferentes accesorios ( 9, 10 y 11 ), el protector contra salpica-
duras 7 y el bol de mezcla 7 con agua tibia jabonosa. Luego enjuáguelos bien
con agua limpia y déjelos secar por completo.
Alternativamente, también puede lavar los accesorios en el lavavajillas (secado sin
calor).

57
Solución de problemas
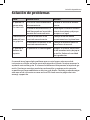
Solución de problemas
Falla: Posible causa: Medida:
El aparato no
parece estar
funcionando.
El enchufe no está conectado
al tomacorriente.
Conecte el enchufe al tomaco-
rriente.
El brazo de accionamiento no
está bloqueado en la posición
correcta de funcionamiento.
Despliegue el brazo de acciona-
miento hacia abajo y deje que
encaje en su lugar.
La batidora de
pedestal hace
un golpeteo.
El bol de mezcla no se ha
insertado correctamente.
Coloque el bol de mezcla
correctamente en la placa base.
El accesorio utilizado no se ha
insertado correctamente.
Coloque el accesorio como se
describe en el manual.
El aparato se
detiene de
repente.
El aparato se ha sobrecargado. Apague el aparato, desconécte-
lo del tomacorriente y deje que
se enfríe. Reduzca la cantidad
de ingredientes.
En caso de tener lugar algún problema que no se incluya en este manual de
instrucciones, diríjase a nuestro servicio de atención al cliente. Nuestros asesores le
ayudarán con mucho gusto. El número de teléfono está impreso en la tarjeta de ga-
rantía. Puesto que nuestros productos se desarrollan y mejoran continuamente,
es posible que haya modificaciones técnicas y de diseño. También puede descargar
este manual de instrucciones como archivo PDF desde nuestra página de inicio
www.gt-support.de.

58
Datos técnicos / Eliminación
Datos técnicos
Tensión nominal: 120 V (CA)
Frecuencia nominal: 60 Hz
Potencia nominal: 420 W
Eliminación
Eliminación del embalaje
Clasifique el material de embalaje antes de deshacerse de este.
Deshágase del papel y el cartón con el servicio de reciclado de
papel y los envoltorios con el servicio de recolección adecuado.
Eliminación del producto
Si el producto deja de funcionar, asegúrese de eliminarlo de forma respetuosa
con el medio ambiente y de acuerdo con la normativa local.

59

60
Made in China
DIST. & SOLD EXCLUSIVELY BY:
ALDI
BATAVIA, IL 60510
US
YEAR WARRANTY
AÑOS DE GARANTÍA
2
AFTER SALES SUPPORT
SERVICIO POSVENTA
MODEL / MODELO: PO51031855
GT-SF-KMR-01-US 10/2023
1-866-558-8096
service@801service.net
US
US
826019
Made in China
DIST. & SOLD EXCLUSIVELY BY:
ALDI
BATAVIA, IL 60510
US
YEAR WARRANTY
AÑOS DE GARANTÍA
3
AFTER SALES SUPPORT
SERVICIO POSVENTA
MODEL / MODELO: PO51031855
GT-SF-KMR-01-US 10/2023
1-866-558-8096
service@801service.net
US
US
826019
-
 1
1
-
 2
2
-
 3
3
-
 4
4
-
 5
5
-
 6
6
-
 7
7
-
 8
8
-
 9
9
-
 10
10
-
 11
11
-
 12
12
-
 13
13
-
 14
14
-
 15
15
-
 16
16
-
 17
17
-
 18
18
-
 19
19
-
 20
20
-
 21
21
-
 22
22
-
 23
23
-
 24
24
-
 25
25
-
 26
26
-
 27
27
-
 28
28
-
 29
29
-
 30
30
-
 31
31
-
 32
32
-
 33
33
-
 34
34
-
 35
35
-
 36
36
-
 37
37
-
 38
38
-
 39
39
-
 40
40
-
 41
41
-
 42
42
-
 43
43
-
 44
44
-
 45
45
-
 46
46
-
 47
47
-
 48
48
-
 49
49
-
 50
50
-
 51
51
-
 52
52
-
 53
53
-
 54
54
-
 55
55
-
 56
56
-
 57
57
-
 58
58
-
 59
59
-
 60
60


Ambiano GT-SF-KMR-01 Manual de usuario
- Categoría
- Pequeños electrodomésticos de cocina
- Tipo
- Manual de usuario
En otros idiomas
- English: Ambiano GT-SF-KMR-01 User manual
Otros documentos
-
Silvercrest 293126 El manual del propietario
-
-
De’Longhi Mixer DSM5 - 7 Series Manual de usuario
-
Silvercrest SKMP 1200 A2 Operating Instructions Manual
-
-
-
Philips HR1568/03 Manual de usuario
-
Kenmore 100.49090 Manual de usuario
-
Oster FPSTSMPL1 El manual del propietario