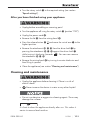
Silvercrest 344452 El manual del propietario
- Categoría
- Mezcladores
- Tipo
- El manual del propietario
Este manual también es adecuado para

IAN 344452_1910
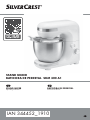
STAND MIXER
BATIDORA DE PEDESTAL SKM 300 A1
STAND MIXER
Operating instructions BATIDORA DE PEDESTAL
Instrucciones de uso
CV_344452_SKM300A1_LB9.indd 1-3 17.02.20 14:24

US - EN Operating instructions Page 1
US - ES Instrucciones de uso Página 19
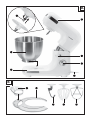
Before reading, unfold the page containing the illustrations and familiarize yourself with all functions of the
device.
Antes de empezar a leer abra la página que contiene las imágenes y, en seguida, familiarícese con todas
las funciones del dispositivo.
CV_344452_SKM300A1_LB9.indd 1-3 17.02.20 14:24

B
A
CV_344452_SKM300A1_LB9.indd 4-6 17.02.20 14:24

SKM 300 A1 US-EN │ 1 ■
Table of contents
Introduction .......................................2
About this manual ............................................2
Warning types ...............................................2
Intended use ................................................3
Safety instructions ..................................3
Important safety instructions ....................................3
Important cord information .....................................5
Check package contents .............................6
Appliance description ...............................7
Operation .........................................7
Preparations ................................................7
Speed settings ...............................................8
Working with the dough hook, whisk, and beater ...................8
After you have finished using your appliance ..................... 11
Cleaning and maintenance ..........................11
Cleaning the housing ....................................... 12
Cleaning accessories ....................................... 12
Storage ..........................................12
Troubleshooting ...................................13
Disposal .........................................13
Disposal of the appliance .................................... 13
Disposal of the packaging ................................... 13
Appendix ........................................14
Recipes .................................................. 14
Technical specifications ...................................... 16
3 year limited warranty ...................................... 16
Distributor ................................................ 18
IB_344452_SKM300A1_LB9.indb 1 18.02.20 11:56

SKM 300 A1
■ 2 │ US-EN
Introduction
About this manual
Congratulations on the purchase of your new appliance.
You have selected a high-quality product. The operating instructions
are part of this product. They contain important information about
safety, usage and disposal. Before using the product, please
familiarize yourself with all operating and safety instructions. Use
the product only as described and for the range of applications
specified. Please also pass these operating instructions on to any
future owner.
Warning types
The following warning types are used in these operating instructions:
This is the safety alert symbol. It is used to alert you to
potential injury hazards. Obey all safety messages that
follow this symbol to avoid possible injury and death.
WARNING indicates a hazardous situation that, if not avoided,
could result in death or serious injury.
CAUTION indicates a hazardous situation that, if not avoided,
could result in minor or moderate injury.
NOTICE indicates information considered important, but not haz-
ard-related (e. g. messages related to property damage).
A “Tip” identifies additional information that will assist you in
using the device.
IB_344452_SKM300A1_LB9.indb 2 18.02.20 11:56

SKM 300 A1 US-EN │ 3 ■
Intended use
This appliance is intended exclusively for processing food in normal
household quantities. This appliance is designed exclusively for
use in private households. It is not suitable for commercial use!
This appliance is intended only for private use in enclosed, dry
spaces. It must not be used outdoors.
The appliance may only be used with original accessories.
Safety instructions
This section contains important safety instructions for using the appliance.
This appliance complies with statutory safety regulations. Improper use may
result in personal injury and property damage.
IMPORTANT SAFETY INSTRUCTIONS
When using electrical appliances, basic safety precautions
should always be followed including the following:
1. READ ALL INSTRUCTIONS.
2. To protect against electrical shock do not immerse cord,
plugs, or the appliance in water or other liquids.
3. This appliance should not be used by children and care
should be taken when used near children.
4. Children should never play with the appliance.
5. Unplug from outlet when not in use, before putting on or
taking off parts, and before cleaning the appliance.
6. Avoid contacting moving parts. Keep hands, hair clothing, as
well as spatulas and other utensils away from beaters during
operation to reduce the risk of injury to persons, and/or
damage to the Stand Mixer.
7. The use of accessory attachments not recommended by the
appliance manufacturer may result in fire, electric shock or
injury to persons.
IB_344452_SKM300A1_LB9.indb 3 18.02.20 11:56

SKM 300 A1
■ 4 │ US-EN
8. Do not operate any appliance with a damaged cord or plug
or after the appliance malfunctions or is dropped or damaged
in any manner. Return appliance to the nearest authorized
service facility for examination, repair, or electrical or
mechanical adjustment.
9. Do not use outdoors.
10. Do not let cord hang over edge of table or counter.
11. Do not let cord contact hot surface, including the stove.
12. Do not place on or near a hot gas or electric burner, or in
a heated oven.
13. To disconnect the appliance, turn any control to off, then
remove plug from wall outlet.
14. Remove beater, whisk or dough hook from the Stand Mixer
before washing.
15. Do not remove food from the bowl until all moving parts
have come to a complete stop. Risk of injury!
16. Never operate the appliance when it is empty.
17. Do not use the appliance to process boiling or hot food.
18. Do not use appliance for other than intended use.
19. Do not operate unattended.
20. This appliance is for household use only.
SAVE THESE INSTRUCTIONS!
FOR HOUSEHOLD USE ONLY!
IB_344452_SKM300A1_LB9.indb 4 18.02.20 11:56

SKM 300 A1 US-EN │ 5 ■
Important cord information
This appliance has a polarized plug (one blade is wider than the
other). To reduce the risk of electric shock, there is only one way
this plug is intended to fit into a polarized outlet. If the plug does
not completely fit into the outlet, reverse the plug. If it still does not
fit, contact a qualified electrician. Do not attempt to modify the
plug in any way.
a) A short power-supply cord (or detachable power-supply cord)
is provided to reduce risks resulting from becoming entangled
in or tripping over a longer cord.
b) Longer detachable power-supply cords or extension cords are
available and may be used if they are used carefully.
c) If a longer detachable power-supply cord or extension cord is
used:
1) The marked electrical rating of the detachable power-supply
cord or extension cord should be at least as great as the
electrical rating of the appliance;
2) If the appliance has a grounded plug, the cord set or exten-
sion cord should also be a grounded 3-wire cord; and
3) The longer cord should be arranged so that it will not drape
over the counter top or table top where it can be pulled on
by children or tripped over.
IB_344452_SKM300A1_LB9.indb 5 18.02.20 11:56

SKM 300 A1
■ 6 │ US-EN
Check package contents
The appliance comes standard with the following components:
▯ Stand Mixer
▯ Mixing bowl with lid and filler neck
▯ Dough hook
▯ Whisk
▯ Beater
▯ Operating instructions
► Do not allow children to play with packaging materials.
Risk of suffocation!
♦ Remove all parts of the appliance and the operating instruc-
tions from the box.
♦ Remove all packaging material.
Check the package for completeness and signs of visible damage.
If the delivery is incomplete or damage occurred as a result of
defective packaging or during transport, please contact the customer
service hotline (see section about 3 year limited warranty).
IB_344452_SKM300A1_LB9.indb 6 18.02.20 11:56

SKM 300 A1 US-EN │ 7 ■
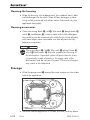
Appliance description
(See fold-out page for illustrations)
Figure A:
Swivel arm
Release button
Rotary switch
Power cord
Base
Mixing bowl
Drive shaft
Figure B:
Filler neck
Lid
Dough hook
- Whisk
3 Beater
Operation
Preparations
♦ Take all parts out of the box and remove the packaging materi-
al and any protective wrapping or stickers.
♦ Clean all components as described in the section "Cleaning
and maintenance". Ensure that all parts are completely dry.
♦ Place the appliance on a clean and level surface and secure
it using the suction cups.
IB_344452_SKM300A1_LB9.indb 7 18.02.20 11:56

SKM 300 A1
■ 8 │ US-EN
Speed settings
Level Attachment suitable for...
1 - 3 Dough hook
Beater 3
- Kneading and mixing firm dough
or harder ingredients
3 - 5 Beater 3
- Mixing thick batter
- Mixing butter and flour
- Mixing yeast dough
- Mixing shortcrust
3 - 4 Dough hook - Kneading yeast dough
- Kneading thick batter
5 - 7 Beater 3
- Cake dough
- Beating butter and sugar
- Cookie dough
7 - 8 Whisk -
- Whipped cream
- Egg whites
- Mayonnaise
- Creaming butter
Working with the dough hook, whisk, and beater
► Never place your hands or fingers in the mixing bowl during
operation! Risk of injury due to rotating parts!
► Never switch from one accessory to another unless the drive
unit is at a complete standstill! After being turned off, the motor
will continue to run for a short time.
► In case of malfunction, turn the appliance off and remove the
plug from the wall socket to prevent the appliance from being
turned on again unintentionally.
IB_344452_SKM300A1_LB9.indb 8 18.02.20 11:56

SKM 300 A1 US-EN │ 9 ■
► When working with the dough hook , whisk -, or beater3,
we recommend allowing the appliance to cool down after 10
minutes of operation.
Proceed as follows to prepare the appliance for operation using
the dough hook , whisk - or beater 3:
♦ Press the release button . The swivel arm will move
upward.
♦ Place the mixing bowl so that the locks on the mixing bowl
engage in the recess on the base . Turn the mixing bowl
clockwise (see symbols and on the base ) to lock it in
place.
♦ Choose the appropriate attachment -3:
–Whisk - to whip cream.
–Beater 3 to mix batter.
–Dough hook to knead heavy doughs, e.g. yeast dough.
♦ Depending on the task you want to perform, attach the dough
hook , whisk -, or beater 3 to the drive shaft :
–Position the dough hook , whisk -, or beater 3(hereinaf-
ter "attachment") on the drive shaft so that the two metal
pins on the drive shaft engage in the recesses on the
attachment -3.
–Firmly push the attachment -3 onto the drive shaft
to compress the spring while turning the attachment
-3 slightly counter-clockwise (towards ).
–Release the attachment -3. It is now firmly seated on
the drive shaft .
♦ Add the ingredients to the mixing bowl , but use the following
table as a guideline for the recommended quantities:
IB_344452_SKM300A1_LB9.indb 9 18.02.20 11:56

SKM 300 A1
■ 10 │ US-EN
Filling quanti-
ties for ... min. max.
Yeast dough N/A 18 oz
(4 cups, 500 g) flour
Batter N/A 14 oz
(3 cups, 400 g) flour
Heavy dough
(e.g. shortcrust
pastry)
N/A 14 oz
(3 cups, 400 g) flour
Cream 6.7 oz
(200 ml) 33.8 oz (1,000 ml)
Egg white (Egg
weight class M) 2 12
Adjust the remaining ingredients of the recipe to the respective
maximum amount.
► Do not exceed the specified maximum filling quantities! Other-
wise the appliance will be overloaded.
► If the appliance is sluggish: Turn off the appliance, take out half
of the dough and knead each half separately.
While kneading and/or mixing, please note that the dough in the
mixing bowl will increase in volume or will be pushed upward
by the tool. For this reason, never fill the mixing bowl to the brim!
♦ Press the release button and move the swivel arm with
the attachment -3 downward into the operating position.
If desired, you can attach the filler neck to the lid :
–Push the filler neck into the recess on the lid .
You can now add ingredients, even during operation.
♦ Slide the lid onto the mixing bowl .
♦ Insert the power plug into the socket.
IB_344452_SKM300A1_LB9.indb 10 18.02.20 11:56

SKM 300 A1 US-EN │ 11 ■
♦ Turn the rotary switch to the required setting (see section
"Speed settings").
After you have finished using your appliance
► Unplug before assembling or removing parts!
♦ Turn the appliance off using the rotary switch (position "OFF").
♦ Unplug the power cord .
♦ Remove the lid from the mixing bowl .
♦ Press the release button and move the swivel arm to the
highest position.
♦ Remove the attachment -3 from the drive shaft by
pressing the attachment -3 against the drive shaft
while turning it clockwise (towards ). You can now remove
the attachment -3.
♦ Remove the mixing bowl by turning it counter-clockwise and
then lifting it upward.
♦ Clean the appliance (see section "Cleaning and maintenance").
Cleaning and maintenance
► Unplug the appliance before cleaning it! There is a risk of
electric shock!
► Never immerse the device in water or any other liquids!
► Do not use abrasive or aggressive cleaning agents. These may
damage the surfaces.
It is best to clean the appliance directly after use. This makes it
easier to remove food residues.
IB_344452_SKM300A1_LB9.indb 11 18.02.20 11:56

SKM 300 A1
■ 12 │ US-EN
Cleaning the housing
♦ Wipe the housing with a damp cloth. For stubborn stains, add
a mild detergent to the cloth. Wipe off any detergent residue
using a cloth moistened with clean water. Afterwards, dry the
appliance thoroughly.
Cleaning accessories
♦ Clean the mixing bowl , lid , filler neck dough hook ,
whisk -, and beater 3 in warm water with a little detergent.
Any residues can be removed with a dish brush. Rinse all parts
with warm clean water and make sure that all parts are dry
before re-using them.
The mixing bowl , lid , filler neck dough hook ,
whisk - and beater 3 are also suitable for cleaning in
the dishwasher. If possible, place all parts that are (even
just partially) made of plastic in the upper rack of the
dishwasher and do not jam the parts. Otherwise the parts
may crack or be deformed.
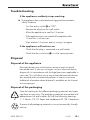
Storage
♦ Wind the power cord around the cord retainer on the under-
side of the appliance:
♦ Store the cleaned appliance in a clean, dust-free, and dry place.
IB_344452_SKM300A1_LB9.indb 12 18.02.20 11:56

SKM 300 A1 US-EN │ 13 ■
Troubleshooting
If the appliance suddenly stops working:
■ The appliance has overheated and triggered the automatic
safety shutdown.
–Turn the rotary switch to "OFF".
–Remove the plug from the wall socket.
–Allow the appliance to cool for 15 minutes.
–If the appliance has not cooled off completely after
15 minutes, it will not start.
–Wait another 15 minutes and try turning it on again.
If the appliance will not turn on:
–Check that the plug is connected to a wall socket.
–Check that the swivel arm is in the correct position.
Disposal
Disposal of the appliance
Electrical devices may not be thrown away as part of normal
household trash. If you can no longer use your electrical device,
dispose of it in accordance with the legal provisions applicable in
your state. This will allow you to ensure that old electrical devices
are recycled and environmental pollution is kept to a minimum.
Additional information about disposal is available on the Internet
at www.epa.gov.
Disposal of the packaging
Note the marking on the different packaging materials and sepa-
rate them as necessary. The packaging materials are marked with
abbreviations (a) and numbers (b) with the following meanings:
1–7: Plastics, 20–22: Paper and cardboard, 80–98: Composites.
Dispose of all packaging materials in an environmentally friendly
manner.
IB_344452_SKM300A1_LB9.indb 13 18.02.20 11:56

SKM 300 A1
■ 14 │ US-EN
Appendix
Recipes
Basic recipe for yeast dough
Ingredients
1.1 lb (4 cups, 500 g) all-purpose flour
1 cube of fresh yeast
2 oz (60 g) butter
1 pinch of salt
7 - 8.5 oz (200 - 250 ml) lukewarm milk
2 eggs
Preparation
♦ Add all ingredients to the mixing bowl .
Knead for 1 minute on level 1 with the dough hook followed
by 5 minutes on level 4.
♦ Leave it in the mixing bowl for 40 minutes to rise. Form the
dough into a ball.
♦ Roll out the dough on a baking tray and add toppings as
desired.
♦ Bake at 400 °F (200 °C) (bottom/top heat) for 25 - 30
minutes.
Basic recipe for shortcrust pastry
Ingredients
8.8 oz (250 g) flour
4.4 oz (125 g) cold butter
1 pinch of salt
1 egg
5.3 oz (150 g) sugar
IB_344452_SKM300A1_LB9.indb 14 18.02.20 11:56

SKM 300 A1 US-EN │ 15 ■
Preparation
♦ Add all the ingredients for the dough to the mixing bowl
and knead with the dough hook on level 1 for about 2 to 3
minutes until the dough is crumbly.
♦ Place it in the refrigerator to cool for 30 minutes.
♦ Preheat the oven to 400 °F (200 °C).
♦ Grease the springform pan and lightly sprinkle it with flour.
♦ Roll out the dough between two sheets of saran wrap (approx.
12” [30 cm] in diameter) and place it in the springform pan.
♦ Bake at 400 °F (200 °C) (bottom/top heat) for 15 minutes.
Basic recipe for pound cake
Ingredients
8.8 oz (250 g) butter
8.8 oz (250 g) sugar
1 packet of vanilla sugar
8.8 oz (250 g) flour
4 eggs
½ packet of baking powder
Preparation
♦ Add the butter, sugar and vanilla sugar to the mixing bowl
and stir with the flat beater 3 at level 3 - 5 until frothy.
♦ Add eggs one at a time and stir until well blended.
♦ Add the flour and baking powder until a smooth batter forms.
♦ Grease a loaf pan (approx. 12” [30 cm]) and add dough.
♦ Bake at 360 °F (180 °C) (bottom/top heat) for approx.
50 - 60 minutes.
IB_344452_SKM300A1_LB9.indb 15 18.02.20 11:56

SKM 300 A1
■ 16 │ US-EN
Technical specifications
Voltage 120 V ~ (AC), 60 Hz
Rated power 300 W
Capacity Bowl 5.28 qt / 5 l
We recommend the following run times:
When working with a dough hook , whisk -, or beater 3,
allow the appliance to cool down after 10 minutes of operation.
If this run time is exceeded, the appliance can be damaged by
overheating.
3 year limited warranty
What does this warranty cover?
The warranty covers:
▯ Damage, breakage or inoperability due to defect.
▯ Damage not caused by normal wear and tear or failure to follow
the safety and maintenance instructions provided in the user
manual.
What is not covered by the warranty?
The warranty does not cover damage caused by:
▯ Normal wear and tear of the product, including fragile parts
(such as switches, glass, etc.);
▯ Improper use or transport;
▯ Disregarding safety and maintenance instructions;
▯ Accidents or acts of nature (e.g. lightning, fire, water, etc.);
▯ Tampering with the product (such as removing cover, unscrewing
screws etc.)
Consequential and incidental damages are also not covered under
this warranty. However, some states do not allow the exclusion or
limitation of incidental or consequential damages, so this limitation
or exclusion may not apply to you.
IB_344452_SKM300A1_LB9.indb 16 18.02.20 11:56

SKM 300 A1 US-EN │ 17 ■
What is the period of coverage and warranty
resolution?
The warranty is for 3 years from the date of purchase.
At our discretion, product will either be refunded or replaced.
What will we not do?
We will not:
▯ Start a new warranty period upon product exchange;
▯ Repair product.
How to process the warranty?
To initiate, please:
▯ Call customer service at 1 (844) 543-5872
▯ Visit the Website Customer Service Platform at
www.lidl.com/contact-us
or
▯ Visit a LIDL store for further assistance
To ensure the quickest warranty return process, please have the
following available:
▯ The original sales receipt that includes the date purchased;
▯ The product and manual in the original package;
▯ A statement of the problem.
What must you do to keep the warranty in effect?
▯ Retain the original receipt;
▯ Follow all product instructions;
▯ Do not repair or modify the product.
How does state law relate to this warranty?
This warranty gives you specific legal rights, and you may also have
other rights which vary from state to state. All implied warranties
are limited by the duration and terms of this warranty. Some states
do not allow limitations on how long an implied warranty lasts, so
the above limitation may not apply to you.
IB_344452_SKM300A1_LB9.indb 17 18.02.20 11:56

SKM 300 A1
■ 18 │ US-EN
Distributor
LIDL US LLC.
ARLINGTON
VA 22202
IB_344452_SKM300A1_LB9.indb 18 18.02.20 11:56

SKM 300 A1 US-ES │ 19 ■
Contenido
Introducción ......................................20
Acerca de este manual ...................................... 20
Tipos de advertencias ....................................... 20
Uso previsto. . . . . . . . . . . . . . . . . . . . . . . . . . . . . . . . . . . . . . . . . . . . . . . 21
Instrucciones de seguridad ..........................21
Instrucciones importantes de seguridad ......................... 21
Información importante sobre el cable .......................... 23
Revisión del contenido del paquete ...................24
Descripción del electrodoméstico .....................25
Operación ........................................25
Preparativos .............................................. 25
Ajustes de velocidads ....................................... 26
Trabajar con el gancho de amasar, el globo y el batidor ........... 26
Una vez que ha terminado de usar su dispositivo ................. 29
Limpieza y mantenimiento ..........................29
Limpieza de la carcasa ...................................... 30
Limpieza de accesorios ...................................... 30
Almacenamiento ..................................30
Solución de problemas .............................31
Eliminación .......................................31
Eliminación del dispositivo ................................... 31
Eliminación del embalaje .................................... 31
Apéndice .........................................32
Recetas .................................................. 32
Especificaciones técnicas .................................... 34
Garantía limitada de 3 años .................................. 34
Importador ............................................... 36
IB_344452_SKM300A1_LB9.indb 19 18.02.20 11:56

SKM 300 A1
■ 20 │ US-ES
Introducción
Acerca de este manual
Felicidades por la compra de su nuevo electrodoméstico.
Ha seleccionado un producto de alta calidad. El instructivo de
operación es parte de este producto. Contiene información importante
sobre seguridad, uso y eliminación. Antes de usar el producto,
familiarícese con todas las instrucciones de operación y seguridad.
Use el producto solamente como se describe y para la variedad
de aplicaciones especificada. También entregue este instructivo
de operación a cualquier propietario futuro.
Tipos de advertencias
Los siguientes tipos de advertencias se usan en este instructivo de
operación:
Este es el símbolo de alerta de seguridad. Se usa para
alertarle sobre peligros de lesiones potenciales. Obedezca
todos los mensajes de seguridad a continuación de este
símbolo para evitar posibles lesiones y la muerte.
ADVERTENCIA indica una situación peligrosa que, si no se evita,
podría provocar la muerte o lesiones graves.
PRECAUCIÓN indica una situación peligrosa que, si no se evita,
podría provocar lesiones leves o moderadas.
AVISO indica información considerada importante, pero que no
está relacionada con un peligro (p. ej., mensajes relacionados
con daños a la propiedad).
Un consejo indica información adicional que facilita el manejo
del dispositivo.
IB_344452_SKM300A1_LB9.indb 20 18.02.20 11:56

SKM 300 A1 US-ES │ 21 ■
Uso previsto
Este dispositivo está diseñado exclusivamente para procesar
alimentos en cantidades normales para el hogar. Este dispositivo
está diseñado exclusivamente para uso en hogares privados.
¡No es adecuado para uso comercial!
Este dispositivo está diseñado exclusivamente para uso particular
en espacios cerrados y secos. No debe usarse al aire libre.
El dispositivo puede ser usado solo con sus accesorios originales.
Instrucciones de seguridad
Esta sección contiene instrucciones de seguridad importantes para el uso del
dispositivo. Este dispositivo cumple con las normas de seguridad legales. El
uso inadecuado puede provocar lesiones personales y daños materiales.
INSTRUCCIONES IMPORTANTES DE
SEGURIDAD
Al usar dispositivos eléctricos, siempre deben observarse
precauciones básicas de seguridad, entre otras:
1. LEA TODAS LAS INSTRUCCIONES.
2. Para protegerse contra descargas eléctricas, no sumerja el
cable, el enchufe o el dispositivo en agua u otro líquido.
3. Los niños no deben usar este dispositivo, y se debe tener
cuidado cuando se use cerca de niños.
4. Los niños nunca deben jugar con el dispositivo.
5. Desenchúfelo de la toma eléctrica cuando no lo use, antes de
colocar o retirar partes y antes de limpiar el dispositivo.
6. Evite el contacto con partes móviles. Mantenga retiradas
tanto las manos, cabellos, ropa como las espátulas de las
varillas mientras estén en funcionamiento para evitar el riesgo
de lesiones graves a personas o daño a el dispositivo.
7. El uso de accesorios no recomendados por el fabricante del
dispositivo puede provocar un incendio, descargas eléctricas
o lesiones a las personas.
IB_344452_SKM300A1_LB9.indb 21 18.02.20 11:56

SKM 300 A1
■ 22 │ US-ES
8. No opere ningún dispositivo con el cable o enchufe dañados
o después de que el mismo haya fallado, se haya dejado caer
o haya sido dañado de alguna manera. Devuelva el dispositivo
al centro de servicio autorizado más cercano para ser revisado,
reparado o ajustado en su sistema eléctrico o mecánico.
9. No lo use en exteriores.
10. No permita que el cable cuelgue sobre el borde de una
mesa o barra.
11. No permita que el cable toque superficies calientes, incluyendo
la estufa.
12. No lo coloque sobre o cerca de un quemador de gas o
eléctrico, o en un horno caliente.
13. Para desconectar el dispositivo, cambie cualquier control
a la posición de apagado y desconecte el enchufe de la
toma de corriente de pared.
14. Quite batidor, globo o gancho de amasar de la batidora
antes de lavar.
15. No retire alimentos del recipiente hasta que todas las pie-
zas móviles se hayan detenido completamente. ¡Riesgo de
lesiones!
16. Nunca opere el dispositivo cuando esté vacío.
17. No use el dispositivo para procesar alimentos hirviendo o
calientes.
18. No use el dispositivo para otro fin distinto al previsto.
19. No lo opere sin atención.
20. Este dispositivo es exclusivo para uso doméstico.
¡CONSERVE ESTE INSTRUCTIVO!
¡EXCLUSIVO PARA USO DOMÉSTICO!
IB_344452_SKM300A1_LB9.indb 22 18.02.20 11:56

SKM 300 A1 US-ES │ 23 ■
Información importante sobre el cable
Este dispositivo tiene una clavija polarizada (una patilla es más
ancha que la otra). Para reducir el riesgo de descargas eléctricas,
solo hay una manera en que esta clavija puede introducirse en un
contacto polarizado. Si la clavija no se introduce por completo
en el contacto, inviértala. Si aun así no se introduce, póngase en
contacto con un electricista calificado. No intente modificar la
clavija de ningún modo.
a) Se proporciona un cable de fuente de alimentación corto (o
cable de alimentación desprendible) para reducir los riesgos
resultantes de enredarse o tropezarse con un cable más largo.
b) Están disponibles cables de alimentación o de extensión des-
prendibles más largos, y pueden usarse si se tiene cuidado en
su uso.
c) Si se usa un cable de fuente de alimentación desprendible o
una extensión más largos:
1) Las características eléctricas marcadas en el cable de
alimentación o cable de extensión desprendible deberán ser
por lo menos de la misma capacidad eléctrica que las del
dispositivo.
2) Si el dispositivo tiene una clavija de tipo aterrizado, el juego
de cable o extensión también deberá ser un cable de tres
hilos de tipo aterrizado.
3) El cable deberá ser tendido de tal manera que no cuelgue
sobre la barra o mesa donde pueda ser jalado por niños o
con el que pueda tropezarse.
IB_344452_SKM300A1_LB9.indb 23 18.02.20 11:56

SKM 300 A1
■ 24 │ US-ES
Revisión del contenido del paquete
El electrodoméstico se entrega de manera estándar con los
siguientes componentes:
▯ Batidora de pedestal
▯ Recipiente para mezclado con tapa y boquilla de llenado
▯ Gancho de amasar
▯ Globo
▯ Batidor
▯ Instructivo de operación
► No permita que los niños jueguen con el material de empaque.
¡Riesgo de asfixia!
♦ Retire todas las partes del electrodoméstico y el instructivo de
operación de la caja.
♦ Retire todo el material de embalaje.
Verifique que el paquete esté completo y no muestre signos
visibles de daño. Si la entrega está incompleta o si ha ocurrido
daño debido al empaque defectuoso o durante el transporte,
póngase en contacto con la línea directa de servicio (vea la
sección “Garantía limitada de 3 años”).
IB_344452_SKM300A1_LB9.indb 24 18.02.20 11:56

SKM 300 A1 US-ES │ 25 ■
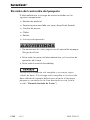
Descripción del electrodoméstico
(Vea las imágenes en la página desplegable)
Figura A:
Brazo basculante
Botón de liberación
Interruptor giratorio
Cable de alimentación
Base
Recipiente para mezclado
Eje del motor
Figura B:
Boquilla de llenado
Tapa
Gancho de amasar
- Globo
3 Batidor
Operación
Preparativos
♦ Saque todas las partes de la caja y retire el material de embalaje,
y cualquier película protectora o etiquetas.
♦ Limpie todos los componentes como se describe en la sección
"Limpieza y mantenimiento". Asegúrese de que todas las
partes estén completamente secas.
♦ Coloque el dispositivo sobre una superficie limpia y nivelada,
y asegúrelo usando las ventosas.
IB_344452_SKM300A1_LB9.indb 25 18.02.20 11:56

SKM 300 A1
■ 26 │ US-ES
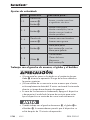
Ajustes de velocidads
Nivel Accesorio Adecuado para...
1 - 3
Gancho de
amasar
Batidor 3
- Amasar y mezclar masa firme
o ingredientes más duros
3 - 5 Batidor 3
- Mezclar masa gruesa
- Mezclar mantequilla y harina
- Mezclar masa con levadura
- Mezclar pastaflora
3 - 4 Gancho de
amasar
- Amasar masa con levadura
- Amasar masa gruesa
5 - 7 Batidor 3
- Masa para pastel
- Batir mantequilla y azúcar
- Masa para galletas
7 - 8 Globo -
- Crema batida
- Claras de huevo
- Mayonesa
- Batir mantequilla
Trabajar con el gancho de amasar, el globo y el batidor
► ¡Nunca meta las manos o los dedos en el recipiente de mez-
clado durante la operación! Riesgo de lesiones debido a
las partes giratorias.
► ¡Nunca cambie de un accesorio a otro a menos que el motor
esté completamente detenido! El motor continuará funcionando
durante un tiempo breve después de apagarse.
► En caso de funcionamiento inadecuado, apague el dispositivo
y desconecte el enchufe de la toma de corriente para evitar
que el dispositivo se encienda de nuevo involuntariamente.
► Cuando trabaje con el gancho de amasar , el globo -o
el batidor 3, le recomendamos permitir que el dispositivo se
enfríe después de 10 minutos de operación.
IB_344452_SKM300A1_LB9.indb 26 18.02.20 11:56

SKM 300 A1 US-ES │ 27 ■
Proceda de la siguiente manera para preparar el dispositivo
para operar usando el gancho de amasar , el globo - o el
batidor3:
♦ Presione el botón de liberación . El brazo basculante
se mueve hacia arriba.
♦ Coloque el recipiente de mezclado de tal manera que los
seguros del recipiente se enganchen en el hueco de la
base . Gire el recipiente de amasado en sentido de las
manecillas del reloj (ver los símbolos y en la base )
para fijarlo en su lugar.
♦ Escoja el accesorio adecuado -3:
–Globo - para batir crema.
–Batidor 3 para mezclar masa.
–Gancho de amasar para amasar masas pesadas, p. ej.
masa con levadura.
♦ Dependiendo de la tarea que desee realizar, sujete el gancho
de amasar , el globo - o el batidor 3 al eje del motor :
–Coloque el gancho de amasar , el globo - o el batidor
3(a partir de aquí "accesorio") en el eje del motor de ma-
nera que los dos pernos de metal del eje se enganchen
en los huecos del accesorio -3.
–Presione firmemente el accesorio -3 en el eje del
motor para comprimir el resorte mientras hace girar el
accesorio -3 ligeramente en sentido contrario a las
manecillas del reloj (hacia ).
–Suelte el accesorio -3. Ahora ha quedado fijado
firmemente en el eje del motor.
♦ Ponga los ingredientes en el recipiente de mezcla , pero ten-
ga en cuenta la siguiente tabla con las cantidades de llenado
recomendadas:
IB_344452_SKM300A1_LB9.indb 27 18.02.20 11:56

SKM 300 A1
■ 28 │ US-ES
Cantidades de
llenado para... mín. máx.
Masa con levadura N/A 18 oz (500 g) de
harina
Masa de bizcocho de
mantequilla N/A 14 oz (400 g) de
harina
Masa gruesa (p. ej.
masa quebrada) N/A 14 oz (400 g) de
harina
Nata 6.7 oz (200 ml) 33.8 oz (1,000 ml)
Clara de huevo (Clase
de peso de huevos M) 2 12
Adapte los demás ingredientes de la receta a la cantidad máxima
correspondiente.
► ¡No sobrepase las cantidades de llenado máximas indicadas! De
lo contrario, se sobrecarga el dispositivo.
► Si el dispositivo se vuelve lento: Apague el dispositivo, retire la
mitad de la masa y bata cada mitad separada.
Mientras esté amasando y/o mezclando, note que la masa del
recipiente de mezclado aumentará su volumen o será empujada
hacia arriba por la herramienta. ¡Por esta razón, nunca llene el
recipiente de mezclado hasta el borde!
♦ Presione el botón de liberación y mueva el brazo bascu-
lante con el accesorio -3 hacia abajo a la posición
de operación.
Si lo desea, puede fijar la boquilla de llenado a la tapa :
–Presione la boquilla de llenado en el hueco de la tapa .
Ahora puede agregar los ingredientes, incluso durante la operación.
♦ Deslice la tapa sobre el recipiente de mezclado .
♦ Inserte el enchufe de alimentación en el contacto.
IB_344452_SKM300A1_LB9.indb 28 18.02.20 11:56

SKM 300 A1 US-ES │ 29 ■
♦ Gire el interruptor giratorio al ajuste requerido (ver sección
"Ajustes de velocidads").
Una vez que ha terminado de usar su dispositivo
► ¡Desconéctelo antes de montar o desmontar partes!
♦ Apague el dispositivo usando el interruptor giratorio
(posición "OFF").
♦ Desconecte el cable de alimentación .
♦ Retire la tapa del recipiente de mezclado .
♦ Presione el botón de liberación y mueva el brazo bascu-
lante a la posición más alta.
♦ Retire el accesorio -3 del eje del motor presionando
el accesorio -3 contra el eje del motor mientras lo
gira en sentido de las manecillas del reloj (hacia ). Ahora
puede retirar el accesorio -3.
♦ Retire el recipiente de mezclado girándolo en sentido contra-
rio a las manecillas del reloj y después levantándolo hacia arriba.
♦ Limpie el dispositivo (ver sección “Limpieza y mantenimiento").
Limpieza y mantenimiento
► ¡Desenchufe el dispositivo antes de limpiarlo! ¡Existe el riesgo
de descarga eléctrica!
► ¡Nunca sumerja el dispositivo en agua o cualquier otro
líquido!
► No use materiales de limpieza abrasivos o agresivos. Esto
puede dañar las superficies.
Es mejor limpiar el dispositivo inmediatamente después de
usarse. Esto facilita la remoción de residuos de comida.
IB_344452_SKM300A1_LB9.indb 29 18.02.20 11:56

SKM 300 A1
■ 30 │ US-ES
Limpieza de la carcasa
♦ Limpie la carcasa con un paño húmedo. Para suciedad difícil,
agregue un detergente suave al paño. Limpie cualquier residuo
de detergente con un paño humedecido en agua limpia.
Después, seque a fondo el dispositivo.
Limpieza de accesorios
♦ Limpie el recipiente de mezclado , la tapa , la boquilla de
llenado , el gancho de amasar , el globo - y el batidor
3 en agua caliente con un poco de detergente. Los residuos
pueden removerse con un cepillo para trastes. Enjuague todas
las partes con agua caliente limpia y asegúrese de que todas
las partes estén secas antes de volver a usarlas.
El recipiente de mezclado , la tapa , la boquilla de
llenado , el gancho de amasar , el globo - y el
batidor 3 también se pueden lavar en un lavavajillas. Si
es posible, coloque todas las partes hechas de plástico
(aunque sea solo parcialmente) en la rejilla superior de la
máquina lavaplatos y no atore las partes. De lo contrario,
las partes pueden fracturarse o deformarse.
Almacenamiento
♦ Enrolle el cable de alimentación alrededor del retén del
cable en la parte inferior del dispositivo:
IB_344452_SKM300A1_LB9.indb 30 18.02.20 11:56

SKM 300 A1 US-ES │ 31 ■
♦ Guarde el dispositivo limpio en un lugar limpio, libre de polvo
y seco.
Solución de problemas
Si el dispositivo deja de trabajar repentinamente:
■ El dispositivo se ha sobrecalentado y se ha activado el apaga-
do de seguridad automático.
–Gire el interruptor giratorio a "OFF".
–Desconecte el enchufe de la toma de corriente de la pared.
–Espere que el dispositivo se enfríe durante 15 minutos.
–Si el dispositivo no se ha enfriado completamente después
de 15 minutos, no arrancará.
–Espere otros 15 minutos y trate de encenderlo de nuevo.
Si el dispositivo no enciende:
–Revise que el enchufe esté conectado a una toma de
corriente de la pared.
–Revise que el brazo basculante esté en la posición correcta.
Eliminación
Eliminación del dispositivo
Los dispositivos eléctricos no deben ser desechados como parte
de la basura doméstica normal. Si ya no puede usar su dispositivo
eléctrico, elimínelo de conformidad con las disposiciones legales
aplicables en su estado. Esto asegura que los dispositivos eléc-
tricos usados sean reciclados y la contaminación ambiental se
mantenga a un nivel mínimo. Puede encontrar más información
acerca de la eliminación de desechos en Internet en www.epa.gov.
Eliminación del embalaje
Observe las marcas en los diferentes materiales de empaque y
sepárelos según sea necesario. Los materiales de empaque están
marcados con abreviaturas (a) y números (b) con los siguientes
significados: 1–7: Plásticos, 20–22: Papel y cartón, 80–98:
Materiales compuestos.
IB_344452_SKM300A1_LB9.indb 31 18.02.20 11:56

SKM 300 A1
■ 32 │ US-ES
Deseche todos los materiales de empaque de una manera
compatible con el medio ambiente.
Apéndice
Recetas
Receta básica masa con levadura
Ingredientes
1.1 lb (500 g) de harina de trigo tipo 550
1 cubo de levadura fresca
2 oz (60 g) de mantequilla
1 pizca de sal
7 - 8.5 oz (200 - 250 ml) de leche tibia
2 huevos
Preparación
♦ Poner todos los ingredientes en el recipiente de mezcla .
Amasar un minuto en el nivel 1 con el gancho amasador , y
a continuación cuatro minutos en el nivel 4.
♦ Dejar reposar 40 minutos en el recipiente de mezcla . Dar
forma de esfera a la masa.
♦ Extender la masa en una bandeja de horno y cubrirla al gusto.
♦ Hornear a 400 °F (200 °C) (calor por arriba y por abajo)
por 25 - 30 minutos.
Receta básica para masa quebrada
Ingredientes
8.8 oz (250 g) de harina
4.4 oz (125 g) de mantequilla fría
1 pizca de sal
1 huevo
5.3 oz (150 g) de azúcar
IB_344452_SKM300A1_LB9.indb 32 18.02.20 11:56

SKM 300 A1 US-ES │ 33 ■
Preparación
♦ Poner todos los ingredientes en el recipiente de mezcla y
amasarlos con el gancho amasador al nivel 1 por aprox.
2 - 3 minutos para hacer una masa quebrada.
♦ Ponerla a enfriar por 30 minutos en el refrigerador.
♦ Precalentar el horno a 400 °F (200 °C).
♦ Engrasar el molde y espolvorear en él un poco de harina.
♦ Extender la masa entre dos hojas plásticas (hasta unos 12”
[30 cm] de diámetro) y ponerla en el molde.
♦ Hornearla a 400 °F (200 °C) (calor por arriba y por abajo)
por 15 minutos.
Receta básica para bizcocho
Ingredientes
8.8 oz (250 g) de mantequilla
8.8 oz (250 g) de azúcar
1 sobre de azúcar de vainilla
8.8 oz (250 g) de harina
4 huevos
½ sobre de levadura en polvo
Preparación
♦ Poner la mantequilla, el azúcar y el azúcar de vainilla en el
recipiente de mezcla y mezclarlas con el mezclador plano
3 al nivel 3 - 5 hasta producir espuma.
♦ Agregar los huevos uno detrás de otro y seguir mezclando
hasta que todo quede bien incorporado.
♦ Agregar la harina y la levadura en polvo, y mezclar todo hasta
hacer una masa plana.
♦ Engrasar un molde rectangular (aprox. 12” [30 cm]) y poner
en él la masa.
♦ Hornear a 360 °F (180 °C) (calor por arriba y por abajo)
por unos 50 - 60 minutos.
IB_344452_SKM300A1_LB9.indb 33 18.02.20 11:56

SKM 300 A1
■ 34 │ US-ES
Especificaciones técnicas
Voltaje 120 V ~ (CA), 60 Hz
Potencia nominal 300 W
Capacidad del
recipiente 5.28 qt / 5 l
Recomendamos los siguientes tiempos de operación:
Cuando trabaje con un gancho de amasar , globo - o
batidor 3, permita que el dispositivo se enfríe después de 10
minutos de operación.
Si se excede este tiempo, el dispositivo puede dañarse por sobre-
calentamiento.
Garantía limitada de 3 años
¿Lo que cubre la presente garantía?
La garantía incluye:
▯ Daños, quebraduras o incapacidad para funcionar debido a
defectos.
▯ Daños que no hayan sido causados por el desgaste propio del
uso o por no seguir las instrucciones de seguridad y mantención
incluidas en el manual para el usuario.
¿Lo que no cubre esta garantía?
La garantía no cubre daños causados por:
▯ El desgaste propio del uso del producto, incluidas las partes
frágiles (como interruptores, piezas de vidrio, etc.).
▯ Uso o transporte no indicado del producto.
▯ Desatención a las instrucciones de seguridad y mantención.
▯ Accidentes o causas de fuerza mayor (e.g. relámpagos, incendio,
inundación, etc.).
▯ Manipulación mal intencionada del producto (retirar la cubierta,
tornillos, etc.).
IB_344452_SKM300A1_LB9.indb 34 18.02.20 11:56

SKM 300 A1 US-ES │ 35 ■
La presente garantía tampoco cubre daños indirectos o emergentes.
Sin embargo algunos estados no permiten la exclusión o limitación
de daños indirectos o emergentes, por lo que dicha exclusión o
limitación pudiera no aplicarse en su caso.
¿Período de cobertura y resolución de la garantía?
La garantía es válida por 3 años a partir de la fecha de compra.
La empresa, según lo estime conveniente, devolverá el dinero o
repondrá el producto.
¿La empresa no?
▯ Dará inicio a un nuevo período de garantía al hacerse el cambio
del producto.
▯ Reparará el producto.
¿Cómo se tramita la garantía?
Recomendamos que primero usted:
▯ Llame al Servicio de atención al cliente al 1 (844) 543-5872.
▯ Visite el Portal de atención al cliente en
www.lidl.com/contact-us
▯ Visite una de nuestras tiendas LIDL en caso de cualquier inquietud.
A fin de acelerar el trámite de la garantía, tenga a bien contar con
lo siguiente:
▯ Recibo de venta original que incluya la fecha de compra.
▯ Producto y manual en su empaque original.
▯ Descripción del problema.
¿Qué debe hacer usted para mantener la garantía
vigente?
▯ Guardar el recibo original.
▯ Seguir todas las instrucciones para el uso del producto.
▯ No realizar ninguna reparación ni alteración al producto.
IB_344452_SKM300A1_LB9.indb 35 18.02.20 11:56

SKM 300 A1
■ 36 │ US-ES
¿De qué manera influyen las leyes estatales con esta
garantía?
La presente garantía le otorga derechos legales específicos, y
pudiera usted contar con otros derechos los cuales varían de un
estado a otro. Todas las garantías implícitas se encuentran limitadas
a la duración y términos de la presente garantía. Algunos estados
no permiten limitaciones al período de tiempo y términos de la
garantía implícita, por lo que dichas limitaciones pudieran no
aplicarse en su caso.
Importador
LIDL US LLC.
ARLINGTON
VA 22202
IB_344452_SKM300A1_LB9.indb 36 18.02.20 11:56

IAN 344452_1910
LIDL US LLC.
ARLINGTON
VA 22202
Made in /Hecho en: China
Last Information Update · Estado de las informaciones:
01 /2020 · Ident.-No.: SKM300A1-012020-1
9
CV_344452_SKM300A1_LB9.indd 1-3 17.02.20 14:24
-
 1
1
-
 2
2
-
 3
3
-
 4
4
-
 5
5
-
 6
6
-
 7
7
-
 8
8
-
 9
9
-
 10
10
-
 11
11
-
 12
12
-
 13
13
-
 14
14
-
 15
15
-
 16
16
-
 17
17
-
 18
18
-
 19
19
-
 20
20
-
 21
21
-
 22
22
-
 23
23
-
 24
24
-
 25
25
-
 26
26
-
 27
27
-
 28
28
-
 29
29
-
 30
30
-
 31
31
-
 32
32
-
 33
33
-
 34
34
-
 35
35
-
 36
36
-
 37
37
-
 38
38
-
 39
39
-
 40
40


Silvercrest 344452 El manual del propietario
- Categoría
- Mezcladores
- Tipo
- El manual del propietario
- Este manual también es adecuado para
en otros idiomas
- English: Silvercrest 344452 Owner's manual