Dorel Home Furnishings 4506 El manual del propietario
- Tipo
- El manual del propietario

WARNING ADVERTENCIA AVERTISSEMENT
Unit can tip over causing severe injury
or death.
Anchor unit to stud or wall.
DO NOT allow children to climb on unit.
Put heavy items on lower shelves or drawers.
Read and follow all assembly instructions.
Este mueble puede caerse por encima
causando daño serio o la muerte
Anolar el mueble a un espárrago muro.
NO dejar que los niños suben por encima del mueble.
Poner los articulos mas pesados en los tableros o cajones inferiores.
Leer y sequir todos de los instucciones para el montaje.
L'unité peut basculer et causer des
blessures graves ou la mort.
Fixez l'unité au mur ou à un montant.
Ne laissez PAS les enfants grimper sur le meuble
Déposez les pièces lourdes sur les tablettes ou tiroirs
du bas.
Lire et suivre toutes les instructions d'assemblage.
STOP
ALTO
ARRÊT
DO NOT RETURN PRODUCT TO THE STORE
NO REGRESAS ESTA PRODUCTO A LA TIENDA
NE RETOURNEZ PAS LE PRODUIT AU MAGASIN
Individual stores do not stock parts.
Las tiendas no tiene partes.
Les magasins individuels ne gardent pas de pièces.
If a part is missing or damaged, please visit our website or call our toll-free customer
service line. We will gladly ship your replacement parts FREE of charge.
Si las partes están perdidas o dañadas Por favor visite nuestra página de Internet o
llame a nuestra línea de teléfono gratis de Servicio al Cliente. Nosotros le enviaremos
sus repuestos sin cargo adicional, serán totalmente gratis.
Si une pièce est manquante ou endommagée, veuillez visiter notre site web ou appelez
sans frais notre Service à la clientèle. Nous expédierons avec plaisir vos pièces de
rechange GRATUITEMENT.
Need Parts or
Assistance?
Nesacitas partes o
Asistancia?
Besoin de Pièces ou
d'assistance?
WWW.AMERIWOOD.COM/PARTS
or call toll free:
o llame a nuestra línea gratis:
ou appelez sans frais:
1-800-489-3351
For prompt, reliable service; please have your assembly manual ready.
Para servicio mas rapido y reliable por favor tenga esta manual listo.
Pour un service rapide et fiable, s'il vous plaît ayez votre livret d'assembage en
main.
-KEEP FOR REFERENCE- -GUARDAR PARA REFERENCIA-
-GARDEZ POUR RÉFÉRENCE-
B344506
14
4506
Please Recycle
Recicle Por Favor
Réutilisez SVP
A Dorel Company
MERIWOOD
INDUSTRIES
TM
La página se está cargando...

B344506
14
3 /9
?? www.ameriwood.com ??
PARTS - PIEZAS - PIECES
left panel
panel izquierdo
panneau gauche
3450615013
right panel
panel derecho
panneau droit
3450615023
top
parte superior
panneau supérieur
3450615034
kick molding
moldura de soporte
moulure de support
3450672101
back panel
panel trasero
panneau arriere
K450601
A
B
C
D
E
F
I
J
K
L
M
fixed shelf
estante fijo
étagère fixe
3450615044
upper left door
puerta superior
izquierda
porte supérieure
gauche
3450615120
bottom shelf
estante de fondo
tablette inférieure
3450615052
3 adjustable shelves
3 estantes ajustables
3 tablette ajustables
3450615061
molding
molde
moulure
3450672092
F
F
upper right door
puerta superior
derecha
porte supérieure
droit
3450615130
lower left door
puerta inferior
izquierda
porte inférieure
gauche
3450615140
lower right door
puerta inferior
derecha
porte inférieure
droit
3450615150
N O
x2 50
#A21110
nail
clavo
clou
x
4
8
#A12810
1" pan head
cabeza redondo 1"
tête ronde
1"
x
5
22
#A12210
1/2" pan head
cabeza redondo 1/2"
tête ronde
x
1 12
#A22500
cam lock
cerradura de leva
serrure de came
x
3
12
cam bolt
#A22510
perno de leva
boulon de came
This piece is paperboard construction. It is not made from wood, but is
required for the assembly of your unit.
Esto pedazo son la construcción del cartón. Ello no son hecho de
madera, pero se requlere para la asamblea de su unidad.
Ces pièce sont de construction en carton. Elle ne sont pas fabriquées
de bois, mais nécessaires pour l'assemblage de votre meuble.

B344506
14
4 /9
?? www.ameriwood.com ??
PARTS - PIEZAS - PIECES
x
12
3
#A53600
angle bracket
équerre
anaquel del ángulo
x
7 4
#A30030
catch kit
coja el equipo
attrapez l'équipement
x
13 4
#A52650
handle
tidador
poignée
x
9 4
A62000
pivot hinge kit
equipo de bisagra
ensemble de penture
9a
9a
9b
9b
9c
9c
x
10 3
#A11310
7/8" flat head
cabeza plano 7/8"
tête plate 7/8"
x8 12
#A80250
shelf support
soporte de tablero
support de la tablette
x
14 1
#A84000
safety strap
esticje de comtirón
ensemble de sécurité
14a
14b
14c
14d
14e
7a
7b
2
3
½ turn to fully
lock.
½ se vuelven a
totalmente
cerradura.
½ tour pour
verrouiller
complètement.
4
Tighten to fully seat. Do not over
tighten.
Apriétese a totalmente asiento. No
haga encima de apriétese.
Serrez pour mettre le siège bien en
place. Ne pas trop serrer.
Proper orientation of cam.
La orientación apropiada de leva.
Bonne orientation de la came.
1
This illustration shows how the CAM fastening system works.
Esta ilustración muestra el sistema de fijación de leva y como funciona.
Cette illustration montre le système de fixation CAME et son fonctionnement.
Lock
Apretar
Serrer
La página se está cargando...
La página se está cargando...

3 4
B344506
14
7 /9
?? www.ameriwood.com ??
Finished Edge
Borde Acabado
Bord Fini
A
B
C
D
E
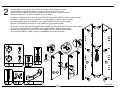
* Press the PANELS (A & B) against the BOTTOM SHELF (E),
FIXED SHELF (D), and TOP SHELF (C) so the CAM BOLTS (3)
inserts into the proper holes.
* Turn the CAM LOCKS (1) clockwise to lock in place.
* Apretar los PANELES (A y B) contra el ESTANTE DE FONDO (E),
ESTANTE FIJO (D) y ESTANTE SUPERIOR (C) para que los
PERNOS DE LA LEVA (3) las inserciones en los agujeros
apropiados.
* Da vuelta los CERRADURAS DE LA LEVA (1) en el sentido de las
agujas del reloj para cerrar con llave en el poner.
* Pressez les PANNEAUX (A & B) contre la TABLETTE
INFÉRIEURE (E), TABLETTE FIXE (D), et TABLETTE
SUPÉRIEURE (C) afin que les BOULONS DE CAME (3) s'insèrent
dans les trous appropriés.
* Tournez les SERRURES DE CAME (1) dans le sens des aiguilles
pour serrer en position.
2
x 40
2
product collapse, and/or serious injury.
Por favor asegúrese que las Parte de atrás se atan
firmemente. Todos los clavos deben manejarse en las
partes recto y deben apretarse firmemente. El fracaso para
hacer para que podría causar inestabilidad, derrumbamiento
del producto, y/o la lesión seria.
S’il-vous-plaît assurez-vous que les PANNEAUX
ARRIÈRES sont attachés solidement. Tous les clous
doivent être enfoncés perpendiculairement et solidement
dans les parties. Sinon le meuble peut devenir instable,
s’effondrer subitement et/ou causer des blessures graves.
tightened firmly. Failure to do so could cause instability,
All nails must be driven into the parts straight and
Please make sure that the Backs are attached securely.
ADVERTENCIA
AVERTISSEMENT
WARNING
* Flush the edge of the BACK PANEL with the bottom edge of the
BOTTOM SHELF. Align squarely and nail straight through into back
edges.
* Alinie el borde del PANEL TRASERO con el BORDE INFERIOR del
ESTANTE INFERIOR. Allinee en ángulo recto y clave derecho dentro
o en los bordes traseros.
*alignez le bord panneau arrière avec le bord inférieur de la tablette
inférieure. Alignez à égalite et envoncez les clous perpendiculairement
dans les bords arrière.
E
K
raw surface
superficie cruda
surface crue
UNLOCK
LOCK
APRETAR
DESAPRETAR
OUVRIR
SERRER

5
B344506
14
8 /9
?? www.ameriwood.com ??
Safety strap attachment.
Las seguridades atan la atadura.
L'attachement de la lanière de la sécurité.
Option 1:
Fasten the safety strap (14a) to a stud in the wall with screw (14d) through
a washer (14e).
Option 2:
Drill a
3
16
" diameter hole (5mm) in the wallboard. Tap the wall anchor
(14b) into the hole until it is flush. Fasten the safety strap (14a) to the wall
anchor (14b) with the screw (14d) through the washer (14e).
Opción 1:
Fije la CORREA (14a) a un montante en el muro con el TORNILLO (14d)
a través de la ARANDELA (14e).
Opción 2:
Taladre un agujero de un diámetro de
3
16
" (5mm) en el muro. Golpear la
ANCLA DE MURO (14b) dentro del agujero hasta que este a ras. Fijar la
CORREA (14a) a la ANCLA DE MURO (14b) con el TORNILLO (14d) a
través de la ARANDELA (14e).
Option 1:
Fixez la CEINTURE (14a) dans une planche du mur avec la VIS (14d) à
travers la RONDELLE (14e).
Option 2:
Forez un trou de
3
16
" (5mm) dans le mur. Enfoncez L'AGRAFFE
MURALE (14b) dans le trou jusqu'à ce qu'il soit ègale. Fixez la
CEINTURE (14a) a L'AGRAFFE MURALE (14b) avec la VIS (14d) à
travers la RONDELLE (14e).
figure 1/figure 1/chiffre 1
figure 2/figure 2/chiffre 2
figure 4/figure 4/chiffre 4
figure 3/figure 3/chiffre 3
stud
montante
planche
wallboard
muro
mur
hole
agujero
trou
* Carefully place the unit upright.
* Install a BUSHING (9b) and a PIVOT
HINGE (9a) as shown in figure 3.
* Place a BUSHING (9b) over the TOP
HINGE (9a) as shown in figure 1.
While holding the door, insert the TOP
HINGE and BUSHING into the hole as
shown in figure 2.
* Using SCREW (9c) fasten the bottom
edge of the door as shown in figure 4.
* Insert the SHELF SUPPORTS (8) at the
desired height as shown.
* Place the ADJUSTABLE SHELVES (F)
onto the SHELF SUPPORTS (8) as shown.
* Cuidadosamente ponga la unidad vertical.
* Instale un BUJE (9b) y una BISAGRA (9a) como
mostrado en fugura 3.
* Poner un BUJE (9b) encima de la BISAGRA
SUPERIOR (9a) como mostrado en figura 1.
Mientras sosteniendo la puerta, inserte la
BISAGRA SUPERIOR y FUJE en el agujero como
mostrado en figure 2.
* Usando el TORNILLO (9c) fije la parte inferior de la
puerta como mostrado en figura 4.
* Inserte los SOPORTES DE TABLERO (8) a la
altura deseada como mostrado.
* Ponga los TABLEROS AJUSTABLES (F) en los
SOPORTES DE TABLERO (8) como mostrado.
* Avec soin place l'unité debout.
* Installez une EMBOITURE (9b) et une PENTURE
(9a) comme montré dans le chiffre 3.
* Place une EMBOITURE (9b) sur la PENTURE
SUPÉRIEURE (9a) comme montré dans le chiffre 1.
En tenant la porte, insérez la PENTURE
SUPÉRIEURE et EMBOITURE dans le trou comme
montré dans le chiffre 2.
* En utilisant la VIS (9c) fixez le bord inférieur de la
porte comme montré dans le chiffre 4.
* Inseréz les SUPPORTS DE TABLETTE (8) à la
hauteur désirée comme montré.
* Placez les TABLETTES AJUSTABLES (F) sur les
SUPPORTS DE TABLETTE (8) comme montré.
8 12x
9b
4x
x
9
2
9a
9b
9c
14e
14d
14b
14c
14a
9 2 x
14b
14e
14e
14a
14a
14a
14c
14e
14d
14d
8
8
8
F
F
F
M
L
N
O
A
E
D
C
9b
9b
9a
9a
9a
9c
D
D
O
Repeat the same procedure
for the other doors.
Repita el mismo
procedimiento para las otras
puertas.
Répétez la ême procédure
pour les autres portes.
Option 1/ Opción 1
Option 2
Opción 2
La página se está cargando...
Transcripción de documentos
4506 A Dorel Company MERIWOOD TM INDUSTRIES DO NOT RETURN PRODUCT TO THE STORE ALTO Individual stores do not stock parts. STOP NO REGRESAS ESTA PRODUCTO A LA TIENDA ARRÊT NE RETOURNEZ PAS LE PRODUIT AU MAGASIN Las tiendas no tiene partes. Les magasins individuels ne gardent pas de pièces. If a part is missing or damaged, please visit our website or call our toll-free customer service line. We will gladly ship your replacement parts FREE of charge. Si las partes están perdidas o dañadas Por favor visite nuestra página de Internet o llame a nuestra línea de teléfono gratis de Servicio al Cliente. Nosotros le enviaremos sus repuestos sin cargo adicional, serán totalmente gratis. Si une pièce est manquante ou endommagée, veuillez visiter notre site web ou appelez sans frais notre Service à la clientèle. Nous expédierons avec plaisir vos pièces de rechange GRATUITEMENT. Nesacitas partes o Asistancia? Need Parts or Assistance? Besoin de Pièces ou d'assistance? WWW.AMERIWOOD.COM/PARTS or call toll free: o llame a nuestra línea gratis: ou appelez sans frais: 1-800-489-3351 For prompt, reliable service; please have your assembly manual ready. Para servicio mas rapido y reliable por favor tenga esta manual listo. Pour un service rapide et fiable, s'il vous plaît ayez votre livret d'assembage en main. -KEEP FOR REFERENCE- WARNING -GUARDAR PARA REFERENCIA- ADVERTENCIA Unit can tip over causing severe injury or death. Este mueble puede caerse por encima causando daño serio o la muerte Anchor unit to stud or wall. DO NOT allow children to climb on unit. Put heavy items on lower shelves or drawers. Read and follow all assembly instructions. Anolar el mueble a un espárrago muro. NO dejar que los niños suben por encima del mueble. Poner los articulos mas pesados en los tableros o cajones inferiores. Leer y sequir todos de los instucciones para el montaje. -GARDEZ POUR RÉFÉRENCE- AVERTISSEMENT L'unité peut basculer et causer des blessures graves ou la mort. Fixez l'unité au mur ou à un montant. Ne laissez PAS les enfants grimper sur le meuble Déposez les pièces lourdes sur les tablettes ou tiroirs du bas. Lire et suivre toutes les instructions d'assemblage. B34450614 Please Recycle Recicle Por Favor Réutilisez SVP PARTS - PIEZAS - PIECES C D top parte superior panneau supérieur 3450615034 fixed shelf estante fijo étagère fixe 3450615044 B A bottom shelf estante de fondo tablette inférieure 3450615052 F F 3 adjustable shelves 3 estantes ajustables 3 tablette ajustables 3450615061 J I molding molde moulure 3450672092 left panel panel izquierdo panneau gauche 3450615013 F E kick molding moldura de soporte moulure de support 3450672101 L M upper left door puerta superior izquierda porte supérieure gauche 3450615120 right panel panel derecho panneau droit 3450615023 upper right door puerta superior derecha porte supérieure droit 3450615130 K N O lower left door puerta inferior izquierda porte inférieure gauche 3450615140 lower right door puerta inferior derecha porte inférieure droit 3450615150 back panel panel trasero panneau arriere K450601 This piece is paperboard construction. It is not made from wood, but is required for the assembly of your unit. Esto pedazo son la construcción del cartón. Ello no son hecho de madera, pero se requlere para la asamblea de su unidad. Ces pièce sont de construction en carton. Elle ne sont pas fabriquées de bois, mais nécessaires pour l'assemblage de votre meuble. 1 x 12 #A22500 cam lock cerradura de leva serrure de came 2 x 50 #A21110 nail clavo clou 3 /9 ?? www.ameriwood.com ?? 3 x 12 #A22510 cam bolt perno de leva boulon de came 5 4 x8 #A12810 1" pan head cabeza redondo 1" tête ronde 1" x 22 #A12210 1/2" pan head cabeza redondo 1/2" tête ronde B34450614 PARTS - PIEZAS - PIECES 9a 7b 9b 9c This illustration shows how the CAM fastening system works. Esta ilustración muestra el sistema de fijación de leva y como funciona. Cette illustration montre le système de fixation CAME et son fonctionnement. 7a 9a 8 x 4 7 2 Tighten to fully seat. Do not over tighten. Apriétese a totalmente asiento. No haga encima de apriétese. Serrez pour mettre le siège bien en place. Ne pas trop serrer. Proper orientation of cam. La orientación apropiada de leva. Bonne orientation de la came. 3 4 x 12 #A80250 shelf support soporte de tablero support de la tablette #A30030 catch kit coja el equipo attrapez l'équipement 1 9c 9b x 4 9 A62000 pivot hinge kit equipo de bisagra ensemble de penture 12 x 3 #A53600 angle bracket anaquel del ángulo équerre 10 x 3 #A11310 7/8" flat head cabeza plano 7/8" tête plate 7/8" 14a Lock Apretar Serrer 14b 14c 14 14d 14e x 1 #A84000 safety strap esticje de comtirón ensemble de sécurité ½ turn to fully lock. ½ se vuelven a totalmente cerradura. ½ tour pour verrouiller complètement. x 4 13 #A52650 handle tidador poignée 4 /9 ?? www.ameriwood.com ?? B34450614 3 4 * Press the PANELS (A & B) against the BOTTOM SHELF (E), FIXED SHELF (D), and TOP SHELF (C) so the CAM BOLTS (3) inserts into the proper holes. * Turn the CAM LOCKS (1) clockwise to lock in place. * Apretar los PANELES (A y B) contra el ESTANTE DE FONDO (E), ESTANTE FIJO (D) y ESTANTE SUPERIOR (C) para que los PERNOS DE LA LEVA (3) las inserciones en los agujeros apropiados. * Da vuelta los CERRADURAS DE LA LEVA (1) en el sentido de las agujas del reloj para cerrar con llave en el poner. * Flush the edge of the BACK PANEL with the bottom edge of the BOTTOM SHELF. Align squarely and nail straight through into back edges. * Alinie el borde del PANEL TRASERO con el BORDE INFERIOR del ESTANTE INFERIOR. Allinee en ángulo recto y clave derecho dentro o en los bordes traseros. *alignez le bord panneau arrière avec le bord inférieur de la tablette inférieure. Alignez à égalite et envoncez les clous perpendiculairement dans les bords arrière. * Pressez les PANNEAUX (A & B) contre la TABLETTE INFÉRIEURE (E), TABLETTE FIXE (D), et TABLETTE SUPÉRIEURE (C) afin que les BOULONS DE CAME (3) s'insèrent dans les trous appropriés. * Tournez les SERRURES DE CAME (1) dans le sens des aiguilles pour serrer en position. WARNING Please make sure that the Backs are attached securely. All nails must be driven into the parts straight and tightened firmly. Failure to do so could cause instability, product collapse, and/or serious injury. AVERTISSEMENT S’il-vous-plaît assurez-vous que les PANNEAUX ARRIÈRES sont attachés solidement. Tous les clous doivent être enfoncés perpendiculairement et solidement dans les parties. Sinon le meuble peut devenir instable, s’effondrer subitement et/ou causer des blessures graves. 2 x 40 ADVERTENCIA UNLOCK DESAPRETAR OUVRIR Por favor asegúrese que las Parte de atrás se atan firmemente. Todos los clavos deben manejarse en las partes recto y deben apretarse firmemente. El fracaso para hacer para que podría causar inestabilidad, derrumbamiento del producto, y/o la lesión seria. LOCK APRETAR SERRER C B D 2 K raw surface superficie cruda surface crue A E E Finished Edge Borde Acabado Bord Fini 7 /9 ?? www.ameriwood.com ?? B34450614 5 Option 1/ Opción 1 Repeat the same procedure for the other doors. Repita el mismo 14e procedimiento para las otras puertas. Répétez la ême procédure pour les autres portes. 14d 14a stud montante planche 14c 14e C 9b 9a 14a * Carefully place the unit upright. 14b * Install a BUSHING (9b) and a PIVOT HINGE (9a) as shown in figure 3. 14e hole * Place a BUSHING (9b) over the TOP agujero HINGE (9a) as shown in figure 1. trou While holding the door, insert the TOP 14d 14a HINGE and BUSHING into the hole as shown in figure 2. wallboard Option 2 * Using SCREW (9c) fasten the bottom muro Opción 2 edge of the door as shown in figure 4. mur * Insert the SHELF SUPPORTS (8) at the desired height as shown. * Place the ADJUSTABLE SHELVES (F) onto the SHELF SUPPORTS (8) as shown. * Cuidadosamente ponga la unidad vertical. * Instale un BUJE (9b) y una BISAGRA (9a) como mostrado en fugura 3. * Poner un BUJE (9b) encima de la BISAGRA SUPERIOR (9a) como mostrado en figura 1. Mientras sosteniendo la puerta, inserte la BISAGRA SUPERIOR y FUJE en el agujero como mostrado en figure 2. * Usando el TORNILLO (9c) fije la parte inferior de la puerta como mostrado en figura 4. * Inserte los SOPORTES DE TABLERO (8) a la altura deseada como mostrado. * Ponga los TABLEROS AJUSTABLES (F) en los SOPORTES DE TABLERO (8) como mostrado. * Avec soin place l'unité debout. * Installez une EMBOITURE (9b) et une PENTURE (9a) comme montré dans le chiffre 3. * Place une EMBOITURE (9b) sur la PENTURE SUPÉRIEURE (9a) comme montré dans le chiffre 1. En tenant la porte, insérez la PENTURE SUPÉRIEURE et EMBOITURE dans le trou comme montré dans le chiffre 2. * En utilisant la VIS (9c) fixez le bord inférieur de la porte comme montré dans le chiffre 4. * Inseréz les SUPPORTS DE TABLETTE (8) à la hauteur désirée comme montré. * Placez les TABLETTES AJUSTABLES (F) sur les SUPPORTS DE TABLETTE (8) comme montré. F figure 1/figure 1/chiffre 1 8 9a L M 9c 9b A 14b D F figure 3/figure 3/chiffre 3 Safety strap attachment. Las seguridades atan la atadura. L'attachement de la lanière de la sécurité. O F N O 9a figure 4/figure 4/chiffre 4 Option 1: Fasten the safety strap (14a) to a stud in the wall with screw (14d) through a washer (14e). 8 14c D D 14a figure 2/figure 2/chiffre 2 8 Option 2: 3 Drill a 16 " diameter hole (5mm) in the wallboard. Tap the wall anchor (14b) into the hole until it is flush. Fasten the safety strap (14a) to the wall anchor (14b) with the screw (14d) through the washer (14e). Opción 1: Fije la CORREA (14a) a un montante en el muro con el TORNILLO (14d) a través de la ARANDELA (14e). 14d 14e Opción 2: 3 Taladre un agujero de un diámetro de 16 " (5mm) en el muro. Golpear la ANCLA DE MURO (14b) dentro del agujero hasta que este a ras. Fijar la CORREA (14a) a la ANCLA DE MURO (14b) con el TORNILLO (14d) a través de la ARANDELA (14e). E 9 x2 Option 1: Fixez la CEINTURE (14a) dans une planche du mur avec la VIS (14d) à travers la RONDELLE (14e). 9a Option 2: 9b 9b x4 8 x 12 9 8 /9 9c x 2 ?? www.ameriwood.com ?? 3 Forez un trou de 16 " (5mm) dans le mur. Enfoncez L'AGRAFFE MURALE (14b) dans le trou jusqu'à ce qu'il soit ègale. Fixez la CEINTURE (14a) a L'AGRAFFE MURALE (14b) avec la VIS (14d) à travers la RONDELLE (14e). B34450614-
 1
1
-
 2
2
-
 3
3
-
 4
4
-
 5
5
-
 6
6
-
 7
7
-
 8
8
-
 9
9


Dorel Home Furnishings 4506 El manual del propietario
- Tipo
- El manual del propietario
en otros idiomas
Artículos relacionados

Otros documentos
-
SystemBuild 7361401PCOM Guía de instalación
-
Cosco 5887218PCOM Manual de usuario
-
-
-
-
Ameriwood Home 5403026PCOM Assembly Manual
-
-
-
-