Kenmore 790.32353 Manual de usuario
- Categoría
- Cocinas
- Tipo
- Manual de usuario

Kenmore Elite®
Gas Cooktop
Plancha de cocinar a gas
* = Color number, número de color
Use & Care Guide
Manual de Uso y Cuidado
English / Español
TM
Models/Modelos: 790.3230*, 3231*, 3232*, 3233*, 3235*
P/N 318203668B (1307)
Sears Brands Management Corporation
Homan Estates, IL 60179 U.S.A.
www.kenmore.com
www.sears.com

2
Printed in China
Kenmore Elite Warranty
When installed, operated and maintained according to all instructions supplied with the product, if this appliance fails due to a defect in material
and workmanship within one year from the date of purchase, call 1-800-4-MY-HOME® to arrange for free repair.
This warranty applies for only 90 days from the date of purchase if this appliance is ever used for other than private family purposes.
This warranty covers only defects in material and workmanship. Sears will NOT pay for:
1. Cracks in a ceramic glass cooktop that are not a result of thermal shock.
2. Stains and scratches on a ceramic glass cooktop resulting from accident or improper operation or maintenance.
3. Expendable items that can wear out from normal use, including but not limited to lters, belts, light bulbs, and bags.
4. A service technician to instruct the user in correct product installation, operation or maintenance.
5. A service technician to clean or maintain this product.
6. Damage to or failure of this product if it is not installed, operated or maintained according to the all instructions supplied with the
product.
7. Damage to or failure of this product resulting from accident, abuse, misuse or use for other than its intended purpose.
8. Damage to or failure of this product caused by the use of detergents, cleaners, chemicals or utensils other than those
recommended in all instructions supplied with the product.
9. Damage to or failure of parts or systems resulting from unauthorized modications made to this product.
Disclaimer of implied warranties; limitation of remedies
Customer’s sole and exclusive remedy under this limited warranty shall be product repair as provided herein. Implied warranties,
including warranties of merchantability or tness for a particular purpose, are limited to one year or the shortest period allowed
by law. Sears shall not be liable for incidental or consequential damages. Some states and provinces do not allow the exclusion or
limitation of incidental or consequential damages, or limitation on the duration of implied warranties of merchantability or tness, so
these exclusions or limitations may not apply to you.
This warranty applies only while this appliance is used in the United States or Canada.
This warranty gives you specic legal rights, and you may also have other rights which vary from state to state.
Table of Contents
Cooktop Warranty ...................................................................... 2
IMPORTANT SAFETY INSTRUCTIONS ............................... 3-4
Product Record ............................................................................. 5
Serial Plate Location ................................................................... 5
Grounding Instructions ................................................................ 5
Liqueed Petroleum (Propane) Gas Conversion .................... 5
Before Setting Surface Controls ............................................ 6-7
Surface Cooking .......................................................................... 8
Setting Surface Controls .........................................................9-11
General Care & Cleaning ....................................................12-13
Cleaning Various Parts of Your Cooktop ..........................12
Porcelain Enamel Cooktop Cleaning Instructions ...........12
Cleaning the Grates .............................................................13
Cleaning the Burner Caps ....................................................13
Cleaning the Burner Heads ................................................. 13
Before You Call ............................................................................14
Protection Agreements ..............................................................15
Sears Service ...............................................................................16
2

3
the cooktop. Destroy the carton and plastic bags after
Never allow children to play with
packaging material. Do not remove the model/serial
plate attached to the cooktop.
•
Install and/or adjust only per
installation instructions provided in the literature package
for this cooktop.
Sears Parts & Repair is the recommended repair service for
this appliance. Know how to disconnect the electrical power
to the appliance at the circuit breaker or fuse box in case
of an emergency.
All other servicing should be done only by a
qualied technician to reduce the risk of personal injury
and damage to the cooktop.
removing panels, wire covers, or any other part of the
hood and range have been designed, tested and listen by
each other.
Do not allow children to climb or play around the cooktop.
This includes paper, plastic and cloth items, such as
cookbooks, plasticware and towels, as well as ammable
liquids. Do not store explosives, such as aerosol cans,
on the cooktop. Flammable materials may explode and
result in re or property damage.
Do not store items of interest to children in
the cabinets above the cooktop.
They should never be allowed to sit or stand on any
part of the appliance.
Surface burners may be
hot even though the ames are not visible. Areas near
surface burners may become hot enough to cause burns.
During and after use, do not touch or let clothing or other
ammable materials touch these areas until they have
had sucient time to cool. Among these areas are the
cooktop and the surfaces facing the cooktop.
Do not let
clothing or other ammable materials contact hot surfaces.
monoxide poisoning.
• When heating fat or grease, watch it closely. Fat or
grease may catch re if allowed to become too hot.
•
Do not let
the potholders touch the ame or burners. Do not use a
towel or other bulky cloth instead of a pot holder.
•
• . Always
turn the knob to the LITE position when igniting the burners.
Visually check that the burner has lit. Then adjust the ame
so it does not extend beyond the edge of the utensil.
Use Proper Flame Size—
The
use of undersized utensils will expose a portion of the
This manual contains important safety symbols and instructions. Please pay attention to these symbols and follow all
instructions given.
This symbol will help alert you to situations that may cause serious bodily harm, death or property damage.
This symbol will help alert you to situations that may cause bodily injury or property damage.
appliance.
department.
3

4
This Use & Care Manual contains general operating instructions for your appliance and feature information for several
models. Your product may not have all the described features. The graphics shown are representative. The graphics on
your appliance may not look exactly like those shown. Common sense and caution must be practiced when installing,
operating and maintaining any appliance.
burner ame to direct contact and may result in ignition
of clothing. Proper relationship of utensil to ame will also
improve eciency.
If you use a stove top grill on a sealed gas
burner, it will cause incomplete combustion and can result
in exposure to carbon monoxide levels above allowable
current standards. This can be hazardous to your health.
Use proper pan size—This appliance is
equipped with one or more surface burners of dierent
sizes. Select utensils having at bottom large enough to
cover the surface burner. The use of undersized utensils will
expose a portion of the surface burner to direct contact
and may result in ignition of clothing. Proper relationship of
utensil to the surface burner will also improve eciency.
Exhaust fan ventilation
hoods and grease lters should be kept clean. Do not
allow grease to accumulate on hood or lter. Greasy
deposits in the fan could catch re. When aming food
under the hood, turn fan on. Refer to hood manufacturer's
instructions for cleaning.
—To reduce the risk of burns, ignition of
ammable materials, and spillage due to unintentional
contact with the utensil, the handle of the utensil should
be positioned so that it is turned inward, and does not
extend over adjacent surface burners.
Settings—Boilovers cause smoking and greasy spillovers
that may ignite, or a pan that has boiled dry may melt.
—Do not use aluminum foil to line surface
burner pans. Protective liners or aluminum foil may
interfere with heat and air distribution, and combustion.
Damage to the cooktop or personal injury may result.
—Only certain types of glass,
glass/ceramic, ceramic, earthenware, or other glazed
utensils are suitable for cooktop service without breaking
due to the sudden change in temperature. Check the
manufacturer's recommendations for cooktop use.
If a
burner is accidentally turned on, the decorative cover will
become hot and possibly melt. You will not be able to see
that the burner is on. Burns will occur if the hot covers are
touched. Damage may also be done to the cooktop or
burners because the covers may cause overheating. Air
will be blocked from the burner and cause combustion
problems.
The California Safe Drinking Water and Toxic Enforcement
Act requires the Governor of California to publish a list of
substances known to the state to cause cancer, birth defects
or other reproductive harm, and requires businesses to warn
customers of potential exposure to such substances.

5
In this space below, record the date of purchase, model and serial
number of your product. You will nd the model and serial number
printed on the serial plate. This serial plate is located under the
cooktop. See bottom of this page for the serial plate location.
Model No. ___________________________________________
Serial No. ____________________________________________
Date of purchase _____________________________________
Save these instructions and your sales receipt for future reference.
Please see the illustration for exact location. Remember to record
the serial number for future reference.
Serial plate is
For personal safety, the cooktop must be properly grounded. For maximum
safety, the power cord must be plugged into an electrical outlet that is
correctly polarized and properly grounded.
DO NOT Operate the cooktop using a 2-prong adapter or an extension
cord. If a 2-prong wall receptacle is the only available outlet, it is the
personal responsibility of the consumer to have it replaced with a properly
grounded 3-prong wall receptacle installed by a qualied electrician.
See the packaged with this cooktop for
complete installation and grounding instructions.
Avoid re hazard or electrical shock. DO
NOT use an adapter plug, an extension cord, or remove
grounding prong from electrical power cord. Failure to follow
this warning can cause serious injury, re or death.
This appliance is equipped with a 3-prong
grounding plug for your protection against shock hazard
and should be plugged directly into a properly grounded
receptacle. DO NOT cut or remove the grounding prong from
this plug.
Do not, under any
circumstances,
cut, remove,
or bypass the
grounding prong.
Power supply
cord with 3-prong
grounding plug
Grounding
type wall
receptacle
This natural gas appliance is designed to allow for
conversion to Liqueed Petroleum (L.P.) Gas.
Only a qualied service agent should perform the L. P.
conversion. Contact the local gas provider for conversion.
The L. P. Conversion Kit is supplied with this unit and is
located in the literature package. The kit contains installation
instructions which must be read before and followed
carefully when installing the kit.
To avoid serious injury, any additions,
changes or conversions required in order for this appliance to
satisfactorily meet the application needs must be made by a
qualied service agent.
5

SIMMER
DUAL RING POWER BURNER
OFF
MED
HI
LITE
LO
t
u
r
b
o
s
i
m
m
e
r
OFF
MED
HI
LITE
LO
OFF
MED
HI
LITE
LO
OFF
MED
HI
LITE
LO
OFF
MED
HI
LITE
LO
Your cooktop is equipped with gas surface burners with di erent BTU
ratings. The ability to heat food quicker and in larger volumes increases as
the burner size increases.
The small • burner is best used for simmering delicate sauces,
etc. This burner is located at the right rear burner position on the
cooktop.
The • burners can be used for most surface cooking needs.
The large • burner is best used for bringing large
quantities of liquid rapidly up to temperature or when preparing larger
quantities of food.
The • burner is best suited when using rectangular or long
shaped cookware. The left rear and left middle are combined and
controlled by the same control knob. The left front burner may also be
added for a total of 3 burners.
The • burner is best used when preparing larger quantities of
food and it quickly bring liquids up to a rolling boil.
The • burner gives precise control from 18,000 BTUs all
the way down to 600 BTUs. The small inner ring is used for optimal
simmering, while both rings are used for even heat distribution and
maximum power.
Regardless of size, always select cookware that is suitable for the
amount and type of food being prepared. Select a burner and ame size
appropriate to the pan. Never allow ames to extend beyond the outer
edge of the pan.
S
I
M
M
E
R
R
E
G
U
L
A
R
T
U
R
B
O
B
O
I
L
D
U
A
L
R
I
N
G
OFF
OFF
OFF
HI
turbo boil
LO
simmer
MED
LITE
MED
LO
HI
LITE
OFF
MED
LO
HI
LITE
LO
HI
LO
HI
LITE
bridge
bridge
SIMMER
BURNER
DUAL RING
BURNER
BRIDGE
BURNER
S
I
M
M
E
R
D
U
A
L
R
I
N
G
B
R
I
D
G
E
B
R
I
D
G
E
R
E
G
U
L
A
R
MED
OFF
LO
HI
LITE
MED
LO
HI
LITE
OFF
MED
LO
HI
LITE
SIMMER BURNER
OFF
DUAL RING BURNER
HI
turbo boil
LO
simmer
MED
LITE
OFF
OFF
MED
LO
HI
LITE
TURBO BOIL
S
I
M
M
E
R
T
U
R
B
O
B
O
I
L
R
E
G
U
L
A
R
REGULAR
D
U
A
L
R
I
N
G
OFF
OFF
OFF
OFF
OFF
LO
HI
LO
HI
LITE
bridge
bridge
MED
LO
HI
LITE
MED
LO
HI
LITE
MED
LO
HI
LITE
SIMMER BURNERBRIDGE BURNER
DUAL RING BURNER
HI
turbo boil
LO
simmer
MED
LITE
S
I
M
M
E
R
S
I
M
M
E
R
R
E
G
U
L
A
R
REGULAR
D
U
A
L
R
I
N
G
R
E
G
U
L
A
R
R
E
G
U
L
A
R
P
O
W
E
R
DUAL RING
B
R
I
D
G
E
6

Make sure that the Burner Caps and Burner Grates are installed
properly and at the correct locations.
1. Remove all packing tape from cooktop and the dual burner.
2. Discard all packing material located under all Burners (if
applicable).
3. To install Burner Caps, refer to gure 2 and make sure both caps are
aligned properly with the burner head.
4. Put back the grates on the cooktop.
REMEMBER —
Always keep the Burner Caps and Burner Heads in place
whenever the surface burners are in use.
Make sure that the Burner Caps and Burner Grates are installed properly and at
the correct locations.
1. Remove all packing tape from cooktop and the bridge burner.
2. Discard all packing material located under all Burners (if applicable).
3. Install Burner Caps, these include one Bridge Burner Center Cap (rectangular
shaped) and the two Bridge Burner End Caps (The Bridge Burner End Caps will
t either the front or rear Bridge Burner Head locations). Make sure that the tabs
located under the Bridge Burner Caps fall into the slots located in the Bridge
Burner Head (See arrows in Figure 3) and that all the Bridge Burner Caps lie at
and evenly on the Bridge Burner Head.
4. Put back the grates on the cooktop.
NOTE: The Bridge Burner Head is removable but should left in place. If you need to
put it back in place, take caution not to damage the igniters. Also make sure the
Bridge Burner Head is at on the cooktop.
REMEMBER —
Always
keep the Burner Caps and Burner Heads in place whenever the surface burners
are in use.
It is very important to make sure that all of the Surface Burner Caps and
Surface Burner Grates are installed correctly and at the correct locations.
1. Remove all packing material from cooktop area.
2. Discard all packing material (if applicable).
3. Position the burner caps in the correct position.
4. Unpack Burner Grates and position on the cooktop.
Always keep
the Burner Caps in place whenever the surface burners are in use.
Burner Cap
Burner Caps
Fixed Burner Head
Fixed Burner Head
Gas Opening
Bridge Burner Head
Bridge
Burner
End
Cap
Bridge
Burner
End
Cap
Bridge
Burner
Center
Cap
Igniter
Hole
Igniter
Hole
7

8
Use Proper Cookware
Cookware should have at bottoms that
Specialty pans such as lobster pots, griddles and pressure cookers
may be used but must conform to the above recommended cookware
requirements.
and straight sides.
• Tight tting lids.
• Weight of handle does not tilt
pan. Pan is well balanced.
• Pan sizes match the amount of
food to be prepared.
• Made of material that conducts
heat well.
• Easy to clean.
• Curved and warped pan bottoms.
• Pan overhangs unit by more than
2.5 cm (1").
• Heavy handle tilts pan.
• Flame extends beyond unit.
with a metal ring that extends beyond
Using a wok
Woks with at bottoms suitable for use
on your cooktop are available in most
cookshop or hardware stores. Round-
bottomed woks (with a support ring that
does not extend beyond the burner unit)
may also be used. The metal ring was
designed to support the wok safely when
it is lled with large amounts of liquids
(soup making) or fat (frying).
Wire trivets: Do not use wire trivets.
Cookware bottoms must be in direct
contact with the grates.
make good contact with
the entire surface heating
element. Check for atness
by rotating a ruler across
the bottom of the cookware
(See Figure 1). Be sure to
follow the recommendations
for using cookware as
shown in Figure 2.
Note: The size and type of cookware used will
inuence the setting needed for best cooking
results.
Note: Always use a utensil for its intended
purpose. Follow manufacturer's instructions.
Some utensils were not made to be used in the
oven or on the cooktop.
8

9
RIGHT
WRONG
Do not place plastic items
holders or plastic wrappings on top of
These items
could melt or ignite. Potholders, towels or
wood spoons could catch re if placed
too close to a ame.
In the event of an electrical power outage,
the surface burners can be lit manually.
To light a surface burner, hold a lit match
to the burner head, then slowly turn the
surface control knob to After burner
lights push in and turn knob to desired
setting. Use caution when lighting surface
burners manually.
Figure 1
size
Type of Cooking
High Flame Start most foods; bring water to a boil; pan broiling.
Medium Flame Maintain a slow boil; thicken sauces, gravies; steaming.
Low Flame Keep foods cooking; poach; stewing.
For most cooking, start on the highest control setting and then turn to a lower
one to complete the process. Use the recommendations below as a guide for
determining proper ame size for various types of cooking. The size and type
of utensil used and the amount of food being cooked will inuence the setting
needed for cooking.
The color
of the ame is the key to proper burner adjustment. A good ame is clear,
blue and hardly visible in a well-lighted room. Each cone of ame should be
steady and sharp. Clean burner if ame is yellow-orange.
Regardless of size, always select cookware that is suitable for the amount and
type of food being prepared. Select a burner and ame size appropriate to
the pan. Never allow ames to extend beyond the outer edge of the pan.
Never extend the ame beyond the outer edge of the utensil. A higher
ame wastes heat and energy and increases your risk of being burned by
the ame (Figure 1).
For deep fat frying, use a thermometer and adjust the surface control knob
accordingly. If the fat is too cool, the food will absorb the fat and be greasy.
If the fat is too hot, the food will brown so quickly that the center will be
undercooked. Do not attempt to deep fat fry too much food at once as the
food will neither brown nor cook properly.
9

10
1. Place cooking utensil on surface burner.
2. Push the surface control knob down and turn out of the OFF
position (See Figure 1).
3. Release the knob and rotate to the LITE position.
Note: All four (or ve) electronic surface ignitors will spark at the same time.
However, only the burner you are turning on will ignite.
4.
5. Once the burner is lit, continue to turn to the desired ame
size. The control knobs do not have to be set at a
particular setting. Use the knob indicator settings
to adjust the ame as needed. DO NOT cook with
the surface control knob in the LITE position (The
electronic ignitor will continue to spark if the knob
is left in the LITE position).
Figure 1 - Regular Burner
Figure 2 - Bridge Burner
OFF
MED
LO
HI
LITE
T
u
r
n
C
o
u
n
t
e
r
c
l
o
c
k
w
i
s
e
OFF
LO
HI
LO
HI
LITE
bridge
bridge
The Bridge Burner should be used with
rectangular shaped cookware. Cookware like
a cast-iron Griddle is designed specically for
best results with the Bridge Burner.
The Bridge Burner feature may be used to combine the cooking power of 2
or if needed 3 gas surface Burners located along the left-hand side of the
cooktop. The left rear and left center Burners are controlled by the left rear
surface Control Knob. In addition the left front Burner may be added to the
Bridge Burner with the left front gas Control Knob.
1. Push the left rear surface control knob in and turn out
of the OFF position (See Figure).
2. Release the knob and rotate to the position (See Figure). Note: All
electronic surface ignitors will spark at the same time. However, only the
selected surface Burner will lite.
3.
4. Continue to rotate the gas control knob counterclockwise past the rst LO.
5. Visually check that both the left rear and left center Burners are lit.
6. When both burners are lit, continue to turn the control knob
to adjust to the desired ame size for both burners
together. Note: The markings between the HI and LO settings on the
left rear control knob before adjusting the ame size for both burners.
7. Add the left front Burner if needed. Once lit, visually adjust the ame size
of the left front Burner to match the ame size of the Bridge Burner.
DO NOT cook with any of the surface control knobs in the LITE position (The
electronic ignitor will continue to spark if the knob is left in the LITE position).
Note: If only the left rear surface Burner is needed, adjust the settings
between the 1st HI and LO.
Note: The left front Burner may be added to the Bridge Burner by setting the
left front gas Control Knob.
10

11
The Dual Ring Burner has two rings of ame that you can control for two dierent
heat levels, one for small and one for large cookware.
1. Place a large cooking utensil centered over the dual surface Burner Grate.
2. Push the surface control knob down and turn out of the OFF
position.
3. Release the knob and rotate to the position (Figures 2 & 3). Note: All
electronic surface ignitors will spark at the same time. However, only the selected
surface Burner will lite.
4.
5. When the burner is lit, continue to turn the control knob
between the HI position and the MED position to adjust to the desired ame size
for both burners together (gure 1). DO NOT cook with any of the surface control
knobs in the LITE position (The electronic ignitor will continue to spark if the knob
is left in the LITE position).
1. Place a small cooking utensil centered over the dual surface Burner Grate.
2. Push the surface control knob in and turn out of the OFF
position (See Figures 2 & 3).
3. Release the knob and rotate to the position. Note: All electronic surface
ignitors will spark at the same time. However, only the Dual Burner will ignite.
4.
5. Continue to turn the gas control knob counterclockwise past the MED position;
zone B will turn o. Adjust the simmer ame size by turning the control knob
between the MED position to the LO position. DO NOT cook with the surface
control knob in the LITE position (The electronic ignitor will continue to spark if
the knob is left in the LITE position).
B
A
T
u
r
n
C
o
u
n
t
e
r
c
l
o
c
k
w
i
s
e
OFF
HI
turbo boil
LO
simmer
MED
LITE
11

Before cleaning any part of the cooktop, be sure all controls are turned OFF and the cooktop is COOL. REMOVE
SPILLOVERS AND HEAVY SOILING AS SOON AS POSSIBLE. REGULAR CLEANINGS NOW WILL REDUCE THE
DIFFICULTY AND EXTENT OF A MAJOR CLEANING LATER.
How to Clean
Painted Control Knobs For general cleaning, use hot soapy water and a cloth. For more dicult soils and built-up
grease, apply a liquid detergent directly onto the soil. Leave on soil for 30 to 60 minutes.
Rinse with a damp cloth and dry. DO NOT use abrasive cleaners on any of these materials;
they can scratch or dull the nish.
Control Panel Wipe the control panel clean after each use. Before cleaning the control panel, turn all
controls to OFF and remove the control knobs. To remove, pull each knob straight o the
shaft. Clean using hot, soapy water and a cloth. Be sure to squeeze excess water from the
cloth before wiping the panel; especially when wiping around the controls. Excess water in
or around the controls may cause damage to the appliance. To replace knobs after cleaning,
line up the at sides of both the knob and the shaft; then push the knob into place.
Stainless Steel Clean with hot, soapy water and a dishcloth. Rinse with clean water and cloth.
cleaners with high concentrations of chlorides or chlorines. Do not use harsh scrubbing
cleaners. Only use kitchen cleaners that are especially made for cleaning stainless steel.
Always be sure to rinse the cleaners o from the surface as bluish stains may occur during
heating that cannot be removed.
Porcelain Enamel
Burner Grates, Cooktop
Surface
Gentle scouring with a soapy scouring pad will remove most spots. Rinse with a 1:1 solution of
clear water and ammonia. If necessary, cover dicult spots with an ammonia-soaked paper
towel for 30 to 40 minutes. Rinse with clean water and a damp cloth, and then scrub with a
soap-lled scouring pad. Rinse and wipe dry with a clean cloth or paper towel. Remove all
cleaners or the porcelain may become damaged during future heating. DO NOT use spray
oven cleaners on the cooktop.
The cooktop is designed to make cleaning easier. Because the gas burner are sealed, cleanups are easy when spillovers
are cleaned up immediately. Correct and consistent cleaning is essential to maintaining your porcelain enamel cooktop.
If food spills and grease spatters are not removed, they may burn onto the surface of the cooktop and cause permanent
discoloration.
Do not use a
cooktop cleaner on a hot
cooktop. The fumes can be
hazardous to your health, and
can chemically damage the
cooking surface.
Before cleaning
the surface cooktop, be sure the
controls are turned to OFF and
the cooktop is cool.
commercial oven cleaners on
the cooktop
Do not remove any parts from the cooktop until they have completely
cooled and are safe to handle.
Daily Cleaning
For normal soil:
1. Allow cooktop surface to cool.
2. Wipe o spills and spatters using a clean paper towel or a clean cloth with warm,
soapy water.
3. If needed, use mild household cleaners or a soap-lled steel wool pad.
4. Be sure to rinse o all cleaning solutions or the porcelain may become damaged
during future heating.
1. Allow cooktop surface to cool.
2. Use a soap lled scouring pad with warm water or cover heavily soiled spots with a
solution of clear water and ammonia. Scour gently. Rinse and wipe dry with a clean
cloth.
12

Cleaning the grates
The burner grates are dishwasher safe and may be cleaned in the dishwasher. Remove any excessive soils before placing in
the dishwasher.
● For proper gas ow and ignition of the burners — DO NOT allow spills, food, cleaning agents or any other material to
enter the gas ori ce opening.
● The cooktop is not removable. Do not attempt to remove or lift the cooktop.
To avoid possible burns use care when cleaning the cooktop. DO NOT attempt to clean the cooktop
whenever the cooktop or burner heads are still hot.
To avoid possible burns DO NOT attempt any of the following cleaning instructions provided before turning
OFF all of the surface burners and allow them to cool.
To avoid possible burns DO NOT attempt to operate the surface burners without the burner caps
Your appliance is shipped with the burner heads and burner caps in the correct locations. Before using your gas appliance
be sure to:
● Follow installation instructions before operating.
● Remove all packing tape from cooktop area.
Should you ever need to remove the burner caps for cleaning, lift the burner cap o the burner head. Clean heavy soils with
an absorbent cloth. Rinse with a clean, damp cloth and immediately thoroughly dry including the bottom and inside of the
cap. Do not use harsh abrasive cleaners. They can scratch the porcelain on the cap. Do not clean burner caps in dishwasher.
When placing the burner caps on the cooktop, be sure the burner caps are seated firmly on top of burner
heads. Improper flame size and uneven heating may result when any surface burners are turned ON and the burner caps
are not seated correctly
Lift the burner cap from the burner head. The surface burner heads are secured to the cooktop and must be cleaned in
place (except for the bridge burner, which is removable. See bridge burner assembly section for proper installation).
For proper gas ow it may be necessary to clean the burner heads and slots. To clean, rst use a clean DAMP cloth to
soak up any spills. Remove any food from between the burner slots using a small nonabrasive brush like a toothbrush and
afterwards wipe using a damp cloth. For stubborn soils located in the slots, use a small-gauge wire or needle to clean.
Should you experience ignition problems it may be that an ignition port hole is partially blocked with soil (see gs 1 & 2).
With the burner head in place, use a small wire gauge needle or the end of a paper clip to clear the ignition port or ports.
Cooktop regular burner head
Slots
Slots
Dual ring burner head
13

, review this list. It may save you time and expense. The list includes common occurrences that are not the
result of defective workmanship or materials in this appliance.
Surface Control knob has not been completely turned to LITE. Push in and turn
the Surface Control knob to LITE until burner ignites and then turn control to
desired ame size.
Be sure gas supply valve is open.
Gas-air mixture needs a straight line to travel. Be sure burner is properly seated
in its support (models with open burners only).
Burner ports or slots are clogged. With the burner o, use a small-gauge wire
or needle to clean ports or slots.
Power cord is disconnected from outlet (electric ignition models). Be sure cord
is plugged securely into outlet.
Electrical power outage (electric ignition models). Burners can be lit manually.
See in this Use & Care Guide.
Burner ports or slots are clogged. With the burner o, clean ports with a small-
gauge wire or needle to clean ports or slots.
Moisture is present after cleaning. Lightly fan the ame and allow burner to
operate until ame is full. To avoid this occurrence dry the burners thoroughly
following instructions under
Dust particles in main line. Allow the burner to operate a few minutes until ame
turns blue.
In coastal areas, a slightly orange ame is unavoidable due to salt air.
low.
Surface burner valves are not adjusted properly. Refer to your LP conversion
instructions for guidance on how to adjust the valves.
14

Master Protection Agreements
Congratulations on making a smart purchase. Your new
Kenmore
®
product is designed and manufactured for years
of dependable operation. But like all products, it may require
preventive maintenance or repair from time to time. That’s when
having a Master Protection Agreement can save you money
and aggravation.
The Master Protection Agreement also helps extend the life of
your new product. Here’s what the Agreement* includes:
; Parts and labor needed to help keep products operating
properly under normal use, not just defects. Our coverage
goes well beyond the product warranty. No deductibles,
no functional failure excluded from coverage – real
protection.
; Expert service by a force of more than 10,000 authorized
Sears service technicians, which means someone you
can trust will be working on your product.
; Unlimited service calls and nationwide service, as
often as you want us, whenever you want us.
; «No-lemon» guarantee – replacement of your covered
product if four or more product failures occur within twelve
months.
; Product replacement if your covered product can’t be
fi xed.
; Annual Preventive Maintenance Check at your request –
no extra charge.
; Fast help by phone – we call it Rapid Resolution –
phone support from a Sears representative on all products.
Think of us as a «talking owner’s manual».
; Power surge protection against electrical damage due to
power fl uctuations.
; $250 Food Loss Protection annually for any food
spoilage that is the result of mechanical failure of any
covered refrigerator or freezer.
; Rental reimbursement if repair of your covered product
takes longer than promised.
; 25% discount off the regular price of any non-covered
repair service and related installed parts.
Once you purchase the Agreement, a simple phone call is all
that it takes for you to schedule service. You can call anytime
day or night, or schedule a service appointment online.
The Master Protection Agreement is a risk free purchase. If
you cancel for any reason during the product warranty period,
we will provide a full refund. Or, a prorated refund anytime after
the product warranty period expires. Purchase your Master
Protection Agreement today!
Some limitations and exclusions apply. For prices and
additional information in the U.S.A. call 1-800-827-6655.
* Coverage in Canada varies on some items. For full details
call Sears Canada at 1-800-361-6665.
Sears Installation Service
For Sears professional installation of home appliances, garage
door openers, water heaters, and other major home items, in
the U.S.A. or Canada call 1-800-4-MY-HOME
®
.
PROTECTION AGREEMENTS
Acuerdos maestros de protección
Enhorabuena por haber hecho una compra inteligente. Su nuevo producto
Kenmore
®
está diseñado y fabricado para brindarle años de funcionamiento
fi able. Pero, como cualquier producto, puede necesitar mantenimiento
preventivo o reparaciones periódicas. Es por eso que tener un Acuerdo
maestro de protección podría ahorrarle dinero y molestias.
El Acuerdo maestro de protección también sirve para prolongar la durabilidad
de su nuevo producto. El acuerdo* incluye lo siguiente:
; Piezas y mano de obra necesarias para contribuir a mantener el
funcionamiento adecuado de los productos utilizados en condiciones
normales de uso, no sólo en caso de defectos de los productos. Nuestra
cobertura va mucho más allá que la garantía del producto. No se
aplican deducibles ni exclusiones por fallas del funcionamiento: es decir,
verdadera protección.
; Servicio técnico por expertos (más de 10000 técnicos autorizados de
Sears), lo cual signifi ca que quien repare o realice el mantenimiento de su
producto será un profesional de confi anza.
; Servicio técnico a escala nacional y número ilimitado de llamadas de
solicitud de servicio técnico: se puede poner en contacto con nosotros
cuantas veces lo desee y cuando lo desee.
; Garantía «sin sorpresas»: se reemplaza el producto cubierto por el
acuerdo si ocurren cuatro o más fallas del producto en un periodo de 12
meses.
; Reemplazo del producto: en caso de que no se pueda reparar el
producto cubierto por el acuerdo.
; Revisión anual preventiva de mantenimiento del producto: puede
solicitarla en cualquier momento, sin costo alguno.
; Rápida asistencia telefónica, la cual denominamos Solución rápida:
es decir, asistencia telefónica a través de cualquiera de nuestros
representantes de Sears, sobre cualquiera de nuestros productos. Piense
en nosotros como en un «manual parlante del usuario».
; Protección contra fallas eléctricas, contra daños debidos a
fl uctuaciones de la corriente eléctrica.
; $250 al año para cubrir cualquier posible deterioro de alimentos que
haya tenido que desechar debido a una falla mecánica de cualquiera de
nuestros refrigeradores o congeladores cubiertos por este acuerdo.
; Devolución de gastos de alquiler de electrodomésticos si la
reparación de su producto asegurado toma más que el tiempo prometido.
; 25% de descuento aplicable tanto a los costos del servicio de reparación,
como de las piezas instaladas relacionadas que no hayan quedado
cubiertos por este acuerdo.
Una vez que haya realizado el pago de este acuerdo, bastará una simple
llamada telefónica para concertar una visita de servicio. Puede llamar a
cualquier hora del día o de la noche, o bien concertar una visita de servicio por
Internet.
La adquisición del Acuerdo maestro de protección es una inversión exenta
de riesgos. Si por cualquier motivo decide cancelar dicho acuerdo durante el
periodo de garantía del producto, le haremos un reintegro total del valor. O
bien un importe proporcional si cancela el acuerdo en cualquier otro momento
posterior al vencimiento del periodo de garantía del producto. ¡Adquiera hoy
mismo su Acuerdo maestro de protección!
Algunas limitaciones y exclusiones podrían aplicarse. Para solicitar
precios e información adicional, llame al 1-800-827-6655 (en los EE.UU.).
* La cobertura en Canadá varía en el caso de algunos artículos. Para
obtener detalles completos al respecto, llame al 1-800-361-6665 de Sears
de Canadá.
Servicio de instalación de Sears
Para solicitar la instalación por profesionales de Sears de electrodomésticos,
abridores de puertas de garaje, calentadores de agua y otros artículos de uso
prioritario en el hogar, llame al 1-800-4-MY-HOME en los EE.UU. o Canadá.
15

® Registered Trademark /
TM
Trademark of KCD IP, LLC in the United States, or Sears Brands, LLC in other countries
® Marca Registrada /
TM
Marca de Fábrica de KCD IP, LLC en Estados Unidos, o Sears Brands, LLC in otros países
MC
Marque de commerce /
MD
Marque déposée de Sears Brands, LLC
Get it fixed, at your home or ours!
Your Home
For troubleshooting, product manuals and expert advice:
www.managemylife.com
For repair – in your home – of all major brand appliances,
lawn and garden equipment, or heating and cooling systems,
no matter who made it, no matter who sold it!
For the replacement parts, accessories and
owner’s manuals that you need to do-it-yourself.
For Sears professional installation of home appliances
and items like garage door openers and water heaters.
1-800-4-MY-HOME
®
(1-800-469-4663)
Call anytime, day or night (U.S.A. and Canada)
www.sears.com www.sears.ca
Our Home
For repair of carry-in items like vacuums, lawn equipment,
and electronics, call anytime for the location of your nearest
Sears Parts & Repair Service Center
1-800-488-1222 (U.S.A.) 1-800-469-4663 (Canada)
www.sears.com www.sears.ca
To purchase a protection agreement on a product serviced by Sears:
1-800-827-6655 (U.S.A.) 1-800-361-6665 (Canada)
Para pedir servicio de reparación
a domicilio, y para ordenar piezas:
1-888-SU-HOGAR
®
(1-888-784-6427)
www.sears.com
Au Canada pour service en français:
1-800-LE-FOYER
MC
(1-800-533-6937)
www.sears.ca

Kenmore Elite®
Plancha de cocinar a gas
Gas Cooktop
* = número de color, Color number
Manual de Uso y Cuidado
Use & Care Guide
Español / English
TM
Modelos/Models: 790.3230*, 3231*, 3232*, 3233*, 3235*
P/N 318203668B (1307)
Sears Brands Management Corporation
www.kenmore.com
www.sears.com

2
Tabla de Materias
Garantía de la plancha de cocinar.........................................18
....... 19-21
.................................................................21
Ubicación de la placa de serie ................................................21
......................................22
Conversión al gas propano/licuado .......................................22
Cocinando con la plancha de cocina ....................................23
.....................................24-26
.............................................27-29
........
27
(algunos modelos)......................................................................28
........28
Modelos con quemadores sellados .........................................29
.........................................................................30
..............................................................31
Servicio Sears ............................................................................. 32
Garantía de electrodomésticos Kenmore Elite
Esta garantía cubre únicamente defectos de material y de fabricación. Sears NO pagará:
proporcionadas con el producto.
5. Un técnico que limpie o realice el mantenimiento de este producto.
instrucciones proporcionadas con el producto.
apropiado.
sean los recomendados en las instrucciones provistas con el producto.
Renuncia de responsabilidades de garantías implícitas; limitación de acciones legales
otro.
Sears Brands Management Corporation, Homan Estates, IL 60179 - Sears Canada Inc., Toronto, Ontario, Canada M5B 2B8

3
• Quite todas las cintas y todo el embalaje antes de usar
la estufa. Después de haber desempacado la cubierta,
destruya todo cartón de embalaje y las bolsas plásticas
después de desempacar la estufa. Nunca permita que los
Instalación correcta—Asegúrese que un técnico calicado
conecte e instale su aparato correctamente y de acuerdo con
la última edición del código nacional de gas ANSI Z223.1,
o en Canadá CAN/CGA B149.1 y CAN/CGA B149.2, así
como la última edición del Código Nacional de Electricidad
ANSI/NFPA No. 70, o en Canadá, el CSA Norma C22.1,
Canadian Electrical CODE Part1, así como de acuerdo con
los requisitos de los códigos locales.
aparato de acuerdo a las instrucciones impartidas en la
.
emergencia.
• Servicio por parte del usuario—No repare ni reemplace
ninguna parte del aparato a menos que los manuales así
lo recomienden.
• Nunca modique ni altere la construcción de una estufa
quitando los paneles, el revestimiento de los alambres ni
cualquier parte del producto.
campana de ventilación superior que sople aire hacia
para el uso combinado de la una con la otra.
Escalar, apoyarse o sentarse sobre las
puertas o gavetas de esta estufa puede provocar lesiones
de consideración. Por otra parte, también puede dañarse la
estufa.
• Almacenamiento dentro del Aparato—No deben
almacenarse materiales inamables sobre la estufa, cerca
de los quemadores.
incendios o daños a la propiedad.
No almacene artículos de interés para los
niños dentro de los armarios situados por encima de la estufa
o en su parte posterior.
• No deje a los niños solos- Los niños no deben ser dejados
solos o sin atención donde el aparato esté funcionando.
No les permita sentarse o pararse sobre ninguna parte del
aparato.
• NO TOQUE LOS QUEMADORES, LAS PARRILLAS, NI LAS
AREAS CERCANAS A ESTAS.
uso, no toque, ni permita que ningún tipo de paño o tela
• Pongase Ropa Adecuada—Nunca lleve puesta ropa suelta
o prendas que cuelguen mientras esté usando la estufa. No
Importantes Instrucciones de Seguridad
Lea todas las instrucciones antes de utilizar el aparato
Guarde estas instrucciones para futura consultación
de seguridad.
la muerte.
ATENCION
al producto solamente.
Si no se sigue exactamente la
información que aparece en este manual, puede
provocarse un incendio o una explosión, con lo que
resultarían daños a la propiedad, lesiones personales o
muerte.
PARA SU SEGURIDAD:
— No almacene o use gasolina ni otros vapores o líquidos
inamables junto a este aparato electrodoméstico ni
de cualquier otro.
— QUE HACER SI HUELE GAS:
• No encienda ningún aparato electrodoméstico.
• No toque ningún interruptor eléctrico; no use ningún
teléfono en su edicio.
• Llame de inmediato a su proveedor de gas desde la
casa de algún vecino. Siga las instrucciones que le dé
el proveedor de gas.
• Si usted no puede ponerse en contacto con su proveedor de
gas, llame al departamento de bomberos.
— Tanto la instalación como el servicio tienen que quedar
a cargo de un instalador profesional, un técnico o el
proveedor de gas.

4
Importantes Instrucciones de Seguridad
NUNCA use este electrodoméstico
como calefactor de área para calentar la habitación. Esto
• No vierta agua ni harina sobre fuego provocado por
grasa—Baja las llamas con la tapa de una olla, o con polvo
de hornear, un producto químico seco o un extinguidor a
base de espuma.
Cuando caliente manteca o grasa, obsérvela de cerca.
demasiado.
Use solamente manoplas o agarraderas secas al asir
utensilios calientes—Cuando se las pone sobre supercies
calientes, las manoplas, o las agarraderas húmedas o
mojadas pueden causar quemaduras resultantes del vapor.
artículos de tela gruesos en lugar de una manopla o una
agarradera.
No caliente envases de comida sin antes abrirlos—La
presión resultante podría causar el estallido del envase y
provocar quemaduras.
Familiarices con las perillas que controlan cada hornilla.
no rebase los bordes de los utensilios.
Ajuste las llamas al tamaño adecuado—
ajústelas de manera que no rebasen los bordes de los
utensilios. Si se usan utensilios de tamaño demasiado pequeño,
contacto directo, con lo cual se podría correr el riesgo de que
al cocinar.
No use parrillas asadoras sobre sus
quemadores sellados. Si usa parrillas asadoras sobre sus
por encima de las normas aceptables. Esto representaría un
peligro para su salud.
Utilice una sartén de tamaño apropiado—
quemador y ocasionar quemaduras de las prendas que lleva
puesta.
• Limpie la plancha de cocina regularmente para mantener
todas las partes sin grasa que puede encenderse y causar
un incendio
de grasa deben estar limpios. No permita que la grasa se
pueden encenderse y causar un incendio. Cuando caliente
• Los Mangos de los Utensilios no Deben Quedar Extendidos
Encima de los Quemadores Que se Encuentran en la Supercie
del Aparato—Para reducir el riesgo de quemaduras, ignición
eventual con el utensilio, hay que colocar su mango de tal
manera que quede volteado hacia adentro y no sobre los
quemadores.
• Nunca deja Desatendidos los Quemadores Cuando Están
Funcionando a Alta Temperatura
humo o desbordamientos de grasa puede provocar la
hasta secarse puede derretirse.
• Revestimientos de Protección
siguiendo las indicaciones que se dan en la Guía de Cocina.
aluminio, puede provocar el riesgo de descargas eléctricas o
incendio.
• Utensilios de Cocina Vidriados—Sólo ciertos tipos de
otros utensilios vidriados se pueden usar sobre las hornillas.
• No Coloque Coberturas Decorativas Sobre las Hornillas. Si
que se ha encendido el quemador. Si se tocan las coberturas
de combustión.
ADVERTENCIA DE SEGURIDAD IMPORTANTE
lista de sustancias conocidas por el estado como causa de
eventual a sustancias.

5
Leer con detenimiento y guardar estas instrucciones
puede no tener
debe usar el sentido común y ser cauteloso cuando se instala, usa y mantiene cualquier dispositivo.
Ubicación de la placa de serie
plancha de cocina.
La placa de serie
está ubicada bajo
la hornilla.
Registro del Producto
modelo y el número de serie impresos en la placa de serie.
No. de Modelo ___________________________________
No. de Serie _____________________________________
Fecha de Compra ________________________________
Conserve estas instrucciones y su recibo de compra para
790.
Para su protección, la plancha de cocinar debe de ser correctamente
NO
o un alargue de corriente alterna. En caso de encontrarse únicamente
INSTRUCCIONES PARA LA INSTALACIÓN provistas con la plancha
de cocinar para completas instrucciones de instalación y de puesta a tierra.
3 patas para su protección contra choque eléctrico, y debe de ser conectado
NO corte o retire
Instrucciones para la puesta a tierra
Evite incendios o choques
eléctricos. NO use un tapón adaptador de
retire la pata de puesta a tierra del cordón
de suministro eléctrico. Si estas advertencias
no son observadas se puede ocurra graves
lesiones, incendio o la muerte.
Cable de encendido
a tierra
pared a tierra
circunstancia cortar,
retirar o hacer una
derivación a la tercera
pata del cable de
encendido.
Petróleo Liquido (Gas Propano) Conversión
Para evitar graves lesiones personales
o la muerte cualquier cambio, o conversión requerido para
uso de Gas Natural.
conversión de gas propano. Un kit de la conversión de
propano se encuentra en el paquete de la documentación. El
hace la conversión.

6
Ajuste de los Controles Superiores
Ajuste de los Controles Superiores
Ubicación de los controles para super cies con quemadores a gas
El quemador LENTO se usa para cocer salsas delicadas, etc.
de cocina.
ESTÁNDAR
necesidades de cocción.
"TURBO BOIL" y de POTENCIA
para calentar grandes cantidades de líquido o para preparar grandes
cantidades de comida.
El quemador de PUENTE
puede encender para usar un total de 3 quemadores.
El quemador de ANILLO DUAL
poder.
Con respecto a la dimensión del quemador, hay que elegir siempre la
Elegir el quemador y la intensidad de la llama según la dimensión
recipiente.
SIMMER
DUAL RING POWER BURNER
OFF
MED
HI
LITE
LO
t
u
r
b
o
s
i
m
m
e
r
OFF
MED
HI
LITE
LO
OFF
MED
HI
LITE
LO
OFF
MED
HI
LITE
LO
OFF
MED
HI
LITE
LO
Figura 1 - Modelo 790.3230*
Figura 2 - Modelo 790.3232*
Figura 3 - Modelo 790.32353 & C970-40610
Figura 5 - Modelo 790.3231*
Figura 4 - Modelo 790.3233*
S
I
M
M
E
R
R
E
G
U
L
A
R
T
U
R
B
O
B
O
I
L
D
U
A
L
R
I
N
G
OFF
OFF
OFF
HI
turbo boil
LO
simmer
MED
LITE
MED
LO
HI
LITE
OFF
MED
LO
HI
LITE
LO
HI
LO
HI
LITE
bridge
bridge
SIMMER
BURNER
DUAL RING
BURNER
BRIDGE
BURNER
S
I
M
M
E
R
D
U
A
L
R
I
N
G
B
R
I
D
G
E
R
E
G
U
L
A
R
MED
OFF
LO
HI
LITE
MED
LO
HI
LITE
OFF
MED
LO
HI
LITE
SIMMER BURNER
OFF
DUAL RING BURNER
HI
turbo boil
LO
simmer
MED
LITE
OFF
OFF
MED
LO
HI
LITE
TURBO BOIL
S
I
M
M
E
R
T
U
R
B
O
B
O
I
L
R
E
G
U
L
A
R
REGULAR
D
U
A
L
R
I
N
G
OFF
OFF
OFF
OFF
OFF
LO
HI
LO
HI
LITE
bridge
bridge
MED
LO
HI
LITE
MED
LO
HI
LITE
MED
LO
HI
LITE
SIMMER BURNERBRIDGE BURNER
DUAL RING BURNER
HI
turbo boil
LO
simmer
MED
LITE
S
I
M
M
E
R
S
I
M
M
E
R
R
E
G
U
L
A
R
REGULAR
D
U
A
L
R
I
N
G
R
E
G
U
L
A
R
R
E
G
U
L
A
R
P
O
W
E
R
DUAL RING
B
R
I
D
G
E

7
Ajuste de los Controles Superiores
Montaje de la Cabeza del Quemador de Anillo Dual:
Es muy importante asegurarse de que todas las tapas de los quemadores
correctamente y en sus lugares correctos.
1. Quite los materiales de empaque dentro del quemador.
RECUERDE — NO PERMITA QUE PENETREN DERRAMES DE ALIMENTOS,
AGENTES DE LIMPIEZA O NINGÚN OTRO MATERIAL EN LA ABERTURA
DEL SOPORTE DE LA TOBERA DE GAS. Siempre mantenga las tapas de los
quemadores en su lugar cuando use los quemadores.
Montaje de la Cabeza del Quemador de Puente:
quemadores superiores estén instaladas correctamente y en sus lugares correctos.
1. Quite los materiales de empaque dentro del quemador.
RECUERDE — NO PERMITA QUE PENETREN DERRAMES DE ALIMENTOS,
AGENTES DE LIMPIEZA O NINGÚN OTRO MATERIAL EN LA ABERTURA
DEL SOPORTE DE LA TOBERA DE GAS. Siempre mantenga las tapas de los
quemadores en su lugar cuando use los quemadores.
Figura 3
Figura 1
Montaje de las Tapas de los Quemadores Superiores y
de las Rejillas de los Quemadores:
Es muy importante asegurarse de que todas las tapas de los
instaladas correctamente y en sus lugares correctos.
1. Quite los materiales de empaque dentro de los quemadores.
apropiada.
3. Coloque las tapas de los quemadores correctas en cada uno de los
quemadores.
Nota: Cabeza de quemadores están jadas. No mover.
RECUERDE — NO PERMITA QUE PENETREN DERRAMES DE
ALIMENTOS, AGENTES DE LIMPIEZA O NINGÚN OTRO MATERIAL
EN LA ABERTURA DEL SOPORTE DE LA TOBERA DE GAS. Siempre
mantenga las tapas de los quemadores en su lugar cuando use los
quemadores.
Tapa de
Quemador
Cabeza de
Quemador
Cabeza de Quemador
Abertura
para gas
Figura 2
Tapa de Quemador
Cabeza de Quemador
Bridge Burner Head
Bridge
Burner
End
Cap
Bridge
Burner
End
Cap
Bridge
Burner
Center
Cap
Igniter
Hole
Igniter
Hole
Tapa del
extremo del
quemador
Tapa
central del
quemador
Tapa del
extremo del
quemador

8
Cocinando en la plancha de cocina
Use el utensilio correcto
*BUENO
•
lados rectos.
a la cantidad de comida a
cocinar.
buenos conductores de calor.
POBRE
alabeados.
" (2.5
cm).
Figura 2
Figura 1
NO use un wok que esté equipado
con un anillo metálico que se
extienda más allá del elemento
de supercie. Debido a que este
anillo aprisiona el calor, el elemento
de supercie y la supercie de la
cubierta pueden verse dañados.
Cacerolas y soportes especiales
Woks
en la mayoría de las tiendas de artículos de
redondeado (con un anillo de soporte que no se
cantidades de líquido (para hacer sopa) o grasa
Soportes metálicos:
plano para que tengan
buen contacto con toda
recomendaciones para usar utensilios como se
muestra en la Figura 2.
Nota: El tamaño y el tipo del utensilio usado
Nota: Siempre use utensilios según sus usos
propuestos. Siga las instrucciones que sean
horno o sobre la plancha de cocinar.

9
RIGHT
WRONG
Tamaño de
la llama
adecuado
Tamaño de
la llama
incorrecto
Figura 1
ATENCION
No coloque
artículos de plástico tales como
saleros y pimenteros, portacucharas
o envoltorios de plástico sobre
la cubierta mientras esté en uso.
y las cucharas de madera pueden
encenderse si se colocan demasiado
cerca de las llamas.
quemadores superiores se pueden
encender manualmente. Para encender
un quemador superior, sostenga una
del quemador y gire la perilla de
control lentamente a la posición
"LITE" (Encender).
quemador se haya encendido, oprima
la perilla hacia adentro y gírela
cuando encienda los quemadores
superiores manualmente.
Ajuste del tamaño de la llama adecuada para los
quemadores superiores
Para la mayoría de las recetas
recomendaciones como guía para determinar el tamaño adecuado de la llama
cocción.
*Tamaño de la llama Tipo de cocción
hervir agua, asar en la asadera.
para carne o para hervir al vapor.
*Estos ajustes se basan en el uso de utensilios de peso medio de metal o de
aluminio con tapas. Los ajustes pueden variar cuando se utilicen otros tipos de
utensilio.
(Fig. 1).
Para freír en aceite,
Ajuste los Controles Superiores

Ajuste los Controles Superiores
Ajuste del Quemador Lento/ Estándar/ Turbo Boil/ Potencia
Ajuste del Quemador de Puente
10
Operando del quemador:
1. Coloque el utensilio de cocina sobre el quemador superior.
la posición "".
3. Suelte la perilla y gire a la posición "".
4. Verique visualmente si el quemador tiene
una llama.
tamaño deseado de llama. No es necesario
la perilla para regular la llama como sea
necesario. NO cocine con la perilla de
control en la posición "". (El encendedor
"").
Figura 2 - Quemador Puente
OFF
MED
LO
HI
LITE
T
u
r
n
C
o
u
n
t
e
r
c
l
o
c
k
w
i
s
e
OFF
LO
HI
LO
HI
LITE
bridge
bridge
Operando del quemador de puente:
El quemador de puente debe usarse con utensilios
El quemador de puente se puede usar para combinar la potencia de cocción
de 2 o, si es necesario, de 3 quemadores superiores ubicados en el lado
Funcionamiento del quemador de puente
gírela a la izquierda"OFF"
"LITE" (Encender) (vea las Figuras). Nota:
3. Verique visualmente que el quemador se haya encendido.
""
6. Cuando ambos quemadores estén encendidos, siga girando la perilla
de control a la izquierda
""
""
quemador de puente.
NO cocine con la perilla de control en la posición "". (El encendedor
"").
Nota:
primer """"
Nota:
puente al momento de regular perilla del control de gas control.

11
Ajuste del Quemador Doble
El quemador doble puede utilizarse con diferentes tamaños de utensilios de cocina.
Utensilios grandes y pequeños pueden usarse con este nuevo quemador.
Operando el doble quemador (Fig. 1; áreas A y B)
1. Coloque un utensilio de cocina de dimensión grande en el centro sobre la parrilla del
2. Presione y gire la perilla en sentido contrario de las manecillas
LITE.
5.
NO
Operando solamente el centro del doble quemador (Fig. 1; área A)
1. Coloque un utensilio de cocina de dimensión pequeña en el centro sobre la parrilla del
2. Presione y gire la perilla en sentido contrario de las manecillas del reloj
LITE
A & B
B
y la posición LO. NO
B
A
Figura 1
Figura 2
Ajuste los Controles Superiores
Figura 4
Figura 3
T
u
r
n
C
o
u
n
t
e
r
c
l
o
c
k
w
i
s
e
OFF
HI
turbo boil
LO
simmer
MED
LITE

12
Cuidado y Limpieza General
Limpieza de diferentes partes de la plancha de cocinar
Supercies Cómo limpiarlas
Perillas de control
NO USE
limpiadores abrasivos sobre estos materiales pues pueden raspar.
Panel de control
apague todos los controles y retire las perillas de control. Para retirarlas, tire la perilla de
Acero inoxidable
una tela. No use limpiadores con una alta concentración de cloruros o cloro. No use
puede ser eliminada.
Porcelana esmaltada
NO
y causar permanente decoloración.
ATENCION
No remover ninguna parte de la estufa hasta asegurar que las piezas
se hayan enfriado.
Limpieza Cotidiana
Para manchas normales:
del calentamiento.
Para manchas difíciles:
No utilizar limpiadores abrasivos en la estufa, estos pueden rayar la porcelana.
Instrucciones para limpiar la cocina en porcelana (algunos modelos)
No
utilice ningún tipo de limpiador
emanaciones pueden ser
peligrosas para la salud o
la cocina.
ATENCION
limpiar la cocina, asegúrese
apagados y que la cocina ha
ATENCION
NO
utilice limpiadores de
horno comerciales en la
parte exterior incluyendo la
puerta.

13
Para limpiar las rejillas
IMPORTANTE
●
●
ATENCION
ATENCION
Para evitar posibles quemaduras, NO
ATENCION
Para evitar posibles quemaduras, NO operar los quemadores sin sus tapas.
● Seguir instrucciones de instalación antes de operar.
●
Limpieza de los tapas de los quemadores
No limpiar tapas en lavaplatos.
IMPORTANTE-
Limpieza de quemadores
clip (de papel) para limpiar el puerto de ignición (o puertos).
Cuidado y Limpieza General
Figura 1 -
Ranuras
Ranuras
Puerto de ignición
Puerto de ignición
Ori cio salida de gas
Ori cio salida
de gas
Ori cio salida
de gas
Figura 2- Quemador doble anillo

Antes de llamar
Soluciones a problemas comunes
Antes de llamar al servicio, revise ésta lista. Puede ahorrarle tiempo y dinero. Esta lista contiene situaciones comunes que no
14
PROBLEMA CAUSA POSIBLE/SOLUCIÓN
Los quemadores no encienden.
luego rote hasta obtener la talla de la llama que desea.
el quemador esté correctamente colocado en su soporte (sólo en el caso de los
modelos con quemadores abiertos).
la toma de corriente.
"" en el Manual del Usuario.
El quemador tiene la mitad de la
llama.
"
General".
La llama del quemador es anaranjada
salado.

15
Master Protection Agreements
Congratulations on making a smart purchase. Your new
Kenmore
®
product is designed and manufactured for years
of dependable operation. But like all products, it may require
preventive maintenance or repair from time to time. That’s when
having a Master Protection Agreement can save you money
and aggravation.
The Master Protection Agreement also helps extend the life of
your new product. Here’s what the Agreement* includes:
; Parts and labor needed to help keep products operating
properly under normal use, not just defects. Our coverage
goes well beyond the product warranty. No deductibles,
no functional failure excluded from coverage – real
protection.
; Expert service by a force of more than 10,000 authorized
Sears service technicians, which means someone you
can trust will be working on your product.
; Unlimited service calls and nationwide service, as
often as you want us, whenever you want us.
; «No-lemon» guarantee – replacement of your covered
product if four or more product failures occur within twelve
months.
; Product replacement if your covered product can’t be
fi xed.
; Annual Preventive Maintenance Check at your request –
no extra charge.
; Fast help by phone – we call it Rapid Resolution –
phone support from a Sears representative on all products.
Think of us as a «talking owner’s manual».
; Power surge protection against electrical damage due to
power fl uctuations.
; $250 Food Loss Protection annually for any food
spoilage that is the result of mechanical failure of any
covered refrigerator or freezer.
; Rental reimbursement if repair of your covered product
takes longer than promised.
; 25% discount off the regular price of any non-covered
repair service and related installed parts.
Once you purchase the Agreement, a simple phone call is all
that it takes for you to schedule service. You can call anytime
day or night, or schedule a service appointment online.
The Master Protection Agreement is a risk free purchase. If
you cancel for any reason during the product warranty period,
we will provide a full refund. Or, a prorated refund anytime after
the product warranty period expires. Purchase your Master
Protection Agreement today!
Some limitations and exclusions apply. For prices and
additional information in the U.S.A. call 1-800-827-6655.
* Coverage in Canada varies on some items. For full details
call Sears Canada at 1-800-361-6665.
Sears Installation Service
For Sears professional installation of home appliances, garage
door openers, water heaters, and other major home items, in
the U.S.A. or Canada call 1-800-4-MY-HOME
®
.
ACUERDOS DE PROTECCIÓN
Acuerdos maestros de protección
Enhorabuena por haber hecho una compra inteligente. Su nuevo producto
Kenmore
®
está diseñado y fabricado para brindarle años de funcionamiento
fi able. Pero, como cualquier producto, puede necesitar mantenimiento
preventivo o reparaciones periódicas. Es por eso que tener un Acuerdo
maestro de protección podría ahorrarle dinero y molestias.
El Acuerdo maestro de protección también sirve para prolongar la durabilidad
de su nuevo producto. El acuerdo* incluye lo siguiente:
; Piezas y mano de obra necesarias para contribuir a mantener el
funcionamiento adecuado de los productos utilizados en condiciones
normales de uso, no sólo en caso de defectos de los productos. Nuestra
cobertura va mucho más allá que la garantía del producto. No se
aplican deducibles ni exclusiones por fallas del funcionamiento: es decir,
verdadera protección.
; Servicio técnico por expertos (más de 10000 técnicos autorizados de
Sears), lo cual signifi ca que quien repare o realice el mantenimiento de su
producto será un profesional de confi anza.
; Servicio técnico a escala nacional y número ilimitado de llamadas de
solicitud de servicio técnico: se puede poner en contacto con nosotros
cuantas veces lo desee y cuando lo desee.
; Garantía «sin sorpresas»: se reemplaza el producto cubierto por el
acuerdo si ocurren cuatro o más fallas del producto en un periodo de 12
meses.
; Reemplazo del producto: en caso de que no se pueda reparar el
producto cubierto por el acuerdo.
; Revisión anual preventiva de mantenimiento del producto: puede
solicitarla en cualquier momento, sin costo alguno.
; Rápida asistencia telefónica, la cual denominamos Solución rápida:
es decir, asistencia telefónica a través de cualquiera de nuestros
representantes de Sears, sobre cualquiera de nuestros productos. Piense
en nosotros como en un «manual parlante del usuario».
; Protección contra fallas eléctricas, contra daños debidos a
fl uctuaciones de la corriente eléctrica.
; $250 al año para cubrir cualquier posible deterioro de alimentos que
haya tenido que desechar debido a una falla mecánica de cualquiera de
nuestros refrigeradores o congeladores cubiertos por este acuerdo.
; Devolución de gastos de alquiler de electrodomésticos si la
reparación de su producto asegurado toma más que el tiempo prometido.
; 25% de descuento aplicable tanto a los costos del servicio de reparación,
como de las piezas instaladas relacionadas que no hayan quedado
cubiertos por este acuerdo.
Una vez que haya realizado el pago de este acuerdo, bastará una simple
llamada telefónica para concertar una visita de servicio. Puede llamar a
cualquier hora del día o de la noche, o bien concertar una visita de servicio por
Internet.
La adquisición del Acuerdo maestro de protección es una inversión exenta
de riesgos. Si por cualquier motivo decide cancelar dicho acuerdo durante el
periodo de garantía del producto, le haremos un reintegro total del valor. O
bien un importe proporcional si cancela el acuerdo en cualquier otro momento
posterior al vencimiento del periodo de garantía del producto. ¡Adquiera hoy
mismo su Acuerdo maestro de protección!
Algunas limitaciones y exclusiones podrían aplicarse. Para solicitar
precios e información adicional, llame al 1-800-827-6655 (en los EE.UU.).
* La cobertura en Canadá varía en el caso de algunos artículos. Para
obtener detalles completos al respecto, llame al 1-800-361-6665 de Sears
de Canadá.
Servicio de instalación de Sears
Para solicitar la instalación por profesionales de Sears de electrodomésticos,
abridores de puertas de garaje, calentadores de agua y otros artículos de uso
prioritario en el hogar, llame al 1-800-4-MY-HOME en los EE.UU. o Canadá.

® Registered Trademark /
TM
Trademark of KCD IP, LLC in the United States, or Sears Brands, LLC in other countries
® Marca Registrada /
TM
Marca de Fábrica de KCD IP, LLC en Estados Unidos, o Sears Brands, LLC in otros países
MC
Marque de commerce /
MD
Marque déposée de Sears Brands, LLC
Get it fixed, at your home or ours!
Your Home
For troubleshooting, product manuals and expert advice:
www.managemylife.com
For repair – in your home – of all major brand appliances,
lawn and garden equipment, or heating and cooling systems,
no matter who made it, no matter who sold it!
For the replacement parts, accessories and
owner’s manuals that you need to do-it-yourself.
For Sears professional installation of home appliances
and items like garage door openers and water heaters.
1-800-4-MY-HOME
®
(1-800-469-4663)
Call anytime, day or night (U.S.A. and Canada)
www.sears.com www.sears.ca
Our Home
For repair of carry-in items like vacuums, lawn equipment,
and electronics, call anytime for the location of your nearest
Sears Parts & Repair Service Center
1-800-488-1222 (U.S.A.) 1-800-469-4663 (Canada)
www.sears.com www.sears.ca
To purchase a protection agreement on a product serviced by Sears:
1-800-827-6655 (U.S.A.) 1-800-361-6665 (Canada)
Para pedir servicio de reparación
a domicilio, y para ordenar piezas:
1-888-SU-HOGAR
®
(1-888-784-6427)
www.sears.com
Au Canada pour service en français:
1-800-LE-FOYER
MC
(1-800-533-6937)
www.sears.ca
-
 1
1
-
 2
2
-
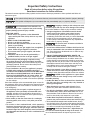 3
3
-
 4
4
-
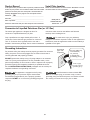 5
5
-
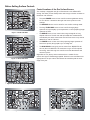 6
6
-
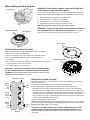 7
7
-
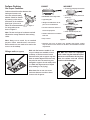 8
8
-
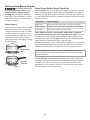 9
9
-
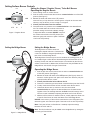 10
10
-
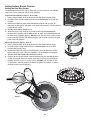 11
11
-
 12
12
-
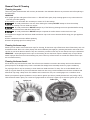 13
13
-
 14
14
-
 15
15
-
 16
16
-
 17
17
-
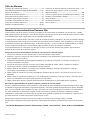 18
18
-
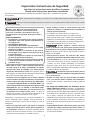 19
19
-
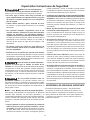 20
20
-
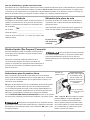 21
21
-
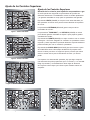 22
22
-
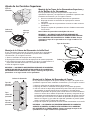 23
23
-
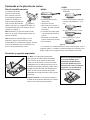 24
24
-
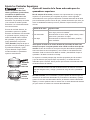 25
25
-
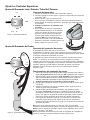 26
26
-
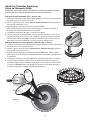 27
27
-
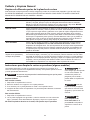 28
28
-
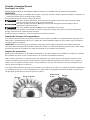 29
29
-
 30
30
-
 31
31
-
 32
32


Kenmore 790.32353 Manual de usuario
- Categoría
- Cocinas
- Tipo
- Manual de usuario
en otros idiomas
- English: Kenmore 790.32353 User manual
Artículos relacionados
-
Kenmore 790.30503 Manual de usuario
-
-
Kenmore 790.34913511 Manual de usuario
-
Kenmore 79032243400 El manual del propietario
-
Kenmore 79032683410 El manual del propietario
-
-
-
-
-
Otros documentos
-
 Frigidaire Professional 790,34913 Manual de usuario
-
 Frigidaire Professional 790,33963 Manual de usuario
-
 Kenmore Elite 79032713410 El manual del propietario
-
Kenmore Elite 79041103100 El manual del propietario
-
Kenmore Pro 79079623701 El manual del propietario
-
 Kenmore Elite 31123 El manual del propietario
-
Kenmore Elite 79047153403 El manual del propietario
-
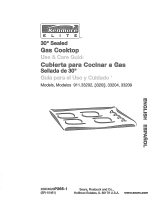 Kenmore Elite 91133204102 El manual del propietario
-
Electrolux EW30GC55GS Use and Care (Spanish)
-
Flymo Turbo 400 El manual del propietario


