Bissell 1986 Series Revolution Pet Pro Guía del usuario
- Tipo
- Guía del usuario

www.BISSELL.com
1
More of a video
person? Look for this
icon and go online
for an instructional
how-to video at
www.BISSELL.com
QUICK START/USER GUIDE
1986 Series
REVOLUTION
™
PET PRO

www.BISSELL.com
2
IMPORTANT SAFETY INSTRUCTIONS
WARNING
TO REDUCE THE RISK OF FIRE, ELECTRIC SHOCK OR INJURY:
» Connect to a properly grounded outlet only. See
grounding instructions. Do not modify the 3-prong
grounded plug.
» Do not leave appliance when it is plugged in. Unplug
from outlet when not in use and before servicing.
» Do not expose to rain. Store indoors.
» Do not allow to be used as a toy. Close attention is
necessary when used by or near children.
» Do not use for any purpose other than described
in this user guide. Use only manufacturer’s
recommended attachments.
» Do not use with damaged cord or plug. If appliance
is not working as it should, or has been dropped,
damaged, left outdoors, or dropped into water, have
it repaired at an authorized service center.
» Do not pull or carry by cord, use cord as a handle,
close a door on cord, or pull cord around sharp edges
or corners.
» Do not run appliance over cord. Keep cord away from
heated surfaces.
» Do not unplug by pulling on cord. To unplug, grasp
the plug, not the cord.
» Do not handle plug or appliance with wet hands.
» Do not put any object into openings. Do not use with
any opening blocked; keep openings free of dust, lint,
hair, and anything that may reduce air flow.
» Keep hair, loose clothing, fingers, and all parts of
body away from openings and moving parts of the
appliance and its accessories.
» Turn OFF all controls before plugging or unplugging
appliance.
» Use extra care when cleaning on stairs.
» Do not use to pick up flammable or combustible
materials (lighter fluid, gasoline, kerosene, etc.) or use
in areas where they may be present.
» Do not use appliance in an enclosed space filled with
vapors given off by oil-based paint, paint thinner,
some moth-proofing substances, flammable dust, or
other explosive or toxic vapors.
» Do not use to pick up toxic material (chlorine bleach,
ammonia, drain cleaner, etc.).
» Do not pick up anything that is burning or smoking,
such as cigarettes, matches or hot ashes.
» Do not pick up hard or sharp objects such as glass,
nails, screws, coins, etc.
» Do not use without filters in place.
» Use only BISSELL® cleaning formulas intended for use
with this appliance to prevent internal component
damage. See the “Cleaning Formulas” section of this
guide.
» Do not immerse. Use only on surfaces moistened by
the cleaning process.
» Keep appliance on a level surface.
» Do not carry the appliance while in use.
» Always install float before any wet pick-up operation.
» Unplug before connecting TurboBrush® Tool.
» Plastic film can be dangerous. To avoid danger of
suffocation, keep away from children.
» If your appliance has a motorized Brush Roll, do not
leave machine running in the same spot without the
handle fully upright.
» Liquid must not be directed towards equipment
containing electrical components.
» Use only the type and amount of liquids specified
under the operations section of this guide.
» Use only on carpet moistened by cleaning process.
READ ALL INSTRUCTIONS BEFORE USING YOUR DEEP CLEANER.
When using an electrical appliance, basic precautions should be observed, including the following:
WARNING
Improper connection of the equipment-grounding conductor can result in
a risk of electrical shock. Check with a qualified electrician or service person
if you aren’t sure if the outlet is properly grounded. DO NOT MODIFY THE
PLUG. If it will not fit the outlet, have a proper outlet installed by a qualified
electrician. This appliance is designed for use on a nominal 120-volt circuit, and
has a grounding attachment plug that looks like the plug in the illustration.
Make certain that the appliance is connected to an outlet having the same
configuration as the plug. No plug adapter should be used with this appliance.
GROUNDING INSTRUCTIONS
This appliance must be connected to a grounded
wiring system. If it should malfunction or break
down, grounding provides a safe path of least
resistance for electrical current, reducing the risk
of electrical shock. The cord for this appliance
has an equipment-grounding conductor and a
grounding plug. It must only be plugged into an
outlet that is properly installed and grounded in
accordance with all local codes and ordinances.
Grounded
Outlet
Grounding Pin
SAVE THESE INSTRUCTIONS
THIS MODEL IS FOR HOUSEHOLD USE ONLY. COMMERCIAL USE OF THIS UNIT VOIDS THE MANUFACTURER’S WARRANTY.

www.BISSELL.com
3
Safety Instructions..............2
Product View...................4
Cleaning Formulas..............6
Operations ...................7-12
Maintenance & Care .........13-17
Troubleshooting ................18
Warranty .......................19
Service .........................19
Product Registration...........20
Parts & Supplies ...............20
NOTE: Standard accessories
may vary by model. To identify
what should be included with
your purchase, please refer
to the “Carton Contents” list
located on the carton top flap.
Package Contents
1. 2. 3. 4.
5. 6. 7.
8. 9. 11.
1. Upper Handle
2. 1 Screw attached to
Upper Handle
3. Base with Dirty Water Tank
4. Clean Water Tank
5. Carry Handle
6. BISSELL Professional Pet
Urine Eliminator + Oxy
7. BISSELL Pro Boost Formula
8. Accessory Bag & Hose
9. Tough Stain Tool
10. 2-in-1 Pet Upholstery Tool
11. Nozzle Clean Out Tool
10.
Thanks for buying a BISSELL® carpet cleaner!
We love to clean and we’re excited to share one of our innovative products with
you. We want your carpet cleaner to work like new for the years to come, so this
guide has tips on how to use, maintain and, if there’s a problem, troubleshoot.
Your carpet cleaner needs a little assembly before getting to work, so flip to the
“Assembly” section and let’s get started!

www.BISSELL.com
4
Getting to Know Your Deep Cleaner
Upper
Handle
In-Use
Cord Clip
Cleaning Mode
Switch
CleanShot®
Button
EdgeSweep®
Brushes
Carry
Handle
Rubber
Tab
Quick
Release™
Cord Wrap
Recline
Pedal
Easy Fill/
Formula Cap
Clean Water Tank
(1 Gallon Capacity)
Power
Button
Float
Stack
Dirty Water Tank
Belt Access
Door
Foot
Spray Trigger
Belt/Brush
Access Plate
Nozzle
Tips Before Carpet Cleaning
• If cleaning an entire room, consider moving your furniture to another area.
• Use a dry vacuum cleaner over area before using your deep cleaner.
• Pre-treat stains with BISSELL® Pretreat to improve performance on coee
stains and ground-in dirt.

www.BISSELL.com
5
Assembly
A Phillips-head screwdriver is required for Assembly in Step 3.
3 4
1
Next, align the Carry Handle with the slots
on either side of the base (behind the
Power Button and Cleaning Mode Switch).
The Carry Handle will “click” into place.
First, insert the
(aluminum)
Upper Handle
at the top of the
base until you
hear a “click”.
Do NOT put
the clean tank
on the machine
until Step 5.
Use a Phillips-head
screwdriver to secure the
screw (found taped to Upper
Handle) into the Carry Handle.
Wrap the cord around
the Carry Handle and
Quick Release™ Cord Wrap
hook.
At the bottom of the
Upper Handle, align the
Clean Water Tank with
the grooves and slide
the tank into place.
WARNING
Do not plug in your deep cleaner until you are familiar with all instructions
and operating procedures.
5
click
Side
View
2

www.BISSELL.com
6
PROFESSIONAL
FORMULAS
2X®* CLEANING FORMULA
BARE FLOOR
FORMULAS
Pet Stain
& Odor +
Antibacterial
Professional
Deep
Cleaning
Professional
Pet Urine
Eliminator+Oxy
Pet Stain &
Odor
DeepClean
+ Protect
DeepClean
+ Refresh
Deep Clean
+ Oxy
Hard Floor
Solutions
Cleans and
Controls
odor causing
bacteria.
Outcleans
all other
formulas
Includes
Scotchgard™
Protector
Our best
formula for
pet urine
stains & odors
Includes
Scotchgard
Protector
Removes
tough pet
stains
Includes
Scotchgard
Protector
Deep cleans
carpets
and protects
from future
stains with
Scotchgard
Protector
Powerful
cleaning
with a
refreshing
scent
Removes
deep down
dirt, pet
stains &
pet odor
Safe use for
linoleum,
vinyl and
ceramic
tile; removes
tough
dirt and grime
BOOST
CARPET CLEANING FORMULA ENHANCER
PRETREAT
PRETREAT SPOTS AND STAINS TO IMPROVE
CARPET CLEANING PERFORMANCE
Oxy Boost Pro Boost Prevent Boost
Pet Oxy
Boost
Oxy Stain Destroyer Pet Stain Pretreat
Pet Pretreat +
Sanitize
Removes old,
set-in stains
permanently
Revives
carpets
to look
their best
Repels stains
from soaking
into carpet
fibers
Removes
pet stains
and odors
permanently
Permanent Stain
Removal in
30 seconds
Pretreat to help
remove tough
pet stains
and odors
Penetrates to
sanitize and loosen
tough stains
Keep plenty of genuine BISSELL formula
on hand so you can clean and protect
whenever it fits your schedule.
Always use genuine BISSELL deep
cleaning formulas. Non-BISSELL cleaning
solutions may harm the machine and may
void the warranty.
Cleaning Formulas
WARNING
To reduce the risk of fi re and electric shock due to internal component damage, use only
BISSELL® cleaning formulas intended for use with the deep cleaner.
ONLY BISSELL Protects from future stains with Scotchgard Protector.
Scotchgard is a trademark of 3M.
*2.5 fl. oz. of 2X concentrated formula is equivalent to 5.0 fl. oz. of non-concentrated formula.

www.BISSELL.com
7
NOTE: Fill with hot (140°F/60°C MAX) tap water and add the appropriate
BISSELL formula. DO NOT USE BOILING WATER. DO NOT HEAT WATER OR
TANK IN MICROWAVE. Do not substitute BISSELL 2X Formula cleaning formula
with other household cleaning products.
With 2X Formula:
Unscrew the cap from
the tank. Add hot tap
water to the water fill
line. Next, reference
the chart below for
formula amounts to
add to the tank. Twist
cap back into place.
Lift the tank straight up to remove from
the machine.
The Clean Water Tank is
at the top of the machine.
At the bottom of the Upper Handle, align
the tank with the grooves and slide the
tank into place.
FORMULA FILLING
INSTRUCTIONS
DEEP CLEAN &
MAX CLEAN MODE
EXPRESS CLEAN
MODE
BISSELL® 2X
Concentrated
Formulas
• Fill water to the Water Fill Line
next to the DEEP/MAX CLEAN
mode on the Clean Water Tank.
• Fill tank with 2.5 oz of formula.
• For extra cleaning power, fi ll
the formula until it reaches the
“Maximum Formula” line (5 oz).
• Fill water to the Water
Fill Line next to the
EXPRESS CLEAN mode
on the Clean Tank.
• Fill tank with 1.25 oz of
formula.
BISSELL Boost
Formula Enhancers
(Optional)
Add 2.5 oz of BISSELL Boost
formula to the tank for enhanced
cleaning results.
Add 2.5 oz of BISSELL
Boost formula to the tank
for enhanced cleaning
results.
Filling Your Clean Water Tank:
2X® Concentrated Formula
Clean Water Tank
(1 Gallon)
Dirty Water Tank
1
2
3
4

www.BISSELL.com
8
Filling Your Clean Water Tank:
For Future Use if selecting Antibacterial Formula with EasyFill
1
Lift the tank straight
up to remove from the
machine.
The Clean Water
Tank is at the top
of the machine.
Clean Water Tank
(1 Gallon)
Dirty Water Tank
Unscrew the cap from the
tank. Add hot tap water to
the water fill line.
At the bottom of the Upper
Handle, align the tank with
the grooves and slide the
tank into place.
A few notes about fi lling the Clean Water Tank:
• Fill with hot (140°F/60°C MAX) tap water and add the appropriate
BISSELL® formula. DO NOT USE BOILING WATER. DO NOT HEAT WATER
OR TANK IN MICROWAVE.
• When using BISSELL Antibacterial formula: Only fi ll your Clean Water
Tank with the recommended amount of water and formula to achieve
antibacterial benefi ts.
NOTICE: Do not overwet carpet. Be careful not to run over loose objects or edges
of area rugs. Stalling the brush may result in premature belt failure.
NOTICE: BISSELL Antibacterial formula is only for BISSELL machines with EasyFill
System.
Firmly insert the full size
formula bottle into the cap
on the tank and squeeze
until formula reaches the
EasyFill line.
After filling the tank with
hot tap water, twist the
yellow cap back onto the
tank.
2
3
4
5

www.BISSELL.com
9
Cleaning Your Carpet
Press the Power Button
to turn the machine ON.
Plug into
a properly
grounded
outlet.
Max Clean - Provides a heavy
cleaning for your dirtiest carpets.
After cleaning, it’s estimated the
carpets will need 8 hours to dry.
Deep Clean - Delivers a deep clean
to your carpet.
Express Clean - Provides a lighter
clean with about a 30-minute dry
time. Recommended Cleaning
Pace: 12 inches per second.
Max Clean &
Deep Clean Modes:
1. Press the Spray Trigger
to apply solution while
making 2 slow wet passes -
1 forward and 1 back.
2. Release the trigger.
3. Make 2 slow dry passes -
1 forward and 1 back, to
suck up the dirty solution.
(Do not hold down the
trigger for this step.)
Antibacterial
Cleaning (Deep Clean
Mode Only)
1. Press the Spray Trigger
to apply solution while
making 3 slow wet passes
- 1 forward, 1 back, and 1
forward again.
2. Release the trigger.
3. Make 1 slow dry pass
back, to suck up the dirty
solution. (Do not hold down
the trigger for this step.)
Express Clean Mode:
1. Press the Spray Trigger to
apply solution while making
2 wet passes - 1 forward
and 1 back.
2. Release the trigger.
3. Make 2 dry passes -
1 forward, 1 back to suck
up the dirty solution.
(Do not hold down the
trigger for this step.)
Recommended Cleaning
Pace: 12 inches per second
NOTICE: To prevent
damage to Berber carpets,
avoid repeated strokes in
the same area.
Select cleaning mode:
To recline your
machine for use,
press the Recline
Pedal with your foot.
1
2
3
4
• Max Clean Mode is intended for your dirtiest carpeted areas. Please note that your
carpets will need an estimated 8 hours to dry. To expedite the drying process, place a
fan in the room or near the carpet.
• In Express Clean Mode, the Dirty Water Tank will not get as full as when cleaning with
Deep or Max Clean Mode.
• It is common to refill the Clean Water Tank and empty the Dirty Water Tank multiple times
throughout your cleaning process. Room size and the speed at which you clean are both
factors that aect how often the tank may need to be refilled and/or emptied.

www.BISSELL.com
10
Cleaning with Hose & Tool
Insert the hose and
snap into place.
Be sure the red-
colored hose
release clip is
facing out, away
from machine.
Press the spray trigger button to spray
the soiled area, then slowly move tool back
and forth over the area.
Release the trigger to suck up the dirty
solution. Work in small sections until the area
is clean.
When finished cleaning, turn the machine ON
to suction up warm clean water to rinse the
inside of the hose and tool. Detach the hose
and tool and close the accessory hose door.
Let the hose and tool air dry before storing.
Attach the tool to the end of the hose.
(Tools may vary by model.) Press the
Power Button to turn machine ON.
NOTE: If using the Deep Reach Tool or Pet Stain Tool be sure the needles of the
tool are pressed down into the carpet so the spray gets into the carpet fibers.
— Keep hair, loose clothing, fingers, and all parts of
body away from openings and moving parts. Brush
Roll continues to rotate when in the upright position.
— Brush Roll continues to turn while product
is turned ON and handle is in upright position.
To avoid damage to carpet, rugs, furniture, and
flooring, avoid tipping cleaner or setting it on
furniture, fringed area rugs, or carpeted stairs during
tool use.
— The Brush Roll remains on while cleaning with
the hose and tool. Do not allow cleaner to sit in one
location for an extended period of time, as damage
to floor can result.
Lift the accessory
hose door on top
of foot on the front
of the machine. The
door flips toward the
machine to open.
Cleaning with CleanShot®
Press the CleanShot
button with your
foot. The window of
the button will be
green and show an “I”
symbol when it is on.
Spray will continue until you
turn it off. To turn CleanShot
off, press the button with
your foot. The window of the
button will be red and show
an “O” symbol when it is off.
Completely cover the
stain with CleanShot
spray. Allow the stain
to soak. To extract,
maneuver the foot
of the machine over
the stain to scrub and
remove. Continue to
clean over the area
multiple times for extra
scrubbing and suction.
1
2
3
4
1
2

www.BISSELL.com
11
DRY MODE NOTE: Use a “raking” motion to clean. Start with the tool farthest
away and rake in small increments as you bring the tool toward you. The rubber
nubs will help attract hair to the suction channel.
Attach the tool and select dry mode
to first pick up dry debris and pet
hair. The suction will be at the lower
part of the tool, near the dry cup.
Follow hose plug-in instructions from
steps 1 & 2 on page 14.
2-in-1 Pet Upholstery Tool
*Make sure your Clean Water Tank has water & formula to use the tool in wet mode.
Turn OFF the machine.
Hold the cup and twist
counter-clockwise line up
the arrow with the unlock
symbol and remove.
Take off the cup
to empty hair
and debris.
To reattach the cup,
line up the cup to the
tool indents, and rotate
clockwise. The arrow will
line up with the locked
icon when secured.
To Deep Clean, move the
switch to wet mode. Press
the trigger to spray your
water and formula; use
the top of the nozzle to
extract stains and odors.
To remove any hair or
trapped debris from the
nozzle, first turn OFF the
machine. Pull the nozzle
tab away from the tool to
remove and rinse under
running water.
Replace to the tool by
lining up the nozzle edge
and snap into place.
Before storing, make sure
all hair is removed from
the dry cup and nozzle
has been rinsed under
running water.
Dry Mode
(switch up)
Wet Mode
(switch
down)
Empty the cup when
it fills with hair and
debris.
Dry
Suction
Channel
Remove hair
that may wrap
around the filter.
Wet
Suction
Channel
WET MODE NOTE: Start from the area farthest away. Hold the trigger down, and
pull the tool toward you. Keep the tool in contact with the surface as you pull. You
will see extraction through the nozzle.
1
2
3
4
5
6
7
8
9

www.BISSELL.com
12
Bare Floor Cleaning
*
With the machine unplugged,
attach the Bare Floor Tool to
the bottom of the machine
by lining the tool to the edge
of the nozzle. Rotate down
until it clicks into place.
Follow filling instructions
on page 10 or 11 and switch
cleaning mode to Express
Clean.
When finished, unplug the
machine and remove the
bare floor tool by rotating
the tool up to unhook
from the nozzle.
Rinse and let dry before
storing. Refer to page 16
for emptying the Dirty
Water Tank. Refer to
page 17 for cleaning your
machine before storing.
Plug into a properly
grounded outlet and press
the Power Button.
Clean by pressing the
trigger for 1 wet pass
forward, 1 wet pass back,
and then release the
trigger and make 1 dry pass
forward, 1 dry pass back.
WARNING
WARNING: To reduce the risk of fire and electric shock when cleaning a hard floor, the
BISSELL® Bare Floor Tool must be used and is only to be used with BISSELL Hard Floor
Formulas intended for use with this appliance.
NOTE: The Bare Floor Tool that is compatible with the ProHeat 2X® Revolution™
is not included. It is available for purchase by contacting our team by phone or
visting us online at BISSELL.com.
*Bare Floor Tool not included with machine.
Important! Please check manufacturer’s tag before cleaning area rugs for
any specialized cleaning instructions. We do not recommend deep cleaning
delicate, silk, wool, antique, or area rugs without a manufacturer’s tag.
Area Rug Cleaning
Regularly clean your high-traffic area rugs in Express Clean Mode:
• Check the manufacturer’s tag.
• Select Express Clean Mode.
• When cleaning area rugs, place the rug on a sealed surface to test for colorfastness
in an inconspicuous area. Your cleaner should not be used on unsealed surfaces.
• Important: Keep the foot of the deep cleaner perpendicular to the rug’s edge with
each cleaning pass to prevent damage.
• Recommended Cleaning Pace: 12 inches per second
1
2
3

www.BISSELL.com
13
Empty Dirty Water Tank
To release Dirty Water
Tank, press down on the
colored tank handle.
Tilt the tank slightly
toward you.
Grab the handle and tank
with both hands and pull
the tank up and away to
remove.
Clean the red filter
below the tank
by wiping off any
remaining dirt or
debris.
For quick empty:
Pull the Rubber Tab
and tilt to pour.
(Located at the corner
of the top of the tank.)
When closing the
Rubber Tab, make
sure all edges are
sealed tight.
For final clean and
rinse: Unscrew the ring
at the bottom of tank.
Gently remove the
float stack, rinse
and clean.
Once clean, return float
stack into the tank by
lining up the arrows
so they point at each
other. This is the only
way the float stack will
fit into the tank.
With the arrows
aligned, the float stack
should lock into place.
Return the ring and
twist to lock. Water
may leak if the ring is
not fully tightened.
Did You Know?
The float stack
is what prevents
your dirty
tank from
overflowing.
WARNING
To reduce the risk of fire, electric shock or injury, turn power OFF and disconnect plug from
electrical outlet before performing maintenance or troubleshooting.
To return the tank:
Angle the tank and
insert bottom first.
Then tilt the tank
toward the machine
and push the top
in until it clicks into
place.
3
2
1
4
5
6

www.BISSELL.com
14
Cleaning Machine After Use
To flush and rinse the machine: Turn the machine ON and
press the trigger for 15 seconds while making back and
forth passes on a section of carpet.
Finally, release the trigger and extract the water. See page
15 to clean the Dirty Water Tank from the water that was
just extracted.
WARNING
To reduce the risk of electric shock, turn power OFF and disconnect plug from electrical
outlet before performing maintenance or troubleshooting checks.
First, fill the Clean Water
Tank with warm tap water
and then empty it all to
rinse. Then fill again with
warm tap water and return
the tank to the machine.
Twist cap back on tightly.

www.BISSELL.com
15
Brush Roll & Nozzle Care
Turn OFF and unplug
the machine from the
grounded outlet.
Remove the Nozzle
from the foot:
scoop and grip the
accessory hose door.
Pull up to remove
the Nozzle.
At this point, the
Nozzle and Brush
Roll cover can
be rinsed under
running water and
the Nozzle Clean
Out Tool can be
inserted to unclog
hair or debris.
Next, remove
the next layer,
the Brush Roll
cover, to reveal
the Brush Rolls.
Press on the
two release
buttons and lift
straight up.
NOTE: Be sure to clean the Brush Rolls and Nozzle before storing your machine.
Follow these steps if your Nozzle becomes clogged with hair or debris.
NOTICE: To reduce the risk of a leaking condition, do not store unit where
freezing may occur. Damage to internal components may result.
1
2
3
4
When finished, return the Brush Roll cover by
pushing it straight down. You will hear a “click”
from each push button when the cover is pushed
down into place. Line up the Nozzle from the edge
near the floor and rotate to snap back into place.
Use the comb to brush out the
debris or hair from the Brush Rolls.
click
5
6
WARNING
To reduce the risk of electric shock, turn power OFF and disconnect plug from electrical
outlet before performing maintenance or troubleshooting checks.

www.BISSELL.com
16
Replacing Belts & Brush Rolls
What you will need: 1 Phillips-head screwdriver & 1 flathead screwdriver
Use a flathead
screwdriver and
press it into the slot
at the back and
then front of the
Belt Access Door.
Lift to remove the
door.
While the machine is upright, unplug the machine and remove both tanks. Remove
the Nozzle and Brush Roll cover (see steps in Brush Roll & Nozzle Care). Press the
Recline Pedal and lay the machine on its back.
Turn the machine on its side and use
a Phillips-head screwdriver to remove
the screw just underneath the wheel.
Slide the wheel down to remove.
Lay the machine
back down on
its back. Use a
Phillips-head
screwdriver to
remove the screw
on the Brush Roll
end cap.
If the gear belt
is broken, gently
remove it. If you
are replacing your
Brush Rolls, gently
remove the belt.
There are washers
at the ends of the
Brush Rolls, be
careful that these
do not fall off or
get lost.
NOTE: To replace Brush Rolls, remove them from the metal posts and replace.
Make sure the metal post goes completely through the end of the Brush Roll.
The bristles should be aligned in a ‘V’ pattern as pictured.
1
2
3
4
5
6
Align Brush Rolls with belt
at other end. To ensure
alignment, hold the end
of one Brush Roll and
twist. The other Brush
Roll rotates with it. Check
that washers are in place.
Reassemble the belt and
end cap, securing with
screws you removed.
WARNING
To reduce the risk of electric shock, turn power OFF and disconnect plug from electrical
outlet before performing maintenance or troubleshooting checks.

www.BISSELL.com
17
Keep it wrapped
on the red pulley
and adjust the
machine so it is
laying on it’s back
again. Use your
thumb to stretch
the flat belt back
to wrap around
the metal axle.
If the flat belt is broken,
gently remove the belt.
If it needs replacing for
any reason, the gear
belt should already
be removed before
removing the flat belt.
Rotate the machine
back to its side. Feed
the new flat belt
through the opening
so that it wraps around
the red pulley.
Replacing Belts & Brush Rolls (Continued)
7
8
Snap the Belt Access Door back
down into place.
Resecure the Wheel and Belt Access Door:
Slide the wheel up back into the slot and
secure with the screw that was removed.
9
NOTE: See Step 6 on page 17 for how to put the Brush Roll Cover and Nozzle
back in place.
10

www.BISSELL.com
18
Problem Possible causes Remedies
Reduced or No
Spray Through Foot
of Machine
Clean Water Tank may be empty. Refill tank.
Clean Water Tank may not be
seated completely.
Turn power OFF; remove and reseat tank.
No Spray Through
Hose & Tool
The hose to your machine is not primed or
may have lost prime.
1. With the machine OFF and unplugged, remove Nozzle from the foot. Place a ball-
point pen in the black cylinder next to the screw. When water bubbles up, remove the
pen. Reassemble the Nozzle and hose.
2. Hold end of hose below water level in tank to prime.
3. With the Clean Water Tank full of water, the machine OFF and RECLINED, press the
CleanShot button ON and wait for the CleanShot to drain for a few seconds; This will
re-prime the machine.
Clean Water Tank may be empty. Refill the Clean Water Tank.
Clean Water Tank may not be seated properly. Turn power OFF. Remove and reseat the tank.
No Spray Through
CleanShot®
Clean Water Tank may be empty. Refill the tank.
Clean Water Tank may not be seated properly. Turn power OFF. Remove and reseat the tank.
The machine is not reclined. Press the Recline Pedal and bring handle down to recline the machine.
Pump may have lost prime. With the machine off and unplugged, remove the nozzle from the foot. Place a ball-
point pen in the black cylinder next to the screw. When water bubbles up, remove the
pen. Reassemble the nozzle before cleaning again.
CleanShot Continues
Spray When
Machine is OFF
CleanShot button is not in the “OFF” position. Press the CleanShot button to turn it off. The button window will show the color red
and a “O” symbol when it is in the off position.
Loss of Suction
Power
Dirty Water Tank may not be seated properly. Pick up tank and reseat so it fits in the unit.
Dirty Water Tank has picked up max amount
of dirty water and reached full line.
Empty tank.
Rubber tab on Dirty Water Tank is not sealed
tight.
Check the Rubber Tab on the Dirty Water Tank and press firmly on all edges to secure it
tightly (see step 4 on page 15 for detail).
Accessory hose door may not be closed
tightly in place.
Check the accessory hose door and make sure it is closed tightly – it should be locked
into place.
Nozzle may be clogged from pet hair or
debris.
Use the Nozzle Clean Out Tool and follow steps on page 17 for “Cleaning Nozzle”.
Brush Roll cover not fully snapped into place. Remove the Nozzle and Brush Roll cover. Follow step 6 from page 17 and make sure
you hear both buttons click into place.
No Power
Cleaning Mode Switch mistaken for Power
Button.
Press the red Power Button on the left side of the machine to turn the machine ON.
Outlet may not be active. Try plugging in a different device that uses a grounded outlet to test for power from
the outlet.
Leaking Tank
Tank may have been over-filled. 1. Make sure your tank has the water and formula that you’ve prepared.
2. With the cap twisted ON tightly, hold your tank at an angle, over a sink or drain, so
any extra water can pour out of the space.
3. Wipe the tank dry with a cloth.
Water may be caught in space between the
tank and the tank’s handle.
Water Sprays from
Rinse & Storage Tray
Tray is too full of water. Only fill the tray with water to fill line on tray. When using the Water Rinse Cup, only
fill with fresh water to the “water line” printed on cup.
Machine is in “Reclined” position. Turn power OFF. Shift handle into the upright position. Proceed to use the tray as
instructed, do not recline machine, follow instructions for use on page 16.
Troubleshooting
WARNING
To reduce the risk of electric shock, turn power OFF and disconnect plug from electrical
outlet before performing maintenance or troubleshooting checks.

www.BISSELL.com
19
If your BISSELL product should
require service:
Contact BISSELL Consumer Care to locate a
BISSELL Authorized Service Center in your
area. If you need information about repairs or
replacement parts, or if you have questions about
your warranty, contact BISSELL Consumer Care.
This warranty gives you specific legal rights,
and you may also have other rights which
may vary from state to state. If you need
additional instruction regarding this warranty
or have questions regarding what it may
cover, please contact BISSELL® Consumer
Care by E-mail or telephone as described
below.
It may be necessary to obtain some of your
personal information, such as a mailing
address, to fulfill terms of this warranty. Any
personal data will be handled pursuant to
BISSELL’s Privacy Policy, which can be found
online at www.BISSELL.com/privacy-policy.
Limited Five-Year Warranty
Subject to the *Exceptions and Exclusions
from the Terms of the Limited Warranty,
upon receipt of the product BISSELL will
repair or replace (with new, refurbished,
lightly used, or remanufactured components
or products), at BISSELL’s option, free
of charge from the date of purchase by
the original purchaser, for five years, any
defective or malfunctioning part.
See information below on "If your BISSELL
product should require service”.
This warranty applies to product used for
personal, and not commercial or rental,
service. This warranty does not apply to
fans or routine maintenance components
such as filters, belts or brushes. Damage or
malfunction caused by negligence, abuse,
neglect, unauthorized repair, or any other use
not in accordance with the user guide is not
covered. This warranty will only be valid if the
product is used in the same country in which
it was sold.
BISSELL is not liable for incidental or
consequential damages of any nature
associated with the use of this product.
BISSELL’s liability will not exceed the
purchase price of the product.
Some states do not allow the exclusion or
limitation of incidental or consequential
damages, so the above limitation or
exclusion may not apply to you.
*Exceptions and Exclusions from the
Terms of the Limited Warranty
This warranty is exclusive and in lieu of
any other warranties, either oral or written.
Any implied warranties, which may arise
by operation of law, including the implied
warranties of merchantability and fitness for
a particular purpose, are limited to the five-
year duration from the date of purchase as
described above.
Some states do not allow limitations on how
long an implied warranty lasts, so the above
limitation may not apply to you.
Warranty
NOTE: Please keep your original sales receipt. It provides proof of date of purchase in the
event of a warranty claim.
Service
Please do not return this product
to the store.
Other maintenance or service not included
in the manual should be performed by an
authorized service representative.
Website:
www.BISSELL.com/service-centers
E-mail:
www.BISSELL.com/email-us
Call:
BISSELL Consumer Care
1-800-237-7691
Monday – Friday: 8am - 10pm ET
Saturday: 9am - 8pm ET
Sunday: 10am - 7pm ET

20
©2019 BISSELL Inc.
All rights reserved. Printed in Malaysia.
Part Number 162-1655 07/19 RevA
Visit our website at: www.BISSELL.com
Registering is quick, easy and offers you benefits over the lifetime of your product.
You’ll receive:
Visit www.BISSELL.com/registration!
Visit the BISSELL website: www.BISSELL.com
When contacting BISSELL, have model number of cleaner available.
Please record your Model Number: ___________________
Please record your Purchase Date: ___________________
NOTE: Please keep your original sales receipt. It provides proof of purchase
date in the event of a warranty claim. See Warranty page for details.
BISSELL® Rewards Points
Automatically earn points for
discounts and free shipping on
future purchases.
Faster Service
Supplying your information now
saves you time should you need
to contact us with questions
regarding your product.
Product Support
Reminders and Alerts
We’ll contact you with any
important product maintenance
reminders and alerts.
Special Promotions
Optional: Register your email
to receive notice of offers,
contests, cleaning tips, and more!
Love y r BISSELL® product?
Don’t keep it a secret.
Let us, and millions of others, know what you think!
Leave your star-rating on BISSELL.com
www.BISSELL.com
Parts & Supplies
For Parts and Supplies, go to www.BISSELL.com and enter your model
number in the search fi eld.
Register your product today!

www.BISSELL.com
1
¿Prefi ere los videos?
Busque este ícono y
conéctese para ver un
video instructivo en
www.BISSELL.com
GUÍA DE INICIO RÁPIDO/DEL USUARIO
Serie 1986
REVOLUTION
™
PET PRO

www.BISSELL.com
2
ADVERTENCIA
La conexión inapropiada del conductor de puesta a tierra del equipo puede
causar peligro de descarga eléctrica. Consulte a un electricista o personal
de mantenimiento calificado si no está seguro que el tomacorriente tenga
una puesta a tierra adecuada. NO MODIFIQUE EL ENCHUFE. Si el enchufe no
encaja en el tomacorriente, pídale a un electricista calificado que instale
el tomacorriente adecuado. Este electrodoméstico está diseñado para
utilizarse en un circuito nominal de 120 voltios y cuenta con un accesorio
de puesta a tierra similar al que se muestra en la ilustración. Asegúrese de
que el electrodoméstico esté conectado a un tomacorriente con la misma
configuración que el enchufe. No debe utilizarse ningún adaptador de enchufe
con este electrodoméstico.
INSTRUCCIONES DE PUESTA A TIERRA
Este electrodoméstico debe conectarse
a un sistema de cableado con puesta a
tierra. En caso de malfuncionamiento o
avería, la puesta a tierra hace que pase la
menor resistencia de corriente eléctrica y
reduce el riesgo de descarga eléctrica. El
cable de este electrodoméstico tiene un
conductor de puesta a tierra del equipo
y un enchufe de puesta a tierra. Debe
conectarse solo a un tomacorriente correctamente instalado y con puesta a
tierra que cumpla con todas las ordenanzas y códigos locales.
INSTRUCCIONES IMPORTANTES DE SEGURIDAD
ADVERTENCIA
PARA
DISMINUIR EL RIESGO DE INCENDIO, DESCARGAS
ELÉCTRICAS O LESIONES:
»Conecte solo a un tomacorriente con
la debida puesta a tierra. Consulte las
instrucciones de puesta a tierra. No
modifique el enchufe con puesta a tierra
de 3 clavijas.
»No se aleje del electrodoméstico si
está enchufado. Desenchúfelo del
tomacorriente cuando no esté en uso y
antes de realizarle mantenimiento.
»No lo exponga a la lluvia. Almacénelo en
interiores.
»No permita que se use como un juguete.
Es necesaria una estricta supervisión
cuando los niños la utilicen o estén cerca.
»No use este electrodoméstico para otro
fin que no sea el especificado en esta
Guía del usuario. Use solo los accesorios
recomendados por el fabricante.
»No lo utilice si el enchufe o el cable está
dañado. Si el artefacto no funciona
debidamente o se ha caído, se ha dañado,
se ha dejado en exteriores o se ha caído
al agua, llévelo a un centro de servicio
autorizado para su reparación.
»No lo jale ni transporte del cable, no use
el cable como manija, no cierre puertas
sobre el cable ni jale del cable alrededor
de esquinas o bordes filosos.
»No pase el electrodoméstico por sobre
el cable. Mantenga el cable alejado de
superficies calientes.
»No jale del cable para desenchufarlo.
Para desenchufarlo, tome el enchufe, no
el cable.
»No manipule el enchufe ni el
electrodoméstico con las manos mojadas.
»No coloque ningún objeto en las
aberturas. No utilice con las aberturas
bloqueadas; mantenga las aberturas libres
de polvo, pelusas, cabellos y cualquier
elemento que pueda reducir el flujo de
aire.
»Mantenga el cabello, las ropas holgadas,
los dedos y todas las partes del cuerpo
lejos de las aberturas y las piezas en
movimiento.
»Apague todos los controles antes
de enchufar o desenchufar el
electrodoméstico.
»Tenga sumo cuidado cuando limpie sobre
escaleras.
»No aspire materiales inflamables o
combustibles (líquido para encendedores,
gasolina, queroseno, etc.) ni lo use en
áreas en que estos estén presentes.
»No utilice el electrodoméstico en un
espacio cerrado lleno de los vapores
despedidos por pintura a base de aceite,
diluyentes de pintura, algunas sustancias
repelentes de polillas, polvo inflamable u
otros vapores explosivos o tóxicos.
»No lo use para aspirar materiales tóxicos
(blanqueador de cloro, amoníaco,
limpiador para desagüe, etc.).
»No aspire objetos encendidos o con
humo, como cigarrillos, fósforos o cenizas
calientes.
»No aspire objetos duros o filosos tales
como vidrio, clavos, tornillos, monedas, etc.
»No la use si los filtros no están en su lugar.
»Utilice solo las fórmulas de limpieza de
BISSELL® que se diseñaron para usarse con
este electrodoméstico con el fin de evitar
el daño de los componentes internos.
Consulte la sección de “Fórmulas de
limpieza” de esta guía.
»No la sumerja. Utilícelo únicamente sobre
superficies humedecidas por el proceso
de limpieza.
»Mantenga el electrodoméstico sobre una
superficie nivelada.
»No transporte el electrodoméstico
mientras esté en uso.
»Siempre instale el flotador antes de
realizar cualquier operación para aspirar
algo húmedo.
»Desenchufe antes de conectar el accesorio
TurboBrush®.
»La película de plástico puede ser peligrosa.
Para evitar el riesgo de asfixia, procura
mantenerla fuera del alcance de los niños.
»Si el aparato cuenta con cepillo de rodillo
motorizado, no lo dejes en funcionamiento
en el mismo lugar sin sostener el mango
totalmente en posición vertical.
»Utiliza únicamente el tipo y la cantidad de
líquido que se especifican en la sección de
funcionamiento de esta guía.
»Usa el producto solo en moquetas que
han quedado húmedas tras limpiarlas.
»No se deben arrojar líquidos hacia equipos
que contengan piezas eléctricas.
LEA TODAS LAS INSTRUCCIONES ANTES DE UTILIZAR SU LIMPIADORA PROFUNDA.
Al usar electrodomésticos, debe respetar las siguientes medidas de precaución básicas:
GUARDE ESTAS INSTRUCCIONES PARA UN PRÓXIMO USO
Este modelo es solo para uso doméstico. El uso comercial de esta unidad anula la garantía del fabricante.
Tomacorriente
con puesta a
tierra
Clavija con puesta a tierra

www.BISSELL.com
3
NOTA: los accesorios estándar
pueden variar según el modelo.
Para saber qué debe estar
incluido ensu compra, consulte
la lista de “Contenidos de la
caja”, en la solapa superior de
la caja.
Contenido del paquete
1. 2. 3. 4.
5. 6. 7.
8. 9. 11.
1. Manija superior
2. 1 tornillo fijado a la manija superior
3. Base con tanque de agua sucia
4. Tanque de agua limpia
5. Manija de transporte
6. Eliminador profesional de orina de
mascotas BISSELL + Oxy
7. Fórmula Pro Boost BISSELL
8. Bolsa de accesorios y manguera
9. Accesorio para manchas difíciles
10. Herramienta para tapicería y
mascotas 2 en 1
11. Accesorio para limpiar la boquillal
10.
Gracias por comprar una limpiadora de alfombras BISSELL®.
Amamos la limpieza y estamos ansiosos por compartir uno de nuestros innovadores productos
con usted. Queremos que la su limpiadora de alfombras funcione como nueva por años, por eso
esta guía presenta sugerencias sobre el uso, el mantenimiento y, si hay algún problema, la solución
de problemas.
La limpiadora de alfombras necesita un poco de ensamblaje antes de ponerla en funcionamiento,
por lo tanto, vaya a la sección “Ensamblaje” y empiece ahora mismo.
Instrucciones de seguridad......2
Vista del producto ..............4
Fórmulas de limpieza ...........6
Funcionamiento ..............7-12
Mantenimiento y cuidado ....13-17
Solución de problemas..........18
Garantía........................19
Reparación .....................19
Registro del producto..........20
Piezas y suministros ...........20

www.BISSELL.com
4
Conozca su limpiadora profunda
Manija
superior
Sujetador
para cable
durante el uso
Interruptor de
modo de limpieza
Botón
CleanShot®
Cepillos EdgeSweep®
Manija de
transporte
Lengüeta
de goma
Abrazadera
para cable
Quick Release™
Pedal para
reclinar
Tapa de
fórmula/
llenado
fácil
Tanque de agua limpia
(capacidad de 3,78 litros)
Botón de
encendido
Flotante
Tanque de agua sucia
Puerta de acceso
a la correa
Patas
Gatillo del rociador
Placa de accesos
a la correa/al cepillo
Boquilla
Sugerencias para antes de limpiar una alfombra
• Si va a limpiar una habitación completa, considere trasladar los muebles
hacia otra área.
• Utilice una aspiradora en seco sobre el área que va a limpiar con su
limpiadora profunda.
• Trate previamente las manchas con el tratamiento previo para manchas
BISSELL® para mejorar el rendimiento sobre manchas de café y suciedad
arraigada.

www.BISSELL.com
5
Ensamblaje
Se requiere un destornillador Phillips para el ensamblaje del paso 3.
3 4
1
Luego, alinee la manija de transporte con las ranuras
a cada lado de la base (detrás del interruptor de
encendido y el interruptor de modo de limpieza).
La manija de transporte hará “clic” cuando esté en
su lugar.
Primero, coloque
la manija superior
(de aluminio) en la
parte más alta de
la base hasta que
escuche un “clic”.
NO coloque el
tanque de limpieza
sobre la máquina
antes del paso 5.
Use un destornillador Phillips para
fijar el tornillo (que está adherido a
la manija superior) en la manija de
transporte.
Enrolle el cable alrededor de
la manija de transporte y el
gancho para enrollar el cable
Quick Release™.
En la parte inferior de la
manija superior, alinee el
tanque de agua limpia con
las ranuras y deslice el
tanque en su lugar.
ADVERTENCIA
No enchufe su limpiadora profunda hasta haber comprendido todas las instrucciones y
procedimientos de funcionamiento.
5
clic
Vista
lateral
2

www.BISSELL.com
6
FÓRMULAS PROFESIONALES
FÓRMULA CONCENTRADA 2X®
FÓRMULAS PARA
PISOS DESCUBIERTOS
Pet Stain
& Odor +
Antibacterial
Professional
Deep
Cleaning
Professional
Pet Urine
Eliminator+Oxy
Pet Stain &
Odor
DeepClean
+ Protect
DeepClean
+ Refresh
Deep Clean
+ Oxy
Hard Floor
Solutions
Limpia y controla
las bacterias que
causan mal olor
Supera a las
demás fórmulas
Incluye el
protector
Scotchgard™
Nuestra mejor
fórmula para las
manchas de orina
y los olores de
mascotas
Incluye el
protector
Scotchgard™
Elimina las
manchas difíciles
causadas por
mascotas
Incluye el
protector
Scotchgard™
Limpia las
alfombras de
forma profunda
y las protege de
futuras manchas
gracias al
protector
Scotchgard
Limpieza
potente con
un aroma
refrescante
Elimina la
suciedad
arraigada y
las manchas
y los olores
provocados
por las
mascotas
Se puede utilizar
en forma segura
sobre linóleo, vinilo
y baldosa
de cerámica;
elimina la suciedad
difícil de quitar.
REALZAR
REALZADOR DE LA FÓRMULA PARA LIMPIEZA DE ALFOMBRAS
TRATAMIENTO PREVIO
REALICE UN TRATAMIENTO PREVIO EN LAS MANCHAS PARA
MEJORAR EL RENDIMIENTO DE LA LIMPIEZA DE LAS ALFOMBRAS
Oxy Boost Pro Boost Prevent Boost
Pet Oxy
Boost
Oxy Stain Destroyer Pet Stain Pretreat
Pet Pretreat +
Sanitize
Elimina antiguas
manchas
profundas de
manera
permanente
Revive las
alfombras para
que luzcan mejor
Repela las
manchas para que
no se impregnen
en las fibras de las
alfombras
Elimina las
manchas y los
olores causados
por las mascotas
de manera
permanente
Eliminación
permanente de
manchas en
30 segundos
Tratamiento previo
para ayudar a eliminar
las manchas y los olores
resistentes causados
por mascotas
Penetra para
desinfectar y
aflojar las manchas
difíciles de quitar
Tenga a mano una buen cantidad de la
fórmula genuina BISSELL para poder limpiar
y proteger en cualquier momento que tenga
libre.
Utilice siempre las fórmulas de limpieza
profunda genuinas de BISSELL. Las soluciones
de limpieza que no sean de BISSELL pueden
dañar la máquina y anular la garantía.
Fórmulas de limpieza
ADVERTENCIA
Para reducir el riesgo de incendio y descarga eléctrica causados por el daño en los componentes internos,
utilice solo las fórmulas de limpieza BISSELL® diseñadas para utilizarse con la limpiadora profunda.
SOLO BISSELL protege de futuras manchas gracias al protector Scotchgard.
Scotchgard es una marca registrada de 3M.
*73,93 ml de fórmula 2 veces más concentrada equivalen a 147,86 ml de fórmula no concentrada.
Pet Pretreat +

www.BISSELL.com
7
NOTA: llénelo con agua caliente de grifo (140 ºF/60 ºC, como máximo) y agregue
la fórmula BISSELL adecuada. NO UTILICE AGUA HIRVIENDO. NO CALIENTE EL
AGUA NI EL TANQUE EN EL MICROONDAS. No sustituya la fórmula de limpieza
BISSELL 2X con otros productos de limpieza domésticos.
Con Fórmula 2X:
Desenrosque la tapa del
tanque. Agregue agua
caliente del grifo hasta la
línea de llenado de agua.
A continuación, consulte
la siguiente tabla para
saber la cantidad de
fórmula que se debe
agregar al tanque.
Enrosque la tapa
en su lugar.
Levante el tanque en posición vertical para
retirarlo de la máquina.
El tanque de agua limpia
está en la parte superior de
la máquina.
En la parte inferior de la manija superior, alinee
el tanque con las ranuras y deslice el tanque
en su lugar.
INSTRUCCIONES DE
LLENADO DE FÓRMULA
MODO DE LIMPIEZA PROFUNDA
Y LIMPIEZA MÁXIMA
MODO DE LIMPIEZA RÁPIDA
Fórmulas concentradas
2X de BISSELL
• Llene el tanque con agua hasta la línea de
llenado que se encuentra junto al modo de
LIMPIEZA PROFUNDA/MÁXIMA.
• Llene el tanque con 73,9 ml de fórmula.
• Para una potencia de limpieza extra, llene
la fórmula hasta alcanzar la línea de “Máxi-
mo de fórmula” (147,86 ml).
• Llene el tanque con agua hasta
la línea de llenado que se
encuentra junto al modo de
LIMPIEZA RÁPIDA.
• Llene el tanque con 36,96 ml de
fórmula.
Realzadores de fórmula BISSELL
Boost (opcional)
Agregue 73,9 ml de fórmula BISSELL Boost
al tanque para obtener mejores resultados de
limpieza.
Agregue 73,9 ml de fórmula
BISSELL Boost al tanque para
obtener mejores resultados de
limpieza.
Llenado del tanque de agua limpia:
Fórmula concentrada 2X®
Tanque de agua limpia
(3,78 litros)
Tanque de agua sucia
1
2
3
4

www.BISSELL.com
8
Llenado del tanque de agua limpia:
Para uso futuro si selecciona la fórmula antibacterial con EasyFill
1
Levante el tanque en
posición vertical para
retirarlo de la máquina.
El tanque de agua
limpia está en la
parte superior de la
máquina.
Tanque de agua limpia
(3,78 litros)
Tanque de agua sucia
Desenrosque la tapa del tanque.
Agregue agua caliente del grifo
hasta la línea de llenado de agua.
En la parte inferior de la manija
superior, alinee el tanque con las
ranuras y deslice el tanque en
su lugar.
Algunas consideraciones sobre el llenado del tanque de agua limpia:
• Llénelo con agua caliente de grifo (140 ºF/60 ºC, como máximo) y agregue la fórmula
BISSELL® adecuada. NO UTILICE AGUA HIRVIENDO. NO CALIENTE EL AGUA NI EL
TANQUE EN EL MICROONDAS.
• Cuando utilice la fórmula Antibacterial de BISSELL: solo llene el tanque de agua limpia
con la cantidad recomendada de agua y fórmula para lograr benefi cios antibacterianos.
AVISO: no humedezca demasiado la alfombra. Tenga cuidado de no pasar por encima de objetos sueltos o
los bordes de los tapetes. El estancamiento del cepillo puede ocasionar el fallo prematuro de la correa.
AVISO:
la fórmula antibacterial BISSELL es solo para máquinas BISSELL con EasyFill System.
Inserte firmemente la botella
de la fórmula de tamaño
completo en la tapa del tanque
y apriete hasta que la fórmula
alcance la línea de EasyFill.
Después de llenar el tanque
con agua caliente de grifo,
vuelva a enroscar la tapa
amarilla en el tanque.
2
3
4
5

www.BISSELL.com
9
Limpieza de la alfombra
Presione el botón de encendido
para encender la máquina.
Enchufe a un
tomacorriente
con la debida
puesta a tierra.
Limpieza máxima: proporciona limpieza profunda
para las alfombras más sucias. Después de la
limpieza, se estima que las alfombras necesitarán 8
horas para secarse.
El modo de limpieza profunda: el modo de limpieza
profunda limpia profundamente su alfombra.
Limpieza rápida: Proporciona una limpieza más
ligera con un tiempo seco de 30 minutos de
limpieza. Recomendada paso: 12 pulgadas por
segundo.
Modos de limpieza máxima
y limpieza profunda:
1. Presione el gatillo del rociador
para aplicar la solución mientras
realiza 2 pasadas lentas y en
húmedo, 1 hacia delante y 1 hacia
atrás.
2. Suelte el gatillo.
3. Realice 2 pasadas de secado
lentas: 1 hacia delante y 1 hacia
atrás, para succionar la solución
sucia. (No mantenga apretado el
gatillo para este paso).
Limpieza antibacterial
(solamente modo de
limpieza profunda)
1. Presione el gatillo del rociador
para aplicar la solución mientras
realiza 3 pasadas lentas y en
húmedo: 1 hacia delante, 1 hacia
atrás y 1 hacia delante nuevamente.
2. Suelte el gatillo
3. Realice una pasada lenta y en
seco hacia atrás para succionar
la solución sucia. (No mantenga
presionado el gatillo en este
paso).
Modo de limpieza rápida:
1. Presione el gatillo del rociador
para aplicar la solución mientras
realiza 2 pasadas en húmedo, 1
hacia delante y 1 hacia atrás.
2. Suelte el gatillo.
3. Realice 2 pasadas en seco:
1 hacia delante y 1 hacia atrás para
succionar la solución sucia. (No
mantenga apretado el gatillo para
este paso).
Ritmo de limpieza recomendado:
30,48 cm por segundo
AVISO: para evitar daños en las
alfombras Beréber, evite pasar
repetidamente sobre la misma
área.
Seleccione el modo de limpieza:
Para reclinar la máquina
para su uso, presione
con el pie el pedal para
reclinar.
1
2
3
4
• El modo de limpieza máxima está diseñado para las áreas alfombradas más sucias. Tenga en cuenta que las
• alfombras necesitarán aproximadamente 8 horas para secarse. Para acelerar el proceso de secado, coloque un
ventilador en la habitación o cerca de la alfombra.
• En el modo de limpieza rápida, el tanque de agua sucia no se llenará como cuando limpia con el modo de
limpieza profunda o máxima.
• Es normal volver a llenar el tanque de agua limpia y vaciar el tanque de agua sucia varias veces durante el
proceso de limpieza. El tamaño de la habitación y la velocidad a la cual limpia son factores que afectan la
frecuencia en la que se necesita volver a llenar o vaciar el tanque.

www.BISSELL.com
10
Limpieza con manguera y accesorio
Inserte la manguera en su
lugar hasta escuchar un
chasquido. Asegúrese de que
el sujetador de liberación
rojo de la manguera esté
orientado hacia afuera,
en dirección opuesta
a la máquina.
Presione el botón del gatillo del rociador para rociar la
superficie sucia y luego mueva lentamente el accesorio
hacia delante y hacia atrás sobre la superficie.
Suelte el gatillo para succionar la solución sucia. Trabaje
en secciones pequeñas hasta que el área esté limpia.
Cuando termine de limpiar, encienda la máquina para
succionar agua caliente limpia para enjuagar el interior
de la manguera y el accesorio. Desconecte la manguera
y el accesorio y cierre la puerta de la manguera. Deje
secar la manguera y el accesorio antes de almacenarlos.
Acople el accesorio al extremo de la manguera.
(Los accesorios pueden variar según el modelo).
Presione el botón de encendido para encender
la máquina.
NOTA: si utiliza las herramientas Deep Reach o Pet Stain, asegúrese de que las agujas del accesorio se
presionen hacia abajo en la alfombra para que el rociado penetre en las fibras de la alfombra.
— Mantenga el cabello, las ropas holgadas, los dedos y todas las
partes del cuerpo lejos de las aberturas y piezas en movimiento.
El cepillo giratorio sigue girando cuando está en posición
vertical.
— El rodillo del cepillo continúa girando mientras el producto
está encendido y la manija está en posición vertical. Para evitar
daños en las alfombras, tapetes, muebles y pisos, evite inclinar
la limpiadora o colocarla sobre algún mueble, en los tapetes
con flecos o en escaleras alfombradas durante el uso de la
herramienta.
— El cepillo giratorio permanece encendido mientras limpia con
la manguera y el accesorio. No deje el limpiador en la misma
posición por un largo período, ya que podría dañarse el piso.
Levante la puerta de la
manguera en la parte
superior del pie en la parte
frontal de la máquina. La
puerta se voltea hacia la
máquina para abrirla.
Limpieza con CleanShot®
Presione el botón CleanShot
con el pie. La ventana del
botón se tornará verde
y mostrará el símbolo “I”
cuando esté encendido.
El rociado continuará hasta que lo
apague. Para apagar CleanShot,
presione el botón con el pie. La
ventana del botón se tornará roja y
mostrará el símbolo “O” cuando esté
apagado.
Cubra por completo la
mancha con el rociador
CleanShot. Deje que la
mancha absorba el producto.
Para extraerlo, pase el pie de
la máquina sobre la mancha
para frotar y eliminarla.
Continúe limpiando sobre
la zona varias veces para un
restregado y una succión
adicionales.
1
2
3
4
1
2

www.BISSELL.com
11
NOTA SOBRE MODO SECO: utilice un movimiento “de rastrillo” para la limpieza. Comience con el
accesorio en el área más alejada y rastrille en pequeños incrementos a medida que acerca el accesorio.
Las protuberancias de goma ayudarán a atraer el pelo hacia el canal de succión.
Conecte el accesorio y seleccione el modo
seco para recoger primero residuos secos y
pelos de mascota. La succión se producirá
en la parte inferior del accesorio, cerca del
recipiente seco.
Siga las instrucciones sobre la conexión de la
manguera de los pasos 1 y 2 en la página 14.
Herramienta para tapicería y mascotas 2 en 1
*Asegúrese de que el tanque de agua limpia tenga agua y fórmula para usar el accesorio en el modo húmedo
Apague la máquina. Sostenga la
base y gire en dirección contraria
a las manecillas del reloj para
alinear la flecha con el símbolo de
desbloqueo y retire.
Retire el recipiente
para sacar el pelo y
los residuos.
Para volver a colocar el
recipiente, alinee el recipiente
con las hendiduras del
accesorio y gire en dirección
de las manecillas del reloj.
Cuando esté asegurado, la
flecha se alineará con el icono
de bloqueo.
Para realizar una limpieza profun-
da, mueva el interruptor al modo
húmedo. Presione el gatillo para
rociar el agua y la fórmula. Use la
parte superior de la boquilla para
eliminar las manchas y los olores.
Para retirar el pelo o los
residuos atrapados en la
boquilla, primero apague la
máquina. Saque la lengüeta de
la boquilla del accesorio para
retirar y enjuagar bajo el agua
corriente.
Para volver a colocarla en el
accesorio, alinee el borde de
la boquilla y fíjela en su lugar.
Antes de almacenar la máquina,
asegúrese de haber sacado todo
el pelo del recipiente seco y de
haber enjuagado la boquilla bajo
el agua corriente.
Modo seco
(interruptor
hacia arriba)
Modo húmedo
(interruptor
hacia abajo)
Vacíe el recipiente cuando
se llene de pelos y
residuos.
Canal de
succión en
seco
Retire el pelo que
se pueda enredar
alrededor del filtro.
Canal
de
succión
en
húmedo
NOTA SOBRE MODO HÚMEDO: comience desde el área más alejada. Mantenga presionado el gatillo y
jale la herramienta hacia usted. Mantenga el accesorio en contacto con la superficie a medida que jala.
Verá la extracción a través de la boquilla.
1
2
3
4
5
6
7
8
9

www.BISSELL.com
12
Limpieza para pisos descubiertos*
Cuando la máquina está desenchu-
fada, acople el accesorio para pisos
descubiertos en la parte inferior de
la máquina; para hacerlo, alinee el
accesorio con el borde de la
boquilla. Rote hacia abajo hasta que
haga clic y calce en su lugar.
Siga las instrucciones de llenado de
la página 10 u 11 y cambie el modo
de limpieza a limpieza rápida.
Cuando termine, desenchufe la
máquina y retire el accesorio
para pisos descubiertos; para
hacerlo, gire el accesorio hacia
arriba para que se desenganche
de la boquilla.
Enjuague y deje secar antes de
almacenar. Consulte la página 16
para vaciar el tanque de agua
sucia. Consulte la página 17 para
la limpieza de la máquina antes
de almacenarla.
Enchúfela a un tomacorriente con la
debida puesta a tierra y presione el
botón de encendido.
Limpie presionando el gatillo para
una pasada en húmedo hacia delante,
una pasada en húmedo hacia atrás
y luego suelte el gatillo y realice una
pasada en seco hacia delante y una
pasada en seco hacia atrás.
ADVERTENCIA
ADVERTENCIA: para reducir el riesgo de incendio y descarga eléctrica al limpiar un piso
duro, el accesorio para pisos descubiertos de BISSELL® se debe usar solo con las fórmulas
Hard Floor de BISSELL destinadas para usar con este electrodoméstico.
NOTA: el accesorio para pisos descubiertos que es compatible con ProHeat
2X® Revolution™ no está incluido. Está disponible para la compra si se pone en
contacto con nuestro equipo por teléfono o puede visitarnos en BISSELL.com.
*El accesorio para pisos descubiertos no se incluye con la máquina.
¡Importante! Verifique la etiqueta del fabricante antes de limpiar tapetes para conocer las
instrucciones de limpieza específicas. No recomendamos que realice una limpieza profunda a
tapetes delicados, antiguos o de materiales como seda o lana sin la etiqueta del fabricante.
Limpieza de tapetes de interiores
Limpie regularmente los tapetes ubicados en lugares de mucho tránsito en modo de limpieza rápida:
• Controle la etiqueta del fabricante.
• Seleccione el modo de limpieza rápida.
• Cuando limpie un tapete, colóquelo sobre una superficie sellada para probar la firmeza del color en un
área poco visible. Su limpiador no debe usarse en superficies sin sellar.
• Importante: mantenga el pie de la limpiadora profunda perpendicular al borde del tapete con cada pasada
de limpieza para evitar daños.
• Ritmo de limpieza recomendado: 30,48 cm por segundo
1
2
3

www.BISSELL.com
13
Vacíe el tanque de agua sucia
Para liberar el tanque de agua
sucia, presione hacia abajo la
manija del tanque de color.
Incline el tanque
ligeramente hacia usted.
Tome la manija y el tanque con
ambas manos y jale el tanque
hacia arriba para sacarlo.
Limpie el filtro rojo
debajo del tanque; para
hacerlo, limpie cualquier
resto de suciedad o
desecho.
Para vaciar rápido:
Jale la lengüeta de goma e
incline para verter. (Ubicada
en la esquina de la parte
superior del tanque).
Al cerrar la lengüeta de
goma, asegúrese de que
todos los bordes estén
herméticamente sellados.
Para la limpieza final y el
enjuague: desenrosque el
anillo en la parte inferior del
tanque.
Retire con cuidado el
flotante, enjuague y limpie.
Una vez limpio, vuelva a
colocar el flotante en el
tanque alineando las flechas
para que se apunten entre sí.
Esta es la única forma en la
que el flotante encajará en
el tanque.
Con las flechas alineadas,
el flotante debe encajar en
su lugar.
Vuelva a colocar el anillo y
gire para bloquear. Podría
filtrarse agua si el anillo no
está bien ajustado.
¿Sabía usted?
El flotante es lo
que evita que el
tanque sucio
se rebalse.
ADVERTENCIA
Para reducir el riesgo de incendio, descarga eléctrica o lesiones, coloque el interruptor de alimentación en la posición OFF
(apagado) y desconecte el enchufe del tomacorriente antes de realizar mantenimiento o solucionar problemas en la unidad.
Para volver a colocar el
tanque: incline el tanque
e inserte primero la parte
inferior. Luego, incline el
tanque hacia la máquina y
presione la parte superior
hasta que haga un chas
-
quido y calce en su lugar.
3
2
1
4
5
6

www.BISSELL.com
14
Limpieza de la máquina después de utilizar
Para la descarga y el enjuague de la máquina: encienda la máquina y
presione el gatillo durante 15 segundos mientras realiza pasadas hacia
atrás y hacia delante en una sección de la alfombra.
Finalmente, suelte el gatillo y extraiga el agua. Consulte la página 15 para
saber cómo limpiar el agua que recién se extrajo del tanque de agua
sucia.
ADVERTENCIA
Para reducir el riesgo de descarga eléctrica, apague la máquina y desconecte el enchufe del
tomacorriente antes de realizarle mantenimiento a la unidad o solucionar problemas.
Primero, llene el tanque de agua
limpia con agua tibia y vacíelo
completamente para enjuagarlo.
Luego, rellene con agua cálida
de grifo y regrese el tanque a la
máquina. Enrosque la tapa
firmemente en su lugar.

www.BISSELL.com
15
Cuidado del rodillo del cepillo y de la boquilla
Apague la máquina
y desconéctela del
tomacorriente con
puesta a tierra.
Retire la boquilla del pie:
saque y tome la puerta
de la manguera. Jale
hacia arriba para retirar
la boquilla.
En este punto, la cubierta
de la boquilla y el cepillo
giratorio se pueden
enjuagar con agua
corriente y se puede
insertar la herramienta de
limpieza de la boquilla para
eliminar obstrucciones de
cabello o desechos.
Luego, retire la
siguiente capa, la
cubierta del cepillo
giratorio, para dejar
al descubierto
los rodillos del
cepillo. Presione
los dos botones de
liberación y levante.
NOTA: asegúrese de limpiar los cepillos giratorios y la boquilla antes de almacenar la máquina. Siga
estos pasos si la boquilla se obstruye con pelos y residuos.
AVISO: para reducir el riesgo de fuga, no almacene la unidad en un lugar donde
se pueda congelar. Se podrían producir daños en los componentes internos.
1
2
3
4
Cuando finalice, presione la cubierta para el cepillo giratorio
hacia abajo para colocarla en su lugar. Escuchará un “clic” de
cada botón de presión cuando la cubierta quede en su lugar.
Alinee la boquilla desde el borde cerca del piso y gírela para
volver a fijarla en su lugar.
Use el cepillo para eliminar los desechos o
los pelos de los cepillos giratorios.
clic
5
6
ADVERTENCIA
Para reducir el riesgo de descarga eléctrica, apague la máquina y desconecte el enchufe del
tomacorriente antes de realizarle mantenimiento a la unidad o solucionar problemas.

www.BISSELL.com
16
Reemplazo de correas y rodillos del cepillo
Usted necesitará: 1 destornillador Phillips y 1 tornillo de cabeza plana
Utilice un destornillador
de cabeza plana y
presiónelo en la ranura
que se encuentra en la
parte posterior y luego
delante de la puerta
de acceso a la correa.
Levante para retirar la
puerta.
Cuando la máquina esté erguida, desenchúfela y retire ambos tanques. Retire la boquilla y la cubierta de
cepillo giratorio (consulte los pasos en Cuidado del cepillo giratorio y de la boquilla). Presione el pedal
para reclinar y acueste la máquina sobre su parte posterior.
Ponga la máquina de lado y use un
destornillador Phillips para retirar el tornillo que
está justo debajo de la rueda. Deslice la rueda
hacia abajo para retirarla.
Vuelva a acostar
máquina sobre su parte
posterior. Utilice un
destornillador Phillips
para retirar el tornillo
que se encuentra en la
tapa del extremo del
cepillo giratorio.
Si la correa del
engranaje está rota,
retírela con suavidad.
Si va a reemplazar los
cepillos giratorios, retire
suavemente la correa.
Hay arandelas en
los extremos de los
cepillos giratorios; tenga
cuidado de que no se
caigan ni pierdan.
NOTA: para reemplazar los cepillos giratorios, retírelos de los postes de metal y reemplácelos.
Asegúrese de que el poste de metal llegue por completo al extremo del cepillo giratorio. Las
cerdas deben estar alineadas en ‘V’, como se muestra.
1
2
3
4
5
6
Alinee los cepillos giratorios con
la correa en el otro extremo. Para
garantizar la alineación, sostenga
el extremo de un cepillo giratorio
y gírelo. El otro cepillo giratorio
gira con él. Verifique que las
arandelas estén en su lugar.
Vuelva a ensamblar la correa y
la tapa del extremo, asegurando
con los tornillos que había
retirado.
ADVERTENCIA
Para reducir el riesgo de descarga eléctrica, apague la máquina y desconecte el enchufe del
tomacorriente antes de realizarle mantenimiento a la unidad o solucionar problemas.

www.BISSELL.com
17
Manténgala enrollada
alrededor de la
polea roja y ajuste la
máquina para volverla
a colocar sobre su
parte posterior. Use
el pulgar para estirar
la correa plana hacia
la parte posterior
para que se enrolle
alrededor del eje de
metal.
Si la correa plana está
rota, retírela con suavidad.
Si por alguna razón debe
reemplazarla, la correa del
engranaje debe retirarse
antes de retirar la correa
plana. Gire la máquina para
colocarla nuevamente de
costado. Pase la nueva
correa plana por la abertura
para que se enrolle alrededor
de la polea roja
Reemplazo de correas y rodillos del cepillo (continuación)
7
8
Vuelva a encajar la puerta de acceso a la
correa en su lugar.
Vuelva a asegurar la rueda y la puerta de acceso a la
correa:
Vuelva a deslizar la rueda hacia arriba en la ranura y
fíjela con el tornillo que retiró.
9
NOTA: consulte el paso 6 en la página 17 para saber cómo volver a colocar la
cubierta para el cepillo giratorio y la boquilla en su lugar.
10

www.BISSELL.com
18
Problema Causas posibles Soluciones
Sale chorro reducido o no
sale chorro de la base de
la máquina
El tanque de agua limpia puede estar vacío. Llene nuevamente el tanque.
El tanque de agua limpia puede no estar asentado
completamente.
Lleve el interruptor de encendido a la posición OFF (Apagado); retire el tanque y vuelva a asentarlo.
No sale chorro de la
manguera ni el accesorio
La manguera a la máquina no está cebada o puede haber
perdido el cebado.
1. Con la máquina apagada y desenchufada, retire la boquilla del pie. Coloque un bolígrafo de punta redonda en
el cilindro negro junto al tornillo. Cuando aparezcan burbujas de agua, retire el bolígrafo. Vuelva a ensamblar la
boquilla y la manguera.
2. Sostenga un extremo de la manguera por debajo del nivel de agua en el tanque para cebar.
3. Con el tanque de agua limpia lleno de agua, la máquina en OFF y reclinada, presione el botón CleanShot y espere
que drene unos segundos. Esto volverá a cebar la máquina.
El tanque de agua limpia puede estar vacío. Vuelva a llenar el tanque de agua limpia.
El tanque de agua limpia puede no estar asentado
correctamente.
Apague la alimentación. Retire y vuelva a asentar el tanque.
No sale chorro de
CleanShot®
El tanque de agua limpia puede estar vacío. Vuelva a llenar el tanque.
El tanque de agua limpia puede no estar asentado
correctamente.
Apague la alimentación. Retire y vuelva a asentar el tanque.
La máquina no está inclinada. Presione el pedal de inclinación y baje la manija para reclinar la máquina.
La bomba puede haber perdido el cebado. Con la máquina apagada y desenchufada, retire la boquilla del pie. Coloque un bolígrafo de punta redonda en
el cilindro negro junto al tornillo. Cuando aparezcan burbujas de agua, retire el bolígrafo. Vuelva a ensamblar la
boquilla antes de limpiar nuevamente.
CleanShot continúa el
chorro cuando la máquina
está apagada
El botón CleanShot no está en la posición de “APAGADO”. Presione el botón CleanShot para apagarla. La ventana del botón mostrará el color rojo y el símbolo “O” cuando
esté en la posición de apagado.
Pérdida de potencia de
succión
El tanque de agua sucia puede no estar asentado
correctamente.
Levante el tanque y asiéntelo para que calce en la unidad.
El tanque de agua sucia ha absorbido la cantidad máxima de
agua sucia y ha alcanzado la línea completa.
Vacíe el tanque.
La lengüeta de goma en el tanque de agua sucia no está
sellada herméticamente.
Revise la lengüeta de goma en el tanque de agua sucia y presione firmemente en todos los bordes para asegurarla
firmemente (consulte el paso 4 en la página 15 para obtener más detalles).
La puerta de la manguera no está cerrada firmemente
en su lugar.
Revise la puerta de la manguera y asegúrese de que se cierre firmemente, debe estar bloqueada en su lugar.
La boquilla puede estar obstruida con pelos de mascotas
o desechos.
Utilice el accesorio de limpieza de la boquilla y siga los pasos en la página 17 para la "limpieza de la boquilla".
La cubierta para el cepillo giratorio no está encajada
completamente en su lugar.
Retire la boquilla y la cubierta del cepillo giratorio. Siga el paso 6 de la página 17 y asegúrese de que ambos botones
encajen en su lugar.
No hay energía
Confusión del interruptor de modo de limpieza con el botón
de encendido.
Presione el botón rojo de encendido ubicado en el costado izquierdo de la máquina para encender la máquina.
El tomacorriente puede no estar activo. Trate de enchufar en otro dispositivo que utiliza un tomacorriente con puesta a tierra para probar la alimentación
del tomacorriente.
Pérdida del tanque
El tanque puede haberse llenado excesivamente. 1. Asegúrese de que el tanque tenga agua y la fórmula que preparó.
2. Con la tapa puesta firmemente, sostenga el tanque en un ángulo, sobre un fregadero o desagüe, para eliminar
toda el agua adicional.
3. Seque el tanque con un paño.
Puede haber quedado agua en el espacio entre el tanque y
la manija del tanque.
Chorrea agua de la
bandeja de enjuague y
almacenamiento
La bandeja está llena de agua. Solo llene la bandeja con agua hasta la línea de llenado. Cuando use la bandeja de enjuague de agua, solo llene con
agua fresca hasta la "línea de agua" impresa.
La máquina está en posición "reclinada". Apague la alimentación. Levante la manija hasta la posición vertical. Proceda a usar la bandeja como se indica. No
incline la máquina y siga las instrucciones de uso de la página 16.
Solución de problemas
ADVERTENCIA
Para reducir el riesgo de descarga eléctrica, apague la máquina y desconecte el enchufe del
tomacorriente antes de realizarle mantenimiento a la unidad o solucionar problemas.

www.BISSELL.com
19
Si su producto BISSELL necesita
reparación:
Póngase en contacto con Atención al Consumidor
de BISSELL para ubicar un Centro de servicio
autorizado de BISSELL en su área. Si necesita
información sobre reparaciones o piezas de
repuesto, o si tiene preguntas sobre la garantía,
póngase en contacto con Atención al Consumidor
de BISSELL.
Esta garantía le otorga derechos legales específicos,
pero podría tener también otros derechos que varían
según el estado. Si necesita instrucciones adicionales
con respecto a esta garantía o tiene preguntas sobre
lo que esta cubre, póngase en contacto con Atención
al Consumidor de BISSELL® por correo electrónico o
teléfono, como se describe a continuación.
Quizá sea necesario obtener algunos de sus datos
personales, como la dirección de correo electrónico,
para completar los términos de esta garantía.
Cualquier dato personal se tratará conforme a la
Política de privacidad de BISSELL, que se encuentra
en línea en www.BISSELL.com/privacy-policy.
Garantía limitada de cinco años
Sujeta a las *Excepciones y exclusiones de los
términos de la garantía limitada, presentando el
comprobante de compra del producto, BISSELL
reparará o reemplazará (con componentes o
productos nuevos, refaccionados, levemente
utilizados o fabricados nuevamente), a discreción de
BISSELL, sin costo a partir de la fecha de compra del
comprador original y durante cinco años, cualquier
pieza defectuosa o con mal funcionamiento.
Consulte la información a continuación sobre
“Si su producto BISSELL necesita un servicio de
mantenimiento”.
Esta garantía se aplica al producto utilizado para
el servicio personal y no comercial o de alquiler.
Esta garantía no se aplica a los ventiladores o
a los componentes de mantenimiento de rutina
como filtros, correas o cepillos. Los daños o el mal
funcionamiento causados por negligencia, uso
inadecuado, descuido, reparación no autorizada
o cualquier otro uso que no se ajuste a la Guía del
usuario no están cubiertos. Esta garantía solo será
válida si el producto se utiliza en el mismo país en el
cual se vendió.
BISSELL no se hace responsable de ningún daño
accidental o resultante de ninguna naturaleza
relacionado con el uso de este producto. La
responsabilidad de BISSELL no superará el precio
de compra del producto.
Algunos estados no permiten la exclusión o
limitación de los daños accidentales o resultantes,
de modo que es posible que las exclusiones o
limitaciones anteriores no se apliquen en su caso.
*Excepciones y exclusiones de los términos
de la garantía limitada
Esta garantía es exclusiva y reemplaza a cualquier
otra garantía oral o escrita. Cualquier garantía
implícita que pueda surgir por una operación
legal, que incluya las garantías implícitas de
comerciabilidad e idoneidad para un fin en particular,
está limitada a cinco años de duración a partir de la
fecha de compra como se detalló anteriormente.
Algunos estados no permiten limitaciones sobre el
tiempo de duración de una garantía implícita, de
modo que es posible que la limitación antes descrita
no se aplique en su caso.
Garantía
NOTA: conserve el recibo de venta original. Es el comprobante de la fecha de compra en
caso de una reclamación de garantía.
Reparación
No devuelva este producto a la tienda.
Cualquier otro mantenimiento o reparación
que no se incluya en el manual debe ser
realizado por un representante de servicio
autorizado.
Sitio Web:
www.BISSELL.com/service-centers
Correo electrónico:
www.BISSELL.com/email-us
Llame a:
Atención al Consumidor de BISSELL
1-800-237-7691
De lunes a viernes: de 8 a.m. a 10 p.m.,
hora del Este
Sábados: de 9 a.m. a 8 p.m., hora del Este
Domingos: de 10 a. m. a 7 p. m., hora del
Este

20
©2019 BISSELL Inc.
Todos los derechos reservados. Impreso en Malaysia.
Número de pieza: 162-1655 07/19 RevA
Visite nuestro sitio web en: www.BISSELL.com
El registro es rápido, fácil y le ofrece beneficios durante la vida útil de su producto.
Usted recibirá:
¡Visite www.BISSELL.com/registration ahora mismo!
Visítenos en línea en: BISSELL.com
Al comunicarse con BISSELL, tenga a mano el número de modelo de la limpiadora.
Anote su Número de modelo: ___________________
Anote su fecha de compra: ___________________
NOTA: Guarde el recibo original de compra. Servirá como comprobante de
la fecha de compra en caso de que necesite hacer un reclamo de garantía.
Consulte la Garantía para ver los detalles.
Puntos de recompensa de
BISSELL®
Gane puntos automáticamente
para descuentos y envío gratis de
compras futuras.
Servicio más rápido
Si suministra su información ahora
le ahorrará tiempo en caso de que
necesite comunicarse con nosotros
con preguntas sobre su producto.
Recordatorios y alertas de
apoyo para su producto
Nos comunicaremos con usted con
recordatorios de mantenimiento y
alertas importantes sobre el
producto.
Promociones especiales
Opcional: ¡Registre su correo
electrónico y reciba avisos de
ofertas, concursos, sugerencias
para la limpieza y mucho más!
¿Le encta su producto BISSELL®?
No se guarde el secreto. Comparta su opinión con
nosotros y con millones de personas.
Deje su calificación con estrellas en BISSELL.com
www.BISSELL.com
Piezas y suministros
Por piezas y suministros vaya a BISSELL.com e ingrese el número de su
modelo en el campo de búsqueda.
¡Registre su producto hoy mismo!
-
 1
1
-
 2
2
-
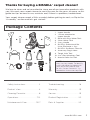 3
3
-
 4
4
-
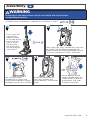 5
5
-
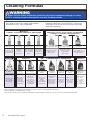 6
6
-
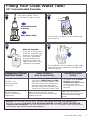 7
7
-
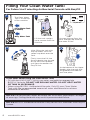 8
8
-
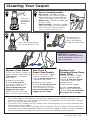 9
9
-
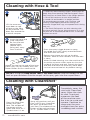 10
10
-
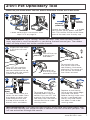 11
11
-
 12
12
-
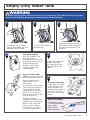 13
13
-
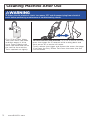 14
14
-
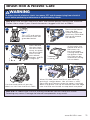 15
15
-
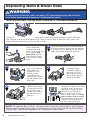 16
16
-
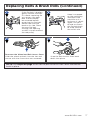 17
17
-
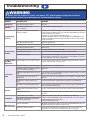 18
18
-
 19
19
-
 20
20
-
 21
21
-
 22
22
-
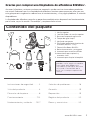 23
23
-
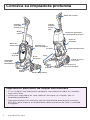 24
24
-
 25
25
-
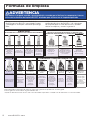 26
26
-
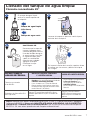 27
27
-
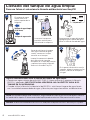 28
28
-
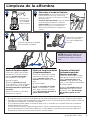 29
29
-
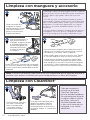 30
30
-
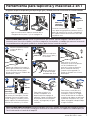 31
31
-
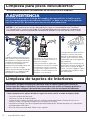 32
32
-
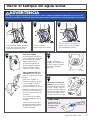 33
33
-
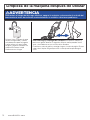 34
34
-
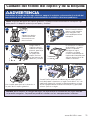 35
35
-
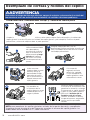 36
36
-
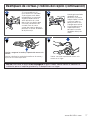 37
37
-
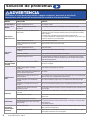 38
38
-
 39
39
-
 40
40


Bissell 1986 Series Revolution Pet Pro Guía del usuario
- Tipo
- Guía del usuario
en otros idiomas
Artículos relacionados
-
Bissell 2089 Series PowerForce PowerBrush Deep Cleaner Guía del usuario
-
-
Bissell 2505 Little Green Pro Guía del usuario
-
-
-
-
-
-
-
