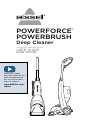
Bissell 2089 Series PowerForce PowerBrush Deep Cleaner Guía del usuario
- Categoría
- Cuidado de mascotas
- Tipo
- Guía del usuario
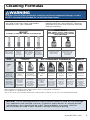
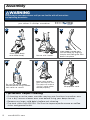
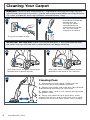
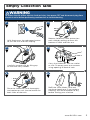
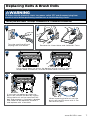
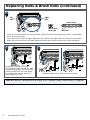
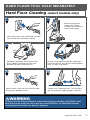
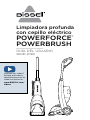
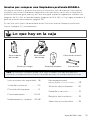
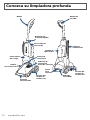
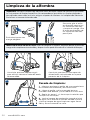
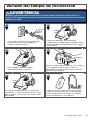
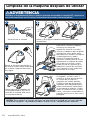
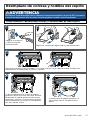
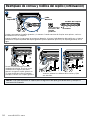
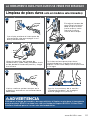
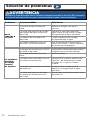
El Bissell 2089 Series PowerForce PowerBrush Deep Cleaner es una máquina potente y fácil de usar que limpia profundamente tus alfombras y tapicerías. Con su fórmula mejorada de doble acción, este limpiador elimina la suciedad y las manchas más difíciles, dejando tus alfombras y muebles frescos y renovados. Además, su diseño compacto y ligero lo hace fácil de maniobrar y almacenar.
El Bissell 2089 Series PowerForce PowerBrush Deep Cleaner es una máquina potente y fácil de usar que limpia profundamente tus alfombras y tapicerías. Con su fórmula mejorada de doble acción, este limpiador elimina la suciedad y las manchas más difíciles, dejando tus alfombras y muebles frescos y renovados. Además, su diseño compacto y ligero lo hace fácil de maniobrar y almacenar.


-
 1
1
-
 2
2
-
 3
3
-
 4
4
-
 5
5
-
 6
6
-
 7
7
-
 8
8
-
 9
9
-
 10
10
-
 11
11
-
 12
12
-
 13
13
-
 14
14
-
 15
15
-
 16
16
-
 17
17
-
 18
18
-
 19
19
-
 20
20
-
 21
21
-
 22
22
-
 23
23
-
 24
24
-
 25
25
-
 26
26
-
 27
27
-
 28
28
-
 29
29
-
 30
30
-
 31
31
-
 32
32


Bissell 2089 Series PowerForce PowerBrush Deep Cleaner Guía del usuario
- Categoría
- Cuidado de mascotas
- Tipo
- Guía del usuario
El Bissell 2089 Series PowerForce PowerBrush Deep Cleaner es una máquina potente y fácil de usar que limpia profundamente tus alfombras y tapicerías. Con su fórmula mejorada de doble acción, este limpiador elimina la suciedad y las manchas más difíciles, dejando tus alfombras y muebles frescos y renovados. Además, su diseño compacto y ligero lo hace fácil de maniobrar y almacenar.
en otros idiomas
Artículos relacionados
-
Bissell 1986 Series Revolution Pet Pro Guía del usuario
-
-
-
-
-
-
Bissell 2505 Little Green Pro Guía del usuario
-
-
-