Bissell 1560, 1564, 1565 Series ProHeat 2X Lift-Off Deep Cleaner Guía del usuario
- Tipo
- Guía del usuario

PROHEAT 2X
®
LIFT-OFF
®
Deep Cleaner
___________
USER GUIDE
1560, 1564, 1565 SERIES

www.BISSELL.com
2
IMPORTANT SAFETY INSTRUCTIONS
WARNING
TO REDUCE THE RISK OF FIRE,
ELECTRIC SHOCK, OR INJURY:
» Connect to a properly grounded
outlet only. See grounding
instructions. Do not modify the
3-prong grounded plug.
» Do not leave appliance when it is
plugged in. Unplug from outlet when
not in use and before servicing.
» Do not expose to rain, store
indoors.
» Do not allow to be used as a toy.
Close attention is necessary when
used by or near children.
» Do not use for any purpose other
than described in this User’s
Guide. Use only manufacturer’s
recommended attachments.
» Do not use with damaged cord
or plug. If appliance is not
working as it should, or has been
dropped, damaged, left outdoors,
or dropped into water, have it
repaired at an authorized
service center.
» Do not pull or carry by cord, use
cord as a handle, close a door on
cord, or pull cord around sharp
edges or corners. Do not run
appliance over cord. Keep cord
away from heated surfaces.
» Do not unplug by pulling on
cord. To unplug, grasp the plug,
not the cord.
» Do not handle plug or appliance
with wet hands.
» Do not put any object into open-
ings. Do not use with any opening
blocked; keep openings free of
dust, lint, hair, and anything that
may reduce air flow.
» Keep hair, loose clothing, fingers,
and all parts of body away from
openings and moving parts.
» Turn off all controls before plug
-
ging or unplugging appliance.
» Use extra care when cleaning
on stairs.
» Do not use to pick up flammable
or combustible materials (lighter
fluid, gasoline, kerosene, etc.)
or use in areas where they may
be present.
» Do not use appliance in an
enclosed space filled with vapors
given off by oil base paint, paint
thinner, some moth proofing
substances, flammable dust,
or other explosive or toxic vapors.
» Do not use to pick up toxic
material (chlorine bleach,
ammonia, drain cleaner, etc.).
» Do not pick up anything that
is burning or smoking, such as
cigarettes, matches, or hot ashes.
» Use only BISSELL cleaning
products intended for use
with this appliance to prevent
internal component damage.
See the Cleaning Formula section
of this guide.
» Unplug before connecting
TurboBrush Tool.
» Do not immerse. Use only on
surfaces moistened by the
cleaning process.
» Keep appliance on a level surface.
» Do not carry the appliance while
in use.
READ ALL INSTRUCTIONS BEFORE USING YOUR DEEP CLEANER.
When using an electrical appliance, basic precautions should be observed, including the following:
This model is for household use only. Commercial use of this unit voids the manufacturer’s warranty.
SAVE THESE INSTRUCTIONS
WARNING
Improper connection of the equipment-grounding
conductor can result in a risk of electrical shock. Check
with a qualified electrician or service person if you
aren’t sure if the outlet is properly grounded. DO NOT
MODIFY THE PLUG. If it will not fit the outlet, have a
proper outlet installed by a qualified electrician. This
appliance is designed for use on a nominal 120-volt
circuit, and has a grounding attachment plug that
looks like the plug in the illustration. Make certain
that the appliance is connected to an outlet having
the same configuration as the plug. No plug adapter
should be used with this appliance.
GROUNDING INSTRUCTIONS
This appliance must be connected to a grounded
wiring system. If it should malfunction or break down,
grounding provides a safe path of least resistance for
electrical current, reducing the risk of electrical shock.
The cord for this appliance has an
equipment-grounding conductor
and a grounding plug. It must
only be plugged into an outlet
that is properly installed and
grounded in accordance with
all local codes and ordinances.
Grounded
Outlet
Grounding Pin

www.BISSELL.com
3
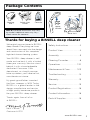
Thanks for buying a BISSELL deep cleaner
We’re glad you purchased a BISSELL
deep cleaner. Everything we know
about floor care went into the design
and construction of this complete,
high-tech home cleaning system.
Your BISSELL deep cleaner is well
made, and we back it with a limited
three-year warranty. We also stand
behind it with a knowledgeable,
dedicated Consumer Care
department, so, should you ever
have a problem, you’ll receive fast,
considerate assistance.
My great-grandfather invented
the floor sweeper in 1876. Today,
BISSELL is a global leader in the
design, manufacture, and service
of high quality homecare products
like your BISSELL deep cleaner.
Thanks again, from all of us
at BISSELL.
Mark J. Bissell
Chairman & CEO
Safety Instructions...........2
Product View................4
Assembly ...................5
Cleaning Formulas...........6
Operations ...............7-10
Maintenance & Care ......11-13
Troubleshooting ............14
Warranty ...................15
Service .....................15
Product Registration........16
Contact Information ........16
Parts & Supplies ............16
Pod
Base
NOTE: Standard accessories may vary
by model. Additional tools may vary –
check carton for contents.
Cleaning
Tool
BISSELL
FormulaQuick Start
Guide
Package Contents
Base Unit
Upper
Handle

www.BISSELL.com
4
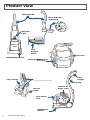
Product View
Removeable Nozzle
Quick Release
Cord Wrap
Pod
Release
Pedal
Carry Handle
Specialty Tools
Recline
Pedal
(tools may vary by model)
Flex Hose
Cord Clip
Spray
Trigger
Formula &
Water Tank
Dirty Water
Tank
EdgeSweep®
Brushes
Base and Pod
Separated
Upper Handle
Indicator
Light
Removeable Nozzle
Quick Release
Cord Wrap
Pod
Release
Pedal
Carry Handle
Specialty Tools
Recline
Pedal
(tools may vary by model)
Flex Hose
Cord Clip
Spray
Trigger
Formula &
Water Tank
Dirty Water
Tank
EdgeSweep®
Brushes
Base and Pod
Separated
Upper Handle
Indicator
Light
Removeable Nozzle
Quick Release
Cord Wrap
Pod
Release
Pedal
Carry Handle
Specialty Tools
Recline
Pedal
(tools may vary by model)
Flex Hose
Cord Clip
Spray
Trigger
Formula &
Water Tank
Dirty Water
Tank
EdgeSweep®
Brushes
Base and Pod
Separated
Upper Handle
Indicator
Light
Removeable Nozzle
Quick Release
Cord Wrap
Pod
Release
Pedal
Carry Handle
Specialty Tools
Recline
Pedal
(tools may vary by model)
Flex Hose
Cord Clip
Spray
Trigger
Formula &
Water Tank
Dirty Water
Tank
EdgeSweep®
Brushes
Base and Pod
Separated
Upper Handle
Indicator
Light

www.BISSELL.com
5
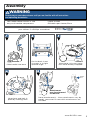
Assembly
Your deep cleaner comes in two
easy-to-assemble components:
• Upper handle
• Portable spot cleaner/Base
The only tool you will need to assemble
your cleaner is a Phillips screwdriver.
2 31
Rotate
to Lock
Crevice
Tool
On the back, insert
4 screws in a slight
upward angle
Slide handle into base
Wrap hose and lock in
place by rotating latch
Store attachment(s) – Since attachments vary by
model, see carton to see which attachments are
included
Wrap cord. Unit may come
with cord already wrapped.
4 5
WARNING
Do not plug in your deep cleaner until you are familiar with all instructions
and operating procedures.
Attachments
may face forward
for best fit.

www.BISSELL.com
6
PROFESSIONAL
FORMULA
2X* CLEANING FORMULA
DeepClean +
Antibacterial
Professional
Deep Cleaning
Pet Stain &
Odor
DeepClean
& Protect
Allergen
Cleansing
DeepClean
+ Refresh
Deep Clean
+ Oxy
2-in-1
formula
Out cleans
all other formulas
Includes
Scotchgard™
Protector
Removes tough
pet stains
and contains
patented odor
removal tech-
nology Includes
Scotchgard™
Protector
Deep cleans
carpets
and protects
from future
stains with
Scotchgard™
Protector
Helps remove
pet & pollen
allergens
Powerful
cleaning
with a
refreshing
scent
Removes
deep down
dirt, pet
stains, &
pet odor
BOOST
CARPET CLEANING FORMULA ENHANCER
PRETREAT
PRE TREAT SPOTS AND STAINS TO IMPROVE
CARPET CLEANING PERFORMANCE
Oxy Boost Renew Boost Prevent Boost
Pet Oxy
Boost
Stain PreTreat Pet Stain PreTreat
Pet PreTreat +
Sanitize
Removes old,
set-in stains
permanently
Revives
carpets
to look
their best
Repels stains
from soaking
into carpet
fibers
Removes
pet stains
and odors
permanently
Pretreat to
penetrate
and loosen
tough stains
Pretreat to
help remove
tough pet stains
and odors
Penetrates to
sanitize and loosen
tough stains
Keep plenty of genuine BISSELL 2X*
formula on hand so you can clean and
protect whenever it fits your schedule.
Always use genuine BISSELL deep
cleaning formulas. Non-BISSELL cleaning
solutions may harm the machine and will
void the warranty.
Cleaning Formulas
WARNING
To reduce the risk of fire and electric shock due to internal component damage, use only
BISSELL cleaning fluids intended for use with the deep cleaner.
ONLY BISSELL Protects from future stains with Scotchgard™ Protector.
Scotchgard™ is a trademark of 3M®.
*2.5 fl. oz. of 2X concentrated formula is equivalent to 5.0 fl. oz. of non-concentrated formula.
Tips Before Carpet Cleaning
• If cleaning an entire room, consider moving your furniture to another area.
• Use a dry vacuum cleaner over area before using your deep cleaner.
• Pre-treat stains with BISSELL PreTreat to improve performance on coee
stains and ground-in dirt.
A note about BISSELL formula
• One of the eective stain removing ingredients in Boost Oxy is Hydrogen Peroxide.
Certain people may be aected by the product when it comes into contact with their
skin; it may turn the skin white and/or cause tingling. Washing your hands after use and
applying hand lotion will remove any possible white discoloration.

www.BISSELL.com
7
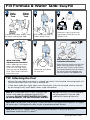
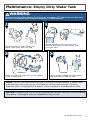
Fill Formula & Water Tank: EasyFill
NOTE: Fill with hot (140°F/60°C MAX) tap
water and add the appropriate BISSELL
solution. DO NOT HEAT WATER OR TANK
IN MICROWAVE, OR USE BOILING WATER.
NOTE: For Easy-Fill Anti-Bacterial
cleaning benefits, do not add
additional cleaning formulas.
TIP: Attaching the Pod
• When the portable machine is seated correctly, the heated cleaning light will
illuminate when you turn the machine on.
• If the heat indicator light does not illuminate, release the pod and re-secure
by pushing firmly until both sides snap into place.
1
Pull handle up and lift
Clean Water Tank.
Locate the Clean Water Tank
on back side of the Pod.
Place the tank back
on the unit.
54
2
Clean
Water
Tank
Dirty
Water
Tank
Remove Cap, fill with hot
tap water (140F/60°C) to
Water Line.
For Future Use with Full-Size
Antibacterial Formula:
BISSELL
+
3
After filling the clean tank with hot
water, twist the yellow cap back
onto the tank. Firmly insert the full
size formula bottle into the cap on
the clean tank and squeeze until
formula reaches the EasyFill line.
With Trial Size
Antibacterial Formula:
After adding hot water,
pour the antibacterial
formula into the clean
tank up to the EasyFill
line. Twist the cap back
onto the tank.
NOTICE: Do not over wet carpet. Take care not to run over loose objects or edges
of area rugs. Stalling brush may result in premature belt failure.
NOTICE: BISSELL Deep Clean + Antibacterial formula is only for BISSELL
machines with EasyFill System
TM
.

www.BISSELL.com
8
TIP: Before Carpet Cleaning
• Move furniture to another area if cleaning an entire room.
• Use a dry vacuum cleaner over area before using your deep cleaner.
• Pre-treat spots and stains in heavy trac areas.
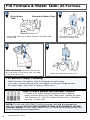
Fill Formula & Water Tank: 2X Formula
1
Pull handle up and lift
Formula & Water Tank
Locate the Formula & Water Tank on the back side
of the Pod
With 2X Formula: Remove cap, fill with
hot tap water to the water line, and add
1.5 oz of 2X formula.
Place the tank back on the unit.
Dirty Water
Tank
Formula & Water Tank
4
NOTE: Fill with hot (140°F/60°C MAX) tap water and add the appropriate
BISSELL solution. DO NOT HEAT WATER OR TANK IN MICROWAVE, OR USE
BOILING WATER. Do not substitute BISSELL 2X Formula cleaning solution with
other household cleaning products.
2
3
BISSELL
2x Formula
+
Pour in more power with BISSELL Boost
• Fill tank with water and 2X formula (Step 3 above)
• Add 2 ounces of any BISSELL Boost per 1 gallon of water.
• The ProHeat 2X® Lift-O® Deep Cleaner has a .75 gallon
formula + water tank.

www.BISSELL.com
9
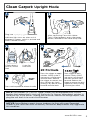
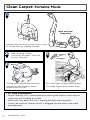
Clean Carpet: Upright Mode
1
After confirming Formula & Water
Tank is filled properly, press the power
button, located on the Cord Wrap side
Plug into a properly grounded outlet
Indicator light turns on when unit is
plugged in, power switch is pushed and
Pod is seated correctly.
Press recline pedal to release handle.
If light doesn’t
turn on, reseat
Pod
Listen for
two clicks
“Click”
“Click”
Power
Button
3
2
5
4
Press the trigger to apply
solution. Slowly make 2
wet passes, one forward
and one back. Release
the trigger to recover the
dirty solution by slowly
making 2 dry passes, one
forward and one back.
Press trigger to apply
solution. Slowly make 3
wet passes, one forward,
one back and one more
forward. Release the
trigger to recover the dirty
solution by slowly making
a final dry pass back.
NOTE: The ProHeat 2X® Lift-O® Deep Cleaner may be equipped with a circuit
breaker that automatically shuts o the brush if a large or loose object catches in
the brush roll. If that occurs, unplug your machine, remove the foreign object, and
plug the unit back in to reset circuit breaker.
NOTICE: Some Berber carpets have a tendency to fuzz with wear. Repeated
strokes in the same area with an ordinary vacuum or deep cleaner may aggravate
this condition.
2X Formula
Recline
Pedal

www.BISSELL.com
10
Clean Carpet: Portable Mode
1
Refer to Upright Filling
instructions on pages 7 (EasyFill)
or 8 (2X Formula)
Unwrap cord and plug Pod into outlet
Unwrap the hose and press Power
Button to turn unit ON
Press the trigger to apply cleaning fluid
Tilt handle slightly up to remove fluids
4
2
3
Power
Button
Lift
Press
Pedal
Base and Pod
Separated
TIP: Pod Placement
• When cleaning stairs, avoid tripping by placing the Pod on same step on
which you are standing or seated.
• Work your way down the stairs, moving the Pod when required.
• Always be aware of where the unit is plugged into the outlet and avoid
entanglement.
Separate Pod from Base to clean stairs or work
on stained areas by stepping on pedal
Cleaning
Tool
Trigger

www.BISSELL.com
11
Maintenance: Empty Dirty Water Tank
1
Swivel handle up and lift the Dirty
Water Tank away from the Pod
Clean the red filter and clear out any debris
in the suction gate
When ready, replace top and reseat
the Tank back inside the Pod
43
2
Rotate handle all the way over tank,
remove top, pour out dirty water and
rinse the Tank
NOTE: CLEAN THE MACHINE BEFORE STORING. Fill the Formula & Water Tank
with hot tap water and turn on unit. Refer to section Maintenance: Cleaning
Machine After Use (page 12) for details. Store machine in a protected dry area.
WARNING
To reduce the risk of fire, electric shock or injury, turn power OFF and disconnect plug from
electrical outlet before performing maintenance or troubleshooting.
NOTICE: To reduce the risk of a leaking condition, do not store unit where freezing
may occur. Damage to internal components may result.

Spray Tip
www.BISSELL.com
12
Remove the screw
that is within the
clear plastic
1
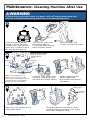
Maintenance: Cleaning Machine After Use
To clean machine before
storing it, fill the Formula
& Water Tank with hot tap
water only, in order to flush
out any residual formula
Turn unit on, press and
hold the trigger for
15 seconds while making
back and forth passes
Release trigger and
suction up all of the water
Remove the pod from the
base. Press the tabs on the
black ends of the spray tips to
remove and rinse off before
returning them to the base
Unscrew three screws with
a Phillips screwdriver from
the clear Brush Rolls covers
Before replacing clear
cover, inspect the
Brush Rolls and remove
any debris
Wipe out the end caps with a
clean paper towel
Rinse and replace clear Brush Covers,
carefully aligning top cover tabs along
front slots of bottom cover
Spray Tips
Spray Tips
Screw 1
Screw 2
Screw 3
Two Covers
Pivot into place
Insert Tabs
into slots
WARNING
To reduce the risk of electric shock, turn power switch o and disconnect plug from
electrical outlet before performing maintenance or troubleshooting checks.
3
2

www.BISSELL.com
13
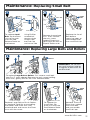
To replace Large Belt or Rollers, first remove small belt
(see first 3 steps above). Remove the only screw holding
Pivot Arm, gently pull off arm with attached Rods
To replace the
Small Belt, flip
Base Unit with the
Pod Release Pedal
on the bottom
Remove the end cap
first. Then, remove
the only screw
holding Pivot Arm,
gently pull off arm to
expose Roller ends
Remove screw to
Pivot Arm, replace
the Small Belt
and reassemble
the End Caps
Replace the Small
Belt before
reversing steps to
reassemble Pivot
Arm and End Cap
Screw 1
End
Cap
Screw 2
Pod
Release
Pedal
Screw 3
Pivot Arm
Small
Belt
Roller
Small
Belt
Washer
Pod Release Pedal
Small
Belt
Maintenance: Replacing Small Belt
Maintenance: Replacing Large Belts and Rollers
IMPORTANT: Do not lose
the small washers held by
a magnet at both ends of
the Brushroll.
Replace Large Belt or Brush Rollers,
as required, carefully reassembling
the Rollers and Pivot Arm with
attached rods and secure the Pivot
Arm with the screw
To replace Small
Belt, flip the Base
Unit to the side
with the Pod
Release Pedal on
the bottom
Using Phillips
screwdriver,
remove three
screws from
the End Cap
and set to side
1
1
2
2
3
3
4

www.BISSELL.com
14
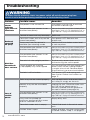
Problem Possible causes Remedies
Heater
indicator
light does not
illuminate
The power is not turned ON The power must be ON to activate
the heater indicator light
The portable spot cleaner is not
attached completely
Make sure the portable spot cleaner is attached. Push
down firmly to check (see “Tip: Attaching the Pod” on
page 7 OR step 3 of page 9 for detailed instructions)
Reduced
spray OR
no spray
Formula & water tank may be empty
Refill tank
Formula & water tank may not be
seated completely
Turn power OFF. Remove and
reseat tank
Pump may have lost prime in
portable spot cleaning mode
Hold end of hose below water level
in tank to prime
The portable spot cleaner is not
attached completely
Make sure the portable spot cleaner is attached. Push
down firmly to check (see “Tip: Attaching the Pod” on
page 7 OR step 3 of page 9 for detailed instructions)
DirtLifter®
PowerBrush
does not turn
The portable spot cleaner is not
attached completely
Make sure the portable spot cleaner is attached. Push
down firmly to check (see “Tip: Attaching the Pod” on
page 7 OR step 3 of page 9 for detailed instructions)
The unit is in the upright position Brushes only rotate when unit is
reclined using the recline pedal
Circuit breaker on machine
(if equipped) may have tripped
Turn the machine OFF and unplug from
outlet. Check to see if foreign object
is caught in brush roll. Remove object.
Plug machine in to reset circuit breaker
The belt is off or broken Turn power OFF and unplug unit
from outlet. Follow instructions on
page 13
Loss of
suction
power
Tanks may not be seated properly Pick up both tanks and reseat them
so it they fit snugly on the unit
Nozzles may not be assembled
properly
Unplug the unit. Check to make sure
the "lip" of the nozzle cover is
securely hooked into the groove on
the top of nozzle (see page 12)
The portable spot cleaner is not
attached completely
Make sure the portable spot cleaner is attached. Push
down firmly to check (see “Tip: Attaching the Pod” on
page 7 OR step 3 of page 9 for detailed instructions)
Dirty tank has picked up
maximum amount of dirty water
and has reached full line
Empty dirty tank
Formula & water tank is empty Check fluid levels in formula & water
tank
Suction Gate is open Check to make sure the suction gate
is closed. Follow “Step 3” on page 11.
Troubleshooting
WARNING
To reduce the risk of electric shock, turn power switch o and disconnect plug from
electrical outlet before performing maintenance or troubleshooting checks.

www.BISSELL.com
15
If your BISSELL product should require service:
Contact BISSELL Consumer Care to locate a BISSELL Authorized Service Center in your area.
If you need information about repairs or replacement parts, or if you have questions about
your warranty, contact BISSELL Consumer Care.
This warranty gives you specific legal rights,
and you may also have other rights which
may vary from state to state. If you need
additional instruction regarding this warranty
or have questions regarding what it may
cover, please contact BISSELL Consumer
Care by E-mail, telephone, or regular mail
as described below.
Limited Three-Year Warranty
Subject to the *EXCEPTIONS AND
EXCLUSIONS identified below, upon receipt
of the product BISSELL will repair or replace
(with new or remanufactured components
or products), at BISSELL’s option, free of
charge from the date of purchase by the
original purchaser, for three years any
defective or malfunctioning part.
See information below on "If your BISSELL
product should require service".
This warranty applies to product used for
personal, and not commercial or rental
service. This warranty does not apply to
fans or routine maintenance components
such as filters, belts, or brushes. Damage or
malfunction caused by negligence, abuse,
neglect, unauthorized repair, or any other
use not in accordance with the User's Guide
is not covered.
BISSELL IS NOT LIABLE FOR INCIDENTAL
OR CONSEQUENTIAL DAMAGES OF ANY
NATURE ASSOCIATED WITH THE USE OF
THIS PRODUCT. BISSELL’S LIABILITY WILL
NOT EXCEED THE PURCHASE PRICE OF
THE PRODUCT.
Some states do not allow the exclusion or
limitation of incidental or consequential
damages, so the above limitation or
exclusion may not apply to you.
*EXCEPTIONS AND EXCLUSIONS FROM
THE TERMS OF THE LIMITED WARRANTY
THIS WARRANTY IS EXCLUSIVE AND
IN LIEU OF ANY OTHER WARRANTIES
EITHER ORAL OR WRITTEN. ANY IMPLIED
WARRANTIES WHICH MAY ARISE
BY OPERATION OF LAW, INCLUDING
THE IMPLIED WARRANTIES OF
MERCHANTABILITY AND FITNESS FOR
A PARTICULAR PURPOSE, ARE LIMITED
TO THE THREE YEAR DURATION FROM
THE DATE OF PURCHASE AS DESCRIBED
ABOVE.
Some states do not allow limitations on
how long an implied warranty lasts so the
above limitation may not apply to you.
Website:
www.BISSELL.com/service-centers
E-mail:
www.BISSELL.com/email-us
Call:
BISSELL Consumer Care
1-800-237-7691
Monday – Friday 8am - 10pm ET
Saturday 9am - 8pm ET
Sunday 10am - 7pm ET
Warranty
Service
Please do not return this product to the store.
Other maintenance or service not included in the manual should be
performed by an authorized service representative.
For any questions or concerns, BISSELL is happy to be of service.
Contact us directly at 1-800-237-7691.
NOTE: Please keep your original sales receipt. It provides proof of date of
purchase in the event of a warranty claim.

16
©2016 BISSELL Homecare, Inc
Grand Rapids, Michigan
All rights reserved. Printed in China
Part Number 161-0549 10/16
Visit our website at: www.BISSELL.com
Scotchgard is a trademark of 3M
Registering is quick, easy and offers you benefits over the lifetime of your product.
You’ll receive:
Visit www.BISSELL.com/registration!
Visit us online at: BISSELL.com
When contacting BISSELL, have model number of
cleaner available.
Please record your
Model Number: ___________________________
Please record your
Purchase Date: ___________________________
NOTE: Please keep your original sales receipt.
It provides proof of purchase date in the event
of a warranty claim. See Warranty on page 15
for details.
BISSELL Rewards Points
Automatically earn points for
discounts and free shipping on
future purchases.
Faster Service
Supplying your information now
saves you time should you need to
contact us with questions regarding
your product.
Product Support Reminders
and Alerts
We’ll contact you with any
important product maintenance
reminders and alerts.
Special Promotions
Optional: Register your email
to receive notice of offers,
contests, cleaning tips and more!
Parts & Supplies
For Parts and Supplies, go to BISSELL.com and
enter your model number in the search field.
Register your product today!
We c’t wait
to ar from y!
We really do read
your comments, tweets,
and posts.
Rate this product on
BISSELL.com
or any of our retailer sites
and let us (and millions of
your closest friends)
know what you think!
For cleaning tips and more visit www.BISSELL.com or find us at:
BISSELL BISSELLClean BISSELL BISSELLBISSELLClean

PROHEAT 2X
®
LIFT-OFF
®
Limpiadora profunda
___________
GUÍA DEL USUARIO
SERIE 1560, 1564, 1565

www.BISSELL.com
2
Este modelo está diseñado solo para uso doméstico. El uso comercial de esta unidad anula la garantía del fabricante.
GUARDE ESTAS INSTRUCCIONES.
ADVERTENCIA
La conexión incorrecta del conductor de conexión a
tierra del equipo puede resultar en riesgo de choque
eléctrico. Compruebe con un electricista o una per
-
sona de servicio calificado si no está seguro si está
correctamente conectado a tierra. NO MODIFIQUE
EL ENCHUFE. Si no calza en el tomacorriente, haga
que un electricista calificado instale un tomacorriente
adecuado. Este electrodoméstico está diseñado para
ser usado en un circuito de 120 voltios nominales, y
tiene un enchufe con puesta a tierra similar al enchufe
del dibujo. Asegúrese de que el electrodoméstico esté
conectado a un tomacorriente que tenga la misma
configuración del enchufe. No se debe usar un adapta
-
dor para enchufes con este electrodoméstico.
INSTRUCCIONES PARA LA
CONEXIÓN A TIERRA
Este artefacto se debe conectar a un sistema
de cableado con conexión a tierra. Si falla o se
descompone, la conexión a tierra proporciona una vía
segura de menor resistencia para la corriente eléctrica,
reduciendo el riesgo de choque eléctrico. El cordón de
este electrodoméstico tiene un conductor de conexión
a tierra del equipo y un enchufe
con conexión a tierra. Se debe
enchufar solamente en un
tomacorriente correctamente
instalado y con conexión a
tierra de acuerdo con todos
los códigos y ordenanzas.
» Enchufe solo en un tomacorriente
correctamente conectado a tierra.
Consulte las instrucciones para la
puesta a tierra. No modifique el
enchufe de 3 clavijas con conexión
a tierra.
» No deje el electrodoméstico
desatendido mientras está
enchufado. Desenchufe del
tomacorriente cuando no se usa
y antes de efectuar tareas de
servicio.
» No exponga a la lluvia, almacene
en interiores.
» No permita que se use como un
juguete. Se debe prestar atención
al usar cuando lo usan niños o
cuando se usa cerca de ellos.
» No la utilice para ningún otro
propósito que no sean los que se
describen en esta guía del usuario.
Use únicamente los accesorios
que recomienda el fabricante.
» No la use si el cordón o el enchufe
están dañados. Si el electro-
doméstico no funciona como
debiera, o si se lo ha dejado caer,
dañado, dejado al aire libre, o si se
ha caído en el agua, haga que lo
reparen en un centro de servicio
autorizado.
» No arrastre ni cargue por el
cordón eléctrico ni utilice el
cordón como si fuera una manija.
No cierre la puerta sobre el
cordón ni tire del mismo sobre
bordes ni esquinas filosas. No pase
el electrodoméstico por arriba del
cordón. Mantenga el cordón
alejado de superficies calientes.
» No desenchufe tirando del cordón.
Para desenchufar sujete del
enchufe, no del cordón.
» No toque el electrodoméstico ni el
enchufe con las manos mojadas.
» No coloque ningún objeto en las
aberturas. No use con aberturas
bloqueadas. Mantenga las
aberturas libres de polvo, pelusas,
pelos y cualquier cosa que pueda
reducir el flujo de aire.
» Mantenga el pelo, la ropa holgada,
los dedos y cualquier parte del
cuerpo lejos de las aberturas y
piezas móviles.
» Apague todos los controles antes
de enchufar o desenchufar el
electrodoméstico.
» Tenga mucho cuidado al limpiar
en escaleras.
» No la use para recoger materiales
inflamables ni combustibles (fluido
para encendedores, gasolina,
queroseno, etc.) ni la use donde
pueda haberlos.
» No utilice el electrodoméstico
en un espacio cerrado lleno de
vapores de pintura al aceite,
disolventes de pintura, ciertas
sustancias antipolillas, polvos
inflamables u otros vapores
explosivos o tóxicos.
» No la use para recoger materiales
tóxicos (blanqueador con cloro,
amoníaco, limpiador de drenajes,
etc.).
» No aspire nada que se esté
quemando o humeando, como
cigarrillos, fósforos o cenizas
calientes.
» Utilice solamente los productos
de limpieza de BISSELL para ser
usados en este artefacto para
evitar daños a los componentes
internos. Consulte la sección de
líquidos de limpieza de esta guía.
» Desenchufe antes de conectar la
herramienta TurboBrush.
» No sumergir. Use solo en super-
ficies humedecidas por el proceso
de limpieza.
» Mantenga el electrodoméstico
sobre una superficie nivelada.
» No cargue el electrodoméstico
mientras está en uso.
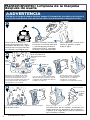
ADVERTENCIA
PARA REDUCIR EL RIESGO DE INCENDIO, DESCARGAS ELÉCTRICAS O LESIONES:
INSTRUCCIONES IMPORTANTES
DE SEGURIDAD
LEA TODAS LAS INSTRUCCIONES ANTES DE UTILIZAR SU LIMPIADORA
PROFUNDA.
Al usar electrodomésticos, debe respetar las siguientes medidas de precaución básicas:
Tomacorriente
con puesta a
tierra
Clavija de
puesta a tierra

www.BISSELL.com
3
Muchas gracias por comprar una limpiadora
profunda BISSELL
Nos complace que haya comprado
una limpiadora profunda BISSELL.
Para diseñar y construir este completo
sistema de limpieza doméstica de alta
tecnología utilizamos todos nuestros
conocimientos sobre el cuidado de los
pisos.
Su limpiadora profunda BISSELL
está bien fabricada y la respaldamos
con una garantía limitada de tres
años. Además, contamos con
un departamento de atención al
consumidor dedicado y debidamente
capacitado, de manera que si usted
llegara a tener algún problema,
recibirá asistencia rápida y
considerada.
Mi bisabuelo inventó la barredora de
pisos en 1876. Hoy, BISSELL es un líder
mundial en el diseño, la fabricación
y el servicio técnico de productos
de gran calidad para el cuidado del
hogar, como su limpiadora profunda.
Gracias de nuevo, en nombre de todo
el equipo de BISSELL.
Mark J. Bissell
Presidente y Director Ejecutivo
Instrucciones de seguridad...2
Vista del producto ...........4
Montaje .....................5
Fórmulas de limpieza ........6
Operaciones .............7-10
Mantenimiento y cuidado
..11-13
Solución de problemas......14
Garantía....................15
Servicio ....................15
Registro del producto.......16
Información de los contactos
. 16
Piezas y suministros ........16
Unidad
Base
NOTA: Los accesorios estándar varían
de un modelo a otro. Las herramientas
adicionales pueden variar, compruebe el
contenido de la caja.
Herramienta
de limpieza
BISSELL
Fórmula Guía de
Inicio
Rápido
Contenido del paquete
Unidad base
Mango
superior

www.BISSELL.com
4
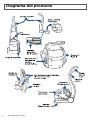
Diagrama del producto

www.BISSELL.com
5
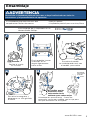
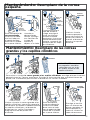
Ensamblaje
Su limpiadora profunda viene en dos
componentes fáciles de montar:
• Manija superior
• Limpiadora portátil para manchas/Base
La única herramienta que necesitará para
el ensamblaje de su limpiadora es un
destornillador Phillips.
2 31
Rotate
to Lock
Crevice
Tool
En el respaldo, inserte
4 tornillos en un
ángulo ligeramente
hacia arriba.
Deslice la manija
en su base.
Envuelva la manguera y
bloquee en su sitio girando
el cierre.
Almacene los accesorios(s) – Como los
accesorios varían por modelo, vea la caja para
ver qué accesorios se incluyeron.
Envuelva el cordón.
La unidad puede venir con
el cordón ya envuelto.
4 5
ADVERTENCIA
No enchufe su limpiadora profunda hasta que se haya familiarizado con todas las
instrucciones y los procedimientos de operación.
Es posible que los
accesorios estén
enfrentados hacia
adelante para calzar mejor.
Haga girar
para
bloquear
Herramienta
para espacios
pequeños

www.BISSELL.com
6
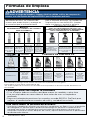
FÓRMULA
PROFESIONAL
FÓRMULA DE LIMPIEZA 2X*
DeepClean +
Antibacterial
Limpieza profun-
da profesional
Pet Stain &
Odor
DeepClean
& Protect
Allergen
Cleansing
DeepClean
+ Refresh
Deep Clean
+ Oxy
Fórmula 2 en 1
Limpia mejor
que otras
fórmulas e
incluye el
protector
Scotchgard™
Elimina manchas
rebeldes de
mascotas y con
-
tiene tecnología
patentada para
eliminar olores
Incluye el protec
-
tor Scotchgard™
Hace una
limpieza pro-
funda de las
alfombras y
protege con-
tra manchas
futuras con
el protector
Scotchgard™
Ayuda a
eliminar
alérgenos de
mascotas y
polen
Poderosa
limpieza con
un perfume
refrescante
Extrae la
suciedad
a gran
profundidad,
manchas
y olor de
mascotas
BOOST
MEJORADOR DE FÓRMULA DE LIMPIEZA
PARA ALFOMBRAS
PRETRATAMIENTO
HAGA UN TRATAMIENTO PREVIO A LAS
MANCHAS PARA MEJORAR EL RENDIMIENTO
DE LA LIMPIEZA DE LA ALFOMBRA
Oxy Boost Renew Boost Prevent Boost
Pet Oxy
Boost
Stain PreTreat Pet Stain PreTreat
Pet PreTreat +
Sanitize
Elimina
permanente-
mente man-
chas viejas y
fijadas
Revive a las
alfombras
para que se
vean lo mejor
posibles
Repele man-
chas impidi-
endo que se
las absorba en
las fibras de la
alfombra
Elimina
permanente-
mente las
manchas y los
olores de las
mascotas
Haga un
tratamiento previo
para aflojar las
manchas rebeldes
Haga un trata-
miento previo para
eliminar manchas y
olores rebeldes de
mascotas
Penetra para desin-
fectar y aflojar las
manchas rebeldes
Mantenga a mano una buena cantidad
de fórmula BISSELL 2X* auténtica de
manera que pueda limpiar y proteger en
el momento que le sea conveniente.
Use siempre fórmulas auténticas BISSELL
para la limpieza profunda. Los líquidos de
limpieza que no son de BISSELL pueden
dañar la máquina y anulará la garantía.
Fórmulas de limpieza
ADVERTENCIA
Para reducir el riesgo de incendio y choques eléctricos debido a daños de componentes
internos, use sólo líquidos de limpieza BISSELL para la limpiadora profunda.
SOLO BISSELL protege contra futuras manchas con el protector Scotchgard™.
Scotchgard™ es una marca registrada de 3M®.
*2.5 onzas líquidas de la fórmula concentrada 2X es equivalente 5.0 onzas líquidas de fórmula no
concentrada.
Consejos antes de limpiar la alfombra
• Si va a limpiar todo un cuarto, considere mover los muebles a otra área.
• Use una aspiradora en seco sobre el área antes de usar su limpiadora
profunda.
• Haga un tratamiento previo en las manchas usando BISSELL PreTreat para
mejorar el rendimiento en manchas de café y suciedad incrustada.
Una nota sobre la fórmula de BISSELL
• Uno de los ingredientes eficaces para eliminar ingredientes en Boost Oxy es el peróxido
de hidrógeno. Es posible que el producto afecte algunas personas cuando entra en
contacto con la piel, es posible que vuelva el color de la piel blanco y/o que cause
cosquilleo. Lavarse las manos después de usarlo y aplicar loción eliminará la posibilidad
de decoloración blanca.

www.BISSELL.com
7
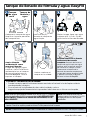
Tanque de llenado de fórmula y agua: EasyFill
NOTA: Llene con agua corriente caliente (máx. de 140°F/60°C) y agregue
la solución de limpieza BISSELL correspondiente. NO HIERVA EL AGUA
NI COLOQUE EL TANQUE EN EL HORNO DE MICROONDAS, NI USE
AGUA HIRVIENTE.
NOTA: Para obtener beneficios de
limpieza contra las bacterias Easy-Fill,
no agregue fórmulas de limpieza
adicionales.
CONSEJO: Instalación de la unidad
• Cuando la máquina portátil está correctamente asentada, se iluminará la luz de limpieza caliente
cuando encienda la máquina.
• Si no se ilumina la luz indicadora de calor, suelte la unidad y vuelva a
asegurarla empujando firmemente hasta que ambos lados calcen en su sitio con un chasquido.
1
Jale la manija y
levante el tanque de
agua limpia.
Coloque el tanque de agua
limpia en la parte posterior
del receptáculo.
Vuelva a colocar el
tanque en la unidad.
54
2
Tanque de
fórmula y
agua
Tanque
de agua
sucia
Retire la tapa, llene con agua
caliente (60 °C/140 °F) del
grifo hasta la línea de llenado.
Para uso futuro con la fórmula
antibacterial de tamaño
completo: Después de llenar el
tanque de agua limpia con agua
caliente, gire la tapa de amarilla
de nuevo en el tanque. Inserte
firmemente la botella de la
fórmula de tamaño completo en
la tapa del tanque de agua limpia
y apriete hasta que la fórmula
alcance la línea de EasyFill.
BISSELL
+
3
Con la fórmula
antibacterial como
muestra Fórmula:
Luego de agregar agua
caliente, vierta la fórmula
antibacterial en el tanque
de agua limpia hasta la
línea de EasyFill. Gire la
tapa en el tanque.
AVISO: No moje demasiado la alfombra. Tenga cuidado de no pasar sobre objetos sueltos ni bordes de
tapetes. Frenar los cepillos puede resultar en la falla prematura de la correa.
AVISO: La fórmula BISSELL Deep Clean + Antibacterial es solo para máquinas BISSELL con EasyFill System™.

www.BISSELL.com
8
CONSEJO: Antes de limpiar la alfombra
• Mueva los muebles a otra área si va limpiar todo el cuarto.
• Use una aspiradora en seco sobre el área antes de usar su limpiadora
profunda
• Haga un tratamiento previo a las manchas en áreas de mucho tráfico.
Llenado del tanque de fórmula y agua:
Formula 2X
1
Tire hacia arriba de la manija y
levante el tanque de fórmula y
de agua.
Busque el tanque de fórmula y de agua en la parte
posterior de la unidad.
Con Fórmula 2X: Quite la tapa, llene con
agua corriente caliente hasta la línea de
agua y agregue 1.5 onzas de Formula 2X.
Coloque el tanque de nuevo en la unidad.
Tanque de agua
sucia
4
NOTA: Llene con agua corriente caliente (máx. de 140°F/60°C) y agregue la
solución de limpieza BISSELL correspondiente. NO HIERVA EL AGUA NI COLOQUE
EL TANQUE EN EL HORNO DE MICROONDAS, NI USE AGUA HIRVIENTE. No
sustituya la solución de limpieza BISSELL 2X Formula por otros productos de
limpieza domésticos.
2
3
BISSELL
2x Formula
+
Vierta más potencia con BISSELL Boost
• Llene el tanque con agua y fórmula 2X (Paso 3 anterior)
• Agregue 2 onzas de cualquier BISSELL Boost por 1 galón de agua.
• El limpiador profundo ProHeat 2X® Lift-O® tiene un tanque de
fórmula + agua de 0.75 galones.
Tanque de fórmula
y agua

www.BISSELL.com
9
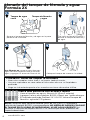
Limpieza de alfombras: Modo vertical
1
Después de confirmar que el tanque de
fórmula y de agua está correctamente
llenado, presione el botón de encendido
situado en el lado del soporte para
envolver el cordón.
Presione el pedal de reclinar para
liberar la manija.
Si no se enciende
la luz, vuelva a
asentar la unidad.
Escuche por
dos chasquidos.
“Chasquido”
“Chasquido”
Power
Button
3
2
5
4
Presione el gatillo para
aplicar solución. Haga
dos pasadas mojadas
lentas, una hacia adelante
y una hacia atrás. Suelte
el gatillo para recuperar la
solución sucia haciendo
lentamente dos pasadas
secas, una hacia adelante
y una hacia atrás.
Presione el gatillo
para aplicar solución.
Lentamente haga tres pa-
sadas mojadas, una hacia
adelante, una hacia atrás,
y una más hacia adelante.
Suelte el gatillo para
recuperar la solución sucia
haciendo lentamente una
pasada final hacia atrás.
NOTA: Se puede equipar la limpiadora profunda ProHeat 2X® Lift-O® con un
disyuntor que corta automáticamente el cepillo si se atrapa un objeto grande
o suelto en el cepillo cilíndrico. Si pasa esto, desenchufe la máquina, extraiga el
cuerpo extraño y enchufe de nuevo la unidad para reponer el disyuntor.
AVISO: Algunas alfombras Berber tienden a formar pelusas con el uso. El paso
repetido de una aspiradora común o una limpiadora profunda en la misma área
puede agravar esta condición.
2X Formula
Recline
Pedal
Enchufe en un
tomacorriente
correctamente
conectado a tierra.
La luz indicadora se enciende cuando se
enchufa la unidad, se presiona el interruptor
de encendido y la unidad está
correctamente asentada.
Herramienta
para espacios
pequeños
Pedal de
reclinar

www.BISSELL.com
10
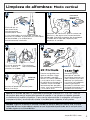
Limpieza de alfombras: Modo portátil
1
Consulte las instrucciones pare el
llenado vertical en las páginas 7
(EasyFill) u 8 (2X Formula).
Desenrolle el cordón y enchufe la unidad
en el tomacorriente.
Desenrolle la manguera y presione el
botón de encendido para encender
la unidad.
Presione el gatillo para aplicar líquido de
limpieza.
Incline la manija ligeramente para eliminar
líquidos.
4
2
3
Power
Button
Levante
Presione
el pedal
Base y unidad
separadas
CONSEJO: Colocación de la unidad
• Al limpiar escaleras, evite tropiezos colocando la unidad en el mismo escalón
en el que esté parado o sentado.
• Trabaje hacia abajo por la escalera, moviendo la unidad cuando es necesario.
• Sepa siempre adónde está enchufada la unidad en el tomacorriente y evite
enredos.
Separe la unidad de la base para limpiar
escaleras o trabajar en áreas manchadas
pisando sobre el pedal.
Herramienta
de
limpieza
Gatillo
Botón de
encendido

www.BISSELL.com
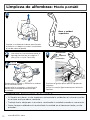
11
Mantenimiento: Vaciado del tanque de
agua sucia
1
Limpie el filtro rojo y limpie la suciedad en la
puerta de succión.
Cuando esté listo vuelva a instalar la
parte superior y vuelva a asentar el
tanque de nuevo dentro de la unidad.
43
2
Haga girar la manija totalmente sobre el
tanque, quite la tapa, vierta el agua sucia
del tanque y enjuague el mismo.
NOTA: CLIMPIE LA UNIDAD ANTES DE ALMACENAR. Llene el tanque de fórmula
y de agua con agua corriente caliente y ponga la máquina en marcha. Consulte la
sección de mantenimiento: Limpieza de la máquina después de usarla (página 12)
para ver detalles adicionales. Almacene la máquina en un área seca y protegida.
ADVERTENCIA
Para reducir el riesgo de incendio, choque eléctrico o lesiones, apague (OFF) en el
encendido y desconecte el enchufe del tomacorriente eléctrico antes de efectuar tareas de
mantenimiento o identificar fallas.
Bascule la manija hacia arriba y levante
el tanque de agua sucia separándolo
de la unidad.
AVISO: Para reducir el riesgo de fuga, no almacene la unidad en un lugar donde
se pueda congelar. Se pueden producir daños en los componentes internos.

Puntas de
rociado
www.BISSELL.com
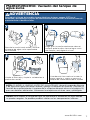
12
Extraiga el tornillo
que está dentro
del plástico claro.
1
Mantenimiento: Limpieza de la máquina
después de usarla
Para limpiar la máquina
antes de almacenarla, llene
el tanque de fórmula y agua
solamente con agua corrien-
te caliente y enjuague para.
eliminar residuos de fórmula.
Encienda la unidad, presione
y mantenga presionado el
gatillo durante 15 segundos
mientras que hace pasadas.
hacia adelante y hacia atrás.
Suelte el gatillo y aspire
toda el agua.
Extraiga la unidad de la base.
Presione las lengüetas en los
extremos posteriores de las
puntas de rociado para eliminar
y enjuague antes de volver a
colocarlas en la unidad.
Con un destornillador Phillips
destornille tres tornillos de las
cubiertas transparentes de los
rodillos cilíndricos.
Antes de volver a instalar
las cubiertas transparentes,
inspeccione los cepillos
cilíndricos y extraiga
cualquier suciedad que haya.
Limpie las tapas de extremo con una toalla
de papel limpia.
Enjuague y vuelva a instalar las cubiertas
transparentes de los cepillos, alineando cui-
dadosamente las lengüetas de la cubierta
superior a lo largo de las ranuras delanteras
de la cubierta inferior.
Puntas de
rociado
Puntas de
rociado
Tornillo 1
Tornillo 2
Tornillo 3
Dos cubiertas
Pivote en su sitio
Inserte las
lengüetas
en las
ranuras
ADVERTENCIA
Para reducir el riesgo de choque eléctrico, apague el interruptor de encendido y desconecte el
enchufe del tomacorriente antes de efectuar tareas de mantenimiento o diagnosticar fallas.
3
2

www.BISSELL.com
13
Para volver a instalar la correa grande o los cepillos cilíndricos, extraiga primero la correa
pequeña (vea los 3 pasos anteriores). Extraiga el único tornillo que sostiene el brazo de
pivote, tire suavemente para extraer el brazo con las varillas instaladas.
Extraiga primero la
tapa de extremo.
Luego, extraiga el
único tornillo que
sostiene el brazo
de pivote y tire suave-
mente del brazo para
quitarlo y exponer los
extremos de los cepil-
los cilíndricos.
Vuelva a instalar
la correa pequeña
antes de invertir los
pasos para volver a
montar el brazo de
pivote y la tapa de
extremo.
Tornillo 1
Tapa
del
extremo
Tornillo 2
Pedal de
liberación
de la unidad
Tornillo 3
Brazo de
pivote
Correa
pequeña
Cepillo
cilíndrico
Correa
pequeña
Arandela
Mantenimiento: Reemplazo de la correa
pequeña
Mantenimiento: Reemplazo de las correas
grandes y los cepillos cilíndricos
IMPORTANTE: No pierda
las pequeñas arandelas
sostenidas con un imán
en ambos extremos del
cepillo cilíndrico.
Para reemplazar la
correa pequeña,
invierta la unidad
hacia el lado con
el pedal de liber-
ación de la unidad
en la parte inferior.
Usando un
destornillador
Phillips, extraiga
tres tornillos de
la tapa de
extremo y
déjelos a un lado.
1
1 2 3
Para reemplazar
la correa pequeña,
invierta la unidad
base hacia el lado
con el pedal de libe-
ración de la unidad
en la parte inferior.
Extraiga el tornillo
que va al brazo de
pivote, remplace la
correa pequeña y
vuelva a instalar las
tapas de extremo.
Pedal de liberación
de la unidad
Correa
pequeña
Vuelva a instalar la correa grande o los
cepillos cilíndricos, como sea necesario,
volviendo a ensamblar cuidadosamente
los cepillos cilíndricos y el brazo de
pivote con las varillas instaladas y
asegure el brazo de pivote con
el tornillo.
2 3 4

www.BISSELL.com
14
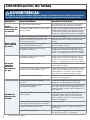
Problema Causas posibles Acciones correctivas
La luz
indicadora del
calentador no
se ilumina
No se ha encendido (ON) la unidad. El encendido debe estar en la posición de encendido
(ON) para activar la luz indicadora del calentador
La limpiadora portátil de manchas no está comple
-
tamente instalada
Asegúrese de que la limpiadora portátil de manchas esté
instalada. Empuje firmemente hacia abajo para comprobar
(consulte: “Consejo: Instalación de la unidad” en la página 7
O el paso 3 en la página 9 para ver instrucciones detalladas)
Rocío a baja
intensidad O
sin rocío
El tanque de fórmula y agua puede estar vacío Vuelva a llenar el tanque
El tanque de fórmula y de agua tal vez no esté
completamente asentado
APAGUE la alimentación. Extraiga y vuelva a asentar
el tanque.
La bomba tal vez haya perdido el cebado en el
modo de limpieza portátil de manchas
Sostenga el extremo de la manguera bajo el nivel del
agua en el tanque para cebar
La limpiadora portátil de manchas no está
completamente instalada
Asegúrese de que la limpiadora portátil de manchas esté
instalada. Empuje firmemente hacia abajo para comprobar
(consulte: “Consejo: Instalación de la unidad” en la página 7
O el paso 3 en la página 9 para ver instrucciones detalladas)
El cepillo
cilíndrico
DirtLifter®
PowerBrush
no gira
La limpiadora portátil de manchas no está
completamente instalada
Asegúrese de que la limpiadora portátil de manchas esté
instalada. Empuje firmemente hacia abajo para comprobar
(consulte: “Consejo: Instalación de la unidad” en la página 7
O el paso 3 en la página 9 para ver instrucciones detalladas)
La unidad está en posición vertical Los cepillos solamente giran cuando la unidad se reclina
usando el pedal de reclinar.
Es posible que se haya disparado el disyuntor de la
unidad (si la unidad está equipada con uno)
Apague (OFF) la máquina y desenchúfela del tomacor
-
riente de la pared. Compruebe para ver si hay un objeto
extraño atrapado en el rodillo del cepillo. Extraiga el
objeto. Enchufe la máquina y reponga el disyuntor
La correa no está instalada o está rota APAGUE y desenchufe la unidad del tomacorriente. Siga
las instrucciones de la página 13
Pérdida de
potencia de
succión
Es posible que los tanques no estén bien
asentados
Levante ambos tanques y vuelva a asentarlos de
manera que calcen apretadamente en la unidad
Es posible que las boquillas no estén
correctamente ensambladas
Desenchufe la unidad. Compruebe para asegurarse de
que el "labio" de la boquilla esté enganchado de manera
segura en la ranura en la parte superior del tanque (con-
sulte la página 12)
La limpiadora portátil de manchas no está comple
-
tamente instalada
Asegúrese de que la limpiadora portátil de manchas
esté instalada. Empuje firmemente hacia abajo para
comprobar (consulte: “Consejo: Instalación de la uni-
dad” en la página 7 O el paso 3 en la página 9 para ver
instrucciones detalladas)
El tanque de agua sucia ha recogido la cantidad máxi-
ma de agua sucia y ha llegado a la línea de completo
Vacíe el tanque sucio
El tanque de formula y agua está vacío Compruebe los niveles de los líquidos en el tanque de
fórmula y agua
El portal de succión está abierto. Compruebe para asegurarse de que el portal de succión
esté cerrado. Siga el “Paso 3” en la página 11.
Identificación de fallas
ADVERTENCIA
Para reducir el riesgo de choque eléctrico, apague el interruptor de encendido y desconecte el
enchufe del tomacorriente antes de efectuar tareas de mantenimiento o diagnosticar fallas.

www.BISSELL.com
15
Si su producto BISSELL necesita una reparación:
Póngase en contacto con la Atención al Consumidor de BISSELL para ubicar un centro de
servicio autorizado de BISSELL en su área.
Si necesita información sobre reparaciones o piezas de repuesto, o si tiene preguntas sobre la
garantía, póngase en contacto con Atención al Consumidor de BISSELL.
Esta garantía le otorga derechos legales especí-
ficos pero podría tener también otros derechos
que pueden variar de estado a estado. Si necesita
instrucciones adicionales con respecto a esta
garantía o tiene preguntas sobre lo que esta
cubre, póngase en contacto con Atención al
Consumidor de BISSELL por correo electrónico,
teléfono o correo regular como se describe a
continuación.
Garantía limitada de tres años
Sujeta a las *EXCEPCIONES Y EXCLUSIONES
detalladas a continuación, presentando el
comprobante de compra del producto, BISSELL
reparará o reemplazará (con componentes o
productos nuevos o fabricados nuevamente),
a discreción de BISSELL, sin costo para el
comprador original a partir de la fecha de
compra y durante tres años, cualquier pieza
defectuosa o con mal funcionamiento.
Vea la información a continuación sobre “Si su
producto BISSELL necesita un servicio de
mantenimiento”.
Esta garantía se aplica al producto utilizado para
el servicio personal y no comercial o de alquiler.
Esta garantía no se aplica a los ventiladores o
a los componentes de mantenimiento de rutina
como filtros, correas o cepillos. Los daños o el
mal funcionamiento causados por negligencia,
uso inadecuado, descuido, reparación no
autorizada o cualquier otro uso que no se ajuste
a la Guía del usuario no están cubiertos.
BISSELL NO SE HACE RESPONSABLE POR
NINGÚN DAÑO ACCIDENTAL O RESULTANTE
DE NINGUNA NATURALEZA RELACIONADO
CON EL USO DE ESTE PRODUCTO. LA
RESPONSABILIDAD DE BISSELL NO SUPERARÁ
EL PRECIO DE COMPRA DEL PRODUCTO.
Algunos estados no permiten la exclusión o
limitación de los daños accidentales o resul-
tantes, de modo que es posible que la exclusión
o limitación anterior no se apliquen en su caso.
*EXCEPCIONES Y EXCLUSIONES DE LOS
TÉRMINOS DE LA GARANTÍA LIMITADA
ESTA GARANTÍA ES EXCLUSIVA Y REEMPLAZA
A CUALQUIER OTRA GARANTÍA ORAL O
ESCRITA. CUALQUIER GARANTÍA IMPLÍCITA
QUE PUEDA SURGIR POR UNA OPERACIÓN
LEGAL, INCLUIDAS LAS GARANTÍAS IMPLÍCITAS
DE COMERCIABILIDAD E IDONEIDAD PARA
UN FIN EN PARTICULAR, ESTÁN LIMITADAS
A TRES AÑOS DE DURACIÓN A PARTIR DE
LA FECHA DE COMPRA COMO SE DETALLÓ
ANTERIORMENTE.
Algunos estados no permiten limitaciones sobre
el tiempo de duración de la garantía implícita,
de modo que la limitación anterior tal vez no se
aplica a su caso.
Sitio Web:
www.BISSELL.com/service-centers
Correo electrónico:
www.BISSELL.com/email-us
Llame a:
Atención al Consumidor de BISSELL
1-800-237-7691
De lunes a viernes de 8 a.m. a 10 p.m.,
hora del Este
Sábados de 9 a.m. a 8 p.m.,
hora del Este
Domingos de 10 a.m. a 7 p.m.,
hora del Este
Garantía
Reparación
No devuelva este producto a la tienda.
Otro mantenimiento o servicio no incluido en el manual debe ser realizado por
un representante de servicio autorizado.
Si tiene alguna pregunta o duda, BISSELL se complace en ser de ayuda.
Póngase en contacto con nosotros directamente al 1-800-237-7691.
NOTA: Conserve el recibo de venta original. Es el comprobante de la fecha de
compra en caso de un reclamo de garantía.

16
©2016 BISSELL Homecare, Inc
Grand Rapids, Michigan
Todos los derechos reservados. Impreso en China
Pieza número 161-0549 10/16
Visite nuestro sitio web en: www.BISSELL.com
Scotchgard es una marca registrada de 3M
Registrarse es rápido, fácil y le ofrece beneficios para todo el período de vida útil del producto.
Usted recibirá:
Visite www.BISSELL.com/registration
Visítenos por Internet en:
BISSELL.com
Cuando se ponga en contacto con BISSELL, tenga
a mano el número de modelo de la aspiradora.
Tenga a bien registrar
el número de modelo: ______________________
Tenga a bien registrar
la fecha de compra: _______________________
NOTA: Conserve el recibo de venta original.
Es el comprobante de la fecha de compra en
caso de una reclamación de garantía. Para
obtener más detalles consulte la garantía en
la página 15.
Puntos de recompensa
BISSELL
Obtenga puntos de manera automática
para descuentos y entregas a domicilio
gratis en
compras futuras.
Servicio más rápido
Si envía la información ahora, ahor-
rará tiempo por si necesita ponerse en
contacto con nosotros con preguntas
relacionadas con el producto.
Recordatorios y alertas del
centro de servicio de
productos
Nos pondremos en contacto con
usted ante cualquier recordatorio y
alerta importante relacionada con el
mantenimiento del producto.
Promociones especiales
Opcional: Registre su correo electrónico
para recibir notificaciones de ofertas,
concursos, consejos de limpieza y más.
Piezas y suministros
Para consultar sobre piezas y suministros, visite el sitio bissell.com e ingrese el
número de modelo en el campo de búsqueda.
¡Registre su producto hoy!
Nos enctaría
saber de usd.
Leemos todos sus
comentarios, tweets y
publicaciones.
Califique este producto
en BISSELL.com
o en cualquiera de nuestros
negocios minoristas y
háganos saber (y a millones
de sus amigos cercanos)
lo que piensa.
Para obtener sugerencias sobre la limpieza y más, visite www.
bissell.com o encuéntrenos en:
BISSELL BISSELLClean BISSELL BISSELLBISSELLClean
-
 1
1
-
 2
2
-
 3
3
-
 4
4
-
 5
5
-
 6
6
-
 7
7
-
 8
8
-
 9
9
-
 10
10
-
 11
11
-
 12
12
-
 13
13
-
 14
14
-
 15
15
-
 16
16
-
 17
17
-
 18
18
-
 19
19
-
 20
20
-
 21
21
-
 22
22
-
 23
23
-
 24
24
-
 25
25
-
 26
26
-
 27
27
-
 28
28
-
 29
29
-
 30
30
-
 31
31
-
 32
32


Bissell 1560, 1564, 1565 Series ProHeat 2X Lift-Off Deep Cleaner Guía del usuario
- Tipo
- Guía del usuario
en otros idiomas
Artículos relacionados
-
Bissell 1565 El manual del propietario
-
Bissell 2505 Little Green Pro Guía del usuario
-
-
-
-
-
-
Bissell 1846 SERIES Manual de usuario
-
-