BUTURE BR400 Manual de usuario

Tipo
Manual de usuario
User Manual
Car Battery Jump Starter
Language
01-07
08-14
15-21
22-28
29-35
English
Deutsch
Français
Italiano
Español
日本36-42
Package Content
1 x Jump Starter 1 x Smart Jumper Cables
1 x Type C Charging Cable 1 x EC5 Cigarette Lighter
1 x Storage Box1 x User Manual
User Manual
Car Battery Jump Starter
EN 01 02 03 04 05 06 07
08 09 10 11 12 13 14
15 16 17 18 19 20 21
22 23 24 25 26 27 28
29 30 31 32 33 34 35
Introduction
Key Features
Thank you for purchasing BUTURE BR400 car jump starter. Please read the user
manual carefully before you start to use the product.
A Powerful Jump Starter: Car Jump Starter with 1600 amps peak current can jump
starts 12V cars, SUV, truck or van (8L petrol or 7L diesel engine) in seconds up to 25
times.
Dual USB Charger with QC3.0 & 5V 2.4A: Ensures the fastest charging efficiency,
4x faster than conventional charger. Backward compatible with QC 1.0 and 2.0
Safety Protection: Premium cells, circuitry and safety features protect you and
your device from surge or short circuits.
LifeSaver Kits: 4 modes LED light: flashlight, strobe light, SOS signal light, and
warning light, built-in safety hammer for emergency.
EN01 02 03 04 05 06 07
08 09 10 11 12 13 14
15 16 17 18 19 20 21
22 23 24 25 26 27 28
29 30 31 32 33 34 35
Know Your Product
Powerful Circuit Protection System - Smart Clamps
Jump Starting Port
LED Light
QC3.0 USB Output
5V/2.4A USB Output
Red Jumper Cable (+)
Black Jumper Cable (-)
TYPE-C Input
Power Switch
Battery Indicator
Safety Hammer
START
Smart Clamp Plug
EN01 02 03 04 05 06 07
08 09 10 11 12 13 14
15 16 17 18 19 20 21
22 23 24 25 26 27 28
29 30 31 32 33 34 35
Getting Started
Charging your Jump Starter
1. Please use the provided Type C Cable to charge the product.(Charging adapter is
not included, 5V/2A or 9V/2A adapter is recommended )
2. Using a 9V/2A adaptor, it will take approximately 4 hours to fully charge the unit. In
order to extend the battery life it is recommended to fully charge the unit every 3 months.
Turn On your Jump Starter
Short press the power switch to boot the system, the battery indicator lights will turn
on. For energy saving, the system will turn to standby mode if there is no operation
within 20 seconds.
4 Modes LED Light
Long press the power switch more than 3 seconds to turn on the light mode. There
are 4 modes which are ON, SOS, Strobe, and Warning, simply short press the
power switch button to change the 4 modes or turn off the light mode. And you can
also press the power switch button for more than 3 seconds to turn off the light mode.
QC3.0 & 5V 2.4A Dual USB Output
This portable jump starter is also equipped with two smart USB outputs that provide
the fastest charging speed(USB1 - QC3.0:5V3A/9V2A/12V1.5A; USB2 - 5V2.4A) for
your portable electronic devices, such as phones,tablets, bluetooth earphones, etc
12V/10A EC5 Cigarette Lighter
Power your devices such as Air Compressor Pump, Car Vacuum Cleaner,etc. Just
plug the adapter into the EC5 Output port and connect the other end with the
device(up to 12V/10A)
EN01 02 03 04 05 06 07
08 09 10 11 12 13 14
15 16 17 18 19 20 21
22 23 24 25 26 27 28
29 30 31 32 33 34 35
Start your Car
1.Insert the plug of the smart clip completely
into the jump starter, the green and red lights
flash alternately.
2.Correctly clip the red and black clamps to the
electrodes of the car battery (red to positive and
black to negative)(The green light stays on)
3.Start the vehicle.
4.When the vehicle is started, remove the jumper
cable from the vehicle battery immediately.
EN01 02 03 04 05 06 07
08 09 10 11 12 13 14
15 16 17 18 19 20 21
22 23 24 25 26 27 28
29 30 31 32 33 34 35
Security Indication
In any of the following situations, the smart clamp turns on protection mode:
1. Use the original smart clamp to start the car.
2. DO NOT use this unit if any cable clamp or cord is damaged.
3. Start only for 12V vehicles,or it will cause serious damages to the unit.
4. Do not jump start your car when the battery capacity of BR400 is lower than 30%.
5. Do not connect two clamps together when the starter is powered on. And do not
connect both cable clamps to the same piece of metal.
6. If the engine does not start on the first try, disconnect it from the car battery and wait
for at least 20 seconds before reconnecting. Maximize three attempts in two minutes.
7. Once the engine is successfully started, disconnect the clamps within 30 seconds.
LED Indicator
The red/green led will flash
The green light is always on
The red light is always on
The red light flashes slowly
The red LED flashes quickly
The green light flashes slowly
Situations
Ready to work
Work status
1.battery clamp is reversely connected
--- check whether the clip is reversely connected
2.The clamp is short-circuited
---check whether two clamps together connect or
connect both cable clamps to the same piece of metal
Back charge protection, the voltage of the car battery is
higher than 12.6V
-No jump starter needed, the car battery is enough to
start your car
The temperature of the clamp exceeds 65(+/-5)degrees
--- remove the clamp until the red-green led flash
The voltage of the starter is too low
--try to replace the startup power supply or change it in
time
EN01 02 03 04 05 06 07
08 09 10 11 12 13 14
15 16 17 18 19 20 21
22 23 24 25 26 27 28
29 30 31 32 33 34 35
Warranty
Our company provides customers with warranty of 24 months from the date of
purchase.
Contact US
For additional assistance or warranty cover claim, please contact us:
E-Mail: suppor[email protected]
FAQ & Trouble Shooting
Q: Why the indicator is always flashing in red and green? Why the indicator does not
turn into green light? Why I can not start my car?
A: Please note this product only works with a dead/drained battery(12V).
Q: How to turn off this power pack?
A: This power pack will power off automatically when no load or charging is complete.
Q: What kind of adapter should I use?
A: You can use the charger of your phone or tablet
Q: How many times can this product start the vehicle with full capacity?
A: Up to 25 times at 25 / 77.(The times may vary based on working temperature )
Q: What is the working temperature range ?
A: -20~60 / -4~140
Care and Maintenance
1. DO NOT put the product under direct sunlight or hot areas.
2. DO NOT drop or knock your car jump starter.
3. DO NOT disassemble the equipment, it may cause damage.
4. DO NOT use chemicals or detergents to clean the product.
5. DO NOT place the products in high temperature environment for long. The
operating temperature: -20~60 / -4~140.
6. Check the power of the product at least every three months, and charge the
product in time.
EN01 02 03 04 05 06 07
08 09 10 11 12 13 14
15 16 17 18 19 20 21
22 23 24 25 26 27 28
29 30 31 32 33 34 35
DE
01 02 03 04 05 06 07
08 09 10 11 12 13 14
15 16 17 18 19 20 21
22 23 24 25 26 27 28
29 30 31 32 33 34 35
Lieferumfang
1 x Tragbare StarthilfePowerbank
Multifunktional
1 x Smart Clamps (Starthilfekabel)
1 x USB TYP C / USB A alles
in einem Kabel 1 x EC5 Zigarettenanzünder
1 x Aufbewahrungskiste1 x Bedienungsanleitung
User Manual
Car Battery Jump Starter
DE
01 02 03 04 05 06 07
08 09 10 11 12 13 14
15 16 17 18 19 20 21
22 23 24 25 26 27 28
29 30 31 32 33 34 35
Vorwort
Hauptmerkmale
Sehr geehrter Kunde, vielen Dank dass Sie sich für den Kauf einer BuTure BR400
Starthilfe-Powerbank entschieden haben. Bitte lessen Sie diese Bedienungsanlei-
tung sorgfältig bevor Sie das Produkt in Betrieb nehmen.
Leistungsstarke Auto Starthilfe:Mit 1600A Spitzenstrom kann Auto Starthilfe 12V
Fahrzeuge (bis zu 8.0L Benzinmotoren oder 7.0L Dieselmotoren) starten. Geeignet
für PKW, SUV,LKW, Motorräder, usw.
Tragbares Ladegerät mit QC3.0 und 5V 2.4A: Sie kann somit Ihre mobile
Gerat(Smartphone, Kamera, Kindle,etc.) schneller laden als ein Standard-Lade-
gerat.Kompatibel mit QC 1.0 und 2.0.
Sicherheitsschutz:der Qualität Batterie,Schaltung und Sicherheitsfunktionen
schützen Sie und Ihr Gerät vor Überspannungen und Kurzschlüssen.
LED-Technik & Sicherheitshammer : Es gib 4 LED-Leucht-Modi (“Normal’, “SOS”,
“Stroboskop” und “Warnlicht”) die sehr niitzlich sein kénnen, z. B. bei Unfallen,
Outdoor-Aktivitaten, etc. Eingebauter Sicherheitshammer.
DE
01 02 03 04 05 06 07
08 09 10 11 12 13 14
15 16 17 18 19 20 21
22 23 24 25 26 27 28
29 30 31 32 33 34 35
Produktdetails
Leistungsstarkes Stromkreisschutz System – Smart Clamps
Auto- Starthilfe - Port
Taschenlampe
QC 3.0 USB Output
5V/2.4A USB Output
Rotes Starthilfekabel(Plus-Pol )
Schwarzes Starthilfekabel(Minus-Pol)
USB C Input
ON/OFF Taster (multifunktional)
Ladestatus-Anzeige
Sicherheitshammer
START
“Smart Clamp”-Stecker
DE
01 02 03 04 05 06 07
08 09 10 11 12 13 14
15 16 17 18 19 20 21
22 23 24 25 26 27 28
29 30 31 32 33 34 35
Inbetriebnahme
So laden Sie Ihre Starthilfe-Powerbank
1.Bitte nutzen Sie bitte das mitgelieferte USB-C-Kabel um die Starthilfe aufzuladen.
2.Wenn Sie den 9V/2A Adapter benutzen(nicht im Lieferumfang enthalten), wird es
ungefähr 4 Stunden dauern, bis die Einheit komplett geladen ist. Um das Leben der
Produkt zu verlängern, wird empfohlen, dass sie die Einheit alle 3 Monate vollladen.
Schalten Sie Ihren Auto starthilfe
Drücken Sie kurz auf den Netzschalter, um das System hochzufahren, der Ladesta-
tus-Anzeige wird sich einschalten. Um Energie zu sparen, wird sich das System in
den Standby-Modus abschalten, wenn es innerhalb von 20 Sekunden nicht mehr
bedient wird.
LED-Betrieb / Modi
Drücken Sie länger als 3 Sekunden auf den Netzschalter, um den Lichtmodus
einzuschalten. Es gibt 4 Modi: Normal, SOS ,Strobo und Warnung, drücken Sie einfach
kurz auf den Netzschalterknopf, um zwischen den 4 Modi hin- und herzuschalten. Und
Sie können auch den Netzschalterknopf länger als 3 Sekunden drücken, um den
Lichtmodus wieder auszuschalten.
QC3.0 & 5V 2.4A Dual USB Output
Mit zwei QC 3.0 USB-Anschlüssen (USB1 - QC3.0:5V3A/9V2A/12V1.5A; USB2 -
5V2.4A) kann er schnell zwei Geräte gleichzeitig aufladen, wie z.B. Telefone, Tablets,
Kameras, usw.
DE
01 02 03 04 05 06 07
08 09 10 11 12 13 14
15 16 17 18 19 20 21
22 23 24 25 26 27 28
29 30 31 32 33 34 35
Starten Sie das Auto mit Starthilfe
Schritt 1: Stecken Sie den Stecker der Smart
Battery Clamp vollstandig in den Starthilfe.
Wenn die griine und die rote Anzeige der
Batterieklemme abwechselnd blinken, können
Sie mit Sicherheit zum nachsten Schritt
Ubergehen.
Schritt 2: Verbinden Sie die rote Klemme mit
dem Pluspol(+) der Autobatterie und verbinden
Sie die schwarze Klemme mit dem Minuspol(-)der
Autobatterie. Wenn die griine und die rote
Anzeige der Batterieklemme abwechselnd
blinken, k6dnnen Sie mit Sicherheit zum
nachsten Schritt Ubergehen.
Schritt 3: Starten Sie das Auto. Wenn Sie Ihr
Auto nicht starten konnten, mussen Sie die
Batterieklemme vom Fahrzeug und vom
Starthilfegerat trennen. Warten Sie mindestens
30 Sekunden und versuchen Sie es erneut.
Schritt 4: Sobald Ihr Auto gestartet ist,
entferne! innerhalb von 30 Sekunden.
12V / 10A EC5 Zigarettenanzünder
Laden Sie Ihr Gerät (Luftkompressor, Autostaubsauger usw) auf.Stecken Sie einfach
den Adapter in den EC5-Ausgang und verbinden Sie das andere Ende mit dem
Gerät (bis zu 12V / 10A).
DE
01 02 03 04 05 06 07
08 09 10 11 12 13 14
15 16 17 18 19 20 21
22 23 24 25 26 27 28
29 30 31 32 33 34 35
Sicherheitsanweisungen
In jeder der folgenden Situationen, schalten die “Smart Clamp” automatisch in
den Schutzmodus:
1. Benutzen Sie nur die original “Smart Clamps” um Ihr Fahrzeug zu starten.
2. Benutzen Sie diese Einheit NICHT, wenn irgendeine Kabelklemme oder ein Kabel
beschädigt sein sollte.
3.Benutzen Sie die Starthilfe nur fir Fahrzeuge mit 12V Bordnetzspannung, sonst
werden schwere Schäden entstehen (an Fahrzeug und Starthilfe).
4.Starten Sie Ihr Auto nicht, wenn die Batterie Kapazität unter 30% liegt.
5. Schließen Sie nicht zwei Smart Clamps zusammen an, wenn der Starter
eingeschaltet ist. Und schließen Sie nicht an dasselbe Stück Metall an.
6. Wenn der Motor nicht beim ersten Mal startet, trennen Sie bitte die Starthilfe von
der Batterie und warten Sie mindestens 20s bevor Sie diese wieder anschließen. Es
sind maximal drei Versuche in zwei Minuten zulässig.
7. Entfernen Sie bitte die Starthilfekabel innerhalb von 30s wenn der Motor erfolgre-
ich gestartet wurde.
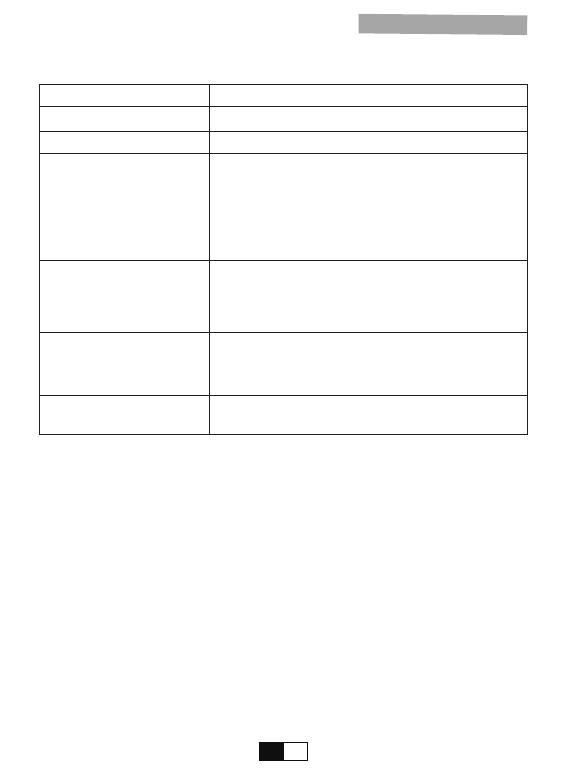
LED Anzeige
Die rote/grüne LED blinkt
Die grüne LED leuchtet
Die rote LED leuchtet
permanent
Die rote LED blinkt langsam
Die rote LED blinkt schnell
Die grüne LED blinkt langsam
Situationen
Einsatzbereit
Die Starthilfe ist in Betrieb
1.Die Starthilfekabel sind verkehrt herum angeschlossen
---Prüfen Sie, ob die Starthilfekabel an den richtigen
Batteriepolen angeschlossen sind
2.Das Starthilfekabel ist “kurzgeschlossen”
---Prüfen Sie, ob die beiden Starthilfekabel einander oder
das Selbe Stück Metall berühren
Rückflusssicherung:Die Batteriespannung der
Autobatterie ist höher als 12,6V
---Keine Starthilfe erforderlich, Die Autobatterie hat genug
Spannung um Ihr Fahrzeug zu starten
Die Temperatur der Starthilfekabel Übersteigt 65(+/-5)
---Entfernen Sie die Starthilfekabel bis die rote/griine LED
blinkt
Die Spannung der Starthilfe ist zu niedrig
---- Laden Sie die Starthilfe zeitnah auf
DE
01 02 03 04 05 06 07
08 09 10 11 12 13 14
15 16 17 18 19 20 21
22 23 24 25 26 27 28
29 30 31 32 33 34 35
Garantie
Wir bieten den Kunden eine Garantie von 24 Monaten ab Kaufdatum.
Kontaktieren Sie uns
Fur Anfragen oder Kommentare zu unseren Produkten senden Sie bitte eine
E-Mail an support@ibuture.com, und wir werden Ihnen so schnell wie méglich
antworten.
FAQ & Trouble Shooting
F: Warum blinkt die LED-Anzeige immer rot und grün? Warum leuchtet die LED-An-
zeige nicht grün auf? Warum kann ich mein Auto nicht starten?
A:Dieses Produkt funktioniert nur mit einer leeren Batterie (12 V).
F: Wie schaltet man diese Powerbank aus?
A: Sie schaltet sich automatisch ab wenn sie nicht belastet wird oder der Ladevor-
gang abgeschlossen ist.
F:Welche Art von Adapter sollte ich verwenden?
A: Sie können das Ladegerät Ihres Smartphones oder Tablets verwenden.
F: Nach vollständiger Aufladung kann das Produkt das Auto mehrmals aufladen?
A: Ungefähr 25 Mal.
F: Arbeitstemperatur?
A:-20~60.
Pflege und Wartung
1. Benutzen Sie das Produkt NICHT unter direkter Sonneneinstrahlung oder in
heißer Umgebung.
2.NICHT auf die Starthilfe schlagen, Produkt NICHT fallen lassen.
3. Produkt NICHT auseinander bauen, es könnte beschädigt werden.
4. Keine Chemikalien oder scharfe Reinigungsmittel zur Reinigung des Produktes
verwenden.
5. Produkt NICHT länger heißen Umgebungen aussetzen. Betriebstemperatur: -20
bis +60°C
6. Überprüfen Sie den Ladestatus des Produktes bitte mindestens alle drei Monate
und laden Sie es rechtzeitig auf.
FR
01 02 03 04 05 06 07
08 09 10 11 12 13 14
15 16 17 18 19 20 21
22 23 24 25 26 27 28
29 30 31 32 33 34 35
Contenu du coffret
1 x Booster Batterie 1 x Câbles intelligents
de démarrage
1 x Câble de type C 1 x EC5 Briquet
1 x Boîte de rangement1 x Manuel d’instruction
User Manual
Car Battery Jump Starter
FR
01 02 03 04 05 06 07
08 09 10 11 12 13 14
15 16 17 18 19 20 21
22 23 24 25 26 27 28
29 30 31 32 33 34 35
Introduction
Les caractéristiques :
Vous avez choisi le <BR400 Booster Batterie>, suivez attentivement les instructions
contenues dans ce guide pour effectuer l’utilisation de votre jump starter dans les
meilleures conditions.
Un puissant Jump Starter: Ce jump starter avec un courant de pointe de 1600A
peut faire démarrer une voiture de 12V, un SUV, un camion ou une camionnette (8L
moteur à essence ou 7L moteur diesel) en quelques secondes, jusqu’à 25 fois.
Le chargeur portable avec QC3.0 & 5V2.4A assure une efficacité de charge la
plus rapide, 4 fois plus rapide que le chargeur conventionnel. Ce produit peut
également être compatible avec QC1.0 et QC2.0
Protection de sécurité : Les units, les circuits et les fonctions de sécurité vous
protègent, ainsi que votre appareil, des surcharges et court-circuits.
Kits LifeSaver: 4 modes d'éclairage LED: lampe de poche, lampe stroboscopique,
signal lumineux SOS et voyant d'avertissement, marteau de sécurité intégré en cas
d'urgence.
FR
01 02 03 04 05 06 07
08 09 10 11 12 13 14
15 16 17 18 19 20 21
22 23 24 25 26 27 28
29 30 31 32 33 34 35
Connaissez votre produit
Système de protection contre les courants importants- Pinces Jump
starter
Pince Rouge(+)
Pince Nori(-)
Prise "Smart Clamp"
Port de départ du saut
LED Lumière
QC3.0 USB Output
5V/2.4A USB Output
Entrée TYPE C
Interrupteur
Ladestatus-Anzeige
Marteau de sécurité
START
FR
01 02 03 04 05 06 07
08 09 10 11 12 13 14
15 16 17 18 19 20 21
22 23 24 25 26 27 28
29 30 31 32 33 34 35
Commencer
Recharger votre jump starter
1.Veuillez utiliser le câble de type C fourni pour charger le produit (adaptateur non
fourni, un adaptateur 5V/3A ou 9V/2A est recommandé)
2.Avec l’adaptateur 5V3A, le chargement complet de l’appareil prends environ 4
heures. Afin de prolonger la vie de batterie, il est recommandé de charger complète-
ment l’appareil tous les 3 mois.
Allumez votre Jump starter
Appuyez brièvement sur l’interrupteur pour démarrer le système, les voyants de la
batterie s’allume. Pour économiser de l’énergie, le système passera en mode veille
si aucune opération n’est effectuée dans les 20 secondes.
4 Modes d'éclairage LED
Appuyez longuement sur l'interrupteur d'alimentation pendant plus de 3secondes
pour activer le mode d'éclairage. Il y a 4 modes qui sont ON, SOS, Strobe et
Warning, il suffit d’appuyer brièvement sur le bouton de l’interrupteur pour changer
mode ou éteindre le mode d’éclairage. Et vous pouvez également appuyez sur
l’interrupteur pendant plus de 3 secondes pour éteindre le mode d’éclairage.
QC3.0 & 5V 2.4A Double sortie USB
Ce jump starter portable est également équipé de deux sorties USB qui offrent la
vitesse de charge la plus rapide(USB1 - QC3.0 : 5V3A/9V2A/12V1.5A ; USB2 -
5V2.4A) pour vos appareils électroniques portables, tels que téléphones, tablettes,
écouteurs Bluetooth, etc
FR
01 02 03 04 05 06 07
08 09 10 11 12 13 14
15 16 17 18 19 20 21
22 23 24 25 26 27 28
29 30 31 32 33 34 35
Démarrer votre voiture
1.Insérez la fiche du clip complètement dans le
démarreur, la lumière verte clignote en alternance.
2.Fixez correctement les pinces rouge et noir aux
électrodes de la batterie de la voiture.(rouge au
postif, noir au négatif)
3.Démarrer le véhicule
4.Retirez le câble de démarrage de la batterie du
véhicule immédiatement après le démarrage du
véhicule.
EC5 Briquet 12V/10A
Alimentez vos appareils tels que la pompe du compresseur d'air, l'aspirateur de
voiture, etc. Branchez simplement l'adaptateur dans le port de sortie EC5 et connec-
tez l'autre extrémité à l'appareil (jusqu'à 12V/10A)
FR
01 02 03 04 05 06 07
08 09 10 11 12 13 14
15 16 17 18 19 20 21
22 23 24 25 26 27 28
29 30 31 32 33 34 35
Indicateurs de sécurité
Si l’une des situations suivantes se produit, le clamp se retrouve en mode
protection
1. Utilisez toujours le clip d’origine pour démarrer le véhicule.
2. N’utilisez pas cet appareil si il y a des dommages avec les câble, pince.
3. Seulement pour véhicule 12V. Si non, il causera de sérieux dommages à
l’appareil.
4. Ne démarrez pas votre voiture si la capacité de la batterie est inférieure à 30%.
5. Ne connectez pas les deux pince ensemble lorsque le démarreur est en marche
ou les connectées à la même pièce de métal.
6. Si le moteur ne démarre pas le premier fois, le-débranchez de la batterie de la
voiture et attendez au moins 20 secondes avant de reconnecter le moteur.
7. Une fois le moteur est démarré, débranchez les pinces dans les 30 secondes.
LED INDICATEUR
La LED verte/rouge clignote
La LED verte toujours allumé
La LED rouge toujours allumé
La LED rouge clignote
lentement
La LED rouge clignote
rapidement
La LED verte clignote
lentement
SITUATION
Prêt à travailler
Statut de travailler
1.La pince de la batterie est connectée à l'envers
— vérifier si le clip est inversement connecté
2.La pince est court-circuitée
— verifiez si deux pince connectées ensemble ou deux
les pince sont connectées à la même pièce de métal
Protection de charge inverse, la tension de la batterie
de la voiture est supérieure à 12V6A
Aucun jump starter nécessaire, la batterie de la
voiture suffit pour démarrer votre voiture
La température de la pince dépasse 65 (+/- 5)degrés
retirer la pince jusqu'à ce que le led rouge-vert
clignote
La tension est trop basse — remplacez l’alimentation de
démarrage ou la changez
FR
01 02 03 04 05 06 07
08 09 10 11 12 13 14
15 16 17 18 19 20 21
22 23 24 25 26 27 28
29 30 31 32 33 34 35
Garantie
Notre entreprise offre à ses clients une garantie de 24 mois à compter de la date
d'achat.
FAQ et dépannage
Q: Pourquoi l'indicateur clignote-t-il toujours en rouge et vert? Pourquoi l'indicateur
ne devient-il pas vert? Pourquoi je ne peux pas démarrer ma voiture?
R: Veuillez noter que ce produit ne fonctionne qu'avecune batterie morte / déchargée
(12V).
Q: comment éteindre cet appareil ?
R: cet appareil s’éteint automatiquement lorsqu’aucune charge ou la charge est
terminée
Q: Quel type d’adaptateur devrais-je utiliser ?
R: vous pouvez utiliser le chargeur de votre téléphone ou tablette
Q: Combien de fois ce produit peut-il démarrer le véhicule à pleine capacité?
R: Jusqu'à 25 fois à 25 / 77. (Les temps peuvent varier en fonction de la
température de travail)
Q: Quelle est la plage de température de travail?
R : -20 ~ 60 / - 4 ~ 140
Q: combien de temps cet appareil sera-t-il complètement changé ?
R: environ 4 heures avec l’adaptateur 5V2A AC
Sécurité
1. Ne pas exposer le produit à la lumière directe du soleil ou à des zones chauds
2. Ne pas frapper ou laisser tomber ce produit
3. Ne démontez pas le produit,c’est dangereux
4. Ne pas utiliser de produit chimique ou de détergent pour nettoyer le produit
5. Ne place pas le produit dans un environnement à haute température pendant
longtemps. La température de fonctionnement : -20 ~ 60 / - 4 ~ 140.
6. Verifiez l’énergie du produit au moins tous les trois mois et le changez à temps
Pour toute assistance supplémentaire ou demande de couverture de garantie,
veuillez nous contacter:
Courriel: support@ibuture.com
Contactez nous
I T
01 02 03 04 05 06 07
08 09 10 11 12 13 14
15 16 17 18 19 20 21
22 23 24 25 26 27 28
29 30 31 32 33 34 35
Contenuto della confezione
1 x Avviatore Batteria 1 x Cavi d'Accoppiamento Smart
1 x Cavo USB C 1 x EC5 Accendisigari
1 x Scatola di immagazzinaggio1 x Manuale Utente
User Manual
Car Battery Jump Starter
I T
01 02 03 04 05 06 07
08 09 10 11 12 13 14
15 16 17 18 19 20 21
22 23 24 25 26 27 28
29 30 31 32 33 34 35
Introduzione
Caratteristiche principali
Grazie per aver acquistato l’avviatore d’emergenza per auto BUTURE BR400.
Leggere attentamente il manuale dell'utente prima di iniziare a utilizzare il prodotto.
Un potente avviatore d’emergenza: Avviatore d’emergenza per auto con 1600
amps di picco può avviare auto, SUV, camion o pulmini (motore benzina da 8L or
diesel da 7L) con batteria da 12V in secondi fino a un massimo di 25 volte senza
ricarica.
Caribatterie portatile con ricarica veloce QC3.0 & 5V 2.4A: Assicura l’efficienza
della ricariva veloce, fino a 4x più veloce delle normali ricariche. Retrocompatibile
con le ricariche veloci QC 1.0 e 2.0
Protezioni di sicurezza: Batterie premium e circuiti di protezione proteggono te e
il tuo dispositivo da sovraccarichi di tensione.
Kit di sicurezza salvavita: Ci sono 4 modalità di luce a LED (normale, SOS, strobo
e avvertimento), martello di sicurezza incorporato per le emergenze. Che è
potenzialmente un salvavita di emergenza quando si va in campeggio, picnic,
avventura all'aperto o durante le indagini.
I T
01 02 03 04 05 06 07
08 09 10 11 12 13 14
15 16 17 18 19 20 21
22 23 24 25 26 27 28
29 30 31 32 33 34 35
Conosci il tuo prodotto
Powerful Circuit Protection System - Smart Clamps
Morsetti rossi(+)
Morsetti neri(-)
Spina Smart Clamp
Salta la porta di partenza
Luce LED
QC3.0 USB Output
5V/2.4A USB Output
Ingresso TIPO C
Interruttore di alimentazione
Indicatore di batteria
Martello di sicurezza
START
I T
01 02 03 04 05 06 07
08 09 10 11 12 13 14
15 16 17 18 19 20 21
22 23 24 25 26 27 28
29 30 31 32 33 34 35
Per Iniziare
Ricaricare il tuo avviatore d’emergenza
1. Utilizzare il cavo di tipo C in dotazione per caricare il prodotto (l’adattatore non è
incluso, si consiglia l'adattatore da 5V3A / 9V2A/)
2. Usando l’adattatore 5V/2A, ci vorranno circa 4 ore per ricaricare completamente il
dispositivo. Per aumentare la vita delle batterie, è raccomandabile ricaricare comple-
tamente il prodotto ogni 3 mesi.
Accendere il tuo avviatore d’emergenza
Attiva il alimentatore d’avviamento
Premere brevemente l'interruttore di alimentazione per avviare il sistema, lo
schermo LCD si accenderà. Il sistema passa in automatico in modalità standby
se non viene eseguita alcuna operazione entro 20 secondi, entrando in
modalità risparmio energetico.
Luce a LED a 4 modali
Modalità Illuminazione: Premere a lungo l'interruttore di alimentazione per più di
3 secondi per attivare la modalità Illuminazione. Ci sono 4 modalità che sono
ON, SOS , Stroboscopica e Warning, Per passare da una modalità all’altra è
sufficiente premere brevemente il pulsante di accensione. Per disattivare la
modalità Illuminazione, premere il pulsante di accensione per più di 3 secondi.
Doppia presa USB da 5V 2.4A Con Ricarica Veloce 3.0
Questo avviatore d’emergenza è inoltre dotato di due uscite USB intelligenti che
forniscono la massima velocità di ricarica (USB1 - QC3.0: 5V3A / 9V2A /
12V1.5A; USB2 - 5V2.4A) per i tuoi dispositivi elettronici portatili, come i
telefoni, tablet, auricolari bluetooth, ecc
I T
01 02 03 04 05 06 07
08 09 10 11 12 13 14
15 16 17 18 19 20 21
22 23 24 25 26 27 28
29 30 31 32 33 34 35
Accendisigari EC5 12V/10A
Alimenta i tuoi dispositivi come la pompa del compressori per l'aria, aspirapolvere
per auto, ecc. Basta collegare l'adattatore alla porta di uscita EC5 e collegare l'altra
estremità con il dispositivo (fino a 12V / 10A)
Avviare la tua Auto
1. Inserire completamente la spina nell'avviatore
d’emergenza, le luci verde e rossa lampeggiano
alternativamente.
2. Agganciare correttamente i morsetti rosso e
nero agli elettrodi della batteria dell'auto (rosso a
quello positivo e nero a quello negativo) (la luce
verde rimane accesa)
3. Accendere il veicolo.
4. All'avvio del veicolo, rimuovere immediata-
mente il cavo d’avviamento dalla batteria del
veicolo.
I T
01 02 03 04 05 06 07
08 09 10 11 12 13 14
15 16 17 18 19 20 21
22 23 24 25 26 27 28
29 30 31 32 33 34 35
Indicazioni di Sicurezza
In ognuna delle seguenti situazioni, i morsetti intelligenti entreranno in
modalità “protezione”:
1. Utilizzare la spina originale originale per avviare l'auto.
2. NON utilizzare questa unità se il morsetto o il cavo sono danneggiati.
3. Avviare solo per veicoli a 12V, altrimenti si potrebbero causare gravi danni
all'unità.
4. Non avviare la macchina quando la capacità della batteria del BR400 è inferiore
al 30%.
5. Non collegare insieme due morsetti quando l’avviatore d’emergenza è acceso. E
non collegare entrambi i fermacavi allo stesso pezzo di metallo.
6. Se il motore non si avvia al primo tentativo, scollegare il dispositivo dalla batteria
dell'auto e attendere almeno 20 secondi prima di ricollegarlo. Massimizza tre
tentativi in due minuti.
7. Una volta avviato il motore, scollegare i morsetti entro 30 secondi.
Indicatore LED
Il led rosso / verde lampeggerà
Il Led verde è acceso fisso
La luce rossa è sempre accesa
La luce rossa lampeggia
lentamente
Il LED rosso lampeggia
rapidamente
La luce verde lampeggia
lentamentelentamente
Significato
Pronto a lavorare
Stato del lavoro
1.Il morsetto della batteria è collegato in modo inverso
--- controlla se la clip è collegata al contrario
2.Il morsetto è in cortocircuito
--- verificare se due morsetti si collegano o collegano
entrambi i cavi allo stesso pezzo di metallo
Protezione da back charge, la tensione della batteria
dell'auto è superiore a 12,6 V.
-Nessun avviamento di salto necessario, la batteria
dell'auto è sufficiente per avviare la tua auto
La temperatura della pinza supera i 65 (+/- 5) gradi
--- rimuovere il morsetto fino a quando il led rosso-verde
lampeggia
La tensione di avviamento è troppo bassa
--possibile sostituire l'alimentatore di avvio o modificarlo
in tempo
I T
01 02 03 04 05 06 07
08 09 10 11 12 13 14
15 16 17 18 19 20 21
22 23 24 25 26 27 28
29 30 31 32 33 34 35
Garanzia
FAQ & Problemi comuni
D: Perché l'indicatore lampeggia sempre in rosso e verde? Perché l'indicatore non
si trasforma in luce verde? Perché non riesco ad avviare la mia macchina?
A: Notare che questo prodotto funziona solo con una batteria scarica / scarica (12V).
D: Come spegnere questo dispositivo?
A: Questo dispositivo si spegne automaticamente quando nessun a batteria è
collegata o a ricarica completata.
D: Che tipo di adattatore dovrei usare?
A: Puoi usare il caricabatterie del tuo telefono o tablet.
D: Quante volte questo prodotto può avviare il veicolo a piena capacità?
A: Fino a 25 volte a 25 / 77 . (I tempi possono variare in base alla temperatura
di lavoro)
D: Quanto tempo occorre per caricare completamente l'avviatore d’emergenza
BUTURE BR400?
A: Circa 4 ore tramite l'adattatore CA 5V2A.
D: Qual è l'intervallo di temperatura di lavoro?
A: -20 ~ 60 / -4 ~ 140
Manutenzione e cura
1. NON esporre il prodotto alla luce diretta del sole o in aree calde.
2. NON far cadere o urtare l’avviatore d’emergenza.
3. NON smontare l'apparecchiatura, potrebbe causare danni.
4. NON utilizzare prodotti chimici o detergenti per pulire il prodotto.
5. NON collocare i prodotti in ambienti ad alta temperatura a lungo. La temperatura
di funzionamento: da -20~60 / -4~140.
6. Controllare il livello di carica del prodotto almeno ogni tre mesi e caricare il
prodotto in tempo.
Contattaci
La nostra azienda offre ai clienti una garanzia di 24 mesi dalla data di acquisto.
Per ulteriore assistenza o richiesta di copertura in garanzia, non esitate a contattarci:
E-mail: support@ibuture.com
ES
01 02 03 04 05 06 07
08 09 10 11 12 13 14
15 16 17 18 19 20 21
22 23 24 25 26 27 28
29 30 31 32 33 34 35
Contenido del Paquete
1 x Arrancador de coche 1 x Abrazaderas Inteligentes
1 x USB tipo C / USB a todo
en un cable 1 x EC5 Encendedor
1 x Caja de Almacenamiento1 x Manual de usuario
User Manual
Car Battery Jump Starter
ES
01 02 03 04 05 06 07
08 09 10 11 12 13 14
15 16 17 18 19 20 21
22 23 24 25 26 27 28
29 30 31 32 33 34 35
Introducción
Características Principales
Muchas gracias por comprar el arrancador de para coche BuTure BR400. Por
favor, lea atentamente el manual del usuario antes de comenzar a utilizar el
producto.
Un potente iniciador de saltoEl BUTURE BR400 es el arrancador de coche
más poderoso. Especialmente diseñado para vehículos de gran porte, puede
arrancar cualquier vehículo que use batería de 12V (para 8.0L vehículo de
Gasolina o 7.0L de Diesel)
Power Bank con salidas USB duales y QC 3.0 carga rápida: Este arrancador
de coche soporta carga rápida tanto de entrada, por lo que puede cargar
smartphones, cámaras, kindle y otros dispositivos con USB A y USB C hasta un
85% más rápido que con una carga estándar.
La Seguridad Es Lo PrimeroLa tecnología de seguridad patentada del clip
de inteligente tiene protección anti-explosión y contra la polaridad inversa, lo
que previene que la abrazadera entre en cortocircuito, así como contra el
recalentamiento, la sobretensión, la sobrecarga, la descarga excesiva y la
sobrecorriente.
Poderosas Luces de LED: Tiene cuatro modos de luces LED (normal, SOS,
estroboscópica y de advertencia), lo que puede ser de gran ayuda en emergen-
cias al ir de camping, picnic, en una aventura en la naturaleza o en investiga-
ciones.
ES
01 02 03 04 05 06 07
08 09 10 11 12 13 14
15 16 17 18 19 20 21
22 23 24 25 26 27 28
29 30 31 32 33 34 35
Sistema de protección de alta corriente-abrazaderas de arranque
Pinza inteligente roja(electrodo positivo)
Pinza inteligente negra(electrodo negativo)
Conector de las pinzas inteligentes
Puerto de arrancar
Linterna
Salida 1, QC 3.0
Salida 2, 5V/2.4A
Entrada USB C
Botón ON/OFF(Multifuncional)
Luces indicadoras de carga
Martillo de Seguridad
START
Conozca su producto
ES
01 02 03 04 05 06 07
08 09 10 11 12 13 14
15 16 17 18 19 20 21
22 23 24 25 26 27 28
29 30 31 32 33 34 35
Empezando
Cargando su arrancador de coche
1.Por favor, use el USB tipo C Kabel incluido para cargar el producto.
2.Usando el adaptador de 9V/2A (el adaptador no está incluido)cargar la unidad por
completo tardará aproximadamente entre 4 horas. Para extender la vida útil el
producto se recomienda que la unidad sea cargada por completo cada 3 meses.
Encienda su arrancador de coche
Presione y suelte rápidamente el interruptor de encendido para inicializar el sistema.
La luces indicadoras de carga se encenderá. Para ahorrar energía, el sistema
pasará al modo de ahorro de energía (standby) si no se efectúa ninguna operación
dentro de los 20 segundos.
Modo LED
Mantenga presionado el interruptor de encendido durante más de 3 segundos para
encender el modo de luz. Hay 4 modos disponibles, que son Encendido(ON), Luz
Estroboscópica (Strobe) ,SOS y Advertencia. Simplemente presione y suelte
rápidamente el interruptor de encendido para cambiar entre los 4 modos o apagar
el modo de luz. También puede presionar el interruptor de encendido durante más
de 3 segundos para apagar el modo de luz.
Doble Salida USB QC 3.0 & 5V 2.4A
Este arrancador de coche portátil también está equipado con dos salidas USB QC
3.0 que ofrecen la velocidad de carga más rápida (USB1--QC3.0:5V3A/9V2A/
12V1.5A ; USB2 - 5V2.4A) para sus dispositivos electrónicos portátiles.como
teléfonos, tabletas, auriculares bluetooth, etc.
ES
01 02 03 04 05 06 07
08 09 10 11 12 13 14
15 16 17 18 19 20 21
22 23 24 25 26 27 28
29 30 31 32 33 34 35
12V/10A EC5 Encendedor
Alimente sus dispositivos, como como del compresor de aire, la aspiradora para
automóviles, etc. Simplemente conecte el adaptador al puerto de salida EC5 y
conecte el otro extremo con el dispositivo (hasta 12V / 10A)
Arrancar su vehículo
Paso1: Inserte el enchufe de la abrazadera de
bateria inteligente por completo en el arrancador
de coche. Si los indicadores de luz verde y roja en
la pinza de la bateria parpadean alternativa-
mente, puede pasar al siguiente paso.
Paso2: Conecte la abrazadera roja al terminal
positivo (+) de la bateria del automovil y conecte
la abrazadera negra al terminal negativo (-) de la
bateria del automdvil. Si los indicadores de luz
verde y roja en la pinza de la bateria parpadean
alternativamente, puede pasar al siguiente paso.
Paso3: Arrancar su automovil.Sino pudo arrancar
su automodvil, debe desconectar la abrazadera
de la bateria del vehiculo y del arrancador de
coche. Espere al menos 30 segundos, luego
inténtelo de nuevo.
Paso4: Una vez que haya arrancado su automo-
vil, retire la abrazadera de la bateria del automévil
y el arrancador en 30segundos.
ES
01 02 03 04 05 06 07
08 09 10 11 12 13 14
15 16 17 18 19 20 21
22 23 24 25 26 27 28
29 30 31 32 33 34 35
Indicaciones de seguridad
Bajo cualquiera de las siguientes situaciones, la abrazadera inteligente
enciende el modo de protección:
1.Use las clip inteligente original para arrancar el vehículo.
2.NO usar el producto si alguno de los cables esta dafiado.
3. Sólo arranque vehículos de 12V, de lo contrario se podrían causar serios daños a
la unidad.
4.No arranque su automóvil cuando la capacidad de la batería sea inferior al 30%.
5.No conecte las dos pinzas entre si cuando el arrancador de coche esté encendido.
No conecte ambas pinzas a la misma pieza de metal.
6.Si el motor no arranca en un primer intento, desconecte la unidad de la bateria del
coche y espere por lo menos 20 segundos antes de volver a conectar. Maximo 3
intentos en 2 minutos.
7.Una vez que el motor se haya conseguido arrancar con éxito, desconectar las
pinzas en los siguientes 30 segundos.
Indicador LED
El LED rojo y verde
parpadean
La luz verde está fija
La luz LED rojo está fija
La luz LED rojo parpadea
lentamente
La luz LED roja parpadea
rapido
La luz verde parpadea
lentamente
Situación
Listo para trabajar
Trabajando
1.La pinza de la bateria esta conectada al revés
---Verificar si el clip esta conectado a la inversa
2.La pinza esta en cortocircuito
----Verifique si las pinzas estan conectadas entre si o si
las pinzas estanconectadas a la misma pieza de metal
Proteccién de vuelta de carga, el voltaje de la bateria del
coche es mayor a 12,6v.
----No necesita el arrancador de coche, la bateria del
coche es suficiente para
La temperatura de la pinza excede los 65(+/-5)°C
----Desconecte la pinza hasta que la luz parpadee entre
rojo y verde
El voltaje del arrancador de coche es muy bajo
----Intente cambiar la fuente de alimentacion o cargarlo
ES
01 02 03 04 05 06 07
08 09 10 11 12 13 14
15 16 17 18 19 20 21
22 23 24 25 26 27 28
29 30 31 32 33 34 35
Garantía
Nuestra empresa ofrece a los clientes una garantia de 24 meses a partir de la fecha
de compra.
Contáctenos
Para cualquier consulta o comentario sobre nuestros productos, envie un correo
electrénico,y le responderemos lo antes posible.
E-Mail: suppor[email protected]
Preguntas Frecuentes y Solución de Problemas
P: ¿Por qué el indicador siempre parpadea en rojo y verde? ¿Por qué el indicador
no se convierte en luz verde? ¿Por qué no puedo encender mi auto?
R:Este producto solo funciona con una batería agotada / descargada (12V).
P: ¿Cómo de apaga esta fuente de energía?
R: Esta fuente de energía se apagará automáticamente cuando no detecte ninguna
carga ni se esté efectuando una recarga.
P: ¿Qué tipo de adaptador debo usar?
R: Puede usar el cargador de su teléfono o tableta.
P: ¿Cuántas veces puede encender el vehículo este producto con una carga
completa?
R: Unas 25 veces.
P: ¿Temperatura de trabajo?
R:-20 60
Cuidado y Mantenimiento
1. NO ponga el producto bajo los rayos del sol o en lugares calurosos.
2. NO deje caer ni golpee el arrancador de batería para coches.
3. NO desarme el equipo; podría causar daños.
4. NO use químicos o detergentes para limpiar el producto.
5. NO exponga el producto a ambientes de alta temperatura durante mucho tiempo.
La temperatura de operación es entre -20 y 60°C.
6. Verifique la carga del producto por lo menos cada tres meses, y cargue el
producto de manera oportuna.
パッ
JP 36
1×ジャンプスターター 1×スマートジャンパーケーブル
1×USB-Cケーブル 1 xEC5シガーライター
1×収納ボックス1×取扱説明書
User Manual
Car Battery Jump Starter
はじ
主な機能
この度BUTURE BR400車ジャンプスターターをお買い上げいただき、ありが
とうございます。 製品を正しく使用するために、お使いの前にこの取扱説明
書をよくお読みください。
パワフルなジャンプスターター:ピーク電流最大1600Aのカージャンプスタ
ーターはジープ・トラック・バンなどの12Vの車(最大8Lガソリンまたは7Lデ
ィーゼルエンジン)を数秒で最大25回ぐらいジャンプスタートできます。
★QC3.0と5V 2.4Aポータブル充電器:従来の充電器より充電速度が4倍速くな
ります。 QC 1.0および2.0との下位互換性があります。
★安全保護:高品質の材料と回路および安全保護機能は短絡からデバイスを
保護します。
★多機能LEDライト:4つのモードのLEDライト:懐中電灯モード・ストロボ
ライトモード・SOS信号ライトモード・警告モードです。緊急時のための安全
ハンマーも備えされています。
JP 37
前と働
強 力な 回 路 保 護 シス テム-スマートクラ
JP 38
START
① ジャンプ開始ポート
② LEDライト
③QC3.0 USB出力
④ 5V / 2.4A USB出力
⑤ USB-C入力
⑥ 電源スイッチ
⑦ バッテリーインジケーター
エスケープハンマー
使い方
ンプスターターの充電方法
1.付属のUSB-Cケーブルを利用して製品に充電してください。(5V/2Aまたは
9V/2Aのアダプターと組み合わせて製品に充電することをお勧めします。充電
アダプターは付属されていません。)
2.9V/2Aのアダプターでフル充電するには約4時間かかります。バッテリーの寿
命を延ばすために、3か月ごとに製品にフル充電してください。
ジャスターターンに
電源スイッチを短く押すと、ジャンプスターターを起動して、バッテリーインジ
ケータライトが点灯します。省エネのため、20秒以内に操作がないとスタンバイ
モードになります。
4 つ の モ ード の L E D ラ イト
電源スイッチ3秒以上長押しをすると、LEDライトが点灯になります。 電灯・ス
トロボ・SOS及び警告の4つのモードがあります。この時電源スイッチボタンを
押すと、4つのモードを変換あるいはLEDライトモードをオフにします。また、
電源スイッチを3秒以上長押しをすると、ライトモードをオフにすることもでき
ます。
QC3.0&5V 2.4AのつのUSB出力
BUTURE BR400ジャンプスターターにはUSB1-QC3.0:5V3A / 9V2A / 12V1.5A
USB2-5V2.4Aの2つのスマートUSB出力が備えられています。この二つのス
マートUSB出力を利用してスマートフォン・タブレット・Bluetoothイヤホンな
どのポータブル電子機器に急速充電が実現できます。
JP 39
12V/10AのEC5シライ
アダプタをEC5出力ポートに差し込み、他の一端をデバイスに接続するだけ
で、エアコンプレッサーポンプ、カー掃除機などのデバイスに電力を供給で
きます。(最大12V/10Aまで)
を始する方
1.スマートクリップのプラグをジャンプスター
ターにしっかり挿入します。この時赤と緑の
ライトが交互に点滅します。
2.赤と黒のクランプを車のバッテリーの電極に
正しくクリップします(赤と正極(+)に、黒
と負極(-)に)。この時緑のライトは点灯し
ます。
3.車両を始動します。
4.車両が始動したら、すぐにジャンパーケーブ
ルを車のバッテリーから取り外してください。
JP 40
上のご
LEDインジケータついての説明:
1.オリジナルスマートクリップを利用して車を始動してください。
2.ケーブルクランプあるいはコードが破損した場合は利用しないでください。
3. 12Vの車のみを始動できます。さもないと製品に厳しい損害を与えます。
4.ジャンプスターターの電気量が30%未満の場合は利用しないでください。
5.ジャンプスターターは電源が入った後、2つのクランプを接続あるいは同じ金
属製に接続しないでください。
6.車を始動されなかった場合、車のバッテリーからジャンプスターターを取り
外してください。少なくとも20秒後に再接続します。2分間で最大3回始動して
ください。
7.車が始動したら、30秒の内にクランプを取り外してください。
JP 41
保証
BUTUREは購入日から製品に24ヶ月の安心保証を提供します。
お問い合わ
追加の支援または保証の補償を求めるには、以下のカスタマーサポートメー
ルをお問い合わせください。
電子メールアドレス:support@ibuture.com
あるお問い合わせ
Q:ジャンプスターターは赤と緑のライトが交互に点滅するのはなぜですか?
緑のライトにならないのはなぜですか? どうして車を始動できませんか?
A:前のLEDインジケータについての説明の表を参考してください。あるいはカ
スタマーサポートに問い合わせてください。[email protected]
Q:このジャンプスターターをオフにする方法は?
A:使用完了または充電完了と自動的にオフになります。
Q:どのようなアダプターを使用して充電しますか?
A:携帯電話やタブレットの充電器を使用してください。
Q:フル充電の状態で何回始動できますか?
A:25℃( 77℉)の温度で最大25回始動できます。(作業温度によって異なる)
Q:作業温度範囲は何ですか?
A:-20℃〜60℃(-4℉〜140℉)です。
存上のご
1.製品を直射や高温の場所に置かないでください。
2.ジャンプスターターを落させないように注意してください。
3.製品を分解しないでください。さもたいと機器を損壊する可能性があります。
4.化学薬品や洗剤で製品を清潔しないでください。
5.製品を長時間高温環境に置かないでください。おすすめの作業温度:-20-60
℃。
6.少なくとも3か月ごとに製品の電気量を確認して充電してください。
JP 42
  • Page 1 1
  • Page 2 2
  • Page 3 3
  • Page 4 4
  • Page 5 5
  • Page 6 6
  • Page 7 7
  • Page 8 8
  • Page 9 9
  • Page 10 10
  • Page 11 11
  • Page 12 12
  • Page 13 13
  • Page 14 14
  • Page 15 15
  • Page 16 16
  • Page 17 17
  • Page 18 18
  • Page 19 19
  • Page 20 20
  • Page 21 21
  • Page 22 22
  • Page 23 23
  • Page 24 24
  • Page 25 25
  • Page 26 26
  • Page 27 27
  • Page 28 28
  • Page 29 29
  • Page 30 30
  • Page 31 31
  • Page 32 32
  • Page 33 33
  • Page 34 34
  • Page 35 35
  • Page 36 36
  • Page 37 37
  • Page 38 38
  • Page 39 39
  • Page 40 40
  • Page 41 41
  • Page 42 42
  • Page 43 43
  • Page 44 44
  • Page 45 45

BUTURE BR400 Manual de usuario

Tipo
Manual de usuario