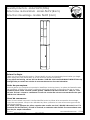
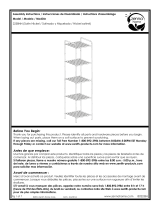
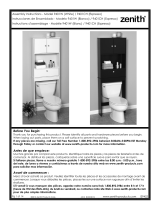
El Zenna Home 9447W es un mueble de almacenamiento versátil y elegante, ideal para cualquier habitación de tu hogar. Con su diseño moderno y funcional, este mueble ofrece una variedad de características para ayudarte a organizar tus pertenencias de manera eficiente. Cuenta con estantes ajustables que te permiten personalizar el espacio de almacenamiento según tus necesidades, y una puerta con imán para mantener tus artículos seguros y protegidos. El Zenna Home 9447W es fácil de montar y está fabricado con materiales de alta calidad para garantizar su durabilidad y resistencia.
El Zenna Home 9447W es un mueble de almacenamiento versátil y elegante, ideal para cualquier habitación de tu hogar. Con su diseño moderno y funcional, este mueble ofrece una variedad de características para ayudarte a organizar tus pertenencias de manera eficiente. Cuenta con estantes ajustables que te permiten personalizar el espacio de almacenamiento según tus necesidades, y una puerta con imán para mantener tus artículos seguros y protegidos. El Zenna Home 9447W es fácil de montar y está fabricado con materiales de alta calidad para garantizar su durabilidad y resistencia.


Transcripción de documentos
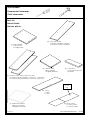
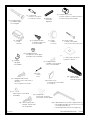
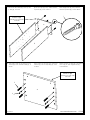
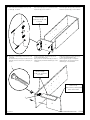
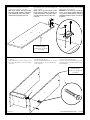
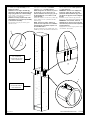
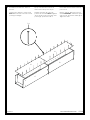
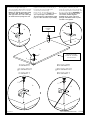
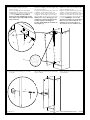
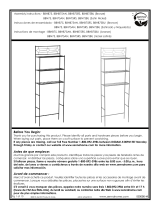
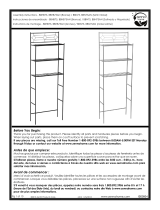
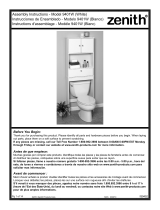
Assembly Instructions - Model 9447W (White) Instrucciones de Ensamblado - Modelo 9447W (Blanco) Instructions d'assemblage - Modèle 9447W (blanc) Before You Begin: Thank you for purchasing this product. Please identify all parts and hardware pieces before you begin. When laying out parts, place them on a soft surface to prevent scratching. If any pieces are missing, call our Toll Free Number 1-800-892-3986 between 8:00AM-5:00PM EST Monday through Friday or contact our website at www.zennahome.com for more information. Antes de que empiece: Muchas gracias por comprar este producto. Identifique todas las piezas y las piezas de ferretería antes de comenzar. Al distribuir las piezas, colóquelas sobre una superficie suave para evitar que se rayen. Si faltaran piezas, llame a nuestro número gratuito 1-800-892-3986 entre las 8:00 a.m.- 5:00 p.m., hora del este, de lunes a viernes o contáctenos a través de nuestro sitio web en www.zennahome.com para solicitar mas información. Avant de commencer : Merci d’avoir acheté ce produit. Veuillez identifier toutes les pièces et les accessoires de montage avant de commencer. Lorsque vous déballez les pièces, placez-les sur une surface non rugueuse afin d’éviter les éraflures. S’il venait à vous manquer des pièces, appelez notre numéro sans frais 1.800.892.3986 entre 8 h et 17 h (heure de l’Est des États-Unis), du lundi au vendredi, ou contactez notre site Web à www.zennahome.com pour de plus amples informations. Pg 1 of 11 ©2017 Zenith Home Corp. MCS 11/10/2017 www.zennahome.com IS7452 (2) 2 Cambolts 2 Pernos para levas 2 boulons à cames (1) 12 Large Screws 12 Tornillos largos 12 vis longues (5) 1 Magnet 1 Imán 1 aimant (3) 8 Dowels 8 Clavijas 8 goujons (6) 2 Magnet Screws 2 Tornillos imantados 2 vis aimantées (8) 1 Knob Screw 1 Tornillo para perilla 1 vis pour boutons de porte (7) 1 Knob 1 Perilla 1 bouton (10) 2 Hinge Bushings 2 Cojinetes para bisagras 2 douilles pour charnières (9) 2 Hinges 2 Bisagras 2 charnières (4) 2 Plastic Snap Cams 2 Pernos de leva a presión plásticos 2 contre-cames en plastique (12) 1 Magnet Strike 1 Contrachapa de imán 1 gâche d’aimant (11) 2 Hinge Screws 2 Tornillos para bisagras 2 vis pour charnières (14) Nails Clavos Clous (13) 1 Magnet Strike Screw 1 Tornillos para Contrachapa de imán 1 vis pour gâche d’aimant (17) 3 Washers 3 Empaques o Arandelas 3 rondelles (15) 8 Screw Caps 8 Cubiertas para tornillos 8 cache-vis (19) 12 Shelf Clips 12 Soportes de repisa 12 attaches pour étagère (18) 1 Anti-topple Screw 1 Tornillo antivolcante 1 vis de retenue Pg 3 of 11 (16) 1 Nylon Strap 1 Tira de Nylon 1 bande en nylon (20) 1 Allen Wrench for use with Large Screws (1) 1 Llave Allen hexagonal para ser usada con los tornillos grandes (1) 1 clé hexagonale pour les vis longues (1) www.zennahome.com IS7452 1. Attach the fixed shelf (A) to the top side panels (B), as shown. Fije la repisa fija (A) a los paneles laterales superiores (B), como se ilustra. Fixez l’étagère fixe (A) aux panneaux latéraux supérieurs (B), comme illustré. 1 finished edge borde con acabado bord fini A B B 2. Attach the cambolts (2) and the wood dowels (3) to the other fixed shelf (A), as shown. Fije los pernos de levas (2) y las clavijas de madera (3) a la otra repisa fija (A), como se ilustra. Fixez les boulons à cames (2) et les goujons en bois (3) à l’autre étagère fixe (A), comme illustré. finished edge borde con acabado bord fini 3 A 2 Pg 4 of 11 www.zennahome.com IS7452 3. Attach the fixed shelf (A) to the top side panels (B), as shown. Fije la repisa fija (A) a los paneles laterales superiores (B), como se ilustra. Fixez l’étagère fixe (A) aux panneaux latéraux supérieurs (B), comme illustré finished edge borde con acabado bord fini B A B 1 A 4. Insert wood dowels (3) to the bottom side panel (C). Attach the trim piece (E) and the bottom shelf (D) to the bottom side panel (C), as shown. Inserte las clavijas de madera (3) en el panel lateral inferior (C). Fije la pieza de terminación (E) y la repisa inferior (D) al panel lateral inferior (C), como se ilustra. Insérez les goujons en bois (3) dans le panneau latéral inférieur (C). Fixez la garniture (E) et l’étagère inférieure (D) au panneau latéral inférieur (C), comme illustré. 1 finished edge borde con acabado bord fini C holes on top orificios en la parte superior trous vers le haut E 3 D Pg 5 of 11 www.zennahome.com IS7452 5. Attach the magnet (5) to the other Fije el imán (5) al otro panel lateral inferior (C), como se ilustra. NOTA: Si desea que la puerta (C) se abra hacia la derecha, instale el imán (5) en el panel lateral inferior en el paso 4. Como se ilustra para la puerta que abre a la izquierda. bottom side panel (C), as shown. NOTE: If you want the door (C) to swing open to the right, install the magnet (5) to the bottom side panel in step 4. As shown for door opening to the left. Fixez l’aimant (5) à l’autre panneau latéral inférieur (C), comme illustré. REMARQUE : si vous désirez que la porte (C) s’ouvre vers la droite, installez l’aimant (5) sur le panneau latéral inférieur à l’étape 4. L’illustration montre la porte s’ouvrant sur la gauche. 6 C 5 finished edge borde con acabado bord fini 6. Insert wood dowels (3) to the bottom side panel (C). Attach the bottom side panel (C) to the trim piece (E) and the bottom shelf (D), as shown. Inserte las clavijas de madera (3) en el panel lateral inferior (C). Fije el panel lateral inferior (C) a la pieza de terminación (E) y a la repisa inferior (D), como se ilustra. C Insérez les goujons en bois (3) dans le panneau latéral inférieur (C). Fixez le panneau latéral inférieur (C) à la garniture (E) et à l’étagère inférieure (D), comme illustré. finished edge borde con acabado bord fini 1 3 C E D Pg 6 of 11 www.zennahome.com IS7452 7. Carefully place top assembly on the bottom assembly. NOTE: Be sure to align cambolts (2) with holes in bottom side panels (C) and hinge pin (9) with hole in fixed shelf (A). Insert 2 snap cams (4) into the holes in the bottom side panels (C). NOTE: If necessary, tap the snap cams with a hammer to secure the top assembly to the bottom assembly. Apply screw caps (15) to screws (1) on exterior of unit. Coloque con cuidado el ensamble superior sobre el ensamble inferior. NOTA: Asegúrese de alinear los pernos de levas (2) con los orificios de los paneles laterales inferiores (C) y el eje de la bisagra (9) con el orificio en la repisa fija (A). Inserte los 2 pernos de levas a presión (4) en los orificios de los paneles laterales inferiores (C). NOTA: Si fuese necesario, golpee los pernos de leva a presión con un martillo para asegurar el ensamble superior con el ensamble inferior. Aplique cubiertas para tornillos (15) a los tornillos (1) en la parte externa de la unidad. Placez délicatement l’unité supérieure sur l’unité inférieure. REMARQUE : assurez-vous d’aligner les boulons à cames (2) et les trous des panneaux latéraux inférieurs (C), ainsi que la broche (9) et le trou de l’étagère fixe (A). Insérez 2 cames à ressort (4) dans les trous des panneaux latéraux inférieurs (C). REMARQUE : si nécessaire, enfoncez légèrement les cames à ressort à l’aide d’un marteau pour fixer l’unité supérieure à l’unité inférieure. Appliquez les cache-vis (15) sur les vis (1) à l’extérieur du meuble. . 15 3 2 B B top assembly ensamble superior unité supérieure A 4 bottom assembly ensamble inferior unité inférieure C C Pg 7 of 11 www.zennahome.com IS7452 8. Carefully lay the unit face down on the floor. Apoye con cuidado la cara de la unidad hacia abajo sobre el piso. Placez délicatement l’unité à l’envers, à plat sur le sol. Fasten back panel (H) to back of unit. NOTE: Make sure the seam side of back panel (H) is facing up. Asegure el respaldo (H) a la parte posterior de la unidad. NOTA: Asegúrese de que el lado de la costura del panel posterior (H) quede hacia arriba. Fixez le panneau arrière (H) au dos du meuble. REMARQUE : assurez-vous que le côté raccord du panneau arrière (H) est dirigé vers le haut. 14 H B H C Pg 8 of 11 www.zennahome.com IS7452 9. Fasten the magnet strike (12) to door (G) using magnet strike screw (13). Fasten hinge (9) to the door, as shown. NOTE: If you want the door (G) to swing open to the right, install the magnet strike (12) on the other end of door (G). As shown for door opening to the left. Sujete la contrachapa de imán (12) a la puerta (G) con un tornillo para contrachapa de imán (13). Inserte el eje de la bisagra (9) en la puerta, como se ilustra. NOTA: Si desea que la puerta (G) se abra hacia la derecha, instale la contrachapa de imán (12) en el otro extremo de la puerta (G). Fixez la gâche d’aimant (12) à la porte (G) à l’aide de la vis pour gâche d’aimant (13). Insérez la broche (9) dans la porte, comme illustré. REMARQUE : si vous désirez que la porte (G) s’ouvre vers la droite, installez la gâche d’aimant (12) de l’autre côté de la porte (G). L’illustration montre la porte s’ouvrant vers la gauche. . 13 top superior haut 11 G 12 9 G G unfinished edge borde sin acabado bord non fini 11 9 Correct!! ¡¡Correcto!! Correct ! Incorrect!! ¡¡Incorrecto!! Incorrect ! 11 11 G G 9 Pg 9 of 11 9 www.zennahome.com IS7452 10. Insert hinge bushings (10) into shelves (A, D). Set bottom hinge (9) into bottom hinge bushing (10). Fit top hinge (9) into top hinge bushing (10) and fasten top hinge (9) to door (5). NOTE: If needed add a washer (17) to the bottom hinge to raise door. Hinges may be adjusted by loosening hinge screws (11). Inserte los manguitos de las bisagras (10) en las repisas (A, D). Coloque la bisagra inferior (9) dentro del manguito de la bisagra inferior (10). Calce la bisagra superior (9) dentro del manguito de la bisagra superior (10) y fije la bisagra superior (9) a la puerta (5). NOTA: Si fuese necesario agregue una arandela (17) a la bisagra inferior para levantar la puerta. Las bisagras se pueden ajustar aflojando los tornillos de las bisagras (11). Enfilez les douilles pour charnières (10) dans les étagères (A, D). Enfilez la charnière inférieure (9) dans la douille pour charnière inférieure (10). Enfilez la charnière supérieure (9) dans la douille pour charnière supérieure (10), puis fixez la charnière supérieure (9) à la porte (5). REMARQUE : si nécessaire, ajoutez une rondelle (17) à la charnière inférieure pour surélever la porte. Les charnières peuvent être réglées en desserrant les vis pour charnières (11). A G 11 9 G 10 D 11. Attach the door knob (7) to door (G), as shown. Pg 10 of 11 Fixez le bouton de porte (7) à la porte (G), comme illustré. G G 7 Fije la perilla de la puerta (7) a la puerta (G), como se ilustra. 8 www.zennahome.com IS7452 Instructions: 12. Mounting WARNING: BEFORE CUTTING OR DRILLING INTO ANY WALL SURFACE, VERIFY THE LOCATION OF ELECTRICAL, PLUMBING, AND GAS LINES. CUTTING ANY OF THESE MAY CAUSE SERIOUS INJURY. Carefully stand the unit up and fasten the nylon strap (16) to the top of the unit using one washer (15) and the anti-topple screw (18) as shown. Fasten nylon strap to wall, using appropriate mounting hardware (not provided). We recommend using a mounting screw of at least two inches in length. If you do not screw directly into wall studs, appropriate wall anchors should be used. Insert adjustable shelves (F) in the desired locations using shelf clips (19). It is imperative that unit be fastened to the wall for safety reasons. Instrucciones de Montaje: Instructions de montage : ADVERTENCIA: ANTES DE CORTAR O TALADRAR EN CUALQUIER SUPERFICIE DE PARED, VERIFIQUE LA UBICACIÓN DE LAS LÍNEAS ELÉCTRICAS, DE PLOMERÍA Y DE GAS. CORTAR CUALQUIERA DE ESTAS LÍNEAS PUEDE CAUSAR UNA LESIÓN GRAVE. AVERTISSEMENT : AVANT DE DÉCOUPER OU DE PERCER TOUTE SURFACE MURALE, VÉRIFIEZ L'EMPLACEMENT DES CANALISATIONS ÉLECTRIQUES, DE PLOMBERIE ET DE GAZ. DES BLESSURES GRAVES POURRAIENT SURVENIR SI L'UNE DE CES C ANALISATIONS ÉTAIT SECTIONNÉE. Ponga con cuidado la unidad en posición vertical y fije la correa de nylon (16) a la parte superior de la unidad con una arandela (15) y el tornillo antivolcante (18) como se ilustra. Asegure la tira de nylon a la pared utilizando el artículo de ferretería de montaje apropiado (no proporcionado). Le recomendamos utilizar un tornillo de montaje de por lo menos dos pulgadas (5.08 cms.) de largo. Sedeben utilizar anclas para pared apropiadas si usted no atornillará directamente en los soportes de pared. Redressez délicatement le meuble et fixez la bande en nylon (16) en haut du meuble à l’aide d’une rondelle (15) et de la vis de retenue (18), comme illustré. Fixez la bande de nylon au mur à l'aide d'une pièce de montage appropriée (non fournie). Il est recommandé d'utiliser des vis de montage d'au moins 5 cm (2 po) de long. Si vous ne vissez pas directement dans des poteaux muraux, utilisez de chevilles murales. Inserte las repisas ajustables (F) en los lugares deseados, usando los soportes de repisa (19). Insérez les étagères amovibles (F) à l’endroit désiré à l’aide des attaches pour étagère (19). Il est impératif que le meuble soit fixé au mur. Por razones de seguridad es imperativo que la unidad se asegure a la pared. 16 18 17 Top of the unit Parte superior de la unidad Haut du meuble Not Included No Incluido Non incluse Pg 11 of 11 www.zennahome.com IS7452-
 1
1
-
 2
2
-
 3
3
-
 4
4
-
 5
5
-
 6
6
-
 7
7
-
 8
8
-
 9
9
-
 10
10
-
 11
11


El Zenna Home 9447W es un mueble de almacenamiento versátil y elegante, ideal para cualquier habitación de tu hogar. Con su diseño moderno y funcional, este mueble ofrece una variedad de características para ayudarte a organizar tus pertenencias de manera eficiente. Cuenta con estantes ajustables que te permiten personalizar el espacio de almacenamiento según tus necesidades, y una puerta con imán para mantener tus artículos seguros y protegidos. El Zenna Home 9447W es fácil de montar y está fabricado con materiales de alta calidad para garantizar su durabilidad y resistencia.
en otros idiomas
- français: Zenna Home 9447W Mode d'emploi
- English: Zenna Home 9447W User guide
Artículos relacionados
-
 Zenna Home 9447W Guía de instalación
-
 Zenna Home 9437W Guía de instalación
-
Zenith 9923WW Guía de instalación
-
Zenith E2523WW Guía de instalación
-
 Zenna Home 2258NN Guía de instalación
-
 Zenna Home BBHB75 Guía de instalación
-
 Zenna Home BBN75 Guía de instalación
-
 Zenna Home 9401W Guía de instalación
-
 Zenna Home E9401CH Guía de instalación
-


